Genesis 270 PVC - Boat Walker Bay - Free user manual and instructions
Find the device manual for free Genesis 270 PVC Walker Bay in PDF.


User questions about Genesis 270 PVC Walker Bay
0 question about this device. Answer the ones you know or ask your own.
Ask a new question about this device
Download the instructions for your Boat in PDF format for free! Find your manual Genesis 270 PVC - Walker Bay and take your electronic device back in hand. On this page are published all the documents necessary for the use of your device. Genesis 270 PVC by Walker Bay.
USER MANUAL Genesis 270 PVC Walker Bay
OWNER'S SAFETY MANUAL
GENESIS
ODYSSEY
DECLARATION OF CONFORMITY
International standards to which conformity is declared:
Recreational Craft Directive, RCD: 94/25/EC, Module A
International Organization for Standardization, ISO: 6185-1/2/3
American Boat and Yacht Council, ABYC: H-28
National Marine Manufacturers Association, NMMA: H-28
CERTIFYING BODIES

Europe United States of America
ICNN
B-4731 Eynatten, Belgium
Tel: 32 87 30 65 30
Fax: 32 87 30 65 36
info@imci.org
National Marine Manufacturers Assn.
Suite 5100-200 E. Randolph Dr.
Chicago, IL 60601-6528, USA
Tel: 1 (312) 946-6214
Fax: 1 (312) 946-0388
MANUFACTURER
Walker Bay Boats, LLC
3555 Bay Street
Union Gap, WA
98903-1887
www.walkerbay.com
Customer Service
email: info@walkerbay.com
TYPE OF EQUIPMENT • TYPE 'D'
Inflatable Boat
HULL IDENTIFICATION NUMBER
HIN / CIN (Found on boat transom): US-EWV
IMPORTER
TABLE OF CONTENTS
INTRODUCTION 3
REGISTRATION AND REGULATIONS 4
MANUFACTURER'S STATEMENT OF ORIGIN (MSO)
WARRANTY & WARRANTY REGISTRATION
SPECIFICATIONS AND MAXIMUM CAPACITIES 5
DESIGN CATEGORIES
TYPICAL FEATURES AND DECK PLAN
MATERIALS 6
OPERATOR INSTRUCTIONS 7
LOADING & BOARDING
WEATHER & HAZARDS
NAVIGATION
CLEANING & MAINTENANCE 8
ENVIRONMENT
STORAGE 9
ANCHORING - MOORING
BEACHING
DAVITS CRADLES & CHOCKS
MOTORING 10
MOTOR SELECTION
MOTOR TRIM
MOTOR HEIGHT
ROWING OR PADDLING
SAFETY EQUIPMENT 11
TOWING BEHIND A BOAT 12
TRANSPORTING BY ROAD
INFLATION 13
INFLATION SEQUENCE
FLOOR INFLATION (AIR FLOOR MODELS)
CHANGES IN TEMPERATURE, PRESSURE OR ALTITUDE
OPERATION OF VALVES
INSTALLING SEATS
REPAIRS 14
RIGID HULL REPAIRS
FINDING SMALL LEAKS IN AIR CHAMBERS
TUBE - SMALL TEARS, CUTS, PUNCTURES
LARGE REPAIRS TO SKIN - SEAMS - BULKHEADS - TRANSOM
REPLACEMENT PARTS
TROUBLE-SHOOTING 15
ATTACHMENTS
MANUFACTURER'S STATEMENT OF ORIGIN (MSO)
WARRANTY
WARRANTY REGISTRATION FORM
SPECIFICATIONS & MAXIMUM CAPACITIES
RECOMMENDED SEATING ARRANGEMENTS
INTRODUCTION
This manual has been compiled to help you operate your craft with safety and pleasure. It contains details of the craft; the equipment supplied or fitted, its systems and information on their operation. Please read it carefully and familiarize yourself with the craft before using it.
This Owner's Safety Manual is not a course on boating safety or seamanship. If this is your first craft or inflatable, or if you are changing to a type of craft you are not familiar with, for your own comfort and safety, please ensure that you obtain handling and operating experience before "assuming command" of the craft. Your dealer or national boating/sailing federation or yacht club will be pleased to advise you of local sea schools or competent instructors.
Ensure that the anticipated wind and sea conditions will correspond to the design category of your craft (see DESIGN CATEGORIES) and that you and your crew are able to handle the craft in these conditions. Even when your boat is categorized for them, the sea and wind conditions corresponding to the design categories A, B, and C range from severe storm conditions for category A, to strong conditions for the top of category C, open to the hazards of a freak wave or gust. These are therefore dangerous conditions, where only a competent, fit and trained crew using a well maintained craft can satisfactorily operate.
This Owner's Safety Manual is not a detailed maintenance or trouble-shooting guide. In case of difficulty, contact Walker Bay or its national representative.
Always use trained and competent people for maintenance, fixing or modifications. Modifications that may affect the safety of the craft must be assessed, executed and documented by competent people. Walker Bay or its representative cannot be held responsible for modifications that Walker Bay® has not approved. Modifications or attachment of items to the hull or tube may affect your warranty (see WALKER BAY® INFLATABLE BOAT LIMITED WARRANTY).
In some countries a driving license, boating license, certification, or authorization are required, or specific regulations are in force for operating a marine craft. Check with your local boating safety office.
Always maintain your craft properly and make allowances for the deterioration that will occur over time and as a result of heavy use or misuse of the craft. Any craft, no matter how strong it may be, can be severely damaged if not used properly. This is not compatible with safe boating (see OPERATOR INSTRUCTIONS). Always adjust the speed and direction of the craft to sea conditions.
The craft should have onboard the appropriate safety equipment (see SAFETY EQUIPMENT) according to the type of craft, weather conditions etc. This equipment is mandatory in some countries. The crew should be familiar with the use of all safety equipment and emergency maneuvering (see SAFETY EQUIPMENT & EMERGENCY PROCEDURES). Contact your local boating/sailing organization for information, lessons or drill sessions. All persons should wear a suitable Coast Guard approved buoyancy aid (life jacket/personal floatation device). Note that in some countries, it is a legal requirement to wear a buoyancy aid that complies with their national regulations at all times.
PLEASE KEEP THIS OWNER'S MANUAL AND YOUR MSO IN A SECURE PLACE AND HAND IT OVER TO THE NEW OWNER WHEN YOU SELL THE CRAFT.
REGISTRATION AND REGULATIONS
REGISTER YOUR BOAT (USING YOUR MANUFACTURERS STATEMENT OF ORIGIN OR MSO, AND YOUR HULL IDENTIFICATION NUMBER OR HIN) WITH YOUR STATE OR PROVINCE IF REQUIRED. REGULATIONS VARY BY JURISDICTION SO CONTACT YOUR LOCAL REGISTRATION OFFICE DIRECTLY.
The operator is responsible for knowledge of federal, state or local regulations concerning operation requirements. For example: safety equipment, discharge of oil, speed, noise, wake etc.
MANUFACTURERS STATEMENT OF ORIGIN (MSO)
Your MSO should be provided to you by your dealer. Keep your MSO in a safe place. You will need it to register your boat with your state or province. Hand the MSO to the new owner if you sell the boat. If your MSO is lost or stolen contact Walker Bay at info@walkerbay.com for a replacement. Note: There is an administrative fee for issuing replacement MSO's.
WARRANTY AND WARRANTY REGISTRATION
For information on the Limited Warranty and Extended Warranty coverage see the WALKER BAY® INFLATABLE BOAT LIMITED WARRANTY included with this manual or go to www.walkerbay.com.
IMPORTANT
We strongly recommend that you register your warranty to extended your warranty coverage as defined in the WALKER BAY® INFLATABLE BOAT LIMITED WARRANTY.
Ask your dealer to complete your Warranty Registration Form and submit it to Walker Bay.
OR
Submit your warranty registration yourself by completing the Warranty Registration/Boat Owner Registration Form online at: www.walkerbay.com/inflatables/registration/
Registering your warranty provides Walker Bay with your contact information in case of warranty or service notifications. The Federal Safety Act of 1971 provides for defect notification to the first purchaser. Failure to register your purchase with Walker Bay constitutes waiver of the right to defect notification.
Registering your warranty will speed up your claim and reduce the paperwork needed to process your claim should you require warranty service in the future.

FAQ? Where do I find the HIN/CIN on the boat?
Answer: The Hull Identification Number or Craft Identification Number can be found on the starboard/right outside of the transom of your boat.

FAQ? What model year is my boat?
Answer: The model year is the last two digits of your HIN/CIN which can be found on the starboard/right outside of the transom of your boat.
SPECIFICATIONS AND MAXIMUM CAPACITIES
For specifications and maximum capacities refer to the SPECIFICATIONS AND MAXIMUM CAPACITIES sheet for your boat model included with this manual or go to www.walkerbay.com to view or download it.

WARNING
Do not exceed maximum recommended number of persons.
Regardless of number of persons on board, total weight of persons and equipment must not exceed maximum recommended load.
Always use seat(s)/seating spaces provided.
Do not exceed maximum recommended load.
Always load craft carefully and distribute loads appropriately to maintain design trim (approximately level). Avoid standing or placing heavy weights high up.
DESIGN CATEGORIES
A - Ocean - Designed for extended voyages where conditions may exceed wind force 8 (Beaufort scale) and significant wave heights of 4 meters and above, and vessels largely self-sufficient;
B - Offshore - Designed for offshore voyages where conditions up to, and including, wind force 8 and significant wave heights up to, and including, 4 meters may be experienced;
C - Inshore - Designed for voyages in coastal waters, large bays, estuaries, lakes and rivers where conditions up to, and including, wind force 6 and significant wave heights up to, and including, 2 meters may be experienced;
D - Sheltered waters - Designed for voyages on small lakes, rivers, and canals where conditions up to, and including, wind force 4 and significant wave heights up to, and including, 0.5 meters may be experienced.
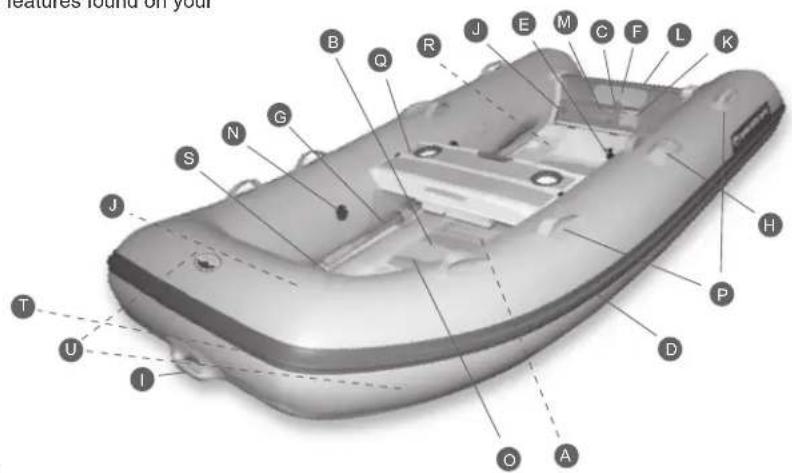
TYPICAL FEATURES AND DECK PLAN
The features listed in this diagram are general features common to most inflatable boats.
They are intended to help find or refer to commone features.
The precise arrangement and type of features found on your model of boat may may differ.
A - Hull
B - Floor
C - Transom
D - Rub Rail
E - Drain Plug
F - Motor Mount
G - Oar
H - Oarlock
I - Hauling Handle
J - Davit Lifting Points
K - Capacity Label
L - Hull ID (CIN) Number
M - Operator's Warning Label*
N - Valve (Typical Placement)
O - Keel Valve (Roll-up models only)
P - Lifting and Re-boarding Handles (Not for Tying or Davits)
Q - Seat with Cup Holders and Compartment (on Select Models)
R - Trim Tabs with Integrated Wheels in The Keel (on Select Models)
S - Bow Seat with Storage Compartment (on Select Models)
T - Bow Eye for Towing (on Select Models)
U - D-rings for Towing (on Select Models)
text_image
features found on your B Q R J E M C F L K S N G J H T U I O A D*Replace warning labels if they become damaged, faded or illegible.
For reordering and replacement of labels contact Walker Bay® Customer Service.
MATERIALS
Walker Bay® uses materials and fabric from the world's most respected manufacturers. We take extra care in our construction to create a line of boats you can depend on.
Walker Bay® HIMC™ - Walker Bay Genesis uses HIMC or High Impact Marine Composite with high-pressure injection molding due to the incredible durability, impact resistance, precision and quality of finish attainable.
The process of building a boat to such high standards requires the largest injection molding machine in the world and a mold which weighs 72 tons. A Genesis hull is then molded at extremely high pressures of up to 6000 tons, producing a one piece hull with no seams where failure can occur. Custom engineered UV resistant resins are used to create an incredibly durable and long lasting boat that has a superior strength-to-weight ratio over other boats. The result is a lightweight, durable, and virtually maintenance free boat.
text_image
HIGH IMPACT HIMC MARINE COMPOSITEWalker Bay® DURATECH™ Advanced Fiberglass Molding is a revolutionary and environmentally friendly vacuum molding process which results in a hull that is 40% more durable and 30% lighter than traditional fiberglass.
40% Higher Glass to Resin Content: Glass (fabric) = strength and more glass is stronger. The DURATECH ^™ process better controls the application of resin resulting in a much higher strength to weight ratio.
Foam Core vs. No Core: The DURATECH™ Foam Core creates incredible structure and is therefore far more resistant to impact. The Air Core pocket on other hulls gives no structure and allows water to penetrate the hull over time increasing weight and potentially delaminating the hull.
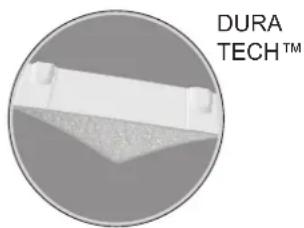
text_image
DURA TECH™A more "ECO" environmentally friendly process. The DURATECH™ closed-mold process reduces styrene emissions and creates a lower emission working environment.
Heytex® 1100 Decitex PVC - All 1100 Decitex PVC boats are made from a high grade 32oz. synthetic material which has an internal woven fabric and multiple layers of polymer coating for maximum durability and minimum weight. This creates a fabric which has been tested and proven to give nearly twice the tear resistance and overall tensile strength of other polymer fabrics.
Thermo-Seal™ - A proprietary bonding technique where material is heated under pressure to create a perfect adhesion area. A three-layer gluing process with all seams internally and externally butted end to end provides maximum strength and durability.

text_image
ney® tex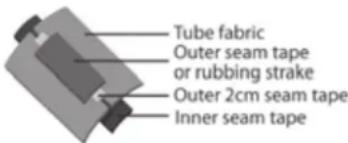
text_image
Tube fabric Outer seam tape or rubbing strake Outer 2cm seam tape Inner seam tapeORCA® CSM - Walker Bay uses the finest CSM or Chlorosulfonated Polyethylene material available. Four layers of calendared sheets offer guaranteed air-tightness and optimal adhesion of rubbers. This combination of materials provides improved resistance against weathering, chemicals and abrasions. The tubes are bonded using a three-layer gluing process with all seams internally and externally butted for maximum reliability.
text_image
able. ORCA®
FAQ? Is my boat made with Hypalon/CSM or PVC fabric?
Answer: Distinguishing between Hypalon or CSM and PVC can be difficult even to the trained eye.
The best way to tell which fabric your boat is made with is by looking very closely at the edges of the seams of where the inflatable parts of the boat are glued together. Hypalon or CSM has a thin (Less than 1mm), dark or black layer in the fabric whereas PVC is the same color throughout the fabric.
OPERATOR INSTRUCTIONS

WARNING
Risk of drowning, injury or loss of life. Read these Operator Instructions carefully.
LOADING AND BOARDING

WARNING
Do not exceed maximum recommended number of persons.
Do not exceed maximum weight capacity. Regardless of number of persons on board, total weight of persons and equipment must not exceed maximum weight capacity.
Step or climb into boat. Do not jump into boat.
Board one person at a time.
Load gear after boarding.
Load and board craft carefully. Distribute loads to maintain design trim (approximately level). Avoid standing or placing heavy weights high up.
Sit inside boat. When motoring all passengers should sit inside boat or on seat(s) provided, not on tubes. Passengers sitting on tubes can fall overboard.
When operating boat all passengers should use handholds provided. Passengers not using handholds can fall overboard.
Children and non-swimmers must wear lifejackets or PFDs when boarding and when onboard.

CAUTION
Inspect and monitor onboard loads to prevent chafing or puncture of tube.
WEATHER AND HAZARDS
All boats in this owner's manual are ISO design category "C" Inshore - Designed for voyages in coastal waters, large bays, estuaries, lakes and rivers where conditions up to, and including, wind force 6 and significant wave heights up to, and including, 2m. may be experienced.

WARNING
BEWARE OF OFFSHORE WINDS AND CURRENTS
Check weather forecasts and obtain local knowledge of marine environment and weather conditions prior to and during voyage.
Carry appropriate safety equipment (see SAFETY EQUIPMENT). Marine weather can change quickly.
Use extreme caution when motoring in darkness. Regulations may require display of navigation lights in darkness, check with local marine authorities.

CAUTION
Wrecks, reefs, rocky shores, sandbars, and shallows are hazardous and should be avoided or approached with extreme caution.
NAVIGATION

WARNING
Do not operate the boat under the influence of drugs or alcohol or any other impairment or disability.

CAUTION
Carry, read and understand navigation charts. Observe right-of-way as defined by "Rules of the Road" and required by COLREGS.
Obey signs for restricted areas designated for swimming, bathing or other forms of recreation.
Learn to control your boat and know the limitations of your capabilities and the capabilities of your boat. If necessary take a boating course to learn these limitations.
Inform someone of your Float Plan including time and place of departure, proposed route and expected time of return.
CLEANING AND MAINTENANCE
Proper cleaning and maintenance is very important for the longevity of your boat. We recommend rinsing your boat with fresh water after each use and thorough cleaning and maintenance at least once per year or at the end of your season.
HULL (HIMC and DURATECH Hulls) - Use a mild boat cleaning agent or cleaner mixed with fresh water to clean the rigid hull of your boat.
FASTENERS & FITTINGS - At the start and the end of your boating season check the condition of fasteners, screws, bolts, nuts, rivets and other fittings. Tighten or replace if necessary. For replacement parts contact your dealer or go to our website at www.walkerbay.com.
TUBES - After use, rinse boat with mild liquid soap and fresh water, rinse away sand and debris.
Apply 303 Aerospace Protectant at least once per season to protect tube from UV (ultra violet) rays. Walker Bay® recommends 303 because it is free of silicone oils, waxes, glycerin, or petroleum distillates unlike many other protectants. 303 leaves a like-new, non-oily, anti-static finish that does not attract dust. 303 can be purchased through the manufacturer's website: www.303products.com
VALVES - Tighten air valves each season or when you suspect a tube is leaking or not holding air. Loose valves may result in air leaks or loss of pressure in the tube. Tighten valves with the tool provided in the repair kit.
Valve replacement should be done by a trained professional. Contact your dealer to replace valves.
WOOD - Wooden components should be inspected for damage or deterioration of the protective finish. To avoid deterioration of the wood, scratches should be re-painted with a marine grade varnish or marine paint.
METAL - Rinse metal parts with fresh water when cleaning the rest of the boat. When replacing or adding components containing metal, use stainless steel or anodized or powder coated aluminum components to prevent corrosion.
Walker Bay uses only stainless steel, anodized or powder coated aluminum metal parts. Nuts, bolts and other metal components may show signs of corrosion. This is usually due to metallic residue from contact with non-stainless metal items like a screwdriver or wrench.

CAUTION
Do not clean with oily or abrasive substances.
Do not use products that contain: phosphates, chlorine, solvents, non-biodegradable or petroleum based products.
Do not use Armor All® automotive cleaning agent and preservative on tube.
Read labels and instructions carefully to avoid products that could be harmful to polypropylene, PVC or other plastics.
Use only diluted citrus-based cleaners. They are excellent for marine cleaning purposes, and safe to use. Full strength citrus-based cleaners can discolor PVC.
Use household cleaners sparingly and do not discharge them into waterways.
CLEANING AND MAINTENANCE CONTINUED

CAUTION
Avoid contact of the tubes' fabric with hazardous or harmful materials such as: battery acid, oil, gasoline, vinyl preserving agents, or alcohol based cleaning solutions, waxes, or solvents.
Avoid contact of sharp or abrasive objects with the tube. They can puncture the tube.
Do not mix cleaners and work in a well ventilated area.
ENVIRONMENT
Be considerate of other people and the environment.

CAUTION
Do not spill, dispose of or discharge fuel or oil into the marine environment.
Avoid water, air and noise pollution.
Do not spill, dispose of or discharge anything into the marine environment.
Dispose of all organic and inorganic garbage, chemicals, and waste in designated places. Marinas and launch sites have facilities for waste disposal, use them.
Motor slowly in NO WAKE/WASH zones.
Avoid excessive noise or speed near other boats.
Check with local authorities regarding environmental regulations. Failure to obey environmental regulations may result in penalties for the operator.
STORAGE
Before storing rinse boat with mild soap and fresh water. Rinse away sand or debris.
Dry boat before storing to prevent accumulation of mould.
Store boat in a cool and dry place.

CAUTION
Risk of fire. Do not store fuel, fuel tanks, fuel lines or any fuel related components in direct sunlight. Read Owner's Manual provided with your outboard motor for storage information.
Avoid storing boat in water when not in use to prevent contact with hazardous chemicals due to pollution, abrasion from foreign objects and accumulation of marine growth.
USE A BOAT COVER OR STORAGE BAG
Avoid unnecessary exposure of the tubes to direct sunlight. If a bag or cover is not provided with your boat, accessory covers are available. For information contact Walker Bay® customer service at info@walkerbay.com.
Do not store boat where it may come in contact with sharp or abrasive objects.
Do not store boat where rodents may have access to it, they can chew through the tube's fabric creating a leak.
Do not place heavy objects on boat in storage.
Tie boat down if you keep it in a potentially windy area.
ANCHORING - MOORING

CAUTION
Anchoring and mooring lines should be attached to metal eyes on hull.
Fasten boat securely. Failure to do so could result in loss of boat.
BEACHING

CAUTION
Approach land slowly with extreme caution.
Avoid hazards below water surface such as rocks. Hazards can damage hull, tube, motor, or propeller.
Do not power boat onto land. You can damage hull or tube.
Do not drag boat across rocks, pavement, or sand. You can damage hull or tube.
DAVITS, CRADLES AND CHOCKS
For information on lifting or storing your boat on davits, chocks or cradles refer to the sheet with diagrams and detailed information for your model of boat included with this manual or go to www.walkerbay.com.

CAUTION
Failure to correctly lift and store your boat with davits, cradles or chocks could result in injury or damage your boat. Walker Bay is not responsible for injury or damage resulting from improper use or storage with davit, cradle or chock systems.
Use metal lifting rings identified in the TYPICAL FEATURES AND DECK PLAN figure in this manual or the DAVIT, CHOCK AND CRADLE sheet included with this manual which can also be seen and downloaded at www.walkerbay.com.
Elevate bow and open drain plug to prevent accumulation of water.
Do not attach lifting device to handles or features not intended for lifting.
Do not lift boat with people onboard.
Cradles must provide adequate support or hull can be damaged or deformed.
Tie boat securely to prevent movement when underway.
USE A BOAT COVER
We recommend storing your boat with a boat cover to maintain the condition and prolong the life of your boat.
GENESIS (HIMC) HULL - STORAGE ON DAVITS, CRADLES AND CHOCKS

CAUTION
The Genesis HIMC hull material is extremely light-weight, durable, and resistant to impact and the elements. It is also flexible in certain areas and must be positioned on the hull's strong resting points when on chocks, cradles or bunks.
For strong points/areas refer to the the diagrams on the attached sheets labeled RESTING POINTS FOR DAVITS, CHOCKS & BUNKS for Genesis. These diagrams can also be viewed and downloaded at www.walkerbay.com.
Support the weight of the motor when storing boat on davits, chocks, bunks or cradles. Failure to support motor can deform or damage the HIMC hull over time.
Deformation or damage to the hull resulting from not properly supporting the hull or motor is not covered under warranty.
MOTORING

WARNING
Risk of injury. Propeller can cut, injure and kill.
Avoid moving parts of engine and propeller. and system.
Use an emergency switch or lanyard attached to your wrist. This will stop motor when lanyard is pulled. Check motor shuts off when lanyard is pulled. The stop/kill switch should activate.
Do not motor near swimmers or divers.
Do not allow swimmers to approach stern or propeller while motor is running.

CAUTION
Risk of capsizing, loss of control or falling overboard. Sit forward when motoring boat alone.
Do not make sharp turns at high speeds. Sharp turns can cause loss of control. See SPECIFICATIONS AND MAXIMUM CAPACITIES attachment for maximum recommended speeds.
Shift engine gear lever to neutral before starting. Unexpected movement can make occupants fall overboard.
Before starting motor, check motor bracket screws are securely fastened. Loose motor bracket screws can result in loss of control or loss of motor.
Pay attention to winds, water conditions, currents and tides. They can affect fuel consumption.
Allow sufficient distance to stop or maneuver if required to avoid collisions.
Reduce speed in waves. Avoid excessive speeds and sharp turns in rough weather.
Avoid rapid acceleration. Rapid acceleration can make operator or passengers fall overboard.
Donot stop or reverse quickly. Stopping or reversing quickly can cause swamping.
MOTOR SELECTION

WARNING
Do not overpower. Do not use a motor with a higher horse power, or kilowatts than the capacity label states. Overpowering can result in severe handling or stability problems.
Do not use fuel tank, fuel lines or fuel system components not approved for use with the motor or boat.

CAUTION
Do not under power. A motor too small for boat size or load may not have adequate power to navigate currents or headwinds.
Do not exceed maximum motor weight (see SPECIFICATIONS AND MAXIMUM CAPACITIES). Overweight motor can cause handling or stability problems or damage the boat.
Do not use a motor not approved for use with the boat.
MOTOR TRIM
Trim motor properly. Correct trim is essential to optimum motoring performance. A general rule is the axis of the propeller should be parallel to surface of water.
Motor trimmed too positively or "up" too much: boat may have difficulty planing, porpoise, ride "bow high" or cavitate/ventilate.
Motor trimmed too negatively or "down" too much: boat may ride nose down, bow steer, or create excessive spray.

CAUTION
Motoring into wind: adjust trim down and keep weight forward to prevent possible capsize.
Motoring in same direction as waves or swell, adjust trim up and keep weight back to prevent bow from submerging.
MOTOR HEIGHT
Position motor height properly. Correct motor height is important for optimum motoring performance. A general rule is the cavitation plate of the motor should be in line with the bottom of the hull where the hull meets the transom.
The cavitation plate should not be more than 1"/2.5cm above or below the bottom of the hull where the hull meets the transom.
Motor positioned too high: propeller may "cavitate" or "ventilate" resulting in loss of power and/or control.
Motor positioned too low: motor may create excessive spray or drag.
ROWING OR PADDLING
Boats are equipped with a paddle or oars and a seat. Secure oars and seat(s) correctly (see ASSEMBLY).

CAUTION
Rowing or paddling power may not overcome currents, tides, or winds. Consider water and weather conditions before operating boat with oars or paddle.
Do not use oars or paddle as levers, they may break.

FAQ? Does the boat take a long shaft motor or short shaft motor?
Answer: For for the correct motor shaft length refer to the SPECIFICATIONS AND MAXIMUM CAPACITIES attachment included with this manual or go to the Specifications section of www.walkerbay.com.

FAQ? What size of motor do I need for this boat?
Answer: The right motor for your boat depends on the model of boat, the type of motor and the load you are carrying. For recommended motor sizes and motoring performance refer to the SPECIFICATIONS AND MAXIMUM CAPACITIES attachment included with this manual or go to the Specifications section of www.walkerbay.com.
SAFETY EQUIPMENT

CAUTION
Carry appropriate safety equipment such as but not limited to:
- Coast Guard approved lifejackets or personal flotation devices for each passenger**
- Charts
- EPIRB device
- Tool kit/ spare parts kit
- Protective clothing in case of weather change
- Flares
- Whistle
- Fire extinguisher
- First Aid kit
- Anchor
- Navigation lights
- Flashlight
- Mobile phone
- Tow line(s)
- Tube repair kit
- Pump
- Bailer
- Oars/paddle
*Note: Specific safety equipment is mandatory in some countries.
Failure to carry safety equipment onboard could result in fines or other penalties. Crew should be familiar with use of all safety equipment and emergency maneuvering (re-boarding, towing, etc.). Contact your local boating or sailing organization for information, lessons or drill sessions.
**Note: All persons should wear a Coast Guard approved buoyancy aid (life jacket/personal flotation device). In some countries, it is a legal requirement to wear a buoyancy aid that complies with national regulations at all times.
Perform checklist actions before operating.
- Documents including registration and licenses on board.
- Federal/state/local regulations concerning operation requirements and safety equipment.
- Weather forecast.
- Local area and conditions.
- Inform someone of your intended route and return time.
- Surrounding area for swimmers or divers.
- Surrounding area for hazards such as submerged rocks.
- Tube pressure is correct and valves are securely fastened (see INFLATION & VALVES).
- Drain plug is closed (see TYPICAL FEATURES & DECK PLAN).
- Fuel lines are intact and connections are secure.
- Adequate fuel for the return journey. Consider extra fuel for delays due to weather or currents.
- Engine is securely fastened to motor mount and gear lever is in "Neutral" position.
- People and cargo are correctly and evenly distributed and do not exceed maximum capacity.
- Propeller is clear of obstructions.
- Safety equipment on board (see SAFETY EQUIPMENT).
- Review the section on OPERATOR INSTRUCTIONS if necessary.
EMERGENCY PROCEDURES

WARNING
PUNCTURE OR LOSS OF PRESSURE TO AIR CHAMBER
- Shift weight to opposite side of boat (use caution when shifting weight).
- Secure leaking or deflated chamber by tying or holding up.
- Immediately proceed to nearest safe land.
LOSS OF POWER
- Drop anchor.
- Attempt to fix problem (carry motor owner's manual, spare parts/tool kit).
- Signal or call for help.
- Stay with boat.
PERSON OVERBOARD PROCEDURE
- Throw life jacket.
- Come around into wind and waves.
- Cut engine.
- Wear a lifejacket when motoring alone as re-boarding when mooring alone is difficult.
RE-BOARDING WITHOUT CAPSIZE OR SWAMPING
- Turn motor off for re-boarding. Do not approach transom or motor while motor is running.
- Use handles for re-boarding.
- Use caution when assisting re-boarding passenger.
- Distribute weight while re-boarding to prevent capsizing.
- To avoid falling overboard, when operating boat do not stand, sit inside not on tubes, and use handles.
SWAMPING
- Bail boat using a bailer or,
- Open drain plug and motor. Water should drain out when boat is moving forward. Close drain plug when water has drained.
ACCIDENT REPORTING (USA)
Obtain knowledge of accident reporting requirements for the United States Coast Guard. Copies of the U.S. Coast Guard Boating Accident Report are available by calling the U.S. Coast Guard Boating Safety Hotline at 1 (800) 368-5647.
RENDERING ASSISTANCE (USA)
United States Code, Title 46 states that “The owner operator of a vessel is required by law to render assistance to any individual or vessel in distress, so long as his vessel is not endangered in the process.”
U.S. Coast Guard Boating Safety Hotline:
1 (800) 368-5647 or 1 (202) 267-1070
TOWING BEHIND A BOAT

WARNING
Keep clear of tow line. If tow line comes free or breaks, recoil can cause injury.
Do not tow with people in boat. They can fall overboard.

CAUTION
When towing inflatable behind another boat, use bow eye on hull or D-ring(s) on sides of tube (see FEATURES & DECK PLANS).
Do not tow with the bow handle.
Use a double tow line when towing behind another boat. The second line acts as a backup in case one line breaks or comes undone.
Allow at least two boat lengths between boats.
Use judgment to determine the ideal length between boats, consider size of waves and wake.
Use line intended for towing, ask your dealer to select correct line for your application (Do not tow with three stranded nylon).
Towing line should have minimum breaking strength equal to 4 times the weight of the boat being towed.
Fasten boat securely and observe frequently.
Avoid towing tender long distances. When traveling long distances or in rough weather stow boat on deck.
Empty inflatable before towing.
Avoid towing with outboard motor installed. Remove outboard motor before towing and stow on mother vessel.
Do not use a tow line with signs of wear. Check tow lines for wear frequently.
Keep tow lines clear of propeller(s).
Keep hands and feet clear of tow lines. Do not hold tow line while towing.
Be prepared to cast loose or cut tow line if necessary.
Do not tow at high speeds or while planing.
Do not attach tow line to fixtures or points not intended for towing, such as handles.
TRANSPORTING BY ROAD

WARNING
Risk of automobile accident, injury or loss of life in case of loss of control of trailer or boat while driving.
ROOF RACK
- Read Owner's Manual provided with roof rack.
- Use an approved roof rack and straps appropriate for fastening boat to roof rack.
- Do not exceed maximum carrying capacity of roof rack.
- Deflate tubes completely and open drain plug.
- Position boat for minimum drag.
- Stop frequently to check boat is securely fastened while driving.
TRAILER
- Read Owner's Manual provided with trailer.
- Use a BUNK trailer. Do not use a ROLLER trailer. Rollers may not provide adequate support for hull.
- Use a trailer suitable for the type of craft and its mass.
- Secure boat to trailer and stop frequently to check boat is securely fastened while driving.
- Do not exceed maximum capacity of trailer.
- Do not trailer boat with objects inside hull.
Check with trailer manufacturer if weight and shape of boat is sufficient for control at driving speeds.

CAUTION
TRUNK, BOOT OR PICK-UP TRUCK BED
- Protect boat from sharp objects, rubbing and chafing.
- Use a boat bag if one is provided.
GENESIS (HIMC) HULL
- The Genesis HIMC hull is flexible in certain areas and requires proper support when transporting on a trailer.
- Use a bunk style trailer with the bunks positioned on the outside of the chines next to the chines (See attachment: RESTING POINTS FOR DAVITS, CHOCKS & BUNKS).
- Also support the weight of the motor when transporting on a trailer.
- Failure to adequately support the hull or motor when trailering can deform or damage the hull over time.
- Deformation or damage to hull resulting from not properly supporting the hull or motor is not covered under warranty.
INFLATION
FIRST TIME INFLATION - When inflating your boat for the first time, inflate all air chambers evenly as directed in INFLATION SEQUENCE. Once the boat is completely inflated release 50% of the air pressure in all chambers and re-inflate all chambers to working pressure. This will allow fabric to settle from packaging.

CAUTION
Do not use a compressed air source (ie. automotive tire air compressor) to inflate boat/tubes. Over inflation by a compressed air source can rupture seams and/or bulkheads.
When using an electric pump to inflate your boat finish inflation procedure with the manual pump provided.
Air chambers must be inflated evenly and to correct working pressure:
Tubes: 0.25bar/3.5psi.
Hi-pressure Air Floor:
Working Pressure: 0.43bar/6psi;
Maximum Pressure: 0.8bar/11.3psi.
Inflatable Keel: 0.25bar/3.5psi).
Over a period of days tubes may lose pressure. Check pressure before use and re-inflate chambers to working pressure if necessary. Failure to do so could result in chafing or damage to tube or other parts of boat.
INFLATION SEQUENCE
Using the pump provided, inflate each chamber to approximately 50%. This will protect the baffles which separate the chambers from unnecessary distortion and potential harm.
Finish inflating each chamber. The tubes should be "drum tight". Working pressure of tubes is 0.25bar or 3.5psi.
FLOOR INFLATION (AIR FLOOR MODELS)
Use high pressure setting on pump provided to inflate floor chambers to working pressure of 0.43bar or 6psi up to maximum pressure of 0.8bar/11.3psi..

CAUTION
Do not exceed working pressure of tubes or maximum pressure of hi-pressure air floor. Exceeding working pressure of tubes or maximum pressure of hi-pressure air floor can damage fabric, baffles, or seams and cause loss of pressure.
CHANGES IN TEMPERATURE, PRESSURE OR ALTITUDE

CAUTION
Changes in air temperature will affect air pressure in tubes. Monitor air pressure in tubes and adjust to maintain working pressure (see INFLATION for working pressure).
Changes in elevation or altitude will affect air pressure. In case of changes of elevation or altitude, adjust air pressure in tubes and/or floor to maintain working pressure. To prevent over-inflation, decrease air pressure before transporting boat to higher elevation.
OPERATION OF VALVES
If this is the first time inflating tubes and/or floor, check that valves are tight. Use tool provided in repair kit and gently tighten valves.
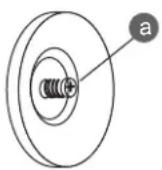
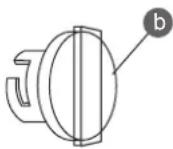
INFLATING - To retain air when inflating, release valves to "out" position by pushing button (a) and turning approximately 90 degrees.
Secure valve with "cap" (b) when finished inflating.
DEFLATING - To release air from tubes remove "cap" (b) and position valve in "in" position by pushing button (a) in and turning approximately 90 degrees clockwise. Valve should remain in the "in" position.

CAUTION
Do not force valves. They may break.
INSTALLING SEATS
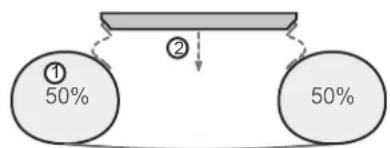
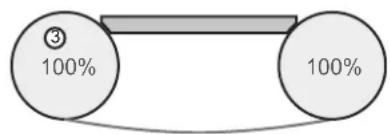
- Inflate tubes to approximately 50% of working pressure.
- Clip or slide seat to seat attachment system on tube.
- Resume inflating tubes to working pressure.
flowchart
graph TD
    A["① 50%"] --> B["②"]
    B --> C["②"]
    C --> D["②"]
flowchart
graph LR
    A["③"] --> B["100%"]
    B --> C["100%"]
REPAIRS
For repairs or service contact your dealer.
To find a the servicing dealer nearest you go to www.walkerbay.com or email: info@walkerbay.com
RIGID HULL REPAIRS
For repairs to fiberglass, DURATECH or GENESIS (HIMC) hulls contact your dealer or Walker Bay customer service by email at: info@walkerbay.com

CAUTION
In the event of more serious hull damage such as a hole or crack do not use the boat. Contact your dealer or Walker Bay® customer service for repair information.
FINDING SMALL LEAKS IN AIR CHAMBERS
- Mix a solution of soapy water with approximately 4 cups of fresh water and 1/2 cup of mild non-anti-bacterial liquid soap. Do not use a spray bottle containing household cleaners.
- Inflate tube approximately to working pressure.
- Spray or wipe the soapy solution over suspected area of leak.
- Look for air bubbles. Bubbles around an air valve indicate it is probably loose. Use the tool included in the repair kit and gently tighten valve. Bubbles on the surface of the tube indicate a puncture or leak.
- Repair the tube by following the procedure for SMALL TEARS - CUTS - PUNCTURES or contact your dealer or Walker Bay® customer service for Return Authorization, Repair Service and Freight Rates.
TUBE - SMALL TEARS, CUTS, PUNCTURES
Small tears, leaks, or punctures less than 0.5 inches or 1cm can be repaired with the repair kit provided with your boat.
- Prepare a round patch no less than 3 inches or 7 centimeters in diameter.
- Clean the patch and the area surrounding the leak with Isopropyl Alcohol. IMPORTANT: patch and tube must be clean or the patch may not adhere properly.
Hypalon® or CSM - For Hypalon® or CSM fabric mildly rough the patch surface area of the tube using a small square of sand paper.
- To contain excess glue, use masking tape to tape off the area around the patch. Excess glue will discolor.
- Apply 3 thin, even coats of repair kit adhesive to both the surface of the tube and the patch. Wait 5 minutes between each coat.
- After the 3rd coat, wait 10-15 minutes before applying the patch. Use a hand roller or blunt tool to apply pressure the patch evenly. Pay special attention to the edges.
- Wait 24 hours before re-inflating tube. Inflate air chamber(s) to working pressure and check water-tightness and/or air-tightness before using.
LARGE REPAIRS TO SKIN - SEAMS - BULKHEADS - TRANSOM

CAUTION
For large tears or repairs to seams, bulkheads or transom it is recommended that the boat be returned to your dealer for repair by a trained professional. To locate a servicing dealer near you go to www.walkerbay.com or email info@walkerbay.com.
REPLACEMENT PARTS
For replacement parts contact your nearest dealer or go to www.walkerbay.com or email: info@walkerbay.com
TROUBLESHOOTING
| PROBLEM | POSSIBLE CAUSE | POSSIBLE SOLUTION |
| Buoyancy chamber loses air: | - Tube valve is loose. | - Tighten valve (see OPERATION OF VALVES). |
| - There is a leak. | - Repair leak (see REPAIRS). | |
| Floor not rigid enough (AIR FLOOR models only): | - Air pressure is too low. | - Adjust air pressure (see INFLATION). |
| Boat does not get on plane: | - Motor is improperly trimmed. | - Adjust motor trim (see MOTOR TRIM). |
| - There is too much load. | - Adjust load (see LOADING). | |
| - There is too much load in the rear of the boat. | - Shift load or passengers forward. | |
| - Motor is too small. | - Change motor size (see MOTOR SELECTION). | |
| - Install hydrofoil fin or wing on motor. | ||
| - AIR models, floor is under inflated. | - Adjust air pressure (see INFLATION) | |
| Boat porpoises: | - Motor is improperly trimmed. | - Adjust motor trim (see MOTOR TRIM). |
| - Boat is loaded incorrectly. | - Adjust load (see LOADING). | |
| Boat rides bow down: | - Motor is improperly trimmed. | - Adjust motor trim (see MOTOR TRIM). |
| - Boat is loaded incorrectly. | - Adjust load (see LOADING). | |
| Water accumulates in hull: | - Drain plug is open. | - Close drain plug (see FEATURES & DECK PLANS). |
| - Drain plug housing is loose. - Tighten drain plug housing. | ||
| - Thru-hulls are not sealed. - Check thru-hulls for watertightness. In case of thru-hull leak apply silica sealant or caulking to seal thru-hull. | ||
| - Genesis (RIB): Tube seal is incorrectly installed. | - Install tube correctly. |