WiPG-1600 - Wireless presenter wePresent - Free user manual and instructions
Find the device manual for free WiPG-1600 wePresent in PDF.


User questions about WiPG-1600 wePresent
0 question about this device. Answer the ones you know or ask your own.
Ask a new question about this device
Download the instructions for your Wireless presenter in PDF format for free! Find your manual WiPG-1600 - wePresent and take your electronic device back in hand. On this page are published all the documents necessary for the use of your device. WiPG-1600 by wePresent.
USER MANUAL WiPG-1600 wePresent
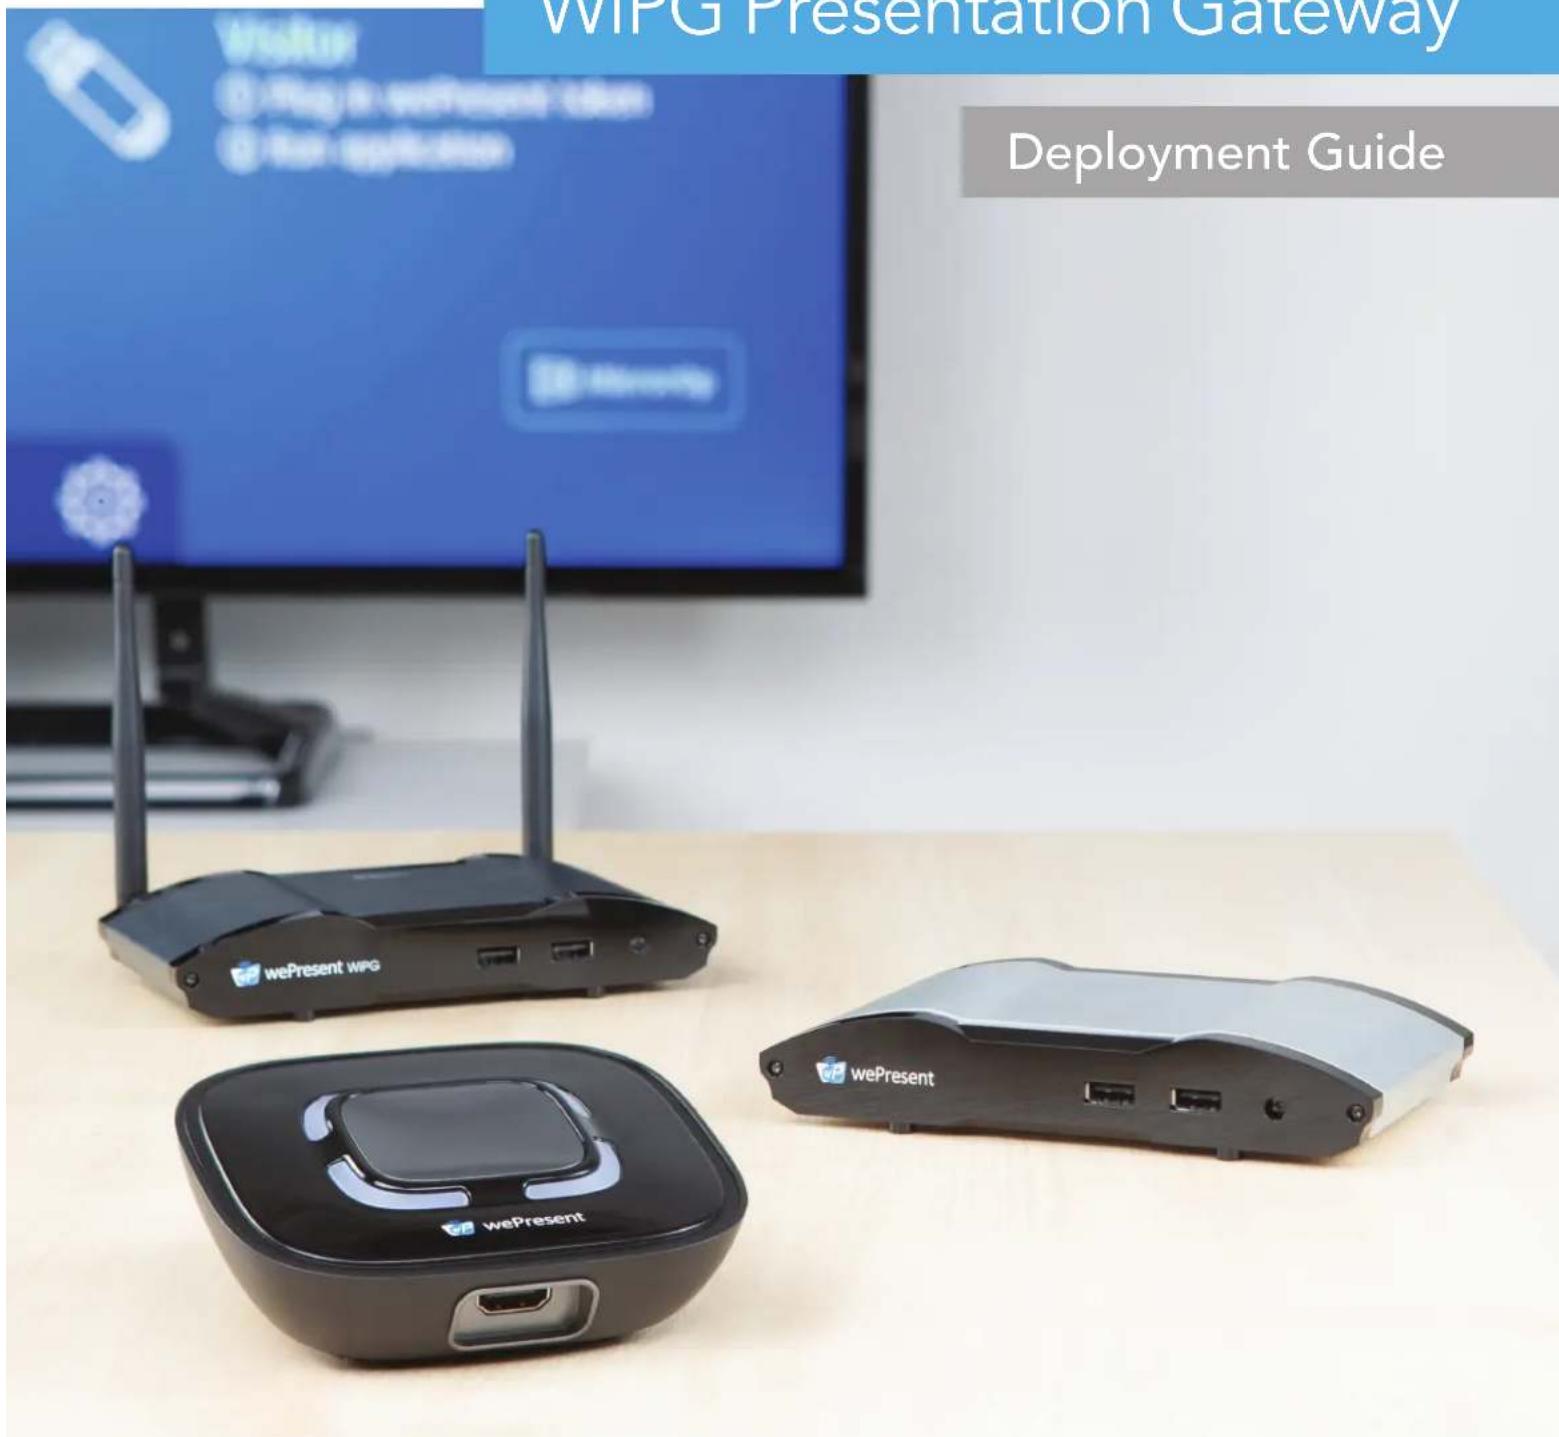
WiPG Presentation Gateway
text_image
WIPG Presentation Gateway Deployment GuideContents
Introduction 1
User Experience 2
Start Up Screen Display 2
Hostname (SSID) 2
IP Address 2
4-Digit Security Code 2
WiPG Device Installation 3
Stand-Alone Connection Mode 3
Network Connection Mode - Option A 4
Network Connection Mode - Option B 5
Network Connection Mode - Option C 6
Connecting to WiPG Device 7
PC Connection 7
MirrorOp Software Deployment Options 8
Mobile Device Connection 10
MirrorOp Device Discovery 11
WiPG Customization 12
Customizing Hostname/SSID 12
ADMIN Panel 13
Firewall Rules 13
Wi-Fi Protocol 15
WiPG Device Security 16
Deployment Options for Guest Network Access 16
VLAN Based Network 17
Physical Air Gap Network 18
Data Transport 19
Firmware Upgrades 21
Single Device 21
Multiple Devices 21
Simple and Advance Mode Configuration 22
Firmware Upgrade Setup 22
Firmware Upgrade Status List 23
The wePresent WiPG Presentation Gateway helps users to bridge the technology gap allowing businesses and classrooms to enjoy the benefits of wireless presentation.
When connected to a display or projector, users can mirror their content without the need for connecting cables. The WiPG device can be used as a stand-alone device projecting its own Wi-Fi Signal or connected to a network through the LAN Ethernet port.
Windows and OS X users can share their desktop by installing and running a free software called MirrorOp. The MirrorOp software is available from the wePresent website, wePresent Admin Panel, and wePresent USB flash drive provided with each unit. Android and iOS users can share their content by installing the free MirrorOp application available from Google Play and the App Store.
Basic WiPG deployment example
The wePresent WiPG is designed for commercial implementation in Corporate, Education, Government, Healthcare and Public environments. This documentation provides deployment information for all three current wePresent models (WiPG-1000, WiPG-1500 and WiPG-2000).
For more information, please visit our website http://wepresentwifi.com or email our help team at help@wepresentwifi.com.
User Experience
Start Up Screen Display
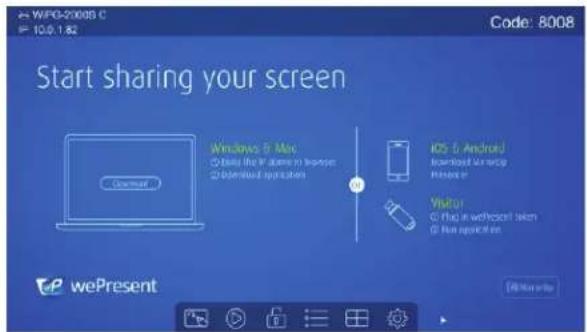
The WiPG device shows the Start Up screen when the connected display device is turned on. Elements shown on the Start Up screen include the Hostname, IP address, login instructions, and 4-digit security code. The display can be personalized to allow custom login instructions and branding.
text_image
WiP0-20089 C IP: 10.0.1.82 Code: 8008 Start sharing your screen Windows 5 Max © files file in stores to license © Download application iOS 5 Android Downloaded Memory Presenter Visitor © files file in stores taken © New application wePresent © New ServiceStart Up Screen Display
Hostname
Displayed in the upper left hand corner of the Start-Up Screen is the hostname of the wePresent device. The hostname can be customized/renamed so that users can easily identify and login into the correct device if multiple units have been deployed on the network (i.e. "Conference Alpha-WP2000").
IP Address
Each WiPG device will be assigned an IP Address displayed in the upper left hand corner of the Start-Up Screen. By typing the IP Address in a web browser, users will have access to download software, Admin Panel, Control Panel, and WebSlides for that particular device.
4-Digit Security Code
Located in the upper right hand corner of the Start-Up Screen is a 4-digit security code. The security code prevents people outside the conference room/classroom from being able to log into the presentation.
There are three settings of operation for the security login:
1) Random: a new 4-digit code is generated after the last user disconnects.
2) Fixed: a static 4-digit code can be set from the Admin Panel
3) Disabled: 4-digit security code can be disabled through the Admin Panel
WiPG Device Installation
Before presenting, users need to connect to the WiPG's Wi-Fi signal in stand-alone mode or connect to the network's Wi-Fi if WiPG device is connected to the network.
Stand-Alone Connection Mode
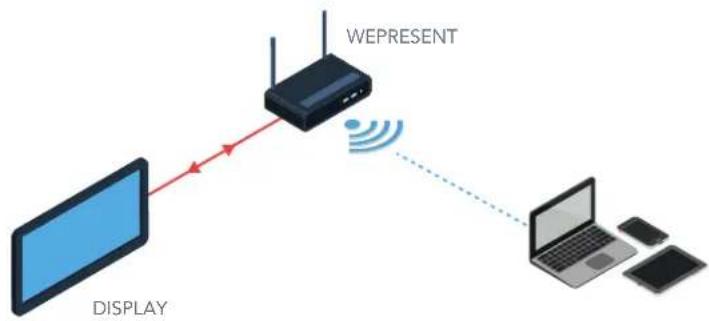
The WiPG device is able to broadcast its own Wi-Fi signal becoming an access point/hotspot that users can log on to present. No internet access is required. The broadcast band for the WiPG-1000 and WiPG-1500 is 2.4GHz. The WiPG-2000s supports dual band and is able to broadcast on 2.4GHz band or 5.0GHz band. The WiPG devices also support up to AES level encryption.
NOTE: Wi-Fi interference can cause disruption or lag during a presentation (Wi-Fi pollution).
flowchart
graph LR
    A["DISPLAY"] --> B["WEPRESENT"]
    B --> C["Laptop with devices"]
Stand-Alone Basic Diagram
Recommended Environment
Small to medium size room with clear Wi-Fi having no more than 5 other access points.
Network Connection Mode (Option A)
Join Corporate Network Through Ethernet With WiPG Wi-Fi Off
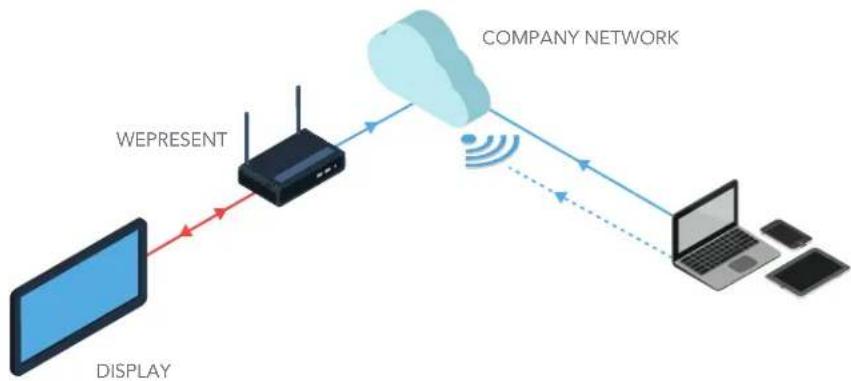
The WiPG device is able to connect to the local enterprise network via the Ethernet/LAN port located in the back of the device using a CAT5/CAT6 cable. In the network connection mode Option A, the Wi-Fi signal of the WiPG device will be disabled. Both guest and internal users will access the WiPG device through the network enterprise's AP.
flowchart
graph LR
    A["DISPLAY"] -->|WEPRESENT| B["WiFi"]
    B --> C["COMPANY NETWORK"]
    C --> D["Laptop"]
    D -->|Wireless Signal| C
◀ Network Connection Mode (Option A) Basic Diagram
Recommended Environment
Office or school with many access points currently installed. Network connection mode Option A is a good option in environments where more than 10 wePresent units are closely deployed. This option is ideal for networks that do not allow additional Wi-Fi APs due to security concerns.
Network Connection Mode (Option B)
Join Corporate Network Through Ethernet With WiPG Wi-Fi On
The WiPG device is able to connect to the local enterprise network via the Ethernet/LAN port in the back of the device using a CAT5/CAT6 cable. In the network connection mode Option B, the WiPG device will continue to broadcast a Wi-Fi signal acting as a wireless access point (WAP). This scenario allows guest users to connect to the wePresent Wi-Fi while internal users connect to the corporate Wi-Fi. The Gatekeeper security feature from the ADMIN Panel allows administrators to customize guest access – allow all / block all / internet only – according to network's security level.
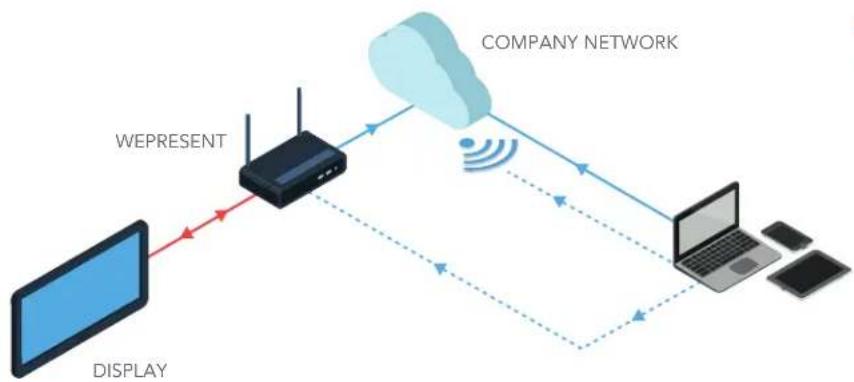
flowchart
graph TD
    A["DISPLAY"] --> B["WEPRESENT"]
    B --> C["COMPANY NETWORK"]
    C --> D["Laptop"]
    D --> E["Smartphone"]
    C --> F["Wireless Signal"]
    F --> B
Network Connection Mode (Option B) Basic Diagram
Recommended Environment
Office or school with many access points currently installed. Network connection mode Option B is good option in environments where more than 10 wePresent unit are closely deployed. Also ideal for scenarios where no corporate WiFi AP exists or the corporate WiFi is not open to guest users.
Network Connection Mode (Option C)
Join Corporation Network Through Wi-Fi Station Mode
The WiPG device is able to connect to the local enterprise network using the WiPG's Wi-Fi. Network administers need to configure the WiPG to Wi-Fi Station Mode in the ADMIN Panel of target device. Both guest and internal users will access the WiPG device through the network enterprise's AP.
NOTE: Performance may not be optimal due to having two Air Hops between PC/Mobile Device and WiPG.
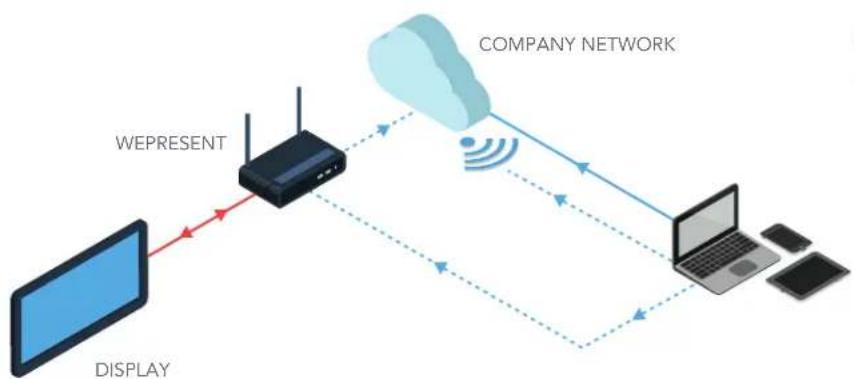
flowchart
graph TD
    A["DISPLAY"] --> B["WEPRESENT"]
    B --> C["COMPANY NETWORK"]
    C --> D["Laptop"]
    D --> E["Mobile devices"]
    style A fill:#4CAF50,stroke:#333
    style B fill:#E6F3FF,stroke:#333
    style C fill:#B2C2FF,stroke:#333
    style D fill:#1980FF,stroke:#333
    style E fill:#4CAF50,stroke:#333
◀ Network Connection Mode (Option C) Basic Diagram
Recommended Environment
Office or school with many access points currently installed. Also good option when corporate network consists of different VLAN for Guest Users and Internal Users. This option is ideal for networks that do not allow additional Wi-Fi APs due to security concerns, and Ethernet connection to enterprise networks is not available.
Connecting to WiPG Device
PC Connection
Internal Users
When presenting from a PC, internal users will need to install the MirrorOp software. MirrorOp can be downloaded from wepresentwifi.com, Admin Panel, and USB flash drive provided with device. MirrorOp is compatible with both Windows and OS X environments. There are no additional licensing fees for multiple software installations across the enterprise.
Guest Users
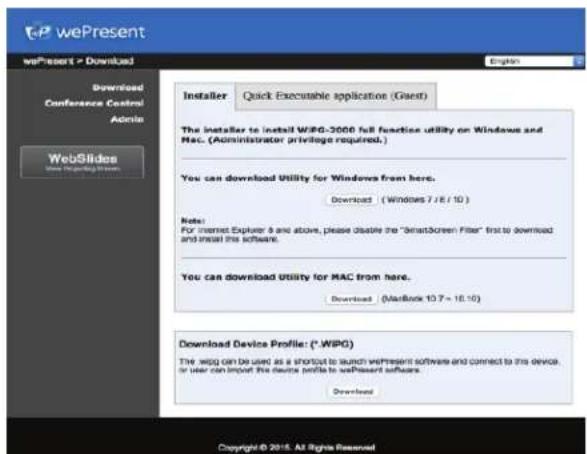
Guest users have the option of installing full software or using the MirrorOp Executable file to connect to the WiPG device. MirrorOp executable file will allow users to launch software and connect to the WiPG device without needing to install full software. MirrorOp executable file along with full software is available in the Admin Panel and Plug-N-Show USB token provided with device.
text_image
wePresent wePresent > Download Download Conference Control Admin WebSlides Iased to download Windows Installer Quick Executable application (Guest) The installer to install WIPG-2000 full function utility on Windows and Mac. (Administrator privilege required.) You can download Utility for Windows from here. Download (Windows 7 / 8 / 10 ) Note: For remote Explorer & and above, please disable the "instScreen Filter" first to download and install this software. You can download Utility for MAC from here. Download (MacBook 10.7 - 16.10) Download Device Profile: (*.WIPG) The wipg can be used as a shortcut to launch wePresent software and connect to this device, or user can import the devices profile to wePresent software. Download Copyright © 2015. All Rights ReservedAdmin Panel Software Installer Page
MirrorOp Software Deployment Options
Listed below are a few options for both small and large scale client software deployments.
MSI Install
Using MSI installer, enterprise IT department can deploy the MirrorOp software directly to Windows user laptops remotely using the MSI command. Link below provides instructions for MSI installer.
https://msdn.microsoft.com/en-us/library/aa372024%28v=vs.85%29.aspx?f=255&MSPPError=-2147217396
Import Profile Install
Using Import Profile installer, users can create a profile link that will launch the MirrorOp software, and allow users to connect to the most frequently used devices or connect to a selected favorite device. The profile link can be exported to users throughout the enterprise. This install option is frequently used for larger organizations with network environments that may block the MirrorOp software from being able to locate WiPG devices during device discovery.
<?xml version="1.0" encoding="UTF-8" standalone="no"?>
<Devices>
    <MirrorOp>
    <Device>
    <Device_name>wePresent-Room1</Device_name>
    <IP>192.168.100.10</IP>
    </Device>
    </MirrorOp>
    <MirrorOp>
    <Device>
    <Device_name>wePresent-Room2</Device_name>
    <IP>192.168.100.11</IP>
    </Device>
    </MirrorOp>
    <MirrorOp>
    <Device>
    <Device_name>wePresent-Room2</Device_name>
    <IP>192.168.100.12</IP>
    </Device>
    </MirrorOp>
</Devices>
Creating wePresent Import Profile: Profile.xml
Connecting to WiPG Device
Plug-N-Show (PnS) Token Install
wePresent provides a PnS USB Token with each WiPG Device. The PnS token comes preloaded with full MirrorOp software for both Windows and MAC environments, a quick executable file, users manual, and supporting drivers. This installation can be performed by users or through the IT department and is recommended for smaller scale organizations.
Users can download and install the full MirrorOp software loaded on the PnS Token for their Windows or MAC PC. Users that are unable to download and install software on their PCs can use the quick executable file to launch the MirrorOp software directly from the PnS Token to connect to target WiPG device.
Additional tokens can be replicated using the settings gear icon located on the Startup Screen menu.
ADMIN Panel Install
Admin Panel install allows users or the IT department to download install the full MirrorOp software directly from the WiPG device webpage. The option to download the Quick Executable application to launch MirrorOp software is also available on the Admin Panel web page.
Association File Install
The WiPG associate file provides a quick way to connect to a predefined receiver. By defining the WiPG association file, a user can double click on the association file and it will connect to the predefined wePresent device automatically.
Creating a wePresent Association File:
1) Adjust Settings of wePresent Device – login to the ADMIN panel of the target wePresent device. Navigate to the "Device Setup" menu, and change the code from "random" to "use the following code". Enter in a static code (also recommend using a Static IP address when using the association file connection method).
2) Create a file with .WiPG extension – create a text file and change the extension to *.WiPG. Your system will change the icon of the file to WiPG automatically. The MirrorOp software has to be installed prior to creating the WiPG extension.
3) Use the Following Profile Format – follow the template format below and enter the user name, device IP address and login code. Save the file to your system.
<?xml version="1.0"?>
<Devices>
<Device>
    <name>Eric's Profile</name>
    <IP>192.168.171</LoginCode>
</Device>
</Devices>
Template Format
4) Launch WiPG associate file – double click the WiPG association file, and it will launch the MirrorOp software and start connecting to the target device according to the connection information stored in the WiPG association file.
Mobile Devices Connection – Smartphones and Tablets
Android Devices
When presenting from an Android device (both smartphone and/or tablet), users will need to install the MirrorOp Sender App. MirrorOp Sender can be downloaded for free from Google Play.
NOTE: The MirrorOp Sender app is not for all Android devices. LG users need to install the LF add-on.
iOS Devices
When presenting from an iOS device (both smartphone and/or tablet), users will need to install the MirrorOp Presenter App. MirrorOp Presenter can be downloaded for free from the Apple App Store.
MirrorOP Device Discovery
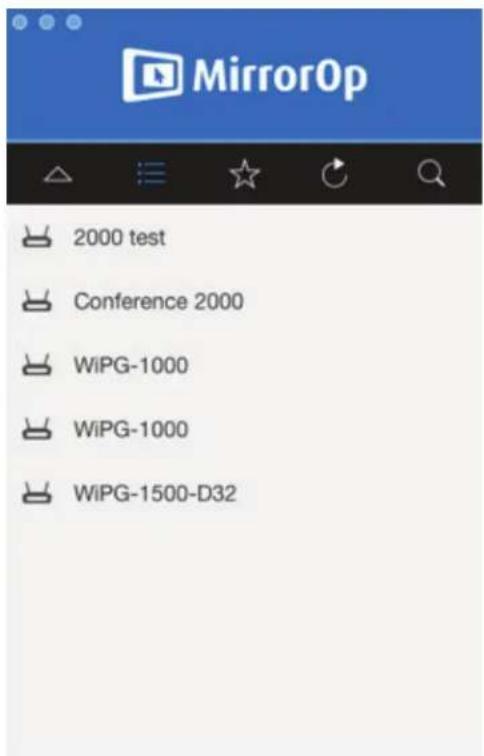
Managing the rooms in which the WiPG device is installed can be a significant task. There may be multiple devices deployed in a certain room or across network enterprise on the same network. The WiPG has two methods to access the connection parameters of a room: Hostname and Manual Entry.
text_image
MirrorOp 2000 test Conference 2000 WiPG-1000 WiPG-1000 WiPG-1500-D32
Input hostname or IP
Hostname (SSID) Device Listing
To view a current listing of wePresent devices, click on the refresh icon from the menu on PC devices or drag down the window on mobile devices. An updated list of wePresent Hostnames will be displayed.
MirrorOp Device Discovery Screen
Manual Entry
WiPG device allows the user to manually enter the Hostname or IP address of the device. Address can be entered in "Input hostname or IP" field located at the bottom of Device Discovery Screen on PC devices. On mobile devices, IP address or Hostname can be entered in the search field.
If the Hostname of the wePresent device is not found when software/application is launched, Manual Entry option will make a direct IP connection to the target WiPG device.
WiPG Customization
Customizing Hostname
wePresent recommends that each WiPG device be given a unique hostname that will assist users in identifying the target WiPG device. Below are a few different ways to manage customizing the Hostname:
NetBIOS resolution: utilized when Host name is 15 characters or less and is disabled when Hostname is longer than 15 characters.
▶ DHCP options 12 and 81: WiPG device is set with static IP address along with the Domain Name System field utilized.
NSUPDATE for dynamic DNS servers
Once the Hostname has been customized, the IP address displayed on the Start Up screen can be turned off as an option.
WiPG Customization
ADMIN Panel
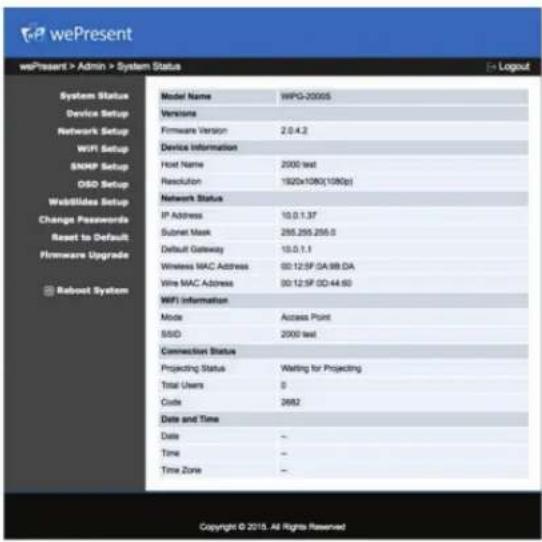
The WiPG device is customized and configured through the built-in web pages of the device called the ADMIN Panel. Parameters such as device IP address, WebSlides settings, centralized management, and wePresent Connected devices are set under the ADMIN menu option. The default password is admin, which can be changed.
text_image
wePresent wePresent > Admin > System Status System Status Device Setup Network Setup WiFi Setup SNMP Setup OSO Setup WebWides Setup Change Passwords Reset to Default Firmware Upgrade Redoost System Model Name WPQ-20005 Versiona Firmware Version 2.0.4.2 Device Information Host Name 2000 text Resolution 1920x1080(1080p) Network Status IP Address 10.0.1.37 Subnet Mask 266.266.266.0 Default Gateway 10.0.1.1 Wireless MAC Address DD:12:5F:GA:88:DA Wire MAC Address DD:12:5F:DD:44:50 WiFi Information Mode Access Point SSD 2000 text Connection Status Projecting Status Waiting for Projecting Total Users 0 Code 2682 Date and Time Date - Time - Time Zone - Copyright © 2019. All Rights ReservedSystem Status Panel
Firewall Settings
The MirrorOp software communicates with the target WiPG device passing through network security systems such as firewalls. An established set of rules needs to be set so traffic can be filtered and passed through the firewall. The firewall administrator will be prompted to add a rule by the operating system if a rule does not exist.
Port Table: Firewall administrator can allow or restrict certain data to be communicated from user to WiPG device using the Port Table.
Port Table:
| USAGE DIRECTION PORT # NOTE | |||
| TCP | 443 AirPlay also uses this port. | ||
| Command Both | 3268 | ||
| 389 | |||
| Data Both | 8080 | Remove 445 by Goody mention. Because Microsoft-DS AD, SMB also use this 445 port number, so we change this port to 31865 | |
| 31865 | |||
| 515 | |||
| Audio Both 1688 | User for screen projection audio data transfer, needs to open it let audio projection work | ||
| Video Both 1041 | |||
| UoIP Both | 3240 | ||
| 6000 | |||
| Activation Both 8000 | MirrorOp/Motiva or others include activation function to use. | ||
| Conference Control | Both 19996 | This is for internal used (WPS<->Emb System). Doesn't need to allow it in enc user sited. | |
| DLNA Both | 2869 DLNA CMD port for connection created | ||
| 49152 | |||
| 49153 | |||
| AirPlay | 80 | ||
| 3689 | |||
| 5353 | |||
| 7000 | |||
| 49153 | |||
| UDP | |||
| Device Discovery | Inbound | Used for device discovery to find available devices; suggest opening all these 3 ports (1047~1049), otherwise, application can't find device, may need to enter IP/hostname manually. | |
| NetBIOS name service | Both 137 | Standard port number. This is for hostname used with windows. | |
| SNMP | Both 161 | Standard port number. This is SNMP protocol port number. | |
| DLNA Both | 1900 SSDP | broadcast used | |
| 50000 - 65500 | DLNA will select one of these ranges to do user action. | ||
| TCP/UDP | AirPlay | 554 | |
Wi-Fi Protocol
wePresent devices have both 2.4G and 5G Wi-Fi capability: WiPG-1000 and WiPG-1500 have 2.4G while the WiPG-2000s has dual band feature with both 2.4G and 5G options. Actual performance might vary due to Radio-Frequency (RF) interference. For small-scale deployment, a Wi-Fi channel analysis tool to find the proper available channel for the WiPG device is recommended. For large-scale deployment, consulting a professional Wi-Fi integrator, or utilizing the enterprise network's Wi-Fi via Ethernet connection is recommended.
Channel Lists for WiPG:
| 2.4G BROADCAST BAND | |||
| CHANNEL | FREQUENCY (MHZ) | WW | EU* |
| 1 2412 Yes Yes | |||
| 2 2417 Yes Yes | |||
| 3 2422 Yes Yes | |||
| 4 2427 Yes Yes | |||
| 5 2432 Yes Yes | |||
| 6 2437 Yes Yes | |||
| 7 2442 Yes Yes | |||
| 8 2447 Yes Yes | |||
| 9 2452 Yes Yes | |||
| 10 2457 Yes Yes | |||
| 11 2462 Yes Yes | |||
| 12 2467 No Yes | |||
| 13 2472 No Yes | |||
* EN 300 328 V1.9.1. Regulation
5G BROADCAST BAND
| CHANNEL | FREQUENCY (MHZ) | WW | EU* JP WW | ||
| 36 | 5180 | Yes | Yes | Yes | No |
| 40 | 5200 | Yes | Yes | Yes | No |
| 44 | 5220 | Yes | Yes | Yes | No |
| 48 | 5240 | Yes | Yes | Yes | No |
| 149 | 5740 | Yes | No | No | No |
| 153 | 5765 | Yes | No | No | No |
| 157 | 5785 | Yes | No | No | No |
| 161 | 5805 | Yes | No | No | No |
| 165 | 5825 | Yes | No | No | No |
Adaptive Frequency Hopping of EN 300 328 V1.9.1 regulation requests the WiPG device to implement the mechanism like Detect and Avoid (DAA) when an equipment identifying frequencies are being used by other devices. The Wi-Fi signal of the WiPG device needs to be temporarily turned off if there is interference from different Wi-Fi Access Points or RF devices in the same environment.
WiPG Device Security
Network security consists of different polices adopted to prevent and monitor unauthorized access, misuse, and/or modification to network resources. The WiPG device has been designed to work in and adhere to a variety of computer network security environments: businesses, education, government and other public entities.
When the WiPG device is connected to a corporate network, all traffic from the device is treated like any other network traffic. With the WiPG WiFi disabled, the device sits on the network like any other network device (printer, etc.). It is important to remember that when connected to a corporate network, the WiPG device as secure as the standards set by the supporting network.
Deployment Options for Guest Network Access
In conference rooms, classrooms or meeting rooms, Network managers need to be able accommodate both internal and guess users and their respective network privileges. Standard network practice is to have a separate network for guest users to access, either a VLAN Based Network or Physical Air Gap Network.
WiPG Device Security
VLAN Based Network
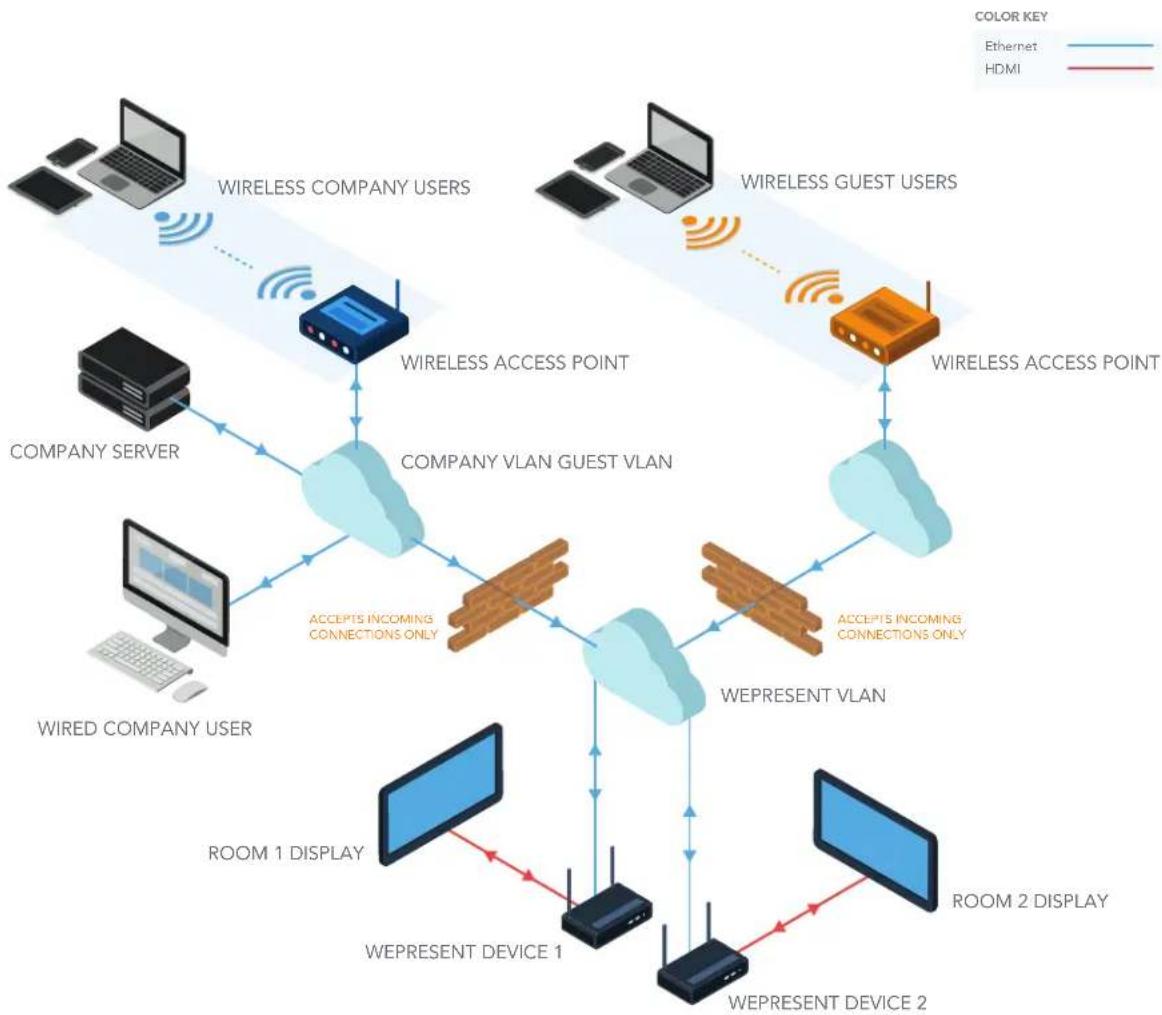
A virtual LAN (VLAN) is a partition that the network administrators have set to provide a separate network for internal users and guest users in order to match different security requirements. The VLAN deployment diagram shows how the WiPG devices communicate with internal VLAN and guest VLAN.
VLAN Based Network Example
flowchart
graph TD
    A["Company Server"] -->|Wireless Access Point| B["Company VLAN Guest VLAN"]
    C["Wired Company User"] -->|Accepts Incoming Connections Only| B
    D["Room 1 Display"] -->|Accepts Incoming Connections Only| B
    E["Room 2 Display"] -->|Accepts Incoming Connections Only| B
    F["Company Server"] -->|Wireless Company Users| G["Wireless Company Users"]
    H["Client Computer"] -->|Wireless Access Point| I["Wireless Guest Users"]
    J["Client Computer"] -->|Wireless Guest Users| K["Wireless Guest Users"]
    L["Client Computer"] -->|Wireless Access Point| M["Wireless Guest Users"]
    N["Client Computer"] -->|Wireless Access Point| O["Wireless Guest Users"]
    P["Client Computer"] -->|Wireless Access Point| Q["Wireless Guest Users"]
    R["Client Computer"] -->|Wireless Access Point| S["Wireless Guest Users"]
    T["Client Computer"] -->|Wireless Access Point| U["Wireless Guest Users"]
    V["Client Computer"] -->|Wireless Access Point| W["Wireless Guest Users"]
    X["Client Computer"] -->|Wireless Access Point| Y["Wireless Guest Users"]
    Z["Client Computer"] -->|Wireless Access Point| AA["Wireless Guest Users"]
    AB["Client Computer"] -->|Wireless Access Point| AC["Wireless Guest Users"]
    AD["Client Computer"] -->|Wireless Access Point| AE["Wireless Guest Users"]
    AF["Client Computer"] -->|Wireless Access Point| AG["Wireless Guest Users"]
    AH["Client Computer"] -->|Wireless Access Point| AI["Wireless Guest Users"]
    AJ["Client Computer"] -->|Wireless Access Point| AK["Wireless Guest Users"]
    AL["Client Computer"] -->|Wireless Access Point| AM["Wireless Guest Users"]
    AN["Client Computer"] -->|Wireless Access Point| AO["Wireless Guest Users"]
    AP["Client Computer"] -->|Wireless Access Point| AQ["Wireless Guest Users"]
    AR["Client Computer"] -->|Wireless Access Point| AS["Wireless Guest Users"]
    AT["Client Computer"] -->|Wireless Access Point| AU["Wireless Guest Users"]
    AV["Client Computer"] -->|Wireless Access Point| AW["Wireless Guest Users"]
    AX["Client Computer"] -->|Wireless Access Point| AY["Wireless Guest Users"]
    AZ["Client Computer"] -->|Wireless Access Point| BA["Wireless Guest Users"]
    BB["Client Computer"] -->|Wireless Access Point| BC["Wireless Guest Users"]
    BD["Client Computer"] -->|Wireless Access Point| BE["Wireless Guest Users"]
    BF["Client Computer"] -->|Wireless Access Point| BG["Wireless Guest Users"]
    BH["Client Computer"] -->|Wireless Access Point| BI["Wireless Guest Users"]
    BJ["Client Computer"] -->|Wireless Access Point| BK["Wireless Guest Users"]
    BL["Client Computer"] -->|Wireless Access Point| BLA["Wireless Guest Users"]
    BM["Client Computer"] -->|Wireless Access Point| BN["Wireless Guest Users"]
    BO["Client Computer"] -->|Wireless Access Point| BR["Wireless Guest Users"]
    BS["Client Computer"] -->|Wireless Access Point| BT["Wireless Guest Users"]
    BU["Client Computer"] -->|Wireless Access Point| BV["Wireless Guest Users"]
    BW["Client Computer"] -->|Wireless Access Point| BWA["Wireless Guest Users"]
    BX["Client Computer"] -->|Wireless Access Point| BY["Wireless Guest Users"]
    BZ["Client Computer"] -->|Accepts Incoming Connections Only| BWB["Accepts Incoming Connections Only"]
    BXZ["Client Computer"] -->|Accepts Incoming Connections Only| BWC["Accepts Incoming Connections Only"]
    BXZZ["Client Computer"] -->|Accepts Incoming Connections Only| BWD["Accepts Incoming Connections Only"]
    BXZX["Client Computer"] -->|Accepts Incoming Connections Only| BWE["Accepts Incoming Connections Only"]
    BXZXZ["XWREPRESENT DEVICE 1"] --> XZX["XWREPRESENT DEVICE 2"]
    BXZXZ["XWREPRESENT DEVICE 1"] --> XZXZ["XWREPRESENT DEVICE 2"]
WiPG Device Security
Physical Air Gap Network
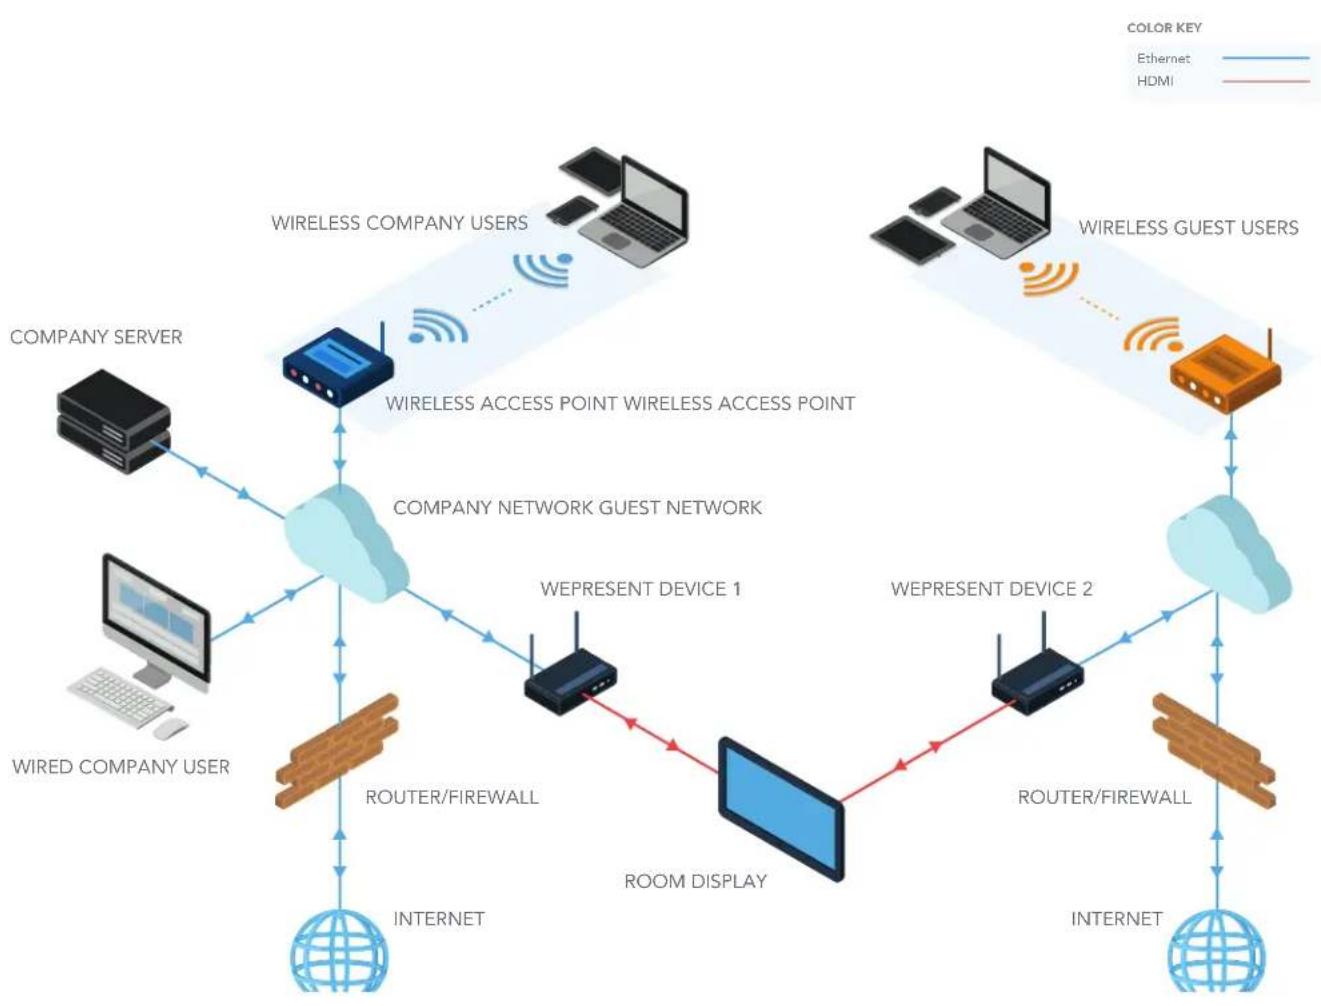
An Air Gap (Air Wall) network is used when network administrators want to physically isolate the internal network from the guest network. In this scenario, one WiPG device is need for the internal network and another WiPG device need for the guest network. Using a matrix switcher allows users to switch from viewing one unit's presentation to the other.
Physical Air Gap Network Example
flowchart
graph TD
    A["COMPANY SERVER"] --> B["COMPANY NETWORK GUEST NETWORK"]
    C["COMPANY SERVER"] --> B
    D["COMPANY SERVER"] --> B
    E["COMPANY SERVER"] --> B
    F["COMPANY SERVER"] --> B
    G["WIRED COMPANY USER"] --> H["INTERNET"]
    I["INTERNET"] --> J["ROOM DISPLAY"]
    K["INTERNET"] --> J
    L["INTERNET"] --> M["ROOM DISPLAY"]
    N["WIRELESS COMPANY USERS"] --> O["INTERNET"]
    P["WIRELESS COMPANY USERS"] --> Q["INTERNET"]
    R["WIRELESS COMPANY USERS"] --> S["INTERNET"]
    T["WIRELESS COMPANY USERS"] --> U["INTERNET"]
    V["WIRELESS COMPANY USERS"] --> W["INTERNET"]
    X["WIRELESS COMPANY USERS"] --> Y["INTERNET"]
    Z["WIRELESS COMPANY USERS"] --> AA["INTERNET"]
    AB["WIRELESS COMPANY USER"] --> AC["INTERNET"]
    AD["WIRELESS COMPANY USER"] --> AE["INTERNET"]
    AF["WIRELESS COMPANY USER"] --> AG["INTERNET"]
    AH["WIRELESS COMPANY USER"] --> AI["INTERNET"]
    AJ["WIRELESS COMPANY USER"] --> AK["INTERNET"]
    AL["WIRELESS COMPANY USER"] --> AM["INTERNET"]
    AN["WIRELESS COMPANY USER"] --> AO["INTERNET"]
    AP["WIRELESS COMPANY USER"] --> AQ["INTERNET"]
    AR["WIRELESS COMPANY USER"] --> AS["INTERNET"]
    AT["WIRELESS COMPANY USER"] --> AU["INTERNET"]
    AV["WIRELESS COMPANY USER"] --> AW["INTERNET"]
    AX["WIRELESS COMPANY USER"] --> AY["INTERNET"]
    AZ["WIRELESS COMPANY USER"] --> BA["INTERNET"]
    BB["WIRELESS COMPANY USER"] --> BC["INTERNET"]
    BD["WIRELESS COMPANY USER"] --> BE["INTERNET"]
    BF["WIRELESS COMPANY USER"] --> BG["INTERNET"]
    BH["WIRELESS COMPANY USER"] --> BI["INTERNET"]
    BJ["WIRELESS COMPANY USER"] --> BK["INTERNET"]
    BL["WIRELESS COMPANY USER"] --> BLA["INTERNET"]
    BM["WIRELESS COMPANY USER"] --> BN["INTERNET"]
    BO["WIRELESS COMPANY USER"] --> BOA["INTERNET"]
    BP["WIRELESS COMPANY USER"] --> BPB["INTERNET"]
    BQ["WIRELESS COMPANY USER"] --> BR["INTERNET"]
    BS["WIRELESS COMPANY USER"] --> BT["INTERNET"]
    BU["WIRELESS COMPANY USER"] --> BV["INTERNET"]
    BW["WIRELESS COMPANY USER"] --> BX["INTERNET"]
    BY["WIRELESS COMPANY USER"] --> BYB["INTERNET"]
    CA["WIRELESS COMPANY USER"] --> CAB["INTERNET"]
    CB["WIRELESS COMPANY USER"] --> CBB["INTERNET"]
    CC["WIRELESS COMPANY USER"] --> CCAB["INTERNET"]
    DD["WIRELESS COMPANY USER"] --> DDAB["INTERNET"]
    DB["WIRELESS COMPANY USER"] --> DBC["INTERNET"]
    DC["WIRELESS COMPANY USER"] --> DCB["INTERNET"]
    DDY["WIRELESS COMPANY USER"] --> DYX["INTERNET"]
    DYX --> DYX
WiPG Device Security
Data Transport
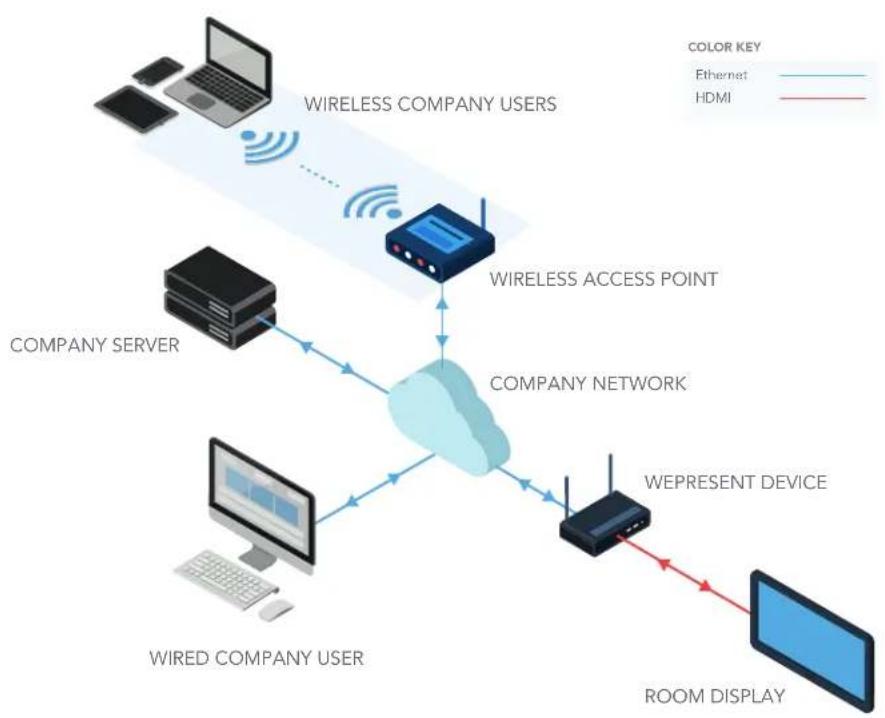
WiPG device employs a proprietary protocol to transport the screen data from a PC or smart mobile unit to the WiPG device. The data is encrypted and users accessing the data will need the four-digit code displayed on the on-screen device (OSD) when launching the MirrorOp software.
WiPG-1000 Data Transport Example
flowchart
graph TD
    A["Wireless Company Users"] --> B["Wireless Access Point"]
    C["Company Server"] --> B
    D["Wired Company User"] --> B
    B --> E["Company Network"]
    E --> F["WePRESENT Device"]
    F --> G["Room Display"]
    style A fill:#f9f,stroke:#333
    style C fill:#ccf,stroke:#333
    style D fill:#cfc,stroke:#333
    style E fill:#fcf,stroke:#333
    style F fill:#cff,stroke:#333
    style G fill:#ffc,stroke:#333
WiPG Security Features
Enhanced security features are implemented in the wePresent system to ensure the Confidentiality, Integrity and Availability of the information communicated with the wePresent system.
| MODULE/APPLICATION | SECURITY ENHANCEMENT | NOTE |
| MirrorOP | ||
| Screen data AES Encryption, 128-bit key | ||
| Audio data No encryption | ||
| Control data, command data AES Encryption, 128-bit key | ||
| Web | ||
| Web Server http (port 80), | https (port 443), | Lighttpd (version: 1.4.35)openSSL (version: 1.0.1l) |
| Download http (port 80) | No encryption | |
| Conference Control https (port 443) | ||
| Web management data https (port 443) | ||
| Web security assessment patched OWASP TOP 10 common | Web ApplicationVulnerabilities. | |
| Remote Management | ||
| SNMP SNMP V3 Encryption | ||
| WiFi Network | ||
| WiFi WEP, WPA, WPA2, | WPA-Enterprise,WPA2-Enterprise. | |
| wePresent System | ||
| Firmware | MD5 encryption | |
| Telnet, ssh | Disabled | |
| Port Scan | Done | |
| Vulnerability scan | Patched | Nexpose.com |
| Application | ||
| Windows | Digital Sign | |
| Mac | Digital Sign | |
Firmware Upgrades
Single Device (Web Interface)
The WiPG device supports firmware upgrades via the web interface. Upgrades are deployed as a single file that is uploaded and programmed by the device. Firmware upgrades take approximately 5 minutes to load.
Multiple Devices (Web Interface)
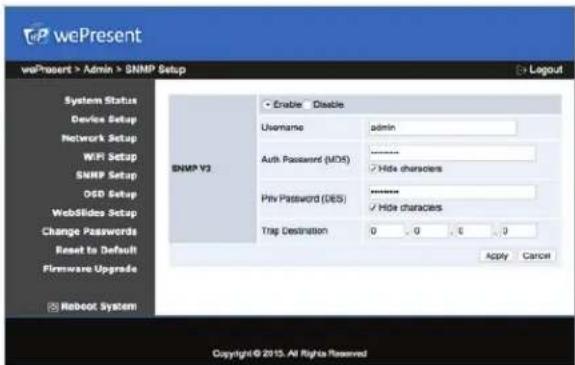
wePresent provides a management feature to upgrade multiple WiPG devices remotely. By enabling the SNMP (Simple Network Management Protocol) protocol (Version 3), the device could be managed and configured through the network. Furthermore, it can also configure and start the FTP Firmware upgrade from SNMP manager.
SNMP V3 Manager Setting: Select the SNMP V3 Mode and input the login information. The settings can be modified using the target wePresent's webpage.
▶ User Name: admin (Default value is admin)
▶ Security Level: auth, priv
▶ Auth Algorithm: MD5
▶ Auth Password: Authadmin (Default value is Authadmin)
▶ Privacy Algorithm: DES
▶ Privacy Password: Privadmin (Default value is Privadmin)
text_image
wePresent wePresent > Admin > SNMP Setup System Status Device Setup Network Setup WiFi Setup SNRP Setup OSD Setup WebSlides Setup Change Passwords Reset to Default Firmware Upgrade Reboot System Enable Disable Username admin SNMP V3 Auth Password (MDS) ******** Priv Password (DES) ******** Hide characters Trap Destination 0 . 0 . 0 . 0 Apply Cancel Copyright©2015. All Rights ReservedSNMPv3 Dialog Box
Simple Mode and Advance Mode Configuration
There are two separate modes to configure your WiPG device: Simple Mode and Advance Mode.
Simple Mode – list all available WiPG devices separately where users can see and modify simultaneously.
NOTE: For the "Read only" item, the column of new value input area is disabled.
NOTE: For the "Read/Written" item, users can modify the setting for multiple devices at the same time.
Advance Mode – users can choose one of the connected devices, and check/configure all detail information from the right hand side.
Firmware Upgrade Setup
You can use the "firmware upgrade setup" to upgrade multiple or single device. Please input required information into these columns.
▶ Host Address: configure the FTP address
▶ Port Number: configure the FTP port number
▶ Account: configure the FTP login account
▶ Password: configure the FTP login password
- Firmware upgrade: set"1" value to start upgrade
▶ Upgrade Status: show the upgrade status (shown on table)
▶ Download Progress: show download progress
Firmware Upgrade Status List:
STATUS DESCRIPTION
-16 [FTP] download file fail
-15 [FTP] Transfer a copy of the file. The URL is wrong or the file isn't existing!
-14 [FTP] can't get the file size.
-13 [FTP] fail to tell the server to enter "passive mode."
-12 [FTP] login to the ftp server fail
-11 [FTP] connect to the ftp server fail
-10 [FW Upgrade] Kernel Version is Different
-9 [FW Upgrade] invalid customization name
-8 [FW Upgrade] write flash error
-7 [FW Upgrade] erase flash error
-6 [FW Upgrade] flash open error
-5 [FW Upgrade] checksum error
-4 [FW Upgrade] version wrong
-3 [FW Upgrade] Invalid FW file
-2 [FW Upgrade] parse header file fail
-1 [FW Upgrade] upgrade file not find
0 Upgrade complete and system reboot
1 [FTP] downloading file
2 [FTP] download complete
3 [FW Upgrade] upgrading
255 None