Entertainer Mobile Set Pro - Pregnant DAP-Audio - Free user manual and instructions
Find the device manual for free Entertainer Mobile Set Pro DAP-Audio in PDF.


User questions about Entertainer Mobile Set Pro DAP-Audio
0 question about this device. Answer the ones you know or ask your own.
Ask a new question about this device
Download the instructions for your Pregnant in PDF format for free! Find your manual Entertainer Mobile Set Pro - DAP-Audio and take your electronic device back in hand. On this page are published all the documents necessary for the use of your device. Entertainer Mobile Set Pro by DAP-Audio.
USER MANUAL Entertainer Mobile Set Pro DAP-Audio
Entertainer Mobile Set Pro
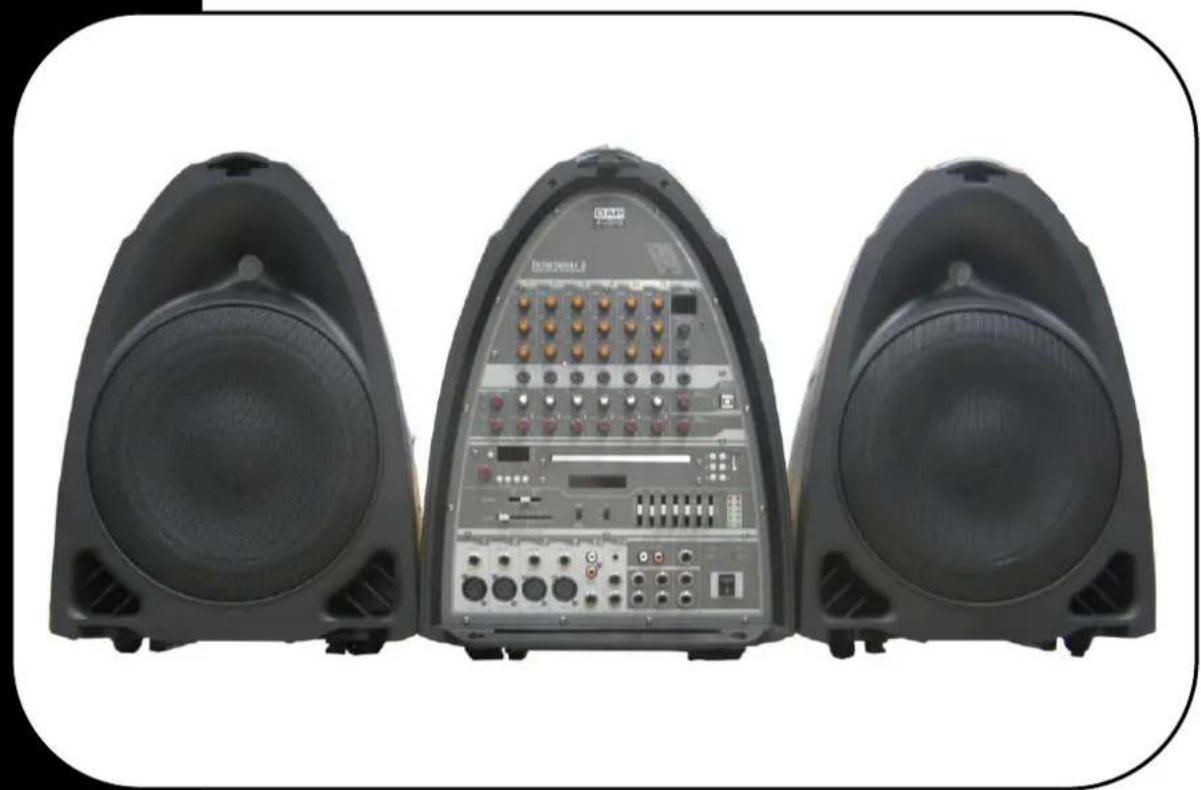
ORDERCODE D3207
natural_image
Three black audio/video equipment speakers with front speakers, showing front, side, and back views (no visible text or symbols)Highlite International B.V.
Vestastraat 2
6469 EX Kerkrade
The Netherlands
Congratulations!
You have bought a great, innovative product from DAP Audio.
The DAP Audio brings excitement to any venue. Whether you want simple plug-&-play action or a sophisticated show, this product provides the effect you need.
You can rely on DAP Audio, for more excellent audio products.
We design and manufacture professional audio equipment for the entertainment industry.
New products are being launched regularly. We work hard to keep you, our customer, satisfied.
For more information: iwant@dap-audio.info
You can get some of the best quality, best priced products on the market from DAP Audio.
So next time, turn to DAP Audio for more great audio equipment.
Always get the best -- with DAP Audio!
Thank you!

text_image
DAP® AUDIODap Audio Entertainer Mobile Set Pro™ Product Guide
Warning....3
Unpacking Instructions....3
Safety-instructions....3
Operating Determinations....4
Return Procedure....5
Claims....5
Description....6
Overview....6
Mixer channels....7
Master section....8
DSP section....8
Patch panel....9
DVD/CD/USB-stick player....1.0
Tuner....1.1
USB port and wireless receivers....12
Wireless Microphone/beltpack....13
Remote Control....14
Installation....15
Set Up and Operation....1.5
DVD/CD Operations....15
Preparation....1.5
Normal Playback....15
Pause....1.5
Stop....1.5
Previous/ Next....1.5
FastForward/Reverse....1.6
Display....16
Subtitle....1.6
Step....16
Time....16
Repeat....16
Slow....1.6
Program....1.6
Zoom....1.6
Volume and Mute....16
Menu....16
Title....1.6
Angle....1.6
Audio Channel Selection....17
Wireless Microphone/Beltpack operations....17
Installing/Replacing the battery....17
Tips for achieving maximum performance....17
System Setup....17
DVD Setup Menu....17
Audio Setup Menu....20
Before switching off the power....21
DvD/CD's....21
Precaution on storage....21
Connection Cables....22
Approval....24
Declaration of conformity....25
Maintenance....27
Replacing a fuse....27
Troubleshooting....27
Product Specifications....28
WARNING
FOR YOUR OWN SAFETY, PLEASE READ THIS USER MANUAL CAREFULLY BEFORE YOUR INITIAL START-UP!
Unpacking Instructions
Immediately upon receiving this product, carefully unpack the carton and check the contents to ensure that all parts are present, and have been received in good condition. Notify the dealer immediately and retain packing material for inspection if any parts appear damaged from shipping or the carton itself shows signs of mishandling. Save the carton and all packing materials. In the event that a fixture must be returned to the factory, it is important that the fixture be returned in the original factory box and packing.
Your shipment includes:
• DAP Entertainer Mobile Set Pro
• 1x Wireless Microphone
- 1x Beltpack
- 1x Headset microphone
• 1x Clip on microphone
- 1x FM Antenna
- 1x AM Antenna
• 2x Speaker stand adapter
- Remote control
- IEC cable (175cm)
• 2x Speakon cable (6m)
- User manual
WARNING

CAUTION!
Keep this system away from rain and moisture!

SAFETY INSTRUCTIONS
Every person involved with the installation, operation and maintenance of this system has to:
- be qualified
- follow the instructions of this manual
CAUTION! Be careful with your operations.
With a dangerous voltage you can suffer a dangerous electric shock when touching the wires!
Before you initial start-up, please make sure that there is no damage caused by transportation. Should there be any, consult your dealer and do not use the system.
To maintain perfect condition and to ensure a safe operation, it is absolutely necessary for the user to follow the safety instructions and warning notes written in this manual.
Please consider that damages caused by manual modifications to the system are not subject to warranty.
This system contains no user-serviceable parts. Refer servicing to qualified technicians only.
IMPORTANT:
The manufacturer will not accept liability for any resulting damages caused by the non-observance of this manual or any unauthorized modification to the system.
- Never let the power-cord come into contact with other cables! Handle the power-cord and all connections with the mains with particular caution!
- Never remove warning or informative labels from the unit.
- Never use anything to cover the ground contact.
- Never leave any cables lying around.
- Do not insert objects into air vents or bassreflex ports.
- Do not connect this system to a dimmerpack.
- Do not switch the system on and off in short intervals, as this would reduce the system's life.
- Do not open the device and do not modify the device.
- Do not drive the inputs with a signal level bigger, than required to drive the equipment to full output.
- Only use system indoor, avoid contact with water or other liquids.
- Avoid flames and do not put close to flammable liquids or gases.
- Always disconnect power from the mains, when system is not used. Only handle the power-cord by the plug. Never pull out the plug by tugging the power-cord.
• Always operate the unit with the AC ground wire connected to the electrical system ground.
- Make sure you don't use the wrong kind of cables or defective cables.
• Make sure that the available voltage is not higher than stated on the rear panel.
- Make sure that the power-cord is never crimped or damaged. Check the system and the power-cord from time to time.
- Please turn off the power switch, when changing the power cord or signal cable, or select the input mode switch.
- Extreme frequency boosts in connection with a high input signal level may lead to overdriving your equipment. Should this occur, it is necessary to reduce the input signal level by using the input control.
- Avoid ground loops! Always be sure to connect the power amps and the mixing console to the same electrical circuit to ensure the same phase!
- If system is dropped or struck, disconnect mains power supply immediately. Have a qualified engineer inspect for safety before operating.
- If the system has been exposed to drastic temperature fluctuation (e.g. after transportation), do not switch it on immediately. The arising condensation water might damage your system. Leave the system switched off until it has reached room temperature.
- If your Dap Audio device fails to work properly, discontinue use immediately. Pack the unit securely (preferably in the original packing material), and return it to your Dap Audio dealer for service.
• Repairs, servicing and electric connection must be carried out by a qualified technician.
- For replacement use fuses of same type and rating only.
- WARRANTY: Till one year after date of purchase.
OPERATING DETERMINATIONS
This system is not designed for permanent operation. Consistent operation breaks will ensure that the system will serve you for a long time without defects.
If this system is operated in any other way, than the one described in this manual, the product may suffer damages and the warranty becomes void.
Any other operation may lead to dangers like short-circuit, burns, electric shock, etc.
You endanger your own safety and the safety of others!
Improper installation can cause serious damage to people and property!
Connection with the mains
Connect the device to the mains with the power-plug.
Always pay attention, that the right color cable is connected to the right place.
| International | EU Cable | UK Cable | US Cable | Pin |
| L | BROWN | RED | YELLOW/COPPER | FASE |
| N | BLUE | BLACK | SILVER | NUL |
| YELLOW/GREEN | GREEN | GREEN | EARTH |
Make sure that the device is always connected properly to the earth!

Return Procedure

Returned merchandise must be sent prepaid and in the original packing, call tags will not be issued. Package must be clearly labeled with a Return Authorization Number (RMA number). Products returned without an RMA number will be refused. Highlite will not accept the returned goods or any responsibility. Call Highlite 0031-455667723 or mail aftersales@highlite.nl and request an RMA prior to shipping the fixture. Be prepared to provide the model number, serial number and a brief description of the cause for the return. Be sure to properly pack fixture, any shipping damage resulting from inadequate packaging is the customer's responsibility. Highlite reserves the right to use its own discretion to repair or replace product(s). As a suggestion, proper UPS packing or double-boxing is always a safe method to use.
Note: If you are given an RMA number, please include the following information on a piece of paper inside the box:
1) Your name
2) Your address
3) Your phone number
4) A brief description of the symptoms
Claims
The client has the obligation to check the delivered goods immediately upon delivery for any shortcomings and/or visible defects, or perform this check after our announcement that the goods are at their disposal. Damage incurred in shipping is the responsibility of the shipper; therefore the damage must be reported to the carrier upon receipt of merchandise.
It is the customer's responsibility to notify and submit claims with the shipper in the event that a fixture is damaged due to shipping. Transportation damage has to be reported to us within one day after receipt of the delivery.
Any return shipment has to be made post-paid at all times. Return shipments must be accompanied with a letter defining the reason for return shipment. Non-prepaid return shipments will be refused, unless otherwise agreed in writing.
Complaints against us must be made known in writing or by fax within 10 working days after receipt of the invoice. After this period complaints will not be handled anymore.
Complaints will only then be considered if the client has so far complied with all parts of the agreement, regardless of the agreement of which the obligation is resulting.
Description of the device
Features
The Entertainer Mobile Set Pro is a truly multifunctional soundsystem which is ideal for presentations, schools, gyms and even mobile DJs. Due to its sturdy and compact design it can fit in any car and is therefore ideal for many mobile applications.
Stands NOT included!!!
• 10 Channel signal input, 1 Wireless Microphone, 1 Wireless Beltpack, 4 MIC/LINE,
- Stereo MP3 Input Connection (3.5mm)
- Independent Tone control for High, Mid and Low 3 band EQ with ±12dB range
• System 7 band EQ with ±12dB range
- DVD/CD Player, compactable DVD/VCD/CD/HDCD/DVD-R/MP3/MPEG4/Photo viewing, video out (composite, RCA connector)
• 99 Digital DSP Effects
- USB Computer Connection Port, Record Output/Input
• FM/AM Digital Stereo Tuner
• Output Power 2 x 150W/ 8 ohm
Overview

natural_image
Close-up of a dark gray DAP Audio guitar body with visible branding and mounting holes (no text or symbols on body)Mixer channels
text_image
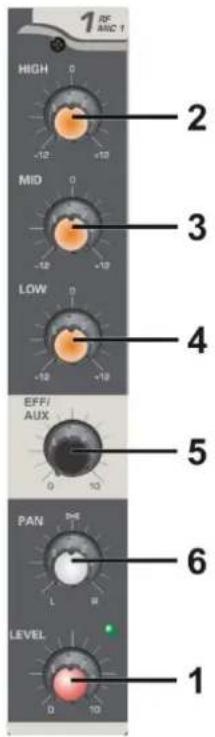
RF ASIC 1 HIGH -10 +10 MID -10 +10 LOW -10 +10 EFF/ AUX 0 10 PAN 5 L B LEVEL 0 10 1 2 3 4 5 61. Level control
Adjust the volume level of each channel. Rotating the control clockwise increases the volume of each channel, counterclockwise decreases the output volume. You can adjust this volume control knob after the main volume has been set up.
2 / 3 / 4. Equalizer section (HIGH / MID / LOW)
The mixer's equalizer section allows shaping of the incoming audio signal. Turning the equalizer controls to the right amplifies the frequency range, turning to the left attenuates the signal. Minor changes to the equalizer controls usually produce the best results. Try to avoid excessive enhancement of the mid band.
5. Eff/Aux control
This control lets you route the corresponding input signal to the integrated digital effect unit at variable levels. In this way assigning special effects to musical instruments or vocals is fairly simple. When making an effect-mix, it's advisable to start with all FX- controls set to their center position. You can further increase or reduce the effect's intensity, depending on your personal preferences. Please make sure to carefully monitor the Peak (23) LED in the DFX channel during a performance.
6. Pan control
By using the panorama control you can change the input signal's position within the stereo image. When the panorama control is set to center position, the audio signal is equal for both the left and right output.
text_image
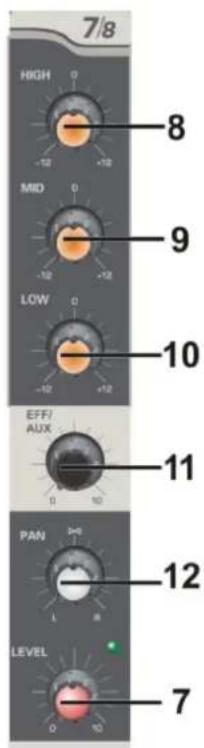
7/8 HIGH 0 -12 +12 MID 0 -12 +12 LOW 0 -12 +12 EFF/AUX 10 11 PAN 3+6 LEVEL 0 10 12 77. Level control
Adjust the volume level of each channel. Rotating the control clockwise increases the volume of each channel, counterclockwise decreases the output volume. You can adjust this volume control knob after the main volume has been set up.
8 / 9 / 10. Equalizer section (HIGH / MID / LOW)
The mixer's equalizer section allows shaping of the incoming audio signal. Turning the equalizer controls to the right amplifies the frequency range, turning to the left attenuates the signal. Minor changes to the equalizer controls usually produce the best results. Try to avoid excessive enhancement of the mid band.
11. Eff/Aux control
This control lets you route the corresponding input signal to the integrated digital effect unit at variable levels. In this way assigning special effects to musical instruments or vocals is fairly simple. When making an effect-mix, it's advisable to start with all FX -controls set to their center position. You can further increase or reduce the effect's intensity, depending on your personal preferences. Please make sure to carefully monitor the Peak (23) LED in the DFX channel during a performance.
12. Pan control
By using the panorama control you can change the input signal's position within the stereo image. When the panorama control is set to center position, the audio signal is equal for both the left and right output.
Master section
text_image
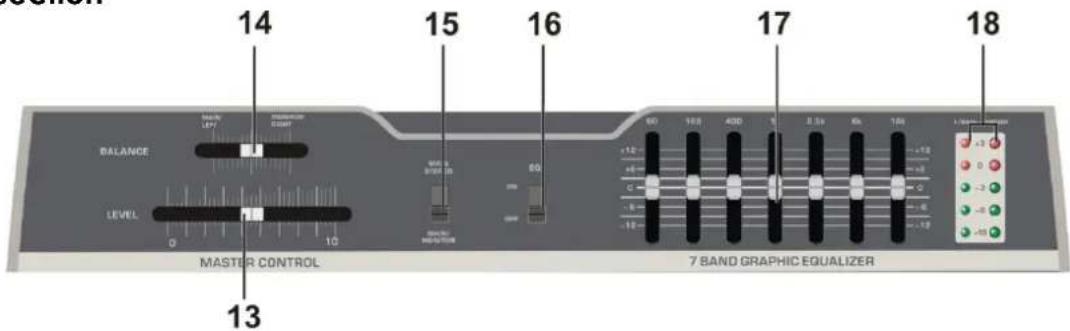
14 15 16 17 18 BALANCE LEVEL 0 10 MASTER CONTROL 60 100 400 8.3s Kb 100 7 BAND GRAPHIC EQUALIZER -3 0 -2 -1 -0 -10 -2 -3 -4 -5 -6 -7 -8 -9 -1013. Master Fader
This fader controls the Left and Right output level.
14. Balance control
In stereo mode, using the balance control allows you to change the output signal's position within the stereo image. In center position, the audio signal is equal for both the left and right output. In dual mode you can adjust the amount of signal send to the main output and the monitor output.
15. Main stereo/monitor switch
The power amplifier can be used in stereo or dual mode. In stereo mode, the system operates as a traditional stereo mixer and power amplifier. In dual mode, the sound of DVD, tuner and effectbus is routed to the main output only. The monitor output will only receive dry signals from the mixer (no effects) no signals from the DVD and tuner.
In dual mode, the main mix is made using the Level (1, 7) controls while the monitor mix can be made using the Eff/Aux (5, 11) controls.
16. EQ On/Off switch
You can press the EQ button to turn this section on.
17. 7-Band Equalizer
All 7 frequency bands (60Hz, 160Hz, 400Hz, 1KHz, 2.5KHz, 6KHz, 16 KHz) provide a ±12dB amplification/attenuation. You can change the overall sound, thus meeting your requirements for different locations. If you want your sound to have more bass, you have to boost the low frequency range, using the 60Hz or the 160Hz controls. If you experience too much bass, lower the levels of the 60Hz and 160HZ controls. If the mid-range sounds a bit nasal, try attenuating the 1KHz, 2.5KHz and 6KHz controls by some decibels. If you want to have a clear and highly intelligible sound, you should increase the level setting of the 6kHz or 16kHz band a bit. When using the equalizer, less attenuation is better than a great change of the control settings.
18. LED VU Meter
DSP section
text_image
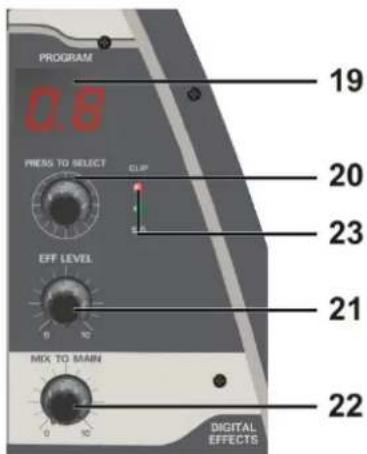
PROGRAM 0.8 PRESS TO SELECT CLIP EFF LEVEL MIX TO MAIN 19 20 23 21 22 DIGITAL EFFECTS01-09 REVERB HALLS
10-19 REVERB PLATES
20-29 ECHO REVERB
30-39 CHORUS REVERB
40-49 DELAY STEREO
50-59 DELAY MONO
60-69 REVERB HALL2
70-79 REVERB ROOM
80-89 ECHO
90-99 SPECIAL
19. DSP Display
Indicates the selected preset number.
20. DSP Selection Knob
Use this dial for selecting an effect preset. Pushing the dial activates the selected preset.
21. Eff Level Control
Rotating the knob clockwise increases the input level and counter clock wise decreases the input level.
When the Peak (23) LED lights, decrease the input level. Don't forget to adjust the DSP output level appropriately.
22. Mix to main
Rotating the knob clockwise increases the DSP output level and counterclockwise decreases the DSP output level.
23. Peak/Signal LED Indicators
The green LED lights when there is any input signal, the red LED lights when the signal strength reaches the peak level. This LED lights continually if the DSP section is bypassed. If the DSP section is active, The LED works as a peak LED. So if the LED lights, decrease the input level of the DSP section by using the Eff Level (22) control.
Patch panel
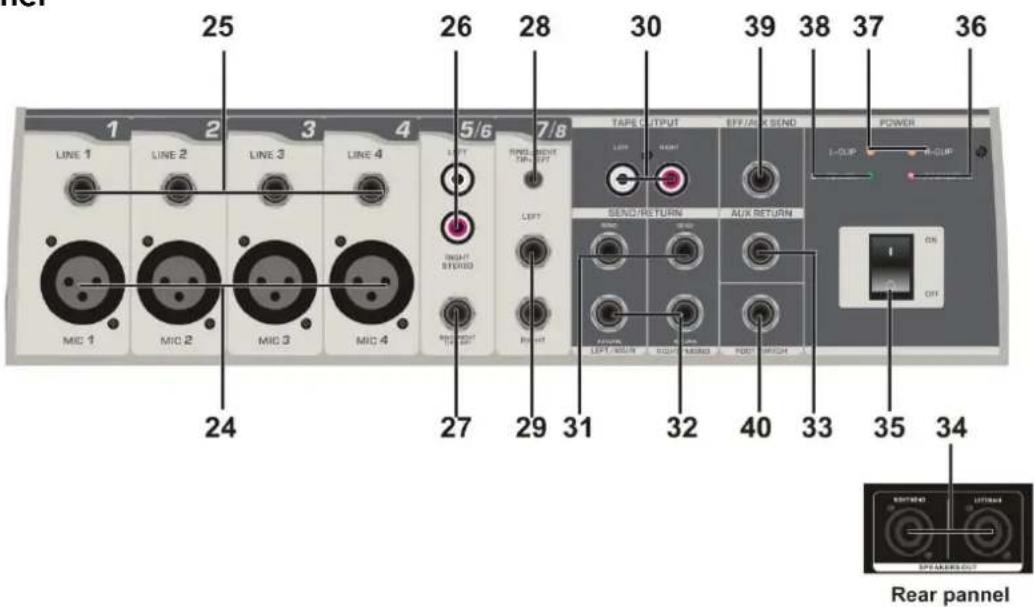
text_image
25 26 28 30 39 38 37 36 1 2 3 4 5/6 7/8 TARE OUTPUT EFF/AUX SEND POWER LINE 1 LINE 2 LINE 3 LINE 4 LEFT RIGHT RANGE OUTPUT LEFT SEND/RIS FURN AUX RETURN I-QUIP MID 1 MID 2 MID 3 MID 4 RIGHT STEREO RIGHT STEREO LEFT LEFT/WIN RIGHT MANGO RIGHT WITCH OFF 31 32 40 33 35 34 OUT OFF Rear pannel24. Mic Input Jack
XLR balanced low impedance microphone input.
25. Mono Line Input Jack
1/4" balanced input jack is suitable for devices with line outputs like keyboards, drums, outboard effects, etc. Accepts both balanced and unbalanced cables.
26/27/28/29. Stereo Line Input
1 / 4", 1/8" TRS jacks or RCA jacks for line level devices such as tape recorders, CD players or other stereo equipment.
30. REC Out
The REC out provides a mix output which is independent of the Master Level (13) control. Connect a device, such as a cassette or DAT recorder. All adjustments to the input level, channels EQ, and DSP can be heard through the REC output. You can only adjust the record level using input controls on your recording equipment.
31/32. Amplifier Send / Return Jacks
Each channel of the amplifier has a send and return jack. These jacks offer an insertion point. The (stereo) effect loop is situated between mixer and poweramp (before EQ and master section).
33. AUX Return
Use this output in combination with the Aux Send (39) to connect an external effect device. Using an external effect device in your aux effect loop will run this effect in parallel with the internal effects.
34. Speaker Output
Connect the Entertainer Mobile Set Pro speakers using the supplied speakon cables.
35. Power Switch
Do not supply power before the whole system is set up and connected properly.
36/38. Power and Protect Indicators
The green Power LED indicates the unit is switched on.
The red Protect LED Indicates that the power amp is in Protect mode (speakers disconnected by the output relay).
37. Clip Indicators
The orange LED indicates the clipping status for the left and right amplifier outputs.
39. EFF/AUX Send
Use this output in combination with the Aux Return (33) to connect an external effect device. Using an external effect device in your aux effect loop will run this effect in parallel with the internal effects.
40. Foot Switch
The foot switch connector allows you to mute the internal DSP section. The input accepts a standard 14 " jackplug shorting the tip to the sleeve will mute the DSP section.
DVD/CD/USB player
text_image
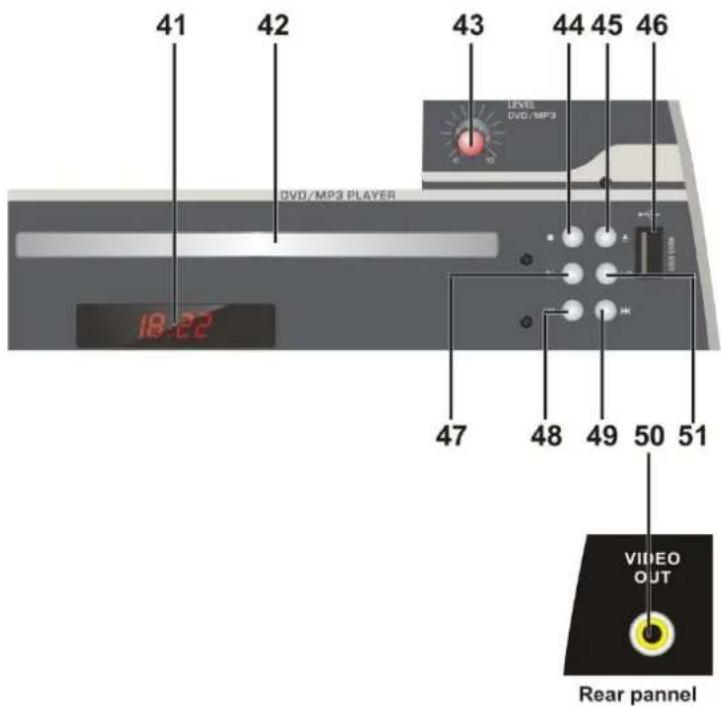
41 42 43 44 45 46 DVD/MP3 PLAYER 18-22 47 48 49 50 51 VIDEO OUT Rear pannel41. Display
42. DVD Disc Holder
Place the disc in the holder. Press the Eject (45) button to open and close the disc holder.
43. DVD/MP3 Level Control
Controls the level of the DVD/MP3 player.
Note: If the Main stereo/monitor switch (15) is set in main monitor position, the DVD/MP3 signal will be routed to the Main output only and will not be routed to the monitor output.
44. Stop
Press this button to stop playback.
45. Eject
Press this button to open and close the disc holder (42).
46. USB Port
Use this port to connect your USB stick for playback/recording. Make sure that all MP3's are located in the root directory. The Entertainer mobile set active will not recognize folders on a USB stick.
47. Play/Pause ▶/|| button
Use this button to start playback. Press once to start playback, twice to set the pause mode, and again to resume playback.
48. Previous | Button
Use this button to go back to the beginning of the current track or select a previous track for playing.
49. Next ▶▶| Button
Use this button to skip to the next track.
50. Composite Video Out
Connect the composite video input of your TV-set to this output.
51. L/R button
This button allows you to assign the DVD/MP3 player's left channel, right channel or both (stereo) channels to the main mix.
Tuner
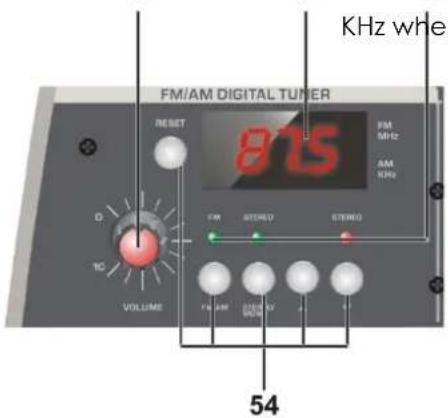
- Tuner frequency display
55 52 53
text_image
FM/AM DIGITAL TUNER RESET 815 FM MHz AM KHz D IC VOLUME FM STAND STAND FM AM 0.0000 0.2 0.4 54 KHz whenDisplays the tuner frequency in MHz when in FM mode or in mode.
53. Tuner status LED's
The FM LED lights up in FM mode and dims in AM mode. The green Stereo LED lights up if the tuner is in stereo mode And dims if the tuner is in mono mode. If the tuner is in stereo mode, the red stereo LED lights up if the radio program received is in stereo.
54. Tuner control buttons
The reset button allows you to reset the tuner.
The stereo/mono button allows you to switch the tuner between stereo and mono mode, the mono mode can be useful if the master section is in main/monitor mode (in main/monitor mode the tuner and CD/DVD signals will be routed to the main output only).
Press the Up ▲ button to tune upwards stepwise. Pressing and holding this button for more than 1 second will start auto search. Now the searching will stop at the first station which comes in with sufficient strength.
Press the Down button to tune downwards stepwise. Pressing and holding this button for more than 1 second will start auto search. Now the searching will stop at the first station which comes in with sufficient strength.
55. Tuner Volume Control
Controls the level of the tuner.
Note: If the Main stereo/monitor switch (15) is set in main monitor position, the tuner signal will be routed to the Main output only and will not be routed to the monitor output.
text_image
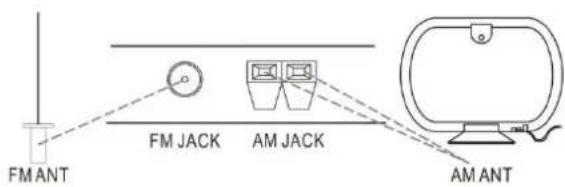
FM ANT FM JACK AM JACK AM ANTNote: Turn the tuner volume (55) control fully counterclockwise (minimum) if the tuner is not used.
Use the included antennas.
As this unit has a switched power supply, there is a slight possibility of interference when listening to the AM band.
USB port and wireless receivers
text_image
LEVEL COMPUTER DIGITAL & SIO POINT 56 57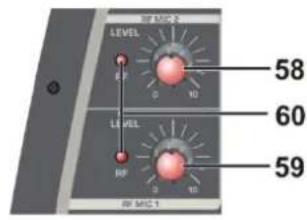
text_image
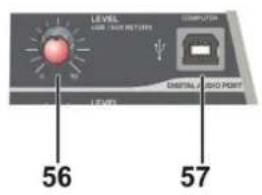
LEVEL 58 60 LEVEL 59 RF MIC156. USB/Aux return level control
Controls the volume level for the USB port (57) and Aux return (39) input.
Note: If the Main stereo/monitor switch (15) is set in main monitor position, the tuner signal will be routed to the Main output only and will not be routed to the monitor output.
57. USB Aux In/Out
This USB port can be used to connect the entertainer to your PC/ laptop. You can use this connector for playback or recording in combination with your favorite software mediaplayer or recording program.
60. RF LED's
Lights if there is a (RF) connection with the wireless microphone.
58. Mic 2 level control
Used to adjust the level of microphone 2.
59. Mic 1 level control
Used to adjust the level of microphone 1.
AC Inlet with integrated fuse holder
This connector is meant for the connection of the supplied main cord. Connect one end of the power cord to the connector, the other end to the mains, then turn on the power switch to operate the unit.
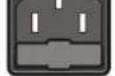
Note: Please make sure that the supply voltage matches the operation voltage before connecting the unit to mains. Replace the fuse only with a fuse of same specification (T6,3A).
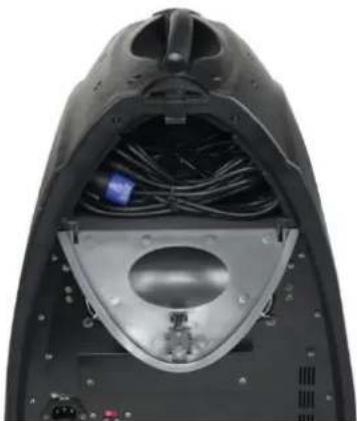
Rear storage compartment
On the rear you can find a small storage compartment. You can use this for storage of your cables.
natural_image
Interior view of a black electronic device showing internal components and wiring (no visible text or symbols)Wireless Microphone/Beltpack
text_image
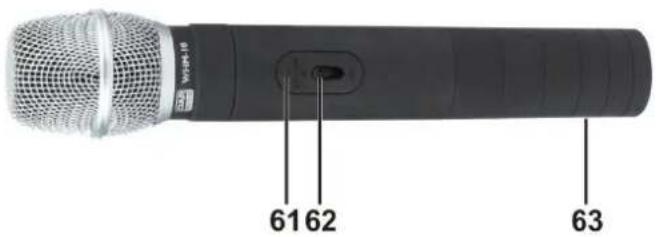
6162 6361. Microphone On LED
The red LED will light up briefly when switching the microphone on or off.
62. Power On switch
Use this switch to turn the microphone on.
63. Battery compartment
Access the battery compartment by removing the cover.
text_image
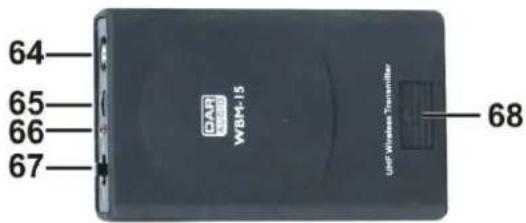
64 65 66 67 CAP W8H-15 USB Wireless Transmitter 6864. Microphone Input
3.5mm mono input jack. Allows you to connect the headset microphone.
65. Level Control
Use this control to adjust the Mic level.
66. Beltpack On LED
The red LED will light up briefly if the microphone is turned on.
67. Power On switch
Use this switch to turn the beltpack on.
68. Battery compartment
Access the battery by softly pressing and sliding the lid in the direction of the arrow.
Remote control
text_image
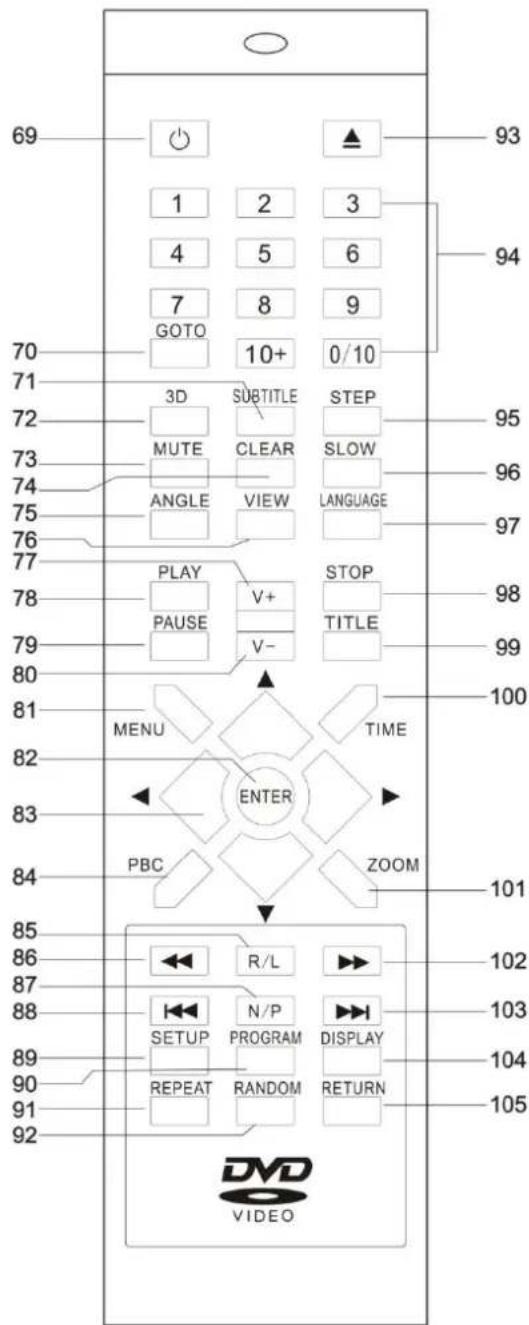
69 1 2 3 4 5 6 7 8 9 GOTO 10+ 0/10 70 71 3D SUBTITLE STEP 95 72 MUTE CLEAR SLOW 96 73 ANGLE VIEW LANGUAGE 97 74 76 PLAY V+ STOP 98 78 PAUSE V- TITLE 99 79 V- 80 MENU TIME 100 81 ENTER PBC ZOOM 82 83 101 84 R/L 102 85 103 86 104 87 105 88 N/P DISPLAY 89 106 90 REPEAT RANDOM RETURN 91 92 DVD VIDEO90. Program Button
98. Stop Button
Enter the program menu
99. Title Button
91. Repeat Button
show DVD title menu
Repeat play
92. Random Button
Random play
Zoom in/out the display
93. Eject Button
Open/close the disc tray
94. Number Buttons
Enter numeric values
Fast forward play
95. Step Button
Play a frame at time
96. Slow Button
104. Display Button
Slow play
Show/hide On-Screen Display
97. Language Button
Change the audio language or channel
69. Power Button
Toggle power Standby and On
70. Goto Button
Play from a specified location
71. Subtitle Button
Change subtitle
72. 3D Button
Gives you access to surround sound options
73. Mute Button
Mute audio
74. Clear button
Clear input numbers
75. Angle Button
Change camera
76. View Button
Change view
77. Volume +
Increase volume
78. Play Button
Start playback
79. Pause Button
Pause play
80. Volume -
Decrease volume
81. Menu Button
Show DVD menu
82. Enter Button
Confirm menu selection
83. Arrow Buttons
Navigate menu selection
84. PBC Button
Playback control (VCD/SVCD)
85. R/L Button
Assign left, right or both channels to the mix
86. Reverse Button
Fast reverse play
87. N/P Button
Switch output TV system: NTSC/PAL
88. Previous Button
Skip previous
89. Setup Button
Enter the DVD player setup menu
Stop playback
100. Zoom Button
101. Time Button
Switch between elapsed and remaining time display
102. Forward Button
103. Next Button
Skip next
105. Return Button
Return to the previous menu
Installation
Remove all packing materials from the Entertainer mobile set active. Check that all foam and plastic padding is removed. Connect all cables.
Always disconnect from electric mains power supply before cleaning or servicing.
Damages caused by non-observance are not subject to warranty.
Set Up and Operation
Before plugging the unit in, always make sure that the power supply matches the product specification voltage. The power supply is printed on the back of the device.
Do not attempt to operate an 115V specification product on 230V power, or vice versa.
Connections
-
Turn off the Power switch.
-
Connect the Entertainer Mobile Set Pro to your other devices you plan on using.
CAUTION: Be sure that the power is off, when connecting the cables.
DVD/CD Operations
Preparation
- When you want to watch a DVD film, switch the TV-set on and select the video input connected to the DVD player.
- If you want to listen to audio via your audio installation, switch the audiosystem on and select the DVD player input.
Normal Playback
- Press standby at the front panel to switch the DVD player on. The start logo appears on the TV screen. If the disc drive already contains a disc, the playback will start as soon as the DVD player is switched on.
- Press the Eject (45, 93) button to open the disc drive and insert a disc.
- Press the Eject (45, 93) button to close the disc drive. Playback will start.
- Press the Play/Pause (47, 78) button if the playback does not start automatically.
- Some discs will start by presenting a menu. Use the Arrow (83) buttons to choose between the different options, then press the Enter (82) button. Alternatively, you can enter the number of the function in question using the Number (94) buttons.
Pause
- Press Pause (79) on the remote control or Play/Pause (47) on the frontpanel to stop playback (still picture). The sound will be deactivated in still mode.
- Press Pause (79) on the remote control or Play/Pause (47) on the frontpanel to resume playback.
Stop
- Press the Stop (44, 98) button on the remote control to stop playback. The start logo will appear on the TV screen. Some discs offer the possibility of resuming from the same spot, e.g. DVD's and music CD's.
- Press Play (78) on the remote control or Play/Pause (47) on the frontpanel to resume playback from where the playback was stopped or from the beginning depending on the DVD.
- Press the Stop (44, 98) button twice to stop the playback completely.
Previous/ Next
During playback, press Previous ◄◀ (48, 88) to return to the start of the track. Press Previous ◄◀ (48, 88) again to go back to the previous. Each time you press the Next ▶▶I (49, 103) button you will skip to the next track.
Fast Forward/ Reverse
- Press Fast Forward ▶▶ (102) to go fast forward on the disc. The speed changes every time Fast Forward ▶▶ (102) is pressed.
- Press Play/Pause (47, 78) to return to normal playback.
- Press Fast Reverse ◀◀ (86) to go fast forward on the disc. The speed changes every time Fast Reverse ◀◀ (86) is pressed.
- Press Play/Pause (47, 78) to return to normal playback.
Display
Press Display (104) to switch between TITLE PLAYE, TITLE LEFT, CHAPTER PLAYED, CHAPTER LEFT and DISPLAY OFF.
Subtitle
When Subtitle (71) is pressed, the display shows SUBTITLE 01/XX XXXXX. Where 01 is language number one. XX is the total number of languages available on the disc. XXXXX is the language. (e.g. Dutch, German etc.) Use the Arrow (83) and Enter (82) buttons to select the desired language.
Step
Press Step (43) to step a single frame/ picture forward during playback. Press Step (43) several times to step several frames/ pictures forward. Press Play/Pause (6, 68) to resume playback.
Time
This button allows you to switch between the elapsed time and remaining time.
Repeat
- Press the Repeat (91) button once to choose on-screen which chapter to repeat.
- Press the Repeat (91) button a second time to choose the title to be repeated.
- Press the Repeat (91) button a third time to repeat all.
- Press the Repeat (91) button a fourth time to exit the Repeat Mode.
Slow
Press Slow (42) to play a disc slowly forwards or backwards. The speed changes every time you press the Slow button. Press the Enter (82) or Play (45, 78) button to return to normal playback.
Program
Press Program (90) to enter program the menu. Use the Arrow (83) and Enter (82) buttons to navigate/edit and confirm the desired item.
Select play to start the program. If you wish to cancel the function, select clear.
Zoom
Press the Zoom (101) button to enlarge the picture. The size of the picture changes every time the button is pressed.
Volume and Mute
Press the Vol + (77) button to increase the volume level and the Vol - (80) button to decrease the volume level. Pressing the Mute (73) button will mute the audiosignal. Press again to cancel the mute function.
Menu
Press the Menu (81) button to see the DVD's main menu and make the desired choice using the Arrow (83) and Enter (82) buttons.
Title
On some DVD's the title menu will appear when pressing the Title (99) button. Choose the desired tracks using the Arrow (83) or the Number (94) buttons and confirm your selection with the Enter (82) button.
Angle
Pressing the Angle (41) button allows you to choose between different cameras. This function only applies to DVD's which are recorded this way.
Audio Channel Selection
Pressing Audio (75) button allows you between different types of sound reproduction for the DVD.
Wireless microphone/beltpack operations
Inserting/replacing the battery
natural_image
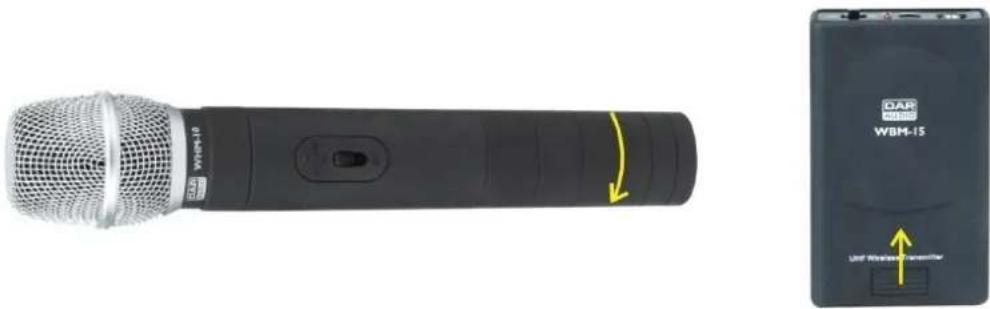
Two electronic devices: a black WBM-10 microphone and a black WBM-15 device with a yellow arrow indicating the left-hand connector (no text or symbols on the devices themselves)• Turn/slide the battery compartment cover in the direction of the arrow and remove the cover.
- Insert the battery. Please observe correct polarity when inserting the battery.
- Close and lock the battery cover.
Tips for achieving maximum performance.
• Make sure you can always see the receiver from the transmitter position.
- Keep the distance from transmitter to receiver as short as possible.
- Avoid placing the receiver near metal surfaces and obstructions.
• Make sure you that you use fresh batteries.
- Perform a walk-through before performance or presentation. If dead spots are found, adjust the location of the receiver. If dead spots remain, mark the dead spots and avoid them.
System Setup
DVD Setup Menu
When you press the Setup (89) button, the setup menu will be displayed. You can select four tabs:
A. General
B. Audio
C. Video
D. Password
E. Exit
When you have entered the setup menu you can use the Arrow (83) and Enter (82) buttons to navigate/edit and select.
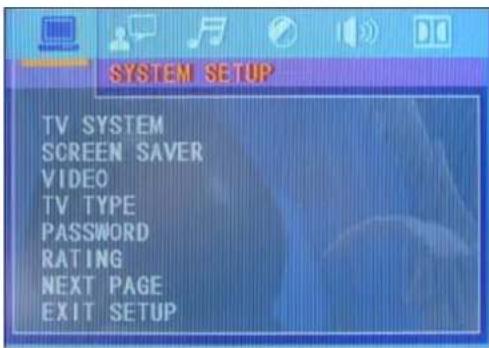
A. System Setup
This menu is used for setting up the TV screen format, video functions and DVD functions and includes:
- TV system
- Screen saver
- Video
- TV type
- Password
- Default
- Resume
text_image
SYSTEM SETUP TV SYSTEM SCREEN SAVER VIDEO TV TYPE PASSWORD RATING NEXT PAGE EXIT SETUP1. TV system
In this submenu you can select the format of the TV to which the DVD is connected you can choose between:
NTSC
PAL60
PAL
Auto
2. Screensaver
If the unit is not used for more than 2 minutes, the screen saver will be activated. This will prolong the service life of the connected TV set. The screen server is factory set to ON.
3. Video
The video setup menu can be accessed, but is not functional in this device.
4. TV type
In this submenu you can select the format of the TV to which the DVD is connected you can choose between:
4:3 PS 4:3 Pan & Scan for a normal TV.
4:3 LB 4:3 Letterbox for a normal TV.
16:9 16:9 Wide screen for a widescreen TV.
Note: Available aspect ratios will be printed on the back of the DVD packaging. Some DVD's are recorded in the cinema widescreen format (16:9) and others in the standard format (4:3). Some DVD's are recorded in both formats and may thus feature the Pan Scan function. If available, the Pan Scan function will allow the 4:3 format to fill out the entire screen. However a part of the picture will be cut off on both sides.
| TV screen Film format | 4:3 | 16:9 | ||
| Normal | Full view | Letterbox | Wide screen | |
| 4:3 | ||||
| 16:9 | ||||
6. Default
The default option allows you to restore the default settings.
7. Resume
If last resume is set to on, the DVD player will remember the last track before switching off. As the unit is switched on again, it will resume playback at the last track played before switching off.
B. Language Setup
Includes:
- OSD language
- Audio Language
- Menu language

text_image
OSD LANGUAGE AUDIO LANG SUBTITLE LANG MENU LANG EXIT SETUP1. OSD Language
This function allows you to select a language for the setup menu.
2. Audio Language
This function allows you to select a language for the setup menu.
3. Subtitle Language
This function allows you to allow you to select a language for the subtitles.
C. Audio Setup
The audio setup menu can be accessed, but is not functional in this device.
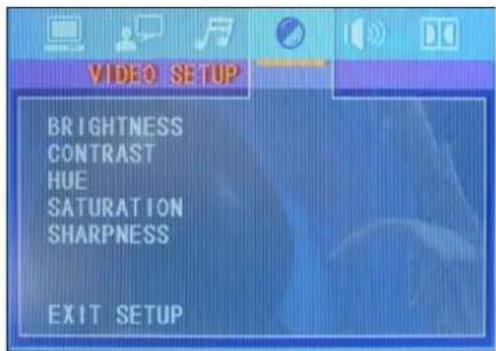
D. Video Setup
Includes:
- Brightness
- Contrast
- Hue
- Saturation
- Sharpness
text_image
VIDEO SETUP BRIGHTNESS CONTRAST HUE SATURATION SHARPNESS EXIT SETUP1. Brightness
Allows you to adjust the Brightness of the video output.
2. Contrast
Allows you to adjust the contrast of the video output.
3. Hue
Allows you to adjust the hue of the video output.
4. Saturation
Allows you to adjust the saturation of the video output.
5. Sharpness
Allows you to adjust the sharpness of the video output.
E. Speaker Setup
The speaker setup menu can be accessed, but is not functional in this device.
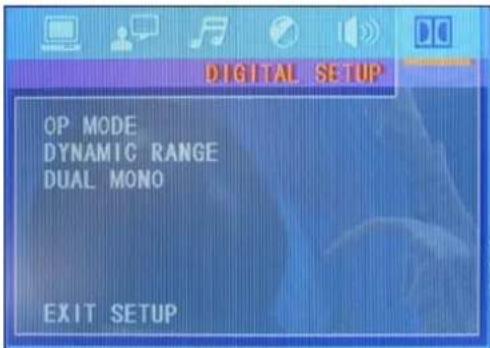
F. Digital setup
Includes:
- OP mode
- Dynamic range
- Dual mono
text_image
OP MODE DYNAMIC RANGE DUAL MONO EXIT SETUPAudio Setup Menu
Pressing the 3D (72) button gives you access to the 3D menu which includes:
A. SRND
B. EQ
C. Band
D. Key
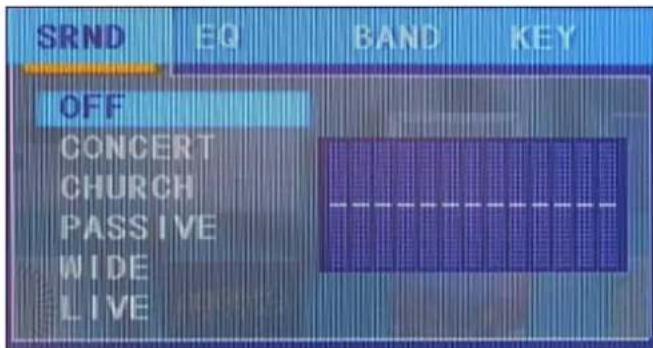
A. SRND
Lets you apply 5 preset reverbs effects to your audio signal and thus creating a more 3 dimensional sound image.
text_image
SRND EQ BAND KEY OFF CONCERT CHURCH PASSIVE WIDE LIVEB. EQ
Allows you to select 5 preset EQ settings or create your own (user) preset.
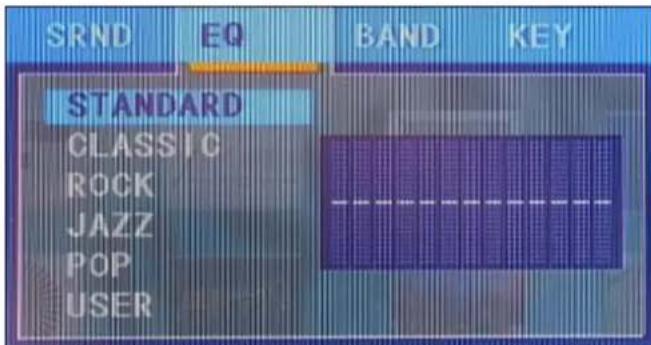
text_image
SRND EQ BAND KEY STANDARD CLASSIC ROCK JAZZ POP USERC. Band
Allows you to view the sound spectrum. Is useful for determining a feedback frequency and suppress it using the EQ.
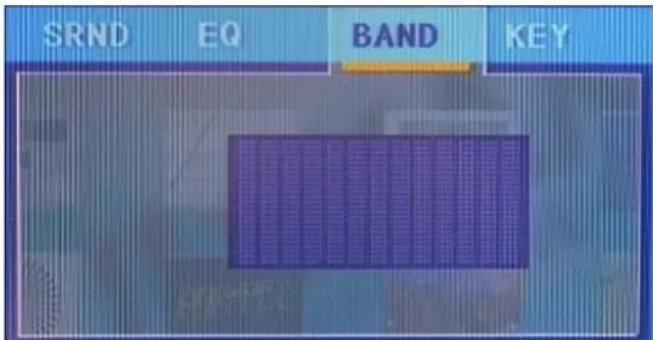
text_image
SRND EQ BAND KEYD. Key
Allows you to change the key of your audio signal.

text_image
SRND EQ BAND KEY+6
- +4 - +2 - 0 - -2 - -4 - -6 bBefore switching off the power
When you have finished using the CD player. Press the Eject ▲ (45, 93) button. When the disc is completely ejected, take out the disc without using force. Now you can safely switch off the power.
CAUTION:
- Do not try to insert the disc when the power is off.
- Do not switch off the power, while the disc is ejecting.
- Switch off the power after the disc has been completely ejected.
DVD/CD's
1. Precautions on handling DVD's
- Do not allow fingerprints, oil or dust to get on the surface of the disc. If the disc is dirty, wipe it off with a soft dry cloth.
- Do not use thinner, water, record spray, electrostatic-proof chemicals, or silicone-treated cloths to clean discs.
• Always handle discs carefully to prevent damaging the surface; in particular when removing a disc from its case or returning it. - Do not bend the disc.
- Do not put the DVD near heating sources.
- Do not enlarge the hole in the center of the disc.
- Do not write on the label (printed side) with a hard-tipped implement such as a pencil or ball point pen.
- Condensation will form if a disc is brought into a warm area from a colder one, such as outdoors in winter. Do not attempt to dry the disc with a hair dryer, etc.
2. Precaution on storage
• After playing a disc, always unload it from the player.
• Always store the disc in the jewel case to protect from dirt or damage.
- Do not place discs in the following areas:
1. Areas exposed to face sunlight for a considerable time.
2. Areas subject to accumulation of dust or high humidity.
3. Areas that are affected by heat from indoor heaters, etc.
Connection Cables
Take care of your cables, always holding them by the connectors and avoiding knots and twists when coiling them: This gives the advantage of increasing their life and reliability. Periodically check your cables. A great number of problems (faulty contacts, ground hum, discharges, etc.) are caused entirely by using unsuitable or faulty cables.
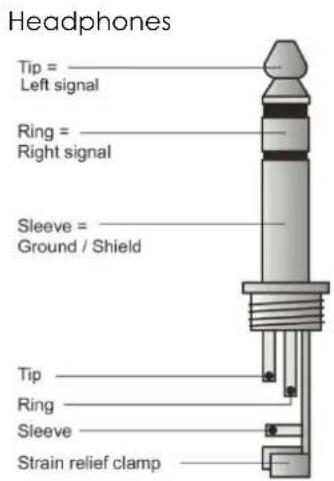
text_image
Headphones Tip = Left signal Ring = Right signal Sleeve = Ground / Shield Tip Ring Sleeve Strain relief clamp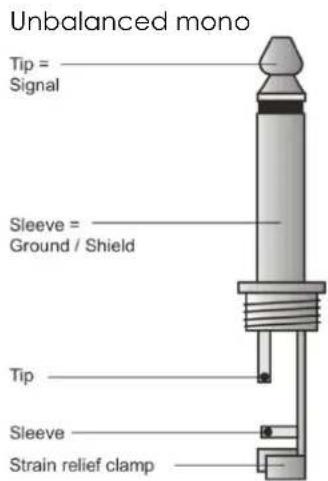
text_image
Unbalanced mono Tip = Signal Sleeve = Ground / Shield Tip Sleeve Strain relief clamp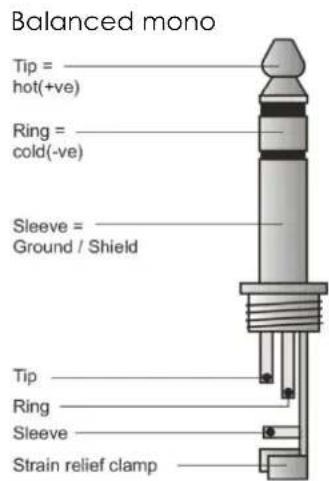
text_image
Balanced mono Tip = hot(+ve) Ring = cold(-ve) Sleeve = Ground / Shield Tip Ring Sleeve Strain relief clamp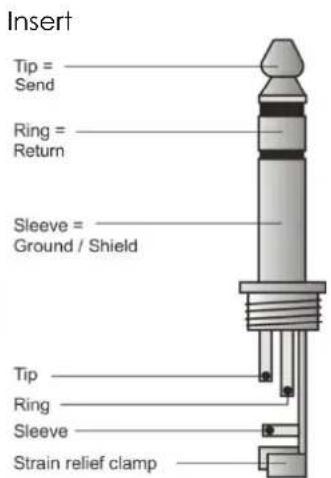
text_image
Insert Tip = Send Ring = Return Sleeve = Ground / Shield Tip Ring Sleeve Strain relief clamp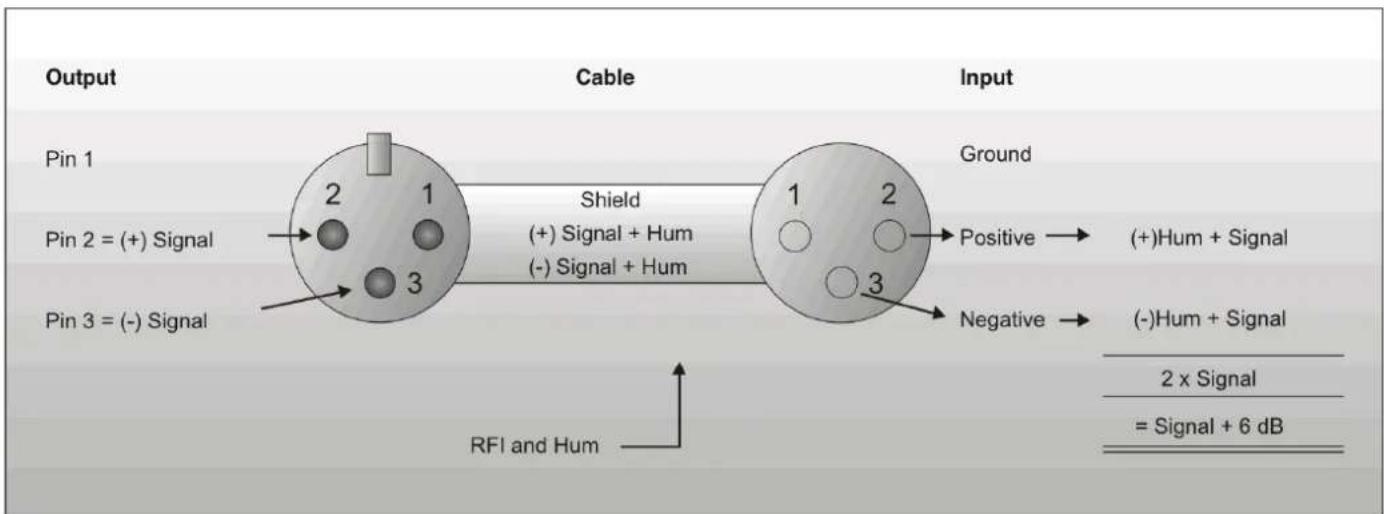
flowchart
graph LR
    A["Pin 1"] -->|2 + 1| B["Cable"]
    C["Pin 2 = (+) Signal"] -->|3| B
    D["Pin 3 = (-) Signal"] -->|3| B
    B -->|Shield (+) Signal + Hum (-) Signal + Hum| E["Ground"]
    B -->|Positive| F["(+)Hum + Signal"]
    B -->|Negative| G["(-)Hum + Signal"]
    H["RFI and Hum"] --> I["Output"]
    J["2 x Signal"] --> K["= Signal + 6 dB"]
Compensation of interference with balanced connections
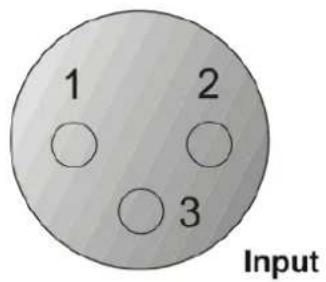
Balanced use with XLR connectors
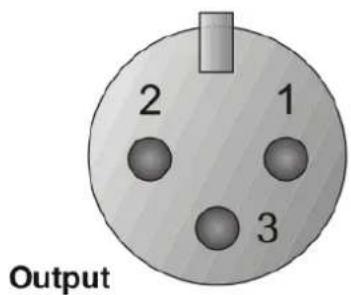
text_image
2 1 3 Output1 = Ground / Shield
2 = hot (+ve)
3 = cold (-ve)
text_image
1 2 3 InputFor unbalanced use PIN 1 and PIN 3 have to be bridged
Approval
The DAP D3207 is a Class II wireless device.
Microphone: 857,55 Mhz for use in: Belgium, Germany, Hungary, Luxembourg, Poland, Romania, Sweden, Switzerland, United Kingdom.
Beltpack: 864,80 Mhz for use in: Denmark, Germany, Greece, Luxembourg, Netherlands, Norway, Portugal, Romania, Slovakia, Sweden, Switzerland, United Kingdom.
Exclusion of liability
The frequency tables in this publication are made according to national laws and regulations. The frequencies are checked on a regular basis. We don't take any responsibility for eventual discrepancies between our listed frequencies and the frequencies actually approved in a given country. We strongly suggest you to inform in your own country or region for any changes or adaptations regarding the allowed frequencies.
Please refer to your authority as listed below:
Telecoms & Postal Regulatory Authorities in Europe
Austria Rundfunk und Telekom Regulierungs-GmbH www.rtr.at Belgium Belgian Institute of postal services and telecommunications (BIPT) www.bipt.be Czech Republic Czech Telecommunication Office www.ctu.cz Denmark National Telecom Agency www.tst.dk Finnland Finnish Communications Regulatory Authority (FICORA) www.ficora.fi France Autorité de Régulation des Télécommunications (ART) www.art-telecom.fr Germany Die Bundesnetzagentur www.bundesnetzagentur.de Greece National Telecommunications Commission (EET) www.eett.gr Hungary Communication Authority (HIF) www.hif.hu Iceland Post and Telecom Administration (PTA) www.pta.is Ireland Commission for Communications Regulation (ComReg) www.comreg.ie Italy Italian Communications Authority (AGC) www.agcom.it Latvia Telecommunication State Inspection www.vei.lv Liechtenstein Office for Communications (AK) www.ak.li Lithuania Radio Administration www.rrt.lt Luxembourg Institut Luxembourgeois des Télécommunications (ILT) www.etat.lu/ILT Netherlands Onafhankelijke Post en Telecommunicatie Autoriteit (OPTA) www.opta.nl Agentschap Telecom www.agentschap-telecom.nl Ministry of Economic Affairs www.ez.nl Norway Norwegian Post and Telecommunications Authority (NPT) www.npt.no Poland Urzad Regulacji Telekomunikacji (URT) www.urt.gov.pl Portugal Autoridad Nacional De Comunicações (ICP-Anacom) www.anacom.pt Slovenia Agencija za telekomunikacije, radiodifuzijo in pošto www.atrp.si
Supplier Details
Name
Highlite International BV
Address
Vestastraat 2
6468EX Kerkrade
The Netherlands
Product Details
Product Name
Entertainer Mobile Set Pro
Ordercode
D3207
Trade Name
DAP AUDIO
Applicable Standards Details
- EMC Directives : 2004/108/EC
EN 55013: 2001+A1: 2003+A2: 2006
EN 55020: 2007
EN 61000-3-2: 2006+A1: 20098+A2: 2009
EN 61000-3-3: 2008
- Low Voltage Directives : 2006/95/EC
EN 60065: 2002+A1: 2006+A2: 2010+A11: 2008+A12: 2011
Supplementary Information
The conformity to above standards is verified by Waltek Services Shenzhen.
Declaration
I hereby declare under our sole responsibility that the product mentioned above to which this declaration relates complies with the above mentioned standards and Directives
Highlite International BV.
S. ildiz Sept. 28, 2011
Signature of representative
Suppliers Details
Name
Highlite International BV
Address
Vestastraat 2
6468EX Kerkrade
The Netherlands
Product Details
Product Name
Entertainer Mobile Set Pro
Ordercode
D3207
Trade Name
DAP AUDIO
Applicable Standards Details
R&TTE Directives : 1999/5/EC
Applied Specifications / Standards
EN 301489-1 V1.9.1: 2011
EN 301489-9 V1.9.1: 2007
EN 300422-1 V1.3.1: 2011
EN 300422-2 V1.3.1: 2011
EN 50371: 2002
The product shall be marked with the CE conformity marking and our Notified Body number as shown on the right.
CE1177!
Supplementary Information
The conformity to above standards is verified by Timco Engineering (Notified Body).
Declaration
I hereby declare under our sole responsibility that the product mentioned above to which this declaration relates complies with the above mentioned standards and Directives
Highlite International BV. Vestastraat 2, 6468 EX Kerkrade, The Netherlands
Name
Issued Date
S. ildiz
Sept. 1, 2011
Signature of representative
Maintenance
The DAP Entertainer Mobile Set Pro requires almost no maintenance. However, you should keep the unit clean. Disconnect the mains power supply, and then wipe the cover with a damp cloth. Do not immerse in liquid. Do not use alcohol or solvents.
Keep connections clean. Disconnect electric power, and then wipe the audio connections with a damp cloth. Make sure connections are thoroughly dry before linking equipment or supplying electric power.
Replacing a Fuse
Power surges, short-circuit or inappropriate electrical power supply may cause a fuse to burn out. If the fuse burns out, the product will not function whatsoever. If this happens, follow the directions below to do so.
- Unplug the unit from electric power source.
- Insert a flat-head screwdriver into a slot in the fuse cover. Gently pry up the fuse cover. The fuse will come out.
- Remove the broken fuse. If brown or unclear, it is burned out.
- Insert the replacement fuse into the holder where the old fuse was. Reinsert the fuse cover. Be sure to use a fuse of the same type and specification. See the product specification label for details.
Troubleshooting
DAP Entertainer Mobile Set Pro
This troubleshooting guide is meant to help solve simple problems. If a problem occurs, carry out the steps below in sequence until a solution is found. Once the unit operates properly, do not carry out following steps.
- If the device does not operate properly, unplug the device.
- Check power from the wall, all cables, connections, etc.
- If all of the above appears to be O.K., plug the unit in again.
- If nothing happens after 30 seconds, unplug the device.
- Return the device to your DAP Audio dealer.
Product Specification
Frequency Response :
20 Hz - 20KHz 1dB (at send out)
45 Hz - 20KHz -3dB (maximum output of the speaker)
Distortion : < 0.05%, 20 Hz - 20KHz 1dB rated output
S/N : > 80dB @ 1W . "1 A" WTD
Output Power : 150W / ch rated power, 8 OHM, both channels driven with THD < 1%
Input Impedance: (channels1,2,3,4): "Mic": 2 KΩ "Line": 33 KΩ
Input Impedance: (5-6 / 7-8 stereo channel): 10 KΩ
Max. Input Level : Mic: -14dBu Line: +15dBu Stereo : +26 dBu
Return Input Level : 47 KΩ
DVD/MP3/USB-disk Player:
DVD/VCD/CD/HDCD/DVD-R/MPEG-4/MP3/Image, MP3, WMA compatible
USB 2.0 high speed digital transmissions
Radio:
Receiving Frequency : FM 87.5 - 108.0MHz AM 522 - 1620KHz
Receiving Sensitivity : FM 12dBμv / m AM + 26dBu / m
S/N : FM > 46dB AM > 34dB
Stereo Separation : FM > 20dB
Fuse : T4A 250V
Wireless Microphone/ Beltpack
RF frequency microphone: 857,55 MHz
RF frequency beltpack: 864,80 MHz
Frequency Response : 50Hz-15KHz +/- 3dB
Audio cables : Speakon male to speakon male 2x6m
Digital DSP Effects : 99 DSP effects 24-bit DSP Effect Processor
USB Port : Analog-digital, digital-analog transform
2.0 high speed digital transmissions
text_image
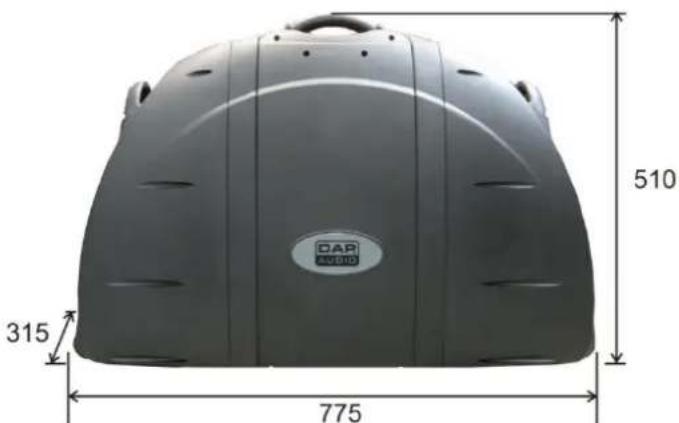
DAP AVBDI 315 775 510Design and product specifications are subject to change without prior notice.

Website: www.Dap-audio.info
Email: service@highlite.nl

text_image
DAP® AUDIO© 2011 Dap Audio.