USER MANUAL LC-32/37/46/52DH66E SHARP
OPERATION MANUAL
BEDIENUNGSANLEITUNG
MODE D'EMPLOI
MANUALE DI ISTRUZIONI
GEBRUIKSAANWIJZING
MANUAL DE MANEJO
MANUAL DE OPERAÇÃO


HDMI™
HIGH-DEFINITION MULTIMEDIA INTERFACE
DVB
Digital Video Broadcasting
DOLBY®
DIGITAL PLUS
C€
SPECIAL NOTE FOR USERS IN THE U.K.
The mains lead of this product is fitted with a non-rewireable (moulded) plug incorporating a 13A fuse. Should the fuse need to be replaced, a BSI or ASTA approved BS 1362 fuse marked 🌐 or 📋 and of the same rating as above, which is also indicated on the pin face of the plug, must be used.
Always refit the fuse cover after replacing the fuse. Never use the plug without the fuse cover fitted.
In the unlikely event of the socket outlet in your home not being compatible with the plug supplied, cut off the mains plug and fit an appropriate type.
DANGER:
The fuse from the cut-off plug should be removed and the cut-off plug destroyed immediately and disposed of in a safe manner.
Under no circumstances should the cut-off plug be inserted elsewhere into a 13A socket outlet, as a serious electric shock may occur.
To fit an appropriate plug to the mains lead, follow the instructions below:
IMPORTANT:
The wires in the mains lead are colored in accordance with the following code:
Blue: Neutral
Brown: Live
As the colors of the wires in the mains lead of this product may not correspond with the colored markings identifying the terminals in your plug, proceed as follows:
- The wire which is colored blue must be connected to the plug terminal which is marked N or colored black.
- The wire which is colored brown must be connected to the plug terminal which is marked L or colored red.
Ensure that neither the brown nor the blue wire is connected to the earth terminal in your three-pin plug.
Before replacing the plug cover make sure that:
- If the new fitted plug contains a fuse, its value is the same as that removed from the cut-off plug.
- The cord grip is clamped over the sheath of the mains lead, and not simply over the lead wires.
IF YOU HAVE ANY DOUBT, CONSULT A QUALIFIED ELECTRICIAN.
OPERATION MANUAL
ENGLISH
- The illustrations and the OSD (On-Screen Display) in this operation manual are for explanation purposes and may vary slightly from the actual operations.
- The examples used throughout this manual are based on the LC-52DH66E model.
- This model is compatible with H.264 (MPEG4 H.264, MPEG4 AVC, MPEG4 AVC/H.264) compressed broadcasts.
Contents
Contents....1
Introduction......2
Dear SHARP customer 2
Important Safety Precautions....2
Trademarks....2
Remote control unit....3
TV (Front view) 4
TV (Rear view)......4
Preparation 5
Supplied accessories....5
Attaching the stand unit 5
Inserting the batteries....6
Using the remote control unit 6
Cautions regarding the remote control unit......6
Quick guide....7
Initial installation overview....7
Before turning on the power....8
Bundling the cables 8
Initial auto installation 9
Checking signal strength and channel strength ..... 9
Watching TV 10
Daily operation....10
Switching on/off....10
Switching between analogue and digital broadcasts....10
Changing channels 10
Selecting an external video source.... 10
Selecting a sound mode 10
EPG (Electronic Programme Guide)....11
EPG Overview....11
Useful settings for using EPG....11
Selecting a programme using EPG....12
Timer recording using EPG 13
Cancelling the timer recording....13
Teletext 14
Using the MHEG-5 application (UK only) 14
Connecting external devices....15
Introduction to connections.... 15
HDMI connection....16
Component connection 16
VIDEO connection 16
SCART connection 17
Controlling devices with SCART using AV Link...... 17
Speaker/amplifier connection.... 18
Inserting a CA Card....19
AQUOS LINK....20
Controlling HDMI devices using AQUOS LINK......20
AQUOS LINK connection....20
AQUOS LINK Setup....21
Operating an AQUOS LINK device....22
What is the MENU? 23
Common operations 23
Basic adjustment....24
Picture Settings....24
AV MODE 25
Audio Settings 25
Power Save Settings....26
Channel Settings....27
Auto Installation 27
Digital channel settings 27
Analogue channel settings 28
Password/Parental lock settings 29
Language Settings (language, subtitle, multi audio) ..... 29
Useful Viewing functions 30
Selecting the picture size 30
Selecting the WSS (Wide Screen Signalling) picture size automatically....30
Selecting the WSS (Wide Screen Signalling) picture size manually 30
Selecting the picture size manually....30
Selecting the recording picture size manually ..... 31
Selecting the HDMI picture size automatically ..... 31
Other picture and audio settings 31
Adjusting image position 31
Automatic volume adjustment....31
Emphasising dialogue....31
Outputting audio only....31
Display Settings 32
Channel display 32
Time and Title display 32
Other useful features 33
Setting when using external devices 33
Input source settings 33
Skipping specified inputs 33
Colour system settings 33
Additional features 33
Connecting a USB device 34
USB Photo Viewer/Music Player 34
Photo Mode....34
Music Mode....35
USB device compatibility 35
Connecting a PC....36
Connecting a PC 36
Setting audio input....36
Displaying a PC image on the screen 36
Selecting the picture size 36
Adjusting the PC image automatically 37
Adjusting the PC image manually....37
Selecting input resolution 37
RS-232C port specifications 38
PC compatibility chart....39
RS-232C command list.... 39
Appendix 40
Troubleshooting 40
Updating your TV via DVB-T 41
Reset 41
Identification 41
Specifications 42
Optional accessory 42
End of life disposal 43
Dear SHARP customer
Thank you for your purchase of the SHARP LCD colour TV product. To ensure safety and many years of trouble-free operation of your product, please read the Important Safety Precautions carefully before using this product.
Important Safety Precautions
- Cleaning—Unplug the AC cord from the AC outlet before cleaning the product. Use a damp cloth to clean the product. Do not use liquid cleaners or aerosol cleaners.
- Water and moisture—Do not use the product near water, such as bathtub, washbasin, kitchen sink, laundry tub, swimming pool and in a wet basement.
- Do not place vases or any other water-filled containers on this product. The water may spill onto the product causing fire or electric shock.
- Stand—Do not place the product on an unstable cart, stand, tripod or table. Doing so can cause the product to fall, resulting in serious personal injuries as well as damage to the product. Use only a cart, stand, tripod, bracket or table recommended by the manufacturer or sold with the product. When mounting the product on a wall, be sure to follow the manufacturer's instructions. Use only the mounting hardware recommended by the manufacturer.
- When relocating the product placed on a cart, it must be moved with utmost care. Sudden stops, excessive force and uneven floor surface can cause the product to fall from the cart.
- Ventilation—The vents and other openings in the cabinet are designed for ventilation. Do not cover or block these vents and openings since insufficient ventilation can cause overheating and/or shorten the life of the product. Do not place the product on a bed, sofa, rug or other similar surface, since they can block ventilation openings. This product is not designed for built-in installation; do not place the product in an enclosed place such as a bookcase or rack, unless proper ventilation is provided or the manufacturer's instructions are followed.
- The LCD panel used in this product is made of glass. Therefore, it can break when the product is dropped or impact applied. If the LCD panel is broken, be careful not to be injured by broken glass.
- Heat sources—Keep the product away from heat sources such as radiators, heaters, stoves and other heat-generating products (including amplifiers).
- To prevent fire, never place any type of candle or naked flames on the top or near the TV set.
- To prevent fire or shock hazard, do not place the AC cord under the TV set or other heavy items.
- Do not display a still picture for a long time, as this could cause an afterimage to remain.
- There is power consumption always if main plug is connected.
- Servicing—Do not attempt to service the product yourself. Removing covers can expose you to high voltage and other dangerous conditions. Request a qualified person to perform servicing.


The LCD panel is a very high technology product, giving you fine picture details.
Due to the very large number of pixels, occasionally a few non-active pixels may appear on the screen as a fixed point of blue, green or red. This is within product specifications and does not constitute a fault.
Precautions when transporting the TV
When transporting the TV, never carry it by holding onto the speakers. Be sure to always carry the TV by two people holding it with two hands—one hand on each side of the TV.
Trademarks
- “HDMI, the HDMI logo and High-Definition Multimedia Interface are trademarks or registered trademarks of HDMI Licensing LLC.” • Manufactured under license from Dolby Laboratories.
- “Dolby” and the double-D symbol are trademarks of Dolby Laboratories.
- The "HD ready" Logo is a trademark of EICTA.
- The DVB logo is the registered trademark of the Digital Video Broadcasting—DVB—project.
- “x.v.Colour” and x.v.Colour are trademarks of Sony Corporation.
NOTE
- This model is compatible with Dolby Digital Plus.
Remote control unit
1 ⏻ | (Standby/On)
(Page 10)
2 Buttons for useful operations
(Teletext)
ATV: Display analogue teletext (Page 14).
DTV: Select MHEG-5 and teletext for DTV (Page 14).
≡? (Reveal hidden Teletext)
(Page 14)
(Subtitle)
Switch subtitle languages on/off (Pages 14 and 29).
(Freeze/Hold)
Press to freeze a moving image on the screen.
Teletext: Stop updating teletext pages automatically or release the hold mode.
Subpage
(Page 14)
(Top/Bottom/Full)
Set the area of magnification in teletext mode (Page 14).
3 0-9 numeric buttons
Set the channel.
Enter desired numbers.
Set the page in teletext mode.
- When the five Nordic countries (Sweden, Norway, Finland, Denmark, or Iceland) are selected in the country setting from “Auto Installation” (page 27), DTV services are four digits. When another country is selected, DTV services are three digits.
4 ⇌ (Flashback)
Press to return to the previously selected channel or external input.
5 DTV
Press to access digital TV mode.
6 ATV
Press to access conventional analogue TV mode.
7 / (Sound mode) I/II/I+II
Select a sound multiplex mode (Page 10).
8 +/− (Volume)
Increase/decrease TV volume.
9 (Mute)
TV sound on/off.
10 (WIDE MODE)
Select a wide mode (Pages 30 and 36).
11 AV MODE
Select a video setting (Page 25).
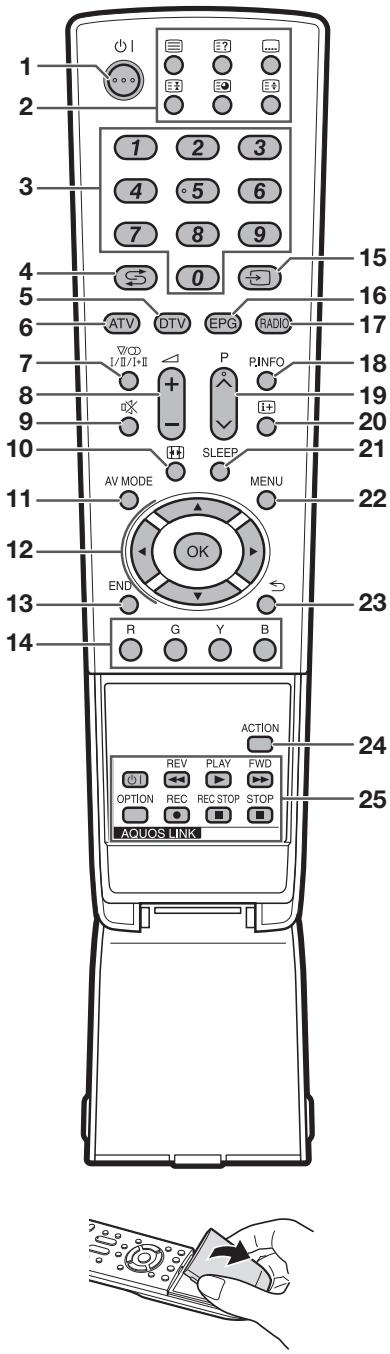
12 ▲/▼/◄/► (Cursor)
Select a desired item on the setting screen.
OK
Execute a command within the "MENU" screen.
ATV/DTV: Display the programme list when no other “MENU” screen is running.
13 END
Exit the "MENU" screen.
14 R/G/Y/B (Colour) buttons
The coloured buttons are correspondingly used to select the coloured items on the screen (e.g. EPG, MHEG-5, Teletext).
15 → (INPUT SOURCE)
Select an input source (Page 10).
16 EPG
DTV: Display the EPG screen (Pages 11–13).
17 RADIO
DTV: Switch between Radio and Data mode.
- When only data broadcasting (no radio broadcasting) is transmitted by DVB, the radio broadcasting will be skipped.
18 P. INFO
Press to display programme information which is transmitted through digital video broadcasting in the upper left corner of the screen (DTV only).
19 P∧∨
Select the TV channel.
Press to display the station information (channel number, signal, etc.) in the upper right corner of the screen (Page 32).
21 SLEEP
Press to schedule a time for the TV to automatically standby (Page 26).
22 MENU
"MENU" screen on/off.
23 ⇐ (Return)
Return to the previous "MENU" screen.
24 ACTION (Action Mode)
This key does not work on this model.
25 AQUOS LINK buttons
If external equipment such as a AQUOS BD Player is connected via HDMI cables and is AQUOS LINK compatible, you can use these AQUOS LINK buttons. See pages 20 and 22 for details.
TV (Front view)

TV (Rear view)
WARNING:
Excessive sound pressure from earphones and headphones can cause hearing loss.
1 EXT4 (ANALOGUE RGB/AUDIO) terminals* 2 HDMI1 (HDMI) terminal 3 HDMI2 (HDMI/AUDIO) terminals* 4 EXT3 (COMPONENT/AUDIO) terminals 5 OUTPUT (AUDIO) terminals 6 DIGITAL AUDIO OUTPUT terminal
7 Antenna terminal 8 RS-232C terminal 9 EXT1 (RGB) terminal 10 EXT2 (RGB) terminal 11 COMMON INTERFACE slot 12 EXT8 terminals 13 HDMI3 (HDMI) terminal 14 USB terminal 15 Headphones 16 AC INPUT terminal
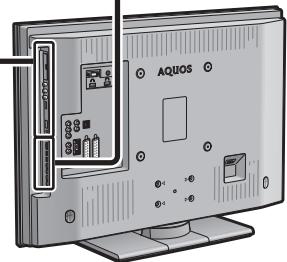
(LC-32DH66E/LC-37DH66E)
* The HDMI2 and EXT4 terminals can both use the same audio input terminal. However, the proper item must be selected in the “PC Audio Select” menu (Refer to page 36 for details).
Supplied accessories
Remote control unit (×1) AC cord (×1)
Pages 3 and 6
Product shape varies in some countries. Page 8 • Operation manual (This publication)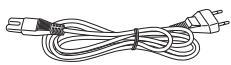
Cable clamp (×1) Page 8
Stand unit (×1) LC-32DH66E
LC-37DH66E
Page 5 - “AAA” size alkaline battery (×2) ... Page 6
Attaching the stand unit
- Before attaching (or detaching) the stand, unplug the AC cord from the AC INPUT terminal.
- Before performing work, spread cushioning over the surface on which you will be laying the TV. This will prevent it from being damaged.
CAUTION
- Attach the stand in the correct direction.
- Be sure to follow the instructions. Incorrect installation of the stand may result in the TV falling over.
1 Confirm that there are eight screws with the stand unit. 2 LC-32DH66E/LC-37DH66E: Attach the supporting post for the stand unit onto the base using the four screws with the screw driver (supplied) as shown.
LC-46DH66E/LC-52DH66E: Attach the supporting post for the stand unit onto the base using the four long screws with the hex key (supplied) as shown.
LC-32DH66E/LC-37DH66E:

NOTE
- To detach the stand unit, perform the steps in reverse order.
3 Inserting the stand.
① Insert the stand into the openings on the bottom of the TV (Hold the stand so it will not drop from the edge of the base area). ② LC-32DH66E/LC-37DH66E: Insert and tighten the four screws into the four holes on the rear of the TV.
LC-46DH66E/LC-52DH66E: Insert and tighten the four short screws into the four holes on the rear of the TV.

Inserting the batteries
Before using the TV for the first time, insert two supplied “AAA” size alkaline batteries. When the batteries become depleted and the remote control unit fails to operate, replace the batteries with new “AAA” size batteries.
1 Open the battery cover. 2 Insert two supplied "AAA" size alkaline batteries.
- Place batteries with their terminals corresponding to the (+) and (−) indications in the battery compartment.
3 Close the battery cover.

CAUTION
Improper use of batteries can result in chemical leakage or explosion. Be sure to follow the instructions below.
- Do not mix batteries of different types. Different types of batteries have different characteristics.
- Do not mix old and new batteries. Mixing old and new batteries can shorten the life of new batteries or cause chemical leakage in old batteries.
- Remove batteries as soon as they have worn out. Chemicals that leak from batteries can cause a rash. If you find any chemical leakage, wipe thoroughly with a cloth.
- The batteries supplied with this product may have a shorter life expectancy due to storage conditions.
- If you will not be using the remote control unit for an extended period of time, remove the batteries from it.
- When replacing the batteries, use alkaline batteries instead of zinc-carbon ones.
Note on disposing batteries:
The batteries provided contain no harmful materials such as cadmium, lead or mercury.
Regulations concerning used batteries stipulate that batteries may no longer be thrown out with the household rubbish. Deposit any used batteries free of charge into the designated collection containers set up at commercial businesses.
Using the remote control unit
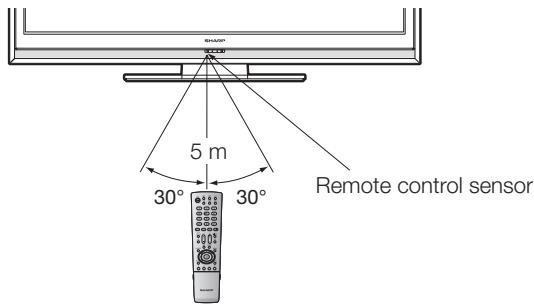
Use the remote control unit by pointing it towards the remote control sensor. Objects between the remote control unit and sensor may prevent proper operation.
Cautions regarding the remote control unit
- Do not expose the remote control unit to shock. In addition, do not expose the remote control unit to liquids, and do not place in an area with high humidity.
- Do not install or place the remote control unit under direct sunlight. The heat may cause deformation of the unit.
- The remote control unit may not work properly if the remote control sensor of the TV is under direct sunlight or strong lighting. In such cases, change the angle of the lighting or the TV, or operate the remote control unit closer to the remote control sensor.

Initial installation overview
Follow the steps below one by one when using the TV for the first time. Some steps may not be necessary depending on your TV installation and connection.
1
Preparation
1 Connect an antenna cable to the antenna terminal (Page 8).

2 If necessary, insert a CA card into the CI slot to watch scrambled broadcasts (Pages 8 and 19).

3 Connect the AC cord to the TV (Page 8).

Product shape varies in some countries.
2
Power on and run the auto installation
1 Turn on the power using ⏻ on the TV (Page 10).

2 Run the initial auto installation (Page 9).
√ Language setting
![graph TD A["English"] --> B[" "] C["Italiano"] --> D[" "] E["Svenska"] --> F[" "] G["..."] --> H[" "]](/content/2025/01/78671/images/124bdb9e0d929b8c7b6e4391e92f05595c7a89a59c1479dd99c2f4ef921b6b22.jpg)
√ Channel search setting


Start searching channels
3
Watch TV
1 Congratulations! Now you can watch TV.
2 If necessary, adjust the antenna to attain maximum signal reception (Page 9).
Connect external devices
1 Connect external devices such as a DVD player/recorder as instructed (Pages 15–17).
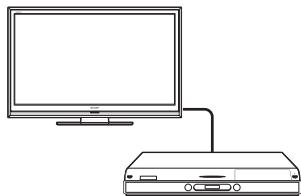
2 Connect external audio devices such as speakers/amplifier as instructed (Pages 15 and 18).

Before turning on the power
![graph TD A["Standard DIN45325 plug (IEC 169-2) 75 Ω coaxial cable"] --> B["TV"] B --> C["Carefully insert the CI Module in the CI slot with the contact side forward."] B --> D["The logo on the CI Module must be facing outward from the rear of the TV."] B --> E["Place the TV close to the AC outlet, a…](/content/2025/01/78671/images/33e3a067234a99a7cb8e9df6b6f85ce4364f36030fb26eaa97632d2e4c05b1f4.jpg)
Product shape varies in some countries.
Mounting the TV on a wall
- This TV should be mounted on a wall only with the wall mount bracket available from SHARP (Page 42). The use of other wall mount brackets may result in an unstable installation and may cause serious injuries.
- Mounting the LCD colour TV requires special skills and should only be performed by qualified service personnel. Customers should not attempt to do the work themselves. SHARP bears no responsibility for improper mounting or mounting that results in accident or injury.
- You can ask qualified service personnel about using an optional bracket to mount the TV to a wall.
- To use this TV mounted on a wall, first remove the adhesive tape at the two locations on the rear of the TV, and then use the screws supplied with the wall mount bracket to secure the bracket to the rear of the TV.
- When you mount the TV on a wall, you should attach the supporting post.
When using wall mount bracket AN-37AG5 or AN-52AG4
You can check the centre of the TV screen using the mark engraved on the wall mount bracket when mounting the TV on the wall.
AN-37AG5
LC-32DH66E: The centre of the TV screen is 4 mm below the mark "A" on the wall bracket.
LC-37DH66E: The centre of the TV screen is 6 mm above the mark "A" on the wall bracket.
AN-52AG4
LC-46DH66E: The centre of the TV screen is at the mark "b" on the wall bracket.
LC-52DH66E: The centre of the TV screen is 7.3 mm below the mark "f" on the wall bracket.
Bundling the cables

Initial auto installation
When the TV is powered on for the first time after purchase, the initial auto installation wizard appears. Follow the menus and make the necessary settings one after another.
Confirm the following before turning on the power
● Is the antenna cable connected? ● Is the AC cord plugged in?
1 Press ( 1 ) on the TV.
- The initial auto installation wizard appears.
2 Setting the OSD language.
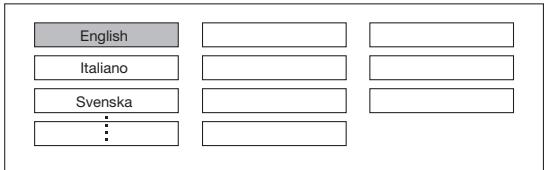
Press ▲/▼/◄/► to select the desired language, and then press OK.
3 Selecting the location of the TV.

Press ◀/▶ to select where you will use this TV, and then press OK.
- HOME: "STANDARD" will be the default value for the "AV MODE" setting.
- STORE: “DYNAMIC (Fixed)” will be the default value for the “AV MODE” setting. If the “AV MODE” is changed, the TV will automatically switch back to “DYNAMIC (Fixed)” when there is no signal input from the TV or remote control unit for 30 minutes.
4 Setting the country.

Press ▲/▼/◄/► to select your country or area, and then press OK.
- This setting screen only appears during the first installation.
5 Starting channel search.

Press ◀/▶ to select “Digital Search” or “Analogue Search”, and then press OK.
- If you want to search for more broadcasts, execute “Additional Search” from the “Programme Setup” menu (Pages 27 and 28).
- To watch both analogue broadcasts and digital broadcasts, you should perform the channel search setting for each format.
EXAMPLE
- If you execute “Digital Search” in the initial auto installation wizard, you should perform “Analogue Search” from “Auto Installation” under the “Setup” menu (Pages 27 and 28).
6 The TV searches for, sorts and stores all the receivable TV stations according to their settings and the connected antenna. - To abort the initial auto installation in progress, press ↩.
NOTE
- If you turn off the power on the TV after performing step 5, the initial auto installation wizard does not appear. The auto installation function allows you to execute the installation again from the “Setup” menu (Page 27).
- The initial auto installation wizard will go off if you leave the TV unattended for 30 minutes before searching for channels in step 6.
Checking signal strength and channel strength
If you install a DVB-T antenna for the first time or relocate it, you should adjust the alignment of the antenna to receive a good reception while checking the antenna setup screen.
1 Press MENU and the "MENU" screen displays. 2 Press ◀/▶ to select "Setup". 3 Press ▲/▼ to select "Antenna Setup-DIGITAL", and then press OK.
- Checking signal strength
Press ▲/▼ to select "Signal Strength".

- Checking channel strength
Press ▲/▼ to select “Channel Strength”, and then press OK.
- You can input a specified frequency band using the 0–9 numeric buttons.

4 Position and align the antenna so that the maximum possible values for “Signal Strength” and “Quality” are obtained.
NOTE
- The values of “Signal Strength” and “Quality” indicate when to check the appropriate alignment of the antenna.
Daily operation
Switching on/off
Turning on/off the power
Press ⏻ on the TV.
Switch it off by pressing ⏻ on the TV.

NOTE
- When turning off the power using ⏻ on the TV, EPG data (Electronic programme guide) will be lost, and programmed timer recordings will not be performed by the TV.
Standby mode
To standby mode
If the TV is switched on, you can switch it to standby by pressing ⏻ | on the remote control unit.
- Switching on from standby
From standby, press ⏻ | on the remote control unit.

TV indicator status
| ⊕ | indicator | Status |
| Off | Power off |
| Green | Power on |
| Red | Standby |
NOTE
- If you are not going to use this TV for a long period of time, be sure to remove the AC cord from the AC outlet.
- A small amount of electric power is still consumed even when ⏻ is turned off.
Switching between analogue and digital broadcasts
- Watching digital broadcasts

- Watching analogue broadcasts

Changing channels
With P∧∨:

With 0–9:

Selecting an external video source
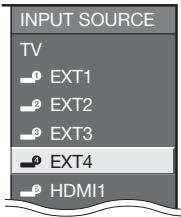
Once the connection is made, press → to display the "INPUT SOURCE" screen, and then press ▲/▼ to switch over to the appropriate external source with OK.
Selecting a sound mode
DTV mode:
If multi sound modes are received, each time you press the button, the mode switches as follows.
![graph TD A["Audio (ENG) : STEREO"] --> B["↓"] B --> C["Audio (ENG) : CH A"] C --> D["↓"] D --> E["Audio (ENG) : MONO"]](/content/2025/01/78671/images/dce140dcb1389e2127ee9ba0b2ee14bb56cdf582078fcee59f9da80b5a8cc9f8.jpg)
Press ◀/▶ to select L or R sound when the STEREO or DUAL MONO screen is displayed.
| Audio (ENG) : STEREO |
| L/R | L | R | LR |
NOTE
- The sound mode screen disappears in six seconds.
- Selectable items vary depending on the received broadcasts.
ATV mode:
Each time you press the button, the mode switches as shown in the following tables.
| NICAM TV broadcasts selection |
| Signal | Selectable items |
| Stereo | NICAM STEREO, MONO |
| Bilingual | NICAM CH A, NICAM CH B, NICAM CH AB, MONO |
| Monaural | NICAM MONO, MONO |
| A2 TV broadcasts selection |
| Signal | Selectable items |
| Stereo | STEREO, MONO |
| Bilingual | CH A, CH B, CH AB |
| Monaural | MONO |
NOTE
- When no signal is input, the sound mode will display "MONO".
EPG (Electronic Programme Guide)
EPG (Electronic Programme Guide) is a programme list that is displayed on the screen. With the EPG, you can check the schedule of DTV/RADIO/DATA, view detailed information about them, tune to an event currently on-air and set a timer for future events.
EPG Overview
Basic functions
- Select a programme using EPG (Page 12)
- Check programme information (Page 12)
Useful functions
- Search for a programme by category (Page 12)
- Search for a programme by date and time (Page 12) ● Timer recording using EPG (Page 13)
Useful settings for using EPG
Common Operation
1 Press MENU and the "MENU" screen displays. 2 Press ◀/▶ to select "Digital Setup". 3 Press ▲/▼ to select "EPG Setup", and then press OK.
![Digital Setup: REC Picture Size [16:9 TV], Download Setup [Yes], EPG Setup, Subtitle, CI Menu](/content/2025/01/78671/images/e1c56db5184c8310e824629b26d14f9de334c26fab8bfce1f530ade0a00abe20.jpg)
4 Press ▲/▼ to select the desired item, and then press OK (Example: "EPG Setup", "Display Range Setup", etc.).

5 Press ▲/▼/◄/► to select or adjust the desired item, and then press OK (Example: "Yes", "No", etc.).
EPG display settings
- EPG Setup (setting for receiving EPG data)
If you want to use the EPG for digital stations, select "Yes". The EPG data must be automatically captured while the TV is in standby mode. After setting to "Yes", it may take some time to turn off the power using the remote control unit due to the process of the data capture.
NOTE
- If the TV main power is switched off, the EPG data will not be captured.
- Display Range Setup
The “Display Range Setup” allows you to select three types of time spans for display on the screen.
Item
Mode1: Displays six hours of programme information. Mode2: Displays three hours of programme information. Mode3: Changes to the EPG display format with a vertical time span.
Genre Icon Setup
You can grey out or place a mark on desired genres and smoothly search for programmes you frequently watch.
Genre Icon List
| Icon | Genre | Icon | Genre |
| Movie/Drama | | Music/Ballet/Dance |
| News/Current affairs | | Arts/Culture (without music) |
| Show/Game show | | Social/Political Issues/Economics |
| Sports | | Education/Science/Factual Topics |
| Children’s/Youth programmes | | Leisure hobbies |
Selecting a programme using EPG
Basic Operation
The illustrations on this page are explained using three digit services.
- Display/Close the EPG screen
Press EPG.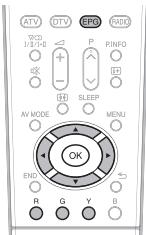
Select a programme
① Select the time span
②![EPG [DTV-TV] Today (Tue)20 (Wed)21 (Thu)22 (Fri)23 (Sat)24 (Sun)25 (Mon)26 [Mon]16/04 10:57 AM. 040 BBC News 24 BBC News. 10:00AM - 1:00 AM 10 AM 11 0 PM 1 2 3. BBC TWO 002, BBC THREE 007 This is BBC THREE This is BBC THREE, BBC FOUR 010, BBC FIVE 012, CBBC Channel 030 BBC NEWS BBC NEWS, BBC 1 061,…](/content/2025/01/78671/images/33166fc6b88828c3ef00c152092fe66e3ea921975e29449c5d2f65281db066e3.jpg)
Press ◀/▶ to select the time span you want to search.
Continue to press ▶ to display programmes in the next time span.
② Select the desired programme
Press ▲/▼ to select the desired programme.
If ▲ or ▼ are displayed on the left of the services, continue to press ▲/▼ to display the next or previous screen.
Selecting a programme
1 Press ▲/▼/◄/► to select the programme you want to check. 2 Press R.
Programme Information
3 Press OK to tune to the selected programme.
④ Search a programme in a category
1 Press G. 2 Press ▲/▼ to select the desired genre, and then press OK. 3 Press ▲/▼ to select a programme you want to watch, and then press OK.
Genre![Movie/Drama, News/Current affairs, Show/Game show, Sports, Children's/Youth programmes, Music/Ballet/Dance, Arts/Culture (without music), Social/Political Issues/Economics, Education/Science/Factual Topics, Leisure hobbies. [Today] AM [Today] PM [Tue] 20 AM [Tue] 20 PM. CBBC Channel 030 Time Mon 19/…](/content/2025/01/78671/images/6dcc361c02d9316cbabb16ed3bf5103b402da85084854e646061190c6f5a942d.jpg)
Refer to page 11 for the genre setting.
⑤ Search for a programme by date/time
1 Press Y. 2 Press ◀/▶ to select the desired time span, and then press OK.

3 Press ▲/▼ to select the desired programme, and then press OK.
NOTE
- When you select a programme outside of the current time span, the timer setting screen is displayed (Page 13).
Timer recording using EPG
You can record TV programmes using data from the EPG.
1 Press EPG. 2 Press ▲/▼/◄/► to select the programme you want to record, and then press OK. 3 Press ◀/▶ to select the preferred timer setting, and then press OK.

- If you select “No”, the TV returns to the EPG screen.
- Watching a programme at a set time
1 Press ◀/▶ to select "Watch", and then press OK. 2 Press ◀/▶ to select "Yes", and then press OK.
- The selected TV programme is marked with an icon.
Recording a programme at a set time
1 Press ◀/▶ to select "Record", and then press OK. 2 Press ◀/▶ to select the preferred timer recording type, and then press OK.
Item
AQUOS LINK: Records a programme at a set time when a device compatible with AQUOS LINK is connected.
AV LINK: Records a programme at a set time when a device compatible with AV LINK is connected.
VHS tape: Records a programme at a set time when a device compatible with VHS tape is connected.
3 Press ◀/▶ to select "Yes", and then press OK.
- The selected TV programme is marked with an icon.
NOTE
- Refer to pages 15–17 and 20–21 for connecting external devices.
Cancelling the timer recording
1 Press EPG. 2 Press ▲/▼/◄/► to select the programme on timer setup, and then press OK. 3 Press ◀/▶ to select "Cancel", and then press OK. 4 Press ◀/▶ to select "Yes", and then press OK.
1 Press EPG. 2 Press B to display the timer recording screen. 3 Press ▲/▼ to select a programme with a set timer recording you want to change, and then press OK. 4 Press ◀/▶ to select "Cancel" and then press OK. 5 Press ◀/▶ to select "Yes", and then press OK.
Teletext
What is Teletext?
Teletext broadcasts pages of information and entertainment to specially equipped TV. Your TV receives teletext signals broadcast by a TV network, and decodes them into graphical format for viewing. News, weather and sports information, stock exchange prices and programme previews are among the many services available.
Turning Teletext on/off
1 Select a TV channel or external source providing a teletext programme. 2 Press ≡ to display the Teletext.
- Many stations use the TOP operating system, while some use FLOF (e.g. CNN). Your TV supports both these systems. The pages are divided into topic groups and topics. After switching on the teletext, up to 2,000 pages are stored for fast access.
- Each time you press Ⓤ, the screen switches as shown below.
- Press 📊 again to display the teletext on the right screen and the normal image on the left screen.
- If you select a programme with no teletext signal, "No Teletext available" displays.
- The same message displays during other modes if no teletext signal is available.
![graph TD A["Input Image"] --> B["TELETEXT"] B --> C["Output Image"]](/content/2025/01/78671/images/c9ab7c8512fdb3596edb0ff6f2fae4b68d2a488252755df9b294d83f99fc4b58.jpg)
NOTE
- Teletext will not work if the selected signal type is RGB (Page 33).
Buttons for teletext operations
| Buttons | Description |
| P / | Increase or decrease the page number. |
| Colour (R/G/Y/B) | Select a group or block of pages displayed in the coloured brackets at the bottom of the screen by pressing the correspondingColour (R/G/Y/B)on the remote control unit. |
| 0-9 | Directly select any page from 100 to 899 by using the0-9numeric buttons. |
| ⊕(Top/Bottom/Full) | Switch the teletext image to Top, Bottom or Full. |
| ⊖?(Reveal hidden Teletext) | Reveal or hide hidden information such as an answer to a quiz. |
| ⊖(Freeze/Hold) | Stop updating teletext pages automatically or release the hold mode. |
| ⊖(Subtitle for Teletext) | Display the subtitle or exit the subtitle screen.Subtitles will not be displayed when the service does not contain subtitle information. |
| ⊖(Subpage) | Reveal or hide subpages.Rbutton: Move to the previous subpage.Gbutton: Move to the following subpage.These two buttons are shown on the screen by the symbols “+” and “−”. |
Using the MHEG-5 application (UK only)
Some services bring you programmes with the MHEG (Multimedia and Hypermedia Expert Group) application encoded, letting you experience DTV interactively. When provided, the MHEG-5 application will start when you press Ⓞ.
Sample MHEG-5 screen
Connecting external devices
Before connecting ...
- Be sure to turn off the TV and any devices before making any connections.
- Firmly connect a cable to a terminal or terminals. • Refer to page 36 for connecting a PC to the TV.
- Carefully read the operation manual of each external device for possible connection types. This also helps you get the best possible audiovisual quality to maximise the potential of the TV and the connected device.
Introduction to connections
The TV is equipped with the terminals as shown below. Find the cable corresponding to the TV's terminal and connect the device.
NOTE
- The cables illustrated in pages 15–18 are commercially available items.
![graph TD A["Audio device (Page 18)"] --> B["Optical audio cable"] A --> C["Audio cable"] D["Video recording device (Pages 16 and 17)"] --> E["Component cable"] D --> F["Audio cable"] D --> G["SCART cable"] H["Game console or camcorder (Page 16)"] --> I["AV cable"] J["HDMI device (Page 16)"] --> K["H…](/content/2025/01/78671/images/d812364bd345794f271418a1b8b9bf1b6c432a7ee519ed44ed9103e64621f2ec.jpg)
ø 3.5 mm stereo minijack cable

HDMI connection
Example of connectable devices
● DVD player/recorder ● Blu-ray player/recorder ● Game console
The HDMI connections (High Definition Multimedia Interface) permit digital video and audio transmission via a connection cable from a player/recorder. The digital picture and sound data are transmitted without data compression and therefore lose none of their quality. Analogue/digital conversion is no longer necessary in the connected devices, which also would result in quality losses.
![graph TD A["EXT 4"] --> B["HDMI"] C["HDMI 1"] --> D["HDMI"] E["HDMI 2"] --> F["HDMI"] G["EXT 4"] --> H["ANALOGUE RGB (PC)"] I["HDMI 2/PC AUDIO (R/L)"] --> J["∅ 3.5 mm stereo minijack cable"] K["DVI/HDMI cable"] --> L["Analog/Residential Cable"] M["AUDIO (R/L)"] --> N["Residential Cable"] O["HDMI3"]…](/content/2025/01/78671/images/04e85050a525346f473260ae07708717a5d44bafe2afe290f7c1603a156ef90e.jpg)
DVI/HDMI conversion
Using a DVI/HDMI cable, the digital video signals of a DVD can also be played via the compatible HDMI connection. The sound must be fed in additionally.
- When connecting a DVI/HDMI cable to the HDMI terminal, the image may not come in clearly.
- Both HDMI and DVI use the same HDCP copy protection method.

When using the HDMI2 terminal
You must set the audio signal input source depending on the type of HDMI cable connected (Refer to page 36 for details).
HDMI-certified cable
Go to "MENU" > "Option" > "PC Audio Select" > select "EXT4 (RGB)".
DVI/HDMI cable
Go to "MENU" > "Option" > "PC Audio Select" > select "HDMI2".
NOTE
- If a connected HDMI device is AQUOS LINK compatible, you can take advantage of versatile functions (Pages 20–22).
- Video noise may occur depending on the type of HDMI cable used. Make sure to use a certified HDMI cable.
- When playing the HDMI image, the best possible format for the picture will be detected and set automatically.
Supported video signal:
576i, 576p, 480i, 480p, 1080i, 720p, 1080p
See page 39 for PC signal compatibility.


Component connection
Example of connectable devices
● VCR ● DVD player/recorder - Blu-ray player/recorder
You will enjoy accurate colour reproduction and high quality images through the EXT3 terminal when connecting a DVD player/recorder or other device.


VIDEO connection
Example of connectable devices
● VCR ● DVD player/recorder Blu-ray player/recorder ● Game console ● Camcorder
You can use the EXT8 terminal when connecting to a game console, camcorder, a DVD player/recorder or other device.
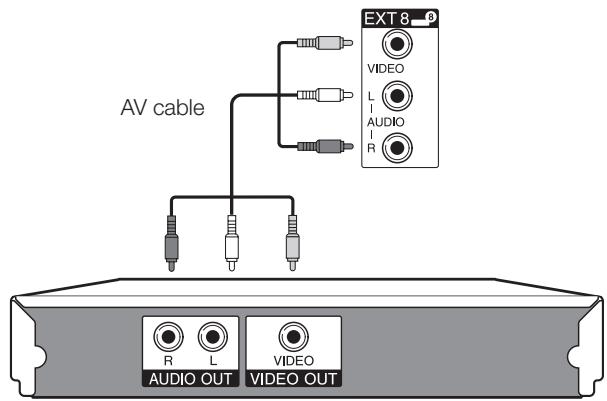

SCART connection
Example of connectable devices
Decoder
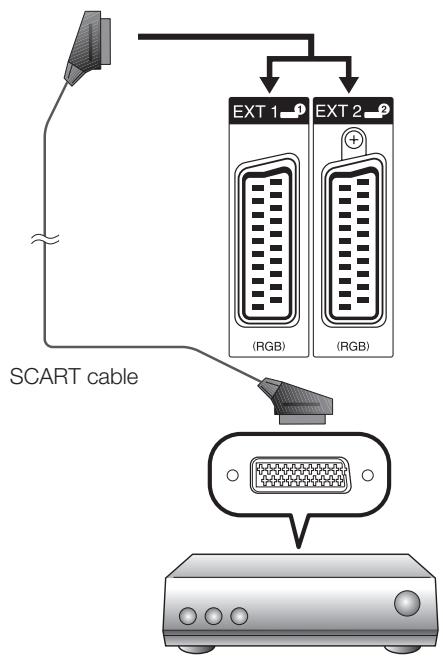
Decoder
Example of connectable devices
● VCR ● DVD player/recorder
When using the EXT2 (SCART) terminal
If your VCR supports TV-VCR advanced AV Link systems, you can connect the VCR using a fully wired SCART cable.

VCR Decoder
NOTE
- In cases when the decoder needs to receive a signal from the TV, make sure to select the appropriate input terminal to which the decoder is connected in “Manual Adjust” in the “Analogue Setting” menu (Page 28). • TV-VCR advanced AV Link systems may not be compatible with some external sources.
- You cannot connect the VCR with Decoder using a fully wired SCART cable when selecting "Y/C" under "EXT2" in the "Input Select" menu.
Controlling devices with SCART using AV Link
This TV incorporates four typical AV Link functions for smooth connections between the TV and other audiovisual equipment.
One Touch Play
While the TV is in standby mode, it automatically turns on and plays back the image from the audiovisual source (e.g. VCR, DVD player/recorder).
TV Standby
When the TV enters standby mode, the connected audiovisual equipment (e.g. VCR, DVD player/recorder) enters standby mode as well.
WYSIWYR (What You See Is What You Record)
When the remote control unit of the connected VCR has the WYSIWYR button, you can automatically start recording by pressing the WYSIWYR button.
Preset Download
Automatically transfers the channel preset information from the tuner on the TV to the one on the connected audiovisual equipment (e.g. VCR) via the EXT2 terminal.
NOTE
• Refer to the operation manuals of external equipment for details. - The AV Link function works only when audiovisual equipment is connected to the EXT2 terminal with a fully wired SCART cable. - The use of the AV Link function is only possible if the TV has enforced a complete auto installation with the connected audiovisual equipment (Page 9, Initial auto installation). The availability of the AV Link function depends on the audiovisual equipment used. Depending on the manufacturer and type of equipment used, it is possible that the described functions may be completely or partially unusable.
Speaker/amplifier connection
Connect an amplifier with external speakers as shown below.
Connecting an amplifier with digital audio input![graph TD A["Digital Audio OUTPUT"] --> B["Optical audio cable"] B --> C["Digital Audio IN"]](/content/2025/01/78671/images/9697cfbf3b524d4b7f31f7cdb2e517b04d6a45b5977af93d3ecd4d0a82070f38.jpg)
Amplifier with digital audio input
Connecting an amplifier with analogue audio input
Amplifier with analogue audio input
After connecting
Digital audio output setting
After connecting an amplifier with digital audio input and external speakers as shown, you should set an audio output format compatible with the programme you are watching or the device connected.
Go to "MENU" > "Option" > "Digital Audio Output" > select "PCM" or "Dolby Digital".
NOTE
- When you set this to “Dolby Digital”, and you receive the Dolby Digital or Dolby Digital Plus audio formats, Dolby Digital audio is output. Otherwise, PCM audio is output. When you set this to "PCM", PCM audio is output no matter what audio formats you receive.
Inserting a CA Card
In order to receive coded digital stations, a Common Interface Module (CI Module) and a CA Card must be inserted in the CI slot of the TV (Page 8).
The CI Module and the CA Card are not supplied accessories. They are usually available from your dealers.
Inserting the CA Card into the CI Module
1 With the side with the gold coloured contact chip facing the side of the CI Module marked with the provider's logo, push the CA Card into the CI Module as far as it will go. Note the direction of the arrow printed on the CA Card.

Inserting the CI Module in the CI slot
2 Carefully insert the CI Module in the CI slot with the contact side forward. The logo on the CI Module must be facing outward from the rear of the TV. Do not use excessive force. Make sure the module is not bent in the process.

NOTE
- Make sure that the CI Module is properly inserted.
- This menu is only available for digital stations.
1 Press MENU and the "MENU" screen displays.
2 Press ◀/▶ to select "Digital Setup".
- The content of this menu depends on the provider of the CI Module.
3 Press ▲/▼ to select "CI Menu", and then press OK.
Module
General information on CI Module displays.
Adjustment parameters of each CA Card displays.
Enquiry
You can input numerical values such as passwords here.
NOTE
- The content of each screen depends on the provider of the CI Module.
Controlling HDMI devices using AQUOS LINK
What is AQUOS LINK?
Using the HDMI CEC (Consumer Electronics Control) protocol, with AQUOS LINK you can interactively operate compatible system devices (AV amplifier, DVD player/recorder, Blu-ray player/recorder) using a single remote control unit.
NOTE
- AQUOS LINK-compatible AQUOS AUDIO speaker system and AQUOS Recorder are scheduled to be on sale after the release of this TV (as of September 2008).
What you can do with AQUOS LINK
√ One Touch Recording (DTV only)
You do not have to search for the remote control unit of your recording device. Press the REC ● or REC STOP ■ buttons inside the flip cover to start/stop recording what you see on the recorder.
√ One Touch Play
When the TV is in standby mode, it will automatically turn on and play back the image from the HDMI source.
√ Single remote control operation
AQUOS LINK automatically recognises the connected HDMI devices and you can control the TV and the devices as if using a universal remote control unit.
Operating Title list of external devices
In addition to displaying the TV's own Timer list (Page 12), you can also call up the external player's Top menu or AQUOS BD Player's/AQUOS Recorder's Title list provided that the devices support AQUOS LINK.
Multiple control of HDMI devices
You can select which HDMI device to operate using the OPTION button.
NOTE
- When you use AQUOS LINK, make sure to use a certified HDMI cable.
- Point the remote control unit toward the TV, not to the connected HDMI device.
- Video noise may occur depending on the type of HDMI cable used. Make sure to use a certified HDMI cable.
- Up to three HDMI recording devices, one AV amplifier and two players can be connected using this system.
- These operations affect the HDMI device selected as the current external source. If the device does not operate, turn on the device and select the appropriate external source using →.
- When you insert/remove HDMI cables or change connections, turn on all connected HDMI devices before turning on the TV. Confirm that picture and audio are correctly output by selecting "HDMI1", "HDMI2" or "HDMI3" from the "INPUT SOURCE" menu.

AQUOS LINK connection
First connect the AQUOS AUDIO speaker system or an AQUOS BD Player/AQUOS Recorder that supports the HDMI CEC protocol.
NOTE
- Refer to the operation manual of the device to be connected for further details.
- After unplugging connection cables or changing the connection pattern, turn on the power of the TV after all relevant devices' power have been turned on. Change the external input source by pressing →, select the appropriate external source and verify the audiovisual output.
- The cables illustrated in the following explanation are commercially available items.
Connecting an AQUOS BD Player/AQUOS Recorder via the AQUOS AUDIO speaker system![graph TD A["Hardware Module"] -->|HDMI 1, HDMI 2| B["Digital Audio Output"] B --> C["Optical audio cable"] C --> D["AQUOS Audio speaker system"] D --> E["HDMI-certified cable"] E --> F["Hardware Module"] F --> G["HDMI 3"] G --> H["HDMI-certified cable"] H --> I["HDMI 1"] H --> J["HDMI 2"] style A fi…](/content/2025/01/78671/images/1d33734eff07263fc26d733531c7399c4605fcf7e1d4fc16808a0db1b8f5ae35.jpg)
Connecting an AQUOS BD Player/AQUOS Recorder only![graph TD A["HDMI 3"] --> B["HDMI 1"] C["HDMI 2"] --> D["HDMI 1"] E["HDMI-certified cable"] --> F["HDMI"] G["AQUOS BD Player/AQUOS Recorder"] --> H["Device"]](/content/2025/01/78671/images/e580c44986f26308e19c442df5f38694375b8356c3f40819e43c41e866c5d8e4.jpg)
AQUOS LINK Setup
AQUOS LINK Control
Set to “On” to enable HDMI CEC functions. When turning on the power while “AQUOS LINK Control” is set to “On”, the connected HDMI devices’ power will be turned on in conjunction with the TV.
1 Press MENU and the "MENU" screen displays. 2 Press ◀/▶ to select "Option". 3 Press ▲/▼ to select “AQUOS LINK Setup”, and then press OK. 4 Press ▲/▼ to select "AQUOS LINK Control", and then press OK. 5 Press ◀/▶ to select "On", and then press OK.
Auto Power On
If this is activated, the One Touch Play function is enabled. While the TV is in standby mode, it automatically turns on and plays back the image from the HDMI source.
1 Repeat steps 1 to 3 in AQUOS LINK Control. 2 Press ▲/▼ to select “Auto Power On”, and then press OK. 3 Press ◀/▶ to select "On", and then press OK.
NOTE
- The factory default for this item is "Off".
Selecting recorder
Here, you can select a recorder for the recording from several connected recorders.
1 Repeat steps 1 to 3 in AQUOS LINK Control. 2 Press ▲/▼ to select “Selecting Recorder”, and then press OK. 3 Select the recorder, and then press OK.
NOTE
- If you have connected the AQUOS AUDIO speaker system between the TV and an AQUOS Recorder, the external source's indication changes (e.g. from "HDMI1" to "HDMI1 (Sub)").
Using Genre Info.
This function allows you to automatically switch to the appropriate sound mode depending on the genre information included in the digital broadcast.
1 Repeat steps 1 to 3 in AQUOS LINK Control. 2 Press ▲/▼ to select "Using Genre Info.", and then press OK. 3 Press ◀/▶ to select "On", and then press OK.
Operating an AQUOS LINK device
AQUOS LINK allows you to operate the HDMI-connected device with a single remote control unit.
1 Open the remote control unit's flip cover. 2 Press PLAY ▶ to start playback of a title.
- See the right column, section "Playback of titles using AQUOS LINK" if you want to start playback using the list of the titles of the AQUOS BD Player/ AQUOS Recorder.
3 Press FWD ▶▶ to fast forward.
Press REV ◀◀ to reverse.
Press STOP ■ to stop.
Press ⏻ | to turn the HDMI-connected device on/off.
Listening with the AQUOS AUDIO speaker system
You can choose to listen to the TV sound only from the AQUOS AUDIO speaker system.
1 Open the remote control unit's flip cover, and then press OPTION.
AQUOS LINK Menu
Recorder EPG
Top Menu/Title List
Media change
By AQUOS AUDIO SP
By AQUOS SP
Sound mode change
Setup Menu
Model select
2 Press ▲/▼ to select "By AQUOS AUDIO SP", and then press OK.
- The sound from the TV speaker and headphone terminal is silenced and only the sound from the AQUOS AUDIO speaker system is audible.
Listening with the AQUOS TV speaker system
You can choose to listen to the TV sound only from the AQUOS TV speaker system.
1 Open the remote control unit's flip cover, and then press OPTION. 2 Press ▲/▼ to select "By AQUOS SP", and then press OK.
Manually changing the AQUOS AUDIO speaker system's sound mode
1 Open the remote control unit's flip cover, and then press OPTION. 2 Press ▲/▼ to select "Sound mode change". 3 The sound mode changes every time you press OK.
- Refer to the operation manual of the AQUOS AUDIO speaker system for details.
You can call up the menu of an HDMI CEC-compatible external device (player, recorder, decoder, etc.) using the "Setup Menu" function.
1 Open the remote control unit's flip cover, and then press OPTION. 2 Press ▲/▼ to select "Setup Menu", and then press OK.
NOTE
- If a connected device does not have this function or the device is in a status where the menu cannot be displayed (recording, entering standby, etc.), this function may not be available.
Playback of titles using AQUOS LINK
This section explains how to play back a title in the AQUOS BD Player/AQUOS Recorder.
1 Open the remote control unit's flip cover, and then press OPTION. 2 Press ▲/▼ to select "Top Menu/Title List", and then press OK.
- The linked recorder now powers on and the TV automatically selects the appropriate external input source.
- The title list data from the connected AQUOS BD Player/AQUOS Recorder displays.
3 Select the title with ▲/▼/◄/►, and then press PLAY ►.
If your recorder has multiple storage media, select the media type here.
1 Open the remote control unit's flip cover, and then press OPTION. 2 Press ▲/▼ to select “Media change”, and then press OK. 3 Select the desired medium, such as DVD recorder or HDD. The media type changes every time you press OK.
HDMI device selection
If multiple HDMI devices are connected in a daisy chain, you can specify which device to control here.
1 Open the remote control unit's flip cover, and then press OPTION. 2 Press ▲/▼ to select “Model select”, and then press OK. The HDMI device changes every time you press OK.
Recording via the AQUOS Recorder EPG (only for recorders)
You can call up the CEC-compatible recorder's EPG and preset timer recordings using the TV's remote control unit.
1 Open the remote control unit's flip cover, and then press OPTION. 2 Press ▲/▼ to select "Recorder EPG", and then press OK.
- The external input source switches and the recorder's EPG is displayed.
3 Select the programme to record.
• Refer to the operation manual of the recorder for details.
- You need to call up the OSD to perform settings for the TV. The OSD for the settings is called "MENU".
- The “MENU” enables various settings and adjustments.
- The “MENU” can be operated with the remote control unit.
Common operations
![graph TD A["1: Display the MENU Screen"] --> B["2: Select an item"] B --> C["3: Exit the MENU screen"] C --> D["4: Select/Adjust the desired menu to the desired level, then press OK."] D --> E["5: Select in the MENU"] E --> F["6: Select or drop off to target menu"] F --> G["7: Select or stop down me…](/content/2025/01/78671/images/11e76c2b50756cf57cf0a6a41df2f9c24407cd0b74a1a89efb9e18ae70ce255b.jpg)
NOTE
- “MENU” options differ in the selected input modes, but the operating procedures are the same.
- The screens in the operation manual are for explanation purposes (some are enlarged, others cropped) and may vary slightly from the actual screens.
- Items with Ⓧ cannot be selected for various reasons.
Operation without a remote control unit
This function is useful when there is no remote control unit within your reach.
1 Press MENU and the "MENU" screen displays. 2 Press P∧/∨ instead of ▲/▼ or △+/- instead of ◀/► to select the item. 3 Press → to complete the setting.

NOTE
- The “MENU” screen will disappear if left unattended for several seconds.
About the Guide Display
The Guide Display at the bottom of the screen shows operations with the OSD.

The bar above is an operational guide for the remote control unit. The bar will change in accordance with each menu setting screen.
Picture Settings![DYNAMIC OPC Backlight [+14] -16 +16 Contrast [+30] 0 +40 Brightness [0] -30 +30 Colour [0] -30 +30 Tint [0] -30 +30 Sharpness [0] -10 +10 Advanced Reset](/content/2025/01/78671/images/dd75d26460af1a030f19e8aeb77adc1c312545a078bb8d51dc6eaac93141cff8.jpg)

Picture
OPC
Automatically adjusts the brightness of the screen.
Item
Off: The brightness is fixed at the value set in "Backlight".
On: Automatically adjusts.
On:Display: Displays the OPC effect on the screen while adjusting the brightness of the screen.
NOTE
- When set to “On”, the TV senses the surrounding light and automatically adjusts the backlight brightness. Make sure no object obstructs the OPC sensor, which could affect its ability to sense surrounding light.

Picture
Picture adjustments
Adjusts the picture to your preference with the following picture settings.
Adjustment items
| Selectable items | ◀ button | ▶ button |
| Backlight | The screen dims | The screen brightens |
| Contrast | For less contrast | For more contrast |
| Brightness | For less brightness | For more brightness |
| Colour | For less colour intensity | For more colour intensity |
| Tint | Skin tones become purplish | Skin tones become greenish |
| Sharpness | For less sharpness | For more sharpness |

Picture
Advanced
This TV provides various advanced functions for optimising the picture quality.
![C.M.S.-Hue C.M.S.-Saturation Colour Temp. Film Mode Active Contrast DNR 3D-Y/C Monochrome Range of OPC R [ 0] -30 Y [ 0] -30 G [ 0] -30 C [ 0] -30 B [ 0] -30 M [ 0] -30 +30 +30 +30 +30 +30 +30 +30 +30](/content/2025/01/78671/images/c07c8e392fcf153bc62cd08b7ae98cf9d2ca80fbaa2fd62adb2d058f19789023.jpg)
C.M.S.-Hue
This function adjusts the hue of a selected colour using a six-colour adjustment system.
C.M.S.-Saturation
This function increases or decreases the saturation of a selected colour using a six-colour adjustment system.
Colour Temp.
Adjusts the colour temperature to give the best white image.
Item
High: White with bluish tone.
Mid-High: Intermediate tone between "High" and "Middle".
Middle: Natural tone.
Mid-Low: Intermediate tone between "Middle" and "Low".
Low: White with reddish tone.
Film Mode
Automatically detects a film-based source (originally encoded at 24 or 25 frames per second, depending on the vertical frequency), analyses it and then recreates each still film frame for high-definition picture quality.
Active Contrast
Automatically adjusts the contrast of an image according to the scene.
DNR
“DNR” (Digital Noise Reduction) produces a clearer image (“Off”, “High”, “Middle”, “Low”).
3D-Y/C
Provides high quality images with minimal dot crawl and cross colour noise by detecting changes in the image.
Item
Standard: Normal adjustment.
Fast: Sets the optimum image quality for fast-moving images.
Slow: Sets the optimum image quality for slow-moving images.
NOTE
- “3D-Y/C” may not operate depending on the input signal type or when the input signal is noisy.
- "3D-Y/C" has even more effect on composite video signals (CVBS).
Monochrome
For viewing a colour video in black & white.
Range of OPC
The brightness level range of the OPC sensor's automatic adjustments can be set according to your preferences. The adjustment range of the OPC sensor can be set to a maximum of +16 and a minimum of -16.
| Selectable items | Description |
| Max. | -16 through +16 |
| Min. | -16 through +16 |
NOTE
- This function is available only when the “OPC” setting is set to “On” or “On:Display”.
- The maximum setting cannot be set to a smaller number than the minimum setting.
- The minimum setting cannot be set to a bigger number than the maximum setting.
- The maximum and minimum settings cannot be set to the same number.
- Depending on the brightness of the surrounding light, the OPC sensor might not operate if the adjustment range is small.
AV MODE
“AV MODE” gives you several viewing options to choose from to best match the system environment, which can vary due to factors like room-brightness, type of programme watched or the type of image input from external equipment.
1 Press AV MODE.
2 Each time you press AV MODE, the mode changes.
- You can also switch the mode on the “Picture” and “Audio” menu screen by pressing AV MODE.
Item
STANDARD: For a highly defined image in a normally bright room.
MOVIE: For viewing a movie in a darkened room.
GAME: For playing of video games.
PC*: For PC.
x.v.Colour**: Produce realistic colour on the TV screen unlike any other signal.
USER: Allows you to customise settings as desired. You can set the mode for each input source.
DYNAMIC (Fixed): For a clear-cut image emphasising high contrast for sports viewing (The “Picture” and “Audio” settings cannot be adjusted).
DYNAMIC: For a clear-cut image emphasising high contrast for sports viewing.
NOTE
- The item marked with * is available only when selecting "HDMI1", "HDMI2", "HDMI3" or "EXT4" from the "INPUT SOURCE" menu.
- The item marked with ** is available only when accepting an “x.v.Colour” signal through an HDMI terminal.
- For input source “USB”, you can only select “USER (USB)”, “DYNAMIC (Fixed)”, “DYNAMIC” and “STANDARD”.
Audio Settings
![Audio DYNAMIC Treble [ 0] -15 +15 Bass [ 0] -15 +15 Balance [ 0] L R Surround Reset [Off]](/content/2025/01/78671/images/193055c47ec32a7aa3ac522edec34aaf4067c5dab70bdeb00f157c05eef3bcea.jpg)

Audio
Audio adjustment
You can adjust the sound quality to your preference with the following settings.
| Selectable items | ◀ button | ▶ button |
| Treble | For weaker treble | For stronger treble |
| Bass | For weaker bass | For stronger bass |
| Balance | Decrease audio from the right speaker | Decrease audio from the left speaker |

Audio
Surround
This function allows you to enjoy realistic live sound.
Power Save Settings
![ECO Energy Save [ Standard] No Signal Off [Disable] No Operation Off [Disable] Sleep Timer](/content/2025/01/78671/images/312e499d6976ef3d53f114fe20ae74777e88a188c75e301c7f2e115625a04cc5.jpg)

ECO
Energy Save
This function enables you to automatically reduce the backlight brightness in order to decrease the power consumption and increase the backlight life span.
Item
Standard: Reduces the backlight brightness by 20%.
Advanced: Reduces the backlight brightness by 30%.
Off: The backlight brightness is the same value of your settings in the selected "AV MODE".
NOTE
- This function does not work when "AV MODE" is set to "DYNAMIC (Fixed)".

"Energy Save" status icons
| Icon | Description |
| “Energy Save” is set to “Standard”. |
| “Energy Save” is set to “Advanced”. |
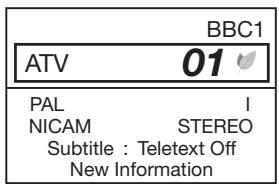
When “Energy Save” is set to “Standard” or “Advanced”, “Energy Save” status icons appear in the “Picture” menu and channel information windows as shown below.
EXAMPLE
![Picture DYNAMIC OPC Backlight [+14] -16 +16 Contrast [+30] 0 +40 [On]](/content/2025/01/78671/images/1d94a0108d763a22e78abe86c94e434f7d77a431f5de9d2f9d324c5b65201a16.jpg)
- When “OPC” is set to “On” or “On:Display”, an “Energy Save” status icon appears to the left of “OPC” in the “Picture” menu.
- When “OPC” is set to “Off”, an “Energy Save” status icon appears to the left of “Backlight” in the “Picture” menu.
EXAMPLE

ECO
No Signal Off
When set to “Enable”, the TV will automatically enter standby mode if there is no signal input for 15 minutes.
- Five minutes before the TV enters standby mode, the remaining time displays every minute.
NOTE
- Even if a TV programme finishes, this function may not operate because of interference from other TV stations or other signals.

ECO
No Operation Off
The TV will automatically enter standby mode if no operations are performed during the time span you set (“30min.” or “3hr.”).
- Five minutes before the TV enters standby mode, the remaining time displays every minute.

ECO
Sleep Timer
Allows you to set a time when the TV automatically enters standby mode.
NOTE
- Select "Off" to cancel the sleep timer.
- When the time has been set, countdown automatically starts.
- Five minutes before the preset time expires, the remaining time displays each minute.
Channel Settings
Auto Installation

Setup
Auto Installation
The TV automatically detects and stores all available services in your area. This function also allows you to perform the channel setting for digital and analogue individually and reconfigure the settings after the initial auto installation has been completed.
After selecting “Yes” on the screen, you can set language and channel search the same as in the initial auto installation. Follow steps 2, 5 and 6 on page 9.
NOTE
- You cannot set the Home/Store setting and the country setting in “Auto Installation” in the “Setup” menu. If you want to reconfigure those settings, automatically execute initial auto installation after executing “Reset” from the “Setup” menu.
- The current country setting is displayed on the screen.
Digital channel settings

Setup
Programme Setup
Digital Setting
You can reconfigure the DTV service settings automatically or manually.

Additional Search
Use this menu to add new services automatically after auto installation has been completed.

Manual Search
Add new services within a specified frequency band.
- Enter the frequency using 0–9 numeric buttons.
- You can perform “Manual Search” with a service number only when the five Nordic countries have been selected in the country setting.

Manual Adjust
Configure various settings for each service using the Colour (R, G, B) buttons.

1 Press ▲/▼ to select the desired service. 2 Press the colour button on the remote control unit corresponding with the item you want to reconfigure.
The √ mark indicates the operation is set to on. Each time the colour button is pressed, you can switch the corresponding operation on/off.
When the service is locked, you must enter your PIN whenever you tune to the service.
Services with a √ mark are passed over when pressing P∧∨ on the TV or remote control unit.
The item position of services can be sorted.
① Press ▲/▼ to select the service whose item position you want to move, and then press OK.
② Press ▲/▼ to move it to the desired position, and then press OK.
③ Repeat steps 1 and 2 until all desired service items are sorted.
Analogue channel settings

Setup
Programme Setup
Analogue Setting
You can reconfigure the analogue TV channels settings automatically or manually.

Additional Search
Use this menu to add new channels automatically after auto installation has been made.
- Start searching channels after selecting the colour system.

Manual Adjust
Use this menu to set up analogue TV channels manually.
After selecting "Yes" on the screen, press ▲/▼/◀/▶ to select the channel you want to set and then press OK.
Fine
You can adjust the frequency to the desired position.
NOTE
- Adjust while checking the background picture as a reference.
- Instead of pressing ◀/▶ to adjust the frequency, you can set by directly entering the frequency number of the channel with 0–9 numeric buttons.
EXAMPLE
• 179.25 MHz: Press 1 → 7 → 9 → 2 → 5. • 49.25 MHz: Press 4 → 9 → 2 → 5 → OK.
Colour sys.
Select the optimum colour system to receive (“Auto”, “PAL”, “SECAM”).
Sound sys. (Broadcasting systems)
Select the optimum sound systems (Broadcasting systems) to receive ("B/G", "D/K", "I", "L/L").
Label
When a TV channel sends its Network Name, the “Auto Installation” detects the information and assigns a name to it. However, you can change channel names individually.
1 Press ▲/▼/◄/► to select each character of the new name for the channel, and then press OK. 2 Repeat step 1 above until the name is fully spelt out.
NOTE
- The name can be five characters or less.
- If a channel name is less than five characters, select "END" to set the channel name.
Skip
Channels with “Skip” set to “On” are passed over when using P∧∨ even if selected while watching the image from the TV.
Decoder
When connecting a decoder to the TV, you need to select "EXT1" or "EXT2".
NOTE
- The factory preset value is "Off".
Lock
You can block the viewing of any channel.
NOTE
• See "Child Lock" for setting a PIN. - When “Lock” is set to “On” for a channel, “Child lock has been activated” displays, and the image and sound of the channel are blocked. - When pressing ◀/▶ while "Child lock has been activated" displays, the PIN input window will display. Inputting the correct PIN unlocks the "Child Lock" temporarily until the power is turned off.

Sort
Channel positions can be sorted freely.
1 Press ◀/▶ to select "Yes", and then press OK. 2 Press ▲/▼/◄/► to select the channel you want to move, and then press OK. 3 Press ▲/▼/◄/► to move it to the desired position, and then press OK. 4 Repeat steps 2 and 3 until all desired channels are sorted.

Erase Programme
Channels can be erased individually.
1 Press ◀/▶ to select "Yes", and then press OK. 2 Press ▲/▼/◄/► to select the channel you want to erase, and then press OK. - A message window pops up. 3 Press ◀/▶ to select "Yes", and then press OK to erase the selected channel. All the subsequent channels move up. 4 Repeat steps 2 and 3 until all desired channels are erased.
Password/Parental lock settings
Setup Child Lock
Allows you to use a PIN to protect certain settings from being accidentally changed.
Change PIN
Register a four-digit password number to use the "Child Lock" function.
1 Enter the four-digit number as a PIN using 0–9 numeric buttons. 2 Enter the same four-digit number as in step 1 to confirm.
- “The system PIN has been changed successfully” displays.
NOTE
- To view a locked channel, you must enter the PIN (See pages 27 and 28 for locking channels from viewing in DTV and ATV mode). When you select a locked channel, a PIN prompt message pops up. Press ⇄ to display the PIN input window.
Cancel PIN
Allows you to reset your PIN.
NOTE
- As a precautionary measure, make a note of your PIN on the back of this operation manual, cut it out and keep it in a safe place that children cannot reach.
Parental rating
This function allows DTV services to be restricted. It prevents children from watching violent or sexual scenes that may be harmful.
NOTE
- “Universal viewing” and “Parental approval pref.” are ratings used exclusively in France. • Refer to page 44 for details about ratings.
Option Key Lock
This function allows you to lock the buttons on the TV or remote control unit in order to prohibit children from changing the channel or volume.
Item
Off: Unlocks the buttons.
RC Control Lock: Locks all buttons on the remote control unit.
Button Control Lock: Locks the buttons on the TV except the power switch.
NOTE
- You cannot set both "RC Control Lock" and "Button Control Lock" at the same time.
Cancelling the lock
Press the MENU button on the TV and set to "Off" to cancel the "RC Control Lock". Press the MENU button on the remote control unit and set to "Off" to cancel the "Button Control Lock".
- Refer to page 23 for menu operation using the MENU button on the TV.
Language Settings (language, subtitle, multi audio)
Setup Language
You can select an OSD language from the "Setup" menu. Select from among 23 languages (Czech, Danish, Dutch, English, Estonian, Finnish, French, German, Greek, Hungarian, Italian, Latvian, Lithuanian, Norwegian, Polish, Portuguese, Russian, Slovak, Slovene, Spanish, Swedish, Turkish, Ukrainian).
Digital Setup Subtitle
Set up to two preferred subtitle languages (including subtitles for the hearing impaired) to display if subtitles are available.
Selectable items
● 1st Language ● 2nd Language ● For hearing impaired
- Switching subtitle languages
Each time you press the subtitle button on the remote control unit, the subtitle switches.
![graph TD A["Off"] --> B["1st Language"] B --> C["2nd Language"] C --> D["......"] D --> A](/content/2025/01/78671/images/6113b94e1f5e8f62e5b6672f6803703b7624591a680a32b30b183fda96b653dc.jpg)
- Set “For hearing impaired” to “Yes”
Subtitles for the hearing impaired have priority over each of the subtitle language settings (Example: “1st Language”, “2nd Language”, etc.).
EXAMPLE

NOTE
- Subtitles will not be displayed when the service does not contain subtitle information.
Option Digital Audio Language
Set up to three preferred multi audio languages to display if the audio languages are available.
- Switching the multi audio languages
Each time you press the audio language button on the remote control unit, the audio language switches.
Selecting the picture size
Selecting the WSS (Wide Screen Signalling) picture size automatically

Setup
WSS
The “WSS” allows the TV to switch automatically among the different picture size.
NOTE
- Use “WIDE MODE” if an image does not switch to the appropriate picture size. When the broadcast signal contains no “WSS” information, the function will not work even if enabled.
Selecting the WSS (Wide Screen Signalling) picture size manually

Setup
4:3 Mode
The “WSS” signal has 4:3 auto-switching that allows you to select between “Normal” and “Panorama”.
Item
Normal: Normal range keeping 4:3 or 16:9 aspect ratio.
Panorama: Wide image without side bars.
WSS signal 4:3 screen
4:3 mode "Normal"
4:3 mode "Panorama"
Selecting the picture size manually
You can select the picture size. Selectable picture size varies with the type of signal received.
Item (for SD [Standard-Definition] signals)
Normal: Keeps the original aspect ratio in a full screen display.
Zoom 14:9: For 14:9 letterbox pictures. A thin side bar appears on each side, and you may also see bars on the top and bottom with some programmes.
Panorama: In this mode, the picture is stretched toward each side of the screen. The picture may appear similar to “Full” depending on broadcast signals.
Full: For 16:9 squeeze pictures.
Cinema 16:9: For 16:9 letterbox pictures. Bars may appear on the top and bottom with some programmes.
Cinema 14:9: For 14:9 letterbox pictures. Bars may appear on the top and bottom with some programmes.
Item (for HD [High-Definition] signals)
Full: Displays with an Overscan image. Crops all sides of screen.
Underscan: Displays with an Underscan image only when receiving a 720p signal. Displays with the High-Definition image adjusted optimally. Noise may appear on the edge of the screen with some programmes.
Dot by Dot: Displays an image with the same number of pixels on the screen when receiving 1080i/1080p signals only.
NOTE
- Some items do not appear depending on the type of received signal.
1 Press 🏠.
- The "WIDE MODE" menu displays.
- The menu lists the “WIDE MODE” options selectable for the type of video signal currently received.
- As you toggle the options, each is immediately reflected on the screen. There is no need to press OK.
Basically, if you set “WSS” to “On” in the “Setup” menu, the optimum “WIDE MODE” is automatically chosen for every broadcast, VCR or DVD player/recorder.
NOTE
- Even if you select your desired “WIDE MODE” manually, the TV may automatically switch to the optimum “WIDE MODE” depending on the signal received when “WSS” is set to “On”.
Selecting the recording picture size manually

Digital Setup
REC Picture Size
You can use this menu to set the appropriate picture size for viewing a 16:9 format TV programme on a 4:3 TV.

Setting to "4:3 TV"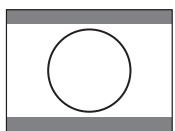
Setting to "16:9 TV"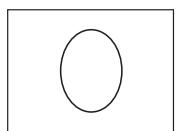
NOTE
- This function must be set before recording.
Selecting the HDMI picture size automatically

Setup
HDMI Auto View
This function allows you to automatically change to the appropriate picture size when viewing an HDMI signal using the HDMI1, 2 and 3 terminals.
Other picture and audio settings
Adjusting image position

Setup
Position
For adjusting a picture's horizontal and vertical position.
Item
H-Pos.: Centres the image by moving it to the left or right.
V-Pos.: Centres the image by moving it up or down.
NOTE
- Adjustments are stored separately for each input source.
- Depending on the input signal type or "WIDE MODE" setting, a position setting may not be available.
- This function is not available for DTV broadcasts with MHEG signals.
Automatic volume adjustment

Option
Auto Volume
Different sound sources sometimes do not have the same volume level, such as a programme and its commercial breaks. The Automatic Volume Control (Auto Volume) reduces this problem by equalizing levels.
Emphasising dialogue

Option
Clear Voice
This function emphasises speech against background noise for greater clarity. It is not recommended for music sources.
Outputting audio only

Option
Audio Only
When listening to music from a music programme, you can set the TV off and enjoy audio only.
Item
Off: Both screen images and audio are output.
On: Audio is output without a screen image.
Display Settings
Channel display
You can display the channel information by pressing ⓘ+ on the remote control unit.
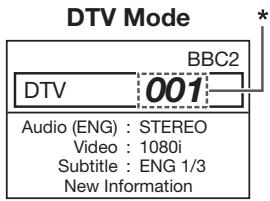

* Four digit numbers (e.g. 0001) are displayed after selecting the five Nordic countries in the country setting.
You can display the time information included in DTV and teletext broadcasts.
NOTE
- Skip step 1 if receiving DTV broadcasts.
1 Select a TV channel (The time information is automatically captured). 2 Press ⓘ+. The channel display will appear on the TV. 3 Press ⓘ again within the several seconds that the channel display is on the screen. Time information will be shown in the lower-right corner of the screen for several seconds. 4 Even when you change the TV channel, you can display the time information with steps 2 and 3 above.
NOTE
- If acquired successfully, the time information will appear in the upper-right corner of the screen by pressing MENU.
Time and Title display

Option
Time Display
Time Display
This function allows you to display the clock time in the lower-right corner of the screen.
Item
On: Displays the clock time. On (half-hourly): Displays the clock time in 30-minute increments. Off: Hides the clock time.
You can select the time format (either "24HR" or "AM/PM") for the clock time.

Option
Game Play Time
This function allows you to display the elapsed time on the screen when “AV MODE” is set to “GAME”.
Item
On: Under connecting a game console to the TV, the elapsed time is displayed in 30-minute increments after you start playing a game.
Off: Hides the time.
NOTE
- This menu is not selectable if the input source is "TV" or "USB".

Option
Programme Title Display
This function allows you to display programme information such as the title and airtime by tuning a channel.
NOTE
- This function is available only when the DTV mode is selected.
Setting when using external devices

Option
For setting the signal type of external equipment.
Item
EXT1: Y/C, CVBS, RGB
EXT2: Y/C, CVBS, RGB
NOTE
- If no (colour) image displays, try changing to another signal type.
- Check the operation manual of the external equipment for the signal type.

Setup
You can label each input source with a custom description.
1 Press → to select the desired input source. 2 Go to "MENU" > "Setup" > "Input Label". 3 Press ▲/▼/◄/► to select each character of the new name for the input source, and then press OK.

4 Repeat until the label is fully spelt out.
NOTE
- The label can be six characters or less.
- When you want to set an input source label of less than six characters, select "END" to set the name.
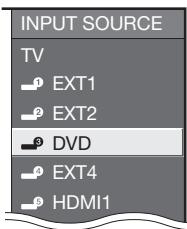
NOTE
- You cannot change labels if the input source is "TV" or "USB".

Setup
This setting allows you to skip the SCART, HDMI or RGB input on the Input Source Selection operation.

Colour system settings

Option
Colour System
You can change the colour system to one that is compatible with the image on the screen.
NOTE
- The factory preset value is "Auto".
- If "Auto" is selected, the colour system for each channel is automatically set. If an image does not display clearly, select another colour system (e.g., "PAL", "SECAM").
Additional features
Setup
Quick Start
You can reduce the TV's start-up time after turning on the power with the remote control unit.
Item
On: The TV quickly starts up from standby. 30 W or more of power consumption is required during standby. Off: Power consumption is small during standby.
Connecting a USB device
Connect a USB device to the TV as shown below.

- Depending on the USB device, the TV may not be able to recognise the contained data.
- Use only alphanumeric characters for naming files.
- File names over 80 characters (may vary depending on character set) may not be displayed.
- Do not disconnect a USB device or memory card from the TV while transferring files, using the slide show function, when a screen is switching to another, or before you exit "USB" from the "INPUT SOURCE" menu.
- Do not connect and disconnect a USB device from the TV repeatedly.
USB Photo Viewer/Music Player
In this mode, you can enjoy viewing photos and listening to music from external USB devices. Select "USB" from the "INPUT SOURCE" menu to enter this mode.

NOTE
- You cannot enter this mode when there is no USB device connected to the TV.
- This mode is not available during DTV timer recording.
- "WIDE MODE" is fixed during this mode.
- "USER (USB)" is the default value for the "AV MODE" setting. Each time you press AV MODE, the mode changes between "USER (USB)", "DYNAMIC (Fixed)", "DYNAMIC", and "STANDARD".
Selecting modes and devices

1. Press ◀/▶ to select between "Photo Mode" and "Music Mode", and then press OK. 2. Press ▲/▼/◄/► to select the drive where you want to find your files, and then press OK.
NOTE
- You do not need to select the drive in step 2 when there is only one drive in the connected USB device.
- 16 is the maximum number of drives that can be displayed.
Photo Mode
Viewing thumbnails

Buttons for thumbnail operations
| Buttons | Description |
| OK | When selecting the folder icon with the ≲ mark: Go back to the parent directory.When selecting a folder icon: Enter this directory.When selecting a photo thumbnail: Display the photo in full screen. |
| ▲/▼/◄/► (Cursor) | Select a desired item. |
| ⇐ | Return to the top menu. |
| R button | Go back to the previous page. |
| G button | Go to the next page. |
| Y button | Select BGM for the slide show. |
| B button | Start the slide show. |
NOTE
- When there are invalid photo files, the ✗ mark will be displayed for the file.
- You can see the file name, shooting date, file size and pixel size of the selected photo in the lower-left corner of the screen (shooting date is only available in the EXIF file format).
Viewing photos in full screen
Buttons for full screen display operation
| Buttons | Description |
| ◀/▶ (Cursor) | Go to the previous/next photo in the same directory. |
| ⇐ | Return to the thumbnail selection screen. |
| R button | Rotate the photo by 90 degrees to the left. |
| G button | Rotate the photo by 90 degrees to the right. |
| B button | Reveal/hide the Guide Display. |
NOTE
- Rotating photos only applies to the temporarily selected item and this setting is not saved.
Slide show
Selecting the BGM

| Buttons | Description |
| OK | When selecting the folder icon with the ≡ mark: Go back to the parent directory. When selecting a folder icon: Enter this directory. When selecting a music file: Play music. |
| ▲/▼ (Cursor) | Select a desired item. |
| ◀ (Cursor) | Page up. |
| ▶ (Cursor) | Page down. |
| ⇐ | Return to the thumbnail selection screen. |
| R button | Stop music. |
| G button | Play/Pause music. |
| Y button | Set the selected music to the slide show BGM. |
| B button | Reset the slide show BGM. |
NOTE
- Only one song can be set to the slide show BGM.
- Slide show BGM will be reset in the cases below.
- Go back to the top menu.
- Change the "INPUT SOURCE".
- When there are invalid music files, the ✗ mark will be displayed for the file.
- The displayed play time may differ slightly from the actual play time depending on the files.
Slide show
| Buttons | Description |
| ⇐ | Return to the thumbnail selection screen. |
| B button | Reveal/hide the Guide Display. |
NOTE
- The selected BGM is played repeatedly.
- The slide show continues until you press ↩.
- The slide show speed is approximately 10 seconds per photo.
Music Mode

| Buttons | Description |
| OK | When selecting the folder icon with the ≧ mark: Go back to the parent directory. When selecting a folder icon: Enter this directory. When selecting a music file: Play music. |
| ▲/▼ (Cursor) | Select the desired item. |
| ◀ (Cursor) | Page up. |
| ▶ (Cursor) | Page down. |
| ⇐ | Return to the top menu. |
| R button | Stop music. |
| G button | Play/Pause music. |
| B button | Turn off the screen image for audio only output. |
NOTE
- When there are invalid music files, the ✗ mark will be displayed for the file.
- The displayed play time may differ slightly from the actual play time depending on the files.
USB device compatibility
| USB device | USB Memory, USB card reader (Mass Storage class) |
| File system | FAT/FAT32 |
| Photo file format | JPEG (.jpg) (DCF2.0 compliant) |
| Music file format | MP3 (.mp3)Bitrate: 32k, 40k, 48k, 56k, 64k, 80k, 96k, 112k, 128k, 160k, 192k, 224k, 256k, 320kbpsSampling frequency: 32k, 44.1k, 48kHz |
NOTE
- Progressive format JPEG files are not supported.
- Music files in USB 1.1 devices may not be played properly. • Operation using USB hubs is not guaranteed.
Connecting a PC
HDMI Connection![graph LR PC["PC"] -->|HDMI-certified cable| HDMI1["HDMI"] HDMI1 -->|HDMI1, 2* or 3| HDMI2["HDMI"]](/content/2025/01/78671/images/2b4e45c49c08c836550ac26a53a75372fdcec2591b506b331b3d5ebb4589663b.jpg)

* When using the HDMI2 terminal, you must select the proper item in the "PC Audio Select" menu depending on the type of HDMI cable connected (Refer to the right column for details).
Analogue Connection![graph TD PC["PC"] -->|RGB cable| EXT4["EXT 4"] EXT4 -->|HDMI 2/PC AUDIO (R/L)| USB["USB Portugal"] EXT4 -->|USB| USB1["USB Portugal"] EXT4 -->|USB cable| USB2["USB Portugal"] EXT4 -->|USB cable| USB3["USB Portugal"]](/content/2025/01/78671/images/ef83f44f29164bab530eff071e7d5657aa4cc5d2f6de725d308f236aeb5d5504.jpg)
3.5 mm stereo minijack cable
![graph TD PC["PC"] -->|DVI/RGB conversion cable| EXT4["EXT4\nANALOGUE RGB (PC)"] EXT4 -->|HDMI 2/PC AUDIO (R/L)| HDMI["+"] EXT4 -->|HDMI 2/PC AUDIO (R/L)| HDMI2["+"] EXT4 -->|HDMI 2/PC AUDIO (R/L)| HDMI3["+"] EXT4 -->|HDMI 2/PC AUDIO (R/L)| HDMI4["+"]](/content/2025/01/78671/images/e7a9bd2750cb5652331505b73407d7a6597e9cb1e6abd5d4d0805533400a594c.jpg)
3.5 mm stereo minijack cable * When using the EXT4 terminal, you must select "EXT4 (RGB)" in the "PC Audio Select" menu (Refer to the right column for details).
NOTE
- The PC input terminals are DDC1/2B-compatible. • Refer to page 39 for a list of PC signals compatible with the TV.
- A Macintosh adaptor may be required for use with some Macintosh computers.
- When connecting to a PC, the input signal type is automatically detected except 1,024 × 768 and 1,360 × 768 signals.

Option
PC Audio Select
When using the EXT4 terminal or HDMI2 terminal, you must select which terminal uses the AUDIO (R/L) jack for analogue audio input.
Item
HDMI2: When connecting devices (including a PC) with DVI/HDMI cable to the HDMI2 terminal and inputting analogue audio signals from the AUDIO (R/L) jack.
EXT4 (RGB): When connecting a PC to the EXT4 terminal, and inputting analogue audio signals from the AUDIO (R/L) jack.
NOTE
- You must set this to “EXT4 (RGB)” when connecting devices (including a PC) with an HDMI-certified cable to the HDMI2 terminal. If “HDMI2” is set, there will be no sound output.
Displaying a PC image on the screen
Selecting the picture size
You can select the picture size.
1 Press 🏠. - The "WIDE MODE" menu displays.
2 Press 🎨 or ▲/▼ to select a desired item on the menu.
NOTE
- Connect the PC before making adjustments.
- Selectable picture size may vary with input signal type.
EXAMPLE![graph TD A[" "] --> B["Normal"] B --> C["Full"]](/content/2025/01/78671/images/46741c1fb431eb291586e142c024f1d41f43fb5320eed911fc73d2f304aaa2ae.jpg)
Item
Full: An image fully fills the screen. Cinema: For letterbox pictures. Bars may appear on the top and bottom with some programmes. Normal: Keeps the original aspect ratio in a full screen display. Dot by Dot: Displays an image with the same number of pixels on the screen.
NOTE
- Refer to page 30 for AV signals (See below). HDMI: 480i/480p/576i/576p/720p/1080i/1080p ANALOGUE RGB: 576p/720p (50Hz)/1080i
- The ANALOGUE RGB terminal (PC) (EXT4) is not compatible with 480i/576i/1080p signals.
Adjusting the PC image automatically
This function enables the screen to be automatically adjusted to its best possible condition when the analogue terminals of the TV and PC are connected with a commercially available DVI/RGB conversion cable, etc.

Setup
Auto Sync.

NOTE
- When “Auto Sync.” is successful, “Auto Sync completed successfully” displays. If not, “Auto Sync.” failed.
- “Auto Sync.” may fail even if “Auto Sync completed successfully” displays.
- "Auto Sync." may fail if the PC image has low resolution, has unclear (black) edges, or is moved while executing "Auto Sync.".
- Be sure to connect the PC to the TV and switch it on before starting "Auto Sync.".
- "Auto Sync." can be executed only when inputting analogue signals through the EXT4 terminal.
Adjusting the PC image manually
Ordinarily you can easily adjust the picture as necessary to change image position using "Auto Sync.". In some cases, however, manual adjustment is needed to optimise the image.

Setup
Fine Sync.
1 Press ▲/▼ to select the specific adjustment item. 2 Press ◀/▶ to adjust the item to the desired position.
![H-Pos. [90] - + V-Pos. [39] - + Clock [90] - + Phase [20] - + Reset](/content/2025/01/78671/images/8b286b29786ccac24e426592558840bada46ed7da691d997d287c10bd63d1daa.jpg)
Item
H-Pos.: Centres the image by moving it to the left or right. V-Pos.: Centres the image by moving it up or down. Clock: Adjusts when the image flickers with vertical stripes. Phase: Adjusts when characters have low contrast or when the image flickers.
NOTE
- For resetting all adjustment items to the factory preset values, press ▲/▼ to select "Reset", and then press OK.
- "Clock" and "Phase" in the "Fine Sync." menu can be adjusted only when inputting analogue signals through the EXT4 terminal.
- Some input signals may have to be registered manually to display properly.
- The pairs of input signals (resolutions) in the list below are not distinguishable when received. In such cases, you have to set the correct signal manually. After setting once, it will display when the same signal (resolution) is input again.

Setup

(Example)
NOTE
- You can only select the "Input Signal" on the "Setup" menu when receiving one of the two input signals listed above.
RS-232C port specifications
PC Control of the TV
- When a programme is set, the TV can be controlled from the PC using the RS-232C terminal. The input signal (PC/video) can be selected, the volume can be adjusted and various other adjustments and settings can be made, enabling automatic programmed playing.
- Use an RS-232C serial control cable (cross type) (commercially available) for the connections.
NOTE
- This operation system should be used by a person who is accustomed to using PCs.

Communication conditions
Set the RS-232C communications settings on the PC to match the TV's communications conditions. The TV's communications settings are as follows:
| Baud rate: | 9,600 bps |
| Data length: | 8 bits |
| Parity bit: | None |
| Stop bit: | 1 bit |
| Flow control: | None |
Communication procedure
Send the control commands from the PC via the RS-232C connector.
The TV operates according to the received command and sends a response message to the PC.
Do not send multiple commands at the same time. Wait until the PC receives the OK response before sending the next command.
Make sure to send “A” with the carriage return and confirm that “ERR” returns before operating.
Eight ASCII codes + CR
![graph TD A["C1"] --> B["Command four digits"] C["C2"] --> D["Parameter four digits"] E["C3"] --> F["Return code"] G["C4"] --> H["P1"] I["P2"] --> J["P3"] K["P4"] <--_L["←"]](/content/2025/01/78671/images/bf8a56e76848acc0851611b7a1873e41ff0b6425a811ff01a87e67b25cc482f1.jpg)
Command four digits: Command. The text of four characters.
Parameter four digits: Parameter 0–9, blank, ?, minus
Parameter
Input the parameter values, aligning left, and fill with blank(s) for the remainder (Be sure that four values are input for the parameter).
When the input parameter is not within an adjustable range, “ERR” returns (Refer to “Response code format”).
When “?” is input for some commands, the present setting value responds.

Normal response

Problem response (communication error or incorrect command)
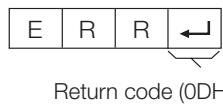
After sending the return code (0DH), make sure to send the line feed (0AH) as well.
PC compatibility chart
| Resolution | Horizontal Frequency | Vertical Frequency | Analogue (D-Sub) | Digital (HDMI) | VESA Standard |
| VGA | 640 × 480 | 31.5 kHz | 60 Hz | √ | √ | √ |
| SVGA | 800 × 600 | 37.9 kHz | 60 Hz | √ | √ | √ |
| XGA | 1,024 × 768 | 48.4 kHz | 60 Hz | √ | √ | √ |
| WXGA | 1,360 × 768 | 47.7 kHz | 60 Hz | √ | √ | √ |
| SXGA | 1,280 × 1,024 | 64.0 kHz | 60 Hz | √ | √ | √ |
| SXGA+ | 1,400 × 1,050 | 65.3 kHz | 60 Hz | | √ | √ |
VGA, SVGA, XGA, WXGA, SXGA and SXGA+ are registered trademarks of International Business Machines Corporation.
NOTE
- This TV has only limited PC compatibility, correct operation can only be guaranteed if the video card conforms exactly to the VESA 60 Hz standard. Any variations from this standard will result in picture distortions.
RS-232C command list
| CONTROL ITEM | COMMAND | PARAMETER | CONTROL CONTENTS |
| POWER SETTING | P | O | W | R | 0 | _ | _ | _ | POWER OFF |
| INPUT SELECTION A | I | T | G | D | _ | _ | _ | _ | INPUT SWITCHING (TOGGLE) |
| I | T | V | D | _ | _ | _ | _ | TV (CHANNEL FIXED) |
| I | D | T | V | _ | _ | _ | _ | DTV (CHANNEL FIXED) |
| I | A | V | D | * | _ | _ | _ | EXT1-4, 8 (1-4, 8), HDMI1-3 (5-7) |
| CHANNEL | D | C | C | H | * | * | _ | _ | TV DIRECT CHANNEL (1-99) |
| C | H | U | P | _ | _ | _ | _ | CHANNEL UP |
| C | H | D | W | _ | _ | _ | _ | CHANNEL DOWN |
| D | T | V | D | * | * | * | _ | THREE DIGIT DTV DIRECT CHANNEL (1-999) (Non-Nordic countries) |
| D | T | V | D | * | * | * | * | FOUR DIGIT DTV DIRECT CHANNEL (1-9999) (Nordic countries only) |
| D | T | U | P | _ | _ | _ | _ | DTV CHANNEL UP |
| D | T | D | W | _ | _ | _ | _ | DTV CHANNEL DOWN |
| INPUT SELECTION B | I | N | P | 1 | 0 | _ | _ | _ | EXT1 (Y/C) |
| I | N | P | 1 | 1 | _ | _ | _ | EXT1 (CVBS) |
| I | N | P | 1 | 2 | _ | _ | _ | EXT1 (RGB) |
| I | N | P | 2 | 0 | _ | _ | _ | EXT2 (Y/C) |
| I | N | P | 2 | 1 | _ | _ | _ | EXT2 (CVBS) |
| I | N | P | 2 | 2 | _ | _ | _ | EXT2 (RGB) |
| AV MODE SELECTION | A | V | M | D | 0 | _ | _ | _ | TOGGLE |
| A | V | M | D | 1 | _ | _ | _ | STANDARD |
| A | V | M | D | 2 | _ | _ | _ | MOVIE |
| A | V | M | D | 3 | _ | _ | _ | GAME |
| A | V | M | D | 4 | _ | _ | _ | USER |
| A | V | M | D | 5 | _ | _ | _ | DYNAMIC (Fixed) |
| A | V | M | D | 6 | _ | _ | _ | DYNAMIC |
| A | V | M | D | 7 | _ | _ | _ | PC |
| A | V | M | D | 8 | _ | _ | _ | x.v.Colour |
| A | V | M | D | ? | ? | ? | ? | 1-8 |
| VOLUME | V | O | L | M | * | * | _ | _ | VOLUME (0-60) |
| CONTROL ITEM | COMMAND | PARAMETER | CONTROL CONTENTS |
| POSITION | H | P | O | S | * | * | * | _ | H-POSITION (AV/PC) |
| V | P | O | S | * | * | * | _ | V-POSITION (AV/PC) |
| C | L | C | K | * | * | * | _ | CLOCK (0–180) |
| P | H | S | E | * | * | _ | _ | PHASE (0–40) |
| WIDE MODE | W | I | D | E | 0 | _ | _ | _ | TOGGLE (AV) |
| W | I | D | E | 1 | _ | _ | _ | NORMAL (AV) |
| W | I | D | E | 2 | _ | _ | _ | ZOOM 14:9 (AV) |
| W | I | D | E | 3 | _ | _ | _ | PANORAMA (AV) |
| W | I | D | E | 4 | _ | _ | _ | FULL (AV) |
| W | I | D | E | 5 | _ | _ | _ | CINEMA 16:9 (AV) |
| W | I | D | E | 6 | _ | _ | _ | CINEMA 14:9 (AV) |
| W | I | D | E | 7 | _ | _ | _ | NORMAL (PC) |
| W | I | D | E | 8 | _ | _ | _ | CINEMA (PC) |
| W | I | D | E | 9 | _ | _ | _ | FULL (PC) |
| W | I | D | E | 1 | 0 | _ | _ | DOT by DOT (AV/PC) |
| W | I | D | E | 1 | 1 | _ | _ | UNDERSCAN (AV) |
| MUTE | M | U | T | E | 0 | _ | _ | _ | TOGGLE |
| M | U | T | E | 1 | _ | _ | _ | MUTE ON |
| M | U | T | E | 2 | _ | _ | _ | MUTE OFF |
| SURROUND | A | C | S | U | 0 | _ | _ | _ | SURROUND TOGGLE |
| A | C | S | U | 1 | _ | _ | _ | SURROUND ON |
| A | C | S | U | 2 | _ | _ | _ | SURROUND OFF |
| AUDIO CHANGE | A | C | H | A | _ | _ | _ | _ | TOGGLE |
| SLEEP TIMER | O | F | T | M | 0 | _ | _ | _ | OFF |
| O | F | T | M | 1 | _ | _ | _ | SLEEP TIMER 30 MIN |
| O | F | T | M | 2 | _ | _ | _ | SLEEP TIMER 1 HOUR |
| O | F | T | M | 3 | _ | _ | _ | SLEEP TIMER 1 HOUR 30 MIN |
| O | F | T | M | 4 | _ | _ | _ | SLEEP TIMER 2 HOUR |
| O | F | T | M | 5 | _ | _ | _ | SLEEP TIMER 2 HOUR 30 MIN |
| TEXT | T | E | X | T | 0 | _ | _ | _ | TEXT OFF |
| T | E | X | T | 1 | _ | _ | _ | TEXT ON (TOGGLE) |
| D | C | P | G | * | * | * | _ | DIRECT PAGE JUMP (100–899) |
Troubleshooting
| Problem | Possible Solution |
| No power. | Check if you pressed ⏻| on the remote control unit.If the indicator on the TV lights up red, press ⏻|.Is the AC cord disconnected?Check if you pressed ⏻ on the TV. |
| The TV cannot be operated. | External influences such as lightning, static electricity, etc., may cause improper operation. In this case, operate the TV after first turning off the power, or unplugging the AC cord and re-plugging it in after one or two minutes. |
| Remote control unit does not operate. | Are batteries inserted with polarity (+, -) aligned?Are batteries worn out? (Replace with new batteries.)Are you using it under strong or fluorescent lighting?Is a fluorescent light illuminating to the remote control sensor? |
| Picture is cut off. | Is the image position correct?Are screen mode adjustments (WIDE MODE) such as picture size made correctly? (Pages 30 and 36) |
| Strange colour, light colour, or dark colour, or colour misalignment. | Adjust the picture tone.Is the room too bright? The picture may look dark in a room that is too bright.Check the “Colour System” setting (Pages 28 and 33). |
| Power is suddenly turned off. | The TV’s internal temperature has increased.Remove any objects blocking the vent or clean.Is the “Sleep Timer” set? Select “Off” from the “Sleep Timer” menu (Page 26).Is “No Signal Off” or “No Operation Off” activated? |
| No picture. | Are connections to external equipment correct? (Pages 15–17)Is the input signal type selected correctly after connection? (Page 33)Is the correct input source selected? (Page 10)Is a non-compatible signal being input? (Page 39)Is the picture adjustment correct? (Pages 24–25)Is the antenna connected properly? (Page 8)Is “On” selected in “Audio Only”? (Page 31) |
| No sound. | Is the volume too low?Make sure that headphones are not connected.Check if you pressed ⏻× on the remote control unit.Is the proper item selected in the “PC Audio Select” menu when connecting devices to the HDMI2 terminal or the EXT4 terminal? (Pages 16 and 36) |
| The TV sometimes makes a cracking sound. | This is not a malfunction. This happens when the cabinet slightly expands and contracts according to changes in temperature. This does not affect the TV’s performance. |
Cautions regarding use in high and low temperature environments
- When the TV is used in a low temperature space (e.g. room, office), the picture may leave trails or appear slightly delayed. This is not a malfunction, and the TV will recover when the temperature returns to normal.
- Do not leave the TV in a hot or cold location. Also, do not leave the TV in a location exposed to direct sunlight or near a heater, as this may cause the cabinet to deform and the LCD panel to malfunction.
Storage temperature: +5 °C to +35 °C.
Software composition
The software included in this product is comprised of various software components whose individual copyrights are held by SHARP or by third parties.
Software developed by SHARP and open source software
The copyrights for the software components and various relevant documents included with this product that were developed or written by SHARP are owned by SHARP and are protected by the Copyright Act, international treaties, and other relevant laws. This product also makes use of freely distributed software and software components whose copyrights are held by third parties. These include software components covered by a GNU General Public License (hereafter GPL), a GNU Lesser General Public License (hereafter LGPL) or other license agreement.
Obtaining source code
Some of the open source software licensors require the distributor to provide the source code with the executable software components. GPL and LGPL include similar requirements. For information on obtaining the source code for the open source software and for obtaining the GPL, LGPL, and other license agreement information, visit the following website:
http://www.sharp-eu.com/gpl/
We are unable to answer any questions about the source code for the open source software. The source code for the software components whose copyrights are held by SHARP is not distributed.
Acknowledgements
The following open source software components are included in this product:
- linux kernel • busy box • uClibc • zlib • libpng • libjpeg
Updating your TV via DVB-T
Ensure that your TV software version is always up to date. From time to time SHARP will make updated TV base software and DVB software available.

Digital Setup
Download Setup
Searching for updates*
* All countries except UK and Sweden are set to “No” for this function.
The TV automatically determines whether a new software version is available when the TV is in standby mode.
Item
Yes: Automatically searches for new software updates available when the TV is in standby mode.
No: Does not search for update information.
Now: Checks if there is new software immediately.
Downloading the software
You can select the method of update.
1 If the software is updated, the confirmation message “New download information has been detected.” appears.
- If the TV receives the update service while in standby mode, a confirmation message displays after turning on the power.
2 Follow the screen prompts.
Item
Yes: Starts downloading immediately. It takes approximately one hour to update. You cannot carry out other operations while downloading.
- Cancels the download by pressing OK on the remote control unit when “Discontinue” is displayed on the screen during the update.
No: Starts downloading automatically several minutes after entering standby mode.
NOTE
- The TV must remain in standby mode for download. Do not turn off the power using ⏻ on the TV.
- Updating the software may take some time.

Message List
When new software is detected, you can confirm the update information and download the software from "Message List".
NOTE
- When the TV succeeds at downloading new software, the message is updated in the "Message List" of the "Information" menu.
- The software update will not be carried out if there is no new software available at the specified download time.

Receiver Report
Display reports regarding failures and changes for timer settings.
Reset
If complex adjustments are made so that the settings cannot be restored to normal, you can reset the settings to the factory preset values.

Setup
Reset
1 Go to "MENU" > "Setup" > "Reset". 2 Press ◀/▶ to select "Yes", and then press OK.
- "Now, TV will restart automatically. OK?" displays on the screen.
3 Press ◀/▶ to select "Yes", and then press OK.
- "Now initialising..." displays on the screen and blinks.
- After the reset has completed, the power shuts off and then comes back on. The screen will have returned to its original settings.

Identification

Setup
Identification
You can check the TV ID on the screen for reporting to customer service.
CLEARING THE PIN
1 Go to "MENU" > "Setup". 2 Press ▲/▼ to select "Auto Installation", "Programme Setup", "Child Lock" or "Reset", and then press OK. The PIN input window will display.

3 Press and hold both P∧ and ∠+ on the TV simultaneously until the message appears on the screen.
Specifications
| Item | 32" LCD COLOUR TV, Model: LC-32DH66E | 37" LCD COLOUR TV, Model: LC-37DH66E | 46" LCD COLOUR TV, Model: LC-46DH66E | 52" LCD COLOUR TV, Model: LC-52DH66E |
| LCD panel | 32" Advanced Super View & BLACK TFT LCD | 37" Advanced Super View & BLACK TFT LCD | 46" Advanced Super View & BLACK TFT LCD | 52" Advanced Super View & BLACK TFT LCD |
| Resolution | 2,073,600 pixels (1,920 × 1,080) |
| Video Colour System | PAL/SECAM/NTSC 3.58/NTSC 4.43/PAL 60 |
| TV Function | TV-Standard | Analogue | CCIR (B/G, I, D/K, L/L') |
| Digital | DVB-T (2K/8K OFDM) |
| Receiving Channel | VHF/UHF | E2-E69 ch, F2-F10 ch, I21-I69 ch, IR A-IR J ch (Digital: IR A ch-E69 ch) |
| CATV | Hyper-band, S1-S41 ch |
| TV-Tuning System | Auto Preset 999 ch: non-Nordic / 9999 ch: Nordic (ATV: 99 ch), Auto Label, Auto Sort |
| STEREO/BILINGUAL | NICAM/A2 |
| Brightness | 450 cd/m2 |
| Backlight life | 60,000 hours (when "Backlight" is set to the default position) |
| Viewing angles | H: 176°, V: 176° |
| Audio amplifier | 10 W × 2 |
| Speaker | (40 mm × 110 mm) × 2 |
| Terminals | Antenna | UHF/VHF 75 Ω Din type (Analogue & Digital) |
| RS-232C | D-Sub 9 pin male connector |
| EXT1 | SCART (AV input, Y/C input, RGB input, TV output) |
| EXT2 | SCART (AV input/monitor output, Y/C input, AV Link, RGB input) |
| EXT3 | COMPONENT IN: Y/PB(CB)/PR(CR), RCA pin (AUDIO R/L) |
| EXT4 | 15 pin mini D-sub, ∅ 3.5 mm jack* |
| HDMI1 (EXT5) | HDMI |
| HDMI2 (EXT6) | HDMI, ∅ 3.5 mm jack* |
| HDMI3 (EXT7) | HDMI |
| EXT8 | RCA pin (AV input) |
| USB | USB 2.0 |
| DIGITAL AUDIO OUTPUT | Optical S/PDIF Digital audio output |
| C. I. (Common Interface) | EN50221, R206001 |
| OUTPUT | RCA pin (AUDIO R/L) |
| Headphones | ∅ 3.5 mm jack (Audio output) |
| OSD language | Czech, Danish, Dutch, English, Estonian, Finnish, French, German, Greek, Hungarian, Italian, Latvian, Lithuanian, Norwegian, Polish, Portuguese, Russian, Slovak, Slovene, Spanish, Swedish, Turkish, Ukrainian |
| Power Requirement | AC 220-240 V, 50 Hz |
| Power Consumption (Method IEC62087) | 142 W (0.5 W Standby) | 172 W (0.5 W Standby) | 220 W (0.5 W Standby) | 269 W (0.5 W Standby) |
| Weight | Without stand | 11.5 kg | 14.5 kg | 21.2 kg | 24.7 kg |
| With stand | 13.5 kg | 16.5 kg | 24.2 kg | 28.3 kg |
| Operating temperature | 0 °C to +40 °C |
* The HDMI2 and EXT4 terminals can both use the same audio input terminal.
- As a part of our policy of continuous improvement, SHARP reserves the right to make design and specification changes for product improvement without prior notice. The performance specification figures indicated are nominal values of production units. There may be some deviations from these values in individual units.
NOTE
• Refer to the inside back cover for dimensional drawings.
Optional accessory
The listed optional accessories are available for this LCD colour TV. Please purchase them at your nearest shop.
- Additional optional accessories may be available in the near future. When purchasing, please read the newest catalogue for compatibility and check the availability.
| No. | Part name | Part number |
| 1 | Wall mount bracket (LC-32DH66E, LC-37DH66E) | AN-37AG5 |
| Wall mount bracket (LC-46DH66E, LC-52DH66E) | AN-52AG4 |


Attention: Your product is marked with this symbol. It means that used electrical and electronic products should not be mixed with general household waste. There is a separate collection system for these products.
1. In the European Union
Attention: If you want to dispose of this equipment, please do not use the ordinary dust bin!
Used electrical and electronic equipment must be treated separately and in accordance with legislation that requires proper treatment, recovery and recycling of used electrical and electronic equipment.
Following the implementation by member states, private households within the EU states may return their used electrical and electronic equipment to designated collection facilities free of charge*. In some countries* your local retailer may also take back your old product free of charge if you purchase a similar new one.
*) Please contact your local authority for further details.
If your used electrical or electronic equipment has batteries or accumulators, please dispose of these separately beforehand according to local requirements.
By disposing of this product correctly you will help ensure that the waste undergoes the necessary treatment, recovery and recycling and thus prevent potential negative effects on the environment and human health which could otherwise arise due to inappropriate waste handling.
2. In other Countries outside the EU
If you wish to discard this product, please contact your local authorities and ask for the correct method of disposal.
For Switzerland: Used electrical or electronic equipment can be returned free of charge to the dealer, even if you don't purchase a new product. Further collection facilities are listed on the homepage of www.swico.ch or www.sens.ch.
1. In the European Union
If the product is used for business purposes and you want to discard it:
Please contact your SHARP dealer who will inform you about the take-back of the product. You might be charged for the costs arising from take-back and recycling. Small products (and small amounts) might be taken back by your local collection facilities.
For Spain: Please contact the established collection system or your local authority for take-back of your used products.
2. In other Countries outside the EU
If you wish to discard of this product, please contact your local authorities and ask for the correct method of disposal.

For EU: The crossed-out wheeled bin implies that used batteries should not be put to the general household waste! There is a separate collection system for used batteries, to allow proper treatment and recycling in accordance with legislation. Please contact your local authority for details on the collection and recycling schemes.
For Switzerland: The used battery is to be returned to the selling point.
For other non-EU countries: Please contact your local authority for correct method of disposal of the used battery.
Rating table for Child Lock
| User-adjusted rating\Broadcasted rating | AGE |
| 4 | 5 | 6 | 7 | 8 | 9 | 10 | 11 | 12 | 13 | 14 | 15 | 16 | 17 | 18 |
| Universal viewing | √ | - | - | - | - | - | - | - | - | - | - | - | - | - | - |
| Parental approval pref. | √ | √ | √ | √ | √ | - | - | - | - | - | - | - | - | - | - |
| X-rated | √ | √ | √ | √ | √ | √ | √ | √ | √ | √ | √ | √ | √ | √ | √ |
| User-adjusted rating\Broadcasted rating | Universal viewing | Parental approval pref. | X-rated |
| Universal viewing | — | — | — |
| Parental approval pref. | √ | — | — |
| X-rated | √ | √ | — |