
RX20 Pro - Lawn mower ROBOMOW - Free user manual and instructions
Find the device manual for free RX20 Pro ROBOMOW in PDF.


| Product Type | Robotic Lawn Mower |
| Brand | Robomow |
| Model | RX20 Pro |
| Cutting Height Range | 15 mm (I) to 45 mm (III) |
| Recommended Lawn Size | Up to 400 m² or more (21 hours/week mowing) |
| Battery Type | Lead Acid or Li-Ion (use manufacturer specified replacement) |
| Power Supply | 230V/120V AC, 10 m / 33 ft extension cable |
| Blade Part Number | MRK9100A / MRK9100W |
| Blade Replacement Tool | RoboTool (included) and Allen tool |
| Safety Features | Child Lock, Disabling Device, Lift Sensor, Tilt Sensor, Obstruction Sensor, Emergency Stop, Anti-Theft (for lawns ≥200 m²) |
| Perimeter Wire | Defines working area; included with plot connectors |
| Base Station | Charging station with perimeter wire signal generator |
| Wire Distance from Edge | Use RoboRuler: distances II, III, IV depending on edge type |
| Maximum Slope on Lawn | 15% (within lawn); 10% slope along edge must be excluded |
| Water Resistance | Do not use high pressure water; clean with air blower or damp cloth |
| Winter Storage | Store in dry indoor conditions above 0°C; disconnect power supply |
| Mobile App Compatibility | Bluetooth LE; for models with lawn ≥200 m² (schedule, theft protection, remote control) |
| Manual Mowing via Remote | Via mobile app (not available for all models) |
| Charging Contacts | Located on rear of mower and base station |
Frequently Asked Questions - RX20 Pro ROBOMOW
User questions about RX20 Pro ROBOMOW
0 question about this device. Answer the ones you know or ask your own.
Ask a new question about this device
Download the instructions for your Lawn mower in PDF format for free! Find your manual RX20 Pro - ROBOMOW and take your electronic device back in hand. On this page are published all the documents necessary for the use of your device. RX20 Pro by ROBOMOW.
USER MANUAL RX20 Pro ROBOMOW
natural_image
Green robotic lawn mower with grass made from a crack, set against a yellow background (no text or symbols)User Guide
See how to install

Original Operating Instructions
I'm Robomow. Nice to meet you.
Safety first......
Installation .... 15
Quick reference .... 35
Safety first
IMPORTANT!
READ CAREFULLY BEFORE USE
KEEP FOR FUTURE REFERENCE
1 Warning decal definitions
2 Safety warnings & precautions
3 Safety features

Do not allow children to use or operate the mower. Children must be supervised at all times.

Warning decal definitions

1234567
- This is a dangerous power tool. Exercise care when operating and follow all safety instructions and warnings.
- Read the Safety Manual carefully before operating your mower.
- Be careful of thrown objects during operation.
- Keep a safe distance from the mower while it is operating. Keep people, especially children, pets and bystanders away from the area where the mower is operating.
- CAUTION - Do not touch rotating blade. Keep hands and feet away and do not lift the mower from the ground.
- Remove the disabling device before working on or lifting the mower (see Section 3.b).
- Do not ride the mower.
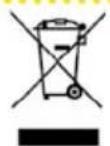
Do not dispose of the mower or any of its parts as unsorted municipal waste. It should be collected separately.

This product conforms to applicable EU directives.
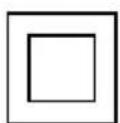
This symbol indicates that the mains electricity is double insulated.
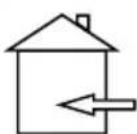
This symbol indicates that the product is designed for indoor use only.

Safety warnings & precautions
A. Before you begin
- Read this Safety Manual carefully before operating the mower to become familiar with its controls and proper use.
- Never allow children, persons with reduced physical, sensory or mental capabilities or lack of experience and knowledge or people unfamiliar with these instructions to use the machine. Local regulations may restrict the age of the operator.
- You are responsible for accidents or for harm to other people or their property.
- It is your responsibility to inform your neighbors about the risks, and that it is forbidden to enter your lawn while the mower is operating.
- If your lawn is open to the street and/or your neighbors, you must be present during the mower's operation to prevent others from accessing your lawn. Alternatively, you must protect / fence your lawn so that others will not be able to access the mower during operation.
B. Preparations
- Ensure the correct installation of the Perimeter Wire, as instructed.
- Inspect periodically the area where the mower is used and remove all stones, sticks, cones, wires and other foreign objects.
- Periodically visually inspect to verify that the blade is not worn or damaged. Replace a worn or damaged blade (Part No. MRK9100A/MRK9100W). Switch the mower off when inspecting or replacing the blade.
C. Operation
IMPORTANT SAFETY WARNING!
Do not leave the mower to operate unattended if you know that there are pets, children or people in the vicinity. Never mow while people (especially children) or pets are nearby.

- Do not operate the mower if any safety feature or any part is damaged, worn or inoperable.
- Keep hands and feet away from the cutting blade and other moving parts.
- Always switch the mower off before lifting it or planning to operate any adjustments.
-
Never pick up or carry the mower while the motors are running.
-
Do not touch the blade before it has completely stopped rotating.
- Do not use the mower for any purpose other than cutting lawn.
- Keep all guards, shields, safety devices, and sensors in place. Repair or replace damaged parts, including decals.
- Set the weekly program at times when there are no people on the grass.
- Do not connect a damaged power cord to the supply, or touch a damaged cord before it is disconnected from the supply as it can lead to contact with live parts.
- Keep the extension power cord away from the blade to prevent the mower from damaging it. A damaged power cord can lead to contact with live parts.
- If the power cord becomes damaged or entangled during use, detach it from the mains by pulling the plug from the socket.
- In the event of accident or breakdown whilst the mower is operating, immediately press the red STOP button.
D. Transportation
Within the working area:
- Press the STOP button to stop the mower.
- Switch the mower off, and carry it by its carrying handle as shown in the picture to the right.
Over long distances:
When transporting your mower over long distances, make sure it is switched off.

natural_image
Silhouette of a human figure holding a mechanical device (no text or symbols)
IMPORTANT! It is recommended to keep the original packaging for shipping purposes.
E. Using the remote control (manual mowing)
- Mow only in daylight or in good artificial light, and avoid operating on wet grass.
- Do not operate the mower barefoot or wearing open sandals. Always wear substantial footwear and long trousers; always make sure of your footing on slopes.
- Use extreme caution when reversing the direction of the mower towards you.
- Always switch on the motor according to the instructions while standing away from the blade.
- Do not mow manually in slopes greater than 15 degrees or where a firm footing is not possible.
F. Batteries
- Do not open or damage the battery pack.
- The Battery Pack contains electrolytes. In case of an electrolyte leakage from the Battery Pack, the following actions should be taken:
- Skin contact: Wash the contact areas off immediately with water and soap.
- Eye contact: Flush the eyes with plenty of clean water for at least 15 minutes immediately, without rubbing.
- Get medical assistance.
- Ensure that the battery is charged using the correct charger recommended by the manufacturer. Incorrect use may result in electric shock, overheating or leakage of corrosive liquid from the battery.
G. Maintenance and special instructions
- Always switch the mower off and remove the Disabling Device before clearing blockage/checking/cleaning/working on it, or after striking a foreign object to inspect the machine for damage. Never attempt to service or adjust the mower while it is in operation.
- In case of abnormal vibrations, stop the mower, switch it off and check for any damage of the blade. Replace a worn or damaged blade (Part No. MRK9100A/MRK9100W) to preserve balance. If the vibration continues, call for service.
- Use heavy gloves when inspecting or servicing the blade.
- Do not perform maintenance barefoot or wearing open sandals. Always wear suitable work shoes and long trousers.
- Replace worn or damaged parts for your safety.
- Use only original equipment and accessories. It is not permitted to modify the original design of the mower. All modifications are made at your own risk.
- Ensure that only replacement cutting means of the right type (Part No. MRK9100A/MRK9100W) are used.
- Maintenance/servicing/cleaning of the mower should be according to manufacturer's instructions.
- Keep all nuts, bolts and screws tight to be sure the machine is in safe working condition.

WARNING!
When there is a risk of a lightning storm, disconnect the Perimeter Wire from the Base Station and the Power Supply 230 V/120 V plug from the power outlet.
H. Product end of use
- The mower and its accessories should be collected separately at the end of their life to prevent waste electrical and electronic equipment from ending up in landfill sites, and to protect and improve the quality of the environment.
- Do not dispose of the mower or any other of its parts (including the Power Supply and Base Station) as unsorted municipal waste – they should be collected separately.
- Ask your local distributor/dealer about return and collection systems availability.
- Do not dispose of the battery pack in a fire, and do not place used batteries in your household trash.
- The battery must be collected, recycled, or disposed of in an environmentally sound manner.
3 Safety features

WARNING!
Your mower is equipped with numerous built-in safety features. However, the mower is a hazardous device with a sharp blade, which can cause major injury to anyone who comes in contact with it.
Therefore, it is absolutely forbidden to be on the lawn while the mower is working. Alternatively, halt the mower's operation when people (especially children) or pets are to stay or play on the lawn.
A. Child Lock
The Child Lock prevents unintended operation of the mower by an accidental press of one of the buttons. Only pressing two buttons in the right order will initiate the operation. It is required to activate the Child Lock feature if children under age 6 may come in contact with the mower.
B. Disabling Device
The Disabling Device will prevent anyone from operating the mower. when it is removed. It is highly recommended to remove the Disabling Device to prevent operation of the mower by children or people who are unfamiliar with the mower. or are not allowed to use it.
C. Lift Sensor
If the mower is raised from the ground during the blade's operation, the blade will stop rotating immediately.
D. Tilt Sensor
If the mower is tilted up towards a vertical position, the blade will stop immediately.
E. Obstruction Sensor
Your mower detects interfering obstacles in its way during operation. When the mower collides with an obstacle, it will stop the rotation of the blade immediately, will stop movement in that direction and reverse itself away from the obstacle.
F. Emergency Stop Button
Pressing the STOP button at any time during operation will stop the mower and the blade immediately.
G. GO/ON-OFF button
The GO/ON-OFF button allows to completely power off your mower. Switching the mower off will prevent it from any operation. It is required to switch the mower off before lifting it and before any maintenance operation.
H. Base Station and Perimeter Wire
Your mower cannot operate without a Perimeter Wire installed and activated through the Base Station. In the event the Perimeter Wire signal is turned off, the mower will stop operating.
I. Anti-Theft (not applicable to models for lawns under 200 m²)
The theft protection function will prevent anyone from using or driving the mower unless they unlock it by connecting to it with a registered mobile device.
Let's get started. Can't wait to mow your lawn.
Installation
Congratulations on purchasing your new mower!
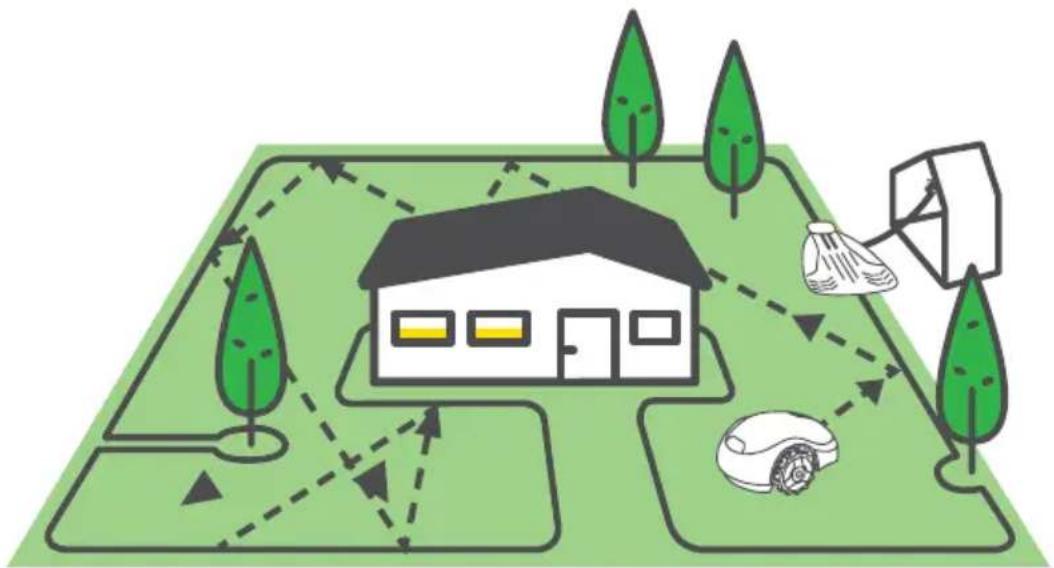
Your new mower will move randomly within its working area, as defined by the Perimeter Wire. This kind of random movement provides the perfect cut and ensures complete coverage of your lawn.
natural_image
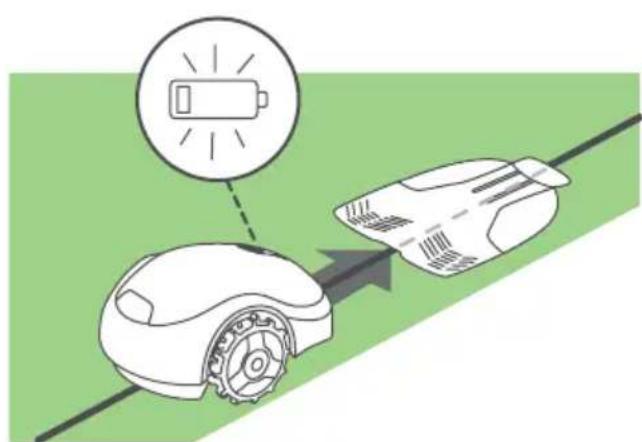
Illustration of a rural landscape with houses, trees, and a drone (no text or symbols)At the end of each mowing ride, your mower will follow the Perimeter Wire and automatically return to the Base Station for charging.
natural_image
Diagram showing a robotic arm interacting with a motor, illustrating battery charging and power transfer (no text or symbols)After a quick and simple installation, you will be ready to enjoy your free time while your new friend looks after your lawn.
So where are we heading?
Correct installation of your mower will ensure maximum results. This is what it takes to prepare it to do a perfect job for you.
Get started
Choose Base Station location
GO!
Your mower is ready
1
Lay the wire
Wire your lawn
5
2
4
3
Power up
Connect Everything
Set base
Install the Base Station
This is what you find in the box
natural_image
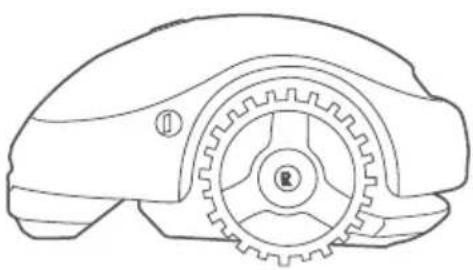
Line drawing of a robotic arm with gear and circular head (no text or symbols)The product
Your new Robotic Mower
natural_image
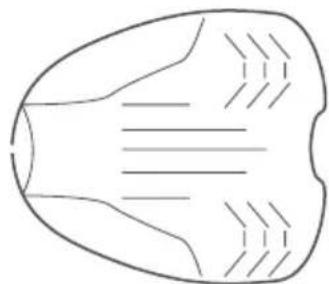
Simple line drawing of a symmetrical abstract shape with internal lines and dashed patterns (no text or symbols)Base Station
This is where the mower recharges
natural_image
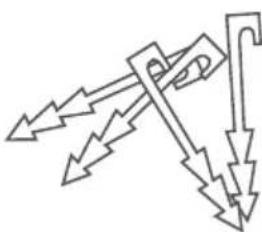
Abstract diagram of intersecting arrows forming a fan-like pattern (no text or symbols)Wire Pegs*
For securing the wire to the ground (*) Not provided with Pro/XR1 models
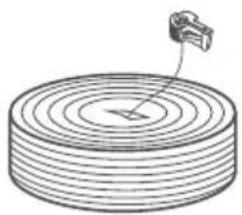
natural_image
Diagram of a cylindrical object with concentric rings and a small protruding component (no text or symbols)Perimeter Wire with a plot connector*
Marks the working area for your mower (*) Not provided with Pro/XR1 models
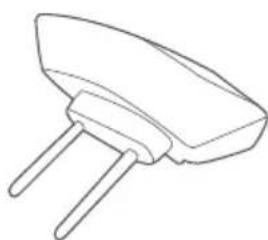
natural_image
Line drawing of a two-pin electronic component (no text or symbols)Base Station Head
Generates Perimeter Wire signal
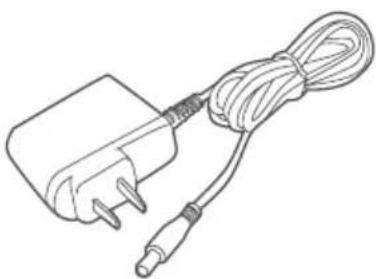
natural_image
Line drawing of a small electric plug connected to a coiled cable (no text or symbols)Power Supply
With 10 m / 33 ft extension cable
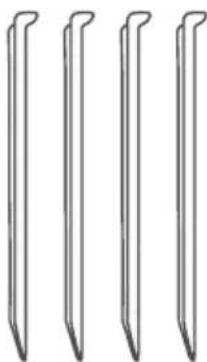
natural_image
Four identical line-drawn vertical rods or blades, no text or symbols presentBase Station Stakes (x4)
For affixing the Base Station to the ground
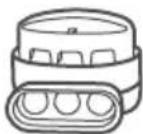
Wire Connectors
For splicing the Perimeter Wire in case of a cut
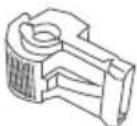
Plot Connectors
For connecting the Perimeter Wire to the Base Station

User Guide

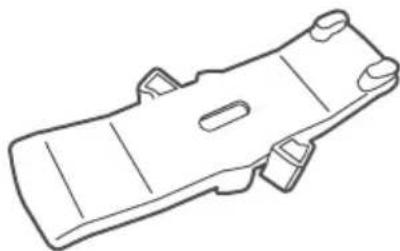
RoboRuler
For measuring the Perimeter Wire's distance from the lawn's edge
natural_image
Line drawing of a mechanical component with slots and mounting holes (no text or symbols)RoboTool
For blades replacement and servicing. IMPORTANT! Keep this tool for future use.

Get started
Choosing the Base Station location
The Base Station is where your mower recharges, and where the Perimeter Wire starts and ends.
Follow these simple guidelines to find a proper location for your Base Station
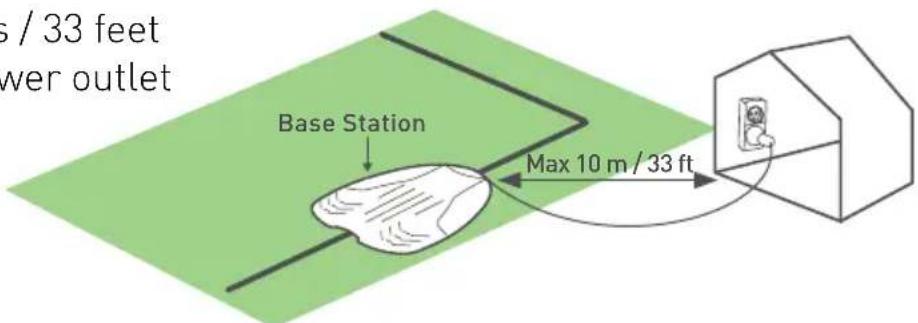
Rule #1:
Up to 10 meters / 33 feet away from a power outlet
Rule #2:
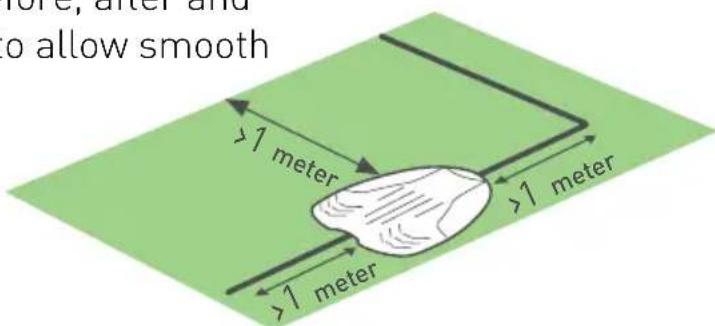
A min. of 1 meter / 3.3 feet straight wire before, after and aside the base to allow smooth docking
Rule #3:
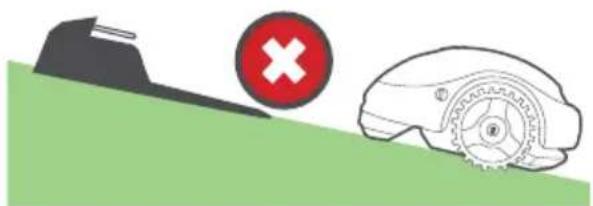
Even and flat (up to +/-5% slope)
natural_image
Illustration of a vehicle climbing a slope with a red 'X' symbol and gear mechanism (no text or labels)Rule #4:
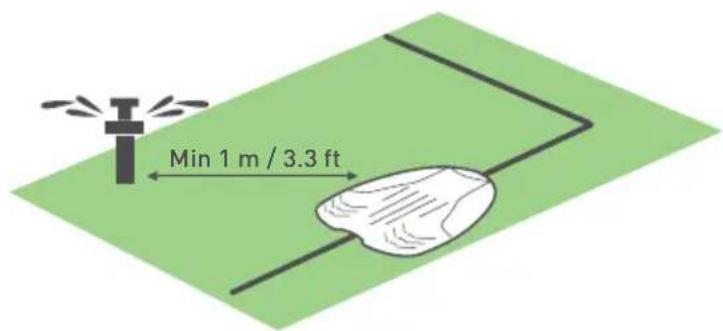
A minimum of 1 meter / 3.3 feet from a sprinkler head to avoid hitting the mower directly and damaging its internal components

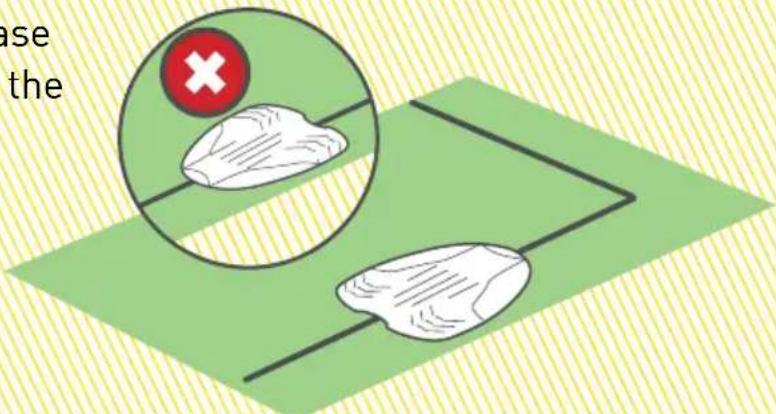
Watch the proper direction of the Base Station relative to the lawn's edge

TIP
The Base Station will be installed at a later stage, after the Perimeter Wire is in place.
** See additional installation options in Appendix A **

Lay the wire
Lay the Perimeter Wire (“virtual boundary”), which defines the working area for the mower.

- Have mower's package nearby.
- Before you start wiring, use your old mower to cut your grass to the height no more than 6 cm (2.5") one last time. This will make inserting pegs easier and help ensure the mower doesn't cut the wire.

WHAT YOU'LL NEED
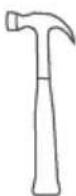
Hammer
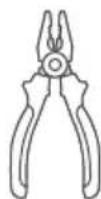
Combination pliers
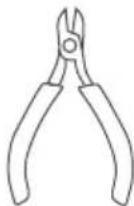
Cutter
A. Get to know wire distances
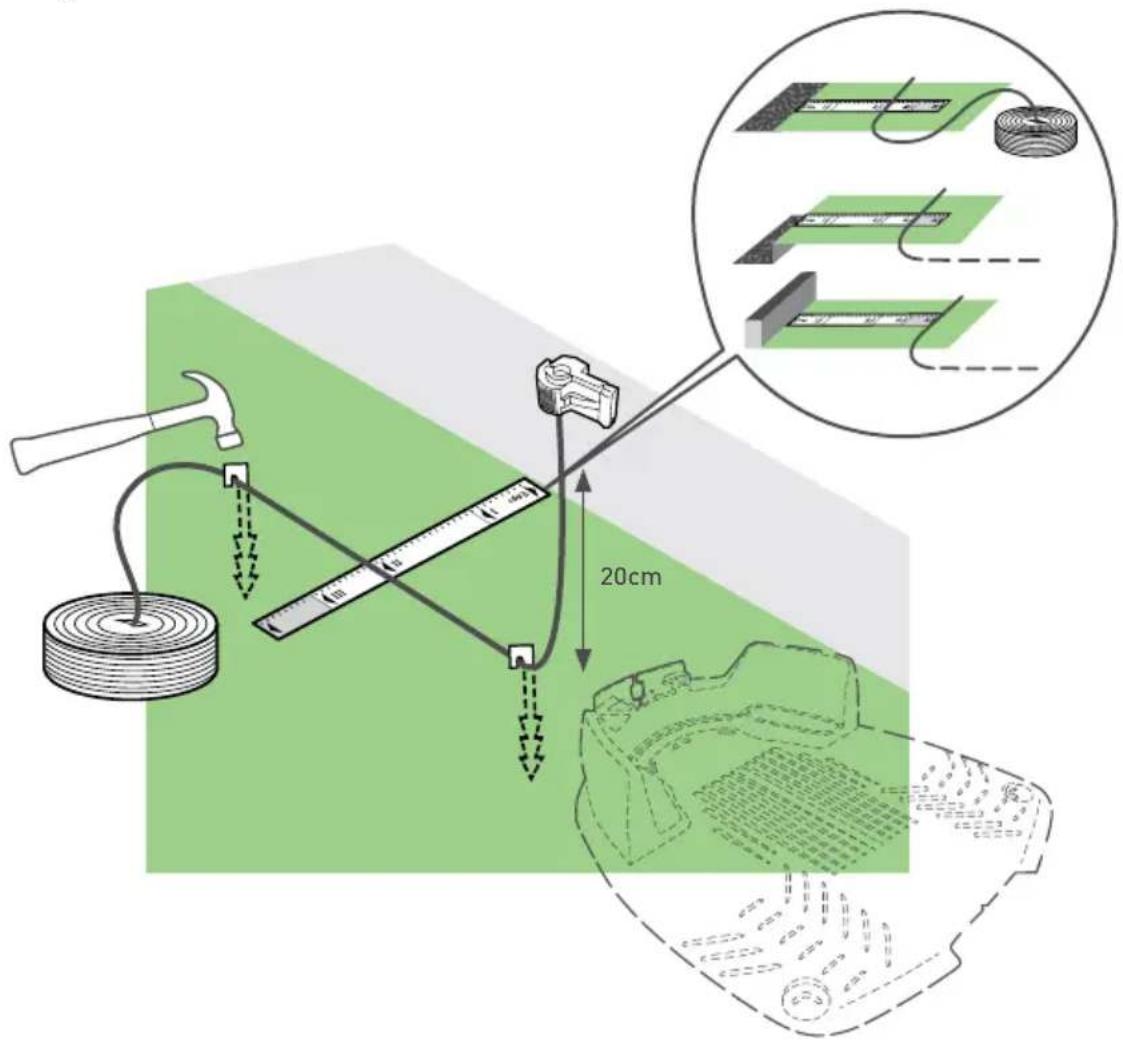
Use the RoboRuler to determine a distance, which you should keep between the Perimeter Wire and the lawn's edge.

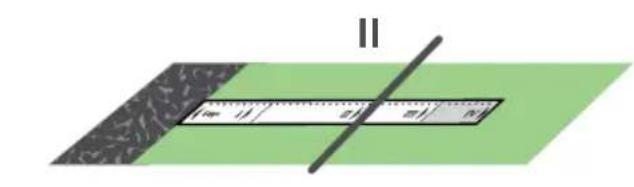
If the edge is relatively flat, lay the wire at RoboRuler distance II from it.
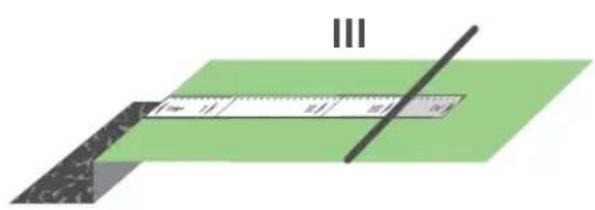
If the edge is a drop or if the ground is sandy/soft, use distance III of the RoboRuler.
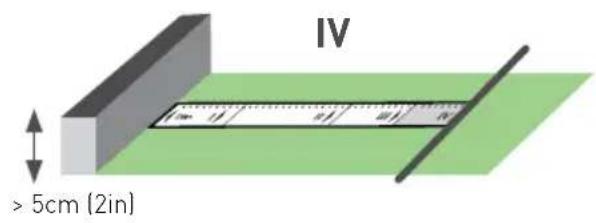
When the edge is a wall or a bush, use distance IV of the RoboRuler.
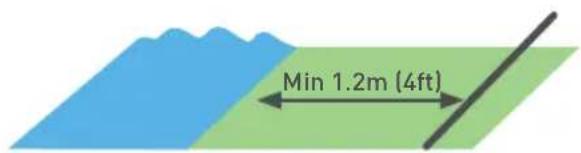
Keep a minimum of 1.2 m (4 ft) if the edge of the lawn borders water.
B. Make a good start
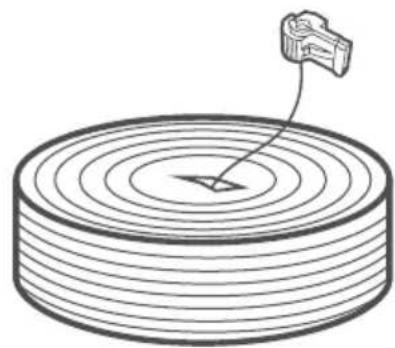
- Pull out the wire end marked "A" from the Perimeter Wire spool
- Leave a tail of approx. 20 cm / 8"
natural_image
Diagram of a mechanical component with concentric circles and a pointer, no text or symbols present- Once a tail is made, secure it to the ground where you intend to install your Base Station. Measure the correct RoboRuler distance from the edge:

SLOPES
Slopes along the edge
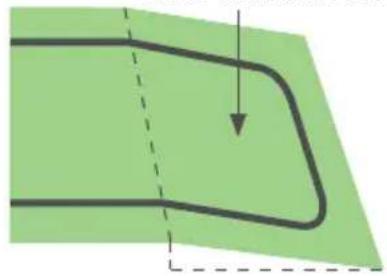
To ensure your mower doesn't slip off the lawn, especially when the grass is wet, the Perimeter Wire must exclude a slope along the edge of your lawn with an incline of over 10% - that is, 10 cm rise per 1 m [4 in rise per 3 ft].
Less than 10% More than 10%
natural_image
Simple diagram showing a curved path with a downward arrow, no text or symbols present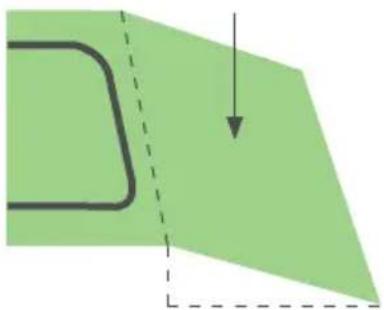
natural_image
Simple diagram showing a green shape with a black outline and a downward arrow, no text or symbols present.Slopes within the lawn
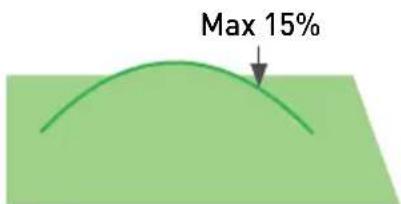
Your mower can mow areas within the lawn with a slope of up to 15% [15 cm rise per 1 m/0.5 ft rise per 3 ft].
Well done! This was the most complex part of the wire installation. Let's move on...
C. Keep laying the wire

Start unwinding the wire counter clockwise around the lawn starting at the Base Station's location.
Lay the Perimeter Wire loosely along the perimeter as you walk along the lawn's edge.
- The Perimeter Wire is secured to the ground by the pegs supplied with the product.
- Pull the wire tight while hammering the pegs to their final depth in the ground.
• Take care not to damage irrigation pipes.
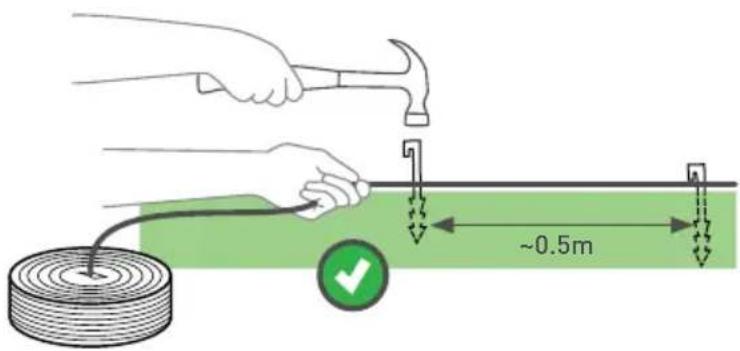
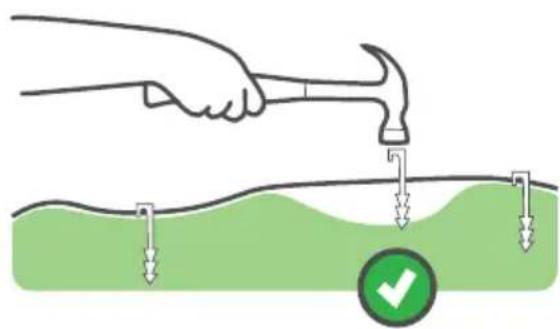
- Place the pegs every few tens of centimeters.
- Add pegs where necessary to keep the wire tight to the ground to avoid damaging it by the mower.
natural_image
Illustration of a hand using a hammer to tighten a green surface with a green checkmark (no text or symbols)D. Protect obstacles
Hard obstacles
Obstacles that are vertical, rigid and higher than 15 cm (6 in), such as trees or telephone poles, do not need to be protected by the Perimeter Wire. The mower will bump into them and turn away.
Soft obstacles
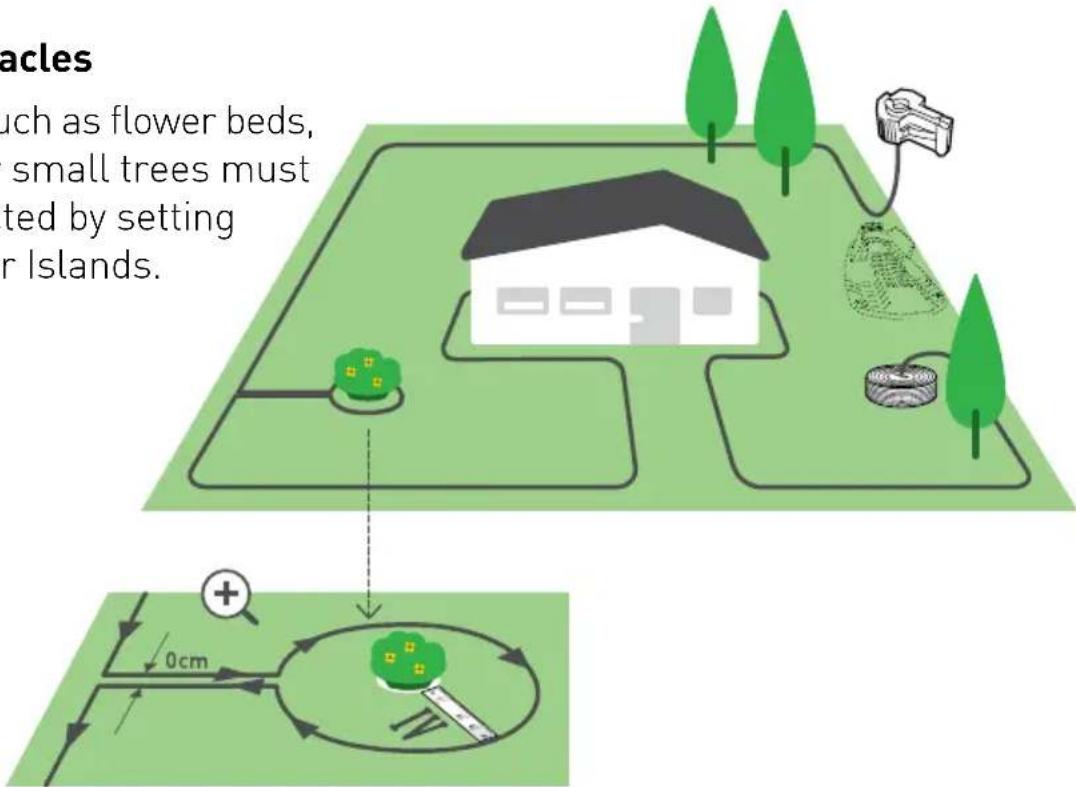
Objects such as flower beds, ponds, or small trees must be protected by setting Perimeter Islands.
flowchart
graph TD
    A["Small Trees"] --> B["Tree"]
    B --> C["House"]
    C --> D["Tree"]
    D --> E["Tree"]
    E --> F["Tree"]
    F --> G["Tree"]
    G --> H["Tree"]
    H --> I["Tree"]
    I --> J["Tree"]
    J --> K["Tree"]
    K --> L["Tree"]
    L --> M["Tree"]
    M --> N["Tree"]
    N --> O["Tree"]
    O --> P["Tree"]
    P --> Q["Tree"]
    Q --> R["Tree"]
    R --> S["Tree"]
    S --> T["Tree"]
    T --> U["Tree"]
    U --> V["Tree"]
    V --> W["Tree"]
    W --> X["Tree"]
    X --> Y["Tree"]
    Y --> Z["Tree"]
    Z --> AA["Tree"]
    AA --> AB["Tree"]
    AB --> AC["Tree"]
    AC --> AD["Tree"]
    AD --> AE["Tree"]
    AE --> AF["Tree"]
    AF --> AG["Tree"]
    AG --> AH["Tree"]
    AH --> AI["Tree"]
    AI --> AJ["Tree"]
    AJ --> AK["Tree"]
    AK --> AL["Tree"]

TIP
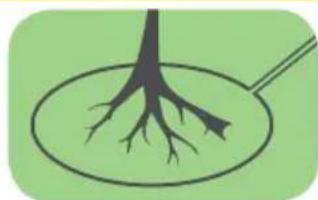
Tree roots, which stick out more than 2 cm above the ground, should be protected by a perimeter island.
natural_image
Illustration of a tree with roots inside a circular container, no text or symbols presentSet the Perimeter Wire CLOCKWISE around the obstacle, otherwise the mower will drive into the Perimeter Island or won't be able to mow the area around it properly.

E. What if you have secondary areas?
If your lawn has additional areas as shown below, see Appendix B.
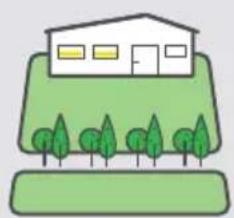
natural_image
Simple illustration of a house on a green hillside with trees (no text or symbols)OR
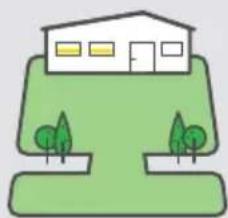
natural_image
Simple illustration of a house on a green hillside with two trees (no text or symbols)F. Complete wire setup
- Arrive back to the base location until the two wire ends meet each other
- Put the last peg very close to the first one
- Make both wire end the same length. Use a cutter to cut off the remaining wire.
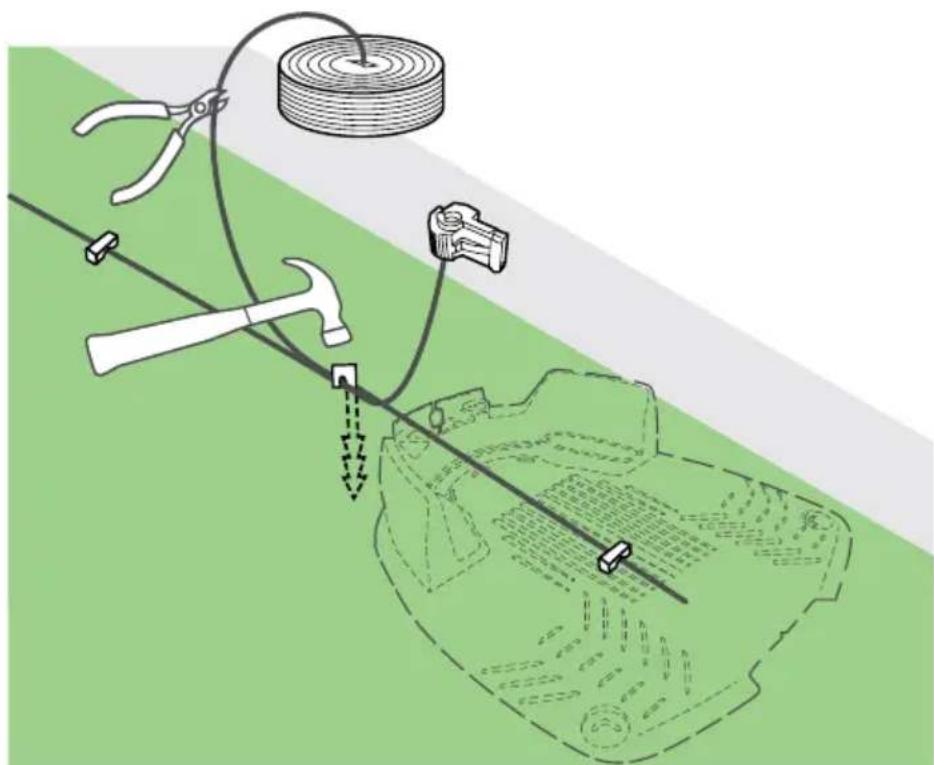
natural_image
Diagram showing a tool and wire installation with a hammer, coiled cable, and a mechanical clamp (no text or symbols)- Put one of the provided plot connectors on the second wire end
- Use pliers to press the connector and a cutter to cut off the remaining wire
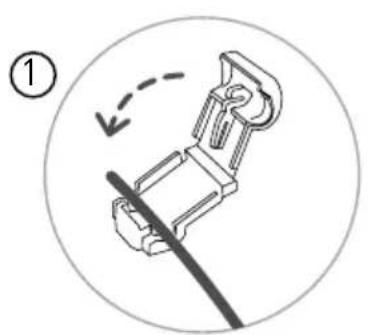
natural_image
Mechanical component diagram showing a lever mechanism with a dashed arrow indicating motion (no text or symbols)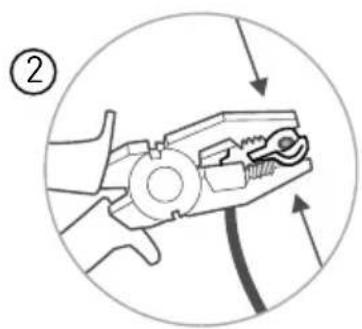
- Do not leave or create wire wraps
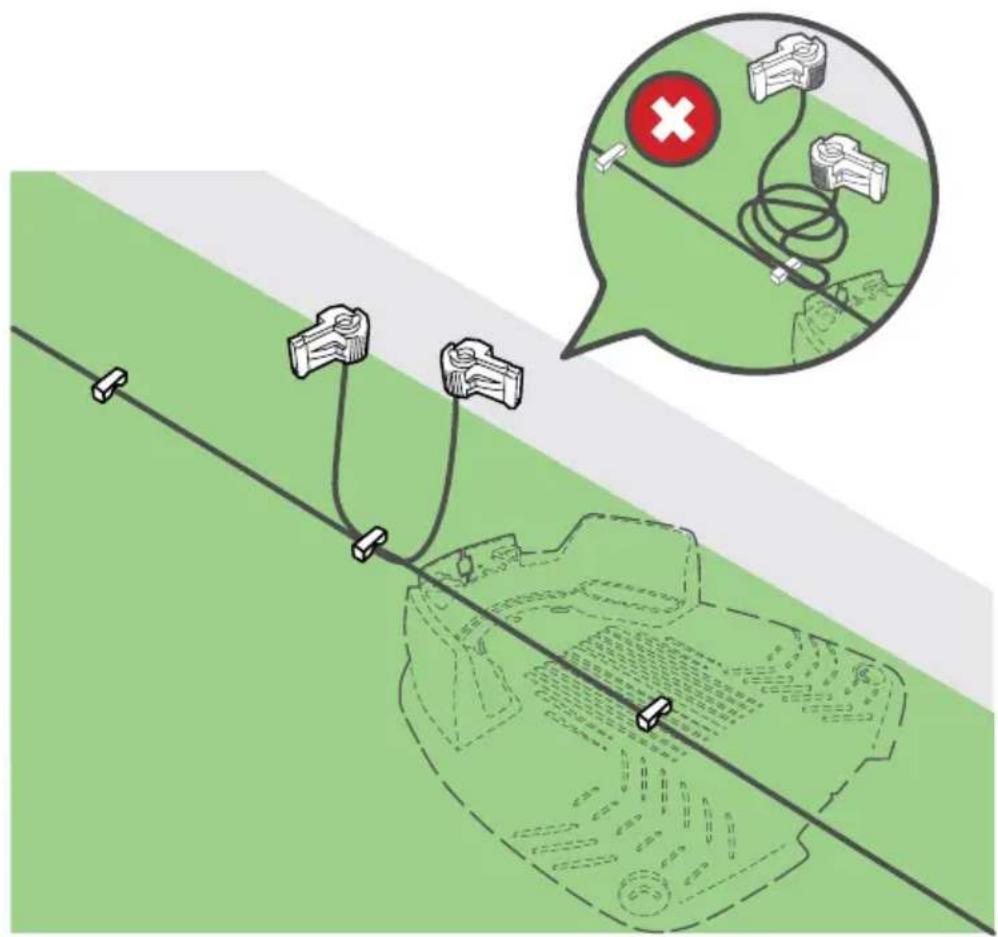

Set base
- Place the Base Station in its planned location
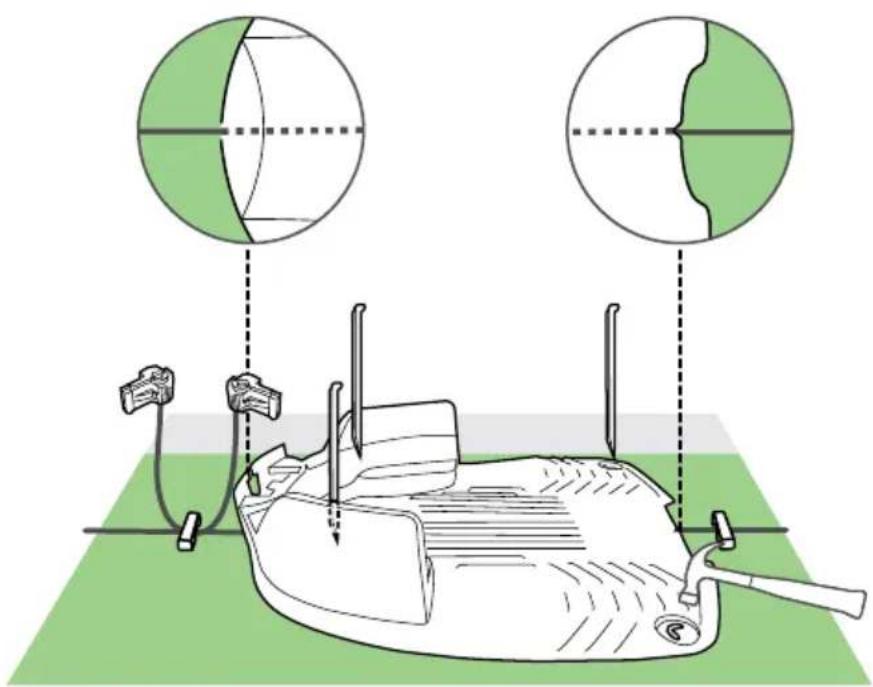
- Properly align the center of the Base Station with the Perimeter Wire
natural_image
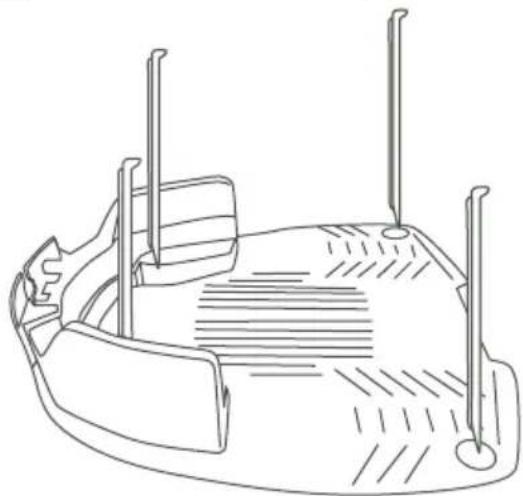
Diagram of a medical procedure with two circular views showing cross-sectional views and a device on a green surface (no text or symbols)• Fix the base to the ground with the 4 supplied metal stakes
natural_image
Line drawing of a boat hull with visible hull, side supports, and side legs (no text or symbols)
Be careful not to damage irrigation pipes when hammering down the stakes.

Power up
-
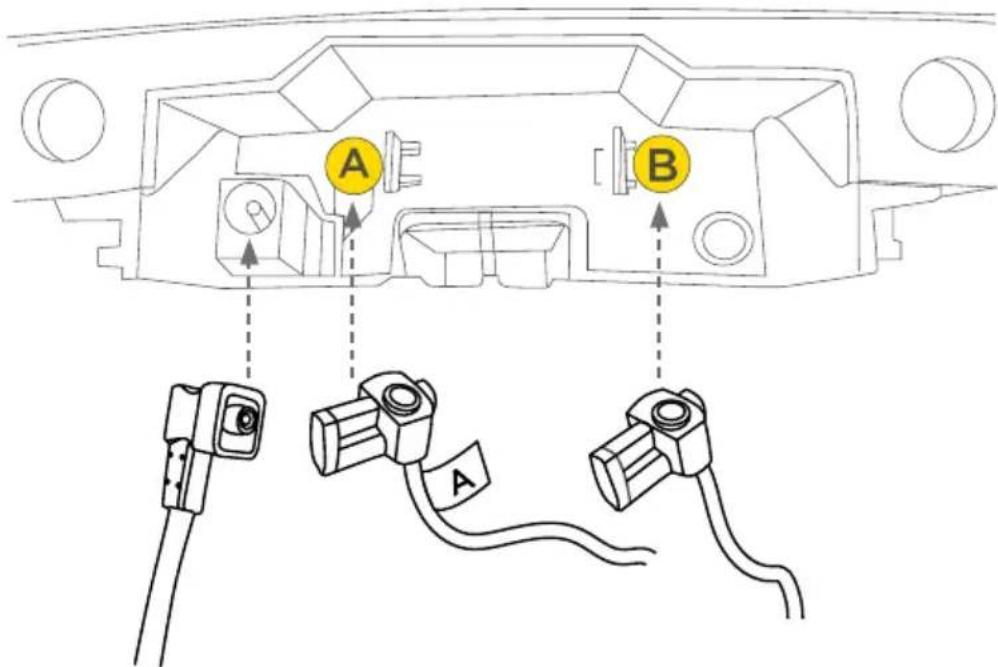
Connect the wire tail marked A to the A terminal and the other tail to the B terminal of the Base Station head.
-
Connect the power supply connector to the Base Station head as well.
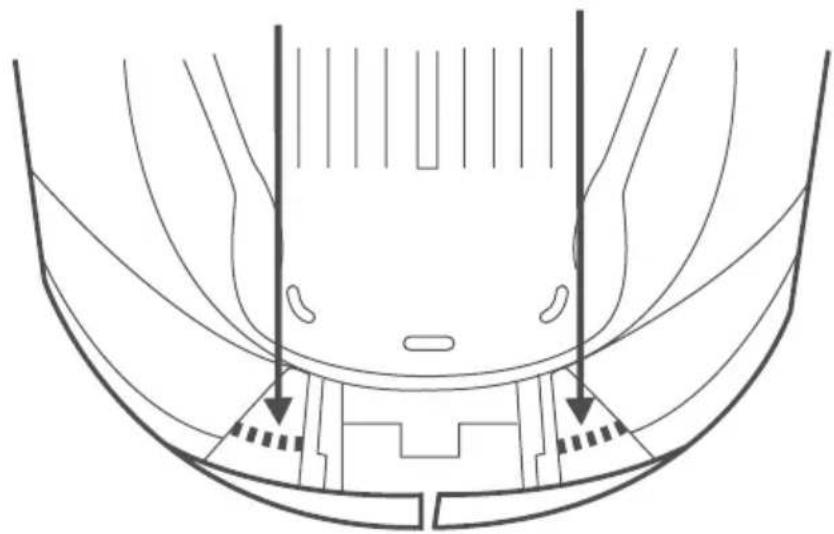
- Note the markings for placing the Base Station Head.
Markings for placing the Base Station Head
natural_image
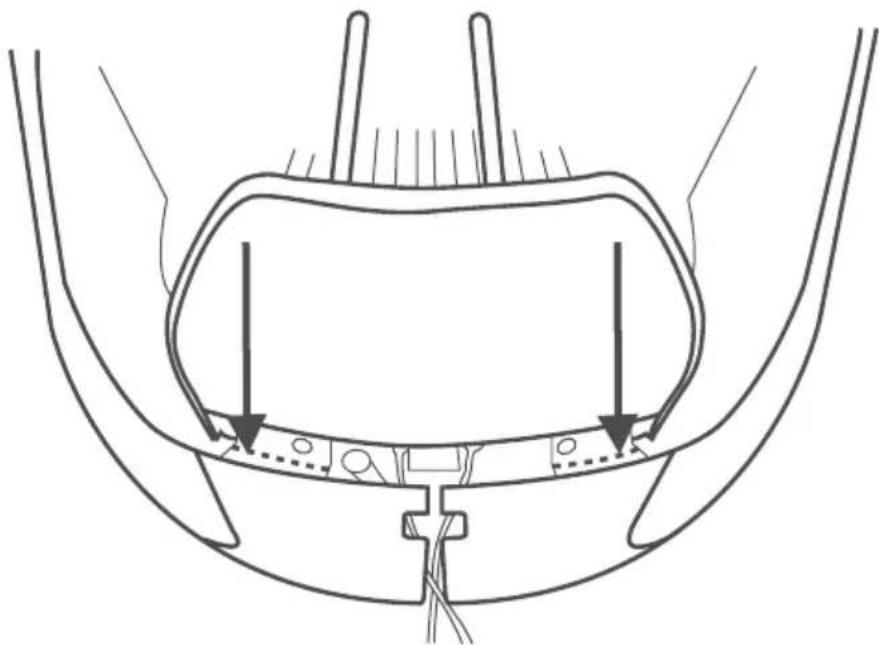
Technical line drawing of a boat hull with structural details and directional arrows (no text or symbols)- Place the head on the Base Station and align it with the markings as shown in the picture below.
natural_image
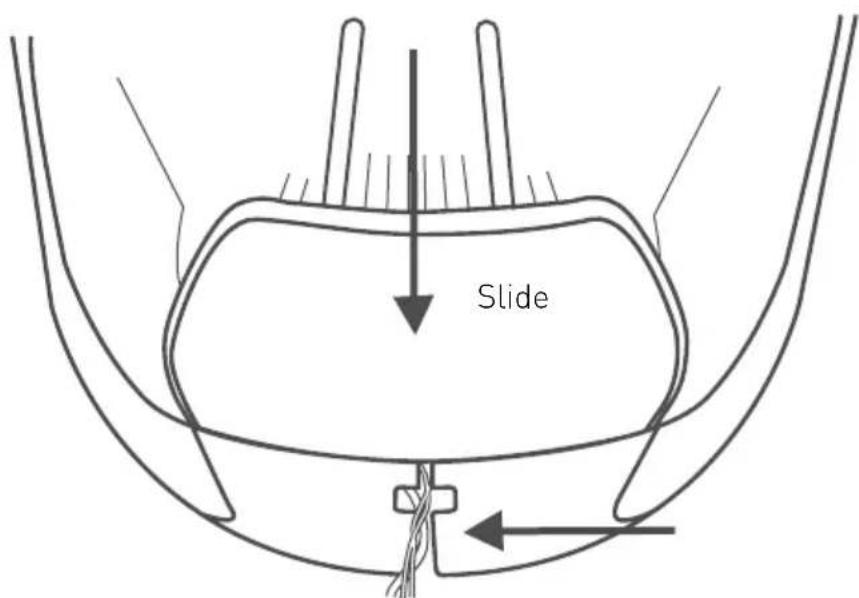
Technical line drawing of a mechanical component with no visible text or symbols- Slide the head all the way through.
Pay attention to the sliders and a dedicated slot for threading the wires.

TIP
If for some reason you need to remove the base station head, you can do so by lifting the lever (A) and pushing it towards the inside of the base.
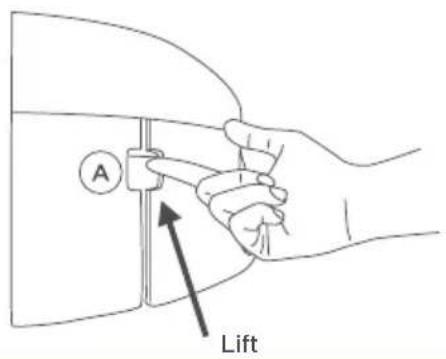
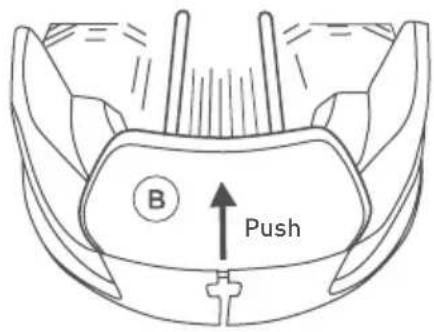
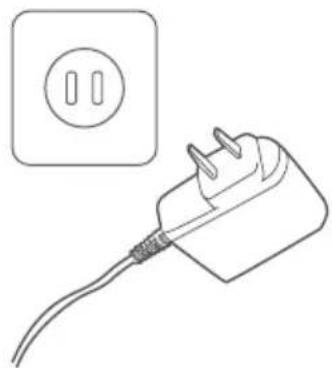
- Plug in the power supply into a socket.
natural_image
Line drawing of a power plug with a circular socket and two terminals, no text or symbols present
Take the power cord out of the mowing area (to prevent the mower from damaging it) and secure the cord firmly to the ground (so that it does not become a tripping hazard).

GO!
- Place your mower in the center of your lawn
- Press GO for 2 seconds to switch it on
- Now press the STOP / once to send the mower to the Base Station.
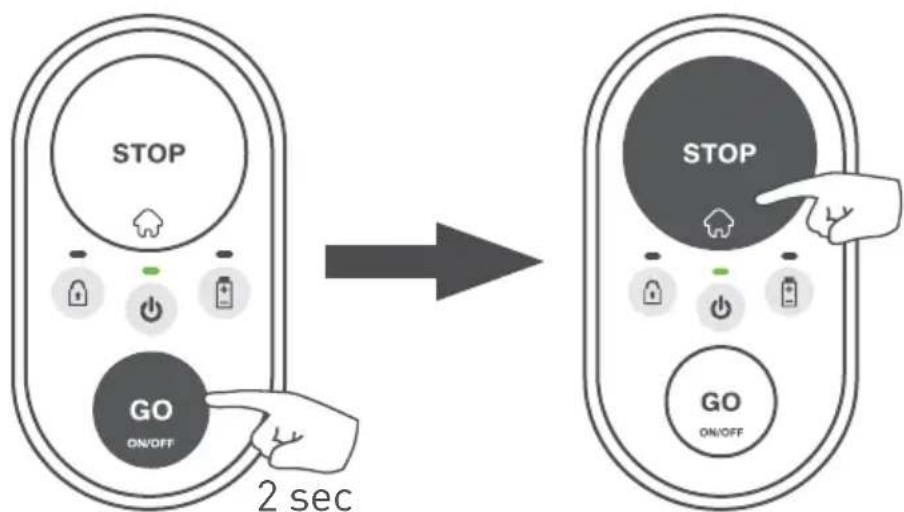
- The mower will start driving towards the edge of the lawn to locate the Perimeter Wire. Once on it, the mower will follow the wire to reach the Base Station and park there for charging.
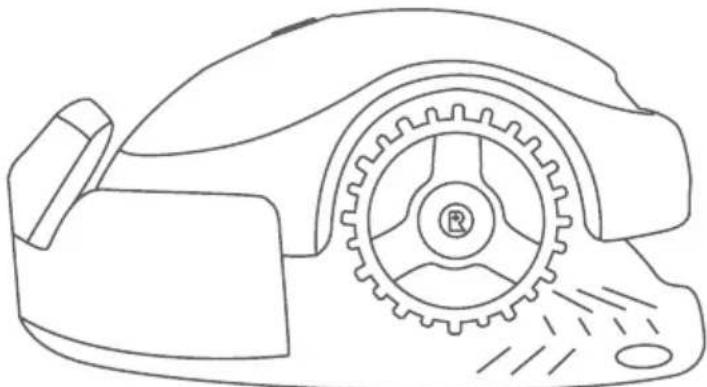
natural_image
Line drawing of a mechanical device with gear and mounting bracket (no text or symbols)Operating your mower is super easy! For basic commands and troubleshooting, please refer to the "Quick Reference" part
Your mower is ready!
Well Done!
Now relax, and let your mower do the work.
Quick reference
Knowing your mower
Single-button operation
Additional options with the mobile app
④ Taking care of your mower
5 Troubleshooting
6 FAQs

Knowing your mower
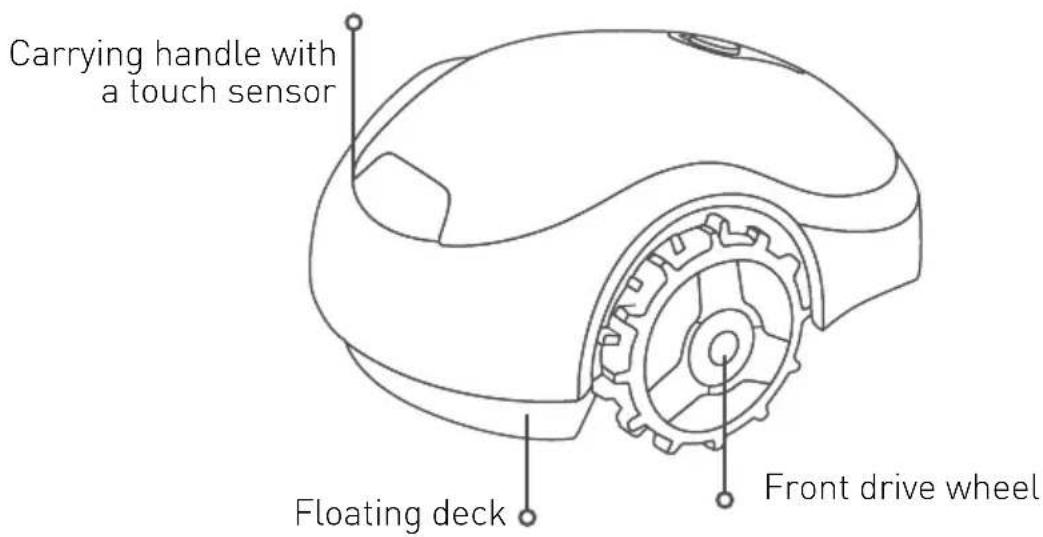
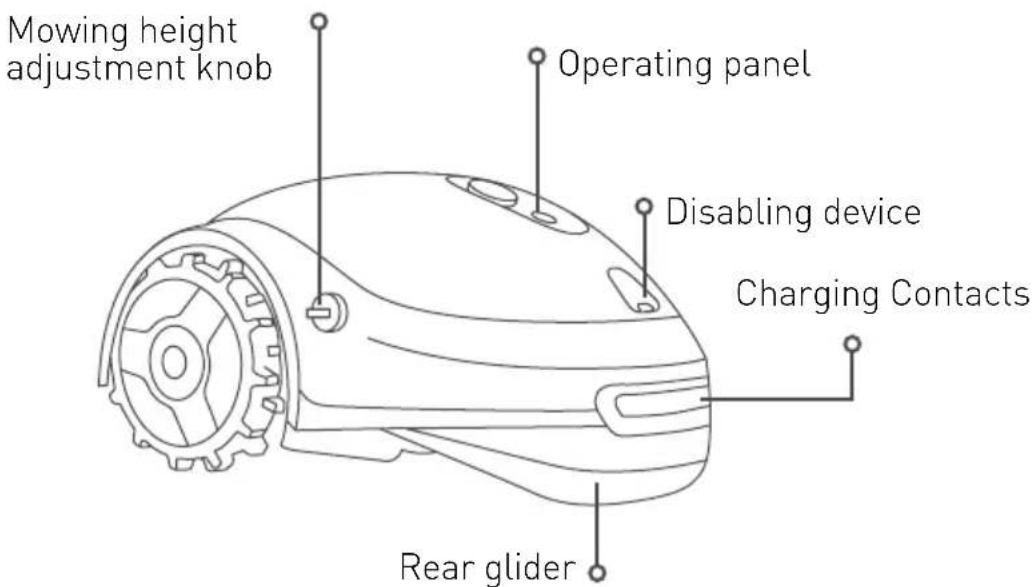
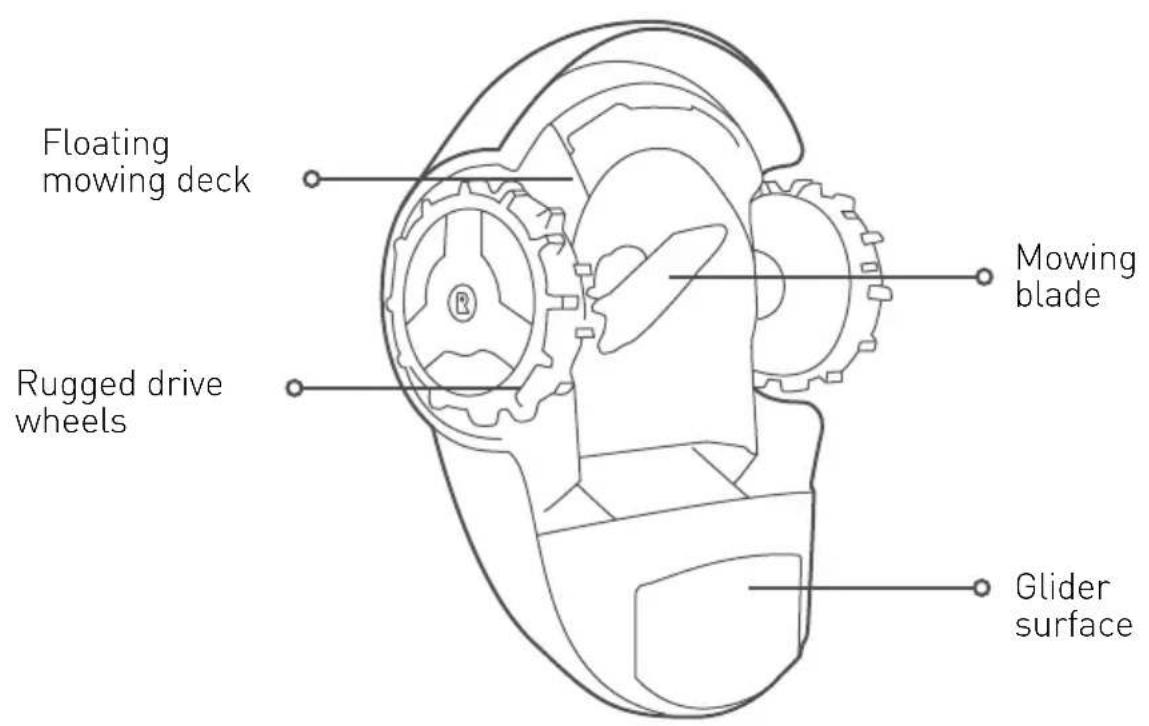
In order to fully enjoy your mower, learn about its different parts and messages. Understanding how it works and interacts will lead to smooth and easy operation.
Front side
Rear side
Bottom view
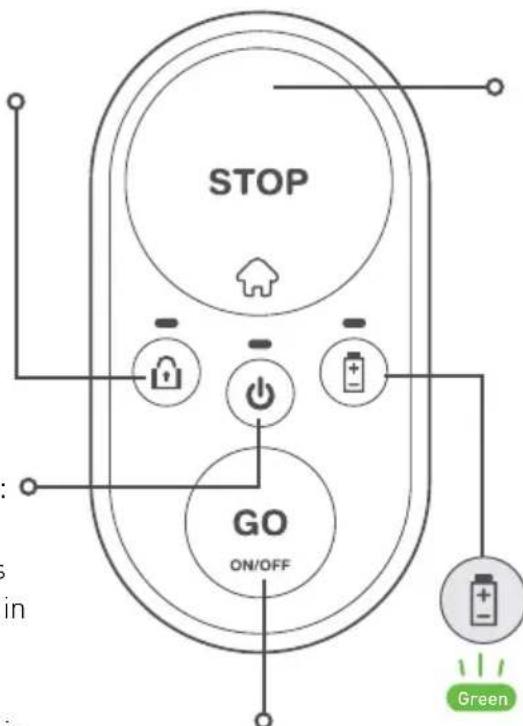
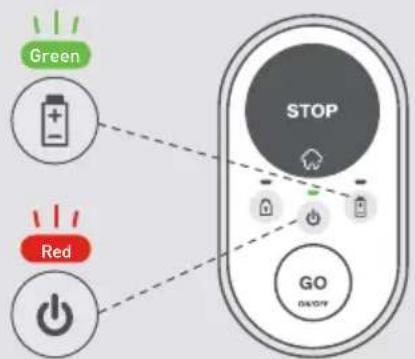
Operating panel

Lock indication:
Orange
Steady orange: child protection is active

Blinking orange: theft protection is active

ON-OFF indication:
Green
Steady green: mower is switched on / mower is in operation

Blinking green: mower is returning to the Base Station / mower is driving to a starting point

Blinking green fast (and beeping): mower is departing from Base Station

Blinking green slow: mower is asleep

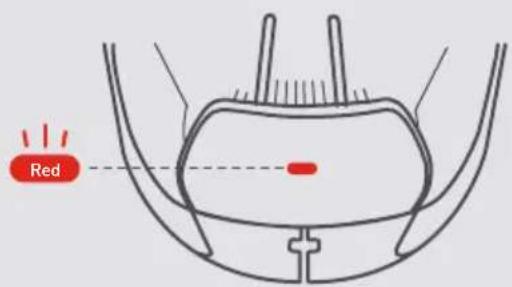
Blinking red / steady red: mower is at fault (see troubleshooting section)
flowchart
graph TD
    A["STOP"] --> B["ON/OFF"]
    B --> C["GO"]
    C --> D["Battery"]
    D --> E["Green"]
GO / ON-OFF switch
STOP / Home button
Green
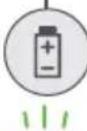
Battery indication:
Blinking green: mower is charging in the base
Green
Steady green: the battery is fully charged

Blinking red: the battery is almost empty, recharging will soon be required
Red
Steady red: the battery is low and needs to be recharged to resume operation
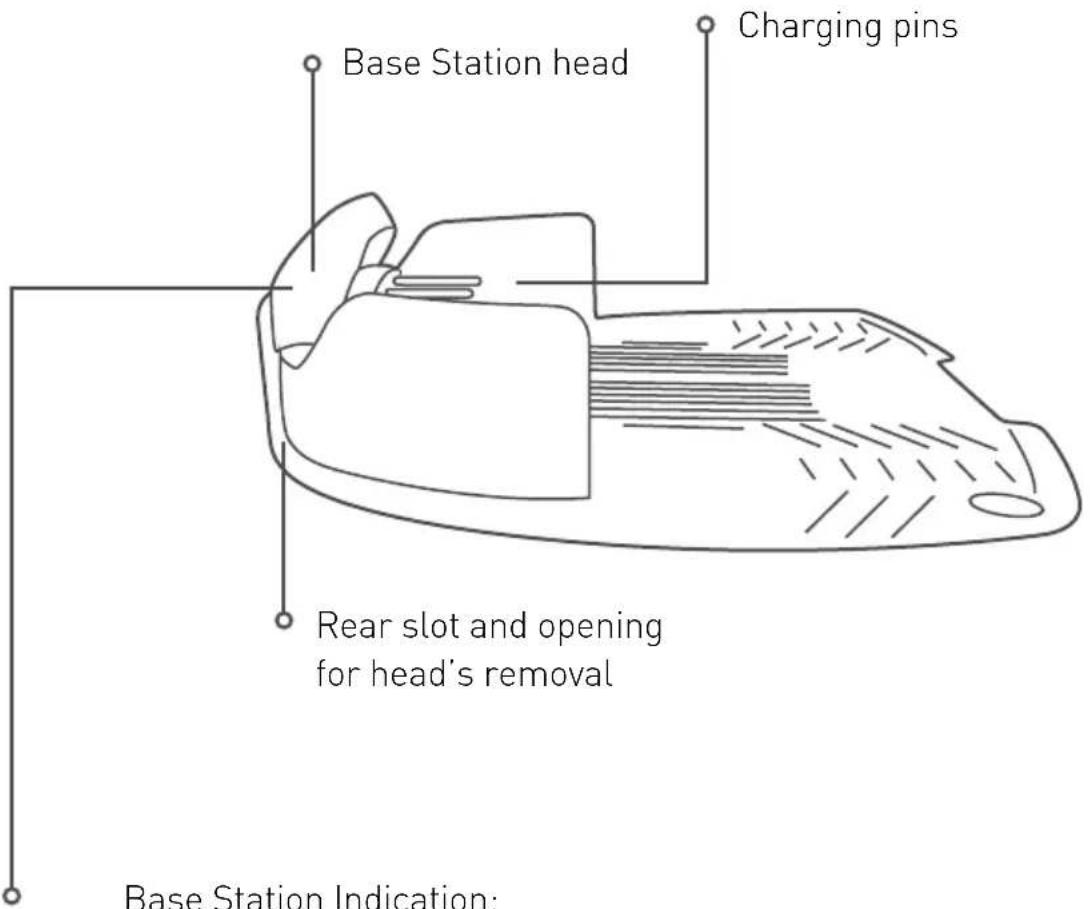
Base Station
Green
Steady green: perimeter wire signal is OK; the mower is inside the base
11
Blinking green: perimeter wire signal is OK; the mower is outside the base
Green
Blinking red fast: perimeter wire is damaged or disconnected
111
Red
1
Red
Red
Blinking red slow: poor perimeter wire connection or the wire is too long
Steady red: faulty power supply

Single-button operation
Before anything else

IMPORTANT SAFETY WARNING!
Do not leave the mower to operate unattended if you know that there are pets, children or people in the vicinity. Never mow while people (especially children) or pets are nearby.
- Set the mowing height to the desired level. We recommend setting the mowing height to the maximum during the first mowing operation or at the beginning of a season, and then gradually reducing it to the desired level.
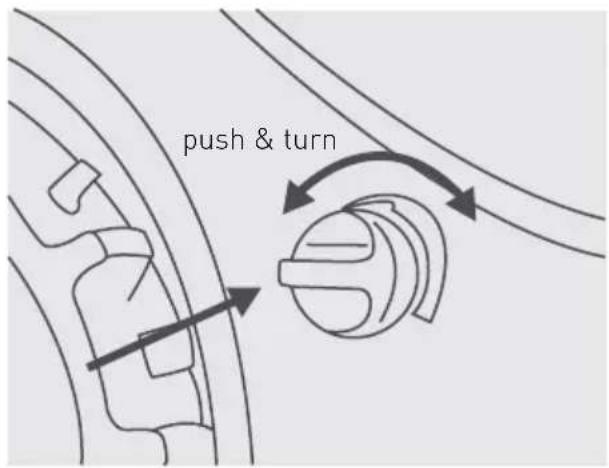
To set the mowing height, push and turn the mowing height adjustment knob to the desired direction:
- I means the lowest mowing height (15 mm / 0.6")
- III means the highest mowing height (45 mm / 1.8")

TIP
- Your mower is designed for frequent cutting at a desired height
- Before the first use, make sure your grass is cut not higher than 60 mm (2.5")

WARNING
Clean the lawn from stones, fallen branches or other foreign objects before using the mower. The limited warranty of your mower does not cover damages caused by objects left in the lawn.
Powering up
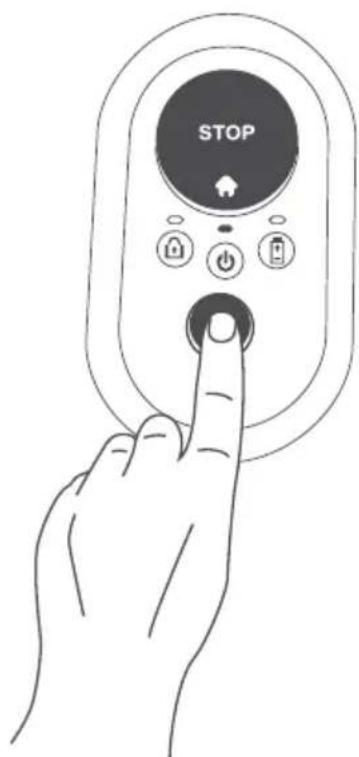
To power up your mower, press and hold the GO button for 2 seconds until the ON/OFF indication is lit.
When you need to switch it off, simply press and hold GO button for 2 seconds, until the ON/OFF indication goes off.
Note: If the theft protection is enabled (not applicable to models for lawns under 200 m ^2 / 2150 ft ^2 ), you will need to unlock your mower via the mobile app before you can switch it off.
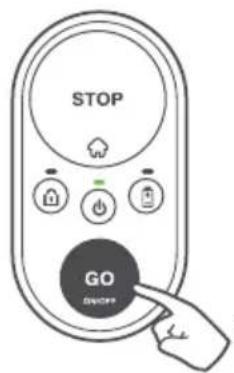
2 seconds
Enabling child protection
Child protection prevents accidental use of the mower by little children. When child protection is enabled, the mower will require a special combination to start a mowing operation or to go back to its base.
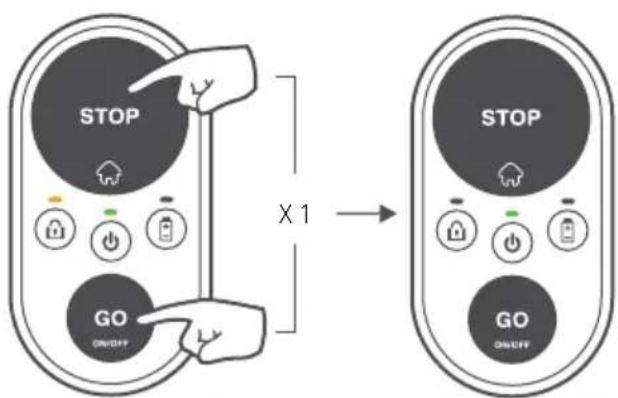
To enable child protection, press and hold the GO + STOP buttons together for 6 seconds.
If you wish to disable child protection, press and hold the GO + STOP buttons together for 6 seconds again.
Alternatively, child protection can be enabled or disabled conveniently via the mobile app (not applicable to models for lawns under 200 m ^2 /2150 ft ^2 ).
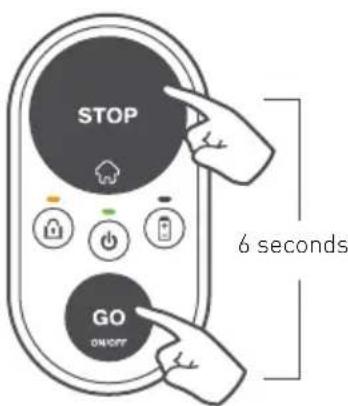
Starting a mowing operation
Starting a mowing operation is super easy!
If you wish to start a regular mowing operation, all you need to do is to press the GO button once.
If the regular mowing duration (depends on a particular model of your mower) is too long for your lawn, you can initiate half-time mowing operation by pressing the GO button twice.
When child protection is enabled, a special combination of keys is required to start a mowing operation. Hold down the STOP button and press the GO button once to unlock the child protection for 30 seconds. The Lock indication will be temporarily switched off. Now you can start a mowing operation as described above. As soon as the mowing operation is started, the child protection will automatically relock itself.
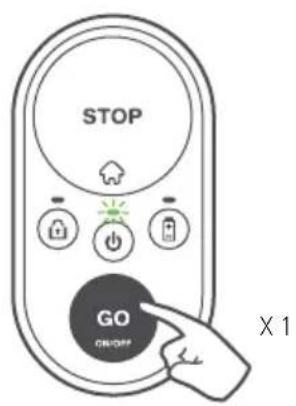
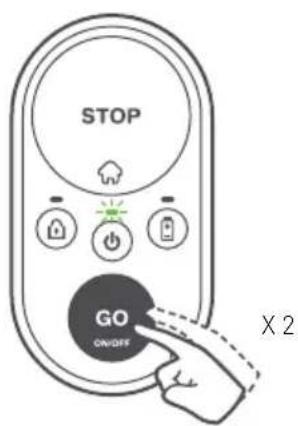
Stopping an operation
To stop any current operation, press the STOP /💡 button.
Sending the mower to its base
To send the mower to its base, simply press the STOP /💡 button when the mower is inside the lawn.
If child protection is enabled, see the “Starting mowing operation” section above to temporarily unlock it. Then press STOP /💡 button to send the mower to its base. The child protection will relock automatically.
Automatic charging
Once a mowing operation is finished, your mower automatically returns to its base station for charging to be ready for the next operation.
How much mowing does your lawn need?
The amount of mowing depends on a season and on the size of your lawn. We recommend the following amounts of weekly mowing times per lawn size in peak season.
| Lawn size * Recommended weekly mowing times | |
| Up to 50 m^2 | 2 hours |
| 51 - 100 m^2 | 4 hours |
| 101 - 150 m^2 | 6 hours |
| 151 - 200 m^2 | 9 hours |
| 201 - 300 m^2 | 14 hours |
| 301 - 400 m^2 | 18 hours |
| more than 400 m^2 | 21 hours |
(*) Check the recommended lawn size in your mower's specifications

For the best look of your lawn, we recommend spreading the mowing times evenly among as many days in a week as possible.

Additional options with the mobile app
(not applicable to models for lawns under 200 m^2 / 2150 ft^2 )
Your mower is a smart connected product. It comes with a built-in Bluetooth LE (Low Energy) device that enables you to control your mower from your smartphone.
A free complementary mobile app will allow you to experience your mower in a whole different way!
You can download the app from Google Play Store (Android) or from Apple AppStore (iOS).
Along with a totally exciting experience, it brings additional options and capabilities to your small and clever mower:
- Setting automatic mowing schedule
- Activating theft protection
- Defining additional starting points
- Remote controlling with manual mowing
- Remote diagnostics by a service station
- Avoiding interference by changing signal type
- Enabling "Energy Saver" mode to minimize power consumption to comply with CEC/DoE regulation.

Taking care of your mower
Periodic maintenance
WARNING Severe injury a
Always switch the mower off before lifting it. The blade is very sharp. It can cause severe cuts or lacerations. Always wear heavy work gloves when working with or around the blade. NEVER use a damaged or broken blade. NEVER sharpen the blade.
Once a month:
- Inspect the underside of the mower. Clean if necessary. Carefully scrape the collected grass debris (using a small stick or similar object) from under the mowing deck.
- Check the Perimeter Wire and add pegs where it is loose and not tight to the ground. In case of seasonal changes in the lawn, make sure to adjust the wire accordingly.
- Inspect the Base Station, clean it from mud and debris to allow proper docking.
IMPORTANT!
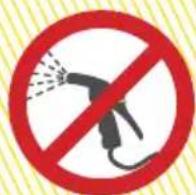
NEVER use high pressure water to clean the mower. Liquids can damage components. Use only an air blower or wet cloth to wipe the surface clean.
To allow better maintenance and to keep your mower in good condition, it is recommended to take it to a certified dealer for service prior to winter storage.
Operating the Disabling Device
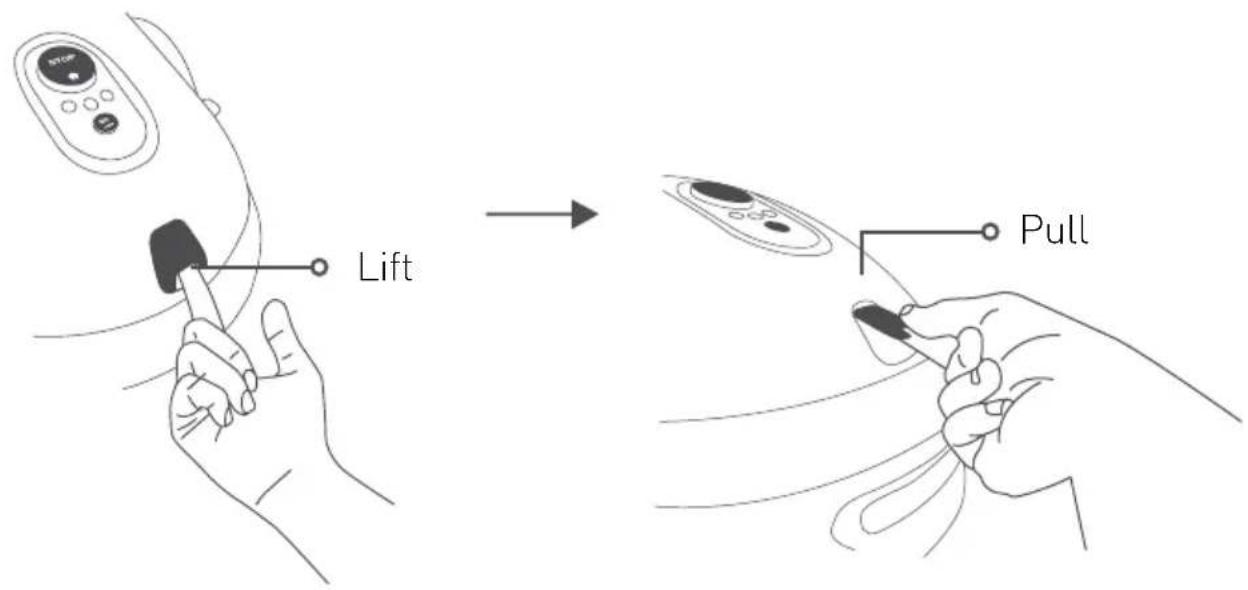
- The Disabling Device prevents the operation of your mower when it is removed.
- If the Disabling Device is pulled out, the current operation will be immediately halted, the Lock indication will blink three times and the ON/OFF LED will switch off.
- If any button on mower's operating panel is pressed, the Lock indication will blink three times to indicate that the Disabling Device is missing.
- If theft protection is enabled, it will remain active even though the Disabling Device is removed.
Replacing the blade
- Power the mower off by pressing GO button for 2 seconds.
- Remove the Disabling Device.
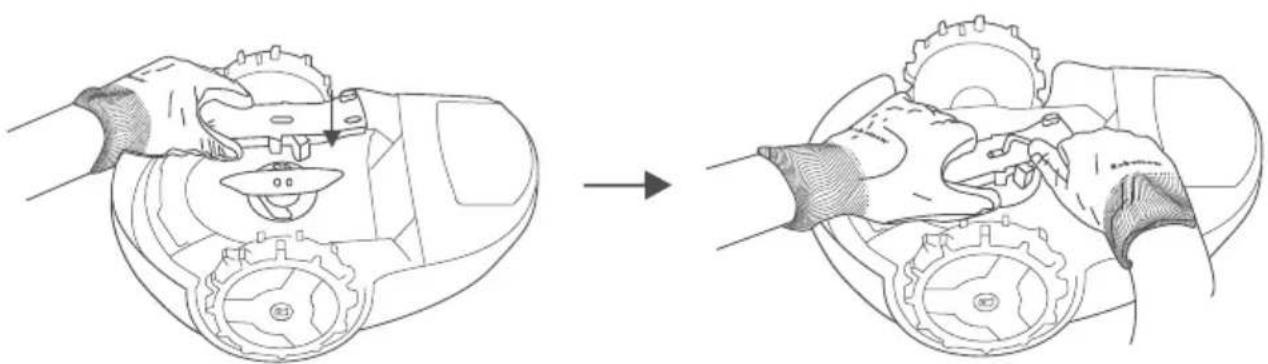
- Put on heavy-duty gloves, and place RoboTool over the blade so that it covers the whole blade.
natural_image
Technical line drawing showing a mechanical assembly before and after disassembly (no text or symbols present)-
Use the provided Allen tool (comes with a replacing blade) to unscrew the screws while holding the blade with the RoboTool.
-
Replace the blade with a new one (Part No.MRK9100A/MRK9100W).
-
Make sure to close both screws tightly.
Winter storage
The mower
- Fully charge the mower in its base
- Switch the mower off by pressing the GO button for 2 seconds
- Store the mower in dry indoor conditions at ambient temperatures above 0^ .
Base Station
- No winter storage is required for a Base Station. It can be left on the lawn during the winter period.
- It is recommended to disconnect the Power Supply from the mains during the winter storage period.
Winter service
- To allow better maintenance and to keep your mower in good condition, it is recommended to bring it to a certified dealer for service prior to winter storage.
- Winter service includes operations like cleaning the mower's parts and mowing deck, checking for worn parts (such as blade, drive wheels and other moving parts) and replacing them if required, testing the mower's functions and safety components, checking the battery, and uploading a latest software version, possibly including newly added features.
Battery replacement
- Make sure the mower is not in the Base Station.
- Power the mower off by pressing GO button for 2 seconds.
- Remove the Disabling Device.
- Use only a battery that is specified by the manufacturer as a suitable replacement and ensure you are using the right type (Lead Acid / Li-lon) for your mower.
- Warning! Do not use a non-rechargeable battery.
- For the orientation of the battery with regard to polarity and the method of replacement, refer to the instructions supplied with the replacing battery or to our online Help Center.
- For the instructions on how to deal with a leaking battery, refer to the "Batteries" section of the provided safety instructions.
- Environmental protection:
a. Remove the battery from the appliance before scrapping it.
b. The battery is to be disposed of safely.
c. For additional disposal instructions see the "Product end of use" section of the provided safety instructions.

Troubleshooting
Simple troubleshooting steps
In case of a fault, the On/Off indication on mower's panel will light up in red. Press any button to check for an optional sound indication for the fault. The table below will guide you to the corresponding action to take.
| No. of beeps | ON-OFF indication | Meaning Corrective action |
| Blinking red Mower crossed outside / mower is stuck in place / lift event detected/ wrong wire connection | Check that the Perimeter Wire is not too close to the edge or not on a sloped area.Move the mower inside the lawn or away from this particular location and renew the operation.Check the ground ditches. Fill with dirt and level off.Swap wire connections at the base station head | |
| Blinking red Check the blade / mow motor overheat | Remove the Disabling Device and inspect the blade for foreign material or debris preventing rotation.Increase cutting height. | |
| Blinking red No wire signal / waiting for signal / wire is cut | Confirm power supply is plugged into the power outlet.Check power supply and perimeter wire connection to the Base Station.Check the indication on the Base Station. If the wire is cut, repair is with the provided wire conenctors. | |
| Blinking red Check drive wheels / drive motor overheat | Check the drive wheels and remove grass or other objects. | |
| No. of beeps | ON-OFF indication | Meaning Corrective action | |
| None Blinking red (two LEDs) | No power supply / charging problem | Confirm power supply is plugged into the power outlet.Confirm a good connection of the power supply to the Base Station.Clean the charging pins. | |
| None Steady red Other faults • Check in the mobile app* or call the service. | |||
(*) All faults and corresponding corrective actions are communicated and described in the app as well. This feature is not available for models sold in the United States.
Special indications
| Indication Meaning | |
| Periodic beeps + ON/OFF LED is red The mower has been lifted or tilted up. | |
| Error sound + Battery LED blinks red two times | Mowing attempt while the battery is low. Need to recharge battery first. |
| Error sound + Lock LED blinks two times | Mowing attempt while child protection is enabled. Press the GO and STOP buttons together to temporary release the child protection. Now press GO once or twice to start mowing. |
| Error sound + Lock LED blinks three times | Mowing attempt while theft protection is enabled. Unlock the mower with a registered mobile device first. |
| ON/OFF LED & Battery LED blink together in red, when the GO button is pressed | Battery voltage is too low to switch the mower on. Need to keep charging. |
| Lock LED blinks three times while ON/OFF LED is off | The Disabling Device is removed. Insert the Disabling Device to operate the mower. |
Rebooting your mower
If for some reason your mower needs to be rebooted, simply switch it off and on.
Resetting the mower to factory defaults
When it is required to bring the mower to its factory defaults, you may do so by pressing the GO button for more than 10 seconds (until you hear a long beep and all LEDs start blinking) while the mower is switched off.

Frequently Asked Questions

Mower does not dock properly and sometimes misses Base Station's contacts
The entrance to the Base Station is not flat. Fill some ground to flatten the lawn around the Base Station to allow smooth entrance. Make sure the Perimeter Wire is laid according to the installation instructions on the supplied installation template. Make sure that the Base Station is placed on a relatively level ground.

Poor mowing quality
The blade may be dull. Remove the Disabling Device. Put on heavy-duty gloves and inspect the blade. Replace if needed. Avoid mowing wet grass. For the best cut, operate your mower when the grass is dry. It is recommended not to mow in the early morning hours.

Patchy and uneven mowing
Current mowing times are not enough. Increase the time your mower runs on the lawn. Define additional starting points (not applicable to models for lawns under 200 m^2 / 2150 ft^2 ) for a more uniform coverage.

Mower does not depart from base for a long time (not applicable to models for lawns under 200 m² / 2150 ft²)
Use the mobile app to understand the reason for the non-departure.

Mower operates at wrong times (not applicable to models for lawns under 200 m² / 2150 ft²)
Verify that the time on the mower is set correctly. The mower's time is automatically synchronized when it connects with a mobile device.

Mower bumps in a rigid lawn's border too frequently
Move the Perimeter Wire to be at a distance of 45 cm /18" from any rigid border (like a fence) at the lawn's edge.

The mower is very noisy
The blade may be damaged or unbalanced. Check if the lawn is free from branches, stones or other objects that can damage the blade. Replace the blade if needed.
Appendix A Additional installation options
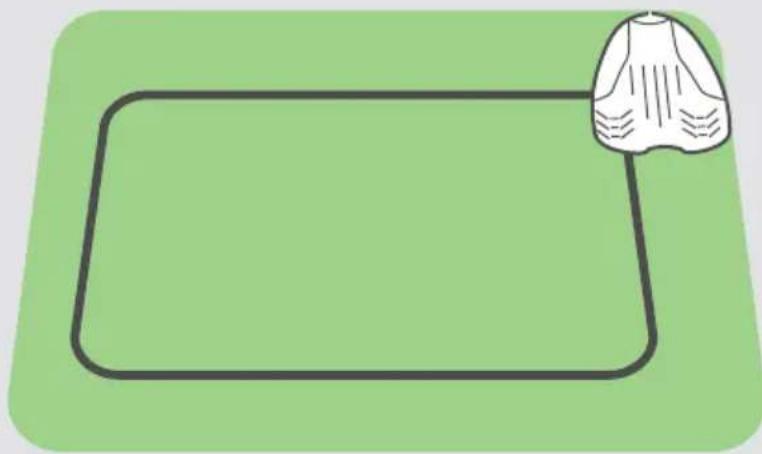
- Internal corner installation.
natural_image
Simple line drawing of a green rectangle with a black outline and a white skirt-like shape on the right (no text or symbols)Refer to our online Help Center for additional information.
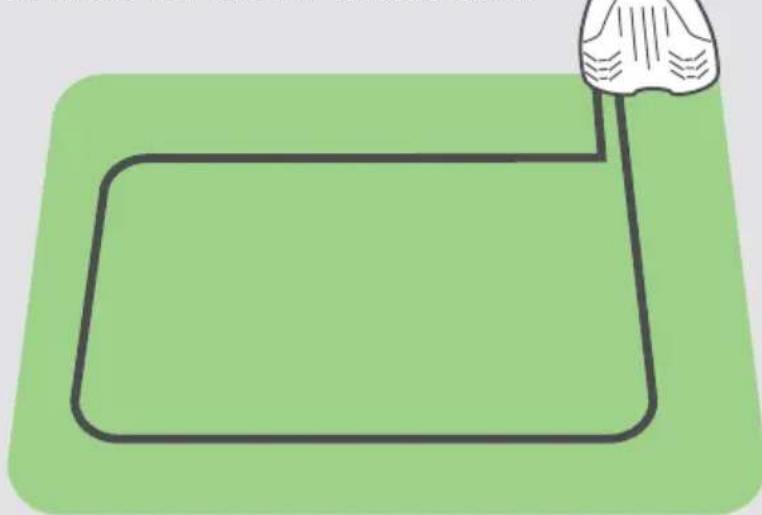
- External corner installation.
natural_image
Simple line drawing of a green rectangular shape with a white shoe on top (no text or symbols)Refer to our online Help Center for additional information.
Appendix B Secondary areas
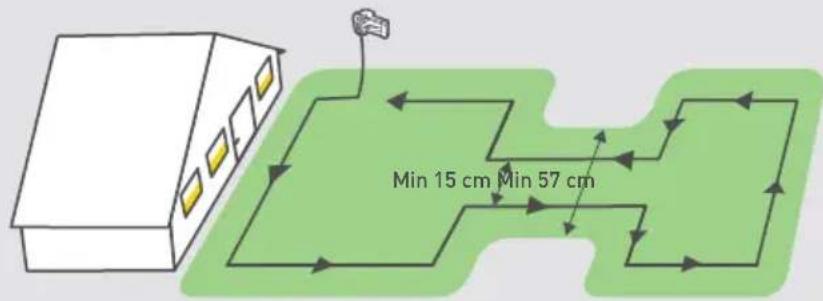
Connected secondary areas
If your lawn has additional areas connected with a passage and the mower is able to drive through it, then you should bear in mind the following rules:
- The minimal distance between the wires in such passage should be 15 cm / 6"
- The minimal width of such passage should be 57 cm / 22"
Separated secondary areas
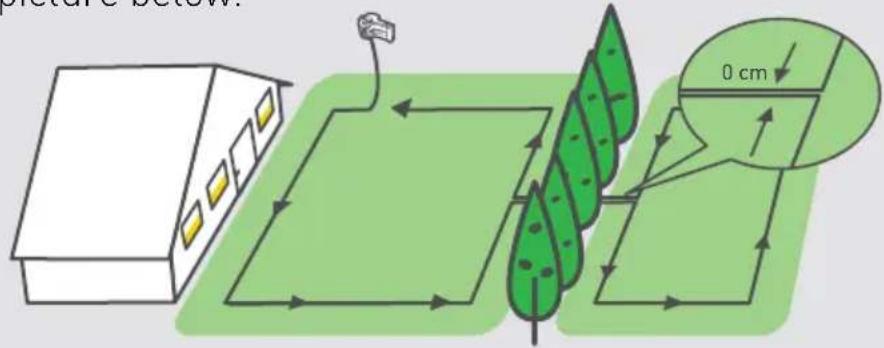
If your lawn has areas, that are completely separated (by a fence, sidewalk, pathway, etc.), then you can extend the perimeter wire to cover such secondary areas as shown in the picture below.
Appendix C Operating basics
| What to do | How to do it | ||
| Switch ON/OFF | Hold |  | for 2 seconds |
| Start regular mowing operation (up to 2 hours) | Press |  | once |
| Start short mowing opration (60 min) | Press |  | twice |
| Send the mower to the Base Station | Press |  | when idle |
Common indications:
Blinking green: The mower is charging in the Base Station.
Blinking red: There is a fault; go to the "Troubleshooting" section of this guide or connect with the mobile app for more information.
Blinking red fast: The perimeter wire is cut. Check the Perimeter Wire's connection to the Base Station. Refer to our online Help Center for assistance on finding a wire break.
Contact us!


WWW.ROBOMOW.COM
MTD Products Aktiengesellschaft Industriestraße 23 • 66129 Saarbrücken • Germany

- User Guide
- I'm Robomow. Nice to meet you.
- Safety first......
- Installation .... 15
- Quick reference .... 35
- Safety first
- Warning decal definitions
- 1234567
- Safety warnings & precautions
- Before you begin
- Preparations
- Operation
- IMPORTANT SAFETY WARNING!
- Transportation
- Using the remote control (manual mowing)
- Batteries
- Maintenance and special instructions
- WARNING!
- Product end of use
- Safety features
- Child Lock
- Disabling Device
- Lift Sensor
- Tilt Sensor
- Obstruction Sensor
- Emergency Stop Button
- GO/ON-OFF button
- Base Station and Perimeter Wire
- Anti-Theft (not applicable to models for lawns under 200 m²)
- Let's get started. Can't wait to mow your lawn.
- Installation
- So where are we heading?
- Get started
- GO!
- Lay the wire
- Power up
- Set base
- This is what you find in the box
- Base Station Stakes (x4)
- Wire Connectors
- Plot Connectors
- RoboRuler
- RoboTool
- Choosing the Base Station location
- Follow these simple guidelines to find a proper location for your Base Station
- Rule #1:
- Rule #2:
- Rule #3:
- Rule #4:
- Get to know wire distances
- Make a good start
- SLOPES
- Slopes along the edge
- Slopes within the lawn
- Keep laying the wire
- Start unwinding the wire counter clockwise around the lawn starting at the Base Station's location.
- Protect obstacles
- Hard obstacles
- Soft obstacles
- What if you have secondary areas?
- Complete wire setup
- Well Done!
- Quick reference
- Knowing your mower
- Front side
- Rear side
- Bottom view
- Operating panel
- Base Station
- Single-button operation
- Before anything else
- WARNING
- Powering up
- Enabling child protection
- Starting a mowing operation
- Stopping an operation
- Sending the mower to its base
- Automatic charging
- How much mowing does your lawn need?
- Additional options with the mobile app
- Taking care of your mower
- Periodic maintenance
- WARNING Severe injury a
- Once a month:
- IMPORTANT!
- Operating the Disabling Device
- Replacing the blade
- Winter storage
- The mower
- Winter service
- Battery replacement
- Troubleshooting
- Simple troubleshooting steps
- Rebooting your mower
- Resetting the mower to factory defaults
- Frequently Asked Questions
- Mower does not dock properly and sometimes misses Base Station's contacts
- Poor mowing quality
- Patchy and uneven mowing
- Mower does not depart from base for a long time (not applicable to models for lawns under 200 m² / 2150 ft²)
- Mower operates at wrong times (not applicable to models for lawns under 200 m² / 2150 ft²)
- Mower bumps in a rigid lawn's border too frequently
- The mower is very noisy
- Appendix A Additional installation options
- Appendix B Secondary areas
- Connected secondary areas
- Separated secondary areas
- Appendix C Operating basics
- Common indications:
Brand : ROBOMOW
Model : RX20 Pro
Category : Lawn mower