
DS-9108HFI-ST - Security Camera Hikvision - Free user manual and instructions
Find the device manual for free DS-9108HFI-ST Hikvision in PDF.


User questions about DS-9108HFI-ST Hikvision
0 question about this device. Answer the ones you know or ask your own.
Ask a new question about this device
Download the instructions for your Security Camera in PDF format for free! Find your manual DS-9108HFI-ST - Hikvision and take your electronic device back in hand. On this page are published all the documents necessary for the use of your device. DS-9108HFI-ST by Hikvision.
USER MANUAL DS-9108HFI-ST Hikvision
This manual, as well as the software described in it, is furnished under license and may be used or copied only in accordance with the terms of such license. The content of this manual is furnished for informational use only, is subject to change without notice, and should not be construed as a commitment by Hangzhou Hikvision Digital Technology Co., Ltd. (Hikvision). Hikvision assumes no responsibility or liability for any errors or inaccuracies that may appear in the book.
Except as permitted by such license, no part of this publication may be reproduced, stored in a retrieval system, or transmitted, in any form or by any means, electronic, mechanical, recording, or otherwise, without the prior written permission of Hikvision.
HIKVISION MAKES NO WARRANTIES, EXPRESS OR IMPLIED, INCLUDING WITHOUT LIMITATION THE IMPLIED WARRANTIES OF MERCHANTABILITY AND FITNESS FOR A PARTICULAR PURPOSE, REGARDING THE HIKVISION SOFTWARE. HIKVISION DOES NOT WARRANT, GUARANTEE, OR MAKE ANY REPRESENTATIONS REGARDING THE USE OR THE RESULTS OF THE USE OF THE HIKVISION SOFTWARE IN TERMS OF ITS CORRECTNESS, ACCURACY, RELIABILITY, CURRENTNESS, OR OTHERWISE. THE ENTIRE RISK AS TO THE RESULTS AND PERFORMANCE OF THE HIKVISION SOFTWARE IS ASSUMED BY YOU. THE EXCLUSION OF IMPLIED WARRANTIES IS NOT PERMITTED BY SOME STATES. THE ABOVE EXCLUSION MAY NOT APPLY TO YOU.
IN NO EVENT WILL HIKVISION, ITS DIRECTORS, OFFICERS, EMPLOYEES, OR AGENTS BE LIABLE TO YOU FOR ANY CONSEQUENTIAL, INCIDENTAL, OR INDIRECT DAMAGES (INCLUDING DAMAGES FOR LOSS OF BUSINESS PROFITS, BUSINESS INTERRUPTION, LOSS OF BUSINESS INFORMATION, AND THE LIKE) ARISING OUT OF THE USE OR INABILITY TO USE THE HIKVISION SOFTWARE EVEN IF HIKVISION HAS BEEN ADVISED OF THE POSSIBILITY OF SUCH DAMAGES. BECAUSE SOME STATES DO NOT ALLOW THE EXCLUSION OR LIMITATION OF LIABILITY FOR CONSEQUENTIAL OR INCIDENTAL DAMAGES, THE ABOVE LIMITATIONS MAY NOT APPLY TO YOU.
Thank you for purchasing our product. If there is any question or request, please do not hesitate to contact dealer. This manual is applicable to following embedded network DVR series.
| Series | Model | Type |
| 9200HWI-ST Series | DS-9204/08/16HWI-ST | Network DVR |
| 9100HFI-ST Series | DS-9104/08/16HFI-ST | Network DVR |
| 9100HWI-ST Series | DS-9104/08/16HWI-ST | Network DVR |
| 9100HFI-RT Series | DS-9104/08/16HFI-RT | Network DVR |
| 9100HFI-XT Series | DS-9116HFI-XT | Network DVR |
| 9000HFI-ST Series | DS-9004/08/16HFI-ST | Network HDVR |
| 9000HWI-ST Series | DS-9004/08/16HWI-ST | Network HDVR |
| 9000HFI-RT Series | DS-9004/08/16HFI-RT | Network HDVR |
| 9000HFI-XT Series | DS-9016HFI-XT | Network HDVR |
| 8100HFI-ST Series | DS-8104/08/16HFI-ST | Network DVR |
| 8100HWI-ST Series | DS-8104/08/16HWI-ST | Network DVR |
| 8000HFI-ST Series | DS-8004/08/16HFI-ST | Network HDVR |
| 8000HWI-ST Series | DS-8004/08/16HWI-ST | Network HDVR |
| 7200HWI-SV Series | DS-7208/16HWI-SV | Network DVR |
This manual may contain several technically incorrect places or printing errors, and the content is subject to change without notice. The updates will be added into the new version of this manual. We will readily improve or update the products or procedures described in the manual.
In order to simplify the description, we make the following conventions (unless otherwise stated):
We define DS-9200HWI-ST, DS-9100HFI-ST, 9100HWI-ST, 9100HFI-RT, 9100HFI-XT, 8100HFI-ST, 8100HWI-ST, and 7200HWI-SV series as DVR, and 9000HFI-ST, 9000HWI-ST, 9000HFI-RT, 9000HFI-XT, 8000HFI-ST and 8000HWI-ST series as HDVR (Hybrid DVR) in this manual.
The front panel operation is not supported by 7200HWI-SV series.
The figures shown in this manual are for reference only. The appearance and interface of the device are subject to the actual model.
Regulatory information
FCC information
FCC compliance: This equipment has been tested and found to comply with the limits for a digital device, pursuant to part 15 of the FCC Rules. These limits are designed to provide reasonable protection against harmful interference when the equipment is operated in a commercial environment. This equipment generates, uses, and can radiate radio frequency energy and, if not installed and used in accordance with the instruction manual, may cause harmful interference to radio communications. Operation of this equipment in a residential area is likely to cause harmful interference in which case the user will be required to correct the interference at his own expense.
FCC conditions
This device complies with part 15 of the FCC Rules. Operation is subject to the following two conditions:
-
This device may not cause harmful interference.
-
This device must accept any interference received, including interference that may cause undesired operation.
EU Conformity Statement

This product and - if applicable - the supplied accessories too are marked with "CE" and comply therefore with the applicable harmonized European standards listed under the Low Voltage Directive 2006/95/EC, the EMC Directive 2004/108/EC, the RoHS Directive 2011/65/EU.

2012/19/EU (WEEE directive): Products marked with this symbol cannot be disposed of as unsorted municipal waste in the European Union. For proper recycling, return this product to your local supplier upon the purchase of equivalent new equipment, or dispose of it at designated collection points. For more information see: www.recyclethis.info.

2006/66/EC (battery directive): This product contains a battery that cannot be disposed of as unsorted municipal waste in the European Union. See the product documentation for specific battery information. The battery is marked with this symbol, which may include lettering to indicate cadmium (Cd), lead (Pb), or mercury (Hg). For proper recycling, return the battery to your supplier or to a designated collection point. For more information see: www.recyclethis.info.
Trademarks and Registered Trademarks
- Windows and Windows mark are trademarks or registered trademarks of Microsoft Corporation in the United States and/or other countries.
- HDMI, HDMI mark and High-Definition Multimedia Interface are trademarks or registered trademarks of HDMI Licensing LLC.
- The products contained in this manual are authorized by HDMI Licensing LLC with the use right of the HDMI technology.

• VGA is the trademark of IBM.
- UPnP ^TM is a certification mark of the UPnP ^TM Implementers Corporation.
- Other names of companies and product contained in this manual may be trademarks or registered trademarks of their respective owners.
Preventive and Cautionary Tips
Before connecting and operating your device, please be advised of the following tips:
- Ensure unit is installed in a well-ventilated, dust-free environment.
- Unit is designed for indoor use only.
- Keep all liquids away from the device.
- Ensure environmental conditions meet factory specifications.
- Ensure unit is properly secured to a rack or shelf. Major shocks or jolts to the unit as a result of dropping it may cause damage to the sensitive electronics within the unit.
- Use the device in conjunction with an UPS if possible.
• Power down the unit before connecting and disconnecting accessories and peripherals. - A factory recommended HDD should be used for this device.
- Improper use or replacement of the battery may result in hazard of explosion. Replace with the same or equivalent type only. Dispose of used batteries according to the instructions provided by the battery manufacturer.
Product Key Features
General
- Connectable to the network cameras, network dome and encoders (this feature is supported by HDVR series).
- Connectable to the third-party network cameras like ACTI, Arecont, AXIS, Brickcom, Bosch, Canon, PANASONIC, Pelco, SAMSUNG, SANYO, SONY, Vivotek and ZAVIO (this feature is supported by HDVR series).
- Connectable to the third-party network cameras that support ONVIF or PSIA protocol (this feature is supported by HDVR series).
- Connectable to Hikvision smart IP cameras.
- PAL/NTSC adaptive video inputs.
● H.264 video compression with high reliability and superior definition.
● Each channel supports dual-stream.
● Up to 32 network cameras can be added (this feature is supported by HDVR series). - Independent configuration for each channel, including resolution, frame rate, bitrate, image quality, etc.
● The quality of the input and output video is configurable. - Each channel supports two kinds of compression parameters, the normal continuous and event. Sub-stream can be configured locally.
- Encoding for both audio/video composite stream and video stream; audio and video synchronization during composite stream encoding.
● Support CABAC (this feature is supported by analog cameras only).
● Watermark technology. - Defog technology providing correct and natural image (this feature is only supported by DS-9200 series DVR).
Local Monitoring
● Simultaneous HDMI, VGA and CVBS outputs.
- HDMI output and VGA output at up to 1920× 1080P resolution.
● Multi-screen display in live view is supported, and the display sequence of screens is adjustable.
- Live view screen can be switched in group. Manual switch and auto-switch are selectable and the auto-switch dwell time is configurable.
- Quick setting menu is provided for live view.
● The selected live view channel can be shielded.
● Motion detection, video tampering detection, video exception alarm and video loss alarm functions.
● VCA alarm function
- Privacy mask.
● Several PTZ protocols supported; PTZ preset, patrol and pattern.
- Zooming in by clicking the mouse and PTZ tracing by dragging mouse.
HDD Management
- For DS-9100/9000HFI-XT series, up to 16 SATA hard disks and 2 cSATA disks can be connected; for DS-7200HWI-SV series, up to 2 SATA hard disks can be connected; and for other models, up to 8 SATA hard disks and 1 eSATA disk can be connected, each disk with a maximum of 4TB storage capacity.
● 8 network disks (8 NAS disks, or 7 NAS disks+1 IP SAN disk) can be connected.
● Support eSATA disk for recording or backup.
- Hot-swappable HDD supporting RAID0, RAID1, RAID5 and RAID10 storage schemes. And 8 virtual disks can be configurable (this feature is supported by DS-9100/9000HFI-RT series only).
- HDD hot swap function (the feature is supported by DS-9100/9000HFI-RT series only).
- HDD group management.
● Support HDD standby function.
- HDD property: redundancy, read-only, read/write (R/W).
- HDD quota management; different capacity can be assigned to different channel.
- HDD frame-extracting management to extend the record time.
● Support S.M.A.R.T. and bad sector detection (this feature is not supported by DS-9100/9000HFI-RT series).
- Disk clone function (this feature is not supported by DS-9100HFI-RT/9000HFI-RT/7200HWI-SV series).
Recording, Capture and Playback
- Provide new playback interface with easy and flexible operation.
● Holiday recording schedule configuration.
● Normal and event video encoding parameters.
● Multiple recording types: manual, normal, alarm, motion, motion | alarm, motion & alarm, VCA.
● 8 recording time periods with separated recording types.
● Pre-record and post-record for alarm, motion detection recording, and pre-record time for schedule and manual recording.
- Searching record files and captured pictures by events (alarm input/motion detection/VCA).
- Customization of tags, searching and playing back by tags.
- Locking and unlocking record files.
- Local redundant recording and capture.
- Searching and playing back record files by camera No., recording type, start time, end time, etc.
● Smart search for the selected area in the video.
● Smart playback to go through less effective information;
- Zooming in when playback.
- Reverse playback for multi-channel.
● Supports pause, fast forward, slow forward, skip forward, and skip backward when playback, locating by dragging the mouse.
- For DS-9200/9100/9000/8100HWI-ST & DS-7200HWI-SV, up to 16-ch synchronous playback at WD1 real time; for other models, up to 16-ch synchronous playback at 4CIF real time.
● Manual capture, continuous capture of video images and playback of captured pictures.
Backup
- Export video data by USB, SATA or eSATA device.
- Export video clips when playback.
● Management and maintenance of backup devices.
● Support NTFS and FAT32 formatted backup devices.
Alarm and Exception
- Configurable arming time of alarm input/output.
-
Alarm for video loss, motion detection, tampering, abnormal signal, video input/output standard mismatch, illegal login, network disconnected, IP confliction, abnormal record/capture, HDD error, and HDD full, etc.
-
Alarm triggers full screen monitoring, audio alarm, notifying surveillance center, sending email and alarm output.
● Automatic restore when system is abnormal.
Other Local Functions
- Users can operate by front panel, mouse, remote control, and control keyboard.
- Three-level user management; admin user is allowed to create many operating accounts and define their operating permission, which includes the limit to access any camera.
● Operation, alarm, exceptions and log recording and searching.
● Manually triggering and clearing alarms. - Importing and exporting of device configuration file.
● Manual video quality diagnostics for analog channels. - Either normal or hot spare working mode is configurable to constitute an N+1 hot spare system (this function is supported by HDVR series only).
Network Functions
- 2 self-adaptive 10M/100M/1000M network interfaces, and three working modes are configurable: multi-address, load balance and network fault tolerance.
- IPv6 is supported.
- TCP/IP protocol, PPPoE, DHCP, DNS, DDNS, NTP, SADP, SMTP, SNMP, NFS, and iSCSI are supported.
● TCP, UDP and RTP for unicast.
● Auto/Manual port mapping and automatically discovered by NAT. - Remote web browser access by HTTPS ensures high security.
● Remote reverse playback by RTSP.
● Support accessing by the platform by ONVIF. - Remote search, playback, download, locking and unlocking the record files, and downloading files broken transfer resume.
- Remote parameters setup; remote import/export of device parameters.
- Remote viewing of the device status, system logs and alarm status.
- Remote keyboard operation.
- Remote locking and unlocking of control panel and mouse.
- Remote HDD formatting and program upgrading.
- Remote system restart.
● RS-232, RS-485 transparent channel transmission.
● Alarm and exception information can be sent to the remote host - Remotely start/stop recording.
● Remotely start/stop alarm output. - Captured pictures can be sent to the FTP server which supports FTP and SFTP protocol, and two FTP servers can be configured (this feature is supported by DVR series).
- Upgraded by remote FTP server is supported.
- Remote PTZ control.
- Remote JPEG capture.
● Two-way voice talk and voice broadcasting. - Embedded WEB server.
Development Scalability:
- SDK for Windows and Linux system.
● Source code of application software for demo.
● Development support and training for application system.
TABLE OF CONTENTS
Product Key Features 6
Chapter 1 Introduction ...... 15
1.1 Front Panel.... 16
1.2 IR Remote Control Operations 20
1.3 USB Mouse Operation....23
1.4 Input Method Description....24
1.5 Rear Panel 25
1.6 Starting Up and Shutting Down the Device 28
Chapter 2 Getting Started....30
2.1 Using the Wizard for Basic Configuration....31
2.2 Adding and Connecting the IP Cameras 35
2.2.1 Adding the IP Cameras....35
2.2.2 Configuring the Connected IP Cameras 39
Chapter 3 Live View 42
3.1 Introduction of Live View....43
3.2 Operations in Live View Mode 44
3.2.1 Front Panel Operation 44
3.2.2 Using the Mouse in Live View....45
3.2.3 Using an Auxiliary Monitor 46
3.2.4 Quick Setting Toolbar in Live View Mode 46
3.3 Adjusting Live View Settings 50
3.4 Channel-zero Encoding....52
3.5 Manual Video Quality Diagnostics....53
3.6 User Logout 54
Chapter 4 PTZ Control....55
4.1 Configuring PTZ Settings 56
4.2 Setting PTZ Presets, Patrols & Patterns....58
4.2.1 Customizing Presets 58
4.2.2 Calling Presets....59
4.2.3 Customizing Patrols 59
4.2.4 Calling Patrols....60
4.2.5 Customizing Patterns 60
4.2.6 Calling Patterns....61
4.2.7 Customizing Linear Scan 61
4.2.8 Calling Linear Scan....62
4.2.9 One-touch Park....62
4.3 PTZ Control Panel 63
Chapter 5 Record and Capture Settings....65
5.1 Configuring Encoding Parameters....66
5.2 Configuring Record/Capture Schedule 70
5.3 Configuring Motion Detection Recording and Capture 73
5.4 Configuring Alarm Triggered Recording and Capture....75
5.5 Configuring VCA Recording and Capture 77
5.6 Configuring Manual Recording and Continuous Capture....79
5.7 Configuring Holiday Recording and Capture 81
5.8 Configuring Redundant Recording and Capture....83
5.9 Configuring HDD Group for Recording and Capture....85
5.10 Files Protection 87
5.10.1 Locking the Record Files 87
5.10.2 Setting HDD property to Read-only 89
Chapter 6 Playback 91
6.1 Playing Back Record Files....92
6.1.1 Playing Back by Time 92
6.1.2 Playing Back by Event 95
6.1.3 Playing Back by Tag 97
6.1.4 Playing Back by Smart Search....99
6.1.5 Playing Back by Searching System Log 101
6.1.6 Playing Back External Files 103
6.1.7 Playing Back Frame Extracting Record 104
6.2 Auxiliary Functions of Playback 106
6.2.1 Playing Back Frame by Frame 106
6.2.2 Digital Zoom....106
6.2.3 Reverse Playback of Multi-channel 107
6.3 Picture Playback 109
Chapter 7 Backup....111
7.1 Backing up Record Files.... 112
7.1.1 Quick Export 112
7.1.2 Backing up by Normal Video Search 113
7.1.3 Backing up by Event Search 115
7.1.4 Backing up Video Clips.... 118
7.2 Backing up Pictures 121
7.3 Managing Backup Devices 124
7.4 Hot Spare Backup 126
7.4.1 Setting the Hot Spare Device 126
7.4.2 Setting the Working Device 127
7.4.3 Hot Spare Management....128
Chapter 8 Alarm Settings....130
8.1 Setting Motion Detection....131
8.2 Setting Sensor Alarm 133
8.3 Detecting Video Loss....135
8.4 Detecting Video Tampering 137
8.5 Detecting VCA Alarm....139
8.6 Handling Exceptions....143
8.7 Setting Alarm Linkage Actions....144
8.8 Triggering or Clearing Alarm Output Manually 147
Chapter 9 Network Settings....148
9.1 Configuring General Settings 149
9.2 Configuring Advanced Settings 152
9.2.1 Configuring PPPoE Settings 152
9.2.2 Configuring DDNS Settings....152
9.2.3 Configuring NTP Server Settings....155
9.2.4 Configuring Email Settings....156
9.2.5 Configuring FTP Server Settings 157
9.2.6 Configuring SNMP Settings....158
9.2.7 Configuring NAT Settings....159
9.2.8 Configuring More Network Settings....161
9.2.9 Configuring HTTPS Settings 163
9.2.10 Virtual Host Settings 164
9.2.11 Telnet Settings.... 165
9.3 Checking Network Traffic 166
9.4 Network Detection....167
9.4.1 Testing Network Delay and Packet Loss.... 167
9.4.2 Exporting Network Packet 167
9.4.3 Checking Network Status....168
9.4.4 Checking Network Statistics 169
Chapter 10 RAID Configuration....171
10.1 Configuring Array and Virtual Disk.... 172
10.1.1 One-touch Configuration.... 173
10.1.2 Manually Creating Array and Virtual Disk.... 174
10.2 Rebuilding Array.... 179
10.2.1 Automatically Rebuilding Array 179
10.2.2 Manually Rebuilding Array.... 180
10.3 Repairing Virtual Disk 181
10.4 Deleting Array / Virtual Disk.... 182
10.4.3 Deleting the Virtual Disk.... 182
10.4.4 Deleting the Array.... 182
10.5 Upgrading Firmware.... 183
Chapter 11 HDD Management.... 185
11.1 Initializing HDDs.... 186
11.2 Managing Network HDD....188
11.3 Managing eSATA....190
11.4 Managing HDD Group 191
11.4.1 Setting HDD Groups 191
11.4.2 Setting HDD Property 192
11.5 Configuring Quota Mode.... 193
11.6 Configuring Frame Extracting Mode.... 195
11.7 Configuring Disk Clone.... 197
11.8 Checking HDD Status....199
11.9 Checking S.M.A.R.T. Information....200
11.10 Detecting Bad Sector 201
11.11 Configuring HDD Error Alarms 202
Chapter 12 Camera Settings....203
12.1 Configuring OSD Settings 204
12.2 Configuring Privacy Mask....205
12.3 Configuring Video Parameters.... 205
Chapter 13 Device Management and Maintenance....208
13.1 Viewing System Information 209
13.2 Searching & Exporting Log Files 210
13.3 Importing/Exporting Configuration Files 212
13.4 Upgrading System....213
13.4.1 Upgrading by Local Backup Device 213
13.4.2 Upgrading by FTP 213
13.5 Restoring Default Settings 214
Chapter 14 Others....215
14.1 Configuring RS-232 Serial Port....216
14.2 Configuring General Settings 217
14.3 Configuring DST Settings....219
14.4 Configuring More Settings 220
14.5 Managing User Accounts....221
14.6 Logging out / Shutting down / Rebooting Device 224
Chapter 15 Appendix ...... 225
Glossary....226
Troubleshooting....227
Summary of Changes 232
List of Compatible IP Cameras 234
List of Hikvision IP Cameras 234
List of Third-party IP Cameras....238
Chapter 1 Introduction
1.1 Front Panel
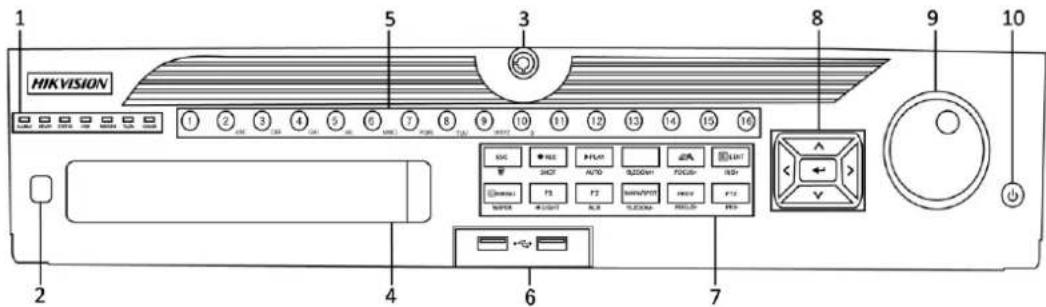
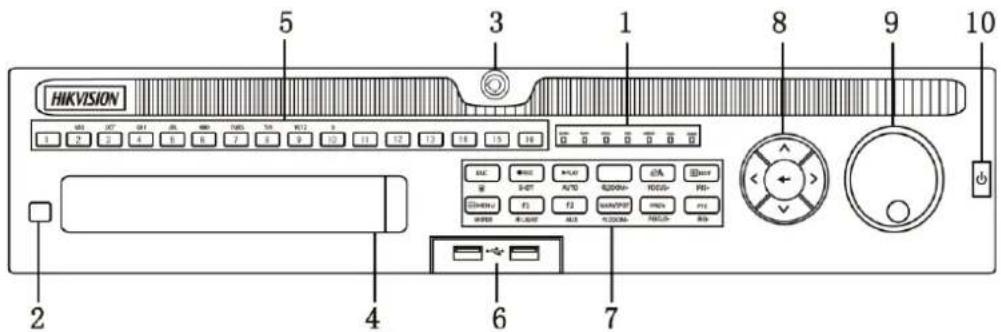
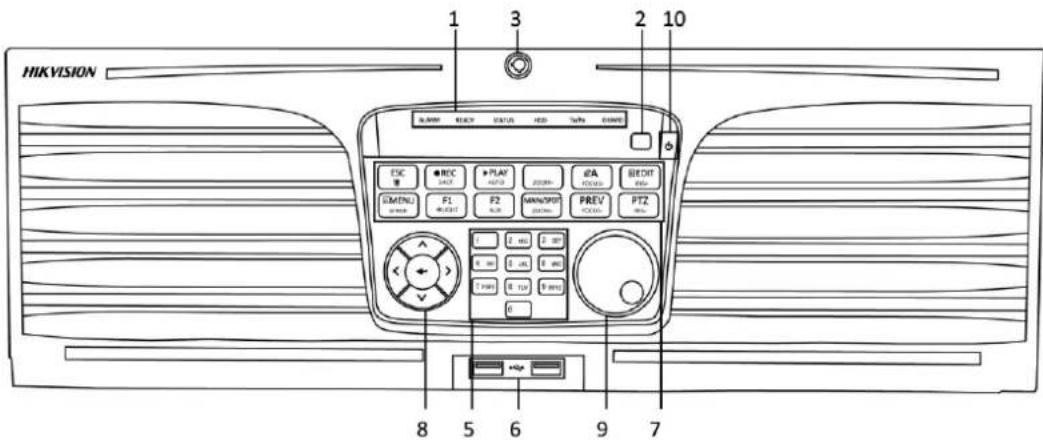
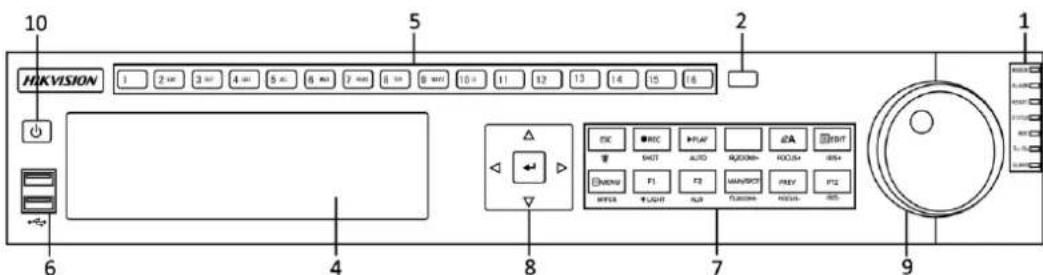
The front panels of the devices are shown in Figure 1.1.
text_image
HIKVISION 1 2 3 4 5 6 7 8 9 10 11 12 13 14 15 16 2 3 4 5 6 7 8 9 10 11 12 13 14 15 16 +/-DS-9100/9000HFI-ST & DS-9100/9000HFI-RT & DS-9200HWI-ST
text_image
HIKVISION 5 3 1 8 9 10 2 4 6 7 2 4 6 7 8 10 12 13 15 16 18 20 22 24 26 28 30 32 34 36 38 40 42 44 46 48 50 52 54 56 58 60 62 64 66 68 70 72 74 76 78 80 82 84 86 88 90 92 94 96 98 100DS-9100/9000HWI-ST
text_image
HIKVISION 1 3 2 10 SUNIOR REACH STATUS HED TIME ORDER ESC ● REC ● PLAY ● ZOOM #A BREDIT #MENU F1 F2 MAIN/SPOT PREV PTZ #MENI F2 F3 PREF CLOL 8 5 6 9 7DS-9100/9000HFI-XT
text_image
10 VIKVISION 1 2 min 3 min 4 min 5 min 6 min 7 min 8 min 9 min 10 min 11 12 13 14 15 16 2 6 4 8 7 9 1DS-8100/8000HFI-ST & DS-8100/8000HWI-ST
Figure 1.1 Front Panel (1)
Table 1.1 Description of Control Panel Buttons (1)
| No. | Name | Function Description |
| 1 | ALARM | Alarm indicator turns red when a sensor alarm is detected. |
| READY | Ready indicator is normally blue, indicating that the device is functioning properly. | |
| STATUS | Status indicator turns blue when device is controlled by an IR remote (if the device ID# is 255, the indicator is off when the device is controlled by an IR remote). | |
| Indicator turns red when controlled by a keyboard and purple when IR remote and keyboard is used at the same time. | ||
| HDD | HDD indicator blinks red when data is being read from or written to HDD. | |
| MODEM (Not supported by 9100/9000HFI-XT) | Reserved for future usage. | |
| TX/RX | TX/RX indicator blinks blue when network connection is functioning properly. | |
| GUARD | Guard indicator turns blue when the device is in armed status; at this time, an alarm is enabled when an event is detected. | |
| The indicator turns off when the device is unarmed. The arm/disarm status can be changed by pressing and holding on the ESC button for more than 3 seconds in live view mode. | ||
| 2 | IR Receiver | Receiver for IR remote |
| 3 | Front Panel Lock (for DS-9200/9100/9000 series) | You can lock or unlock the panel by the key. |
| 4 | DVD-R/W | Slot for DVD-R/W. (Optional for DS-9100/9000HFI-RT) |
| 5 | Alphanumeric Buttons | Switch to the corresponding channel in Live view or PTZ Control mode. |
| Input numbers and characters in Edit mode. | ||
| Switch channels in Playback mode. | ||
| The light of the button is blue when the corresponding channel is recording; it is red when the channel is in network transmission status; it is pink when the channel is recording and transmitting. | ||
| 6 | USB Interfaces | Universal Serial Bus (USB) ports for additional devices such as USB mouse and USB Hard Disk Drive (HDD). |
| 7 | ESC | Back to the previous menu. |
| Press for arming/disarming the device in Live View mode. | ||
| REC/SHOT | Enter the Manual Record setting menu. | |
| In PTZ control settings, press the button and then you can call a PTZ preset by pressing Numeric button. | ||
| It is also used to turn audio on/off in the Playback mode. | ||
| PLAY/AUTO | The button is used to enter the Playback mode. | |
| It is also used to auto scan in the PTZ Control menu. | ||
| ZOOM+ | Zoom in the PTZ camera in the PTZ Control setting. | |
| A/FOCUS+ | Adjust focus in the PTZ Control menu. | |
| It is also used to switch input methods (upper and lowercase alphabet, symbols and numeric input). | ||
| EDIT/IRIS+ | Edit text fields. When editing text fields, it will also function as a Backspace button to delete the character in front of the cursor.On checkbox fields, pressing the button will tick the checkbox. | |
| In PTZ Control mode, the button adjusts the iris of the camera. | ||
| In Playback mode, it can be used to generate video clips for backup. | ||
| Enter/exit the folder of USB device and eSATA HDD. | ||
| MAIN/SPOT/ZOOM- | Switch main and spot output. | |
| In PTZ Control mode, it can be used to zoom out the image. | ||
| F1/ LIGHT | Select all items on the list when used in a list field. | |
| In PTZ Control mode, it will turn on/off PTZ light (if applicable). | ||
| In Playback mode, it is used to switch play and reverse play. | ||
| F2/ AUX | Cycle through tab pages. | |
| In synchronous playback mode, it is used to switch channels. | ||
| MENU/WIPER | Press the button will help you return to the Main menu (after successful login). | |
| Press and hold the button for 5 seconds will turn off audible key beep. | ||
| In PTZ Control mode, the MENU/WIPER button will start wiper (if applicable). | ||
| In Playback mode, it is used to show/hide the control toolbar. | ||
| PREV/FOCUS- | Switch single screen and multi-screen mode. | |
| In PTZ Control mode, it is used to adjust the focus in conjunction with the A/FOCUS+ button. | ||
| PTZ/IRIS- | Enter the PTZ Control mode. | |
| In the PTZ Control mode, it is used to adjust the iris of the PTZ camera. | ||
| 8 | DIRECTION | The DIRECTION buttons are used to navigate between different fields and items in menus. |
| In the Playback mode, the Up and Down button is used to speed up and slow down recorded video. The Left and Right button will select the next and previous record files. | ||
| In Live View mode, these buttons can be used to cycle through channels. | ||
| In PTZ control mode, it can control the movement of the PTZ camera. | ||
| ENTER | The ENTER button is used to confirm selection in any of the menu modes. | |
| It can also be used to tick checkbox fields. | ||
| In Playback mode, it can be used to play or pause the video. | ||
| In single-frame Playback mode, pressing the button will advance the video by a single frame. | ||
| In Auto-switch mode, it can be used to stop /start auto switch. | ||
| 9 | JOG SHUTTLE Control | Move the active selection in a menu. It will move the selection up and down. |
| In Live View mode, it can be used to cycle through different channels. | ||
| In the Playback mode: For DS-9200/9100/9000 series, the ring is used to jump 30s forward/backward in video files. For DS-8100/8000 series, the outer ring is used to speed up or slow down the record files and the inner ring is used to jump 30s forward/backward in records files. | ||
| In PTZ control mode, it can control the movement of the PTZ camera. | ||
| 10 | POWER ON/OFF | Power on/off switch. |
If GUARD indicator is blue (default), all the alarm event and exception settings are valid. Otherwise, alarm event and exception settings are invalid, but normal recording is still available.

It is important to note that you must press the EDIT button on either the remote or front panel on a text field before you're able to edit its content. After you're done entering text, you must hit the ENTER button to be able to move on to the next field.

text_image
HIKVISION POWER STATUS TPU 1 2 3 4 5DS-7200HWI-SV
Figure 1.2 Front Panel (2)
Table 1.2 Description of Control Panel Buttons (2)
| No. | Name | Function Description |
| 1 | POWER | POWER indicator turns green when DVR is powered up. |
| 2 | STATUS | STATUS indicator lights in red when data is being read from or written t HDD. |
| 3 | Tx/Rx | Tx/Rx indicator blinks green when network connection is functioning properly. |
| 4 | IR Receiver | Receiver for IR remote. |
| 5 | USB Interface | Connects USB mouse or USB flash memory devices. |
1.2 IR Remote Control Operations
The device may also be controlled with the included IR remote control, shown in Figure 1.3.

Batteries (2× AAA) must be installed before operation.

text_image
1 2 ABC DEF 1 GH1 JKL MNO 4 POS TLV MXYZ 7 B 9 EDIT 0 A 4 REC INFO PLAY 6 8 MENU VOL/P/ROW 9 10 11 ENTER PTZ ESC 12 13 14 15 17 + + F1 16 - + FOUR 200W F2 18Figure 1.3 Remote Control
The keys on the remote control closely resemble the ones on the front panel. See Table 1.3.
Table 1.3 Description of the IR Remote Control Buttons
| No. | Name | Description |
| 1 | POWER | Power on/off the device. |
| 2 | DEV | Enables/Disables Remote Control. |
| 3 | Alphanumeric Buttons: | Switch to the corresponding channel in Live view or PTZ Control mode. |
| Input numbers and characters in Edit mode. | ||
| Switch channels in Playback mode. | ||
| 4 | EDIT Button | Edit text fields. When editing text fields, it will also function as a Backspace button to delete the character in front of the cursor. |
| On checkbox fields, pressing the button will tick the checkbox. | ||
| In PTZ Control mode, the button adjusts the iris of the camera. | ||
| In Playback mode, it can be used to generate video clips for backup. | ||
| Enter/exit the folder of USB device and eSATA HDD. | ||
| 5 | A Button | Adjust focus in the PTZ Control menu. |
| It is also used to switch input methods (upper and lowercase alphabet, symbols and numeric input). | ||
| 6 | REC Button | Enter the Manual Record setting menu. |
| In PTZ control settings, press the button and then you can call a PTZ preset by pressing Numeric button. | ||
| It is also used to turn audio on/off in the Playback mode. | ||
| 7 | PLAY Button | The button is used to enter the Playback mode. |
| It is also used to auto scan in the PTZ Control menu. | ||
| 8 | INFO Button | Reserved for future usage. |
| 9 | VOIP/MON Button | Switch main and spot output. |
| In PTZ Control mode, it can be used to zoom out the image. | ||
| 10 | MENU Button | Press the button will help you return to the Main menu (after successful login). |
| Press and hold the button for 5 seconds will turn off audible key beep. | ||
| In PTZ Control mode, the MENU/WIPER button will start wiper (if applicable). | ||
| In Playback mode, it is used to show/hide the control toolbar. | ||
| 11 | PREV Button | Switch single screen and multi-screen mode. |
| In PTZ Control mode, it is used to adjust the focus in conjunction with the A/FOCUS+ button. | ||
| 12 | DIRECTION/ENTER Buttons | The DIRECTION buttons are used to navigate between different fields and items in menus. |
| In the Playback mode, the Up and Down button is used to speed up and slow down recorded video. The Left and Right button will select the next and previous record files. | ||
| In Live View mode, these buttons can be used to cycle through channels. | ||
| In PTZ control mode, it can control the movement of the PTZ camera. | ||
| The ENTER button is used to confirm selection in any of the menu modes. | ||
| It can also be used to tick checkbox fields. | ||
| In Playback mode, it can be used to play or pause the video. | ||
| In single-frame Playback mode, pressing the button will advance the video by a single frame. | ||
| In Auto-switch mode, it can be used to stop /start auto switch. | ||
| 13 | PTZ Button | Enter the PTZ Control mode. |
| In the PTZ Control mode, it is used to adjust the iris of the PTZ camera. | ||
| 14 | ESC Button | Back to the previous menu. |
| Press for arming/disarming the device in Live View mode. | ||
| 15 | RESERVED | Reserved for future usage. |
| 16 | F1 Button | Select all items on the list when used in a list field. |
| In PTZ Control mode, it will turn on/off PTZ light (if applicable). | ||
| In Playback mode, it is used to switch play and reverse play. | ||
| 17 | PTZ Control Buttons | Buttons to adjust the iris, focus and zoom of a PTZ camera. |
| 18 | F2 Button | Cycle through tab pages. |
| In synchronous playback mode, it is used to switch channels. |
Remote Control Troubleshooting:

Make sure you have installed batteries properly in the remote control. And you have to aim the remote control at the IR receiver in the front panel.
If there is no response after you press any button on the remote, follow the procedure below to troubleshoot.
Steps:
- Go to Menu > Settings > General > More Settings by operating the front control panel or the mouse.
- Check and remember device ID#. The default ID# is 255. This ID# is valid for all the IR remote controls.
- Press the DEV button on the remote control.
- Enter the device ID# in step 2.
- Press the ENTER button on the remote.
If the Status indicator on the front panel turns blue, the remote control is operating properly. If the Status indicator does not turn blue and there is still no response from the remote, please check the following:

When the device ID# is 255, the Status indicator is off when device is controlled by an IR remote control.
- Batteries are installed correctly and the polarities of the batteries are not reversed.
- Batteries are fresh and not out of charge.
- IR receiver is not obstructed.
If the remote still can't function properly, please change a remote and try again, or contact the device provider.
1.3 USB Mouse Operation
A regular 3-button (Left/Right/Scroll-wheel) USB mouse can also be used with this device. To use a USB mouse:
-
Plug USB mouse into one of the USB interfaces on the front panel of the device.
-
The mouse should automatically be detected. If in a rare case that the mouse is not detected, the possible reason may be that the two devices are not compatible, please refer to the recommended device list from your provider.
The operation of the mouse:
Table 1.4 Description of the Mouse Control
| Name | Action | Description |
| Left-Click | Single-Click | Live view: Select channel and show the quick set menu.Menu: Select and enter. |
| Double-Click | Live view: Switch single-screen and multi-screen. | |
| Click and Drag | PTZ control: pan, tilt and zoom.Tamper-proof, privacy mask and motion detection: Select target area.Digital zoom-in: Drag and select target area.Live view: Drag channel/time bar. | |
| Right-Click | Single-Click | Live view: Show menu.Menu: Exit current menu to upper level menu. |
| Scroll-Wheel | Scrolling up | Live view: Previous screen.Right-click Menu: Previous item. |
| Scrolling down | Live view: Next screen.Right-click Menu: Next item. |
1.4 Input Method Description

text_image
1 2 3 4 5 6 7 8 9 0 Q W E R T Y U I O P A S D F G H J K L Z X C V B N M 123/..Figure 1.4 Soft Keyboard (1)
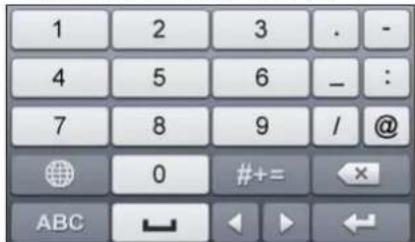
text_image
1 2 3 . - 4 5 6 _ : 7 8 9 / @ 0 #+= x ABC ↙ ↓ ↓ ↙Figure 1.5 Soft Keyboard (2)
Description of the buttons on the soft keyboard:
Table 1.5 Description of the Soft Keyboard Icons
| Icon | Description | Icon | Description |
 | Number |  | English letter |
| Lowercase/Uppercase | Backspace | ||
| Switch the keyboard | Space | ||
| Positioning the cursor | Exit | ||
| Symbols | Reserved |
1.5 Rear Panel
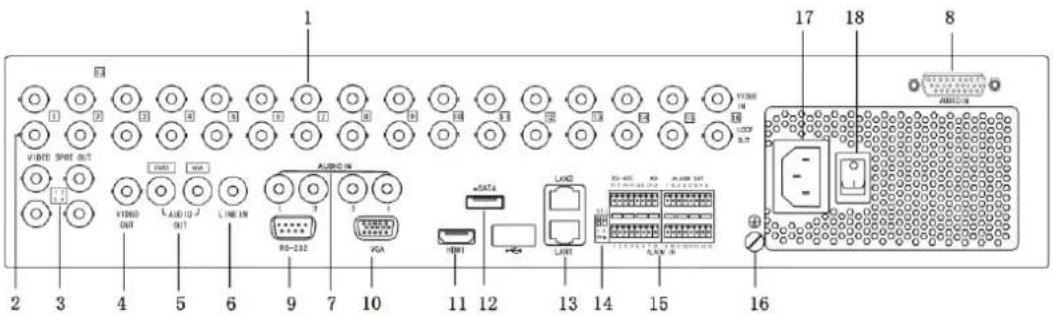
text_image
1 2 3 4 5 6 7 8 9 10 11 12 13 14 15 16 VIDEO SPOT OUT VIDEO OUT AUDIO OUT LINE IN AUDIO IN RS-232 VGA HDMI LND LED VIME IN USB USB USB USB USB USB USB USB USB USB USB USB USB USB USB USB USB USB USB USB USB USB USB USB USB USB USB USB USB USB USB USB USB USBDS-9100/9000HFI-ST
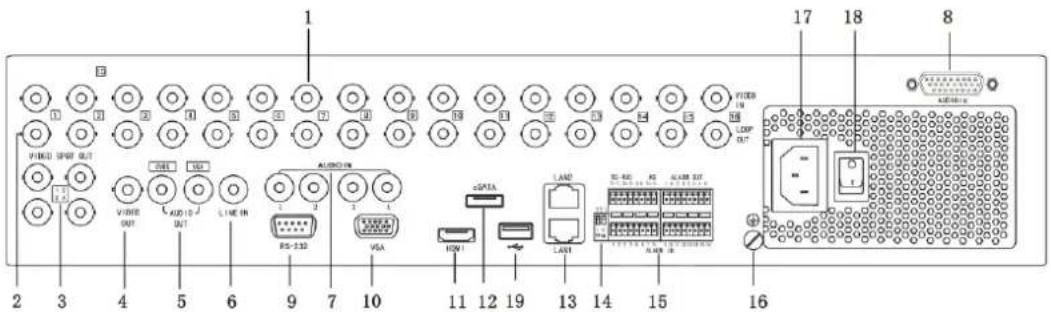
text_image
1 2 3 4 5 6 7 8 VISED OUTPUT OUT VINE OUT AUDIO OUT LINE IN RS-332 AUDIO IN VISA HIVI LAD LAN ALAB OUT 17 18 8 OUTPUT OUTDS-9200/9100/9000HWI-ST & DS-9100/9000HFI-RT
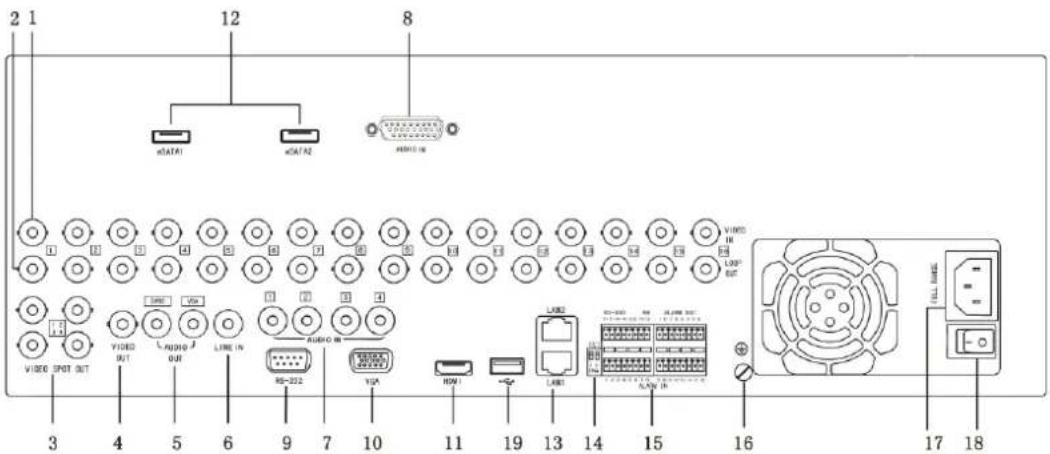
text_image
2 1 12 8 nDATA1 nDATA2 VHDD IN VIDEO OUT VIDEO OUT LPG LPG LINE IN AUDIO IN RS-222 YGA HON1 LPG1 LPG2 LED LED OUT USB OUT USB OUT 3 4 5 6 7 8 9 10 11 11 19 13 14 15 16 17 18DS-9100/9000HFI-XT
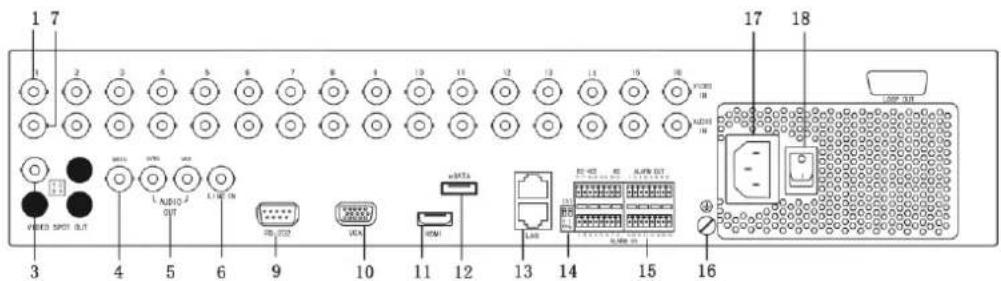
text_image
1 7 2 3 4 5 6 7 8 9 10 11 12 13 14 15 16 I/O port VDDI SPOIT ULF U-A/IO-2 OUT USB U/A HDMI +MOSA USB I/O port I/O port I/O port I/O port I/O port I/O port I/O port I/O port I/O port I/O port I/O port I/O port I/O port I/O port I/O port I/O port I/O port I/O port I/O port I/O port I/O port I/O port I/O port I/O port I/O port I/O ports I/O ports I/O ports I/O ports I/O ports I/O ports I/O ports I/O ports I/O ports I/O ports I/O ports I/O ports I/O ports I/O ports I/O ports I/O ports I/O ports I/O ports I/O ports I/O ports I/O ports I/O ports I/O ports I/O ports I/O ports I/O port I/O port I/O port I/O port I/O port I/O port I/O port I/O port I/O port I/O port I/O port I/O port I/O port I/O port I/O port I/O port I/O port I/O port I/O port I/O port I/O port I/O port I/O port I/O port I/O PortugalDS-8100/8000HFI-ST
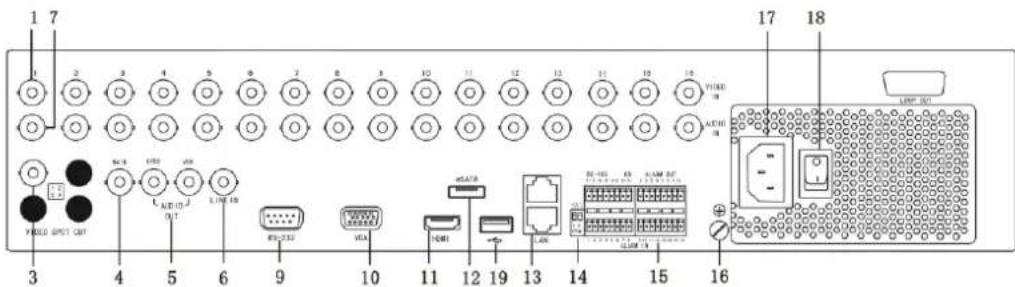
text_image
1 7 2 3 4 5 6 7 8 9 10 11 12 13 14 15 16 I/O port I/O port I/O port I/O port I/O port I/O port I/O port I/O port I/O port I/O port I/O port I/O port I/O port I/O port I/O port I/O port I/O port I/O port I/O port I/O port I/O port I/O port I/O port I/O port I/O port I/O ports I/O ports I/O ports I/O ports I/O ports I/O ports I/O ports I/O ports I/O ports I/O ports I/O ports I/O ports I/O ports I/O ports I/O ports I/O ports I/O ports I/O ports I/O ports I/O ports I/O ports I/O ports I/O ports I/O ports I/O ports I/O port I/O port I/O port I/O port I/O port I/O port I/O port I/O port I/O port I/O port I/O port I/O port I/O port I/O port I/O port I/O port I/O port I/O port I/O port I/O port I/O port I/O port I/O port I/O port I/O Portugal (1) 17 18 LIFE SCIDS-8100/8000HW1-ST
Figure 1.6 Rear Panel (1)
Table 1.6 Description of Rear Panel (1)
| No. | Item | Description |
| 1 | VIDEO IN | BNC connector for analog video input. |
| 2 | LOOP OUT(forDS-9100/9000HFI-ST/RT/XT& 9200/9100/9000HWI-STseries) | BNC connector for video loop output. |
| 3 | VIDEO SPOT OUT | BNC connector for video output. |
| 4 | VIDEO OUT | BNC connector for video output. |
| 5 | AUDIO OUT | RCA (for DS-9200/9100/9000 series) / BNC (for DS-8100/8000 series) connector for audio output. This connector is synchronized with VIDEO OUT. |
| 6 | LINE IN | RCA (for DS-9200/9100/9000 series) / BNC (for DS-8100/8000 series) connector for two-way audio. |
| 7 | AUDIO IN | RCA (for DS-9200/9100/9000 series) / BNC (for DS-8100/8000 series) connector for audio input. |
| 8 | AUDIO IN(forDS-9100/9000HFI-ST/RT/XT& 9200/9100/9000HWI-STseries) | DB26 connector for audio input. |
| 9 | RS-232 Interface | Connector for RS-232 devices. |
| 10 | VGA | DB9 connector for VGA output. Display local video output and menu. |
| 11 | HDMI | HDMI video output connector. |
| 12 | eSATA | Connects external SATA HDD, DVD-R/W. |
| 13 | LAN Interface | Network interface. |
| 14 | Termination Switch | RS-485 termination switch.Up position is not terminated.Down position is terminated with 120Ω resistance. |
| 15 | RS-485 Interface | Connector for RS-485 devices. T+ and T- pin connects to R+ and R-pin of PTZ receiver respectively. |
| Controller PortALARM IN | D+, D- pin connects to Ta, Tb pin of controller. For cascading devices, the first DVR's D+, D- pin should be connected with the D+, D- pin of the next DVR.Connector for alarm input. | |
| ALARM OUT | Connector for alarm output. | |
| 16 | GND | Ground (needs to be connected when DVR starts up). |
| 17 | AC 100V ~ 240V | AC 100V ~ 240V power supply. |
| 18 | POWER | Switch for turning on/off the device. |
| 19 | USB | Universal Serial Bus (USB) ports for additional devices such as USB Hard Disk Drive (HDD). |
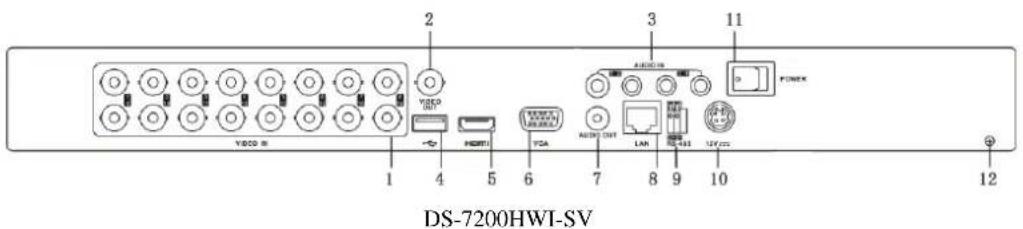
text_image
2 3 11 V800 8 HDMI VCA AUX OUT LAN USB 12 VCC 1 4 5 6 7 8 9 10 12 DS-7200HWI-SVFigure 1.7 Rear Panel (2)
Table 1.7 Description of Rear Panel (2)
| No. | Item | Description |
| 1 | VIDEO IN | BNC connector for analog video input. |
| 2 | VIDEO OUT | BNC connector for video output. |
| 3 | AUDIO IN | RCA connector for audio input. |
| 4 | USB Interface | Connects USB mouse or USB flash memory devices. |
| 5 | HDMI | HDMI video output. |
| 6 | VGA | DB15 connector for VGA output. Display local video output and menu. |
| 7 | AUDIO OUT | RCA connector for audio output. |
| 8 | LAN Interface | Network interface. |
| 9 | RS-485 Interface | Connector for RS-485 devices. Connect the D+ and D- terminals to R+ and R- of PTZ receiver respectively. |
| 10 | 12V | 12 VDC power supply. |
| 11 | POWER | Switch for turning on/off the device. |
| 12 | GND | Ground (needs to be connected when DVR starts up). |
1.6 Starting Up and Shutting Down the Device
Purpose:
Proper startup and shutdown procedures are crucial to expanding the life of the device.
Before you start:
Check that the voltage of the extra power supply is the same with the device's requirement, and the ground connection is working properly.
Starting up the device:
Steps (for 7200 series):
- Check the power supply is plugged into an electrical outlet. It is HIGHLY recommended that an Uninterruptible Power Supply (UPS) be used in conjunction with the device.
- Press the POWER button on the rear panel. The Power indicator LED should turn green indicating that the device begins to start up.
- After startup, the Power indicator LED is solid green. A splash screen with the status of the HDD appears on the monitor. The row of icons at the bottom of the screen shows the HDD status. 'X' means that the HDD is not installed or cannot be detected.
Steps (for other series):
- Check the power supply is plugged into an electrical outlet. It is HIGHLY recommended that an Uninterruptible Power Supply (UPS) be used in conjunction with the device.
- Turn on the Power Switch on the rear panel and press the POWER button on the front panel. The Power indicator LED should turn blue indicating that the device begins to start up.
- After startup, the Power indicator LED is solid blue. A splash screen with the status of the HDD appears on the monitor. The row of icons at the bottom of the screen shows the HDD status. 'X' means that the HDD is not installed or cannot be detected.
Shutting down the device:
Steps:
There are two proper ways to shut down the device.
Task 1: Standard shutdown
- Enter the Shutdown menu.
Menu > Shutdown
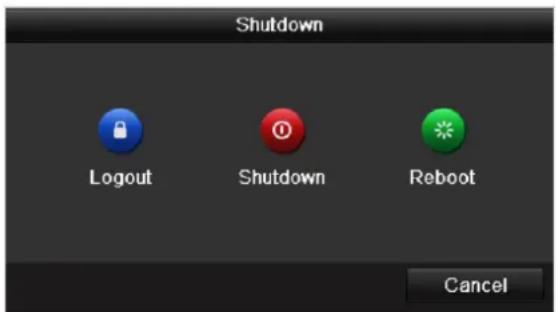
text_image
Shutdown Logout Shutdown Reboot CancelFigure 1.8 Shutdown Menu
- Click the Shutdown button.
- Click the Yes button.
Take 2: By operating the front panel (not available for 7200 series)
- Press and hold the POWER button on the front panel for 3 seconds.
- Enter the administrator's username and password in the dialog box for authentication.
- Click the Yes button.

- Do not press the POWER button again when the system is shutting down.
- If you disable the ID Authentication in General Settings interface (Chapter 14.2), the dialog box for authentication does not pop up.
Rebooting the device
In the Shutdown menu (Figure 1.7), you can also reboot the device.
Steps:
- Enter the Shutdown menu by clicking Menu > Shutdown.
- Click the Logout button to logout the device or the Reboot button to reboot the device.
Chapter 2 Getting Started
2.1 Using the Wizard for Basic Configuration
By default, the Setup Wizard starts once the device has loaded.
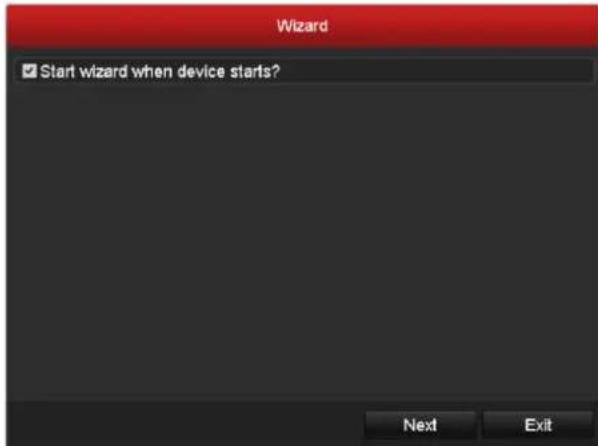
text_image
Wizard ✓ Start wizard when device starts? Next ExitFigure 2.1 Start Wizard Interface
Operating the Setup Wizard:
-
The Start Wizard can walk you through some important settings of the device. If you don't want to use the Start Wizard at that moment, click Exit. You can also choose to use the Start Wizard next time by leaving the "Start wizard when device starts?" checkbox checked.
-
Click Next on the Wizard window to enter the Login window.
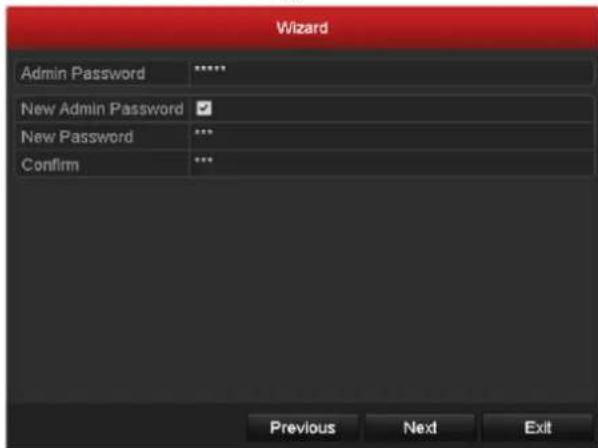
text_image
Wizard Admin Password ****** New Admin Password ✓ New Password *** Confirm *** Previous Next ExitFigure 2.2 Login Window
- Enter the admin password. By default, the password is 12345.

You are highly recommended to change the initial password right after the first login to avoid safety problem.
-
Optionally, to change the admin password, check the New Admin Password checkbox. Enter the new password and confirm the password in the given fields.
-
Click Next to enter the date and time settings window.
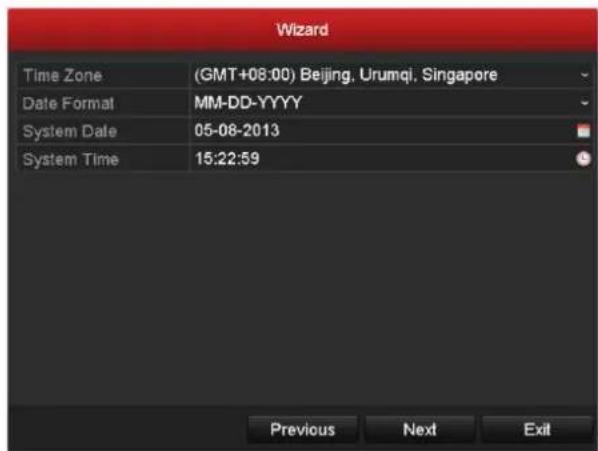
text_image
Wizard Time Zone (GMT+08:00) Beijing, Urumqi, Singapore Date Format MM-DD-YYYY System Date 05-08-2013 System Time 15:22:59 Previous Next ExitFigure 2.3 Date and Time Settings
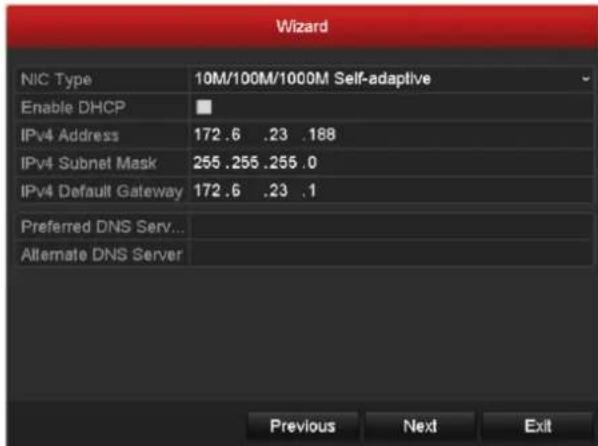
- After the time settings, click Next which takes you to the Network Start Wizard window.

Dual NIC is not supported by DS-7200HWI-SV series.
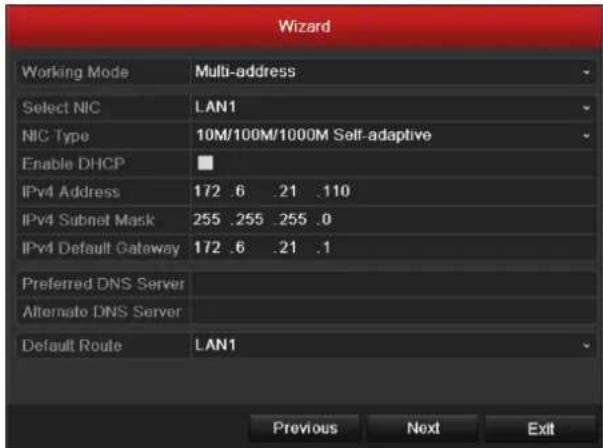
text_image
Wizard Working Mode Multi-address Select NIC LAN1 NIC Type 10M/100M/1000M Self-adaptive Enable DHCP IPv4 Address 172 .6 .21 .110 IPv4 Subnet Mask 255 .255 .255 .0 IPv4 Default Gateway 172 .6 .21 .1 Preferred DNS Server Alternate DNS Server Default Route LAN1 Previous Next ExitDS-9100/9000HFI-ST/RT/XT & DS-9200/9100/9000HWI-ST & DS-8100/8000HFI (HWI)-ST
text_image
Wizard NIC Type 10M/100M/1000M Self-adaptive Enable DHCP IPv4 Address 172.6 .23 .188 IPv4 Subnet Mask 255.255.255.0 IPv4 Default Gateway 172.6 .23 .1 Preferred DNS Serv... Alternate DNS Server Previous Next ExitDS-7200HWI-ST
Figure 2.4 Network Configuration
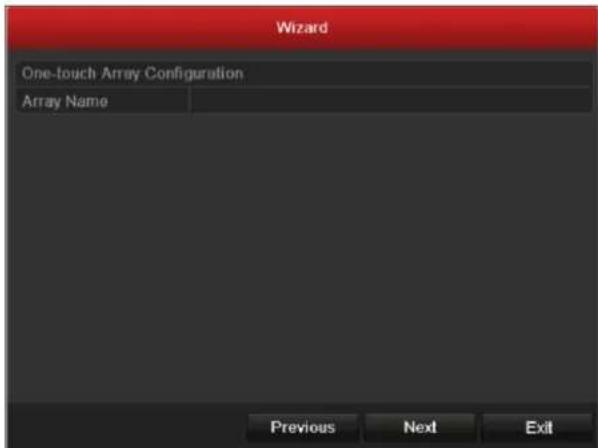
- Click Next after you configured the network parameters, which takes you to the Array Management window
(supported by DS-9100/9000HFI-RT series only).
text_image
Wizard One-touch Array Configuration Array Name Previous Next ExitFigure 2.5 Array Management
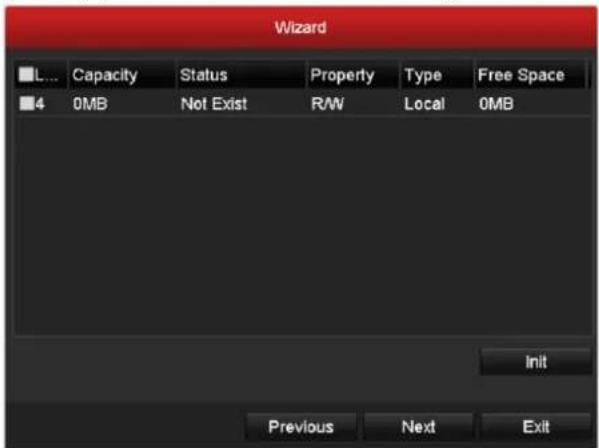
- After configuring array settings, click Next to enter the HDD Management window.
text_image
Wizard L... Capacity Status Property Type Free Space 4 0MB Not Exist R/W Local 0MB Init Previous Next ExitFigure 2.6 HDD Management
- To initialize the HDD, click Init. Initialization removes all the data saved in the HDD.
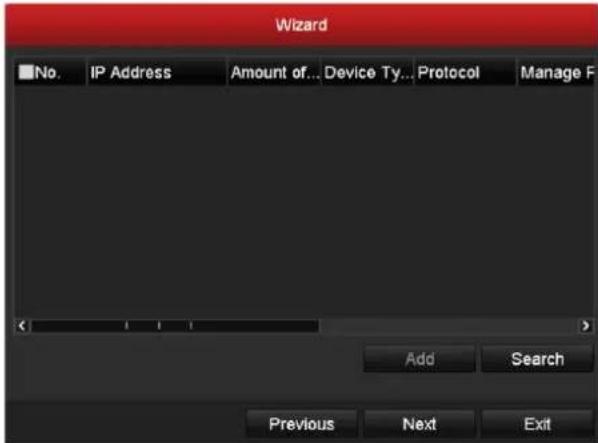
- Click Next to enter the IP Camera Management window (only supported by HDVR series).
text_image
Wizard No. IP Address Amount of... Device Ty... Protocol Manage F Add Search Previous Next ExitFigure 2.7 IP Camera Management
- Click Search to search IP Camera. Click Add to add IP Camera (only supported by HDVR series).
- After finishing IP Camera settings, click Next to enter the Record Settings window.
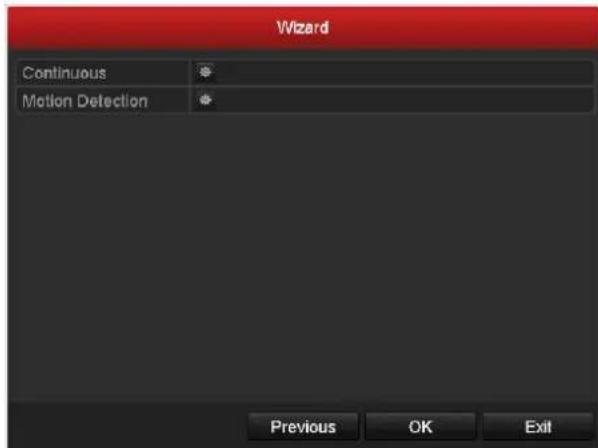
Click the icon, and you can enable the continuous recording or motion Detection recording for all channels of the device.
text_image
Wizard Continuous Motion Detection Previous OK ExitFigure 2.8 Record Settings
- Click OK to complete the wizard settings.
2.2 Adding and Connecting the IP Cameras

This Chapter is available for HDVR series only.
2.2.1 Adding the IP Cameras
Purpose:
HDVR can connect the network cameras and record the video got from them. So before you can get a live view or record of the video, you should add the network cameras to the connection list of the device.
Before you start:
Ensure the network connection is valid and correct. For detailed checking and configuring of the network, please see Chapter 9.1 Configuring General Settings, Chapter 9.3 Checking Network Traffic and Chapter 9.4 Network Detection.
Steps:
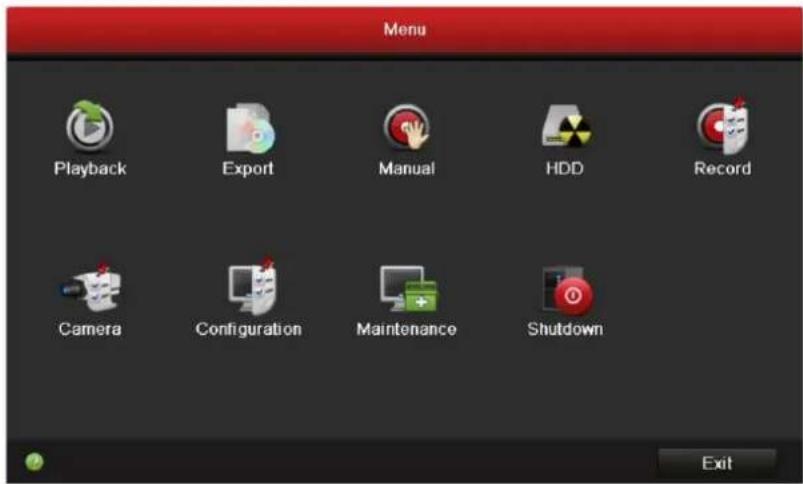
- Enter the Camera Management interface.
Menu > Camera > Camera
text_image
Menu Playback Export Manual HDD Record Camera Configuration Maintenance Shutdown ExitFigure 2.9 Main Menu

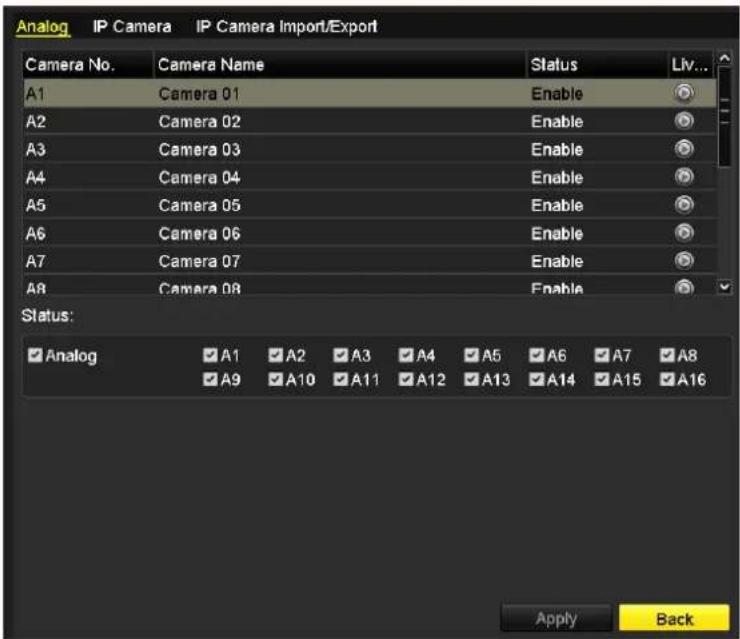
In Analog Camera Management interface, the status of analog cameras is displayed. Clear the checkboxes, and you can disable the corresponding analog cameras. One more network camera can be added by disabling one analog camera. 16 /8 /4 network cameras can be added to DS-9016&8016
HFI-ST&9016HFI-RT&9016HFI-XT&9016HWI-ST/9008&8008HFI-ST&9008HFI-RT&9008HWI-ST/9004&8004HFI-ST&DS-9004HFI-RT&9004HWI-ST series at most when all the analog cameras are enabled. 32/16 /8 network cameras can be added to DS-9016&8016
HFI-ST&9016HFI-RT&9016HFI-XT&9016HWI-ST/9008&8008HFI-ST&9008HFI-RT&9008HWI-ST/9004&8004HFI-ST&DS-9004HFI-RT&9004HWI-ST series at most when all the analog cameras are disabled.
text_image
Analog IP Camera IP Camera Import/Export Camera No. Camera Name Status Liv... A1 Camera 01 Enable A2 Camera 02 Enable A3 Camera 03 Enable A4 Camera 04 Enable A5 Camera 05 Enable A6 Camera 06 Enable A7 Camera 07 Enable A8 Camera 08 Enable Status: ✓ Analog ✓ A1 ✓ A2 ✓ A3 ✓ A4 ✓ A5 ✓ A6 ✓ A7 ✓ A8 ✓ A9 ✓ A10 ✓ A11 ✓ A12 ✓ A13 ✓ A14 ✓ A15 ✓ A16 Apply BackFigure 2.10 Analog Camera Management
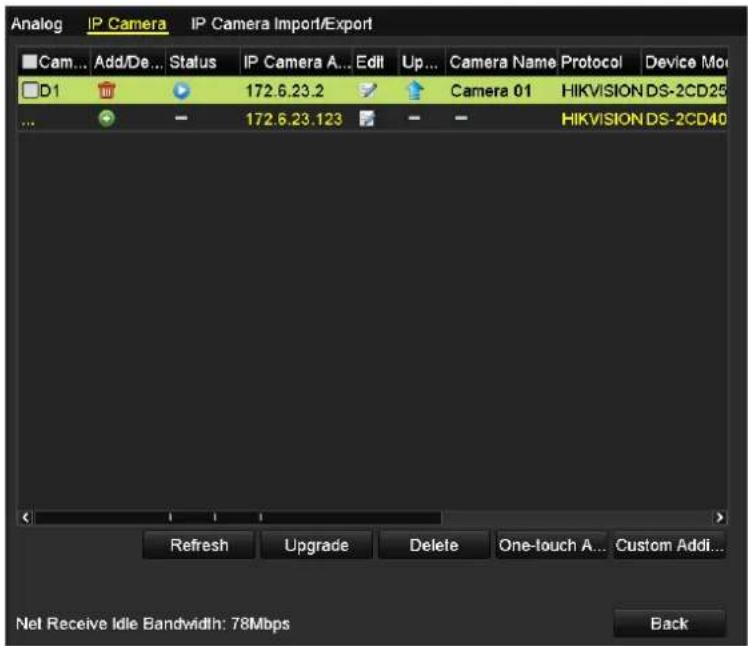
2. To add the online cameras:
1) Select the IP Camera tab, and the online cameras in the same network segment with the device will be displayed on the list. You can click the button Refresh to refresh the information of the online cameras.
text_image
Analog IP Camera IP Camera Import/Export Cam... Add/De... Status IP Camera A... Edit Up... Camera Name Protocol Device Mov D1 172.6.23.2 Camera 01 HIKVISION DS-2CD25 ... 172.6.23.123 HIKVISION DS-2CD40 Refresh Upgrade Delete One-touch A... Custom Addi... Net Receive Idle Bandwidth: 78Mbps BackFigure 2.11 IP Camera Management
2) Click the icon + on the list, and the corresponding camera will be added automatically;
Or click the button Add All to add all the online cameras automatically. The user name and password are admin and 12345 by default.
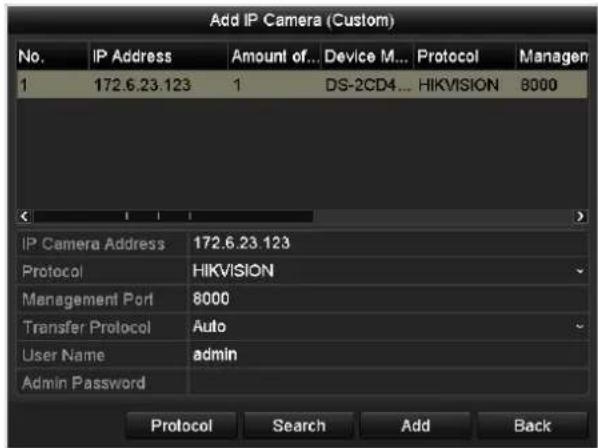
3) Optionally, you can click the button Custom Adding to enter the Custom Adding interface.
text_image
Add IP Camera (Custom) No. IP Address Amount of... Device M... Protocol Managen 1 172.6.23.123 1 DS-2CD4...HIKVISION 8000 IP Camera Address 172.6.23.123 Protocol HIKVISION Management Port 8000 Transfer Protocol Auto User Name hemin Admin Password Protocol Search Add BackFigure 2.12 Custom Adding
Input the required information, including the IP address, protocol, management port, user name and admin password, and then click the button Add to add the camera manually.

● The cameras added and not added are differently color coded.
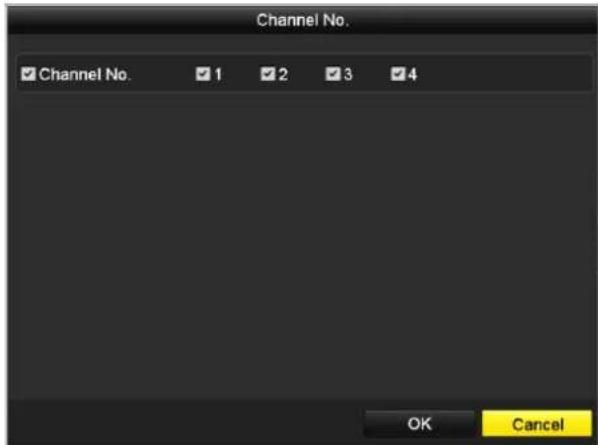
- When adding encoding device with multiple channels, check the checkbox in the pop-up window to select the channels to be added and click OK.
text_image
Channel No. ✓ Channel No. ✓ 1 ✓ 2 ✓ 3 ✓ 4 OK CancelFigure 2.13 Selecting Multiple Channels
- Import/Export the configuration file of the IP cameras.
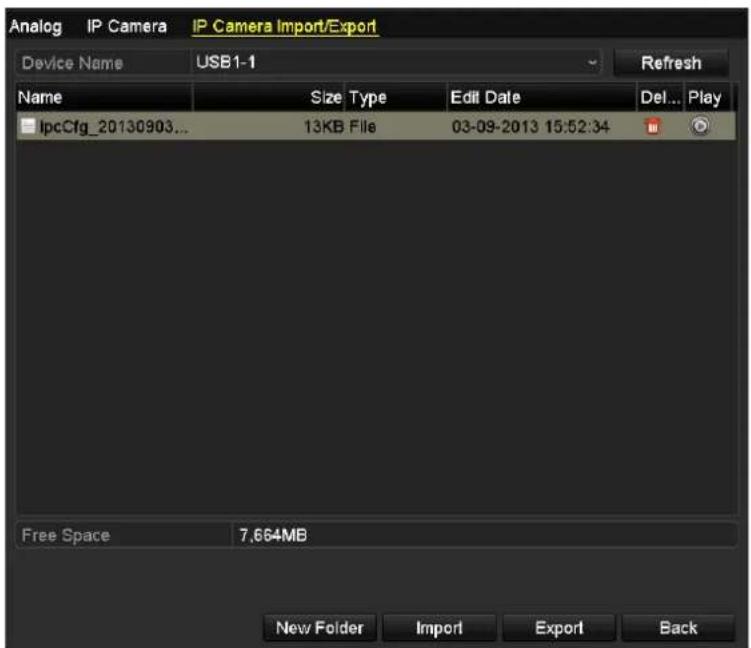
Import the configuration file of IP cameras to the device:
Connect the backup device on which the configuration file is stored to the device.
1) Click the IP Camera Import/Export tab.
text_image
Analog IP Camera IP Camera Import/Export Device Name USB1-1 Refresh Name Size Type Edit Date Del... Play IpcCfg_20130903... 13KB File 03-09-2013 15:52:34 Free Space 7,664MB New Folder Import Export BackFigure 2.14 Import IP Camera Configuration File
2) Select the backup device from the drop-down list and you can click the Refresh button to get the latest information of the backup device.
3) Select the configuration file of IP camera from the list.
4) Click the Import button to import the IP cameras to the device.
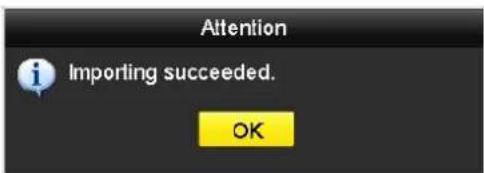
5) Click OK on the pop-up message box after the importing process is complete. The imported IP cameras will be displayed on the IP Camera Management interface.
text_image
Attention Importing succeeded. OKFigure 2.15 Attention-Importing Succeeded
Export the configuration file of IP cameras to backup device:
Connect the backup device on which the configuration file is stored to the device.
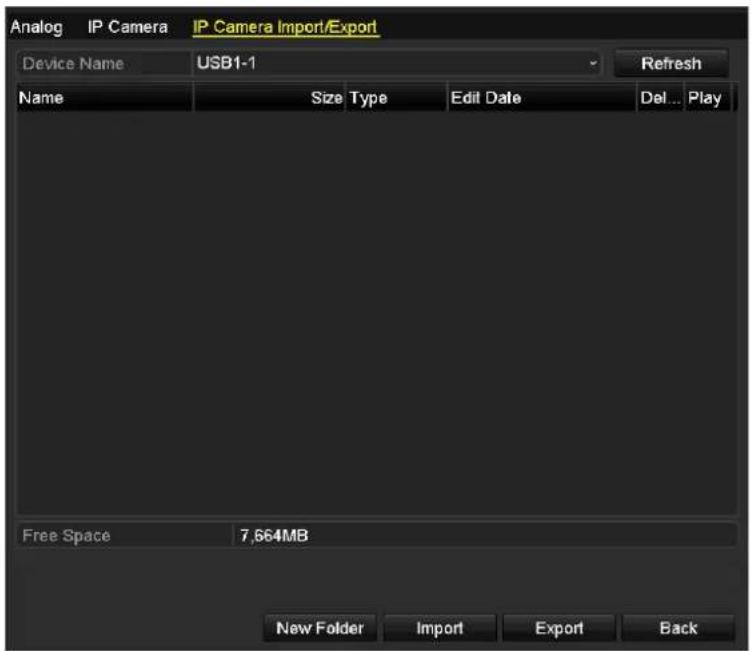
1) Click the IP Camera Import/Export tab.
text_image
Analog IP Camera IP Camera Import/Export Device Name USB1-1 Refresh Name Size Type Edit Date Del ... Play Free Space 7,664MB New Folder Import Export BackFigure 2.16 Export IP Camera Configuration File
2) Select the backup device from the drop-down list and you can click the Refresh button to get the latest information of the backup device.
3) Click the Export button to export the configuration file of IP cameras to the backup device.
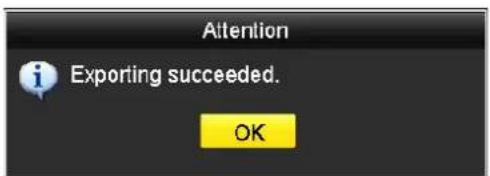
4) Click OK on the pop-up message box after the exporting process is complete. The configuration file of IP cameras will be displayed on a list.
text_image
Attention Exporting succeeded. OKFigure 2.17 Attention-Exporting Succeeded
2.2.2 Configuring the Connected IP Cameras
Editing the connected IP cameras
Purpose:
The detailed information of the added IP cameras will be displayed on a list, and you can configure the basic setting of the cameras if needed.
Steps:
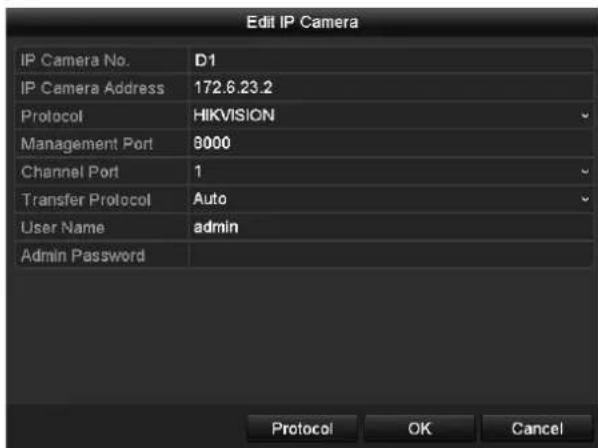
- Click the icon 📋 on the camera list to enter the Edit IP Camera interface.
text_image
Edit IP Camera IP Camera No. D1 IP Camera Address 172.6.23.2 Protocol HIKVISION Management Port 8000 Channel Port 1 Transfer Protocol Auto User Name adults Admin Password Protocol OK CancelFigure 2.18 Edit IP Camera
2. Edit the camera information, such as the IP address, protocol, port, etc.
3. Click the button OK to save the new settings.
4. To delete the added camera, click the icon III; Or check the corresponding checkbox and click the button Delete.
Description of the icons:
 | Add the online IP camera automatically. |
 | Edit the basic parameters of the added IP camera. |
 | Delete the added IP camera. |
 | Get the live view of the added IP camera. |
 | Upgrade the added IP camera. |
Configuring the custom protocols
Purpose:
Custom protocols can be set for the network cameras which are not configured with the standard protocols.
Steps:
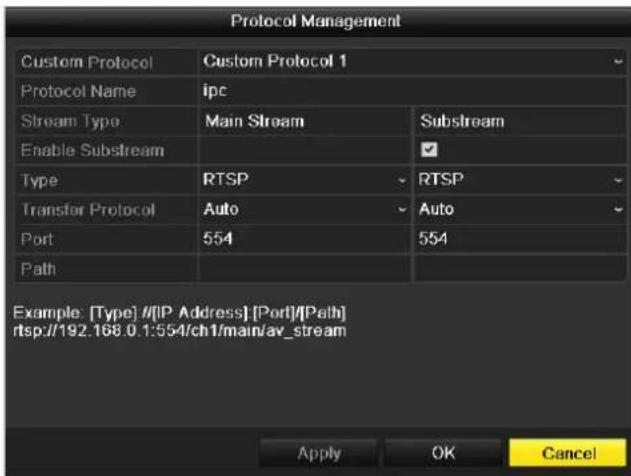
- Click the button Protocol on the Custom Adding interface to open the Protocol Management page.
text_image
Protocol Management Custom Protocol Custom Protocol 1 Protocol Name ipc Stream Type Main Stream Substream Enable Substream Type RTSP RTSP Transfer Protocol Auto Auto Port 554 554 Path Example: [Type] #[IP Address] [Port]/[Path] rtsp://192.168.0.1:554/ch/main/av_stream Apply OK CancelFigure 2.19 Protocol Management Interface
- There are 16 custom protocols provided in the system. Select a custom protocol from the drop-down list, and configure its corresponding parameters.

Before customizing the protocol for the network camera, you have to contact the manufacturer of the network camera to consult the URL (uniform resource locator) for getting main stream and sub-stream.
The format of the URL is: [Type]://[IP Address of the network camera]:[Port]/[Path].
Example: rtsp://192.168.1.55:554/ch1/main/av_stream.
• Protocol Name: Edit the name for the custom protocol.
- Enable Sub-stream: If the network camera does not support sub-stream or the sub-stream is not needed, leave the checkbox empty.
- Type: The network camera adopting custom protocol must support getting stream through standard RTSP.
• Transfer Protocol: Select the transfer protocol for the custom protocol.
• Port: Set the port No. for the custom protocol.
• Path: Set the resource path for the custom protocol. E.g., ch1/main/av_stream.
- Click Apply to save the settings and click OK exit.
After added successfully, the custom protocol will be displayed in the drop-down list of protocol on the Custom Adding interface.
Chapter 3 Live View
3.1 Introduction of Live View
Live view shows you the video image getting from each camera in real time. The device automatically enters Live View mode when powered on. It is also at the very top of the menu hierarchy, thus right-clicking the mouse repeatedly (depending on which menu you're on) brings you to the Live View mode.
Live View Icons
In the live view mode, there are icons in the upper-right corner of the live view window, or in the lower-left corner of the screen for each channel, showing the status of the record and alarm in the channel, so that you can know whether the channel is recorded, or whether there are alarms occur as soon as possible.
Table 3.1 Description of Live View Icons
| Icons | Description |
| [SCAX] | Alarm (video loss, tampering, motion detection or sensor alarm) |
| [6475] | Record (manual recording, continuous recording, motion detection or sensor alarm triggered recording) |
| [KST2] | Alarm & Record |
| [6CGB] | Event/Exception (motion detection, sensor alarm or exception information. For details, see Chapter 8.6 Handling Exceptions.) |

Sensor alarm is not supported by DS-7200HWI-SV series.
3.2 Operations in Live View Mode
Table 3.2 Priorities of Outputs for DS-9200/9100/9000/8100/8000HWI-ST & DS-7200 Series
| HDMI/VGA | CVBS | Main output | Auxiliary output | |
| 1 | HDMI/VGA | CVBS | ||
| 2 | × | HDMI/VGA | ||
| 3 | × | CVBS |
Table 3.3 Priorities of Outputs for Other Models
| HDMI | VGA | CVBS | Main output | Auxiliary output | |
| 1 | √ | √ | √ | HDMI | VGA |
| 2 | √ | × | √ | HDMI | CVBS |
| 3 | × | √ | √ | VGA | CVBS |
| 4 | × | × | √ | CVBS |
√ means the interface is in use, × means the interface is out of use or the connection is invalid. And the HDMI, VGA and CVBS can be used at the same time.
When the aux output is enabled, you can do some basic operation in the live view mode for the Aux output, while no operation is allowed for the main output.
3.2.1 Front Panel Operation

Front panel operation is not supported by 7200HWI-SV series.
Table 3.4 Front Panel Operation in Live View
| Functions | Front Panel Operation |
| Show single screen | Press the corresponding Alphanumeric button. E.g. Press 2 to display only the screen for channel 2. |
| Show multi-screen | Press the PREV/FOCUS- button. |
| Manually switch screens | Next screen: right direction button.Previous screen: left direction button. |
| Auto-switch | Press Enter button. |
| Playback | Press Play button. |
| Switch main and aux output | Press Main/Aux button and Enter button. |
3.2.2 Using the Mouse in Live View
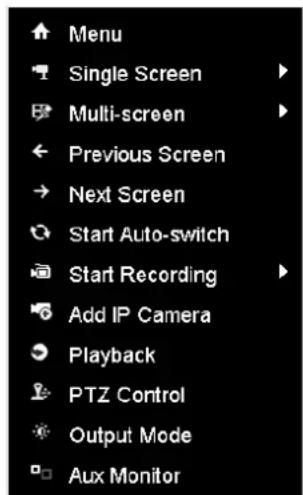
text_image
Menu Single Screen Multi-screen Previous Screen Next Screen Start Auto-switch Start Recording Add IP Camera Playback PTZ Control Output Mode Aux MonitorFigure 3.1 Right-click Menu
Table 3.5 Mouse Operation in Live View
| Name | Description |
| Menu | Enter the main menu of the system by right clicking the mouse. |
| Single Screen | Switch to the single full screen by choosing channel number from the drop-down list. |
| Multi-screen | Adjust the screen layout by choosing from the drop-down list. |
| Previous Screen | Switch to the previous screen. |
| Next Screen | Switch to the next screen. |
| Start/Stop Auto-switch | Enable/disable the auto-switch of the screens. |
| Start Recording | Start all-day normal recording or motion detection recording for all channels. |
| Add IP Camera | Add IP camera to the device. |
| Playback | Play back the video of the selected channel. |
| PTZ Control | Enter the PTZ control panel in live view mode. |
| Output Mode | Set the video output mode to Standard, Bright, Gentle or Vivid. |
| Aux Monitor | Switch to the auxiliary output mode. |

- The dwell time of the live view configuration must be set before using Start Auto-switch. Refer to Chapter 3.3 for dwell time settings.
- If you enter Aux monitor mode and the Aux monitor is not connected, the mouse operation is disabled; you need to switch back to the Main output with the MAIN/AUX button and Enter button on the front panel or remote.
- Add IP Camera is only available for the HDVR series.
3.2.3 Using an Auxiliary Monitor
Certain features of the Live View are also available while in an Aux monitor. These features include:
- Single Screen: Switch to a full screen display of the selected camera. Camera can be selected from a drop-down list.
• Multi-screen: Switch different display layout options. Layout options can be selected from a drop-down list. - Previous Screen: When displaying less than the maximum number of cameras in Live View, clicking this feature will switch to the previous set of displays.
- Next Screen: When displaying less than the maximum number of cameras in Live View, clicking this feature will switch to the next set of displays.
- Playback: Enter into Playback mode.
• PTZ: Enter PTZ control panel in live view mode.
• Output Mode: Set the video output mode to Standard, Bright, Gentle or Vivid.
• Main Monitor: Enter Main operation mode.

In the live view mode of the main output monitor, the menu operation is not available when Aux output mode is enabled.
3.2.4 Quick Setting Toolbar in Live View Mode
Click on the live view window, a quick setting toolbar will be shown on the bottom as follows:

The Live View Strategy icon 📄 and Information icon 📄 are only available for network cameras.

text_image
Screenshot of a software toolbar with icons for media, video, image editing, and camera controlFigure 3.2 Quick Setting Toolbar
Table 3.6 Description of Quick Setting Toolbar Icons
| Icons | Description | Icons | Description | Icons | Description |
 | Enable/Disable Record |  _ _ | Instant Playback |  | Mute/Audio on |
 | Capture |  _ _ | PTZ Control | [YYT7] _ | Digital Zoom |
 _ _ | Image Settings |  | Live View Strategy |  | Information |
 _ _ | Close |

Instant Playback only shows the record in last five minutes. If no record is found, it means there is no record le during the last five minutes.

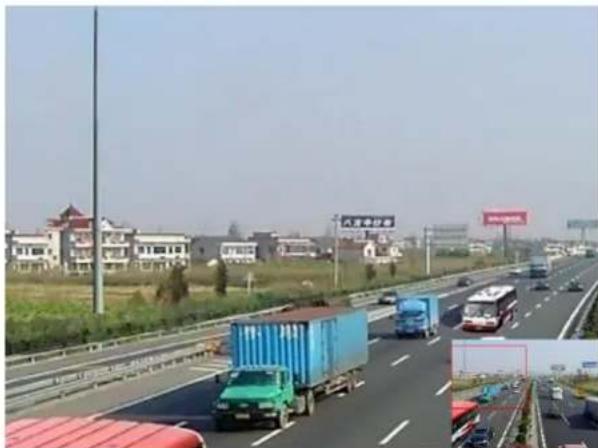
Digital Zoom function makes the camera zoom in on selected area, thus to get a close view of the picture. You click-and-drag the mouse to select the area for zooming in.
natural_image
Highway scene with trucks, shipping containers, and residential buildings in the background (no visible text or symbols)Figure 3.3 Digital Zoom

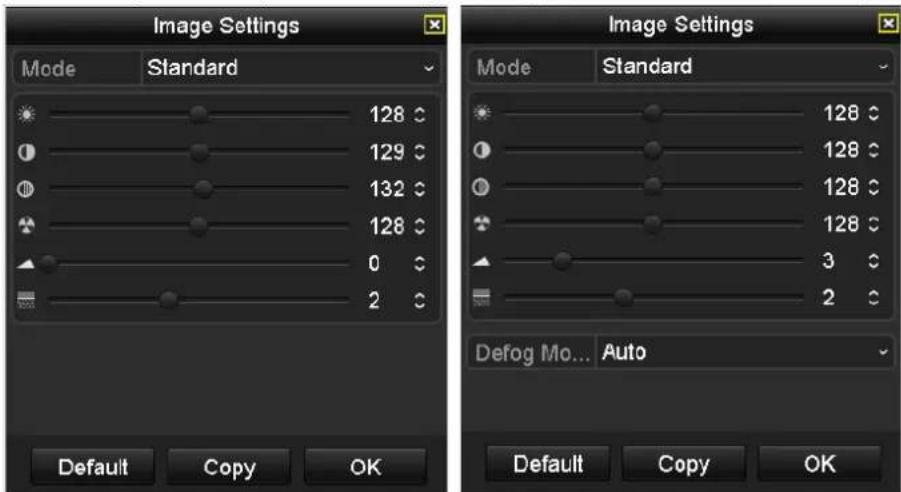
Image Settings icon can be selected to enter the Image Settings menu.
For Analog Cameras:
Four modes are selectable according to the real situation:
• Standard: for general lighting conditions (default).
• Indoor: the image is relatively smoother.
• Dim Light: the image is smoother than the other two modes.
• Outdoor: the image is relatively clearer and sharper. The degree of contrast and saturation is high.
text_image
Image Settings Mode Standard 128 ° 129 ° 132 ° 128 ° 0 ° 2 ° Default Copy OK Image Settings Mode Standard 128 ° 128 ° 128 ° 128 ° 3 ° 2 ° Defog Mo... Auto Default Copy OKFigure 3.4 Image Settings for Analog Camera
You can adjust the image parameters, including brightness, contrast, saturation, hue, sharpness and denoising. You can also click Default to restore the default settings and click Copy to copy the image settings to other analog channels.

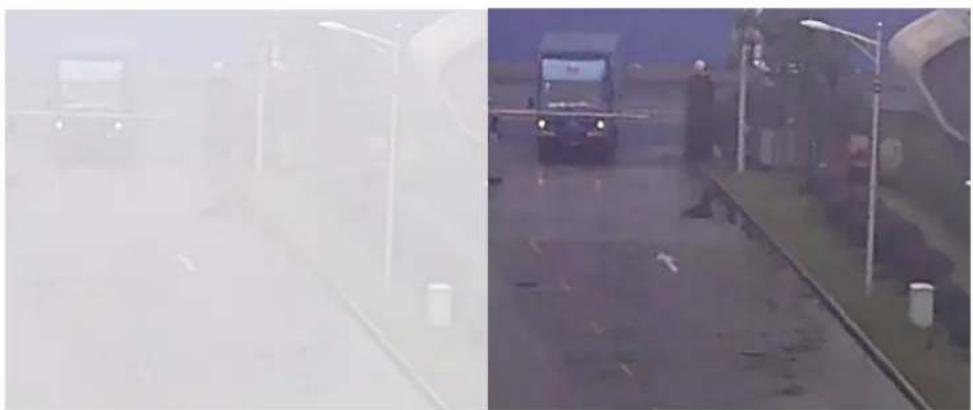
For analog cameras connected to DS-9200 HWI-ST series device, the defog mode is available. The defog function is useful in foggy environment and 3 types of defog modes are selectable: Auto (default), Manual and Disable. A correct and natural image will be provided with the defog function enabled.
natural_image
Two-panel image showing a vehicle on a wet street with a person walking nearby; no visible text or symbols.Figure 3.5 A Comparison of the Details Before and After Defogging
For Network Cameras:
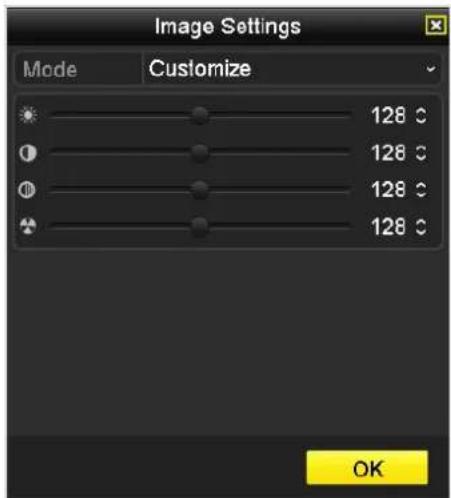
You can customize the brightness, contrast, saturation and hue of network cameras.
text_image
Image Settings Mode Customize 128 °C 128 °C 128 °C 128 °C OKFigure 3.6 Image Settings- Customize for Network Camera
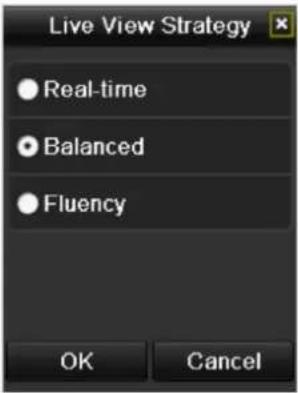
Live View Strategy icon can be selected to enter the Live View Strategy menu. You can set the live view performance to real-time, balanced or fluency.

This feature is only available for network cameras.
text_image
Live View Strategy Real-time Balanced Fluency OK CancelFigure 3.7 Live View Strategy
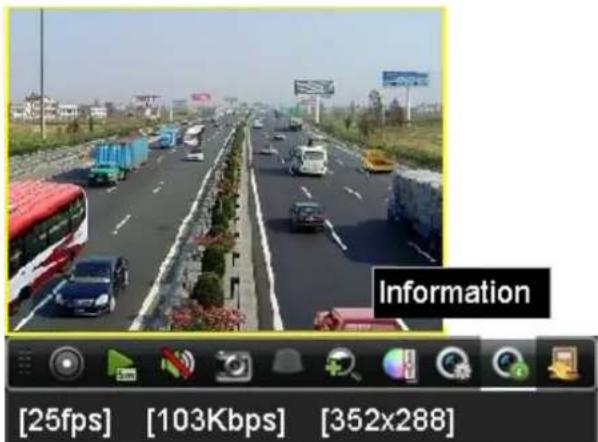
Information icon can be selected to show the real-time status of the network camera, including the frame rate, bitrate and resolution.
text_image
Information [25fps] [103Kbps] [352x288]Figure 3.8 Information
3.3 Adjusting Live View Settings
Purpose:
Live View settings can be customized to meet different needs. You can configure the output interface, number of display window, dwell time for screen display, audio output settings, etc.

We use the interface of DS-9100HFI-ST series (unless otherwise stated) as the example to describe the following settings.
Steps:
- Enter the Live View Settings interface.
Menu> Configuration> Live View
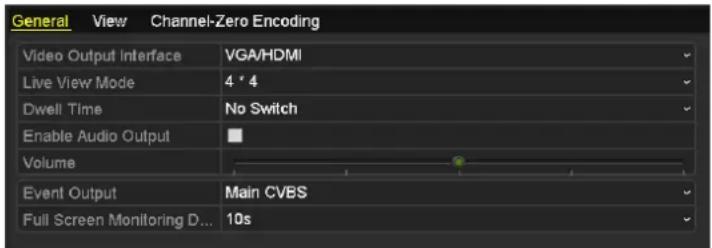
text_image
General View Channel-Zero Encoding Video Output Interface VGA/HDMI Live View Mode 4 * 4 Dwell Time No Switch Enable Audio Output Volume Event Output Main CVBS Full Screen Monitoring D... 10sFigure 3.9 Live View-General
The settings available in this menu include:
- Video Output Interface: Designates the output to configure the settings for. The interfaces include HDMI (depends on the model), VGA, Main CVBS and Spot Output.
• Live View Mode: Designates the display mode to be used for Live View. - Dwell Time: The time in seconds to dwell between switching of channels when enabling auto-switch in Live View.
- Enable Audio Output: Enables/disables audio output for the selected video output.
-
Volume: Adjust the volume of live view, playback and two-way audio for the selected output interface.
• Event Output: Designates the output to show event video.
• Full Screen Monitoring Dwell Time: The time in seconds to show alarm event screen. -
Setting Camera Order
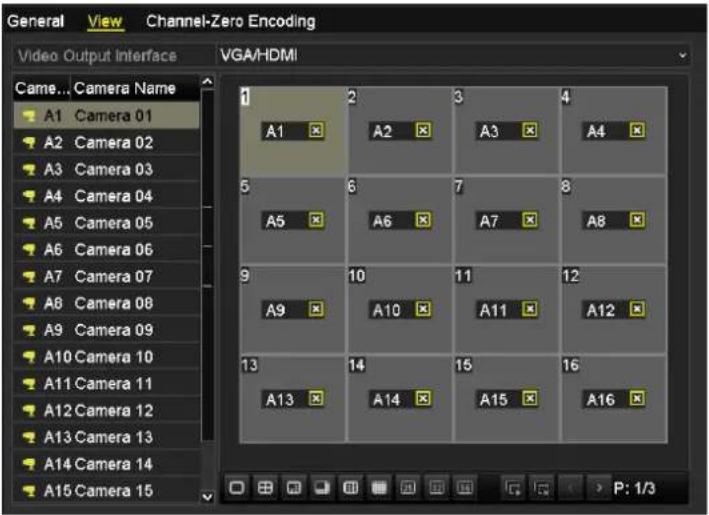
text_image
General View Channel-Zero Encoding Video Output Interface VGA/HDMI Camera... Camera Name A1 Camera 01 A2 Camera 02 A3 Camera 03 A4 Camera 04 A5 Camera 05 A6 Camera 06 A7 Camera 07 A8 Camera 08 A9 Camera 09 A10 Camera 10 A11 Camera 11 A12 Camera 12 A13 Camera 13 A14 Camera 14 A15 Camera 15 1 2 3 4 A1 A2 A3 A4 5 6 7 8 A5 A6 A7 A8 9 10 11 12 A9 A10 A11 A12 13 14 15 16 A13 A14 A15 A16 P: 1/3Figure 3.10 Live View- Camera Order
To set the camera order:
1) Click the View tab.
2) Select a Video Output Interface and select a screen layout

3) Select the small window, and double-click on the channel number to display the channel on the window.

X × means the channel will not be displayed.
You can also click 📄 to start live view of all channels in order and click 📄 to stop live view of all channels. Click 📄 to go to the previous or next page.
4) Click Apply to save the setting.
You can also click-and-drag the camera to the desired window on the live view interface to set the camera order.
3.4 Channel-zero Encoding
Purpose:
Sometimes you need to get a remote view of many channels in real time from web browser or CMS (Client Management System) software, in order to decrease the bandwidth requirement without affecting the image quality, channel-zero encoding is provided as an option for you.
Steps:
- Enter the Live View Settings interface.
Menu> Configuration> Live View
- Click the Channel-Zero Encoding tab.
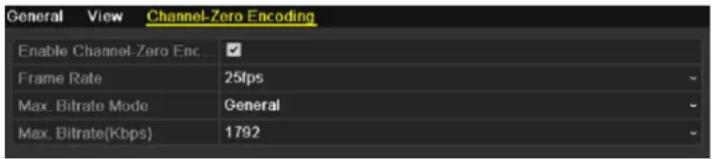
text_image
General View Channel-Zero Encoding Enable Channel-Zero Enc... Frame Rate 25fps Max. Bitrate Mode General Max. Bitrate(Kbps) 1792Figure 3.11 Live View- Channel-Zero Encoding
- Check √ checkbox to enable channel-zero encoding.
- Configure the Frame Rate, Max. Bitrate Mode and Max. Bitrate.
After you set the channel-zero encoding, you can get a view in the remote client or web browser of all the channels in one screen.
3.5 Manual Video Quality Diagnostics
Purpose:
The video quality of the analog channels can be diagnosed manually and you can view the diagnostic results from a list.
Steps:
- Enter the Manual Video Quality Diagnostics interface.
Menu> Manual >Manual Video Quality Diagnostics
-
Check the checkboxes to select the channels for diagnostics.
-
Click the button Diagnose, and the results will be displayed on a list. You can view the video status and diagnostics time of the selected channels.
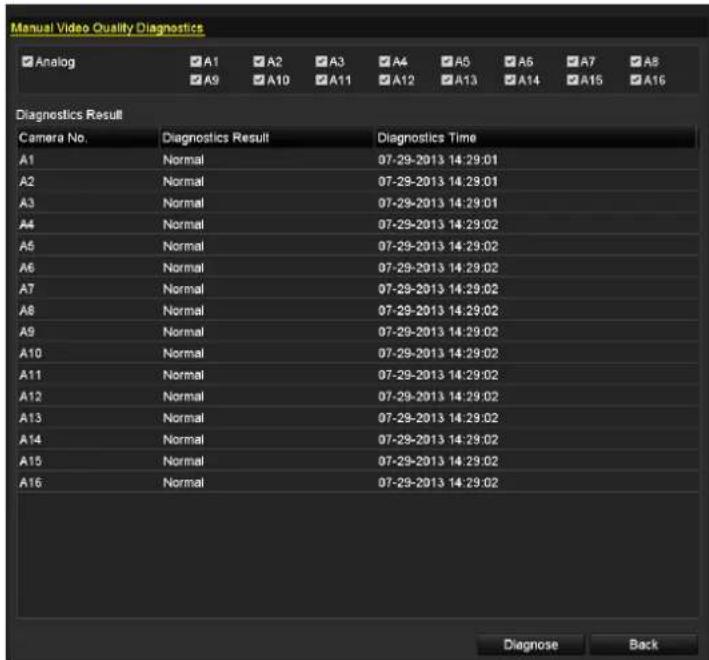
text_image
Manual Video Quality Diagnostics Analog A1 A2 A3 A4 A5 A6 A7 A8 A9 A10 A11 A12 A13 A14 A15 A16 Diagnostics Result Camera No. Diagnostics Result Diagnostics Time A1 Normal 07-29-2013 14:29:01 A2 Normal 07-29-2013 14:29:01 A3 Normal 07-29-2013 14:29:01 A4 Normal 07-29-2013 14:29:02 A5 Normal 07-29-2013 14:29:02 A6 Normal 07-29-2013 14:29:02 A7 Normal 07-29-2013 14:29:02 A8 Normal 07-29-2013 14:29:02 A9 Normal 07-29-2013 14:29:02 A10 Normal 07-29-2013 14:29:02 A11 Normal 07-29-2013 14:29:02 A12 Normal 07-29-2013 14:29:02 A13 Normal 07-29-2013 14:29:02 A14 Normal 07-29-2013 14:29:02 A15 Normal 07-29-2013 14:29:02 A16 Normal 07-29-2013 14:29:02 Diagnose BackFigure 3.12 Diagnostics Result

- Connect the analog signal to the device for the video quality diagnostics.
● Three exception types can be diagnosed: Blurred Image, Abnormal Brightness and Color Cast.
3.6 User Logout
Purpose:
After logging out, the monitor turns to the live view mode and if you want to do some operation, you need to enter user name and password to log in again.
Steps:
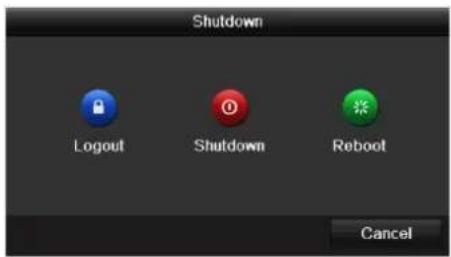
- Enter the Shutdown menu.
Menu > Shutdown
text_image
Shutdown Logout Shutdown Reboot CancelFigure 3.13 Shutdown
- Click Logout.

After you have logged out the system, menu operation on the screen is invalid. It is required a user name and password to login the system.
Chapter 4 PTZ Control
4.1 Configuring PTZ Settings
Purpose:
Follow the procedure to set the parameters for PTZ. The configuring of the PTZ parameters should be done before you control the PTZ camera.
Before you start:
Make sure that the PTZ camera and the device are connected properly via RS-485 interface.
Steps:
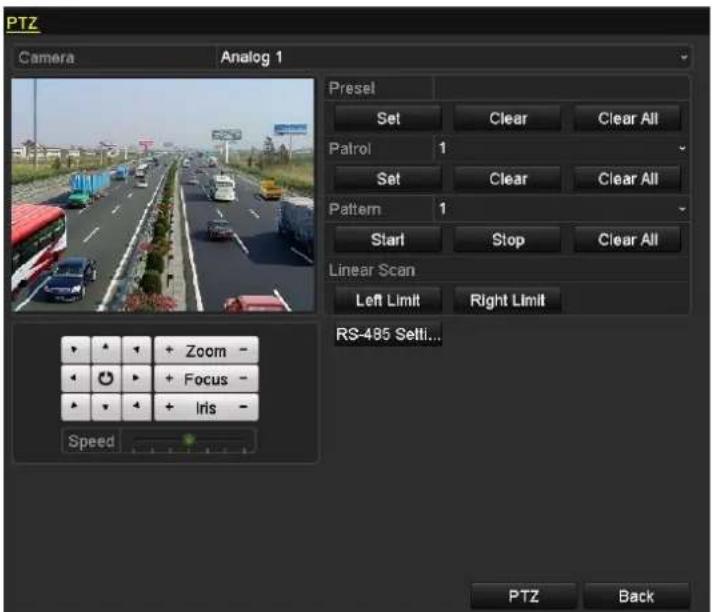
- Enter the PTZ Settings interface.
Menu > Camera > PTZ
text_image
PTZ Camera Analog 1 Presel Set Clear Clear All Patrol 1 Set Clear Clear All Pattern 1 Start Stop Clear All Linear Scan Left Limit Right Limit RS-485 Setti... Zoom - Focus - Iris - Speed PTZ BackFigure 4.1 PTZ Settings
- Select the camera for PTZ setting from the drop-down list.
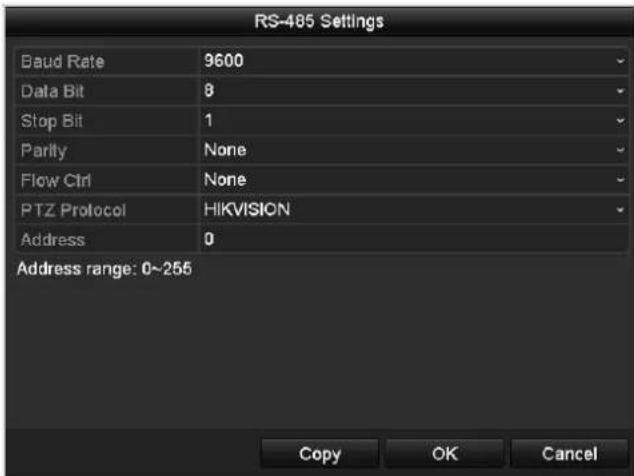
- Click the RS-485 Settings button and then configure the RS-485 parameters of the device.
text_image
RS-485 Settings Baud Rate 9600 Data Bit 8 Stop Bit 1 Parity None Flow Ctrl None PTZ Protocol HIKVISION Address 0 Address range: 0~255 Copy OK CancelFigure 4.2 RS-485 Settings

All the parameters should be exactly the same as the PTZ camera parameters. Only PTZ Protocol can be configured for network cameras.
Example: If the PTZ camera has a Baud rate as 115200, you should input 115200 in the Baud Rate field.
- Click Copy if you want to configure same settings to other analog PTZ cameras.
- Click Apply to save the settings.
4.2 Setting PTZ Presets, Patrols & Patterns
Before you start:
Make sure that the presets, patrols and patterns should be supported by PTZ protocols.

We use the interface of DS-9100HFI-ST series (unless otherwise stated) as the example to describe the following settings.
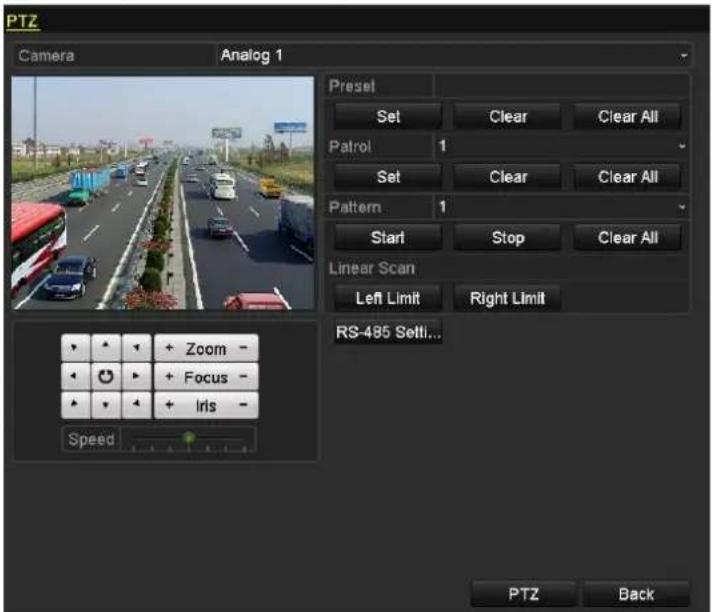
Enter the PTZ Settings interface (Menu> Camera >PTZ).
text_image
PTZ Camera Analog 1 Preset Set Clear Clear All Patrol 1 Set Clear Clear All Pattern 1 Start Stop Clear All Linear Scan Left Limit Right Limit RS-485 Set... Zoom - Focus - Iris - Speed PTZ BackFigure 4.3 PTZ Settings
4.2.1 Customizing Presets
Purpose:
A preset is a predefined image position which contains information of pan, tilt, focus and other parameters. You can customize the presets and the presets can be used with the event triggered action.
Steps:
- Select the camera for PTZ setting from the drop-down list.
- Use the directional and zoom / focus / iris buttons on the PTZ control panel to steer the camera to the desired view.
- Input the preset No. (1\~255) in the Preset text field, and then click the Set button under the Preset item to save the preset.
- Repeat the steps 3-4 to save more presets.
- You can click the Clear button under the Preset item to clear the selected preset or click the Clear All button to clear all the presets.
4.2.2 Calling Presets
Purpose:
The view angle of the PTZ camera will be moved to the predefined position when you call a preset.
Steps:
- Click the button PTZ in the lower-right corner of the PTZ setting interface;
or press the PTZ button on the front panel;
or click the PTZ Control icon 📄 in the quick setting toolbar during the live view process, or click PTZ Control on the right-click menu to open the PTZ control panel in live view mode.
- Select the PTZ camera from the drop-down list for control.
- Click the icon ▶ on the panel and then click the General tab to enter the general PTZ control interface.
- Input the preset No. in the corresponding text field, and then click the Call Preset button to call it.
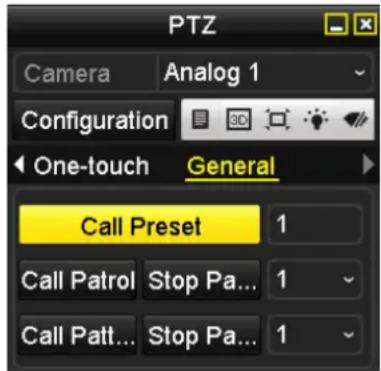
text_image
PTZ Camera Analog 1 Configuration One-touch General Call Preset 1 Call Patrol Stop Pa... 1 Call Patt... Stop Pa... 1Figure 4. 4 PTZ Control Panel-Call Preset
4.2.3 Customizing Patrols
Purpose:
A patrol is a scanning track specified by a group of user-defined key points, with the scanning speed between two key points and the duration time at each key point separately programmable. The key points are corresponding to the presets.
Steps:
- Select the camera for PTZ setting from the drop-down list.
- Select patrol number from the drop-down list.
- Click the button Set under the Patrol item to open KeyPoint settings interface.
- Configure key point parameters, such as the preset No., duration of staying for one key point and speed of patrol. The key point is corresponding to the preset. The Preset determines the order at which the PTZ will follow while cycling through the patrol. The Duration refers to the time span to stay at the corresponding key point. The Speed defines the speed at which the PTZ will move from one key point to the next.
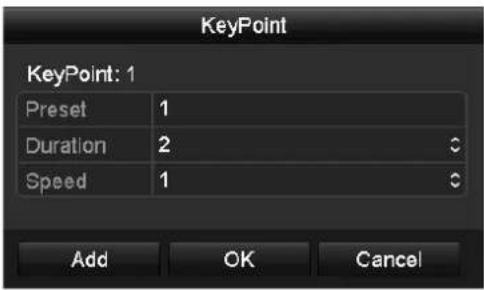
text_image
KeyPoint KeyPoint: 1 Preset 1 Duration 2 Speed 1 Add OK CancelFigure 4.5 Key point Configuration
- Click Add to save the current key point, and then repeat the above steps to set the next one.
- Click OK to save the patrol settings
- You can click the Clear button under the Patrol item to clear the selected patrol or click the Clear All button to clear all the patrol.
4.2.4 Calling Patrols
Purpose:
The PTZ camera will move according to the predefined patrol path when you call a patrol.
Steps:
- Click the button PTZ in the lower-right corner of the PTZ setting interface; or press the PTZ button on the front panel;
or click the PTZ Control icon 📄 in the quick setting toolbar during the live view process, or click PTZ Control on the right-click menu to open the PTZ control panel in live view mode.
- Select the PTZ camera from the drop-down list for control.
- Click the icon ▶ on the panel and then click the General tab to enter the general PTZ control interface.
- Select the patrol from the corresponding drop-down list, and then click the Call Patrol button to start the patrol.
- To stop the patrol, you can click the button Stop Patrol on the panel.
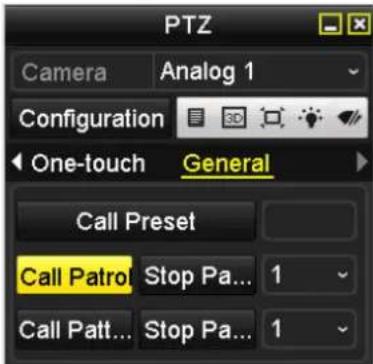
text_image
PTZ Camera Analog 1 Configuration One-touch General Call Preset Call Patrol Stop Pa... 1 Call Patt... Stop Pa... 1Figure 4.6 Control Panel-Call Patrol
4.2.5 Customizing Patterns
Purpose:
A pattern is a memorized, repeating series of pan, tilt, zoom, and preset functions.
Steps:
- Select the camera for PTZ setting from the drop-down list.
- Select the pattern number from the drop-down list.
- Click the Start button under the Pattern item and then click the eight directional buttons under the image to move the PTZ camera.
- Click the Stop button, and the movement of PTZ is recorded as the pattern.
4.2.6 Calling Patterns
Purpose:
The PTZ camera will move according to the predefined pattern path when you call a pattern.
Steps:
-
Click the button PTZ in the lower-right corner of the PTZ setting interface; or press the PTZ button on the front panel; or click the PTZ Control icon in the quick setting toolbar during the live view process; or click PTZ Control on the right-click menu to open the PTZ control panel in live view mode.
-
Select the PTZ camera from the drop-down list for control.
- Click the icon ▶ on the panel and then click the General tab to enter the general PTZ control interface.
- Select the patrol from the corresponding drop-down list, and then click the Call Pattern button to start the pattern.
- To stop the pattern, you can click the button Stop Pattern on the panel.
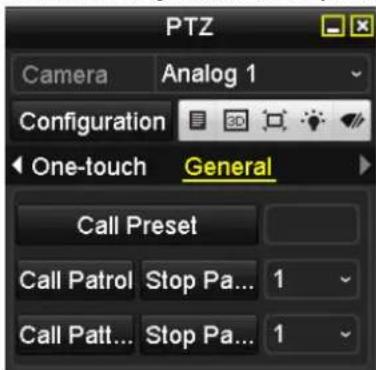
text_image
PTZ Camera Analog 1 Configuration One-touch General Call Preset Call Patrol Stop Pa... 1 Call Patt... Stop Pa... 1Figure 4.7 Control Panel-Call Pattern
4.2.7 Customizing Linear Scan
Purpose:
Two limit points can be set for the view of the PTZ camera, and then the PTZ camera can horizontally auto scan between the two predefined limits.

This function requires the support of the connected PTZ camera.
Steps:
- Select the camera for PTZ setting from the drop-down list.
- Use the directional and zoom / focus / iris buttons on the PTZ control panel to steer the camera to the desired view, and click the button Left Limit / Right Limit to set the left / right limit point.
4.2.8 Calling Linear Scan
Purpose:
The PTZ camera will horizontally auto scan between the two predefined limit points.
Steps:
- Click the button PTZ in the lower-right corner of the PTZ setting interface; or press the PTZ button on the front panel;
or click the PTZ Control icon 📄 in the quick setting toolbar during the live view process; or click PTZ Control on the right-click menu to open the PTZ control panel in live view mode.
- Select the PTZ camera from the drop-down list for control.
- Click the icon ☐ on the panel and then click the One-touch tab to enter the One-touch control interface.
- Click the Linear Scan button to start the linear scan.
- To stop the linear scan, you can click the Linear Scan button again on the panel.
- You can click the Restore button and then reboot the PTZ camera to clear the limit points information.
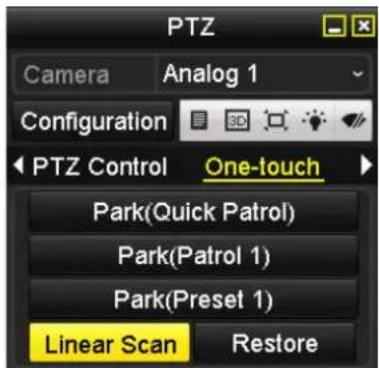
text_image
PTZ Camera Analog 1 Configuration PTZ Control One-touch Park(Quick Patrol) Park(Patrol 1) Park(Preset 1) Linear Scan RestoreFigure 4.8 Control Panel-Call Linear Scan
4.2.9 One-touch Park
Purpose:
The one-touch park function allows the PTZ camera to start a predefined action (park action: scan, preset, pattern, etc.) automatically after a period of inactivity (park time).
Steps:
- Click the button PTZ in the lower-right corner of the PTZ setting interface; or press the PTZ button on the front panel;
or click the PTZ Control icon 📄 in the quick setting toolbar during the live view process; or click PTZ Control on the right-click menu to open the PTZ control panel in live view mode.
- Select the PTZ camera from the drop-down list for control.
- Click the icon ▶ on the panel and then click the One-touch tab to enter the One-touch control interface.
- There are 3 one-touch park types selectable, click the corresponding button to activate the park action.
Park (Quick Patrol): The PTZ camera starts the quick patrol (from preset 1 to preset 32 in order) automatically after the park time. The undefined preset will be skipped.
Park (Patrol 1): The PTZ camera moves according to the path of predefined patrol 1 after the park time.
Park (Preset 1): The PTZ camera moves to the location of predefined preset 1 after the park time.
- Click the button again to inactivate the corresponding park action.
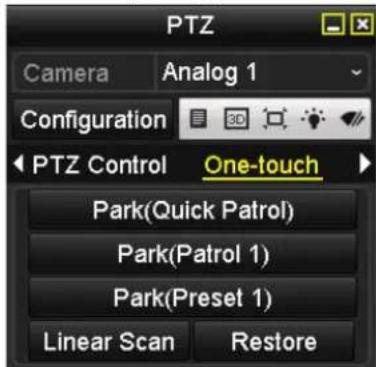
text_image
PTZ Camera Analog 1 Configuration PTZ Control One-touch Park(Quick Patrol) Park(Patrol 1) Park(Preset 1) Linear Scan RestoreFigure 4.9 Control Panel-Call Linear Scan

The park time can only be set through the local menu of PTZ camera and the default value is 5s.
4.3 PTZ Control Panel
To enter the PTZ control Panel, there are 2 ways supported:
Option1:
In the PTZ settings interface, click the PTZ button on the lower-right corner.
Option2:
In the Live View mode, you can press the PTZ Control button on the front panel or on the remote control, or click the PTZ Control icon in the quick setting toolbar, or click PTZ Control on the right-click menu to enter the PTZ control panel.
Click the Configuration button on the panel, and you can enter the PTZ Settings interface.

In PTZ control mode, the PTZ panel will be displayed when a mouse is connected with the device. If no mouse is connected, the PTZ icon appears in the lower-left corner of the window, indicating that this camera is in PTZ control mode.
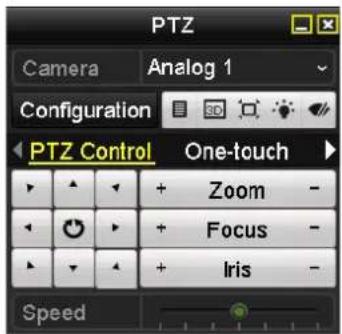
text_image
PTZ Camera Analog 1 Configuration PTZ Control One-touch Zoom - Focus - Iris - Speed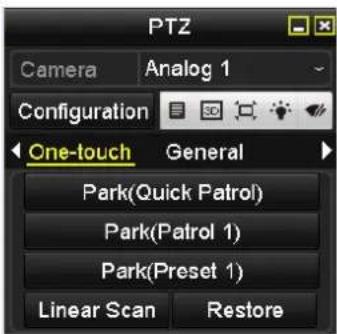
text_image
PTZ Camera Analog 1 Configuration One-touch General Park(Quick Patrol) Park(Patrol 1) Park(Preset 1) Linear Scan Restore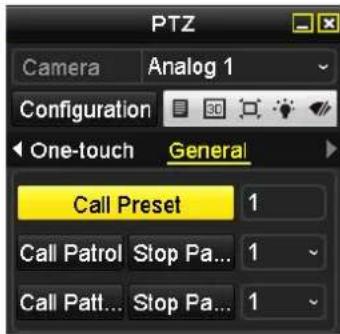
text_image
PTZ Camera Analog 1 Configuration One-touch General Call Preset 1 Call Patrol Stop Pa... 1 Call Patt... Stop Pa... 1Figure 4.10 PTZ Panel
Table 4.1 Description of the PTZ panel icons
| Icon | Description | Icon | Description | Icon | Description |
 | Direction button and auto-cycle button | Zoom+, Focus+, Iris+ | Zoom-, Focus-, Iris- | ||
| Speed of PTZ movement | Light on/off | Wiper on/off | |||
| 3D-Zoom | Image Centralization | Menu | |||
 | Switch to the PTZ control interface |  | Switch to the one-touch control interface |  | Switch to the general settings interface |
| Previous item | Next item | Minimize windows | |||
| Exit |
Chapter 5 Record and Capture Settings

Sensor alarm is not supported by DS-7200HW1-SV series. The interfaces of the device are subject to the actual model.
5.1 Configuring Encoding Parameters
Purpose:
By configuring the encoding parameters you can define the parameters which affect the image quality, such as transmission stream type, the resolution, etc.
Before you start:
- Make sure that the HDD has already been installed. If not, please install a HDD and click Init to initialize it. (Menu > HDD > General)
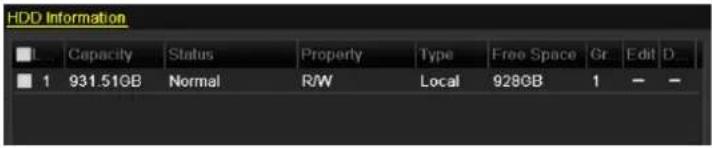
text_image
HDD Information I Capacity Status Property Type Free Space Gr Edit D 1 931.51GB Normal R/W Local 928GB 1 - -Figure 5.1 HDD- General
- Check the storage mode of the HDD
1) Click Advanced to check the storage mode of the HDD.
2) If the HDD mode is Quota, please set the maximum record capacity and maximum picture capacity. For detailed information, see Chapter 11.5 Configuring Quota Mode.
3) If the HDD mode is Group, you should set the HDD group. For detailed information, see Chapter 5.9 Configuring HDD Group for Recording and Capture.
Steps:
- Enter the Record settings interface to configure the encoding parameters:
Menu > Record > Parameters
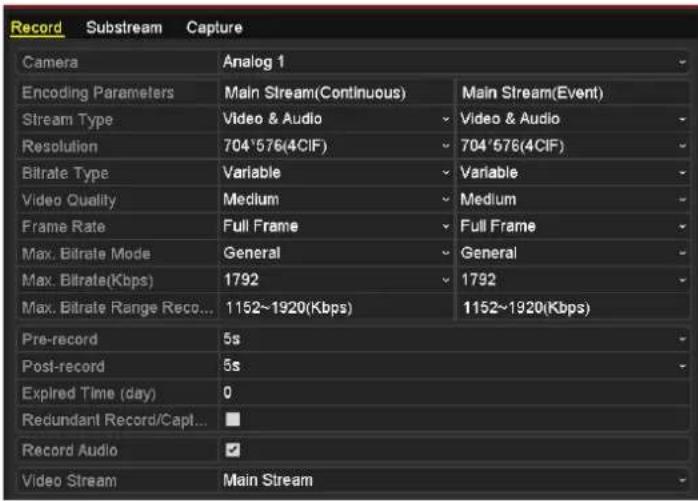
text_image
Record Substream Capture Camera Analog 1 Encoding Parameters Main Stream(Continuous) Main Stream(Event) Stream Type Video & Audio - Video & Audio - Resolution 704'576(4CIF) - 704'576(4CIF) - Bitrate Type Variable - Variable - Video Quality Medium - Medium - Frame Rate Full Frame - Full Frame - Max. Bitrate Mode General - General - Max. Bitrate(Kbps) 1792 - 1792 - Max. Bitrate Range Reco... 1152~1920(Kbps) 1152~1920(Kbps) Pre-record 5s Post-record 5s Expired Time (day) 0 Redundant Record/Capt... Record Audio ✓ Video Stream Main StreamFigure 5.2 Record Parameters
2. Encoding Parameters for Recording
1) Click the Record tab to configure the record parameters, such as stream type, resolution, bitrate type, video quality, frame rate, etc.
- Pre-record: The time you set to record before the scheduled time or event. For example, when an alarm triggered the recording at 10:00, if you set the pre-record time as 5 seconds, the camera records it at 9:59:55.
- Post-record: The time you set to record after the event or the scheduled time. For example, when an alarm triggered the recording ends at 11:00, if you set the post-record time as 5 seconds, it records till 11:00:05.
- Expired Time: The time for keeping the record files in the HDDs, once exceeded, the files will be deleted. The files will be saved permanently if the value is set as 0. The actual keeping time for the files should be determined by the capacity of the HDDs.
- Redundant Record/ Capture: Enabling redundant record or capture means you save the record and captured picture in the redundant HDD. See Chapter 5.8 Configuring Redundant Recording/ Capture.
- Record Audio: Enable this feature to record the sound and disable it to record the video without sound.
- Video Stream: Main stream and sub-stream are selectable for recording. When you select sub-stream, you can record for a longer time with the same storage space

text_image
Pre-record 5s Post-record 5s Expired Time (day) 0 Redundant Record/Capture ■Figure 5.3 Record Encoding (when HDD Mode is Group)
| Pre-record | 5s |
| Post-record | 5s |
| Expired Time (day) | 0 |
Figure 5.4 Recording Encoding (when HDD Mode is Quota or Frame Extracting)

● The Redundant Record/Capture option is only available when the HDD mode is Group.
- Redundant HDD is required for the redundant record/capture function. For detailed information, see Chapter 11.4.2 Setting HDD Property.
- For network cameras, the parameters of Main Stream (Event) are not editable.
- For DS-9100/9000/8100/8000HWI-ST & DS-7200HWI-SV series, you can enable/disable the WD1 mode.
2) Click Apply to save the settings.
3) Optionally, you can click Copy to copy the settings to other analog channels if needed.
3. Encoding Parameters for Sub-stream
1) Click the Substream tab to configure the parameters of sub-stream, such as stream type, resolution, frame rate, etc.

text_image
Record Substream Capture Camera Analog 1 Stream Type Video & Audio Resolution 176*144(QCIF) Bitrate Type Variable Video Quality Medium Frame Rate Full Frame Max. Bitrate Mode General Max. Bitrate(Kbps) 128 Max. Bitrate Range Reco... 192~320(Kbps)Figure 5.5 Sub-stream Encoding
2) Click Apply to save the settings.
3) Optionally, you can click Copy to copy the settings to other analog channels if needed.
- Encoding Parameters for Capture
1) Click the Capture tab to configure the capture parameters, such as resolution, picture quality, etc.
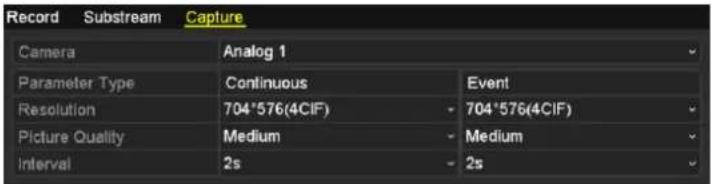
text_image
Record Substream Capture Camera Analog 1 Parameter Type Continuous Event Resolution 704*576(4CIF) - 704*576(4CIF) Picture Quality Medium - Medium Interval 2s - 2sFigure 5.6 Capture Encoding
2) You can configure the continuous and event parameters separately.
3) Click Apply to save the settings.
4) Optionally, you can click Copy to copy the settings to other analog channels if needed.

The interval is the time period between two capturing actions and the interval can be set as 1s, 2s, 3s, 4s, 5s, 10min, 30min, 1h, 12h and 24h. You can configure all the parameters on this menu on your demand.
- Configure the overwrite mode of the HDD (Menu>Record>Advanced>Advanced). Check ☑ checkbox to enable the overwrite mode, and then the record files will be overwritten when the HDD becomes full. Otherwise, the recording will stop when the HDD becomes full.

text_image
Advanced Two-way Audio Overwrite eSATA eSATA1 Usage Record/CaptureFigure 5.7 Overwrite Mode
- Configure the two-way audio record (Menu>Record>Advanced>Two-way Audio). Check ☑ checkbox to enable the two-way audio record and select the camera from the drop-down list. Then, the two-way audio record will be bound to the selected camera as the audio input.

● The two-way audio record can only be bound to the analog cameras.
● The bound two-way audio record will overlap the original audio input during the two-way audio.

text_image
Advanced Two-way Audio Enable Two-way Audio R... Camera Analog 1Figure 5.8 Two-way Audio Record
5.2 Configuring Record/Capture Schedule
Purpose:
Set the record schedule, and then the camera automatically starts/stops recording according to the configured schedule.

- In this chapter, we take the record schedule procedure as an example, and the same procedure can be applied to configure schedule for both continuous recording and capture. To schedule the automatic capture, you need to choose the Capture tab in the Schedule interface.
- We use the interface of DS-9000HFI-ST series (unless otherwise stated) as example to describe the following settings.
Steps:
- Enter the Record Schedule interface.
Menu > Record > Schedule
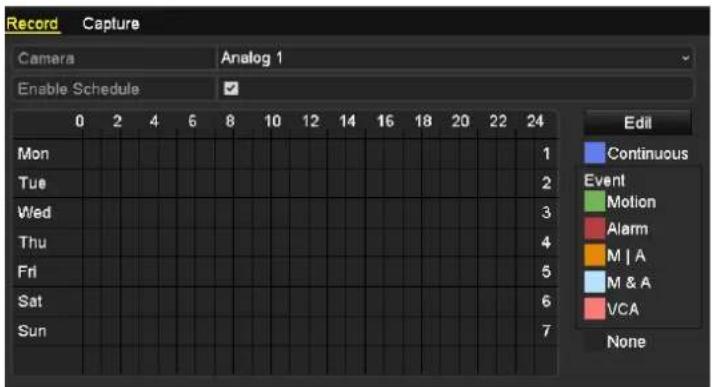
text_image
Record Capture Camera Analog 1 Enable Schedule 0 2 4 6 8 10 12 14 16 18 20 22 24 Mon Tue Wed Thu Fri Sat Sun Edit Continuous Event Motion Alarm M | A M & A VCA NoneFigure 5.9 Record Schedule
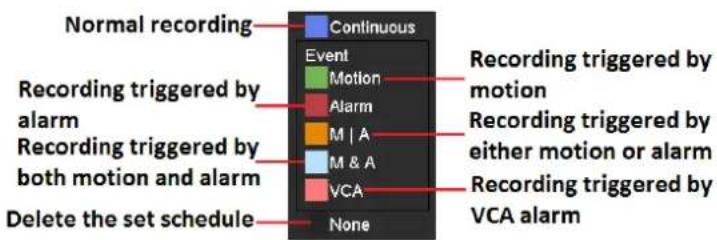
text_image
Normal recording Continuous Event Recording triggered by motion Recording triggered by alarm Recording triggered by both motion and alarm Recording triggered by M | A Recording triggered by either motion or alarm Recording triggered by VCA Recording triggered by VCA alarm Recording triggered by alarm Recording triggered by both motion and alarm Delete the set scheduleFigure 5.10 Record Type

- The VCA settings and VCA event triggered recording / capture are supported by the analog cameras 01\~04 or the smart IP cameras connected to the HDVR only.
-
To enable Motion, Alarm, M | A (motion or alarm), M & A (motion and alarm) and VCA (Video Content Analysis) triggered recording and capture, you must configure the motion detection settings, alarm input settings or VCA settings as well. For detailed information, refer to Chapter 8.1, Chapter 8.2 and Chapter 8.5.
-
Click the Record tab, select the camera for schedule settings, and then check the checkbox of Enable Schedule.
There are two ways to configure the record schedule for the selected camera.
Task 1: Edit the Schedule
Steps:
1) Click Edit.
2) In the message box, you can choose the day which you want to set schedule.
3) To set an all-day recording for the schedule, check the checkbox of All Day, and then select the recording type from the drop-down list, including Continuous, Motion, Alarm, Motion | Alarm, Motion & Alarm and VCA.
4) To set recording for different time periods, leave the checkbox of All Day blank, specify the start / end time, and then select the recording type for the corresponding time period.

Up to 8 time periods can be configured for each day. And the time periods cannot be overlapped each other.
5) Repeat the above steps 3)-4) to schedule recording/capture for other days in the week. Optionally, you can also click Copy and copy the current schedule settings to other days.
6) Click OK to save settings and exit.
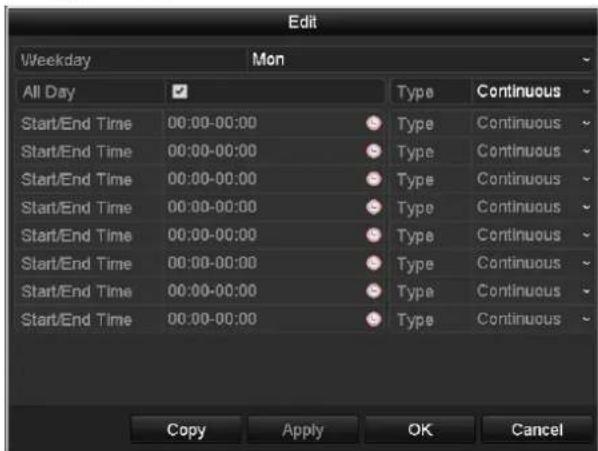
text_image
Edit Weekday Mon All Day ✓ Type Continuous Start/End Time 00:00-00:00 ● Type Continuous Start/End Time 00:00-00:00 ● Type Continuous Start/End Time 00:00-00:00 ● Type Continuous Start/End Time 00:00-00:00 ● Type Continuous Start/End Time 00:00-00:00 ● Type Continuous Start/End Time 00:00-00:00 ○ Type Continuous Start/End Time 00:00-00:00 ○ Type Continuous Copy Apply OK CancelFigure 5.11 Edit the Schedule

The Holiday option is available when you enable holiday schedule in Holiday settings. Refer to Chapter 5.7 Configuring Holiday Record and Capture.
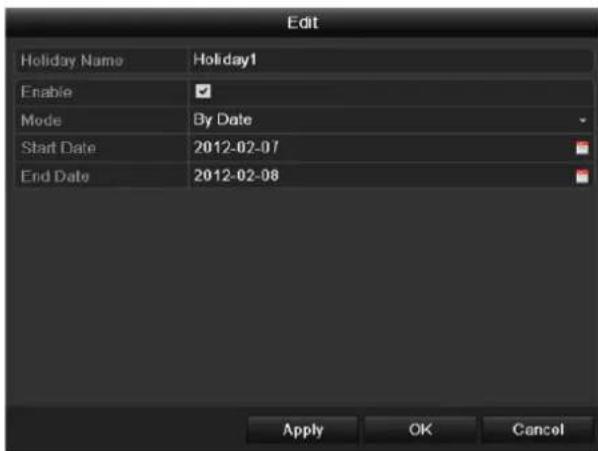
text_image
Edit Holiday Name Holiday1 Enable Mode By Date Start Date 2012-02-07 End Date 2012-02-08 Apply OK CancelFigure 5.12 Holiday Settings
Task 2: Draw the Schedule
Steps:
1) Click to select a record type, including Continuous, Motion, Alarm, M | A, M & A, VCA and None.
2) Use the mouse to drag and draw time periods.

Up to 8 periods can be configured for each day.
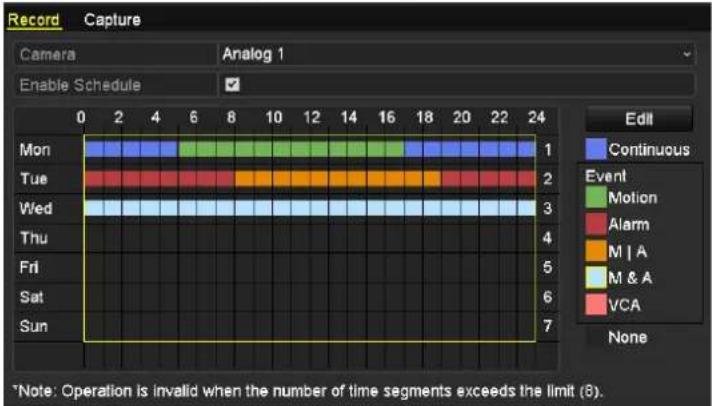
bar
| Day | Event Count | |---|---| | Mon | 1 | | Tue | 2 | | Wed | 3 | | Thu | 4 | | Fri | 5 | | Sat | 6 | | Sun | 7 | Note: Operation is invalid when the number of time segments exceeds the limit (8).Figure 5.13 Draw the Schedule
- Repeat the above steps to set schedule for other channels. Optionally, you can click Copy and copy the current schedule settings to other channels.
- Click Apply in the Record/Capture Schedule interface to save the settings.
5.3 Configuring Motion Detection Recording and Capture
Purpose:
Follow the steps to set the motion detection parameters. In the live view mode, once a motion detection event takes place, the device can analyze it and do many actions to handle it. Enabling motion detection function can trigger certain channels to start recording/capture, or trigger full screen monitoring, audible warning, notify the surveillance center and so on. In this chapter, you can follow the steps to schedule a record which triggered by the detected motion.
Steps:
- Enter the Motion Detection interface.
Menu > Camera > Motion
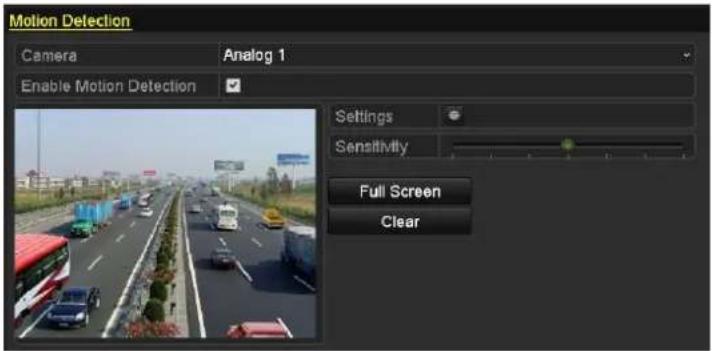
text_image
Motion Detection Camera Analog 1 Enable Motion Detection Settings Sensitivity Full Screen ClearFigure 5.14 Motion Detection
- Configure Motion Detection:
1) Choose camera you want to configure.
2) Check √ checkbox to enable motion detection.
3) Drag and draw the area for motion detection by mouse. If you want to set the motion detection for all the area shot by the camera, click Full Screen. To clear the motion detection area, click Clear.
4) Click ☐ to configure the motion detection settings in the pop-up message box.
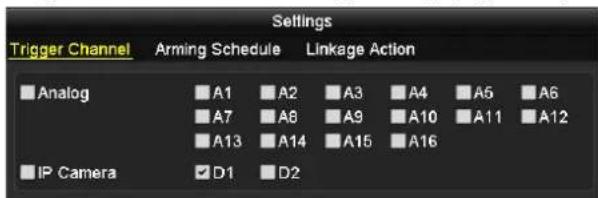
text_image
Settings Trigger Channel Arming Schedule Linkage Action ■ Analog ■A1 ■A2 ■A3 ■A4 ■A5 ■A6 ■A7 ■A8 ■A9 ■A10 ■A11 ■A12 ■A13 ■A14 ■A15 ■A16 ■IP Camera ✓D1 ■D2Figure 5.15 Motion Detection Settings

IP Camera is supported by HDVR series only.
5) Select the channels which you want the motion detection event to trigger recording.
6) Click Apply to save the settings.
7) Click OK to back to the upper level menu.
8) Click Apply in the Motion Detection interface to save the settings.
9) Exit the Motion Detection interface.
- Enter Record/Capture Schedule settings interface (Menu> Record> Schedule>Record/Capture Schedule), and then set Motion as the record type. For details, see step 2 in Chapter 5.2 Configuring Record/Capture Schedule.
5.4 Configuring Alarm Triggered Recording and Capture
Purpose:
Follow the procedure to configure alarm triggered recording or capture.

● Sensor alarm is not supported by DS-7200HWI-SV series.
We use the interface of DS-9100HFI-ST series (unless otherwise stated) as example to describe the following settings.
Steps:
- Enter the Alarm setting interface.
Menu > Configuration > Alarm

text_image
Alarm Status Alarm Input Alarm Output Alarm Input List Alarm Input No. Alarm Name Alarm Type Local<-1 1 N.C Local<-2 N.O Local<-3 N.O Local<-4 N.O Local<-5 N.O Local<-6 N.O Local<-7 N.O Alarm Output List Alarm Output No. Alarm Name Dwell Time Local->1 5s Local->2 5s Local->3 5s Local->4 5sFigure 5.16 Alarm Settings
- Click Alarm Input tab.
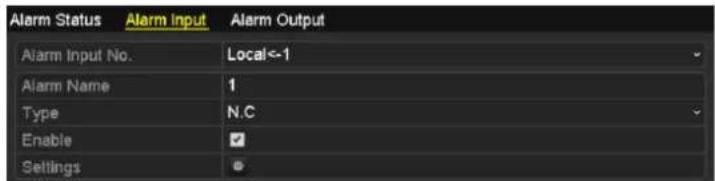
text_image
Alarm Status Alarm Input Alarm Output Alarm Input No. Local<-1 Alarm Name 1 Type N.C Enable ✓ SettingsFigure 5.17 Alarm Settings-Alarm Input
1) Select Alarm Input No. and configure alarm parameters.
2) Edit the alarm name as desired and choose N.O (normally open) or N.C (normally closed) for alarm type.
3) Check √ checkbox to enable the alarm input.
4) Click ☐ to configure the alarm settings.
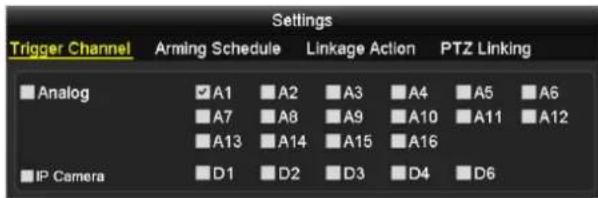
text_image
Settings Trigger Channel Arming Schedule Linkage Action PTZ Linking ■ Analog ✓A1 ■A2 ■A3 ■A4 ■A5 ■A6 ■A7 ■A8 ■A9 ■A10 ■A11 ■A12 ■A13 ■A14 ■A15 ■A16 ■IP Camera ■D1 ■D2 ■D3 ■D4 ■D6Figure 5.18 Alarm Input Settings

IP Camera is supported by HDVR series only.
5) Check the checkbox √ to choose the alarm triggered recording/capture channel.
6) Click Apply to save settings.
7) Click OK to back to the upper level menu.
8) Click Apply in the Alarm Input interface to save the settings.
9) Repeat the above steps to configure parameters of other alarm inputs. Optionally, you can click Copy to copy the current settings to other alarm inputs.
- Enter Record/Capture Schedule settings interface (Menu> Record> Schedule>Record/Capture Schedule), and then set Alarm as the record type. For details, see step 2 in Chapter 5.2 Configuring Record/Capture Schedule.
5.5 Configuring VCA Recording and Capture
Purpose:
Follow the procedure to configure VCA event triggered recording or capture.

The VCA settings and VCA event triggered recording / capture are supported by the analog cameras 01\~04 or the smart IP cameras connected to the HDVR only.
Steps:
- Enter the VCA settings interface and select a camera for the VCA settings. Menu> Camera> VCA
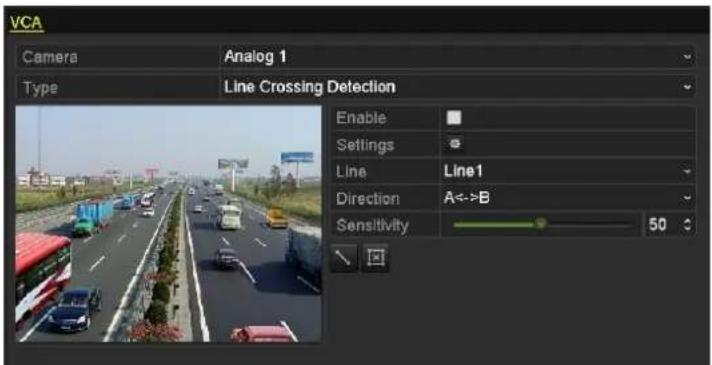
text_image
VCA Camera Analog 1 Type Line Crossing Detection Enable Settings Line Line1 Direction A<->B Sensitivity 50Figure 5.19 VCA Settings-Analog Camera
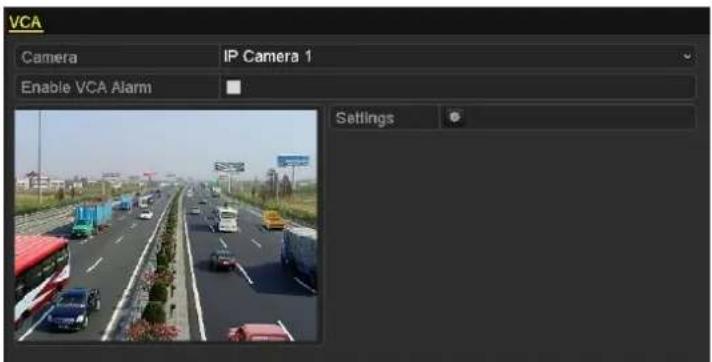
text_image
VCA Camera IP Camera 1 Enable VCA Alarm SettingsFigure 5. 20 VCA Settings-IP Camera
- Configure the detection rules for VCA events. For details, see the step 2 in Chapter 8.5 Detecting VCA Alarm.
- Click the icon ☐ to configure the alarm linkage actions for the VCA events. Select Trigger Channel tab and select one or more channels which will start to record/capture when VCA alarm is triggered. Click Apply to save the settings
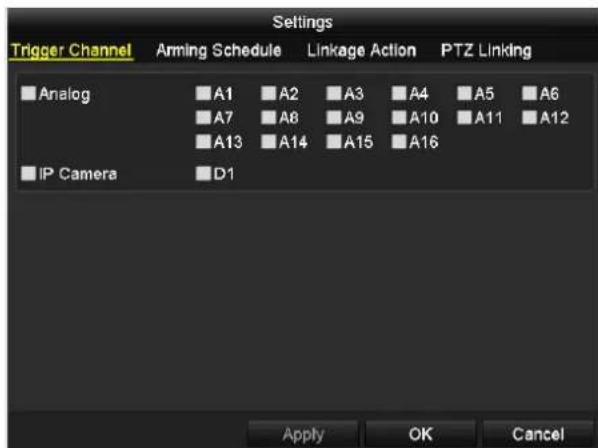
text_image
Settings Trigger Channel Anming Schedule Linkage Action PTZ Linking Analog A1 A2 A3 A4 A5 A6 A7 A8 A9 A10 A11 A12 A13 A14 A15 A16 IP Camera D1 Apply OK CancelFigure 5.21 Set Trigger Camera of VCA Alarm

The PTZ Linking function is only available for the VCA settings of IP cameras.
- Enter Record/Capture Schedule settings interface (Menu> Record> Schedule>Record/Capture Schedule), and then set VCA as the record type. For details, see step 2 in Chapter 5.2 Configuring Record/Capture Schedule.
5.6 Configuring Manual Recording and
Continuous Capture
Purpose:
Follow the steps to set parameters for the manual recording and continuous capture. Using manual recording and continuous capture, you need to manually cancel the record and capture. The manual recording and manual continuous capture is prior to the scheduled recording and capture.
Steps:
- Enter the Manual settings interface.
Menu> Manual
Or press the REC/SHOT button on the front panel.
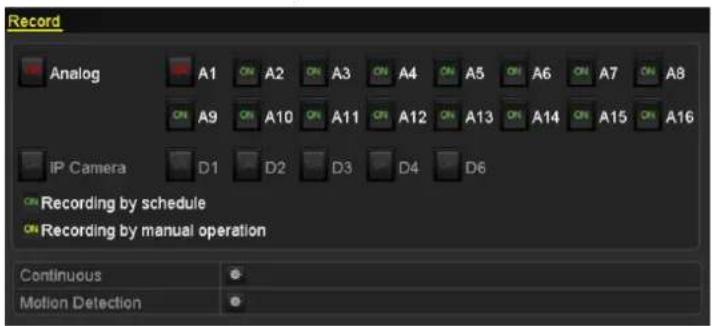
text_image
Record Analog A1 ON A2 ON A3 ON A4 ON A5 ON A6 ON A7 ON A8 ON A9 ON A10 ON A11 ON A12 ON A13 ON A14 ON A15 ON A16 IP Camera D1 D2 D3 D4 D6 ON Recording by schedule ON Recording by manual operation Continuous Motion DetectionFigure 5.22 Manual Record

IP Camera is supported by HDVR series only.
- Enable manual record
1) Select Record tab on the left bar.
2) Click the status button before camera No. to change

- Disable manual record.
Click the status button to change CN .

After rebooting, all the manual records enabled will be canceled.
- Start all-day normal recording or all-day motion detection recording of all channels.
1) Click for Continuous or Motion Detection
2) Confirm the pop-up message box to enable all-day continuous recording or all-day motion detection recording of all channels.
- Enabling and disabling the continuous capture.
1) Select Continuous Capture tab on the left bar.
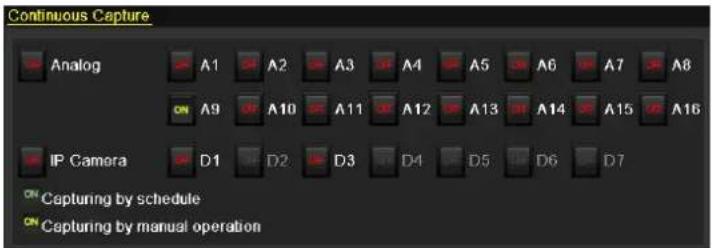
text_image
Continuous Capture Analog A1 A2 A3 A4 A5 A6 A7 A8 ON A9 A10 A11 A12 A13 A14 A15 A16 IP Camera D1 D2 D3 D4 D5 D6 D7 ON Capturing by schedule ON Capturing by manual operationFigure 5. 23 Continuous Capture

IP Camera is supported by HDVR series only.
2) Click the status button before camera number to change ON to ON to enable continuous capture.
3) Or click the status button to change ON to ON to disable continuous capture.

After rebooting, all the continuous capture will be canceled.
5.7 Configuring Holiday Recording and
Capture
Purpose:
You may want to have different plan for recording and capture on holiday. Follow the steps to configure the record or capture schedule on holiday for that year.

The priority of holiday schedule is higher than any other schedule.
Steps:
- Enter the Record setting interface.
Menu > Record
- Choose Holiday on the left bar.
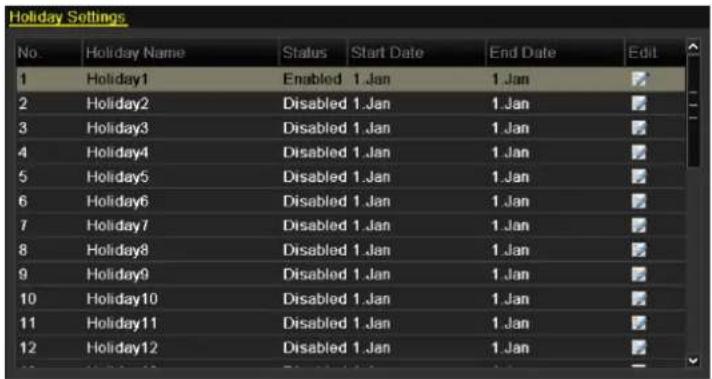
text_image
Holiday Settings No.Holiday Name Status Start Date End Date Edit 1 Holiday1 Enabled 1 Jan 1 Jan 2 Holiday2 Disabled 1 Jan 1 Jan 3 Holiday3 Disabled 1 Jan 1 Jan 4 Holiday4 Disabled 1 Jan 1 Jan 5 Holiday5 Disabled 1 Jan 1 Jan 6 Holiday6 Disabled 1 Jan 1 Jan 7 Holiday7 Disabled 1 Jan 1 Jan 8 Holiday8 Disabled 1 Jan 1 Jan 9 Holiday9 Disabled 1 Jan 1 Jan 10 Holiday10 Disabled 1 Jan 1 Jan 11 Holiday11 Disabled 1 Jan 1 Jan 12 Holiday12 Disabled 1 Jan 1 JanFigure 5.24 Holiday Settings
- Enable editing holiday schedule.
1) Click to enter the Edit interface.
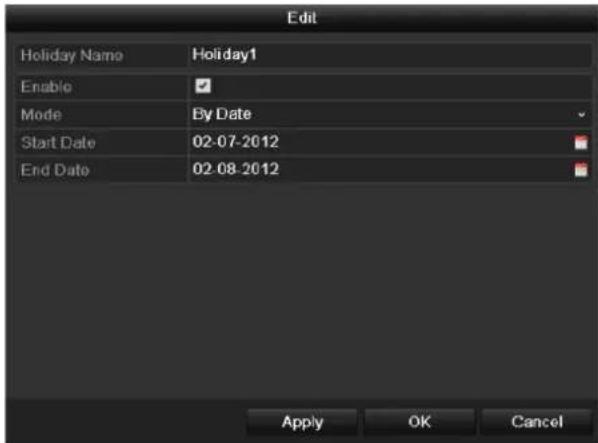
text_image
Edit Holiday Name Holiday1 Enable Mode By Date Start Date 02-07-2012 End Date 02-08-2012 Apply OK CancelFigure 5.25 Edit Holiday Settings
2) Check √ checkbox to enable the holiday schedule.
3) Select Mode from the drop-down list.
There are three different modes for the date format to configure holiday schedule, including Date, Week and Month.
4) Set the start and end date.
5) Click Apply to save settings.
6) Click OK to exit the Edit interface.
- Enter Record/Capture Schedule settings interface (Menu>Record>Schedule>Record/Capture Schedule). For detailed information about record schedule settings, refer to step 2 in Chapter 5.2 Configuring Record/Capture Schedule.

You need to select schedule type as Holiday or draw the schedule for the Holiday.
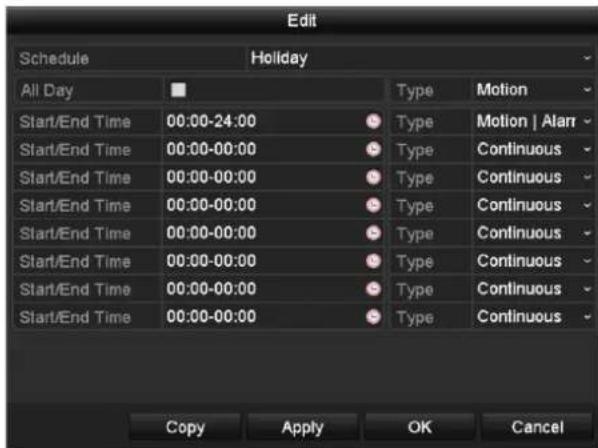
text_image
Edit Schedule Holiday All Day Type Motion Start/End Time 00:00-24:00 ● Type Motion | Alam Start/End Time 00:00-00:00 ● Type Continuous Start/End Time 00:00-00:00 ● Type Continuous Start/End Time 00:00-00:00 ● Type Continuous Start/End Time 00:00-00:00 ● Type Continuous Start/End Time 00:00-00:00 ● Type Continuous Start/End Time 00:00 00:00 00:00 00:00 00:00 Copy Apply OK CancelFigure 5.26 Edit Schedule- Holiday
5.8 Configuring Redundant Recording and
Capture
Purpose:
The record files and captured pictures are stored not only in the R/W (read/write) HDD but also in the redundant HDD when the Redundant Record/Capture function is enabled, thus enhancing the data safety and reliability effectively.

The storage mode of the HDD needs to be set as Group. For details, see Chapter 11.4 Managing HDD Group. There should be at least another HDD which is in R/W mode.
Steps:
- Enter HDD Information interface.
Menu > HDD > General
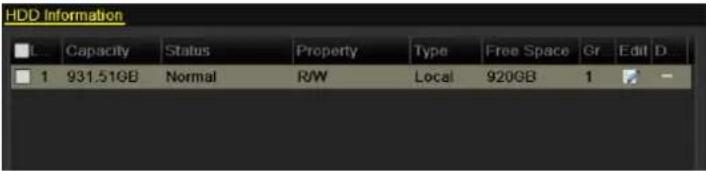
text_image
HDD Information L Capacity Status Property Type Free Space Gr Edit D 1 931.51GB Normal R/W Local 920GB 1 -Figure 5.27 HDD General
- Select the HDD and click ☑ to enter the Local HDD Settings interface.
1) Set the HDD property to Redundancy.
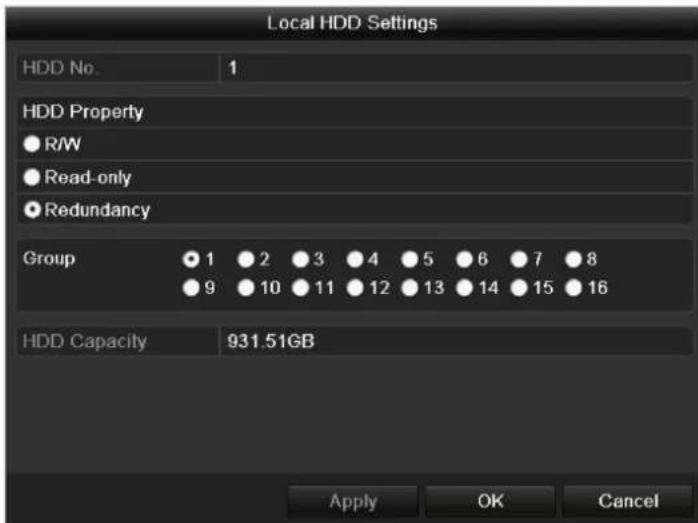
text_image
Local HDD Settings HDD No. 1 HDD Property ● R/W ● Read-only ● Redundancy Group 1 2 3 4 5 6 7 8 ● 9 10 11 12 13 14 15 16 HDD Capacity 931.51GB Apply OK CancelFigure 5.28 HDD General-Editing
2) Click Apply to save the settings.
3) Click OK to back to the upper level menu.
- Enter the Record setting interface.
Menu > Record > Parameters
1) Select Record.
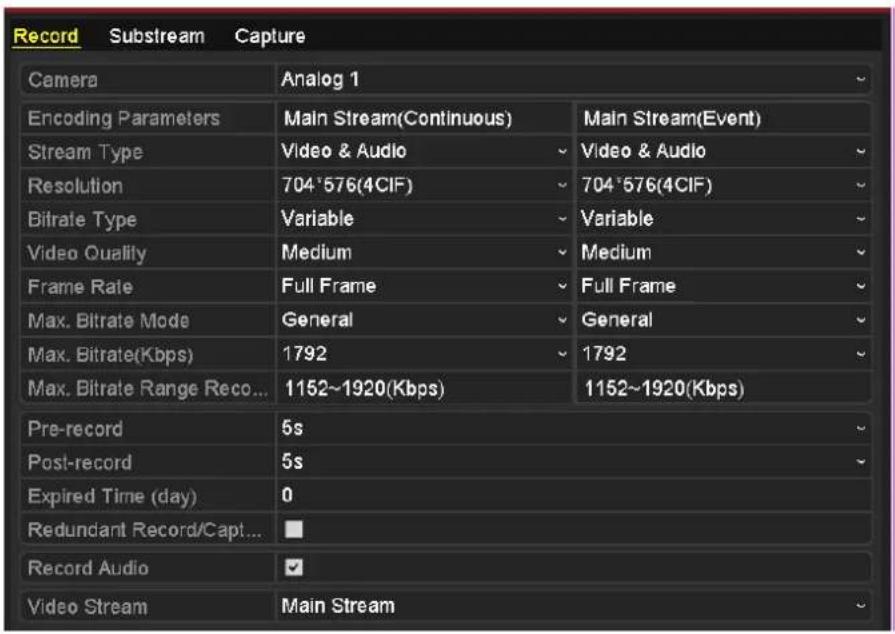
text_image
Record Substream Capture Camera Analog 1 Encoding Parameters Main Stream(Continuous) Main Stream(Event) Stream Type Video & Audio Video & Audio Resolution 704*576(4CIF) 704*576(4CIF) Bitrate Type Variable Variable Video Quality Medium Medium Frame Rate Full Frame Full Frame Max. Bitrate Mode General General Max. Bitrate(Kbps) 1792 1792 Max. Bitrate Range Reco... 1152~1920(Kbps) 1152~1920(Kbps) Pre-record 5s Post-record 5s Expired Time (day) 0 Redundant Record/Cap!... Record Audio ✓ Video Stream Main StreamFigure 5.29 Record Parameters
2) Select Camera you want to configure.
3) Check Redundant Record/Capture ☑ checkbox to enable redundant recording and capture.
4) Click Apply to save settings.
Repeat the above steps2)-4) for configuring other channels. If the setting can also be applied to other analog channels, click Copy and then choose the channel(s).
5.9 Configuring HDD Group for Recording and Capture
Purpose:
You can group the HDDs and save the record files and captured pictures in certain HDD group.
Steps:
- Enter HDD setting interface.
Menu > HDD
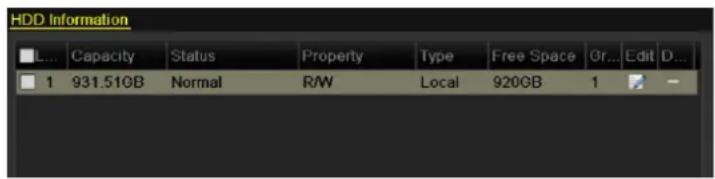
text_image
HDD Information L... Capacity Status Property Type Free Space Gr... Edit D... 1 931.51GB Normal R/W Local 920GB 1 -Figure 5.30 HDD General
- Select Advanced on the left bar.
Check whether the storage mode of the HDD is Group. If not, set it to Group. For detailed information, please refer to Chapter 11.4 Managing HDD Group.
-
Select General in the left bar and click ☐ to enter editing interface.
-
Configuring HDD group.
1) Choose a group number for the HDD group.
2) Click Apply and then in the pop-up message box, click Yes to save your settings.
3) Click OK to back to the upper level menu.
Repeat the above steps3-4 to configure more HDD groups.
- Choose the channels of which you want to save the record files and captured pictures in the HDD group.
1) Select Advanced on the left bar.
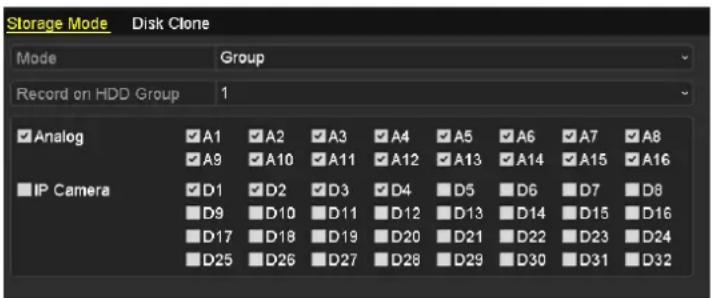
text_image
Storage Mode Disk Clone Mode Group Record on HDD Group 1 ✓ Analog ✓A1 ✓A2 ✓A3 ✓A4 ✓A5 ✓A6 ✓A7 ✓A8 ✓ A9 ✓A10 ✓A11 ✓A12 ✓A13 ✓A14 ✓A15 ✓A16 ■ IP Camera ✓D1 ✓D2 ✓D3 ✓D4 ✓D5 ✓D6 ✓D7 ✓D8 ✓D9 ✓D10 ✓D11 ✓D12 ✓D13 ✓D14 ✓D15 ✓D16 ✓D17 ✓D18 ✓D19 ✓D20 ✓D21 ✓D22 ✓D23 ✓D24 ✓D25 ✓D26 ✓D27 ✓D28 ✓D29 ✓D30 ✓D31 ✓D32Figure 5. 31 HDD Advanced for HDVR Series

IP Camera is supported by HDVR series only.
2) Choose Group number in the drop-down list of Record on HDD Group.
3) Check the channels you want to save in this group.
4) Click Apply to save settings.

After having configured the HDD groups, you can configure the Recording and Capture settings by following the procedure provided in Chapter 5.2-5.8.
5.10 Files Protection
Purpose:
You can lock the recorded files or set the HDD property to Read-only to protect the record files from being overwritten.

We use the interface of DS-9000HFI-RT series (unless otherwise stated) as example to describe the following settings.
5.10.1 Locking the Record Files
Task 1: Lock File when Playback
Steps:
- Enter the Normal Playback/Event Playback/Tag Playback interface. For details, see Chapter 6.1.2\~ Chapter 6.1.4.
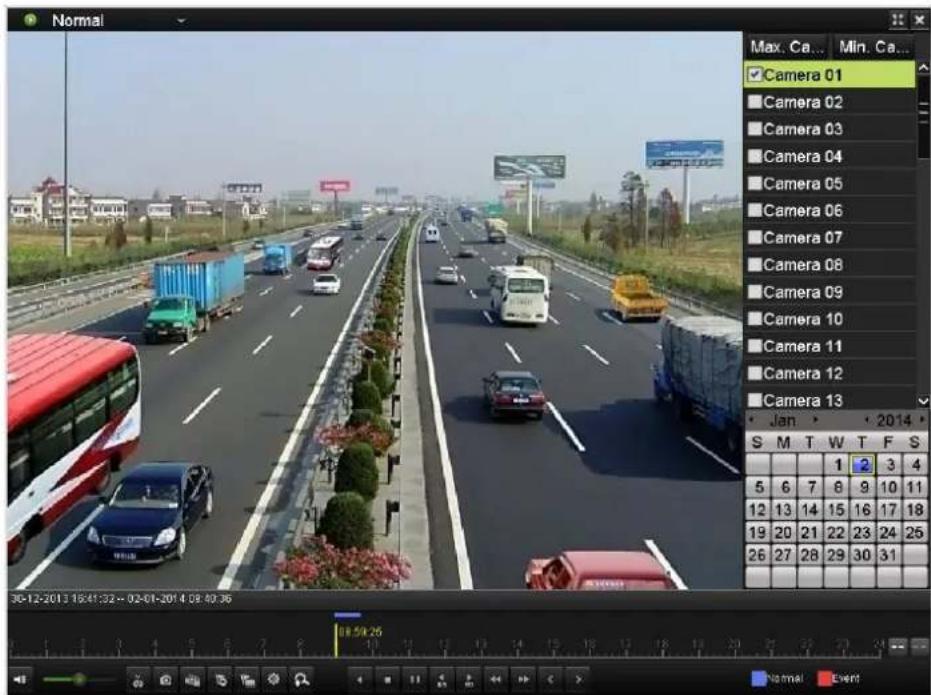
text_image
Normal Max. Ca... Min. Ca... Camera 01 Camera 02 Camera 03 Camera 04 Camera 05 Camera 06 Camera 07 Camera 08 Camera 09 Camera 10 Camera 11 Camera 12 Camera 13 Jan 2014 S M T W T F S 1 2 3 4 5 6 7 8 9 10 11 12 13 14 15 16 17 18 19 20 21 22 23 24 25 26 27 28 29 30 31 30-12-2013 16:41:32 ~ 02-01-2014 08:40:36 Normal EventFigure 5.32 Playback
- Click the button on the toolbar, and the current record file in playback will be locked.

In multi-channel playback mde, click the button and all the record files related to the playback channels will be locked.
- Click the button on the toolbar, select Locked File tab, and you can view and export the locked files.
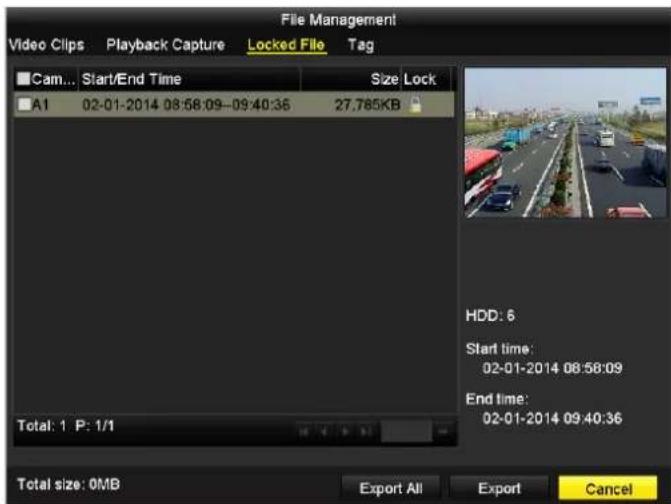
text_image
File Management Video Clips Playback Capture Locked File Tag Cam... Start/End Time Size Lock A1 02-01-2014 08:58:09-09:40:36 27.785KB Total: 1 P: 1/1 HDD: 6 Start time: 02-01-2014 08:58:09 End time: 02-01-2014 09:40:36 Total size: 0MB Export All Export CancelFigure 5.33 Locked File Management
- You can click the icon 📄 on the Locked File Management interface to unlock the selected record file.
Task 2: Lock File when Export
Steps:
- Enter Export setting interface.
Menu> Export
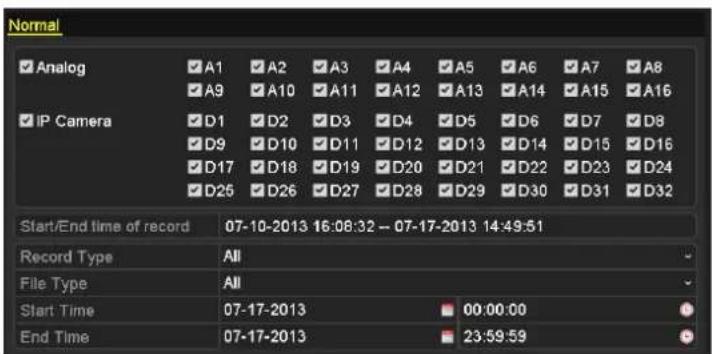
text_image
Normal ✓ Analog ✓A1 ✓A2 ✓A3 ✓A4 ✓A5 ✓A6 ✓A7 ✓A8 ✓ A9 ✓A10 ✓A11 ✓A12 ✓A13 ✓A14 ✓A15 ✓A16 ✓ IP Camera ✓D1 ✓D2 ✓D3 ✓D4 ✓D5 ✓D6 ✓D7 ✓D8 ✓ D9 ✓D10 ✓D11 ✓D12 ✓D13 ✓D14 ✓D15 ✓D16 ✓ D17 ✓D18 ✓D19 ✓D20 ✓D21 ✓D22 ✓D23 ✓D24 ✓ D25 ✓D26 ✓D27 ✓D28 ✓D29 ✓D30 ✓D31 ✓D32 Start/End time of record 07-10-2013 16:08:32 -- 07-17-2013 14:49:51 Record Type All File Type All Start Time 07-17-2013 00:00:00 End Time 07-17-2013 23:59:59Figure 5.34 Export Interface
- Check the checkbox √ to select the channels.
- Select the record type, file type and then specify the start/end time for search.
- Click Search to show the results.
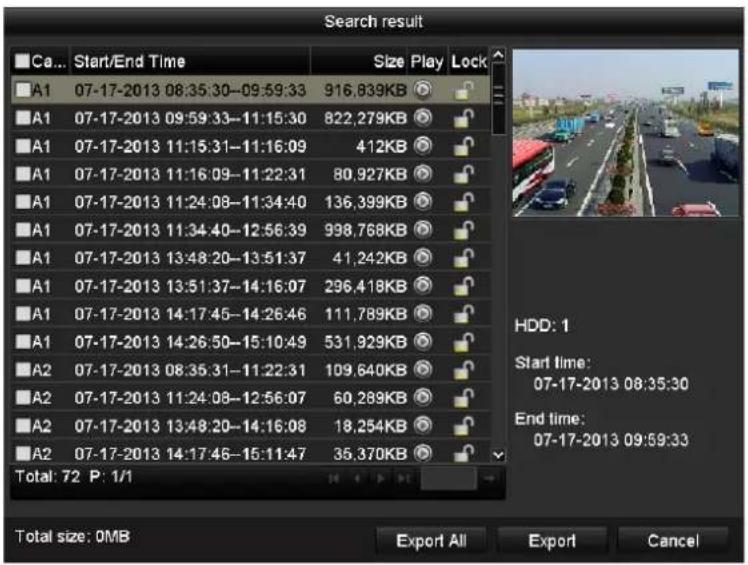
text_image
Search result Ca... Start/End Time Size Play Lock A1 07-17-2013 08:35:30-09:59:33 916,839KB A1 07-17-2013 09:59:33-11:15:30 822,279KB A1 07-17-2013 11:15:31-11:16:09 412KB A1 07-17-2013 11:16:09-11:22:31 80,927KB A1 07-17-2013 11:24:08-11:34:40 136,399KB A1 07-17-2013 11:34:40-12:56:39 998,768KB A1 07-17-2013 13:48:20-13:51:37 41,242KB A1 07-17-2013 13:51:37-14:16:07 296,418KB A1 07-17-2013 14:17:45-14:26:46 111,789KB A1 07-17-2013 14:26:50-15:10:49 531,929KB A2 07-17-2013 08:35:31-11:22:31 109,640KB A2 07-17-2013 11:24:08-12:56:07 60,289KB A2 07-17-2013 13:48:20-14:16:08 18,254KB A2 07-17-2013 14:17:46-15:11:47 36,370KB Total: 72 P: 1/1 HDD: 1 Start time: 07-17-2013 08:35:30 End time: 07-17-2013 09:59:33 Total size: OMB Export All Export CancelFigure 5.35 Export- Search Result
5. Protect the record files.
1) Select the record file to be protected, and then click the icon. The icon turns to indicating that the file is locked.
2) Click the icon 🔍 to unlock the file and the file is not protected.
5.10.2 Setting HDD property to Read-only

To edit HDD property, you need to set the storage mode of the HDD to Group. See Chapter 11.4 Managing HDD Group.
Steps:
- Enter HDD setting interface.
Menu> HDD
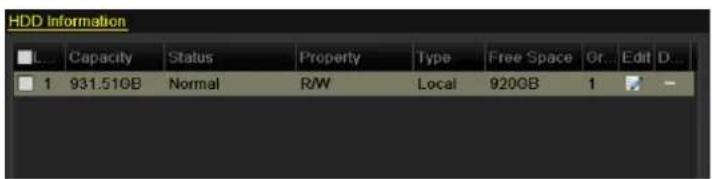
text_image
HDD Information L... Capacity Status Property Type Free Space Gr Edit D... 1 931.51GB Normal R/W Local 920GB 1 -Figure 5.36 HDD General
- Click ☐ to edit the HDD you want to protect.
- Set the HDD to Read-only.
- Click OK to save settings and back to the upper level menu.

- You can't save any files in a Read-only HDD. If you want to save files in the HDD, change the property to R/W.
- If there is only one HDD and is set to Read-only, the device can't record any files. Only live view mode is available.
- If you set the HDD to Read-only when the device is saving files in it, then the file will be saved in next R/W HDD. If there is only one HDD, the recording will be stopped.
Chapter 6 Playback
6.1 Playing Back Record Files

We use the interface of DS-9000HFI-ST series (unless otherwise stated) as the example to describe the following settings.
6.1.1 Playing Back by Time
Purpose:
Play back the recorded video files of a specific channel in the live view mode. Channel switch is supported.
Instant Playback by Channel:
Choose a channel in live view mode using the mouse and click the button in the quick setting toolbar.

Only record files recorded during the last five minutes on this channel will be played back.
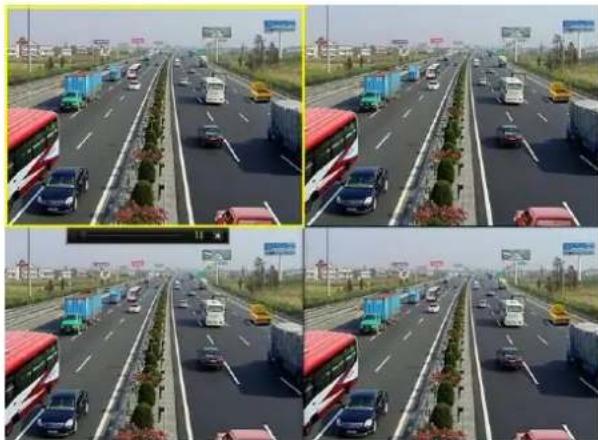
natural_image
Four-panel composite image showing a multi-lane highway with vehicles and traffic, no visible text or symbols.Figure 6.1 Instant Playback Interface
Normal Playback by Channel
Steps:
- Enter the Playback interface.
Mouse: Right-click a live view window and click Playback on the pop-up menu to enter the playback interface.
Front Panel: Press PLAY button to play back record files of the channel under single-screen live view mode.

Pressing numerical buttons will switch playback to the corresponding channels during playback process.
Front panel operation is not supported by 7200HWI-SV series.
- The playback starts from 5 minutes before by default.
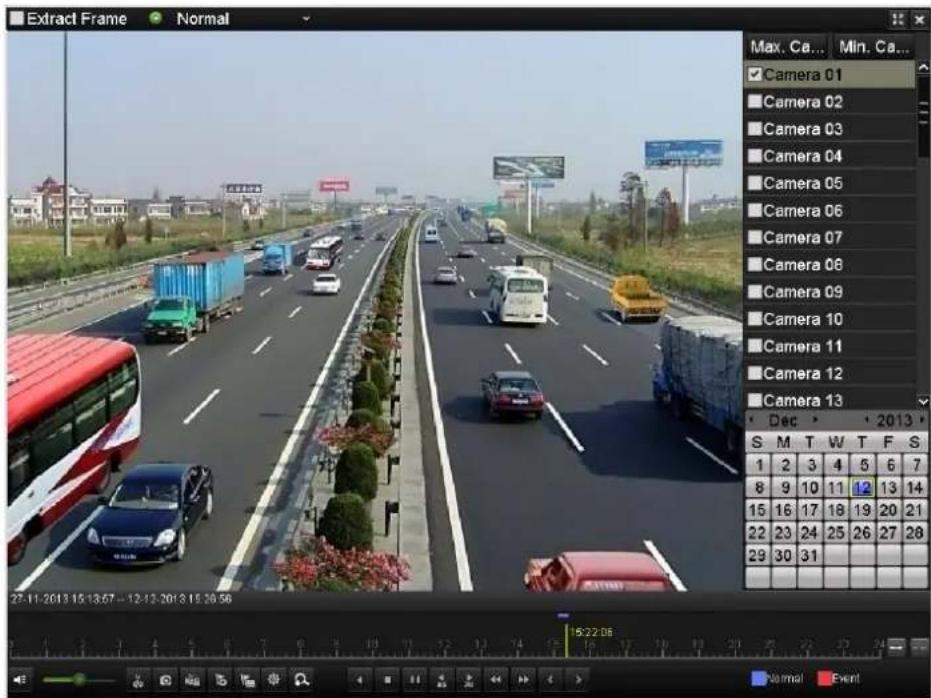
text_image
Extract Frame Normal Max. Ca... Min. Ca... Camera 01 Camera 02 Camera 03 Camera 04 Camera 05 Camera 06 Camera 07 Camera 08 Camera 09 Camera 10 Camera 11 Camera 12 Camera 13 Dec S M T W T F S 1 2 3 4 5 6 7 8 9 10 11 12 13 14 15 16 17 18 19 20 21 22 23 24 25 26 27 28 29 30 31 27:11:2013 15:13:57 -- 12:13:2013 15:30:58 15:22:08 Normal EventFigure 6.2 Playback Interface

The 27-11-2013 15:13:57 -- 12-12-2013 15:26:56 indicates the start time and end time of the record files.
- represents normal recording (manual or schedule); - represents event recording (motion, alarm, motion | alarm, motion & alarm, VCA).
- Playback progress bar: use the mouse to click any point of the progress bar to locate special frames, and a thumbnail of the specified frame will be displayed.
- Check the checkboxes to select the channel(s), and then the video from the selected channels will be played back synchronously. Up to 16 channels can be set for synchronous playback.
Click the Max. Camera for Playback tab, and you can play back the video from 16 channels at a time.
Click the Min. Camera for Playback tab, and you can play back the video from only one channel.
Normal Playback by Time
Purpose:
The time bar indicates the time duration for the record file. Click on the time bar to play back the video of the specified time.
Steps:
-
Enter Playback interface.
Menu>Playback -
Select Normal from the drop-down list in the upper-left corner of the page to enter the Normal Playback
interface.
-
Check √ checkbox of channel(s) in the channel list.
-
Double-click to select a date on the calendar to play back the record file.

- If there are normal recordings (manual or schedule) for that camera in that day, on the calendar, the icon for that day is displayed as 9; If there are event triggered recordings (motion, alarm, motion | alarm, motion & alarm VCA) for that camera in that day, in the calendar, the icon for that day is displayed as 8; Otherwise it is displayed as .
● The event triggered recordings will be displayed prior to the normal recordings on the calendar when both the two types of recordings are available in that day.
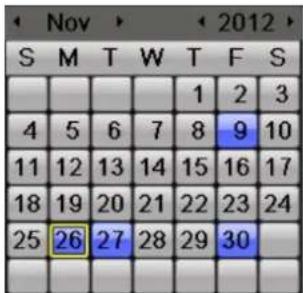
text_image
Nov 2012 S M T W T F S 4 5 6 7 8 9 10 11 12 13 14 15 16 17 18 19 20 21 22 23 24 25 26 27 28 29 30Figure 6.3 Playback Calendar
In the Playback interface:
The toolbar in the bottom part of Playback interface can be used to control playing process.
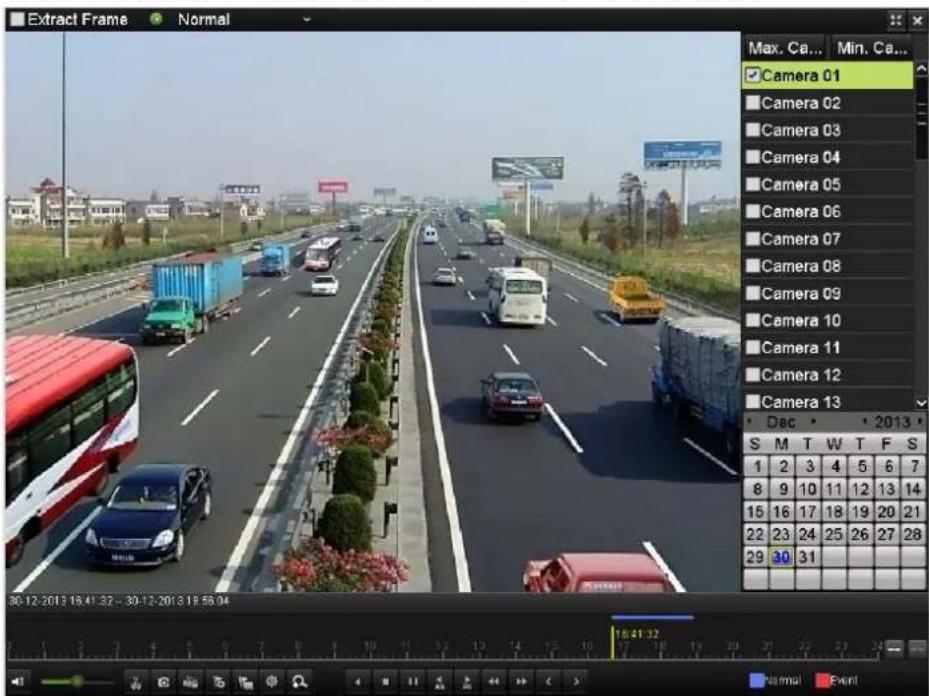
text_image
Extract Frame Normal Max. Ca... Min. Ca... Camera 01 Camera 02 Camera 03 Camera 04 Camera 05 Camera 06 Camera 07 Camera 08 Camera 09 Camera 10 Camera 11 Camera 12 Camera 13 Dec 2013 S M T W T F S 1 2 3 4 5 6 7 8 9 10 11 12 13 14 15 16 17 18 19 20 21 22 23 24 25 26 27 28 29 30 31 30:12:2013 18:41:32 - 30:12:2013 19:58:04 Normal EventFigure 6.4 Interface of Playback by Time

text_image
20-12-2013 16:41:32 - 20-12-2013 19:58:24 19:41:32 Normal EventFigure 6.5 Toolbar of Playback by Time

The 30-12-2013 16:41:32 -- 30-12-2013 18:56:04 indicates the start time and end time of the record files.
- represents normal recording (manual or schedule); - represents event recording (motion, alarm, motion | alarm, motion & alarm, VCA).
- Playback progress bar: use the mouse to click any point of the progress bar to locate special frames, and a thumbnail of the specified frame will be displayed.
Table 6.1 Detailed Explanation of Playback-by-time Interface
| Button | Operation | Button | Operation | Button | Operation | Button | Operation |
 | Audio on/ Mute |  | Adjust volume |  | Start/Stop clipping | [30X2] | Capture |
| [15CT] | Lock file |  | Add default tag |  | Add customized tag | [W3KD] | File management |
 | Digital Zoom | —— | Pause/Play Reverse | [CSXA] | Stop | —— | Pause/Play |
 | 30s backward |  | 30s forward |  | Slow forward | [H072] | Fast forward |
 | Previous | [DS6A] | Next | [X8ZC] | Scaling up/down time bar | [AHBC] | Process bar |
 | Full Screen |  | Exit |  | Frame extracting mode |
6.1.2 Playing Back by Event
Before you start:
Configure the event (motion, alarm input and VCA) triggered record schedule. For details, see Chapter
5.3\~Chapter 5.5.
Purpose:
Play back the recordings triggered by different types of events (e.g. alarm input and motion detection).
Steps:
- Enter the playback interface.
Menu>Playback
- Select Event from the drop-down list in the upper-left corner of the page to enter the Event Playback interface.
- Select Alarm Input, Motion or VCA as the event type, and specify the start time and end time for search.
- Click Search, and the record files matching the search conditions will be displayed on a list.
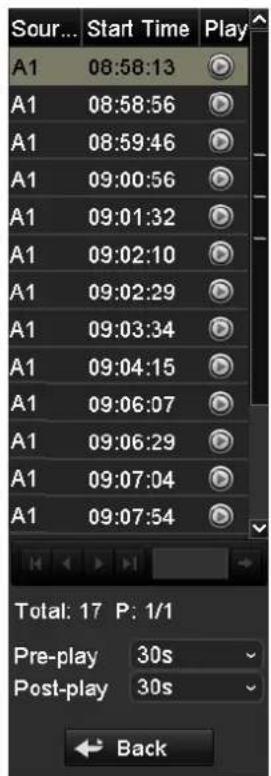
text_image
Sour... Start Time Play A1 08:58:13 A1 08:58:56 A1 08:59:46 A1 09:00:56 A1 09:01:32 A1 09:02:10 A1 09:02:29 A1 09:03:34 A1 09:04:15 A1 09:06:07 A1 09:06:29 A1 09:07:04 A1 09:07:54 Total: 17 P: 1/1 Pre-play 30s Post-play 30s BackFigure 6.6 Result of Video Search by Alarm Input
- Click 🎨 button to play back the record files.
You can click Back to return to the search interface.

Pre-play and post-play can be configured for the playback of event triggered record files.
Pre-play: The time you set to play back before the event. For example, when an alarm triggered the recording at 10:00, if you set the pre-play time as 5 seconds, the video plays back from 9:59:55.
Post-play: The time you set to play back after the event. For example, when an alarm triggered the recording ends at 11:00, if you set the post-play time as 5 seconds, the video plays back till 11:00:05.
If there is only one channel is triggered by an alarm input, clicking 📋 button takes you to Full-screen Playback interface of this channel.
If several channels are triggered, clicking ⏻ button takes you to the interface. Check √ checkbox to select one channel for playback or select multiple channels for synchronous playback.

For DVR series, 4-ch, 8-ch and 16-ch devices support 4-ch, 8-ch and 16-ch synchronous playback respectively. While for HDVR series, 4-ch, 8-ch, 16-ch devices support 8-ch, 16-ch and 16-ch synchronous playback respectively.
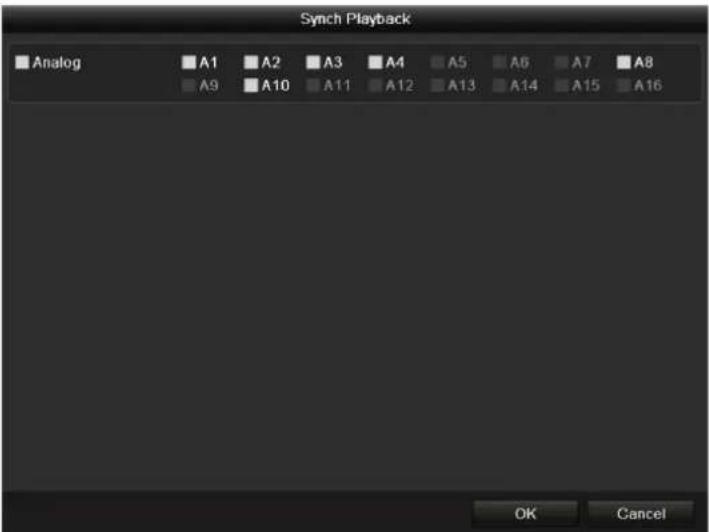
text_image
Synch Playback Analog A1 A2 A3 A4 A5 A6 A7 A8 A9 A10 A11 A12 A13 A14 A15 A16 OK CancelFigure 6.7 Select Channels for Synchronous Playback
6. Event playback interface.
The toolbar in the bottom part of Playback interface can be used to control playing process.
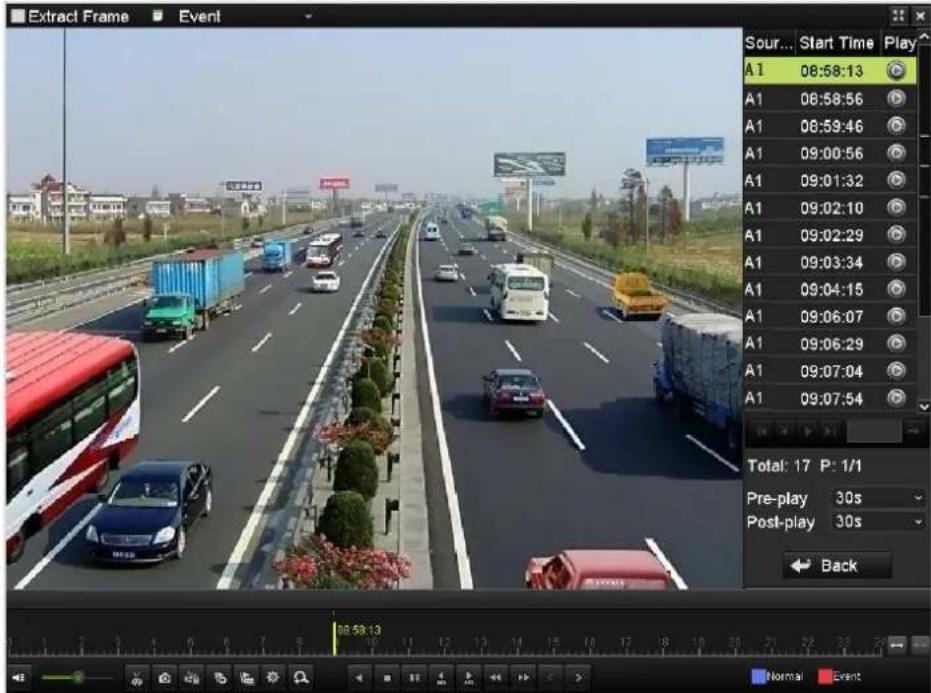
text_image
Extract Frame Event Sour... Start Time Play A1 08:58:13 A1 08:58:56 A1 08:59:46 A1 09:00:56 A1 09:01:32 A1 09:02:10 A1 09:02:29 A1 09:03:34 A1 09:04:15 A1 09:06:07 A1 09:06:29 A1 09:07:04 A1 09:07:54 Total: 17 P: 1/1 Pre-play 30s Post-play 30s BackFigure 6.8 Interface of Playback by Event
6.1.3 Playing Back by Tag
Purpose:
Default tags and customized tags can be added to mark the record files, and you can search the added tags and play back the marked record files through tag playback.
Before you start:
- Enter the Normal Playback or Event Playback interface. For details, see Chapter 6.1.2 and Chapter 6.1.3.
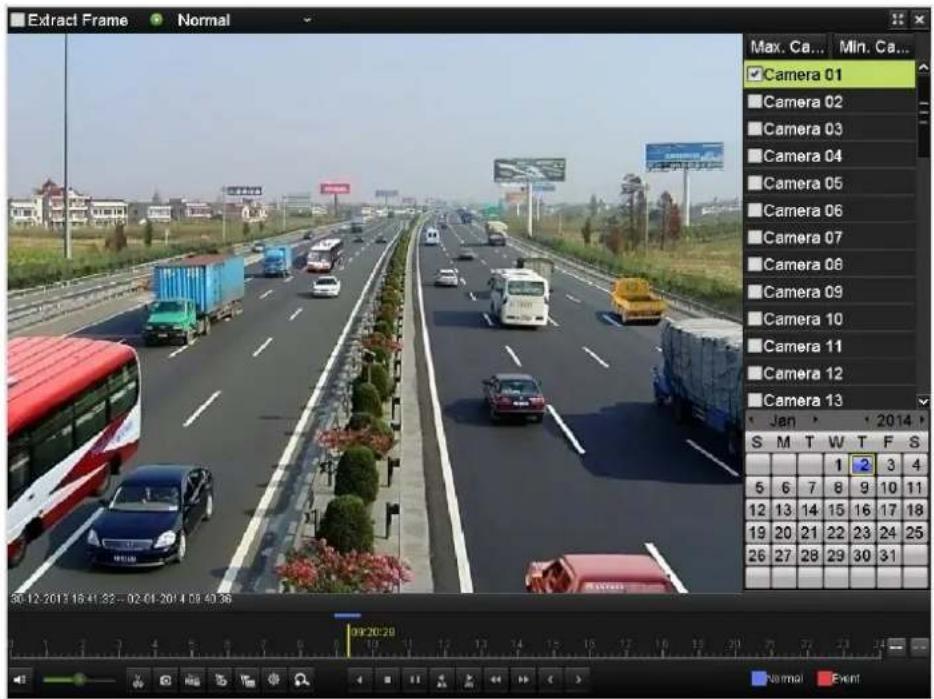
text_image
Extract Frame Normal Max. Ca... Min. Ca... Camera 01 Camera 02 Camera 03 Camera 04 Camera 05 Camera 06 Camera 07 Camera 08 Camera 09 Camera 10 Camera 11 Camera 12 Camera 13 Jan 2014 S M T W T F S 1 2 3 4 5 6 7 8 9 10 11 12 13 14 15 16 17 18 19 20 21 22 23 24 25 26 27 28 29 30 31 30:12:2013 16:41:32...02:01:2014 09:40:36 38:20:29 Normal EventFigure 6.9 Interface of Playback by Time
- Click the icon 📋 at the bottom of the interface to add the default tag.
Click the icon and input the tag name to add the customized tag.
Click the icon Select the Tag tab, and you can view, edit and delete the added tag(s).

Up to 64 tags can be added to a single video file.
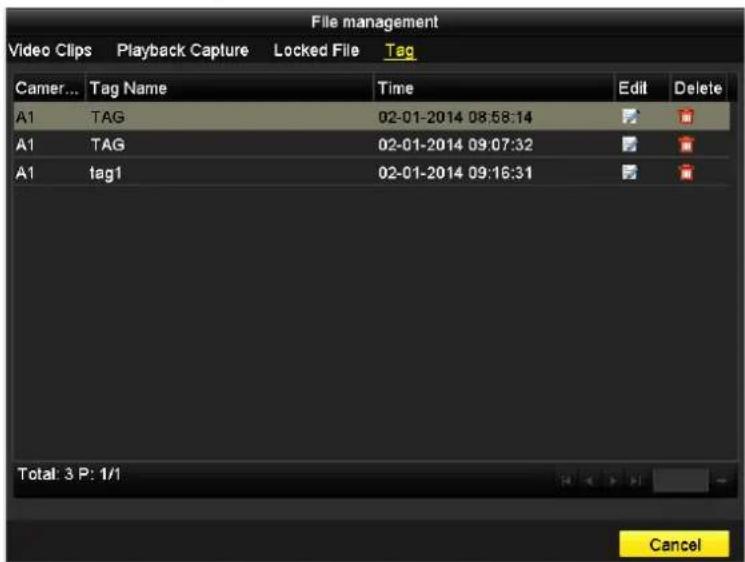
text_image
File management Video Clips Playback Capture Locked File Tag Camer... Tag Name Time Edit Delete A1 TAG 02-01-2014 08:58:14 A1 TAG 02-01-2014 09:07:32 A1 tag1 02-01-2014 09:16:31 Total: 3 P: 1/1 CancelFigure 6.10 Tag Management Interface
Steps:
- Enter Playback interface.
Menu > Playback
- Select Tag from the drop-down list in the upper-left corner of the page to enter the Tag Playback interface.
- Select the channels from the list, and specify the start time and end time for search.
- Optionally, you can input the keyword of the tag name in the Keyword text field to narrow the search.
- Click Search, and the tags matching the search conditions will be displayed on a list.
- Click button to play back the file.
You can click the Back button to back to the search interface.
Pre-play and post-play time can be set according to actual needs.

Pre-play time and post-play time is added to the time point of the tag.
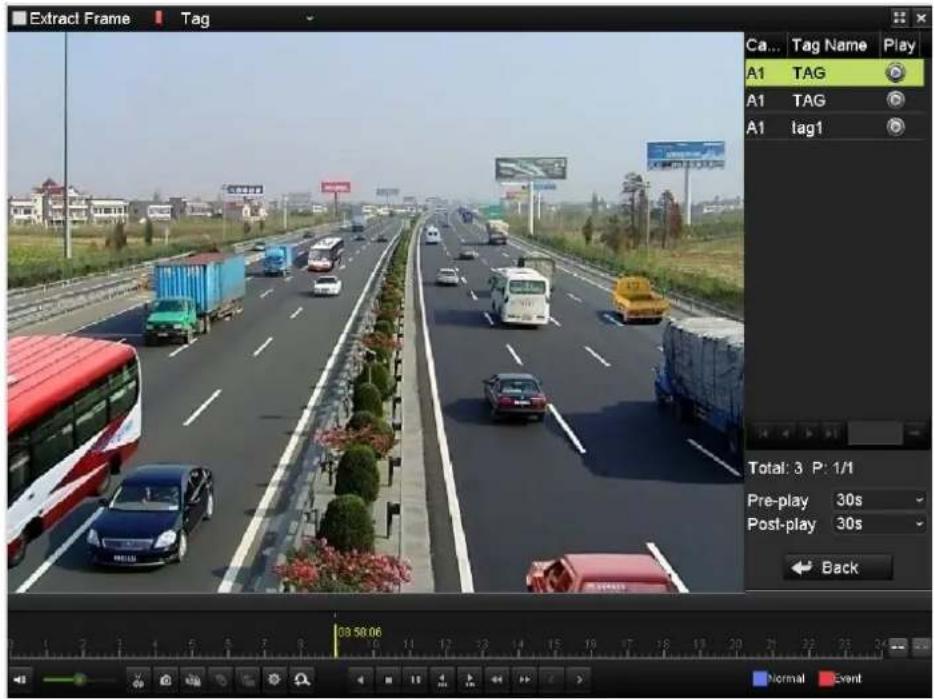
text_image
Extract Frame Tag Ca... Tag Name Play A1 TAG A1 TAG A1 lag1 Total: 3 P: 1/1 Pre-play 30s Post-play 30s Back Normal EventFigure 6.11 Interface of Playback by Tag
6.1.4 Playing Back by Smart Search
Purpose:
The smart playback function provides an easy way to get through the less effective information. When you select the smart playback mode, the system will analyze the video containing motion or VCA information, and mark it with green color on the playback process bar. The filtering rule of record files and playback speed for the non-related and related video can be configured on your demand.
Steps:
- Enter the Smart Playback interface.
- Select a camera in the camera list and select a date in the calendar and click the button to play.
- Click the 📋 on the toolbar to enter Smart Search mode. The smart search toolbar appears at the bottom of
the screen.
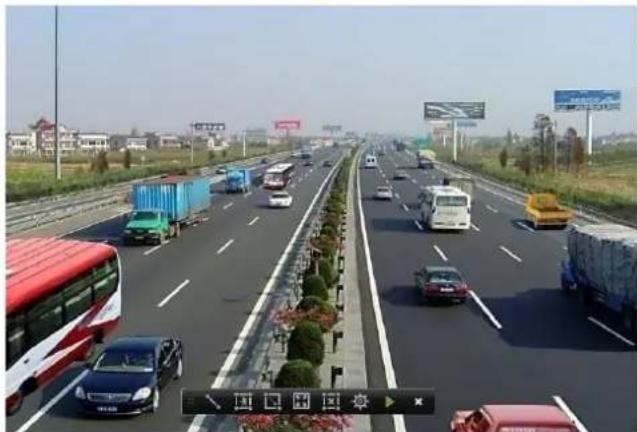
natural_image
Highway scene with multiple vehicles and a red double-decker bus, no visible text or signageFigure 6.12 Draw Area for Smart Search
- Click-and-drag the mouse to draw area(s) for smart search of VCA event or motion event.
● Traversing Virtual Plane Detection
Click the 📄 button, and then click on the video display screen to specify the start point and end point of the virtual plane.
- Intrusion Detection
Click the button, and then specify 4 points to set a quadrilateral region for intrusion detection. Only one region can be set.
- Motion Detection
Click the button and then click-and-draw the mouse to set the detection area manually. You can also click the button to set the full screen as the detection area.

Smart search of VCA events is only supported by smart IP cameras connected to the HDVR series.
- Click the button to set the playback rule.
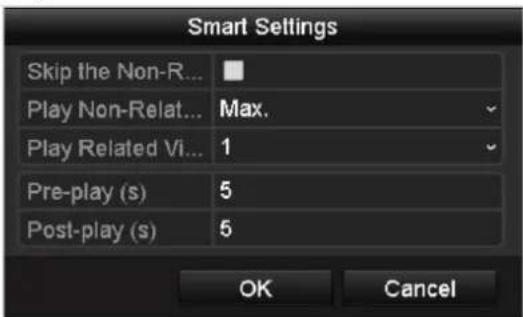
text_image
Smart Settings Skip the Non-R... Play Non-Relat... Max. Play Related Vi... 1 Pre-play (s) 5 Post-play (s) 5 OK CancelSkip the Non-Related Video: The non-related video will not be played if this function is enabled.
Play Non-Related Video at: Set the speed to play the non-related video. Max./8/4/1 are selectable.
Play Related Video at: Set the speed to play the related video. Max./8/4/1 are selectable.

Pre-play and post-play is not available for the motion event type.
- Click the ▶ to search, and then the result will be displayed as ■ in the progress bar of the Smart Playback interface.
Or you can click the button to clear all the set areas.
- Click the ▶ button to play
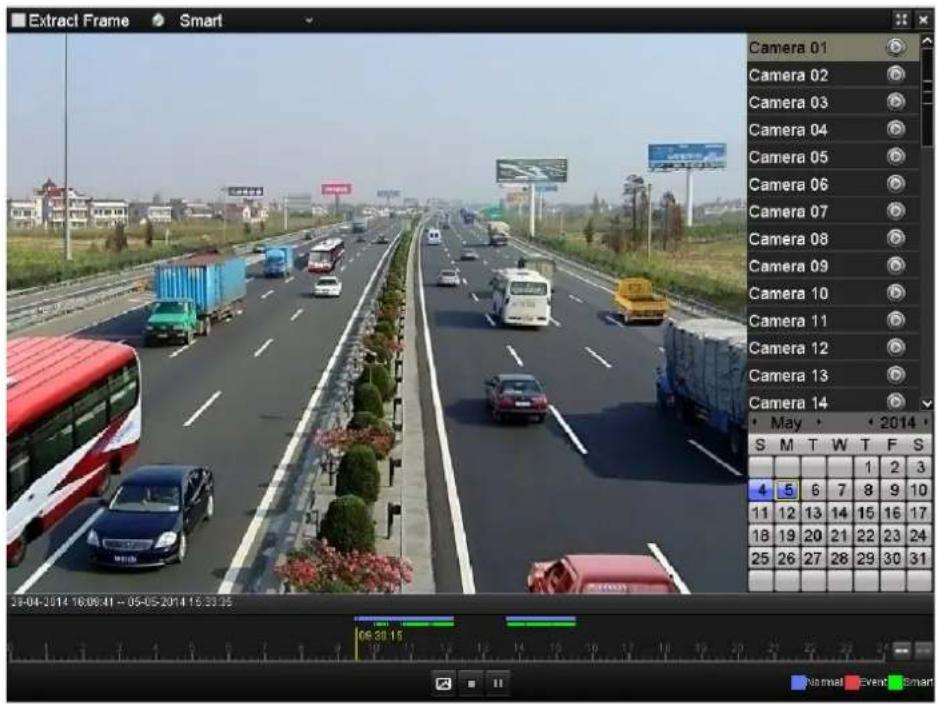
text_image
Extract Frame Smart Camera 01 Camera 02 Camera 03 Camera 04 Camera 05 Camera 06 Camera 07 Camera 08 Camera 09 Camera 10 Camera 11 Camera 12 Camera 13 Camera 14 May 2014 S M T W T F S 4 5 6 7 8 9 10 11 12 13 14 15 16 17 18 19 20 21 22 23 24 25 26 27 28 29 30 31 Normal Event SmartFigure 6.13 Smart Playback Interface

The 29-04-2014 16:09:41 -- 05-05-2014 15:33:35 indicates the start/end time of the record.
- represents normal recording (manual or schedule); - represents event recording (motion, alarm, motion | alarm, motion & alarm, VCA); and - represents the smart search result.
- Playback progress bar: use the mouse to click any point of the progress bar or drag the progress bar to locate special frames.
Table 6.2 Detailed Explanation of Smart Playback
| Button | Operation | Button | Operation | Button | Operation |
| Smart search | Stop | Pause play/Play | |||
| Process bar | Scaling up/down the time line | Video type / picture |
6.1.5 Playing Back by Searching System Log
Purpose:
You can also play back record file(s) after searching system logs.
Steps:
- Enter Log Information interface.
Menu>Maintenance>Log Information>Log Search
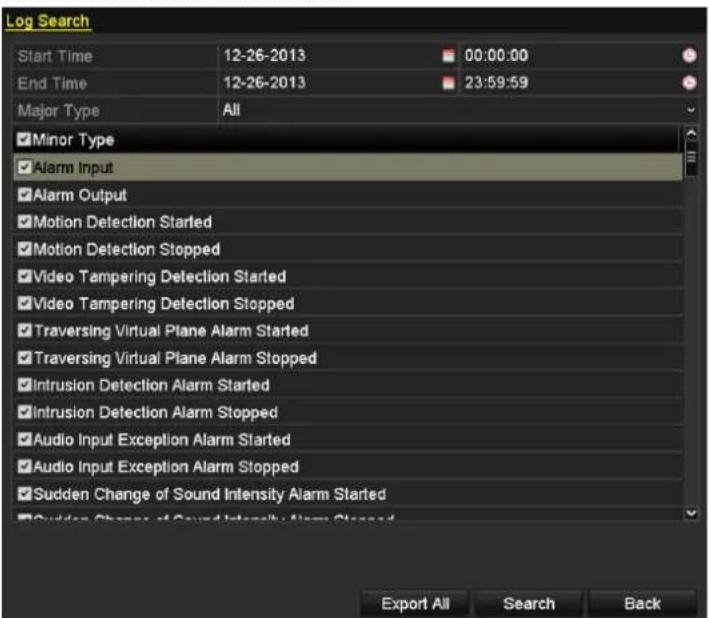
text_image
Log Search Start Time 12-26-2013 00:00:00 End Time 12-26-2013 23:59:59 Major Type All Minor Type Alarm Input Alarm Output Motion Detection Started Motion Detection Stopped Video Tampering Detection Started Video Tampering Detection Stopped Traversing Virtual Plane Alarm Started Traversing Virtual Plane Alarm Stopped Intrusion Detection Alarm Started Intrusion Detection Alarm Stopped Audio Input Exception Alarm Started Audio Input Exception Alarm Stopped Sudden Change of Sound Intensity Alarm Started Sudden Change of Sound Intensity Alarm Stopped Export All Search BackFigure 6.14 Log Search Interface
- Specify the start time and end time for search.
- Select the major type of the log from the drop-down list. 4 major types are selectable: Alarm, Exception, Operation and Information.
- Check the checkboxes to select the minor type of the log for search.
- Click Search, and the logs matching the search conditions will be displayed on a list.
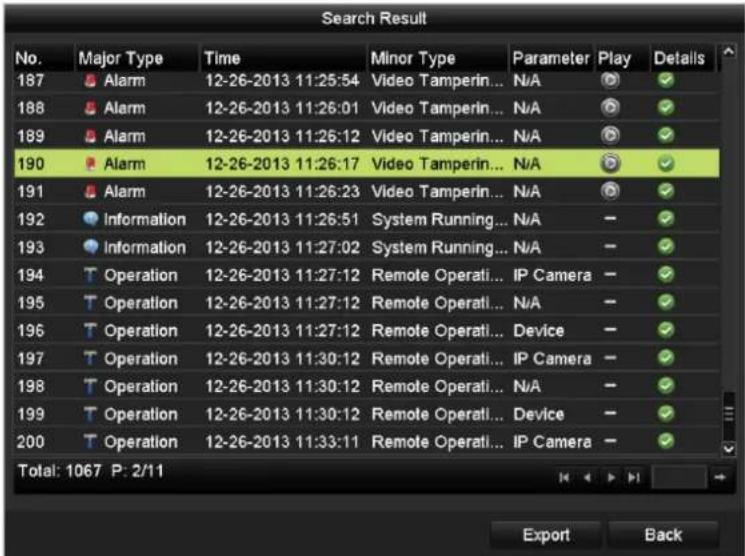
text_image
Search Result No. Major Type Time Minor Type Parameter Play Details 187 Alarm 12-26-2013 11:25:54 Video Tamperin... N/A ✓ 188 Alarm 12-26-2013 11:26:01 Video Tamperin... N/A ✓ 189 Alarm 12-26-2013 11:26:12 Video Tamperin... N/A ✓ 190 Alarm 12-26-2013 11:26:17 Video Tamperin... N/A ✓ 191 Alarm 12-26-2013 11:26:23 Video Tamperin... N/A ✓ 192 Information 12-26-2013 11:26:51 System Running... N/A - ✓ 193 Information 12-26-2013 11:27:02 System Running... N/A - ✓ 194 T Operation 12-26-2013 11:27:12 Remote Operati....IP Camera - ✓ 195 T Operation 12-26-2013 11:27:12 Remote Operati... N/A - ✓ 196 T Operation 12-26-2013 11:27:12 Remote Operati... Device - ✓ 197 T Operation 12-26-2013 11:30:12 Remote Operati... IP Camera - ✓ 198 T Operation 12-26-2013 11:30:12 Remote Operati... N/A - ✓ 199 T Operation 12-26-2013 11:30:12 Remote Operati... Device - ✓ 200 T Operation 12-26-2013 11:33:11 Remote Operati... IP Camera - ✓ Total: 1067 P: 2/11Figure 6.15 Result of System Log Search
- Select a log with record file and click 📋 button to enter Playback interface.

If there is no record file at the time point of the log, the message box "No result found" will pop up.
natural_image
Highway scene with multiple vehicles and a red double-decker bus, no visible text or symbols on the road or traffic.Figure 6.16 Interface of Playback by Log
6.1.6 Playing Back External Files
Purpose:
The record files stored in the external storage devices, e.g., USB flash drives, USB HDDs, can be searched and played back.
Before you start:
Insert the external device(s) with available record files into the device.
Steps:
- Enter the Playback interface.
Menu > Playback
- Select External File from the drop-down list in the upper-left corner of the page to enter the External File Playback interface.
The files stored in the extremal device are listed in the right-side list.
You can click the Refresh button to refresh the file list.
- Select a record file and click 📋 to play it.
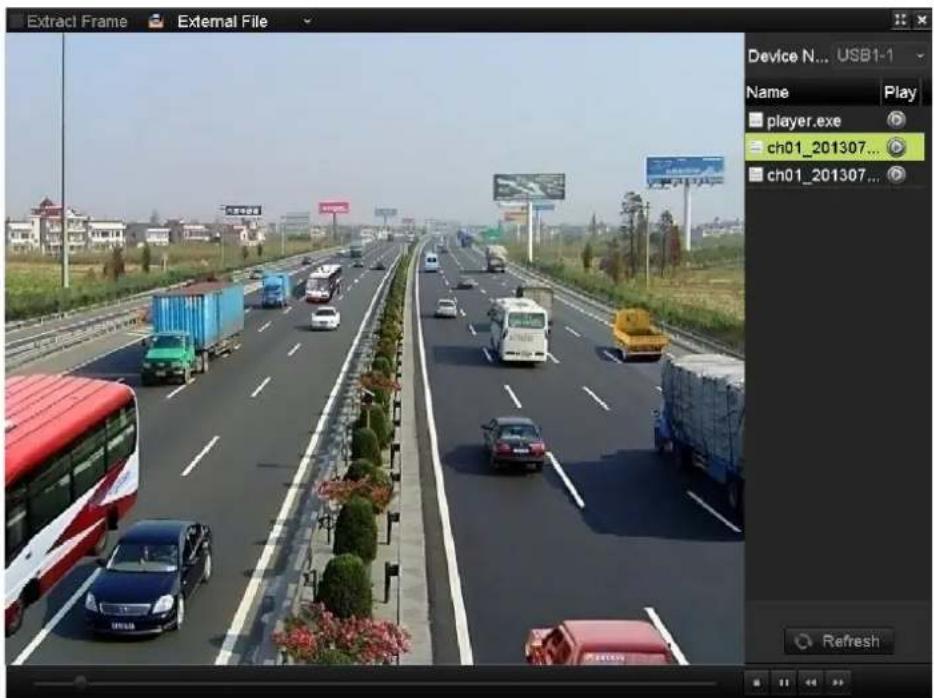
text_image
Extract Frame External File Device N... USB1-1 Name Play player.exe ch01_201307... ch01_201307... RefreshFigure 6.17 Interface of External File Playback
6.1.7 Playing Back Frame Extracting Record
Purpose:
If there are frame extracting record files existing in the HDD, you can search and play back them.

● Frame extracting playback is supported by analog cameras only.
● The frame extracting record is with low bitrate and the frame rate is 1 fps.
We use the interface of DS-9100HFI-RT series as example to describe the following settings.
Steps:
- Enter the Playback interface, and check ☑ checkbox to select the frame extracting mode. Menu>Playback
- Select the record type (Normal, Event and Tag) from the drop-down list and search the corresponding files. For details, see Chapter 6.1.1\~ Chapter 6.1.3.
- Play back the record files if available.
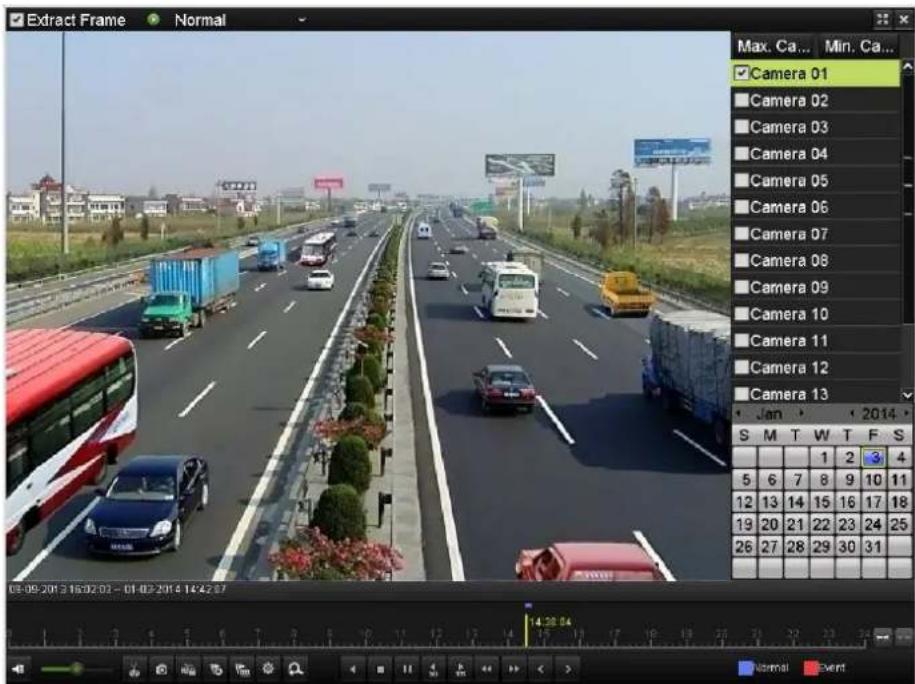
text_image
Extract Frame Normal Max. Ca... Min. Ca... Camera 01 Camera 02 Camera 03 Camera 04 Camera 05 Camera 06 Camera 07 Camera 08 Camera 09 Camera 10 Camera 11 Camera 12 Camera 13 Jan 2014 S M T W T F S 1 2 4 5 6 7 8 9 10 11 12 13 14 15 16 17 18 19 20 21 22 23 24 25 26 27 28 29 30 31 08-09-2013 16:02:02 - 01-03-2014 14:22:07 14:28:04 Normal EventFigure 6.18 Frame Extracting Record Playback
6.2 Auxiliary Functions of Playback
6.2.1 Playing Back Frame by Frame
Purpose:
Play video files frame by frame, in order to view the image details of the video when abnormal events occur.
Steps:
• Using a Mouse:
Go to Playback interface. If you choose playback of the record file: click button ◀ until the speed changes to Single frame and one click on the playback screen represents playback of one frame. If you choose reverse playback of the record file: click button ◀ until the speed changes to Single frame and one click on the playback screen represents reverse playback of one frame. It is also feasible to use button in toolbar.
• Using the Front Panel:
Rotate and hold the outer ring on Jog Shuttle counterclockwise (for DS-8100/8000-ST series only) or click the button to set the speed to Single frame. One click on button one click on the playback screen or Enter button on the front panel represents playback or reverse playback of one frame.
6.2.2 Digital Zoom

We use the interface of DS-9000HFI-RT series (unless otherwise stated) as example to describe the following settings.
Steps:
- Enter the Playback interface and start the playback. For details, see Chapter 6.1.
- Click the icon 📄 on the playback control toolbar to enter Digital Zoom mode.
- Click-and-drag the mouse to draw a red rectangle on the window in the lower-right corner of the interface. And then the image within it will be enlarged up to 16 times.
- Right-click to exit the Digital Zoom mode.
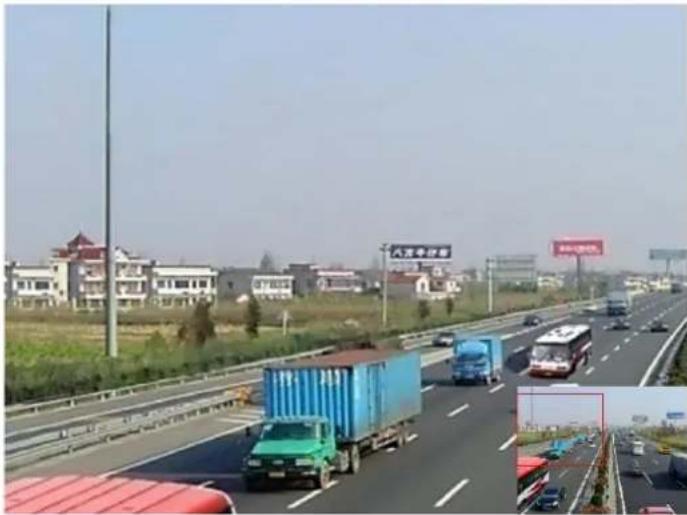
natural_image
Highway scene with vehicles and shipping containers, residential buildings in background (no visible text or symbols)Figure 6.19 Draw Area for Digital Zoom
6.2.3 Reverse Playback of Multi-channel
Purpose:
You can play back record files of multi-channel reversely.

We use the interface of DS-9000 HFI-RT series (unless otherwise stated) as example to describe the following settings.
Steps:
- Enter the Playback interface.
Menu>Playback
- Check ☑ checkbox to select the channel(s) and double-click to select a date on the calendar.
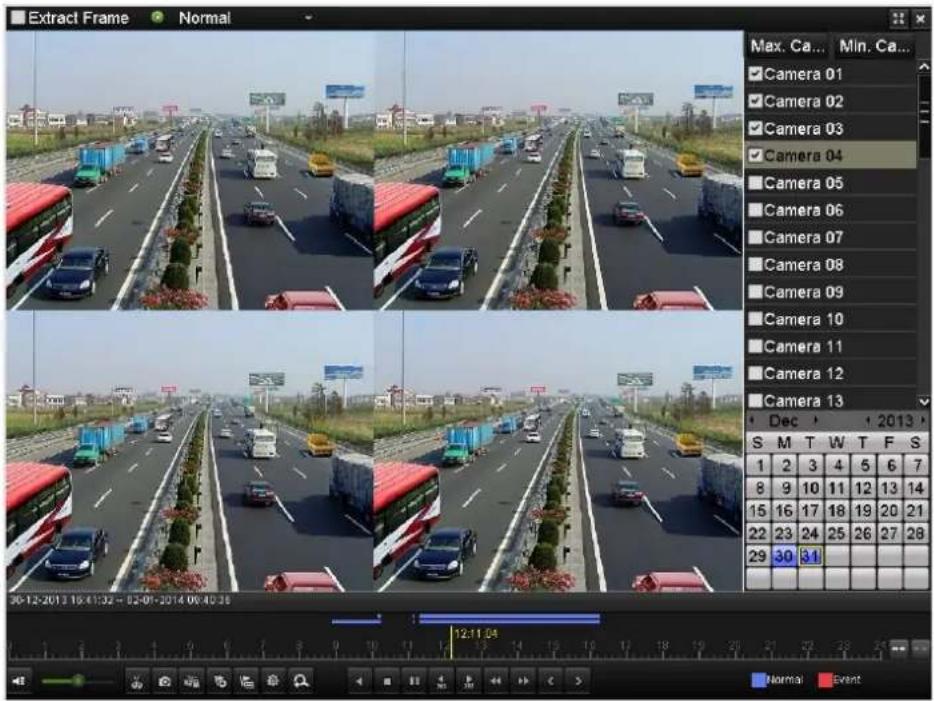
text_image
Extract Frame Normal Max. Ca... Min. Ca... Camera 01 Camera 02 Camera 03 Camera 04 Camera 05 Camera 06 Camera 07 Camera 08 Camera 09 Camera 10 Camera 11 Camera 12 Camera 13 Dec 2013 S M T W T F S 1 2 3 4 5 6 7 8 9 10 11 12 13 14 15 16 17 18 19 20 21 22 23 24 25 26 27 28 29 30 31 30-12-2013 16:41:32 - 02-01-2014 06:40:36 12:11:04 Normal EventFigure 6. 20 4-ch Synchronous Playback Interface

- If more than one channel is optional, the synchronous playback will be activated.
- The record files will be marked by two lines on the process bar. The upper one indicates the record files of the selected channel; and the lower one indicates the record files of all the selected channels.
- Click the icon 📁 on the playback control toolbar, and the record files will be played back reversely.

For DVR series, up to 16-ch simultaneous reverse playback is supported. While for Hybrid DVR series, up to 16-ch (with 704*576 resolution) simultaneous reverse playback is supported; up to 8-ch (with 1280*720 resolution) simultaneous reverse playback is supported; up to 4-ch (with 1920*1080P resolution) simultaneous reverse playback is supported and up to 1-ch (with 2560*1920 resolution) reverse playback is supported.
6.3 Picture Playback
Purpose:
The captured pictures stored in the HDDs of the device can be searched and viewed.
Steps:
- Enter Playback interface.
Menu>Playback - Select Picture from the drop-down list in the upper-left corner of the page to enter the Picture Playback interface.
- Check ☑ checkbox to select the channel(s) and specify the start time and end time for search.
- Click Search to enter Search Result interface.

Up to 4000 pictures can be displayed each time.
- Choose a picture you want to view and click 🎨 button.
You can click Back to return to the search interface.
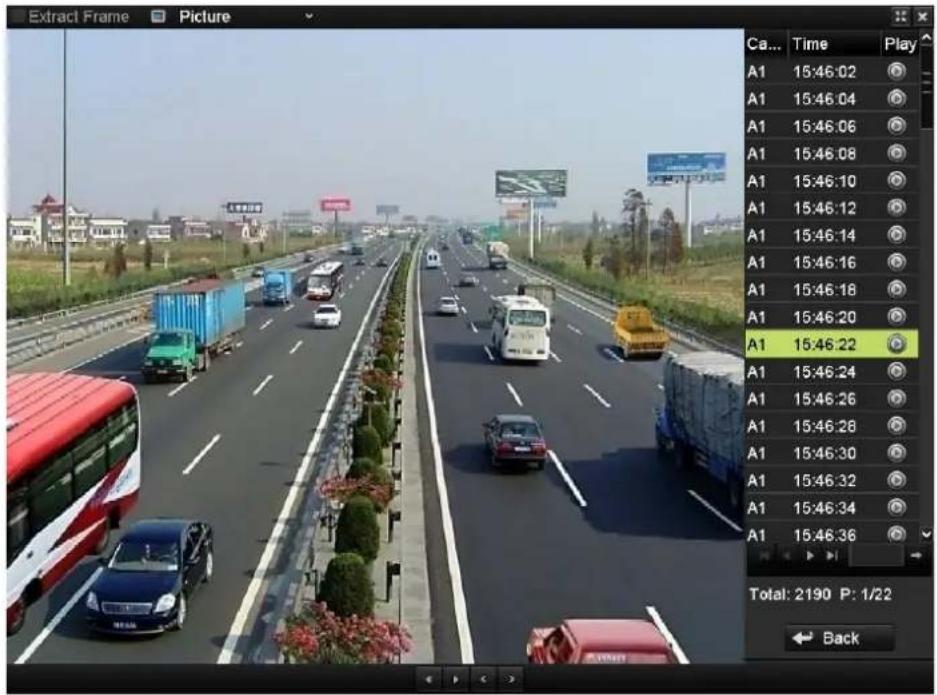
text_image
Extract Frame Picture Ca... Time Play A1 15:46:02 A1 15:46:04 A1 15:46:06 A1 15:46:08 A1 15:46:10 A1 15:46:12 A1 15:46:14 A1 15:46:16 A1 15:46:18 A1 15:46:20 A1 15:46:22 A1 15:46:24 A1 15:46:26 A1 15:46:28 A1 15:46:30 A1 15:46:32 A1 15:46:34 A1 15:46:36 Total: 2190 P: 1/22 BackFigure 6.21 Result of Picture Playback
- The toolbar in the bottom part of Playback interface can be used to control playing process.
Figure 6.22 Picture Playback Toolbar
Table 6.3 Detailed Explanation of Picture-playback Toolbar
| Button | Function | Button | Function | Button | Function | Button | Function |
| [202K] | Play reverse |  | Play | [K238] | Previous picture |  | Next picture |
Chapter 7 Backup
7.1 Backing up Record Files
Before you start:
Please insert the backup device(s) into the device.
7.1.1 Quick Export
Purpose:
Export record files to backup device(s) quickly.

We use the interface of DS-9000HFI-RT series (unless otherwise stated) as example to describe the following settings.
Steps:
- Enter Normal Export interface.
Menu>Export>Normal
- Select the channel(s) you want to back up and set the search conditions.

The start time and end time for search should be within the same day.
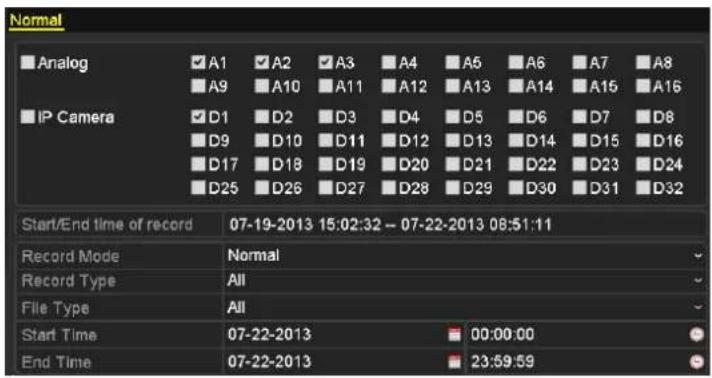
text_image
Normal Analog A1 A2 A3 A4 A5 A6 A7 A8 A9 A10 A11 A12 A13 A14 A15 A16 IP Camera D1 D2 D3 D4 D5 D6 D7 D8 D9 D10 D11 D12 D13 D14 D15 D16 D17 D18 D19 D20 D21 D22 D23 D24 D25 D26 D27 D28 D29 D30 D31 D32 Start/End time of record 07-19-2013 15:02:32 - 07-22-2013 08:51:11 Record Mode Normal Record Type All File Type All Start Time 07-22-2013 00:00:00 End Time 07-22-2013 23:59:59Figure 7.1 Quick Export Interface
- Click the button Quick Export, and the Export interface pops up.
- Select the backup device from the drop-down list and click the button Export.
The record files within the start time and end time will be exported to the external storage device (e.g., USB Flash Drive) after the backup process is complete.

The Player program player.exe will be exported automatically during record file export.
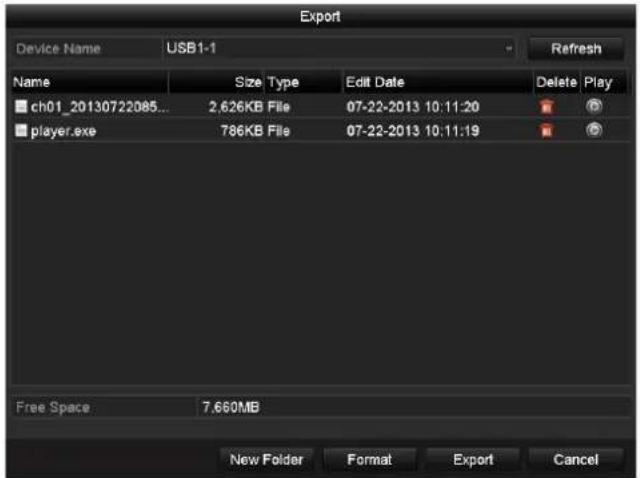
text_image
Export Device Name USB1-1 Refresh Name Size Type Edit Date Delete Play ch01_20130722085... 2.626KB File 07-22-2013 10:11:20 player.exe 786KB File 07-22-2013 10:11:19 Free Space 7.660MB New Folder Format Export CancelFigure 7.2 Checkup of Quick Export Result Using USB1-1
Click the button on the Export interface, and you can view the video. Click the button on the Export interface, and you can delete the record file.
7.1.2 Backing up by Normal Video Search
Purpose:
The record files can be backed up to various devices, such as USB devices (USB flash drives, USB HDDs, USB writer), DVD-R/W and eSATA HDD.

We use the interface of DS-9000HFI-RT series (unless otherwise stated) as example to describe the following settings.
Before you start:
When the backup device is the eSATA HDD, click Menu>Record>Advanced, select eSATA1 from the eSATA drop-down list, and set the usage as Export. Click Apply to save the settings and click Yes to confirm it.
Backup using USB flash drives, USB HDDs, USB writer and DVD-R/W
Steps:
- Enter Normal Export interface.
Menu>Export>Normal
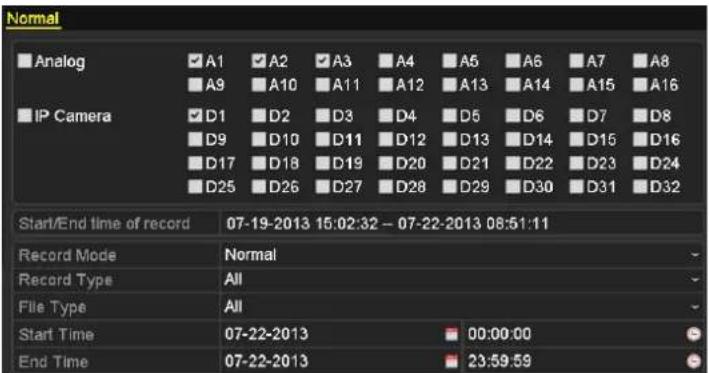
text_image
Normal Analog A1 A2 A3 A4 A5 A6 A7 A8 A9 A10 A11 A12 A13 A14 A15 A16 IP Camera D1 D2 D3 D4 D5 D6 D7 D8 D9 D10 D11 D12 D13 D14 D15 D16 D17 D18 D19 D20 D21 D22 D23 D24 D25 D26 D27 D28 D29 D30 D31 D32 Start/End time of record 07-19-2013 15:02:32 - 07-22-2013 08:51:11 Record Mode Normal Record Type All File Type All Start Time 07-22-2013 00:00:00 End Time 07-22-2013 23:59:59Figure 7.3 Normal Video Search for Backup
- Set the search conditions and click the button Search to enter the search result interface. You can click the button ☐ play the record file if you want to view it.

- 8 different Record types are selectable: Continuous, Motion, Alarm, Motion | Alarm, Motion & Alarm, Command Triggered, Manual and VCA. The command triggered record is configured by the platform when the device accessed via the platform.
- Two different File types are selectable: Unlocked and Locked.
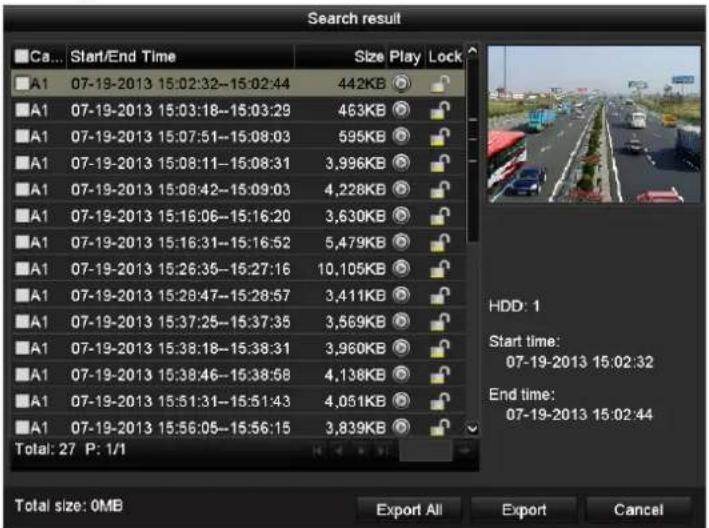
text_image
Search result Ca... Start/End Time Size Play Lock A1 07-19-2013 15:02:32--15:02:44 442KB A1 07-19-2013 15:03:18--15:03:29 463KB A1 07-19-2013 15:07:51--15:08:03 595KB A1 07-19-2013 15:08:11--15:08:31 3,996KB A1 07-19-2013 15:08:42--15:09:03 4,228KB A1 07-19-2013 15:16:06--15:16:20 3,630KB A1 07-19-2013 15:16:31--15:16:52 5,479KB A1 07-19-2013 15:26:35--15:27:16 10,105KB A1 07-19-2013 15:28:47--15:28:57 3,411KB A1 07-19-2013 15:37:25--15:37:35 3,569KB A1 07-19-2013 15:38:18--15:38:31 3,960KB A1 07-19-2013 15:38:46--15:38:58 4,138KB A1 07-19-2013 15:51:31--15:51:43 4,051KB A1 07-19-2013 15:56:05--15:56:15 3,839KB Total: 27 P: 1/1 HDD: 1 Start time: 07-19-2013 15:02:32 End time: 07-19-2013 15:02:44 Total size: 0MB Export All Export CancelFigure 7.4 Result of Normal Video Search for Backup
- Check the checkboxes to select the record files, and click the button Export to enter the Export interface. You can also click Export All to select all the record files for backup and enter the Export interface.

The size of the currently selected files is displayed in the lower-left corner of the window.
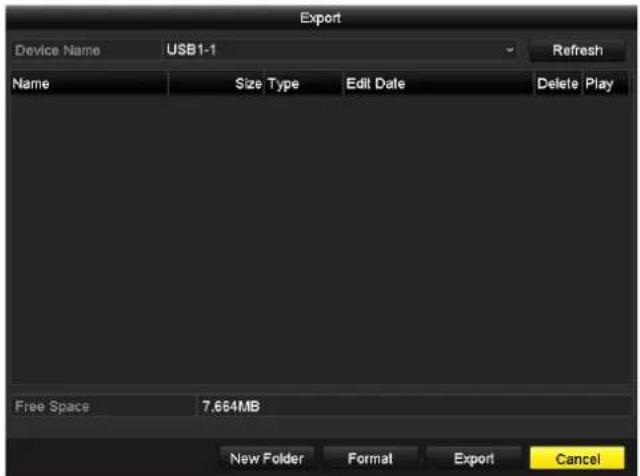
text_image
Export Device Name USB1-1 Refresh Name Size Type Edit Date Delete Play Free Space 7.664MB New Folder Format Export CancelFigure 7.5 Export by Normal Video Search using USB Flash Drive
- Click the button Export on the Export interface to start the backup process. A prompt message will pop up
after the backup process is complete.
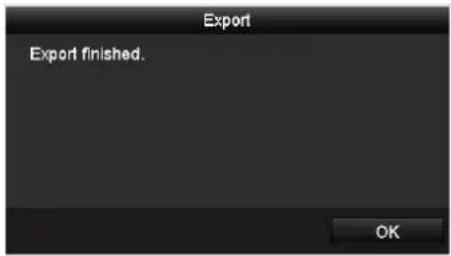
text_image
Export Export finished. OKFigure 7.6 Export Finished
- The exported record files will be displayed in a list on the Export interface.
You can click 🎨 to view the video, or click 🌐 to delete the record file.

The Player program player.exe will be exported automatically during record file export.
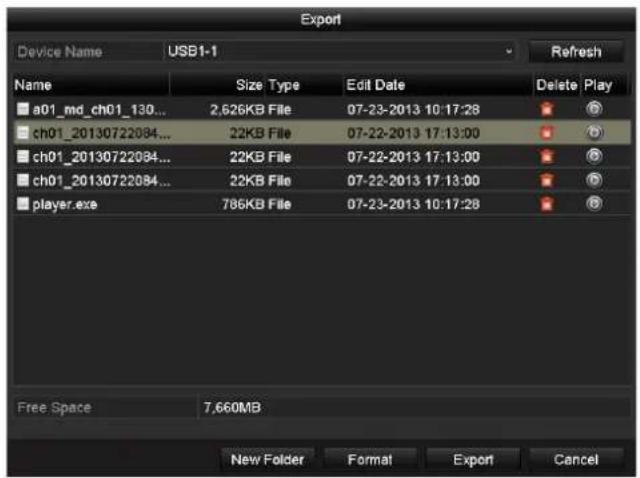
text_image
Export Device Name USB1-1 Refresh Name Size Type Edit Date Delete Play a01_md_ch01_130... 2,626KB File 07-23-2013 10:17:28 ch01_20130722084... 22KB File 07-22-2013 17:13:00 ch01_20130722084... 22KB File 07-22-2013 17:13:00 ch01_20130722084... 22KB File 07-22-2013 17:13:00 player.exe 786KB File 07-23-2013 10:17:28 Free Space 7,660MB New Folder Format Export CancelFigure 7.7 Checkup of Export Result using USB Flash Drive
7.1.3 Backing up by Event Search
Purpose:
The event triggered recordings can be backed up on USB devices (USB flash drives, USB HDDs, USB writer), DVD-R/W or eSATA HDD. Quick Backup and Normal Backup are supported.
Steps:
- Enter Event Export interface.
Menu>Export>Event
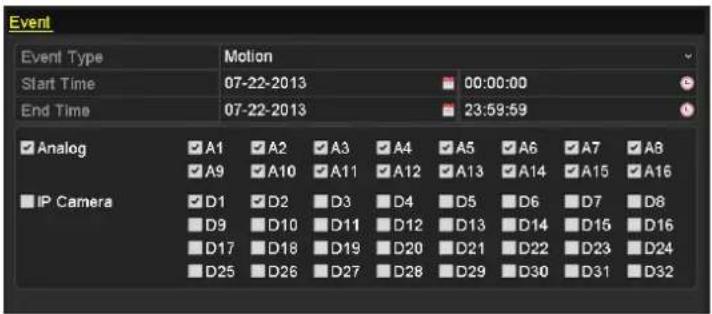
text_image
Event Event Type Motion Start Time 07-22-2013 00:00:00 End Time 07-22-2013 23:59:59 ✓ Analog ✓ A1 ✓ A2 ✓ A3 ✓ A4 ✓ A5 ✓ A6 ✓ A7 ✓ A8 ✓ A9 ✓ A10 ✓ A11 ✓ A12 ✓ A13 ✓ A14 ✓ A15 ✓ A16 IP Camera ✓ D1 ✓ D2 ✓ D3 ✓ D4 ✓ D5 ✓ D6 ✓ D7 ✓ D8 ✓ D9 ✓ D10 ✓ D11 ✓ D12 ✓ D13 ✓ D14 ✓ D15 ✓ D16 ✓ D17 ✓ D18 ✓ D19 ✓ D20 ✓ D21 ✓ D22 ✓ D23 ✓ D24 ✓ D25 ✓ D26 ✓ D27 ✓ D28 ✓ D29 ✓ D30 ✓ D31 ✓ D32Figure 7.8 Event Search for Backup
- Select Alarm Input, Motion or VCA from the drop-down list as the event type, select the channel and specify the start time and end time for search, and then click the button Search to enter the Search Result interface.
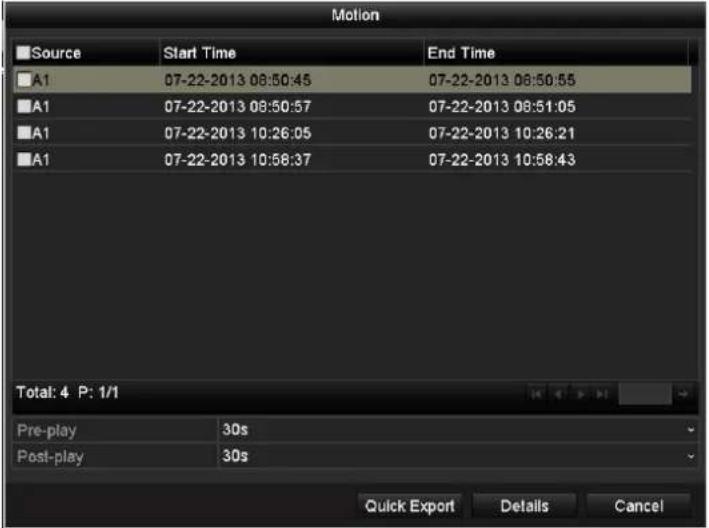
text_image
Motion Source Start Time End Time A1 07-22-2013 08:50:45 07-22-2013 08:50:55 A1 07-22-2013 08:50:57 07-22-2013 08:51:05 A1 07-22-2013 10:26:05 07-22-2013 10:26:21 A1 07-22-2013 10:58:37 07-22-2013 10:58:43 Total: 4 P: 1/1 Pre-play 30s Post-play 30s Quick Export Details CancelFigure 7.9 Result of Event Search
- Select the record file from the list and click the button Quick Export to enter the Export interface.
Click the button Details, and you can view the detailed information of selected events. Then, select the record files, click the button Export or click the button Export All to select all the record files directly to enter the Export interface.

The size of the currently selected files is displayed in the lower-left corner of the window.
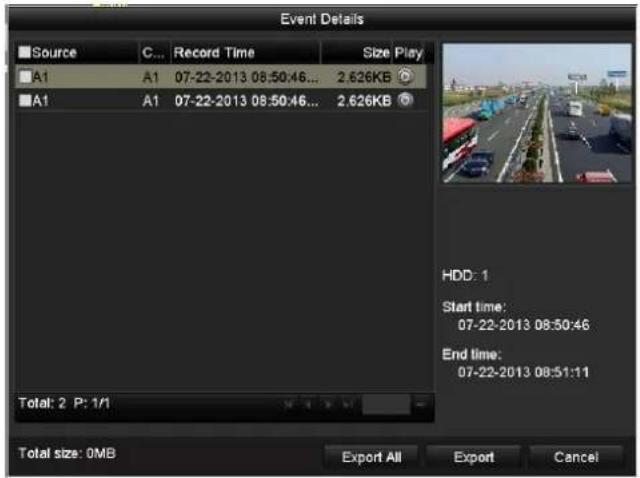
text_image
Event Details Source C... Record Time Size Play A1 A1 07-22-2013 08:50:46... 2.626KB A1 A1 07-22-2013 08:50:46... 2.626KB Total: 2 P: 1/1 HDD: 1 Start time: 07-22-2013 08:50:46 End time: 07-22-2013 08:51:11 Total size: 0MB Export All Export CancelFigure 7.10 Event Details Interface
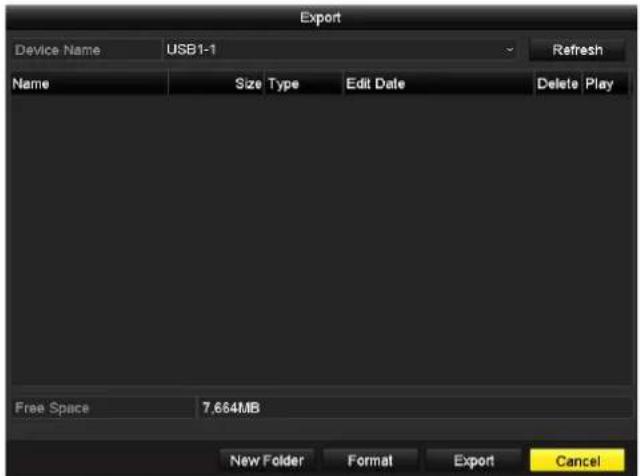
text_image
Export Device Name USB1-1 Refresh Name Size Type Edit Date Delete Play Free Space 7.664MB New Folder Format Export CancelFigure 7.11 Export by Event Using USB Flash Drive
- Click the button Export on the export interface to start the backup process. A prompt message will pop up after the backup process is complete.
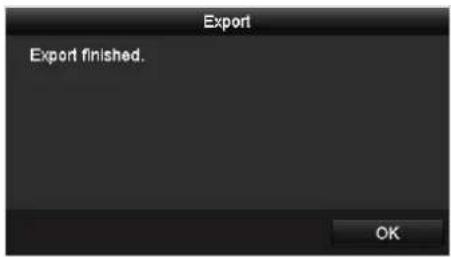
text_image
Export Export finished. OKFigure 7.12 Export Finished
- The exported record files will be displayed in a list on the Export interface.
You can click 🎨 to view the video, or click 🌐 to delete the record file.

The Player program player.exe will be exported automatically during record file export.
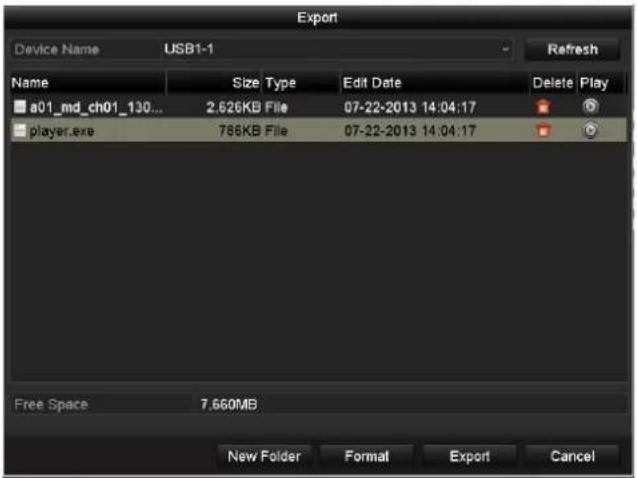
text_image
Export Device Name USB1-1 Name Size Type Edit Date Delete Play a01_md_ch01_130... 2.626KB File 07-22-2013 14:04:17 player.exe 785KB File 07-22-2013 14:04:17 Free Space 7.660MB New Folder Format Export CancelFigure 7.13 Checkup of Event Export Result Using USB Flash Drive
7.1.4 Backing up Video Clips
Purpose:
You can also export the video clips directly during Playback, using USB devices (USB flash drives, USB HDDs, USB writer), DVD-R/W or eSATA HDD.
Steps:
- Enter Playback interface and start the playback. For details, see Chapter 6.1.
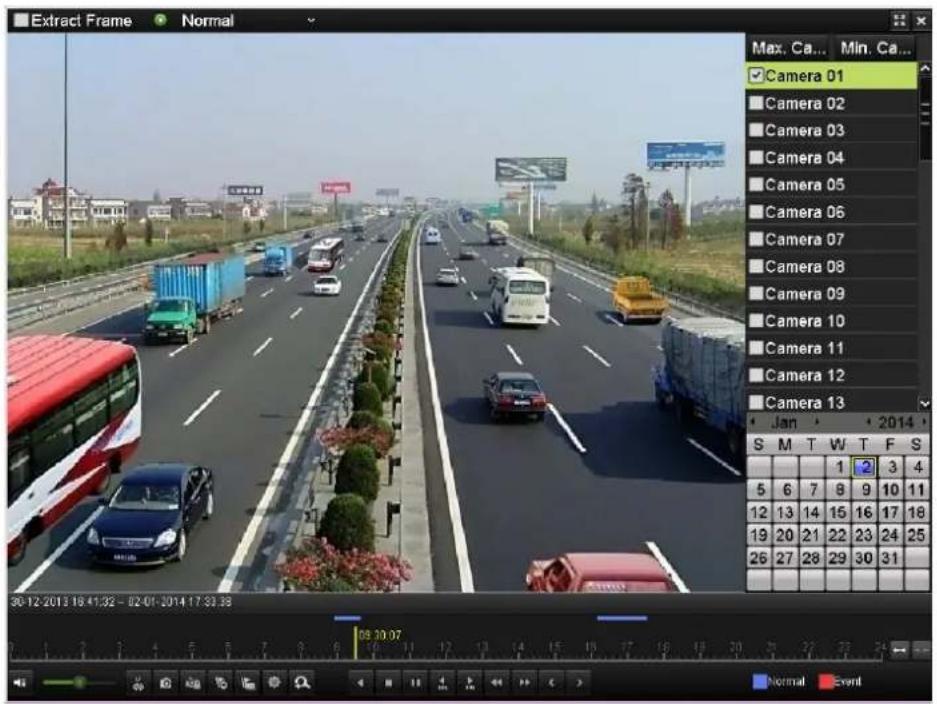
text_image
Extract Frame Normal Max. Ca... Min. Ca... Camera 01 Camera 02 Camera 03 Camera 04 Camera 05 Camera 06 Camera 07 Camera 08 Camera 09 Camera 10 Camera 11 Camera 12 Camera 13 Jan 2014 S M T W T F S 1 2 3 4 5 6 7 8 9 10 11 12 13 14 15 16 17 18 19 20 21 22 23 24 25 26 27 28 29 30 31 30-12-2013 16:41:32 - 02-01-2014 17:33:38 08:00:07 Normal EventFigure 7.14 Interface of Playback by Time
- In the playback process, click the icon 🎨 in the playback toolbar to start/stop clipping record file(s).
- Click the button on the toolbar, select Video Clip tab, and you can view and export the video clips.
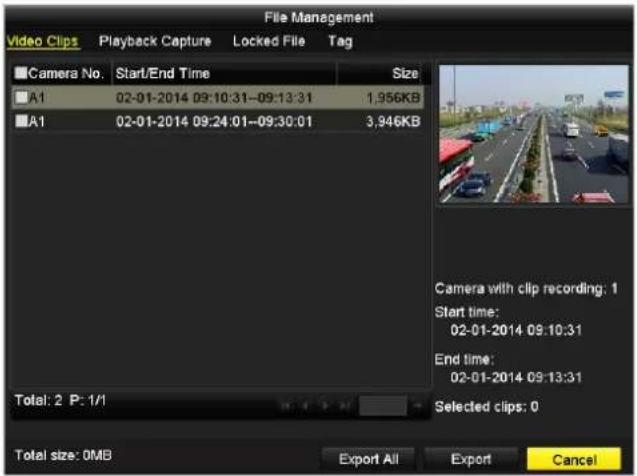
text_image
File Management Video Clips Playback Capture Locked File Tag Camera No. Start/End Time Size A1 02-01-2014 09:10:31-09:13:31 1,956KB A1 02-01-2014 09:24:01-09:30:01 3,946KB Total: 2 P: 1/1 Total size: 0MB Export All Export Cancel Camera with clip recording: 1 Start time: 02-01-2014 09:10:31 End time: 02-01-2014 09:13:31 Selected clips: 0Figure 7.15 Clips Export

Up to 30 items of video clips can be selected for backup at one time.
- Click the button Export to export the selected video clips to the backup device.
You can also click the button Export All to export all the video clips to the backup device.
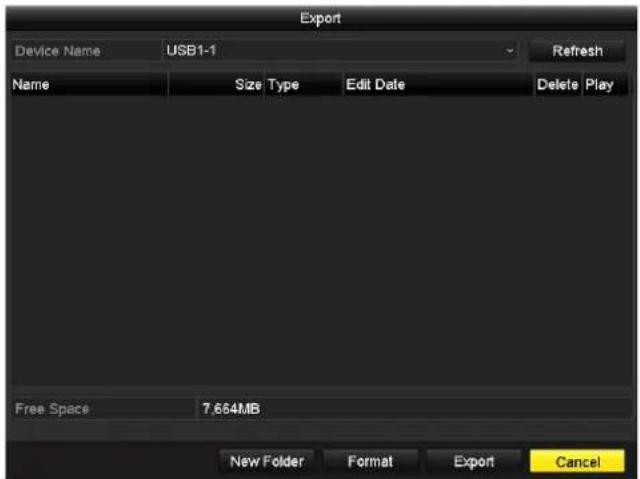
text_image
Export Device Name USB1-1 Refresh Name Size Type Edit Date Delete Play Free Space 7.664MB New Folder Format Export CancelFigure 7.16 Export Video Clips Using USB Flash Drive
Stay in the Exporting interface until all record files are exported with pop-up message "Export finished".
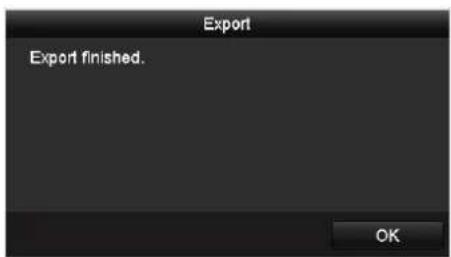
text_image
Export Export finished. OKFigure 7.17 Export Finished
- After the backup is complete, the exported record files will be displayed in a list on the Export interface.

The Player program player.exe will be exported automatically during record file export.
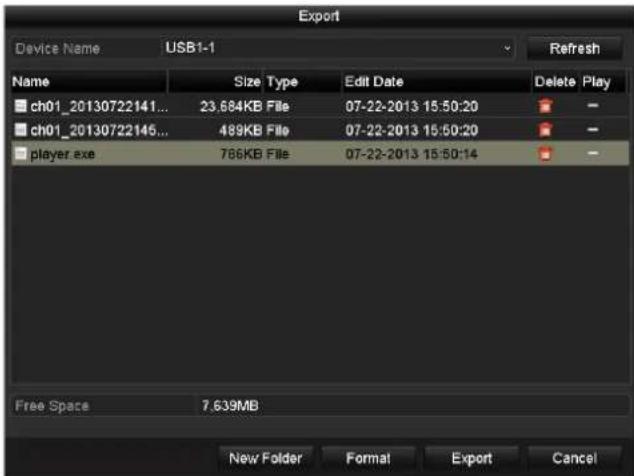
text_image
Export Device Name USB1-1 Refresh Name Size Type Edit Date Delete Play ch01_20130722141... 23.684KB File 07-22-2013 15:50:20 ch01_20130722145... 489KB File 07-22-2013 15:50:20 player.exe 766KB File 07-22-2013 15:50:14 Free Space 7.639MB New Folder Format Export CancelFigure 7.18 Checkup of Video Clips Export Result Using USB Flash Drive
7.2 Backing up Pictures
Task 1: Back up Captured Pictures when Playback
Purpose:
Back up the pictures captured during playback.
Steps:
- Enter Playback interface and start the playback. For details, see Chapter 6.1.
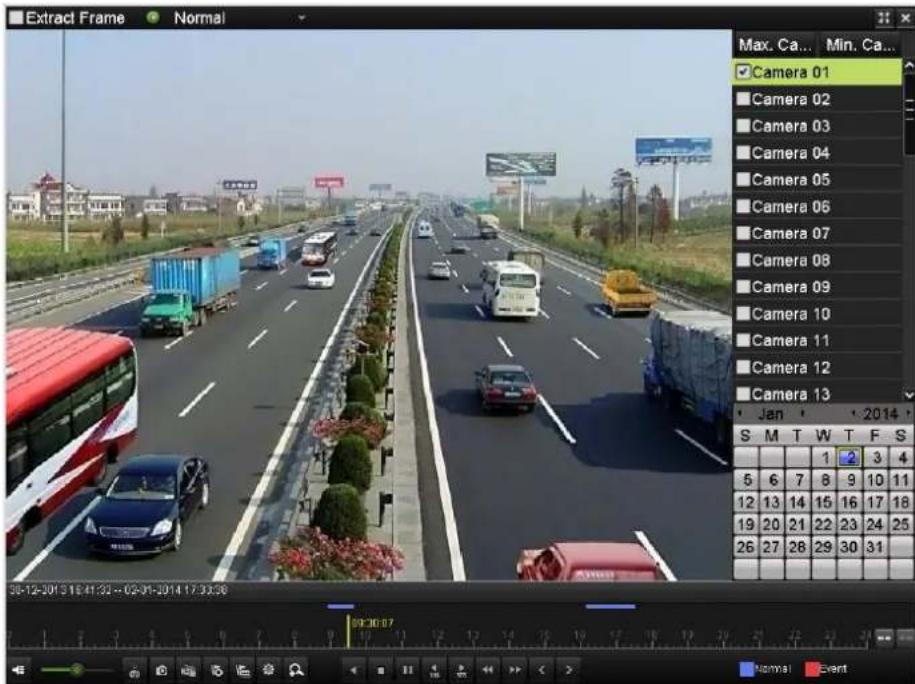
text_image
Extract Frame Normal Max. Ca... Min. Ca... Camera 01 Camera 02 Camera 03 Camera 04 Camera 05 Camera 06 Camera 07 Camera 08 Camera 09 Camera 10 Camera 11 Camera 12 Camera 13 Jan 2014 S M T W T F S 1 2 3 4 5 6 7 8 9 10 11 12 13 14 15 16 17 18 19 20 21 22 23 24 25 26 27 28 29 30 31 06-12-2013 10:41:33 -- 02-01-2014 17:33:36 09:30:07 Normal EventFigure 7.19 Interface of Playback by Time
- In the playback process, click the icon 📋 in the playback toolbar to capture the pictures.
- Click the button on the toolbar, select Playback Capture tab, and you can view and export the pictures captured when playback.
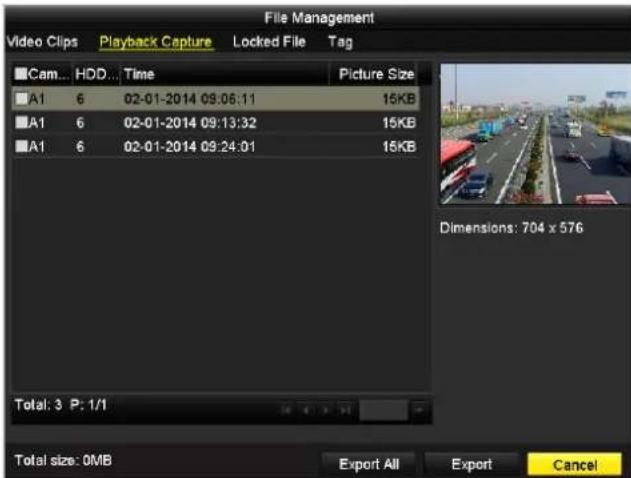
text_image
File Management Video Clips Playback Capture Locked File Tag Cam... HDD... Time Picture Size A1 6 02-01-2014 09:06:11 15KB A1 6 02-01-2014 09:13:32 15KB A1 6 02-01-2014 09:24:01 15KB Dimensions: 704 x 576 Total: 3 P: 1/1 Total size: 0MB Export All Export CancelFigure 7.20 Captured Picture Export Interface
- Refer to the steps4\~5 in Chapter 7.1.4 to export the pictures.
Task 2: Back up All Types of Captured Pictures
Purpose:
Back up pictures using USB devices (USB flash drives, USB HDDs, USB writer), DVD-R/W or eSATA HDD.
Steps:
- Enter Picture Export interface.
Menu>Export>Picture
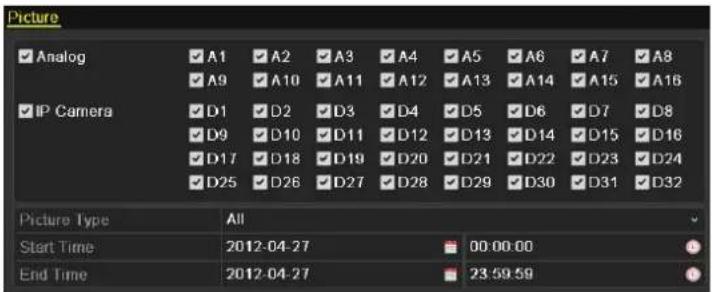
text_image
Picture ✓ Analog ✓ A1 ✓ A2 ✓ A3 ✓ A4 ✓ A5 ✓ A6 ✓ A7 ✓ A8 ✓ A9 ✓ A10 ✓ A11 ✓ A12 ✓ A13 ✓ A14 ✓ A15 ✓ A16 ✓ IP Camera ✓ D1 ✓ D2 ✓ D3 ✓ D4 ✓ D5 ✓ D6 ✓ D7 ✓ D8 ✓ D9 ✓ D10 ✓ D11 ✓ D12 ✓ D13 ✓ D14 ✓ D15 ✓ D16 ✓ D17 ✓ D18 ✓ D19 ✓ D20 ✓ D21 ✓ D22 ✓ D23 ✓ D24 ✓ D25 ✓ D26 ✓ D27 ✓ D28 ✓ D29 ✓ D30 ✓ D31 ✓ D32 Picture Type All Start Time 2012-04-27 00:00:00 End Time 2012-04-27 23:59:59Figure 7.21 Picture Search for Backup

Picture search of IP Camera is supported by HDVR series only.
- Set the search conditions and click the button Search to enter the search result interface.
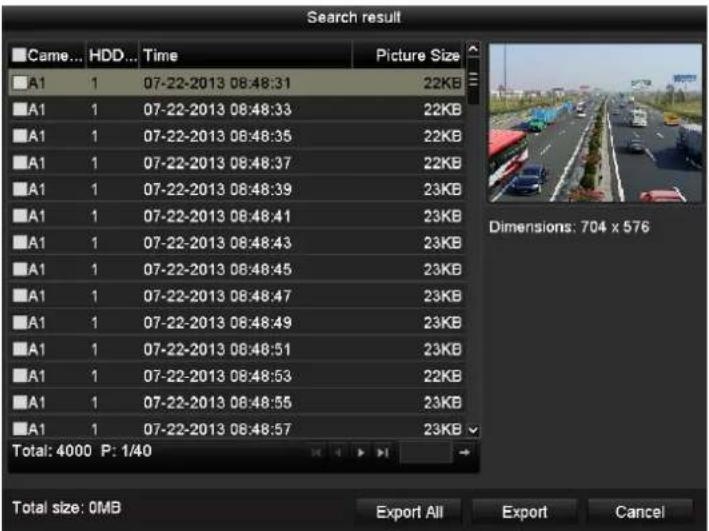
text_image
Search result Came... HDD... Time Picture Size A1 1 07-22-2013 08:48:31 22KB A1 1 07-22-2013 08:48:33 22KB A1 1 07-22-2013 08:48:35 22KB A1 1 07-22-2013 08:48:37 22KB A1 1 07-22-2013 08:48:39 23KB A1 1 07-22-2013 08:48:41 23KB A1 1 07-22-2013 08:48:43 23KB A1 1 07-22-2013 08:48:45 23KB A1 1 07-22-2013 08:48:47 23KB A1 1 07-22-2013 08:48:49 23KB A1 1 07-22-2013 08:48:51 23KB A1 1 07-22-2013 08:48:53 22KB A1 1 07-22-2013 08:48:55 23KB A1 1 07-22-2013 08:48:57 23KB Total: 4000 P: 1/40 Dimensions: 704 x 576 Total size: OMB Export All Export CancelFigure 7.22 Result of Picture Search
- Check the checkboxes to select pictures and click the button Export to enter the Export interface; or click the button Export All to select all the pictures and enter the Export interface.

Here we take USB flash drive as an example. For more backup devices, see Chapter 7.1.2.
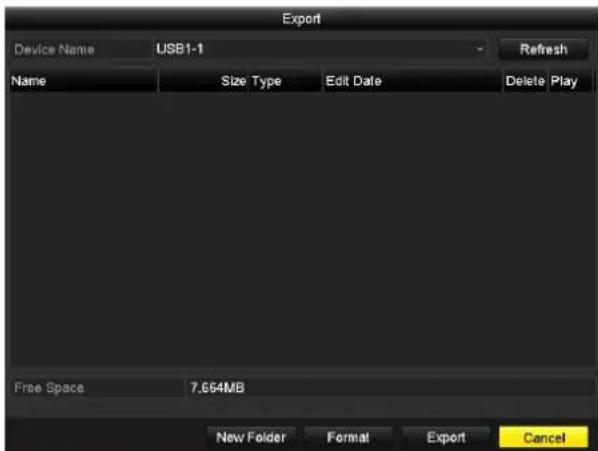
text_image
Export Device Name USB1-1 Refresh Name Size Type Edit Date Delete Play Free Space 7.664MB New Folder Format Export CancelFigure 7.23 Export Pictures Using USB Flash Drive
- Click the button Export on the Export interface to start the backup process. A prompt message will pop up after the backup process is complete
text_image
Export Export finished. OKFigure 7.24 Export Finished
- The exported pictures will be displayed in a list on the Export interface.
You can click to view the picture, or click to delete the picture.
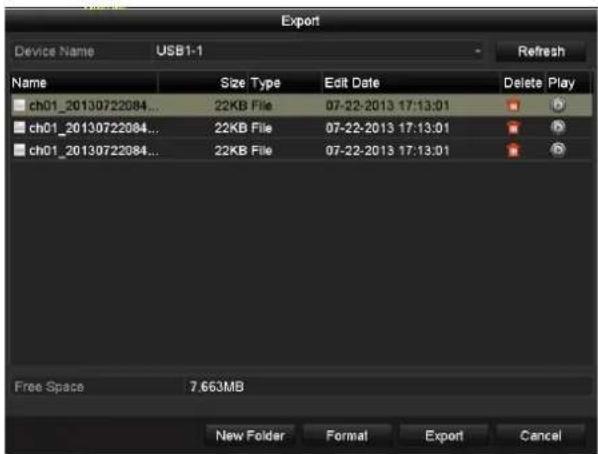
text_image
Export Device Name USB1-1 Name Size Type Edit Date Delete Play ch01_20130722084... 22KB File 07-22-2013 17:13:01 ch01_20130722084... 22KB File 07-22-2013 17:13:01 ch01_20130722084... 22KB File 07-22-2013 17:13:01 Free Space 7.663MB New Folder Format Export CancelFigure 7.25 Checkup of Picture Export Using USB Flash Drive
7.3 Managing Backup Devices

We use the interface of DS-9000HFI-RT series (unless otherwise stated) as example to describe the following settings.
Steps:
- Enter the Export interface of backup device. For details, see Chapter 7.1-7.2.
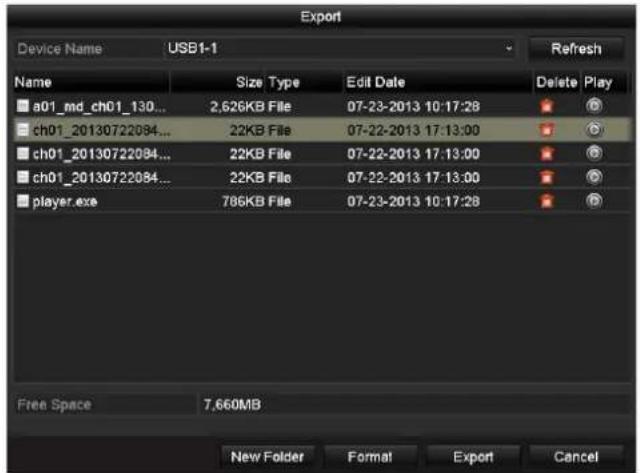
text_image
Export Device Name USB1-1 Refresh Name Size Type Edit Date Delete Play a01_md_ch01_130... 2.626KB File 07-23-2013 10:17:28 ch01_20130722084... 22KB File 07-22-2013 17:13:00 ch01_20130722084... 22KB File 07-22-2013 17:13:00 ch01_20130722084... 22KB File 07-22-2013 17:13:00 player.exe 786KB File 07-23-2013 10:17:28 Free Space 7,660MB New Folder Format Export CancelFigure 7. 26 Management of USB Flash Drives, USB HDDs and eSATA HDDs
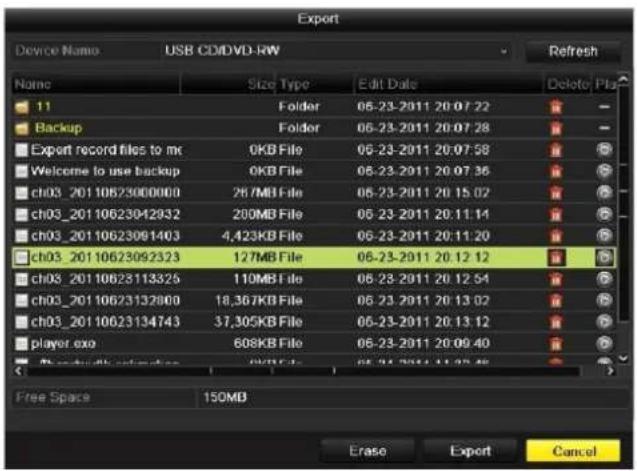
text_image
Export Device Name USB CD/DVD-RW Refresh Name Size Type Edit Date Delete Place 11 Folder 05-23-2011 20:07:22 Backup Folder 05-23-2011 20:07:28 Export record files to mc 0KB File 05-23-2011 20:07:58 Welcome to use backup 0KB File 05-23-2011 20:07:36 ch03_20110623000000 267MB File 05-23-2011 20:15:02 ch03_20110623042932 200MB File 05-23-2011 20:11:14 ch03_20110623091403 4,423KB File 05-23-2011 20:11:20 ch03_20110623092323 127MB File 05-23-2011 20:12:12 ch03_20110623113326 110MB File 05-23-2011 20:12:54 ch03_20110623132860 18,367KB File 05-23-2011 20:13:02 ch03_20110623134743 37,305KB File 05-23-2011 20:13:12 player exo 608KB File 05-23-2011 20:09:40 Free Space 150MB Erase Export CancelFigure 7.27 Management of USB Writers and DVD-R/W
- Select a record file/folder/picture in the backup device, click the icon 📄, and you can delete it. Select a record file/picture, click the icon 📄 and then you can play and view the video/picture.
For USB Flash Drives, USB HDDs and eSATA HDDs:
Click the button New Folder, and you can create a new folder in the backup device.
Click the button Format, and you can format the backup device. Two kinds of file system can be configurable, including FAT32 and NTFS.
For USB Writers and DVD-R/W:
Click the button Erase, and you can erase the files from a re-writable CD/DVD.

If the inserted device is not recognized, you can perform the following steps:
- Click the button Refresh.
- Reconnect device.
- Check for compatibility from vendor.
7.4 Hot Spare Backup

This section is only applicable to the devices of HDVR series.
Before you start:
At least 2 devices are required to be online.
Purpose:
Several devices can form an N+1 hot spare system. The system consists of several working devices and a hot spare device; when the working device fails, the hot spare device is switched into operation, thus increasing the reliability of the system.
A bidirectional connection should be built for the working device and hot spare device.

flowchart
graph LR
    A["Start Finish"] --> B["Set a hot spare device"]
    B --> C["Add a hot spare device on normal device"]
    C --> D["Add the normal device on the hot spare device"]
    D --> E["End"]
Figure 7.28 Building Hot Spare System
7.4.1 Setting the Hot Spare Device

● The camera connection will be disabled when the device works in the hot spare mode.
● After switching the working mode of the hot spare device to normal mode, restore the defaults of the device to ensure the normal operation afterwards.
Steps:
- Enter the Hot Spare Settings interface of the hot spare device.
Menu>Configuration>Hot Spare - Select Hot Spare Mode as the working mode.
- Click the button Apply and reboot the device to activate the settings.
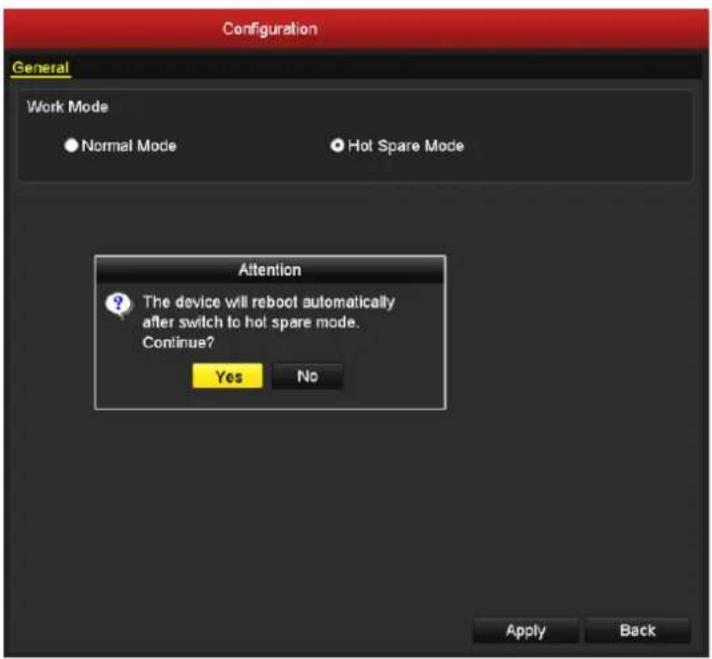
text_image
Configuration General Work Mode ● Normal Mode ● Hot Spare Mode Attention ? The device will reboot automatically after switch to hot spare mode. Continue? Yes No Apply BackFigure 7.29 Hot Spare Mode Settings
7.4.2 Setting the Working Device
Steps:
- Enter the Hot Spare Settings interface of the working device. Menu>Configuration>Hot Spare
- Set the working mode of the device as Normal Mode (default).
- Check the checkbox of Enable, input the IP address and administrator password of the hot spare device.
- Click the button Apply to connect the hot spare device to the working device.
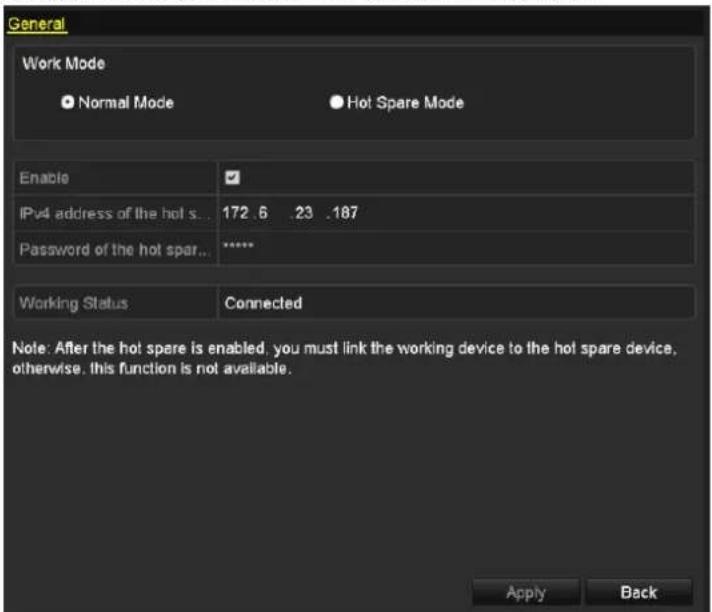
text_image
General Work Mode Normal Mode Hot Spare Mode Enable IPv4 address of the hot sp... 172 .6 .23 .187 Password of the hot spar... ***** Working Status Connected Note: After the hot spare is enabled, you must link the working device to the hot spare device, otherwise, this function is not available. Apply BackFigure 7.30 Normal Mode Settings
7.4.3 Hot Spare Management
Steps:
- Enter the Hot Spare Settings interface of the hot spare device again.
The connected working device is displayed on the device list. Check the checkbox to select the working device from the list, and click the button Add to link the working device to the hot spare device.

Up to 32 working devices can be linked to one hot spare device
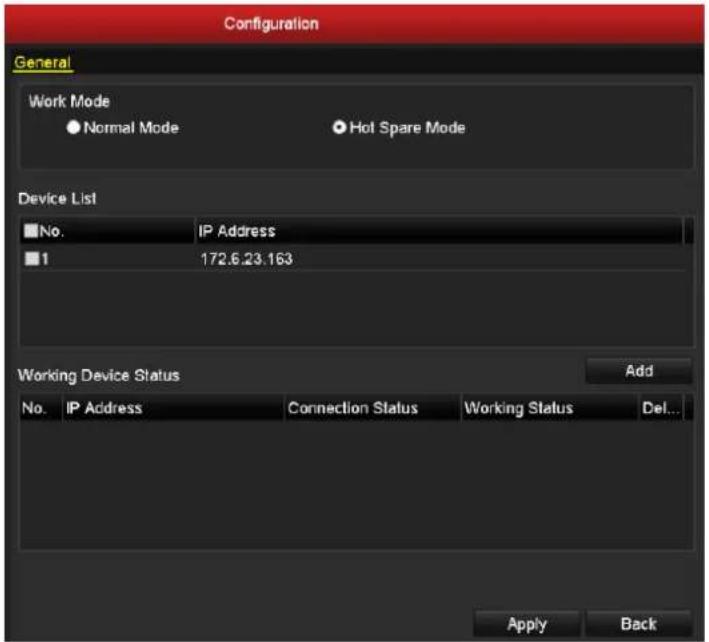
text_image
Configuration General Work Mode ● Normal Mode ● Hot Spare Mode Device List No. IP Address 1 172.6.23.163 Working Device Status Add No. IP Address Connection Status Working Status Del... Apply BackFigure 7.31 Link Working Device to Hot Spare Device
- You can view the working status of the hot spare device on the Working Device Status list.
When the working device works properly, the working status of the hot spare is displayed as No record.
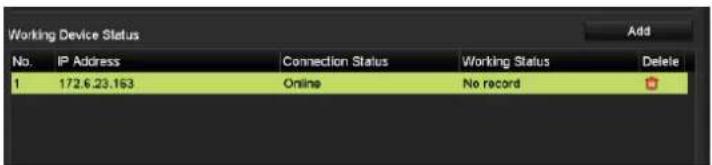
text_image
Working Device Status Add No. IP Address Connection Status Working Status Delete 1 172.6.23.163 Online No recordFigure 7.32 Working Status of Hot Spare Device-1
When the working device gets offline, the hot spare device will record the video of the IPCs connected to the working device for backup.
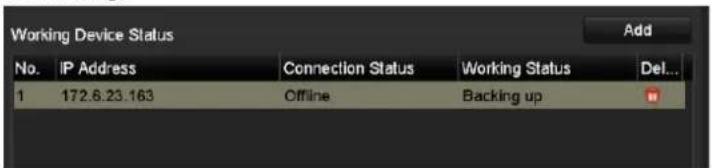
text_image
Working Device Status No. IP Address Connection Status Working Status Del... 1 172.6.23.163 Offline Backing upFigure 7.33 Working Status of Hot Spare Device-2
When the working device comes online, the lost video files will be restored by the record synchronization
function.

The record synchronization function can be enabled for up to 1 working device at a time.
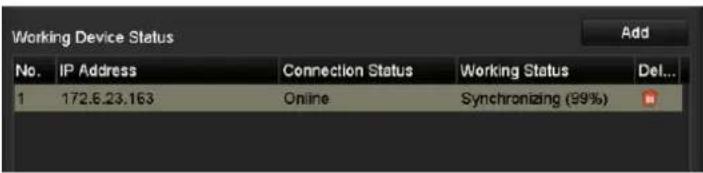
text_image
Working Device Status No. IP Address Connection Status Working Status Del... 1 172.6.23.163 Online Synchronizing (99%)Figure 7.34 Working Status of Hot Spare Device-3
Chapter 8 Alarm Settings
8.1 Setting Motion Detection

We use the interface of DS-9100HFI-ST series (unless otherwise stated) as example to describe the following settings.
Steps:
- Enter Motion Detection interface and choose a camera you want to set motion detection. Menu> Camera> Motion
- Set detection area and sensitivity.
Check ☑ checkbox to enable motion detection, use the mouse to draw detection area(s) and drag the sensitivity bar to set sensitivity.
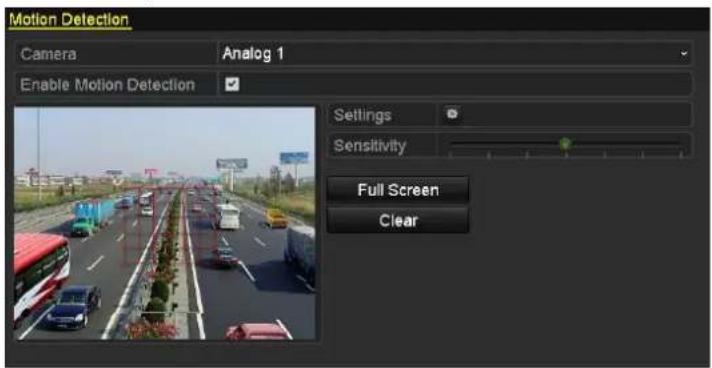
text_image
Motion Detection Camera Analog 1 Enable Motion Detection Settings Sensitivity Full Screen ClearFigure 8.1 Set Detection Area and Sensitivity
- Click 📋 to configure the motion detection settings. Click Trigger Channel tab and select one or more channels which will start to record/capture or become full-screen monitoring when motion alarm is triggered. Click Apply to save the settings.
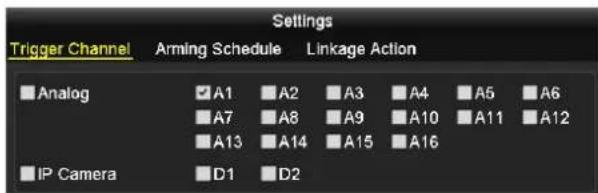
text_image
Settings Trigger Channel Arming Schedule Linkage Action ■ Analog ✓A1 ■A2 ■A3 ■A4 ■A5 ■A6 ■A7 ■A8 ■A9 ■A10 ■A11 ■A12 ■A13 ■A14 ■A15 ■A16 ■IP Camera ■D1 ■D2Figure 8.2 Set Trigger Camera of Motion Detection

Triggering IP Camera is supported by HDVR series only.
- Set arming schedule of the channel.
Select Arming Schedule tab and set arming schedule of the channel.
Choose one day of a week and up to eight time periods can be set within each day. Set up arming schedule of other days of a week. You can also click the button Copy to copy an arming schedule to other days. Click Apply to save the settings.

Time periods cannot be repeated or overlapped.
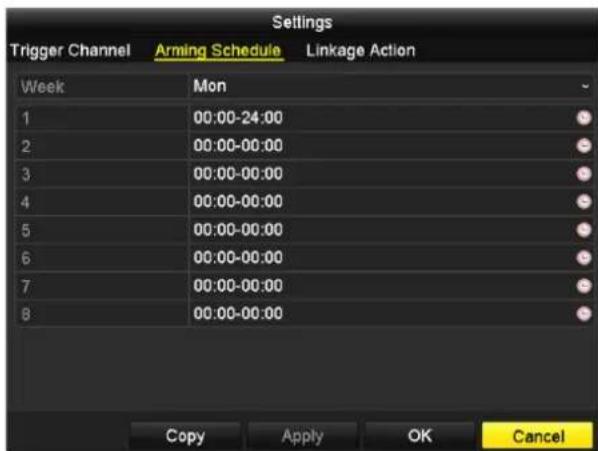
text_image
Settings Trigger Channel Arming Schedule Linkage Action Week Mon 1 00:00-24:00 2 00:00-00:00 3 00:00-00:00 4 00:00-00:00 5 00:00-00:00 6 00:00-00:00 7 00:00-00:00 8 00:00-00:00 Copy Apply OK CancelFigure 8.3 Set Arming Schedule of Motion Detection
- Click Linkage Action tab to set alarm linkage actions of motion detection (please refer to Chapter 8.7).
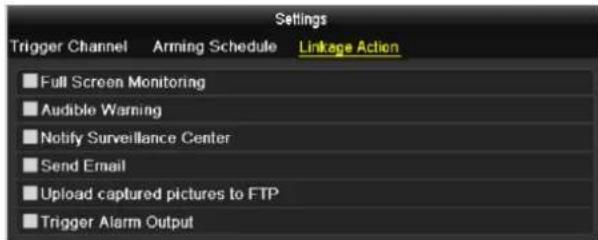
text_image
Settings Trigger Channel Arming Schedule Linkage Action Full Screen Monitoring Audible Warning Notify Surveillance Center Send Email Upload captured pictures to FTP Trigger Alarm OutputFigure 8.4 Set Alarm Linkage Actions of Motion Detection

Upload captured pictures to FTP is only supported by DVR series.
Click Apply to save the settings. Click OK to complete the motion detection settings of the channel.
- If you want to set motion detection for another channel, repeat the above steps or just click Copy in the Motion Detection interface to copy the above settings to it.

You are not allowed to copy the "Trigger Channel" action and motion detection settings to IP camera.
8.2 Setting Sensor Alarm
Purpose:
You can set handling method of an external sensor alarm.

Sensor alarm is not supported by DS-7200HWI-SV series.
Steps:
- Enter Alarm Settings interface and select an alarm input.
Menu>Configuration>Alarm
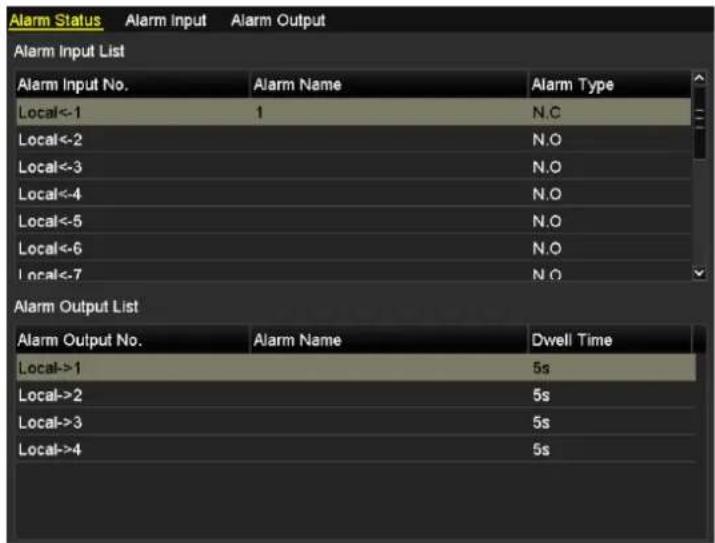
text_image
Alarm Status Alarm Input Alarm Output Alarm Input List Alarm Input No. Alarm Name Alarm Type Local<-1 1 N.C Local<-2 N.O Local<-3 N.O Local<-4 N.O Local<-5 N.O Local<-6 N.O Local<-7 N.O Alarm Output List Alarm Output No. Alarm Name Dwell Time Local->1 5s Local->2 5s Local->3 5s Local->4 5sFigure 8.5 Alarm Status Interface
- Select Alarm Input tab to enter Alarm Input Settings interface, edit the name for the alarm input and set the handling method of the selected alarm input.
Check ☑ checkbox to enable the alarm input and click ⚙️ to configure the alarm settings..
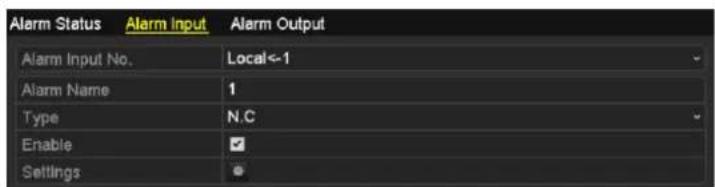
text_image
Alarm Status Alarm Input Alarm Output Alarm Input No. Local<-1 Alarm Name 1 Type N.C Enable ✓ Settings ●Figure 8.6 Alarm Input Settings Interface
- Select Trigger Channel tab and select one or more channels which will start to record/capture or become full-screen monitoring when an external alarm is input. Click Apply to save the settings.
- Select Arming Schedule tab to set the channel's arming schedule.
Choose one day of a week and up to eight time periods can be set within each day. Set up arming schedule of other days of a week. You can also click Copy to copy an arming schedule to other days. Click Apply to save the settings.

Time periods cannot be repeated or overlapped.
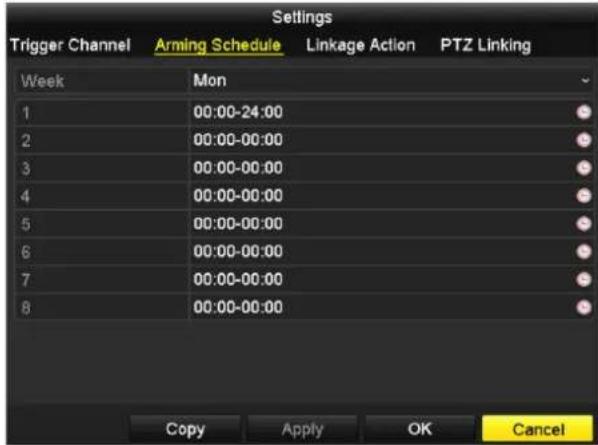
text_image
Settings Trigger Channel Arming Schedule Linkage Action PTZ Linking Week Mon 1 00:00-24:00 2 00:00-00:00 3 00:00-00:00 4 00:00-00:00 5 00:00-00:00 6 00:00-00:00 7 00:00-00:00 8 00:00-00:00 Copy Apply OK CancelFigure 8.7 Set Arming Schedule of Alarm Input
- Select Linkage Action tab to set alarm linkage actions of the alarm input (please refer to Chapter 8.7).
- If necessary, select PTZ Linking tab and set PTZ linkage of the alarm input.
Set PTZ linking parameters and click Apply to save the settings. Click OK to complete the settings of the alarm input.

Please check whether the PTZ or speed dome supports PTZ linkage.
One alarm input can trigger presets, patrol or pattern of more than one channel. But presets, patrols and patterns are exclusive.
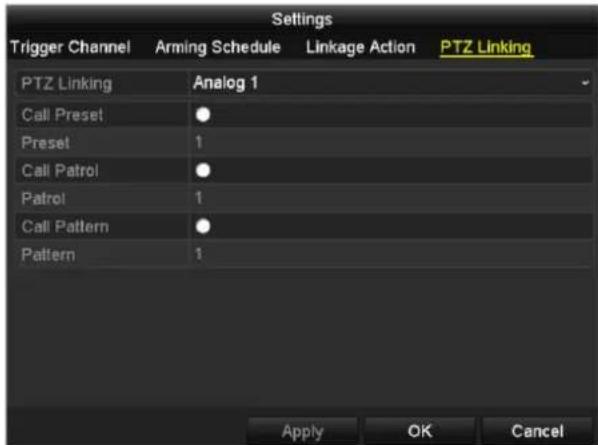
text_image
Settings Trigger Channel Arming Schedule Linkage Action PTZ Linking PTZ Linking Analog 1 Call Preset ● Preset 1 Call Patrol ● Patrol 1 Call Pattern ● Pattern 1 Apply OK CancelFigure 8.8 Set PTZ Linking of Alarm Input
- If you want to set alarm settings of another alarm input, repeat the above steps or just copy the above settings to it by clicking Copy in Alarm Input Settings interface.
8.3 Detecting Video Loss
Purpose:
Detect video loss of a channel and take alarm linkage action(s).
Steps:
- Enter Video Loss interface and select a channel you want to detect.
Menu> Camera> Video Loss
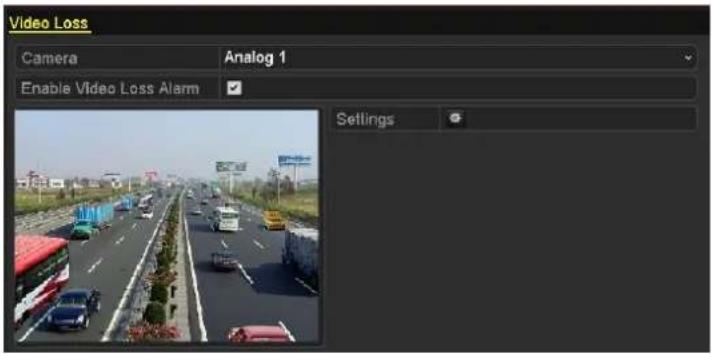
text_image
Video Loss Camera Analog 1 Enable Video Loss Alarm SettingsFigure 8.9 Video Loss Settings Interface
- Set handling method of video loss.
Check ☑ checkbox to enable video loss alarm, and click ⚙️ to set handling method of video loss.
- Set arming schedule of the channel.
Select Arming Schedule tab to set the channel's arming schedule.
Choose one day of a week and up to eight time periods can be set within each day. Set up arming schedule of other days of a week. You can also use Copy to copy an arming schedule to other days. Click Apply to save the settings.

Time periods cannot be repeated or overlapped.
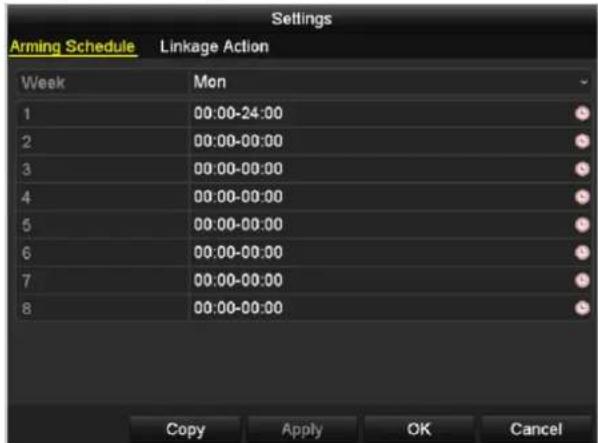
text_image
Settings Arming Schedule Linkage Action Week Mon 1 00:00-24:00 2 00:00-00:00 3 00:00-00:00 4 00:00-00:00 5 00:00-00:00 6 00:00-00:00 7 00:00-00:00 8 00:00-00:00 Copy Apply OK CancelFigure 8.10 Set Arming Schedule of Video Loss
-
Select Linkage Action tab to set up alarm linkage action of video loss (please refer to Chapter 8.7). Click Apply to save the settings and click OK to complete the video loss settings of the channel.
-
If you want to set video loss handling method for another channel, repeat the above steps or just click Copy in Video Loss interface to copy the above settings to it.

Copying video loss settings to IP camera is not supported.
8.4 Detecting Video Tampering
Purpose:
Trigger alarm and take alarm linkage action(s) when the lens is covered.
Steps:
- Enter Video Tampering interface and select a channel you want to detect video tampering.
Menu> Camera> Video Tampering
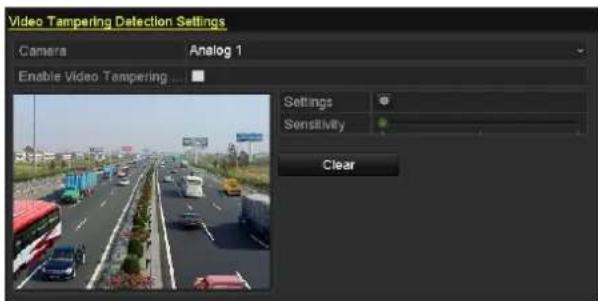
text_image
Video Tampering Detection Settings Camera Analog 1 Enable Video Tampering ... Settings Sensitivity ClearFigure 8.11 Video Tampering Detection Settings Interface
- Set the video tampering handling method of the channel.
Check checkbox to enable detecting video tampering.
Drag the sensitivity bar and choose a proper sensitivity level. Use the mouse to draw an area you want to detect video tampering.
- Click 📋 to configure the video tampering settings. Set arming schedule and alarm linkage actions of the channel.
1) Click Arming Schedule tab to set the channel's arming schedule.
2) Choose one day of a week and up to eight time periods can be set within each day. Set up arming schedule of other days of a week. You can also click Copy to copy an arming schedule to other days. Click Apply to save the settings.

Time periods cannot be repeated or overlapped.
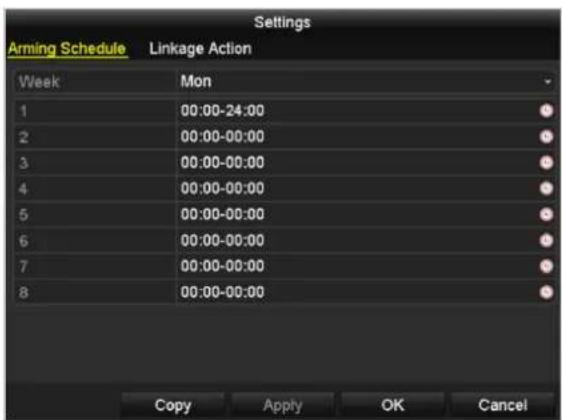
text_image
Settings Arming Schedule Linkage Action Week Mon 1 00:00-24:00 2 00:00-00:00 3 00:00-00:00 4 00:00-00:00 5 00:00-00:00 6 00:00-00:00 7 00:00-00:00 8 00:00-00:00 Copy Apply OK CancelFigure 8.12 Set Arming Schedule of Video Tampering
- Select Linkage Action tab to set alarm linkage actions of video tampering alarm. For details, see Chapter 8.7.
Click Apply to save the settings and click OK to complete the video tampering settings of the channel.
- If you want to set up linkage actions of video tampering detection alarm for another channel, repeat step two and three, or just click Copy on Video Tampering Detection Settings interface to copy the above settings to it.

You cannot copy the video tampering settings to IP channels.
8.5 Detecting VCA Alarm
Purpose:
You can set detection rules for VCA events, including Line Crossing Detection and Intrusion Detection, and then configure the linkage actions for the VCA alarm.
Steps:
- Enter the VCA settings interface and select a camera for the VCA settings.
Menu> Camera> VCA
- Configure the detection rules for VCA events.

The line crossing detection settings and intrusion detection settings you configured on the DVR / HDVR side are only supported by analog cameras 01\~04.
Task 1: Line Crossing Detection
When people, vehicles or other objects go across a pre-defined virtual line, the line crossing detection alarm is triggered. The line crossing direction can be set as bidirectional, from left to right or from right to left.
1) Select Line Crossing Detection from the drop-down list as the VCA event type.
2) Check the checkbox of Enable to enable the line crossing detection function.
3) Select the virtual line rule from the drop-down list of Line.
4) Click the icon 📁 and then click on the live video to specify the two endpoints for the virtual line. You can click the icon 📁 clear the line rules on the live video.
5) Select the direction for the line crossing detection.
A->B: Only the object crossing the line from the A side to the B side can be detected.
B->A: Only the object crossing the line from the B side to the A side can be detected.
A<->B: The object crossing the line from directions (A->B and B->A) can both be detected.
6) Click-and-drag the sensitivity bar to set the sensitivity for the line crossing detection.
7) Click Apply to save the new settings.

● Up to 4 virtual lines can be set for the line crossing detection.
- The sensitivity value ranges from 1 to 100, and the default value is 50. The larger the value is, the higher the detection sensitivity is.
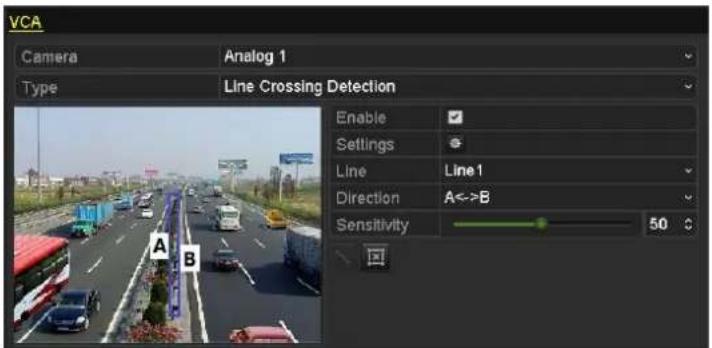
text_image
VCA Camera Analog 1 Type Line Crossing Detection Enable Settings Line Line1 Direction A<->B Sensitivity 50 °CFigure 8.13 Line Crossing Detection Settings Interface
Task 2: Intrusion Detection
When people, vehicles or other objects enter a pre-defined virtual region, the intrusion detection alarm is triggered.

The intrusion detection settings you configured on the DVR / HDVR side are only supported by analog cameras.
1) Select Intrusion Detection from the drop-down list as the VCA event type.
2) Check the checkbox of Enable to enable the intrusion detection function.
3) Select the virtual region rule from the drop-down list of Intrusion Region.
4) Click the icon and then click on the live video to specify the four vertexes for the intrusion region. You can click the icon set the whole surveillance scene as the intrusion region. You can click the icon clear the region rules on the live video.
5) Click-and-drag the sensitivity bar to set the sensitivity for the intrusion detection.
6) Set the percentage and time threshold for intrusion detection.
Percentage: Range [1-100]. Percentage defines the ratio of the in-region part of the object which can trigger the alarm. For example, if the percentage is set as 50%, when the object enters the region and occupies half of the whole region, the alarm is triggered.
Time Threshold: Range [0-10s], the threshold for the time of the object loitering in the region. If you set the value as 0, alarm is triggered immediately after the object entering the region.
7) Click Apply to save the new settings.

- Up to 4 intrusion regions can be set for the intrusion detection.
- The sensitivity value ranges from 1 to 100, and the default value is 50. The larger the value is, the higher the detection sensitivity is.
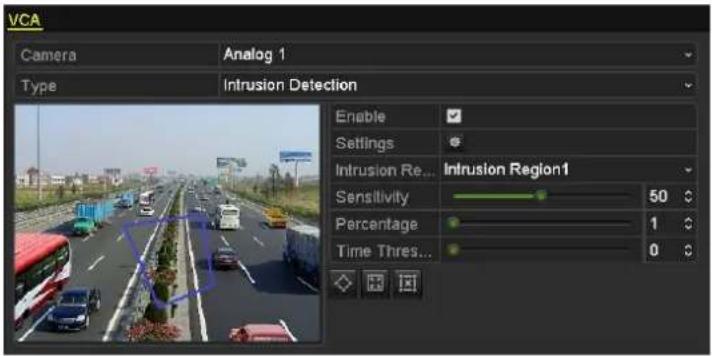
text_image
VCA Camera Analog 1 Type Intrusion Detection Enable Settings Intrusion Re... Intrusion Region1 Sensitivity 50 °C Percentage 1 °C Time Thres... 0 °CFigure 8.14 Intrusion Detection Settings Interface
Task 3: VCA Alarm for Network Camera
The HDVR series can receive the VCA alarm sent by smart IP cameras.
1) Set the VCA detection rules on the IP camera side. For details, see the user manual of the IP camera.
2) Check the checkbox of Enable VCA Alarm to enable the VCA alarm function.
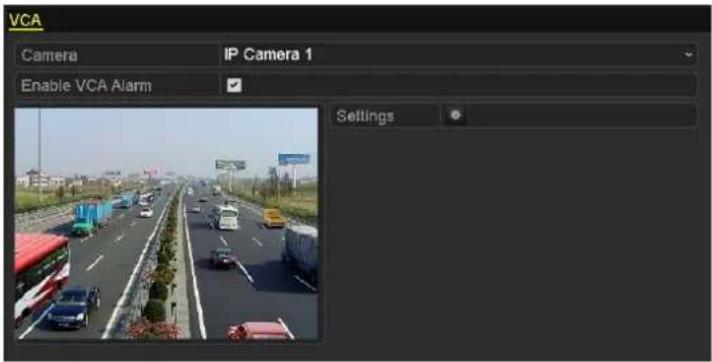
text_image
VCA Camera IP Camera 1 Enable VCA Alarm SettingsFigure 8.15 VCA Settings Interface-IP Camera
- Click the icon 🙏 to configure the alarm linkage actions for the VCA events.
Select Trigger Channel tab and select one or more channels which will start to record/capture or become full-screen monitoring when VCA alarm is triggered. Click Apply to save the settings.
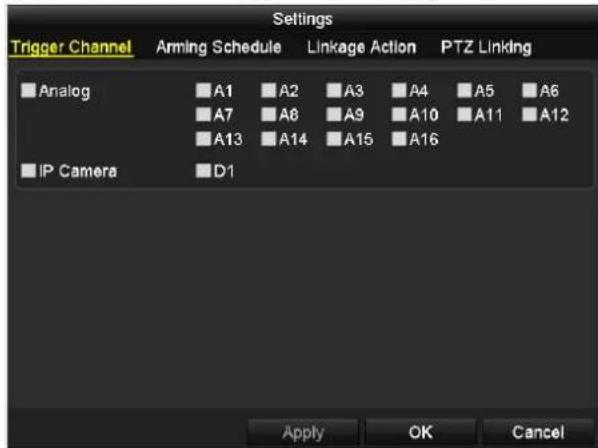
text_image
Settings Trigger Channel Anming Schedule Linkage Action PTZ Linking Analog A1 A2 A3 A4 A5 A6 A7 A8 A9 A10 A11 A12 A13 A14 A15 A16 IP Camera D1 Apply OK CancelFigure 8.16 Set Trigger Camera of VCA Alarm
- Select Arming Schedule tab and set arming schedule of the channel.
Choose one day of a week and up to eight time periods can be set within each day. Set up arming schedule of other days of a week. You can also click the button Copy to copy an arming schedule to other days. Click Apply to save the settings.

Time periods cannot be repeated or overlapped.
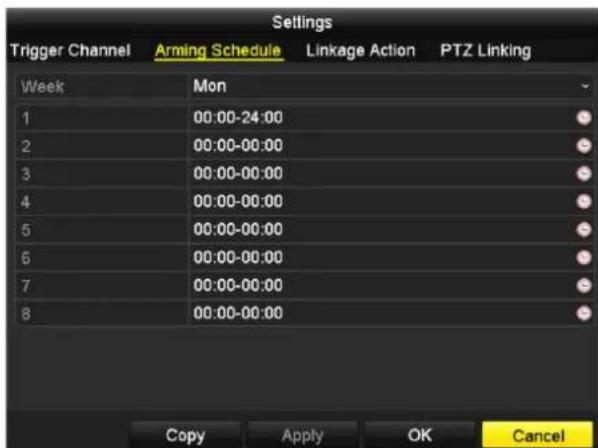
text_image
Settings Trigger Channel Arming Schedule Linkage Action PTZ Linking Week Mon 1 00:00-24:00 2 00:00-00:00 3 00:00-00:00 4 00:00-00:00 5 00:00-00:00 6 00:00-00:00 7 00:00-00:00 8 00:00-00:00 Copy Apply OK CancelFigure 8.17 Set Arming Schedule of VCA Alarm
- Select Linkage Action tab to set linkage actions of the VCA alarm (please refer to Chapter 8.7).
- Select PTZ Linking tab, set PTZ linkage of the VCA alarm, and click Apply to save the settings.

● The PTZ linking is supported by IP cameras only.
- Please check whether the PTZ or speed dome supports PTZ linkage.
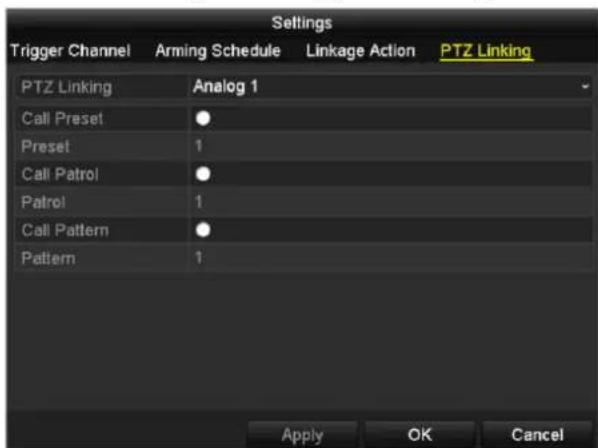
text_image
Settings Trigger Channel Arming Schedule Linkage Action PTZ Linking PTZ Linking Analog 1 Call Preset ● Preset 1 Call Patrol ● Patrol 1 Call Pattern ● Pattern 1 Apply OK CancelFigure 8.18 Set PTZ Linking of VCA Alarm
- Click Apply to save the new settings.
8.6 Handling Exceptions
Purpose:
Exception settings refer to the handling method of various exceptions, e.g.
- HDD Full: The HDD is full.
- HDD Error: Writing HDD error, unformatted HDD, etc.
● Network Disconnected: Disconnected network cable.
● IP Conflicted: Duplicated IP address. - Illegal Login: Incorrect user ID or password.
● Video Signal Exception: Unstable video signal.
● Input / Output Video Standard Mismatch: I/O video standards do not match. - Record / Capture Exception: No space for saving recorded files or captured images.
- Array Exception: Abnormal virtual disks under array.
● Hot Spare Exception: For the working device, the exception occurs when the hot spare device is disconnected; for the hot spare device, the exception occurs when the working device is offline.

- Input / Output Video Standard Mismatch and Video Signal Exception are not supported by IP cameras of HDVR series.
- Array Exception is only supported by DS-9100/9000HFI-RT series.
● Hot Spare Exception is only supported by HDVR series.
Steps:
- Enter Exceptions interface and handle various exceptions.
Menu> Configuration> Exceptions - Set the alarm linkage actions. For details, see Chapter 8.7.
- Click Apply to save the settings.
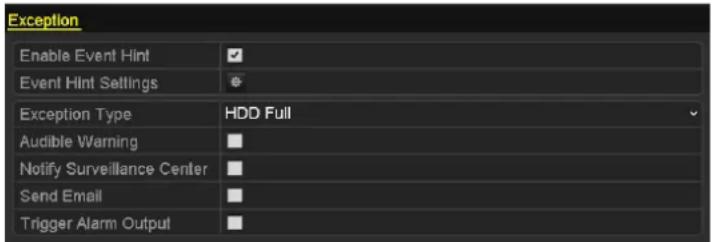
text_image
Exception Enable Event Hint Event Hint Settings Exception Type HDD Full Audible Warning Notify Surveillance Center Send Email Trigger Alarm OutputFigure 8.19 Exception Settings Interface
8.7 Setting Alarm Linkage Actions
Purpose:
Alarm linkage actions will be activated when an alarm or exception occurs, including Event Hint Display, Full Screen Monitoring, Audible Warning (buzzer), Notify Surveillance Center, Send Email, Upload Captured Pictures to FTP (this function is supported by DVR series only) and Trigger Alarm Output (not supported by the DS-7200 series).
Event Hint Display
When an event or exception occurs, a hint icon can be displayed in the lower-left corner of live view interface. You can click the icon to view the details and select the event for display.
Steps:
- Enter the Exception settings interface.
Menu > Configuration > Exceptions
- Check the checkbox of Enable Event Hint.
| Enable Event Hint | ✓ |
| Event Hint Settings | ✿ |
Figure 8.20 Event Hint Settings Interface
-
Click the icon 🎨, and select the event types for display.
-
Click OK to save the new settings.
Full Screen Monitoring
When an alarm is triggered, the local monitor (HDMI, VGA or BNC monitor) display in full screen the video image from the alarming channel configured for full screen monitoring.
If alarms are triggered simultaneously in several channels, their full-screen images will be switched at an interval of 10 seconds (default dwell time). A different dwell time can be set by going to Menu > Configuration >Live View> Full Screen Monitoring Dwell Time.
Auto-switch will terminate once the alarm stops and you will be taken back to the Live View interface.

You must select during "Trigger Channel" settings the channel(s) you want to make full screen monitoring.
Audible Warning
Trigger an audible beep when an alarm is detected.
Notify Surveillance Center
Sends an exception or alarm signal to remote alarm host when an event occurs. The alarm host refers to the PC installed with Remote Client.

The alarm signal will be transmitted automatically at detection mode when remote alarm host is configured. Please refer to Chapter 9.2.7 for details of alarm host configuration.
Send Email
Send an email with alarm information to a user or users when an alarm is detected.
Please refer to Chapter 9.2.13 for details of Email configuration.
Upload Captured Pictures to FTP
Capture the image when an alarm is triggered and upload the picture to a FTP server.

This function is supported by DVR series only. Please set FTP address and configure the remote FTP server first.
Refer to Chapter 9.2.4 for FTP settings.
Trigger Alarm Output (not supported by DS-7200 series)
Trigger an alarm output when an alarm is triggered.
Steps:
1. Enter Alarm Output interface.
Menu> Configuration> Alarm> Alarm Output
Select an alarm output and set alarm name and dwell time.

If "Manually Clear" is selected in the drop-down list of Dwell Time, you can clear it only by going to Menu> Manual> Alarm and clicking Clear All.
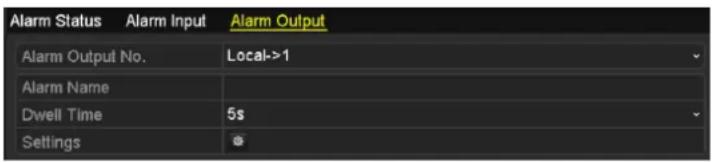
text_image
Alarm Status Alarm Input Alarm Output Alarm Output No. Local->1 Alarm Name Dwell Time 5s SettingsFigure 8.21 Alarm Output Settings Interface
2. Set arming schedule of the alarm output.
Click 📋 to set the arming schedule of alarm output. Choose one day of a week and up to 8 time periods can be set within each day.

Time periods cannot be repeated or overlapped.
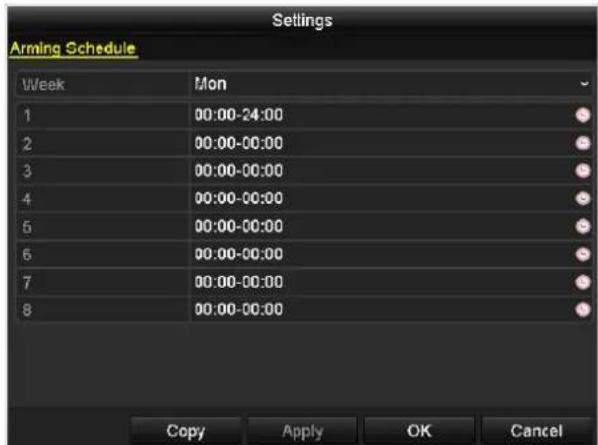
text_image
Settings Arming Schedule Week Mon 1 00:00-24:00 2 00:00-00:00 3 00:00-00:00 4 00:00-00:00 5 00:00-00:00 6 00:00-00:00 7 00:00-00:00 8 00:00-00:00 Copy Apply OK CancelFigure 8.22 Set Arming Schedule of Alarm Output
- Repeat the above steps to set up arming schedule of other days of a week. You can also click Copy to copy an arming schedule to other days. Click OK to complete the settings of the alarm output.
- You can also click Copy in Alarm Output interface to copy the above settings to another channel.
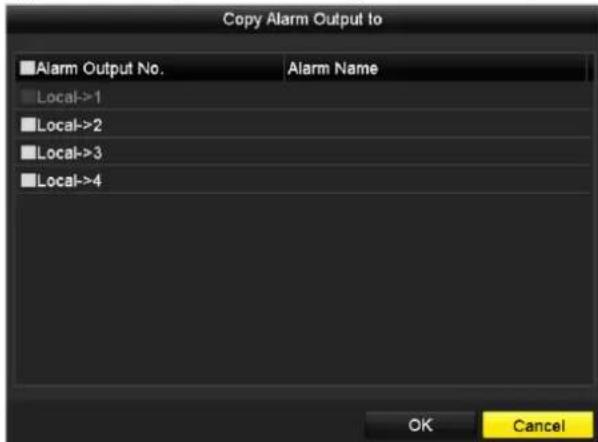
text_image
Copy Alarm Output to ■Alarm Output No. Alarm Name Local->1 ■Local->2 ■Local->3 ■Local->4 OK CancelFigure 8.23 Copy Settings of Alarm Output
8.8 Triggering or Clearing Alarm Output
Manually
Purpose:
Sensor alarm can be triggered or cleared manually. If “Manually Clear” is selected in the drop-down list of dwell time of an alarm output, the alarm can be cleared only by clicking Clear button in the following interface.
Steps:
Select the alarm output you want to trigger or clear and make related operations.
Menu> Manual> Alarm
Click Trigger / Clear button if you want to trigger or clear an alarm output.
Click Trigger All button if you want to trigger all alarm outputs.
Click Clear All button if you want to clear all alarm output.
| Alarm | ||
| Alarm Output No. | Alarm Name | Trigger |
| Local->1 | No | |
| Local->2 | No | |
| Local->3 | No | |
| Local->4 | No | |
Figure 8.24 Clear or Trigger Alarm Output Manually
Chapter 9 Network Settings
9.1 Configuring General Settings
Purpose:
Network settings must be properly configured before you operate device over network.
Steps:
- Enter the Network Settings interface.
Menu > Configuration > Network
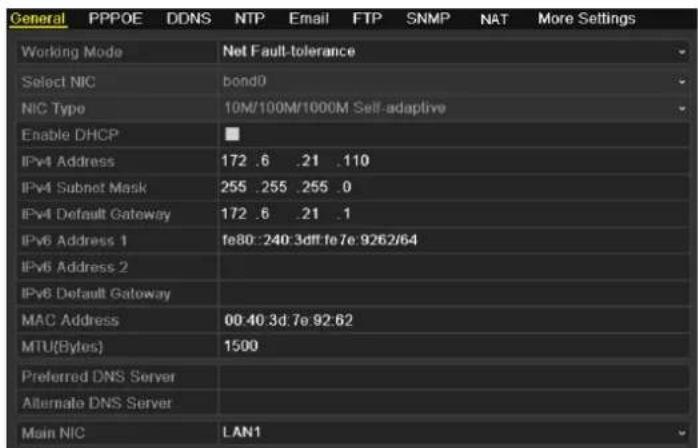
text_image
General PPPOE DDNS NTP Email FTP SNMP NAT More Settings Working Mode Net Fault-tolerance Select NIC bond0 NIC Type 10M/100M/1000M Self-adaptive Enable DHCP IPv4 Address 172 .6 .21 .110 IPv4 Subnet Mask 255 .255 .255 .0 IPv4 Default Gateway 172 .6 .21 .1 IPv6 Address 1 fe80:240:3dft:fe7e:9262/64 IPv6 Address 2 IPv6 Default Gateway MAC Address 00:40:3d:7e:92:62 MTU(Bytes) 1500 Preferred DNS Server Alternate DNS Server Main NIC LAN1Figure 9.1 Network Settings Interface for DS-9200HWI-ST & DS-9100HFI-ST/RT/XT (HWI-ST) & DS-8100HFI(HWI)-ST
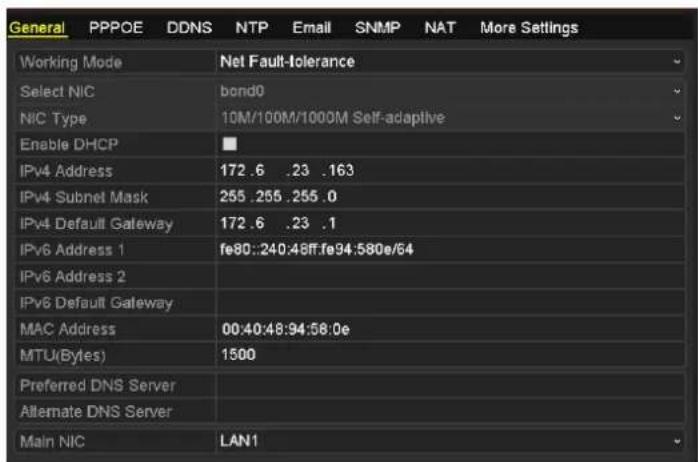
text_image
General PPPOE DDNS NTP Email SNMP NAT More Settings Working Mode Net Fault-tolerance Select NIC bond0 NIC Type 10M/100M/1000M Self-adaptive Enable DHCP IPv4 Address 172.6 .23 .163 IPv4 Subnet Mask 255.255.255.0 IPv4 Default Gateway 172.6 .23 .1 IPv6 Address 1 fe80::240:48ff.fe94:580e/64 IPv6 Address 2 IPv6 Default Gateway MAC Address 00:40:48:94:58:0e MTU(Bytes) 1500 Preferred DNS Server Alternate DNS Server Main NIC LAN1Figure 9.2 Network Settings Interface for DS-9000HFI-ST/RT/XT (HWI-ST) & DS-8000HFI(HWI)-ST
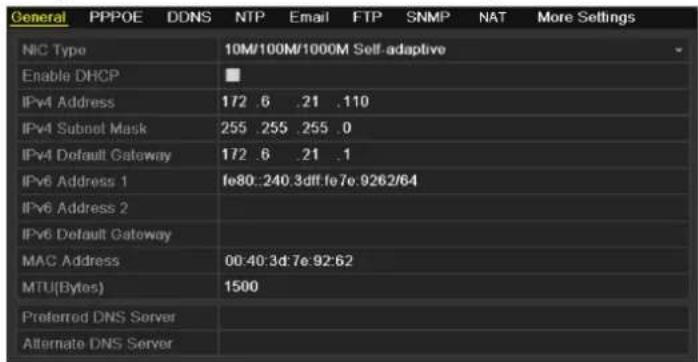
text_image
General PPPOE DDNS NTP Email FTP SNMP NAT More Settings NIC Type 10M/100M/1000M Self-adaptive Enable DHCP IPv4 Address 172 .6 .21 .110 IPv4 Subnet Mask 255 .255 .255 .0 IPv4 Default Gateway 172 .6 .21 .1 IPv6 Address 1 fe80:240.3diff fe7e:9262/64 IPv6 Address 2 IPv6 Default Gateway MAC Address 00:40:3d:7e:92:62 MTU(Bytes) 1500 Preferred DNS Server Alternate DNS ServerFigure 9.3 Network Settings Interface for DS-7200HWI-SV

● The FTP setting is supported by DVR series only.
● The Dual NIC (network interface card) is not supported by DS-7200HWI-SV series.
- We use the interface of DS-9100HFI-ST series (unless otherwise stated) as example to describe the following settings.
- Select the General tab.
- In the General Settings interface:
For DS-7200HW1-SV series, you can configure the following settings: NIC Type, IPv4 Address, IPv4 Subnet Mask, IPv4 Gateway, MTU and DNS Server.
For other series, you can configure the following settings: Working Mode, NIC Type, IPv4 Address, IPv4 Subnet Mask, IPv4 Gateway, MTU and DNS Server.
If the DHCP server is available, you can check the checkbox of Enable DHCP to automatically obtain an IP address and other network settings from that server.

The valid value range of MTU is 500 \~ 9676.
- After having configured the general settings, click Apply to save the settings.
Working Mode: There are two 10M/100M/1000M NIC cards provided by the device, and it allows the device to work in the Multi-address, Load Balance and Net Fault-tolerance modes.
Multi-address Mode: The parameters of the two NIC cards can be configured independently. You can select LAN1 or LAN2 in Select NIC text field for parameter settings.
You can select one NIC card as default route. And when the system is connecting with the extranet the data will be forwarded through the default route.
| Working Mode | Multi-address | |||
| Select NIC | LAN1 | |||
| NIC Type | 10M/100M/1000M Self-adaptive | |||
| Enable DHCP | ||||
| IPv4 Address | 172.6 | .21 | .110 | |
| IPv4 Subnet Mask | 255.255 | .255 | .0 | |
| IPv4 Default Gateway | 172.6 | .21 | .1 | |
| IPv6 Address 1 | fe80::240:48ff:fe72:cc85/64 | |||
| IPv6 Address 2 | ||||
| IPv6 Default Gateway | ||||
| MAC Address | 00:40:48:72:cc:85 | |||
| MTU(Bytes) | 1500 | |||
| Preferred DNS Server | ||||
| Alternate DNS Server | ||||
| Default Route | LAN1 | |||
Figure 9.4 Multi-address Working Mode
Load Balance Mode: By using the same IP address, and two NIC cards share the load of the total bandwidth, which enables the system to provide two Gigabit network capacity.
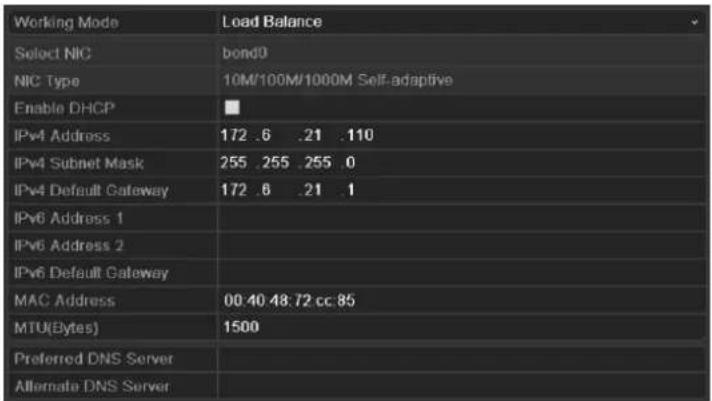
text_image
Working Mode Load Balance Select NIC bond0 NIC Type 10M/100M/1000M Self-adaptive Enable DHCP IPv4 Address 172 .6 .21 .110 IPv4 Subnet Mask 255 .255 .255 .0 IPv4 Default Gateway 172 .6 .21 .1 IPv6 Address 1 IPv6 Address 2 IPv6 Default Gateway MAC Address 00:40:48:72 cc:85 MTU(Bytes) 1500 Preferred DNS Server Alternate DNS ServerFigure 9.5 Load Balance Working Mode
Net Fault-tolerance Mode: The two NIC cards use the same IP address, and you can select the Main NIC to LAN1 or LAN2. By this way, in case of one NIC card failure, the device will automatically enable the other standby NIC card so as to ensure the normal running of the whole system.
| Working Mode | Net Fault-tolerance | ||
| Select NIC | bond0 | ||
| NIC Type | 10M/100M/1000M Self-adaptive | ||
| Enable DHCP | |||
| IPv4 Address | 172.6 | 21.110 | |
| IPv4 Subnet Mask | 255.255 | 255.0 | |
| IPv4 Default Gateway | 172.6 | 21.1 | |
| IPv6 Address 1 | fe80:240:3dff:fe7e:9262/64 | ||
| IPv6 Address 2 | |||
| IPv6 Default Gateway | |||
| MAC Address | 00:40:3d:7e:92:62 | ||
| MTU(Bytes) | 1500 | ||
| Preferred DNS Server | |||
| Alternate DNS Server | |||
| Main NIC | LAN1 | ||
Figure 9.6 Net Fault-tolerance Working Mode
9.2 Configuring Advanced Settings

We use the interface of DS-9100HFI-ST series (unless otherwise stated) as example to describe the following settings.
9.2.1 Configuring PPPoE Settings
Purpose:
Your device also allows access by Point-to-Point Protocol over Ethernet (PPPoE).
Steps:
- Enter the Network Settings interface.
Menu > Configuration > Network
- Select the PPPoE tab to enter the PPPoE Settings interface.

text_image
Enable PPPOE User Name PasswordFigure 9.7 PPPoE Settings Interface
- Check √ checkbox to enable PPPoE.
- Enter User Name and Password for PPPoE access.

The User Name and Password should be assigned by your ISP.

text_image
Enable PPPOE User Name test PasswordFigure 9.8 PPPoE Settings Interface
- Click Apply to save and exit the interface.
- After successful settings, the system asks you to reboot the device to activate the new settings, and the PPPoE dial-up is automatically connected after reboot.
You can go to Menu > Maintenance > System Info > Network interface to view the status of PPPoE connection. Please refer to Chapter 13.1.5 Viewing Network Information for PPPoE status.
9.2.2 Configuring DDNS Settings
Purpose:
If your device is set to use PPPoE as its default network connection, you may set Dynamic DNS (DDNS) to be used for network access.
Prior registration with your ISP is required before configuring the system to use DDNS.
Steps:
- Enter the Network Settings interface.
Menu > Configuration > Network
-
Select the DDNS tab to enter the DDNS Settings interface.
-
Check √ checkbox to enable DDNS.
-
Select DDNS Type. Five different DDNS types are selectable: IPServer, DynDNS, PeanutHull, NO-IP and HiDDNS.
• IPServer: Enter Server Address for IPServer, and other fields are read only.

The Server Address should be the IP address of the PC that runs IPServer.
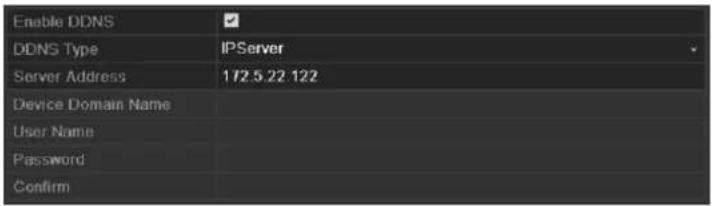
text_image
Enable DDNS DDNS Type IPServer Server Address 172.5.22.122 Device Domain Name User Name Password ConfirmFigure 9.9 IPServer Settings Interface
• DynDNS:
1) Enter Server Address for DynDNS (e.g. members.dyndns.org).
2) In the Device Domain Name text field, enter the domain obtained from the DynDNS website.
3) Enter the User Name and Password registered in the DynDNS website.
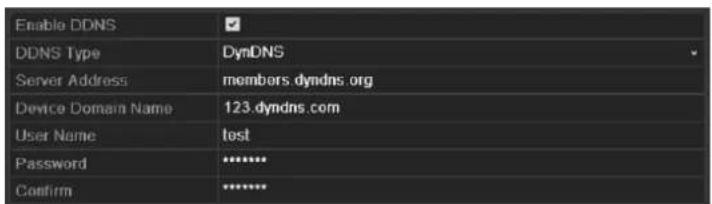
text_image
Enable DDNS DDNS Type DynDNS Server Address members.dyndns.org Device Domain Name 123.dyndns.com User Name test Password ******** Confirm ********Figure 9.10 DynDNS Settings Interface
- PeanutHull: Enter User Name and Password obtained from the PeanutHull website, and other fields are read only.
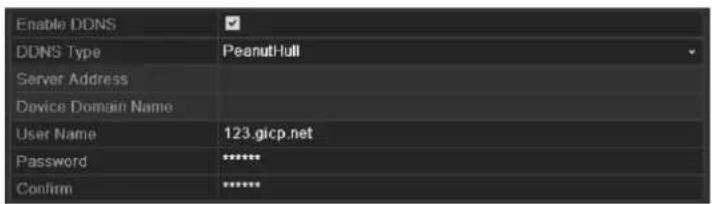
text_image
Enable DDNS DDNS Type PeanutHull Server Address Device Domain Name User Name 123.gicp.net Password ****** Confirm ******Figure 9.11 Peanut Hull Settings Interface
- NO-IP:
Enter the account information in the corresponding fields.
1) Enter Server Address for NO-IP.
2) In the Device Domain Name text field, enter the domain obtained from the NO-IP website (www.no-ip.com).
3) Enter the User Name and Password registered in the NO-IP website.
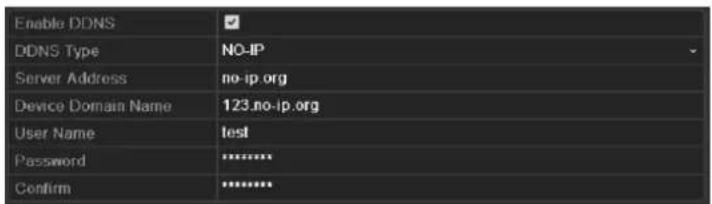
text_image
Enable DDNS DDNS Type NO-IP Server Address no-ip.org Device Domain Name 123.no-ip.org User Name test Password ****** Confirm ******Figure 9. 12 NO-IP Settings Interface
- HiDDNS: You need to enter the Server Address and Device Domain Name for HiDDNS, and other fields are read only.
1) Edit the Server Address of the HiDDNS server. By default, www.hik-online.com will be automatically available in the Server Address field when HiDDNS is selected.
2) Enter the Device Domain Name. You can register the device domain name in the HiDDNS server first and then enter the name to the Device Domain Name in the device; you can also enter the domain name directly on the device to create a new one.

If a new device domain name is defined in the device, it will replace the old one registered on the server.
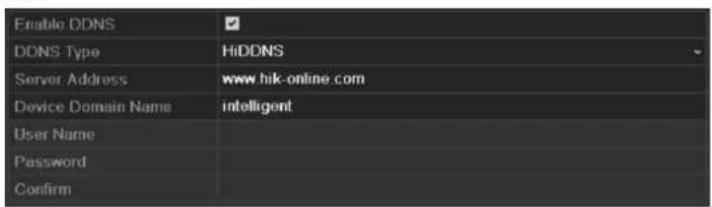
text_image
Enable DDNS DDNS Type HiDDNS Server Address www.hik-online.com Device Domain Name intelligent User Name Password ConfirmFigure 9.13 HiDDNS Settings Interface

The device name can only contain the lower-case English letter, numeric and ‘-’; and it must start with the lower-case English letter and cannot end with ‘-’.
Access the Device via Web Browser or Client Software
After having successfully registered the device on the HiDDNS server, you can access your device via web browser or Client Software with the Device Domain Name (Device Name).
Task 1: Access the Device via Web Browser
Open a web browser, and enter http://www.hik-online.com/alias in the address bar. Alias refers to the Device Domain Name on the device or the Device Name on the HiDDNS server.
Example: http://www.hik-online.com/dvr

If you mapped the HTTP port on your router and changed it to port No. except 80, you have to enter http://www.hik-online.com/alias:HTTP port in the address bar to access the device. You can refer to Chapter 9.2.6 for the mapped HTTP port No.
Task 2: Access the Devices via iVMS-4200
For iVMS-4200, in the Add Device window, select and then edit the device
information.
Nickname: Edit a name for the device as you want.
Server Address: www.hik-online.com
Device Domain Name: It refers to the Device Domain Name on the device or the Device Name on the HiDDNS server you created.
User Name: Enter the user name of the device. By default it is admin.
Password: Enter the password of the device. By default it is 12345.
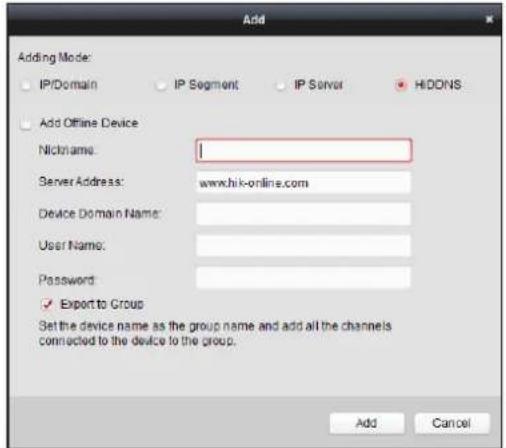
text_image
Add Adding Mode: IP/Domain IP Segment IP Server HIDONS Add Offline Device Nickname: 1 Server Address: www.hik-online.com Device Domain Name: User Name: Password: ✓ Export to Group Set the device name as the group name and add all the channels connected to the device to the group. Add CancelFigure 9.14 Access Device via iVMS4200
- Click Apply to save and exit the interface.
9.2.3 Configuring NTP Server Settings
Purpose:
A Network Time Protocol (NTP) Server can be configured on your device to ensure the accuracy of system date/time.
Steps:
- Enter the Network Settings interface.
Menu > Configuration > Network
- Select the NTP tab to enter the NTP Settings interface.

text_image
Enable NTP Interval (min) 60 NTP Server 210.72.145.44 NTP Port 123Figure 9.15 NTP Settings Interface
- Check √ checkbox to enable NTP.
- Configure the following NTP settings:
Interval: Time interval between the two synchronizing actions with NTP server. The unit is minute.
NTP Server: IP address of NTP server.
NTP Port: Port of NTP server.
- Click Apply to save and exit the interface.

The time synchronization interval can be set from 1 to 10080min, and the default value is 60min. If the device is connected to a public network, you should use a NTP server that has a time synchronization function, such as the server at the National Time Center (IP Address: 210.72.145.44). If the device is setup in a more customized network, NTP software can be used to establish a NTP server used for time synchronization.
9.2.4 Configuring Email Settings
Purpose:
The system can be configured to send an Email notification to all designated users if an alarm event is detected, a motion detection event is detected, etc.
Before you start:
The device must be connected to a local area network (LAN) that maintains an SMTP mail server. The network must also be connected to either an intranet or the Internet depending on the location of the email accounts to which you want to send notification.
Steps:
- Enter the Network Settings interface.
Menu > Configuration > Network
- Set the IPv4 Address, IPv4 Subnet Mask, IPv4 Gateway and the Preferred DNS Server in the Network Settings interface.
| Working Mode | Net Fault-tolerance | |||
| Select NIC | bond0 | |||
| NIC Type | 10M/100M/1000M Self-adaptive | |||
| Enable DHCP | ||||
| IPv4 Address | 172.6 | .21 | .110 | |
| IPv4 Subnet Mask | 255.255 | .255 | .0 | |
| IPv4 Default Gateway | 172.6 | .21 | .1 | |
| IPv6 Address 1 | fe80:240:3diff fe7e:9262/64 | |||
| IPv6 Address 2 | ||||
| IPv6 Default Gateway | ||||
| MAC Address | 00:40:3d:7e:92:62 | |||
| MTU(Bytes) | 1500 | |||
| Preferred DNS Server | 192.0.0.200 | |||
| Alternate DNS Server | ||||
| Main NIC | LAN1 | |||
Figure 9.16 Network Settings Interface
- Click Apply to save the settings.
- Select the Email tab to enter the Email Settings interface.
- Configure the following Email settings:
Enable Server Authentication (optional): If your mail server requires authentication, check this checkbox to use authentication to log in to this server and enter the login User Name and Password.
User Name: The user name of sender's account registered on the SMTP server.
Password: The password of sender's account registered on the SMTP server.
SMTP Server: The SMTP Server IP address or host name (e.g., smtp.263xmail.com).
SMTP Port: The SMTP port. The default TCP/IP port used for SMTP is 25.
Enable SSL (optional): Check the checkbox to enable SSL if required by the SMTP server.
Sender: The name of sender.
Sender's Address: The Email address of sender.
Select Receivers: Select the receiver. Up to 3 receivers can be configured.
Receiver: The name of user to be notified.
Receiver's Address: The Email address of user to be notified.
Enable Attached Pictures: Check the checkbox of Enable Attached Picture if you want to send email with attached alarm images.
Interval: The interval refers to the time between two actions of sending attached pictures.
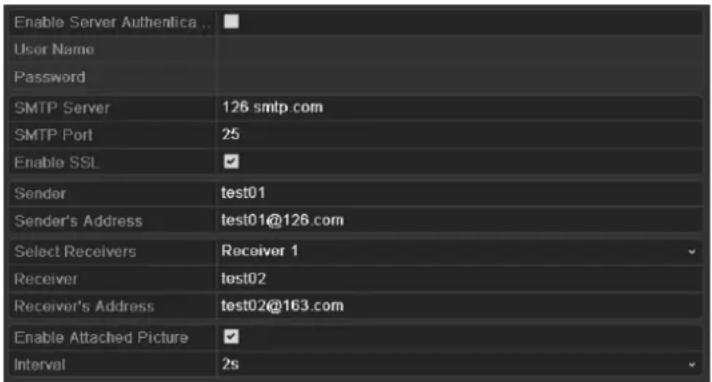
text_image
Enable Server Authentica... User Name Password SMTP Server 126 smtp.com SMTP Port 25 Enable SSL ✓ Sender test01 Sender's Address test01@126.com Select Receivers Receiver 1 Receiver tost02 Receiver's Address test02@163.com Enable Attached Picture ✓ Interval 2sFigure 9.17 Configure Email Settings
- Click Apply to save the Email settings.
- Optionally, you can click Test to test whether the Email settings work.
9.2.5 Configuring FTP Server Settings

FTP configuration is supported by DVR series only.
Purpose:
The FTP (File Transfer Protocol) can be configured on your device to realize dual-directional transmission of control files over Internet. And the captured pictures of device can be uploaded to FTP server as well.
Steps:
- Enter the Network Settings interface.
Menu > Configuration > Network - Select the FTP tab to enter the FTP Settings interface.
- Select a FTP server. Preferred FTP Server and Alternate FTP Server are selectable.
- Check √ checkbox to enable the FTP server.

When both two FTP servers are enabled and configured properly, once the preferred FTP server fails, the alternate FTP server will be used until the preferred FTP server resumes work.
- Configure the FTP settings for preferred and alternate FTP server, including FTP protocol, server address, port, user name, password and the directory.
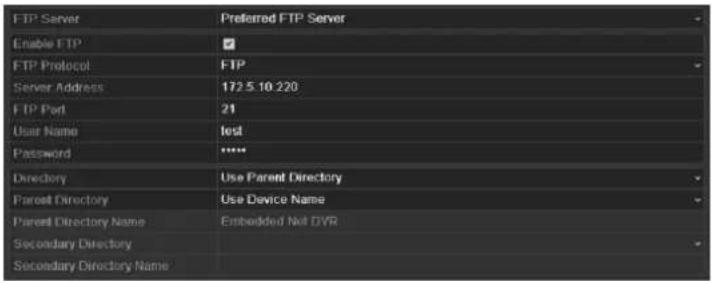
text_image
FTP Server Enable FTP FTP Protocol Server Address FTP Port User Name Password Directory Parent Directory Parent Directory Name Secondary Directory Secondary Directory Name Preferred FTP Server FTP FTP 172.5 10.220 21 test **** Use Parent Directory Use Device Name Embedded Net DVRFigure 9.18 Configure FTP Settings
FTP Protocol: Select the protocol for the FTP server. FTP and SFTP (Secure File Transfer Protocol) are available. For SFTP, the remote FTP server should support the SFTP protocol. It is a more secure way for file transmission by adopting the secure encryption method. However, due to the secure encryption method, the speed of the file transmission with SFTP protocol is much lower than that with FTP protocol.
Directory: In the Directory field, you can select the Root directory, Parent directory and secondary directory. When the Parent Directory is selected, you have the option to use the Device Name, Device No. or Device IP for the name of the directory, or you can customize the directory name; and the when the Secondary Directory is selected, you can use the Camera Name or Camera No. as the name of the directory, or you can customize the directory name.

If you want to modify the Device Name, Device No., Device IP or Camera Name, please enter the corresponding interface to modify.
- Click Apply to save and exit the interface.

Please make sure the remote FTP server has been started up before setting the FTP parameters.
9.2.6 Configuring SNMP Settings
Purpose:
You can use Simple Network Management Protocol (SNMP) to get the device status and alarm related information.
Steps:
- Enter the Network Settings interface.
Menu > Configuration > Network - Select the SNMP tab to enter the SNMP Settings interface.
- Check ☑ checkbox to enable SNMP.
- Configure the SNMP settings.
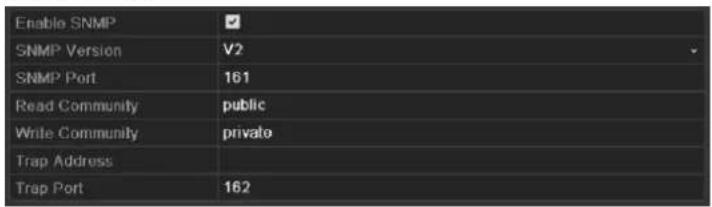
text_image
Enable SNMP SNMP Version V2 SNMP Port 161 Read Community public Write Community private Trap Address Trap Port 162Figure 9.19 Configure SNMP Settings
- Click Apply to save and exit the interface.

Before setting the SNMP, please download the SNMP software and manage to receive the device information via SNMP port. By setting the Trap Address, the device is allowed to send the alarm event and exception message to the surveillance center.
9.2.7 Configuring NAT Settings
Two ways are provided for port mapping to realize the remote access via the cross-segment network, UPnP™ and manual mapping.
• UPnP TM
Purpose:
Universal Plug and Play (UPnP™) permits the device to discover the presence of other network devices on the network seamlessly and establish functional network services for data sharing, communications, etc. You can use the UPnP™ function to enable the fast connection of the device to the WAN via a router without port mapping.
Before you start:
Enable the UPnP™ function of the router to which your device is connected. When the network working mode of the device is set as multi-address, the Default Route of the device should be in the same network segment as that of the LAN IP address of the router.
Steps:
- Enter the Network Settings interface.
Menu > Configuration > Network - Select the NAT tab to enter the UPnPTM interface.
- Check √ checkbox to enable UPnPTM.
- Select the Mapped Type as Manual or Auto in the drop-down list.
Task1: Auto
If you select Auto, the Port Mapping items are read-only, and the external ports are set by the router automatically.
Steps:
1) Click Apply to save the settings.
2) You can click Refresh to get the latest status of the port mapping.
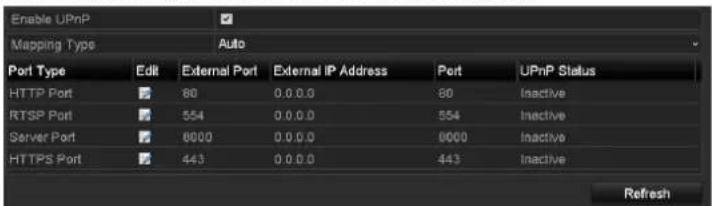
text_image
Enable UPnP Mapping Type Auto Port Type Edit External Port External IP Address Port UPnP Status HTTP Port 80 0.0.0 80 Inactive RTSP Port 554 0.0.0 554 Inactive Server Port 8000 0.0.0 8000 Inactive HTTPS Port 443 0.0.0 443 Inactive RefreshFigure 9.20 UPnPTM Settings Finished-Auto
Task2: Manual
If you select Manual as the mapping type, you can edit the external port on your demand by clicking to activate the External Port Settings dialog box.
Steps:
1) Click ☐ to activate the External Port Settings dialog box. Configure the external port No. for server port, http port, RTSP port and https port respectively.

- You can use the default port No., or change it according to actual requirements.
● External Port indicates the port No. for port mapping in the router. - The value of the port No. should be between 1 and 65535 and the value must be different from each other. If multiple devices are configured for the UPnPTM settings under the same router, the value of the port No. for each device should be unique.
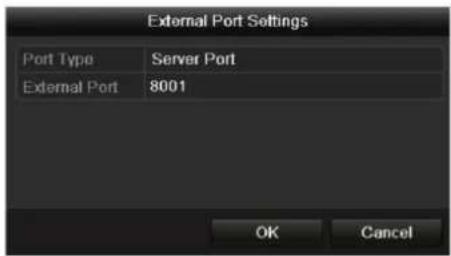
text_image
External Port Settings Port Type Server Port External Port 8001 OK CancelFigure 9. 21 External Port Settings Dialog Box
2) Click Apply to save the settings.
3) You can click Refresh to get the latest status of the port mapping.
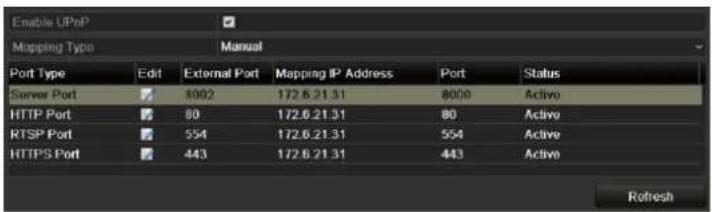
text_image
Enable UPnP Mapping Type Manual Port Type Edit External Port Mapping IP Address Port Status Server Port 1002 172.6.21.31 8000 Active HTTP Port 80 172.6.21.31 80 Active RTSP Port 554 172.6.21.31 554 Active HTTPS Port 443 172.6.21.31 443 Active RefreshFigure 9. 22 UPnP™ Settings Finished-Manual
- Manual Mapping
If your router does not support the UPnP ^TM function, perform the following steps to map the port manually in an easy way.
Before you start:
Make sure the router support the configuration of internal port and external port in the interface of Forwarding.
Steps:
- Enter the Network Settings interface.
Menu > Configuration > Network - Select the NAT tab to enter the port mapping interface.
- Leave the Enable UPnP checkbox unchecked.
- Click ☐ to activate the External Port Settings dialog box. Configure the external port No. for server port, http port, RTSP port and https port respectively.

The value of the RTSP port No. should be 554 or between 1024 and 65535, while the value of the other ports should be between 1 and 65535 and the value must be different from each other. If multiple devices
are configured for the UPnP™ settings under the same router, the value of the port No. for each device should be unique.
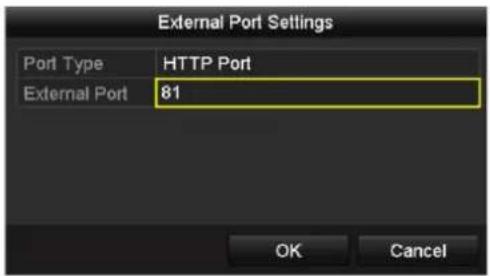
text_image
External Port Settings Port Type HTTP Port External Port 81 OK CancelFigure 9.23 External Port Settings Dialog Box
- Click OK to save the setting for the current port and return to the upper-level menu.
- Click Apply button to save the settings.
- Enter the virtual server setting page of router. Input the internal port value in the Internal Source Port textfield, the external port value in the External Source Port textfield, and other required information.

Each item should be corresponding with the internal or external device port, including server port, http port, RTSP port and https port.

text_image
Delete External Source Port Protocol Internal Source IP Internal Source Port Application 81 TCP 192.168.251.101 80 HTTPFigure 9.24 Setting Virtual Server Item

The above virtual server setting interface is for reference only, it may be different due to different router manufactures. Please contact the manufacturer of router if you have any problems with setting virtual server.
9.2.8 Configuring More Network Settings
Purpose:
You can also configure the remote alarm host settings, Server / HTTP port settings, multicast settings, RTSP port settings and high-speed download settings.
- Alarm Host: With a remote alarm host configured, the device will send the alarm event or exception message to the host when an alarm is triggered. The remote alarm host must have the CMS (Client Management System) software installed.
- Server and HTTP Port: You can change the server and HTTP ports in the Network Settings menu. The default server port is 8000 and the default HTTP port is 80.
- Multicast: The multicast can be configured to realize live view for more than 128 cameras through network. A multicast address spans the Class-D IP range of 224.0.0.0 to 239.255.255.255. It is recommended to use the IP address ranging from 239.252.0.0 to 239.255.255.255.
● RTSP: The RTSP (Real Time Streaming Protocol) is a network control protocol designed for use in
entertainment and communications systems to control streaming media servers.
- High-speed Download: You can enable the High-speed Download function to widen the outgoing bandwidth of the device. In this way you can speed up the download of record files through web browser or CMS software.
Steps:
- Enter the Network Settings interface (Menu > Configuration > Network), and select the More Settings tab to enter the More Settings interface.
| Alarm Host IP | |
| Alarm Host Port | 0 |
| Server Port | 8000 |
| HTTP Port | 80 |
| Multicast IP | |
| RTSP Port | 554 |
| Enable HTTPS | ✓ |
| HTTPS Port | 443 |
| Enable High-speed Download | ■ |
Figure 9.25 More Settings Interface
- Enter Alarm Host IP and Alarm Host Port in the text fields.

The Alarm Host IP refers to the IP address of the remote PC on which the CMS (Client Management System) software (e.g., iVMS-4200) is installed, and the Alarm Host Port must be the same as the alarm monitoring port configured in the software.
- Enter the Server Port and HTTP Port in the text fields.

The Server Port should be set to the range of 2000-65535 and it is used for remote client software access. The HTTP port is used for remote IE access.
- Enter the Multicast IP in the text field.

When adding a device to the CMS (Client Management System) software, the multicast address must be the same as the device's multicast IP.
- Enter the RTSP Port in the text field.

The default RTSP port is 554, and you can change it according to different requirements.
- Check the checkbox of Enable High-speed Download, and confirm the pop-up message box.

If you enable the high-speed download function, the outgoing bandwidth of the device will be increased by 40Mbps, and the local menu operation will be affected. It is recommended to disable this function after finishing the remote download of record files.
- Click Apply to save the new settings and exit.
9.2.9 Configuring HTTPS Settings
Purpose:
HTTPS (Hyper Text Transfer Protocol Secure) ensures the data transferred is encrypted using Secure Socket Layer (SSL) or Transport Layer Security (TLS). HTTPS provides authentication of the web site and associated web server that one is communicating with and creates a secure channel over an insecure network.
HTTPS URLs begin with https:// and use port 443 by default. You can modify the port No. as desired.
Example:
If you set the port No. as 445 and the IP address of the device is 192.0.0.64, you can access the device by inputting https://192.0.0.64:445 in the web browser.
Steps:
- Access the device via the web browser and enter the HTTPS settings interface.
Configuration > Remote Configuration > Network Settings > HTTPS
- Create the self-signed certificate or authorized certificate.
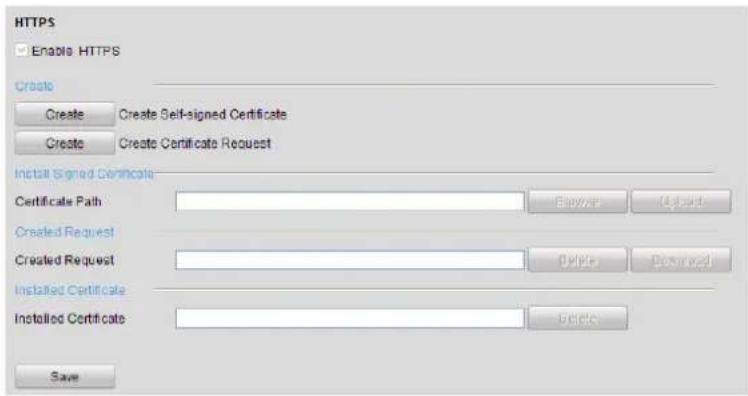
text_image
HTTPS Enable HTTPS Create Create Create Self-signed Certificate Create Create Certificate Request Install Signed Certificate Certificate Path: Browse Import Created Request Created Request: Delete Remove Installed Certificate Installed Certificate: Delete SaveFigure 9.26 HTTPS Settings
OPTION 1: Create the self-signed certificate
1) Click the Create button and a dialog box pops up as follows:
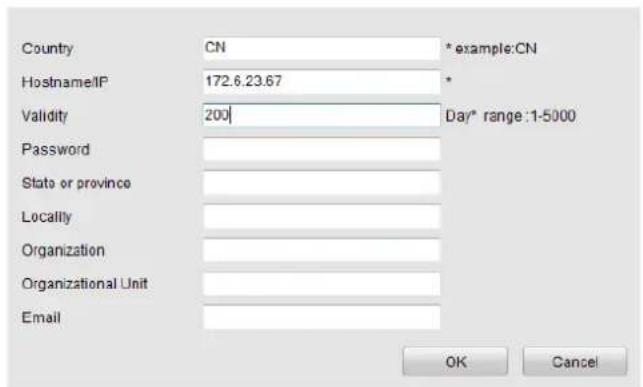
text_image
Country CN * example:CN Hostname/IP 172.6.23.67 * Validity 200 | Dar* range:1-5000 Password State or province Locally Organization Organizational Unit Email OK CancelFigure 9.27 Create Self-signed Certificate
2) Enter the country, host name/IP, validity and other information.
3) Click OK to save the settings.
OPTION 2: Create the authorized certificate
1) Click the Create button to create the certificate request.
2) Download the certificate request and submit it to the trusted certificate authority for signature.
3) After receiving the signed valid certificate, import the certificate to the device.
- The certificate information will be displayed after you successfully created and installed the certificate.
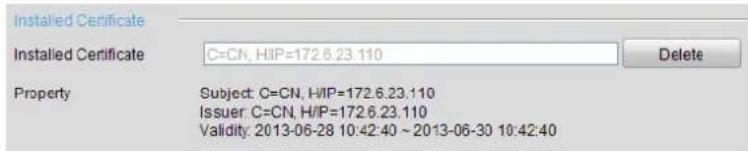
text_image
Installed Certificate Installed Certificate C=CN, HIP=172.6.23.110 Delete Property Subject: C=CN, HIP=172.6.23.110 Issuer: C=CN, H/IP=172.6.23.110 Validity: 2013-06-28 10:42:40 ~ 2013-06-30 10:42:40Figure 9.28 Installed Certificate Property
- Check the checkbox to enable the HTTPS function.

The HTTPS Port should be set to the range of 1-65535.
9.2.10 Virtual Host Settings
Purpose:
You can directly get access to the IP camera management interface from the HDVR management interface.

● The Virtual host function is only supported by the HDVR series.
● You can only configure the virtual host settings through the web browser.
Steps:
- Enter the Advanced settings interface.
Configuration > Remote Configuration > Network Settings > Advanced
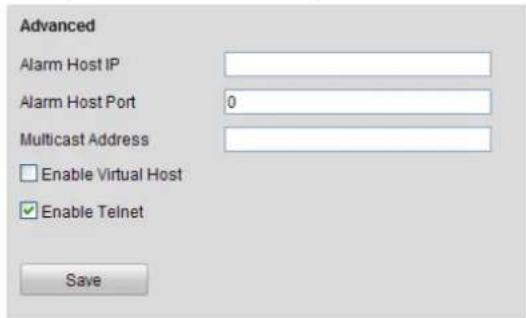
text_image
Advanced Alarm Host IP Alarm Host Port 0 Multicast Address Enable Virtual Host Enable Telnet SaveFigure 9.29 Advanced Settings Interface
- Check the checkbox of the Enable Virtual Host.
- Click the Save button to save the setting.
- Enter the IP camera management interface of HDVR. The Connect column appears on the right-most side of the camera list.
Configuration > Remote Configuration > Camera Management > IP Camera

text_image
IP Camera Add Modify Delete Quick Add Custom Protocol Channel No. IP Camera Address Channel No. Management Port Status Protocol Connect D01 172.6.23.123 1 8000 Online HIKVISION http://172.6.23.123:80Figure 9.30 Accessing IP Camera
- Click the link to go the management page of the selected IP camera.
9.2.11 Telnet Settings
Purpose:
Telnet function provides an easy way to get access to the DVR/HDVR. You can see the advanced information about the device by inputting command; as well the configuration can also be realized through telnet connection.
Steps:
- Enter the Advanced settings interface.
Configuration > Remote Configuration > Network Settings > Advanced
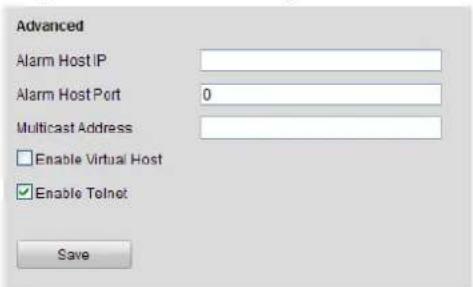
text_image
Advanced Alarm Host IP Alarm Host Port 0 Multicast Address Enable Virtual Host Enable Telnet SaveFigure 9.31 Advanced Settings Interface
- Check the checkbox of the Enable Telnet.
- Click the Save button to save the setting.
- You can open the Command Prompt window in your PC, and input "telnet IP Address" to connect with the DVR, as shown in the figure below.
Example:
The IP address of the DVR is 192.0.0.64, you can input "telnet 192.0.0.64" and then press Enter to connect to the DVR.
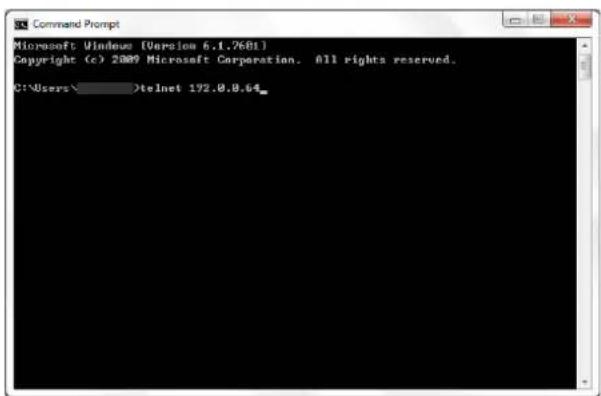
text_image
Microsoft Windows [Version 6.1.7681] Copyright (c) 2009 Microsoft Corporation. All rights reserved. C:\Users\ telnet 192.0.0.64_Figure 9.32 Connect to DVR

The telnet function turns invalid after the device shutting down or rebooting, and you need to enable it again if required.
9.3 Checking Network Traffic
Purpose:
You can check the network traffic to obtain real-time information of device such as linking status, MTU, sending/receiving rate, etc.
Steps:
- Enter the Network Traffic interface.
Menu > Maintenance > Net Detect
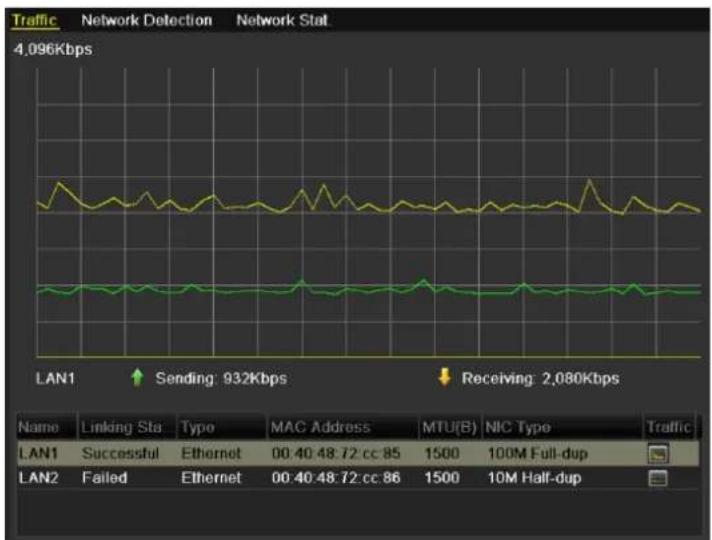
line
| Name | Linking Sta | Type | MAC Address | MTU(B) | NIC Type | Traffic | |------|-------------|------|-------------|--------|----------|---------| | LAN1 | Successful | Ethernet | 00:40:48:72 cc:85 | 1500 | 100M Full-dup | 1500 | | LAN2 | Failed | Ethernet | 00:40:48:72 cc:86 | 1500 | 10M Half-dup | 1500 |Figure 9.33 Network Traffic Interface
- You can view the sending rate and receiving rate information on the interface. The traffic data is refreshed every 1 second.
9.4 Network Detection
Purpose:
You can obtain network connecting status of device through the network detection function, including network delay, packet loss, etc.
9.4.1 Testing Network Delay and Packet Loss
Steps:
- Enter the Network Detection interface.
Menu > Maintenance > Net Detect
- Click the Network Detection tab to enter the Network Detection menu.
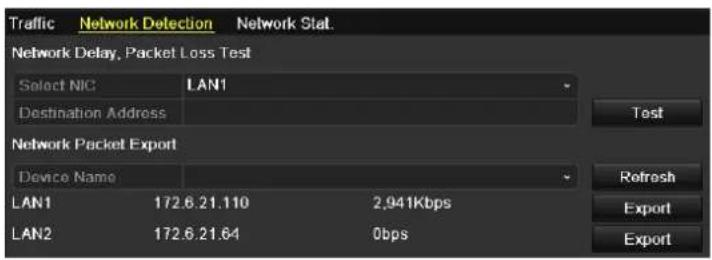
text_image
Traffic Network Detection Network Stat. Network Delay, Packet Loss Test Select NIC LAN1 Destination Address Test Network Packet Export Device Name LAN1 172.6.21.110 2,941Kbps LAN2 172.6.21.64 0bps Refresh Export ExportFigure 9.34 Network Detection Interface for Other Series

- Dual NIC is not supported by DS-7200HWI-SV series. - We use the interface of DS-9100HFI-ST series (unless otherwise stated) as example to describe the following settings.
-
Select a NIC to test network delay and packet loss.
-
Enter the destination address in the text field of Destination Address.
-
Optionally, you can click Test to test the network delay and packet loss. The testing result pops up on the window. If the testing is failed, the error message box will pop up as well.
9.4.2 Exporting Network Packet
Purpose:
By connecting the device to network, the captured network data packet can be exported to USB-flash disk, SATA/eSATA DVD-R/W and other local backup devices.

● Dual NIC is not supported by DS-7200HWI-SV series.
- We use the interface of DS-9100HFI-ST series (unless otherwise stated) as example to describe the following settings.
Steps:
- Enter the Network Traffic interface.
Menu > Maintenance > Net Detect
- Click the Network Detection tab to enter the Network Detection interface.
- Select the backup device from the drop-down list of Device Name.

Click Refresh if the connected local backup device cannot be displayed. When it fails to detect the backup device, please check whether it is compatible with the device. You can format the backup device if the format is incorrect.
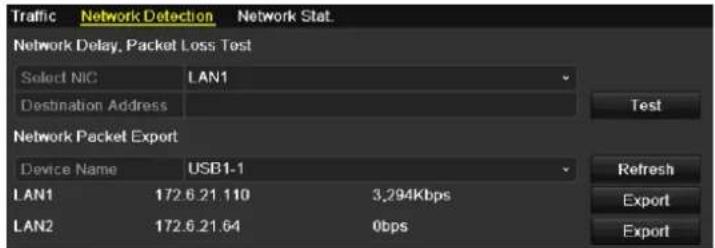
text_image
Traffic Network Detection Network Stat. Network Delay, Packet Loss Test Select NIC LAN1 Destination Address Test Network Packet Export Device Name USB1.1 LAN1 172.6.21.110 3,294Kbps LAN2 172.6.21.64 0bps Refresh Export ExportFigure 9.35 Export Network Packet
- Click Export to start exporting.
- After the exporting is complete, click OK to finish the packet export.

Up to 1M data can be exported each time.
9.4.3 Checking Network Status
Purpose:
You can also check the network status and quick set the network parameters in this interface.

● Dual NIC is not supported by DS-7200HWI-SV series.
- We use the interface of DS-9100HFI-ST series (unless otherwise stated) as example to describe the following settings.
Steps:
- Enter the Network Traffic interface.
Menu > Maintenance > Net Detect
- Click the Network Detection tab to enter the Network Detection interface.
- Click Status to get the network status.
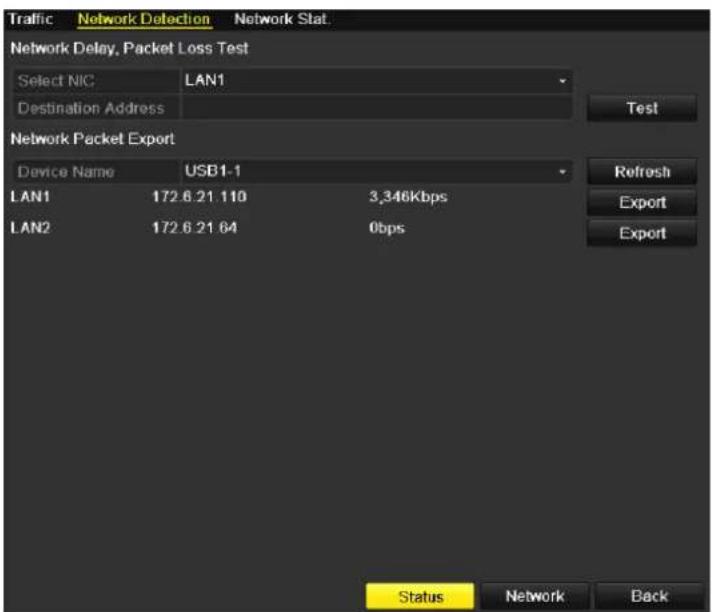
text_image
Traffic Network Detection Network Stat. Network Delay, Packet Loss Test Select NIC LAN1 Destination Address Test Network Packet Export Device Name USB1.1 LAN1 172.6.21.110 3,346Kbps LAN2 172.6.21.64 0bps Refresh Export Export Status Network BackFigure 9.36 Checking Network Status
You can click Network to enter the quick setting interface of network parameters if needed.
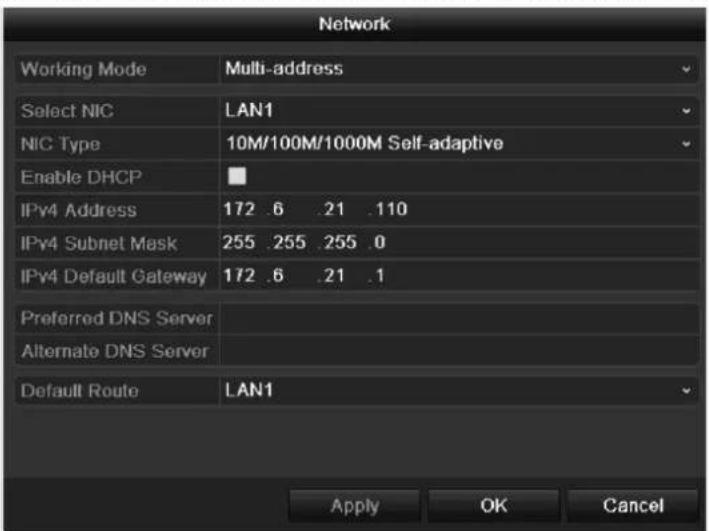
text_image
Network Working Mode Multi-address Select NIC LAN1 NIC Type 10M/100M/1000M Self-adaptive Enable DHCP IPv4 Address 172 .6 .21 .110 IPv4 Subnet Mask 255 .255 .255 .0 IPv4 Default Gateway 172 .6 .21 .1 Preferred DNS Server Alternate DNS Server Default Route LAN1 Apply OK CancelFigure 9.37 Network Parameters Configuration
9.4.4 Checking Network Statistics
Purpose:
You can check the network statistics to obtain the real-time information of the device.
Steps:
- Enter the Network Statistics interface.
Menu > Maintenance> Net Detect
- Click the Network Stat. tab to enter the Network Statistics interface.
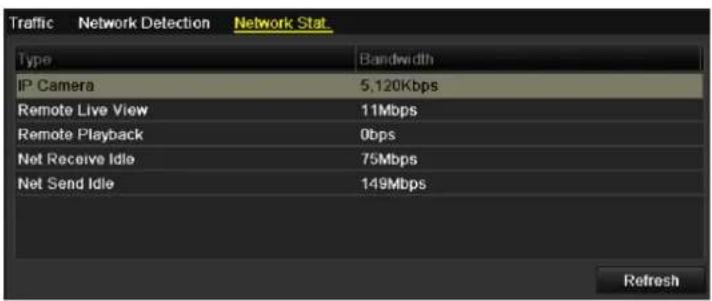
text_image
Traffic Network Detection Network Stat Type Bandwidth IP Camera 5,120Kbps Remote Live View 11Mbps Remote Playback 0bps Net Receive Idle 75Mbps Net Send Idle 149Mbps RefreshFigure 9.38 Network Stat. Interface
- View the bandwidth of IP Camera, bandwidth of Remote Live View, bandwidth of Remote Playback, bandwidth of Net Receive Idle and bandwidth of Net Send Idle.

● The bandwidth of IP Camera is only displayed in HDVR series.
● The value of the bandwidth is subject to the actual model.
- Click Refresh to get the latest bandwidth statistics.
Chapter 10 RAID Configuration

This chapter is available for DS-9100/9000HFI-RT series only. For the configuration for alarm linkage actions of array exception, please refer to Chapter 8.6 and Chapter 8.7.
10.1 Configuring Array and Virtual Disk
Purpose:
RAID (redundant array of independent disks) is a storage technology that combines multiple disk drive components into a logical unit. A RAID setup stores data over multiple hard disk drives to provide enough redundancy so that data can be recovered if one disk fails. Data is distributed across the drives in one of several ways called "RAID levels", depending on what level of redundancy and performance is required. The DS-9000/9100HFI-RT is capable of realizing RAID settings, supporting RAID 0, RAID 1, RAID 5 and RAID 10.
Before you start:
Please install the HDD(s) properly and it is recommended to use the same enterprise-level HDDs (including model and capacity) for array creation and configuration so as to maintain reliable and stable running of the disks.
Introduction:
The DS-9000/9100HFI-RT series can store the data (such as record, picture, log information) in the HDD only after you have created the virtual disk or you have configured network HDD (refer to Chapter 11.2 Managing Network HDD). Our device provides two ways for creating the virtual disk, including one-touch configuration and manual configuration. The following flow chart shows the process of creating virtual disk.
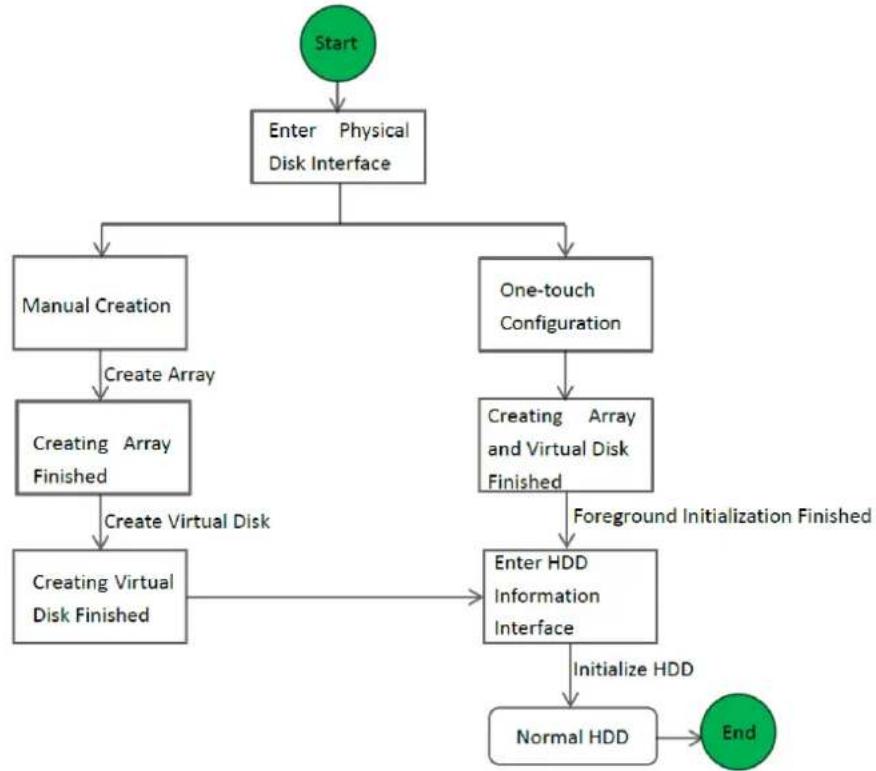
flowchart
graph TD
    A["Start"] --> B["Enter Physical Disk Interface"]
    B --> C["Manual Creation"]
    B --> D["One-touch Configuration"]
    C --> E["Create Array"]
    E --> F["Creating Array Finished"]
    F --> G["Create Virtual Disk"]
    G --> H["Creating Virtual Disk Finished"]
    D --> I["Creating Array and Virtual Disk Finished"]
    I --> J["Foreground Initialization Finished"]
    J --> K["Enter HDD Information Interface"]
    K --> L["Initialize HDD"]
    L --> M["Normal HDD"]
    M --> N["End"]
Figure 10.1 RAID Working Flow
10.1.1 One-touch Configuration
Purpose:
Through one-touch configuration, you can quickly create the disk array and virtual disk. By default, the array type to be created is RAID 5.
Steps:
- Enter the Physical Disk Settings interface.
Menu > HDD > RAID > Physical Disk
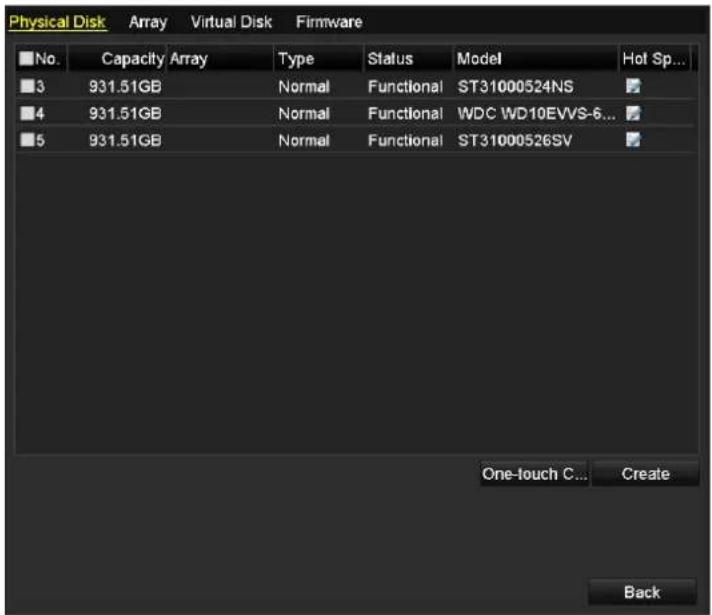
text_image
Physical Disk Array Virtual Disk Firmware No. Capacity Array Type Status Model Hot Sp... 3 931.51GB Normal Functional ST31000524NS 4 931.51GB Normal Functional WDC WD10EVVS-6... 5 931.51GB Normal Functional ST31000526SV One-touch C... Create BackFigure 10.2 Physical Disk Settings Interface
- Click One-touch Config to enter the One-touch Array Configuration interface.

As the default array type is RAID 5, at least 3 HDDs must be installed in you device.
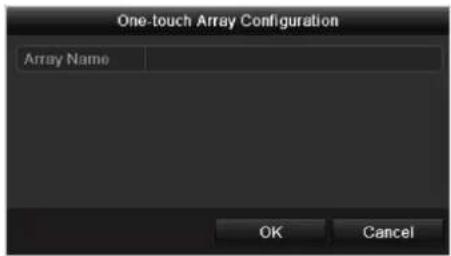
text_image
One-touch Array Configuration Array Name OK CancelFigure 10.3 One-touch Array Configuration
- Edit the array name in the Array Name text filed and click OK start array configuration.

If you install 4 HDDs or above for one-touch configuration, a hot spare disk will be set by default. It is recommended to set hot spare disk for automatically rebuilding the array when the array is abnormal.
-
When the array configuration is complete, click OK in the pop-up message box to finish the settings.
-
You can click Array tab to view the information of the successfully created array.

By default, one-touch configuration creates an array and a virtual disk.

text_image
Physical Disk Array Virtual Disk Firmware No. Name Free Space Physic... Hot ... Status Level Re... Del... Task 1 array1_1 0/1862G 3 4 5 Funci... RAID 5 NoneFigure 10.4 Array Settings Interface
- Click Virtual Disk tab to view the automatically created virtual disk.

By default, one-touch configuration adopts background initialization to initialize the virtual disk.

text_image
Physical Disk Array Virtual Disk Firmware No. Name Cap... Array Status Type Repair Delete Task 1 vd1_array1 1862G array1_1 Functio... RAID 5 - Initialize (Background)Figure 10.5 Virtual Disk Settings Interface
- After the initialization of the virtual disk is complete, the virtual disk will be displayed in the HDD Information interface (Menu>HDD>General). For operation guide of initializing the virtual disk, please refer to Chapter 11.1 Initializing HDDs.

For configuring hot spare disk manually, please refer to steps 12-15 of Chapter 10.1.2.
10.1.2 Manually Creating Array and Virtual Disk
Purpose:
You can manually create the array of RAID 0, RAID 1, RAID 5 and RAID 10.

In this section, we take RAID 5 as an example to describe the manual configuration of array and virtual disk.
Steps:
- Enter the Physical Disk Settings interface.
Menu > HDD > RAID > Physical Disk
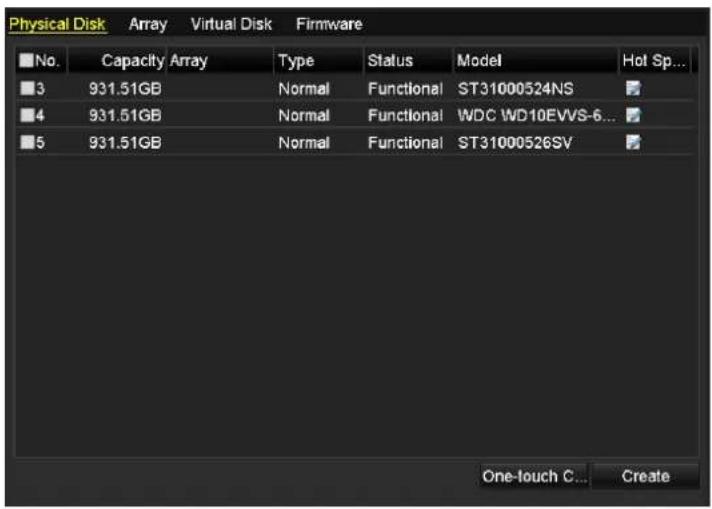
text_image
Physical Disk Array Virtual Disk Firmware No. Capacity Array Type Status Model Hot Sp... 3 931.51GB Normal Functional ST31000524NS 4 931.51GB Normal Functional WDC WD10EVVS-6... 5 931.51GB Normal Functional ST31000526SV One-touch C... CreateFigure 10.6 Physical Disk Settings Interface
- Click Create to enter the Create Array interface.
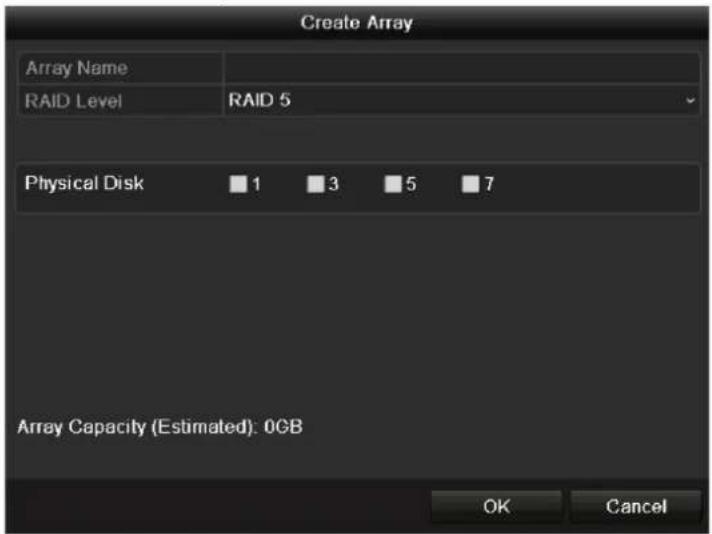
text_image
Create Array Array Name RAID Level RAID 5 Physical Disk 1 3 5 7 Array Capacity (Estimated): 0GB OK CancelFigure 10.7 Create Array Interface
- Edit the Array Name; set the RAID Level to RAID 0, RAID 1, RAID 5 or RAID 10; select the Physical Disk that you want to configure array.

- If you choose RAID 0, at least 2 HDDs must be installed.
- If you choose RAID 1, 2 HDDs need to be configured for RAID 1.
- If you choose RAID 5, at least 3 HDDs must be installed.
-
If you choose RAID 10, 4/6/8 HDDs need to be configured for RAID 10.
-
Click OK to create array.

If the number of HDDs you select is not compatible with the requirement of the RAID level, the error message box will pop up.
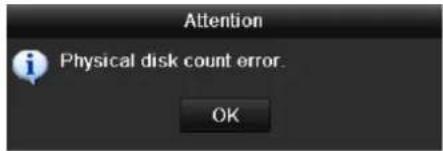
text_image
Attention Physical disk count error. OKFigure 10.8 Error Message Box
- You can click Array tab to view the successfully created array.
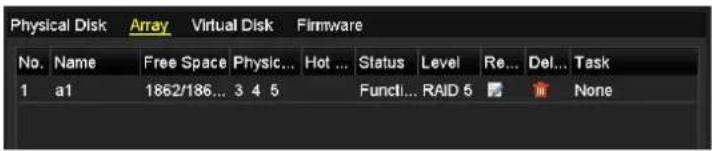
text_image
Physical Disk Array Virtual Disk Firmware No. Name Free Space Physic... Hot ... Status Level Re... Del... Task 1 a1 1862/186... 3 4 5 Funci... RAID 5 NoneFigure 10.9 Array Settings Interface
- Click to select an array and click Create Vd to enter the Create Virtual Disk interface.

The device supports creating at most 8 virtual disks.
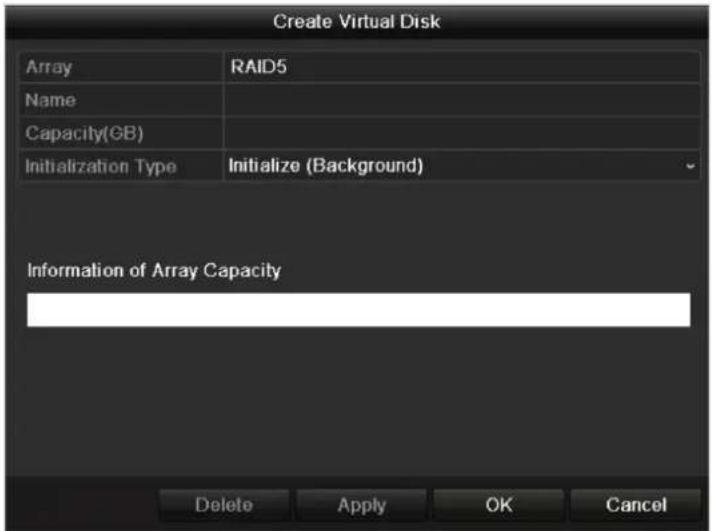
text_image
Create Virtual Disk Array RAID5 Name Capacity(GB) Initialization Type Initialize (Background) Information of Array Capacity Delete Apply OK CancelFigure 10.10 Create Virtual Disk Interface
- Edit the name of the virtual disk, set the capacity for the virtual disk and select the initialization type for the virtual disk.

- You can also click the Information of Array Capacity area to set the remaining capacity of the array for the disk.
- It is recommended to create one virtual disk of an array.
- At least 100GB capacity must be configured for each virtual disk.
● There are three initialization types, including Background, Foreground and Fast.
Fast (Not Recommended): The fast initialization usually takes short time and only initializes part of the RAID, and cannot detect the bad sector.
Foreground (Recommended): By using foreground initialization, the RAID will be initialized totally
and the bad sector of the hard disks can be detected and repaired. The virtual disk can be used only after the initialization is complete.
Background: The background initialization can synchronize the disks, and detect and repair the bad sector of the disks. During the background initialization, the virtual disk is allowed to be used.
- Click Apply to save the settings and click OK to return to Array Settings interface.
- Click Virtual Disk tab to enter the Virtual Disk interface. The successfully created virtual disk will be listed on the interface.
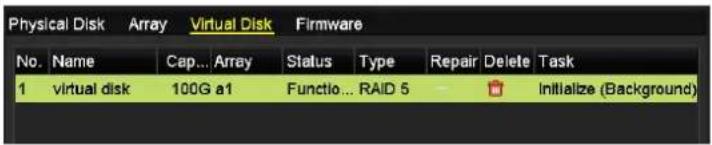
text_image
Physical Disk Array Virtual Disk Firmware No. Name Cap... Array Status Type Repair Delete Task 1 virtual disk 100G a1 Functlo... RAID 5 Initialize (Background)Figure 10.11 Virtual Disk Interface
- Enter the HDD Information interface (Menu>HDD>General) and the virtual disk will be displayed. For operation guide of initializing the virtual disk, please refer to Chapter 11.1 Initializing HDDs.

If you adopt foreground initialization, the virtual disk will be displayed in the HDD Information interface after the initialization is complete.

text_image
HDD Information L... Capacity Status Property Type Free Space Gr... Edil D... 1 100GB Normal R/W Array 99GB 1 -Figure 10.12 HDD Information Interface
- Enter the Physical Disk Settings interface to configure the hot spare disk.
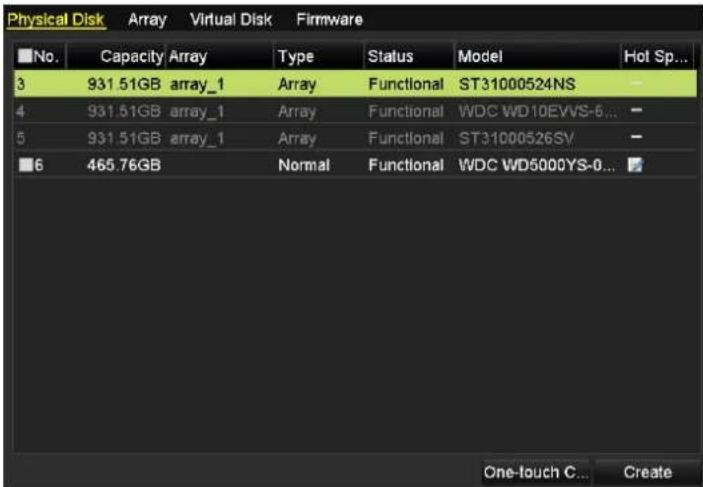
text_image
Physical Disk Array Virtual Disk Firmware No. Capacity Array Type Status Model Hot Sp... 3 931.51GB array_1 Array Functional ST31000524NS 4 931.51GB array_1 Array Functional WDC WD10EVVS-6... 5 931.51GB array_1 Array Functional ST31000526SV 6 465.76GB Normal Functional WDC WD6000YS-0... One-touch C... CreateFigure 10. 13 Physical Disk Settings Interface
- Select a free disk and click the icon ☐ Then the free disk will be set as the global hot spare disk.
You can click the icon to delete the hot spare disk.
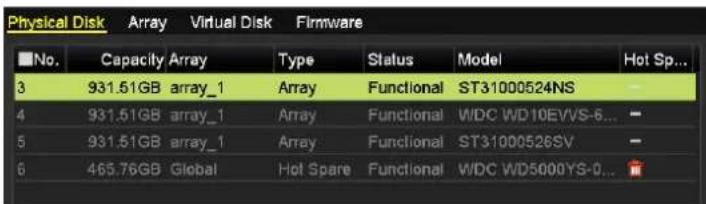
text_image
Physical Disk Array Virtual Disk Firmware No. Capacity Array Type Status Model Hot Sp... 3 931.51GB array_1 Array Functional ST31000524NS 4 931.51GB array_1 Array Functional WDC WD10EVVS-6... 5 931.51GB array_1 Array Functional ST31000526SV 6 465.76GB Global Hot Spare Functional WDC WD5000YS-0...Figure 10.14 Hot Spare Disk
10.2 Rebuilding Array
Purpose:
The working status of array includes Functional, Disk Loss and Offline. By viewing the array status, you can take immediate and proper maintenance for the disks so as to ensure the high security and reliability of the data stored in the disk array.
When there is no disk loss in the array, the working status of array will change to Functional; when the number of lost disks has exceeded the limit, the working status of array will change to Offline; in other conditions, the working status is Disk Loss.
When the virtual disk is in Degraded status, you can restore it to Functional by array rebuilding.
10.2.1 Automatically Rebuilding Array
Purpose:
When the virtual disk is in Degraded status, the device can start rebuilding the array automatically with the hot spare disk to ensure the high security and reliability of the data.
Before you start:
The hot spare disk needs to be configured.
Steps:
- Enter the Array Settings interface. When the status of the array is Disk Loss, the hot spare disk will be automatically used for array rebuilding.
Menu > HDD > RAID > Array

text_image
Physical Disk Array Virtual Disk Firmware No. Name Free Space Physic... Hol ... Status Level Re... Del... Task 1 array 831/931G 7 3 6 Disk L... RAID 5 Rebuild(Running)Figure 10.15 Array Settings Interface
- Enter the Virtual Disk interface to view the rebuilding status of the virtual disk.
Menu>HDD>RAID>Virtual Disk

text_image
Physical Disk Array Virtual Disk Firmware No. Name Cap... Array Status Type Repair Delete Task 1 vd 100G array Degrad... RAID 5 - Rebuild(Running) 8%Figure 10.16 Virtual Disk Settings Interface

If there is no hot spare disk after rebuilding, it is recommended to install a HDD into the device and set is as a hot spare disk to ensure the high security and reliability of the array.
10.2.2 Manually Rebuilding Array
Purpose:
If there is no hot spare disk available, you can rebuild the array manually to restore the array when the virtual disk is in Degraded status.
Steps:
- Enter the Array Settings interface. The status of the array is displayed as Disk Loss, and the status of the virtual disk is displayed as Degraded.
Menu > HDD > RAID > Array;
Menu > HDD > RAID > Virtual Disk

text_image
Physical Disk Array Virtual Disk Firmware No. Name Free Space Physic... Hot ... Status Level Re... Del... Task 1 array 831/931G 3 6 Disk Loss RAID 5 NoneFigure 10.17 Array Settings Interface

text_image
Physical Disk Array Virtual Disk Firmware No. Name Cap... Array Status Type Repair Delete Task 1 1 100G array Degrad... RAID 5 NoneFigure 10.18 Virtual Disk Interface
- Click the icon 📋 on the Array Settings interface to rebuild the array.

At least one available physical disk should exist for rebuilding the array.
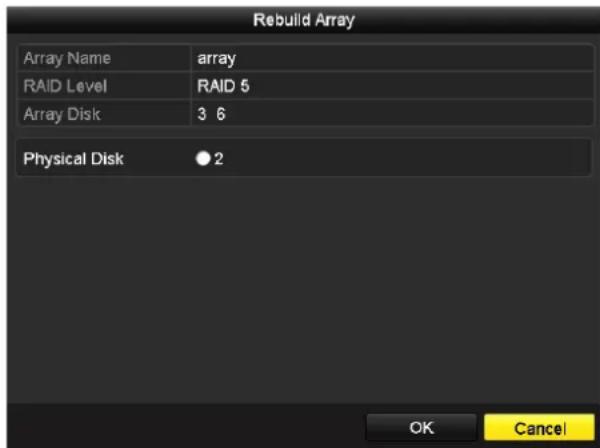
text_image
Rebuild Array Array Name array RAID Level RAID 5 Array Disk 3 6 Physical Disk 2 OK CancelFigure 10.19 Rebuild Array Interface
- Select the available free physical disk and click OK to confirm to rebuild the array.
- The "Do not unplug the physical disk when it is under rebuilding" message box pops up. Click OK to start rebuilding.
- After rebuilding successfully, the array and virtual disk will restore to Functional. You can enter the Array Settings interface and Virtual Disk interface to view the rebuilding status.
10.3 Repairing Virtual Disk
Purpose:
When the disk cannot be displayed on the HDD Information interface while the virtual disk can still show in the Array Settings interface, you have to repair the virtual disk.

If the virtual disk is under foreground initialization, the repairing cannot be done.
Steps:
- Enter the Virtual Disk interface.
Menu > HDD > RAID > Virtual Disk
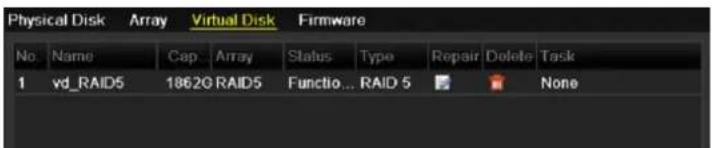
text_image
Physical Disk Array Virtual Disk Firmware No. Name Cap Array Status Type Repair Delete Task 1 vd_RAID5 1862G RAID5 Functio... RAID 5 NoneFigure 10.20 Virtual Disk Interface
- Click ☐ to repair the virtual disk. After successfully repairing, the following message box will pop up. Click OK to finish the settings.
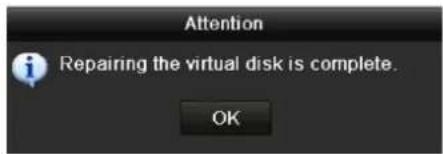
text_image
Attention Repairing the virtual disk is complete. OKFigure 10.21 Repairing Virtual Disk Successfully
The disk shows again in the HDD Information interface (Menu>HDD>General).
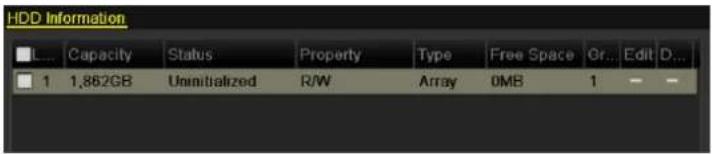
text_image
HDD Information L... Capacity Status Property Type Free Space Gr... Edit D... 1 1,862GB Uninitialized R/W Array 0MB 1 - -Figure 10.22 HDD Information Interface
10.4 Deleting Array / Virtual Disk

Before deleting the array, the virtual disk(s) under this array must be deleted first. Deleting array and virtual disk will delete all the data saved in the disk.
10.4.3 Deleting the Virtual Disk
Steps:
- Enter the Virtual Disk interface.
Menu > HDD > RAID > Virtual Disk
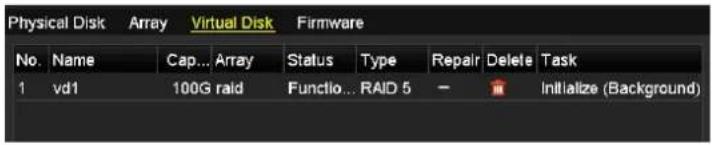
text_image
Physical Disk Array Virtual Disk Firmware No. Name Cap... Array Status Type Repair Delete Task 1 vd1 100G raid Functio... RAID 5 - Initialize (Background)Figure 10.23 Virtual Disk Interface
- Select a virtual disk and click 📄 to delete the virtual disk.

Deleting virtual disk will cause to delete all the data saved in the disk.
10.4.4 Deleting the Array

If all the virtual disks under an array have been deleted, then you can delete that array.
Steps:
- Enter the Array Settings interface.
Menu>HDD>RAID>Array

text_image
Physical Disk Array Virtual Disk Firmware No. Name Free Space Physic... Hot ... Status Level Re... Del... Task 1 raid 1762/186... 1 2 5 Funci... RAID 5 NoneFigure 10.24 Array Settings Interface
- Select an array and click 📄 to delete the array.

Deleting array will cause to delete all the data in the array.
10.5 Upgrading Firmware
Purpose:
You can view the information of the firmware and upgrade the firmware by local backup device or remote FTP server.
Steps:
- Enter the Firmware interface to view the information of the firmware, including the version, maximum physical disk quantity, maximum array quantity, auto-rebuild status, etc.
Menu > HDD > RAID > Firmware
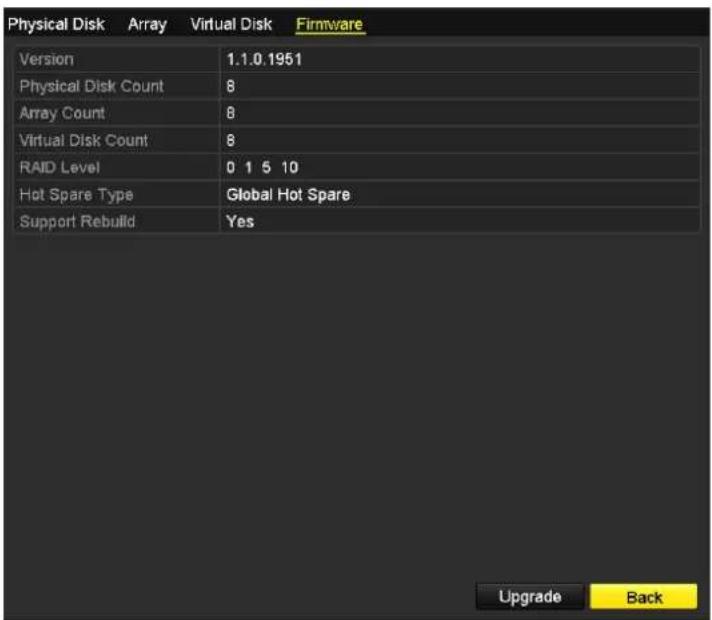
text_image
Physical Disk Array Virtual Disk Firmware Version 1.1.0.1951 Physical Disk Count 8 Array Count 8 Virtual Disk Count 8 RAID Level 0 1 5 10 Hot Spare Type Global Hot Spare Support Rebuild Yes Upgrade BackFigure 10.25 Firmware Interface
- You can click Upgrade to upgrade the firmware. Local upgrade and FTP upgrade are available. Since the upgrading process of the firmware is the same as that of the device firmware, you can refer to Chapter 13.4 for detailed information.

Please contact the dealer immediately if the device cannot work properly after upgrading.
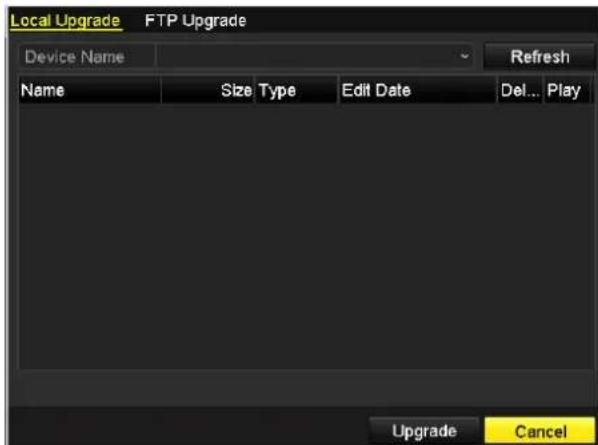
text_image
Local Upgrade FTP Upgrade Device Name Name Size Type Edit Date Refresh Del... Play Upgrade CancelFigure 10.26 Upgrade the Firmware
Chapter 11 HDD Management

We use the interface of DS-9100HFI-ST series (unless otherwise stated) as example to describe the following settings.
11.1 Initializing HDDs
Purpose:
A newly installed hard disk drive (HDD) must be initialized before it can be used with your device.

If there is uninitialized HDD existed in the device, perform the following steps to initialize the HDD(s).
Steps:
- Enter the HDD Information interface.
Menu > HDD > General
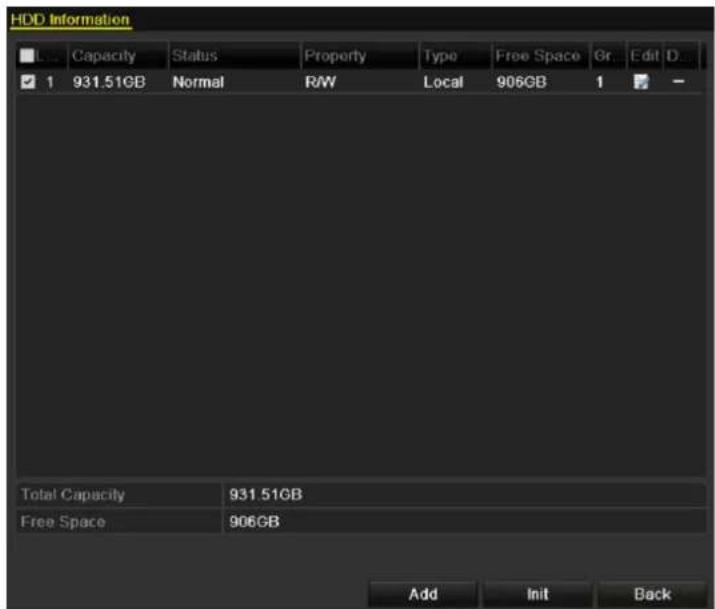
text_image
HDD Information Capacity Status Property Type Free Space Gr Edit D 1 931.51GB Normal R/W Local 906GB 1 Total Capacity 931 51GB Free Space 906GB Add Init BackFigure 11.1 HDD Information Interface
- Select HDD to be initialized.
- Click Init to initialize the selected HDD.

text_image
HDD Information L... Capacity Status Property Type Free Space Gr... Edit D... 4 931.51GB Initializing 44% R/W Local 0MB 1 - -Figure 11.2 Start Initialization
- After the HDD has been initialized, the status of the HDD will change from Uninitialized to Normal.

text_image
HDD Information L... Capacity Status Property Type Free Space Gr... Edit D... 5 931.51GB Normal RW Local 846GB 1 -Figure 11. 3 HDD Status Changes to Normal

Initializing the HDD will erase all data on it.
The HDDs which are free of working for a long time can be enabled to sleep, thus to decrease the power consumption of the device and extend the life of the HDDs.
Click Menu > HDD > Advanced.

text_image
Enable HDD SleepingFigure 11.4 Enable HDD Sleeping
Check the checkbox of Enable HDD Sleeping (by default), and the HDDs which are free of working for a long time will be set to sleep.
Uncheck the checkbox of Enable HDD Sleeping, and the HDDs will be set to work for all time.
11.2 Managing Network HDD
Purpose:
You can add the allocated NAS or disk of IP SAN to device, and use it as network HDD.
Steps:
- Enter the HDD Information interface.
Menu > HDD > General - Click Add to enter the Add NetHDD interface.
- Add the allocated NetHDD.
- Select the type to NAS or IP SAN.
- Configure the NAS or IP SAN settings.
Add NAS disk:
1) Enter the NetHDD IP address in the text field.
2) Click Search to search the available NAS disks.
3) Select the NAS disk from the list shown below.
Or you can just manually enter the directory in the text field of NetHDD Directory.
4) Click OK to add the configured NAS disk.

Up to 8 NAS disks can be added.
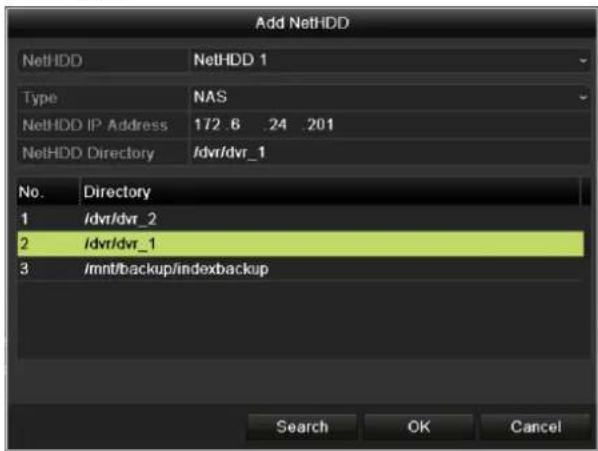
text_image
Add NetHDD NetHDD NetHDD 1 Type NAS NetHDD IP Address 172.6 24 201 NetHDD Directory /dvr/dvr_1 No. Directory 1 /dvr/dvr_2 2 /dvr/dvr_1 3 /mnt/backup/indexbackup Search OK CancelFigure 11.5 Add NAS Disk
Add IP SAN:
1) Enter the NetHDD IP address in the text field.
2) Click Search to search the available IP SAN disks.
3) Select the IP SAN disk from the list shown below.
4) Click OK to add the selected IP SAN disk.

Up to 1 IP SAN disk can be added.
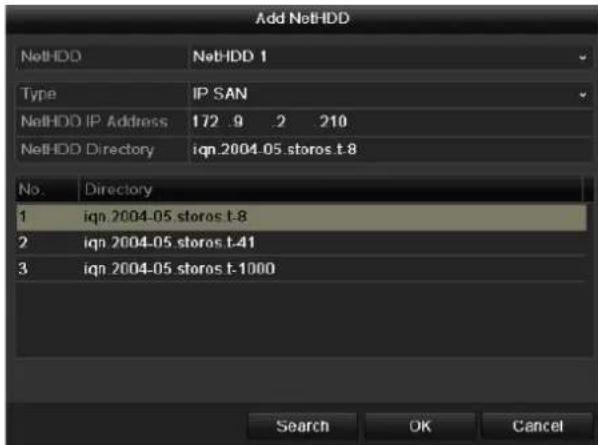
text_image
Add NetHDD NetHDD NetHDD 1 Type IP SAN NetHDD IP Address 172.9 2 210 NetHDD Directory ign.2004-05.storos.t.8 No. Directory 1 ign.2004-05.storos.t.8 2 ign.2004-05.storos.t.41 3 ign.2004-05.storos.t-1000 Search OK CancelFigure 11.6 Add IP SAN Disk
- After having successfully added the NAS or IP SAN disk, return to the HDD Information menu. The added NetHDD will be displayed in the list.

If the added NetHDD is uninitialized, please select it and click Init for initialization.
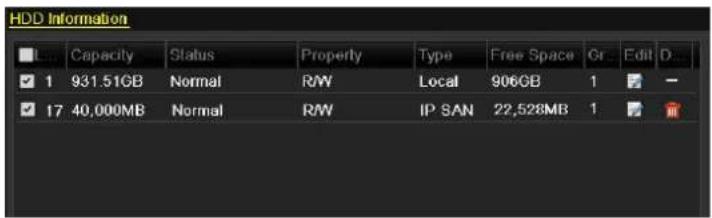
text_image
HDD Information Capacity Status Property Type Free Space Gr Edit D... ✓ 1 931.51GB Normal RW Local 906GB 1 ✓ - ✓ 17 40,000MB Normal RW IP SAN 22,528MB 1 ✓Figure 11.7 Initialize Added NetHDD
11.3 Managing eSATA
Purpose:
When there is an external eSATA device connected to device, you can configure eSATA for the use of Record/Capture or Export, and you can manage the eSATA in the device.
Steps:
- Enter the Advanced Record Settings interface.
Menu > Record>Advanced - Select the eSATA type to eSATA1.
- Set the Usage as Record/Capture or Export.
Export: Use the eSATA for backup. Refer to Backup using eSATA HDDs in Chapter 7.1.2 Backing up by Normal Video Search for operating instructions.
Record/Capture: Use the eSATA for record/capture. Refer to the following steps for operating instructions.

text_image
Advanced Overwrite eSATA eSATA1 Usage Record/CaptureFigure 11.8 Set eSATA Usage
4. When the eSATA usage is selected to Record/Capture, enter the HDD Information interface.
Menu > HDD > General
5. Edit the property of the selected eSATA, or initialize it is required.

Three storage modes can be configured for the eSATA when it is used for Record/Capture. Please refer to Chapter 11.4, Chapter 11.5 and Chapter 11.6 for details.
| L... | Capacity | Status | Property | Type | Free Space | Gr... | Edit | D... |
| 1 | 931.51GB | Normal | R/W | Local | 927GB | 1 | - | |
| 2 | 931.51GB | Normal | R/W | eSATA | 930GB | 1 | - |
Figure 11.9 Initialize Added eSATA
11.4 Managing HDD Group
11.4.1 Setting HDD Groups
Purpose:
Multiple HDDs can be managed in groups. Video from specified channels can be recorded onto a particular HDD group through HDD settings.
Steps:
- Enter the Storage Mode interface.
Menu > HDD > Advanced > Storage Mode
- Set the Mode to Group, as shown below.

Reboot the device to activate the new settings.
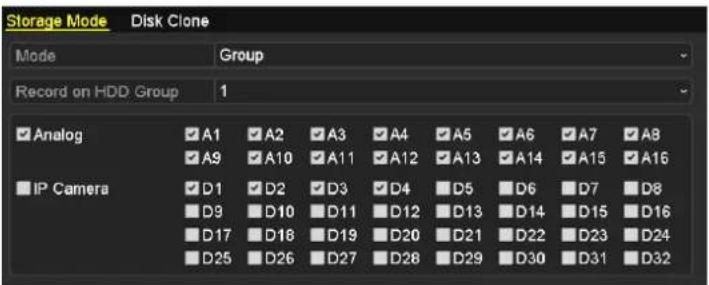
text_image
Storage Mode Disk Clone Mode Group Record on HDD Group 1 ✓ Analog ✓A1 ✓A2 ✓A3 ✓A4 ✓A5 ✓A6 ✓A7 ✓A8 ✓ A9 ✓A10 ✓A11 ✓A12 ✓A13 ✓A14 ✓A15 ✓A16 ■ IP Camera ✓D1 ✓D2 ✓D3 ✓D4 ✓D5 ✓D6 ✓D7 ✓D8 D9 ✓D10 ✓D11 ✓D12 ✓D13 ✓D14 ✓D15 ✓D16 D17 ✓D18 ✓D19 ✓D20 ✓D21 ✓D22 ✓D23 ✓D24 D25 ✓D26 ✓D27 ✓D28 ✓D29 ✓D30 ✓D31 ✓D32Figure 11. 10 Storage Mode Interface

IP Camera is supported by HDVR series only.
-
Click Apply and reboot the device to activate the new settings.
-
After reboot of device, enter the HDD Information interface.
Menu > HDD > General
- Select a HDD from the list and click 📋 to enter the Local HDD Settings interface.
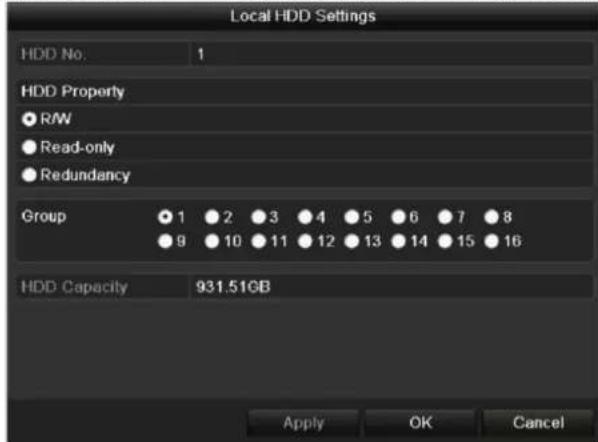
text_image
Local HDD Settings HDD No. 1 HDD Property ● R/W ● Read-only ● Redundancy Group ● 1 ● 2 ● 3 ● 4 ● 5 ● 6 ● 7 ● 8 ● 9 ● 10 ● 11 ● 12 ● 13 ● 14 ● 15 ● 16 HDD Capacity 931.51GB Apply OK CancelFigure 11.11 Local HDD Settings Interface
- Select the Group number for the current HDD.

The default group No. for each HDD is 1.
- Click OK and confirm the pop-up message box to finish the settings.
11.4.2 Setting HDD Property
Purpose:
The HDD property can be set to redundancy, read-only or read/write (R/W). Before setting the HDD property, please set the storage mode to Group (refer to step1-4 of Chapter 11.4.1 Setting HDD Groups).
A HDD can be set to read-only to prevent important recorded files from being overwritten when the HDD becomes full in overwrite recording mode.
When the HDD property is set to redundancy, the video can be recorded both onto the redundancy HDD and the R/W HDD simultaneously so as to ensure high security and reliability of video data.
Steps:
- Enter the HDD Information interface.
Menu > HDD > General
- Select a HDD from the list and click ☐ to enter the Local HDD Settings interface.
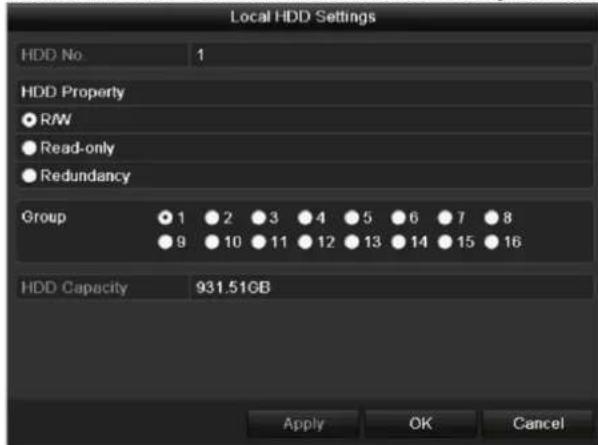
text_image
Local HDD Settings HDD No 1 HDD Property ● R/W ● Read-only ● Redundancy Group ● 1 ● 2 ● 3 ● 4 ● 5 ● 6 ● 7 ● 8 ● 9 ● 10 ● 11 ● 12 ● 13 ● 14 ● 15 ● 16 HDD Capacity 931.51GB Apply OK CancelFigure 11. 12 Set HDD Property
- Set the HDD property to R/W, Read-only or Redundancy.
- Click OK to save the settings and exit the interface.
- In the HDD Information menu, the HDD property will be displayed in the list.

At least 2 hard disks must be installed on your device when you want to set a HDD to Redundancy, and there is one HDD with R/W property.
11.5 Configuring Quota Mode
Purpose
Each camera can be configured with allocated quota for the storage of recorded files or captured pictures.
Steps
- Enter the Storage Mode interface.
Menu > HDD > Advanced
- Set the Mode to Quota.
- Select a camera for which you want to configure quota. In HDVR series device you can select IP Camera.
- Enter the storage capacity in the text fields of Max. Record Capacity (GB) and Max. Picture Capacity (GB).
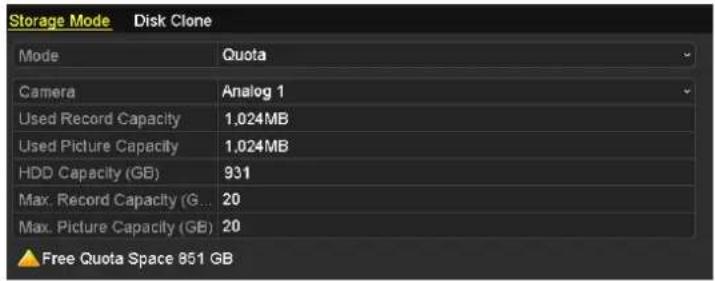
text_image
Storage Mode Disk Clone Mode Quota Camera Analog 1 Used Record Capacity 1,024MB Used Picture Capacity 1,024MB HDD Capacity (GB) 931 Max. Record Capacity (G... 20 Max. Picture Capacity (GB) 20 ▲ Free Quota Space 851 GBFigure 11. 13 Configure Record/Picture Quota
- You can copy the quota settings of the current camera to other cameras if required. Click Copy to enter the Copy Camera menu, as shown below.
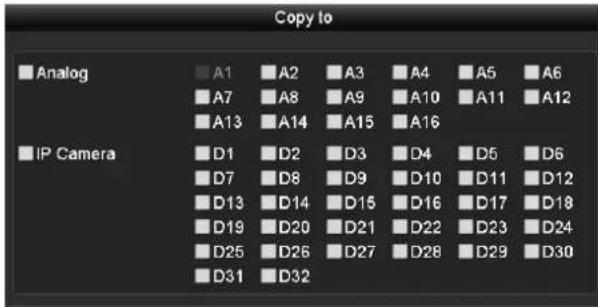
text_image
Copy to Analog A1 A2 A3 A4 A5 A6 A7 A8 A9 A10 A11 A12 A13 A14 A15 A16 IP Camera D1 D2 D3 D4 D5 D6 D7 D8 D9 D10 D11 D12 D13 D14 D15 D16 D17 D18 D19 D20 D21 D22 D23 D24 D25 D26 D27 D28 D29 D30 D31 D32Figure 11. 14 Copy Settings to Other Camera(s)

IP Camera is supported by HDVR series only.
- Select the camera (s) to be configured with the same quota settings. You can also click the checkbox of Analog or IP Camera to select all cameras.
- Click OK to finish the Copy settings and back to the Storage Mode interface.
- Click Apply to save the settings.

● The device must be rebooted to activate the changes.
- If the quota capacity is set to , then all cameras will use the total capacity of HDD for record and picture
capture.
11.6 Configuring Frame Extracting Mode
Purpose:
If you want to extend the record time of the HDD, you can set the storage mode of the HDD to Frame Extracting. In this mode, the bitrate of frame extracting record is less than 1/8 of that of normal record and the frame rate of frame extracting record is 1 fps so as to maintain longer storage time of the record files.

Frame extracting record is only supported by analog cameras.
Steps:
-
Enter the Storage Mode interface.
Menu > HDD > Advanced -
Set the Mode to Frame Extracting.

The device must be rebooted to activate the change.
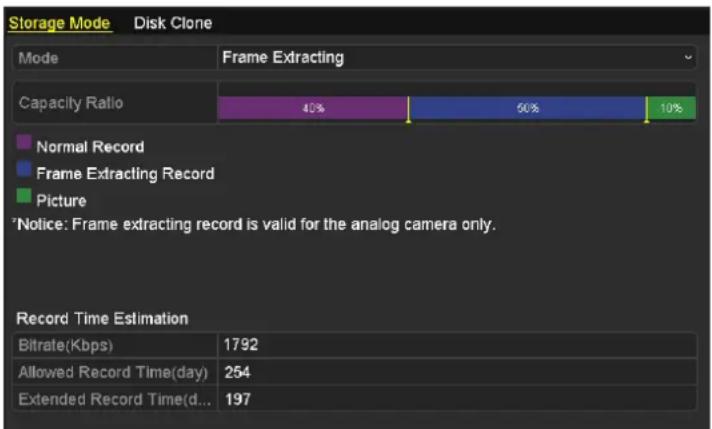
bar
Storage Mode Disk Clone | Mode | Frame Extracting (%) | |---|---| | Capacity Ratio | 40 | | Normal Record | 50 | | Picture | 10 | *Notice: Frame extracting record is valid for the analog camera only. Record Time Estimation | Bitrate(Kbps) | 1792 | | Allowed Record Time(day) | 254 | | Extended Record Time(d...) | 197 |Figure 11. 15 Storage Mode Settings Interface
-
Drag I to adjust the storage percentages of normal record, frame extracting record and picture according to actual requirements.
-
You can edit the bitrate of the camera and the Allowed Record Time and Extended Record Time will change accordingly.
Allowed Record Time: The total recording time that is allowed when using the frame-extracting recording mode.
Extended Record Time: The recording time that is extended when using the frame-extracting recording mode.
Example: With the frame extracting mode configured, the Allowed Record Time is estimated as 12 and the Extended Record Time as 10, it means the HDD capacity allows the frame extracting record to last 12 days and the record time is extended for about 10 days. If you have not configured the frame extracting mode, the HDD capacity allows the record to last 2 days only.
- Click Apply and reboot the device to activate the new settings.

● The estimation of the record time is only for reference.
- If you change the storage capacity of the device, e.g., a new HDD is connected or a HDD is removed, you have to configure the frame extracting mode again.
11.7 Configuring Disk Clone
Before you start:
Connect a HDD to the device via the eSATA interface.
Purpose:
You can clone all the data stored on the HDD, which is installed on the device, to a connected eSATA disk according to the actual needs or when the S.M.A.R.T. detection result declares the HDD is abnormal. For details of S.M.A.R.T. detection, see Chapter 11.9.

● The disk clone function is not supported by 9100HFI-RT/9000HFI-RT/7200HWI-SV Series.
For 9100HFI-XT/9000HFI-XT Series, the disk clone is only available when the RAID function is disabled.
Steps:
- Enter the HDD Advanced Setting interface:
Menu > HDD > Advanced
- Click the Disk Clone tab to enter the Disk Clone Settings interface.
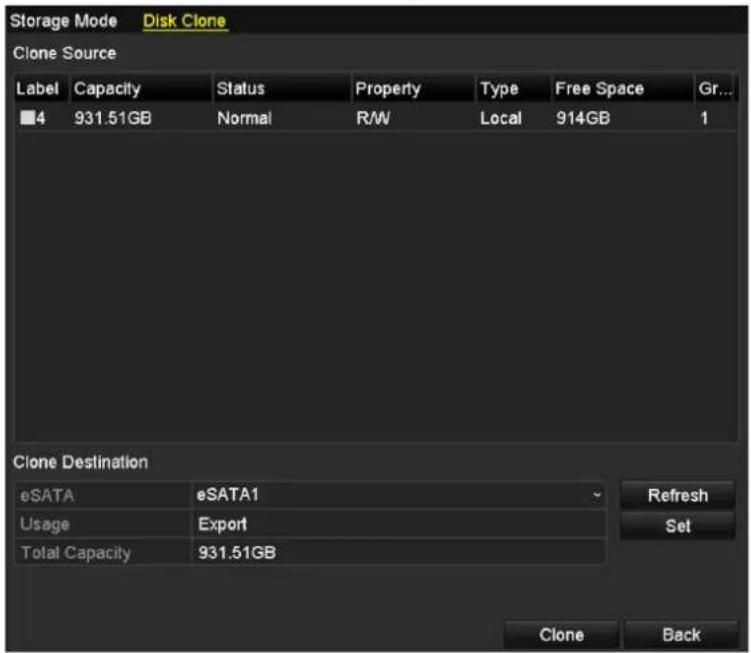
text_image
Storage Mode Disk Clone Clone Source Label Capacity Status Property Type Free Space Gr... ■4 931.51GB Normal R/W Local 914GB 1 Clone Destination eSATA eSATA1 Refresh Usage Export Set Total Capacity 931.51GB Clone BackFigure 11. 16 Disk Clone Settings Interface
- Make sure the usage of the eSATA disk is set as Export.
If not, click the Set button to set it. Choose Export and click the OK button.
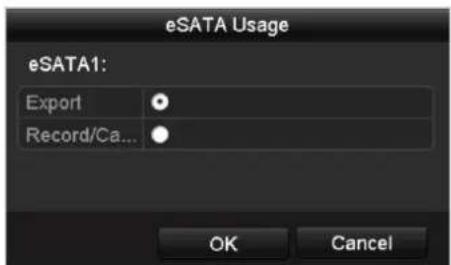
text_image
eSATA Usage eSATA1: Export Record/Ca... OK CancelFigure 11. 17 Setting eSATA Usage

The capacity of destination disk must be the same as that of the clone source disk.
- Check the checkbox of the HDD to be cloned in the Clone Source list.
- Click the Clone button and confirm the pop-up message box.
You can check the clone progress in the HDD status.
| Label | Capacity | Status | Property | Type | Free Space | Gr... |
| 4 | 931.51GB | Cloning 01% | R/W | Local | 0MB | 1 |
Figure 11. 18 Check Disk Clone Progress
11.8 Checking HDD Status
Purpose:
You may check the status of the installed HDDs on device so as to take immediate check and maintenance in case of HDD failure.
Checking HDD Status in HDD Information Interface
Steps:
- Enter the HDD Information interface.
Menu > HDD>General
- Check the status of each HDD which is displayed on the list.
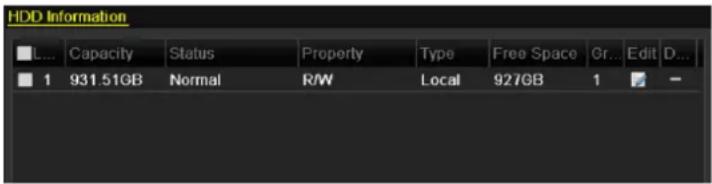
text_image
HDD Information L... Capacity Status Property Type Free Space Gr... Edit D... 1 931.51GB Normal R/W Local 927GB 1 -Figure 11. 19 View HDD Status (1)

If the status of HDD is Normal or Sleeping, it works normally. If the status is Uninitialized or Abnormal, please initialize the HDD before use. And if the HDD initialization is failed, please replace it with a new one.
Checking HDD Status in HDD Information Interface
Steps:
- Enter the System Information interface.
Menu > Maintenance > System Info
- Click the HDD tab to view the status of each HDD displayed on the list.
| Device Info | Camera | Record | Alarm | Network | HDD | ||
| Label | Status | Capacity | Free Space | Property | Type | Group | |
| 1 | Normal | 931.51GB | 927GB | R/W | Local | 1 | |
Figure 11. 20 View HDD Status (2)
11.9 Checking S.M.A.R.T. Information
Purpose:
The S.M.A.R.T. (Self-Monitoring, Analysis and Reporting Technology) is a monitoring system for HDD to detect and report on various indicators of reliability in the hopes of anticipating failures.

This chapter is not available for DS-9100/9000HFI-RT series.
Steps:
- Enter the S.M.A.R.T. Settings interface.
Menu > Maintenance > HDD Detect > S.M.A.R.T. Settings
- Select a HDD to view its S.M.A.R.T. information list.

If you want to use the HDD even when the S.M.A.R.T. checking is failed, you can check the checkbox before the Continue to use this disk when self-evaluation is failed item.
- Three self-tests of S.M.A.R.T are provided, including Short Test, Expanded Test and Conveyance Test. You can select a self-test type and click 📋 start self-test.
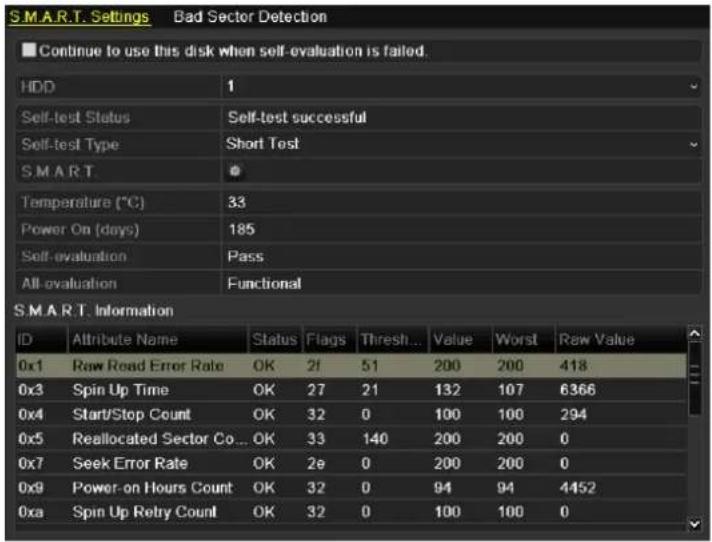
text_image
S.M.A.R.T. Settings Bad Sector Detection ■ Continue to use this disk when self-evaluation is failed. HDD 1 Self-test Status Self-test successful Self-test Type Short Test S.M.A.R.T Temperature (°C) 33 Power On (days) 185 Self-evaluation Pass All-evaluation Functional S.M.A.R.T. Information ID Attribute Name Status Flags Thresh... Value Worst Raw Value 0x1 Raw Road Error Rate OK 2f 51 200 200 418 0x3 Spin Up Time OK 27 21 132 107 6366 0x4 Start/Stop Count OK 32 0 100 100 294 0x5 Reallocated Sector Co... OK 33 140 200 200 0 0x7 Seek Error Rate OK 2e 0 200 200 0 0x9 Power-on Hours Count OK 32 0 94 94 4452 0xa Spin Up Retry Count OK 32 0 100 100 0Figure 11. 21 S.M.A.R.T. Settings Interface
11.10 Detecting Bad Sector
Purpose:
You can detect the bad sector of the HDD to check the status of the HDD.

This chapter is not available for DS-9100/9000HFI-RT series.
Steps:
- Enter the Bad Sector Detection interface.
Menu > Maintenance > HDD Detect > Bad Sector Detection
- Select a HDD and choose Full Detection or Key Area Detection as the detection type.
- Click Detect to start detecting.
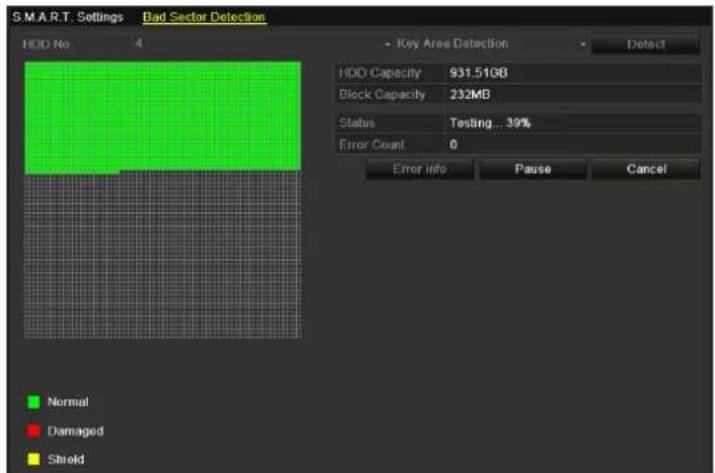
text_image
S.M.A.R.T. Settings Bad Sector Detection HDD No 4 - Key Area Detection Detect HDD Capacity 931.51GB Block Capacity 232MB Status Testing... 39% Error Count 0 Error Info Pause Cancel Normal Damaged ShieldFigure 11. 22 Bad Sector Detecting
- You can click Pause to pause the detection and click Resume to resume the detection.
- If there is error information about the HDD, you can click Error info to view the information.
11.11 Configuring HDD Error Alarms
Purpose:
You can configure the HDD error alarms when the HDD status is Uninitialized or Abnormal.
Steps:
- Enter the Exception interface.
Menu > Configuration > Exceptions
- Select the Exception Type to HDD Error from the drop-down list.
- Click the checkbox(s) below to select the HDD error alarm type (s).

The alarm type can be selected to: Audible Warning, Notify Surveillance Center, Send Email and Trigger Alarm Output. Please refer to Chapter 8.7 Setting Alarm Linkage Actions.
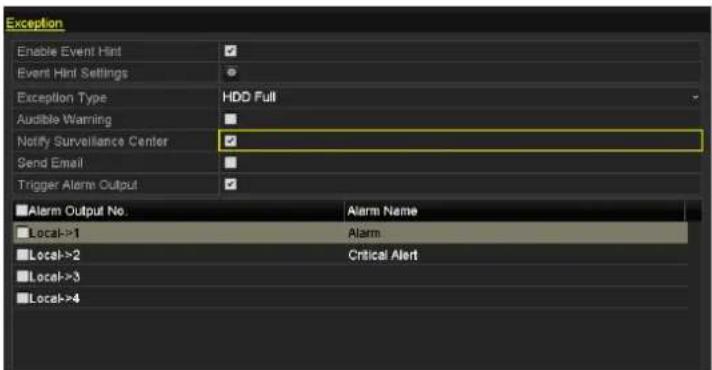
text_image
Exception Enable Event Hint Event Hint Settings Exception Type HDD Full Audible Warning Notify Surveillance Center Send Email Trigger Alarm Output Alarm Output No. Alarm Name Local->1 Alarm Local->2 Critical Alert Local->3 Local->4Figure 11.23 Configure HDD Error Alarm
- When the Trigger Alarm Output (not supported by DS-7200HWI-SV series) is selected, you can also select the alarm output to be triggered from the list below.
- Click Apply to save the settings.
Chapter 12 Camera Settings
12.1 Configuring OSD Settings
Purpose:
You can configure the OSD (On-screen Display) settings for the camera, including date /time, camera name, etc.

We use the interface of DS-9100HFI-ST series (unless otherwise stated) as example to describe the following settings.
Steps:
- Enter the OSD Configuration interface.
Menu > Camera > OSD
- Select the camera to configure OSD settings.
- Edit the Camera Name in the text field.
- Configure the Display Name, Display Date and Display Week by checking the checkbox.
- Select the Date Format, Time Format and Display Mode.
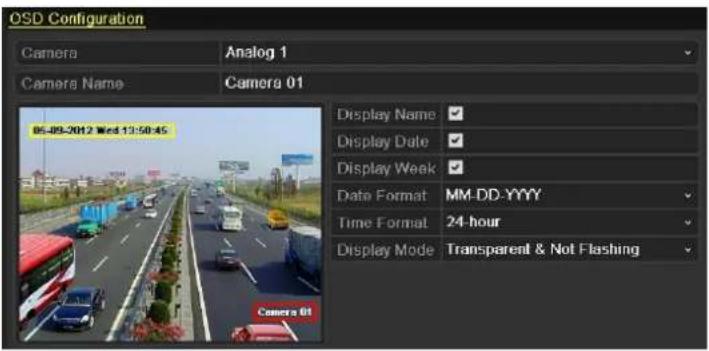
text_image
OSD Configuration Camera Analog 1 Camera Name Camera 01 05-09-2012 Wed 13:50:45 Display Name ✓ Display Date ✓ Display Week ✓ Data Format MM-DD-YYYY Time Format 24-hour Display Mode Transparent & Not Flashing Camera 01Figure 12.1 OSD Configuration Interface
- You can use the mouse to click and drag the text frame on the preview window to adjust the OSD position.
- Copy Camera Settings
1) If you want to copy the OSD settings of the current camera to other cameras, click Copy to enter the Copy Camera interface.

Copying the OSD settings to network cameras is not available.
2) Select the camera (s) to be configured with the same OSD settings. You can also check checkbox to select all cameras.
3) Click OK to finish the Copy settings and back to the OSD Configuration interface.
- Click Apply to apply the settings.
12.2 Configuring Privacy Mask
Purpose:
Privacy mask enables you to cover certain areas on the live video to prevent certain spots in the surveillance area from being live viewed and recorded.
Steps:
- Enter the Privacy Mask Settings interface.
Menu > Camera > Privacy Mask
- Select the camera to set privacy mask.
- Check √ checkbox to enable privacy mask.
- Use the mouse to draw a zone on the window. The zones will be marked with different frame colors.

Up to 4 privacy mask zones can be configured, and the size of each area can be adjusted.
- The configured privacy mask zones on the window can be cleared by clicking the corresponding Clear Zone1-4 icons on the right side of the window, or click Clear All to clear all zones.
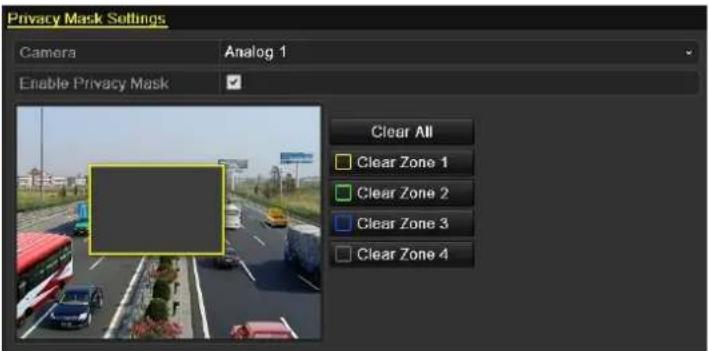
text_image
Privacy Mask Settings Camera Analog 1 Enable Privacy Mask Clear All Clear Zone 1 Clear Zone 2 Clear Zone 3 Clear Zone 4Figure 12.2 Set Privacy Mask Area
- You can click Copy to copy the privacy mask settings of the current camera to other cameras. Please refer to step 7 of Chapter 12.1 Configuring OSD Settings.

Copying the privacy mask settings to network cameras is not available.
- Click Apply to save the settings.
12.3 Configuring Video Parameters
Steps:
- Enter the Image Settings interface.
Menu > Camera > Image
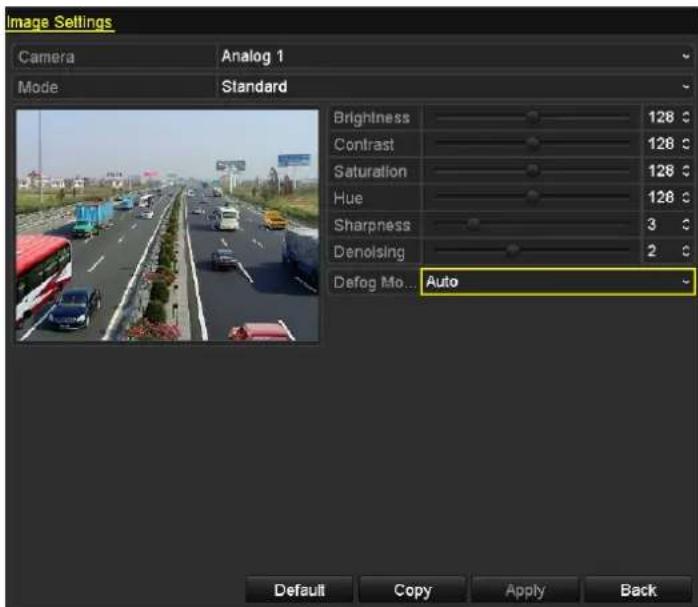
text_image
Image Settings Camera Analog 1 Mode Standard Brightness 128 ° Contrast 128 ° Saturation 128 ° Hue 128 ° Sharpness 3 ° Denolizing 2 ° Defog Mode... Auto Default Copy Apply BackFigure 12.3 Image Settings Interface for Analog Camera Connected to DS-9200 HWI-ST Series
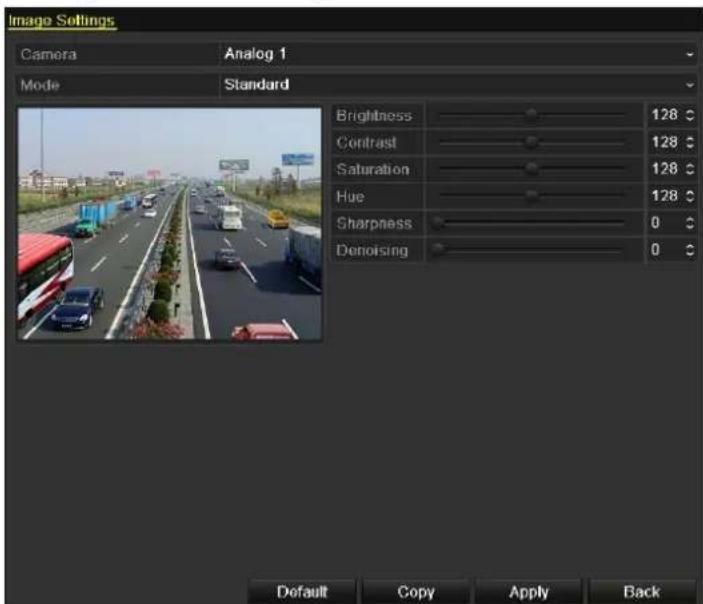
text_image
Image Settings Camera Analog 1 Mode Standard Brightness 128 ° Contrast 128 ° Saturation 128 ° Hue 128 ° Sharpness 0 ° Denoising 0 ° Default Copy Apply BackFigure 12.4 Image Settings Interface for Analog Camera Connected to Other Series

text_image
Image Settings Camera IP Camera 2 Mode Customize Brightness 128 ° Contrast 128 ° Saturation 128 ° Hue 128 ° Default Copy Apply BackFigure 12.5 Image Settings Interface for IP Camera

- The defog mode is only available for analog cameras connected to DS-9200 HWI-ST series device.3 types of defog modes are available: Auto (default), Manual and Disable.
● IP Camera is supported by the HDVR series.
- Select the camera to set image parameters.
- Select the mode from the drop-down list of Mode. For analog cameras, four modes are selectable: Standard, Indoor, Dim Light and Outdoor. While for IP cameras, only Customize is supported.
- Adjust the image parameters according to actual needs. The parameters are including Brightness, Contrast, Saturation, Hue, Sharpness and Denoising. You can also click Default to restore the default settings.

Sharpness, Denoising and restoring default settings are not supported by IP cameras.
- You can click Copy to copy the image settings of the current camera to other analog cameras.

Copying the image settings to IP cameras is not available.
- Click Apply to save the settings.
Chapter 13 Device Management and Maintenance
13.1 Viewing System Information
Steps:
- Enter the System Information interface.
Menu > Maintenance > System Info
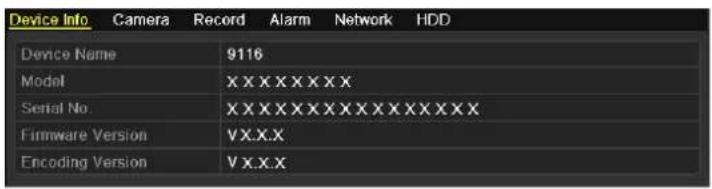
text_image
Device Info Camera Record Alarm Network HDD Device Name 9116 Model XXXXXXXXX Serial No XXXXXXXXXXXXXXXXX Firmware Version VXX.X Encoding Version VXX.XFigure 13.1 Device Information Interface
- Select the tab and you can view the detailed information of device, camera, record, alarm, network and HDD.

● IP Camera is supported by HDVR series.
● The alarm function is not supported by DS-7200HWI-SV series.
13.2 Searching & Exporting Log Files
Purpose:
The operation, alarm, exception, information and running status of the device can be stored in log files, which can be viewed and exported at any time.
Before you start:
Connect the backup device, such as USB flash drive, to the device before exporting the log files.
Steps:
1. Enter the Log Search interface.
Menu > Maintenance > Log Information
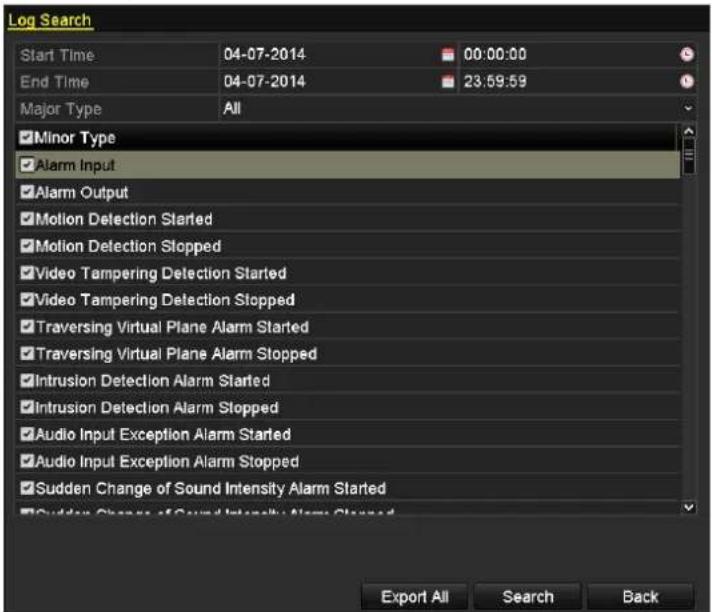
text_image
Log Search Start Time 04-07-2014 00:00:00 End Time 04-07-2014 23:59:59 Major Type All Minor Type Alarm Input Alarm Output Motion Detection Started Motion Detection Stopped Video Tampering Detection Started Video Tampering Detection Stopped Traversing Virtual Plane Alarm Started Traversing Virtual Plane Alarm Stopped Intrusion Detection Alarm Started Intrusion Detection Alarm Stopped Audio Input Exception Alarm Started Audio Input Exception Alarm Stopped Sudden Change of Sound Intensity Alarm Started Sudden Change of Sound Intensity Alarm Stopped Export All Search BackFigure 13.2 Log Search Interface
2. Enter the Export interface.
Task 1: Export All Logs
Click Export All to enter the Export interface, and all the system logs will be exported to the backup device.
Task 2: Export Specified Logs
Steps:
1) Specify the search conditions, including the Start Time, End Time, Major Type and Minor Type.
2) Click Search to search the log files. The matched log files will be displayed on the list.
Click the icon for double-click the item, and you can view the detailed information of the corresponding log.
Click the icon and you can view the related video files if available.

Up to 2000 log files can be displayed each time.
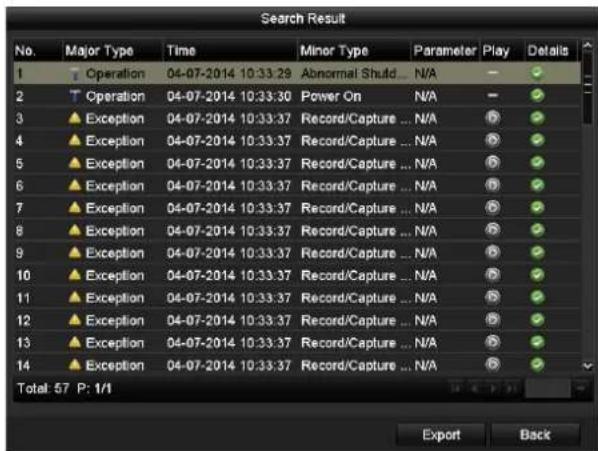
text_image
Search Result No. Major Type Time Minor Type Parameter Play Details 1 Operation 04-07-2014 10:33:29 Abnormal Shuld... N/A 2 Operation 04-07-2014 10:33:30 Power On N/A 3 Exception 04-07-2014 10:33:37 Record/Capture ... N/A 4 Exception 04-07-2014 10:33:37 Record/Capture ... N/A 5 Exception 04-07-2014 10:33:37 Record/Capture ... N/A 6 Exception 04-07-2014 10:33:37 Record/Capture ... N/A 7 Exception 04-07-2014 10:33:37 Record/Capture ... N/A 8 Exception 04-07-2014 10:33:37 Record/Capture ... N/A 9 Exception 04-07-2014 10:33:37 Record/Capture ... N/A 10 Exception 04-07-2014 10:33:37 Record/Capture ... N/A 11 Exception 04-07-2014 10:33:37 Record/Capture ... N/A 12 Exception 04-07-2014 10:33:37 Record/Capture ... N/A 13 Exception 04-07-2014 10:33:37 Record/Capture ... N/A 14 Exception 04-07-2014 10:33:37 Record/Capture ... N/A Total: 57 P: 1/1 Export BackFigure 13. 3 Log Search Results
3) Click Export to enter the Export interface, and the matched logs will be exported to the backup device.
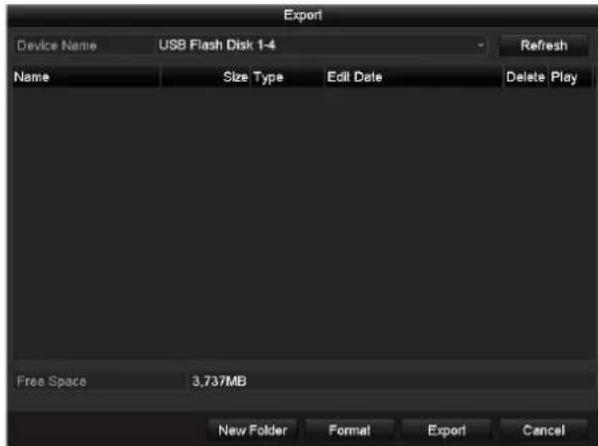
text_image
Export Device Name USB Flash Disk 1-4 Refresh Name Size Type Edit Date Delete Play Free Space 3.737MB New Folder Format Export CancelFigure 13.4 Export interface
- Select the backup device from the drop-down list.
- Click the button Export on the Export interface to export the system logs to the selected backup device.

The log files exported to the backup device are named by exporting time, e.g., 20140704143907logBack.txt.
13.3 Importing/Exporting Configuration Files
Purpose:
The configuration files of the device can be exported to local device for backup; and the configuration files of one device can be imported to multiple devices if they are to be configured with the same parameters.
Steps:
- Enter the Import/Export Configuration File interface.
Menu > Maintenance > Import/Export
- Select the backup device from the drop-down list.
- Click Export to export configuration files of the device to the selected backup device.
- To import the configuration file, select the file from the selected backup device and click Import.
After the import process is completed, the device will automatically reboot to activate the new settings.
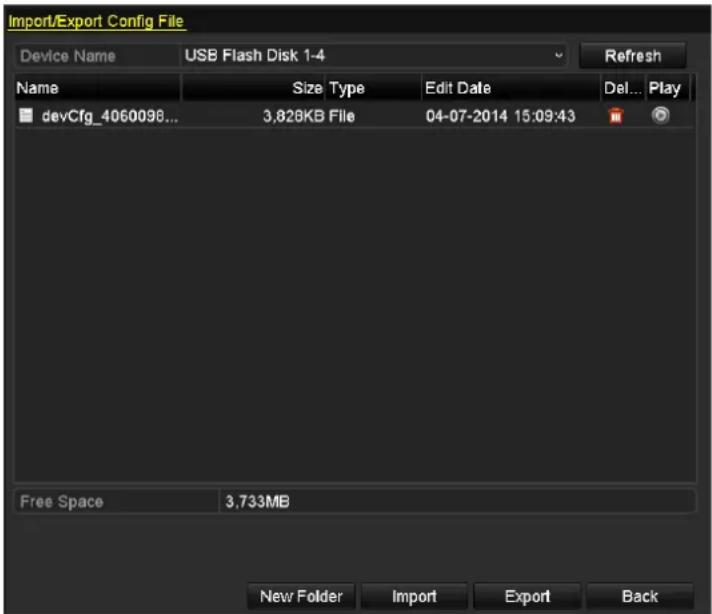
text_image
Import/Export Config File Device Name USB Flash Disk 1-4 Refresh Name Size Type Edit Date Del... Play devCfg_4060098... 3,828KB File 04-07-2014 15:09:43 Free Space 3,733MB New Folder Import Export BackFigure 13.5 Import/Export Config File
13.4 Upgrading System
Purpose:
The firmware on your device can be upgraded by local backup device or remote FTP server.
13.4.1 Upgrading by Local Backup Device
Steps:
- Connect your device with a local backup device where the update firmware file is located.
- Enter the Upgrade interface.
Menu > Maintenance > Upgrade - Click the Local Upgrade tab to enter the local upgrade menu.
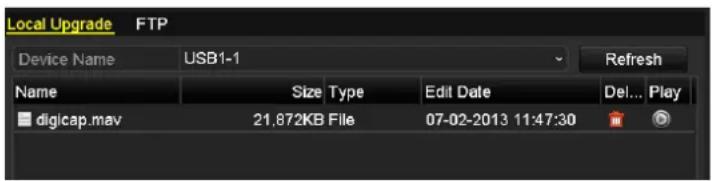
text_image
Local Upgrade FTP Device Name USB1-1 Refresh Name Size Type Edit Date Del... Play digicap.mav 21,872KB File 07-02-2013 11:47:30Figure 13.6 Local Upgrade Interface
- Select the update file from the backup device.
- Click Upgrade to start upgrading.
- After the upgrading is complete, reboot the device to activate the new firmware.
13.4.2 Upgrading by FTP
Before you start:
Configure PC (running FTP server) and device to the same Local Area Network. Run the 3^rd -party TFTP software on the PC and copy the firmware into the root directory of TFTP.
Steps:
- Enter the Upgrade interface.
Menu > Maintenance > Upgrade - Click the FTP tab to enter the local upgrade interface.
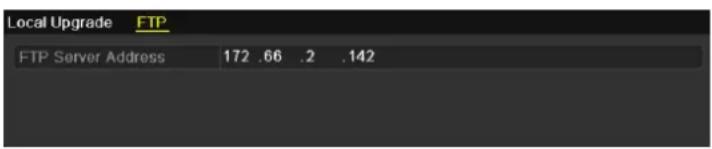
text_image
Local Upgrade FTP FTP Server Address 172 .66 .2 .142Figure 13.7 FTP Upgrade Interface
- Enter the FTP Server Address in the text field.
- Click Upgrade to start upgrading.
- After the upgrading is complete, reboot the device to activate the new firmware.
13.5 Restoring Default Settings
Steps:
- Enter the Default interface.
Menu > Maintenance > Default
- Click OK to restore the default settings.

Except the network parameters (including IP address, subnet mask, gateway, MTU, NIC working mode, default route and server port), all other parameters of the device will be restored to factory default settings.
Chapter 14 Others
14.1 Configuring RS-232 Serial Port
Purpose:
The RS-232 port can be used in two ways:
Parameters Configuration: Connect a PC to the device through the PC serial port. Device parameters can be configured by using software such as HyperTerminal. The serial port parameters must be the same as the device's when connecting with the PC serial port.
Transparent Channel: Connect a serial device directly to the device. The serial device will be controlled remotely by the PC through the network.

RS-232 serial port is not available for DS-7200HWI-SV series.
Steps:
- Enter the RS-232 Settings interface.
Menu > Configuration > RS-232
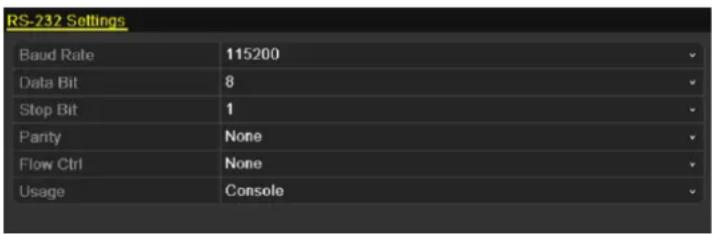
text_image
RS-232 Settings Baud Rate 115200 Data Bit 8 Stop Bit 1 Parity None Flow Ctrl None Usage ConsoleFigure 14.1 RS-232 Settings Interface
- Configure RS-232 parameters, including baud rate, data bit, stop bit, parity, flow control and usage.
- Click Apply to save the settings.
14.2 Configuring General Settings
Purpose:
You can configure the BNC output standard, VGA output resolution, mouse pointer speed, etc.
Steps:
- Enter the General Settings interface.
Menu > Configuration > General
- Select the General tab.
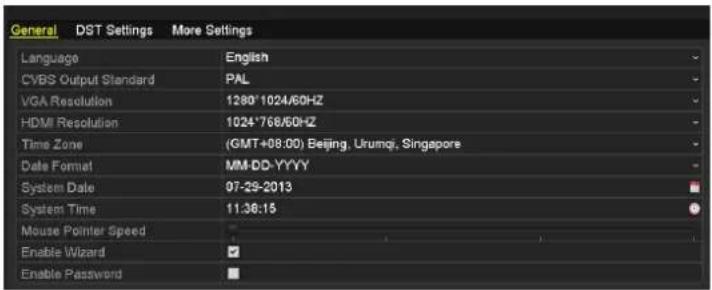
text_image
General DST Settings More Settings Language English CVBS Output Standard PAL VGA Resolution 1280*1024/60HZ HDMI Resolution 1024*768/60HZ Time Zone (GMT+08:00) Beijing, Urumqi, Singapore Date Format MM-DD-YYYY System Date 97-29-2013 System Time 11:36:15 Mouse Pointer Speed Enable Wizard ✓ Enable Password ■Figure 14.2 General Settings Interface When HDMI/VGA Simultaneous Output Disabled
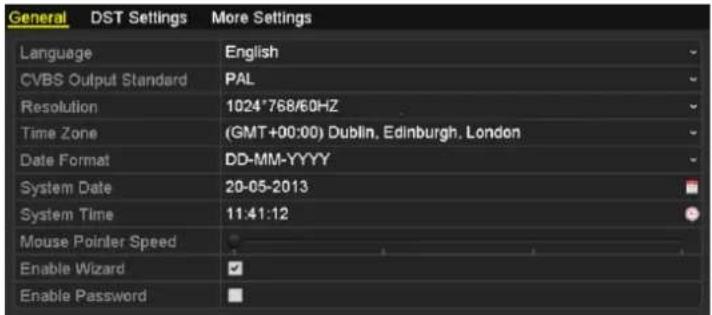
text_image
General DST Settings More Settings Language English CVBS Output Standard PAL Resolution 1024*768/60HZ Time Zone (GMT+00:00) Dublin, Edinburgh, London Date Format DD-MM-YYYY System Date 20-05-2013 System Time 11:41:12 Mouse Pointer Speed Enable Wizard ✓ Enable Password ■Figure 14.3 General Settings Interface When HDMI/VGA Simultaneous Output Enabled
- Configure the following settings:
• Language: The default language used is English.
- CVBS Output Standard: Select the CVBS output standard to NTSC or PAL, which must be the same with the video input standard.
- VGA Resolution: Select the VGA output resolution, which must be the same with the resolution of the monitor screen.
- HDMI Resolution: Select the HDMI resolution, which must be the same with the resolution of the monitor screen.
- Resolution: Select the resolution for the VGA and HDMI output, which must be the same with the resolution of the monitor screen.

When HDMI/VGA Simultaneous Output is disabled (Menu >Configuration >More Settings), individual operation and settings can be achieved on VGA output and HDMI output.
• Time Zone: Select the time zone.
- Date Format: Select the date format.
• System Date: Select the system date.
• System Time: Select the system time.
- Mouse Pointer Speed: Set the speed of mouse pointer; 4 levels are configurable.
- Enable Wizard: Enable/disable the Wizard when the device starts up.
- Enable Password: Enable/disable the use of the login password.
- Click Apply to save the settings.
14.3 Configuring DST Settings
Steps:
-
Enter the General Settings interface.
Menu >Configuration>General -
Choose DST Settings tab.
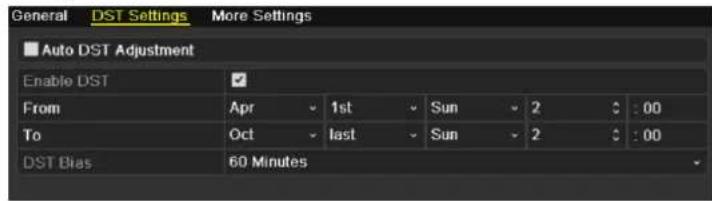
text_image
General DST Settings More Settings ■ Auto DST Adjustment Enable DST ✓ From Apr 1st Sun 2 : 00 To Oct last Sun 2 : 00 DST Bias 60 MinutesFigure 14.4 DST Settings Interface
You can check √ checkbox before the Auto DST Adjustment item.
Or you can manually check the Enable DST checkbox, and then you choose the date of the DST period.
14.4 Configuring More Settings
Steps:
- Enter the General Settings interface.
Menu > Configuration > General
- Click the More Settings tab to enter the More Settings interface.
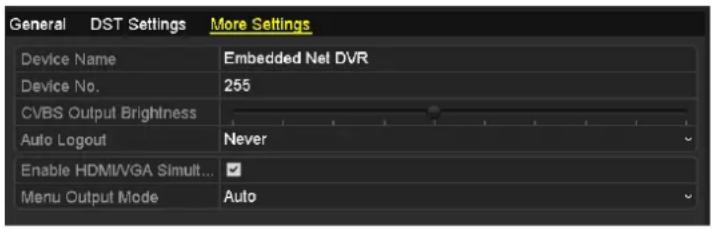
text_image
General DST Settings More Settings Device Name Embedded Net DVR Device No. 255 CVBS Output Brightness Auto Logout Never Enable HDMI/VGA Simult... Menu Output Mode AutoFigure 14.5 More Settings Interface
- Configure the following settings:
• Device Name: Edit the name of device.
- Device No.: Edit the serial number of device. The Device No. can be set in the range of 1\~255, and the default No. is 255.
• CVBS Output Brightness: Adjust the video output brightness.
- Auto Logout: Set timeout time for menu inactivity. E.g., when the time is set to 5 Minutes, then the system will exit from the current operation menu to live view screen after 5 minutes of menu inactivity.
- Enable HDMI/VGA Simultaneous Output: The operation and settings on VGA output and HDMI output cannot be achieved respectively when this function is enabled.

This function is not supported by DS-7200HWI-SV& DS-9200HWI-ST series.
- Menu Output Mode: Set the menu output mode as Auto, HDMI, VGA or Main CVBS. E.g., when VGA is selected and VGA output interface is connected, then the menu will be displayed on VGA monitor.

When HDMI/VGA Simultaneous Output is enabled, Auto, HDMI/VGA and Main CVBS are selectable for Menu Output Mode.
- Click Apply to save the settings.
14.5 Managing User Accounts
Purpose:
There is a default account in the device: Administrator. The Administrator user name is admin and the password is 12345. The Administrator has the permission to add and delete user and configure user parameters.
Steps:
- Enter the User Management interface.
Menu > Configuration > User

text_image
User Management No. User Name Level User's MAC Address Pe... Edit Del... 1 admin Admin 00:00:00:00:00:00 - -Figure 14.6 User Management Interface
- Click Add to enter the Add User interface.
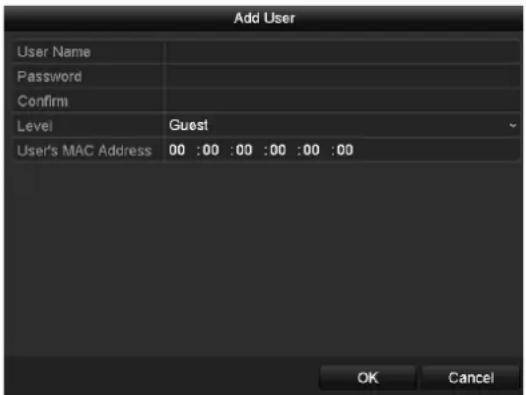
text_image
Add User User Name Password Confirm Level Guest User's MAC Address 00 :00 :00 :00 :00 :00 OK CancelFigure 14.7 Add User Interface
- Enter the information for new user, including User Name, Password, Level and User's MAC Address.
Level: Set the user level to Operator or Guest. Different user levels have different operating permission.
Operator: The Operator user level has permission of Local Log Search in Local Configuration, Remote Log Search and Two-way Audio in Remote Configuration and all operating permission in Camera Configuration.
Guest: The Guest user has permission of Local Log Search in Local Configuration, Remote Log Search in Remote Configuration and only has the local/remote playback in the Camera Configuration.
User's MAC Address: The MAC address of the remote PC which logs onto the device. If it is configured and enabled, it only allows the remote user with this MAC address to access the device.
- Click OK to save the settings. The added user will be displayed in a list on the User Management interface.
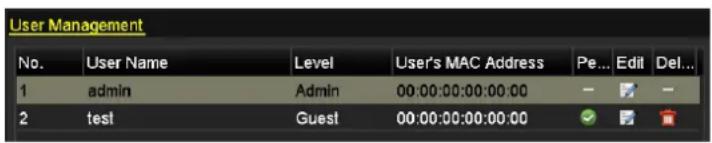
text_image
User Management No. User Name Level User's MAC Address Pe... Edil Del... 1 admin Admin 00:00:00:00:00:00 - - - 2 test Guest 00:00:00:00:00:00Figure 14.8 User List
- You can assign permissions for the added user.
1) Select the user from the list and then click the icon to enter the Permission Settings interface.
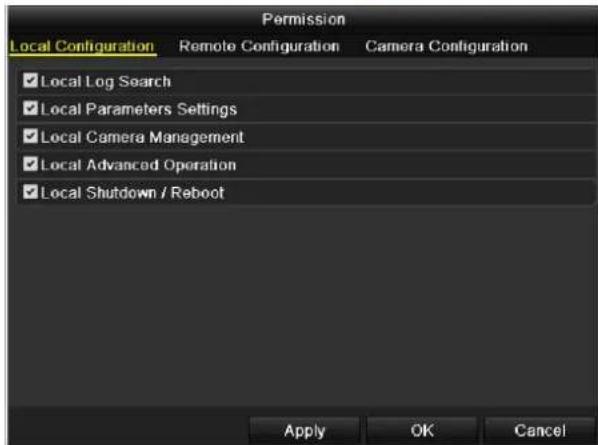
text_image
Permission Local Configuration Remote Configuration Camera Configuration ✓ Local Log Search ✓ Local Parameters Settings ✓ Local Camera Management ✓ Local Advanced Operation ✓ Local Shutdown / Reboot Apply OK CancelFigure 14.9 User Permission Settings Interface
2) Set the operating permission of Local Configuration, Remote Configuration and Camera Configuration for the user.
Local Configuration
- Local Log Search: Searching and viewing logs and system information of device.
- Local Parameters Settings: Configuring parameters, restoring factory default parameters and importing/exporting configuration files.
- Local Camera Management: Enabling and disabling analog camera (s). Adding, deleting and editing of network camera (s). This function is supported by HDVR series.
- Local Advanced Operation: Operating HDD management (initializing HDD, setting HDD property), upgrading system firmware, clearing I/O alarm output.
- Local Shutdown /Reboot: Shutting down or rebooting the device.
Remote Configuration
- Remote Log Search: Remotely viewing logs that are saved on the device.
- Remote Parameters Settings: Remotely configuring parameters, restoring factory default parameters and importing/exporting configuration files.
- Remote Camera Management: Remotely enabling and disabling analog camera (s), and adding, deleting and editing of network camera (s). This function is supported by HDVR series.
- Remote Serial Port Control: Configuring settings for RS-232 and RS-485 ports.
- Remote Video Output Control: Sending remote control panel signal.
- Two-way Audio: Realizing two-way radio between the remote client and the device.
- Remote Alarm Control: Remotely arming (notify alarm and exception message to the remote client) and controlling the alarm output.
- Remote Advanced Operation: Remotely operating HDD management (initializing HDD, setting HDD property), upgrading system firmware, clearing I/O alarm output.
- Remote Shutdown/Reboot: Remotely shutting down or rebooting the device.
Camera Configuration
- Remote Live View: Remotely viewing live video of the selected camera (s).
- Local Manual Operation: Locally starting/stopping manual recording, picture capturing and alarm output of the selected camera (s).
- Remote Manual Operation: Remotely starting/stopping manual recording, picture capturing and alarm output of the selected camera (s).
-
Local Playback: Locally playing back recorded files of the selected camera (s).
-
Remote Playback: Remotely playing back recorded files of the selected camera (s).
- Local PTZ Control: Locally controlling PTZ movement of the selected camera (s).
- Remote PTZ Control: Remotely controlling PTZ movement of the selected camera (s).
- Local Video Export: Locally exporting recorded files of the selected camera (s).

Local Camera Management is supported by HDVR series.
3) Click OK to save the settings and exit.
- To delete the added user, you can select the user from the list and click the corresponding icon
- To edit the added user, you can select the user from the list and click the corresponding icon ☐, and then edit the user information, including user name, password, level and MAC address.


- You cannot delete the admin user and can only change the password of it.
- Only the admin user account has the permission of restoring factory default parameters.
14.6 Logging out / Shutting down / Rebooting
Device
Steps:
- Enter the Shutdown interface.
Menu > Shutdown
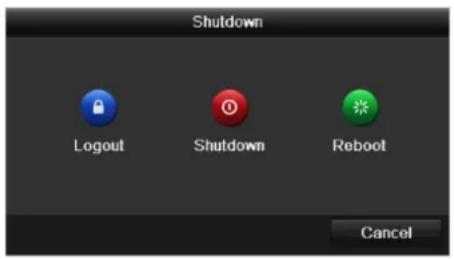
text_image
Shutdown Logout Shutdown Reboot CancelFigure 14. 10 Shutdown Menu
- Click 🔒 to log out, or
Click to shut down the device, or
Click to reboot the device.

After you have logged out the system, menu operation on the screen is invalid. It is required a user name and password to log in to the system.
Chapter 15 Appendix
Glossary
- Dual Stream: Dual stream is a technology used to record high resolution video locally while transmitting a lower resolution stream over the network. The two streams are generated by the device, with the main stream having a maximum resolution of 4CIF and the sub-stream having a maximum resolution of CIF.
- DVR: Acronym for Digital Video Recorder. A DVR is device that is able to accept video signals from analog cameras, compress the signal and store it on its hard drives.
- HDD: Acronym for Hard Disk Drive. A storage medium which stores digitally encoded data on platters with magnetic surfaces.
- DHCP: Dynamic Host Configuration Protocol (DHCP) is a network application protocol used by devices (DHCP clients) to obtain configuration information for operation in an Internet Protocol network.
- HTTP: Acronym for Hypertext Transfer Protocol. A protocol to transfer hypertext request and information between servers and browsers over a network
- PPPoE: PPPoE, Point-to-Point Protocol over Ethernet, is a network protocol for encapsulating Point-to-Point Protocol (PPP) frames inside Ethernet frames. It is used mainly with ADSL services where individual users connect to the ADSL transceiver (modem) over Ethernet and in plain Metro Ethernet networks.
- DDNS: Dynamic DNS is a method, protocol, or network service that provides the capability for a networked device, such as a router or computer system using the Internet Protocol Suite, to notify a domain name server to change, in real time (ad-hoc) the active DNS configuration of its configured hostnames, addresses or other information stored in DNS.
• Hybrid DVR: A hybrid DVR is a combination of a DVR and NVR. - NTP: Acronym for Network Time Protocol. A protocol designed to synchronize the clocks of computers over a network.
- NTSC: Acronym for National Television System Committee. NTSC is an analog television standard used in such countries as the United States and Japan. Each frame of an NTSC signal contains 525 scan lines at 60Hz.
- NVR: Acronym for Network Video Recorder. An NVR can be a PC-based or embedded system used for centralized management and storage for IP cameras, IP Domes and other DVRs.
- PAL: Acronym for Phase Alternating Line. PAL is also another video standard used in broadcast televisions systems in large parts of the world. PAL signal contains 625 scan lines at 50Hz.
- PTZ: Acronym for Pan, Tilt, Zoom. PTZ cameras are motor driven systems that allow the camera to pan left and right, tilt up and down and zoom in and out.
- USB: Acronym for Universal Serial Bus. USB is a plug-and-play serial bus standard to interface devices to a host computer.
Troubleshooting
- No image displayed on the monitor after the device is starting up normally.
Possible Reasons
a) No VGA or HDMI connections.
b) Connection cable is damaged.
c) Input mode of the monitor is incorrect.
Steps
- Verify the device is connected with the monitor via HDMI or VGA cable.
If not, please connect the device with the monitor and reboot. - Verify the connection cable is good.
If there is still no image display on the monitor after rebooting, please check if the connection cable is good, and change a cable to connect again. - Verify Input mode of the monitor is correct.
Please check the input mode of the monitor matches with the output mode of the device (e.g. if the output mode of DVR is HDMI output, then the input mode of monitor must be the HDMI input). And if not, please modify the input mode of monitor. - Check if the fault is solved by the step 1 to step 3.
If it is solved, finish the process.
If not, please contact the engineer from our company to do the further process.
- There is an audible warning sound "Di-Di-Di-Didi" after a new bought device starts up.
Possible Reasons
a) No HDD is installed in the device.
b) The installed HDD has not been initialized.
c) The installed HDD is not compatible with the device or is broken-down.
Steps
- Verify at least one HDD is installed in the device.
1) If not, please install the compatible HDD.

Please refer to the "Quick Operation Guide" for the HDD installation steps.
2) If you don't want to install a HDD, select "Menu>Configuration > Exceptions", and uncheck the Audible Warning checkbox of "HDD Error".
- Verify the HDD is initialized.
1) Select "Menu>HDD>General".
2) If the status of the HDD is “Uninitialized”, please check the checkbox of corresponding HDD and click the “Init” button.
- Verify the HDD is detected or is in good condition.
1) Select "Menu>HDD>General".
2) If the HDD is not detected or the status is "Abnormal", please replace the dedicated HDD according to the requirement.
- Check if the fault is solved by the step 1 to step 3.
1) If it is solved, finish the process.
2) If not, please contact the engineer from our company to do the further process.
- The status of the added IPC displays as “Disconnected” when it is connected through the protocol of our company. Select “Menu>Camera>Camera>IP Camera” to get the camera status.
Possible Reasons
a) Network failure, and the DVR and IPC lost connections.
b) The configured parameters are incorrect when adding the IPC.
c) Insufficient bandwidth.
Steps
- Verify the network is connected.
1) Connect the HDVR and PC with the RS-232 cable.
2) Open the Super Terminal software, and execute the ping command. Input "ping IP" (e.g. ping 172.6.22.131).

Simultaneously press Ctrl and C to exit the ping command.
If there exists return information and the time value is little, the network is normal.
- Verify the configuration parameters are correct.
1) Select "Menu>Camera>Camera>IP Camera".
2) Verify the following parameters are the same with those of the connected IP devices, including IP address, protocol, management port, user name and password.
- Verify the whether the bandwidth is enough.
1) Select "Menu >Maintenance >Net Detect >Network Stat.".
2) Check the usage of the access bandwidth, and see if the total bandwidth has reached its limit.
- Check if the fault is solved by the step 1 to step 3.
If it is solved, finish the process.
If not, please contact the engineer from our company to do the further process.
- The IPC frequently goes online and offline and the status of it displays as “Disconnected”.
Possible Reasons
a) The IPC and the HDVR versions are not compatible.
b) Unstable power supply of IPC.
c) Unstable network between IPC and HDVR.
d) Limited flow by the switch connected with IPC and HDVR.
Steps
- Verify the IPC and the HDVR versions are compatible.
1) Enter the IPC Management interface "Menu > Camera > Camera>IP Camera", and view the firmware version of connected IPC.
2) Enter the System Info interface "Menu>Maintenance>System Info>Device Info", and view the firmware version of HDVR.
- Verify power supply of IPC is stable.
1) Verify the power indicator is normal.
2) When the IPC is offline, please try the ping command on PC to check if the PC connects with the IPC.
- Verify the network between IPC and HDVR is stable.
1) When the IPC is offline, connect PC and HDVR with the RS-232 cable.
2) Open the Super Terminal, use the ping command and keep sending large data packages to the connected IPC, and check if there exists packet loss.

Simultaneously press Ctrl and C to exit the ping command.
Example: Input ping 172.6.22.131 -l 1472 -f.
- Verify the switch is not flow control.
Check the brand, model of the switch connecting IPC and HDVR, and contact with the manufacturer of the switch to check if it has the function of flow control. If so, please turn it down.
- Check if the fault is solved by the step 1 to step 4.
If it is solved, finish the process.
If not, please contact the engineer from our company to do the further process.
- When there is no monitor connected to the HDVR and you add the IPC via web browser, the IPC status shows as Connected; and then you connect the HDVR with the monitor via VGA or HDMI interface and reboot the device, there is black screen with the mouse cursor.
Connect the HDVR with the monitor before startup via VGA or HDMI interface, and manage the IPC to connect with the device locally or remotely, the status of IPC displays as Connected. And then connect the device with the CVBS, and there is black screen either.
Possible Reasons:
After connecting the IPC to the HDVR, the image is output via the main spot interface by default.
Steps:
- Enable the output channel.
- Select "Menu > Configuration > Live View > View", and select video output interface in the drop-down list and configure the window you want to view.

● The view settings can only be configured by the local operation of HDVR.
- Different camera orders and window-division modes can be set for different output interfaces separately, and digits like “D1” and “D2” stands for the channel number, and “X” means the selected window has no image output.
3. Check if the fault is solved by the above steps.
If it is solved, finish the process.
If not, please contact the engineer from our company to do the further process.
● Live view stuck when video outputs locally.
Possible Reasons:
a) Poor network between device and IPC, and there exists packet loss during the transmission.
b) The frame rate has not reached the real-time frame rate.
Steps:
- Verify the network between device and IPC is connected.
1) When image is stuck, connect the RS-232 ports on PC and the rear panel of device with the RS-232 cable.
2) Open the Super Terminal, and execute the command of "ping 192.168.0.0 -1 1472 -f" (the IP address may change according to the real condition), and check if there exists packet loss.

Simultaneously press Ctrl and C to exit the ping command.
- Check the parameters of Main Stream (Continuous) and Main Stream (Event).
Select "Menu > Record > Parameters > Record", and set the resolution of Main Stream (Event) the same as the one of Main Stream (Continuous).
- Verify the frame rate is real-time frame rate.
Select "Menu > Record > Parameters > Record", and set the Frame rate to Full Frame.
- Check if the fault is solved by the above steps.
If it is solved, finish the process.
If not, please contact the engineer from our company to do the further process.
- When using the device to get the live view audio, there is no sound or there is too much noise, or the volume is too low.
Possible Reasons:
a) Cable between the pickup and camera is not connected well; impedance mismatches or incompatible.
b) The stream type is not set as "Video & Audio".
c) The encoding standard is not supported with device.
Steps:
- Verify the cable between the pickup and camera is connected well; impedance matches and compatible.
- Verify the setting parameters are correct.
Select "Menu > Record > Parameters > Record", and set the Stream Type as "Audio & Video".
- Verify the audio encoding standard of the camera is supported by the HDVR.
HDVR supports G722.1 and G711 standards, and if the encoding parameter of the input audio is not one of the previous two standards, you can log in the IPC to configure it to the supported standard.
- Check if the fault is solved by the above steps.
If it is solved, finish the process.
If not, please contact the engineer from our company to do the further process.
● The image gets stuck when HDVR is playing back by single or multi-channel IPC.
Possible Reasons:
a) Poor network between HDVR and IPC, and there exists packet loss during the transmission.
b) The frame rate is not the real-time frame rate.
c) The HDVR supports up to 16-channel synchronize playback at the resolution of 4CIF, if you want a 16-channel synchronize playback at the resolution of 720p, the frame extracting may occur, which leads to a slight stuck.
Steps:
- Verify the network between HDVR and IPC is connected.
1) When image is stuck, connect the RS-232 ports on PC and the rear panel of HDVR with the RS-232 cable.
2) Open the Super Terminal, and execute the command of "ping 192.168.0.0 -l 1472 -f" (the IP address may change according to the real condition), and check if there exists packet loss.

Simultaneously press the Ctrl and C to exit the ping command.
- Verify the frame rate is real-time frame rate.
Select "Menu > Record > Parameters > Record", and set the Frame Rate to "Full Frame".
- Verify the hardware can afford the playback.
Reduce the channel number of playback.
Select "Menu > Record > Encoding > Record", and set the resolution and bitrate to a lower level.
- Reduce the number of local playback channel.
Select "Menu > Playback", and uncheck the checkbox of unnecessary channels.
- Check if the fault is solved by the above steps.
If it is solved, finish the process.
If not, please contact the engineer from our company to do the further process.
- No record file found in the device local HDD, and the prompt "No record file found" pops up when you search the record files.
Possible Reasons:
a) The time setting of system is incorrect.
b) The search condition is incorrect.
c) The HDD is error or not detected.
Steps:
-
Verify the system time setting is correct. Select "Menu > Configuration > General > General", and verify the "Device Time" is correct.
-
Verify the search condition is correct. Select "Playback", and verify the channel and time are correct.
-
Verify the HDD status is normal. Select "Menu > HDD > General" to view the HDD status, and verify the HDD is detected and can be read and written normally.
-
Check if the fault is solved by the above steps. If it is solved, finish the process. If not, please contact the engineer from our company to do the further process.
Summary of Changes
Version 3.1.3
Added
- Support VCA recording / capture schedule settings. (Chapter 5.5)
Updated
- Optimize the event playback (Chapter 6.1.2)
- Optimize the frame-extracting playback. (Chapter 6.1.7)
- Optimize the VCA settings. (Chapter 8.5)
- Optimize the frame-extracting record. (Chapter 11.6)
- Optimize the Enable HDMI/VGA Simultaneous Output function (Chapter 14.4)
Version 3.1.2
Added
- Support connection to more models of IP camera from third-party manufactures. (List of Compatible IP Cameras)
Updated
- Optimize the right-click menu, adding PTZ control option. (Chapter 3.2.2, Chapter 3.2.3, Chapter 6.1.1)
- Optimize the PTZ settings interface and PTZ control panel. (Chapter 4)
- Optimize the smart playback interface, adding smart settings function. (Chapter 6.1.5)
- Optimize the outgoing bandwidth after the high-speed download enabled. (Chapter 9.2.12)
Deleted
- Combine smart search function with smart playback, deleting original smart search section.(Chapter 6.2.2)
Version 3.1.0
Added
- Support smart IP camera connection, VCA alarm and VCA triggered recording. (Chapter 5.2; Chapter 8.3)
- Support transfer protocol settings when adding/editing IP cameras. (Chapter 2.2)
- Support viewing the real-time frame rate, bitrate, and resolution of added IP camera on the live view interface. (Chapter 3.2.4)
- Support volume adjusting of live view, playback and two-way audio. (Chapter 3.3)
- Support camera order adjusting on the live view interface. (Chapter 3.3)
- Support two-way audio record. (Chapter 5.1)
- Support locking record file when playback. (Chapter 5.9.1)
- Support marking of normal recording and event recording on the playback process bar. (Chapter 6.1)
- Support marking of normal recording and event recording on the calendar when playback. (Chapter 6.1.2)
- Support thumbnail display on the process bar when playback. (Chapter 6.1.1; Chapter 6.1.2)
- Support volume adjusting of selected camera when playback. (Chapter 6.1.1\~Chapter 6.1.4)
-
Support searching and playing back of record files triggered by VCA alarm. (Chapter 6.1.3)
-
Support smart playback of VCA event in 16-time speed. (Chapter 6.1.5)
- Support smart search of VCA event on the specified area. (Chapter 6.2.2)
- Support marking record files of multiple channels in two lines when synchronous playback. (Chapter 6.2.4)
- Support capturing and exporting pictures when playback. (Chapter 7.2)
- Support remote virtual host and telnet function. (Chapter 9.2.14; Chapter 9.2.15)
- Support the disk clone function. (Chapter 11.7)
Updated
- Optimize the layout of soft keyboard. (Chapter 1.4)
- Optimize the control panel of PTZ, adding the configuration shortcut button on the panel. (Chapter 4.3)
List of Compatible IP Cameras
List of Hikvision IP Cameras

For the list, our company holds right to interpret.
| Type | Model | Version | Max. Resolution | Sub-stream | Audio |
| SD Network Camera | DS-2CD7133F-E | V5.1.0 build 131202 | 640*480 | √ | × |
| DS-2CD793NFWD-EI | V5.1.0 build 131202 | 704*576 | √ | √ | |
| DS-2CD802NF | V2.0 build 090522 | 704*576 | √ | √ | |
| V2.0 build 090715 | |||||
| V2.0 build 110301 | |||||
| DS-2CD833F-E | V5.1.0 build 131202 | 640*480 | √ | √ | |
| DS-2CD893PF-E | V5.1.0 build 131202 | 704*576 | √ | √ | |
| HD Network Camera | DS-2CD2012-I | V5.1.6 build 140412 | 1280*960 | √ | × |
| DS-2CD2132-I | V5.1.6 build 140412 | 2048*1536 | √ | × | |
| DS-2CD2410FD-I(W) | V5.1.7 build 140528 | 1280*720 | √ | √ | |
| DS-2CD2612F-I | V5.1.6 build 140412 | 1280*960 | √ | × | |
| DS-2CD2612F-IS | V5.1.6 build 140412 | 1280*960 | √ | √ | |
| DS-2CD2632F-I | V5.1.6 build 140412 | 2048*1536 | √ | × | |
| DS-2CD2632F-IS | V5.1.6 build 140412 | 2048*1536 | √ | √ | |
| DS-2CD2710F-I | V5.1.7 build 140527 | 1280*960 | √ | × | |
| DS-2CD2720F-I | V5.1.7 build 140527 | 1920*1080 | √ | × | |
| DS-2CD4010F | V5.1.7 build 140528 | 1280*960 | √ | √ | |
| DS-2CD4012F | V5.1.7 build 140527 | 1280*1024 | √ | √ | |
| DS-2CD4026FWD | V5.1.7 build 140527 | 1920*1080 | √ | √ | |
| DS-2CD4026FWD-SDI | V5.1.7 build 140527 | 1920*1080 | √ | √ | |
| DS-2CD4032FWD | V5.1.7 build 140527 | 2048*1536 | √ | √ | |
| DS-2CD4065F | V5.1.6 build 140528 | 3072*2048 | √ | √ | |
| DS-2CD4124F-I(2.8-12mm) | V5.1.7 build 140527 | 1920*1080 | √ | √ | |
| DS-2CD4132FWD-I(2.8-12mm) | V5.1.7 build 140527 | 2048*1532 | √ | √ | |
| DS-2CD4212F-I(2.8-12mm) | V5.1.7 build 140527 | 1280*1024 | √ | × | |
| DS-2CD4212F-IS(2.8-12mm) | V5.1.7 build 140527 | 1280*1024 | √ | √ | |
| DS-2CD4212FWD-I | V5.1.7 build 140527 | 1280*960 | √ | × | |
| DS-2CD4212FWD-IS | V5.1.7 build 140527 | 1280*960 | √ | √ | |
| DS-2CD4224F-I | V5.1.7 build 140527 | 1920*1080 | √ | × | |
| DS-2CD4232FWD-I | V5.1.7 build 140527 | 2048*1536 | √ | × | |
| DS-2CD4232FWD-IS(2.8-12mm) | V5.1.7 build 140527 | 2048*1536 | √ | √ | |
| DS-2CD4312F-I | V5.1.7 build 140527 | 1280*1024 | √ | × | |
| DS-2CD4312FWD-I | V5.1.7 build 140527 | 1280*960 | √ | × | |
| DS-2CD4324F-I | V5.1.7 build 140527 | 1920*1080 | √ | × | |
| DS-2CD4332FHWD-IS | V5.1.7 build 140527 | 2048*1536 | √ | √ | |
| DS-2CD4332FHWD-I | V5.1.7 build 140527 | 2048*1536 | √ | × | |
| DS-2CD4332FWD-I | V5.1.7 build 140527 | 2048*1536 | √ | × | |
| DS-2CD6026FHWD | V5.1.7 build 140527 | 1920*1080 | √ | √ | |
| DS-2CD6213F | V5.1.0 build 131202 | 1280*960 | √ | × | |
| DS-2CD6223F | V5.1.0 build 131202 | 1920*1080 | √ | × | |
| DS-2CD6233F | V5.1.0 build 131202 | 2048*1536 | √ | × | |
| DS-2CD7153-E | V5.1.0 build 131202 | 1600*1200 | √ | × | |
| DS-2CD7164-E | V5.1.0 build 131202 | 1280*720 | √ | × | |
| DS_2CD754F-EI | V5.1.0 build 131202 | 2048*1536 | √ | √ | |
| DS-2CD754FWD-E | V5.1.0 build 131202 | 1920*1080 | √ | √ | |
| DS-2CD754FWD-EIZ | V5.1.0 build 131202 | 2048*1536 | √ | √ | |
| DS_2CD783F-EI | V5.1.0 build 131202 | 2560*1920 | √ | √ | |
| DS-2CD8153F-E | V5.1.0 build 131202 | 1600*1200 | √ | √ | |
| DS-2CD8464F-EI | V5.1.0 build 131202 | 1280*960 | √ | √ | |
| DS-2CD852MF-E | V2.0 build 110614 | 1600*1200 | √ | √ | |
| V2.0 build 110426 | |||||
| V2.0 build 100521 | |||||
| DS-2CD855F-E | V5.1.0 build 131202 | 1920*1080 | √ | √ | |
| DS-2CD862MF-E | V2.0 build 110614 | 1280*960 | √ | √ | |
| V2.0 build 110426 | |||||
| V2.0 build 100521 | |||||
| DS-2CD863PF/NF-E | V5.1.0 build 131202 | 1280*960 | √ | √ | |
| DS-2CD864FWD-E | V5.1.0 build 131202 | 1280*720 | √ | √ | |
| DS-2CD876MF/BF-E | V4.0.3 build120913 | 1600*1200 | √ | √ | |
| DS-2CD877BF | V4.0.3 build120913 | 1920*1080 | √ | √ | |
| DS-2CD886MF-E | V4.0.3 build 120913 | 2560*1920 | √ | √ | |
| DS-2CD9111(B) | V3.7.1 build140417 | 1360*1024 | √ | × | |
| DS-2CD9120-H | V3.7.1 build140417 | 1600*1200 | √ | × | |
| DS-2CD9121 | V3.7.1 build140417 | 1600*1200 | √ | × | |
| iDS-2CD9121 | V3.7.1 build140417 | 1600*1200 | √ | × | |
| DS-2CD9121A | V3.7.1 build140417 | 1600*1200 | √ | × | |
| iDS-2CD9121A | V3.7.1 build140417 | 1600*1200 | √ | × | |
| DS-2CD9122 | V3.7.1 build140417 | 1920*1080 | √ | × | |
| DS-2CD9122-H | V3.7.1 build140417 | 1920*1080 | √ | × | |
| DS-2CD9131 | V3.7.1 build140417 | 2048*1536 | √ | × | |
| iDS-2CD9131 | V3.7.1 build140417 | 2048*1536 | √ | × | |
| DS-2CD9131-K | V3.7.0 build140403 | 2048*1536 | √ | √ | |
| DS-2CD9151A | V3.7.1 build140509 | 2448*2048 | √ | × | |
| iDS-2CD9151A | V3.7.1 build140509 | 2448*2048 | √ | × | |
| iDS-2CD9151A-E | V3.7.0 build140403 | 2448*2048 | √ | × | |
| DS-2CD9152 | V3.7.1 build140417 | 2560*1920 | √ | × | |
| iDS-2CD9152 | V3.7.1 build140417 | 2560*1920 | √ | × | |
| DS-2CD9152-H | V3.7.1 build140417 | 2592*2048 | √ | × | |
| iDS-2CD9152-H | V3.7.1 build140417 | 2592*2048 | √ | × | |
| DS-2CD9152-HK | V3.7.0 build140403 | 2592*2048 | √ | √ | |
| DS-2CD9182-H | V3.7.0 build 140403 | 3296*2472 | √ | × | |
| iDS-2CD9282 | V3.5.0 build130810 | 3296*2472 | √ | × | |
| DS-2CD966(B) | V3.1 build 120423 | 1360*1024 | × | × | |
| DS-2CD966-V(B) | V3.1 build 120423 | 1360*1024 | × | × | |
| DS-2CD976(C) | V3.1 build 120423 | 1600*1200 | × | × | |
| DS-2CD976-V(C) | V3.1 build 120423 | 1600*1200 | × | × | |
| DS-2CD977(C) | V3.1 build 120423 | 1920*1080 | × | × | |
| DS-2CD986A(C) | V3.1 build 120423 | 2448*2048 | × | × | |
| DS-2CD986C (B) | V2.3.6 build 120401 | 2560*1920 | × | × | |
| Network Speed Dome | DS-2DF1-402 | V3.2.0 build 131223 | 704*576 | √ | √ |
| DS-2DF1-518 | V3.2.0 build 131223 | 704*576 | √ | √ | |
| DS-2DE5172-A | V5.1.8 build 140530 | 1280*960 | √ | √ | |
| DS-2DF5274-A | V5.1.8 build 140616 | 1280*960 | √ | √ | |
| DS-2DF5284-A | V5.1.8 build 140530 | 1920*1080 | √ | √ | |
| DS-2DE7174-A/AE/D | V5.1.8 build 140530 | 1280*960 | √ | √ | |
| DS-2DE7186-A/AE | V5.1.8 build 140530 | 1920*1080 | √ | √ | |
| DS-2DF7274-A | V5.1.8 build 140616 | 1280*960 | √ | √ | |
| DS-2DM7274-A | V5.1.8 build 140616 | 1280*960 | √ | √ | |
| DS-2DF7284-A | V5.1.8 build 140530 | 1920*1080 | √ | √ | |
| DS-2ZCN3006 | V5.1.6 build 140409 | 1280*960 | √ | √ | |
| DS-2ZCN3007 | V5.1.6 build 140409 | 1920*1080 | √ | √ | |
| SD Encoder | DS-6501HCI | V1.0.1 build130607 | 352*288 | √ | √ |
| DS-6501HCI-SATA | V1.0.1 build130607 | 352*288 | √ | √ | |
| DS-6501HFI | V1.0.1 build130607 | 704*576 | √ | √ | |
| DS-6501HFI- SATA | V1.0.1 build130607 | 704*576 | √ | √ | |
| DS-6502HCI | V1.0.1 build130607 | 352*288 | √ | √ | |
| DS-6502HCI- SATA | V1.0.1 build130607 | 352*288 | √ | √ | |
| DS-6502HFI | V1.0.1 build130607 | 704*576 | √ | √ | |
| DS-6502HFI- SATA | V1.0.1 build130607 | 704*576 | √ | √ | |
| DS-6504HCI | V1.0.1 build130607 | 352*288 | √ | √ | |
| DS-6504HCI- SATA | V1.0.1 build130607 | 352*288 | √ | √ | |
| DS-6504HFI | V1.0.1 build130607 | 704*576 | √ | √ | |
| DS-6504HFI- SATA | V1.0.1 build130607 | 704*576 | √ | √ | |
| DS-6508HCI | V1.0.1 build130607 | 352*288 | √ | √ | |
| DS-6508HCI- SATA | V1.0.1 build130607 | 352*288 | √ | √ | |
| DS-6508HFI | V1.0.1 build130607 | 704*576 | √ | √ | |
| DS-6508HFI- SATA | V1.0.1 build130607 | 704*576 | √ | √ | |
| DS-6516HCI | V1.0.1 build130607 | 352*288 | √ | √ | |
| DS-6516HCI- SATA | V1.0.1 build130607 | 352*288 | √ | √ | |
| DS-6516HFI | V1.0.1 build130607 | 704*576 | √ | √ | |
| DS-6516HFI- SATA | V1.0.1 build130607 | 704*576 | √ | √ | |
| DS-6601HCI | V1.2.1 build131202 | 352*288 | √ | √ | |
| DS-6602HCI | V1.2.1 build131202 | 352*288 | √ | √ | |
| DS-6604HCI | V1.2.1 build131202 | 352*288 | √ | √ | |
| DS-6601HFI(-SATA) | V1.2.1 build131202 | 704*576 | √ | √ | |
| DS-6602HFI(SATA) | V1.2.1 build131202 | 704*576 | √ | √ | |
| DS-6604HFI(-SATA) | V1.2.1 build131202 | 704*576 | √ | √ | |
| DS-6701HWI | V1.2.0 build140414 | 960*576 | √ | √ | |
| DS-6701HWI-SATA | V1.2.0 build140414 | 960*576 | √ | √ | |
| DS-6704HWI | V1.2.0 build140414 | 960*576 | √ | √ | |
| DS-6704HWI-SATA | V1.2.0 build140414 | 960*576 | √ | √ | |
| DS-6708HWI | V1.2.0 build140414 | 960*576 | √ | √ | |
| DS-6708HWI-SATA | V1.2.0 build140414 | 960*576 | √ | √ | |
| DS-6716HWI | V1.2.0 build140414 | 960*576 | √ | √ | |
| DS-6716HWI-SATA | V1.2.0 build140414 | 960*576 | √ | √ | |
| HDEncoder | DS-6601HFHI | V1.0.4 build130115 | 1920*1080 | √ | √ |
| DS-6601HFHI/L | V1.0.4 build130115 | 1920*1080 | √ | √ |
List of Third-party IP Cameras

ONVIF compatibility refers to the camera can be supported both when it uses the ONVIF protocol and its private protocols. Only ONVIF is supported refers to the camera can only be supported when it uses the ONVIF protocol.
Only AXIS is supported refers to the function can only be supported when it uses the AXIS protocol.
| IP Camera Manufacturer or Protocol | Model | Version | Max. Resolution | Sub-stream | Audio |
| ACTi | ACM3401-09L-X-00227 | A1D-220-V3.13.16-AC | 1208*1024 | × | × |
| TCM4301-10D-X-00083 | A1D-310-V4.12.09-AC | 1208*1024 | × | √ | |
| TCM5311-11D-X-00023 | A1D-310-V4.12.09-AC | 1208*960 | × | √ | |
| Arecont | AV1305 M | 65175 | 1208*1024 | √ | × |
| AV2815 | 65220 | 1920*1080 | √ | × | |
| AV3105M | 65175 | 1920*1080 | √ | × | |
| AV8185DN | 65172 | 1600*1200 | × | × | |
| Axis | M1114 | 5.09.1 | 1024*640 | √ | × |
| M3011(ONVIF compatibility) | 5.21 | 640*480 (704*576) | √(×) | × | |
| M3014(ONVIF compatibility) | 5.21.1 | 1280*800 | √ | × | |
| P1346 | 5.40.9.2 | 2048*1536 | √ | √ | |
| P3301(ONVIF compatibility) | 5.11.2 | 640*480 (768*576) | √ | √(×) | |
| P3304(ONVIF compatibility) | 5.20 | 1280*800 (1440*900) | √ | √(×) | |
| P3343(ONVIF compatibility) | 5.20.1 | 800*600 | √ | √(×) | |
| P3344(ONVIF compatibility) | 5.20.1 | 1280*800 (1440*900) | √ | √(×) | |
| P5532 | 5.15 | 720*576 | √ | × | |
| Q7404 | 5.02 | 720*576 | √ | √ | |
| Bosch | AutoDome Jr 800 HD (ONVIF compatibility) | 39500450 | 1920*1080 | × | √(×) |
| Dinion NBN-921-P (ONVIF compatibility) | 10500453 | 1280*720 | × | √(×) | |
| NBC 265 P (ONVIF compatibility) | 07500452 | 1280*720 | × | √(×) | |
| Brickcom | CB-500Ap(Brickcom-50xA)(ONVIF compatibility) | v3.2.1.3 | 1920*1080 | × | (×) |
| Canon | VB-H410(ONVIF compatibility) | Vcr.+1.0.0 | 1920*1080(1280*960) | × | √ |
| VB-S9000F | Ver. 1.0.0 | 1920*1080 | × | × | |
| VB-S300D | Ver. 1.0.0 | 1920*1080 | × | × | |
| VB-H6100D | Ver. 1.0.0 | 1920*1080 | × | × | |
| VB-H7100F | Vcr. 1.0.0 | 1920*1080 | × | √ | |
| VB-S8000 | Vcr. 1.0.0 | 1920*1080 | × | × | |
| Panasonic | SP306H(ONVIF compatibility) | Application:1.34Image data:1.06 | 1280*960 | (×) | √ |
| SF336H | Application:1.06Image data: 1.06 | 1280*960 | √ | √ | |
| Pelco | D5118(ONVIF compatibility) | 1.8.2-20120327-2.9310-A1.7852 | 1280*960 | √ | × |
| IX30DN-ACFZHB3(ONVIF compatibility) | 1.8.2-20120327-2.9080-A1.7852 | 2048*1536 | √ | × | |
| IXE20DN-AAXVUU2(ONVIF compatibility) | 1.8.2-20120327-2.9081-A1.7852 | 1920*1080 | √ | × | |
| Sanyo | 2300P(with lens) | 2.03-02 (110318-00) | 1920*1080 | × | × |
| 2500P(with lens) | 2.02-02 (110208-00) | 1920*1080 | × | √ | |
| 4600P | 2.03-02 (110315-00) | 1920*1080 | × | √ | |
| SONY | SNC-CH220 | 1.50.00 | 1920*1080 | × | × |
| SNCDH220T(ONVIF only) | 1.50.00 | 2048*1536 | × | × | |
| SNC-EP580(ONVIF compatibility) | 1.53.00 | 1920*1080 | √ | √ | |
| SNC-RH124(ONVIF compatibility) | 1.79.00 | 1280*720 | √ | √ | |
| SUMSUNG | SND-5080(ONVIF compatibility) | 3.10_130416 | 1280*1024 | √ | √ |
| Vivotek | IP7133 | 0203a | 640*480 | × | × |
| FD8134(ONVIF compatibility) | 0107a | 1280*800 | × | × | |
| IP8161(ONVIF compatibility) | 0104a | 1600*1200 | × | (×) | |
| IP8331(ONVIF compatibility) | 0102a | 640*480 | × | × | |
| IP8332(ONVIF compatibility) | 0105b | 1280*800 | × | × | |
| Zavio | D5110 (ONVIF compatibility) | MG.1.6.03P8 | 1280*1024 | (x) | × |
| F3106 (ONVIF compatibility) | M2.1.6.03P8 | 1280*1024 | (x) | √ | |
| F3110 (ONVIF compatibility) | M2.1.6.01 | 1280*720 | (x) | √ | |
| F3206 (ONVIF compatibility) | MG.1.6.02c045 | 1920*1080 | (x) | √ | |
| F531E (ONVIF compatibility) | LM.1.6.18P10 | 640*480 | (x) | √ |
0301031040727

text_image
FirstFirst Choice for Security Professionals