DW12V-AAA-9 - Dishwasher Eurolux - Free user manual and instructions
Find the device manual for free DW12V-AAA-9 Eurolux in PDF.


User questions about DW12V-AAA-9 Eurolux
0 question about this device. Answer the ones you know or ask your own.
Ask a new question about this device
Download the instructions for your Dishwasher in PDF format for free! Find your manual DW12V-AAA-9 - Eurolux and take your electronic device back in hand. On this page are published all the documents necessary for the use of your device. DW12V-AAA-9 by Eurolux.
USER MANUAL DW12V-AAA-9 Eurolux
Getting familiar with your machine 4
- Technical specifications .... 6
- Conformity with the standards and Test data 6
Safety information and Recommendations.... 6
- Recycling 6
- Safety information .... 6
- Recommendations 8
- Items not suitable for dishwashing 8
Installing the machine 8
- Positioning the machine 8
• Water connections 8 - Water inlet hose 9
• Water outlet hose 9 - Electrical connection.... 10
- Prior to using the machine 11
Preparing the machine for use 11
- The importance of water decalcification 11
- Filling with salt 11
- Testing strip.... 12
- Adjusting salt consumption.... 12
- Detergent usage 14
- Filling the detergent compartment.... 14
- Combined detergent.... 14
- Filling with rinse aid and making the setting.... 15
Loading your dishwasher 16
- Top basket.... 16
- Lower basket.... 17
• Alternative basket loads 18
• Standard loading and Test data 19
Programme descriptions 20
- Programme items 20
Switching on the machine and selecting a programme.... 21
- Switching on the machine.... 21
• Programme follow-up 21 - Changing a programme 21
- Changing a programme with resetting 22
- Switching the machine off 22
Maintenance and Cleaning 23
- Filters 23
- Spray arms 24
- Hose filter 24
Failure codes and what to do in case of failure 25
Practical and useful information.... 27
text_image
Technical diagram of a multi-level cleaning machine with numbered components for identification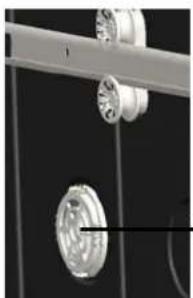
natural_image
Close-up of mechanical components including a wheel and shaft assembly (no visible text or symbols)Drying with fan: This system provides better drying performance for your dishes.
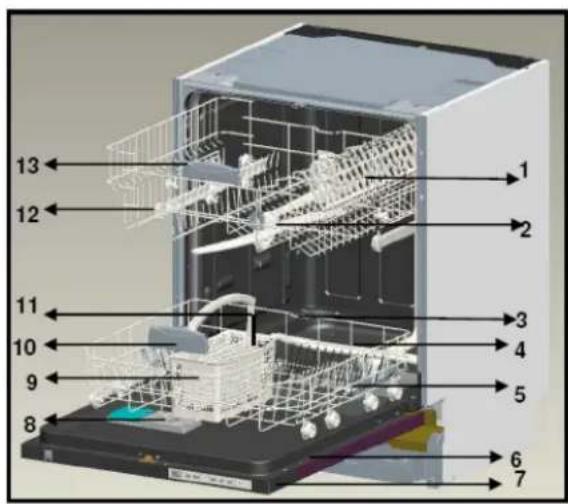
- Upper basket with racks
- Upper spray arm
- Lower basket
- Lower spray arm
- Filters
- Rating plate
- Control Panel
- Detergent and rinse-aid dispenser
- Cutlery basket
- Lower basket handle
- Salt dispenser
12 Upper basket track latch - Top basket handle
GETTING FAMILIAR WITH YOUR MACHINE
1.) Power On/Off Button
When the Power On/Off button is pressed, end of program indicator starts lighting.
2.) Program Display
Program display indicates the times of the programs and the remaining time during the program flow. You can also follow-up the selected programs by this display.
3.) Program selection button
With the program selector button, you can select a suitable program for your dishes.
4.) Delay Timer Button
You can delay the start time of a selected program for 1-2 ....19 hours by pressing the delay timer button of your machine. When you press the delay timer button, delay "1h" appears on the program display. If you continue pressing the delay timer button, 1-2... 19 will be displayed respectively. You can activate the delayed start by selecting the delay time and the desired washing program with the program selection button. It is also possible to select the program first and the delayed start afterwards. If you want to change or cancel the delayed start time, you can adjust it with the delay timer button; it will be activated according to the last value entered.
5.) Tablet Detergent Button (3 in 1 button)
Press tablet detergent button when you use combined detergents that include salt and rinse aid.
6.) Prewash Buton
If you select an extra pre-washing program, you improve washing performance. When you select pre-washing, since it improves washing performance, it changes the temperature and washing time of some programs.
Note: When a program which is not compatible with the pre-wash program is selected, a buzzer sound is heard indicating that the selected program is not compatible with the pre-wash option.
Note : If you will only make pre-washing, select prewash program with program selection button.
7.) 12 Half Load Buton
Using the function 12 , three sorts of washing up can be done those being lower basket, upper basket and both baskets.
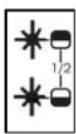
If you have little amount of dishes in your machine and if you have to wash them, you can also activate the semi-filling function in some of the programs additionally. If you have dishes in both baskets, press the key 12 and select the position in which both lamps are highlighted.
If you have dishes only in the upper basket, pres the key 12 and select the position in which the upper lamp is illuminated. Thus, washing up shall be done only on the upper basket of your machine. No dishes should certainly be available in the lower basket while using this feature.
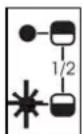
If you have dishes only in the lower basket, press the key 12 and select the position in which the lower lamp is illuminated. Thus, washing up shall be done only on the lower basket of your machine. In using this feature, make sure that there are no dishes in the upper basket.
Note : If you have used an extra feature on the latest washing program, this feature will remain active also on the next washing program. If you do not want to use this feature on the newly selected washing program, press the selected feature button again, and check that the lamp on the button goes off.
Note: When you select an incompatible program with the half load button, a buzzer sound is heard which indicates that the selected option is not compatible.
8.) Salt Lack Warning indicator
In order to see whether softening salt in your machine is sufficient or not, check salt lack warning light on the display. When salt light warning light starts coming on, you need to fill in the salt chamber.
Rinse aid Lack Warning indicator
In order to check that there is sufficient rinse aid in your machine check rinse aid lack warning light on the display. When rinse aid warning light starts coming on, fill in rinse aid chamber.
End of Program Indicator
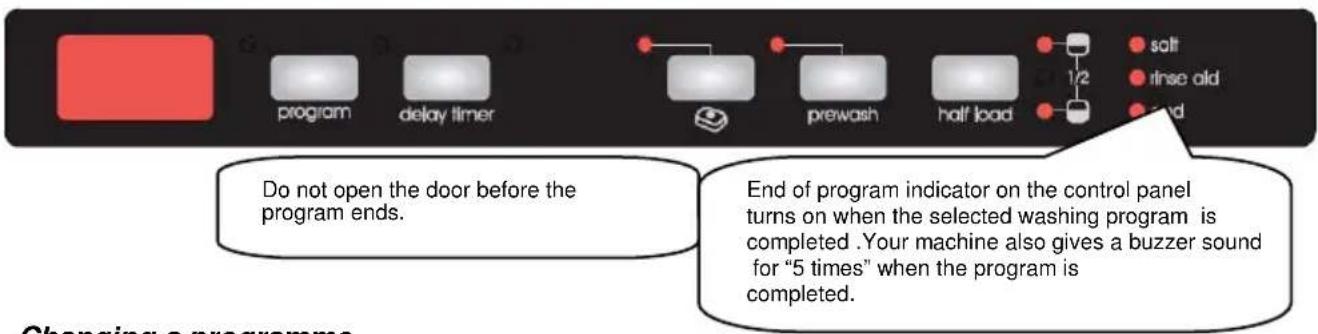
End of program indicator on the control panel turns on when the selected washing program is completed. Your machine also gives a buzzer sound for "5 times" when the program is completed.
Technical specifications
| Capacity | 12 place settings |
| Height | 815 mm – 870 mm |
| Width | 596 mm |
| Depth | 550 mm |
| Net Weight | 38 kg |
| Electricity input | 220-240 V, 50 Hz |
| Total Power | 2200 W |
| Heating Power | 2000 W |
| Pump Power | 100 W |
| Drain Pump Power | 30 W |
| Water supply pressure | 0.03 MPa (0,3 bar) - 1 MPa (10 bar) |
| Current | 10 A |
- Producer company has its right to amend design and technical specifications reserved.
- The machine's service life is 10 years (the duration required to keep spare parts for the machine to fulfil its usage functions).
Conformity with the standards and Test data / EC Declaration of Conformity
All stages related to the machine are executed in accordance with the safety rules provided in all relevant directives of the European Community.
2004/108/EC, 2006/95/EC, IEC 436/DIN 44990, EN 50242
SAFETY INFORMATION AND RECOMMENDATIONS
Recycling
- Certain components and the packaging of your machine have been produced from recyclable materials.
- Plastic parts are marked with international abbreviations:
- Cardboard parts have been produced from recycled paper and they should be disposed of into waste paper collection containers for recycling.
- Such materials are not suitable for being disposed of into garbage bins. They should be delivered to recycling centres instead.
- Contact relevant centres in order to obtain information on methods and points of disposal.
$$ (> \mathrm{PE} < , > \mathrm{PS} < , > \mathrm{POM} < , > \mathrm{PP} < , \dots) $$
Safety Information
When you take delivery of your machine
- Check for any damage to your machine or to its packaging. Never start a machine damaged in any way, make sure to contact an authorised service.
• Unwrap the packaging materials as indicated and dispose of them in accordance with the rules.
The points to pay attention during machine installation
- Choose a suitable, safe and level place to install your machine.
- Carry out the installation and connection of your machine by following the instructions.
- This machine should be installed and repaired by an authorised service only.
-
Only original spare parts should be used with the machine.
-
Before installing, be sure that the machine is unplugged.
- Check whether the indoor electrical fuse system is connected according to the regulations.
- All electrical connections must match the values indicated on the rating plate.
• Pay special attention and be sure that the machine does not stand on the electricity supply cable. - Never use an extension cord or a multiple socket for making a connection. The plug should be comfortably accessible after the machine has been installed.
- Please assemble the dishwasher, which is inserted under or in the kitchen platform, according to the instruction. Be sure that the product is fixed properly.
- After installing the machine to a suitable place, run it unloaded for the first time.
In daily use
- This machine is for household use, do not use it for any other purpose. Commercial usage of the dishwasher will void the guarantee.
- Do not get up, sit or place a load on the open door of the dishwasher, it may fall over.
- Never put into the detergent and rinse aid dispensers of your machine anything other than those detergents and rinse aids which are produced specifically for dishwashers. Our company will not be responsible for any damage that might occur in your machine otherwise.
- The water in the machine's washing section is no drinking water, do not drink it.
- Due to danger of explosion, do not put into the machine's washing section any chemical dissolving agents such as solvents.
- Check whether plastic items are heat-resistant before washing them in the machine.
- Do not put into your machine those items which are not suitable for dishwashing. Also, do not fill any basket above its capacity. Our company will not be responsible for any scratch or rust to form on the inner frame of your machine due to basket movements otherwise.
- Especially because hot water may flow out, the machine door should not be opened under any circumstances while the machine is in operation. In any case, a safety device ensures that the machine stops if the door is opened.
- Do not leave your dishwasher's door open. Failure to do so may lead to accidents.
- Place knives and other sharp-ended objects in the cutlery basket in blade-down position.
- This appliance is not intended for use by persons (including children) with reduced physical, sensory or mental capabilities, or lack of experience and knowledge, unless they have been given supervision or instruction concerning use of the appliance by a person responsible for their safety.
For your children's safety
- After removing the machine's packaging, make sure that the packaging material is out of reach of children.
- Do not allow children to play with or start the machine.
- Keep your children away from detergents and rinse aids.
- Keep children away from the machine while it is open because there may still be residues of cleaning substances inside the machine.
- Be sure that your old machine does not pose any threat to your children. Children are known to have gotten themselves locked in old machines. To forestall such a situation, break your machine's door lock and tear off the electrical cables.
In case of malfunctioning
- Any malfunction in the machine should be repaired definitely by qualified persons. Any repair work performed by anyone other than the authorised service personnel will cause your machine to be left outside the scope of warranty.
- Prior to any repair work on the machine, be sure that the machine is cut off from the mains. Switch off the fuse or unplug the machine. Do not pull by the cable when unplugging. Make sure to turn off the water tap.
Recommendations
- For energy and water saving, remove coarse residues on your dishes before placing the dishes into the machine. Start your machine after having fully loaded it
- Use the pre-wash programme only whenever necessary.
- Place such hollow items as bowls, glasses and pots into the machine in such a way that they will face down.
• You are recommended not to load into your machine any dishes different or more than indicated.
Items not suitable for dishwashing:
• Cigarette ashes, candle leftovers, polish, paint, chemical substances, iron-alloy materials;
- Forks, spoons and knives with wooden or bone, or ivory or nacre-coated handles; glued items, items soiled with abrasive, acidic or base chemicals
- Plastic items that are not heat-resistant, copper or tin-coated containers;
- Aluminium and silver objects (they may discolour, become dull)
- Certain delicate glass types, porcelains with ornamental printed patterns as they fade even after the first wash; certain crystal items as they lose their transparency over time, adhered cutlery that is not heat-resistant, lead crystal glasses, cutting boards, items manufactured with synthetic fibre;
- Absorbent items as sponges or kitchen rags are not suitable for dishwashing.
Warning: Take care to buy dishwasher-proof sets in your future purchases.
INSTALLING THE MACHINE
Positioning the machine
When determining the place to put your machine on, take care to choose a place where you can easily load and unload your dishes.
Do not put your machine in any location where there is the probability for the room temperature to fall below 0^ C.
Before positioning, take the machine out of its packaging by following the warnings located on the package.
Position the machine close to a water tap or drain. You need to site your machine, taking into consideration that its connections will not be altered once they are made.
Do not grip the machine by its door or panel in order to move it.
Take care to leave a certain clearance from all sides of the machine so that you can comfortably move it back and forth during cleaning.
Make sure that the water inlet and outlet hoses do not get squeezed while positioning the machine. Also, make sure that the machine does not stand on the electrical cable.
Adjust the machine's adjustable feet so that it can stand level and balanced. Proper positioning of the machine ensures problem-free opening and closing of its door.
If the door of you machine does not close properly, check if the machine is stable on the floor it stands; if not, adjust the adjustable feet and ensure its stable position.
Water connection
Be sure that the indoor plumbing is suitable for installing a dishwasher. Also, we recommend that you fit a filter at the entrance of your place or apartment so as to avoid any damage to your machine because of any contamination (sand, clay, rust etc.) that might be occasionally carried in through the mains water supply or the indoor plumbing, and to forestall such complaints as yellowing and formation of deposits after washing.
natural_image
Illustration of a hand holding a faucet with a valve, showing a curved arrow indicating rotation (no text or symbols)Water inlet hose
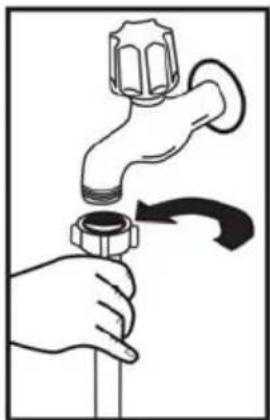
Do not use the water inlet hose of your old machine, if any. Use the new water inlet hose supplied with your machine instead. If you are going to connect a new or long-unused water inlet hose to your machine, run water through it for a while before making the connection. Connect the water inlet hose directly to the water inlet tap. The pressure supplied by the tap should be at a minimum of 0.03 Mpa and and at a maximum of 1 Mpa. If the water pressure is above 1 Mpa, a pressure-relief valve should be fitted inbetween.
After the connections are made, the tap should be turned on fully and checked for water tightness.
after each wash programme is finished.

natural_image
Diagram of a faucet with a valve and a connector, showing no text or symbols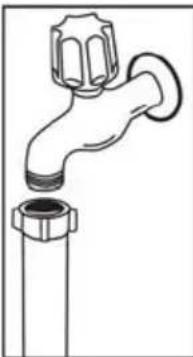
natural_image
Line drawing of a faucet with a flanged handle and a base (no text or symbols)NOTE: Aquastop water spout is used in some models. In case of using Aquastop, a dangerous tension exists. Do not cut Aquastop water spout. Do not let it get folded or twisted.
text_image
max 110cm min 50cm min 4cmWater outlet hose
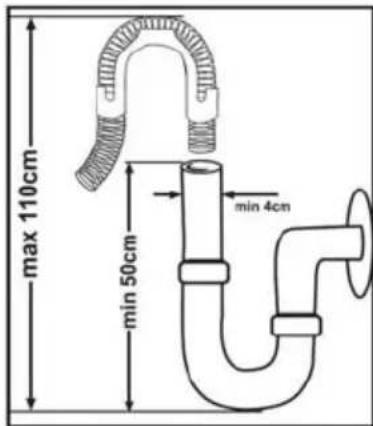
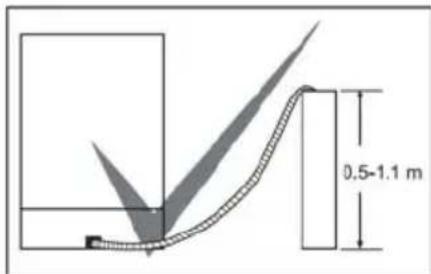
The water drain hose can be connected either directly to the water drain hole or to the sink outlet spigot. Using a special bent pipe (if available), the water can be drained directly into the sink via hooking the bent pipe over the edge of the sink.
This connection should be at a minimum of 50 cm and and at a maximum of 110 cm from the floor plane.
Warning: When a drain hose longer than 4 m is used, the dishes might remain dirty. In that case, our company will not accept responsibility.

text_image
0.5-1.1 m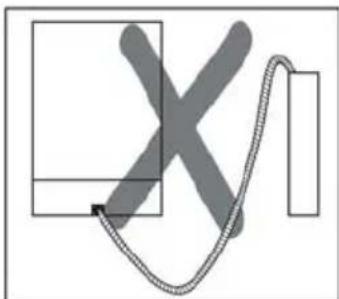
natural_image
Pure electrical circuit lines without any symbolsElectrical connection
The earthed plug of your machine should be connected to an earthed outlet supplied by suitable voltage and current. If there is no earthing installation, have a competent electrician carry out an earthing installation. In case of usage without earthing installed, our company will not be responsible for any loss of usage that might occur.
The indoor fuse current value should be 10-16 A.
Your machine is set according to 220-240 V. If the mains voltage in your location is 110 V, connect a transformer of 110/220 V and 3000 W in between. The machine should not be plugged in during positioning.
Always use the coated plug supplied with your machine.
The machine's electrical cable should be replaced by an authorised service or an authorised electrician only. Failure to do so may lead to accidents.
In order not to cause an electric shock, do not unplug when your hands are wet.
For safety purposes, always make sure to disconnect the plug when a wash programme is finished.
Running in low voltage will cause a decline in washing quality.
When disconnecting your machine from the mains supply, always pull from the plug. Never pull the cord itself.
Prior to using the machine for the first time
- Check whether the electricity and supply water specifications match the values indicated by the installation instructions for the machine.
- Remove all packaging materials inside the machine.
- Set the water softener.
- Add 2 kg salt into the salt compartment and fill with water up to a level at which it will almost overflow.
- Fill the rinse aid compartment.
PREPARING THE MACHINE FOR USE
The importance of water decalcification
For a good washing function, the dishwasher needs soft, i.e. less calcareous water. Otherwise, white lime residues will remain on the dishes and the interior equipment. This will negatively affect your machine's washing, drying and shining performance. When water flows through the softener system, the ions forming the hardness are removed from the water and the water reaches the softness required to obtain the best washing result. Depending on the level of hardness of the inflowing water, these ions that harden the water accumulate rapidly inside the softener system. Therefore, the softener system has to be refreshed so that it operates with the same performance also during the next wash. For this purpose, dishwasher salt is used.
Filling with salt

natural_image
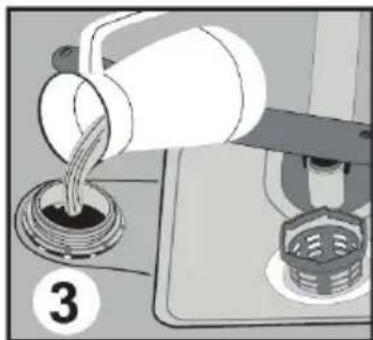
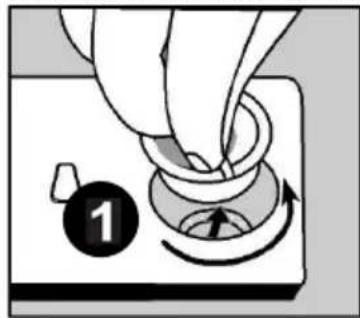
Mechanical assembly diagram showing a lever and base with a gear-like component (no text or symbols)Use softener salt specifically produced for use in dishwashers. To put softener salt, first remove the lower basket and then open the salt compartment cap by turning it counter clockwise.1 At first fill the compartment with 2kg salt and water at overflowing level If available, using the funnel provided will make filling easier. refit the cap and close it. If the salt warning lamp on the control panel becomes on fill the salt compartment with salt again.
Fill the salt compartment with water at first use only.
If you put a tablet into the salt compartment, do not fill the compartment completely. We recommend that you use small-grained or powder softener salt.
Do not put table salt into your
natural_image
Illustration of a coffee maker pouring liquid from a bottle into a container on a stand (no text or symbols)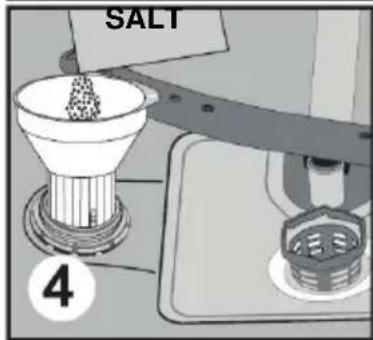
text_image
SALT 4machine. Otherwise, the function of the softener compartment may decrease over time. When you start your dishwasher, the salt compartment gets filled with water. Therefore, put the softener salt prior to starting your machine.
This way, overflowing salt gets immediately cleaned up through the wash operation. If you are not going to wash any dishes immediately after putting salt, then run a short washing program with an empty machine in order to avoid any damage (to prevent corrosion) to your machine due to the salt overflow while filling in the salt container.
Testing strip
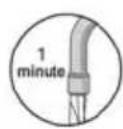
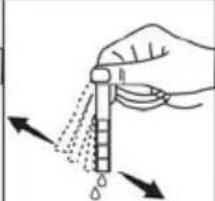
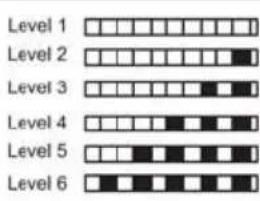
The washing effectiveness of your machine depends on the softness of the tap water. For this reason, your machine is equipped with a system that reduces the hardness in mains water supply. The washing effectiveness will increase when the system is correctly set. To find out the water hardness level of water in your area, contact your local water board or determine water hardness level by using the test strip(if available).
| Open the testing strip. | Run water through your tap for 1 min. | Keep the testing strip in water for 1 sec. | Shake the testing strip after taking it out of water. | Wait for 1 min. | Make your machine's water hardness setting according to the result obtained through the testing strip. |

natural_image
Hand holding a droplet on a vertical tube with arrows indicating force direction (no text or symbols)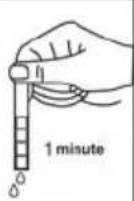
text_image
Level 1 Level 2 Level 3 Level 4 Level 5 Level 6
Adjusting salt consumption
Table of Water Hardness Level Settings
| Water hardness level | German hardness dH | French hardness dF | British hardness dE | Hardness Level Indicator |
| 1 | 0-5 | 0-9 | 0-6 | L1 is seen on display. |
| 2 | 6-11 | 10-20 | 7-14 | L2 is seen on display. |
| 3 | 12-17 | 21-30 | 15-21 | L3 is seen on display. |
| 4 | 18-22 | 31-40 | 22-28 | L4 is seen on display. |
| 5 | 23-31 | 41-55 | 29-39 | L5 is seen on display. |
| 6 | 32-50 | 56-90 | 40-63 | L6 is seen on display. |
If the hardness of the water you use is above 90 dF (French hardness) or if you are using well water; you are recommended to use filter and water refinement devices.
NOTE: Hardness level is adjusted to level 3 as a factory setting.
Adjust the water softener according to how hard your tap water is.

text_image
1 2 3 program powercall full load
After resetting your machine, press the program selection button and keep it pressed down.3
Meanwhile, energise the machine by pressing the Power On/Off button. 1
Keep the program selection button pressed until "SL" disappears from the display.3
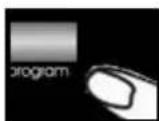
Release the program selection button after "SL" disappears from the display.
Your machine displays the latest entered water hardness setting.
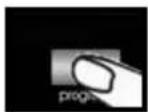
Water hardness can be adjusted by the program selection button. 3 according to Table of Water Hardness Level Settings.
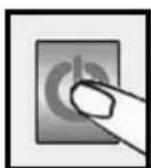
After adjusting the water hardness level, press on/off button to save settings in memory.1
Detergent usage
Use a detergent specifically designed for use in domestic dishwashers.
You can find powder,gel,and tablet detergents in the market that have been designed for household dishwashers.
Detergent should be put into the compartment prior to starting the machine. Keep your detergents in cool, dry places out of reach of your children.
Do not fill detergent into the detergent compartment more than required; otherwise it may cause scratches on your glasses as well as lead to a poorly dissolved detergent.
Should you need more information concerning the detergent you will use, contact detergent manufacturers directly.
Filling the detergent compartment
natural_image
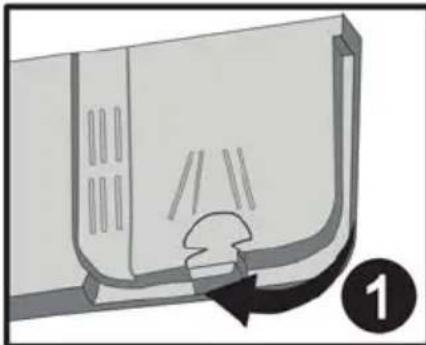
Diagram of a door handle with a curved arrow indicating rotation or movement (no text or symbols)Push the latch to open the detergent container as shown in the image. 1 Detergent pod has level lines inside. It is possible to measure the right detergent amount using these lines.
Detergent pod can take totally 40 cm ^3 detergent.
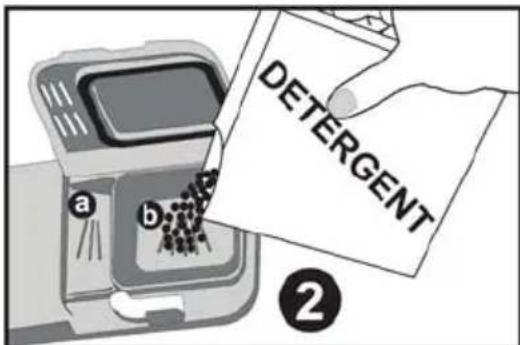
Open the dishwasher detergent and pour into the larger compartment ▪ 25 cm ^3 if your dishes are heavily soiled or 15
cm ^3 if they are less
soiled.2 If your dishes have been kept dirty for a very long time, if there are dried food wastes
on them, and if you have overly loaded the dishwasher, pour 5 cm ^3 detergent into the pre-wash compartment and start your machine.
You may have to add more detergent into your machine, depending on the degree of soil and on the water hardness level in your area.
text_image
DETERGENT a b ②Combined detergent
Detergent manufacturers also produce combined detergents called "2 in 1", "3 in 1" or "5 in 1" etc.
"2 in 1" detergents contain detergent + salt or rinse aid. When using "2 in 1" detergents make sure to check the specifications of the tablet.
Other tablet detergents contain detergent + rinse aid + salt + various extra functions.
Generally, combined detergents produce sufficient results under certain usage conditions only. Such detergents contain rinse aid and/or salt in preset amounts
Points to consider when using this type of products:
- Always make sure to check the specifications of the product you will use or whether or not it is a combined product.
- Check if the detergent used is appropriate for the hardness of mains water that machine is appertaining to.
- Observe the instructions on packagings when using such products.
-
If such detergents are in the form of tablets, never put them into the interior section or the cutlery basket of the dishwasher. Always put the tablets into the detergent compartment in the detergent dispenser.
-
They produce good results for certain types of usage only. If you are using this type of detergents, you need to contact the manufacturers and find out about the suitable conditions of use.
- When the conditions of use of such products and the machine settings are appropriate, they ensure savings in salt and/or rinse aid consumption.
- Contact the detergent manufacturers if you are not obtaining good wash results (if your dishes stay calcareous and wet) after having used 2 in 1 or 3 in 1 detergents. The scope of warranty for your machine does not cover any complaints caused by the use of these types of detergents.
Recommended usage: If you are using a combined detergent, then add rinse agent into your machine, switch the rinse agent settings into its lowest (1) position and active the tablet detergent button in order to obtain better results. If the water hardness level is above level 4, then it is necessary to fill in the salt container with salt. It is not recommended to use combined detergents in fast programs.
Warning: Should any problem, which you have not encountered before, arise with the use of this type of detergents, contact the detergent manufacturers directly.
When you give up using combined detergents
- Fill the salt and rinse aid compartments.
- Adjust the water hardness setting to the highest position and run an empty-wash.
- Adjust the water hardness level.
- Make the suitable rinse aid setting.
Filling with rinse aid and making the setting
Rinse aid is used to prevent the stay of white water drops, lime stains, white film strip-shaped stains that may form on the dishes, as well as to increase the drying performance. Contrary to the popular beliefs, it is used not only for obtaining shinier dishes but also for obtaining sufficiently dried dishes. For this reason, care should be taken that there is adequate amount of rinse aid in the rinse aid compartment and only polishing material produced for use at dishwashers should be used.
natural_image
Hand turning a knob with a circular dial indicator (no text or symbols)If the rinse aid lamp on the control panel becomes on fill the rinse aid compartment with rinse.
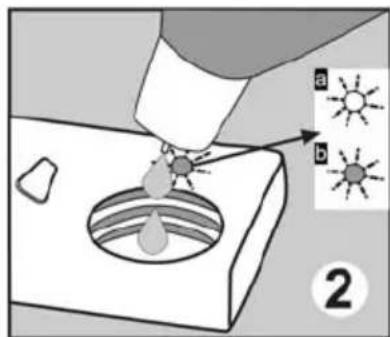
To put rinse aid, remove the rinse aid compartment cap by turning it. Fill the rinse aid compartment with rinse aid until the rinse aid level indicator becomes dark; 2 refit the cap and close it by turning it in a way that the nails will correspond to one another. By checking the rinse aid level indicator on the detergent dispenser, you can understand whether or not your machine needs rinse aid.
text_image
Diagram illustrating a droplet being injected into a container with two labeled parts (a and b) showing sun icons.A dark indicator ^1 means that there is rinse aid in the compartment, while a light indicator ^2 shows that you need to fill the compartment with rinse aid.
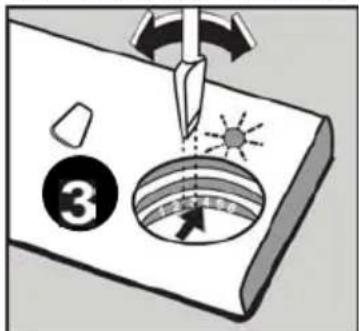
The rinse aid level adjuster can be set to a position between 1 and 6. Factory setting for rinse aid is the position 3. You need to increase the degree of the adjuster if water
stains form on your dishes after a wash, whereas you need to decrease the degree if a blue stain is left when wiped by hand.
text_image
Diagram illustrating a solar-powered tool application with labeled components and directional arrowsWarning: Use only those rinse aid materials which are allowed for use in the machine. As rinse aid residues left as a result of overflowing will create extremely high amounts of foam and thus reduce the washing performance, remove the excess amount of rinse aid by wiping it with a rag.
LOADING YOUR DISHWASHER
If you properly place your dishes into the machine, you will be using it in the best way in terms of energy consumption, washing and drying performance.
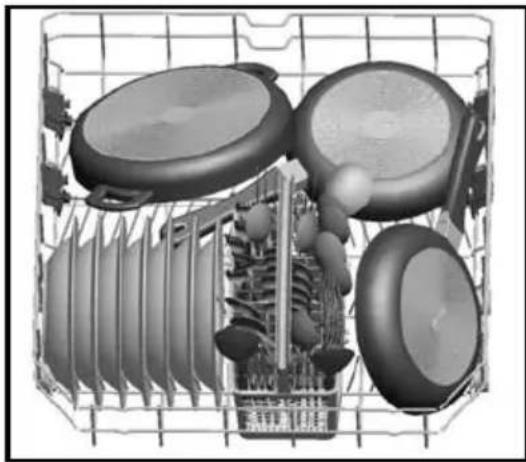
There are two separate baskets for you to load your dishes into your machine. You can load into the lower basket such round and deep items as pots with long handles, pot lids, plates, salad plates, cutlery sets.
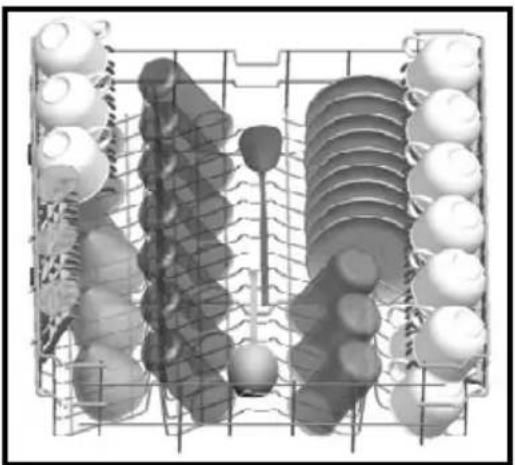
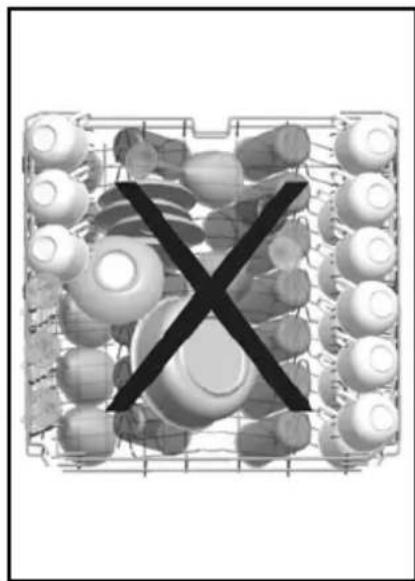
The upper basket has been designed for tea plates, dessert plates, salad bowls, cups and glasses. When placing long-stem glasses and goblets, lean them against the basket edge, rack or glass supporter wire and not against other items. Do not lean long glasses against one another or they cannot remain steady and may receive damage.
It is more appropriate to locate the thin narrow parts into the middle sections of baskets.
You can place spoons among the other cutlery sets in order to prevent them from sticking to one another. You are recommended to use the cutlery grid in order to obtain the best result.
To avoid any possible injuries, always place such long-handle and sharp-pointed dishes as serving fork, bread knife etc. with their sharp points facing down or horizontally on the baskets.
Warning: Place your dishes into your machine in a way that they will not prevent the upper and lower spray arms from spinning.
Top basket
Height Adjustable Rack
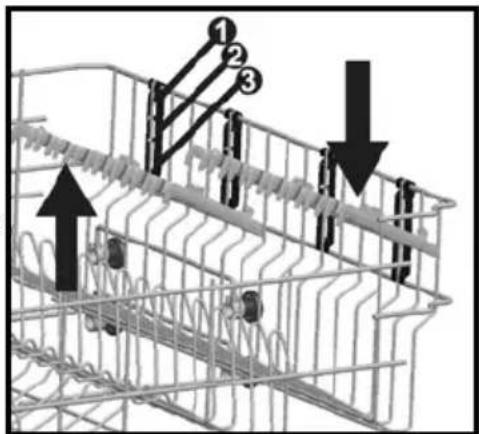
These racks are designed to increase the capacity of the top basket. You can place your glasses and cups on the racks. You can adjust the height of these racks. Thanks to this feature, you can place different sizes of glasses under these racks.
Thanks to height adjustment plastics mounted on the basket, you can use your racks in 3 different heights. In addition, you can place long forks, knives and spoons on these racks laterally, so that they do not block the revolution of propeller.
text_image
Technical diagram showing a wire mesh structure with numbered components and directional arrows indicating assembly or movement.Top basket height adjustment
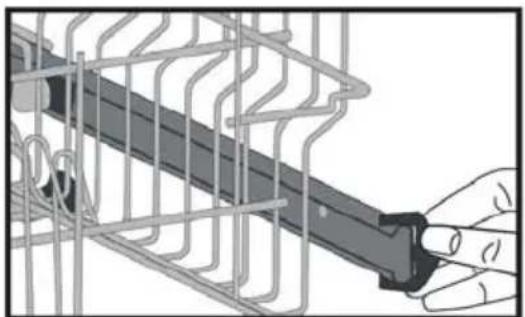
Top basket of your machine is in upper position. When it is in this position, you can place big items such as pans, etc. on lower basket. When you take top basket to lower position, you can place and wash big sized plates on the top basket.
Use wheels in order to change the basket height. Open the basket retaining parts at the end of top basket rails by turning them to the sides, and take the basket out. Change the position of the wheels; reinstall the basket to the rail, and close basket retainer parts. In this way, you take the top basket to lower position.
natural_image
Illustration of a hand holding a mechanical component inside a wire cage (no text or symbols visible)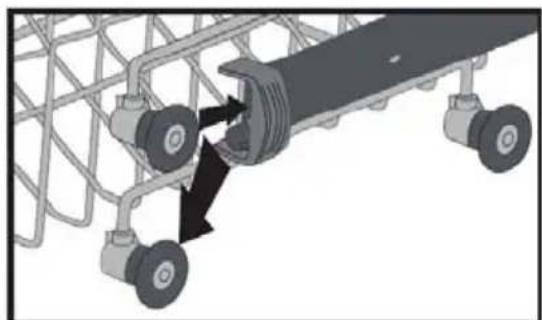
natural_image
Mechanical assembly diagram showing a conveyor belt system with two wheels and directional arrows indicating motion (no text or symbols)Spoon Rack with Goblet clamp
natural_image
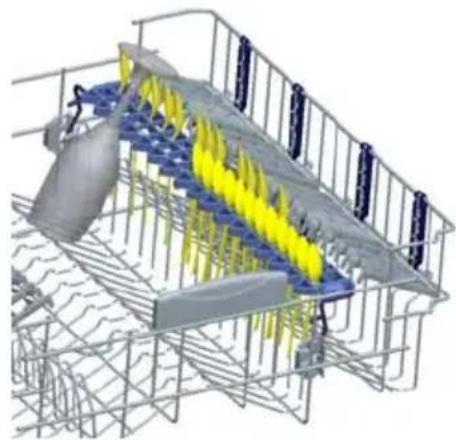
3D wireframe model of a mechanical assembly with yellow and blue components, no visible text or symbolsYou can place your spoons and forks in Spoon Rack and also it enables safe wash of your goblets with long foot and glasses. Do not lean your long glasses on one another, this way they can not remain stable and can be damaged during washing.
To create wide spaces when you do not want to use Spoon rack with goblet clamp, turn to position
natural_image
3D architectural rendering of a water treatment facility with blue structural elements and mesh walls (no text or symbols visible)Lower Basket
Folding Racks
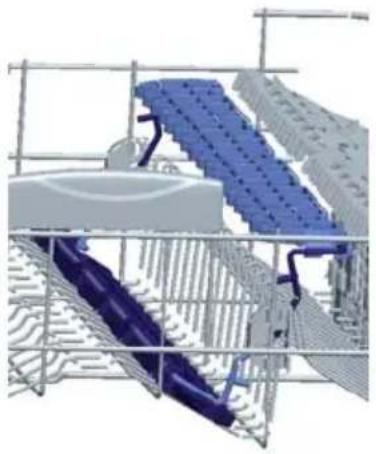
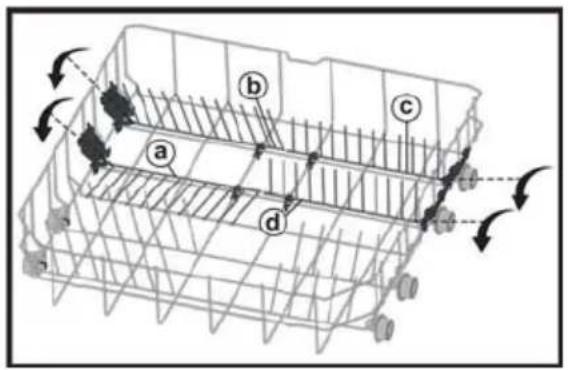
Folding racks consisting of four parts that are located on the lower basket of your machine are designed in order to let you place big items easier such as pots, pans, etc. If requested, each part can be folded separately, or all of them can be folded and larger spaces can be obtained. You can use folding racks by raising them upwards, or by folding.
text_image
Diagram of a multi-layered container with labeled sections (a, b, c, d) and directional arrows indicating flow or movement.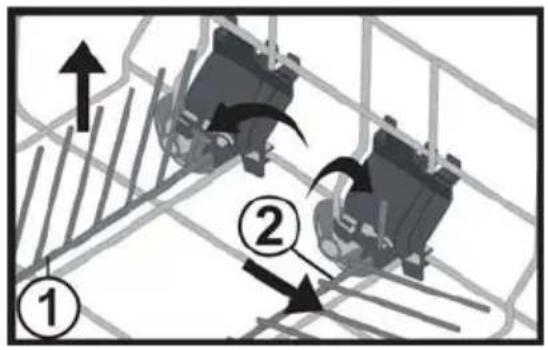
text_image
Diagram showing two mechanical components with numbered annotations and directional arrows, likely illustrating a system or process flow.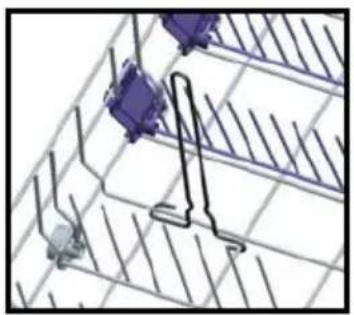
natural_image
3D wireframe diagram of a mechanical assembly with purple components and gray base (no text or symbols)Bottle Rack
Bottle rack is designed to let you wash items with large openings and higher items easier. You can pull out bottle rack in the direction of the arrow as shown on the picture when you do not use it.
Modular Cutlery Basket
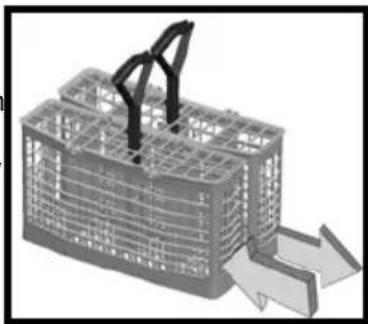
You can separate modular cutlery basket into 2 parts according to the amount of your dirty spoons, forks and knives. You can place that separated parts in different places within the lower basket and upper basket. In order to separate modular cutlery basket, hold it from both sides and move one part forwards, while moving the other part backwards. You can re-assemble modular cutlery basket by performing the same action in reverse order.
natural_image
3D wireframe model of a shopping basket with arrows indicating flow or movement (no text or symbols)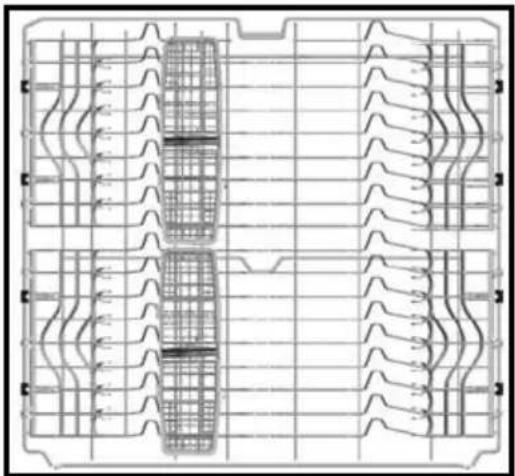
natural_image
Technical line drawing of a mechanical component with grid lines and internal channels (no text or symbols)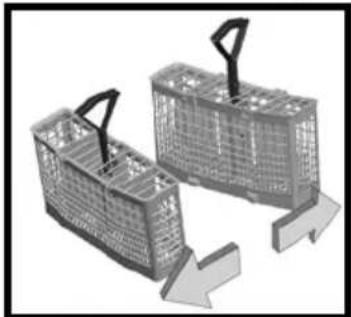
natural_image
Two plastic crates with handles and downward arrows indicating flow or movement (no text or symbols)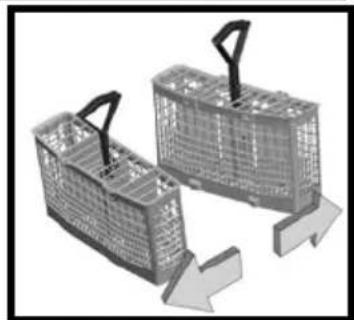
natural_image
Two plastic crates with handles and downward arrows indicating flow or movement (no text or symbols)Alternative basket loads
Lower Basket
natural_image
Cross-sectional diagram of a mechanical device showing internal components and housing (no text or labels)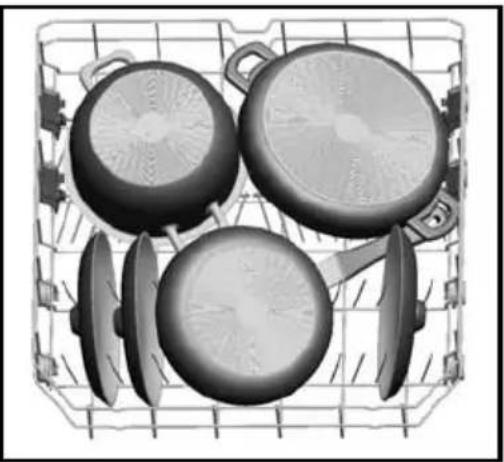
natural_image
Black-and-white illustration of four cooking pots arranged in a wire basket (no text or symbols visible)Top basket
natural_image
Diagram of a multi-layered storage or processing unit with cylindrical and toroidal components (no text or labels)Faulty loads
natural_image
Diagram of a container with multiple spherical objects and a black X symbol, no text or labels present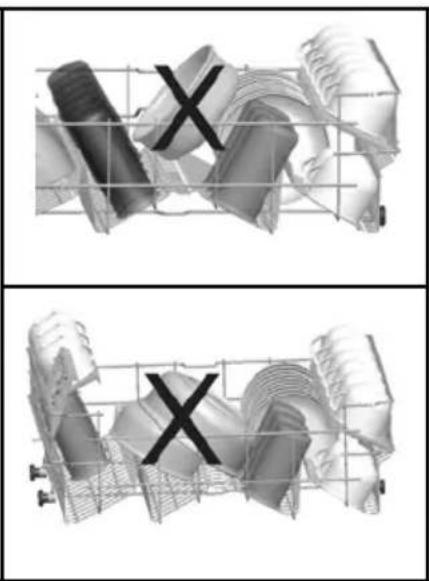
natural_image
3D rendered mechanical components with grid overlay, no visible text or symbols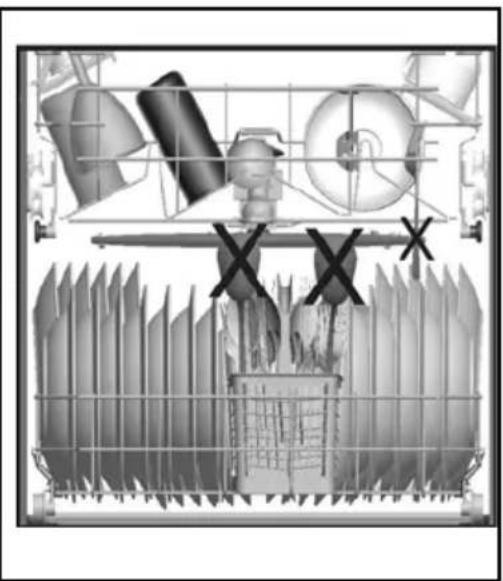
natural_image
Cross-sectional diagram of industrial equipment components including flasks, pipes, and a storage unit (no text or labels)Standard loading and test data
Capacity:
Upper and lower baskets: 12 place settings. The upper basket should be adjusted to high position. Cups should be placed on to the dish rack pins.
Detergent / Rinse aid
5+25 cm ^3 , in accordance with EN50242-DIN 44990 IEC 436 (international norms) / Rinse aid dosage adjustment: 4
Programme test
Economic 50°C, in accordance with EN 50242 (international norms)
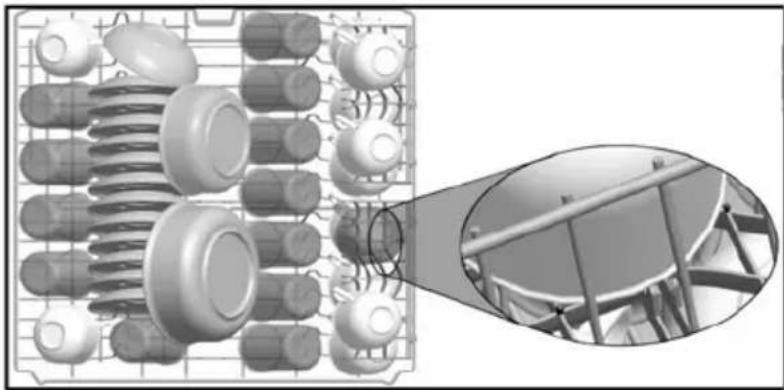
natural_image
Diagram of a mechanical assembly with multiple rollers and a magnified inset showing internal components (no text or labels)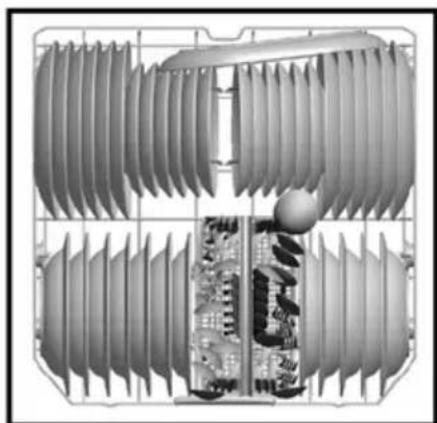
natural_image
Cross-sectional diagram of a mechanical or electrical component with layered structure and internal circuitry (no text or symbols)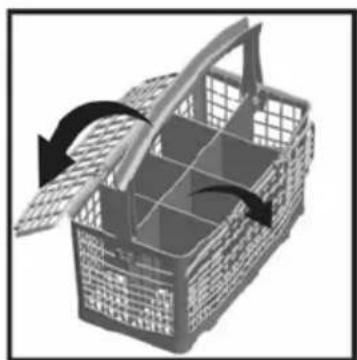
natural_image
3D illustration of a woven basket with handle and side compartments, showing internal structure and rotation arrows (no text or symbols)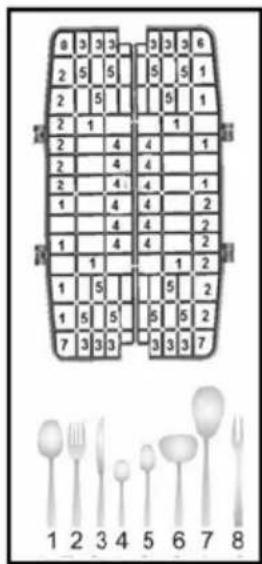
text_image
8 3 3 3 2 5 5 2 5 2 1 2 4 4 2 4 4 2 4 4 1 4 4 1 4 4 1 5 1 5 5 7 3 3 3 3 3 3 7 1 2 5 6 7 8PROGRAMME DESCRIPTIONS
Programme items
| Programme No | Auto Intensive | Auto Normal | Auto Delicate | Hygiene | 55°C 60°C | Economic | Quick | Rinse | Extra Hygiene (Prewash+Hygiene 60°C) |
| Programme names and temperatures | 60-70°C (P1) | 50-60°C (P2) | 30-50°C(P3) | 60°C (P4) | 60°C (P5) | 50°C (P6) | 40°C (P7) | -P8) | 70°C |
| Type of food waste | Automatically adjust the washing time with temperature and amount of water by determining the soil level of dishes | Dishes with dense dirt waiting for a long time or requiring hygienic washing | soups, sauces, pasta, eggs, pilaf, potato and oven dishes. fried foods | coffee,milk,tea,cold meats,vegetables ,not kept for long | coffee,milk,tea,cold meats,vegetables ,not kept for long | Pre-wash tor lse and loosen residue awaiting full load then select a programme | Dishes with dense din waiting for a long time or requiring hygienic washing. | ||
| Level of soil | high | high | small | high | medium | medium | small | high | |
| Detergent amount A: 25 cm3/15 cm3B: 5 cm3 | A+B A+B A | A+B A+B A+B A | A+B | ||||||
| Automatically adjust the washing time with temperature and amount of water by determining the soil level of dishes. | Prewash | Prewash | Prewash | Prewash | Prewash | Prewash | |||
| 60°C Wast | 60°C Wast | 50°C Wast | 40°C Wast | End | 50°C Prewash | ||||
| Cold Rinse | Cold Rinse | Cold Rinse | Cold Rinse | 70°C Wash | |||||
| Hot rinse | Hot rinse | Hot rinse | Hot rinse | Cold Rinse | |||||
| Dry | Dry | Dry | Dry | Warmish Rinse | |||||
| End | End | End | End | Hot Rinse | |||||
| Dry | |||||||||
| End | |||||||||
| Programme duration (min.) | 111-183 | 100-127 | 64-92 | 123 | 55 | 170 | 30 | 15 | 161 |
| Electricity consumption (kW hours) | 1,25-1,78 | 1,03-1,28 | 0,60-0,80 | 1,55 | 0,93 | 1,05 | 0,71 | 0,02 | 1,75 |
| Water consumption (liters) | 13,3-24,6 | 10,9-18,5 | 10,6-17,7 | 15 | 11 | 13,5 | 11 | 4,2 | 22,7 |
The values declared above are the values obtained under laboratory conditions according to relevant standards. These values can change depending on conditions of product's use and environment (network tension, water pressure, water input temperature and environment temperature).
SWITCHING ON THE MACHINE AND SELECTING A PROGRAMME
Switching on the machine

text_image
NORDEMENDE 1 2 3 4 5 6 7 8
text_image
Machine is energized when the On/Off button is pressed, two dashes appear in the program display and the end of program indicator turns on. When you select a program with the program selection buton,the program you select ( P1,P2,etc )appears on the program display and the end of program indicator turns off.- Press the Power On/Off key.
- Select the program suiting your dishes via the Program Selection button.
- If you prefer or wish to prefer, you can choose additional function.
- Close door. The program starts automatically.
Note: If you decide not to start to machine after selecting the program, just press the on/off button. Your machine will become ready for the new program selection when you press on/off button again. You can select the new program by pressing the program selection button.
Program follow-up
flowchart
graph LR
    A["Start"] --> B["program"]
    B --> C["delay timer"]
    C --> D["End"]
    D --> E["prewash"]
    E --> F["half load"]
    F --> G["1/2"]
    G --> H["salt"]
    G --> I["rinse old"]
    G --> J["end"]
Changing a programme
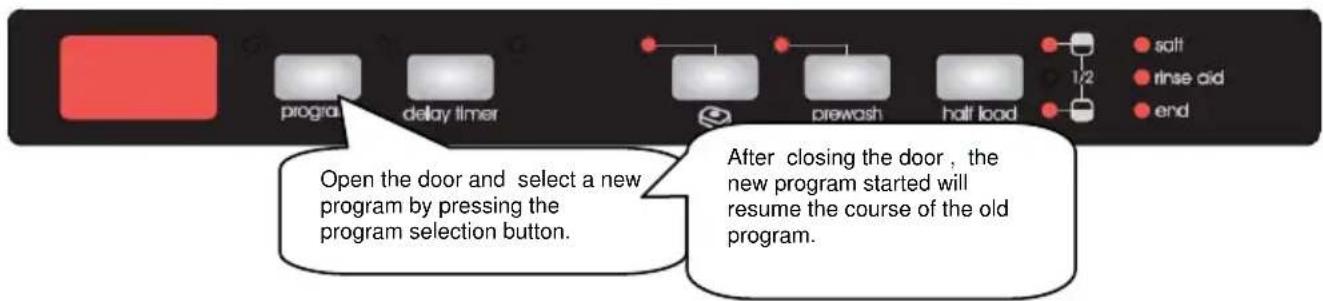
If you would like to change programs while a washing program is continuing.
flowchart
graph LR
    A["Start"] --> B["Program"]
    B --> C{Delay Timer}
    C --> D["Prewash"]
    D --> E{Half Load}
    E --> F["End"]
    G["After closing the door, the new program started will resume the course of the old program."] --> H["End"]
    I["Open the door and select a new program by pressing the program selection button."] --> B
    J["soft"] --> E
    K["rinse aid"] --> E
    L["end"] --> F
Note: When the door of the machine is opened in order to stop the washing program before it is completed first open the door slightly in order to avoid water spillage.
Changing a programme with resetting
If you would like to cancel a program while a washing program is resumed
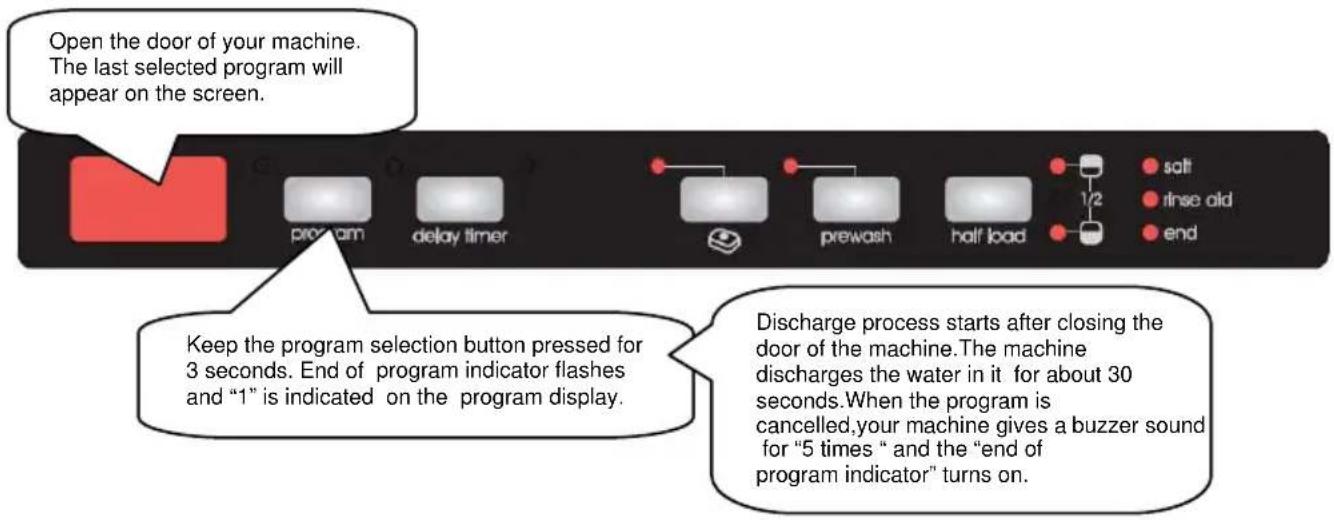
flowchart
graph LR
    A["Open the door of your machine. The last selected program will appear on the screen."] --> B["program"]
    B --> C["delay timer"]
    C --> D["1/2"]
    D --> E["prewash"]
    E --> F["half load"]
    F --> G["salt"]
    F --> H["rinse old"]
    F --> I["end"]
    J["Keep the program selection button pressed for 3 seconds. End of program indicator flashes and "1" is indicated on the program display."] --> K["Discharge process starts after closing the door of the machine. The machine discharges the water in it for about 30 seconds. When the program is cancelled, your machine gives a buzzer sound for "5 times " and the "end of program indicator" turns on."]
Note: When the door of the machine is opened in order to stop the washing program before it is completed first open the door slightly in order to avoid water spillage.
Switching the machine off

text_image
NORMENDE When end of program indicator turns on, switch your machine off by using the Power On/Off button. Pull the plug out of the outlet. Turn of the water tap.Note: After the buzzer sound which indicates the end of the program when the washing program comes to an end (end indicator light is on), you can leave the door of your machine ajar in order to hasten the drying.
Note: If the machine door opens during washing or the power is cut off, the machine will go on to the program in case the door is shut or the power is back.
MAINTENANCE AND CLEANING
Cleaning the machine in regular intervals prolongs the machine's service life.
Oil and lime may accumulate in the machine's washing section. In case of such accumulation; -Fill the detergent compartment without loading any dishes into the machine, select a programme that runs at high temperature, and start the machine. In case of insufficiency, use special cleansing material available in the market. (Cleansing material produced special to machines by detergent producers.)
Cleaning the seals in the machine door,
-To clean any accumulated residues in the door seals, wipe the seals regularly by using a dampened cloth.
Cleaning the machine,
Clean the filters and spray arms at least once a week.
Unplug your machine and turn off its tap before starting the cleaning.
Do not use hard materials when cleaning your machine. Wipe with a fine cleaning material and a dampened cloth.
Filters
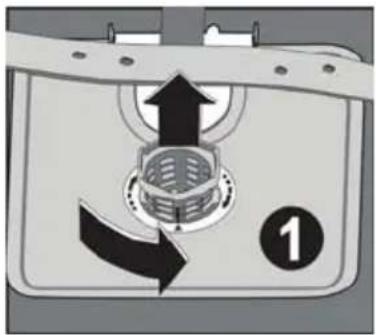
Check if any food wastes have remained on the coarse and fine filters. If any food wastes are left, remove the filters and clean them thoroughly under the water tap.
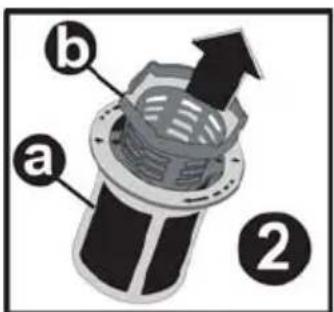
a. Micro Filter
b. Coarse Filter
c. Metal/Plastic Filter
text_image
Diagram showing a mechanical component with labeled parts and directional arrows indicating motion or flow.To remove and clean the filter combination, turn it counter clockwise and take it out by lifting upwards.1
Pull and remove the metal/plastic filter. 3 Then pull the coarse filter out of the micro filter.2 Rinse it with lots of water under the tap. Refit the metal/plastic filter. Insert the coarse filter into the micro filter in a way that the marks will correspond to one another. Attach micro filter into the metal/plastic filter and turn to the direction of arrow and it is locked when the arrow on micro filter can be seen from across. 4
text_image
a b ②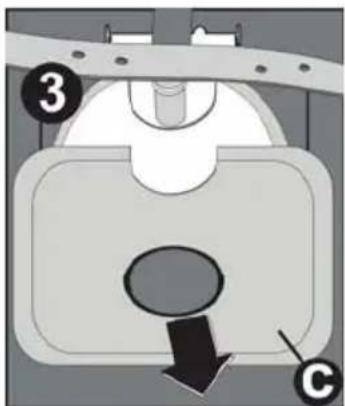
text_image
Diagram of a mechanical component with labeled parts and directional arrow, showing numbered callouts 3 and C.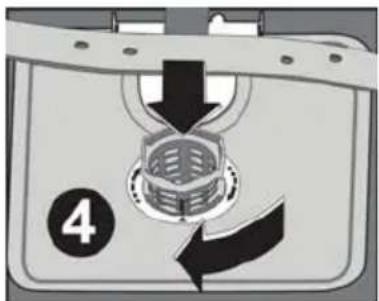
text_image
4- Never use your dishwasher without any filter.
- Incorrect fitting of the filter will reduce the washing effectiveness.
- Clean filters are very important in terms of the proper running of the machine.
natural_image
Diagram of a mechanical assembly with directional arrows indicating motion or force (no text or symbols)Spray arms
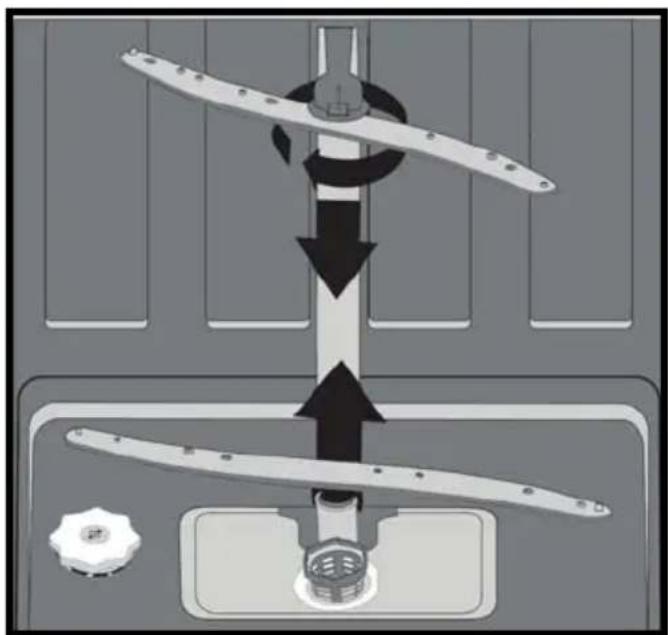
Check whether or not the holes for the upper and lower spray arms are clogged. If there is any clogging, remove the spray arms and clean them under water.
You can remove the lower spray arm by pulling it upwards, while the upper spray arm nut can be removed by turning the nut to the left.
Be sure that the nut is perfectly tightened when refitting the upper spray arm.
Hose filter
Water is prevented by the inlet hose filter so as to avoid any damage to your machine because of any contamination (sand, clay, rust etc.) that might be occasionally carried in through the mains water supply or the indoor plumbing, and to forestall such complaints as yellowing and formation of deposits after washing. Check the filter and the hose from time to time and clean them if necessary. To clean the filter, first turn off your tap and then remove the hose. After removing the filter from the hose, clean it under the tap. Insert the cleaned filter back into its place inside the hose. Refit the hose.
FAILURE CODES AND WHAT TO DO IN CASE OF FAILURE
| ERROR CODE ERROR | DESCRIPTION CONTROL | |
| F5 | Inadequate water supply | Make sure the water input tap is totally open and that there is no water cut.Close the water input tap, separate the water input hose from the tap and clean the filter at the connection end of the hose.Restart your machine, contact the service if the error resumes. |
| F3 | Error of continuous water input | Close the tap.Contact the service. |
| F2 | The waste water in the machine cannot be discharged. | Water discharge hose is clogged.The filters of your machine might be clogged.Power off-on your machine and activate the program cancellation command.If the error continues, contact the service. |
| F8 | Heater error | Contact the service. |
| F1 | Alarm is active against water overflow | Power off your machine and close the tap.Contact the service. |
| FE | Faulty electronic card | Contact the service. |
| F7 | Overheating error (temperature in the machine is too high) | Contact the service. |
| F9 | Divisor position error | Contact the service. |
| F6 | Faulty heater sensor | Contact the service. |
If the programme won't start
- Check if the plug is connected.
- Check your indoor fuses.
- Be sure that the water inlet tap is turned on.
- Be sure that you have closed the machine door.
- Be sure that you switched off the machine by pressing the Power On / Off button.
- Be sure that the water inlet filter and the machine filters are not clogged.
If detergent residues are left in the detergent compartment
Detergent has been added when the detergent compartment was wet.
If water is left inside the machine at the end of the programme
- The water drain hose is clogged or twisted.
- The filters are clogged.
- The programme is not finished yet.
If the machine stops during a wash operation
- Power failure.
• Water inlet failure. - Program can be on standby mode.
If shaking and hitting noises are heard during a wash operation
- Dishes placed incorrectly.
- Spray arm hitting the dishes.
If there are partial food wastes left on the dishes
- Dishes placed incorrectly into the machine, sprayed water did not reach related places.
- Basket overly loaded.
- Dishes leaning against one another.
• Very small amount of detergent added. - An unsuitable, rather weak wash programme selected.
- Spray arm clogged with food wastes.
- Filters clogged.
- Filters incorrectly fitted.
• Water drain pump clogged.
If there are whitish stains on the dishes
- A very small amount of detergent is being used.
- Rinse aid dosage setting at a very low level.
- No special salt is being used despite the high degree of water hardness.
• Water softener system setting is at a very low level. - Salt compartment cap not closed well.
- A detergent without phosphate used; try one that contains phosphate.
If the dishes won't dry up
- A programme without a dry operation selected.
- Rinse aid dosage set too low
- Dishes unloaded too fast.
If there are rust stains on the dishes
• Stainless-steel quality of the dishes washed is insufficient.
• High rate of salt in the wash water.
- Salt compartment cap not closed well.
- Too much salt spilt into the sides and into the machine while filling it with salt.
- Unhealthy mains grounding.
Door is not opened / closed properly ;
- Not proper weight wooden part inserted on the door. (Follow the weight given in the Assembly manuel)
- The tensile of the door spring not adjusted properly. Adjust it according to the Assembly manuel.
Call an authorised service if the problem still persists after the controls or in case of any malfunction not described above.
PRACTICAL AND USEFUL INFORMATION
- Whenever you will not be operating your machine
- Unplug the machine and then turn the water off.
- Leave the door slightly ajar in order to prevent the formation of unpleasant smells.
- Keep the machine interior clean.
- Eliminating water droplets
- Wash the dishes with the intensive programme.
• Take all of the metal containers in the machine out. - Do not add detergent.
- If you properly place your dishes into the machine, you will be using it in the best way in terms of energy consumption, washing and drying performance.
- Clean all rough waste before you place dirty dishes to the machine.
- Operate the machine after it is completely full.
- Use pre-washing program only when necessary.
- Observe program information and average consumption values table when selecting a program.
- Since the machine will reach high temperatures, it should not be mounted near refrigerator.
- If the appliance is located in a place where the risk of freezing exists, you must completely drain the water that has remained in the machine. Turn off the water tap, disconnect the water inlet hose from the tap and allow the interior water to drain.