Impressia - Printer Xanté - Free user manual and instructions
Find the device manual for free Impressia Xanté in PDF.


User questions about Impressia Xanté
0 question about this device. Answer the ones you know or ask your own.
Ask a new question about this device
Download the instructions for your Printer in PDF format for free! Find your manual Impressia - Xanté and take your electronic device back in hand. On this page are published all the documents necessary for the use of your device. Impressia by Xanté.
USER MANUAL Impressia Xanté
XANTÉ IMPRESSIA DIGITAL MULTI-MEDIA PRESS
Operating Instructions
Hardware Guide
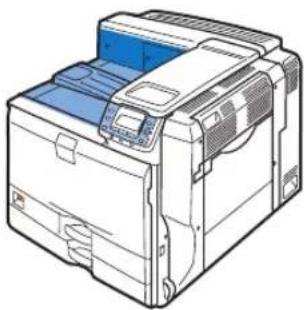
natural_image
Line drawing of a printer with blue cover and paper filter (no text or symbols)1 Guide to the Printer
2 Installing Options
3 Connecting the Printer
4 Cables Configuration
5 Paper and Other Media
6 Replacing Consumables
7 Cleaning the Printer
8 Adjusting the Printer
9 Troubleshooting
10 Removing Misfed Paper
11 Appendix
Introduction
This manual contains detailed instructions and notes on the operation and use of this printer. For your safety and benefit, read this manual carefully before using the printer. Keep this manual in a handy place for quick reference. For safe and correct use, be sure to read the "Safety Information" before using the machine.
Trademarks
Adobe, Acrobat, Acrobat Reader, Adobe Type Manager, Flash, Macromedia, PageMaker and PostScript are either registered trademarks or trademarks of Adobe Systems Incorporated in the United States and/or other countries.
Apple, AppleTalk, Bonjour, Macintosh, Mac OS, Mac OS X and True Type are trademarks of Apple Inc., registered in the U.S. and other countries.
Citrix® and MetaFrame® are registered trademarks of Citrix Systems, Inc.
Monotype® is a registered trademark of Monotype Imaging, Inc.
Netware®, IPXTM, IPX/SPXTM, Novell ClientTM are either registered trademarks or trademarks of Novell, Inc.
Netscape® and Netscape Navigator® are registered trademarks of Netscape Communications Corporation.
PCL® is a registered trademark of Hewlett-Packard Company.
Safari is a trademark of Apple Inc.
SolarisTM is trademark of Sun Microsystems, Inc. in the U.S. and other countries.
UNIX® is a registered trademark of The Open Group.
UPnPTM is a trademark of the UPnPTM Implementers Corporation.
Other product names used herein are for identification purposes only and might be trademarks of their respective companies. We disclaim any and all rights to those marks.
Microsoft®, Windows®, Windows Server®, MS-DOS®, and Windows Vista® are registered trademarks of Microsoft Corporation in the United States and/or other countries. * The product names of Windows 2000 are as follows: Microsoft® Windows® 2000 Advanced Server Microsoft® Windows® 2000 Server Microsoft® Windows® 2000 Professional * The product names of Windows XP are as follows: Microsoft® Windows® XP Professional Microsoft® Windows® XP Home Edition * The product names of Windows Vista are as follows: Microsoft® Windows Vista® Ultimate Microsoft® Windows Vista® Enterprise Microsoft® Windows Vista® Business Microsoft® Windows Vista® Home Premium Microsoft® Windows Vista® Home Basic * The product names of Windows Server 2003 are as follows: Microsoft® Windows Server® 2003 Standard Edition Microsoft® Windows Server® 2003 Enterprise Edition Microsoft® Windows Server® 2003 Web Edition * The product names of Windows Server 2003 R2 are as follows: Microsoft® Windows Server® 2003 R2 Standard Edition Microsoft® Windows Server® 2003 R2 Enterprise Edition Microsoft® Windows Server® 2003 R2 Web Edition * The product names of Windows Server 2008 are as follows: Microsoft® Windows Server® 2008 Standard Microsoft® Windows Server® 2008 Enterprise Microsoft® Windows Server® 2008 Datacenter
Some illustrations in this manual might be slightly different from the machine.
TABLE OF CONTENTS
Positions of WARNING and CAUTION Labels....6
Manuals for This Printer....9
How to Read This Manual....10
Symbols....10
Model-Specific Information....11
List of Options....12
1. Guide to the Printer
Exterior: Front View....13
Exterior: Side View....15
Interior....17
Control Panel....19
Power on and off....21
Turning on the Power....21
Turning off the Power....22
Display Panel....24
Reading the Display and Using Keys....25
2. Installing Options
Available Options....27
Order of Option Installation....27
Where to Install Options....28
Cautions When Re-installing the Controller Board....31
Attaching the Paper Feed Unit....32
Attaching the 1000-sheet/2000-sheet Paper Feed Unit....33
Installing the Memory Expansion Units....39
Installing the SDRAM Module....39
Installing the Hard Disk....42
Installing the Interface Units....48
Installing the Gigabit Ethernet Board....48
Installing the IEEE 1284 Interface Board....53
3. Connecting the Printer Cables
Ethernet Cable Connection....55
Reading the LED Lamps....58
USB Cable Connection....59
Digital Camera Connection....59
Parallel Cable Connection....61
4. Configuration
Ethernet Configuration....63
Specifying an IP Address (No DHCP)....64
Receiving an IP Address Automatically (DHCP)....66
5. Paper and Other Media
Supported Paper for Each Tray....69
Symbols....69
Tray 1....69
Tray 2, 500/1000-sheet Paper Feed Unit (Tray 3 to 5)....70
2000-sheet Paper Feed Unit (Tray 3)....72
Bypass Tray....72
Paper Weight and Capacity....74
Paper Recommendations....75
Storing Paper....75
Types of Paper and Other Media....75
Paper Not Supported by This Printer....84
Print Area....84
Loading Paper....86
Paper Tray, 500/1000-sheet Paper Feed Unit....86
2000-sheet Paper Feed Unit....94
Bypass Tray....96
Using Paper Types that Have Unique Names....103
From Registration of User Paper Types to Use....103
Registering Names to Paper Types....104
Setting User Paper Types to Trays....105
Printing Using Registered Paper Types....106
6. Replacing Consumables
Adding Toner....107
Replacing the Black Drum Unit/Color Drum Units....111
Replacing the Transfer Unit....118
Replacing the Waste Toner Bottle....124
Replacing the Fusing Unit, Transfer Roller, and Dustproof Filter....129
Replacing the Fusing Unit....129
Replacing the Transfer Roller....133
Replacing the Dustproof Filter....135
7. Cleaning the Printer
Cautions When Cleaning....137
Cleaning the Friction Pads....138
Paper Trays, 500/1000-sheet Paper Feed Unit....138
2000-sheet Paper Feed Unit....139
Cleaning the Registration Roller....141
Cleaning the Dustproof Glass....142
8. Adjusting the Printer
Adjusting the Color Registration....145
Adjusting Printing Position....148
9. Troubleshooting
Error and Status Messages that Appear on the Control Panel....151
Panel Tones....162
Printer Does Not Print....163
Checking the Port Connection....165
Printing Problems....166
Additional Troubleshooting....174
10. Removing Misfed Paper
Removing Misfed Paper....177
Paper Misfeed Message (A)....178
Paper Misfeed Message (B)....180
Paper Misfeed Message (C)....182
Paper Misfeed Message (Y)....187
Paper Misfeed Message (Z)....188
Duplex Print Always Misfeeds....191
11. Appendix
Moving and Transporting the Printer....193
Moving the Printer....194
Consumables....196
Specifications....199
Mainframe....199
Options....202
Positions of WARNING and CAUTION Labels
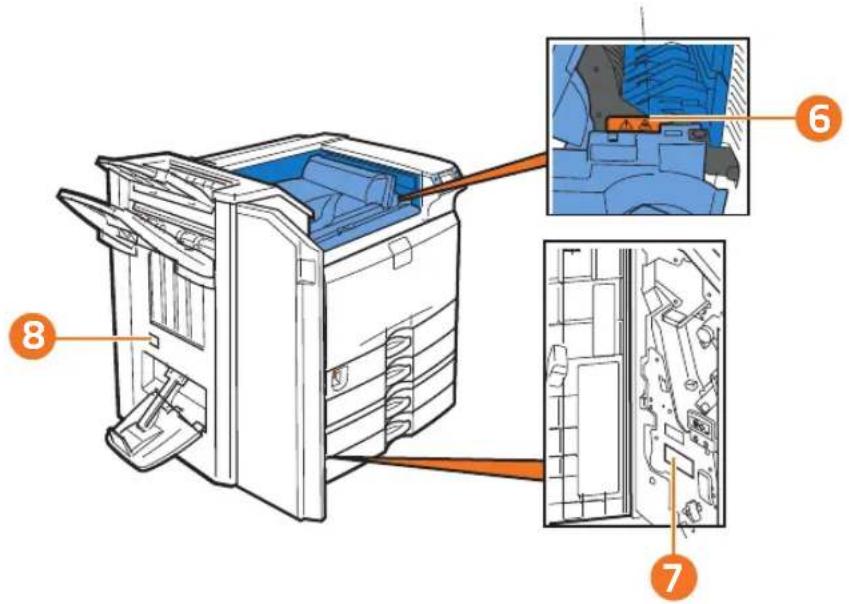
This machine has labels for △WARNING and △CAUTION at the positions shown below. For safety, please follow the instructions and handle the machine as indicated.
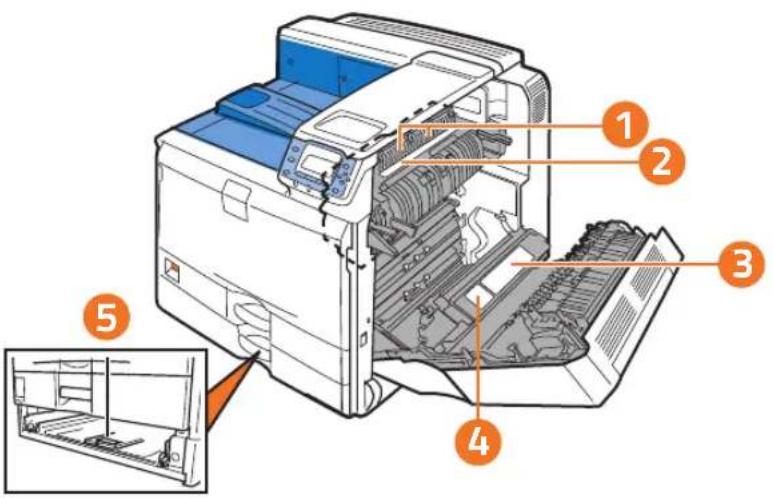
text_image
Technical diagram of an open file printer with numbered parts and a zoomed-in inset showing internal components.BMW036S
1


BJA052S
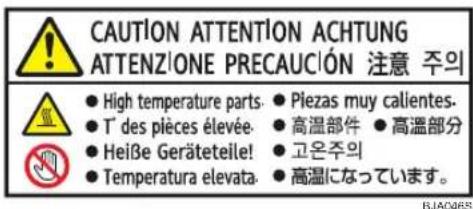
Do not touch the parts a label indicates. The inside of the machine could be very hot.
Caution should be taken when removing misfed paper.
2

High temperature parts. Wait a while to allow the Fusing Unit to cool down before removing misfed paper.
3
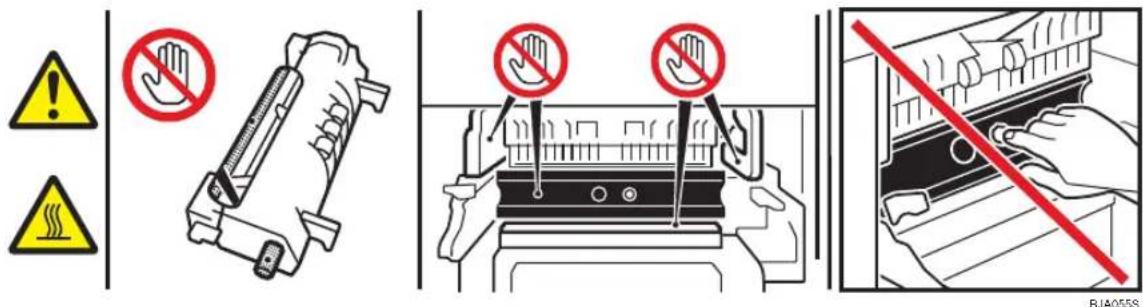
text_image
! ! BJA055SDo not touch the parts a label indicates. The inside of the machine could be very hot. Caution should be taken when removing misfed paper.
4
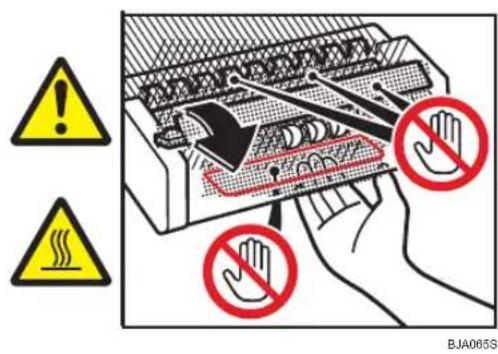
text_image
BAJ065SDo not touch the parts a label indicates. The inside of the machine could be very hot. Caution should be taken when removing misfed paper.
5
The inside of the machine could be very hot. Do not touch the parts which a label is put on. Otherwise, an injury might occur.
text_image
Technical diagram of an open refrigerator with labeled parts and interior viewsBMW037S
6

text_image
Yellow traffic sign with three symbols: warning triangle, steam drop triangle, and no hand holding a circleBJAC66S
Do not touch! Surface may be very hot.
Manuals for This Printer
Refer to the manuals that are relevant to what you want to do with the printer.

Important
• Media differ according to manual.
- The printed and electronic versions of a manual have the same contents.
- Adobe Acrobat Reader/Adobe Reader must be installed in order to view the manuals as PDF files.
- A Web browser must be installed in order to view the html manuals.
Quick Installation Guide
Contains procedures for removing the printer from its box, connecting it to a computer, and installing its driver.
Hardware Guide (This manual)
Contains information about paper and procedures such as installing options, replacing consumables, responding to error messages, and resolving jams. Software Guide Contains information about using this printer, its software, and its security functions.
Security Guide
Contains information for administrators of the printer. It explains security functions that the administrators can use to prevent data tampering or unauthorized use of the printer.
Also refer to this manual for the procedure for registering an administrator, as well as setting user and administrator authentication.

Note
- Manuals provided are specific to machine types.
How to Read This Manual
Symbols
This manual uses the following symbols:
WARNING
Indicates important safety notes.
Ignoring these notes could result in serious injury or death. Be sure to read these notes. They can be found in the “Safety Information” section of this manual.
CAUTION
Indicates important safety notes.
Ignoring these notes could result in moderate or minor injury, or damage to the machine or to property. Be sure to read these notes. They can be found in the “Safety Information” section of this manual.
Important
Indicates points to pay attention to when using the machine, and explanations of likely causes of paper misfeeds, damage to originals, or loss of data. Be sure to read these explanations.
Note
Indicates supplementary explanations of the machine's functions, and instructions on resolving user errors.
Reference
This symbol is located at the end of sections. It indicates where you can find further relevant information.
[ ]
Indicates the names of keys that appear on the machine's display panel.
[ ]
Indicates the names of keys on the machine's control panel.
Model-Specific Information
In this manual, the following symbols indicate information that relates to a specific printer model.
220-240V
This indicates information about the 220 to 240 V model printer.
Read if you have purchased this model.
120V
This indicates information about the 120 V model printer.
Read if you have purchased this model.

Note
- Check the label on the rear of the printer to identify the printer's model.
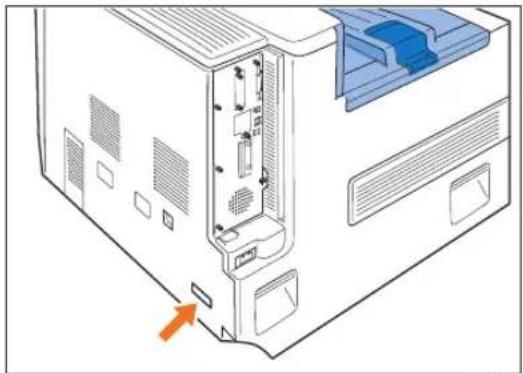
natural_image
Diagram of a computer tower internal structure showing ventilation slots and drive bays (no text or labels)BMW031S
List of Options
This section provides a list of options for this printer, and how they are referred to as in this manual. In this manual, the models with the hard disk drive are referred to as the HDD standard model. The models for which the hard disk drive is optional are referred to as the Basic model.
| Option Name Referred to as | |
| Memory Unit Type J 512 MB | SDRAM module |
| Printer Hard Disk Drive Type 820 | Hard disk |
| Gigabit Ethernet Type B | Gigabit Ethernet board |
| IEEE 1284 Interface Board Type A | IEEE 1284 interface board |
| VM Card Type K | VM card |
| Paper Feed Unit PB3040 | 1000-sheet paper feed unit |
| LCIT PB3050 | 2000-sheet paper feed unit |
1. Guide to the Printer
This chapter explains the names and functions of the printer's components.
Exterior: Front View
This section explains names and functions of the parts on the front and right side of the printer.
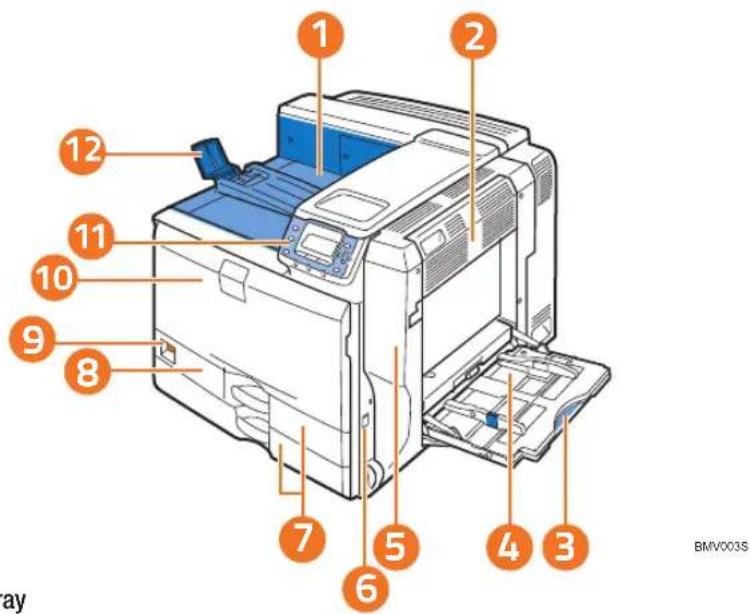
text_image
1 2 12 11 10 9 8 7 5 6 4 3 BMV003S- Standard Output Tray
Printed pages are output here.
-
Upper Right Cover Open this cover to remove jammed paper.
-
Bypass Tray
Up to 100 sheets of plain paper can be loaded.
- Bypass Tray Extension
When loading paper larger than A4☐, pull out the bypass tray extension. For details about the sizes and types of paper that can be used, see “Supported Paper for Each Tray”.
- Right Cover
Open this cover to replace the fusing unit and transfer roller, or to remove jammed paper.
- Handle
Pull out this handle when lifting the printer.
- Tray 1, Tray 2
Up to 550 sheets of paper can be loaded in each tray, when using plain paper.
In this manual, tray 1, tray 2, the optional 1000-sheet paper feed unit trays (trays 3 to 4) are collectively referred to as 500-sheet trays.
1. Guide to the Printer
8. Left Front Cover
Open this cover when replacing the waste toner bottle. The waste toner bottle collects toner that is left over during printing.
If the “ ✅ Waste Toner Bottle full” message appears on the display, replace the waste toner bottle.
9. Power Switch
Use this switch to turn the power on or off.
Perform the shutdown procedure before turning the power off. For details about how to shut down the printer, see “Power on and off”.
10. Front Cover
Open this when replacing the toner, black drum unit / color drum units or transfer unit.
11. Control Panel
Contains keys for printer control and a display that shows printer status.
12. Paper Support
Extend the paper support when printing to paper larger than A3 □.

Reference
• p.25 "Power on and off"
• p.101 "Supported Paper for Each Tray"
Exterior: Side View
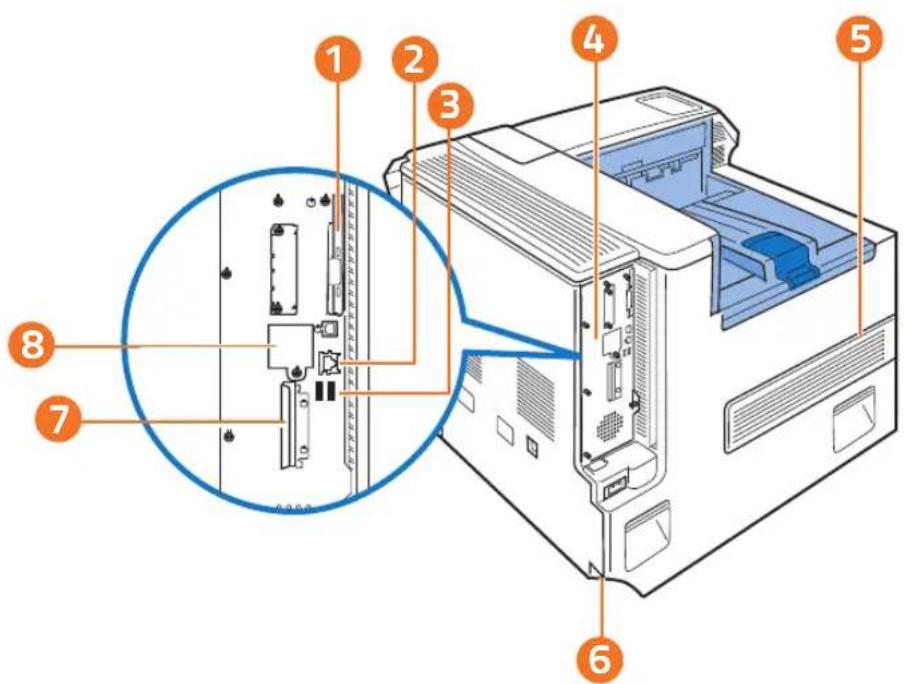
This section explains names and functions of the parts on the rear side of the printer.
text_image
Diagram of a printer internal structure with numbered parts, highlighting internal components and a magnified view.- Expansion Card Slots
Remove the cover to install SD cards.
- Ethernet Port
Use a network interface cable to connect the printer to the network.
- USB Port A
Connect external devices to the printer, such as a digital camera.
- Controller Board
Slide this out to install options such as the SDRAM module, hard disk, or Gigabit Ethernet board.
- Ventilator
Releases heat from internal components to prevent overheating. Do not place objects against or near these holes.
Doing so results in printer malfunction.
Replace the dustproof filter when the "Replace IntTrans Unit Soon." message appears on the display. Replace it with the transfer until together.
1
6. Power Connector
Connect the power cable to the printer. Insert the other end into an electrical outlet.
7. Handle
Hold this handle when you pull out the controller board.
8. Optional Gigabit Ethernet Board Slot
By removing this cover and installing the optional Gigabit Ethernet board, you can connect an Ethernet cable to the printer.

Note
- A hard disk is pre-installed in the HDD standard model.
Interior
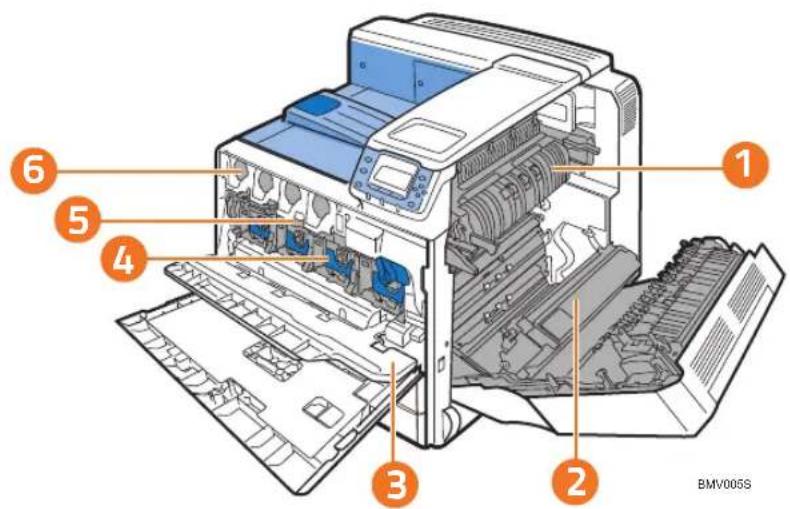
This section explains names and functions of the parts inside of the printer.
text_image
1 2 3 4 5 6 BMW005S1
1. Fusing Unit
Replace the fusing unit when the following messages appear:
- "Replace Fusing Unit."
Replace the fusing unit and the transfer roller together.
2. Transfer Roller
Replace the transfer roller when the following messages appear:
- "Replace Fusing Unit."
Replace the transfer roller and the fusing unit together.
3. Inner Cover
Open this cover when replacing the black drum unit / color drum units or transfer units.
4. Black Drum Unit / Color Drum Units
From the left, the drum units are installed in the order of yellow (Y), cyan (C), magenta (M), and black (K). Replace the relevant black drum unit / color drum units when the following messages appear:
- "Replace PCU:Black."
- "Replace PCU:Color."
5. Transfer Unit
Replace the transfer unit when the following messages appear:
- "Replace IntTrans Unit Soon."
- "Replace IntTrans Unit."
6. Toner
From the left, the toner is installed in the order of black (K), yellow (Y), cyan (C), and magenta (M).
Replace the relevant toner when the following messages appear:
- “ 🖱️ Out of toner.”
- “ Add toner
Control Panel
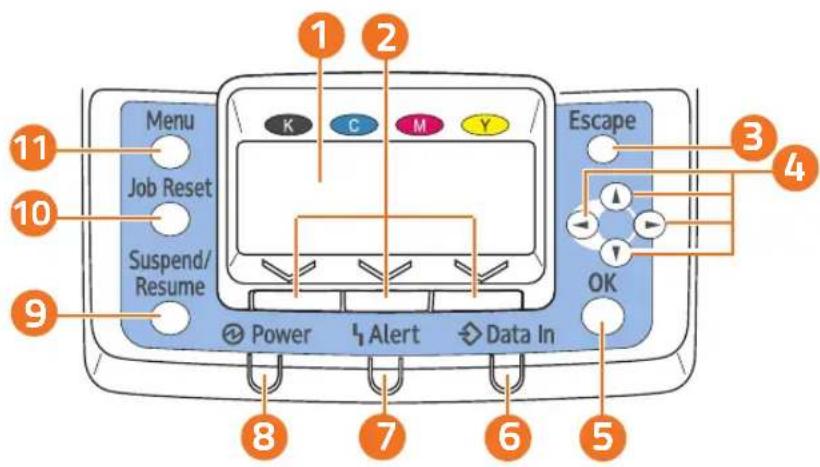
This section explains names and usage of the parts of the control panel.
text_image
Menu Job Reset Suspend/ Resume Power Alert Data In Escape OK 1 2 3 4 5 6 7 8 9 10 11BMV029S
1. Display
Displays the current printer status and error messages.
Entering energy saver mode turns off the back light. For details about energy saver mode, see Software Guide.
2. Selection Keys
Correspond to the function items shown on the bottom line of the display.
3. [Escape] Key
Press this key to return to the previous display.
4. Scroll Keys
Press to move the cursor in each direction.
When the [▲] [▼] [◀] [▶] keys appear in this manual, press the scroll key of the same direction.
5. [OK] Key
Use this key to confirm settings, or setting values, or move to the next menu level.
6. Data in Indicator
Blinks when the printer is receiving data from a computer, Lights up if there is data to be printed.
7. Alert Indicator
Lights up in red or yellow when a printer error occurs.
Red: printing is not possible / possible but print quality can not be ensured.
Yellow: printer requires maintenance, such as replacing consumables, shortly.
Follow the instructions that appear on the display.
8. Power Indicator
Remains lit while the power is on. It is unlit when the power is off or while the printer is in energy saver mode.

9. [Suspend/Resume] Key
Press this key to suspend a print job. They key lights up while the job is suspended.
To resume the job, press this key again.
10. [Job Reset] Key
Press this key to cancel an ongoing print job.
11. [Menu] Key
Press this key to configure and check the current printer settings.
While configuring settings, press this key to return to the initial screen.
Power on and off
This section explains how to turn on or off the printer's power.

WARNING
- It is dangerous to handle the plug with wet hands. Doing this may result in receiving an electric shock.

Important
- Do not turn off the power switch before following the shutdown procedure shown here. Doing so can result in damage to the hard disk or memory, leading to malfunction.
- Do not physically disturb the printer while printing is in progress. Doing so may damage the printer.
Turning on the Power
This section explains how to turn on the printer's power.
-
Make sure the power switch is set to Off.
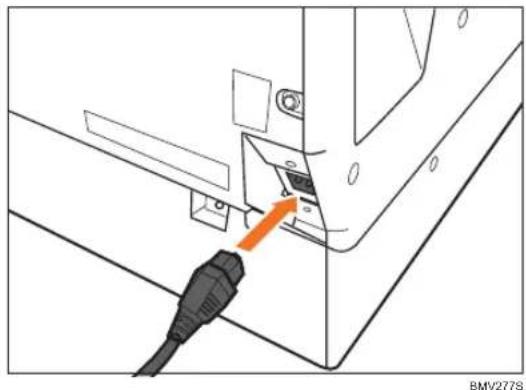
-
Plug the power cord into the rear of the printer.
natural_image
Diagram showing a cable inserted into a device with an orange arrow pointing to a component (no text or symbols present)Make sure the power cord is plugged securely into the wall outlet.
Turn the power switch off when plugging and unplugging the power plug.
-
Guide to the Printer
-
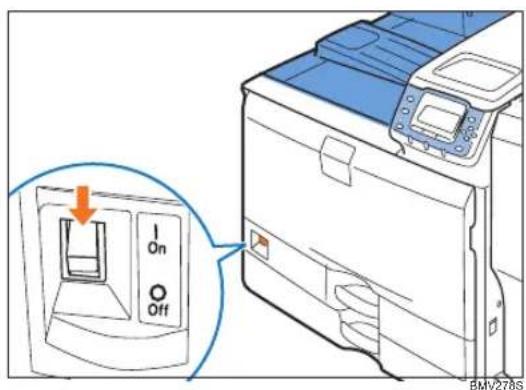
Turn the power switch on.
text_image
On Off BMV278SThe power indicator on the control panel lights up.

Note
- Wait until "Ready" appears on the display panel.
- The machine may make a noise while initializing. This noise does not indicate a malfunction.
Turning off the Power
This section explains how to turn off the printer's power.
- Press the [Menu] key.
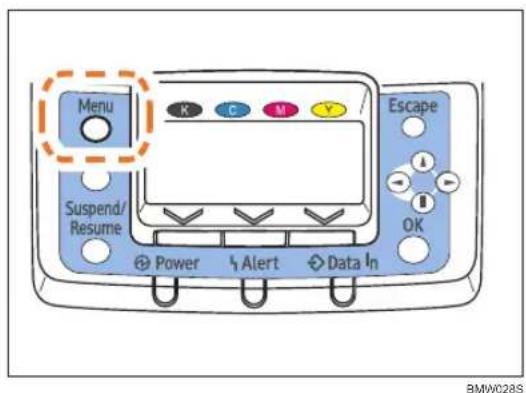
text_image
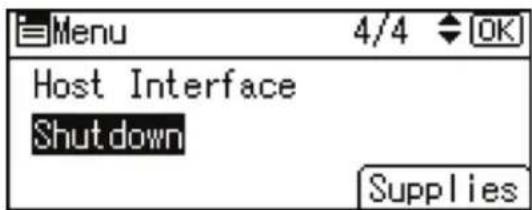
Menu Suspend/ Resume Power Alert Data In Escape OK BMW028S- Press the [▼] or [▲] key to select [Shutdown], and then press the [OK] key.
text_image
Menu 4/4 OK Host Interface Shutdown Supplies- Press [Yes].

text_image
Are you sure you want to shut down? No Yes- Wait until a screen prompting you to turn off the main power appears, then turn off the main power switch.

Note
• Even if you follow the shutdown procedure, the machine might not shutdown in the following cases:
- If it is communicating with external devices.
- If the hard disk is active.
- If the printer's cover is opened.
Display Panel
This section explains configuration using the initial screen of the display panel.
The items are highlighted when selected.

Important
- Do not touch the display panel.
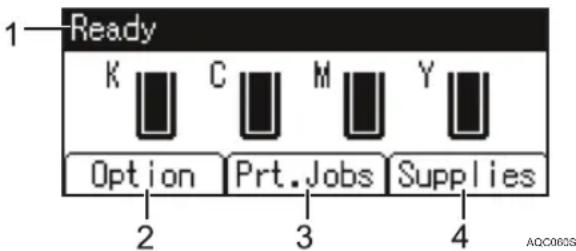
The following screen appears when you turn on the printer.
text_image
1 Ready K C M Y Option Prt.Jobs Supplies 2 3 4 AOC0005- Operational Status or Messages
Displays the printer status or the messages.
- [Options]
Press to display the status of options installed in the printer.
- [Prt.Jobs]
Press to display prints jobs sent from a computer.
- [Supplies]
Press to display the menu of supplies for the printer.

Note
- [Prt.Jobs] is displayed only when the hard disk is installed in the printer.
- By default, the remaining amount of toner is displayed. To not display the remaining amount of toner, press the [Menu] key, and then select [Maintenance] on the display. Select [General Settings], then [Display Supply Info], and then select [Off].
- Adjust the brightness if the screen is dark. To adjust the display contrast, press the [Menu] key, and then select [Maintenance] on the display. Select [General Settings] and then [Display Contrast].
Reading the Display and Using Keys
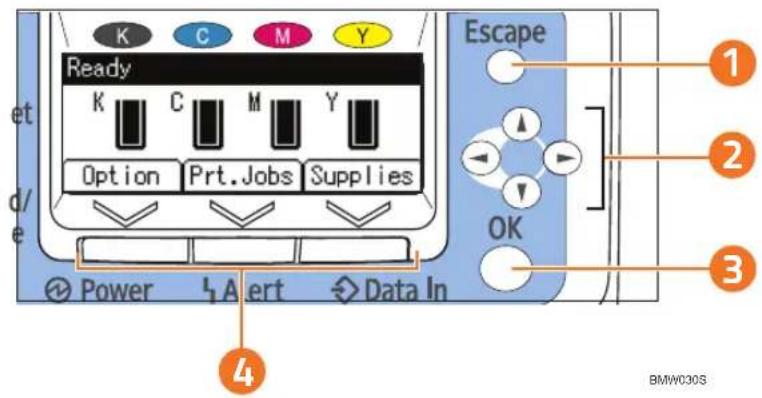
text_image
K C M Y Ready K C M Y Option Prt.Jobs Supplies Escape 1 2 OK 3 Power Alert Data In 4 BMW030S1
1. [Escape] Key
Cancels an operation or returns to the previous display.
2. Scroll Keys
Move the cursor in each direction.
When the [▲] [▼] [▶] [◀] keys appear in this manual, press the scroll key of the same direction.
3. [OK] Key
Confirms settings and setting values, or moves to the next menu level.
4.Selection Keys
Correspond to the function items shown on the bottom line of the display. When this manual instructs you to "press [Option]", press the left selection key.
1
2. Installing Options
This chapter explains how to install various options for this printer.
Available Options
By installing options, you can improve printer performance and expand the available features.
CAUTION
- Before installing options, the machine should be turned off and unplugged for at least an hour. Components inside the machine become very hot, and can cause a burn if touched.
Order of Option Installation
When installing multiple options, the following order is recommended:
- Attach the 1000-sheet paper feed unit or 2000-sheet paper feed unit
Either the 1000-sheet paper feed unit or 2000-sheet paper feed unit can be attached, but not both. - Install the SDRAM module
Install in the slot inside the controller board. - Install the hard disk
Install inside the controller board. - Install the Gigabit Ethernet board
Install inside the controller board. - Install the interface board
Install in the slot of the controller board.
Only one interface board can be installed. - Insert SD card options
Insert in the SD card slot of the controller board.
There are two slots for the SD cards.
Each slot supports different types of SD cards.
Where to Install Options
Install options in the locations shown in the following illustrations.
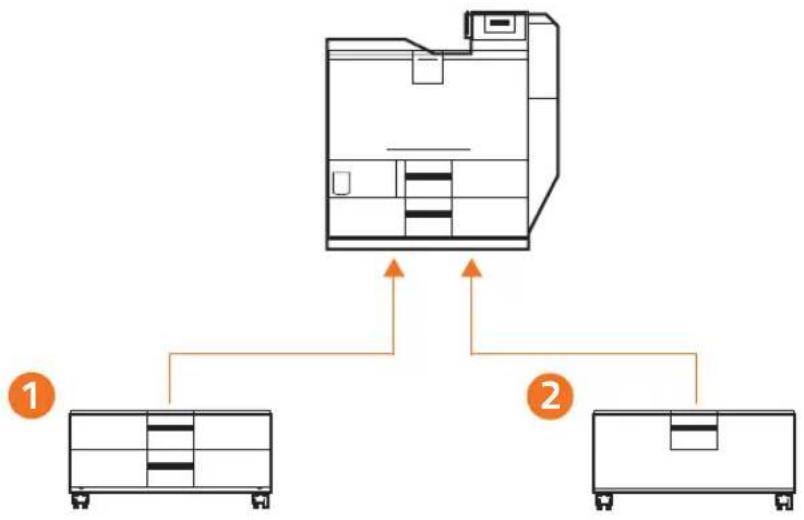
External options
2
flowchart
graph TD
    A["Central Unit"] --> B["Component 1"]
    A --> C["Component 2"]
BMW002S
- 1000-sheet paper feed unit
Attach to the underside of the printer. See "Attaching the Paper Feed Unit".
- 2000-sheet paper feed unit
Attach to the underside of the printer. See "Attaching the Paper Feed Unit".
2
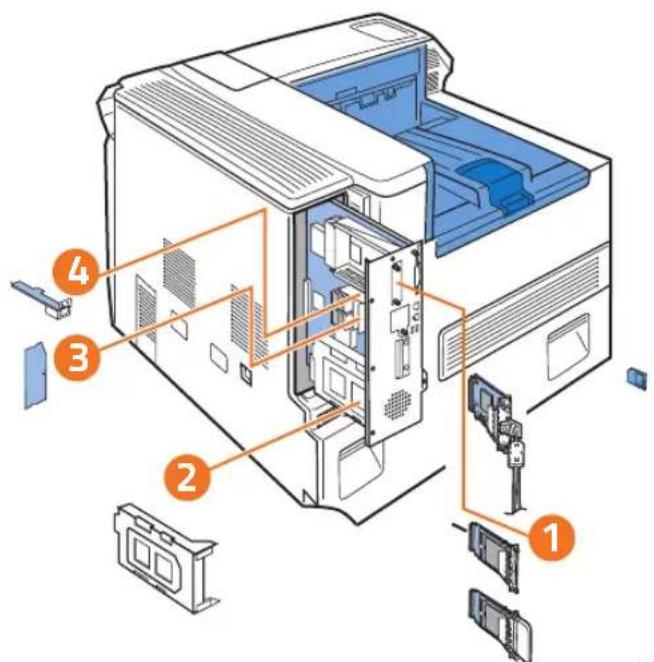
Internal options

text_image
Exploded view diagram of a computer system with numbered components for identificationBMV141S
- Optional Interface Board
Only one interface board can be installed.
- IEEE 1284 interface board
- Hard disk
See "Installing the Memory Expansion Units".
- SDRAM module
See "Installing the Memory Expansion Units".
- Gigabit Ethernet Board
See "Installing the Interface Units".
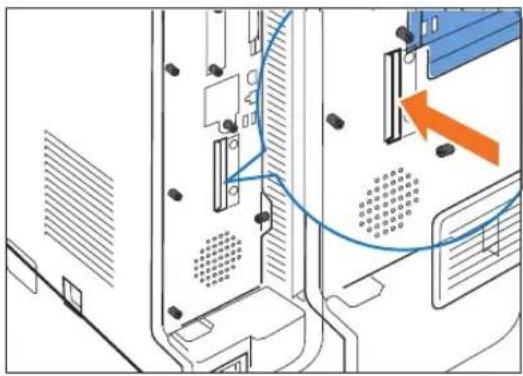
Cautions When Re-installing the Controller Board
When installing options inside the controller board, handle the board carefully while it is outside the printer.
To re-install the controller board, holding the handle in the center of the board, push the board firmly into the printer.

Important
- The following may occur if the controller board is not correctly installed:
- All control panel indicators are lit.
- No control panel indicators are lit.
- The "SC670" error message appears on the display.
natural_image
Diagram of a computer tower with ventilation slots and a blue cable, showing no text or symbolsBMV142S
Attaching the Paper Feed Unit
This section explains how to attach the paper feed units.

Important
- When attaching multiple options, attach the paper feed unit first.
- Four people are required to attach the paper feed unit. Make sure that the necessary number of people is available before beginning.
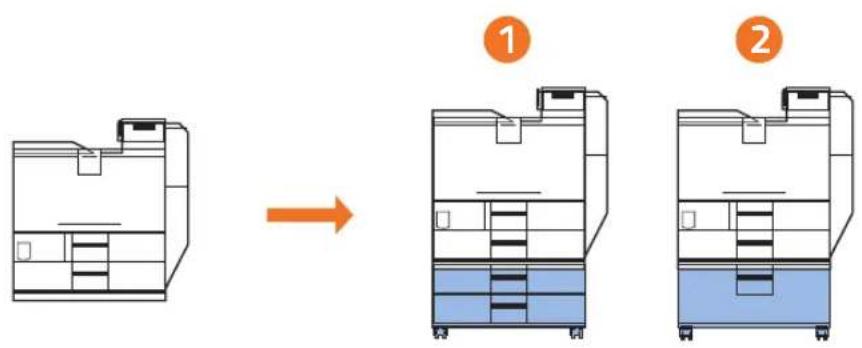
Option configurations
The table below shows the possible configurations of printer and options.
flowchart
graph LR
    A["Original Office"] --> B["Add Space to Machine"]
    B --> C["Storage Unit with Blue Box"]
    style A fill:#f9f,stroke:#333
    style B fill:#bbf,stroke:#333
    style C fill:#dfd,stroke:#333
BMW026S
1. Printer+ 1000-sheet paper feed unit
See "Attaching the 500-sheet/1000-sheet/2000-sheet Paper Feed Unit" for attachment instructions.
2. Printer + 2000-sheet paper feed unit
See "Attaching the 500-sheet/1000-sheet/2000-sheet Paper Feed Unit" for attachment instructions.

Reference
• p.37 "Attaching the 500-sheet Paper Feed Unit to the 1000-sheet Paper Feed Unit"
• p.39 "Attaching the 500-sheet/1000-sheet/2000-sheet Paper Feed Unit"

Attaching the 1000-sheet/2000-sheet Paper Feed Unit
This section describes how to attach the 1000-sheet paper feed unit, and 2000-sheet paper feed unit. The procedure is the same for all units. The 1000-sheet paper feed unit is used as an example.
CAUTION
• The printer weights approximately 97 kg (214 lb.).
- Four or more people are required to move the printer. Hold the handles located on both sides, and then lift it slowly. Lifting it carelessly or dropping it may cause an injury.
Important
- When the 1000-sheet paper feed unit is attached, the 2000-sheet paper feed unit cannot be attached.
-
When the 2000-sheet paper feed unit is attached, the 1000-sheet paper feed unit can be attached.
-
Before using the new paper feed unit, you must configure settings in the printer driver.
- Four or more people are required for installation.
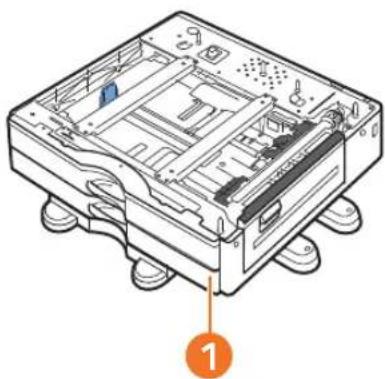
- Package contents for 1000-sheet paper feed unit

natural_image
Illustration of a computer chassis with labeled components (no text or symbols beyond numbered label)

text_image
3- 1000-sheet paper feed unit
- Two brackets
- Three screws
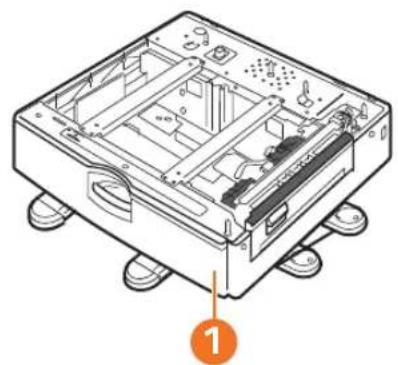
- Package contents for 2000-sheet paper feed unit
natural_image
Technical line drawing of a computer chassis with labeled component (no text or symbols present)

- 2000-sheet paper feed unit
- Two brackets
-
Three screws
-
Turn the printer off and unplug the power cable.
- Remove the packaging from the paper feed unit.
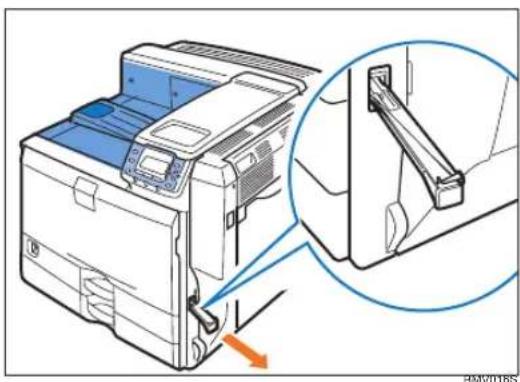
- Pull out the handle from the right side of the printer.
natural_image
Diagram of a printer with a close-up view showing internal components (no text or symbols)- Lift the printer using the handles on both sides of it.
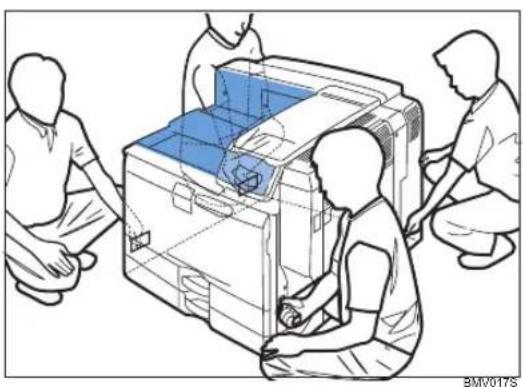
natural_image
Illustration of three people assembling or inspecting a large electronic device (no text or symbols visible)The printer should always be lifted by at least four people.
- Align the front of the printer with the front of the paper feed unit, and slowly lower it. Place it so that it is held firmly in place by the vertical pins.
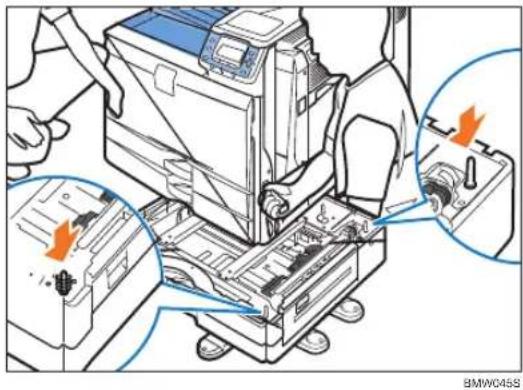
natural_image
Technical illustration of a printer assembly with mechanical components and orange arrows indicating parts (no text or symbols)Return the handle you pulled out from the printer to its original position.
- Pull tray 2 of the printer out slowly until it stops, then lift the front of the tray slightly, and pull it out completely.
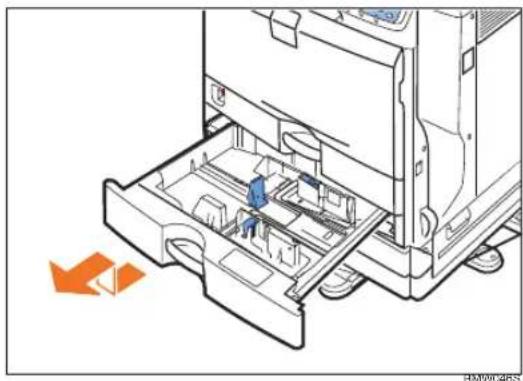
natural_image
Technical illustration of a mechanical assembly with a worker inside a housing, showing internal components and an orange arrow indicating direction (no text or symbols)Place the tray on a flat surface.
- Attach a screw in the hole on the left side of the tray opening to secure the printer to the paper feed unit.
Tighten the screw firmly using a coin.

natural_image
Technical line drawing of a mechanical assembly with a magnified inset showing a component detail (no text or symbols)- Lift the front of the tray, and slide it carefully into the printer until it stops.
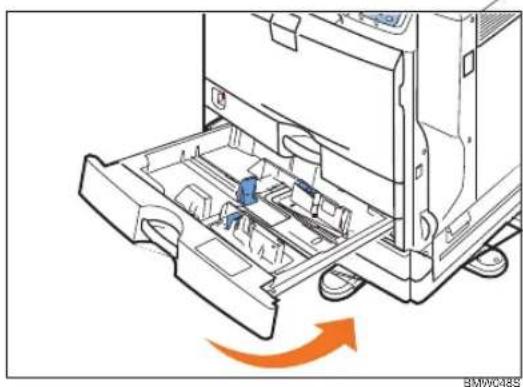
natural_image
Mechanical assembly diagram showing a component being inserted into a housing, with an orange arrow indicating motion (no text or symbols present)- On the rear of the unit, attach two brackets using the remaining screws. Tighten the screws firmly using a coin.
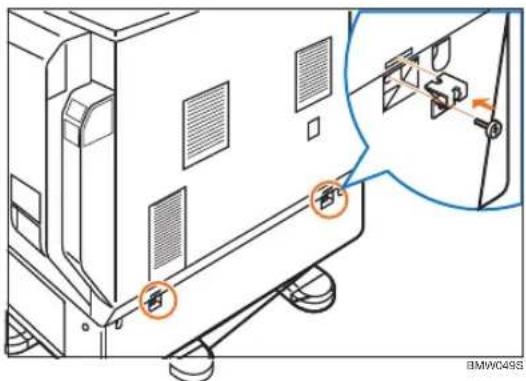
text_image
Technical diagram showing a device with labeled components and an inset view of a mechanical assembly with a bracket and mounting bracket.-
Plug in the power cable, and then turn on the printer.
-
Print the configuration page to confirm that the unit was attached correctly.

Note
- To confirm whether the optional paper feed unit was correctly attached, print the configuration page, and check "Attached Equipment" on the configuration page. If the unit was attached correctly, the following will be displayed:
• 1000-sheet paper feed unit: Twin Trays
• 2000-sheet paper feed unit: LCT
- If the optional paper feed unit was not installed properly, repeat the procedure from the beginning. If it cannot be installed correctly even after reattempting installation, contact your sales or service representative.
- If the print area is not centered correctly, adjust the printing position for the 1000-sheet paper feed unit (tray 3 to tray 5). For details, see “Adjusting Printing Position”.
- For information about printing the configuration page, see "List/Test Print Menu", Software Guide.
- To use the 1000-sheet or 2000-sheet paper feed unit, configure the printer options in “Change Accessories” in the printer driver. For details about opening “Change Accessories”, see “Making printer default settings - the printer properties”, Software Guide.

Reference
- "Adjusting Printing Position"
Installing the Memory Expansion Units
This section describes how to install the memory expansion units.
Installing the SDRAM Module
CAUTION
- Do not touch the inside of the controller board compartment. It may cause a machine malfunction or a burn.
Important
- Before beginning work, ground yourself by touching something metal to discharge any static electricity. Static electricity can damage the SDRAM module.
- Do not subject the SDRAM module to physical shocks.
- When installing the SDRAM module and wireless LAN interface board together, install the SDRAM module first, and then install the wireless LAN interface board. If the wireless LAN interface board is already installed, remove it before installing the SDRAM module.
- The printer comes equipped with 512 MB of memory. This can be expanded to a maximum of 1024 MB.
- Before using the new SDRAM module, you must configure settings in the printer driver.
-
Turn the printer off and unplug the power cord.
-
Remove the five screws securing the controller board.
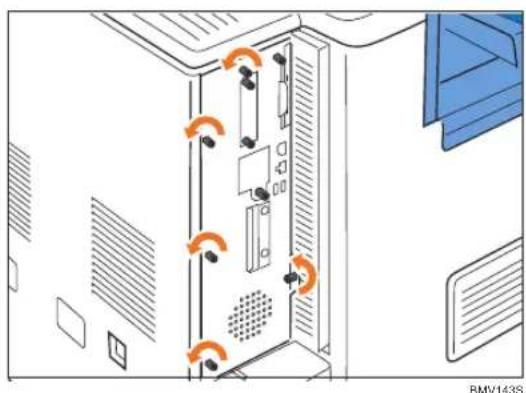
natural_image
Diagram of a server room with ventilation ducts and ventilation grilles, showing orange arrows indicating airflow or movement (no text or symbols)The removed screws will be used to secure the controller board again later.
- Holding the handle, carefully pull out the controller board.
Slide the controller board completely out and place it on a flat surface such as a table.

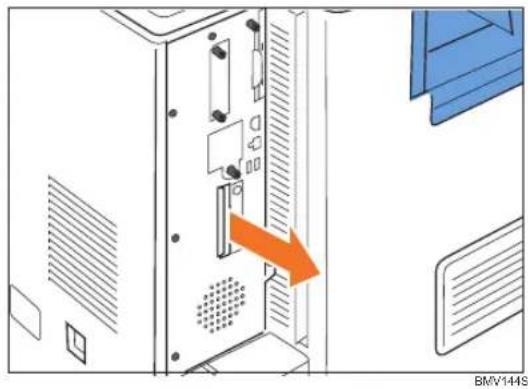
natural_image
Diagram of a computer tower with an orange arrow pointing to a panel, no text or symbols presentUse both hands to slide the controller board completely out, and then place it on a flat surface such as a table.
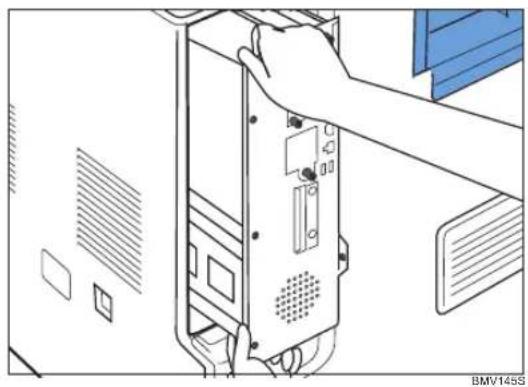
natural_image
Illustration of a hand inserting a computer into a drive bay (no text or symbols visible)- Install the SDRAM module in the indicated position.
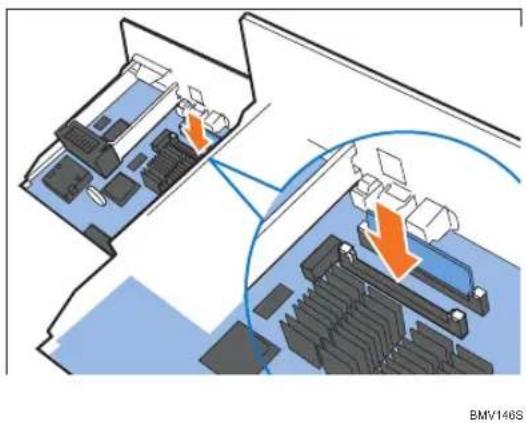
text_image
BMV146SThere are two SDRAM slots. A 512 MB SDRAM module is installed in the outer slot. When installing an expansion SDRAM module, install the module in the free, inner slot.
- Align the notch on the SDRAM module with the slot, and then carefully push in the SDRAM module perpendicularly.
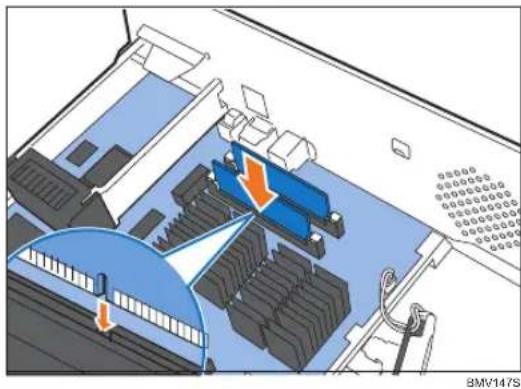
natural_image
Interior view of a server room with blue equipment and orange directional arrows indicating flow or movement (no text or symbols)- Press the SDRAM module straight down until it clicks into place.
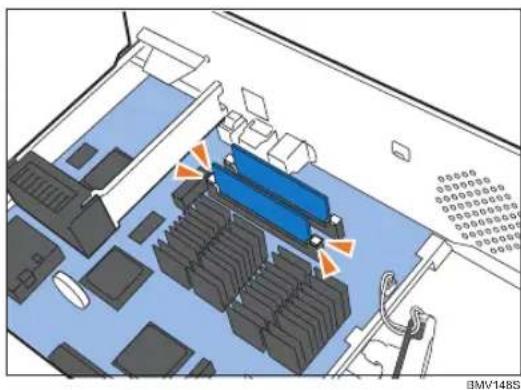
natural_image
Diagram of a server rack with blue and orange indicators indicating ports or connections (no readable text or symbols)- When also installing the hard disk, install it before returning the controller board to the printer.
See "Installing the Hard Disk" for instructions about installing the hard disk.
- Fit the controller board into the printer, and push it carefully in until it stops.
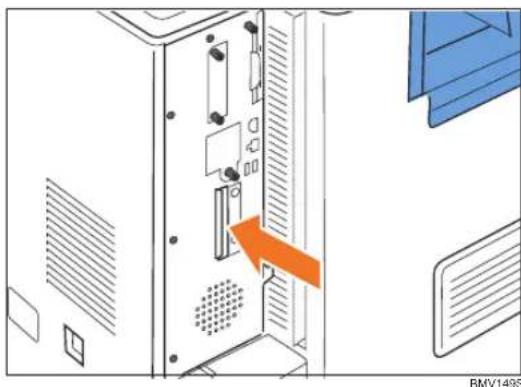
natural_image
Diagram of a computer tower with an orange arrow pointing to the door panel (no text or symbols present)Push it firmly into the printer using the handle. The printer may malfunction if the controller board is not properly installed.
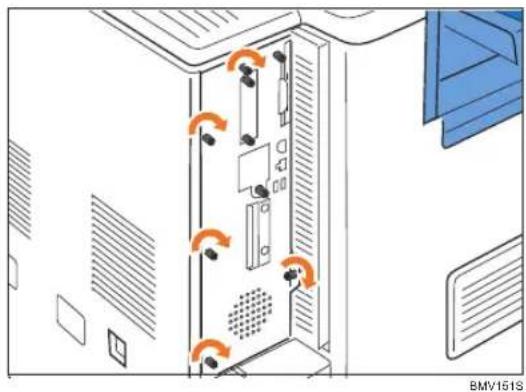
- Fasten the controller board to the printer using the five screws.
natural_image
Diagram of a server rack with ventilation slots and ventilation ducts, no text or symbols present
Note
- Confirm that the SDRAM module was correctly installed by printing the configuration page. Check that the total memory value is shown in "Device Connection" on the configuration page.
-
The table below shows the total SDRAM module capacities.
-
If the SDRAM module was not installed properly, repeat the procedure from the beginning. If it cannot be installed correctly even after reattempting installation, contact your sales or service representative.
- For information on printing the configuration page, see "List/Test Print Menu", Software Guide.
- Install the controller board carefully. For details, see "Cautions When Re-installing the Controller Board".
- To use the installed SDRAM module, configure the printer options in "Change Accessories" in the printer driver. For details about opening "Change Accessories", see "Making printer default settings - the printer properties", Software Guide.

Reference
- "Cautions When Re-installing the Controller Board"
Installing the Hard Disk
This section explains how to install the hard disk in the basic model.
A hard disk is pre-installed in the HDD standard model.
! CAUTION
- Do not touch the inside of the controller board compartment. It may cause a machine malfunction or a burn.
Important
- Before beginning work, ground yourself by touching something metal to discharge any static electricity. Static electricity can damage the hard disk.
- Do not subject the hard disk to physical shocks.
- When installing the hard disk and wireless LAN interface board together, install the hard disk first, and then install the wireless LAN board. If the wireless LAN interface board is already installed, remove it before installing the hard disk.
• Install the hard disk carefully if the SDRAM module is already installed. If the hard disk comes in contact with the SDRAM module, the SDRAM module may become damaged. -
Before using the new hard disk, you must configure settings in the printer driver.
-
Check the contents of the package.

text_image
Technical diagram showing four labeled components of an electronic device, including a housing, cable, and connector parts.BMV152S
- Hard Disk
- Power Cable
- Flat Cable
-
Three Screws
-
Turn the printer off and unplug the power cord.
-
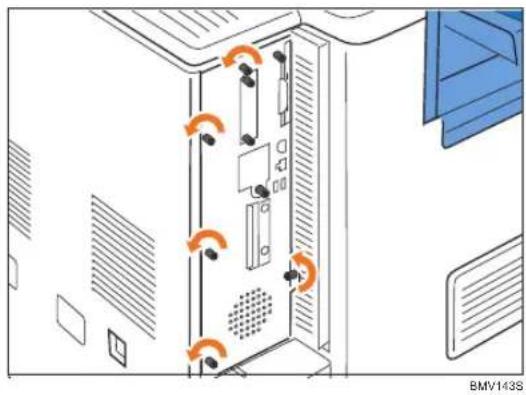
Remove the five screws securing the controller board.
natural_image
Diagram of a server rack with ventilation slots and orange circular arrows indicating clockwise motion (no text or symbols)The removed screws will be used to secure the controller board again later.
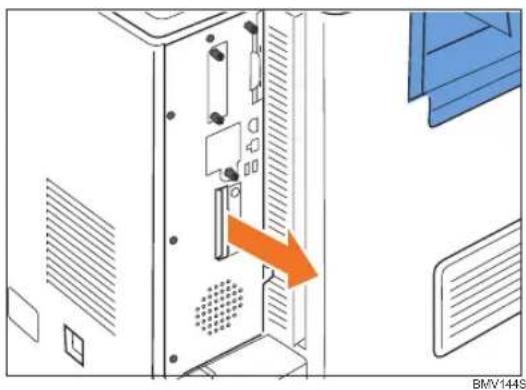
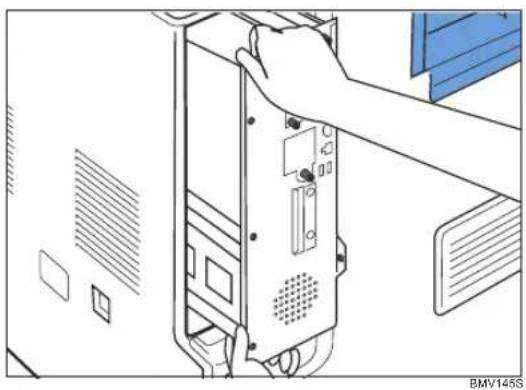
- Holding the handle, carefully pull out the controller board.
natural_image
Diagram of a computer tower with an orange arrow pointing to the door panel (no text or symbols present)Use both hands to slide the controller board completely out, and then place it on a flat surface such as a table.
natural_image
Illustration of a computer tower with hands installing or adjusting the internal components (no text or symbols visible)- Install the hard disk in the indicated position.
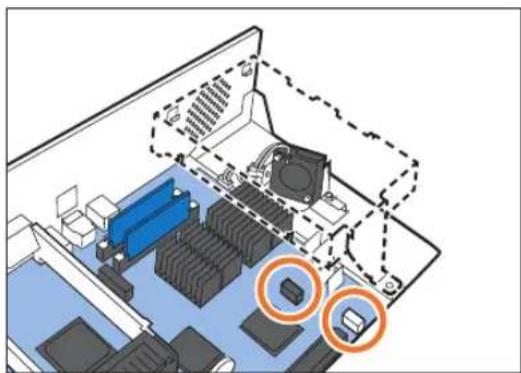
natural_image
Interior view of an electronic device with labeled components and highlighted areas (no text or symbols present)BMV153S
Install the hard disk carefully if the SDRAM module is already installed. If the hard disk comes in contact with the SDRAM module, the SDRAM module may become damaged.
- Hook the mounting indents on the hard drive onto the tabs on the controller board panel.
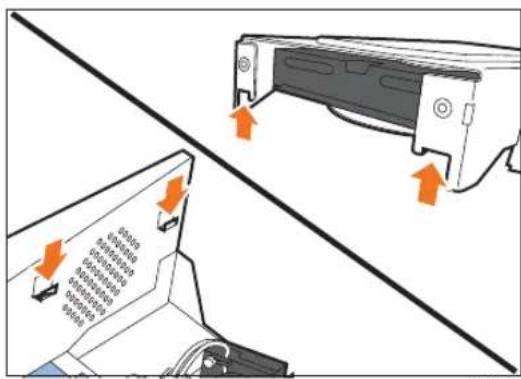
text_image
Diagram showing a device with orange arrows indicating directional changes, including a screen with grid layout and a rack-mounted device.BMV154S
- Use two coin screws to fasten the hard disk to the controller board panel.

natural_image
Technical line drawing of a computer chassis with labeled ports and connectors (no text or symbols)BMV155S
- Fasten the hard disk to the circuit board with the remaining coin screw.
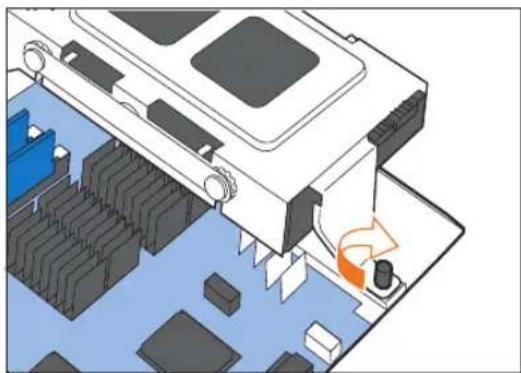
natural_image
Isometric diagram of a computer motherboard with a component and directional arrows indicating motion (no text or symbols)BMV156S
- Connect the power cable to the hard disk and the controller board.
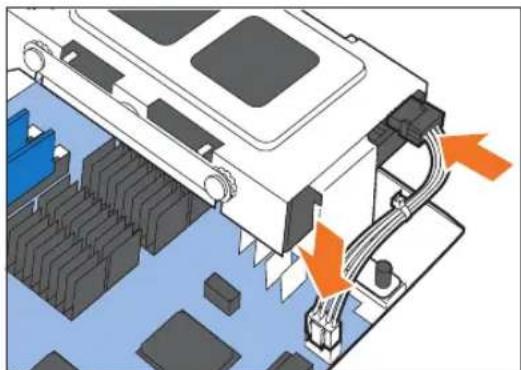
natural_image
Diagram of an electronic device with connectors and a highlighted cable, showing internal components without any text or symbols.BMV157S
- Connect the flat cable to the hard disk and the controller board.
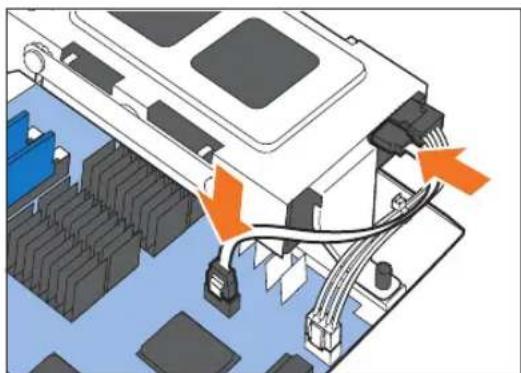
natural_image
Diagram of a computer motherboard with connectors and wiring, showing no text or symbolsBMV158S
-
If you are installing other options onto the controller board, proceed to install the next option without reinserting the controller board.
-
Fit the controller board into the printer, and push it carefully until it stops.
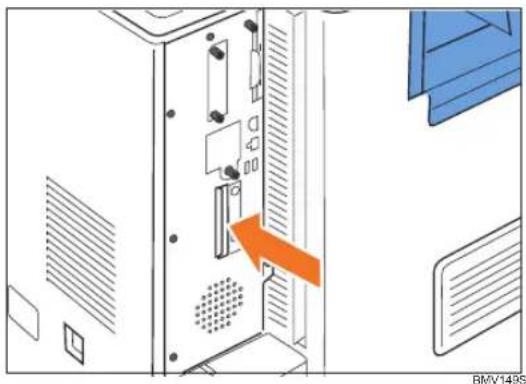
natural_image
Diagram of a computer tower with an orange arrow pointing to a door panel (no text or symbols present)Push it firmly into the printer using the handle. The printer may malfunction if the controller board is not properly installed.
- Fasten the controller board to the printer using the five screws.
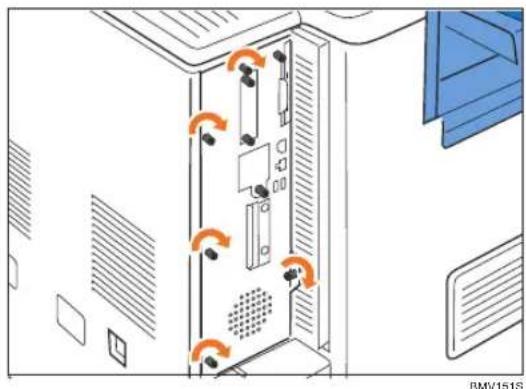
natural_image
Diagram of a server rack with ventilation slots and orange arrows indicating clockwise or rotary motion (no text or symbols)When you turn the power to the printer on, the hard disk will be formatted automatically.

Note
- Confirm that the hard disk was correctly installed by printing the configuration page. If it is correctly installed, "Hard Disk Drive" will appear for "Device Connection" on the configuration page.
- If the hard disk was not installed properly, repeat the procedure from the beginning. If it cannot be installed correctly even after reattempting installation, contact your sales or service representative.
- For information on printing the configuration page, see "List/Test Print Menu", Software Guide.
- Install the controller board carefully. For details, see "Cautions When Re-installing the Controller Board".
- To use the installed hard disk, configure the printer options in "Change Accessories" in the printer driver. For information about opening "Change Accessories", see "Making printer default settings -the printer properties". Software Guide.

Reference
- "Cautions When Re-installing the Controller Board"
Installing the Interface Units
Installing the Gigabit Ethernet Board
2

Important
- Before beginning work, ground yourself by touching something metal to discharge any static electricity. Static electricity can damage the board.
- Do not subject the board to physical shocks.
- The printer's Ethernet port is not available when the Gigabit Ethernet board is attached to the printer.
Use the Ethernet port on the Gigabit Ethernet board.
- When installing the Gigabit Ethernet board and wireless LAN interface board together, install the Gigabit Ethernet board first, and then install the wireless LAN interface board. If the wireless LAN interface board is already installed, remove it before installing the Gigabit Ethernet board.
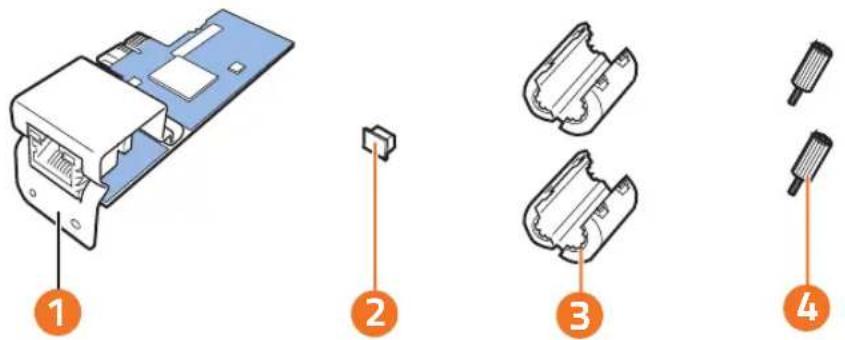
text_image
Diagram showing four stages of an electronic device component with numbered labels indicating each step.BMV159S
1. Check the contents of the package.
- Gigabit Ethernet Board
- One Protective Cap
- Two Ferrite Cores
- Two coin screws
Use the included ferrite cores when connecting an Ethernet cable to the board.
2. Turn the printer off and unplug the power cord.
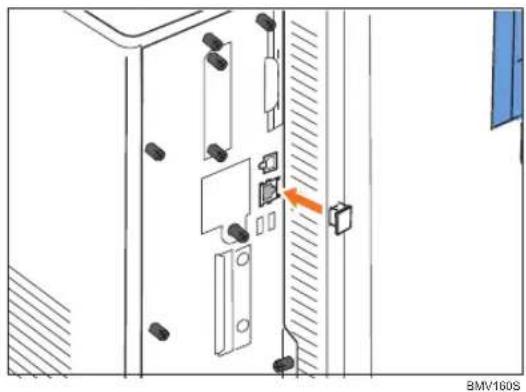
- Unplug the cable from the Ethernet port, and then cover it with the protective cap.
natural_image
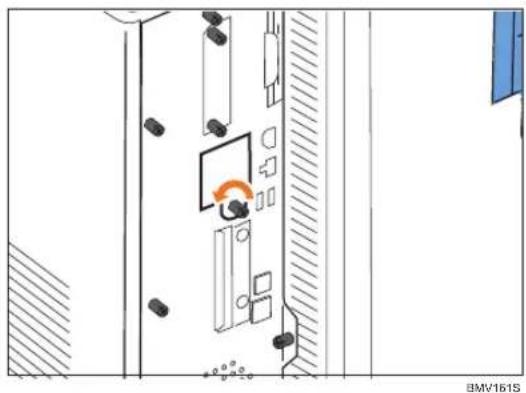
Technical diagram of a door or cabinet with internal components and a highlighted orange arrow pointing to a component (no text or symbols present)- Loosen the screw and remove the slot cover.
natural_image
Interior view of a room with furniture and a door, no visible text or symbolsThe removed cover will not be reused.
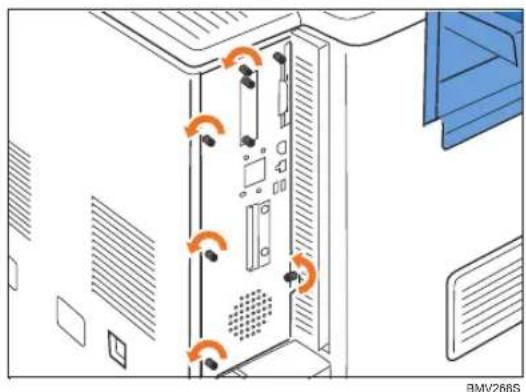
- Remove the 5 screws securing the controller board.
natural_image
Diagram of a server rack with ventilation slots and ventilation ducts, no text or symbols presentThe removed screws will be used to secure the controller board again later.
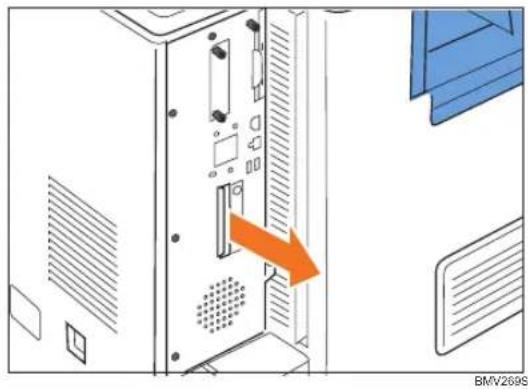
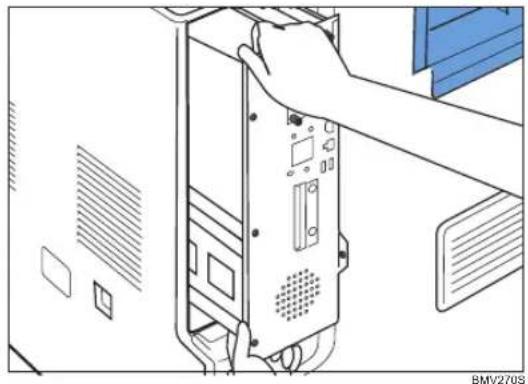
- Holding the handle, carefully pull out the controller board.
Slide the controller board completely out, and then place it on a flat surface such as a table.

natural_image
Diagram of a computer tower with an orange arrow pointing to the door panel (no text or symbols present)Use both hands to slide the controller board completely out.
natural_image
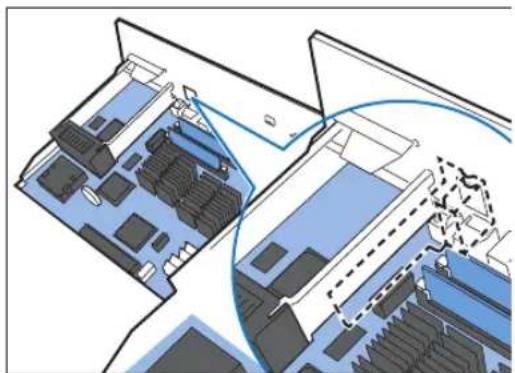
Illustration of a hand inserting a computer into a drive case (no text or symbols visible)- Install the Gigabit Ethernet board in the indicated position.
natural_image
Diagram of a computer motherboard showing internal components and circuitry (no text or labels)BMV162S
Install the hard disk carefully if the SDRAM module is already installed. If the hard disk comes in contact with the SDRAM module, the SDRAM module may become damaged.
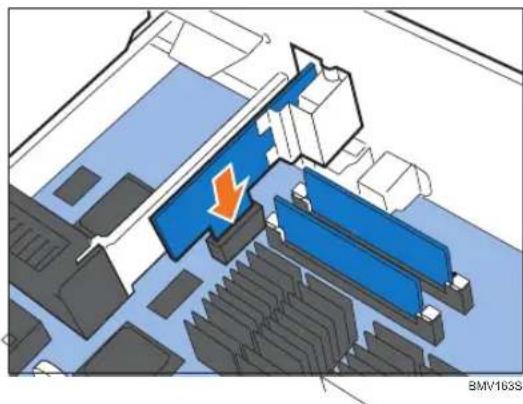
- Carefully insert the Gigabit Ethernet board vertically, all the way to the back.
natural_image
Architectural diagram showing a blue structural element with an orange arrow indicating direction, surrounded by gray panels and a white wall (no text or symbols)Push the Gigabit Ethernet board all the way to the back, and confirm that it is securely connected to the controller board.
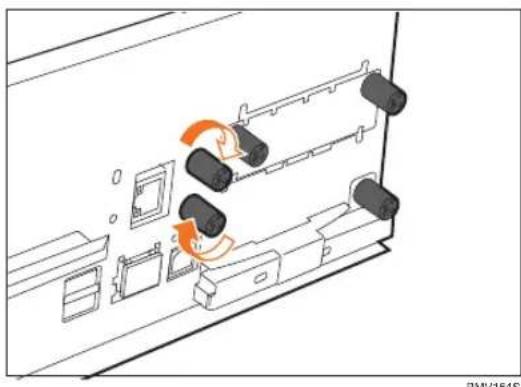
- Use 2 coin screws to fasten the Gigabit Ethernet board to the controller board panel.
natural_image
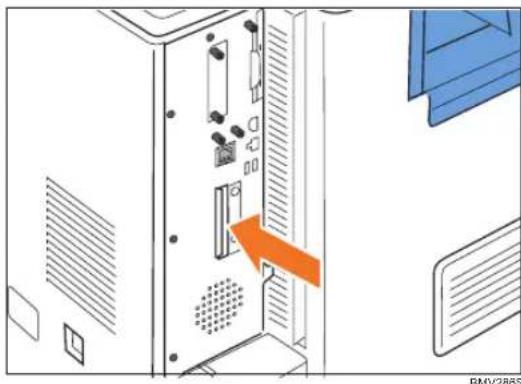
Diagram of a vehicle chassis with rollers and wheels, showing motion direction (no text or symbols)- Fit the controller board into the printer, and push it carefully until it stops.
natural_image
Diagram of a computer tower with an orange arrow pointing to a device panel (no text or symbols present)Push it firmly into the printer using the handle. The printer may malfunction if the controller board is not properly installed.
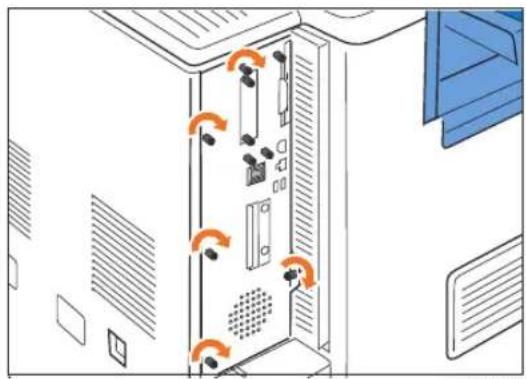
- Fasten the controller board to the printer using the five screws.
natural_image
Diagram of a server rack with ventilation slots and ventilation ducts, showing no text or symbolsBMV271S

Note
- Confirm that the board was correctly installed by printing the configuration page. If it is correctly installed, "Gigabit Ethernet Board" will appear for "Device Connection" on the configuration page.
- If the board was not installed properly, repeat the procedure from the beginning. If it cannot be installed correctly even after reattempting installation, contact your sales or service representative.
- For information on printing the configuration page, see "List/Test Print Menu", Software Guide.
- Before using the board, you must configure settings from the control panel. For details, see "Ethernet Configuration".

Reference
- "Ethernet Cable Connection"
-
"Ethernet Configuration"
-
If the board was not installed properly, repeat the procedure from the beginning. If it cannot be installed correctly even after reattempting installation, contact your sales or service representative.
- For details, see the operating instructions included with the Bluetooth interface unit.
- For information on printing the configuration page, see "List/Test Print Menu", Software Guide.
Installing the IEEE 1284 Interface Board
2

Important
- Before beginning work, ground yourself by touching something metal to discharge any static electricity. Static electricity can damage the board.
- Do not subject the board to physical shocks.
-
For connection to the IEEE 1284 interface board, use a half pitch 36-pin interface cable.
-
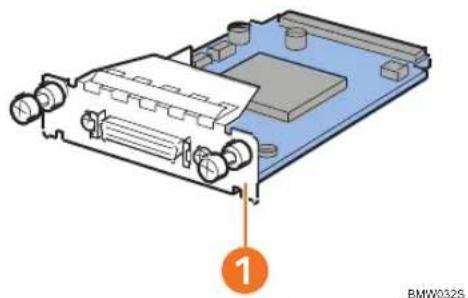
Check the contents of the package.
natural_image
Technical diagram of a mechanical device with labeled component (1), no readable text or symbols present-
IEEE 1284 Interface Board
-
Turn the printer off and unplug the power cord.
-
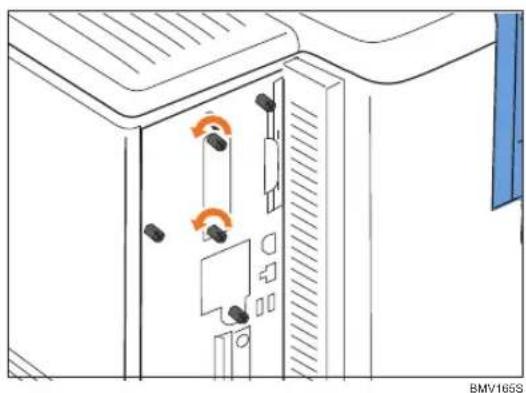
Loosen the two screws and remove the slot cover.
natural_image
Diagram of a server rack with two switches and orange circular arrows indicating rotation (no text or symbols)The removed cover will not be reused.
- Fully insert the IEEE 1284 interface board.
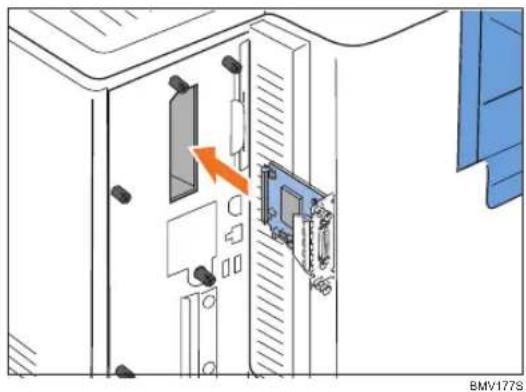
natural_image
Diagram of a device interior with labeled components and an orange arrow indicating a directional flow (no text or symbols present)Confirm that the IEEE 1284 interface board is firmly connected to the controller board.
- Tighten the two screws to secure the interface board.
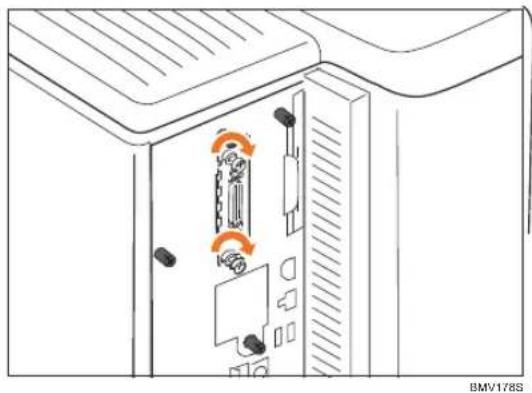
natural_image
Diagram of a door with internal components and directional arrows indicating motion (no text or symbols)-
Plug in the power cord, and then turn on the printer.
-
Print the configuration page to confirm that the board was attached correctly.

Note
- Confirm that the board was correctly installed by printing the configuration page. If it is correctly installed, "Parallel Interface" will appear for "Device Connection" on the configuration page.
- If the board was not installed properly, repeat the procedure from the beginning. If it cannot be installed correctly even after reattempting installation, contact your sales or service representative.
- For information on printing the configuration page, see "List/Test Print Menu", Software Guide.

Reference
- "Parallel Cable Connection"
3. Connecting the Printer Cables
This chapter explains how to connect network and USB cables.
Ethernet Cable Connection
Prepare a hub and other network devices, and connect the Ethernet cable to the printer.
If you are connecting the printer using the printer's standard Ethernet port, use a 10BASE-T or 100BASE-TX cable.
If you are connecting the printer using the optional Gigabit Ethernet board, you can use a 1000BASE-T cable, instead of a 10BASE-T or 100BASE-TX cable.
CAUTION
- A network interface cable with a ferrite core must be used for RF interference suppression.
- For users outside the United States of America: properly shielded and grounded cables and connectors must be used for connections to a host computer (and/or peripheral) in order to meet emission limits.
- For users in the United States of America: properly shielded and grounded cables and connectors must be used for connections to a host computer (and/or peripheral) in order to meet FCC emission limits.
Important
- An Ethernet cable is not supplied with this printer. Select your cable according to the network environment.
- The printer's Ethernet port is not available when the Gigabit Ethernet board is attached to the printer.
-
Use the following Ethernet cables:
-
When using 100Base-TX/10Base-T
Unshielded twisted pair (UTP) cable or Shielded twisted pair (STP) cable, category 5 or greater. - When using 1000Base-T:
Unshielded twisted pair (UTP) cable or Shielded twisted pair (STP) cable, category 5e or greater.
Connecting to the standard Ethernet port
- Attach the ferrite core supplied with this printer at the printer end of the Ethernet cable about 5 cm (2.5 inches) (①) from the connector, making a loop as shown.
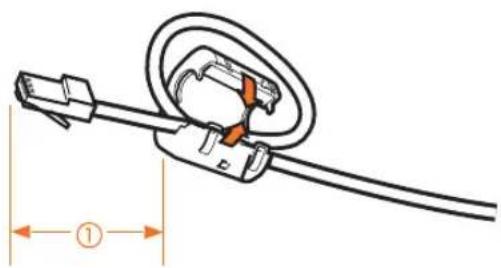
natural_image
Diagram of a cable connector with a circular housing and orange connectors, labeled with dimension ① (no text or symbols beyond basic geometry)BBM011S
- Connect the Ethernet cable to the Ethernet port that is located on the left side of the printer.

text_image
BMV182S- Connect the other end of the cable to the network, for example using a hub.
Connecting to the Ethernet port of the Gigabit Ethernet board
- Attach the two ferrite cores to the Ethernet cable.
Attach the ferrite cores supplied with the Gigabit Ethernet board about 5 cm (2.5 inches) (①) from the connector at both ends of the Ethernet cable, making a loop as shown.
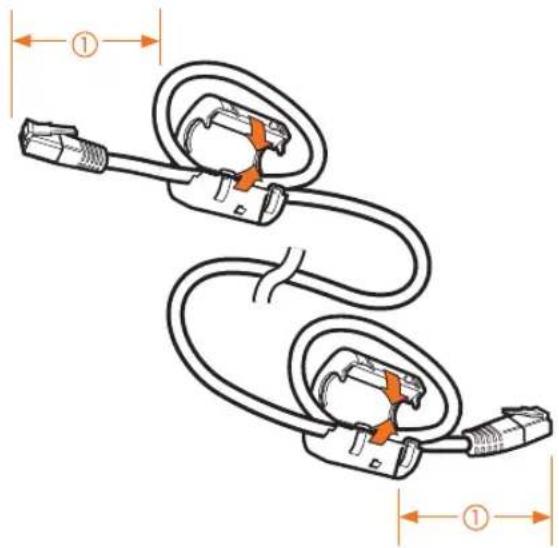
text_image
Diagram showing two connected cable connectors with labeled dimensions and orange connectors indicating internal components.BAX007S
- Connect the Ethernet cable to the Ethernet port of the Gigabit Ethernet board.
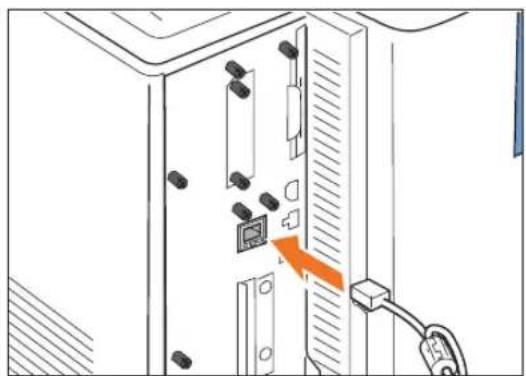
natural_image
Diagram of a computer interface showing a door panel with connectors and a cable inserted (no text or symbols)BMV1635
- Connect the other end of the cable to a network hub, for example, to connect the printer to the network.

Note
- For details about configuring the network environment, see "Ethernet Configuration".

Reference
- "Installing the Gigabit Ethernet Board"
- "Ethernet Configuration"
Reading the LED Lamps
Standard Ethernet port
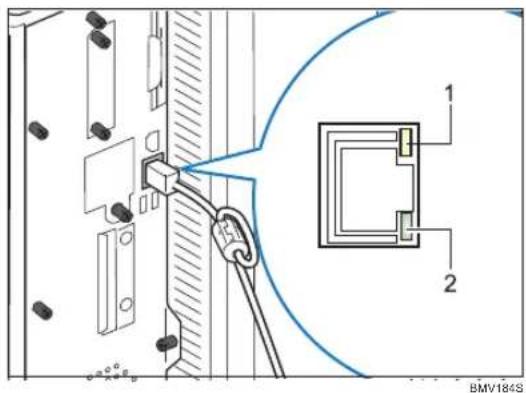
text_image
BMV184S- Yellow: turns on when 100BASE-TX is in use. It turns off when 10BASE-T is in use.
- Green: turns on when the printer is properly connected to the network.
Ethernet port of the Gigabit Ethernet board
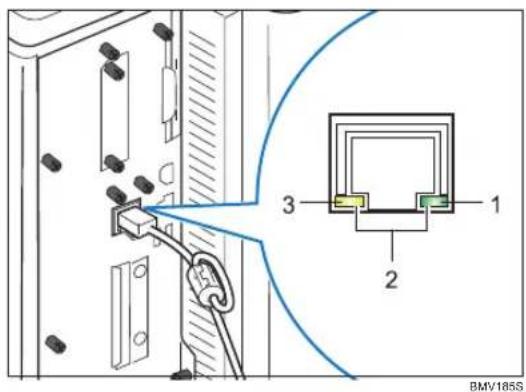
text_image
BMV185S 1 2 3- Green: turns on when 10BASE-T is in use.
- Both the green and yellow lamps are lit when 1000BASE-T is in use.
- Yellow: turns on when 100BASE-TX is in use.
USB Cable Connection
CAUTION
- For users outside the United States of America: properly shielded and grounded cables and connectors must be used for connections to a host computer (and/or peripheral) in order to meet emission limits. - For users in the United States of America: properly shielded and grounded cables and connectors must be used for connections to a host computer (and/or peripheral) in order to meet FCC emission limits.
Important
- USB connection is possible under Windows 2000/XP/Vista, Windows Server 2003/2003 R2/2008, Mac OS 9, and Mac OS 10.3.3 or later.
- USB connection with a Macintosh is only possible via the printer's USB port.
-
A USB cable is not supplied with this printer. Select your cable according to the computer.
-
Connect the square-shaped connector of the USB cable to USB port B on the left side of the printer.
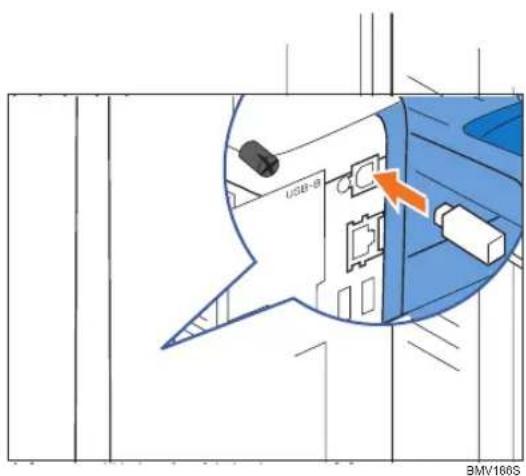
text_image
USB1-B BMW166S- Connect the opposite end's flat connector to the desired device such as your computer's USB interface, or a USB hub.
Digital Camera Connection
This printer supports direct printing, which allows you to print images taken with a digital camera by connecting the camera directly to the printer. The following describes how to connect the printer to a digital camera.
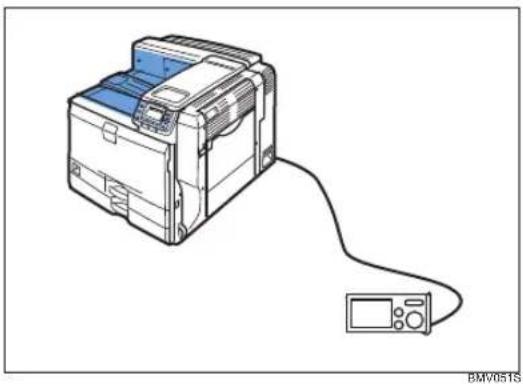
natural_image
Illustration of a printer connected to a digital display unit (no text or symbols visible)
Important
• This function requires Camera direct print card.
- Make sure your digital camera supports PictBridge.
- A USB cable is not supplied. Use the USB cable that was included with your digital camera.
- Confirm that the printer and digital camera are turned on.
- Connect the USB cable to USB port A on the printer and to your digital camera.
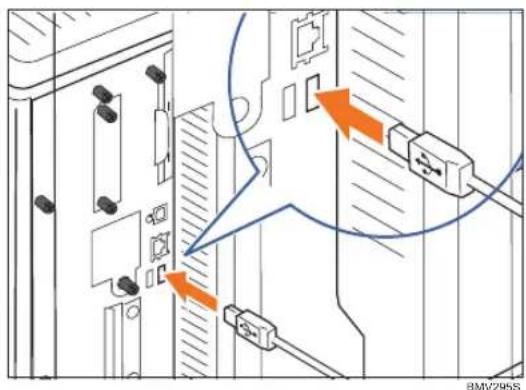
text_image
BMW295S- When a digital camera is not connected to the printer, store the USB cable in a location where it will not be damaged.

Note
- For the printing method, see "PictBridge Printing", Software Guide.

Reference
• p.67 "Installing SD Card Options"
Parallel Cable Connection
The type of cable required varies depending on the computer you are using. Make sure to use the interface cable compliant with your computer.

CAUTION
- For users outside the United States of America: properly shielded and grounded cables and connectors must be used for connections to a host computer (and/or peripheral) in order to meet emission limits.
- For users in the United States of America: properly shielded and grounded cables and connectors must be used for connections to a host computer (and/or peripheral) in order to meet FCC emission limits.

Important
- The printer's parallel connection is a standard bidirectional interface that requires an IEEE 1284-compliant half pitch 36-pin parallel cable and host computer parallel port.
-
Use shielded interface cable. Unshielded cables create electromagnetic interference.
-
Turn off the printer and computer.
-
Connect the interface cable to the IEEE 1284 interface board.
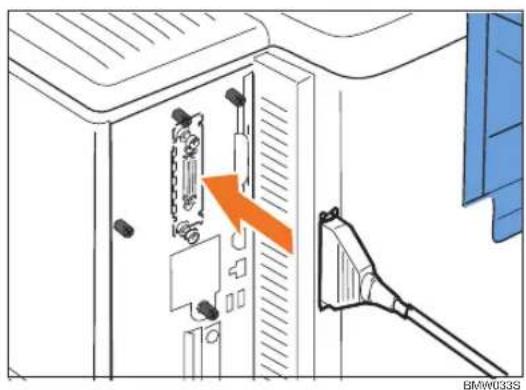
natural_image
Diagram of a device interior with an orange arrow pointing to a component, showing no text or symbols.- Connect the other end of the interface cable to your computer, and then secure the cable.

Note
- "Preparing for Printing", Software Guide

Reference
• p.65 "Installing the IEEE 1284 Interface Board"
4. Configuration
This chapter explains supported network connections, and settings for the IP addresses and the Wireless LAN security.
Ethernet Configuration
Configure the following network settings according to the network environment using the control panel.

Important
- The following table shows the control panel settings and their default values. These items appear in the [Host Interface] menu.
| Setting Name Default | |
| Machine IPv4 Address | DHCP: OnIPv4 Address: 11.22.33.44Subnet Mask: 0.0.0.0Gateway Address: 0.0.0.0 |
| IPv6 Stateless Setting | Active |
| IPsec | Inactive |
| NW Frame Type | Auto Select |
| Effective Protocol | IPv4: ActiveIPv: InactiveNetWare: InactiveSMB: ActiveApple Talk: Inactive |
| Ethernet Speed | Auto Select |
| IEEE802.1X Auth. (Ethernet) | Inactive |
| Restr.IEEE802.1X Auth.Def. | - |
| LAN Type | Ethernet |

Note
- If DHCP is in use on your network, the IP address, subnet mask, and gateway address are all set automatically.
- If the printer is already placed on a TCP/IP-capable environment, you can also use SmartDeviceMonitor for Admin or a Web browser to configure IP address-related settings.
Specifying an IP Address (No DHCP)
Follow this procedure to assign a specific IP address to the printer. This is only necessary when you will use the printer on a network without DHCP, or want to prevent the printer's IP address from changing. Before beginning, make sure that you know the IP address, subnet mask and gateway address that the printer will use.
1. Press the [Menu] key.
![Xanté Impressia - Press the [Menu] key. - 1](/content/2026/05/785924/images/15b7ac1def5e2b71c933519562a325a899caedc907afc14995f2ca0df13ec217.jpg)
text_image
Menu Suspend/ Resume Power Alert Data In Escape OK BMW28S- Press the [▼] or [▲] key to select [Host Interface], and then press the [OK] key.
![Xanté Impressia - Press the [Menu] key. - 2](/content/2026/05/785924/images/2891d78e02224097ee5f5e9d3a4e3dd71d05f503367507754d5076798538e17b.jpg)
text_image
Menu 4/4 OK Host Interface Shutdown Supplies- Press the [▼] or [▲] to select [Network], and then press the [OK] key.
![Xanté Impressia - Press the [Menu] key. - 3](/content/2026/05/785924/images/07881e921781f6efa8e1f8d93ae85a2f2e802bd1706ed3093569d22504f9ef4c.jpg)
text_image
Host Interfc. 1/2 OK I/O Buffer I/O Timeout Network- Press the [▼] or [▲] key to select [Effective Protocol], and then press the [OK] key.
![Xanté Impressia - Press the [Menu] key. - 4](/content/2026/05/785924/images/e155ff4d90ca88ccd2635171992f1524266fad9e869a8d764c7159a8a9bf06be.jpg)
text_image
Network 2/3 OK NW Frame Type Effective Protocol Ethernet Speed![Xanté Impressia - Press the [Menu] key. - 5](/content/2026/05/785924/images/858ad999a176560b7823d8ea63e48e7eb62e25a08da4e5184bd91d9c776baaf4.jpg)
- Press the [▼] or [▲] key to select the appropriate network protocol, and then press the [OK] key.
![Xanté Impressia - Press the [Menu] key. - 6](/content/2026/05/785924/images/8081cc574041f615b6ec517c6184aa6c6760d401c6ed3b3f8c56ae7615b751b8.jpg)
text_image
Effective Prot. 1/2 OK IPv4 IPv6 SMB- Press the [▼] or [▲] key to select [Active] or [Inactive], and then press the [OK] key.
![Xanté Impressia - Press the [Menu] key. - 7](/content/2026/05/785924/images/155089f6c58fb3cdf8714b65b7b2caa825e193681dfa1d059ada27f674fb8cd0.jpg)
text_image
IPv4: 1/1 OK Active InactiveSet other protocols you need to set in the same way.
- Select [Inactive] for unused protocols.
- Enable IPv4 to use the pure IPv4 environment of NetWare5/5.1, Netware 6/6.5. 7. Press the [Escape] key until the screen returns to the [Network] menu.
- If you use IPv4, assign the IPv4 address to the printer. Press the [▼] or [▲] key to select [Machine IPv4 Address], and then press the [OK] key.
![Xanté Impressia - Press the [Menu] key. - 8](/content/2026/05/785924/images/c8f60c089fb43bdb232243fd9ff585fb5c9c2679d14f31f6347d1d3fe4dbcf38.jpg)
text_image
Network 1/3 OK Machine IPv4 Address IPv6 Stateless Setting IPsecTo get the IP address for the printer, contact your network administrator.
- To specify the IP address, press [IP Add.].
![Xanté Impressia - Press the [Menu] key. - 9](/content/2026/05/785924/images/aa49bc1f9ed84761f00fde4705f753f3cf176e9403d07f31271273fc422b2ff4.jpg)
text_image
IPv4 Address: 1/1 OK Auto-Obtain (DHCP) Specify IP Add. Subnet M GatewayIf you use IPv4, also assign the subnet mask and gateway address. To assign these, press [Subnet M] or [Gateway].
- Press the [▼] or [▲] to enter the address, and then press the [OK] key.
Press the [▼] or [▲] key to enter the left-most entry field of the address. After entering the left field, press the [▶] key, and then you can enter the next field. After completing entry of the all fields, press the [OK] key. Use the same method to assign the subnet mask and gateway address.
- Change the IP address from "11.22.33.44" to an IP address supported by your network.
- Press the [▼] or [▲] key to select [Specify], and then press the [OK] key.
![Xanté Impressia - Press the [Menu] key. - 10](/content/2026/05/785924/images/069cc348110f52916d9911e80d55c02dc1cfffffbcc4107a4c97b0a5cc02e6da.jpg)
text_image
IPv4 Address: 1/1 OK Auto-Obtain (DHCP) Specify IP Add. Subnet M GatewayIf you do not select [Specify] in this step, the address you set will not be saved.
- Press the [Menu] key to return to the initial screen.
- Print a configuration page to confirm the settings.
![Xanté Impressia - Press the [Menu] key. - 11](/content/2026/05/785924/images/e575de1038f6b137c537b88c12a2a8fd9d365e68f52c8b768bd4f2dc24e85e7a.jpg)
Note
- For details about printing the configuration page, see "List/Test Print Menu", Software Guide.
Receiving an IP Address Automatically (DHCP)
Follow this procedure to set the printer to receive an IP address automatically using DHCP. The DHCP feature is active by default, so this procedure is only required if you have changed the default settings.

Important
- When [DHCP] is selected, you cannot configure the IP address, subnet mask, or gateway address.
-
Consult your network administrator for information about configuring network settings.
-
Press the [Menu] key.
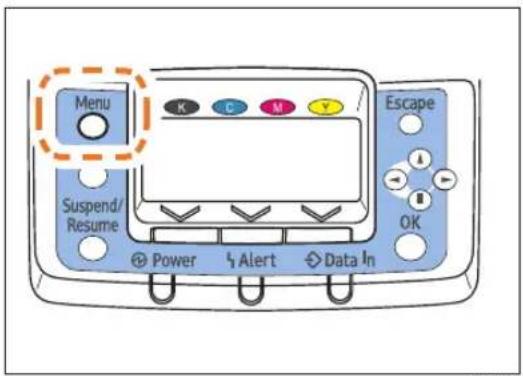
text_image
Menu Suspend/ Resume Power Alert Data In Escape OKBMW028S

- Press the [▼] or [▲] key to select [Host Interface], and then press the [OK] key.
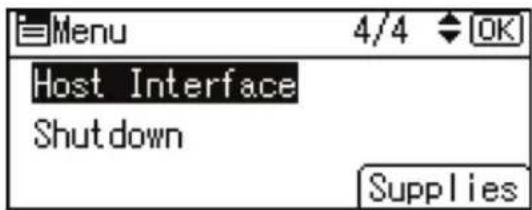
text_image
Menu 4/4 OK Host Interface Shutdown Supplies- Press the [▼] or [▲] key to select [Network], and then press the [OK] key.

text_image
Host Interfc. 1/2 OK I/O Buffer I/O Timeout Network- Press the [▼] or [▲] key to select [Machine IPv4 Address], and then press the [OK] key.
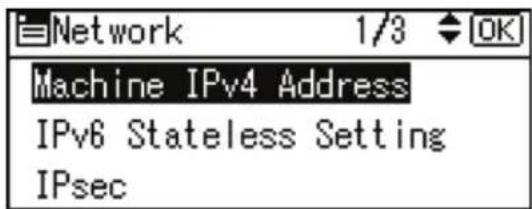
text_image
Network 1/3 OK Machine IPv4 Address IPv6 Stateless Setting IPsec- Press the [▼] or [▲] key to select [Auto-Obtain (DHCP)], and then press the [OK] key.
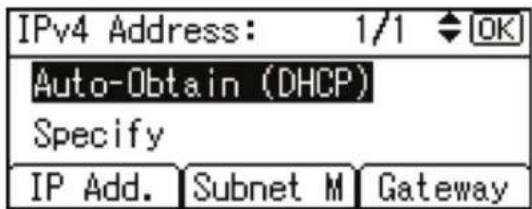
text_image
IPv4 Address: 1/1 OK Auto-Obtain (DHCP) Specify IP Add. Subnet M GatewayThe printer will automatically receive an IP address.
To check the detected addresses, press the following:
• [IP Add.]: IP address
• [Subnet M] : Subnet mask
• [Gateway] : Gateway address
-
Press the [Menu] key to return to the initial screen.
-
Print a configuration page to confirm the settings.

Note
- For details about printing the configuration page, see "List/Test Print Menu", Software Guide.

5. Paper and Other Media
This chapter explains the paper sizes and type supported by this printer, and how to load paper in the paper trays.
Supported Paper for Each Tray
This section describes the paper size, feed direction, and the maximum amount of paper that can be loaded into each paper tray in this printer.
Symbols
| In this manual On the display Paper feed direction | ||
| (Feed direction) | A4 (210x297) 812 × 11 | Short-edge feed direction |
| (Feed direction) | A5 (210x148) 812 × 512 | Long-edge feed direction |

Note
- Be careful of the paper feed direction when loading paper. The direction is determined for each paper size.
Tray 1
| 220-240 V | 120 V | |
| Paper sizes A4 8 12 " x 11" | (Letter) ☐ | ☐ |

| 220-240V | 120V | |
| Types of paper | Plain PaperRecycled PaperSpecial Paper 1 to 3Color PaperLetterheadCoated Paper: Gloss PrintCoated PaperPreprintedBond PaperCardstockMiddle ThickThick Paper 1 to 3+ Custom 1 to 8 | |

Note
- +Custom X (X: 1 to 8) is the paper type that is named under a unique name, according to usage. For details about registering, see “Registering Names to Paper Types”.
- The paper tray guides are fixed. However, you can switch the setting between A4, B5, A5 and 8^1/2 × 11 (Letter).

Reference
- "Registering Names to Paper Types"
Tray 2, 500/1000-sheet Paper Feed Unit (Tray 3 to 5)
| 220-240V 120V | ||
| Paper sizes selected-automatically | A3 □A4 □ □A5 □B4JIS □B5JIS □ □8 12 " x 11" (Letter) □220-240V | 11" x 17" □8 12 " x 14" (Legal) □8 12 " x 11" (Letter) □ □7 14 " x 10 12 " (Executive) □A4 □A5 □B5JIS □120V |
| Paper sizes requiring manual setting | 11" x 17"☐81⁄2" x 14" (Legal)☐8" x 13" (F/GL2)☐81⁄2" x 13" (Foolscap)☐81⁄2" x 11" (Letter)☐81⁄4" x 13" (Folio)☐71⁄4" x 101⁄2" (Executive)☐8K☐16K☐Custom size: 182 to 297 mm in width, 148 to 432 mm in length *1 | 81⁄2" x 13" (Foolscap)☐81⁄4" x 13" (Folio)☐8" x 13" (F/GL)☐71⁄4" x 101⁄2" (Executive)☐A3☐A4☐B4 JIS☐B5 JIS☐8K☐16K☐Custom size: 7.17" to 11.69" in width, 5.83" to 17" in length *1 |
| Types of Paper | Plain PaperRecycled PaperSpecial Paper 1 to 3Color PaperLetterheadCoated Paper: Gloss PrintCoated PaperPreprintedBond PaperCardstockMiddle ThickThick Paper 1 to 3+ Custom 1 to 8 | |
*1If the length of custom size paper is 420 mm (16.54 inches) or more, the maximum width is 279 mm (10.98 inches)

Note
- +Custom X (X: 1 to 8) is the paper type that is named under a unique name, according to usage. For details about registering, see "Registering Names to Paper Types".
- When using paper whose sizes are not automatically selected, select the paper size manually using the control panel. See "Loading Paper".

Reference
- "Registering Names to Paper Types"
- "Loading Paper"
2000-sheet Paper Feed Unit (Tray 3)
| 220-240V | 120V | |
| Paper sizes | A4 812 " x11" (Letter) | |
| Types of Paper | Plain PaperRecycled PaperSpecial Paper 1 to 3Color PaperLetterheadCoated Paper: Gloss PrintCoated PaperPreprintedBond PaperCardstockMiddle ThickThick Paper 1 to 3+ Custom 1 to 8 | |

Note
- +Custom X (X: 1 to 8) is the paper type that is named under a unique name, according to usage. For details about registering, see “Registering Names to Paper Types”.
- The paper tray guides are fixed. However, you can switch the setting between A4 and 8/2" × 11" (Letter).

Reference
- "Registering Names to Paper Types"
Bypass Tray
| 220-240V | 120V | |
| Paper sizes selected automatically | A3 □A4 □□A5 □□A6 □ | 11" x 17" □8 12 " x 11" (Letter) □□5 12 " x 8 12 " (Half Letter) □ |
| Paper sizes requiring manual setting | B4 JIS B5 JIS B6 JIS 11" x 17" 8 12 " x 14" (Legal) 8 12 " x 13" (Foolscap) 8 12 " x 11" (Letter) 8 14 " x 13" (Folio) 8" x 13" (F/GL) 7 14 " x 10 12 " (Executive) 5 12 " x 8 12 " (Half Letter) 4.125" x 9 12 " 3.875" x 7 12 " C5 Envelope C6 Envelope DL Envelope 8K 16K 12" x 18" Custom size: 90 to 305 mm in width, 148 to 1260 mm in length | 8 12 " x 14" (Legal) 8 12 " x 13" (Foolscap) 8 14 " x 13" (Folio) 8" x 13" (F/GL) 7 14 " x 10 12 " (Executive) 4.125" x 9 12 " 3.875" x 7 12 " C5 Envelope C6 Envelope DL Envelope A3 A4 A5 A6 B4 JIS B5 JIS B6 JIS 8K 16K 12" x 18" Custom size: 3.55" to 12" in width, 5.83" to 49.60" in length |
| Types of Paper | Plain PaperRecycled PaperSpecial Paper 1 to 3Color PaperLetterheadLabelsTransparencyEnvelopeCoated Paper: Gloss PrintCoated PaperPreprintedBond PaperCardstockThin PaperMiddle ThickThick Paper 1 to 3+Custom 1 to 8 | |

Note
- +Custom X (X: 1 to 8) is the paper type that is named under a unique name, according to usage. For details about registering, see "Registering Names to Paper Types".
- Tracing paper can curl easily due to humidity. If the paper has curled considerably, flatten it first, and then load it.
- Some types of paper have a clear vertical or horizontal orientation depending on the direction of the fibers. If you feed this type of paper in the opposite orientation, paper jams can occur. When loading tracing paper, load the paper so that it is fed in the direction of the fibers.
- Print quality may not be guaranteed for custom size paper that is wider than 297 mm (11.69 inches) in width or longer than 433 mm (17.05 inches) in length.
- When using paper whose sizes are not automatically selected, select the paper size manually using the control panel. See “Loading Paper”.
- Reference
- "Registering Names to Paper Types"
- "Loading Paper"
Paper Weight and Capacity
| Tray Supported paper weight | Supported capacity (Plain paper) |
| Tray 1 | 60 to 256 g/m2(16 to 68 lb.) |
| Tray 2 | 60 to 256 g/m2(16 to 68 lb.) |
| 1000-sheet paper feed unit | 60 to 256 g/m2(16 to 68 lb.) |
| 2000-sheet paper feed unit | 60 to 256 g/m2(16 to 68 lb.) |
| Bypass Tray | 52 to 256 g/m2(14 to 68 lb.) |
Note
- Do not load the paper so that the top of the stack exceeds the under limit mark inside the tray.
Paper Recommendations
This section describes loading and storing paper, details of each type of paper, and the printable area.
Configure the settings depending on the type of paper you are using.

Important
- Print quality cannot always be guaranteed for all types of paper that are sold at stores.
Storing Paper
Take care when storing paper. Improperly stored paper might result in poor print quality, paper misfeeds, or printer damage. Recommendations are as follows:
- Avoid storing paper in humid areas.
- Avoid exposing paper to direct sunlight.
- Store on a flat surface.
- Keep paper in its original package until time to use it.
Types of Paper and Other Media
This section describes the types of paper and required settings.
Plain paper
| Paper thickness | 60 to 90 g/m2 (16 to 24 lb.) |
| Printer setup | Select [Paper Input] → [Paper Type: (tray name)] → [Plain Paper]. |
| Printer driver setup | Select [Plain] in [Paper Type]. |
| Supported paper feeding tray | Any input tray can be used. |

| Paper capacity | Tray 1, 2: 550Tray 3: 1000 (1000-sheet paper feed unit) or 2000 (2000-sheet paper feed unit)Tray 4:550Tray 5: 550Bypass tray: 100Make sure paper is not stacked higher than the upper limit mark (▼) inside the tray. When using the bypass tray, make sure paper is not stacked higher than the paper guides inside it. |
| Duplex Printing Supported | |
| Additional Cautions | Default: [Plain Paper 2]When loading paper with a weight of 60 to 74 g/m2(16 to 20 lb.), change the plain paper setting to [Plain Paper 1]. To do this, press the [Menu] key, and select [Maintenance] on the display. Select [General Settings], then [Plain Paper Setting], and then select [Plain Paper 1]. |
Middle Thick
| Paper Thickness | 91 to 105 g/m2 (24 to 28 lb.) |
| Printer setup | Select [Paper Input] → [Paper Type: (tray name)] → [Middle Thick]. |
| Printer driver setup | Select [Middle Thick] in [Paper type]. |
| Supported paper feeding tray | Any input tray can be used. |
| Paper capacity | Tray 1, 2: 550Tray 3: 1000 (1000-sheet paper feed unit) or 2000 (2000-sheet paper feed unit)Tray 4: 550Tray 5: 550Bypass tray: 100Make sure paper is not stacked higher than the upper limit mark (▼) inside the tray.When using the bypass tray, make sure paper is not stacked higher than the paper guides inside it. |
| Duplex printing Supported |
Thick paper
| Paper Thickness | 106 to 256 g/m2 (28 to 68 lb.)• [Thick Paper 1]: 106 to 169 g/m2 (28 to 45 lb.)• [Thick Paper 2]: 170 to 220 g/m2 (45 to 59 lb.)• [Thick Paper 3]: 221 to 256 g/m2 (59 to 68 lb.) |
| Printer setup | Select [Paper Input] → [Paper Type: (tray name)] → [Thick Paper 1] to [Thick Paper 3] |
| Printer driver setup | Select [Thick 1 (106 - 170 g/m2)] to [Thick 3 (221 - 256 g/m2)] in [Paper Type]. |
| Supported paper feeding tray | Any input tray can be used. |
| Paper capacity | • Bypass tray: 40 for [Thick Paper 1], 20 for [Thick Paper 2] and [Thick Paper 3]Make sure paper is not stacked higher than the upper limit mark (▼) inside the tray. When using the bypass tray, make sure paper is not stacked higher than the paper guides inside it. |
- Paper and Other Media
| Duplex Printing | • [Thick Paper 1]: Supported• [Thick Paper 2], [Thick Paper 3]: Not supported |
| Additional cautions | • Print speed is slightly slower than when using plain paper.• When loading paper in the printer paper trays or the paper feed units, load at least 20 sheets. Also, adjust the side guide so that it lightly touches the paper.• Curled paper: If the paper is curled, flatten the paper before loading it.• If you are using thick paper with a smooth surface, paper jams or multiple feeding can occur. Fan the paper before loading it. If a paper jam or multiple feeding occurs even after you have fanned the paper, set the paper one sheet at a time. |
Thin paper
| Paper Thickness | 52 to 59 g/m2 (14 to 16 lb.) |
| Paper setup | Select [Paper Input] → [Paper Type: Bypass Tray] → [Thin Paper]. |
| Paper driver setup | Select [Thin (52 - 60 g/m20] in [Paper type]. |
| Supported paper feeding tray | Bypass tray |
| Paper capacity | Make sure paper is not stacked higher than the upper limit mark (▼) inside the tray. When using the bypass tray, make sure paper is not stacked higher then the paper guides inside it. |
| Duplex Printing | Not supported |
| Additional Cautions | When printing on thin paper, make a test print and check the print quality. Depending on the type of paper you are using, print quality may degrade. |
OHP transparencies
| Printer setup | Select [Paper Input] → [Paper Type: Bypass Tray] → [OHP (Transparency)]. |
| Printer driver setup | Select [OHP Transparency] in [Paper Type]. |
| Supported paper feeding tray | Bypass tray |
| Paper capacity | Make sure paper is not stacked higher than the paper guides inside the bypass tray. |
| Duplex Printing | Not supported |
| Additional Cautions | When loading OHP transparencies, take care not to load them upside down. Doing so may cause malfunction.It is recommended to place one sheet at a time.Make sure to fan OHP transparencies every time before printing. Leaving OHP transparencies loaded in the paper tray may cause them to stick together and result in a misfeed.If multiple OHP transparencies are fed at the same time, load them one by one.When printing on OHP transparencies, remove the transparencies one by one as they are output. |
Letterhead
| Printer setup | Select [Paper Input] →[Paper Type: (tray name)]→[Letterhead]. |
| Printer driver setup | Select [Letterhead] in [Paper type]. |
| Supported paper feeding tray | Any input tray can be used. |
| Paper capacity | Make sure paper is not stacked higher than the upper limit mark (▼) inside the tray. When using the bypass tray, make sure paper is not stacked higher than the paper guides inside it. |
5. Paper and Other Media
| Duplex printing Supported | |
| Letterhead setup | Default: [Letterhead 1]If the print quality needs to be improved, select [Maintenance] →[General Settings] →[Letterhead] →[Letterhead 1] to [Letterhead 3] to change the setting value to a different number depending on the paper thickness that you are using. High numbered settings allow thicker paper to be used, but are printed more slowly. |
| Additional cautions | When loading paper whose orientations are specified such as letterhead or letter paper, misprints may occur. Refer to “Printing on paper whose orientations are specified” for loading paper. |
Label paper
| Printer setup | Select [Paper Input] →[Paper Type: Bypass Tray] →[Label Paper]. |
| Printer driver setup | Select [Labels] in [Paper Type]. |
| Supported paper feeding tray | Bypass tray |
| Paper capacity | 1 |
| Duplex Printing | Not supported |
| Additional cautions | Print speed is slightly slower than when using plain paper.Shuffle paper before loading the stack on to the tray, so multiple sheets are not fed in together. |
Coated paper: gloss print
| Printer setup | Select [Paper Input] → [Paper Type: (tray name)]→[Coated Paper: Gloss Print]. |
| Printer driver setup | Select [Coated paper: gloss print] in [Paper type]. |
| Supported paper feeding tray | Any input tray can be used.Make sure paper is not stacked higher than the upper limit mark (▼) inside the tray. When using the bypass tray, make sure paper is not stacked higher than the paper guides inside it. |
| Duplex printing | Not supported |
| Additional cautions | Print speed is slightly slower than when using plain paper.If the paper is curled, flatten it before loadingFan the paper before loading it. When using the bypass tray, set the paper one page at a time if multiple sheets are fed, paper jams occur, or you hear a strange noise. |
Coated paper
| Printer setup Select [Paper Input] | [Paper Type: (tray name)]→ → [Coated Paper]. |
| Printer driver setup | Select [Coated paper] in [Paper type]. |
| Supported paper feeding tray | Any input tray can be used.Make sure paper is not stacked higher than the upper limit mark (▼) inside the tray. When using the bypass tray, make sure paper is not stacked higher than the paper guides inside it. |
| Duplex printing | Not supported |

| Coated paper setup | Default: [Coated Paper 1]If the print quality needs to be improved, select [Maintenance] → [General Settings]→ [Coated Paper Setting] → [Coated Paper 1] to [Coated Paper 7].When selecting the paper settings depending on the thickness, select [Coated Paper 1] to [Coated Paper 5]. High numbered settings allow thicker paper to be used, but are printed more slowly.When selecting the paper setting depending on the type, select [Coated Paper 6], [Coated Paper 7].High numbered settings allow thicker paper to be used, but are printed more slowly. |
| Additional cautions | Print speed is slightly slower than when using plain paperFan the paper before loading it. When using the bypass tray, set the paper one page at a time if multiple sheets are fed, paper jams occur, or you hear a strange noise. |
Special paper
| Special paper standard When you can not print successfully with other paper type setting, set special paper. | |
| Printer setup | Select [Paper Input] → [Paper Type: (tray name)] → [Special Paper 1] to [Special Paper 3]. |
| Printer driver setup | Select [Special 1] to [Special 3] in [Paper type]. |
| Supported paper feeding tray | Any input tray can be used. |
| Paper capacity | Make sure paper is not stacked higher than the upper limit mark (▼) inside the tray. When using the bypass tray, make sure paper is not stacked higher than the paper guides inside it. |
| Duplex printing | Supported |
Envelopes
| Printer setup Select [Paper Input] | [Paper Type: Bypass Tray] [Envelope]. |
| Printer driver setup | Select [Envelope] in [Paper type]. |
| Supported paper feeding tray | Bypass tray |
| Paper capacity | Make sure paper is not stacked higher than the paper guides inside the bypass tray. |
| Duplex printing | Not supported |
| Additional cautions | Load envelopes with the print side down, and open end of the envelope facing out from the printer.When printing on envelopes, set the envelope size using the printer driver or control panel. See “Loading Paper” for details.Before loading envelopes, remove any air inside and make sure all edges are sharply increased. If envelopes are curled, straighten them before loading.If envelopes are curled when they are output, straighten them by rubbing.Depending on the printing environment, envelopes may be output with the edges wrinkled, with toner marks on the back, or blurred. In addition, when printing solid black areas, steaks may appear where two envelopes touch.Depending on the type of envelope or printing environment, envelopes might be output creased or printed improperly. In such cases, try changing the loading orientation. |

Reference
- "Loading Paper"
Paper Not Supported by This Printer

Important
- Do not use the following types of paper:
- Ink-jet printer paper
- GelJet special paper
- Bent, folded, or creased paper
- Curled or twisted paper
- Wet paper
- Paper that is dry enough to emit static electricity
• Paper that has already been printed on
Misprints are especially likely when using paper printed on by printers other than a laser printer (e.g. monochrome and color copiers, ink-jet printers, etc.) Refrain from printing on the side on which nothing is printed.
- Surface-processed paper (excluding specified paper)
- Special paper, such as thermal paper and carbon paper
- Paper whose weight is heavier or lighter than the limitation
- Perforated paper
- Adhesive label paper on which glue or base paper is exposed
• Paper with clips or staples

Note
- Even if paper is adequate for the printer, poorly stored paper can cause paper misfeeds, print quality degradation, or malfunctions.
- Using pre-punched paper may cause paper misfeed or undetected paper size.
Print Area
This section describes the area of a page that is available for printing.
The following diagram shows the print area for this printer.
Paper
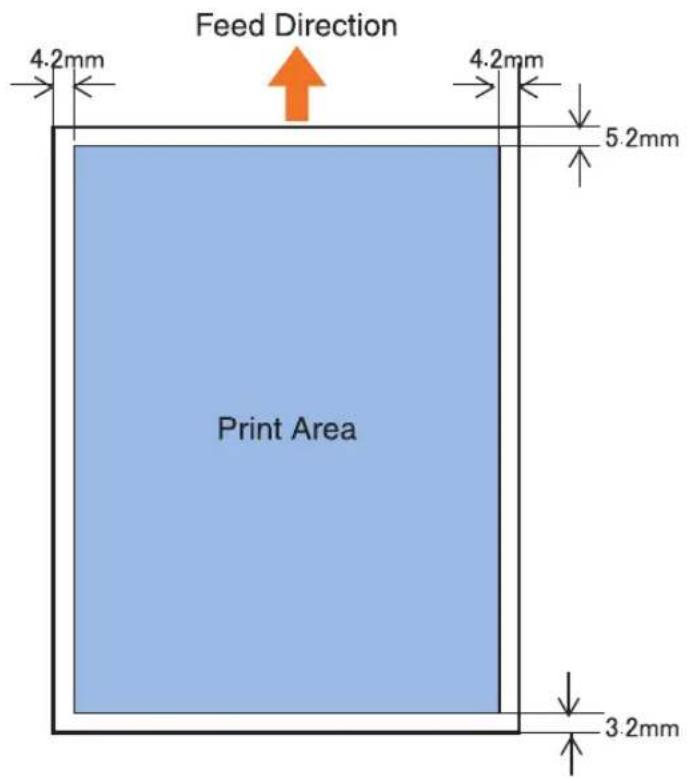
text_image
Feed Direction 4.2mm 4.2mm 5.2mm Print Area 3.2mmBMW001S

Note
- While printing may be possible on the entire page depending on the settings of the printer driver or print conditions, the quality cannot be guaranteed for the 5.2 mm (0.21 inches) margin of the upper side, the 4.2 mm (0.17 inches) margins of the right and left sides, and the 3.2 mm (0.13 inches) margin of the lower side.
- The print area of long paper is restricted to 1260 mm (49.60 inches) long in the feed direction.
Loading Paper
This section describes how to load paper into the paper tray or onto the bypass tray.
Do not add paper to a tray before it runs out of paper. If you do so, multiple sheets of paper may be fed at one time, which results in a paper jam.
Paper Tray, 500/1000-sheet Paper Feed Unit
The following example explains how to load paper into paper trays, and how to change paper size. The same procedure can be used for all trays. Tray 2 is used as an example.

Important
- Make sure paper is not stacked higher than the upper limit mark inside the paper tray. Paper misfeeds might occur.
- Do not mix different types of paper in the same paper tray.
- During printing, do not open or close the printer covers or bypass tray, or pull out or push in the paper tray.
1. Carefully pull out the paper tray until it stops.
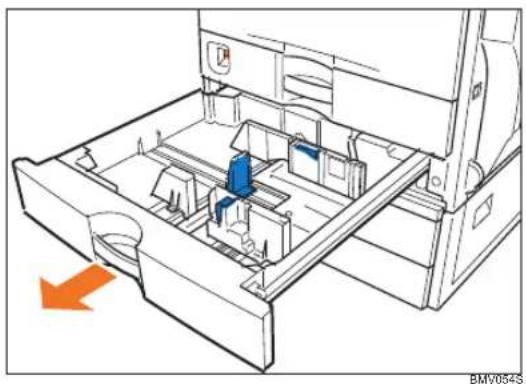
natural_image
Technical line drawing of a mechanical device with internal components and an orange arrow indicating direction (no text or symbols)When printing using the bypass tray, do not pull out the paper tray.

- Unlock the side guides.
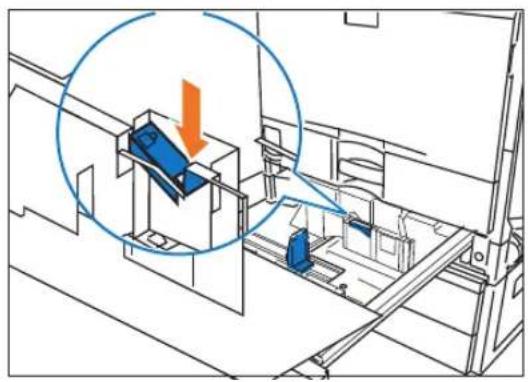
natural_image
Isometric technical diagram of a mechanical assembly with a highlighted component and directional arrow (no text or symbols)BMV055S
- Pinch the clip on the side guide (①), and match the guides to the paper size (②).
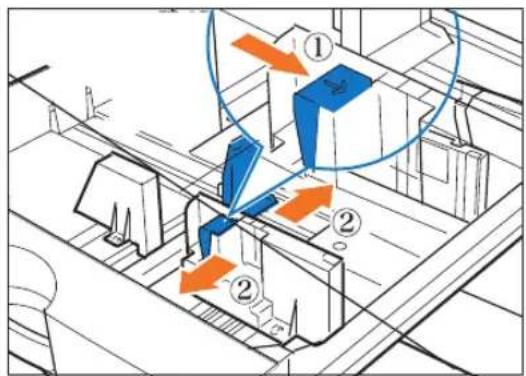
text_image
Technical diagram showing mechanical assembly with numbered components and directional arrows indicating motion or flowBEK001S
- Align and load paper in the tray with the print side up.
You can load up to 550 sheets in each tray.
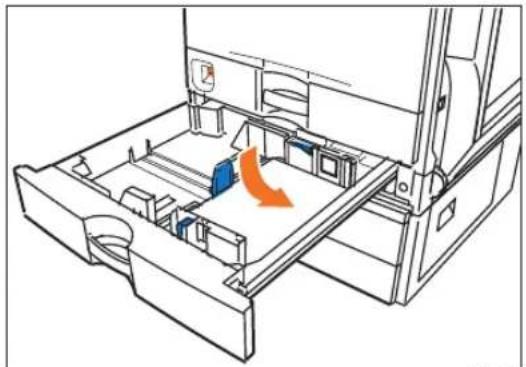
natural_image
Technical line drawing of a mechanical assembly with internal components and an orange arrow indicating motion (no text or symbols)BMV056S
- Pinch the clips on the end guide (①), and match the guide to the paper size (②).
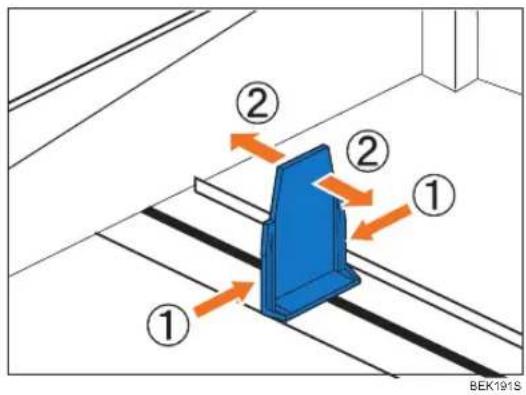
text_image
① ② ② ① BEK191SConfirm that there are no gaps between the paper and paper guides. If there are gaps, adjust the guides.
- Lock the side guides.
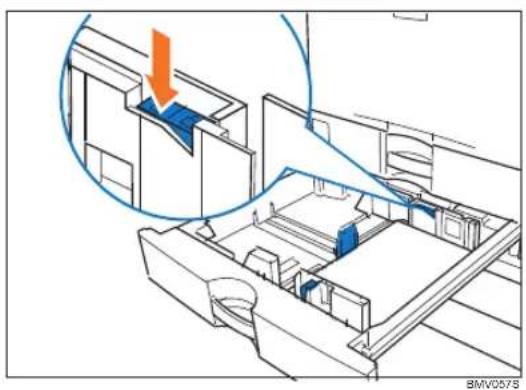
natural_image
Technical line drawing of a mechanical assembly with an arrow indicating a component (no text or symbols present)- Push the paper tray carefully into the printer until it stops. If you push the tray forcefully, the paper guides might move.
Reference
- For details about types of paper supported by this printer, see "Supported Paper for Each Tray".
Setting paper size not selected automatically
Set the paper size using the control panel when loading paper whose size cannot be selected automatically.

- Press the [Menu] key.
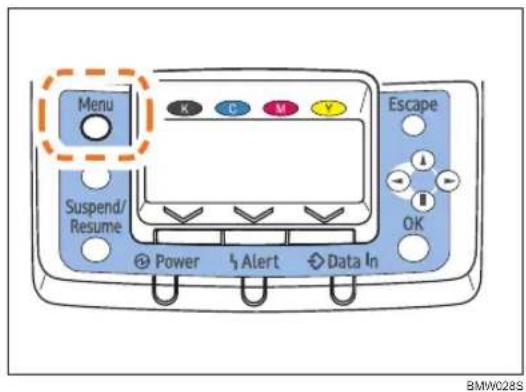
text_image
Menu Suspend/ Resume Power Alert Data In Escape BMW28S- Press the [▼] or [▲] key to select [Paper Input], and then press the [OK] key.
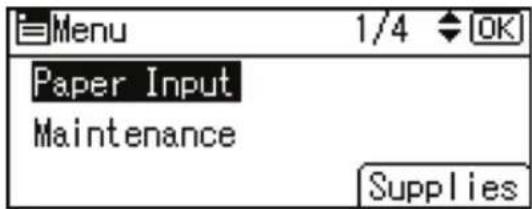
text_image
Menu 1/4 OK Paper Input Maintenance Supplies- Press the [▼] or [▲] key to select [Paper Size: (tray name)], and then press the [OK] key. For example, [Paper Size: Tray 2] is selected for Tray 2 as shown.
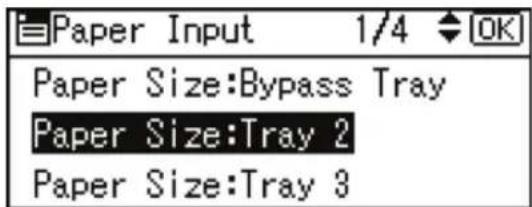
text_image
Paper Input 1/4 OK Paper Size:Bypass Tray Paper Size:Tray 2 Paper Size:Tray 3- Select the paper size you want to set using the scroll keys, and then press the [OK] key.
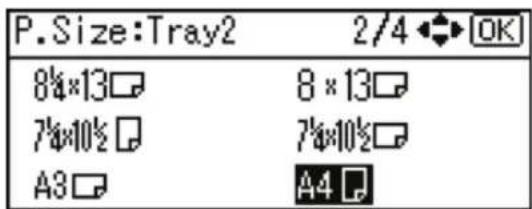
text_image
P.Size:Tray2 2/4 OK 8¼×13□ 8 × 13□ 7¼×10½□ 7¼×10½□ A3□ A4 □About two seconds later, the display returns to the [Paper Input] screen.
- Press the [Menu] key.
The display returns to the initial screen. This completes the paper size setting.
If you want to return the settings to [Auto Detect], load paper into the paper tray and follow the procedure below.
- Press the [Menu] key.
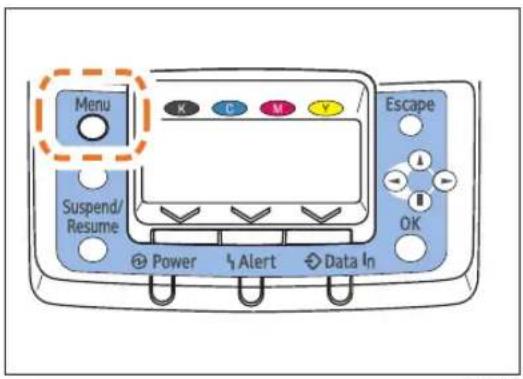
text_image
Menu Suspend/ Resume Power Alert Data In Escape OK-
Press the [▼] or [▲] key to select [Paper Input], and then press the [OK] key.
-
Press the [▼] or [▲] key to select [Paper Size: Tray 2], and then press the [OK] key.
-
Select [Auto Detect] using the scroll keys, and then press the [OK] key.
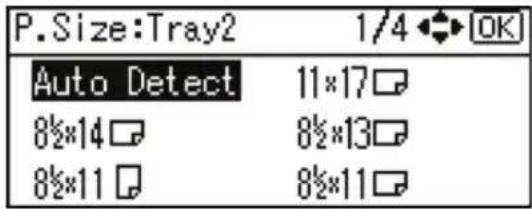
text_image
P.Size:Tray2 1/4 OK Auto Detect 11×17 8½*14 8½*13 8½*11 8½*11About two seconds later, the display returns to the [Paper Input] screen.
- Press the [Menu] key.
The display returns to the initial screen.
Setting custom size paper
Set the custom paper size using the control panel when loading custom size paper.

Important
- When printing on custom size paper, specify the paper size using the control panel or printer driver.
- The custom size paper selected using the printer driver overrides that selected using the control panel. Do not configure settings using the control panel if you have already configured settings using the printer driver. However, when printing with a printer driver other than the RPCS printer driver, you must configure the settings using the control panel.
- The following is the range of paper size that can be set as custom size: 182 to 297 mm (7.17 to 11.69 inches) in width and 148 to 432 mm (5.83 to 17.00 inches) in length.
- The printer cannot print to custom size paper from applications that do not support custom size paper.

- Press the [Menu] key.
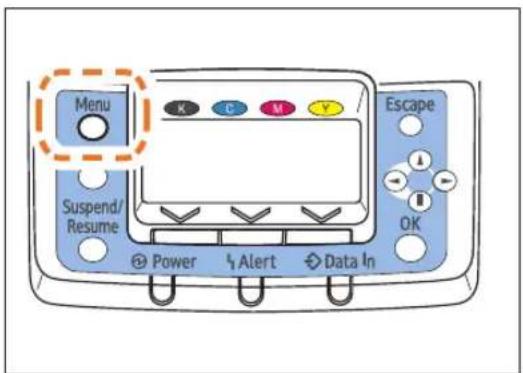
text_image
Menu Suspend/ Resume Power Alert Data In Escape OKBMW028S
- Press the [▼] or [▲] key to select [Paper Input], and then press the [OK] key.
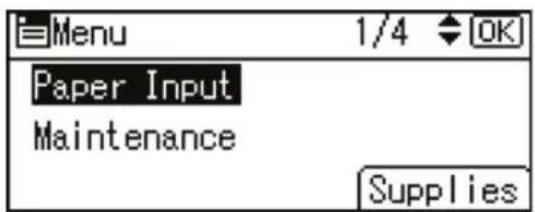
text_image
Menu 1/4 OK Paper Input Maintenance Supplies- Press the [▼] or [▲] key to select [Paper Size: (tray name)], and then press the [OK] key. For example, [Paper Size: Tray 2] is selected for Tray 2 as shown.
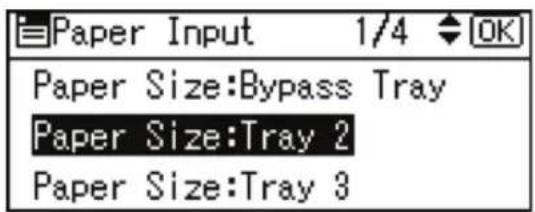
text_image
Paper Input 1/4 OK Paper Size:Bypass Tray Paper Size:Tray 2 Paper Size:Tray 3- Select [Custom Size] using the scroll keys, and then press the [OK] key.
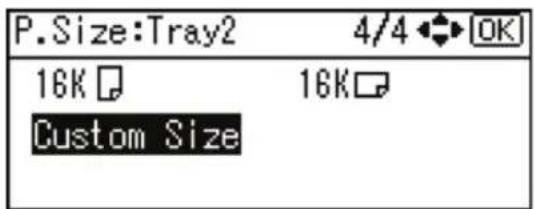
text_image
P.Size:Tray2 4/4 OK 16K 16K Custom Size- Press the [▼] or [▲] key to enter the horizontal value, and then press the [OK] key.
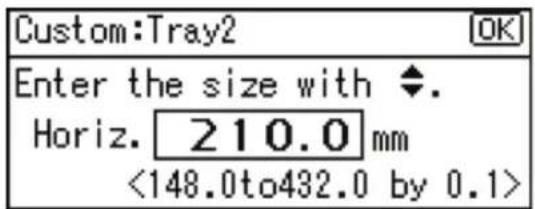
text_image
Custom:Tray2 Enter the size with ♦. Horiz. 210.0 mm <148.0to432.0 by 0.1>If you press and hold the key, the value increases/decreases by 1 or 10 mm.
- Press the [▼] or [▲] key to enter the vertical value, and then press the [OK] key.
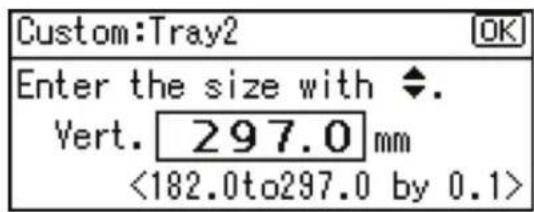
text_image
Custom:Tray2 Enter the size with ♦. Vert. 297.0 mm <182.0to297.0 by 0.1>If you press and hold the key, the value increases/decreases by 1 or 10 mm.
The settings appear and about two seconds later, the display returns to the [Paper Input] screen.
7. Press the [Menu] key.
The display returns to the initial screen.
If you want to return the settings to [Auto Detect], load paper into the paper tray, and follow the procedure below.
8. Press the [Menu] key.
![Xanté Impressia - Press the [Menu] key. - 1](/content/2026/05/785924/images/90dbee0486755a52da83d8ce07edb0300c3af6602a4c3f9d8d85bcfc671731dd.jpg)
text_image
Menu Suspend/ Resume Power Alert Data In Escape BMW028S-
Press the [▼] or [▲] key to select [Paper Input], and then press the [OK] key.
-
Press the [▼] or [▲] key to select [Paper Size: Tray 2], and then press the [OK] key.
-
Select [Auto Detect] using the scroll keys, and then press the [OK] key.
![Xanté Impressia - Press the [Menu] key. - 2](/content/2026/05/785924/images/c4c3737a7cfceae7e945d19f07fe2d33da279f14557d5db9434117621c95e50a.jpg)
text_image
P.Size:Tray2 1/4 OK Auto Detect 11×17 8½*14 8½*13 8½*11 8½*11About two seconds later, the display returns to the [Paper Input] screen.
12. Press the [Menu] key.
The display returns to the initial screen.
![Xanté Impressia - Press the [Menu] key. - 1](/content/2026/05/785924/images/02e7a5402c9ee819028b6ade956f60d2cab344b04c6e4906e1efc88f652815fb.jpg)
Specifying a paper type
This section describes how to specify a paper type. You can improve printer performance by selecting the optimum paper type for the tray.
- Press the [Menu] key.
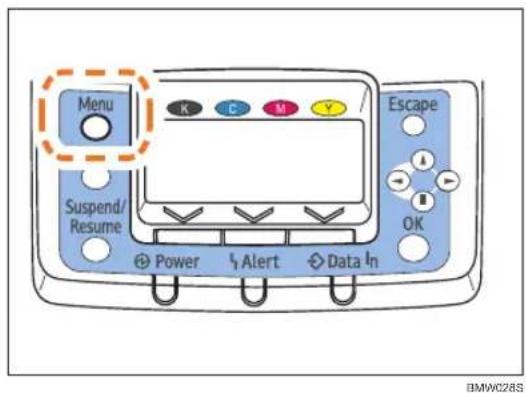
text_image
Menu Suspend/ Resume Power Alert Data In Escape OK BMW28S- Press the [▼] or [▲] key to select [Paper Input], and then press the [OK] key.
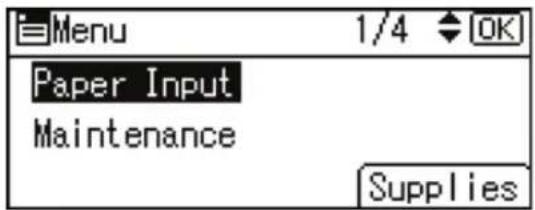
text_image
Menu 1/4 OK Paper Input Maintenance Supplies- Press the [▼] or [▲] key to select [Paper Type: (tray name)], and then press the [OK] key. For example, [Paper Type: Tray 2] is selected for Tray 2 as shown.
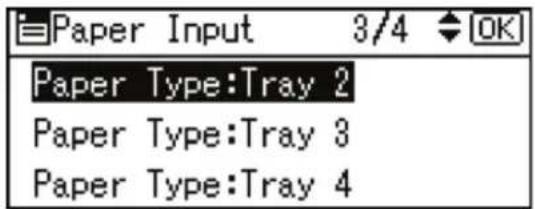
text_image
Paper Input 3/4 OK Paper Type:Tray 2 Paper Type:Tray 3 Paper Type:Tray 4- Press the [▼] or [▲] key to select the paper type that is loaded, and then press the [OK] key.
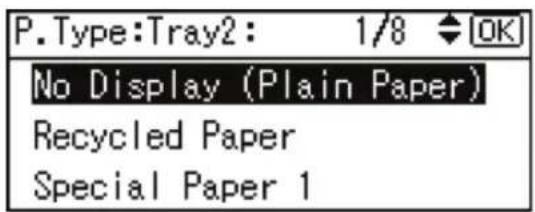
text_image
P.Type:Tray2: 1/8 OK No Display (Plain Paper) Recycled Paper Special Paper 1About two seconds later, the display returns to the [Paper Input] screen.
- Press the [Menu] key.
The display returns to the initial screen.

Note
• The tray does not support envelopes and OHP transparencies.
- Duplex printing is not supported for the following paper types: labels, Thin paper, cardstock, OHP transparency, envelopes, thick paper ([Thick Paper 2], [Thick Paper 3]), coated paper, coated paper: gloss print.
2000-sheet Paper Feed Unit
This section describes how to load paper into the 2000-sheet paper feed unit (tray 3).

Important
- Make sure paper is not stacked higher than the upper limit mark inside the paper tray. Paper misfeeds might occur.
- Do not mix different types of paper in the same paper tray.
- During printing, do not open or close the printer covers, bypass tray, or paper tray.
- Make sure to align paper and push it neatly to both sides of the tray. If you do not, it can cause a paper misfeed.
-
The paper tray guides are fixed at A4 1/2 ( 220-240V8 ^1/2 × 11 (Letter) 1/2 (120Vsize positions. However, you can switch the setting between A4 1/2 and 8 ^1/2 × 11 (Letter) 1/2 If you wish to use a paper size other than the default, contact your sales or service representative.
-
Carefully pull out the paper tray until it stops.
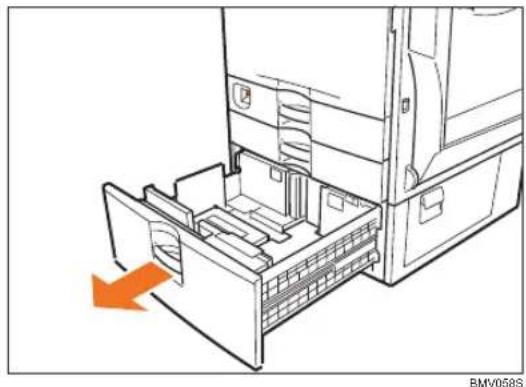
natural_image
Technical line drawing of a refrigerator internal compartments with an orange arrow indicating a directional flow (no text or symbols present)When printing using the bypass tray, do not pull out the paper tray.
- Align and load paper into the right and left sides with the print side up. You can load up to 1000 sheets in each side.
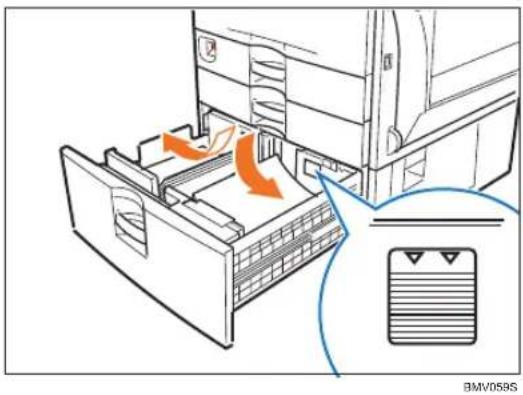
natural_image
Diagram of a refrigerator interior with orange arrows indicating airflow or movement, showing no text or symbols.- Push the paper tray carefully into the printer until it stops.

Reference
- For details about types of paper supported by this printer, see "Supported Paper for Each Tray".
Specifying a paper type
This section describes how to specify a paper type. You can improve printer performance by selecting the optimum paper type for the tray.
- Press the [Menu] key.
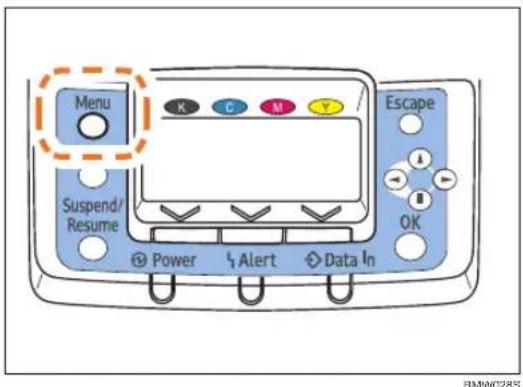
text_image
Menu Suspend/ Resume Power Alert Data In Escape OK BMW028S- Press the [▼] or [▲] key to select [Paper Input], and then press the [OK] key.
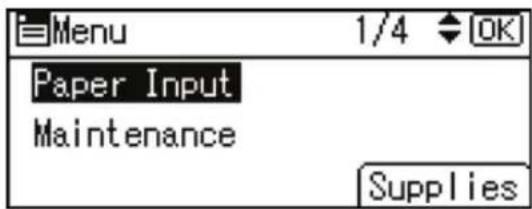
text_image
Menu 1/4 OK Paper Input Maintenance Supplies- Press the [▼] or [▲] key to select [Paper Type: Tray 3], and then press the [OK] key.
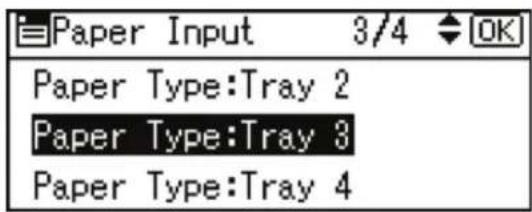
text_image
Paper Input 3/4 OK Paper Type:Tray 2 Paper Type:Tray 3 Paper Type:Tray 4- Press the [▼] or [▲] key to select the paper type that is loaded, and then press the [OK] key.
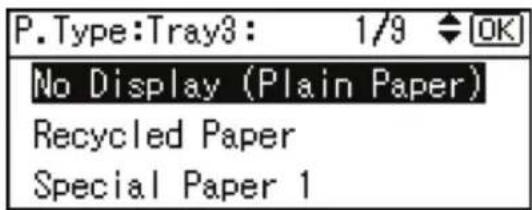
text_image
P.Type:Tray3: 1/9 OK No Display (Plain Paper) Recycled Paper Special Paper 1About two seconds later, the display returns to the [Paper Input] screen.
- Press the [Menu] key.
The display returns to the initial screen.

Note
- The tray does not support envelopes and OHP transparencies.
- Duplex printing is not supported for the following paper types: Thin paper, cardstock, OHP transparency, envelopes, thick paper ([Thick Paper 2], [Thick Paper 3]), coated paper, coated paper: gloss print.
Bypass Tray
This section explains how to load paper into the bypass tray and change paper size.
Loading standard size paper

Important
- Shuffle paper before loading the stack onto the tray, so multiple sheets are not fed in together.
- Set the size and direction of the loaded paper on the control panel or with the printer driver. Make sure the settings do not conflict. Otherwise, the paper may jam or the print quality may be affected.
- Load paper with the print side down and in the short-edge feed direction.
- The bypass tray does not support duplex printing.
- When setting long paper to the bypass tray, support it with your hand to ensure it is fed properly.
- Paper feeding process or image quality varies depending on the paper thickness or width.
-
Check the print in advance using the same type of paper.
-
Open the bypass tray.
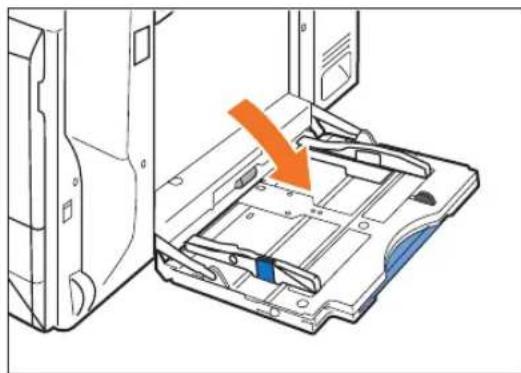
natural_image
Diagram of a printer holder with an orange arrow indicating the component (no text or symbols present)BMW072S
- If you load paper longer than A4, pull out the bypass tray extension.
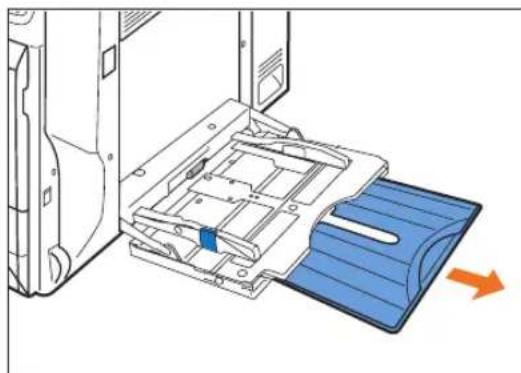
natural_image
Diagram of a printer's internal structure showing blue cover and orange arrow indicating motion (no text or symbols)BEK014S
- Slide the side guides outward (①), and then load paper with the print side down (②), flush against the printer.
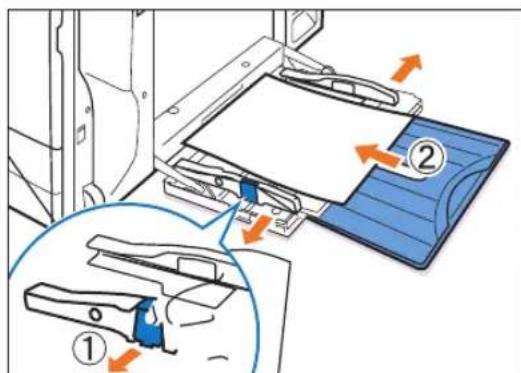
text_image
Diagram illustrating a mechanical assembly with labeled parts and directional arrows, showing component positioning and movement.BEK015S
- Adjust the side guides to fit the paper width.
Paper capacity of the bypass tray differs between plain and thick paper. Check the limit marks on the paper guide of the bypass tray.
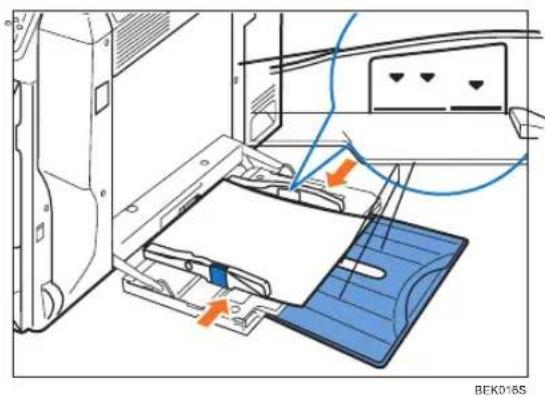
natural_image
Diagram of a printer or printer assembly with an open door and blue cover, showing internal components and orange arrows indicating parts (no text or symbols present)- Press the [Menu] key.
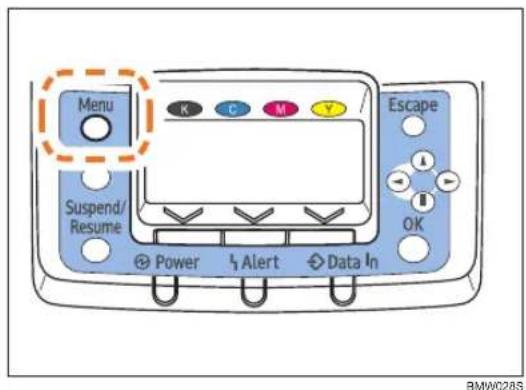
text_image
Menu Suspend/ Resume Power Alert Data In Escape BMW28S- Press the [▼] or [▲] key to select [Paper Input], and then press the [OK] key.
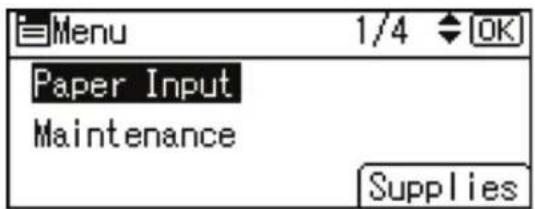
text_image
Menu 1/4 OK Paper Input Maintenance Supplies- Press the [▼] or [▲] key to select [Paper Size: Bypass Tray], and then press the [OK] key.
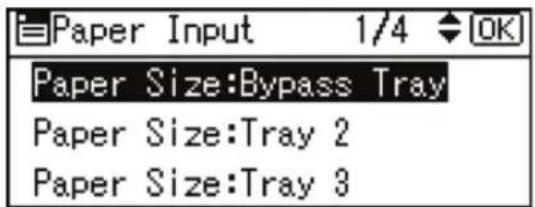
text_image
Paper Input 1/4 OK Paper Size:Bypass Tray Paper Size:Tray 2 Paper Size:Tray 3- Select the paper size you want to set using the scroll keys, and then press the [OK] key.
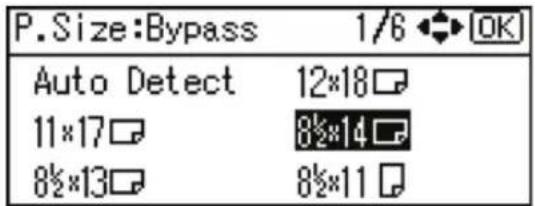
text_image
P.Size:Bypass 1/6 OK Auto Detect 12×18 11×17 8½×14 8½×13 8½×11About two seconds later, the display returns to the [Paper Input] screen.
9. Press the [Menu] key.
The display returns to the initial screen.
![Xanté Impressia - Press the [Menu] key. - 1](/content/2026/05/785924/images/ea9a9d519324cdf36f59f921a167ee757d45c57162e2b3813572f84e1f4328cf.jpg)
Note
- Make sure paper is not stacked higher than the paper guides inside the bypass tray.
- Be sure to select the appropriate paper type when you load labels, thick paper, envelopes, or OHP transparencies in the bypass tray.
Setting custom size paper

Important
- When printing on custom size paper, specify the paper size using the control panel or printer driver.
- The custom size paper selected using the printer driver overrides that selected using the control panel. Do not configure settings using the control panel if you have already configured settings using the printer driver. However, when printing with a printer driver other than the RPCS printer driver, you must configure the settings using the control panel.
- The following is the range of paper size that can be set as custom size: 90 to 305 mm (3.55 to 12 inches) in width and 148 to 1260 mm (5.83 to 49.60 inches) in length.
- The printer cannot print to custom size paper from applications that do not support custom size paper.
1. Press the [Menu] key.
![Xanté Impressia - Press the [Menu] key. - 1](/content/2026/05/785924/images/8f5961422e4ff8132997ae59f77e3029c9f92a49ca4e85b5591e1d52cd7d0a36.jpg)
text_image
Menu Suspend/ Resume Power Alert Data In Escape OK BMW28S- Press the [▼] or [▲] key to select [Paper Input], and then press the [OK] key.
![Xanté Impressia - Press the [Menu] key. - 2](/content/2026/05/785924/images/34510978eb3152084dd8e7dcb2550581e3e92bbef757b26b7fb2f431f47f69c3.jpg)
text_image
Menu 1/4 OK Paper Input Maintenance Supplies- Press the [▼] or [▲] key to select [Paper Size: Bypass Tray], and then press the [OK] key.
![Xanté Impressia - Press the [Menu] key. - 3](/content/2026/05/785924/images/11882f2565e7b10a52966fd3a7e3a39fd528ba51227224b379eaf0c10c375dff.jpg)
text_image
Paper Input 1/4 OK Paper Size:Bypass Tray Paper Size:Tray 2 Paper Size:Tray 3- Select [Custom Size] using the scroll keys, and then press the [OK] key.
![Xanté Impressia - Press the [Menu] key. - 4](/content/2026/05/785924/images/f6c8d261eb351a79d014585224bce7417f2f2ec06568909ade3fcd042804b4f1.jpg)
text_image
P.Size:Bypass 6/6 OK Custom Size- Press the [▼] or [▲] key to enter the horizontal value, and then press the [OK] key.
![Xanté Impressia - Press the [Menu] key. - 5](/content/2026/05/785924/images/fab67b88116ae721454023f39eb079131f508ea12d17d986fb6e3a938992bc43.jpg)
text_image
Custom:Bypass Enter the size with ♦. Horiz. 210.0 mm <148.0to1260.0 by 0.1>If you press and hold the key, the value increases / decreases by 1 or 10 mm.
- Press the [▼] or [▲] key to enter the vertical value, and then press the [OK] key.
![Xanté Impressia - Press the [Menu] key. - 6](/content/2026/05/785924/images/7512d78b12f51fcb4b81cffbefe265eceecf8f2930600fdbef718f9822c009c7.jpg)
text_image
Custom:Bypass Enter the size with ♦. Vert. 297.0 mm <90.0to305.0 by 0.1>If you press and hold the key, the value increases/decreases by 1 or 10 mm.
The settings appear and about two seconds later, the display returns to the [Paper Input] screen.
- Press the [Menu] key.
The display returns to the initial screen.
![Xanté Impressia - Press the [Menu] key. - 7](/content/2026/05/785924/images/ab788ce50b88b6f179b86351134055493473fedd46dd5481aa9a6e9a01c25800.jpg)
Note
- Print quality may not be guaranteed for custom size paper that is wider than 297 mm (11.69 inches) in width or longer than 433 mm (17.05 inches) in length.
Specifying a paper type
This section describes how to specify a paper type. You can improve printer performance by selecting the optimum paper type for the tray.

Important
- Be sure to select the appropriate paper type when you load labels, thick paper, envelopes, or OHP transparencies in the bypass tray.
- The paper type selected using the printer driver overrides that selected using the control panel.
1. Press the [Menu] key.
![Xanté Impressia - Press the [Menu] key. - 1](/content/2026/05/785924/images/e7c37a004d33418946a968c24b1070566a4e6f0ffeb59f5dedb9a249a22a1017.jpg)
text_image
Menu Suspend/ Resume Power Alert Data In Escape OKBMW28S
- Press the [▼] or [▲] key to select [Paper Input], and then press the [OK] key.
![Xanté Impressia - Press the [Menu] key. - 2](/content/2026/05/785924/images/71630429c9d8d0c52355957eff2ce1511d7dfed79245790afaf41e5186a5c93b.jpg)
text_image
Menu 1/4 OK Paper Input Maintenance Supplies- Press the [▼] or [▲] key to select [Paper Type: Bypass Tray], and then press the [OK] key.
![Xanté Impressia - Press the [Menu] key. - 3](/content/2026/05/785924/images/6af1792d288008838619dc92968b6d148e8bd7eae0cd82e8a9dd05897a0c6b7a.jpg)
text_image
Paper Input 2/4 OK Paper Size:Tray 4 Paper Type:Bypass Tray Paper Type:Tray 1- Press the [▼] or [▲] key to select the paper type that is loaded, and then press the [OK] key.
![Xanté Impressia - Press the [Menu] key. - 4](/content/2026/05/785924/images/dae35c10b867a1257b5b28b07db1b313bed3657b135fb74bcf908e2fe0a93c3f.jpg)
text_image
P.Type:Bypass: 6/8 OK Thin Paper Middle Thick Thick Paper 1About two seconds later, the display returns to the [Paper Input] screen.
5. Press the [Menu] key.
The display returns to the initial screen.
Printing on Orientation-Fixed or Two-Sided Paper
This section explains how to print on paper whose orientation and printing side are unchangeable (letterhead paper, for example).
When loading paper with a fixed orientation, such as letterhead or letter paper, misprints may occur. To make sure documents are printed correctly, press the [Menu] key using control panel, and in the [Maintenance] menu, select [General Settings], [Letterhead Setting] and [On (Always)]. Select [Letterhead] as the paper type in the RPCS printer driver's settings when you have selected [Auto Detect] or [Off] in the [Maintenance] menu
For the letterhead print settings, see "Types of Paper and Other Media".
| Paper Orientation | Paper Trays 1-5 | Bypass Tray | ||
| Letterhead Setting [On] | Letterhead Setting [Off] | Letterhead Setting [On] | Letterhead Setting [Off] | |
| 1-sided print | ABC | ABC | ○○A | ○○A |
| 2-sided print | ○○A | ○○A | ABC | ABC |
| 1-sided print | ABC | ABC | ○○ | ○○ |
| 2-sided print | ○○ | ○○ | ABC | ABC |

Note
- If a print job is changed partway through printing from 1-sided to 2-sided printing, 1-sided output after the first copy may print facing a different direction.
- To ensure all 1-sided copies are output on the same print side, use separate paper trays for 1-sided and 2-sided printing, and disable 2-sided printing for the tray used for 1-sided printing.

Reference
• "Paper Recommendations"
Using Paper Types that Have Unique Names
From Registration of User Paper Types to Use
This section explains the procedures for selecting the paper type according to usage, registering the paper type under a unique name, and printing a file using the registered paper type.

Important
• This function can be used
- when the printer is operating in a network,
- in conjunction with the RPCS printer driver, and
- under Windows 2000 or higher (under earlier systems, registered paper types appear as [Plain] in the printer driver).
• This function cannot be used
- with the printer driver's [Save/Restore Settings] function (registered paper types appear as [Plain] in the printer driver) and
- if the printer and computer are not using bi-directional communication.
- Also, be aware that
- the printer driver might not display the paper type name correctly if it is registered using an unsupported language,
- the control panel might not display the paper type name correctly if it is registered using nonalphanumeric characters (i.e., other than a-z, A-Z, or 0-9), and
- the printer's logs do not record names of user paper types.
The example below explains setting a custom size paper under the name “Invoice A” and feeding it from a bypass tray.
-
Using Web Image Monitor, register the name under [User Paper Type].
-
Enter "Invoice A" for [Paper Name] and select [Plain Paper] for [Paper Type].
- When printing a file, the paper type is automatically set by selecting [User Paper Type] on the printer driver setting screen.
-
For details about this procedure, see “Registering Names to Paper Types”.
-
In Web Image Monitor, set [User Paper Type] for the bypass tray.
-
Set [Paper Type] for the tray to "Invoice A".
-
For details about this procedure, see "Setting User Paper Types to Trays".
-
Load the paper you want to use on the bypass tray.
- Set an unprinted paper on the bypass tray.
- For details about this procedure, see “Loading Paper”, Hardware Guide.
4. Using RPCS Printer Driver, print a document on the registered custom size paper.
- Select [Invoice A] for [Paper Type:], then proceed with the printing. When [Paper Type:] is set to [Invoice A], Plain paper that is suitable for “Invoice A” is selected automatically. Registering a descriptive name makes selecting a paper type from the [Paper Type:] list easier.
- For details about this procedure, see "Printing Using Registered Paper Types".

Note
- You can register up to eight user paper types.

Reference
- "Registering Names to Paper Types"
- "Setting User Paper Types to Trays"
- "Printing Using Registered Paper Types"
Registering Names to Paper Types
Log on to Web Image Monitor in the administrator mode.

Important
- The control panel might not display the paper type name correctly if it is registered using nonalphanumeric characters (i.e., other than a-z, A-Z, or 0-9).
1. Start your Web browser.
- Enter "http://(printer's address)/" in the address bar of the Web browser.
The Top of Web Image Monitor appears.
If the printer's host name has been registered on the DNS or WINS server, you can enter it in the address bar.
If SSL (encrypted HTTP) is running in a server authentication environment, enter "https:// (printer's address)".
3. On the Top Page, click [Login].
A dialog box for entering the user name and password appears.
4. Enter your login user name and password, and then click [Login].
For details about the login user name and password, consult your administrator.
5. In the menu area, click [Configuration].
- On the [Device Settings], click [User Paper Type], and then change the settings as necessary.
The screen for selecting [User Paper Type] appears.
7. Make changes to the following settings:
Paper Name: Enter a descriptive name for easier recognition.
Paper Type: Select a suitable paper type from the list.
The example below is for printing invoices.
- Enter "Invoice A" for [Paper Name].
- Select [Plain Paper] for [Paper Type]. If the setting is incorrect, the paper might become jammed or print quality could be affected.
- For details about combinations of paper sizes types, paper type, see “Paper and Other Media”, Hardware Guide.
8. Click [OK].
![Xanté Impressia - Click [OK]. - 1](/content/2026/05/785924/images/f14d9c685d9ea1e9f7b371e9783cbd6089b7f608a5cca8a3ea848ae91faa3759.jpg)
Note
- You can register up to eight user paper types.
Setting User Paper Types to Trays
Before printing, set the paper registered on the user paper type to the paper tray, and then set the paper type already registered. Paper types can be set either from Web Image Monitor or from the printer's control panel.
- Log on to Web Image Monitor in administrator mode.
- In the menu area, click [Configuration].
- On the [Device Settings], click [Paper].
- Set the paper tray you want to use as a user paper type, and then select the registered paper type.
The example below is for printing invoices.
The registered paper type “Invoice A” is displayed as [+ Invoice A (Custom x)] on this screen. Select [+ Invoice A (Custom x)] for [User Paper Type]. Make the appropriate changes to other settings as required.
- Click [OK].
- Click [Logout].
- Quit Web Image Monitor.

Note
- For details about loading paper, see “Loading Paper”, Hardware Guide.
- For details about setting the paper type from control panel, see “Loading Paper”, Hardware Guide.
Printing Using Registered Paper Types
Select a registered paper type to print onto.

Important
- This function can be used when the printer is operating in a network, in conjunction with the RPCS printer driver, and under Windows 2000 or higher (under earlier systems, registered paper types appear as [Plain] in the printer driver).
- This function cannot be used with the printer driver's [Save/Restore Settings] function (registered paper types appear as [Plain] in the printer driver) and if the printer and computer are not using bidirectional communication.
- The printer driver might not display the paper type name correctly if it is registered using an unsupported language.
- The control panel might not display the paper type name correctly if it is registered using nonalphanumeric characters (i.e., other than a-z, A-Z, or 0-9).
-
The printer's logs do not record names of user paper types.
-
Select your application's print command.
-
On the tab in the properties dialog box that appears, select a registered paper type under [Paper type:].
If you select Custom Setting, click the [Print Settings] tab.
- Execute the print command.
The preregistered settings are applied and print is performed.

Note
- For details about printer driver settings, see the printer driver Help.
6. Replacing Consumables
This chapter explains how to replace consumables.
Adding Toner

WARNING
- Do not incinerate spilled toner or used toner. Toner dust is flammable and might ignite when exposed to an open flame.
- Disposal should take place at an authorized dealer or an appropriate collection site.
- Dispose of used toner containers in accordance with local regulations.

CAUTION
- Keep toner (used or unused) and toner containers out of reach of children. If a child swallows toner, consult a doctor immediately.
- If toner or used toner is inhaled, gargle with plenty of water and move into a fresh air environment. Consult a doctor if necessary.
- If toner or used toner gets into your eyes, flush immediately with large amounts of water. Consult a doctor if necessary.
- If toner or used toner is swallowed, dilute by drinking a large amount of water. Consult a doctor if necessary.
- Avoid getting toner on your clothes or skin when removing a paper jam or replacing toner. If your skin comes into contact with toner, wash the affected area thoroughly with soap and water.
- If toner gets on your clothing, wash with cold water. Hot water will set the toner into the fabric and may make removing the stain impossible.
- Our products are engineered to meet high standards of quality and functionality. When purchasing expendable supplies, we recommend using only those specified by an authorized dealer.
- Do not open toner containers forcefully. Toner can spill, dirtying your clothes or hands, and possibly resulting in accidental ingestion.

Important
- When removing toner, be careful not to drop it.
- Do not forcefully push toner in.
- When handling toner, never stand them up on either end or position them upside down.
- Store toner in a cool dark place.
- Toner is a consumable and not covered by warranty. If there is a problem, contact the store where it was purchased.
Replace the toner when the following message appears on the display:

text_image
Out of toner Option Prt.Jobs Supplies Add tonerWhen the following message appears on the display, the toner should be replaced soon. Prepare a new toner.

text_image
Toner is almost empty Option Prt.Jobs Supplies- Holding the left and right side grips, carefully open the front cover.
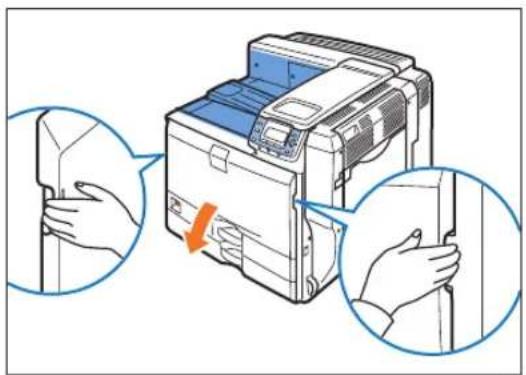
natural_image
Illustration of a printer with open lid and side panel, showing hand positioning and adjustment (no text or symbols)BMV060S
From the left, the toner is installed in the order of black (K), yellow (Y), cyan (C), and magenta (M).
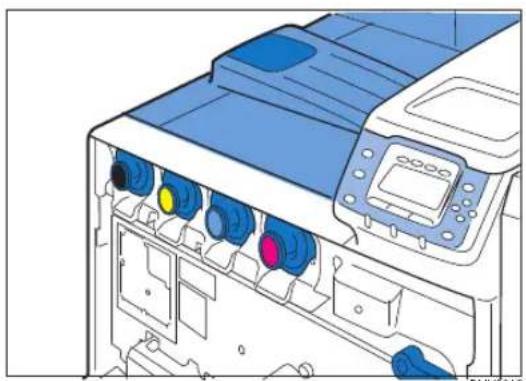
natural_image
Illustration of a printer internal structure with color-coded ports (no text or symbols)- Holding the toner of the color to replace, pull it out carefully.
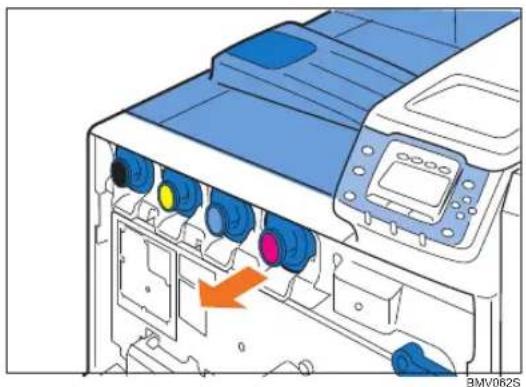
natural_image
Diagram of a printer internal structure showing ports and connectors with an orange arrow indicating a specific component (no text or symbols present)Do not shake the removed toner. Any remaining toner may leak.
Pull the toner out slowly and carefully to prevent leakage.
Place the old toner on paper or some other material to avoid dirtying your workspace.
-
Take the new toner out of the box.
-
Shake the toner up and down five or six times.
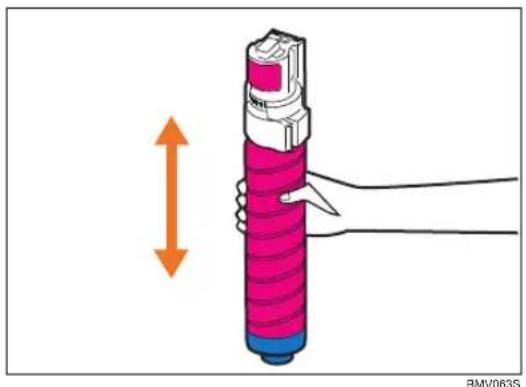
natural_image
Illustration of a hand holding a cylindrical object with an orange double-headed arrow indicating vertical displacement (no text or symbols)Even distribution of toner within the container improves print quality.
- With the label facing up, fully insert toner into place, keeping the container horizontal.
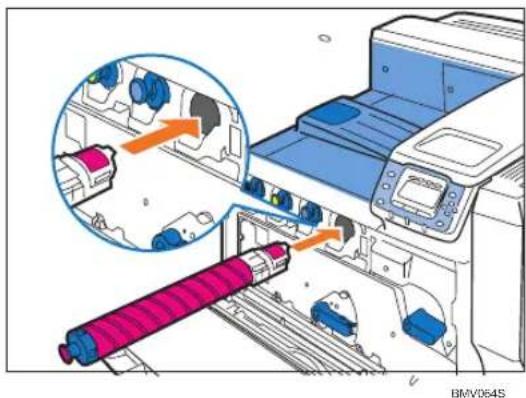
natural_image
Diagram of a printer printing process with an inset showing internal components (no text or symbols visible)Do not install and remove toner repeatedly. Doing so results in toner leak.
6. Carefully close the front cover.
Wait until “Loading toner” disappears from the display.
Replacing the Black Drum Unit/Color Drum Units
Replace the black drum unit/color drum units if any of the following messages appear on the display:
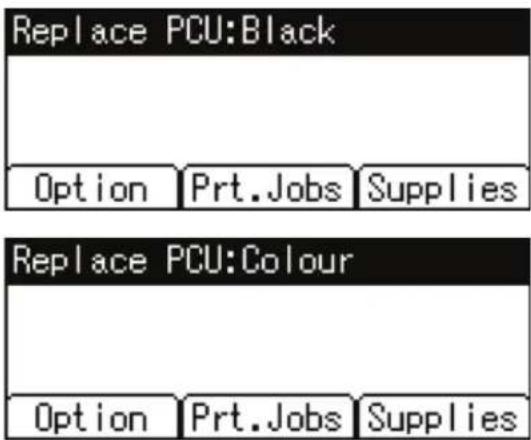
text_image
Replace PCU:Black Option Prt.Jobs Supplies Replace PCU:Colour Option Prt.Jobs SuppliesWhen the following messages appear on the display, the black drum unit/color drum units should be replaced soon. Prepare a new Black Drum Unit/Color Drum Unit.
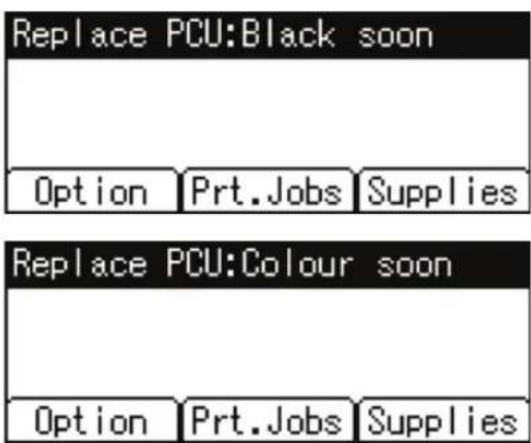
text_image
Replace PCU:Black soon Option Prt.Jobs Supplies Replace PCU:Colour soon Option Prt.Jobs SuppliesImportant
- Exposure to light reduces black drum unit/color drum units performance. Replace the unit as quickly as possible.
- Do not pull out the black drum unit/color drum units quickly or with force as it may fall.
• Take care that nothing comes into contact with the top surface of the black drum unit/color drum units. - When holding the black drum unit/color drum units, grab the green grip on the left and the handle on the front together. Do not move the black drum unit/color drum units by only grabbing the grip. Doing so may damage the grip.
- Place no objects on the front or inner cover.
The following is the replacement procedure for the black drum unit located at the left end. This procedure applies to the replacement of other drum units.
- Turn off the printer and unplug the power cable.
- Holding the left and right side grips, carefully open the front cover.
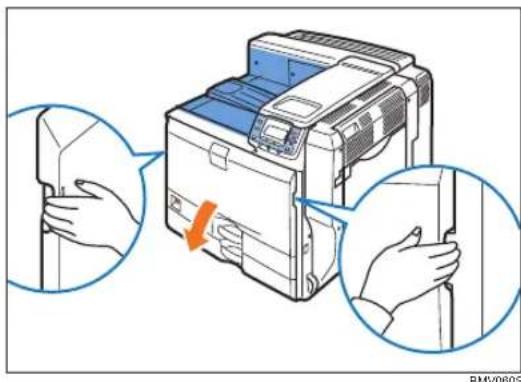
text_image
Illustration showing hand holding a document with magnified views of the device, highlighting a red arrow indicating a drop or change.BMV060S
- Turn the two green levers counterclockwise.
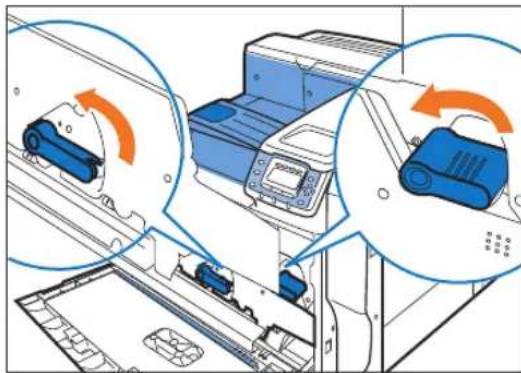
natural_image
Illustration of a printer with two blue rollers and orange scroll arrows indicating rotation (no text or symbols)BMV065S
- Pulling the handle, slowly open the inner cover.
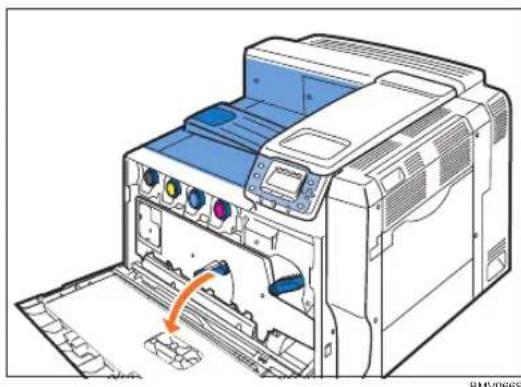
natural_image
Illustration of a printer with internal components and an orange arrow indicating a process (no text or symbols present)BMV066S
The drum units are installed as shown. From the left, the units are attached in the order of black (K), yellow (Y), cyan (C), and magenta (M).
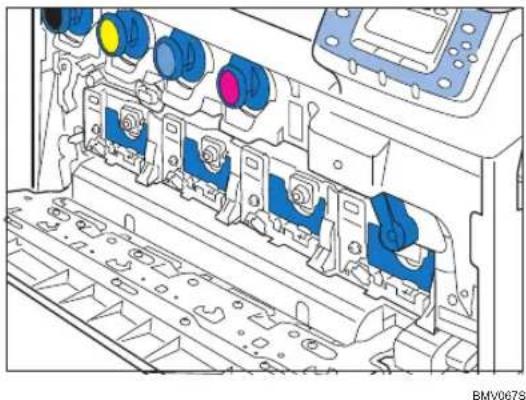
natural_image
Technical diagram of an electronic device showing internal components with colored indicators (no text or symbols)- Pull out the ring pull handle of the black drum unit.

natural_image
Hand inserting a blue component into an industrial machine (no text or symbols visible)- Holding the handle, pull the drum unit out until the green grip area is completely visible on the left side.
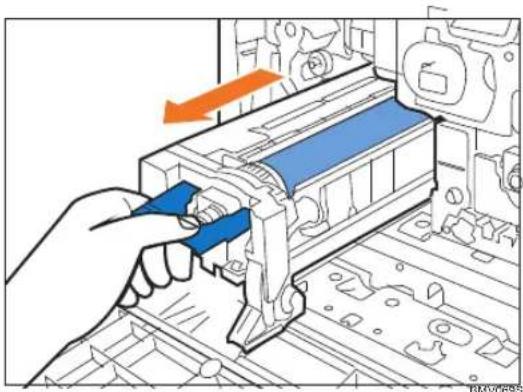
natural_image
Illustration of a hand using a tool to adjust or install a blue component inside a machine (no text or symbols visible)- Holding the green grip on the left and the handle on the front, pull out the drum unit.
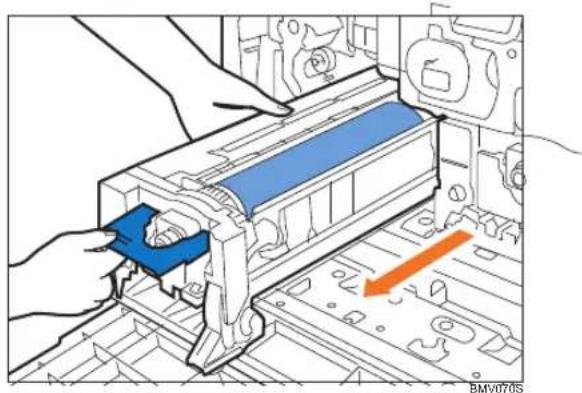
natural_image
Mechanical assembly diagram showing a blue component being inserted into a housing, with an orange arrow indicating direction (no text or symbols present)- Take the new black drum unit out of the box.
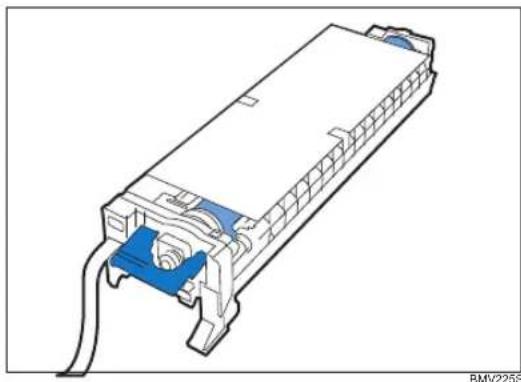
natural_image
Technical line drawing of a battery pack with blue connectors and wiring (no text or symbols)For black, install one black drum unit; for color, install all three together.
Exposure to light reduces black drum unit/color drum units performance. Replace the unit as quickly as possible.
- Remove the protecting cover. Do not remove the tape hanging from the front yet.
Take care that nothing comes into contact with the top surface of the drum unit.
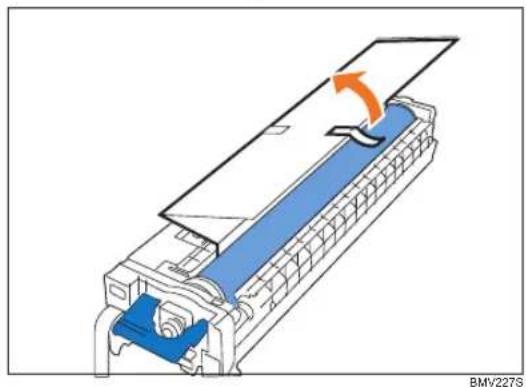
natural_image
Diagram of a printer or scanner with blue cover and orange arrow indicating motion (no text or symbols)When holding the drum unit, hold the green grip on the left and the handle on the front together. Do not move the drum unit by only holding the grip. Doing so may damage the grip.
-
Remove all the orange tape from the drum unit. Do not remove the tape coming out of the unit.
-
Remove the cap.
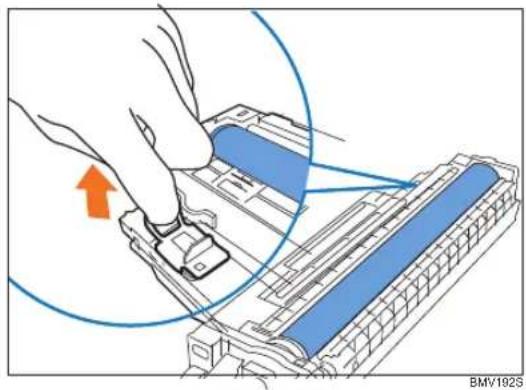
natural_image
Illustration of a hand inserting a component into a device with blue components, showing an orange arrow indicating the direction (no text or symbols present)- Holding the green grip on the left and the handle on the front, carefully insert the front end into the space horizontally.
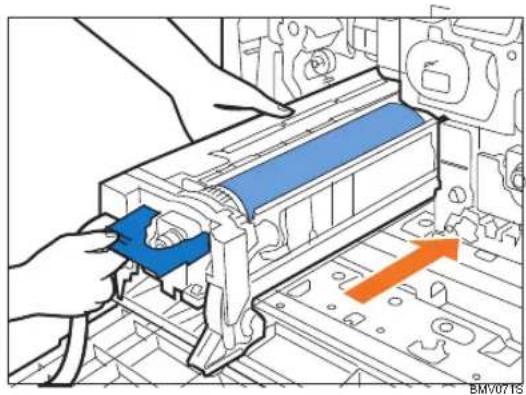
natural_image
Illustration of a printer's internal structure with blue cover and orange arrow indicating motion (no text or symbols)Insert it horizontally as shown below.
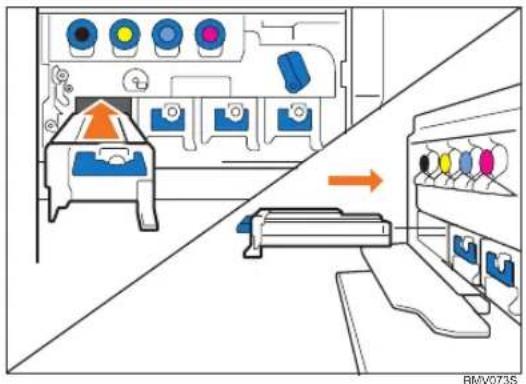
text_image
Diagram showing a printer setup with labeled components and an arrow indicating process direction, likely from an industrial or manufacturing context.- Pushing the front of the drum unit, fully insert it into the printer.
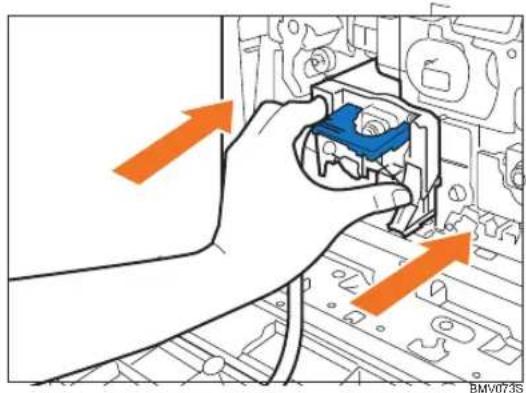
natural_image
Hand inserting a component into an electrical panel with orange arrows indicating direction (no text or symbols)- Lower the handle located on the front of the drum unit, and push it until it clicks into place.
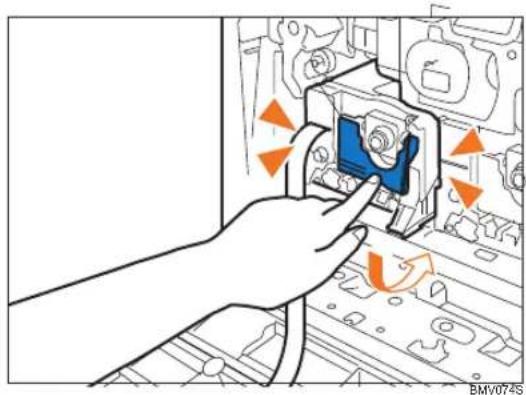
natural_image
Hand inserting a blue component into a mechanical housing (no text or symbols visible)- Holding the drum unit firmly in place, pull out the tape.
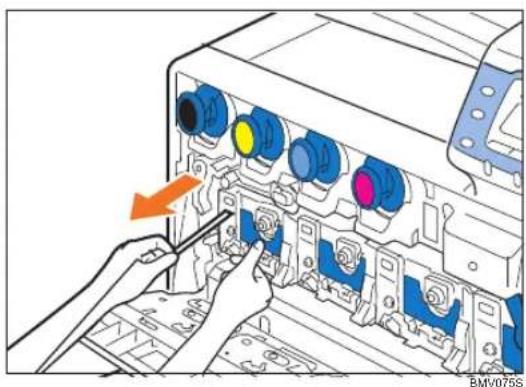
natural_image
Illustration of a computer tower with labeled ports and a hand inserting a cable (no text or symbols present)- Remember to pull out the tape. Malfunctions occur if you attempt to print while the tape is still attached.
-
The removed tape is dirty. Be careful not to let it touch your hands or clothes.
-
When replacing a color drum unit, replace the three color units together using the same procedure, before closing the inner cover.
-
Pressing both sides, firmly close the inner cover.
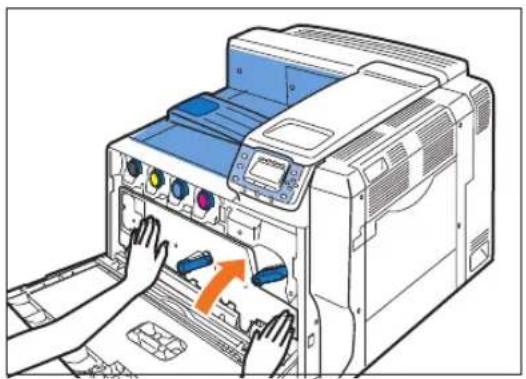
natural_image
Illustration of a printer with hands inserting or opening the paper (no text or symbols visible)BMV076S
- Turn the two green levers clockwise to lock the cover.
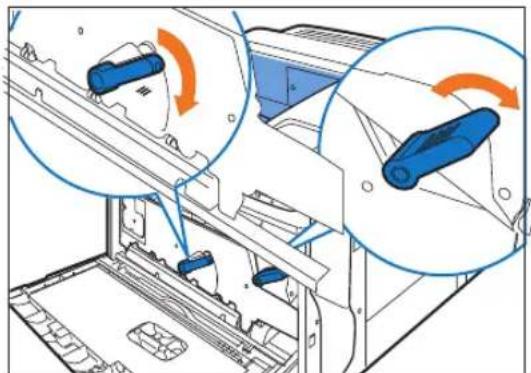
natural_image
Technical diagram of a mechanical assembly with two blue components and orange rotation arrows indicating motion (no text or symbols)BMV077S
-
Carefully close the front cover.
-
Plug in the power cable, and then turn on the printer.
[Calibrating...] appears on the display, and the printer starts calibration. Wait until it stops. Calibration takes four to five minutes. Do not turn off the power during calibration. Doing so results in a malfunction.
Replacing the Transfer Unit
Replace the transfer unit if any of the following messages appear on the display:
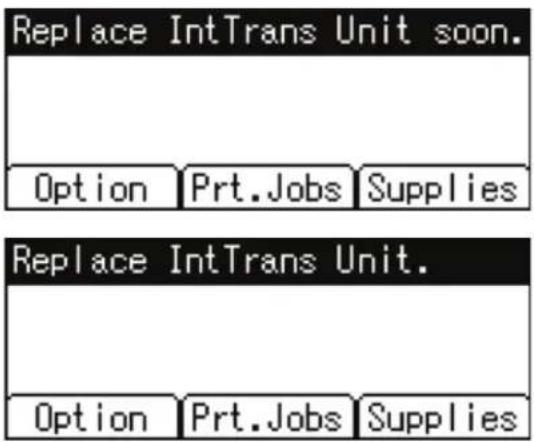
text_image
Replace IntTrans Unit soon. Option Prt.Jobs Supplies Replace IntTrans Unit. Option Prt.Jobs SuppliesReplacing the Transfer Unit
CAUTION
- The inside of this printer becomes very hot. Do not touch parts labeled “⚠️” (indicating a hot surface). Touching these parts will result in burns.
Important
- If the transfer unit is not installed correctly, a message appears on the control panel. Re-install the transfer unit. If installation fails three times in a row, "SC443" appears on the control panel. If this message appears, contact your sales or service representative.
-
Turn off the printer and unplug the power cable.
-
Holding the left and right side grips, carefully open the front cover.
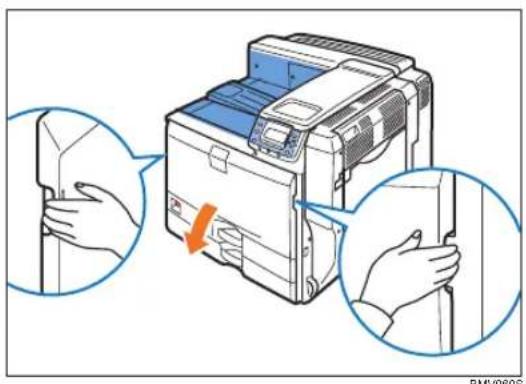
text_image
BMV060S- Turn the two green levers counterclockwise.
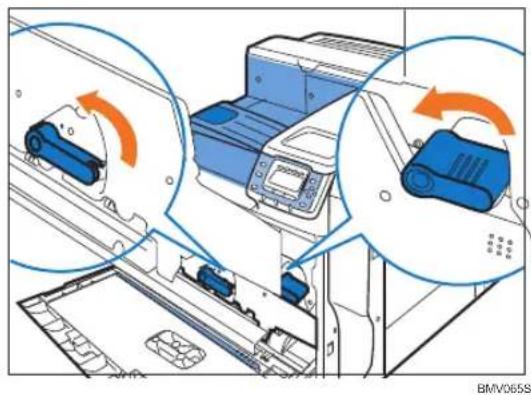
natural_image
Illustration of a printer printing process with three circular insets showing blue components and orange rotation arrows (no text or symbols)- Pulling the handle, slowly open the inner cover.
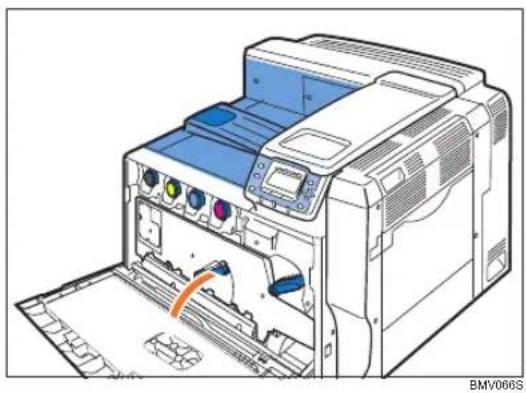
natural_image
Diagram of an open printer with internal components and a cable outlet (no text or symbols visible)The transfer unit is installed as shown below.

natural_image
Technical diagram of an internal mechanical or electrical component with multiple ports and wiring (no visible text or symbols)- Push up the lever on the right side, and open the printer's right cover carefully. Opening the right cover is necessary for transfer unit replacement.
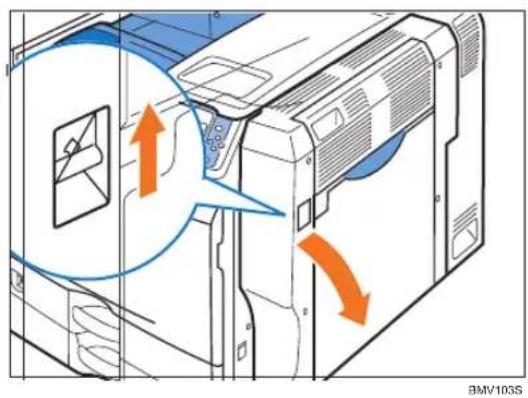
text_image
BMV103S- Turn the green lever located on the left side of the transfer unit counterclockwise.
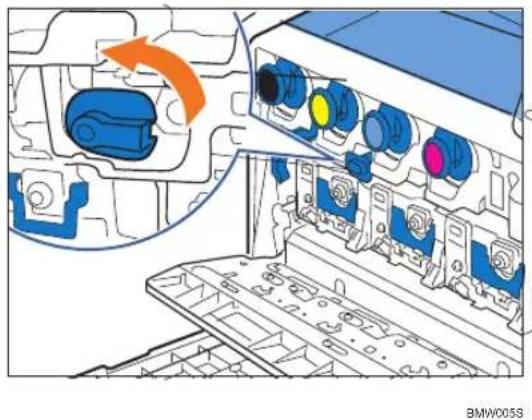
natural_image
Diagram of an automotive electrical panel with labeled ports and a highlighted component (no text or symbols present)- Holding the green grip in the center of the transfer unit, pull the unit out until the handles on the top surface become completely visible.
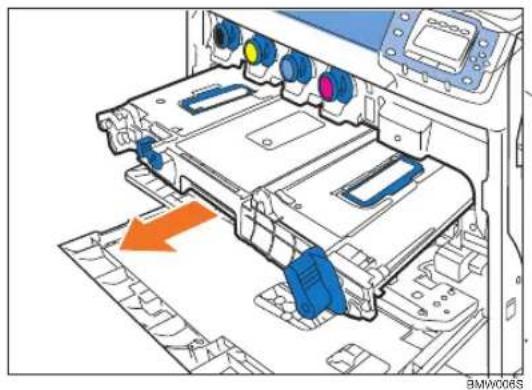
natural_image
Technical diagram of a printer internal structure with color-coded components and an orange arrow indicating a loading or movement (no text or symbols present)- Lift the handles on the top surface.
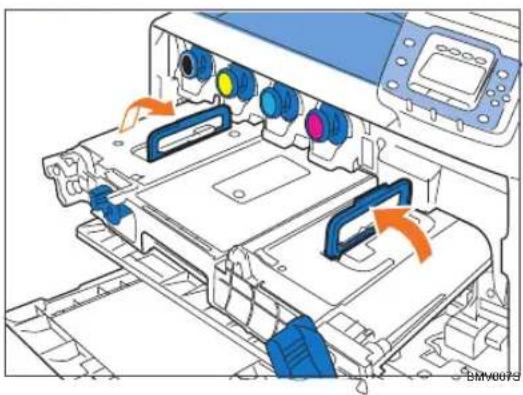
natural_image
Diagram of a printer internal structure with colored components and orange arrows indicating motion (no text or symbols)-
Holding the handles, slowly pull out the transfer unit.
-
Take the new transfer unit out of the bag and remove the cover from the transfer unit.
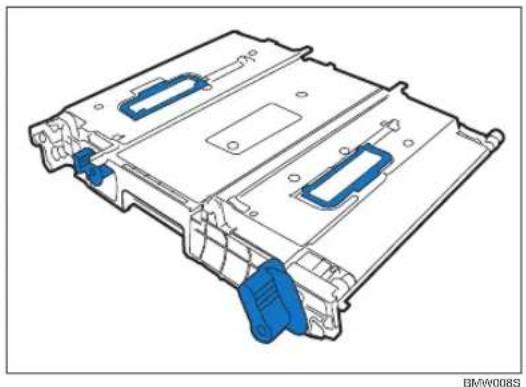
natural_image
Technical line drawing of a mechanical housing or enclosure component with blue connectors and mounting holes (no text or symbols)- Lift the handles on the top surface.
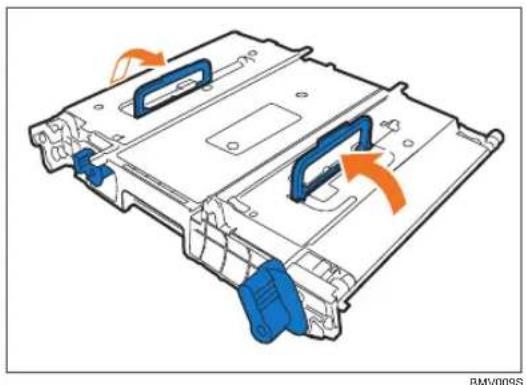
natural_image
Technical diagram of a battery pack with blue and orange components, no text or symbols present- Slide the transfer unit along the guide rails into the printer until the upper handles touch the printer body.
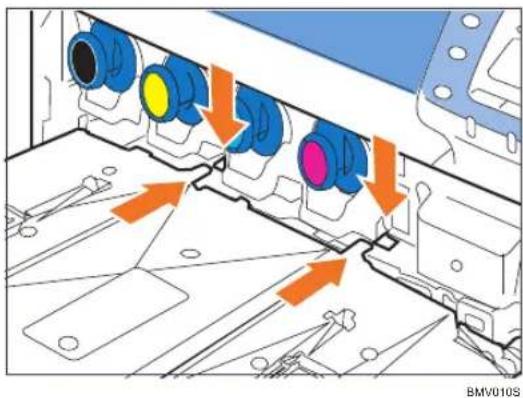
text_image
BMV010S- Lower the handles, and then push the front of the transfer unit to fully insert it into the printer.
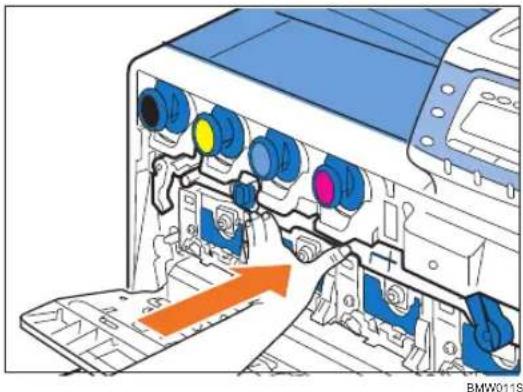
natural_image
Diagram of an electronic device showing internal components with colored lights and a blue panel, no readable text or symbols present.- Turn the green lever on the left side of the transfer unit clockwise.
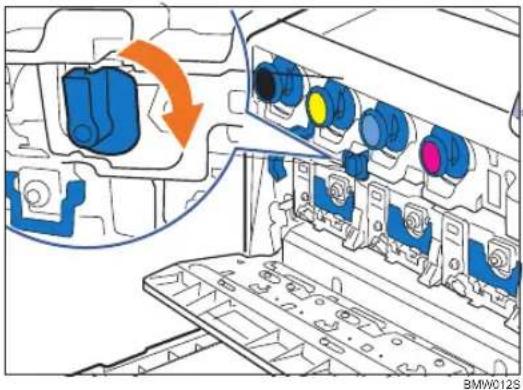
natural_image
Diagram of an automotive electrical panel with color-coded indicators and a magnified view of the component (no text or symbols present)- Pressing both sides, firmly close the inner cover.
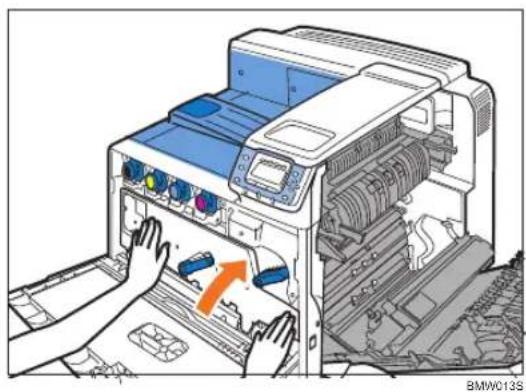
natural_image
Illustration of a printer with hands operating the front panel and a yellow arrow indicating a process (no text or symbols present)- Turn the green levers clockwise.
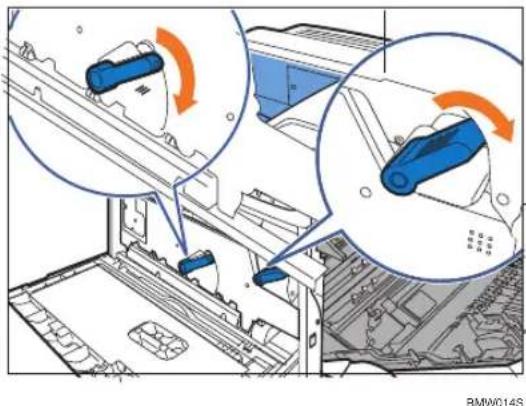
natural_image
Technical diagram of a mechanical assembly with two views of blue components, no visible text or symbols- Carefully close the right cover.
- Carefully close the front cover.
- Plug in the power cable and turn on the printer.
Replacing the Waste Toner Bottle
! WARNING
- Do not incinerate spilled or used toner. Toner dust is flammable and might ignite when exposed to an open flame.
- Dispose of used toner containers in accordance with local regulations.
CAUTION
- Keep toner (used or unused) and the toner containers out of reach of children. If a child swallows toner, consult a doctor immediately.
Important
- Waste toner bottles cannot be reused.
• Purchasing and storing extra waste toner bottles is recommended. - Before removing the waste toner bottle from the printer, spread paper or some other material around the area to keep toner from dirtying your workspace.
Replace the waste toner bottle if the following message appears on the display:
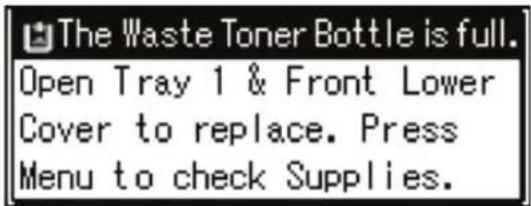
text_image
The Waste Toner Bottle is full. Open Tray 1 & Front Lower Cover to replace. Press Menu to check Supplies.When the following message appears on the display, the waste toner bottle should be replaced soon. Prepare a new waste toner bottle.
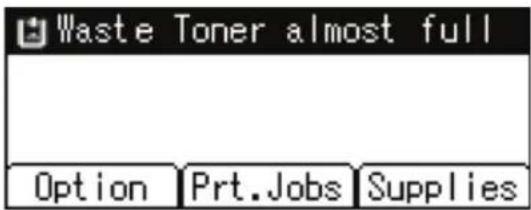
text_image
Waste Toner almost full Option Prt.Jobs Supplies-
Turn off the printer and unplug the power cable.
-
Pull out Tray 1 carefully until it stops.
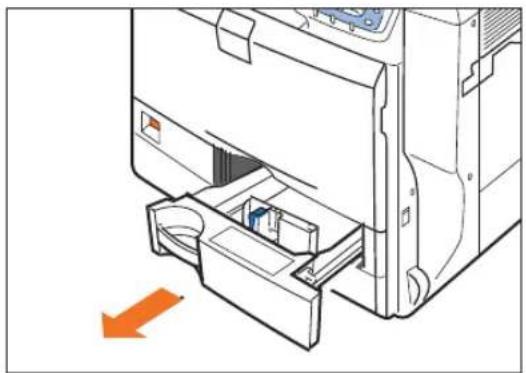
natural_image
Diagram of a printer or printer with an orange arrow indicating a process or operation (no text or symbols present)BMV076S
- Open the left front cover slowly.
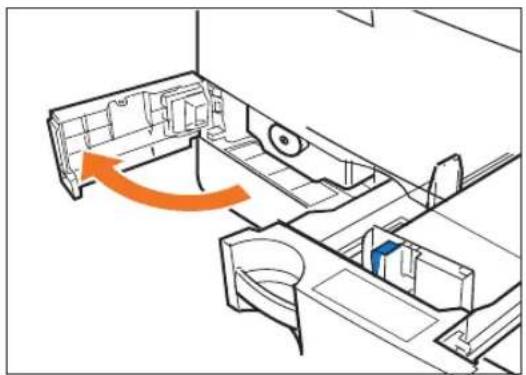
natural_image
Architectural floor plan diagram showing room layouts and a directional arrow (no text or labels)BMV079S
- Holding the green grip located under the front of the waste toner bottle, and pull it out until the handle on the top is completely visible.
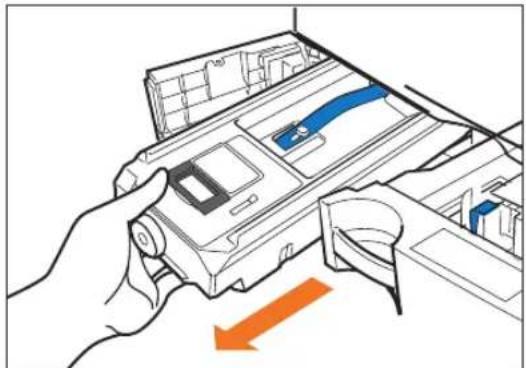
natural_image
Illustration of hands holding a device with an orange arrow indicating direction (no text or symbols present)BMVOAOS
- Holding the handle, carefully pull out the waste toner bottle horizontally.
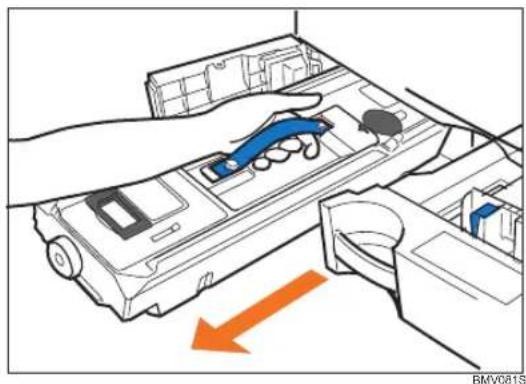
natural_image
Illustration of a hand operating a device with an orange arrow indicating direction (no text or symbols present)-
Put the waste toner bottle into the supplied plastic bag to prevent toner from leaking out of the bottle. Then, seal the bag.
-
Take the new waste toner bottle out of the box.
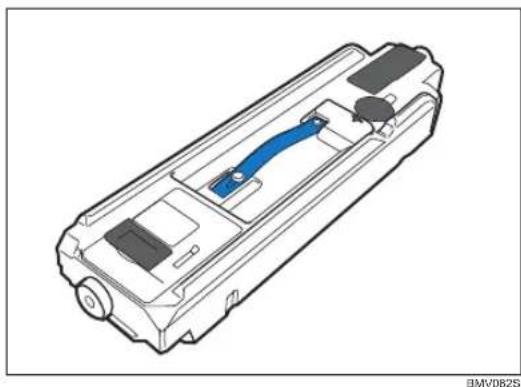
natural_image
Technical line drawing of a mechanical component with a blue internal structure (no text or symbols)- Remove the tape slowly.
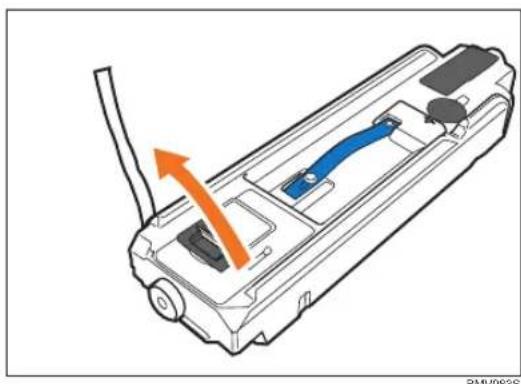
natural_image
Diagram of a mechanical device with orange and blue arrows indicating directional movement (no text or symbols)- Slowly pull the thick paper out of the waste toner bottle vertically.
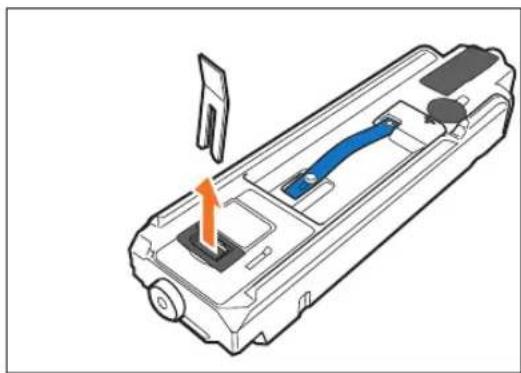
natural_image
Diagram of a handheld device with an orange arrow indicating motion or force, showing internal components and a screen (no text or symbols)BMV064S
- Holding the handle on the top, insert the waste toner bottle into the printer carefully.
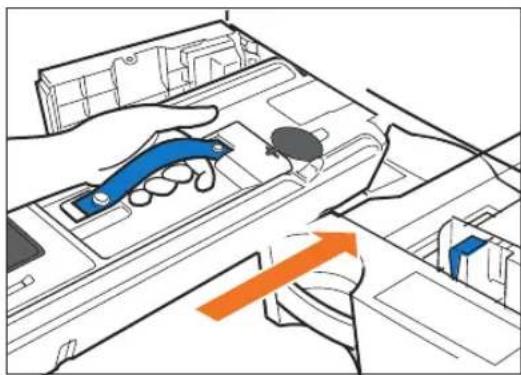
natural_image
Illustration of a hand holding a blue tool interacting with a device panel, with an orange arrow indicating direction (no text or symbols present)BMV085S
- When the waste toner bottle is inserted to the handle area, push the front side of the waste bottle to fully insert it into the printer.
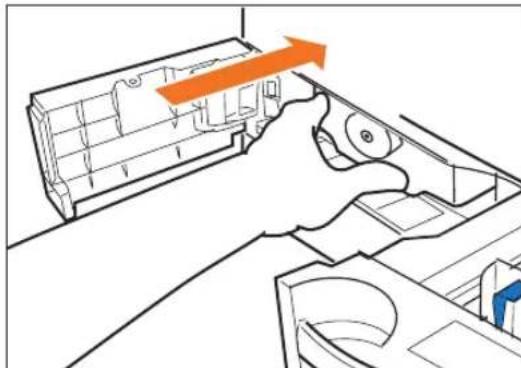
natural_image
Diagram of a hand pressing down on a device component with an orange arrow indicating motion (no text or symbols present)BMV086S
- Carefully close the left front cover.
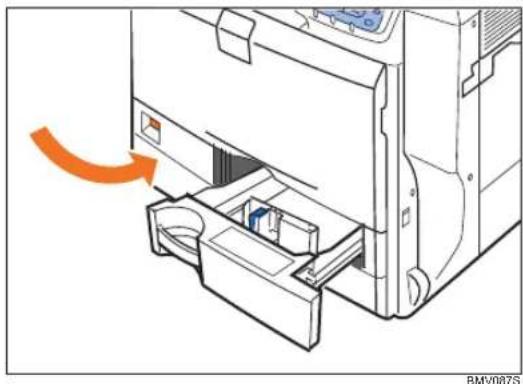
natural_image
Diagram of a refrigerator internal drawer with an orange arrow indicating motion (no text or symbols)-
Carefully push Tray 1 into the printer until it stops.
-
Plug in the power cable and turn on the printer.
Replacing the Fusing Unit, Transfer Roller, and Dustproof Filter
Replace the fusing unit if any of the following messages appear on the display:
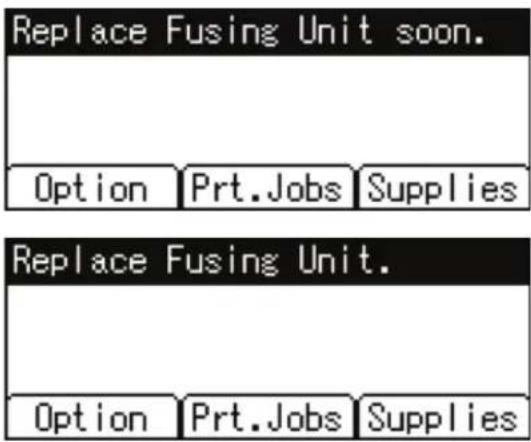
text_image
Replace Fusing Unit soon. Option Prt.Jobs Supplies Replace Fusing Unit. Option Prt.Jobs SuppliesReplace the transfer roller and the dustproof filter at the same time.

Replacing the Fusing Unit
When replacing the fusing unit, clean it simultaneously.
CAUTION
- The fusing unit becomes very hot. When installing a new fusing unit, turn off the printer and wait at least an hour after power off before replacing parts. Not allowing the printer to cool may result in burns.
- Turn off the printer and unplug the power cable.
- Push up the lever on the right side, and open the printer's right cover carefully.
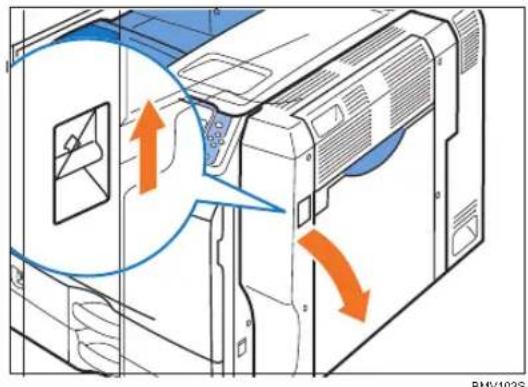
text_image
BMV103SBMV103S
- Loosen the screws to remove the brackets from both sides of the fusing unit.
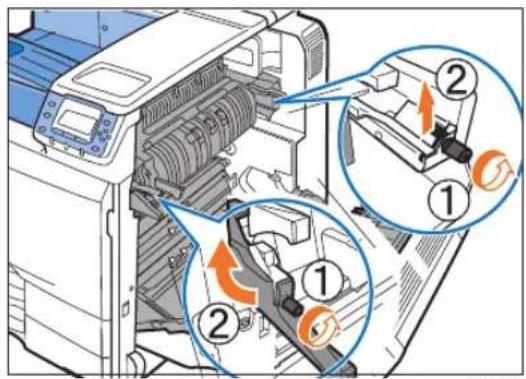
text_image
Diagram of a printer's internal mechanism with numbered annotations indicating process stepsBMV257S
- Raise the C1 levers on both sides.
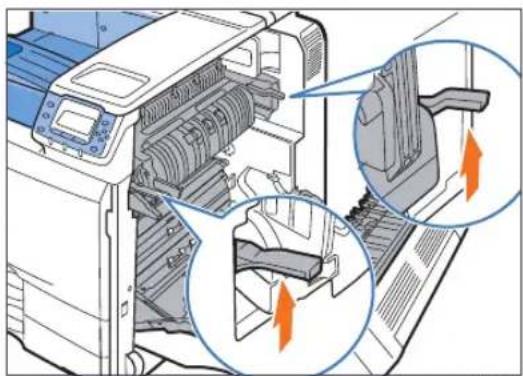
natural_image
Diagram of a printer's internal structure showing internal components and directional arrows (no text or symbols)BMV236S
- Holding the C2 levers, pull out the fusing unit.
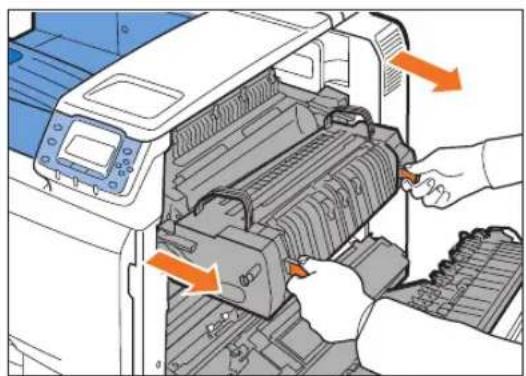
natural_image
Illustration of a printer's internal structure being processed with orange arrows indicating motion (no text or symbols present)BMV117S
- While holding the handles, slowly pull up the fusing unit.
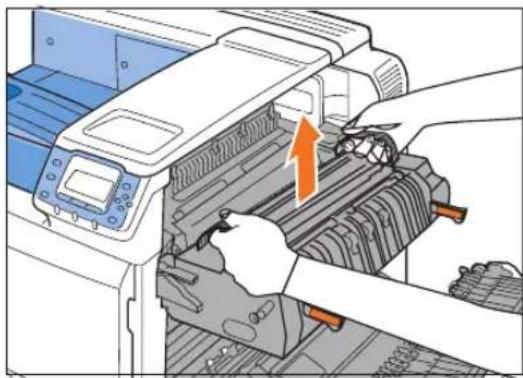
natural_image
Illustration of hands operating a printer with a scroll wheel and orange arrow indicating motion (no text or symbols)BMW035S
- Clean the lens inside of the printer after pulling up the fusing unit.
For details about the cleaning procedure, see the replacement guide provided with the fusing unit.
- Take the new fusing unit out of the bag.
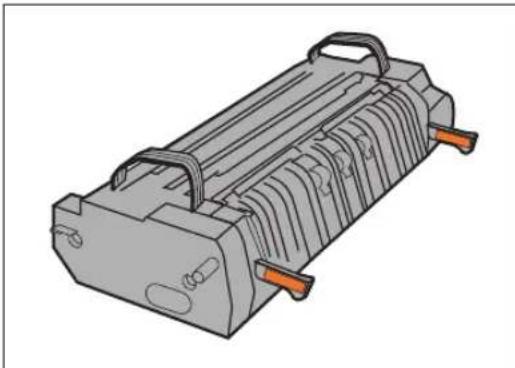
natural_image
3D rendering of a mechanical component with orange connectors and internal channels (no text or symbols)BMV259S
- Set the fusing unit on the guide plate, making sure to align the green marks on the fusing unit and the printer.
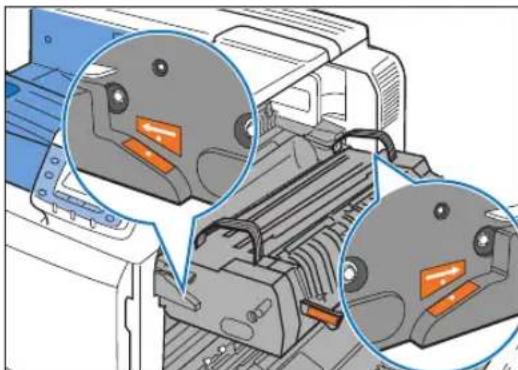
natural_image
Diagram of a printer's internal components with highlighted parts (no text or symbols)BMV256S
- Push the fusing unit back into the printer carefully until it completely stops.
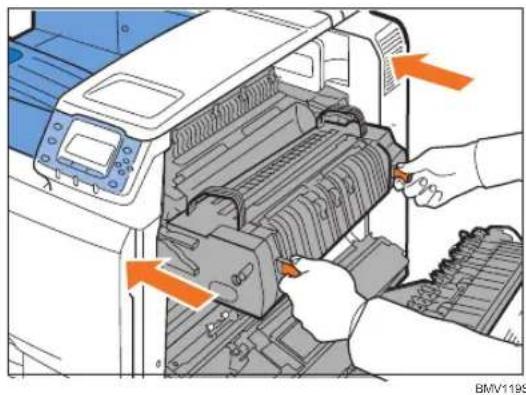
natural_image
Illustration of a printer being inserted into a rack, with orange arrows indicating process direction (no text or symbols present)- Push down the C1 levers on both sides.
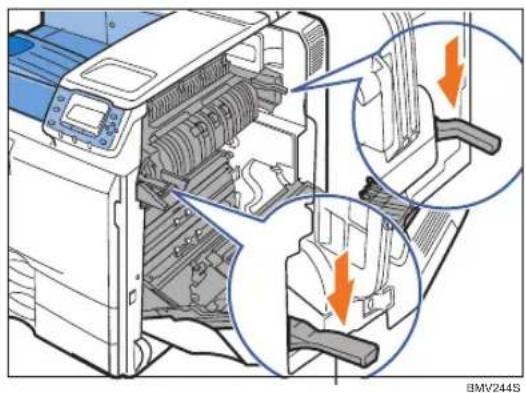
natural_image
Diagram of a printer internal structure showing internal components and directional arrows (no text or symbols)- Reattach the brackets to both sides of the fusing unit and tighten the screws.
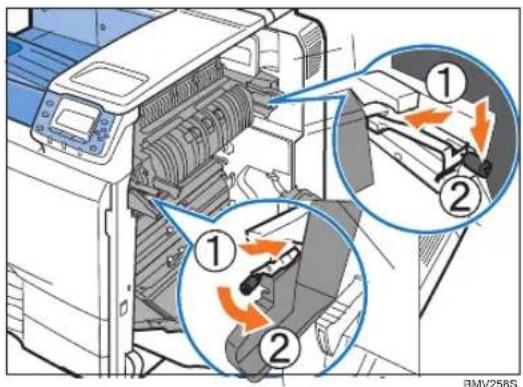
text_image
Diagram showing printer operation with numbered steps and directional arrows indicating process flow
Note
- This completes fusing unit replacement. Leave the right cover open, replace the transfer roller and the dustproof filter as shown below.
Replacing the Transfer Roller
- The transfer roller is installed as shown below.
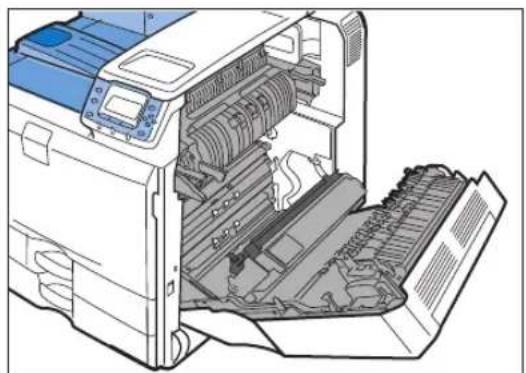
natural_image
Diagram of an open printer with internal components and a paper sheet (no text or symbols visible)BMW019S
- Holding the green grips on both sides, pull up the transfer roller.
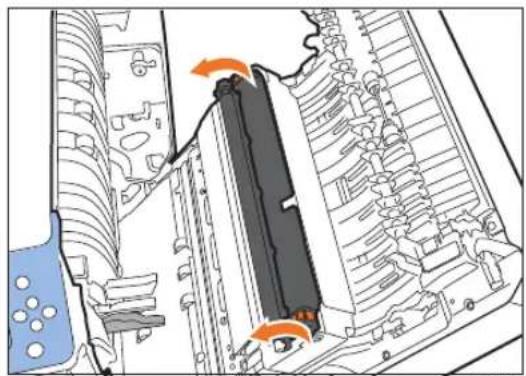
natural_image
Diagram of a mechanical assembly with internal components and directional arrows (no text or symbols)BMW20S
- Holding the green grips, pull out the transfer roller from the printer.

natural_image
Diagram of a mechanical assembly with internal components and an orange arrow indicating a specific section (no text or symbols present)BMW021S
- Take the new transfer roller out of the bag.
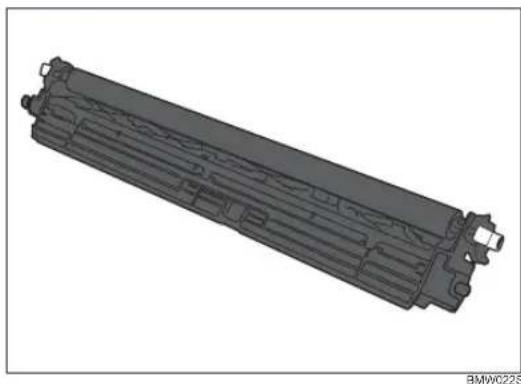
natural_image
3D CAD model of a mechanical component with internal channels and mounting holes (no text or symbols visible)Hold the grips on both sides of the transfer roller.
- Place the transfer roller into the grooves of the printer.
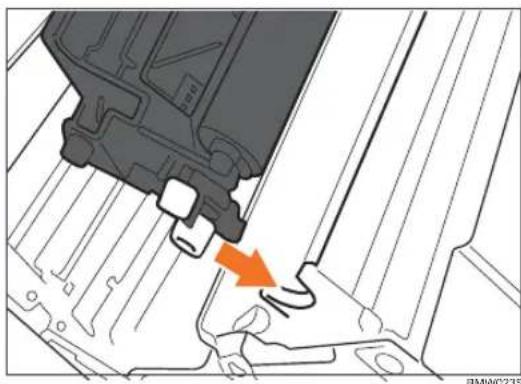
natural_image
Technical diagram showing a mechanical component being cut with an orange arrow indicating the process (no text or symbols present)- Secure the transfer roller by pushing the green grips on both sides until it locks into place.
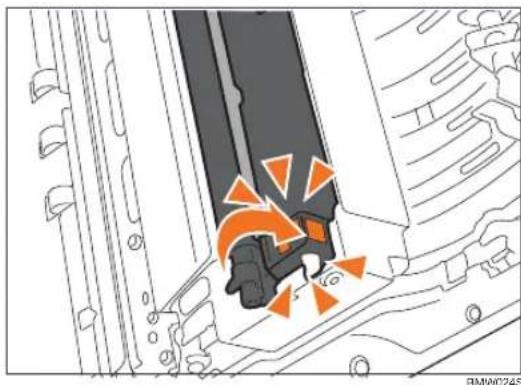
natural_image
Technical illustration of a mechanical assembly with orange arrows indicating motion or force (no text or symbols)- Carefully close the right cover.

Note
- This completes the transfer roller replacement. Follow the next procedure to replace the dust-proof filter as shown below.
Replacing the Dustproof Filter
- Remove the dustproof filter cover by sliding it to the right.
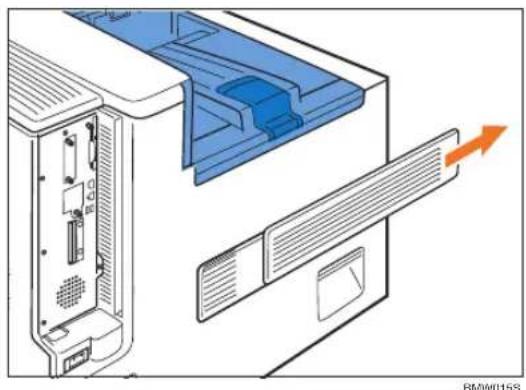
natural_image
Diagram of a computer tower with ventilation duct and fan, showing internal components without any text or symbols- Take out the new dustproof filters and glove from the box.
- Put the glove on either hand.
- Remove the filters with the gloved hand. Put the filters into the fusing unit's box.
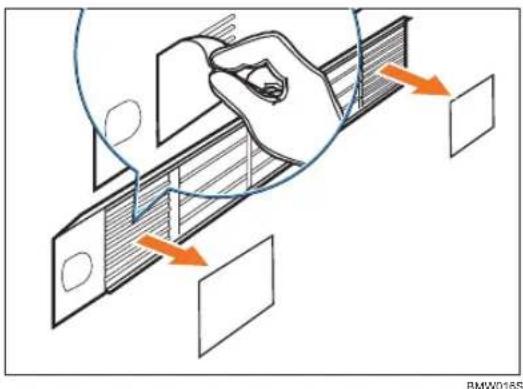
text_image
BMW016SHandle the removed filters with care. Waving the filters will release toner.
- Remove the glove.
Put the glove into the fusing unit's box.
- Attach the new filters.
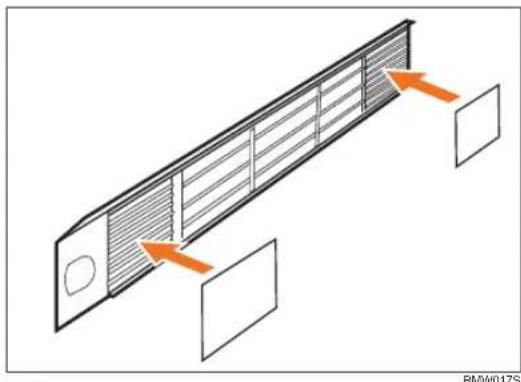
natural_image
Diagram of a ventilation duct with airflow arrows indicating direction, no text or symbols present- Slide the dustproof filter cover back to its original position.
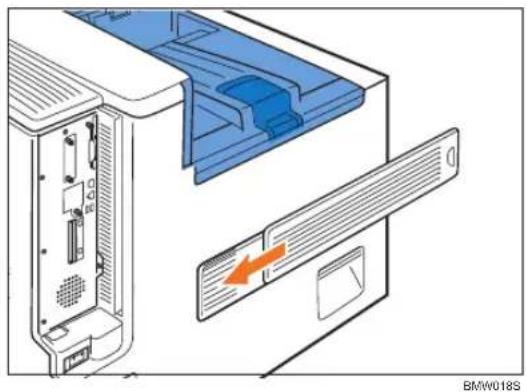
natural_image
Diagram of a computer tower with internal components and an orange arrow indicating a directional flow (no text or symbols present)- Plug in the power cable and turn on the printer.
7. Cleaning the Printer
This chapter explains how to clean this printer.
Cautions When Cleaning
! WARNING
- To avoid hazardous electric shock or laser radiation exposure, do not remove any covers or screws other than those specified in this manual. When the machine needs to be checked, adjusted, or repaired, contact your service representative.
- Do not take apart or attempt any modifications to this machine. There is a risk of fire, electric shock, explosion or loss of sight. If the machine has laser systems, there is a risk of serious eye damage.
CAUTION
- When removing misfed paper, do not touch the fusing unit because it could be very hot.
Clean the printer periodically to maintain fine printing.
Dry wipe the exterior with a soft cloth. If dry wiping is not enough, wipe with a soft, wet cloth that is wrung out well. If you still cannot remove the stain or dirt, apply a neutral detergent, and then wipe over with a well-wrung wet cloth, dry wipe, and then let it dry.
Important
- To avoid deformation, discoloration, or cracking, do not use volatile chemicals, such as benzine and thinner, or spray insecticide on the printer.
- If there is dust or grime inside the printer, wipe with a clean, dry cloth.
- You must disconnect the plug from the wall outlet at least once a year. Clean away any dust and grime from the plug and outlet before reconnecting. Accumulated dust and grime pose a fire hazard.
Cleaning the Friction Pads
If the friction pad is dirty, multi-feeds or misfeeds might occur. In this case, clean the pad as shown below.

Important
- Do not use chemical cleaner or organic solvent such as thinner or benzine.

Note
- If misfeeds or multi-feeds of paper occur after cleaning the friction pad, contact your sales or service representative.
Paper Trays 1000-sheet Paper Feed Unit
The same procedure is applied to clean the friction pads of the standard paper trays and the 1000-sheet paper feed units. Tray 2 is used as an example.
- Carefully pull out the paper tray until it stops.
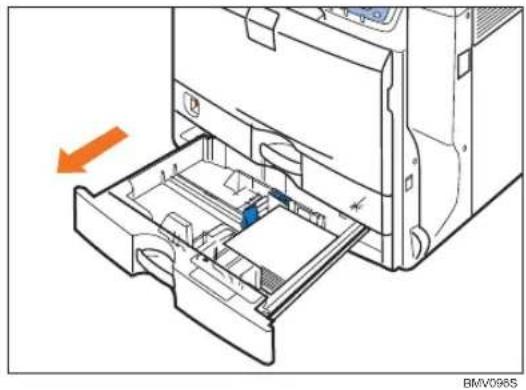
natural_image
Diagram of a computer printer internal structure with an orange arrow indicating motion (no text or symbols present)-
Remove the loaded paper.
-
Wipe the friction pad with a soft damp cloth.
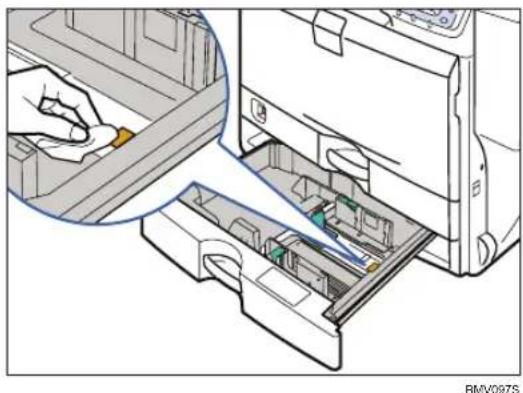
natural_image
Illustration of a printer's internal structure with a hand inserting a tool into the paper (no text or symbols visible)- Reload the paper into the paper tray and push it gently into the printer until it stops.
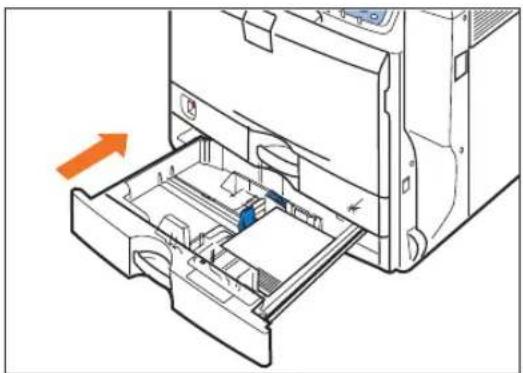
natural_image
Diagram of a printer's internal structure showing paper feeding into a slot, with an orange arrow indicating the direction (no text or symbols present)BMV098S
Do not slide the paper tray in with force. If you do, the paper guides might move.
2000-sheet Paper Feed Unit
- Carefully pull out the paper tray until it stops.
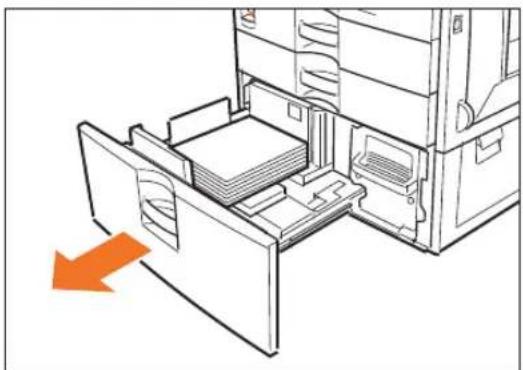
natural_image
Line drawing of a file drawer with an orange arrow indicating direction (no text or symbols)BMV099S
- Holding the lever on the right side of the tray, pull the tray completely out.
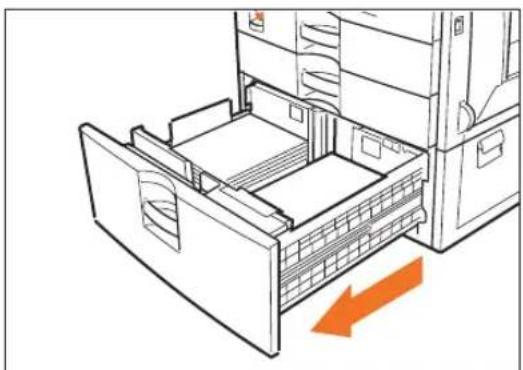
natural_image
Line drawing of a file drawer with an orange arrow indicating compression or disassembly (no text or symbols present)BMV100S
-
Remove the loaded paper.
-
Wipe the friction pad with a soft damp cloth.
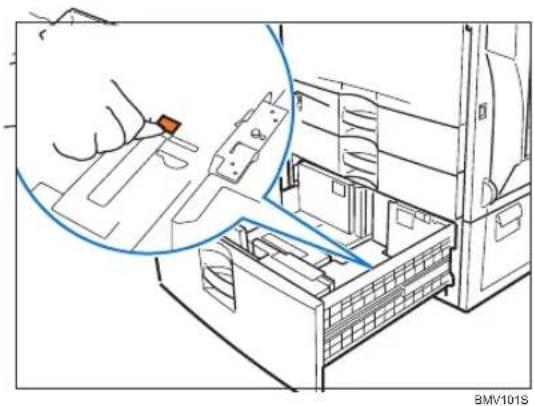
natural_image
Technical line drawing of a computer motherboard with an inset showing a hand inserting a component (no text or symbols present)- Reload the paper into the paper tray and push it gently into the printer until it stops.
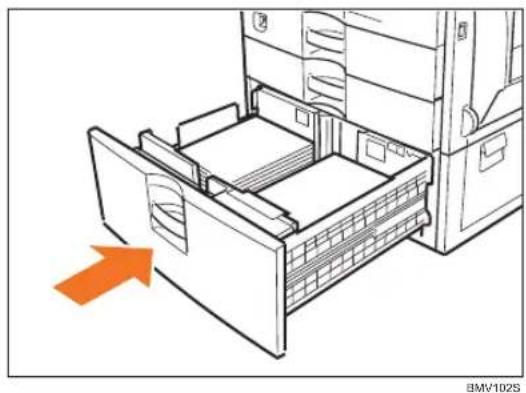
natural_image
Line drawing of a refrigerator drawer with an orange arrow pointing to the drawer (no text or symbols present)Cleaning the Registration Roller
If types of paper other than the standard types are used, specks of paper may stick around the registration roller, causing problems. Clean the registration roller if white dots appear on prints.

CAUTION
- The inside of this printer becomes very hot. Do not touch parts labeled “⚠️” (indicating a hot surface). Touching these parts will result in burns.

Important
- Do not use chemical cleaners or organic solvents such as thinners or benzine. - Do not touch the belt of the roller when cleaning.
-
Turn off the printer and unplug the power cord.
-
Push up the lever on the right side, and open the printer's right cover carefully.
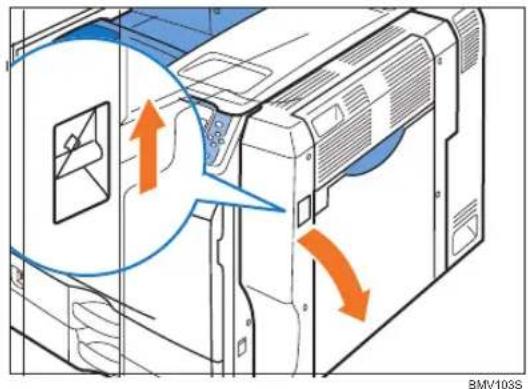
text_image
BMW103S- Clean the registration roller by applying a soft damp cloth while turning it.
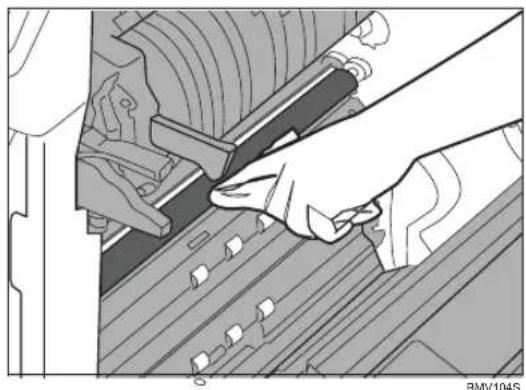
natural_image
Mechanical assembly diagram showing hands operating a component with no visible text or symbols- Close the right cover.
- Plug in the power cord and turn on the printer.
Cleaning the Dustproof Glass
Clean the dustproof glass if white lines appear on prints.

Important
- Do not forcefully insert the cleaning stick. It may scratch the inside of the printer.
- Turn the printer off and unplug the power cable.
- Holding the left and right handles, open the front cover.
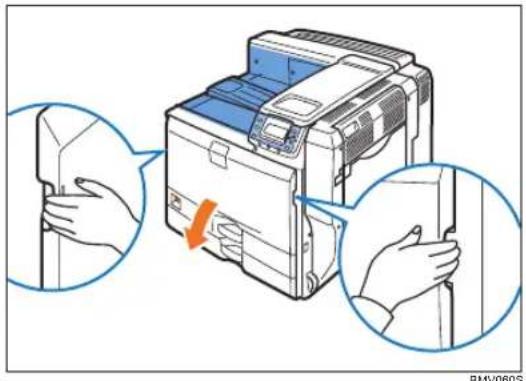
natural_image
Illustration of a printer with hands holding a document, showing mechanical components and a red arrow indicating a detail (no text or symbols present)The cleaning stick is installed inside the front cover.
- Push and hold the grip in the center (①), and lift the handle of the cleaning stick (②).
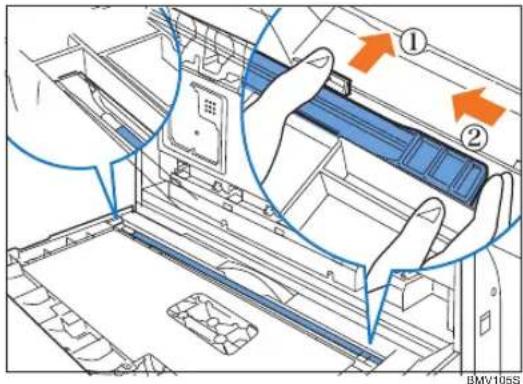
text_image
Diagram showing hands installing or adjusting a device panel with numbered annotations and directional arrowsThere are four holes to insert the cleaning stick.

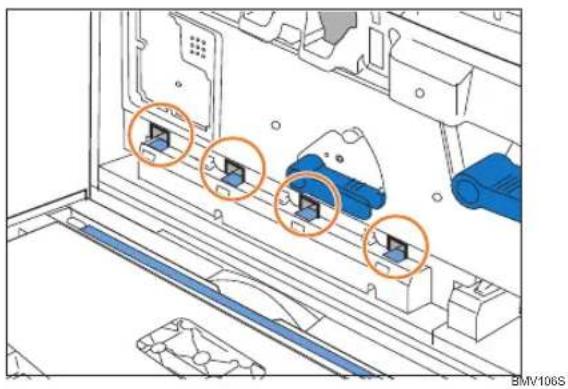
natural_image
Technical diagram of a mechanical assembly with labeled components and zoomed-in circular annotations (no readable text or symbols)- Place the cleaning stick back inside the front cover.
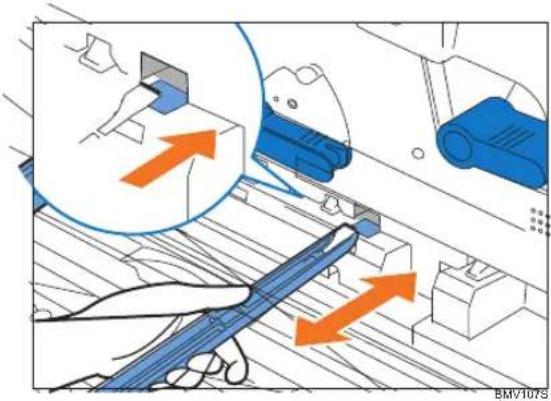
natural_image
Illustration of a robotic arm with blue tool and orange directional arrows indicating movement or force (no text or symbols)Clean all holes.
- Return the cleaning stick inside the front cover.
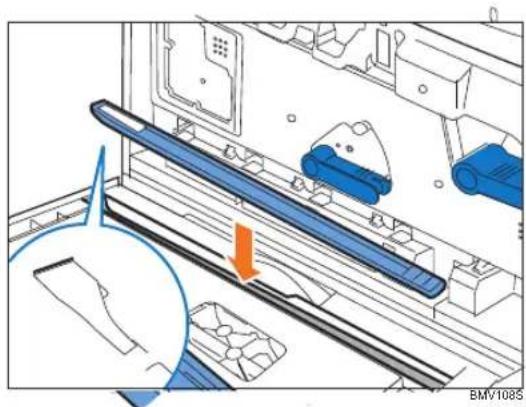
natural_image
Diagram of a printer or scanner assembly with blue components and an orange arrow indicating a process (no text or symbols present)Be sure the cloth tape faces down when you replace the stick.
- Close the front cover carefully.
- Plug in the power cable and turn on the printer.
8. Adjusting the Printer
This chapter explains how to adjust the color gradations, color alignment, and print position.
Adjusting the Color Registration
This section describes automatic color adjustment.
After moving the printer, printing on thick paper, or printing repeatedly for some time, color degradation may occur. By performing automatic color adjustment, you can restore optimum print quality.
- Press the [Menu] key.
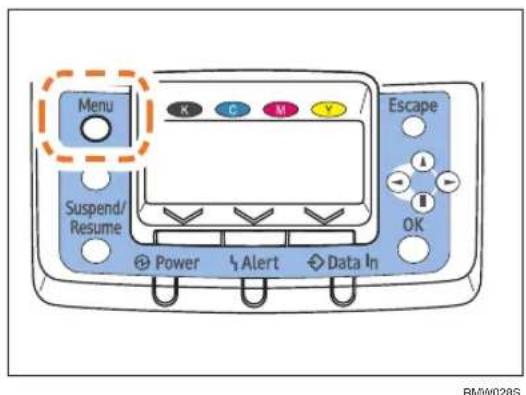
text_image
Menu Suspend/ Resume Power Alert Data In Escape BMW028S- Press the [▼] or [▲] key to select [Maintenance], and then press the [OK] key.
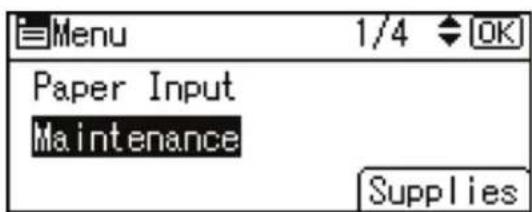
text_image
Menu 1/4 OK Paper Input Maintenance Supplies- Press the [▼] or [▲] key to select [Quality Maintenance], and then press the [OK] key.
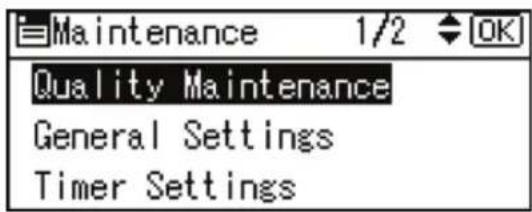
text_image
Maintenance 1/2 OK Quality Maintenance General Settings Timer Settings- Press the [▼] or [▲] key to select [Color Registration], and then press the [OK] key.
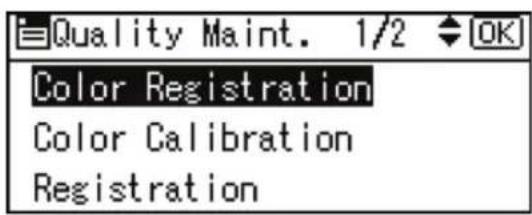
text_image
Quality Maint. 1/2 OK Color Registration Color Calibration Registration- Press the [OK] key.
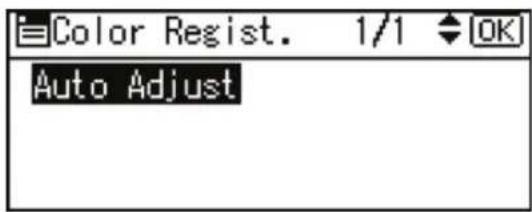
text_image
Color Regist. 1/1 OK Auto Adjust- The confirmation message appears. Press [OK].

text_image
Are you sure you want to perform Auto Color Registration? Cancel OKAutomatic adjustment begins.
Automatic adjustment takes about 30 seconds.
A confirm message appears when complete.
- Press [Exit].
The display returns to the Color Registration screen.
The display returns to the initial screen.
Adjusting Printing Position
You can adjust the printing position for the 1000-sheet paper feed unit (tray 3 to tray 5). Only the horizontal printing position can be adjusted. "Horizontal" means perpendicular to the feed direction. Normally you do not need to update the printing position. However, updating is useful in some cases when the optional paper feed unit is installed.
1. Press the [Menu] key.
![Xanté Impressia - Press the [Menu] key. - 1](/content/2026/05/785924/images/a0d7fe18ca9a66dab037ebd4b06bf7fd759436a0a4a765830e082fb88aa743e5.jpg)
text_image
Menu Suspend/ Resume Power Alert Data In Escape BMW028S- Press the [▼] or [▲] key to select [Maintenance], and then press the [OK] key.
![Xanté Impressia - Press the [Menu] key. - 2](/content/2026/05/785924/images/0af4fe3050191c63931a936c6ca3da027a628ec8bd586bab7549dc32273e2164.jpg)
text_image
Menu 1/4 OK Paper Input Maintenance Supplies- Press the [▼] or [▲] key, and then press the [OK] key to select [Quality Maintenance].
![Xanté Impressia - Press the [Menu] key. - 3](/content/2026/05/785924/images/672bfcef5345ebdc4aab4014198f3726e435789c5a8e11c9925a5fd5e38bbb68.jpg)
text_image
Maintenance 1/2 OK Quality Maintenance General Settings Timer Settings- Press the [▼] or [▲] key to select [Registration], and then press the [OK] key.
![Xanté Impressia - Press the [Menu] key. - 4](/content/2026/05/785924/images/9c0087463a30e2308ba21edc1b81669f8eef4b6e2da7b5abcb8c2d677da35e98.jpg)
text_image
Quality Maint. 1/2 OK Color Registration Color Calibration Registration![Xanté Impressia - Press the [Menu] key. - 5](/content/2026/05/785924/images/8ffca82099afc393aae3acf0a14fef9bc55148af367028663080ec17d301b5c5.jpg)
- Press the [▼] or [▲] key to select [Print Test Sheet], and then press the [OK] key.
![Xanté Impressia - Press the [Menu] key. - 6](/content/2026/05/785924/images/150a19cc79cbee04c61893c689df66399ce8d2f29841223ad44252caac7ea8da.jpg)
text_image
Registration 1/1 OK Print Test Sheet Adjustment-
Press the [▼] or [▲] key to select the tray you want to adjust, and then press the [OK] key.
-
Print the test sheet to preview the settings.
![Xanté Impressia - Press the [Menu] key. - 7](/content/2026/05/785924/images/b7edec28a4a78d9467769850ad6fa773c752bc3d8e838b69a66d9deb40ae754b.jpg)
natural_image
Empty white square with four corner brackets and a central cross mark (no text or symbols)Use this sheet to confirm the current print position.
-
Press the [Escape] key to return to the registration menu.
-
Press the [▼] or [▲] key to select [Adjustment], and then press the [OK] key.
![Xanté Impressia - Press the [Menu] key. - 8](/content/2026/05/785924/images/60fe0f588d3c522c9fd42d78461fc36cc9f693e941346b1198a0f0ac5d600eb5.jpg)
text_image
Registration 1/1 OK Print Test Sheet Adjustment- Press the [▼] or [▲] key to select the tray you want to adjust, and then press the [OK] key.
![Xanté Impressia - Press the [Menu] key. - 9](/content/2026/05/785924/images/a451113bb04b01140fe7d18b32730ad82efe95ba39f1f9ebc3df6e5846fadde8.jpg)
text_image
Registration 1/4 OK Vertical:Tray 1 Vertical:Tray 2 Vertical:Tray 3- Press the [▼] or [▲] key to change the registered value (mm).
![Xanté Impressia - Press the [Menu] key. - 10](/content/2026/05/785924/images/51a63c10ea0ec2367c7e8167d1b030ca3c755cb370add941c435cc0fd5c93cd6.jpg)
text_image
Reg.: Vert.: Tray 1: [OK] Enter value with ◆. -0.2 <-4.0to4.0 by 0.1>Increase the value to shift the print area in the direction indicated by the “+” symbol in the diagram below. Decrease to shift the print area in the direction indicated by the “-” symbol.
![Xanté Impressia - Press the [Menu] key. - 11](/content/2026/05/785924/images/0456ab9c700af44911d61e5ffed5df1e860856d7e13bfbf83ab5e96148331cb0.jpg)
text_image
② - ← + + ① BEK101S①): Print Area
②): Paper Feed Direction
- Press the [OK] key to return to the [Registration] menu.
- Print the test sheet to confirm the adjustment result.
- Press the [Menu] key.
The display returns to the initial screen.
![Xanté Impressia - Press the [Menu] key. - 12](/content/2026/05/785924/images/953c6063d6a5e574bda489d206609b0b23ebe5cd6933125ba197dcd31341778a.jpg)
9. Troubleshooting
This chapter provides solutions to common problems and it also explains how to correct unwanted print results.
Error and Status Messages that Appear on the Control Panel
This section explains the meanings of messages that appear on the control panel and what to do when a particular message appears.
Status Messages (in alphabetical order)
@Remote Certif. updating...
The printer is updating the @Remote certificate.
Calibrating...
The printer is calibrating the color. Wait a while.Energy
Saver
The printer is in Energy Saver mode. Press any keys to recover to the normal mode. Hex Dump
Mode
In Hex Dump mode, the printer receives data in hexadecimal format. Turn off the printer after printing, and then turn back on.
Loading toner
The printer is loading the toner. Wait a while.
Offline
The printer is offline and cannot print.
Please wait...
This message may appear for a few seconds. It means the printer is preparing, cooling down the fusing unit, initializing the development unit, loading toner, or executing maintenance operations. Wait a while.
Preparing to start firmware update.
The printer is checking for firmware updates.
Printing...
The printer is printing. Wait a while.
Printing Suspended
Printing is suspended. Turn off the printer, and turn it on again to recover.
Ready
This is the default ready message. The printer is ready for use. No action is required.
Remote Diagnostics
The printer is performing diagnostic tests remotely.
Resetting Job...
The printer is resetting jobs. Wait a while.
Setting change...
The printer is changing settings. Wait a while.
Set the Fusing Unit correctly.
The fusing unit may not be installed correctly. Turn the printer off and re-install the fusing unit.
If the message is still displayed after re-installation, contact your sales or service representative.
See “Replacing the Fusing Unit, Transfer Roller, and Dustproof Filter” for fusing unit installation.
SmartServ.Call
The printer is contacting the Smart Service center. Some or all of the printer's functions may not be available.
Updating Certificate...
The printer is updating @Remote certificate.
Waiting for print data...
The printer is waiting for the next data to print. Wait a while.
Alert Messages (in alphabetical order)
@Remote Cert. update failed
Updating the @Remote certificate failed. Contact your sales or service representative.
@Remote error. Call service
There was an error with the @Remote line.
Add toner
The printer has run out of the indicated toner. Replace the indicated toner cartridge. See p.139 "Adding Toner".
Cannot connect=>Comm.Serv.
There was a communication error in the remote service modem.
Cannot connect=>Comm.Serv./ Check proxy user/password.
The proxy user name or password is incorrect. Check the proxy server settings, and change the user name and/or password if they are incorrect.
Netwrk connection failed./ Check IP Address.
The connection with the network has failed. Check that the IP address is correct.
Netwrk connection failed./ Contact the administrator.
The connection with the network failed. Contact the network administrator.
Netwrk connection failed./ Please call service.
The connection to the network failed.
Cannot connect with DHCP (101/201)
Cannot obtain IP address from DHCP server. Contact the network administrator.
Cannot connect with/ NetWare print server. (107/207)
Connection with NetWare print server is unavailable. Contact the network administrator.
Cannot connect with/ NetWare server.(106/206)
Connection with NetWare server is unavailable. Contact your network administrator.
Cannot print.
Check the file you want to print is a supported file type. Check for misfeeds and ask your network administrator for help.
Cannot recognize SDRAM mod./ Please call service.
The printer could not recognize the installed optional memory.
Cannot set IPv4 within/ the same subnet range. (###)
The IPv4 address cannot be set within the same subnet ranges.
Change (tray name) to the following settings: A4 ☐ (Recycled)
The specified paper type is different from the paper type in the indicated tray. This message does not apply to the bypass tray. Press [Change] to change the tray's settings, press [Job Reset] to reset the job, or press [FormFeed] to force printing.
Check @Remote Line
Check the connection status of @Remote Line.
Check network / settings.(103/203)
The IP address setting is incorrect. Check the IP address, subnet mask, and gateway address. For details, see p.79 "Ethernet Configuration".
Cover Open
Close the cover indicated on the control panel.
Current wireless card is not WPA compatible. (###)
The wireless LAN you are using is not compatible with WPA.
Device access violation may have occurred. Contact the administrator.
An attempt was made to access the printer from outside of the network.
Duplex mode is in off position for (tray name)
The duplex mode for the indicated tray is off; you can only use one-sided printing. Press [Change] to change the tray's settings, press [Job Reset] to reset the job, or press [FormFeed] to force printing.
Ethernet Board Error
An error on the Ethernet board is detected. Pull out and then re-install the controller board. If the problem persists, contact your sales or service representative.
Failed to connect to server for Remote Diagnostics.
The printer cannot communicate with Remote Communication Gate. Check the connection to the Remote Server Gate.
Independent-supply toner
Independent-supply toner is set. Use toner recommended for this printer.
IPv6 Address already exists Link-local Address (109/209)
The same IPv6 address already exists. Contact your network administrator.
IPv6 Address already exists Stateless Address (109/209)
The same IPv6 address already exists. Contact your network administrator.
IPv6 Address already exists Manual Config. Address (109/209)
The same IPv6 address already exists. Contact your network administrator.
LCT Error. Power Off/On. Error recurs, call service.
An error has occurred in the LCT unit. Turn the power off, and then back on again. If the error recurs, contact your sales or service representative.
Load paper in (tray name) or [Cancel] to FormFeed. A4 ☐ (Recycled)
There is no paper in the specified tray. Load the specified paper in the tray, press [Job Reset] to reset the job, or press [FormFeed] to force printing.
Load paper in (tray name) A4 □ (Recycled)
There is no paper in the specified tray. Load the specified paper in the tray, press [Job Reset] to reset the job, or press [FormFeed] to force printing.
Login failed due to user lockout. Please contact the administrator.
Login failed because the wrong password was repeatedly used for login.
Option RAM Error
The printer cannot detect an optional SDRAM module. It may be incorrectly installed.
Check if it is installed properly.
For details about installing the unit, see p.45 "Installing the Memory Expansion Units".

No paper in tray.
The indicated tray is out of paper. Add more paper.
Paper size/type mismatch. Change settings to: A4☐ (Recycled)
The paper type and size in all trays are not the same as the paper tray type and size setting, when Auto Paper Select mode is selected. Press [Change] to change the settings, press [Job Reset] to reset the job, or press [FormFeed] to force printing.
Malfunction: (tray name)
There is a problem with the paper tray motor. Select a different tray and force printing, or press [Reset Job] to reset the job.
Parallel I/F Error
The printer's self diagnostic test failed due to a loopback error. Replace the IEEE 1284 board that caused the error.
For details, see "Installing the Interface Units".
Printer Font Error.
There are problems with the printer's font file.
Contact your sales or service representative.
[Print] without below mode? [Staple] [Punch] [Staple/Punch]
Continue printing without using the function listed on the third line of the display. Press [OK] to cancel the displayed modes and resume printing.
Printing suspended. Resume printing from PC side.
Printing has been suspended. Resume the print job from your computer.
Problem with Hard Disk Please call service.
The printer cannot detect a hard disk. It may be incorrectly installed.
Check if it is installed properly or contact your sales or service representative.
For details about installing the unit, see p.54 "Installing the Interface Units".
Check that the wireless LAN or Bluetooth board is installed properly, or contact your sales or service representative.
For details about installing the unit, see p.54 "Installing the Interface Units".
Proxy error. If it recurs: Please call service.
There is a problem connecting with the proxy server. Possible causes include: an incorrect proxy server address or port number, the proxy server is not activated, the center URL is incorrect, or the proxy server is not set.
Contact your sales or service representative if the problem persists. Ready
Server communicat. failed
There was no reply from the server.
Ready Problem: Printer Module
There was an error with a DIMM module (slot 1).
Ready Problem:PS3 module Please call service.
There was an error with a DIMM module (slot 1).
Full: Output Tray(s)
The output trays are full. Remove the paper.
Replace Fusing Unit.
You need to replace the fusing unit. See "Replacing the Fusing Unit, Transfer Roller, and Dustproof Filter".
Replace Fusing Unit soon. A new kit is required. Contact your local vendor.
You will need to replace the fusing unit soon. Contact your sales or service representative to obtain a new unit.
Replace IntTrans Unit.
You need to replace the transfer unit.
Replace IntTrans Unit soon. A new unit is required. Contact your local vendor.
You will need to replace the transfer unit soon. Contact your sales or service representative to obtain a new unit.
Replace PCU:Black
You need to replace the black drum unit. See p.143 "Replacing the Black Drum Unit/Color Drum Units".
Replace PCU:Black soon. A new PCU is required. Contact your local vendor.
You will need to replace the black drum unit soon. Contact your sales or service representative to obtain a new unit.
Replace PCU:Color.
You need to replace the color drum units. See p.143 "Replacing the Black Drum Unit/Color Drum Units".
Replace PCU:Color soon. A new PCU is required. Contact your local vendor
You will need to replace the color drum units soon. Contact your sales or service representative to obtain a new unit.
Reset Paper Tray correctly. A4 (Recycled)
The paper tray is not set correctly. Set the indicated tray again, or select a different tray to print from.
SD Card authenticatn.failed Error recurs, call service
Authentication from the SD card failed. Turn the power off, and then back on. If the error recurs, contact your sales or service representative.
Set the Fusing Unit correctly.
The fusing unit is not set correctly. Set the fusing unit again.
Set the Intermediate Transfer Unit correctly.
The transfer unit is not set correctly. Set the transfer unit again.
Set the Toner Cartridge correctly.
The indicated toner cartridge is not set correctly. Set the indicated toner cartridge again.
Set Tray to below setting or [Cancel] to FormFeed. A4 ☐ (Recycled)
A size and paper type mismatch has occurred with Auto tray select mode set. Set the tray to the indicated size and paper type, press [Job Reset] to reset the job, or press [FormFeed] to force printing.
Set Waste Toner Bottle correctly.
The waste toner bottle is not set correctly. Set the waste toner bottle again.
SRAM problem occurred. SRAM was formatted.
There was an error in the SRAM.
Standard Tray is full. Remove the paper.
The standard output tray is full, or there is a problem with the paper tray motor. Remove the paper from the tray.
The same IP Address exists on several interfaces (###)
The same IP address has already been set on several interfaces. Contact the network administrator.
The same IPv4 Address already exists.(102/202)
The IPv4 address specified for the machine is already in use by another device on the network. Contact the network administrator.
The selected job(s) has already been printed or deleted.
This message might appear if you print or delete a job from Web Image Monitor. Press Exit on the message screen.
This NetBIOS name is already in use.(108/208)
The NetBIOS name specified for the machine is already in use by another device on the network. Contact your network administrator.
Toner is almost empty.
The printer is almost out of the toner indicated in the message. Contact your sales or service representative to obtain a new unit.
(tray name) Error. Power Off/On. Error recurs, call service.
There was an error with an input tray motor. Turn the power off, and then on again.
Turn power off, then set the PCU correctly.
The black drum unit/color drum units are not set correctly. Turn the power off, and then set the black drum unit/color drum units again.
USB has a problem. Please call service.
The printer has detected a USB board failure. Turn the power off, and then on again. If the problem persists, contact your sales or service representative.
Values set for IPv6/Gateway addresses are invalid.(110/210)
The IPv6 address or gateway address is invalid. Check the network settings.
Waste Toner almost full Contact your local vendor. Please call service.
The waste toner bottle is almost full. Contact your sales or service representative.
Waste Toner Bottle full
Replace the waste toner bottle. See p.156 "Replacing the Waste Toner Bottle".
WPA Auth. incomplete.(211)
WPA authentication could not complete. Contact your network administrator.
Supply Alert Messages (in alphabetical order)

Out of toner. Replace Toner Cartridge.
The printer is out of the toner color indicated in the message. Replace the indicated toner cartridge. See p.139 "Adding Toner" for installation instructions.

placement Alert Replace Fusing Unit.
You need to replace the fusing unit. Contact your sales or service representative to obtain a new unit. See "Replacing the Fusing Unit, Transfer Roller, and Dustproof Filter" for installation instructions.

placement Alert Replace IntTrans Unit.
You need to replace the transfer unit. Contact your sales or service representative to obtain a new unit. See p.150 "Replacing the Transfer Unit" for installation instructions.

placement Alert Replace PCU:Black.
You need to replace the black drum unit. Contact your sales or service representative to obtain a new unit. See “Replacing the Black Drum Unit/Color Drum Units” for installation instructions.

placement Alert Replace PCU:Colour.
You need to replace the color drum units. Contact your sales or service representative to obtain a new unit. See “Replacing the Black Drum Unit/Color Drum Units” for installation instructions.

oply order has failed.
The automatic supply order failed. The message indicates the supplies that the printer tried to order. Print/Data Errors (in alphabetical order)

nmand Error.
An RPCS command error occurred. Check the connection between the printer and the computer, make sure you are using the correct driver for the printer, and make sure that the memory settings for the driver match the memory installed in the printer.

Impressed Data Error
The printer detected corrupt compressed data. Check the connection between the computer and the printer. Check that the program you used to compress the data is functioning correctly.

sufficient Memory.
A memory retrieval error occurred.
(a) Failure in memory retrieval while drawing.
(b) Failure in processing frame.
Add additional memory to the printer. See “Installing the Memory Expansion Units” for instructions on installing memory.

Memory Retrieval Error.
A memory retrieval error occurred. This alert is displayed when failures cannot be avoided even though additional memory is installed in the printer. For example, this error can occurs if there is a failure in initializing RPCS. Turn the printer off, and then on again. If the error persists, replace the memory module. See p.45 "Installing the Memory Expansion Units" for instructions on installing memory.
Paper Type Error
The paper type specified by the driver was not recognized by the printer. Retrieve the latest paper type information from the printer.
Receiving data failed.
This error occurs when the printer receives an unexpected end-of-file signal. Try printing again.
Sending data failed.
The printer received a command from the driver to suspend data transmission. Check that the host is operating normally.
Note
- Confirm error details by printing the Error Log. For details, see "List/Test Print Menu", Software Guide.
Panel Tones
The following table explains the meaning of the various tone patterns that the printer used to alerts to users about its condition.
| Tone Pattern | Meaning Cause | |
| Two long beeps. Printer ready. | After cooling or being switched on, the printer has fully warmed up and is ready for use. | |
| Single short beep. | Panel/screen input accepted. | A valid control panel or screen key was pressed.Single short beeps are produced only when valid keys are pressed. |
| Single long beep. | Job completed. | A printer job has finished. |
| Four long beeps. | Printer initialized. | The screen is changing back to the initial screen after the printer came out of the energy-saving mode or was reset. |
| Five short beeps repeated five times. | Printer alert. | Printer requires user attention.Paper may have jammed or toner may need replenishing. |

Important
- Users cannot mute the printer's tone alerts. When the printer beeps to alert users of a paper jam or toner request, if the printer's covers are opened and closed repeatedly within a short space of time, the tone alert might continue, even after normal status has resumed.
Printer Does Not Print
Is the power on?
Confirm that the cord is securely plugged into both the power outlet and the printer.
Turn on the power.
Does the Alert indicator stay red?
If so, check the error message on the display and take the required action.
See "Error and Status Messages that Appear on the Control Panel".
Is paper loaded?
Load paper into the paper tray or onto the bypass tray.
See "Loading Paper".
Can you print a configuration page?
If you cannot print a configuration page, it probably indicates a printer malfunction. Contact your sales or service representative.
See "List/Test Print Menu", Software Guide.
Is the interface cable connected securely to the printer and the computer?
Connect the interface cable securely. If it has a fastener, fasten it securely as well.
Are you using the correct interface cable?
The type of interface cable you should use depends on the computer you use. Be sure to use the correct one.
If the cable is damaged or worn, replace it with a new one.
See "Specifications".
Is the Data In indicator blinking or lit after starting the print job?
If not blinking or lit, the data is not being sent to the printer.
If the printer is connected to the computer using the interface cable
Check the port connection setting is correct. For details about checking the port connection, see "Checking the Port Connection".
Network Connection
Contact your network administrator.
Infrastructure Mode
Check the signal status in the [Wireless LAN] menu on the control panel. If the signal is poor, either move to a location where it is good, or remove obstructions.
If printing still does not start, contact your sales or service representative. Consult with the store where the printer was purchased for information about the location of sales or service representatives.
Checking the Port Connection
*(n) varies depending on the number of printers connected. This section describes how to check the print port when the Data In indicator does not light up or blink.
Check if the print port setting is correct. When it is connected using a parallel interface, connect it to LPT1 or LPT2.
Windows 2000
- Click the [Start] button, point to [Settings], and then click [Printers].
- Click the icon of the machine. On the [File] menu, click [Properties].
- Click the [Ports] tab.
- In the [Print to the following port(s)] list, confirm the correct port is selected.
Windows XP Professional or Windows Server 2003/2003 R2
- Click the [Start] button, and then click [Printers and Faxes].
- Click the icon of the machine. On the [File] menu, click [Properties].
- Click the [Ports] tab.
- In the [Print to the following port(s)] list, confirm the correct port is selected.
Windows XP Home Edition
- Click the [Start] button, and then click [Control Panel].
- Click [Printers and Other Hardware].
- Click [Printers and Faxes].
- Click the icon of the machine. On the [File] menu, click [Properties].
- Click the [Ports] tab.
- In the [Print to the following port(s)] list, confirm the correct port is selected.
Windows Vista/ Windows Server 2008
- Click the [Start] button, and then click [Control Panel].
- Click [Printers].
- Click the icon of the machine. On the [Organize] menu, click [Properties].
- Click the [Ports] tab.
- In the [Print to the following port(s)] list, confirm the correct port is selected.
Printing Problems
Toner smears appear on the print side of the page.
- The paper setting may not be correct. For example, although you are using thick paper, the setting for thick paper may not be set. Check the paper setting of the control panel and printer driver. See “Paper and Other Media” and the printer driver Help.
- When “Replace PCU:Black.” or “Replace PCU:Colour.” appears on the display, replace the black drum unit/color drum units.
See "Replacing the Black Drum Unit/Color Drum Units". - Confirm that the paper is not curled or bent. Envelopes can be curled easily. Flatten paper before loading.
See "Paper Recommendations".
Paper jams occur frequently.
- Check the following:
- Paper guides are set correctly, leaving no gaps between paper guides and paper.
- The side guides of the paper tray are locked.
- Paper guides are not set too tight. If too tight, re-position the guides so that they gently touch the loaded paper.
- The top of the paper stack is not higher than the limit mark inside the tray, or side guides of the bypass tray.
See "Loading Paper".
- If paper misfeeds every time duplex print is performed, check the following items.
- The end guides of the paper tray are set correctly.
- The loaded paper and the paper type set at the control panel match. For more solutions to this problem, see “Duplex Print Always Misfeeds”.
- When printing on thick paper, it is recommended to load more than 20 sheets.
- If paper misfeeds occur regularly when printing from the bypass tray, the settings of the control panel and those of the printer driver may not match.
- Paper not suitable for printing is used. For example, paper may be too thick, too thin, bent or wrinkled, damp, or already been printed on. See “Paper Recommendations”.
- Pages may be sticking together. Fan the paper before loading it, or feed the pages one at a time.
Multiple pages are fed at once.
- Check the following:
- Paper guides are set correctly, leaving no gaps between paper guides and paper.
- The side guides of the paper tray are locked.
- Paper guides are not set too tight. If too tight, re-position the guides so that they gently touch the loaded paper.
- The top of the paper stack is not higher than the limit mark inside the tray, or side guides of the bypass tray.
See "Loading Paper".
- Paper not suitable for printing is used. For example, paper may be too thick, too thin, bent or wrinkled, damp, or already been printed on. See “Paper Recommendations”.
- Pages may be sticking together. Fan the paper before loading it, or feed the pages one at a time.
Paper gets wrinkles or the paper edges become bent.
- Check the following:
- Paper guides are set correctly, leaving no gaps between paper guides and paper.
- The side guides of the paper tray are locked.
- Paper guides are not set too tight. If too tight, re-position the guides so that they gently touch the loaded paper.
- The top of the paper stack is not higher than the limit mark inside the tray, or side guides of the bypass tray.
See "Loading Paper".
- Paper not suitable for printing is used. For example, paper may be too thick, too thin, bent or wrinkled, damp, or already been printed on. See “Paper Recommendations”.
- The paper has a high moisture content. Store paper at an appropriate temperature and humidity level.
- The fusing unit is deteriorated or damaged. Replace the unit.
See "Replacing the Fusing Unit, Transfer Roller, and Dustproof Filter".
The back of the paper is printed on.
- The paper has been loaded upside down.
Load paper in the 500-sheet paper trays or 2000-sheet paper feed unit with the print side up. Load paper in the bypass tray with the print side down. See p.118 "Loading Paper".
Duplex printing cannot be performed.
- Duplex printing is not supported for the following paper types: labels, Thin paper, cardstock, OHP transparency, envelopes, thick paper ([Thick Paper 2], [Thick Paper 3]), coated paper, coated paper: gloss print.
- Paper heavier than 161g / m^2 (40 lb.) is loaded. Change the paper for printing.
With Windows 2000/XP/Vista, Windows Server 2003/2003 R2/2008, when doing aggregate prints or bound prints.
- Check that the paper size and direction set in the [Menu] tab of the printer driver are the same as those set in the application.
If the settings are not the same, change the settings of the printer driver.
Paper is not fed from the selected tray.
- When you are using a Windows operating system, the printer driver settings override those set using the control panel. Set the desired input tray using the printer driver. See the printer driver Help.
A printed image is different from the image on the computer's display.
- When you use some functions, such as enlargement and reduction, the layout of the image might be different from that displayed in the computer display.
- You might have selected to replace True Type fonts with printer fonts in the printing process. To print an image similar to the image on the computer, make the settings to print out True Type fonts as an image.
See the printer driver Help.
It takes too much time to turn on the printer.
- If the printer is turned off while it is still accessing the hard disk (for example: during file deletion), the printer will require more time to power-up the next time it is turned on. To avoid this time delay, do not turn the power off while it is in operation.
It takes too much time to resume printing.
- The data is so large or complex that it takes time to process it. If the Data In indicator is blinking, the data is being processed. Just wait until it resumes.
- If an OHP transparency or glossy paper is being used, printing takes more time to start.
- The printer was in the Energy Saver mode. To resume from the Energy Saver mode, the printer has to warm up, and this takes time until printing starts. To disable the Energy Saver mode, select [Off] for [Energy Saver] in the [System] menu.
It takes too much time to complete the print job.
- Photographs and other data intensive pages take a long time for the printer to process, so simply wait when printing such data.
Changing the settings with printer driver may help to speed up printing.
See the printer driver Help.
- The data is so large or complex that it takes time to process it. If the Data In indicator is blinking, the data is being processed. Just wait until it resumes.
- If "Please wait." appears on the display, the printer is now warming up. Wait for a while.
Images are cut off, or excess pages are printed.
- If you are using paper smaller than the paper size selected in the application, use the same size paper as that selected in the application. If you cannot load paper of the correct size, use the reduction function to reduce the image, and then print. See the printer driver Help.
The color of the printout is different from the color on the computer's display.
- The colors made using color toner are different from colors displayed on the display in its production system.
- When [Toner saving] is checked under the “Print Quality” tab in the printer driver’s dialog box, the color gradation may appear differently. See the printer driver Help.
Color changes extremely when adjusted with the printer driver.
- Do not extreme settings for the color balance under the “Print Quality” tab in the printer driver's dialog box.
Please note that the sample image displayed in the printer driver is used only to show what processing will be performed, so may not match the print results. See the printer driver Help.
Photo images are coarse.
- Some applications lower the resolution for making prints.
Raise the resolution in the settings for that application.
Color documents are printed in black and white.
- The printer driver is not set up for color printing.
See the printer driver Help.
- Some applications print color files in black and white.
Fine dot pattern does not print.
- Change the [Dithering:] setting in the printer driver's dialog box. See the printer driver Help.
Solid areas, lines or text are shiny or glossy when created as a mixture of cyan, magenta, yellow.
- Select [K: Black] for [Gray reproduction (Text/Line Art):] in the printer driver's dialog box. See the printer driver Help.
Black gradation is not natural.
- Select [Gray reproduction (Text/Line Art):] in the printer driver's dialog box. See the printer driver Help.
Solid lines are printed as broken lines.
- Change the [Dithering:] setting in the printer driver's dialog box.
See the printer driver Help.
Images are printed at an angle
- Confirm that the side guides of the paper tray are locked. If paper is not loaded correctly, it may be processed at an angle.
Images appear only partially.
- The Paper is damp. Use paper that has been stored properly. See “Paper Recommendations”.
- Toner is almost depleted. When the “Add toner” or “Toner is almost empty.” message appears on the display panel, or the toner indicator on the initial screen seems empty, replace the toner. See “Adding Toner”.
- When "Replace PCU:Black." or "Replace PCU:Colour." appears on the display, replace the black drum unit/color drum units. See "Replacing the Black Drum Unit/Color Drum Units".
- Condensation may have collected. If rapid change in temperature or humidity occurs, use this printer only after it has acclimatized.
A color is missing or partially blurred.
- Paper is damp. Use paper that has been stored properly. See "Loading Paper".
- Toner is almost depleted. When the “Out of toner” / “Replace Toner cartridge.” / “(color)”, “Toner is almost empty” /“(color)”, or “Add Toner:” message appears on the display panel, or the toner indicator on the initial screen seems empty, replace the toner cartridge of the displayed color. See “Adding Toner”.
- When "Replace PCU:Black." or "Replace PCU:Colour." appears on the display, replace the black drum unit/color drum units. See "Replacing the Black Drum Unit/Color Drum Units".
- Condensation may have collected. If rapid change in temperature or humidity occurs, use this printer only after it has acclimatized.
The whole printout is blurred.
- Paper is damp. Use paper that has been stored properly. See "Paper Recommendations".
- If you select [Toner saving] on the [Print Quality] tab in the printer properties dialog box, printing is generally less dense. See the printer driver Help.
- Toner is almost depleted. When the “Out of toner” / “Replace Toner Cartridge.” / “(color)”, or “Toner is almost empty” /“(color)” message appears on the display panel, or the toner indicator on the initial screen seems empty, replace the toner cartridge of the displayed color. See “Adding Toner”.
- When “Replace PCU:Black.” or “Replace PCU:Colour.” appears on the display, replace the black drum unit/color drum units. See “Replacing the Black Drum Unit/Color Drum Units”.
- Condensation may have collected. If rapid change in temperature or humidity occurs, use this printer only after it has acclimatized.
White streaks appear or color streaks appear.
- Toner is almost depleted. When the “Out of toner” / “Replace Toner cartridge.” / “(color)”, or “Toner is almost empty” /“(color)” message appears on the display panel, or the toner indicator on the initial screen seems empty, replace the toner cartridge of the displayed color. See “Adding Toner”.
- When "Replace PCU:Black." or "Replace PCU:Colour." appears on the display, replace the black drum unit/color drum units. See "Replacing the Black Drum Unit/Color Drum Units".
- The paper is damp. Use paper that has been stored at a suitable temperature and humidity.
- Specks of paper may be attached to the registration roller. Clean the registration roller. For details, see “Cleaning the Registration Roller”.
White or color rivers appear.
- When "Replace PCU:Black." or "Replace PCU:Colour." appears on the display, replace the black drum unit/color drum units. See "Replacing the Black Drum Unit/Color Drum Units".
The backs of printed sheets are blemished.
- When removing a jammed sheet, the inside of the printer may have become dirtied. Print several sheets until they come out clean.
- If document size is larger than paper size, e.g. A4 document on B5 paper, the back of the next printed sheet may be dirtied.
Printed pages are faint, or have white streaks.
- If 📁 is flashing, toner is almost depleted. Add toner.
See "Adding Toner".
Printed pages are faint.
- The appropriate paper is not loaded. (Printed pages may be faint when printing to coarse or coated paper.) For details, see “Paper Recommendations”.
If rubbed with your finger, it smears out.
- The setting of the paper may not be correct. For example, although thick paper is used, the setting for thick paper may not be set. On the [Menu] tab of the printer driver, set [Paper Input] to [Thick Paper].
- Check the paper settings of this printer.
See "Paper Recommendations".
- Check the paper settings of the printer driver.
See the printer driver Help.
- The fusing unit is deteriorated or damaged. Replace the unit. See “Replacing the Fusing Unit, Transfer Roller, and Dustproof Filter”.
When printing on OHP transparencies, a color is missing or black or white dots are obvious.
- The registration roller is dirty. Clean the registration roller. See “Cleaning the Registration Roller”.
When printing on plain paper, white dots are obvious.
- The registration roller is dirty. Clean the registration roller. See “Cleaning the Registration Roller”.
PDF Direct Print is not executed (PDF file is not printed).
- When printing a PDF with a password set, set the password of the PDF file using the [Change PDF Password] menu in [PDF Menu] or Web Image Monitor. For [Change PDF Password], see the "Print Settings Menu", Software Guide. For Web Image Monitor, see Web Image Monitor Help.
- PDF files not allowed to be printed by the PDF file security setting cannot be printed.
- Highly compressed PDFs cannot be printed using PDF Direct Print. Open the relevant application and print the PDF file using the printer driver.
Set the file format to standard PDF.
As a result of printing using PDF Direct Printing, characters are missing or misshapen.
- Before printing, embed the font in the PDF file to be printed.
The paper size appears on the control panel and printing is not performed with PDF Direct Print.
- When using PDF Direct Print, printout requires paper set within the PDF file. When a message indicating a paper size appears, either place the indicated size in the paper tray, or perform Form Feed. Also, if [Sub Paper Size] in the [System] Menu is set to [Auto], printing is performed assuming letter size and A4 size to be the same size. For example, When a PDF file set to A4 size paper is printed using PDF Direct Print and letter size paper is installed in the paper tray, the file will print out. This applies similarly to the opposite case.
With Windows 2000/XP/Vista, Windows Server 2003/2003 R2/2008, attached options are not detected.
- The computer and printer are not in two-way communication. You must configure attached options in the printer properties.
For details, see the printer driver Help.
If the problem cannot be solved, contact your sales or service representative.
Additional Troubleshooting

Important
- If the printer is still not operating satisfactorily after attempting the flowing solutions, contact your sales or service representative. Consult with the store where the printer was purchased for information about the location of sales or service representatives.

Strange noise is heard.
- If a supply was recently replaced or an option attached in the area the strange noise is coming from, check the supply or option is properly attached. If the strange noise persists, contact your sales or service representative.

No e-mail is received when an Alert occurs, and after resolving an Alert.
- Confirm [Auto Email Notify] is active in the [System] Menu on the Control Panel. See “System Menu”, Software Guide.
- Access the printer through the Web browser, log on as an Administrator on the Web Image Monitor, and then confirm the following settings in [Auto E-mail Notification]:
• Device E-mail Address
- Groups to Notify
- Select Groups/Items to Notify
For details about the settings, see Web Image Monitor Help.
- Access the printer through the Web browser, log on as an Administrator on the Web Image Monitor, and then confirm the settings of the SMTP server in [E-mail]. For details about the settings, see Web Image Monitor Help.
- When the power is turned off before the e-mail is transmitted, the e-mail will not be received.
- Check the e-mail address set for the destination. Confirm the printer's operation history using the Web Image Monitor's System Log menu in [Network]. If the e-mail was sent but not received, it is possible the destination was incorrect. Also check the information concerning error mail from the e-mail server. The setting for [Auto Email Notify] on the System Menu was changed from [Off] to [On], but e-mail is not arriving.
- After changing the setting, turn the main unit's power off and then back on again.

Error notification e-mail was received, but no error-solved e-mail is received.
- Check e-mail is set for sending using the Web Image Monitor's [Auto E-mail Notification] at the time the error was fixed. You must click the [Edit] button of [Detailed Settings of Each Item] in [Auto E-mail Notification], and set [Notify when error:] to [Occurs & Fixed] on the displayed screen.
For details about the settings, see Web Image Monitor Help.
Alert Resolving is set for sending e-mail, but no Alert-resolved e-mail is sent.
- If the power of the main unit is turned off after an Alert occurs, the Alert is resolved during the time the power is off: no Alert-resolved e-mail is sent.
Alert Occurrence and Alert Resolving are set for sending e-mail, but while no Alert Occurrence mail is received, Alert-resolved e-mail is received.
- Alert-notification e-mail is not sent if the problem is resolved before sending. However, an Alert-resolved e-mail is sent.
Alert-notification level was changed, and e-mail stopped arriving.
- If an Alert-notification e-mail, set with the earlier notification level, arrives, later e-mail will not be sent, even if the notification level is changed after.
When no date information is included in sent e-mail, the mail server has a malfunction.
- Configure the setting for obtaining time information from the SNTP server. Refer to the Web Image Monitor's Help to the settings.
9
10. Removing Misfed Paper
This chapter explains how to remove misfed paper.
Removing Misfed Paper
An error message appears if a paper misfeed occurs. The error message gives the location of the misfeed.
Check the location and remove the paper.
CAUTION
- The inside of this printer becomes very hot. Do not touch parts labeled “” (indicating a hot surface). Touching these parts will result in burns.
Important
- Do not forcefully remove misfed paper, it may tear and torn pieces may remain inside the printer.
-
When paper is misfed a number of times, the following are possible causes.
-
The control panel settings do not match the size or orientation of the loaded paper.
• The friction pad is dirty. -
Misfed paper may be covered with toner. Be careful not to get toner on your hands or clothes.
- If paper is still misfed after you have checked the above-mentioned causes, contact your sales or service representative.
-
When printing restarts after removing jammed paper, the printing position may be different, depending on the location of the jam.
-
If the paper jam occurred in the optional finisher, printing will restart from the top page of the data currently being printed, or from the page where the paper jam occurred.
- If the paper jam occurred in the printer, printing will restart from the page where the paper jam occurred.
- Even if the paper jam occurred in the printer, the error will not be cleared unless the cover of the finisher is opened and closed.
- Reference
- "Cleaning the Friction Pads"
Paper Misfeed Message (A)
The “A Open the part as shown and remove paper.” error message appears when a paper misfeed occurs in the paper feed section.

Important
- The inside of this printer becomes very hot. Before removing paper around the fusing unit, wait until the temperature of the covers inside the fusing unit and duplex unit cool down.
-
When a paper misfed (A) occurs, the paper tray is locked and cannot be pulled out. Do not forcefully pull out the tray.
-
Push up the lever on the right side, and open the printer's right cover carefully.
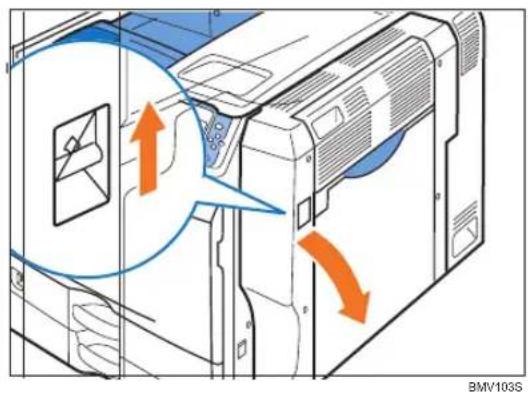
text_image
BMW103S- When using tray 1 or tray 2, remove the misfed paper slowly from inside of the printer's right cover.

natural_image
Illustration of a printer's internal structure showing paper feeding into a stack of sheets (no text or symbols visible)- When using bypass tray, remove the misfed paper slowly from inside of the bypass tray.
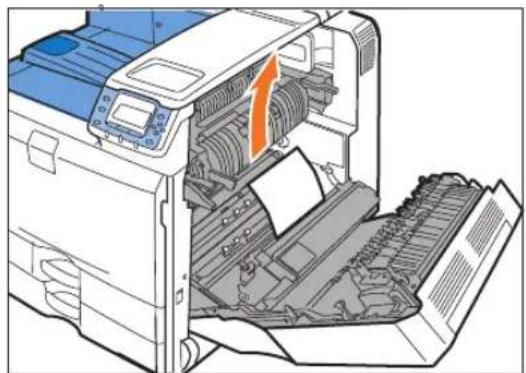
natural_image
Illustration of a printer's internal structure showing paper feed, paper sheet, and printer tray (no text or symbols)BMV112S
- If you cannot remove the misfed paper from inside of the bypass tray, remove the misfed paper slowly from outside of the bypass tray.
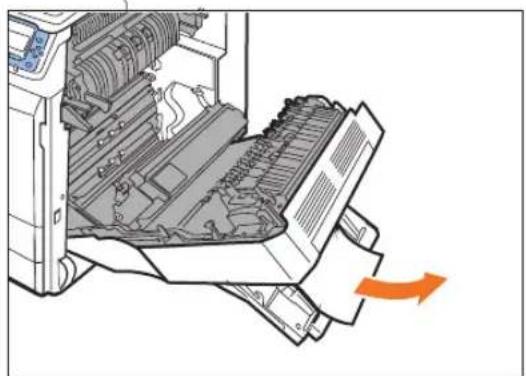
natural_image
Diagram of a printer's internal structure with an orange arrow indicating rotation (no text or symbols present)BMV113S
- Carefully close the right cover.
- Carefully close the bypass tray.
Paper Misfeed Message (B)
The “B Read instructions in Front Cover to remove.” error message appears when a paper misfeed occurs in the paper feed section.

Important
- The inside of this printer becomes very hot. Before removing paper around the fusing unit, wait until the temperature of the covers inside the fusing unit and duplex unit cool down.
- When removing misfed paper from the fusing unit, do not touch any parts other than those specified in this manual.
-
When a paper misfeed (B) occurs, the paper tray is locked and cannot be pulled out. Do not forcefully pull out the tray.
-
Push up the lever on the right side, and open the printer's right cover carefully.
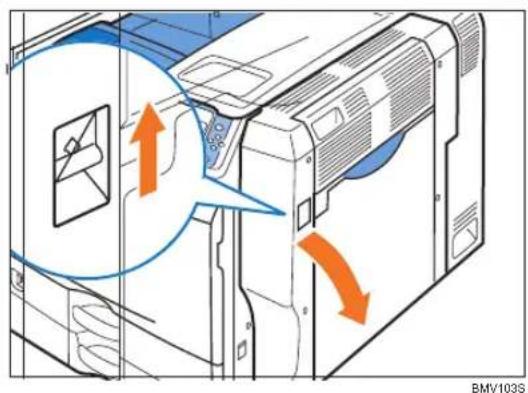
text_image
BMV103S- Turn lever B1 five to eight times.
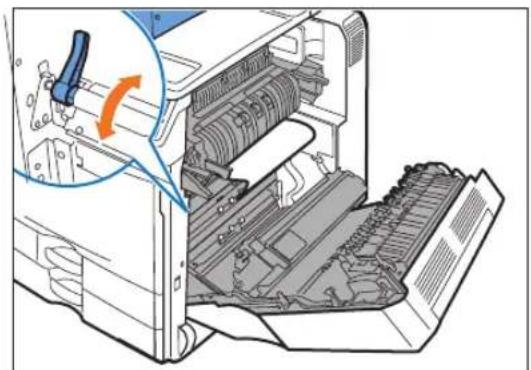
natural_image
Diagram of a printer internal structure showing internal components and a blue tool interacting with the lid (no text or symbols present)BMV114S
- Remove misfed paper slowly.
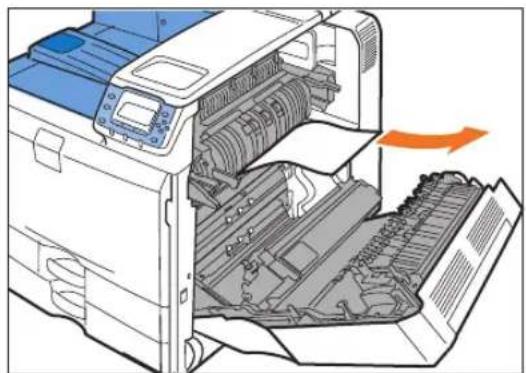
natural_image
Illustration of a printer's internal structure showing internal components and a paper feed (no text or symbols)BMV115S
- Carefully close the right cover.
10
Paper Misfeed Message (C)
The “#C Read instructions in Front Cover to remove.” error message appears when a paper misfeed occurs in the paper feed section.

Important
- The inside of this printer becomes very hot. Before removing paper around the fusing unit, wait until the temperature of the covers inside the fusing unit and duplex unit cool down.
- When removing misfed paper from the fusing unit, do not touch any parts other than those specified in this manual.
-
When a paper misfeed (C) occurs, the paper tray is locked and cannot be pulled out. Do not forcefully pull out the tray.
-
Push up the lever on the right side, and open the printer's right cover carefully.
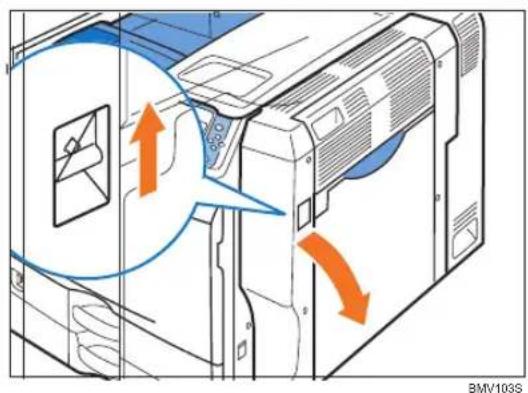
text_image
BMW10GS- Loosen the screws to remove the brackets from both sides of the fusing unit.
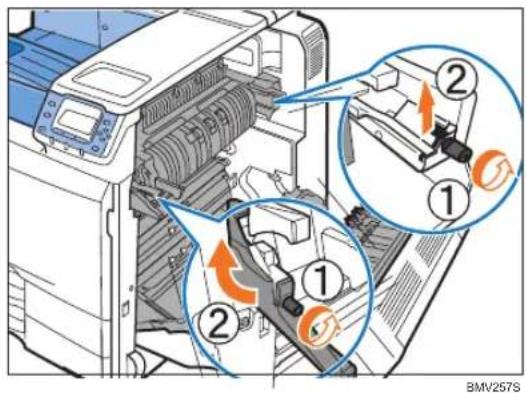
text_image
BMV257S- Raise the C1 levers on both sides.
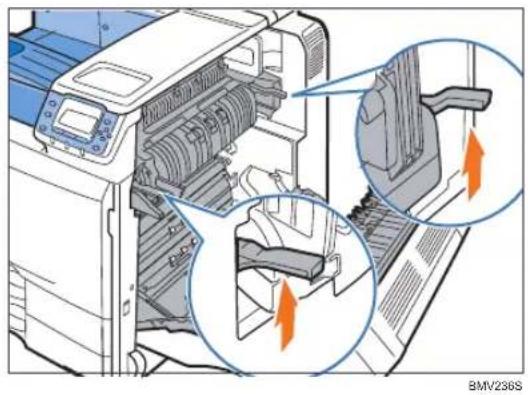
natural_image
Diagram of a printer internal structure with highlighted parts and arrows indicating motion (no text or symbols present)- Holding the C2 levers, pull out the fusing unit.
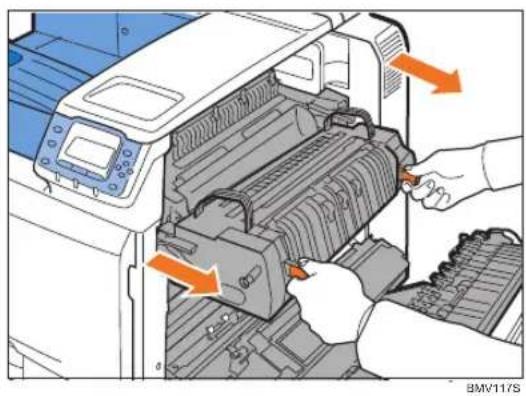
natural_image
Illustration of a printer's internal structure with orange arrows indicating process direction (no text or symbols)- Remove the paper carefully.
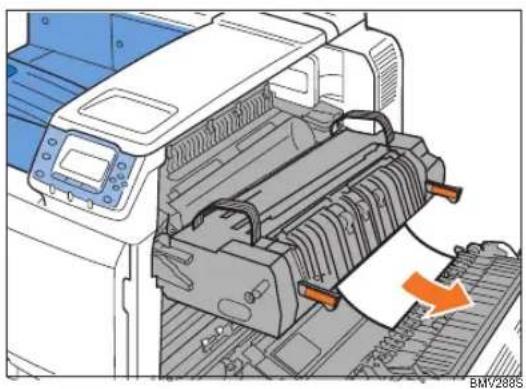
natural_image
Illustration of a printer printing a sheet of paper with an orange arrow indicating the paper's cutting (no text or symbols present)10
- If you can not remove the misfeed paper, raise the C3 lever and remove the paper carefully.
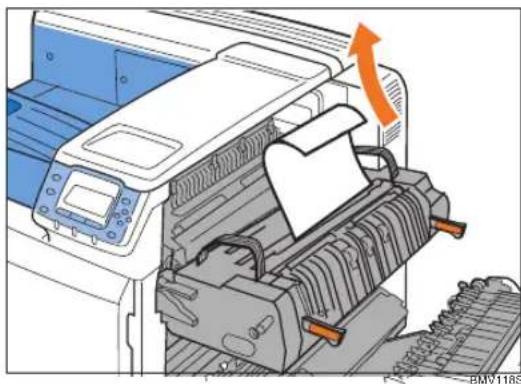
natural_image
Illustration of a printer with a paper roll being inserted, showing mechanical components and an orange arrow indicating motion (no text or symbols present)- Push the fusing unit back into the printer carefully until it completely stops.
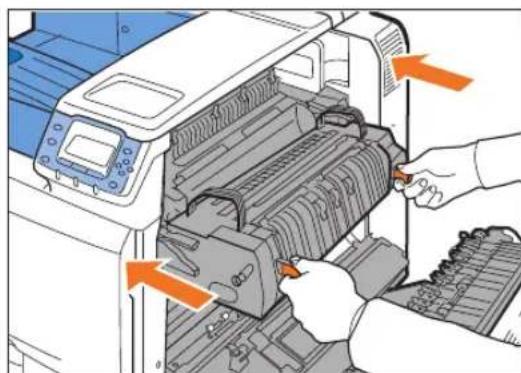
natural_image
Illustration of a printer's internal structure with orange arrows indicating parts of the printer's handle (no text or symbols present)BMV119S
- Push down the C1 levers on both sides.
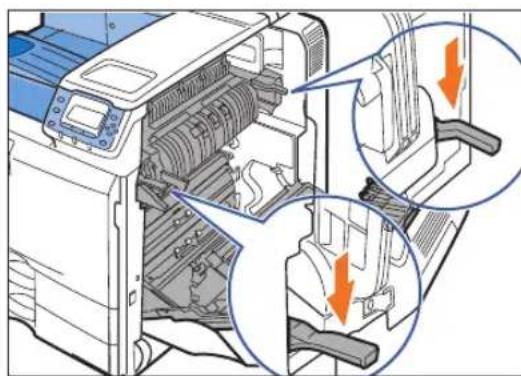
natural_image
Diagram of a printer internal structure showing internal components and highlighted parts (no text or symbols)BMV244S

- Reattach the brackets to both sides of the fusing unit and tighten the screws.
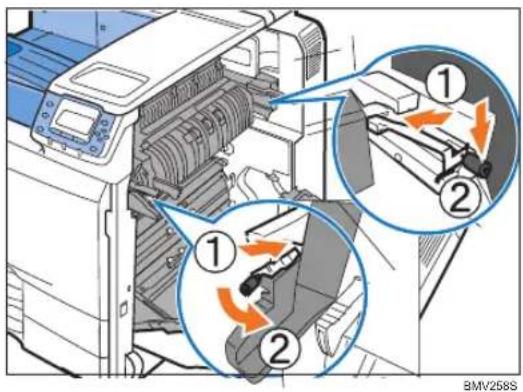
text_image
Diagram illustrating a printer operation with numbered steps and directional arrows indicating process flow- Remove the paper slowly from the output area of the printer.
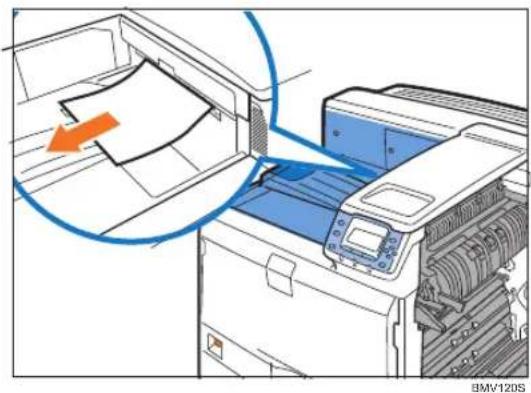
natural_image
Diagram of a printer with paper being inserted, showing paper sheet being placed into the cover (no text or symbols present)- Carefully close the right cover.

Note
- If the message indicating paper misfeed does not disappear, pull the fusing unit out and push it back in several times.

Paper Misfeed Message (Y)
The “ ⚠️Y Open the part as shown and remove paper.” error message appears when a paper misfeed occurs in the paper feed section of an optional paper feed unit.

Important
- When a paper misfeed (Y) occurs, the paper tray is locked and cannot be pulled out. Do not forcefully pull out the tray.
- Open the cover on the right side of the 1000-sheet paper feed unit or 2000-sheet paper feed unit carefully.
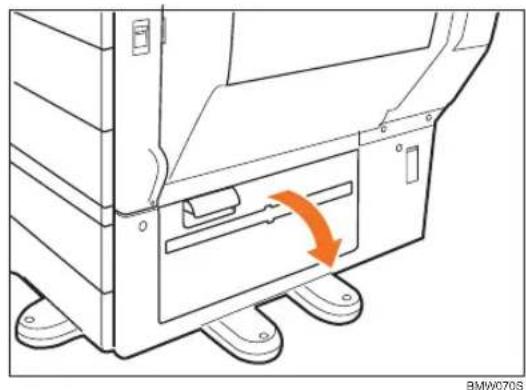
natural_image
Technical line drawing of a mechanical device with an orange arrow indicating rotation or movement (no text or symbols present)- Remove misfed paper slowly.
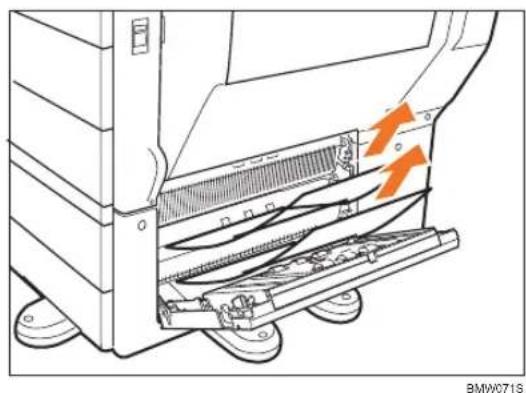
natural_image
Technical diagram of a mechanical device with orange arrows indicating motion or force, no visible text or symbols- Close the cover on the right side of the 1000-sheet paper feed unit or 2000-sheet paper feed unit carefully.
Paper Misfeed Message (Z)
The “Press Z to open cover and remove paper.” error message appears when a paper misfeed occurs inside the duplex unit.

Important
- The inside of this printer becomes very hot. Before removing paper around the fusing unit, wait until the temperature of the covers inside the fusing unit and duplex unit cool down.
-
When a paper misfeed (Z) occurs, the paper tray is locked and cannot be pulled out. Do not forcefully pull out the tray.
-
Push up the lever on the right side, and open the printer's right cover carefully.
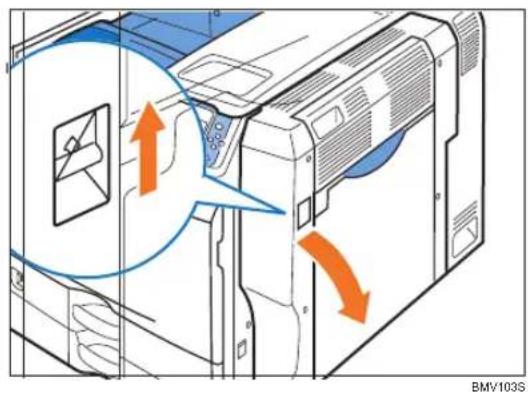
text_image
BMV103S- Remove misfed paper slowly.
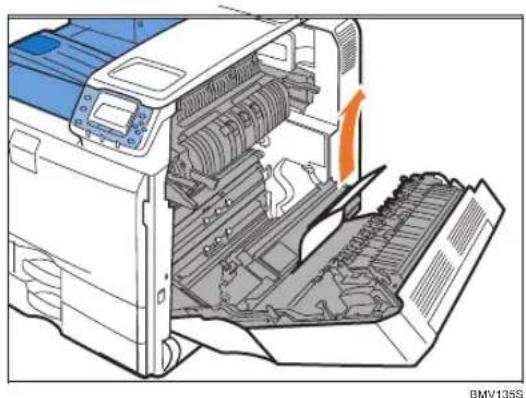
natural_image
Diagram of an open industrial machine with internal components and a highlighted section, showing no visible text or symbols.- Holding knob Z, open the cover, and then remove the paper carefully.
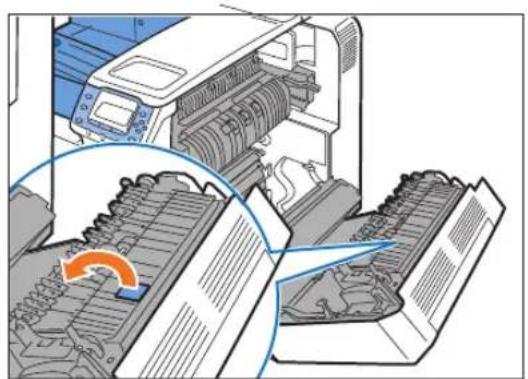
natural_image
Illustration of a printer's internal structure with an orange arrow indicating a process (no text or symbols present)BMV242S
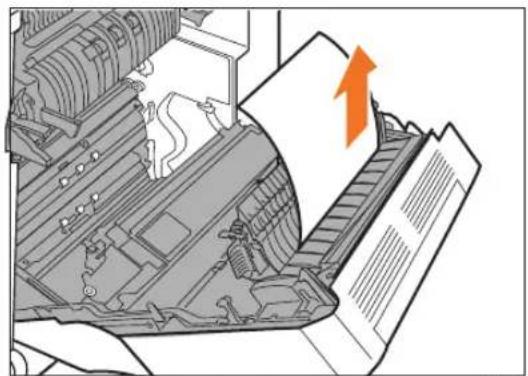
natural_image
Diagram of a printer's internal structure with paper feed and an orange arrow indicating paper direction (no text or symbols present)BMV136S
- Close the cover.
- Carefully close the right cover.
- Open the upper right cover.
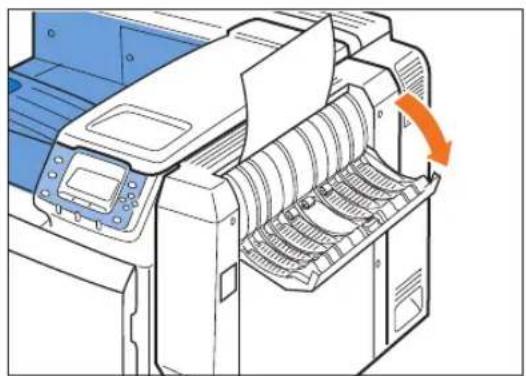
natural_image
Illustration of a printer with a scroll wheel and orange arrow indicating rotation (no text or symbols)BEK044S
- Remove misfed paper slowly.
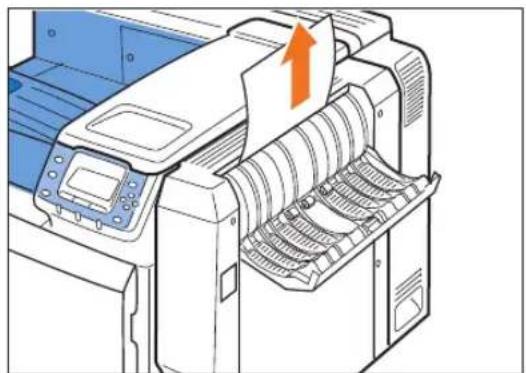
natural_image
Illustration of a printer with paper feed and paper roll, showing internal structure (no text or symbols)BEK095S
- Close the upper right cover.
Duplex Print Always Misfeeds

Important
- The inside of this printer becomes very hot. Before removing paper around the duplex units, wait until the covers inside the fusing unit and duplex unit cool down.
- Push up the lever on the right side, and open the printer's right cover carefully.
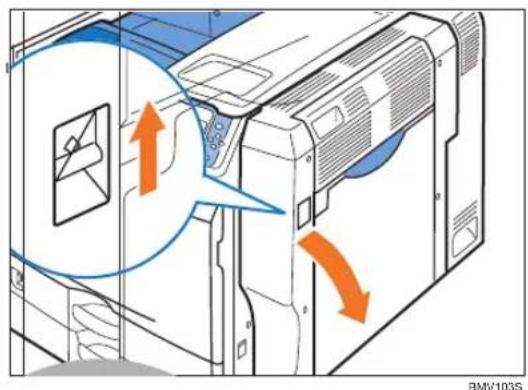
text_image
BMW103S- Check if there is paper in the location shown below.
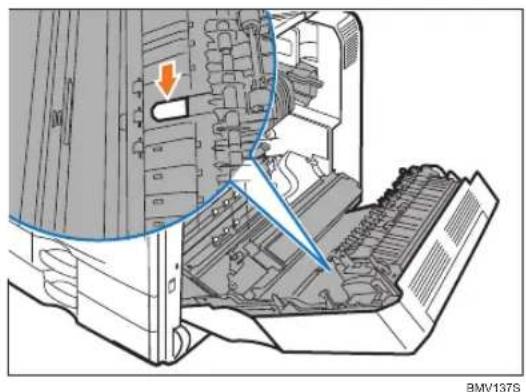
natural_image
Technical diagram of a computer tower with internal components and an orange arrow indicating a specific area (no text or symbols present)- If there is paper, open the upper right cover.
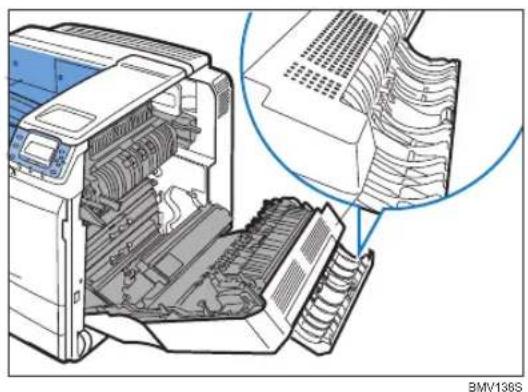
natural_image
Diagram of an open printer with internal components and a magnified inset showing internal structure (no text or symbols)- Using your finger, push the paper up in the direction of the arrow.
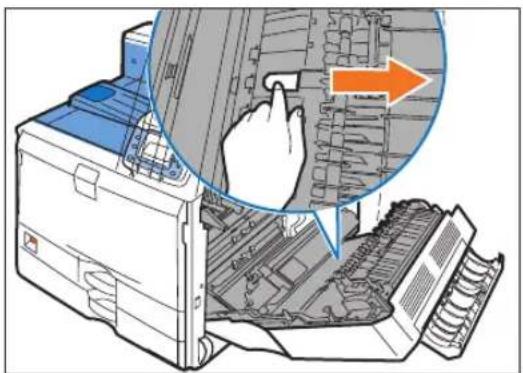
natural_image
Illustration of a printer with a hand inserting a component into the main chamber, showing internal structure and no text or symbols.BMV139S
- Remove the paper from the upper right cover area carefully.
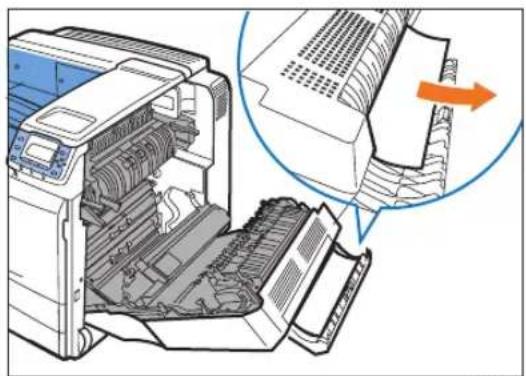
natural_image
Illustration of a printer with internal components and a paper feeding into a stack, showing a magnified view of the printer's paper feed (no text or symbols present)BMV14DS
-
Close the upper right cover.
-
Carefully close the right cover.
11. Appendix
This chapter explains safety precautions and procedures for moving the printer, consumables, and printer specifications and option specifications.
Moving and Transporting the Printer

WARNING
- Disconnect the power plug (by pulling the plug, not the cable) if the power cable or plug becomes frayed or otherwise damaged.
- It is dangerous to handle the plug with wet hands. Doing this may result in receiving an electric shock.

CAUTION
- Before moving the machine, unplug the power cord from the wall outlet. If the cord is unplugged abruptly, it could become damaged. Damaged plugs or cords can cause an electrical or fire hazard.
- When moving the printer after use, do not take out any of the toners, black drum unit/color drum units, nor waste toner bottle to prevent toner spill inside the machine.
- When moving the machine, hold the handles at both sides, and then lift the printer slowly. Lifting it carelessly or dropping it may cause an injury.

Important
- Be sure to disconnect all cables from the printer before transporting it.
- The printer is a piece of precision machinery. Take care to avoid damage during transportation.
- If optional paper feed units are attached, remove them from the printer and move them separately. Repack the printer using its original packaging for transporting.

Note
• The printer weighs approximately 97 kg (214 lb.).
Moving the Printer

CAUTION
- When moving the machine, hold the handles at both sides, and then lift the printer slowly. Lifting it carelessly or dropping it may cause an injury.
- Before moving the machine, unplug the power cable from the wall outlet. If the cable is unplugged abruptly, it could become damaged. Damaged plugs or cables can cause an electrical or fire hazard.
Moving the printer a short distance

Important
- Be sure to place the printer on a smooth and stable place.
- Be sure to check the following points:
• The power switch is turned off.
- The power cord is unplugged from the wall outlet.
-
The interface cable is unplugged from the printer.
-
If any external options are attached, remove them.
See the relevant sections in this manual and reverse the steps to remove options.
- Pull out the handle from the right side of the printer.
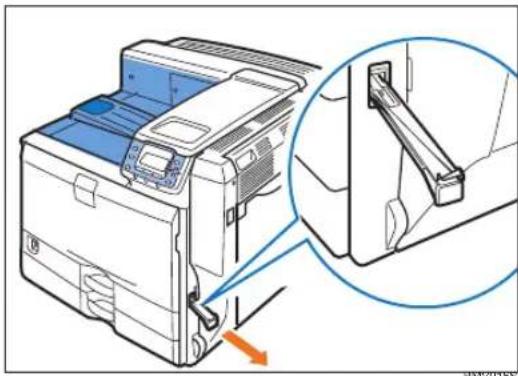
natural_image
Diagram of a printer with an inset close-up showing the internal structure (no text or symbols present)- Lift the printer with four people by using the handles on both sides of the printer, and then move it to the place where you want to install it, keeping it horizontal.
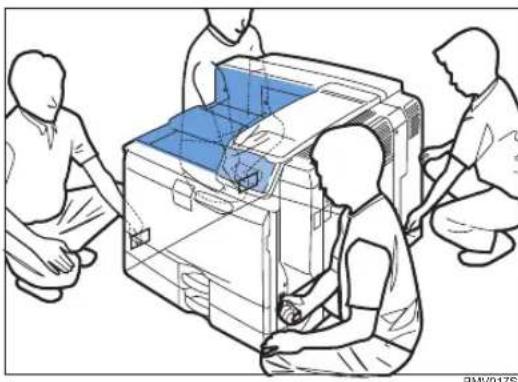
natural_image
Illustration of people assembling or inspecting a large electronic device (no text or symbols visible)-
Return the handle you pulled out from the printer to its original position.
-
If you removed options, reattach them.
For details, see the relevant sections in this manual.

Note
- For turning on and off the power, see "Power on and off".
- At least four people are required to lift the printer.
- Be sure to keep the printer horizontal while moving it. To prevent toner from being released, move the printer slowly.
- If optional paper feed units are attached, remove them from the printer and move them separately.
- When finished, return the handles to their original position.
Reference
• p.25 "Power on and off"
Consumables
Print Cartridge
| Toner | Average printable number of pages per toner ^1 |
| Black | 20,000 pages |
| Cyan | 15,000 pages |
| Magenta | 15,000 pages |
| Yellow | 15,000 pages |
^1 A4/Letter 5% test chart; 3 pages/job; Cyan, Magenta and Yellow: color printing only.

Note
- Our products are engineered to meet the highest standards of quality and functionality. When purchasing expendable supplies, we recommend using only those specified by an authorized dealer.
- If the toner is not changed when necessary, printing will become impossible. We recommend keeping a stock of toner or purchasing one soon.
- The number of printable pages is an estimate, based on continuous print jobs of 3 pages. The actual number of printable pages varies depending on the image volume and density, number of pages to be printed at a time, paper type and paper size used, contents of print images, and environmental conditions such as temperature and humidity.
- Toner (consumable) is not covered by warranty. However, if there is a problem, contact the store where it was purchased.
- Toner may need to be changed sooner than indicated above due to deterioration over the period of use.
Black Drum Unit/Color Drum Unit
| Name Average printable number of pages | *1 |
| Black Drum Unit Impressia 40,000 pages | |
| 40,000 pagesColor Drum Unit Impressia |
^*1 A4/Letter 5% test chart; 3 pages/job; Color Drum Unit: color printing only.

Note
- The number of printable pages is an estimate, based on continuous print jobs of 3 pages. The actual number of printable pages varies depending on the image volume and density, number of pages to be printed at a time, paper type and paper size used, contents of print images, and environmental conditions such as temperature and humidity.
- If the black drum unit/color drum units are not changed when necessary, print quality is not guaranteed. We recommend keeping extra sets of black drum unit/color drum units.
- Black drum unit/color drum units (consumables) are not covered by warranty. However, if there is a problem, contact the store where they were purchased.
- Black drum unit/color drum units may need to be changed sooner than indicated above due to deterioration over the period of use.
Waste Toner Bottle
| Name Average printable number of pages | *1 |
| Waste Toner Bottle Impressia 40,000 pages |
^1 A4/Letter 5% test chart; 3 pages/job; 30% B&W/70% color printing.

Note
- The number of printable pages is an estimate, based on continuous print jobs of 3 pages. The actual number of printable pages varies depending on the used paper type and size, and environmental conditions.
- Waste toner bottles are consumables and not covered by warranty. However, if there is a problem, contact the store where they were purchased.
Transfer Unit
| Name | Average printable number of pages*1 |
| Transfer Unit Impressia | 200,000 pages |
^*1 A4/Letter 5% test chart, 3 pages/job.

Note
- The number of printable pages is an estimate, based on continuous print jobs of 3 pages. The actual number of printable pages varies depending on the image volume and density, number of pages to be printed at a time, paper type and paper size used, and environmental conditions such as temperature and humidity.
- If the transfer unit is not changed when necessary, the quality of printing is not guaranteed. We recommend keeping a stock of transfer unit or purchasing one soon. Transfer unit package contains dustproof filters.
Fusing Unit
| Name | Average printable number of pages ^1 |
| Fusing Unit Impressia | 160,000 pages |
*1A4/Letter 5% test chart, 3 pages/job.

Note
- The number of printable pages is an estimate, based on continuous print jobs of 3 pages. The actual number of printable pages varies depending on the image volume and density, number of pages to be printed at a time, paper type and paper size used, and environmental conditions such as temperature and humidity.
- If the fusing unit is not changed when necessary, print quality is not guaranteed. We recommend keeping a stock of fusing unit. A fusing unit package contains a transfer roller.
Specifications
Mainframe
Configuration:
Desktop
Memory:
Standard 512 MB, up to 1024 MB (with the optional memory unit)
Print Process:
Laser beam scanning and Electrophotographic printing
Dualcomponent development
First Print Speed:
Basic Model
Color printing: 9 seconds or less, Monochrome printing: 8 seconds or less (A4☐, 8^1/2 × 11" (Letter) ☐)
HDD standard model
Color printing: 8 seconds or less, Monochrome printing: 7 seconds or less (A4☐, 8 ^1/2 × 11" (Letter)☐)
Note that if the printer has not been used for some time, there may be a short delay before the first page starts printing.
Printing Speed:
HDD standard model
Maximum 50 pages per minute (A4☐, 8 ^1/2 × 11" (Letter)☐)
Fonts:
Monotype Imaging 35 Intellifonts, 10 TrueType fonts, 13 International fonts
Paper Size:
See "Paper and Other Media".
Paper Weight:
See "Paper and Other Media".
Media Type:
See "Paper and Other Media".
Resolution:
600 × 600 dpi
1200 × 1200 dpi
2400 × 2400 dpi
Printer Language:
RPCS, PCL5c/6, PostScript 3, PDF, PJL, PictBridge (optional)
Network protocol:
TCP/IP, IPX/SPX, AppleTalk, NetBEUI, IPP, SMB
Interfaces: Standard:
- Ethernet (10BASE-T/100BASE-TX)
- USB 2.0, USB Host
To use USB 2.0, a USB computer port and cable that support USB 2.0 are required.
Noise Emission (Sound Power Level) ^*1
Standby: 40 dB (A) or less
During Printing (color print):
- 67 dB (A) or less (Basic model)
- 68 dB (A) or less (HDD standard model)
During Printing (black and white print): - 65 dB (A) or less (Basic model)
- 66 dB (A) or less (HDD standard model)
Standby: 26 dB (A) or less
During Printing (color print):
- 53 dB (A) or less (Basic model)
- 54 dB (A) or less (HDD standard model)
Noise Emission (Sound Pressure level) ^2
During Printing (black and white print):
- 51 dB (A) or less (Basic model/HDD standard model)
*1The preceding measurements made in accordance with ISO7779 are actual values.
*2Measured at the position of a bystander.
Warm-up Time:
220-240V
HDD standard model: 48 seconds (23 °C, 73 °F)
120V
HDD standard model: 50 seconds (23 °C, 73 °F)
| Standard Paper Tray 550 sheets x 2 | trays |
| 100 sheetsBypass Tray |
Power Source:
220-240V
220-240 V, 50/60 Hz, 7 A or more
120V
120 V, 60 Hz, 12 A or more
Power Consumption:
220-240V
Maximum 1400 W (Unplug the power cord to turn off the power completely.)
Energy saver mode: 2.7 W
120V
Maximum 1400 W (Unplug the power cord to turn off the power completely.)
Energy saver mode: 2.2 W
Dimensions (W × D × H):
$$ 6 7 0 \times 6 7 0 \times 6 4 0 \mathrm{mm} (2 6. 4 \times 2 6. 4 \times 2 5. 2 \text { inches }) $$
Weight:
Approximately 97 kg (214 lb.)
Options
Paper Feed Unit PB3080
Paper Size:
A3 □, A4 □, A5 □, B4 JIS □, B5 JIS □, 1" × 17" □, 8½" × 14" (Legal) □, 8½
“× 13” (Foolscap) □, 8½” × 11” (Letter) □□, 8¼” × 13” (Folio) □, 8” × 13” (F/GL) □,
7 ¼" × 10½" (Executive) □□, 8K□, 16K□□
Custom Size: 182 to 297 mm (7.17 to 11.69 inches) in width, 148 to 432 mm (5.83 to 17.00 inches) in length
Dimensions (W × D × H):
580 × 620 × 120 mm (22.9 × 24.4 × 4.8 inches) Paper Capacity (80 g/m2, 20 lb.):
550 sheets × 1 trays
Weight:
Approximately 15 kg (33.1 lb.)
Power Consumption:
Maximum 55 W (Power is supplied from the main unit.)
Paper Feed Unit PB3040
Paper Size:
A3 □, A4 □□A5 ,B4 JIS □B5 JIS □11" × 17" ,8½" × 14" (Legal) □8½ "× 13" (Foolscap) □, 8½" × 11" (Letter) □8¼" × 13" (Folio) □8" × 13" (F/GL) □7¼" × 10½" (Executive) □, 8K □, 16K □
Custom Size: 182 to 297 mm (7.17 to 11.69 inches) in width, 148 to 432 mm (5.83 to 17.00 inches) in length
Dimensions (W × D × H):
580 × 620 × 260 mm (22.9 × 24.5 × 10.3 inches)
Paper Capacity (80 g/m², 20 lb.):
550 sheets x 2 trays
Weight:
Approximately 26 kg (57.4 lb.)
Power Consumption:
Maximum 60 W (Power is supplied from the main unit.)
LCIT PB3050
Paper Size:
220-240V: A4
120V: 8 ^1/2 " × 11" (Letter)
Dimensions (W × D × H):
580 × 650 × 260 mm (22.9 × 24.5 × 10.3 inches) Paper Capacity (80 g/m2, 20 lb.):
1000 sheets × 2trays
Weight:
Approximately 26 kg (57.4 lb.) Power Consumption:
Maximum 55 W (Power is supplied from the main unit.)
- 50 sheets for the following paper sizes (80 g/m², 20 lb.): A3 □, B4 JIS □, 12 × 18 □, 11 × 17 □, 8½ × 14 (Legal) □, 8K □
Paper Size:
A3 □, A4 □□, A5 □□, A6 □, B4 JIS □, B5 JIS □□, B6 JIS □, 12" × 18" □, 11" × 17" □, 8½" × 14" (Legal) □, 8½" × 13" (Foolscap) □, 8½" × 11" (Letter) □□,
8 ^1 / 4 " × 13" (Folio) ☐, 8" × 13" (F/GL) ☐, 7 ^1 / 4 " × 10 ^1 / 2 " (Executive) ☐, 5 ^1 / 2 " × 8 ^1 / _2 " (Half letter) ☐, 8K ☐, 16K☐☐
Custom Size: 100 to 305 mm (3.94 to 12.00 inches) in width, 148 to 460 mm (5.83 to 18.11 inches) in length
Paper Weight:
52 to 256 g/m² (14 to 68 lb.)
Paper Capacity:
- 1000 sheets for the following paper sizes (80 g/m², 20 lb.): A4 □□, B5 JIS □□, B6 JIS □, A6 □, 8½ × 13 (Foolscap) □, 8½ × 11 (Letter) □□, 8¼ × 13 (Folio) □, 8 × 13 (F/ GL) □, 7¼ × 10½ (Executive) □□, 5½ × 8½ (Half letter) □, 16K □□
- 500 sheet for the following paper sizes (80 g/m², 20 lb.): A3□, B4 JIS□, A5□, 12 × 18□, 11 × 17□, 8½ × 14 (Legal)□, 8K □
- 100 sheets for the following paper sizes (80 g/m2, 20 lb.): A5□, B6□, A6□
Memory Unit Type J 256 MB/Memory Unit Type J 512 MB
Module Type:
SO-DIMM (Small Outline Dual-in-line Memory Module)
Memory Type:
SDRAM (Synchronous Dynamic RAM) Number of Pins:
200 pins
Printer Hard Disk Drive Type 820
Storage Capacity (Formatted):
80 GB
Specifications:
- Spooling print data to collate
- Storing/Spooling Sample Print/Locked Print/Hold Print/Stored Print data
- Storing PostScript fonts
- Storing log data

Note
- You can install PostScript fonts with this optional hard disk drive. With Mac OS, types of fonts supported are PostScript Type 1 and PostScript Type 2. To download them, use Printer Utility for Mac.