714-STD - Guitar Aria - Free user manual and instructions
Find the device manual for free 714-STD Aria in PDF.


User questions about 714-STD Aria
0 question about this device. Answer the ones you know or ask your own.
Ask a new question about this device
Download the instructions for your Guitar in PDF format for free! Find your manual 714-STD - Aria and take your electronic device back in hand. On this page are published all the documents necessary for the use of your device. 714-STD by Aria.
USER MANUAL 714-STD Aria
Electric Guitar/Electric Bass/Acoustic Guitar/Classic Guitar
Produced by ARIA
Owner's Manual
Thank you for choosing an Aria instrument. Please take a moment to read through this owners manual. We will not be responsible for personal injury or damage to your instrument, which may result from incorrect use.
CAUTION
HOW TO AVOID INJURY AND INSTRUMENT DAMAGE
- It is advisable not to attempt to dismantle or repair your instrument, seek professional advice through your local music dealer.
- To prevent electric shock avoid playing your Aria in a damp conditions.
- To avoid damage caused by leaking batteries, remove old batteries as soon as possible and do not store your instrument for long periods of time with the batteries installed.
- Do not dispose of old batteries in a fire.
- It is normal for the fingerboard to shrink, which will leave the fret ends exposed, be aware that these fret ends can be sharp enough to cause injury.
- It is advisable to change strings regularly, tied and tarnished strings will sound dull and break more easily. Overtuning strings will also break them. To avoid injury, be aware that ends of strings are sharp.
- Be aware that guitar vibratos use strong springs to counter string tension, when changing strings or adjusting the vibrato keep your fingers clear of the back edge of the vibrato and the springs.
- If you use a strap attach it securely to the strap buttons.
- To avoid injury be aware that some pick guards have sharp edges.
SAFETY INSTRUCTIONS
- You should keep your Aria instrument in an area which is not excessively dry or wet and since temperature effects relative humidity, somewhere which is not excessively hot or cold. Avoid storing your guitar near to heating radiators or vents and in your car.
When traveling with your Aria, try to give time for it to acclimatize when you reach your destination, leaving it in a case is a good idea. - Hold the jack plug on your guitar cable when you unplug, this will help avoid damaging the cable.
- Use appropriate polish on your guitar, your local music dealer can advise you. Never use solvents.
- Before lifting your guitar case or gig bag make sure that the catches or zippers are secure, a guitar can easily fall from an open case, causing damage.
- Always store your guitar in a case or gig bag and avoid leaning it against chairs or tables.
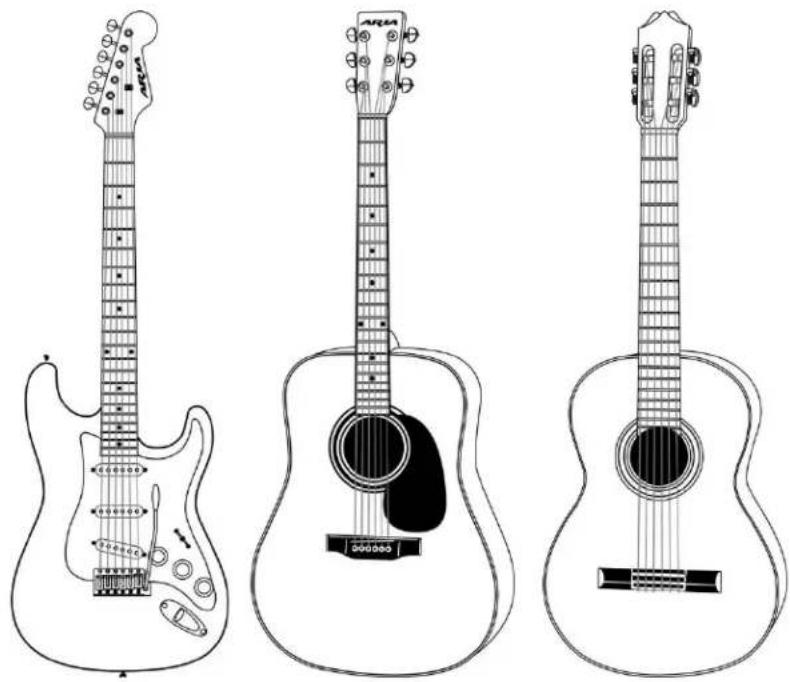
Component Parts of Guitars
Headstock
Machine head (tuning peg)
Neck
Top Nut
Fingerboard
Fret
Position Marker
Body
Strap button
Pick guard
Front Pickup
Center Pickup
Rear Pickup
Vibrato Arm (Tremolo arm)
Pickup selector switch
Control Knob (volume or tone)
Bridge
Output jack
Endpin
Top
Side
Back
Sound hole
Bridge Saddle
natural_image
Line drawings of three acoustic guitars: standard, midsize, and plain (no text or symbols)Tuning
Tuning by ear
Tune your guitar by the following method, and then apply the 'Tuning by Harmonics', detailed below to fine-tune.
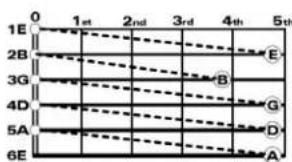
First, tune the open 5 ^th string to A440Hz using a tuning fork or a tuner for reference. Turn the machine head anti-clockwise to tune up (in pitch) and clockwise to tune down. Then tune each remaining string in the sequence below.
-
Pluck the 6^th string fretted at the 5^th fret and tune until it is the same pitch as the open (unfretted) 5^th string. (6E)
-
Pluck the 5^th string fretted at the 5^th fret and tune the 4^th string until it is the same pitch as the fretted 5^th string. (4D)
-
Pluck the 4^th string fretted at the 5^th fret and tune the 3rd string until it is the same pitch as the fretted string. (3G)
-
Pluck the 3rd string fretted at the 4^th fret and tune the 2nd string until it is the same pitch as the fretted 3rd string. (2B)
-
Pluck the 2nd string fretted at the 5^th fret and tune the 1^st string until it is the same pitch as the fretted 2nd string. (1E)
text_image
1E 2B 3G 4D 5A 6E 0 1st 2nd 3rd 4th 5th E B G D AFor bass guitar follow the instructions below (A bass is tuned one octave lower than 6th to 3rd strings a guitar)
-
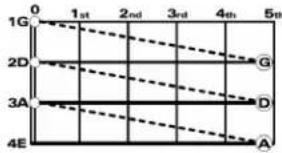
Pluck the 4^th string fretted at the 5^th fret and tune until it is the same pitch as the open (unfretted) 3rd string. (4E)
-
Pluck the 3rd string fretted at the 5^th fret and tune the 2nd string until it is the same pitch as the fretted 3rd string. (2D)
-
Pluck the 2nd string fretted at the 5^th fret and tune the 1^st string until it is the same pitch as the fretted 2nd string. (1G)
flowchart
graph TD
    A["0"] --> B["1st"]
    B --> C["2nd"]
    C --> D["3rd"]
    D --> E["4th"]
    E --> F["5th"]
    G["1G"] --> H["2D"]
    H --> I["3A"]
    I --> J["4E"]
    K["G"] --> L["D"]
    L --> M["A"]
Tuning by Harmonics
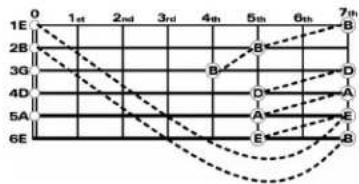
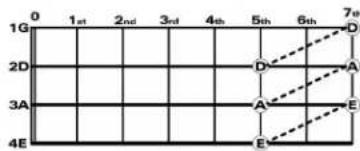
To play a harmonic lightly touch the string directly above a fret and then pluck the string, immediately take your left hand finger off the string so that it rings. The diagram below shows you how to fine-tune using harmonics, guitar on the left and bass on the right. For example a harmonic played above the 5^th fret on the 6^th string should be at the same pitch as a harmonic played above the 7^th fret on the 5^th string.
*Electronic tuners are available at your music dealer, they are very precise and easy for a beginner to use. Refer to the tuners instructions for more detail.
*If you do not use the instrument for more than one month, we recommend slackening the strings. It's not advisable to take the strings off or reduce the string tension too much.
flowchart
graph TD
    A["0"] --> B["1st"]
    B --> C["2nd"]
    C --> D["3rd"]
    D --> E["4th"]
    E --> F["5th"]
    F --> G["6th"]
    G --> H["7th"]
    style A fill:#f9f,stroke:#333
    style B fill:#f9f,stroke:#333
    style C fill:#f9f,stroke:#333
    style D fill:#f9f,stroke:#333
    style E fill:#f9f,stroke:#333
    style F fill:#f9f,stroke:#333
    style G fill:#f9f,stroke:#333
    style H fill:#f9f,stroke:#333
text_image
0 1G 1st 2nd 3rd 4th 5th 6th 7th 2D 3A 4E D A A E EHow to wind strings
For electric guitars and acoustic guitars
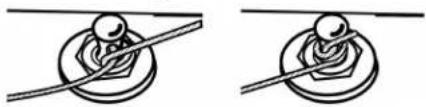
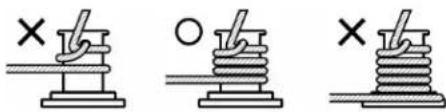
For 3 a side headstocks wind the machine head post clockwise for the ^th45^th and 6^th strings and anti-clockwise for the 1^st , 2^nd and 3^rd strings. For 6 in line headstocks wind all the machine head posts clockwise. Turn machine heads 6 to 8 times for 1^st and 2^nd strings, and 3 to 4 times for 3^rd to 6^th strings.
[How to set the strings for 4^th , 5^th \& 6^th strings.]
[As they would appear when the guitar is tuned.]
natural_image
Two diagrams showing a bolt securing a nut, with no text or symbols present.[Not wound enough]
[Coiled sufficiently around the post.]
[Wound Too much]
text_image
Diagram showing three mechanical or electrical states with cross symbols indicating failure or failure pointsFor Electric Basses
For basses there is a hole in the middle of the machine head post to take the end of the string. Bend the string 15 - 18cm beyond the machine head post as shown below then trim the string length 2cm beyond the bend, insert the string into the machine head post hole then proceed to wind the string clockwise around the post 3-4 times.

text_image
15~18cm 2cmRemoving and refitting strings to an acoustic guitar
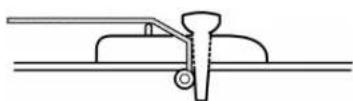
When replacing strings on an acoustic guitar, firstly slacken the strings so that the bridge pin can be easily extracted from the bridge. Once the bridge pin is out the ballend of the string can pass out of the hole in the bridge.
For Classic Guitar
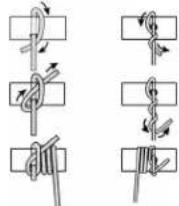
At the machine head - wind clockwise for the 4^th , 5^th and 6^th strings and anti clockwise for the 1^st , 2^nd and 3^rd strings. Wind finely so that the strings do not cross on the post. Pass the tip of string through the hole in the barrel of the machine head and tie as illustrated below, this will help prevent the string slipping on the machine head post when it is tuned.
[How to wind Low-pitched strings.]
[How to wind High-pitched strings.]
At the bridge - fix the end of string to the bridge (see the illustration below). Coil twice ^st and 3rd (unwound) strings so that they will not slip when being tuned.
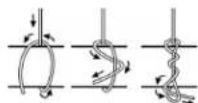
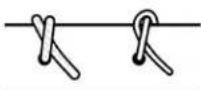
*Replace the strings one by one, so that the saddle and top nut do not fall from the guitar.
Control
Control of electric guitar & bass
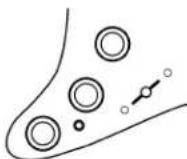
Different models feature some or all of the following controls.
VOLUME: Adjusts volume level. Turning to the right, volume increases. Turn it to the left, volume is decreased
TONE: Turn to the left high frequencies are cut.
PICKUP SELECTOR: Selects combination of pickups.
COIL SPLIT SWITCH: Cancels one coil of a Humbucking pickup, giving a sigle coil sound.
BALANCE CONTROL: Adjusts the balance volume between two pickups.
Control of electric acoustic guitar
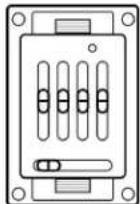
The volume and tone of a piezo pickup is controlled via a built in
Equalizer.
The jack socket acts as a switch, so unplug when the guitar is not being used and you will prevent the unnecessary draining of your battery.
You will notice a drop in volume and an increase in background noise as the battery dies. Change batteries in advance of an important performance!
VOLUME: Adjusts volume level.
TREBLE: Adjusts tone of high frequency range.
MIDDLE: Adjusts tone of middle frequency range.
BASS: Adjusts tome of low frequency range.
PRESENCE/BRILLANCE: Adjusts tone of extremely high frequency range.
FREQUENCY/CONTOUR: Use to select frequency range to be controlled by the MIDDLE control.
PHASE: Phase reverse switch, can be used to eliminate feedback (that annoying howling sound).
MUTE: Mutes output volume.
NOTCH/SCOOP: Allows you to reduce the frequencies causing feedback.
BATTERY: When battery capacity becomes low, LED Light becomes weak. For the "Fishman" equalizer, LED light glows when the battery capacity is low.
Adjustment of Guitar
If you feel confident tackling minor adjustments to your guitar then you will find the information below, helpful. If in doubt seek professional advice.
Neck adjustment (Electric / Electric bass / Acoustic guitar)
An incorrectly adjusted or in the worst case, a warped neck, will result in fret buzz or a note 'choking'. If the action (distance between the string and the fret) is too low, you will also notice string buzz.
Any checking of the neck should be done whilst the guitar is tuned to 'concert pitch'
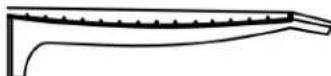
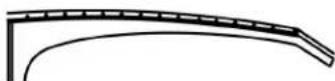
By sighting down the neck from the headstock end you will be able to easily see if the neck is bowed or arched excessively.
Any excessive bow or arch can be rectified by tightening or loosening the truss-rod, which is mounted inside the neck.
(1) excessive bow
(2) excessive arch
Slacken the strings before adjusting the truss rod.
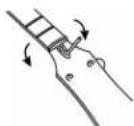
The truss rod adjuster location varies from model to model, but will be either at the body end of the neck or at the headstock end, sometimes below a truss rod cover. The correct wrench will have been shipped with the guitar. As you would expect, turn clockwise to tighten and anti-clockwise to loosen.
[Tighten][Loosen]
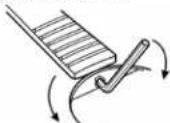
*Generally, there's no truss-rod in the classic guitar. We recommend asking a repair specialist to adjust the neck.
String height adjustment (for electric guitar/bass)
String height is controlled by using a wrench to raise or lower the small allen screws on either side of the saddle. For PE and TA type guitars, string height is controlled by raising or lowering the two studs on either side of the bridge, using a slot head (-) screwdriver.
Intonation adjustment (for electric guitar/bass)
When the string height and/or string gauge is changed or the truss rod adjusted then it will normally be necessary to reintonate the bridge saddles.
Compare the note played fretted at the 12^th fret with the harmonic (achieved by holding a finger lightly against string directly above the fret and removing immediately after plucking the string, which produces a bell like tone). These two notes should be the same pitch, If the fretted note is higher (sharp) increase the string length by turning the intonation screw clockwise and anticlockwise if the fretted note is lower (flat). Repeat the same procedure for each string.
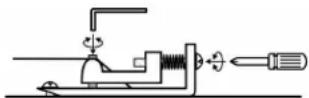
Adjustment of Vibrato spring (for electric guitar)
When movement of a vibrato (tremolo) arm is excessively hard, the spring inside body should be adjusted. Remove the cavity cover plate from the back of the body, using a Phillips head (+) screwdriver, turn the spring tension adjustment screw and adjust the length of spring. Turned to the left, tension will become weak and the motion of arm will become lighter. Retune the guitar to the proper pitch and check the angle.
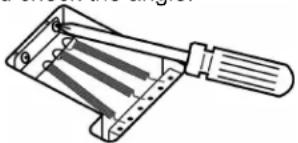
natural_image
Line drawing of a mechanical tool with multiple blades and a handle (no text or symbols)*If the screws are loosened too much, the back end of a bridge will be raised (1). Please adjust bridge carefully, balancing the tension of springs and strings, since the state of (2) is proper.
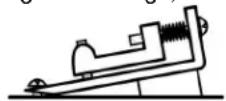
(1)
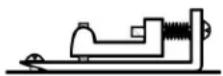
(2)
Please see our web site http://www.ariaguitars.com for more details of each product.