Virtuoso SG800EU - Printer Sawgrass - Free user manual and instructions
Find the device manual for free Virtuoso SG800EU Sawgrass in PDF.


User questions about Virtuoso SG800EU Sawgrass
0 question about this device. Answer the ones you know or ask your own.
Ask a new question about this device
Download the instructions for your Printer in PDF format for free! Find your manual Virtuoso SG800EU - Sawgrass and take your electronic device back in hand. On this page are published all the documents necessary for the use of your device. Virtuoso SG800EU by Sawgrass.
USER MANUAL Virtuoso SG800EU Sawgrass
natural_image
White SAVIGRASS printer with digital display and control buttons (no readable text or symbols on device body)This User Guide provides information and instructions related to the printer hardware.

Visit sawgrassink.com for more information and to download the printer software and related instructions.
Table of Contents
Introduction – Read This First
Manuals for this Printer 1
Manuals List 1
Important Notice----2
User's Notes 2
Information about this Manual 4
Symbols 4
Note 5
Model-Specific Information----5
Available Units and Options for Each Model 6
About The Virtuoso SG400 and SG800
Guide to Components 7
Front View 7
Rear View----8
Left Side View 8
Options and Accessories 9
Option Tray SG400NA / SG400EU----9
Option Tray for SG800NA / SG800EU---- 10
Bypass Tray for SG400NA / SG400EU---- 10
Bypass Tray for SG800NA / SG800EU---- 11
Control Panel 12
Turning On/Off the Power 13
Turning on the power 13
Turning off the power 14
Setup and Installation
Setup Procedure 15
Checking the Installation Area 16
Installation Area 16
Checking the power source 18
Checking the Supplied Items and Unpacking the Printer 20
Attaching and Detaching Options 22
Attaching and Detaching the Option Tray 22
Attaching the option tray 22
Detaching the option tray 23
Attaching and Detaching the Bypass Tray 25
Attaching the bypass tray 25
Detaching the bypass tray 26
Loading Sublimation Transfer Paper 27
Loadable Paper Sizes 27
Handling and Storage Precautions 28
Paper handling precautions---- 28
Paper storage precautions 28
Loading Paper 29
Loading Paper into Tray 1-3 ----29
Extending the Paper Tray to Load Paper----31
Installing the Ink Cartridges 34
Plugging in the Power Cord and Turning the Power On 36
Connecting the Printer 38
Confirming the Connection Method 38
USB Connection 38
Ethernet Connection 40
Using the Control Panel to Make Printer Settings
Overview of Settings 42
Using the [Paper Input] Menu 44
Changing the [Paper Input] Menu 45
Using the [List/Test Print] Menu 46
Printing a Configuration Page----46
Interpreting the Configuration Page 46
Using the [Maintenance] Menu 47
Nozzle Check 48
Head-cleaning 50
No-fuss head cleaning 51
Head-flushing 51
Head Position 52
Adjust Paper Feed 55
Registration----57
Setting the Date and Time----59
Date setting----59
Time setting----60
Time zone setting 60
De-condensation 61
Using the [System] Menu----61
Changing the [System] Menu 62
Using the [Host Interface] Menu 63
Changing the [Host Interface] Menu 66
Precautions When Using a Networked Printer---- 66
Using the [Language] Menu 67
Software
System Requirements----68
Design Software Requirements 69
Download, Install and Configure Software 69
Monitoring and Configuring the Printer
Using Web Image Monitor----70
Displaying Top Page 71
Menu 72
Logging in Using Web Image Monitor 72
Changing the Printer Settings----73
Notifying the Printer Status by E-mail 76
Specifying notification the printer status by e-mail 77
Auto Email Notification: Error Notification by Email: Group 1-3----79
Auto Email Notification: Counter Notification: Group 80
Auto Email Notification: Detailed Settings for Error Notification 81
Auto Email Notification: Counter Notification 83
Maintenance
Ink Cartridges 84
Checking the Remaining Ink 84
Checking the remaining ink level on the display---- 84
Checking the remaining ink level on the Web Image Monitor---- 84
Checking the remaining ink level via PowerDriver 85
Replacing an Ink Cartridge 85
Handling Ink Cartridges 86
Waste Collection Unit 88
Checking the Waste Ink Level 88
Checking the waste ink level on the display 88
Checking the waste ink level on the Web Image Monitor 88
Checking the waste ink level via PowerDriver 88
Replacing a Waste Collection Unit 89
Cleaning 91
Cleaning the Power Cable Plug 91
Moving 92
Moving a Short Distance 92
Moving a Long Distance----93
Disposing 94
When Not Using for a Long Period of Time----94
Troubleshooting
Canceling Printing 96
Canceling Printing Using the [Job Reset] Key 96
Canceling Printing from the Windows Taskbar 98
Canceling a Print Job from the Macintosh Print Job Queue Window 98
Printing Does Not Start----98
Paper Is Not Fed or Delivered Normally 99
Paper Jam 100
Using the [Form Feed] Key to Remove Jammed Paper---- 101
Removing Paper Jammed in Tray 1----102
Paper Jam in Tray 2/3 103
Removing Paper Jammed in the Bypass Tray---- 104
Removing Paper Jammed under the Top Cover 105
Opening the Rear Cover to Remove Jammed Paper 107
Removing Paper Jammed in Tray 2/3 108
Opening the Rear Unit Cover to Remove Jammed Paper (SG400NA/SG400EU) ---- 109
Poor Print Quality 110
Prints are Unsatisfactory 110
Colors are not correct 112
Image Position is not Correct or Only a Partial Image is Printed---- 112
Error & Status Messages on the Display 113
Error Messages 113
Errors Displayed by the Web Image Monitor 118
No Paper/Tray Not Detected (Tray 1)---- 118
No Paper/Tray Not Detected (Tray 2/3) 118
No Paper/Tray Not Detected (Bypass Tray) 119
Paper Size Mismatch/Paper Type Mismatch (Tray 1) 119
Paper Size Mismatch/Paper Type Mismatch (Tray 2/3)---- 119
Paper Size Mismatch/Paper Type Mismatch (Bypass Tray) 120
Paper Size Mismatch/Paper Type Mismatch (Auto Tray Select)---- 120
Cover Open 120
Cover Open / Ink Cartridge(s) Not Detected 121
If the cover is open---- 121
If the ink cartridges are not installed or are installed incorrectly 121
Cartridge Almost Empty 122
Cartridge Empty 123
Used Cartridge 123
Waste Collection Unit Not Detected 123
Waste Collection Unit Almost Full 124
Waste Collection Unit Full 125
Used Waste Collection Unit 125
Out of Printable Temperature Range 125
Printer Error 125
Network Interface Error---- 126
Maintenance Failed 126
Cannot Recover Error Page 126
Where to Inquire 126
Recommended Consumables 126
Options 127
Introduction – Read This First
Manuals for this Printer
Read this manual carefully before using this printer.
Refer to the sections that are relevant to what you want to do with the printer.

Important
Safety Information
This booklet contains important information about using the printer safely and correctly.
Be sure to read this before using the printer.
Quick Installation Guide
This guide briefly explains how to unpack and install the printer.
User Guide (PDF)
This guide explains in detail how to install and use the printer.
The guide also provides instruction on how check and change settings on the printer itself, and how to make and check printer settings using a Web browser.
It contains basic troubleshooting procedures, such as those related to printing and paper jams, and important information about consumables such as paper and ink.
We recommend this guide be installed on the computer so it can be easily referred to.
Manuals List
| Manual Name | Printed Manuals Provided | PDF Manuals Provided |
| Quick Installation Guide | Yes | No |
| User Guide | No | Yes |
| Safety Information Yes No |
Important Notice
In no event will Sawgrass be liable for direct, indirect, special, incidental, or consequential damages as a result of handling or operating the printer.
For good output quality, Sawgrass recommends that only genuine SubliJet-HD ink from Sawgrass be used.
Sawgrass shall not be responsible for any damage or expense that might result from the use of parts other than genuine parts from Sawgrass with the printer.
User's Notes
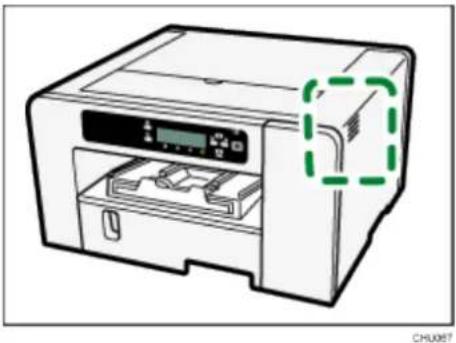
- High temperatures inside the printer can cause a breakdown. Do not lean anything against the vent or block it in any way.
natural_image
Illustration of a printer with a green dashed outline highlighting the internal structure (no text or symbols present)■ Warm air from the vent is normal and not a cause for concern.
- Do not leave the top or right front cover open. If you do, dust or other matter might get inside the printer, and this will reduce print quality.
■ During printing, do not move the printer or open its covers.
- Do not open the top or right front cover during printing. If you do, printing will stop.
During printing, do not pull out a tray. Printing will stop and the paper will jam.
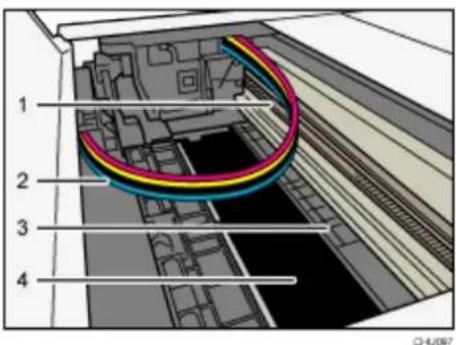
- Do not touch the feed belt, ink tubes, paper pressing board, or toothed rubber belt. Also, take care not to catch cables or ink tubes with your sleeves.
text_image
1 2 3 4 CH-4/097- Toothed rubber belt
- Ink tubes
- Paper pressing board
- Feed belt
Take care not to let paper clips and other foreign objects fall inside the printer.
- After the ink cartridges are installed and the printer is turned on for the first time, the print head priming process will begin. After it is completed, a head cleaning procedure may be required to achieve a full nozzle check.
- During printing, do not turn off the power or unplug the power cord from the wall outlet.
- During printing, do not subject the printer to external shock such as that caused by tapping paper on it.
- Sawgrass recommends keeping the printer powered on at all times. This will allow the printer to run automatic maintenance utilities for optimal performance.
- Up to 10 kg (22.1 lb.) of evenly spread weight can be placed on the printer. Do not place any concentrated weight of more than 2.5 kg (5.6 lb.) on the printer.
- Do not place unsteady objects on the printer. If they fall, they will cause injury to users and/or damage to the printer.
The operational life also depends on the environment in which the printer is used.
- The Waste Collection unit may fill up sooner than normal based on the specifics of your printing practices and/or maintenance procedures.
- "Prepare new Waste Collection Unit" message appears shortly before the waste collection unit is full. Although the printer remains usable until the unit is completely full, contact Sawgrass or an authorized distributor to purchase a replacement.
- Ink cartridges should be used up before the “Recommended Use By” date label affixed to each cartridge. Using ink in the printer past this date may be harmful to the unit and/or result in poor output quality.
- Cartridges that the printer report as empty may still contain a small amount of ink. This is normal as the cartridges are overfilled to prevent them from completely running dry. This prevents air from being drawn into the printer.
- Ink cartridges and supplies comply with the manufacturer's safety specifications. To ensure safety and reliability, use genuine SubliJet-HD ink cartridges and supplies.
- Printing hundreds of copies in a single day might cause nozzle loss the following day. If this happens, perform the head cleaning procedure.
- To ensure consistent print quality this printer performs regular automatic maintenance after and/or during printing. Maintenance is also performed when printing begins after a period of inactivity. A higher than normal amount of ink will be consumed during this
maintenance procedure and/or irreversible damage to the print head may occur if printer is not used at least once a month.
- Color ink may be used even when printing all-black or when black and white printing is specified. It may also be used for print head cleaning and refreshing, which are done to maintain printer performance.
- Sawgrass recommends that the printer be used often to ensure the print head nozzles do not become clogged.
- When not in use, do not power off the printer. Leave it powered on so that automatic maintenance utilities can run.
Note that the printer consumes a considerable amount of ink for maintenance and print head cleaning when used after a long period of inactivity. - Do not move the printer while it is powered on. Even when it is off, make sure the printer is on a level surface and safe from shock and vibration.
- Do not turn the printer off while it is busy. Make sure the printer is idle before turning it off
- Condensation can form inside the printer if it is moved from a cold place to a warm place. Allow any condensation to fully evaporate by not turning the printer on for at least an hour after moving it.
Information about this Manual
Be sure to read this section first to understand how information is presented in this manual. This guide uses Windows 7 for its examples. Procedures and screens might vary depending on the operating system being used.
Symbols
This manual uses the following symbols:

Important
Indicates points to pay attention to when using the printer and explanations of likely causes of paper misfeeds, damage to originals, or loss of data. Be sure to read these explanations.

Note
Indicates supplementary explanations of the printer's functions and instructions on resolving user errors.

Reference
This symbol is located at the end of sections. It indicates where further relevant information can be found.
[ ]
Indicates the names of keys on the printer's display or control panels.

(mainly Europe and Asia)

(mainly North America)
Differences in the functions of Region A and Region B models are indicated by two symbols. Read the information indicated by the symbol that corresponds to the region of the model being used. For details about which symbol corresponds to the model being used, see the section "Model-Specific Information".
Note
Contents of this manual are subject to change without prior notice.
Some illustrations in this manual might be slightly different from the actual printer.
Model-Specific Information
This section explains how to identify the region the printer belongs to.
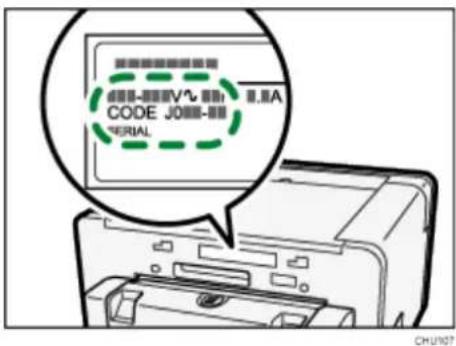
There is a label on the rear of the printer, located in the position shown below. The label contains details that identify the printer's region.
text_image
CODE JO###-### SERIAL CHU107The following information is region-specific. Read the information under the symbol that corresponds to the region of the printer.

(mainly Europe and Asia)
If the label contains the following, the printer is a region A model:
CODE XXXX -22, -27
220-240 V

(mainly North America)
If the label contains the following, the printer is a region B model:
CODE XXXX -17
100-120 V

Note
- Dimensions in this manual are given in two units of measure: metric and inch. If the printer is a Region A model, refer to the metric units. If the printer is a Region B model, refer to the inch units.
Available Units and Options for Each Model
The available units and options differ depending on the model.
| Unit/Option | SG400NA/SG400EU | SG800NA/SG800EU |
| Option Tray | Optional | Optional |
| Bypass Tray | Optional | Optional |
| Ethernet Interface | Standard Equipment | Standard Equipment |
| USB2.0 | Standard Equipment | Standard Equipment |
About The Virtuoso SG400 and SG800
This chapter describes the names and functions of the printer's parts and options.
Guide to Components
Front View
text_image
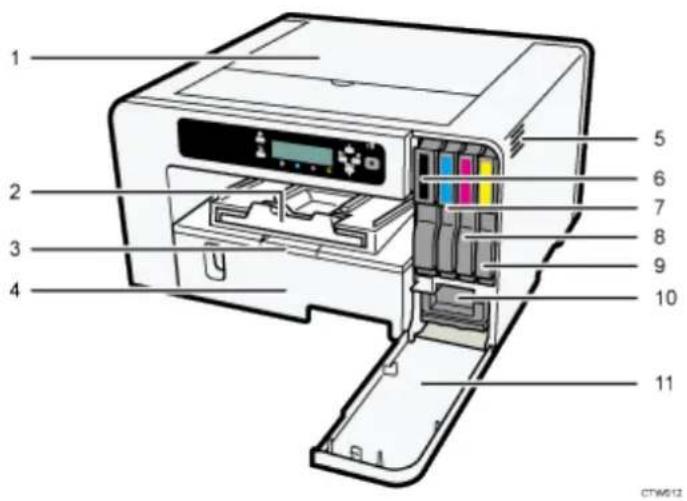
1 2 3 4 5 6 7 8 9 10 11 CTW6121. Top Cover
Normally, keep this cover closed. If jammed paper cannot be located or removed easily, you may be able to access it from the top of the printer.
2. Output Ramp
Prints are delivered on the output ramp.
Pull out when using large paper to keep the printed paper from falling.
3. Paper Tray Cover Extension (SG800NA / SG800EU)
Pull out this cover when using the tray extension to prevent an accumulation of dust. Do not pull out this cover if the extension unit is not used.
4. Tray 1
Load paper here. Use the Tray Extension and Paper Tray Cover Extension for larger paper sizes.
5. Vent
Air is vented here to prevent the inside of the printer from getting too warm. Do not lean anything against the vent or block it in any way. If the inside of the printer gets too warm, it may not function properly.
- Ink Cartridge (black)
- Ink Cartridge (cyan)
- Ink Cartridge (magenta)
- Ink Cartridge (yellow)
- Waste Collector Unit
- Right Front Cover
Normally, keep this cover closed. Open this cover to install or replace an ink cartridge or the waste collector unit.
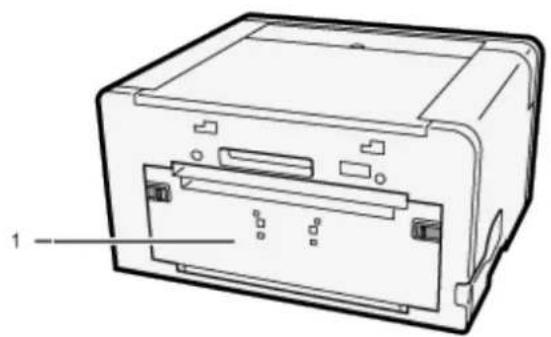
Rear View
natural_image
Technical line drawing of a computer case with labeled component (no text or symbols present)- Rear cover
Open this to clear paper jams inside the printer.
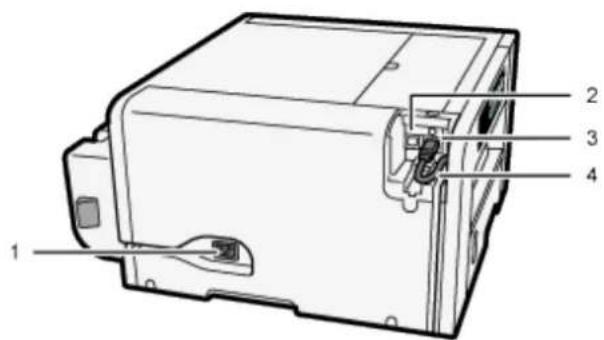
Left Side View
text_image
Technical diagram of a device rear panel with numbered components labeled 1 to 4- Power inlet
Plug for the power cord.
- USB port
Port for connecting the USB2.0 interface cable.
- Ethernet port
Port for connecting the 100BASE-TX or 10BASE-T cable.
Options and Accessories
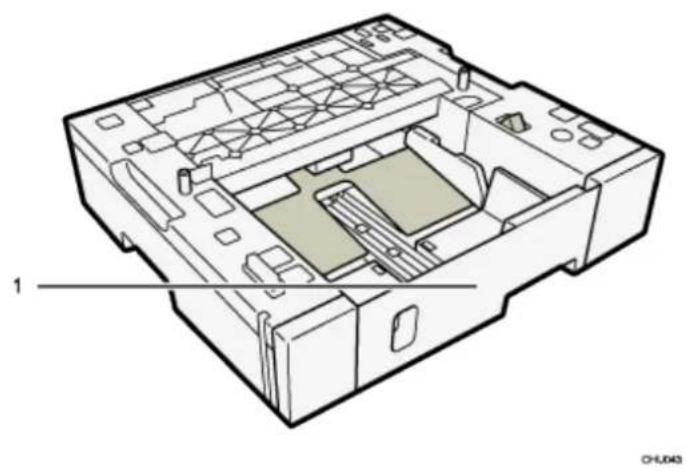
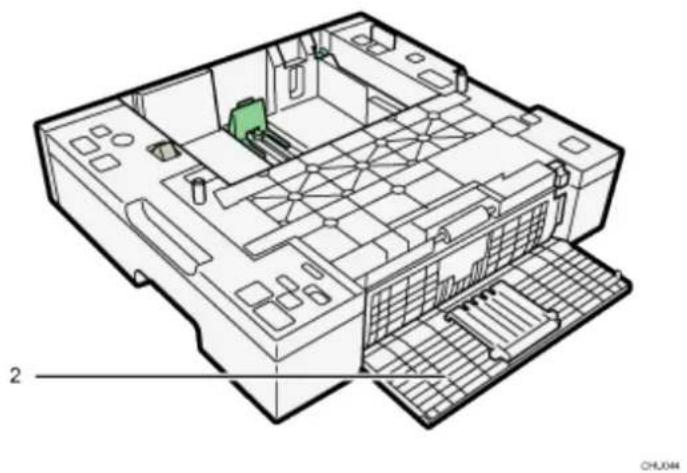
Option Tray SG400NA / SG400EU
This unit allows you to load additional sheets of paper. Two units can be stacked.
Front View
natural_image
Technical line drawing of a mechanical device interior with labeled component '1' (no text or symbols beyond label)Rear View
natural_image
Isometric line drawing of a multi-level electronic device with labeled components (no text or symbols present)1. Tray 2/Tray 3
When using paper larger than A4 or letter, extend the tray.
If two option trays are attached, one on top of the other, the unit on top is Tray 2, and the unit on the bottom is Tray 3.
2. Rear unit cover
Open to remove paper that has jammed inside the option tray.
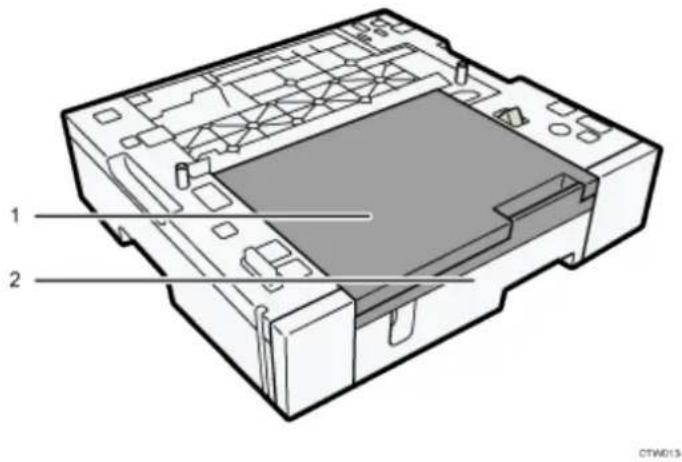
Option Tray for SG800NA / SG800EU
This unit allows you to load additional sheets of paper. Only one unit can be attached.
Front View
text_image
1 2 CTWD131. Paper Tray Cover Extension
Pull out this cover when using the tray extension unit, to prevent an accumulation of dust. Do not pull out this cover if the extension unit is not used.
2. Tray 2
To print on paper larger than A4 or letter size, pull the tray extension out.
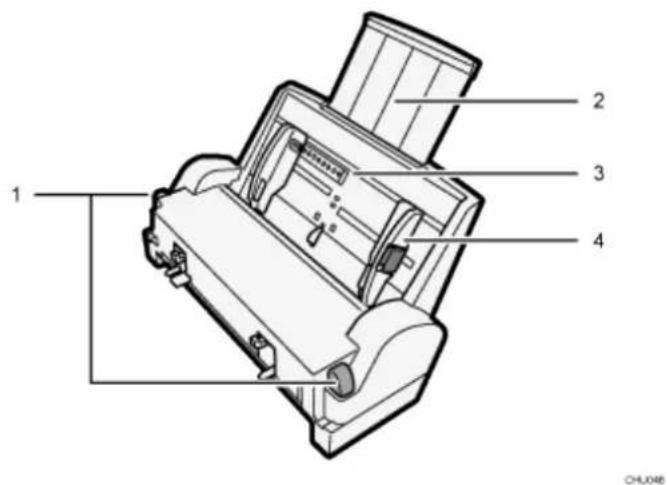
Bypass Tray for SG400NA / SG400EU
Use this tray to feed in sheets manually.
text_image
1 2 3 4 CHU0481. Tabs for bypass tray attachment and detachment
Press to lock the bypass tray before attaching it or to unlock the tray before detaching it.
- Bypass tray extension
Pull this out according to the paper size.
- Bypass tray
Load paper here.
- Side paper guides
Adjust the position of the side paper guides to match the paper size. Squeeze the locking lever and push the side paper guides.
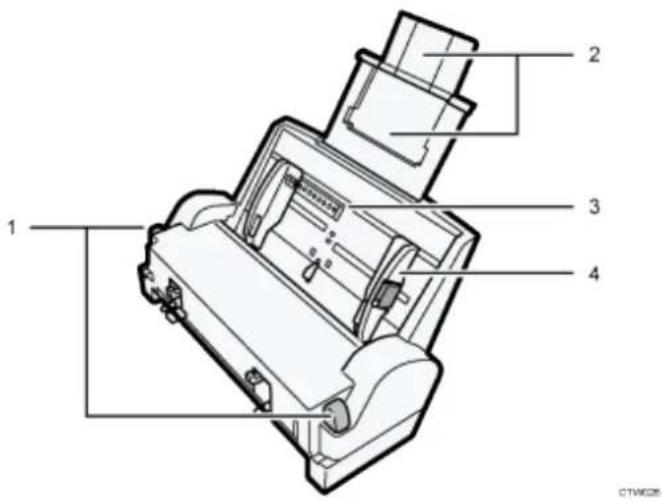
Bypass Tray for SG800NA / SG800EU
Use this tray to feed in sheets manually and/or for oversize paper.
text_image
1 2 3 4 CTVM025- Tabs for bypass tray attachment and detachment
Press to lock the bypass tray before attaching it or to unlock the tray before detaching it.
- Bypass tray extension
Pull this out according to the paper size.
To load paper larger than A3 or Tabloid, extend the auxiliary trays.
- Bypass tray
Load paper here.
- Side paper guides
Adjust the position of the side paper guides to match the paper size. Squeeze the locking lever and push the side paper guides.
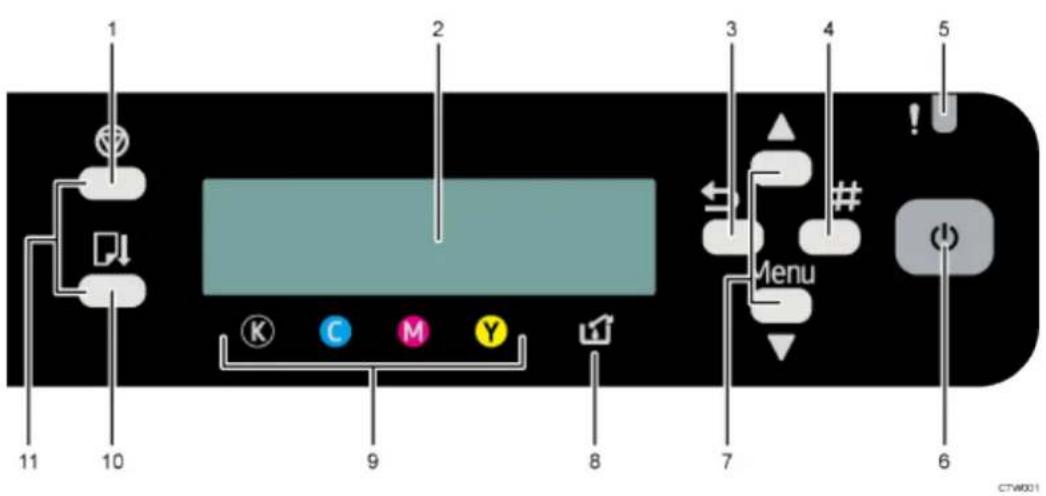
Control Panel
text_image
1 2 3 4 5 6 7 8 9 10 11 Menu C M Y CTW0011. [Job Reset] key
When the printer is online, press this key to cancel an ongoing print job.
2. Display
Displays the current printer status and messages.
3. [Escape] key
Press this key to return to the previous condition on the display.
4. [#Enter] key
Press this key to execute menu items selected on the display.
5. Alert indicator
Lights up or blinks whenever a printer error occurs.
If the red light is on, follow the instructions that appear on the display.
6. [Power] key
Press this key to turn the power on. To turn the power off, press and hold down this key for one second.
See the section "Turning On/Off the Power" for more information.
Blinks when the printer is receiving data from a computer or if there is data to be printed.
7. [ ], [ /Menu] keys
Use these keys to scroll through menu options, increase or decrease values on the display and to change settings.
Keep the key pressed for quick scrolling, and increase or decrease values on the display in units of 10.
To apply this function: under [Maintenance], set [Key Repeat] to [On].
See section "Using the [Maintenance] Menu" for more information.
When the printer is in standby mode, press the [▼Menu] key to make and check the current printer settings.
8. Waste ink full indicator
The amount of waste ink is indicated on the six-level display. A message appears when it is near time and time to replace the waste collection unit.
9. Cartridge replacement indicator
Each color corresponds to an ink cartridge.
K, C, M, and Y indicate black, cyan, magenta, and yellow, respectively.
The amount of ink remaining in each ink cartridge is indicated on the six-level display.
10. [Form Feed] key
Use this to force the printer to print data received when the paper size or type does not match the actual size or type of paper loaded in the tray.
If there is a paper jam, press this key according to the displayed error message and remove the jammed paper.
11. No-Fuss Head Cleaning
When the printer is in standby mode, press the [Job Reset] and [Form Feed] keys at the same time to perform head cleaning for all colors.
Turning On/Off the Power

Important
- Sawgrass recommends keeping the printer powered on at all times. This will allow the printer to run automatic maintenance utilities for optimum performance.
Turning on the power
1. Press the [Power] key.
![Sawgrass Virtuoso SG800EU - Press the [Power] key. - 1](/content/2026/05/784876/images/d0d2ffd6dbab0bc9b5d8d8164eaec5f3a684375a3a6e016da0ef1f85fa8501fe.jpg)
text_image
Menu CTW0038The [Power] key flashes and the "Waiting..." message will be displayed when the
printer starts warming up.
The [Power] key lights and the "Ready" message will be displayed when the printer is ready for use.
Turning off the power
1. Press and hold down the [Power] key for one second.
When the printer is in shutdown mode, the "Shutting down..." message is displayed.
When the printer stops, the [Power] key and the display turn off.
Note
- If the printer is not used for a specified time after turning it on, it will automatically go into Energy Saver mode, and electricity consumption of the printer will be reduced. To specify a wait period for Energy Saver mode initiation, configure the system settings. See section "Using the [System] Menu" for more information.
- If the printer is in Energy Saver mode, the [Power] key lights but the LCD is blank. (SG400NA / SG400EU)
- If the printer is in Energy Saver mode, the [Power] key lights and the "Energy Saver" message will be displayed. (SG800NA / SG800EU)
- The printer recovers from Energy Saver mode when it receives a print job or when any key is pressed.
Setup and Installation
This chapter describes setup and installation procedures.
Setup Procedure
This section explains the tasks necessary for setting up the printer.
Install and set up the printer by following the steps in the order shown.
| Task | Reference Section for Full Details | |
| 1 | Check the installation environment | "Checking the Installation Area" |
| 2 | Check the supplied items | "Checking the Supplied Items and Unpacking the Printer" |
| 3 | Attach any options | "Attaching and Detaching Options" |
| 4 | Load paper | "Loading Paper" |
| 5 | Install the ink cartridges | "Installing the Ink Cartridges" |
| 6 | Plug the power cord in and turn the power on | "Plugging in the Power Cord and Turning the Power On" |
| 7 | Connect the printer to the computer | "Connecting the Printer" |
| 8 | Acquire, install and configure software | "Printer and Color Management Software" |

Important
■ Follow these instructions for physical installation of the printer.
- Instructions for installation and configuration of software are provided in separate documents located on sawgrassink.com.
- Do not turn the printer on until you have been instructed to do so.
- Do not connect the printer to a computer via USB until directed to do so in the instructions for software installation.
- Connecting the printer to the computer via USB prior to being instructed to do so may cause the printer to not be automatically recognized resulting in a communication failure with the printer software.
Checking the Installation Area
The printer's location should be carefully chosen because environmental conditions greatly affect its performance.
Installation Area
WARNING
- Do not use flammable sprays or solvents in the vicinity of this printer. Also, avoid placing these items in the vicinity of this printer. Doing so could result in fire or electric shock.
- Do not place vases, plant pots, cups, toiletries, medicines, small metal objects, or containers holding water or any other liquids, on or close to this printer. Fire or electric shock could result from spillage or if such objects or substances fall inside this printer.
- Be sure to locate the printer as close as possible to a wall outlet. This will allow easy disconnection of the power cord in the event of an emergency.
CAUTION
- Keep the printer away from humidity and dust. Otherwise a fire or an electric shock might occur.
- Do not place the printer on an unstable or tilted surface. If it topples over, an injury might occur.
- Do not place heavy objects on the printer. Doing so can cause the printer to topple over, possibly resulting in injury.
- Do not obstruct the printer's vents. Doing so may lead to a fire caused by overheated, internal components.
■ Make sure the room where the printer is used is well ventilated and spacious. Good ventilation is especially important when the printer is used heavily.
Important
- To avoid malfunctions, position the printer away from the following:
- direct sunlight
■ flow of air from air conditioners or heaters
■ radios, televisions, or other electronic devices
■ areas of high/low temperature and high/low moisture
■ humidifying appliances
■ oil stoves and ammonia-emitting appliances (such as copiers)
Choose a flat, stable area to install the printer.
The surface should be level within two degrees, left to right and front to back.
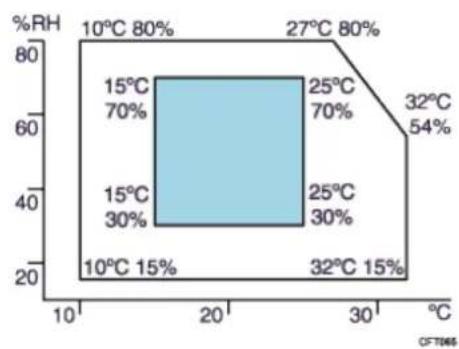
- To prevent condensation, install the printer in an area where temperature and humidity conditions do not exceed those indicated in the diagram below.
The printer may cease to print if these limitations are exceeded.
Region A (mainly Europe and Asia)
heatmap
| Temperature | Zone Label | Percentage (%) | | :--- | :--- | :--- | | 10°C | 15°C | 15 | | 10°C | 30°C | 30 | | 10°C | 70°C | 70 | | 10°C | 80°C | 80 | | 27°C | 25°C | 70 | | 27°C | 32°C | 54 | | 27°C | 80% | 80 | | 32°C | 25°C | 30 | | 32°C | 32°C | 15 | CF-T46Region B (mainly North America)
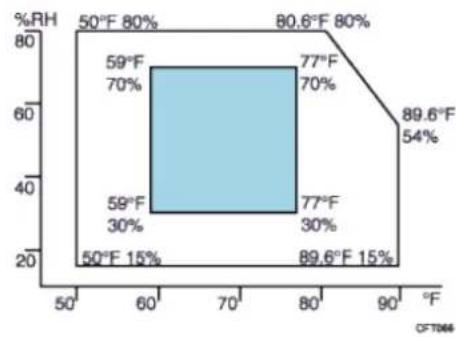
heatmap
| Temperature Range | %RH (%) | | :--- | :--- | | 50°F - 80% | 80 | | 50°F - 70% | 70 | | 50°F - 77% | 70 | | 50°F - 89.6% | 54 | | 50°F - 60% | 30 | | 50°F - 59% | 30 | | 50°F - 59% | 15 | | 60° - 70° | 30 | | 60° - 77° | 30 | | 60° - 89.6° | 15 | The chart displays a single rectangular region representing the distribution of RH values across temperature ranges. The label 'CFT066' appears in the bottom left corner. The color scale is not explicitly defined but corresponds to the temperature range labels.White area: Permissible Range
Blue area: Recommended Range
- The following diagram shows the ideal clearance for loading paper, replacing ink cartridges and removing jammed paper
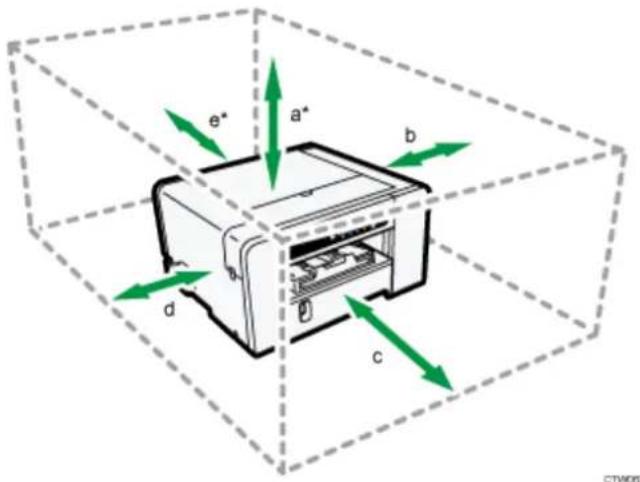
text_image
e* a* b d c CTW05SG400NA / SG400EU
a. 26 cm (10.3 inches)
b. 10 cm (4.0 inches)
c. 45 cm (17.8 inches)
d. 3 cm (1.2 inches)
e. 13 cm (5.2 inches)
* A clearance of 30 cm (11.9 inches) is necessary if the bypass tray is attached.
SG800NA / SG800EU
a. 26 cm (10.3 inches)
* A clearance of 41 cm (16.2 inches) is necessary if the bypass tray is attached.
b. 10 cm (4.0 inches)
c. 70 cm (27.6 inches)
d. 3 cm (1.2 inches)
e. 35 cm (13.8 inches)
* A clearance of 38 cm (15.0 inches) is necessary if the bypass tray is attached.
Checking the power source

WARNING
Failure to follow any of the warnings below could result in fire or electric shock:
- Do not use any power sources other than those that match the specifications shown in this manual.
- Do not use any frequencies other than those that match the specifications shown.
-
Do not use multi-socket adaptors or extension cords.
-
Do not touch the prongs of the power cable's plug with anything metallic.
- Do not handle the power cord plug with wet hands.
- The supplied power cord is for use with this printer only. Do not use it with other appliances.
- Do not use power cords that are damaged, broken, or modified. Also, do not use power cords that have been trapped under heavy objects, pulled hard, or bent severely.
- If the power cord is damaged and its inner wires are exposed or broken, contact Sawgrass for a replacement. Use of damaged power cords could result in fire or electric shock.
- Be sure to locate the printer as close as possible to a wall outlet. This will allow easy disconnection of the power cord in the event of an emergency.
CAUTION
- Locate the printer as close as possible to a wall outlet. This will allow easy disconnection of the power cord in the event of an emergency.
- Be sure to push the plug of the power cord fully into the wall outlet. A partially inserted plug may create an unstable connection that can result in unsafe buildup of heat.
- When disconnecting the power cord from the wall outlet, always pull the plug, not the cord. Pulling the cord can damage the power cord.
Region A (mainly Europe and Asia)
SG400EU
■ 220-240 V: 50/60 Hz 0.6 A
SG800EU
■ 220-240 V: 50/60 Hz 0.6 A
Region B (mainly North America)
SG400NA
■ 100-120 V: 60 Hz 1.0 A
SG800NA
■ 100-120 V: 60 Hz 1.2 A
Checking the Supplied Items and Unpacking the Printer
WARNING
- The following explains the warning messages on the plastic bag used in this product's packaging.
- Keep the polythene materials (bags, etc.) supplied with this printer away from babies and small children at all times. Suffocation can result if polythene materials are brought into contact with the mouth or nose.
CAUTION
■ SG800NA and SG800EU weigh around 15 kg (33 lb.).
- Grip the center area at the base of the printer's sides. Lift it slowly and do not strain your body.
- When moving the printer, remove the option. Careless handling and over exertion when lifting can result in breakage and/or injury.
Important
- Do not turn the printer on until you have been instructed to do so.
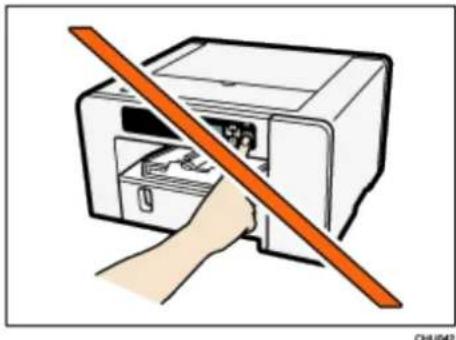
natural_image
Illustration of a hand using a printer to press or remove a device (no text or symbols visible)- Do not connect the printer to a computer via USB until directed to do so in the instructions for software installation.
- Connecting the printer to the computer via USB prior to being instructed to do so may cause a communication failure between the software and the printer.
Open the printer box and take out all supplied items. Check that all the following items are present:
Power Cord
■ Safety information
USB Cable
Open the box containing the ink cartridges and other accessories and ensure you have the following:
■ SubliJet-HD Ink Cartridge – Black
SubliJet-HD Ink Cartridge – Cyan
■ SubliJet-HD Ink Cartridge – Magenta
■ SubliJet-HD Ink Cartridge – Yellow
■ Quick Installation Guide
- Warranty Card
- Take off the protective covering.
- Remove the plastic bag.
- Lift the printer and move it to the place where it will be installed.
Grip the indented area at the base of the printer's sides, as shown. Lift and carry the printer slowly and carefully.
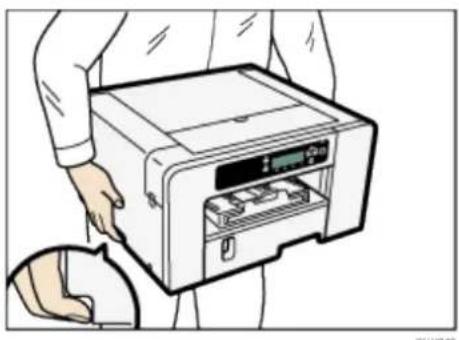
natural_image
Illustration of a person opening a printer into a rack (no text or symbols visible)-
Remove the tape from the printer body.
-
Attach units and options.
See the section "Attaching and Detaching Options" for more information.
Note
- Sawgrass recommends the box be kept on hand and not disposed.
■ 100BASE-TX or 10BASE-T LAN cables are not supplied.
Attaching and Detaching Options
WARNING
The following explains the warning messages on the plastic bag used in this product's packaging.
- Keep the polythene materials (bags, etc.) supplied with this printer away from babies and small children at all times. Suffocation can result if polythene materials are brought into contact with the mouth or nose.
Attaching and Detaching the Option Tray
CAUTION
■ SG800NA and SG800EU weigh around 15 kg (33 lb.).
- Grip the center area at the base of the printer's sides. Lift it slowly and do not strain your body.
- When moving the printer, remove the option first. Careless handling and over exertion when lifting can result in breakage and/or injury.
Important
Before installing or removing options, always disconnect the power cord plug from the wall outlet.
Attaching the option tray
- If the printer is powered on, press and hold down the [Power] key until it turns off and then unplug the power cord.
- If necessary, disconnect the USB cable or Ethernet cable.
- Take the option tray out of the box and remove the tape.
- Position the option tray close to the printer.
- Align the connecting parts of the printer and option tray, then lower the printer onto the option tray.
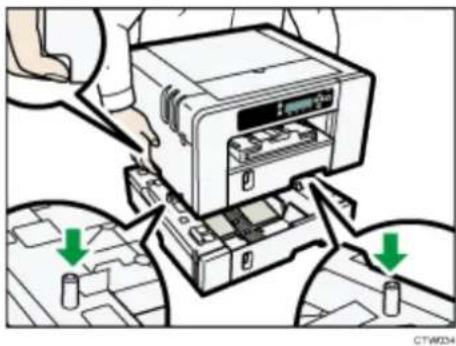
natural_image
Illustration of a printer being inserted into a circuit board, with arrows indicating process flow (no text or symbols present)Grip the center area at the base of the printer's sides. Lift it slowly and do not strain your body.
- Attach the clamping plate and secure it with a coin screw. (SG800NA / SG800EU)
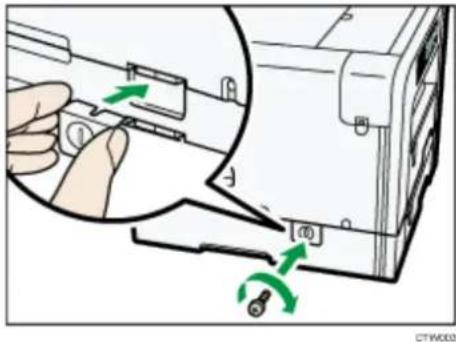
text_image
Diagram showing a hand inserting a component into a device with green arrows indicating rotation or adjustment, labeled with parts ① and ⑥.- Connect the power cord, USB cable or Ethernet cable.
Note
- Align the option tray and printer using their corners.
- When the printer is placed on top of the option tray, installation is complete.
- Do not tilt the printer.
■ Be careful not to trap your fingers.
■ Up to option trays can be attached. (SG400NA / SG400EU) - To install two option trays, put the upper option tray (Tray 2) on the lower option tray (Tray 3) first, then lower the printer onto the upper option tray (Tray 2).
■ After attaching an option tray, the printer driver may need to be configured to recognize it. - After attaching the option tray, you must register where to start printing on paper loaded in the option tray. See the section "Registration" for more information.
Detaching the option tray
-
If the printer is powered on, press and hold down the [Power] key until it turns off and then unplug the power cord.
-
If necessary, disconnect the USB cable or Ethernet cable.
-
Remove the coin screw and then detach the clamping plate. (SG800NA / SG800EU)
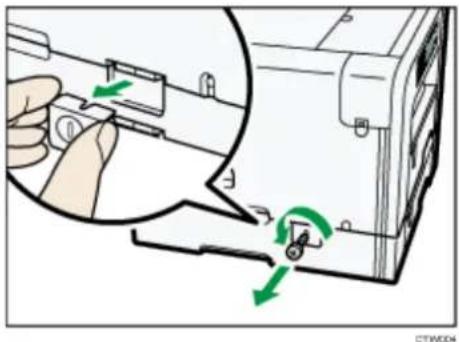
natural_image
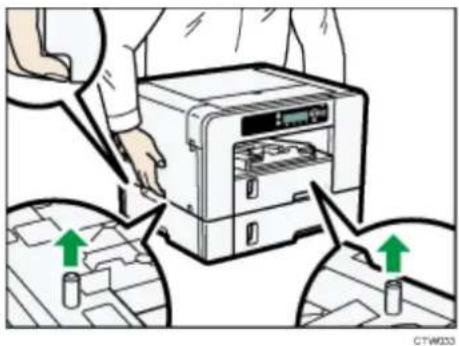
Illustration of a hand inserting a component into a device, showing green arrows indicating rotation or adjustment (no text or symbols present)- Temporarily move the printer to a nearby flat and stable surface to detach the option tray.
text_image
CTW033Grip the center area at the base of the printer's sides. Lift it slowly and do not strain your body.
-
Place the printer back in the previous location.
-
Connect the power cord, USB cable or Ethernet cable.
Note
- Do not tilt the printer.
- Be careful not to trap your fingers.
Attaching and Detaching the Bypass Tray
This section explains how to attach and detach the bypass tray.

CAUTION
- Do not place the printer on an unstable or tilted surface. If it topples over an injury might occur.

Important
- Do not place the printer near the edge of a desk if the bypass tray is attached. There is a risk of it falling to the floor.
- Before installing or removing options, always disconnect the power cord plug from the wall outlet.
- Do not forcefully press down on the bypass tray. It may come off the printer and paper misfeeds or positioning problems may result.
Attaching the bypass tray
- If the printer is powered on, press and hold down the [Power] key until it turns off and then unplug the power cord.
- If necessary disconnect the USB cable or Ethernet cable.
- Take the bypass tray out of the box and remove the tape.
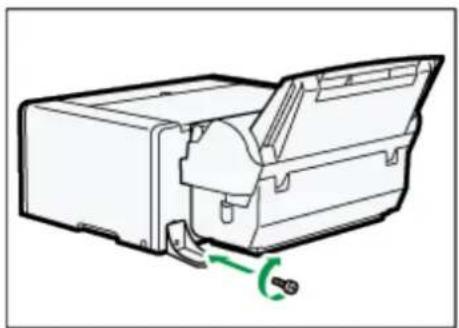
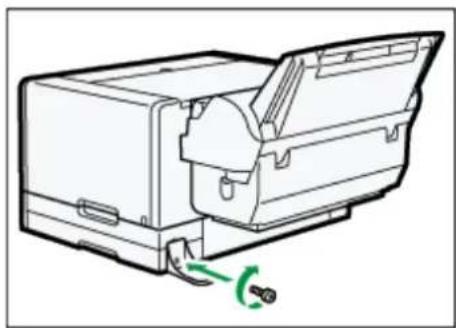
- Attach the anti-topple stand and then secure it with a coin screw. (SG800NA/SG800EU)
natural_image
Technical line drawing of a mechanical component with a green arrow indicating a rotation or adjustment (no text or symbols present)CTW027
natural_image
Technical line drawing of a mechanical device with internal components and a green rotation arrow (no text or symbols)CTWDER
If an option tray is installed, attach the anti-topple stand to it.
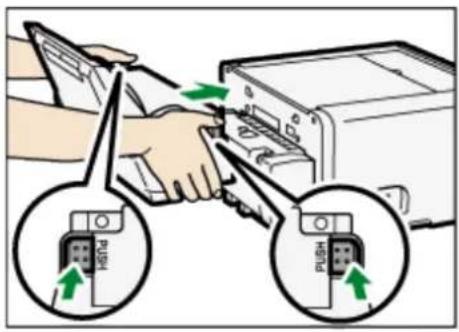
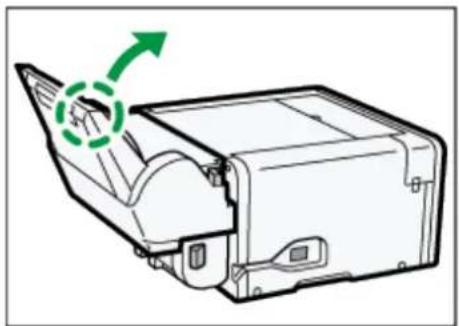
- Attach the bypass tray while pressing the tabs on each side, then push it in all the way. Attach the bypass tray into the printer until you hear it click.
text_image
Diagram showing two connected devices with labeled ports and directional arrows indicating connection or movement.CHU053
Make sure the tabs return to their original positions.
If the tabs do not return to their original positions, push the tray in while pulling up on its top left part as shown.
natural_image
Technical line drawing of a mechanical component with an arrow indicating rotation (no text or symbols present)CHU257
- Connect the power cord, USB cable or Ethernet cable.
Note
- After attaching an option tray, the printer driver may need to be configured to recognize it.
- After attaching the bypass tray, you must register where to start printing on paper loaded in the bypass tray. See the section "Registration" for more information.
- The coin screw on the underside of the bypass tray is used when setting the side fence.
Detaching the bypass tray
- Press and hold down the [Power] key until it turns off, then unplug the power cord.
- If necessary, disconnect the USB cable or Ethernet cable.
- Remove any paper in the bypass tray.
- If the bypass tray extension is pulled out, push it back in.
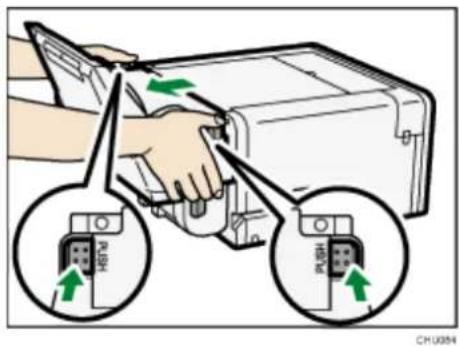
- Pressing the tabs on each side of the bypass tray, detach the unit.
text_image
Diagram showing a hand operating a device with labeled ports and directional arrows indicating movement or operation.- Connect the power cord, USB cable or Ethernet cable.
Loading Sublimation Transfer Paper
This section explains the available paper sizes and how to load paper.
Loadable Paper Sizes
Option Tray 1, Option Tray 2, and/or Bypass Tray (SG400NA / SG400EU / SG800NA / SG800EU)
| Type Paper Size | |
| Sublimation Transfer Paper (standard sizes) | A4 ( 210 × 297 mm)☐A3 ( 297 × 420 mm)☐A3+ ( 328 × 483 mm)☐Letter ( 8^1/2 × 11 ) ☐ ^1 Legal ( 8^1/2 × 14 ) ☐ ^1 Tabloid ( 11 × 17 ) ☐ ^1 13 × 19 ☐ ^1 |
| Sublimation Transfer Paper (custom cut) | Vertical: 139.7-297.0 mm (5.50-11.69 inches)Vertical: 139.7-356.0 mm ^*1 (5.50-14.01 inches)Horizontal: 88.0-216.0 mm (3.47-8.50 inches) |
*1 (mainly North America)
Handling and Storage Precautions
Paper handling precautions
- Load only Sawgrass recommended sublimation transfer paper in the paper tray(s).
- Do not load paper of different types or sizes at the same time.
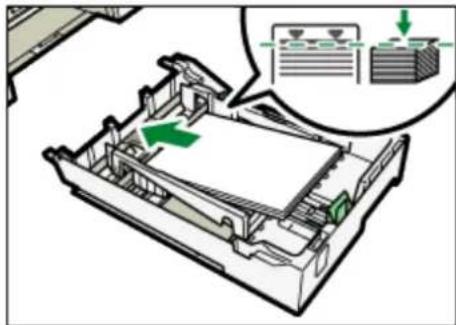
■ Pull Trays 1-3 completely out before loading them with paper. - Load transfer paper in Tray 1-3 print side down (bright, white side or side without watermark or logo), with the shorter edge pointing in the paper feed direction.
- Do not stack paper over the limit mark.
natural_image
Diagram of a printer internal structure with green arrows indicating motion, and an inset showing printer details (no text or symbols present)CHU100
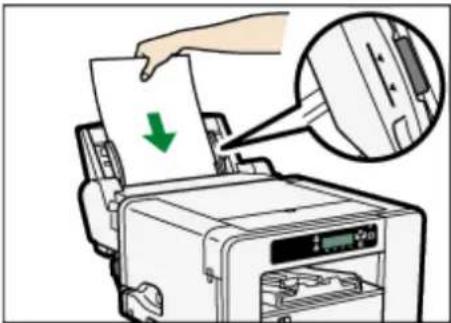
- Load transfer paper in the bypass tray print side up (bright, white side or side without watermark or logo), with the shorter edge pointing in the paper feed direction.
text_image
Diagram showing printer press application with a green download arrow and magnified detail viewCHUJ74
- Curled paper may jam. Straighten any curls within 2 mm (0.08 inches) before loading.
Paper storage precautions
If stored under adverse conditions, even paper suitable for printing can cause paper jams, poor print quality or printer malfunctions. Heed the following when paper is stored:
- Do not store paper in humid places.
■ Do not store paper in direct sunlight.
■ Store paper flat.
■ Store unused paper in the original package.
Loading Paper
CAUTION
- When loading paper, take care not to trap or injure your fingers.
Loading Paper into Tray 1-3
- Using the grip, pull the tray halfway out, lift it slightly, then pull it out completely.
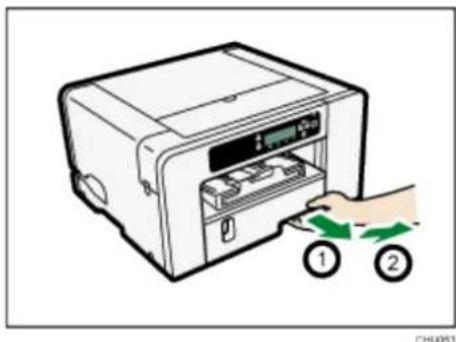
text_image
Diagram showing a printer with two labeled arrows indicating process steps, likely illustrating a printing or printing process.Pull the tray out completely. Take care not to drop it.
- Pinch the catch of the paper guide on the right side, slide the paper guides to match the size of the paper to load, then push the end paper guide out until there is space between them.
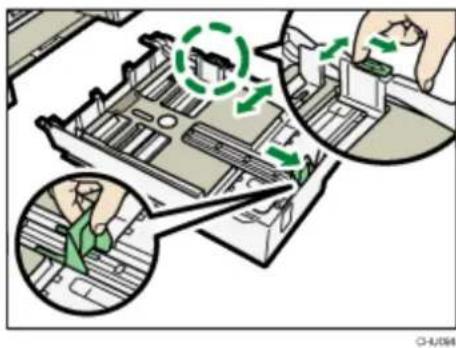
text_image
Diagram illustrating a mechanical assembly process with labeled steps and green circular indicators indicating motion or movement.- Load paper with the print side face down but not over the limit mark.
Print side is the bright, white side or side without watermark or logo and should be placed face down, with the shorter edge pointing in the paper feed direction.
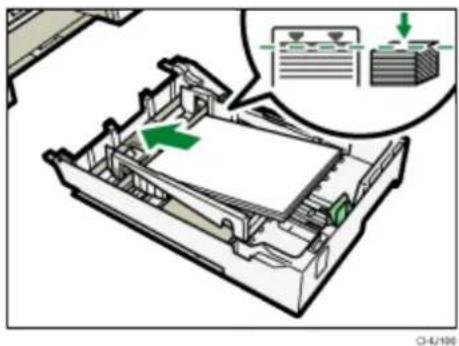
natural_image
Diagram of a printer internal structure with green arrows indicating flow or movement, and an inset showing a printer with a paper feeding into a stack (no text or symbols present)- Squeeze the front end paper guide, then slide it to touch the edge of the paper.
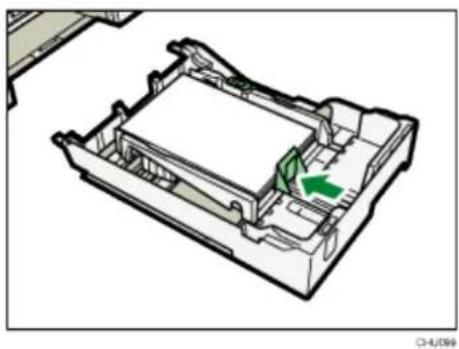
natural_image
Technical line drawing of a mechanical housing or enclosure with internal components and a green arrow indicating a specific part (no text or symbols present)- Push the tray gently in until it stops.
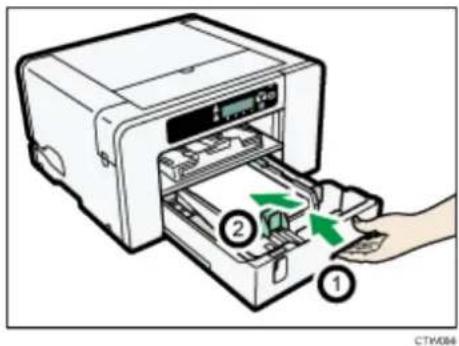
text_image
Diagram showing a printer with green arrows indicating process steps, labeled with numbers 1 and 2.Before Tray 1 is pushed in, make sure the output ramp is closed.
- Pull out the output ramp extension.
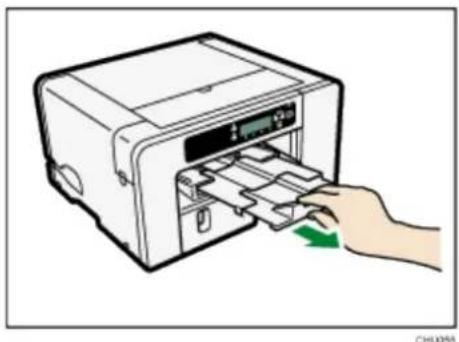
natural_image
Illustration of a hand inserting a card into a printer (no text or symbols visible)Extending the Paper Tray to Load Paper
- Using the grip, pull the tray halfway out, lift it slightly, then pull it out completely.
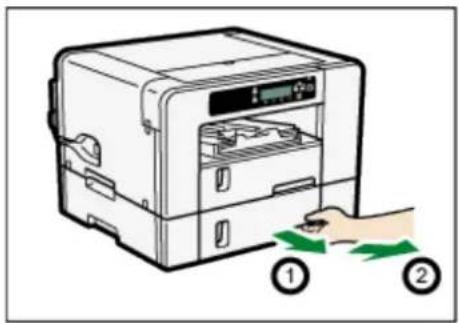
text_image
Diagram showing a printer with labeled parts and directional arrows indicating process flow or movement, marked with numbers ① and ②.CHUITT
- Slide the tabs on both sides of the tray, then release the lock.
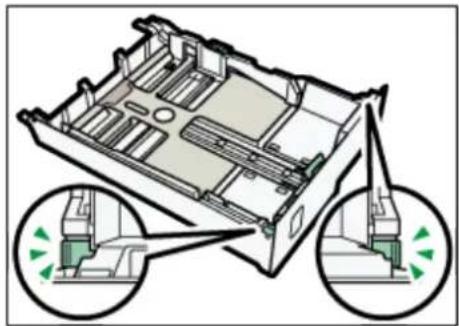
natural_image
Diagram of a vehicle chassis with two circular insets showing internal components (no text or labels)CTV028
- Pull out the tray extension.
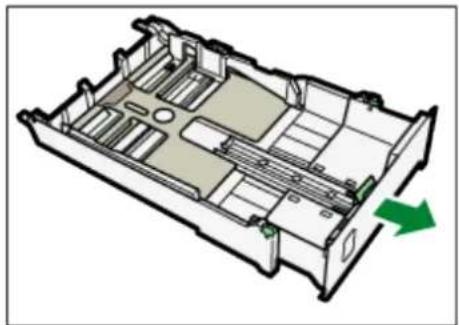
natural_image
Isometric technical diagram of a multi-chamber electronic device casing with internal compartments and a green directional arrow indicating motion (no text or symbols)CHU102
- Slide both tabs to the original positions, then lock the tray.
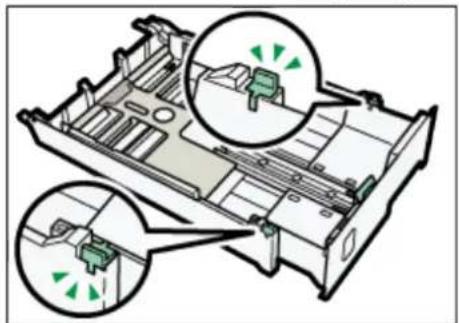
natural_image
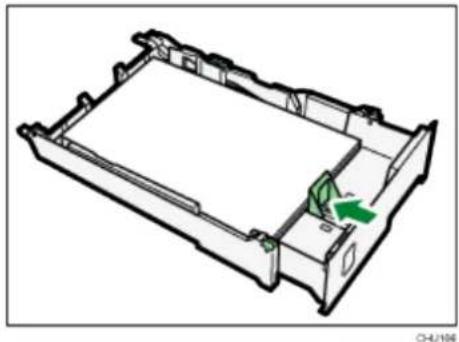
Diagram of a battery pack assembly with two views showing internal components and green indicator lights (no text or symbols)- Pinch the catch of the paper guide on the right side, slide the paper guides to match the size of paper to load, then push the end paper guide out until there is space between them.
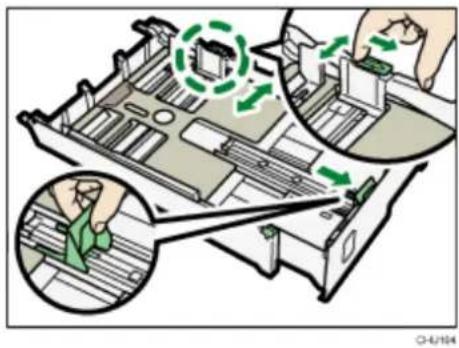
text_image
Diagram illustrating a device's internal structure and cleaning process, with magnified views showing hand positioning and green arrows indicating steps.- Load paper with the print side face down but not over the limit mark. Print side is the bright, white side or side without watermark or logo and should be placed face down, with the shorter edge pointing in the paper feed direction.
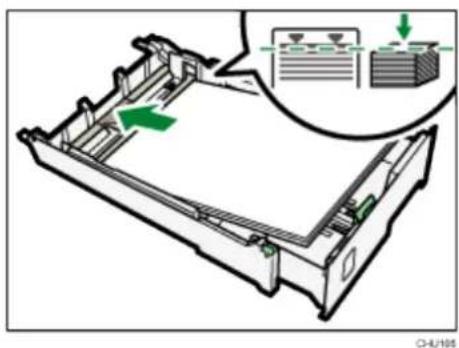
text_image
Diagram showing a device with green arrows indicating directional flow, accompanied by an inset diagram illustrating server racks and data transfer.- Squeeze the front end paper guide, then slide it to touch the edge of the paper.
natural_image
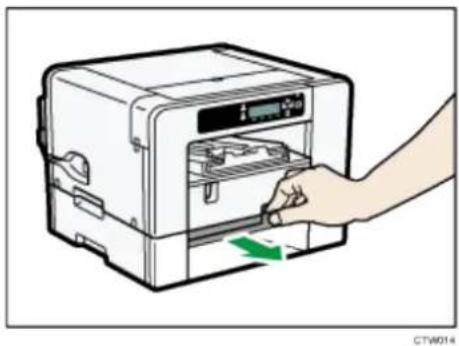
Technical line drawing of a mechanical component with a green arrow indicating a specific part (no text or symbols present)- Pull out the paper tray cover extension. (SG800NA / SG800EU)
natural_image
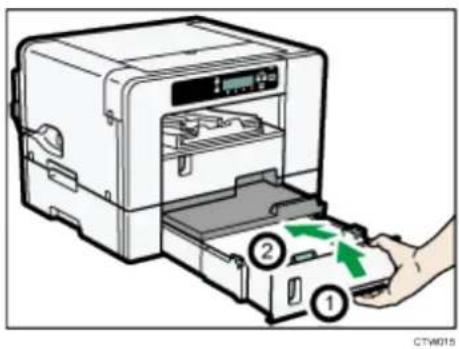
Illustration of a hand inserting a device into an open storage unit (no text or symbols visible)- Push the tray gently in until it stops.
text_image
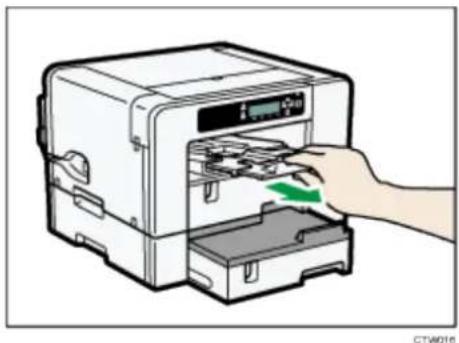
CTW015- Pull out the output ramp extension.
natural_image
Illustration of a hand inserting a device into an open storage unit (no text or symbols visible)Note
- Do not use the tray extension for A4 (Letter) size paper or smaller paper.
Important
- Curled paper may jam. Straighten any curls within 2 mm (0.08 inches) before loading.
Installing the Ink Cartridges
CAUTION
- Keep ink and ink containers out of reach of children.
- If ink gets into contact with eyes, flush eyes with clean, lukewarm water (low pressure) for at least 15 minutes, occasionally lifting eyelids to ensure that the chemical is being flushed out of the eyes. Obtain medical attention.
- If ink is ingested, wash out mouth with water provided person is conscious. Consult a doctor immediately.
- When removing jammed paper or replacing ink, avoid getting ink on your clothing. If ink comes into contact with your clothing, immediately rinse the stained area with cold water and wash the garment with laundry detergent per the care productions provided on the label.
- When removing jammed paper or replacing ink, avoid getting ink on your skin. If ink comes into contact with your skin, wash the affected area thoroughly with soap and water. If irritation develops, seek medical attention.
- When removing the ink cartridge, avoid putting your hand near the place where the ink cartridge is installed. If ink comes in contact with your hands, wash them thoroughly with soap and water. If irritation develops, seek medical attention.
Important
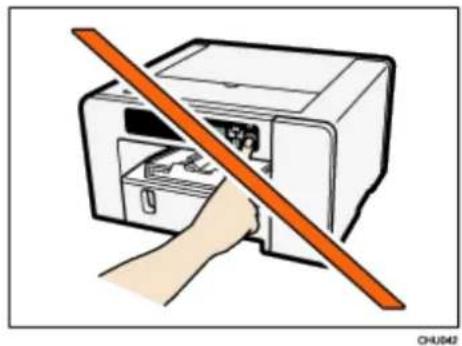
- When installing the ink cartridge, do not touch the inside of the printer.
- Do not turn the printer on until you have been instructed to do so.
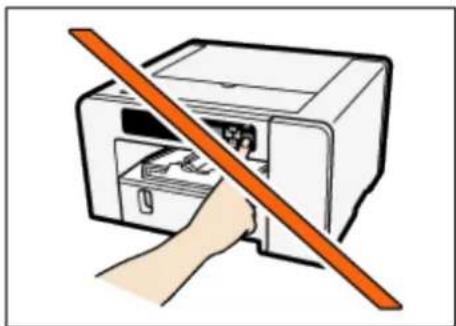
natural_image
Illustration of a hand using a printer to press or adjust a device (no text or symbols visible)CHU042
- Be sure to install the Sawgrass SubliJet-HD ink cartridges.
- Remove the packaging from the ink cartridges.
Do not touch the ink supply ports or chip contacts of ink cartridges.
- Open the right front cover.

natural_image
Illustration of a hand inserting a printer into a slot, with a green arrow indicating the motion (no text or symbols present)- Check the orientation of each cartridge, then install them gently.
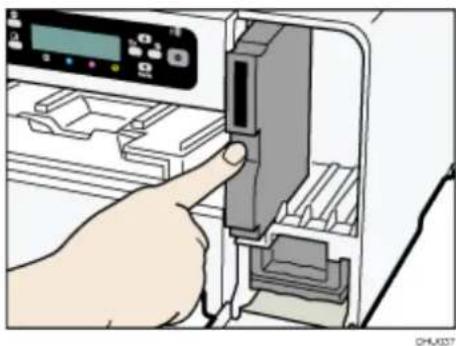
natural_image
Hand inserting a device into a printer case (no visible text or symbols)Install in the following order from the left: black, cyan, magenta, and yellow.
- Push in each cartridge.
- Repeat steps 3 to 4 for all four cartridges.
- Close the right front cover.
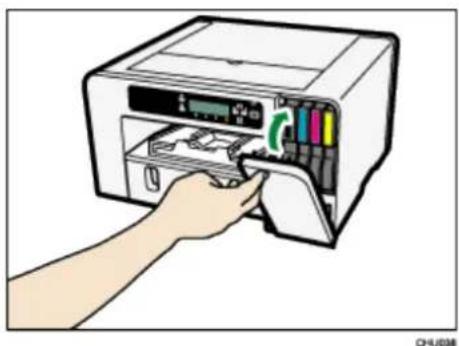
natural_image
Illustration of a hand inserting a CD into a printer (no text or symbols visible)Plugging in the Power Cord and Turning the Power On
Connect the printer's power cord and turn the printer on but do not connect the printer to a computer yet.

Important
- Do not connect the printer to a computer via USB until directed to do so in the instructions for software installation.
- Connecting the printer to the computer via USB prior to being instructed to do so may cause the printer to not be automatically recognized resulting in a communication failure with the printer software.

WARNING
Failure to follow any of the warnings below could result in fire or electric shock:
- Do not use any power sources other than those that match the specifications shown in this manual.
- Do not use any frequencies other than those that match the specifications shown.
- Do not use multi-socket adaptors or extension cords.
- Do not touch the prongs of the power cable's plug with anything metallic.
- Do not handle the power cord plug with wet hands.
- The supplied power cord is for use with this printer only. Do not use it with other appliances.
- Do not use power cords that are damaged, broken, or modified. Also, do not use power cords that have been trapped under heavy objects, pulled hard, or bent severely.
- If the power cord is damaged and its inner wires are exposed or broken, contact Sawgrass for a replacement.

CAUTION
- Locate the printer as close as possible to a wall outlet. This will allow easy disconnection of the power cord in the event of an emergency.
- Be sure to push the plug of the power cord fully into the wall outlet. A partially inserted plug may create an unstable connection that can result in unsafe buildup of heat.
-
When disconnecting the power cord from the wall outlet, always pull the plug, not the cord. Pulling the cord can damage the power cord.
-
Plug the power cord fully into the printer.
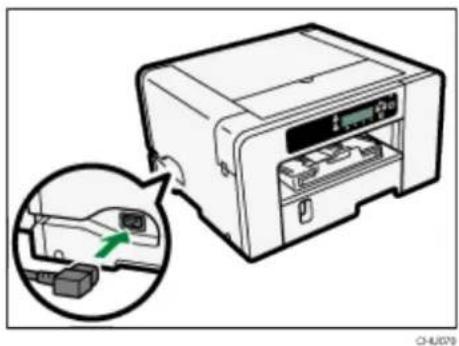
natural_image
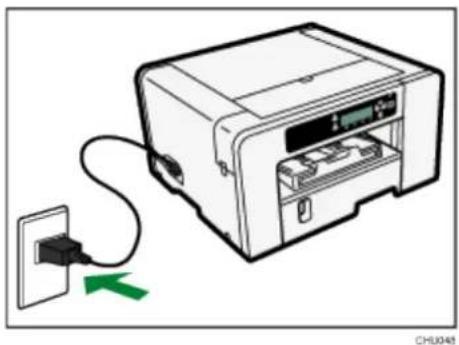
Diagram of a printer with an inset showing internal components (no text or symbols)- Plug the power cord fully into the wall outlet.
natural_image
Diagram of a printer with an outlet cable and green arrow indicating connection (no text or symbols)Make sure the power cord is not trapped under the printer.
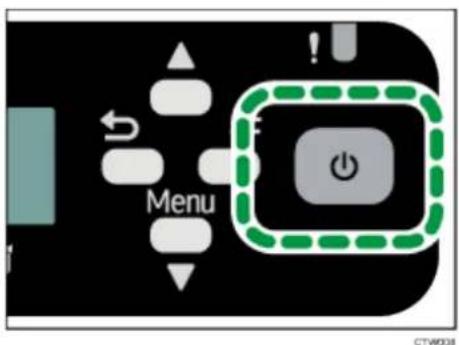
- Press the [Power] key.
text_image
MenuThe printer will start performing the initial ink fill.
Important
- Do not disturb the printer while it is performing the initial ink fill.
Leave the printer idle for about six minutes until the message "Ready" appears.
Do not remove the plug from the wall outlet while the ink is being fed.
You may hear a clicking sound while the initial ink fill is being performed. This is not a malfunction and will stop after the process is complete.
When ink is completely fed, the [Power] key stops flashing and remains lit.
Note
- The amount of ink remaining in the ink cartridges is represented by six levels on the display.
- After installation of the first set of ink cartridges and the initial ink fill, the ink levels on the display will not be at 100%. This is normal and does not mean the ink has been lost or wasted. It is now inside the printer and ready for printing.
- Open the top cover of the printer to view the ink tubes where the initial ink from the first set of cartridges is being stored inside the printer.
- Any subsequent, new ink cartridge will read at the 100% level.
Connecting the Printer
This section explains how to attach the printer to the computer.
Confirming the Connection Method
This printer supports both USB and network (100BASE-TX or 10BASE-T Ethernet) connection.
Before installing the software, determine how the printer is connected.
If unsure, begin with the USB installation using the cable provided or contact your network administrator.
USB Connection
This section explains how to connect the printer to a computer using a USB cable.
Note
- Even if the computer connected to the printer to via USB is networked, you can still connect the printer and computer according to the procedure explained in this section.
Important
- Do not turn the printer on until directed to do so during the installation of software.
natural_image
Illustration of a hand using a printer to remove a file (no text or symbols visible)- Make sure the printer is off.
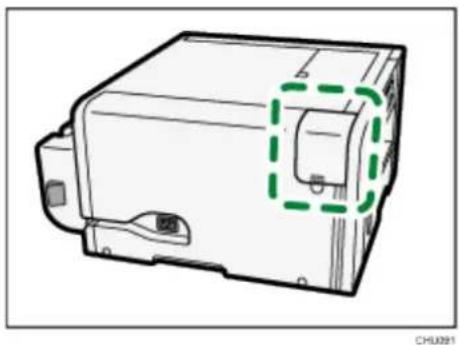
- Open the port cover.
natural_image
Technical line drawing of a mechanical component with a highlighted green dashed area (no text or symbols)- Insert the USB cable's hexagonal (type B) plug firmly into the port.
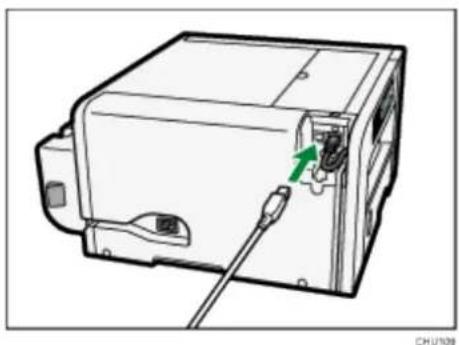
natural_image
Diagram of a device with a green arrow pointing to a component, no text or symbols present- Close the port cover.
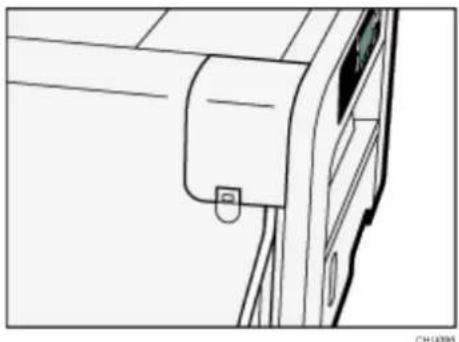
natural_image
Line drawing of a mechanical device with a clip and mounting bracket (no text or symbols)- Insert the USB cable's rectangular (type A) plug firmly into the computer's USB port.
Note
- Check the shape and orientation of the USB cable's plug and insert it fully.
Ethernet Connection
This section explains how to connect the printer to a computer using Ethernet.
Be sure to install all necessary network equipment, such as hubs, etc. before connecting the Ethernet cable to the printer.
Connect the printer via Ethernet first, then specify the printer's network settings according to the network environment.
Important
- Ethernet cables are not supplied with the printer. Select your cable according to the network environment.
-
You can connect a 10BASE-T or 100BASE-TX cable to the printer.
-
Open the port cover.
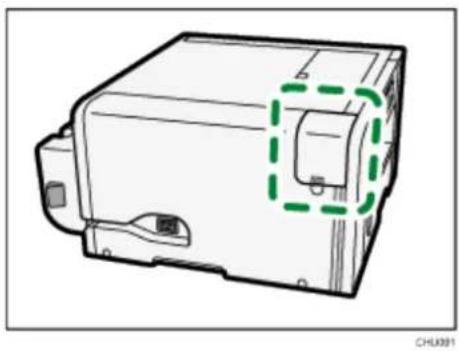
natural_image
Technical line drawing of a mechanical component with a highlighted green dashed area (no text or symbols)- Plug the Ethernet cable into the port.
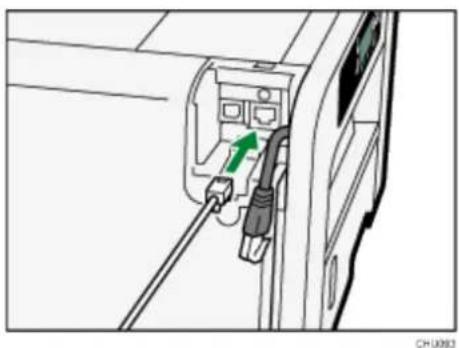
natural_image
Diagram of a computer interface showing a cable inserted into a socket with a green arrow indicating the cable's direction (no text or symbols present)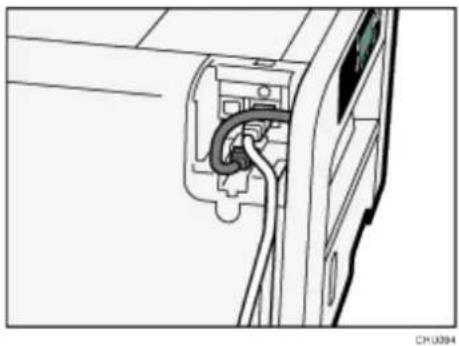
natural_image
Diagram of a computer interface showing cable routing and ventilation slots (no text or symbols)3. Connect the other end of the cable to the printer's network, such as to a hub.
When they printer has been powered on, you can check the LEDs on the Ethernet port.
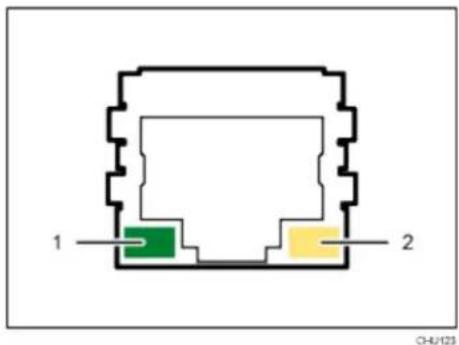
text_image
1 2 CH-4/1231. Indicator (green)
Lights whenever the printer is properly connected to the network.
2. Indicator (yellow)
Lights whenever the printer is sending or receiving data via the network.
4. Close the port cover.
Note
■ Network settings may need to be changed according to the network interface you are using.
- See section "Using the [Host Interface] menu" for information on the settings that can be specified and their default factory values.
Using the Control Panel to Make Printer Settings
This chapter describes use of the printer's control panel to make changes to various printer settings.
Overview of Settings
Paper Input
You can configure the paper tray settings.
| Menu |
| Tray Paper Size |
| Paper Type |
| Auto.Tray Select |
| Tray Priority |
See section "Using the [Paper Input] Menu" for more information.
List/Test Print
You can check the printer's present settings and operational status.
| Menu |
| Config. Page |
| Color Demo Page |
| Error Log |
| PCL Config.Page |
See the section "Using the [List/Test Print] Menu" for more information.
Maintenance
You can adjust the print quality.
| Menu |
| Nozzle Check |
| Head-cleaning |
| Head-flushing |
| Head Position |
| Adj.Paper Feed |
| Registration |
| Date/Time |
| Key Repeat |
| Dry-delay (Exit) |
| Dry-delay (Dup) |
| Paper Feed Test |
| De-condensation |
See section "Using the [Maintenance] Menu" for more information.
Language
You can select which language the menu is displayed in. North American and European versions are different. Language options for these printers may vary.
| Menu |
| English |
| German |
| French |
| Italian |
| Dutch |
| Danish |
| Swedish |
| Norwegian |
| Spanish |
| Finnish |
| Portuguese |
| Czech |
| Polish |
| Hungarian |
The [Language] menu will be displayed in English.
See section "Using the [Language] Menu" for more information.
Using the [Paper Input] Menu
This section explains the settings you can specify in the [Paper Input] menu, such as those for the size and type of the paper loaded in each paper tray, although changes in this manner are not recommended by Sawgrass.
Tray Paper Size
You can specify the size of the paper loaded in the paper tray.

Important
Sawgrass recommends that you do not change the paper size in this manner since it may conflict with settings controlled by the printer driver.
Paper Type
You can specify the type of the paper loaded in the paper tray.

Important
Sawgrass recommends that you do not change the type of paper in this manner since it may conflict with settings controlled by the printer driver.
Aut.Tray Select
Specify that the paper tray be automatically selected. The paper tray will automatically be selected according to the paper size and paper type.
Tray Priority
You can specify the prioritized paper tray.
Default: [Tray 1]
Note
- "Aut.Tray Select" can be specified only if the bypass tray or the option tray is attached.
- If you select "Aut.Tray Select", the paper tray is automatically selected according to the paper size and paper type for the paper trays in "Tray Paper Size" and "Paper Type".
- "Tray Priority" will be specified only if the option tray is attached.
Changing the [Paper Input] Menu
The following procedure is an example of setting the Tray Paper Size, although changes in this manner are not recommended for use with the Sawgrass PowerDriver.
- Press the [/Menu] key.
- Press the [▲] or [▼/Menu] key to display [Paper Input], then press the [#Enter] key.
Menu:
Paper Input
- Press the [▲] or [▼/Menu] key to display [Tray Paper Size], then press the [#Enter] key.
Paper Input:
Tray Paper Size
- Press the [▲] or [▼/Menu] key to display the paper tray you want to specify, then press the [#Enter] key.
Tray Paper Size:
Tray 1
- Press the [▲] or [▼/Menu] key to display appropriate paper size, then press the [#Enter] key.
Tray 1:
*A4 (210 x 297)
- Press the [Escape] key.
Using the [List/Test Print] Menu
Use the [List/Test Print] menu to check that the printer is working properly and to also check the printer's system configuration and settings.
Config. Page
You can print the current configuration of the printer.
Color Demo Page
You can print a sample image, but do not use the output to judge output quality or imaging issues.
Error Log
You can print error logs.
Printing a Configuration Page
1. Press the [/Menu] key.
![Sawgrass Virtuoso SG800EU - Press the [/Menu] key. - 1](/content/2026/05/784876/images/0769a1545c1aea0811a74fa06d48512974c5ae170f8fc02ac1dc171b73098417.jpg)
text_image
MenuCTV010
2. Press the [▲] or [▼/Menu] key to display [List/Test Print], then press the [#Enter] key.
Menu: List/Test Print
3. Press the [▲] or [▼/Menu] key to display [Config. Page], then press the [#Enter] key.
List/Test Print: Config. Page
The configuration page is printed.
4. Press the [Escape] key.
Interpreting the Configuration Page
System Reference
Information such as the counter numbers (Pages Printed), the printer's firmware
version, attached options, language and remaining ink are printed in this area.
Paper Input
The specified Tray Priority setting and the specified settings in the [Paper Input] menu, such as the size and type of paper loaded in each paper tray, are printed in this area.
Maintenance
The specified settings in the [Maintenance] menu are printed in this area.
System
The specified settings in the [System] menu are printed in this area.
Host Interface, Interface Information
The specified settings in the [Host Interface] menu are printed in this area.
Language
The selected language in the [Language] menu is printed in this area.
Using the [Maintenance] Menu
Use the [Maintenance] menu to specify printer maintenance settings.
Nozzle Check
Print a test pattern to check that print head nozzles are printing properly.
If nozzle blockages occur, ink cannot be ejected properly. This will result in poor print quality.
Head-cleaning
Clean the print head if the test pattern indicates the nozzles are not printing properly. Head cleaning consumes ink but is sometimes necessary to achieve a full nozzle check.
Important
Perform a head cleaning up to five (5) times.
Print and check for any changes in the nozzle check test pattern between each head cleaning.
Head-flushing
Perform a more thorough head cleaning if print head nozzles cannot be cleared by up to five (5) head cleanings.
Important
Head flushing consumes more ink than head cleaning.
Do not perform more than one (1) head flush.
If nozzles do not print properly after five (5) head cleanings and one (1) head flush, contact Sawgrass for assistance.
Head Position
Adjust the print head to resolve some print quality problems such as printed lines that are vertically misaligned.

Important
- Although instructions are provided, Sawgrass recommends that the procedure to adjust the print head be performed from the printer driver and not the printer control panel.
Adj.Paper Feed
If printed lines are horizontally misaligned or if images are printed unevenly, print the test pattern and adjust the paper feed setting.

Important
- Although instructions are provided, Sawgrass recommends that the procedure to adjust the paper feed be performed from the printer driver and not the printer control panel.
Registration
Print the test pattern and align the point where printing starts for each paper tray.
Date/Time
You can specify the date and time.
Key Repeat
The key repeat function allows you to specify setting values in units of ten or scroll the display quickly by pressing and holding down the [▲] or [▼/Menu] key.
Default: [On]
Dry-delay (Exit)
To prevent spoiling of printed copies, select a print delivery interval to allow them to dry.
The interval must be long enough to allow a sheet to dry. You can specify an interval between 1 and 20 seconds.
Default: [Off]
Paper Feed Test
You can eject a sheet of paper without printing anything on it.
De-condensation
To remove moisture from inside the printer, you can eject three sheets of paper without printing anything on them.
Nozzle Check
Follow the procedure below to print a nozzle check test pattern used to check if the print head nozzles are printing properly.
-
Press the [/Menu] key.
-
Press the [▲] or [▼/Menu] key to display [Maintenance], then press the [#Enter] key.
Menu: Maintenance
- Press the [▲] or [▼/Menu] key to display [Nozzle Check], then press the [#Enter] key.
Maintenance: Nozzle Check
- Press the [#Enter] key.
Press # to print pattern
A test pattern is printed.
-
Press the [Escape] key.
-
Check the printed test pattern.
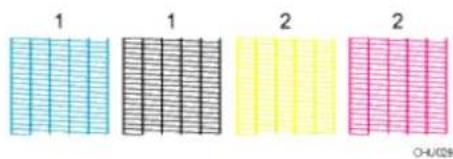
Printed Test Pattern
text_image
1 1 2 2 O-H/09Using the printed test pattern, check for missing nozzles.
The number above each color in the test pattern is the number of the print head.
The print head for cyan and black is [Head 1].
The print head for yellow and magenta is [Head 2].
Check which print head is missing nozzles by referring to the following illustration.
Normal
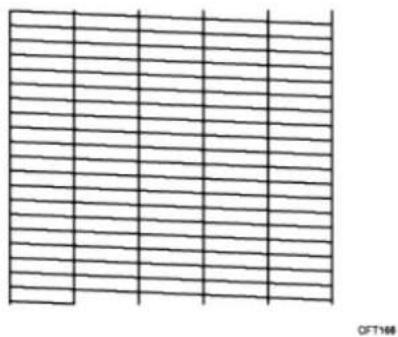
natural_image
Pure grid pattern with horizontal lines and no text or symbolsOFT166
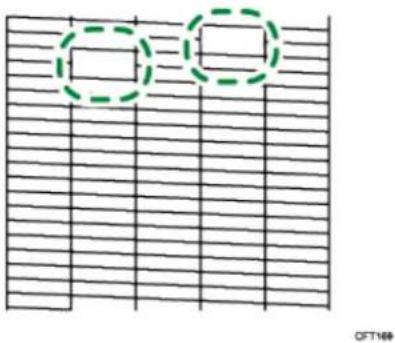
When a print head is missing nozzles
natural_image
Pure grid pattern with two green dashed circles highlighting specific rectangular regions (no text or symbols)If the print head is missing nozzles, perform a Head Cleaning. See section "Head-cleaning" for more information.
If the problem persists, perform Head Flushing. See section "Head-flushing" for more information.
Head-cleaning
Follow the procedure below to perform a print head cleaning.
Perform a head cleaning when print quality if affected by missing nozzles.
Head cleaning consumes ink but is sometimes necessary to achieve a full nozzle check.
After an ink cartridge is replaced, a print head cleaning will be automatically performed.
Important
■ Perform a head cleaning up to five (5) times in an attempt to clear missing nozzles.
- Print and check for any changes in the nozzle check test pattern between each head cleaning.
- Do not turn the printer off during print head cleaning. If the printer is turned off during a print head cleaning, start again by printing a nozzle check test pattern.
-
Press the [/Menu] key.
-
Press the [▲] or [▼/Menu] key to display [Maintenance], then press the [#Enter] key.
Menu: Maintenance
- Press the [▲] or [▼/Menu] key to display [Head-cleaning], then press the [#Enter] key.
Maintenance: Head-cleaning
- Press the [▲] or [▼/Menu] key to select a color, then press the [#Enter] key.
Head-cleaning: All Heads
To clean all the print heads, select [All Heads].
To clean the print head for cyan and black, select [Head 1].
To clean the print head for yellow and magenta, select [Head 2].
5. Press the [#Enter] key.
Press # to
clean heads
Head cleaning starts.
Maintenance
in process...
6. Press the [Escape] key.
No-fuss head cleaning
You can perform a one-touch head cleaning for all colors.
1. Press the [Job Reset] and [Form Feed] keys at the same time.
![Sawgrass Virtuoso SG800EU - Press the [Job Reset] and [Form Feed] keys at the same time. - 1](/content/2026/05/784876/images/84b7c8c8fb93324888f27a73970745369481681218af6f709e8367586ca850ba.jpg)
text_image
Control panel interface with navigation icons and a screen displaying K, C, M buttonsThe following message appears:
Press # to
clean heads
2. Press the [#Enter] key.
Head cleaning starts.
Head-flushing
Follow the procedure below to perform a thorough print head cleaning.
Important
- Perform a head flushing only if print head nozzles cannot be cleared by up to five (5) head cleanings.
- Head flushing consumes more ink that head cleaning.
- Do not perform more than one (1) head flush.
- If nozzles do not print properly after up to five (5) head cleanings and one (1) head flush, contact Sawgrass for assistance.
-
Do not turn the printer off during print head flushing. If the printer is turned off during print head flushing, start again from printing the nozzle check test pattern.
-
Press the [/Menu] key.
-
Press the [▲] or [▼/Menu] key to display [Maintenance], then press the [#Enter] key.
Menu:
Maintenance
- Press the [▲] or [▼/Menu] key to display [Head-flushing], then press the [#Enter] key.
Maintenance:
Head-flushing
- Press the [▲] or [▼/Menu] key to select a color, then press the [#Enter] key.
Head-flushing:
All Heads
To clean all the print heads, select [All Heads].
To clean the print head for cyan and black, select [Head 1].
To clean the print head for yellow and magenta, select [Head 2].
- Press the [#Enter] key.
Press # to
flush heads
Head flushing starts.
Maintenance
in process...
- Press the [Escape] key.
Head Position
Adjusts the print head. Perform this operation if printed lines are vertically misaligned.

Important
- Although instructions are provided, Sawgrass recommends that the procedure to adjust the print head be performed from the printer driver and not the printer control panel.
If there are several lines in the test pattern, check adjustment values for each line, and adjust the print head positions. If the adjustment value is set to "0", adjustment is not necessary. Adjust all lines so their adjustment values indicate "0".
-
Press the [/Menu] key.
-
Press the [▲] or [▼/Menu] key to display [Maintenance], then press the [#Enter] key.
Menu: Maintenance
- Press the [▲] or [▼/Menu] key to display [Head Position], then press the [#Enter] key.
Maintenance: Head Position
- Press the [▲] or [▼/Menu] key to display [Pr.Test Pattern], then press the [#Enter] key.
Head Position: Pr.Test Pattern
- Press the [▲] or [▼/Menu] key to select the target's resolutions, then press the [# Enter] key.
Pr.Test Pattern: High Speed
A test pattern to adjust print head positions is printed.
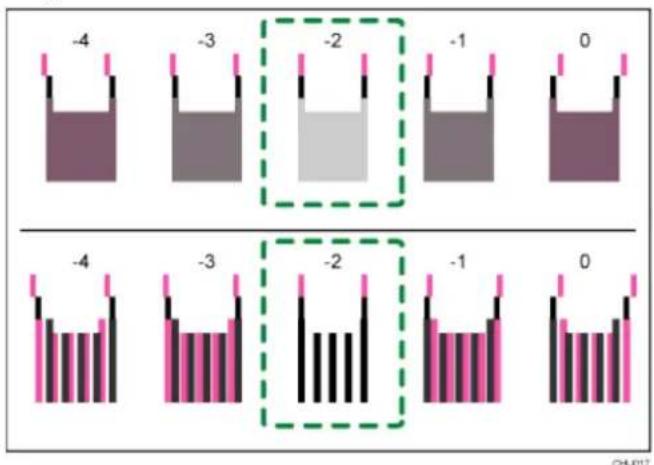
- To determine the adjustment value, select the square that is faintest (closest to white). Alternatively, select the square whose internal lines overlap to form a single color.
text_image
-4 -3 -2 -1 0 -4 -3 -2 -1 0 CHU17Combined two-color lines form squares, and depending on line overlapping, (white)
spaces between the lines are painted and look darker. Sometimes the colors of the lines are identical.
For this illustration, the adjustment value is "-2". Checking adjustment values for each item is required.
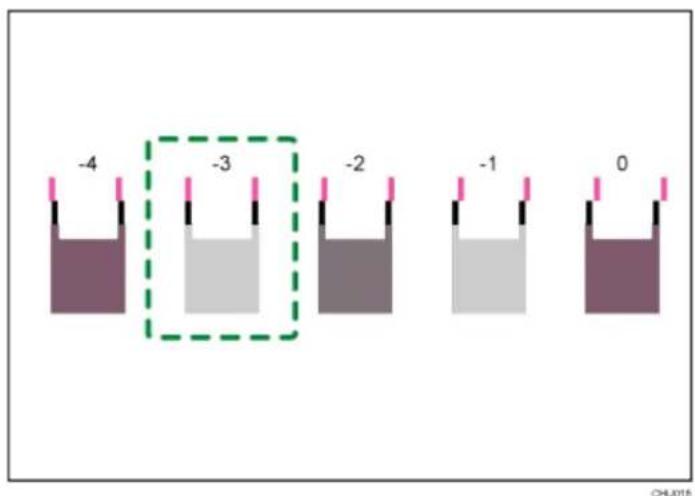
- If you cannot determine the adjustment value, select the square that is between the straightest lines.
text_image
-4 -3 -2 -1 0Each vertical line is made of an upper part and lower part. If the print head is not properly positioned, the vertical line will be displayed as two disconnected lines, so that the line looks misaligned.
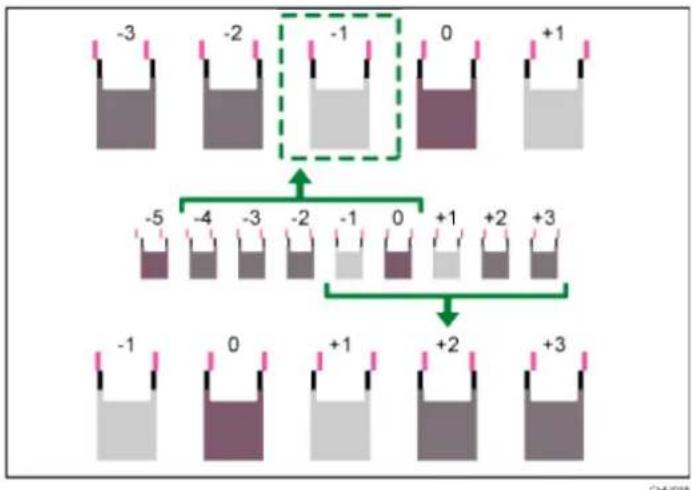
- If you still cannot determine the adjustment value, locate the square that is between adjacent squares whose lines form symmetry. Adjacent squares can be one or two places either side (at positions ± 1 or ± 2 ).
This illustration indicates an adjustment value that is set to "-1".
flowchart
graph TD
    A["Reaction 1: -3, -2, -1"] --> B["Reaction 2: -5, -4, -3, -2, -1, 0, +1, +2, +3"]
    B --> C["Final Product: -1, 0, +1, +2, +3"]
- Press the [▲] or [▼/Menu] key to display [Adjustment] then press the [#Enter] key.
Head Position:
Adjustment
- Press the [▲] or [▼/Menu] key to select a resolution from Step 5, then press the [#Enter] key.
Adjustment:
High Speed
- Select the items that you need to adjust, then press the [# Enter] key.
Adjustment:
1.A
- Enter the optimal adjustment values from Step 6, then press the [#Enter] key.
A: (-4, +4) 0
- Press the [Escape] key.
Adjust Paper Feed
If printed horizontal lines are misaligned, print images are patchy, or streaks are printed at regular intervals, print a test pattern, then adjust the paper feed setting.
Important
- Although instructions are provided, Sawgrass recommends that the procedure to adjust the paper feed be performed from the printer driver and not the printer control panel.
- Press the [/Menu] key.
- Press the [▲] or [▼/Menu] key to display [Maintenance], then press the [#Enter] key.
Menu:
Maintenance
- Press the [▲] or [▼/Menu] key to display [Adj.Paper Feed], then press the [#Enter] key.
Maintenance:
Adj.Paper Feed
- Press the [▲] or [▼/Menu] key to display [Pr.Test Pattern], then press the [#Enter] key.
Adj.Paper Feed: Pr.Test Pattern
A test pattern to adjust paper feed is printed.
5. Check the optimal adjustment values on the printed test pattern.
The optimal adjustment value is the number that appears on the left of the lightest gray square with straight horizontal lines on both sides. When this number is "+2", the optimal adjustment value is "+2".
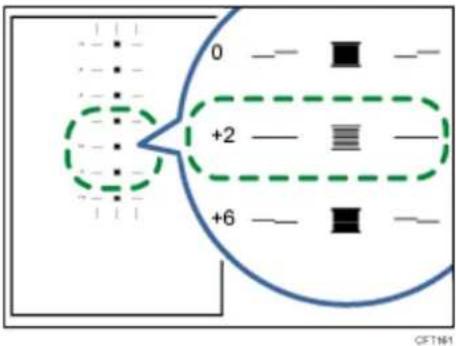
text_image
0 +2 +6 CF161When horizontal lines beside the lightest gray square are broken, select the optimal adjustment value by referring to the lines broken in the opposite direction. When the "+2" square is the lightest gray square and the "+6" horizontal lines are broken in the opposite direction, the optimal adjustment value is between "+3" and "+5". After adjustment, check the adjustment result.
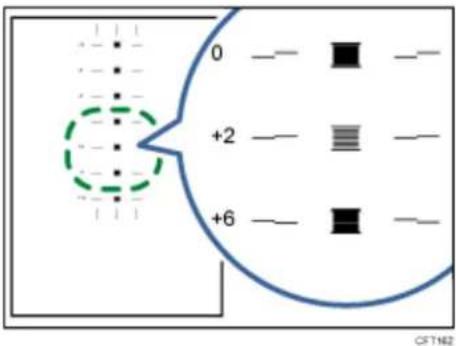
text_image
0 +2 +6 CFT162- Press the [▲] or [▼/Menu] key to display [Adjustment], then press the [#Enter] key.
Adj.Paper Feed: Adjustment
- Press the [▲] or [▼/Menu] key to enter the adjustment value (-14 to +14) from Step 5, then press the [#Enter] key.
Adjustment: (-14, +14) 0
- Press the [Escape] key.
Note
- If streaks still appear after the adjustment, continue to adjust the value by 1 and executing "Adjustment".
■ If black streaks appear, increase the adjustment value.
■ If white streaks appear, decrease the adjustment value. - Keep adjusting the value and executing "Adjustment" until the black or white streaks disappear.
Registration
Follow the procedure below to adjust where to start printing on paper loaded in each paper tray after checking the test pattern printed.
- Press the [/Menu] key.
- Press the [▲] or [▼/Menu] key to display [Maintenance], then press the [#Enter] key.
Menu:
Maintenance
- Press the [▲] or [▼/Menu] key to display [Registration], then press the [#Enter] key.
Maintenance:
Registration
- Press the [▲] or [▼/Menu] key to display [Pr.Test Pattern], then press the [#Enter] key.
Registration:
Pr.Test Pattern
- Press the [▲] or [▼/Menu] key to select a paper tray, then press the [#Enter] key.
Pr.Test Pattern:
Tray 1
A test pattern to adjust the print start position is printed.
Check the optimal adjustment values on the printed test pattern.
- Fold the test pattern sheet in half lengthwise.
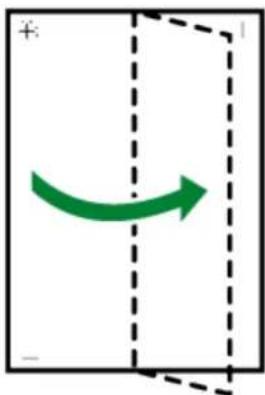
natural_image
Green curved arrow inside a dashed rectangular frame, no text or symbols presentCFT089
- The optimal adjustment value is the difference between the single vertical line and the cross's vertical line that you can see when the folded paper is held up to light. When the difference is one calibration mark in the "+" direction, the optimal adjustment value for the [Read Direction] is "+1.0".
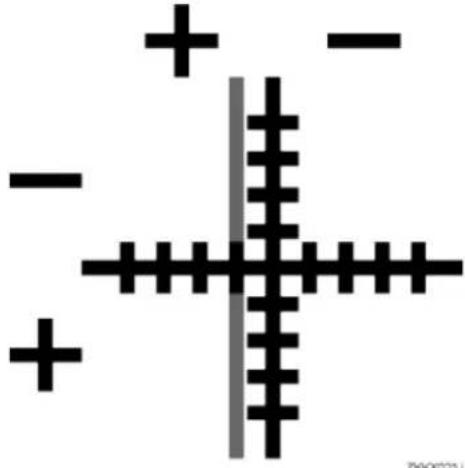
natural_image
Abstract geometric pattern with black plus signs and a vertical gray bar (no text or symbols)- Fold the test pattern sheet in half widthwise, then check the adjustment value for the [Feed Direction].
Adjustment values are in 0.1 increments.
- Press the [▲] or [▼/Menu] key to display [Adjustment], then press the [#Enter] key.
Registration: Adjustment
- Press the [▲] or [▼/Menu] key to select a paper tray, then press the [#Enter] key.
Adjustment: Tray 1
- Press the [▲] or [▼/Menu] key to enter the adjustment values (-4.0 to +4.0) in the
[Read Direction] from Step 7, then press the [#Enter] key.
Read Direction: (-4, +4) 0.0
- Press the [▲] or [▼/Menu] key to enter the adjustment values (-4.0 to +4.0) in the [Feed Direction] from Step 8, then press the [#Enter] key.
Feed Direction: (-4, +4) 0.0
- Press the [Escape] key.
Setting the Date and Time
Use the following procedure to specify the date, time, and time zone.
Date setting
- Press the [/Menu] key.
- Press the [▲] or [▼/Menu] key to display [Maintenance], then press the [#Enter] key.
Menu:
Maintenance
- Press the [▲] or [▼/Menu] key to display [Date/Time], then press the [#Enter] key.
Maintenance:
Date/Time
- Press the [▲] or [▼/Menu] key to display [Date Setting], then press the [#Enter] key.
Date/Time:
Date Setting
- Press the [▲] or [▼/Menu] key to set the date, then press the [#Enter] key.
Region A (mainly Europe and Asia)
Date Setting:
30/8/2012
Region B (mainly North America)
Date Setting:
8/30/2012
To specify the time next, go to Step 4 in section "Time Setting".
- Press the [Escape] key.
Time setting
- Press the [/Menu] key.
- Press the [▲] or [▼/Menu] key to display [Maintenance], then press the [#Enter] key.
Menu:
Maintenance
- Press the [▲] or [▼/Menu] key to display [Date/Time], then press the [#Enter] key.
Maintenance:
Date/Time
- Press the [▲] or [▼/Menu] key to display [Time Setting], then press the [#Enter] key.
Date/Time:
Time Setting
- Press the [▲] or [▼/Menu] key to set the time, then press the [#Enter] key.
Region A (mainly Europe and Asia)
Time Setting:
10:31:25
Region B (mainly North America)
Time Setting:
10:31:25 AM
To specify the time zone next, go to Step 4 in section "Time Zone Setting".
- Press the [Escape] key.
Time zone setting
- Press the [/Menu] key.
- Press the [▲] or [▼/Menu] key to display [Maintenance], then press the [#Enter] key.
Menu:
Maintenance
- Press the [▲] or [▼/Menu] key to display [Date/Time], then press the [#Enter] key.
Maintenance:
Date/Time
- Press the [▲] or [▼/Menu] key to display [Time Zone], then press the [#Enter] key.
Date/Time:
Time Zone
- Press the [▲] or [▼/Menu] key to set the time zone, then press the [#Enter] key.
Time Zone:
GMT+00:00
- Press the [Escape] key.
De-condensation
If the SC57000 error message appears, there might be condensation inside the printer. Dry the printer's interior by performing the de-condensation procedure. See page section "Printer Errors" for more information.
- Press the [/Menu] key.
- Press the [▲] or [▼/Menu] key to display [Maintenance], then press the [#Enter] key.
Menu:
Maintenance
- Press the [▲] or [▼/Menu] key to display [De-condensation], then press the [#Enter] key.
Maintenance:
De-condensation
Three sheets are fed through the printer without anything being printed on them.
- Turn the printer off, then turn it on again.
If the error message does not reappear, the printer's interior has fully dried.
Note
- If the error persists, turn the printer off, leave it for an hour, and then turn it on again. If this does not resolve the problem, contact Sawgrass.
Using the [System] Menu
Energy Saver
Use Energy Saver mode to reduce the printer's power consumption.
You can specify how long the printer remains idle before it switches to Energy Saver mode. When the printer is in Energy Saver mode, it requires time to start up when it receives a print job. You can specify between 5 and 60 minutes as the idle time before switching to the Energy Saver mode.
Default: [5 minutes]
Notify by Email
You can specify whether or not to send notification that a printer error has occurred to a particular e-mail address.
Use the Web browser to specify e-mail address to send notification. See section
"Notifying the Printer Status by E-mail".
Default: [Off]
Memory Usage
Insufficient memory can cause printing to fail or a file's image data to not be printed. If this happens, you can specify the priority assigned to the printer's memory space.
Select [Font Priority] if a file's image data is not printed. Select [Frame Priority] if printing fails due to insufficient memory.
Default: [Frame Priority]
Unit of Measure
You can switch the measurement between "mm" and "inch".
Region A (mainly Europe and Asia)
Default: [mm]
Region B (mainly North America)
Default: [inch]
Page Size
You can select the default paper size.
Region A (mainly Europe and Asia)
Default: [A4 (210 × 297)]
Region B (mainly North America)
Default: [8^1/_2 × 11]
Ink C.U. Space
You can check the remaining capacity of the waste collection unit.
Changing the [System] Menu
The following procedure is an example of setting the Energy Saver mode.
-
Press the [/Menu] key.
-
Press [▲] or [▼/Menu] key to display [System], then press the [#Enter] key.
Menu: System
- Press [▲] or [▼/Menu] key to display [Energy Saver], then press the [#Enter] key.
System:
Energy Saver
-
Press the [#Enter] key.
-
Press [▲] or [▼/Menu] key to select the lead time needed to switch to the Energy Saver mode.
E.Saver Timer:
*5 minutes
-
Press the [#Enter] key.
-
Press the [Escape] key.
Using the [Host Interface] Menu
In the [Host Interface] menu, you can specify settings related to connection and communication. Settings made using the [Host Interface] menu remain effective even if you turn the printer off.
To configure the printer's network settings, use the [Network Setup] menu.
I/O Timeout
Specify how long the printer waits for the currently-connected interface to respond.
When the specified time elapses, the printer can receive data from another interface.
If you make the I/O Timeout period too short, timeout might occur while data transfer is in progress. If this happens, the print job will be interrupted by a new job from another interface.
You can specify a timeout between 10 and 60 seconds.
Default: [15 seconds]
Network Setup
You can make network-related settings.
Printer Name
Displays the printer's name.
Host Name
Displays the printer's host name.
Domain Name
Displays the printer's domain name.
IPv4 DNS
Specify the DNS server settings under IPv4.
If DHCP is off, enter the IPv4 addresses for the primary and secondary DNS servers in the format "xxx.xxx.xxx.xxx" (where each x represents a digit).
Default: [0.0.0.0]
IPv4 DDNS
Specify the setting to update the host or domain name.
Default: [On]
DHCP
You can specify whether or not to use DHCP in an IPv4 environment.
Default: [On]
IPv4 Address
You can specify the printer's IPv4 address.
When DHCP is set to on, the IP address cannot be changed. To change it, set DHCP to off.
Contact your network administrator for information about the network configuration.
Default: [11.22.33.44]
IPv4 Subnet M.
You can specify the subnet mask.
When DHCP is set to on, the subnet mask cannot be changed. To change it, set DHCP to off. Contact your network administrator for information about the network configuration.
Default: [0.0.0.0]
IPv4 Gateway.Ad.
You can specify the IPv4 gateway address.
When DHCP is set to on, the gateway address cannot be changed. To change it, set DHCP to off. Contact your network administrator for information about the network configuration.
Default: [0.0.0.0]
IPv6 DDNS
Specify the setting to update the host or domain name.
Default: [On]
IPv6 DNS
Specify the DNS server settings under IPv6.
If DHCP is off, enter the IPv6 addresses for the primary and secondary DNS servers in the form "xxxx:xxxx:xxxx:xxxx:xxxx:xxxx:xxxx" (where each x represents a digit).
Default: [::]
DHCPv6
You can specify whether or not to use DHCP in an IPv6 environment.
Default: [Off]
IPv6 Statlss Ad
Select whether to enable or disable IPv6 stateless address auto configuration.
Default: [On]
IPv6 Address
You can specify the printer's IPv6 address.
IPv6 Gateway.Ad.
You can specify the IPv6 gateway address.
Default: [::]
Active Protocol
Select the protocol by setting the IPv4, IPv6, HTTP (IPv4), HTTP (IPv6), and Web protocols to [Active] or [Not Active].
Default: [Active]
IPsec
Specify the printer's IPsec function Active/Not Active.
Default: [Off]
MAC Address
Displays the printer's MAC address (physical address).
Ethernet Speed
Set the access speed for networks.
Select a speed that matches your network environment. [Auto Select] should usually be selected.
Default: [Auto Select]
Prmt SNMPv3 Com
Select SNMPv3 communication for managing the printer using MIB.
Default: [Ciphertext]
Pmt SSL/TLS Com
Set SSL/TLS communication under IPv4 and IPv6 to [Active] or [Not Active]. This communication mode will be used when you specify printer settings using a Web browser.
Default: [Active]
Restore Default
You can reset the network settings to their defaults.
You can display the wireless LAN's MAC address (physical address).
USB Setting
You can specify the settings related to communication when the computer and printer
are connected via USB. Usually, you do not need to change these settings.
After changing this setting, turn the printer off, then turn it on again.
USB Speed
Default: [Auto]
Port Setting
Default: [Off]
Changing the [Host Interface] Menu
This section gives an example of changing a setting in the [Host Interface] menu.
- Press the [▼/Menu] key.
- Press the [▲] or [▼/Menu] key to display [Host Interface], then press the [#Enter] key.
Menu:
Host Interface
- Press the [▲] or [▼/Menu] key to display [I/O Timeout], then press the [#Enter] key.
Host Interface:
I/O Timeout
- Press the [▲] or [▼/Menu] key to display [20 seconds], then press the [#Enter] key.
I/O Timeout:
20 seconds
- Press the [Escape] key.
Precautions When Using a Networked Printer
Using DHCP
- You can register the host name to a DNS server. In the Web Image Monitor menu, you can enable or disable [Notify Host Name to DHCP Server]. For details, see section "Changing the Printer Settings" for more information.
■ The DHCP Relay Agent is not supported. - Supported DHCP server operating systems are: Windows Server 2003/2003 R2, Windows Server 2008, and UNIX standard.
- The IP address acquired from DHCP can be checked on the configuration page. For details about printing a configuration page, see section "Using the [List/Test Print] Menu".
- When there are multiple DHCP servers, make the same configuration for all. This printer uses information from the DHCP server that responds first.
Using the [Language] Menu
This section explains how to select the language used for the settings and messages displayed on the display.
- Press the [/Menu] key.
- Press the [▲] key once, then press the [#Enter] key.
Menu:
Language
- Press the [▲] or [▼/Menu] key to select the language, then press the [#Enter] key.
Language:
*English
On the display, the names of the available languages appear in English.
The message "Power Off On to Change Setting" appears.
- Turn the printer off then turn it on again.
Software
This chapter describes system and design software requirements and how to acquire, install and configure printer driver and color management software.
System Requirements
The printer may be used with both Windows and Macintosh operating systems that meet recommended system specifications.
Sawgrass may limit support to customers who use less than the minimum stated requirements.

Important
Problems may occur if the computer does not meet recommended system requirements
- Print speeds may be longer and therefore less economical to run.
- Larger graphic files may not print properly or at all.
- The computer may get 'hung up' or "time out" during the processing of the print command.
■ Graphic design programs may be much slower to use. - Print spooling may not work properly because of lack of computer or printer memory capacity.
■ Graphics may not print correctly. - Images may be cut off.
- Longer print times can lead to nozzle drops or banding.
| Windows* Macintosh | |
| Windows OS versions 7 or 8Minimum RAM: 2GBRecommended RAM: 4GBRecommended CPU: Dual Core GHzFree Hard Drive Space: 10% | Macintosh OS 10.6 or laterMinimum RAM: 2GBRecommended RAM: 4GBRecommended CPU: Intel Dual Core GHzFree Hard Drive Space: 10% |
* Only Professional, Business, Enterprise and Ultimate Editions have been tested and approved.
Design Software Requirements
Certain types of design software are required for high quality prints and correct color output.
Sawgrass may limit support to customers who do not use the specified software.

Important
Poor print and color quality will likely occur if specified software is not used.
| Windows* Macintosh | |
| CorelDRAW 12 – X7Adobe PhotoShop CS – CS6Adobe Illustrator CS – CS6Adobe Creative Cloud (“CC”)Adobe PhotoShop Elements 8 – 12 | Adobe PhotoShop CS – CS6Adobe Illustrator CS – CS6Adobe Creative Cloud (“CC”)Adobe PhotoShop Elements 8–10 & 12 |
*Specific versions may only be supported on Windows 7 or 8.
Download, Install and Configure Software
Download the printer software and related instructions from sawgrassink.com.

Note
- If the computer to be used with the printer is not connected to the internet, download what is needed from another computer that has internet access.
- Using the USB drive supplied with the printer, transfer the files to the computer without internet access.
■ Alternatively, contact an authorized Sawgrass distributor for assistance.
Monitoring and Configuring the Printer
This chapter describes how to monitor and configure the printer.
Using Web Image Monitor
The following operations can be remotely performed using Web Image Monitor from a client computer.
■ Displaying printer status or settings
■ Making printer settings
■ Making e-mail notification settings
■ Making network protocol settings
■ Performing maintenance
■ Making security settings
- Resetting the printer
■ Updating the printer's firmware
Configuring the printer
To perform the operations from Web Image Monitor, TCP/IP is required. After the printer is configured to use TCP/IP, operations from Web Image Monitor become available.
Recommended Web browsers
- Windows: Internet Explorer 6.0 or higher Firefox 2.0 or higher Google Chrome 2.0 or higher
- Mac OS: Safari 2.0 or higher Firefox 2.0 or higher Google Chrome 2.0 or higher
Note
- If the previous versions of the Web browser above are used or JavaScript and cookies are not enabled with the Web browser used, display and operation problems may occur.
-
Non-recommended Web browsers might not display certain screen elements correctly.
-
If you are using a proxy server, change the Web browser settings. Contact your network administrator for information about the settings.
- The previous page may not appear even after the back button of a Web browser is clicked. If this happens, click the refresh button of a Web browser.
Displaying Top Page
This section explains the Top Page and how to display Web Image Monitor.
1. Launch the Web browser.
2. In the address bar, enter "http://(printer's IP address or host name)/".
When setting SSL, a protocol for encrypted communication, under environment which server authentication is issued, enter "https://(printer's IP address or host name)/".
The displayed Web Image Monitor page is split into the following areas:
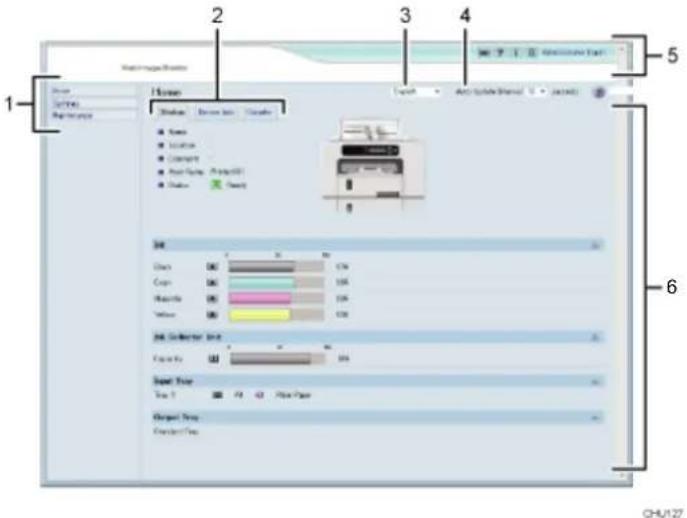
text_image
Home Layout Auto Scale Panel 1 2 3 4 5 6 7 8 9 10 11 12 13 14 15 16 17 18 19 20 21 22 23 24 25 26 27 28 29 30 31 32 33 34 35 36 37 38 39 40 41 42 43 44 45 46 47 48 49 50 51 52 53 54 55 56 57 58 59 60 61 62 63 64 65 66 67 68 69 70 71 72 73 74 75 76 77 78 79 80 81 82 83 84 85 86 87 88 89 90 91 92 93 94 95 96 97 98 99 1001. Menu Area
A menu to access Home, Settings and Maintenance.
2. Tab area
Details about each menu will display in each tab.
3. Language Selection Menu
Select a language.
If the displayed page is garbled when using an English language operating system, select "English" with the language selection menu.
4. Auto Update Interval
Specify the update interval for information on the [Status] tab.
Information for other menus and tabs are not automatically updated, so click [Refresh] to update.
Default: [10 seconds]
5. Header area
Check the version of the printer's firmware by clicking ⓘ . Sawgrass may periodically provide updates to the printer's firmware. Change the printer settings by clicking [Administrator Login] to access the printer as an administrator.
6. Main Area
Displays the contents of the item selected in the menu area.
Note
- To display Web Image Monitor, click [Web Image Monitor...] on the [Configuration/About] tab in the [Printing Preferences] dialog box.
Menu
This section explains the items in the Web browser menu.
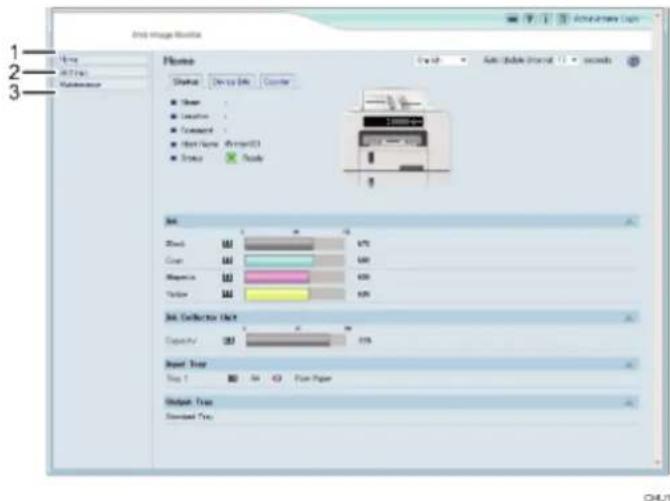
text_image
Auto Image Manager Name Setup View Mode Counter Show Locking Connect Text/Write (Insert) Draw Ready Set Size Color Magnitude Texture Color Set Collector Size Capacity Output Type Step 1 Run Paper Output Type Standard Type 1 2 3 OUTPUT1. Home
The [Status], [Device Info], and [Counter] tab are displayed. Details of the tab menu are displayed on the work area.
2. Settings
Make system settings for the printer, interface settings, and security.
3. Maintenance
Click to perform printer maintenance.
Logging in Using Web Image Monitor
To change the printer settings, log in to the printer as the administrator.
-
Launch the Web browser.
-
In the address bar, enter "http://(printer's IP address or host name)/".
-
Click [Administrator Login].
A dialog box for entering the user name and password opens.
4. Enter the user name and password, then click [OK].
If this is the first time to do this, enter "admin" as the user name and leave the password blank.
To ensure security, it is important you change the password.
5. In the menu area, click [Settings].
6. Specify the printer settings.
7. Click [OK].
The specified settings are transmitted to the printer.
Changing the Printer Settings
You can specify the following settings on each page of Web Image Monitor.
[Device Settings] area
■ [System] page
You can specify [Device Name], [Comment], [Location], and [Recycle Paper Mode].
- [Date/Time] page
You can specify [Set Date], [Set Time], [SNTP Server Address], [SNTP Polling Interval], [Time Zone], and [Daylight saving time settings].
- [Email] page
For details about the items and descriptions, see section "Notifying the Printer Status by E-mail".
■ [ROM Update] page
You can check the printer's firmware version Sawgrass may periodically provide updates to the printer's firmware.
[Auto Email Notification] area
See section "Notifying the Printer Status by E-mail".
[Administrator Tools] area
■ [Administrator Authentication] page
You can specify [New Password] and [Confirm New Password].
■ [Restore Defaults] page
You can restore the default settings for the network interface.
[Interface] area
■ [Interface Settings] page
■ [Ethernet]
You can specify [Ethernet Speed].
[Network] area
■ [IPv4] page
You can specify whether to enable or disable [IPv4].
- [Ethernet + Wireless LAN]
You can specify [Host Name], [DHCP], [Notify Host Name to DHCP Server], [Domain Name], [Use Domain Name], [IPv4 Address], [Subnet Mask], and [AutoIP].
- [Details]
You can specify [Default Gateway Address], [DNS Server1], [DNS Server2], [DNS Protocol Priority], [LPR(515)], [DIPRINT(9100)], [IPP(80/631)], [WSD (Device)], [WSD (Device) Port Number], [WSD (Printer)], [WSD (Printer) Port Number], [WSD (Printer) / IPP Timeout], and [LLTD].
■ [IPv6] page
You can specify whether to enable or disable [IPv6].
- [Ethernet + Wireless LAN]
You can specify [Host Name], [Domain Name], and [Manual Configuration Address].
- [Details]
You can specify [Default Gateway Address], [DNS Server1], [DNS Server2], [DNS Protocol Priority], [LPR(515)], [DIPRINT(9100)], [IPP(80/631)], [WSD (Device)], [WSD (Device) Port Number], [WSD (Printer)], [WSD (Printer) Port Number], [WSD (Printer) / IPP Timeout], and [LLTD].
- [DHCPv6] page You can specify [DHCPv6 Operation Mode], [IAID], and [Request Timeout].
- [DDNS] page You can specify [IPv4], [IPv6], [A Record Registration for DHCP], [AAAA Record Registration for DHCPv6], [Operation when records are duplicated], and [Interval to Update Device's Record].
■ [SNMP] page
- [Protocol] You can specify whether to enable or disable IPv4 and IPv6 when using [SNMP(161)].
- [SNMPv1,v2 Setting] You can specify [SNMPv1,v2 Function], [SNMPv1 Trap Communication], and [SNMPv2 Trap Communication].
■ [Community]
You can configure up to four SNMP communities.
■ [SNMPv3] page
- [SNMPv3 Setting] You can specify [SNMPv3 Function], [SNMPv3 Trap Communication], and [Permit SNMPv3 Communication].
- [Permit SNMPv3 Communication] You can configure up to five SNMPv3 trap destinations.
- [Account(User)] You can specify [Account Name(User)], [Authentication Password(User)], [Authentication Password re-enter(User)], [Encryption Password(User)], [Encryption Password re-enter(User)], and [Access Type(User)].
- [Account(Administrator)] You can specify [Account Name(Administrator)], [Authentication Password(Administrator)], [Authentication Password re-enter(Administrator)], [Encryption Password(Administrator)], [Encryption Password re-enter(Administrator)], and [Access Type(Administrator)].
■ [Bonjour] page
You can specify whether to enable or disable IPv4 and IPv6 when using [Bonjour].
■ [Details]
You can specify [Computer Name] and [Location].
■ [Print Order Priority]
You can specify [DIPRINT], [LPR], and [IPP].
[Security] area
■ [Network Security] page
■ [SSL/TLS Version]
You can specify [TLS1.1], [TLS1.0], and [SSL3.0].
■ [Encrypted Communication Settings]
You can specify [AES], [3DES], and [RC4].
■ [Access Control] page
■ [IPv4]
You can configure up to five access control ranges.
■ [IPv6]
You can configure up to five [Range] and [Mask] settings.
■ [IPP Authentication] page
You can configure up to ten [Authentication], [User Name], and [Password] settings.
- [SSL/TLS] page You can specify [SSL/TLS(443)] and [Permit SSL/TLS Communication].
■ [Site Certificate] page
- [Imported Site Certificate] You can select [Delete] or [Update to Trustworthy Certificate] for an imported site certificate. - [Site Certificate to Import] Import the site certificate according to the displayed instructions.
■ [Device Certificate] page
You can select [Create], [Request], [Install], [Install intermediate Certificate], [Delete/Cancel Request], and [Delete intermediate Certificate] for up to three certificates.
- [Certification] Select the certificate to be used in [SSL/TLS], [Wireless LAN], and [IPsec].
■ [IPsec] page
You can specify [IPsec]. You can configure up to ten parameters.
Notifying the Printer Status by E-mail
You can be notified of the printer status by e-mail on an occasion such as if the printer runs out of paper or paper is jammed.
The e-mail notifying the printer status will be sent to the e-mail address specified as the destination in advance. You can also specify the timing and status to notify.

Important
- Depending on your e-mail application, a phishing warning message might appear when you receive e-mail. To stop this warning message, see your e-mail application's Help for details about registering trusted senders.
To receive reports of the printer's status by e-mail, set [Notify by Email] to [On] in the [System] menu, then specify an e-mail address and other required settings using Web Image Monitor. The [Auto Email Notification] setting can be changed only by the administrator.
The following status can be notified:
■ The printer error has occurred.
■ The ink has run out.
■ The ink will run out soon.
■ The Waste Collection Unit must be replaced now.
■ The Waste Collection Unit must be replaced soon.
■ The paper has run out.
■ The paper has jammed.
■ The paper type is wrong.
■ The paper size is wrong.
■ The paper size and type are wrong.
- A cover is open.
- The specified part such as paper tray is not attached correctly.
■ The printer is out of its operational temperature range.
■ The total number of printed pages.
Note
- For details about Notify by Email, see section "Using the [System] Menu".
- How to log in as the administrator, see section "Logging in Using Web Image Monitor".
Specifying notification the printer status by e-mail
On the [Email] page, you can specify the basic and authentication settings for sending e-mail.
You can enable or disable Auto Email Notification. The "Administrator Email Address" will appear in the e-mail message. The "Device Email Address" will appear in the "From" box.
[Auto Email Notification]
You can specify whether to enable or disable this function.
Default: [Inactive]
[Device Email Address]
Enter the device's e-mail address using up to 127 characters.
Default: Blank
[Administrator Email Address]
Enter the administrator's e-mail address using up to 127 characters.
Default: Blank
[Email Body]
Enter messages using up to 255 characters.
Default: Blank
[SMTP]
You can specify the SMTP server name and SMTP Port No. By specifying the SMTP authentication setting, you can send e-mails to destinations where the e-mail server carries out SMTP authentication.
By specifying the SMTP authentication setting, you can log on to SMTP servers which require authentication. The supported authentication protocols are: CRAM MD5, PLAIN, and LOGIN.
- [SMTP Server Name]
Enter the server name using up to 127 characters.
Default: Blank
■ [SMTP Port No.]
Default: [25]
■ [SMTP AUTH]
You can specify whether to enable or disable this function.
Default: [Inactive]
■ [SMTP Auth. User Name]
Enter the user name using up to 191 characters.
Default: Blank
■ [SMTP Auth. Password]
Enter the password using up to 63 characters.
Default: Blank
■ [Confirm SMTP Auth. Password]
Enter the password using up to 63 characters.
Default: Blank
■ [SMTP Auth. Encryption]
If you select [Auto Select], the printer logs on using DIGEST MD5, CRAM MD5, NTLM Authentication, LOGIN, then PLAIN.
If you select [On], the printer logs on using DIGEST MD5, CRAM MD5, then NTLM Authentication.
If you select [Off], the printer logs on using LOGIN and then PLAIN.
Default: [Auto Select]
[POP before SMTP]
By specifying the SMTP authentication setting, you can send e-mails to destinations where the e-mail server carries out SMTP authentication.
By using POP before SMTP, you can log on to an SMTP server supporting POP before SMTP.
You can specify whether to use POP before SMTP, and specify the POP server name, POP port number, POP user name, and POP password.
■ [POP before SMTP]
You can specify whether to enable or disable this function.
Default: [Inactive]
■ [POP User Name]
Enter a user name using up to 127 characters.
Default: Blank
■ [POP Password]
Enter a password using up to 63 characters.
Default: Blank
■ [Confirm POP Password]
Enter a password using up to 63 characters.
Default: Blank
■ [POP Auth. Encryption]
If you select [Auto Select], the printer logs on by APOP login, then in plain text.
If you select [On], the printer logs on only by APOP login.
If you select [Off], the printer logs on only in plain text.
Default: [Auto Select]
- [Timeout setting after POP Auth.]
In standby time following POP authentication (in milliseconds), you can specify
how long the printer can wait for logging on to the SMTP server after logging on to the POP server.
Default: [300 milli-second]
[POP3/IMAP4]
■ [POP Server Name]
Enter the server name using up to 127 characters.
Default: Blank
[Email Reception Port]
■ [POP3 Reception Port No.]
Default: [110]
Auto Email Notification: Error Notification by Email: Group 1-3
[Groups to Notify]
■ [Group Name]
Enter a group name using up to 19 characters.
Default: Blank
- [Email Language]
You can select the language used for e-mail.
Default: [English]
■ [Subject]
Enter a subject using up to 31 characters.
Default: Blank
■ [Message]
Enter a message using up to 255 characters.
Default: Blank
[Notify]
■ [Notify 1-5]
Enter up to 19 characters for [Name] and up to 127 characters for [Email Address].
Default: Blank
[Error Items to Notify]
Select which errors are sent as e-mail notifications.
- [Error: Printer]
■ [Out of Ink]
■ [Low Ink]
■ [Replace Waste Collection Unit]
■ [Prepare new Waste Collection Unit]
■ [Out of Paper]
■ [Paper Misfeed]
■ [Paper Size Error]
■ [Paper Type Error]
■ [Paper Size/Paper Type Error]
■ [Cover Open]
■ [Unit/Cartridge Not Set]
- [Device cannot be used in this temperature conditions.]
Default: Not selected
Auto Email Notification: Counter Notification: Group
[Groups to Notify]
- [Email Language]
You can select the language used for e-mail.
Default: [English]
■ [Subject]
Enter a subject using up to 31 characters.
Default: Blank
[Notify]
- [Notify 1-5] Enter up to 19 characters for [Name] and up to 127 characters for [Email Address]. Default: Blank
[Notification Item]
■ [Total Pages Printed] Default: Not selected
Auto Email Notification: Detailed Settings for Error Notification
[Error: Printer]
- [Notify when error:]
Default: [Occurs]
■ [Notify within:]
Default: [5 minute(s)]
[Out of Ink]
- [Notify when error:]
Default: [Occurs]
■ [Notify within:]
Default: [5 minute(s)]
[Low Ink]
■ [Notify when error:]
Default: [Occurs]
■ [Remaining]
Default: [10%]
[Replace Ink Collector Unit]
■ [Notify when error:]
Default: [Occurs]
■ [Notify within:]
Default: [5 minute(s)]
[Prepare new Ink Collector Unit]
■ [Notify when error:]
Default: [Occurs]
■ [Remaining]
Default: [10%]
[Out of Paper]
■ [Notify when error:]
Default: [Occurs]
■ [Notify within:]
Default: [5 minute(s)]
[Paper Misfeed]
■ [Notify when error:]
Default: [Occurs]
■ [Notify within:]
Default: [5 minute(s)]
[Paper Size Error]
■ [Notify when error:]
Default: [Occurs]
■ [Notify within:]
Default: [5 minute(s)]
[Paper Type Error]
■ [Notify when error:]
Default: [Occurs]
■ [Notify within:]
Default: [5 minute(s)]
[Paper Size/Paper Type Error]
- [Notify when error:]
Default: [Occurs]
■ [Notify within:]
Default: [5 minute(s)]
[Cover Open]
■ [Notify when error:]
Default: [Occurs]
■ [Notify within:]
Default: [5 minute(s)]
[Unit/Cartridge Not Set]
■ [Notify when error:]
Default: [Occurs]
- [Notify within:]
Default: [5 minute(s)]
[Device cannot be used in this temperature conditions.]
■ [Notify when error:]
Default: [Occurs]
■ [Notify within:] Default: [5 minute(s)]
Auto Email Notification: Counter Notification
[Total Pages Printed]
■ [Method to Notify]
Default: [Number of Pages]
■ [Interval]
Default: [100 Per Page]
- [Date to Notify]
Default: [1]
Maintenance
This chapter describes how to maintain the printer.
Ink Cartridges
Checking the Remaining Ink
Follow the procedure below to check when to replace ink cartridges using the Web Image Monitor or the cartridge replacement indicators.
Checking the remaining ink level on the display
You can check the remaining ink level by looking at the icon that appears above the cartridge replacement indicator.
K, C, M, and Y indicate black, cyan, magenta, and yellow, respectively.
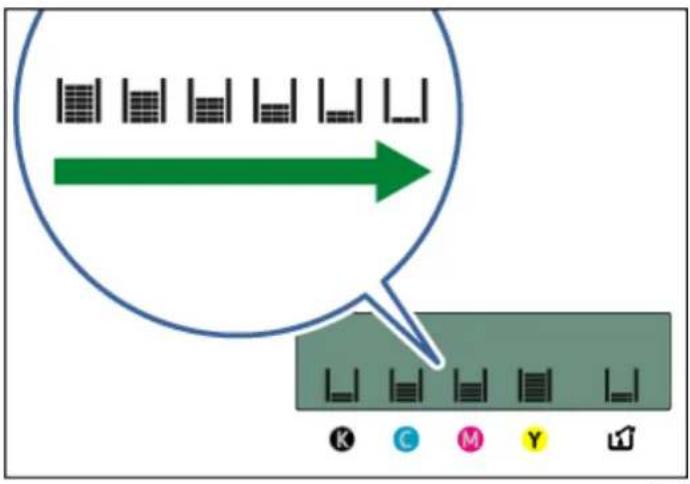
text_image
Diagram showing a sequence of rectangular blocks with an arrow pointing to a server rack, labeled K, C, M, Y, and a menu icon.If the ink will soon run out, the message "Low Ink" appears on the display.
Make sure you have a new ink cartridge for the color indicated by the icon.
If an ink cartridge runs out of ink, the message "Open Front Cover / Replace Ink Crtg" appears on the display.
Replace the ink cartridge indicated by the | | or ↓| icon.
Checking the remaining ink level on the Web Image Monitor
The Web Image Monitor can be used to check ink levels.
See section "Using Web Image Monitor" for more information.
Checking the remaining ink level via PowerDriver
PowerDriver on Windows OS can also be used to check ink levels.
See sawgrassink.com for more information.
Replacing an Ink Cartridge
Clear any errors, such as when there is a paper jam or when no paper is loaded, before replacing an ink cartridge.

Important
- When removing the ink cartridge, do not touch the inside of the printer.
-
Carefully install an ink cartridge in the correct position.
-
Take the ink cartridge out of the box.
-
Open the right front cover.
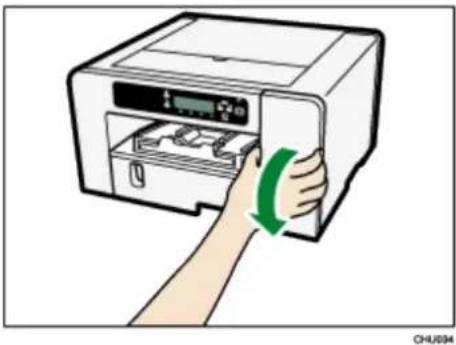
natural_image
Illustration of a hand inserting a printer into a device with a green arrow indicating the process (no text or symbols present)- Take out the empty cartridges.
While taking out the cartridges, be sure to hold the printer firmly so that it does not move.
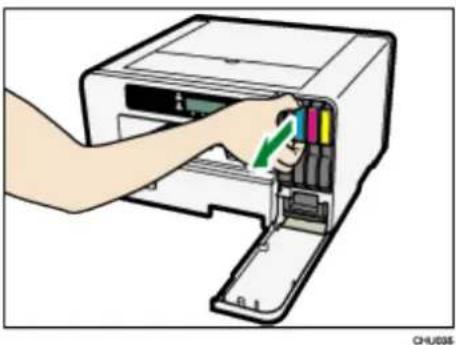
natural_image
Illustration of a hand inserting a color into a printer's internal compartment (no text or symbols visible)- Check the cartridges' orientation, then install them carefully.
Install in the following order from the left: black, cyan, magenta, and yellow.
- Push each cartridge fully in.
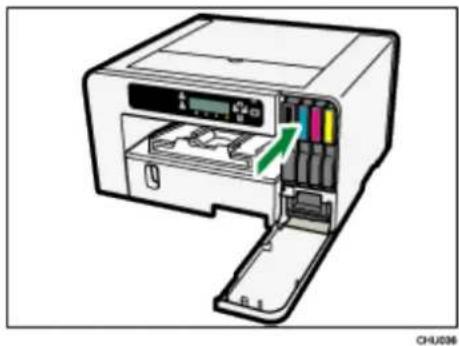
natural_image
Diagram of a printer with internal components and a green arrow indicating a loading or movement (no text or symbols present)6. Close the right front cover.
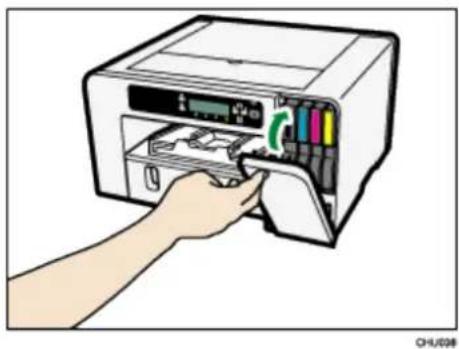
natural_image
Illustration of a hand inserting a printer into a rack, showing internal components and a green circular arrow (no text or symbols)Handling Ink Cartridges
WARNING
- The following explains the warning messages on the plastic bag used in this product's packaging.
- Keep the polythene materials (bags, gloves, etc.) supplied with this printer away from babies and small children at all times. Suffocation can result if polythene materials are brought into contact with the mouth or nose.
CAUTION
- Keep ink and ink containers out of reach of children.
- If ink gets into contact with eyes, flush eyes with clean, lukewarm water (low pressure) for at least 15 minutes, occasionally lifting eyelids to ensure that the chemical is being flushed out of the eyes. Obtain medical attention.
- If ink is ingested, wash out mouth with water provided person is conscious. Consult a doctor immediately.
- When removing jammed paper or replacing ink, avoid getting ink on your clothing. If ink comes into contact with your clothing, refer to the ink cartridge labeling for recommended procedures.
- When removing jammed paper or replacing ink, avoid getting ink on your skin. If ink comes into contact with your skin, wash the affected area thoroughly with soap and water. If irritation develops, seek medical attention.
- When removing the ink cartridge, avoid putting your hand near the place where the ink cartridge is installed. If ink comes in contact with your hands, wash them thoroughly with soap and water. If irritation develops, seek medical attention.
About ink cartridges
- Ink cartridges comply with the Sawgrass safety specifications. To ensure safety and reliability, use genuine SubliJet-HD ink cartridges.
- Do not reuse the SubliJet-HD ink cartridges.
Using ink cartridges
- Ink cartridges should be used up before their “Recommended Use by Date”, ideally within six months of being removed from their packaging.
- Do not open the package of an ink cartridge until the cartridge will be installed in the printer.
- Do not touch the cartridge's ink inlets or chip contacts.
- Do not shake ink cartridges strongly. Ink may leak out.
- Do not take apart ink cartridges.
- Do not turn off the power or unplug the power cord during the process of installing the cartridges.
■ Always confirm the color of an ink cartridge before installing it. - Do not remove an ink cartridge while printing is being performed. Printing will stop.
Storing ink cartridges
- Store ink cartridges at a temperature between 15°C and 25°C (59°F to 77°F), relative humidity above 35% without condensation.
Ink consumption
- To protect the print head and ensure print quality, the printer performs periodic maintenance and print head cleaning when it is turned on. Both operations consume ink.
Note
If you intend not been use the printer for a period of time, see section "
- When Not Using for a Long Period of Time" for precautionary information.
Waste Collection Unit
Checking the Waste Ink Level
Follow the procedure below to check when to replace a waste collection unit using the Web Image Monitor or the waste ink full indicator.
Checking the waste ink level on the display
You can check the waste ink level by looking at the icon that appears above the waste ink full indicator.
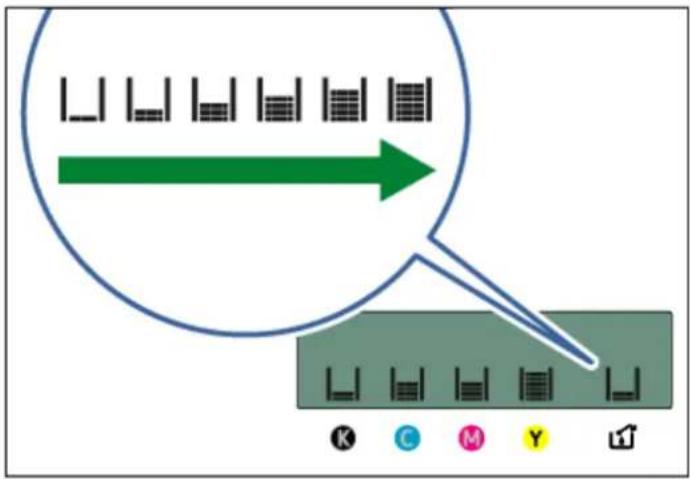
text_image
Diagram showing a green arrow pointing to a grid of rectangular blocks, with a blue magnifying glass highlighting the grid pattern.OHU124
If the waste collection unit is almost full, the message "Prepare new Waste Collection Unit" appears on the display.
Make sure you have a new waste collection unit on hand.
If the waste collection unit is full, the message "Waste Collection Unit is full / Replace
Waste Collection Unit" appears on the display.
Replace the waste collection unit.
Checking the waste ink level on the Web Image Monitor
The Web Image Monitor can be used to check ink levels.
See section "Using Web Image Monitor" for more information.
Checking the waste ink level via PowerDriver
PowerDriver on Windows OS can also be used to check ink levels.
See sawgrassink.com for more information.
Replacing a Waste Collection Unit

WARNING
- The following explains the warning messages on the plastic bag used in this product's packaging. - Keep the polythene materials (bags, gloves, etc.) supplied with this printer away from babies and small children at all times. Suffocation can result if polythene materials are brought into contact with the mouth or nose.

Important
- Do not use a waste collection unit that has not been used for a long time.
- Do not touch the waste collection unit's chip contacts.
Take care not to drop the waste collection unit.
Take care not to drop the waste collection unit when putting it in the supplied plastic bag. The bag might tear, causing ink to spill. -
Make sure the waste collection unit is fully inserted. If it is not, an error may occur or ink will leak inside the printer.
-
Take the waste collection unit out of the box.
-
Open the right front cover.

natural_image
Illustration of a hand inserting a printer into a slot, with a green arrow indicating the motion (no text or symbols present)- Wait at least five seconds, then remove the waste collection unit from the printer.
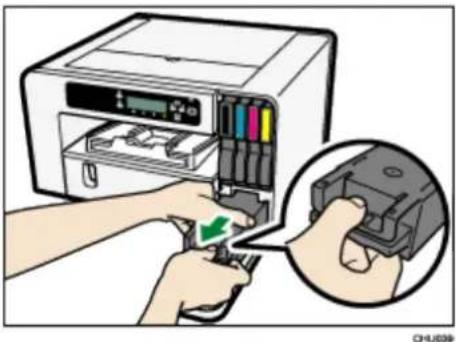
natural_image
Illustration of hands inserting a CD into a printer into a device, with a magnified inset showing the printer's internal structure (no text or symbols present)Press on the area marked "PUSH" to pull the unit out. Keep the unit level.
- Put the waste collection unit in the supplied plastic bag.
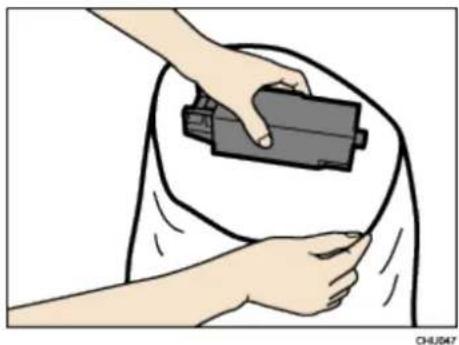
natural_image
Illustration of hands holding a battery on a curved surface (no text or symbols)- Insert the new waste collection unit.
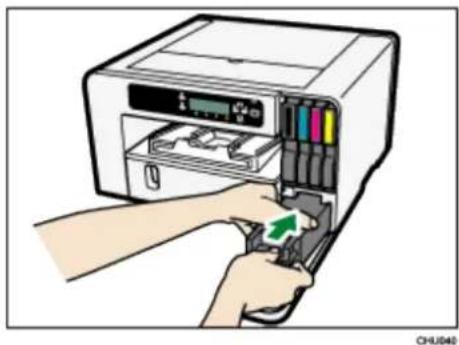
natural_image
Illustration of a hand inserting a color into an open printer into a device (no text or symbols visible)- Slide the waste collection unit carefully into the printer until you hear it click.
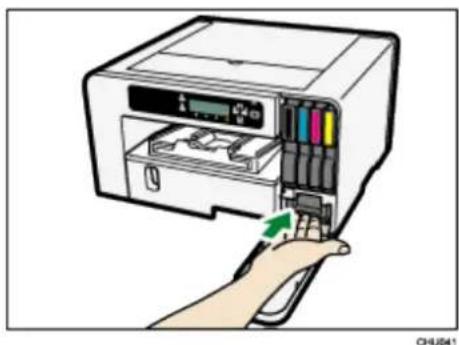
natural_image
Illustration of a hand inserting a color into an open printer (no text or symbols visible)- Close the right front cover.
Cleaning
Clean the outside of the printer regularly to maintain the condition of the printer.

WARNING
- Do not remove any covers or screws other than those explicitly mentioned in this manual. Inside this printer are high voltage components that are an electric shock hazard. Contact Sawgrass if any of the printer's internal components require maintenance, adjustment, or repair.
- Do not attempt to disassemble or modify this printer. Doing so risks burns and electric shock.

CAUTION
- When performing maintenance on the printer, always disconnect the power cord from the wall outlet.
To clean the exterior of the printer, wipe it with a soft, dry or damp cloth. If the dirt does not come off, wipe the printer first with a cloth moistened with a neutral detergent, then with a damp cloth, and finally with a dry cloth.

Important
- Do not use volatile chemicals like benzene or thinner, or insecticides on the printer. Using these chemicals could deform, crack, or change the color of the printer.
- When wiping the printer with a cloth moistened with detergent, be sure to wipe only the exterior.
Cleaning the Power Cable Plug
This section describes precautions for cleaning the power cable plug.

WARNING
- Be sure to disconnect the plug from the wall outlet at least once a year and check for the following:
■ There are burn marks on the plug. - The prongs on the plug are deformed.
- If any of the above conditions exist, do not use the plug and consult Sawgrass. Use of the plug could result in fire or electric shock.
- Be sure to disconnect the power cord from the wall outlet at least once a year and check for the following:
■ The power cord's inner wires are exposed, broken, etc.
- The power cord's coating has a crack or dent.
- When bending the power cord, the power turns off and on.
■ Part of the power cord becomes hot.
■ The power cord is damaged.
- If any of the above conditions exist, do not use the power cord and consult Sawgrass. Use of the power cord could result in fire or electric shock.
CAUTION
- Be sure to disconnect the plug from the wall outlet and clean the prongs and the area around the prongs at least once a year. Allowing dust to build up on the plug constitutes a fire hazard.
Moving
The precautions when moving the printer a short distance or long distance are explained.
Moving a Short Distance
Take the following precautions when moving the printer a short distance - for instance, when attaching an optional paper tray or relocating the printer inside the same room.
CAUTION
■ SG800NA and SG800EU weigh around 15 kg (33 lb.).
- Grip the center area at the base of the printer's sides. Lift it slowly and do not strain your body.
- When moving the printer, remove the option. Careless handling and over exertion when lifting can result in breakage and/or injury.
- Unplug the power cord from the wall outlet before you move the printer. While moving the printer, take care that the power cord is not damaged under the printer. Failing to take these precautions could result in fire or electric shock.
- When disconnecting the power cord from the wall outlet, always pull the plug, not the cord. Pulling the cord can damage the power cord. Use of damaged power cords could result in fire or electric shock.

Important
- Be sure to keep the printer level. If it is unduly tilted, ink will leak from the waste collection unit.
-
Press and hold down the [Power] key until it turns off, then unplug the power cord.
-
Disconnect the USB cable or Ethernet cable.
-
If options are installed, remove it.
See section "Attaching or Detaching Options" for more information.
- Lift the printer and move it to the place where you want to install it.
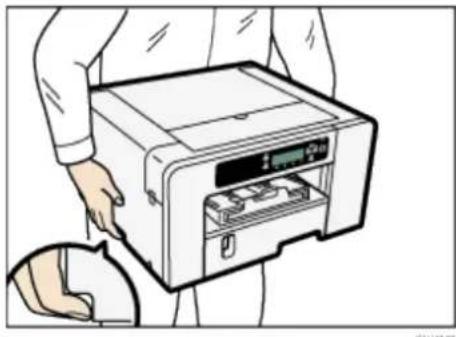
natural_image
Illustration of a person opening a printer into a rack, with no visible text or symbolsGrip the indented area at the base of the printer's sides, as shown. Lift and carry the printer slowly and carefully.

Note
- When you move the printer, unplug the power cord from the printer, too.
■ Make sure the power cord is not trapped under the printer.
Moving a Long Distance
To transport the printer, put it in the box it came in. Do the same for any options. If a box is needed, contact Sawgrass.

CAUTION
- Transporting the printer without ink cartridges or a waste collection unit installed will result in ink leaking out and damaging the printer.

Important
- Do not remove the ink cartridges.
- Do not remove the Waste Collection Unit.
- Remove the paper.
- When you move the printer, also unplug the power cord from the printer.

Note
- The inside of the printer may become dirty if the printer is not level when transported.
Disposing
When disposing of the printer, be sure to comply with local disposal regulations.
When Not Using for a Long Period of Time

CAUTION
- Sawgrass recommends that the printer be used often to ensure the print head nozzles do not become clogged.
- Sawgrass also recommends keeping the printer powered on at all times. This will allow the printer to run automatic maintenance utilities for optimal performance.
- The printer consumes a considerable of ink for maintenance and print head cleaning when used after a long period of inactivity.
When not in use, be careful of the following:
- Even with automatic maintenance utilities, the nozzles of the print heads may dry out and become clogged. To prevent this, periodically print something.
If you choose to ignore Sawgrass' recommendations and power the printer off during periods of inactivity, at least turn the printer on for a few minutes once every 20-25 days, even if you don't print anything. - If you want to print something after the printer has not been used for a period of time, always check for missing nozzles by printing a nozzle check test pattern. See section "Nozzle Check" for more information.
- If necessary, clean the print heads up to five (5) times prior to printing. See section "Head-cleaning" for more information.
- If (5) head cleans do not clear missing nozzles, perform one (1) head flush. See section "Head-flushing" for more information.
Note
■ If there is no improvement after performing the steps above, contact Sawgrass.
Troubleshooting
This chapter describes common troubleshooting procedures that are applicable to functions of the printer and what to do when paper misfeeds (become jammed inside the printer).

Note
■ More troubleshooting information, particularly related to the printer and color management software, is located on sawgrassink.com.
Canceling Printing
Print jobs can be canceled from either a printer or computer. How to cancel print jobs differs according to their job status. Check the job status first.
Canceling a print job already sent to the printer
Cancel the print job by pressing the [Job Reset] key.
Canceling a print job that is not sent to the printer
Cancel the print job from the taskbar of the computer.
Canceling Printing Using the [Job Reset] Key
Follow the procedure below to cancel a print job that was already sent to the printer.
The [Job Reset] key cancels all print jobs being printed or that were received. If you do not want to cancel another print job that was sent later, it's possible to delete only the current print job.
Cancel only the print job being printed
-
Check that printing has started.
-
Press the [Job Reset] key.
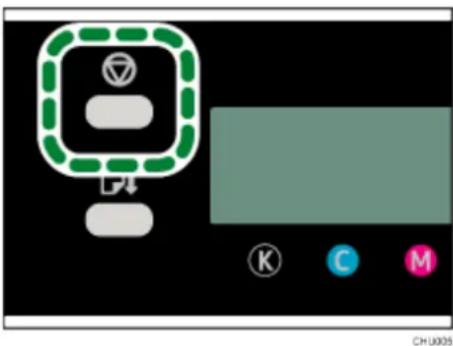
text_image
D4 K C M CHU005The confirmation screen appears.
Job Reset? Current Job
- Press the [#Enter] key.
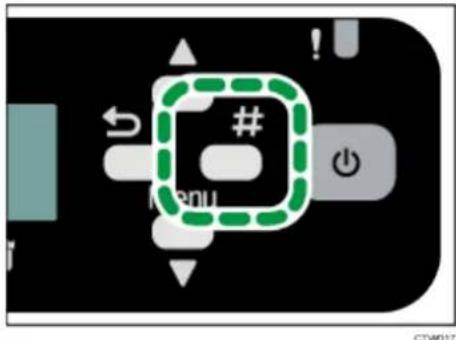
text_image
Diagram showing a green icon with a hash and minus sign inside a square, surrounded by directional arrows and a power button.Only the print job being printed is deleted.
If there are other print jobs waiting, they will be printed after the current print job is deleted.
It takes time to cancel the print job.
Cancel all print jobs received
-
Check that printing has started.
-
Press the [Job Reset] key.
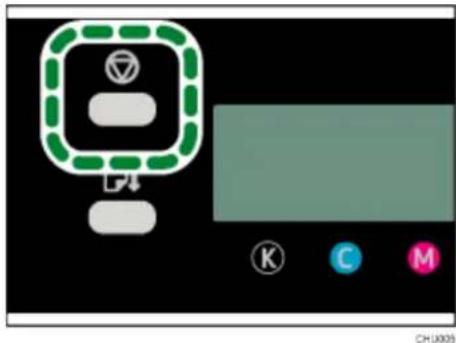
text_image
CH.X005The confirmation screen appears.
Job Reset? Current Job
- Press [▲] or [▼/Menu] key to display [Job Reset? All Jobs], then press the [#Enter] key.
Job Reset? All Jobs
text_image
Menu #The confirmation screen appears.
Reset all received Jobs?
4. Press the [#Enter] key.
All print jobs received will be canceled.
It takes time to cancel the print job.
Canceling Printing from the Windows Taskbar
Follow the procedure below to cancel a print job in the printer queue.
- Double-click the printer icon on the taskbar.
- Select the print job you want to cancel in the printer queue that is displayed. Click [Cancel] on the [Document] menu.
Canceling a Print Job from the Macintosh Print Job Queue Window
You can delete a print job before, during, and after its being sent from the computer to the printer.
- Check that the print job queue window opens.
- In the print job queue window, select the print job you want to cancel.
- Click [Delete Job] in the [Jobs] menu or [Delete] on the toolbar.
Printing Does Not Start
If printing fails, check the following:
Check the printer's power.
- The [Power] key is not lit.
Turn the printer on.
See section "Turning On/Off the Power" for more information.
■ The power indicator does not light up or blink despite the [Power] key being pressed.
- Check whether the power cord is plugged into the receptacle properly.
- Plug another appliance that works into the receptacle to determine whether the receptacle is all right.
If the problem persists, unplug the power cord and contact your Sawgrass.
Check the error message.
- If the error message appears on the display See section "Error & Status Messages on the Display" for more information.
Check the name associated with the printer's icon.
Check communication issue with PowerDriver.
This may occur if the printer is powered on and/or connected prior to the appropriate step during the installation of software.
- Visit sawgrassink.com or contact Sawgrass for more information.
Paper Is Not Fed or Delivered Normally
If the printer is operating but paper will not feed or paper jams multiple times, check the condition of the printer and paper.
Paper does not feed smoothly.
- Paper guides are not adjusted correctly. The paper guides of the paper tray do not match the paper loaded. Adjust the paper guides and load the paper again. See section "Loading Paper" for more information.
- Paper is not loaded correctly. The paper is not loaded correctly. Load the paper correctly. See section "Loading Paper" for more information.
- Paper is curled. Remove the loaded paper and check if it is curled. If it is, straighten the curl within 2 mm (0.08 inches).
Paper jams multiple times.
- Paper is still jammed in the printer. Pull the paper tray out, then open the output ramp to check for jammed paper.
Multiple sheets of paper are fed at one time.
- Load the paper again. Remove the paper from the paper tray, fan it well, and tap it on a flat surface such as a desk to even the edges. Check the position of the paper guides of the paper tray, then load the paper again.
- A double-feed may occur when using the bypass tray to print on paper that has a rough
surface or that is friction prone.
If a double-feed occurs several times, use Trays 1, 2, or 3 to print.
- See sections "Handling and Storage Precautions" and "Loading Paper" for more information.
The paper does not feed even after a paper jam has been cleared.
- When a paper jam occurs, clear the paper jam, then press the [Form Feed] key. See page 101 "Using the [Form Feed] Key to Remove Jammed Paper" for more information.
Paper Jam
This section explains how to remove a paper jam.

CAUTION
- When removing jammed paper or replacing ink, avoid getting ink on your clothing. If ink comes into contact with your clothing, immediately rinse the stained area with cold water and wash the garment with laundry detergent per the care productions provided on the label.
- When removing jammed paper or replacing ink, avoid getting ink on your skin. If ink comes into contact with your skin, wash the affected area thoroughly with soap and water. If irritation develops, seek medical attention.
- When removing jammed paper, make sure not to trap or injure your fingers.
If a paper jam error message appears on the display Web Image Monitor, remove the paper according to the message.

Important
- Before installing or removing options, always disconnect the power cord plug from the wall outlet.

Reference
See sections listed below for more information:
- "Using the [Form Feed] Key to Remove Jammed Paper".
- "Continue to remove the jammed paper according to subsequent error messages until the messages no longer appear. See section "" for more information.
■ Paper Jam" for more information. - If paper jams occur repeatedly, see section "Paper Is Not Fed or Delivered Normally" for more information.
■ Removing Paper Jammed in Tray 1".
- "Continue to remove the jammed paper according to subsequent error messages until the messages no longer appear. See section "" for more information.
■ Paper Jam" for more information.
- If paper jams occur repeatedly, see section "Paper Is Not Fed or Delivered Normally" for more information.
■ Paper Jam in Tray 2/3".
- "Continue to remove the jammed paper according to subsequent error messages until the messages no longer appear. See section "" for more information.
■ Paper Jam" for more information.
- If paper jams occur repeatedly, see section "Paper Is Not Fed or Delivered Normally" for more information.
■ Removing Paper Jammed in the Bypass Tray".
■ "Removing Paper Jammed under the Top Cover".
■ "Removing Paper Jammed in Tray 2/3".
■ "Opening the Rear Unit Cover to Remove Jammed Paper"
Using the [Form Feed] Key to Remove Jammed Paper
- Press the [Form Feed] key.
text_image
CHU007- Remove the jammed paper.
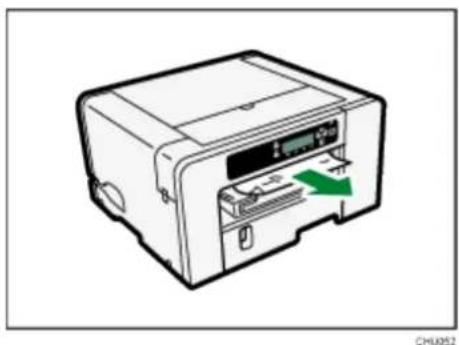
natural_image
Illustration of a printer with a green arrow indicating a directional control or operation (no text or symbols present)Printing starts.

Note
- Continue to remove the jammed paper according to subsequent error messages until the messages no longer appear. See section "" for more information.
- Paper Jam" for more information.
- If paper jams occur repeatedly, see section "Paper Is Not Fed or Delivered Normally" for more information.
Removing Paper Jammed in Tray 1
- Hold the grip on Tray 1, lift the tray slightly (①), then pull it out (②).
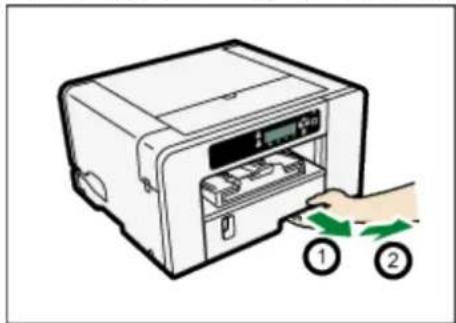
natural_image
Illustration of a printer with a hand inserting a green arrow to the front panel (no text or symbols present)Pull the tray completely out. Take care not to drop it.
- Open the output ramp, then remove the jammed paper.
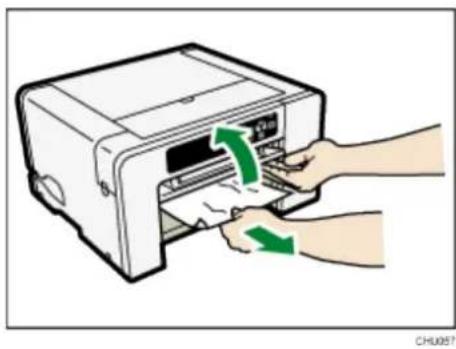
natural_image
Illustration of hands inserting a printer into a slot with green arrows indicating motion (no text or symbols)If you cannot remove the jammed paper or it is difficult to remove, the paper may be jammed inside the printer. Examine the paper carefully and remove.
- Close the output ramp.
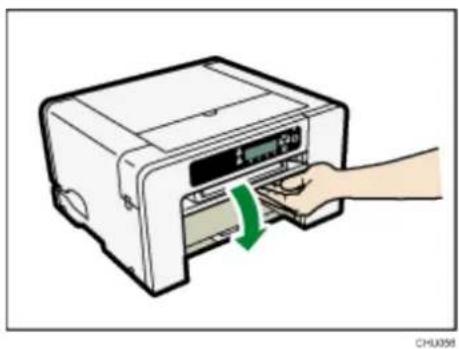
natural_image
Illustration of a printer with a hand inserting a slot into the front panel (no text or symbols visible)- Push Tray 1 gently in until it stops.
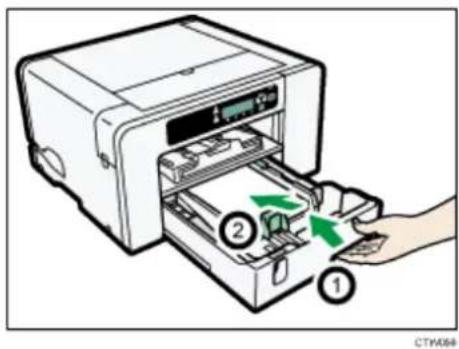
text_image
Diagram of a printer with labeled parts showing internal components and green arrows indicating movement or flow.Before pushing the paper tray in, make sure the output ramp is closed.
Printing starts. Blank paper may be delivered after printing resumes.
Note
- Continue to remove the jammed paper according to subsequent error messages until the messages no longer appear. See section "" for more information.
■ Paper Jam" for more information. - If paper jams occur repeatedly, see section "Paper Is Not Fed or Delivered Normally" for more information.
Paper Jam in Tray 2/3
- Remove the paper jammed in Tray 2/3.
See section "Removing Paper Jammed in Tray 2/3" for more information.
- Open the rear unit cover and remove the jammed paper.
See section "Opening the Rear Unit Cover to Remove Jammed Paper (for more information.
Note
- Continue to remove the jammed paper according to subsequent error messages until the messages no longer appear. See section "" for more information.
- Paper Jam" for more information.
- If paper jams occur repeatedly, see section "Paper Is Not Fed or Delivered Normally" for more information.
Removing Paper Jammed in the Bypass Tray
- Remove any paper in the bypass tray.
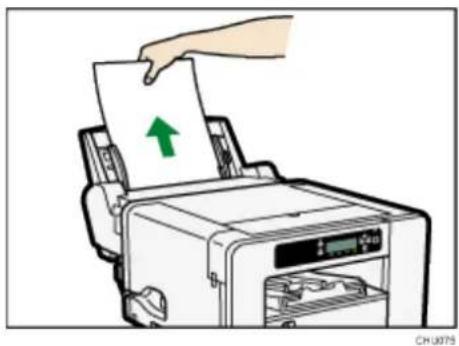
natural_image
Illustration of a printer being inserted into a paper with a green arrow indicating the paper's direction (no text or symbols present)- Remove the jammed paper.
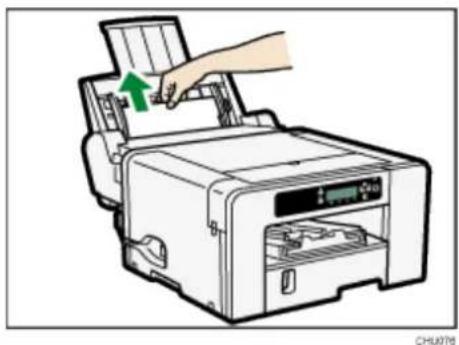
natural_image
Illustration of a printer being inserted into a paper airplane, with a green arrow indicating the process (no text or symbols present)- Load paper in the bypass tray with the side to be printed on facing up and without exceeding the sheet limit.
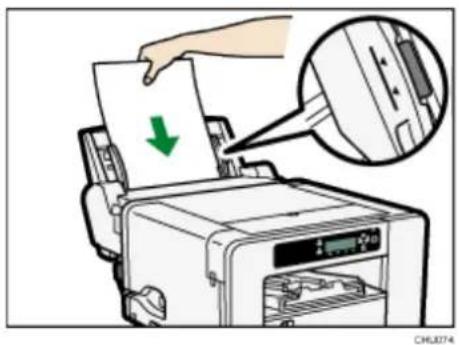
text_image
Diagram showing printer press application with a green arrow indicating a document being inserted, and an inset magnified view of the printer's internal structure.- Press the [Form Feed] key.
Printing starts. Blank paper may be delivered after printing resumes.
If it is difficult to remove the jammed paper, detach the bypass tray so that the paper can be removed.
Detach the bypass tray.
See section "Attaching and Detaching the Bypass Tray" for more information.
- Remove the jammed paper from the rear of the printer.
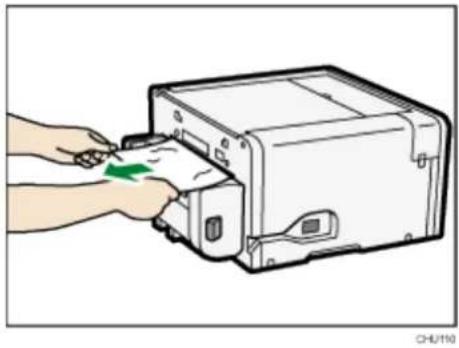
natural_image
Illustration of a hand inserting a green arrow into a device from an open box (no text or symbols)Reattach the bypass tray.
See section "Attaching and Detaching the Bypass Tray" for more information.
- Load paper in the bypass tray with the side to be printed on facing up and without exceeding the sheet limit.
Note
- Continue to remove the jammed paper according to subsequent error messages until the messages no longer appear. See section "" for more information.
■ Paper Jam" for more information. - If paper jams occur repeatedly, see section "Paper Is Not Fed or Delivered Normally" for more information.
Removing Paper Jammed under the Top Cover
Important
- Do not touch the feed belt, ink tubes, paper pressing board, or toothed rubber belt. Also, take care not to catch cables or ink tubes with your sleeves.
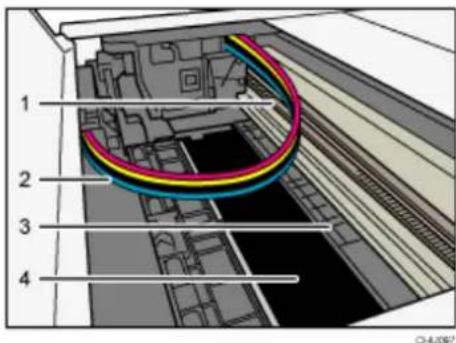
text_image
1 2 3 4- Toothed rubber belt
-
Ink tubes
-
Paper pressing board
-
Feed belt
-
Open the top cover.
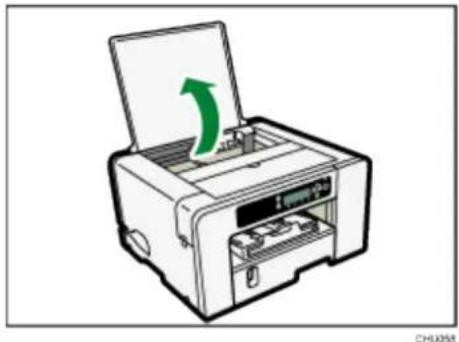
natural_image
Illustration of a printer with an open lid and green arrow indicating rotation (no text or symbols)-
Press the [Form Feed] key.
-
Remove the jammed paper through the top cover opening.
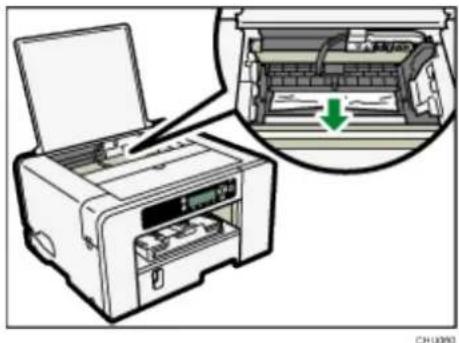
natural_image
Illustration of a printer with an open lid and a magnified inset showing internal components (no text or symbols)When removing the paper, slowly pull it obliquely upward. Pulling it forcibly or directly upward may cause some parts to come off.
If the print head has stopped halfway, move it to either end.
- Close the top cover.
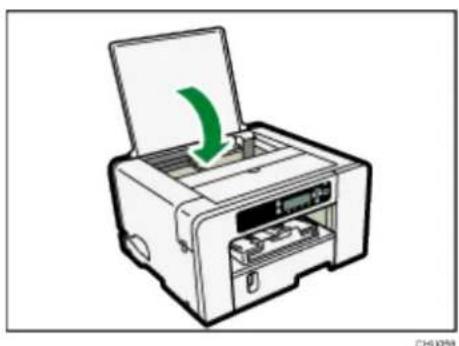
natural_image
Illustration of a printer with an open lid and green arrow indicating rotation (no text or symbols)Printing starts. Blank paper may be delivered after printing resumes.
- Print the nozzle check test pattern to make sure the print head's nozzles are not missing.
See section "Nozzle Check" for more information.

Note
- Continue to remove the jammed paper according to subsequent error messages until the messages no longer appear. See section "" for more information.
■ Paper Jam" for more information. - If paper jams occur repeatedly, see section "Paper Is Not Fed or Delivered Normally" for more information.
Opening the Rear Cover to Remove Jammed Paper
- Slide the tabs on the sides to unlock, then open the rear cover.
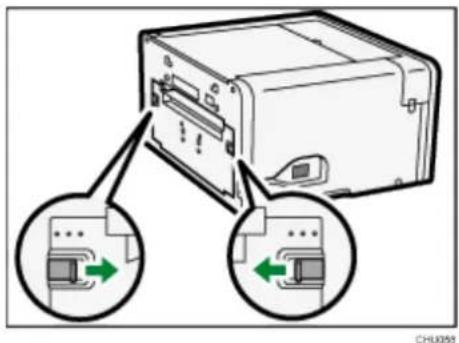
text_image
CHU055- Remove the jammed paper.
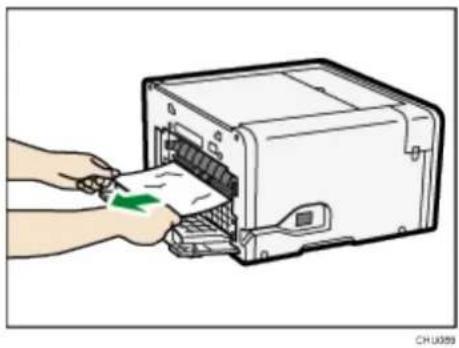
natural_image
Illustration of hands inserting a paper into a printer (no text or symbols visible)- Close the rear cover.
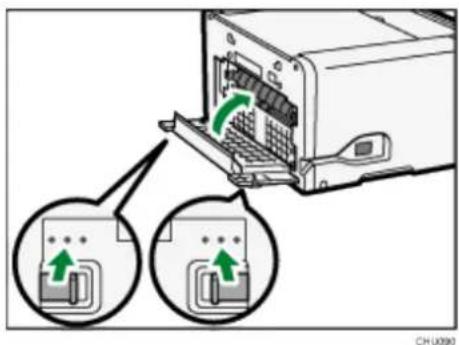
text_image
CHU090Make sure to return the tabs to their original positions.
Printing starts. Blank paper may be delivered after printing resumes.
Note
- Continue to remove the jammed paper according to subsequent error messages until the messages no longer appear. See section "" for more information.
■ Paper Jam" for more information. - If paper jams occur repeatedly, see section "Paper Is Not Fed or Delivered Normally" for more information.
Removing Paper Jammed in Tray 2/3
- Hold the grip on Tray 2/3, lift the tray slightly (①), then pull it out (②).
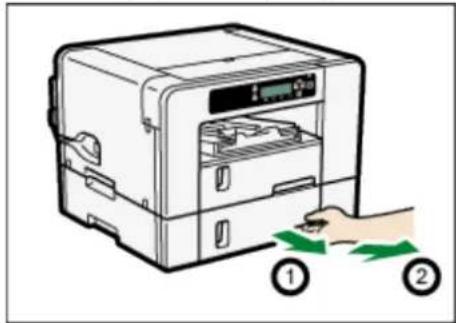
natural_image
Illustration of a hand inserting a green arrow into a device labeled ① and ② (no text or symbols on the device itself)Pull the tray completely out. Take care not to drop it.
- Remove the jammed paper.
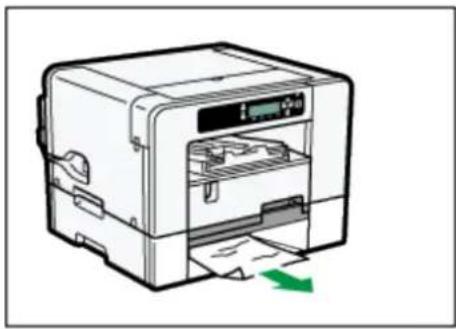
natural_image
Illustration of a printer with paper and green arrow indicating print direction (no text or symbols)CTW050
- Push Tray 2/3 gently in until it stops.
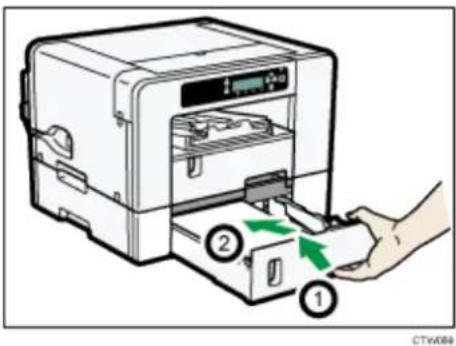
text_image
Diagram showing a hand inserting a device into a device with labeled parts 1, 2, and directional arrows indicating process flow.Printing starts. Blank paper may be delivered after printing resumes.
Note
- Continue to remove the jammed paper according to subsequent error messages until the messages no longer appear. See section "" for more information.
■ Paper Jam" for more information. - If paper jams occur repeatedly, see section "Paper Is Not Fed or Delivered Normally" for more information.
Opening the Rear Unit Cover to Remove Jammed Paper (SG400NA/SG400EU)
- Slide the tabs on the sides to unlock, then open the rear unit cover.
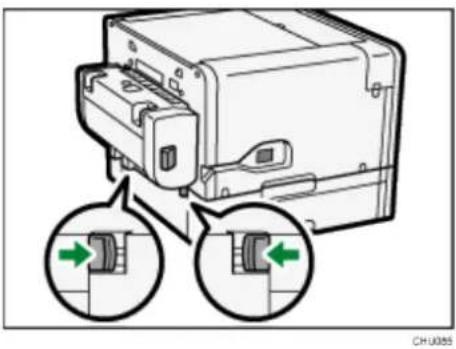
natural_image
Diagram of a device with two circular insets showing internal components (no text or symbols)- Remove the jammed paper.
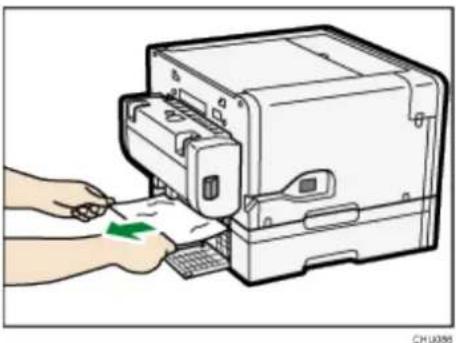
natural_image
Illustration of a hand inserting a green arrow into a printer (no text or symbols present)- Close the rear unit cover.
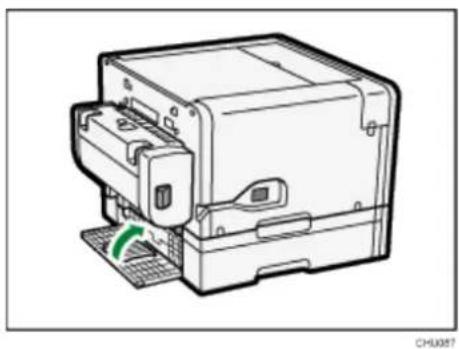
natural_image
Technical line drawing of a mechanical device with a green circular arrow indicating rotation (no text or symbols)Make sure to return the tabs to their original positions.
Printing starts. Blank paper may be delivered after printing resumes.
Note
- Continue to remove the jammed paper according to subsequent error messages until the messages no longer appear. See section "" for more information.
■ Paper Jam" for more information. - If paper jams occur repeatedly, see section "Paper Is Not Fed or Delivered Normally" for more information.
Poor Print Quality
If print quality is poor, check the printer and printer driver and design software settings for problems. If no problems are apparent, check the "Recommended Use by Date" for the ink cartridges or issues with the sublimation paper. For details about handling paper, see section "Loading Sublimation Transfer Paper" for more information. For details about handling the ink cartridges, see section "Handling Ink Cartridges" for more information.
Note
If problems persist visit sawgrassink.com for more troubleshooting information.
Prints are Unsatisfactory
This section explains how to troubleshoot the printer when printing is uneven or when prints are streaked, smudged, smeared, or blotchy.
Have you printed the nozzle check test pattern?
Print the nozzle check test pattern to check whether the print head nozzles are all ejecting ink properly, and, if necessary, carry out head cleaning and/or head-flushing.
- If necessary, clean the print heads up to five (5) times prior to printing. See section "Head-cleaning" for more information.
■ If (5) head cleans do not clear missing nozzles, perform one (1) head flush. See
section "Head-flushing" for more information.
Has the printer not been used for a long time?
The ink may be dry causing the print head nozzles to become clogged. Print the nozzle check test pattern and clean the print heads as necessary.
See section "When not Using for a Long Period of Time" for more information.
Have the print heads been aligned?
Blurred or double lines indicate the print heads may be incorrectly positioned.
See section "Using the [Maintenance] Menu" for more information.
Is there a problem with the printer's location?
Make sure that the printer is level. Place the printer in a location where it will not be subject to shaking or excessive force.
See section "Checking the Installation Area" for more information.
Have you performed registration?
Perform registration if the print start point indicates misalignment.
After attaching the option tray, and the bypass tray, you must register where to start printing on paper loaded in each paper tray.
See section "Registration" for more information.
Have you changed the paper feed setting?
If horizontal lines are printed unaligned, print images are patchy, or black or white streaks are printed at regular intervals, print a test pattern, then adjust the paper feed setting.
See section "Adjust Paper Feed" for more information.
Does the paper type setting match?
Make sure that the paper type setting of the printer driver matches the type of paper loaded.
See section "Using the [Paper Input] Menu" for more information.
Have any of the inks past the “Recommended Use by Dates”?
Ink cartridges should be used prior to the “Recommended Use by Date,” preferably within six months of being removed from their packaging. Using ink in the printer past this date may be harmful to the unit and/or result in poor output quality.
Are you printing on the right type or wrong side of the paper?
Check that you are printing on sublimation transfer paper and that the print is on the correct, bright white side.
See sections "Handling and Storage Precautions" and "Loadable Paper Sizes Paper" for more information.
Is the paper loaded in the correct orientation?
Some paper cannot be loaded lengthwise depending on the size of the paper. Check the
orientation in which the paper is loaded.
See section "Loadable Paper Sizes" for more information.
Colors are not correct
If the color of the printed output differs from what is expected, refer to the following questions:
Note
More information specifically regarding color can be found on sawgrassink.com.
Does color not match what is onscreen?
Since printed colors and screen colors are produced by different methods, a color printed and a color displayed on a screen can have different hues even though they are the "same" color.
Has the nozzle check been performed?
The print heads may be missing nozzles. Print the nozzle check test pattern and clean the print heads as necessary.
See sections "Nozzle Check" and "Head-cleaning" for more information.
Are you printing on the right type or wrong side of the paper?
Check that you are printing on sublimation transfer paper and that the print is on the correct, bright white side.
See sections "Handling and Storage Precautions" and "Loading Paper" for more information.
Have any of the inks past the “Recommended Use by Dates”?
Ink cartridges should be used prior to the “Recommended Use by Date,” preferably within six months of being removed from their packaging. Using ink in the printer past this date may be harmful to the unit and/or result in poor output quality.
Is a supported design software being used and is it configured properly?
Certain types of design software are required for correct color output. Poor color quality will likely occur if specified software is not used or configured properly.
See section "Design Software Requirements" for more information.
Image Position is not Correct or Only a Partial Image is Printed
If the position of printed items is not correct or only a partial image is printed, refer to the following questions:
Have the settings for page layout been made?
Check whether page layout settings have been made with the design software.
Does the paper size setting match?
Make sure that the paper size selected in the [Print On:] list of the [Printer Properties] dialog box matches the size of the paper loaded.
Is there a printer error?
View the display or Web Image Monitor to check whether an error has occurred.
Is the correct paper size selected in the design software and printer driver?
Make sure that the paper size selected in design software and printer driver matches the size of the paper loaded.
Does the computer meet system requirements?
Check that the computer being used meets system requirements.
See section "System Requirements" for more information.
Error & Status Messages on the Display
This section explains what the messages that appear on the display mean and what to do when a particular message appears.
Depending on the "Auto Continue" settings specified on the [System] menu, some of the following messages might not appear. See section "Using the [System] Menu" for more information.
Error Messages
Cannot recover error page(s) / FormFeed to print remaining
The printer confirmed that the error has been cleared and printing has resumed. However, some page(s) did not print.
To continue printing, press the [Form Feed] key and print the missing page after the print job is finished. To delete the print job, press the [Job Reset] key.
See section "Cannot Recover Error Page" for more information.
Cannot use High Temp. / Power Off On
The temperature is abnormally high.
Check the installation area and relocate the printer. Alternatively, wait until the printer acclimates to the room temperature.
See section "Out of Printable Temperature Range" for more information.
Cannot use Low Temp. / Power Off On
The temperature is abnormally low.
Check the installation area and relocate the printer. Alternatively, wait until the printer acclimates to the room temperature.
See section "Out of Printable Temperature Range" for more information.
Paper Size or Type Mismatch
The size of paper in the tray # (Tray 1, 2, 3, or the bypass tray) is different from the size specified.
Load the paper of the size specified in the paper tray, then change the paper size in the paper input menu accordingly.
Alternatively, press the [Form Feed] key, select a paper tray containing paper of the specified size, then print. To cancel the print job, press the [Job Reset] key.
See sections "See section "Cancelling Printing" for more information.
Paper Size Mismatch/Paper Type Mismatch (Tray 1)" and "See section "Cancelling Printing" for more information.
Paper Size Mismatch/Paper Type Mismatch (Tray 1) for more information.
Hardware Problem Ethernet Board
An error in the Ethernet port (ethernet board) network function has occurred.
Disconnect all cables, turn the printer off, and then turn it on again.
If the message reappears, contact Sawgrass.
See section "Network Interface Error" for more information.
Waste Collection Unit is not set / Set the Waste Collection Unit.
The waste collection unit has not been installed correctly.
Reset the waste collection unit correctly.
See section "Waste Collection Unit Not Detected" for more information.
Waste Collection Unit is full / Replace Waste Collection Unit
The waste collection unit is full.
Replace the waste collection unit.
See section "Waste Collection Unit" for more information.
Load Paper or Form Feed
There is no paper trays that contain paper of the specified size and type.
Load paper of the specified size and type in a paper tray, then specify the size and type in the paper input menu accordingly.
Alternatively, press the [Form Feed] key, select a paper tray containing paper of the specified size or type, then print. To cancel the print job, press the [Job Reset] key.
See section "Paper Size Mismatch/Paper Type Mismatch (Auto Tray Select)" for more information.
Load Paper: Tray# or Form Feed
The tray (Tray 1, 2, 3, or the bypass tray) has run out of paper.
Reload the paper tray.
Alternatively, press the [Form Feed] key, select a different paper tray, then print. To cancel
the print job, press the [Job Reset] key.
See sections "No Paper/Tray Not Detected (Tray 1)", "No Paper/Tray Not Detected (Tray 1) and "No Paper/Tray Not Detected (Tray 1)" for more information.
Load Paper:Tray1
Tray 1 has run out of paper.
Reload Tray 1.
To cancel the print job, press the [Job Reset] key.
See section "No Paper/Tray Not Detected (Tray 1)" for more information.
Loading Ink... / WAIT! N minutes
Ink being filled.
"N" indicates time required for this operation.
Low Ink
The ink will soon run out.
Make sure you have a new ink cartridge for the color indicated by the icon.
Maintenance failed
Head cleaning, head flushing, or other maintenance operations have failed.
Run the maintenance again after clearing the error.
You can clear a maintenance error as follows:
■ The printer receives another print job.
- Press the [#Enter] key.
Maintenance in process...
The printer is cleaning or flushing its print head.
Wait a moment.
Open Front Cover / Replace Ink Crtg
The ink has run out.
Install a new ink cartridge indicated by the | | or |↓| icon.
See section "Ink Cartridge" for more information.
Open Front Cover / Reset Cartridge
No ink cartridge has been installed.
Install the ink cartridge correctly.
See section "Cover Open / Ink Cartridge(s) Not Detected" for more information.
Page Drying...
Being dried.
See section "Using the [Maintenance] Menu" for more information.
Panel Locked Cannot use
You have pressed a locked key.
Unlock the key.
Paper Misfeed / Press Form Feed
A paper jam occurs.
Press the [Form Feed] key to feed the paper.
See section "Using the [Form Feed] Key to Remove Jammed Paper" for more information.
Paper Misfeed Bypass Tray / Reset Paper
A paper misfeed has occurred in the bypass tray.
Reposition the paper in the bypass tray.
See section "Loading Paper" for more information.
Paper Misfeed Remove all Rear / Covers then remove misfeed
A paper jam occurs.
Open the rear cover or rear unit cover, then remove the jammed paper.
See sections "Opening the Rear Cover to Remove Jammed Paper" and "Opening the Rear
Unit Cover to Remove Jammed Paper" for more information.
Paper Misfeed remove Tray # / or Rear Covers, remove misfeed
Paper has jammed in the tray (Tray 2 or 3).
Remove the jammed paper.
See section "Paper Jam in Tray 2/3" for more information.
Paper Misfeed Tray # / Remove tray(s), reset paper
A paper misfeed has occurred in the tray (Tray 1, 2, or 3).
Reposition the paper in the paper tray, then press the [Form Feed] key.
See section "Loading Paper" for more information.
Prepare new Waste Collection Unit
The waste collection unit is almost full.
Make sure you have a new waste collection unit on hand.
If an ink cartridge starts running out of ink when the waste collection unit is almost full, the alert indicator will flash and a message informing you of the cartridge's low ink level will appear on the display.
Processing...
The printer is printing.
Ready
The printer is able to print.
Rear Cover is open / Close Rear Cover
The rear cover is open.
Close the rear cover.
See section "Cover Open" for more information.
Remove Misfeed Open Top Cover / Press Form Feed, remove misfeed
A paper jam occurs.
Open the top cover, press the [Form Feed] key, then remove the jammed paper from the opening.
See section "Removing Paper Jammed under the Top Cover" for more information.
Reset Bypass Tray correctly
The bypass tray has not been installed correctly.
Reset the bypass tray correctly.
See section "Attaching and Detaching the Bypass Tray" and "No Paper/Tray Not Detected (Bypass Tray)" for more information.
Resetting Job...
The printer is reinitializing a print job.
Wait a moment.
Right Front Cover is open / Close Right Front Cover
The right front cover is open.
Close the ink cartridge cover.
See section "Cover Open / Ink Cartridge(s) Not Detected" for more information.
Right Int. Unit almost full
Internal unit is a service replacement part.
For details about internal unit replacement, contact Sawgrass.
SCXXX-XX Power Off On / Call Service if error reoccurs
An error has occurred.
Turn the printer off and then on. If the message reappears, contact Sawgrass.
Setting change...
The printer is updating the network interface.
Wait a moment.
Temp. alert Please wait...
The printer is too hot or cold at start-up.
Wait until "Ready" appears on the display.
Top Cover is open / Close Top Cover
The top cover is open.
Close the top cover.
See section "Cover Open" for more information.
Tray # Rear Cover is open / Close Tray # Rear Cover
The rear unit cover of the tray (Tray 2 or 3) is open.
Close the rear unit cover.
See section "Cover Open" for more information.
Used Ink Collect Unit is set / Replace Ink Collector Unit
A used waste collection unit was installed.
Install a new waste collection unit.
See section "Waste Collection Unit" for more information.
Used Ink Crtrdge / Replace Ink Crtg
A used ink cartridge was installed.
Replace the ink cartridge indicated by the | | or ↓| icon.
See section "Ink Cartridge" for more information.
Waiting...
Wait a moment.
Errors Displayed by the Web Image Monitor
If an error occurs with the printer, the Web Image Monitor displays an error message.
Check the manual for the page corresponding to the error where you can check how to resolve the problem in more detail.
Depending on the "Auto Continue" settings specified on the [System] menu, some of the following messages might not appear. See section "Using the [System] Menu" for more information.
No Paper/Tray Not Detected (Tray 1)
Tray 1 has run out of paper or the tray is not installed correctly.
Follow the procedure below:
- Load paper into the paper tray.
See section "Loading Paper" for more information. - Print by Form Feed.
Press the [Form Feed] key, select a different paper tray, then print. - Cancel the print job.
See section "Cancelling Printing" for more information.
No Paper/Tray Not Detected (Tray 2/3)
Tray 2/3 has run out of paper or the tray is not installed correctly.
Follow the procedure below:
- Load paper into the paper tray.
See section "Loading Paper" for more information.
- Print by Form Feed.
Press the [Form Feed] key, select a different paper tray, then print. - Cancel the print job.
See section "Cancelling Printing" for more information.
No Paper/Tray Not Detected (Bypass Tray)
The bypass tray has run out of paper or the bypass tray is not installed correctly.
Follow the procedure below:
- Load paper into the paper tray.
See section "Loading Paper" for more information. - Attach the bypass tray properly.
See section "Attaching and Detaching the Bypass Tray" for more information. - Print by Form Feed.
Press the [Form Feed] key, select a different paper tray, then print. - Cancel the print job.
See section "Cancelling Printing" for more information.
Paper Size Mismatch/Paper Type Mismatch (Tray 1)
Tray 1 is not loaded with paper of the correct size or type.
Follow the procedure below:
- Change the paper settings.
See section "Using the [Paper Input] Menu" for more information. - Print by Form Feed.
Press the [Form Feed] key, select a paper tray containing paper of the specified size or type, then print. - Cancel the print job.
See section "Cancelling Printing" for more information.
Paper Size Mismatch/Paper Type Mismatch (Tray 2/3)
Tray 2/3 is not loaded with paper of the correct size or type.
Follow the procedure below:
- Change the paper settings.
See section "Using the [Paper Input] Menu" for more information.
- Print by Form Feed.
Press the [Form Feed] key, select a paper tray containing paper of the specified size or type, then print.
- Cancel the print job. See section "Cancelling Printing" for more information.
Paper Size Mismatch/Paper Type Mismatch (Bypass Tray)
The bypass tray is not loaded with paper of the correct size or type.
Follow the procedure below:
- Change the paper settings. See section "Using the [Paper Input] Menu" for more information.
- Print by Form Feed. Press the [Form Feed] key, select a paper tray containing paper of the specified size or type, then print.
- Cancel the print job. See section "Cancelling Printing" for more information.
Paper Size Mismatch/Paper Type Mismatch (Auto Tray Select)
Paper tray is not loaded with paper of the correct size or type.
Follow the procedure below:
- Change the paper settings. See section "Using the [Paper Input] Menu" for more information.
- Print by Form Feed. Press the [Form Feed] key, select a paper tray containing paper of the specified size or type, then print.
- Cancel the print job. See section "Cancelling Printing" for more information.
Cover Open
The top, rear, or rear unit cover is open.
Close the cover.
If these covers are closed, open and close each of them again.
- Close the cover.
Top cover
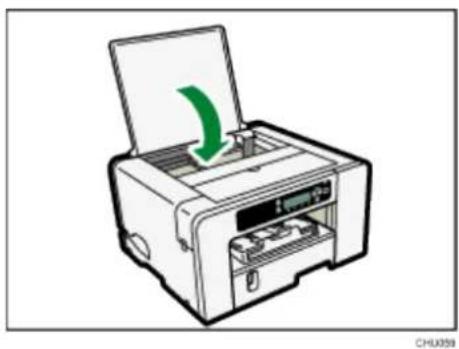
natural_image
Illustration of a printer with a green arrow indicating the paper's direction (no text or symbols present)Rear cover
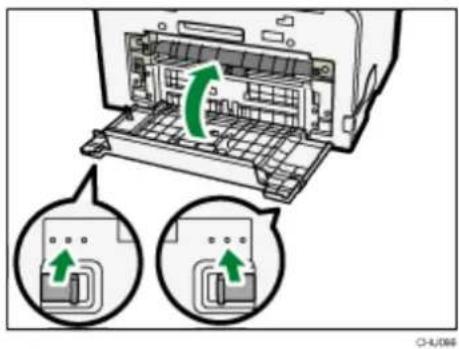
natural_image
Diagram of a computer interface showing a keyboard with green directional arrows indicating rotation, and two circular insets showing device components (no text or symbols present)Make sure to return the tabs to their original positions.
Cover Open / Ink Cartridge(s) Not Detected
The right front cover is open. Close the right front cover.
Alternatively, the ink cartridges are not installed or are installed incorrectly.
Install the ink cartridges correctly.
If the cover is open
- Close the right front cover.
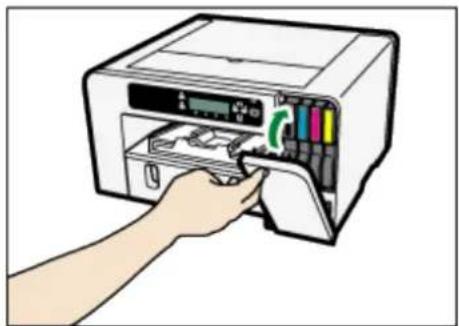
natural_image
Illustration of a hand inserting a printer into a rack with color-coded slots (no text or symbols)If the ink cartridges are not installed or are installed incorrectly
- Open the right front cover.
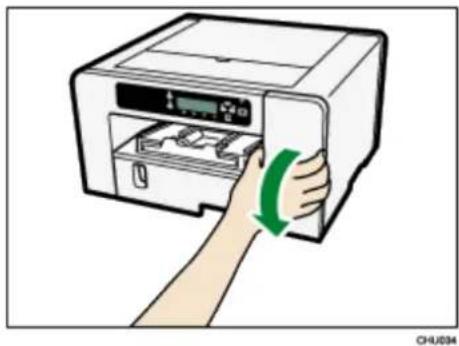
natural_image
Illustration of a hand inserting a printer into a slot, with a green arrow indicating the motion (no text or symbols present)- Push the cartridge fully in.
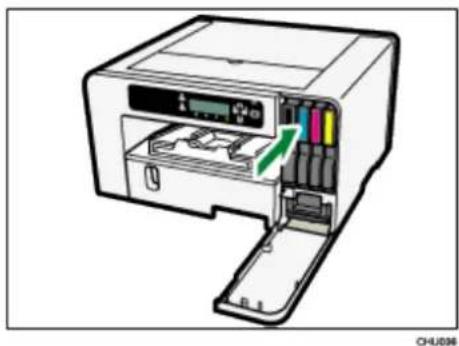
natural_image
Diagram of a printer internal structure showing internal components and a green arrow indicating a specific area (no text or symbols present)- Close the right front cover.
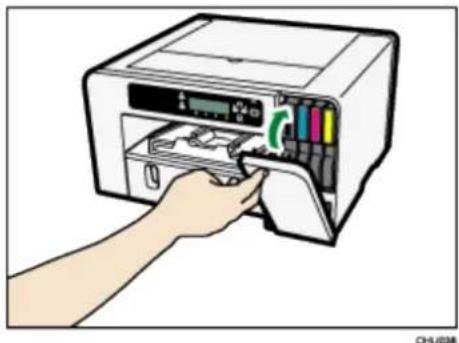
natural_image
Illustration of a hand inserting a CD into a printer (no text or symbols visible)Note
- If the error persists, remove the ink cartridge, then re-install it. Do this once only.
■ If there is a problem with the ink cartridge, try installing a new cartridge. - For details about handling the ink cartridges, see section "Handling Ink Cartridges" for more information.
Cartridge Almost Empty
One of the ink cartridges is almost empty.
Check which color ink cartridge will soon have to be replaced, then have a new cartridge handy.
Note
- Do not carry out head cleaning or head flushing. If you do, the ink may run out.
If you turn the printer off then on again, the ink in the ink cartridge may run out.
- The amount of remaining ink shown in the cartridge replacement indicator is for reference only and may differ from the actual amount. Also, cartridges can become empty without a low ink warning appearing.
Cartridge Empty
The ink has run out.
Replace the cartridge.
Note
- If the cartridge is empty, head cleaning or flushing cannot be performed.
- If the ink runs out during printing, the printer may eject blank or partially printed sheets.
- Cartridges that the printer report as empty may still contain a small amount of ink. This is normal as the cartridges are overfilled to prevent them from completely running dry. This prevents air from being drawn into the printer.
Used Cartridge
A used ink cartridge was installed.
Replace the ink cartridge.
See section "Ink Cartridge" for more information.
Note
- If the cartridge is empty, head cleaning or flushing cannot be performed.
- Ink cartridges should be used up before the “Recommended Use By” date label affixed to each cartridge. Using ink in the printer past this date may be harmful to the unit and/or result in poor output quality.
- Cartridges that the printer report as empty may still contain a small amount of ink. This is normal as the cartridges are overfilled to prevent them from completely running dry. This prevents air from being drawn into the printer.
Waste Collection Unit Not Detected
The waste collection unit is not inserted correctly.
Insert the waste collection unit correctly.
1. Open the right front cover.
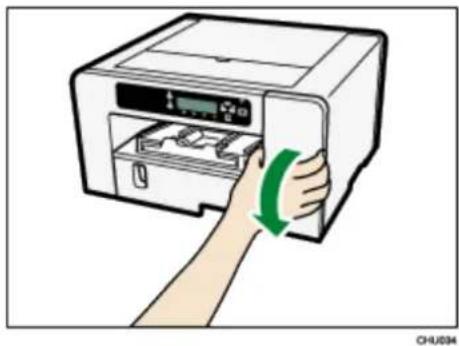
natural_image
Illustration of a hand inserting a printer into a slot, with a green arrow indicating the motion (no text or symbols present)- Attach the waste collection unit by pushing it in until it clicks.
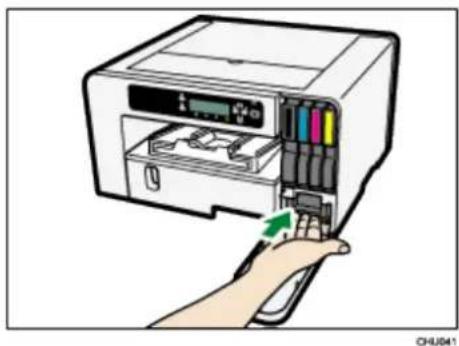
natural_image
Illustration of a hand inserting a color into an inkjet printer (no text or symbols visible)- Close the right front cover.
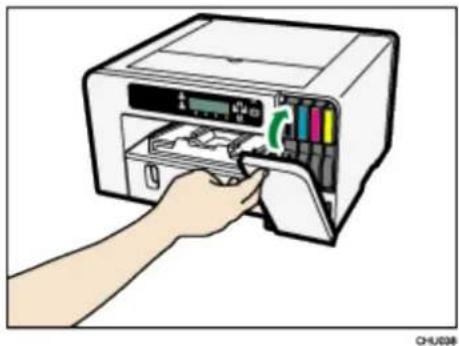
natural_image
Illustration of a hand inserting a printer into a rack, showing internal components and color-coded slots (no text or symbols)If the message reappears, contact Sawgrass.
Waste Collection Unit Almost Full
The waste collection unit is almost full.
Have a new waste collection unit handy.
Note
- If an ink cartridge starts running out of ink when the waste collection unit is almost full, the alert indicator will flash and a message informing you of the cartridge's low ink level will appear on the display.
Waste Collection Unit Full
The waste collection unit is full.
Replace the waste collection unit.
See section "Waste Collection Unit" for more information.
Used Waste Collection Unit
A used waste collection unit is installed.
Replace the waste collection unit.
See section "Waste Collection Unit" for more information.
Out of Printable Temperature Range
Printing is not possible because the printer is placed in a location that is too hot or cold.
Move the printer to a more suitable environment.
-
Press and hold down the [Power] key for one second.
-
Place the printer in an environment where the temperature range is between 15^ C and 25^ C ( 59^ F and 77^ F).
-
Turn the printer on.
Note
- If humidity is more than 54%, the upper temperature limit will be lower.
- Even after the power is turned on, the printer may remain in standby mode until it acclimates to the room temperature. If this happens, wait until the [Power] key stops flashing and stays lit.
Reference
- For details about what conditions the printer can be used under (ambient temperature and humidity range), see section "Checking the Installation Area" for more information.
Printer Error
An error has occurred in the printer.
Turn the printer off, then turn it on again.
Note
- If the printer is relocated from a cold area to a warm area or the printer is placed in a room where the temperature varies greatly, condensation may form inside the printer causing errors. If this happens, perform the decondensation procedure. See section "De-condensation" for more information.
If the error still does not clear after the printer acclimates to room temperature and
the power is turned back on, contact Sawgrass.
Network Interface Error
An error in the Ethernet port network function has occurred.
Turn the printer off, then turn it on again.
Note
■ If the message reappears, contact Sawgrass.
Maintenance Failed
Head cleaning, head flushing, or other maintenance operations have failed.
Run the maintenance again after clearing the error.
You can clear a maintenance error as follows:
■ The printer receives another print job.
- Press the [#Enter] key.
Cannot Recover Error Page
If you resume printing after removing a paper jam, an error message may appear if some pages cannot be printed. If so, follow the procedure below:
- Print by Form Feed.
Press the [Form Feed] key, then the printer prints the remaining pages following the missed page(s). - Cancel the print job.
See section "Cancelling Printing" for more information.
Where to Inquire
For inquiries, contact Sawgrass or an authorized Sawgrass distributor.
Recommended Consumables
Consumables recommended for this printer are listed.
Purchase necessary consumables before your supply runs out.
For information about consumables, contact Sawgrass or an authorized Sawgrass distributor.
- Ink cartridges
■ Waste Collection Unit
Options
SG400OPTIONTRAY / SG800OPTIONTRAY
This unit allows you to load additional sheets of paper.
SG400BYPASSTRAY / SG800BYPASSTRAY
Use this tray to feed in sheet manually and/or for oversize paper.
For information about options, contact Sawgrass or an authorized Sawgrass distributor.