214 FS - Bottes Monterey - Free user manual and instructions
Find the device manual for free 214 FS Monterey in PDF.


User questions about 214 FS Monterey
0 question about this device. Answer the ones you know or ask your own.
Ask a new question about this device
Download the instructions for your Bottes in PDF format for free! Find your manual 214 FS - Monterey and take your electronic device back in hand. On this page are published all the documents necessary for the use of your device. 214 FS by Monterey.
USER MANUAL 214 FS Monterey
natural_image
Abstract blue logo design with stylized lightning bolt and wave elements (no text or symbols)MONTEREY BOATS
SPORT BOAT OWNER'S MANUAL
180 FS 234 FS/FSX
194 FS 254 FS/FSX
214 FS 254 FS Cuddy
214 FS Cuddy
natural_image
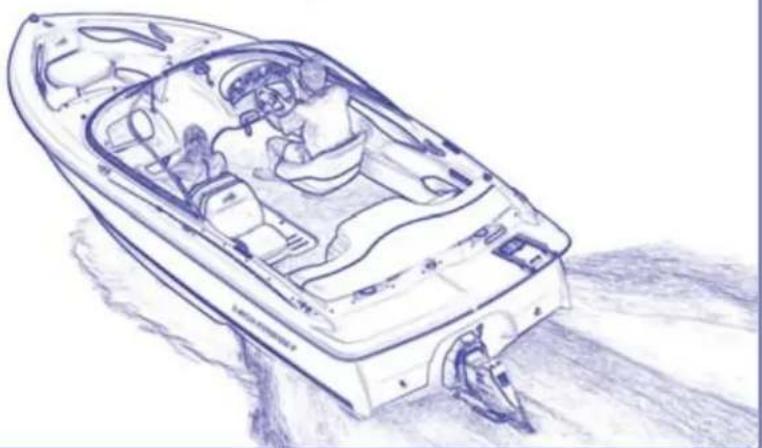
Line drawing of a speedboat with passengers and steering wheel (no text or symbols)Dear Valued Customer,
Welcome to the Monterey Life!
We would like to extend to you our "Thank You" for choosing a Monterey boat!
You have made an investment in our product and we are confident you will enjoy many years of boating pleasure. Your new boat has been built to the standards set forth by the United States Coast Guard and the National Marine Manufacturers Association. We are proud to have you in our “Family!”
At this time, we need you to read your owner's manual and become familiar with all systems on your boat. Make certain that you and your dealer have filled out and mailed your warranty registration card back to us here at the factory. It is very important to us and it is also a U.S. Federal Regulation.
This manual is an important aid in the operation and maintenance of your boat. The descriptions, information and specifications are intended as a guide and cannot cover every question you may have about your boat and boating in general. We encourage you to contact your dealership for any additional information you might need. If there is a question about your boat that can't be answered by your dealer, please contact our factory direct by calling the Monterey Boats Customer Service Department, (352) 529-9181 or online if you prefer at: www.info@montereyboats.com.
If you are new to boating, we recommend you participate in a boating class or group to gain more knowledge and confidence. Contact your dealer, local U.S. Coast Guard or U.S. Power Squadron Organizations for information in your area.
With proper care, routine service and preventive maintenance, your Monterey boat will not only reward you with enjoyment, but with reliability, dependability and one of the higher resale values in today's boating industry.
Enjoy your new boat and please respect our environment at all times. Always remember to practice safe boating procedures for your protection as well as those around you.
Sincerely,
The M.O.S.T. (Monterey Owners Support Team)
TO COMPLY WITH FEDERAL REGULATIONS IT IS IMPORTANT TO RETURN THE WARRANTY REGISTRATION CARD WITHIN 15 DAYS.
MONTEREY
IDENTIFICATION NUMBERS
Safeguard information about your boat by recording the Hull Identification Number (HIN) and model of your boat, and model and serial numbers of the engine, trailer, and accessories below. The HIN is located on the upper, starboard corner of the transom. The HIN must be clearly visible and may not be removed, altered or tampered with in any way as regulated by federal law.
The identification numbers are important! Keep a copy of these numbers stored in a safe place off the boat. In case of theft, damage, etc., report these numbers to the local authorities, your insurance agent and your dealer.
DATE PURCHASED
DEALER/PHONE NUMBER ____
BOAT MODEL
HULL NUMBER ____
TRAILER ID NUMBER ____
ENGINE #1 MAKE/MODEL
ENGINE #1 SERIAL NUMBER
ACCESSORY MAKE/MODEL
ACCESSORY SERIAL NUMBER
Monterey Boats has long been known as a quality boat manufacturer with a commitment to customer satisfaction. This manual is but one example to that commitment. We have carefully prepared this information to assist you in the proper operation and care of your new boat, and some of the responsibilities that go along with owning/operating a boat.
This section contains supplemental information about your Monterey boat that is different or not covered elsewhere in this manual. If you have questions about your boat not covered in this manual, or in the other supplied information, your dealer will be glad to assist you. Refer to the Table of Contents on page v to locate general information.
As part of your warranty responsibilities, you must perform periodic maintenance/ inspections as outlined in this manual, the engine owner's manual and other information supplied in the owner's important papers packet. Please keep this manual onboard for future reference and pass it along to the new owner if you ever decide to sell the craft.
All information, illustrations, and specifications contained in this manual are based on the latest product information available at the time of publication. Monterey Boats reserves the right to make changes at any time, without notice and without incurring obligation, in colors, materials, equipment, specifications and models.
Once again, thank you for choosing a Monterey boat; we wish you many years of boating enjoyment!
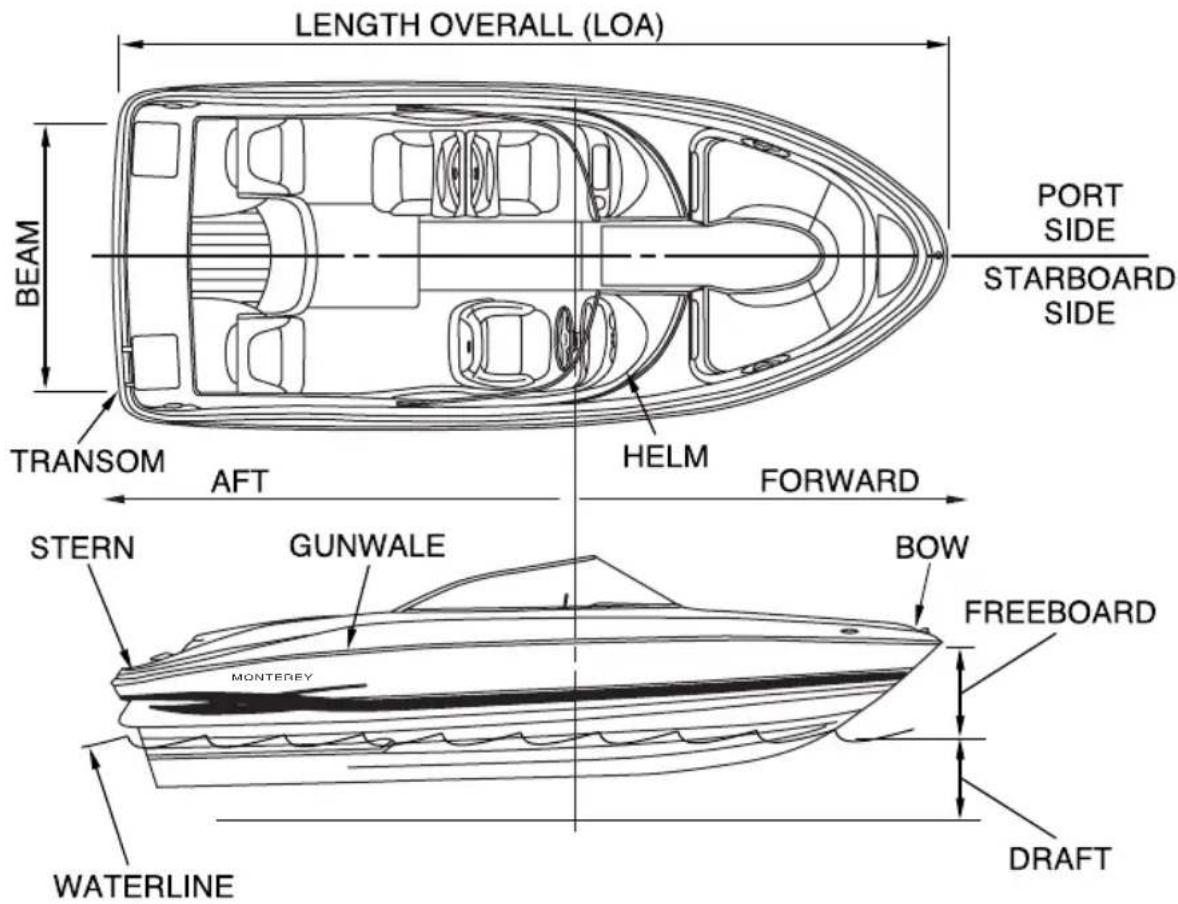
BOATING TERMINOLOGY
text_image
LENGTH OVERALL (LOA) PORT SIDE STARBOARD SIDE BEAM TRANSOM AFT HELM FORWARD STERN GUNWALE BOW MONTEREY FREEBOARD DRAFT WATERLINE* An easy way to remember PORT side from STARBOARD side is "PORT" and "LEFT" both have four letters.
Page
M Monterey Boats ...... M-1
New Boat Delivery .....M-1
Parts.....M-1
Warranty Registration/
New Boat Checklist......M-2
Specifications ......M-3
Special Care &
Cleaning M-4
Instrument Console ......M-13
Battery Switches ......M-13
Battery Specifications ....M-14
Fire Extinguishing
System M-15
Fresh Water Tank .....M-16
Head and Waste
Containment System .....M-18
Important Papers
Package ......M-19
Boat Layouts & Details ...M-19
Wiring Diagrams .....M-36
1 Boating Safety 1-1
Boating Regulations .....1-2
Boat Safety Labels ......1-2
Boater Responsibilities.....1-2
Required Safety
Equipment 1-3
Recommended Equipment ...1-7
Emergencies 1-8
Hazardous Conditions......1-9
Boating Under the
Influence....1-14
Carbon Monoxide......1-14
Operation By Minors. .....1-15
Passenger Safety......1-16
General Precautions .....1-16
Safety While Boating.....1-17
Water Sports 1-19
General Water Sport
Precautions ......1-20
Teak Surfing 1-22
Our Environment .....1-23
Page
2 Basic Rules Of The Road ....2-1
Aids To Navigation......2-1
Right-Of-Way......2-7
Burdened Boats....2-8
3 Ship Systems....3-1
Ventilation System......3-1
Fire Extinguishing System ......3-2
Fuel System 3-2
Exhaust System 3-2
Lubrication System......3-3
Cooling System 3-3
Electrical System......3-4
Steering System 3-4
4 Controls and Indicators .....4-1
Shift/Throttle Controls......4-1
Switches 4-2
Indicators 4-6
5 Operation....5-1
Fueling....5-1
Lubrication 5-3
Starting 5-4
Shifting/Running 5-5
Warning Alarm 5-5
Steering 5-6
Stopping 5-7
Docking....5-7
Boat Trim 5-9
Drive Trim Angle....5-10
6 Getting Underway......6-1
Safety Checklist......6-1
Safety Equipment 6-2
Boarding 6-3
7 Running 7-1
Maneuvering Techniques .....7-1
Salt Water....7-2
Freezing Temperatures......7-2
Towing Procedure....7-2
Anchoring 7-4
Propellers 7-7
Page
8 Care and Maintenance......8-1
Repairs and Modifications.....8-1
Electrical....8-1
Corrosion Protection......8-4
General Maintenance 8-5
Fuel System 8-8
Steering system......8-8
9 Troubleshooting....9-1
Trouble Check Chart .....9-1
10 Storage....10-1
Storage Preparation .....10-1
Lifting the Boat 10-4
11 Trailering 11-1
Foreign Species......11-1
Classifications......11-2
Hitch....11-2
Safety Chains 11-3
Trailer Brakes 11-4
Trailering Checklist ......11-4
12 Glossary of Terms......12-1
Warranty
NEW BOAT DELIVERY
Your Monterey boat is inspected at each step of the manufacturing process. Before leaving the factory, every Monterey boat undergoes a thorough check for systems operation, fit and finish. Your Monterey Dealer also performs a Pre-Delivery inspection prior to final delivery. When the new boat is delivered to you, the customer, a final check is performed during orientation. Both the Pre-Delivery and Final Delivery inspections are documented (New Boat Checklist) to ensure trouble free operation and returned to Monterey Boats.
At the time of new boat delivery, your Monterey Dealer will ask you to sign the completed Warranty Registration and New Boat Checklist for the boat and other accessory equipment. By signing these documents, you acknowledge that you have reviewed and understand all information.
PARTS
Should you require new parts or would like to order an option after your original purchase, please contact your Monterey Boats Dealer to place your orders. Orders may not be placed with the manufacturer.
WARRANTY REGISTRATION AND
NEW BOAT CHECKLIST
SPORT BOAT & DECK BOAT

MONTEREY
BOATS
Boat Number (HIN): ____
Boat Model:
1579 S.W. 18 ^th Street
Williston, FL 32696
Tel 352-529-9181
Fax 888-922-6287
www.montereyboats.com
Selling Dealer:
Dealer Code:
Engine Brand:
Engine Model:
Engine Serial #:
Drive Serial #: ____
Date of Sale:
Warranty Start Date: ____
Owner Name (Last, First): ____
Address:
State: ____ Zip: ____
City:
E-Mail Address:
Phone:
PLEASE, INSPECT AND CHECK OFF THE LOW TOLERATIONS
Indicate Status with the following Key: 1 - OK, 2 - Needs Co' tion, 3 - Completed, N/A - Not Applicable
BOAT
Boat gel coat, striping & graphics
Upholstery fit, clean and free of defects
Sundeck/Sun Island/lounger operation
Canvas fit, clean and free of defects
Hatches, cabinets & head doors, latches operat
All thru-hull fittings, ball valves, head drain, and drain,
drain plug-hull, wet bar drain are secure, no le
Windshield fit
Ladders
ENGLINE - AFTER STARTING: (in water)
Oil pressure
Fuel line connectors - no leaks
Engine has no water or oil leaks
Idle speed per engine specs, in gear
Ignition timing check with timing light or scan tool
Gear shift works properly – forward, neutral, reverse
Instruments read correctly
Exhaust system - no leaks
EQUI PMEN
Running Lights (Navigation)
Cockpit lights
Toilet (Head) operation & hoses
Stereo - Radio, CD, P Control
Bilge Pumps - Auto- und „ch
Water pressure s on (let pressure stan minutes to see if
pump goes on) heater
Bilge Blower(s)
Wipers
Horn
Tables
Plumbing Hose Clamps
SEA TRIAL:
Boat performance
Port engine operation
Starboard engine operation
Steering - smooth operation
Stern drive trim operation
Instruments register properly
Technical Check Performed by
Technician Date
PRE-DELIVERY FINAL CHECK
All accessory equipment operates (Mech. & Elect.)
Carpets, curtains, cushions & canvas installed
All boat, engine and accessory literature
Boat properly cleaned, interior and exterior
Trailer wiring, wheels, fenders & brakes
OWNER ORIENTATION
Review & familiarize Owner with operation of all features
and options on boat
Sea Trial with Owner
Review of Owners Manual
Review of Warranties
Review of Owner Responsibilities
Review of Service & Maintenance Procedures
Review of Care & Cleaning
Owner Orientation Performed by
Dealer Personnel Date
I have read and agree with the checklist. I have read and understand the Monterey Boats Limited Warranty as it appears on back.
Owner Signature Date
COMMENTS
Distribution: Factory CS - White, Dealer - Yellow. Owner - Manila Card Rev 0904
Warranty is located in the back of this manual.
SPECIFICATIONS
The specifications given were in effect at the time of printing. Monterey Boats reserves the right to make changes without incurring obligation.
| Type | 180 FS 194 FS 214 FS 214 FSC | |||
| LOA w/ Swim Platform | 18'-2" (5.5 m) 21'-3" (6.6 m) 22'-9" (6.9 m) 22'-9" (6.9 m) | |||
| BEAM (meters) | 7'-8" (2.3 m) 8'-4" (2.5 m) 8'-6" (2.6 m) 8'-6" (2.6 m) | |||
| BRIDGE CLEAR | 3'-9" (1.1 m) 4'-2" (1.3 m) 4'-9" (1.5 m) 4'-9" (1.5 m) | |||
| DEADRISE | 18° 19° 20° 20° | |||
| DRAFT DRIVE DOWN | 34" (.86 m) | 34" (.86 m) | 36" (.91 m) | 36" (.91 m) |
| DRAFT DRIVE UP | 21" (.53 m) | 21" (.53 m) | 23" (.58 m) | 23" (.58 m) |
| WATER CAPACITY (liters) | N/A | 9 gal (34 l) | 9 gal (34 l) | 9 gal (34 l) |
| FUEL CAPACITY (liters) | 28 gal (106 l) | 36 gal (164 l) | 55 gal (208 l) | 55 gal (208 l) |
| DRY WEIGHT (kg) | 2500 lbs(1134 kg) | 3100 lbs(1406 kg) | 3500 lbs(1587.6 kg) | 3900 lbs(1769 kg) |
| MAX POWER | 225 HP (168 kw) | 270 HP (201 kw) | 300 HP (224 kw) | 300 HP (224 kw) |
| MAX CAPACITY - PERSONS | 8 Persons or 1300 lbs(590 kg) | 9 persons or 1500 lbs(680 kg) | 10 Persons or 1775 lbs(805 kg) | 10 Persons or 1775 lbs(805 kg) |
| MAX CAPACITY - PERSONS & GEAR | 1500 lbs(680 kg) | 1675 lbs(757 kg) | 1900 lbs(861 kg) | 1900 lbs(861 kg) |
| Type | 234 FS | 234 FSX | 254 FS/FSX 254 FSC | |
| LOA w/ Swim Platform | 24'-0" (7.3 m) 24'-0" (7.3 m) 26'-7" (8.1 m) 26'-7" (8.1 m) | |||
| BEAM (meters) | 8'-6" (2.6 m) 8'-6" (2.6 m) 8'-6" (2.6 m) | |||
| BRIDGE CLEAR | 8'-2" (2.49 m) 8'-2" (2.49 m) | |||
| DEADRISE | 19° 19° 20° 20° | |||
| DRAFT DRIVE DOWN | 38" (.98 m) | 38" (.98 m) | 41" (1.02 m) | 41" (1.02 m) |
| DRAFT DRIVE UP | 22" (.56 m) | 22" (.56 m) | 26" (.66 m) | 26" (.66 m) |
| WATER CAPACITY (liters) | 10 gal (38 l) | 10 gal (38 l) | 15 gal (56.8 l) | 15 gal (56.8 l) |
| FUEL CAPACITY (liters) | 62 gal (235 l) | 62 gal (235 l) | 80 gal (302.8 l) | 80 gal (302.8 l) |
| DRY WEIGHT (kg) | 4300 lbs(1950 kg) | 4500 lbs(2041 kg) | 5200 lbs(2,359 kg) | 5500 lbs(2,495 kg) |
| MAX POWER | 320 HP (239 kw) | 320 HP (239 kw) | 425 HP (316.9 kw) | 425 HP (316.9 kw) |
| MAX CAPACITY - PERSONS | 11 persons or 1800 lbs(816 kg) | 11 persons or 1800 lbs(816 kg) | 1323 lbs(600 kg) | 1323 lbs(600 kg) |
| MAX CAPACITY - PERSONS & GEAR | 2000 lbs(907 kg) | 2000 lbs(907 kg) | 8 Persons & Gear - 1764 lbs(800 kg) | 8 Persons & Gear - 1764 lbs(800 kg) |
- Draft Up and Draft Down - Minimum shown, will increase based on loading and placement
● Water and Waste Capacity - may differ according to options - Dry Weight - Average weight of base boat without options, fuel, water, waste, battery(ies) or gear.
SPECIAL CARE & CLEANING
The marine environment (sun, salt, pollution, and bird droppings) requires special products for proper care and cleaning. Your dealer is best suited for recommendations on marine care and cleaning products that work best in your area.
Canvas
The convertible/bimini top is made of acrylic materials. To gain longer life and top performance from your canvas including windshield connector, side and aft curtains, bow and cockpit covers, we recommend the following:
●The canvas and clear plastic are not designed to withstand long periods of time exposed to the elements as a protective cover at dock side or when your boat is in storage. A full, properly fitted, light colored mooring transportation or storage cover should be used for these purposes.
- If canvas gets wet during use, remove side curtains and open windshield so seams can dry out. The air circulation will allow all canvas to dry and prevent the growth of mildew. Never store wet or damp canvas.
- Occasionally set up all canvas and curtains and hose down with fresh water to remove accumulated soot and dirt. Sweep or brush the underside of the canvas to prevent the accumulation of dirt and mildew.
●The outer canvas surfaces can be cleaned with a soft scrub brush and either automotive convertible top cleaners or household cleaners suitable for use on acrylic surfaces. The underside of the canvas may be periodically sprayed with a spray disinfectant to prevent the growth of mildew.
- Do not store or dock your boat under trees. Tree sap is very corrosive to canvas and can also be harmful to gelcoat and vinyl interiors.
- Adjust top bows to eliminate pockets in which rain water can accumulate. The weight of this accumulated water can collapse the top or bag the canvas.

WARNING
Never trailer your boat with the convertible/bimini canvas (including side curtains, aft curtain, windshield connector, bow cover and cockpit cover) up. Monterey Boats' canvas is not designed to withstand the high wind loads of trailering. Severe wind damage can occur such as torn material, fastener pull-out and frame distortion. Damage caused by trailering is not covered under the limited warranty.
- Zippers and snaps should never be forced. Occasionally lubricate with silicone/Teflon grease.
- When trailering, dismantle, roll or fold and securely stow all canvas to prevent damage. Monterey recommends purchasing a transportation cover to keep your boat clean on the road. Your Monterey Dealer will assist you in finding a suitable cover (not available from Monterey Boats).
- Roll clear plastic (isinglass) curtains (do not fold) and store in a clean, dry place.
- Do not allow petroleum products or bug sprays to come in contact with canvas.
NOTICE
Your Monterey boat is basically an open vehicle. Therefore, in spite of well-designed and well-fitting canvas enclosures, your boat is not waterproof. We have made every effort to design these enclosures to conform with the boat, but a certain amount of leakage may occur, especially at the seam lines. After cleaning with soap and water, allow seams to thoroughly dry. A sealant can be applied on the seams to somewhat close the needle holes according to the manufacturer's instructions.
Acrylic and Plexiglass
Acrylics and plexiglass have properties that make them ideal for the marine environment. Components such as cabin doors and deck hatches need special care to prevent scratches and other damage. The following guidelines will help keep acrylics and plexiglass looking good for years to come.
DO'S
●Wash your hatches, windshield connector, side curtains and other clear plastic pieces, as well as other acrylic components on your boat with a mild soap and plenty of lukewarm water.
●Use a clean, soft cloth, applying only light pressure.
●Rinse with clear water and dry by blotting with a damp cloth or chamois.
- Grease, oil or tar may be removed with a good grade of hexane, aliphatic naphtha or kerosene. These solvents may be obtained at a paint or hardware store and should be used in accordance with the manufacturer's recommendations.
- To maintain a high-luster finish on your acrylics, we recommend that after properly cleaning, apply Meguiar's™ Mirror Glaze #10 with a soft towel. Note: If slight scratches appear on acrylics, use Meguiar's™ Mirror Glaze #17.
NOTICE
Clear plastic (isinglass) is subject to ultraviolet (sunlight) degradation over time. It may turn yellow-brown (a burnt appearance) and get brittle. Two things that can accelerate this degradation are:
- Direct contact with aluminum or stainless steel frames. Use "Standoffs."
- In salt water areas, dried salt crystals on the plastic will amplify sunlight. Wash after each use and/or windy day.
DON'TS
●Do not subject acrylic material to high temperatures when polishing.
- Do not use glass cleaning sprays, scouring compounds, or solvents like acetone, gasoline, benzene, carbon tetrachloride or lacquer thinner.
- Do not use masking tapes, duct tapes or packing tapes on your acrylic materials.
- Do not drill holes in your acrylic materials without proper drill bits (special bits are used in acrylic material to avoid damage).
Stainless Steel
Marine grade stainless steel components such as hardware, cleats, eyes, and rails offer superior corrosion resistance. When properly maintained, stainless steel will not rust or stain, even in harsh saltwater environments. However, if not maintained, stainless steel can rust, discolor, or even corrode. The following guidelines will help keep stainless steel looking good for years to come.
DO'S
●Clean stainless steel frequently (daily in salt or polluted environments) with mild soap and plenty of water. Any cleaner safe for use on glass is usually safe for stainless.
- Remove rust spots (especially around welds) immediately with a brass, silver, or chrome cleaner. Irreversible pitting will develop under rust allowed to remain on stainless for any period of time.
- Remove rust stains on gelcoat. See dealer for recommended product.
●Protect stainless with waxes or polishes suitable for marine use.
DON'TS
- Do not use coarse abrasives like sandpaper or steel wool which may actually cause rusting.
CAUTION
Apply No-Slip tape or step plates on surfaces which are walked on. Waxed gelcoat surfaces are extremely slippery, especially when wet.
- Do not use acids or bleaches which may etch the naturally occurring protective coating.
- Do not leave stainless steel in contact with iron, steel, or other metals which cause contamination leading to rust or corrosion.
Gemlux Stainless Steel Information and Care Instructions
The GEMLUX Stainless Steel products on your boat are made to the highest quality standards. Stringent quality control processes such as metallurgical analysis, precision polishing, multiple inspections and Six Sigma procedures ensure the highest quality possible. In order to ensure that your GEMLUX Stainless Steel maintains its beautiful finish, it is critical that you care for it properly.
| WARNING: Your Stainless Steel can be damaged by exposure to acids and other corrosive agents found in many cleaning products. A partial list of additives that may cause staining and a weakening of the finish is provided below. Use of these and other similar solutions to clean your boat can cause your Stainless Steel to bleed and will void your warranty. | |||
| Chlorsulphonic Acid | Comet | Sodium | Hydrochloric Acid |
| Ferrous lodide | EZ-ON, EZ-OFF | Hypochlorite | Hydrofluoric Acid |
| Hydrobromic Acid | Cleaner | Sulphuric Acid | Sodium Bifluoride |
| Iodine | Ferric Chloride | Muriatic Acid | Stannic Chloride |
| Sodium Chlorite | Fluorine | On & Off Cleaner | SnoBol |
| Sulphur Chloride | Hydrofluosilicic Acid | Rust StainsAway | Soft Scrub |
| Bleach | Silver Chloride | Ferrous Chloride | MarineSpray |
Cleaning and Cleansers
Frequent cleaning of your stainless steel with soap, water and GEMLUX Cleaning Wax will help maintain the finish. Always rinse the metal thoroughly with clean water and dry completely. Clean soft cloths or pads should be used. The use of steel wool pads or other highly abrasive brushes or sponges are not recommended and will damage the surface.
Contamination of the surface by chemicals, dirt or other material hinders the passivation process and traps corrosive agents, thus reducing corrosion protection. If your stainless is exposed to such chemicals it should be repassivated with GEMLUX Passivation solution.
| Job | Cleaning Agents | Method | Comments |
| Routine cleaning | Soap and water | Apply with a sponge or soft cloth. Dry area completely. | Once your stainless is free of discoloration and/or bleeding, spray GEMLUX Passivation Solution directly onto stainless. Allow to cure for 30-60 seconds. Rinse with fresh water and dry the area. This solution will help re-passivate the stainless steel. |
| Stubborn stains, discoloration or bleeding | GEMLUX Cleaning Wax | Apply with soft, dry cloth. Allow to dry. Polish and buff using a clean, dry cloth. |
For purchase information on the GEMLUX Cleaning Wax or GEMLUX Passivation Solution, please contact us at the numbers listed below.
Tel: 904-264-0173 / 888-GEMLUX-1 (888-436-5891) • Fax: 904-269-5905
www.gemlux.com
Gelcoats
The smooth, beautiful skin of the fiberglass hull is made of gelcoat. Gelcoat is a strong but thin (though thicker than automotive paint) layer of colored resin. The best way to keep the gelcoat skin on your boat in top condition is through regular maintenance. The following guidelines will help keep gelcoat looking good for years to come.
DO'S
- Keep the gelcoat surface out of direct sunlight or covered when not in use.
●Wash gelcoat frequently (daily in salt or polluted environments) with mild detergent and plenty of fresh water. Remove any stains quickly. Gelcoat is microscopically porous, so long term staining may become permanent.
●Regularly (monthly in salt or polluted environments) wax gelcoat surfaces with marine grade wax recommended for fiberglass finishes.
DON'TS
- Do not use plastic or other non-porous (non-breathable) materials to cover gelcoat surfaces. Trapped moisture from condensation can cause gelcoat damage. Shrink wrap storage covers must be properly ventilated, including hullsides.
- Do not use abrasives, bleaches, ammonias, acids or harsh detergents. See your dealer for special marine formulations.
●NEVER wax a gelcoat surface in direct sunlight.
- Do not attempt to remove stains and scratches. Chalking, stains, and minor scratches can be removed in most cases with careful rubbing and polishing with appropriate chemicals and is best done by a professional – see your dealer.
Cockpit Vinyl Upholstery with PreFixx® Coating
Beginning with the 2008 model year, Monterey Boats uses OMNOVA white, smoother and embossed pleated vinyl material with PreFixx top coating. All other accent embossed white and colored vinyl requires different care and maintenance. Please refer to page 8-5 for more information.
PreFixx Cleaning Instructions
PreFixx is engineered so that upholstery can be cleaned again and again without showing signs of wear. With easy cleanability, proven stain and abrasion resistance, PreFixx protective finish can reduce maintenance costs and frequent reupholstery.
Durability. Creates a barrier that resists stains from penetrating to the surface of the vinyl for proven, long-lasting protection. With laboratory-tested stain resistance and improved wear properties, BoltaSoft® upholstery treated with PreFixx protective finish can retain a “like-new” appearance longer.
Easy Maintenance. Enables most common stains like dirt and smudges to wipe off easily. Many difficult stains like ballpoint ink also can be cleaned with active solvents, such as nail polish remover, without damaging the PreFixx protective finish (when recommended cleaning instructions are followed).
Normal Care and Cleaning
Remove ordinary dirt and smudges with a mild soap and water solution and a clean, soft cloth or towel. Dry with a soft, lint-free cloth or towel. CAUTION: The use of vinyl “conditioners” or “protectants” is not recommended and should be avoided on vinyl upholstery treated with PreFixx protective finish.
Special Cleaning Problems
Although BoltaSoft upholstery treated with PreFixx protective finish is resistant to most common stains, the dyes and pigments in some staining agents have the ability to create a permanent stain if not treated properly. To clean difficult stains from upholstery treate with PreFixx protective finish, locate the staining agent in the lists below and follow its recommended cleaning method. For best results, treat all stains immediately.
Cleaning Tip: To determine the method and type of cleaners, the source of the stain should be identified.
Staining Agents: Baby oil, ketchup, chocolate, motor oil, olive oil, grape juice, urine, blood, hair oil tonic, tea, coffee and betadine. Use Method 1.
Staining Agents: Eye shadow, crayon and grease. Use Method 1. If stains remain, use Method 2.
Staining Agents: Tobacco tar (nicotine), permanent felt tip marker, yellow mustard, lipstick, ballpoint pen and spray paint. Use Method 1. If stains remain, use Method 2. For stubborn stains still remaining, use Method 3.
The recommended cleaners used in Cleaning Methods 1, 2 and 3 are progressively more aggressive. Often, it is better to begin with the least aggressive cleaner and move to the next strongest only if the stain remains. NEVER EXCEED a staining agent's recommended cleaner or cleaning method, however.
Method 1: Use one of the following cleaners with a soft cloth or damp sponge. Rinse area with fresh water, and then dry with a clean, lint-free cloth.
●Formula 409 ^® All-Purpose Spray Cleaner
●Fantastik ^® Spray Cleaner
Method 2: Use a solvent-type cleaner*, such as rubbing alcohol (isopropyl alcohol). Rinse cleaned area with fresh water, and then dry with a clean, lint-free cloth.
Method 3: Use a strong, active solvent cleaner* diluted in water (70% water/30% solvent cleaner), such as nail polish remover (acetone/water). Clean with a soft cloth or damp sponge. Stain should be removed with less than six (6) rubs. If the stain persists after six rubs, the stain has set and probably cannot be removed. Rinse cleaned area with fresh water, and then dry with a clean, lint-free cloth.
CAUTION
Some solvents are highly flammable. Exercise proper care in cleaning and notify personnel in area of danger. Wear rubber gloves during all cleaning activities. Use caution in cleaning around buttons, stitching and wooden or decorative trim, since these solvents could seriously damage such areas.
PREFIXX is a registered trademark of OMNOVA Solutions, Inc. FORMULA 409 is a registered trademark of The Clorox Company. FANTASTIK is a registered trademark of Dow Consumer Products, Inc.
Exterior Carpet
Exterior carpet manufactured by Syntec Industries is produced with a special blend of resilient fibers to withstand traffic and retain its beauty.
Carpets manufactured by Syntec are inherently stain-resistant. To keep your carpet at its best, we recommend regular vacuuming for general cleaning, soap and water for hard-to-remove spots and an approved cleaner for deep cleansing and to revitalize the carpet.
Stain Removal
If a spill does occur, it can easily be removed by following the stain removal chart. All stains should be removed as soon as possible, as this enhances the ability to remove the stain.
| Miscellaneous StainsCoffee, Tea, Coke, Dye, Fruit Juice, Ice Cream, Motor Oil, Clay, Grease, Blood, Catsup, Chocolate, Milk, Rust, Latex Paint, Water Colors, Berry Stains, Egg, Salad Dressing, Wine, Furniture Polish, Fish Formula, Mayonnaise or Urine | Removal ProcessApply warm water and household detergent in minimal amounts to the stained area. Sponge or scrape until stain is removed and wash thoroughly with clean water. |
| Persistent StainsChewing Gum, Crayon, Ink, Wax, Lipstick, Tar, Polish or Oil Paint | Removal ProcessApply warm water and household detergent. Work well into the stained area, then flush with warm water. |
NOTICE
Most stains should be removed easily from olefin fibers. If the stain persists, the cleaning procedure should be repeated to ensure stain removal. Remember, the sooner the stain removal process begins, the easier the stain will be to remove. Under no circumstances should any solvents normally associated with the dry cleaning of apparel (perchlorethylene, carbon tetrachloride, etc.) be utilized, as permanent damage to the fiber will result.
INSTRUMENT CONSOLE
All Monterey boat models are equipped with full instru men tation for monitoring boat performance. Each individually switched electrical circuit is protected with a replaceable fuse. An accessory circuit is provided for additional electrical accessories. Refer to the Controls and Indicators section for more information. See page M-27 to M-35 for Sport boat helms.
BATTERY SWITCHES
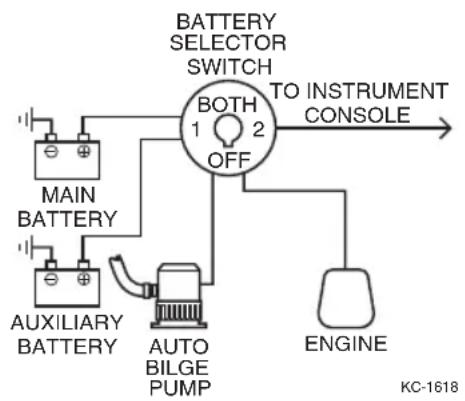
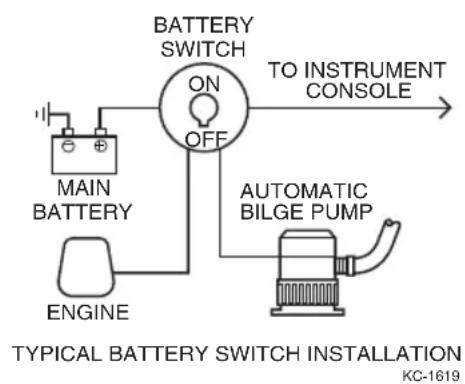
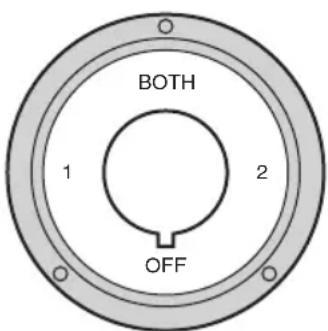
Your boat may be equipped with an optional battery switch which connects/disconnects all power to the electrical system (except the automatic bilge pump, stereo memory, and electronic corrosion controller if equipped). Two types of battery switches are common; a single battery switch for one battery system, and a dual battery selector switch for systems with an auxiliary battery.
flowchart
graph TD
    A["MAIN BATTERY"] --> B["AUXILIARY BATTERY"]
    B --> C["AUTO BILGE PUMP"]
    C --> D["BATTERY SELECTOR SWITCH"]
    D --> E["TO INSTRUMENT CONSOLE"]
    E --> F["ENGINE"]
    F --> G["KC-1618"]
    style D fill:#f9f,stroke:#333
    style E fill:#ccf,stroke:#333
flowchart
graph TD
    A["MAIN BATTERY"] --> B["BATTERY SWITCH ON OFF"]
    C["ENGINE"] --> B
    B --> D["TO INSTRUMENT CONSOLE"]
    E["AUTOMATIC BILGE PUMP"] --> B
    style A fill:#f9f,stroke:#333
    style C fill:#f9f,stroke:#333
    style E fill:#f9f,stroke:#333

WARNING
Never turn switch to the OFF position while the engine(s) is running or serious alternator/electrical system damage could occur.
Battery Switch – Connects the battery to the electrical system. Provides isolation and positive disconnect of battery. Rotate switch to the OFF position when boat is not in use.
Battery Selector Switch – Operates as a battery switch and provides the additional ability to connect two batteries in parallel for starting in case one battery is low. Rotate switch to the OFF position when the boat is not in use.
text_image
BOTH 1 2 OFFTYPICAL BATTERY
SELECTOR SWITCH
KC-0705
ATTENTION
MINIMUM BATTERY SIZE REQUIRED: Group 24
750 CCA @ 0°F/-18°C or 950 MCA
ATTENTION
MINIMUM BATTERY SIZE REQUIRED: Group 31
800 CCA @ 0°F/-18°C or 1000 MCA
Group 24 is for: V6 & V8 Small Block Engines up to 6.2 Liters.
Group 31 is for: Volvo 8.1L, Merc 496 Mag Big Block Engines and Merc DTS Models
IMPORTANT
Do not use a battery with wing nut connectors; use hex nuts. Battery cables should always be tightened with a wrench.
CAUTION
Do not use deep cycle batteries on EFI engines. A deep cycle battery, while it may have enough cold cranking amps (CCA), will cause problems with EFI engines. The correct battery for EFI engines is a standard marine starting battery.
NOTICE
Batteries are not provided by Monterey Boats. The above battery information was obtained from installation and owners manuals published by Mercury Marine and Volvo Penta of the Americas. For sourcing and additional battery information, please contact your local Monterey dealer.
FIRE EXTINGUISHING SYSTEM
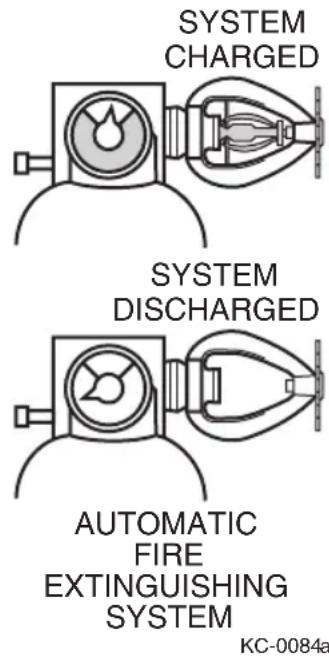
Some stern drive boats are equipped with an optional Automatic Fire Extinguishing System for an engine compartment fire. The system is automatically actuated when temperatures reach or exceed a preset limit.
When actuation occurs, a loud popping sound may be heard followed by “rushing” air sound. When a discharge occurs, immediately shut down all electrical and mechanical systems including engine, and powered ventilation (Blowers).
Do not open the engine hatch at this time! This feeds oxygen to the fire and flashback can occur. Allow the extinguishing agent to “soak” the compartment for at least fifteen (15) minutes, and wait for hot metals and fuels to cool before inspecting for cause or damage.
text_image
SYSTEM CHARGED SYSTEM DISCHARGED AUTOMATIC FIRE EXTINGUISHING SYSTEM KC-0084a
WARNING
Fire extinguishing agents and fire by-product fumes are toxic; do not breath fire fumes. Accidental discharge can be dangerous and may cause serious injury. do not attempt to service the system unless qualified to do so.

WARNING
If fire is still active after system discharges: All occupants should immediately put on PFDs (Personal Flotation Devices) and get off the boat.
FRESH WATER TANK
The fresh water tank is filled through the deck plate filler marked “WATER.” The tank is vented through the combination water fill/vent fitting; this allows air to enter/escape as water levels rise and fall. The water tank is full when water comes out of the fill/vent fitting.
NOTICE
Fill the tank only with potable water. Using and refilling the tank often will help keep it a source of clean drinking water.
To fill the tank:
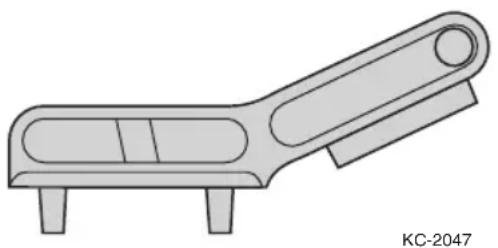
- Insert the filler cap (special) key provided with your boat.
TYPICAL DECK PLATE KEY
natural_image
Technical line drawing of a mechanical lever or handle component (no text or symbols)- Insert the key into the slot in the cap and turn counterclockwise to unlock.
- Remove the cap.
- Using a sanitary drinking water hose (blue or white), fill the tank with clean, fresh drinking water.
- Replace the cap and lock into position with the key.
Filter and Pump
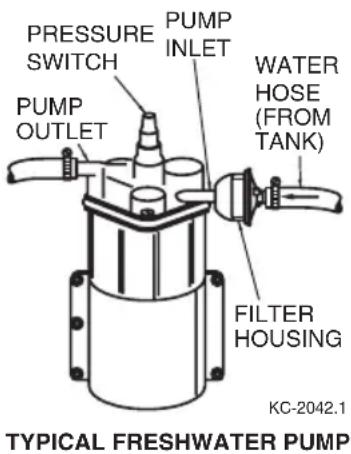
Water is drawn from the tank by a self-priming pump located in the engine area. Before entering the pump, the water passes through a filter to capture any solid contaminants. The pump provides a flow of water at a preset pressure to the remainder of the system.
text_image
PRESSURE SWITCH PUMP OUTLET PUMP INLET WATER HOSE (FROM TANK) FILTER HOUSING KC-2042.1 TYPICAL FRESHWATER PUMPInitial Fresh Water System Startup
- Fill the fresh water tank (approximately 15 gallon capacity) with potable water.
- Turn the FRESH WATER PUMP switch "ON."
- Open the wet bar faucet to allow air to escape. Close the faucet when a steady flow of water is apparent.
- Bleed air from the remainder of the faucets, showers, etc., in the same manner as step 3. After all lines have been bled, the pump will build to operating pressure and then shut off.
- You may now continue to fill the tank to its capacity.
CAUTION
The fresh water pump works on demand and WILL NOT automatically shut-off when the tank is empty. If the switch is in the “ON” position, and the tank is empty, the pump will run continuously and may overheat.
Fresh Water System Maintenance
The following maintenance actions should be performed monthly to keep the fresh water system clean and sanitary:
- Drain the fresh water tank completely (using all faucets, showers, etc.). Refill tank with at least 15 gallons of clean, fresh water and drain again.
- Clean fresh water pump inlet filter screen.
- Rotate housing slightly counterclockwise and pull to separate housings and gain access to the filter screen. After cleaning, reverse procedure. Ensure O-Ring is in place.
Sanitizing the Fresh Water System
If water in the tank has been allowed to stagnate and you suspect that the fresh water system may be contaminated, sanitize the system. To sanitize:
- Drain the fresh water tank completely (using all faucets, showers, etc.).
- Mix a solution of 1/4 cup household bleach to 1 gallon of water for every 15 gallons of tank capacity. Pour the solution into the fresh water tank.
- Fill the tank with clean, fresh water.
- Turn fresh water pump "ON" and bleed air from all faucets, showers, etc.
- After approximately 3 hours, drain the system completely.
- Flush the system with one full tank of water.
- Fill tank with clean, fresh drinking water.
If you can smell or taste bleach in the water:
- Drain the system completely.
- Mix a solution of one quart of white vinegar to 5 gallons of water. Pour the solution into the fresh water tank.
- Allow the solution to remain in the tank until approximately one hour of cruising time is logged.
NOTICE
Boat motion will “slosh” the vinegar/water solution to help clean the tank.
- Allow the solution to remain in the tank for at least one week.
- Drain the fresh water system completely.
- Flush the system with one full tank of water.
- Fill the tank with clean, fresh drinking water.
HEAD AND WASTE CONTAINMENT SYSTEM
Some models have either a portable chemical toilet, chemical toilet with optional pump-out fittings, or porcelain manual pump. It is recommended to read the separate owner's manual before operating toilet.
Waste Disposal Dockside Pump-out
To clear holding tank of wastewater, you need to use the dockside pump-out services provided at certain marinas, etc.
To empty the tank of waste, hook suction hose to the pump-out plate and to the dockside pump. The marina will handle the proper disposal of the waste, and may charge for this service. After emptying, be sure to add fresh toilet chemical per label directions.
IMPORTANT PAPERS PACKAGE
(May vary according to options)
Stereo Remote Control – Hand Held
Battery Post Covers
Keys
Engine Owner's Package
Gas Cap Key
Garboard Drain Plug
Owner's Package:
• Monterey Boats Owner's Manual
• Water Systems Pump Literature
- Tilt Mechanism Instructions
- Safe-T Helms Instructions
• Steering Cable Instructions
- Depth Sounder Owner's Manual
• Marine Ignition Interrupt Switch Literature
- Compass Literature
• Audio Keypad Literature
- Kenwood Stereo Literature
- Propeller Literature
- Canvas Literature
- Throttle Control Manual
- Waste System Literature
BOAT LAYOUTS & DETAILS
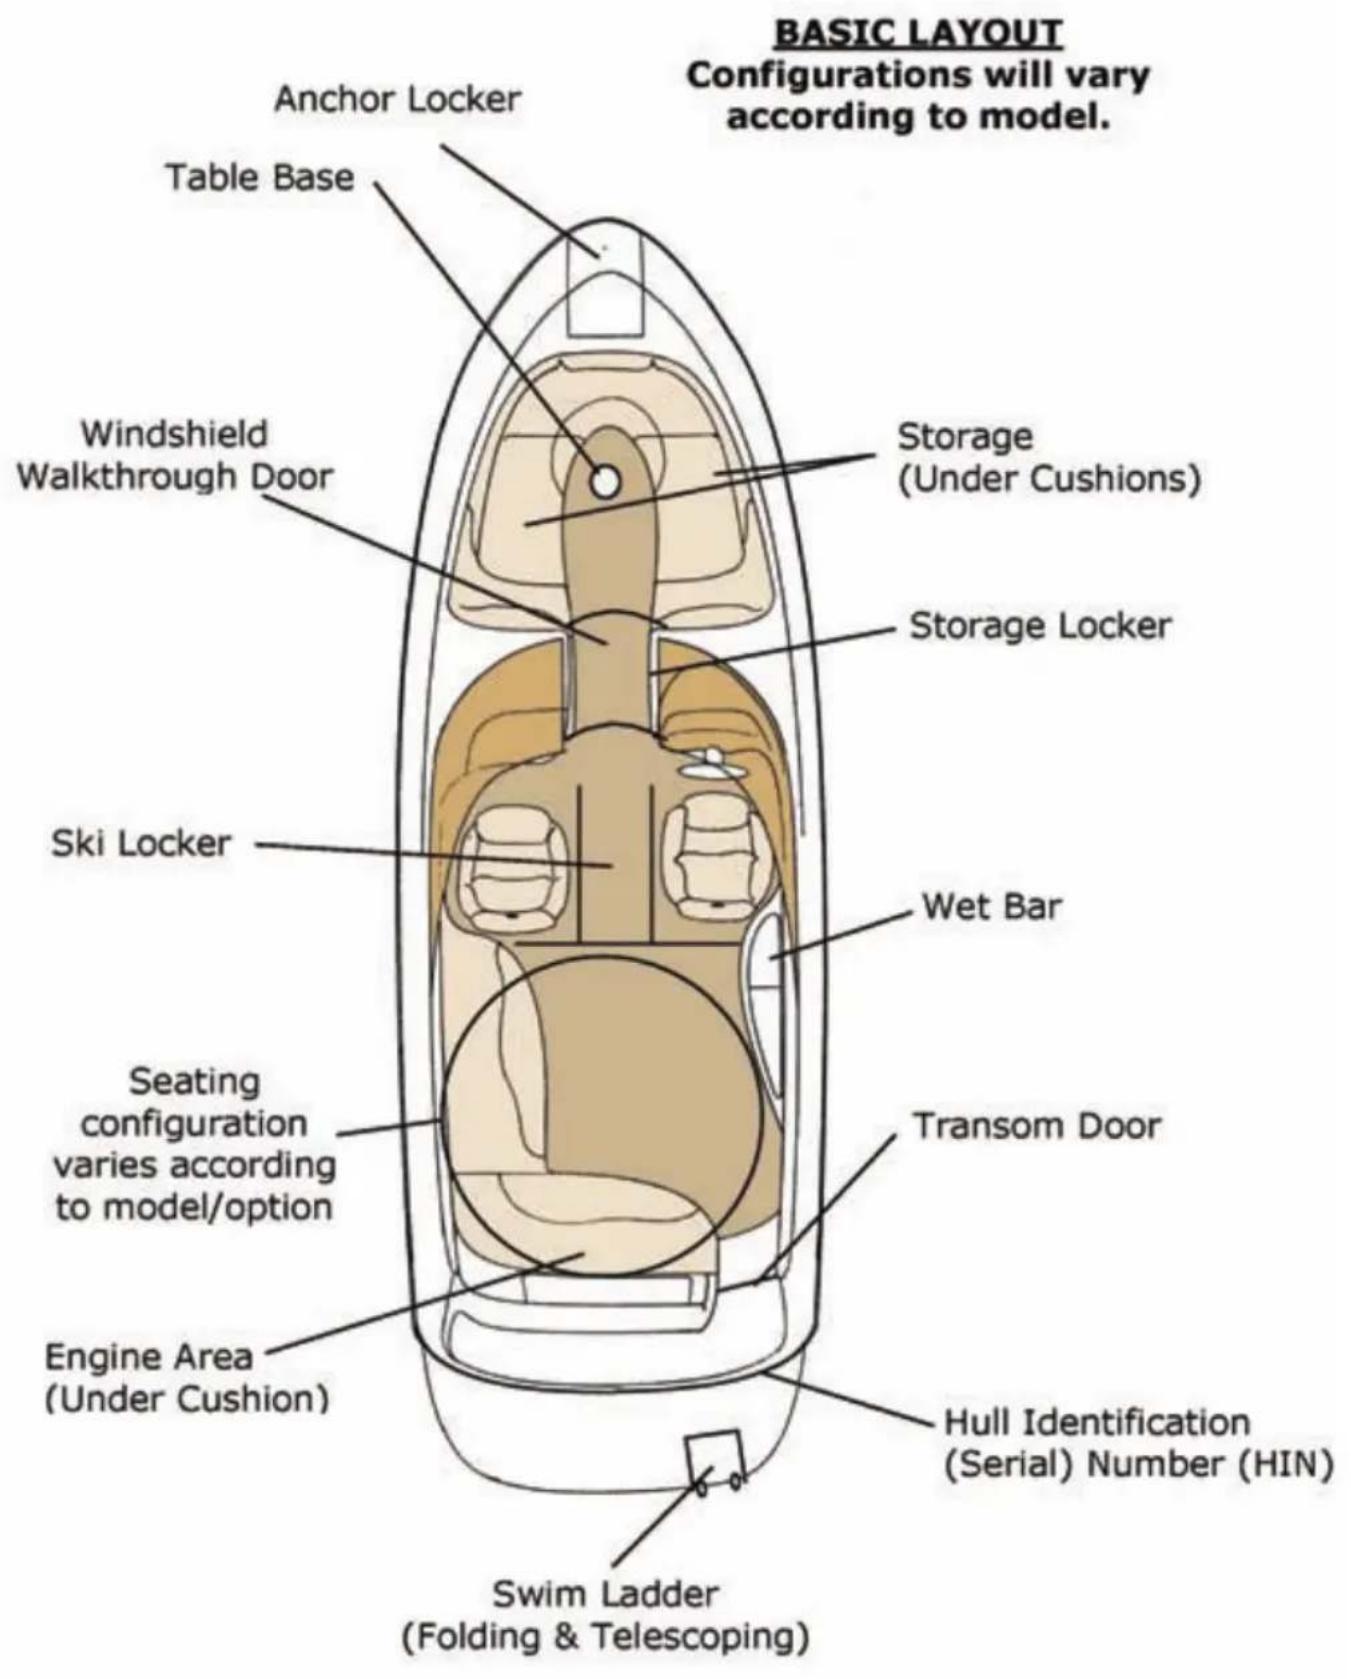
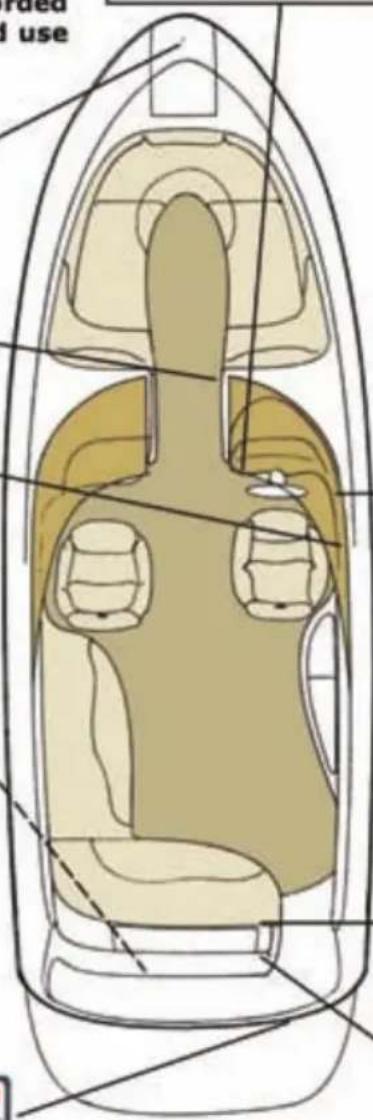
The following illustrations are intended to give you, the boat owner, a brief overview of your new sport boat. These illustrations are a representation and may not reflect all options or layouts. Your Monterey dealer or their representative can give you a detailed demonstration of your boat and operation of its many features.
text_image
BASIC LAYOUT Configurations will vary according to model. Anchor Locker Table Base Windshield Walkthrough Door Storage (Under Cushions) Storage Locker Ski Locker Wet Bar Seating configuration varies according to model/option Transom Door Engine Area (Under Cushion) Hull Identification (Serial) Number (HIN) Swim Ladder (Folding & Telescoping)WARNING & SAFETY LABELS
Label placement shown is approximate. The labels on this page are a sample of the warning and safety labels on your boat. There may be additional or differently worded labels. Please be aware and use appropriate caution.
WARNING
GASOLINE VAPORS CAN EXPLODE BEFORE STARTING ENGINE: CHECK ENGINE COMPARTMENT FOR GASOLINE OR VAPORS. OPERATE BLOWER FOR 4 MINUTES. RUN BLOWER BELOW CRUESING SPEED.
DANGER
AVOID COLLISIONS
- Maintain Look-out as required by the "Rules of the Road" - Visibility can be limited by high-level turn angles, persons, men, weather and light conditions.
- At all times proceed at a Sails Speed to that you can take proper and effective action to good handelices conditions. Such issues are considered under the control of the operator
CARBÓN MONOXIDE CAN BE FATAL.
In all gasoline-powered boats, engine and generator exhaust systems produce canineless and colourless carbon monoxide gas (CO). Direct prolonged exposure can result in CO poisoning which may be harmful or fatal. To prevent excess exposure and reduce the presiding of accumulations of CO in the cabin and cockpit of the boat, the operator should more adequate ventilation in each the cabin and cockpit areas. Through utilization of cabin fixtures, cabin doors, cabin windows, exercise windshield windows and side windshield vents to increase air movement through the cabin and cockpit areas. The following conditions lend to increase the accumulation of CO in and about the boat and reduce the operator's particular attention:
-
Operation of snow speeds or dead in the water
-
Operation with a high bow angle attitude.
-
The utilization of canvas tape, side curves and back curtail.
-
Contributing pinellic conditions, such as a head wind.
-
Operation of engines and/or generator is combined in cases or of discharge.
-
Any Blockage of full exhaust outlets.
Indications of excessive exposure to ECD concentrations may include failures, illnesses, and preventness. Avoid risk of injuries or deaths, SHUTOFF ENGINE NEAR SHIMMERS OR PRIOR TO USE COM PLATFORM AND BOARDING LAZDER
Placed on Windshield Walk-thru
▲ CAUTION
SECURE ANCHOR LOCKER LID WHILE BOAT IS UNDERWAY
CAUTION
TO AVOID INJURY, GLASS DOOR MUST BE SECURED IN A CLOSED AND LOCKED POSITION WHEN BOAT IS UNDER WAY. USE BOTH TURN LOCKS TO SECURE DOOR.
Volvo Engine
▲WARNING
Interrupt switch must be attached to operator while engine is running. Qualified operator must be in control at all times. Read Owner's Manual Before use.
ENGINE AREA LABELS
WARNING
DO NOT STORE FUEL OR FLAMMABLE LIQUID HERE VENTILATION HAS NOT BEEN PROVIDED FOR EXPLOSIVE VAPERS
CAUTION
DO NOT USE THIS AREA FOR STORAGE.
text_image
l used useMAXIMUM CAPACITIES
11 PERSONS OR 1800 LBS.
2006 LBS. PERSONS. DEAR
THIS SOAT COMPLIES WITH U.S. COAST GUARD SAFETY STANDARDS IN EFFECT ON THE DATE OF CERTIFICATION.
HONSTOWN MONTINLEY HOACE WILLISTON FL 32048
m: 234 F9
WARNING
LEAKING FUEL IS A FIRE AND EXPLOSION HAZARD. INSPECT SYSTEM REGULARLY EXAMINE FUEL SHANDS FOR LEARS OR CORNOCION AT LEAST ANNUALLY
CAUTION
INSERT PIN WHEN BOLSTER IS IN UPRIGHT POSITION
WARNING
IN THE EVENT OF A FIRE: - TO KEEP FLAMES CONTAINED. DO NOT OPEN ENGINE BOX OR COMPARTMENT - SHUT ONION ENGINES, GENERATORS, AND BLOWERS, CONTRACKSLY DISCHARGE, ENTIRE CONTENTS OF PORTABLE FIRE EXTAGUISHER THROUGH FIRE PORT IMPIRATES.
Placed on optional wakeboard tower
! WARNING
This tow tower should be used for towing water sports devices only.
Improper use may overstress the tow tower, imbalance the boat, or allow the tow rope to contact passengers. When using the tower, watch for low bridges, overhanging tree limbs or power lines that may come in contact with the tower. Do not use this tower for towing parasails, kites, or other watercraft. Do not tow more than one person at a time from this tow tower. Do not allow passengers to sit behind the rope attachment point when the tower is in use.
Do not climb on, hang on, sit on top, jump or dive off this tow tower at any time.
Do not allow the loose end of a tow rope to dangle down into the cockpit.
Check to be certain all bolts are in place and that they are tight before using the tower.
Failure to adhere to these guidelines may cause personal injury or death.
Back to Back Lounge Seating
text_image
Figure 1 Figure 3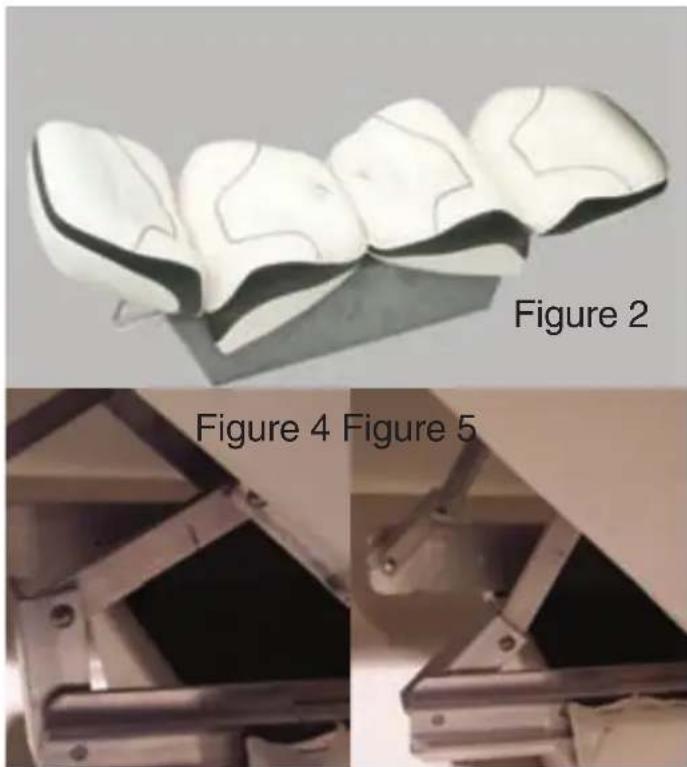
natural_image
Two-panel image showing a dental model and its 3D views: Figure 2 shows a toothed structure, Figure 4 shows a mechanical clamp (no text or symbols)To adjust seat position forward or aft:
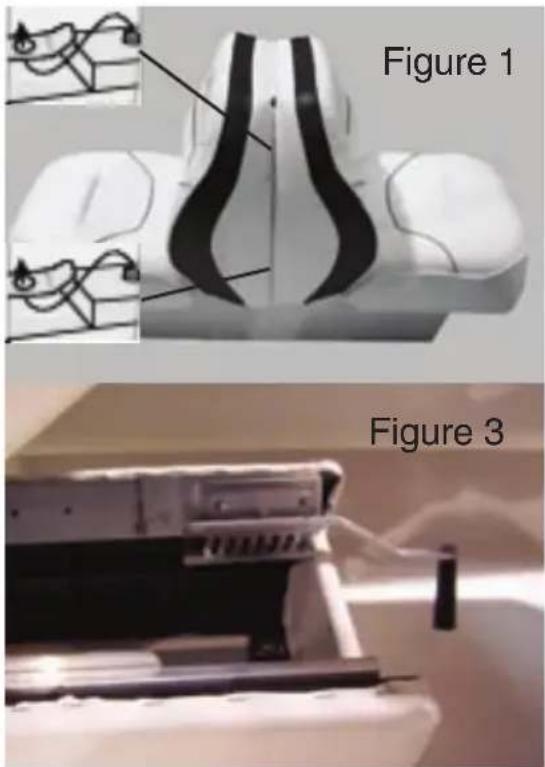
- Turn lever in figure 3 clockwise to release rack teeth and hold, moving seat forward or aft until in desired position. Return lever to original up & down position to lock position. Ensure at least 2 rack teeth are engaged.
To change from upright position (figure 1) to lounge position (figure 2):
-
Turn lever in figure 3 clockwise to release rack teeth. Hold & Pull lever toward front of boat while lifting up on seat bottom, releasing both tabs (figure 1) until seat pulls freely and move seat into lounge position.
-
To secure headrest (aft) in angled position, push brackets in figure 4 into locked position as shown in figure 5.
To change from lounge position (figure 2) to upright position (figure 1):
-
Push seat back into almost* upright position. While holding one end, slide the other end with a quick motion, exerting some pressure until seat snaps into place (tab inside framework shown in figure 1 will drop back into place).
-
Ensure lever in figure 3 is in the up/down position.
*Leave an approximate 6 inch gap at bottom of seat back.
text_image
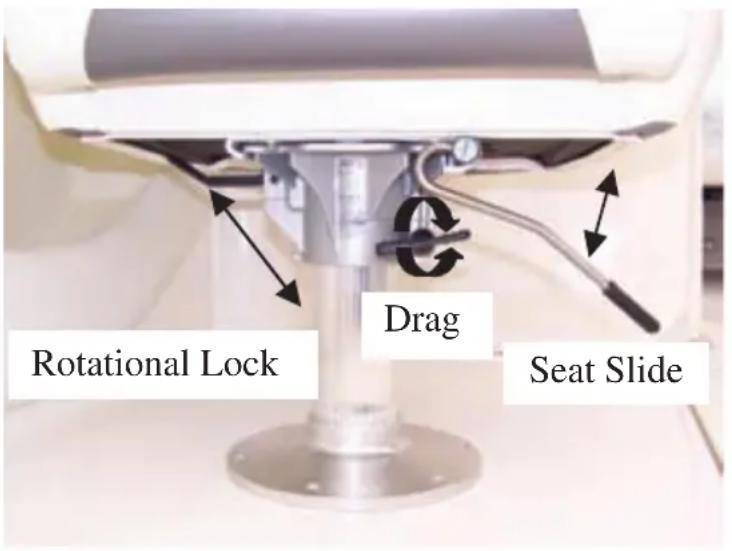
Rotational Lock Drag Seat SlideOPERATING INSTRUCTIONS
SEAT SLIDE
To slide: Lift lever.
To lock: Release lever.
Push lever down slightly to further secure in locked position.
DRAG CONTROL
To increase tension:
Rotate handle clockwise.
To decrease tension:
Rotate handle
counterclockwise.
ROTATIONAL LOCK
To lock: Push handle down completely.
To rotate: Lift handle up completely.
CAUTION
Pedestal is equipped with a 360° swivel rotation feature*. A positive locking mechanism can secure your seat swivel from unintentional rotation. Follow these instructions to avoid unnecessary wear that could cause permanent damage to the lock.

WARNING

Do Not Ride On Bolster In Rough Water Conditions

Keep Both Feet On Deck (Floor)

Keep Head And Arms Out Of Flip-Up Bolster Area

WARNING
Avoid serious or fatal injury due to rotation of seat. Lock swivel when speed exceeds 5 mph.
Engine Area
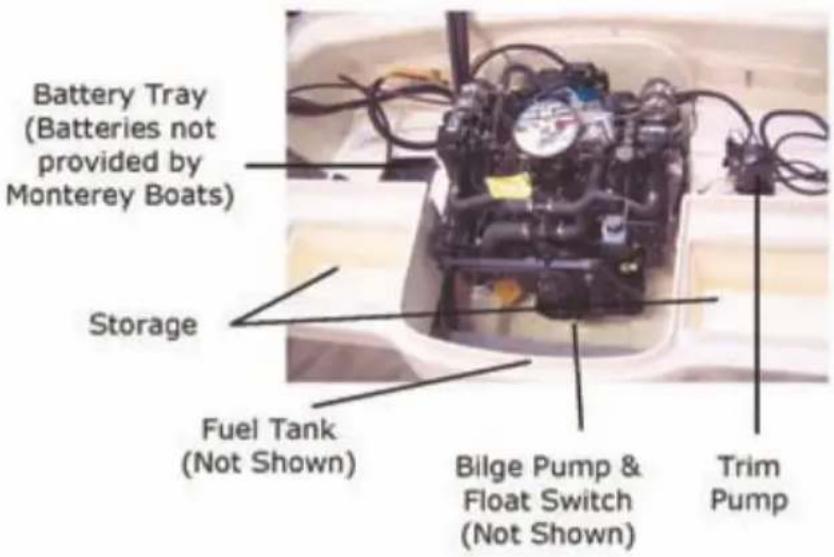
text_image
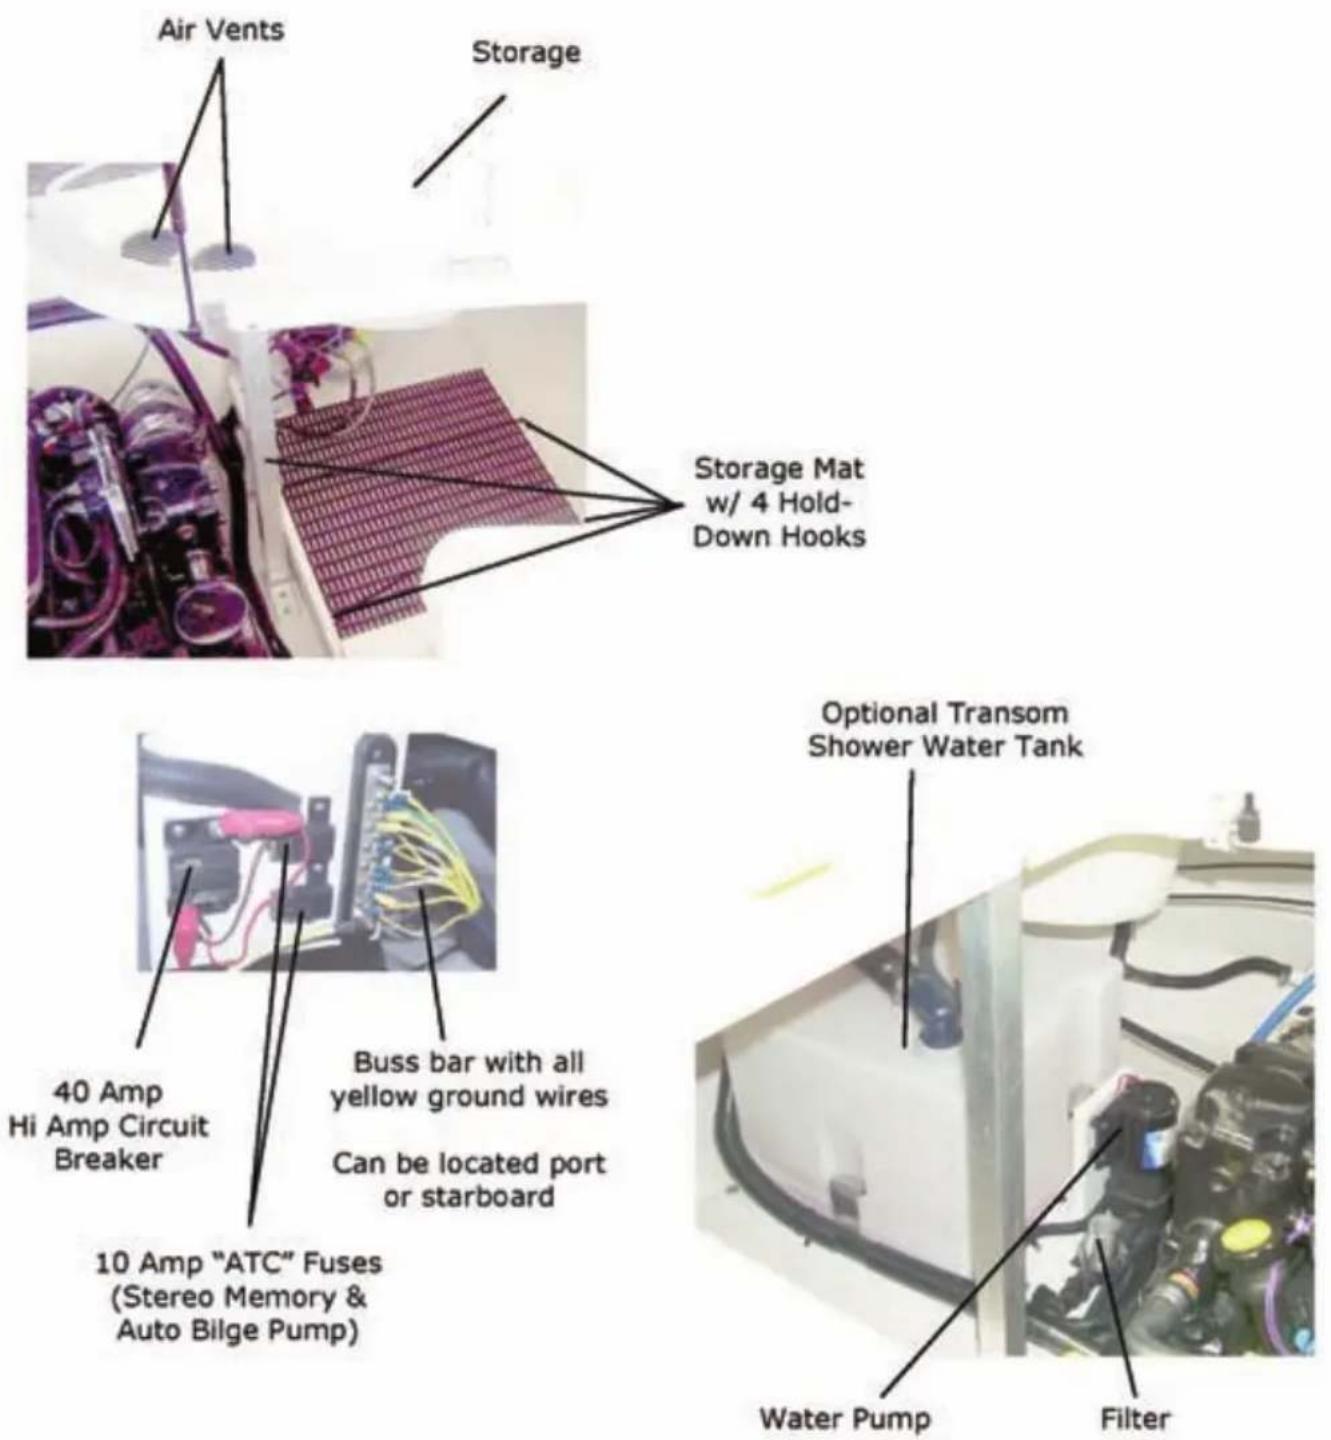
Battery Tray (Batteries not provided by Monterey Boats) Storage Fuel Tank (Not Shown) Bilge Pump & Float Switch (Not Shown) Trim Pump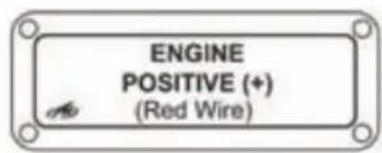
text_image
ENGINE POSITIVE (+) (Red Wire)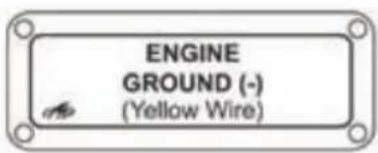
text_image
ENGINE GROUND (-) (Yellow Wire)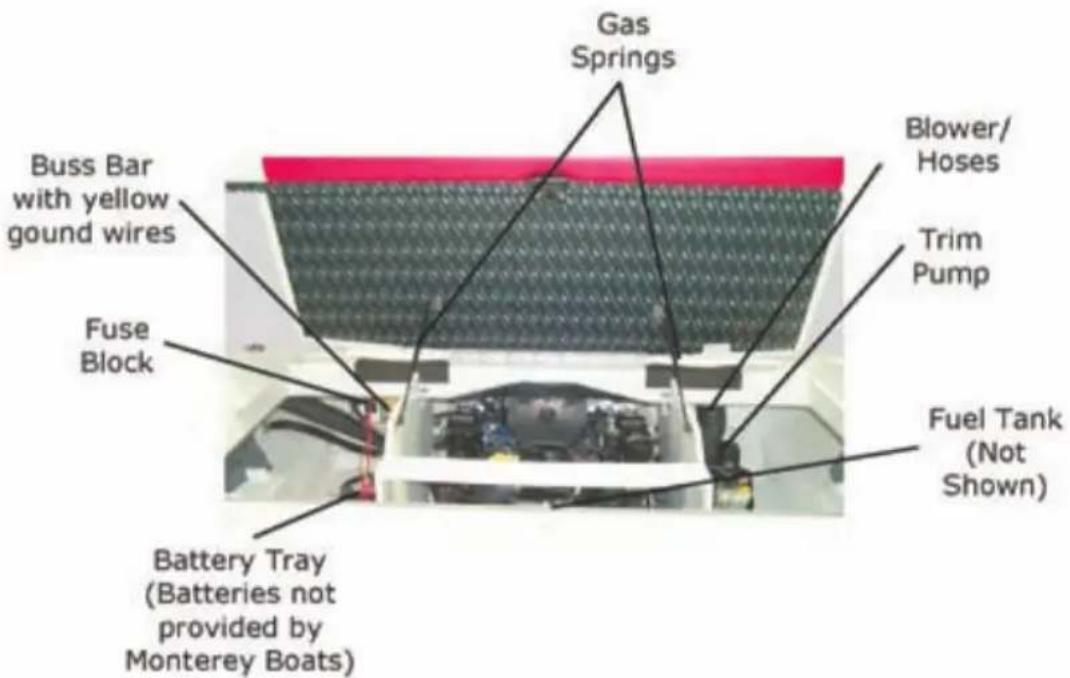
text_image
Gas Springs Blower/ Hoses Trim Pump Buss Bar with yellow ground wires Fuse Block Battery Tray (Batteries not provided by Monterey Boats) Fuel Tank (Not Shown)The above engine layouts are typical of most Monterey Sport Boats.
The above engine layouts are typical of most Monterey Sport Boats.
General Features
text_image
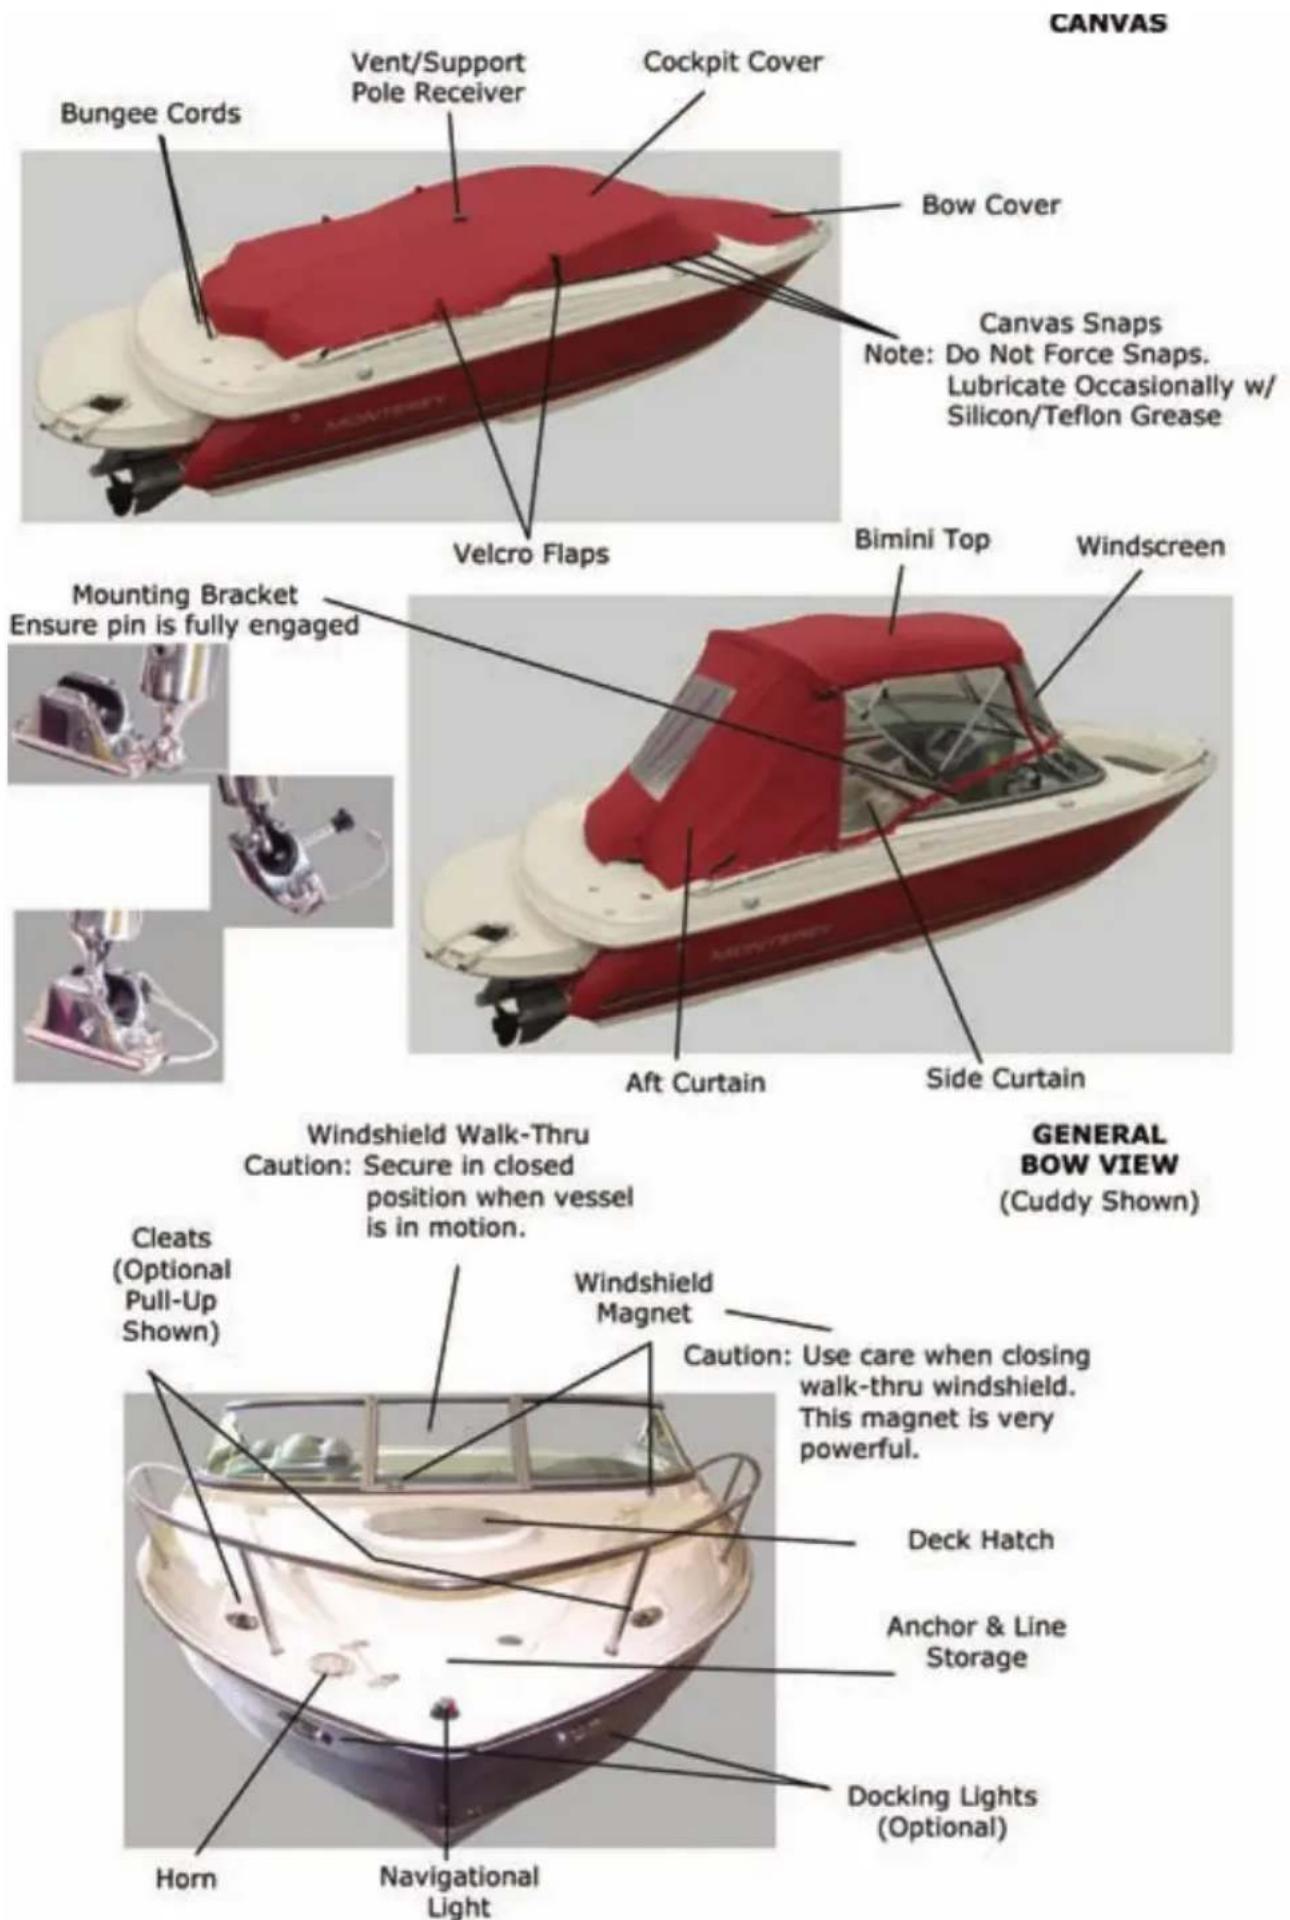
CANVAS Bungee Cords Vent/Support Pole Receiver Cockpit Cover Bow Cover Canvas Snaps Note: Do Not Force Snaps. Lubricate Occasionally w/ Silicon/Teflon Grease Velcro Flaps Mounting Bracket Ensure pin is fully engaged Aft Curtain Side Curtain Bimini Top Windscreen Windshield Walk-Thru Caution: Secure in closed position when vessel is in motion. General BOW VIEW (Cuddy Shown) Cleats (Optional Pull-Up Shown) Windshield Magnet Caution: Use care when closing walk-thru windshield. This magnet is very powerful. Deck Hatch Anchor & Line Storage Docking Lights (Optional) Horn Navigational Light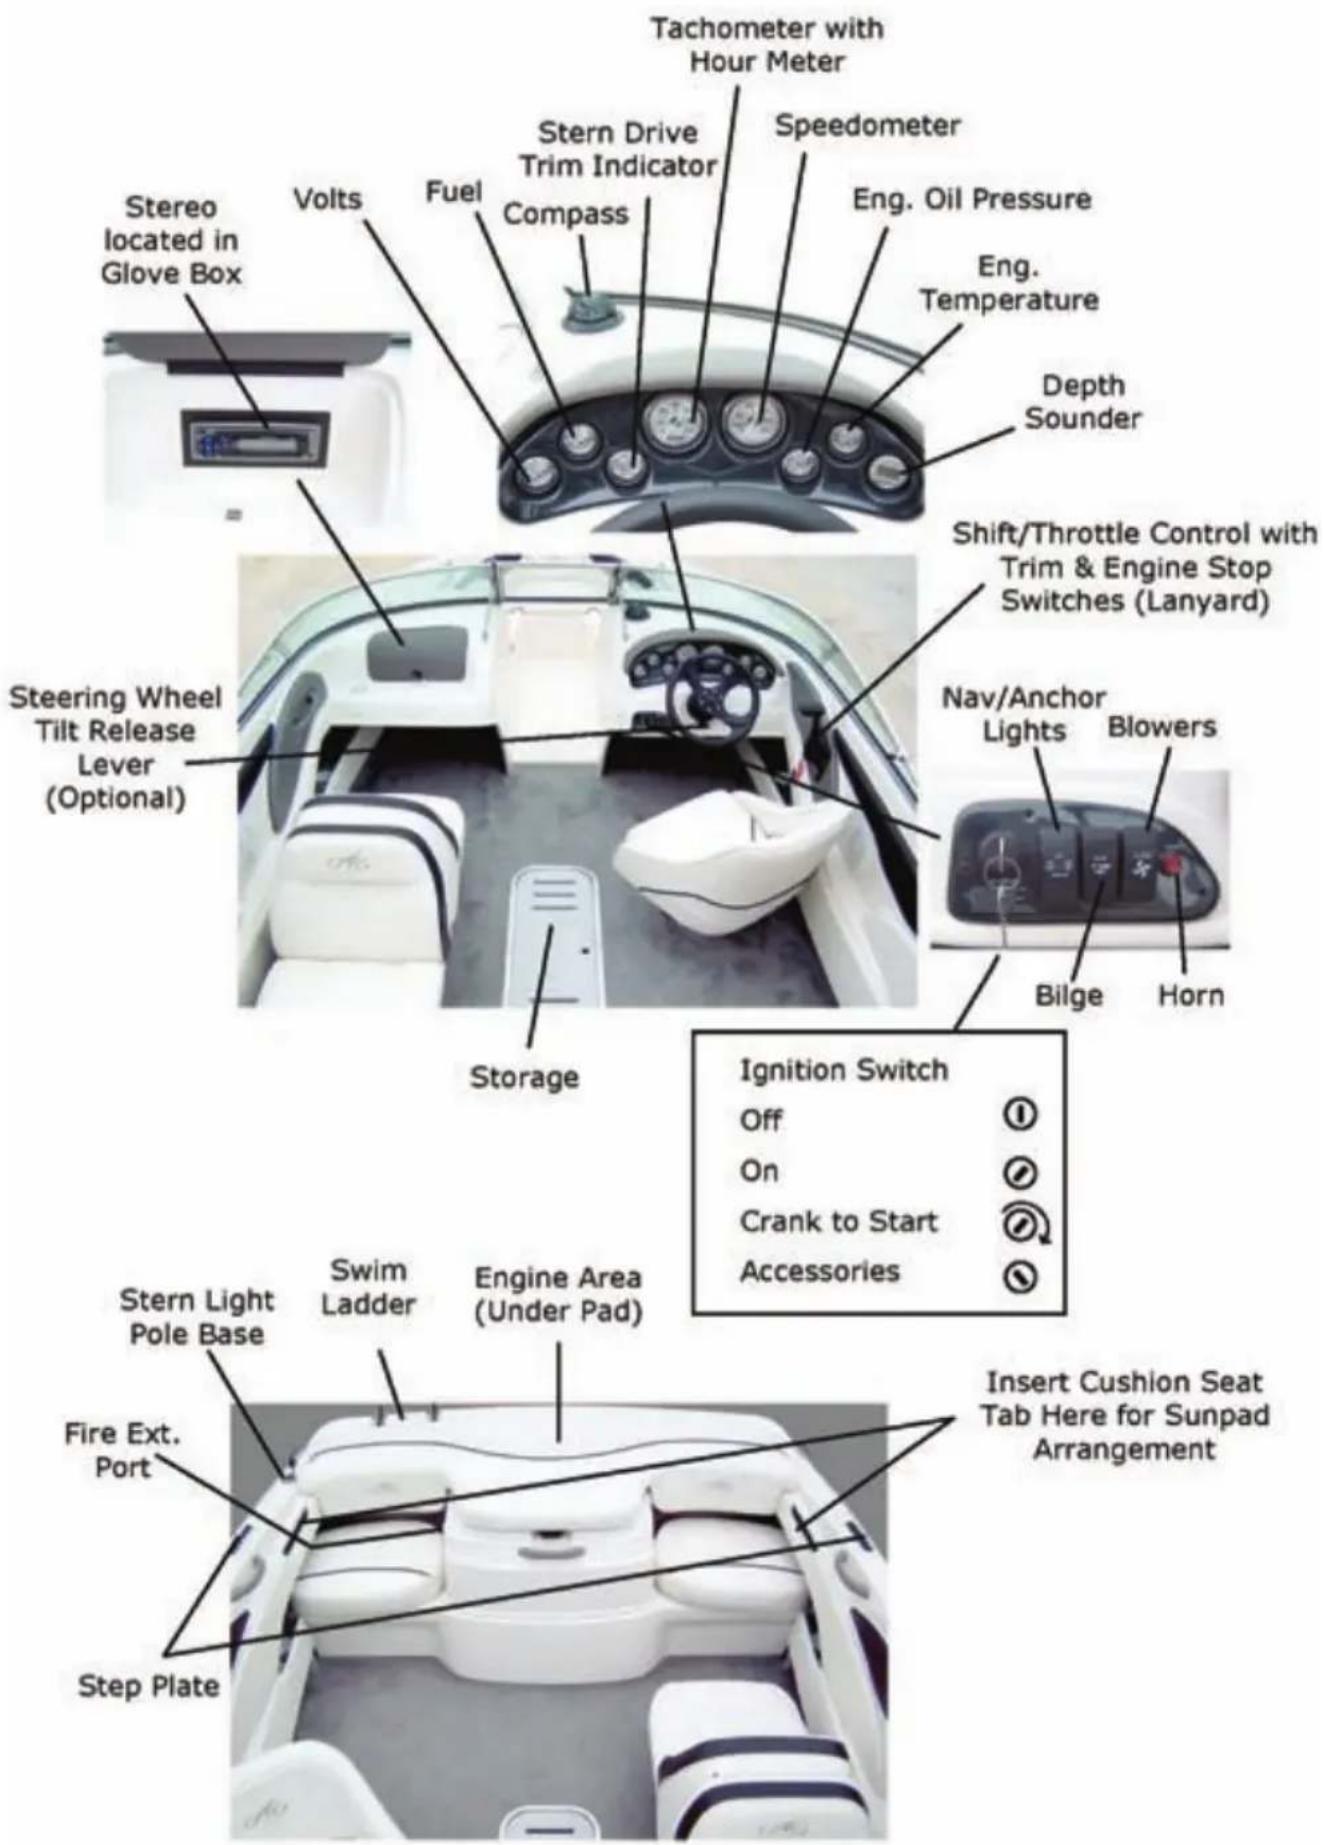
text_image
Tachometer with Hour Meter Speedometer Eng. Oil Pressure Eng. Temperature Depth Sounder Volts Fuel Stern Drive Trim Indicator Compass Stereo located in Glove Box Shift/Throttle Control with Trim & Engine Stop Switches (Lanyard) Steering Wheel Tilt Release Lever (Optional) Nav/Anchor Lights Blowers Storage Ignition Switch Off On Crank to Start Accessories Bilge Horn Stern Light Pole Base Swim Ladder Engine Area (Under Pad) Fire Ext. Port Insert Cushion Seat Tab Here for Sunpad Arrangement Step Plate194/214 FS/214 FSC Layout
text_image
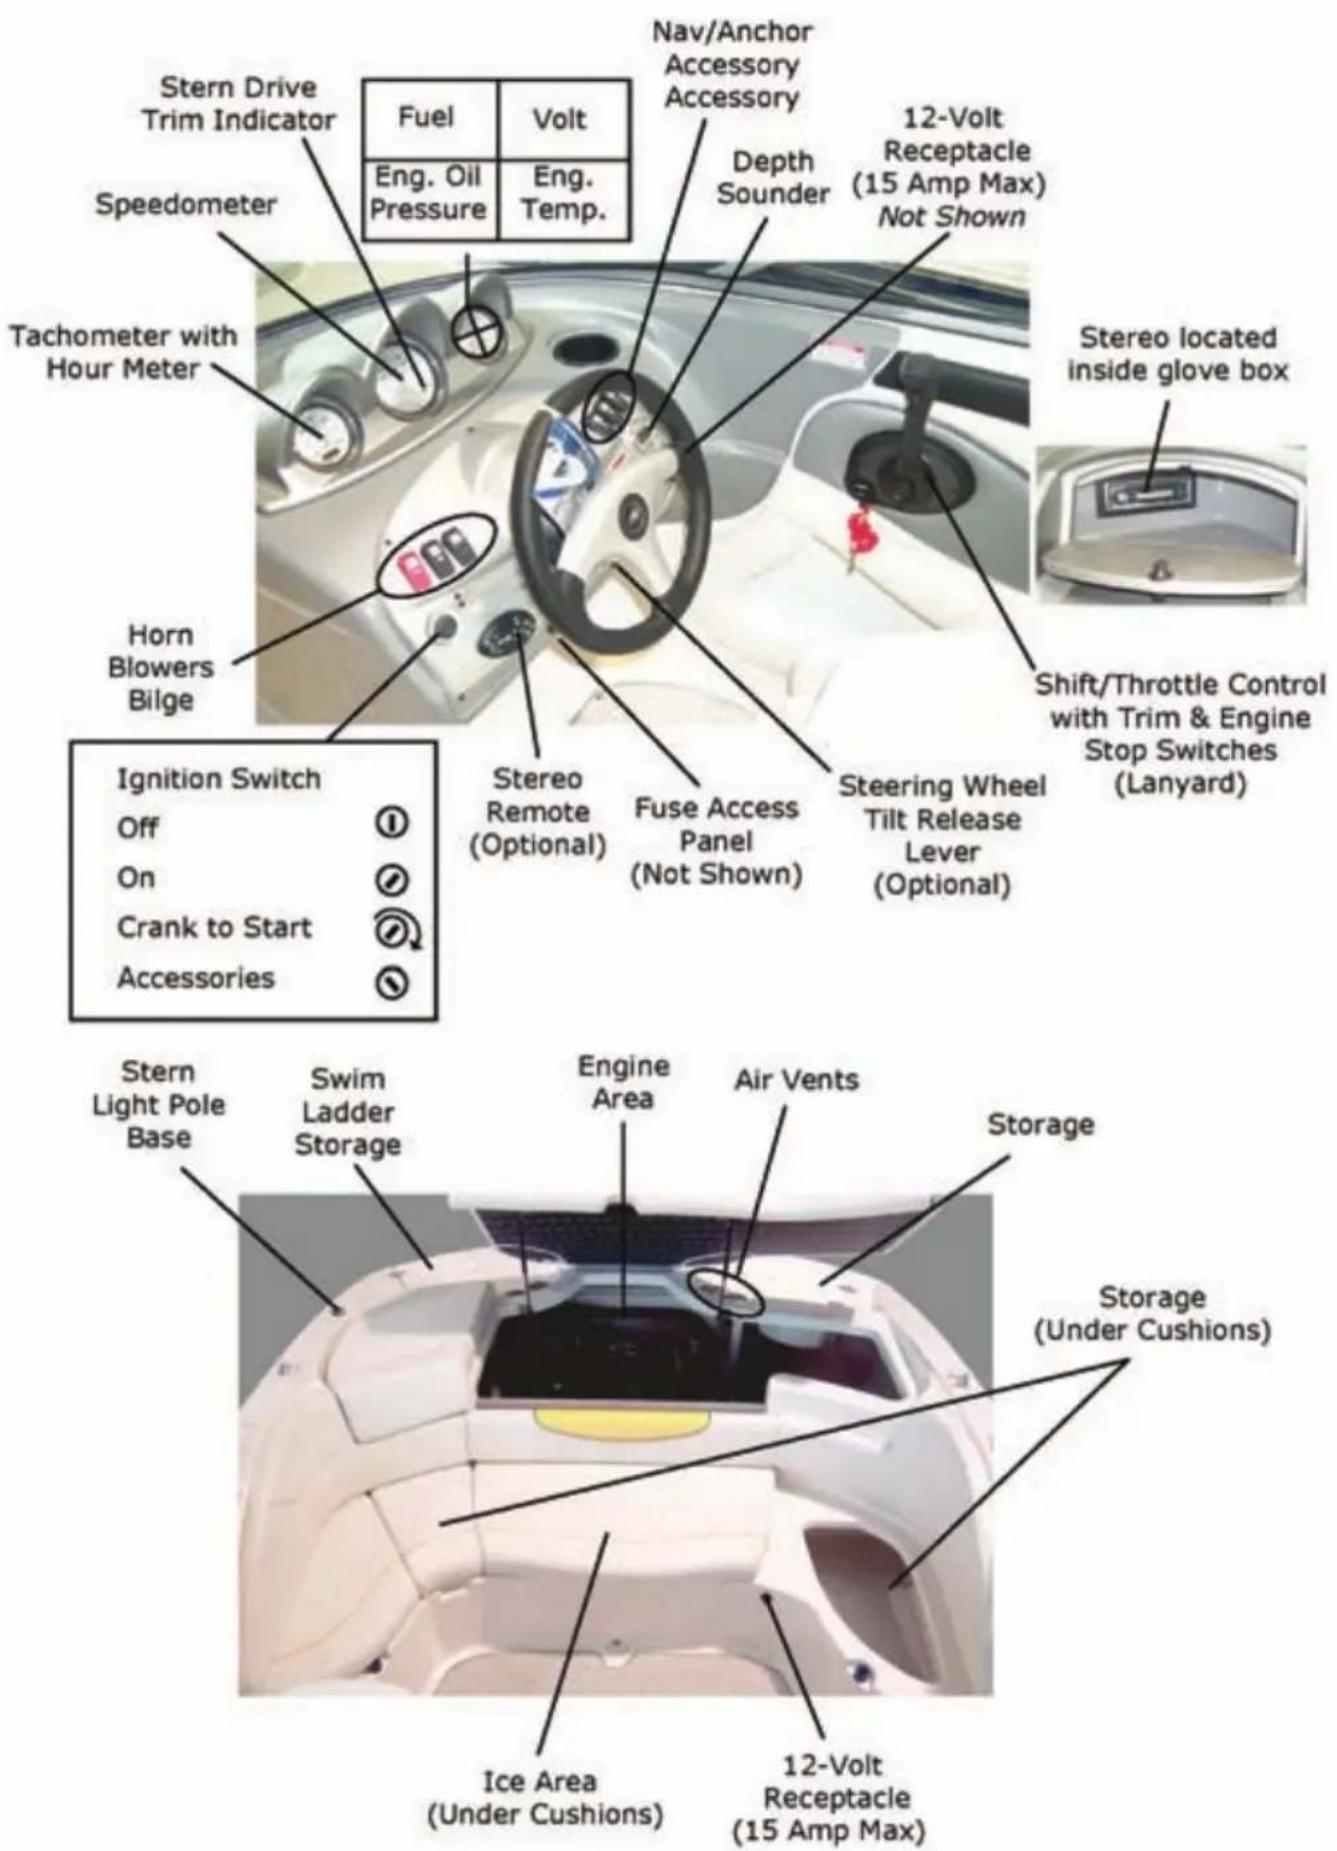
Stern Drive Trim Indicator Fuel Volts Eng. Oil Pressure Eng. Temp. Speedometer Tachometer with Hour Meter Nav/Anchor Accessory Accessory Depth Sounder 12-Volt Receptacle (15 Amp Max) Not Shown Horn Blowers Bilge Stereo located inside glove box Ignition Switch Off ① On ② Crank to Start ③ Accessories Stereo Remote (Optional) Fuse Access Panel (Not Shown) Steering Wheel Tilt Release Lever (Optional) Shift/Throttle Control with Trim & Engine Stop Switches (Lanyard) Stern Light Pole Base Swim Ladder Storage Engine Area Air Vents Storage Storage (Under Cushions) Ice Area (Under Cushions) 12-Volt Receptacle (15 Amp Max)
text_image
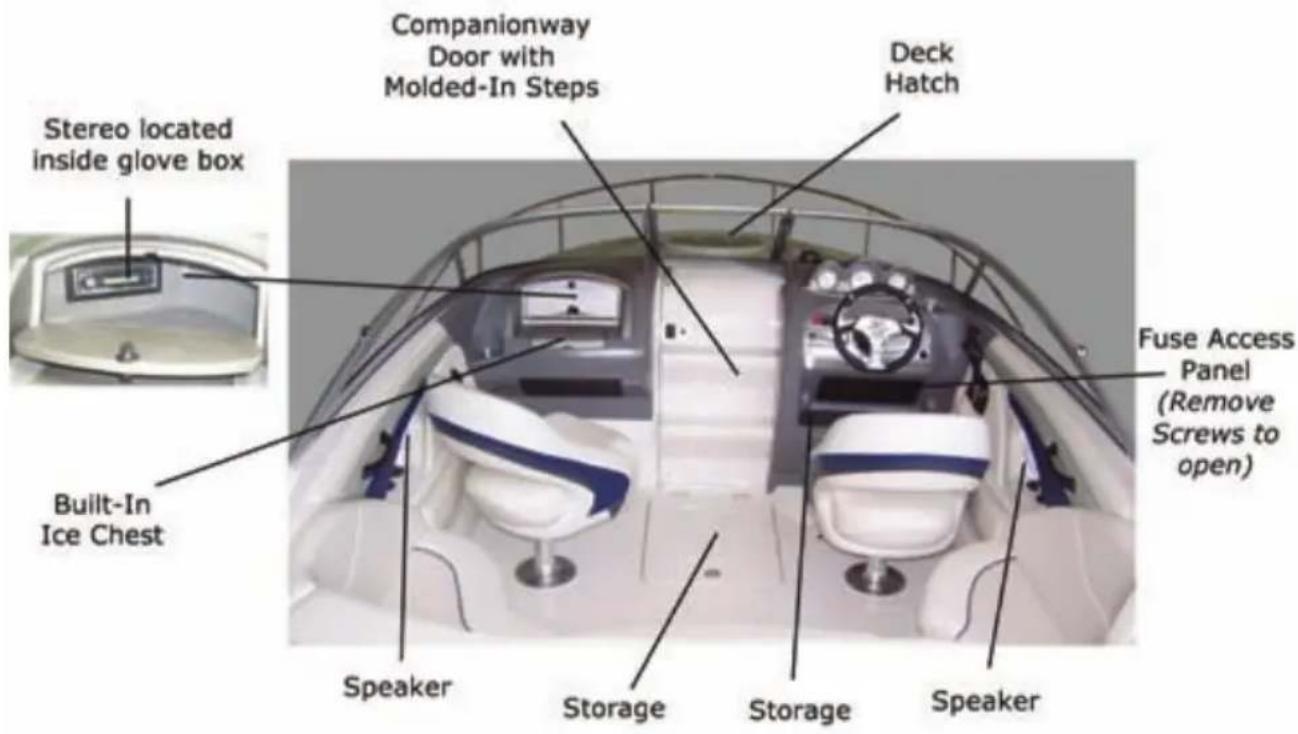
Stereo located inside glove box Built-In Ice Chest Speaker Companionway Door with Molded-In Steps Deck Hatch Fuse Access Panel (Remove Screws to open) Storage Speaker Storage234 FS / FSX Features (1 of 2)
text_image
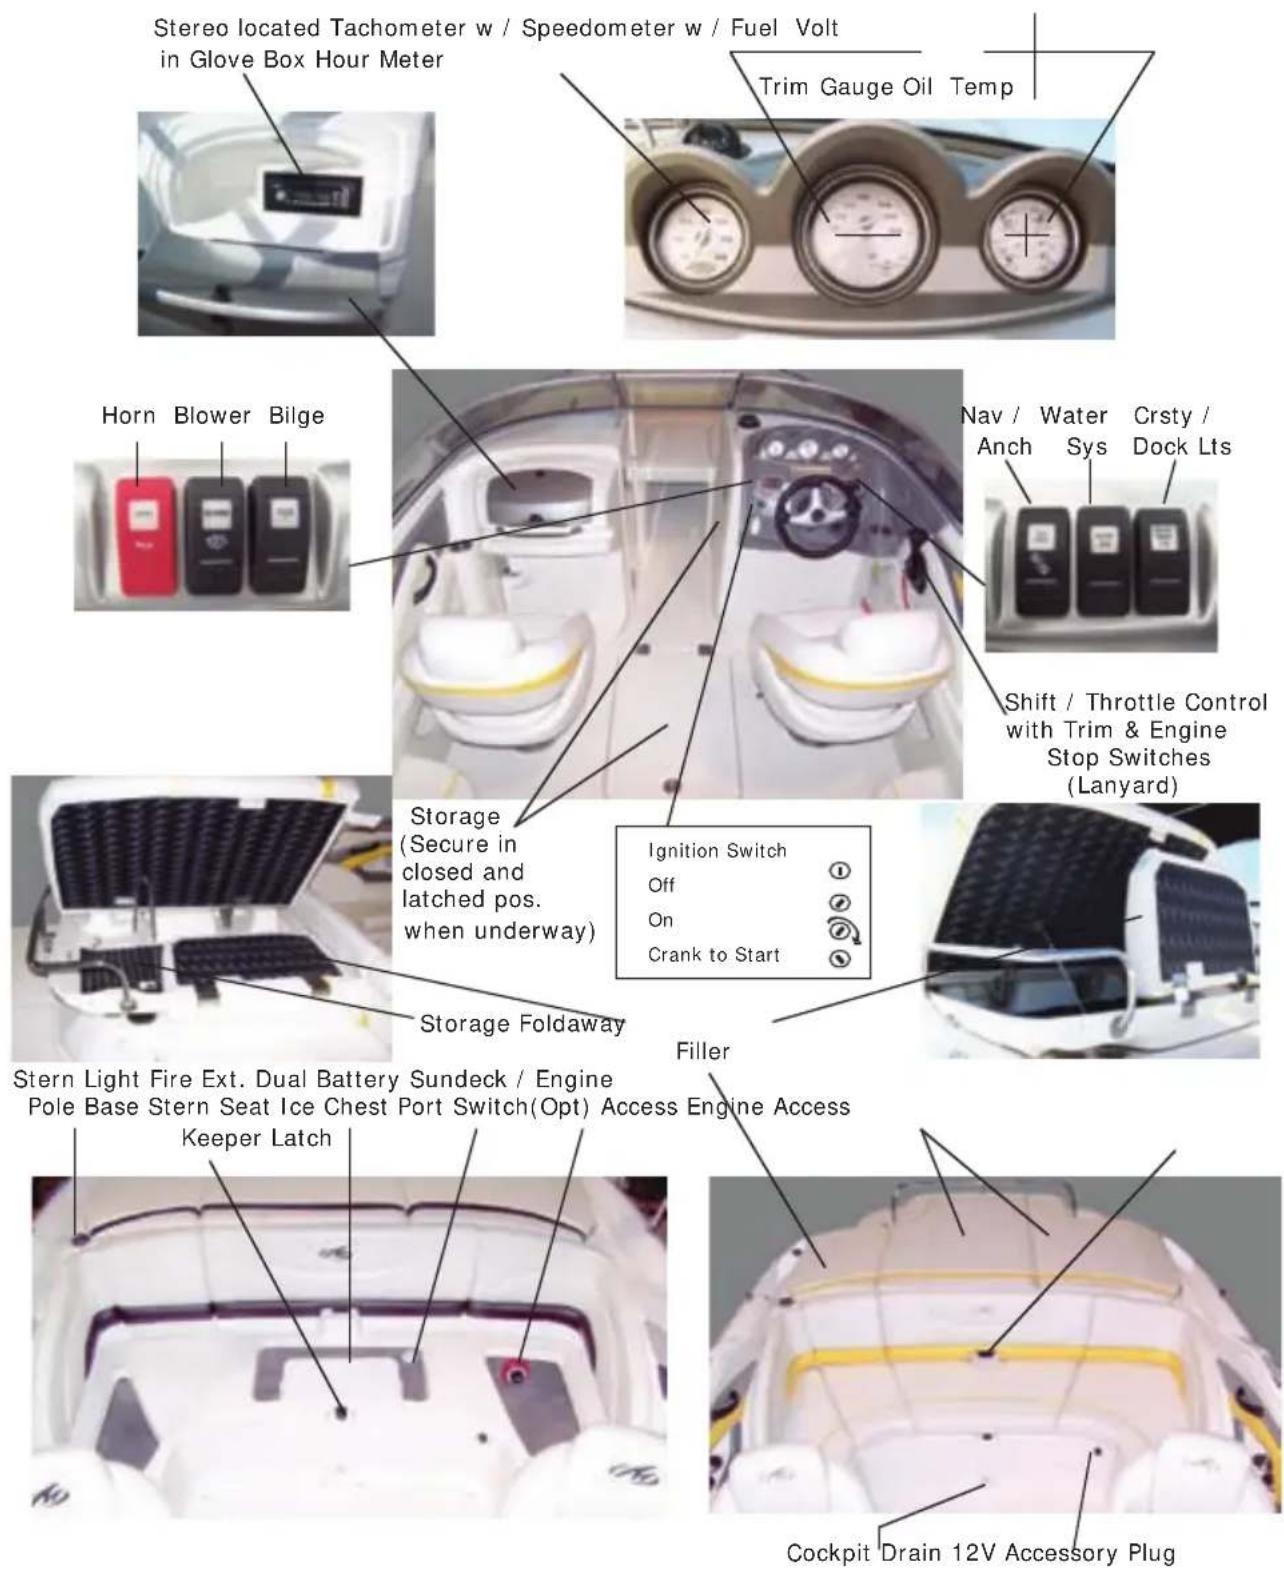
Stereo located Tachometer w / Speedometer w / Fuel Volt in Glove Box Hour Meter Trim Gauge Oil Temp Horn Blower Bilge Nav / Water Crsty / Anch Sys Dock Lts Shift / Throttle Control with Trim & Engine Stop Switches (Lanyard) Storage (Secure in closed and latched pos. when underway) Ignition Switch Off On Crank to Start Storage Foldaway Filler Stern Light Fire Ext. Dual Battery Sundeck / Engine Pole Base Stern Seat Ice Chest Port Switch(Opt) Access Engine Access Keeper Latch Cockpit Drain 12V Accessory Plug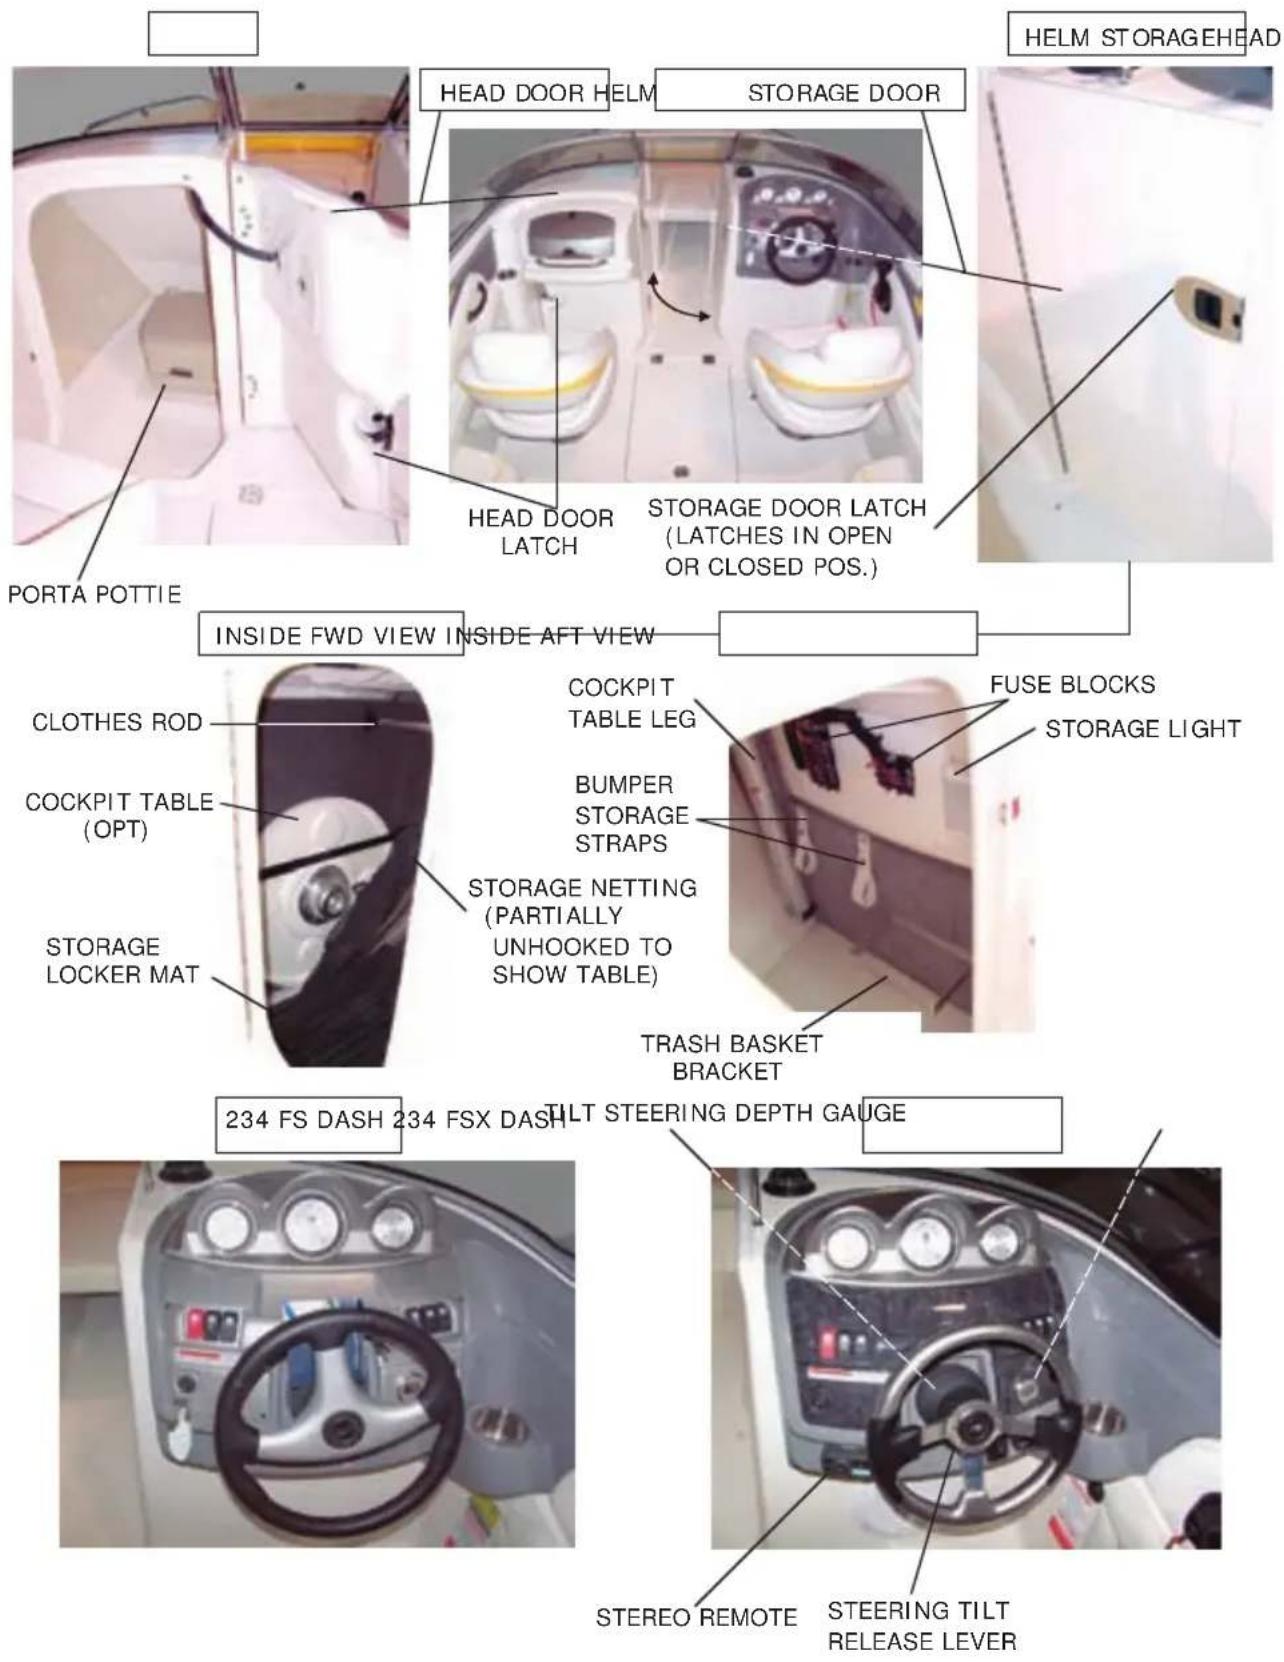
text_image
HEAD DOOR HELM STORAGE DOOR HELM STORAGEHEAD PORTA POTTIE HEAD DOOR LATCH STORAGE DOOR LATCH (LATCHES IN OPEN OR CLOSED POS.) INSIDE FWD VIEW INSIDE AFT VIEW CLOTHES ROD COCKPIT TABLE (OPT) STORAGE LOCKER MAT COCKPIT TABLE LEG BUMPER STORAGE STRAPS STORAGE NETTING (PARTIALLY UNHOOKED TO SHOW TABLE) TRASH BASKET BRACKET FUSE BLOCKS STORAGE LIGHT 234 FS DASH 234 FSX DASH TILT STEERING DEPTH GAUGE STEREO REMOTE STEERING TILT RELEASE LEVER254 FS / FSX General Features
text_image
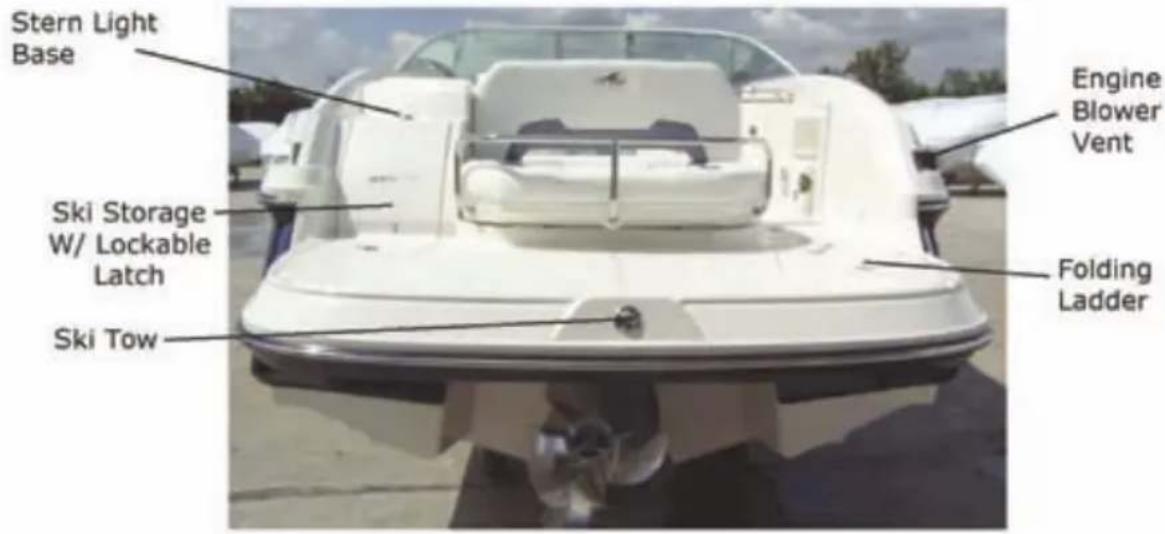
Stern Light Base Ski Storage W/ Lockable Latch Ski Tow Engine Blower Vent Folding Ladder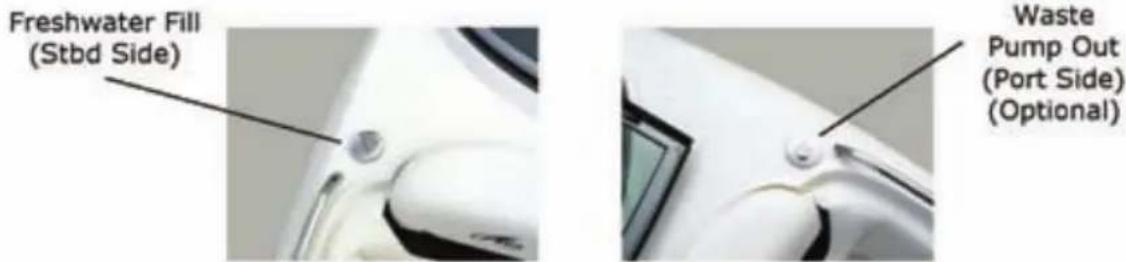
text_image
Freshwater Fill (Stbd Side) Waste Pump Out (Port Side) (Optional)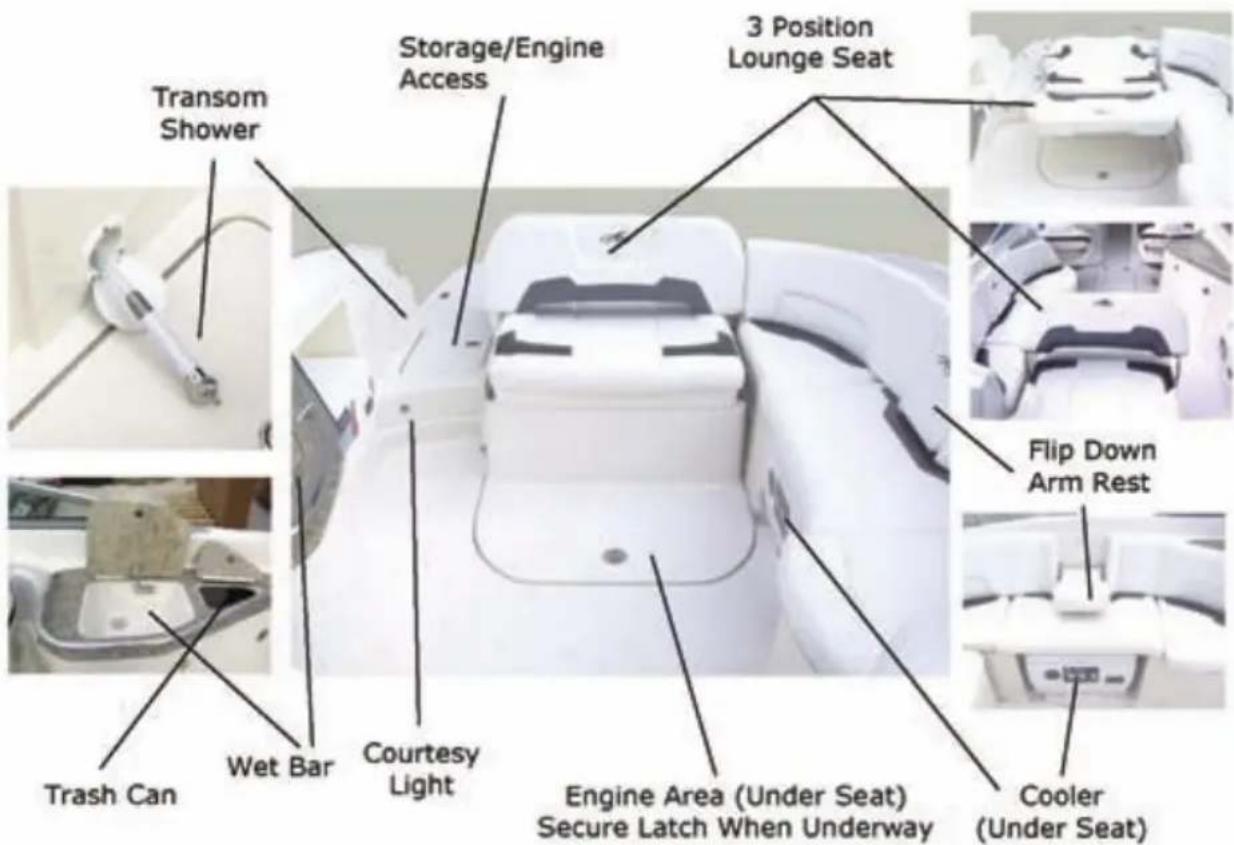
text_image
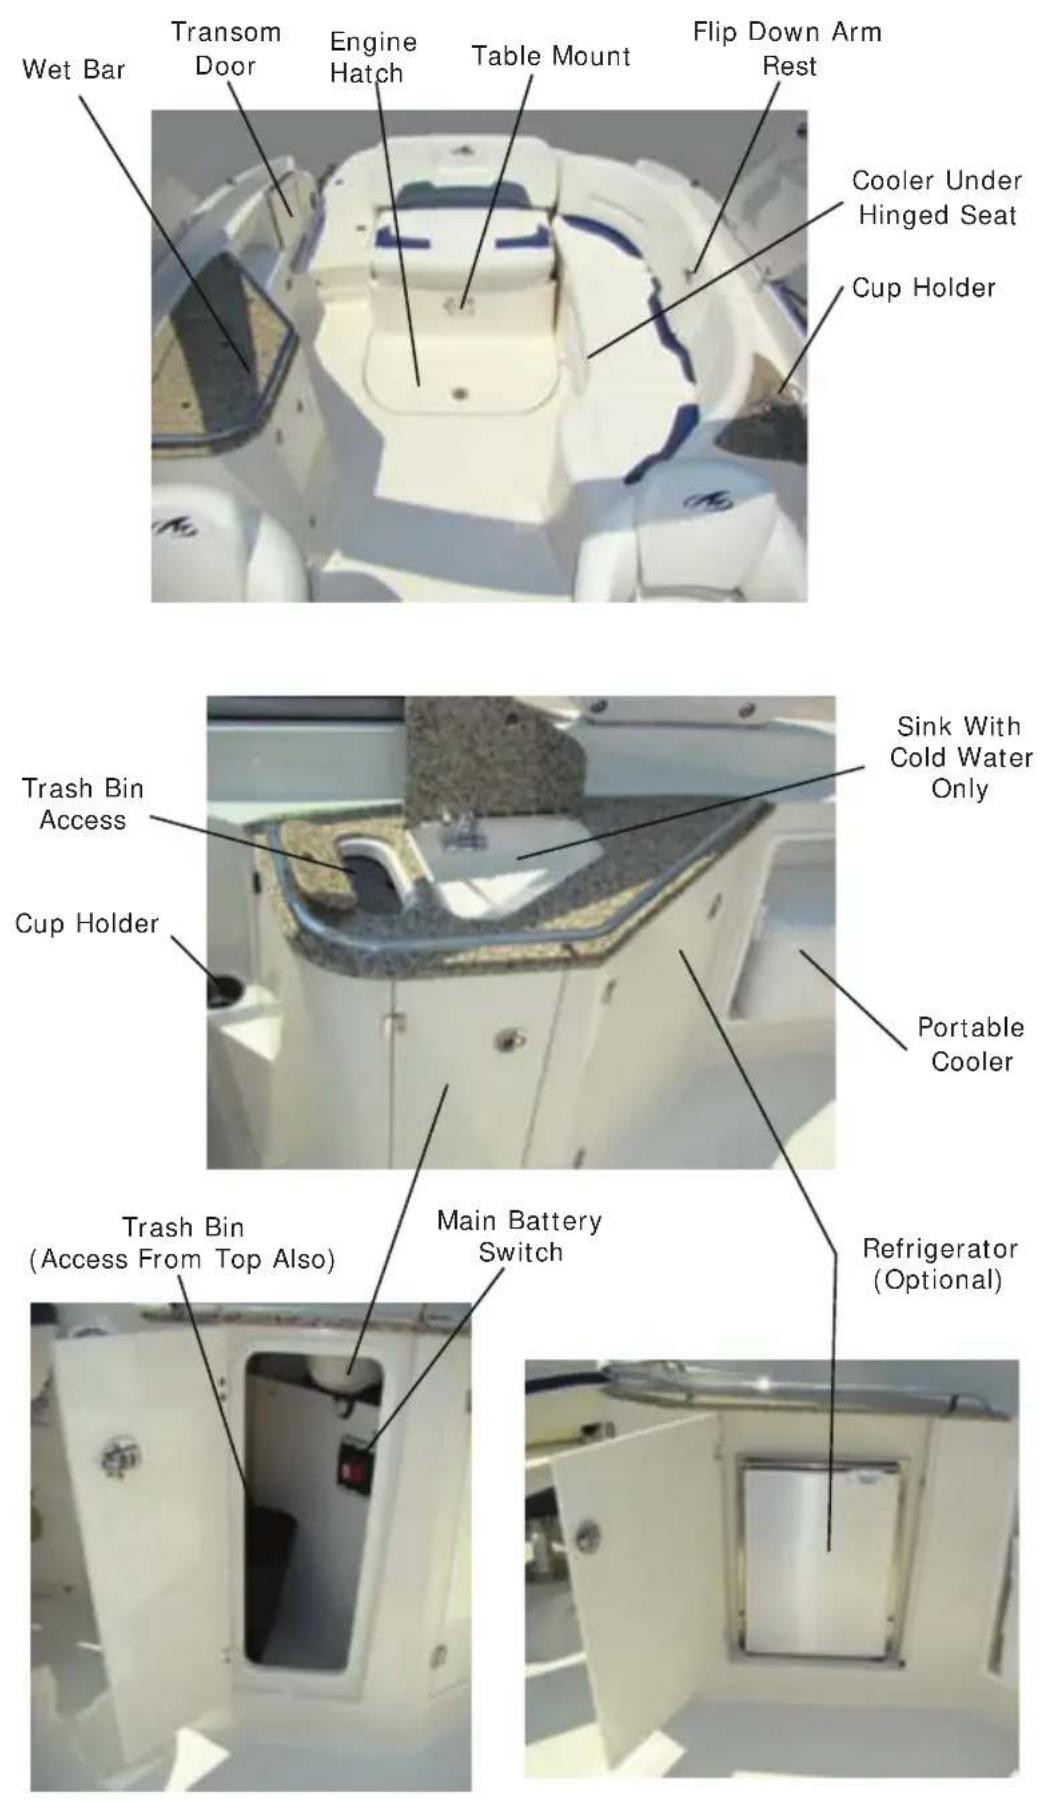
Transom Shower Storage/Engine Access 3 Position Lounge Seat Flip Down Arm Rest Trash Can Wet Bar Courtesy Light Engine Area (Under Seat) Secure Latch When Underway Cooler (Under Seat)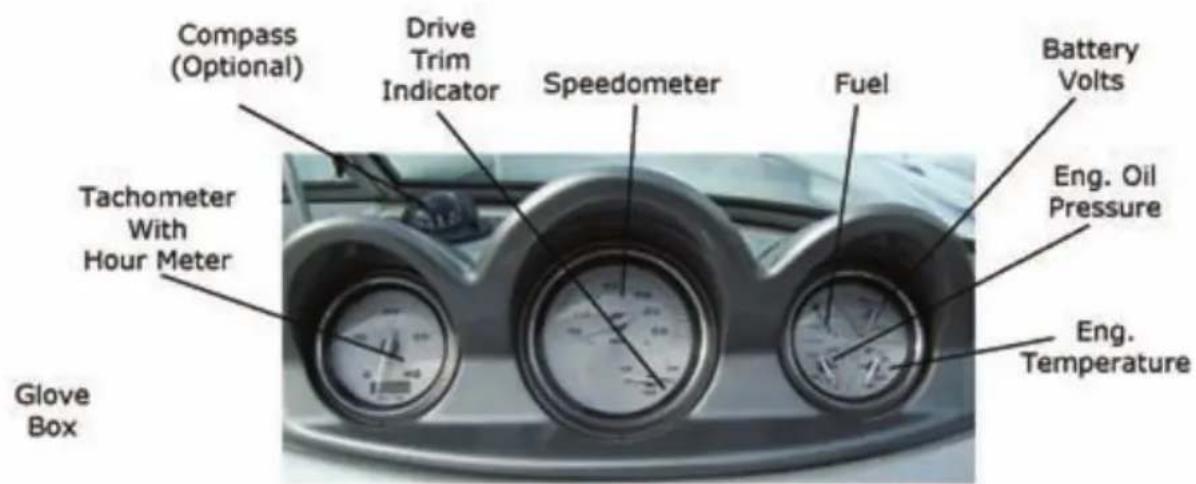
text_image
Compass (Optional) Drive Trim Indicator Speedometer Fuel Battery Volts Tachometer With Hour Meter Eng. Oil Pressure Eng. Temperature Glove Box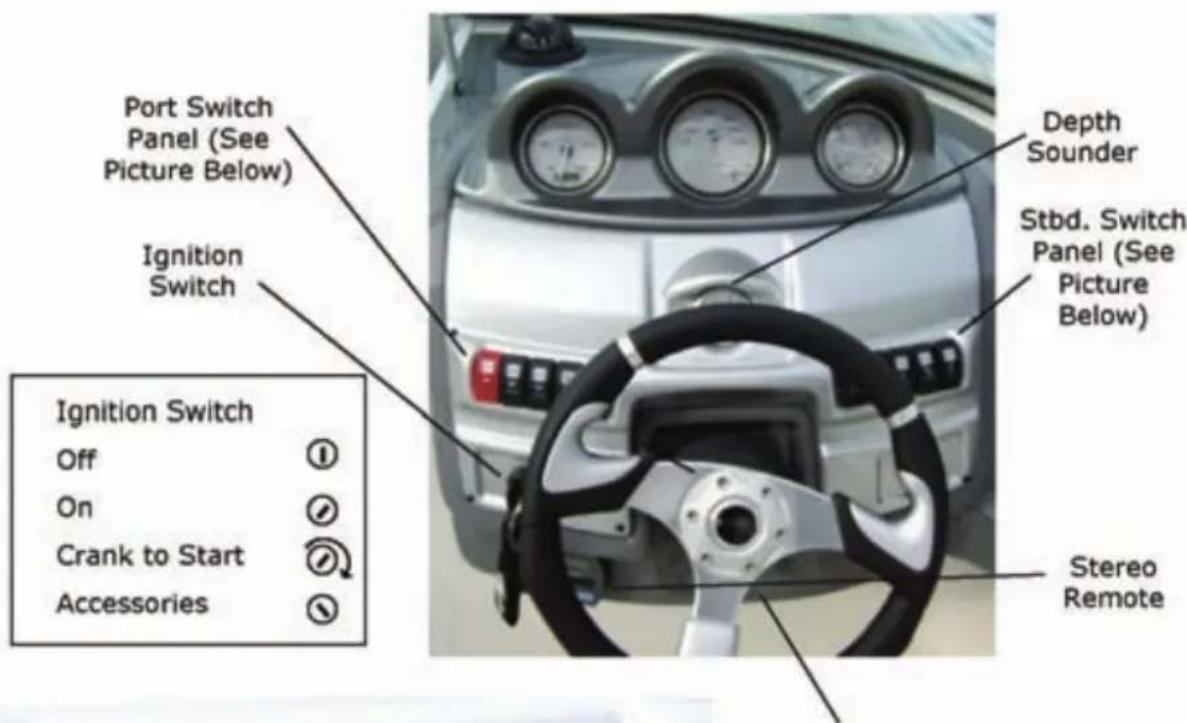
text_image
Port Switch Panel (See Picture Below) Ignition Switch Ignition Switch Off On Crank to Start Accessories Depth Sounder Stbd. Switch Panel (See Picture Below) Stereo Remote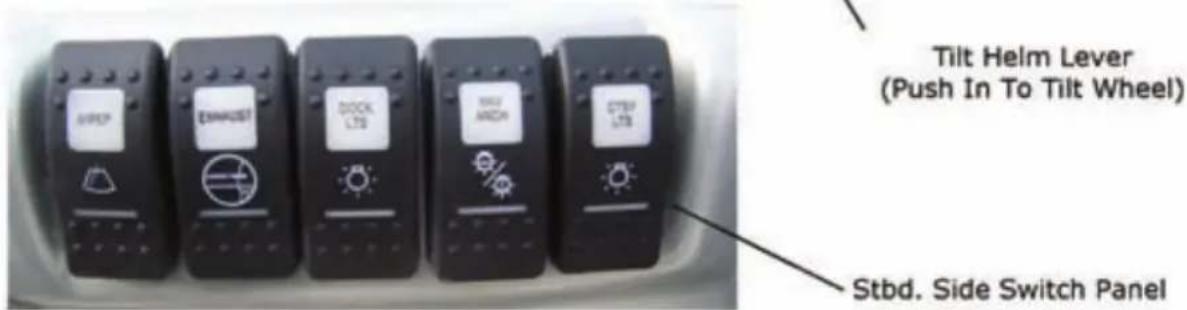
text_image
Tilt Helm Lever (Push In To Tilt Wheel) Stbd. Side Switch Panel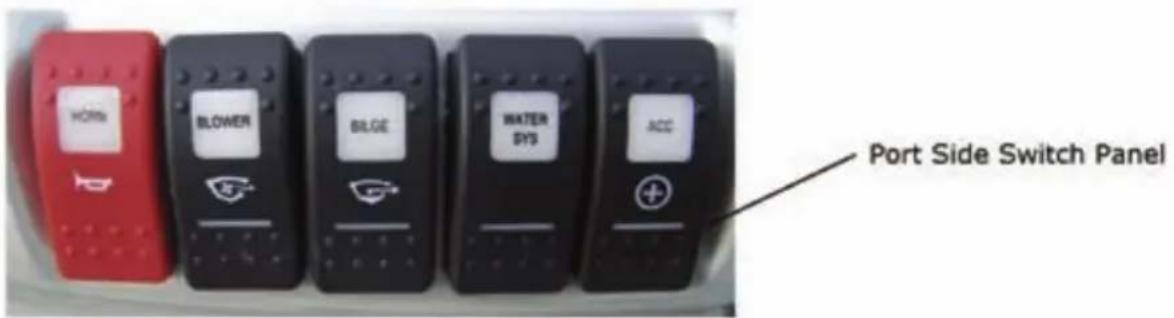
text_image
HORIs BLOWER BLGE WATER SYS ACC Port Side Switch Panel
text_image
Glove Box Head Compartment Ski Storage Safety Labels (see labels page) Throttle/Shift Control Speaker Storage/Radio Under Helm Tilt Lever For Wheel (press in to adjust)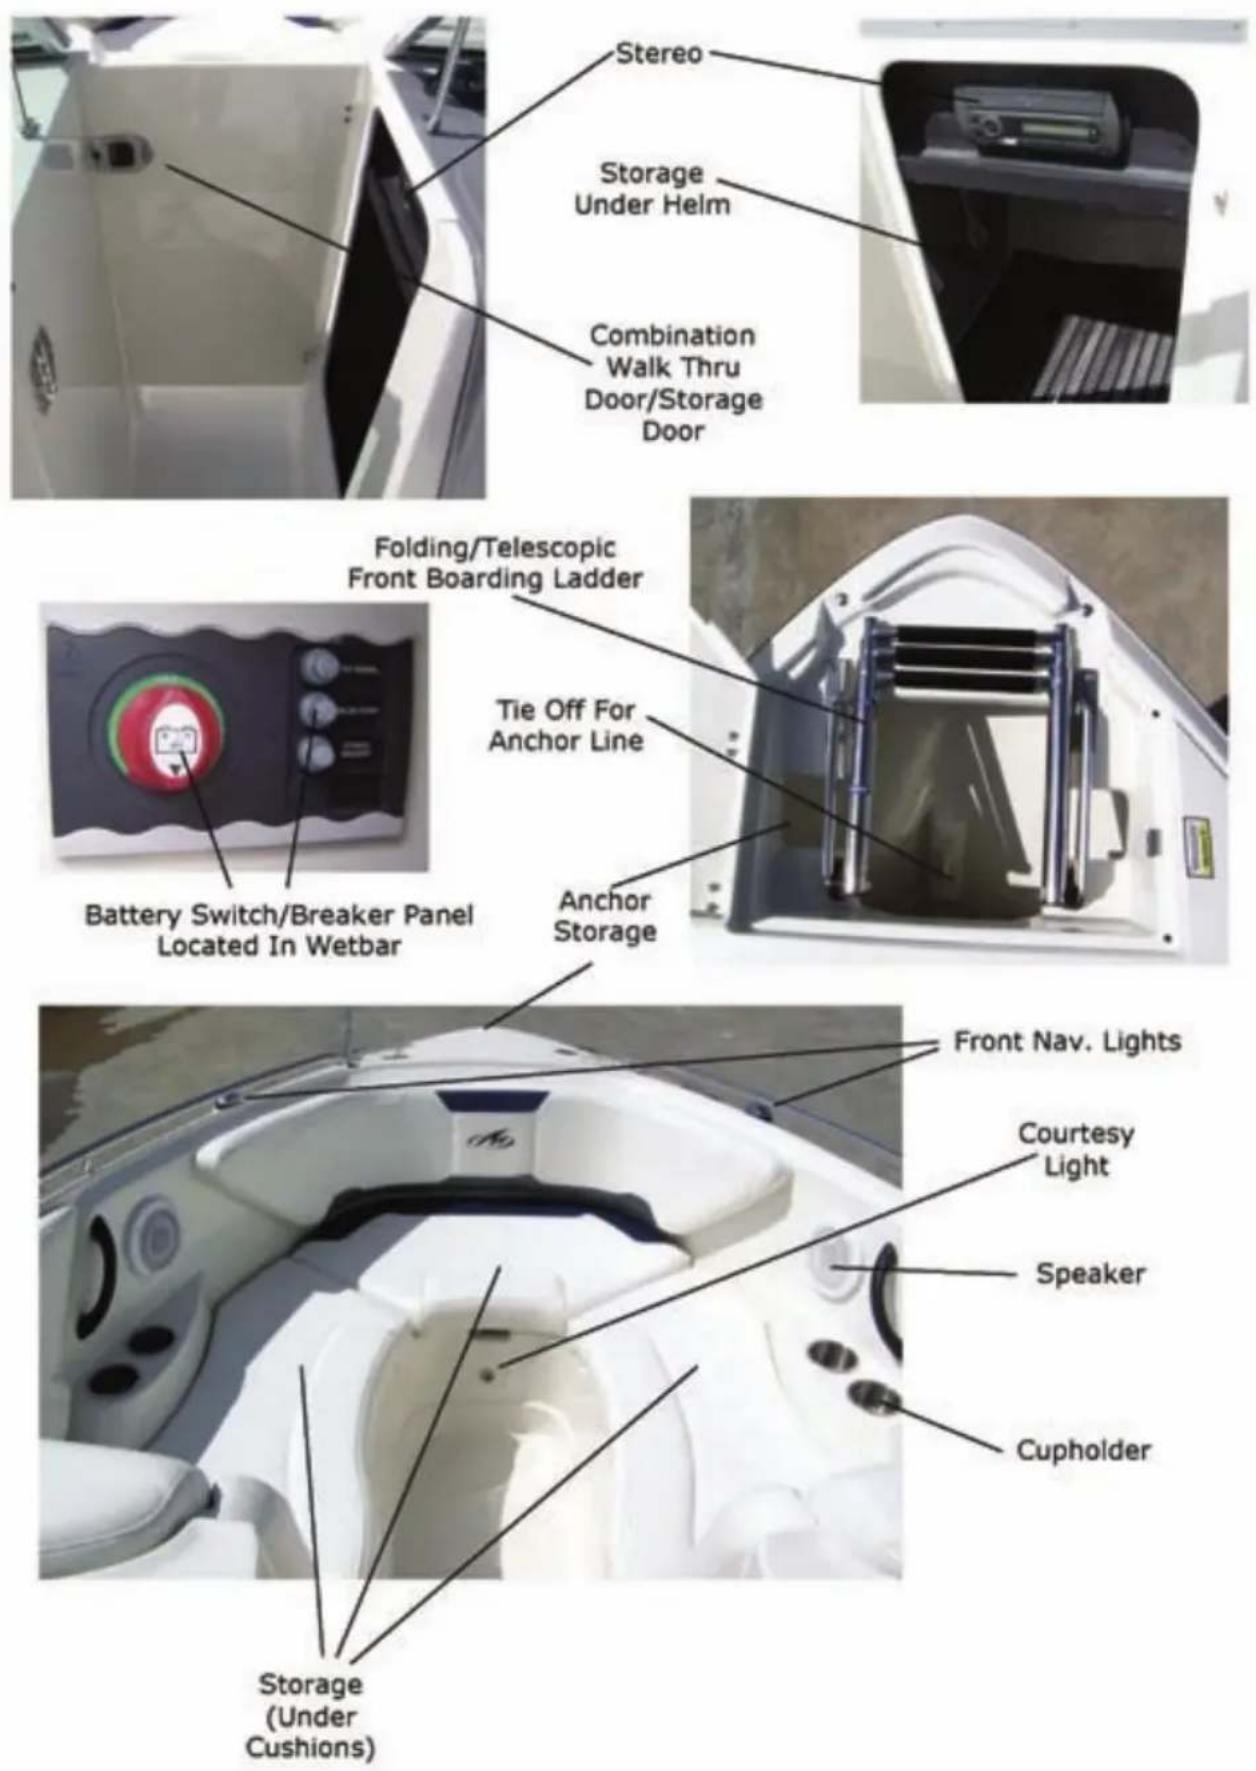
254 Cuddy General Features
text_image
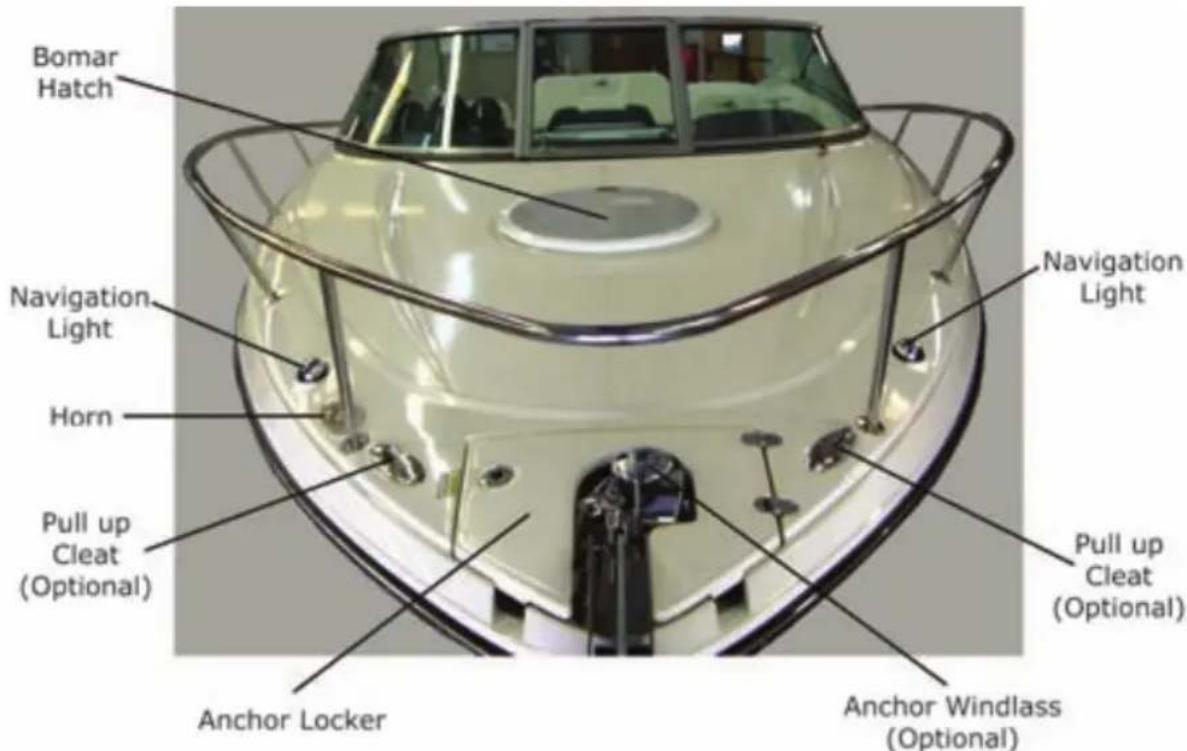
Bomar Hatch Navigation Light Horn Pull up Cleat (Optional) Anchor Locker Anchor Windlass (Optional) Navigation Light Pull up Cleat (Optional)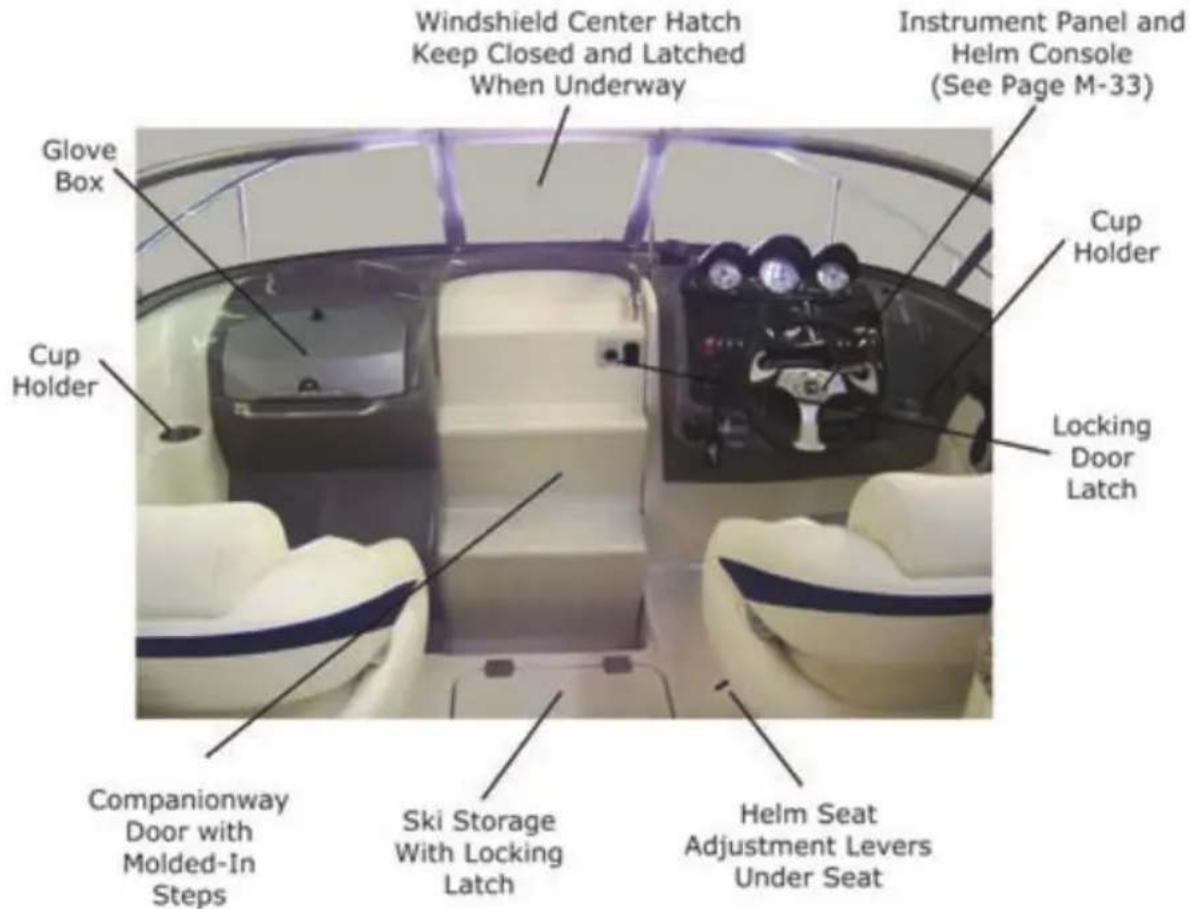
text_image
Windshield Center Hatch Keep Closed and Latched When Underway Instrument Panel and Helm Console (See Page M-33) Glove Box Cup Holder Cup Holder Locking Door Latch Companionway Door with Molded-In Steps Ski Storage With Locking Latch Helm Seat Adjustment Levers Under Seat254 Cuddy General Features
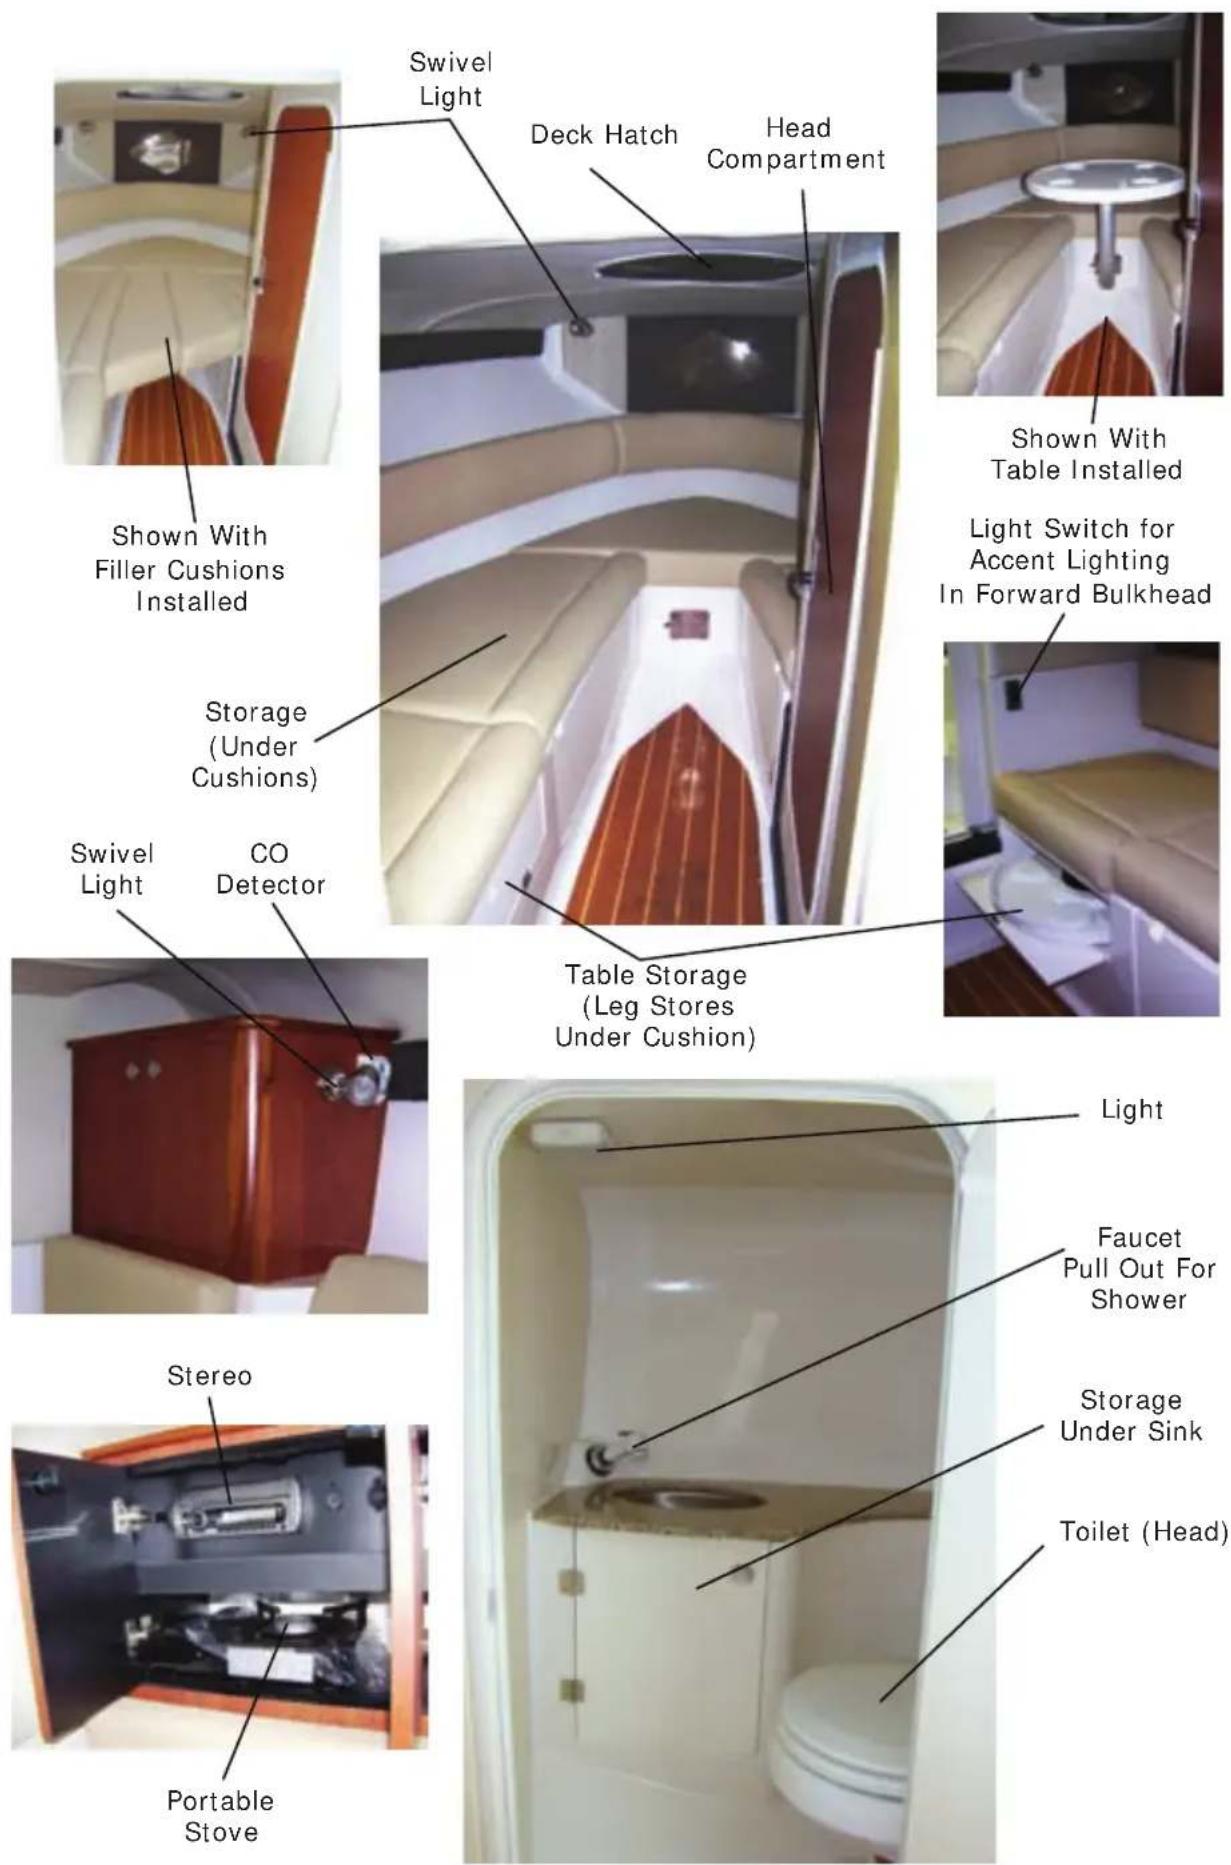
254 Cuddy Cabin
text_image
Swivel Light Deck Hatch Head Compartment Shown With Filler Cushions Installed Shown With Table Installed Light Switch for Accent Lighting In Forward Bulkhead Storage (Under Cushions) Swivel Light CO Detector Table Storage (Leg Stores Under Cushion) Light Faucet Pull Out For Shower Stereo Storage Under Sink Toilet (Head) Portable Stove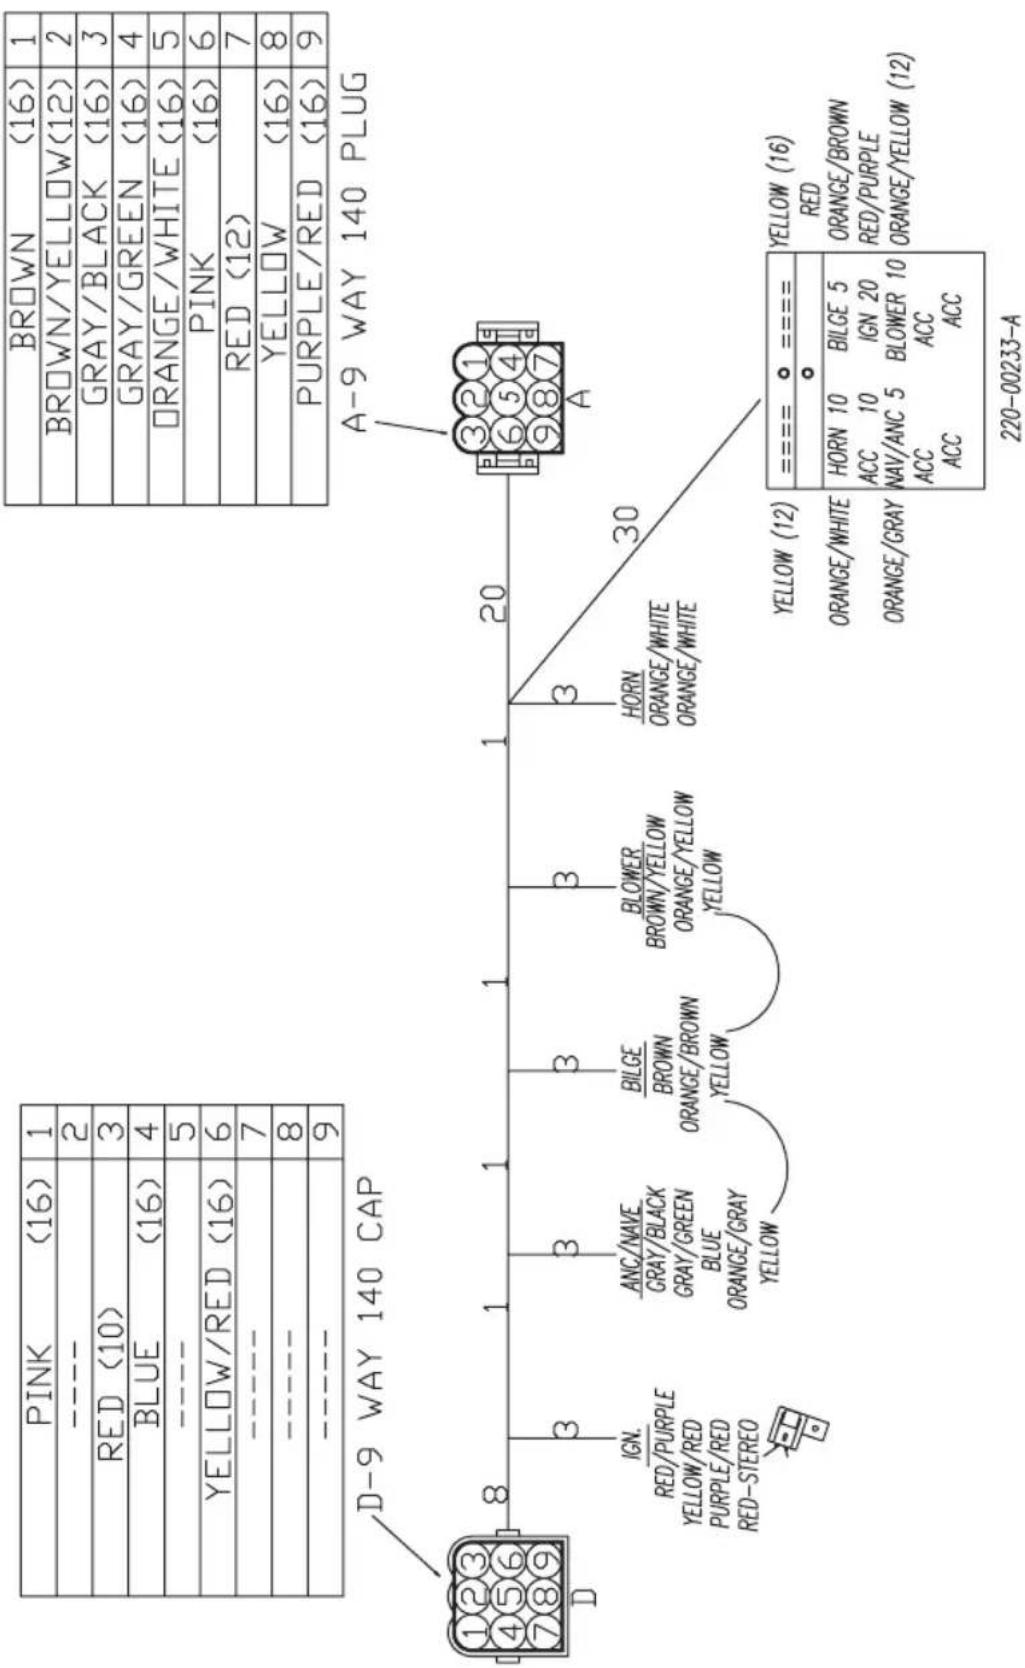
text_image
PINK (16) 1 ---- 2 RED (10) 3 BLUE (16) 4 ---- 5 YELLOW/RED (16) 6 ---- 7 ---- 8 ---- 9 BROWN (16) 1 BROWN/YELLOW (12) 2 GRAY/BLACK (16) 3 GRAY/GREEN (16) 4 ORANGE/WHITE (16) 5 PINK (16) 6 RED (12) 7 YELLOW (16) 8 PURPLE/RED (16) 9 D-9 WAY 140 CAP A-9 WAY 140 PLUG 321 654 987 3 8 1 1 1 3 30 3 HORN ORANGE/WHITE ORANGE/WHITE 32 12 YELLOW (12) ORANGE/WHITE HORN 10 BILGE 5 ACC 10 IGN 20 ORANGE/GRAY NAV/ANC 5 BLOWER 10 ACC ACC ACC ACC YELLOW (16) RED ORANGE/BROWN RED/PURPLE ORANGE/YELLOW (12) 220-00233-ACONDUT
FRAME RETARDBANT
text_image
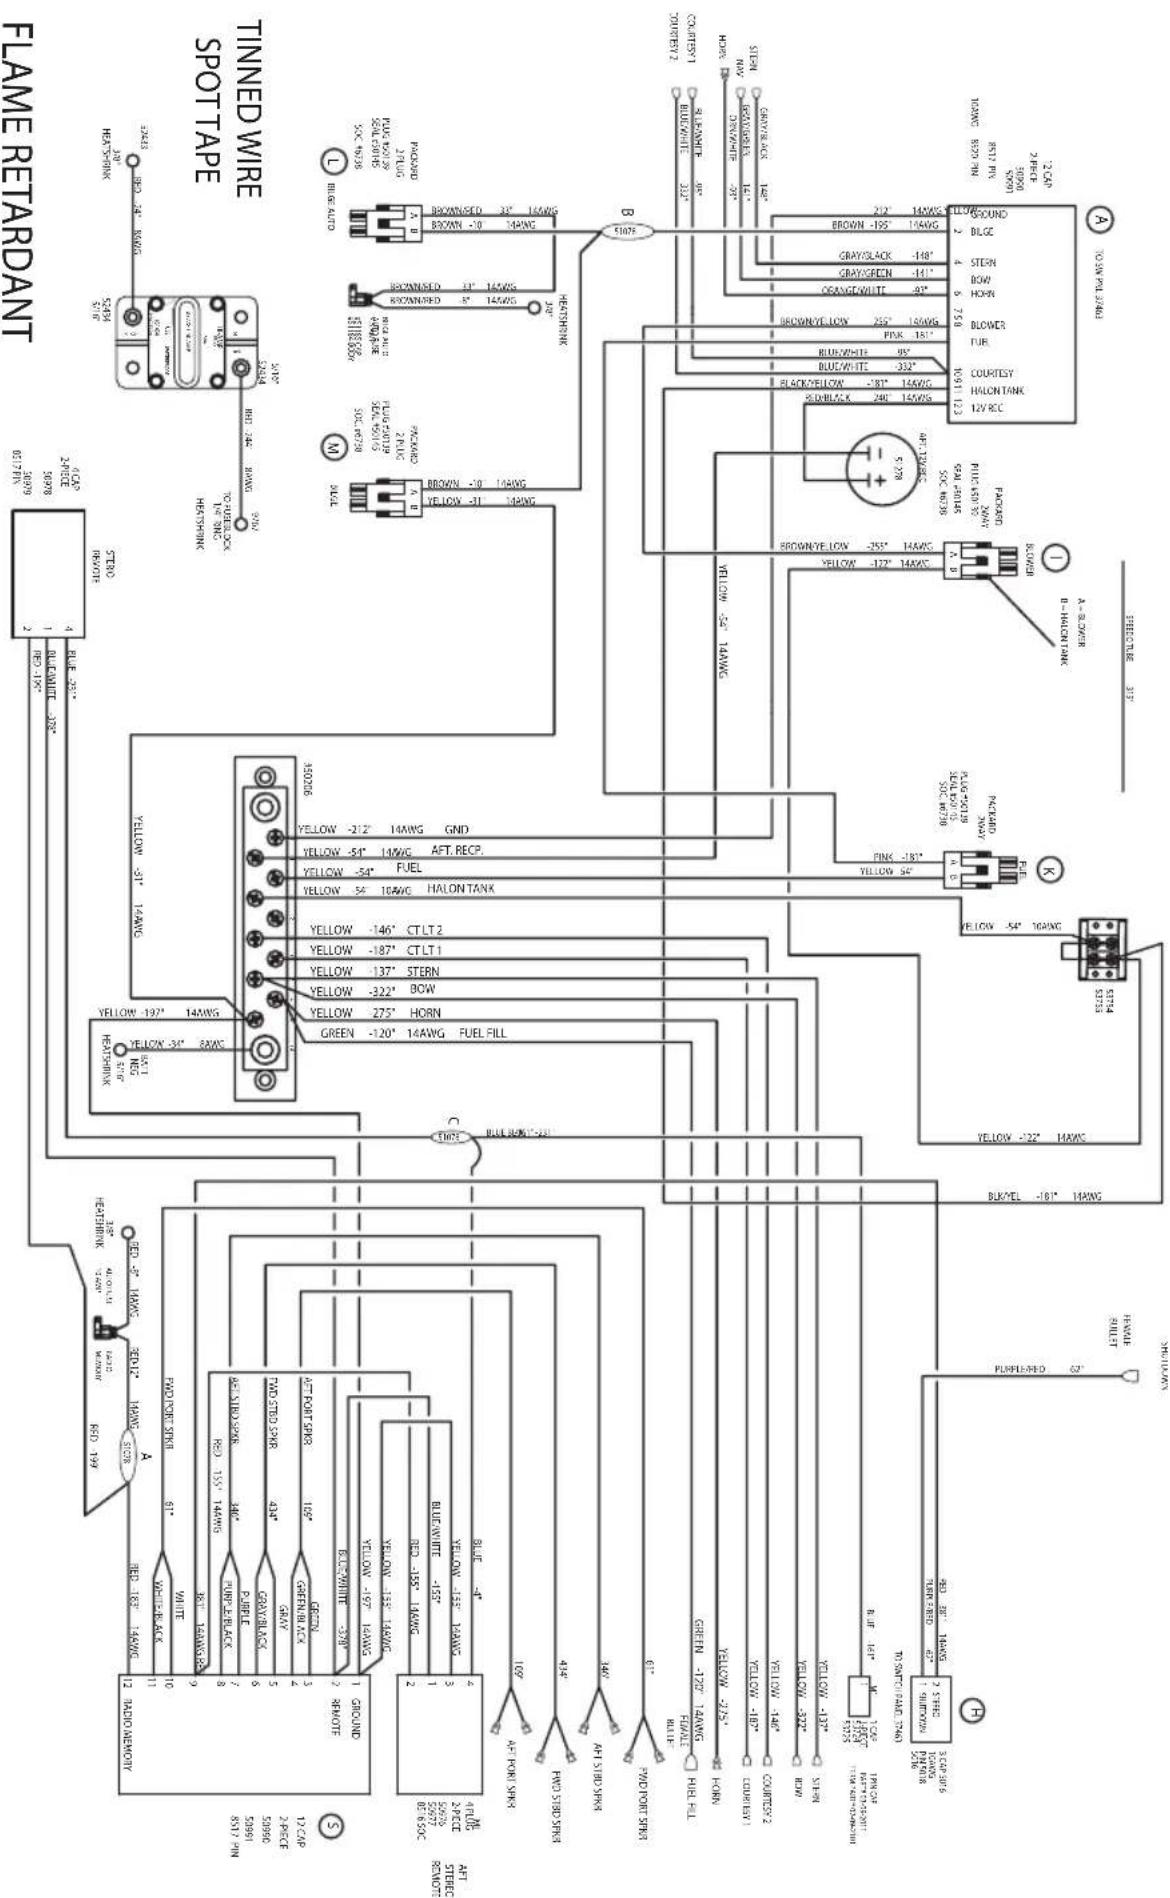
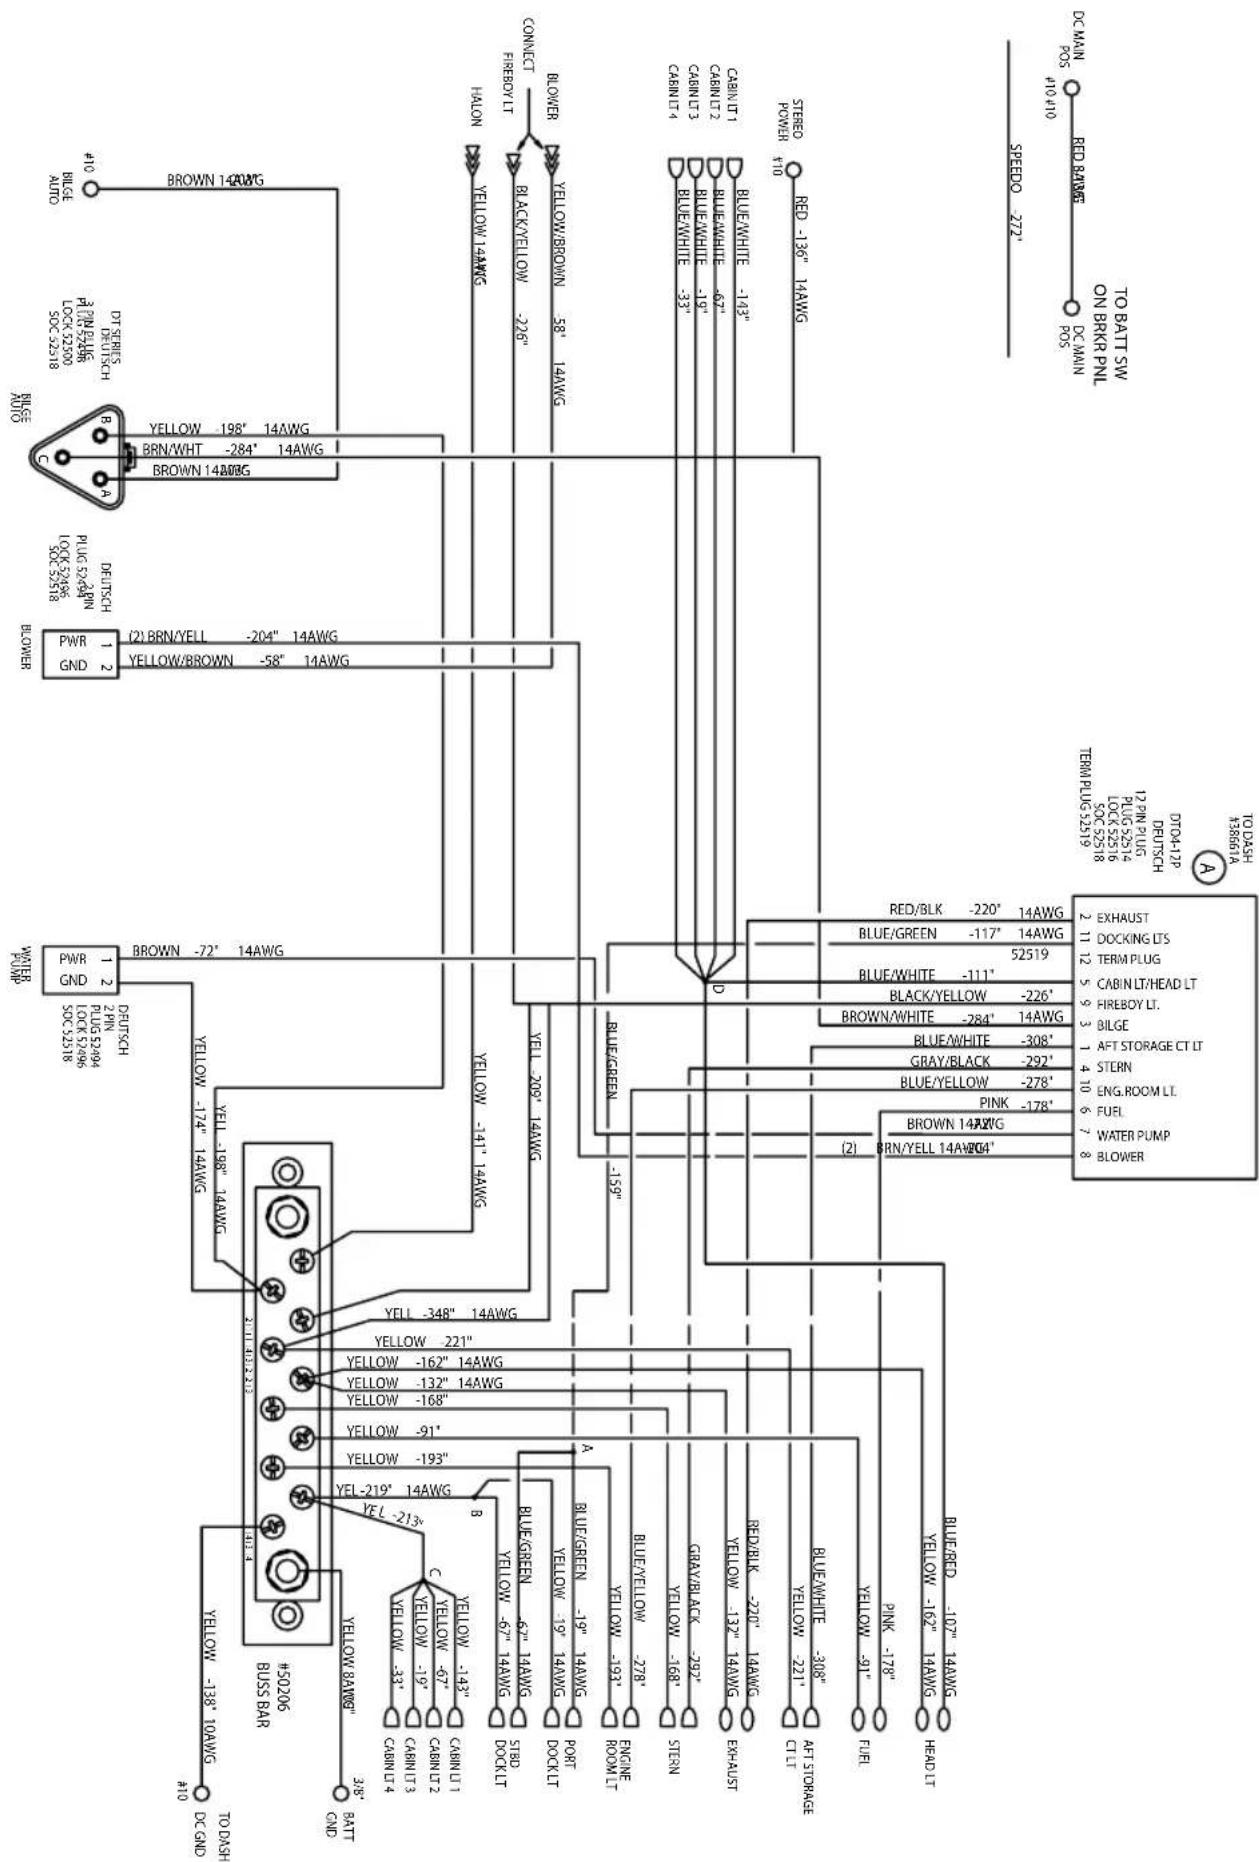
FLAME RETRAPANT TINNED WIRE SPOIT TAPE 1.2 VOLT ON 60V 15V 1.5V 7 VOLT ON 8 VOLT ON 9 VOLT ON 10 VOLT ON 11 VOLT ON 12 VOLT ON 13 VOLT ON 14 VOLT ON 15 VOLT ON 16 VOLT ON 17 VOLT ON 18 VOLT ON 19 VOLT ON 20 VOLT ON 21 VOLT ON 22 VOLT ON 23 VOLT ON 24 VOLT ON 25 VOLT ON 26 VOLT ON 27 VOLT ON 28 VOLT ON 29 VOLT ON 30 VOLT ON 31 VOLT ON 32 VOLT ON 33 VOLT ON 34 VOLT ON 35 VOLT ON 36 VOLT ON 37 VOLT ON 38 VOLT ON 39 VOLT ON 40 VOLT ON 41 VOLT ON 42 VOLT ON 43 VOLT ON 44 VOLT ON 45 VOLT ON 46 VOLT ON 47 VOLT ON 48 VOLT ON 49 VOLT ON 50 VOLT ON 51 VOLT ON 52 VOLT ON 53 VOLT ON 54 VOLT ON 55 VOLT ON 56 VOLT ON 57 VOLT ON 58 VOLT ON 59 VOLT ON 60 VOLT ON 61 VOLT ON 62 VOLT ON 63 VOLT ON 64 VOLT ON 65 VOLT ON 66 VOLT ON 67 VOLT ON 68 VOLT ON 69 VOLT ON 70 VOLT ON 71 VOLT ON 72 VOLT ON 73 VOLT ON 74 VOLT ON 75 VOLT ON 76 VOLT ON 77 VOLT ON 78 VOLT ON 79 VOLT ON 80 VOLT ON 81 VOLT ON 82 VOLT ON 83 VOLT ON 84 VOLT ON 85 VOLT ON 86 VOLT ON 87 VOLT ON 88 VOLT ON 89 VOLT ON 90 VOLT ON 91 VOLT ON 92 VOLT ON 93 VOLT ON 94 VOLT ON 95 VOLT ON 96 VOLT ON 97 VOLT ON 98 VOLT ON 99 VOLT ON 100 VOLT ON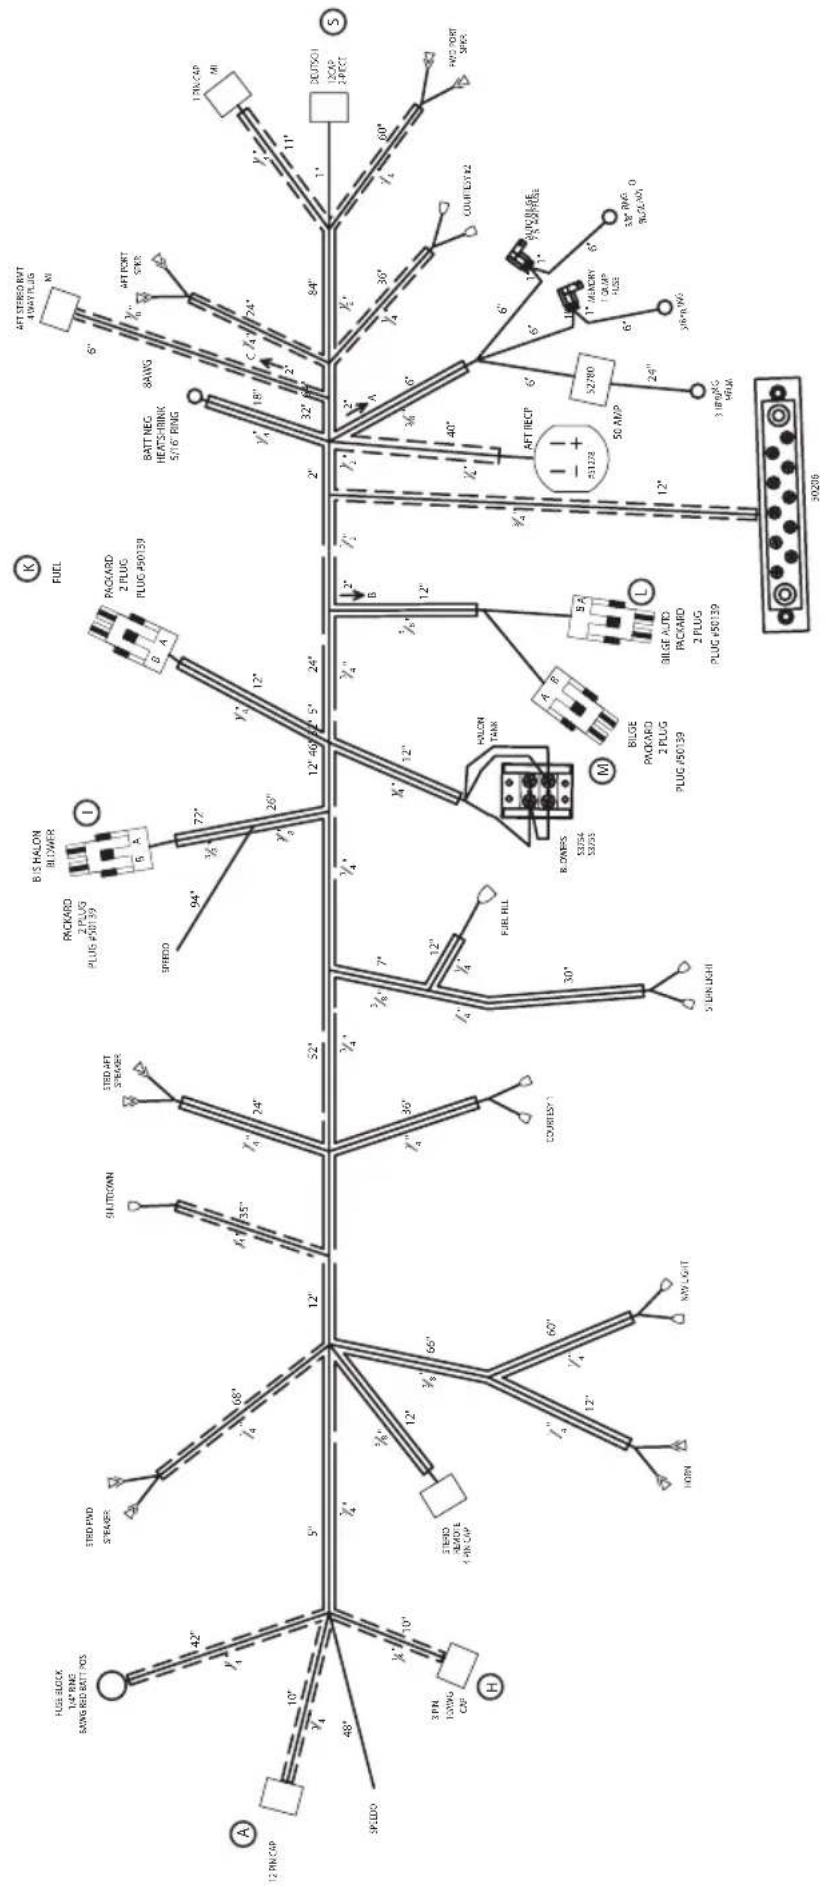
flowchart
graph TD
    A["12' PIN CAP"] --> B["FUSE BLOCK 1/4" RING SAWG RED BATT POS"]
    A --> C["STRED PND SPEAKER"]
    A --> D["3' PIN TOWG CAP"]
    A --> E["STRED HEATD 1-PIN CAP"]
    A --> F["3' PIN TOWG CAP"]
    A --> G["3' PIN TOWG CAP"]
    A --> H["H"]
    A --> I["5''"]
    A --> J["68'"]
    A --> K["7'4'"]
    A --> L["10''"]
    A --> M["48'"]
    A --> N["10''"]
    A --> O["12''"]
    A --> P["66'"]
    A --> Q["60'"]
    A --> R["12''"]
    A --> S["7'4'"]
    A --> T["36'"]
    A --> U["7'4'"]
    A --> V["12''"]
    A --> W["12''"]
    A --> X["30'"]
    A --> Y["S'UN LIGHT"]
    A --> Z["52'"]
    A --> AA["94'"]
    A --> AB["72'"]
    A --> AC["26'"]
    A --> AD["12''"]
    A --> AE["24'"]
    A --> AF["K"]
    A --> AG["FUEL"]
    A --> AH["BIS HALON BLOWER"]
    AH --> AI["PACKARD 2 PLUG PLUG #50139"]
    AH --> AJ["PACKARD 2 PLUG PLUG #50139"]
    AH --> AK["8A"]
    AH --> AL["AFT STEREO RVT 4"WAT" PLUG #K"]
    AH --> AM["AFT PORT STRIKE"]
    AH --> AN["AFT RECIP 52780"]
    AH --> AO["AFT RECIP 50 AMP"]
    AH --> AP["3" BING MFLM"]
    AH --> AQ["3" BING MFLM"]
    AH --> AR["AUT REG HEATS-HINK 5/16" RING"]
    AH --> AS["AUT REG HEATS-HINK 5/16" RING"]
    AH --> AT["AUT REG HEATS-HINK 5/16" RING"]
    AH --> AU["AUT REG HEATS-HINK 5/16" RING"]
    AH --> AV["AUT REG HEATS-HINK 5/16" RING"]
    AH --> AW["AUT REG HEATS-HINK 5/16" RING"]
    AH --> AX["AUT REG HEATS-HINK 5/16" RING"]
    AH --> AY["AUT REG HEATS-HINK 5/16" RING"]
    AH --> AZ["AUT REG HEATS-HINK 5/16" RING"]
    AH --> BA["AUT REG HEATS-HINK 5/16" RING"]
    AH --> BB["AUT REG HEATS-HINK 5/16" RING"]
    AH --> BC["AUT REG HEATS-HINK 5/16" RING"]
    AH --> BD["AUT REG HEATS-HINK 5/16" RING"]
    AH --> BE["AUT REG HEATS-HINK 5/16" RING"]
    AH --> BF["AUT REG HEATS-HINK 5/16" RING"]
    AH --> BG["AUT REG HEATS-HINK 5/16" RING"]
    AH --> BH["AUT REG HEATS-HINK 5/16" RING"]
    AH --> BI["AUT REG HEATS-HINK 5/16" RING"]
    AH --> BJ["AUT REG HEATS-HINK 5/16" RING"]
    AH --> BK["AUT REG HEATS-HINK 5/16" RING"]
    AH --> BL["AUT REG HEATS-HINK 5/16" RING"]
    AH --> BM["AUT REG HEATS-HINK 5/16" RING"]
    AH --> BN["AUT REG HEATS-HINK 5/16" RING"]
    AH --> BO["AUT REG HEATS-HINK 5/16" RING"]
    AH --> BP["AUT REG HEATS-HINK 5/16" RING"]
    AH --> BQ["AUT REG HEATS-HINK 5/16" RING"]
    AH --> BR["AUT REG HEATS-HINK 5/16" RING"]
    AH --> BS["AUT REG HEATS-HINK 5/16" RING"]
    AH --> BT["AUT REG HEATS-HINK 5/16" RING"]
    AH --> BU["AUT REG HEATS-HINK 5/16" RING"]
    AH --> BV["AUT REG HEATS-HINK 5/16" RING"]
    AH --> BW["AUT REG HEATS-HINK 5/16" RING"]
    AH --> BX["AUT REG HEATS-HINK 5/16" RING"]
    AH --> BY["AUT REG HEATS-HINK 5/16" RING"]
    AH --> BZ["AUT REG HEATS-HINK 5/16" RING"]
    AH --> CA["AUT REG HEATS-HINK 5/16" RING"]
    AH --> CB["AUT REG HEATS-HINK 5/16" RING"]
    AH --> CC["AUT REG HEATS-HINK 5/16" RING"]
    AH --> CD["AUT REG HEATS-HINK 5/16" RING"]
    AH --> CE["AUT REG HEATS-HINK 5/16" RING"]
    AH --> CF["AUT REG HEATS-HINK 5/16" RING"]
    AH --> CG["AUT REG HEATS-HINK 5/16" RING"]
    AH --> CH["AUT REG HEATS-HINK 5/16" RING"]
    AH --> CI["AUT REG HEATS-HINK 5/16" RING"]
    AH --> CJ["AUT REG HEATS-HINK 5/16" RING"]
    AH --> CK["AUT REG HEATS-HINK 5/16" RING"]
    AH --> CL["AUT REG HEATS-HINK 5/16" RING"]
    AH --> CM["AUT REG HEATS-HINK 5/16" RING"]
    AH --> CN["AUT REG HEATS-HINK 5/16" RING"]
    AH --> CO["AUT REG HEATS-HINK 5/16" RING"]
    AH --> CP["AUT REG HEATS-HINK 5/16" RING"]
    AH --> CS["AUT REG HEATS-HINK 5/16" RING"]
    AH --> CT["AUT REG HEATS-HINK 5/16" RING"]
    AH --> CU["AUT REG HEATS-HINK 5/16" RING"]
    AH --> CV["AUT REG HEATS-HINK 5/16" RING"]
    AH --> CW["AUT REG HEATS-HINK 5/16" RING"]
    AH --> CX["AUT REG HEATS-HINK 5/16" RING"]
    AH --> CYA["AUT REG HEATS-HINK 5/16" RING"]
    AH --> CZA["AUT REG HEATS-HINK 5/16" RING"]
    AH --> DAV["AUT REG HEATS-HINK 5/16" RING"]
    AH --> DBV["AUT REG HEATS-HINK 5/16" RING"]
    AH --> DCV["AUT REG HEATS-HINK 5/16" RING"]
FLAME
RETARDANT CONDUIT
254 FS Hull Harness (1 of 2)
text_image
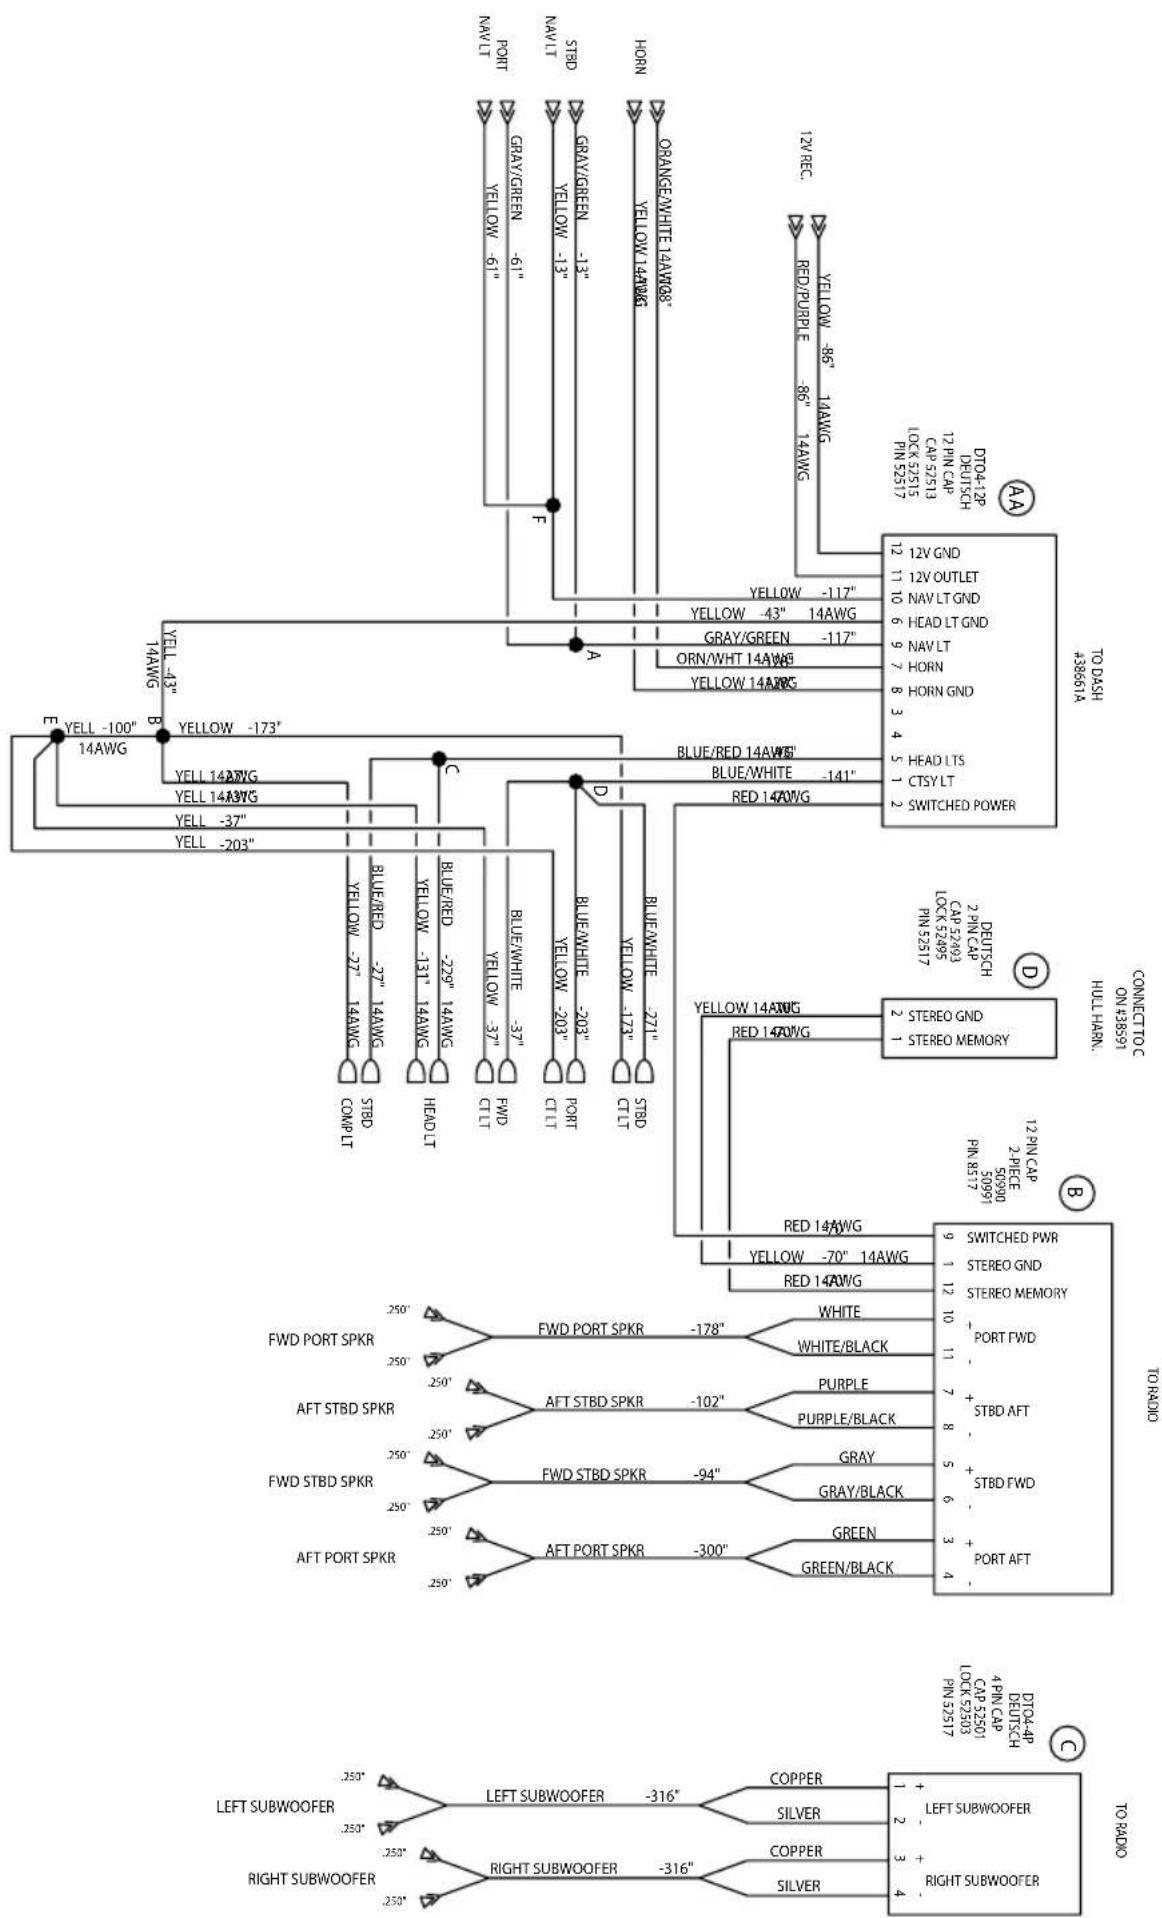
TO BATT SW ON BKR PNL 12 Pin 3 Pin 10 Pin 15 Pin 14 Pin 13 Pin 12 Pin 11 Pin 9 Pin 8 Pin 7 Pin 6 Pin 5 Pin 4 Pin 3 Pin 2 Pin 1 Pin 0 Pin 0 Pin 0 Pin 0 Pin 0 Pin 0 Pin 0 Pin 0 Pin 0 Pin 0 Pin 0 Pin 0 Pin 0 Pin 0 Pin 0 Pin 0 Pin 0 Pin 0 Pin 0 Pin 0 Pin 0 Pin 0 Pin 0 Pin 0 Pin 0 Pin 0 Pin 0 Pin 0 Pin 0 Pin 0 Pin 0 Pin 0 Pin 0 Pin 0 #10 DC GND #10 BATT GND #3/8 BATT GND #50206 BUSB BAR #78.72.23. #78.72.23. #78.72.23. #78.72.23. #78.72.23. #78.72.23. #78.72.23. #78.72.23. #78.72.23. #78.72.23. #78.72.23 #78.72.23. #78.72.23. #78.72.23. #78.72.23. #78.72.23. #78.72.23. #78.72.23. #78.72.23. #78.72.23. #78.72.26 CABN11 CABN11 CABN11 CABN11 CABN11 CABN11 CABN11 CABN11 CABN11 CABN11 CABN11 CABN11 CABN11 CABN11 CABN11 CABN11 CABN11 CABNA CABN11 CABN11 CABN11 CABN11 CABN11 CABN11 CABN11 CABN11 CABN11 CABN11 CABN11 CABN11 CABN11 CABN11 CABN11 CABN11 CABR BROWN S8' 14AWG HALON FIBROVLT HANON GREEN LED BLUE/RAWEN GREEN LED BLUE/GREEN GREEN LED RED/BLK -220' 14AWG GREEN LED -278' -278' GREEN LED -278' -278' GREEN LED -278' -278' GREEN LED -278' -278' GREEN LED -278' -278' GREEN LED -278' -278' GREEN LED -278' -278' GREEN LED -278' -278' GREEN LED -278' -278' GREEN LED -33' GREEN LED -33' GREEN LED -33' GREEN LED -33' GREEN LED -33' GREEN LED -33' GREEN LED -33' GREEN LED -33' GREEN LED -33' GREEN LED -33' GREEN LED -33' GREEN LED -33' GREEN LED -33' GREEN LED -33' GREEN LED -33' GREEN LED -33' GREEN LED -33' GREEN LED-456 SLSI9 GREEN LED-456 SLSI9 GREEN LED-456 SLSI9 GREEN LED-456 SLSI9 GREEN LED-456 SLSI9 GREEN LED-456 SLSI9 GREEN LED-456 SLSI9 GREEN LED-456 SLSI9 GREEN LED-456 SLSI9 GREEN LED-456 SLSI9 Green LED-456 SLSI9 Green LED-456 SLSI9 Green LED-456 SLSI9 Green LED-456 SLSI9 Green LED-456 SLSI9 Green LED-456 SLSI9 Green LED-456 SLSI9 Green LED-456 SLSI9 Blue/GREEN -6" TAWG -6" TAWG -6" TAWG -6" TAWG -6" TAWG -6" TAWG -6" TAWG -6" TAWG -6" TAWG -6" TAWG -6" TAWG -6" TAWG -6" TAWG -6" TAWG -6" TAWG -6" TAWG -6" TAWG -6"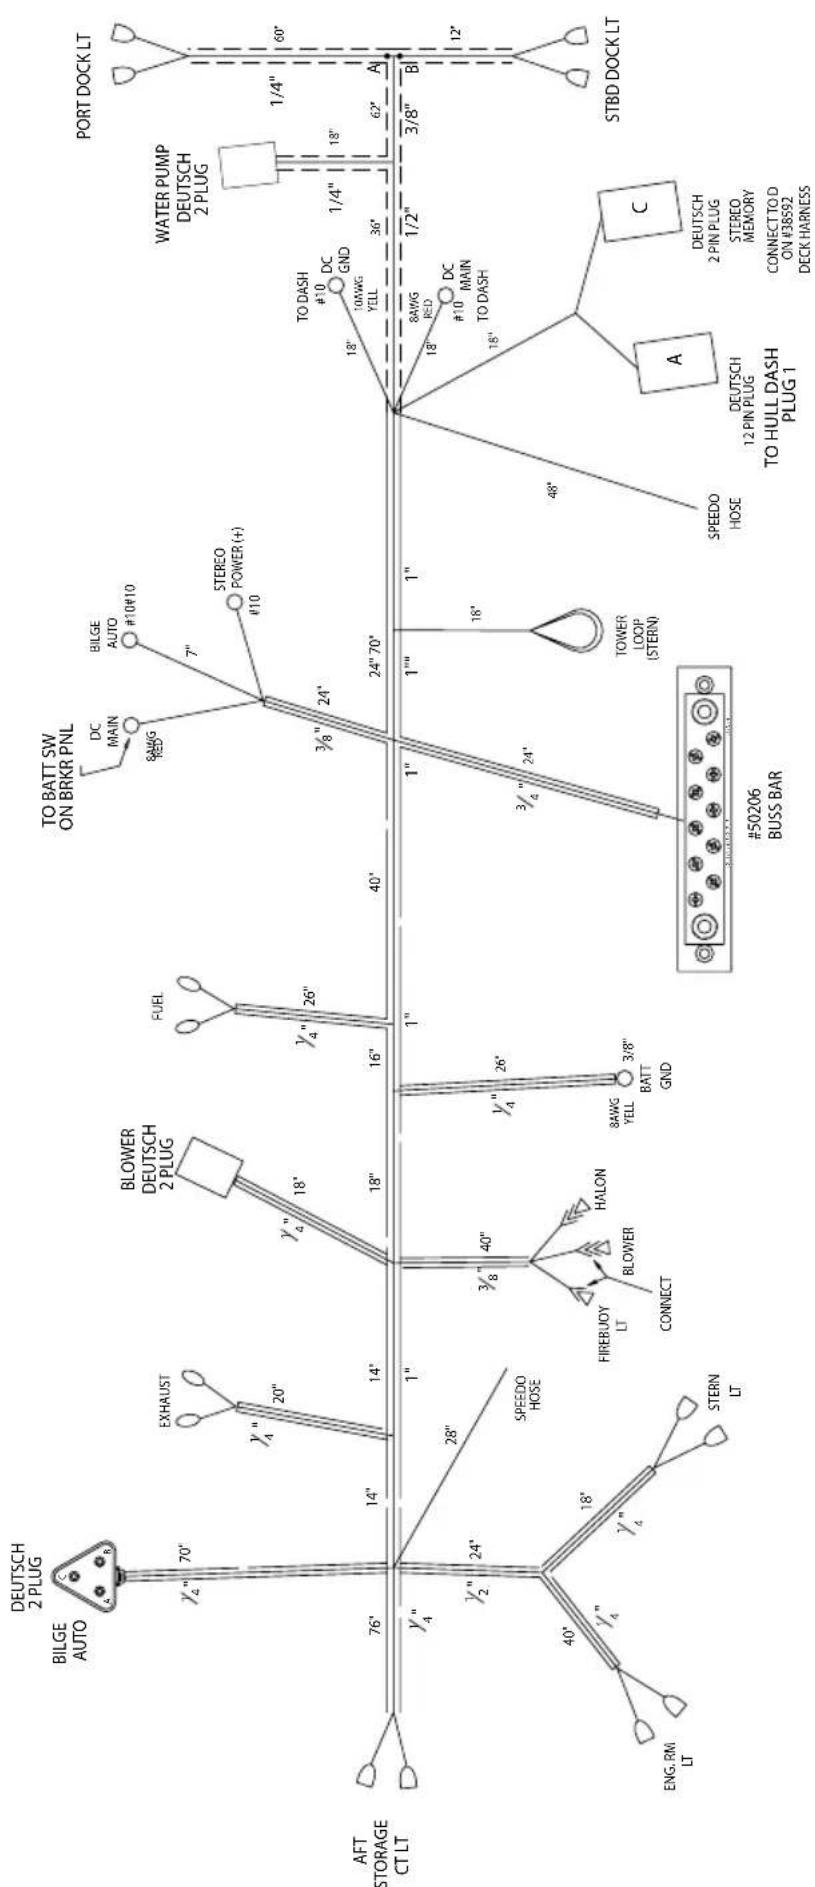
flowchart
graph TD
    A["AFT STORAGE CT LT"] -->|76'| B["BILGE AUTO"]
    A -->|14'| C["EXHAUST"]
    A -->|14'| D["FUEL"]
    A -->|14'| E["SPEEDO HOSE"]
    A -->|28'| F["FIREBUOY LT"]
    A -->|24'| G["STERN LT"]
    A -->|40'| H["SPEEDO HOSE"]
    A -->|18'| I["FIREBUOY LT"]
    A -->|18'| J["STERN LT"]
    A -->|3/8'| K["BLOWER"]
    A -->|40'| L["HALON"]
    A -->|3/8'| M["BATT GND"]
    A -->|26'| N["8AWG YELL"]
    A -->|24'| O["TOWER LOOP (STERIN)"]
    P["TO BATT SW ON BRKR PNL"] --> Q["DC MAIN"]
    P --> R["8AWG RED"]
    P --> S["#10"]
    P --> T["STEREO POWER (+)"]
    U["WATER PUMP DEUTSCH 2 PLUG"] --> V["#10"]
    W["PORT DOCK LT"] --> X["1/4""]
    W --> Y["60'"]
    Z["STBD DOCK LT"] --> AA["12'"]
    AB["#50206 BUSS BAR"] --> AC["TOWER LOOP (STERIN)"]
    AD["SPEEDO HOSE"] --> AE["A"]
    AF["DEUTSCH 12 PIN PLUG"] --> AG["C"]
    AH["DEUTSCH 2 PIN PLUG"] --> AI["STEREO MEMORY"] --> AJ["CONNECT TO D ON #38592 DECK HARNESS"]
254 FS Deck Harness (1 of 2)
flowchart
graph TD
    subgraph TO RADIO
        A["RIGHT SUBWOOFER"] --> B["250°"]
        C["LEFT SUBWOOFER"] --> D["250°"]
        E["SILVER"] --> F["3"]
        G["COPPER"] --> H["+"]
        I["4 Pin CP 4 Pin CS01 Look S2503 Pin N52517"] --> J["+"]
        K["TO RADIO"] --> L["RIGHT SUBWOOFER -316°"]
        L --> M["2"]
        N["LEFT SUBWOOFER -316°"] --> O["+"]
        P["RIGHT SUBWOOFER"] --> Q["3"]
        R["SILVER"] --> S["+"]
        T["LEFT SUBWOOFER"] --> U["+"]
        V["COPPER"] --> W["+"]
    end

    subgraph SWITCHED PWR
        X["AFT PORT SPRK"] --> Y["250°"]
        Z["FWD STRD SPRK"] --> AA["250°"]
        AB["AFT STRD SPRK"] --> AC["250°"]
        AD["FWD PORT SPRK"] --> AE["250°"]
        AF["AFT PORT SPRK"] --> AG["250°"]
        AH["FWD STRD SPRK"] --> AI["250°"]
        AJ["AFT STRD SPRK"] --> AK["250°"]
        AL["FWD PORT SPRK"] --> AM["250°"]
        AN["AFT PORT SPRK"] --> AO["250°"]
        AP["AFT PORT SPRK"] --> AQ["250°"]
        AR["FWD STRD SPRK"] --> AS["250°"]
        AT["AFT STRD SPRK"] --> AU["250°"]
        AV["FWD PORT SPRK"] --> AW["250°"]
        AX["FWD PORT SPRK"] --> AY["250°"]
        AZ["FWD STBD SPRK"] --> BA["250°"]
        BB["FWD STRD SPRK"] --> BC["250°"]
        BD["FWD STRD SPRK"] --> BE["250°"]
        BF["FWD STBD SPRK"] --> BG["250°"]
        BH["FWD STRD SPRK"] --> BI["250°"]
        BJ["FWD STBD SPRK"] --> BK["250°"]
        BL["FWD STBD SPRK"] --> BM["250°"]
        BN["FWD STBD SPRK"] --> BO["250°"]
        BP["FWD STBD SPRK"] --> BQ["250°"]
        BR["FWD STBD SPRK"] --> BS["250°"]
        BT["FWD STBD SPRK"] --> BU["250°"]
        BV["FWD STBD SPRK"] --> BW["250°"]
        BX["FWD STBD SPRK"] --> BY["250°"]
        BZ["FWD STBD SPRK"] --> CA["250°"]
        CB["FWD STBD SPRK"] --> DA["250°"]
        DB["FWD STBD SPRK"] --> DBQ["250°"]
        DC["FWD STBD SPRK"] --> DD["250°"]
        DEF["FWD STBD SPRK"] --> DF["250°"]
        DG["FWD STBD SPRK"] --> DH["250°"]
        DI["FWD STBD SPRK"] --> DJ["250°"]
        DK["FWD STBD SPRK"] --> DL["250°"]
        DV["FWD STBD SPRK"] --> DVQ["250°"]
        DW["FWD STBD SPRK"] --> DWQ["250°"]
        BXG["FWD STBD SPRK"] --> BXQ["250°"]
        BYG["FWD STBD SPRK"] --> BYQ["250°"]
        BZG["FWD STBD SPRK"] --> BZQ["250°"]
        BZG --> BZQ
        CC["FWD STBD SPRK"] --> CCQ["250°"]
        DZF["FWD STBD SPRK"] --> DZQ["250°"]
        DZF --> DZQ
        DZF --> DZQ
    end

    subgraph SWITCHED POWER
        E["RUB/RAWG"] --> F["YUE/WHITE -271""]
        G["RUB/RAWG"] --> H["YUE/WHITE -371""]
        I["RUB/RAWG"] --> J["YUE/WHITE -371""]
        K["RUB/RAWG"] --> L["YUE/WHITE -371""]
        M["RUB/RAWG"] --> N["YUE/WHITE -371""]
        O["RUB/RAWG"] --> P["YUE/WHITE -371""]
    end

    subgraph TO DASH
        Q["RUB/RAWG"] --> R["YUE/WHITE -172""]
        S["RUB/RAWG"] --> S["TIBO CTI"]
    end

    subgraph SWITCHED POWER
        T["RUB/RAWG"] --> U["YUE/WHITE -141""]
        V["RUB/RAWG"] --> W["YUE/WHITE -141""]
    end

    subgraph TO DASH
        X["RUB/RAWG"] --> Y["YUE/WHITE -61""]
        Z["RUB/RAWG"] --> Z["TIBO CTI"]
    end

    subgraph SWITCHED POWER
        AA["RUB/RAWG"] --> AB["YUE/WHITE -61""]
        AC["RUB/RAWG"] --> AC["TIBO CTI"]
    end

    subgraph TO DASH
        AD["RUB/RAWG"] --> AE["YUE/WHITE -131""]
        AF["RUB/RAWG"] --> AF["TIBO CTI"]
    end

    subgraph SWITCHED POWER
        AF["RUB/RAWG"] --> AF["TIBO CTI"]
    end

    subgraph TO DASH
        AG["RUB/RAWG"] --> AH["YUE/WHITE -131""]
        AI["RUB/RAWG"] --> AI["TIBO CTI"]
    end

    subgraph SWITCHED POWER
        AJ["RUB/RAWG"] --> AJ["TIBO CTI"]
    end

    subgraph SWITCHED POWER
        AK["RUB/RAWG"] --> AK["TIBO CTI"]
    end

    subgraph SWITCHED POWER
        AL["RUB/RAWG"] --> AL["TIBO CTI"]
    end

    subgraph SWITCHED POWER
        AM["RUB/RAWG"] --> AM["TIBO CTI"]
    end

    subgraph SWITCHED POWER
        AN["RUB/RAWG"] --> AN["TIBO CTI"]
    end

    subgraph SWITCHED POWER
        AO["RUB/RAWG"] --> AO["TIBO CTI"]
    end

    subgraph SWITCHED POWER
        AP["RUB/RAWG"] --> AP["TIBO CTI"]
    end

    subgraph SWITCHED POWER
        AQ["RUB/RAWG"] --> AQ["TIBO CTI"]
    end

    subgraph SWITCHED POWER
        AR["RUB/RAWG"] --> AR["TIBO CTI"]
    end

    subgraph SWITCHED POWER
        AS["RUB/RAWG"] --> AS["TIBO CTI"]
    end

    subgraph SWITCHED POWER
        AT["RUB/RAWG"] --> AT["TIBO CTI"]
    end

    subgraph SWITCHED POWER
        AU["RUB/RAWG"] --> AU["TIBO CTI"]
    end

    subgraph SWITCHED POWER
        AV["RUB/RAWG"] --> AV["TIBO CTI"]
    end

    subgraph SWITCHED POWER
        AW["RUB/RAWG"] --> AW["TIBO CTI"]
    end

    subgraph SWITCHED POWER
        AX["RUB/RAWG"] --> AX["TIBO CTI"]
    end

    subgraph SWITCHED POWER
        AY["RUB/RAWG"] --> AY["TIBO CTI"]
    end

    subgraph SWITCHED POWER
        AZ["RUB/RAWG"] --> AZ["TIBO CTI"]
    end

    subgraph SWITCHED POWER
        BA["RUB/RAWG"] --> BA["TIBO CTI"]
    end

    subgraph SWITCHED POWER
        BB["RUB/RAWG"] --> BB["TIBO CTI"]
    end

    subgraph SWITCHED POWER
        BC["RUB/RAWG"] --> BC["TIBO CTI"]
    end

    subgraph SWITCHED POWER
        BD["RUB/RAWG"] --> BD["TIBO CTI"]
    end

    subgraph SWITCHED POWER
        BE["RUB/RAWG"] --> BE["TIBO CTI"]
    end

    subgraph SWITCHED POWER
        BF["RUB/RAWG"] --> BF["TIBO CTI"]

    subgraph SWITCHED POWER
        BG["RUB/RAWG"] --> BG["TIBO CTI"]

    subgraph SWITCHED POWER
        BH["RUB/RAWG"] --> BH["TIBO CTI"]

    subgraph SWITCHED POWER
        BI["RUB/RAWG"] --> BI["TIBO CTI"]

    subgraph SWITCHED POWER
        BJ["RUB/RAWG"] --> BJ["TIBO CTI"]

    subgraph SWITCHED POWER
        BK["RUB/RAWG"] --> BK["TIBO CTI"]

    subgraph SWITCHED POWER
        BL["RUB/RAWG"] --> BL["TIBO CTI"]

    subgraph SWITCHED POWER
        BM["RUB/RAWG"] --> BM["TIBO CTI"]

    subgraph SWITCHED POWER
        BN["RUB/RAWG"] --> BN["TIBO CTI"]

    subgraph SWITCHED POWER
        BO["RUB/RAWG"] --> BO["TIBO CTI"]

    subgraph SWITCHED POWER
        BP["RUB/RAWG"] --> BP["TIBO CTI"]

    subgraph SWITCHED POWER
        BZ["PIN 8.6" / 1.4AWG"]

    subgraph SWITCHED POWER
        CA["PIN 8.6" / 1.4AWG"]

    subgraph SWITCHED POWER
        CB["PIN 8.6" / 1.4AWG"]

    subgraph SWITCHED POWER
        CD["PIN 8.6" / 1.4AWG"]

    subgraph SWITCHED POWER
        CE["PIN 8.6" / 1.4AWG"]

    subgraph SWITCHED POWER
        CF["PIN 8.6" / 1.4AWG"]

    subgraph SWITCHED POWER
        GD["PIN 8.6" / 1.4AWG"]

    subgraph SWITCHED POWER
        GH["PIN 8.6" / 1.4AWG"]

    subgraph SWITCHED POWER
        ID["PIN 8.6" / 1.4AWG"]

    subgraph SWITCHED POWER
        IA["PIN 8.6" / 1.4AWG"]

    subgraph SWITCHED POWER
        AJ["PIN 8.6" / 1.4AWG"]

    subgraph SWITCHED POWER
        AK["PIN 8.6" / 1.4AWG"]

    subgraph SWITCHED POWER
        AL["PIN 8.6" / 1.4AWG"]

    subgraph SWITCHED POWER
        AM["PIN 8.6" / 1.4AWG"]

    subgraph SWITCHED POWER
        AN["PIN 8.6" / 1.4AWG"]

    subgraph SWITCHED POWER
        AO["PIN 8.6" / 1.4AWG"]

    subgraph SWITCHED POWER
        AP["PIN 8.6" / 1.4AWG"]

    subgraph SWITCHED POWER
        AQ["PIN 8.6" / 1.4AWG"]

    subgraph SWITCHED POWER
        AR["PIN 8.6" / 1.4AWG"]

    subgraph SWITCHED POWER
        AS["PIN 8.6" / 1.4AWG"]

    subgraph SWITCHED POWER
        AT["PIN 8.6" / 1.4AWG"]

    subgraph SWITCHED POWER
        AU["PIN 8.6" / 1.4AWG"]

    subgraph SWITCHED POWER
        AV["PIN 8.6" / 1.4AWG"]

    subgraph SWITCHED POWER
        AW["PIN 8.6" / 1.4AWG"]

    subgraph SWITCHED POWER
        AX["PIN 8.6" / 1.4AWG"]

    subgraph SWITCHED POWER
        AY["PIN 8.6" / 1.4AWG"]

    subgraph SWITCHED POWER
        AZ["PIN 8.6" / 1.4AWG"]

    subgraph SWITCHED POWER
        BA["PIN 8.6" / 1.4AWG"]

    subgraph SWITCHED POWER
        BB["PIN 8.6" / 1.4AWG"]

    subgraph SWITCHED POWER
        BC["PIN 8.6" / 1.4AWG"]

    subgraph SWITCHED POWER
        DA["PIN 8.6" / 1.4AWG"]

    subgraph SWITCHED POWER
        AE["PIN 8.6" / 1.4AWG"]

    subgraph SWITCHED POWER
        AF["PIN 8.6" / 1.4AWG"]

    subgraph SWITCHED POWER
        AG["PIN 8.6" / 1.4AWG"]

    subgraph SWITCHED POWER
        AH["PIN 8.6" / 1.4AWG"]

    subgraph SWITCHED POWER
        AI["PIN 8.6" / 1.4AWG"]

    subgraph SWITCHED POWER
        AJ["PIN 8.6" / 1.4AWG"]

    subgraph SWITCHED POWER
        AK["PIN 8.6" / 1.4AWG"]

    subgraph SWITCHED POWER
        AL["PIN 8.6" / 1.4AWG"]

    subgraph SWITCHED POWER
        AM["PIN 9.6" / 1.4AWG"]

    subgraph SWITCHED POWER
        AN["PIN 9.6" / 1.4AWG"]

    subgraph SWITCHED POWER
        AO["PIN 9.6" / 1.4AWG"]

    subgraph SWITCHED POWER
        AP["PIN 9.6" / 1.4AWG"]

    subgraph SWITCHED POWER
        AQ["PIN 9.6" / 1.4AWG"]

    subgraph SWITCHED POWER
        AR["PIN 9.6" / 1.4AWG"]

    subgraph SWITCHED POWER
        AS["PIN 9.6" / 1.4AWG"]

    subgraph SWITCHED POWER
        AT["PIN 9.6" / 1.4AWG"]

    subgraph SWITCHED POWER
        AU["PIN 9.6" / 1.4AWG"]

    subgraph SWITCHED POWER
        AV["PIN 9.6" / 1.4AWG"]

    subgraph SWITCHED POWER
        AZ["PIN 9.6" / 1.4AWG"]

    subgraph SWITCHED POWER
        AY["PIN 9.6" / 1.4AWG"]

    subgraph SWITCHED POWER
        AZP["PIN 9.6" / 1.4AWG"]

    subgraph SWITCHED POWER
        BA["PIN 9.6" / 1.4AWG"]

    subgraph SWITCHED POWER
        BB["PIN 9.6" / 1.4AWG"]

    subgraph SWITCHED POWER
        CA["PIN 9.6" / 1.4AWG"]

    subgraph SWITCHED POWER
        AZP["PIN 9.6" / 1.4AWG"]

    subgraph SWITCHED POWER
        BA["PIN 9.6" / 1.4AWG"]

    subgraph SWITCHED POWER
        BB["PIN 9.6" / 1.4AWG"]

    subgraph SWITCHED POWER
        CA[PIN
254 FS Deck Harness (2 of 2)
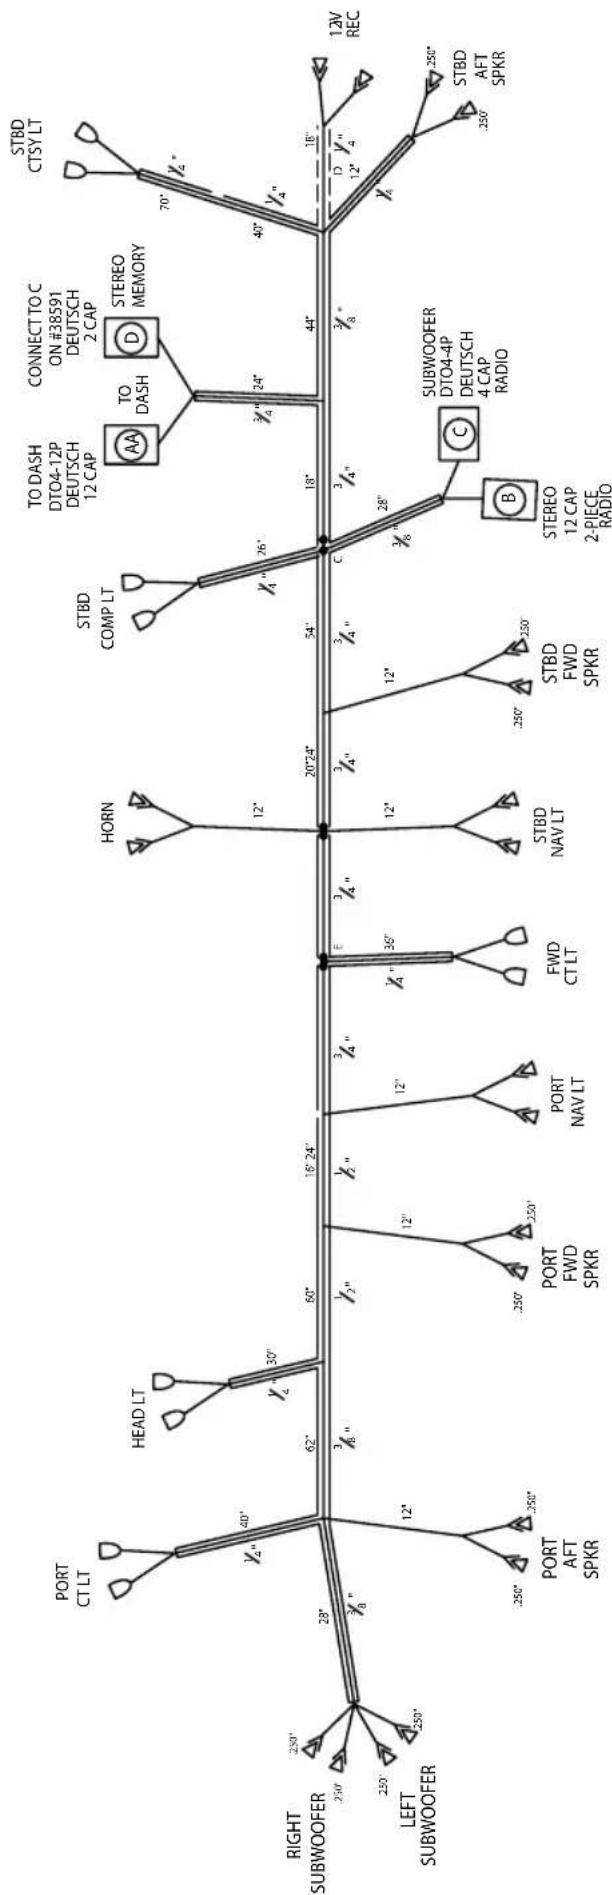
flowchart
graph TD
    A["PORT CT LT"] -->|40° 28' 30' 62° 16' 24' 12' 20' 24' 54' 18' 44' 70' 12V REC| B["HEAD LT"]
    C["PORT AFT SPKR"] -->|12' 250' 250' 250' 250' 250' 250' 250' 250' 250' 250' 250' 250' 250' 250' 250' 250' 250' 250' 250' 250' 25V REC]
    D["STBD COMP LT"] -->|12' 3/4" 3/4" 3/4" 3/4" 3/4" 3/4" 3/4" 3/4" 3/4" 3/4" 3/4" 3/4" 3/4" 3/4" 3/4" 3/4" 3/4" 3/4" 3/4" 3/4" 3/4"
    E["STBDC TSY LT"] -->|12V REC| F["STBDAFT SPKR"]
    G["STBDC TSY LT"] -->|12V REC| H["STBDAFT SPKR"]
    I["STBDC TSY LT"] -->|12V REC| J["STBDAFT SPKR"]
    K["STBDC TSY LT"] -->|12V REC| L["STBDAFT SPKR"]
    M["STBDC TSY LT"] -->|12V REC| N["STBDAFT SPKR"]
    O["STBDC TSY LT"] -->|12V REC| P["STBDAFT SPKR"]
    Q["STBDC TSY LT"] -->|12V REC| R["STBDAFT SPKR"]
    S["STBDC TSY LT"] -->|12V REC| T["STBDAFT SPKR"]
    U["STBDC TSY LT"] -->|12V REC| V["STBDAFT SPKR"]
    W["STBDC TSY LT"] -->|12V REC| X["STBDAFT SPKR"]
    Y["STBDC TSY LT"] -->|12V REC| Z["STBDAFT SPKR"]
    AA["STBDC TSY LT"] -->|12V REC| AB["STBDAFT SPKR"]
    AC["STBDC TSY LT"] -->|12V REC| AD["STBDAFT SPKR"]
    AE["STBDC TSY LT"] -->|12V REC| AF["STBDAFT SPKR"]
    AG["STBDC TSY LT"] -->|12V REC| AH["STBDAFT SPKR"]
    AI["STBDC TSY LT"] -->|12V REC| AJ["STBDAFT SPKR"]
    AK["STBDC TSY LT"] -->|12V REC| AL["STBDAFT SPKR"]
    AM["STBDC TSY LT"] -->|12V REC| AN["STBDAFT SPKR"]
    AO["STBDC TSY LT"] -->|12V REC| AP["STBDAFT SPKR"]
    AQ["STBDC TSY LT"] -->|12V REC| AR["STBDAFT SPKR"]
    AS["STBDC TSY LT"] -->|12V REC| AT["STBDAFT SPKR"]
    AU["STBDC TSY LT"] -->|12V REC| AV["STBDAFT SPKR"]
    AW["STBDC TSY LT"] -->|12V REC| AX["STBDAFT SPKR"]
    AY["PORT AFT SPKR"] --> AZ["PORT FWD SPKR"]
    BA["PORT NAV LT"] --> BB["FWD CT LT"]
    BC["HORN"] --> BD["STBD NAV LT"]
    BE["SUBWOOFER DTO4-4P DEUTSCH 4 CAP RADIO"] --> BF["STEREO 12 CAP 2-PIECE RADIO"]
    BG["TODASH DTO4-12P DEUTSCH 12 CAP"] --> BH["AA TO DASH"]
    BI["CONNECT TO C ON #38591 DEUTSCH 2 CAP"] --> BJ["D TO DASH"]
    BK["STEREO MEMORY"] --> BL["C STEREO 12 CAP"]
    BL --> BM["B STEREO 12 CAP"]
254 FSC Deck Harness
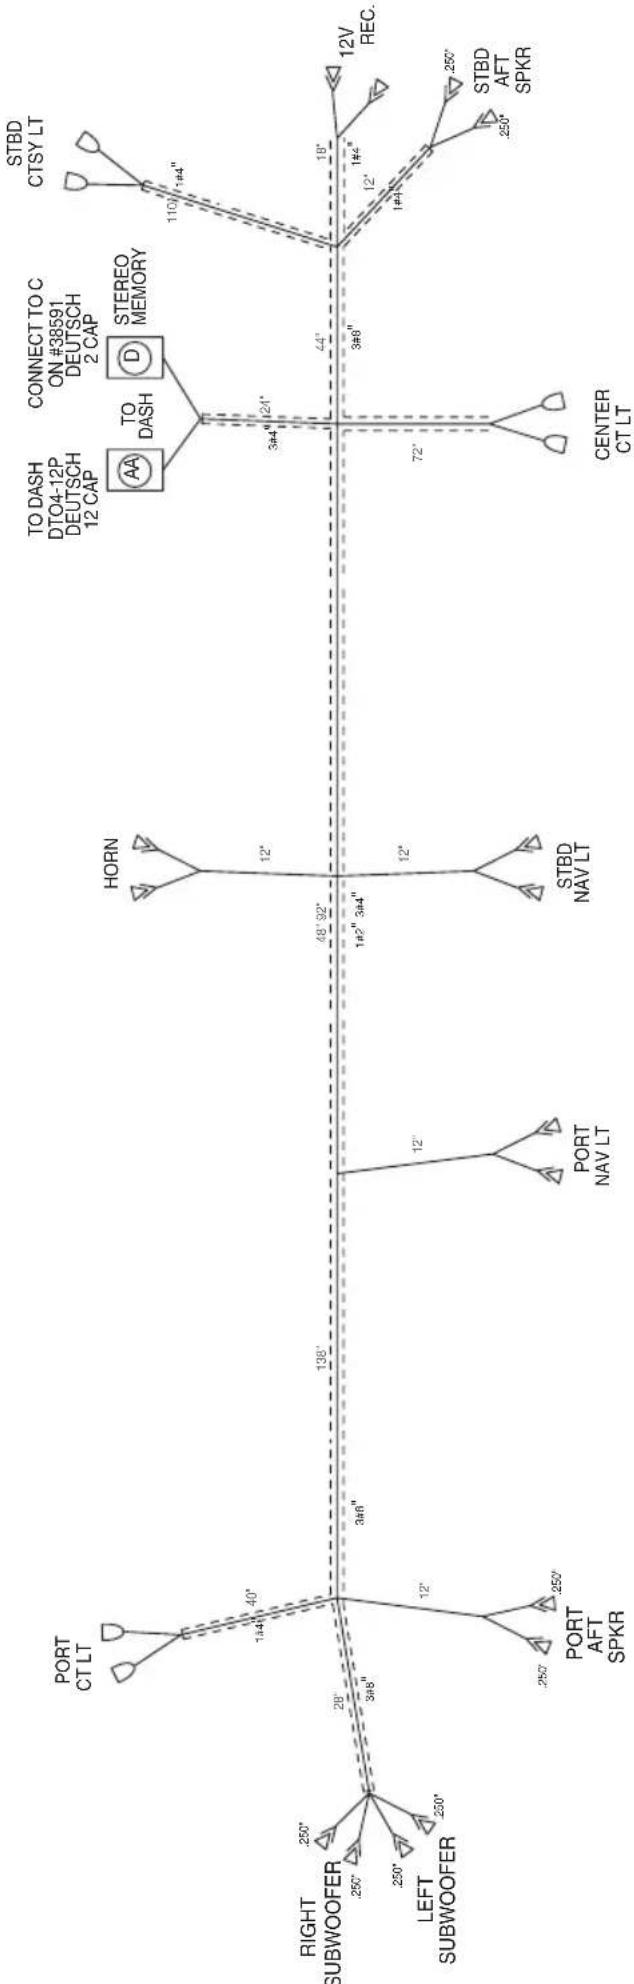
flowchart
graph TD
    A["PORT CT LT"] -->|138'| B["PORT NAV LT"]
    C["PORT AFT SPKR"] -->|250'| B
    D["HORN"] -->|12'| E["STBD NAV LT"]
    F["TO DASH DTO4-12P DEUTSCH 12 CAP"] --> G["CONNECT TO C ON #38591 DEUTSCH 2 CAP"]
    H["TO DASH"] --> I["STEREO MEMORY"]
    J["110° 1#4""] --> K["STBD CTSY LT"]
    L["72°"] --> M["CENTER CT LT"]
    N["3#8""] --> M
    O["3#4""] --> M
    P["44°"] --> M
    Q["12V REC."] --> R["STBD AFT SPKR"]
    S["250°"] --> R
    T["250°"] --> R
    U["250°"] --> R
    V["250°"] --> R
    W["250°"] --> R
    X["250°"] --> R
    Y["250°"] --> R
    Z["250°"] --> R
    AA["250°"] --> R
    AB["250°"] --> R
    AC["250°"] --> R
    AD["250°"] --> R
    AE["250°"] --> R
    AF["250°"] --> R
    AG["250°"] --> R
    AH["250°"] --> R
    AI["250°"] --> R
    AJ["250°"] --> R
    AK["250°"] --> R
    AL["250°"] --> R
    AM["250°"] --> R
    AN["250°"] --> R
    AO["250°"] --> R
    AP["250°"] --> R
    AQ["250°"] --> R
    AR["250°"] --> R
    AS["250°"] --> R
    AT["250°"] --> R
    AU["250°"] --> R
    AV["250°"] --> R
    AW["250°"] --> R
    AX["250°"] --> R
    AY["RIGHT SUBWOOFER"] --> AZ["250°"]
    AY --> BA["250°"]
    AY --> BB["250°"]
    AY --> BC["250°"]
    AY --> BD["250°"]
    AY --> BE["250°"]
    AY --> BF["250°"]
    AY --> BG["250°"]
    AY --> BH["250°"]
    AY --> BI["250°"]
    AY --> BJ["250°"]
    AY --> BK["250°"]
    AY --> BL["250°"]
    AY --> BM["250°"]
    AY --> BN["250°"]
    AY --> BO["250°"]
    AY --> BP["250°"]
    AY --> BQ["250°"]
    AY --> BR["250°"]
    AY --> BS["250°"]
    AY --> BT["250°"]
    AY --> BU["250°"]
    AY --> BV["250°"]
    AY --> BW["250°"]
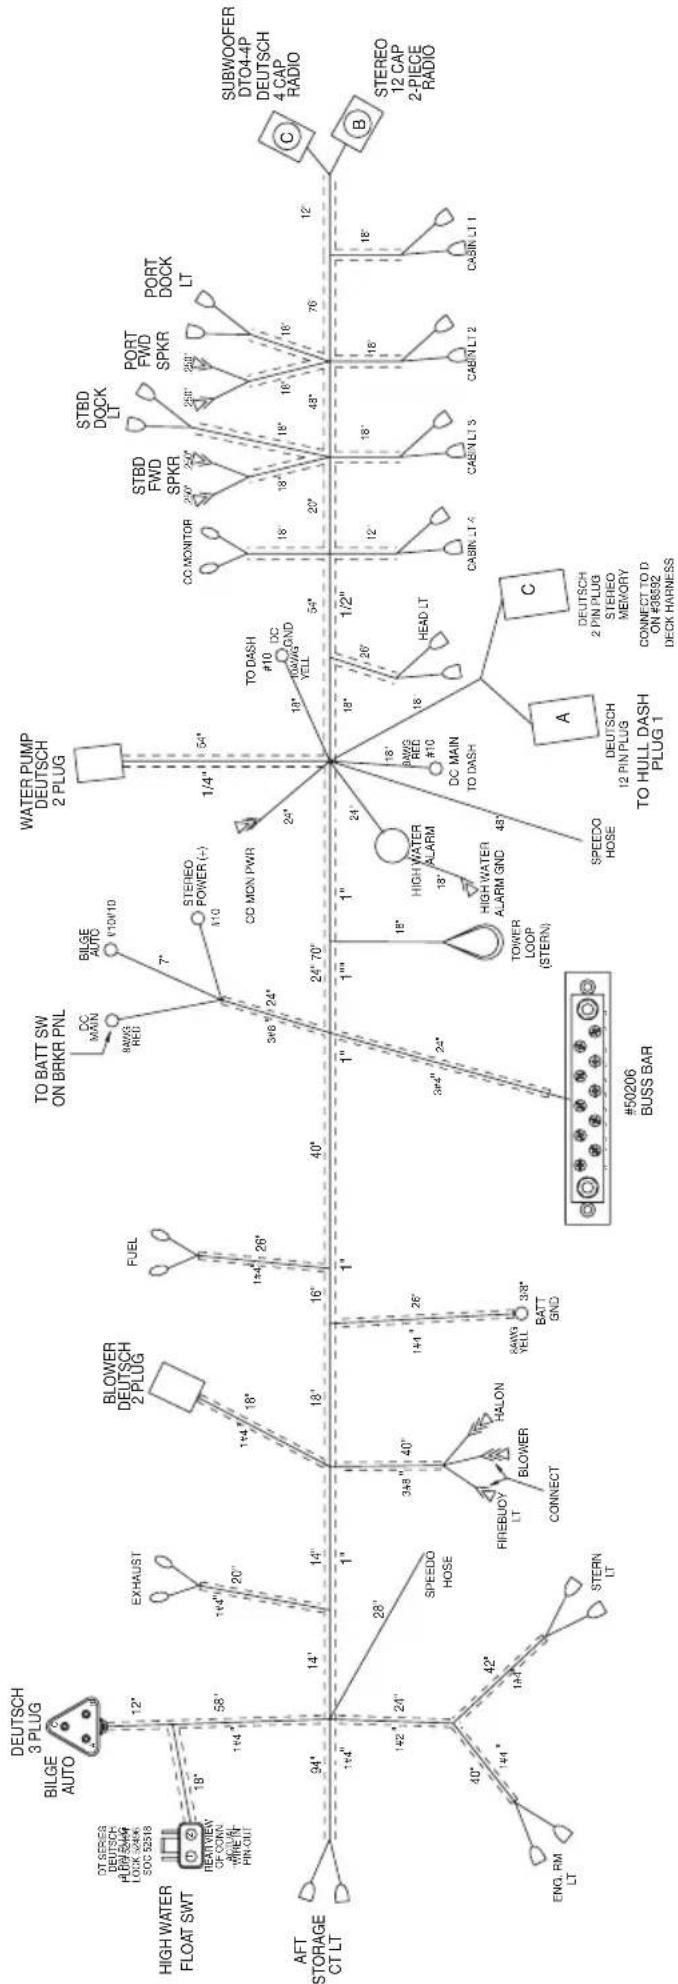
flowchart
graph TD
    A["DEUTSCH 3 PLUG"] -->|12°| B["BILGE AUTO"]
    A -->|58°| C["EXHAUST"]
    A -->|14°| D["BLOWER DEUTSCH 2 PLUG"]
    A -->|14°| E["FUEL"]
    A -->|1°| F["TO BATT SW ON BRKR PNL"]
    A -->|1°| G["WATER PUMP DEUTSCH 2 PLUG"]
    A -->|1°| H["#50206 BUSS BAR"]
    A -->|1°| I["STEREO POWER (+)"]
    A -->|1°| J["CO MON PWR"]
    A -->|1°| K["HIGH WATER ALARM"]
    A -->|1°| L["TOWER LOOP (STERN)"]
    A -->|1°| M["SPEEDO HOSE"]
    A -->|1°| N["ENGL RM LT"]
    A -->|1°/4" 24" 40" 34/8" 42" 14/4" 14/4" 14/4" 14/4" 14/4" 14/4" 14/4" 14/4" 14/4" 14/4" 14/4" 14/4" 14/4" 14/4" 14/4" 14/4" 14/4" 16° 26° 24° 7° 24° 70° 24° 70° 24° 70° 24° 70° 24° 70° 24° 70° 24° 70° 24° 70° 24° 70° 24° 70° 24° 70° 24° 70° 24° 70° 26° 26° 26° 26° 26° 26° 26° 26° 26° 26° 26° 26° 26° 26° 26° 26° 26° 26° 26° 26° 26° 26° 26° 26° 26° 28° 28' 33/8" BLOWER DEUTSCH 2 PLUG
    A -->|18°-20' -18.5' -18.5' -18.5' -18.5' -18.5' -18.5' -18.5' -18.5' -18.5' -18.5' -18.5' -18.5' -18.5' -18.5' -18.5' -18.5' -18.5' -16.5' -16.5' -16.5' -16.5' -16.5' -16.5' -16.5' -16.5' -16.5' -16.5' -16.5' -16.5' -16.5' -16.5' -16.5' -16.5' -16.5' +33/8" BLOWER DEUTSCH 2 PLUG
    A -->|94°-14°-28°-33/8" BLOWER DEUTSCH 2 PLUG
    A -->|33/8" BLOWER DEUTSCH 2 PLUG
    A -->|33/8" BLOWER DEUTSCH 2 PLUG
    A -->|33/8" BLOWER DEUTSCH 2 PLUG
    A -->|33/8" BLOWER DEUTSCH 2 PLUG
    A -->|33/8" BLOWER DEUTSCH 2 PLUG
    A --> |94°-94°-94°-94°-94°-94°-94°-94°-94°-94°-94°-94°-94°-94°-94°-94°-94°-94°-94°-94°-94°-94°-94°-94°-94°-94°+33/8" BLOWER DEUTSCH 2 PLUG
    A -->|33/8" BLOWER DEUTSCH 2 PLUG
    A -->|33/8" BLOWER DEUTSCH 2 PLUG
    A -->|33/8" BLOWER DEUTSCH 2 PLUG
    A -->|33/8" BLOWER DEUTSCH 2 PLUG
    A --> #50206 BUSS BAR
    A --> #50206 BUSS BAR
    A --> #50206 BUSS BAR
    A --> #50206 BUSS BAR
    A --> #50206 BUSS BAR
    A --> #50206 BUSS BAR
    A --> #50206 BUSS BAR
    A --> #50206 BUSS BAR
    A --> #502OFC DOTS OF CONN TIN PIN OUT
    A --> #AT STORAGE CT LT
    A --> #STEREO 12 CAP
    A --> #STEREO 12 CAP
    A --> #STEREO RADIO
    A --> #STEREO RADIO
    A --> #STEREO RADIO
    A --> #STEREO RADIO
    A --> #STEREO RADIO
    A --> #STEREO RADIO
    A --> #STEREO RADIO
    A --> #STEREO RADIO
    A --> #STEREO RADIO
    A --> #STEREO RADIO
    A --> #STEREO RADIO
    A --> #STEREO RADIO
    A --> #STEREO RADIO
    A <--> #STEREO RADIO
    A <--> #STEREO RADIO
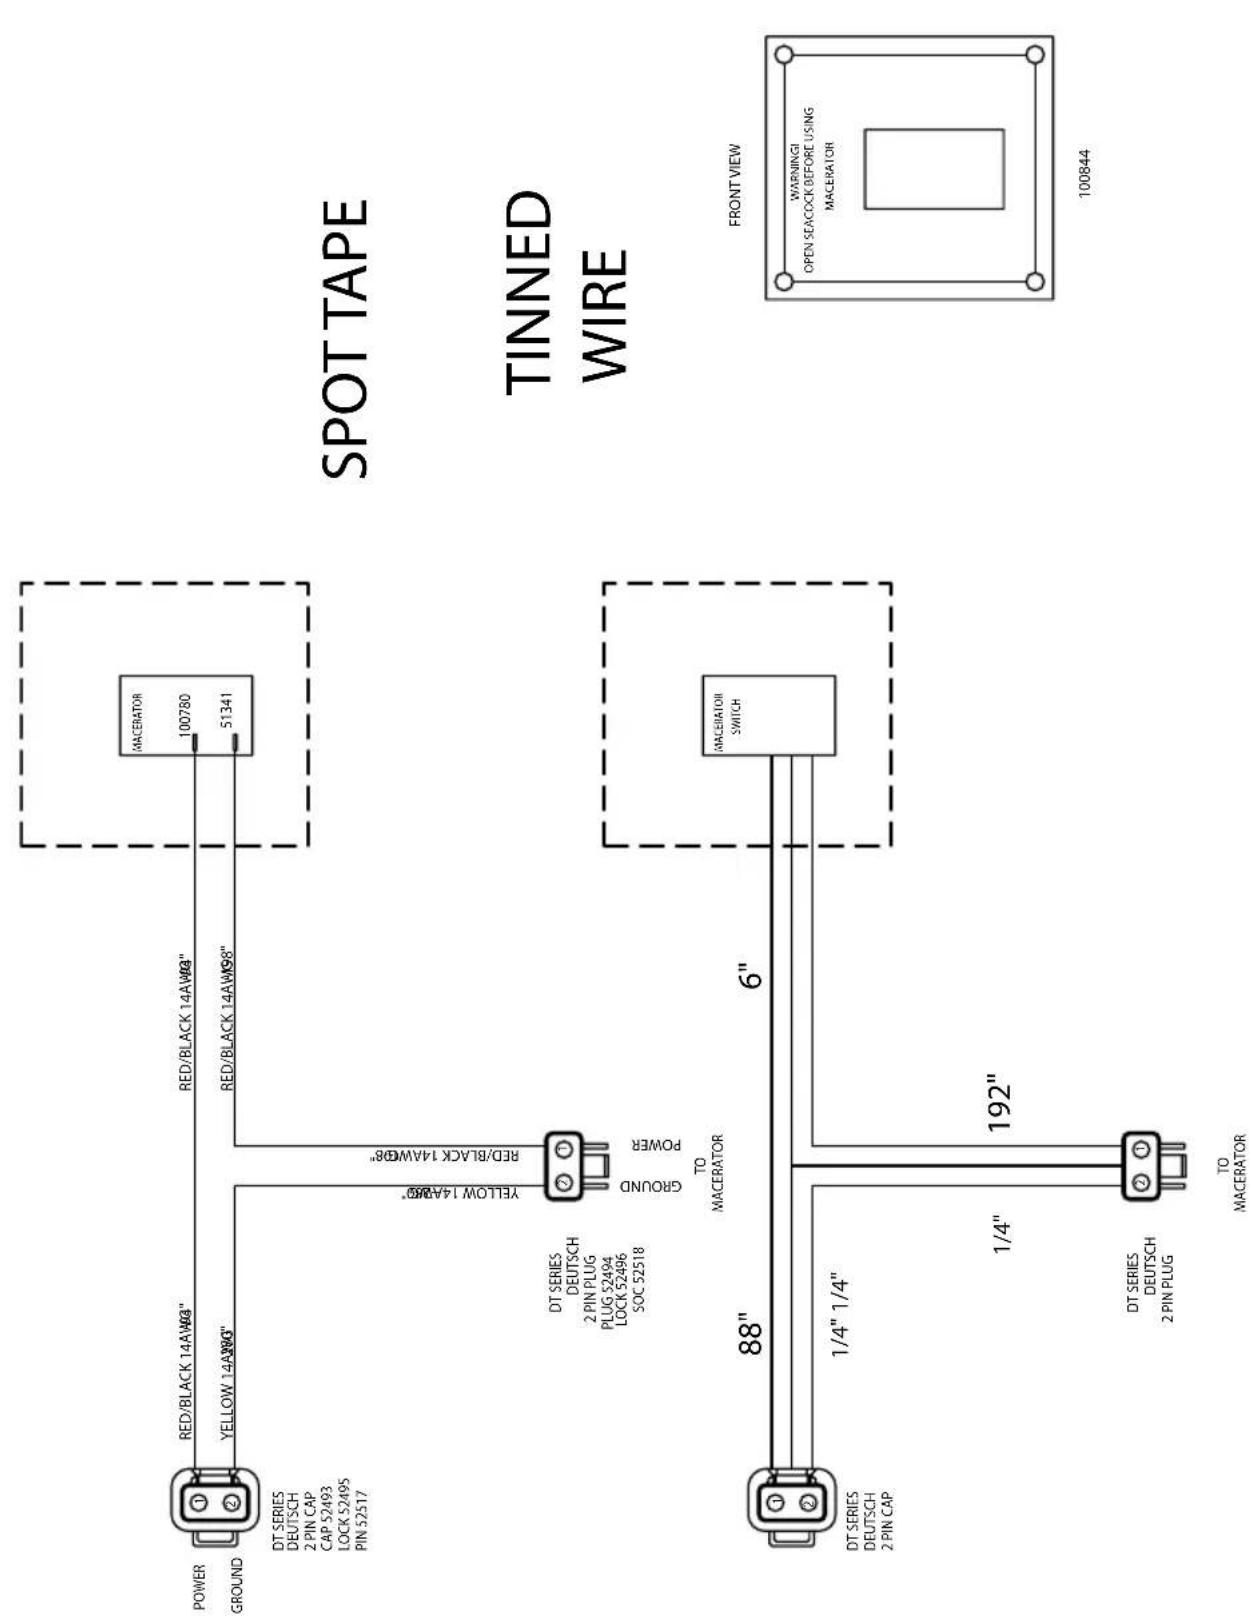
text_image
POWER 1 2 GROUND DT SERIES DEUTSCH 2 PIN CAP CAP S2493 LOCK S2495 PIN 52517 RED/BLACK 14AW8" YELLOW 14AW8" RED/BLACK 14AW8" RED/BLACK 14AW9" RED/BLACK 14AW9" MACERATOR 100780 51341 SPOT TAPE TINNED WIRE GROUND POWER DT SERIES DEUTSCH 2 PIN PLUG PLUG S2494 LOCK S2496 SOC 52518 88" 6" MACERATORI SWITCH FRONT VIEW DT SERIES DEUTSCH 2 PIN CAP 1/4" 1/4" 1/4" 192" DT SERIES DEUTSCH 2 PIN PLUG TO MACERATOR WARNING! OPEN SEACOCK BEFORE USING MACERATOR 100844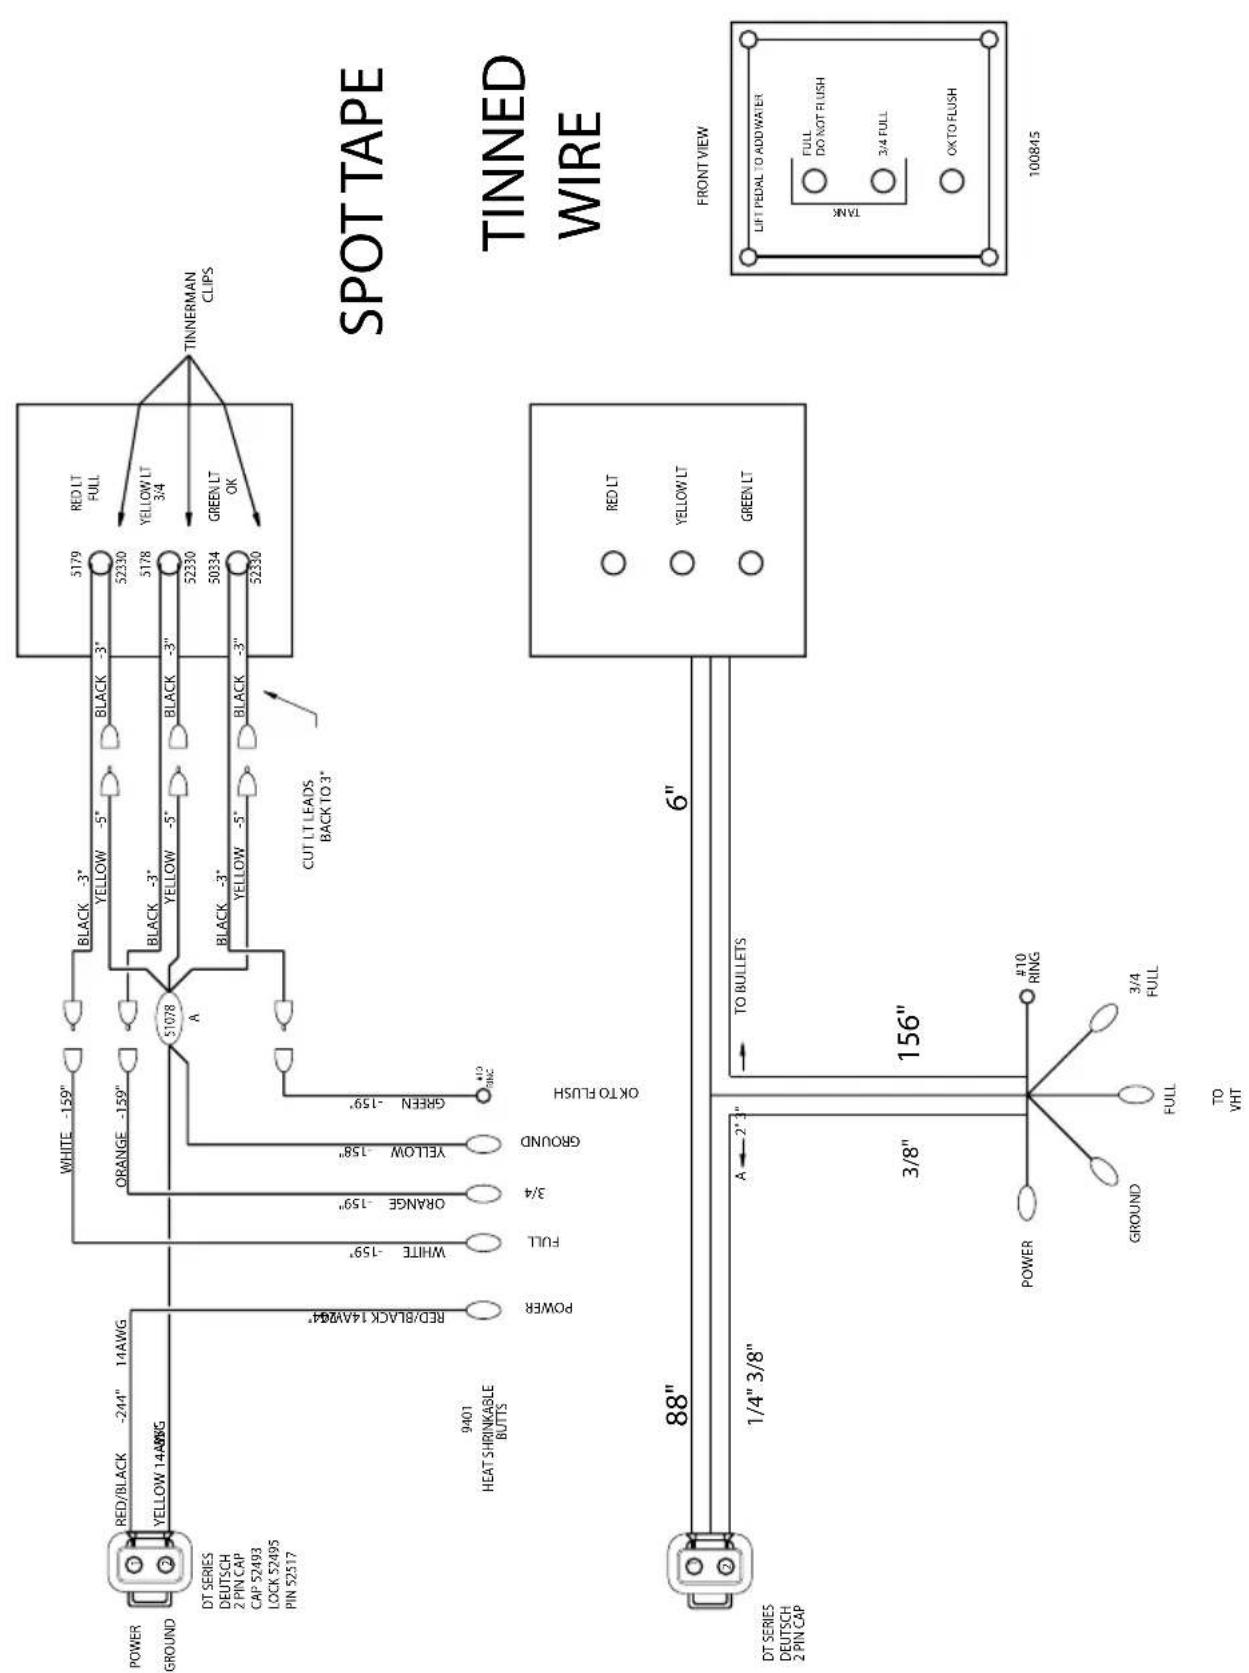
text_image
SPOT TAPE TINNED WIRE FRONT VIEW LIFT PEDAL TO ADDWATER TANK FULL DO NOT FLUSH 3/4 FULL OKTO FLUSH 100845 DT SERIES DEUTSCH 2 PIN CAP POWER GROUND RED/BLACK -244" 14AWG YELLOW 14AWG DT SERIES DEUTSCH 2 PIN CAP CAP 52493 LOCK 52495 PIN 52517 9401 HEAT SHRINKABLE BUTTS POWER FULL ORANGE -159" YELLOW 158" GREEN -159" A 6" 1/4" 3/8" A 2" 3" TO BULLETS 3/8" 156" POWER #10 RING GROUND FULL 3/4 FULL TO VHT WHITE -159" BLACK -3" YELLOW -5" BLACK -3" BLACK -3" YELLOW -5" BLACK -3" BLACK -3" BLACK -3" BLACK -3" BLACK -3" BLACK -3" BLACK -3" BLACK -3" BLACK -3" BLACK -3" BLACK -3" BLACK -3" BLACK -3" BLACK -3" BLACK -3" BLACK -3" BLACK -3" BLACK -3" BLACK -3" BLACK -3" BLACK -3" BLACK -3" BLACK -3" BLACK -3" BLACK -3" BLACK -244" 14AWG GREEN 14AWG TINNERMAN CLIPS254 Manual Head Panel
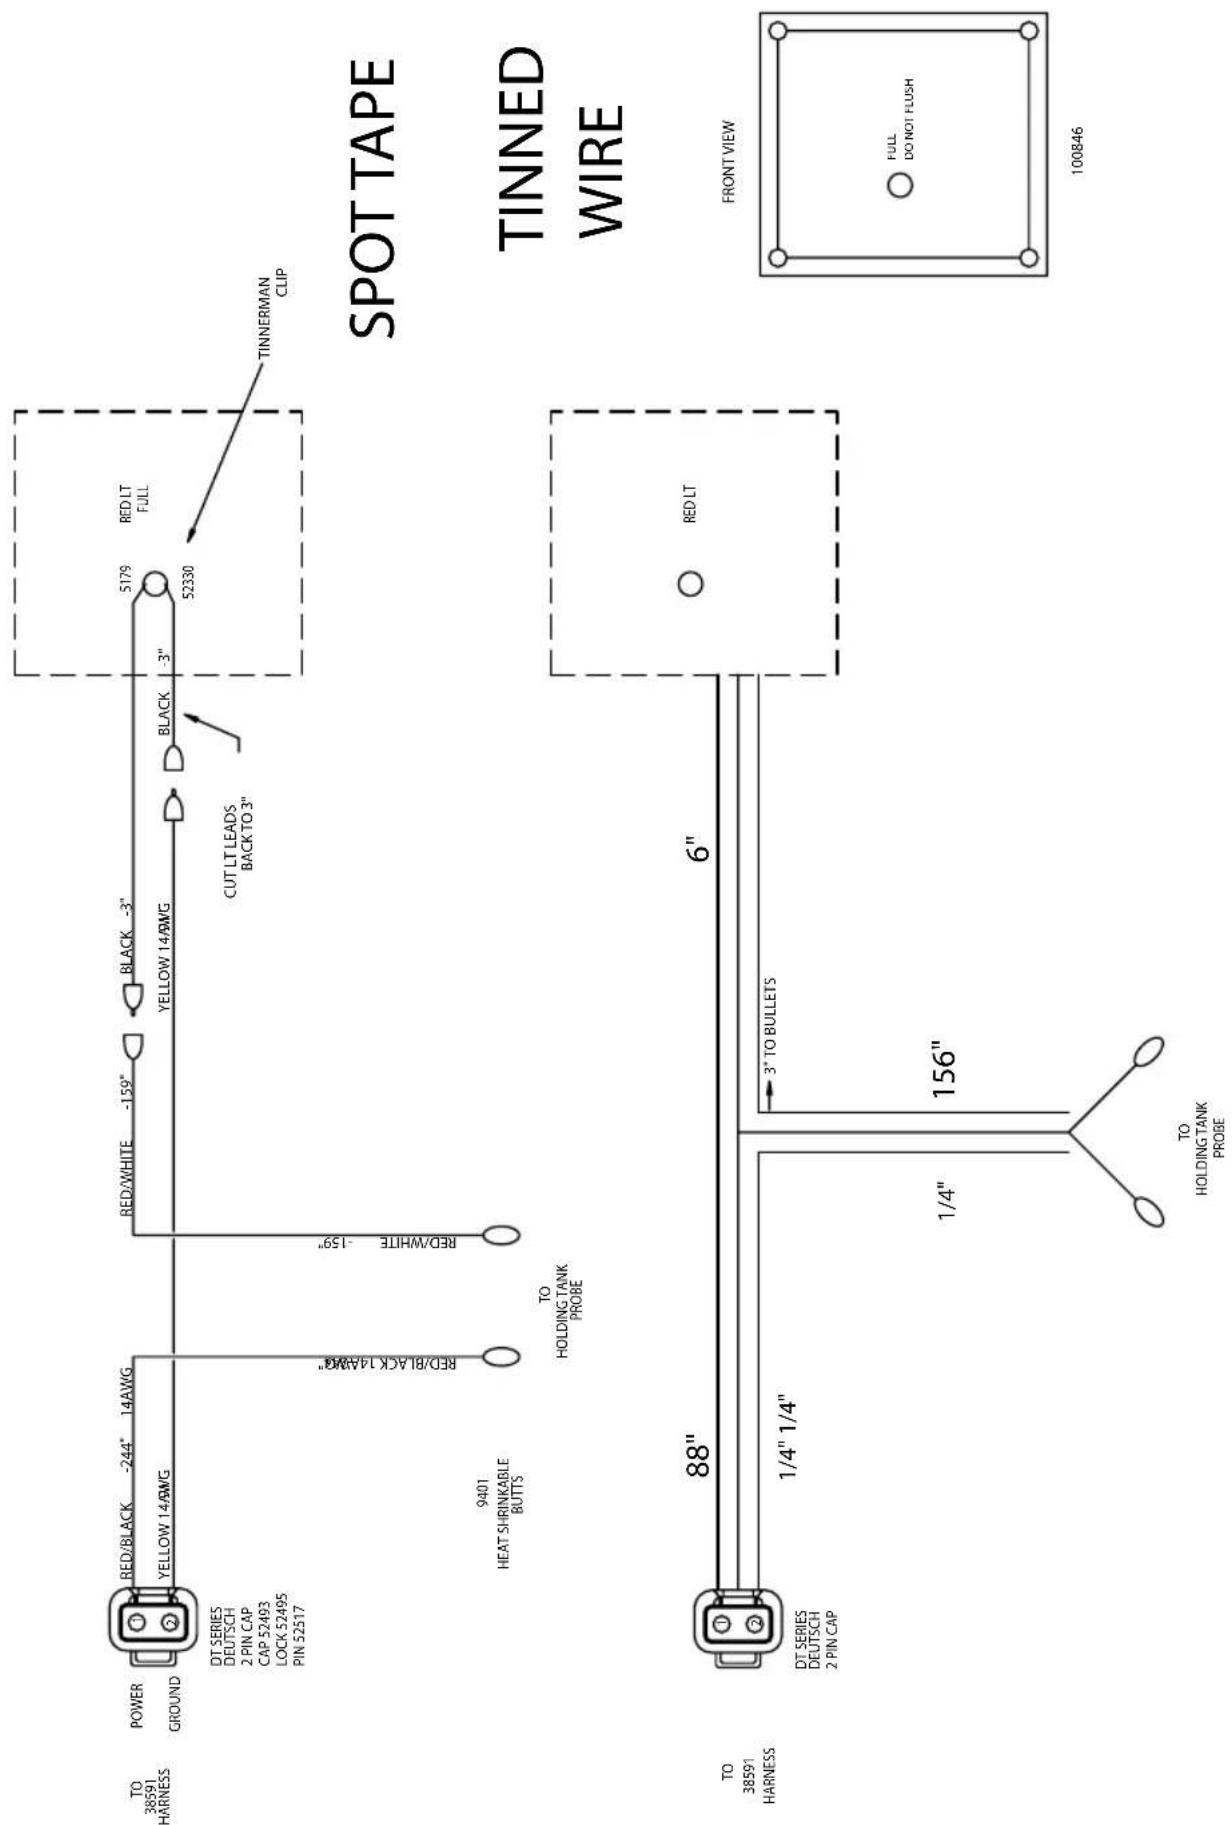
text_image
TO 38591 HARNESS POWER GROUND DT SERIES DEUTSCH 2 PIN CAP CAP 52493 LOCK 52495 PIN 52517 RED/BLACK -244" 14AWG YELLOW 14AWG RED/WHITE -159" RED/WHITE 159" RED/WHITE -159" RED/WHITE -159" RED/WHITE -159" RED/WHITE -159" RED/WHITE -159" RED/WHITE -159" RED/WHITE -159" RED/WHITE -159" RED/WHITE -159" RED/WHITE -159" RED/WHITE -159" RED/WHITE -159" RED/WHITE -159* CUT LT LEADS BACK TO 3" 5179 RED LT FULL 52330 TINNERMAN CLIP SPOT TAPE TINNED WIRE TO 38591 HARNESS 88" 6" 1/4" 1/4" 3" TO BULLETS 1/4" 156" TO HOLDING TANK PROBE RED LT FRONT VIEW FULL DO NOT FLUSH 100846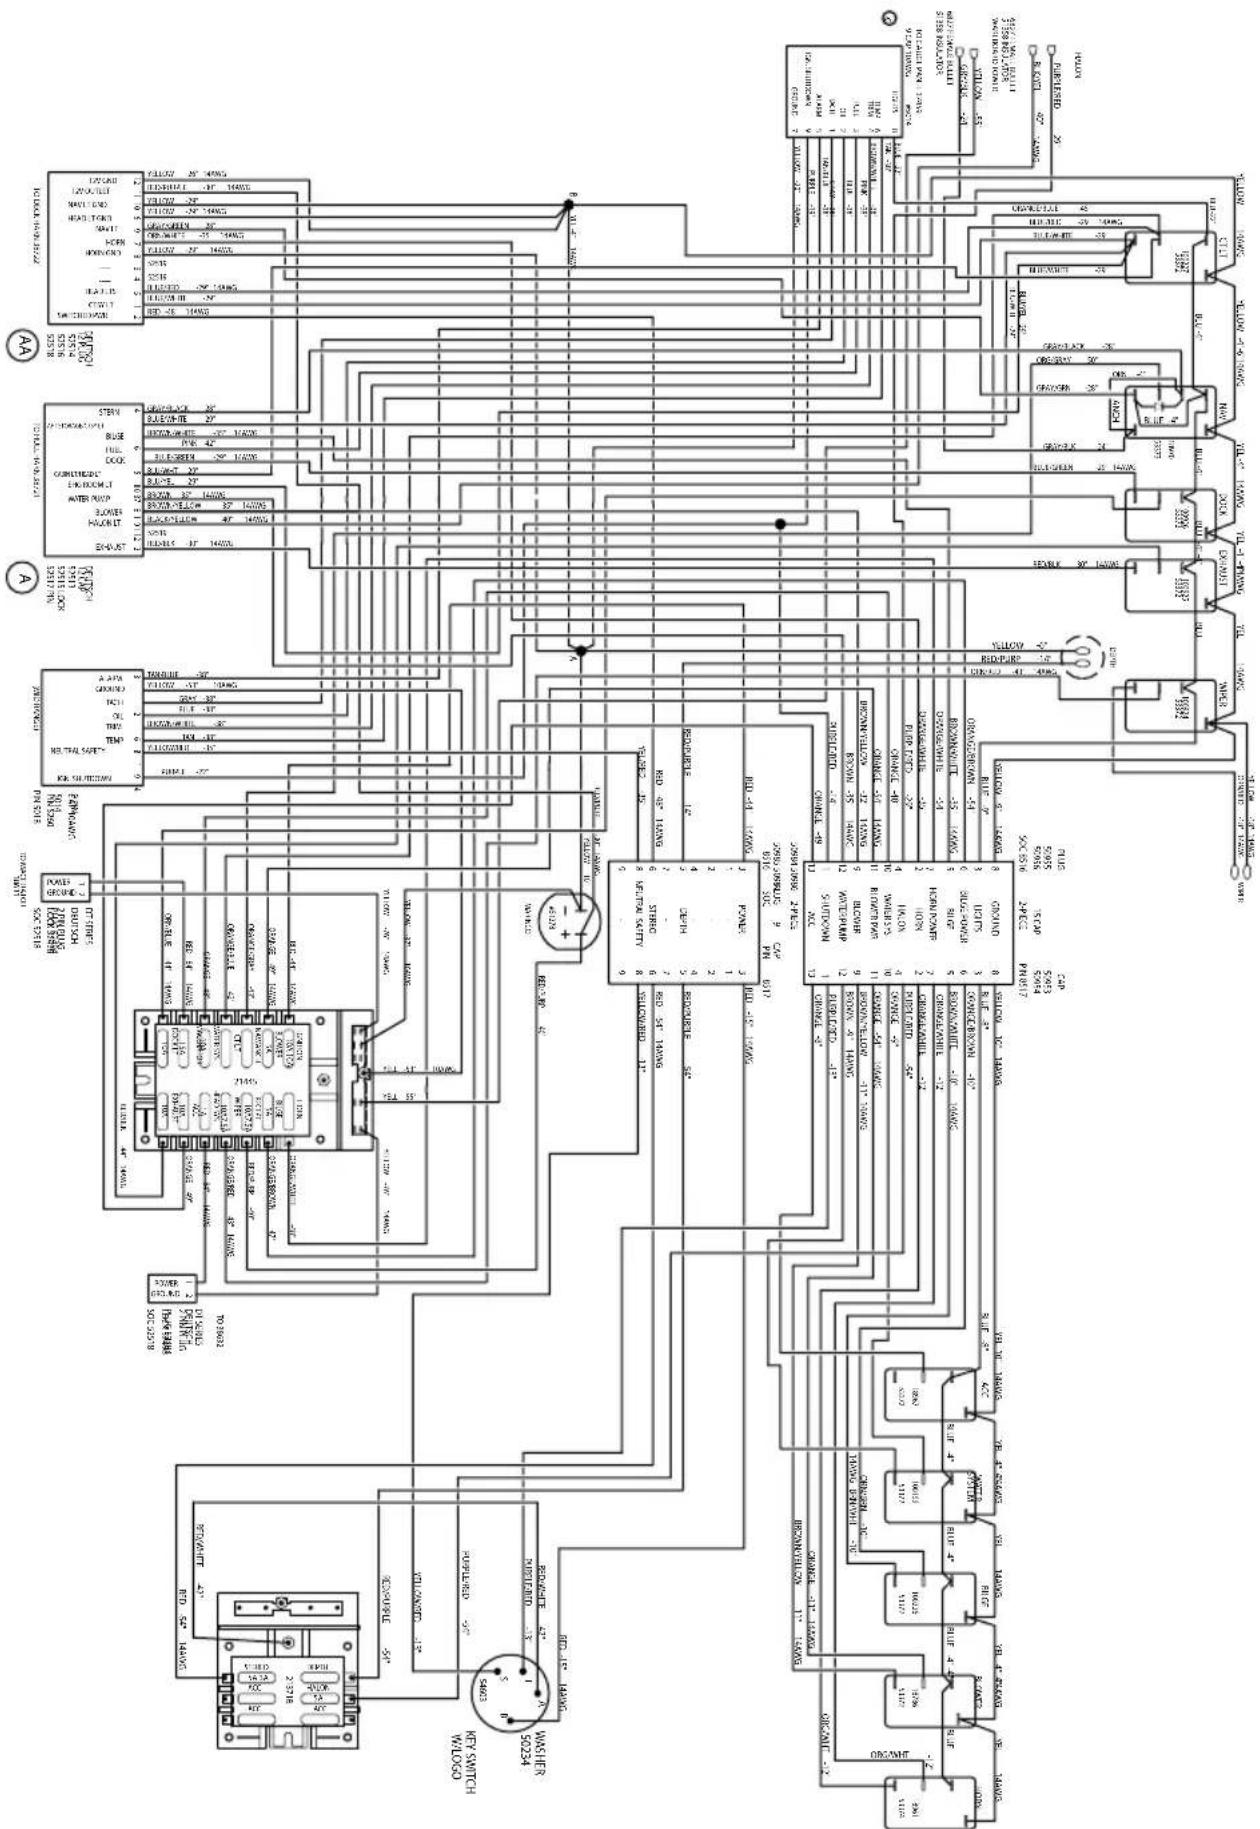
text_image
Electrical schematic diagram with labeled components, wiring, and connections for a power supply or control circuit.254 Sump Pump Harness
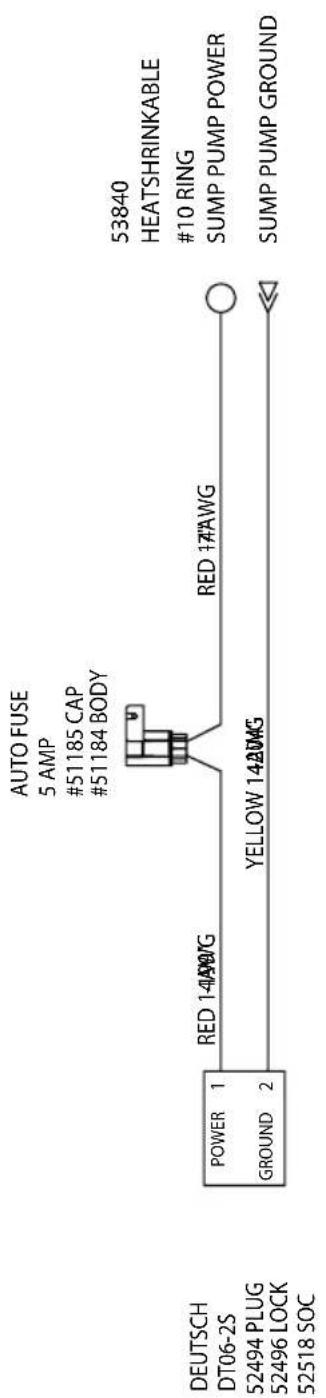
text_image
DEUTSCH DT06-2S 52494 PLUG 52496 LOCK 52518 SOC POWER 1 RED 14AWG AUTO FUSE GROUND 2 YELLOW 14AWG RED 17AWG 53840 HEATSHRINKABLE #10 RING SUMP PUMP POWER SUMP PUMP GROUND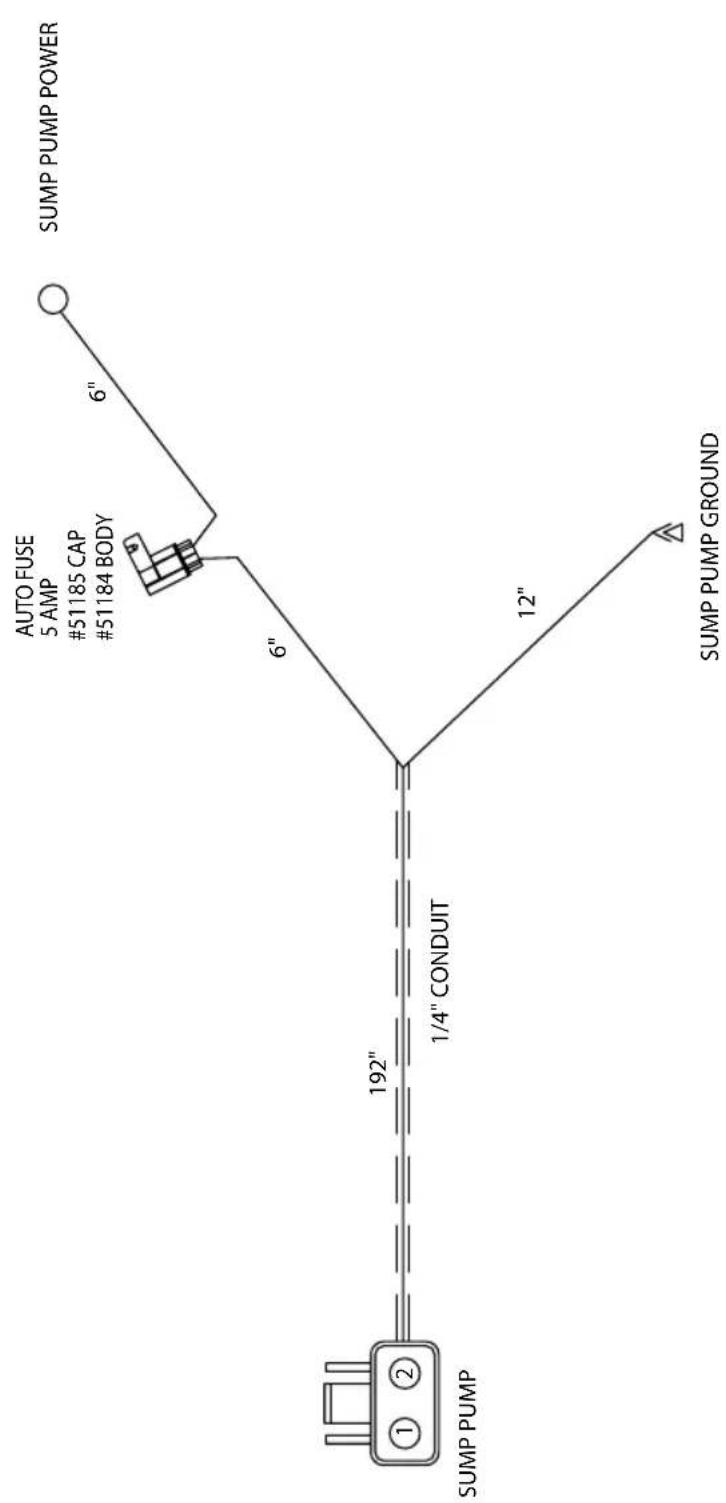
flowchart
graph TD
    A["SUMP PUMP"] -->|192" CONDUIT| B["1/4" CONDUIT"]
    B --> C["6" AUTO FUSE 5 AMP #51185 CAP #51184 BODY"]
    B --> D["12" SUMP PUMP GROUND"]
    C --> E["6" SUMP PUMP POWER"]

natural_image
Black and white icon with a central exclamation mark, surrounded by a grid pattern (no text or symbols)Chapter 1
Boating Safety
The popularity of boating and other water sports has undergone an explosion of growth in the past few years. Because of this, safety is an important issue for everyone who shares in the use of our waterways.
This section covers general boating safety information. Throughout this manual, specific precautions and symbols identify safety related information.

The Safety Alert Symbol means ATTENTION! BECOME ALERT! YOUR SAFETY IS INVOLVED!

DANGER
Indicates the presence of a hazard which WILL cause SEVERE injury, death or substantial property damage.

WARNING
Indicates the presence of a hazard which CAN cause SEVERE injury, death or substantial property damage.

CAUTION
Indicates the presence of a hazard which WILL or CAN cause MINOR or MODERATE personal injury or property damage.
NOTICE
Indicates installation, operation or maintenance information which is important but not hazard-related.
The precautions listed in this manual and on the boat are not all-inclusive. If a procedure, method, tool or part is not specifically recommended, you must satisfy yourself that it is safe for you and others, and that the boat will not be damaged or made unsafe as a result of your decision. REMEMBER – ALWAYS USE COMMON SENSE WHEN OPERATING YOUR BOAT!
BOATING REGULATIONS
The U.S. Coast Guard is the authority of the waterways; they are there to help the boating public. State boating regulations are enforced by local authorities. You are subject to marine traffic laws and “Rules of the Road” for both federal and state waterways; you must stop if signaled to do so by enforcement officers, and permit to be boarded if asked.
There are many pamphlets, prepared by the Coast Guard, available to you. These pamphlets explain “Rules of the Road,” signal lights, buoys, safety, international and inland regulations and much more than is presented in this manual. For more information contact your local U.S. Coast Guard Unit or visit www.uscgboating.com.
BOAT SAFETY LABELS
Your boat is affixed with various safety labels at the time of manufacture. These labels appear at specific locations on the craft where safety is of particular concern. Safety labels must remain legible. If you suspect a label is missing or one becomes damaged, contact your dealer for immediate replacement.
BOATER RESPONSIBILITIES
Registration
The U.S. Coast Guard requires that all power boats operated on the navigable waters of the United States must be registered in the state of main use; also, many states require registration in that state whenever boating on waters within their state boundary. Always contact your state boating authorities (and neighboring states) for registration information on boats and trailers. Your dealer can supply you with the appropriate forms.
Education
This manual is not intended to provide complete training on all aspects of boat operation. We strongly recommend that all operators of this boat seek additional training on boat handling and safety. Some states require youths 16 years of age and younger to complete a boating safety course before operating any watercraft. Many others require operators under the age of 18 to be licensed in small boat operation.
The following is a listing of some of the agencies and organizations that offer Water Safety, First Aid and CPR. To find boating safety courses in your area, call your state's local boating agency or the Coast Guard boating safety Courseline at 1-800-336-2628 (1-800-245-2628 in Virginia), United States Coast Guard Auxiliary, www.cgaux.org and United States Power Squadrons, 1-888-FOR-USPS, www.usps.org.
Insurance
You must get insurance before operating your new boat. Loss by fire, theft or other causes, or liability protection against accidents is a must for responsible boaters. The boat owner is legally responsible for any damage or injury caused when he, or someone else operating the boat, is involved in an accident. Many states have laws detailing minimum insurance needs. Your insurance agent or your dealer may be able to supply you with more information.
REQUIRED SAFETY EQUIPMENT
Your boat has been equipped at the factory with most federally required Class 1 - 4.8 m to less than 7.9 m (16 ft to less than 26 ft) safety equipment. As the owner, it is your responsibility to obtain other mandatory safety equipment not provided by the boat manufacturer, and to ensure all equipment is kept in good, serviceable condition.
NOTICE
Many state equipment requirements go beyond Coast Guard requirements. Contact your state boating office for further information.
Equipment requirements for coastal and inland waters differ. Check with local authorities or the Coast Guard for further information about coastal water requirements.
| MINIMUM REQUIRED SAFETY EQUIPMENT | |||
| EQUIPMENT | CLASS 14.8 to less than 7.9 m(16 to less than 26 ft) | CLASS 27.9 to less than 12.2 m(26 to less than 40 ft) | CLASS 312.2 to not more than 19.8 m(40 to not more than 65 ft) |
| PERSONAL FLOTATION DEVICES (PFDs) | One approved Type I, II, III or V (if used according to Coast Guard requirements) device aboard for each person on board or being towed on water skis, etc.; and, in addition, one throwable Type IV device. | ||
| FIREEXTINGUISHER(Must say Coast Guard Approved.) | At least one B-I type approved hand portable fire extinguisher (Not required on outboard motorboats less than 26 feet in length and not carrying passengers for hire if the construction of such motorboats will not permit entrapment of explosive or flammable gasses or vapors and if fuel tanks are not permanently installed.) | At least two B-I type approved portable fire extinguishers; OR at least one B-II type approved portable fire extinguisher. | At least three B-I type approved portable fire extinguishers; OR at least one B-I type plusone B-II type approved portable fire extinguisher. |
| DAY AND NIGHT VISUAL DISTRESS SIGNALS | Orange flag with black square-and-disk (day); and an S-O-S electric light (night); or three orange smoke signals, hand held or floating (day); or three red flares of hand held, meteor, or parachute type (day/night).Required only on coastal waters, the Great Lakes, territorial seas, and those waters connected directly to them, up to a point where a body of water is less than two miles wide. | ||
| WHISTLE/HORN,BELL | Every vessel less than 12 meters (39.4 ft) in length must carry an efficient sound producing device. | Every vessel 12 meters (39.4 ft) but less than 20 meters (65.6 ft) in length must carry a whistle or horn and a bell. The whistle or horn must be audible for 1/2 nautical mile. The mouth of the bell must be at least 200 mm (7.87 in) in diameter. | |
KC-0081.2
Personal Flotation Devices
Federal law also requires at least one Type I, II, III or V Personal Flotation Device (PFD) for each person on board or being towed, and at least one Type IV throwable PFD in the boat.
PFDs are intended to help save lives. Therefore, you and your passengers should wear a PFD whenever boating. It is especially important that children and nonswimmers wear a PFD at all times. Make certain all passengers know how to put on and properly adjust their PFDs. Also, selecting the proper type PFD for your kind of outing helps ensure your time on the water can be the safest possible. There are four types of PFDs to wear and one type used for throwing in emergency situations.

KC-0041
Type I: Most buoyant PFD and effective on all waters, especially open, rough water.
Type II: Good for calm water near shore on most inland waters where quick rescue is likely.
Type III: Good for most inland water applications where quick rescue is likely. Come in various styles and some are designed for watersport activities.
Type IV: Intended for heavy traffic inland waters where help is always available. Designed to be thrown to a person in the water and should never be worn.
Type V: Inflatable design for special use activities and may be used instead of a Type I, II, or III PFD if used in accordance with the approval conditions on the label and if worn when the boat is underway. Some Type V PFDs provide increased protection against hypothermia.
NOTICE
- If a Type V PFD is to be counted toward the minimum carriage requirements, it must be worn.
- Special PFDs are available for skiing and other watersports. These PFDs are constructed with materials suitable for high impact falls.
Keep the following PFD points in mind:
- Set an example and wear your PFD. Require your passengers to wear them also.
- Make sure the PFD fits properly; this is especially important for children and nonswimmers.
- At the beginning of each season, check PFDs for damage and test for proper flotation.
Fire Extinguisher
U.S. Coast Guard approved fire extinguishers are generally required on all Class I-III boats. Extinguishers should be mounted in readily accessible areas away from the engine compartment and alcohol stove (if equipped). All passengers should know the location and operating procedure of each extinguisher.
Any marine fire extinguisher must be classified to extinguish type B fires (gasoline, oil, or grease). The size and number of required fire extinguishers depend on the size of your boat. Check pressure gauge regularly for proper pressure; have extinguisher filled if necessary.
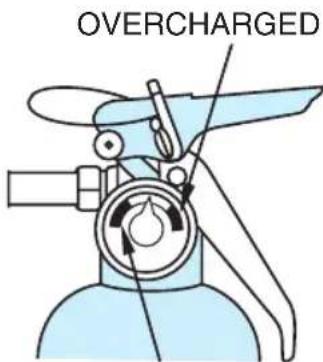
text_image
OVERCHARGEDRECHARGE
KC-0083
Refer to MINIMUM REQUIRED SAFETY EQUIPMENT chart in this section.
Visual Distress Signals
Federal law also requires boats 4.8 m (16 ft) and longer to carry day and night visual distress signals when operating on coastal waters, the Great Lakes, territorial seas or those waters directly connected to them, up to a point where the body of water is less than two miles wide. Carry several types of signaling devices to handle a variety of conditions.

WARNING
Pyrotechnic signaling devices can cause injury and property damage if improperly handled. Follow the manufacturer's directions.
NOTICE
- Some pyrotechnics are restricted from use on certain bodies of water, so always check with local authorities.
- All signaling devices must be in serviceable condition, readily accessible, and in compliance with Coast Guard requirements.
RECOMMENDED EQUIPMENT
As a precaution, a good boater will avoid potential problems on an outing by having additional equipment on board. Normally, this equipment is dependent on the body of water and the length of the trip, your dealer can assist you:
- First aid kit and manual
- Anchor with at least 23 m (75 ft) of line
• Mooring lines and fenders - Bailing device (bucket, hand pump, etc.)
- Combination oar/boat hook
• Day/night visual distress signals - Lubricant
- Tool kit
- Tow Line
• Auxiliary starting battery - Insect repellent
-
Food and water provisions
-
Spare propeller, nut and washer
- Spare fuses and bulbs
- Local charts and compass
- Waterproof flashlight
- Cellular Phone
- Portable AM/FM radio with weather band
- Spare flashlight and radio batteries
• Sunglasses and sun block
• VHF marine radio - Extra keys
- Extra drain plug
- Sea anchor
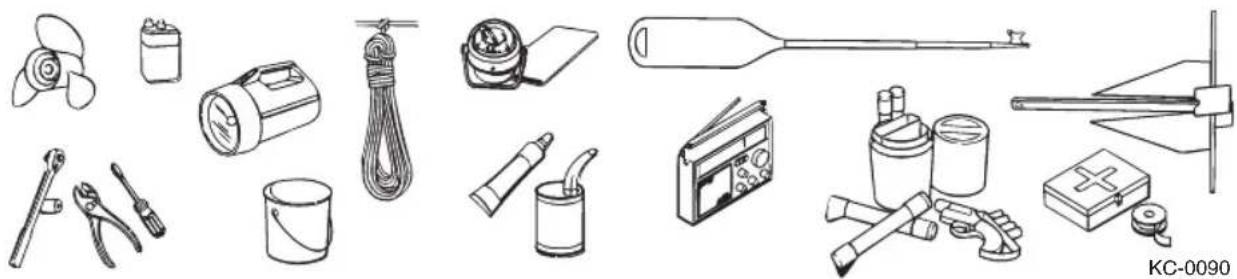
natural_image
Illustration of various electrical and mechanical components including propeller, lamp, fuse, and fan (no text or labels)Notice
When fishing offshore it is always a good idea to have an auxiliary engine for emergency power or trolling.
EMERGENCIES
Be prepared to deal with emergencies before they happen. Try to formulate a plan for each type in advance so that decisions can be made quickly and without hesitation. Precious moments lost can mean the difference between losing and saving a life.
Reporting Accidents
The U.S. Coast Guard requires the owner or operator of a boat involved in an accident to report the incident to the proper marine law enforcement agency for the State in which the accident occurred. Immediate notification to the nearest State boating authority is required if a person dies or disappears as a result of a recreational boating accident. If a person dies or injuries requiring more than first aid are involved, a formal report must be filed within 48 hours of the accident. A formal report must be filed within 10 days for accidents exceeding \$500 in property damage or complete loss of boat.
Giving Assistance
If you see a distress signal or suspect a boat is in trouble, you must assume it is a real emergency and render assistance immediately. By law, the operator in charge of the craft is obligated to provide assistance to any individual in danger if such assistance can be provided safely. Failure to render assistance can result in a fine and/or imprisonment.
The 1971 Boating Safety Act grants protection to a “Good Samaritan” boater providing good faith assistance, and absolves a boater from any civil liability arising from such assistance.
Fires
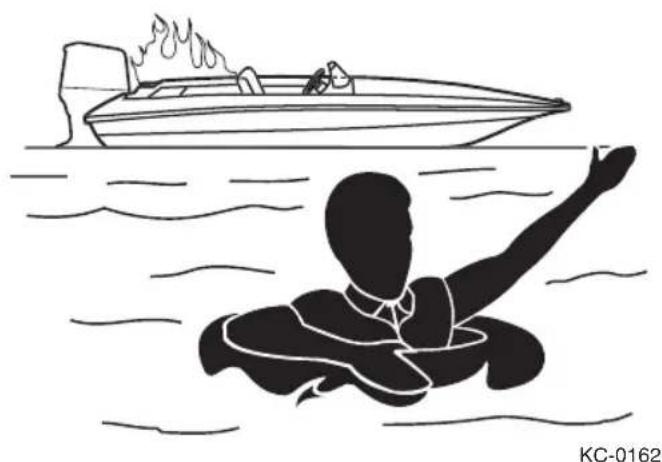
natural_image
Silhouette of a person in a swimming boat floating on water, with a small boat visible in the background (no text or symbols)Most fires are the result of gasoline and oil accumulating in the bilge from careless fueling practices. Use the fire extinguisher at the base of the flames using a sweeping motion. Prudent and accurate use of the available chemicals should contain all but the worst fires. Verify that the fire has been extinguished. If so, check damage and get assistance immediately. If not, get out and
swim at least 23 m (25 yds) upwind from the boat and use the visual distress signals to get assistance.
On-board fires involving the fuel system usually result in either an explosion that completely destroys the boat, or the boat burning to the waterline and self extinguishing. Deciding on abandoning the boat or staying to fight the fire is difficult and depends on many factors. Try to formulate a fire plan in advance to make that decision quickly and without hesitation.

WARNING
Gasoline will float on top of water and can burn. If the boat is abandoned, swim up wind, far enough to avoid fuel that may spread over the surface of the water to avoid serious injury.
Capsizing and Swamping
A boat may capsize or swamp when least expected. Like fires, try to formulate a plan in advance on what to do if it should happen. Keep in mind the following guidelines:
- Try to turn the engine OFF to prevent damage.
- If others were on board, try to locate them, make sure they're conscious and that they can swim.
- STAY WITH THE BOAT! Climb up on the hull and try to get assistance.
- DO NOT try to swim to shore. It's usually farther than it looks.
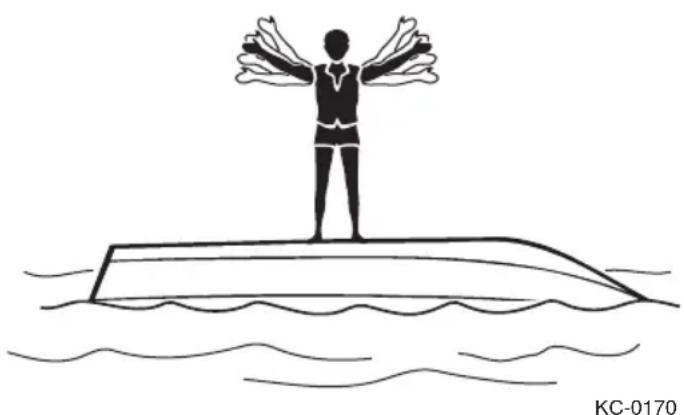
natural_image
Simple line drawing of a person standing on a boat with arms outstretched, above water (no text or symbols)HAZARDOUS CONDITIONS
Every waterway poses hazards that you should avoid; shallow water, tree stumps, sand bars, etc. Ask local boaters for information and consult a marine chart when boating on unfamiliar waters. As the operator of the boat, you should try to avoid all hazards, known and unknown. The following information does not contain all possible water hazards.
Weather
Getting caught in severe weather is hazardous. Check with local weather stations, the U.S. Coast Guard, or Weather service broadcasts (162.55 or 162.40 Megahertz) for the latest conditions. It is recommended to check the weather not only before but periodically while you are boating.
Storms – Take common sense precautions if you are forced to operate your boat in stormy conditions:
- Wear PFDs.
- Stow all gear and lash equipment on deck.
- Reduce speed and head for place of refuge you can reach most easily.
- If you lose power, keep boat headed into the waves by rigging a sea anchor off the bow.

WARNING
If caught in high winds with dangerous wave action, point the bow of the boat perpendicular to (heading into) the waves and pursue the nearest shoreline by riding over the crests of the waves. Allowing high waves to strike the side of the boat may capsize or swamp the vessel.
Fog – It is best to avoid operating your boat in foggy weather. When fog sets in take bearings and log courses and speeds. You are required to emit a five second blast from your horn or whistle once every minute. Additionally, have passengers wear PFDs and watch for oncoming vessels.
Dam Spillways
The water around a dam spillway is a hazardous area. It is subject to rapid changes. Boaters must keep clear of the spillway areas below dams.
Weeds
Weeds are generally a threat to your boat's engine. Weeds on the propeller may cause the engine to vibrate. They may also restrict water intake causing the engine to overheat. If you run into weeds, stop the engine and clear the propeller and water intake completely of weeds. Consult the engine operating manual for more information.
NOTICE
Weeds can sometimes be removed by shifting to NEUTRAL, pausing a moment, then shifting to REVERSE to unwind the weeds from the propeller.
Shallow Water Operation
Operating in shallow water presents a number of hazards. If the engine strikes an underwater hazard, check for boat and engine damage. If the engine vibrates excessively after striking an underwater obstruction, it may indicate a damaged propeller.
Sand bars in narrow inlets are constantly shifting, making it difficult to mark them with buoys. Sometimes, sand bars are indicated by waves as they form into breakers when passing over the sand bar. If you ground the boat on a sand bar, seek help from another boater or radio for help.
In coastal areas, tides can affect water level as much as 9 m (30 ft). Check with local marinas or Coast Guard stations for tide tables and current charts.
| DAYTIME WARNING | DESCRIPTION | NIGHTIME WARNING |
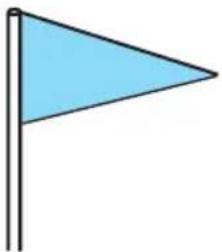 | Small Craft Advisory - Winds greater than 18 knots, sustained for two hours or more or hazardous wave conditions. Following a storm, hazardous wave conditions can persist long after the high winds have subsided. |  |
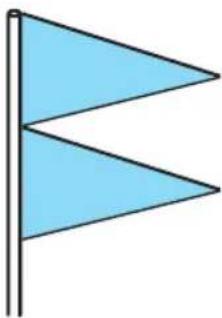 | Gale Warning - Sustained winds (2 or more hours) of 34-47 knots. |  |
 | Storm Warning - Sustained winds of 48 knots or greater. |  |
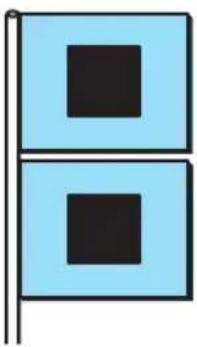 | Hurricane Warning - Forecast winds of 64 knots and above. Displayed only in connection with a hurricane. |  |
Actual Signal in red
KC-0371
Warning Markers
It is a good idea to ask local authorities if there are hazardous areas and how they are marked. Boaters must also recognize the flag designs which indicate that skin divers are present and keep well clear of the area.
Watch for swimmers. Swimming areas may not be marked. Steer clear from the area and always remain alert.
Navigation markers serve as a means of identifying navigable routes, and indicate water hazards. Boaters should become familiar with navigation markers and stay within marked boundaries and clear of hazards.
DIVERS FLAG
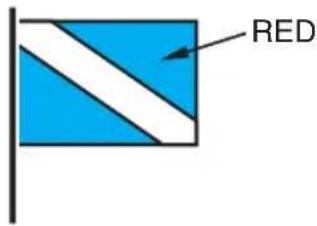
text_image
REDALPHA FLAG
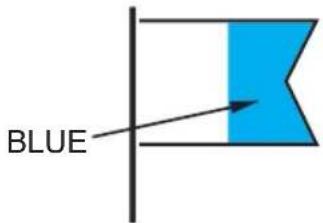
text_image
BLUEDISTRESS FLAG
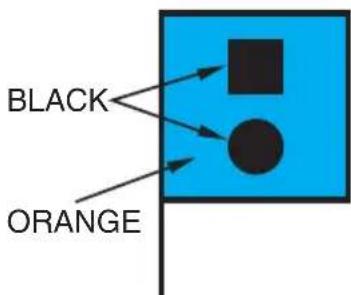
text_image
BLACK ORANGEUSED BY RECREATIONAL DIVERS - INDICATES DIVER'S POSITION
WORLDWIDE VESSELS
ENGAGED IN DIVING
OPERATIONS - DOES
NOT INDICATE
DIVER'S POSITION
INDICATES
FELLOW
BOATER IS IN
NEED OF
ASSISTANCE
KC-0352
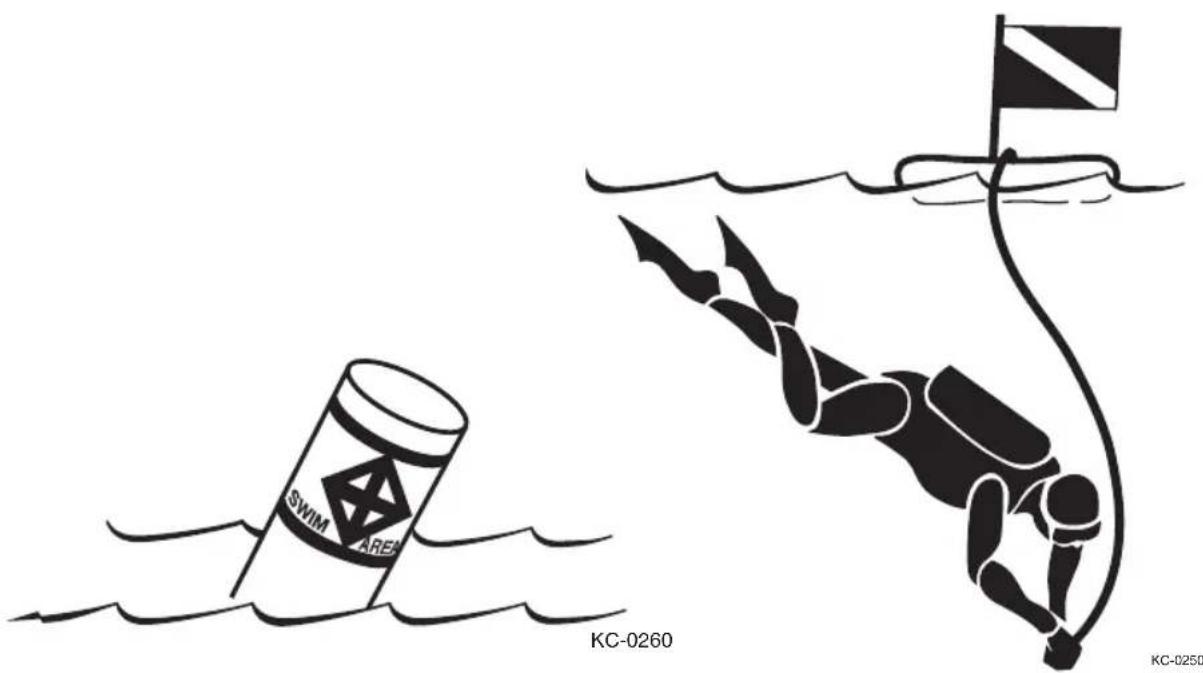
natural_image
Illustration of a diver approaching water with a flag, labeled KC-0260 and KC-0250 (no text or symbols on the diagram itself)BOATING UNDER THE INFLUENCE

WARNING
Federal and state laws prohibit operating a boat under the influence of alcohol and other drugs. These regulations are actively enforced. Impaired operation may result in severe personal injury or death.
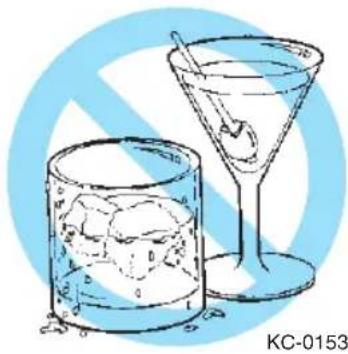
natural_image
Illustration of a martini glass and ice cubes with a straw, set against a blue circular background (no text or symbols)Boating, alcohol and the use of other drugs just don't mix. These substances slow your reaction time and affect your better judgment. Combined with the sun, wind, waves, and noise of other watercraft, the effects of drugs are increased and will significantly slow your reaction time. As the owner/operator, you are responsible for the alcohol/drug use and on-board behavior of your passengers.
NOTICE
If the operator's blood alcohol content is 0.10% (0.08% in some states) or above, violators are subject to a civil penalty up to \1,000 or criminal penalty up to \5,000, one year imprisonment or both. Operating a boat under the influence can also result in a loss of motor vehicle driving privileges.

text_image
! COCARBON MONOXIDE
Carbon Monoxide (CO) is a colorless and odorless gas produced by all engines and fuel burning appliances. Even with the best boat design and construction, plus the utmost care in inspection, operation, and maintenance, hazardous levels of CO may still be present in accommodation spaces under certain conditions. To reduce CO accumulation, always ventilate the boat interior by opening the deck hatches, windows or canvas to provide adequate ventilation.
DANGER
EXTREME HAZARD - Carbon Monoxide gas (CO) is colorless, odorless and extremely dangerous. All engines and fuel burning appliances produce CO as exhaust. Direct and prolonged exposure to CO will cause BRAIN DAMAGE or DEATH. Signs of exposure to CO include nausea, dizziness and drowsiness. Sources of CO include:
① Blockage of boat exhausts by obstruction.
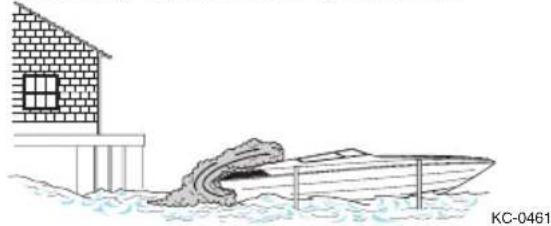
natural_image
Illustration of a flooded boat with waves crashing near a brick building (no text or symbols)④ Operating with high bow angle.
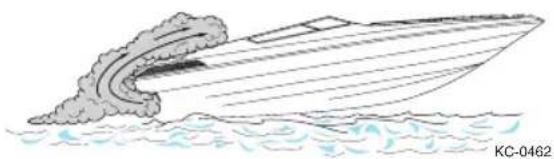
natural_image
Line drawing of a boat creating a large cloud over water (no text or symbols)② Exhausts traveling along obstruction
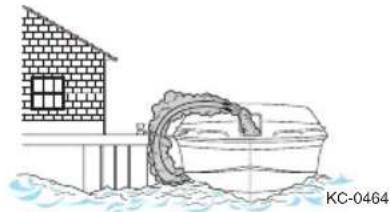
natural_image
Simple line drawing of a small boat with a curved ramp, next to a brick house on water (no text or symbols)⑤ Exhausts from other vessels in confined areas.
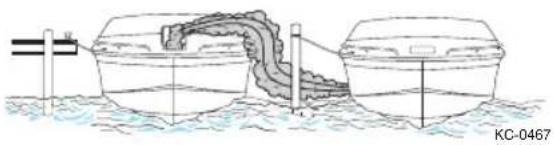
natural_image
Diagram of a boat being lowered into water, showing structural components and platform (no text or symbols)③ Operating at slow speed or while dead in the water.
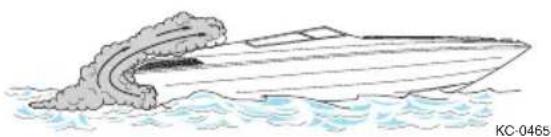
natural_image
Illustration of a boat surfacing water with a large wake (no text or symbols)⑥ Operating with canvas tops and side curtains in place without ventilation.
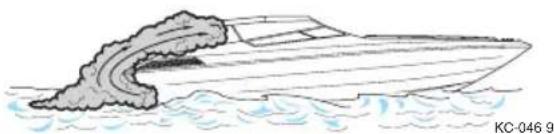
natural_image
Illustration of a large ship crashing into water with smoke plume (no text or symbols)ENSURE ADEQUATE VENTILATION FOR CORRECT AIR MOVEMENT THROUGH BOAT!
OPERATION BY MINORS
Minors must always be supervised by an adult whenever operating a boat. Many states have laws regarding the minimum age and licensing requirements of minors. Be sure to contact the state boating authorities for information.
PASSENGER SAFETY
Whenever you are going for an outing, make sure that at least one passenger is familiar with the operation and safety aspects of the boat in case of emergency. Show all passengers the location of emergency equipment and explain how to use it. DO NOT allow passengers to drag their feet or hands in the water, or sit on the bow, bow pulpit, deck, or gunwale while the engine is running.
GENERAL PRECAUTIONS
Your safety, the safety of your passengers, and other boaters are among your responsibilities as operator of this boat. Your boat must be in compliance with U.S. Coast Guard safety equipment regulations. You should know how to react correctly to adverse weather conditions, have good navigation skills, and follow the “Rules of the Road” as defined by the Coast Guard and state/county/local regulations.

WARNING
Read and understand this manual and the engine operator's manual, and be sure that you understand all controls and operating instructions before attempting to operate the boat. Improper operation can be extremely hazardous.
Before each outing you should check all safety equipment, such as fire extinguishers, PFDs, flares, distress flags, flashlights and engine stop switch. They should be operable, in good condition, readily visible, and easily accessed.
Tell someone of your travel plans. Check local weather reports before casting off; do not leave the dock area when strong winds and electrical storms are in the area or predicted to be in the area.
Know the weight capacity of your boat. DO NOT overload your boat.
SAFETY WHILE BOATING
Boating-related accidents are generally caused by the operator's failure to follow basic safety rules or written precautions. Most accidents can be avoided if the operator is completely familiar with the boat, its operation and can recognize potentially hazardous situations.
In addition to everyday safety, failure to observe the safety recommendations may result in severe personal injury or death to you or to others. Use caution and common sense when operating your boat. Don't take unnecessary chances! Remember that at least three people are needed for safe towing.
Failure to adhere to these warnings may result in severe injury or death to you and/or others.
- Look before you turn the boat. As a boater you are obligated to maintain a course and speed unless it is safe to alter course and speed. Look before you turn.
- Improper operation of the boat is extremely dangerous. Operators must read and understand all operating manuals supplied with the boat before operation.
- On-board equipment must always conform to the governing federal, state and local regulations.
- DO NOT operate the boat while under the influence of alcohol or other drugs.
- DO NOT stand or allow passengers to stand in the boat, or sit on the transom, seat backs, engine cover or sides of the boat while the engine is running. You or others may be thrown from the boat.
- DO NOT allow any type of spark or open flame on board. It may result in fire or explosion.
- DO NOT leave children in the boat without adult supervision.
- DO NOT sit in front of the operator to avoid obstructing the operator's view.
- DO NOT dive from the boat without being absolutely sure of the depth of the water, otherwise severe injury or death may occur from striking the bottom or submerged objects.
- DO NOT swim near the boat when the engine is running. Being in NEUTRAL is not enough, the propeller may still be turning and carbon monoxide may be present.
-
DO NOT replace your boat's marine parts with automotive parts.
-
DO NOT remove or modify any components of the fuel system except for maintenance by qualified personnel. Tampering with fuel components may cause a hazardous condition.
- DO NOT wrap ski lines or mooring lines around any body part which may become entangled in the line if you fall overboard and the boat is moving.
- Keep track of ski lines and dock lines so they do not become entangled in the propeller.
- Be sure to securely attach the engine emergency stop switch lanyard to a part of your clothing, such as a belt loop, when operating the boat.
- Be sure to keep a watch for other boats, swimmers and obstructions in the water. Stay away from other boats and personal watercraft.
- Be sure to have an experienced operator at the helm and always have at least three people present for safe towing – one to drive, one to observe and one to ski or ride.
- Seek shelter from open water if there is threat of lightning.
- Operate slowly in congested areas such as marinas and mooring areas.
- The bow may be slippery. Do not go forward while the engine is running.
- When you leave the boat take the keys with you. This will keep untrained and unauthorized persons from operating the boat.
• Engine exhaust contains carbon monoxide. - DO NOT operate the engine in a confined space.
- DO NOT go under the boat cover with the engine running or shortly after the engine has been running.
- DO NOT use boarding platform with the engine running.
• DO NOT “teak surf.” - Allow adequate ventilation with fresh air before entering.
- Slow down when crossing waves or wake in order to minimize the impact on passengers and the boat.
WATER SPORTS
Larger boats produce a wake too big for skiers. Only boats that are equipped with a ski-tow eye should be used to pull water skiers.
NOTICE
It is unlawful to participate in water sports while under the influence of alcohol or other drugs.
When participating in water sports, be safe and courteous and follow these guidelines:
- Be considerate to fishermen and others you share the water with.
- DO NOT perform water sports in congested areas.
- Stay away from navigation markers.
- Stay away from other boats and water sports participants.
- Return immediately to a fallen water sport participant.
- Regularly inspect water sport equipment to ensure it is safe.
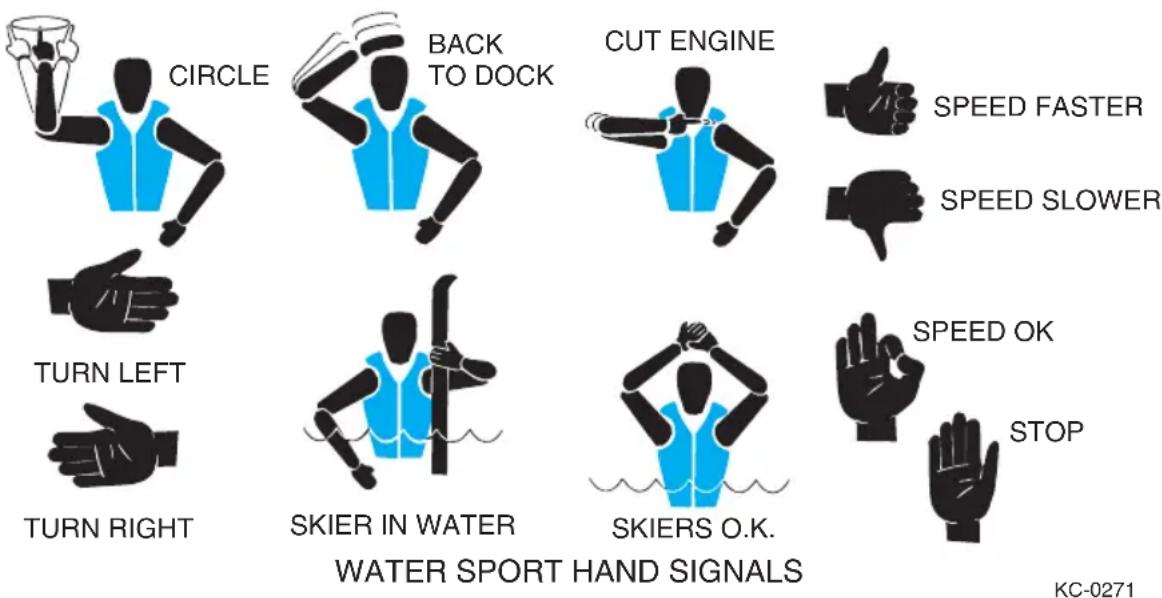
text_image
CIRCLE BACK TO DOCK CUT ENGINE SPEED FASTER SPEED SLOWER TURN LEFT TURN RIGHT SKIER IN WATER WATER SPORT HAND SIGNALS SKIERS O.K. SPEED OK STOP KC-0271GENERAL WATER SPORT PRECAUTIONS
• DO NOT ski in shallow water, close to shore or in water where you do not know the depth or what is beneath the surface.
- DO NOT put your arm, head, or any other part of your body through the handle-bridle of the ski line nor wrap the line around any part of the body at any time.
• DO NOT ski at night or directly in front of other boats.
- DO NOT jump from a boat that is moving at any speed, nor enter or exit the water when the engine is running.
- DO NOT approach the boat if the engine is running.
• DO NOT ski near swimming areas, beaches or personal watercraft.
- DO NOT follow directly behind another boat or skier without leaving an adequate safe distance.
- DO NOT "back up" to anyone in the water.
- DO NOT ski with multiple skiers with different length ropes.
• DO NOT ski in limited visibility conditions.
- DO NOT approach the rear of the boat while the engine is running.
- Be sure everyone knows and uses hand signals and common skiing courtesy.
- Be sure the engine is OFF before allowing anyone to approach the boat.
- Be sure the engine is OFF before a skier enters or exits the boat, boarding platform or ladder.
- Be sure every skier always wears a U.S. Coast Guard-approved Type III personal flotation device. Special PFDs are available for high impact falls into the water.
- Be sure to maintain a distance of at least 100 feet from all other objects, including other boats, piers, rafts, mooring and navigational buoys, pilings, abutments or any other items.
- Be sure to have an experienced operator and observer in the boat when skiing.
- Be sure to look before you turn the boat to pick up a fallen skier.
- Have ship to shore communication devices if operating at a significant distance off shore.
- The operator should never retrieve or pick up an article from the water while the engine is running. Be sure the engine is OFF.
- The operator should always keep the skier in view when the skier is entering or exiting the boat.
- Communicate skiing speed with the skier before starting.
- The operator should know the ability level of the skier.
- The skier should indicate he/she is clear of the boat prior to starting the boat or putting the boat into gear and tightening the rope.
- The operator, observer and skier should agree to communication hand signals before starting.
- Observer in the boat should keep operator apprised of skier status.
- The operator should always watch the skier as the line is tightened to start (in case rope wraps around ski or skier).
- The operator should look ahead before starting.
- Start from a safe place with good forward and peripheral visibility.
- The operator should check the direction of the boat before starting (in gear, slowly making sure the boat goes in the intended direction).
- The operator should be primarily aware of what is occurring in front of the boat, but be aware of skier's progress.
- Be sure to inspect the towing equipment before use. If there is any evidence of corrosion or other damage, DO NOT use damaged equipment.
• Always inspect water sports equipment for wear, fraying, etc., before use. DO NOT use if they show signs of wear or fraying. - Inspect towline for fraying, unnecessary knots or cuts. Replace when the rope shows signs of wear. DO NOT wait for the rope to break before replacing an old rope.
- Be sure to wear wet suits or protective shorts when skiing to prevent abrasions, hypothermia and injuries from impact with a water surface.
- When people are getting on or off of water sports equipment, always turn the engine OFF. If boarding water sports equipment from the boat, always do so from the boarding platform.
- Be sure to approach a downed skier on the operator's side, always keeping the skier in view.
- Display a skier down flag whenever the skier is in the water and not skiing.
- Be sure to follow the approved towing pattern on each lake.
TEAK SURFING
READ, UNDERSTAND and be FAMILIAR with the information contained on warning labels and adhere to the boat operation practices described on them. The United States Coast Guard issued a SAFETY ALERT on August 28, 2001 that covers some of the issues of improper use of the boarding platform. The SAFETY ALERT and portions of the accompanying information follow:
Every year tragic deaths occur from the negligence of unsafe boating and dangerous activities. Experts say, “many of these deaths may have been caused by an invisible hazard, carbon monoxide poisoning.” Taking the risk of swimming under a boarding platform when the engine is running, skiing within 20 feet (6.1 meters), “teak surfing” or “dragging” behind a moving boat can be fatal.
DO NOT use the boarding platform or ladder for any other purpose than boarding the boat or preparation of entering the water, and DO NOT use the boarding platform or ladder when the engine is running.
SAFETY ALERT From August 28, 2001:
The United States Coast Guard advised boaters not to “Teak Surf.” Recent boating fatalities revealed carbon monoxide (CO) emitted from a vessel’s exhaust resulted in CO poisoning and death. Do not allow persons in the vicinity of a swim platform or ladder when equipped (in the water or in the boat) with the engine(s) or a generator operating, while at rest or underway at slow speed. “Teak Surfing” places the individual in position directly exposed to the CO in the engine’s exhaust. This may result in a loss of coherent responses and even death. In addition, “Teak Surfing” dangerously exposes the individual to a possible propeller injury, and since it is done without a life jacket (PFD), it significantly increases the probability of drowning. Therefore, the Coast Guard stresses, “Teak Surfing” is a very dangerous activity and advises boaters not to participate in it.
Carbon monoxide is one of the most dangerous gases. It impairs and can often lead to death. It is important to the Coast Guard that it be avoided in every circumstance.
OUR ENVIRONMENT
As a boater, you already appreciate nature's beauty and the peace of the great outdoors. It is a boater's responsibility to protect the natural environment by keeping waterways clean.

DO NOT put anything in the water you wouldn't want to eat or drink!
Conserve Fishery and Wildlife Resources
There is a tremendous drain on our natural resources. Over-fishing/hunting and pollution have strained the fish and game population. Do your part by keeping only what you will eat by practicing catch-and-release and obeying bag limits.
Foreign Species
If you trailer your boat from lake to lake, you may unknowingly introduce a foreign aquatic species from one lake to the next. Thoroughly clean the boat below the water line, remove all weeds and algae, and drain the bilge and livewells before launching the boat in a new body of water.
Fuel and Oil Spillage
The spilling of fuel or oil into our waterways contaminates the environment and is dangerous to wildlife. DO NOT discharge or dispose of fuel or oil into the water; it is prohibited and you could be fined. There are two common, accidental types of discharge:
• Overfilling the fuel tank
- Pumping contaminated bilge water

WARNING
Fumes from rags can collect in bilge and be extremely hazardous. DO NOT store rags used to wipe up fuel or solvent spills in the boat. Dispose of rags properly ashore.
Discharge and Disposal of Waste
Waste means all forms of garbage, plastics, recyclables, food, wood, detergents, sewage and even fish parts in certain waters - in short, nearly everything. We recommend you bring back everything you take out with you for proper disposal ashore.
If you have a marine sanitation device (head or marine toilet) installed, use an approved pump-out facility at your marina. Many areas prohibit the
discharge of sewage overboard or even an operable overboard waste discharge.
Excessive Noise
Noise means engine noise, radio noise or even yelling. Many bodies of water have adopted noise limits. DO NOT use thru-transom exhaust unless you're well off shore. Music and loud conversation can carry a considerable distance on water, especially at night.
Wake and Wash
Be alert for NO WAKE zones. You may be responsible for any damage or injury caused by your wake/wash. Prior to entering a NO WAKE zone, come off plane to the slowest steerable speed.
Exhaust Emissions
Increased exhaust (hydrocarbon) emissions pollute our water and air. Keep your engine tuned and boat hull clean for peak performance. Consult your dealer and engine operator's manual for information.
Paints
If your boat is kept in water where marine growth is a problem, the use of anti-fouling paint may reduce the growth rate. Be aware of environmental regulations that may govern your paint choice. Contact your local boating authorities for information.
Cleaning Agents
Household cleaners should be used sparingly and not discharged into waterways. DO NOT mix cleaners and be sure to use plenty of ventilation in enclosed areas. DO NOT use products which contain phosphates, chlorine, solvents, non-biodegradable or petroleum based products. Citrus based cleaners are excellent for marine cleaning purposes and are safe for you and the environment. Refer to MAINTENANCE for more information.
MARPOL Treaty
The U.S. Coast Guard (USCG) enforces the International Convention for the Prevention of Pollution from ships, commonly referred to as the MARPOL Treaty (MARine POLlution). This treaty prohibits the overboard dumping of all ship-generated plastics, chemicals, garbage and oil.
Chapter 2

natural_image
Simple icon of a cylindrical object on a surface, no text or symbols presentBasic Rules Of The Road

WARNING
The nautical rules of the road must be followed to prevent collisions between vessels. Like traffic laws for automobiles, the operator is legally required to follow the rules.
The following information outlines only the most basic of the nautical rules of the road. For more information, contact your local U.S. Coast Guard Auxiliary.
AIDS TO NAVIGATION
Learn to recognize the different buoys and day markers; they are the signposts of the waterways. The United States Aids to Navigation System (USATONS) is the primary marking system used on inland water, coastal waters and rivers. This system is maintained by the U.S. Coast Guard (USCG).
Types of Buoys
There are several types and shapes of buoys. Buoys may be unlighted, lighted, with sound or may have both an audible and a visual signal. Lights, bells and horns are used on buoys for night or poor visibility conditions. Different shapes of buoys are shown below.
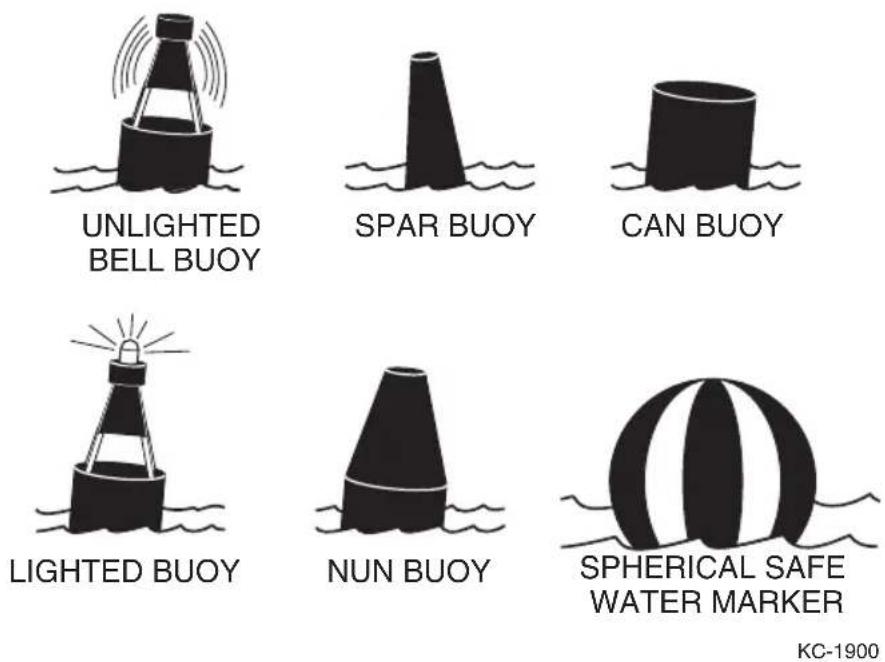
Buoys with unique light flashing characteristics are identified on nautical charts with the specific flashing pattern.
Mooring Buoys
The only buoys you are permitted to moor to are mooring buoys. Mooring buoys are white with a blue horizontal stripe. Mooring to a navigation buoy, regulatory markers or lateral markers is illegal.
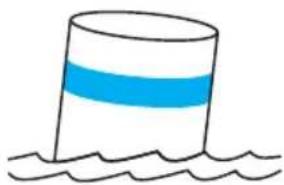
natural_image
Simple line drawing of a cylindrical object partially submerged in water (no text or symbols)KC-1901_2C
Regulatory Markers
Regulatory markers indicate dangerous or restricted controlled areas. These markers are used to indicate speed zones, areas set aside for particular use, general information and directions.
Regulatory markers are white with orange geometric shapes and also have orange bands near the top and at the water line of the buoy. You must obey regulatory markers.
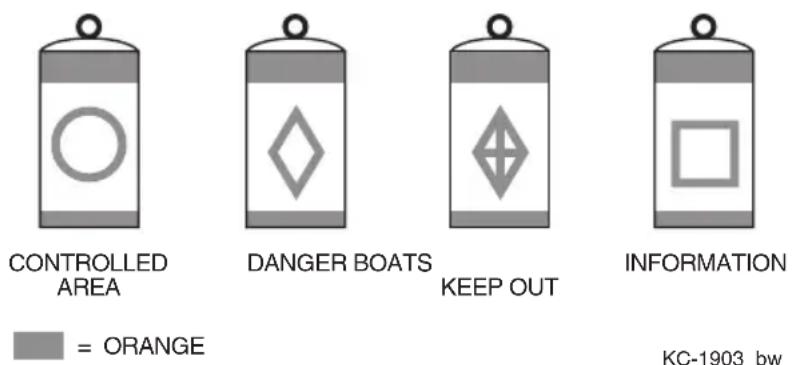
= ORANGE
KC-1903_bw
Lateral Markers
Lateral markers are oriented from the perspective of being entered from seaward (the boater is going toward the port). This means that red buoys are passed on the starboard (right) side of the vessel when proceeding from open water into port, and green buoys to the port (left) side.
The right side (starboard) of the channel is marked with RED, even-numbered buoys. The left side (port) of the channel is marked with GREEN, odd-numbered buoys.
Day markers are colored and numbered the same as buoys. RED, triangular day markers with even numbers mark the starboard side of the channel. GREEN, square day markers with odd numbers mark the port side of the channel.
Fairways and mid-channels may be marked with safe water marks or buoys. These marks indicate safe water all around. Safe water marks are red and white striped and are round or have a red spherical topmark.
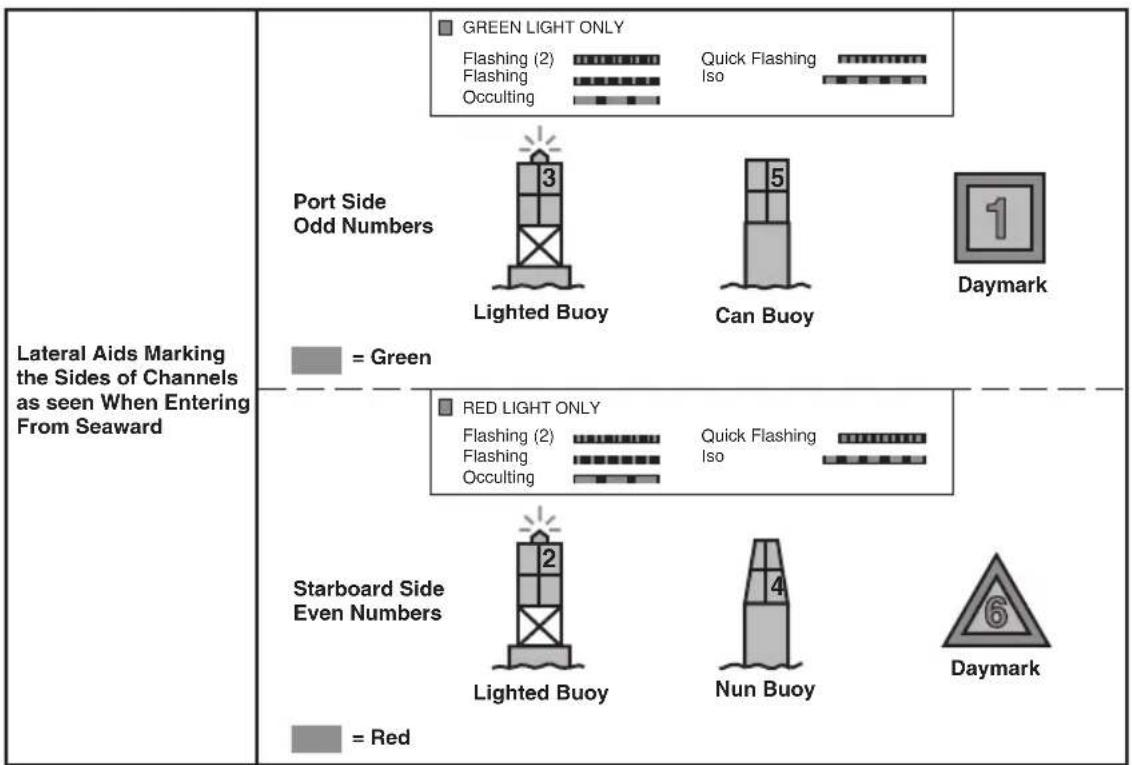
text_image
Lateral Aids Marking the Sides of Channels as seen When Entering From Seaward GREEN LIGHT ONLY Flashing (2) Flashing Occulting Quick Flashing Iso Port Side Odd Numbers 3 Lighted Buoy 5 Can Buoy 1 Daymark = Green RED LIGHT ONLY Flashing (2) Flashing Occulting Quick Flashing Iso Starboard Side Even Numbers 2 Lighted Buoy 4 Nun Buoy 6 Daymark = RedKC-1904_bw
Basic Rules Of The Road
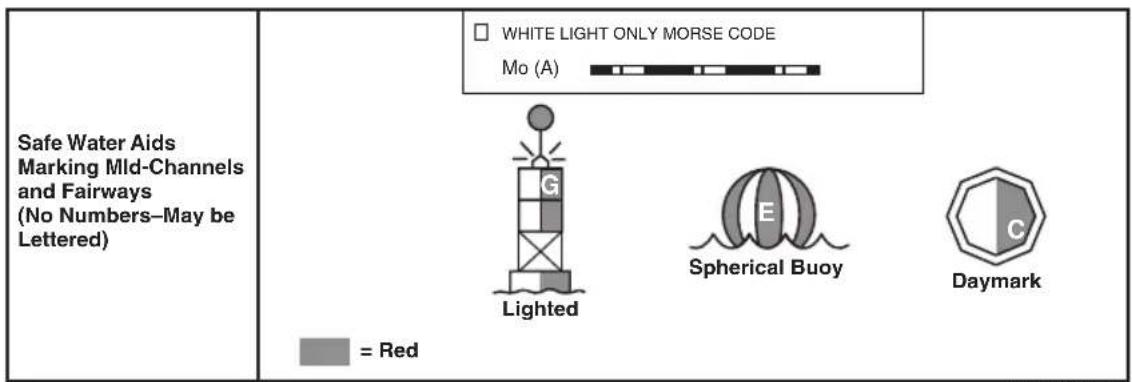
text_image
Safe Water Aids Marking Mld-Channels and Fairways (No Numbers–May be Lettered) = Red WHITE LIGHT ONLY MORSE CODE Mo (A) Lighted Spherical Buoy DaymarkKC-1905_bw
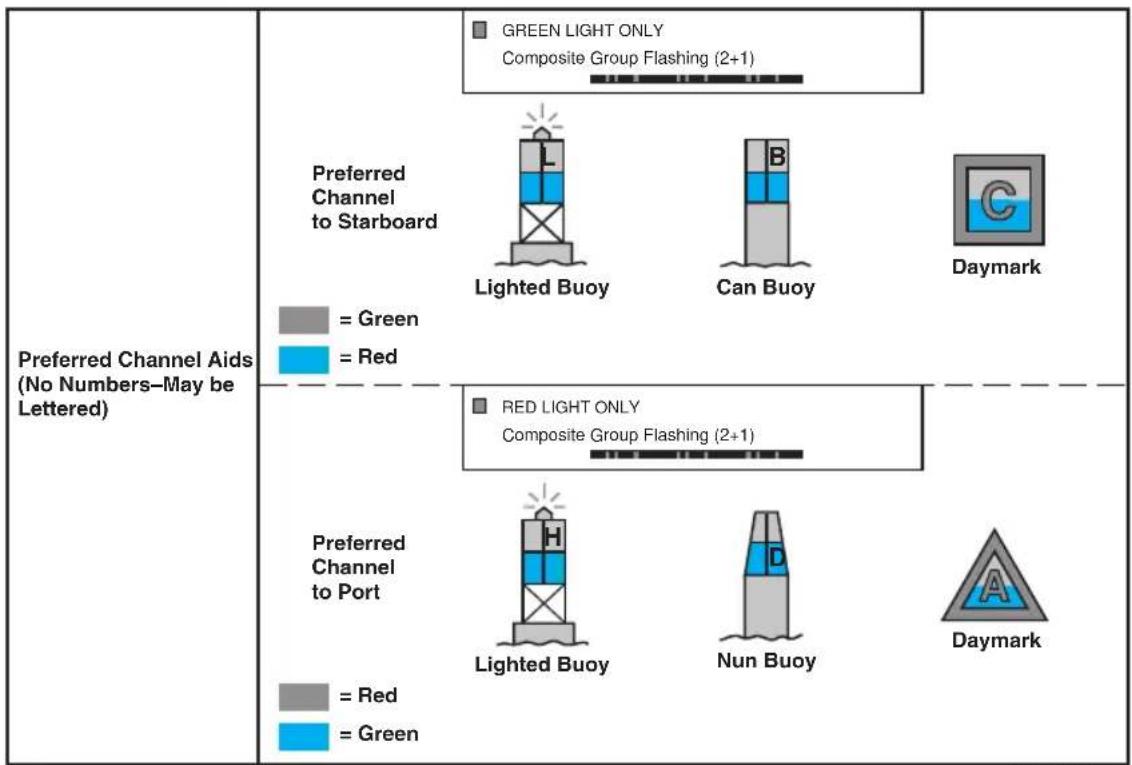
flowchart
graph TD
    A["Preferred Channel Aids\n(No Numbers–May be Lettered)"] --> B["Preferred Channel to Starboard"]
    A --> C["Preferred Channel to Port"]
    B --> D["Green Light ONLY Composite Group Flashing (2+1)"]
    B --> E["Lighted Buoy"]
    B --> F["Can Buoy"]
    B --> G["Daymark"]
    C --> H["RED LIGHT ONLY Composite Group Flashing (2+1)"]
    C --> I["Lighted Buoy"]
    C --> J["Nun Buoy"]
    C --> K["Daymark"]
    style A fill:#f9f,stroke:#333
    style B fill:#ccf,stroke:#333
    style C fill:#cfc,stroke:#333
    style B fill:#ffc,stroke:#333
    style C fill:#fcc,stroke:#333
KC-1906_bw
Obstructions, channel junctions, etc. are marked with RED and GREEN horizontally striped buoys.
A RED band at the top means the preferred channel is to the left of the buoy; a GREEN top band means the preferred channel is to the right of the buoy.
Isolated Danger Markers
Isolated danger markers indicate an isolated danger which may be passed on all sides. These markers are colored black with one or more broad horizontal red bands and are equipped with a topmark of two black spheres, one above the other.
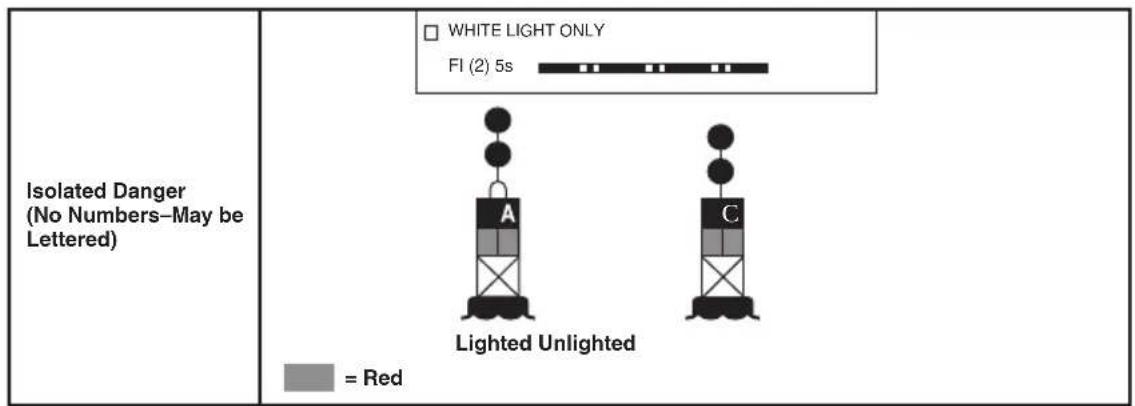
text_image
Isolated Danger (No Numbers-May be Lettered) WHITE LIGHT ONLY FI (2) 5s Lighted Unlighted = RedKC-1907_bw
On inland waters, a buoy with alternating vertical black and white stripes may be used to indicate that an obstruction or other danger exists between the buoy and the nearest shore. DO NOT pass between the buoy and the shore.
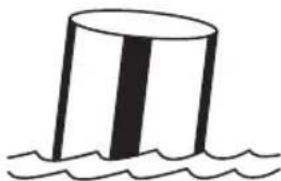
natural_image
Simple line drawing of a cylindrical object partially submerged in water (no text or symbols)BLACK-STRIPED
WHITE BUOY
KC-1902
RIGHT-OF-WAY
NOTICE
In general, boats with less maneuverability have right-of-way over more agile craft. You must stay clear of the vessel with right-of-way and pass to his stern.
Whistle/Horn Signals
Signaling other boats with a whistle or horn is similar to using turn signals on an automobile. It is not necessary to sound a signal every time a boat is nearby. In general, boat operators should signal their intention to avoid potentially confusing or hazardous situations.
It is customary for the privileged boat to signal first, and the burdened boat to return the same signal to acknowledge she understands and will comply. Use the danger signal (five or more short and rapid blasts) if intent is not clear.
Use the following signal blasts early enough to be noticed and understood by other boaters:
- One long blast: Warning signal (coming out of slip or passing astern)
• One short blast: Pass on my port side - Two short blasts: Pass on my starboard side
- Three short blasts: Engines in reverse
- Five or more short and rapid blasts: Danger Signal!
Privileged Boats
Privileged boats have right-of-way and can hold course and speed. Sailboats and boats paddled or rowed have the right-of-way over motorboats. Sailboats under power are considered motorboats. Small pleasure craft must yield to large commercial boats in narrow channels.
BURDENED BOATS
The burdened boat is the boat that must make whatever adjustments to course and speed necessary to keep out of the way of the privileged boat.
Crossing Situation
In crossing situations, the boat to the right from the 12 o'clock to the 4 o'clock position has the right-of-way. It must hold course and speed. The burdened boat keeps clear and passes behind the privileged boat. Boats going up and down a river have the privilege over boats crossing the river.
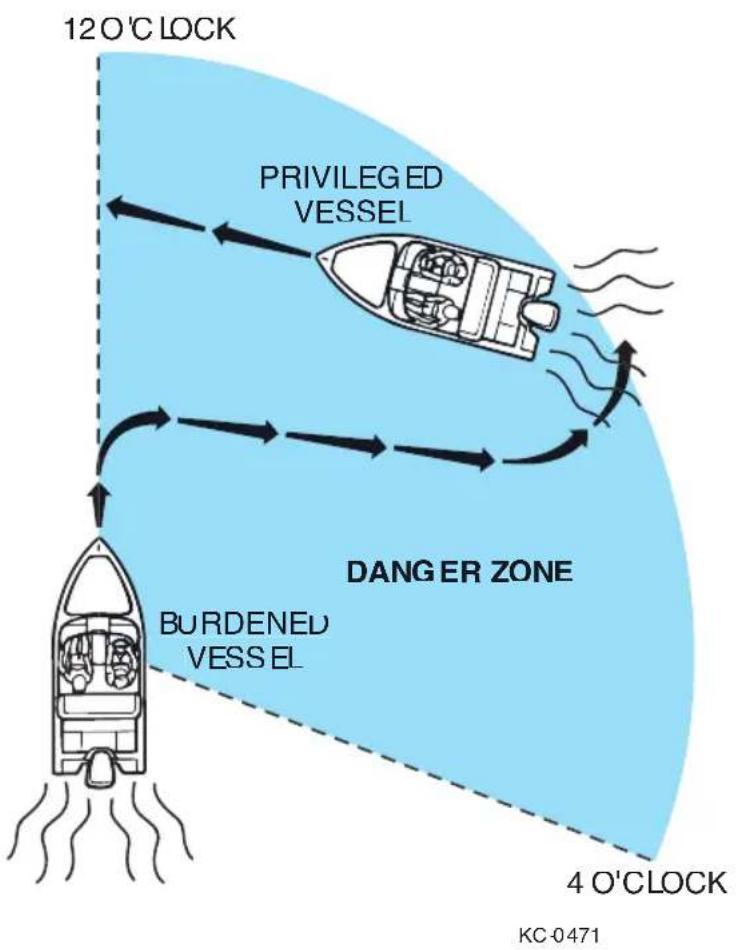
flowchart
graph TD
    A["12 O'CLOCK"] --> B["PRIVILEGED VESSEL"]
    B --> C["DANGER ZONE"]
    C --> D["BURDENED VESSEL"]
    D --> E["4 O'CLOCK"]
Basic Rules Of The Road
Meeting Head-On
Neither boat has the right-of-way in this situation. Both boats should decrease speed, should turn to the right, and pass port-to-port. However, if both boats are on the left side of a channel, each vessel should sound two short horn blasts and pass starboard to starboard.
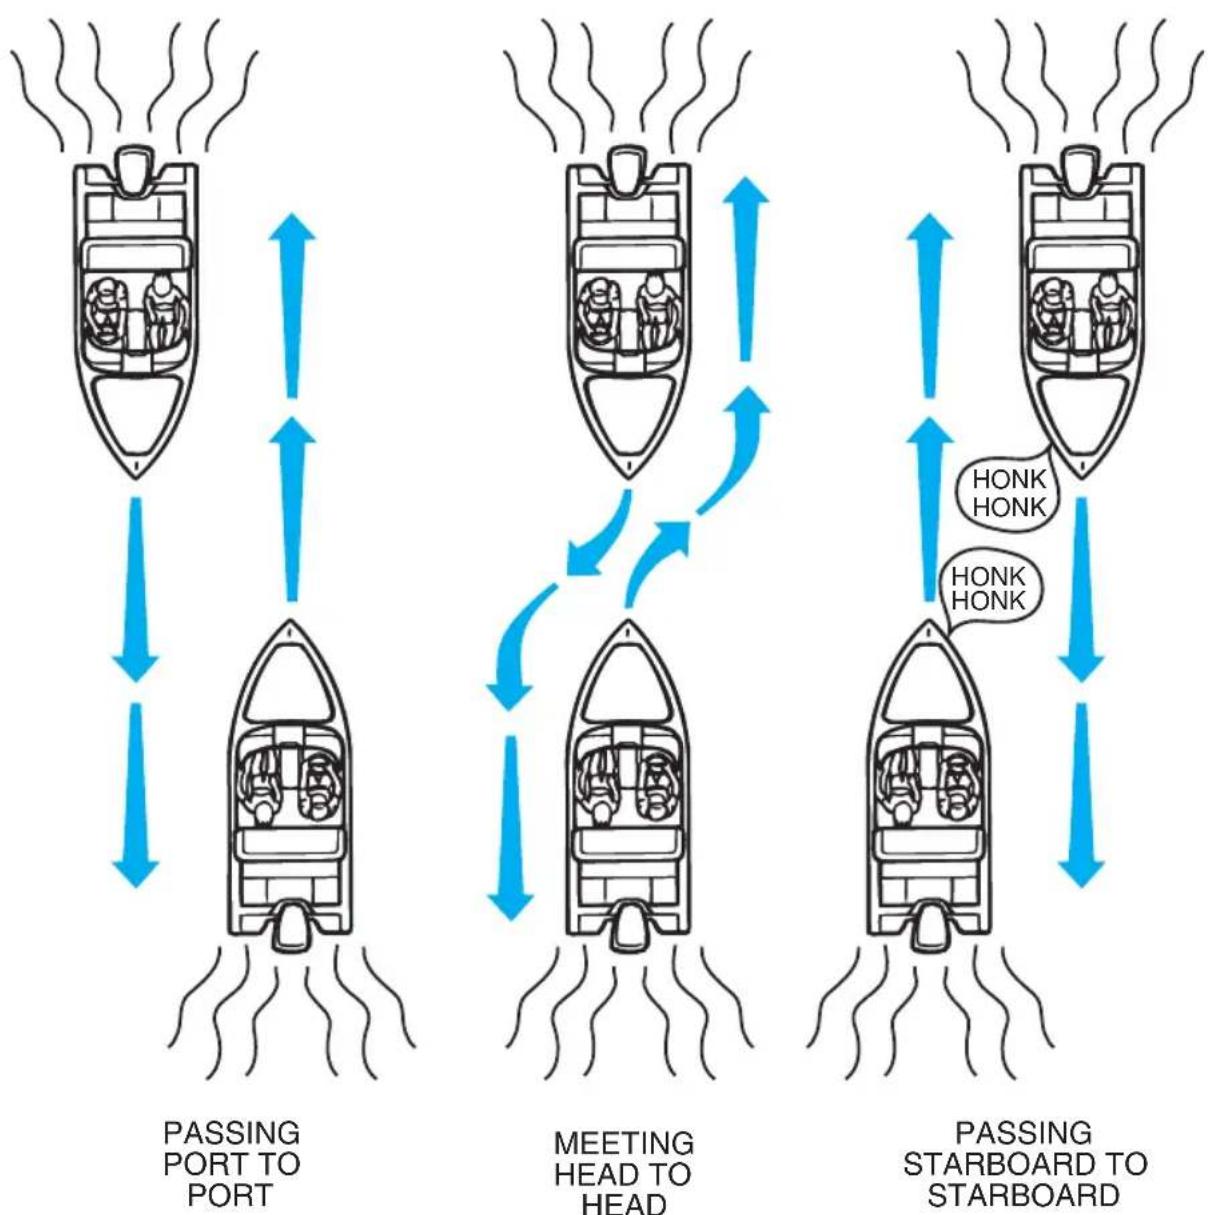
flowchart
graph TD
    A["Passing Port TO PORT"] --> B["MEETING HEAD TO HEAD"]
    B --> C["PASSING STARBOARD TO STARBOARD"]
    D["HONK HONK"] --> B
    E["HONK HONK"] --> C
KC-0581
Overtaking
The boat that is overtaking one ahead of it is the burdened boat and must make any adjustments necessary to keep out of the way of the privileged boat. The privileged boat should hold its course and speed.
The General Prudential Rule
The general prudential rule regarding right-of-way is that if a collision appears unavoidable, neither boat has right-of-way. As described in the Rules of the Road, both boats must act to avoid collision.
Night Running
Boats operating between sunset and sunrise (hours vary by state) must use navigational lights. Nighttime operation, especially during bad weather or fog can be dangerous. All Rules of the Road apply at night, but it is best to slow down and stay clear of all boats, regardless of who has right-of-way.
Protect your night vision by avoiding bright lights and have a passenger, if possible, help keep watch for other boats, water hazards, and aids to navigation.
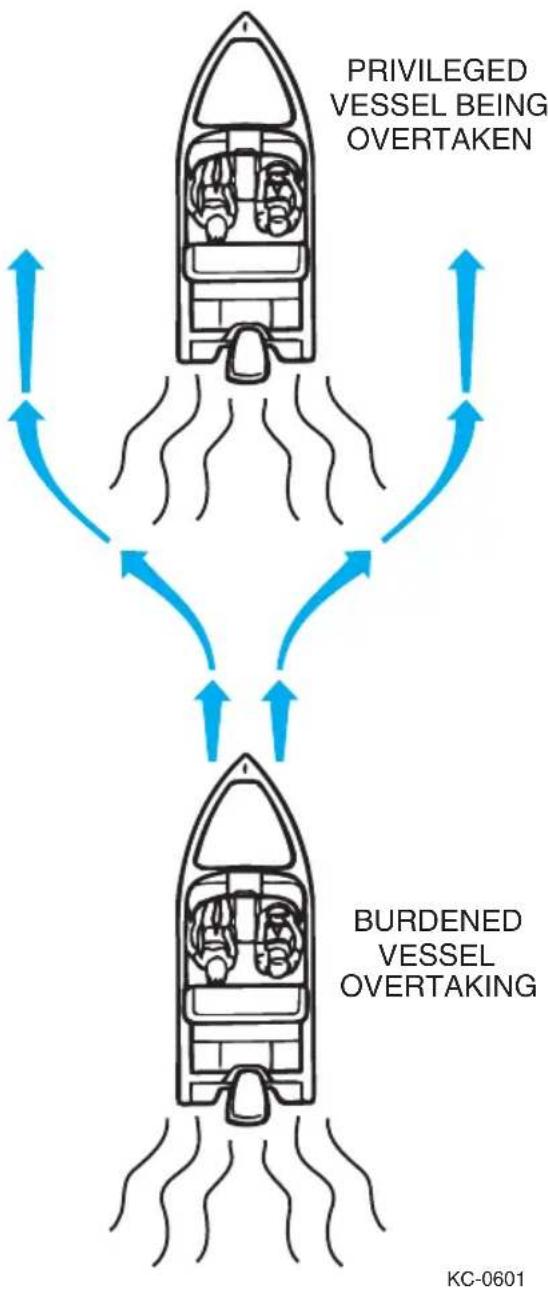
flowchart
graph TD
    A["Privileged VESSEL BEING OVERTAKEN"] --> B["BURDENED VESSEL OVERTAKING"]
    B --> C["Downward flow from private vessel to Burdened vessel"]
    style A fill:#f9f,stroke:#333
    style B fill:#bbf,stroke:#333
The size, speed, and direction of other vessels are determined at night from the running lights. A green light indicates the starboard side of the boat, and a red light indicates the port side. Generally, if you see a green light, you have the right-of-way; if you see a red light, give-way to vessel.
natural_image
Weather warning symbol with lightning bolt and two water droplets (no text)Chapter 3
Ship Systems
Your boat is equipped with a variety of major systems to operate the craft and provide the conveniences you expect while on the water. This section describes the basic operational principles of these systems. The procedures and illustrations in this section are representative of typical ship systems. Be sure to read and understand all information provided with your particular boat before operating its systems.

WARNING
Regularly inspect and maintain all systems to prevent unexpected hazards associated with worn or faulty components. Be sure to replace system components and hardware with marine grade parts, not automotive components.
VENTILATION SYSTEM
The ventilation system is designed to remove and prevent the accumulation of explosive vapors in the hull and engine compartment. Therefore, proper ventilation is extremely important to boat safety.
Powered systems consist of a blower which pulls air out from the engine compartment and bilge area; one or more vents allow fresh air in. Natural systems have both intake and exhaust vents; as the boat moves, air is forced into the intake and escapes through the exhaust vents.
FIRE EXTINGUISHING SYSTEM
Models equipped with an Automatic Fire Extinguishing System automatically actuate when temperatures reach a preset limit. When actuation occurs, a loud popping sound may be heard followed by a “rushing” air sound. When a discharge occurs, immediately shut down all electrical and mechanical systems and powered ventilation.

text_image
KC-5040WARNING
If the fire system discharges, wait for at least 15 minutes before opening engine hatch. Fire system gas displaces oxygen to “smother” the fire. Opening the hatch too soon may feed oxygen to the fire and flashback can occur.
FUEL SYSTEM
The basic fuel system consists of one or more permanent tanks with vent, level sensor and fuel indicator. Each tank has an anti-siphon valve to prevent fuel from accumulating in the bilge if a hose should break. Some models are also equipped with a fuel shutoff valve at each tank to prevent fuel from reaching downrange fuel valves or the engine. It is recommended the fuel shutoff valves be closed during long periods of inactivity or storage. Boat models with multiple fuel tanks are also equipped with a fuel selection valve for individual tank selection.
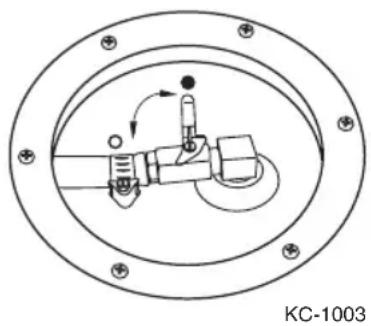
natural_image
Technical diagram of a mechanical assembly with concentric rings and mounting holes (no text or symbols)When the engine is operating, the fuel pump "pulls" fuel from the tank, bringing it into the engine where it is distributed to the cylinders and burned. Oil injected engines also include an oil reservoir and pump for injecting oil into the system. Consult the engine operator's manual for fuel recommendations.
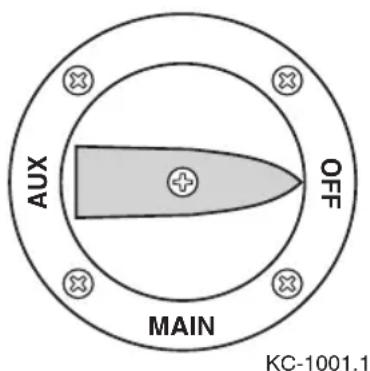
text_image
AUX OFF MAIN KC-1001.1EXHAUST SYSTEM
The engine exhaust system removes the gases produced by the running engine and helps to vent them away from the boat. Inboard engines are equipped with a muffler and may use water injection as part of the exhaust
system. Some stern drives are equipped with an exhaust diverter valve which, when activated, routes engine exhaust to through-transom exhaust pipes or down through the propeller hub. Through-transom exhaust is only used when well offshore. Never change or modify the standard manufactured exhaust system.
LUBRICATION SYSTEM
Depending on engine type, your boat may be equipped with one of several engine lubrication systems. Many small to mid-range outboards are lubricated by oil mixed directly with the gasoline in the fuel tank, while other outboards may be equipped with an oil injection system. In both systems, the oil is consumed as the engine runs. Oil injection systems include a separate reservoir for oil containment and an oil pump or combination fuel/oil pump that supplies oil to the fuel system for engine lubrication.
Stern drive engines, like automobile engines, use a continuous loop lubrication system that must be periodically serviced. Refer to the engine operator's manual for oil recommendations.
COOLING SYSTEM
The majority of marine engines are cooled by the continuous intake of raw lake water and circulating it around components. Inboards are equipped with seacocks and strainers at the raw water intake. Some marine engines used in saltwater may be equipped with a self-contained freshwater cooling system that pumps engine coolant through a heat exchanger to reduce engine temperature. Raw water is circulated through the other side of the heat exchanger to absorb engine heat from the coolant.
Any water intake or outlet below the water line is equipped with a seacock. Seacocks, located at the through-hull fitting, should be kept closed during long periods of inactivity and opened only when needed.
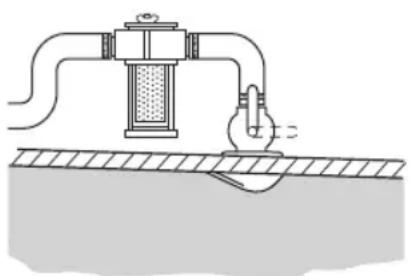
natural_image
Diagram of a laboratory apparatus with tubing and a glass tube, no text or symbols presentKC-2165.1
WARNING
Keep seacocks closed during periods of inactivity. A downstream hose failure could flood the boat if the seacock is left open.
ELECTRICAL SYSTEM
The boat may be equipped with a 12-volt direct current (12 VDC) negative ground electrical system. The positive (red) wire is hot and feeds current from the battery to the electrical systems. The negative (black) wire is ground and completes the circuit back to the battery. Until the engine is running at high idle or faster, all electrical power comes from the main battery. Once the engine is started and running at adequate RPM, electrical power is then provided by the engine alternator. The alternator provides more power as engine speed is increased. When the engine is operating, the alternator is charging the battery.
More electrical accessories than ever are being used on today's boats. Continuous operation of electrical accessories when the engine is not operating, or operating at low idle (trolling) speeds may discharge the battery to the point where it may not be able to crank the engine. A poorly maintained battery will discharge more quickly, and if corrosion is present the engine might not start due to high electrical resistance at the battery terminals, even though there may be sufficient battery reserves to start the engine.
STEERING SYSTEM
The steering system may be mechanical, power-assisted or hydraulic in operation. Boat steering is not self-centering. Always keep a secure grip on the steering wheel to maintain full boat control.
With mechanical steering, the helm unit transfers rotary motion of the steering wheel to linear motion in the cable which pushes or pulls the steering arm. Some boats are equipped with two cables; one cable pushes and the other pulls.
With power-assisted systems, the helm unit transfers rotary motion of the steering wheel to linear motion which pushes or pulls a cable. The cable movement is sensed and a signal is sent to a hydraulic pump which moves the hydraulic cylinder attached to the steering arm.
A hydraulic system has a pump mounted directly to the steering wheel with two hoses running from the pump to a hydraulic cylinder. When the steering wheel is turned, it moves the hydraulic cylinder which is connected to the steering arm. A reservoir, either separate or integral with the pump, holds extra fluid and maintains a pressure head to prevent air from entering the system.
Chapter 4
natural_image
Pure diagram of a steering wheel and vertical screw with directional arrows, no text or symbols present.Controls and Indicators
Knowing the controls and indicators on your boat is essential for safe and proper operation. The controls and indicators shown in this section may be optional or slightly different from those on your boat.

WARNING
Improperly maintained controls are hazardous and may cause sudden loss of control. Make sure all shift/throttle hardware and cables are regularly inspected and maintained. Improper maintenance may result in a loss of control, resulting in serious injury or death.
SHIFT/THROTTLE CONTROLS
The shift/throttle control on your boat differs from model to model and may depend on the engine used. The following shift/throttle controls are typical of the operation of most controls used. Be sure to consult the engine or control manual for specific operational differences.

CAUTION
DO NOT shift too quickly from FORWARD to REVERSE. Stay in NEUTRAL or idle position until the boat has lost most of its headway, before completing the shift to REVERSE or engine damage may occur.
NOTICE
All shift/throttle controls are equipped with a safety switch for “start in neutral only” operation. Be sure the control is in NEUTRAL before attempting to start the engine.
Single Lever Controls
Single lever controls operate as both a gear shifter and a throttle for a select engine. The lever is detented in the NEUTRAL position for starting. Shifting is accomplished by moving the lever into the first 15° of travel; push the lever for FORWARD, and pull the lever back for REVERSE. By advancing the lever beyond 15°, you move from the shifting range to the throttle range. DO NOT attempt to shift without the engine running. For engine warm-up, a separate lever or button on the control is used for throttle advance while the transmission remains in NEUTRAL.
A. NEUTRAL Position - Safety switch will allow starting in this position only.
B. FORWARD Position - Press release button under handle to allow shifting to FORWARD (or REVERSE) position.
C. REVERSE Position - Do not shift quickly from FORWARD to REVERSE.
D. THROTTLE Position - Pushing in forward or pulling in REVERSE increases engine speed.
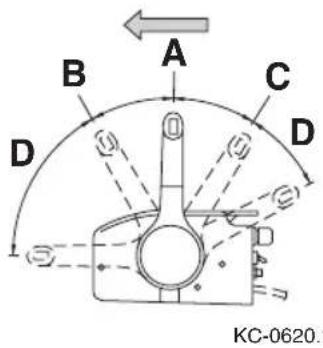
text_image
A B C D KC-0620.1DO NOT attempt to shift without the engine running. For engine warm-up, a separate lever on the control is used for throttle advance when in NEUTRAL.
Dual lever controls have individual levers for transmission shift and engine throttle.
A. Shift Lever - Neutral is in center detent position; push for forward, pull for reverse.
B. Throttle Lever - Full throttle is all the way up, idle is all the way down.
For engine warm-up, the shift levers are positioned in neutral and the throttle levers are advanced as needed.
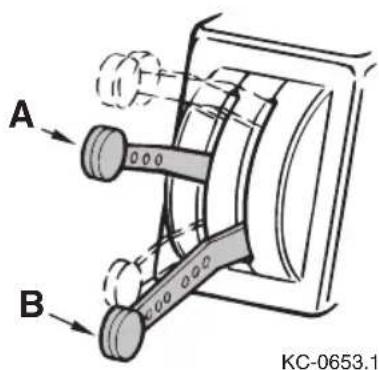
text_image
A B KC-0653.1SWITCHES
Each electrical circuit on your boat is equipped with a control switch. Some switches may have an LED indicator for easy ON/OFF identification. Most switches will have a fuse holder, or circuit breaker adjacent to the switch.
Controls and Indicators
Master Power Switch – Disconnects the boat electrical systems from the batteries. When not using the boat, keep this switch in the OFF position.
Fuel Gauge Switch – Allows you to check the amount of fuel in the fuel tank when the navigation lights are OFF or the ignition switch is OFF.
Battery Switch – Connects the battery to the electrical system. Provides isolation and positive disconnect of battery to protect against tampering, electrical fire hazards, and battery rundown. Rotate switch to the OFF position when the boat is not in use.

text_image
ON OFFTYPICAL BATTERY SWITCH
KC-0704
Battery Selection Switch – Permits current to be carried by either of the two batteries, by two batteries simultaneously, or cuts off current at the source.

CAUTION
DO NOT turn the battery select switch to OFF with the engine running as this could damage the charging system.
More than two batteries may be used. Contact your boat dealer's electrical technician for other concepts and designs.
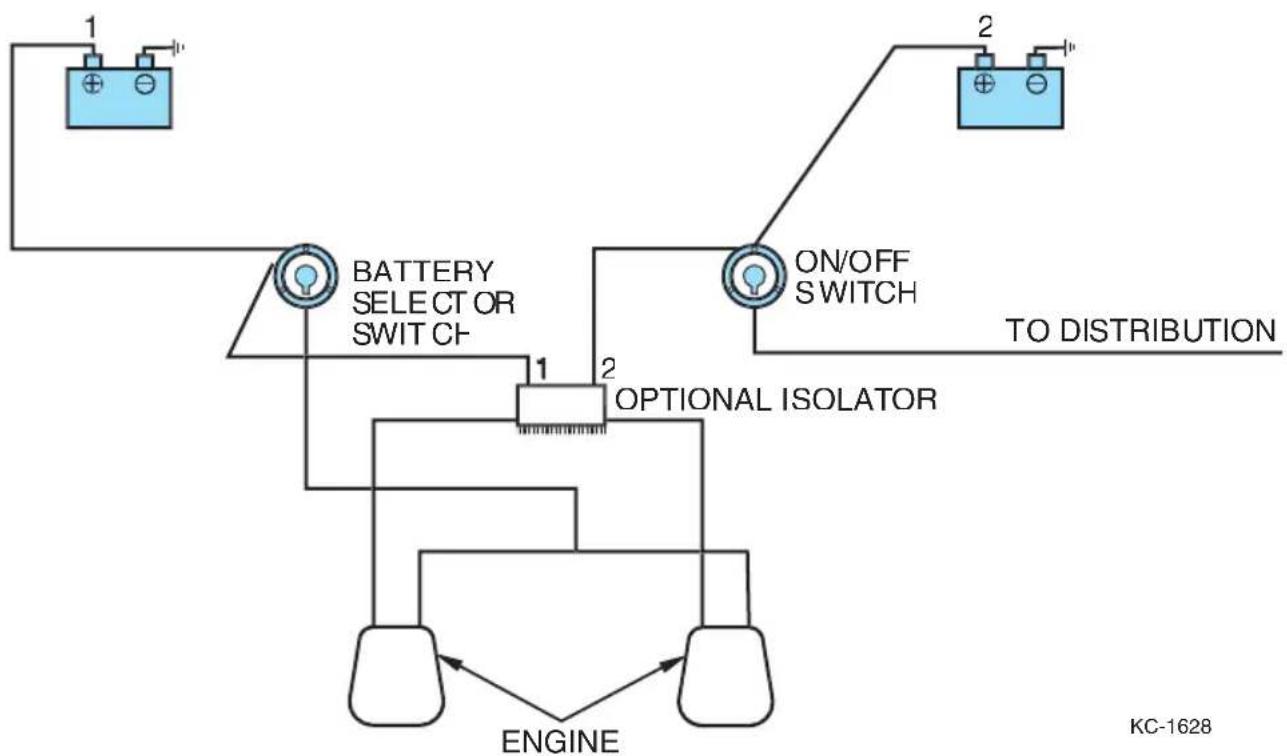
flowchart
graph TD
    A["1 Battery"] --> B["BATTERY SELECT OR SWITCH"]
    C["2 Battery"] --> D["ON/OFF SWITCH"]
    B --> E["OPTIONAL ISOLATOR"]
    D --> E
    E --> F["ENGINE"]
    style A fill:#cce5ff,stroke:#333
    style C fill:#cce5ff,stroke:#333
    style D fill:#cce5ff,stroke:#333
    style E fill:#f9f9f9,stroke:#333
    style F fill:#cce5ff,stroke:#333
One battery selector switch, one on/off or selector switch, two alternators, one isolator, two batteries. In the example, the isolator separates the alternators so both batteries will charge simultaneously. The lowest battery automatically charges first. Both batteries can be used for start or accessory source.
Navigation Lights Switch – Controls the running and anchor lights for night operation. NAV position will turn on the red and green navigation bow lights, white stern light, and gauge illumination. ANC position turns on only the white stern light for night anchoring.
NOTICE
DO NOT operate the boat between sunset and sunrise with the switch in the anchor light position. Running lights are legally required to indicate direction and right-of-way at night.
Boarding and Courtesy Lights Switches – Are controlled by selector switches for operation of boarding lights and cockpit courtesy lights. The main DC breaker (Master Power) switch must first be in the ON position to activate lighting.
Blower Switch (Inboard/Stern Drive Only) – Activates the engine compartment ventilation blower to remove explosive fumes from the engine and bilge areas.
Bilge Switch – Activates the bilge pump to remove excess water from the bottom of the boat. Some models are equipped with an automatic bilge pump setting. Switch to AUTO whenever the boat is in operation. Water will be pumped out as it enters the bilge and the pump will automatically shut down when the bilge is dry.

CAUTION
Be sure to switch the bilge OFF (not AUTO) when the boat is not in use. Wave action or trailer travel can cause the pump to drain the battery. Running the pump when the bilge is dry will damage the pump.
Ignition Switch – Starts and stops the engine. A built-in protection system prevents the engine from starting in any other gear than neutral. Be sure to consult the engine operator's manual for more information.
Controls and Indicators
Horn Button – Push and hold to sound the horn.
Trim Switch – If your engine is equipped with power trim and tilt, this switch activates that function. Push and hold the switch until the engine is at the desired angle. Use this switch in combination with the trim gauge.
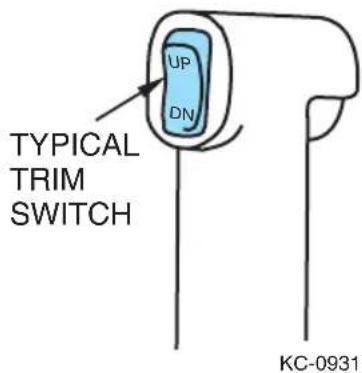
text_image
TYPICAL TRIM SWITCH UP DN KC-0931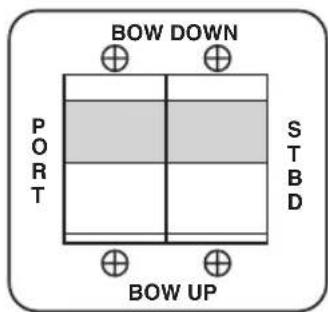
text_image
BOW DOWN PORT STBD BOW UPKC-0932
Trim Tab Switches – These rocker switches control the trim tabs located on the port and starboard transom. Adjusting trim tabs will improve the ride of your boat and correct listing from side to side due to varying conditions. See the OPERATION Section in this manual for further trimming procedures.
Engine Stop Switch and
Lanyard – The engine stop switch stops the engine when engaged. Attach the lanyard to the boat operator whenever the engine is running. If the operator is thrown from the seat or moves too far from the helm, the lanyard will engage the switch and shut off the engine.
To attach the lanyard, connect one end to the safety switch and the hook on the opposite end of the lanyard to a strong piece of clothing on the operator, such as a belt loop.
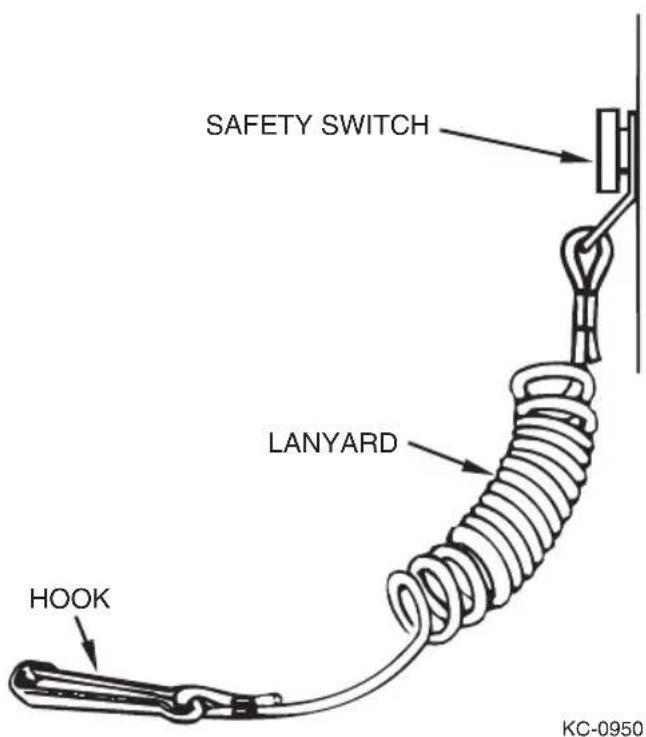
text_image
SAFETY SWITCH LANYARD HOOK KC-0950
WARNING
Attach the engine stop switch lanyard to the operator before starting the engine. This will prevent the boat from becoming a runaway if the operator is accidentally thrown away from the helm.
The engine stop switch can only be effective when it is in good working condition. Observe the following:
- DO NOT remove or modify the engine stop switch and/or lanyard.
- Lanyard must always be free from obstructions that could interfere with its operation.
Once a month: Check switch for proper operation. With engine running, pull lanyard. If engine does not stop, consult your dealer for replacement of switch.
NOTICE
The engine will not start unless the engine stop switch lanyard is attached.
INDICATORS
NOTICE
Some boat models may be equipped with a multi-gauge instrument which integrates the functions of several single gauges.
Instruments are illuminated for night operation. Their type, number, and location vary by model; some may not appear on your model.
Tachometer
Registers engine speed in revolutions per minute (RPM). Use this gauge to keep the engine within the proper operating range. Refer to the engine operator's manual for the proper RPM operating range for your engine.
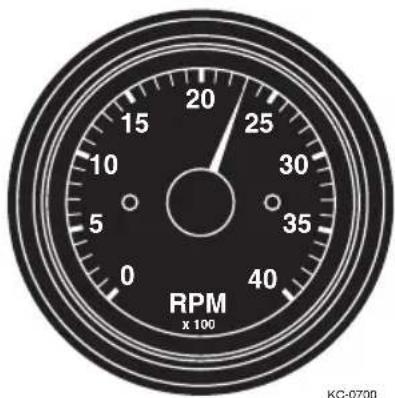
radar
| RPM (x 100) | |-------------| | 20 | | 25 | | 30 | | 35 | | 40 |Controls and Indicators
Speedometer
Registers forward boat speed in miles per hour. Use this guide to monitor fuel consumption and propeller performance. Since most marine speedometers operate with water pressure, accuracy is only approximate.
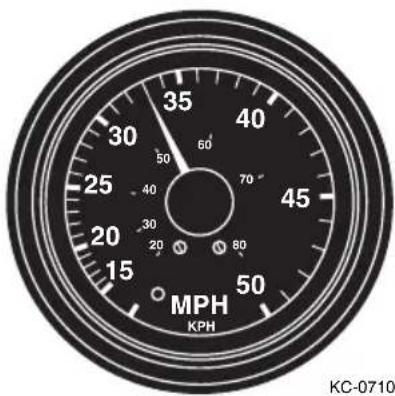
radar
| Value | |-------| | 35 | | 40 | | 45 | | 50 | | 50 | | 25 | | 30 | | 20 | | 15 | | 80 |Fuel Level Gauge
On models with a permanent fuel tank, this gauge registers approximate fuel level in the gas tank. The ignition switch must be in the RUN position or the fuel gauge switch ON to activate the gauge.
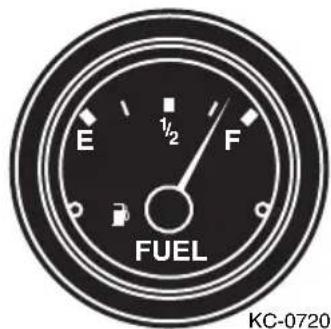
text_image
E 1/2 F FUEL KC-0720Water Pressure Gauge
Registers the water circulated by the water pump in pounds per square inch (PSI). Use this gauge to observe that the engine cooling system is operating properly. Refer to the engine operator's manual for the normal operating PSI range.
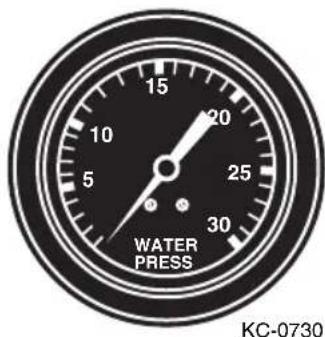
text_image
15 20 10 25 5 30 WATER PRESS KC-0730Oil Level Gauge (Oil Injection Only)
Registers the level of injection oil in the reservoir. Some injection systems may provide an indicator on the reservoir. Refer to the engine operator's manual for more information.
Trim Gauge
Measures engine or stern drive tilt and indicates the relative position of the bow, up or down when boat is on plane. Use this gauge to monitor boat trim.

text_image
DN UP TRIM KC-0740Voltmeter
Indicates the condition of the main or cranking battery in volts DC. Normal operating range is 12+ volts.
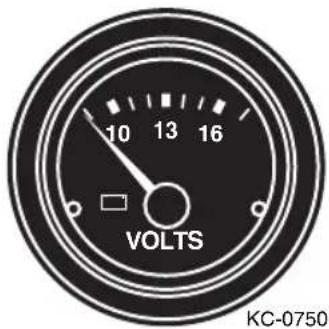
text_image
10 13 16 VOLTS KC-0750Ammeter
Measures the charging current in the electrical system. Refer to the engine operator's manual for the normal operating range.

text_image
50 0 50 AMP KC-0760Engine Water Temperature Gauge
Indicates the water/coolant temperature inside the engine. Refer to the engine operator's manual for the normal operating range.
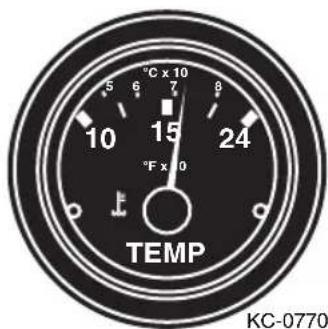
text_image
5 6 7 8 10 15 24 °F x 0 TEMP KC-0770Engine Oil Pressure Gauge (Stern Drive Only)
Indicates the pressure of the lubricating oil inside the engine. Refer to the engine operator's manual for the normal operating range.
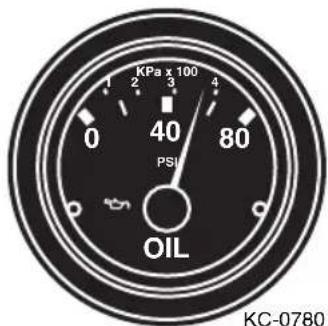
text_image
KPa x 100 0 40 PSI 80 OIL KC-0780Engine Hourmeter
Registers accumulated engine operating time, and is activated when the ignition switch is in the ON position. Be aware that time will be logged whenever the ignition switch is ON, even when the engine is not running. Use the hourmeter to keep accurate logs for scheduled maintenance.
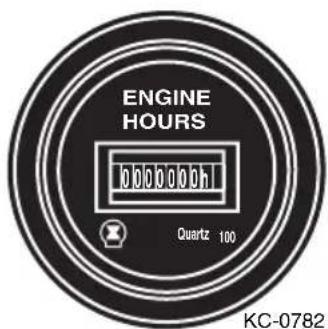
text_image
ENGINE HOURS 0000000h Quartz 100 KC-0782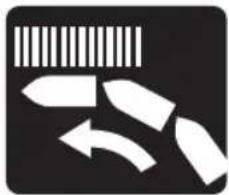
natural_image
Abstract graphic with diagonal stripes and curved arrows, no text or symbols presentChapter 5
Operation
This section describes the basics of fueling, starting, running, stopping, steering, trimming and docking your boat. Since there is a variety of control and engine options, be sure to consult the other owner's manuals provided with your boat.
FUELING
Portable tanks must be removed from the boat when fueling. Consult the engine operator's manual for proper procedures. Built-in tanks have the fuel filler aft in the boat. Models with oil injection also have fillers for the oil reservoir.
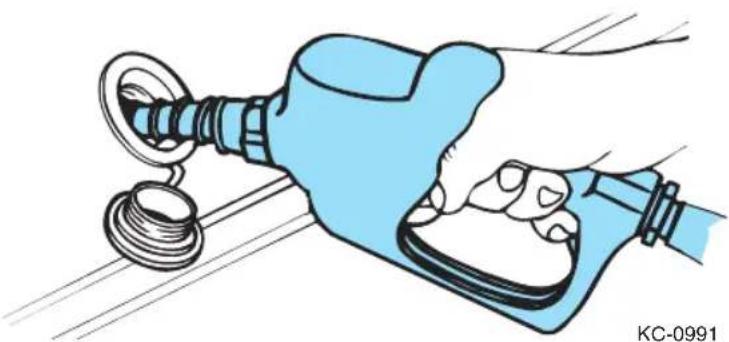
natural_image
Illustration of a hand holding a blue gas pump nozzle with a coiled spring (no text or symbols)The fuel tank is equipped with either a shut-off valve or anti-siphon valve. The shut-off valve requires you to manually turn the fuel valve, while the anti-siphon valve operates automatically. Because gasoline fumes are heavier than air, they will sink to the lowest part of your boat, such as the bilge. It is important to always evacuate fumes with the blower (if equipped) before attempting to start engine.

CAUTION
To prevent unwarranted engine damage, consult your engine operator's manual for manufacturer recommended fuel and oil specifications.

DANGER
FIRE, EXPLOSION, and OPEN FLAME HAZARD!
Gasoline is extremely dangerous under certain conditions.
When refueling, observe the following:
Stop all engines, motors and fans before refueling.
DO NOT smoke or allow open flames or sparks nearby, within 15 m (50 ft) of the fueling area.
If equipped, close all doors, windows, hatches and ports that could allow fuel vapors to enter the boat's enclosed spaces.
DO NOT overfill the fuel tanks. Allow for at least a 2% expansion of fuel when refueling. If the fuel temperature is 0^ C ( 32^ F) or lower, allow at least 6% for expansion of fuel.
Static Electricity Hazard
An electrostatic spark can ignite fuel vapors causing serious injury and property damage. Use extreme caution when filling the fuel system. In addition:
- Refuel only at approved venues such as marina fuel docks or automotive fuel service stations. Approved venues have safeguards in place to lessen the likelihood of static discharge.
- Read and follow ALL warnings on the pump or in the vicinity of the pump.
- Maintain contact between the fuel nozzle and the fill pipe at all times, before and during refueling, to prevent an electrostatic spark.
- DO NOT re-enter your vehicle during refueling. Getting into and out of your vehicle might build up a static charge that could ignite the fumes at the fill pipe.
If a fire occurs, don't panic.
- DO NOT remove the nozzle from the gas tank.
- Evacuate all passengers from the vehicle and refueling area and immediately tell the station attendant so they can use the emergency shut-off and fire extinguisher.
After Refueling
! DANGER
FIRE and EXPLOSION HAZARD!
Leaking fuel is a fire and explosion hazard.
The first time you fill your boat's fuel tank(s) and after each refueling, check the entire fuel system for leaks and/or damaged parts.
- Leaks and/or damaged parts must be repaired and the area ventilated to remove explosive fumes.
- Close the fill cap(s) securely.
- Wipe up any spilled fuel completely. Dispose of the rags properly onshore.
- Open all doors, windows, hatches and ports to ventilate all spaces. Check for fuel vapors before starting any engines or appliances.
- If equipped, operate the blower for a minimum of four minutes before each time the engine is started.
NOTICE
Each time you fill up, inspect fuel lines for leaks and hose deterioration.
NOTICE
The Federal Water Pollution Control Act prohibits the discharge of oil or oily waste into the water. Violators can be fined \$5,000. We urge you to protect our fragile environment by avoiding any type of discharge, trash, or litter into our waterways.
LUBRICATION
Your engine may be equipped with an oil injection system that automatically feeds oil to the engine. Use lubricant that is recommended by the manufacturer, or NMMA TC-W3 certified. You will find the recommended lubricant listed in the engine manual. If you need assistance, consult your dealer.
STARTING
- Open vent screw on fuel tank (portable tanks).
- Connect the fuel line to fuel tank (portable tanks).
- Squeeze fuel primer bulb several times until firm (outboard models).
- Operate blower (stern drive models).

WARNING
The blower must be operated for a minimum of four minutes before each time the engine is started. In addition, the blower should be operated continuously when at idle or slow speed running. Failure to operate the blower can cause an explosion.
Use of the bilge blower system is NOT A GUARANTEE that explosive fumes have been removed. BEFORE turning on any electrical devices or starting the engine(s), ALWAYS use the “sniff test” to check the engine and bilge areas for fuel vapors.
If you smell fuel, DO NOT turn on any electrical devices and DO NOT start the engine(s). Investigate immediately.
- Attach emergency engine stop switch lanyard to its switch and to the operator.
- Place shift/throttle control handle in NEUTRAL.
- Turn key clockwise to START position. After engine starts, release key.
- Push control handle forward to go FORWARD, pull back for REVERSE.

WARNING
Always go slowly in REVERSE to avoid taking water in over the transom. You can swamp the boat by taking on too much water.
SHIFTING/RUNNING
Follow these guidelines when shifting your boat:
- Pause in NEUTRAL before shifting from FORWARD to REVERSE, or REVERSE to FORWARD.
- Avoid shifting into REVERSE while the boat is traveling forward at speed.
- Keep the shifter control clean and clear of obstructions.
To shift into
FORWARD: press the neutral lock button while pushing the control lever forward.
To shift into REVERSE:
press the neutral lock button while pushing the control lever backward.
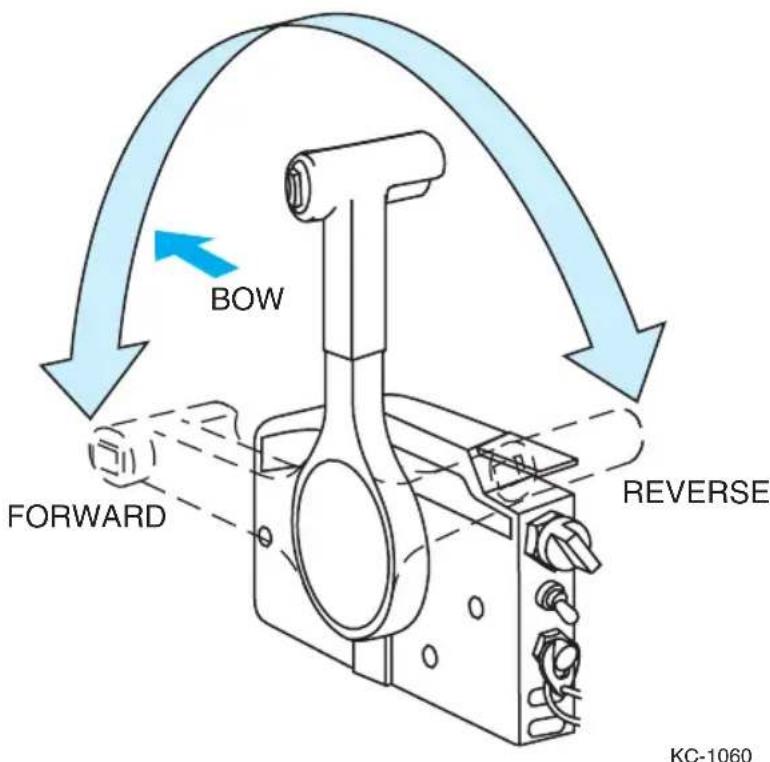
text_image
BOW FORWARD REVERSE KC-1060WARNING ALARM

CAUTION
Continued operation after the warning alarm has sounded may cause severe engine damage.
Your boat may be equipped with a warning alarm that will sound if an engine problem develops. If the warning alarm sounds, IMMEDIATELY throttle back to idle speed and shift into NEUTRAL. IMMEDIATELY check the gauges and stop the engine. On some models, the horn may emit a short chirping sound during starting to verify operation. Refer to the engine operator's manual for additional information.
STEERING
Practice steering your boat. Make sure that the steering system is working correctly and is properly maintained.
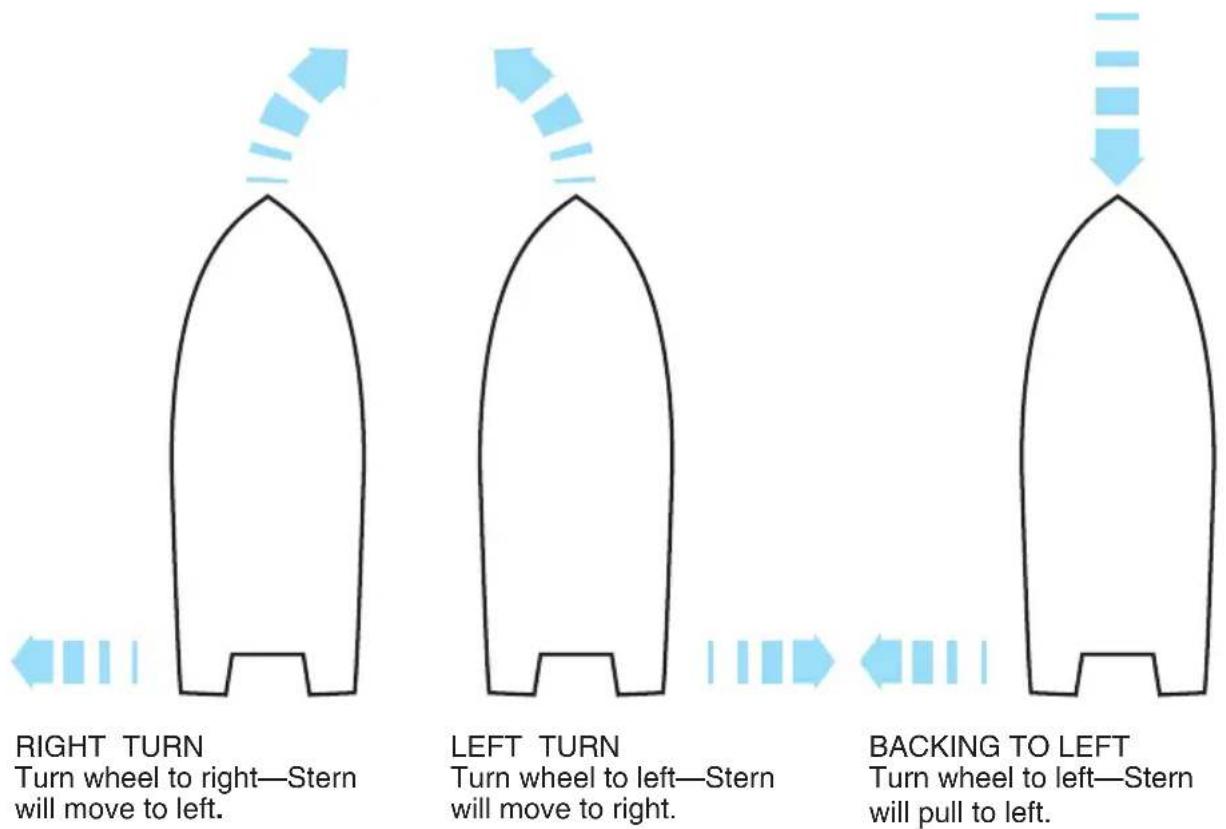
Turn wheel to right—Stern will move to left.
Turn wheel to left—Stern will move to right.
Turn wheel to left—Stern will pull to left.
KC-1071
Follow these guidelines to keep your boat handling well.
- Keep the cable end clear of obstructions such as wiring, control cables, fuel lines, tow lines and mooring lines.
- Keep the moving parts clean and lubricated.
- Inspect the steering cables for kinks, damage, and corrosion.

WARNING
The steering system must be in good operating condition for safe boat operation. Frequent inspection, lubrication, and adjustment by your dealer is recommended.
All boats have a tendency to wander somewhat at slow speeds. A natural reaction to this effect is to steer the boat back and forth in an attempt to compensate for wandering. Invariably, the compensation will result in
oversteer and only worsen the effect. Keep the steering wheel in the center position. The boat will wander back and forth somewhat, but the overall course will be a straight one.
STOPPING
- Slowly bring throttle control to the idle position and the shift control to the NEUTRAL position. If the boat has been driven for a long period of time at high speed, allow the engine a 2-3 minute cool-down period at low idle.
- Turn the ignition key to the OFF position.
- If any problems were encountered during the outing, have the boat inspected by your dealer and request any necessary repairs before the next outing.

WARNING
DO NOT use the engine stop switch for normal shut down. Doing so may impair your ability to re-start the engine quickly or may create a hazardous swamping condition.
DOCKING
Practice docking before attempting it for the first time. Use a float, like a plastic milk jug with a line and small weight, as your docking target.

WARNING
DO NOT use your hand, arm or other part of your body to attempt to keep the boat from hitting the dock. The boat could push against the dock, causing severe injury.
Follow these guidelines when docking:
- Approach docks with the port side of the boat if possible.
- Come to a stop a short distance from the dock, then proceed slowly.
- Have fenders, mooring lines and crew ready.
- Observe how the wind and current are moving your boat. Approach the dock with the boat pointed into the wind, if possible. If the wind or current is pushing you away from the dock, use a sharper angle of approach. If you must approach the dock downwind or down current,
use a slow speed and shallow angle. Be ready to reverse to stop and maintain position.
- If there is no wind or current, approach the dock at a 10 to 20 degree angle.
- If possible, throw a line to a person on the dock and have that person secure a bow line.
- With the bow secure, swing the stern in with the engine, or pull it in with a boat hook.
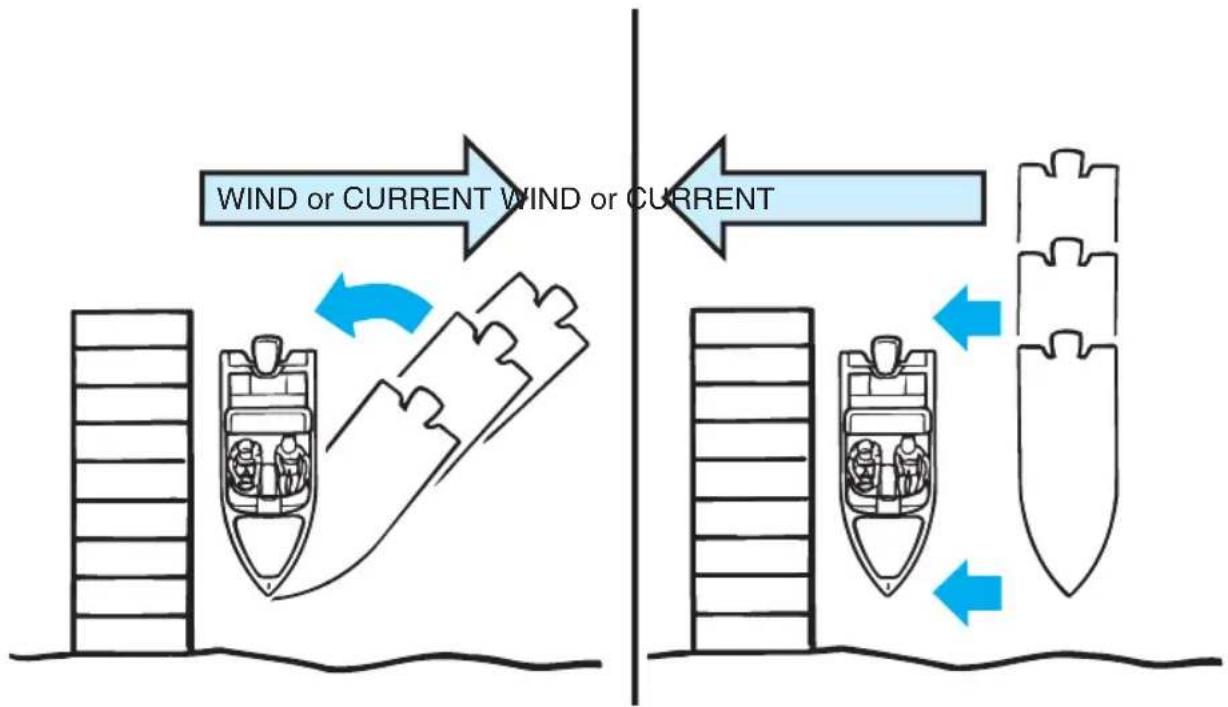
flowchart
graph TD
    A["Ship with hull"] -->|Wind or Current Wind or Current| B["Ship with hull"]
    style A fill:#f9f,stroke:#333
    style B fill:#bbf,stroke:#333
KC-1120
Before tying up the boat, be sure to use enough fenders to protect the boat from damage. If possible, tie up with the bow toward the waves with a good quality double-braided nylon line. Tie up only to the lifting or tie-down eyes; never use the handrails or windshield frames. If the boat is to be moored for a long period of time, use chafing protectors on lines to protect the gelcoat finish. Leave a little slack in the lines to allow for some wave movement or tidal action if applicable.
Follow these guidelines when departing:
• Very slowly shift into forward at idle speed.
- When the stern moves away from the dock, turn the engine away from the dock.
- Cast off bow line and back away.
If the wind or current is pushing away from the dock, cast off all lines and allow to drift until you are clear.
BOAT TRIM
The performance of your boat depends on load weight and distribution. Distribute weight evenly, from bow to stern, and also from port to starboard. After loading, the boat's trim can be adjusted by changing the engine trim angle and trim tabs.
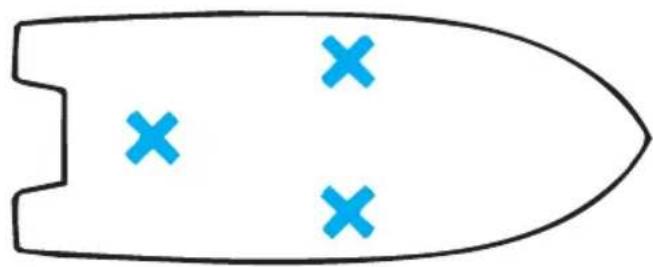
natural_image
Simple line drawing of a boat shape with four blue 'X' marks on its side (no text or symbols)PROPER DISTRIBUTION
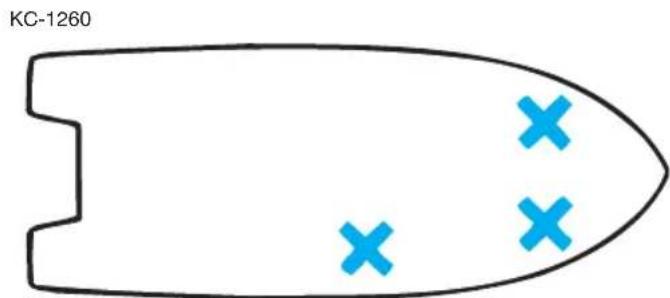
text_image
KC-1260IMPROPER DISTRIBUTION (BOW HEAVY)
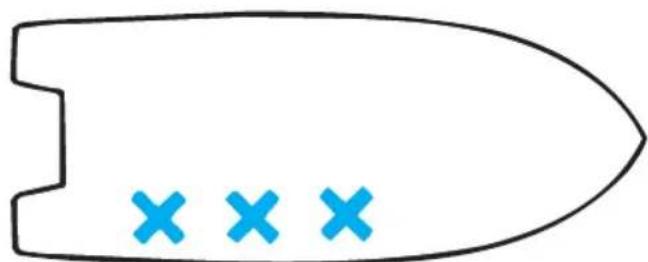
natural_image
Simple line drawing of a boat hull with three blue 'X' marks inside (no text or symbols)IMPROPER DISTRIBUTION (STARBOARD HEAVY)
KC-1270
KC-1280
DRIVE TRIM ANGLE
Trim angle is the angular relationship between the lower drive unit and the transom of the boat. Boat trim while underway greatly affects boat performance and efficiency. For best results, the boat should be on plane and trimmed to reduce the wetted surface. With less boat in the water, both speed and fuel economy increases. Engines with manual trim must be adjusted for best overall operation for the load and conditions. Engines with power trim should be adjusted continuously for best results.
If the engine is trimmed in too far (closer to the boat bottom), speed drops, fuel economy decreases, and the boat may not handle correctly. However, it does provide better acceleration from a standstill; and because it forces the bow down, visibility is improved. If the engine is trimmed out too far (away from the boat bottom), steering torque may increase, the boat may be difficult to get on a plane, and may bounce.
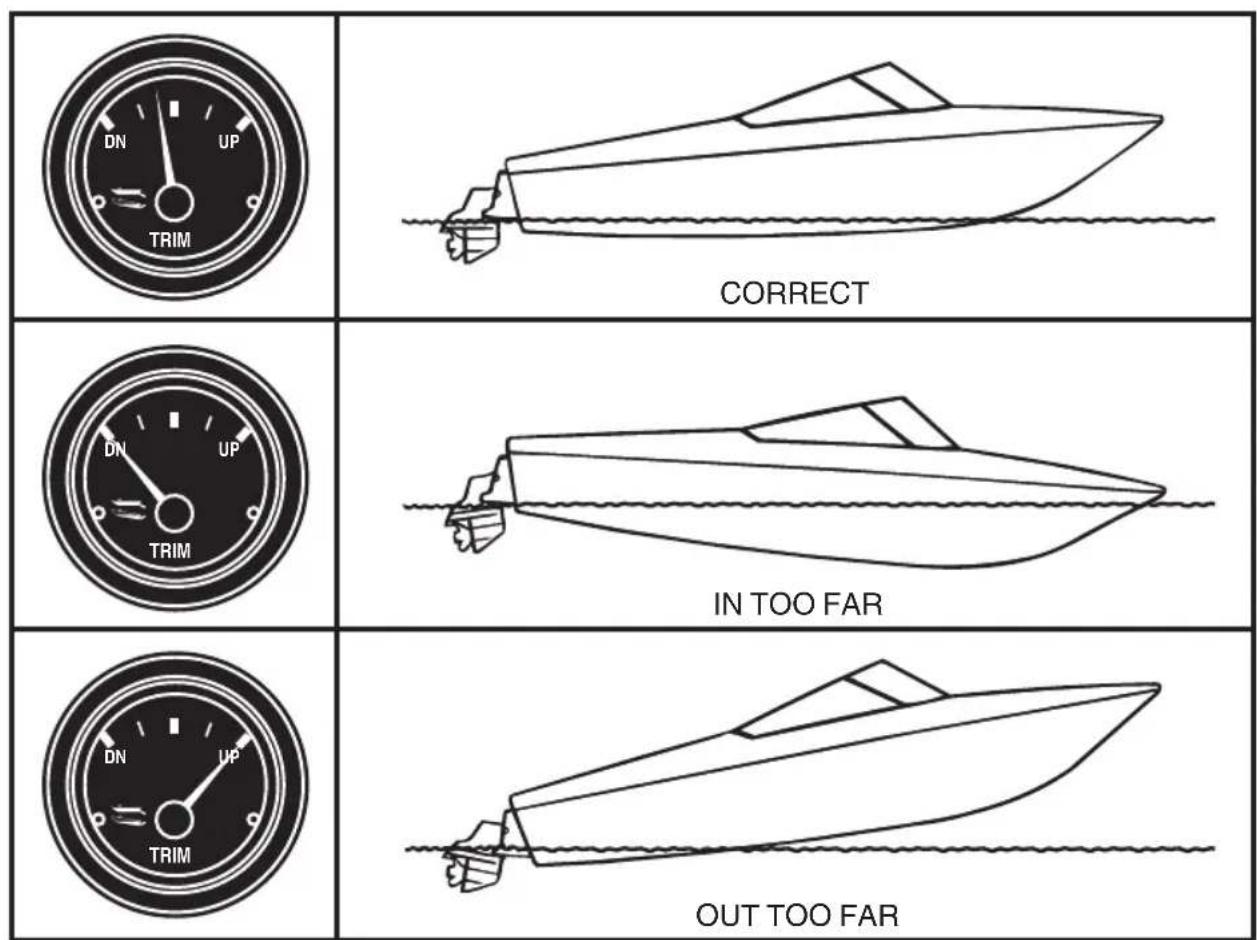
KC-1150
WARNING
DO NOT trim the engine out too far or the boat may begin to "porpoise" (bounce up and down). Porpoising reduces control and visibility.
To use power trim effectively, always start with the engine trimmed in. As the boat planes, increase the angle out. Experience is the best teacher for understanding proper trim.
NOTES
natural_image
Simple icon showing a barcode bar above an arrow pointing right, no text or symbols presentChapter 6
Getting Underway
There are many things to consider to make your boating trip safe and enjoyable. This section includes a safety checklist, boarding guidelines, boat loading, and capacity information.
The contents of this section should be read and understood before casting off. Remember, if you have a problem during your cruise, you can't get out and fix it, or walk to safety or for help.
You are responsible for the safety of all passengers, the boat, and any damage the boat or its wake may cause. Always keep passengers from blocking your view so that you do not run into other boats, swimmers, water skiers, personal water vehicles, or aids to navigation.
SAFETY CHECKLIST
The following checks are essential to safe boating and must be performed before starting the engine. Get in the habit of performing these checks in the same order each time so that it becomes routine.

WARNING
DO NOT launch the boat if any problem is found during the Safety Check. A problem could lead to an accident during the outing causing severe injury or death. Have any problem attended to immediately; consult your dealer.
Fuel Management
Use the “one third” rule in fuel management. Use one-third of the fuel to get there, one-third to get back and keep one-third in reserve.
Pre-Operation
- Check the weather report, wind and water conditions.
- Check that the required safety equipment is on board.
- Check that the fire extinguisher is fully charged.
- Check that bilge drain plugs are installed properly.
- Check that no fuel, oil or water is leaking or has leaked into the bilge compartment.
- Check all hoses and connections for leakage and damage.
- Check the propeller for damage.
- Check the engine cooling water intake pick-up for blockage.
- Check that battery terminals are clean and tight.
- Check that throttle/shift control is in NEUTRAL.
- Check that the steering system operates properly.
- Check that all required maintenance has been performed.
During Operation
- Check gauges frequently for signs of abnormal behavior.
- Check that controls operate smoothly.
- Check for excessive vibration.
After Operation
- Fill fuel tank to prevent moisture due to condensation.
- Check for fuel, oil and water leakage.
- Check the propeller for damage.
SAFETY EQUIPMENT
Federal and local laws require certain safety equipment to be on board at all times. In addition, responsible boaters carry other equipment in case of emergency. Check with local boating authorities for any additional requirements over and above federal requirements.
BOARDING
When boarding the boat, always step in. DO NOT jump. Avoid stepping on fiberglass or other potentially slippery surfaces. Board one person at a time.
DO NOT board the boat while carrying gear. Set gear on the dock, board the boat and then pick up the gear.
Boat Loading
The performance of your boat is dependent on load weight and distribution. Passengers should board one at a time and should distribute themselves to maintain trim. Remember to distribute weight from right to left, and also from front to back.

WARNING
All passengers should be carefully seated and not be riding on the bow, bow pulpit, deck, gunwale or rear sun deck while underway. Passengers riding in the bow should exercise extreme caution. During rough water operation, passengers in the bow should move to the aft passenger seats.
- DO NOT allow your passengers to ride with their feet dangling over the side; floating debris can cause serious injury.
- Avoid excess weight in the bow or stern.
- Securely stow all extra gear in stowage areas to prevent load shifting. DO NOT stow gear on top of safety equipment; safety equipment must be quickly accessible.
- In adverse weather, reduce the load in the boat. People/load capacity ratings are based upon normal boating conditions.
- DO NOT use the engine unit as a boarding ramp. Make sure engine is off when swimmers, divers, and skiers are boarding to prevent injury.
Capacity
Boats less than 6.4 m (20 ft) are required by the USCG to have a certification plate, attached to the hull near the transom, indicating maximum person/load capacity. The person/load capacity is determined by various USCG formulas. Actual capacity is determined by the availability of proper seating on the boat. Acceptable seating determines the number of passengers, not the overall load capacity.
NOTICE
The capacity plate for outboard powered boats lists the maximum horsepower that the boat can safely use. It is unlawful to overpower a boat.

WARNING
DO NOT exceed the USCG certified maximum capacities under any circumstances. Overloading will reduce freeboard and increase the likelihood of swamping, especially in heavy seas. Overloading causes handling to become sluggish, making it difficult to react quickly.
Overpowering an outboard-powered craft is extremely dangerous. Overpowering will make the boat unstable and could cause loss of control.
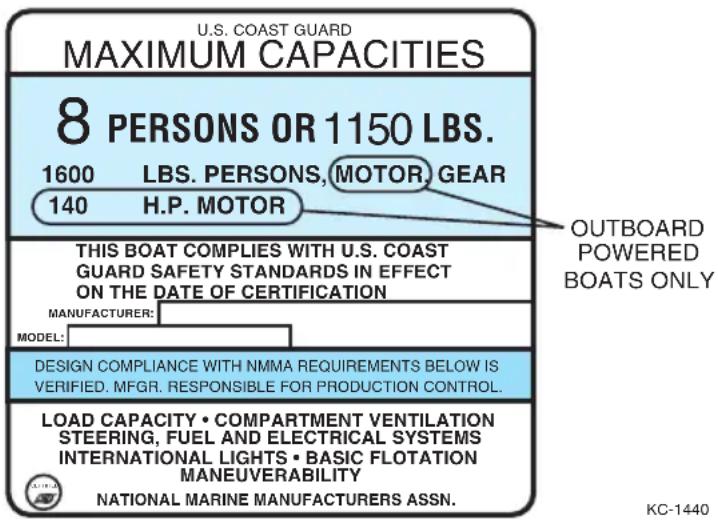
text_image
U.S. COAST GUARD MAXIMUM CAPACITIES 8 PERSONS OR 1150 LBS. 1600 LBS. PERSONS, MOTOR, GEAR 140 H.P. MOTOR THIS BOAT COMPLIES WITH U.S. COAST GUARD SAFETY STANDARDS IN EFFECT ON THE DATE OF CERTIFICATION MANUFACTURER: MODEL: DESIGN COMPLIANCE WITH NMMA REQUIREMENTS BELOW IS VERIFIED. MFGR. RESPONSIBLE FOR PRODUCTION CONTROL. LOAD CAPACITY • COMPARTMENT VENTILATION STEERING, FUEL AND ELECTRICAL SYSTEMS INTERNATIONAL LIGHTS • BASIC FLOTATION MANEUVERABILITY NATIONAL MARINE MANUFACTURERS ASSN. KC-1440 OUTBOARD POWERED BOATS ONLY
text_image
Chapter 7 RunningWe urge you and all others operating the boat to seek certified instruction from the local boating authorities.
This section is designed to present the most basic operational principles. It is NOT intended to cover all conditions encountered during operation.
Therefore, the principles presented in this manual are limited to the facts related directly to the operation of the boat, while the responsibility for the proper application of these principles belongs to you.
MANEUVERING TECHNIQUES
Steering response depends on three factors: engine position, motion and throttle.
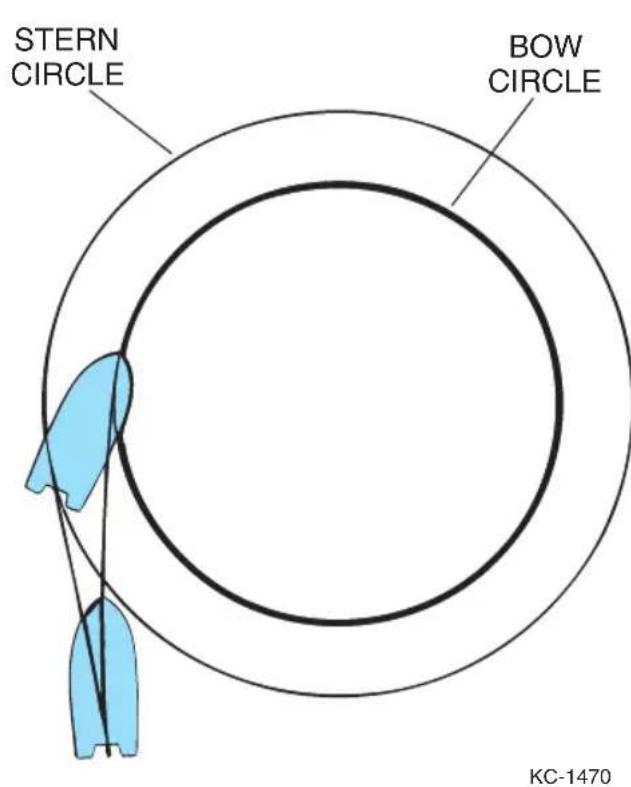
text_image
STERN CIRCLE BOW CIRCLE KC-1470Like an automobile, high speed maneuvering is relatively easy and takes little practice to learn. Slow speed maneuvering, on the other hand, is far more difficult and requires time and practice to master.
When making tight maneuvers, it is important to understand the effects of turning. Since both thrust and steering are at the stern of the boat, the stern will push away from the direction of the turn. The bow follows a smaller turning circle than the stern.
The effects of unequal propeller thrust, wind, and current must also be kept in mind. While wind and
current may not always be present, an experienced boater will use them to
his advantage. Unequal thrust is an aspect shared by all single engine propeller-driven watercraft. A clockwise rotation propeller tends to cause the boat, steering in the straight ahead position, to drift to starboard when going forward, and to port when going backward. At high speed, this effect is usually unnoticed, but at slow speed, especially during backing, it can be powerful. For this reason, many veteran boaters approach the dock with the port side of the boat toward the dock, if possible.
Twin-engine craft with counterrotating engines operate with less propeller torque induced drifting, using the concept of counterrotation. One engine propeller turns clockwise while the other turns counterclockwise. This helps maintain an even keel by eliminating the tendency of your dual-powered boat to veer.
SALT WATER
If boat is moored in salt water for long periods, tilt the engine out of the water (except during freezing temperatures). After removing the boat from the water, lower the engine to the run (down) position until the cooling system has drained thoroughly. Hose the entire hull down with fresh water and wipe dry.
Today's engines are built for operation in either fresh or salt water. Fresh water internal flushing is not normally required; however, it may be desirable after use in salt, polluted, or brackish water. Your dealer will assist you in securing the appropriate engine flushing device.
FREEZING TEMPERATURES
When the boat will be operated and left in the water and temperatures drop below freezing, the engine must remain in the tilted down (submerged) position at all times to prevent water in the engine from freezing. When the boat is removed from the water, drain the engine completely.
TOWING PROCEDURE
If seas are rough, it may not be easy to extend the tow line from one boat to another. In these cases, use a light throwing line with a weight on one end and with the heavier towing line secured to it.
DO NOT attempt to tow a much larger or grounded vessel. Because of the tremendous stress caused by towing, use a tow line that is rated at least four times the gross weight of the boat being towed. Tow ropes must always be in good condition, free of any cuts or abrasions.
Attach tow line to the bow eye on the disabled boat. Attach the opposite end of the bridle only to the stern eyes of the tow boat. Wrap the bridle with chafing gear where it rubs against the boat or any corners. Leave at least two boat lengths between the boats for adequate movement.
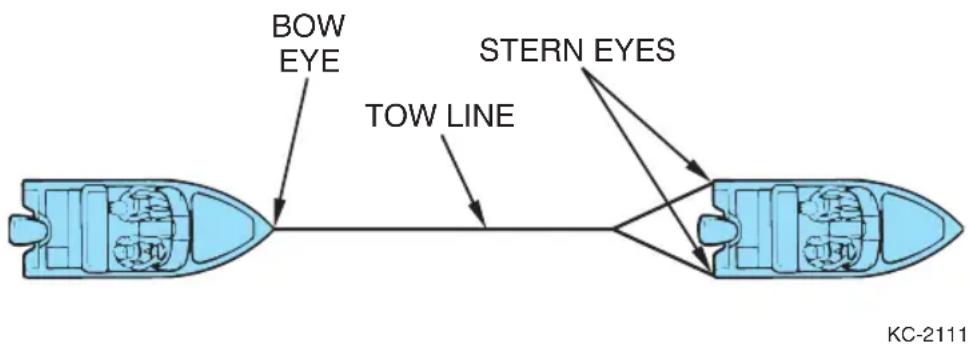
text_image
BOW EYE TOW LINE STERN EYES KC-2111! DANGER
When towing, use only the bow and stern eyes; never use cleats, handrails, etc. DO NOT allow anyone to be in line with the tow rope. If the rope should break or pull free, a dangerous recoil could occur resulting in severe injury or death to anyone in its path.
Adjust the tow line to match wave action. Keep the boats on the crest or in the trough of the waves at the same time. In protected, calm waters, shorten the line for better handling. Always tow at moderate speed, allowing for adverse wind and wave conditions. Have the operator of the towed boat steer with you if possible.
If you need a tow, or wish to tow another boat, use great care. The boat structure can be damaged by excessive pulling strain. You should always offer help to a boat in trouble. However, towing a capsized, grounded, or hull damaged boat is dangerous. Give assistance to the occupants; then call the proper authorities.
ANCHORING
Dropping Anchor
There are many types of anchors available on the market. The choice of one anchor over another depends on many factors. An anchor will usually hold best in a mixture of mud and clay or in hard sand. A lightweight Danforth anchor is recommended for general boating. For more information on anchors consult your dealer.
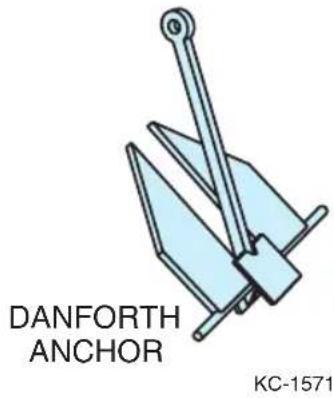
text_image
DANFORTH ANCHOR KC-1571! WARNING
Always anchor from the bow; DO NOT anchor from the stern. A small amount of current will make the boat unsteady...a strong current can pull a boat, anchored by the stern, under water and keep it there.
When anchoring, it is helpful to keep a few guidelines in mind.
• Make sure the line is tied to the anchor and tie the other end of the line to the forward cleat or bow eye.
• Head the boat into the wind or current over the spot where you want to lower the anchor.
- Stop the boat before lowering the anchor.
- When the anchor hits bottom, slowly back up the boat, keeping tension on the line. Let out an anchor line that is 4 to 6 times the depth of the water. For example, if you are in 3 ~m (10 ft) of water, let out 12 to 18 ~m (40 to 60 ft) of line.
- Secure anchor line to the bow cleat. Pull on line to make sure anchor is holding.
- Occasionally check your position against the shoreline. If the anchor is dragging and you are drifting, reset the anchor.
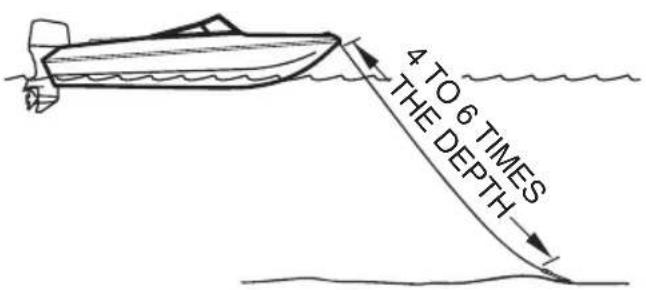
text_image
4 TO 6 TIMES THE DEPTHKC-1531
Weighing (Pulling In) Anchor
Start engine and move forward until anchor line is straight up and down. Pull hard to lift anchor from the bottom material.
If the anchor is stuck, attach anchor line to the bow cleat so that it is tight. The up and down motion of the bow from wave action may lift the anchor from the bottom. If the anchor remains stuck, let out a few more feet of line and attach it to the bow cleat. Slowly maneuver the boat around the anchor until the anchor pulls loose. Be sure to keep the line tight during this procedure.
PERFORMANCE BOATING
Some boat models, especially those with high horsepower engines, are capable of truly exhilarating performance. Don't be tempted to push your boat to its limits until you are completely familiar with the boat's operating characteristics. The operator should have at least 10 hours of experience with the boat before any extended full throttle operation.
Here are some guidelines for performance operation. Read them, practice them, and soon you will be operating your boat to its full capability.
Before Running
- Keep the bottom clean and free of scum, barnacles and other growth. Growth on the hull can slow the boat down considerably.
- Prepare the boat. Be sure all gear is properly stowed and compartments are latched.
- Weight distribution affects performance. Keep weight in the boat low and evenly distributed. Remove unnecessary weight and keep on shore.
- The propeller(s) should be of the proper pitch to turn the recommended RPM rating for the engine and of the proper type for your average load and individual requirements. Your dealer can help you select a performance propeller.
When Underway
WARNING
Keep one hand on the wheel and the other on the throttle controls at all times. If the boat begins to operate in an unsafe way, pull back on the throttle and trim the engines IN at the same time. Failure to maintain control could result in severe injury or death.
- Raise the trim tabs above the boat bottom.
- Increase speed. The bow will start to come down.
- When the bow begins to fall, trim the engine(s) out. Trimming the engine(s) out at speed will cause the boat to rise up. The boat will begin accelerating without adjusting the throttle because less of the boat is dragging in the water. Steering will become easier because the propeller has less torque.
WARNING
DO NOT trim the engine out too far or the boat may begin to "porpoise" (bounce up and down). Porpoising reduces control and visibility and lowers top speed and fuel efficiency. Failure to maintain control or visibility could result in serious injury or death.
- Watch the tachometer to keep the engine within the full throttle operating range. See the engine operator's manual for the proper tachometer reading at full throttle.
High speed operation on smooth water is very stable, but quick reactions and adjustments are needed to maintain control. Know your limits and stay within them. Always keep one hand on the steering wheel and the other on the throttle; constant adjustments are necessary for rapidly changing conditions. Small inputs of throttle and steering are exaggerated at high speeds. Depending on the speed, keep watch well ahead so that you may have enough time to react.
PROPELLERS
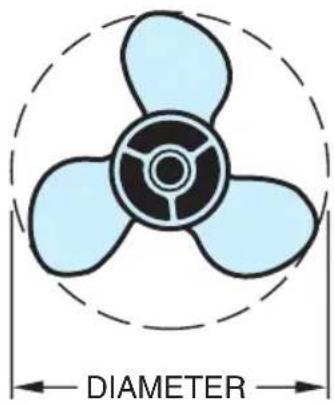
text_image
DIAMETERKC-1580
The propeller converts the engine's power into the thrust needed to propel the boat. Care and selection of your propeller is very important to proper boat operation. Propellers are identified by two numbers, such as 13 x 19, and a material identification, such as aluminum or stainless steel. In the number sequence, the first number is the diameter of the propeller and the second is the pitch.
Pitch is the angle of the blades expressed in the theoretical distance a propeller travels in each revolution. In the above example, the pitch is 19, or each revolution of the propeller pushes the boat 483 mm (19 in.) through the water. A 19 pitch is considered “higher” pitched and a 15 pitch propeller is considered “lower” pitched.
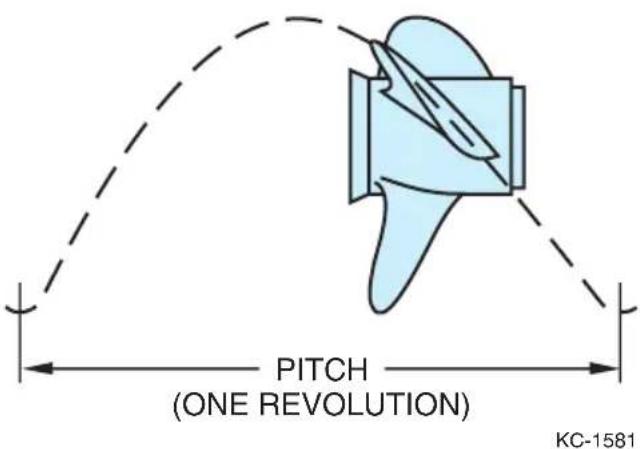
text_image
PITCH (ONE REVOLUTION) KC-1581Keep these guidelines in mind when selecting a propeller:
- There are many different propeller designs for specific operating characteristics, including the number of blades, relief holes and cupping. DO NOT attempt to change propellers until after you have a chance to determine your average load and individual requirements. Your dealer is best qualified to help you select a propeller.
- Engine RPM must be within the recommended operating range. Refer to the engine operator's manual.
- Higher propeller pitch reduces: RPM, acceleration, engine noise, and usually improves fuel economy and top speed.
- Lower propeller pitch increases: RPM, acceleration, engine noise, reduces fuel economy and top speed.

WARNING
To prevent accidental start-up, complete the following before installing or removing the propeller:
- Put the remote control in the NEUTRAL position.
- Put the main switch in the OFF position and remove the key.
Failure to observe this warning could result in severe injury.
A smaller pitch propeller should be selected for water skiing or for heavy loads. A smaller pitch propeller will develop more thrust for raising skiers quickly. When a skier has fallen, or a skier is not being towed, it is important that the operator watch the tachometer to make sure engine RPM does not continuously exceed the maximum full throttle RPM range of the engine.

WARNING
DO NOT use your hand to hold the propeller when loosening the nut. Put a wood block between the cavitation plate and the propeller blade to prevent the propeller from turning. Failure to observe this warning could result in injury.
Problems associated with propellers include ventilation, cavitation, and blow-out. These problems have similar symptoms and are best diagnosed by an expert. If you think you have a propeller related problem, consult your dealer.
Chapter 8
natural_image
Illustration of a bucket, spray bottle, and sponge on a surface (no text or symbols)Care and Maintenance
This section describes how to care for and maintain your boat. It includes information about maintaining electrical components, corrosion protection, and general maintenance. Use the service/maintenance log provided to track maintenance performed.
REPAIRS AND MODIFICATIONS
Your boat has been designed for safety in the harsh marine environment and thoroughly tested and certified for compliance with applicable safety standards. Because of the possibility of interference with the design of the boat, owner installation of additional equipment or modification of factory equipment is not recommended.
In addition, do not attempt to make repairs unless you are certified to do so, have the necessary authorized repair information, and use approved marine replacement parts.
Your dealer is qualified to make such repairs, additions or modifications to your boat that will not compromise safety, design integrity, or warranty coverage.
ELECTRICAL
Battery

WARNING
Batteries contain sulfuric acid which can cause severe burns. Wear protective clothing to avoid acid contact with skin, eyes, etc. Failure to observe this warning could result in severe injury.
Check the battery frequently for signs of corrosion. If corrosion is evident, clean terminal posts with a baking soda and water solution and a wire brush. Before cleaning, remove the vent caps and seal the vent wells with corks to prevent the solution from getting inside the battery.
NOTICE
Some batteries are sealed, and cannot be filled.
Check the fluid levels in the cells. Usually, a level approximately 6 to 13 mm (1/4 to 1/2 in.) above the plates is sufficient. If needed, fill with distilled water; do not overfill!
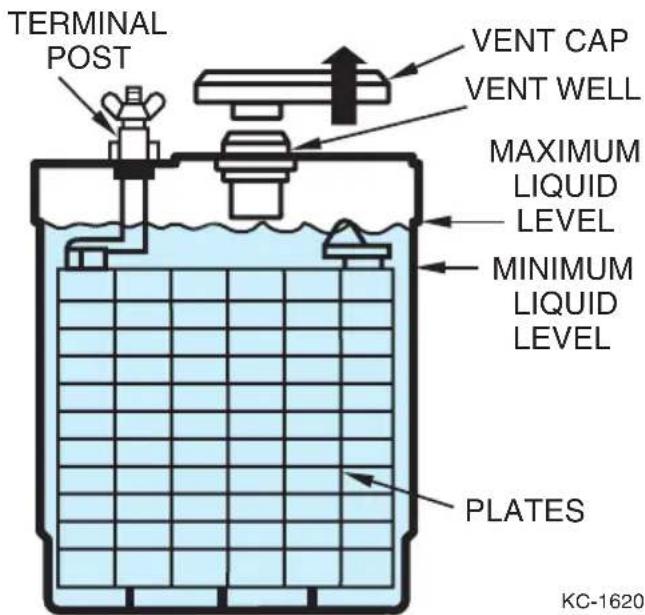
text_image
TERMINAL POST VENT CAP VENT WELL MAXIMUM LIQUID LEVEL MINIMUM LIQUID LEVEL PLATES KC-1620
WARNING
Batteries produce explosive hydrogen gas. DO NOT attempt to start your engine with jumper cables under any circumstances. Keep all sparks, flames and smoking materials away from batteries. Risk of spark at the battery post igniting gasoline or hydrogen fumes is too great. Always wear eye protection when near batteries and have adequate ventilation when charging. An explosion can cause blindness or other serious injuries.
Batteries are perishable products and will self-discharge. If you operate your boat sparingly, you may want to charge your battery occasionally. To recharge, remove the battery from the boat and remove the battery caps (when applicable). Recharge the battery according to the directions enclosed with your battery charger. When installing the battery in the boat, make sure the battery is secured in the battery box.
Circuit Breakers and Fuses
All electrical circuits are protected from overload by the use of fuses or circuit breakers. In the event of an overload or short circuit, the fuse will blow or circuit breaker will trip. If a circuit continuously overloads under normal operating conditions, have your boat inspected by the dealer immediately.
WARNING
DO NOT exceed the recommended fuse sizes or bypass the fuse safeguard. Always install the proper (type and rating) fuses whenever replacing or changing fuses. Continuous fuse/breaker failures indicate a severe problem and require immediate attention. Failure to install the correct fuse may result in damage to the electrical system or severe personal injury.
Some boat models have each individual circuit protected with a circuit breaker located next to the switch. To reset a tripped circuit breaker, switch OFF the circuit, wait about one minute for the breaker to cool, push the breaker button fully, and switch ON the circuit.
Some boat models have circuits protected by fuses. If the fuse should blow-out, locate the fuse block behind the instrument panel. Use a fuse removal/installation tool to replace the fuse.
NOTICE
The electrical system is designed to protect you from short circuits and overload. Any modifications to the system, such as adding electrical accessories, should be done by a qualified technician.
TYPICAL IN-LINE FUSE HOLDER
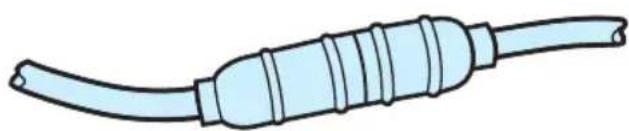
natural_image
Illustration of a light blue cable with segmented ends and ends, no text or symbols present.(TWIST AND PULL TO OPEN)
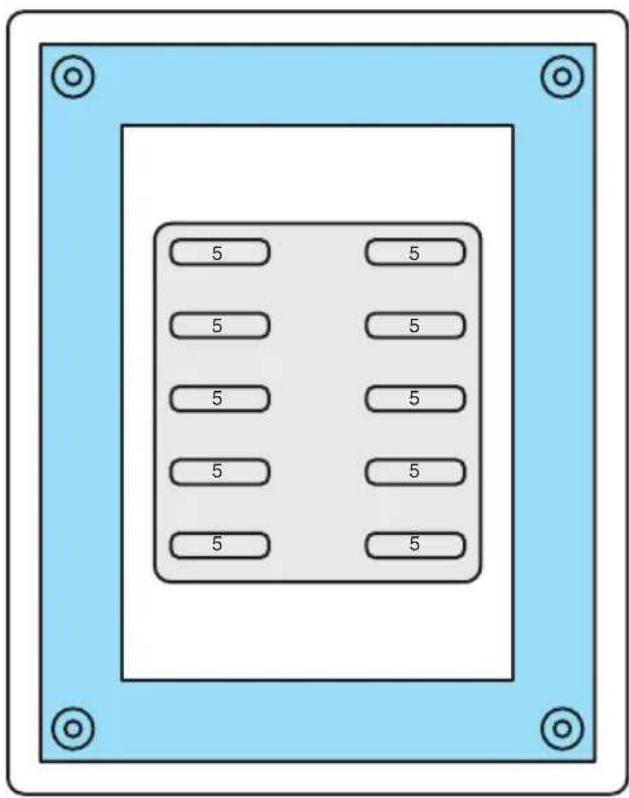
text_image
5 5 5 5 5 5 5 5 5 5AUTOMOTIVE STYLE FUSE PANEL
KC-1635
Some installed accessories, such as the stereo, have an additional fuse located in the positive lead of the stereo. Some in-line fuse holders can be found near the battery.
KC-1640
CORROSION PROTECTION
Galvanic Corrosion
Galvanic corrosion (electrolysis) is the break-up of metals due to the effects of electrolytic action. When two dissimilar metals are immersed in a conductive fluid such as salt water, an electric current is produced, much like a battery. As the current flows, it takes with it tiny bits of the softer metal. If not stopped, a great deal of damage could occur.
If you operate in salt, polluted, or brackish waters, your boat should be equipped with a transom mounted zinc anode to prevent damage to those metal parts coming in contact with the water. By design, the anode is self-sacrificing. It is slowly eroded away by electrolytic action and requires periodic inspection for deterioration. If the zinc shows extreme erosion, it must be replaced for continued protection.
Most engines are equipped with one or more zinc anodes which must also be inspected regularly for deterioration. Some boat models may be equipped with an electronic cathode system. This system emits a low current electrical charge into the water close to the metal components. This charge cancels the effect of electrolysis.

CAUTION
DO NOT paint or coat zinc anodes or cathodes with any substance. Once covered, they do not provide protection from galvanic corrosion. Replace anodes if they have deteriorated 50% or more.
Salt Water Corrosion
The entire boat should be rinsed with fresh water and washed immediately after use in salt water. If the boat is used primarily in salt water, wax the hull monthly and apply corrosion inhibitor to all hardware. See your dealer for products suitable for the marine salt water environment. Fresh water internal flushing is recommended when used in salt, polluted, or brackish waters. Flush the entire engine cooling system with fresh water for at least five minutes after use in these waters. See your dealer for appropriate flushing devices.
GENERAL MAINTENANCE
Marine Growth
If accelerated marine growth is a problem in your area, an anti-fouling bottom paint may be necessary to slow growth and prevent gelcoat damage. Before selecting a bottom paint, talk with other boaters and your dealer to determine which product works best in your area. Many local variables can affect the selection of paint. Be sure to follow the paint manufacturer's directions exactly.
Cleaning
Periodic cleaning is the best way to keep your boat looking new. Regular washing and waxing keep dirt and scum from building up and deteriorating the finish. Keeping your boat in “show room” condition means greater personal satisfaction and higher resale value. Special cleaning products are available from your dealer to remove mildew.
Hull
When washing the boat, be sure to use a mild detergent and warm water solution. DO NOT use abrasive cleaners, solvents, ammonia or chlorine as these will damage the gelcoat surface. Under extreme conditions, special cleaners may be used to remove marine growth, such as scum or algae, from the hull. Consult your dealer.
Waxing the entire gelcoat surface at least twice a season is recommended for all climates. Use of a specially formulated marine gelcoat wax will prevent color fade and soil and scum adhesion. If the gelcoat has chalked or faded from lack of proper maintenance, buffing may be necessary to bring back the shiny appearance. Hand buffing with #7 rubbing compound or power buffing with glazing compound #1 will quickly restore the surface.
Upholstery
Regular washing with mild detergent and warm water or non-solvent type automotive vinyl cleaner is sufficient to keep the cushions, canopy top, and other vinyl coverings in good condition. Keep the cushions from becoming soaked and dry off thoroughly after washing to prevent mildew accumulation after the boat is covered. Prop the cushions up in the boat when covered to allow air circulation and spray with mildew repellent. Lubricate canopy top snaps with petroleum jelly.
For tough stains on vinyl such as adhesive and rust, use a citrus cleaner followed by a mild detergent and warm water. For ink stains, apply denatured alcohol and wipe off. Note that some products such as suntan lotion, shoe polish and wet leaves may stain permanently.
Although not always convenient, minimizing your boat's contact with damaging ultraviolet (UV) rays and storing removable seats and canopies indoors when not being used will increase the longevity of vinyl upholstery.
CAUTION
Certain automotive, household and industrial cleaners can cause further damage and discoloration. Solvents and dry cleaning fluids, or products that contain dyes such as waxes, should be used with caution. Whenever cleaning stubborn stains, be sure to test the treatment in an unseen area first. The following stain treatments should be used with discretion. Between steps, be sure to rinse thoroughly with plenty of clean water and allow to dry.
Canvas
In most cases, boat canvas is subjected to more abuse than any other item on the boat. Canvas must be regularly maintained for long life and top performance.
Moisture, dirt and chemicals from industrial fallout, heat, ultraviolet rays and salt water can all contribute to the deterioration of canvas. These elements can cause serious damage if left unchecked. The following guidelines should help keep your canvas in good condition for years to come.
- The convertible top is not designed to withstand long periods of time exposed to the elements as a protective cover at dock side or when your boat is in storage. A full, properly fitted, light colored mooring cover should be used for these purposes.
- If canvas gets wet during use, remove side curtains and open windshield so seams can dry out. The air circulation will allow all canvas to dry and prevent the growth of mildew. DO NOT STORE FOLDED OR ROLLED UP DAMP CANVAS!
- Occasionally set up all canvas and curtains and hose down with fresh water to remove accumulated soot and dirt. Sweep or brush the underside of the canvas to prevent the accumulation of dirt and mildew.
-
Wet canvas must be allowed to dry thoroughly before storage. DO NOT allow canvas to dry loose since shrinkage can occur. Erect all canvas fully on the boat when drying.
-
DO NOT allow the canvas to be exposed to direct sunlight for long periods of time.
- Use care when handling clear vinyl curtains and windows to prevent scratching.
- DO NOT use cleaners on clear vinyl curtains and windows. Clean with plenty of clean water and a soft, clean cloth.
- DO NOT fold canvas parts. Loosely roll canvas to prevent damage.
- DO NOT store canvas in poly bags. Canvas should be kept in a well ventilated compartment.
- The outer canvas surfaces can be cleaned with a soft scrub brush and either automotive convertible top cleaners or household cleaners suitable for use on vinyl surfaces. The underside of the canvas may be periodically sprayed with a spray disinfectant to prevent the growth of mildew.
- DO NOT store or dock your boat under trees. Tree sap is very corrosive to canvas and can also be harmful to gelcoat and vinyl interiors.
- Adjust top bows to eliminate pockets in which rain water can accumulate. The weight of this accumulated water can collapse the top or cause the canvas to bag.
- Snaps and zippers should be regularly lubricated. Vaseline, silicone spray, or paraffin are some of the lubricants that are effective. ZIPPERS SHOULD NEVER BE FORCED!
- DO NOT trailer your boat with the convertible top in the mounted position. All canvas should be dismantled, rolled, and securely stored while trailering your boat to prevent wind damage.
Carpet
Occasional vacuuming and washing with mild detergent and warm water or household carpet cleaners will keep the carpet clean. Thoroughly hose the detergent out of the carpet and into the bilge. This is usually the best time to clean the bilge. Let the carpet dry in the sun to prevent any mildew or odor caused by moisture.
Windshield
A clean windshield is important. If your boat is equipped with a glass windshield, applying a non-abrasive glass cleaner with a soft cloth will remove most dirt and smudges. Smoked plexi-glass or plastic windshields should be cleaned with a mild soap solution and damp cloth only. Harsh detergents, solvents, chemicals or dry cloths used on any glass or plastic windshield will scratch the surface.
Bilge
Your bilge accumulates oil and greasy dirt over a period of time and should be cleaned out. Usually, ordinary soap and water does not remove the accumulation, and something stronger is necessary. Consult your dealer for recommendations on special bilge cleaning products.
Stainless Steel and Chrome
Stainless steel and chrome plated parts are not totally resistant to corrosion. Occasional cleaning and polishing with a marine chrome and stainless polish will maintain and extend the useful life. In salt water areas, rinse all hardware with fresh water and apply a light coating of corrosion inhibitor oil to enhance appearance. Check hardware tightness at least once a season.
FUEL SYSTEM
Fuel vents are normally located in the hull or transom below and in the same general area as the fuel fills. Check to see that the fuel fill and vent lines are free of obstructions and kinks. Be sure to check fuel filter periodically and clean as needed.
Fuel lines, vent hoses, and drain hoses should be checked frequently for leaks. Some models are equipped with removable inspection plates for fuel system component inspection. If a leak occurs around the fitting, then tightening of the hose clamps may be all that is necessary. However, if the leak continues, replace the hose immediately to prevent a build-up of fluids or gases. Surface cracking on the hose indicates wear, and replacement is recommended. Use fuel system parts certified for marine use only; do not substitute automotive parts in marine application.
STEERING SYSTEM
The steering system is the primary link for engine control and must be inspected and maintained regularly. The hardware at both the helm and engine end must be checked frequently for tightness. Refer to the engine operator's manual for the appropriate torques.
Make sure hydraulic hoses are tight and leak-free. Cylinder seals should be checked for dampness indicating leaks. Check the fluid reservoir monthly and top off if necessary. Consult the steering system manufacturer's manual for more information.
The steering bar must be lubricated monthly to ensure smooth operation. Turn the steering wheel to a full starboard turn to expose bar. Use a high quality waterproof marine grease and fully coat the bar. Turn the steering wheel back and forth to work the grease in.
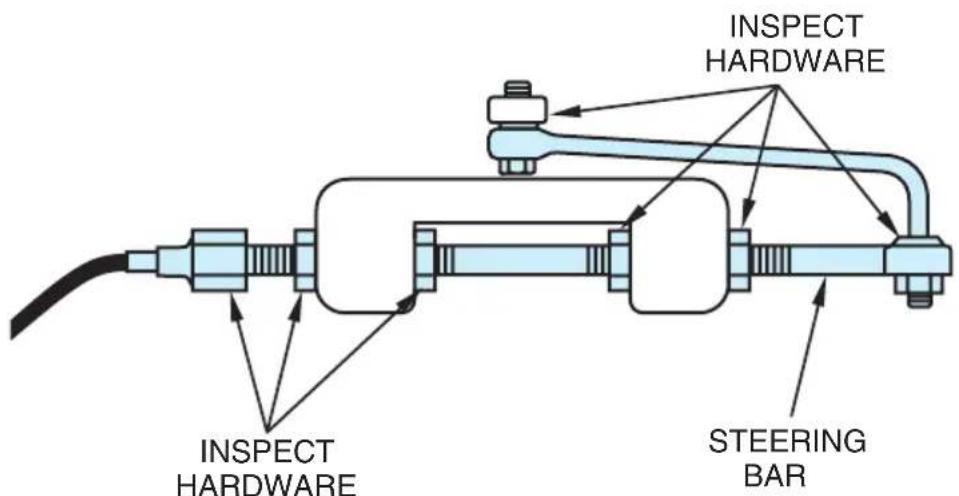
text_image
INSPECT HARDWARE INSPECT HARDWARE STEERING BARTYPICAL OUTBOARD ENGINE STEERING LINK KC-1645
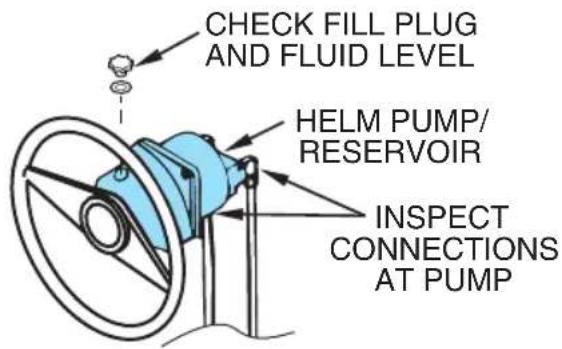
text_image
CHECK FILL PLUG AND FLUID LEVEL HELM PUMP/ RESERVOIR INSPECT CONNECTIONS AT PUMP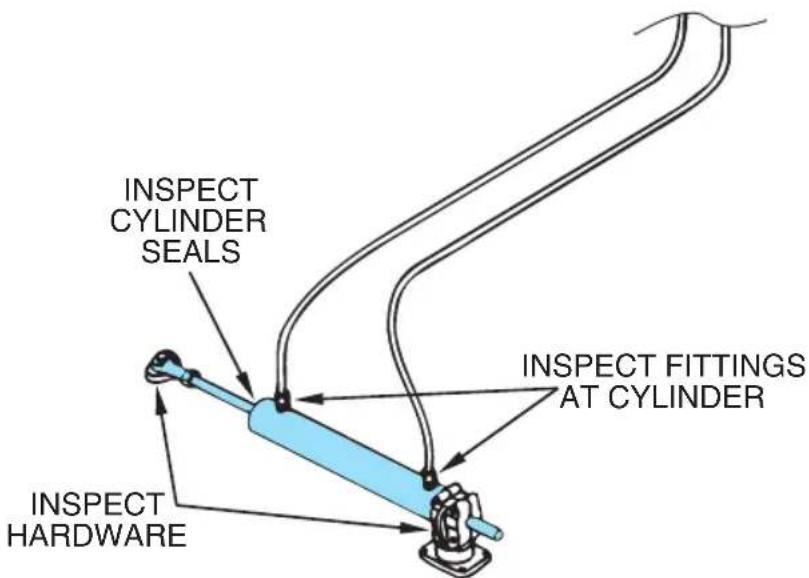
text_image
INSPECT CYLINDER SEALS INSPECT Fittings AT CYLINDER INSPECT HARDWARETYPICAL HYDRAULIC STEERING SYSTEM
KC-1883.1
NOTES
natural_image
Simple icon of a boat with a question mark above it, no text or symbols presentChapter 9
Troubleshooting
The following chart will assist you in finding and correcting minor mechanical and electrical problems. If an engine problem is indicated, consult your engine owner's manual.
Some problems may require specialized skill and tools to correct them. Consult your dealer.
TROUBLE CHECK CHART
| Symptom Possible Cause | |
| Engine will not crank | ·Engine stop switch not connected·Shift/throttle control in gear·Main circuit breaker open·Battery terminals corroded·Weak battery·Loose or corroded battery wiring connections·Engine problem |
| Engine cranks but will not start | ·No fuel in tank·Fuel filter clogged·Contaminated fuel·Engine problem |
| Poor boat performance | ·Contaminated fuel·Uneven load distribution·Engine trim wrong·Improper propeller selection·Excessive water in bilge·Engine problem |
| Poor gas mileage | ·Plugged flame arrestor·Engine trim wrong·Marine growth on hull·Engine problem |
| Throttle/shifting problems | ·Corroded cable·Kink in cable·Engine problem |
| Excessive vibration | ·Propeller damaged or fouled·Bent propeller shaft·Engine problem |
| Electrical problems | ·Blown fuse or open circuit·Loose wiring connections·Defective switch or gauge |
text_image
Chapter 10 StorageStorage or winter lay-up requires special preparation to prevent damage to the boat. Perform all annual maintenance at this time.
Without proper preparation, storage for long periods of time may cause internal parts of the engine and drive unit to rust because of lack of lubrication. Or, if the boat is stored in below freezing temperatures, water inside the bilge or cooling system may freeze causing damage. Damage to the boat due to improper storage will not be covered by the warranty. The following procedures should help prevent damage to your boat.
STORAGE PREPARATION
While The Boat Is Still In The Water
- Fill fuel tank and add the proper amount of fuel stabilizer and conditioner according to the manufacturer's recommendations.
- Operate boat for at least 15 minutes to be sure that treated fuel has reached engine.
NOTICE
If the boat is to be stored for more than 5 months, stored in a high moisture (humidity) environment, in temperature extremes, or stored outdoors, “fog” the engine with a rust preventative fogging oil according to the manufacturer’s recommendations. See your dealer.
When The Boat Is Removed From The Water
NOTICE
Remove the bilge drain plug immediately after taking the boat out of the water. After washing, raise the bow of the boat high to allow as much water as possible to drain while performing other storage preparations.
- Flush the engine cooling system with clean water. DO NOT exceed 1500 RPM when flushing.
- Perform all scheduled maintenance. For stern drives, tuning the engine and changing the oil and fuel filters (if equipped) is especially important.
- Thoroughly clean the hull, deck and interior of the boat as soon as it is removed from the water. Cleaning at this time is easier because the marine growth is still wet. Be sure to allow for a couple of days of air drying to prevent mildew due to trapped moisture.
- Apply a coat of wax to the entire surface of the boat and rust inhibitor on all metal parts.
- Clean all traces of dirt, oil, grime, and grease from the engine and bilge. Touch up areas of engine where paint has been removed.
- Prepare the engine for storage according to the instructions contained in the engine owner's manual.
- Store the bilge drain plug in a plastic bag and tape it to the throttle control lever so that it is easily found for reactivation.
- Remove the batteries from the boat. Clean, fully charge and store the batteries in an area not subject to freezing temperatures. Never store batteries close to heat, spark, or flame producing devices.
- Repack trailer wheel bearings with water resistant wheel bearing grease. If the trailer is equipped with bearing protectors, apply grease into hubs with a grease gun.
- Park trailer and boat in a protected area. If the rig is left outside, install a boat cover. Consult your dealer.
- Loosen tie-downs and winch line but be sure the boat is resting properly on hull supports.
- Jack up trailer and place blocks under trailer frame to relieve weight on trailer tires and springs.
Reactivating The Boat After Storage
- Charge and install batteries in boat.
- Check engine and bilge for signs of nesting animals; clean as necessary.
- Check entire engine for cracks and leaks caused by freeze damage.
-
Check hose condition and all hose clamps for tightness.
• Install bilge drain plugs. -
Perform daily maintenance. If not performed during lay-up, perform annual maintenance.
- If the boat is equipped with the optional fresh water cooling system (stern drive only) and was drained for storage, fill the system with fresh coolant solution.
- Check and lubricate steering system.
- Remove blocks from under trailer frame.
- Tighten tie-downs and trailer winch line.
- Check tire pressure and lug nuts on trailer.
• Take the boat to the water and start it. It may take a minute of cranking to allow the fuel system to prime. Allow a one minute cool down period for every 15 seconds of cranking. When the engine starts, keep a close watch over the gauge readings and check for leaks and abnormal noises. Keep speeds low for the first 15 minutes until the engine has reached normal operating temperature. - Refer to engine operator's manual and boat accessory manuals for additional information.
LIFTING THE BOAT
When the boat is hoisted from the water, use the lifting eyes or slings for easy, damage-free lifting.

CAUTION
Lifting slings must never contact the propeller shaft, struts or hardware protruding from the hull.

CAUTION
- Do not use the transom mounted tow eye for lifting.
- Do not use the lifting eyes if corrosion is present. If you suspect corrosion is present on a lifting eye, have your dealer check and/or replace it.
- Do not use the ski pylon for lifting.
- Never lift a boat with a large amount of water in the bilge. The extra weight will put unnecessary stress on the hull and lifting equipment.
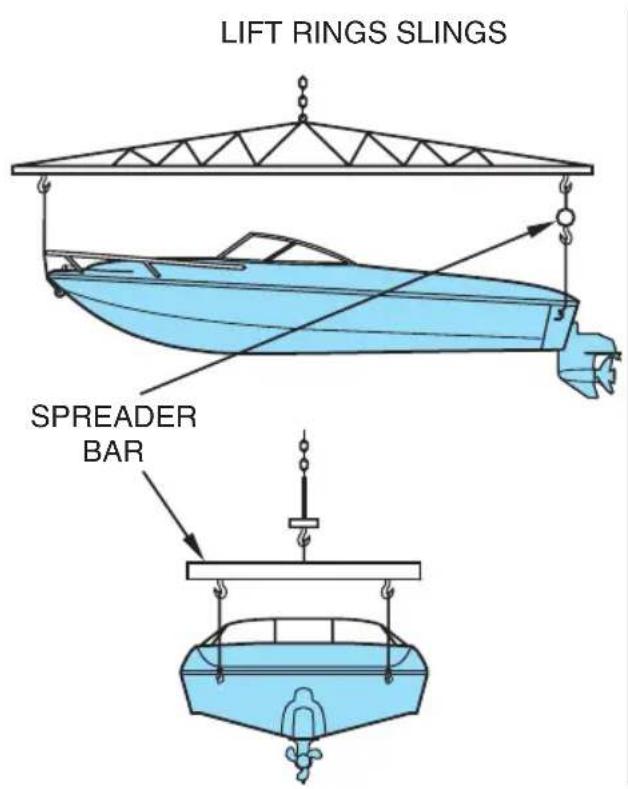
text_image
LIFT RINGS SLINGS SPREADER BAR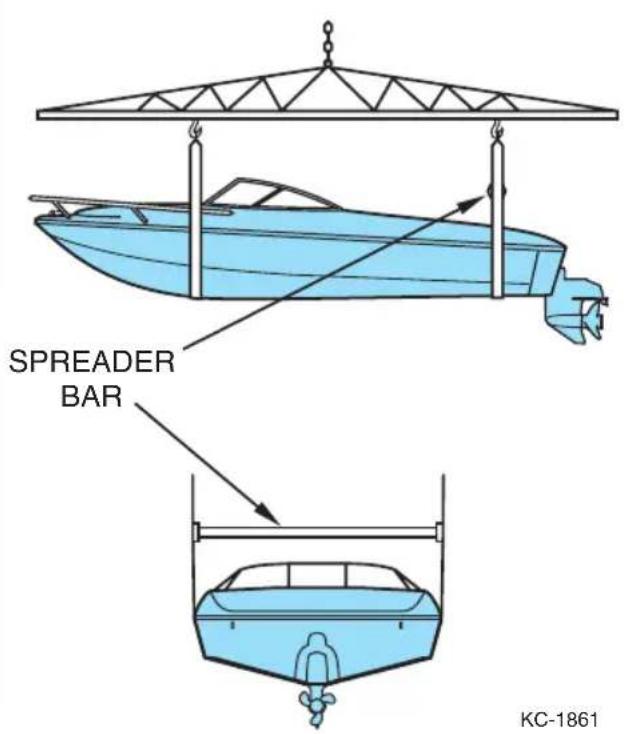
text_image
SPREADER BAR KC-1861
natural_image
Simple line drawing of a boat on water with a ramp and hull (no text or symbols)Chapter 11
Trailering
This section provides information about trailering. It describes the hitch and safety chains, backing your trailer, preparing to launch, launching, and loading your trailer. Also included is a trailering checklist.

WARNING
- The trailer must be matched for the boat's weight and hull.
- The towing vehicle must have the capability of pulling the load.
Pulling a load that exceeds the trailer's or vehicle's towing capacity may cause loss of control.
NOTICE
Check the certification label on the left forward side of your trailer. The label is required to show the Gross Vehicle Weight Rating (GVWR), which is the load carrying capacity plus the weight of the trailer itself. Be sure that the total weight of your boat, engine, gear, and trailer do not exceed the GVWR.
Trailer laws on things such as lighting, registration, trailer brakes, gross vehicle weight, etc., vary widely from state to state. Contact your state Department of Motor Vehicles (and that of other states through which you may be traveling) for laws with which you must be in compliance.
FOREIGN SPECIES
If you trailer your boat from lake to lake, you may unknowingly introduce a foreign aquatic species from one lake to the next. Thoroughly clean the boat below the water line, remove all weeds and algae, and drain the bilge and livewells before launching the boat in a new body of water.
CLASSIFICATIONS
Trailers are separated into four classes based on gross vehicle weight (GVW). Gross vehicle weight equals the trailer weight plus the maximum load it may carry at 60 MPH.
• Class One GVW under 907 kg (2000 lb)
• Class Two GVW over 907 kg (2000 lb) under 1588 kg (3500 lb)
• Class Three GVW over 1588 kg (3500 lb) under 2268 kg (5000 lb)
• Class Four GVW over 2268 kg (5000 lb)
HITCH
Hitches are divided into classes that specify the gross trailer weight (GTW) and maximum tongue weight for each class. Always use a hitch with the same class number as the trailer, or greater.
Most boat trailers connect to a ball hitch that is bolted or welded to the towing vehicle. Special heavy-duty equalizing hitches are necessary for trailer tongue weights of 159 kg (350 lb) or greater.
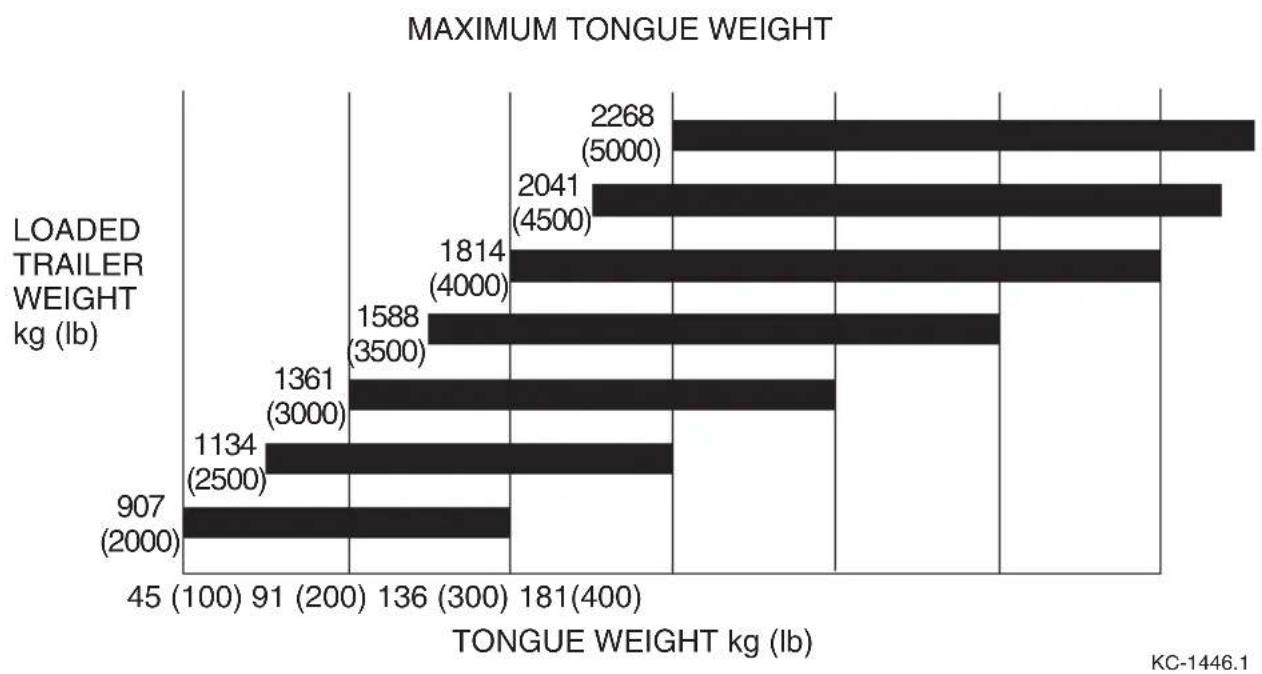
bar
MAXIMUM TONGUE WEIGHT | TONGUE WEIGHT (kg) | Value | |---|---| | 45 (100) 91 (200) | 181(400) | | 136 (300) | 1588 (3500) | | 1814 (4000) | 1814 (4000) | | 2041 (4500) | 2041 (4500) | | 2268 (5000) | 2268 (5000) | | 907 (2000) | 907 (2500) |The trailer hitch coupler must match the size of the hitch ball. DO NOT use a hitch ball that does not match the trailer coupler. The correct ball diameter is marked on the trailer coupler.
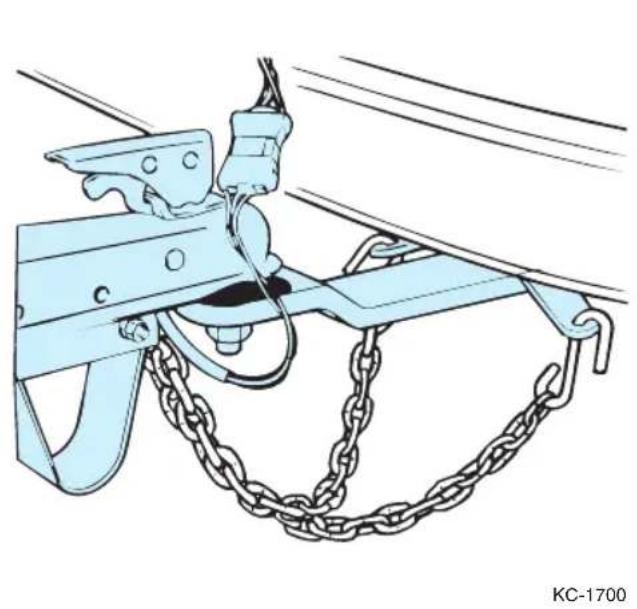
natural_image
Technical illustration of a mechanical clamp or bracket with chains and metal components (no text or symbols)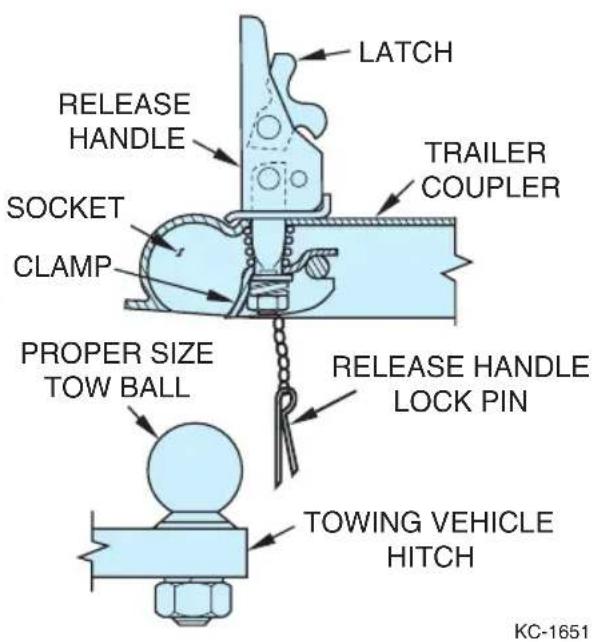
text_image
LATCH RELEASE HANDLE TRAILER COUPLER SOCKET CLAMP PROPER SIZE TOW BALL RELEASE HANDLE LOCK PIN TOWING VEHICLE HITCH KC-1651SAFETY CHAINS
Safety chains on your boat trailer provide added insurance that it will not become completely detached from the towing vehicle when underway.
Crisscross the chains under the trailer tongue to prevent the tongue from dropping to the road if the trailer separates from the hitch ball. Rig the chains as tight as possible with just enough slack to permit tigh
CRISSCROSS SAFETY CHAINS

text_image
TRAILER TOW VEHICLEBOTTOM VIEW OF HITCH COUPLING
KC-1691
Make sure the proper chains are correctly attached between the towing vehicle and trailer before and during each trip.
TRAILER BRAKES
In some states, any trailer with a gross vehicle weight rating (GVWR) of 680 kg (1500 lb) or more is required to have brakes. Usually, this brake is a self-contained, hydraulic surge system, with either a drum or disk brake. Some trailer brake systems are electrically actuated and require a control box inside the towing vehicle. Consult your trailer manufacturer's owner's manual for more information on operation, adjustments and maintenance.
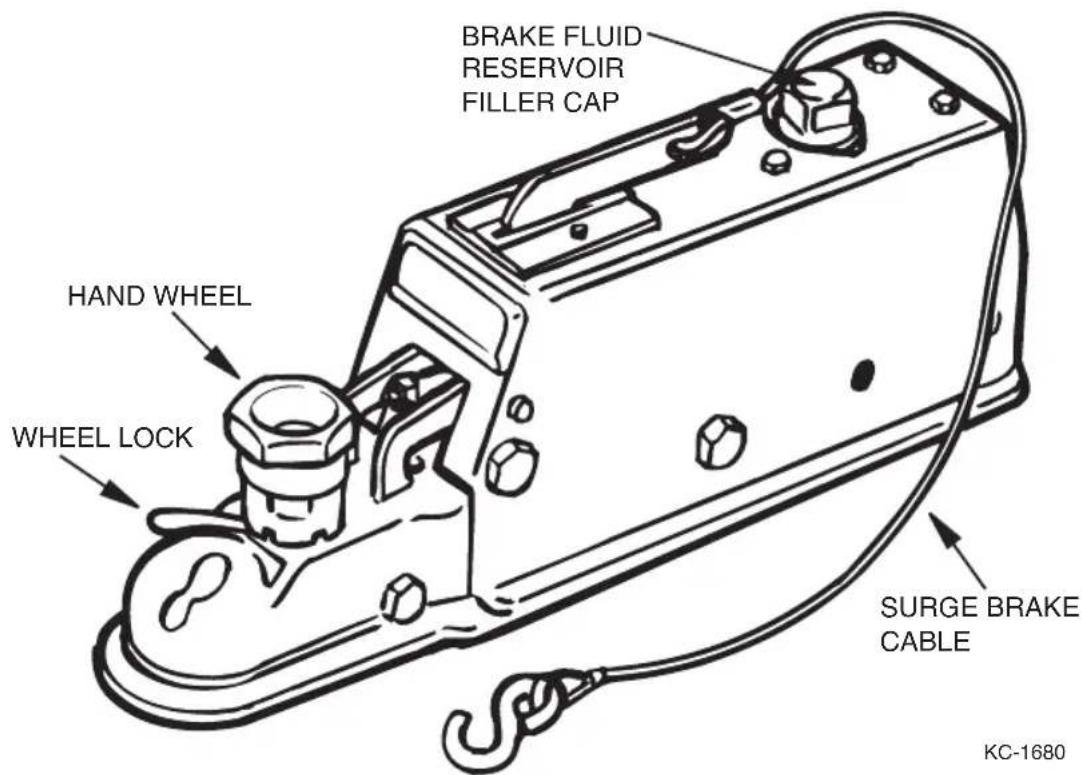
text_image
BRAKE FLUID RESERVOIR FILLER CAP HAND WHEEL WHEEL LOCK SURGE BRAKE CABLE KC-1680TRAILERING CHECKLIST
Below is a checklist to follow when trailering your boat:
√ Consult your state laws as to brake and axle load requirements. Check brakes for proper operation and fluid level prior to departure on each trip.
√ Check springs and undercarriage for loose parts.
√ Check tires for proper inflation. Under-inflated tires heat up rapidly and tire damage or failure is likely to occur.
√ Wheel bearings and lug nuts should be checked before each trip.
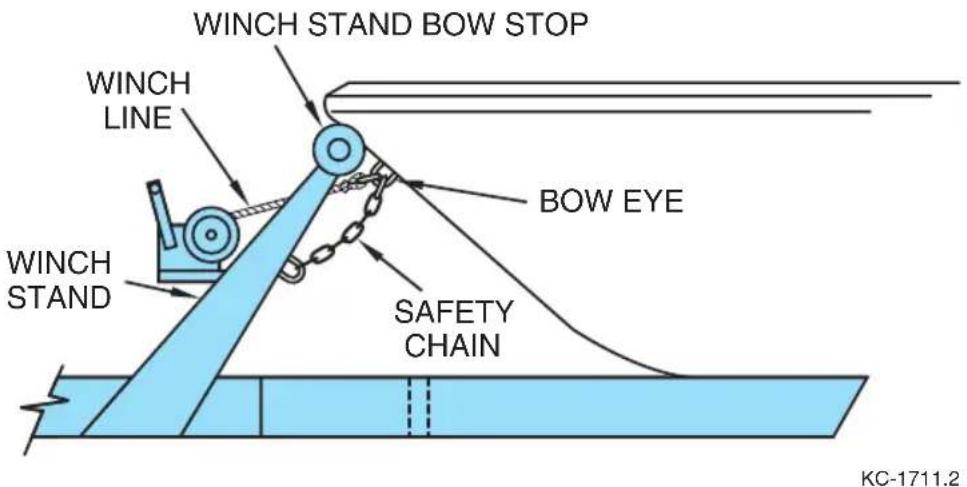
text_image
WINCH STAND BOW STOP WINCH LINE WINCH STAND BOW EYE SAFETY CHAIN KC-1711.2√ Your boat should be fastened to the trailer with the winch line connected to the bow eye, PLUS a bow tie-down to the winch stand or trailer tongue. A safety chain, strap or rope can be used as a suitable tie-down. The stern of your boat should be secured to the trailer from the stern eyes. If travel conditions require, use an additional tie-down strap across the rear of the boat from side-to-side to further secure the stern. Check all strapping material for wear.
√ Check to be sure the taillights and turning signals work prior to towing.
√ Too much or too little tongue weight will cause difficult steering and will make tow vehicle sway. A rough rule of thumb is 5% to 10% of boat and trailer weight on the tongue.
√ Convertible tops and detachable windshields are not designed to stay on boats at highway speeds. Before towing, take down the convertible top, side curtains, back cover and detachable windshield if so equipped.
√ Carry a spare tire for both your trailer and your towing vehicle along with sufficient tools to change them.
Consult the engine operator's manual for engine related trailering precautions.
√ On extended trips, carry spare wheel bearings, seals, and races.
√ While traveling, check the wheel hubs every time you stop for gas or refreshments. If the hub feels abnormally hot, the bearing should be inspected before continuing your trip.
√ When rounding turns on highways or streets, do not cut corners. Also, go slow over railroad tracks.
√ Outboard motors should be tied in place so they will not tilt or turn due to road shock. Continuous road shocks may fatigue the boat steering system.
√ Before backing your trailer into water, disconnect the light plug from the towing vehicle to reduce the likelihood of blowing out lights when they become submerged.
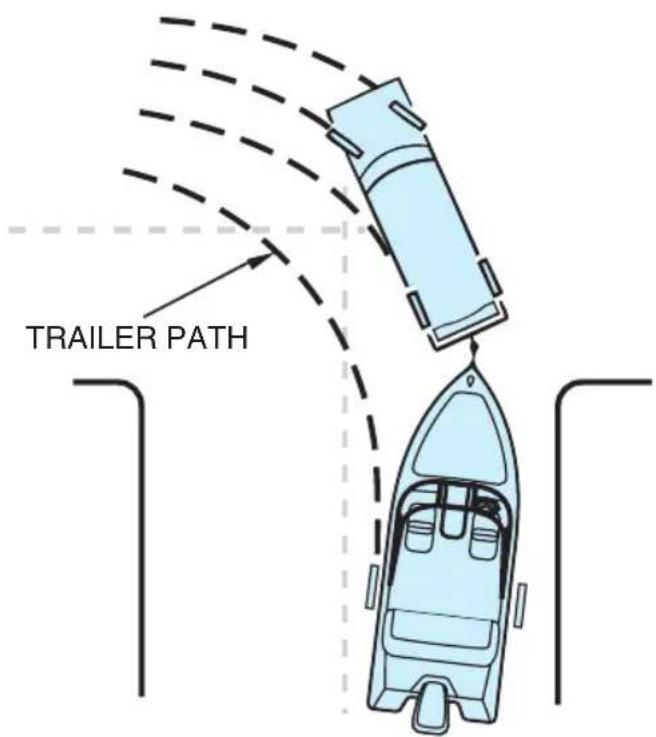
text_image
TRAILER PATHKC-1731
BACKING UP TRAILERS
If you have never towed a trailer before, take the time to practice backing your trailer before using it for the first time. Follow these guidelines when backing:
- Back slowly and make small steering adjustments.
- Turn the car wheels in the opposite direction you want the trailer to go.
• After the trailer begins moving, turn the car to follow it.
• Have a second person assist you with hand signals.

text_image
BACKING TO RIGHT BACKING TO LEFT FOLLOWING THRU TURNKC-1761
LAUNCHING
Before launching your boat, stay to one side and watch a couple of launchings to notice any problems on the ramp and the effects of the wind and current on launching. It is a common courtesy to prepare the boat for launching away from the ramp especially during busy periods. Perform the pre-launch sequence as follows:
- Remove the boat cover, if equipped.
- Check that bilge drain plug is in place.
- Remove any additional trailering tie-downs from the boat.
- Attach the bow and stern docking lines and fenders if necessary.
- Disconnect the trailer lights from the car.
Launching with two people is recommended. Since all launches are different from each other in some way, the following procedure must be modified to fit the launch in use:
- Back the boat down the ramp until the wheels are at least halfway submerged. Keep the trailer/car combination as straight as possible and at 90 degrees to the shore line.
- Loosen and detach the bow strap from the bow eye.
- Back the boat further down until the top of the fenders are about 50 mm (2 in.) above the water.
- Board the boat and start it. If possible, remain on the trailer until the engine has warmed up.
LOADING
Loading, like launching, is best done with two people:
- Disconnect the trailer's light harness from the tow vehicle.
- Back the trailer into the water until the top of the fenders are about 75 mm (3 in.) above the water. Keep the trailer/car combination as straight as possible and, if possible, at 90 degrees to the shoreline. Set the parking brake securely.
- Approach the trailer in a straight line from at least 1.5 m (5 ft) out. Use "bursts" of propeller thrust to move toward the trailer at the slowest steerable speed. Guide the boat onto the support bunks.
- Check to see that the boat is centered on the support rails and is headed in a straight line for the bow stop (bumper board).

WARNING
Excessive throttle can cause the boat to travel over the bumper board causing extensive damage to the boat, trailer, and car and could cause severe personal injury.
- Using a very light touch on the throttle, ease the boat forward until the bow comes to rest against the bow stop (bumper board).

CAUTION
The winch bow strap is merely a means of securing the boat to the trailer and is not intended to winch or pull the boat onto the trailer. Winching the boat onto the trailer could cause severe injury.
- Attach and tighten the winch bow strap.
- Pull the trailer up the ramp and attach any additional tie-downs and connect the trailer light harness.
- Pull drain plug.
Chapter 12
Glossary of Terms
ABOARD - On or in the boat.
ABYC - American Boat and Yacht Council, Inc.
AFLOAT - On the water.
AFT - Toward the rear or stern of the boat.
AGROUND - Touching bottom.
AMIDSHIP - Center or middle of the boat.
ANCHOR - (1) An iron casting shaped to grip the lake bottom to hold the boat. (2) The act of setting the anchor.
ASHORE - On the shore.
ASTERN - Toward the stern.
BAIL - To remove water from the bottom of the boat with a pump, bucket, sponge, etc.
BAITWELL - A miniature livewell used to store and keep live bait alive and healthy.
BEAM - The widest point on the boat.
BEARING - Relative position or direction of an object from the boat.
BILGE - The lowest interior section of the boat hull.
BILGE KEELS - The raised areas or aluminum extrusions on the bottom of a boat that parallel the keel.
BOARDING - To enter the boat.
BOUNDARY WATERS - A body of water between two areas of jurisdiction; i.e., a river between two states.
BOW - The front of the boat.
BULKHEAD - Vertical partition (wall) in a boat.
BUNKS - Carpeted trailer hull supports.
BURDENED BOAT - Term for the boat that must "give-way" to boats with the right-of-way.
CAPACITY PLATE - A plate that provides maximum weight capacity and engine horsepower rating information. It is located in full view of the helm.
CAPSIZE - To turn over.
CAST-OFF - To unfasten mooring lines in preparation for departure.
CENTER LINE - A lengthwise imaginary line which runs fore and aft with the boat's keel.
CHINE - The point on a boat where the side intersects (meets) the bottom.
CLEAT - A deck fitting with ears to which lines are fastened.
CONSOLE - Also called helm. The steering wheel area of the boat.
CRANKING BATTERY - The main battery used for engine starting and electrical circuits.
CURRENT - Water moving in a horizontal direction.
DECK - The open surface on the boat where the passengers walk.
DEEP CYCLE BATTERIES - Special long-running batteries which can be repeatedly discharged and recharged without significant loss of power.
DOLLY WHEEL - A rolling jack assembly at the front of the trailer used for positioning the coupler during trailer hookup.
DRAFT - The depth of the boat below the water line, measured vertically to the lowest part of the hull.
ELECTROLYSIS - The break-up of metals due to the effects of galvanic corrosion.
FATHOM - Unit of depth or measure; 1 fathom equals 6 feet.
FENDERS - Objects placed alongside the boat for cushioning. Sometimes called bumpers.
FORE - Toward the front or bow of the boat. Opposite of aft.
FREEBOARD - The distance from the water to the gunwale.
FUEL SENDING UNIT - The electrical device that is mounted on the outside of a built-in fuel tank and controls the dashboard fuel gauge.
GIVE-WAY BOAT - (1) Term for the boat that must take whatever action necessary to keep well clear of the boat with the right-of-way in meeting or crossing situations. (2) The burdened boat.
GUNWALE - The rail or upper edge of a boat's side.
HEAD - A marine toilet.
HELM - The steering wheel or command area.
HULL - The body of the boat.
HYPOTHERMIA - A physical condition where the body loses heat faster than it can produce it.
IN-LINE FUSE - A type of protective fuse located in the power wire of a direct current (DC) circuit usually near the battery.
KEEL - The lowest portion of the boat; extends fore and aft along the boat's bottom.
LIST - Leaning or tilt of a boat toward the side.
MAKING WAY - Making progress through the water.
MARINE CHART - Seagoing maps showing depths, buoys, navigation aids, etc.
MOORING - An anchor, chain, or similar device that holds a boat in one location.
NAVIGATION AID - Recognizable objects on land or sea such as buoys, towers or lights which are used to fix position to identify safe and unsafe waters.
NMMA - National Marine Manufacturers Association
NO-WAKE SPEED - The speed at which a boat travels to produce an imperceptible wake.
PFD - Personal flotation device.
PITOT TUBE - See SPEEDOMETER PICKUP TUBE.
PLANING HULL - A hull designed to lift, thereby reducing friction and increasing efficiency.
PORPOISE - A condition in which the bow bounces up and down caused by trimming the engine too far out.
PORT - (1) The left side of a boat when facing the bow. (2) A destination or harbor.
PRIVILEGED BOAT - Term used for the boat with the right-of-way.
RIGHT-OF-WAY - Term for the boat that has priority in meeting or crossing situations. The stand on or privileged boat.
RULES OF THE ROAD - Regulations for preventing collisions on the water.
SPEEDOMETER PICKUP TUBE - Also called pitot tube. The plastic device that extends below the bottom of the boat. It connects to the speedometer with plastic flexible tubing.
SPLASHWELL - The section of an outboard-equipped boat that is just forward of the transom.
STAND ON BOAT - Term for the boat that must maintain course and speed in meeting or crossing situations. The privileged boat.
STARBOARD - The right side of the boat when looking toward the bow.
STERN - The back of the boat.
STOW - To pack the cargo.
SURGE BRAKES - A type of trailer braking system designed to automatically actuate when the tow vehicle's brakes are applied.
TRANSDUCER - The unit that sends/receives signals for the depth sounder.
TRANSOM - The transverse beam across the stern.
TRIM - Fore to aft and side to side balance of the boat when loaded.
UNDERWAY - Boat in motion; i.e., not moored or anchored.
USCG - United States Coast Guard
WAKE - The waves that a boat leaves behind when moving through the water.
WATERWAY - A navigable body of water.
V-PAD - A modified vee hull design with a small, flat area in the keel aft.
VISUAL DISTRESS SIGNAL - A device used to signal the need for assistance such as flags, lights and flares.
MONTEREY BOATS LIFETIME LIMITED WARRANTY
MONTEREY BOATS warrants to the original retail purchaser of its product beginning with the 2008 models that it will repair or replace defects in materials and workmanship found to exist in its product during the applicable warranty periods defined below if purchased from an authorized MONTEREY BOATS dealer, subject to the exclusions, limitations, conditions and provisions noted below. All repairs and replacements under the following warranties will be performed by MONTEREY BOATS or an authorized MONTEREY BOATS dealer or representative selected by MONTEREY BOATS at its sole discretion.
LIFETIME LIMITED STRUCTURAL HULL AND DECK WARRANTY:
MONTEREY BOATS warrants to the original retail purchaser of its product that MONTEREY BOATS will repair or replace the fiberglass hull or deck of its product if it is found to be structurally defective in materials or workmanship for as long as the original retail purchaser owns the product. For purposes of this limited warranty: (1) a structural defect is defined as a defect that causes the hull or deck to be unsafe or unfit for use under normal operating conditions; (2) the fiberglass hull is defined as the single fiberglass molded shell and integral fiberglass structural components including stringers, transom and related structural components which are below the hull flange; and (3) the deck is defined as the single fiberglass molded shell and integral fiberglass structural components attached to the hull flange. This warranty is further subject to the exclusions, limitations, conditions and provisions noted below.
TEN-YEAR TRANSFERABLE LIMITED STRUCTURAL HULL AND DECK WARRANTY:
Beginning with the 2008 models, MONTEREY BOATS also offers a Ten-Year Transferable Limited Structural Hull and Deck Warranty. Under this warranty, MONTEREY BOATS will repair or replace the fiberglass hull or deck if it is found to be structurally defective in materials or workmanship within the first ten (10) years after the date of purchase by the original retail purchaser. For purposes of this warranty: (1) a structural defect is defined as a defect that causes the hull or deck to be unsafe or unfit for use under normal operating conditions; (2) the fiberglass hull is defined as the single fiberglass molded shell and integral fiberglass structural components including stringers, transom and related structural components which are below the hull flange; and (3) the deck is defined as the single fiberglass molded shell and integral fiberglass structural components attached to the hull flange. This warranty may be transferred to subsequent purchasers (hereinafter “new owner”) provided the new owner registers the transfer and pays the transfer fee in accordance with the requirements set forth below. This transfer will only apply to the balance of any warranty period left during the ten (10) year period commencing on the date of purchase by the original retail purchaser.
- The request for transfer must be made in writing by the new owner and sent within thirty (30) days of the date of his/her purchase of the boat to:
MONTEREY BOATS
1579 SW 18th Street
Williston, Florida 32696
-
The request must include: A copy of the bill of sale with the Hull ID number, the new owner's name and address and a Certified Check or Money Order for the correct transfer fee amount.
-
The transfer fee is \300.00 for boats with hull lengths under 27', \500.00 for boats with hull lengths from 27' but under 33', and \$700.00 for boats with hull lengths 33' and over.
In the event fiberglass hull or deck work is required, the new owner must return the boat to the original selling dealer or to a dealer authorized to service MONTEREY BOATS products. The cost of returning the boat to and from MONTEREY BOATS or an authorized MONTEREY BOATS dealer or representative will be the sole responsibility of the new owner. This warranty is further subject to the exclusions, limitations, conditions and provisions noted below.
FIVE-YEAR LIMITED HULL BLISTER WARRANTY:
MONTEREY BOATS warrants to the original retail purchaser of its product that MONTEREY BOATS will repair any osmotic blisters which occur on the underwater gelcoated surfaces of the hull as a result of defects in materials or workmanship within five (5) years from the date of purchase by the original retail purchaser according to the following prorated schedule provided that the original factory gelcoat surface has not been altered in any way:
-
Up to two (2) years from the date of original retail purchase, MONTEREY BOATS will pay 100% of the repair costs.
-
After two (2) years but up to three (3) years from the date of original retail purchase, MONTEREY BOATS will pay 85% of the repair costs.
-
After three (3) years but up to four (4) years from the date of original retail purchase, MONTEREY BOATS will pay 65% of the repair costs.
-
After four (4) years but up to five (5) years from the date of original retail purchase, MONTEREY BOATS will pay 35% of the repair costs.
-
After five (5) years from the date of original retail purchase, MONTEREY BOATS will pay 0% of the repair costs.
Alterations which will void this warranty include, without limitation, damage, accident repair, sanding, scraping, sandblasting, or improper surface preparation for application of a marine barrier coating or bottom paint. A marine barrier coating must be properly applied to the hull bottom if the boat is to be moored in water for periods of more than sixty (60) days in any ninety (90) day period and a marine barrier coating is also required if the boat is to be bottom painted. This warranty is further subject to the exclusions, limitations, conditions and provisions noted below.
TWO-YEAR EXTERIOR COSMETIC GELCOAT LIMITED WARRANTY:
MONTEREY BOATS warrants to the original retail purchaser of its product that MONTEREY BOATS will correct or repair any cracking, crazing or fading of, and any air voids in, the exterior gelcoat surface of the boat as result of defects in materials or workmanship within two (2) years from the date of purchase by the original retail purchaser according to the following prorated schedule provided that the original factory gelcoat surface has not been altered in any way:
- Up to twelve (12) months from the date of original retail purchase, MONTEREY BOATS will pay 100% of the repair costs.
- After twelve (12) months but up to fifteen (15) months from the date of original retail purchase, MONTEREY BOATS will pay 55% of the repair costs.
- After fifteen (15) months but up to twenty-four (24) months from the date of original retail purchase, MONTEREY BOATS will pay 30% of the repair costs.
- After twenty-four (24) months from the date of original retail purchase, MONTEREY BOATS will pay 0% of the repair costs.
Alterations which will void this warranty include, without limitation, damage, accident repair, sanding, scraping, sandblasting, improper surface preparation for application of a marine barrier coating or paint, or if damage to the exterior gelcoat surface results from or is attributable to the addition of items not installed by MONTEREY BOATS. This warranty is further subject to the exclusions, limitations, conditions and provisions noted below.
LIMITED WARRANTY FOR NON-STRUCTURAL PARTS AND COMPONENTS:
MONTEREY BOATS warrants to the original retail purchaser of its product that MONTEREY BOATS will repair or replace the following described non-structural parts and components for the reasons and during the periods indicated below measured from the date of purchase by the original retail purchaser whether or not separately warranted by the part or component manufacturer:
- Canvas: if it fades or dry rots within five (5) years or if it is found to be defective in materials or workmanship within two (2) years.
- Upholstery: if it is found to be defective in materials or workmanship within two (2) years.
- All other non-structural parts and components: if they are found to be defective in materials or workmanship within one (1) year.
WHAT IS NOT COVERED:
The limited warranties set forth above do not cover:
- Engines, outdrives, generators, air conditioners, and trim tabs;
- Any boat that has been repaired or altered by persons other than MONTEREY BOATS or an authorized MONTEREY BOATS dealer or representative or modified in any way so as to affect its use and operation:
- Any boat used for racing or for rental or commercial purposes or that has been subject to misuse, neglect, accident or structural modification:
- Normal wear, tear, deterioration (including rust) of hardware, vinyl coverings, vinyl and fabric upholstery, plastic, stainless steel, other metal, wood, and trim tape.
- Any defect caused by the failure of the owner to provide reasonable care and maintenance.
- Installation of engines, generators, air conditioners, wake board towers, parts or other after market accessories produced, installed or attached by anyone other than MONTEREY BOATS.
-
Loss of time, inconvenience, loss of the use of the boat or other matters not specifically covered hereunder; and
-
Any boat purchased by a consumer through an authorized dealer located in the United States, which said boat is registered and/or operated outside the United States.
GENERAL PROVISIONS:
All general, special, indirect, incidental and/or consequential damages are excluded from this warranty and are totally disclaimed by MONTEREY BOATS. It is the intent of the parties that the owner's sole and exclusive remedy is the repair or replacement of the product or its allegedly defective component parts and that no other legal or equitable remedies shall be available to said owner. Some states do not allow the exclusion of incidental or consequential damages so the inclusion of incidental or consequential damages may not apply to you. This is a limited warranty. MONTEREY BOATS makes no warranty other than contained herein. To the extent allowed by law any warranties of merchantability or fitness for a particular purpose arising in state law are expressly excluded. To the extent allowed by law, any implied warranty of merchantability is limited to the duration of the limited warranty applicable to the particular warranted part, component, or defect. All obligations of monterey boats are specifically set forth herein. Some states do not allow limitations on how long an implied warranty lasts, so the above limitation may not apply to you. MONTEREY BOATS' obligation with respect to this warranty is limited to making repairs to or replacing the defective parts and no claim for breach of warranty shall be cause for cancellation or rescission of the contract or sale for any boat manufactured by MONTEREY BOATS.
MONTEREY BOATS will discharge its obligations under this warranty as rapidly as possible, but cannot guarantee any specific completion date due to the different nature of claims which may be made and services which may be required. This limited warranty gives you specific legal rights, and you may also have other rights which may vary from state to state. No person, including a MONTEREY BOATS dealer, is authorized to make any repairs or replacements under this warranty without the prior written approval of MONTEREY BOATS. MONTEREY BOATS shall in no way be responsible for any repairs not PRE-AUTHORIZED by a MONTEREY BOATS Customer Service Manager or repairs performed by a repair shop not PRE-AUTHORIZED by a MONTEREY BOATS Customer Service Manager.
MONTEREY BOATS does not authorize any person to create or assume for it any other obligation or liability with respect to its products. The sales personnel or other employees of MONTEREY BOATS dealers are not authorized to make warranties concerning MONTEREY BOATS products. No brochure, pamphlet or other written or pictorial presentation constitutes a warranty or representation as to any aspect of MONTEREY BOATS products.
MONTEREY BOATS shall have no obligation under this Lifetime Limited Warranty unless and until each of the following conditions are met:
- The original retail purchaser of its product or the MONTEREY BOATS dealer either completes and returns the Warranty Registration to MONTEREY BOATS by mail or facsimile or the MONTEREY BOATS dealer registers the Warranty electronically "online" within fifteen (15) days from the date the product is delivered to the original retail purchaser;
- Notice of each warranty claim is given to the MONTEREY BOATS dealer within a reasonable period of time after discovery of any claimed defect;
- Notice of each warranty claim is made in writing to MONTEREY BOATS within the applicable time periods identified in the respective warranties as measured from the date of purchase by the original retail purchaser; and
- All transportation charges incurred in transporting the boat for warranty work are paid for by the owner.
MONTEREY BOATS reserves the right to make changes at any time, without notice, in prices or to make changes in design, colors, specifications, equipment, options, materials, etc., and MONTEREY BOATS shall be under no obligation to equip or modify product built prior to such changes.
IMPORTANT: Proper registration of the Warranty with MONTEREY BOATS is important for purposes of recording customer information for notification and correction of product defects under the Federal Boat Safety Act.
MONTEREY BOATS is the registered tradename and trademark of SEABRING MARINE INDUSTRIES, INC., a Florida corporation, the warrantor herein.
SEABRING MARINE INDUSTRIES, INC.
d.b.a. MONTEREY BOATS
1579 SW 18th Street – Williston, Florida 32696
Telephone (352) 528-2628 / Facsimile (352) 529-2628
DEALER
Monterey Boats
1579 S.W. 18th Street
Williston, FL 32696
Phone 352-529-9181 Fax 352-529-9173
www.montereyboats.com