NovaBACKUP PC - Backup Software Novastor - Free user manual and instructions
Find the device manual for free NovaBACKUP PC Novastor in PDF.


User questions about NovaBACKUP PC Novastor
0 question about this device. Answer the ones you know or ask your own.
Ask a new question about this device
Download the instructions for your Backup Software in PDF format for free! Find your manual NovaBACKUP PC - Novastor and take your electronic device back in hand. On this page are published all the documents necessary for the use of your device. NovaBACKUP PC by Novastor.
USER MANUAL NovaBACKUP PC Novastor
NovaStor / April 2016
Table Of Contents
Installing the Software...6....
Getting To Know the User Interface...7....
Launch Button...8....
Copy Tab...10....
Button Functions...13....
"Copy To" Button...13....
"Make Folder" Button...13....
"Estimate" Button...13....
"Schedule" button...13....
"Settings" button...13....
"Copy" button:..13....
Backup Tab.... 13
Backup Job Name 14
Button Functions...15....
"Estimate" Button...15....
"Schedule" button...15....
"Settings" button...15....
"Backup To.. " button.... 1
"Backup" button.... 16
Restore Tab.... 16
Button Functions...19....
Logs Tab.... 20
Button Functions...21....
Schedule Tab 21
Right-Click Functions...23
Button Functions...23
Device Tab_23
Right-Click Functions...25
Hard Drive, Removable Hard Drives, Networked Drives...&...Tape:25
& Tape Devices...25
Internet and Network storage devices...25
Button Functions...25
Status Tab...25
Button Functions...27
"Stop" Button - Stops the currently running...job...27.
"Pause" Button - Pauses the currently running job - Job...remains...active...27.
"Resume" Button -Resumes the previously paused...job...27.
The Scheduler...27
The Express Wizard 29
Virtual Dashboard 29
Adding a hypervisor 29
Adding a VMware hypervisor.... 3
Adding a Hyper-V hypervisor 3
Editing a local Hyper-V hypervisor
Editing a remote Hyper-V hypervisor
Editing a hypervisor 31
Removing a hypervisor 31
Adding a virtual machine 3
Editing a VMware hypervisor....
Editing a Hyper-V hypervisor....
Editing a local Hyper-V hypervisor 32
Editing a remote Hyper-V hypervisor 32
Backing up virtual machines 32
Backing up VMware 33
Changed Block Tracking 33
Setting up VMware backups 33
VMware Retention 33
Full 33
Incremental and Differential initial backups 33.
Incremental 34
Differential 34
Backing up Hyper-V 34
Setting up Hyper-V backups 34
Hyper-V Retention 34
Restoring VMware backups 34
Mount (Individual file restore)
Restoring Hyper-V backups 35
Mount (Individual file restore)
Restore (Original Location) 35
Restore (Alternate Location) 36
VMware Replication 36
Changed Block Tracking 36
VMware Replication Retention 36
Setting up VMware replication
Hyper-V Replication 37
Requirements 37
Setting up Hyper-V Replication 37
Glossary 37
Backup .38
Changed Block Tracking 38
Replication 38
VMware Replication 38
Hyper-V Replication 38
Retention 38
Run as 38
Image Backup Operation Type 38
Introduction 39
Selection 41
Process 42
Selection 43
Process 46
Boot Disc - Introduction and Selection
Install Windows components for Windows XP
Install Windows components for Windows Vista_or_later
Boot Disc - Install Windows components (advanced mode only)
Create Boot Image 53
Write Boot Disc 55
Tools 57
Select Backup Type 57
Select Items for Image Backup.
Image Backup Destination 60
Completing the Image Backup...Job...62
Backup Retention Overview...64.
Backup Retention Basic .Tab...66
Backup Retention Advanced .Tab..67
Program Settings...68
Copy Tab...69
Restore Tab...73
Notification Tab...75
Filters Tab...78
Run As Tab...80
80
Custom Tab...82.
Advanced Options Tab...83
Management Server Tab...85
VMware Servers Tab 86
Copy Job Options 87
Copy Job Filters 89
Copy Job Notification 90
Copy Job Run As 94
Copy Job Network Credentials 9
Copy Job Custom Commands 9
Backup Job Options 97
Backup Job Filters 99
Backup Job Notifications 100
Backup Job Encryption 104
Backup Job Run As 105
Backup Job Network Credentials 107
Backup Job Custom Commands 108
Restore Job Options 109
Restore Job Custom Commands 118
Logs Tab 119
Button Functions 120
Viewing the Logs 120
Summary Reports 121
Filters Tab 124
Online Storage Devices 125
Configuring FTP Storage Device 12
Configuring S3 Storage Device 12
Network Device Overview 128
Network Device Settings 129
xSP Staging Settings 135
File Selection, System State & Registry
Registry & System State Backup
Importing Backups 143
Scripted Environment Variables 145
Installing the Software
Installing from downloaded file:
Run the SETUP.EXE program to install NovaBACKUP.
To install from CD:
Insert the CD into your CD-ROM drive. In most cases, SETUP.EXE will automatically begin. (If this fails to work, double click the SETUP.EXE file on the CD).
Getting To Know the User Interface
The User Interface
The user interface consists of a single main screen. At the top of this screen you'll find the "Launch Button", "Quick Access Toolbar" and a set of seven tabs.
Launch Button
text_image
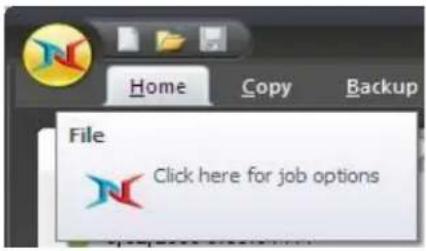
Home Copy Backup File Click here for job optionsThe Launch Button is in the top-left corner of NovaBACKUP. It provides fast access to files and frequently used commands. From here, you can quickly create a new job, open, run and save an existing job, or import previous backup jobs.
Quick Access Toolbar
text_image
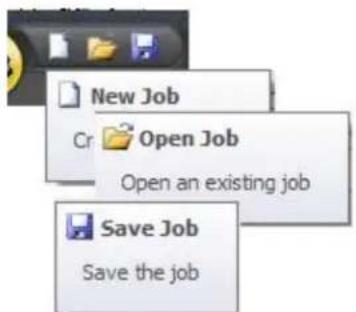
New Job Open Job Open an existing job Save Job Save the jobFrom here, simply click on the appropriate icon to create a new job, open an existing job or save the current job.
Tabs

text_image
NovaBACKUP Home Copy Backup Restore Logs Schedule Device Status SupportThe Home tab contains convenient information about your previous and next scheduled backup as well as useful shortcuts and the "Quick Select" feature. The Backup tab allows you to select files and folders to backup. Similarly, the Copy tab allows you to select files and folders to be copied to another destination. The Restore tab enables you to make selections in order to restore files and folders. The Schedule tab provides a means to schedule backup jobs to run at a future time/date. The Logs tab provides access to logs for pre-
viously run jobs. The Device tab provides a means to configure and view backup devices. The Status tab give you a method to view the progress of the currently running job.
The file lists in the Backup, Copy and Restore tabs look very similar to the Windows Explorer, which makes it familiar and easy to use. Selected files can be browsed by expanding the drives or network resources in the tree view display on the left-hand side. Next to each folder and file is a check box. These are used for adding and removing files from the selection list.
Note: The name of the currently selected job is listed at the top of the NovaBACKUP program window.
Launch Button
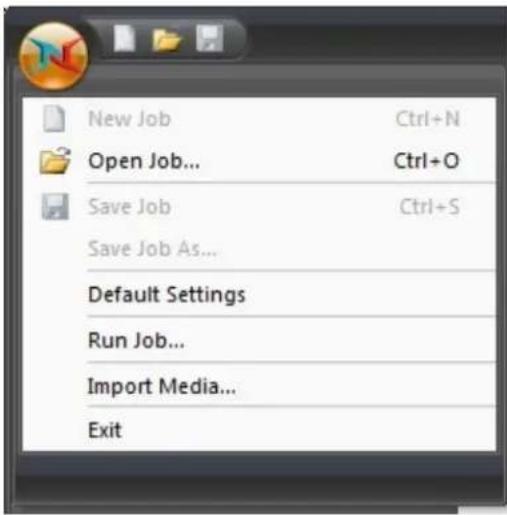
The Launch Button is in the top-left corner of NovaBACKUP. It provides fast access to files and frequently used commands. From there, you can quickly create a new job, open, run and save an existing job, or import previous backup sets.
text_image
New Job Ctrl+N Open Job... Ctrl+O Save Job Ctrl+S Save Job As... Default Settings Run Job... Import Media... ExitItem Detail
New This will allow you to create a new job based on the tab selected.
Job
Open This will allow you to open a previously saved job.
Job
Save This will allow you to save the current job.
Job
Save This will allow you to save the current job using a different name.
Job As
Default Default Settings.
Settings
Run This will allow you to run a previously saved job
Job
Import This will allow you to import backup jobs that do not appear in the Restore View. These
Media backup jobs are usually created with previous installations of or from other computers running NovaBACKUP.
Recent From this list, you can select a recently used job.
Files
List
Exit This exits the application.
HomeTab
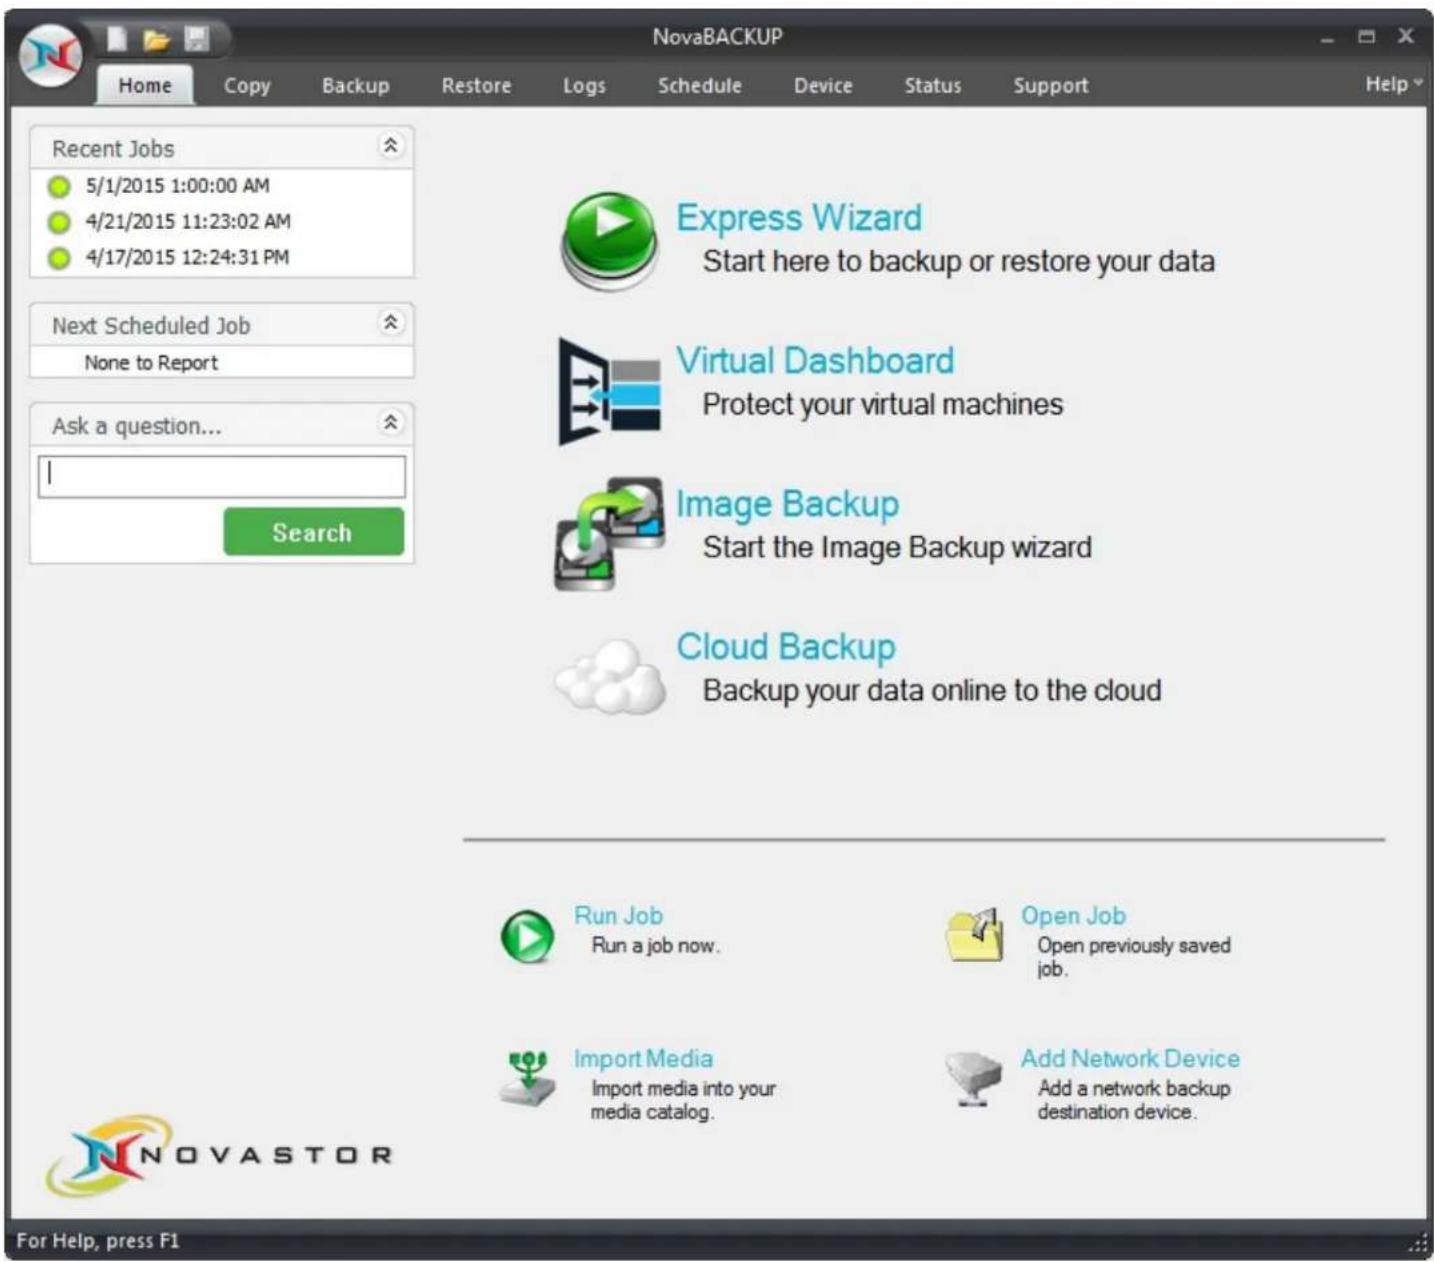
On this tab, you will find the task window on the left containing summary information on the most recent and next scheduled operations, the link to configure global settings and display the help file.
text_image
NovaBACKUP Home Copy Backup Restore Logs Schedule Device Status Support Help Recent Jobs 5/1/2015 1:00:00 AM 4/21/2015 11:23:02 AM 4/17/2015 12:24:31 PM Next Scheduled Job None to Report Ask a question... Search Express Wizard Start here to backup or restore your data Virtual Dashboard Protect your virtual machines Image Backup Start the Image Backup wizard Cloud Backup Backup your data online to the cloud Run Job Run a job now. Open Job Open previously saved job. Import Media Import media into your media catalog. Add Network Device Add a network backup destination device. For Help, press F1Left panel items:
Click on any of the "Recent Tasks" items to open the corresponding log file for review.
Click on any of the "Next Scheduled Task" items to open the corresponding schedule to view or edit.
Main selections:
The Express Wizard
The Express Wizard provides a step by step method to perform many common tasks available in the application. Topics will be added soon which outline the features and steps available in the Express Wizard.
Virtual Dashboard
The Virtual Dashboard is where all VMware and Hyper-V backups that are capable of restoring individual files take place. It is also the center of VMware and Hyper-V replication operations. These backups are not the same as backups that are done through the Backup tab.
Image Backup
The Image Backup selection opens the screen from where an image backup or restore operation can be performed, or image backup jobs can be created and scheduled.
Cloud Backup
Click Cloud Backup to setup a cloud backup device through our network of selected partners.
Utilities:
Run Job- Clicking this link allows you quickly select a specific Backup, Copy or Restore task to run. After making your selection click "Run" and the specific task will be performed immediately.
Open Job -Select this link to open a previously save Backup, Copy or Restore job permitting the job to be updated, saved or run.
Import Media- This link launches the Import Media function allowing you to add details for media not already saved to the current NovaBACKUP database. For example, media from another system or installation of NovaBACKUP.
Add Network Device – Click this link to create a new network storage device. Once the device is created you can manage the device as well as all other devices by clicking the device tab.
Copy Tab
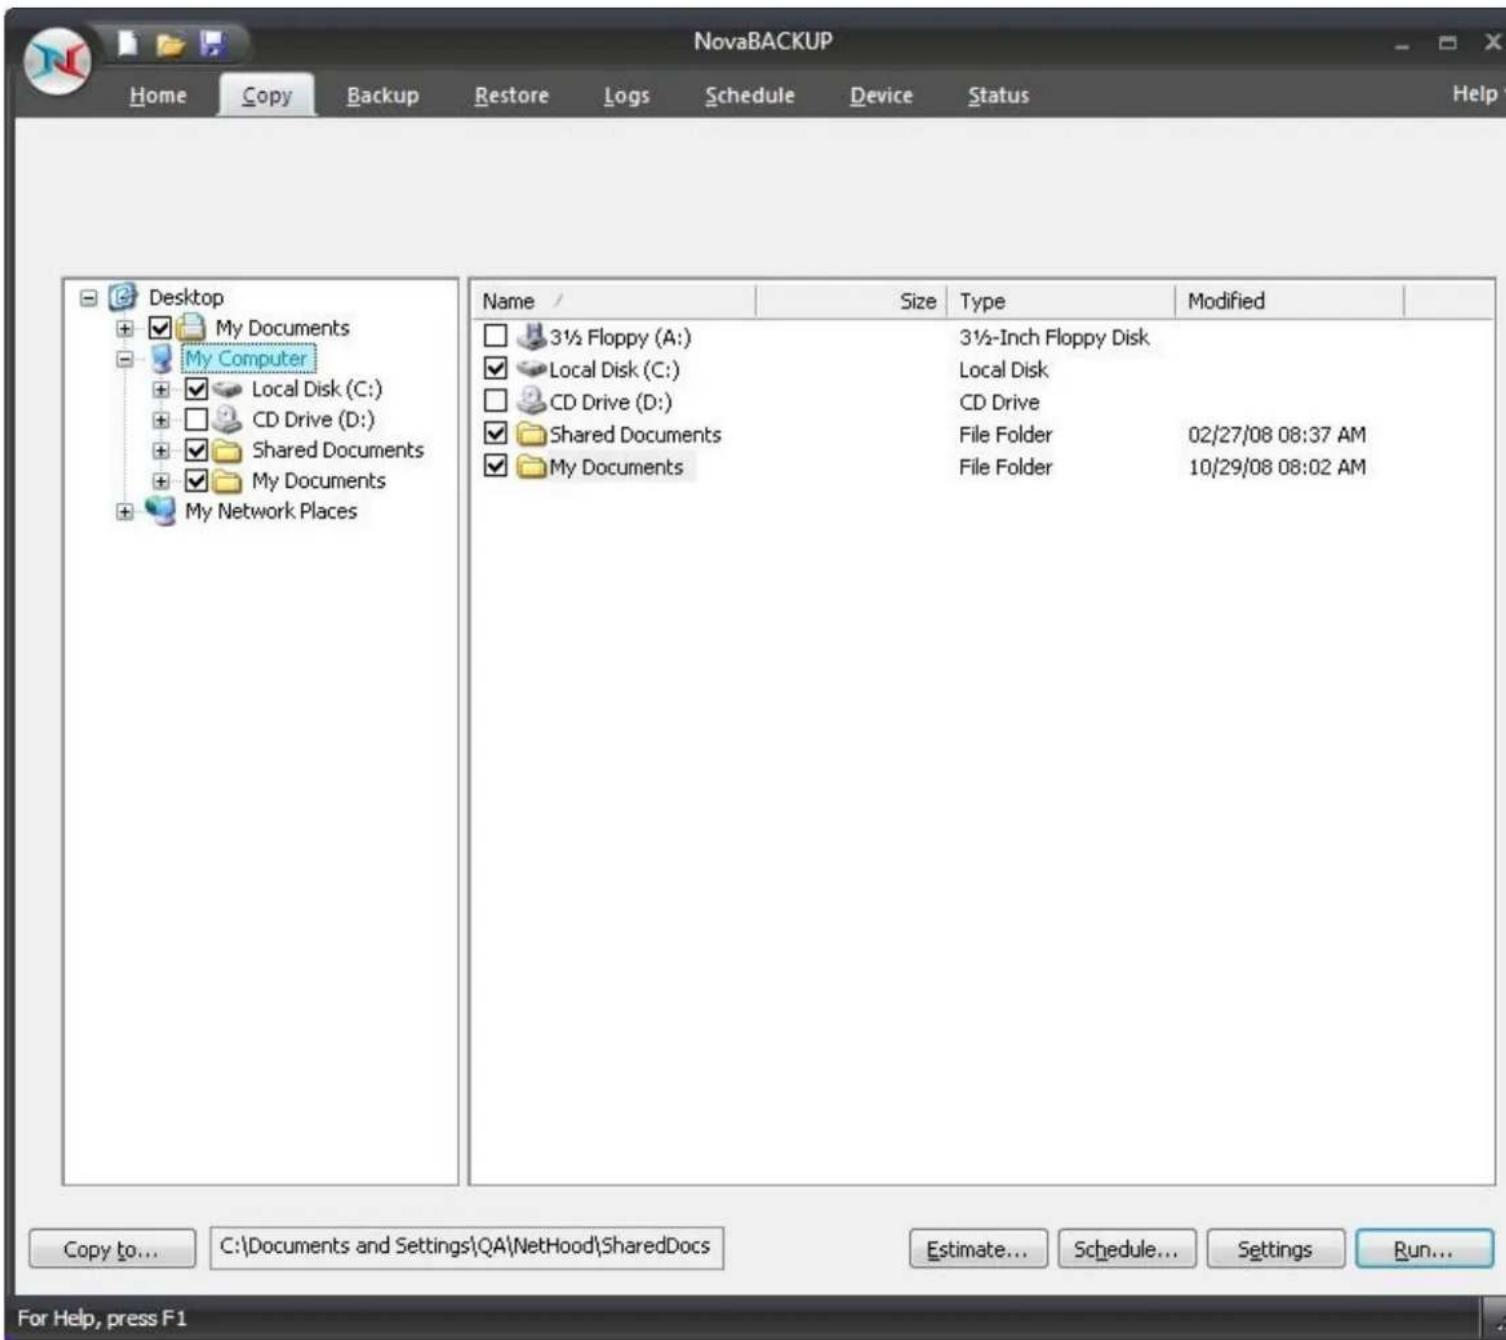
From here, you can create a job that will copy the files/folders you specify from one location to another. The different options available allow you to adjust the copy job to your specific needs.

What are copy jobs? Copy jobs are combinations of directories and files that are selected as well as any of the options (including filters) that go along with that specific copy job. Copyjobs differ from backup jobs in that they result in the exact same set of files being "copied" or transferred to the destination device including: Hard Disk, Network Drive, and online storage. Note: Copy jobs DO NOT permit the use of tape.
text_image
NovaBACKUP Home Copy Backup Restore Logs Schedule Device Status Help Desktop My Documents My Computer Local Disk (C:) CD Drive (D:) Shared Documents My Documents My Network Places Name / Size Type Modified 3½ Floppy (A:) Local Disk (C:) CD Drive (D:) Shared Documents My Documents 3½-Inch Floppy Disk Local Disk CD Drive File Folder 02/27/08 08:37 AM File Folder 10/29/08 08:02 AM Copy to... C:\Documents and Settings\QA\NetHood\SharedDocs Estimate... Schedule... Settings Run... For Help, press F1Button Functions
"Copy To" Button
Click this button to display a dialog showing all available devices. From here, select the destination device and/or path you want to use for this job
"Make Folder" Button
By highlighting an existing path and clicking this button, you are able to create a new, empty folder
"Estimate" Button
This will allow you to find out the estimated number of files and size of the current copy job. Once selected a "Estimate" box will appear with the following information:
Files
This indicates the Count (number of files) and Size (In Gigabytes) that you have selected for the job. This is especially helpful if the size of a copy is an issue when attempt to copy files to external devices with limited space such
Folders
This indicates the number of folders that you have selected for the job.
"Schedule" button
This button is used for the schedule options. Within this window, you will be able to schedule the job as well as name it. You have various scheduling options including; one time, minute, hourly, daily, weekly, or monthly. You may also set the time and date of when the job will run.
"Settings" button
This will take you to the Advanced options for this specific copy job. Refer to the Copy Job Settings Topic for further information
"Copy" button:
This button starts the selected copy job immediately.
Backup Tab
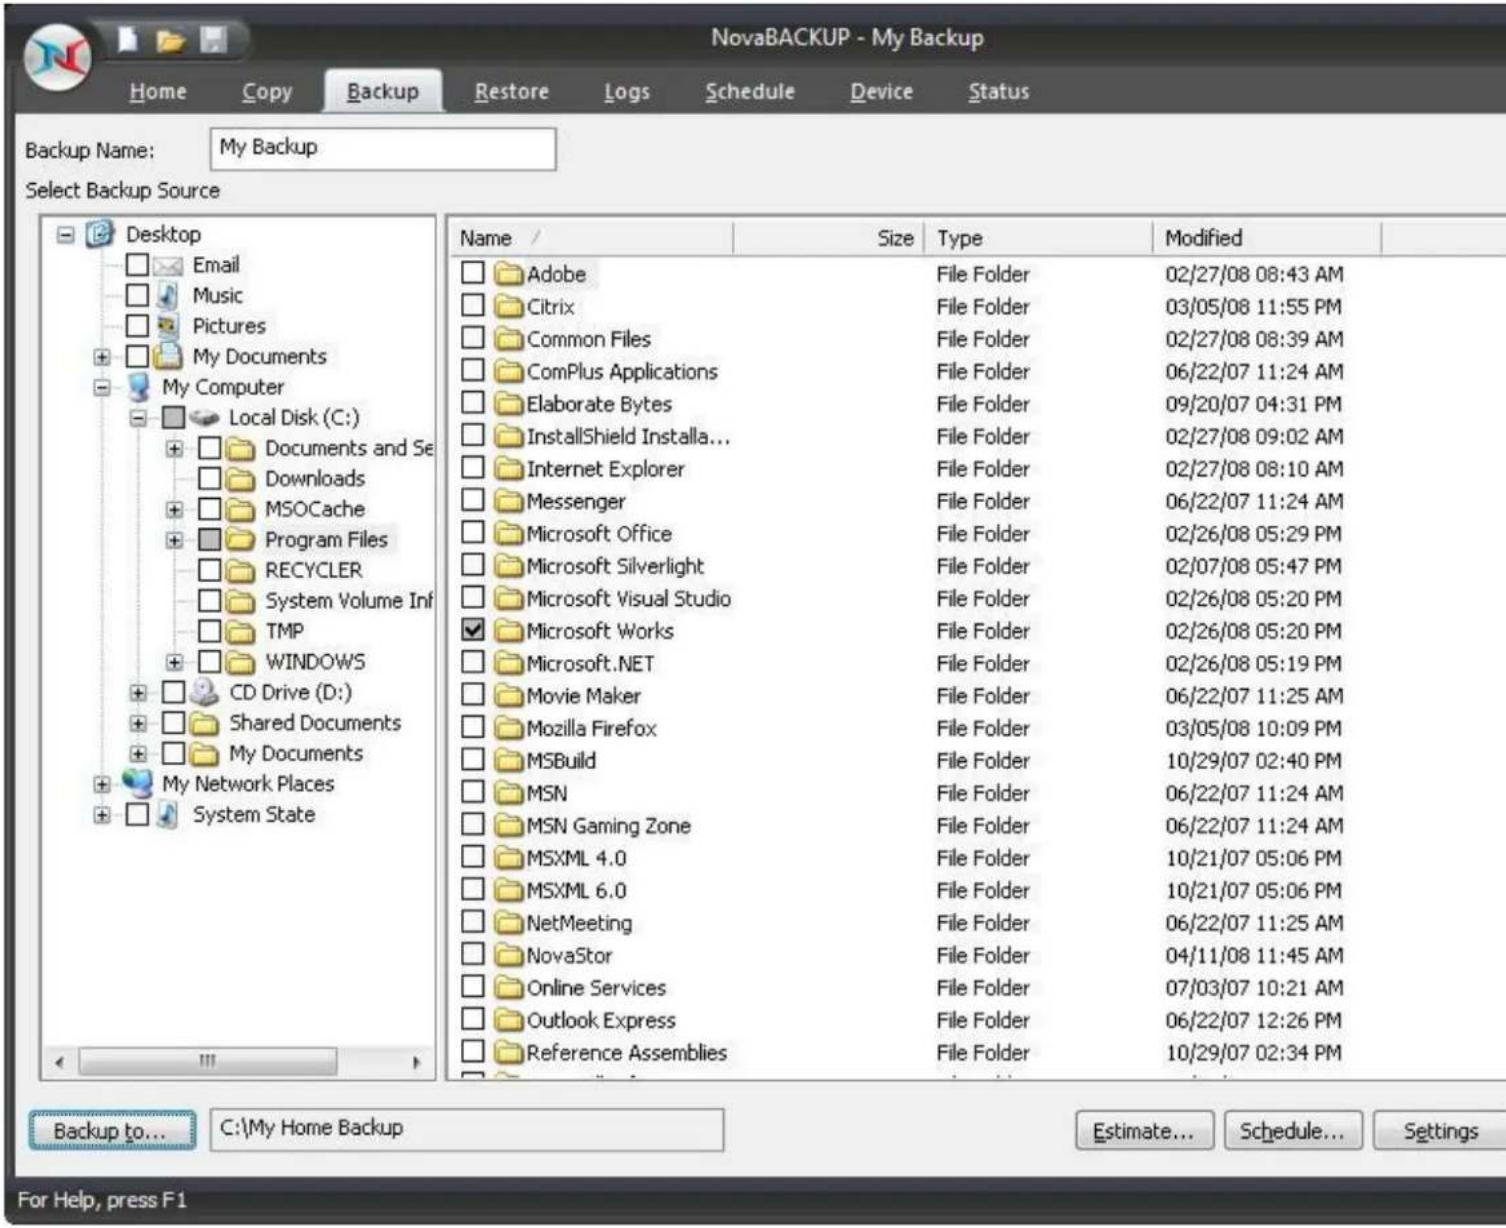
Using this tab, you can create a backup set that will include the files that you specify. The different options available allow you to adjust the backup job to your needs.
You may select items from the "Select Backup Source" pane. Folders and volumes will be on the left and files on the right. You may select a descriptive name for the backup job by enter it in the "Backup Name" field at the top. This will allow you to clearly identify each job on a specific media.
text_image
NovaBACKUP - My Backup Home Copy Backup Restore Logs Schedule Device Status Backup Name: My Backup Select Backup Source Desktop Email Music Pictures My Documents My Computer Local Disk (C:) Documents and Se Downloads MSOCache Program Files RECYCLER System Volume Inf TMP WINDOWS CD Drive (D:) Shared Documents My Documents My Network Places System State Name / Size Type Modified Adobe File Folder 02/27/08 08:43 AM Citrix File Folder 03/05/08 11:55 PM Common Files File Folder 02/27/08 08:39 AM ComPlus Applications File Folder 06/22/07 11:24 AM Elaborate Bytes File Folder 09/20/07 04:31 PM InstallShield Installa... File Folder 02/27/08 09:02 AM Internet Explorer File Folder 02/27/08 08:10 AM Messenger File Folder 06/22/07 11:24 AM Microsoft Office File Folder 02/26/08 05:29 PM Microsoft Silverlight File Folder 02/07/08 05:47 PM Microsoft Visual Studio File Folder 02/26/08 05:20 PM Microsoft Works File Folder 02/26/08 05:20 PM Microsoft.NET File Folder 02/26/08 05:19 PM Movie Maker File Folder 06/22/07 11:25 AM Mozilla Firefox File Folder 03/05/08 10:09 PM MSBuild File Folder 10/29/07 02:40 PM MSN File Folder 06/22/07 11:24 AM MSN Gaming Zone File Folder 06/22/07 11:24 AM MSXML 4.0 File Folder 10/21/07 05:06 PM MSXML 6.0 File Folder 10/21/07 05:06 PM NetMeeting File Folder 06/22/07 11:25 AM NovaStor File Folder 04/11/08 11:45 AM Online Services File Folder 07/03/07 10:21 AM Outlook Express File Folder 06/22/07 12:26 PM Reference Assemblies File Folder 10/29/07 02:34 PM Backup to... C:\My Home Backup Estimate... Schedule... Settings For Help, press F1Backup Job Name
In this text box, you can input an optional name for the current backup job you are creating. Be sure not to confuse this with the file-name of the backup job. The backup job name is essentially a descriptive name that you have assigned to the actual backup job file. A default job name will be assigned to each new backup indicating the date and time within the name. This name structure is just one way to help organize your backup jobs.

What are backup jobs? Backup jobs are combinations of directories and files that are selected for backup as well as any of the options (including filters) that go along with that specific backup. Backup jobs are used to allow one or more collections of files to be backed up at different times. For example, one backup job could be created for accounting data, and another backup job could be created for important data that changes daily. The important data might be backed up daily or even hourly, while the accounting data could be backed up at the end of the week.

Remember that setting a backup job name is optional and is meant to aid in managing backup jobs. For instance, under the Logs Tab, which will be discussed later, a listing of previous backup activity can be seen. Each of these logs is indicated by a Backup Job Name and a date. If you do not specify a Backup Job Name for any of your backup jobs, it will be a daunting task to differentiate the several backups solely by the dates and times of each of the backups. Thus, it is highly recommended that you assign a name to each of your backup jobs in order to ease your ability to distinguish the different backups.
Button Functions
"Estimate" Button
This will allow you to find out the estimated number of files and size of the current backup job. Once selected a "Estimate" box will appear with the following information:
Files
This indicates the Count (number of files) and Size (In Gigabytes) that you have selected for the job. This is especially helpful if the size of a backup job is an issue when attempting to backup files to external devices with limited space such as USB Devices.
Folders
This indicates the number of folders that you have selected for the job.
"Schedule" button
This button is used for the schedule options. Within this window, you will be able to schedule the job as well as name it. You have various scheduling options including; one time, minute, hourly, daily, weekly, or monthly. You may also set the time and date of when the job will run.
"Settings" button
This will take you to the Advanced options for this specific backup job. Refer to the Backup Job Settings Topic for further information.
"Backup To.. " button
Click this button to display a dialog showing all available devices. From here, select the backup destination device and/or path you want to save the backup to
"Backup" button
This button starts the selected backup job immediately.
Restore Tab
Under the Restore tab you will find all the folders/files from previous backups that you can restore either to the original or alternate location.
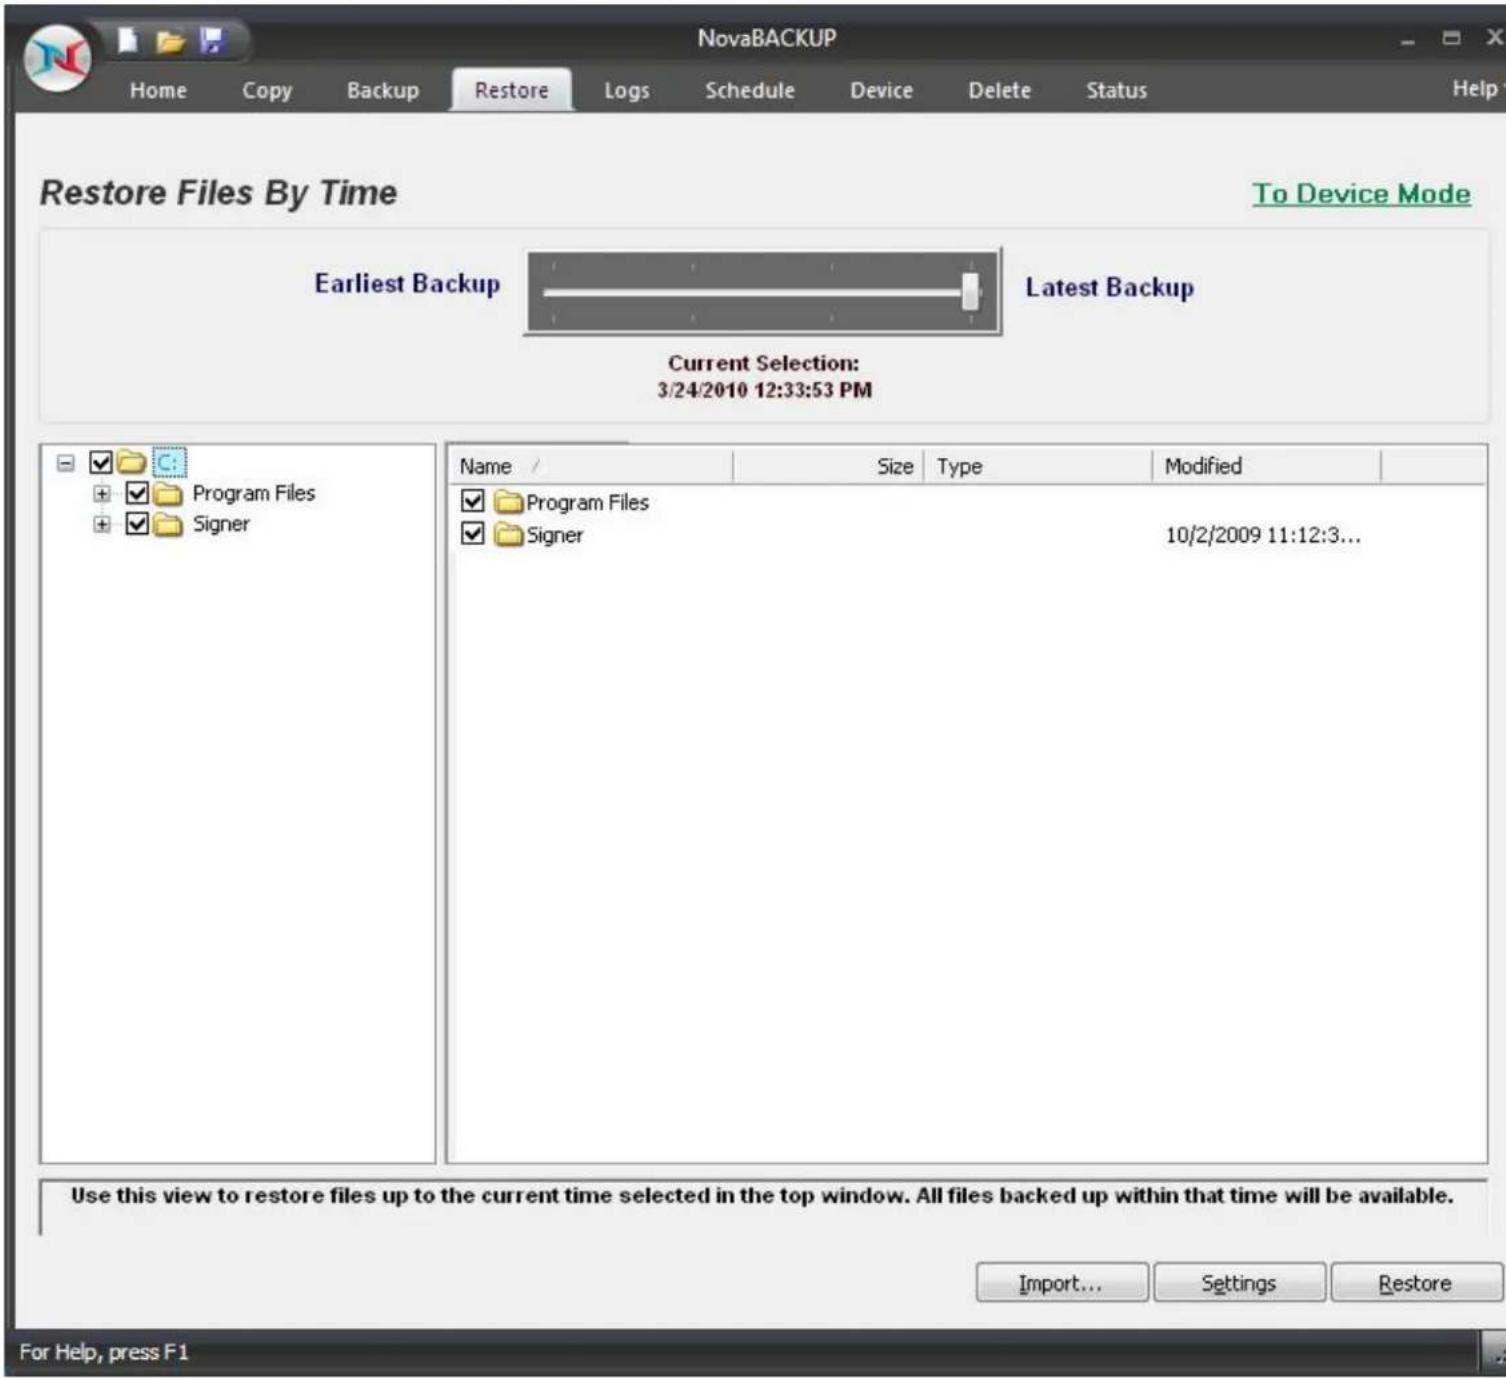
Restore Files By Time
This 'TimeSlider' view uses a patent pending technology to provide a single restorable fileset without the need to select the backup source device. Using the slider, files are listed based on the range of time the backup has run.
text_image
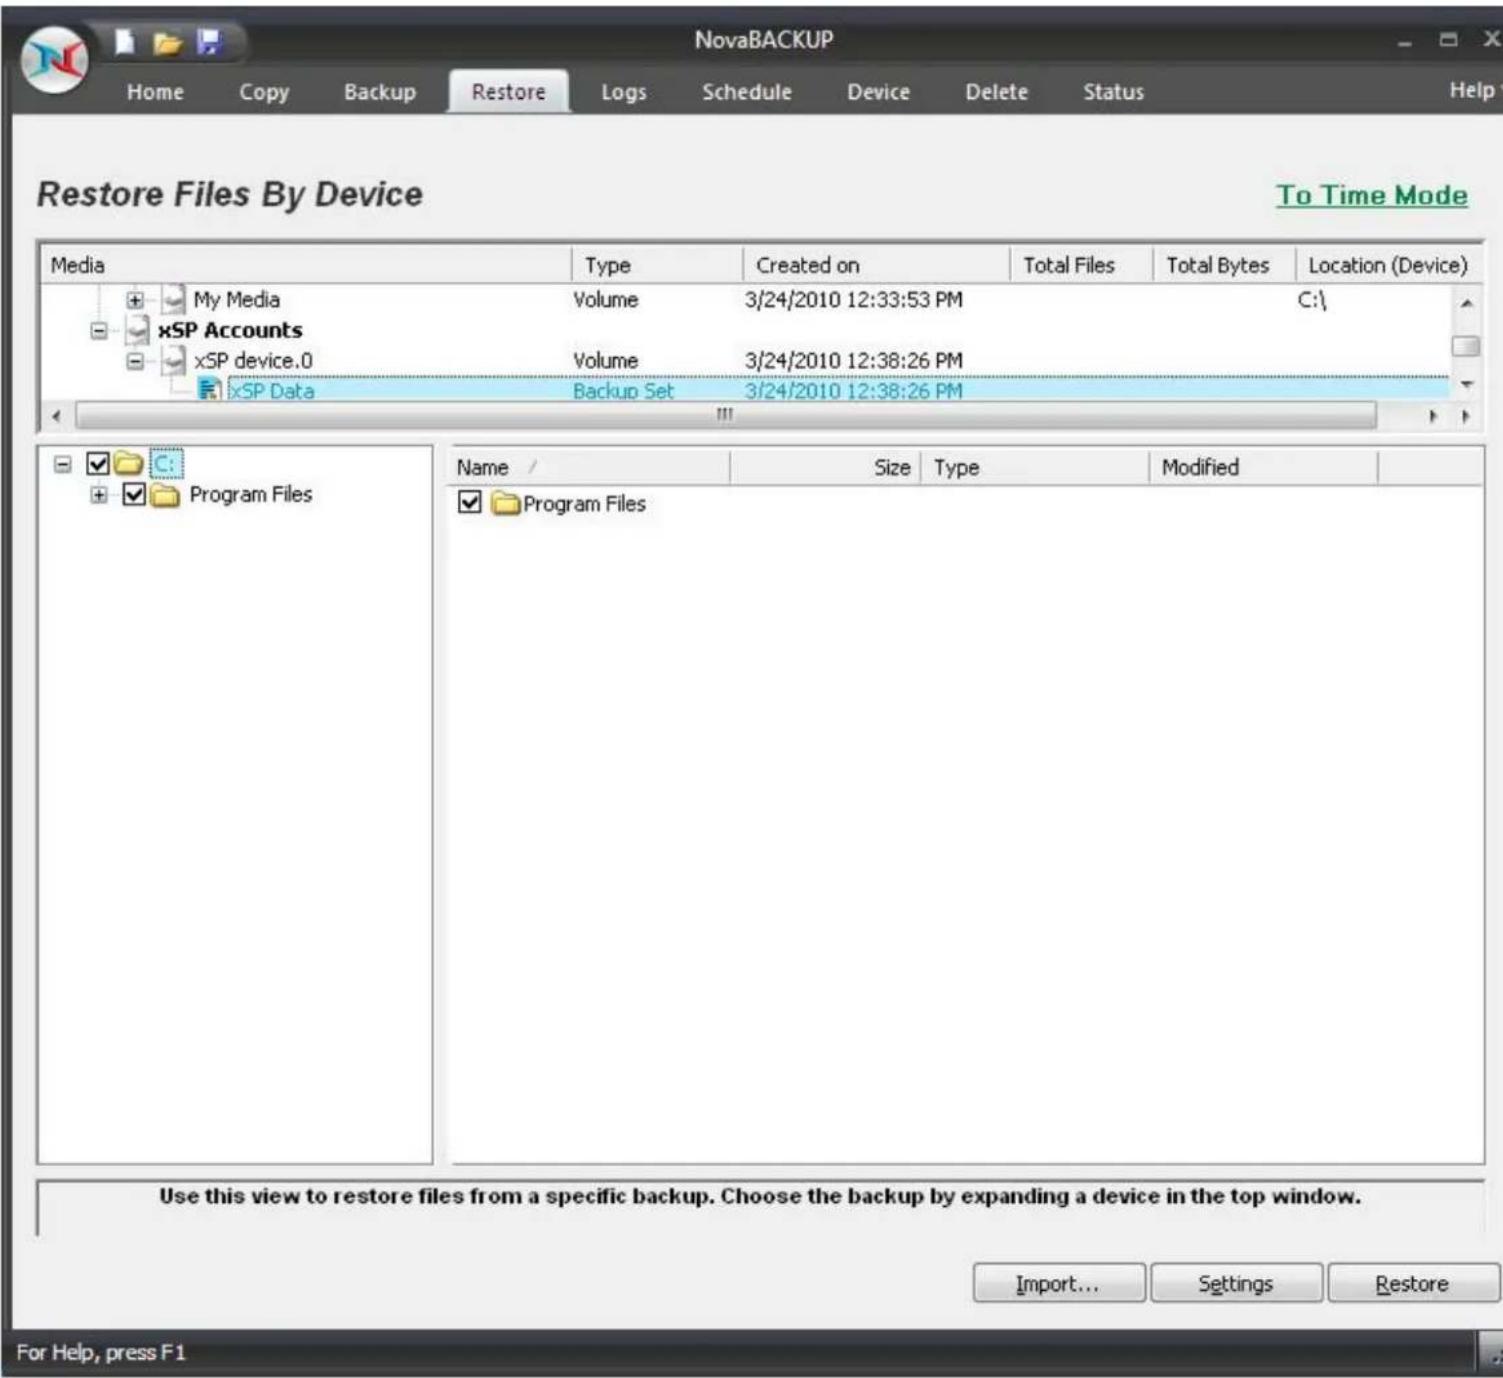
NovaBACKUP Home Copy Backup Restore Logs Schedule Device Delete Status Help Restore Files By Time To Device Mode Earliest Backup Latest Backup Current Selection: 3/24/2010 12:33:53 PM Name / Size Type Modified ✓ Program Files ✓ Signer 10/2/2009 11:12:3... Use this view to restore files up to the current time selected in the top window. All files backed up within that time will be available. Import... Settings Restore For Help, press F1This view displays a restorable fileset contained in a specific backup. Use the device view in the upper window to select the location of the backup and the backup session containing the files available to restore.
text_image
NovaBACKUP Home Copy Backup Restore Logs Schedule Device Delete Status Help Restore Files By Device To Time Mode Media Type Created on Total Files Total Bytes Location (Device) My Media Volume 3/24/2010 12:33:53 PM C:\ xSP Accounts xSP device.0 Volume 3/24/2010 12:38:26 PM xSP Data Backup Set 3/24/2010 12:38:26 PM Program Files Name / Size Type Modified Program Files Use this view to restore files from a specific backup. Choose the backup by expanding a device in the top window. Import... Settings Restore For Help, press F1
Why don't I see any media listed?
If you are unable to see anything populated in the media view, you might need to perform an import on the media which is explained below in the import section.
Select Backup Job
From the Media View in the top window, you will see a list of available backups that you can restore from. Simply select the backup you would like to restore by double-clicking the entry and a listing of the folder/files included in that backup will appear in the windows below.
The Media View - Restore Mode
This window allows you to view all available backups to restore from, based on the database of backup jobs and folder/file selections cataloged within the database. All backups are categorized by destination type (Disk, Removable Disk, Internet, and Tape) and further categorized by backup job name. This view is similar to the Media View as seen in the Backup mode. However, only destinations with backups available for restoration will be listed.
Select Restore Item(s)
These selection windows are similar to the ones seen on the Backup Tab. Here, a listing of files and folders will be displayed once a backup job has been selected for restoration. The only files and directories that will be listed are the ones that were included in the backup job that you are restoring. In the selection windows, you can select files and/or folders just as you did in the Backup Tab when you selected the files for backup.

By default, if you are restoring files to their original location, files that already exist in that location will not be overwritten by the files that are to be restored. Check your Restore Setting to alter this.
Button Functions
"Import" Button
This button will allow you to import backup jobs that are not in the currentNovaBACKUPdatabase. Simply click on the button and browse to the backup job that you desire to import. Once imported into database, the backup job will then be listed in the media view, and available for restoration.
"Settings" Button
This button will allow you to access some options that you have in the restore process. These options are discussed in Restore Job Settings Topic.
"Restore" Button
Once you have selected the files, folders, or drives that you want to restore, you may press this button to start the restore immediately.

If you are restoring from a complete set of spanned media, you should always select the first piece of media as your first restoration media. NovaBACKUP will prompt you to insert each subsequent piece of media if necessary. You must have all media available to do the restore. If your backup consists of 5 pieces of media and media #3 is corrupt/missing/damaged, you will only be able to restore data from the first two pieces of media.
Logs Tab
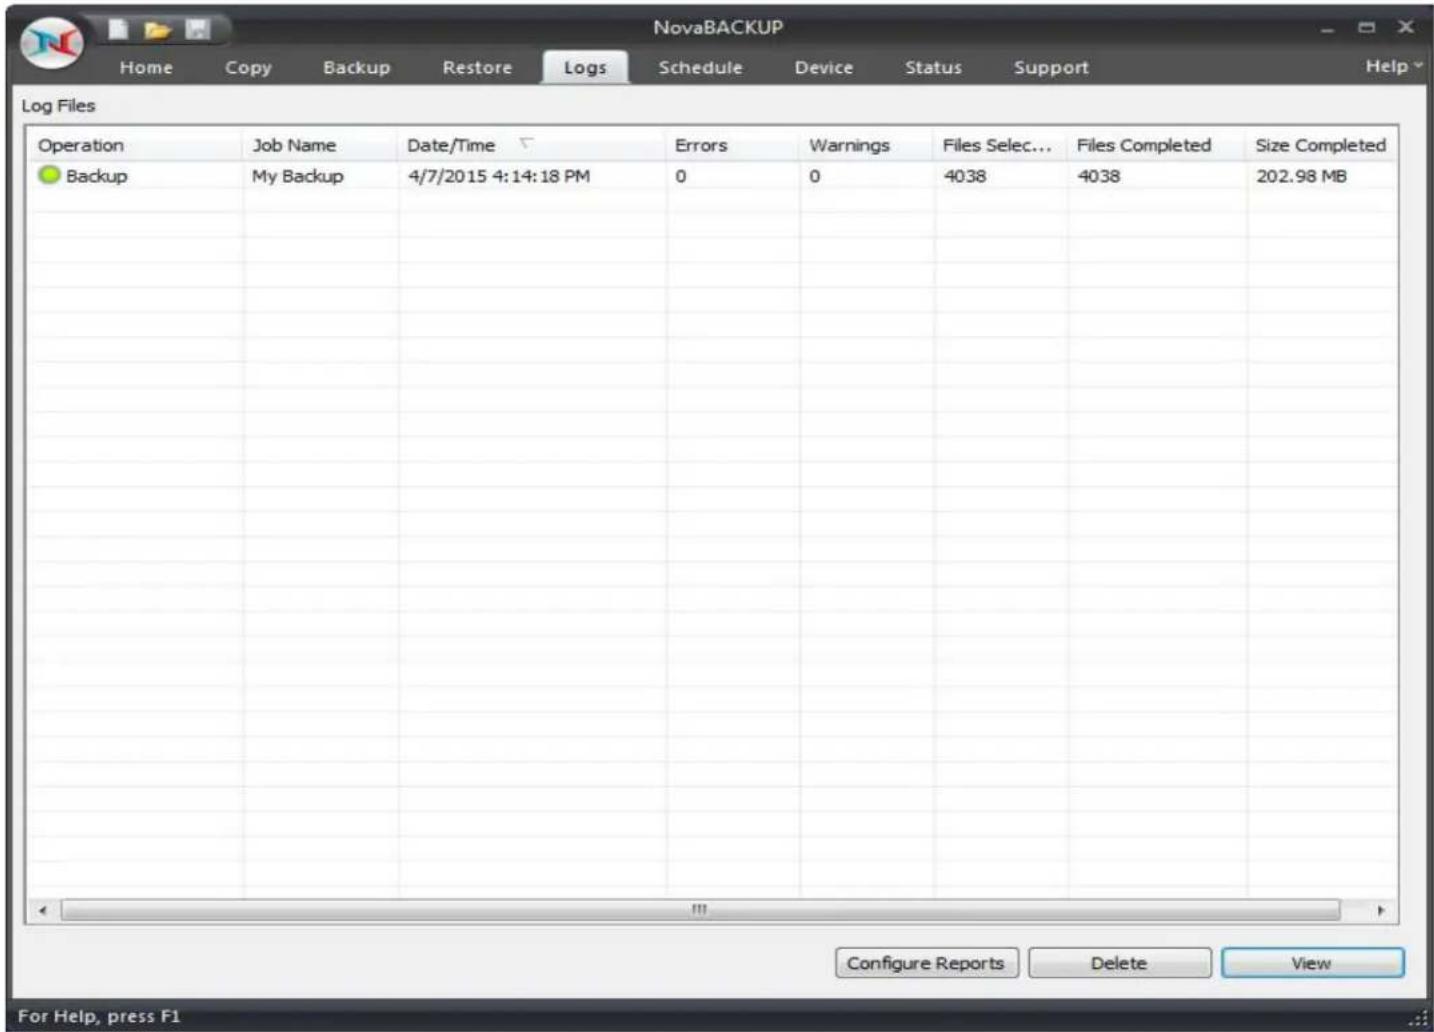
From here, you can quickly determine the status of a Copy, Backup or Restore job that was performed.
text_image
NovaBACKUP Home Copy Backup Restore Logs Schedule Device Status Support Help Log Files Operation Job Name Date/Time Errors Warnings Files Select... Files Completed Size Completed Backup My Backup 4/7/2015 4:14:18 PM 0 0 4038 4038 202.98 MB Configure Reports Delete View For Help, press F1The columns in the summary view include:
Operation: Includes - Copy, Backup, Restore & Import.
You can quickly determine the status of the backup by the color-coded icon next to each
Operation completed successfully
Operation completed, but had warnings
Operation had errors
Job Name: The name of the job for this log file
Date/Time: The Date & Time the specific job was run
Errors: The number of errors encountered after running the job
Warnings: The number of warnings encountered after running the job
Objects Selected: The number of objects selected before running the job
Objects Completed: The number of objects successfully completed after running the job
Size Completed: The total size of all objects successfully completed after running the job

You can quickly sort the logs view by clicking on the appropriate column heading at the top of the window
Button Functions
Configure Reports
Click this button to use the summary reports feature.
Delete Button
To delete a log file, simply select the log file and press the Deletebutton. To delete multiple log files, you may select more than one by using the Shift and/or Ctrl buttons on your keyboard to select the logs and pressing the Delete button.
View Button
To view the log file, select the log you would like to open and press the View button. Alternatively, you may also simply double-click the log file you want to view. For further details, see the Using the Logssection.
Schedule Tab
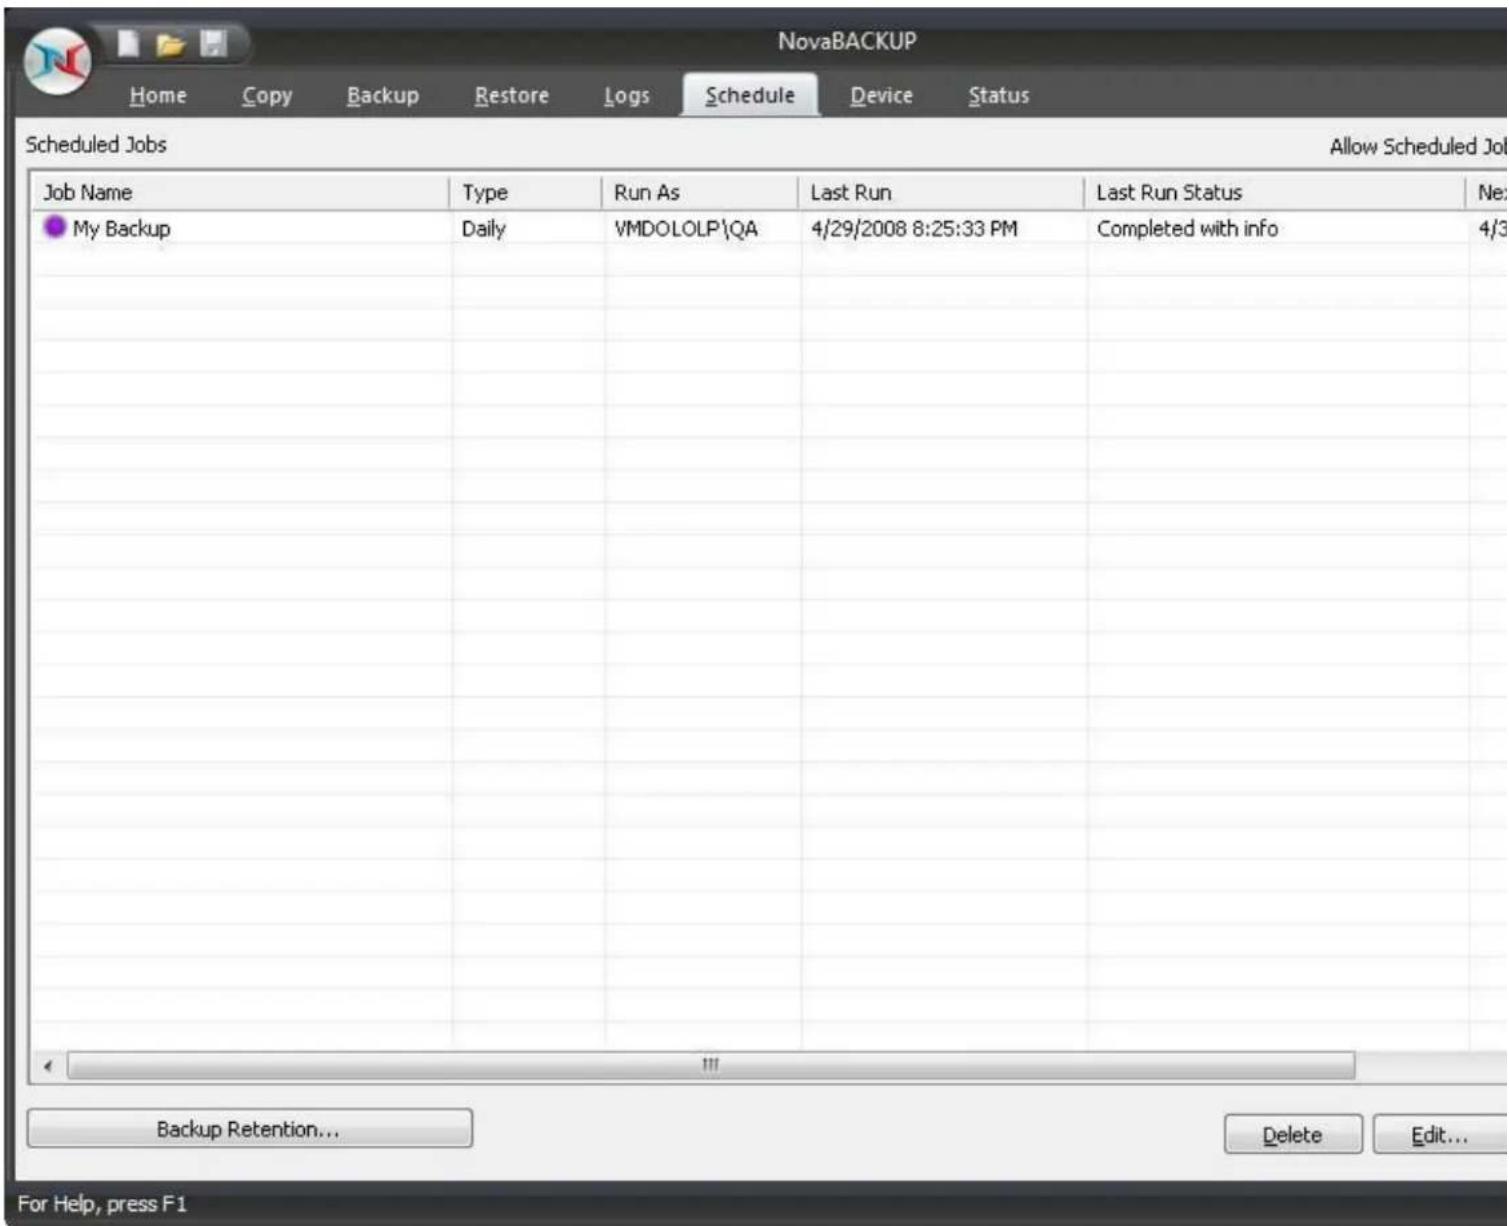
From this tab you are able to view, modify, add, run, and delete scheduled tasks.
text_image
NovaBACKUP Home Copy Backup Restore Logs Schedule Device Status Scheduled Jobs Allow Scheduled Job Job Name Type Run As Last Run Last Run Status Ne: My Backup Daily VMDOLOLP\QA 4/29/2008 8:25:33 PM Completed with info 4/3 Backup Retention... Delete Edit... For Help, press F1
Remember: You can quickly disable all schedules from running by unchecking the option - "Allow scheduled jobs to execute"
The initial view contains an overview of all scheduled jobs including the following columns:
Job Name: Job or Script Name
Type: The "Type" of schedule set - includes (One Time, Minute, Hourly, Daily, Weekly, Monthly)
Run As: Account used to run the job,
Last Run: When the job last ran
Last Run Status: The status the last time the job ran - includes:
Completed - The scheduled job completed with no information (log)
Completed with info - The scheduled job completed successfully and a log was generated
Completed with warnings - The scheduled job completed but had warnings
Completed with errors - The scheduled job completed but had errors
Failed - The scheduled job failed to run
Next Run: When the job is scheduled to run again
Current Status:
- Waiting - Schedule is waiting to run
Running - Schedule is running
Held - Schedule has been placed on hold
Error - Schedule will not run again until the error is corrected (Invalid Credentials, no media, no c
Right-Click Functions
Right-clicking on any of the listed schedules displays a menu with the following functions:
New - Create a new schedule
Hold/Resume Schedule - Permits the selected schedule to be placed on hold or resumed if already held
Modify Schedule - Displays the schedule details so they can be viewed/modified
Modify Job - Displays the specific job details so they can be viewed/modified
Run Now . . . - Runs the job associated with the selected schedule immediately
View Log - Displays the log details of the scheduled job the last time it was run
Delete - Deletes the selected schedule item from the list
Button Functions
Delete Button
This button will allow you to delete the selected schedule item from the list, regardless of its status.
Edit Button
This button will allow you to edit the selected schedule item.
Add Button
This button will allow you to create new scheduled tasks.
Backup Retention Button
Click this button to display the screen which is used to define a backup retention job.
Device Tab
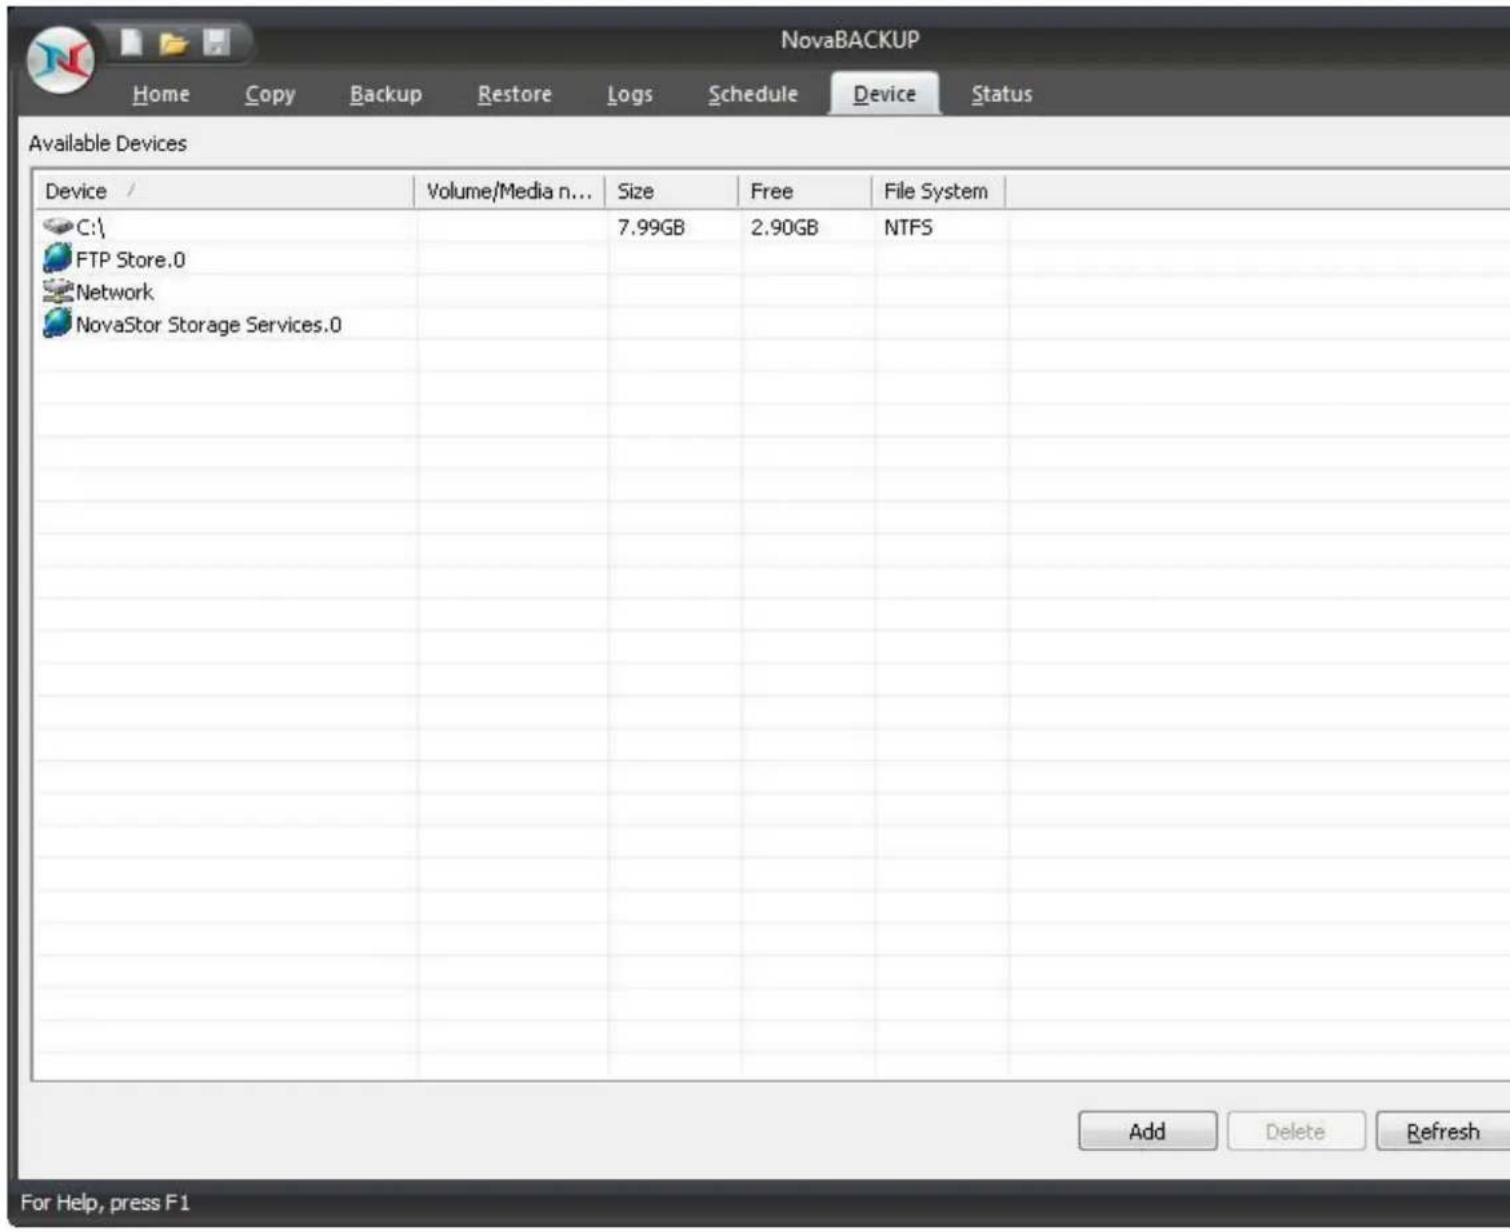
The Device Tab shows a list of all available storage devices jobs can be configured to utilize. In from this tab, you're able to add, modify and delete devices
text_image
NovaBACKUP Home Copy Backup Restore Logs Schedule Device Status Available Devices Device / Volume/Media n... Size Free File System C:\ FTP Store.0 7.99GB 2.90GB NTFS Network NovaStor Storage Services.0 Add Delete Refresh For Help, press F1The initial view contains an overview of all scheduled jobs including the following columns:
Device - The name of the device
Volume (Media) - The name of the volume (Disk, Removable Disk) or media name (Tape)
Size - Total size of the device or media
Free - Total available size of the device or media
File System - Type of file system (NTFS, UDF, FAT32, FAT, etc)
Right-Click Functions
Right-clicking on any of the listed devices displays a menu with functions appropriate to the device:
Hard Drive, Removable Hard Drives, Networked Drives & Tape:
Import - Allows you to import backup jobs that are not in the current NovaBACKUP database & Tape Devices
Eject Media - Eject the currently inserted media
Quick Erase Media - Performs a quick erase (header information is erased, but data remains)
Full Erase Media - All data is erased from media
Internet and Network storage devices
Delete Device - Deletes the currently selected Internet device
Properties - List the properties associated with the selected device
Button Functions
"Add" Button (Only applies to Internet and Network Devices)
Launches the Internet and Network Device dialog.
"Delete" Button (Only applies to Internet and Network devices)
Deletes the currently highlighted Internet device from the list.
"Refresh" Button
Refreshes the device view to include newly added or connected devices.
"Properties" Button (Only applies to Internet and Network devices)
Displays the properties of the highlighted Internet and Network devices. You can also display the device properties by double-clicking on the device in the list.
Status Tab
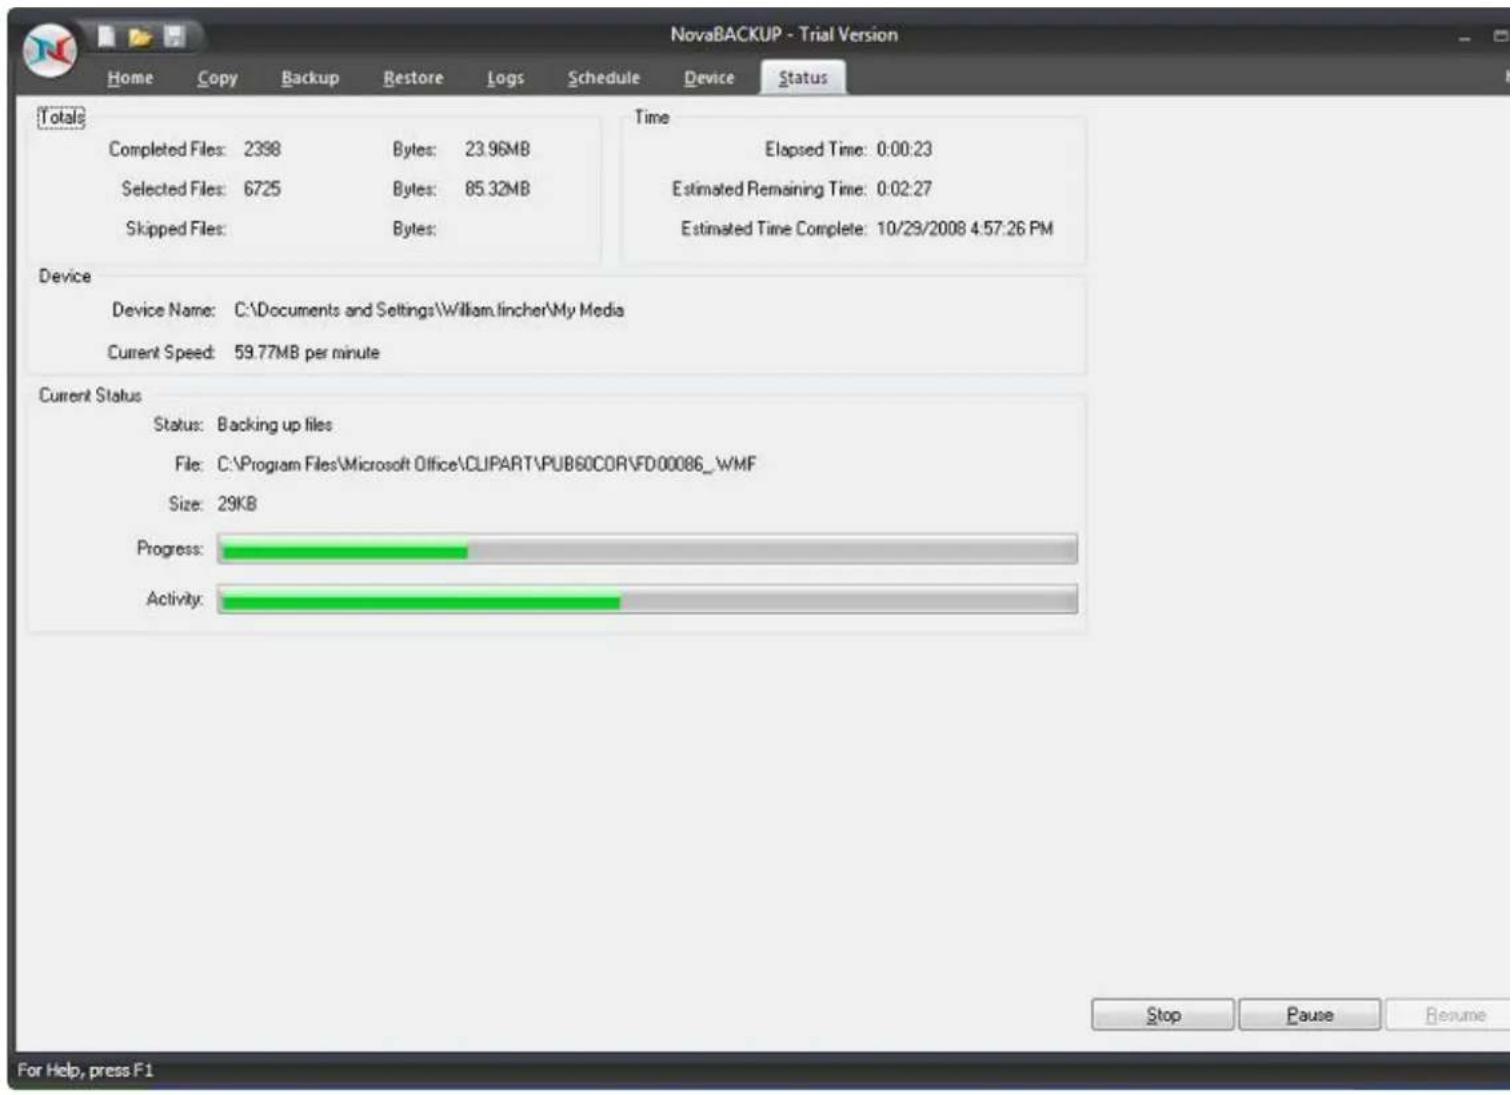
From here, you can quickly determine the status of a currently running job
text_image
NovaBACKUP - Trial Version Home Copy Backup Restore Logs Schedule Device Status Totals Completed Files: 2398 Bytes: 23.96MB Selected Files: 6725 Bytes: 85.32MB Skipped Files: Bytes: Time Elapsed Time: 0:00:23 Estimated Remaining Time: 0:02:27 Estimated Time Complete: 10/29/2008 4:57:26 PM Device Device Name: C:\Documents and Settings\William.lincher\My Media Current Speed: 59.77MB per minute Current Status Status: Backing up files File: C:\Program Files\Microsoft Office\CLIPART\PUB60COR\FD00086_WMF Size: 29KB Progress: Activity:The status view includes the following sections and items:
Totals
Completed Files/Bytes - The number of files and bytes successfully completed
Selected Files/Bytes - The total number of files and bytes selected by the job
Skipped Files/Bytes - The number of files and bytes that were skipped while running the job
Time
Elapsed Time: Hours: Minutes: Seconds representing the total amount of time the current job has been running
Estimated Remaining Time: Hours: Minutes: Seconds representing the estimated time remaining for the current job to complete (This figure is an estimate only - actual time may vary)
Estimated Time Completed: Date/Time representing the estimated completion time of the current job (This figure is an estimate only - actual time my vary)
Device
Device Name: The name of the device/media used for the currently running job
Current Speed: The speed (thruput) of the data being transferred for the currently running job
Current Status
Status: Status of the currently running or completed job
File: The file currently being transferred
Size: The size of the file currently being transferred
Progress: The progress bar representing the percentage completed of the currently running job (This is an approximate indication of job completion. Actual percentage may vary).
Button Functions
"Stop" Button - Stops the currently running job
"Pause" Button - Pauses the currently running job - Job remains active
"Resume" Button -Resumes the previously paused job
The Scheduler
text_image
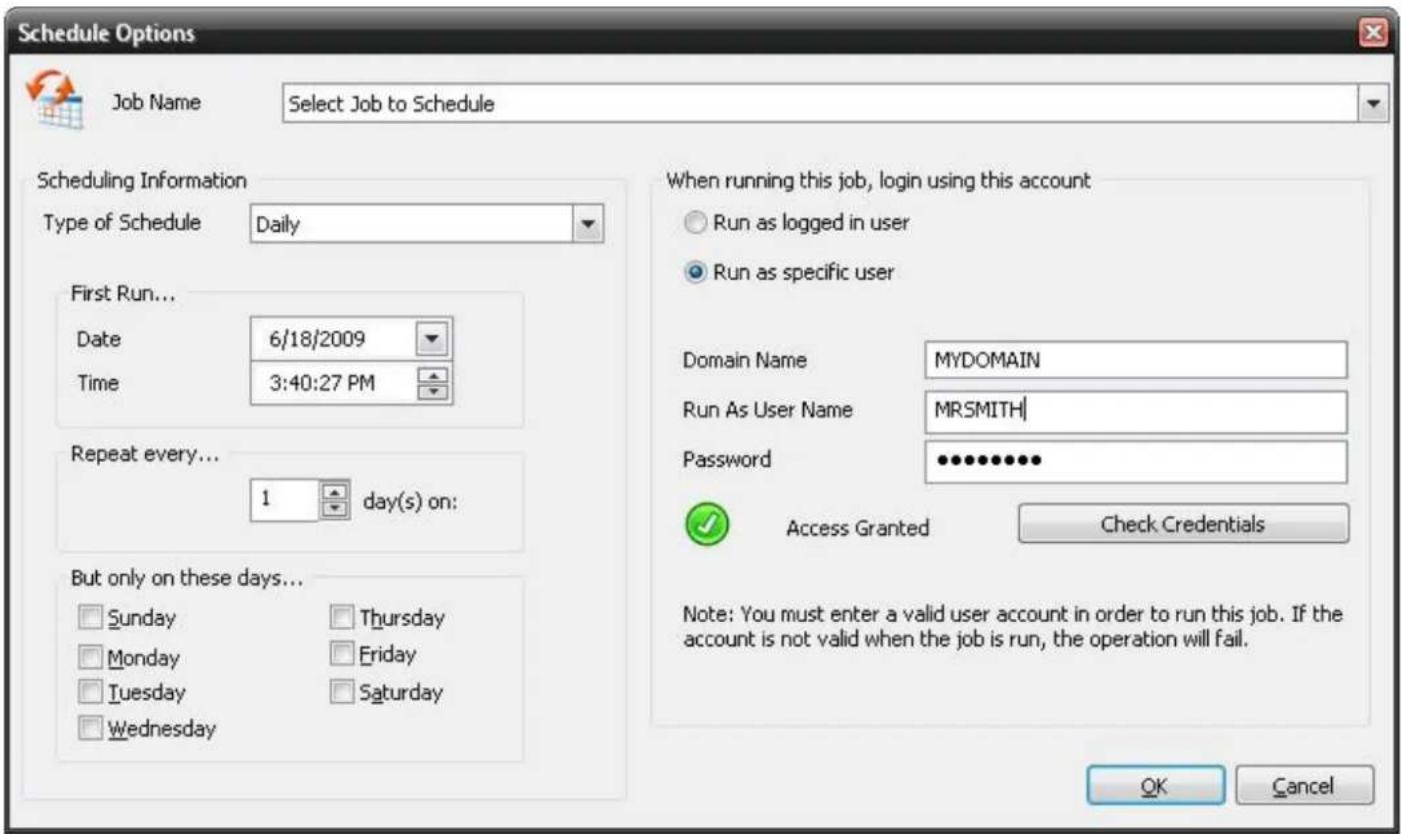
Schedule Options Job Name Select Job to Schedule Scheduling Information Type of Schedule Daily First Run... Date 6/18/2009 Time 3:40:27 PM Repeat every... 1 day(s) on: But only on these days... Sunday Thursday Monday Friday Tuesday Saturday Wednesday When running this job, login using this account Run as logged in user Run as specific user Domain Name MYDOMAIN Run As User Name MRSMITH| Password •••••••••• Access Granted Check Credentials Note: You must enter a valid user account in order to run this job. If the account is not valid when the job is run, the operation will fail. OK CancelSchedule Type
This drop-down list allows you to select whether you want the backup script to run once, hourly, daily, weekly, or monthly.
BackupJob Name
This allows you to select the job that you would like to run. Click on the "Browse..." button next to the text box to see a list of all saved backup and copyscripts.
Start Date
Here, you may select the date on which you would like the scheduled backup to start. The default date that is selected is the current date as indicated by your computer. However, you may manually input a desired date or you can click on the "down" arrow next to the date. Doing so will give you a calendar view of the current month, see illustration.

text_image
June, 2009 Sun Mon Tue Wed Thu Fri Sat 31 1 2 3 4 5 6 7 8 9 10 11 12 13 14 15 16 17 18 19 20 21 22 23 24 25 26 27 28 29 30 1 2 3 4 5 6 7 8 9 10 11 Today: 6/18/2009The red square indicates the current date. The solid square indicates the date that the scheduled backup is set to start on. To select a different day to start, simply click on the desired date. To see a calendar view of the previous or subsequent months, simply click on the left and right arrows, respectively.

To quickly change the year, rather than going forward month by month, simply click on the year in the blue bar on the top of the calendar view and then scroll up and down using the arrow buttons that appear to the right of the date. To quickly select a desired month without scrolling through them, click on the current month in the blue bar and select the desired month from the list that appears.
Start Time
Using this area of the schedule will allow you to designate the time at which thejobshould occur. You can change the time using a number of different ways. After selecting the desired item to change, (the hour, the minutes, or time of day), you may use the up and down arrows to the right of the time to scroll the time up or down, respectively. You may also use the up and down arrows on the keyboard to do so or you may simply input the time using the number pad on your keyboard as well. The time of day, AM or PM, may be changed in the same manner, using the up and down arrows or by using the "A" and "P" keys on your keyboard.
When running a job, login using this account
Run as logged in user:
Run the job using the Windows login credentials in effect at that time.
Run as specific user:
Permits you to set the default system/domain account to be used for new jobs.
Domain Name: The domain name you are logging into.
Run as User Name: The user name you want the job to run as.
Password: The password for the account you want the job to run as.

Note: The account information entered here is usually account you use to login to windows. However, you may need to use a different account when backing up network/shared drives.

Important: If you have entered credentials you must click the "Check Credentials" button to validate the account you have entered before proceeding forward.
OK
After completing the setup of a scheduled job, you must press "OK" in order to complete the process.
Cancel
If you would like to exit the scheduler without setting the schedule, click on the "Cancel" to revert back to the main user interface.
The Express Wizard
The Express Wizard provides a step by step method to perform many common tasks available in the application. Topics will be added soon which outline the features and steps available in the Express Wizard.
Virtual Dashboard
The Virtual Dashboard is where all VMware and Hyper-V backups that are capable of restoring place. It is also the center of VMware and Hyper-V replication operations. These backups are that are done through the Backup tab.
In order to access the Virtual Dashboard users will need to start NovaBACKUP and then click "Virtual Dashboard" from the "Home" tab.
Adding a hypervisor
Upon opening the Virtual Dashboard users will be prompted with the option to add a hypervisor. Click the Add button at the top of the Hypervisor's menu. Once clicking "Add" users will be prompted to enter information relating to their Hypervisor.
Note: If there are already VMware hosts added through the legacy backup functionality in NovaBACKUP, those servers will already be added to the Virtual Dashboard.
Adding a VMware hypervisor
Once users are in the "Add" menu of the Virtual Dashboard, select VMware. Users will then have four options:
Display Name: This is the friendly name for the hypervisor. This can be anything and is designed for ease of use.
Hostname / IP Address: The Hostname or IP address of the VMware ESXi or vCenter applica
Username: The username with access to the ESXi or vCenter application.
Password: The password for the user
Test / Save: Test the provided configuration or Save the provided configuration. Clicking Save will also test the credentials.
Adding a Hyper-V hypervisor
Once a user is in the "Add" menu of the Virtual Dashboard, select Hyper-V. Users will then be presented with two options:
Editing a local Hyper-V hypervisor
If NovaBACKUP is being installed onto a local Hyper-V host, users will not need to enter user Hyper-V service. Users will need to add two fields of information.
Display Name: This is the friendly name for the hypervisor. This can be anything and is designed for ease of use.
Hostname: This is the Fully Qualified Domain Name (FQDN) or hostname of the Hyper-V host.
Test / Save: Test the provided configuration or Save the provided configuration. Clicking Save will also test the credentials.
Editing a remote Hyper-V hypervisor
If NovaBACKUP is being installed on a machine to manage a remote Hyper-V host, users will dentials to access the Hyper-V service. Users will need to add four fields of information. If the Hyper-V host is remote, check "Connect using different credentials".
Display Name: This is the friendly name for the hypervisor. This can be anything and is designed for ease of use.
Hostname: This is the Fully Qualified Domain Name (FQDN) or hostname of the Hyper-V host.
Username: The local or domain username with access to the Hyper-V host
Password: The password for the user
Test / Save: Test the provided configuration or Save the provided configuration. Clicking Save will also test the credentials.
Editing a hypervisor
To edit a hypervisor, click "Add" after selecting the hypervisor to be edited.
Removing a hypervisor
To remove a hypervisor, click "Remove" after selecting the hypervisor to be edited.
Note: Removing a Hypervisor will remove all protected virtual machines and their backups from the Virtual Dashboard. Removing a virtual machine removes the ability to restore that virtual machine through the Virtu:
Adding a virtual machine
After adding a hypervisor, users will be shown a selection of virtual machines available for pro next to the virtual machine needing protection in order to add it to the list of available virtual
Editing a VMware hypervisor
Once a user is in the "Add" menu of the Virtual Dashboard, select VMware. Users will then have four options:
Display Name: This is the friendly name for the hypervisor. This can be anything and is designed for ease of use.
Hostname / IP Address: The Hostname or IP address of the VMware ESXi or vCenter applica
Username: The username with access to the ESXi or vCenter application.
Password: The password for the user
Test / Save: Test the provided configuration or Save the provided configuration. Clicking Save will also test the credentials.
Editing a Hyper-V hypervisor
Once a user is in the "Add" menu of the Virtual Dashboard, select Hyper-V. Users will then be presented with two options:
Editing a local Hyper-V hypervisor
If NovaBACKUP is being installed onto a local Hyper-V host, users will not need to enter user Hyper-V service. Users will need to add two fields of information.
Display Name: This is the friendly name for the hypervisor. This can be anything and is designed for ease of use.
Hostname: This is the Fully Qualified Domain Name (FQDN) or hostname of the Hyper-V host.
Test / Save: Test the provided configuration or Save the provided configuration. Clicking Save will also test the credentials.
Editing a remote Hyper-V hypervisor
If NovaBACKUP is being installed on a machine to manage a remote Hyper-V host, users will dentials to access the Hyper-V service. Users will need to add four fields of information. If the Hyper-V host is remote, check "Connect using different credentials".
Display Name: This is the friendly name for the hypervisor. This can be anything and is designed for ease of use.
Hostname: This is the Fully Qualified Domain Name (FQDN) or hostname of the Hyper-V host.
Username: The local or domain username with access to the Hyper-V host
Password: The password for the user
Test / Save: Test the provided configuration or Save the provided configuration. Clicking Save will also test the credentials.
Backing up virtual machines
After adding a virtual machine to the list of protected virtual machines, users are able to create backup jobs that are able to restore individual files as well as directly back into the hypervisor.
When creating a backup job, files will be stored in a hierarchical folder structure rather than a single file. After selecting a target folder on the user's machine, the Virtual Dashboard will automatically create another folder NovaBACKUP underneath that folder. Users may continue to select the original destination for all
Example: A user selecting C:\Backups\ may continue to select this folder for all future backup jobs. After the first backup job runs, users will see a separate folder: C:\Backups\NovaBACKUP\
Backing up VMware
VMware backups can be performed from any Windows 7 or Server 2008 R2 machine or greate
Changed Block Tracking
Changed Block Tracking (CBT) is a VMware feature that helps perform incremental backups. After treated virtual machine, users will see an option for CBT in the bottom right of the virtual media dashboard. Checking this box will enable CBT or show the current status of CBT on that virtual
Without CBT enabled, users will be unable to create an Incremental or Differential backup.
Note: Enabling or disabling CBT may take time, as this is a VMware function change.
Setting up VMware backups
Name: The name of the backup job as it appears in the Virtual Dashboard
Type: The type of backup job to configure &endash; Full, Incremental, or Differential
Retention: In either "Generations" (number of versions to keep or count) or "Days old" (number of days to keep available)
Run as: Users may choose to run the job as either the current user or as a specified user
Schedule: Users may choose to schedule the job in a variety of methods. If no schedule is desired, users may toggle the "Schedule" switch in the top right to turn off the scheduler.
VMware Retention
VMware backups are able to maintain a retention value in either generations (count) or days for backups. In order to apply retention to an Incremental backup, users will need to target the same folder as their incremental backup with a scheduled or manually run full backup job that includes a retention value
Full
A full backup is a backup of the entire virtual machine all at once. These backups can be very large in nature and users should be aware of how much storage space is available on the destination.
Incremental and Differential initial backups
If a user has not previously run a Full backup of a virtual machine, the initial Incremental or Differential backup job will execute as a full backup. This is intended behavior due to the required dependencies of Incremental or Differential jobs to their respective last full backup.
Incremental
Incremental backup jobs are backup jobs that base themselves on the last incremental backup job incremental job is dependent upon the previous incremental backup in order to restore any partic
Differential
Differential backup jobs are backup jobs that base themselves on the last full backup job run. This means that each differential backup job is independent from each other and only the last full backup and the desired differential backup are required to restore a particular file.
Backing up Hyper-V
Hyper-V backups can be performed from either the Hyper-V 2012 or Hyper-V 2012 R2 host m backups, NovaBACKUP must be installed on the Hyper-V host where the virtual machine desired ated.
Setting up Hyper-V backups
When creating a new backup job, users will be presented with the following options:
Name: The name of the backup job as it appears in the Virtual Dashboard
Retention: In either "Generations" (number of versions to keep or count) or "Days old" (number of days to keep available)
Run as: Users may choose to run the job as either the current user or as a specified user
Schedule: Users may choose to schedule the job in a variety of methods. If no schedule is desired, users may toggle the "Schedule" switch in the top right to turn off the scheduler.
Hyper-V Retention
Hyper-V backups can currently only be run in a full mode. Retention maintains either a Genera Day's.
Restoring VMware backups
To restore a VMware backup, browse to the previously configured VMware backup job. Immediate Summary" section will be a list of old and new backup job logs. Backup jobs that are still available for restore will be listed with three commands: Mount, Restore and Log. To restore a VMware backup users are given
Mount (Individual file restore)
Clicking the "Mount" button will mount the virtual machine's virtual hard drives on the local drive. Once the drive has been mounted a Windows Explorer will appear to browse the file structure. Additionally, if a drive is already mounted, users will be shown the current drive letter of the mounted image.
Once mounted, the Mount button will switch to Unmount. After a user is finished restoring any files from the Virtual Machine, clicking Unmount will disconnect that virtual machine's virtual har
Restoring an image directly to a hypervisor
Name: The name of the backup job within the Virtual Dashboard
Target VM Name: The name of the virtual machine at its destination hypervisor.
Destination Hypervisor: This is the destination, or target, hypervisor. This will display any currently configured VMware hypervisors. If the desired hypervisor has not already been configured, users may click the blue "+" sign to add a hypervisor at this time.
Target Datastore: The target ESXi / vCenter datastore that the user wishes this VM to be replicated to
VM Folder: The target ESXi / vCenter datastore that the user wishes to replicate this virtual machine into
Restoring Hyper-V backups
To restore a Hyper-V backup, browse to the previously configured Hyper-V backup job. Immediate Summary" section will be a list of old and new backup job logs. Backup jobs that are still available for restore will be listed with three commands: Mount, Restore and Log. To restore a Hyper-V backup users are given
Mount (Individual file restore)
Clicking the "Mount" button will mount the virtual machine's virtual hard drives on the local drive. Once the drive has been mounted a Windows Explorer will appear to browse the file structure. Additionally, if a drive is already mounted, users will be shown the current drive letter of the mounted image.
Once mounted, the Mount button will switch to Unmount. After a user is finished restoring any files from the Virtual Machine, clicking Unmount will disconnect that virtual machine's virtual har
Restore (Original Location)
Restoring to the original location allows a user to place the backed up copy of the virtual machine directly back in place to its original location in the Hyper-V server. This will overwrite any existing Hyper-V machines that might still be in
place.
Restore (Alternate Location)
Restoring to an alternate location allows a user to export a copy of the backed up virtual machine to a new destination in so that it may be moved (example: restore to USB or NAS to manually move to an alternat
VMware Replication
VMware Replication uses the NovaBACKUP Backup/Copy Engine to copy data from either a sing host to itself or from one host to another.
Changed Block Tracking
Changed Block Tracking (CBT) is a VMware feature that helps perform incremental backups. After treated virtual machine, users will see an option for CBT in the bottom right of the virtual m dashboard. Checking this box will enable CBT or show the current status of CBT on that virt
Without CBT enabled, replication jobs will be transferred in full each time the job is executed, which could increase replication time significantly.
Note: Enabling or disabling CBT may take time, as this is a VMware function change.
VMware Replication Retention
VMware backups are able to maintain a retention value in either generations (count) or days for backups. In order to apply retention to an Incremental backup, users will need to target the same folder as their incremental backup with a scheduled or manually run full backup job that includes a retention value
Setting up VMware replication
After clicking "Replicate" users are presented with the following options:
Name: The name of the backup job within the Virtual Dashboard
Target VM Name: The name of the virtual machine at its destination hypervisor. This will default to whatever the current name is plus the suffix of "_rep"
Destination Hypervisor: This is the destination, or target, hypervisor. This will display any currently configured VMware hypervisors. If the desired hypervisor has not already been configured, users may click the blue "+” sign to add a hypervisor at this time.
Target Datastore: The target ESXi / vCenter datastore that the user wishes this VM to be replicated to
VM Folder: The target ESXi / vCenter datastore that the user wishes to replicate this virtual machine into
Retention: The number of previously available versions stored on the target destination ESXi / vCenter. These are stored as snapshots within the ESXi / vCenter.
Schedule: Users may choose to schedule the job in a variety of methods. If no schedule is desired, users may toggle the "Schedule" switch in the top right to turn off the scheduler.
Hyper-V Replication
Hyper-V Replication uses the Hyper-V Replica technology through Microsoft's Hyper-V service. The technology is a block-level, asynchronous transfer from one Hyper-V host to another. After an in Hyper-V maintains a regularly occurring block transfer to the alternate destination.
Requirements
In order to successfully configure Hyper-V replication, users will need to properly configure their Hyper-V hosts must be Hyper-V 2012 or newer and all Hyper-V hosts are required to connect (tication purposes). Additionally, the target or destination Hyper-V server needs to be configured as destination.
Setting up Hyper-V Replication
After clicking "Replicate" users are presented with the following options:
Name: The name of the backup job within the Virtual Dashboard
Replica Server: This is the destination, or target, hypervisor. This will display any currently configured Hyper-V hypervisors that are not the source Hyper-V. If the desired hypervisor has not already been configured blue "r;+" sign to add a hypervisor at this time.
Retention: The number of previously available versions stored on the target Hyper-V hypervisor.
Schedule: Users may choose a schedule for when the first initial replication takes place. If no schedule is desired, users may toggle the "Schedule" switch in the top right to turn off the scheduler.
Note: Replication is a single-run job type and only needs to be executed once to initialize the replication. After being configured, the Virtual Dashboard reports on the current health of the virtual machine's replication
Glossary
Backup
Backups in the Virtual Dashboard are different than traditional virtual backups from the NovaBACKUP Backup tab because they are able to restore individual files from them.
Changed Block Tracking
Changed Block Tracking (CBT) is a VMware feature that helps perform incremental backups. After clicking on a protected virtual machine, users will see an option for CBT in the bottom right of the virtual machine's individual dashboard. Checking the CBT box will enable CBT as well as it displays the current status of CBT on that particular virtual machine..
Without CBT enabled, users will be unable to create an Incremental or Differential backup.
Replication
Replication is the act of copying a virtual machine from one hypervisor to another. There are two types of replication: VMware and Hyper-V Replication.
VMware Replication
VMware Replication uses the VMware's vStorage API for Data Protection (VADP) in order to copy virtual machines from one ESXi host to another. By enabling Changed Block Tracking (CBT), users are able to perform a complete full copy followed by smaller block level changes on a schedule chosen by the user.
Hyper-V Replication
Hyper-V Replication uses the Hyper-V Replica technology through Microsoft's Hyper-V service. The Hyper-V Replica technology is a block-level, asynchronous transfer from one Hyper-V host to another. After an initial full transfer, Hyper-V maintains a regularly occurring block transfer to the alternate destination.
Retention
Retention is the act of removing older backups in order to reduce the amount of storage space required. After every backup job is run, retention is automatically performed based on the backup configuration.
Run as
Some domain or workstation configurations require running background applications as a particular user. The Run as section of each protection type allows for administrators to provide these credential.
Image Backup Operation Type
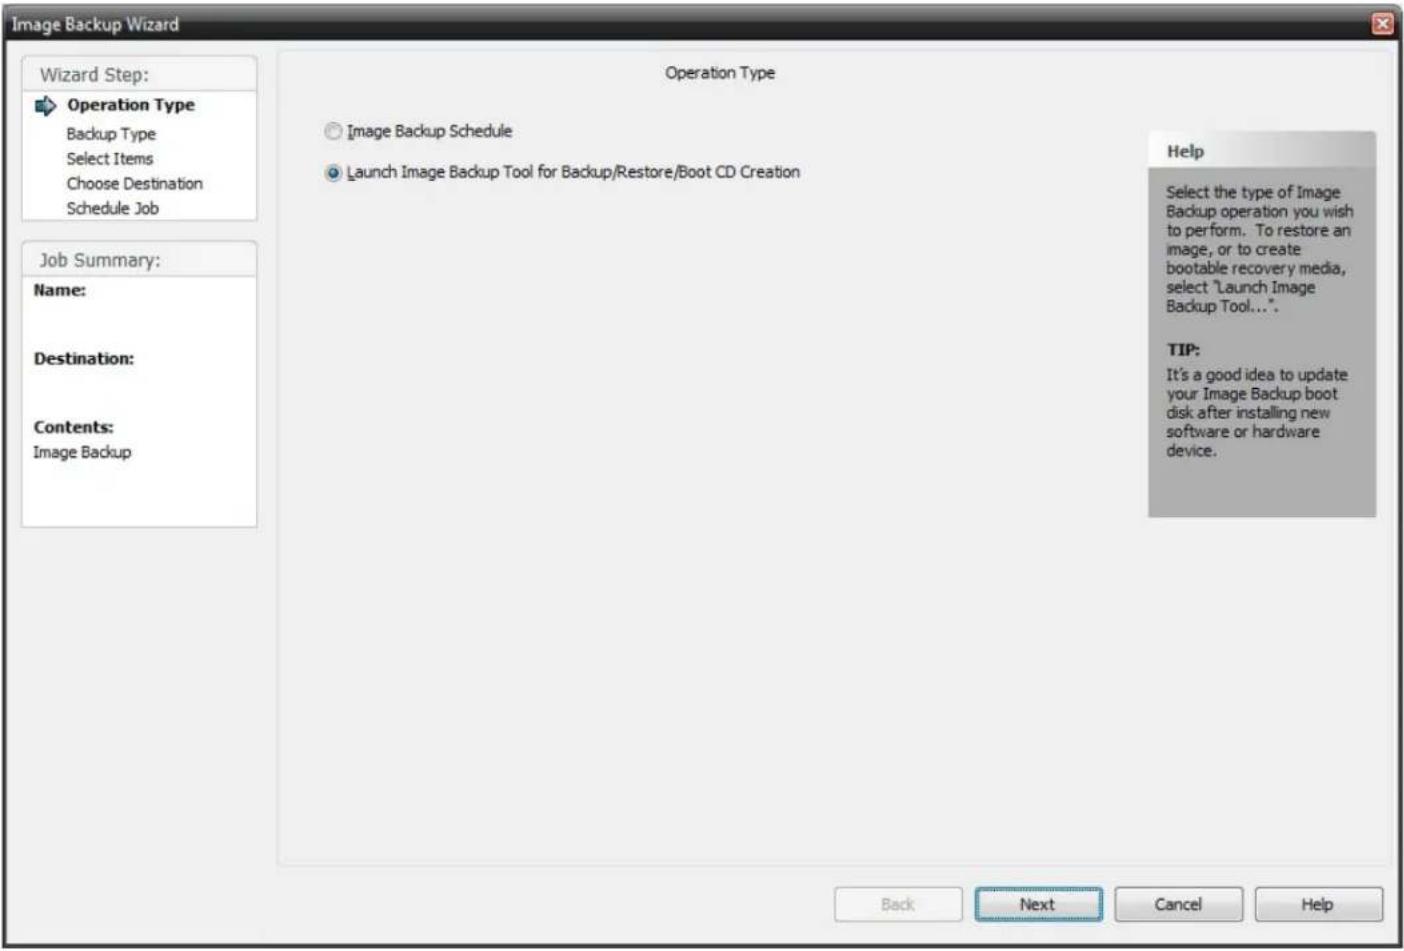
Select the type of image backup operation that you want to perform. There are two choices on this screen, "Image Backup Schedule" and "Launch Image Backup Tool". To create a Scheduled Image backup job, that being a scheduled image backup of your hard drive for instance which can be scheduled for weekly, daily, monthly image backup, you would choose the top option which is "Image Backup Schedule". To create a manual image backup of your hard drive you would choose the "Launch Image Backup Tool" choice.
text_image
Image Backup Wizard Wizard Step: Operation Type Backup Type Select Items Choose Destination Schedule Job Job Summary: Name: Destination: Contents: Image Backup Operation Type Image Backup Schedule Launch Image Backup Tool for Backup/Restore/Boot CD Creation Help Select the type of Image Backup operation you wish to perform. To restore an image, or to create bootable recovery media, select "Launch Image Backup Tool...". TIP: It's a good idea to update your Image Backup boot disk after installing new software or hardware device. Back Next Cancel HelpImage Backup Schedule: Setup an image backup job to be scheduled to run at a later time.
Launch Image Backup Tool: Launches the image backup tool used to backup or restore an image, or to create a system boot disk.
Image Backup Tool Introduction
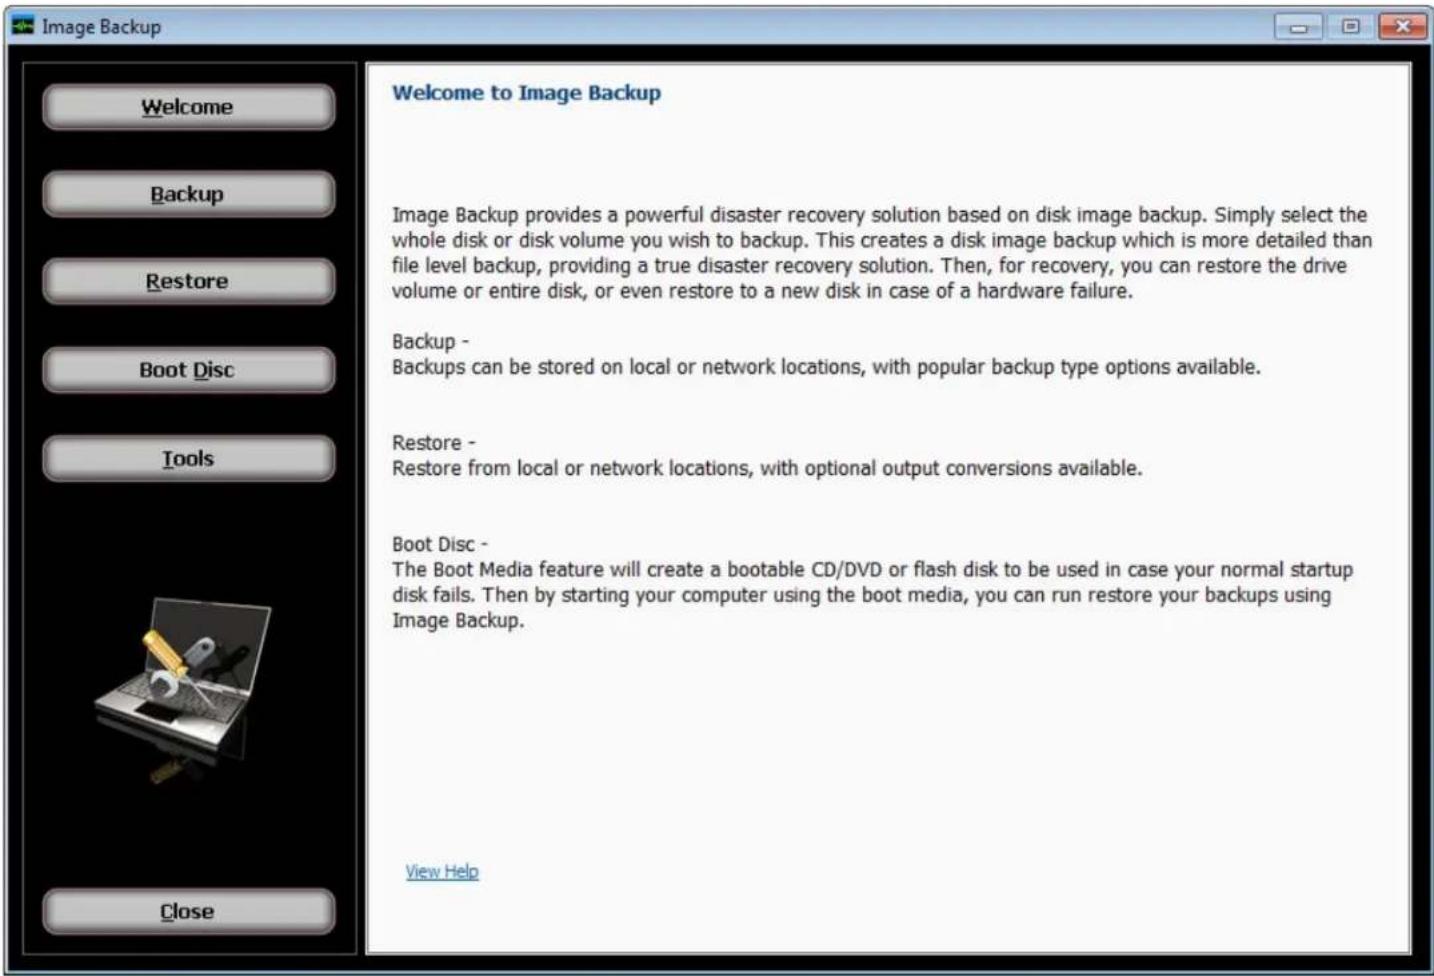
A welcome screen is presented when the Image Backup tool is launched.
text_image
Welcome to Image Backup Image Backup provides a powerful disaster recovery solution based on disk image backup. Simply select the whole disk or disk volume you wish to backup. This creates a disk image backup which is more detailed than file level backup, providing a true disaster recovery solution. Then, for recovery, you can restore the drive volume or entire disk, or even restore to a new disk in case of a hardware failure. Backup - Backups can be stored on local or network locations, with popular backup type options available. Restore - Restore from local or network locations, with optional output conversions available. Boot Disc - The Boot Media feature will create a bootable CD/DVD or flash disk to be used in case your normal startup disk fails. Then by starting your computer using the boot media, you can run restore your backups using Image Backup. View HelpUse the buttons on the left side of the screen to manually perform an image backup or restore operation, create a boot disc, or access various disk image management tools. Creating backup images manually allows more control over where the images are stored and how they are named than do scheduled backup jobs, but requires the user to assume additional responsibility for managing the images.
If utilizing Advanced Boot Disc creation mode you will need about 5 GB of free disk space to create a boot disc.
Press the Close button to return to the operation selection screen.
Selection
Image Backup - Selection
text_image
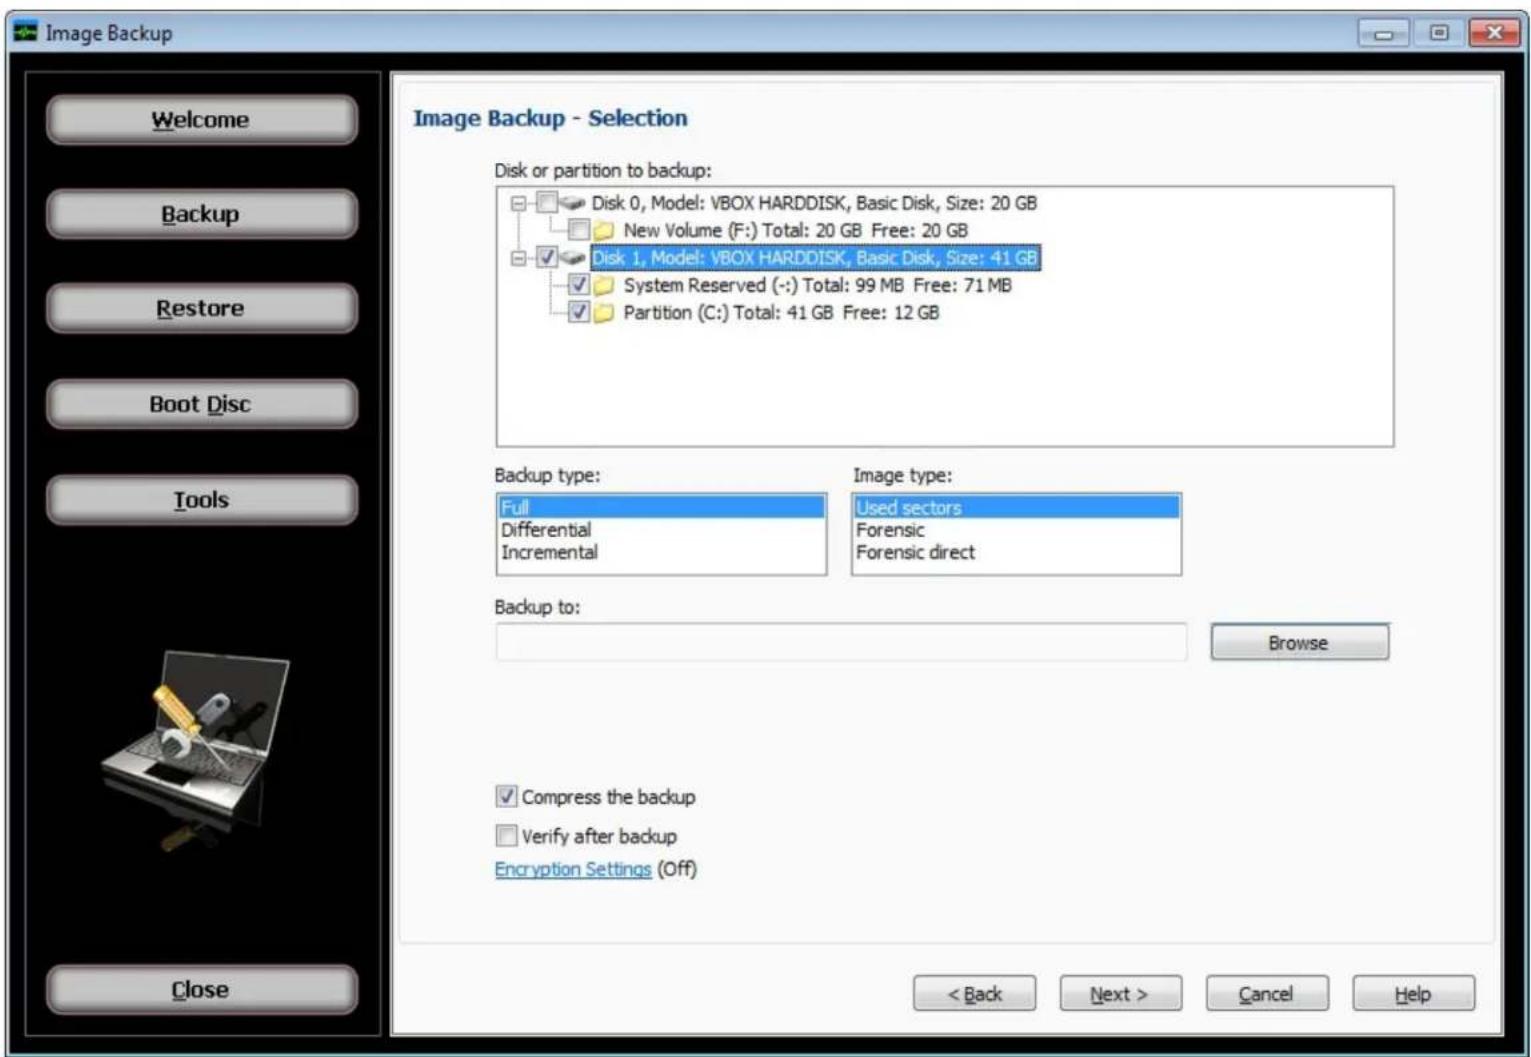
Image Backup Welcome Backup Restore Boot Disc Tools Close Image Backup - Selection Disk or partition to backup: Disk 0, Model: VBOX HARDDISK, Basic Disk, Size: 20 GB New Volume (F:) Total: 20 GB Free: 20 GB Disk 1, Model: VBOX HARDDISK, Basic Disk, Size: 41 GB System Reserved (-:) Total: 99 MB Free: 71 MB Partition (C:) Total: 41 GB Free: 12 GB Backup type: Full Differential Incremental Image type: Used sectors Forensic Forensic direct Backup to: Browse Compress the backup Verify after backup Encryption Settings (Off) < Back Next > Cancel HelpUse this screen to select disk volumes or entire disks for backup to a local disk or network location.
Disk or partition to backup:
Use the checkboxes to select the items you wish to backup.
Backup to:
Use the browse button to choose a location and file name to store your backup. You can navigate to the location desired or type a path into the edit box to obtain the same result. Additionally, any configured network devices may be selected as the destination path for users running Windows 7 or later. Network device definitions may added from the Device Tab in the main backup application.
Previous backup:
This is only shown if you have selected differential or incremental backup types. It is used to select the base backup for reference when creating the new backup.
Backup options:
Use compression:
Set this checkbox to use compression when backing up. This results in a smaller output file but may increase the time required to complete the backup.
Verify after backup
The files that are backed up will be verified to make sure that they were written correctly. Selecting this option will increase backup time. This setting is selected by default.
Encryption settings
Click 'Encryption settings' to set backup encryption on or off. Encryption provides enhanced security by storing the backup data in a secure format. You may choose the encryption type as None (off), or one of encryption types AES 128, AES 192 or AES 256 (On). A secret key must be also be entered, which is similar to creating a password.
IMPORTANT: You will be prompted to enter the secret key to restore an encrypted backup. The restore will not be permitted unless the correct secret key is entered.
Backup type:
Select from this list to create a backup of these possible types.
Full - A backup which does not rely on other backups to complete a single restorable backup.
Differential - A backup of the differences from the previously completed full backup which you select.
Incremental - A backup of the differences from the previously completed differential or incremental backup which you select.
Image type:
Select from this list to create a backup containing these possible image types.
Used Sector - Only save disk space that is being used.
Forensic - Save all disk space even if it is not being used.
Forensic Direct - A forensic image type suited to disks using encryption.
Process
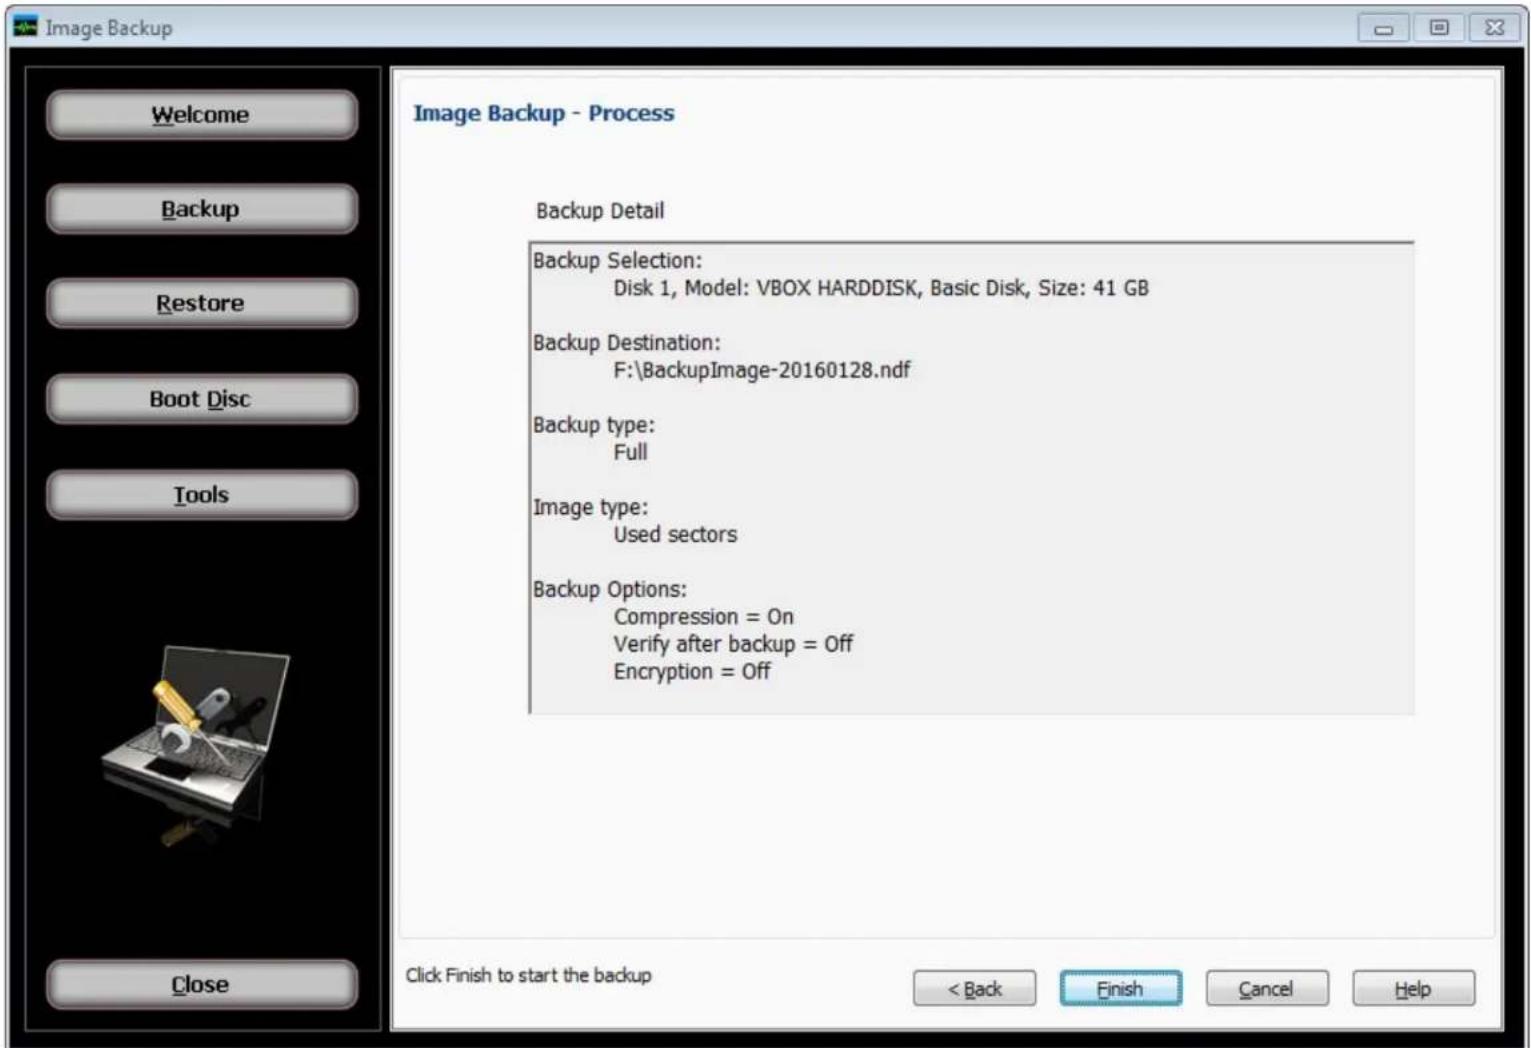
Image Backup - Process
text_image
Image Backup Welcome Backup Restore Boot Disc Tools Close Image Backup - Process Backup Detail Backup Selection: Disk 1, Model: VBOX HARDDISK, Basic Disk, Size: 41 GB Backup Destination: F:\BackupImage-20160128.ndf Backup type: Full Image type: Used sectors Backup Options: Compression = On Verify after backup = Off Encryption = Off Click Finish to start the backup < Back Finish Cancel HelpThis final step is used to start the backup job based on selections and options set in the previous screen.
The summary of all backup selections and options are displayed to confirm your choices. You can change any option by clicking the back button. Once changes are complete, click the next button to return to this screen.
Click the finish button to start the backup. A progress bar appears during the process with the option to stop the backup if you wish to cancel.
When the process completes, a final status message is shown to indicate success or errors. More information about the job can be found using the main backup application 'Logs' menu item.
Selection
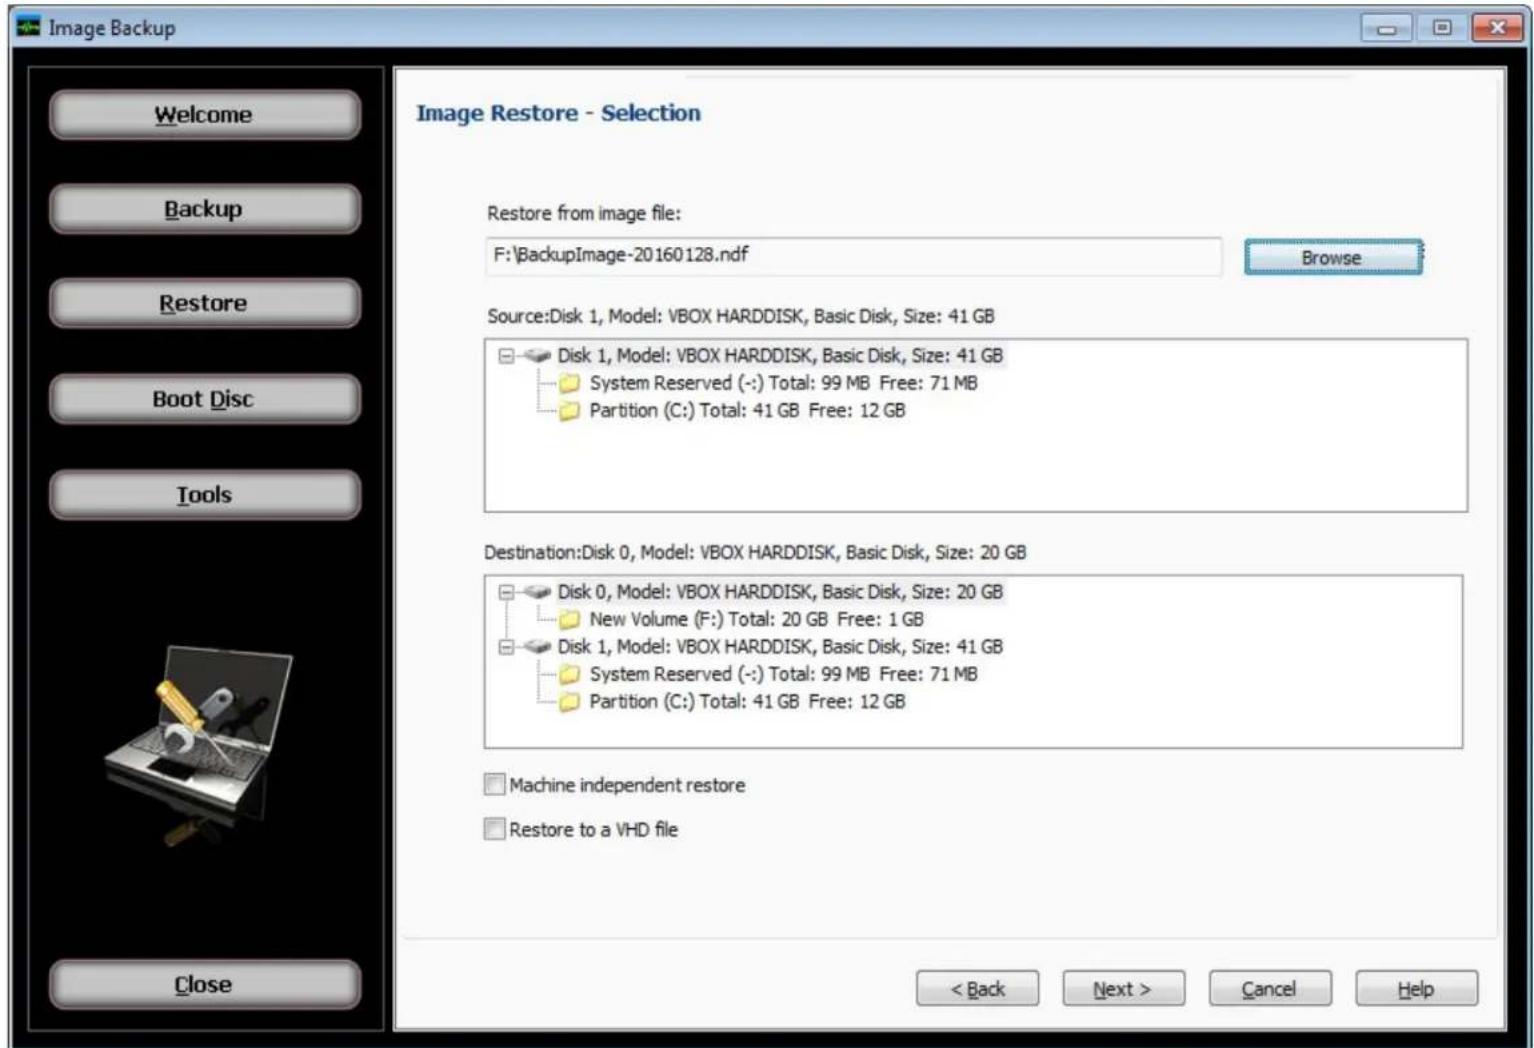
Image Restore - Selection
text_image
Image Backup Welcome Backup Restore Boot Disc Tools Close Image Restore - Selection Restore from image file: F:\BackupImage-20160128.ndf Browse Source:Disk 1, Model: VBOX HARDDISK, Basic Disk, Size: 41 GB Disk 1, Model: VBOX HARDDISK, Basic Disk, Size: 41 GB System Reserved (-:) Total: 99 MB Free: 71 MB Partition (C:) Total: 41 GB Free: 12 GB Destination:Disk 0, Model: VBOX HARDDISK, Basic Disk, Size: 20 GB Disk 0, Model: VBOX HARDDISK, Basic Disk, Size: 20 GB New Volume (F:) Total: 20 GB Free: 1 GB Disk 1, Model: VBOX HARDDISK, Basic Disk, Size: 41 GB System Reserved (-:) Total: 99 MB Free: 71 MB Partition (C:) Total: 41 GB Free: 12 GB Machine independent restore Restore to a VHD file < Back Next > Cancel Help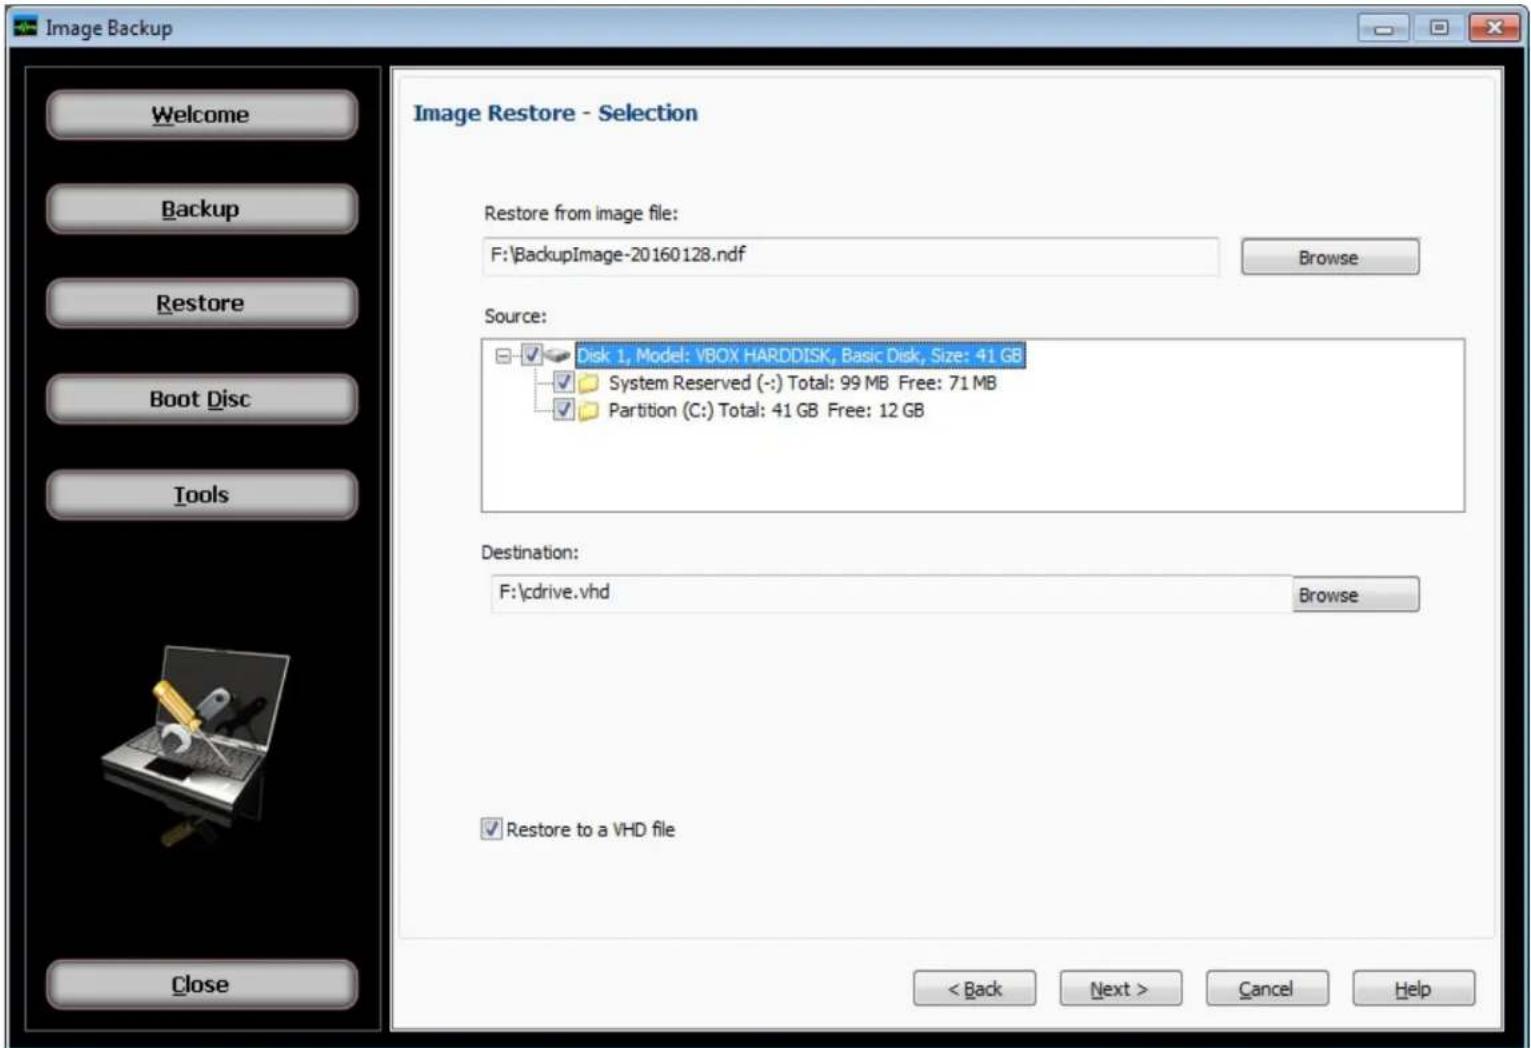
text_image
Image Backup Welcome Backup Restore Boot Disc Tools Close Image Restore - Selection Restore from image file: F:\BackupImage-20160128.ndf Browse Source: Disk 1, Model: VBOX HARDDISK, Basic Disk, Size: 41 GB System Reserved (-:) Total: 99 MB Free: 71 MB Partition (C:) Total: 41 GB Free: 12 GB Destination: F:\drive.vhd Browse Restore to a VHD file < Back Next > Cancel HelpUse this screen to select disk volumes or entire disks from backup files stored on a local disk or network location.
Normal data recovery requires no special options, only source and destination choices. First choose the backup file, and from that backup select the item you wish to recover. Then in the destination list of existing disks, select the item to restore from the selected backup item.
Restore from image file:
This is the first choice available before any other options are shown. Use the browse button to the locate the desired backup. After confirming the selected backup file, the source list will show the backup content.
Destination: (drive list)
This list shows existing drives and volumes available to restore from the selected backup item. This list will not appear when selecting the VHD output option.
Destination: (file name)
This is used to specify the output file when selecting VHD output option. Use the browse button to select a location and file name for the output file.
Restore options:
Restore to a VHD file - Using the selections in the backup image, create an output file instead of restoring to another disk. The output file is created using the specified name and location and converted to a Microsoft mountable VHD format. Note that only a used sector backup can be used to create a VHD output file which will mount successfully.
Machine independent restore - Use this feature to restore an image containing the system partition onto another computer with different hardware. Note that only a volume (or partition) may be selected from the backup to perform this type of restore, and the destination must not be the current active partition.
Process
text_image
Image Backup Welcome Backup Restore Boot Disc Tools Close Image Restore - Process Restore Detail Source: Disk 1, Model: VBOX HARDDISK, Basic Disk, Size: 41 GB Destination: G:\Drive_C.vhd Restore Settings: Restore as VHD file = On Click Finish to start the restore < Back Finish Cancel HelpThis final step is used to start the restore job based on your selections and options set in the previous screen.
The summary of all restore selection and options are displayed to confirm your choices. You can change any option by clicking the back button. Once changes are complete, click the next button to return to this screen.
Click the finish button to start the restore. A progress bar appears during the process with the option to stop the restore if you wish to cancel.
When the process completes, a final status message is shown to indicate success or errors. More information about the job can be found using the main backup application 'Logs' menu item.
Boot Disc - Introduction and Selection
Boot Disc - Introduction and boot disc creation type selection

text_image
Image Backup Welcome Backup Restore Boot Disc Tools Close Boot Disc - Introduction Welcome to the Image Backup Boot Disc Wizard. Use this to create a bootable CD/DVD disc or flash drive. This provides the ability to restore a if your computer is unable to boot due to a disk failure. When starting your computer this wa Backup application starts automatically. Please select either simple or advanced boot media creation methods. Boot Media Type: Simple Simple Boot Media: This is the quickest and simplest method using your existing configuration. You may be required your operating system installation DVD to complete this task. Next >The Boot Disc Introduction screen is also used to select the type of boot disc method you prefer. In most cases the basic type is preferred since there are no additional components required to download.
However, for those users running configurations that require special handling, such as special device drivers included in the boot disc, the advanced type may be needed to create a boot disc capable of starting the system successfully.
Install Windows components for Windows XP
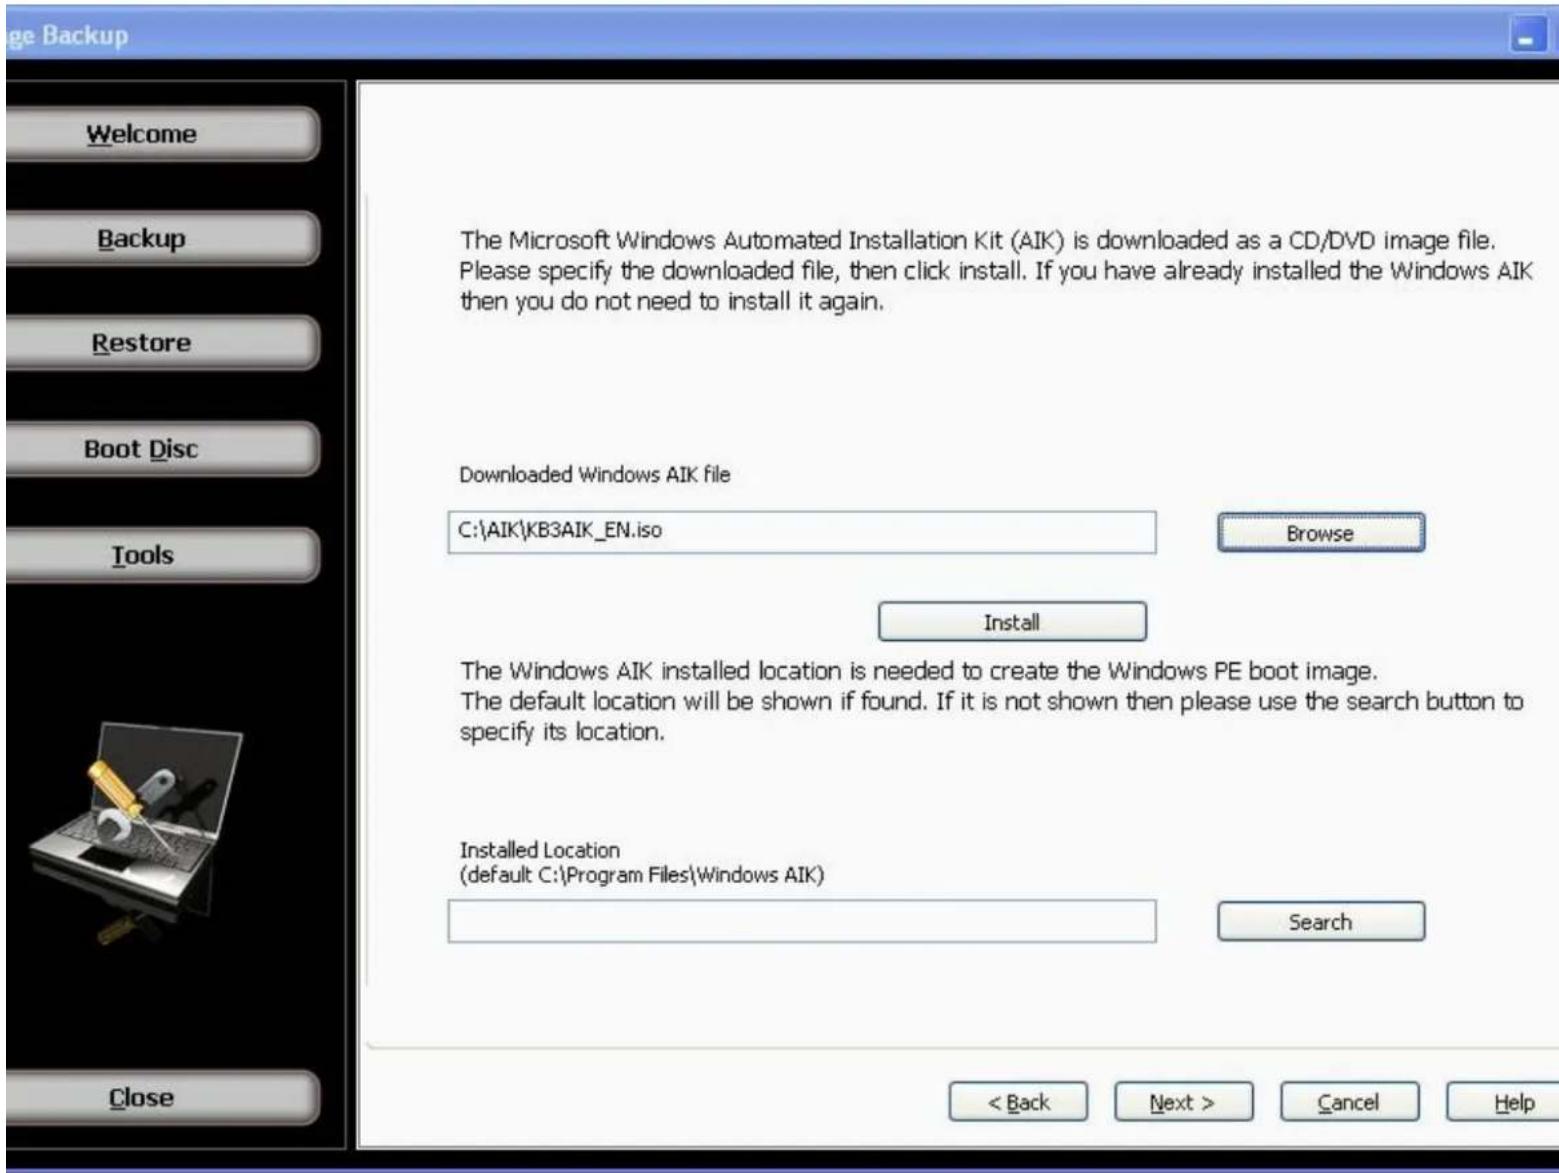
Boot Disc - Install Windows components (advanced mode only)
text_image
g e Backup Welcome Backup Restore Boot Disc Tools Close The Microsoft Windows Automated Installation Kit (AIK) is downloaded as a CD/DVD image file. Please specify the downloaded file, then click install. If you have already installed the Windows AIK then you do not need to install it again. Downloaded Windows AIK file C:\AIK\KB3AIK_EN.iso Browse Install The Windows AIK installed location is needed to create the Windows PE boot image. The default location will be shown if found. If it is not shown then please use the search button to specify its location. Installed Location (default C:\Program Files\Windows AIK) Search < Back Next > Cancel HelpDownloaded Windows AIK file:
The Microsoft Windows Automated Installation Kit (AIK) is downloaded as a CD/DVD image file. Use the browse button to locate the file which was downloaded in the previous step. The location and name of the file is needed so that the Windows AIK installation DVD can be created.
Install button:
With the downloaded Windows AIK file location showing above, click the install button. If you have already installed the Windows AIK then you do not need to install it again.
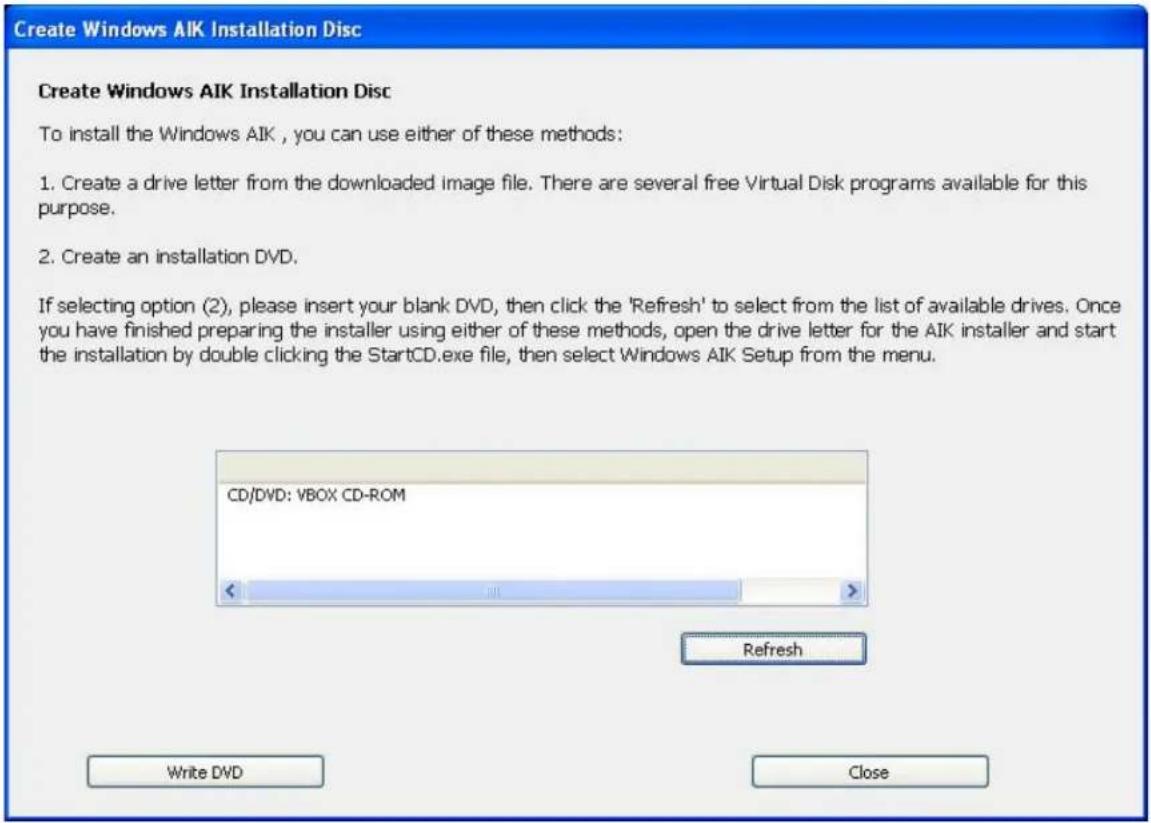
When clicking the install button, another screen appears:
text_image
Create Windows AIK Installation Disc Create Windows AIK Installation Disc To install the Windows AIK , you can use either of these methods: 1. Create a drive letter from the downloaded image file. There are several free Virtual Disk programs available for this purpose. 2. Create an installation DVD. If selecting option (2), please insert your blank DVD, then click the 'Refresh' to select from the list of available drives. Once you have finished preparing the installer using either of these methods, open the drive letter for the AIK installer and start the installation by double clicking the StartCD.exe file, then select Windows AIK Setup from the menu. CD/DVD: VBOX CD-ROM < > Refresh Write DVD CloseCreate Windows AIK Installation Disc:
To install the Windows AIK program, you can use either of these methods:
- Create a drive letter from the downloaded Windows AIK installation file. There are several free Virtual Disk programs available for this purpose.
- Create an installation DVD.
If selecting option (2), please insert your blank DVD into a writable DVD drive, then click the Refresh button to select the listed drive to use to create the installation DVD. Once you have made that selection, click the Write DVD button and wait for the process to complete.
Once you have finished preparing the installer using either of these methods, open the drive letter for the AIK installer and start the installation by double clicking the StartCD.exe file, then select Windows AIK Setup from the menu.
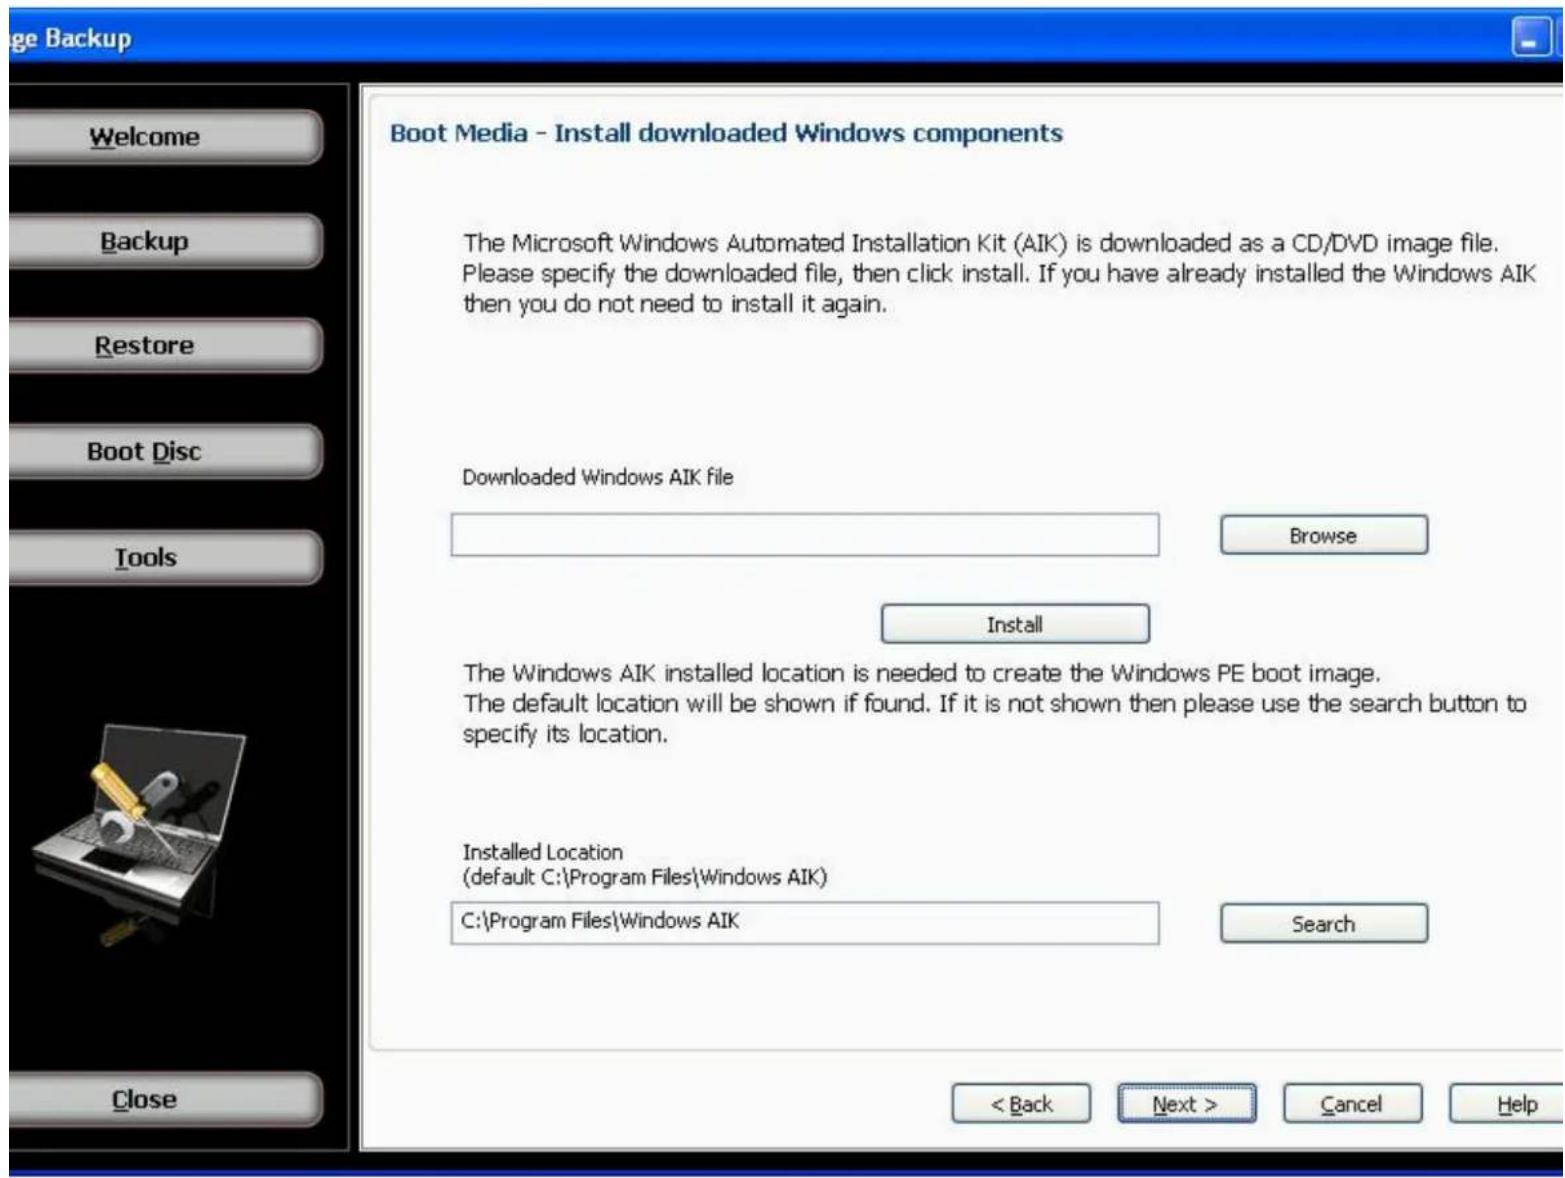
Installed Windows AIK location:
Once the Windows AIK has been installed, its location is needed to run the steps required to create boot image file based on the Windows PE operating system. The default location will be shown if found. If it is not shown then please use the search button to specify the folder where it has been installed.
text_image
Boot Media - Install downloaded Windows components The Microsoft Windows Automated Installation Kit (AIK) is downloaded as a CD/DVD image file. Please specify the downloaded file, then click install. If you have already installed the Windows AIK then you do not need to install it again. Downloaded Windows AIK file Browse Install The Windows AIK installed location is needed to create the Windows PE boot image. The default location will be shown if found. If it is not shown then please use the search button to specify its location. Installed Location (default C:\Program Files\Windows AIK) C:\Program Files\Windows AIK Search < Back Next > Cancel HelpInstall Windows components for Windows Vista or later
Boot Disc - Install Windows components (advanced mode only)
text_image
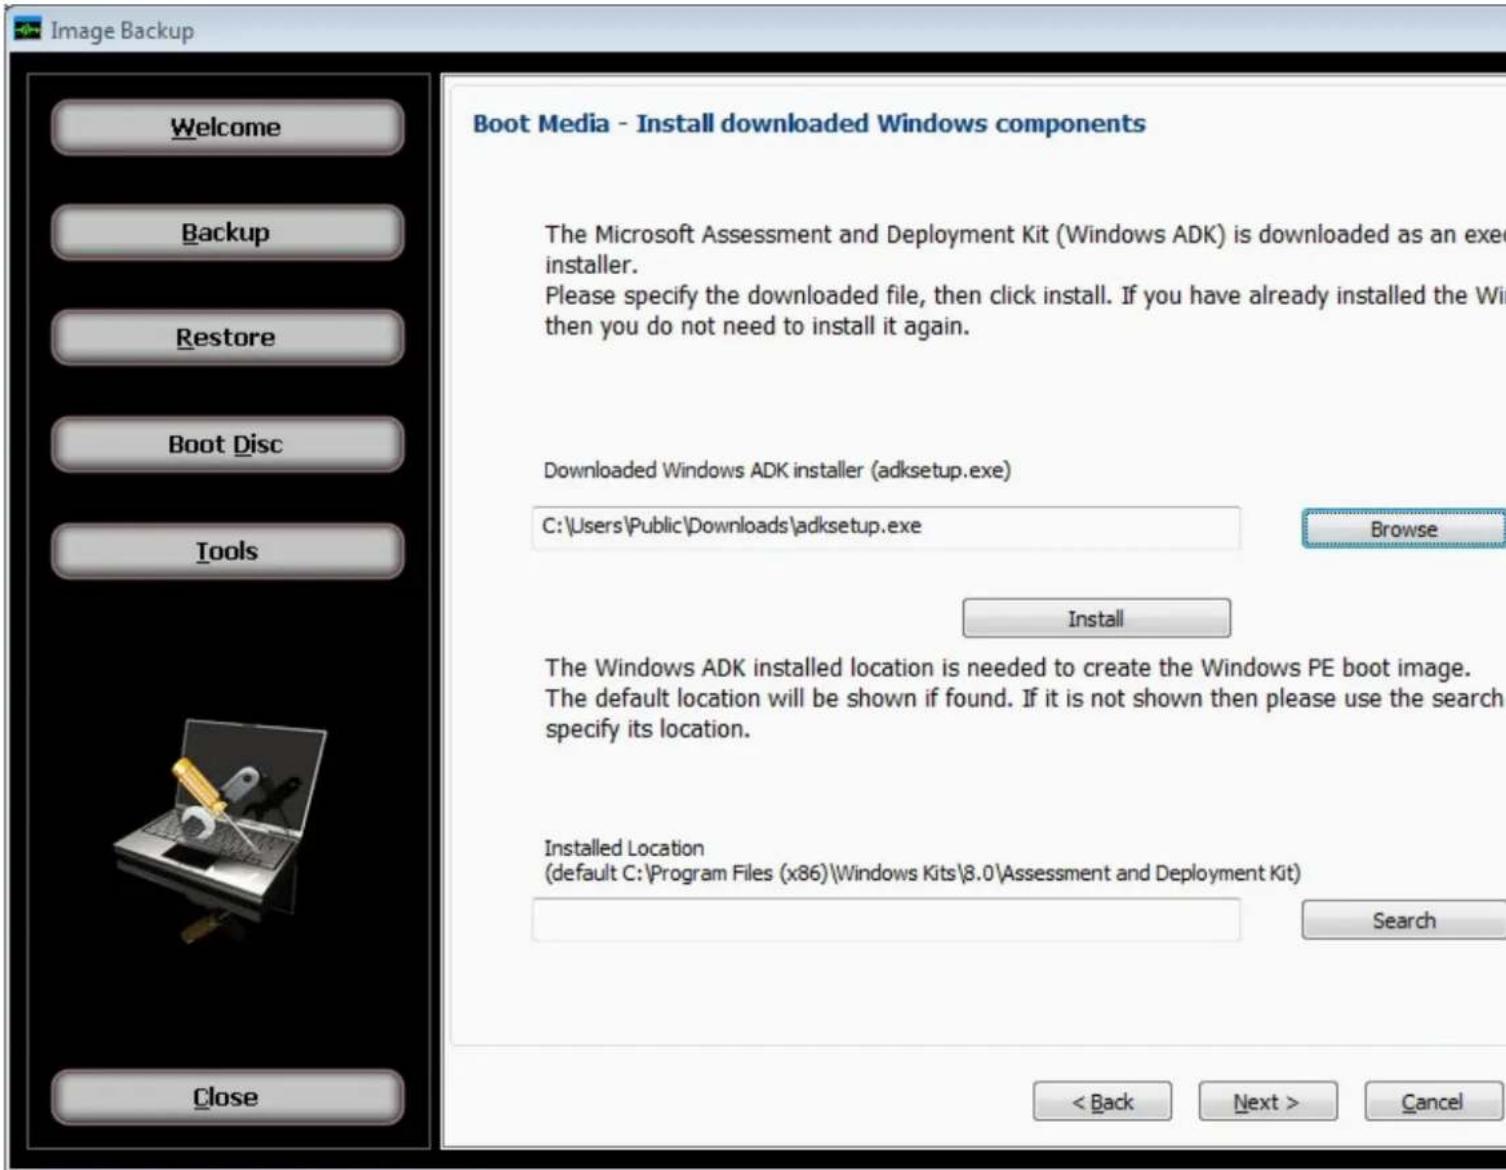
Image Backup Welcome Backup Restore Boot Disc Tools Close Boot Media - Install downloaded Windows components The Microsoft Assessment and Deployment Kit (Windows ADK) is downloaded as an exe installer. Please specify the downloaded file, then click install. If you have already installed the Wi then you do not need to install it again. Downloaded Windows ADK installer (adksetup.exe) C:\Users\Public\Downloads\adksetup.exe Browse Install The Windows ADK installed location is needed to create the Windows PE boot image. The default location will be shown if found. If it is not shown then please use the search specify its location. Installed Location (default C:\Program Files (x86)\Windows Kits\8.0\Assessment and Deployment Kit) Search < Back Next > CancelDownloaded Windows ADK file:
The Microsoft Windows Assessment and Deployment Kit (ADK) is downloaded as an executable file. Use the browse button to locate the file which was downloaded in the previous step. The location and name of the file is needed so that the Windows ADK installation can be launched.
Install button:
With the downloaded Windows ADK setup file location showing above, click the install button. If you have already installed the Windows ADK then you do not need to install it again.
When clicking the install button the ADK installer is started and pre-configured to only select the component you need, which is the Windows Preinstallation Environment (Windows PE).
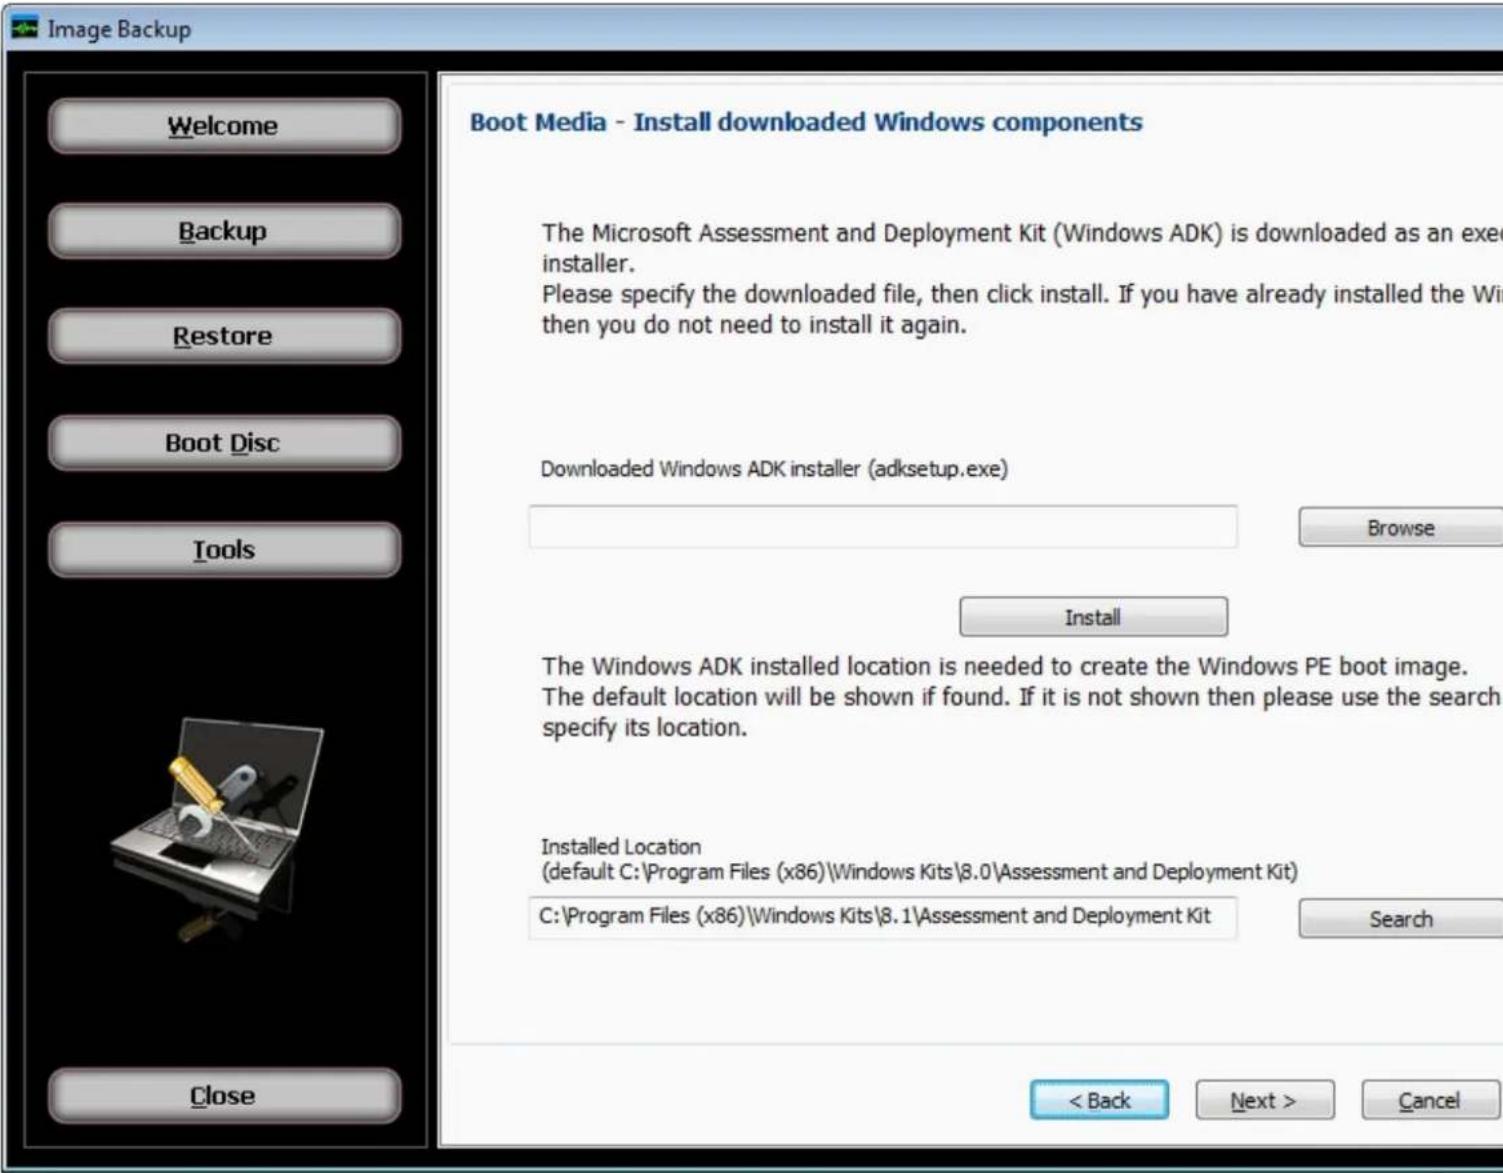
Installed location:
Once the Windows ADK has been installed, its location is needed to run the steps required to create boot image file based on the Windows PE operating system. The default location will be shown if found. If it is not shown then please use the search button to specify the folder where it has been installed.
text_image
Image Backup Welcome Backup Restore Boot Disc Tools Close Boot Media - Install downloaded Windows components The Microsoft Assessment and Deployment Kit (Windows ADK) is downloaded as an exe installer. Please specify the downloaded file, then click install. If you have already installed the Wi then you do not need to install it again. Downloaded Windows ADK installer (adksetup.exe) Browse Install The Windows ADK installed location is needed to create the Windows PE boot image. The default location will be shown if found. If it is not shown then please use the search specify its location. Installed Location (default C:\Program Files (x86)\Windows Kits\8.0\Assessment and Deployment Kit) C:\Program Files (x86)\Windows Kits\8.1\Assessment and Deployment Kit Search < Back Next > CancelCreate Boot Image
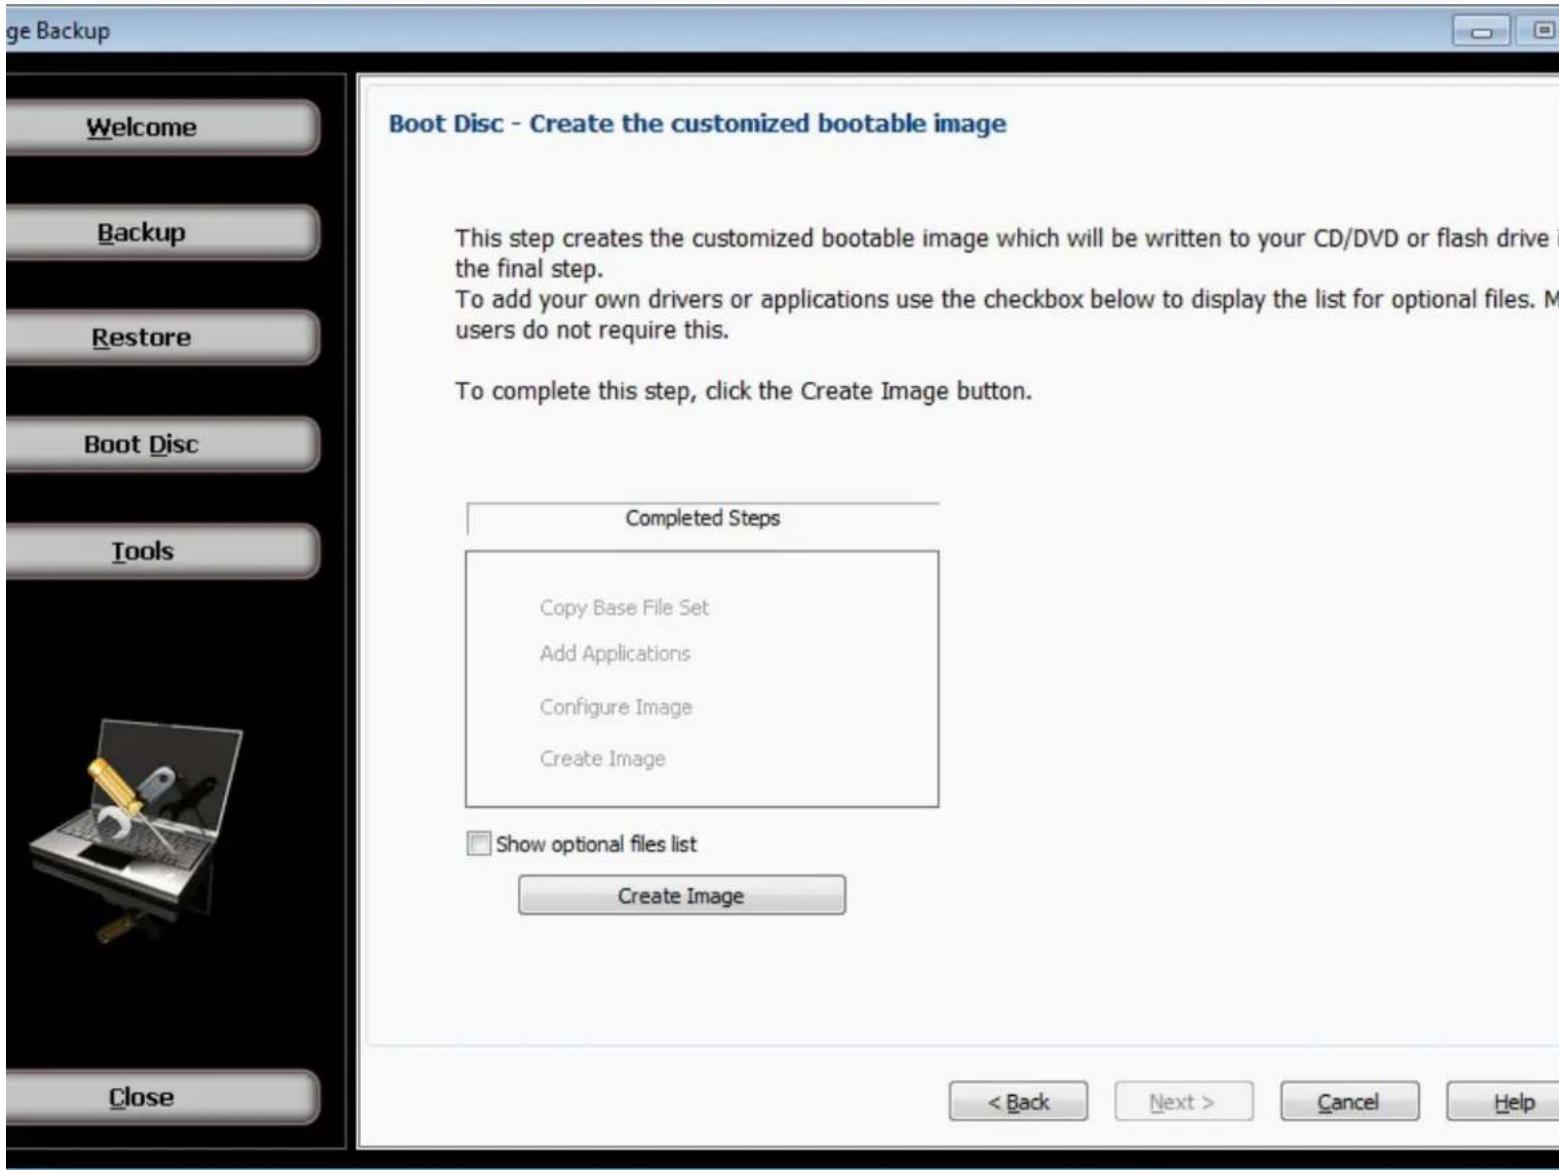
Boot Disc - Create the customized bootable image
text_image
Boot Disc - Create the customized bootable image This step creates the customized bootable image which will be written to your CD/DVD or flash drive in the final step. To add your own drivers or applications use the checkbox below to display the list for optional files. M users do not require this. To complete this step, click the Create Image button. Completed Steps Copy Base File Set Add Applications Configure Image Create Image Show optional files list Create Image < Back Next > Cancel HelpThis step creates the customized disaster recovery boot image which will be written to your CD/DVD or flash drive in the final step. To add your own drivers or applications use the optional files checkbox to show that list. Most users do not require this.
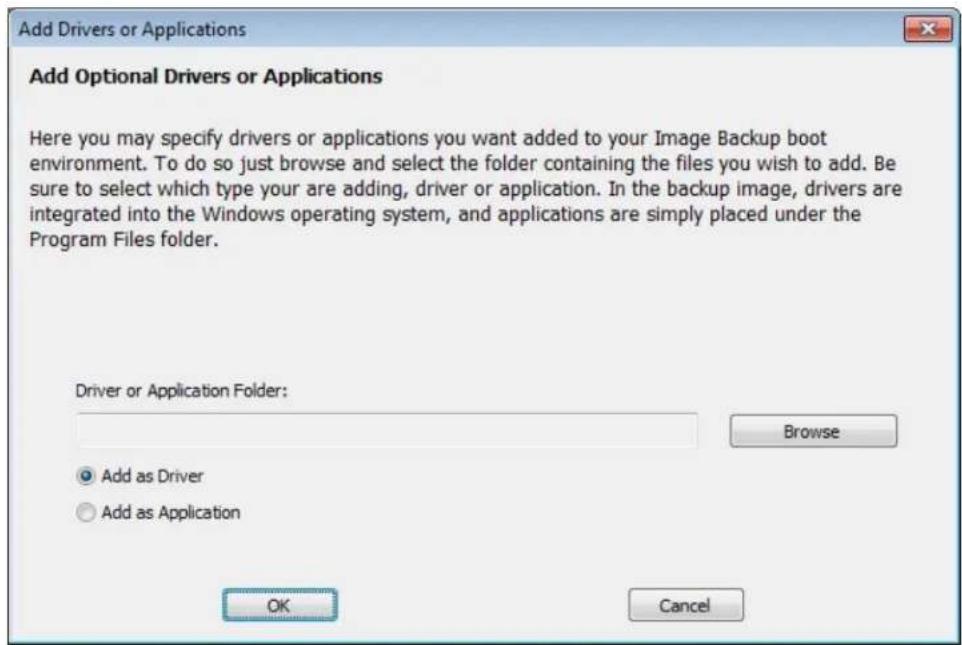
Show optional files list (Advanced Mode)
text_image
Add Drivers or Applications Add Optional Drivers or Applications Here you may specify drivers or applications you want added to your Image Backup boot environment. To do so just browse and select the folder containing the files you wish to add. Be sure to select which type your are adding, driver or application. In the backup image, drivers are integrated into the Windows operating system, and applications are simply placed under the Program Files folder. Driver or Application Folder: Browse Add as Driver Add as Application OK CancelWhen this checkbox is set, this displays the list used to specify optional drivers or applications you can add to your boot image. Click the Add / Browse button to select the folder containing the files you wish to add. Be sure to select which type you are adding, driver or application. In the Boot Image, drivers are integrated into the Windows PE operating system and applications are simply placed under the Program Files folder. To delete any item that has been added to the list, just select that item in the list and click the Remove button.
To complete this step, click the Create Image button. This will begin the various processes needed to create the Boot Image with messages showing its progress. When the process has completed, click the next button to proceed to the last step.
Write Boot Disc
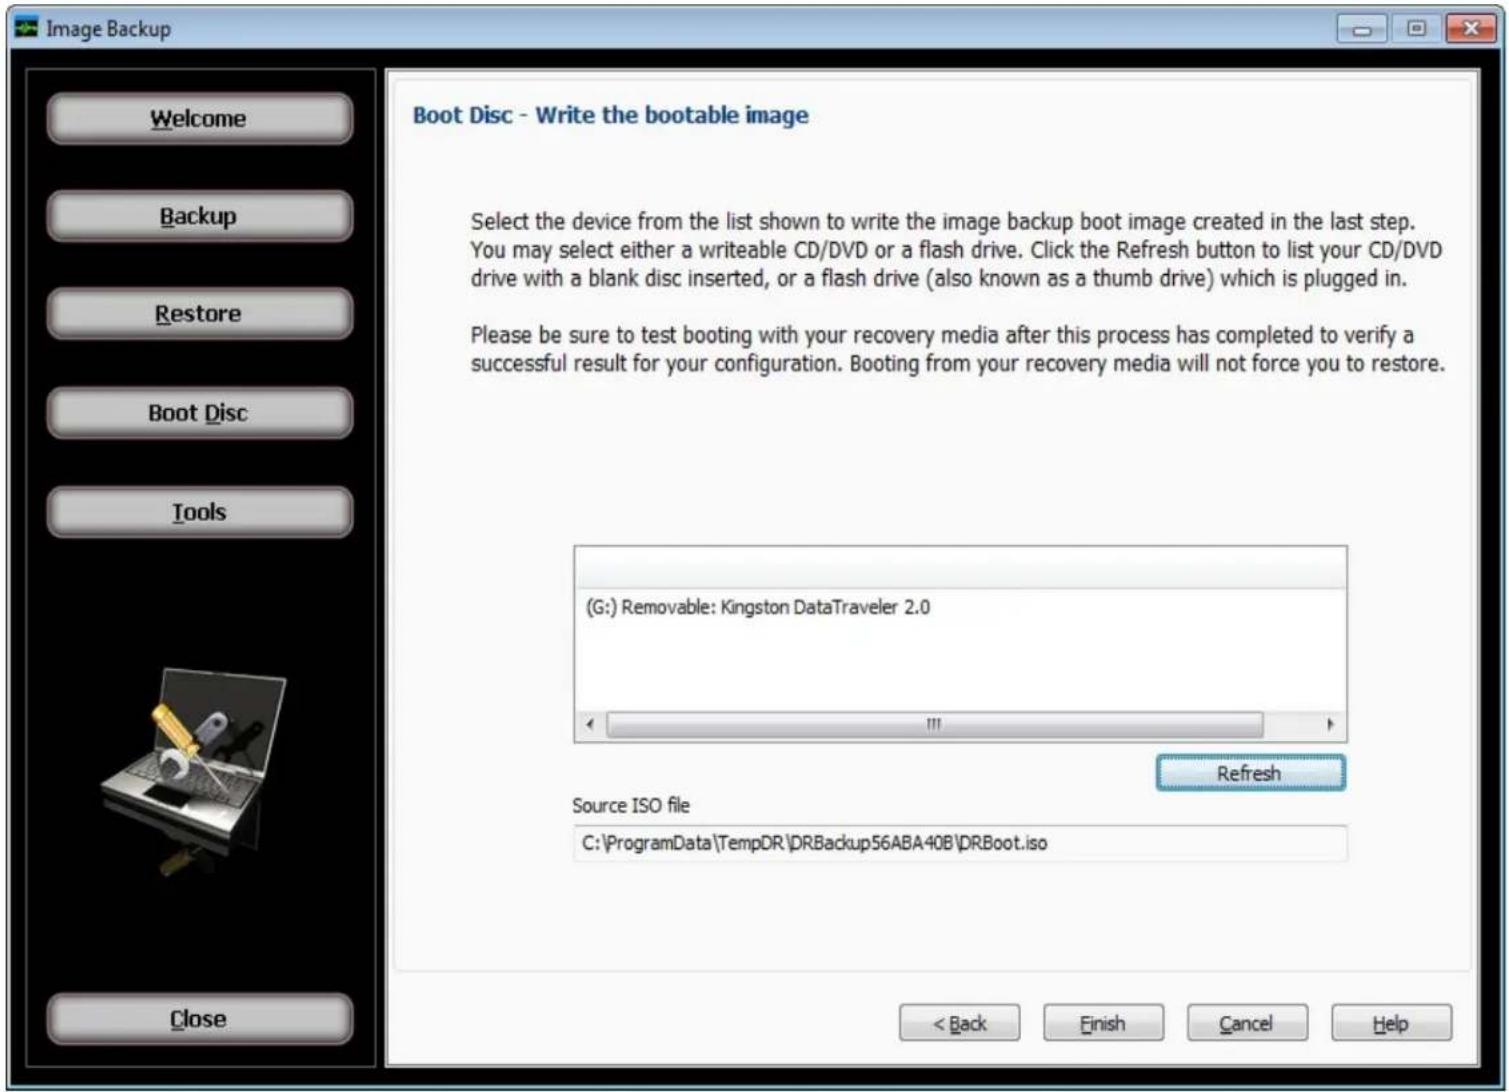
Boot Disc - Write the bootable image
text_image
Image Backup Welcome Backup Restore Boot Disc Tools Close Boot Disc - Write the bootable image Select the device from the list shown to write the image backup boot image created in the last step. You may select either a writeable CD/DVD or a flash drive. Click the Refresh button to list your CD/DVD drive with a blank disc inserted, or a flash drive (also known as a thumb drive) which is plugged in. Please be sure to test booting with your recovery media after this process has completed to verify a successful result for your configuration. Booting from your recovery media will not force you to restore. (G:) Removable: Kingston DataTraveler 2.0 Refresh Source ISO file C:\ProgramData\TempDR\DRBackup56ABA40B\DRBoot.iso < Back Finish Cancel HelpSelect the device from the list shown to write the disaster recovery boot image created in the last step. You may select either a writable CD/DVD or a flash drive. Click the Refresh button to list your CD/DVD drive with a blank disc inserted, or a flash drive (also known as a thumb drive) which is plugged in. Note that not all computers are capable of booting from a flash drive.
Click the Finish button when you are ready to write the bootable image to the selected device and wait for the process to complete.
If you do not wish to write the boot media but only create the ISO file, the checkbox provides that option. If checked, you will also see the path and file name where the file will be available after clicking the finish button.
It is recommended to test booting from the selected boot device to be sure you can successfully start your computer using the boot disc or flash drive. Once the boot process completes you should see the Image Backup application started. You do not have to run an actual image backup operation when you have started your computer this way.
Tools
Tools
The Tools button will display a screen which provides a list from which the user may select a variety of functions:
Mount backup image volume to a drive letter
This provides the ability to access files in a backup image without having to run a restore operation. By specifying the backup image, the user may select from any volume listed in the backup image, then select any available listed drive letter to associate with that volume. Then after clicking the 'Mount' button, files will be available by accessing the selected drive letter the same way files are normally accessed.
Mount ISO file to a drive letter
This provides the ability to access files in an ISO file without having to bum that file to a CD or DVD. By specifying the ISO file image, the user only needs to then select any available listed drive letter to associate with that ISO file. Then after clicking the 'Mount' button, files will be available by accessing the selected drive letter the same way files are normally accessed.
Unmount image from a drive letter
Any drive letter that exists from a mount operation may be released and made available again using the unmount function. All that is required is to specify the drive letter desired, then clicking the 'Unmount' button.
Convert backup image to a VHD
A VHD (virtual hard disk) file is normally associated with the Microsoft Hyper-V server. During restore operations, the user has the option to create VHD file output instead of performing a restore to disk operation. This tool makes the same result possible without requiring the steps normally used for restore. After selecting the source backup image and the drive desired for conversion in the backup, the user then specifies the desired output filename and location. Then after clicking the "Convert" button, the process to create the output file begins with progress displayed.
Image Backup Schedule - Creating a Scheduled Image Backup
The first step in creating a Scheduling Image backup job is to choose the type of image job; the choices here are Full, Differential and Incremental. It is REQUIRED to have a Full image backup job in order to utilize the other choices. The next step will be how to create your Full image backup job, and subsequently you can create a Differential or Incremental image backup job and we cover that in later pages.
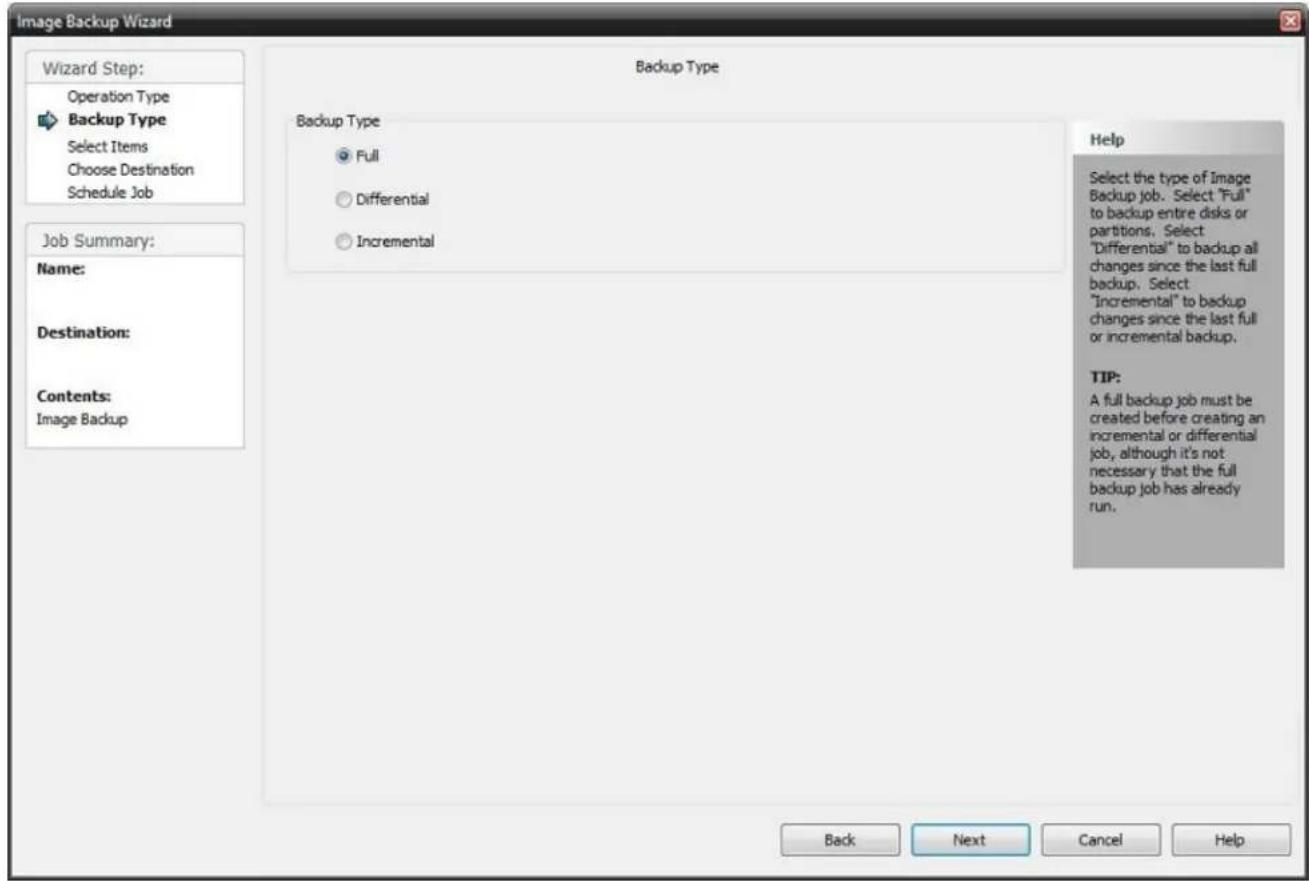
text_image
Image Backup Wizard Wizard Step: Operation Type Backup Type Select Items Choose Destination Schedule Job Job Summary: Name: Destination: Contents: Image Backup Backup Type Full Differential Incremental Help Select the type of Image Backup job. Select "Full" to backup entire disks or partitions. Select "Differential" to backup all changes since the last full backup. Select "Incremental" to backup changes since the last full or incremental backup. TIP: A full backup job must be created before creating an incremental or differential job, although it's not necessary that the full backup job has already run. Back Next Cancel HelpThe Help panel on the right side of the screen describes the different type of image backup jobs.

Incremental and Differential image backup jobs can reduce the amount of space needed for the backup by only saving changes made since a previous backup.
Differential backup jobs save the changes made since the last full backup. Incremental backup jobs save the changes made since a previous incremental backup, or since the last full backup if no previous incremental backup exists. The space savings comes at the cost of slower image restore operations since multiple incremental or differential backup files may need to be applied to the full backup file in order to arrive at the desired restore point.
You will be required to have a Scheduled Full image backup job created prior to creating a Scheduled Incremental or Differential image backup job. You will not have the ability to choose Differential or Incremental as the Backup Type on this screen if you do not already have a Scheduled Full image backup job in place.
Since we need to create a Scheduled Full image backup job always as the first operation then go ahead and select "Full" from the Backup Type for Scheduled Image backup. See the screen on the next page to continue creating your Scheduled Full image backup job.
Select Items for Scheduled Full Image Backup
From here, select the disks and/or partitions you wish to image with your Scheduled Full image backup job. Make sure not to select any CD/DVD drives or any disks and/or partitions which show a size of "0 MB" in size if they are listed as those are probably not valid items to image. After selecting the items to image click Next to continue.
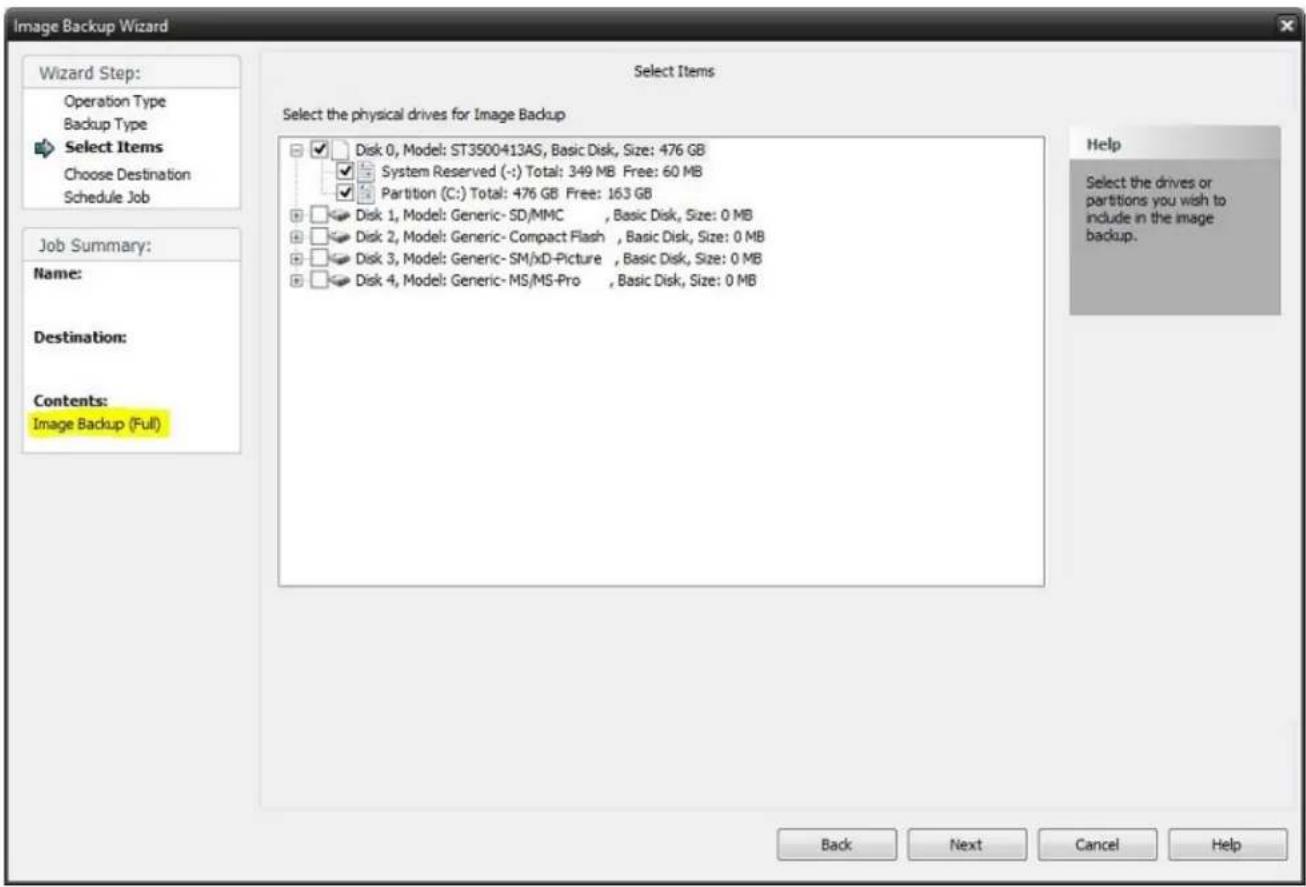
text_image
Image Backup Wizard Wizard Step: Operation Type Backup Type Select Items Choose Destination Schedule Job Job Summary: Name: Destination: Contents: Image Backup (Full) Select Items Select the physical drives for Image Backup Disk 0, Model: ST3500413AS, Basic Disk, Size: 476 GB System Reserved (-:) Total: 349 MB Free: 60 MB Partition (C:) Total: 476 GB Free: 163 GB Disk 1, Model: Generic- SD/MMC , Basic Disk, Size: 0 MB Disk 2, Model: Generic- Compact Flash , Basic Disk, Size: 0 MB Disk 3, Model: Generic- SM/xd-Picture , Basic Disk, Size: 0 MB Disk 4, Model: Generic- MS/MS-Pro , Basic Disk, Size: 0 MB Help Select the drives or partitions you wish to include in the image backup. Back Next Cancel HelpDestination Options for Scheduled Full Image Backup
From here, we will set the name, destination, and other options for our Scheduled Full Image job. You will choose a "Backup Name" for your Scheduled Full image backup. You will also set your backup destination as well as other various options. You can read about these various options below. Once done click Next.
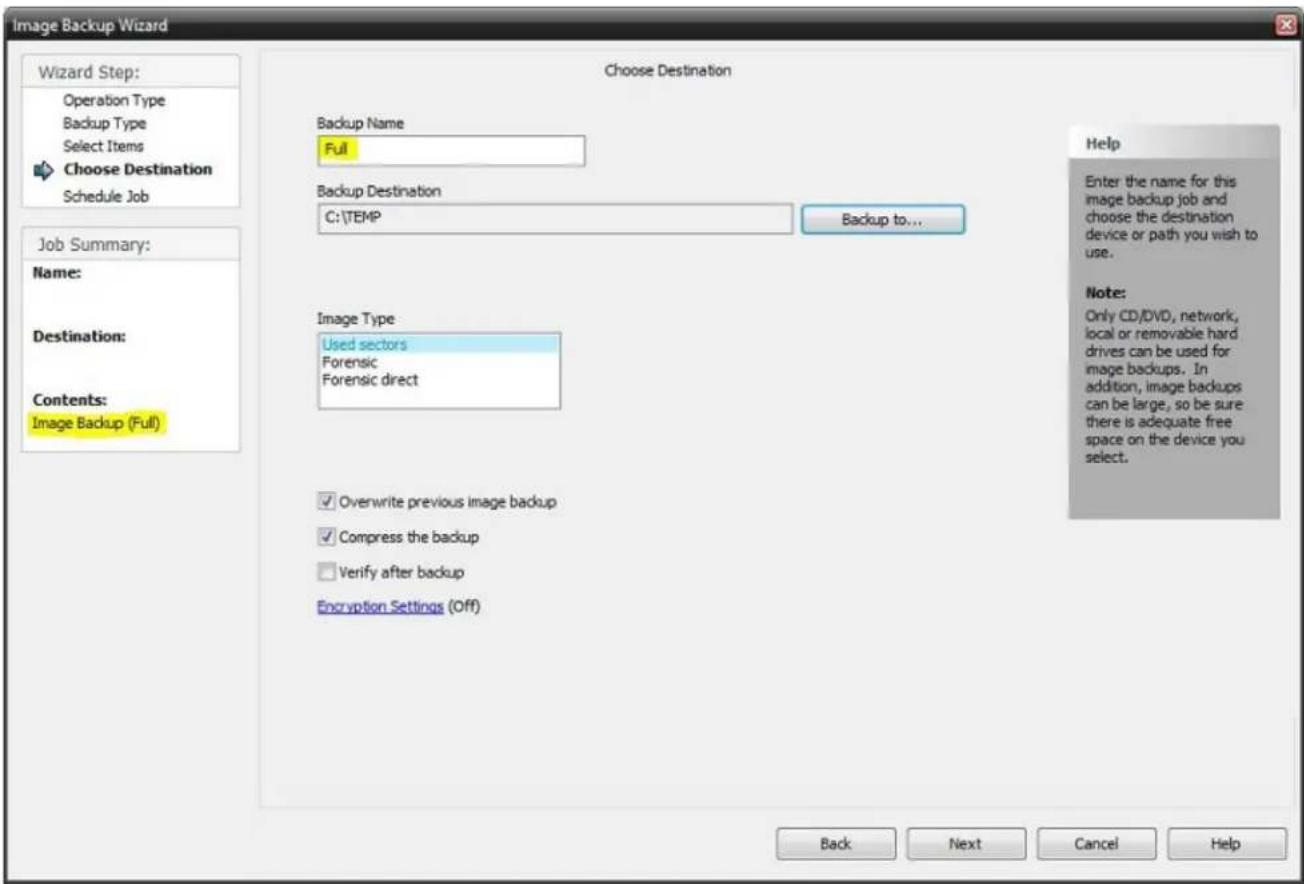
text_image
Image Backup Wizard Wizard Step: Operation Type Backup Type Select Items Choose Destination Schedule Job Choose Destination Backup Name Full Backup Destination C:\TEMP Backup to... Help Enter the name for this image backup job and choose the destination device or path you wish to use. Name: Destination: Contents: Image Backup (Full) Image Type Used sectors Forensic Forensic direct ✓ Overwrite previous image backup ✓ Compress the backup ☐ Verify after backup Encryption Settings (Off) Note: Only CD/DVD, network, local or removable hard drives can be used for image backups. In addition, image backups can be large, so be sure there is adequate free space on the device you select. Back Next Cancel HelpBackup Name: This field is where you set the name of your scheduled full image backup. Ultimately the "Backup Name" is how the scheduled full image file will be named when it is created on your destination storage device, as well as the name that this job is displayed on your schedule as. NOTE: This field is grayed out for Differential and Incremental Image backup jobs. The information in this field is inherited by the Scheduled Full image backup job and cannot be modified.
Backup Destination: This field is where you set the destination storage location for where your scheduled full image backup is to be stored. This field is grayed out for Differential and Incremental Image backup jobs. The information in this field is inherited by the Scheduled Full image backup job and cannot be modified.
Backup Options:
Overwrite previous image backup:
Set this check box to use to overwrite previous backups. This option only applies to full or differential backups since incremental backups depend on all previous backup images being available. If the overwrite option is disabled, then a date and time stamp is added to the backup file name to make it unique.
Compress the backup:
For Differential/Incremental Image backup jobs this option is grayed out. This option is inherited from the Scheduled Full image backup job and cannot be modified.
Verify after backup:
For Differential/Incremental Image backup jobs this option is grayed out. This option is inherited from the Scheduled Full image backup job and cannot be modified.
Encryption Settings:
Click 'Encryption settings' to set backup encryption on or off. Encryption provides enhanced security by storing the backup data in a secure format. You may choose the encryption type as None (off), or one of encryption types AES 128, AES 192 or AES 256 (On). A secret key must be also be entered, which is similar to creating a password. IMPORTANT: You will be prompted to enter the secret key to restore an encrypted backup. The restore will not be permitted unless the correct secret key is entered.
Schedule Options for Full Image Backup job
From here, select the Type of Schedule to utilize. Scheduled Image backup jobs will often require the "Run as specific user" option enabled to run as an administrator user. Click Finish to complete your Scheduled Full image backup job.
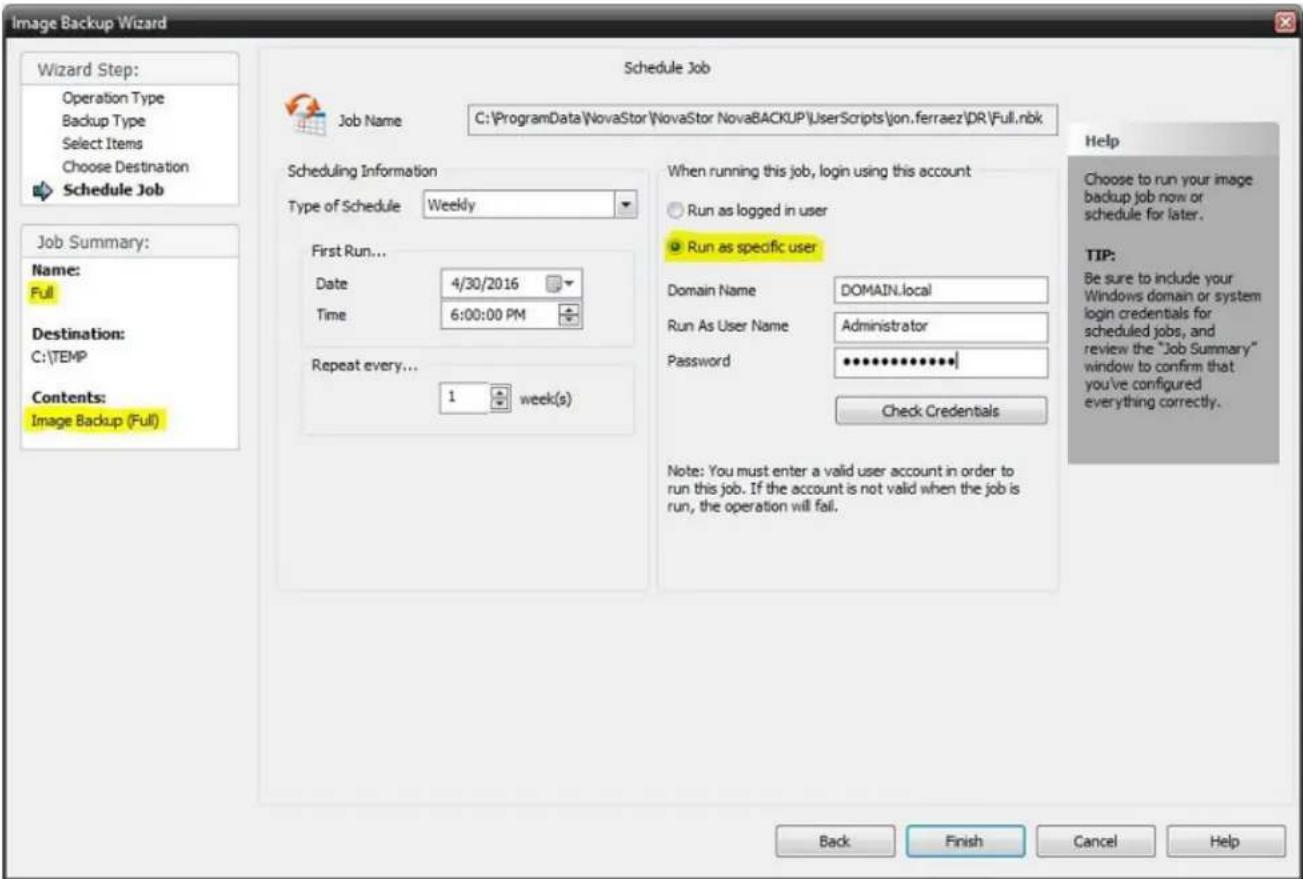
text_image
Image Backup Wizard Wizard Step: Operation Type Backup Type Select Items Choose Destination Schedule Job Job Summary: Name: Full Destination: C:\TEMP Contents: Image Backup (Full) Schedule Job Job Name C:\ProgramData\NovaStor\NovaStor NovaBACKUP\UserScripts\jon.ferraez\DR\Full.nbk Scheduling Information Type of Schedule Weekly First Run... Date 4/30/2016 Time 6:00:00 PM Repeat every... 1 week(s) When running this job, login using this account Run as logged in user Run as specific user Domain Name DOMAIN.local Run As User Name Administrator Password ************ Check Credentials Note: You must enter a valid user account in order to run this job. If the account is not valid when the job is run, the operation will fail. Help Choose to run your image backup job now or schedule for later. TIP: Be sure to include your Windows domain or system login credentials for scheduled jobs, and review the "Job Summary" window to confirm that you've configured everything correctly. Back Finish Cancel HelpFor a detailed explanation of the "Type of Schedule" and other Schedule related options read the next page.
Now that you have completed creating your Scheduled Full Image backup job you can verify that job exists by looking at the "Schedule" tab inside NovaBACKUP. It will show the name of your Scheduled Full image job in the list of jobs as the name that you provided when prompted to name your Full image backup.
Type of Schedule and other Schedule Options Explained (Scheduled Full Image Backup)
Type of Schedule
This drop-down list allows you to select whether you want the backup job to run once, by the minute, hourly, daily, weekly, or monthly.
Run Once: Run the job once, at the date and time specified under "Scheduling Information."
Minute: Run the job based on a minute/second increment starting at a specific date and time. Under "Scheduling Information", select the appropriate date and time the job is to start and the number of minutes and seconds between each run.
Hourly: Run the job based on an hourly increment starting at a specific date and time. Under "Scheduling Information", select the appropriate date and time the job is to start and the number of hours you want the job to repeat.
Daily: Run the job based on an daily increment starting at a specific date and time. Under "Scheduling Information", select the appropriate date and time the job is to start and the number of days you want the job to repeat. You can also select specific days to run or not run the job.
Weekly: Run the job based on an weekly increment starting at a specific date and time. Under "Scheduling Information", select the appropriate date and time the job is to start and the number of weeks you want the job to repeat.
Monthly: Run the job based on an monthly increment starting at a specific date and time. Under "Scheduling Information", select the appropriate date and time the job is to start, and the day of the month and number of months you want the job to repeat.
Job Name
This allows you to select the job that you would like to run. Click on the "Browse..." button next to the text box to see a list of all saved backup and copy job scripts.
Run Job As . .
Run as logged in user:
Run the job using the Windows login credentials in effect at that time.
Run as specific user:
In order for the job to run, you must enter valid windows account details.
Domain Name: The domain name you are logging into.
Run as User Name: The user name you want the job to run as.
Password: The password for the account you want the job to run as.

Note: The account information entered here is usually account you use to login to windows. However, you may need to use a different account when backing up network/shared drives.

Important: You can click the "Check Credentials" button to validate the account you have entered, otherwise the credentials are checked when the Finish button is pressed.
Creating a Scheduled Differential or Incremental Image Backup job
With your Scheduled Full Image backup job now in place we can optionally cover creating either a Differential or Incremental Scheduled Image Backup job. In the example below we will be selecting Differential for the "Backup Type". Take note that "Incremental" will work the same way when creating either a Differential or Incremental image backup job.
If either the Incremental or Differential image "Backup Type" is selected, then a list of Scheduled Full image backup jobs is displayed for you to choose from, as shown in the screen above.
In the dialog box under the Backup Type choices, only FULL image backup jobs will be displayed in the list. That means that the list will be populated ONLY if you have a Scheduled Full image backup job in place. Select the Full image backup job from the list to be used as the base image for the differential or incremental job. Now click Next to continue.
Destination Options for Differential or Incremental Image Backup
From here, select the options that you would like to utilize for your Differential or Incremental Image Backup job. NOTE: Since this is a Differential or Incremental image backup job the majority of the settings are inherited from the "Scheduled Full image" job so you will NOT be able to modify most of the fields / information on this screen.
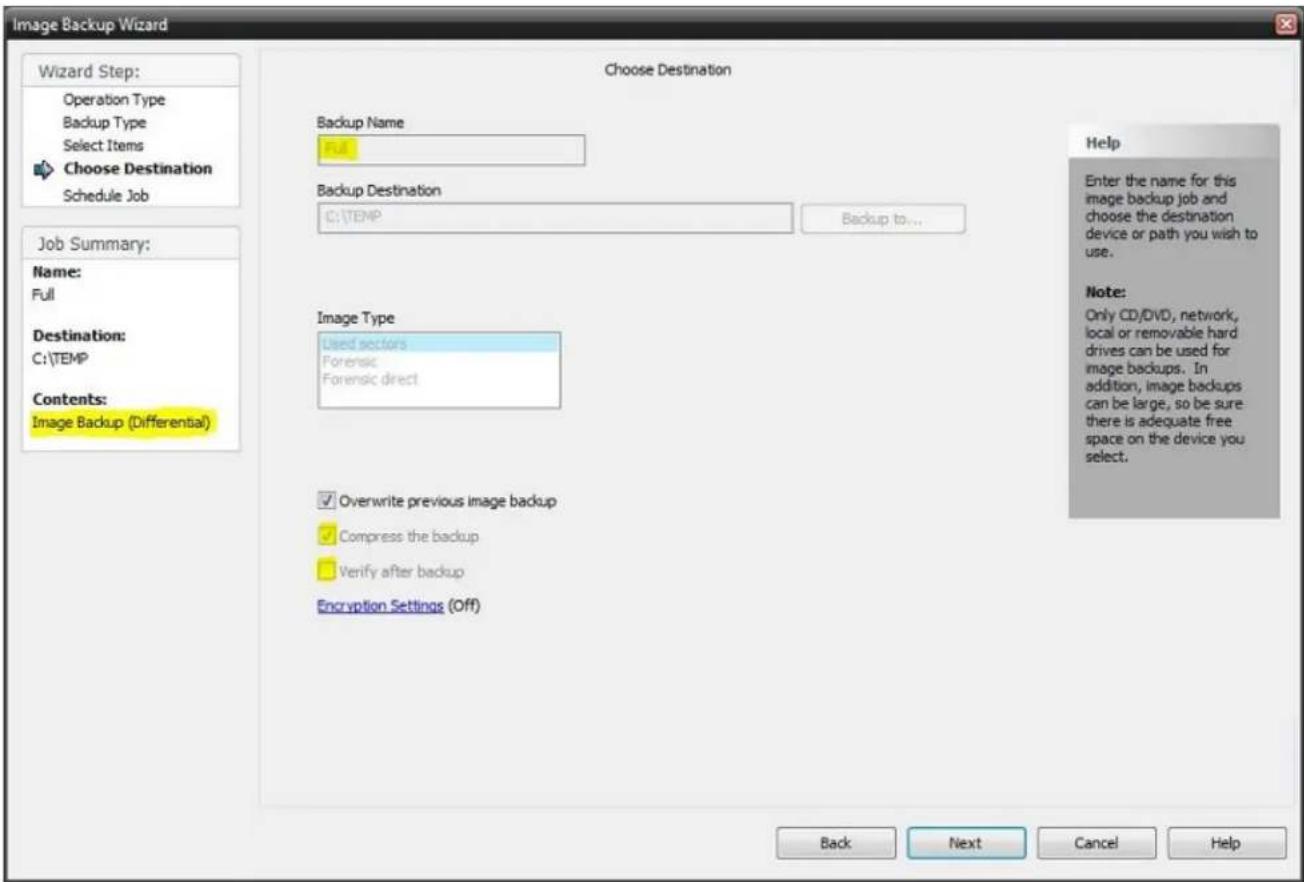
text_image
Image Backup Wizard Wizard Step: Operation Type Backup Type Select Items Choose Destination Schedule Job Choose Destination Backup Name Full Backup Destination C:\TEMP Backup to... Job Summary: Name: Full Destination: C:\TEMP Contents: Image Backup (Differential) Image Type Used sectors Forensic Forensic direct Overwrite previous image backup Compress the backup Verify after backup Encryption Settings (Off) Help Enter the name for this image backup job and choose the destination device or path you wish to use. Note: Only CD/DVD, network, local or removable hard drives can be used for image backups. In addition, image backups can be large, so be sure there is adequate free space on the device you select. Back Next Cancel HelpBackup Name: This field is grayed out for Differential and Incremental Image backup jobs. The information in this field is inherited by the Scheduled Full image backup job and cannot be modified. The word "Differential" or "Incremental" will be appended to the end of the existing "Backup Name" that you specified when creating your Scheduled Full image backup job.
Backup Destination: This field is grayed out for Differential and Incremental Image backup jobs. The information in this field is inherited by the Scheduled Full image backup job and cannot be modified.
Backup Options:
Overwrite previous image backup:
Set this check box to use to overwrite previous backups. This option only applies to full or differential backups since incremental backups depend on all previous backup images being available. If the overwrite option is disabled, then a date and time stamp is added to the backup file name to make it unique.
Compress the backup:
For Differential/Incremental Image backup jobs this option is grayed out. This option is inherited from the Scheduled Full image backup job and cannot be modified.
Verify after backup:
For Differential/Incremental Image backup jobs this option is grayed out. This option is inherited from the Scheduled Full image backup job and cannot be modified.
Encryption Settings:
Click 'Encryption settings' to set backup encryption on or off. Encryption provides enhanced security by storing the backup data in a secure format. You may choose the encryption type as None (off), or one of encryption types AES 128, AES 192 or AES 256 (On). A secret key must be also be entered, which is similar to creating a password.
IMPORTANT: You will be prompted to enter the secret key to restore an encrypted backup. The restore will not be permitted unless the correct secret key is entered.
Scheduling the Differential or Incremental Image Backup job
You will now choose the schedule options on this screen. From here, select the Type of Schedule to utilize. Image backup jobs will often require the "Run as specific user" option enabled to run as an administrator user. Click Finish to complete creating your Scheduled Differential (or Incremental) image job. Click Finish to complete the Differential or Incremental job.
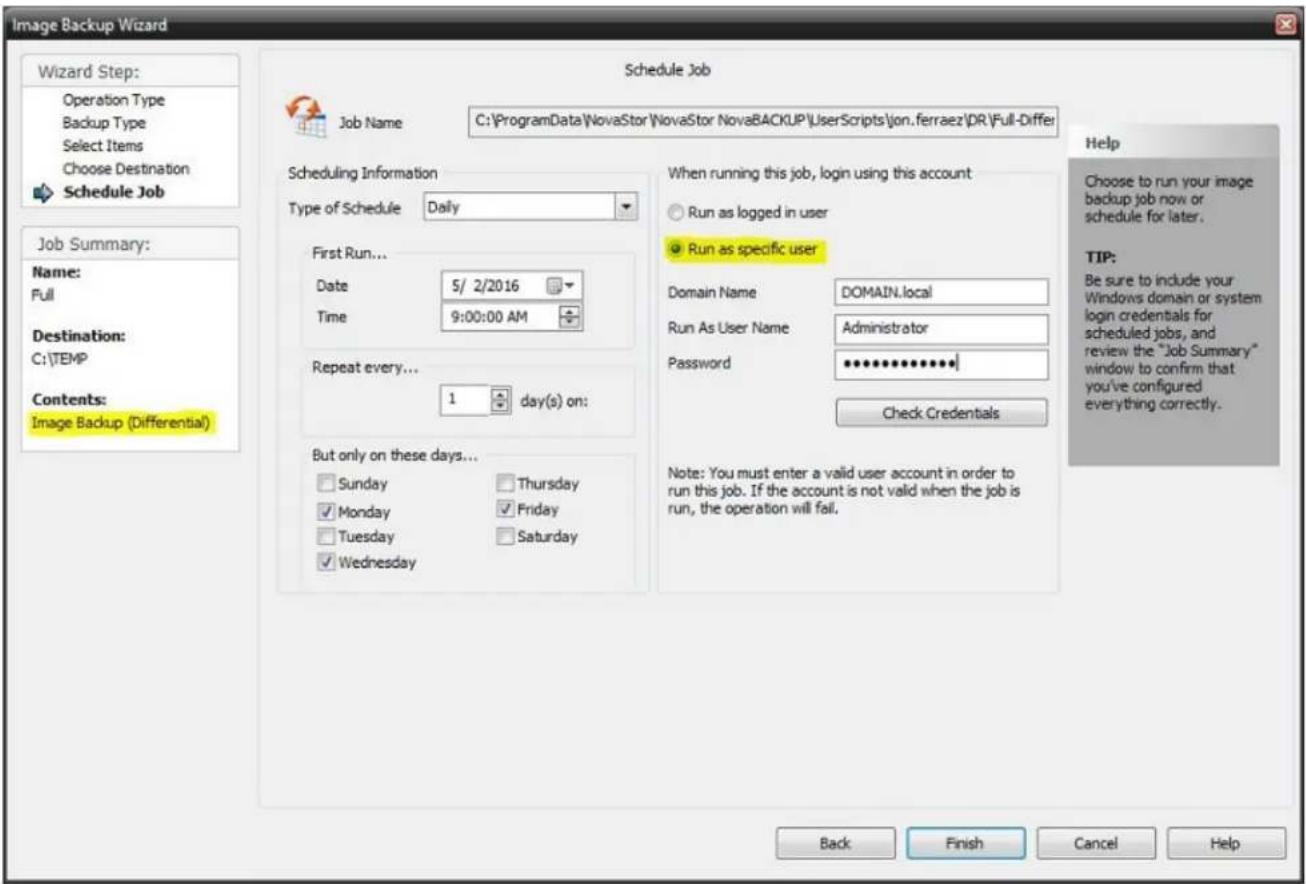
text_image
Image Backup Wizard Wizard Step: Operation Type Backup Type Select Items Choose Destination Schedule Job Job Summary: Name: Full Destination: C:\TEMP Contents: Image Backup (Differential) Schedule Job C:\ProgramData\NovaStor\NovaStor NovaBACKUP\UserScripts\jon.ferraez'DR\Full-Differ Job Name Scheduling Information Type of Schedule Daily First Run... Date 5/ 2/2016 Time 9:00:00 AM Repeat every... 1 day(s) on: But only on these days... Sunday Thursday Monday Friday Tuesday Saturday Wednesday When running this job, login using this account. Run as logged in user Run as specific user Domain Name DOMAIN.local Run As User Name Administrator Password ************ Check Credentials Note: You must enter a valid user account in order to run this job. If the account is not valid when the job is run, the operation will fail. Help Choose to run your image backup job now or schedule for later. TIP: Be sure to include your Windows domain or system login credentials for scheduled jobs, and review the "Job Summary" window to confirm that you've configured everything correctly. Back Finish Cancel HelpFor a detailed explanation of the "Type of Schedule" and other Schedule related options read the next page.
Now that you have completed creating your Scheduled Differential or Incremental Image backup job you can verify that job exists by looking at the "Schedule" tab inside NovaBACKUP. It will show the name of your Scheduled Differential or Incremental image job in the list of jobs as the name that you provided when prompted to name your Scheduled Full image backup with the addition of "Differential" or "Incremental" word appended to the end of the original Full image backup job name. You cannot change the wording of the Differential or Incremental image backup job since that is inherited from the Full image backup job name.

Job Name: This field is grayed out and will only show the name of the Differential or Incremental image backup job. It may not show the full name of the job if the path is very long.
Type of Schedule and other Schedule Options Explained (Scheduled Differential or Incremental Image Backup)
Type of Schedule
This drop-down list allows you to select whether you want the backup job to run once, by the minute, hourly, daily, weekly, or monthly.
Run Once: Run the job once, at the date and time specified under "Scheduling Information."
Minute: Run the job based on a minute/second increment starting at a specific date and time. Under "Scheduling Information", select the appropriate date and time the job is to start and the number of minutes and seconds between each run.
Hourly: Run the job based on an hourly increment starting at a specific date and time. Under "Scheduling Information", select the appropriate date and time the job is to start and the number of hours you want the job to repeat.
Daily: Run the job based on an daily increment starting at a specific date and time. Under "Scheduling Information", select the appropriate date and time the job is to start and the number of days you want the job to repeat. You can also select specific days to run or not run the job.
Weekly: Run the job based on an weekly increment starting at a specific date and time. Under "Scheduling Information", select the appropriate date and time the job is to start and the number of weeks you want the job to repeat.
Monthly: Run the job based on an monthly increment starting at a specific date and time. Under "Scheduling Information", select the appropriate date and time the job is to start, and the day of the month and number of months you want the job to repeat.
Job Name
This allows you to select the job that you would like to run. Click on the "Browse..." button next to the text box to see a list of all saved backup and copy job scripts.
Run Job As . .
Run as logged in user:
Run the job using the Windows login credentials in effect at that time.
Run as specific user:
In order for the job to run, you must enter valid windows account details.
Domain Name: The domain name you are logging into.
Run as User Name: The user name you want the job to run as.
Password: The password for the account you want the job to run as.

Note: The account information entered here is usually account you use to login to windows. However, you may need to use a different account when backing up network/shared drives.

Important: You can click the "Check Credentials" button to validate the account you have entered, otherwise the credentials are checked when the Finish button is pressed.
When the Finish button is pressed the job information is saved and will appear in the application's Schedule Tab along with other scheduled backup jobs.
Backup Retention Overview
The backup retention feature provides the ability to create jobs to control which backups should be kept. This is useful in cases where too many backups have accumulated, storage space is running too low or you wish to keep future backups within a specified range or condition.
Backup retention jobs also check for dependencies to ensure that no backup gets deleted if another backup depends on it in order to be restored as expected. For example an incremental backup will not be deleted if an older related incremental backup remains. Also if a backup was split out to multiple files, that backup sequence will maintain its integrity by not allowing any member of that sequence to be deleted as long as others remain.
A backup retention job may be run on demand or scheduled to run automatically. To access this feature, click the schedule menu item, then click the "Backup Retention" button.
Settings contained in the basic and advanced tabs are explained in separate topics, while those common to the main screen are explained here.
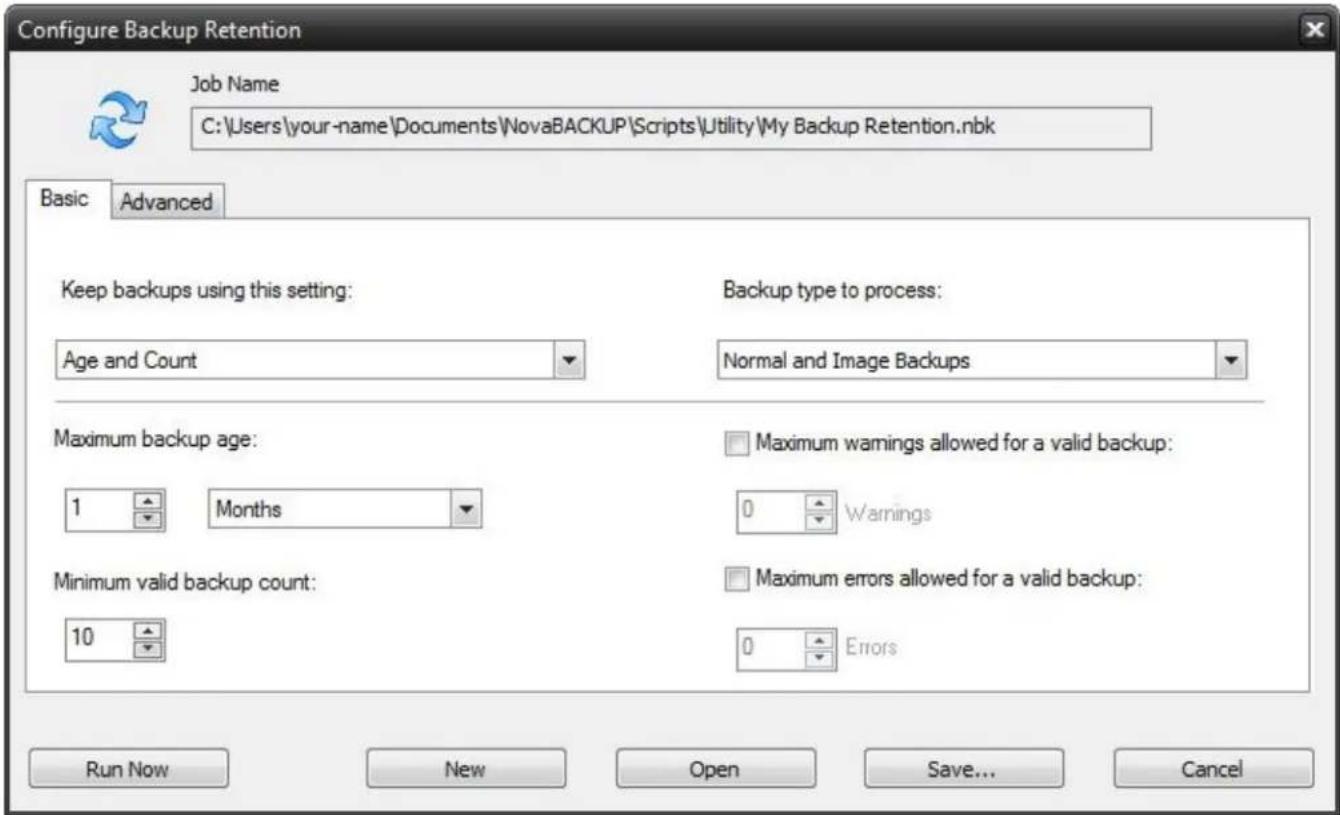
text_image
Configure Backup Retention Job Name C:\Users\your-name\Documents\NovaBACKUP\Scripts\Utility\My Backup Retention.nbk Basic Advanced Keep backups using this setting: Age and Count Backup type to process: Normal and Image Backups Maximum backup age: 1 Months Maximum warnings allowed for a valid backup: 0 Warnings Minimum valid backup count: 10 Maximum errors allowed for a valid backup: 0 Errors Run Now New Open Save... CancelJob Name
This field displays the current backup retention job script and location. If you wish to schedule a backup retention job, you will need to specify the script as it would be displayed here.
Run Now Button
Click this button to run the backup retention job using the current settings. This will also save the settings to the job script as shown in the job name field.
New Button
Click this button to open a dialog to specify a name for a new backup retention job. The new job script will have all default settings, which may then be edited and saved to the same name or to a different name.
Open Button
Click this button to open a dialog to select an existing backup retention job. This will load the job settings and set it as the current backup retention job script.
Save... Button
Click this button to open a dialog to save the settings to the current backup retention job script. You can save to the current job script name or save to a different name if preferred.
Cancel Button
Click this button to close the backup retention screen without saving any changes.
Backup Retention Basic Tab
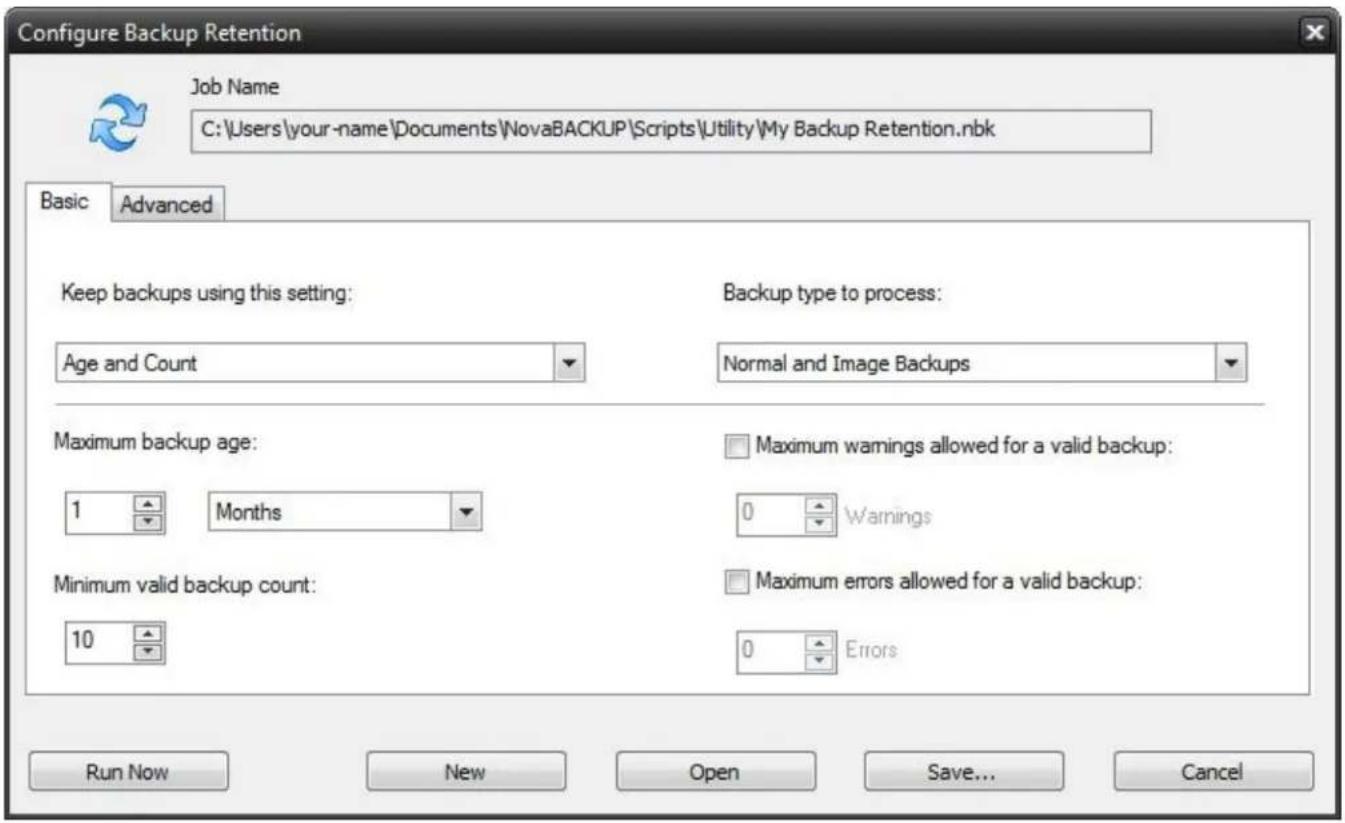
text_image
Configure Backup Retention Job Name C:\Users\your-name\Documents\NovaBACKUP\Scripts\Utility\My Backup Retention.nbk Basic Advanced Keep backups using this setting: Age and Count Backup type to process: Normal and Image Backups Maximum backup age: 1 Months Maximum warnings allowed for a valid backup: 0 Warnings Minimum valid backup count: 10 Maximum errors allowed for a valid backup: 0 Errors Run Now New Open Save... CancelKeep backups using this setting:
Age
Keep backups for a specified minimum amount of time.
Count
Keep a specified minimum number of backups.
Age and Count
Keep backups for a specified minimum amount of time after the minimum required count is reached.
Backup type to process:
Normal Backup
The standard backup type which is based on file selection, also known simply as file backup.
Image Backup
Disk image backup created with the Image Backup tool.
Normal and Image Backups
Both the normal file and image backups are processed. This is the same process as each type of job were run separately with all settings applied to each type of backup separately.
Minimum backup age:
This setting specifies the age when keeping backups based on a minimum age.
Minimum valid backup count:
This setting specifies the count when keeping backups based on a minimum count.
Maximum warnings allowed for a valid backup:
If this is checked, a backup will be counted as valid only if it has the set number of warnings or less.
Maximum errors allowed for a valid backup:
If this is checked, a backup will be counted as valid only if it has the set number of errors or less.
Backup Retention Advanced Tab
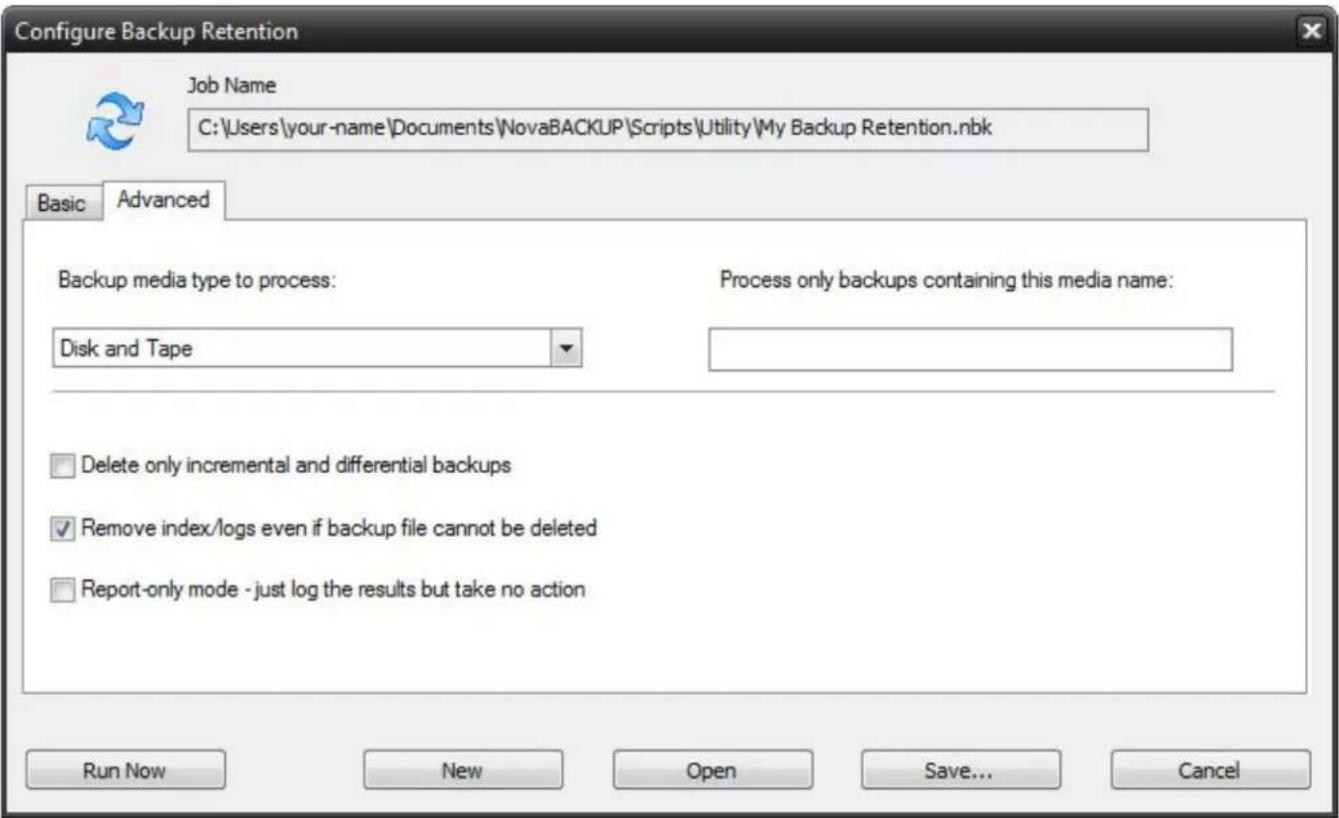
text_image
Configure Backup Retention Job Name C:\Users\your-name\Documents\NovaBACKUP\Scripts\Utility\My Backup Retention.nbk Basic Advanced Backup media type to process: Disk and Tape Process only backups containing this media name: Delete only incremental and differential backups Remove index/logs even if backup file cannot be deleted Report-only mode - just log the results but take no action Run Now New Open Save... CancelBackup media type to process:
Disk
Process only backups that have been saved to disk or network.
Tape
Process only backups that have been saved to tape.
Disk and Tape
Process backups that have been saved to disk, network or tape.
Process only backups containing this media name:
For normal backup types, limit the backup retention process to media containing the name specified. For image backup types, limit the backup retention process to backups with filenames containing the name specified. Just leave this setting blank to process backups of any name.
Delete only incremental and differential backups
If this is checked, only incremental and differential backups are allowed to be deleted. This will avoid the removal of any full or snapshot backup types.
Remove index/logs even if backup file cannot be deleted
If this is checked, related content gets removed only if the backup was deleted successfully. Related content includes indexes used to list the backup and its log entries as well as actual log files. Note that this setting does not apply to tape backup, because only disk or network backups can be deleted.
Report only mode: just log the results but take no action
If this is checked, only the results of a retention job is logged, with no changes to the state of any backups. This is similar to a print preview without actually printing.
Program Settings
To access the default settings for all tasks, select "Default Settings" in the applicationmenu by clicking the upper left graphic in the Home screen. To access options for individual tasks, press the "Settings" button in the Copy, Backup or Restore Tab to set options for that specific task.

Note: The settings defined from in Global Settings are overridden by settings defined from the individual task settings.
Copy Tab
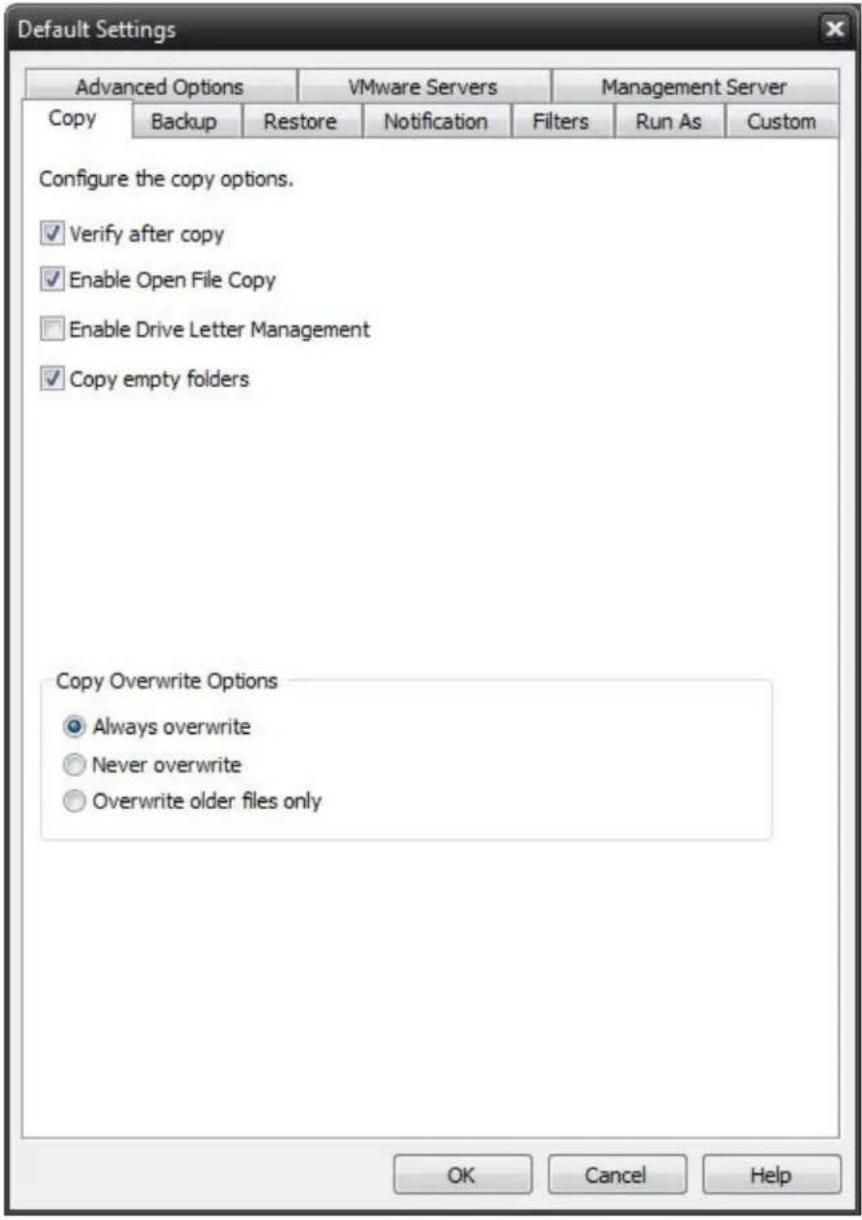
text_image
Default Settings Advanced Options VMware Servers Management Server Copy Backup Restore Notification Filters Run As Custom Configure the copy options. ✓ Verify after copy ✓ Enable Open File Copy □ Enable Drive Letter Management ✓ Copy empty folders Copy Overwrite Options ● Always overwrite ○ Never overwrite ○ Overwrite older files only OK Cancel HelpVerify after copy
The files that are copied will be verified to make sure that they were written correctly. Selecting this option will increase copy time. This setting is selected by default.

It is highly recommended to select the option to verify your data after a copy job. This helps to ensure that the copied data matches the data presently on your system. If you do not select this option, and there is an error in some of your copied data, you will not be aware of the errors until you go to access the copied data.
Enable Open FileCopy
Select this option to have NovaBACKUP automatically copy open files on the local system using Volume Snapshot Service (VSS). Note: This option NOT available when running on Windows 2000.
Enable Drive Letter Management
Select this option to have NovaBACKUP automatically select the correct removable disk device (USB) even when it's drive letter changes.
Copy empty Folders
Select this option to copy empty folders.
CopyOverwrite Options
Always Overwrite
Source file will always overwrite an existing file of the same name on the destination.
Never Overwrite
Source file will never overwrite an existing file of the same name on the destination.
Overwrite older files only
Source file will overwrite an existing file of the same name on the destination if the destination file is older.
Backup Tab
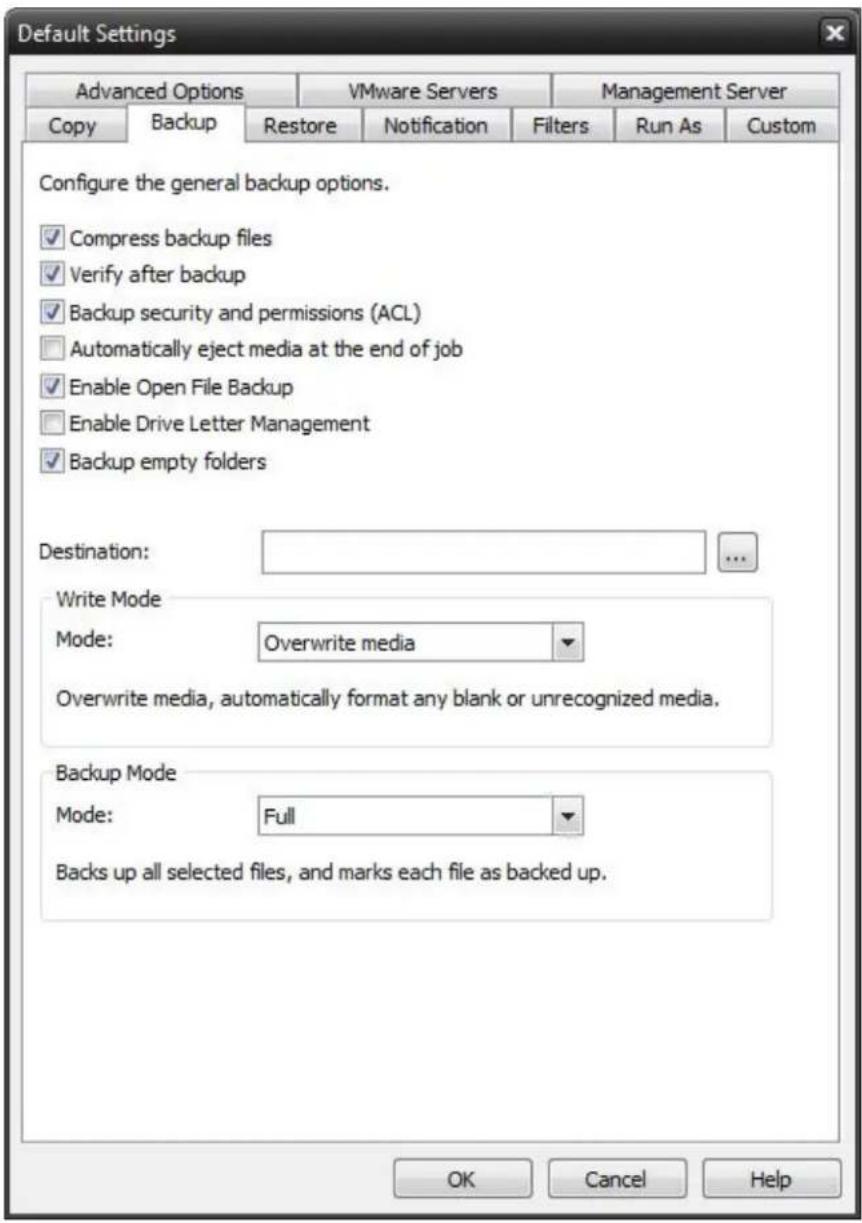
text_image
Default Settings Advanced Options VMware Servers Management Server Copy Backup Restore Notification Filters Run As Custom Configure the general backup options. ✓ Compress backup files ✓ Verify after backup ✓ Backup security and permissions (ACL) □ Automatically eject media at the end of job ✓ Enable Open File Backup □ Enable Drive Letter Management ✓ Backup empty folders Destination: ... Write Mode Mode: Overwrite media Overwrite media, automatically format any blank or unrecognized media. Backup Mode Mode: Full Backs up all selected files, and marks each file as backed up. OK Cancel HelpCompress backup files
The backup files are compressed to save space. Backup speed is decreased when this option is selected. This setting is unselected by default.
Verify after backup
The files that are backed up will be verified to make sure that they were written correctly. Selecting this option will increase backup time. This setting is selected by default.

It is highly recommended to select the option to verify your data after a backup. This helps to ensure that the backed up data matches the data presently on your system. If you do not select this option, and there is an error in some of your backed up data, there will be errors upon restoring that data if you should need to.
Backup ACL File Permissions
Select this option to backup Access Control Lists (ACL's) in addition to file data. ACL's contain file and system permissions. This option should be enabled to maintain system security.
Automatically Eject Media. . .
Select this option to have NovaBACKUP automatically eject the media after a backup has completed (device must support media eject)
Enable Open File Backup
Select this option to have NovaBACKUP automatically backup open files on the local system using Volume Snapshot Serv (VSS).
Note: This option is NOT available when running on Windows 2000.
Enable Drive Letter Management
Select this option to have NovaBACKUP automatically select the correct removable disk device (USB) even when it's drive letter changes.
Backup empty folders
Select this option backup empty folders.
Destination
Select the default destination device a backup for all new backup jobs
Write Mode
Overwrite media:
Overwrite all recognized media. Automatically format blank or unrecognized media
Append to Media:
Append to recognized media. Automatically format blank or unrecognized media
Backup Mode
Full
Backs up all selected files, and marks each file as backed up. This is the default setting.
Incremental
Backs up (and marks as backed up) selected files that have either not been backed up previously or have changed.
Differential
Backs up selected files that have either not been backed up previously or have changed. These backed up files are not marked as backed up, however.
Snapshot
Backs up all selected files and does not mark any files as backed up.
Restore Tab
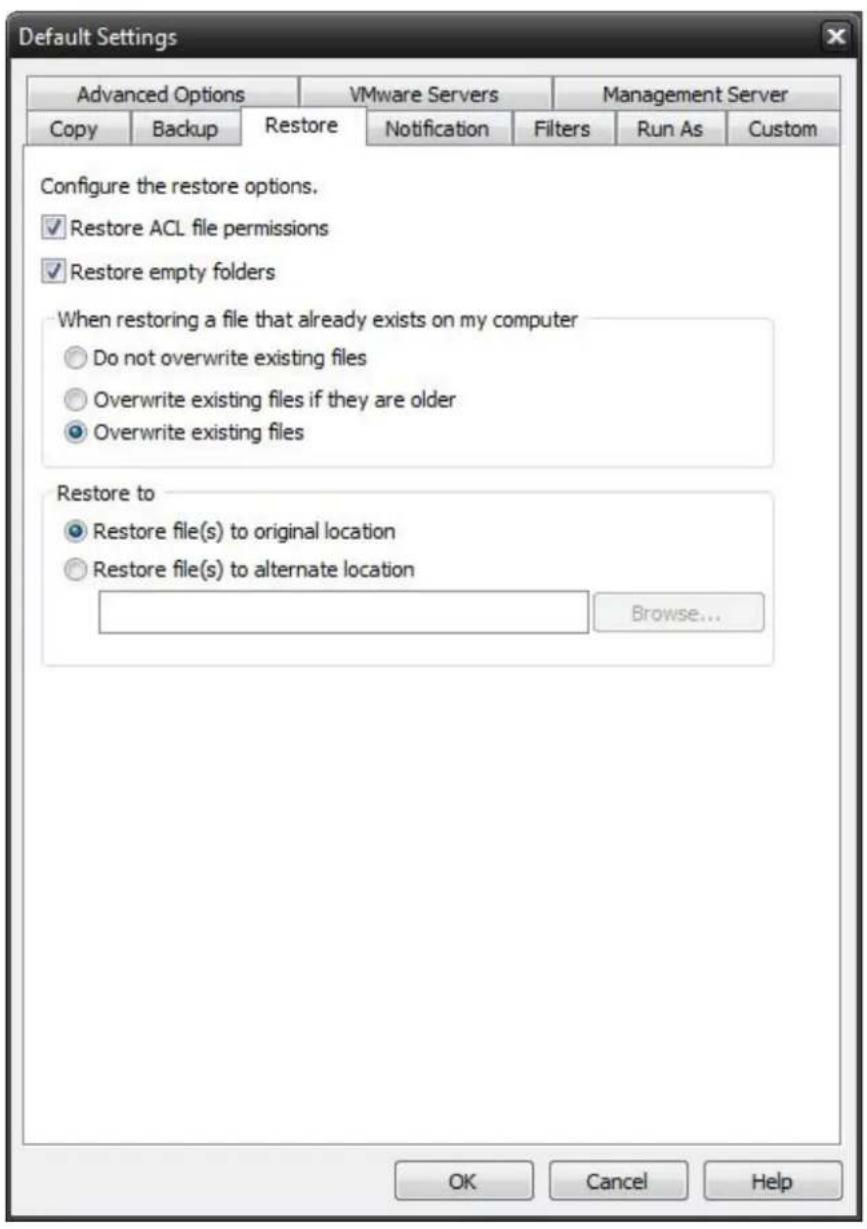
text_image
Default Settings Advanced Options VMware Servers Management Server Copy Backup Restore Notification Filters Run As Custom Configure the restore options. ✓Restore ACL file permissions ✓Restore empty folders When restoring a file that already exists on my computer ○Do not overwrite existing files ○Overwrite existing files if they are older ●Overwrite existing files Restore to ●Restore file(s) to original location ○Restore file(s) to alternate location Browse... OK Cancel HelpRestore ACL File Permissions
Select this option to restore security permissions on files and subdirectories. Note that the backup ACL's option must have been selected during the original backup for them to be restored.
Restore empty folders
Select this option to restore empty folders.
Existing Files Options
The recommended setting is to not overwrite a file if it already exists on your computer. Other choices include only overwriting the file if the existing file is older or always overwriting the file.
Do not overwrite existing files
Upon restoration, files that already exist on your computer will not be overwritten by files from the backup
Overwrite existing files if they are older
Upon restoration, if a file is found to exist on your computer already, it will only be overwritten if the file on your computer is older than the one found in the backup.
Overwrite existing files
Upon restoration, if a file is found to already exist on your computer, it will always be overwritten.
Restore File Placement
The default setting is to restore the file(s) to the original location they were backed up from.
Restore file to its original location
Upon restoration, all files will be restored to their original location.
Restore file(s) to an alternate location
Upon restoration, all files will be restored to an alternate location. This location can be specified by typing the path to the restoration directory in the text box or by selecting a directory by clicking on the "Browse" button that will appear to the left of the text box when the radio button is selected.
Notification Tab
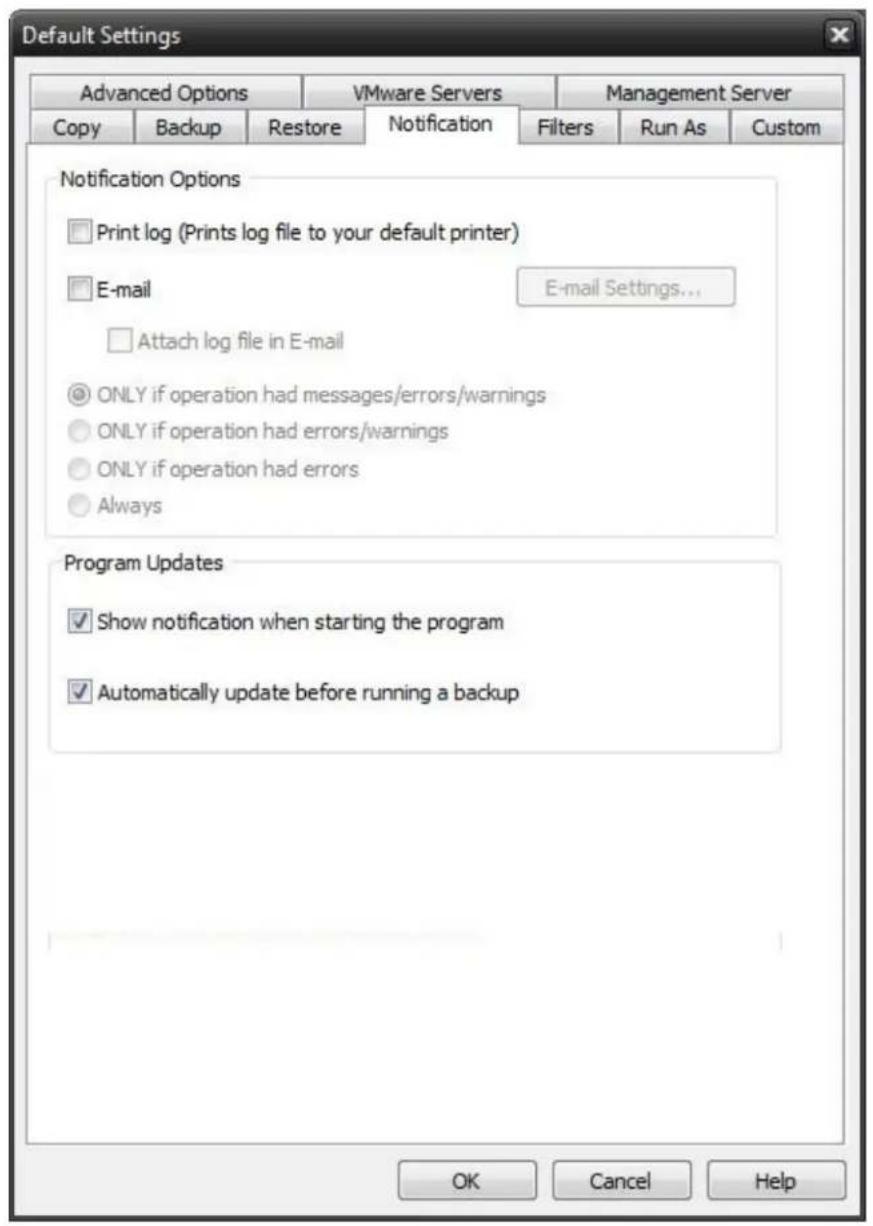
text_image
Default Settings Advanced Options VMware Servers Management Server Copy Backup Restore Notification Filters Run As Custom Notification Options Print log (Prints log file to your default printer) E-mail E-mail Settings... Attach log file in E-mail ONLY if operation had messages/errors/warnings ONLY if operation had errors/warnings ONLY if operation had errors Always Program Updates Show notification when starting the program Automatically update before running a backup OK Cancel HelpNotification Options
Use this option to receive job notification in E-mail.
You have the option to allow the logs to be e-mailed to the specified email address. To utilize these settings you must first configure the e-mail options by clicking on the "E-Mail Settings" button.
E-mail Settings
Depending on your product, you may be able to choose to use the NovaBACKUP Alerts service to send your e-mail logs or to manually enter a custom SMTP configuration.
- If you choose to use the NovaBACKUP Alerts service, the only information you need to provide is the recipient e-mail address or addresses you would like to receive notifications.
- If you choose to use a Custom SMTP service, your SMTP server information may be acquired from your System Administrator or service provider.
•You will need to input a valid e-mail addresses for both the sender and the recipient.
•These can be the same e-mail address.
If your SMTP server requires authentication, you may do so by tagging the checkbox for authentication and supplying your user name and password.
NovaBACKUP Alerts
If your product supports it, you may have the ability to choose the NovaBACKUP Alerts service to send your e-mail notifications. The NovaBACKUP Alerts service is a pre-configured email notification service.
* It is not required to use this service and you should check with your System Administrator to see if sending e-mail notifications through a 3rd party service is allowed in your organization.
* By using the NovaBACKUP Alerts service, you are agreeing to our End-User Licensing Agreement and Privacy P
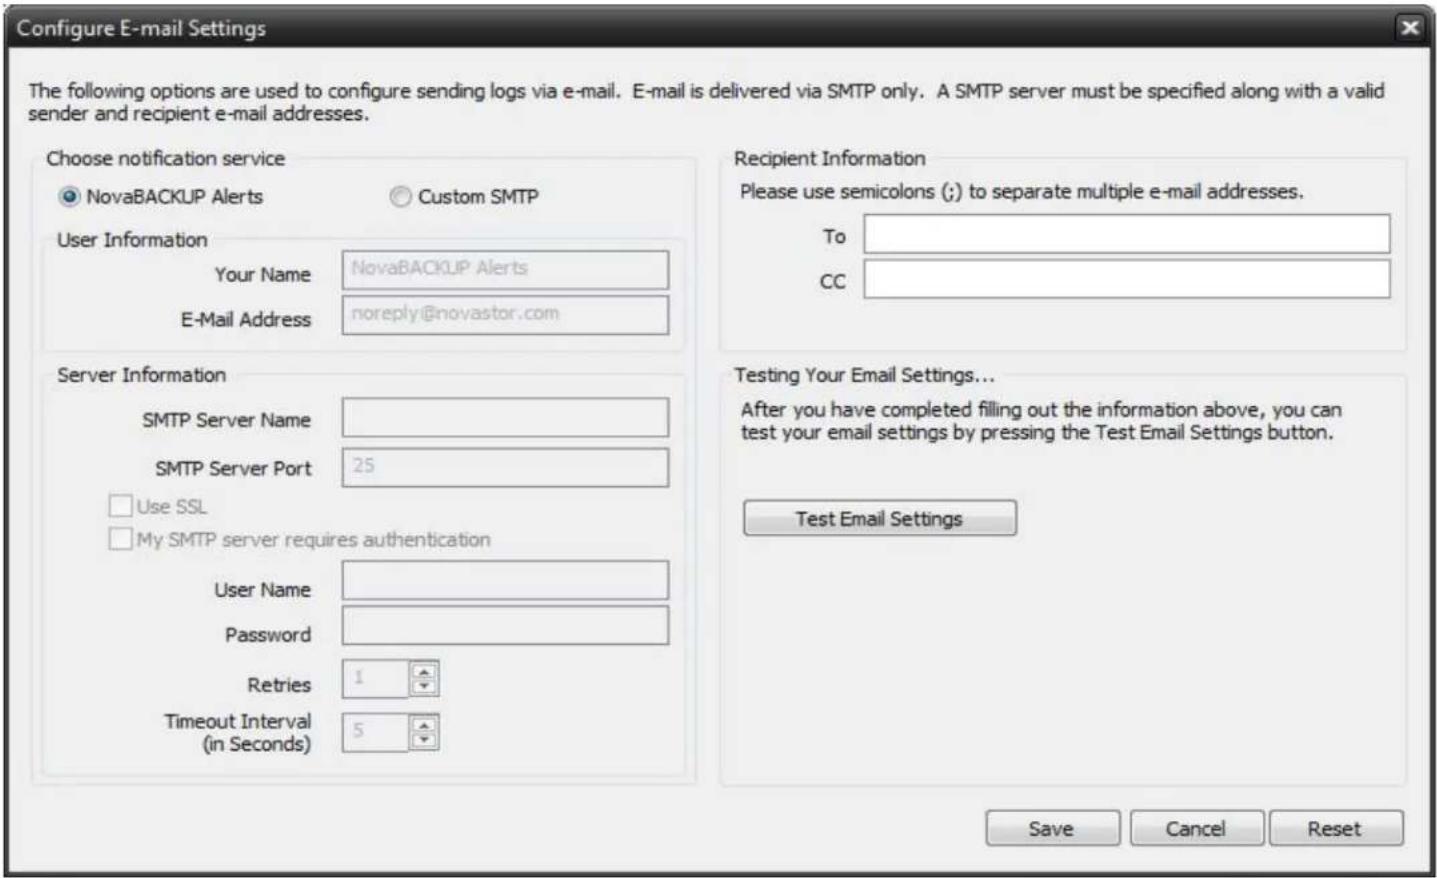
text_image
Configure E-mail Settings The following options are used to configure sending logs via e-mail. E-mail is delivered via SMTP only. A SMTP server must be specified along with a valid sender and recipient e-mail addresses. Choose notification service NovaBACKUP Alerts Custom SMTP User Information Your Name NovaBACKUP Alerts E-Mail Address noreply@novastor.com Server Information SMTP Server Name SMTP Server Port 25 Use SSL My SMTP server requires authentication User Name Password Retries 1 Timeout Interval (in Seconds) 5 Recipient Information Please use semicolons (;) to separate multiple e-mail addresses. To CC Testing Your Email Settings... After you have completed filling out the information above, you can test your email settings by pressing the Test Email Settings button. Test Email Settings Save Cancel Reset
Be sure to test your settings by clicking the "Test Email settings" button
Print Log
Here, you have the option to print the log automatically to your default printer.
Notification Conditions
• ONLY if operation had messages/errors/warnings
- ONLY if operation had errors/warnings
• ONLY if operation had errors
• Always
Program Updates
When a program update is available, display the option to install it when the program starts.
Show notification when starting the program
When a program update is available, display the option to install it when the program starts.
Automatically update before running a backup
When a program update is available, install it before starting the next backup.
Filters Tab
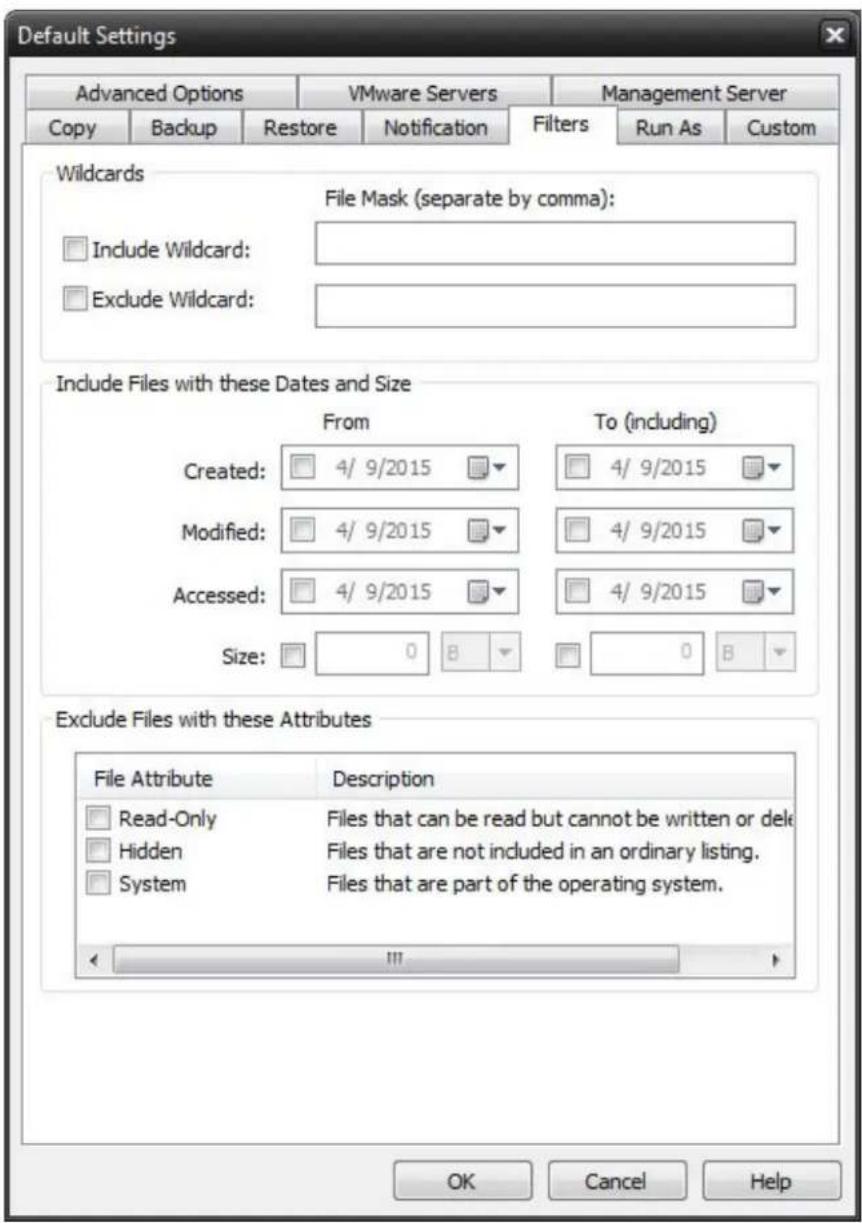
text_image
Default Settings Advanced Options VMware Servers Management Server Copy Backup Restore Notification Filters Run As Custom Wildcards File Mask (separate by comma): Include Wildcard: Exclude Wildcard: Include Files with these Dates and Size From To (including) Created: 4/ 9/2015 4/ 9/2015 Modified: 4/ 9/2015 4/ 9/2015 Accessed: 4/ 9/2015 4/ 9/2015 Size: 0 8 0 8 Exclude Files with these Attributes File Attribute Description Read-Only Files that can be read but cannot be written or delete Hidden Files that are not included in an ordinary listing. System Files that are part of the operating system. OK Cancel HelpWildcards
IncludeWildcard: Enter all wildcards for files you want to include in the default job separated by a comma (example:
*.doc,*.xls,*.dat)
ExcludeWildcard:Enter all wildcards for files you want to include in the default job separated by a comma (example:
*.doc,*.xls,*.dat)
Include Files with these Dates and Size
Under this section, you can create an include filter by selecting dates that files were last created, modified, or accessed or by there file size that you wish to ensure are included in your backup. This is helpful if you want to reduce the time or file size of a backup. You may want to exclude older files that are no longer accessed or larger files you have already backed up..
Exclude Files with these Attributes
Under this section, you can create an exclude filter based on the file attributes: "Read Only", "Hidden" and "System". For example, if you would to exclude System or Hidden files, check the appropriate box next to the attribute.
Run As Tab
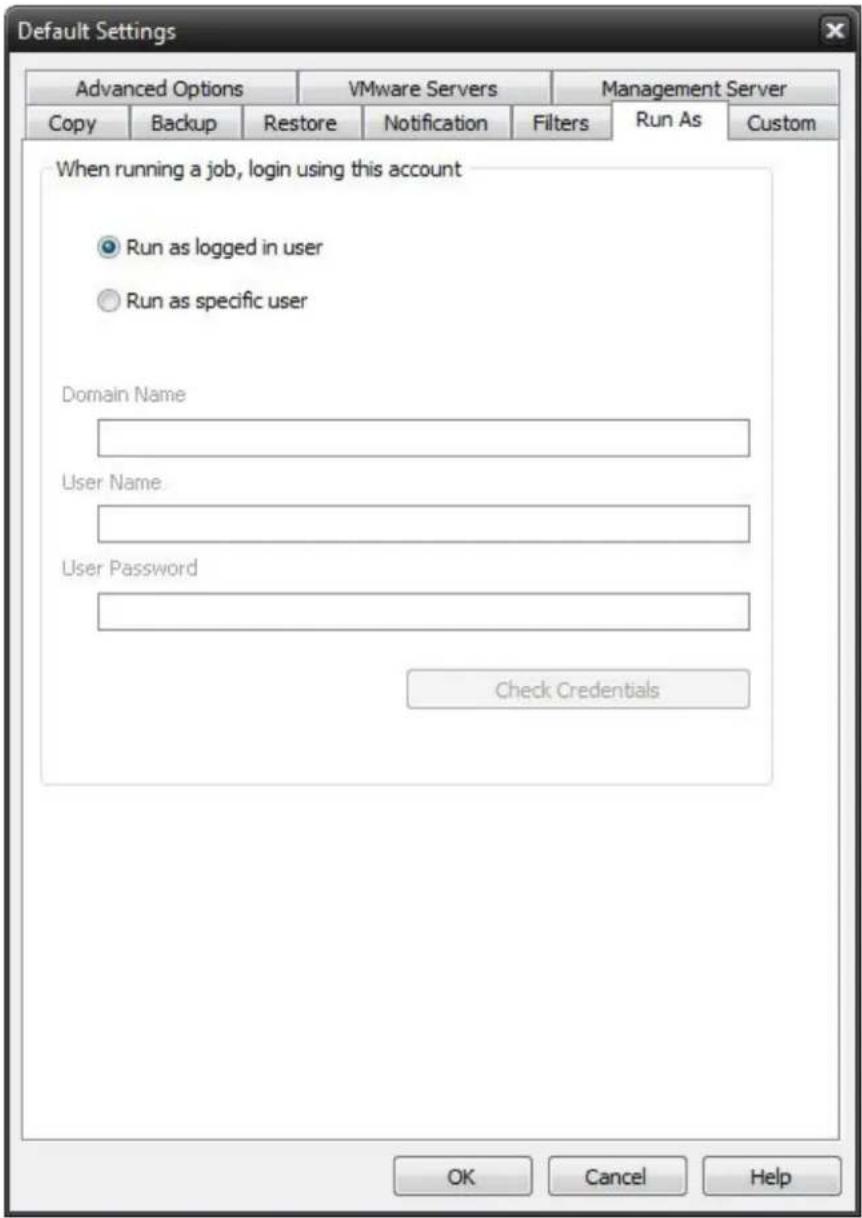
text_image
Default Settings Advanced Options VMware Servers Management Server Copy Backup Restore Notification Filters Run As Custom When running a job, login using this account ● Run as logged in user ○ Run as specific user Domain Name User Name User Password Check Credentials OK Cancel HelpWhen running a job, login using this account
Run as logged in user:
Run the job using the Windows login credentials in effect at that time.
Run as specific user:
Run the job using the specified credentials.
Domain Name: The domain name you are logging into.
Run as User Name: The user name you want the job to run as.
Password: The password for the account you want the job to run as.

Note: The account information entered here is usually account you use to login to windows. However, you may need to use a different account when backing up network/shared drives.

Important: If you have entered credentials you must click the "Check Credentials" button to validate the account you have entered before proceeding forward.
Custom Tab
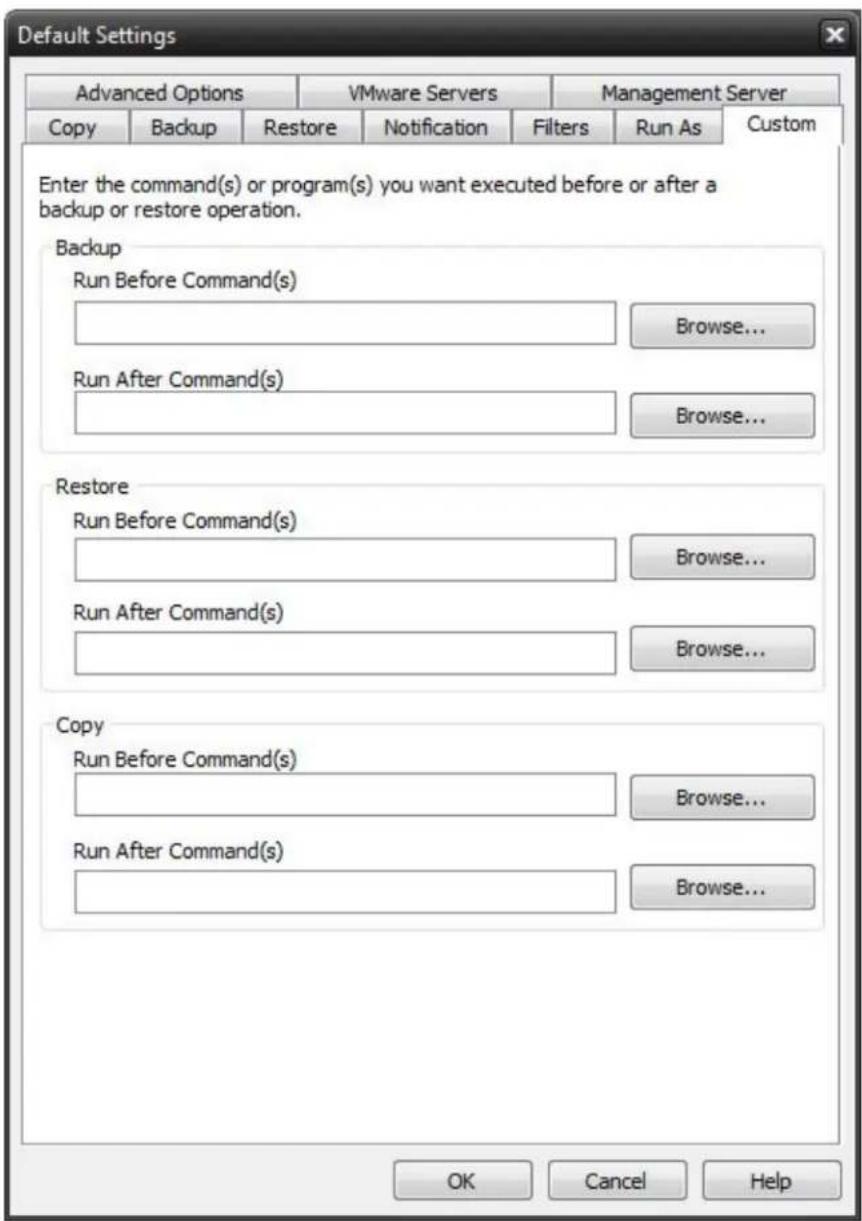
text_image
Default Settings Advanced Options VMware Servers Management Server Copy Backup Restore Notification Filters Run As Custom Enter the command(s) or program(s) you want executed before or after a backup or restore operation. Backup Run Before Command(s) Browse... Run After Command(s) Browse... Restore Run Before Command(s) Browse... Run After Command(s) Browse... Copy Run Before Command(s) Browse... Run After Command(s) Browse... OK Cancel HelpThis feature enables a command to run before or after a backup, restore or copy job
To select which program or command you would like to run before or after those operations, simply browse to the program or command using the "Browse" button.

The benefits of this feature are numerous. For instance, one would be able to stop Antivirus scanning by issuing a command to their Anti-virus program prior to NovaBACKUP beginning the backup. Alternatively, a command can be issued at the end of the backup to
begin an anti-virus scan. Also one could issue a command to close a database at the beginning of a backup and reopen it at the end of a backup
Advanced Options Tab
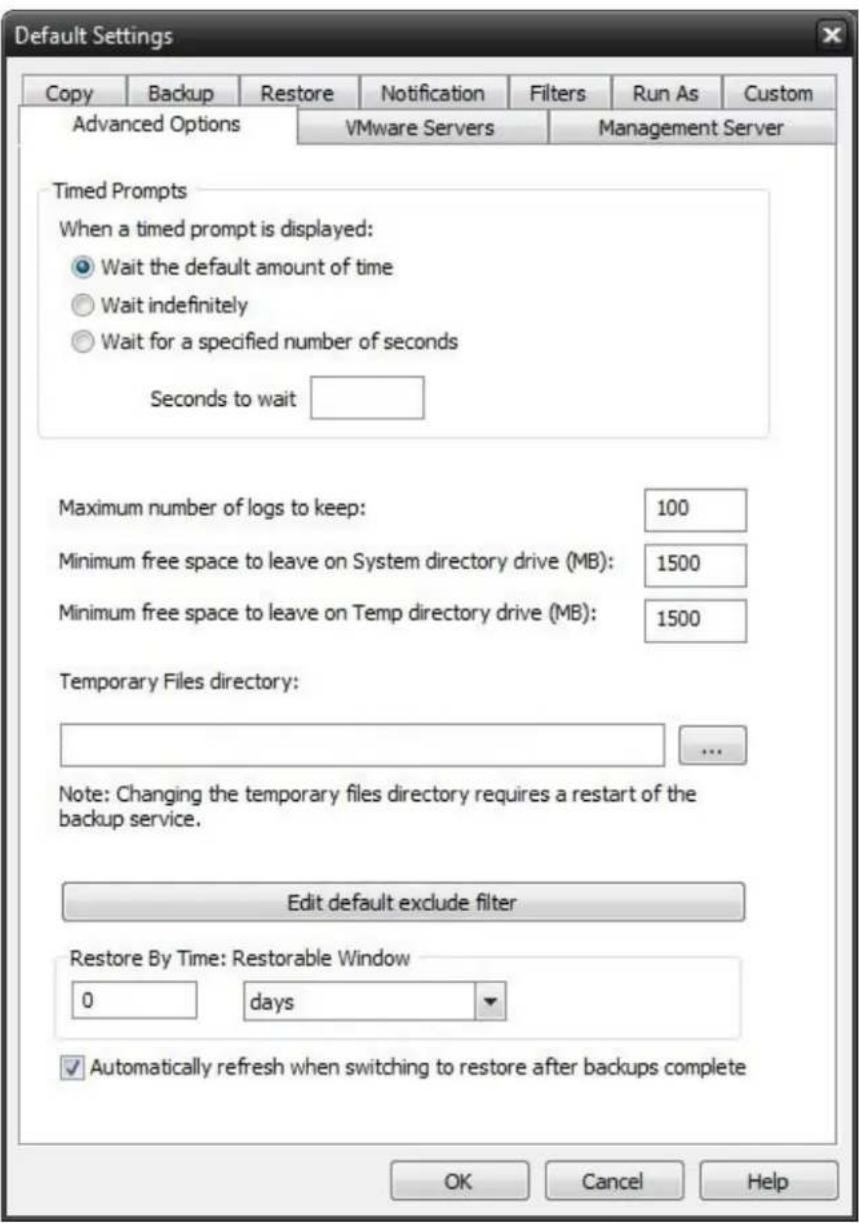
text_image
Default Settings Copy Backup Restore Notification Filters Run As Custom Advanced Options VMware Servers Management Server Timed Prompts When a timed prompt is displayed: ● Wait the default amount of time ○ Wait indefinitely ○ Wait for a specified number of seconds Seconds to wait Maximum number of logs to keep: 100 Minimum free space to leave on System directory drive (MB): 1500 Minimum free space to leave on Temp directory drive (MB): 1500 Temporary Files directory: Note: Changing the temporary files directory requires a restart of the backup service. Edit default exclude filter Restore By Time: Restorable Window 0 (days ✓ Automatically refresh when switching to restore after backups complete OK Cancel HelpTimed Prompts
When prompts or dialogs are displayed, select the action you want performed.

This option is useful in allowing fully unattended operation or permitting the administrator to respond to specific issues or requests.
Maximum number of logs to keep
This value limits the number of logs saved to disk. The most recent logs up to the maximum will remain available.
"Minimum Free Space" settings
This values represent the minimum amount of free disk space that must be available on the System (OS) and Temp drive (if different) in order for jobs to run.
"Temporary files directory"
Directory used to stage working files used by NovaBACKUP. If your system is running low on space, you can move this directory to another drive.
"Edit default exclude filter"
Select this option to add or edit folders, files or file types that should be excluded from jobs regardless of selection.
"Restore By Time: Restorable Window"
Use this option to restrict the time range in effect for the Restore Files By Time view. A setting of zero will have no effect. Otherwise the value set here will define the time in effect from the current time selected moving back in time. This setting has no effect in the Restore Files By Device view.
"Automatically refresh when switching to restore after backups complete"
Use this option to make the Restore By Time view automatically build a new filelist when switching to the restore view after a backup has completed.
Management Server Tab
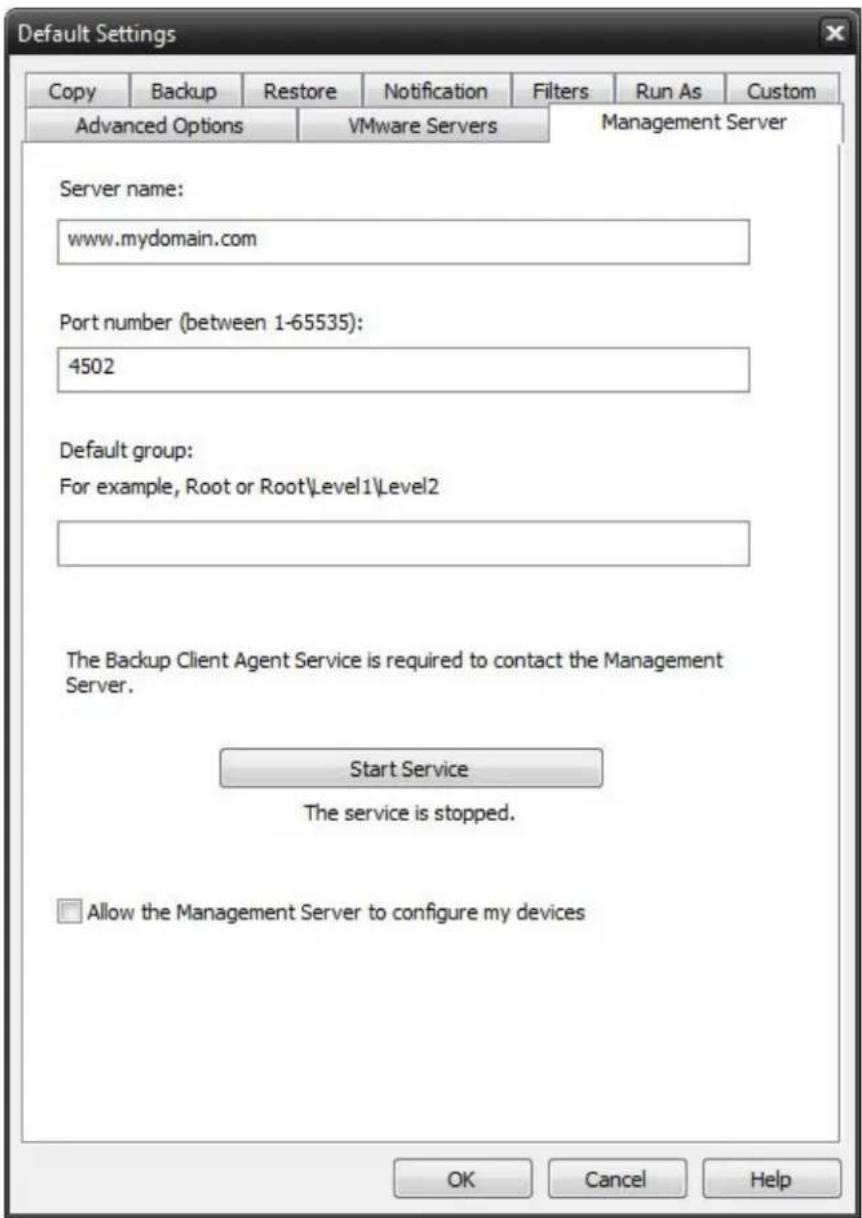
text_image
Default Settings Copy Backup Restore Notification Filters Run As Custom Advanced Options VMware Servers Management Server Server name: www.mydomain.com Port number (between 1-65535): 4502 Default group: For example, Root or Root\level1\level2 The Backup Client Agent Service is required to contact the Management Server. Start Service The service is stopped. Allow the Management Server to configure my devices OK Cancel HelpFor those installations accessible from a central management console, this screen may be used to specify the and port to access the management server.
Default Group
Use this setting to specify the group name to use when adding this client to the central management console. If this setting is not specified, this client will be added to the default group.
VMware Servers Tab
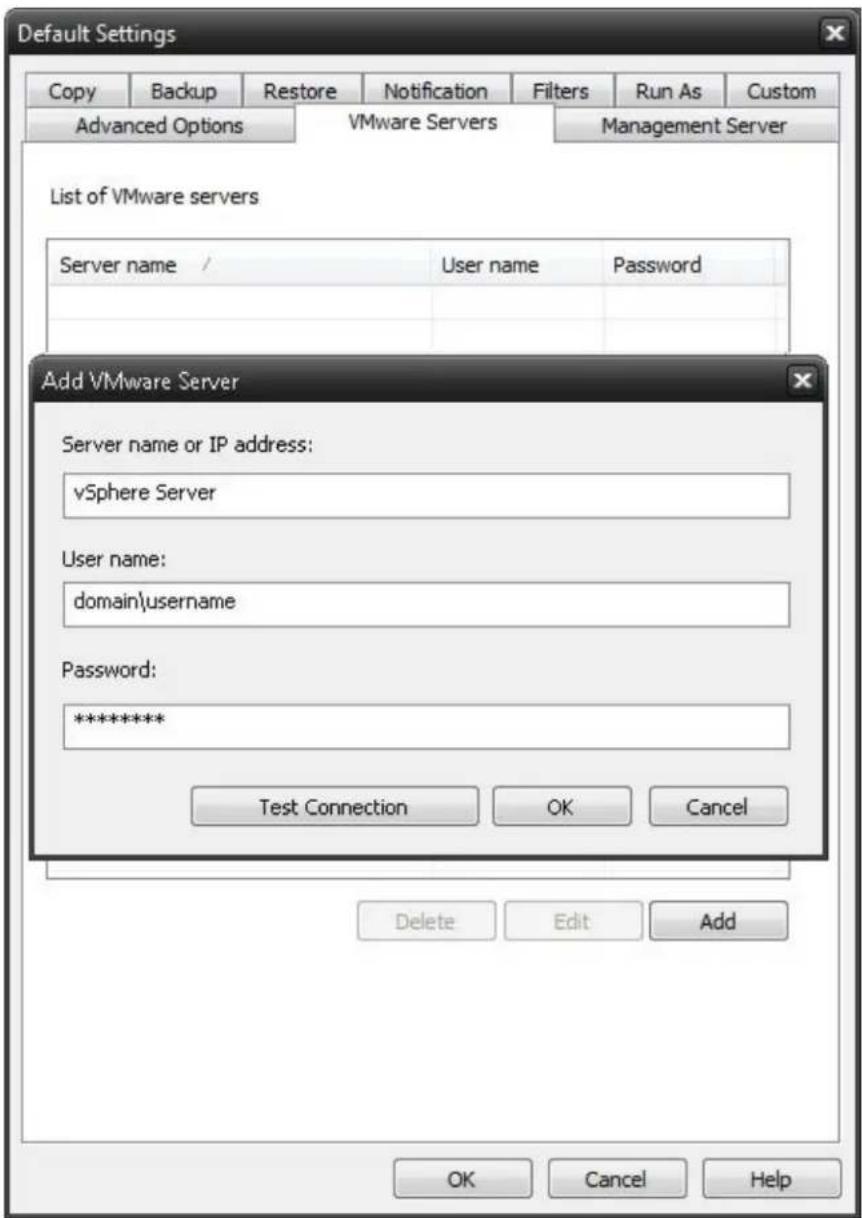
text_image
Default Settings Copy Backup Restore Notification Filters Run As Custom Advanced Options VMware Servers Management Server List of VMware servers Server name / User name dgassword Add VMware Server Server name or IP address: vSphere Server User name: domain\username Password: ************ Test Connection OK Cancel Delete Edit Add OK Cancel HelpFor those licensed to use the VMware Plugin, this tab is used to add a new connection to an ESX(i) or vSpl
Copy Job Options

text_image
Advanced Settings Copy Filters Notification Run As Network Credentials Custom Commands Configure the copy options. ✓ Verify after copy ✓ Enable Open File Copy ☐ Enable Drive Letter Management ✓ Copy empty folders Copy Overwrite Options ● Always overwrite ○ Never overwrite ○ Overwrite older files only OK Cancel HelpVerify after copy
The files that are copied will be verified to make sure that they were written correctly. Selecting this option will increase copy time. This setting is selected by default.

It is highly recommended to select the option to verify your data after a copy job. This helps to ensure that the copied data matches the data presently on your system. If you do not select this option, and there is an error in some of your copied data, you will not be aware of the errors until you go to access the copied data.
Enable Open FileCopy
Select this option to have NovaBACKUP automatically copy open files on the local system using Volume Snapshot Service (VSS).
Note: This option NOT available when running on Windows 2000.
Enable Drive Letter Management
Select this option to have NovaBACKUP automatically select the correct removable disk device (USB) even when it's drive letter changes.
Copy empty folders
Select this option to copy empty folders.
CopyOverwrite Options
Always Overwrite
Source file will always overwrite an existing file of the same name on the destination.
Never Overwrite
Source file will never overwrite an existing file of the same name on the destination.
Overwrite older files only
Source file will overwrite an existing file of the same name on the destination if the destination file is older.
Copy Job Filters
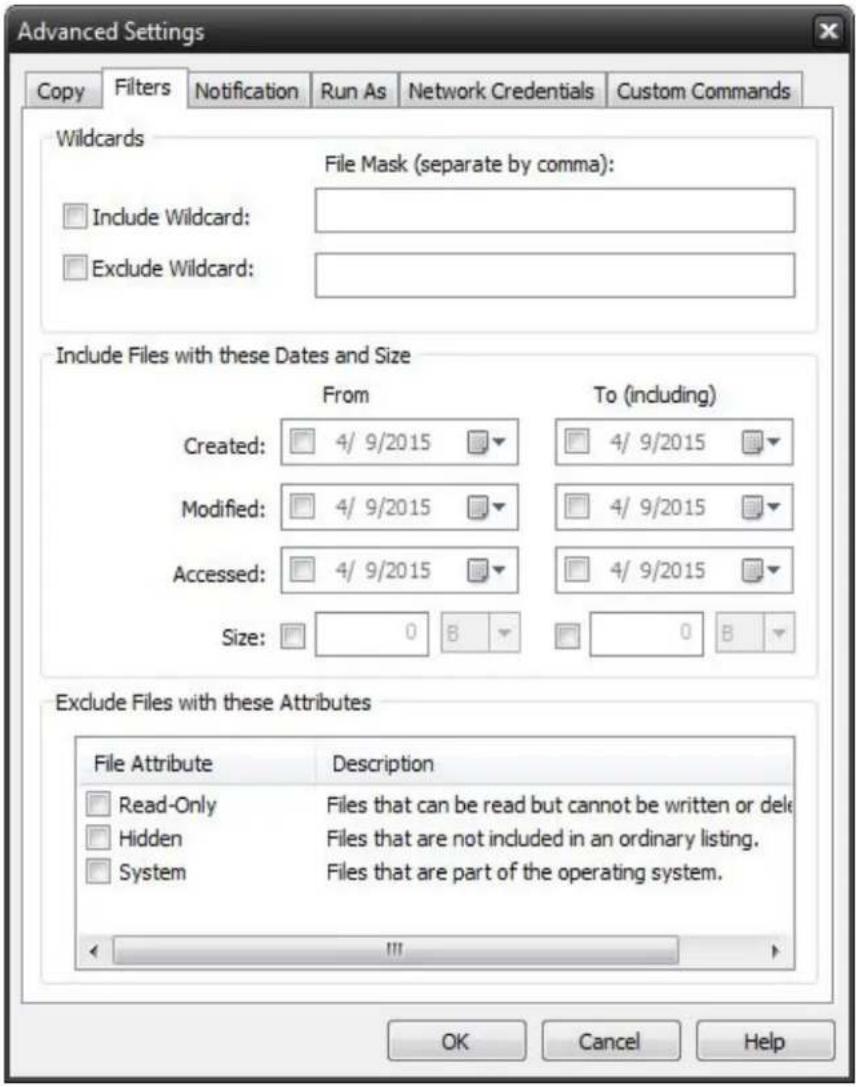
text_image
Advanced Settings Copy Filters Notification Run As Network Credentials Custom Commands Wildcards File Mask (separate by comma): Include Wildcard: Exclude Wildcard: Include Files with these Dates and Size From To (including) Created: 4/ 9/2015 4/ 9/2015 Modified: 4/ 9/2015 4/ 9/2015 Accessed: 4/ 9/2015 4/ 9/2015 Size: 0 B 0 B Exclude Files with these Attributes File Attribute Description Read-Only Files that can be read but cannot be written or delete Hidden Files that are not included in an ordinary listing. System Files that are part of the operating system. OK Cancel HelpWildcards
IncludeWildcard: Enter all wildcards for files you want to include in the default job separated by a comma (example:
*.doc,*.xls,*.dat)
ExcludeWildcard:Enter all wildcards for files you want to include in the default job separated by a comma (example:
*.doc,*.xls,*.dat)
Include Files with these Dates and Size
Under this section, you can create an include filter by selecting dates that files were last created, modified, or accessed or by there file size that you wish to ensure are included in your backup. This is helpful if you want to reduce the time or file size of a backup. You may want to exclude older files that are no longer accessed or larger files you have already backed up..
Exclude Files with these Attributes
Under this section, you can create an exclude filter based on the file attributes: "Read Only", "Hidden" and "System". For example, if you would to exclude System or Hidden files, check the appropriate box next to the attribute.
Type topic text here.
Copy Job Notification
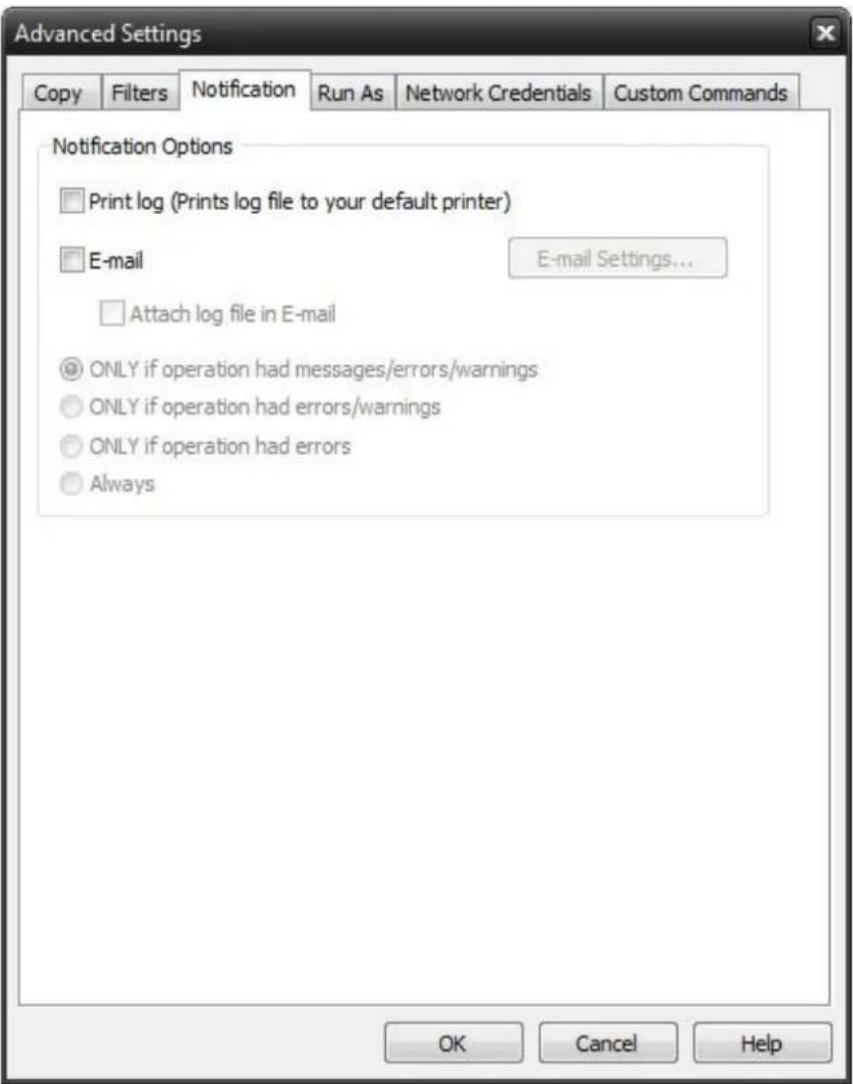
text_image
Advanced Settings Copy Filters Notification Run As Network Credentials Custom Commands Notification Options Print log (Prints log file to your default printer) E-mail E-mail Settings... Attach log file in E-mail ONLY if operation had messages/errors/warnings ONLY if operation had errors/warnings ONLY if operation had errors Always OK Cancel Help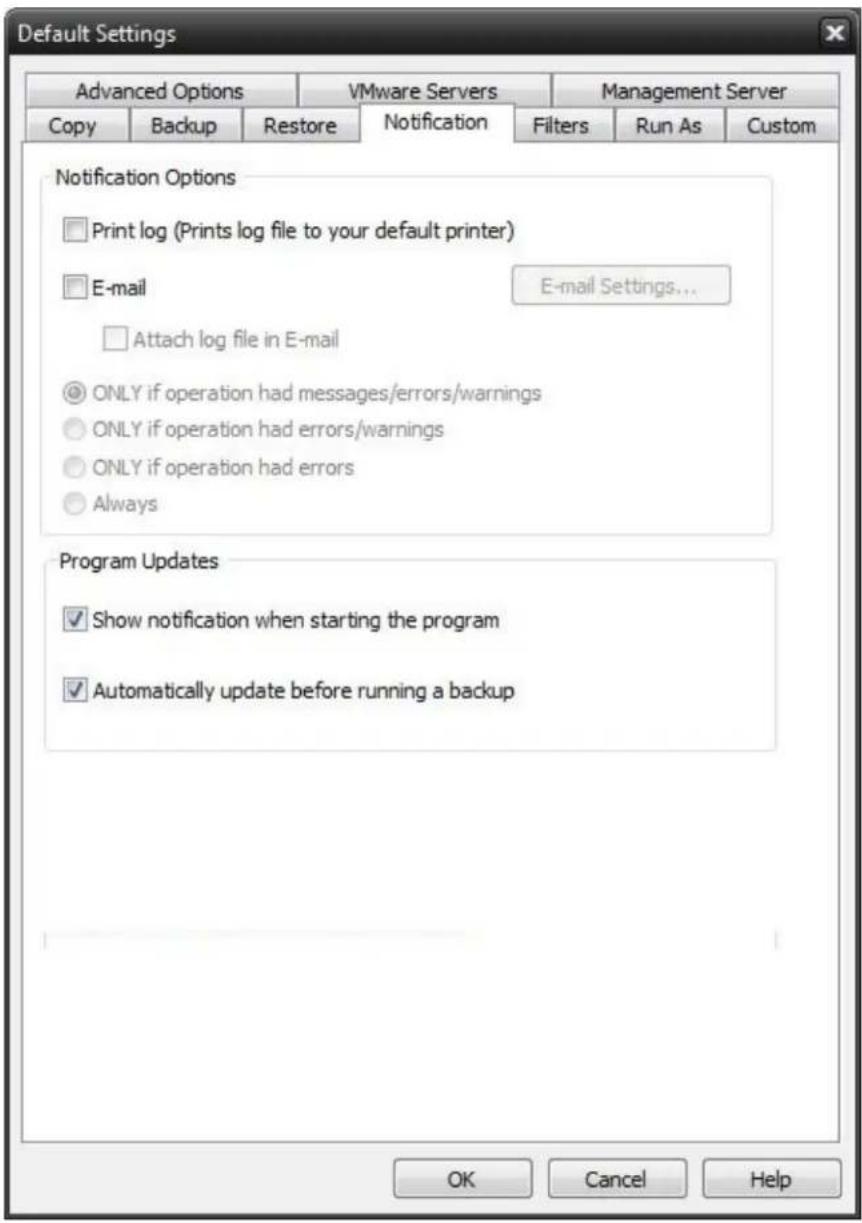
text_image
Default Settings Advanced Options VMware Servers Management Server Copy Backup Restore Notification Filters Run As Custom Notification Options Print log (Prints log file to your default printer) E-mail E-mail Settings... Attach log file in E-mail ONLY if operation had messages/errors/warnings ONLY if operation had errors/warnings ONLY if operation had errors Always Program Updates Show notification when starting the program Automatically update before running a backup OK Cancel HelpNotification Options
Use this option to receive job notification in E-mail.
You have the option to allow the logs to be e-mailed to the specified email address. To utilize these settings you must first configure the e-mail options by clicking on the "E-Mail Settings" button.
E-mail Settings
Depending on your product, you may be able to choose to use the NovaBACKUP Alerts service to send your e-mail logs or to manually enter a custom SMTP configuration.
- If you choose to use the NovaBACKUP Alerts service, the only information you need to provide is the recipient e-mail address or addresses you would like to receive notifications.
- If you choose to use a Custom SMTP service, your SMTP server information may be acquired from your System Administrator or service provider.
- You will need to input a valid e-mail addresses for both the sender and the recipient.
•These can be the same e-mail address.
•If your SMTP server requires authentication, you may do so by tagging the checkbox for authentication and supplying your user name and password.
NovaBACKUP Alerts
If your product supports it, you may have the ability to choose the NovaBACKUP Alerts service to send your e-mail notifications. The NovaBACKUP Alerts service is a pre-configured email notification service.
* It is not required to use this service and you should check with your System Administrator to see if sending e-mail notifications through a 3rd party service is allowed in your organization.
* By using the NovaBACKUP Alerts service, you are agreeing to our End-User Licensing Agreement and Privacy Policies.
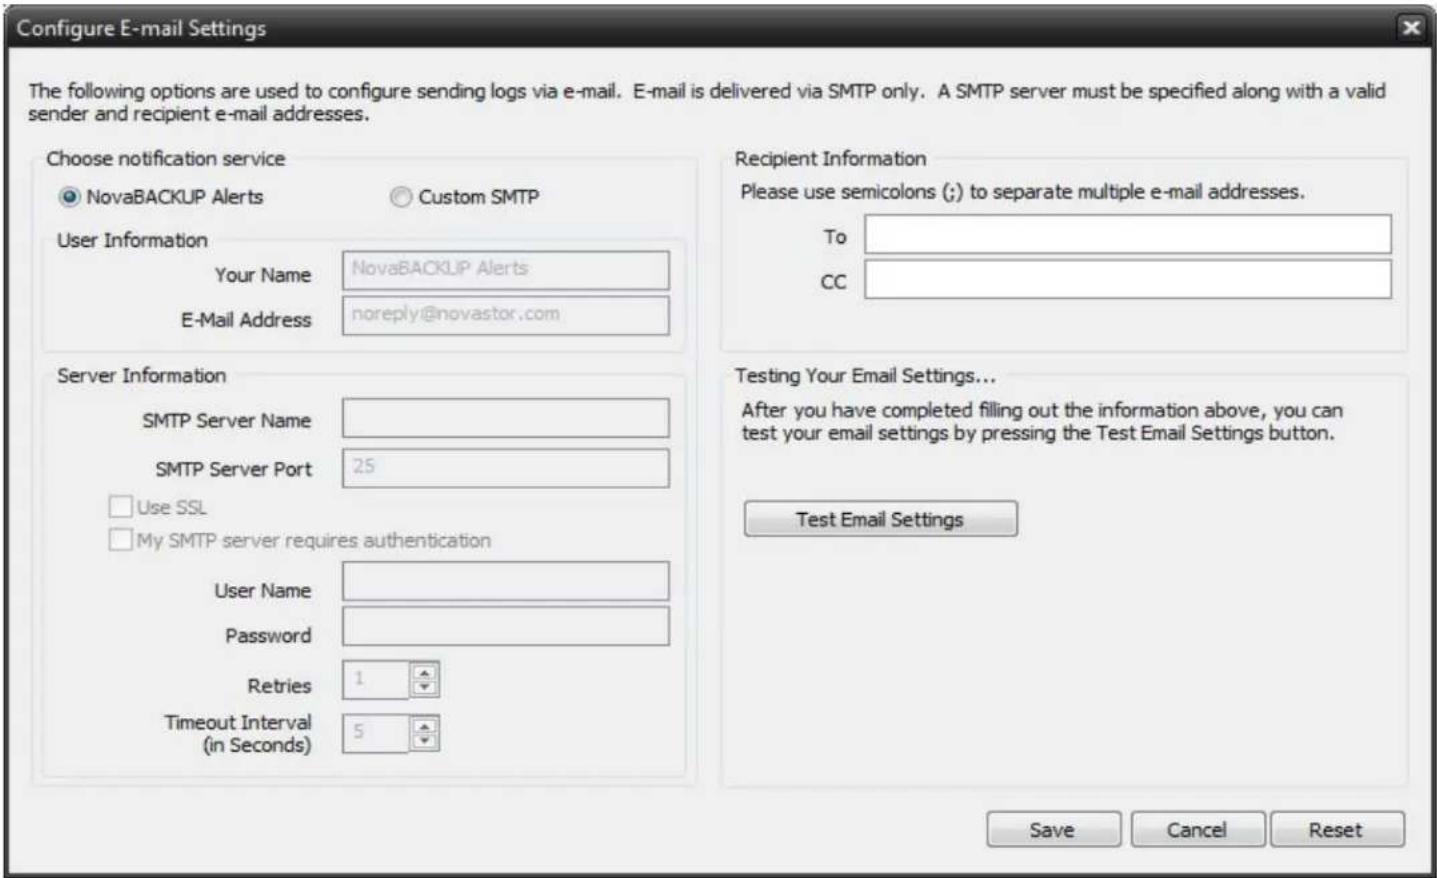
text_image
Configure E-mail Settings The following options are used to configure sending logs via e-mail. E-mail is delivered via SMTP only. A SMTP server must be specified along with a valid sender and recipient e-mail addresses. Choose notification service NovaBACKUP Alerts Custom SMTP User Information Your Name NovaBACKUP Alerts E-Mail Address noreply@novastor.com Server Information SMTP Server Name SMTP Server Port 25 Use SSL My SMTP server requires authentication User Name Password Retries 1 Timeout Interval (in Seconds) 5 Recipient Information Please use semicolons (;) to separate multiple e-mail addresses. To CC Testing Your Email Settings... After you have completed filling out the information above, you can test your email settings by pressing the Test Email Settings button. Test Email Settings Save Cancel Reset
Be sure to test your settings by clicking the "Test Email settings" button
Print Log
Here, you have the option to print the log automatically to your default printer. Notification Conditions
- ONLY if operation had messages/errors/warnings
• ONLY if operation had errors/warnings - ONLY if operation had errors
• Always
Copy Job Run As
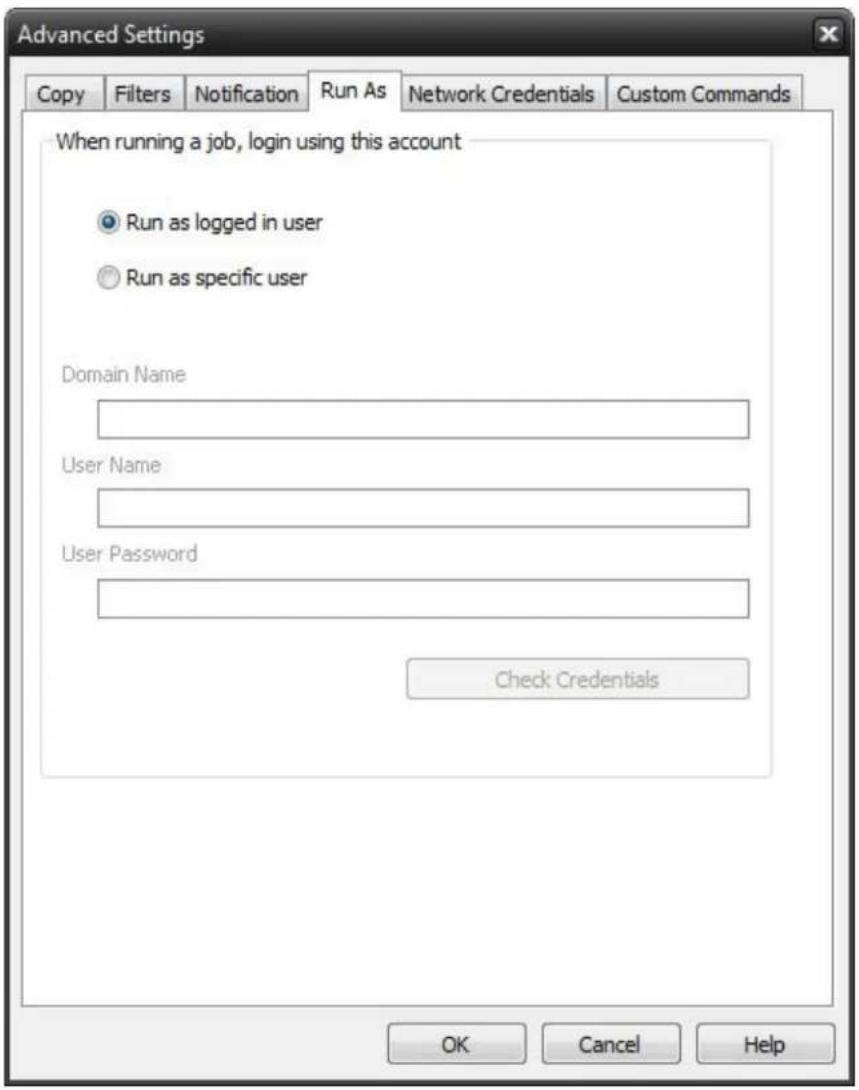
text_image
Advanced Settings Copy Filters Notification Run As Network Credentials Custom Commands When running a job, login using this account Run as logged in user Run as specific user Domain Name User Name User Password Check Credentials OK Cancel HelpWhen running a job, login using this account
Run as logged in user:
Run the job using the Windows login credentials in effect at that time.
Run as specific user:
Run the job using the specified credentials.
Domain Name: The domain name you are logging into.
Run as User Name: The user name you want the job to run as.
Password: The password for the account you want the job to run as.

Note: The account information entered here is usually account you use to login to windows. However, you may need to use a different account when backing up network/shared drives.

Important: If you have entered credentials you must click the "Check Credentials" button to validate the account you have entered before proceeding forward.
Copy Job Network Credentials
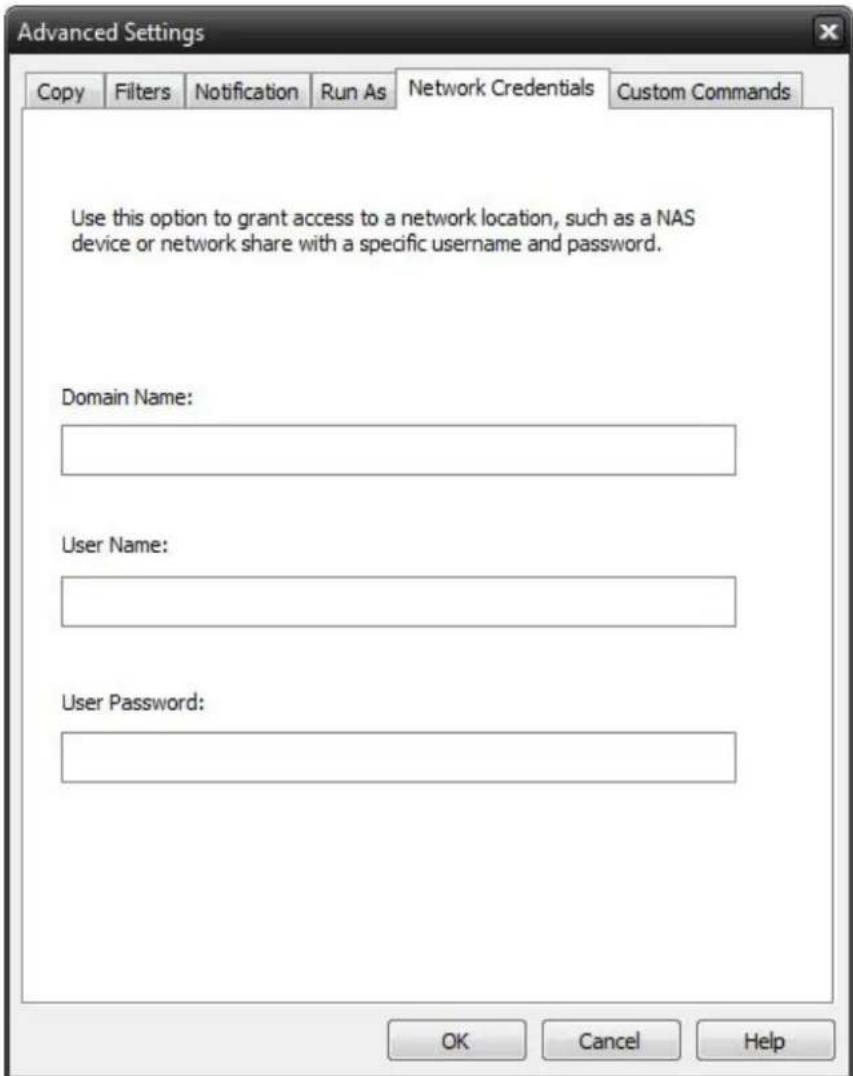
text_image
Advanced Settings Copy Filters Notification Run As Network Credentials Custom Commands Use this option to grant access to a network location, such as a NAS device or network share with a specific username and password. Domain Name: User Name: User Password: OK Cancel HelpThis option may be used to access devices on the network which require different credentials than the defaults. You may use different credentials for this purpose than those set in the "Run As" Tab.
Copy Job Custom Commands
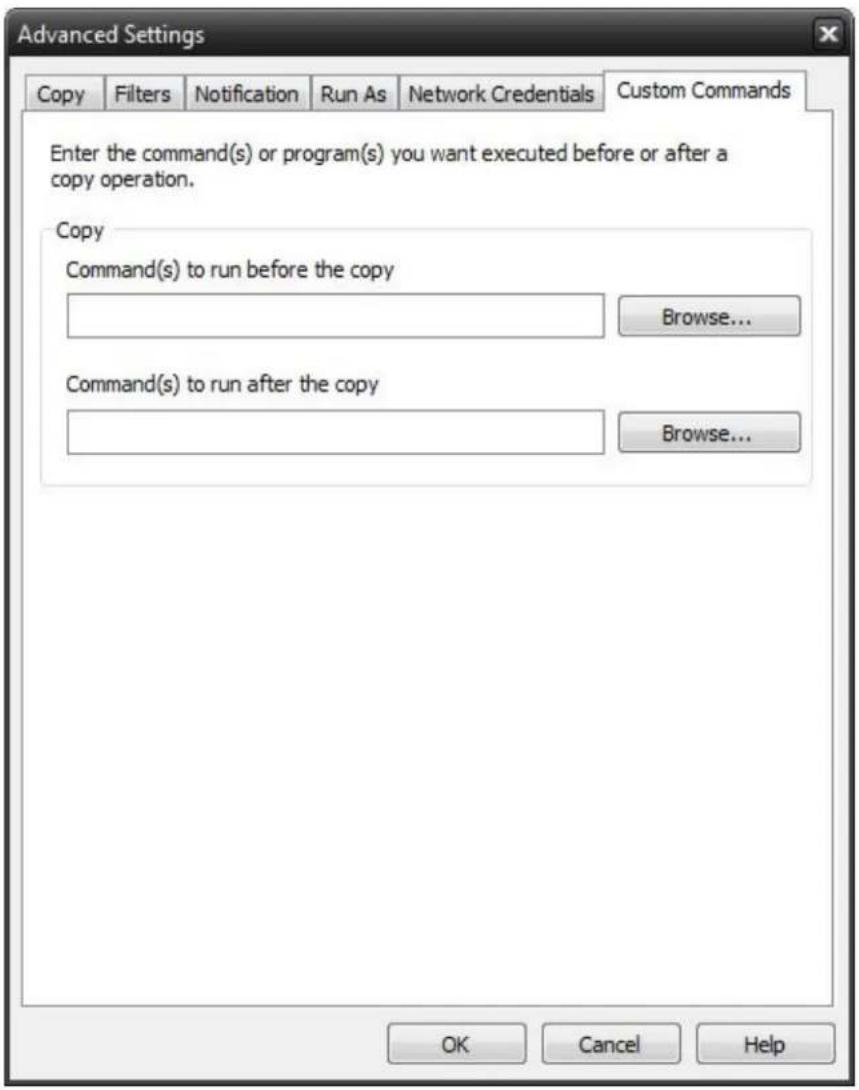
text_image
Advanced Settings Copy Filters Notification Run As Network Credentials Custom Commands Enter the command(s) or program(s) you want executed before or after a copy operation. Copy Command(s) to run before the copy Browse... Command(s) to run after the copy Browse... OK Cancel HelpThis feature enables a command to run before or after a copy job
To select which program or command you would like to run before or after the copy operation, simply browse to the program or command using the "Browse" button.

The benefits of this feature are numerous. For instance, one would be able to stop Antivirus scanning by issuing a command to their Anti-virus program prior to NovaBACKUP beginning the copy job. Alternatively, a command can be issued at the end of the job to begin an anti-virus scan. Also one could issue a command to close a database at the beginning of a job and reopen it at the end of a job.
Backup Job Options
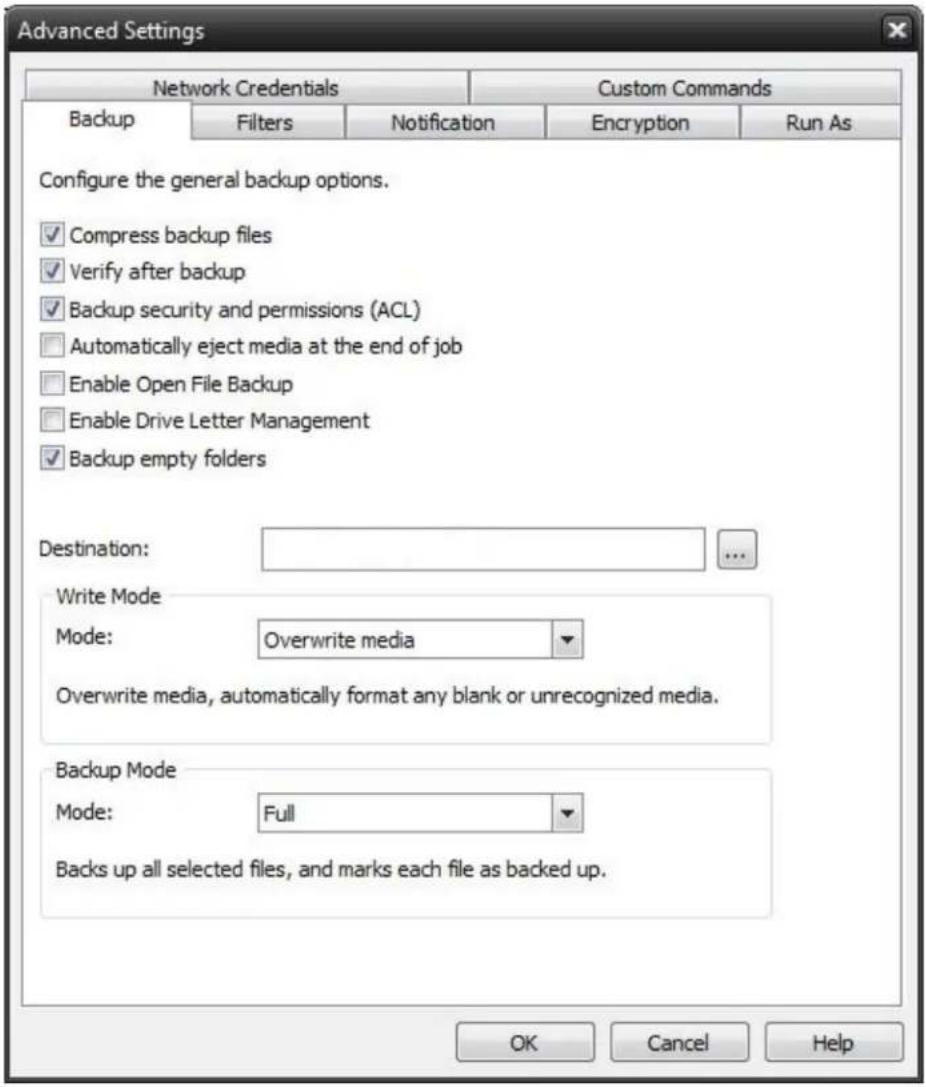
text_image
Advanced Settings Network Credentials Custom Commands Backup Filters Notification Encryption Run As Configure the general backup options. ✓ Compress backup files ✓ Verify after backup ✓ Backup security and permissions (ACL) □ Automatically eject media at the end of job □ Enable Open File Backup □ Enable Drive Letter Management ✓ Backup empty folders Destination: ... Write Mode Mode: Overwrite media Overwrite media, automatically format any blank or unrecognized media. Backup Mode Mode: Full Backs up all selected files, and marks each file as backed up. OK Cancel HelpCompress backup files
The backup files are compressed to save space. Backup speed is decreased when this option is selected. This setting is unselected by default.
Verify after backup
The files that are backed up will be verified to make sure that they were written correctly. Selecting this option will increase backup time. This setting is selected by default.

It is highly recommended to select the option to verify your data after a backup. This helps to ensure that the backed up data matches the data presently on your system. If you do not select this option, and there is an error in some of your backed up data, there will be errors upon restoring that data if you should need to.
Backup ACL File Permissions
Select this option to backup Access Control Lists (ACL's) in addition to file data. ACL's contain file and system permissions. This option should be enabled to maintain system security.
Automatically Eject Media. . .
Select this option to have NovaBACKUP automatically eject the media after a backup has completed (device must support media eject)
Enable Open File Backup
Select this option to have NovaBACKUP automatically backup open files on the local system using Volume Snapshot Serv (VSS).
Note: This option is NOT available when running on Windows 2000.
Enable Drive Letter Management
Select this option to have NovaBACKUP automatically select the correct removable disk device (USB) even when it's drive letter changes.
Backup empty folders
Select this option to have backup empty folders.
Destination
Select the default destination device a backup for all new backup jobs
Write Mode
Overwrite media:
Overwrite all recognized media. Automatically format blank or unrecognized media
Append to Media:
Append to recognized media. Automatically format blank or unrecognized media
Backup Mode
Full
Backs up all selected files, and marks each file as backed up. This is the default setting.
Incremental
Backs up (and marks as backed up) selected files that have either not been backed up previously or have changed.
Differential
Backs up selected files that have either not been backed up previously or have changed. These backed up files are not marked as backed up, however.
Snapshot
Backs up all selected files and does not mark any files as backed up.
Backup Job Filters
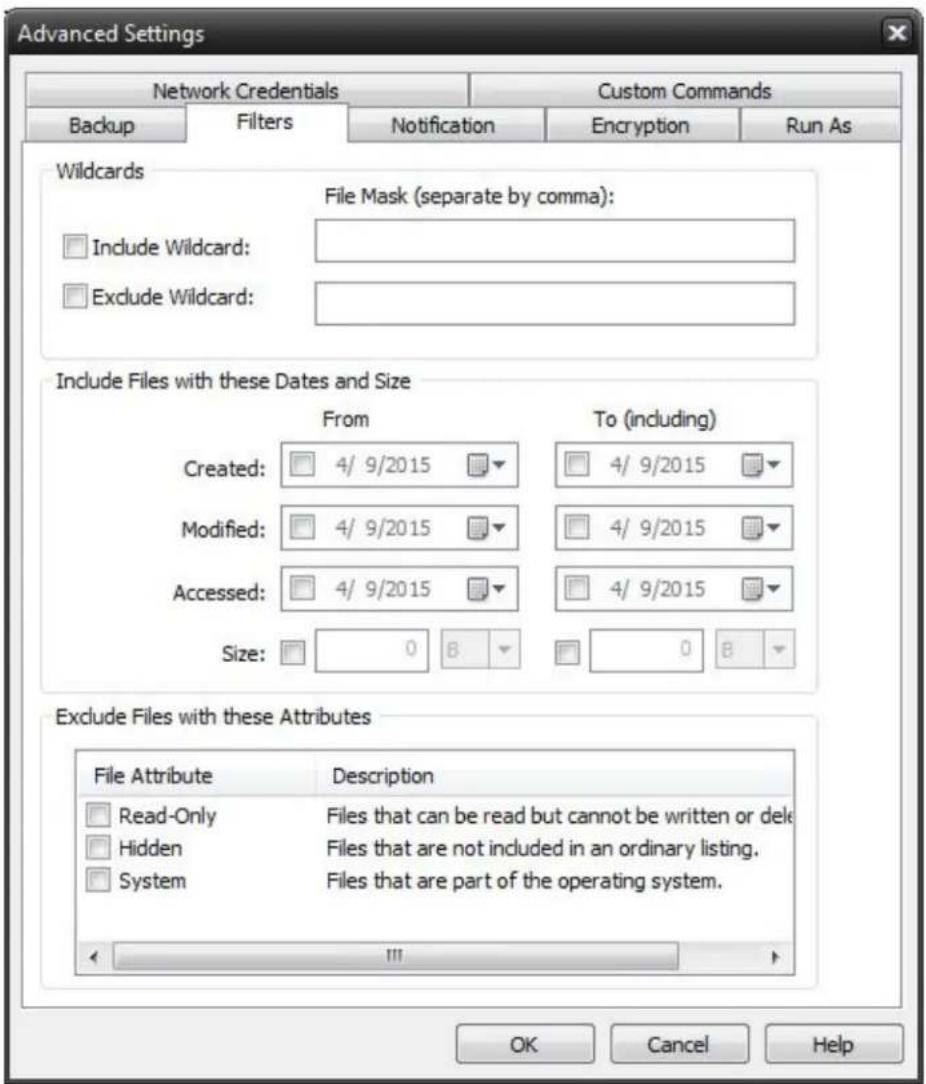
text_image
Advanced Settings Network Credentials Custom Commands Backup Filters Notification Encryption Run As Wildcards File Mask (separate by comma): Include Wildcard: Exclude Wildcard: Include Files with these Dates and Size From To (including) Created: 4/ 9/2015 4/ 9/2015 Modified: 4/ 9/2015 4/ 9/2015 Accessed: 4/ 9/2015 4/ 9/2015 Size: 0 B 0 B Exclude Files with these Attributes File Attribute Description Read-Only Files that can be read but cannot be written or delet Hidden Files that are not included in an ordinary listing. System Files that are part of the operating system. OK Cancel HelpWildcards
IncludeWildcard: Enter all wildcards for files you want to include in the default job separated by a comma (example:
*.doc,*.xls,*.dat)
ExcludeWildcard:Enter all wildcards for files you want to include in the default job separated by a comma (example:
*.doc,*.xls,*.dat)
Include Files with these Dates and Size
Under this section, you can create an include filter by selecting dates that files were last created, modified, or accessed or by there file size that you wish to ensure are included in your backup. This is helpful if you want to reduce the time or file size of a backup. You
may want to exclude older files that are no longer accessed or larger files you have already backed up..
Exclude Files with these Attributes
Under this section, you can create an exclude filter based on the file attributes: "Read Only", "Hidden" and "System". For example, if you would to exclude System or Hidden files, check the appropriate box next to the attribute.
Backup Job Notifications
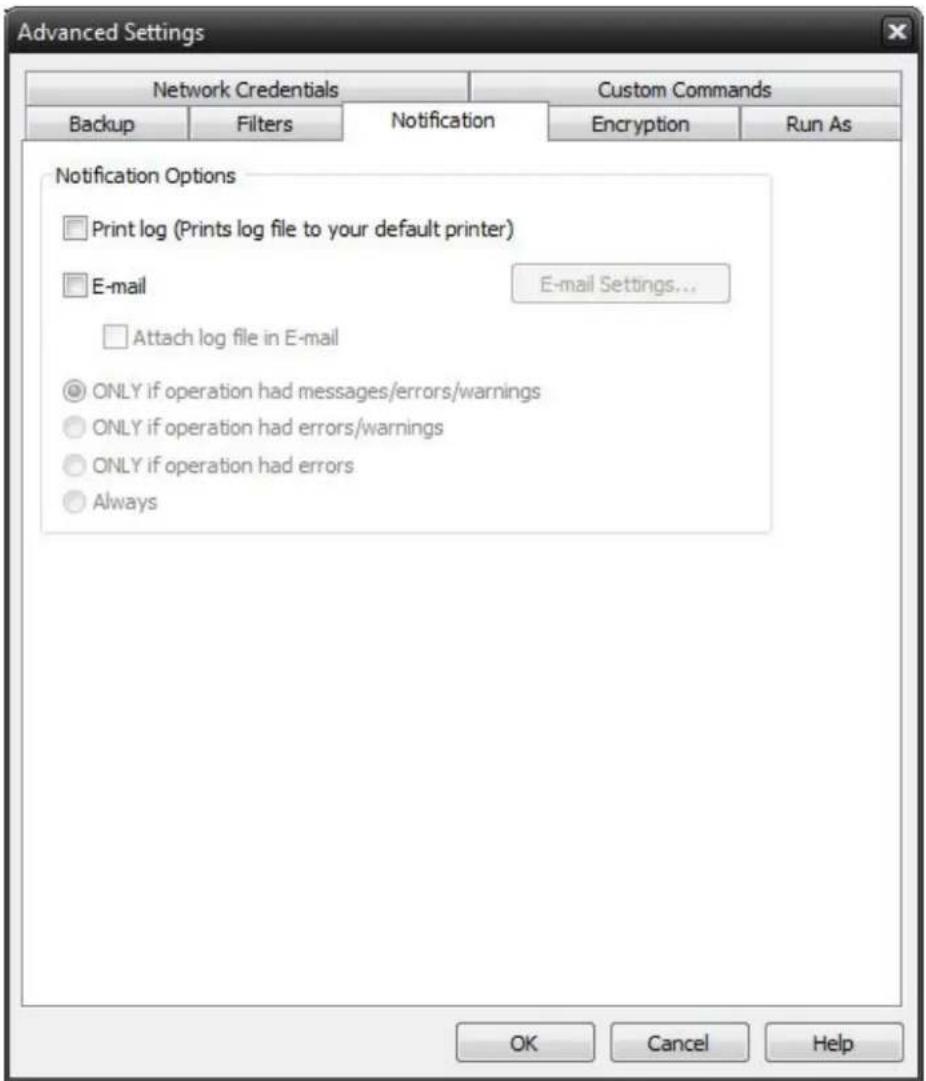
text_image
Advanced Settings Network Credentials Custom Commands Backup Filters Notification Encryption Run As Notification Options Print log (Prints log file to your default printer) E-mail E-mail Settings... Attach log file in E-mail ONLY if operation had messages/errors/warnings ONLY if operation had errors/warnings ONLY if operation had errors Always OK Cancel Help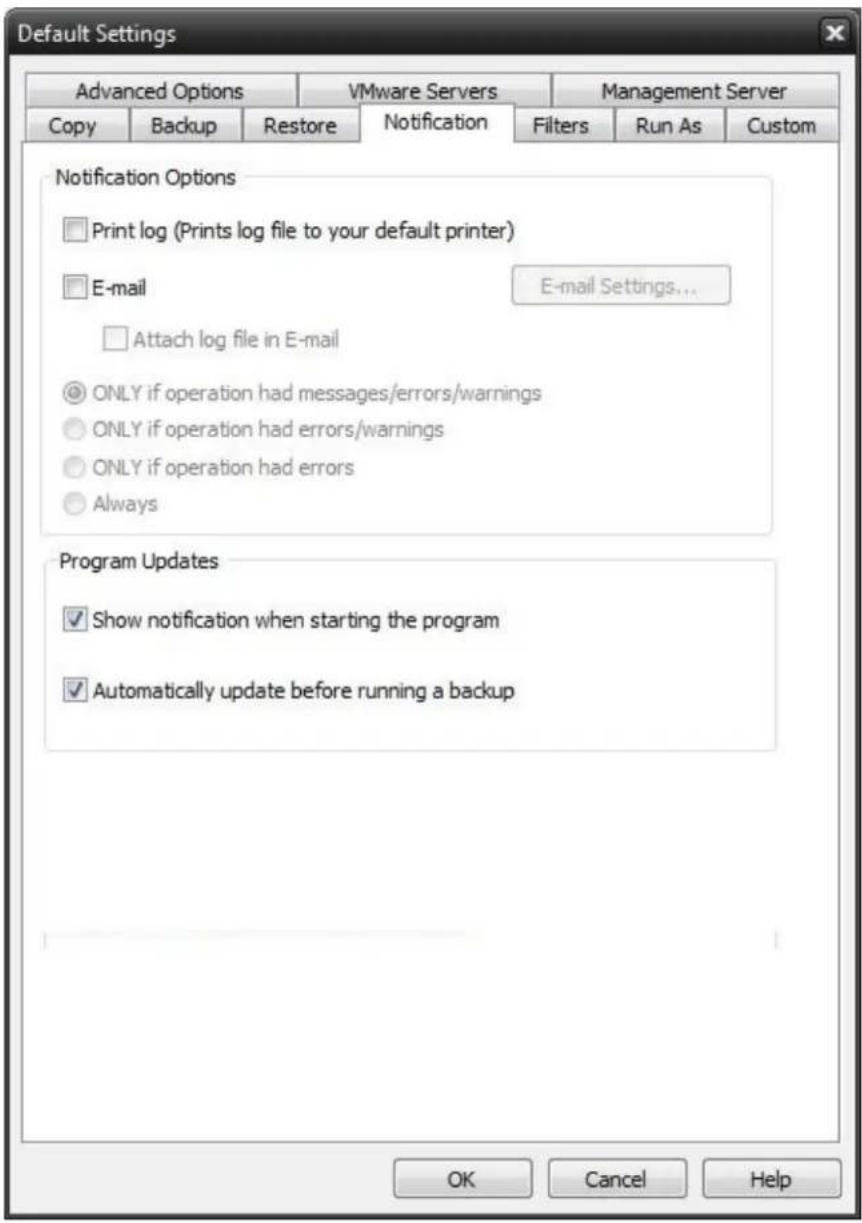
text_image
Default Settings Advanced Options VMware Servers Management Server Copy Backup Restore Notification Filters Run As Custom Notification Options Print log (Prints log file to your default printer) E-mail E-mail Settings... Attach log file in E-mail ONLY if operation had messages/errors/warnings ONLY if operation had errors/warnings ONLY if operation had errors Always Program Updates Show notification when starting the program Automatically update before running a backup OK Cancel HelpNotification Options
Use this option to receive job notification in E-mail.
You have the option to allow the logs to be e-mailed to the specified email address. To utilize these settings you must first configure the e-mail options by clicking on the "E-Mail Settings" button.
E-mail Settings
Depending on your product, you may be able to choose to use the NovaBACKUP Alerts service to send your e-mail logs or to manually enter a custom SMTP configuration.
- If you choose to use the NovaBACKUP Alerts service, the only information you need to provide is the recipient e-mail address or addresses you would like to receive notifications.
- If you choose to use a Custom SMTP service, your SMTP server information may be acquired from your System Administrator or service provider.
- You will need to input a valid e-mail addresses for both the sender and the recipient.
•These can be the same e-mail address.
•If your SMTP server requires authentication, you may do so by tagging the checkbox for authentication and supplying your user name and password.
NovaBACKUP Alerts
If your product supports it, you may have the ability to choose the NovaBACKUP Alerts service to send your e-mail notifications. The NovaBACKUP Alerts service is a pre-configured email notification service.
* It is not required to use this service and you should check with your System Administrator to see if sending e-mail notifications through a 3rd party service is allowed in your organization.
* By using the NovaBACKUP Alerts service, you are agreeing to our End-User Licensing Agreement and Privacy Policies.
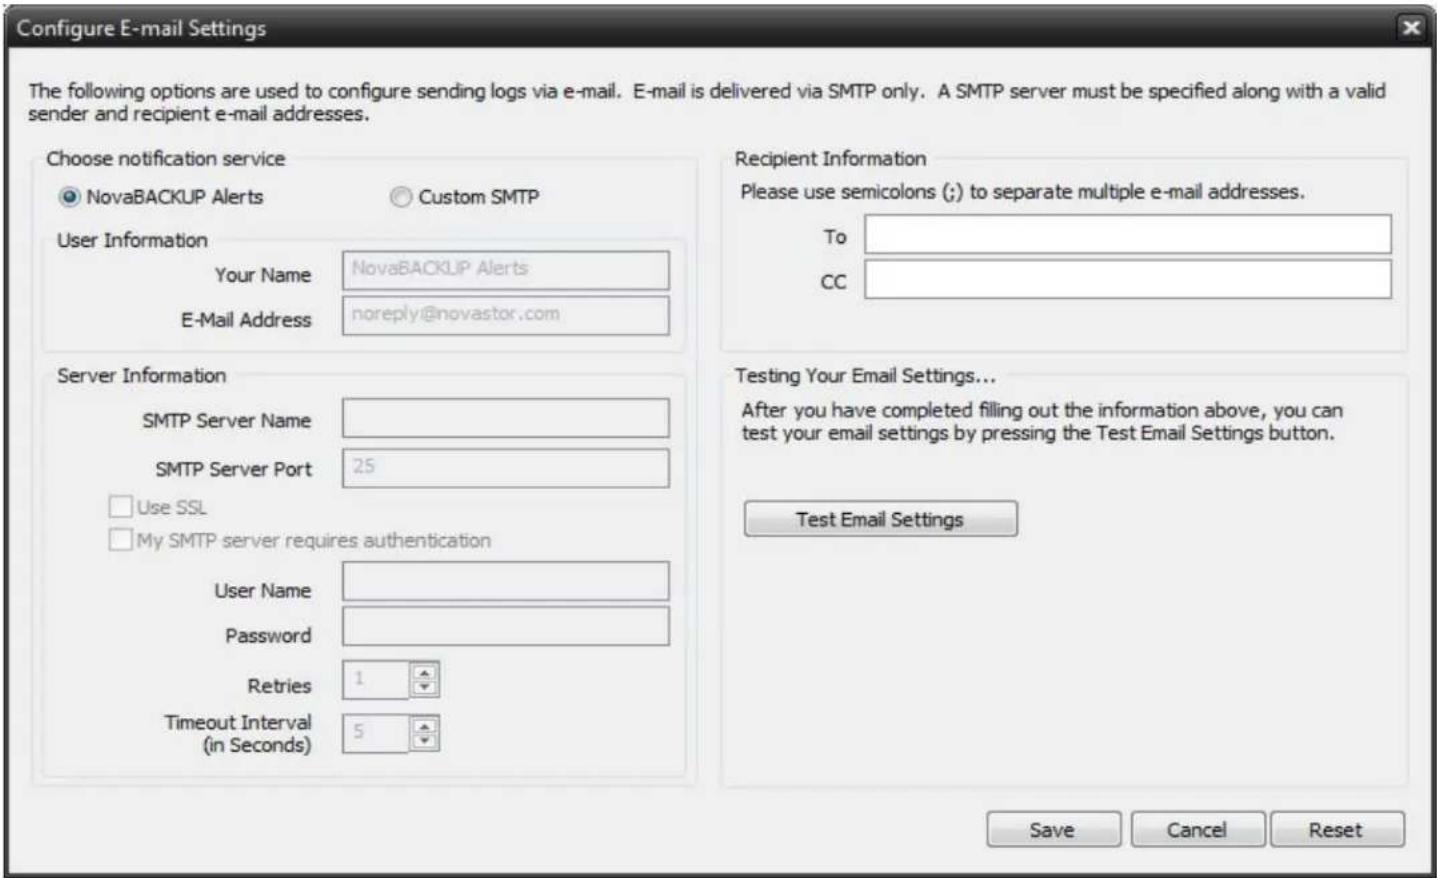
text_image
Configure E-mail Settings The following options are used to configure sending logs via e-mail. E-mail is delivered via SMTP only. A SMTP server must be specified along with a valid sender and recipient e-mail addresses. Choose notification service NovaBACKUP Alerts Custom SMTP User Information Your Name NovaBACKUP Alerts E-Mail Address noreply@novastor.com Server Information SMTP Server Name SMTP Server Port 25 Use SSL My SMTP server requires authentication User Name Password Retries 1 Timeout Interval (in Seconds) 5 Recipient Information Please use semicolons (;) to separate multiple e-mail addresses. To CC Testing Your Email Settings... After you have completed filling out the information above, you can test your email settings by pressing the Test Email Settings button. Test Email Settings Save Cancel Reset
Be sure to test your settings by clicking the "Test Email settings" button
Print Log
Here, you have the option to print the log automatically to your default printer.
Notification Conditions
- ONLY if operation had messages/errors/warnings
- ONLY if operation had errors/warnings
• ONLY if operation had errors
• Always
Backup Job Encryption
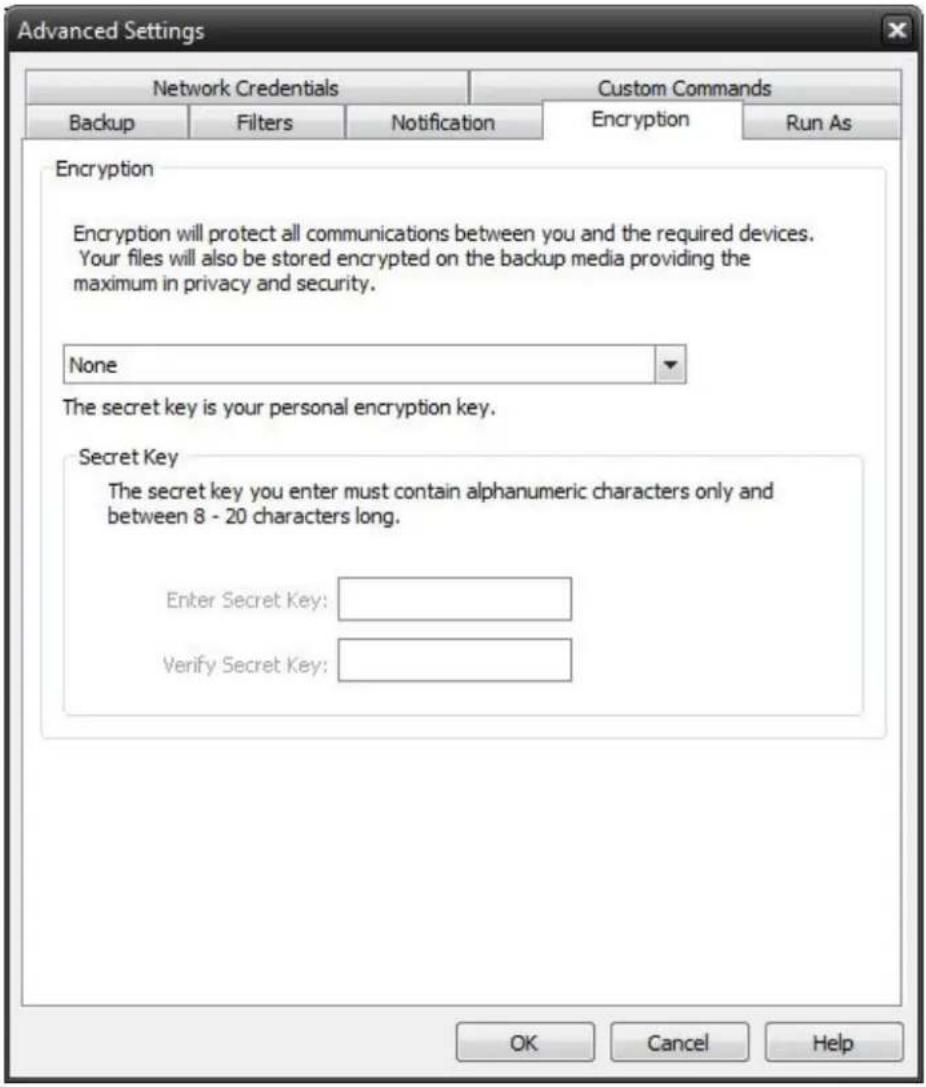
text_image
Advanced Settings Network Credentials Custom Commands Backup Filters Notification Encryption Run As Encryption Encryption will protect all communications between you and the required devices. Your files will also be stored encrypted on the backup media providing the maximum in privacy and security. None The secret key is your personal encryption key. Secret Key The secret key you enter must contain alphanumeric characters only and between 8 - 20 characters long. Enter Secret Key: Verify Secret Key:Encryption
Encrypt Files on backup
Encryption protects files as they are backed up to the selected device. In addition, files are maintained encrypted on the destination media for added security.
Secret Key
Encryption Key used for this particular backup job. Select a key containing from 8 to 20 characters

For added security, select a secret key that contains a combination of upper/lower case characters as w bers, punctuation and symbols.

Select a secret key that you will be able to remember. If you forgot your secret key, you will not be a the data from the destination media.
Backup Job Run As
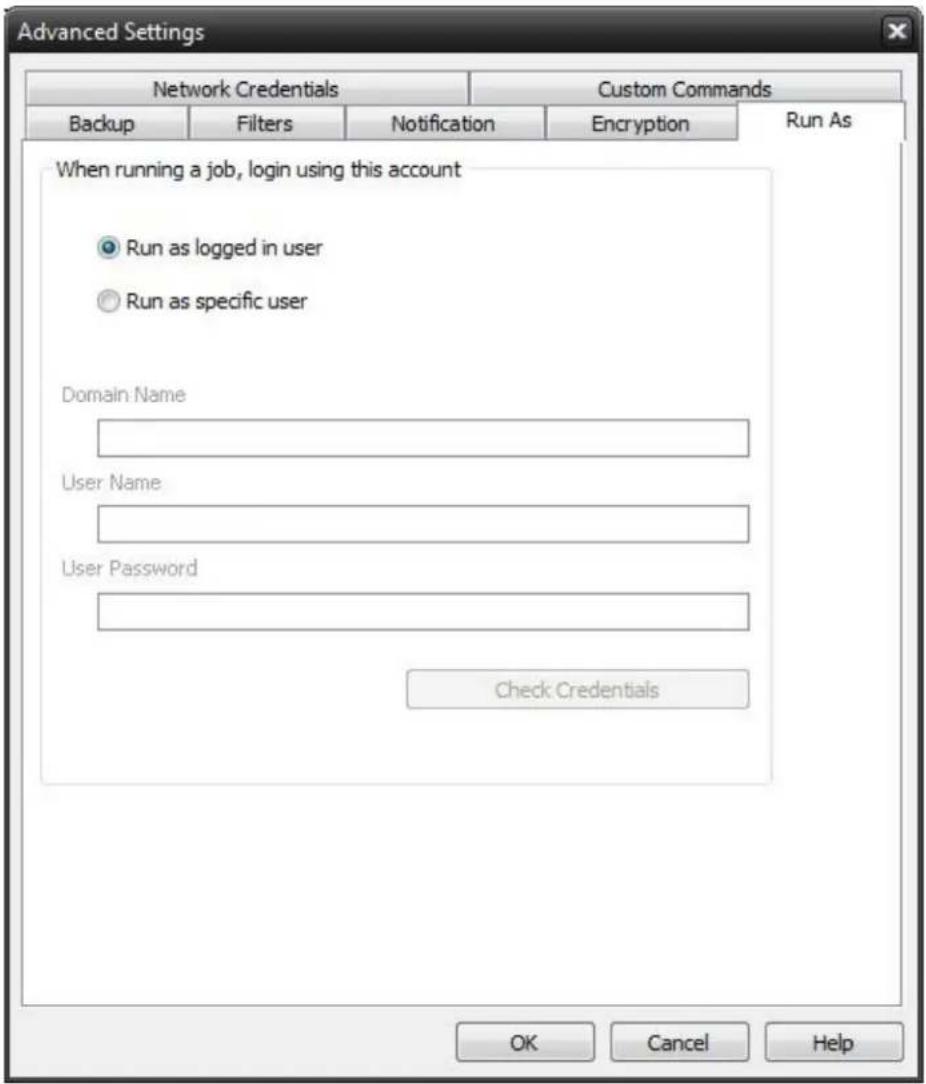
text_image
Advanced Settings Network Credentials Custom Commands Backup Filters Notification Encryption Run As When running a job, login using this account ● Run as logged in user ○ Run as specific user Domain Name User Name User Password Check Credentials OK Cancel HelpWhen running a job, login using this account
Run as logged in user:
Run the job using the Windows login credentials in effect at that time.
Run as specific user:
Run the job using the specified credentials.
Domain Name: The domain name you are logging into.
Run as User Name: The user name you want the job to run as.
Password: The password for the account you want the job to run as.

Note: The account information entered here is usually account you use to login to windows. However, you may need to use a different account when backing up network/shared drives.

Important: If you have entered credentials you must click the "Check Credentials" button to validate the account you have entered before proceeding forward.
Backup Job Network Credentials
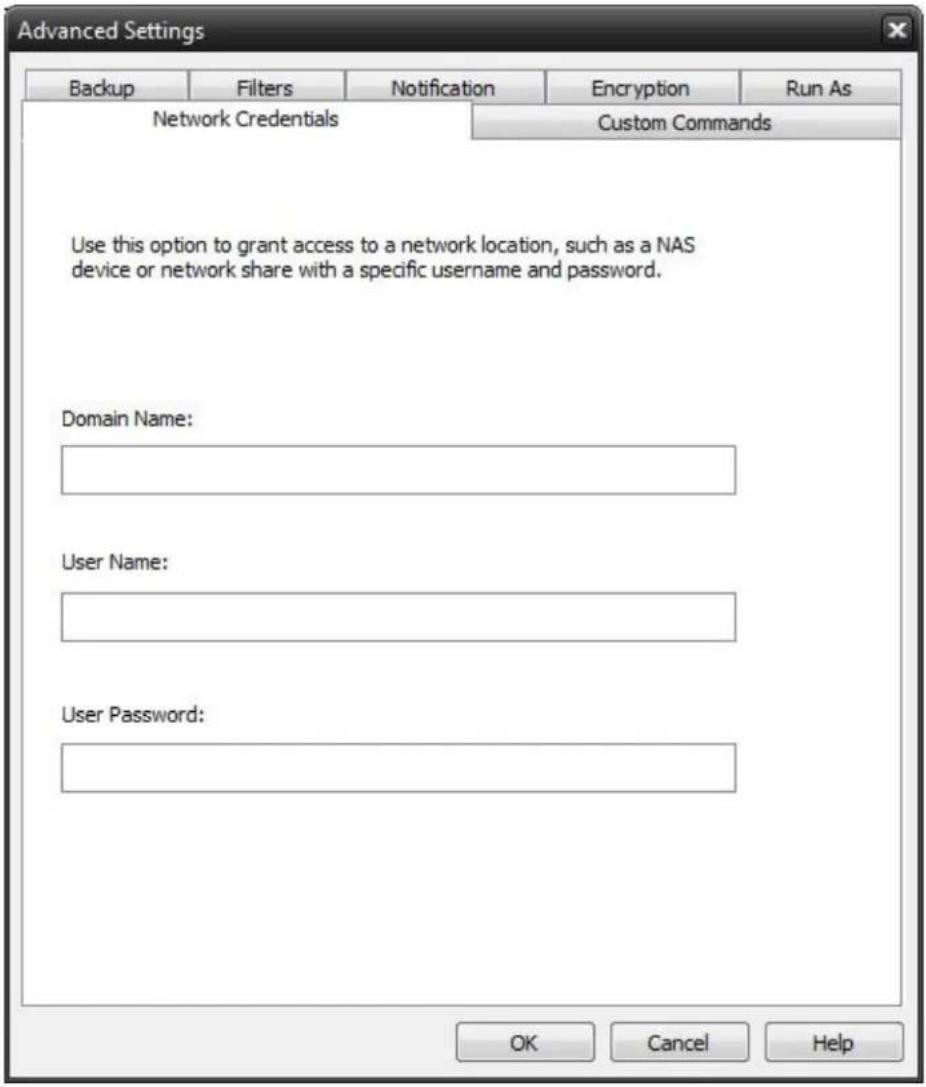
text_image
Advanced Settings Backup Filters Notification Encryption Run As Network Credentials Custom Commands Use this option to grant access to a network location, such as a NAS device or network share with a specific username and password. Domain Name: User Name: User Password: OK Cancel HelpThis option may be used to access devices on the network which require different credentials than the defaults. You may use different credentials for this purpose than those set in the "Run As" Tab.
Backup Job Custom Commands
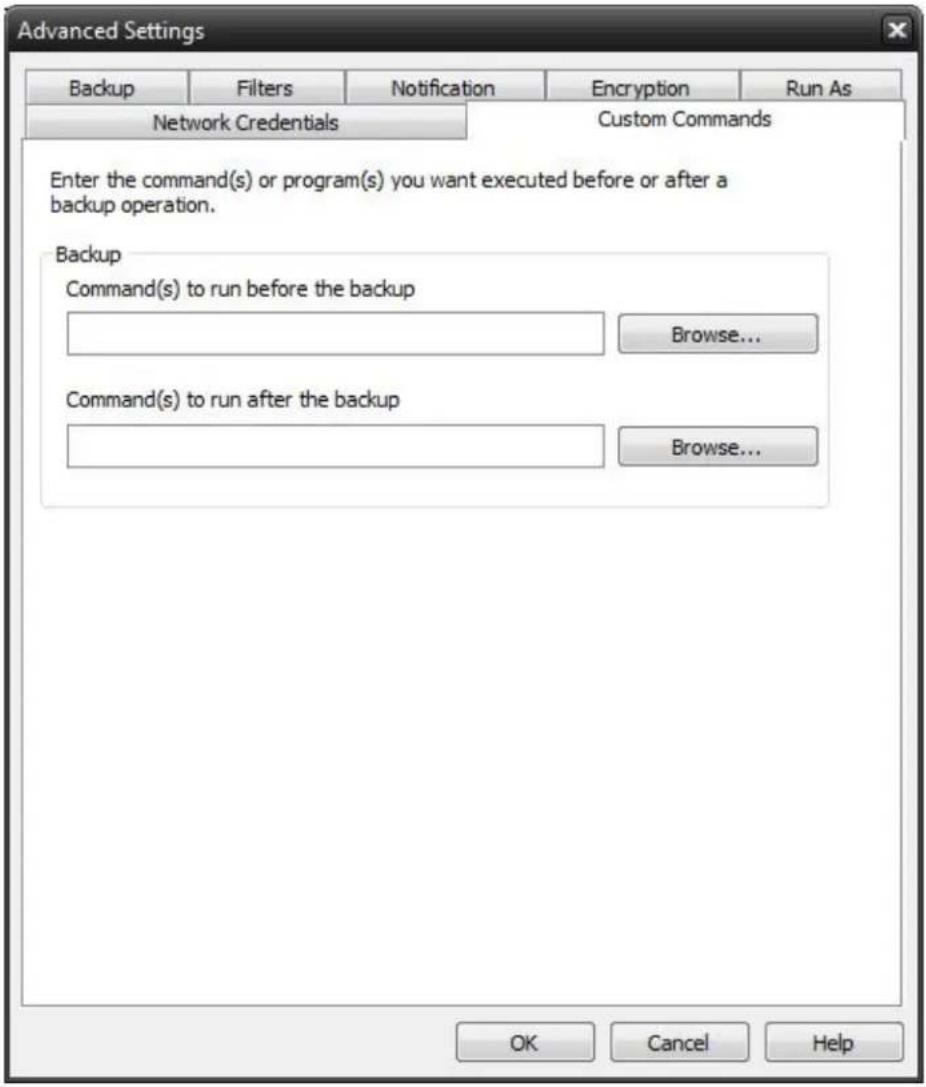
text_image
Advanced Settings Backup Filters Notification Encryption Run As Network Credentials Custom Commands Enter the command(s) or program(s) you want executed before or after a backup operation. Backup Command(s) to run before the backup Browse... Command(s) to run after the backup Browse... OK Cancel HelpThis feature enables a command to run before or after a backup job
To select which program or command you would like to run before or after the copy operation, simply browse gram or command using the "Browse" button.

The benefits of this feature are numerous. For instance, one would be able to stop Antivirus scanning by issui mand to their Anti-virus program prior to NovaBACKUP beginning the backup job. Alternatively, a command car issued at the end of the job to begin an anti-virus scan. Also one could issue a command to close a database at the beginning of a job and reopen it at the end of a job.
Restore Job Options
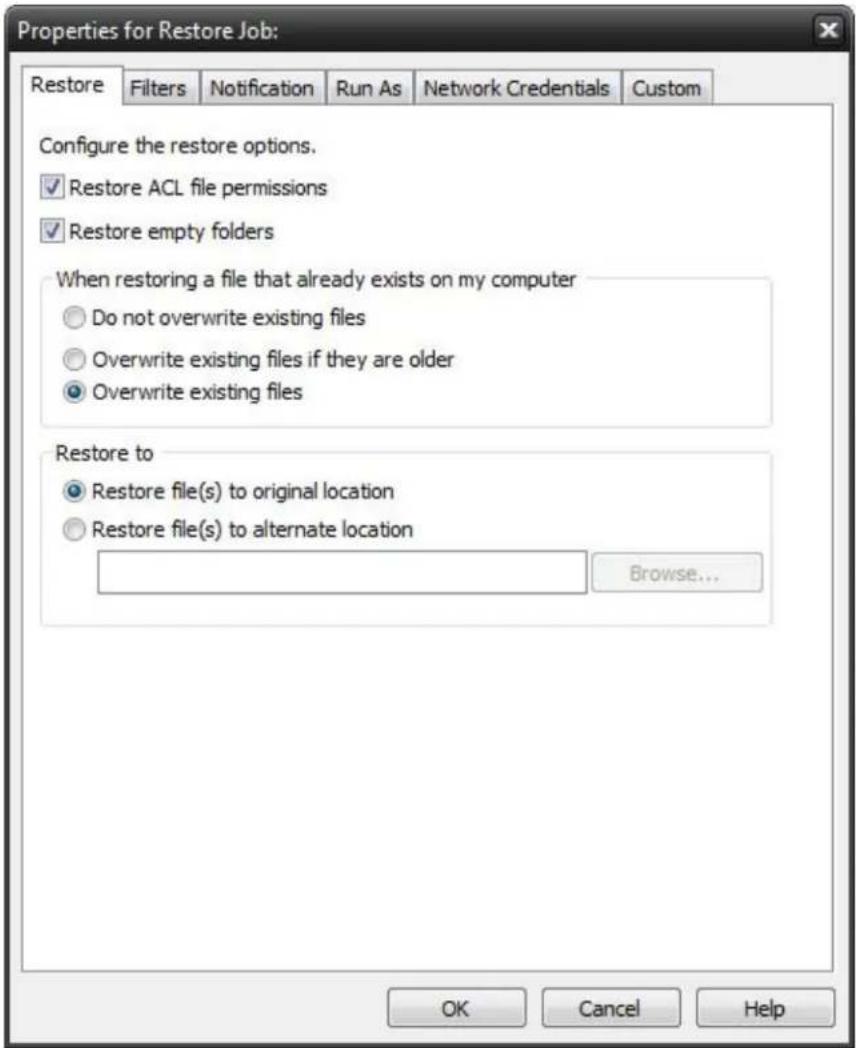
text_image
Properties for Restore Job: Restore Filters Notification Run As Network Credentials Custom Configure the restore options. ✓ Restore ACL file permissions ✓ Restore empty folders When restoring a file that already exists on my computer ○ Do not overwrite existing files ○ Overwrite existing files if they are older ● Overwrite existing files Restore to ● Restore file(s) to original location ○ Restore file(s) to alternate location Browse... OK Cancel HelpRestore ACL File Permissions
Select this option to restore security permissions on files and subdirectories. Note that the backup ACL's option must have been selected during the original backup for them to be restored.
Restore empty folders
Select this option to restore empty folders.
Existing Files Options
The recommended setting is to not overwrite a file if it already exists on your computer. Other choices include only overwriting the file if the existing file is older or always overwriting the file.
Do not overwrite existing files
Upon restoration, files that already exist on your computer will not be overwritten by files from the backup
Overwrite existing files if they are older
Upon restoration, if a file is found to exist on your computer already, it will only be overwritten if the file on your computer is older than the one found in the backup.
Overwrite existing files
Upon restoration, if a file is found to already exist on your computer, it will always be overwritten.
Restore File Placement
The default setting is to restore the file(s) to the original location they were backed up from.
Restore file to its original location
Upon restoration, all files will be restored to their original location.
Restore file(s) to an alternate location
Upon restoration, all files will be restored to an alternate location. This location can be specified by typing the path to the restoration directory in the text box or by selecting a directory by clicking on the "Browse" button that will appear to the left of the text box when the radio button is selected.
Restore Job Filters
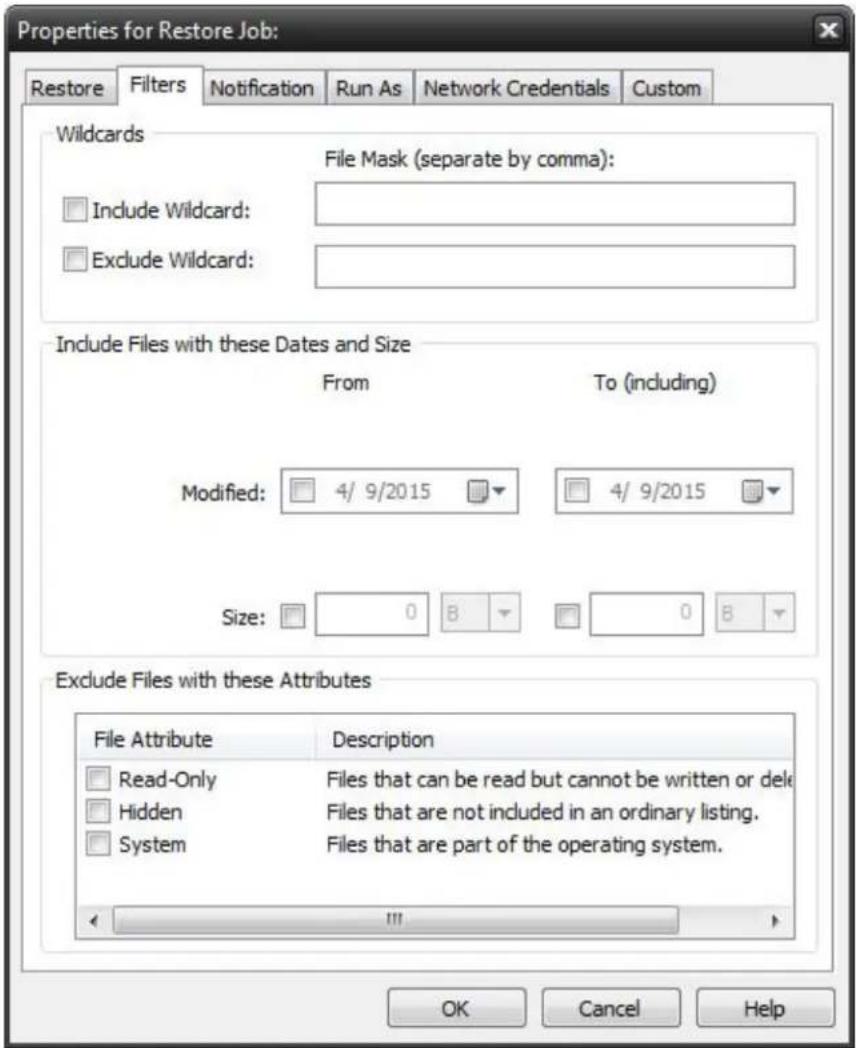
text_image
Properties for Restore Job: Restore Filters Notification Run As Network Credentials Custom Wildcards File Mask (separate by comma): Include Wildcard: Exclude Wildcard: Include Files with these Dates and Size From To (including) Modified: 4/ 9/2015 4/ 9/2015 Size: 0 8 0 8 Exclude Files with these Attributes File Attribute Description Read-Only Files that can be read but cannot be written or delete Hidden Files that are not included in an ordinary listing. System Files that are part of the operating system. OK Cancel HelpWildcards
IncludeWildcard: Enter all wildcards for files you want to include in the default job separated by a comma (example: *.doc,*.xls,*.dat)
ExcludeWildcard:Enter all wildcards for files you want to include in the default job separated by a comma (example: *.doc,*.xls,*.dat)
Include Files with these Dates and Size
Under this section, you can create an include filter by selecting dates that files were last created, modified, or accessed or by there file size that you wish to ensure are included in your backup. This is helpful if you want to reduce the time or file size of a backup. You may want to exclude older files that are no longer accessed or larger files you have already backed up..
Exclude Files with these Attributes
Under this section, you can create an exclude filter based on the file attributes: "Read Only", "Hidden" and "System". For example, if you would to exclude System or Hidden files, check the appropriate box next to the attribute.
Restore Job Notification
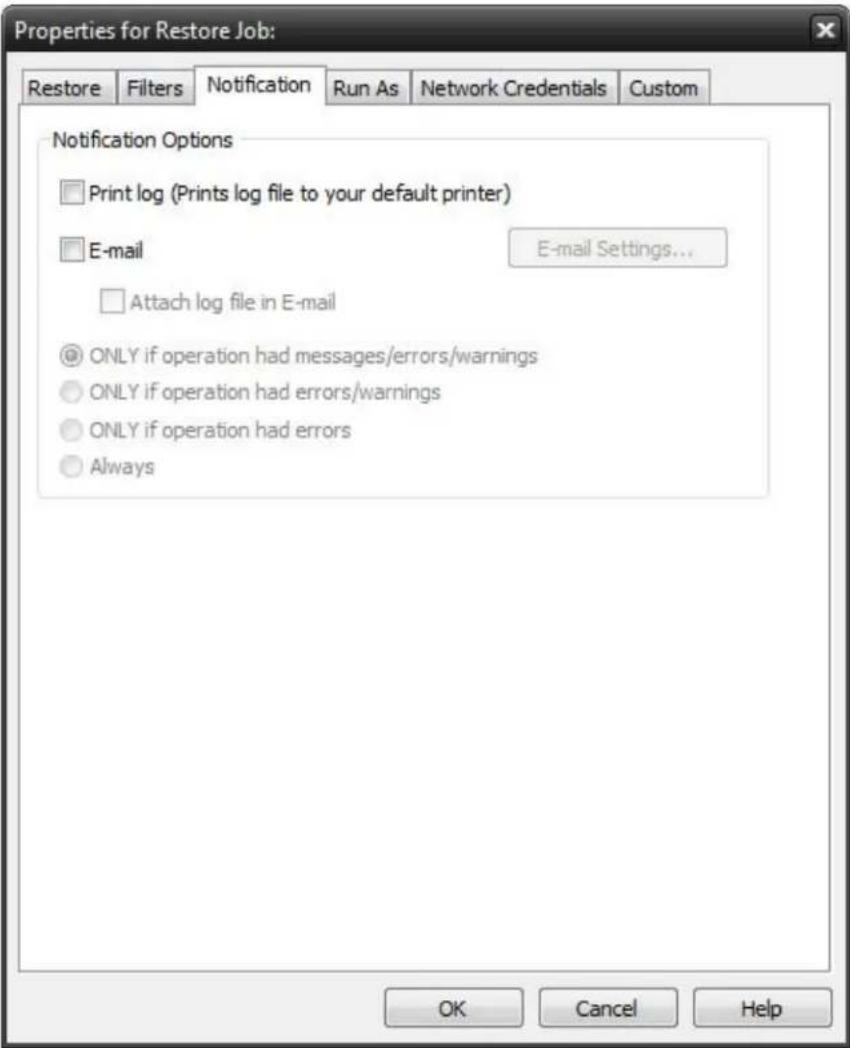
text_image
Properties for Restore Job: Restore Filters Notification Run As Network Credentials Custom Notification Options Print log (Prints log file to your default printer) E-mail E-mail Settings... Attach log file in E-mail ONLY if operation had messages/errors/warnings ONLY if operation had errors/warnings ONLY if operation had errors Always OK Cancel Help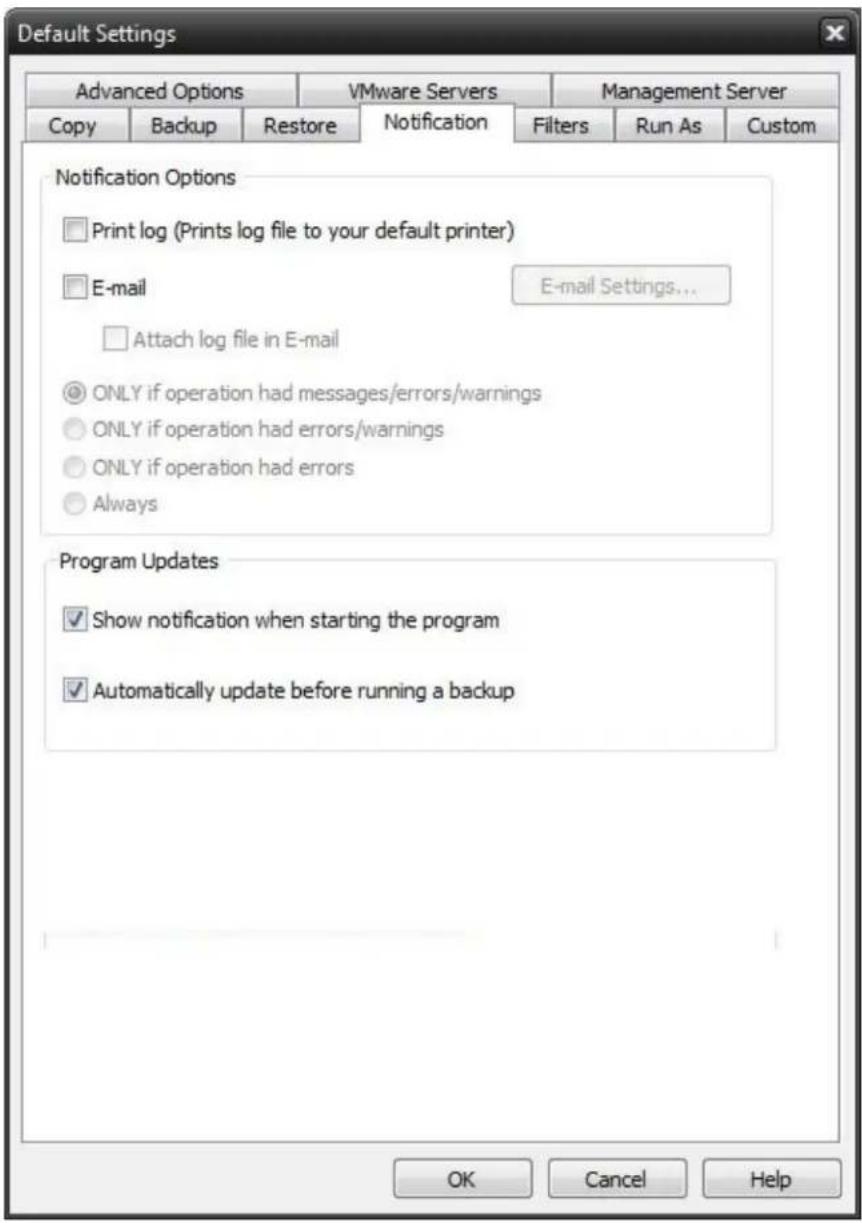
text_image
Default Settings Advanced Options VMware Servers Management Server Copy Backup Restore Notification Filters Run As Custom Notification Options Print log (Prints log file to your default printer) E-mail E-mail Settings... Attach log file in E-mail ONLY if operation had messages/errors/warnings ONLY if operation had errors/warnings ONLY if operation had errors Always Program Updates Show notification when starting the program Automatically update before running a backup OK Cancel HelpNotification Options
Use this option to receive job notification in E-mail.
You have the option to allow the logs to be e-mailed to the specified email address. To utilize these settings you must first configure the e-mail options by clicking on the "E-Mail Settings" button.
E-mail Settings
Depending on your product, you may be able to choose to use the NovaBACKUP Alerts service to send your e-mail logs or to manually enter a custom SMTP configuration.
- If you choose to use the NovaBACKUP Alerts service, the only information you need to provide is the recipient e-mail address or addresses you would like to receive notifications.
- If you choose to use a Custom SMTP service, your SMTP server information may be acquired from your System Administrator or service provider.
- You will need to input a valid e-mail addresses for both the sender and the recipient.
•These can be the same e-mail address.
•If your SMTP server requires authentication, you may do so by tagging the checkbox for authentication and supplying your user name and password.
NovaBACKUP Alerts
If your product supports it, you may have the ability to choose the NovaBACKUP Alerts service to send your e-mail notifications. The NovaBACKUP Alerts service is a pre-configured email notification service.
* It is not required to use this service and you should check with your System Administrator to see if sending e-mail notifications through a 3rd party service is allowed in your organization.
* By using the NovaBACKUP Alerts service, you are agreeing to our End-User Licensing Agreement and Privacy Policies.
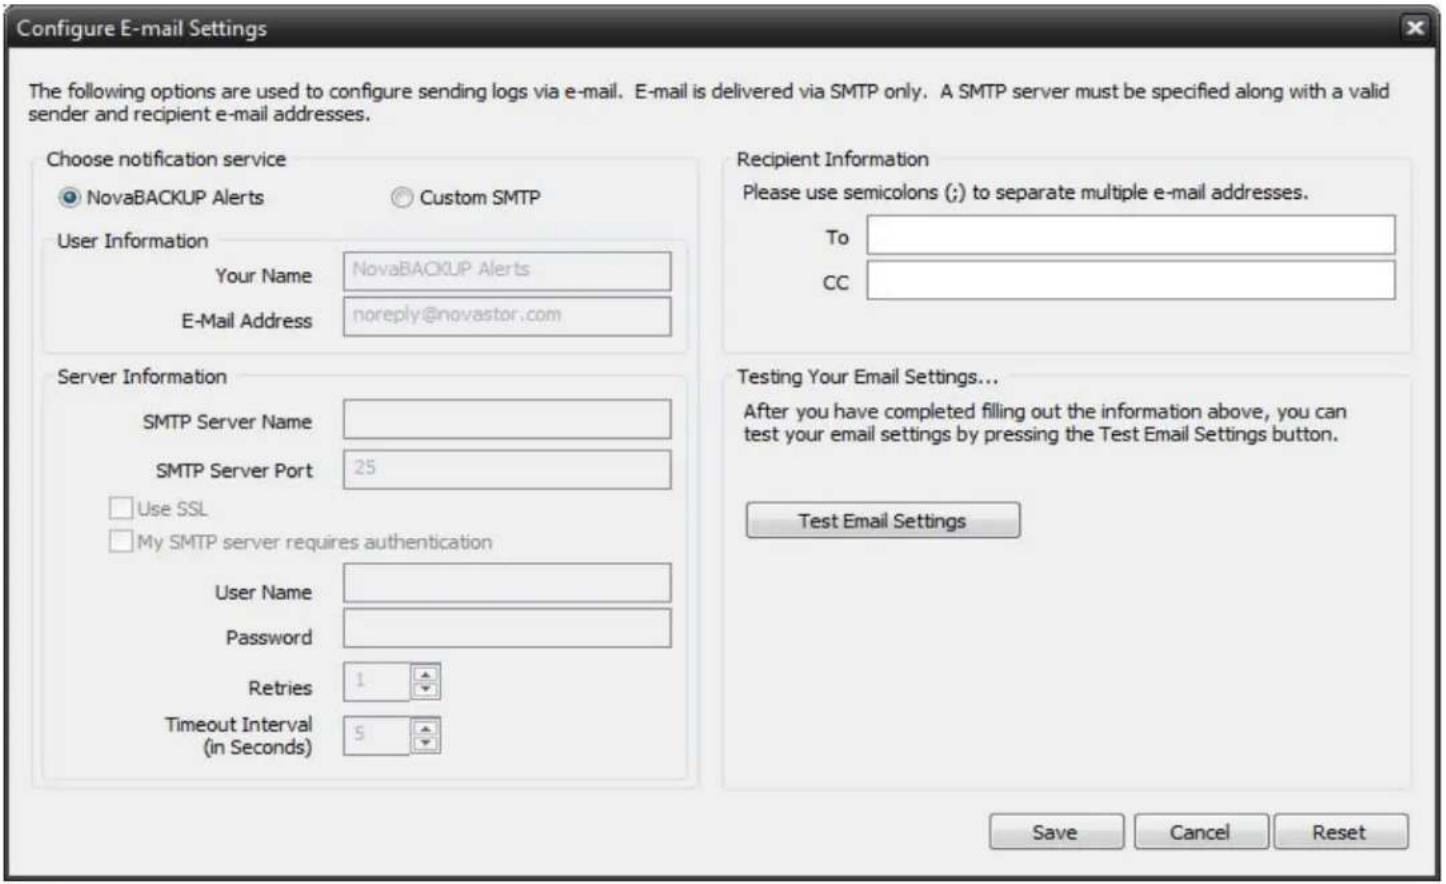
text_image
Configure E-mail Settings The following options are used to configure sending logs via e-mail. E-mail is delivered via SMTP only. A SMTP server must be specified along with a valid sender and recipient e-mail addresses. Choose notification service NovaBACKUP Alerts Custom SMTP User Information Your Name NovaBACKUP Alerts E-Mail Address noreply@novastor.com Recipient Information Please use semicolons (;) to separate multiple e-mail addresses. To CC Server Information SMTP Server Name SMTP Server Port 25 Use SSL My SMTP server requires authentication User Name Password Retries 1 Timeout Interval 5 Testing Your Email Settings... After you have completed filling out the information above, you can test your email settings by pressing the Test Email Settings button. Test Email Settings Save Cancel Reset
Be sure to test your settings by clicking the "Test Email settings" button
Print Log
Here, you have the option to print the log automatically to your default printer.
Notification Conditions
- ONLY if operation had messages/errors/warnings
- ONLY if operation had errors/warnings
• ONLY if operation had errors
• Always
Restore Job Run As
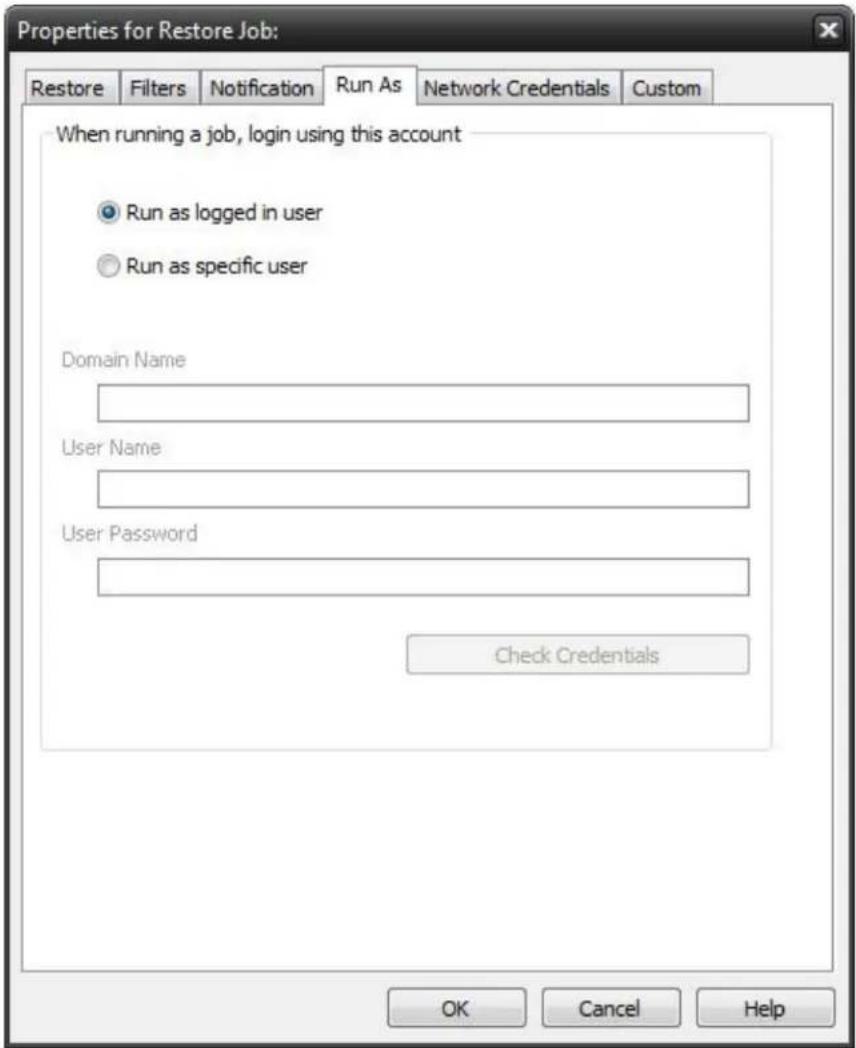
text_image
Properties for Restore Job: Restore Filters Notification Run As Network Credentials Custom When running a job, login using this account Run as logged in user Run as specific user Domain Name User Name User Password Check Credentials OK Cancel HelpWhen running a job, login using this account
Run as logged in user:
Run the job using the Windows login credentials in effect at that time.
Run as specific user:
Run the job using the specified credentials.
Domain Name: The domain name you are logging into.
Run as User Name: The user name you want the job to run as.
Password: The password for the account you want the job to run as.

Note: The account information entered here is usually account you use to login to windows. However, you may need to use a different account when backing up network/shared drives.

Important: If you have entered credentials you must click the "Check Credentials" button to validate the account you have entered before proceeding forward.
Restore Job Network Credentials
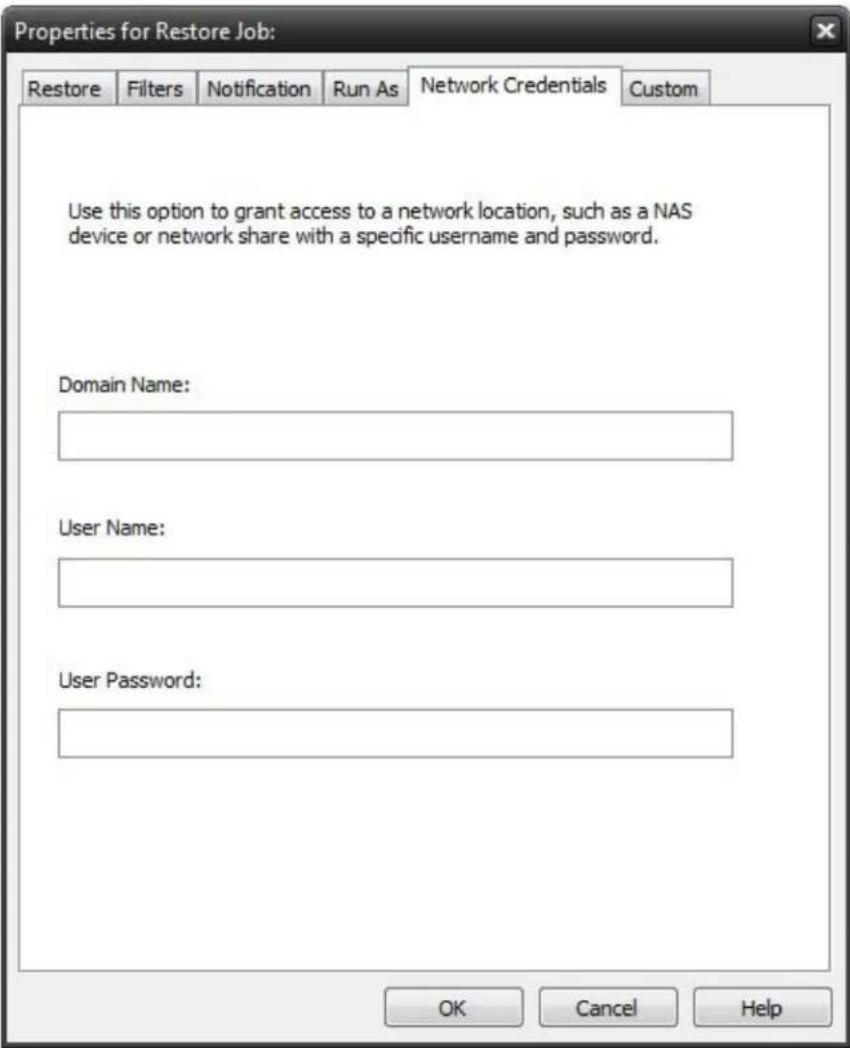
text_image
Properties for Restore Job: Restore Filters Notification Run As Network Credentials Custom Use this option to grant access to a network location, such as a NAS device or network share with a specific username and password. Domain Name: User Name: User Password: OK Cancel HelpThis option may be used to access devices on the network which require different credentials than the defaults. You may use different credentials for this purpose than those set in the "Run As" Tab.
Restore Job Custom Commands
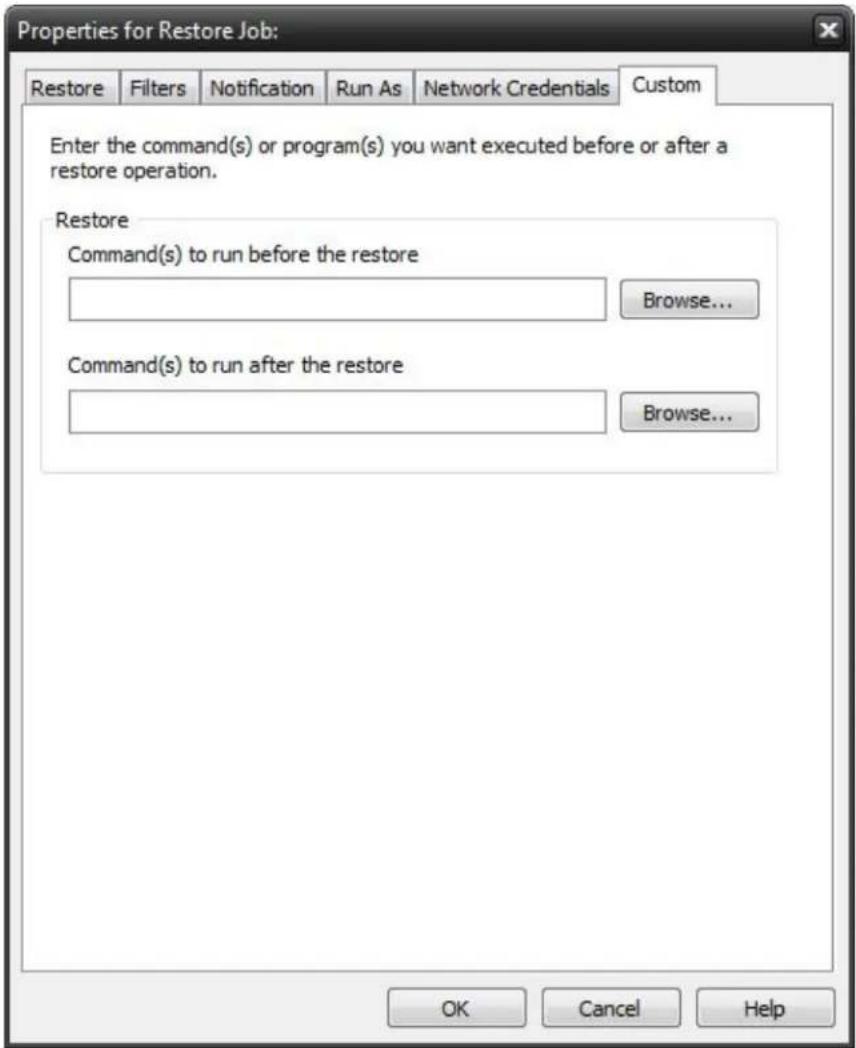
text_image
Properties for Restore Job: Restore Filters Notification Run As Network Credentials Custom Enter the command(s) or program(s) you want executed before or after a restore operation. Restore Command(s) to run before the restore Browse... Command(s) to run after the restore Browse... OK Cancel HelpThis feature enables a command to run before or after a restore job
To select which program or command you would like to run before or after the copy operation, simply browse gram or command using the "Browse" button.

The benefits of this feature are numerous. For instance, one would be able to stop Antivirus scanning by issui mand to their Anti-virus program prior to NovaBACKUP beginning the restore job. Alternatively, a command car issued at the end of the job to begin an anti-virus scan. Also one could issue a command to close a database at the beginning of a job and reopen it at the end of a job.
Logs Tab
From here, you can quickly determine the status of a Copy, Backup or Restore job that was performed.
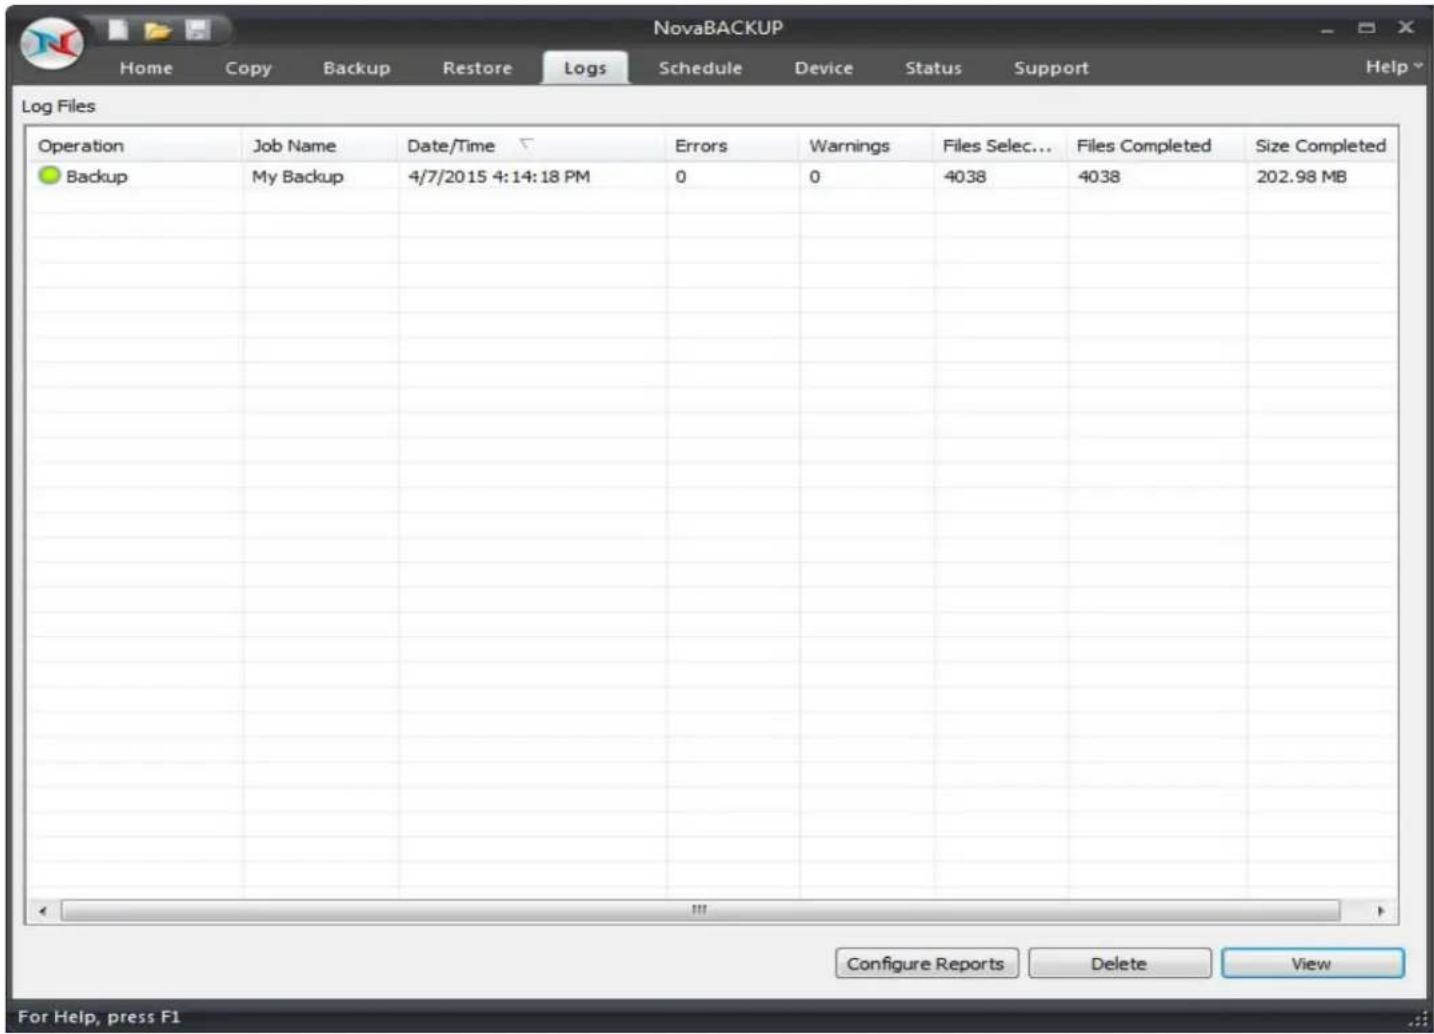
text_image
NovaBACKUP Home Copy Backup Restore Logs Schedule Device Status Support Help Log Files Operation Job Name Date/Time Errors Warnings Files Select... Files Completed Size Completed Backup My Backup 4/7/2015 4:14:18 PM 0 0 4038 4038 202.98 MB Configure Reports Delete View For Help, press F1The columns in the summary view include:
Operation: Includes - Copy, Backup, Restore & Import.
You can quickly determine the status of the backup by the color-coded icon next to each
Operation completed successfully
Operation completed, but had warnings
Operation had errors
Job Name: The name of the job for this log file
Date/Time: The Date & Time the specific job was run
Errors: The number of errors encountered after running the job
Warnings: The number of warnings encountered after running the job
Objects Selected: The number of objects selected before running the job
Objects Completed: The number of objects successfully completed after running the job
Size Completed: The total size of all objects successfully completed after running the job

You can quickly sort the logs view by clicking on the appropriate column heading at the top of the window
Button Functions
Configure Reports
Click this button to use the summary reports feature.
Delete Button
To delete a log file, simply select the log file and press the Deletebutton. To delete multiple log files, you may select more than one by using the Shift and/or Ctrl buttons on your keyboard to select the logs and pressing the Delete button.
View Button
To view the log file, select the log you would like to open and press the View button. Alternatively, you may also simply double-click the log file you want to view. For further details, see the Using the Logssection.
Viewing the Logs
Job Summary section
The top half of the log viewer displays the job summary. This section lists settings which apply to the job and a summary of the job status. A disabled setting is marked with a red 'X', and an enabled settings is marked with a checkmark.
Events section
The bottom half of the log viewer displays the job events. There are four types of events: Error, Warning, Informational, and Files. Each type can be shown or hidden by clicking its associated button.
When the log is first opened, the file list is not displayed. To see the list, click the 'Files' button. Each file entry in the list can be expanded to display additional details about that file.
Saving as a file
Logs displayed in the viewer can be saved as either HTML or Text files.
Click the 'save' icon at the top left of the viewer window. Browse to the desired location to save the file. Enter the filename, select 'r;HTML' or 'r;TXT' file type, then click the 'Save' button.
Printing
Click the print icon at the top left of the viewer window to launch a print preview window displaying the html formatted log.
Use page settings to adjust how the printed log will look. For example, the 'Print Background Colors and Images' option is disabled by default, but should be checked to print the log as shown. Access page settings by clicking the gear icon at the top of the print preview window.
The log viewer supports printing a file list of up to 500 entries. To print a log containing more than 500 file entries, you must click the 'files' button to hide the file list if it is currently displayed. To print a log containing over 500 file entries, save the log as a .txt file then use a text editor to open and print the file.
Opening a different log
After the log viewer is opened, click the 'open' icon at the top left of the viewer window to open a new log. This will display the 'open file' dialog. Browse to the log file to view, then click the 'open' button to view the log.
Summary Reports
Summary reports are scheduled reports which provide an aggregated view of recent jobs performed. Summary reports include information about backup jobs such as:
- When the job was performed
- When the job finished
•The destination of the data
•The job type - Whether the job was scheduled or run manually
•The number of files selected for backup and the number of files completed
•The total size for the job once completed
Configure Reports
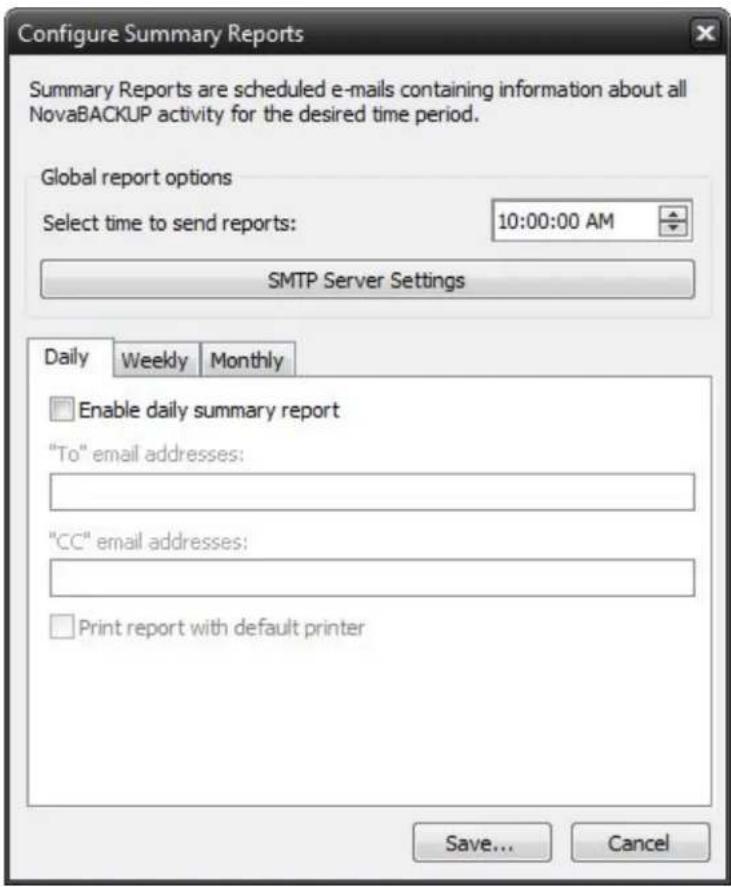
text_image
Configure Summary Reports Summary Reports are scheduled e-mails containing information about all NovaBACKUP activity for the desired time period. Global report options Select time to send reports: 10:00:00 AM SMTP Server Settings Daily Weekly Monthly Enable daily summary report "To" email addresses: "CC" email addresses: Print report with default printer Save... CancelGlobal report options
Scheduled time
The selected time is when any / all reports will be sent. If multiple reports are scheduled to be sent on a particular day, they will be sent individually.
SMTP Server settings
The SMTP server settings for all reports to be sent with.
Note: Summary Reports default to using the new NovaBACKUP Alerts service.
Daily Reports
The daily report sends a report which summarizes the last 24 hours since the scheduled time.
Enable daily summary report
Check this box to enable or disable the daily summary report
To / CC addresses
Enter the e-mail addresses you wish to receive the report. Separate multiple addresses with a se
Print report with default printer
Print the report with the default printer (if available)
Weekly Reports
The weekly report sends a report which summarizes the last 7 days since the scheduled time.
Enable weekly summary report
Check this box to enable or disable the weekly summary report
To / CC addresses
Enter the e-mail addresses you wish to receive the report. Separate multiple addresses with a se
Day of week to send reports
Choose which day of the week the report is sent.
Print report with default printer
Print the report with the default printer (if available)
Monthly Reports
The monthly report sends a report which summarizes the last month since the scheduled time.
Note: If the current month does not have this date available, the report will process on the 1
Enable monthly summary report
Check this box to enable or disable the monthly summary report
To / CC addresses
Enter the e-mail addresses you wish to receive the report. Separate multiple addresses with a se
Print report with default printer
Print the report with the default printer (if available)
Filters Tab
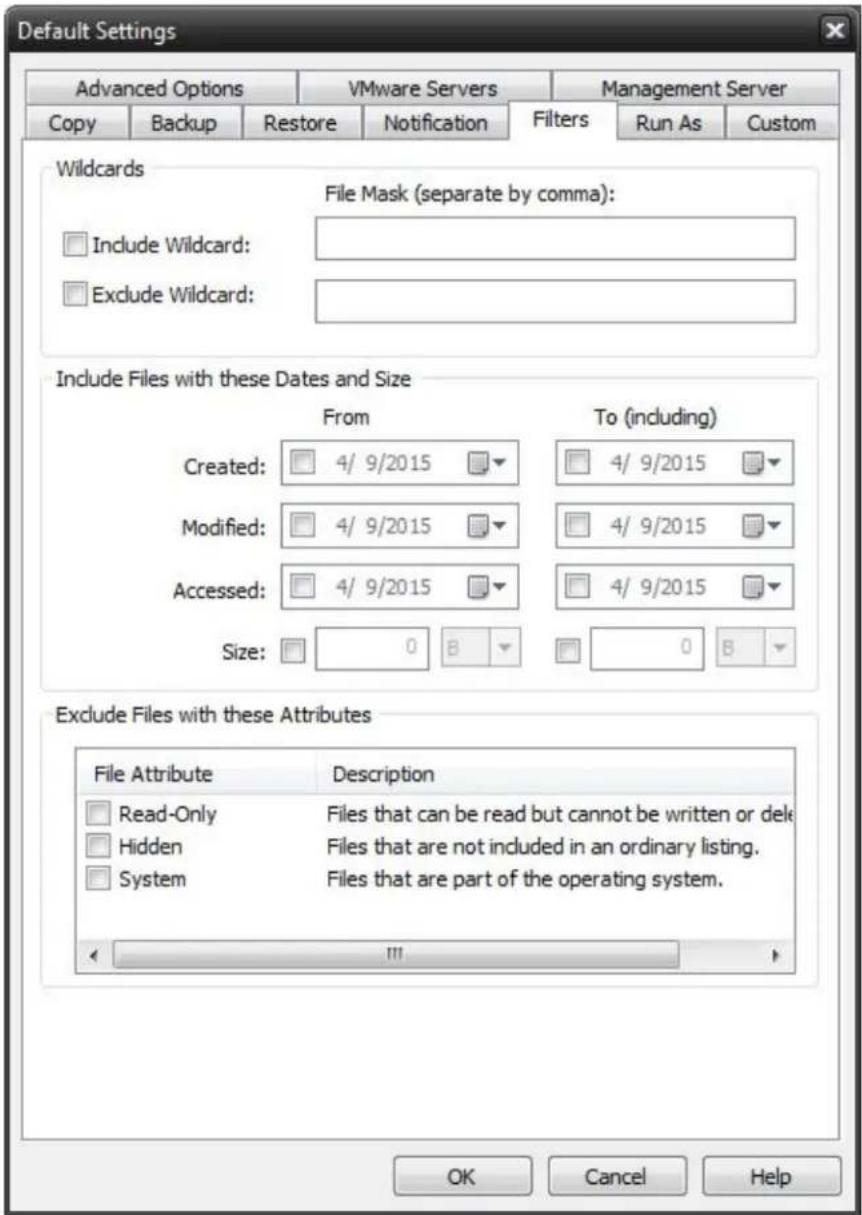
text_image
Default Settings Advanced Options VMware Servers Management Server Copy Backup Restore Notification Filters Run As Custom Wildcards File Mask (separate by comma): Include Wildcard: Exclude Wildcard: Include Files with these Dates and Size From To (including) Created: 4/ 9/2015 4/ 9/2015 Modified: 4/ 9/2015 4/ 9/2015 Accessed: 4/ 9/2015 4/ 9/2015 Size: 0 B 0 B Exclude Files with these Attributes File Attribute Description Read-Only Files that can be read but cannot be written or delete Hidden Files that are not included in an ordinary listing. System Files that are part of the operating system. OK Cancel HelpWildcards
IncludeWildcard: Enter all wildcards for files you want to include in the default job separated by a comma (example: *.doc,*.xls,*.dat)
ExcludeWildcard:Enter all wildcards for files you want to include in the default job separated by a comma (example:
*.doc,*.xls,*.dat)
Include Files with these Dates and Size
Under this section, you can create an include filter by selecting dates that files were last created, modified, or accessed or by there file size that you wish to ensure are included in your backup. This is helpful if you want to reduce the time or file size of a backup. You may want to exclude older files that are no longer accessed or larger files you have already backed up..
Exclude Files with these Attributes
Under this section, you can create an exclude filter based on the file attributes: "Read Only", "Hidden" and "System". For example, if you would to exclude System or Hidden files, check the appropriate box next to the attribute.
Online Storage Devices
NovaBACKUP includes the ability to backup to a number of online storage devices including FTP, Amazon's Simple Storage Service (S3) and NovaStor Web Storage Service (xSP).
Once you have configured an online storage device, you can utilize that device just as you would a device. You will be able to perform backup and copy jobs to your configured online storage devices as local devices adding additional levels of protection to your data by permitting both local and remote backups to be performed.
Configuring FTP Storage Device

text_image
Add Device FTP Store Update existing device properties FTP Store.0 OK CancelSelect "FTP Store" from the "Add Device" option drop down. This will display the FTP properties dialog

text_image
FTP Properties General Device Settings Device: FTP Store.0 Select Connection Type: Normal FTP over SSL/TLS (FTPS) SSH/SFTP Password authentication Key authentication Server Address Port 0 Use Passive Mode Anonymous Access Backup directory Username: Password: Private key file path ... Private key password if encrypted Check credentials OK Cancel HelpDevice: Enter the name for this device
Server Address: Enter the DNS Name or IP Address of the FTP server. Check the "Use Passive Mode" if required.
Login Settings
Anonymous Access: Check this option if your server supports this option.
Use FTP Over SSL/TLS (FTPS): Check this option to enable a secure FTPS connection.
Use SSH/SFTP: Check this option to Use the SSH File Transfer Protocol. You then must select either the password or key authentication type. If choosing selecting key authentication, the related entries to define the become enabled.
Username: Enter the username for your FTP account on this server
Password: Enter the password for your FTP account on this server
Backup Directory: Enter in the directory you want your backups stored in
Click "Check Credentials" to confirm your settings
Configuring S3 Storage Device
Select "Amazon Simple Storage Service" from the "Add Device" option drop down. This will display the S3 properties dialog
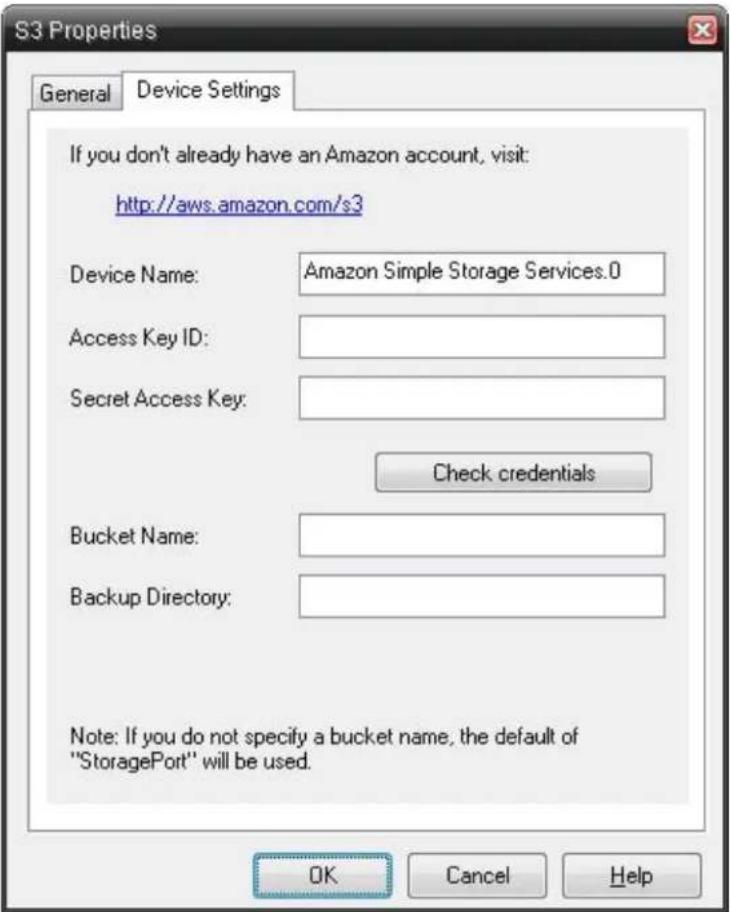
text_image
S3 Properties General Device Settings If you don't already have an Amazon account, visit: http://aws.amazon.com/s3 Device Name: Amazon Simple Storage Services.0 Access Key ID: Secret Access Key: Check credentials Bucket Name: Backup Directory: Note: If you do not specify a bucket name, the default of "StoragePort" will be used. OK Cancel HelpDevice: Enter the name for this device.
Access Key ID: Enter the Amazon S3 Access Key ID for your account login.
Secret Access Key: Enter the Amazon S3 Secret Access Key for your account login.
Click "Check Credentials" to confirm your settings for Access Key ID and Secret Access Key.
Bucket Name: Enter the name of the S3 Bucket you want your data stored in.
Backup Directory: Enter the directory you want your data stored within the S3 Bucket.
Network Device Overview
A network device may be used in cases where the user wishes to refer to a network location and related permissions as a named device for convenient reference like any other backup device. For example you may wish to store backups to \my-network\share\user-one along with its required username amd password credentials, but would like to refer to this using one simple name, such as "NetUserOne". Network devices provide this convenience and allow several different named devices to exist as may be desired for any configuration.
Network devices may be created by clicking on "Add Network Device" in the home tab view, or by clicking the "Add" button in the device tab view.
Network Device Settings
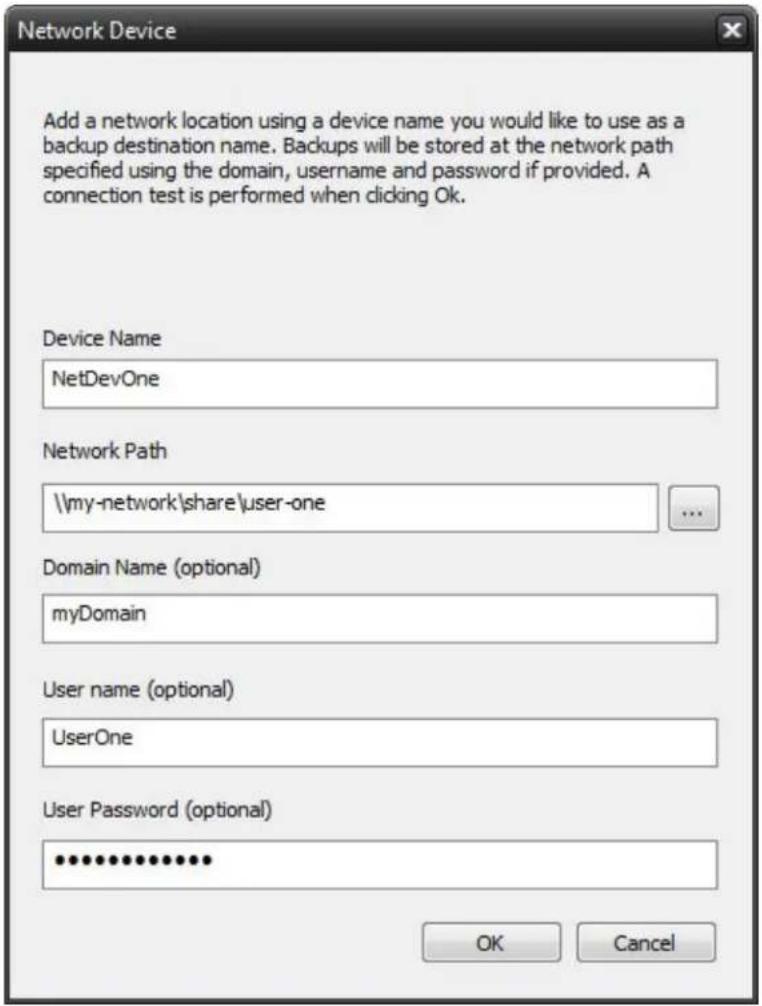
text_image
Add a network location using a device name you would like to use as a backup destination name. Backups will be stored at the network path specified using the domain, username and password if provided. A connection test is performed when clicking Ok. Device Name NetDevOne Network Path \my-network\share\user-one Domain Name (optional) myDomain User name (optional) UserOne User Password (optional) ********** OK CancelThis screen is displayed when adding a network device, or when right clicking on the device listed in the device tab to view the its properties. The following values may be entered, some of which are optional as noted.
Device name
This name entered here is used to identify the device. This name will appear when devices are listed to reference this device throughout the application.
Network Path
This is the path where backups are to be stored using this device.
Domain Name
This optional parameter is used to specify the domain for the network path. When no value entered the current domain, if any, will be in effect.
User Name
This optional parameter is used to specify the user who has permission to access the network path.
User Password
This optional parameter is used to specify the user's password who has permission to access the network path.
xSP Storage Device Overview
The xSP storage device is used for backup to an online server.
To access settings first select the device tab.
To add a new device click the Add button then select the xSP device type.
To edit an existing device select its name in the device list then click the properties button, or right click then select properties.
The configure screen will be displayed when adding a new device or selecting properties. Use the configure screen to edit all settings for the xSP device.
Click Test Connection if you wish to just test the specified settings.
Click OK to commit the settings or Cancel to avoid making changes.
xSP Account Settings
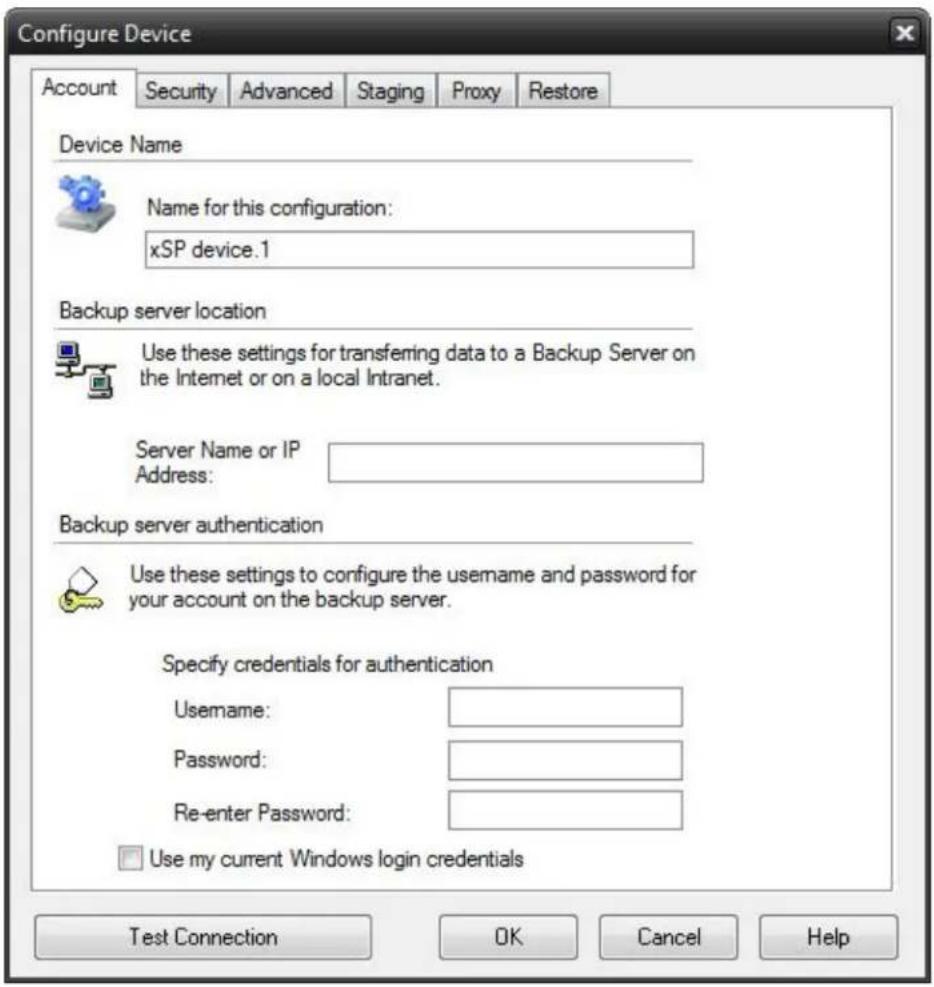
text_image
Configure Device Account Security Advanced Staging Proxy Restore Device Name Name for this configuration: xSP device.1 Backup server location Use these settings for transferring data to a Backup Server on the Internet or on a local Intranet. Server Name or IP Address: Backup server authentication Use these settings to configure the username and password for your account on the backup server. Specify credentials for authentication Username: Password: Re-enter Password: Use my current Windows login credentials Test Connection OK Cancel HelpDevice Name
- Name for this configuration
This field is used to specify any name you wish to identify the device.
Backup server location
- Server Name or IP Address
This field is used to specify the IP address or the host name of the backup server. If this value is already populated, you can disregard this entry. If this value is unknown, it can be obtained from the network administrator or backup service provider.
Backup server authentication
To enter specific credentials:
- Username: Enter in the unique username used to access the backup server.
-
Password: This is your logon password
-
Re-Enter Password: Re-enter your password to confirm
To use your current Windows login credentials: - Selecting this option will use the current Windows login credentials for authentication on the backup server.
xSP Security Settings
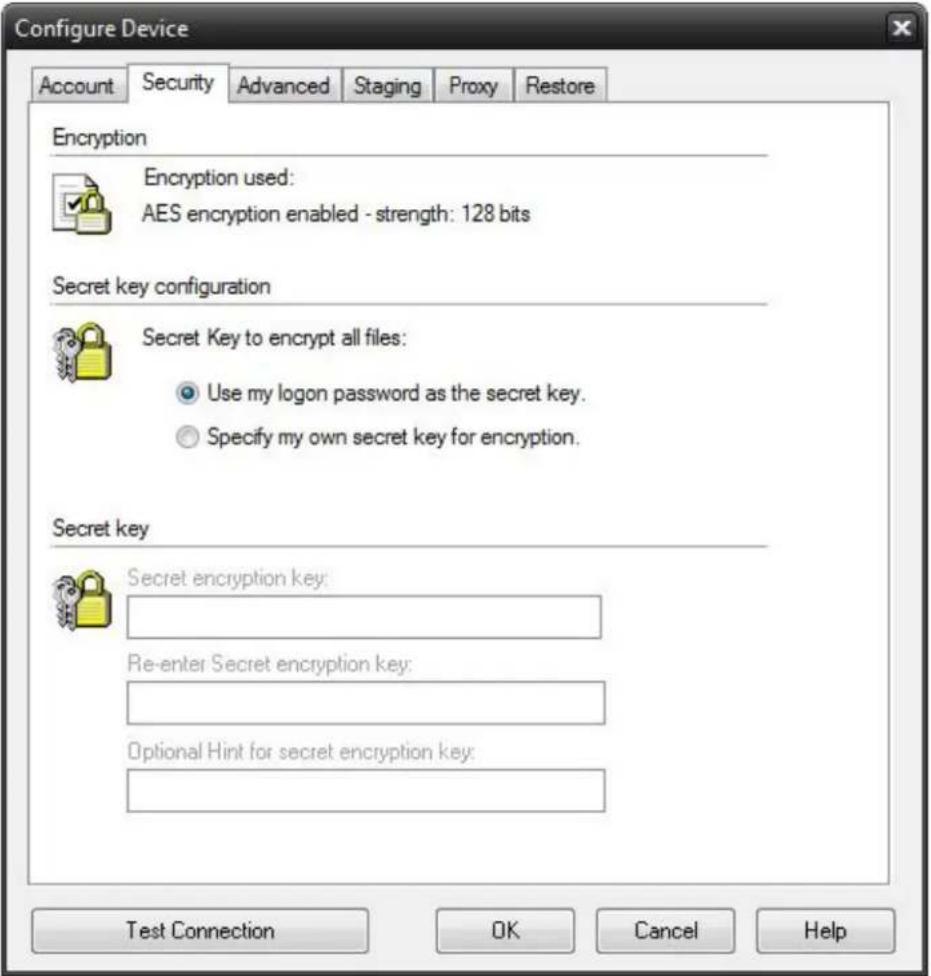
text_image
Configure Device Account Security Advanced Staging Proxy Restore Encryption Encryption used: AES encryption enabled - strength: 128 bits Secret key configuration Secret Key to encrypt all files: Use my logon password as the secret key. Specify my own secret key for encryption. Secret key Secret encryption key: Re-enter Secret encryption key: Optional Hint for secret encryption key: Test Connection OK Cancel HelpEncryption
- Encryption used
Indicates the encryption type in effect.
Secret Key Configuration
- Use my logon password to encrypt my files
This option will cause the backup server logon password to be used to encrypt all files.
- Set a special secret key to encrypt my files
This option will allow a private secret key of your choosing to be specified for file encryption.
Note: If the secret key is forgotten or lost, the backup server administrator may not be able to recover the data residing on the server.
Secret Key
The secret key is a special text string used to encrypt all data that is stored on the server. The secret key can be changed at any time in between backups or restores. If the secret key is forgotten or lost, the backup server administrator may not be able to recover the data on the server.
- Secret encryption key
This field is the secret key. The text can be any length and is case-sensitive. The secret key should be written down and kept it in a safe place so that it is not forgotten.
- Secret encryption key verification
This field is where the secret key should be re-typed. It is used for verification only.
- Optional hint for secret encryption key
This field is where a text phrase can be entered to allow the secret key to be remembered. If it is necessary to restore files to a fresh system and the secret key is forgotten or lost, the text phrase will be displayed so that the secret key can be recalled more easily. This field is optional. If security is a concern because somebody may be able to use the hint to guess the secret key, this field should probably be left empty.
xSP Advanced Settings
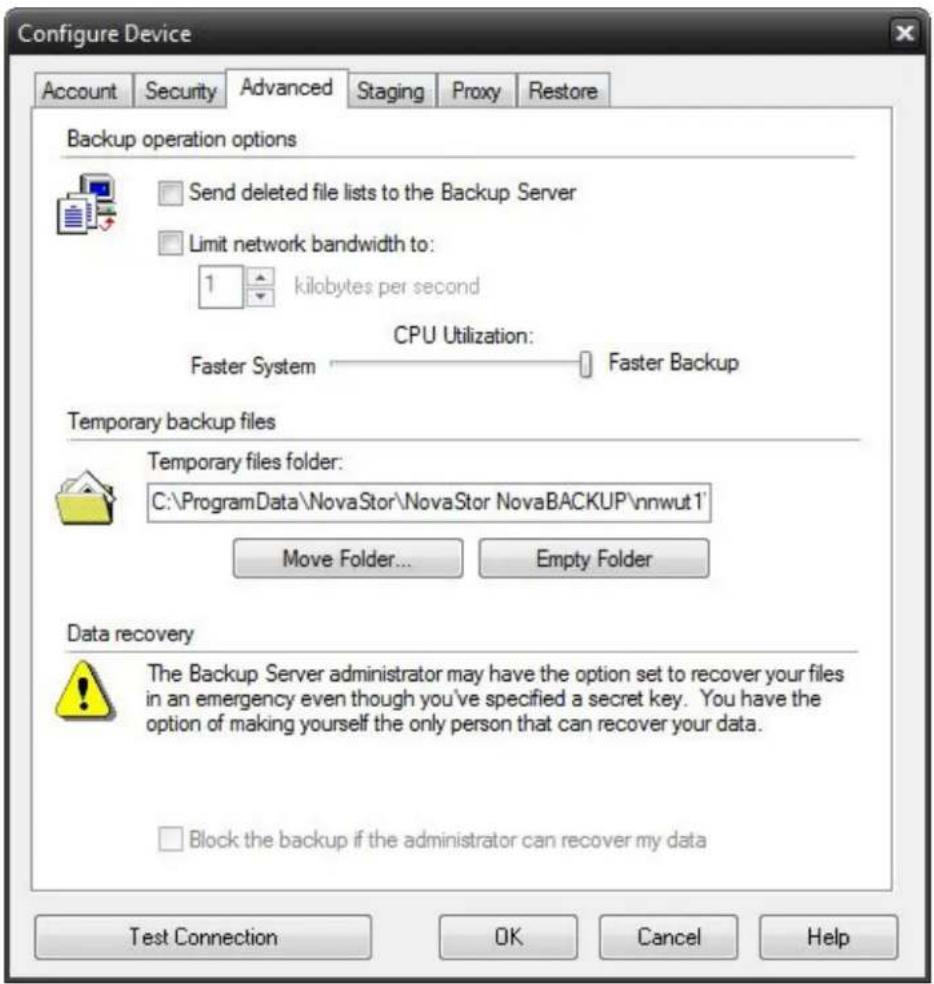
text_image
Configure Device Account Security Advanced Staging Proxy Restore Backup operation options Send deleted file lists to the Backup Server Limit network bandwidth to: 1 kilobytes per second CPU Utilization: Faster System Faster Backup Temporary backup files Temporary files folder: C:\ProgramData\NovaStor\NovaStor NovaBACKUP\nnwut1' Move Folder... Empty Folder Data recovery The Backup Server administrator may have the option set to recover your files in an emergency even though you've specified a secret key. You have the option of making yourself the only person that can recover your data. Block the backup if the administrator can recover my data Test Connection OK Cancel HelpBackup operation options
- Send deleted file lists to the Backup Server
Selecting this option will allow the backup server to be notified when files are deleted or removed from the selection list. Eventually, the files will also be deleted from the backup server. This occurs after the deletion date has gone out of the scope of the allowable restore window on the backup server. The allowable restore window is configured by the backup server administrator.
- Limit network bandwidth to:
This setting can be used to reduce the amount of data sent over the network in case other processes need greater access or speed.
- CPU Utilization
This setting can be used to adjust how much CPU usage may be desired for the backup process. It may be preferable to reduce CPU usage for backup so other processes on the system can run faster.
Temporary backup files
- Temporary files folder
This option can be used to specify where the backup "work files" should be saved. These files contain important information pertaining to backups. At any point in time, the contents of this folder can be moved to a different location or the folder can be emptied. Emptying the folder will remove all the files in the disk cache.
Data recovery
- Block the backup if the administrator can recover my data
In certain situations, such as a corporate environment, it may be a requirement for the corporation to have access to all the corporation's data. The backup server administrator may set an option to allow the recovery of data without requiring the secret key.
This option should be selected to guarantee that absolutely no one else is able to recover the data for this account. IF THIS OPTION IS SET AND THE SECRET KEY IS LOST OR FORGOTTEN, THE DATA CANNOT BE RECOVERED
xSP Staging Settings
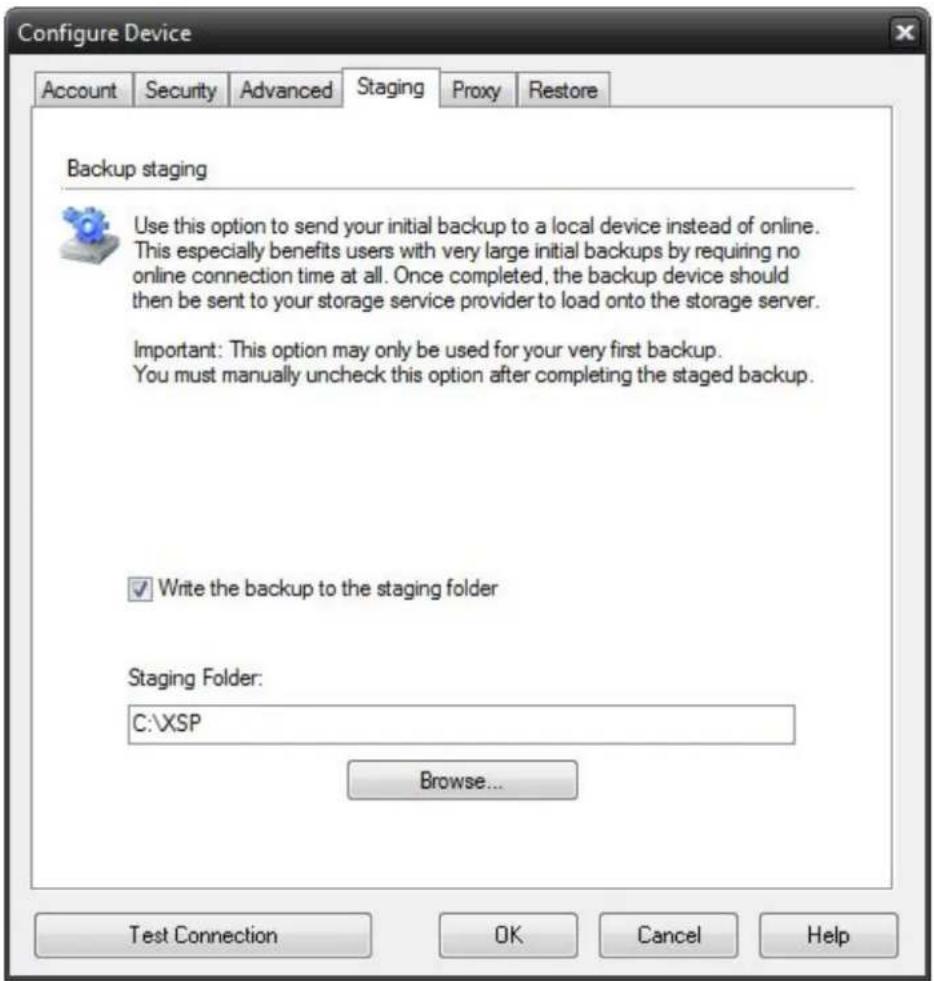
text_image
Configure Device Account Security Advanced Staging Proxy Restore Backup staging Use this option to send your initial backup to a local device instead of online. This especially benefits users with very large initial backups by requiring no online connection time at all. Once completed, the backup device should then be sent to your storage service provider to load onto the storage server. Important: This option may only be used for your very first backup. You must manually uncheck this option after completing the staged backup. ✓ Write the backup to the staging folder Staging Folder: C:\XSP Browse... Test Connection OK Cancel HelpUse this option to send your initial backup to a local device instead of online.
This especially benefits users with very large initial backups by requiring no online connection time at all. Once completed, the backup device should then be sent to your storage service provider to load onto the storage server.
Important: This option may only be used for your very first backup. You must manually uncheck this option after completing the staged backup.
xSP Proxy Settings
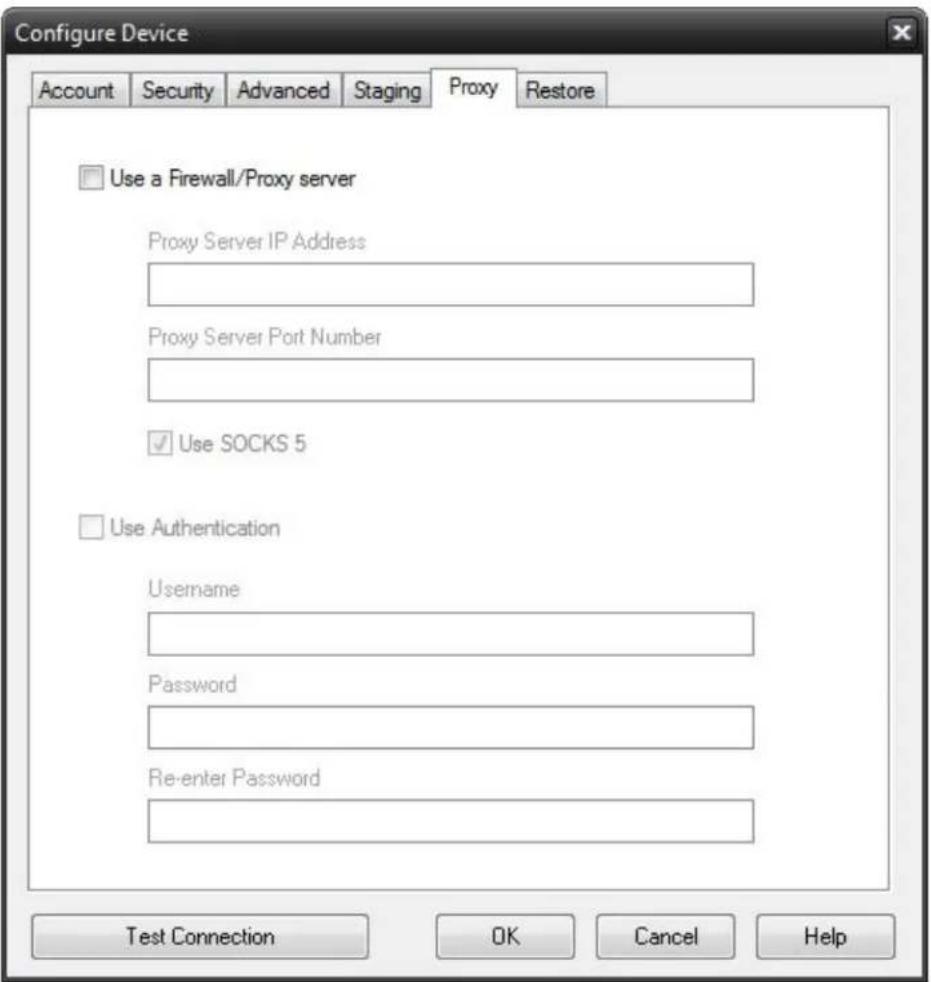
text_image
Configure Device Account Security Advanced Staging Proxy Restore Use a Firewall/Proxy server Proxy Server IP Address Proxy Server Port Number ✓ Use SOCKS 5 Use Authentication Username Password Re-enter Password Test Connection OK Cancel HelpUse this option to connect to your backup server through a proxy server connection.
text_image
Configure Device Account Security Advanced Staging Proxy Restore Local Restore Use this option to restore files directly from copied server storage without the need to use an online connection. For example if your server storage exists as C:\UserData\UserOne, you can copy the UserOne folder to your computer and restore files from that storage location. Note: If a password is specified in the account tab, the restore process will test that as your secret key with the option to specify another if needed. Restore from local server storage Storage Folder: Browse... Test Connection OK Cancel HelpUse local restore if you wish to restore from server storage that has been copied to your computer rather than connecting to the backup server online.
Restore from local storage
This must be checked to enable local restore mode.
Storage Folder
Enter the path where you have copied the server storage or use the browse button to locate that path for you.
xSP FastBIT Settings
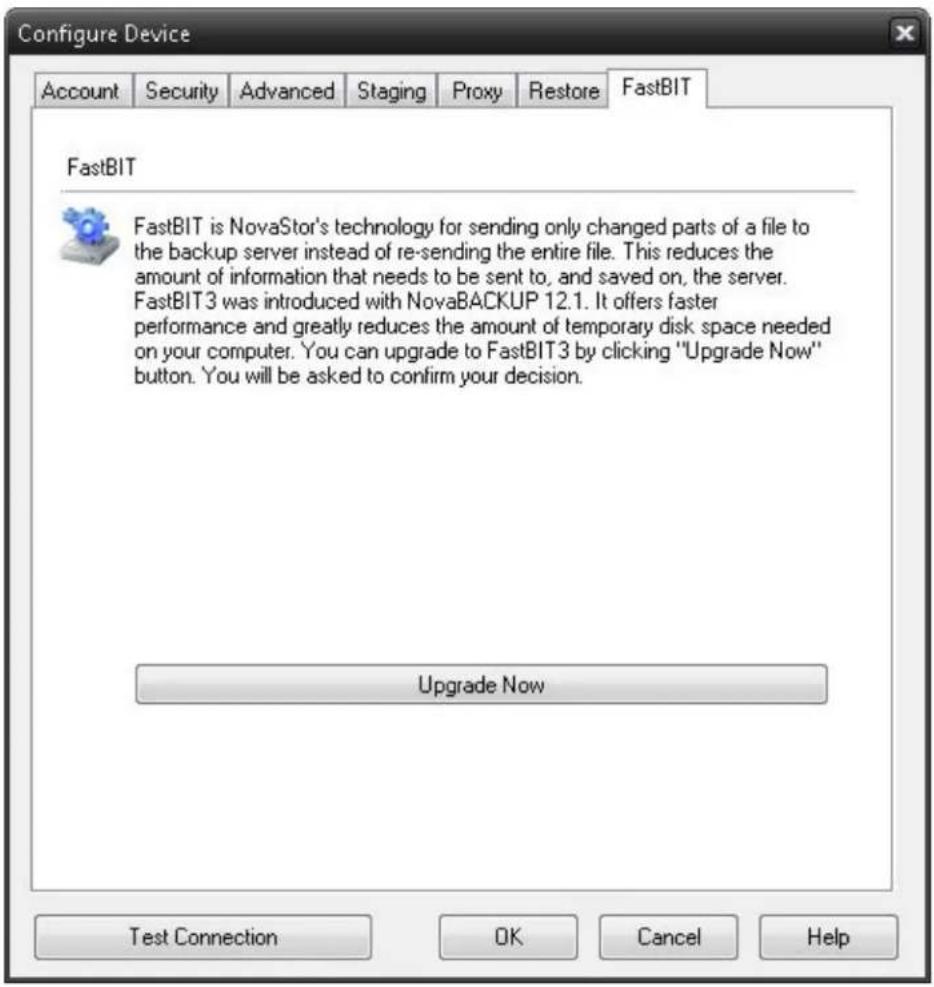
text_image
Configure Device Account Security Advanced Staging Proxy Restore FastBIT FastBIT FastBIT is NovaStor's technology for sending only changed parts of a file to the backup server instead of re-sending the entire file. This reduces the amount of information that needs to be sent to, and saved on, the server. FastBIT3 was introduced with NovaBACKUP 12.1. It offers faster performance and greatly reduces the amount of temporary disk space needed on your computer. You can upgrade to FastBIT3 by clicking "Upgrade Now" button. You will be asked to confirm your decision. Upgrade Now Test Connection OK Cancel HelpThis option is provided so that you can easily upgrade to the latest FastBIT implementation. This tab will only appear if you are not already using FastBIT3.
File Selection, System State & Registry
Overview
Security Information Backups
Depending on your system configuration, you can have special security configurations for files, drives and/or subdirectories. NovaBACKUP has full support for this information. This data is backed up each time you backup your registry. Please note that this information will ONLY be restored if you restore your registry, it is not stored on a file-by-file basis due to potential security issues.
Details on Backing UpSystemStateData
System state data is comprised of the following files:
- Boot files, including the system files, and all files protected by Windows File Protection (WFP).
- Active Directory (on a domain controller only).
- Sysvol (on a domain controller only).
• Certificate Services (on certification authority only). - Cluster database (on a cluster node only).
• The registry. - Performance counter configuration information.
- Component Services Class registration database.
The system state data can be backed up in any order. Restoration of the system state replaces boot files first and commits the system hive of the registry as a final step in the process.
System state backup and restore operations include all system state data: you cannot choose to backup or restore individual components due to dependencies among the system state components. However, you can restore system state data to an alternate location in which only the registry files, Sysvol directory files, and system boot files are restored. The Active Directory database, Certificate Services database, and Component Services Class Registration database are not restored to the alternate location.
You cannot change which components of the system state are backed up.
NOTE: If you have more than one domain controller in your organization and Active Directory is replicated to any of these other servers, you might have to authoritatively restore any Active Directory data that you want to restore.
For more information about authoritative restores, see the Microsoft® Windows® 2000/2003Server Resource Kit Distributed Systems Guide.

Keep the following in mind when you are backing up system state data:
- You must be an administrator or a backup operator to back up files and folders.
- You can only back up the system state data on a local computer. You cannot back up the sy computer.

To select files to be backed up from other PCs on a peer to peer network, once you click on Backup, in the left window click the plus sign next to My Network Places. Then click on Entire Network, and click on Microsoft Windows Network. There, you should find the other PCs.
To backup to a network device, it is recommended that you select the UNC path and not the mapped drive letter. Example \server\path and not use a drive mapping (S:\path)
Registry & System State Backup
In Windows®2000, Windows®2003, Windows®XP and Windows®Vista, you have the option to backup the System State with a backup. The System State will be seen as an item in the selection window while you are selecting other files and folders from the Backup Tab. All you need to do to backup the System State is to tag the checkbox next to it prior to running the backup.
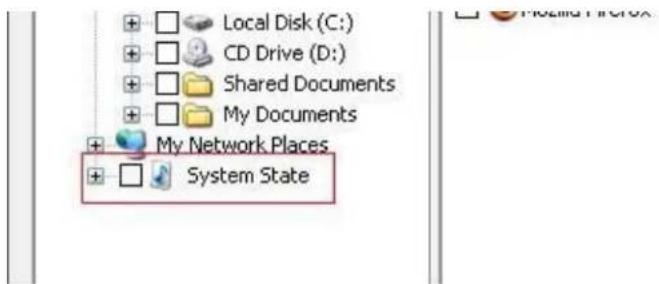
text_image
Local Disk (C:) CD Drive (D:) Shared Documents My Documents My Network Places System State
What is the System State? The System State is actually a combination of a fewthings:
- Boot files, including the system files, and all files protected by Windows File Protection (WFP).
• Active Directory (on a domain controller only). - Sysvol (on a domain controller only).
• Certificate Services (on certification authority only). - Cluster database (on a cluster node only).
• The registry.
• Performance counter configuration information. - Component Services Class registration database.
These are the items seen in the right selection window when System State is selected.

Does NovaBACKUP support backing up Active Directory? Yes, in fact, NovaBACKUP features include the ability to backup Active Directory when you are backing up the System State.
System State backup and restore operations include all System State data. You cannot choose to back up or restore individual components because of dependencies among the System State components. However, you can restore System State data to an altem-
ate location in which only the registry files and system boot files are restored. The Component Services class registration database is not restored to the alternate location.
Microsoft Exchange Plug-In
Using the Microsoft Exchange Plug-in
The Exchange server plug-in works on the following Microsoft Exchange server version: 2003, 2007, 2010
Backup using the Exchange Plug-in
If the client is installed on one of the supported platforms listed above and you have an active Exchange plug-in, you may select your Exchange server for backup using the file selection tree or list view under the Backup Tab.
If you check the box next to the server name, all storage groups (if multiple) will be selected for backup. To select only a specific storage group, expand the Exchange Server object by clicking on the + symbol and check only the appropriate storage groups you want to backup.
Note: In order to perform a complete and accurate backup of Microsoft Exchange, you should also select the "System State" object within the same backup set. For more information, review the Backup up System State section of
Restore using the Exchange Plug-in
If the client is installed on one of the supported platforms listed above and you have an active Exchange plug-in, you may restore a previous Exchange backup using the plug-in by selecting the Exchange server using the file selection tree or list view under the Restore Tab.
Note: To restore an Exchange storage group, you must mark the database as being able to be overwritten by a restore in the properties of the exchange store you want to restore using the Exchange System Manager. You also need to dismount the store. (For more information on using the Exchange System Manager, refer to your Exchange server documentation
This will permit you to restore the exchange storage group to the original location on the original backed up machine or on a new system with the same machine name. Also note that if you are doing a full restore of exchange you need to restore the System State BEFORE you restore the Exchange Storage Group.
Microsoft SQL Server Plug-In
Using the Microsoft SQL Plug-in
The SQL server plug-in works on the following Microsoft SQL servers: 2005, 2008, 2010 and 2012.
Backup using the SQL Plug-in
If the client is installed on one of the supported platforms listed above and you have an active SQL plug-in, you may select your SQL server for backup using the file selection tree or list view under the Backup Tab.
If you check the box next to the server name, all databases will be selected for backup. To select only a specific database, expand the SQL Server object by clicking on the + symbol and check only the appropriate databases you
Restore using the SQL Plug-in
If the client is installed on one of the supported platforms listed above and you have an active SQL plug-in, you may restore a previous SQL backup using the plug-in by selecting the SQL server using the file selection tree or list view under the Restore Tab.
If you check the box next to the server name, all databases will be selected for restore. To select only a specific database, expand the SQL Server object by clicking on the + symbol and check only the appropriate databases you. This will permit you to restore the SQL database(s) to their original location on the original backed up machine or on a new system with the same machine name.
VMware Plug-In
Using the VMware Plug-in
The computer with NovaBACKUP installed needs to have connectivity to either the vSphere server or the ESX( NovaBACKUP can alternatively be installed on the vSphere server or on a Virtual Machine. Version 4.1, 5.0, 5 of ESX(i) and vSphere licensed with the vStorage APIs are the currently supported versions of software with w VMware plug-in for NovaBACKUP can communicate.
Backup using the VMware Plug-in
Clicking on each ESX(i) or vSphere server node will display the Virtual Machines that are available to backup. machines may be backed up individually, or all of them may be backed up at once.
You must specify the server name and user credentials for each VMware server you want to appear in the backup file selection tree. This is provided in the VMware Servers tab in the program default settings screen.
Restore using the VMware Plug-in
Restoring a Virtual Machine is quite easy. Simply select the Virtual Machine to restore in the restore screen and click the restore button.
More Information
For additional information such as techniques for differential backup and restore please download the document all the VMware plug-in features.
Hyper-V Plug-In
Using the Hyper-V Plug-in
The Hyper-V plug-in supports direct backup and restore of Hyper-V virtual machines which reside on the same your backup client. The virtual machines can be either running or stopped when doing a backup.
Backup using the Hyper-V Plug-In
If you have an active Hyper-V plug-in, you may select your Hyper-V virtual machines for backup using the file selection tree or list view under the Backup Tab.
If you check the box next to the Hyper-V name, all virtual machines will be selected for backup. To select only a specific virtual machine, expand the Hyper-V object by clicking on the + symbol and check only the virtual machines you backup.
Restore using the Hyper-VPlug-in
If you have an active Hyper-V plug-in, you may restore a previous Hyper-V backup by selecting the Hyper-V r the file selection tree or list view under the Restore Tab.
If you check the box next to the Hyper-V name, all virtual machines will be selected for restore. To select only a specific virtual machine, expand the Hyper-V object by clicking on the + symbol and check only the virtual machines you restore. Restoring a Hyper-V virtual machine will overwrite the current version of the Hyper-V virtual machine that is there.
Importing Backups
Importing a backup from media may become necessary if your machine crashes or you wish to restore a backup created on one computer to another computer. The process is simple. To get the backup contents into the current, local NovaBACKUP database (and therefore be able to select files, folders and drives for restoration), follow these steps: From the Restore tab, first click on the "Import" button located near the bottom of the screen. Alternatively, you can select "Import Backup Job" from the Launch Button.
If you run the import from the Restore Tab, you will receive an Import Source selection screen. (If selecting import source from the toolbar, you will forgo this window.)
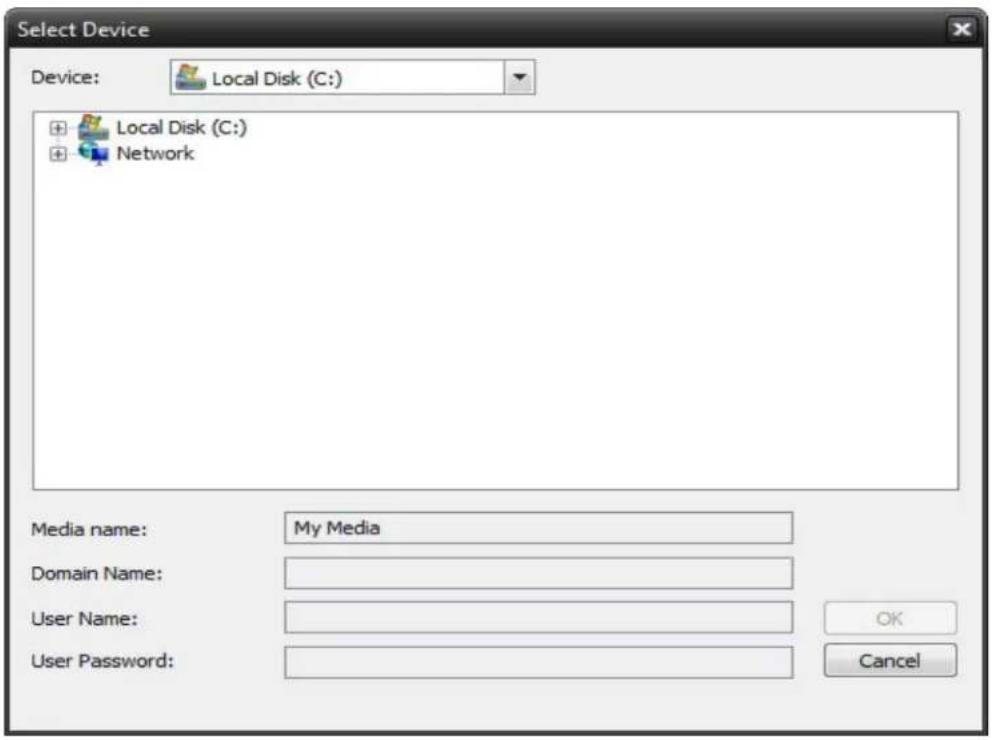
text_image
Select Device Device: Local Disk (C:) + Local Disk (C:) + Network Media name: My Media Domain Name: User Name: User Password: OK CancelBrowse to the backup file you would like to import, and select it. If your backup is on a network, browse to the network location and select the backup file. Then enter the username and password for network credentials. Click OK to switch to the job status view and start the import process.
If your import source is Tape, then you will be given a Tape Drive selection screen. Select the tape device you would like to import and press "OK." A progress window will then appear and the import process will begin immediately.

If you are importing from a complete set of spanned media, you should always select the first piece of media as your first import. NovaBACKUP will then prompt you to insert each subsequent piece of media if required. It is necessary to have the complete backup, all media available to do the import and subsequent restore. For example; If your backup consists of 5 pieces of media and media #3 is corrupt/missing/ damaged, you will only be able to restore data from the first two pieces of media.
After importing the media, it may be necessary to press the "Refresh" button on the Restore tab. All imported backups will appear under an "Imported Backups" heading in the Media View.

Importing vs. Restoring
It is important to know the difference between importing and restoring. The import process does NOT restore your data to your hard drive. What it simply does is import a "listing" of available data on the imported media. This information is imported into the database and enables NovaBACKUP to create a tree listing of the data in the Restore view. From there, you will be able to select the data you would like to restore from the media and complete a restoration just like you would any other restoration.
Command Line Options
You can use the command line and several options to run your backups and other scripts. This quick method will allow a user to input a single command into a command prompt to begin running a specific NovaBackX script. For more details please read the steps below.
Getting Started:
- To begin, open the START menu button and then select RUN.
- Type CMD in the line provided by the RUN program.
- This will open a "Command Prompt" window resembling the old Microsoft DOS.
-
Now type CD C:\program files\NovaStor\NovaStorNovaBackX
-
This will change the directory you are running commands from so that you are now in the NovaBackX installation directory, and ready to run your command.
Syntax:
nsCmd -u [User name] -d [Domain] -p [Password] [Options] -s [Script location]
Example 1: A basic command
nscmd -s c:\file location\backup.nbk
Example 2: Running a script specifying credentials and queuing
nscmd -u John -d Mydomain -p Password -q -s c:\file location\backup.nbk
General Options:
-q Use this option to allow queuing for the script.
-h This option will hide the console when the script runs.
IMPORTANT:
In Windows XP and 2003 server all scripts are saved by default in C:\Documents and Settings\All Users\Application Data\NovaStor\NovaStorNovaBackX\Scripts
In Windows Vista, the scripts are saved by default in C:\program data\application data\NovaStor\NovaStorNovaBackX\scripts
Scripted Environment Variables
NovaBackX is able to use Windows environment variables in the script file. Though in order to use these variables you will have to manually edit the script file. User set environment variables are not available for use, just the default Windows environment variables.
Below is an example of a script excerpt using these environment variables, please notice that you have to define the variables that you want to use at the bottom of the script.
Example portion of a script file:
( . . . )
[select]
path.item.0=+Env Variable.item.0
path.numberOfItems=1
( . . . )
[device]
SessionLogicalId=0
SessionName=My Backup
SessionId=000000000000000000000000000000000000000
MediaLogicalId=0
MediaExtension=nbd
MediaName=My Media
Mediald=000000000000000000000000000000000000000
DeviceUnit=\\Server\HomeDrive\Env Variable.item.1
DeviceName=Network
DeviceId=0900dcfe0b0000f0a98187492b78000002000000
[Environment variable]
Env Variable.item.0=%USERPROFILE%
Env Variable.item.1=%USERNAME%
Env Variable.numberOfItems=2