EFX 5.21 - Fitness Equipment Precor - Free user manual and instructions
Find the device manual for free EFX 5.21 Precor in PDF.


User questions about EFX 5.21 Precor
0 question about this device. Answer the ones you know or ask your own.
Ask a new question about this device
Download the instructions for your Fitness Equipment in PDF format for free! Find your manual EFX 5.21 - Precor and take your electronic device back in hand. On this page are published all the documents necessary for the use of your device. EFX 5.21 by Precor.
USER MANUAL EFX 5.21 Precor
natural_image
Exterior view of a modern stationary exercise machine (no text or symbols visible)IMPRECOR®
EFX® 5.21
EFX® 5.23
ELLiptical Fitness Crosstrainer™
Thank you for choosing Precor. For proper installation, please read this guide thoroughly and follow the assembly instructions. If you do not assemble the EFX according to these guidelines, you could void the Precor Limited Warranty.
Obtaining Service
You should not attempt to service the EFX except for maintenance tasks described in the owner's manual. Should you need more information regarding Customer Support numbers or a list of Precor authorized Service Centers, visit the Precor web site at www.precor.com.
Unpacking the Equipment
The EFX is carefully tested and inspected before shipment. The unit is shipped in one box. Ask for help to unpack and assemble the EFX. If any items are missing, contact your dealer.
Required Tools
- Wire cutter
• Rubber mallet (EFX5.23 only)
• Philips head screwdriver
Installation Requirements
Follow these installation requirements when assembling the unit:
- Assemble the EFX in the location where you plan to use it. No rollers or wheels exist on the EFX, so it is not easy to move once it is fully assembled.
- Provide ample space around the unit. Open space around the unit allows for easier access.
- Set up the unit on a solid, flat surface. A smooth, flat surface under the unit helps keep it level. A level unit has fewer malfunctions.
- Open the box and assemble the components in the sequence presented in this guide.
- Obtain assistance. Ask another capable adult for assistance during the assembly process.
- Use your fingers or the appropriate tools to insert fasteners.
Proper alignment helps alleviate cross-threading. Do not fully tighten fasteners until instructed to do so.
When fully tightened, the head of the fastener should be flush with the product. If it is not, cross-threading has occurred. Do not attempt to rework the assembly as more damage to the equipment will occur. Contact Customer Support. Refer to Obtaining Service.
Hardware Kit
| Fasteners Quantity | ||
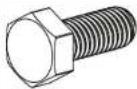 | (A) Hex head screw (M8 x 20 mm) | 8 |
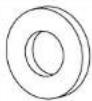 | (B) Flat washer (M8) | 8 |
 | (C) Buttonhead screw (M8 x 12 mm) | 6 |
 | (D) Lock washer (M8) | 6 |
 | (K) Phillips-head screw (M5 x 16 mm) | 3 |
| Additional Fasteners for EFX5.23 only Quantity | ||
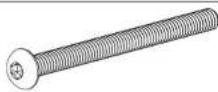 | (G) Buttonhead screw (M8 x 50 mm) | 2 |
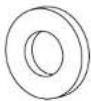 | (H) Flat washer (M8) | 4 |
 | (J) Locknut (M8) | 2 |
2 - Handlebar caps (L) (EFX5.23 only)
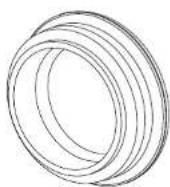
1 - Ferrite (N)
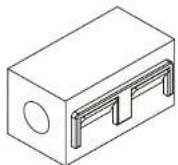
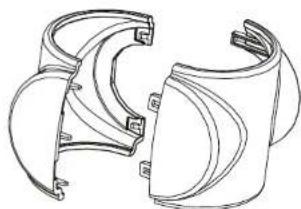
2 - Moveable arm cuffs (each cuff is two pieces) (M) (EFX5.23 only)
| Additional Fasteners for EFX5.23 only Quantity | ||
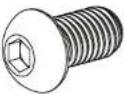 | (E) Buttonhead screw (M10 x 20 mm) | 2 |
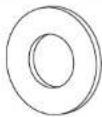 | (F) Flat washer (M10) | 2 |
natural_image
Technical line drawing of a mechanical component with curved and flanged sections (no text or symbols)1 - Double-ended box wrench
2 - Hex key
1 - Power cord
Assembly Steps
text_image
Technical diagram of a stationary exercise machine with labeled components and wiring detailsImportant: Read the Installation Requirements before assembling the EFX.
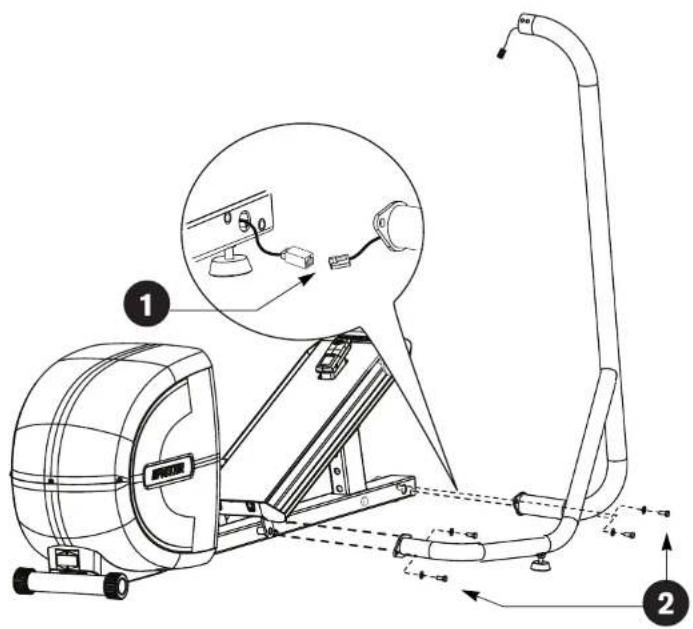
1 Ask your assistant to hold the right stabilizer, which has the cable protruding from both ends, next to the base frame. Connect the base cable. An audible click is heard when the cable is properly attached. Place excess cable into the base frame.
2 Secure the stabilizer to the base frame using four hex head screws (A) and four washers (B). Partially tighten.
Note: For easier access to the base mounts, lift the front of the EFX off the floor and place a wedge of packing material beneath its base.
text_image
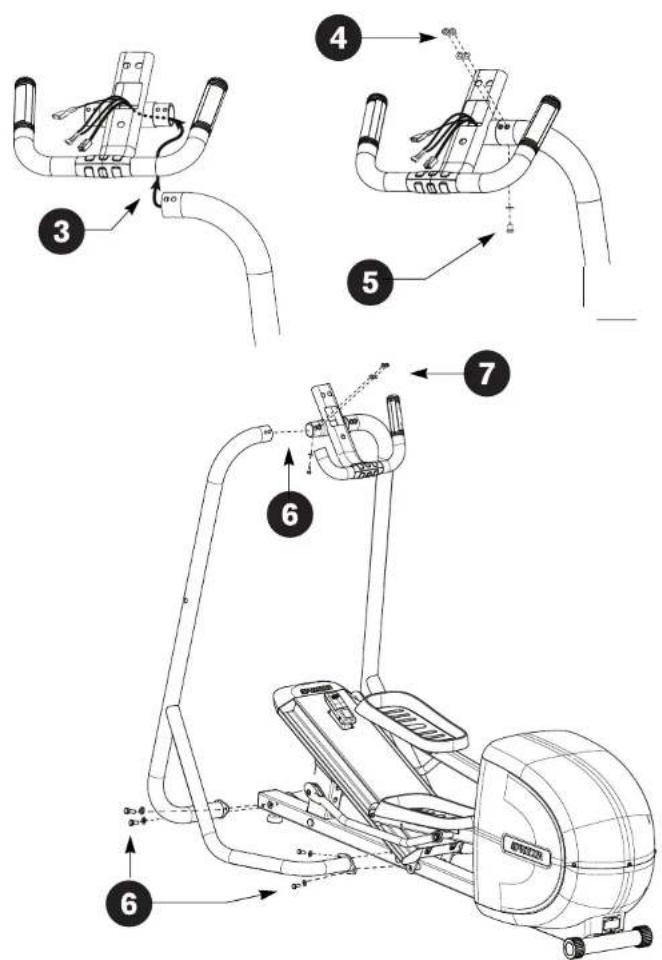
Technical diagram illustrating the step-by-step assembly of a stationary exercise machine, labeled with numbered components and motion arrows.3 Cut any wire ties that secure the cable to the stabilizer. Unwrap the cable and remove any kinks. Feed the cable through the console bracket as shown in the illustration.
4 Slide the console bracket into the right stabilizer and align the three mounting holes. Insert the top two buttonhead screws (C) with lock washers (D). Partially tighten.
CAUTION: Make sure you do not pinch the cables while attaching the console bracket. Any damage caused during installation is not covered by the Precor Limited Warranty.
5 Insert the bottom buttonhead screw (C) with lock washer (D). Partially tighten.
6 Slide the left stabilizer onto the console bracket and secure its base using four hex head screws (A) and four washers (B). Partially tighten.
Note: You may need to pivot the stabilizer back and forth to fit it snugly onto the console bracket.
7 Return to the console bracket and insert the three remaining fasteners. Fully tighten all six console bracket fasteners.
text_image
Technical diagram of an EPRICER stationary bike with numbered components and instructional annotations in Chinese.Important: If your EFX is a 5.23 model, you will need to attach the movable arms. If your EFX is a 5.21 model, please skip steps 8-11.
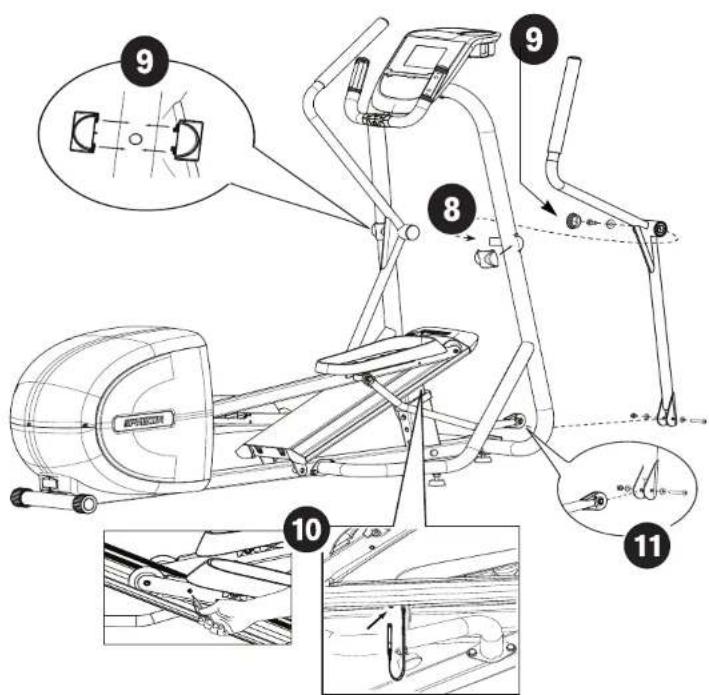
8 Attach the right moving handlebar. Slide the handlebar pivot joint onto the stabilizer axle (use a rubber mallet if needed).
9 Secure the handlebar using one buttonhead screw (E) and one washer (F). Fully tighten. Snap the moveable arm cuff (M) into place and then place a handlebar cap (L) onto the connection.
CAUTION: Guide the handlebar to its balance point and let it rest there. When attaching the lower link arms, have your assistant hold the moving handlebar for safety. Failure to do so could result in injury.
10 Remove the locking pin so you can move the foot pedals to a convenient location to attach the moving handlebars. Store the locking pin in the hole underneath the ramp.
11 Attach the handlebar to the lower link arm using one buttonhead screw (G), two washers (H), and one locknut (J). Fully tighten. Repeat steps 8, 9, and 10 to secure the left handlebar.
text_image
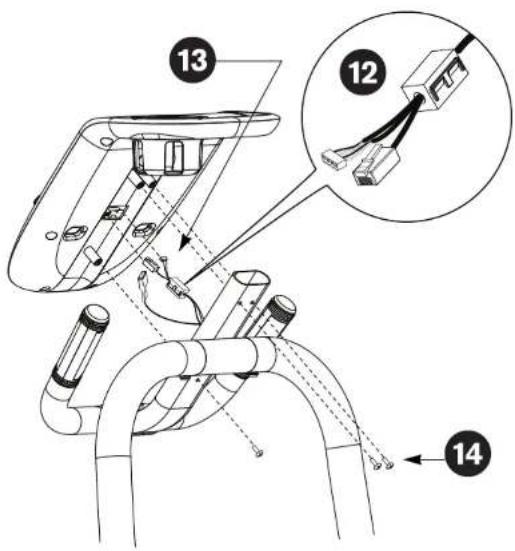
Technical diagram of a mechanical device with numbered components and labeled parts, including zoomed-in detail view.12 Open the ferrite (N) and attach it near the ends of the cables, leaving enough space to attach both connectors.
Note: Make sure the ferrite is securely closed around the cables.
13 Connect the 4-pin connector and the RJ45 to the appropriate receptacles on the back of the display console. You will hear the cable click into place when it is properly attached. Place the ferrite and excess cable into the console bracket.
Connect the green grounding wire to the middle receptacle marked GND.
14 Attach the display console to the console bracket using three Phillips-head screws (K). Tighten securely.
15 Return to the base of the stabilizers and fully tighten all eight hex head screws.
Note: If necessary, remove the wedge of packing material used in step 2.
Adjusting the Ramp
The EFX ramp incline can be set to one of three positions: Low (15 degrees), Medium (20 degrees), or High (25 degrees).
16 If you are on the equipment, dismount. To adjust the ramp, you can straddle the equipment with one foot on either side or stand to one side of it.
CAUTION: To adjust the ramp, you must be standing on the floor. You cannot be standing on the equipment or the foot pedals.
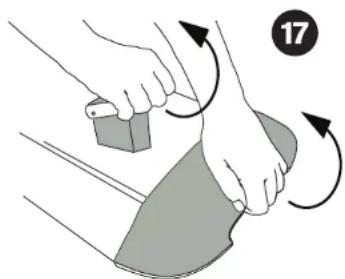
17 Place one hand under the front of the ramp and one hand on the lever. Pull the front of the ramp up and toward you while pulling the lever back and up. This releases the ramp for adjustment.
natural_image
Illustration of hands performing a physical maneuver with directional arrows (no text or symbols)18 Carefully adjust the ramp to the desired height.
Important: Before releasing your grip, test the ramp by gently pushing it down with your hands to make sure that it has securely clicked into one of the incline positions. The ramp should not move when tested.
CAUTION: Be aware of the position of the handrails and console when you are adjusting the ramp. Be careful not to bump your head on the console when you stand up.
19 Before exercising, make sure the EFX is level and does not wobble from side to side.
Important: If the EFX is placed on a slightly uneven surface, turning the leveling pads can help, but will not compensate for extremely uneven surfaces.
- Kneel by the side of the stabilizer and lift the base slightly so you can access the levelers.
- Rotate the levelers as needed.
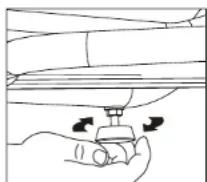
- When the EFX is level, fully tighten the lock nut and lower the EFX to the floor.
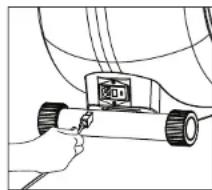
20 Connect the power cord.
CAUTION: Use the supplied power cord. Do not remove or otherwise bypass the 3-prong plug with an adapter in order to use a non-grounded outlet. Do not plug the EFX into a power transformer in an attempt to adjust the voltage requirements. Failure to follow these instructions might damage the unit and will void the Precor Limited Warranty.
- Insert the power plug connector into its receptacle at the rear of the unit.
natural_image
Line drawing of a hand holding a small mechanical component with wheels, no text or symbols present- Plug the other end into a grounded outlet so you can maintain a consistent power source without overloading any other circuitry. Be sure to use the appropriate voltage. Refer to Grounding Instructions in the owner's manual.
21 Turn the unit On.
Use the power switch to turn the unit On. Check that the Precor banner appears on the display. If the display remains blank, cycle the power. If the display continues to remain blank, check the cable connections.
Important: Make sure the locking pin is removed and stored before you begin exercising.
IMPRECOR®
Precor Incorporated
20031 142nd Avenue NE
P.O. Box 7202
Woodinville, WA USA 98072-4002
1-800-347-4404


©2011 Precor Incorporated
www.precor.com
EFX 5.21/5.23 AG 300085-141, en
23 July 2011
QUICKSTART™
IMPRECOR®
CAUTION: Before using the EFX, read all these instructions. Failure to do so may result in serious injury.
- Do not allow children or those unfamiliar with its operation, on or near this equipment.
- Before beginning any fitness program, see your physician for a thorough physical examination. Seek advice from your physician to learn the target heart rate appropriate for your fitness level.
• Always face the display and use the stationary handrail for balance. Never attempt to turn around on the EFX. - If you feel pain, faintness, or dizziness, stop exercising immediately.
The Locking Pin on the Roller Arm
The locking pin on the EFX ramp secures the roller arm from use. To prevent unauthorized use, secure the roller arm with the locking pin after every workout.
Pull firmly on the pin to slide it out of the roller arm. A lanyard attaches the locking pin to the ramp. Store the locking pin underneath the ramp once it is removed from the roller arm.
EFX ^® 5.21 EFX ^® 5.23
Elliptical Fitness Crosstrainer™
Workout Tips
- Before and after an exercise session, gently stretch your lower body and back to help prevent stiffness or soreness.
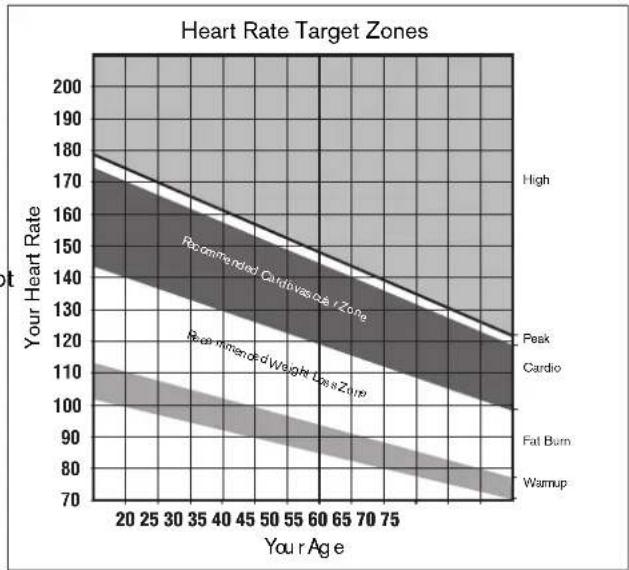
- At the beginning of an exercise session, take several minutes to bring your heart rate into your target zone (shown in Diagram A on the other side of this card).
- To display your heart rate, use both hands to grasp the touch-sensitive grips.
- To pause during your workout, stop pedaling. Pause mode has a 10-minute time limit.
- Incorporate a cool-down period into your exercise session to help lower your heart rate and minimize muscle stiffness and soreness.
Begin Your Workout with QUICKSTART
To begin exercising immediately without personalizing your exercise session, take the following steps.
- Turn On the EFX using the power switch located at the rear of the unit, near the power cord.
- Remove the locking pin that secures the roller arm.
- Manually adjust the ramp to your preferred incline
- Hold on to the stationary handrail and step on the foot pedals.
- Begin pedaling. Maintain a comfortable stride rate between 100 and 150 strides per minute depending on your level of fitness.
- Press QUICKSTART and the Manual Program begins. An exercise session goal of 30 minutes appears in the TIME display and counts down. Note: To select a different program, refer to your owner's manual.
- When you reach the time goal, you automatically enter a cool-down period. After you complete the cool-down period, the equipment displays a summary of your exercise session statistics. If you used the touch-sensitive grips during your workout, your average heart rate appears in the display as well.
- Stop pedaling and hold on to the stationary handrail while you carefully step down from the EFX.
- To prevent unauthorized use, turn Off the EFX and secure the roller arm with the locking pin.
Choosing a Program
- Determine your level of fitness: beginner, intermediate, or advanced.
- Determine your immediate goal: endurance training, cardio-conditioning, or weight loss.
If you are a beginner, start a cardio-conditioning program to slowly adjust your body to a comfortable level of exercise. Over a recommended 8-week period, you will increase your endurance and strength while improving flexibility.
For all fitness levels, plan to exercise at a comfortable pace for 20 to 30 minutes a day. To monitor your heart rate, use the touch-sensitive grips. Supplement your plans with fitness workouts from the Precor web site (www.precor.com).
Using the Touch Heart Rate Feature
Note: Touch heart rate performance may vary based on a user's physiology, fitness level, age, and other factors. You may experience an erratic readout if your hands are dry, dirty, or oily, or if the skin on your palms is especially thick. Wearing hand lotion can also cause an erratic readout. In addition, make sure that the sensors are clean to ensure proper contact can be maintained.
To use the touch heart rate feature, place the palm of your hands directly on the metal heart rate sensors on the equipment's handlebars. To ensure a more accurate heart rate readout, make sure you follow these tips:
- Both hands must grip the sensors for your heart rate to register.
- It takes a number of consecutive heart beats (15-20 seconds) for your heart rate to register.
-
When gripping the sensors, do not grip tightly. Keep a loose, cupping hold. Holding the grips tightly can affect the reading.
-
As you work out, your perspiration will help transmit your heart rate signal. If you have difficulty using the handheld grips to determine your heart rate, try the sensors again later in the workout to see if you can obtain a heart rate signal.
- If the touch heart rate feature does not work for you, Precor recommends that you use a chest transmitter strap.
CAUTION: Your heart rate should never exceed 85% of your maximum aerobic heart rate. Your maximum heart rate is equal to 220 minus your age. (Diagram A).
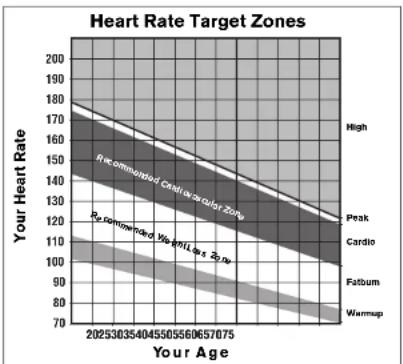
line
| Your Age | High | Peak | Cardio | Fatburn | Warmup | | -------- | ---- | ---- | ------ | ------ | ------ | | 2025 | 180 | 160 | 140 | 120 | 100 | | 303 | 170 | 150 | 130 | 110 | 90 | | 404 | 160 | 140 | 120 | 100 | 80 | | 505 | 150 | 130 | 110 | 90 | 70 | | 556 | 140 | 120 | 100 | 80 | 60 | | 606 | 130 | 110 | 90 | 70 | 50 | | 707 | 120 | 100 | 80 | 60 | 40 | | 708 | 110 | 90 | 70 | 50 | 30 | | 709 | 100 | 80 | 60 | 40 | 20 | | 710 | 90 | 70 | 50 | 30 | 10 | | 711 | 80 | 60 | 40 | 20 | 5 | | 712 | 70 | 50 | 30 | 10 | 2 | | 713 | 60 | 40 | 20 | 5 | 1 | | 714 | 50 | 30 | 10 | 2 | 5 | | 715 | 40 | 20 | 5 | 1 | 2 | | 716 | 30 | 10 | 2 | 5 | 1 | | 717 | 20 | 5 | 1 | 2 | 5 | | 718 | 10 | 2 | 5 | 1 | 2 | | 719 | 5 | 1 | 2 | 5 | 1 | | 720 | 2 | 5 | 1 | 2 | 5 | | 721 | 1 | 2 | 5 | 1 | 2 | | 722 | 5 | 1 | 2 | 5 | 1 | | 723 | 2 | 5 | 1 | 2 | 5 | | 724 | 1 | 2 | 5 | 1 | 2 | | 725 | 5 | 1 | 2 | 5 | 1 | | 726 | 2 | 5 | 1 | 2 | 5 | | 727 | 1 | 2 | 5 | 1 | 2 | | 728 | 5 | 1 | 2 | 5 | 1 | | 729 | 2 | 5 | 1 | 2 | 5 | | 730 | 1 | 2 | 5 | 1 | 2 | | Note: The data is already provided in the code. The 'Recommended Cardio' label indicates a reference point for the 'High' target zone. The 'Warmup' label indicates a reference point for the 'Low' target zone. There are no additional data series in this case. The values for the 'High' target zone are explicitly labeled on the graph. The 'Warmup' label is also labeled on the graph but not explicitly shown in the original image. The 'Low' target zone is also labeled on the graph but not explicitly shown in the original image. The 'Peak' target zone is also labeled on the graph but not explicitly shown in the original image. The 'Cardio' target zone is also labeled on the graph but not explicitly shown in the original image. The 'Fatburn' target zone is also labeled on the graph but not explicitly shown in the original image. The 'Warmup' target zone is also labeled on the graph but not explicitly shown in the original image. The 'Recommended Cardio' label is explicitly labeled as 'Recommended Cardio'.Diagram A
Using a Chest Strap Transmitter
WARNING
Signals used by the Chest Strap Transmitter (or heart rate strap) may interfere with pacemakers or other implanted devices. Consult your physician and the manufacturers of your Chest Strap Transmitter and implanted device before using a Chest Strap Transmitter.
Wearing a chest strap transmitter during your workout provides steady heart rate information. For the equipment to detect your heart rate, you must grip the touch heart rate sensors or wear a chest strap transmitter while exercising. In the presence of both touch and wireless data, the touch data takes precedence and will display.
Note: To receive an accurate reading, the strap needs to be in direct contact with the skin on the lower sternum (just below the bust line for women).
To use a chest strap:
- Carefully dampen the back of the strap with tap water. Important: Do not use deionized water. It does not have the proper minerals and salts to conduct electrical impulses.
- Adjust the strap and fasten it around your chest. The strap should feel snug, not restrictive.
- Make sure that the chest strap is right side up, lies horizontally across, and is centered in the middle of your chest.
- Test the chest strap placement by checking the heart rate function on the equipment. If a heart rate is registering, your chest strap placement is correct. If the equipment does not register a heart rate, readjust the strap and recheck the heart rate function.
IMPRECOR®
Precor Incorporated
20031 142nd Avenue NE
P.O. Box 7202
Woodinville, WA USA 98072-4002
www.precor.com
5.2x HR INFO 300090-141
©2011 Precor Incorporated
Owner's Manual
EFX® 5.21
EFX® 5.23
Elliptical Fitness Crosstrainers™
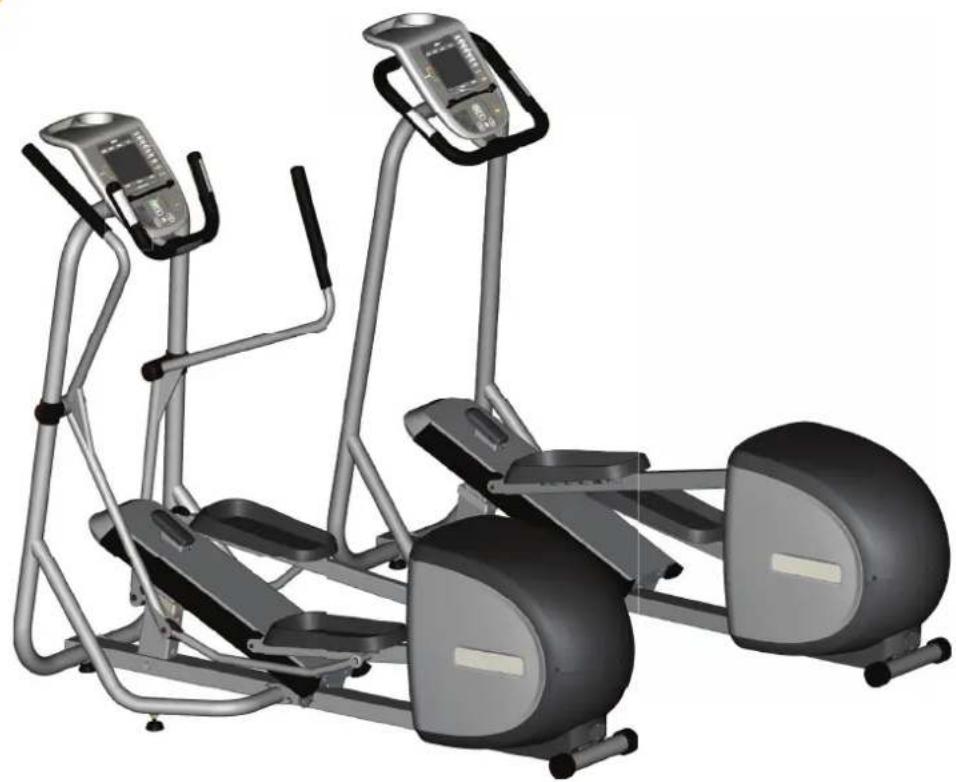
natural_image
Exterior view of a modern stationary exercise machine with two articulated arms and two circular wheels (no text or symbols visible)IMPRECOR®
Important Safety Instructions
Read the following precautions thoroughly before you begin assembly, and save them afterward for future reference.
Safety Precautions
Always follow basic safety precautions when using the EFX to reduce the chance of injury, fire, or damage. Other sections in this manual provide more details of safety features. Be sure to read these sections and observe all safety notices. These precautions include the following:
- Read all instructions in this guide before installing and using the equipment and follow any labels on the equipment.
- Make sure all users see a physician for a complete physical examination before they begin any fitness program.
- Il est conseillé de subir un examen médical complet avant d'entreprendre tout programme d'exercice. Si vous avez des étourdissements ou des faiblesses, arrêtez les exercices immédiatement.
-
Do not allow children, or people unfamiliar with the operation of this equipment, on or near it. Do not leave children unsupervised around the equipment.
-
Make sure all users wear proper exercise clothing and shoes for their workouts and avoid loose or dangling clothing. Users should not wear shoes with heels or leather soles, and they should check the soles of their shoes to remove any dirt and embedded stones. They should also tie long hair back.
- Never leave the equipment unattended when it is plugged in. Unplug the equipment from its power source when it is not in use, before cleaning it, and before providing authorized service.
Note: The optional power adapter is considered a power source for self-powered equipment. - Use the power adapter provided with the equipment. Plug the power adapter into an appropriate, grounded power outlet as marked on the equipment.
- Care should be taken when mounting or dismounting the equipment.
- Read, understand, and test the emergency stop procedures before use.
- Keep the power cord or optional power adapter and plug away from heated surfaces.
-
Route power cables so that they are not walked on, pinched, or damaged by items placed upon or against them, including the equipment itself.
-
Ensure the equipment has adequate ventilation. Do not place anything on top of or over the equipment. Do not use on a cushioned surface that could block the ventilation opening.
- Assemble and operate the equipment on a solid, level surface.
• Proper Location for Equipment - For all equipment other than treadmills: Locate at least 40 inches (1 meter) away from walls or furniture on either side of the equipment, and 40 inches (1 meter) away from objects behind the equipment.
- For treadmills: Locate at least 40 inches (1 meter) away from walls or furniture on either side of the treadmill, and at least 80 inches (2 meters) away from objects behind the treadmill.
- Keep equipment away from water and moisture. Avoid dropping anything on or spilling anything inside the equipment to prevent electric shock or damage to the electronics.
- Do not operate electrically powered equipment in damp or wet locations.
-
Never operate this equipment if it has a damaged cord or plug, if it is not working properly, or if it has been dropped, damaged, or exposed to water. Call for service immediately if any of these conditions exist.
-
Maintain the equipment to keep it in good working condition, as described in the Maintenance section of the assembly and maintenance guide. Inspect the equipment for incorrect, worn, or loose components, and then correct, replace or tighten prior to use.
- If you plan to move the equipment, obtain help and use proper lifting techniques. Refer to the "Moving the Equipment" section of the assembly and maintenance guide.
- Use the equipment only for its intended purpose as described in this manual. Do not use accessory attachments that are not recommended by Precor. Such attachments may cause injuries.
- Do not operate the equipment where aerosol (spray) products are being used or where oxygen is being administered.
- Do not use outdoors.
- Do not attempt to service the equipment yourself, except to follow the maintenance instructions in this manual.
-
Never drop or insert objects into any opening. Keep hands away from moving parts.
-
Do not set anything on the stationary handrails, handlebars, control console, or covers. Place liquids, magazines, and books in the appropriate receptacles.
- Do not lean on or pull on the console at any time.

CAUTION: DO NOT remove the cover, or you may risk injury due to electric shock. Read the assembly and maintenance guide before operating. There are no user-serviceable parts inside. Contact Customer Support if the equipment needs servicing. For use with single phase AC supply only.
Grounding Instructions
The EFX must be grounded. If the unit malfunctions or breaks down, grounding provides a path of least resistance for electric current, which reduces the risk of electrical shock. The unit is equipped with a power cord having an equipment-grounding conductor and a grounding plug. The plug must be inserted into an outlet that is properly installed and grounded in accordance with all local codes and ordinances. Failure to properly ground the EFX could void the Precor Limited Warranty.
DANGER
Improper connection of the equipment-grounding conductor can result in a risk of electric shock. Check with a qualified electrician or service person if you are in doubt as to whether the unit is properly grounded. Do not modify the plug provided with the EFX. If it does not fit the outlet, have a proper outlet installed by a qualified electrician.
Hazardous Materials and Proper Disposal
The batteries within self-powered equipment contain materials that are considered hazardous to the environment.
Federal law requires proper disposal of these batteries. If you plan to dispose of your equipment, contact Precor Commercial Products Customer Support for information regarding battery removal. Refer to Obtaining Service.
Product Recycling and Disposal
This equipment must be recycled or discarded according to applicable local and national regulations.
Product labels, in accordance with European Directive 2002/96/EC concerning waste electrical and electronic equipment (WEEE), determine the framework for the return and recycling of used equipment as applicable throughout the European Union. The WEEE label indicates that the product is not to be thrown away, but rather reclaimed upon end of life per this Directive.
In accordance with the European WEEE Directive, electrical and electronic equipment (EEE) is to be collected separately and to be reused, recycled, or recovered at end of life. Users of EEE with the WEEE label per Annex IV of the WEEE Directive must not dispose of end of life EEE as unsorted municipal waste, but use the collection framework available to customers for the return, recycling, and recovery of WEEE. Customer participation is important to minimize any potential effects of EEE on the environment and human health due to the potential presence of hazardous substances in EEE. For proper collection and treatment, refer to Obtaining Service.
Regulatory Notices for Cardiovascular Exercise Equipment
The regulatory information in this section applies to the exercise equipment and its control console.
Safety Approvals for Cardiovascular Equipment
Precor equipment has been tested and found to comply with the following applicable safety standards.
Cardiovascular Type Equipment:
• CAN/CSA, IEC, EN 60335-1 (Household and similar electrical appliances - Safety)
• EN 957 (Stationary training equipment, class H/B compliant equipment)
Radio Frequency Interference (RFI)
Federal Communications Commission, Part 15
The EFX has been tested and found to comply with the limits for a Class B digital device, pursuant to Part 15 of the FCC Rules. These limits are designed to provide reasonable protection against harmful interference in a residential installation. The EFX generates, uses, and can radiate radio frequency energy and, if not installed and used in accordance with the owner's manual instructions, may cause harmful interference to radio communications.
WARNING
Per FCC rules, changes or modifications not expressly approved by Precor could void the user's authority to operate the equipment.
Canadian Department of Communications
This digital apparatus does not exceed the Class B limits for radio noise emissions from digital apparatus set out in the Radio Interference Regulations of the Canadian Department of Communications.
ATTENTION: Haute Tension
European Applications
CE compliance is claimed to the following directives:
• 2004/108/EC EMC Directive
• 2006/95/EC LVD Directive
• 2002/95/EC RoHS Directive
Directive compliance has been verified to the following standards:
• EN 55022
• EN 55024
• EN 60335-1
• EN 60065 (PVS)
Electrical Recommendations: 120 V and 240 V Elliptical Fitness Crosstrainers
Note: This is a recommendation only. NEC (National Electric Code) guidelines or local region electric codes must be followed.
You should have received a power cable that meets your local electrical code requirements along with the equipment. Elliptical Fitness Crosstrainers may be connected to branch circuits with other devices within the circuit limits. If you need additional help with the power connections contact your Precor authorized dealer.
Obtaining Service
You should not attempt to service the EFX except for maintenance tasks as described in this manual. The EFX does not contain any user-serviceable parts that require lubrication. For information about product operation or service, see the Precor web site at www.precor.com.
Should you need more information regarding customer support numbers or a list of Precor authorized service centers, visit the Precor web site at www.precor.com/corp/contact.
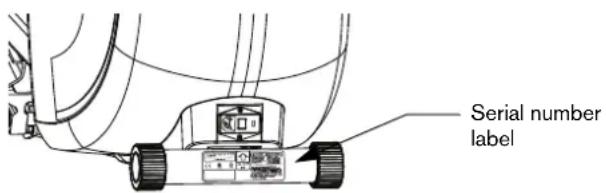
For future reference, write the model, serial number, and date of purchase for your unit in the space provided. The serial number is printed on a label located beneath the power receptacle (Diagram 1).
Model #: ____ Serial #: ____
Date purchased: ____
text_image
Serial number labelDiagram 1: Location of serial number
Owner's Manual: Important Safety Instructions 7
Table of Contents
Important Safety Instructions ....1
Safety Precautions ....1
Grounding Instructions ....3
Hazardous Materials and Proper Disposal ....4
Product Recycling and Disposal 4
Regulatory Notices for Cardiovascular
Exercise Equipment 5
Obtaining Service 7
EFX Features ....10
The Locking Pin 10
Using the Stationary Handrail 11
Turning the Unit On and Off 11
Location 11
Heart Rate Features 12
Important Safety Instructions 12
Using the Touch-Sensitive Grips 12
Exercising to Your Target Heart Rate 13
Using SmartRate 14
Display Console 15
Using the Upper Display 16
Using the Center Display 17
Using the Lower Display 18
Workout Options 20
Adjusting the Ramp 21
Choosing QUICKSTART 22
Selecting a Program 23
Cooling Down After a Workout 23
Pausing During a Workout or the Cool-Down Period .....24
Ending a Workout 24
Programs 25
Choosing a Program 25
Program Tips 26
Manual Program 26
Weight Loss Program 27
Fat Burner Program 27
CrossTrainer Program 28
Interval Program 28
Hill Climb Program 29
Gluteals Program 29
Heart Rate Program ....30
Advanced Programming and Troubleshooting .... 32
Advanced Programming Tips 32
Selecting a U.S. Standard
or Metric Display ....33
Viewing Other Settings 33
Viewing the Error Log ....34
Troubleshooting Error Codes ....34
Troubleshooting Heart Rate Program ....35
Maintenance ....36
Cleaning the Equipment 36
Long-Term Storage 36
Precor Residential Equipment Limited Warranty...... 37
EFX Features
The EFX is equipped with features designed to help you meet your fitness goals. These features include:
• Stationary handgrips with heart rate feature
- Moving handlebars (EFX5.23 only)
- Preset programs
• Comprehensive resistance settings
- Manually adjustable ramp with three settings
The Locking Pin
CAUTION: Always use the locking pin to secure the foot pedals when the EFX is not in use.
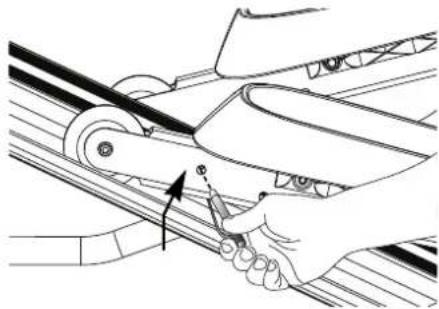
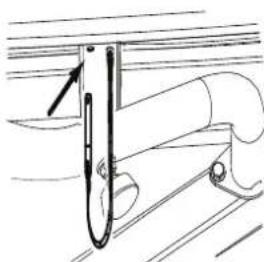
The locking pin secures the foot pedals to keep them from traveling up or down the ramp. Before beginning your exercise session, pull firmly on the pin to slide it out of the roller arm. Refer to Diagram 2. A lanyard attaches the locking pin under the ramp.
Store the locking pin underneath the ramp once it is removed from the roller arm. Refer to Diagram 3. After exercising, use the locking pin to secure the foot pedals.
natural_image
Illustration of a hand operating a mechanical device with a curved arrow indicating rotation (no text or symbols present)Diagram 2: Remove locking pin before exercising
natural_image
Technical line drawing of a mechanical assembly with a tool and component (no text or symbols)Diagram 3: Store the locking pin under the ramp
Using the Stationary Handrail
To maintain your balance, always grasp a stationary handrail when you step on or off the foot pedals, and when you use the keypad.
To learn more about the touch-sensitive grips on the EFX, refer to Heart Rate Features.
Turning the Unit On and Off
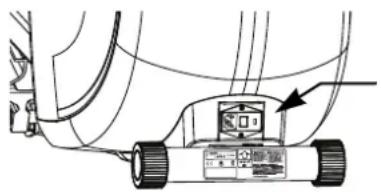
To turn the unit on and off, use the power switch located at the rear of the unit, near the power cord receptacle. Refer to Diagram 4.
Important: Turn the unit off when it is not being used.
natural_image
Technical line drawing of a lawn mower with attached control panel (no text or symbols)Diagram 4: Power switch
Location
It is important to keep a minimum distance of one foot (30 cm) around the EFX open and free from obstacles such as other equipment.
CAUTION: The EFX is not equipped with wheels and should be assembled in the location where you plan to use it. If you need to move the EFX, use the locking pin to secure the foot pedals, obtain help, and use proper lifting techniques.
Heart Rate Features
Important Safety Instructions
Read the following before using the heart rate or SmartRate features.
- Consult your physician before engaging in any vigorous exercise. Do not use the heart rate programs until authorized by your physician.
- Know your heart rate and your physician-recommended heart rate target zone.
Using the Touch-Sensitive Grips
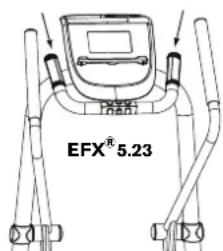
Note: While exercising, you must grasp both touch-sensitive grips for a minimum of five to ten seconds to transmit your heart rate to the display.
text_image
EFX® 5.23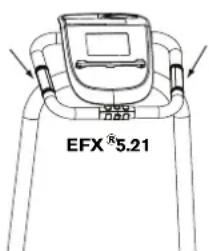
text_image
EFX®5.21Diagram 5: Touch-sensitive grips
Owner's Manual: Heart Rate Features 12
Note: Handheld heart rate performance may vary based on a user's physiology, fitness level, age, and other factors. You may experience an erratic readout if your hands are dry, dirty, or oily, or if the skin on your palms is especially thick. Wearing hand lotion can also cause an erratic readout.
To use the handheld heart rate feature place the palm of your hands directly on the metal heart rate sensors on the unit's handlebars. To ensure a more accurate heart rate readout, make sure you follow these tips.
- It takes a number of consecutive heartbeats (15-20 seconds) for your heart rate to register.
- When gripping the sensors, do not grip tightly. Keep a loose, cupping hold. Holding the grips tightly can make it difficult to read your heart rate.
- Make sure that the sensors are clean to ensure proper contact can be maintained.
- As you work out, your perspiration will help in transmitting your heart rate signal. If you are having difficulty using the handheld grips to determine your heart rate, try the sensors again later in your workout to see if you can get a heart rate signal.
Exercising to Your Target Heart Rate
The HEART RATE display shows your heart rate while exercising. To view your heart rate (beats per minute) on the display, grasp both touch-sensitive grips.
To test your current heartrate:
• To use the touch-sensitive grips on the EFX, grasp both grips and wait five to ten seconds.
- I f Hr appears in the HEART RATE display, the EFX is not detecting a signal, or has not yet determined your heart rate.
Note: When a signal is detected, the heart rate icon flashes and a number appears in the HEART RATE display that indicates your heart rate.
• Always face forward on the EFX and use the stationary handrail for balance. Keep upper body movement to a minimum.
Note: If the handheld heart rate sensors do not work for you, then we recommend that you use a chest transmitter strap. A chest strap is not included with this model.
line
| Your Age | Your Heart Rate | | -------- | --------------- | | 20 | 180 | | 30 | 170 | | 40 | 160 | | 50 | 150 | | 60 | 140 | | 70 | 130 | | 75 | 120 |Diagram 6: Heart rate target zones
Using SmartRate
The SmartRate feature helps you monitor and maintain your heart rate in the target zone best suited to your specific needs.
When the EFX detects a heart rate, a single bar blinks and indicates your current heart rate zone. All 10 bars may appear during an exercise session.
Important: To use the SmartRate feature, you must choose a program and enter your age during the setup phase of your exercise session.
Table 1 shows the percents used in calculating the heart rate target zones. While your heart rate remains within these zones, the corresponding bar blinks and provides a visual cue.
The calculation used to determine your maximum aerobic heart rate is (220 minus your age). When you multiply it by the percent indicated in Table 1, you can understand the relationship between the blinking bar and your target heart rate.
CAUTION: Your heart rate should never exceed 87% of your maximum aerobic heart rate or go above PEAK. If it does, immediately slow down and adjust the ramp incline or resistance to return your heart rate to your physician-recommended target zone.
Table 1. Heart rate target zones and SmartRate Segments
| Heart Rate Zone Percent | Segment Blinking Label | |
| Above 87 Tenth HIGH | ||
| 85 to 87 Ninth PEAK | ||
| 80 to 84 Eighth CARDIO | ||
| 75 to 79 Seventh CARDIO | ||
| 70 to 74 Sixth | CARDIO | |
| 65 to 69 | Fifth | FATBURN |
| 60 to 64 | Fourth | FATBURN |
| 55 to 59 | Third | FATBURN |
| 50 to 54 | Second | WARMUP |
| Below 50 First | WARMUP |
The SmartRate indicator bars do not appear when:
- You press QUICKSTART at the Precor banner.
- You do not to grasp both touch-sensitive grips on the EFX for five to ten seconds.
Note: Enter your age when prompted, otherwise a default age of 35 years is used for heart rate calculations.
Display Console
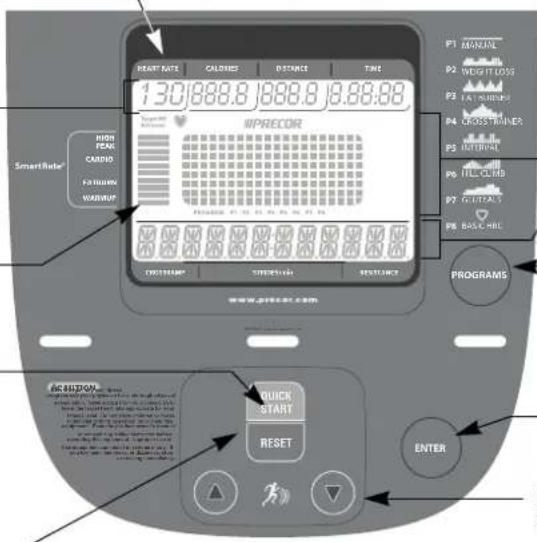
Upper display: While you exercise, shows exercise session information and time.
SmartRate display: Blinking horizontal bars appear when the SmartRate feature is activated. Use the SmartRate display to monitor your heart rate and maintain it in your target zone.
QUICKSTART key: Press the ____ QUICKSTART key at the Precor banner to immediately begin exercising. For more information, refer to Choosing QUICKSTART.
HEART RATE display: Grasp both touch-sensitive grips to display and monitor your pulse.
text_image
REATTAGE CALORIES DISTANCE TIME 130.888.8 1888.8 8.88.88 WIPRECOR HIGH FEAR CARD FAIRISHING WABRUP P1 MANUAL P2 WEIGHT LOSS P3 LAT SUBPUS P4 CROSS RAINERS P5 INTERCIAL P6 TILE CHIPS P7 CUTTING P8 BASIC REC PROGRAMS NEXTSTART QUICK RESET ENTERCenter display: Initially shows the Precor banner. It changes to the program profile when you select a program or press QUICKSTART. A blinking column in the profile indicates your position.
Lower display: While you exercise, shows information about your session.
PROGRAMS key: To begin an exercise session, press a PROGRAMS key to cycle through the available programs. For program descriptions, refer to Programs.
ENTER key: Use the ENTER key to confirm responses to specific prompts.
RESISTANCE arrow keys: Use the arrow keys to adjust the resistance.
RESET key: Press this key to end your exercise session and view your workout summary. Pressing the key a second time, causes the display to reset to the Precor banner.
Using the Upper Display
text_image
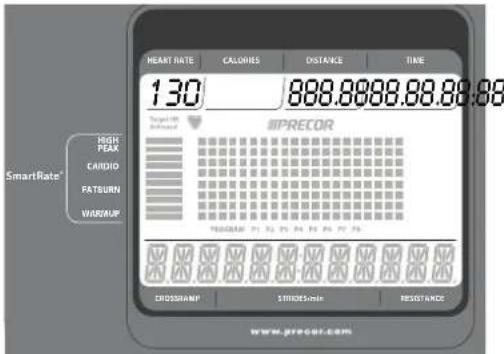
HEART RATE CALORIES DISTANCE TIME 130 888.8888.88.88.88 Target HR IPRECOR SmartRate* HIGH PEAK CARDIO PASTURN WARMUP PROGRAM 21 22 23 24 25 26 27 28 DRUG/RAMP STRONG/MIN RESISTANCE www.precor.comHEART RATE—displays your heart rate when you grasp both touch-sensitive grips. Refer to Heart Rate Features.
CALORIES—displays the estimated cumulative number of calories burned. The calorie calculation is derived from the pedaling speed, resistance, and your weight. An accurate weight entry results in a more accurate calorie count. When using QUICKSTART and a weight has not been specified, the default weight is 150 pounds (68 kilograms).
DISTANCE—displays an estimate of your cumulative distance travelled in miles or kilometers based on your resistance level, weight, and caloric expenditure. You can use the DISTANCE display as a unique motivational unit of measurement and realize your fitness goals by varying the elliptical motion of the EFX. Higher resistance levels will result in greater distance travelled.
TIME—displays the amount of time remaining in an exercise session.
Using the Center Display
text_image
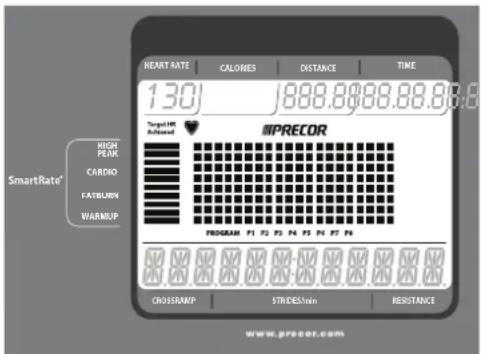
HEART RATE CALORIES DISTANCE TIME 130 888.8888.88.88 Target 1/4 Advanced PRECOR HIGH PEAK CARDIO FATBUMN WARMUP PROGRAM 21 22 23 24 25 26 27 28 CROSSRAMP STRIDEWIN RESISTANCE www.precor.comSmartRate—displays your heart rate as a blinking bar which indicates the zone you are in when you grasp both touch-sensitive grips. A heart icon blinks in the center display when a heart rate is being detected. Refer to Using SmartRate.
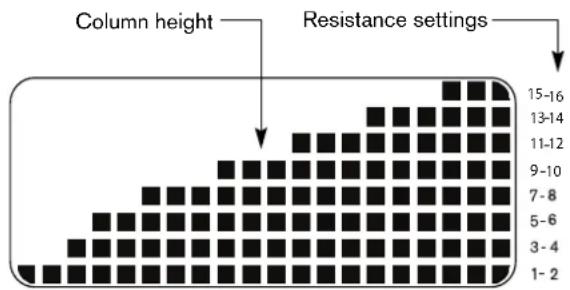
PROGRAM PROFILE—In most programs, the resistance setting affects the column height in the program profile as shown in Diagram 7. The profile raises or lowers according to which arrow key is pressed.
text_image
Column height Resistance settings 15-16 13-14 11-12 9-10 7-8 5-6 3-4 1-2Diagram 7: Column height in the program profile
PROGRAM—displays the current program selection. Refer to Programs.
Using the Lower Display

text_image
HEART RATE CALORIES DISTANCE TIME 130 888.888.88.88.88 Target: 99 Advanced #PRECOR HIGH PEAK CARDIO FATBURN WADWUP PROGRAM P1 P2 P3 P4 P5 P6 P7 P8 CROSSHAPP STRODUSMIN RESISTANCE SmartRateThe lower display provides information about your exercise session. The numbers that appear relate to your workout statistics. On certain programs, the lower display is also used to occasionally indicate information such as an upcoming change to the resistance or the percent of a program you have completed.
MANUALLY-ADJUSTABLE RAMP— The manually-adjustable ramp has three incline positions. Low is a 15 degree incline, medium is equal to 20 degrees, and high is equal to 25 degrees.
STRIDES/MIN—displays the number of strides you complete in a minute up to a maximum value of 510 strides per minute. A stride is an exaggerated walking movement. If you start in a position with one foot pedal forward, a stride is completed when you move the rear foot pedal all the way forward while the other foot pedal moves to the rear. Two strides create one complete revolution of the flywheel. So, the value that appears on the display is always an even number between 20 and 510. Maintain a comfortable and consistent stride rate while exercising.
RESISTANCE—displays the resistance you feel against your stride. The RESISTANCE arrow keys let you set a resistance level between 1 and 16.
PROGRAMS Key

The PROGRAMS key provides access to all the exercise programs. Use the PROGRAMS key to cycle through the eight available programs. For a description of each program, refer to Programs.
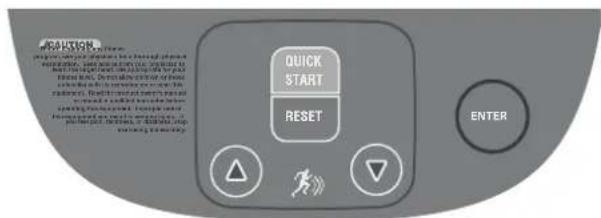
Lower Keypad
text_image
CAUTION QUICK START RESET ENTERQUICKSTART-Press QUICKSTART to start your exercise session immediately using the Manual Program. Refer to Choosing QUICKSTART.
RESET-Press RESET to end an exercise session or return to the Precor banner.
RESISTANCE-Press and hold the RESISTANCE arrow keys to increase or decrease the resistance from 1 to 16.
ENTER-Use the ENTER key to confirm responses to specific prompts.
Note: The arrow keys are also used to change selections at specific prompts.
Workout Options
CAUTION: Before beginning any fitness program, see your physician for a complete physical examination. Know your physician-recommended heart rate target zone.
- Turn the unit On. The Precor banner scrolls across the display.
- Hold on to a stationary handrail while stepping on to the foot pedals.
- Face the display. When you are comfortably situated, begin pedaling.
Important: Before exercising, review the Important Safety Instructions found at the beginning of this manual.
- Select one of the following options:
| Option... Steps... | |
| To start exercising immediately | Use the QUICKSTART key. |
| To view the list of programs | Press the PROGRAMS key. |
| To begin exercising using personal preferences | Press your USER key. |
Equipment Break-in Notice
A thin protective sheath covers the roller arm wheels on your EFX. As you exercise, the roller arms move up and down the ramp and the wheels tend to squeak until the protective sheath wears off. Any noise from the wheels is normal and will stop after a break-in period. Please allow a break-in period of approximately ten hours before calling Customer Support.
Adjusting the Ramp
The EFX ramp incline can be set to one of three positions: Low (15 degrees), Medium (20 degrees), or High (25 degrees).
- If you are on the equipment, dismount and straddle the equipment with one foot on either side or stand to one side of it.
CAUTION: To adjust the ramp, you must be standing on the floor. You cannot be standing on the equipment or the foot pedals.
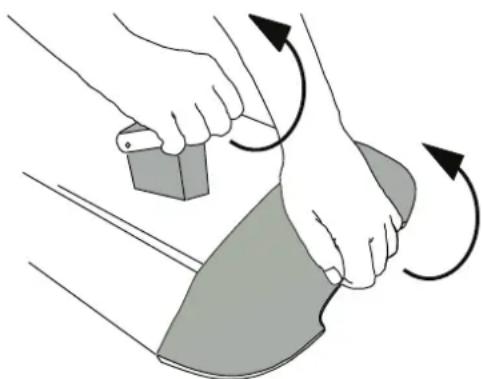
- Place one hand under the front of the ramp and one hand on the lever. Pull the front of the ramp up and toward you while pulling the lever back and up. This releases the ramp for adjustment.
natural_image
Illustration of a hand pressing down on a mechanical component with motion arrows indicating rotation (no text or symbols)Diagram 8: Lift the front of the ramp as you lift the lever
- Carefully adjust the ramp to the desired height.
Important: Before releasing your grip, test the ramp by gently moving it up and down with your hands to make sure that it has securely clicked into one of the incline positions. The ramp should not move when tested.
CAUTION: Be aware of the position of the handrails and console when you are adjusting the ramp. Be careful not to bump your head on the console when you stand up.
Choosing QUICKSTART
text_image
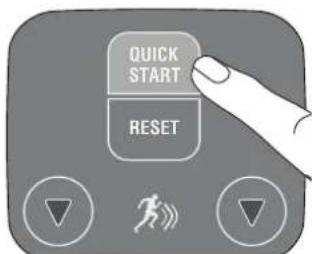
QUICK START RESET- While the Precor banner scrolls, press QUICKSTART to begin the Manual Program.
Note: The SmartRate feature is disabled when you select QUICKSTART from the Precor banner. If you select QUICKSTART after selecting a Program, the SmartRate feature is enabled and the program uses default values.
QUICKSTART applies the following defaults:
| Prompts Default Value | |
| Program Manual | |
| Time 30 minutes | |
| Weight 150 lb (68 kg) | |
| Age 35 | |
-
Maintain a comfortable and consistent stride rate while exercising.
-
Use the RESISTANCE arrow keys to adjust the resistance.
-
Manually adjust the ramp to your to your preferred incline.
Selecting a Program
- While the Precor banner scrolls, repeatedly press the PROGRAMS key to review the list of programs. Choose the program you want, and then press ENTER. For a description of each program, refer to Programs.
Note: You can use the QUICKSTART key to bypass the prompts for time, weight, and age and begin exercising immediately using default values. Refer to Choosing QUICKSTART for more information.
-
A session time blinks in the center display if you choose a time-based program. Use the arrow keys to select a number between 1–90 minutes, then press ENTER.
-
Enter your weight (23–250 lbs/10–114 kg) and then your age (10–99).
Note: To change a value (program, time, weight, or age) that you have already entered, press RESET to return to the Precor banner. Select a program and again, enter the appropriate values.
- Manually adjust the ramp to your to your preferred incline.
Cooling Down After a Workout
Incorporate a cool-down period into your workout to help lower your heart rate and minimize muscle stiffness or soreness.
Note: You cannot switch to a different program or change display options during the cool-down period.
When you complete a program with a time limit, you automatically enter a cool-down period. The resistance is reduced by 20%. To lower your heart rate, reduce your strides per minute.
Manually adjust the ramp to your to your preferred incline.
A workout summary appears at the end of the cool-down period. Refer to Ending a Workout.
Important: If you exit a program before completing it, the cool-down period is bypassed.
To prematurely end the cool-down period, do the following:
- Grasp a stationary handrail with one hand.
- Press RESET to view the workout summary.
- Press RESET again to return to the Precor banner.
Important: Hold on to a stationary handrail. Step off the EFX when the lift has stopped moving.
Pausing During a Workout or the Cool-Down Period
Stop pedaling to pause anytime during a workout or during a cool-down period. The pause mode has a default time limit of 10 minutes. If you do not resume exercising during that time, the display returns to the banner.
- To pause, stop pedaling.
The center display indicates the amount of time remaining in pause mode.
- To resume exercising from pause mode, begin pedaling.
Ending a Workout
CAUTION: Hold on to a stationary handrail when you near the end of your exercise session.
- Slow your pedaling when you complete the cool-down period.
When the cool-down period ends, or you press the RESET key, workout statistics, such as TOTAL CALORIES and DISTANCE, appear on the display. The statistics flash eight times before the display automatically resets to the Precor banner.
Note: The workout statistics include warm-up and cool-down periods.
- To return to the Precor banner before the workout summary ends, press the RESET key.
- Turn Off the EFX and lock the foot pedals in place with the locking pin.
Important: Never leave children unsupervised around the EFX. Always turn Off and unplug the EFX when it is not in use. Lock the foot pedals in place with the locking pin.
Programs
This section describes the programs available on the EFX. Use this section as a reference tool to better understand each program's purpose. For more information, refer to Selecting a Program.
The program descriptions are presented in menu selection order. The programs available on the EFX are:
| RogenCode RogenName | |
| P1 Manual | |
| P2 Weight Loss | |
| P3 Fat Burner | |
| P4 Cross Trainer | |
| P5 Interval | |
| P6 Hill Climb | |
| P7 Gluteals | |
| P8 Basic HRC | |
Choosing a Program
Choosing a program depends on your goals. If you are a beginner or returning to regular exercise, you can start a cardio-conditioning program to slowly return your body to a comfortable level of exercise. If you have been exercising and feel that you have an intermediate or advanced fitness level, you probably have established goals. The Precor web site (www.precor.com) can give you many ideas about fitness workouts and advice from the experts.
Several exercise choices on the EFX are pre-programmed with recommendations resistance and alternating interval levels. You always have the option to override the suggested levels with the exception of the Basic HRC.
Manually adjust the ramp to your preferred incline.
Program Tips
- Begin at the Precor banner. Refer to Workout Options.
- A blinking column indicates your position as you progress through a program.
- To use the SmartRate feature, you need to specify your age and hold on to the touch-sensitive grips. Refer to Using SmartRate.
- To exercise indefinitely in any program (with the exception of Weight Loss), an unlimited exercise time setting may be an available option. Refer to Selecting a Program.
- If your level of exertion becomes too great, reduce your strides per minute and change the resistance settings using the arrow keys to override each upcoming column in the program profile.
- Manually adjust the ramp to your preferred incline.
- To pause during a program, stop pedaling. Refer to Pausing During a Workout or the Cool-Down Period.
- When you complete a program that contains a time goal, the automatic cool-down period begins. Refer to Cooling Down After a Workout.
- Default time limits exist for the cool-down period and pause mode.
- Cumulative workout statistics appear when you end your exercise session. Refer to Ending a Workout.
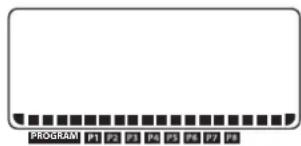
The Manual Program (P1) profile begins as a flat line. You control resistance settings using the RESISTANCE arrow keys.
Manually adjust the ramp to your preferred incline.
Adjustments to the resistance are reflected in the lower display and affect the remainder of the program. The blinking column indicates your position in the program. A cool-down period occurs automatically when you complete your specified time goal.
To use the SmartRate feature, you need to specify your age during the setup prompts.

Weight Loss Program
The Weight Loss Program (P2) is targeted at lowering body fat while improving muscle tone and conditioning. Use this
program if you are beginning or returning to a regular fitness routine. The exercise session time is fixed at 28 minutes and consists of seven 4-minute intervals. You are not prompted for a session time. The program raises and lowers your level of exertion repeatedly over the course of the exercise session.
Set a comfortable pace and adjust resistance settings using the RESISTANCE arrow keys to meet the target zone.
Manually adjust the ramp to your preferred incline.
For ideal weight loss, your heart rate should be between 55% and 70% of your maximum aerobic heart rate. Set a comfortable pace and adjust the resistance setting using the RESISTANCE arrow keys to meet the target zone. Refer to Heart Rate Features.
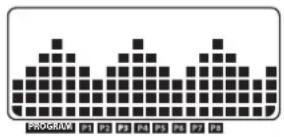
The Fat Burner Program (P3) is targeted at lowering body fat while improving muscle tone and conditioning.
The program consists of alternating forward and backward pedaling movements. Display prompts appear indicating when to reverse pedal direction at select intervals: 25%, 50%, and 75% of program completion.
For ideal weight loss, your heart rate should be between 55% and 70% of your maximum aerobic heart rate. Set a comfortable pace and adjust resistance settings using the RESISTANCE arrow keys to meet the target zone.
Manually adjust the ramp to your preferred incline.
Refer to Heart Rate Features. Adjustments to the resistance affect the remainder of the program.
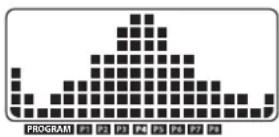
CrossTrainer Program
The CrossTrainer Program (P4) has preprogrammed settings and an initial resistance of 1.
The program consists of optimized settings combined with alternating forward and backward pedaling movements that focus on working the thigh, gluteal, and calf muscle groups. Display prompts appear indicating when to reverse pedal direction at select intervals: 25%, 50%, and 75% of program completion.
During your exercise session, set a comfortable and consistent stride rate. Set a comfortable pace and adjust resistance settings using the RESISTANCE arrow keys to meet the target zone.
Manually adjust the ramp to your preferred incline.
Adjustments to the resistance affect the remainder of the program.
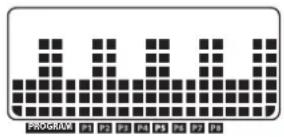
The Interval Program (P5) is one of the best for conditioning your cardiovascular system. The program raises and lowers
your level of exertion repeatedly for the specified period of time.
The lower display indicates when the preset resistance level is about to change and displays the level of the next interval.
During your exercise session, set a comfortable and consistent stride rate. Set a comfortable pace and adjust resistance settings using the RESISTANCE arrow keys to meet the target zone.
Manually adjust the ramp to your preferred incline.
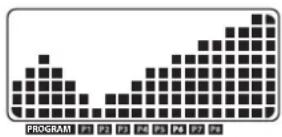
Hill Climb Program
The Hill Climb Program (P6) has preprogrammed settings in a fixed pattern. It is designed to increase muscle tone, cardio-
conditioning, and endurance over several weeks.
The program consists of alternating forward and backward pedaling movements that focus on working the gluteal muscle group. Display prompts appear indicating when to reverse pedal direction at select intervals: 25%, 50%, and 75% of program completion.
During your exercise session, set a comfortable and consistent stride rate. Set a comfortable pace and adjust resistance settings using the RESISTANCE arrow keys to meet the target zone.
Manually adjust the ramp to your preferred incline.
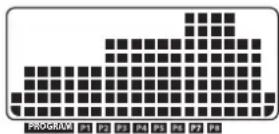
Gluteals Program
The Gluteals Program (P7) is designed to exercise your gluteal muscles.
The program consists of alternating forward and backward pedaling movements. Display prompts appear indicating when to reverse pedal direction at select intervals: 25%, 50%, and 75% of program completion.
During your exercise session, set a comfortable and consistent stride rate. Set a comfortable pace and adjust resistance settings using the RESISTANCE arrow keys to meet the target zone.
Manually adjust the ramp to your preferred incline.
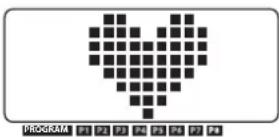
Heart Rate Program
The Basic HRC Program (P8) adjusts the resistance to maintain your heart rate within two beats per minute of the
target heart rate while you exercise. To help you monitor your heart rate while using this program, Target HR Achieved appears at the top of the SmartRate display when your heart rate is within two beats per minute of the target heart rate.
To use this program, you must enter your age and grasp the touch-sensitive grips so your heart rate can be monitored throughout the session.
Important: Consult your physician to determine the appropriate target heart rate for your age and fitness level. If your physician recommends a different target heart rate than the one that appears on the display, adjust it accordingly. Do not exercise over the recommended range of 87% of your maximum aerobic heart rate.
Heart Rate Program Tips
The Basic HRC Program enhances your overall cardiovascular fitness level to help you achieve your weight loss and fitness goals. Read through the following tips before selecting a program. These tips provide general information regarding how the program functions. For more information and exercise suggestions, refer to the Precor web site at www.precor.com.
- The program provides a 3-minute warm-up period. During this time, you may change the resistance, but you cannot adjust the time. At the end of the warm-up period, the program automatically controls the resistance.
Note: The warm-up period ends and the program begins when the 3-minute period elapses or your target heart rate is maintained within +/- 2 beats per minute.
- Pressing the RESISTANCE arrow keys during the Basic HRC program adjusts your target heart rate.
- The program sets the default target heart rate as 70% of 220 minus your age. Changing your stride rate or ramp incline affects the unit's ability to maintain your target heart rate in the preferred zone. It takes time for the EFX to readjust the resistance so that your heart rate remains on target. Check the SmartRate and the HEART RATE displays to see if you are maintaining your preferred zone and to determine your actual heart rate. For information about understanding your target heart rate, refer to Heart Rate Features.
• Automatic resistance changes appear in the RESISTANCE display.
- A cool-down period is incorporated into the program.
Advanced Programming and Troubleshooting
Certain features remain hidden and can only be accessed using special keypresses. Read this section if you want to:
- Select the units of measure
• View the odometer - Display the number of hours you have used your EFX
• View the software versions and part numbers - Check the error log
In general, you would only access this information if directed to do so by Precor Customer Support.
Advanced Programming Tips
• Always start at the Precor banner.
- The advanced programming and troubleshooting mode is accessed by pressing and holding the ENTER key at the Precor banner, then entering the appropriate key combination. Any remaining key presses must occur quickly and without pause.
- The QUICKSTART key is disabled while in advanced programming mode.
- Use the arrow keys to change blinking prompts.
- Press ENTER to make selections and RESET to return to the Precor banner.
Selecting a U.S. Standard or Metric Display
The EFX can display measurements in either metric or U.S. standard. The default factory setting is set to display U.S. standard. To change this setting, perform the following steps:
- At the Precor banner, press and hold ENTER while pressing the following keys in sequence without pause.
RESET, RESISTANCE ▲, RESISTANCE ▼
The software part numbers scroll across the center display while the odometer and hour meter scroll across the lower display.
Use the arrow keys to select a unit of measure (either METRIC or U.S.).
- When you are ready, press ENTER to accept the displayed setting. The display indicates the setting is saved. Press RESET to return to the Precor banner.
Note: Changing the display to metric measurements affects the default settings. Distances and the odometer values are converted to and appear in kilometers (KM). Speed appears in kilometers per hour.
Viewing Other Settings
The EFX stores the total number of strides and the total number of hours the unit has been in use. You can view this information by performing the following steps:
- At the Precor banner, press and hold ENTER while pressing the following keys in sequence without pause.
RESET, RESISTANCE ▲, RESISTANCE ▼
The software part numbers scroll across the center display while the odometer and hour meter scroll across the lower display.
- Write the software part numbers below. You will need these numbers if you call Customer Support with questions. This information will help rule out any software-related problems:
UPPER: ____
LOWER: ____
- When you are ready, press RESET to return to the Precor banner.
Viewing the Error Log
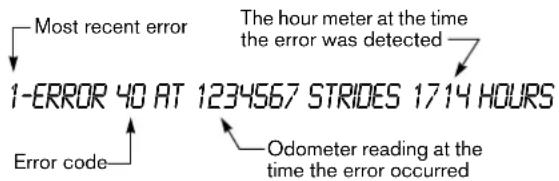
The error log displays information about errors that may have occurred while using the EFX. Up to ten errors are recorded along with the odometer and hour meter values at the time the error occurred.
- At the Precor banner, press and hold the RESET key for at least four seconds to view the error log. The most recent error recorded appears on the lower display. Refer to Diagram 8.
Note: If there are no errors in the log, NO ERRORS appears on the display.
text_image
Most recent error The hour meter at the time the error was detected 1-ERROR 40 AT 1234567 STRIDES 1714 HOURS Error code Odometer reading at the time the error occurredDiagram 9: Error log
- Use the arrow keys to cycle through the error log.
- Copy the error code information to paper so you can provide it to Customer Support if needed. Be sure to copy it exactly as shown.
- When you no longer need the information in the error log, press QUICKSTART for at least four seconds to erase it. NO ERRORS appears on the display and remains static to let you know when the error log has been cleared.
Important: You cannot retrieve the error log once you have cleared it. You may want to resolve any issues you are experiencing with the EFX before clearing the error log. - When you are ready, press RESET to return to the Precor banner.
Troubleshooting Error Codes
If any error codes appear in the display, turn the unit Off and On. If the error continues to occur, call an authorized service person for assistance. Refer to Radio Frequency Interference (RFI).
Troubleshooting Heart Rate Program
Table 2 may help you understand and troubleshoot erratic heart rate readings.
Important: A heart rate can only be detected when the EFX is turned On and you hold on to both touch-sensitive grips.
To conduct electrical impulses from a user's heart, both touch-sensitive grips must be grasped firmly for five to ten seconds. Usually, the concentration of salts in a person's perspiration provides enough conductivity to transmit a signal to the receiver in the display console. However, because of body chemistry or erratic heartbeats, some people cannot use the heart rate feature.
Table 2. Erratic heart rate readings
| What appears on the display Cause What to Do | ||
| Nothing The heart rate receiver is not installed or it has been disconnected. | To receive Customer Support, refer to Radio Frequency Interference (RFI). | |
| Hr No signal is being detected, or the transmission requires more time to establish a heart rate. | Use both hands and make sure your hands are moist, not dry. | |
| Pulsing HEART The heart icon blinks when a heart beat is detected. | If the heart icon is pulsating, it indicates that the heart rate equipment is working properly. | |
Maintenance
It is important to perform the minor maintenance tasks described in this section. Failure to maintain the EFX as described here could void the Precor Limited Warranty.
DANGER
To reduce the risk of electrical shock, always unplug the unit from its power source before cleaning it or performing any maintenance tasks.
Inspect the EFX before use.
Look and listen for slipping belts, loose fasteners, unusual noises, worn or frayed power cords, and any other indications that the equipment may be in need of service. If you notice any of these, obtain service.
Important: If you determine that the EFX needs service, make sure that the EFX cannot be used inadvertently. Turn the unit Off, insert the locking pin and then unplug the power cord from its power source. Make sure other users know that the EFX needs service.
To order parts or to contact a Precor authorized service provider in your area, refer to Radio Frequency Interference (RFI).
Cleaning the Equipment
Most of the working mechanisms are protected inside the covers. However, for efficient operation, the EFX relies on low friction. To keep the friction low, the unit's ramp, foot pedals, handlebars, and covers must be as clean as possible.
Precor recommends the EFX be cleaned before and after each exercise session. Use mild soap and water; dampen a soft cloth and wipe all exposed surfaces. This helps remove any dust or dirt.
CAUTION: Do not use any acidic cleaners. Doing so will weaken the paint or powder coatings and void the Precor Limited Warranty. Never pour water or spray liquids on any part of the EFX. Allow the EFX to dry completely before using.
Frequently vacuum the floor around the unit to prevent the accumulation of dust and dirt, which can affect the smooth operation of the unit. Use a soft nylon scrub brush to clean the foot pedals.
Long-Term Storage
When the EFX is not in use for any length of time, turn it Off. Make sure that the power cord is unplugged from its power source and is positioned so that it will not become damaged or interfere with people or other equipment.
Precor Residential Equipment Limited Warranty
PLEASE READ THESE WARRANTY TERMS AND CONDITIONS CAREFULLY BEFORE USING YOUR PRECOR INCORPORATED PRODUCT. BY USING THE EQUIPMENT, YOU ARE CONSENTING TO BE BOUND BY THE FOLLOWING WARRANTY TERMS AND CONDITIONS.
Limited Warranty
Precor Incorporated warrants all new Precor products to be free from defects in materials and manufacture for the warranty period set forth below. The warranty period commences on the invoice date of original purchase. This warranty applies only against defects discovered within the warranty period and extends only to the original purchaser of the product. Parts repaired or replaced under the terms of this warranty will be warranted for the remainder of the original warranty period only. To make claim under warranty, the buyer must notify Precor or their authorized Precor dealer within 30 days after the date of discovery of any nonconformity and make the affected product available for inspection by Precor or its service representative. Precor's obligations under this warranty are limited and set forth below.
Warranty Periods and Coverage
All residential products and commercial products used in the home are warranted for the following periods:
• Lifetime frame and welds
• 5 years parts and wear items
• 1 year labor
- Coverage for options and accessories defined below.
Options / Accessories
Many options or accessories have components that are connected internally or mounted inside the electronic console. The following guidelines determine the warranty for these components. If the internal components are installed by the factory or by an authorized dealer as part of the original sale and delivery, they have a warranty that is identical to the warranty of the equipment in which they are connected or mounted. If the internal components are not installed by the factory or by an authorized dealer as part of the original sale and delivery, they have a 90-day parts and labor limited warranty. All components that are not internally connected have 90-day parts only limited warranty. Satisfactory proof of purchase is required in all cases.
Conditions and Restrictions
This warranty is valid only in accordance with the conditions set forth below:
-
The warranty applies to the Precor product only while: a. It remains in the possession of the original purchaser and proof of purchase is demonstrated
b. It has not been subjected to accident, misuse, abuse, improper service, or non-Precor modifications
c. Claims are made within the warranty period -
This warranty does not cover damage or equipment failure caused by electrical wiring not in compliance with electrical codes or Precor owner's manual specifications, or failure to provide reasonable and necessary maintenance as outlined in the owner's manual.
-
Warranty of all Precor products applies to residential use only and is void when products are used in a nonresidential environment or installed in a country other than where sold.
- Except in Canada, Precor does not pay labor outside the United States.
- Warranties outside the United States and Canada may vary. Please contact your local Dealer for details.
This limited warranty shall not apply to:
- Software version upgrades
- Cosmetic items, including, but not limited to the following: grips, seats, and labels.
- Repairs performed on Precor equipment missing a serial number or with a serial tag that has been altered or defaced.
- Service calls to correct installation of the equipment or instruct owners on how to use the equipment.
- Pickup, delivery, or freight charges involved with repairs.
- Any labor costs incurred beyond the applicable labor warranty period.
Disclaimer and Release
The warranties provided herein are the exclusive warranties given by Precor and supersede any prior, contrary or additional representations, whether oral or written. ANY IMPLIED WARRANTIES, INCLUDING THE WARRANTY OF MERCHANTABILITY OR FITNESS FOR A PARTICULAR PURPOSE THAT APPLY TO ANY PARTS DESCRIBED ABOVE ARE LIMITED IN DURATION TO THE PERIODS OF EXPRESS WARRANTIES GIVEN ABOVE FOR THOSE SAME PARTS. PRECOR HEREBY DISCLAIMS AND EXCLUDES THOSE WARRANTIES THEREAFTER. Some states do not allow limitation on how long an implied warranty lasts, so the above limitation may not apply to you. PRECOR ALSO HEREBY
DISCLAIMS AND EXCLUDES ALL OTHER OBLIGATIONS OR LIABILITIES, EXPRESS OR IMPLIED, ARISING BY LAW OR OTHERWISE, WITH RESPECT TO ANY NONCONFORMANCE OR DEFECT IN ANY PRODUCT, INCLUDING BUT NOT LIMITED TO: (A) ANY OBLIGATION, LIABILITY, RIGHT, CLAIM OR REMEDY IN TORT, WHETHER OR NOT ARISING FROM THE NEGLIGENCE OF PRECOR OR ITS SUPPLIERS (WHETHER ACTIVE, PASSIVE OR IMPUTED); AND (B) ANY OBLIGATION, LIABILITY, RIGHT, CLAIM, OR REMEDY FOR LOSS OF OR DAMAGE TO ANY EQUIPMENT. This disclaimer and release shall apply even if the express warranty set forth above fails of its essential purpose.
Exclusive Remedies
For any product described above that fails to conform to its warranty, Precor will provide, at their option, one of the following: (1) repair; (2) replacement; or (3) refund of the purchase price. Precor Limited Warranty service may be obtained by contacting the authorized dealer from whom you purchased the item. Precor compensates Servicers for warranty trips within their normal service area to repair equipment at the owner's location. You may be charged a trip charge outside the service area. THESE SHALL BE THE SOLE AND EXCLUSIVE REMEDIES OF THE BUYER FOR ANY BREACH OF WARRANTY.
Exclusion of Consequential and Incidental Damages
PRECOR AND/OR ITS SUPPLIERS SHALL HAVE NO OBLIGATION OR LIABILITY, WHETHER ARISING IN CONTRACT (INCLUDING WARRANTY), TORT (INCLUDING ACTIVE, PASSIVE, OR IMPUTED NEGLIGENCE AND STRICT LIABILITY), OR OTHERWISE, FOR DAMAGE TO THE EQUIPMENT, PROPERTY DAMAGE, LOSS OF USE, REVENUE OR PROFIT, COST OF CAPITAL, COST OF SUBSTITUTE EQUIPMENT, ADDITIONAL COST INCURRED BY BUYER (BY WAY OF CORRECTION OR OTHERWISE) OR ANY OTHER INCIDENTAL, SPECIAL, INDIRECT, OR CONSEQUENTIAL DAMAGES, WHETHER RESULTING FROM NONDELIVERY OR FROM THE USE, MISUSE OR INABILITY TO USE THE PRODUCT. This exclusion applies even if the above warranty fails of its essential purpose and regardless of whether such damages are sought for breach of warranty, breach of contract, negligence, or strict liability in tort or under any other legal theory. Some states do not allow the exclusion or limitation of incidental or consequential damages, so the above limitation might not apply.
This warranty gives you specific legal rights, and you may also have other rights, which vary state to state.
Effective 01 July, 2010
P/N 36287-111
EFX5.21/EFX5.23 Elliptical Fitness CrossTrainers™
Product Specifications
EFX5.21 EFX5.23
Length: 77 in (196 cm) 77 in (196 cm)
Width: 29 in (74 cm) 29 in (74 cm)
Height: 61 in (155 cm) 61 in (155 cm)
Weight: 193 lb (72 kg) 193 lb (72 kg)
Power:* 120 VAC, 60 Hz 120 VAC, 60 Hz
240 VAC, 50 Hz 240 VAC, 50 Hz
Resistance Levels 1-16 1-16
Frame: Powder-coated steel Powder-coated steel
Regulatory Approvals: FCC, ETL, CE FCC, ETL, CE
* See the product label to determine the operating voltage of your equipment.
Product Features
| QUICKSTARTTM |
| SmartRate® |
| Touch Heart Rate |
Programs
| Manual (P1) |
| Weight Loss (P2) |
| Fat Burner (P3) |
| Cross Trainer (P4) |
| Interval (P5) |
| Hill Climb (P6) |
| Gluteals (P7) |
| Basic HRC* (P8) |
Electronic Readouts
| % Complete SmartRate* | |
| Average Heart Rate* | Strides per Minute |
| Calories | Target Heart Rate |
| Heart Rate* | Time |
| Telemetry Heart Rate | Total Strides |
| Profile | Units |
| Resistance | Vertical Gain |
* Use of touch-sensitive grips is required.
IMPRECOR®
Precor Incorporated
20031 142nd Ave NE
P.O. Box 7202
Woodinville, WA USA 98072-4002
Precor, C, CrossRamp, EFX, M, Move Beyond, and SmartRate are registered trademarks of Precor Incorporated, Crosstrainer, QuickStart, and StretchTrainer are trademarks of Precor Incorporated.
Copyright 2011 Precor Incorporated.
Specifications subject to change without notice.
www.precor.com
NOTICE:
Precor is widely recognized for its innovative, award winning designs of exercise equipment.
Precor aggressively seeks U.S. and foreign patents for both the mechanical construction and the visual aspects of its product design. Any party contemplating the use of Precor's product designs is hereby forewarned that Precor considers the unauthorized appropriation of its proprietary rights to be a very serious matter. Precor will vigorously pursue all unauthorized appropriation of its proprietary rights.

EFX 5.21/5.23 OM 300998-141, en
Warranty #36287-111, en
Registration Card #45623-141, en
29 July 2011