IC50C - Webcam Micro Innovations - Free user manual and instructions
Find the device manual for free IC50C Micro Innovations in PDF.


| Product Type | Webcam |
| Brand | Micro Innovations |
| Model | IC50C |
| Compatible Operating Systems | Windows 98SE, Me, 2000, XP, Vista |
| Interface | USB |
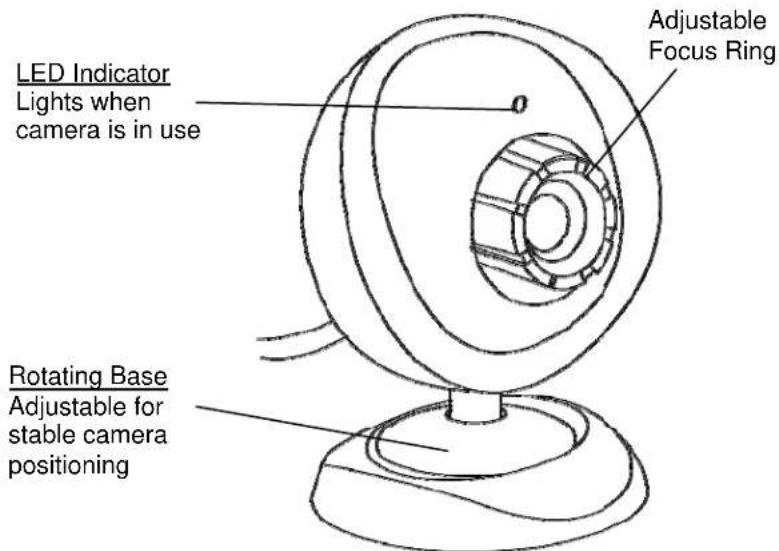
| LED Indicator | Lights when camera is in use |
| Focus Adjustment | Adjustable focus ring on front of webcam |
| Base | Rotating base for stable positioning |
| Included Software | EZ Media Box 2.0 for video capture, editing, and organization |
| Package Contents | Basic Webcam (USB), Installation & EZ Media Box CD, Quick Installation Guide, User's Manual, Warranty Information |
| Power Source | USB powered |
| Installation Requirement | Software must be installed before connecting webcam |
| Maintenance | Keep away from moisture and extreme temperatures; do not use harsh or abrasive cleaners; do not disassemble |
| Safety Certifications | FCC Class B (compliant with Part 15 of FCC Rules) |
| Technical Support | Website: www.microinv.com; Toll-free: 1-877-550-5534 (Mon-Fri 8:30am-7pm EST) |
Frequently Asked Questions - IC50C Micro Innovations
User questions about IC50C Micro Innovations
0 question about this device. Answer the ones you know or ask your own.
Ask a new question about this device
Download the instructions for your Webcam in PDF format for free! Find your manual IC50C - Micro Innovations and take your electronic device back in hand. On this page are published all the documents necessary for the use of your device. IC50C by Micro Innovations.
USER MANUAL IC50C Micro Innovations
Basic Webcam
User's Manual
Model IC50C
Before installing device it is recommended that your operating system contain the most recent updates and service packs available.
Install the software first before connecting the webcam to your PC. You will be prompted to restart your PC during this installation. Close and save all work before installing this device.
FCC STATEMENT
This device complies with part 15 of FCC Rules. Operation is subject to the following two conditions: (1) this device may not cause harmful interference, and (2) this device must accept any interference received, including interference that may cause undesired operation. This equipment has been tested and found to comply with the limits for a Class B digital device, pursuant to part 15 of FCC Rules. These limits are designed to provide reasonable protection against harmful interference when the equipment is operated in a residential installation. This equipment generates, uses, and can radiate radio frequency energy and, if not installed and used in accordance with the instruction guide, may cause harmful interference to radio communications. However, there is no guarantee that interference will not occur in a particular installation. If this equipment does cause harmful interference to radio or television reception, which can be determined by turning the equipment off and on, the user is encouraged to try to correct the interference by one or more of the following measures:
- Reorient or relocate the receiving antenna.
- Increase the separation between the equipment and the receiver.
- Connect the equipment into an outlet on a circuit different from that to which the receiver is connected.
- Consult a service representative for help.
Properly shielded and grounded cables and connectors must be used in order to comply with FCC emission limits. Micro Innovations is not responsible for any radio or television interference caused by using other than recommended cables and connectors or by unauthorized changes or modifications to this equipment. Unauthorized changes or modifications could void the user's authority to operate the equipment.
Responsible party:
Micro Innovations
400 Clearview Ave.
Edison, NJ 08837
Telephone: 732-346-9333
FC
Tested To Comply With FCC Standards
FOR HOME OR OFFICE USE
Table of Contents
Getting Started.... Page 4
Installing Your Webcam.... Page 5
Using EZ Media Box 2.0™ Page 6
Troubleshooting...... Page 7
Helpful Hints and Technical Support...... Page 8
Getting Started
Congratulations on the purchase of your new Basic Webcam.
The Basic Webcam is compatible with IBM® or compatible PCs with an available USB port. It is supported by Windows® 98SE, Me, 2000, XP and Vista™.
Package contents:
- Basic Webcam (USB)
• Installation & EZ Media Box™ CD - Quick Installation Guide
- User's Manual
- Warranty Information
Installation Procedures
During the software installation, you must install the DRIVER. You can install the E-Z Media Box 2.0™ software at a later time. Frequently check for updated webcam software by visiting our website, www.microinv.com.

natural_image
Line drawing of a desktop computer tower with a door and mouse pointer (no text or symbols)Turn on your computer.
Note in order for you to use your webcam you must install the software before plugging the webcam into your PC.
natural_image
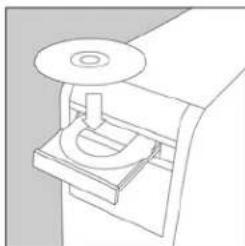
Line drawing of a mechanical device with a circular knob and lever mechanism (no text or symbols)Insert the CD into your PC and follow the on-screen instructions. Note you must choose the Driver Only installation in order for your webcam to function properly. You will be prompted to restart your PC.
natural_image
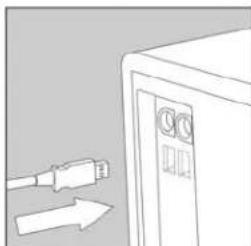
Simple line drawing of a door with an attached cable and an arrow pointing to the door (no text or symbols)Connect the webcam into an available USB port. Follow all on-screen instructions to install your new hardware. Your new webcam is now ready for use. For further information on usage please refer to the user's manual.
To Uninstall the DRIVER:
Click Start Programs Basic Webcam Uninstall
Using EZ Media Box 2.0™
This program will allow you capture, edit and organize your video and other multimedia files.
If you did not install the EZ Media Box 2.0™ software during the initial software installation, reinsert the Basic Webcam software CD into your PC.
Once the installation screen appears choose "Install EZ Media Box 2.0 Software". Follow the on-screen instructions.
Once the software has been installed correctly, you can begin recording video, creating movies or editing pictures.
To start EZ Media Box 2.0 software:
Click Start Programs Best On EZ-Media Box 2.0 EZ-Media Box 2.0 or click the icon located on your desktop.
To Uninstall the EZ Media Box 2.0 software:
Click Start Programs Best On EZ-Media Box 2.0 Uninstall
To view the "Help" file for the EZ Media Box 2.0 software:
Click Start Programs Best On EZ-Media Box 2.0 EZ-Media Box 2.0 Help
Troubleshooting
| Problem | Resolution |
| “No capture device found” error | Make sure you have connected the webcam correctly into the USB port or try a different USB port on your PC. |
| “Camera not connected” error | Try removing the previous driver and reinstalling the software. There may be a conflict with previous camera/scanner software installed on your PC. You may need to remove the previous software before using this device. |
| Webcam image is blurry | For a sharper image, adjust the focus by rotating the focus ring located on the front of your webcam. |
| Webcam image is too dark (Black or green screen) | Try removing the previous driver and reinstalling the software. |
Helpful Hints
The following hints will help you achieve the best results with your webcam:
Webcam placement
- Position the webcam so that the subject is centered.
- Place the webcam on a steady surface.
Lighting
- Use sufficient lighting.
- Place the light source behind the camera and facing the subject.
- Do not aim the webcam directly at the light source.
Maintenance
- Keep the webcam away from moisture and extreme temperature.
• Never use harsh or abrasive cleaners or organic solvents on the webcam or on any of its parts. - Never disassemble or touch the inside of the webcam.
For technical assistance visit www.microinv.com or call toll free: 1-877-550-5534. Technical Support hours of operation: Monday - Friday 8:30am to 7:00pm E.S.T.


Brand : Micro Innovations
Model : IC50C
Category : Webcam