
Fish Hunter 6 - Boat SEVYLOR - Free user manual and instructions
Find the device manual for free Fish Hunter 6 SEVYLOR in PDF.


User questions about Fish Hunter 6 SEVYLOR
0 question about this device. Answer the ones you know or ask your own.
Ask a new question about this device
Download the instructions for your Boat in PDF format for free! Find your manual Fish Hunter 6 - SEVYLOR and take your electronic device back in hand. On this page are published all the documents necessary for the use of your device. Fish Hunter 6 by SEVYLOR.
USER MANUAL Fish Hunter 6 SEVYLOR
Including the following Model Series: Fish Hunter™, Super Caravelle, Caravelle, Colossus™ and HUI
READ THE FOLLOWING INSTRUCTIONS AND WARNINGS TO AVOID DROWNING OR SERIOUS INJURY

WARNING:
• Not a life saving device.
• Not for use by children without adult supervision.
• Always wear an approved Personal Flotation Device (Life Preserver).
- Do not overload.
• Never tow from another boat or vehicle.
- Use only in water away from debris and obstructions.
- Do not use in high wind, strong currents, open water or dangerous tides.
- Be familiar with the area you intend to use the boat.
• Never allow diving into or from these boats.
• Never leave in or near water when not in use.
- Know and follow local water safety rules and boating regulations.
• Use only in protected waters.
- Do not use this product under the influence of alcohol or drugs.
- Do not over inflate.
• Follow inflation sequence on the product.
IMPORTANT INFORMATION
The warnings below relate to various situations. Please observe them.

CAUTION!
Denotes a imminent hazard which will result in severe injury if you do not comply with the instructions.

WARNING!
Reminds you of safety measures which must be observed. Also denotes unsafe practices which could result in personal injury or damage to the product or property, if you do not comply with the instructions.

CAUTION!
It is the owner's responsibility to make sure all users carefully read and follow the instructions for safe operation of this product. Observe all local and national laws. Always wear a Personal Flotation Device approved by the proper authorities. Please carefully observe the Capacity Plate information which is printed on the product.

WARNING!
These boats are not meant for towing because the extreme pressure of the water while towing can tear the eyelets and/or handles. These boats are not meant to be used in whitewater.
These boats are made of the highest quality materials and comply with NMMA (National Marine Manufacturers Association) regulations.

CAUTION!
Altering the construction of these boats could jeopardize the safety of the occupants and will void the limited warranty.

CAUTION!
Keep boat away from gasoline, battery acid, solvents, etc., as they can damage the boat.
INFLATION INSTRUCTIONS

CAUTION!
Do not over inflate. Pressurize product to "Inflation Pressure" stated in the chart for your specific product.

WARNING!
Never use a compressor, CO_2 or compressed air to inflate the boat. Do not let your boat come into contact with sharp, pointed objects.
To inflate using any Sevylor® QuickPump™ unit:
natural_image
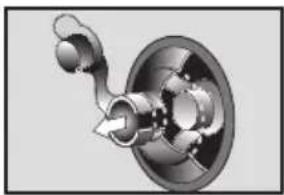
Mechanical component diagram showing a dial and housing assembly (no text or symbols)To begin inflation, open external stopper and pull to extend out.
natural_image
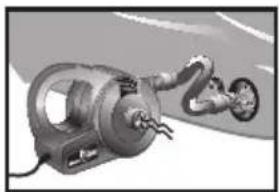
Illustration of a mechanical device with a person lying down, no visible text or symbolsAttach adapter hose to inflation end of QuickPump™ unit. Insert hose and turn on.
natural_image
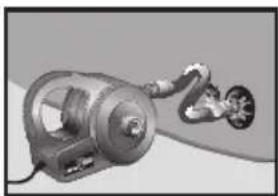
Mechanical device with attached hoses and a central hub (no visible text or symbols)When fully inflated, seal valve by pushing in the pump nozzle to maintain seal. Gently back pump out of valve.
natural_image
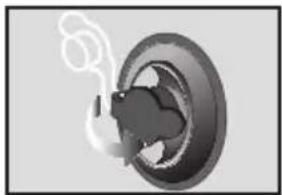
Mechanical component illustration showing a rotating wheel and gear assembly (no text or symbols)Fully remove adapter and close external stopper. Valve should appear depressed into itself.
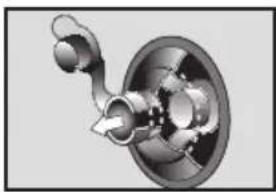
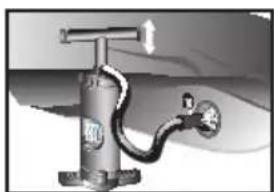
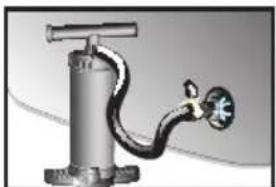
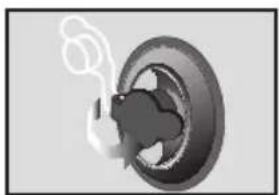
To inflate using the Sevylor® Dual Action Hand Pump or other inflation device:
natural_image
Mechanical component diagram showing a dial and housing assembly (no text or symbols)To begin inflation, open external stopper and pull to extend out.
natural_image
Mechanical valve assembly diagram showing fluid flow path with no visible text or symbolsInsert nozzle of inflation device into the extended valve and turn on or begin pumping.
natural_image
Illustration of a metallic pressure pump with a valve and handle (no text or symbols)To close valve: Push in with inflation device until stopper has been depressed, sealing internal stopper.
natural_image
Mechanical component illustration showing a rotating wheel and gear assembly (no text or symbols)Fully remove adapter and close external stopper.
Valve should appear depressed into itself.
IMPORTANT! Inflate the boat chambers in the following order:
- Inflate the inside all-around safety chamber.
- Inflate the floor chamber(s).
- Inflate the bottom tunnel chambers. (These tubular chambers are only found on Super Caravelle and Fish Hunter™ models.)
- Inflate the bustle chamber. (This support chamber positioned at the stern is found only on the large Super Caravelle models.)
- Inflate the outside main chamber.
The chambers on the boat will be numbered to indicate order of inflation also. This order of inflation will ensure the proper volume and buoyancy of the safety chamber.
Note: To inflate the mini double lock valve, which is used on some of the Sevylor boat floors and seat bottoms, follow the same inflation instructions above, using the mini double lock valve adapter. The mini Double Lock™ valve adapter is included with all Sevylor pumps. The adapter can be purchased from Customer Service by calling 1-800-835-3278 (Part Number 5010000707).

CAUTION!
Water temperature and weather does affect the pressure in inflatable products. In cold weather your product will lose some pressure due to the fact the air will contract. If this occurs, you may want to add a little air to improve your products performance. However, in hot weather, the air will expand. You must let some air out to prevent your product from failing due to overpressure. You should avoid exposing your product to extreme temperatures (hot or cold).
DEFLATION INSTRUCTIONS
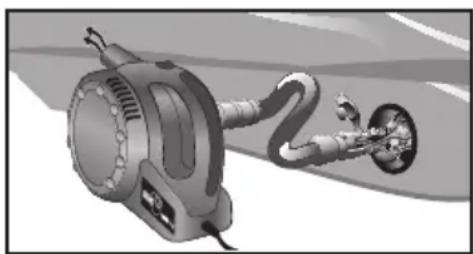
Deflation instructions using any Sevylor® QuickPump™ unit:
natural_image
Illustration of a handheld electric shaver with attached motor and connector (no text or symbols)Remove adapter hose from inflation end and attach to opposite deflation end of pump. Repeat same steps as inflation. This will draw the air out quickly.
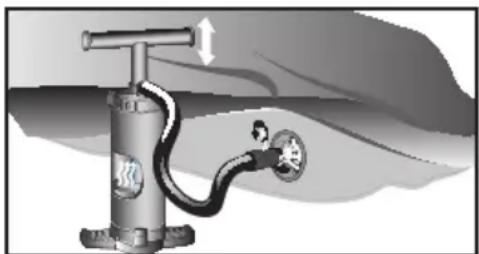
Deflation instructions using the Sevylor® Dual Action Hand Pump:
natural_image
Illustration of a mechanical valve with a handle and pipe, no text or symbols presentRemove adapter hose from inflation port and attach to deflation port on pump handle. Repeat same steps as inflation. This will draw the air out quickly.

WARNING!
Do not exceed the certified maximum capacities under any circumstances!
| NMMA (ABYC Standard) | Persons Capacity | Maximum Pay- load Capacity | Engine | Inflation Pressure | Inflation Pressure |
| Model # Persons Only | Persons, Gear, Motor (if applicable) | Max. HP Engine | Main Chamber(s) | Floor Chamber(s) | |
| HUI 100 | 1 Pers. or 190 lbs. | 190 lbs. N/A 0.4 PSI 0.4 PSI | |||
| HUI 200 | 2 Pers. or 370 lbs. | 370 lbs. N/A 0.4 PSI 0.4 PSI | |||
| HUI 400 | 4 Pers. or 650 lbs. | 650 lbs. N/A 0.4 PSI 0.4 PSI | |||

WARNING!
Do not exceed the certified maximum capacities under any circumstances!
| NMMA (ABYC Standard) | Persons Capacity | Maximum Pay- load Capacity | Engine | Inflation Pressure | Inflation Pressure |
| Model # Persons Only | Persons, Gear, Motor (if applicable) | Max. HP Engine | Main Chamber(s) | Floor Chamber(s) | |
| ColossusTM2 Person Boat | 2 Pers. or 435 lbs. | 435 lbs. N/A 0.5 PSI 0.5 PSI | |||
| ColossusTM3 Person Boat | 3 Pers. or 680 lbs. | 680 lbs. N/A 0.5 PSI 0.5 PSI | |||
| ColossusTM4 Person Boat | 4 Pers. or 840 lbs. | 840 lbs. N/A 0.5 PSI 0.5 PSI | |||

WARNING!
Do not exceed the certified maximum capacities under any circumstances!
| NMMA (ABYC Standard) | Persons Capacity | Maximum Pay- load Capacity | Engine | Inflation Pressure | Inflation Pressure |
| Model # Persons Only | Persons, Gear, Motor (if applicable) | Max. HP Engine | Main Chamber(s) | Floor Chamber(s) | |
| Caravelle 2 Person Boat | 2 Pers. or 300 lbs. | 360 lbs. N/A | 0.9 PSI 0.9 PSI | ||
| Caravelle 3 Person Boat | 3 Pers. or 550 lbs. | 600 lbs. | 12V Electric Motor (Sevylor 2000004144) | 0.9 PSI 0.9 PSI | |
| Caravelle 4 Person Boat | 4 Pers. or 600 lbs. | 700 lbs. 3.0 * | 0.9 PSI 0.9 PSI | ||
| Caravelle 5 Person Boat | 5 Pers. or 800 lbs. | 900 lbs. 3.0 * | 0.9 PSI 0.9 PSI | ||
| * Requires 2000004146 Motor Mount Kit (sold separately) for motors other than Sevylor 12 Volt Motor, Model 2000004144 | |||||

WARNING!
Do not exceed the certified maximum capacities under any circumstances!
| NMMA (ABYC Standard) | Persons Capacity | Maximum Pay-load Capacity | Engine | Inflation Pressure | Inflation Pressure |
| Model # Persons Only | Persons, Gear, Motor (if applicable) | Max. HP Engine | Main Chamber(s) | Floor Chamber(s) | |
| Fish HunterTM 3 Person Boat | 3 Pers. or 450 lbs. | 600 lbs. 2.0 * | 0.9 PSI 0.9 PSI | ||
| Fish HunterTM 4 Person Boat | 4 Pers. or 650 lbs. | 700 lbs. 4.0 * | 0.9 PSI 0.9 PSI | ||
| Fish HunterTM 6 Person Boat | 6 Pers. or 900 lbs. | 1200 lbs. 3.0 * | 0.9 PSI 0.9 PSI | ||
| Fish MasterTM 4 Person Boat | 4 Pers. or 800 lbs. | 900 lbs. 3.0 * | 1.5 PSI N / A | ||
| * Requires 2000004146 Motor Mount Kit (sold separately) for motors other than Sevylor 12 Volt Motor, Model 2000004144 | |||||

WARNING!
Do not exceed the certified maximum capacities under any circumstances!
| NMMA (ABYC Standard) | Persons Capacity | Maximum Pay- load Capacity | Engine | Inflation Pressure | Inflation Pressure |
| Model # Persons Only | Persons, Gear, Motor (if applicable) | Max. HP Engine | Main Chamber(s) | Floor Chamber(s) | |
| Super Caravelle 2 Person Boat | 2 Pers. or 300 lbs. | 360 lbs. | 12V Electric Motor (Sevylor 2000004144) | 0.9 PSI 0.9 PSI | |
| Super Caravelle 3 Person Boat | 3 Pers. or 550 lbs. | 600 lbs. 2.0 * | 0.9 PSI 0.9 PSI | ||
| Super Caravelle 4 Person Boat | 4 Pers. or 600 lbs. | 700 lbs. 3.5 * | 0.9 PSI 0.9 PSI | ||
| Super Caravelle 6 Person Boat | 6 Pers. or 900 lbs. | 1,100 lbs. 3.5 * | 0.9 PSI 0.9 PSI | ||
| * Requires 2000004146 Motor Mount Kit (sold separately) for motors other than Sevylor 12 Volt Motor, Model 2000004144 | |||||

WARNING!
Do not attempt to mount a motor on any boat that does not state a Max. HP Engine rating.
SEVYTEST™ GAUGE
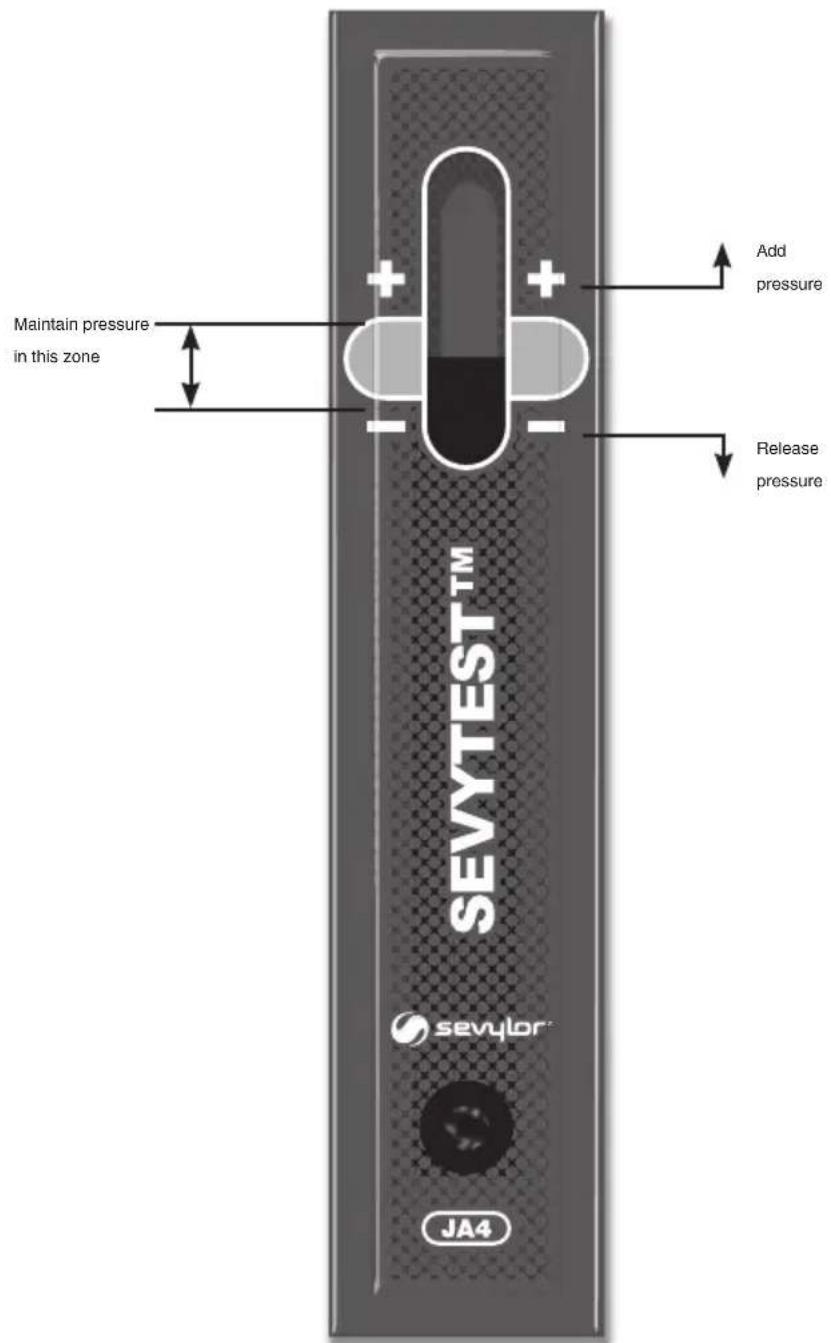
Some of the Sevylor® products are equipped with a Sevytest™ gauge. The Sevytest™ device is a pressure gauge, not an inflation gauge. The Sevytest™ gauge is found on the side wall, inside the main chamber(s). The purpose is to show you when to let some air out after the pressure has increased due to temperature change.
The principle of the Sevytest™ gauge is based on the lengthening of the PVC under the influence of pressure. Once the boat is properly inflated, note the position of the Sevytest™ indicator. Then periodically check the Sevytest™ gauge and let out enough air to keep the test strip in the same general area. If the Sevytest™ indicator is in the “+” zone, add pressure to the product. If the Sevytest™ indicator is in “-” zone, release pressure from the product.
text_image
Maintain pressure in this zone Add pressure Release pressure SEVYTEST™ sevylor® JA4OPERATING INSTRUCTIONS:
- Follow all local boating regulations and navigation rules.
Familiarize yourself with boating conditions where you plan to use the boat. Use common sense and caution when operating in unfamiliar places. - Observe the maximum weight the boat can carry and do not overload past this limit. Over-loading jeopardizes the safety of the occupants.
- Be sure all accessories and/or equipment (e.g. oars, life jackets) are in proper working condition before using the boat. Each person occupying the boat is to wear an approved Personal Flotation Device (life preserver).
- Sharp objects are not to be carried in the boat without adequate protection or storage.
- When navigating the boat in any water depth, watch for submerged or sharp objects that may damage or pierce the boat's air chambers.
- Enter the boat from the port (left) or starboard (right) sides - not from the fore (front) or aft (back) sides.
- Never tow with a boat or any other vehicle.
MOTOR MOUNTING

DANGER!
CARBON MONOXIDE (CO) CAN CAUSE PERSONAL INJURY, BRAIN DAMAGE OR DEATH.
Carbon monoxide is an odorless, colorless, extremely toxic gas.
Symptoms of carbon monoxide poisoning are dizziness, ears ringing, headaches, nausea and unconsciousness.
Have the victim breathe fresh air deeply. If breathing stops, resuscitate. A victim often revives, then relapses because organs are damaged by lack of oxygen. Seek immediate medical attention.

WARNING!
ROTATING PROPELLER MAY CAUSE SERIOUS INJURY OR DEATH
- Keep away from the rear of boat while engine is running.

WARNING!
- DO NOT mount a motor on any boat that exceeds the Maximum Horsepower rating for your specific boat model. See pages 5 and 6.
All Sevylor® boats that have a Horsepower Rating can accept the Sevylor® 12V Trolling Motor, Model 2000004144 without purchasing any additional mounting hardware. Refer to 12V Trolling Motor mounting instructions.
Mounting any motor other than the Sevylor® 12V Trolling Motor, Model 2000004144, requires the Sevylor® Motor Mount Kit, Model 2000004146, which is sold separately.
PROPER SEATING LOCATION
WARNING!
AVOID SERIOUS INJURY OR DEATH
- DO NOT sit on the side tubes while the boat is underway. Sudden movement of the boat will cause you to lose balance and fall. Sit on the floor or on the seating cushion and use the grab line to prevent loss of balance.
When a motor is attached to the boat, it should only be operated from the rear seating position on either the port (left) or starboard (right) side of the boat.
CARE & STORAGE:
- These boats are made of the highest quality materials and comply with NMMA (National Marine Manufacturers Association) regulations. Altering the construction of these boats will void the limited warranty and could jeopardize the safety of the occupants.
- If your boat has been used in salt water, rinse it off with fresh water as soon as possible.
- Remove tar spots or other soiled areas by using a mild soap and rinsing with fresh water.
- Be sure your boat is completely dry before storing.
- The boats may be stored inflated, but do not place any heavy or sharp objects on it. Storage is best in a dry room.
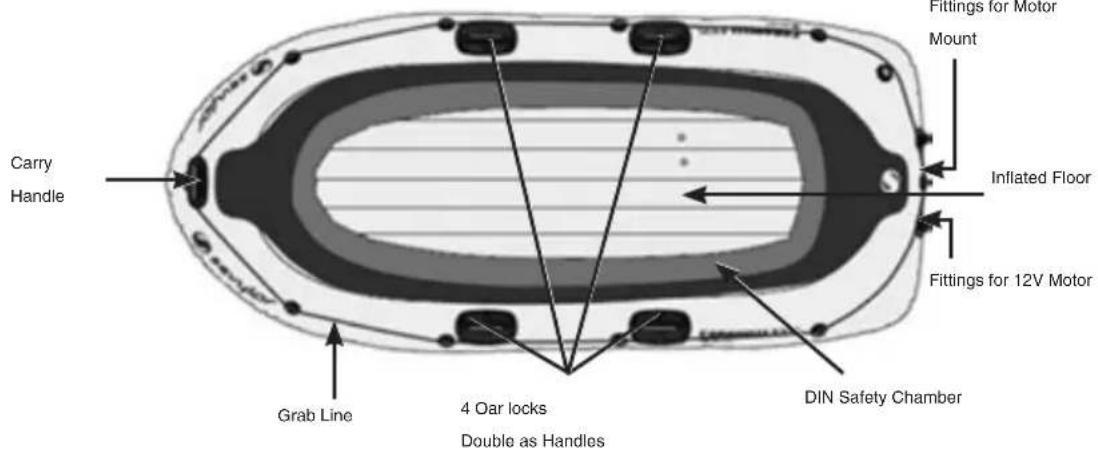
Caravelle Models
5 PERSON
text_image
Fittings for Motor Mount Inflated Floor Fittings for 12V Motor DIN Safety Chamber 4 Oar locks Double as Handles Grab Line Carry Handle4 PERSON
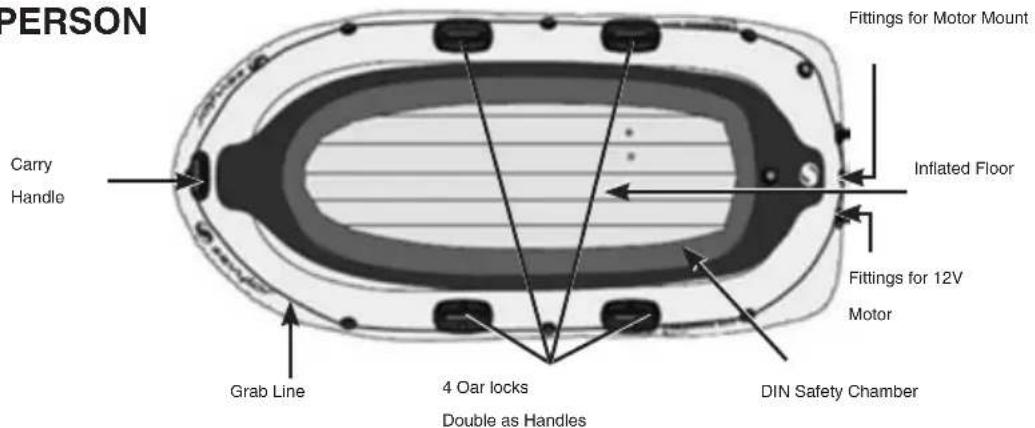
text_image
PERSON Fittings for Motor Mount Carry Handle Inflated Floor Fittings for 12V Motor Grab Line 4 Oar locks Double as Handles DIN Safety Chamber3 PERSON
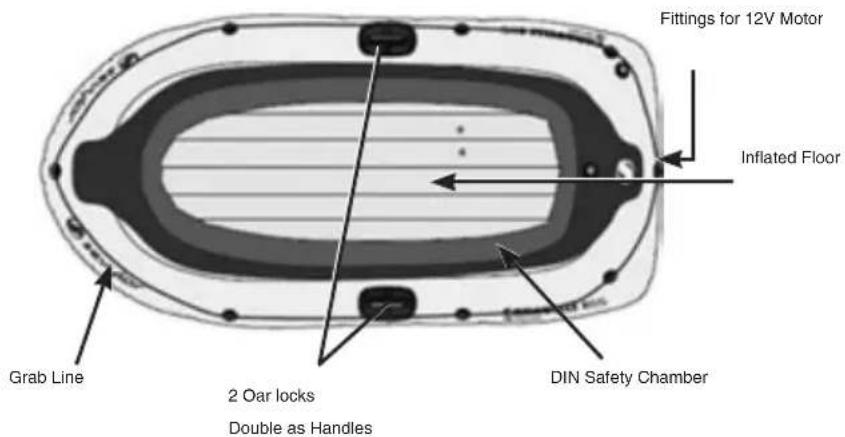
text_image
Fittings for 12V Motor Inflated Floor Grab Line 2 Oar locks Double as Handles DIN Safety Chamber2 PERSON
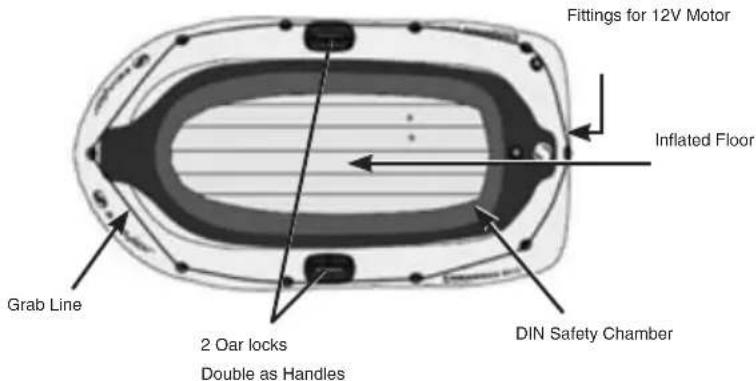
text_image
Fittings for 12V Motor Inflated Floor Grab Line 2 Oar locks Double as Handles DIN Safety ChamberSuper Caravelle Models
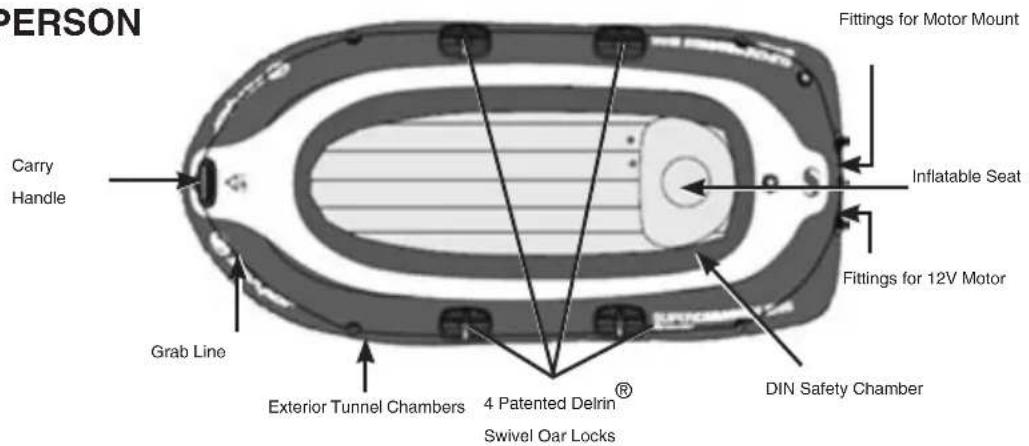
6 PERSON
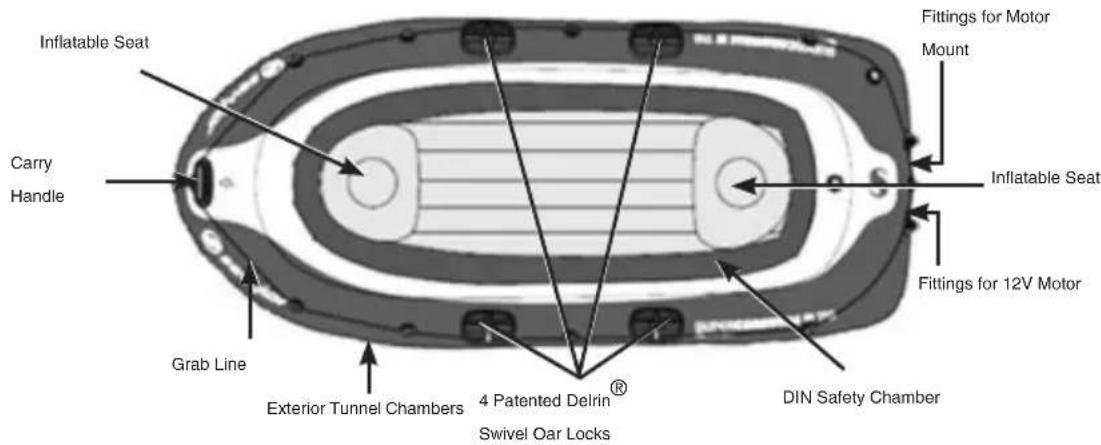
text_image
Inflatable Seat Carry Handle Grab Line Exterior Tunnel Chambers 4 Patented Delrin® Swivel Oar Locks Fittings for Motor Mount Inflatable Seat Fittings for 12V Motor DIN Safety Chamber4 PERSON
text_image
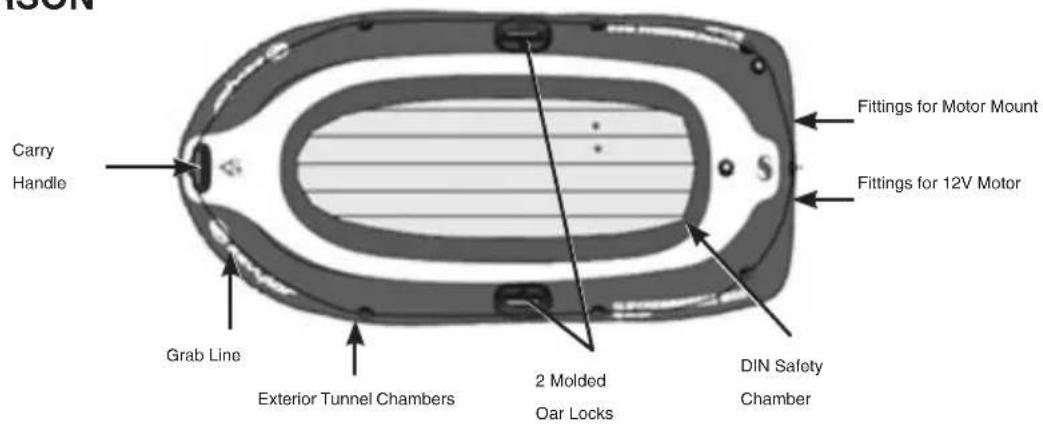
PERSON Fittings for Motor Mount Carry Handle Inflatable Seat Fittings for 12V Motor Grab Line DIN Safety Chamber Exterior Tunnel Chambers 4 Patented Delrin® Swivel Oar Locks3 PERSON
text_image
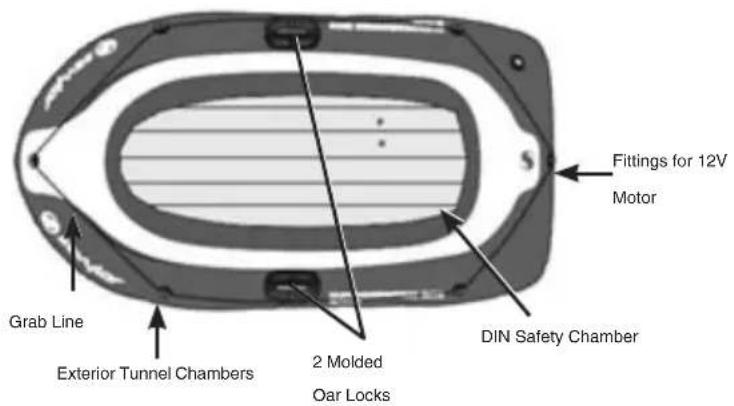
Carry Handle Grab Line Exterior Tunnel Chambers Fittings for Motor Mount 2 Molded Oar Locks DIN Safety Chamber Fittings for 12V Motor2 PERSON
text_image
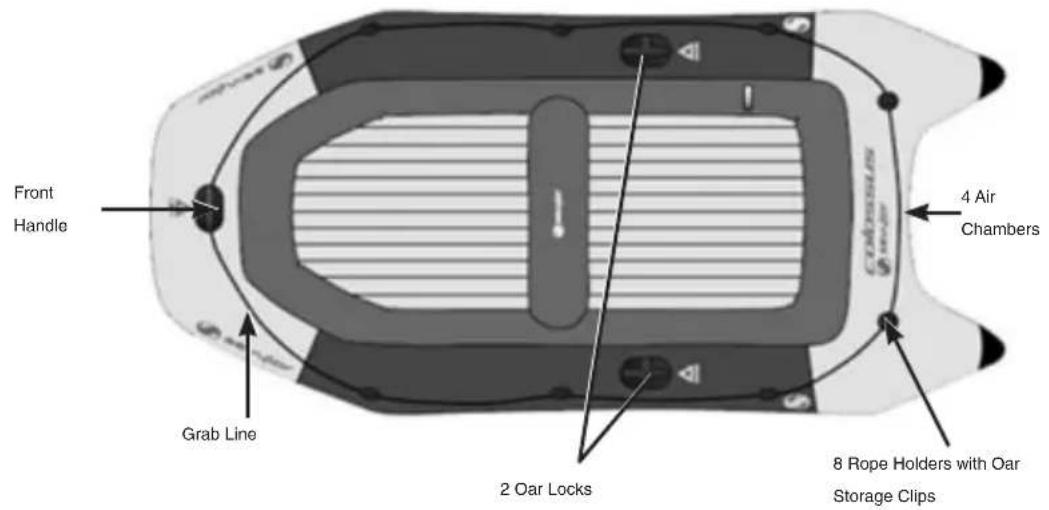
Fittings for 12V Motor Grab Line Exterior Tunnel Chambers 2 Molded Oar Locks DIN Safety ChamberColossus™ Models
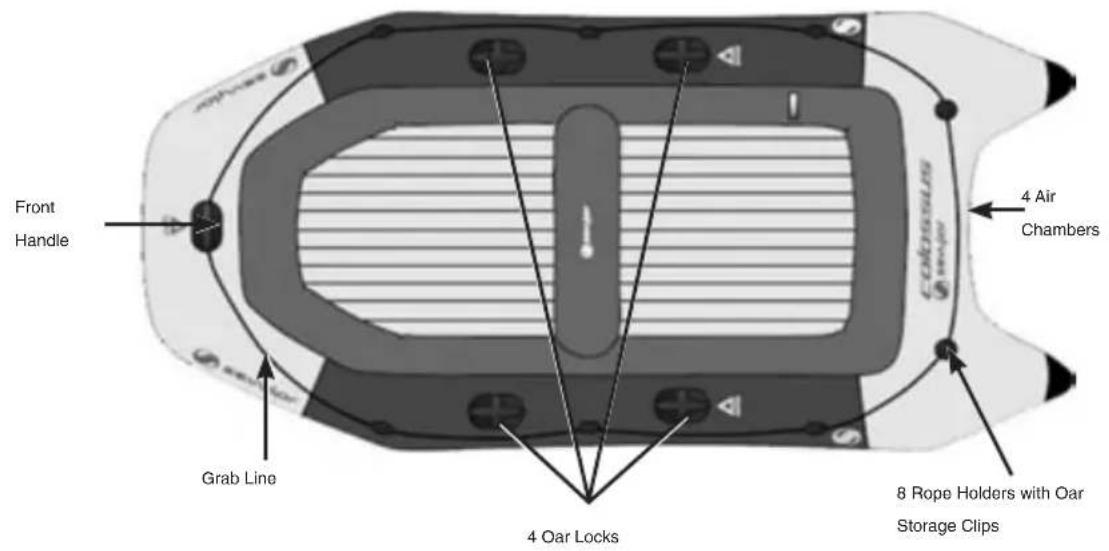
4 PERSON
text_image
Front Handle Grab Line 4 Air Chambers 4 Oar Locks 8 Rope Holders with Oar Storage Clips3 PERSON
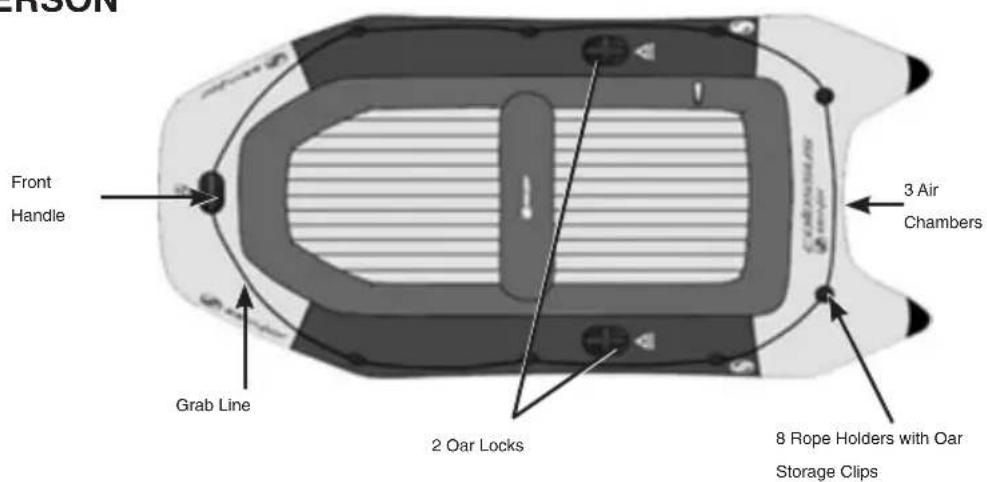
text_image
Front Handle Grab Line 2 Oar Locks 4 Air Chambers 8 Rope Holders with Oar Storage Clips2 PERSON
text_image
FRONT Handle Grab Line 2 Oar Locks 3 Air Chambers 8 Rope Holders with Oar Storage ClipsFish Hunter™ Models
6 PERSON
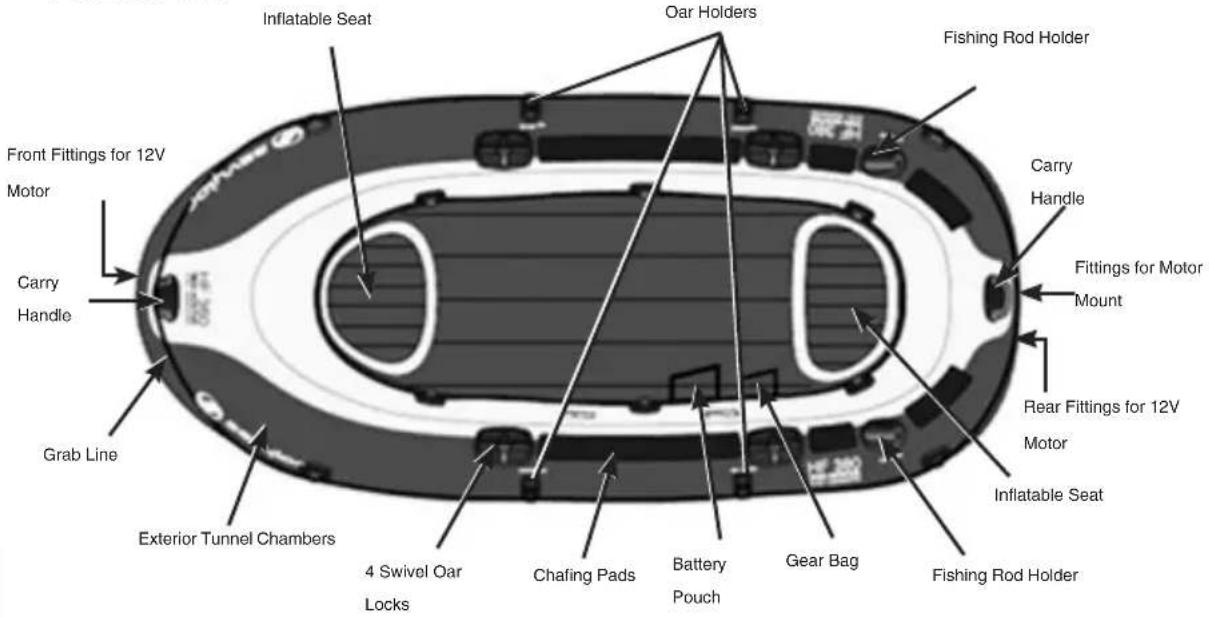
text_image
Inflatable Seat Oar Holders Fishing Rod Holder Front Fittings for 12V Motor Carry Handle Grab Line Exterior Tunnel Chambers 4 Swivel Oar Locks Chafing Pads Battery Pouch Gear Bag Fitting Rod Holder Carry Handle Fittings for Motor Mount Rear Fittings for 12V Motor Inflatable Seat4 PERSON
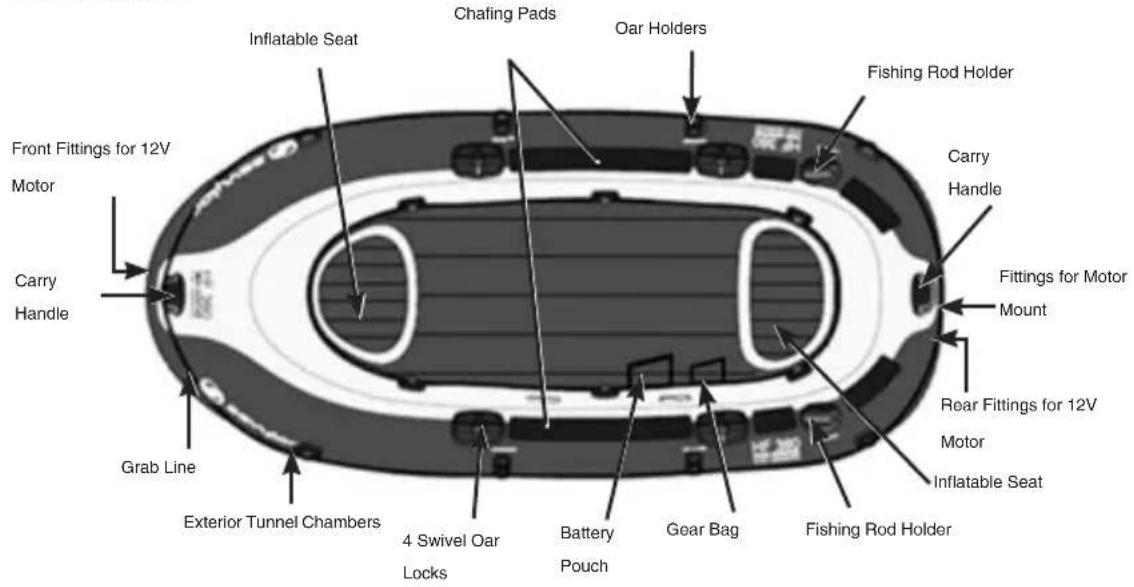
text_image
Inflatable Seat Chafing Pads Oar Holders Fishing Rod Holder Carry Handle Front Fittings for 12V Motor Carry Handle Grab Line Exterior Tunnel Chambers 4 Swivel Oar Locks Battery Pouch Gear Bag Fittings for Motor Mount Rear Fittings for 12V Motor Inflatable Seat Fishing Rod Holder3 PERSON
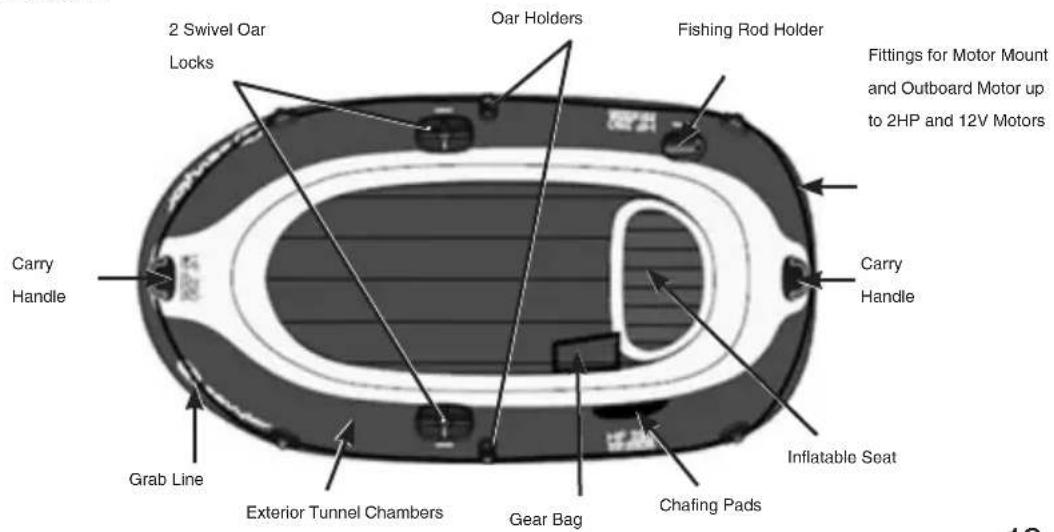
text_image
2 Swivel Oar Locks Oar Holders Fishing Rod Holder Fittings for Motor Mount and Outboard Motor up to 2HP and 12V Motors Carry Handle Carry Handle Inflatable Seat Grab Line Exterior Tunnel Chambers Gear Bag Chafing PadsHUI Models
HUI 400
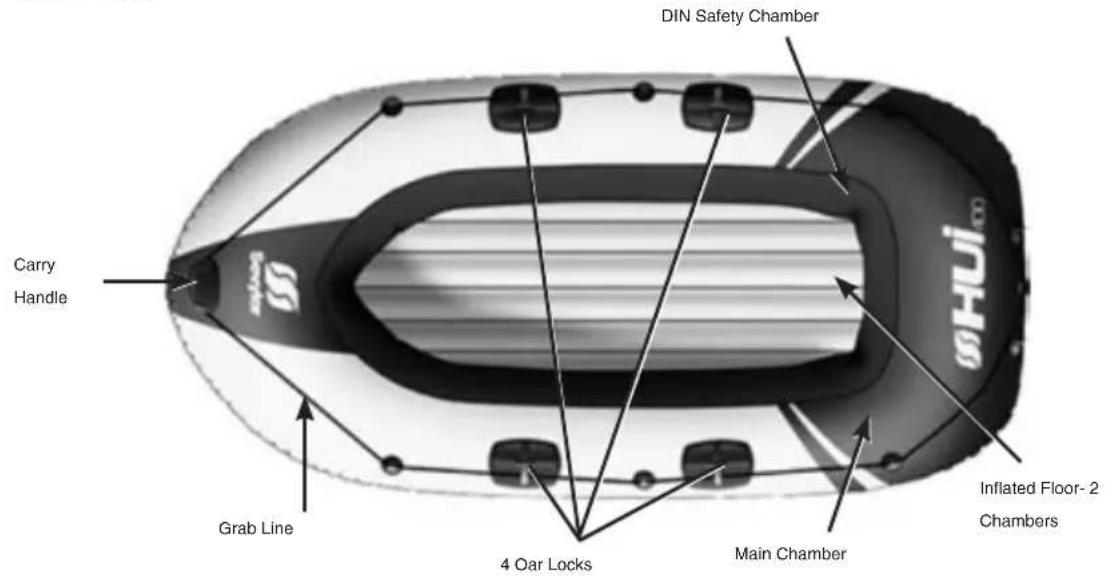
text_image
DIN Safety Chamber Carry Handle Grab Line 4 Oar Locks Main Chamber Inflated Floor- 2 Chambers SHUHUI 200
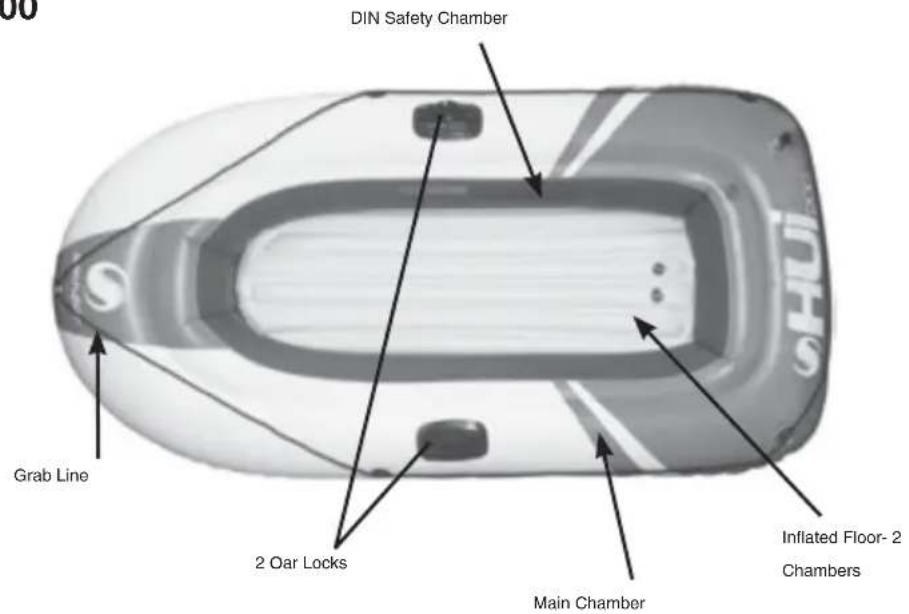
text_image
300 DIN Safety Chamber Grab Line 2 Oar Locks Main Chamber Inflated Floor- 2 ChambersHUI 100
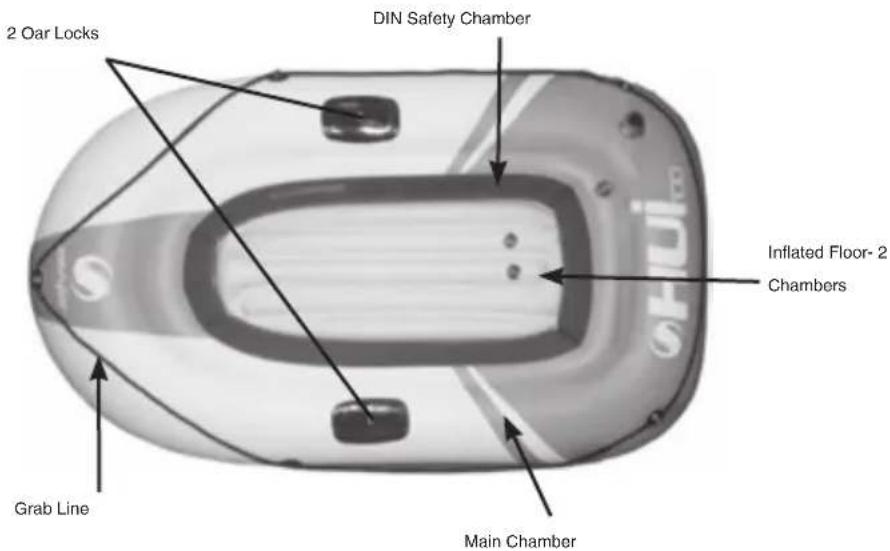
text_image
2 Oar Locks DIN Safety Chamber Inflated Floor- 2 Chambers Grab Line Main ChamberGRAB LINE INSTALLATION:
IMPORTANT: To properly install the inflatable boat's grab line, first inflate the boat. Feed the grab line through the eyelets on each of the rope holders. Then tie the two loose ends in a square knot at the rear of the boat.

natural_image
Two diagrams showing rope knotting with shaded bands and arrows indicating direction (no text or symbols)Square Knot
OAR ASSEMBLY:
(for models with oar included)
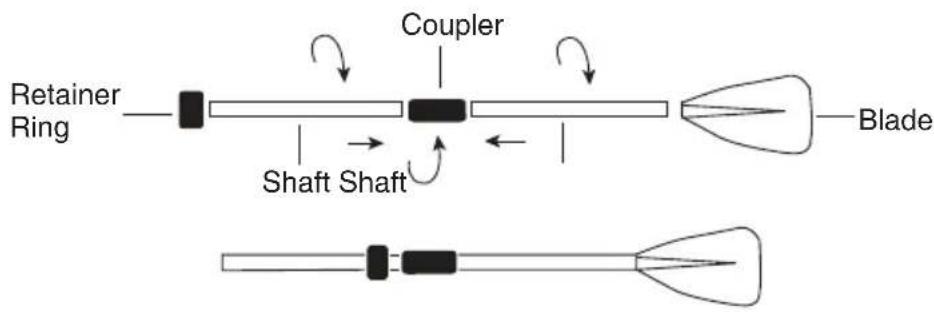
Join the two shafts together by screwing them together into the coupler. Attach the blade to the shafts by screwing in into the bottom of the shaft.
Replacement Part #2000004151
text_image
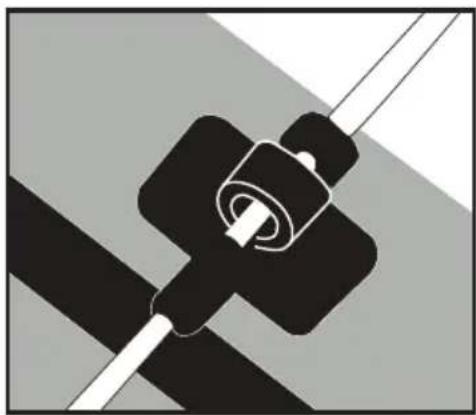
Retainer Ring Shaft Shaft Coupler BladeThe assembled oar is to be inserted into the oar locks from the outside of the boat. The oar retainer ring is then placed onto the top half of the assembled oar, from the inside of the boat, to prevent the oar from sliding into the water (see below).
natural_image
Abstract diagram of a mechanical or electrical component with black and gray sections, no visible text or symbolsREPAIRING SMALL PUNCTURES
Inadvertent punctures can be repaired using 3 different methods described below.
Included “Sticky Back Repair Patch” (included with select models only)
- Thoroughly clean and dry the damaged area. Completely deflate the product.
- Cut a portion of the patch to cover the puncture and allow an additional 14 " on all sides. Always cut a round patch, never leave square corners.
- Be sure the repair area is completely dry.
- Peel the backing from the patch.
- Adhere the patch to the puncture.
- Using your thumb or finger, apply even pressure across the entire surface of the patch.
Included Vinyl Repair Patch (included with select models only)
If your model does not include the Sticky Repair Patch noted above, then it will come with a Vinyl Repair Patch. This vinyl repair patch does not include vinyl glue, but it can be purchased from any home or hardware store (PVC cement).
- Thoroughly clean and dry the damaged area. Completely deflate the product.
- Cut a portion of the patch to cover the puncture and allow an additional 14 " on all sides. Always cut a round patch, never leave square corners.
- Be sure the repair area is completely dry.
- Apply generous coat glue to the vinyl repair patch and to the product.
- Allow the glue to dry for 2 to 3 minutes, or until the glue becomes tack y.
- Apply the patch to the product, using your thumb or finger; apply even pressure across the entire surface of the patch. Make sure the edges of the patch are pressed down along the entire diameter.
- Allow the product to dry for at least 10 hours before inflating and using.
Sevylor Air Seal (Model 2000003730 – not included)
The Sevylor AirSeal is another repair option for repairing small punctures, in inflatable products such as pool floats, small boats, air mattresses and rainwear. The Sevylor AirSeal can also be used as the vinyl glue, for the vinyl patch noted in the above section. Refer to the repair instructions included with the Sevylor AirSeal. The Sevylor AirSeal contains enough material for several small repairs, and is intended for use with 100% PVC products only.
Do not use with any other material.
Sevylor Repair Patch (Model 2000003731 – not included)
The Sevylor Repair Patch is another repair option for repairing small punctures, in inflatable products. It can be used on inflatable boats, canoes, kayaks, floats, vinyl mattresses, tents & rainwear. The Sevylor Repair Patch will repair punctures and small tears in inflatable products and the product can be used immediately after the repair is completed. No drying time is required.
You may purchase the Sevylor Repair Patch (Model 2000003731) and the Sevylor AirSeal (Model 2000003730) by calling Coleman Customer Service at 1-800-835-3278 or by going to www.sevylor.com.
Note
Note
Limited 90 Day Warranty
The Coleman Company, Inc. ("Coleman") warrants that for a period of 90 days from the date of original retail purchase, this product will be free from defects in material and workmanship. Coleman, at its option, will repair or replace this product or any component of the product found to be defective during the warranty period. Replacement will be made with a new or remanufactured product or component. If the product is no longer available, replacement may be made with a similar product of equal or greater value. This is your exclusive warranty.
This warranty is valid for the original retail purchaser from the date of initial retail purchase and is not transferable. Keep the original sales receipt. Proof of purchase is required to obtain warranty performance. Coleman dealers, service centers, or retail stores selling Sevylor® products do not have the right to alter, modify or in any way change the terms and conditions of this warranty.
What This Warranty Does Not Cover
This warranty does not cover normal wear of parts, parts that are not genuine Sevylor® parts, or damage resulting from any of the following: negligent use or misuse of the product; commercial use of the product; use contrary to the operating instructions; disassembly, repair or alteration by anyone other than Coleman or an authorized service center. Further, the warranty does not cover Acts of God, such as fire, flood, hurricanes and tornadoes. Warranty void if damage to the product results from the use of a part other than a genuine Sevylor® part.
COLEMAN SHALL NOT BE LIABLE FOR DEFECTS THAT ARE CAUSED BY THE USE OF UNAUTHORIZED PARTS OR SERVICE. COLEMAN SHALL NOT BE LIABLE FOR ANY INCIDENTAL OR CONSEQUENTIAL DAMAGES CAUSED BY THE BREACH OF ANY EXPRESS OR IMPLIED WARRANTY OR CONDITIONS. EXCEPT TO THE EXTENT PROHIBITED BY APPLICABLE LAW, ANY IMPLIED WARRANTY OF MERCHANTABILITY OR FITNESS FOR A PARTICULAR PURPOSE IS LIMITED IN DURATION TO THE DURATION OF THE ABOVE WARRANTY OR CONDITIONS. SOME STATES OR JURISDICTIONS DO NOT ALLOW THE EXCLUSION OR LIMITATION OF INCIDENTAL OR CONSEQUENTIAL DAMAGES OR LIMITATIONS ON HOW LONG AN IMPLIED WARRANTY LASTS, SO THE ABOVE LIMITATIONS OR EXCLUSION MAY NOT APPLY TO YOU. THIS WARRANTY GIVES YOU SPECIFIC LEGAL RIGHTS, AND YOU MAY ALSO HAVE OTHER RIGHTS THAT VARY FROM STATE TO STATE.
How to Obtain Warranty Service
Take the product to an authorized Coleman service center. You can find the nearest authorized Coleman service center by visiting www.coleman.com or calling 1-800-835-3278 or TDD 1-316-832-8707. If a service center is not conveniently located, attach to the product a tag that includes your name, address, daytime telephone number and description of the problem. Include a copy of the original sales receipt. Carefully package the product and send either by courier or insured mail with shipping and insurance prepaid to:
The Coleman Company, Inc.
3600 North Hydraulic
Wichita, KS 67219 USA
The costs of transporting the product to Coleman or an authorized service center for warranty service is the responsibility of the purchaser.
DO NOT RETURN THIS PRODUCT TO THE PLACE OF PURCHASE.
If you have any questions regarding this warranty please call 1-800-835-3278 or TDD 1-316-832-8707.
© 2012 The Coleman Company, Inc. All rights reserved.
QuickPump™, Fish Hunter™, Double Lock™ and Colossus™ are trademarks of The Coleman
Company, Inc. Sevylor® is a registered trademark and ● is a trademark of Sevca, LLC.

sevylor®
3600 North Hydraulic • Wichita, KS 67219 U.S.A.
1-800-835-3278 • www.Sevylor.com