
I2757FH - Screen AOC - Free user manual and instructions
Find the device manual for free I2757FH AOC in PDF.


User questions about I2757FH AOC
0 question about this device. Answer the ones you know or ask your own.
Ask a new question about this device
Download the instructions for your Screen in PDF format for free! Find your manual I2757FH - AOC and take your electronic device back in hand. On this page are published all the documents necessary for the use of your device. I2757FH by AOC.
USER MANUAL I2757FH AOC
LCD Monitor User Manual
12757FH
SEE IT. FEEL IT.
IN NEW RESOLUTIONS.
57LED SERIES
natural_image
Underwater photo of a shark swimming among colorful coral and sea creatures (no text or symbols visible)
natural_image
Modern monitor with AOC logo and silver cable attachment, set against a blue abstract background (no text or symbols on device)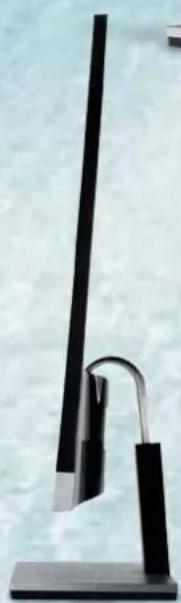
natural_image
Modern desk lamp with black handle and silver frame against a light blue textured background (no text or symbols visible)Safety....3
National Conventions....3
Power 4
Installation....5
Cleaning....6
Other....7
Setup 8
Contents in Box 8
Setup Stand & Base 9
Adjusting Viewing Angle....11
Connecting the Monitor....12
Adjusting 13
Setting Optimal Resolution 13
Windows Vista....13
Windows XP 15
Windows ME/2000....16
Hotkeys....17
OSD Setting....18
Luminance....19
Image Setup 21
Color Setup....23
Picture Boost 25
OSD Setup 27
Extra 29
Exit....31
LED Indicator....32
Driver 33
Monitor Driver 33
Windows 7....33
Windows Vista 37
Windows XP 39
Windows 2000....42
Windows ME 42
i-Menu....43
e-Saver 44
Screen+ 45
Troubleshoot 46
Specification....47
General Specification....47
Preset Display Modes 48
Pin Assignments 49
Plug and Play....50
Regulation....51
FCC Notice 5
CE Declaration of Conformity....5
WEEE Declaration....52
Service....54
Warranty Statement for Europe 54
Warranty Statement for North & South America (excluding Brazil)......56
Safety
National Conventions
The following subsections describe notational conventions used in this document.
Notes, Cautions, and Warnings
Throughout this guide, blocks of text may be accompanied by an icon and printed in bold type or in italic type. These blocks are notes, cautions, and warnings, and they are used as follows:

NOTE: A NOTE indicates important information that helps you make better use of your computer system.

CAUTION: A CAUTION indicates either potential damage to hardware or loss of data and tells you how to avoid the problem.

WARNING: A WARNING indicates the potential for bodily harm and tells you how to avoid the problem. Some warnings may appear in alternate formats and may be unaccompanied by an icon. In such cases, the specific presentation of the warning is mandated by regulatory authority.
Power
The monitor should be operated only from the type of power source indicated on the label. If you are not sure of the type of power supplied to your home, consult your dealer or local power company.
The monitor is equipped with a three-pronged grounded plug, a plug with a third (grounding) pin. This plug will fit only into a grounded power outlet as a safety feature. If your outlet does not accommodate the three-wire plug, have an electrician install the correct outlet, or use an adapter to ground the appliance safely. Do not defeat the safety purpose of the grounded plug.
⚠️ Unplug the unit during a lightning storm or when it will not be used for long periods of time. This will protect the monitor from damage due to power surges.
Do not overload power strips and extension cords. Overloading can result in fire or electric shock.
To ensure satisfactory operation, use the monitor only with UL listed computers which have appropriate configured receptacles marked between 100 - 240V \~, Min. 5A
The wall socket shall be installed near the equipment and shall be easily accessible.
For use only with the attached power adapter (Output 12Vdc) which have UL,CSA listed license (Only for monitors with power adapter).
Manufacturers:
1) TPV ELECTRONICS(FUJIAN) CO., LTD model: ADPC1245
2) HONOR ELECTRONIC CO.,LTD model: ADS-65LSI-12-1 12045G
Installation
Do not place the monitor on an unstable cart, stand, tripod, bracket, or table. If the monitor falls, it can injure a person and cause serious damage to this product. Use only a cart, stand, tripod, bracket, or table recommended by the manufacturer or sold with this product. Follow the manufacturer's instructions when installing the product and use mounting accessories recommended by the manufacturer. A product and cart combination should be moved with care.
Never push any object into the slot on the monitor cabinet. It could damage circuit parts causing a fire or electric shock. Never spill liquids on the monitor.
Do not place the front of the product on the floor.
If you mount the monitor on a wall or shelf, use a mounting kit approved by the manufacturer and follow the kit instructions.
Leave some space around the monitor as shown below. Otherwise, air-circulation may be inadequate hence overheating may cause a fire or damage to the monitor.
See below the recommended ventilation areas around the monitor when the monitor is installed on the stand:
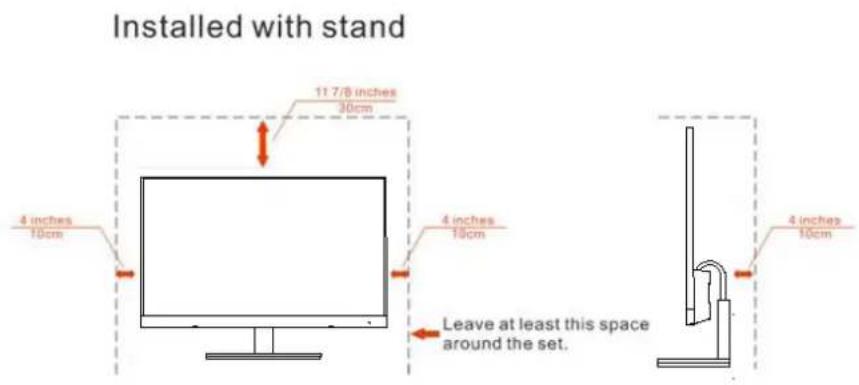
text_image
Installed with stand 11.7/8 inches 30cm 4 inches 10cm 4 inches 10cm Leave at least this space around the set. 4 inches 10cmCleaning
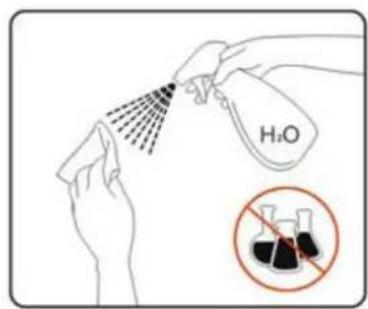
Clean the cabinet regularly with cloth. You can use soft-detergent to wipe out the stain, instead of strong-detergent which will cauterize the product cabinet.
When cleaning, make sure no detergent is leaked into the product. The cleaning cloth should not be too rough as it will scratch the screen surface.
⚠️Please disconnect the power cord before cleaning the product.
text_image
H₂O
natural_image
Simple line drawing of a monitor with two curved lines and a power plug attached to the left (no text or symbols)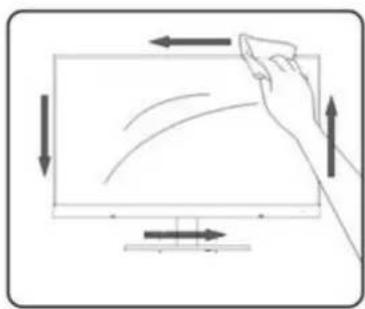
natural_image
Diagram showing a hand interacting with a computer monitor, with arrows indicating motion direction (no text or symbols)Other
If the product is emitting a strange smell, sound or smoke, disconnect the power plug IMMEDIATELY and contact a Service Center.
Make sure that the ventilating openings are not blocked by a table or curtain.
Do not engage the LCD monitor in severe vibration or high impact conditions during operation.
Do not knock or drop the monitor during operation or transportation.
Setup
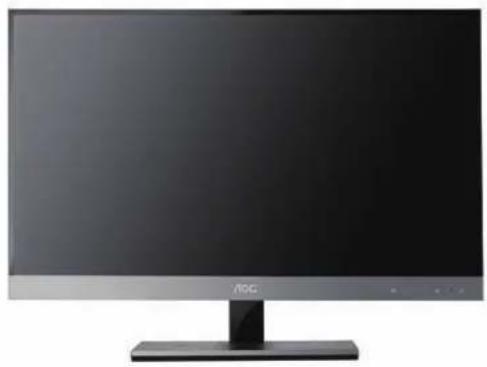
Contents in Box

natural_image
Front view of a modern computer monitor with a black stand and 'AOC' logo on the front panel (no additional text or symbols visible)Monitor
text_image
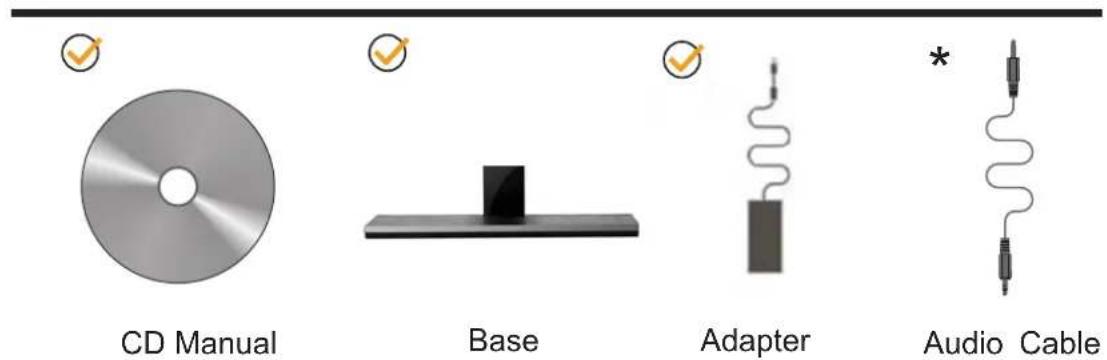
CD Manual Base Adapter Audio Cable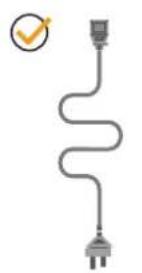
Power Cable
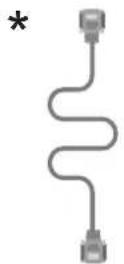
VGA Cable
natural_image
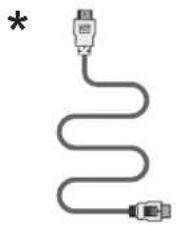
Pure diagram of a U-shaped cable with two connectors, no text or symbols presentHDMI Cable
* Not all signal cables (VGA, and HDMI cables) will be provided for all countries and regions. Please check with the local dealer or AOC branch office for confirmation.
Setup Stand & Base
Please setup or remove the base following the steps as below.
Setup:
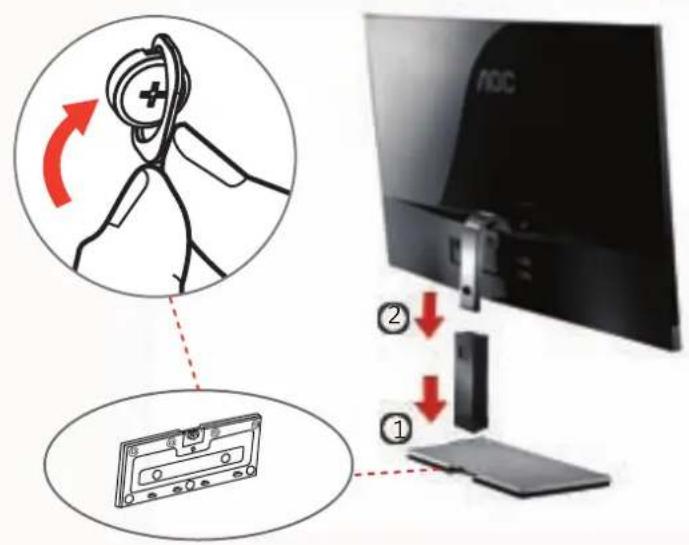
text_image
Diagram illustrating a device operation with labeled steps: adding a cable to a person using a magnifying glass, and adding a CD to a monitor.Remove:
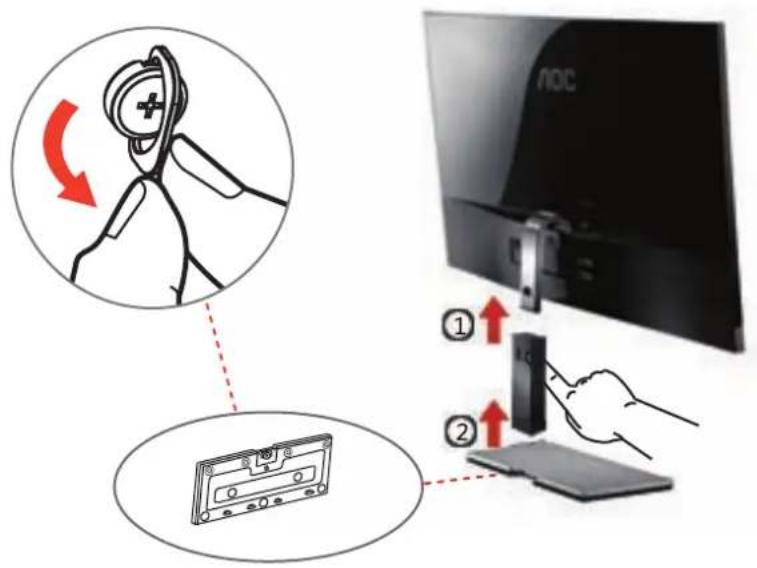
text_image
Diagram illustrating a device operation with labeled steps: adding a cable to a monitor, adding a cable to a CD, and adding a CD to a laptop.Unit standing without base is available. (Caution: must put unit in flat surface. Any uneven or sloped surface may result unit damaged or injury to user.)
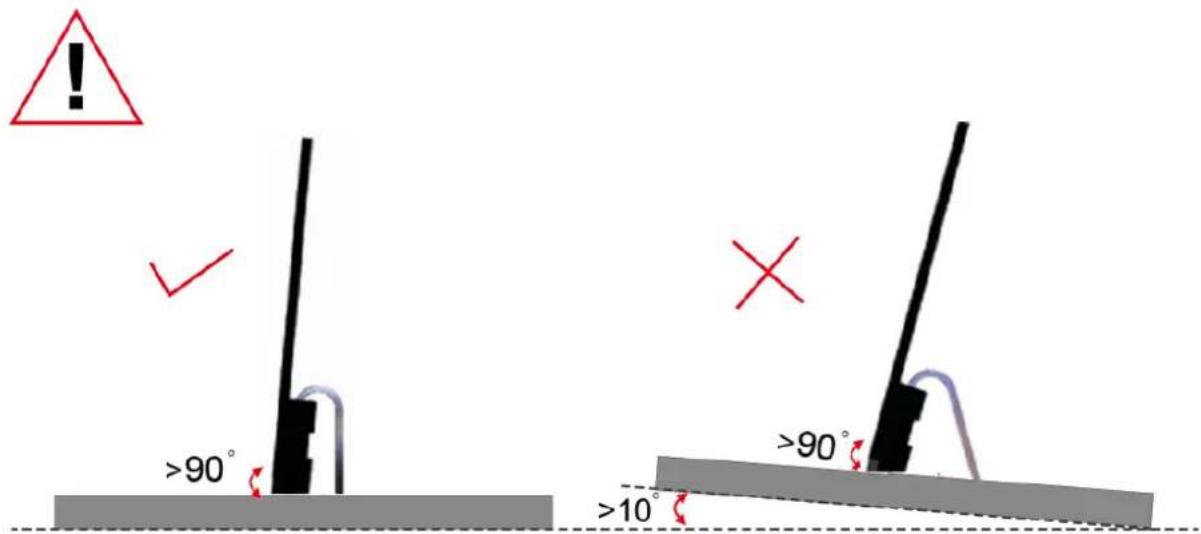
text_image
! >90° >90° >10°Adjusting Viewing Angle
For optimal viewing it is recommended to look at the full face of the monitor, then adjust the monitor's angle to your own preference.
Hold the stand so you will not topple the monitor when you change the monitor's angle.
You are able to adjust the monitor's angle from -5^ to 15^ .
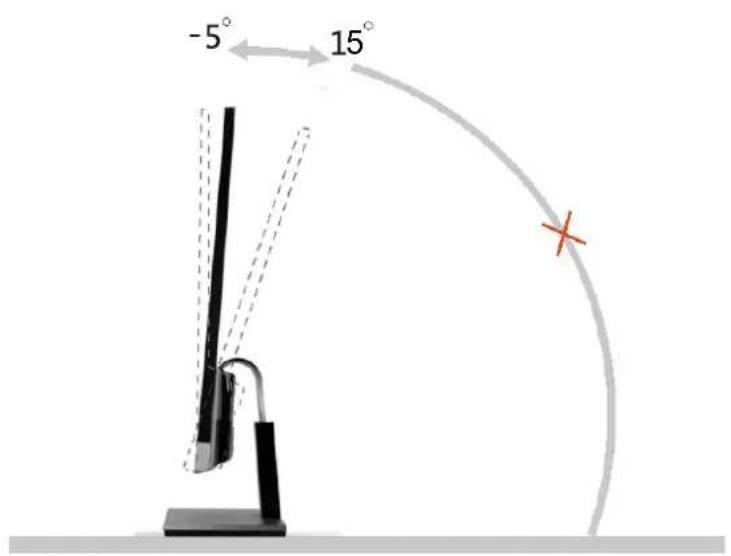
text_image
-5° 15°
NOTE:
Do not touch the LCD screen when you change the angle. It may cause damage or break the LCD screen.
Connecting the Monitor
Cable Connections In Back of Monitor and Computer:
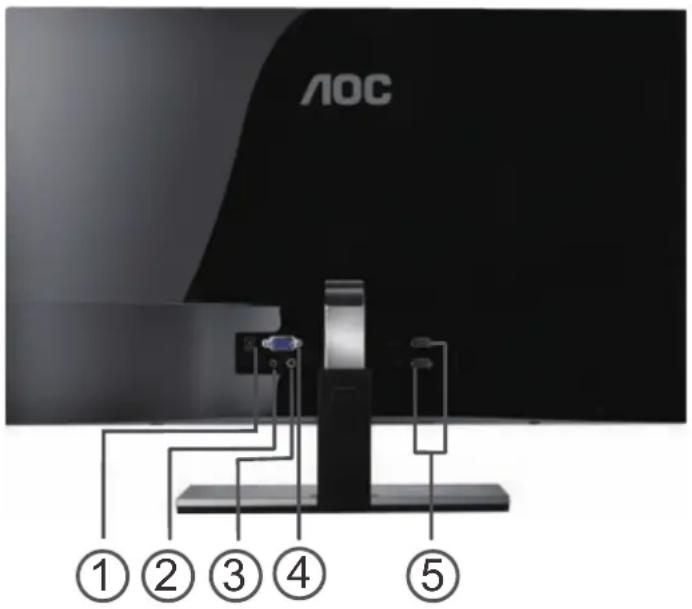
text_image
AOC ① ② ③ ④ ⑤- Power
- Earphone
- Audio cable
- D-Sub cable
- HDMI cable
To protect equipment, always turn off the PC and LCD monitor before connecting.
1 Connect the power cable to the AC port on the back of the monitor.
2 Connect one end of the 15-pin D-Sub/HDMI cable to the back of the monitor and connect the other end to the computer's D-Sub/HDMI port.
3 Turn on your monitor and computer.
If your monitor displays an image, installation is complete. If it does not display an image, please refer Troubleshooting.
Adjusting
Setting Optimal Resolution
Windows Vista
For Windows Vista:
1 Click START.
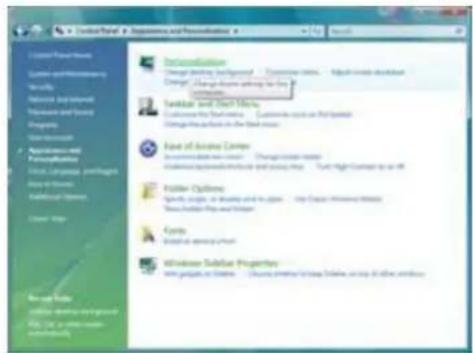
2 Click CONTROL PANEL.
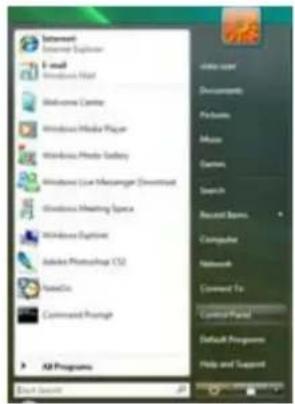
text_image
Internet Internet Explorer E-mail Windows Host Welcome Center Windows Media Player Windows Media Safari Windows Live Messages Download Windows Meeting Space Windows Express Sales Photoshop CS2 SendTo Command Prompt All Programs Start Menu Internet User Documents Pictures Mouse Canvas Canvas Search Recent Bars Computer Network Comment To Control Panel Default Programs Help and Support3 Click Appearance and Personalization.
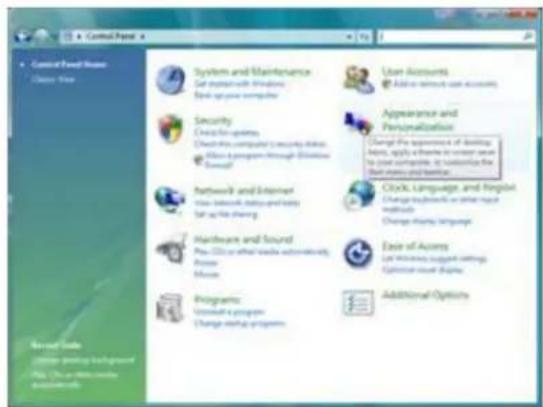
text_image
Control Panel 4 Control Panel 5 System and Maintenance Set desktop with Windows Back-up via computer Security Create the options Check this computer's security details. Allow a program through Additional Default Network and Internet new network setup and help Set up file sharing Hardware and Sound Pre-CD or other audio automatically Power Mouse Progrants Install a program Change setup programs User Accounts Add to remote user accounts Appearance and Personalization Change the appearance of desktop logs, apply some or more users to post-compliant, it contains for the mail name and partner. Clock, Language, and Register Change keywords or other key methods Change drivers, language Ease of Assets Let Windows support settings. Optimize user Engine Additional Options4 Click Personalization
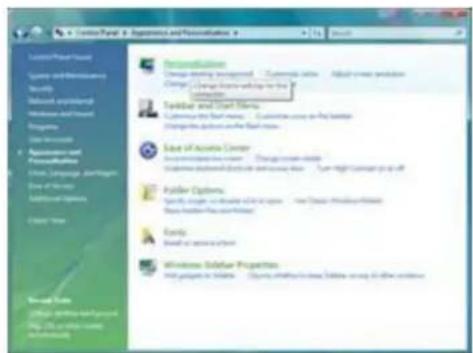
text_image
Custom/Panel 3: Organics and Personalization Personals Change setting management - Customize settings - Adjust current settings Change to General settings for the Computer Symbol and Script Options Language and the field name - Customize access to the website Designing functions on the field name Use of Active Center An integrated user - Change screen size System installed directly and access via - User might change go off Provider Options Specify single or double access to the user - New Digital Windows Provider New Internet Files and Internet Events Send to an email client Windows Database Properties Find people to users - Options and files in any database using all other services5 Click Display Settings.
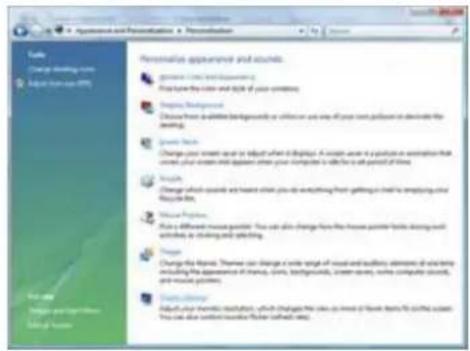
text_image
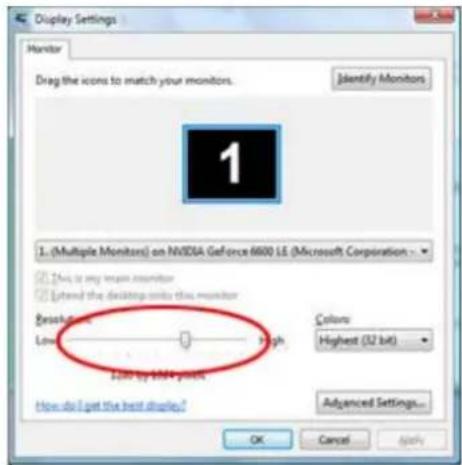
Add to Personalization and Recommendation & Recommendation Details Change starting news Select from user-up (0%) Personalization app resumed and sounds: genuine C-Link and Questioning Play the color and style of your content. Display Background Close from available backgrounds or filters on any one of your text patches or directly the viewing. Smooth Touch Change your content as an update when it displays. A sound wave is a picture or illustration that covers your content and image within your computer to select for all periods of time. Analyze Change which sounds and frames show you do everything from getting in hand to applying out Recycle file. Visual Properties Make a different music picture. You can also change from the house picture blocks sharing and others, or clicking and posting. Change Change the home. These can change a wide range of visual and audio elements of music types including the appearance of home, scene, background, screen, audio, computer, and audio formats. Show effects Adjust your music format, which changes the video space in book format to this product. You can also contain more than several times.6 Set the resolution SLIDE-BAR to 1920 by 1080.
text_image
Display Settings Monitor Drag the icons to match your monitors. Identify Monitors 1 (Multiple Monitors) on NVIDIA GeForce 6600 LE (Microsoft Corporation) This is any longer monitor Extend the desktop-only this monitor Resolution: Low High Color: Highest (32 bit) Add by 6600 pixels How do I get the best display? Advanced Settings... OK Cancel ApplyWindows XP
For Windows XP:
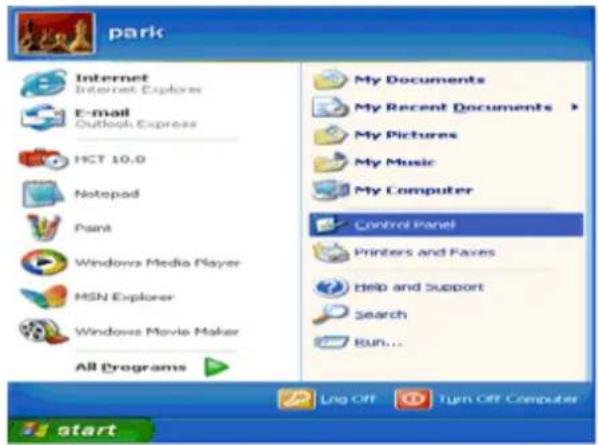
1 Click START.
text_image
park Internet Internet Explorer E-mail Outlook Express HCT 10.0 Notepad Paint Windows Media Player MSN Explorer Windows Movie Maker All Programs My Documents My Recent Documents > My Pictures My Music My Computer Control Panel Printers and Faxes help and Support Search Run... Log Off Turn Off Computer start2 Click SETTINGS.
3 Click CONTROL PANEL.
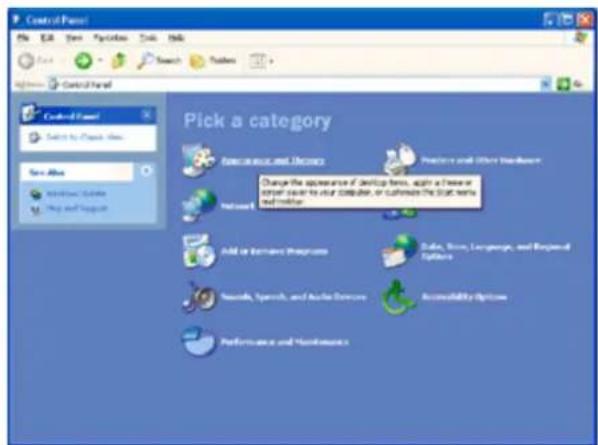
4 Click Appearance and Themes.
text_image
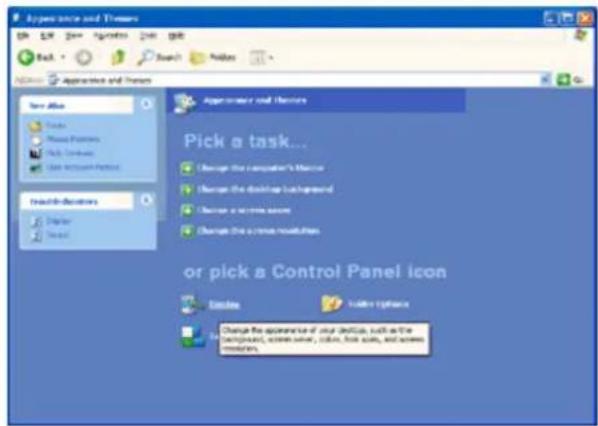
Control Panel File Edit View Options Tools Help Control Panel Control Panel Select to Create New... Save Asks Internet Options Img and Support Pick a category Search or your own library Features and Other Hardware Choose the appearance of desktop items, click a text or other reader to your computer, or customize the Start Text and matter. Network Add or Remove Programs Sales, Review, Language, and Rejected Options Smooth, Speech, and Audio Exercises Accessible Options Performance and Maintenance5 Double click DISPLAY.
text_image
Approve and Timers OK Apply Save Apply Edit Help Back Search New Update Paste Approve and Timers Save All Tools Mouse Patterns Help Timers Use AI/Artificial Patterns Search & Settings Display Search Approve and Timers Pick a task... Change the computer's monitor Change the desktop background Change the screen security Change the video resolutions or pick a Control Panel icon Update Update Options Change the appearance of your interface, such as the management, screen view, zoom, hot size, and screen resolutions.6 Click SETTINGS.
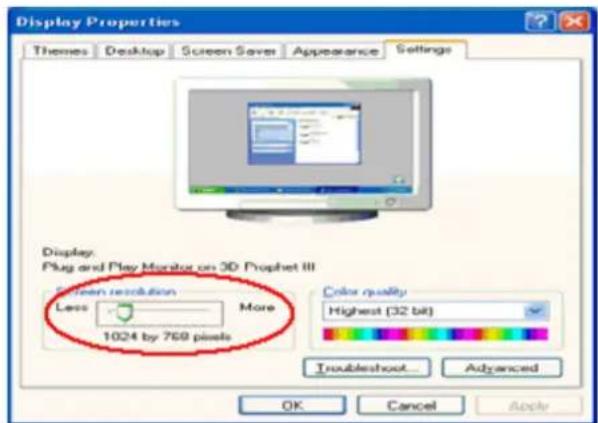
7 Set the resolution SLIDE-BAR to 1920 by 1080.
text_image
Display Properties Themes Desktop Screen Save Appearance Settings Display: Plug and Play Monitor on 3D Prophet III Screen resolution More Less 1024 by 769 pixels Color quality Highest (32 bit) Troubleshoot Advanced OK Cancel ApplyWindows ME/2000
For Windows ME/2000:
1 Click START.
2 Click SETTINGS.
3 Click CONTROL PANEL.
4 Double click DISPLAY.
5 Click SETTINGS.
6 Set the resolution SLIDE-BAR to 1920 by 1080.
Hotkeys
text_image
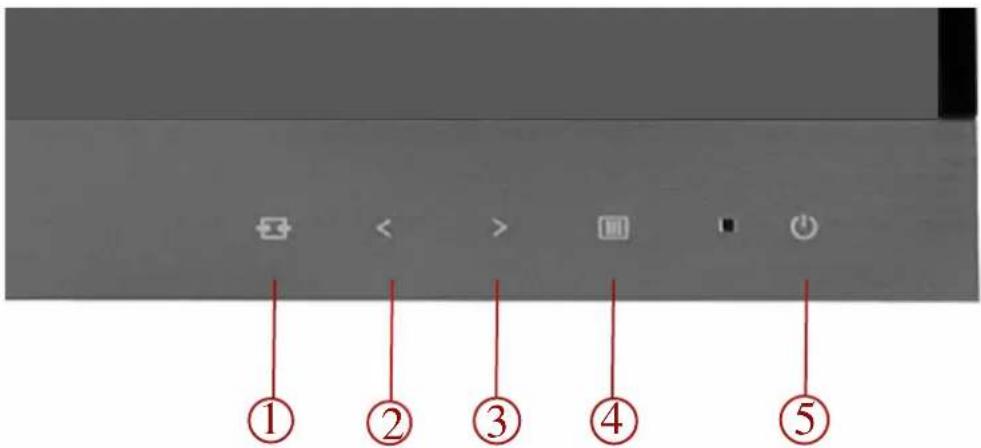
① ② ③ ④ ⑤| 1 | Source/Auto/Exit |
| 2 | Eco (DCR) /< |
| 3 | Volume/> |
| 4 | Menu/Enter |
| 5 | Power |
Power
Press the Power button to turn on/off the monitor.
Eco (DCR) /<
Press the Eco key continuously to select the Eco mode of brightness and DCR on when there is no OSD. (Eco mode hot key may not be available in all models).
Volume b
When there is no OSD, press Volume adjust volume.
Auto / Exit / Source hot key
When there is no OSD, press Auto/Source button continuously about 2 second to do auto configure.
When the OSD is closed, press Source button will be Source hot key function. Press Source button continuously to select the input source showed in the message bar, press Menu/Enter button to change to the source selected.
OSD Setting
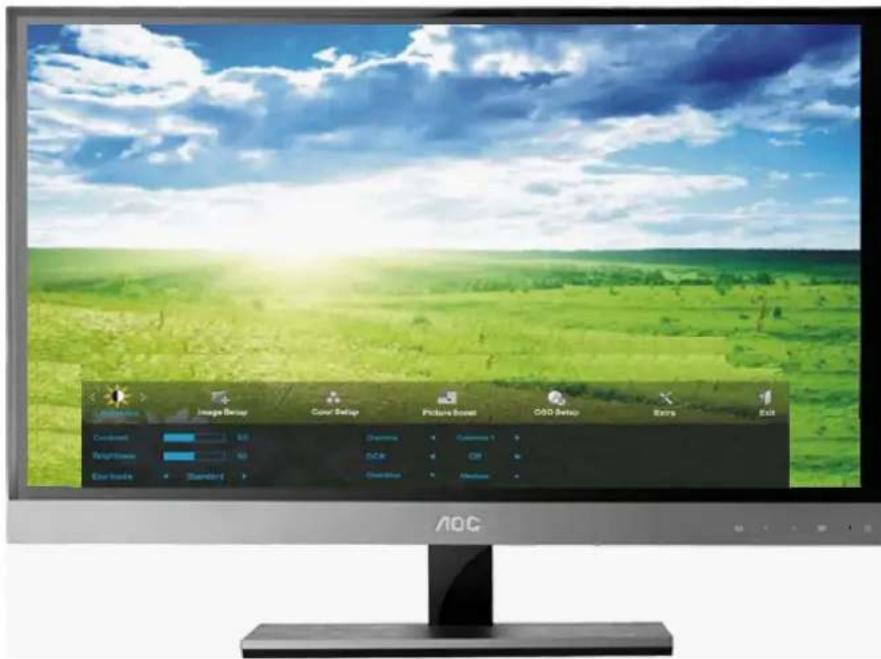
Basic and simple instruction on the control keys.
text_image
AOC Image Setup Cover Setup Picture Secret GOD Setup Extra Exit Condens RGB Brightness RGB Eco tracks Standard Gamma Customize 1 Ctrl Clearbox Clearbox Maximum1) Press the MENU-button to activate the OSD window.
2) Press
3) Press
4) OSD Lock Function: To lock the OSD, press and hold the MENU button while the monitor is off and then press power button to turn the monitor on. To un-lock the OSD - press and hold the MENU button while the monitor is off and then press power button to turn the monitor on.
Notes:
1) If the product has only one signal input, the item of "Input Select" is disable to adjust.
2) If the product screen size is 4:3 or input signal resolution is wide format, the item of "Image Ratio" is disable to adjust.
3) One of non-standard ECO, DCR, DCB, Picture Boost is activated, the other three of functions are turned off accordingly.
Luminance
text_image
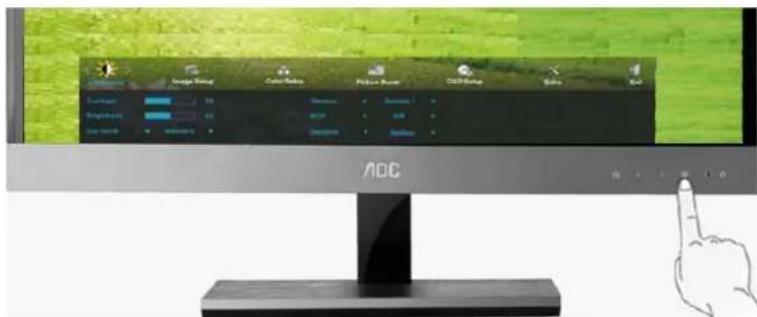
AOC Image Rating Color Filter Picture Room CCTG/Regio Sales Turnover 80 80 80 80 80 80 80 80 80 80 80 80 80 80 80 80 80 80 80 80 80 80 80 80 80 80 80 80 80 80 80 80 80 80- Press MENU (Menu) to display menu.
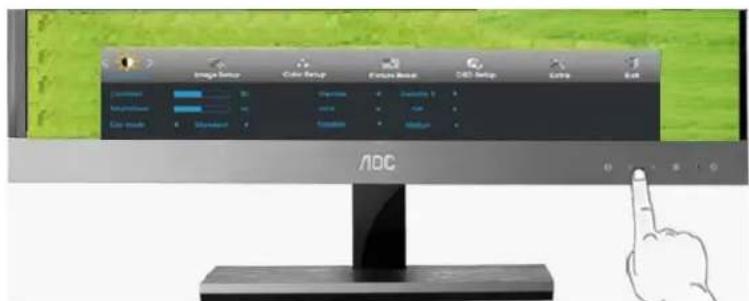
text_image
Image Setup Color Setup English Reset 400 Setup Extra Exit Customize None OK Cancel OK Cancel OK OK OK OK OK OK OK OK OK OK OK OK OK OK OK OK OK OK OK OK OK OK OK OK OK OK OK OK OK OK OK OK OK OK OK OK OK OK OK OK OK OK OK OK OK OK OK OK OK OK ONC- Press <> or to select (Luminance), and press MENU to enter.
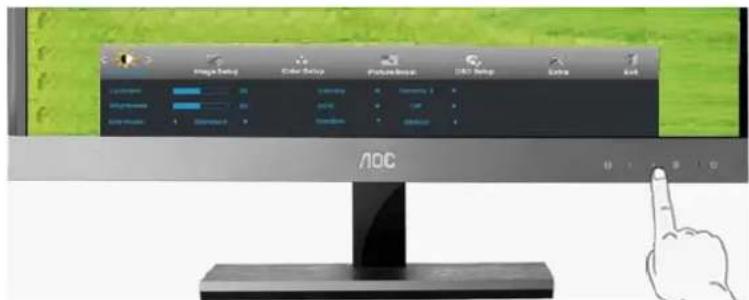
text_image
noc- Press < or > to select submenu, and press MENU to enter.
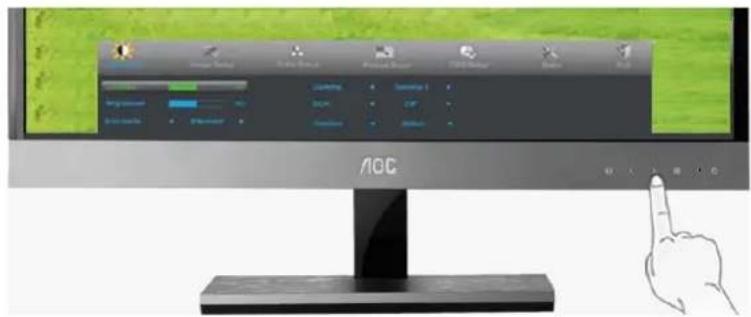
text_image
Computer monitor displaying a green screen with icons and status bar, showing system status and navigation buttons.- Press < or > to adjust.
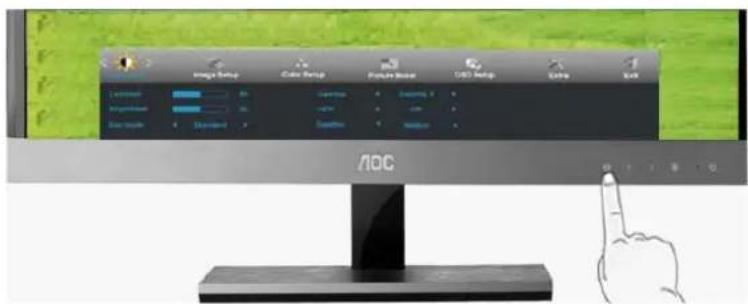
text_image
Image Setup Color Setup RGB Photo Mode RGB Setup Extra Exit 100% 100% 100% 100% 100% 100% 100% 100% 100% 100% 100% 100% 100% 100% 100% 100% 100% 100% 100% 100% 100% 100% 100% 100% 100% 100 100 100 100 100 100 100 100 100 100 100 100 100 100 100 100 100 100 100 100 100 100 100 100 100 100- Press AUTO to exit.
 | Brightness | 0-100 | Backlight Adjustment | |
| Contrast | 0-100 | Contrast from Digital-register. | ||
| Eco mode | Standard |  | Standard Mode | |
| Text |  | Text Mode | ||
| Internet |  | Internet Mode | ||
| Game |  | Game Mode | ||
| Movie |  | Movie Mode | ||
| Sports |  | Sports Mode | ||
| Gamma | Gamma1 Adjust to Gamma1 | |||
| Gamma2 Adjust to Gamma 2 | ||||
| Gamma3 Adjust to Gamma 3 | ||||
| DCR | Off | Disable dynamic contrast ratio | ||
| On |  | Enable dynamic contrast ratio | ||
| Overdrive | Weak | Adjust the response time | ||
| Medium | ||||
| Strong | ||||
| Off | ||||
Image Setup
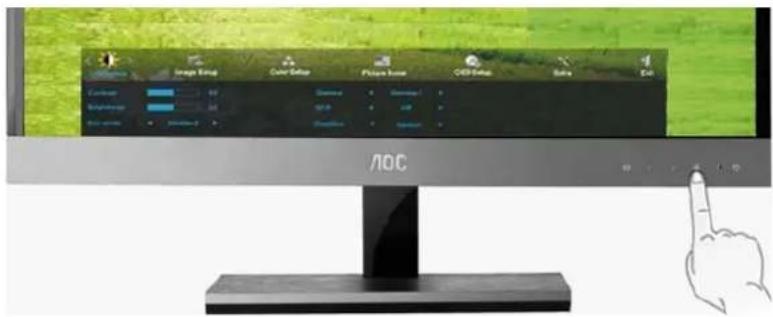
text_image
AOC- Press MENU (Menu) to display menu.
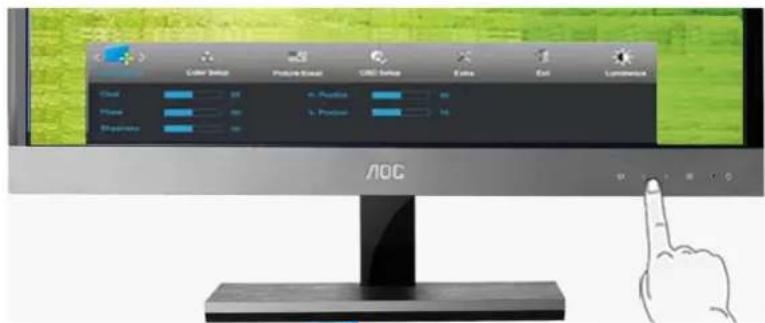
text_image
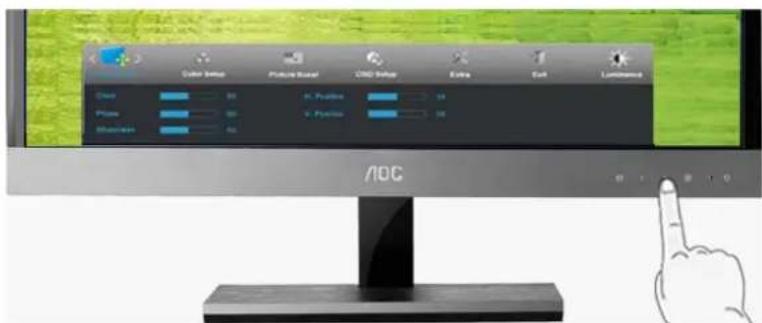
Color Setup Picture Setup HDR Setup Extra Exit Luminance Clear + Position + Position + Position None Properties AOC- Press <> or to select (Image Setup), and press MENU to enter.
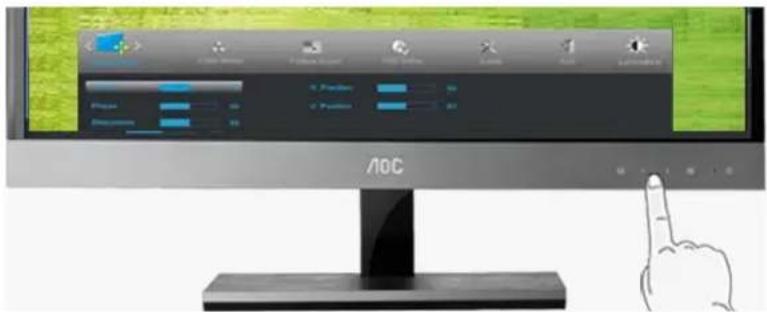
text_image
AOC File Edit View Help Tools Help Settings Tools Help Settings Help Settings Help Settings Help Settings Help Settings Help Settings Help Settings Help Settings Help Settings Help Settings Help Settings Help Settings Help Settings Help Settings Help Settings Help Settings Help Settings Help Settings Help Settings Help Settings Help Settings Help Settings Help Settings Help Settings Help Settings Help Settings Help Settings Help Settings Help Settings Help Settings Help Settings Help Settings Help Settings Help Settings Help Settings Help Settings Help Settings Help Settings Help Settings Help Settings Help Settings Help Settings Help Settings Help Settings Help Settings Help Settings Help Settings Help Settings Help Settings Help Settings Help AOC- Press < or > to select submenu, and press MENU to enter.
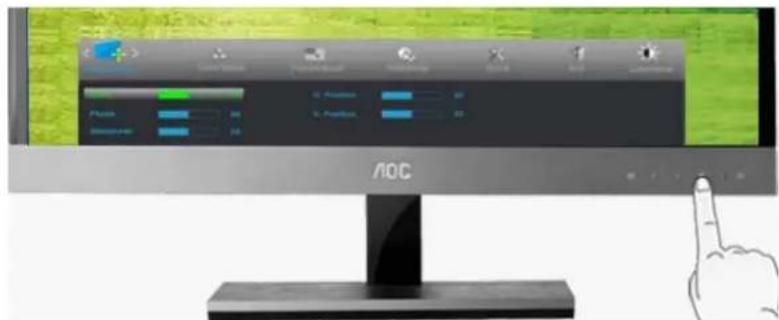
text_image
AOC- Press < or > to adjust.
text_image
Color Offset Product Seal CMYK Offset Extra Cut Luminance Clear H. Positive 10 Photo V. Positive 10 Shannon Aa AOC- Press AUTO to exit.
 | Clock | 0-100 | Adjust picture Clock to reduce Vertical-Line noise. |
| Phase | 0-100 | Adjust Picture Phase to reduce Horizontal-Line noise | |
| Sharpness | 0-100 | Adjust picture sharpness | |
| H.Position | 0-100 | Adjust the horizontal position of the picture. | |
| V.Position | 0-100 | Adjust the vertical position of the picture. |
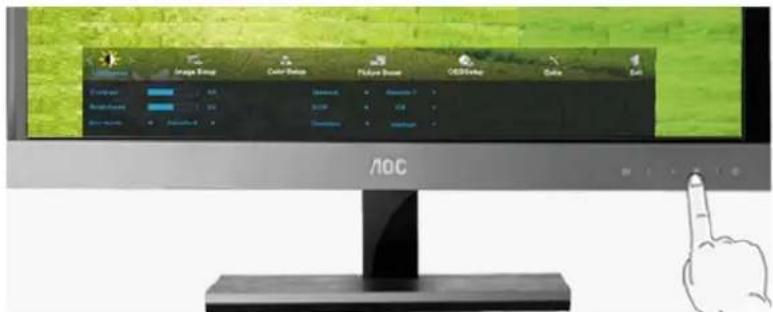
Color Setup
text_image
Image Setup Color Setup Picture Room OBS Setup Guide View AOC- Press MENU (Menu) to display menu.

text_image
Product Export CROP Export Entry BOX Lock/Lock/Lock Image Entry AOC- Press < or > to select (Color Setup), and press MENU to enter.
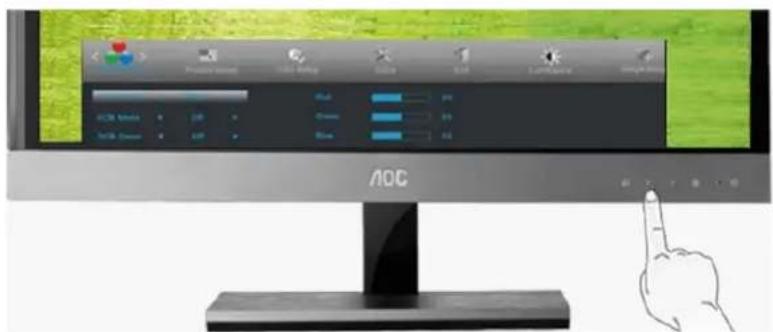
text_image
AOC- Press < or > to select submenu, and press MENU to enter.
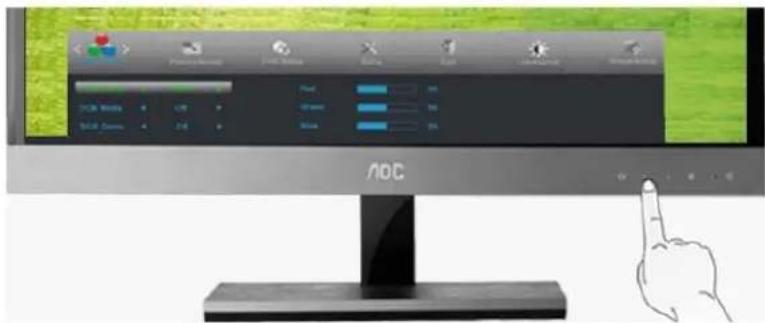
text_image
AOC- Press
to adjust.
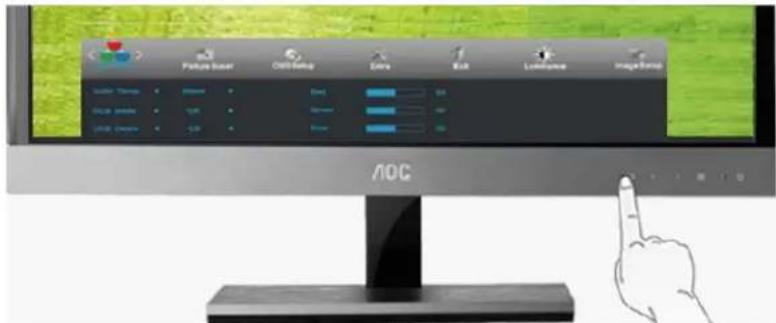
text_image
Picture based Occtbase Extra Edit Lockframe Image based Color: Chrome RGB: 100% RGB: 100% RGB: 100% AOC- Press AUTO to exit.
 | Color setup. | Warm | Recall Warm Color Temperature from EEPROM. | |
| Normal | Recall Normal Color Temperature from EEPROM. | |||
| Cool | Recall Cool Color Temperature from EEPROM. | |||
| sRGB | Recall SRGB Color Temperature from EEPROM. | |||
| User | Red | Red Gain from Digital-register | ||
| Green | Green Gain Digital-register. | |||
| Blue | Blue Gain from Digital-register | |||
| DCB Mode | Full Enhance | on or off | Disable or Enable Full Enhance Mode | |
| Nature Skin | on or off | Disable or Enable Nature Skin Mode | ||
| Green Field | on or off | Disable or Enable Green Field Mode | ||
| Sky-blue | on or off | Disable or Enable Sky-blue Mode | ||
| AutoDetect | on or off | Disable or Enable AutoDetect Mode | ||
| DCB Demo | On or off | Disable or Enable Demo |
Picture Boost
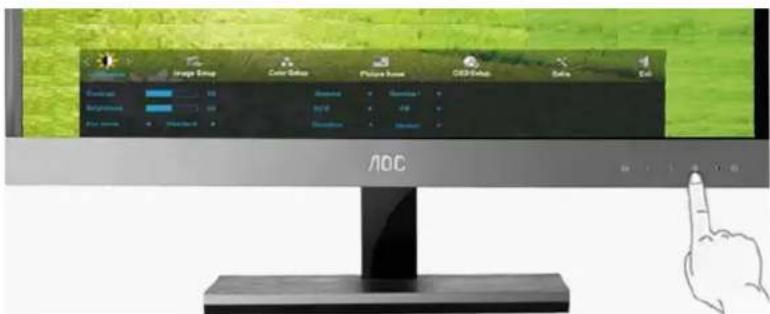
text_image
AOC Image Help Color Colors Picture Names GSD Labels Sales Edit Clear up Background Play screen Balance 0 Balance 1 Balance 2 Balance 3 Balance 4 Balance 5 Balance 6 Balance 7 Balance 8 Balance 9 Balance 10- Press MENU (Menu) to display menu.
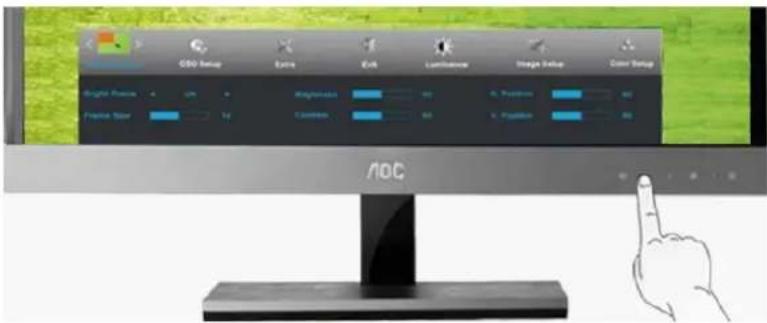
text_image
GBO Setup Extra Exit Luminance Image Setup Color Setup Brightness 400 Hypertension 80 X: Position 80 Pixel Size 1.2 Customs 80 X: Position 80 AOC- Press
to select (Picture Boost), and press MENU to enter.
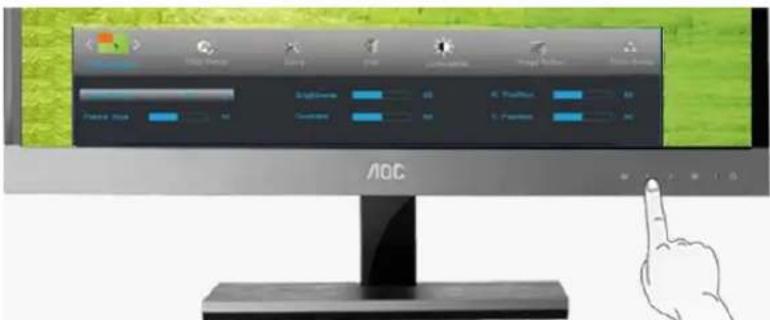
text_image
AOC- Press <or to select submenu, and press MENU to enter.
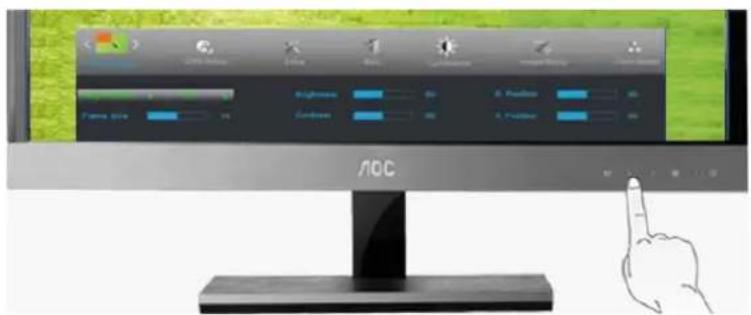
text_image
RGB RGB RGB RGB RGB RGB RGB RGB RGB RGB RGB RGB RGB RGB RGB RGB RGB RGB RGB RGB RGB RGB RGB RGB RGB RGB RGB RGB RGB RGB RGB RGB RGB RGB RGB RGB RGB RGB RGB RGB RGB RGB RGB RGB RGB RGB RGB RGB RGB RGB RGB
- Press <>or to adjust.
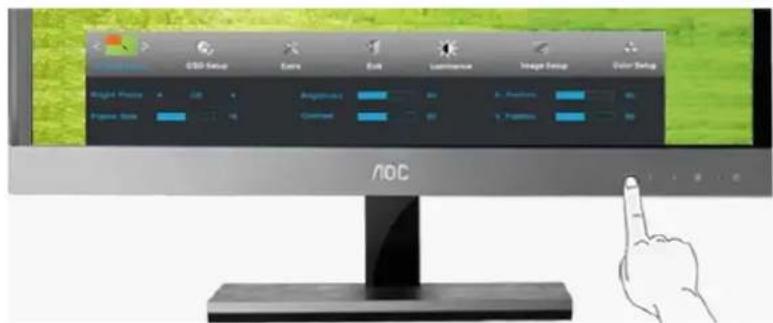
text_image
ODI Setup Extra Exit Latimance Image Setup Color Setup Weight Picture A Aptitude A A. Platform B Figure Size 14 Contour B A. Platform B noc- Press AUTO to exit.
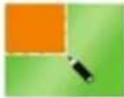 | Frame Size | 14-100 | Adjust Frame Size |
| Brightness | 0-100 | Adjust Frame Brightness | |
| Contrast | 0-100 | Adjust Frame Contrast | |
| H. position | 0-100 | Adjust Frame horizontal Position | |
| V.position | 0-100 | Adjust Frame vertical Position | |
| Bright Frame | on or off | Disable or Enable Bright Frame |
OSD Setup
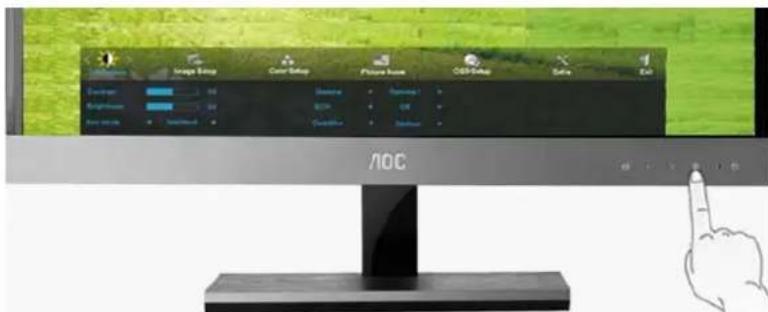
text_image
Image Setup Color/Temp Picture Base RGB/Temp Balance OK Balance OK Balance OK AOC- Press MENU (Menu) to display menu.
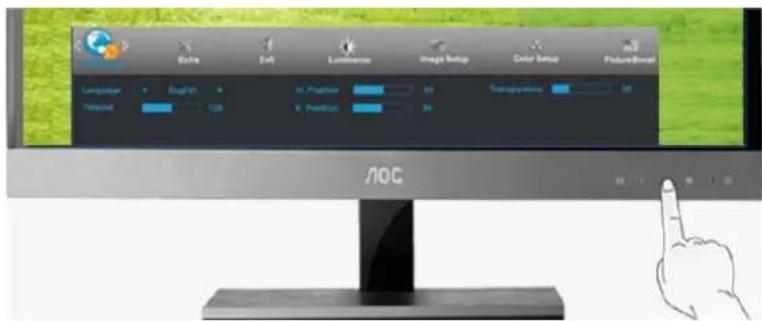
text_image
Light Soft Luminance Image Setup Color Setup Picture/Blot Language English In: Position Transparency Textual 128 Textual 90 NOC- Press <> or to select (OSD Setup), and press MENU to enter.
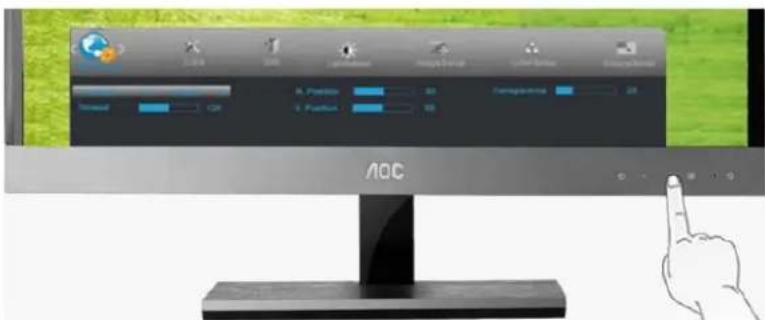
text_image
AOC AOC Color LightBlue LightBlue Cyan Gray Green Black Black Black Black Black Black Black Black Black Black Black Black Black Black Black Black Black Black Black Black Black Black Black Black Black Black Black Black Black Black Black Black Black Black Black Black Black Black Black Black Black Black Black Black Black Black Black Black Black Black AOC- Press < or > to select submenu, and press MENU to enter.
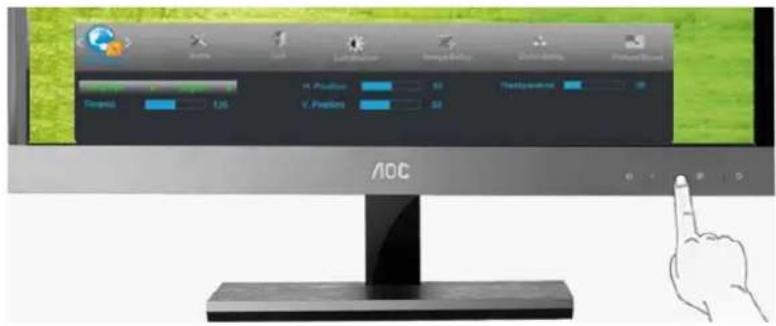
text_image
AOC 1.26 A. Position V. Position 90 40 Transpensional 70 AOC- Press < or > to adjust.
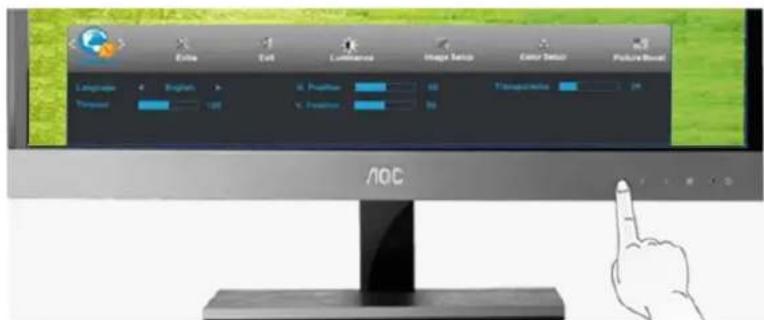
text_image
AOC- Press AUTO to exit.
 | H.Position | 0-100 | Adjust the horizontal position of OSD |
| V.Position | 0-100 | Adjust the vertical position of OSD | |
| Timeout | 5-120 | Adjust the OSD Timeout | |
| Transparence | 0-100 | Adjust the transparence of OSD | |
| Language | Select the OSD language |
Extra
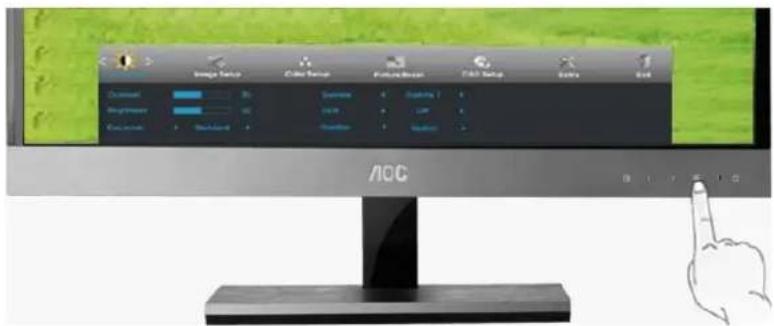
text_image
Image Setup Color Setup Functional F&D Setup Sigma End Default 30 Standard Standard Standard ACC B I T E I C- Press MENU (Menu) to display menu.
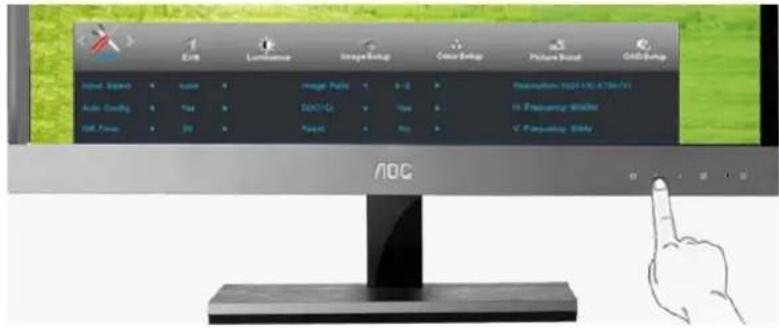
text_image
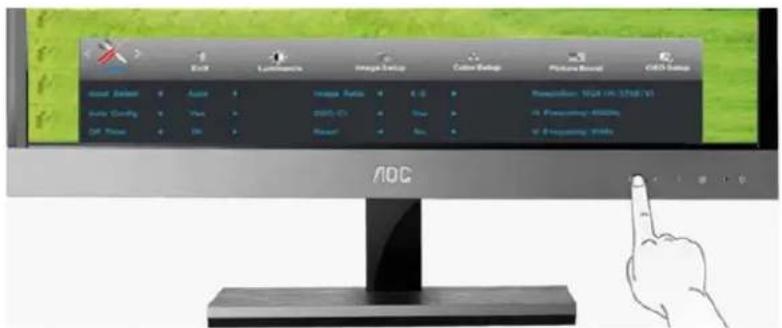
EVR Lumbrance Image Setup Color Setup Picture Based RGB Setup Input Screen Auto Coding Diff. Power Image Filter ESC-CI New New Pre Slovenia: ISO/150, ISO/150 Frequency Width Frequency Width AOC- Press
to select (Extra), and press MENU to enter.
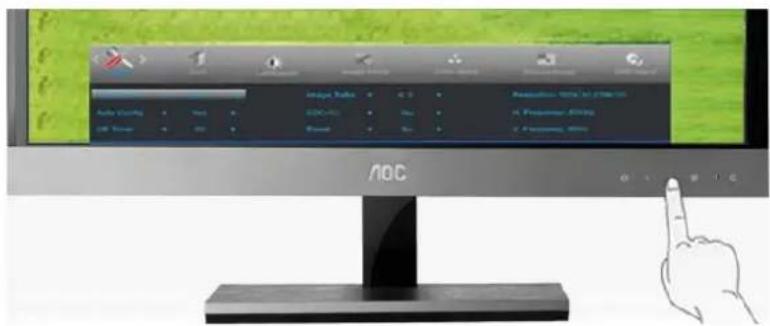
text_image
Auto (OK) OK Image Status SICO-10 Event Photo Presentation: 1974.10.2016 A Proportant, 85%- Press <> or to select submenu, and press MENU to enter.
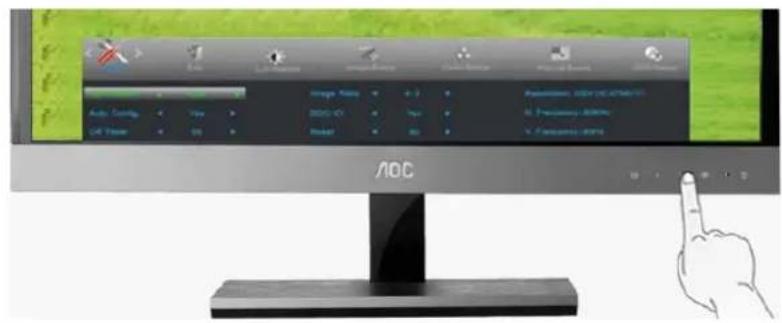
text_image
AOC Image Help Auto Tools View Get Home OK +2 BDO-10 Yes Reset No Pre Slovenia: USB 15.0 GB/15.0 Hi: Precision 800% V: Precision 80%- Press < or > to adjust.
text_image
AOC Auto Control Auto Control Air Force Air Force Air Force Image Assets BOSC Reset Preparation: 1024 (IN: 5758/1) At Preparation: 4000/10 At Preparation: Wildy- Press AUTO to exit.
 | Input Select | Auto Select to Auto Detect input signal | |
| D-SUB | Select Signal Source as Input | ||
| HDMI1 | Select HDMI 1 Source as Input | ||
| HDMI 2 | Select HDMI 2 Source as Input | ||
| Auto Config yes or no Auto adjust the picture to default | |||
| Image Ratio wide or 4:3 Select wide or 4:3 format for display | |||
| DDC-CI yes or no Turn ON/OFF DDC-CI Support | |||
| Reset | yes or no | Reset the menu to default | |
| Off Timer | 0~24hours | Select timing to turn off the monitor. | |
| Information | Show the information of the main image and sub-image source | ||
Exit
text_image
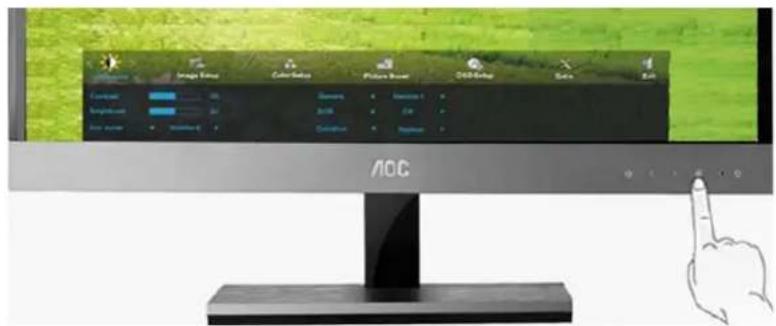
AOC Image Edit Color/Sattn Picture Screen OOS/Setup Sigma Edit Camera Brightness Noise Current Continuous AOC- Press MENU (Menu) to display menu.
text_image
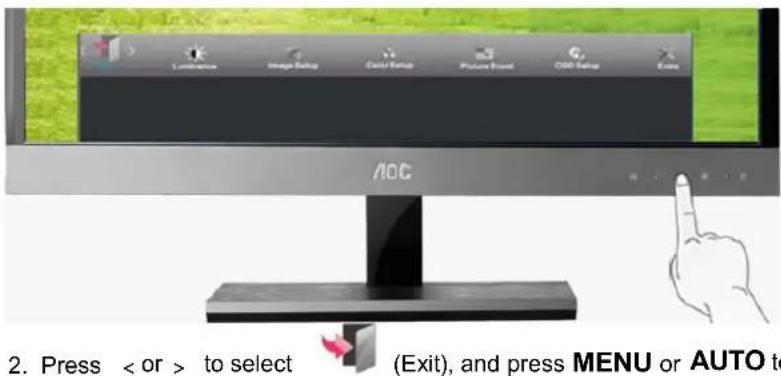
Luminance Image Setup Color Setup Picture Board CDD Setup Eate AOC 2. Press < or > to select (Exit), and press MENU or AUTO to- Press < or > to select (Exit), and press MENU or AUTO to exit.
 | Exit Exit the main OSD |
LED Indicator
| Status LED Color | ||
| Full Power Mode Blue | ||
| Active-off Mode | orange |
Driver
Monitor Driver
Windows 7
-
Start Windows® 7
-
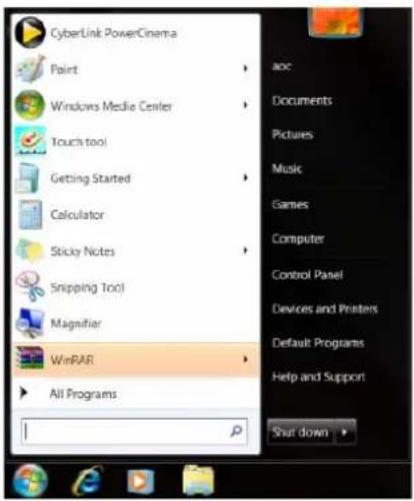
Click on the 'Start' button and then click on 'Control Panel'.
text_image
CyberLink PowerCinema Point Windows Media Center Touch tool Getting Started Calculator Sticky Notes Snipping Tool Magnifier WinRAR All Programs aoc Documents Pictures Music Games Computer Control Panel Devices and Printers Default Programs Help and Support Shut down- Click on the 'Display' icon.
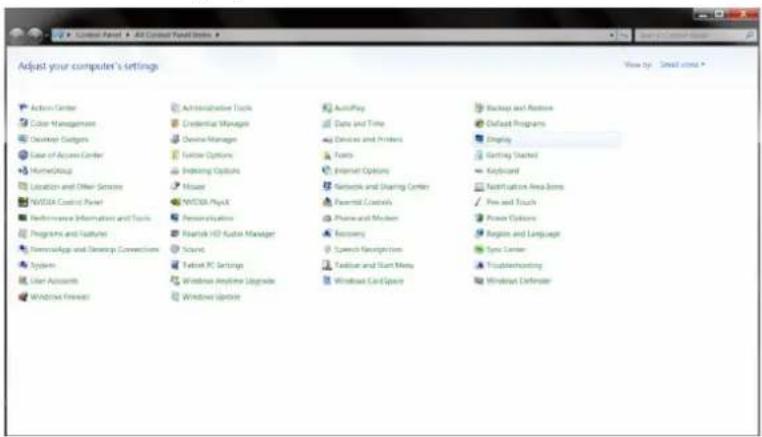
text_image
Adjust your computer's settings View by: Small screen * Action Center Color Management Desktop Budgets Use of Action Center HomeGroup Location and Other Services NVISTA Control Panel Preferences Information and Tools Programs and Features Knowledge and Desktop Connections System User Accounts Windows Forward Administrative Tools Credential Manager Device Manager Service Options Indexing Options Mouse NVISTA PlayX Personal Controls Pharm and Medium Resource Speech Recognition Texter and Start Menu Windows Card Space AutoPlay Data and Time Devices and Printers Tools Internet Options Networks and Sharing Center Parental Controls Phone and Medium Recovery Speech Recognition Texter and Start Menu Windows Card Space Backup and Active Default Programs Display Getting Started Keyboard Notification Area Bars Fire and Touch Power Options Regions and Language Sync Center Troubleshooting Windows Defender4. Ckick on the "Change display settings" button.
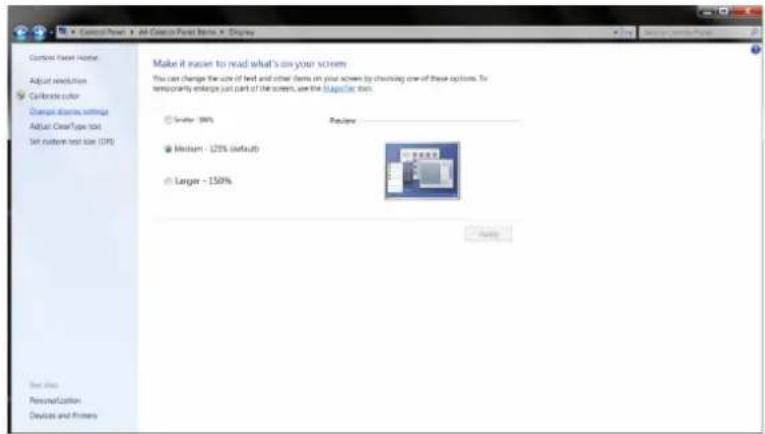
text_image
Control Panel - All-Cross Panel Name - Display Make it easier to read what's on your screen You can change the size of bed and other items on your screen by checking one of these options. To temporarily enlarge just part of the screen, see the "stopLine" tool. Scale: 100% Package: Medium: 125% (default) Large: 150% Options End Site Personalization Devices and Frames5. Click the "Advanced Settings" button.

text_image
Change the appearance of your display Display: 2. Verita Default Flat Panel Resolution: 1400 x 1000 (recommended) Orientations: Landscape Advert settings Make text and other items longer or shorter What disaster settings should I choose? OK Cancel Apply6. Click the "Monitor" tab and then click the "Properties" button.
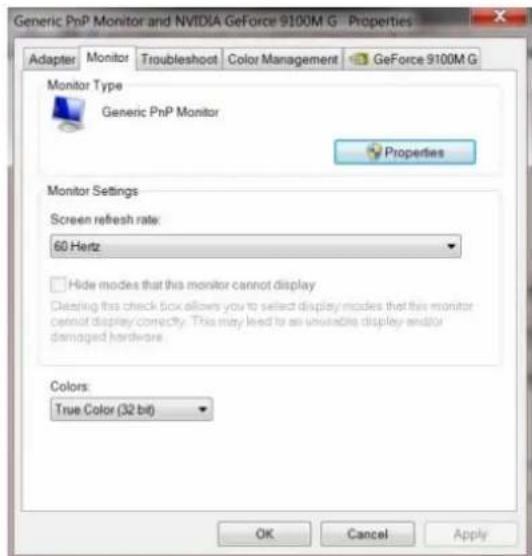
text_image
Generic PnP Monitor and NVIDIA GeForce 9100M G Properties Adapter Monitor Troubleshoot Color Management GeForce 9100M G Monitor Type Generic PnP Monitor Properties Monitor Settings Screen refresh rate: 60 Hertz Hide modes that this monitor cannot display Clearing this check box allows you to select display modes that this monitor cannot display correctly. This may lead to an invalid display and/or damaged hardware. Colors: True Color (32 bit) OK Cancel Apply7. Click the "Driver" tab.

text_image
Generic PnP Monitor Properties General Driver Details Generic PnP Monitor Driver Provider: Microsoft Driver Date: 6/21/2006 Driver Version: 6.1.7600.16385 Digital Signer: Microsoft Windows Driver Details To view details about the driver files. Update Driver: To update the driver software for this device. Roll Back Driver: If the device fails after updating the driver, roll back to the previously installed driver. Disable Disables the selected device. Uninstall To uninstall the driver (Advanced). OK Cancel- Open the "Update Driver Software-Generic PnP Monitor" window by clicking on "Update Driver... "and then click the "Browse my computer for driver software" button.
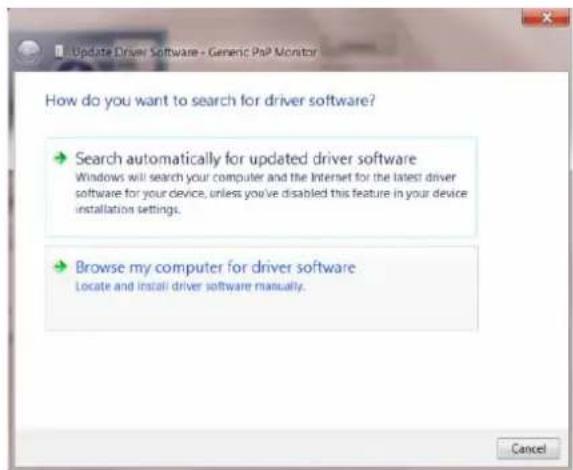
text_image
Update Driver Software - Generic PaP Monitor How do you want to search for driver software? → Search automatically for updated driver software Windows will search your computer and the Internet for the latest driver software for your device, unless you've disabled this feature in your device installation settings. → Browse my computer for driver software Locate and install driver software manually. Cancel- Select "Let me pick from a list of device drivers on my computer".
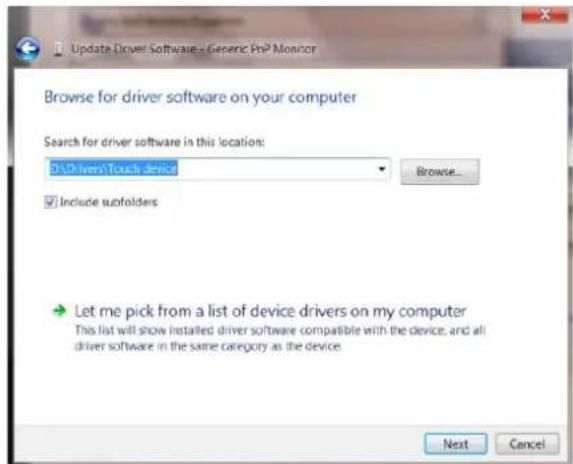
text_image
Update Driver Software - Generic PoP Monitor Browse for driver software on your computer Search for driver software in this location: D:\Driver\Touch device Include subfolders Let me pick from a list of device drivers on my computer This list will show installed driver software compatible with the device, and all driver software in the same category as the device. Next Cancel- Click the "Have Disk" button. Click on the "Browse" button and navigate to the following directory: X:\Driver\module name (where X is the drive letter designator for the CD-ROM drive).
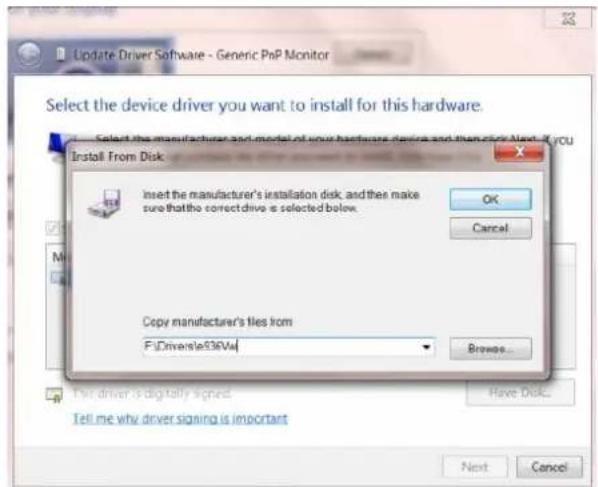
text_image
Update Driver Software - Generic PnP Monitor Select the device driver you want to install for this hardware. Select the manufacturer and model of your hardware device and then click Next if you Install From Disk Insert the manufacturer's installation disk and then make sure that the correct drive is selected below. OK Cancel Copy manufacturer's files from F:\Driver\e536V4\ Browse... For driver is digitally signed. Have Disk... Tell me why driver signing is important Next Cancel- Select the "xxx.inf" file and click the "Open" button. Click the "OK" button.
- Select your monitor model and click the "Next" button. The files will be copied from the CD to your hard disk drive.
- Close all open windows and remove the CD.
- Restart the system. The system will automatically select the maximum refresh rate and corresponding Color Matching Profiles.
Windows Vista
- Click "Start" and "Control Panel". Then, double-click on "Appearance and Personalization".
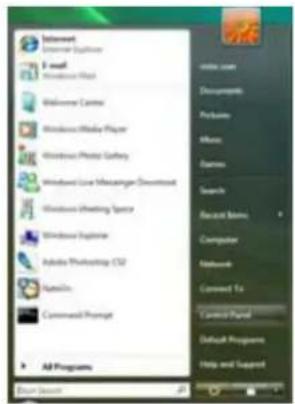
text_image
Microsoft Start Menu E-mail Microsoft Outlook Windows Control Windows Outlook Player Windows Photo Gallery Windows Live Miscellaneous Desired Windows Offering Space Windows Explorer Adobe Photoshop CS2 Special Teams Command Prompt All Programs Stop Search end to start end to end end to start end to end end to start end to end end to start end to end end to start end to end end to start end to end end to start end to end end to start end to end end to start end to end end to start end to end end to start end to end end to start end to end end to start end to end end to begin end to end end to begin end to begin end to begin end to begin end to begin end to begin end to begin end to begin end to begin end to begin end to begin end to begin end to begin end to begin end to begin end to begin end to begin end to begin end to begin end to begin end to begin end to begin end to begin end to begin end to begin end to end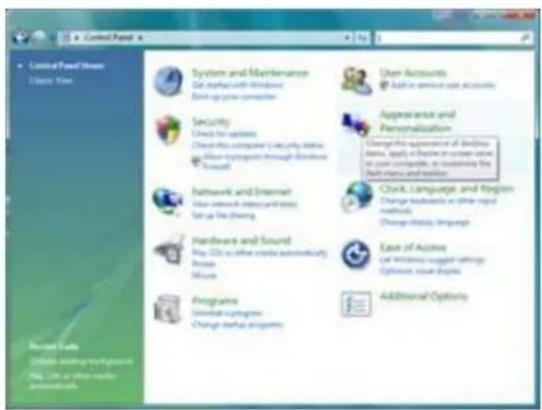
text_image
Control Panel Share History View System and Maintenance Get further with Windows Save up your computer Security Check for options Check this computer's security details Close up your computer through Windows Network and Internet Use network icons and tools Set up the sharing Hardware and Sound Play iOS to effect music automatically Focus Music Programs Download programs Change desktop programs User Accounts Add to ensure user accounts Appearance and Personalization Change the appearance of building tools, apply, or create a server unit to your computer, as maintaining the Debt menu and list. Clock, Language and Foreign Change techniques or other key methods Change closing language Case of Actions Get Windows shortcut settings Options: user interface Additional Options- Click "Personalization" and then "Display Settings".
text_image
C:\Users\Prel & Impactions and Personalization Recommendation Change in the background Change in the background Change in the background Language and Social Language and Social Language and Social Language and Social Language and Social Language and Social Language and Social Language and Social Language and Social Language and Social Language and Social Language and Social Language and Social Language and Social Language and Social Language and Social Language and Social Language and Social Language and Social Language and Social Language and Social Language and Social Language and Social Language and Social Language and Social Language and Political Language and Political Language and Political Language and Political Language and Political Language and Political Language and Political Language and Political Language and Political Language and Political Language and Political Language and Political Language and Political Language and Political Language and Political Language and Political Language and Political Language and Political Language and Political Language and Political Language and Political Language and Political Language and Political Language and Political Language and Political Language and Physical Language and Physical Language and Physical Language and Physical Language and Physical Language and Physical Language and Physical Language and Physical Language and Physical Language and Physical Language and Physical Language and Physical Language and Physical Language and Physical Language and Physical Language and Physical Language and Physical Language and Physical Language and Physical Language and Physical Language and Physical Language and Physical Language and Physical Language and Physical Language and Physical Language and Political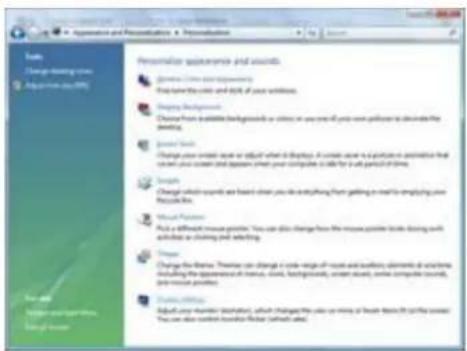
text_image
Appetition and Personalization Personalization appertensive and accurate General Online Appetitions Find that the code and key of your activities. Display Background Choose from available backgrounds or colors in your own file you have been used to create the meeting. Green Text Change your content type or subject what it displays. It can change to a particular application that creates your content and appears to use your computer to guide the link between the time. Scripts Change which sounds are heard when you are anything from getting an email to implying your resources. Visual Function Make a different mouse picture. You can also change from the mouse picture table drawing off each article as clicking and editing. Theme Change the theme. Theme can change in color range of image and brightness elements of text, including the appearance of theme, color, background, color, and other computer images. Video effects Adjust your audience's attention, which changes the color size of fresh items (if the content. You can also control the audience's traffic).- Click "Advanced Settings...".
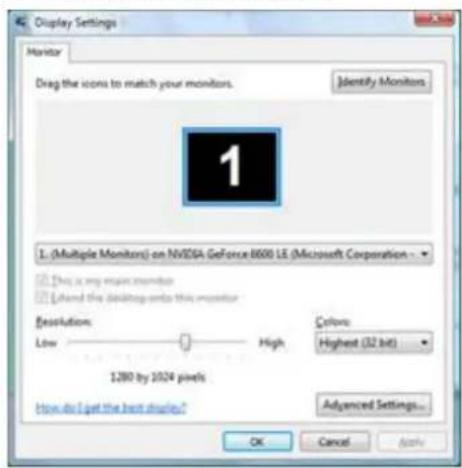
text_image
Display Settings Monitor Drag the icons to match your monitors. Identify Monitors 1 (Multiple Monitors) on NVIDIA GeForce 8600 LE (Microsoft Corporation) Dry is my main monitor Lshed the desktop-only this monitor Resolution: Low High 1280 by 1024 pixels Colors: Highest (32 bit) How do I get the best display? Advanced Settings... OK Cancel Apply- Click "Properties" in the "Monitor" tab. If the "Properties" button is deactivated, it means the configuration for your monitor is completed. The monitor can be used as is.
If the message "Windows needs..." is displayed, as shown in the figure below, click "Continue".
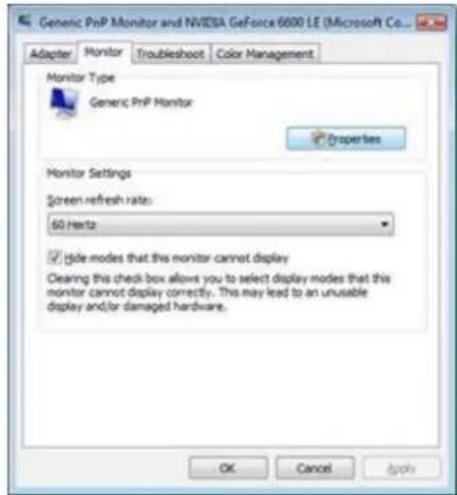
text_image
Generic PrnP Monitor and NVIDIA GeForce 6000 LE (Microsoft Co... Adapter Monitor Troubleshoot Color Management Monitor Type Generic PrnP Monitor Properties Monitor Settings Screen refresh rate: 60 Hertz ✓ Hide modes that this monitor cannot display Clearing this check box allows you to select display modes that this monitor cannot display correctly. This may lead to an unusable display and/or damaged hardware. OK Cancel Apply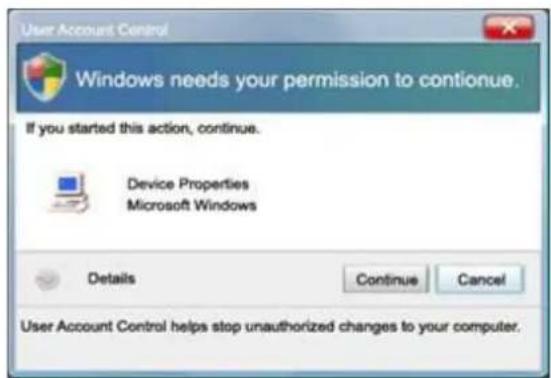
text_image
User Account Control Windows needs your permission to continue. If you started this action, continue. Device Properties Microsoft Windows Details Continue Cancel User Account Control helps stop unauthorized changes to your computer.- Click "Update Driver..." in the "Driver" tab.
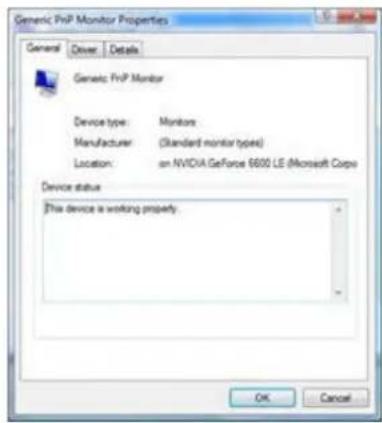
text_image
Generic PrGP Monitor Properties General Driver Details Generic PrGP Monitor Device type: Monitors Manufacturer: (Standard monitor types) Location: on NVIDIA GeForce 6600 LE (Microsoft Corp) Device status This device is working property. OK Cancel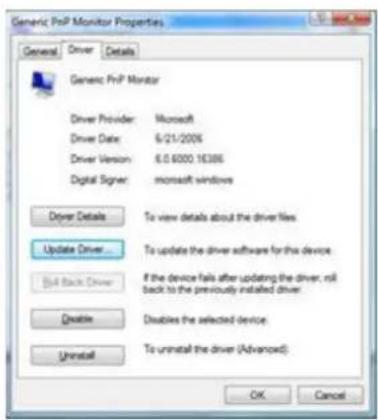
text_image
Generic PrnP Monitor Properties General Driver Details Generic PrnP Monitor Driver Provider: Microsoft Driver Date: 6/21/2006 Driver Version: 6.0 6000 16386 Digital Signer: microsoft windows Driver Details To view details about the driver files Update Driver... To update the driver software for this device Build Back Driver If the device fails after updating the driver, will back to the previously installed driver Enable Disables the selected device Uninstall To uninstall the driver (Advanced) OK Cancel- Check the "Browse my computer for driver software" checkbox and click "Let me pick from a list of device drivers on my computer".
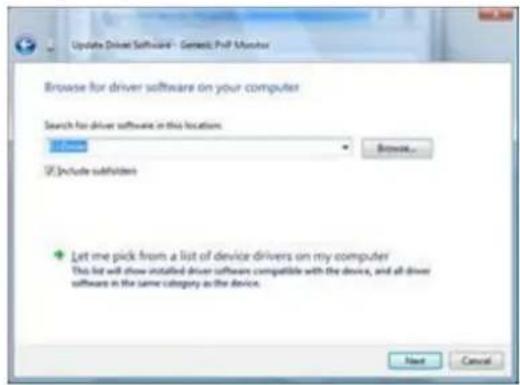
text_image
Update Driver Software - Semest Prof Monitor Browse for driver software on your computer Search for driver software in this location Browse... If Include subfolders Let me pick from a list of device drivers on my computer This list will show installed driver software compatible with the device, and all driver software in the same category as the device. Next Cancel- Click on the 'Have disk...' button, then click on the 'Browse...' button and then select the appropriate drive F:\Driver (CD-ROM Drive).
- Select your monitor model and click on the 'Next' button.
- Click "Close" → "Close" → "OK" → "OK" on the following screens displayed in sequence.
Windows XP
- Start Windows® XP
- Click on the 'Start' button and then click on 'Control Panel'.
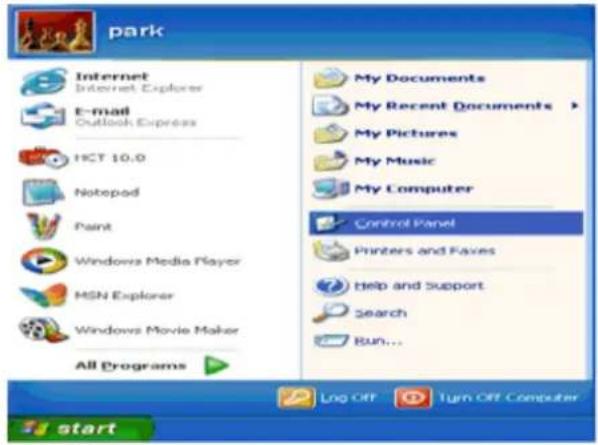
text_image
park Internet Internet Explorer E-mail Outlook Express HCT 10.0 Notepad Paint Windows Media Player MSN Explorer Windows Movie Maker All Programs My Documents My Recent Documents > My Pictures My Music My Computer Control Panel Printers and Faxes help and Support Search Run... Log Off Turn Off Computer start- Select and click on the category 'Appearance and Themes'
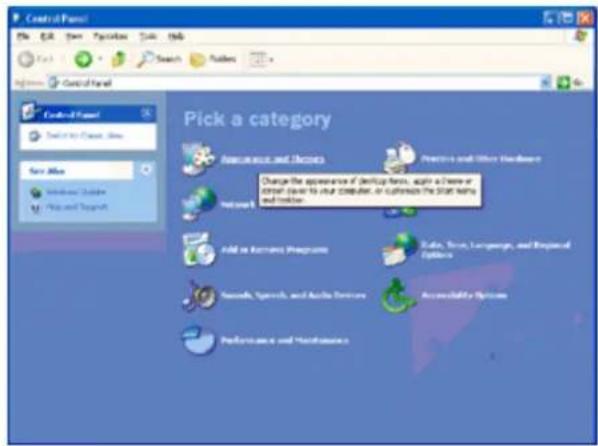
text_image
Control Panel Find it in Open, Save Save Active Internet Options Find and Assign Pick a category Resource and Devices Practice and Other Hardware Change the appearance of desktop fans, again a time or clock prior to your computer, or refresh the Start Wang and more. Networks Add or Remove Programs Sales, Text, Languages, and Optional Options Smooth, Speech, and Audio Timms Accessibility Options Performance and Maintenance- Click on the 'Display' Item.
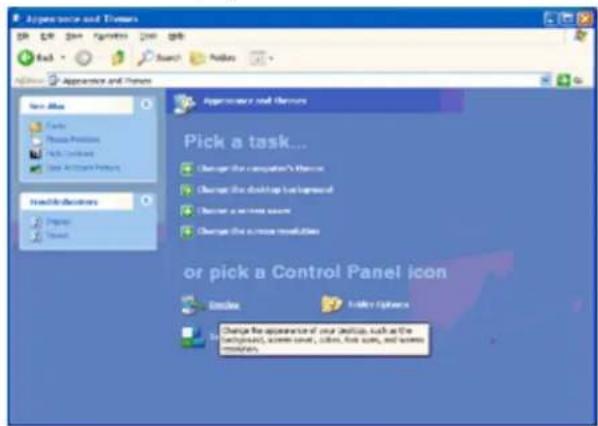
text_image
Applications and Patterns New Office Tools Physics Properties MAC Structures Data Architecture Properties New Office Patterns Preview Preview Applications and Patterns Pick a task... Change the computer's features Change the desktop background Change the next session Change the more resolution or pick a Control Panel icon Actions Make Options Change the appearance of your items, such as the background, screen color, colors, font colors, and screen colors.- Select the 'Settings' tab then click on the 'Advanced' button.
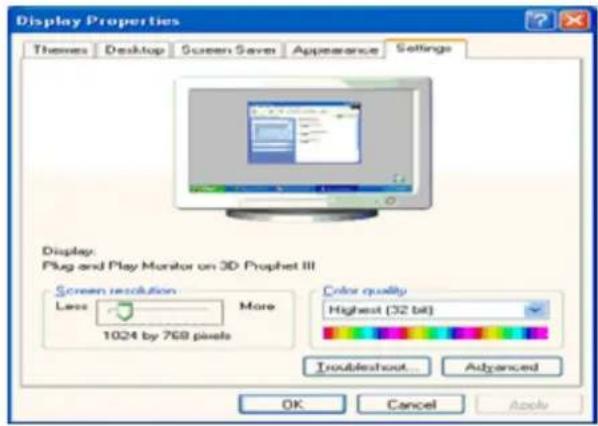
text_image
Display Properties Themes Desktop Screen Save Appearance Settings Display: Plug and Play Monitor on 3D Prophet III Screen resolution More Less 1024 by 768 pixels Color quality Highest (32 bit) Troubleshoot... Advanced OK Cancel Apply-
Select 'Monitor' tab
-
If the 'Properties' button is inactive, it means your monitor is properly configured. Please stop installation.
- If the 'Properties' button is active, click on 'Properties' button.
Please follow the steps below.

text_image
Plug and Play Monitor and 3D Prophet III Properties GeForce3 Device Selection Color Correction General Adapter Monitor Troubleshoot Color Management Monitor type Plug and Play Monitor Properties Monitor settings Screen refresh rate: 60 Hertz Hide modes that this monitor cannot display Clearing this check box allows you to select display modes that this monitor cannot display correctly. This may lead to an unusable display and/or damaged hardware. OK Cancel Apply- Click on the 'Driver' tab and then click on 'Update Driver...' button.
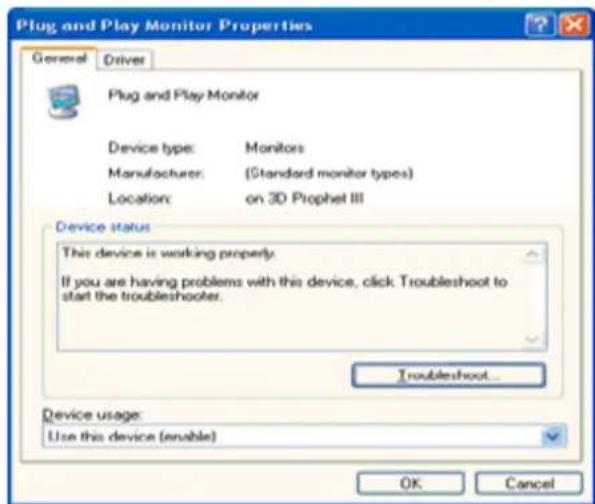
text_image
Plug and Play Monitor Properties General Driver Plug and Play Monitor Device type: Monitors Manufacturer: (Standard monitor types) Location:on 3D Prophet III Device status This device is working properly. If you are having problems with this device, click Troubleshoot to start the troubleshooter. Troubleshoot... Device usage: Use this device (enable) OK Cancel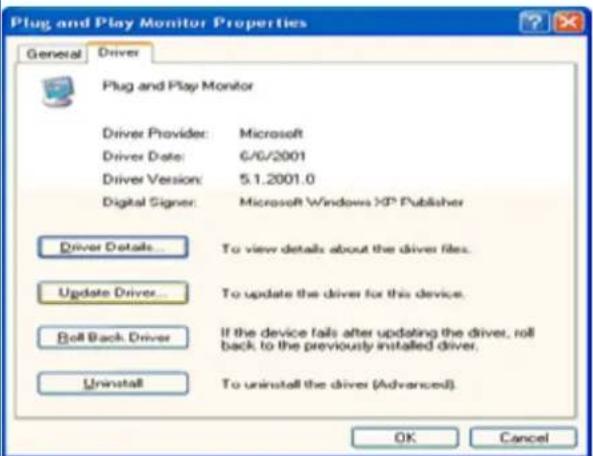
text_image
Plug and Play Monitor Properties General Driver Plug and Play Monitor Driver Provider: Microsoft Driver Date: 6/6/2001 Driver Version: 5.1.2001.0 Digital Signer: Microsoft Windows XP Publisher Driver Details... To view details about the driver files. Update Driver... To update the driver for this device. Roll Back Driver If the device fails after updating the driver, roll back to the previously installed driver. Uninstall To uninstall the driver (Advanced). OK Cancel- Select the 'Install from a list or specific location [advanced]' radio button and then click on the 'Next' button.
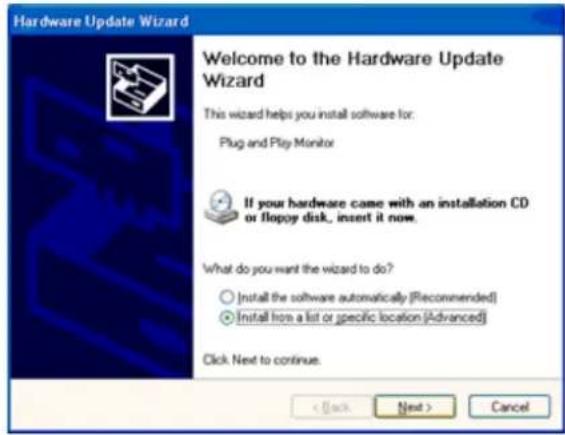
text_image
Hardware Update Wizard Welcome to the Hardware Update Wizard This wizard helps you install software for: Plug and Play Monitor If your hardware came with an installation CD or floppy disk, insert it now. What do you want the wizard to do? ○ Install the software automatically (Recommended) ● Install from a list or specific location (Advanced) Click Next to continue. < Back Next > Cancel- Select the 'Don't Search. I will choose the driver to install' radio button. Then click on the 'Next' button.
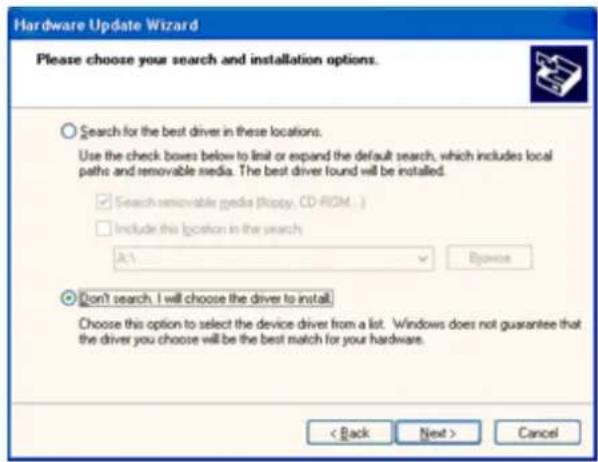
text_image
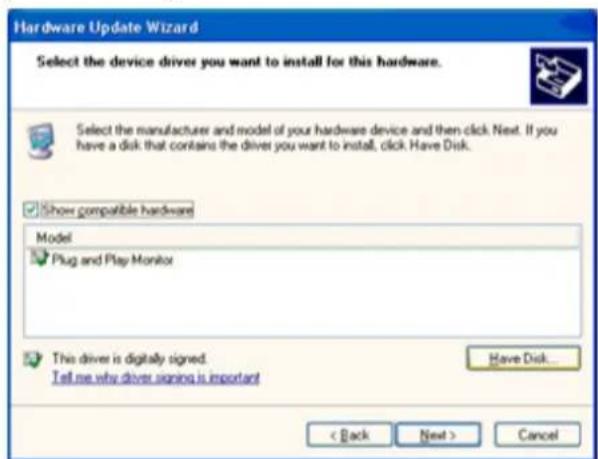
Hardware Update Wizard Please choose your search and installation options. Search for the best driver in these locations. Use the check boxes below to limit or expand the default search, which includes local paths and removable media. The best driver found will be installed. ✓ Search removable media (Hopy, CD-ROM...) Include this location in the search A:\ Browse Don't search. I will choose the driver to install. Choose this option to select the device driver from a list. Windows does not guarantee that the driver you choose will be the best match for your hardware. < Back Next > Cancel- Click on the 'Have disk...' button, then click on the 'Browse...' button and then select the appropriate drive F: (CD-ROM Drive).
text_image
Hardware Update Wizard Select the device driver you want to install for this hardware. Select the manufacturer and model of your hardware device and then click Next. If you have a disk that contains the driver you want to install, click Have Disk. Show compatible hardware Model Plug and Play Monitor This driver is digitally signed. Tell me why driver signing is important Have Disk... < Back Next > Cancel- Click on the 'Open' button, then click the 'OK' button.
- Select your monitor model and click on the 'Next' button.
- If you can see the 'has not passed Windows® Logo testing to verify its compatibility with Windows® XP' message, please click on the 'Continue Anyway' button.
- Click on the 'Finish' button then the 'Close' button.
- Click on the 'OK' button and then the 'OK' button again to close the Display Properties dialog box.
Windows 2000
- Start Windows® 2000
- Click on the 'Start' button, point to 'Settings', and then click on 'Control Panel'.
- Double click on the 'Display' Icon.
- Select the 'Settings' tab then click on 'Advanced...'.
- Select 'Monitor'
- If the 'Properties' button is inactive, it means your monitor is properly configured. Please stop installation.
- If the 'Properties' button is active. Click on 'Properties' button. Please follow the steps given below.
- Click on 'Driver' and then click on 'Update Driver...' then click on the 'Next' button.
- Select 'Display a list of the known drivers for this device so that I can choose a specific driver', then click on 'Next' and then click on 'Have disk...'.
- Click on the 'Browse...' button then select the appropriate drive F: (CD-ROM Drive).
- Click on the 'Open' button, then click on the 'OK' button.
- Select your monitor model and click on the 'Next' button.
- Click on the 'Finish' button then the 'Close' button.
If you can see the 'Digital Signature Not Found' window, click on the 'Yes' button.
Windows ME
- Start Windows® Me
- Click on the 'Start' button, point to 'Settings', and then click on 'Control Panel'.
- Double click on the 'Display' Icon.
- Select the 'Settings' tab then click on 'Advanced...'.
- Select the 'Monitor' button, then click on 'Change...' button.
- Select 'Specify the location of the driver(Advanced)' and click on the 'Next' button.
- Select 'Display a list of all the drivers in a specific location, so you can choose the driver you want', then click on 'Next' and then click on 'Have Disk...'.
- Click on the 'Browse...' button, select the appropriate drive F: (CD-ROM Drive) then click on the 'OK' button.
- Click on the 'OK' button, select your monitor model and click on the 'Next' button.
- Click on 'Finish' button then the 'Close' button.
i-Menu

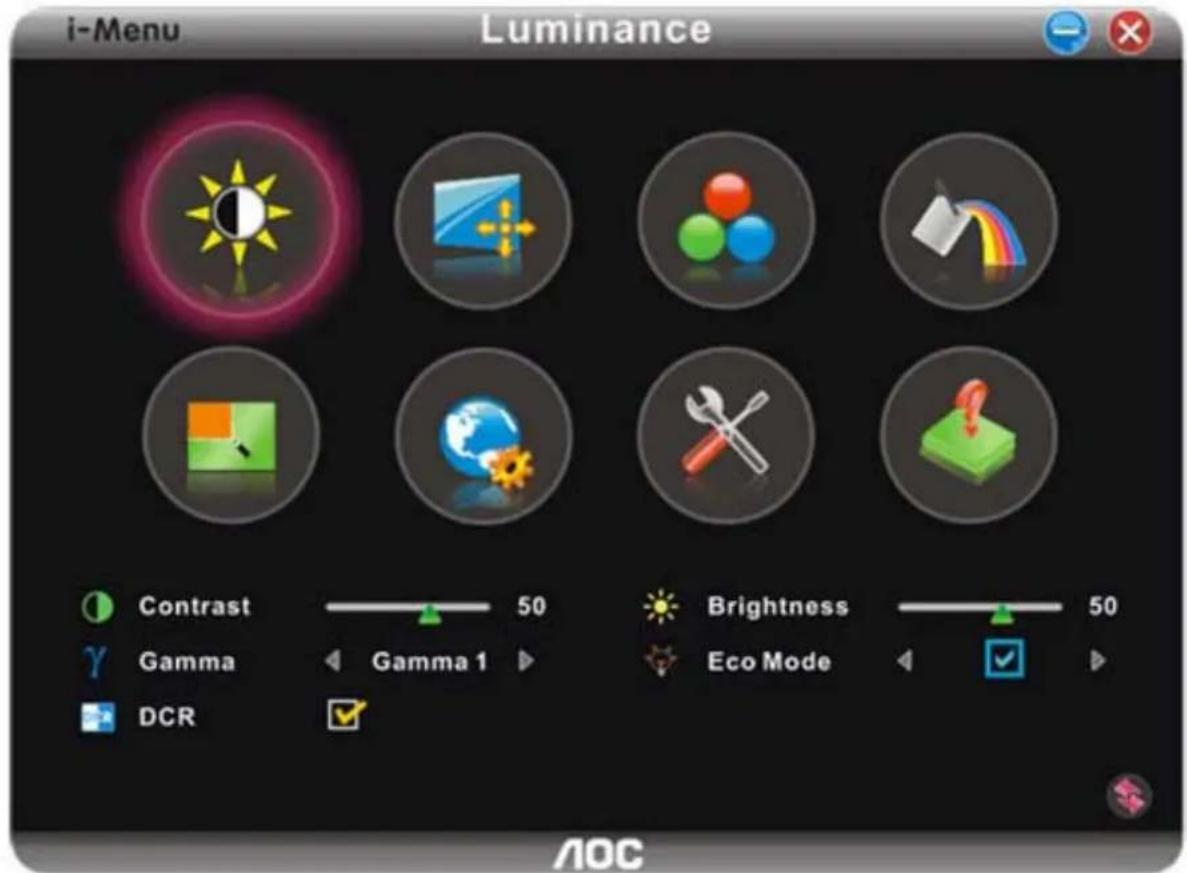
Welcome to "i-Menu" software by AOC. i-Menu makes it easy to adjust your monitor display setting by using on screen menus instead of the OSD button on the monitor. To complete installation, please follow the installation guide.
text_image
i-Menu Luminance Contrast 50 Brightness 50 Gamma Gamma 1 Eco Mode DCR AOCe-Saver

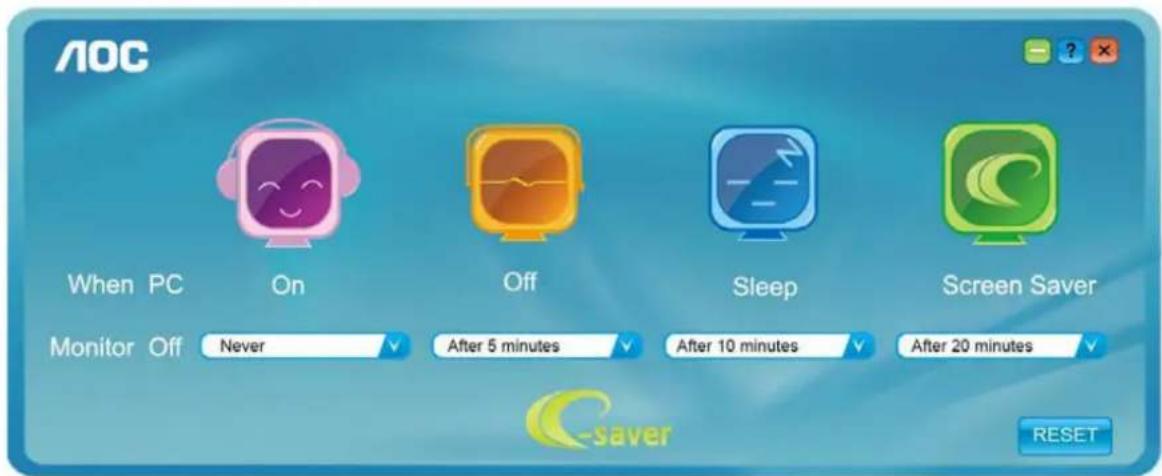
Welcome to use AOC e-Saver monitor power management software! The AOC e-Saver features Smart Shutdown functions for your monitors, allows your monitor to timely shutdown when PC unit is at any status (On, Off, Sleep or Screen Saver); the actual shutdown time depends on your preferences (see example below).
Please click on "driver/e-Saver/setup.exe" to start installing the e-Saver software, follow the install wizard to complete software installation.
Under each of the four PC status, you may choose from the pull-down menu the desired time (in minutes) for your monitor to automatically shutdown. The example above illustrated:
1) The monitor will never shutdown when the PC is powered on.
2) The monitor will automatically shutdown 5 minutes after the PC is powered off.
3) The monitor will automatically shutdown 10 minutes after the PC is in sleep/stand-by mode.
4) The monitor will automatically shutdown 20 minutes after the screen saver appears.
text_image
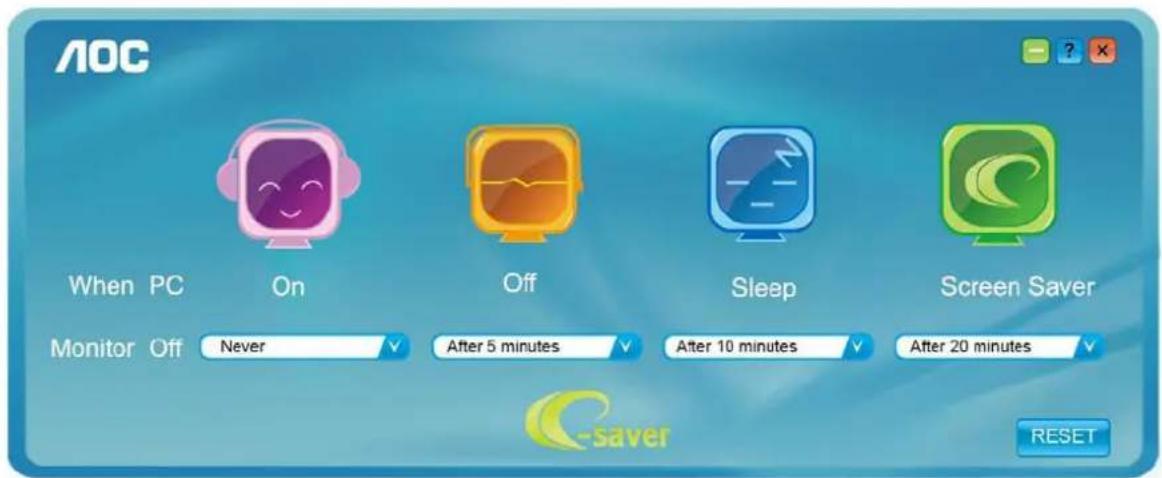
AOC When PC On Off Sleep Screen Saver Monitor Off Never After 5 minutes After 10 minutes After 20 minutes C-saver RESETYou can click "RESET" to set the e-Saver to its default settings like below.
text_image
AOC When PC On Off Sleep Screen Saver Monitor Off Never After 5 minutes After 10 minutes After 20 minutes C-saver RESETScreen+
Welcome to "Screen+" software by AOC, Screen+ software is a desktop screen splitting tool, it splits the desktop into different panes, each pane displays a different window. You only need to drag the window to a corresponding pane, when you want to access it. It supports multiple monitor display to make your task easier. Please follow the installation software to install it.

text_image
×□□日□□□□Troubleshoot
| Problem & Question | Possible Solutions |
| Power LED Is Not ON | Make sure the power button is ON and the Power Cord is properly connected to a grounded power outlet and to the monitor. |
| No images on the screen | Is the power cord connected properly?Check the power cord connection and power supply.Is the cable connected correctly?(Connected using the D-sub cable)Check the DB-15 cable connection.(Connected using the DVI cable)Check the DVI cable connection.* DVI input is not available on every model.If the power is on, reboot the computer to see the initial screen (the login screen), which can be seen.If the initial screen (the login screen) appears, boot the computer in the applicable mode (the safe mode for Windows ME/XP/2000) and then change the frequency of the video card.(Refer to the Setting the Optimal Resolution)If the initial screen (the login screen) does not appear, contact the Service Center or your dealer.Can you see "Input Not Supported" on the screen?You can see this message when the signal from the video card exceeds the maximum resolution and frequency that the monitor can handle properly.Adjust the maximum resolution and frequency that the monitor can handle properly.Make sure the AOC Monitor Drivers are installed. |
| Picture Is Fuzzy & Has Ghosting Shadowing Problem | Adjust the Contrast and Brightness Controls.Press to auto adjust.Make sure you are not using an extension cable or switch box. We recommend plugging the monitor directly to the video card output connector on the back . |
| Picture Bounces, Flickers Or Wave Pattern Appears In The Picture | Move electrical devices that may cause electrical interference as far away from the monitor as possible.Use the maximum refresh rate your monitor is capable of at the resolution your are using. |
| Monitor Is Stuck In Active Off-Mode" | The Computer Power Switch should be in the ON position.The Computer Video Card should be snugly fitted in its slot.Make sure the monitor's video cable is properly connected to the computer.Inspect the monitor's video cable and make sure no pin is bent.Make sure your computer is operational by hitting the CAPS LOCK key on the keyboard while observing the CAPS LOCK LED. The LED should either turn ON or OFF after hitting the CAPS LOCK key. |
| Missing one of the primary colors (RED, GREEN, or BLUE) | Inspect the monitor's video cable and make sure that no pin is damaged.Make sure the monitor's video cable is properly connected to the computer. |
| Screen image is not centered or sized properly | Adjust H-Position and V-Position or press hot-key (AUTO). |
| Picture has color defects (white does not look white) | Adjust RGB color or select desired color temperature. |
| Horizontal or vertical disturbances on the screen | Use Windows 95/98/2000/ME/XP shut-down mode Adjust CLOCK and FOCUS.Press to auto-adjust. |
Specification
General Specification
| Panel | Model name 2757F | I H |
| Driving system TFT Color LCD | ||
| Viewable Image Size | 686.00mm Diagonal | |
| Pixel pitch | 0.1038*RGB(H)mm x 0.3114 (V)mm | |
| Video R, G, B Analog Interface ,HDMI | ||
| Separate Sync. H/V TTL | ||
| Display Color 16.7M Colors | ||
| Dot Clock 170MHz | ||
| Resolution | Horizontal scan range 30kHz to 83kHz | |
| Horizontal scan Size(Maximum) | 597.8mm | |
| Vertical scan range 50Hz to 76Hz | ||
| Vertical scan Size(Maximum) 386.3mm | ||
| Optimal preset resolution 1920×1080@60Hz | ||
| Plug & Play VESA DDC2B/C1 | ||
| Input Connector VGA,HDMI×2 | ||
| Input Video Signal | Analog: 0.7Vp-p(standard), 75 OHM, Positive , HDMI | |
| Power Source | 100-240V~, 50/60Hz | |
| Power Consumption | Active<40W(Typical) | |
| Standby < 0.5 W | ||
| Off timer | 0-24 hrs | |
| Physical Characteristics | Connector Type | VGA、HDMI×2 |
| Signal Cable Type | Detachable | |
| Dimensions & Weight: | ||
| Height (with base) | 449mm | |
| Width | 622mm | |
| Depth | 130mm | |
| Weight (monitor only) | 5.7kg | |
| Weight (with packaging) | 7.95kg | |
| Environmental | Temperature:Operating 0° to 40° | |
| Non-Operating -25° to 55° | ||
| Humidity: | ||
| Operating 10% to 85% (non-condensing) | ||
| Non-Operating 5% to 93% (non-condensing) | ||
| Altitude: | ||
| Operating 0~2000m (0~6562 ft) | ||
| Non-Operating 0~12192m (0~40000 ft) | ||
Preset Display Modes
| STAND | Resolution | HORIZONTAL FREQUENCY(kHZ) | VERTICAL FREQUENCY(Hz) |
| VGA | 640x480@60Hz | 31.469 | 59.940 |
| 640x480@72Hz | 37.861 | 72.809 | |
| 640x480@75Hz | 37.500 | 75.00 | |
| SVGA | 800x600@56Hz | 35.156 | 56.250 |
| 800x600@60Hz | 37.879 | 60.317 | |
| 800x600@72Hz | 48.077 | 72.188 | |
| 800x600@75Hz | 46.875 | 75.000 | |
| XGA | 1024x768@60Hz | 48.363 | 60.004 |
| 1024x768@70Hz | 56.476 | 70.069 | |
| 1024x768@75Hz | 60.023 | 75.029 | |
| SXGA | 1280x1024@60Hz | 63.981 | 60.020 |
| 1280x1024@75Hz | 79.976 | 75.025 | |
| WXGA+ | 1440x900@60Hz | 55.935 | 59.887 |
| WSXGA | 1680x1050@60Hz | 65.290 | 59.954 |
| HD | 1920x1080@60Hz | 67.500 | |
| *** | 1280x960@60HZ | 60.000 | 60.000 |
| IBM MODE DOS | 640x350@70Hz | 31.469 | 70.087 |
| 720x400@70Hz | 31.469 | 70.087 | |
| MAC MODE VGA | 640x480@67Hz | 35.000 | 66.667 |
60.000
| MAC MODE SVGA | 832x624@75Hz | 49.725 | 74.551 |
| MAC MODE XGA | 1024x768@75Hz | 60.241 | 74.927 |
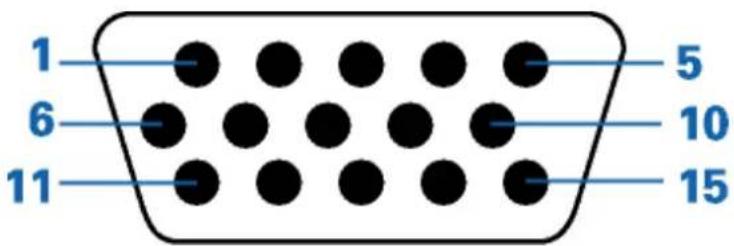
Pin Assignments
text_image
1 6 11 5 10 15| Pin Number 15-Pin Side of the Signal Cable | |
| 1 Video-Red | |
| 2 Video-Green | |
| 3 Video-Blue | |
| 4 N.C. | |
| 5 Detect Cable | |
| 6 GND-R | |
| 7 GND-G | |
| 8 GND-B | |
| 9 +5V | |
| 10 Ground | |
| 11 N.C. | |
| 12 DDC-Serial data | |
| 13 H-sync | |
| 14 V-sync | |
| 15 DDC-Serial clock | |
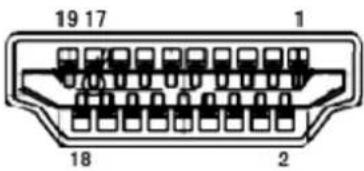
text_image
19 17 1 18 2| Pin No. | Signal Name | Pin No. | Signal Name | Pin No. | Signal Name |
| 1 TM | DS Data 2+ 9 TMDS Data 0 17 | DDC/CEC Ground | |||
| 2 | TMDS Data 2 Shield | 10 | TMDS Clock + | 18 | +5V Power |
| 3 | TMDS Data 2 | 11 TM | MDS Clock Shield 19 | Hot Plug | Detect |
| 4 TM | DS Data 1+ 12 | TMDS Clock | |||
| 5 TM | DS Data 1Shield | 13 CEC | |||
| 6 | TMDS Data 1 | 14 | Reserved (N.C. on device | ||
| 7 TM | DS Data 0+ 15 SCL | ||||
| 8 TM | DS Data 0 Shield 16 SDA |
Plug and Play
Plug & Play DDC2B Feature
This monitor is equipped with VESA DDC2B capabilities according to the VESA DDC STANDARD. It allows the monitor to inform the host system of its identity and, depending on the level of DDC used, communicate additional information about its display capabilities.
The DDC2B is a bi-directional data channel based on the I2C protocol. The host can request EDID information over the DDC2B channel.
Regulation
FCC Notice
FCC Class B Radio Frequency Interference Statement WARNING: (FOR FCC CERTIFIED MODELS)
NOTE: This equipment has been tested and found to comply with the limits for a Class B digital device, pursuant to Part 15 of the FCC Rules. These limits are designed to provide reasonable protection against harmful interference in a residential installation. This equipment generates, uses and can radiate radio frequency energy, and if not installed and used in accordance with the instructions, may cause harmful interference to radio communications. However, there is no guarantee that interference will not occur in a particular installation. If this equipment does cause harmful interference to radio or television reception, which can be determined by turning the equipment off and on, the user is encouraged to try to correct the interference by one or more of the following measures:
Reorient or relocate the receiving antenna.
Increase the separation between the equipment and receiver.
Connect the equipment into an outlet on a circuit different from that to which the receiver is connected.
Consult the dealer or an experienced radio/TV technician for help.
NOTICE :
The changes or modifications not expressly approved by the party responsible for compliance could void the user's authority to operate the equipment.
Shielded interface cables and AC power cord, if any, must be used in order to comply with the emission limits.
The manufacturer is not responsible for any radio or TV interference caused by unauthorized modification to this equipment. It is the responsibilities of the user to correct such interference. It is the responsibility of the user to correct such interference.
CE Declaration of Conformity
i ro ct i in conformity it t e follo in tan ar
• EN60950-1:2006 and A11+A1 (Safety requirement of Information Technology Equipment).
• EN 55022:2006+A1: 2007 (Radio Disturbance requirement of Information Technology Equipment).
• EN55024:1998+A1:2001+A2:2003 (Immunity requirement of Information Technology Equipment).
• EN 61000-3-2:2006+A1: 2009+A2: 2009 (Harmonic current emissions).
- EN 61000-3-3:2008 (Voltage fluctuations & flicker) following provisions of directives applicable.
• 2006/95/EC (Low Voltage Directive).
• 2004/108/EC (EMC Directive).
- 2005/32/EC (EuP Directive, EC No. 1275/2008 implementing Directive for Standby and Off mode power consumption) and is produced by a manufacturing organization on ISO9000 level.
WEEE Declaration
Disposal of Waste Equipment by Users in Private Household in the European Union.
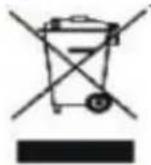
This symbol on the product or on its packaging indicates that this product must not be disposed of with your other household waste. Instead, it is your responsibility to dispose of your waste equipment by handing it over to a designated collection point for the recycling of waste electrical and electronic equipment. The separate collection and recycling of your waste equipment at the time of disposal will help to conserve natural resources and ensure that it is recycled in a manner that protects human health and the environment. For more information about where you can drop off your waste equipment for recycling, please contact your local city office, your household waste disposal service or the shop where you purchased the product.

WEEE/E-Waste declaration for India

This symbol on the product or on its packaging indicates that this product must not be disposed of with your other household waste. Instead, it is your responsibility to dispose of your waste equipment by handing it over to a designated collection point for the recycling of waste electrical and electronic equipment. The separate collection and recycling of your waste equipment at the time of disposal will help to conserve natural resources and ensure that it is recycled in a manner that protects human health and the environment. For more information about where you can drop off your waste equipment for recycling in India, please visit the below web link.
www.aocindia.com/ewaste.php
Service
Warranty Statement for Europe
LIMITED THREE-YEAR WARRANTY*
AOC Color Monitors sold within Europe
AOC International (Europe) BV warrants this product to be free from defects in material and workmanship for a period of Three (3) years after the original date of consumer purchase. During this period, AOC International (Europe) BV will, at its option, either repair the defective product with new or rebuilt parts, or replace it with a new or rebuilt product at no charge except as *stated below. The defective products that are replaced become the property of AOC International (Europe) BV.
If the product appears to be defective, please contact your local dealer or refer to the warranty card when attached to the product.
Deliver the dated proof of purchase to the AOC Authorized Service Center.
If you cannot deliver the product in person:
• Pack it in its original shipping container (or equivalent)
- Put the RMA number on the address label
- Put the RMA number on the shipping carton
• Insure it (or assume the risk of loss/damage during shipment)
• Pay all shipping charges
AOC International (Europe) BV is responsible neither for any damage or loss during inbound transport damage nor to inbound product that was not properly packaged.
AOC International (Europe) BV will pay the return shipping charges within one of the countries specified within this warranty statement. AOC International (Europe) BV is not responsible for any costs associated with the transportation of product across international borders. This includes the international border within the European Union.
* This limited warranty does not cover any losses or damages that occur as a result of
• Shipping or improper installation or maintenance
- Misuse
- Neglect
- Any cause other than ordinary commercial or industrial application
- Adjustment by non-authorized source
• Repair, modification, or installation of options or parts by anyone other than an AOC Authorized Service Center
- Improper environment
• Excessive or inadequate heating or air conditioning or electrical powers failures, surges, or other irregularities
This limited warranty does not cover any of the product firmware or hardware that you or any third party have
modified or altered; you bear the sole responsibility and liability for any such modification or alteration.
ALL EXPRESS AND IMPLIED WARRANTIES FOR THIS PRODUCT (INCLUDING THE WARRANTIES OF MERCHANTABILITY AND FITNESS FOR A PARTICULAR PURPOSE) ARE LIMITED IN DURATION TO A PERIOD OF THREE (3) YEARS FOR PARTS AND LABOR FROM THE ORIGINAL DATE OF CONSUMER PURCHASE. NO WARRANTIES (EITHER EXPRESSED OR IMPLIED) APPLY AFTER THIS PERIOD.
AOC INTERNATIONAL (EUROPE) BV OBLIGATIONS AND YOUR REMEDIES HEREUNDER ARE SOLELY AND EXCLUSIVELY AS STATED HERE. AOC INTERNATIONAL (EUROPE) BV LIABILITY, WHETHER BASED ON CONTRACT, TORT, WARRANTY, STRICT LIABILITY, OR OTHER THEORY, SHALL NOT EXCEED THE PRICE OF THE INDIVIDUAL UNIT WHOSE DEFECT OR DAMAGE IS THE BASIS OF THE CLAIM. IN NO EVENT SHALL AOC INTERNATIONAL (EUROPE) BV BE LIABLE FOR ANY LOSS OF PROFITS, LOSS OF USE OR FACILITIES OR EQUIPMENT, OR OTHER INDIRECT, INCIDENTAL, OR CONSEQUENTIAL DAMAGE. SOME STATES DO NOT ALLOW THE EXCLUSION OR LIMITATION OF INCIDENTAL OR CONSEQUENTIAL DAMAGES, SO THE ABOVE LIMITATION MAY NOT APPLY TO YOU. ALTHOUGH THIS LIMITED WARRANTY GIVES YOU SPECIFIC LEGAL RIGHTS, YOU MAY HAVE OTHER RIGHTS, WHICH MAY VARY FROM COUNTRY TO COUNTRY. THIS LIMITED WARRANTY IS ONLY VALID FOR PRODUCTS PURCHASED IN THE MEMBER COUNTRIES OF THE EUROPEAN UNION.
Information in this document is subject to change without notice.
For more details, please visit: http://www.aoc-europe.com/en/service/index.php
Warranty Statement for North & South America (excluding Brazil)
WARRANTY STATEMENT
for AOC Color Monitors
Including those Sold within North America as Specified
Envision Peripherals, Inc. warrants this product to be free from defects in material and workmanship for a period of three (3) years for parts & labor and one (1) year for CRT Tube or LCD Panel after the original date of consumer purchase. During this period, EPI (EPI is the abbreviation of Envision Peripherals, Inc.) will, at its option, either repair the defective product with new or rebuilt parts, or replace it with a new or rebuilt product at no charge except as *stated below. The parts or product that are replaced become the property of EPI.
In the USA to obtain service under this limited warranty, call EPI for the name of the Authorized Service Center closest to your area. Deliver the dated proof of purchase to the EPI Authorized Service Center.
If you cannot deliver the product in person:
- Pack it in its original shipping container (or equivalent)
- Put the RMA number on the address label
- Put the RMA number on the shipping carton
• Insure it (or assume the risk of loss/damage during shipment)
• Pay all shipping charges
EPI is not responsible for damage to inbound product that was not properly packaged.
EPI will pay the return shipment charges within one of the countries specified within this warranty statement. EPI is not responsible for any costs associated with the transportation of product across international borders. This includes the international borders of the countries within this warranty statements.
In the United States and Canada contact your Dealer or EPI Customer Service, RMA Department at the toll free number (888) 662-9888. Or you can request an RMA Number online at www.aoc.com/na-warranty.
* This limited warranty does not cover any losses or damages that occur as a result of:
- Shipping or improper installation or maintenance
- Misuse
- Neglect
• Any cause other than ordinary commercial or industrial application - Adjustment by non-authorized source
• Repair, modification, or installation of options or parts by anyone other than an EPI Authorized Service Center - Improper environment
- Excessive or inadequate heating or air conditioning or electrical power failures, surges, or other irregularities
This three-year limited warranty does not cover any of the product's firmware or hardware that you or any third party have modified or altered; you bear the sole responsibility and liability for any such modification or alteration.
ALL EXPRESS AND IMPLIED WARRANTIES FOR THIS PRODUCT (INCLUDING THE WARRANTIES OF MERCHANTABILITY AND FITNESS FOR A PARTICULAR PURPOSE) ARE LIMITED IN DURATION TO A PERIOD OF THREE (3) YEARS FOR PARTS AND LABOR AND ONE (1) YEAR FOR CRT TUBE OR LCD PANEL FROM THE ORIGINAL DATE OF CONSUMER PURCHASE. NO WARRANTIES (EITHER EXPRESSED OR IMPLIED) APPLY AFTER THIS PERIOD. IN THE UNITED STATES OF AMERICA, SOME STATES DO NOT ALLOW LIMITATIONS ON HOW LONG AN IMPLIED WARRANTY LASTS, SO THE ABOVE LIMITATIONS MAY NOT APPLY TO YOU.
EPI OBLIGATIONS AND YOUR REMEDIES HEREUNDER ARE SOLELY AND EXCLUSIVELY AS STATED HERE. EPI' LIABILITY, WHETHER BASED ON CONTRACT, TORT. WARRANTY, STRICT LIABILITY, OR OTHER THEORY, SHALL NOT EXCEED THE PRICE OF THE INDIVIDUAL UNIT WHOSE DEFECT OR DAMAGE IS THE BASIS OF THE CLAIM. IN NO EVENT SHALL ENVISION PERIPHERALS, INC. BE LIABLE FOR ANY LOSS OF PROFITS, LOSS OF USE OR FACILITIES OR EQUIPMENT OR OTHER INDIRECT, INCIDENTAL, OR CONSEQUENTIAL DAMAGE. IN THE UNITED STATES OF AMERICA, SOME STATES DO NOT ALLOW THE EXCLUSION OR LIMITATION OF INCIDENTAL OR CONSEQUENTIAL DAMAGES. SO THE ABOVE LIMITATION MAY NOT APPLY TO YOU. ALTHOUGH THIS LIMITED WARRANTY GIVES YOU SPECIFIC LEGAL RIGHTS. YOU MAY HAVE OTHER RIGHTS WHICH MAY VARY FROM STATE TO STATE.
In the United States of America, this limited warranty is only valid for Products purchased in the Continental United States, Alaska, and Hawaii.
Outside the United States of America, this limited warranty is only valid for Products purchased in Canada.
Information in this document is subject to change without notice.
For more details, please visit:
USA: http://us.aoc.com/support/warranty
ARGENTINA: http://ar.aoc.com/support/warranty
BOLIVIA: http://bo.aoc.com/support/warranty
CHILE: http://cl.aoc.com/support/warranty
COLOMBIA: http://co.aoc.com/warranty
COSTA RICA: http://cr.aoc.com/support/warranty
DOMINICAN REPUBLIC: http://do.aoc.com/support/warranty
ECUADOR: http://ec.aoc.com/support/warranty
EL SALVADOR: http://sv.aoc.com/support/warranty
GUATEMALA: http://gt.aoc.com/support/warranty
HONDURAS: http://hn.aoc.com/support/warranty
NICARAGUA: http://ni.aoc.com/support/warranty
PANAMA: http://pa.aoc.com/support/warranty
PARAGUAY: http://py.aoc.com/support/warranty
PERU: http://pe.aoc.com/support/warranty
URUGUAY: http://pe.aoc.com/warranty
VENEZUELA: http://ve.aoc.com/support/warranty
IF COUNTRY NOT LISTED: http://latin.aoc.com/warranty

Only for AOC branded monitors sold within the continental United States.
All AOC branded monitors are now covered by the EASE Program. If your monitor malfunctions at any time during the first three months, AOC will provide a replacement monitor within 72 hours after you are approved for our program. If your monitor qualifies for the EASE program, AOC will pay for freight both ways.
Step 1: Phone our TECH Department at 888.662.9888
Step 2: Fill out and return EASE registration forms by mail or fax.
Step 3: We will issue a Return Authorization Number upon verification into the program.
Step 4: A monitor will be advance shipped to your location.
Step 5: We will issue a UPS Call Tag to pick up the defective unit.
Step 6: Please review the following chart to see your EASE program qualifications.
| WARRANTY PERIOD | COVERAGE AT NO CHARGE | CUSTOMER CHARGES |
| Within the first three months of purchase: Covered by EASE | - New AOC monitor- Call tag dispatched and return freight charges via UPS | - None* |
| Between 4 months – 1 Year - All Parts & Labor Including CRT Tube & LCD Panel | - UPS Return Freight to AOC | |
| Between 1 Year - 3 Years: Covered by standard limited warranty | - Parts & Labor (excluding CRT Tube & LCD Panel) | - UPS Return Freight to AOC |
*AOC will need to obtain a credit card number if you would like to get a new AOC monitor advanced shipped to your location, prior to the defective unit arriving at AOC's service center. If you do not wish to supply a credit card, AOC will only ship the new monitor, once the defective unit arrives at the AOC service center.

us.aoc.com