GA-324WB - Router Getnet - Free user manual and instructions
Find the device manual for free GA-324WB Getnet in PDF.


User questions about GA-324WB Getnet
0 question about this device. Answer the ones you know or ask your own.
Ask a new question about this device
Download the instructions for your Router in PDF format for free! Find your manual GA-324WB - Getnet and take your electronic device back in hand. On this page are published all the documents necessary for the use of your device. GA-324WB by Getnet.
USER MANUAL GA-324WB Getnet
GA-324WA User Manual
Contents
1 Introduction ...... 1
1.1 Packing List....1
1.2 Safety Cautions .... 1
1.3 LEDs and Interfaces....2
1.4 System Requirements 4
1.5 Features 4
1.6 Supported Protocols....5
2 Hardware Installation 6
3 About the Web Configuration....9
3.1 How to Access the Router 9
3.2 Status....10
3.2.1 System....10
3.2.2 LAN 11
3.2.3 WLAN 11
3.2.4 WAN 12
3.2.5 Port Mapping 12
3.2.6 Statistics....13
3.2.7 ARP Table....14
3.3 Wizard 14
3.4 Network 27
The GA-324WA supports multiple line modes. It provides four 10/100 base-T Ethernet interfaces and one USB device interface at the user end. The device provides high-speed ADSL broadband connection to the Internet or Intranet for high-end users, such as net bars and office users. The device provides high performance access to the Internet, downlink up to 24 Mbps and uplink up to 1 Mbps.
The device supports WLAN access, as WLAN AP or WLAN router, to the Internet. It complies with IEEE 802.11, 802.11b/g specifications, and WEP, WPA and WPA2 security specifications.
1.1 Packing List
● 1 x GA-324WA
- 1 x external splitter
- 1 x power adapter
● 2 x telephone cables (RJ11)
● 1 x Ethernet cable (RJ45)
- 1 x USB cable
- 1 x CD
1.2 Safety Cautions
Follow the following instructions to prevent the device from risks and damage caused by fire or electric power:
- Use volume labels to mark the type of power.
- Use the power adapter packed within the device package.
- Pay attention to the power load of the outlet or prolonged lines. An overburden power outlet or damaged lines and plugs may cause electric shock or fire accident. Check the power cords regularly. If you find any damage, replace it at once.
● Proper space left for heat dissipation is necessary to avoid damage caused by overheating to the device. The long and thin holes on the device are
designed for heat dissipation to ensure that the device works normally. Do not cover these heat dissipation holes.
- Do not put this device close to a place where a heat source exits or high temperature occurs. Avoid the device from direct sunshine.
- Do not put this device close to a place where it is over damp or watery. Do not spill any fluid on this device.
- Do not connect this device to any PCs or electronic products, unless our customer engineer or your broadband provider instructs you to do this, because any wrong connection may cause power or fire risk.
● Do not place this device on an unstable surface or support.
1.3 LEDs and Interfaces
Front Panel

text_image
ADSL Internet 4 3 2 1 WPSThe following table describes the LEDs of the device:
| LEDs Color Status | Description | ||
| Green | On The device is powered on. | ||
| Off The device is powered off. | |||
| Red | On | The device is self-testing or self-testing is failed, or the software is upgrading. | |
| ADSL | Green | On | The device has established connection with the office physical layer. |
| Blinks (fast) | The device is handshaking with the office physical layer. | ||
| Blinks (slow) | The device does not detect the signals. | ||
| Internet | Green | On | The device has a successful Internet |

| LEDs Color Status | Description | ||
| connection in the routing mode, and no data is being transmitted. | |||
| Blinks | Data is being transmitted on the Internet in the routing mode. | ||
| Off The device is in bridge mode. | |||
| Red | On | After the successful synchronous in the routing mode, the Internet connection is failed. | |
| 4/3/2/1 | Green | On | The device has successful LAN connection. |
| Blinks | Data is being transmitted on LAN or data is being transmitted on the Internet in the bridge mode. | ||
| Off The LAN connection is failed. | |||
 | Green | On | The device has successful WLAN connection. |
| Blinks Data is being transmitted on WLAN. | |||
| Off The WLAN connection is failed. | |||
| WPS | Green | Blinks The WPS process is initializing. | |
| Off The WPS process is failed. | |||
Rear Panel

text_image
Line 1 2 3 4 Power WPS On/Off ResetThe following table describes the interfaces of the device:
| Interface Description | |
| Line | RJ-11 interface, for connecting to the ADSL interface or a splitter through the telephone cable. |
| 1/2/3/4 | RJ-45 interface, for connecting to the Ethernet interface of the PC or the Ethenet devices with the cable. |
| Power | Power interface, for connecting to the power adapter of 12 V DC, 0.8 A.. |
| Reset | Reset to the factory defaults. To restore factory defaults, keep the device powered on and push a paper clip into the hole. Press down the button over 3 seconds and then release. |
| WPS | Press the button and hold for more than 3 seconds, to initialize WPS negotiation. |
| Power switch, power on or power off the router. | |
1.4 System Requirements
Recommended system requirements are as follows:
● A 10/100 base-T Ethernet card is installed on your PC
- A hub or Switch. (attached to several PCs through one of Ethernet interfaces on the device)
- Operating system: Windows 98SE, Windows 2000, Windows ME, Windows XP or Windows Vista
- Internet Explorer V5.0 or higher, Netscape V4.0 or higher, or firefox 1.5 or higher
1.5 Features
The device supports the following features:
● Various line modes (line auto-negotiation)
● External PPPoE dial-up access
● Internal PPPoE/PPPoA dial-up access
● Zero installation PPP bridge mode (ZIPB)
● 1483B/1483R/MER access
● Multiple PVCs (eight at most)
● A single PVC with multiple sessions
● Multiple PVCs with multiple sessions
- DHCP server
NAT/NAPT - Static route
● Firmware upgrading through Web, TFTP, or FTP - Rsetting to the factory defaults through Reset button or Web
- DNS relay
- Virtual server
- Two-level passwords and usernames
- Web interface
- Telnet CLI
- System status display
- PPP session PAP/CHAP
- IP/Port, MAC, URL filter
- Remote access control
● Line connection status test - Remote access control
● Backup and restoration of configuration file
● IP quality of service (QoS)
● Universal plug and play (UPnP) - WLAN with high-speed data transmission rate, up to 54 Mbps, compatible with IEEE 802.11b/g, 2.4 GHz compliant equipment
1.6 Supported Protocols
The device supports the following protocols:
● ITU G.992.1 (G.DMT) Annex A
● ITU G.992.2 (G.LITE)
● ANSI T1.413 Issue 2
● ITU G.992.3 (ADSL2)
● ITU G.992.5 (ADSL2+)
- Annex L
- Annex M
2 Hardware Installation
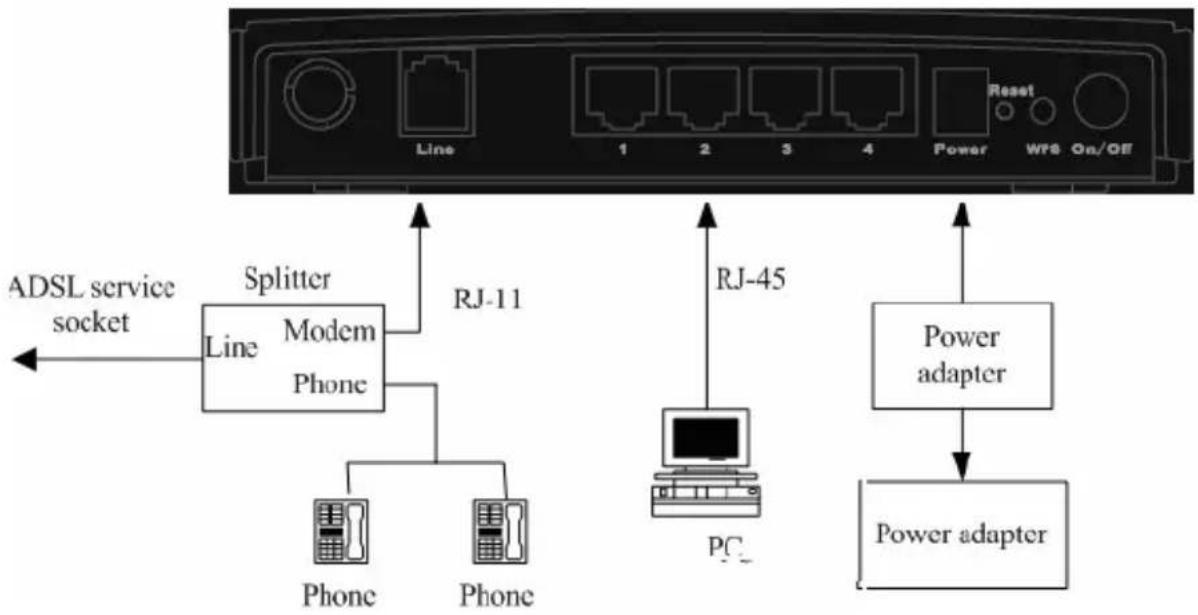
Step 1 Connect the Line interface of the device and the Modem interface of the splitter through a telephone cable. Connect the phone to the Phone interface of the splitter through a cable. Connect the incoming line to the Line interface of the splitter.
The splitter has three interfaces:
● Line: Connect to a wall phone jack (RJ-11 jack)
● Modem: Connect to the ADSL jack of the device
● Phone: Connect to a telephone set.
Step 2 Connect the Ethernet interface of the device to the network card of the PC through an Ethernet cable (MDI/MDIX).

Note:
Use twisted-pair cables to connect with the hub or switch.
Step 3 Plug one end of the power adapter to the wall outlet and connect the other end to the Power interface of the device.
Connection 1
错误!未找到引用源。 displays the application diagram for the connection of the router, PC, splitter and the telephone sets, when no telephone set is placed before the splitter.
flowchart
graph TD
    A["ADSL service socket"] --> B["Splitter"]
    B --> C["Modem Phone"]
    C --> D["RJ-11"]
    D --> E["Phone"]
    D --> F["Phone"]
    G["RJ-45"] --> H["PC"]
    I["Power adapter"] --> J["Power adapter"]
    K["Reset"] --> L["Line"]
    L --> M["1"]
    L --> N["2"]
    L --> O["3"]
    L --> P["4"]
    L --> Q["Power"]
    L --> R["WRS On/Off"]
Figure 1 Connection diagram (Without connecting telephone sets before the splitter)
Connection 2
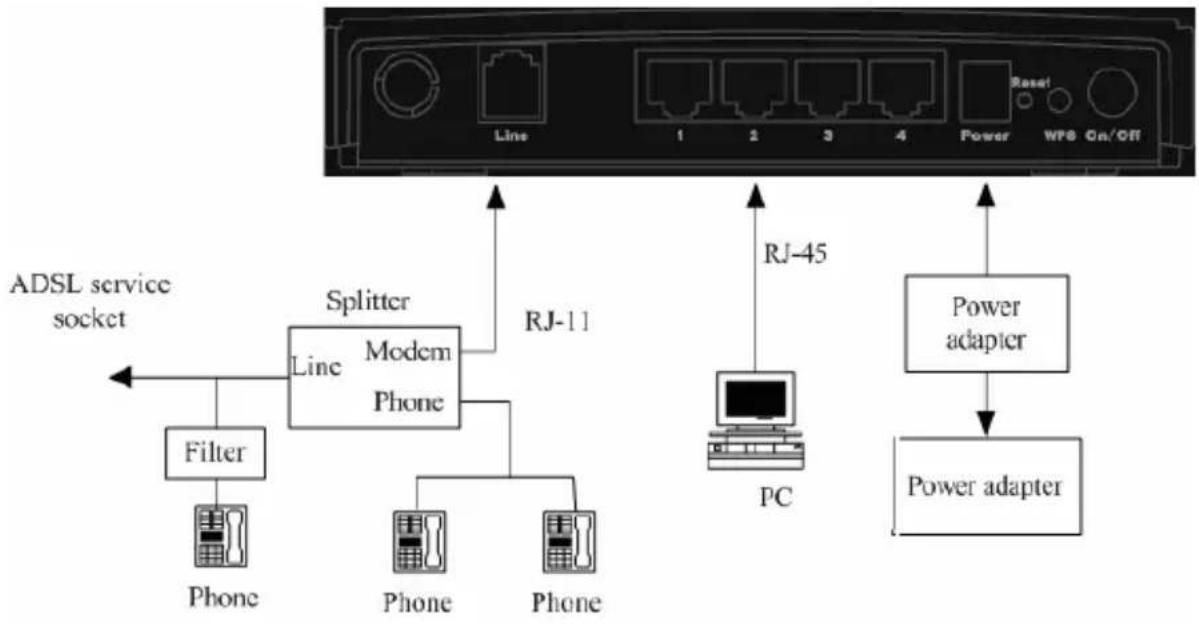
Figure 2 shows the connection when the splitter is installed close to the router.
flowchart
graph TD
    A["ADSL service socket"] --> B["Filter"]
    B --> C["Phone"]
    C --> D["Splitter"]
    D --> E["Modem Phone"]
    E --> F["RJ-11"]
    F --> G["Power adapter"]
    G --> H["Power adapter"]
    I["PC"] --> J["RJ-45"]
    K["Line"] --> L["1"]
    K --> M["2"]
    K --> N["3"]
    K --> O["4"]
    K --> P["Power"]
    Q["Reset"] --> R["WPS On/Off"]
Figure 2 Connection diagram (Connecting a telephone set before the splitter)

Note:
When connection 2 is used, the filter must be installed close to the telephone cable. See Figure2. Do not use the splitter to replace the filter.
Installing a telephone directly before the splitter may lead to failure of connection between the device and the central office, or failure of Internet access, or slow connection speed. If you really need to add a telephone set before the splitter, you must add a microfilter before a telephone set. Do not connect several telephones before the splitter or connect several telephones with the microfilter.
3 About the Web Configuration
This chapter describes how to configure the router by using the Web-based configuration utility.
3.1 How to Access the Router
The following is the detailed description of accessing the router for the first time.
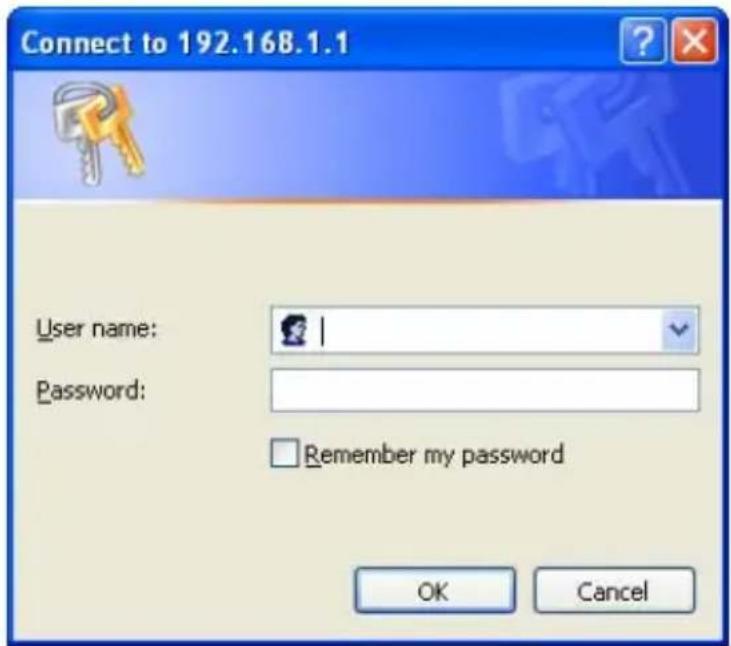
Step 1 Open the Internet Explorer (IE) browser and enter http://192.168.1.1.
Step 2 In the LOGIN page that is displayed, enter the username and password.
● The username and password of the super user are admin and admin.
● The username and password of the common user are user and user.
text_image
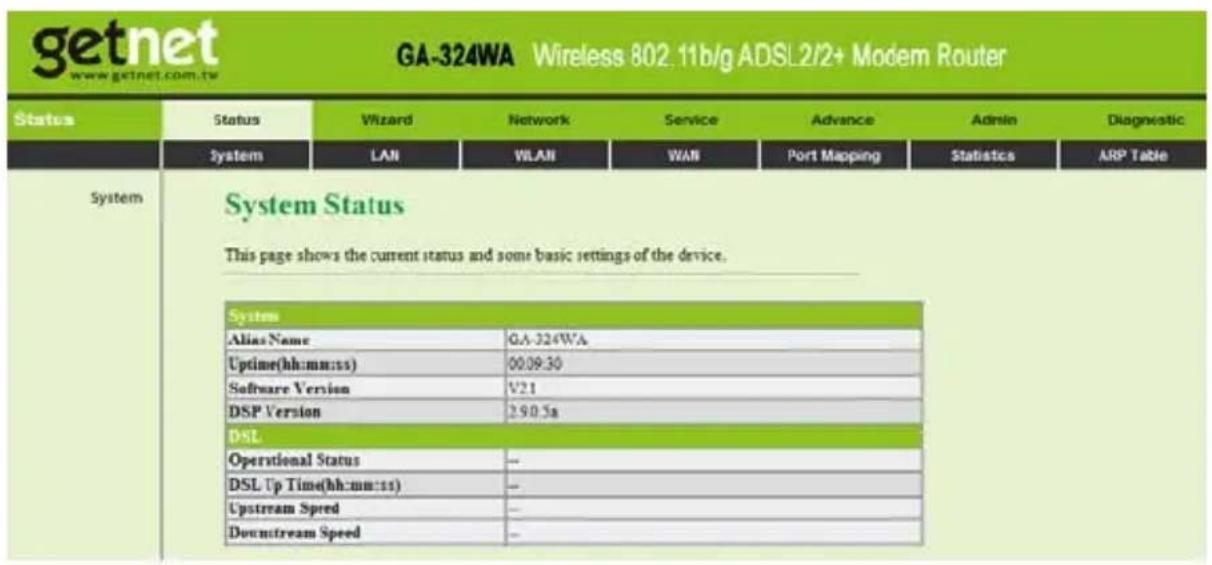
Connect to 192.168.1.1 User name: Password: Remember my password OK CancelIf you log in as the super user, the page shown in the following figure appears. You can check, configure and modify all the settings.
text_image
gaetnet www.getnet.com.tw GA-324WA Wireless 802.11b/g ADSL 2/2+ Modem Router Status Status Vizard Network Service Advance Admin Diagnostic System LAN WLAN WAN Port Mapping Statistics ARP Table System System Status This page shows the current status and some basic settings of the device. System Alias Name GA-324WA Uptime(hh:mm:ss) 00:09:30 Software Version V21 DSP Version 2.90.5s DSL Operational Status -- DSL Up Time(hh:mm:ss) -- Upstream Speed -- Downstream Speed --If you log in as a common user, you can check the status of the router, but can not configure the most of the settings.
3.2 Status
In the navigation bar, choose Status. In the Status page that is displayed contains: System, LAN, WLAN, WAN, Port Mapping, Statistic, and ARP Table.
3.2.1 System
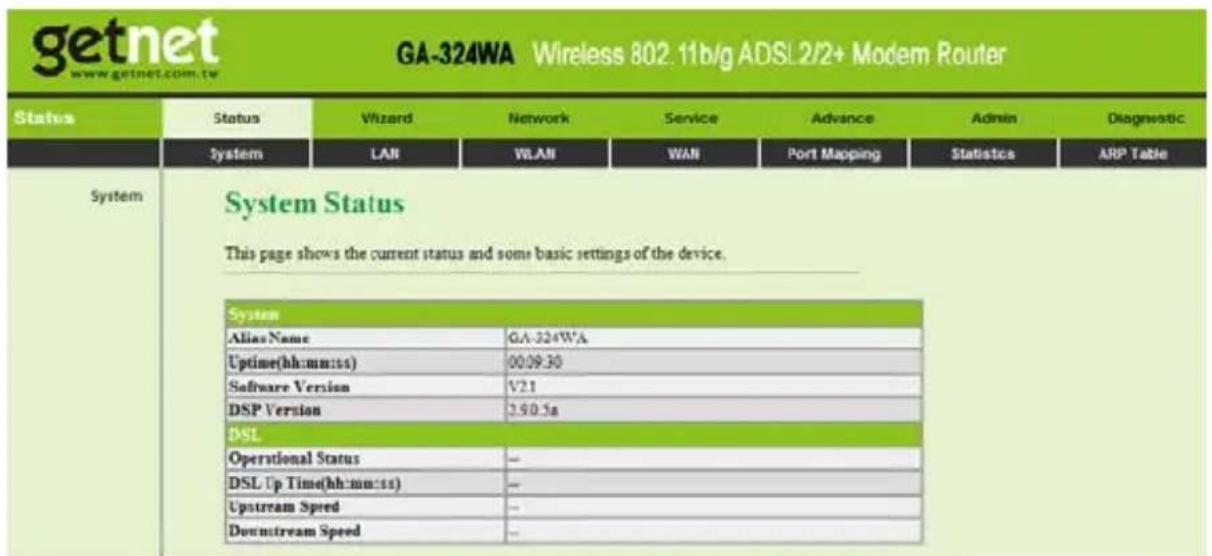
Choose Status > System. The page that is displayed shows the current status and some basic settings of the router, such as software version, DSP version, uptime, upstream speed, and downstream speed.
text_image
getnet www.getnet.com.tw GA-324WA Wireless 802.11b/g ADSL 2/2+ Modem Router Status Status Vizard Network Service Advance Admin Diagnostic System LAN VLAN WAN Port Mapping Statistics ARP Table System System Status This page shows the current status and some basic settings of the device. System Alias Name GA-324WA Uptime(hh:mm:ss) 00:09:30 Software Version V21 DSP Version 2.90.5g DSL Operational Status - DSL Up Time(hh:mm:ss) - Upstream Speed - Downstream Speed -3.2.2 LAN
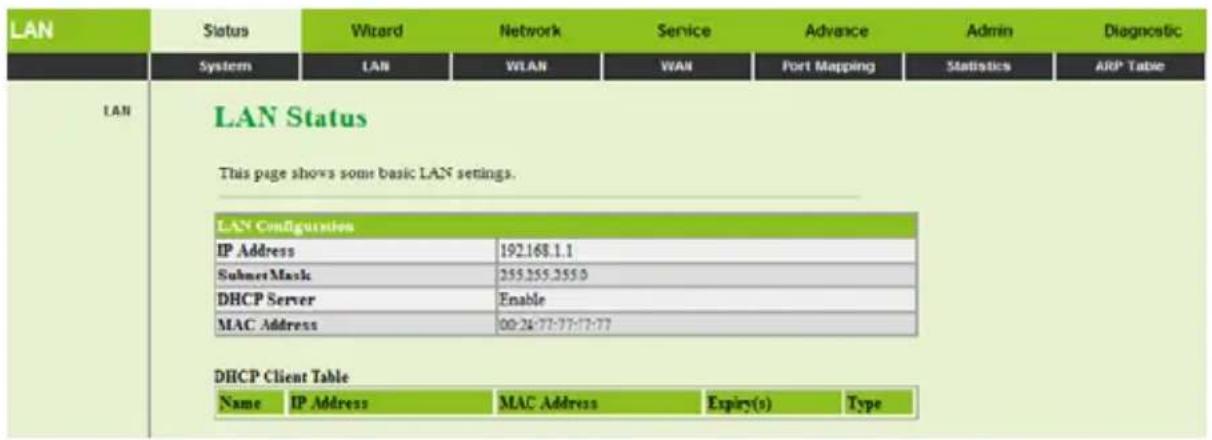
Choose Status > LAN. The page that is displayed shows some basic LAN settings of the router. In this page, you can view the LAN IP address, DHCP server status, MAC address, and DHCP client table. If you want to configure the LAN network, refer to chapter 3.4.1.1 LAN IP.
text_image
LAN Status Wizard Network Service Advance Admin Diagnostic System LAN WLAN WAN Port Mapping Statistics ARP Table LAN Status This page shows some basic LAN settings. LAN Configurations IP Address 192.168.1.1 Submit Mask 255.255.255.0 DHCP Server Enable MAC Address 00-24-77-77-77-77 DHCP Client Table Name IP Address MAC Address Expiry(s) Type3.2.3 WLAN
Choose Status > WLAN. The page that is displayed shows some basic WLAN settings of the router. In this page, you can view basic status of WAN and DNS server. If you want to configure the WAN network, refer to chapter 3.4.3.
| WLAN | Status | Wizard | Network | Service | Advance | Admin | Diagnostic |
| System | LAN | WLAN | WAN | Port Mapping | Statistics | ARP Table | |
| WLAN | WLAN Status This page shows some basic status of wireless lan. | ||||||
| Wireless Configuration | |||||||
| Wireless | Enabled | ||||||
| Band | 2.4 GHz (B+G) | ||||||
| Mode | AP | ||||||
| Broadcast SSID | Enabled | ||||||
| Power | |||||||
| Status | Enabled | ||||||
| SSID | RTL867x-ADSL | ||||||
| Authentication Mode | Auto | ||||||
| Encrypt Mode | None | ||||||
| Vap0 | |||||||
| Status | Disabled | ||||||
| Vap1 | |||||||
| Status | Disabled | ||||||
| Vap2 | |||||||
| Status | Disabled | ||||||
| Vap3 | |||||||
| Status | Disabled | ||||||
| Wireless Client List | |||||||
| MAC Address | Tx Packet | Rx Packet | Tx Rate (Mbps) | Power Swing | Expired Time (s) | ||
| None | — | — | — | — | — | ||
| Current Access Control List Mode | Disabled | ||||||
3.2.4 WAN
Choose Status > WAN. The page that is displayed shows some basic WAN settings of the router. In this page, you can view basic status of WAN and DNS server. If you want to configure the WAN network, refer to chapter 3.4.2.1 WAN.
| WAN | Status | Wizard | Network | Service | Advance | Admin | Diagnostic | ||
| System | LAR | WLAN | WAN | Port Mapping | Statistics | ARP Table | |||
| WAN | WAN Status This page shows some basic WAN settings. | ||||||||
| Interface | VPI/VCI | Encap | Drouts | Protocol | IP Address | Gateway | Status | ||
| DNS Servers | |||||||||
3.2.5 Port Mapping
Choose Status > Port Mapping. In this page, you can view the mapping relation and the status of port mapping.
| Port Mapping | Status | Wizard | Network | Service | Advance | Admin | Diagnostic |
| System | LAN | WLAN | WAN | Port Mapping | Statistics | ARP Table | |
| Port Mapping | Port Mapping This page shows the mapping relation and the status of port napping. Status: Disabled | ||||||
| Mapping Relation | |||||||
| Select | Interfaces | Status | |||||
| Default | LAN1, LAN2, LAN3, LAN4, wlan, wlan-vap0, wlan-vap1, wlan-vap2, wlan-vap3 | Enabled | |||||
| Group1 | - | ||||||
| Group2 | - | ||||||
| Group3 | - | ||||||
| Group4 | - | ||||||
3.2.6 Statistics
Choose Status > Statistics. The Statistics page that is displayed contains Traffic Statistic and DSL Statistic.
3.2.6.1 Traffic Statistic
Click Traffic Statistic in the left pane. The page shown in the following figure appears. In this page, you can view the statistics of each network port.
| Traffic Statistic | Status | Vlizard | Network | Service | Advance | Admin | Diagnost |
| System | LAN | WLAN | WAN | Port Mapping | Statistics | ARP Table | |
| Traffic Statistic DSL Statistic | Statistics This page shows the packet statistics for transmission and reception regarding to network interface. | ||||||
| Interface | Rx pkt | Rx err | Rx drop | Tx pkt | Tx err | Tx drop | |
| a1 | 211 | 0 | 0 | 210 | 0 | 0 | |
| a0 | 0 | 0 | 0 | 0 | 0 | 0 | |
| a1 | 0 | 0 | 0 | 0 | 0 | 0 | |
| a2 | 0 | 0 | 0 | 0 | 0 | 0 | |
| a3 | 0 | 0 | 0 | 0 | 0 | 0 | |
| a4 | 0 | 0 | 0 | 0 | 0 | 0 | |
| a5 | 0 | 0 | 0 | 0 | 0 | 0 | |
| a6 | 0 | 0 | 0 | 0 | 0 | 0 | |
| a7 | 0 | 0 | 0 | 0 | 0 | 0 | |
| w1 | 753 | 0 | 0 | 0 | 0 | 577 | |
| w2 | 0 | 0 | 0 | 0 | 0 | 0 | |
| w3 | 0 | 0 | 0 | 0 | 0 | 0 | |
| w4 | 0 | 0 | 0 | 0 | 0 | 0 | |
| w5 | 0 | 0 | 0 | 0 | 0 | 0 | |
3.2.6.2 DSL Statistic
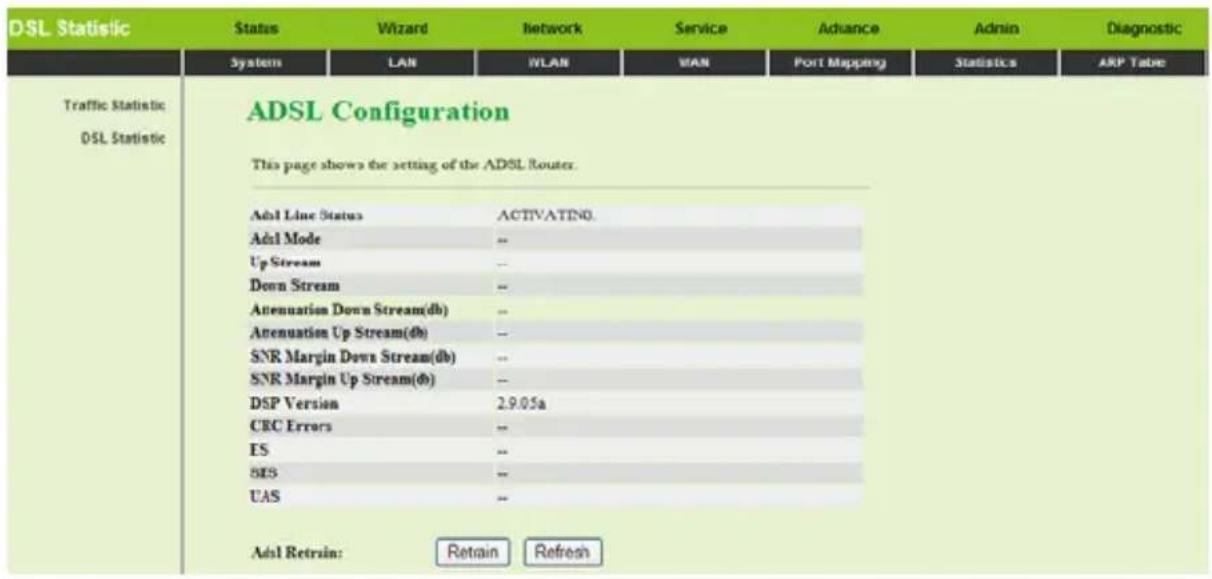
Click DSL Statistic in the left pane. The page shown in the following figure appears. In this page, you can view the ADSL line status, upstream rate, downstream rate, and other information.
text_image
DSL Statistic Status Wizard Network Service Advance Admin Diagnostic System LAN WLAN WAN Port Mapping Statistics ARP Tube Traffic Statistic DSL Statistic ADSL Configuration This page shows the setting of the ADSL Router. Adsl Line Status ACTIVATING. Adsl Mode -- Up Stream -- Down Stream -- Attenuation Down Stream(db) -- Attenuation Up Stream(db) -- SNR Margin Down Stream(db) -- SNR Margin Up Stream(db) -- DSP Version 2.9.05a CRC Errors -- ES -- SIS -- UAS -- Adsl Retrain: Retain Refresh3.2.7 ARP Table
Choose Status > ARP Table. In the ARP Table page, you can view the table that shows a list of learned MAC addresses.
| ARP Table | Status | Wizard | Network | Service | Advance | Admin | Diagnostic |
| System | LAN | WLAN | WAN | PortMapping | Statistics | ARP Table | |
| ARP Table | Arp tables The page show MAC address tables. | ||||||
| IP address | Max address | ||||||
| 192.168.1.112 | 00:14:78:0C:F2:CE | ||||||
| 192.168.1.1 | 00:24:77:77:77:77 | ||||||
| Refresh | |||||||
3.3 Wizard
When subscribing to a broadband service, you should be aware of the method by which you are connected to the Internet. Your physical WAN device can be either PPP, ADSL, or both. The technical information about the properties of your Internet connection is provided by your Internet Service Provider (ISP). For example, your ISP should inform you whether you are connected to the Internet
using a static or dynamic IP address, and the protocol that you use to communicate on the Internet.
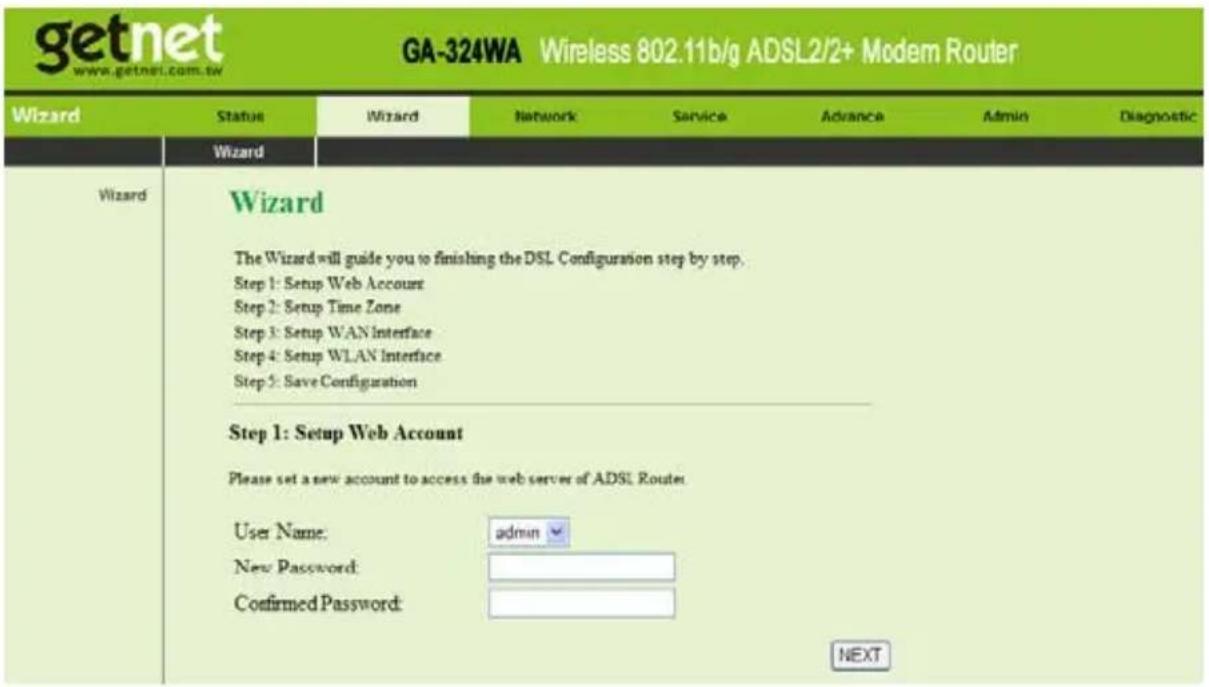
In the navigation bar, choose Wizard. The page shown in the following figure appears. The Wizard page guides fast and accurate configuration of the Internet connection and other important parameters. The following sections describe these various configuration parameters. Whether you configure these parameters or use the default ones, click NEXT to enable your Internet connection.
text_image
getnet www.getnet.com.tw GA-324WA Wireless 802.11b/g ADSL2/2+ Modem Router Wizard Status Wizard Network Service Advance Admin Diagnostic Wizard Wizard The Wizard will guide you to finishing the DSL Configuration step by step. Step 1: Setup Web Account Step 2: Setup Time Zone Step 3: Setup WAN Interface Step 4: Setup WLAN Interface Step 5: Save Configuration Step 1: Setup Web Account Please set a new account to access the web server of ADSL Router User Name: admin New Password: Confirmed Password: NEXTEnter the correct password and then click NEXT. The page shown in the following figure appears. In this page, you can set the system time and Network Time Protocol (NTP) server.
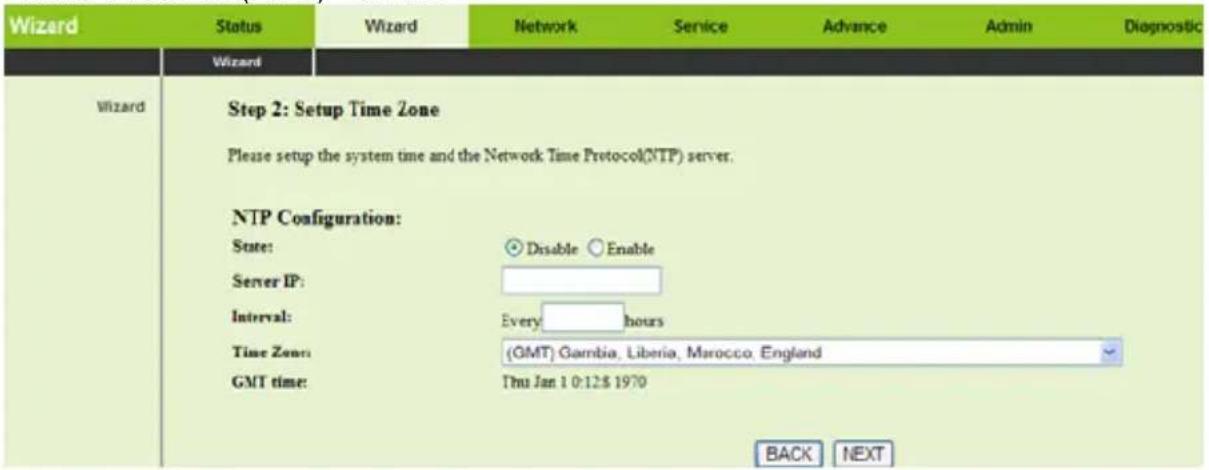
text_image
Wizard Status Wizard Network Service Advance Admin Diagnostic Wizard Wizard Step 2: Setup Time Zone Please setup the system time and the Network Time Protocol(NTP) server. NTP Configuration: State: Disable Enable Server IP: Interval: Every hours Time Zone: (GMT) Gambia, Liberia, Morocco, England GMT time: Thu Jan 1 0:12:$ 1970 BACK NEXTThe following table describes the parameters of this page:
| Field | Description |
| State | You can disable or enable NTP function. You have to enable it if you want to configure the parameters in this page. |
| Server IP Enter the IP address of the specified time server manually. | |
| Interval | Set the interval that the router obtains the time from the time server. That is, the interval that the router verifies the time with the server. |
| Time Zone Choose the time zone of your country. | |
| GMT time It displays the Greenwich mean time. | |
After finishing the configuration, click NEXT. The page shown in the following figure appears.
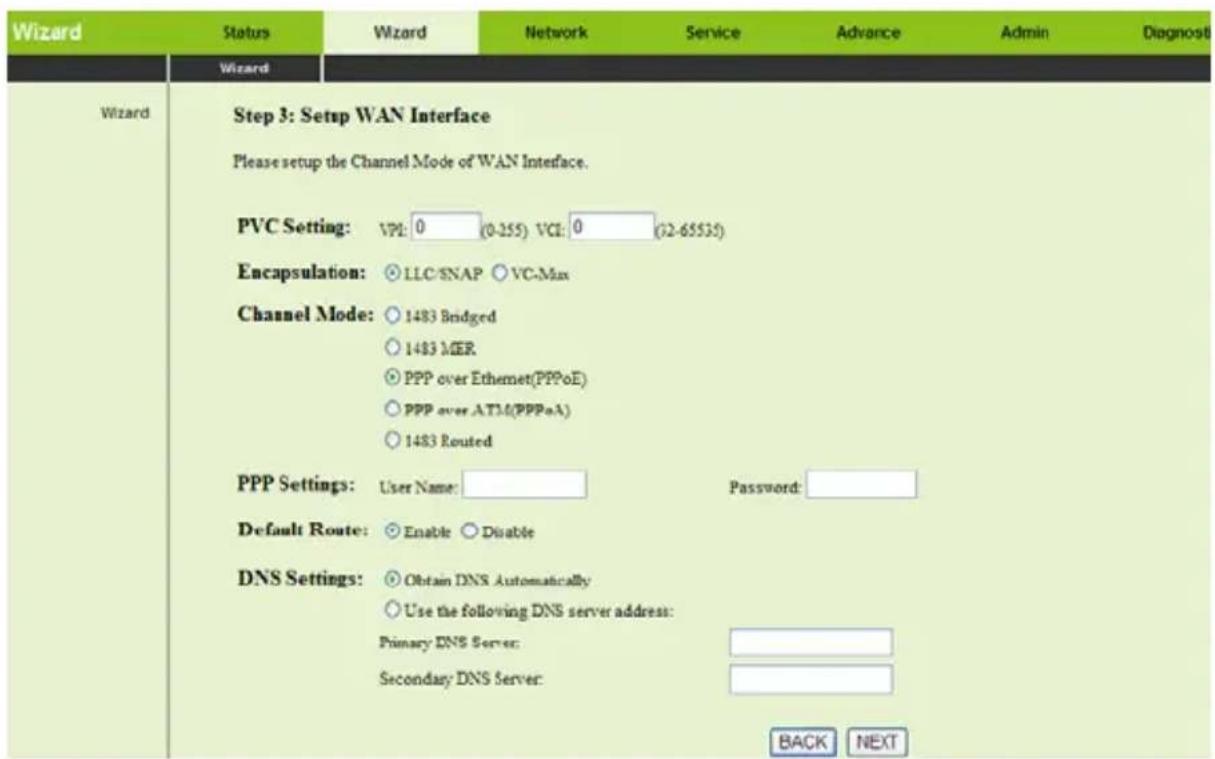
text_image
Wizard Status Wizard Network Service Advance Admin Diagnost Wizard Step 3: Setup WAN Interface Please setup the Channel Mode of WAN Interface. PVC Setting: VM: 0 (0-255) VCI: 0 (32-65535) Encapsulation: ○ LLC/SNAP ○ VC-Max Channel Mode: ○ 1483 Bridged ○ 1483 MER. ○ PPP over Ethernet(PPPoE) ○ PPP over ATM(PPPoA) ○ 1483 Routed PPP Settings: User Name: Password: Default Route: ○ Enable ○ Disable DNS Settings: ○ Obtain DNS Automatically ○ Use the following DNS server address: Primary DNS Server: Secondary DNS Server: BACK NEXTThe following table describes the parameters of this page:
| Field | Description |
| PVC Settings | ● The virtual path between two points in an ATM |
GA-324WA User Manual
| Field | Description |
| network, and its valid value is from 0 to 255.● The virtual channel between two points in an ATM network, ranging from 32 to 65535 (0 to 31 is reserved for local management of ATM traffic). | |
| Encapsulation | Select the method of encapsulation provided by your ISP. You can select LLC/SNAP or VC-Mux. |
| Channel Mode | Select the WAN connection type. You can select 1483 Bridged, 1483 MER, PPP over Ethernet (PPPoE), PPP over ATM (PPPoA), or 1483 Routed. |
| PPP Settings | The username and password apply to PPPoE and PPPoA encapsulation only. Ensure that you enter the correct username and password. |
| Default Route | You can select Enable or Disable. |
| DNS Settings | Obtain DNS Automatically: Obtain the DNS server assigned by the uplink equipment, such as BAS.Use the following DNS server address: If you want to enter the DNS server address by yourself, select it and enter the related data. |
After finishing the configuration, click NEXT. The page shown in the following figure appears.
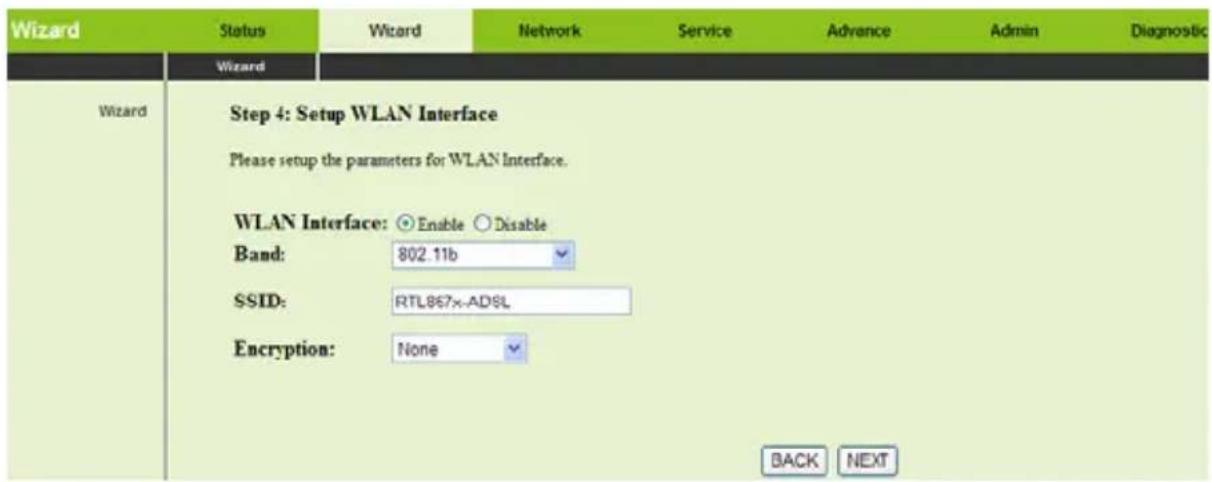
text_image
Wizard Status Wizard Network Service Advance Admin Diagnostic Wizard Wizard Step 4: Setup WLAN Interface Please setup the parameters for WLAN Interface. WLAN Interface: ○ Enable ○ Disable Band: 802.11b SSID: RTL867x-AD6L Encryption: None BACK NEXTThe following table describes the parameters of this page:
GA-324WA User Manual
| Field | Description |
| WLANInterface | You can choose Enable or Disable. By default, WAN interface is enabled.You need to enable WAN interface, and then you can set the parameters in this page. |
| Band | Choose the working mode of the router. You can choose 2.4 GHz (B), 2.4 GHz (G), or 2.4 GHz (B + G). By default, the band is 2.4 GHz (B + G). |
| SSID | The service set identification (SSID) is a unique name to identify the router in the wireless LAN. Wireless stations associating to the router must have the same SSID.Enter a descriptive name that is used when the wireless client connecting to the router. |
| Encryption | Configure the wireless encryption mode. You can choose None, WEP, WPA (TKIP), WPA (AES), WPA2 (AES), WPA2 (TKIP), or WPA2 Mixed.Wired equivalent privacy (WEP) encrypts data frames before transmitting over the wireless network.Wi-Fi protected access (WPA) is a subset of the IEEE802.11i security specification draft.WPA2 Mixed is the collection of WPA and WPA2 encryption modes. The wireless client establishes the connection between the router through WPA or WPA2.Key differences between WPA and WEP are user authentication and improved data encryption. |
After finishing the configuration, click NEXT. The page shown in the following figure appears.
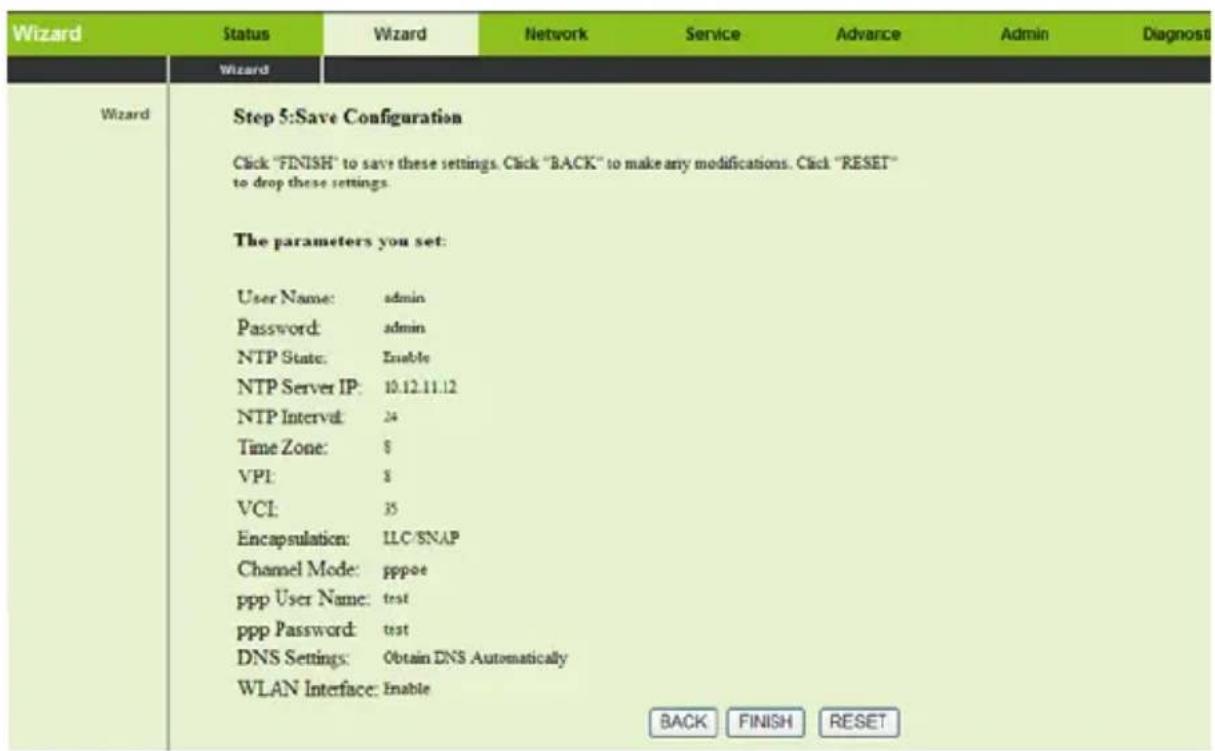
text_image
Wizard Status Wizard Network Service Advance Admin Diagnost Wizard Step 5:Save Configuration Click "FINISH" to save these settings. Click "BACK" to make any modifications. Click "RESET" to drop these settings. The parameters you set: User Name: admin Password: admin NTP State: Enable NTP Server IP: 10.12.11.12 NTP Interval: 24 Time Zone: $ VPI: $ VCI: 35 Encapsulation: LLC/SNAP Channel Mode: pppoe ppp User Name: test ppp Password: test DNS Settings: Obtain DNS Automatically WLAN Interface: Enable BACK FINISH RESET1483 Bridged
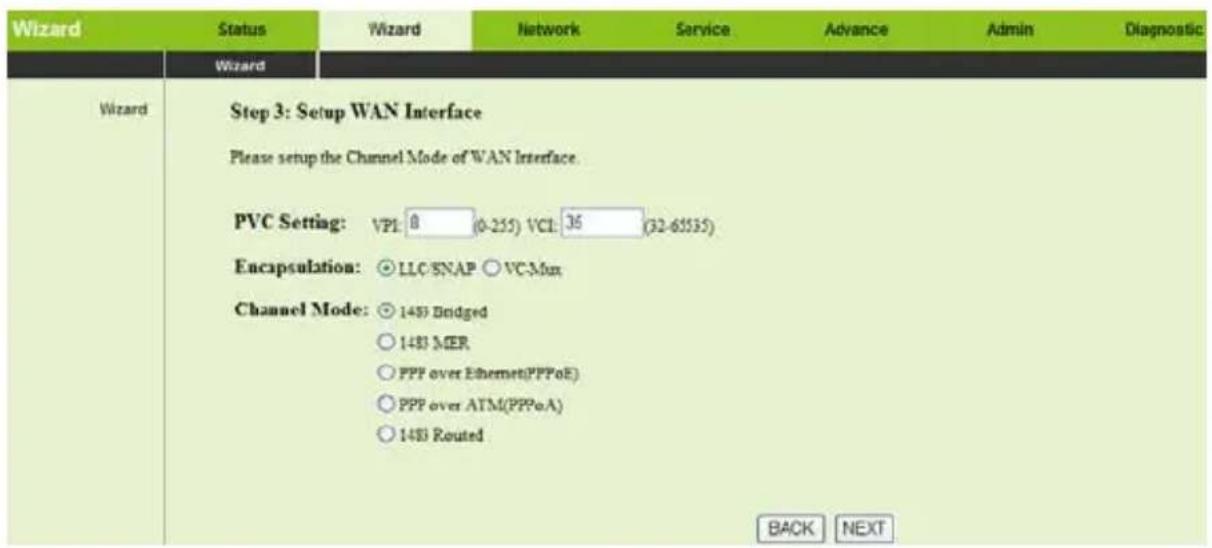
text_image
Wizard Status Wizard Network Service Advance Admin Diagnostic Wizard Step 3: Setup WAN Interface Please setup the Channel Mode of WAN Interface. PVC Setting: VPI: 8 (0-255) VCI: 35 (32-65535) Encapsulation: ○ LLC/SNAP ○ VC-Mux Channel Mode: ○ 1489 Bridged ○ 1489 MER ○ PPP over Ethernet(PPPoE) ○ PPP over ATM(PPPoA) ○ 1489 Routed BACK NEXTIn the Setup WAN Interface page, enter the correct PVC, set the channel mode to 1483 MER, and click NEXT. The page shown in the following figure appears.
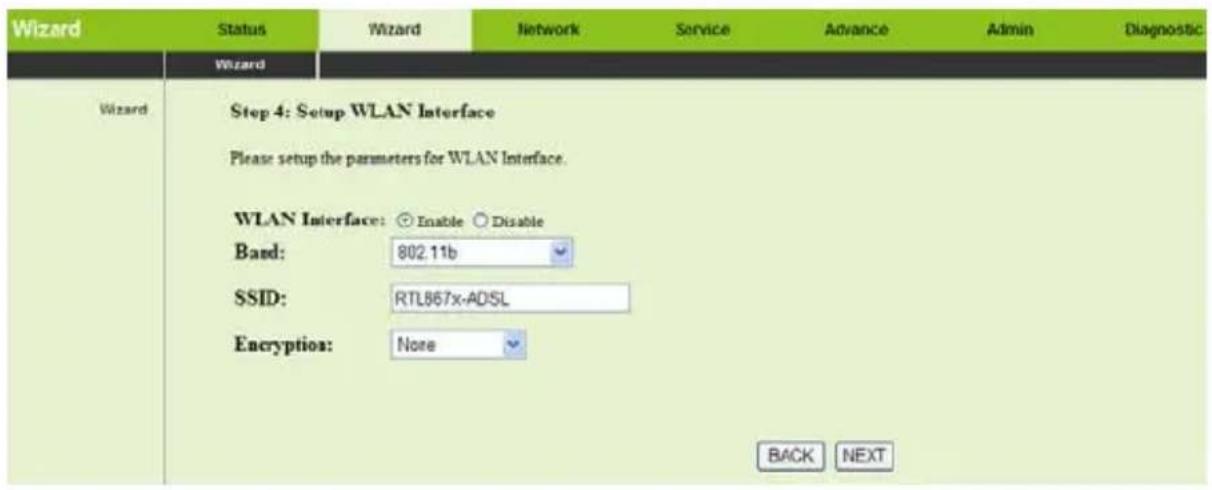
text_image
Wizard Status Wizard Network Service Advance Admin Diagnostic Wizard Step 4: Setup WLAN Interface Please setup the parameters for WLAN Interface. WLAN Interface: ○ Enable ○ Disable Band: 802.11b SSID: RTL867x-ADSL Encryption: None BACK NEXTThe following table describes the parameters of this page:
| Field | Description |
| WLANInterface | You can choose Enable or Disable. By default, WAN interface is enabled.You need to enable WAN interface, and then you can set the parameters in this page. |
| Band | Choose the working mode of the router. You can choose 2.4 GHz (B), 2.4 GHz (G), or 2.4 GHz (B + G). By default, the band is 2.4 GHz (B + G). |
| SSID | The service set identification (SSID) is a unique name to identify the router in the wireless LAN. Wireless stations associating to the router must have the same SSID.Enter a descriptive name that is used when the wireless client connecting to the router. |
| Encryption | Configure the wireless encryption mode. You can choose None, WEP, WPA (TKIP), WPA (AES), WPA2 (AES), WPA2 (TKIP), or WPA2 Mixed.Wired equivalent privacy (WEP) encrypts data frames before transmitting over the wireless network.Wi-Fi protected access (WPA) is a subset of the IEEE802.11i security specification draft.WPA2 Mixed is the collection of WPA and WPA2 encryption modes. The wireless client establishes |
GA-324WA User Manual
| Field | Description |
| the connection between the router through WPA or WPA2.Key differences between WPA and WEP are user authentication and improved data encryption. |
After finishing the configuration, click NEXT. The page shown in the following figure appears.
| Wizard | Status | Wizard | Network | Service | Advance | Admin | Diagnostic |
| Wizard | |||||||
| Wizard | Step 5:Save Configuration Click "FINISH" to save these settings. Click "BACK" to make any modifications. Click "RESET" to drop these settings. The parameters you set: User Name: admin Password: admin NTP State: Enable NTP Server IP: 10.12.11.12 NTP Interval: 24 Time Zone: 0 VPI: 8 VCI: 35 Encapsulation: LLC SNAP Channel Mode: 1483 bridge WLAN Interface: Enable | ||||||
| BACK | FINISH | RESET | |||||
1483 MER
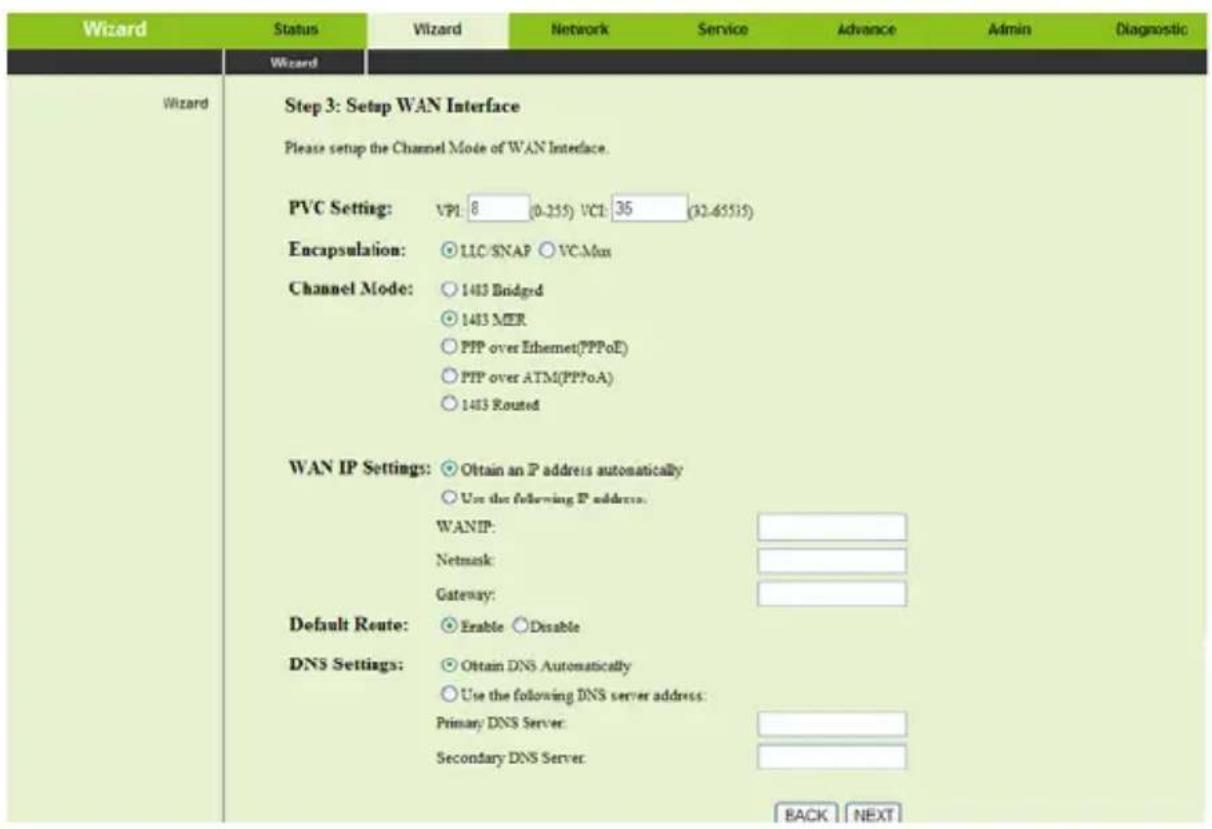
text_image
Wizard Wizard Step 3: Setup WAN Interface Please setup the Channel Mode of WAN Interface. PVC Setting: VPI: 8 (0-255) VCI: 35 (32-65515) Encapsulation: ○ LLC/SNAP ○ VC/Mus Channel Mode: ○ 1413 Bridged ○ 1413 MER ○ PIP over Ethernet(PPPoE) ○ PIP over ATM(PPPoA) ○ 1413 Routed WAN IP Settings: ○ Obtain an IP address automatically ○ Use the following IP address: WANIP: Network: Gateway: Default Route: ○ Enable ○ Disable DNS Settings: ○ Obtain DNS Automatically ○ Use the following DNS server address: Primary DNS Server: Secondary DNS Server: BACK NEXTThe following table describes the parameters of this page:
| Field | Description |
| PVC Settings | ● The virtual path between two points in an ATM network, and its valid value is from 0 to 255.● The virtual channel between two points in an ATM network, ranging from 32 to 65535 (0 to 31 is reserved for local management of ATM traffic). |
| Encapsulation | Select the method of encapsulation provided by your ISP. You can select LLC/SNAP or VC-Mux. |
| Channel Mode | Select the WAN connection type. You can select 1483 Bridged, 1483 MER, PPP over Ethernet (PPPoE), PPP over ATM (PPPoA), or 1483 Routed. |
| WAN IP Settings | ● Obtain an IP address automatically: Obtain the DNS server assigned by the uplink equipment, such as BAS.● Use the following IP address: The static IP address that your ISP provides. |
GA-324WA User Manual
| Field | Description |
| Default Route | You can select Enable or Disable. |
| DNS Settings | Obtain DNS Automatically: The dynamic IP address is not fixed. Your ISP assigns the different one each time.Use the following DNS server address: If you want to enter the DNS server address by yourself, select it and enter the related data. |
Click NEXT, the page shown in the following figure appears.
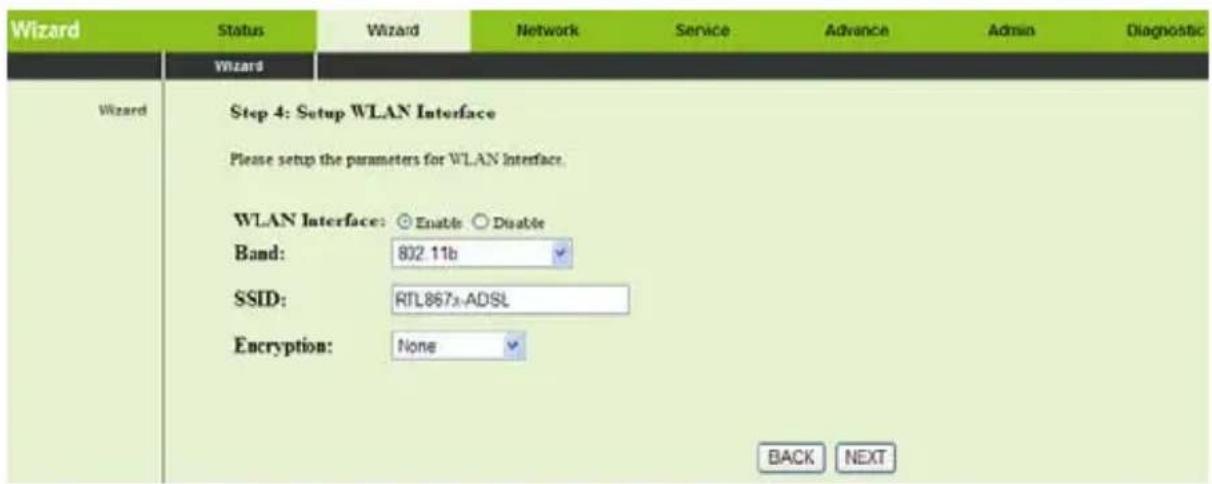
text_image
Wizard Status Wizard Network Service Advance Admin Diagnostic Wizard Wizard Step 4: Setup WLAN Interface Please setup the parameters for WLAN Interface. WLAN Interface: ○ Enable ○ Disable Band: 802.11b SSID: RTL867A-ADSL Encryption: None BACK NEXTThe following table describes the parameters of this page:
| Field | Description |
| WLANInterface | You can choose Enable or Disable. By default, WAN interface is enabled.You need to enable WAN interface, and then you can set the parameters in this page. |
| Band | Choose the working mode of the router. You can choose 2.4 GHz (B), 2.4 GHz (G), or 2.4 GHz (B + G). By default, the band is 2.4 GHz (B + G). |
| SSID | The service set identification (SSID) is a unique name to identify the router in the wireless LAN. Wireless stations associating to the router must have the same SSID.Enter a descriptive name that is used when the wireless |
GA-324WA User Manual
| Field | Description |
| client connecting to the router. | |
| Encryption | Configure the wireless encryption mode. You can choose None, WEP, WPA (TKIP), WPA (AES), WPA2 (AES), WPA2 (TKIP), or WPA2 Mixed.Wired equivalent privacy (WEP) encrypts data frames before transmitting over the wireless network.Wi-Fi protected access (WPA) is a subset of the IEEE802.11i security specification draft.WPA2 Mixedis the collection of WPA and WPA2 encryption modes. The wireless client establishes the connection between the router through WPA or WPA2.Key differences between WPA and WEP are user authentication and improved data encryption. |
After finishing the configuration, click NEXT. The page shown in the following figure appears.
| Wizard | Status | Wizard | Network | Service | Advance | Admin | Diagnosti |
| Wizard | |||||||
| Wizard | Step 5:Save Configuration Click "FINISH" to save these settings. Click "BACK" to make any modifications. Click "RESET" to drop these settings. The parameters you set: User Name: admin Password: admin NTP State: Enable NTP Server IP: 10.12.11.12 NTP Interval: 24 Time Zone: 8 VPI: 8 VCI: 33 Encapsulation: LLC/SNAP Channel Mode: 1483 mer WAN IP Settings: Obtain an IP address automatically DNS Settings: Obtain DNS Automatically WLAN Interface: Enable | ||||||
| BACK | FINISH | RESET | |||||
1483 Routed
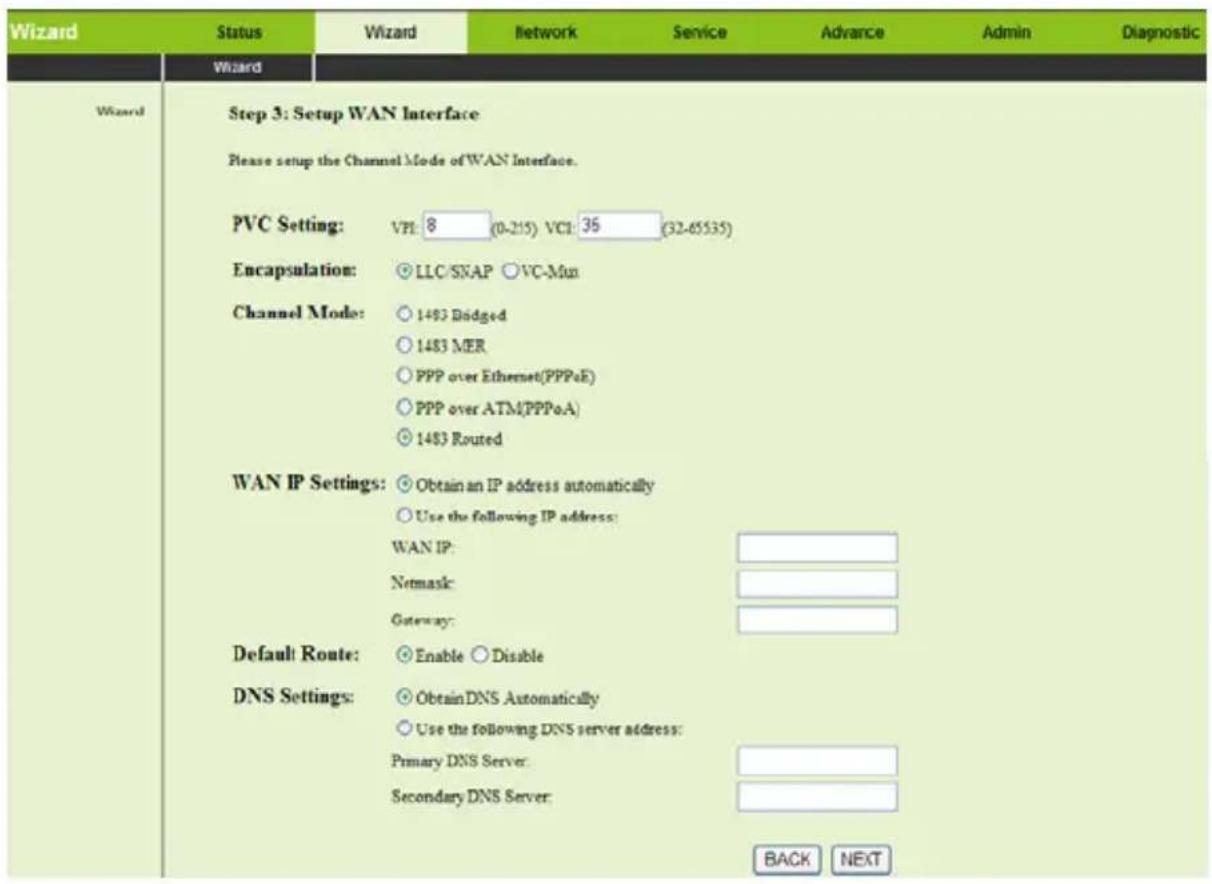
text_image
Wizard Wizard Step 3: Setup WAN Interface Please setup the Channel Mode of WAN Interface. PVC Setting: VPI: 8 (0-215) VCI: 35 (32-65535) Encapsulation: ○ LLC/SNAP ○ VC-Min Channel Mode: ○ 1493 Bridged ○ 1483 MER ○ PPP over Ethernet(PPPoE) ○ PPP over ATM(PPPoA) ○ 1483 Routed WAN IP Settings: ○ Obtain an IP address automatically ○ Use the following IP address: WAN IP: Netmask: Gateway: Default Route: ○ Enable ○ Disable DNS Settings: ○ Obtain DNS Automatically ○ Use the following DNS server address: Primary DNS Server: Secondary DNS Server: BACK NEXTThe following table describes the parameters of this page:
| Field | Description |
| PVC Settings | ● The virtual path between two points in an ATM network, and its valid value is from 0 to 255.● The virtual channel between two points in an ATM network, ranging from 32 to 65535 (0 to 31 is reserved for local management of ATM traffic). |
| Encapsulation | Select the method of encapsulation provided by your ISP. You can select LLC/SNAP or VC-Mux. |
| Channel Mode | Select the WAN connection type. You can select 1483 Bridged, 1483 MER, PPP over Ethernet (PPPoE), PPP over ATM (PPPoA), or 1483 Routed. |
| WAN IP Settings | ● Obtain an IP address automatically: Obtain the DNS server assigned by the uplink equipment, such as BAS.● Use the following IP address: The static IP |
GA-324WA User Manual
| Field | Description |
| address that your ISP provides. | |
| Default Route | You can select Enable or Disable. |
| DNS Settings | Obtain DNS Automatically: The dynamic IP address is not fixed. Your ISP assigns the different one each time.Use the following DNS server address: If you want to enter the DNS server address by yourself, select it and enter the related data. |
Click NEXT, the following page appears.
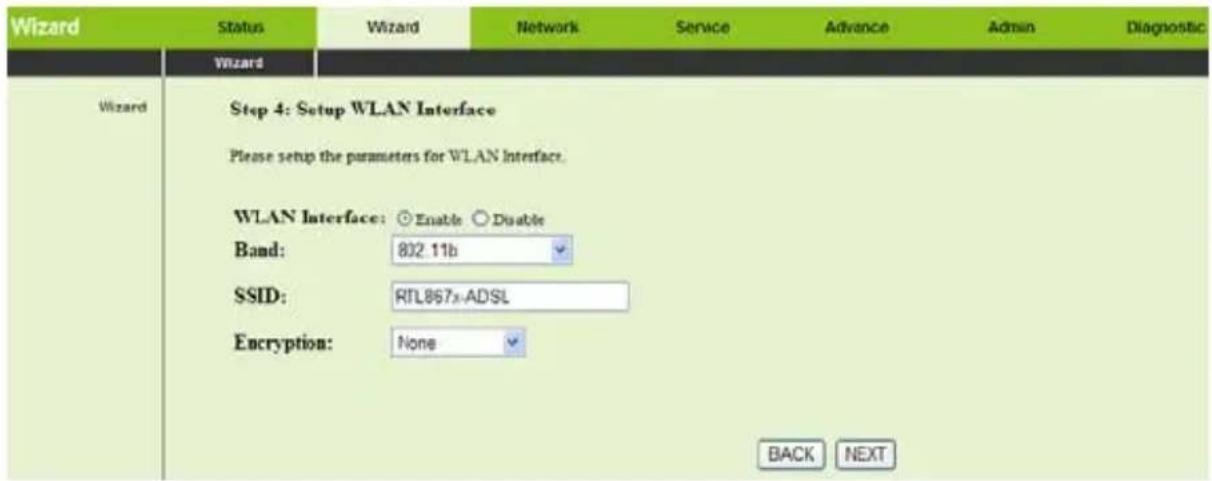
text_image
Wizard Status Wizard Network Service Advance Admin Diagnostic Wizard Step 4: Setup WLAN Interface Please setup the parameters for WLAN Interface. WLAN Interface: ○Enable ○Disable Band: 802.11b SSID: RTL867x-ADSL Encryption: None BACK NEXTThe following table describes the parameters of this page:
| Field | Description |
| WLANInterface | You can choose Enable or Disable. By default, WAN interface is enabled.You need to enable WAN interface, and then you can set the parameters in this page. |
| Band | Choose the working mode of the router. You can choose 2.4 GHz (B), 2.4 GHz (G), or 2.4 GHz (B + G). By default, the band is 2.4 GHz (B + G). |
| SSID | The service set identification (SSID) is a unique name to identify the router in the wireless LAN. Wireless stations associating to the router must have the same SSID.Enter a descriptive name that is used when the wireless |
GA-324WA User Manual
| Field | Description |
| client connecting to the router. | |
| Encryption | Configure the wireless encryption mode. You can choose None, WEP, WPA (TKIP), WPA (AES), WPA2 (AES), WPA2 (TKIP), or WPA2 Mixed.Wired equivalent privacy (WEP) encrypts data frames before transmitting over the wireless network.Wi-Fi protected access (WPA) is a subset of the IEEE802.11i security specification draft.WPA2 Mixedis the collection of WPA and WPA2 encryption modes. The wireless client establishes the connection between the router through WPA or WPA2.Key differences between WPA and WEP are user authentication and improved data encryption. |
After finishing the configuration, click NEXT. The page shown in the following figure appears.
| Wizard | Status | Wizard | Network | Service | Advance | Admin | Diagnostie |
| Wizard | |||||||
| Wizard | Step 5:Save Configuration Click "FINISIT" to save these settings. Click "BACK" to make any modifications. Click "RESET" to drop these settings. The parameters you set: User Name: admin Password: admin NTP State: Enable NTP Server IP: 10.12.11.12 NTP Interval: 24 Time Zone: 8 VPI: 8 VCE: 35 Encapsulation: LLC/SNAP Channel Mode: 1483 router WAN IP Settings: Obtain an IP address automatically DNS Settings: Obtain DNS Automatically WLAN Interface: Enable | ||||||
| BACK | FINISH | RESET | |||||
3.4 Network
In the navigation bar, choose Network. The Network page that is displayed contains LAN, WAN, and WLAN.
3.4.1 LAN
Choose Network > LAN. The LAN page that is displayed contains LAN IP, DHCP, and DHCP Static IP.
3.4.1.1 LAN IP
Click LAN IP in the left pane. The page shown in the following figure appears. In this page, you can change IP address of the router. The default IP address is 192.168.1.1. This is the private IP address of the router. This is the address under which the router can be reached in the local network. It can be freely assigned from the block of available addresses.
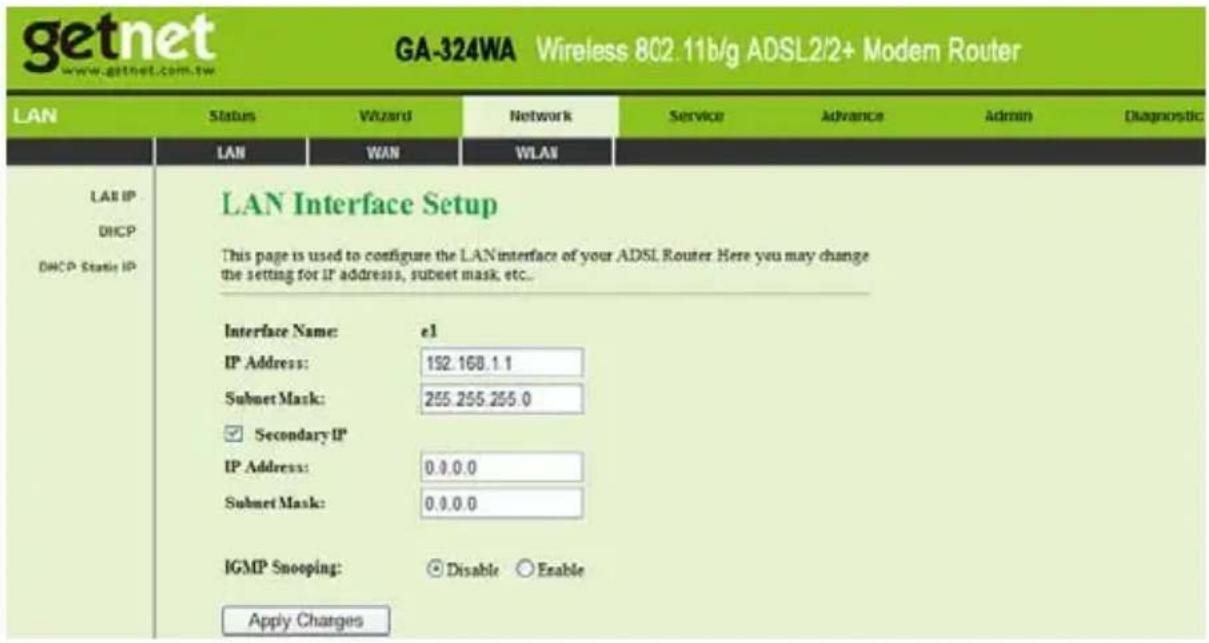
text_image
getnet www.getnet.com.tw GA-324WA Wireless 802.11b/g ADSL2/2+ Modem Router LAN Status Wizard Network Service Advance Admin Diagnostic LAN WAN WLAN LAN IP DHCP DHCP Static IP LAN Interface Setup This page is used to configure the LAN interface of your ADSL Router. Here you may change the setting for IP address, subnet mask, etc.. Interface Name: e1 IP Address: 152.168.1.1 Subnet Mask: 255.255.255.0 Secondary IP IP Address: 0.0.0.0 Subnet Mask: 0.0.0.0 IGMP Snooping: Disable Enable Apply ChargesThe following table describes the parameters and button of this page:
| Field Description | |
| IP Address | Enter the IP of LAN interface. It is recommended to use an address from a block that is reserved for private use. This address block is 192.168.1.1-192.168.255.254. |
| Subnet Mask | Enter the subnet mask of LAN interface. The range of subnet mask is from255.255.0.0-255.255.255.254. |
| Secondary IP | Select it to enable the secondary LAN IP. The two LAN IP addresses must be in the different network. |
| IGMP Snooping You | can disable or enable IGMP Snooping. |
| Apply Changes Click | it to save the settings of this page. |
3.4.1.2 DHCP
Dynamic Host Configuration Protocol (DHCP) allows the individual PC to obtain the TCP/IP configuration from the centralized DHCP server. You can configure this router as a DHCP server or disable it. The DHCP server can assign IP address, IP default gateway, and DNS server to DHCP clients. This router can also act as a surrogate DHCP server (DHCP proxy) where it relays IP address assignment from an actual real DHCP server to clients. You can enable or disable DHCP server or DHCP proxy.
Click DHCP in the left pane. The page shown in the following figure appears.
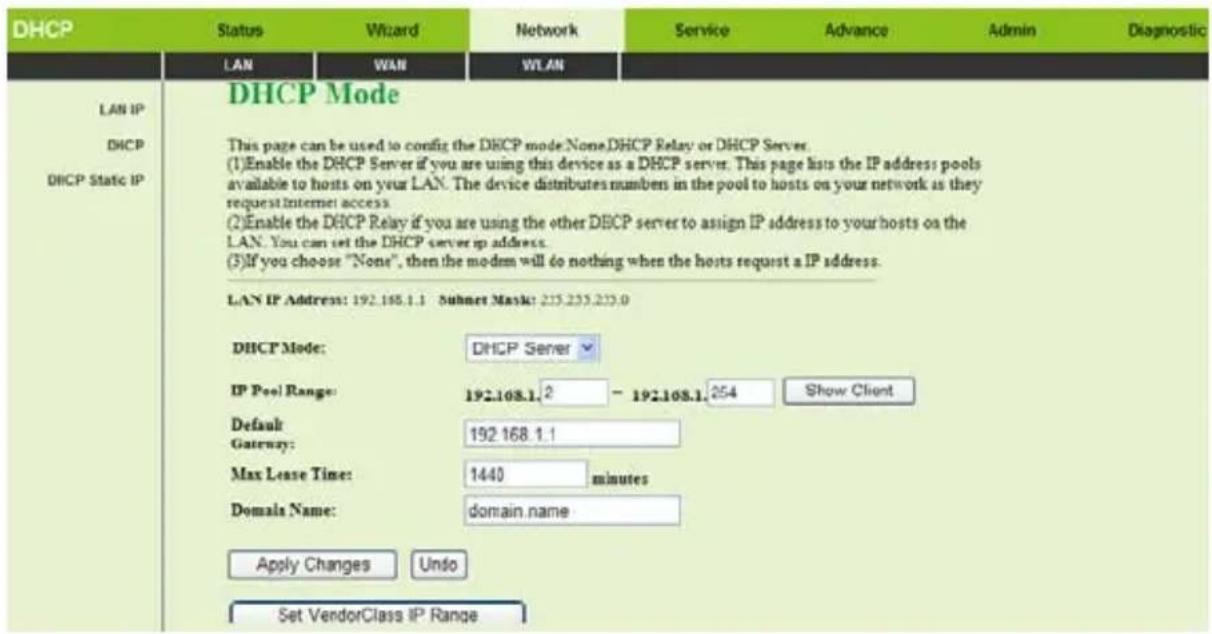
text_image
DHCP Status Wizard Network Service Advance Admin Diagnostic LAN WAN WLAN DHCP Mode DHCP DHCP Static IP This page can be used to config the DHCP mode.None.DHCP Relay or DHCP Server. (1)Enable the DHCP Server if you are using this device as a DHCP server. This page lists the IP address pools available to hosts on your LAN. The device distributes numbers in the pool to hosts on your network as they request Internet access. (2)Enable the DHCP Relay if you are using the other DHCP server to assign IP address to your hosts on the LAN. You can set the DHCP server ip address. (3)If you choose "None", then the modem will do nothing when the hosts request a IP address. LAN IP Address: 192.168.1.1 Subnet Mask: 215.233.233.0 DHCP Mode: DHCP Server IP Pool Range: 192.168.1.2 - 192.168.1.254 Show Client Default Gateway: 192.168.1.1 Max Lease Time: 1440 minutes Domain Name: domain name Apply Changes Undo Set VendorClass IP RangeThe following table describes the parameters in this page:
| Field Description | |
| DHCP Mode | If set to DHCP Server, the router can assign IP addresses, IP default gateway and DNS Servers to |
| Field Description | |
| Windows95, Windows NT and other systems that support the DHCP client. | |
| IP Pool Range | It specifies the first and the last of contiguous IP address of the IP address pool. |
| Show Client | Click it, the Active DHCP Client Table page appears. It shows the assigned IP address of the clients. |
| Default Gateway | Enter the IP default gateway of the IP address pool. |
| Max Lease Time | The lease time determines the period that the PCs retain the assigned IP addresses before the IP addresses change. |
| Domain Name | Enter the domain name if you know. If you leave this blank, the domain name obtained by DHCP from the ISP is used. You must enter host name (system name) on each individual PC. The domain name can be assigned from the router through the DHCP server. |
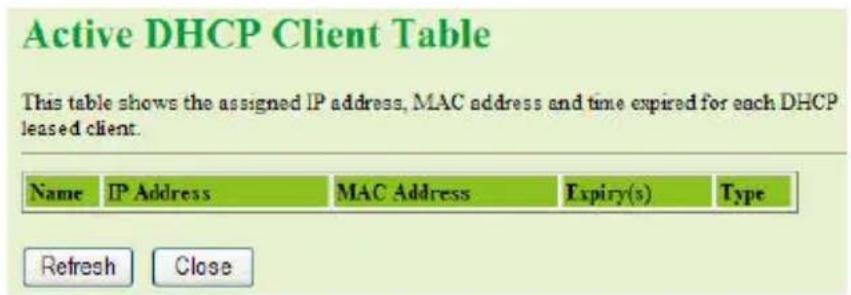
Click Show Client in the DHCP Settings page. The page shown in the following figure appears. You can view the IP address assigned to each DHCP client.
text_image
Active DHCP Client Table This table shows the assigned IP address, MAC address and time expired for each DHCP leased client. Name IP Address MAC Address Expiry(s) Type Refresh CloseThe following table describes the parameters and buttons in this page:
| Field | Description |
| IP Address | It displays the IP address relative to the MAC address. |
| MAC Address | It displays the MAC address of the PC.Each Ethernet device has a unique MAC address.The MAC address is assigned at the factory and it |
GA-324WA User Manual
| Field | Description |
| consists of six pairs of hexadecimal character, for example, 00-A0-C5-00-02-12. | |
| Expired (s) | It displays the lease time. The lease time determines the period that the PCs retain the assigned IP addresses before the IP addresses change. |
| Refresh Click it to refresh this page. | |
| Close Click it to close this page. | |
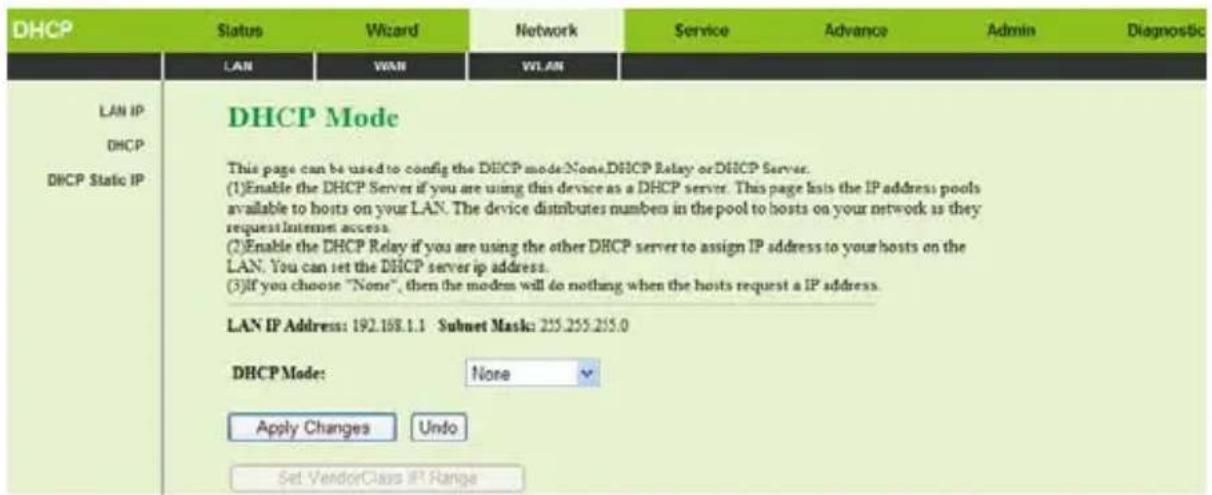
Choose None in the DHCP Settings page. The page shown in the following figure appears.
text_image
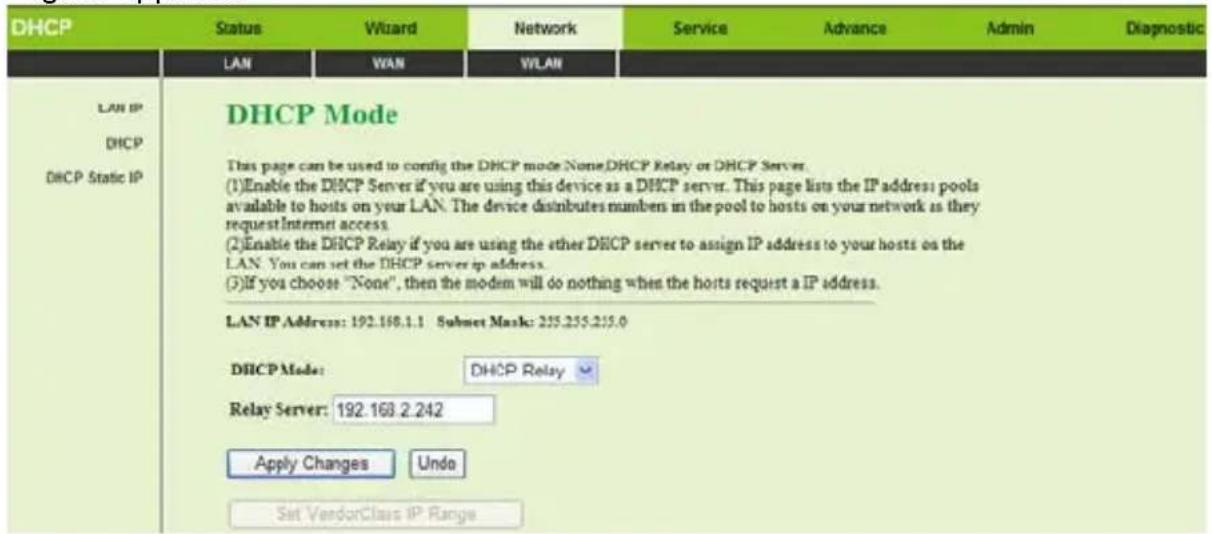
DHCP Status Wizard Network Service Advance Admin Diagnostic LAN WAN WLAN LAN IP DHCP DHCP Static IP DHCP Mode This page can be used to config the DHCP mode:None,DHCP Relay or DHCP Server. (1)Enable the DHCP Server if you are using this device as a DHCP server. This page lists the IP address pools available to hosts on your LAN. The device distributes numbers in the pool to hosts on your network as they request Internet access. (2)Enable the DHCP Relay if you are using the other DHCP server to assign IP address to your hosts on the LAN. You can set the DHCP server ip address. (3)If you choose "None", then the modem will do nothing when the hosts request a IP address. LAN IP Address: 192.168.1.1 Subnet Masks: 225.255.255.0 DHCP Mode: None Apply Changes Undo Set VendorClass IP RangeChoose DHCP Relay in the DHCP Mode page. The page shown in the following figure appears.
text_image
DHCP Status Wizard Network Service Advance Admin Diagnostic LAN WAN WLAN LAN IP DHCP DHCP Static IP DHCP Mode This page can be used to config the DHCP mode None.DHCP Relay or DHCP Server. (1)Enable the DHCP Server if you are using this device as a DHCP server. This page lists the IP address: pools available to hosts on your LAN. The device distributes numbers in the pool to hosts on your network as they request Internet access. (2)Enable the DHCP Relay if you are using the other DHCP server to assign IP address to your hosts on the LAN. You can set the DHCP server ip address. (3)If you choose "None", then the modem will do nothing when the hosts request a IP address. LAN IP Address: 192.168.1.1 Subset Mask: 255.255.255.0 DHCP Mode: DHCP Relay Relay Server: 192.168.2.242 Apply Changes Undo Set VendorClass IP RangeThe following table describes the parameters of this page:
| Field Description | |
| DHCP Mode | If set to DHCP Relay, the router acts a surrogate DHCP Server and relays the DHCP requests and responses between the remote server and the client. |
| Relay Server Enter the DHCP server address provided by your ISP. | |
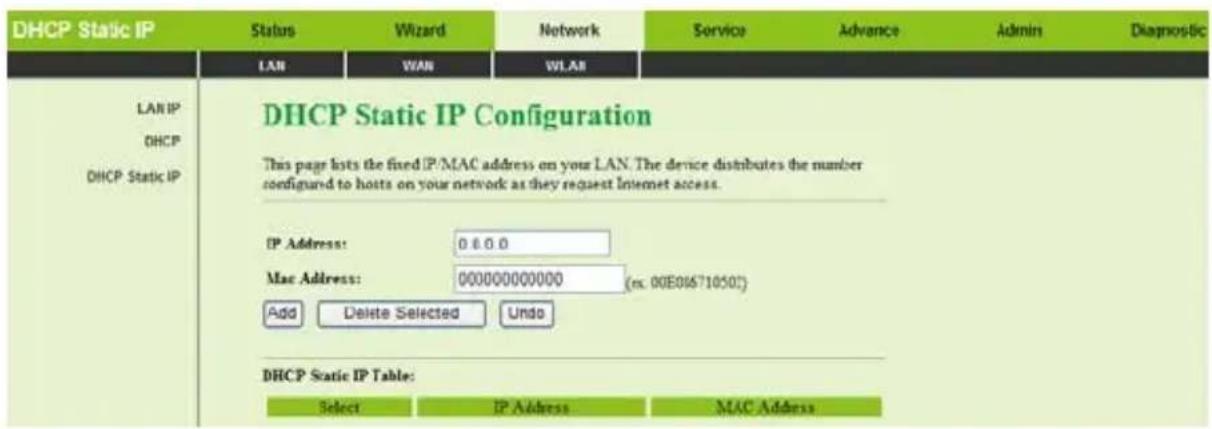
Click DHCP Static IP in the left pane. The page shown in the following figure appears. You can assign the IP addresses on the LAN to the specific individual PCs based on their MAC address.
text_image
DHCP Static IP Status Wizard Network Service Advance Admin Diagnostic LAN WAN WLAN LAN IP DHCP DHCP Static IP DHCP Static IP Configuration This page lists the fixed IP/MAC address on your LAN. The device distributes the number configured to hosts on your network as they request Internet access. IP Address: 0 8 0 0 Mac Address: 000000000000 (ex. 00E01671050) Add Delete Selected Undo DHCP Static IP Table: Select IP Address MAC AddressThe following table describes the parameters and buttons of this page:
| Field Description | |
| IP Address It specifies | the IP address of the IP address pool. |
| Mac Address Enter the | MAC address of a PC on the LAN. |
| Add After entering the | IP address and MAC address,click it. A row will be added in the DHCP Static IP Table. |
| Delete Selected | Select a row in the DHCP Static IP Table, then click it, this row is deleted. |
| Undo Click it to refresh | this page. |
| DHCP Static IP Table It | shows the assigned IP address based on the |
| Field Description | |
| MAC address. | |
3.4.2 WAN
Choose Network > WAN. The WAN page that is displayed contains WAN, ATM Setting, and ADSL Setting.
3.4.2.1 WAN
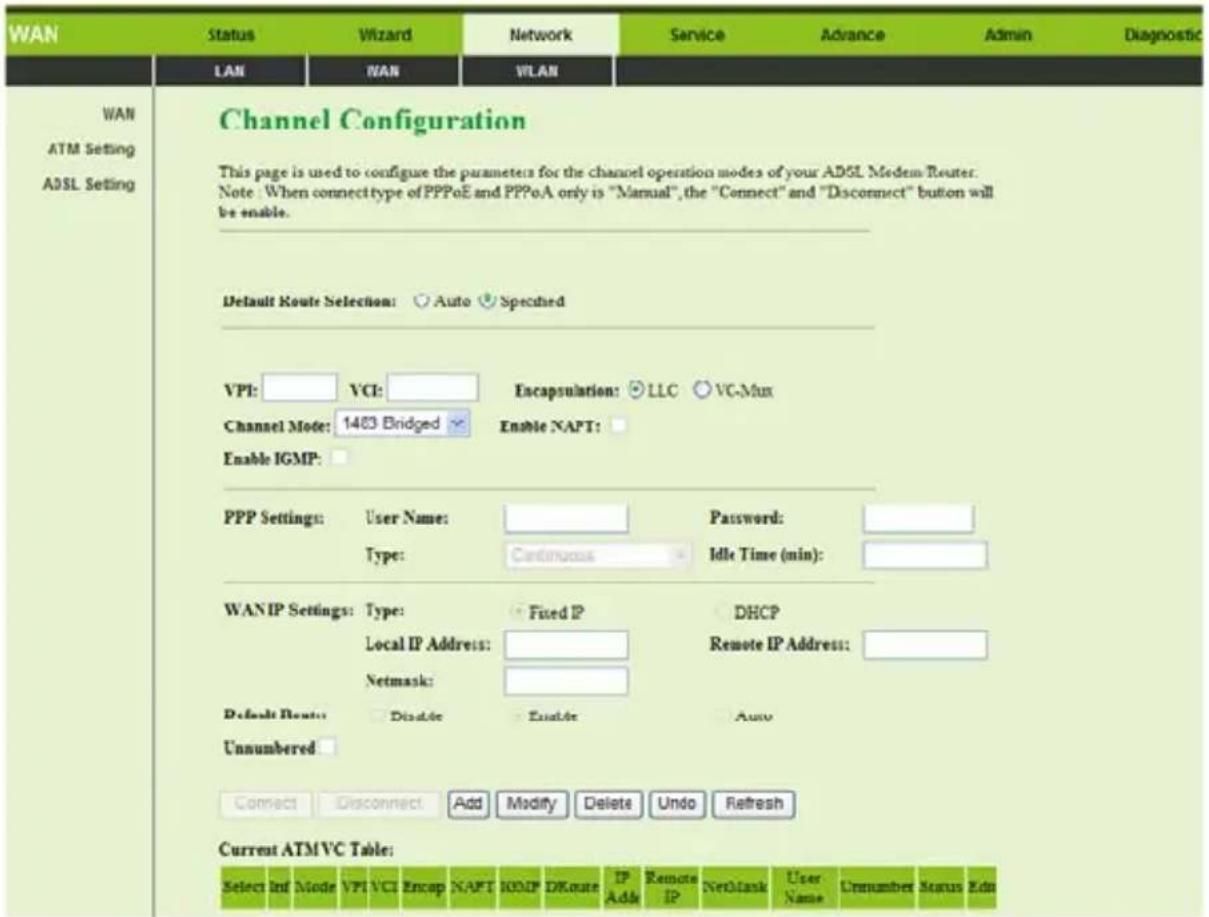
Click WAN in the left pane. The page shown in the following figure appears. In this page, you can configure WAN interface of your router.
text_image
WAN Status Wizard Network Service Advance Admin Diagnostic LAN WAN VLAN WAN ATM Setting ADSL Setting Channel Configuration This page is used to configure the parameters for the channel operation modes of your ADSL Medem/Router. Note: When connect type of PPPoE and PPPoA only is "Manual", the "Connect" and "Disconnect" button will be enable. Default Route Selection: Auto Specured VPI: VCI: Encapsulation: LLC VC-Mux Channel Mode: 1463 Bridged Enable NAPT: Enable IGMP: PPP Settings: User Name: Password: Type: Continuous Idle Time (min): WANIP Settings: Type: Fixed IP DHCP Local IP Address: Remote IP Address: Netmask: Default Route: Disable Enable Auto Unnumbered: Connect Disconnect Add Modify Delete Undo Refresh Current ATMVC Table: Select Inf Mode VPI VCI Encap NAPT ROMD DKnute IP Remote IP NetMask User Name Unnumber Status EdnThe following table describes the parameters of this page:
| Field Description | |
| Default Route Selection | You can chooseAutoorSpecified. |
| VPI The virtual path between two points in an | |
| Field Description | |
| ATM network, ranging from 0 to 255. | |
| VCI | The virtual channel between two points in an ATM network, ranging from 32 to 65535 (1 to 31 are reserved for known protocols) |
| Encapsulation | You can choose LLC and VC-Mux. |
| Channel Mode | You can choose 1483 Bridged, 1483 MER, PPPoE, PPPoA, or 1483 Routed. |
| Enable NAPT | Select it to enable the NAPT function of the router. If you do not select it and you want to access the Internet normally, you must add a route on the uplink equipment. Otherwise, the access to the Internet fails. Normally, it is required to enable NAPT. |
| Enabel IGMP You can enable or disable IGMP function. | |
| PPP Settings | |
| User Name | The correct user name that your ISP has provided to you. |
| Password | The correct password that your ISP has provided to you. |
| Type | You can choose Continuous, Connect on Demand, or Manual. |
| Idle Time (min) | If select connect on demand, you need to enter the idle timeout time. Within the preset minutes, if the router does not detect the flow of the user continuously, the router automatically disconnects the PPPoE connection. |
| WAN IP Settings | |
| Type | You can choose Fixed IP or DHCP. If select fixed IP, you should enter the local IP address, remote IP address and subnet mask. If set to use DHCP, the router is a DHCP client, the WAN IP address is assigned by the remote DHCP server. |
GA-324WA User Manual
| Field Description | |
| Local IP Address | It is the IP address of WAN interface that is provided by your ISP. |
| Remote IP Address | This is the gateway IP address that is provided by your ISP. |
| Netmask It is the subnet mask of the local IP address. | |
| Unnumbered | Select this checkbox to enable IP Unnumbered function. |
| Add | After configuring the parameters of this page, click it to add a new PVC into the current ATM VC table. |
| Modify | Select a PVC in the current ATM VC table, then modify the parameters of this PVC. After finishing, click it to apply the change of this PVC. |
| Current ATM VC Table | This table shows the existed PVCs. It shows the Interface name, channel mode, VPI/VCI, encapsulation mode, local IP address, remote IP address and other information. The maximum item of this table is eight. |
| Click it, the PPP Interface-Modify page appears. You can modify the PVCs' parameters. | |
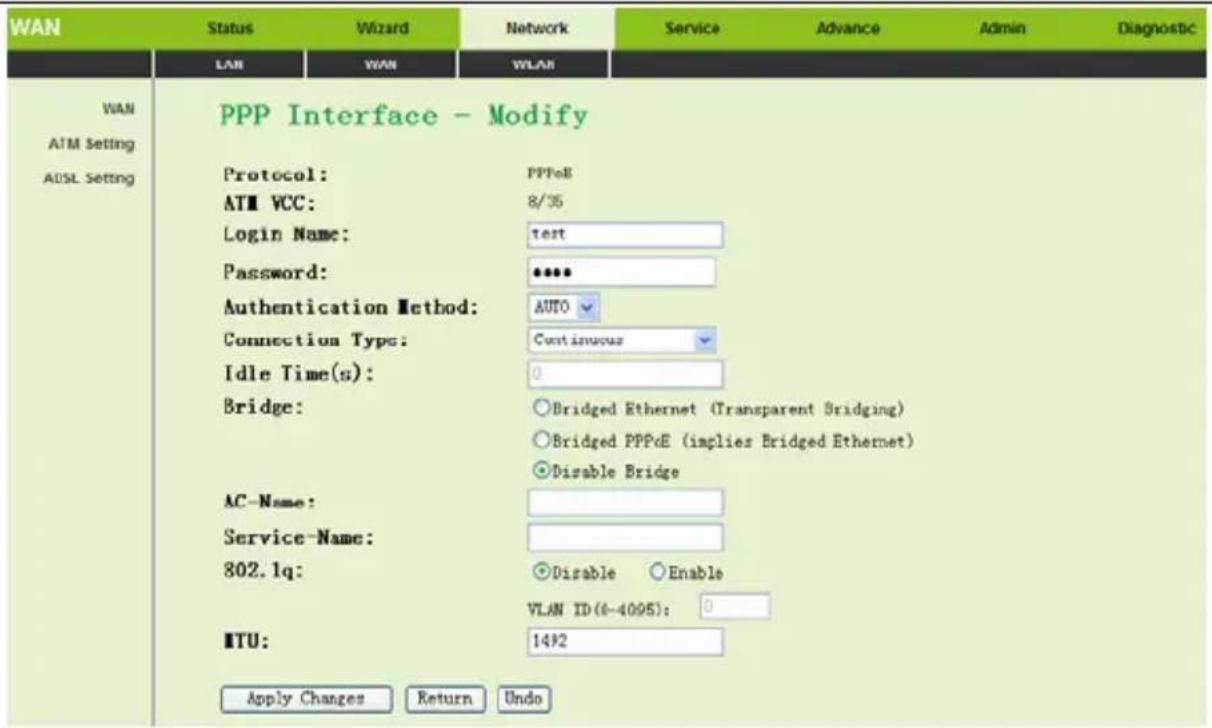
Click in the PPPoE mode. The page shown in the following figure appears. In this page, you can configure parameters of this PPPoE PVC.
text_image
WAN Status Wizard Network Service Advance Admin Diagnostic LAN WAN WLAN WAN ATM Setting AOSL Setting PPP Interface - Modify Protocol: PPPoE ATM VCC: 8/35 Login Name: test Password: **** Authentication Method: AUTO Connection Type: Continuous Idle Time(s): 0 Bridge: ○Bridged Ethernet (Transparent Bridging) ○Bridged PPPoE (implies Bridged Ethernet) ○Disable Bridge AC-Name: Service-Name: 802.1q: ○Disable ○Enable VLAN ID(6-4095): 0 ITU: 1492 Apply Changes Return UndoThe following table describes the parameters and buttons of this page:
| Field Description | |
| Protocol The protocol type used for this WAN connection. | |
| ATM VCC The ATM virtual circuit connection assigned for this PPP interface (VPI/VCI). | |
| Login Name The login name provided by your ISP. | |
| Password The password provided by your ISP. | |
| Authentication Method | You can choose AUTO, CHAP, or PAP. |
| Connection Type | You can choose Continuous, Connect on Demand, or Manual. |
| Idle Time (s) | If choose Connect on Demand, you need to enter the idle timeout time. Within the preset minutes, if the router does not detect the flow of the user continuously, the router automatically disconnects the PPPoE connection. |
| Bridge | You can choose Bridged Ethernet, Bridged PPPoE, or Disable Bridge. |
| AC-Name The accessed equipment type. | |
| Service-Name The service name. | |
| Apply Changes Click it to save the settings of this page. | |
| Return Click it to return to the WAN Interface page. | |
| Undo Click it to refresh this page. | |
3.4.2.2 ATM Setting
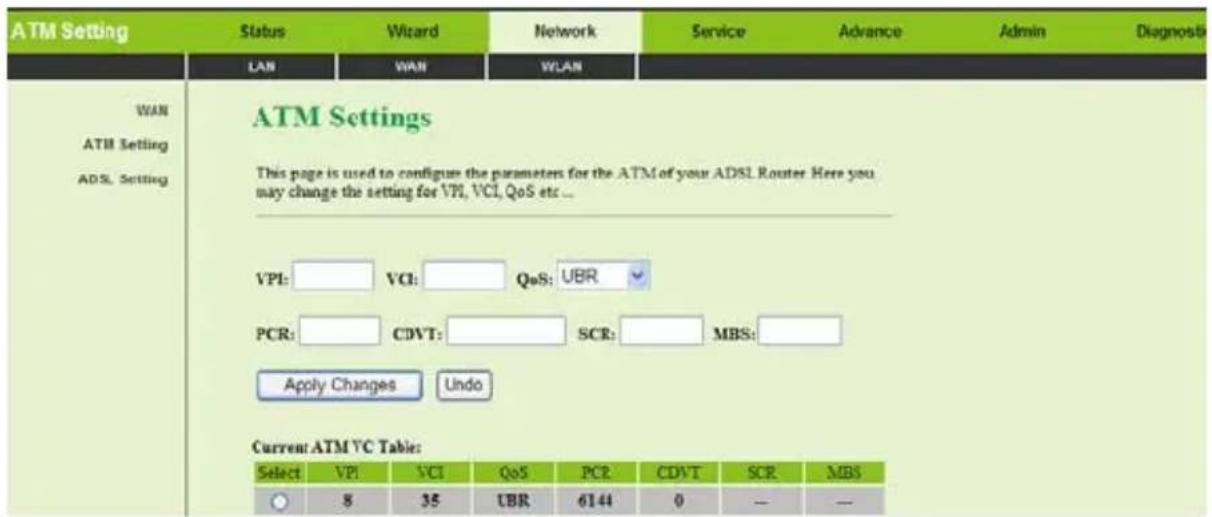
Click ATM Setting in the left pane. The page shown in the following figure appears.
In this page, you can configure the parameters of the ATM, including QoS, PCR, CDVT, SCR, and MBS
text_image
ATM Setting Status Wizard Network Service Advance Admin Diagnosti LAN WAN WLAN WAN ATM Settings This page is used to configure the parameters for the ATM of your ADSL Router Here you may change the setting for VPI, VCI, QoS etc... VPI: VCI: QoS: UBR PCR: CDVT: SCR: MBS: Apply Changes Undo Current ATM VC Table: Select VPI VCI QoS PCR CDVT SCR MBS 8 35 UBR 6144 0 — —The following table describes the parameters and buttons of this page:
| Field Description | |
| VPI The virtual path identifier of the ATM PVC. | |
| VCI The virtual channel identifier of the ATM PVC. | |
| QoS The QoS category of the PVC. You can choose UBR, CBR, rt-VBR, or nrt-VBR. | |
| PCR The maximum rate at which cells can be transported along a connection in the ATM network. | |
| CDVT The amount of delay permitted between ATM cells (expressed in microseconds). | |
| SCR The maximum rate that traffic can pass over a PVC without the risk of cell loss. | |
| MBS The maximum number of cells that can be transmitted at the PCR. | |
| Apply Changes Click it to save the settings of this page. | |
| Undo Click it to refresh this page. |
3.4.2.3 ADSL Setting
Click ADSL Setting in the left pane. The page shown in the following figure appears.
In this pae, you can select the DSL modulation. Mostly, you need to remain this factory default settings. The router supports these modulations: GLite, G.Dmt, T1.413, ADSL2, ADSL2+, AnnexL, and AnnexM. The router negotiates the modulation modes with the DSLAM.
| ADSL Setting | Status | Wizard | Network | Service | Advance | Admin | Diagnostic |
| LAN | WAN | WLAN | |||||
| WAN ATM Setting ADSL Setting | ADSL Settings | ||||||
| ADSL settings: | |||||||
| ADSL modulation: | |||||||
| 6 Lite 6 Dmt T1.413 ADSL2 ADSL2+ | |||||||
| AnnexL Option: | Enabled | ||||||
| AnnexM Option: | Enabled | ||||||
| ADSL Capability: | Bitswap Enable SRA Enable | ||||||
| Apply Changes | |||||||
3.4.3 WLAN
Choose Network > WLAN. In the WLAN page that is displayed contains Basic Setting, Security, Access Control, multi-SSID, Advance Setting, and WPS.
3.4.3.1 Basic Setting
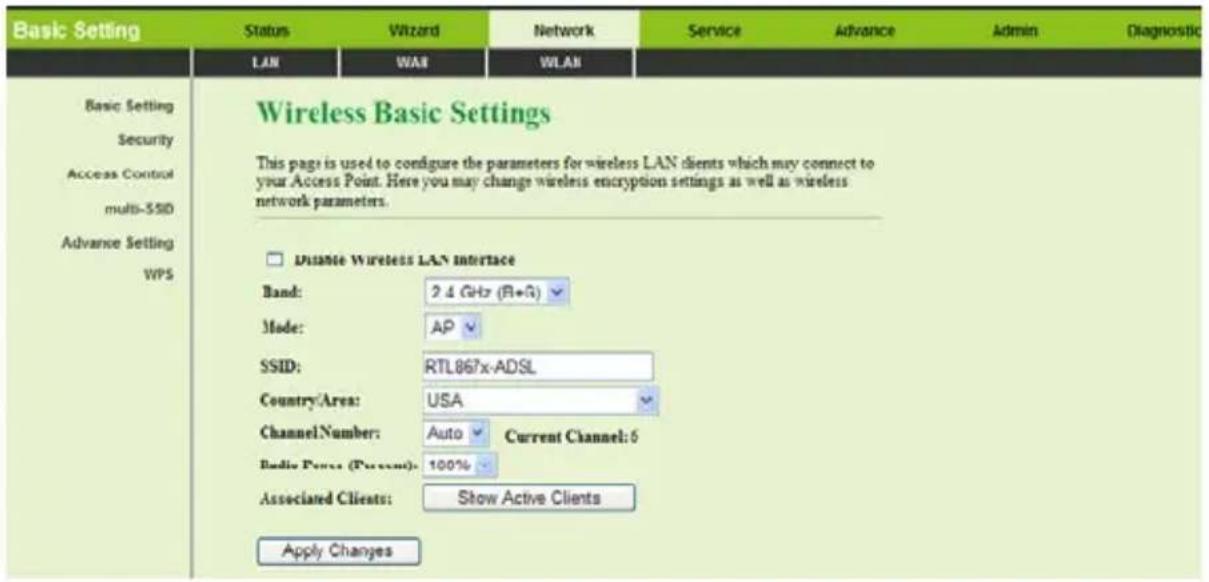
Click Basic Setting in the left pane. The page shown in the following figure appears. In this page, you can configure the parameters for wireless LAN clients that may connect to the router.
text_image
Basic Setting Status Wizard Network Service Advance Admin Diagnostic LAN WAR WLAN Basic Setting Security Access Control multi-SSD Advance Setting WPS Wireless Basic Settings This page is used to configure the parameters for wireless LAN clients which may connect to your Access Point. Here you may change wireless encryption settings as well as wireless network parameters. Distance Wireless LAN Interface Band: 2.4 GHz (R+G) Mode: AP SSID: RTL867x-ADSL Country/Area: USA Channel Number: Auto Current Channel: 5 Radio Power (Percent): 100% Associated Clients: Show Active Clients Apply ChangesThe following table describes the parameters and buttons of this page:
| Field Description | |
| Band | Choose the working mode of the router. You can choose 2.4 GHz (B), 2.4 GHz (G), or 2.4 GHz (B + G). By default, the band is 2.4 GHz (B + G). |
| Mode | Choose the network modle of the router, which is varied according to the software. By default, the network model of the router is AP. |
| SSID | The service set identification (SSID) is a unique name to identify the router in the wireless LAN. Wireless stations associating to the router must have the same SSID. Enter a descriptive name that is used when the wireless client connecting to the router. |
| Channel Number | A channel is the radio frequency used by 802.11b/g wireless devices. There are 11 channels (from 1 to 11) available depending on the geographical area. You may have a choice of |
GA-324WA User Manual
| Field Description | |
| channels (for your region) and you should use a different channel from an adjacent AP to reduce the interference. Interference and degrading performance occurs when radio signal from different APs overlap.Choose a channel from the drop-down list box. | |
| Radio Power (Percent) | You can choose the transmission power of the radio signal. It is recommended to choose the default value 100%. |
| Show Active Clients | Click it to view the information of the wireless clients that are connected to the router. |
| Apply Changes Click it to save the settings of this page. | |
3.4.3.2 Security
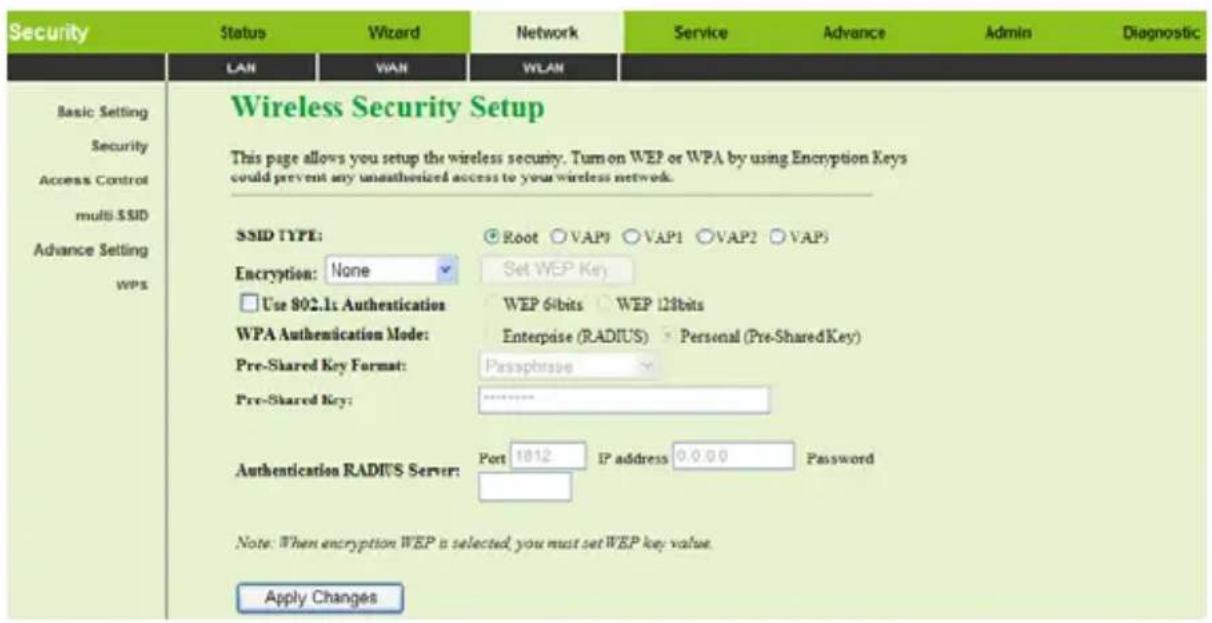
Click Security in the left pane. The page shown in the following figure appears.
text_image
Security Status Wizard Network Service Advance Admin Diagnostic LAN WAN WLAN Basic Setting Security Access Control multi-SSID Advance Setting WPS Wireless Security Setup This page allows you setup the wireless security. Turn on WEP or WPA by using Encryption Keys could prevent any unauthorized access to your wireless network. SSID TYPE: Encryption: None Use 802.1s Authentication WPA Authentication Mode: Pre-Shared Key Format: Pre-Shared Key: Authentication RADIUS Server: Root VAP9 VAP1 VAP2 VAP3 Set WEP Key WEP 64bits WEP 128bits Enterprise (RADIUS) Personal (Pre-SharedKey) Passphrase Password Port 1012 IP address 0.0.00 Apply Changes Note: When encryption WEP is selected, you must set WEP key value.The following table describes the parameters of this page:
| Field Description | |
| Encryption Configure | the wireless encryption mode. You can |
GA-324WA User Manual
| Field Description | |
| choose None, WEP, WPA (TKIP), WPA (AES), WPA2 (AES), WPA2 (TKIP), or WPA2 Mixed.Wired equivalent privacy (WEP) encrypts data frames before transmitting over the wireless network.Wi-Fi protected access (WPA) is a subset of the IEEE802.11i security specification draft.WPA2 Mixed is the collection of WPA and WPA2 encryption modes. The wireless client establishes the connection between the router through WPA or WPA2.Key differences between WPA and WEP are user authentication and improved data encryption. | |
| Set WEP Key | It is available when you set the encryption mode to WEP. Click it, the Wireless WEP Key Setup page appears. |
| WPA Authentication Mode | Select Personal (Pre-Shared Key), enter the pre-shared key in the Pre-Shared Key field.Select Enterprise (RADIUS), enter the port, IP address, and password of the Radius server. You need to enter the username and password provided by the Radius server when the wireless client connects the router. If the encryption is set to WEP, the router uses 802.1 X authentication, which is Radius authentication. |
Click Set WEP Key, and the following page appears.
Wireless WEP Key Setup
This page allows you setup the WEP key value. You could choose use 64-bit or 128-bit as the encryption key, and select ASCII or Hex as the format of input value.
SSID TYPE:
Root VAP0 VAP1 VAP2 VAP3
Key Length:
64-bit
Key Format:
ASCII (5 characters)
Default Tx Key:
Key 1
Encryption Key 1:
[Unreadable]
Encryption Key 2:
2015
Encryption Key 3:
2018
Encryption Key 4:
★★★★★
Apply Changes
Close
Reset
The following describes the parameters and button of this page:
| Field Description | |
| Key Length | Choose the WEP key lenth. You can Choose 64-bit or 128-bit. |
| Key Format | If you choose 64-bit, you can choose ASCII (5 characters) or Hex (10 characters).If you choose 128-bit, you can choose ASCII (13 characters) or Hex (26 characters). |
| Default Tx Key | Choose the index of WEP Key. You can choose Key 1, Key 2, Key 3, or Key 4. |
| Encryption Key 1 to 4 | The Encryption keys are used to encrypt the data. Both the router and wireless stations must use the same encryption key for data transmission.If you choose 64-bit and ASCII (5 characters), enter any 5 ASCII characters.If you choose 64-bit and Hex (10 characters), enter any 10 hexadecimal characters.If you choose 128-bit and ASCII (13 characters), enter any 13 ASCII characters.If you choose 128-bit and Hex (26 characters), enter any 26 hexadecimal characters. |
| Field Description |
| Apply Changes Click it to save the settings of this page. |
3.4.3.3 Access Control
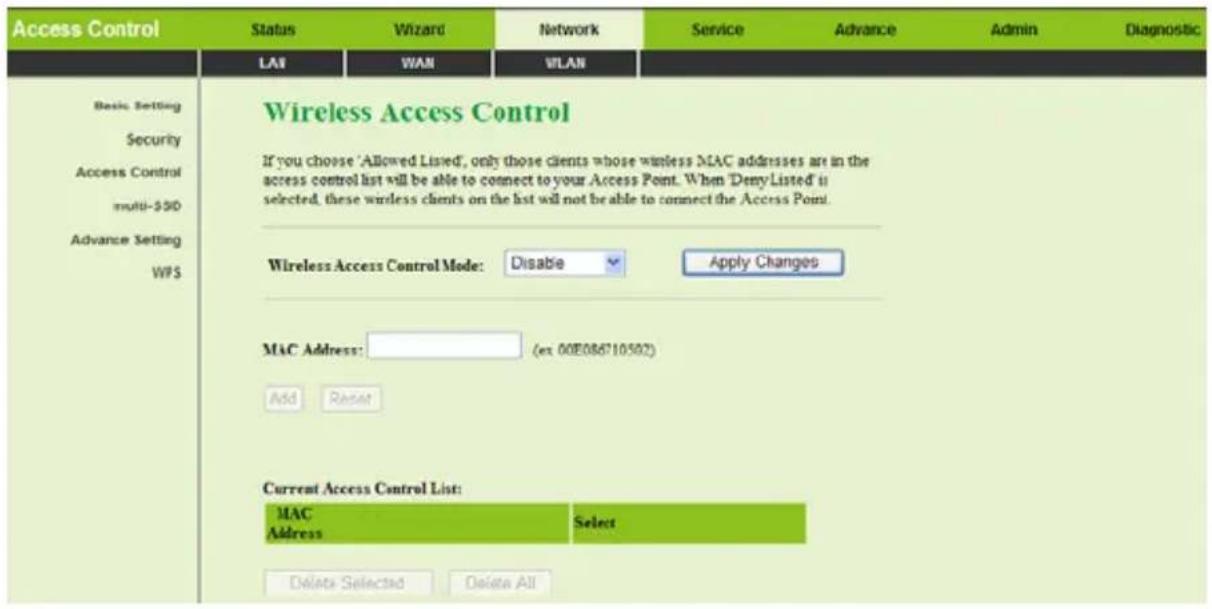
Click Advanced Setting in the left pane. The page shown in the following figure appears. In this page, you can configure the access control of the wireless clients.
text_image
Access Control Status Wizard Network Service Advance Admin Diagnostic LAI WAN VLAN Basic Setting Security Access Control multi-350 Advance Setting WPS Wireless Access Control If you choose 'Allowed Listed', only those clients whose wireless MAC addresses are in the across control list will be able to connect to your Access Point. When 'DenyListed' is selected, these wireless clients on the list will not be able to connect the Access Point. Wireless Access Control Mode: Disable Apply Changes MAC Address: (ex 00E086710502) Add Reset Current Access Control List: MAC Address Select Delete Selected Delete AllChoose Allow Listed in the Wireless Access Control Mode field to enable white list function. Only the devices whose MAC addresses are listed in the Current Access Control List can access the router.
Choose Deny Listed in the Wireless Access Control Mode field to enable black list function. The devices whose MAC addresses are listed in the Current Access Control List are denied to access the router.
3.4.3.4 multi-SSID
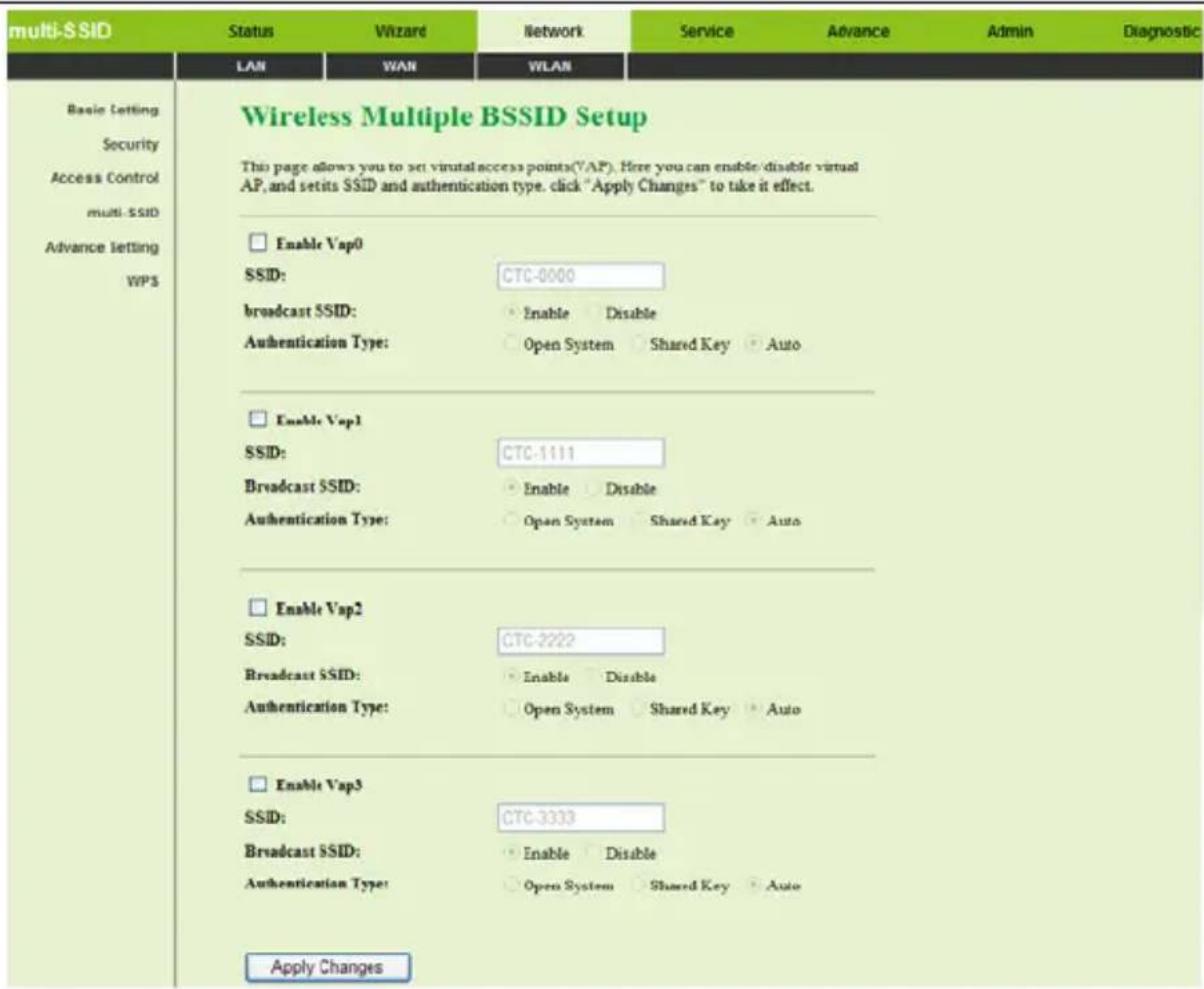
Click multi-SSID in the left pane. The page shown in the following figure appears.
text_image
multi-SSID Status Wizard Network Service Advance Admin Diagnostic LAN WAN WLAN Basic Setting Security Access Control multi-SSID Advance setting WPS Wireless Multiple BSSID Setup This page allows you to set virtual access points(VAP). Here you can enable/disable virtual AP, and sets SSID and authentication type. click "Apply Changes" to take it effect. Enable Vap0 SSID: CTC-0000 broadcast SSID: Enable Disable Authentication Type: Open System Shared Key Auto Enable Vap1 SSID: CTC-1111 Broadcast SSID: Enable Disable Authentication Type: Open System Shared Key Auto Enable Vap2 SSID: CTC-2222 Broadcast SSID: Enable Disable Authentication Type: Open System Shared Key Auto Enable Vap3 SSID: CTC-3333 Broadcast SSID: Enable Disable Authentication Type: Open System Shared Key Auto Apply ChangesThe following table describes parameter and button of this page:
| Field Description | |
| SSID The service set identification (SSID) is a unique name to identify the router in the wireless LAN. | |
| Apply Changes Click it to save the settings of this page. |
3.4.3.5 Advance Setting
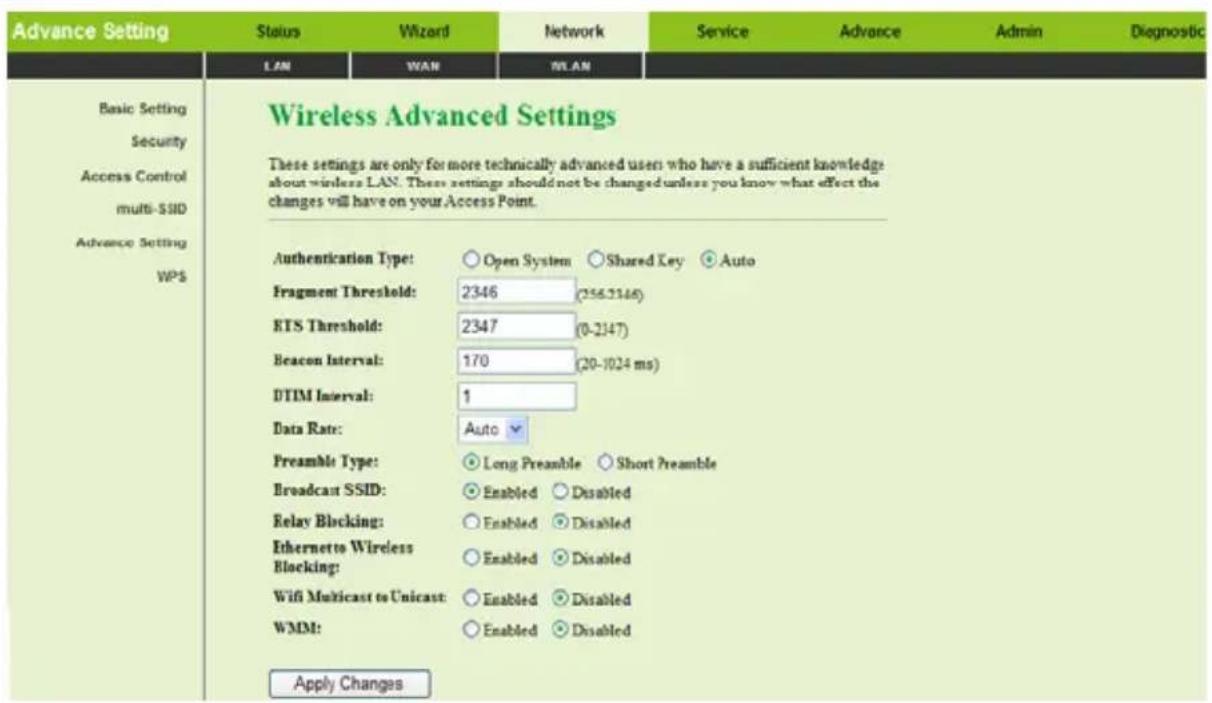
Click Advance Setting in the left pane. The page shown in the following figure appears. In this page, you can configure the wireless advanced parameters. It is recommended to use the default parameters.

Note:
The parameters in the Wireless Advanced Settings page are modified by the professional personnel, it is recommended to keep the default values.
text_image
Advance Setting Status Wizard Network Service Advance Admin Diagnostic LAN WAN WLAN Basic Setting Security Access Control multi-SIID Advance Setting WPS Wireless Advanced Settings These settings are only for more technically advanced users who have a sufficient knowledge about wireless LAN. These settings should not be changed unless you know what effect the changes will have on your Access Point. Authentication Type: Open System Shared Key Auto Fragment Threshold: 2346 (256-2146) ETS Threshold: 2347 (0-2147) Beacon Interval: 170 (20-1024 ms) DTIM Interval: 1 Data Rate: Auto Preamble Type: Long Preamble Short Preamble Broadcast SSID: Enabled Disabled Relay Blocking: Enabled Disabled Ethernetto Wireless Blocking: Enabled Disabled Wifi Multicast to Unicast: Enabled Disabled WMM: Enabled Disabled Apply ChangesThe following table describes the parameters and button of this page:
| Field Description | |
| Authentication | Select the router operating in the open system or encryption authentication. You can chooseOpen System, Shared Key, or Auto.In the open system, the wireless client can directly connect to the deviceIn the encryption authentication, the wireless client connects to the router through the shared key. |
| Data Rate | Choose the transmission rate of the wireless data. You can chooseAuto, 1 M, 2 M, 5.5 M, 11 M, 6 M, 9 M, 12 M, 18 M, 24 M, 36 M, 48 M, or 54 M. |
| Broadcast SSID | Select whether the router broadcasts SSID or not. You can selectEnableor Disable.Select Enable, the wireless client searches the router through broadcasting SSID.Select Disableto hide SSID, the wireless clients can not search the SSID. |
| Relay Blocking | Wireless isolation. SelectEnable, the wireless |
| Field Description | |
| clients that are connected to the router can not intercommunication. | |
| Ethernet to Wireless Blocking | Whether the wireless network can communicate with the Ethernet network or not. |
| Apply Changes Click | it to save the settings of this page. |
3.4.3.6 WPS
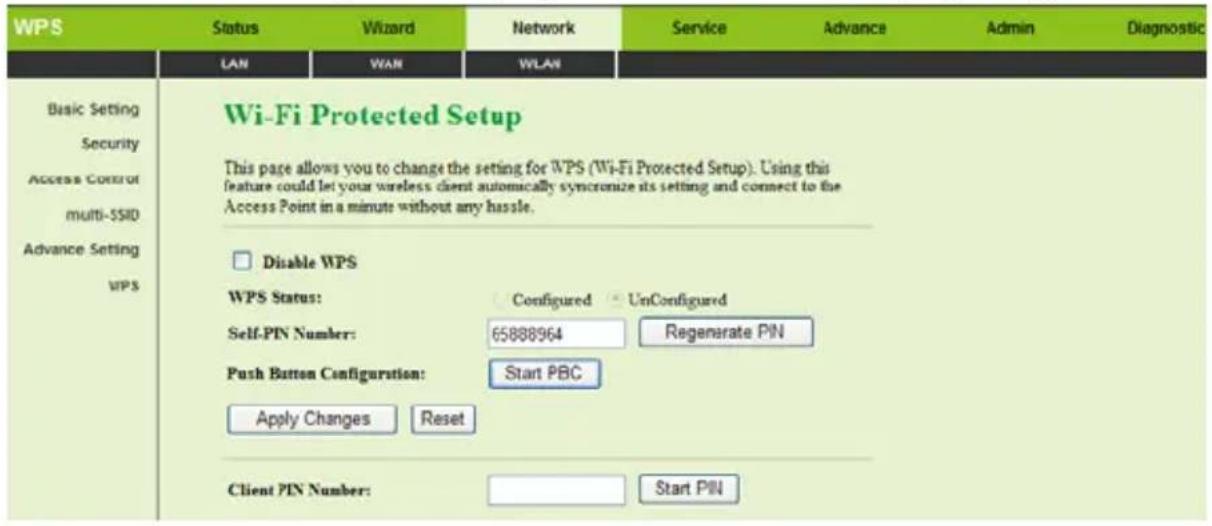
Click WPS in the left pane. The page shown in the following figure appears.
text_image
WPS Status Wizard Network Service Advance Admin Diagnostic LAN WAN WLAN Basic Setting Security Access Control multi-SSIO Advance Setting WPS Wi-Fi Protected Setup This page allows you to change the setting for WPS (Wi-Fi Protected Setup). Using this feature could let your wireless client automatically synchronize its setting and connect to the Access Point in a minute without any hassle. Disable WPS WPS Status: Configured UnConfigured Self-PIN Number: 65888964 Regenerate PIN Push Button Configuration: Start PBC Apply Changes Reset Client PIN Number: Start PINThere are two ways for the wireless client to establish the connection with the router through WPS. The router generates PIN, see the above figure. Click Regenerate PIN to generate a new PIN, then click Start PCB, press WPS button on the wireless client simultaneously. The wireless client automatically establishes the connection with the router through the encryption mode, and you need not to enter the key. The other way is the wireless client generates PIN. In the above figure, enter PIN of the wireless client in the Client PIN Number field, then click Start PIN to establish the connection.

Note:
The wireless client establishes the connection with the router through WPS negotiation. The wireless client must support WPS.
3.5 Service
In the navigation bar, choose Service. The Service page that is displayed contains DNS, Firewall, UPNP, IGMP Proxy, TR069, and ACL.
3.5.1 DNS
Choose Service > DNS. The DNS page that is displayed contains DNS and DDNS.
3.5.1.1 DNS
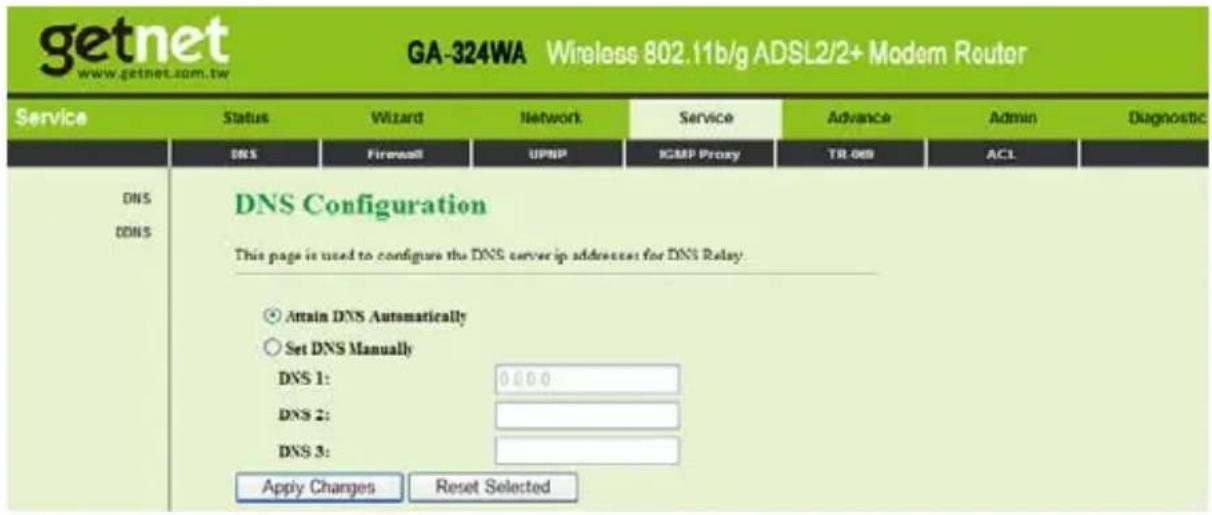
Click DNS in the left pane. The page shown in the following figure appears. Domain name system (DNS) is an Internet service that translates the domain name into IP address. Because the domain name is alphabetic, it is easier to remember. The Internet, however, is based on IP addresses. Every time you use a domain name, a DNS service translates the name into the corresponding IP address. For example, the domain name www.example.com might translate to 198.105.232.4. The DNS system has its own network. If one DNS server does not know how to translate a particular domain name, it asks another one, and so on, until the correct IP address is returned.
text_image
getnet www.getnet.com.tw GA-324WA Wireless 802.11b/g ADSL2/2+ Modern Router Service Status Wizard Network Service Advance Admin Diagnostic DNS DFS Firewall UPBP IGMP Proxy TR-069 ACL DNS Configuration This page is used to configure the DNS server ip addresses for DNS Relay. Attain DNS Automatically Set DNS Manually DNS 1: 0.000 DNS 2: DNS 3: Apply Changes Reset SelectedThe following table describes the parameters and buttons of this page:
| Field Description | |
| Attain DNSAutomatically | Select it, the router accepts the first received DNSassignment from one of the PPPoA, PPPoE or MER |
GA-324WA User Manual
| Field Description | |
| enabled PVC(s) during the connection establishment. | |
| Set DNS Manually | Select it, enter the primary and optional secondary DNS server IP addresses. |
| Apply Changes Click it to save the settings of this page. | |
| Reset Selected Click it to refresh this page. | |
3.5.1.2 DDNS
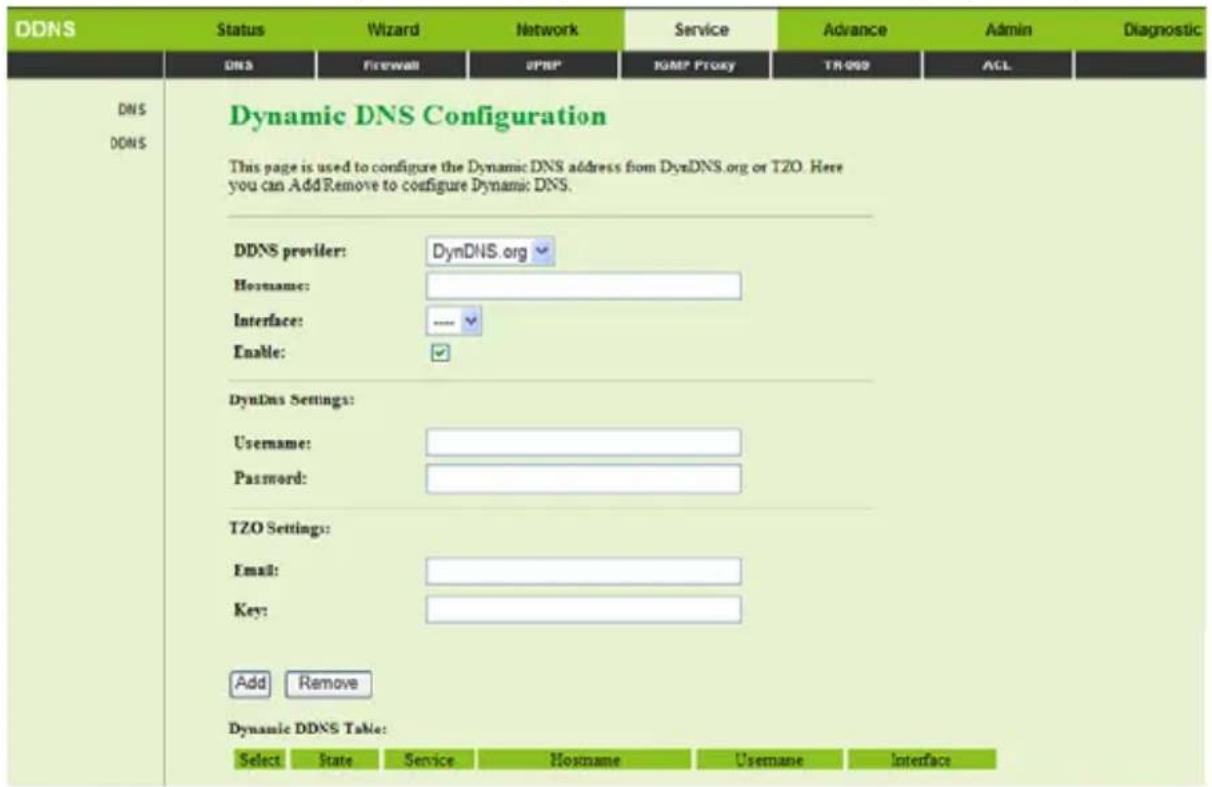
Click DDNS in the left pane. The page shown in the following figure appears.
text_image
DDNS Status Wizard Network Service Advance Admin Diagnostic DNS Firewall UPRP ICMP Proxy TR-009 ACL DNS DDNS Dynamic DNS Configuration This page is used to configure the Dynamic DNS address from DynDNS.org or TZO. Here you can Add Remove to configure Dynamic DNS. DDNS provider: DynDNS.org Hostname: Interface: ---- Enable: ✓ DynDNS Settings: Username: Password: TZO Settings: Email: Key: Add Remove Dynamic DDNS Table: Select State Service Hostname Username InterfaceThe following table describes the parameters of this page:
| Field Description | |
| DDNS provider | Choose the DDNS provider name. |
| Hostname The | DDNS identifier. |
| Interface The WAN interface of the router. | |
| Enable Enable or disable DDNS function. | |
| Username The name provided by DDNS provider. | |
| Password The password provided by DDNS provider. | |
| Email The email provided by DDNS provider. | |
| Key The key provided by DDNS provider. | |
3.5.2 Firewall
Choose Service > Firewall. The Firewall page that is displayed contains IPPort Fileter, MAC Filter, URL Blocking, Virtual Server, DMZ Setting, ALG Setting, and DoS Setting.
3.5.2.1 IPPort Filter
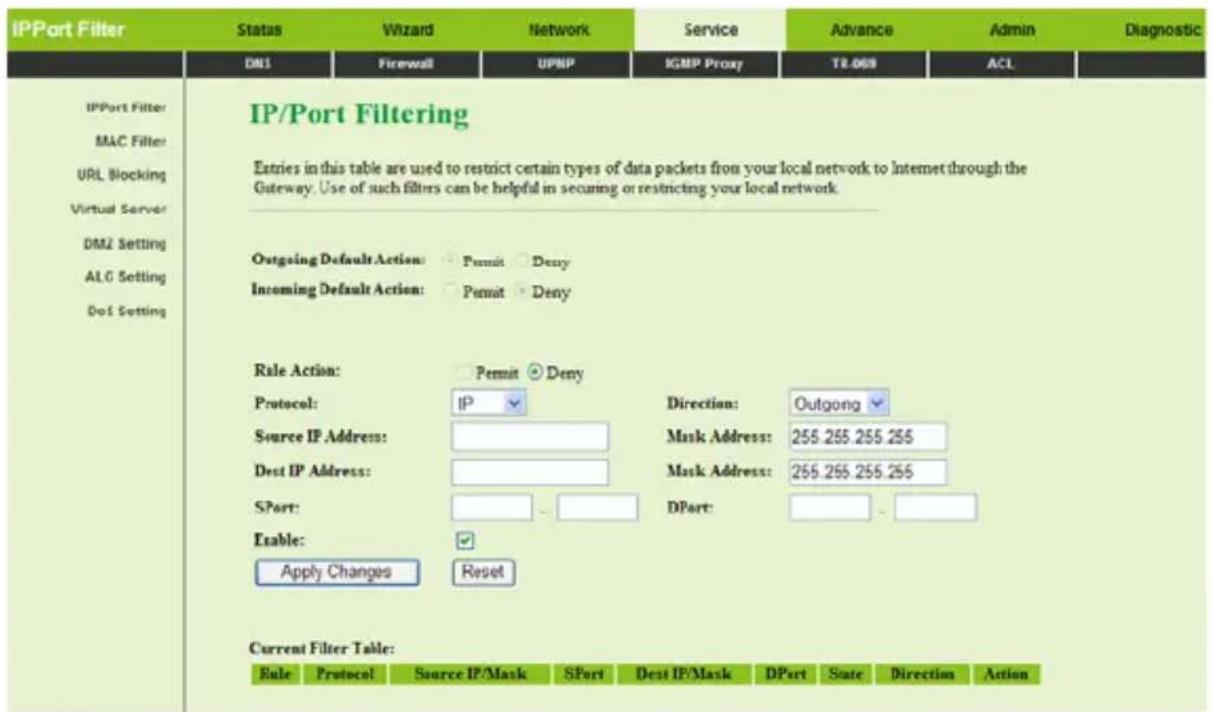
Click IPPort Filter in the left pane. The page shown in the following figure appears. Entries in this table are used to restrict certain types of data packets through the gateway. These filters are helpful in securing or restricting your local network.
text_image
IPPort Filter Status Wizard Network Service Advance Admin Diagnostic DNS Firewall UPNP IGMP Proxy TR-069 ACL IPPort Filter MAC Filter URL Blocking Virtual Server DMZ Setting ALG Setting DoS Setting IP/Port Filtering Entries in this table are used to restrict certain types of data packets from your local network to Internet through the Gateway. Use of such filters can be helpful in securing or restricting your local network. Outgoing Default Action: Permit Deny Incoming Default Action: Permit Deny Rule Action: Permit Deny Protocol: IP Direction: Outgong Source IP Address: Mask Address: 255.255.255.255 Dest IP Address: Mask Address: 255.255.255.255 SPort: DPort: Enable: ✓ Apply Changes Reset Current Filter Table: Rule Protocol Source IP/Mask SPort Dest IP/Mask DPort State Direction ActionClick Apply Changes to save the settings of this page.
Click Add to add a new rule of the IP/Port filter.
3.5.2.2 MAC Filter
Click MAC Filter in the left pane. The page shown in the following figure appears. Entries in this table are used to restrict certain types of data packets from your local network to Internet through the gateway. These filters are helpful in securing or restricting your local network.
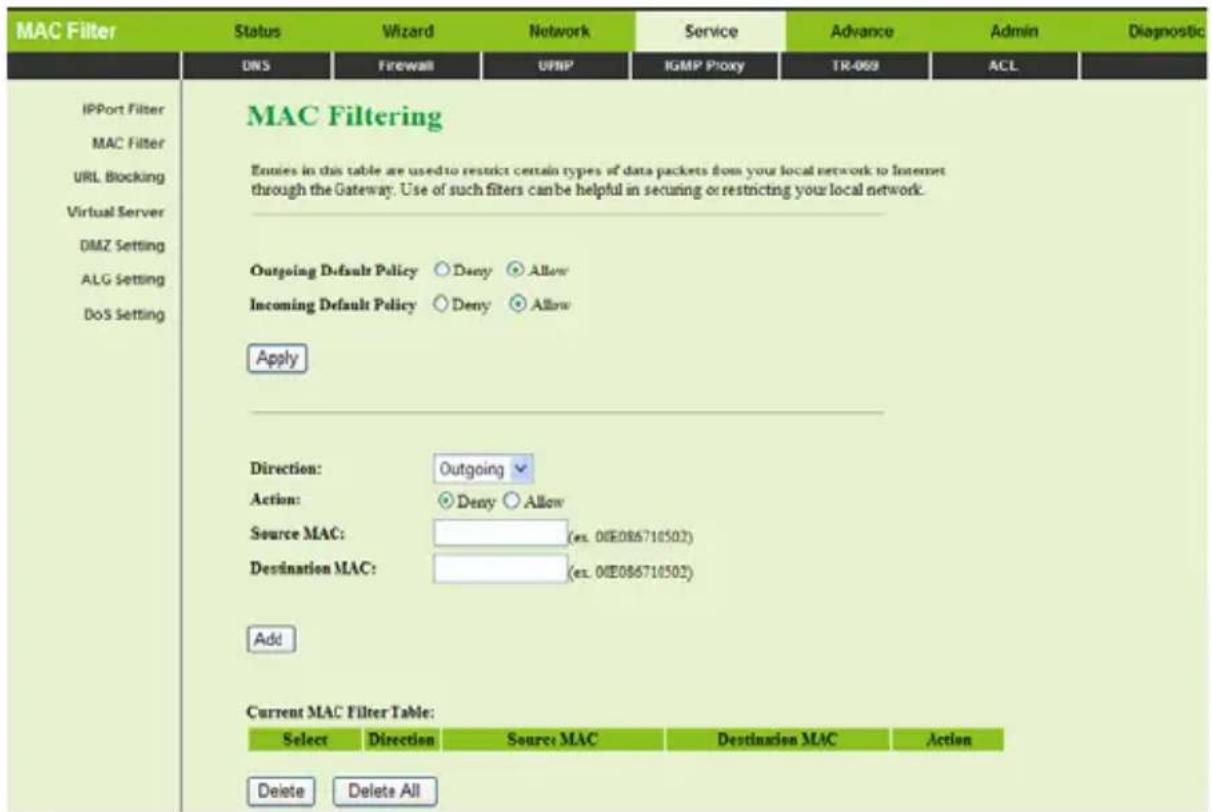
text_image
MAC Filter Status Wizard Network Service Advance Admin Diagnostic DNS Firewall UMP IGMP Proxy TR-069 ACL IPPort Filter MAC Filter URL Blocking Virtual Server DMZ Setting ALG Setting DoS Setting MAC Filtering Entries in this table are used to restrict certain types of data packets from your local network to Internet through the Gateway. Use of such filters can be helpful in securing or restricting your local network. Outgoing Default Policy ○Deny ○Allow Incoming Default Policy ○Deny ○Allow Apply Direction: Outgoing Action: ○Deny ○Allow Source MAC: (ex. 0IE086710502) Destination MAC: (ex. 0IE086710502) Add Current MAC Filter Table: Select Direction Source MAC Destination MAC Action Delete Delete AllClick Apply Changes to save the settings of this page.
Click Add to add a new rule of the MAC filter.
3.5.2.3 URL Blocking
Click URL Blocking in the left pane. The page shown in the following figure appears. This page is used to block a fully qualified domain name (FQDN), such as tw.yahoo.comand and filtered keyword. You can add or delete FQDN and filtered keyword.
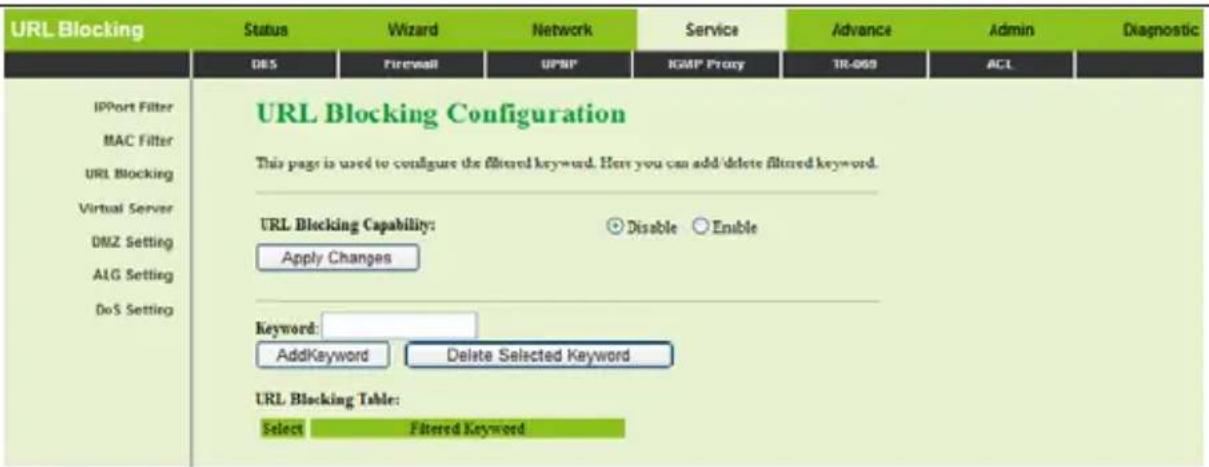
text_image
URL Blocking Status Wizard Network Service Advance Admin Diagnostic DBS Firewall UPHP IGMP Proxy TR-059 ACL IPPort Filter MAC Filter URL Blocking Virtual Server DMZ Setting ALG Setting DoS Setting URL Blocking Configuration This page is used to configure the filtered keyword. Here you can add/delete filtered keyword. URL Blocking Capability: Disable Enable Apply Changes Keyword: AddKeyword Delete Selected Keyword URL Blocking Table: Select Filtered KeywordThe following table describes the parameters and buttons of this page:
| Field Description | |
| URL Blocking Capability | You can choose Disable or Enable.Choose Disabled to turn off URL blocking and keyword filtering.Choose Enable to block access to the URLs and keywords specified in the URL Blocking Table and Keyword Filtering Table. |
| Apply Changes Click it to save the settings of this page. | |
| Keyword The keyword to block. | |
| Add Keyword Click it to add the keyword to the keyword filtering table. | |
| Delete Selected Keyword | Select a row in the Keyword Filtering Table and click it to delete the row. |
| URL Blocking Table | A list of the URL (s) to which access is blocked. |
3.5.2.4 Virtual Server
Click Virtual Server in the left pane. The page shown in the following figure appears.
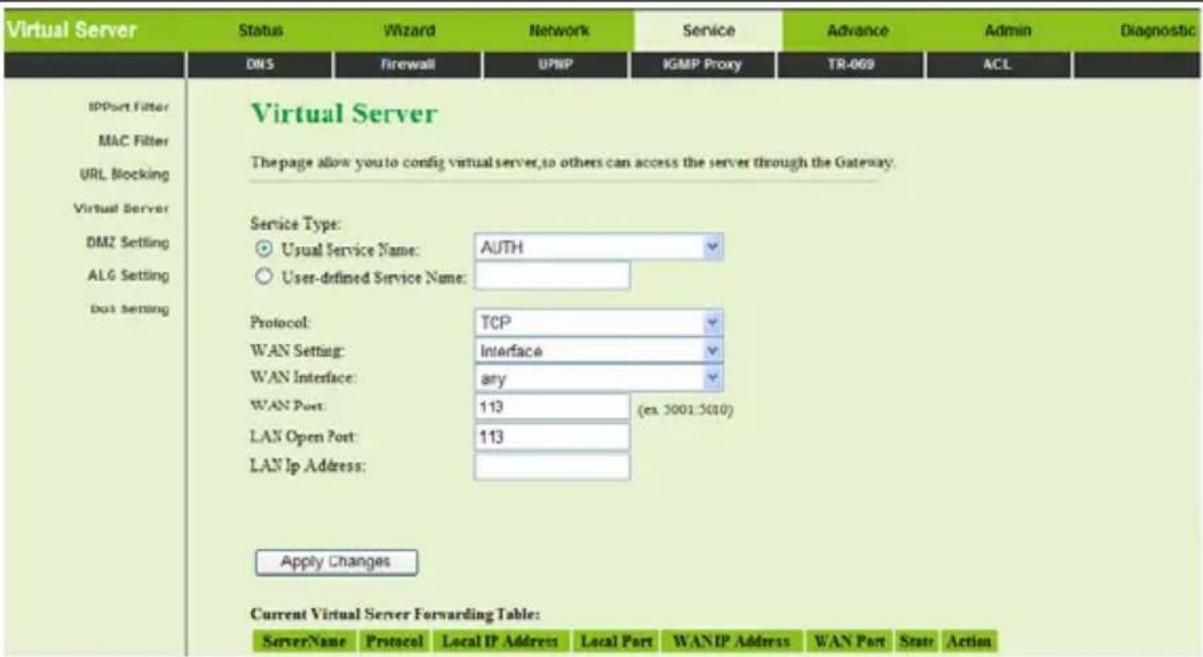
text_image
Virtual Server Status Wizard Network Service Advance Admin Diagnostic DNS Firewall UPNP IGMP Proxy TR-069 ACL IPPort Filter MAC Filter URL Blocking Virtual Server DMZ Setting ALG Setting DOS Setting Virtual Server The page allow you to config virtual server, so others can access the server through the Gateway. Service Type: ● Usual Service Name: AUTH ○ User-defined Service Name: Protocol: TCP WAN Setting: Interface WAN Interface: any WAN Port: 113 (ex. 3001:5010) LAN Open Port: 113 LAN Ip Address: Apply Changes Current Virtual Server Forwarding Table: ServerName Protocol Local IP Address Local Port WANIP Address WAN Port State ActionThe following table describes the parameters of this page:
| Field Description | |
| Service Type | You can choose the common service type, such as AUTH, DNS, or FTP. You can also define a service name.If you choose the common service type, the corresponding WAN communication port/service host communication port has the default settings.If you define service type, you need to enter the corresponding port. |
| Protocol | Choose the transport layer protocol that the service type uses. You can choose TCP or UDP. |
| WAN Setting | You can choose Interface or Ip Address. |
| WAN Interface Choose the router port that uses virtual server. | |
| WAN Port Enter the access port on the WAN. | |
| LAN Open Port Enter the port number of the specified service type. | |
| LAN Ip Address | Enter the IP address of the virtual server. It is in the same network segment with LAN IP address of the router. |
3.5.2.5 DMZ Setting
Click DMZ Setting in the left pane. The page shown in the following figure appears. A demilitarized zone is used to provide Internet services without sacrificing unauthorized access to its local private network. Typically, the DMZ host contains services accessible to Internet traffic, such as web (HTTP) servers, FTP servers, SMTP (e-mail) servers and DNS servers.
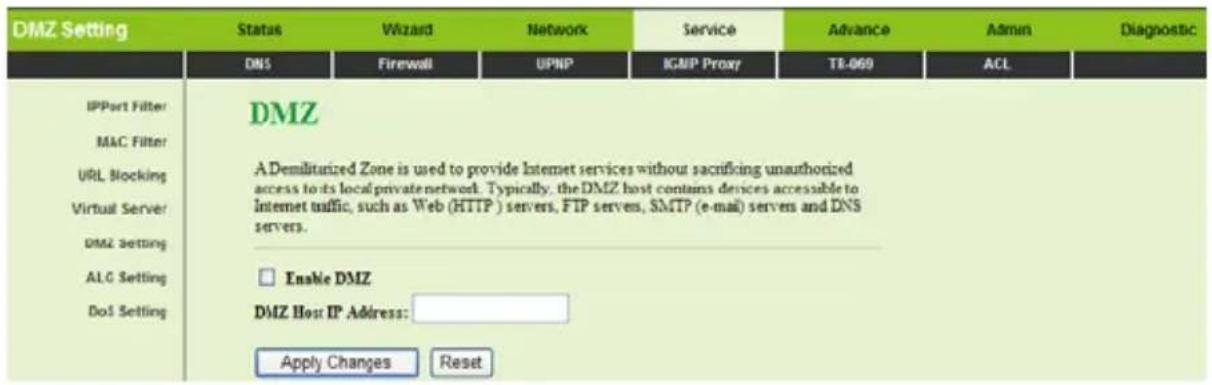
text_image
DMZ Setting Status Wizard Network Service Advance Admin Diagnostic DNS Firewall UPNP IGMP Proxy TR-069 ACL IPPort Filter MAC Filter URL Blocking Virtual Server DMZ Setting ALC Setting DoS Setting DMZ A Demilitarized Zone is used to provide Internet services without sacrificing unauthorized access to its local private network. Typically, the DMZ host contains devices accessible to Internet traffic, such as Web (HTTP) servers, FTP servers, SMTP (e-mail) servers and DNS servers. Enable DMZ DMZ Host IP Address: Apply Changes ResetStep 1 Select Enable DMZ to enable this function.
Step 2 Enter an IP address of the DMZ host.
Step 3 Click Apply Changes to save the settings of this page.
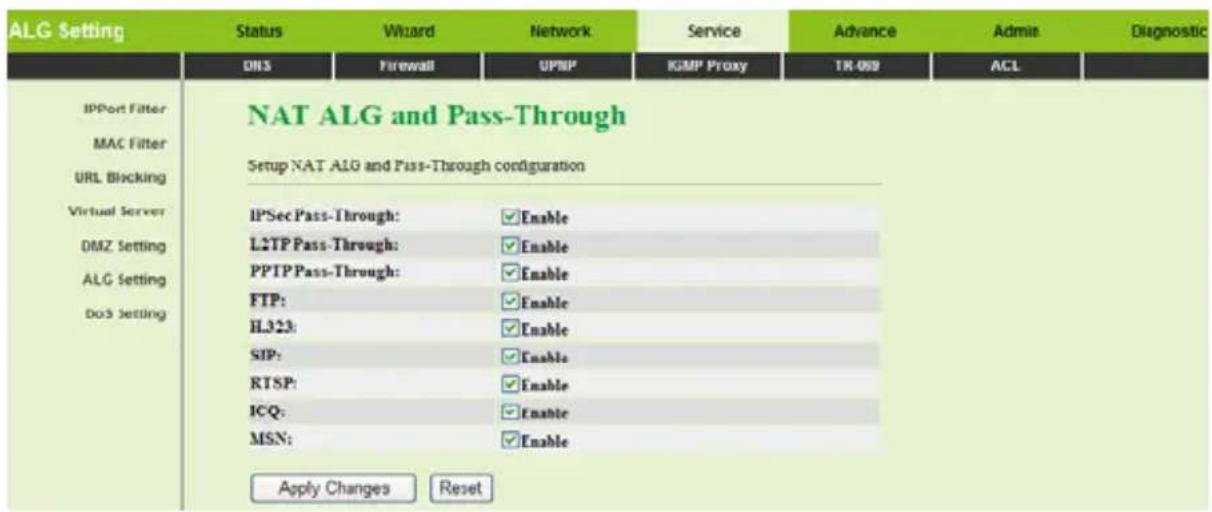
3.5.2.6 ALG Setting
Click ALG Setting in the left pane. The page shown in the following figure appears.
text_image
ALG Setting Status Wizard Network Service Advance Admin Diagnostic DNS Firewall UPNP IGMP Proxy TR-059 ACL IPPort Filter MAC Filter URL Blocking Virtual Server DMZ Setting ALG Setting Dos Setting NAT ALG and Pass-Through Setup NAT ALG and Pass-Through configuration IPSec Pass-Through: ✓Enable L2TP Pass-Through: ✓Enable PPTP Pass-Through: ✓Enable FTP: ✓Enable IL323: ✓Enable SIP: ✓Enable RTSP: ✓Enable ICQ: ✓Enable MSN: ✓Enable Apply Changes Reset3.5.2.7 DoS Setting
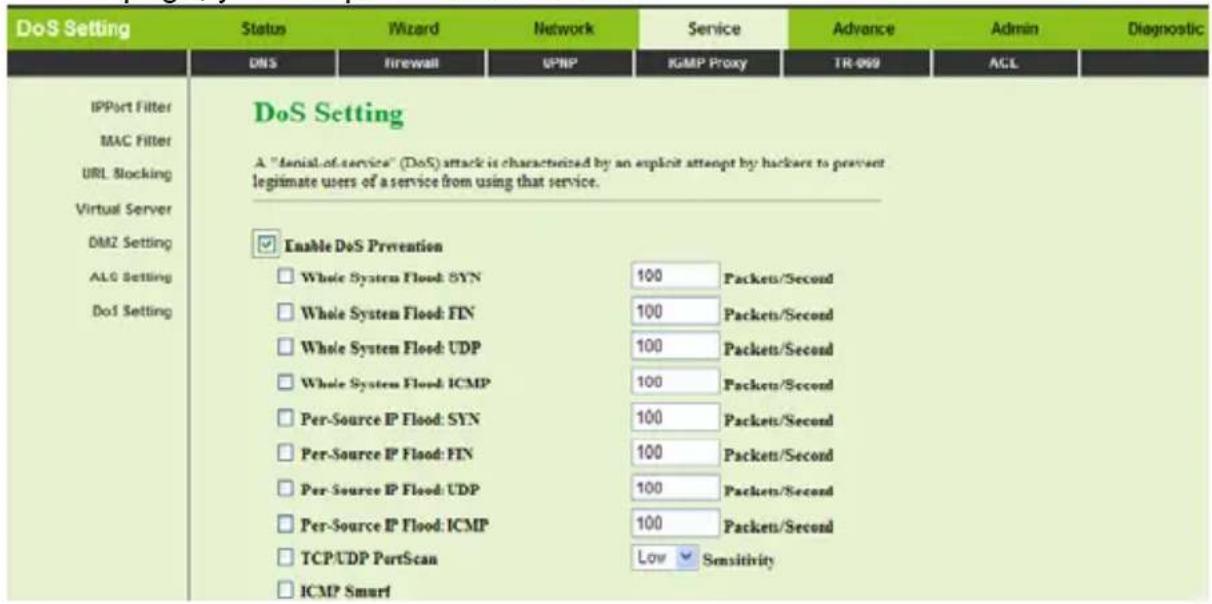
Click DoS Setting in the left pane. The page shown in the following figure appears. Denial-of-service attack (DoS Attack) is a type of attack on a network that is designed to bring the network to its knees by flooding it with useless traffic. In this page, you can prevent DoS attacks.
text_image
DoS Setting Status Wizard Network Service Advance Admin Diagnostic DNS firewall UPNP ICMP Proxy TR-069 ACL IPPort Filter MAC Filter URL Blocking Virtual Server DMZ Setting ALG Setting DoS Setting DoS Setting A "Denial-of-service" (DoS) attack is characterized by an explicit attempt by hackers to prevent legitimate users of a service from using that service. Enable DoS Prevention Whole System Flood: SYN 100 Packets/Second Whole System Flood: FIN 100 Packets/Second Whole System Flood: UDP 100 Packets/Second Whole System Flood: ICMP 100 Packets/Second Per-Source IP Flood: SYN 100 Packets/Second Per-Source IP Flood: FIN 100 Packets/Second Per-Source IP Flood: UDP 100 Packets/Second Per-Source IP Flood: ICMP 100 Packets/Second TCP/UDP PartScan Low Sensitivity ICMP Smurf3.5.3 UPNP
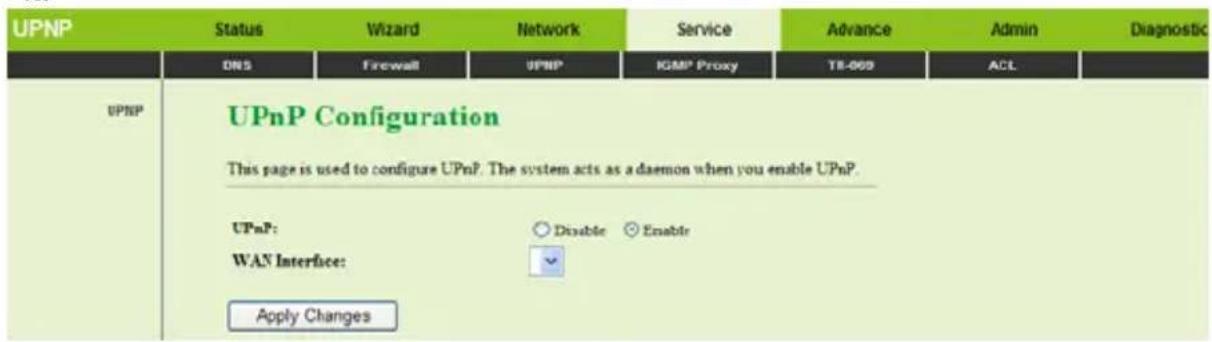
Choose Service > UPNP. The page shown in the following figure appears. This page is used to configure UPnP. The system acts as a daemon after you enable it.
text_image
UPNP Status Wizard Network Service Advance Admin Diagnostic DNS Firewall UPNP IGMIP Proxy TB-009 ACL UPNP UPnP Configuration This page is used to configure UPnP. The system acts as a daemon when you enable UPnP. UPnP: Disable Enable WAN Interface: Apply Changes3.5.4 IGMP Proxy
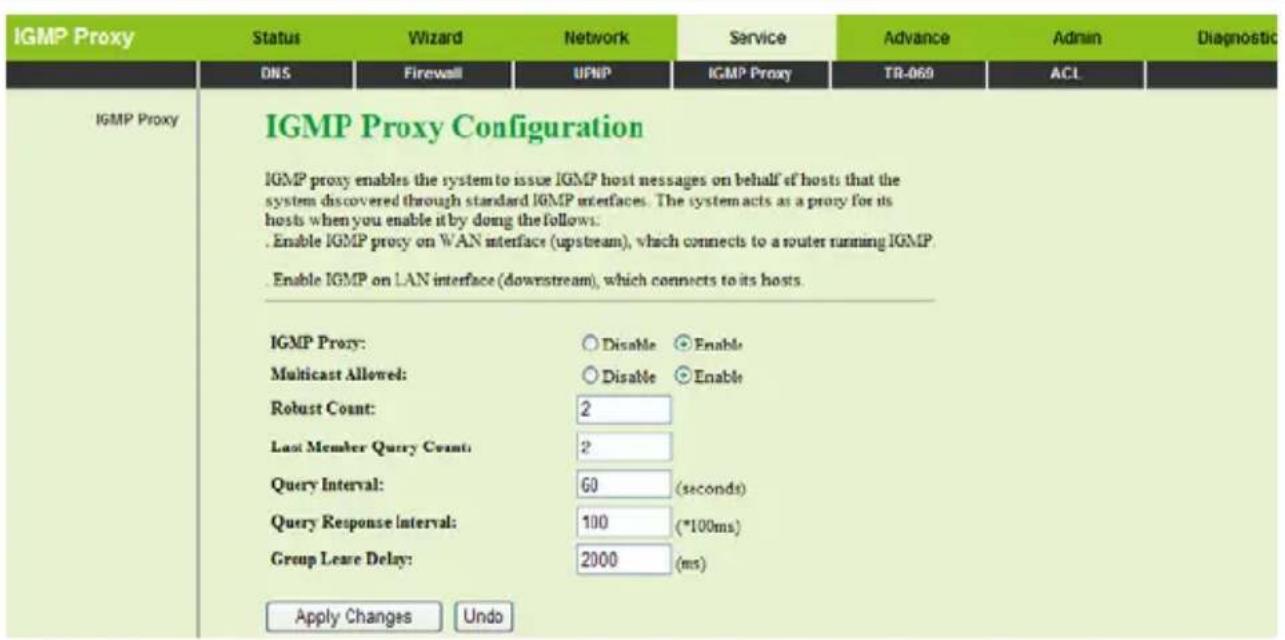
Choose Service > IGMP Proxy in the left pane. The page shown in the following figure appears. IGMP proxy enables the system to issue IGMP host messages on behalf of hosts that the system discovered through standard IGMP interfaces. The system acts as a proxy for its hosts after you enable it.
text_image
IGMP Proxy Status Wizard Network Service Advance Admin Diagnostic DNS Firewall UPMP IGMP Proxy TR-069 ACL IGMP Proxy IGMP Proxy Configuration IGMP proxy enables the system to issue IGMP host messages on behalf of hosts that the system discovered through standard IGMP interfaces. The system acts as a proxy for its hosts when you enable it by doing the follows: Enable IGMP proxy on WAN interface (upstream), which connects to a router running IGMP. Enable IGMP on LAN interface (downstream), which connects to its hosts. IGMP Proxy: Disable Enable Multicast Allowed: Disable Enable Robust Count: 2 Last Member Query Count: 2 Query Interval: 60 (seconds) Query Response interval: 100 (*100ms) Group Leave Delay: 2000 (ms) Apply Changes Undo3.5.5 TR069
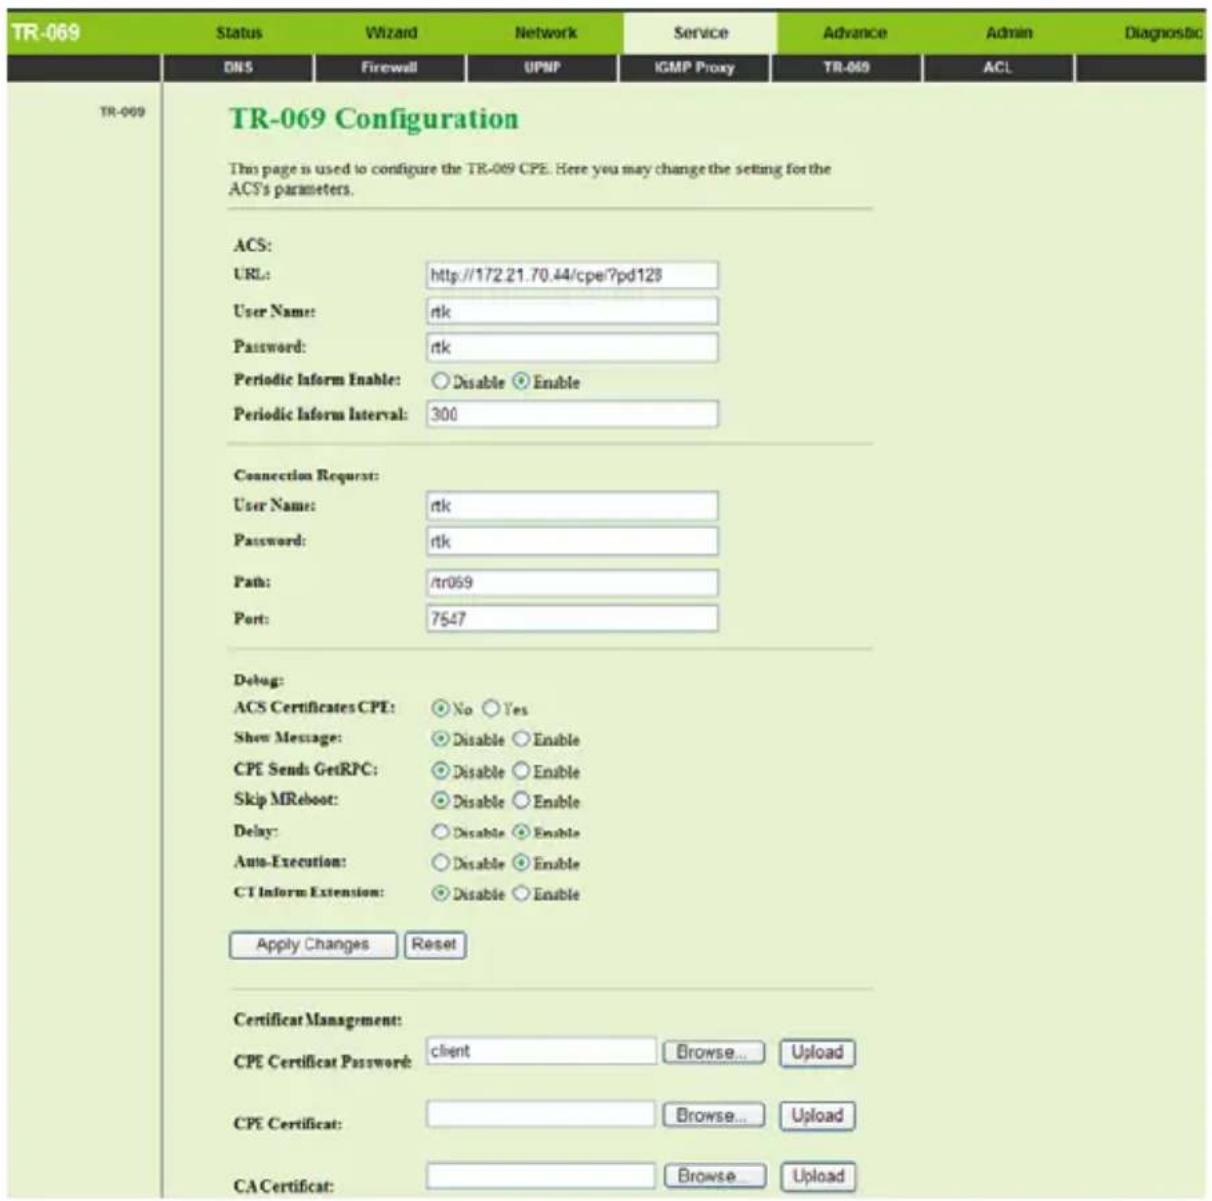
Choose Service > TR069. The page shown in the following page appears. In this page, you can configure the TR-069 of the router.
text_image
TR-069 Status Wizard Network Service Advance Admin Diagnostic DNS Firewall UPMP IGMP Proxy TR-069 ACL TR-069 TR-069 Configuration This page is used to configure the TR-069 CPE. Here you may change the setting for the ACS's parameters. ACS: URL: http://172.21.70.44/cpe/?pd125 User Name: rtk Password: rtk Periodic Inform Enable: ○ Disable ○ Enable Periodic Inform Interval: 300 Connection Request: User Name: rtk Password: rtk Path: tr059 Port: 7547 Debug: ACS Certificates CPE: ○ No ○ Yes Show Message: ○ Disable ○ Enable CPE Sends GetRPC: ○ Disable ○ Enable Skip MReboot: ○ Disable ○ Enable Delay: ○ Disable ○ Enable Auto-Execution: ○ Disable ○ Enable CT Inform Extension: ○ Disable ○ Enable Apply Changes Reset Certificat Management: CPE Certificat Password: client Browse... Upload CPE Certificat: Browse... Upload CA Certificat: Browse UploadThe following table describes the parameters and buttons of this page.
| Field Description | |
| ACS | |
| URL The URL of the auto-configuration server to connect to. | |
| User Name The user name for logging in to the ACS. | |
| Password The password for logging in to the ACS. | |
| Periodic Inform Enable | Select Enable to periodically connect to the ACS to check for configuration updates. |
| Periodic Inform Interval Specify the amount of time between connections to ACS. | |
| Connection Request | |
| User Name The username to connect the router from the ACS. | |
| Password The password to connect the router from the ACS. | |
| Debug | |
| ACS Certificates CPE Specify whether to check the ACS certification of the router. | |
| Show Message Select Enable to display ACS SOAP messages on the serial console. | |
| CPE Sends GetRPC Select Enbale, the CPE contact the ACS to obtain configuration updates. | |
| Skip MReboot Specify whether to send an MReboot event code in the inform message. | |
| Delay Specify whether to start the TR-069 program after a short delay. | |
| Auto-Execution Specify whether to automatically start the TR-069 after the router is powered on. | |
| CT Inform Extension Specify whether to support China Telecom extension inform type. | |
| Apply Changes Save the settings in this page. | |
| Undo | Refresh this page. |
| Certificate Management | |
| CPE Certificate Password | The certificate password of the router |
| Apply | Save the settings of this page. |
| CPE Certificate Click it to browse and upload the certificate for the router. | |
| CA Certificate | Click it to browse and upload the CA certificate for the router. |
3.5.6 ACL
Choose Service > ACL. The page shown in the following figure appears.
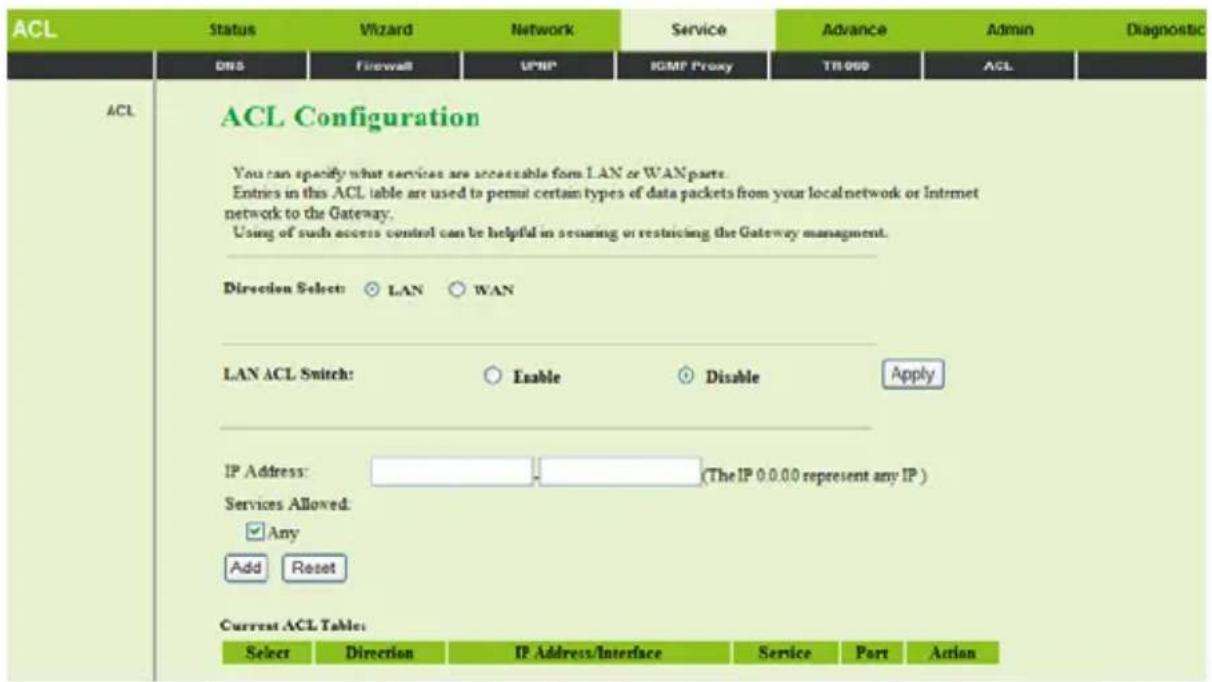
text_image
ACL Status Wizard Network Service Advance Admin Diagnostic DNS Firewall UMPF RMPF Proxy TH000 ACL ACL ACL Configuration You can specify what services are accessible from LAN or WAN parts. Entries in this ACL table are used to permit certain types of data packets from your local network or Internet network to the Gateway. Using of such access control can be helpful in securing or restricting the Gateway management. Direction Select: LAN WAN LAN ACL Switch: Enable Disable Apply IP Address: (The IP 0.0.00 represent any IP ) Services Allowed: ✓ Any Add Reset Current ACL Table: Select Direction IP Address/Interface Service Port ActionThe following table describes the parameters and buttons of this page:
| Field Description | |
| Direction Select | Select the router interface. You can select LAN or WAN. |
| LAN ACL Switch Enable or disable ACL. | |
| IP Address | Enter the IP address of the specified interface. Only the IP address that is in the same network segment with the IP address of the specified interface can access the router. |
| Services Allowed | You can choose the following services from LAN or WAN: web, telnet, ftp, tftp, snmp, or ping. You can also choose all the services. |
| Add | After setting the parameters, click it to add the Current ACL Table. |
| Reset Click it to refresh this page. | |
3.6 Advance
In the navigation bar, choose Advance. The Advance page that is displayed contains Bridge Setting, Routing, Port Mapping, QoS, SNMP, and Others.
3.6.1 Bridge Setting
Choose Advance > Bridge Setting. The page shown in the following figure appears. This page is used to configure the bridge parameters. In this page, you can change the settings or view some information in the bridge mode and its attached ports.
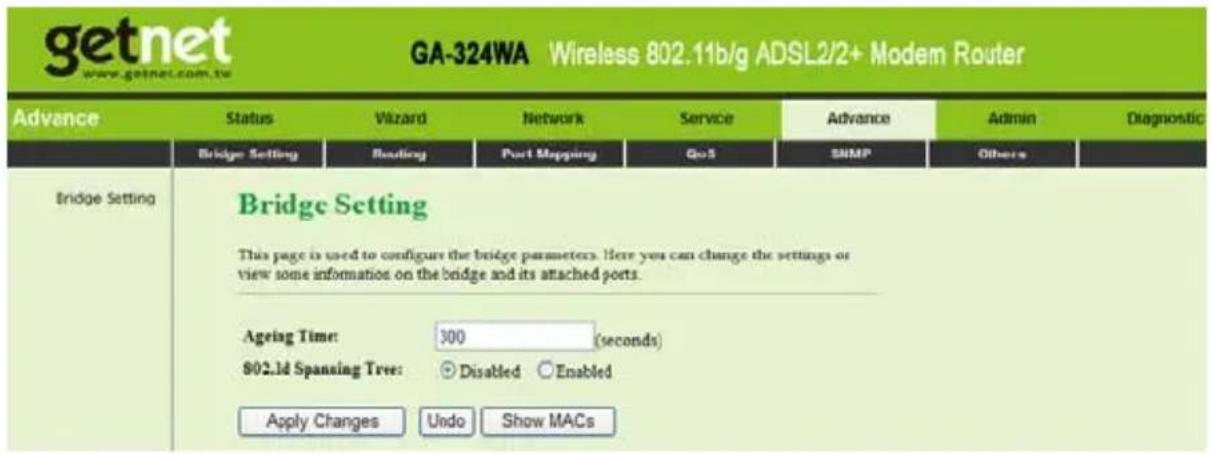
text_image
getnet www.getnet.com.tw GA-324WA Wireless 802.11b/g ADSL2/2+ Modem Router Advance Status Vizard Network Service Advance Admin Diagnostic Bridge Setting Bridge Setting Rading Port Mapping GoS SNMP Others Bridge Setting Bridge Setting This page is used to configure the bridge parameters. Here you can change the settings or view some information on the bridge and its attached ports. Ageing Time: 300 (seconds) $02.ld Spanning Tree: Disabled Enabled Apply Changes Undo Show MACsThe following table describes the parameters and buttons of this page:
| Field Description | |
| Aging Time If the host is idle for 300 seconds (default value), its entry is deleted from the bridge table. | |
| 802.1d Spanning Tree | You can select Disable or Enable.Select Enable to provide path redundancy while preventing undesirable loops in your network. |
| Apply Changes Click it to save the settings of this page. | |
| Undo Click it to refresh this page. | |
| Show MACs Click it to show a listing of the learned MAC addresses for the bridge. | |
Click Show MACs. The page shown in the following figure appears. This table shows a list of learned MAC addresses for this bridge.
Forwarding Table
| MAC Address | Port | Type | Aging Time |
| 01:80:c2:00:00:00 | 0 | Static | 300 |
| 01:00:5e:00:00:09 | 0 | Static | 300 |
| 00:24:77:77:77:77 | 0 | Static | 300 |
| 00:14:78:0c:f2:ce | 1 | Dynamic | 300 |
| ff:ff:ff:ff:ff:ff | 0 | Static | 300 |
3.6.2 Routing
Choose Advance > Routing. The Routing page that is displayed contains Static Route and RIP.
3.6.2.1 Static Route
Click Static Route in the left pane. The page shown in the following figure appears. In this page, you can configure the routing information. You can add or delete IP routes.
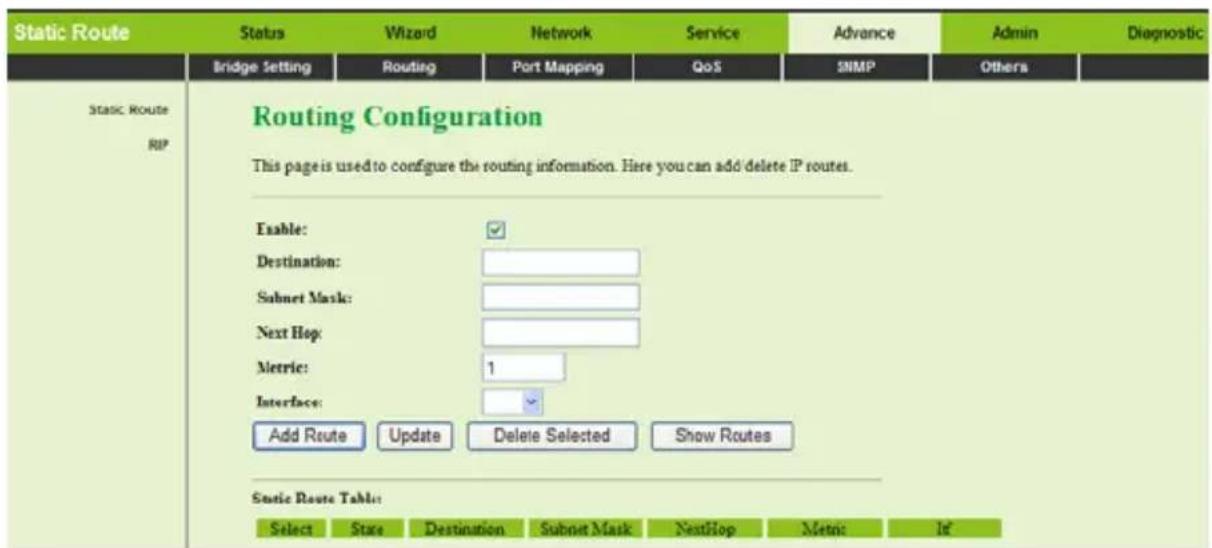
text_image
Static Route Status Wizard Network Service Advance Admin Diagnostic Bridge Setting Routing Port Mapping QoS SNMP Others Static Route RIP Routing Configuration This page is used to configure the routing information. Here you can add delete IP routes. Enable: ✓ Destination: Subnet Mask: Next Hop: Metric: 1 Interface: Add Route Update Delete Selected Show Routes Static Route Table: Select State Destination Subnet Mask NextHop Metric ItThe following table describes the parameters and buttons of this page:
| Field Description | |
| Enable Select | it to use static IP routes. |
| Destination Enter the IP address of the destination device. | |
| Subnet Mask | Enter the subnet mask of the destination device. |
| Next Hop Enter | the IP address of the next hop in the IP route to the destination device. |
| Metric The metric cost for the destination. | |
| Interface The interface for the specified route. | |
| Add Route Click it to add the new static route to the table. | |
| Update Select | a row in the table to populate the configuration fields with that row's values. Make any necessary changes to those values and click it to save those changes. |
| Delete Selected | Select a row in the table and click it to delete the row. |
| Show Routes | Click it, the IP Route Table appears. You can view a list of destination routes commonly accessed by your network. |
| Static Route Table | A list of the previously configured static IP routes. |
Click Show Routes. The table shown in the following figure appears. The table shows a list of destination routes commonly accessed by your network.
IP Route Table
This table shows a list of destination routes commonly accessed by your network.
| Destination | Subnet Mask | NextHop | Iface |
| 239.0.0.0 | 255.0.0.0 | * | e1 |
| 192.168.1.0 | 255.255.255.0 | * | e1 |
Refresh Close
3.6.2.2 RIP
Click RIP in the left pane. The page shown in the following figure appears. If you are using this device as a RIP-enabled router to communicate with others who is using the Routing Information Protocol (RIP), enable the RIP. This page is used
to select the interfaces on your devices that use RIP, and the version of the protocol used.
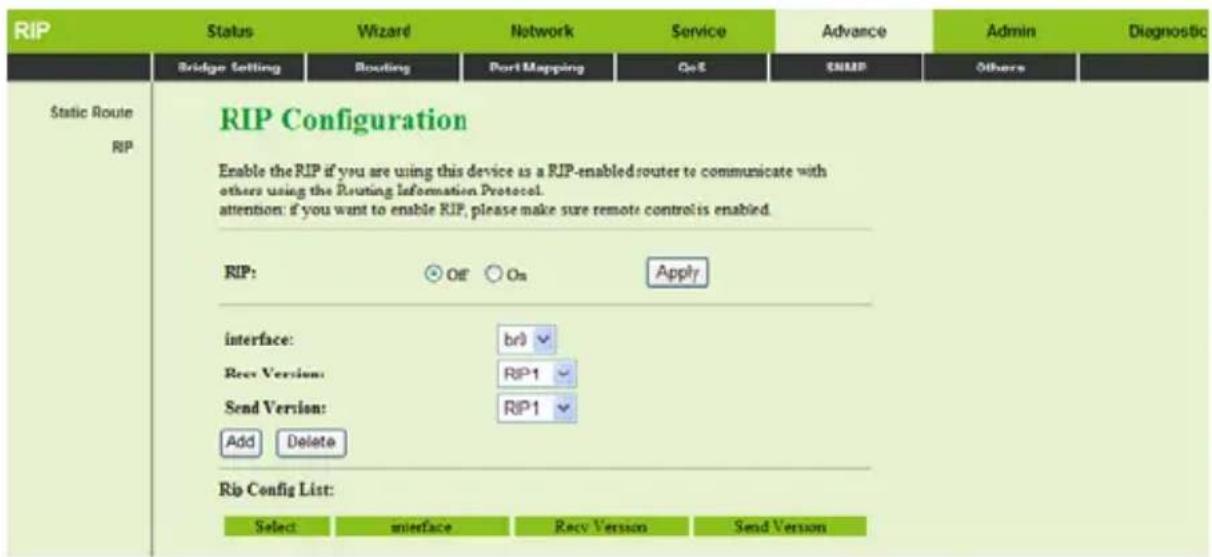
text_image
RIP Status Wizard Network Service Advance Admin Diagnostic Bridge Setting Routing Port Mapping On E ENABLE Others Static Route RIP RIP Configuration Enable the RIP if you are using this device as a RIP-enabled router to communicate with others using the Routing Information Protocol. attention: if you want to enable RIP, please make sure remote control is enabled. RIP: Off On Apply interface: br1 Recv Version: RIP1 Send Version: RIP1 Add Delete Rip Config List: Select interface Recv Version Send VersionThe following table describes the parameters and buttons of this page:
| Field Description | |
| RIP | Select On, the router communicates with other RIP-enabled devices. |
| Apply Click it to save the settings of this page. | |
| Interface The router interface that uses RIP. | |
| Recv Version The interface type to accept RIP messages. You can choose RIP1, RIP2, or Both.Choose RIP1 indicates the router receives RIP v1 messages.Choose RIP2 indicates the router receives RIP v2 messages.Choose Both indicates the router receives RIP v1 and RIP v2 messages. | |
| Send Version The working mode for sending RIP messages. You can choose RIP1 or RIP2.Choose RIP1 indicates the router broadcasts RIP1 messages only.Choose RIP2 indicates the router multicasts RIP2 messages only. | |
GA-324WA User Manual
| Field Description | |
| Add | Click it to add the RIP interface to the Rip Config Table. |
| Delete | Select a row in the Rip Config Table and click it to delete the row. |
| Rip Config Table A list of the router interfaces that enable RIP. | |
3.6.3 Port Mapping
Choose Advance > Port Mapping. The page shown in the following figure appears. In this page, you can bind the WAN interface and the LAN interface to the same group.
| Port Mapping Status Wizard Network Service Advance Admin Diagnostic | |||||||
| Bridge Setting | Routing | Port Mapping | QoS | SHMP | Others | ||
| Port Mapping | Port Mapping Configuration To manipulate a mapping group: 1. Select a group from the table. 2. Select interfaces from the available grouped interface list and add it to the grouped available interface list using the arrow buttons to manipulate the required mapping of the ports. 3. Click "Apply Changes" button to save the changes. Note that the selected interfaces will be removed from their existing groups and added to the new group. | ||||||
| Disable Enable | |||||||
| WAN LAN Add > < Del Interface group | |||||||
| Select | Interfaces | Status | |||||
| Default | LAN1,LAN2,LAN3,LAN4,wlan,wlan-vap0,wlan-vap1,wlan-vap2,wlan-vap3 Enabled | ||||||
| Group1 O | - | ||||||
| Group2 O | - | ||||||
| Group3 O | - | ||||||
| Group4 O | - | ||||||
| Apply | |||||||
The procedure for manipulating a mapping group is as follows:
Step 1 Select Enable to enable this function.
Step 2 Select a group from the table.
Step 3 Select interfaces from the WAN and LAN interface list and add them to the grouped interface list using the arrow buttons to manipulate the required mapping of the ports.
Step 4 Click Apply to save the changes.
3.6.4 QoS
Choose Advance > QoS. The page shown in the following figure appears. Entries in this table are used to assign the precedence for each incoming packet based on physical LAN port, TCP/UDP port number, and source/destination IP address/subnet masks.
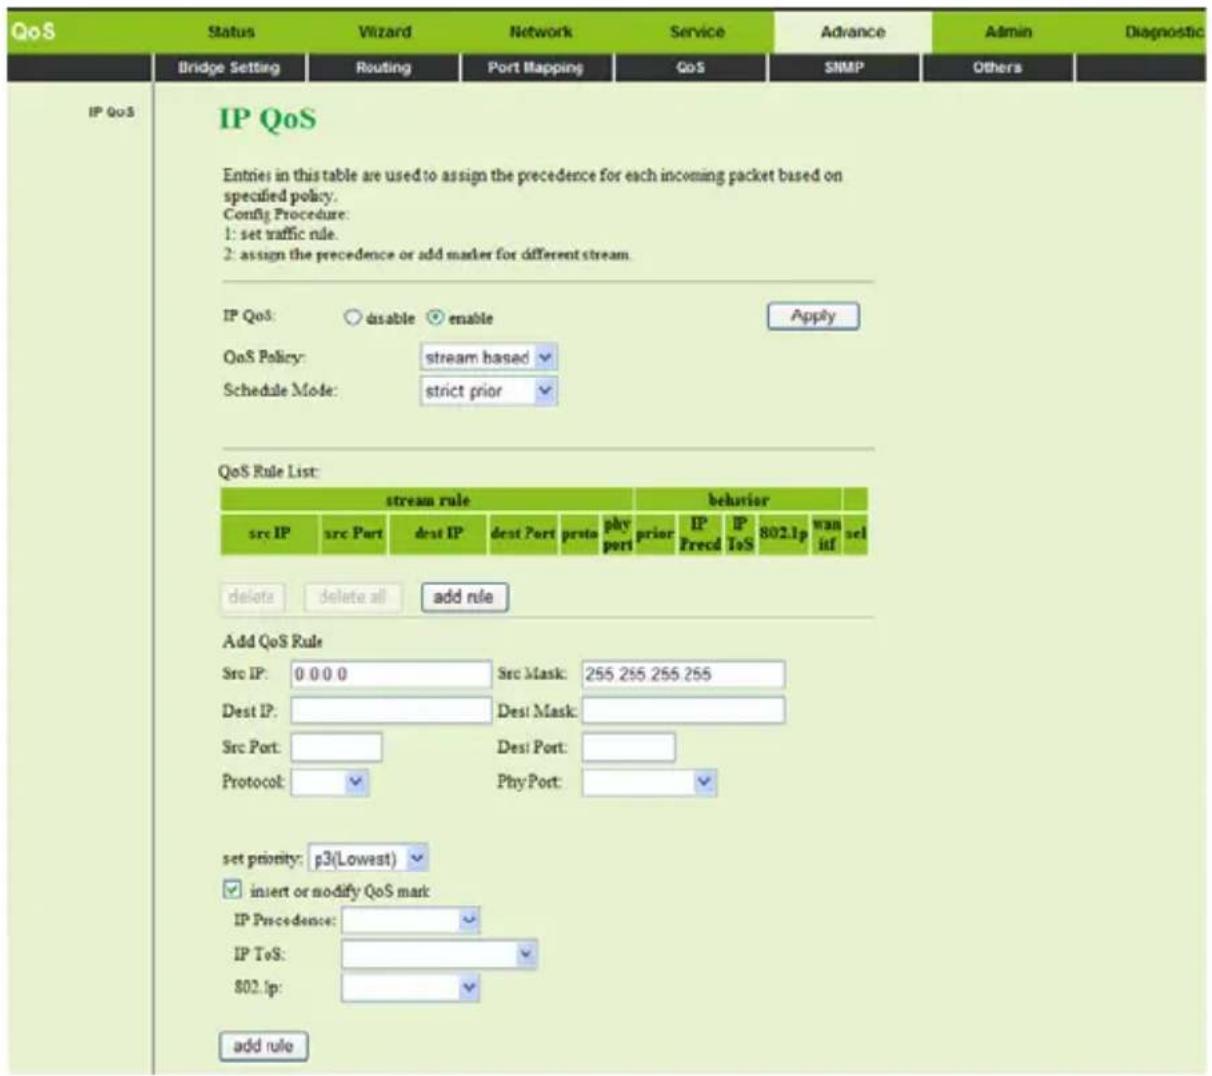
text_image
QoS Status Wizard Network Service Advance Admin Diagnostic Bridge Setting Routing Port Mapping GoS SNMP Others IP QoS IP QoS Entries in this table are used to assign the precedence for each incoming packet based on specified policy. Config Procedure: 1: set traffic rule. 2: assign the precedence or add marker for different stream. IP QoS: ○ disable ○ enable Apply QoS Policy: stream based Schedule Mode: strict prior QoS Rule List: stream rule behavior src IP src Port dest IP dest Port proto phy port prior IP Precord IP ToS 802.1p wan itf sel delete delete all add rule Add QoS Rule Src IP: 0 0 0 0 Src Mask: 255.255.255.255 Dest IP: Desi Mask: Src Port: Desi Port: Protocol: Phy Port: set priority: p3(Lowest) ✓ insert or modify QoS mark IP Precedence: IP ToS: 802.1p: add ruleThe following table describes the parameters and buttons of this page:
| Field Description | |
| IP QoS | You can choose disable or enable. By default, IP QoS is disabled.You need to enable IP QoS, and then you can set the parameters in this page. |
| QoS Policy | You can choose stream based, 802.1p based, or DSCP based. |
| Schedule Mode | You can choose strict prior or WFQ (4:3:2:1). |
| Src IP The IP address of the source data packet. | |
| Src Mask The subnet mask of the source IP address. | |
| Src Port The port of the source data packet. | |
| Dest IP The IP address of the destination data packet. | |
| Dest Mask The subnet mask of the destination IP address. | |
| Dest Port The port of the destination data packet. | |
| Protocol The protocol responds to the IP QoS rules. You can choose TCP, UDP, or ICMP. | |
| Phy Port The LAN interface responds to the IP QoS rules, including four LAN interfaces, one AP interface, and four virtual AP interfaces. | |
| Set priority The priority of the IP QoS rules. P0 is the highest priority and P3 is the lowest. | |
| IP Precedence You can choose from 0 to 7 define the priority in the ToS of the IP data packet. | |
| IP ToS | The type of IP ToS for classifying the data packageYou can choose Normal Service, Minimize Cost, Maximize Reliability, Maximize Throughput, or Minimize Delay. |
| 802.1p | You can choose from 0 to 7. |
| delete | Select a row in the table and click it to delete the row. |
| delete all | Select all the rows in the table and click it to delete the rows. |
3.6.5 SNMP
Choose Advance > SNMP. The page shown in the following figure appears.
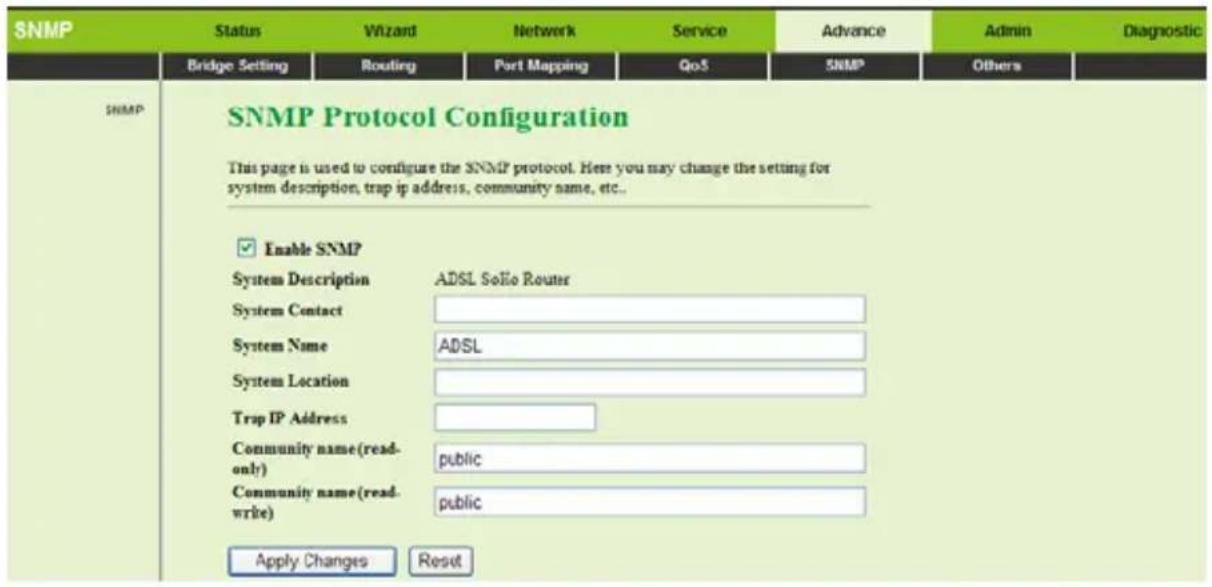
text_image
SNMP Status Wizard Network Service Advance Admin Diagnostic Bridge Setting Routing Port Mapping QoS SNMP Others SNMP SNMP Protocol Configuration This page is used to configure the SNMP protocol. Here you may change the setting for system description, trap ip address, community name, etc.. Enable SNMP System Description ADSL SoEo Router System Contact System Name ADSL System Location Trap IP Address Community name (read- only) public Community name (read- write) public Apply Changes ResetThe following table describes the parameters and buttons of this page:
| Field Description | |
| Trap IP Address | Enter the IP address of trap host. The trap information is sent to the host. |
| Community name (read-only) | The common character string that is used for obtaining the device information. It is like password, through which SNMP application entry obtains the device information directly. |
| Community name (read-write) | Modify the common character string that is configured by the device. It is like password, through which SNMP application entry modifies the device information directly. |
3.6.6 Others
Choose Advance > Others. The page shown in the following figure appears.
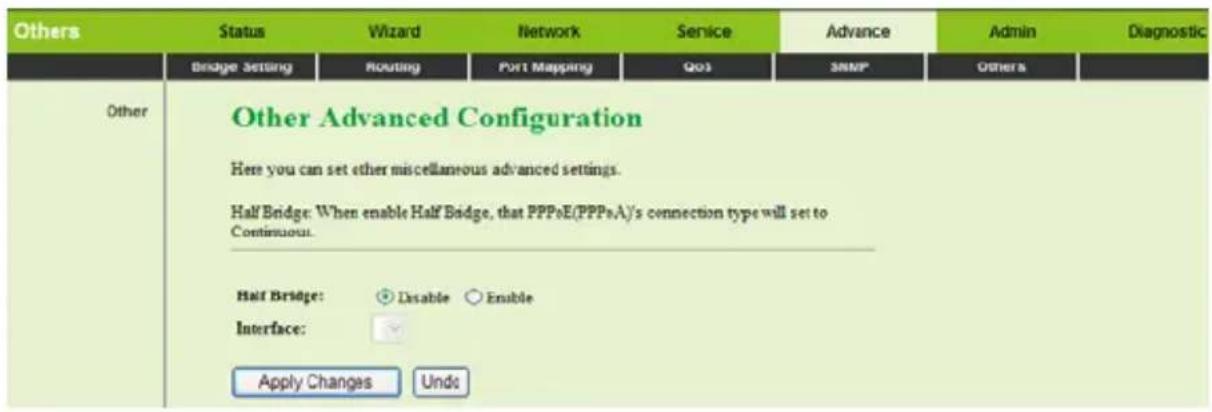
text_image
Others Status Wizard Network Service Advance Admin Diagnostic Bridge Setting Routing Port Mapping Qo3 SNMP Others Other Other Advanced Configuration Here you can set ether miscellaneous advanced settings. Half Bridge: When enable Half Bridge, that PPPeE(PPPeA)'s connection type will set to Continuous. Half Bridge: Disable Enable Interface: Apply Changes Undo3.7 Admin
In the navigation bar, choose Admin. The Admin page that is displayed contains Commit/Reboot, Upgrade, System Log, Password, and Time Zone.
3.7.1 Commit/Reboot
Choose Admin > Commit/Reboot. The page shown in the following figure appears. In this page, you can set the router reset to the default settings or set the router to commit the current settings.
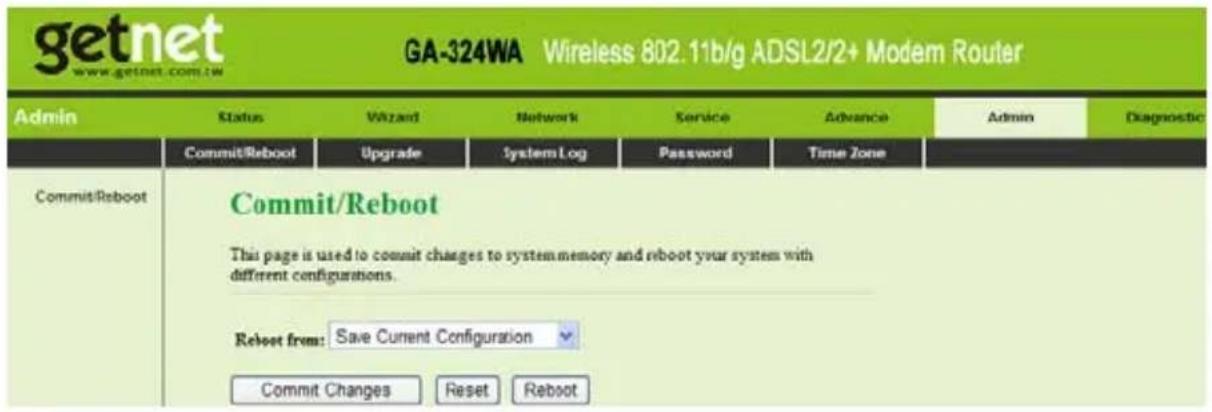
text_image
getnet www.getnet.com.tw GA-324WA Wireless 802.11b/g ADSL2/2+ Modem Router Admin Status Wizard Network Service Advance Admin Diagnostic Commit/Reboot Upgrade System Log Password Time Zone Commit/Reboot This page is used to commit changes to system memory and reboot your system with different configurations. Reboot from: Save Current Configuration Commit Changes Reset RebootThe following table describes the parameters of this page:
| Field Description | |
| Factory DefaultConfiguration | Select it to reset the router to the default settings. |
| Save CurrentConfiguration | Select it to save the current settings and reboot the router. |
| Field Description |
| Reboot Click it to reboot the router. |
3.7.2 Upgrade
Choose Admin > Upgrade. The Upgrade page that is displayed contains Upgrade Firmware and Backup/Restore.
3.7.2.1 Upgrade Firmware
Click Upgrade Firmware in the left pane. The page shown in the following figure appears. In this page, you can upgrade the firmware of the router.

Note:
Do not turn off your router or press the Reset button while this procedure is in progress.
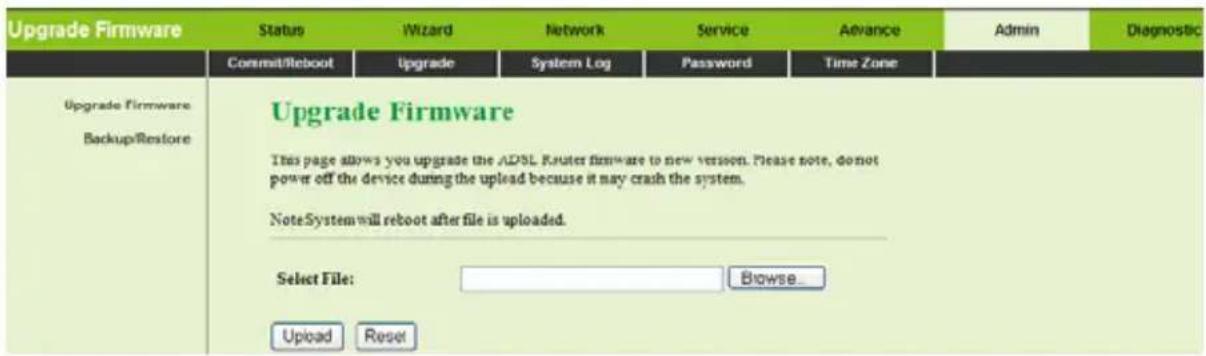
text_image
Upgrade Firmware Status Wizard Network Service Advance Admin Diagnostic Commit/Reboot Upgrade System Log Password Time Zone Upgrade Firmware Backup/Restore Upgrade Firmware This page allows you upgrade the ADSL Router firmware to new version. Please note, do not power off the device during the upload because it may crash the system. Note:System will reboot after file is uploaded. Select File: Browse... Upload ResetThe following table describes the parameters and buttons of this page:
| Field Description | |
| Select File Click Browse to select the firmware file. | |
| Upload | Select the firmware file and click Upload to begin upgrading the firmware. |
| Reset Click it to begin selecting the firmware file. | |
3.7.2.2 Backup/Restore
Click Backup/Restore. The page shown in the following figure appears. In this page, you can backup the current settings to a file and restore the settings from the file which was saved previously.

Note:
Do not turn off your router or press the Reset button while these procedures are in progress.
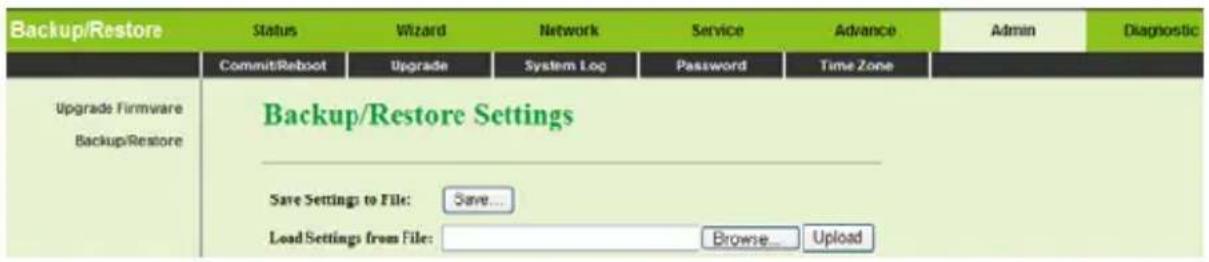
text_image
Backup/Restore Status Wizard Network Service Advance Admin Diagnostic Commit/Reboot Upgrade System Log Password Time Zone Upgrade Firmware Backup/Restore Backup/Restore Backup/Restore Settings Save Settings to File: Save... Load Settings from File: Browse... UploadThe following table describes the parameters and buttons of this page:
| Field Description | |
| Save Settings to File | Click it and select the path. Then you can save the configuration file of the router. |
| Load Settings from File | Click Browse to select the configuration file. |
| Upload | Select the configuration file of the router. Click Upload to begin restoring the router configuration. |
3.7.3 System Log
Choose Admin > System Log. The page shown in the following figure appears. In this page, you can view the log information.
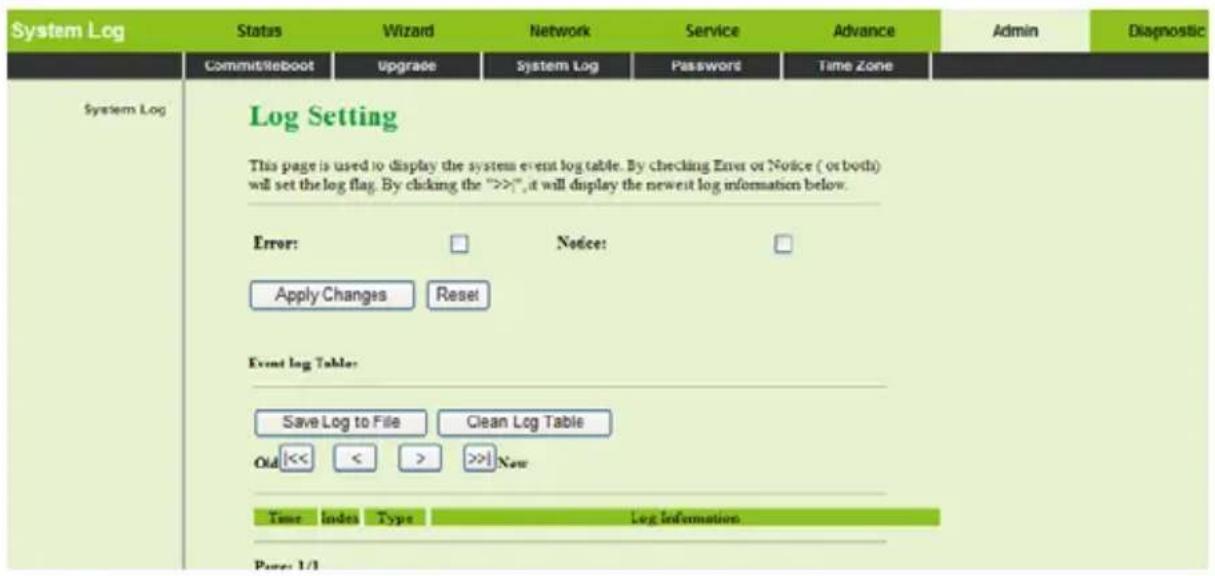
text_image
System Log Status Wizard Network Service Advance Admin Diagnostic Commit/Reboot Upgrade System Log Password Time Zone System Log Log Setting This page is used to display the system event log table. By checking Error or Notice ( or both) will set the log flag. By clicking the ">>>", it will display the newest log information below. Error: □ Notice: □ Apply Changes Reset Event log Table: Save Log to File Clean Log Table Old << < > >>| New Time Index Type Log Information Page 1/13.7.4 Password
Choose Admin > Password. The page shown in the following figure appears. In this page, you can change the password of the user, including admin and user. By default, the super user name and password are admin and admin. The common user name and password are user and user.
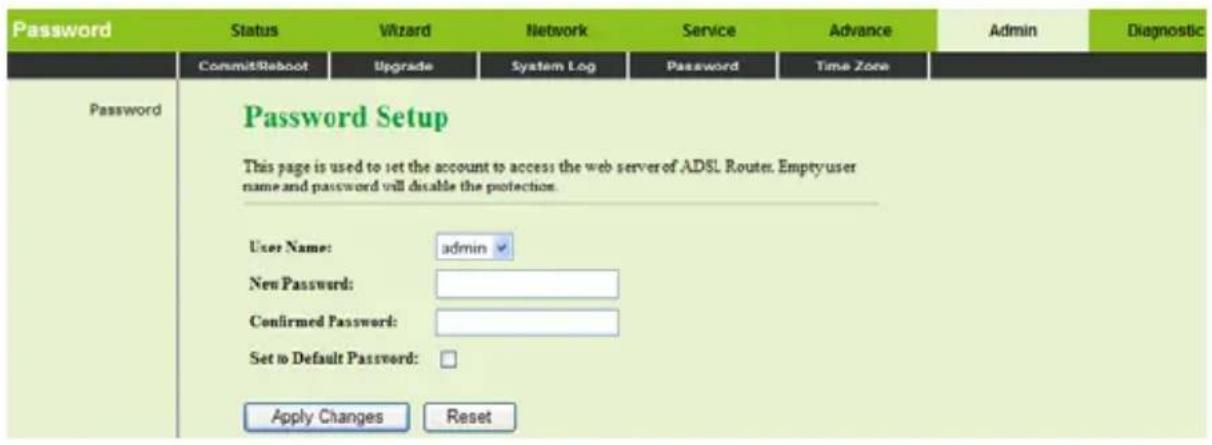
text_image
Password Status Wizard Network Service Advance Admin Diagnostic Commit/Reboot Upgrade System Log Password Time Zone Password Setup This page is used to set the account to access the web server of ADSL Router. Empty-user name and password will disable the protection. User Name: admin New Password: Confirmed Password: Set to Default Password: Apply Changes ResetThe following table describes the parameters of this page:
| Field Description | |
| User Name | You can chooseadminoruser. |
| New Password | Enter the password to which you want to change the old password. |
| Confirmed Password Enter the new password again. | |
| Set to Default After selecting it, the password you set does not | |
| Field Description | |
| Password take effect. It keeps the default password. | |
3.7.5 Time Zone
Choose Admin > Time Zone. The page shown in the following figure appears. In this page, you can set the system time manually or get the system time from the time server.
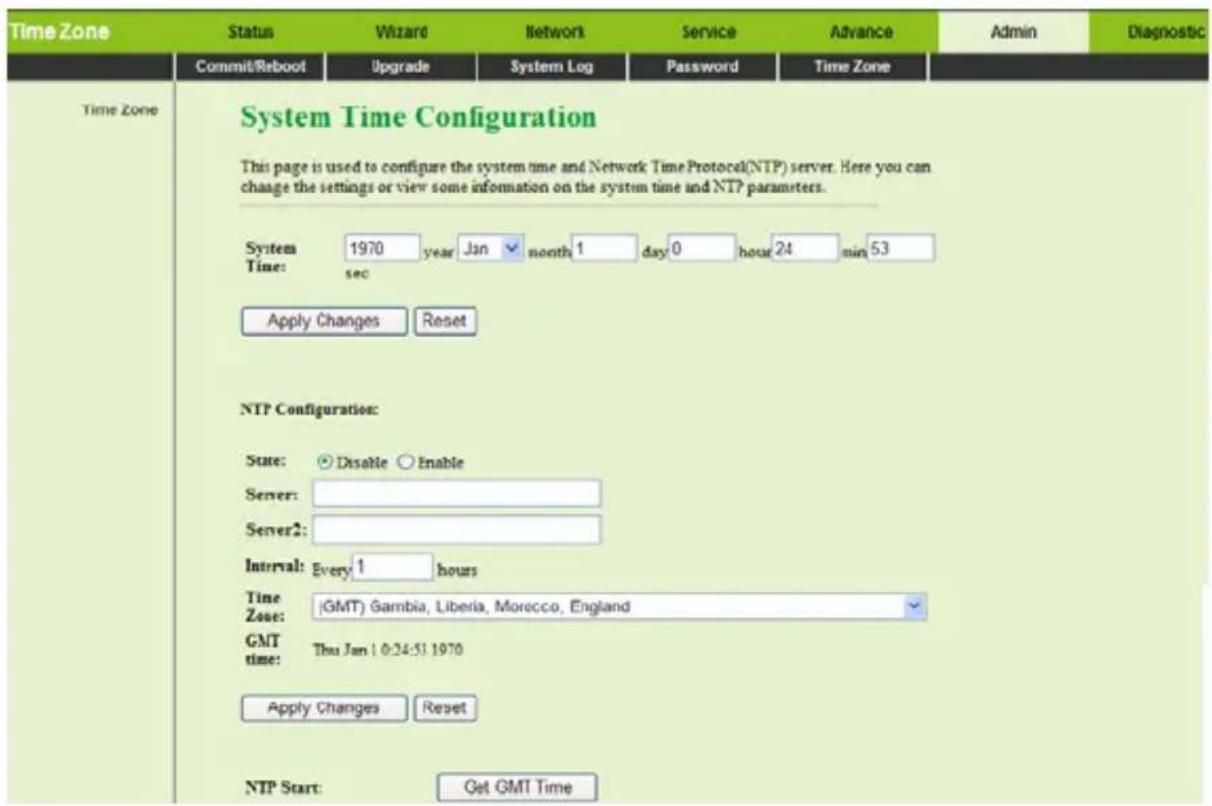
text_image
Time Zone Status Wizard Network Service Advance Admin Diagnostic Commit/Reboot Upgrade System Log Password Time Zone Time Zone System Time Configuration This page is used to configure the system time and Network Time Protocol(NTP) server. Here you can change the settings or view some information on the system time and NTP parameters. System 1970 year Jan month 1 day 0 hour 24 min 53 Time: sec Apply Changes Reset NTP Configuration: State: Disable Enable Server: Server2: Interval: Every 1 hours Time : (GMT) Gambia, Liberia, Morocco, England Zone: GMT time: Thu Jan 1 0:24:51 1970 Apply Changes Reset NTP Start: Get GMT Time3.8 Diagnostic
In the navigation bar, choose Diagnostic. The Diagnostic page that is displayed contains Ping, ATM Loopback, ADSL and Diagnostic.
3.8.1 Ping
Choose Diagnostic > Ping. The page shown in the following figure appears.
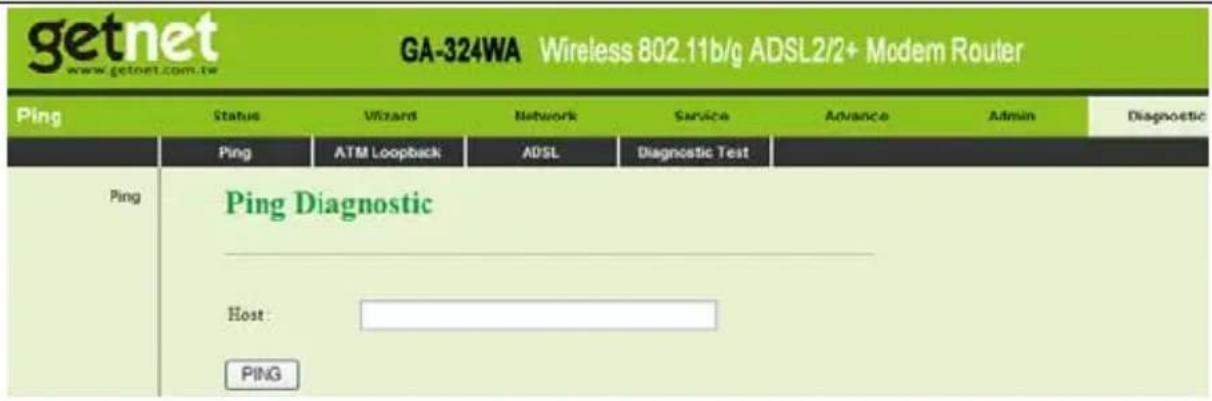
text_image
getnet www.getnet.com.tw GA-324WA Wireless 802.11b/g ADSL2/2+ Modem Router Ping Status Wizard Network Service Advance Admin Diagnostic Ping ATM Loopback ADSL Diagnostic Test Ping Diagnostic Host: PINGThe following table describes the parameters and buttons in this page:
| Field Description |
| Host Enter the IP address. |
| PING Click it to begin to Ping the host address. |
3.8.2 ATM Loopback
Choose Diagnostic > ATM Loopback. The page shown in the following figure appears. In this page, you can use VCC loopback function to check the connectivity of the VCC.
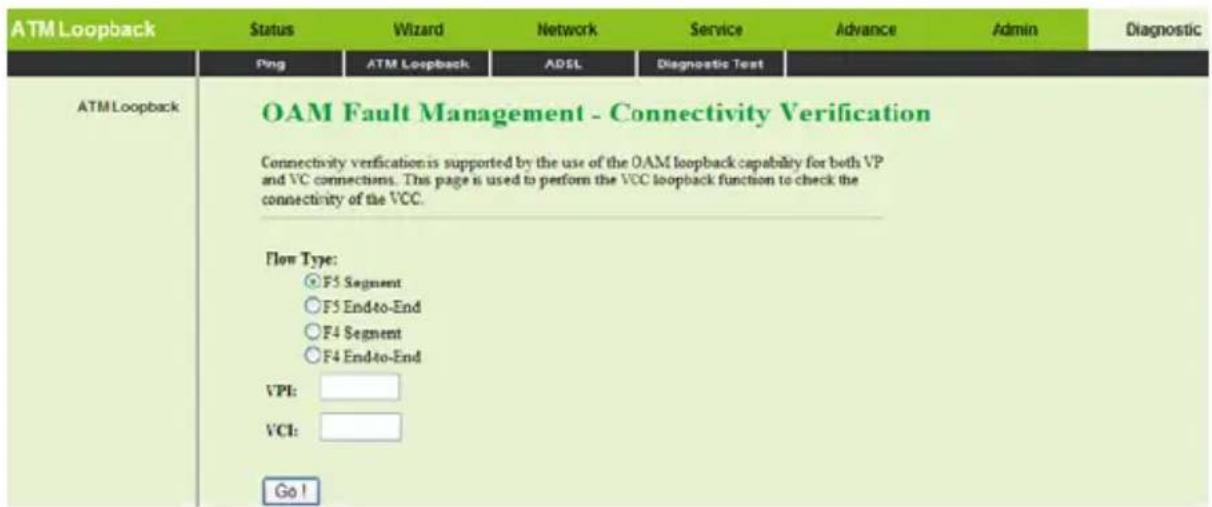
text_image
ATM Loopback Status Wizard Network Service Advance Admin Diagnostic Ping ATM Loopback ADSL Diagnostic Test ATM Loopback OAM Fault Management - Connectivity Verification Connectivity verification is supported by the use of the OAM loopback capability for both VP and VC connections. This page is used to perform the VCC loopback function to check the connectivity of the VCC. Flow Type: ○F5 Segment ○F5 End-to-End ○F4 Segment ○F4 End-to-End VPI: VCI: Go !3.8.3 ADSL
Choose Diagnostic > ADSL. The page shown in the following figure appears. It is used for ADSL tone diagnostics.
GA-324WA User Manual
| ADSL | Status Wizard Network Service Advance Admin Diagnostic | |||||
| Ping ATM Loopback ADSL Diagnostic Test | ||||||
| ADSL | Diagnostic ADSL Adal Tone Diagnostic Start Hlin Scale Loop Attenuation(dB) Signal Attenuation(dB) SNR Margin(dB) Attainable Rate(Kbps) Output Power(dBms) | |||||
| Tone Number H Real H Image SN2 QLN Hlog | ||||||
| 0 | ||||||
| 1 | ||||||
| 2 | ||||||
| 3 | ||||||
Click Start to begin ADSL tone diagnostics.
3.8.4 Diagnostic Test
Choose Diagnostic > Diagnostic Test. The page shown in the following figure appears. In this page, you can test the DSL connection.
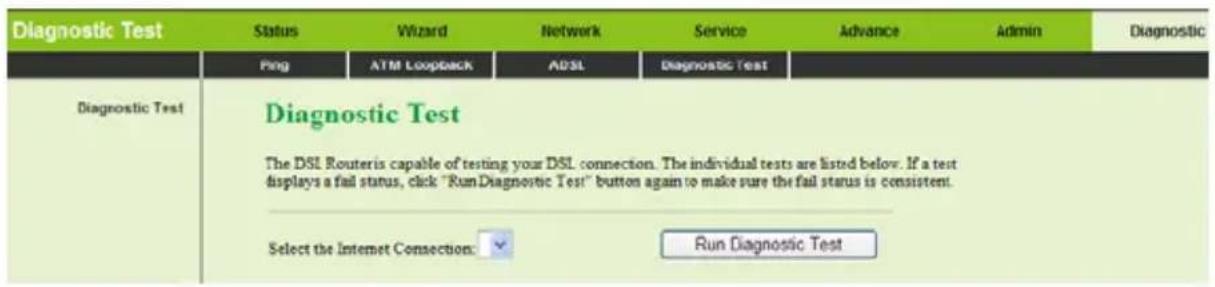
text_image
Diagnostic Test Status Wizard Network Service Advance Admin Diagnostic Ping ATM Loopback ADSL Diagnostic Test Diagnostic Test Diagnostic Test The DSL Router is capable of testing your DSL connection. The individual tests are listed below. If a test displays a fail status, click "Run Diagnostic Test" button again to make sure the fail status is consistent. Select the Internet Connection: Run Diagnostic TestClick Run Diagnostic Test to begin testing.