RT860i - Label printer Godex - Free user manual and instructions
Find the device manual for free RT860i Godex in PDF.


| Product Type | Industrial Label Printer |
| Model | Godex RT860i |
| Print Resolution | 203 dpi (8 dots/mm) |
| Print Speed | Up to 152 mm/s (6 ips) |
| Max Print Width | 108 mm (4.25 inches) |
| Max Print Length | 1727 mm (68 inches) |
| Media Type | Continuous, die-cut, fanfold, black mark |
| Media Width | 25.4 to 118 mm (1 to 4.65 inches) |
| Media Core Size | 25.4 mm (1 inch) |
| Ribbon Type | Wax, wax/resin, resin (max 300 m) |
| Connectivity | USB 2.0, Ethernet, RS-232, USB Host |
| Memory | 256 MB Flash, 256 MB RAM |
| Display | 2.4-inch color TFT, touchscreen |
| Dimensions (W x D x H) | 300 x 255 x 295 mm |
| Weight | Approximately 9.5 kg |
| Power Supply | 100-240 VAC, 50/60 Hz, auto-switching |
| Operating Temperature | 5°C to 40°C |
| Humidity | 20-85% non-condensing |
| Languages | English, French, German, Italian, Spanish, Portuguese, Dutch, Polish, Czech, Russian, Turkish, Chinese, Japanese, Korean |
| Emulations | EPL, ZPL, DPL, CPCL, I2C, IPCL |
| Cutter | Optional (factory installed) |
Frequently Asked Questions - RT860i Godex
User questions about RT860i Godex
0 question about this device. Answer the ones you know or ask your own.
Ask a new question about this device
Download the instructions for your Label printer in PDF format for free! Find your manual RT860i - Godex and take your electronic device back in hand. On this page are published all the documents necessary for the use of your device. RT860i by Godex.
USER MANUAL RT860i Godex
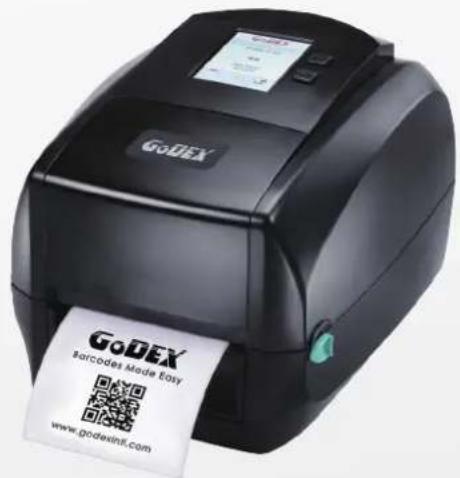
RT860i BARCODE PRINTER USER MANUAL
text_image
GoDEX godex sarcodes Made 80sy www.godexint.com1 Barcode Printer 001
1.1 Box Content 001
1.2 Getting to Know Your Printer 002
2 Printer Setup 006
2.1 Open the Printer 006
2.2 Loading the Ribbon 007
2.3 Loading the Label Roll Module 012
2.4 Connecting the Printer to the Host Computer 014
2.5 Wizard CD Standard Installation 016
2.6 Wizard CD Other Choice Installation 019
3 Printer Setting and Control 022
3.1 Operation Panel 022
3.2 LCD Touch Panel Introduction 023
3.3 LCD Interface Function 028
3.4 Label Calibration and Self Test 033
3.5 Error Alerts 035
3.6 USB Host 037
4 NetSetting for Ethernet 039
4.1 Installing the NetSetting Software 039
4.2 The Interface of NetSetting 041
5 Accessories 048
5.1 Preparation Steps 048
5.2 Installing the Label Dispenser 050
5.3 Installing the Cutter 056
6 Maintenance and Adjustment 060
6.1 Cleaning the Print Head 060
6.2 Troubleshooting 061
Appendix
Product Specifications
Interface
File Manipulation When Using USB Stick
FCC COMPLIANCE STATEMENT FOR AMERICAN USERS
This equipment has been tested and found to comply with the limits for a CLASS A digital device, pursuant to Part 15 of the FCC Rules. These limits are designed to provide reasonable protection against harmful interference when the equipment is operated in a commercial environment. This equipment generates, uses, and can radiate radio frequency energy and, if not installed and used in accordance with the instructions, may cause harmful interference to radio communications. Operation of this equipment in a residential area is likely to cause harmful interference in which case the user will be required to correct the interference at own expense.
EMS AND EMI COMPLIANCE STATEMENT FOR EUROPEAN USERS
This equipment has been tested and passed with the requirements relating to electromagnetic compatibility based on the standards EN55022:2010/AC2011 Class A, EN61000-3-2:2006/A1:2009/A2:2009, EN 61000-3-3:2009 and EN55024:2010, IEC 61000-4-2:2008 series The equipment also tested and passed in accordance with the European Standard EN55022 for the both Radiated and Conducted emissions limits.
RT860i
TO WHICH THIS DECLARATION RELATES IS IN CONFORMITY WITH THE FOLLOWING STANDARDS
IEC 60950-1:2005(2nd Edition)+Am 1:2009, CB9254-2008 (Class A) ; GB17625. 1-2003; GB4943.1-2011, EN55022:2010/AC2011 Class A, EN61000-3-2:2006/A1:2009/A2:2009, EN 61000-3-3:2008 and EN55024:2010, IEC 61000-4-2:2008 series, UL 60950-1, 2nd Edition, 2011-12-19, CSA C22.2 No. 60950-1-07, 2nd Edition, 2011-12, CFR 47, part 15 subpart B
WARNING
This is a Class A product. In a domestic environment this product may cause radio interference in which case the user may be required to take adequate measures.
Please read the following instructions carefully.
- Keep the equipment away from humidity.
- Before you connect the equipment to the power outlet, please check the voltage of the power source.
- Make sure the printer is off before plugging the power connector into the power jack.
- It is recommended that you connect the printer to a surge protector to prevent possible transient overvoltage damage.
- Be careful not to get liquid on the equipment to avoid electrical shock.
- For safety and warranty reasons, ONLY qualified service personnel should open the equipment.
- Do not repair or adjust energized equipment under any circumstances.
Caution
* Danger of explosion if battery is incorrectly replaced. Replace only with the equivalent type recommended by the manufacturer.
** Dispose of used batteries according to the manufacturer's instructions.
*** Only use with designated power supply adapter model.
**** Changes or modifications not expressly approved by the party responsible for compliance could void the user's authority to operate the equipment.
1 Barcode Printer
1.1 Box Content
Please check that all of the following items are included with your printer.
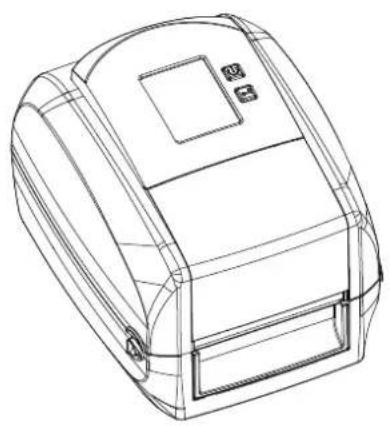
• RT860i Barcode Printer
natural_image
Line drawing of a mechanical device with no visible text or symbols- Label Stock
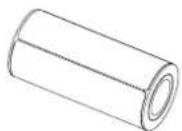
- Ribbon Module Empty Ribbon Core
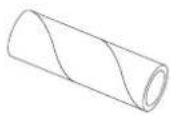
Ribbon

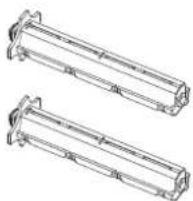
Ribbon Hubs Set of 2.
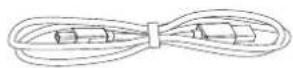
USB Cable
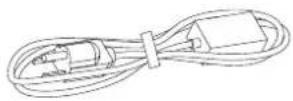
• Power Adapter Power Cord
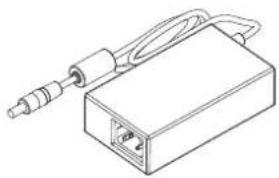
AC Adapter
natural_image
Line drawing of a rectangular electronic device with a coiled cable and connector (no text or symbols)• RT860i Series Quick Guide
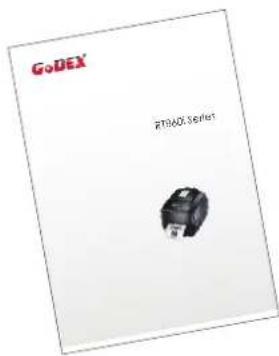
text_image
GoDEX RT340 Series• CD Including GoLabel software and user's manual.
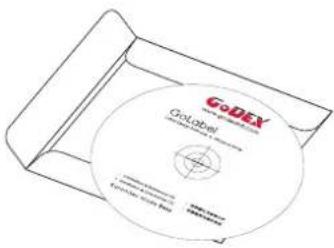
text_image
GoDEX GO-Global Golobetrol 100% 100% 100% 100%1 Barcode Printer
1.2 Getting to Know Your Printer
Device Overview
- Front View
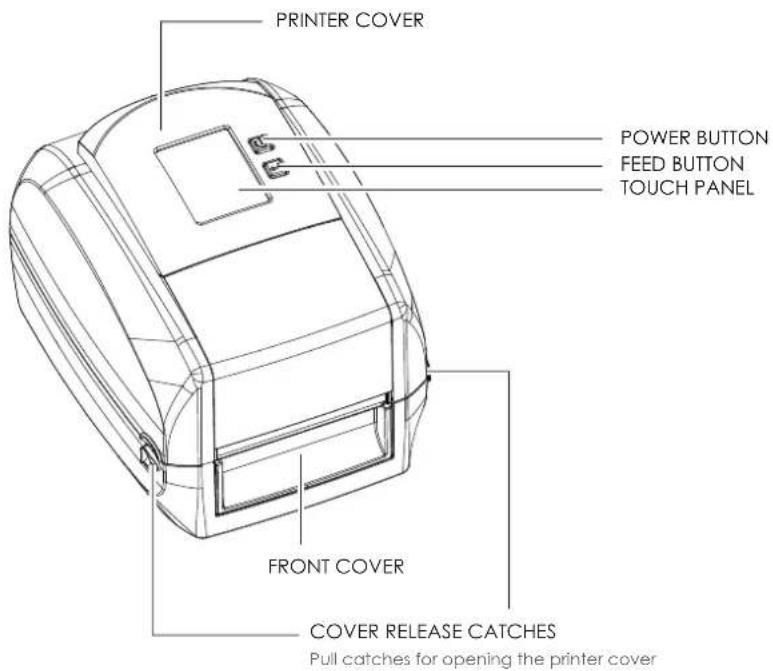
text_image
PRINTER COVER POWER BUTTON FEED BUTTON TOUCH PANEL FRONT COVER COVER RELEASE CATCHES Pull catches for opening the printer cover- Rear View
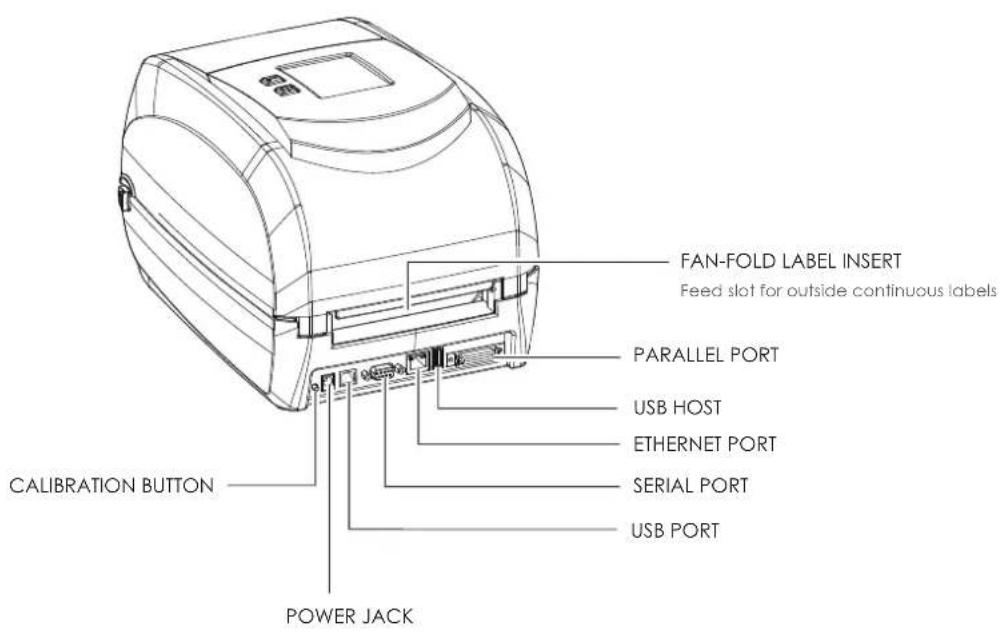
text_image
FAN-FOLD LABEL INSERT Feed slot for outside continuous labels PARALLEL PORT USB HOST ETHERNET PORT SERIAL PORT USB PORT CALIBRATION BUTTON POWER JACK1 Barcode Printer
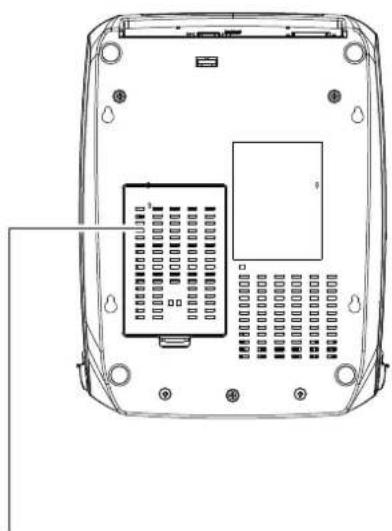
- Bottom View
natural_image
Line drawing of a device rear panel with internal components and mounting holes (no text or symbols)COVER OF THE MODULE CONNECTION JACKS
Note
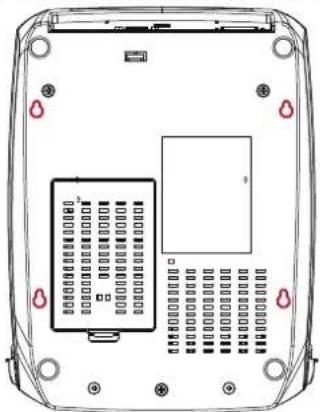
* Cut-outs are not intended for wall-mount use. Please make sure that the machine and personnel protective measures in case you need to use the wall-mount.
natural_image
Diagram of a mobile phone rear panel with indicator lights and a central display (no text or symbols)1
Barcode Printer
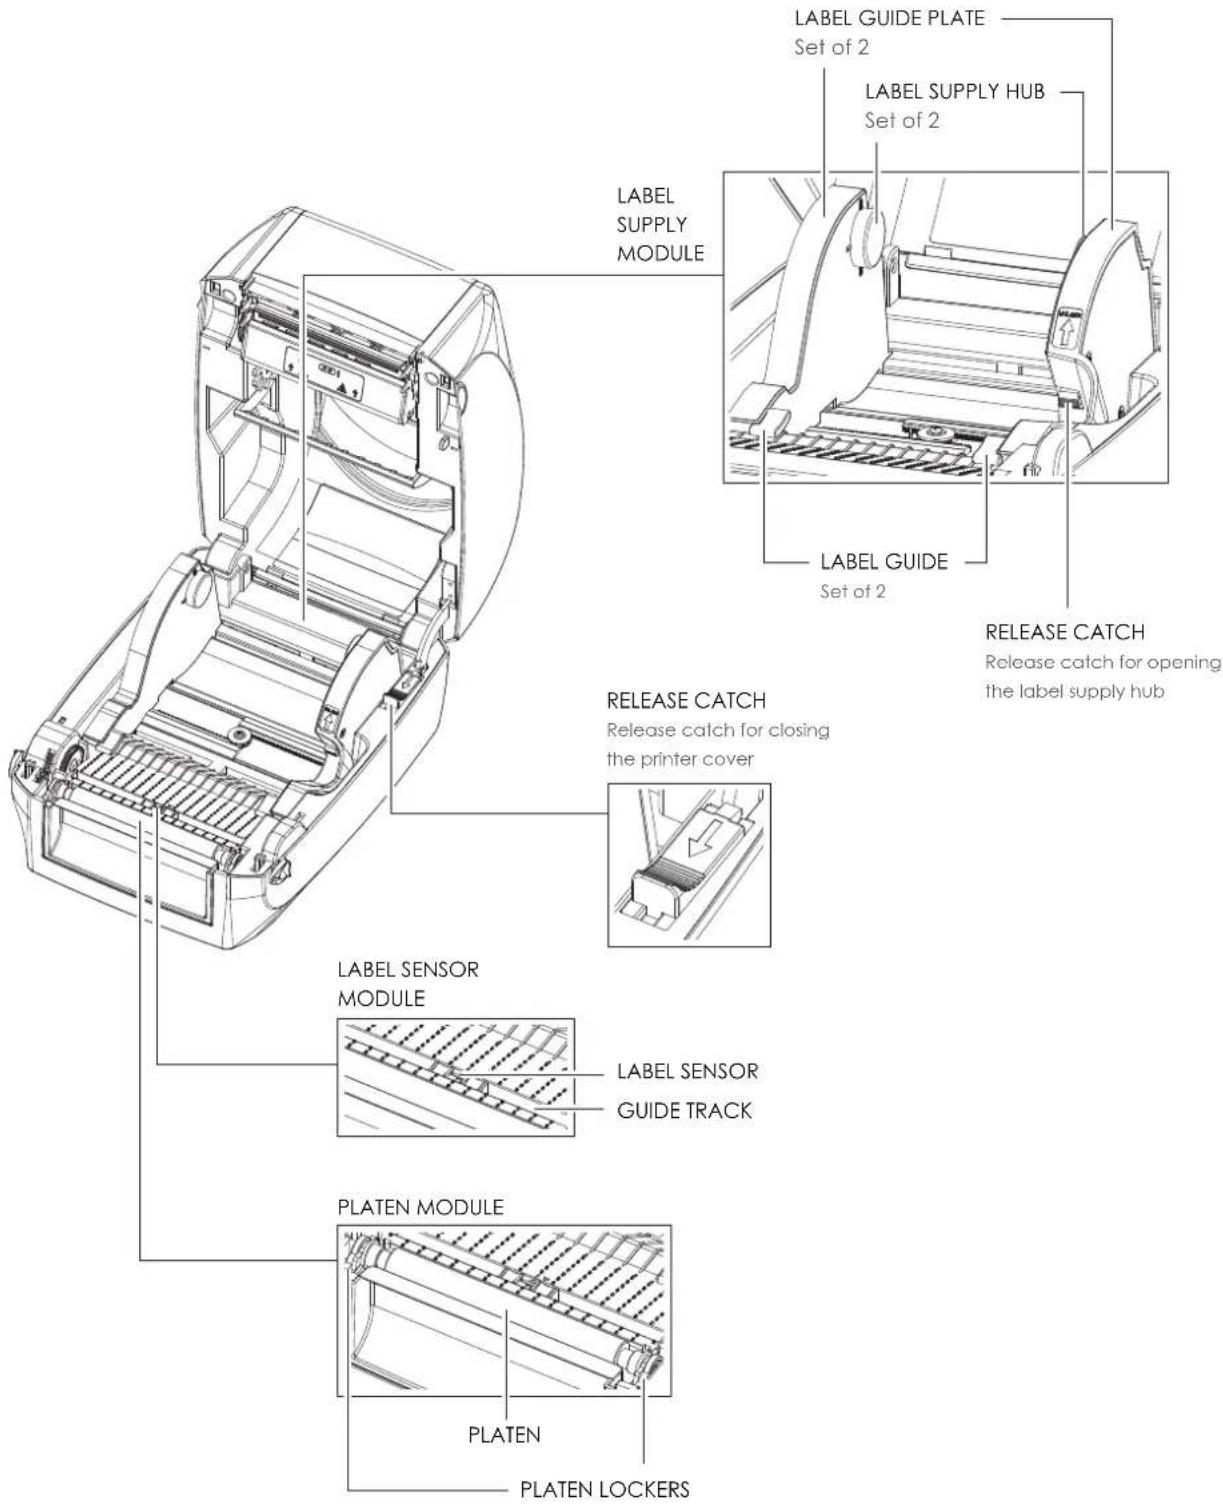
The Internal View of Printer
text_image
LABEL GUIDE PLATE Set of 2 LABEL SUPPLY HUB Set of 2 LABEL SUPPLY MODULE LABEL GUIDE Set of 2 RELEASE CATCH Release catch for opening the label supply hub RELEASE CATCH Release catch for closing the printer cover LABEL SENSOR MODULE LABEL SENSOR GUIDE TRACK PLATEN MODULE PLATEN PLATEN LOCKERS1
Barcode Printer
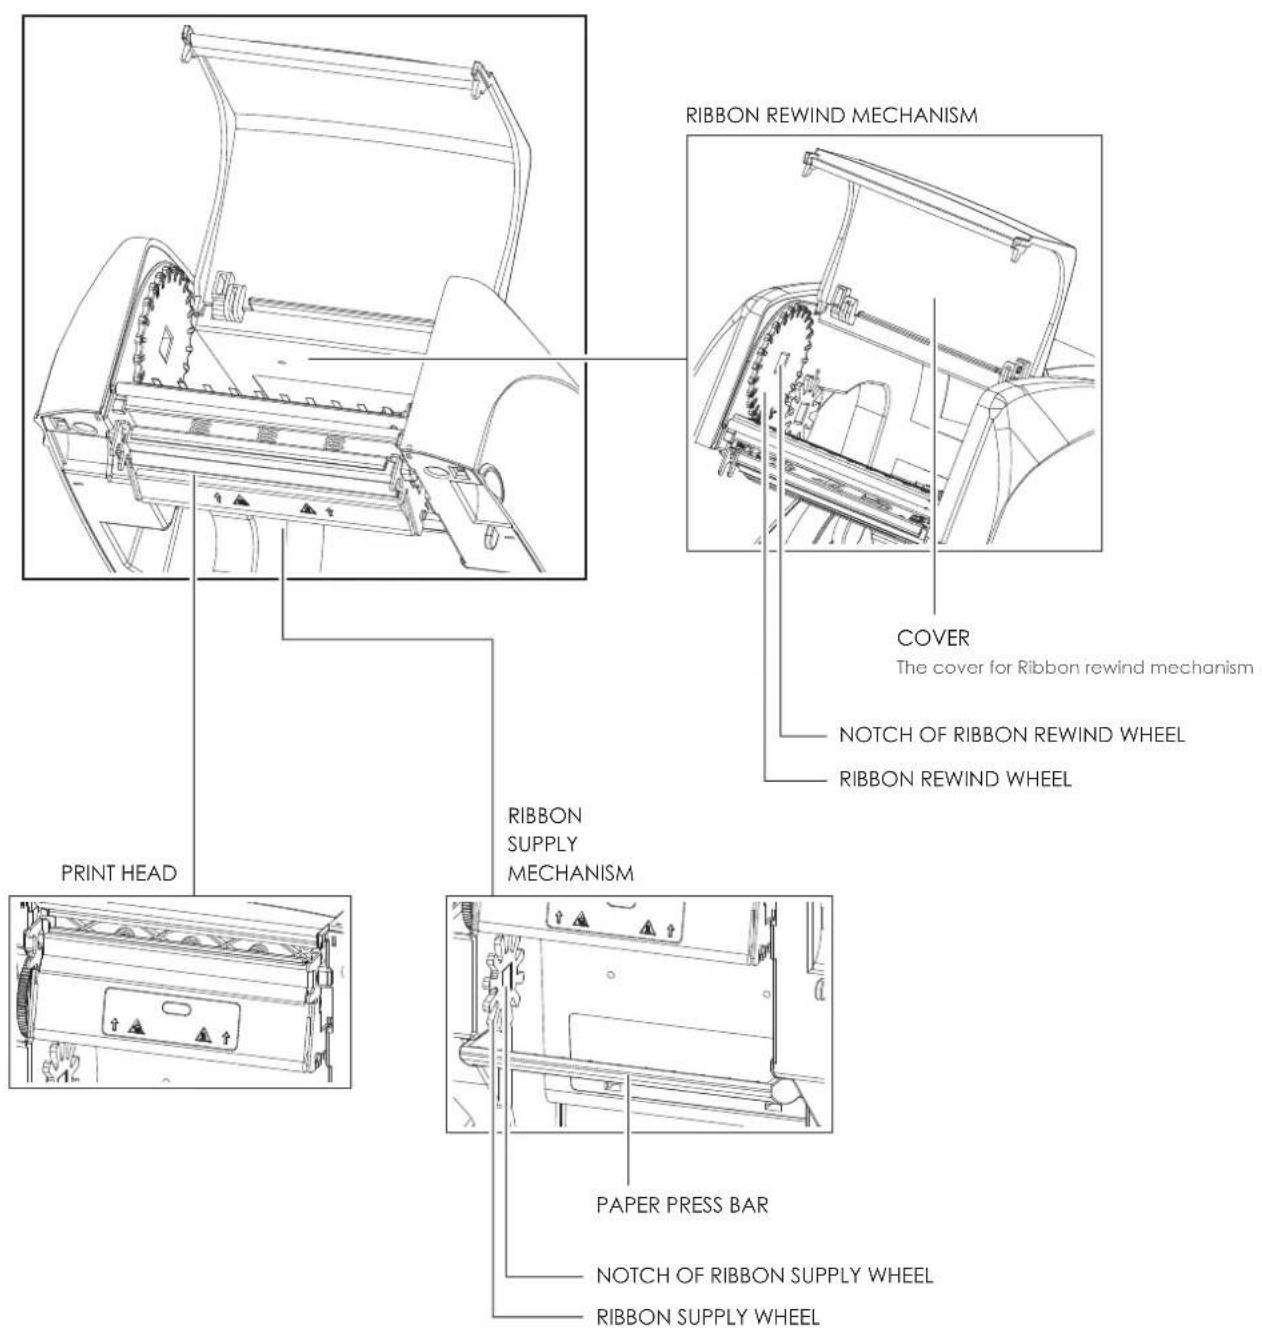
The Printing Mechanism
text_image
RIBBON REWIND MECHANISM COVER The cover for Ribbon rewind mechanism NOTCH OF RIBBON REWIND WHEEL RIBBON REWIND WHEEL PRINT HEAD RIBBON SUPPLY MECHANISM PAPER PRESS BAR NOTCH OF RIBBON SUPPLY WHEEL RIBBON SUPPLY WHEEL2 Printer Setup
2.1 Open the Printer
Open the Printer Cover and the Printing Mechanism
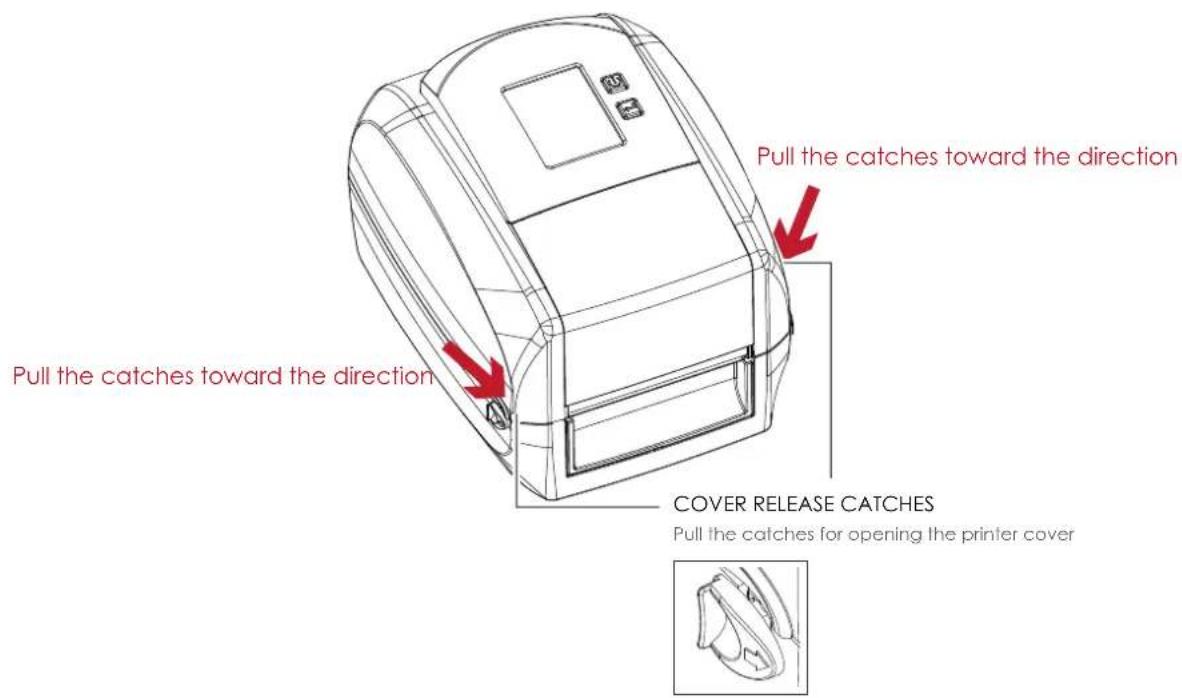
Place the printer on a flat surface. Open the printer cover by pulling the cover release catches on both sides of the printer and lift the printer cover.
text_image
Pull the catches toward the direction Pull the catches toward the direction COVER RELEASE CATCHES Pull the catches for opening the printer cover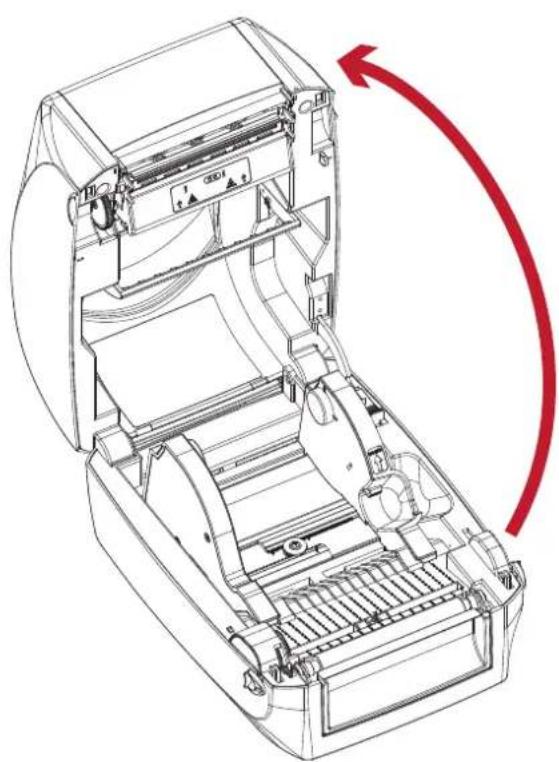
natural_image
Technical line drawing of a mechanical device with internal components and a red curved arrow indicating rotation (no text or symbols)The printing mechanism is lifted up with the printer cover
2 Printer Setup
2.2 Loading the Ribbon
A New Ribbon Module Installation
text_image
D+OEX D+OEX G+OEX G+OEX G+OEXEMPTY RIBBON COREA NEW RIBBORBON HUB
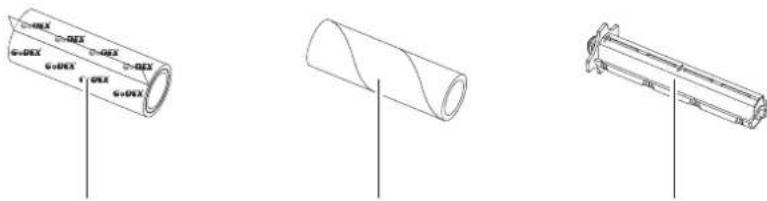
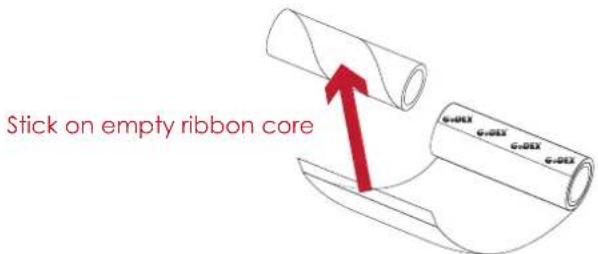
- Attach the ribbon to the empty ribbon core with the adhesive strip at the end of the ribbon.
text_image
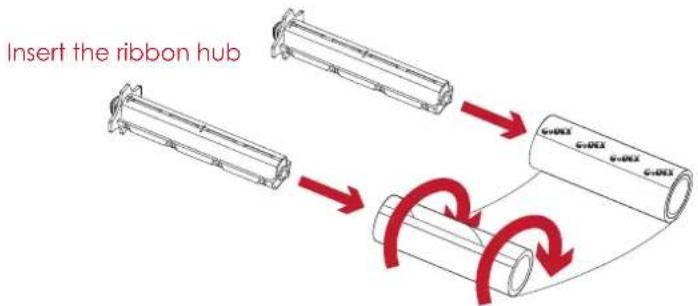
Stick on empty ribbon core G=DEX G=OEX G=OEX- Insert the ribbon hub into empty ribbon core and new ribbon. Wind the ribbon around the empty ribbon core for 2 to 3 circles.
text_image
Insert the ribbon hub G+D3 G+D3 G+D3Wind the ribbon around the core
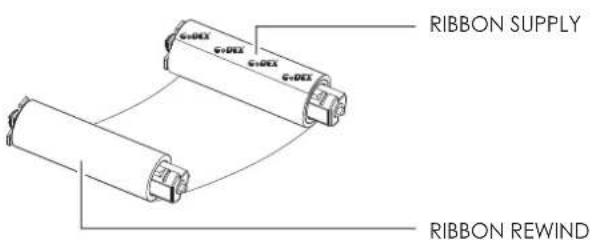
- A ribbon module is assembled as below.
A NEW RIBBON MODULE
text_image
G+DEX G+DEX G+DEX RIBBON SUPPLY RIBBON REWIND2 Printer Setup
Load the Ribbon on the Printer
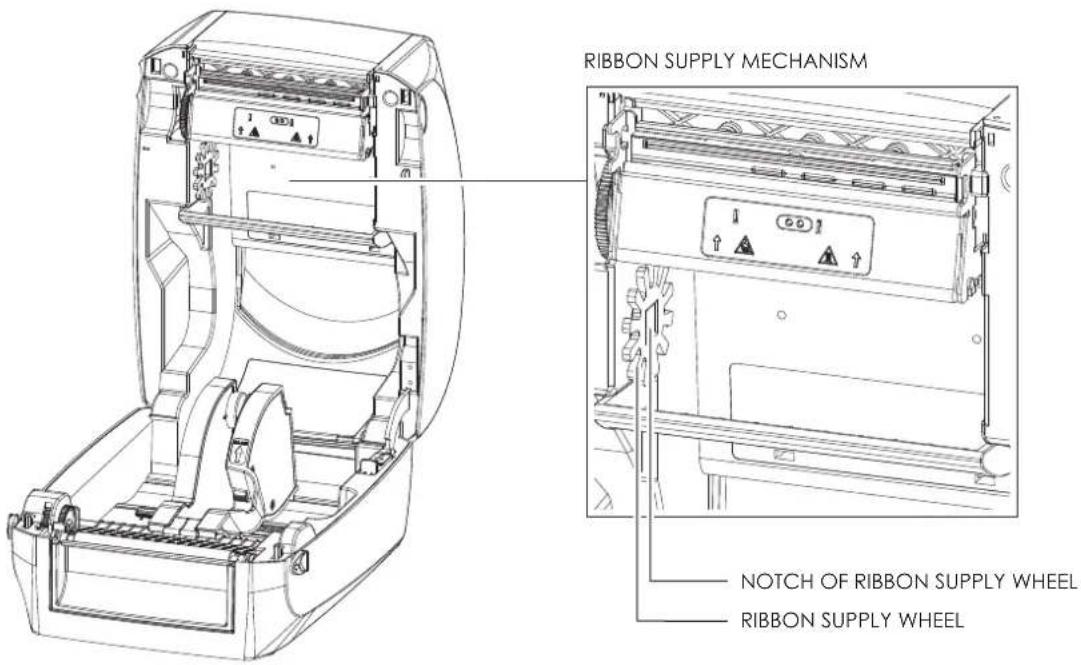
For Ribbon Supply Module
text_image
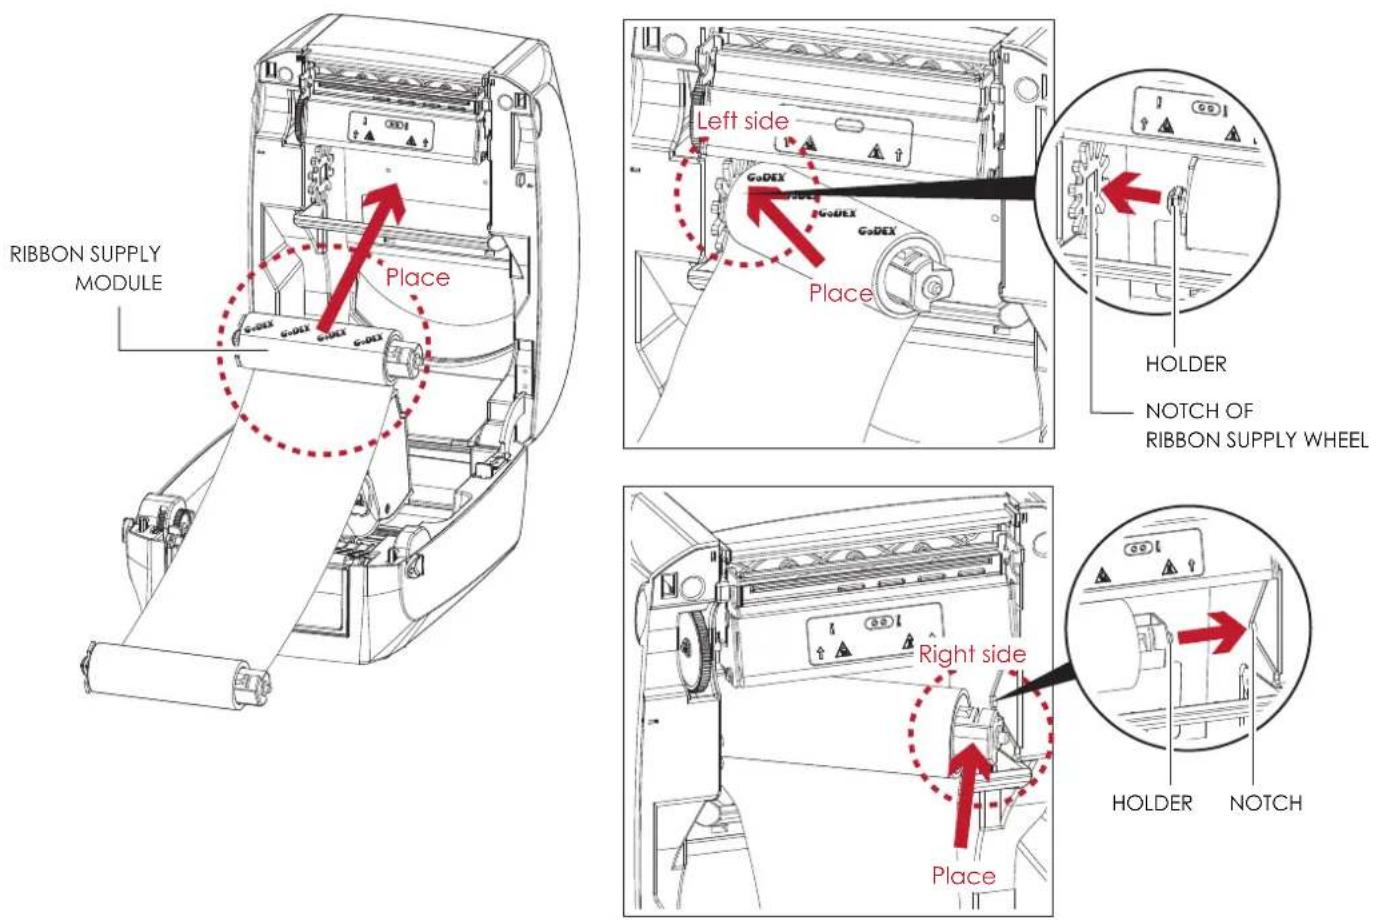
RIBBON SUPPLY MECHANISM NOTCH OF RIBBON SUPPLY WHEEL RIBBON SUPPLY WHEEL- Place the ribbon supply module into the printing mechanism. Please the left-hand side of ribbon hub first. Make sure the holder of ribbon hub is inserted into the notch. Then place the right-hand side of ribbon hub.
text_image
RIBBON SUPPLY MODULE Place Left side GoDEX GoDEX GoDEX Place HOLDER NOTCH OF RIBBON SUPPLY WHEEL Right side Place HOLDER NOTCH2 Printer Setup
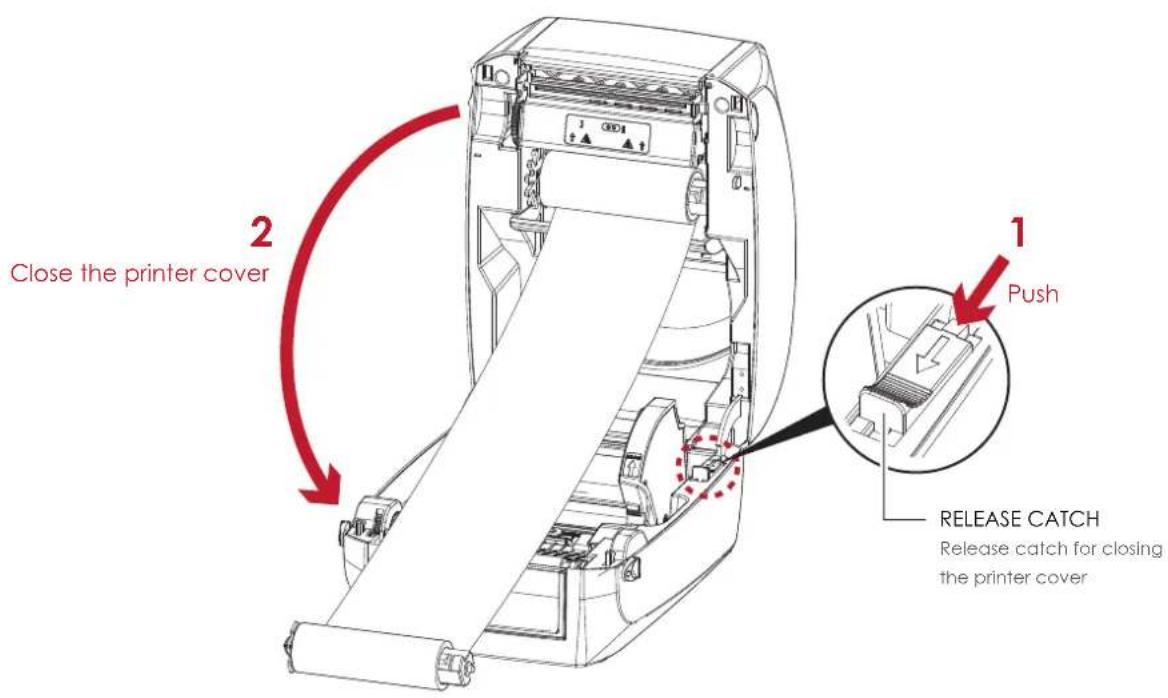
- Unlock the release catch to close the printer cover. Push the release catch forward to unlock it. The ribbon supply module loading is completed.
text_image
Close the printer cover 2 1 Push RELEASE CATCH Release catch for closing the printer coverLoad the Ribbon on the Printer
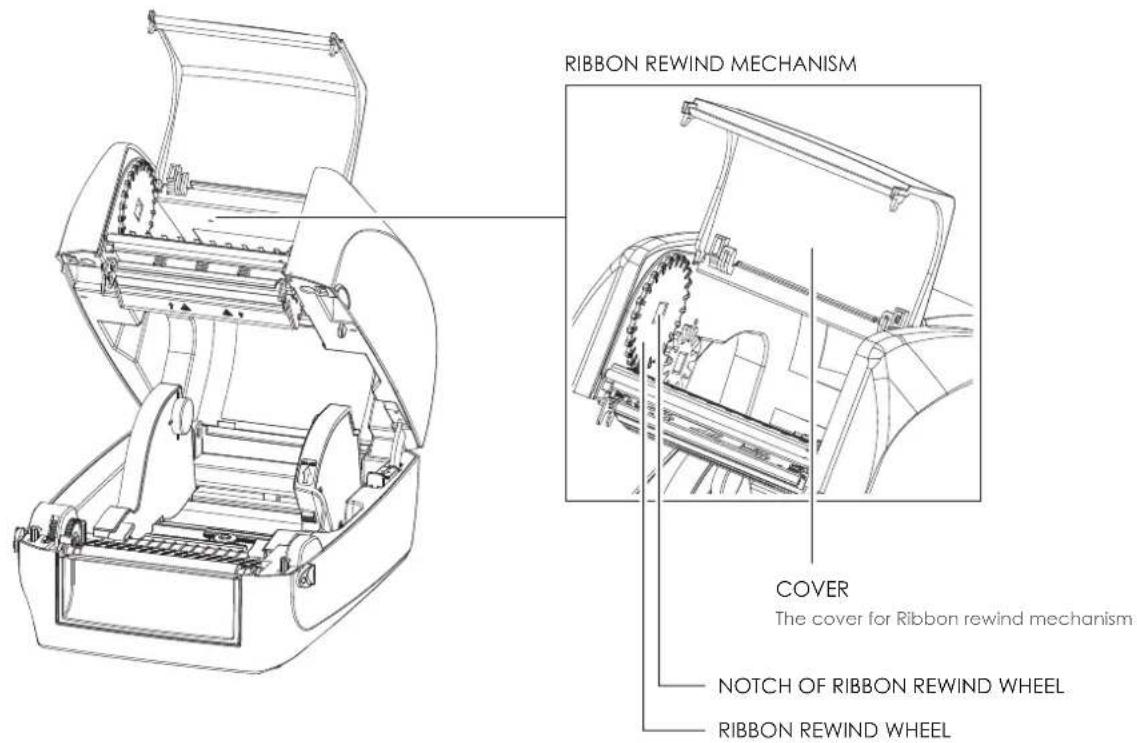
For Ribbon Rewind Module
text_image
RIBBON REWIND MECHANISM COVER The cover for Ribbon rewind mechanism NOTCH OF RIBBON REWIND WHEEL RIBBON REWIND WHEEL2 Printer Setup
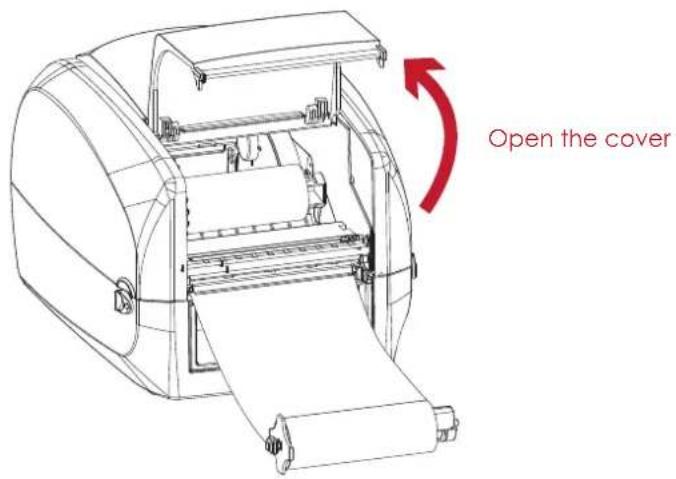
- Open the cover of ribbon rewind mechanism.
text_image
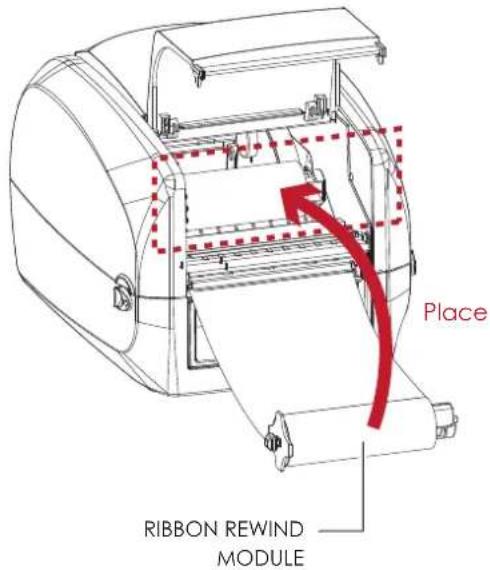
Open the cover- Place the ribbon rewind module into the ribbon rewind mechanism.
Please the left-hand side of ribbon hub first. Make sure the holder of ribbon hub is inserted into the notch. Then place the right-hand side of ribbon hub.
text_image
Place RIBBON REWIND MODULE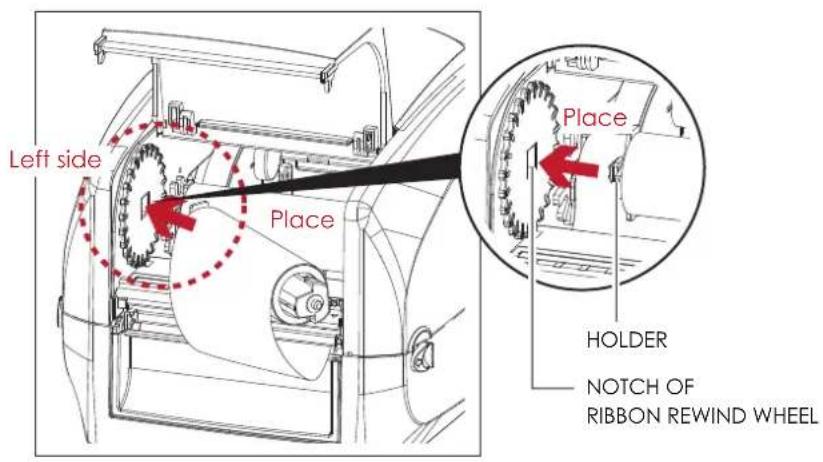
text_image
Left side Place Place HOLDER NOTCH OF RIBBON REWIND WHEEL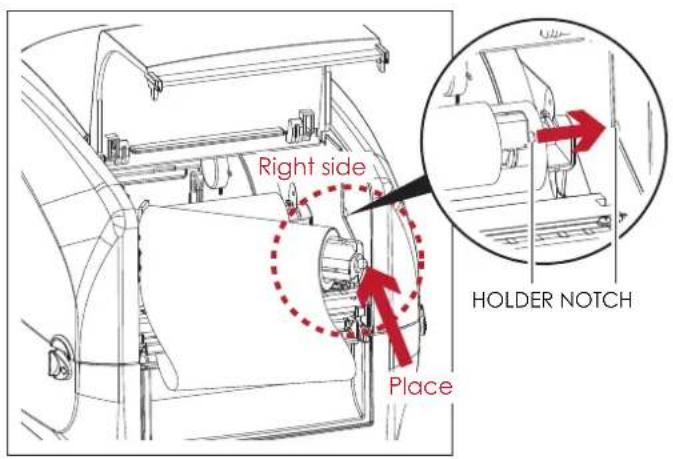
text_image
Right side Place HOLDER NOTCH2
Printer Setup
- Turn the ribbon rewind wheel to tighten the ribbon until it has no wrinkles.
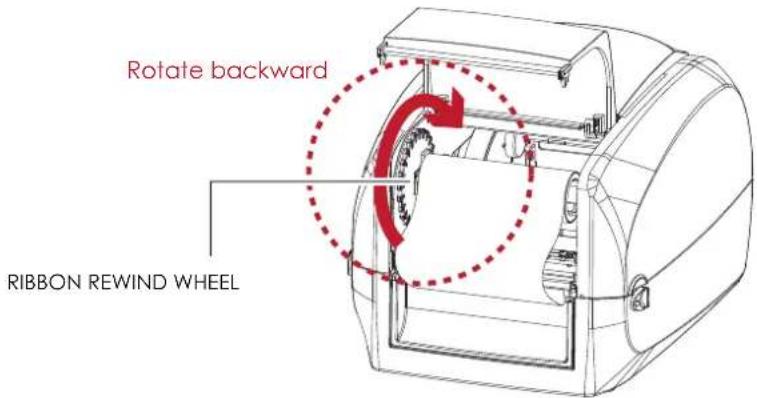
text_image
Rotate backward RIBBON REWIND WHEEL- Close the cover of ribbon rewind mechanism.
The ribbon loading is completed once the ribbon supply module and ribbon rewind module are assembled correctly.
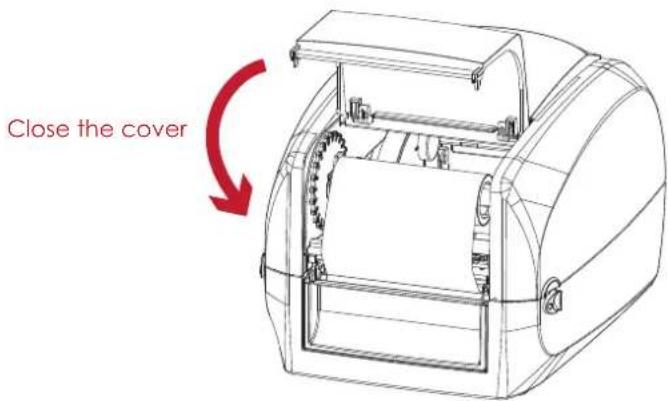
text_image
Close the cover2
Printer Setup
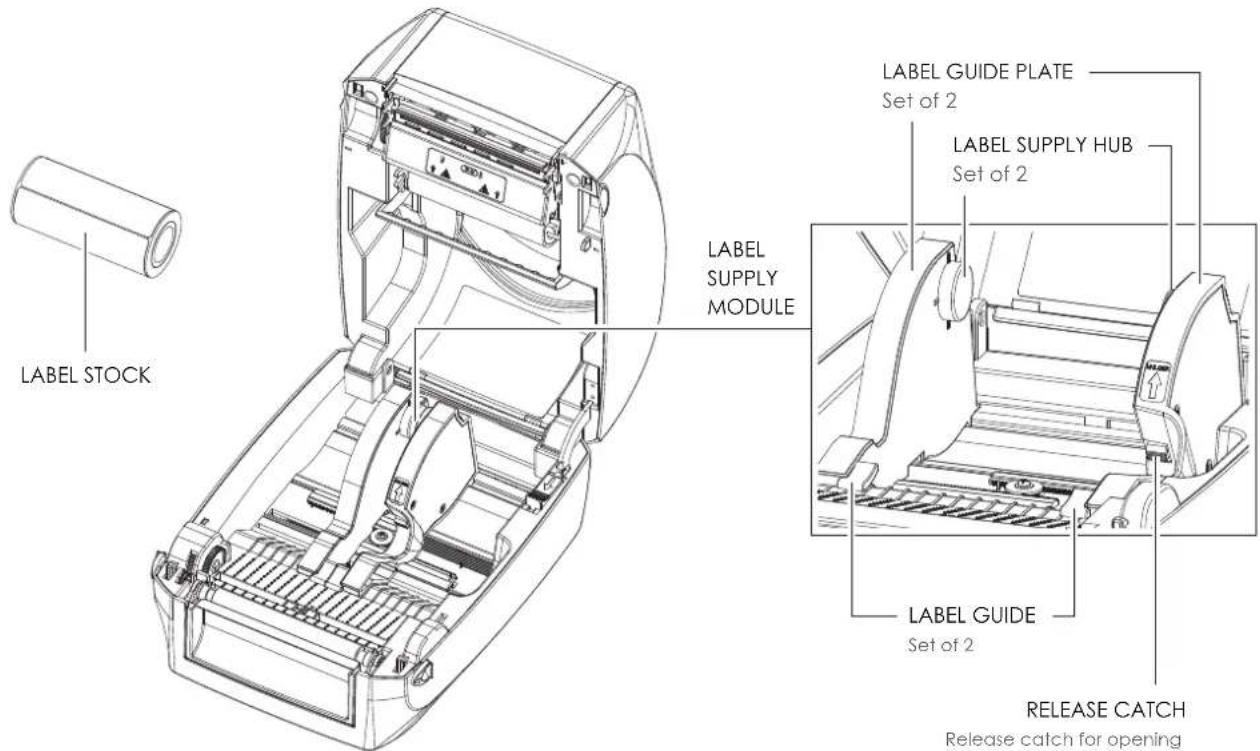
2.3 Loading the Label Roll Module
Loading the Label Stock on the Printer
text_image
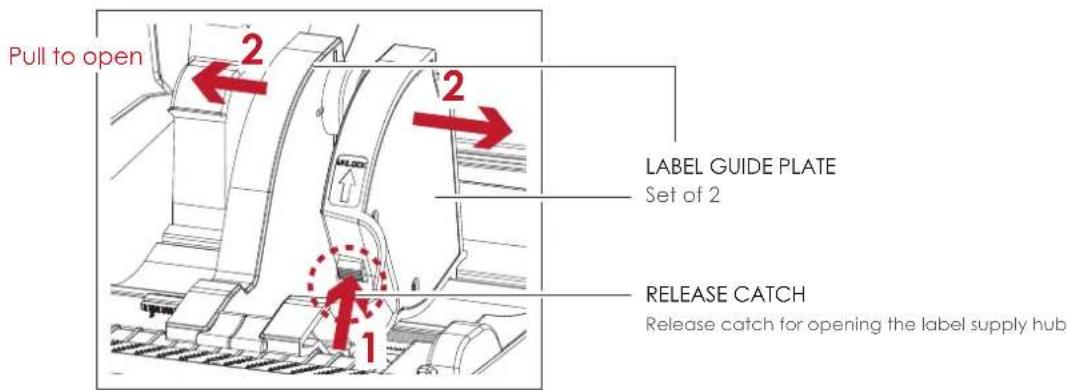
LABEL STOCK LABEL SUPPLY MODULE LABEL GUIDE PLATE Set of 2 LABEL SUPPLY HUB Set of 2 LABEL GUIDE Set of 2 RELEASE CATCH Release catch for opening- Unlock the ribbon catch and pull to open the label guide plate.
text_image
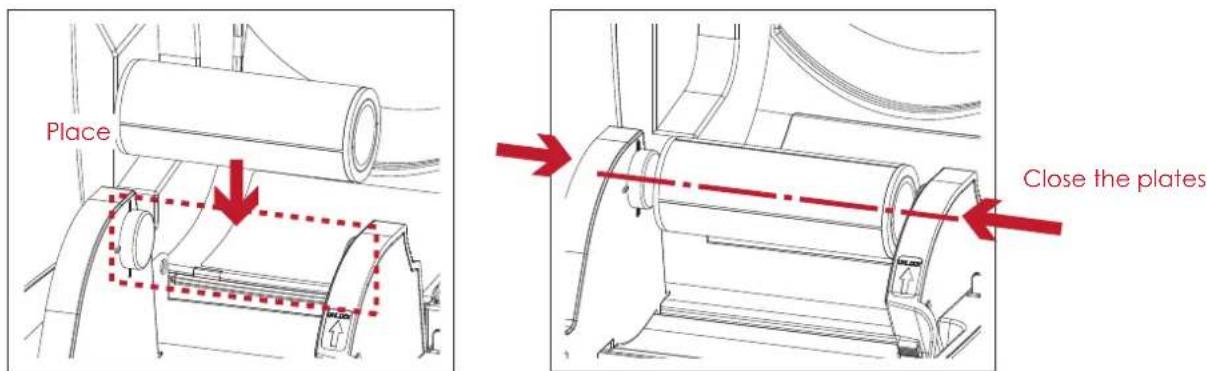
Pull to open 2 2 LABEL GUIDE PLATE Set of 2 RELEASE CATCH Release catch for opening the label supply hub- Place the label stock on label supply hubs. Make sure the label stock is aligned to both hubs.
Adjust the label guide plates to fix the label width.
Remember to push the release catch when moving the label guide plates.
text_image
Place Close the plates2 Printer Setup
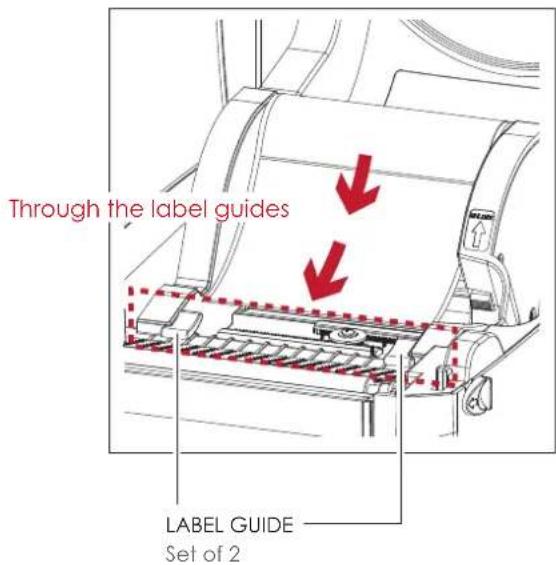
- Feed the Label through the label guides. The label guides will help to prevent the label swaying.
text_image
Through the label guides LABEL GUIDE Set of 2- Unlock the release catch to close the printer cover.
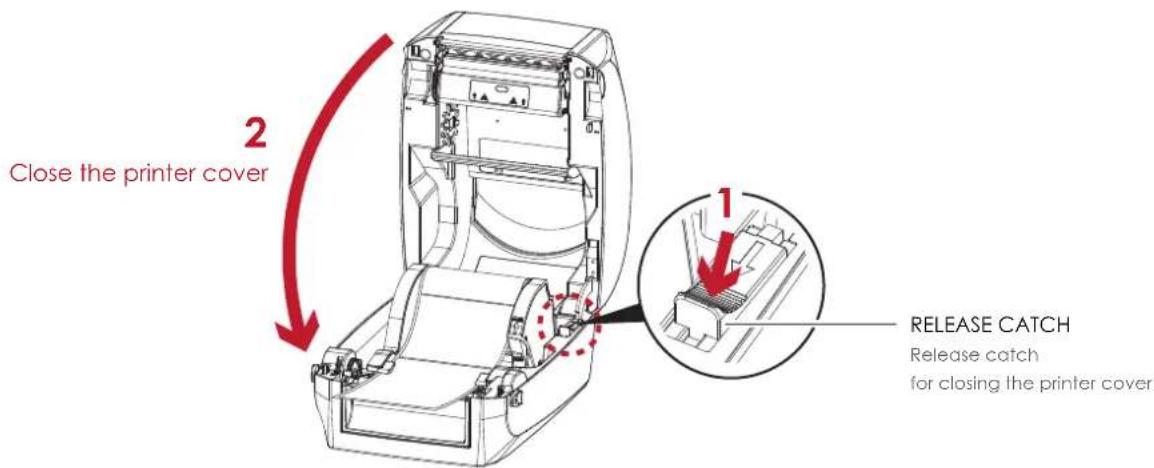
text_image
Close the printer cover 2 1 RELEASE CATCH Release catch for closing the printer cover- Press the FEED key and make sure the label is fed smoothly. The label loading is completed now.
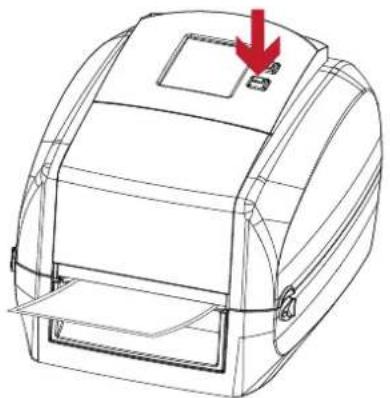
natural_image
Line drawing of a mechanical device with a red arrow pointing to a button (no text or symbols present)Note
* Please keeps the rack gear clean to ensure the smoothness of label holder.
2 Printer Setup
2.4 Connecting the Printer to the Host Computer
- Please make sure that the printer is switched off.
- Connect the power cord to the AC adapter.
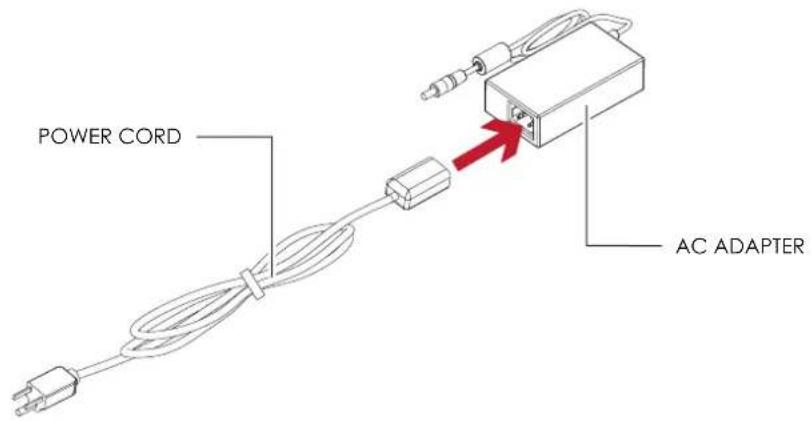
text_image
POWER CORD AC ADAPTERConnect the jack of the power adapter to the printer and connect the plug of the power adapter to the socket of the wall.
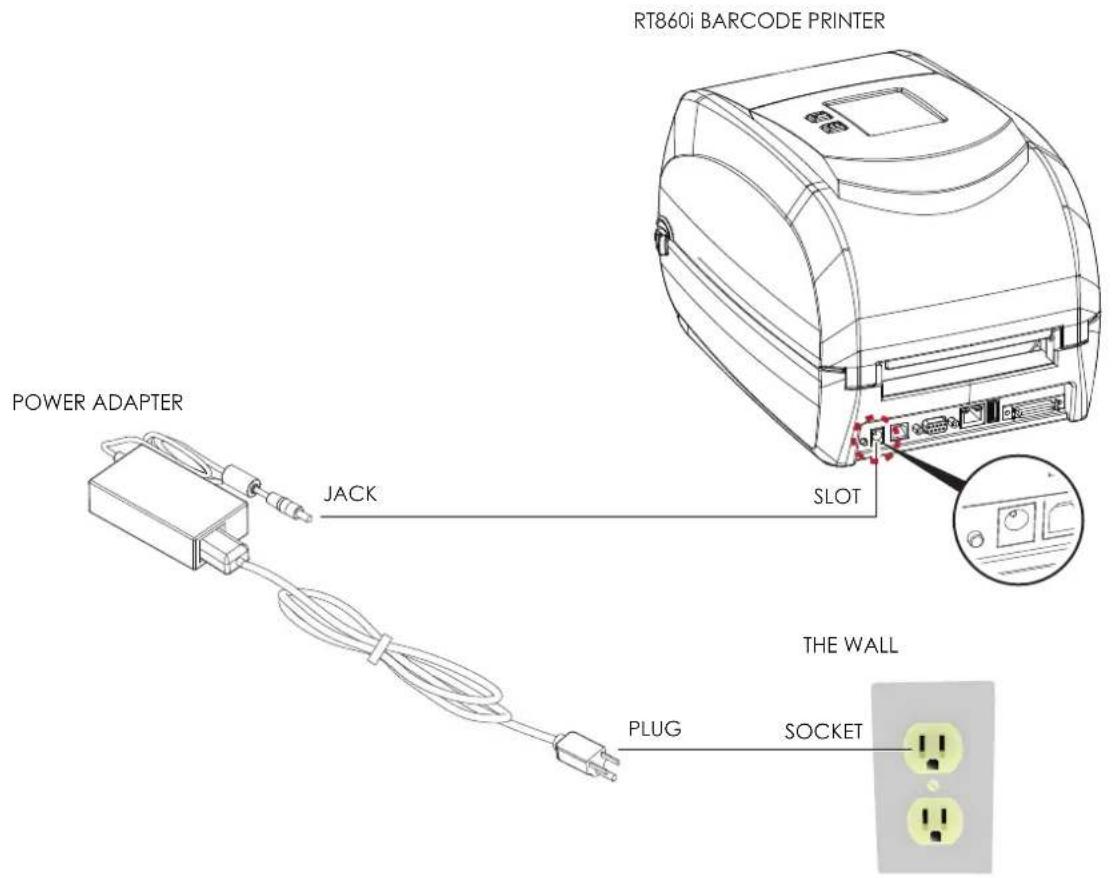
text_image
RT860i BARCODE PRINTER POWER ADAPTER JACK SLOT THE WALL PLUG SOCKET2
Printer Setup
- Connect the USB/serial cable to the printer and host computer.
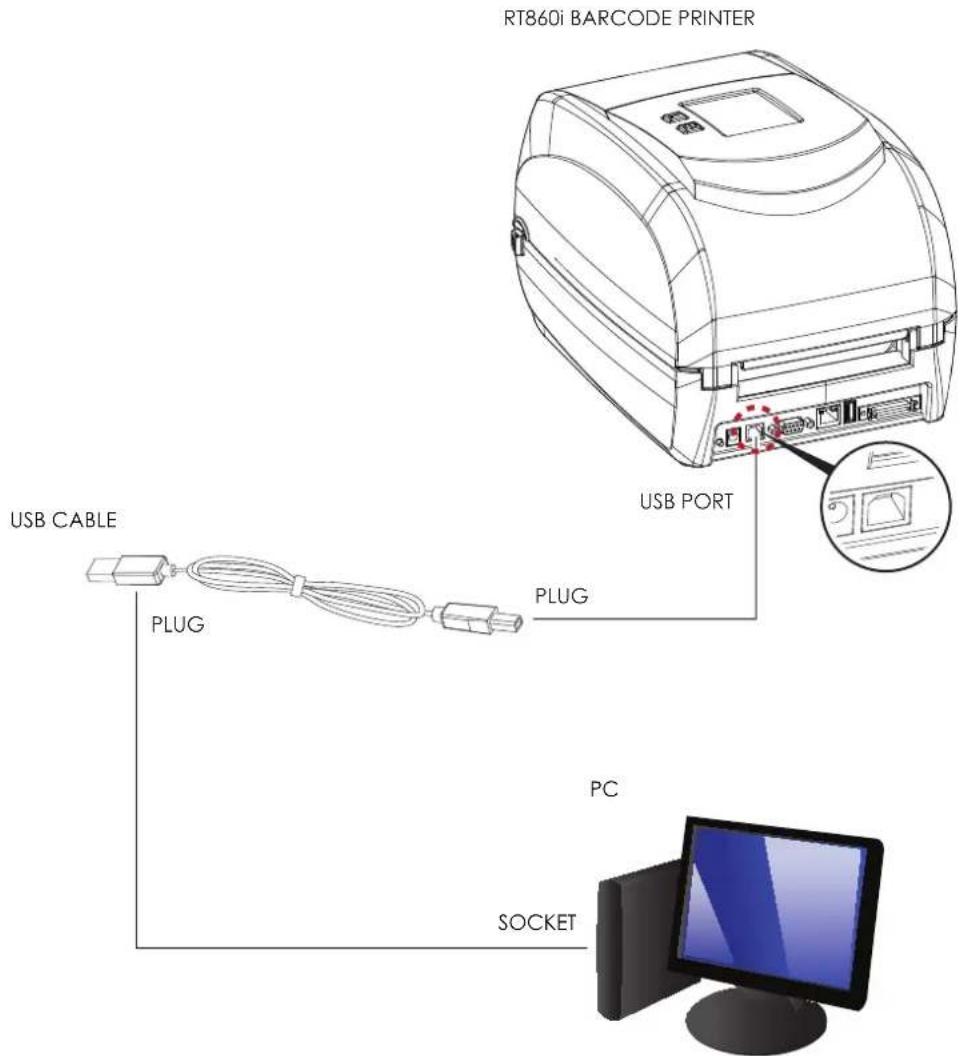
text_image
RT860i BARCODE PRINTER USB PORT USB CABLE PLUG PLUG PC SOCKET- Pressing the power button. The Touch Panel LCD will lights up.
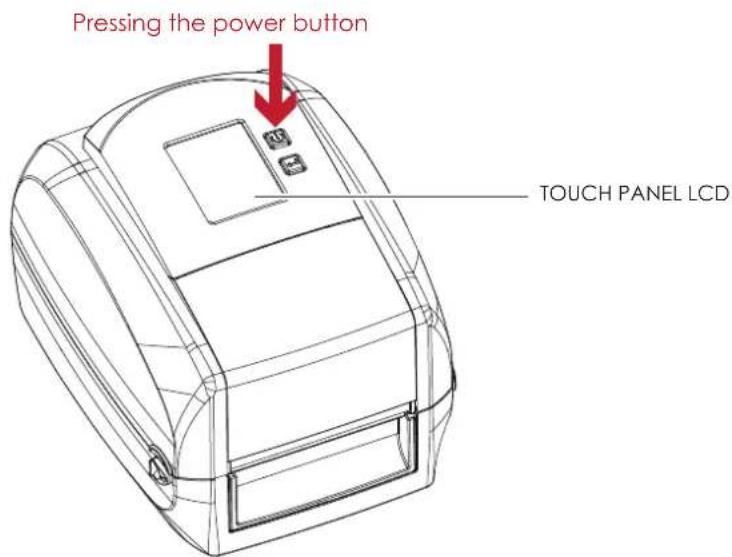
text_image
Pressing the power button TOUCH PANEL LCD2 Printer Setup
2.5 Wizard CD Standard Installation
- Insert the Super Wizard CD in the CD/DVD drive of the host computer and the installation program should pop up automatically.
You will see the Welcome screen first. On the Welcome screen, choose "STANDARD INSTALLATION".
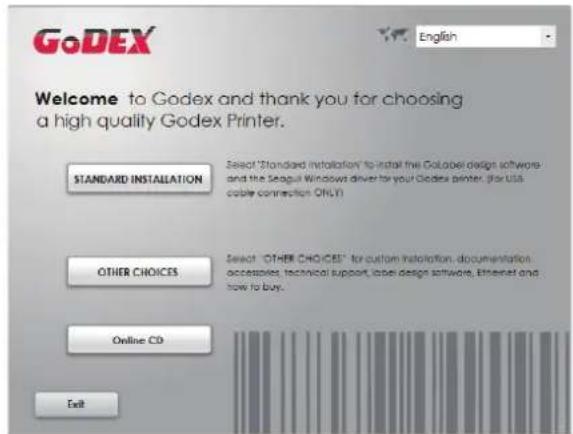
text_image
GoDEX English Welcome to Godex and thank you for choosing a high quality Godex Printer. STANDARD INSTALLATION Select "Standard Installation" to install the GoLabel design software and the Seagull Windows driver to your Godex printer. (for US$ cable connection ONLY) OTHER CHOICES Select "OTHER CHOICES" for custom installation, documentation accessories, technical support, label design software, Ethernet and how to buy. Online CD Exit- The wizard will then ask you to make sure your USB and power cables are connected and that the power is turned on. Then click "NEXT".
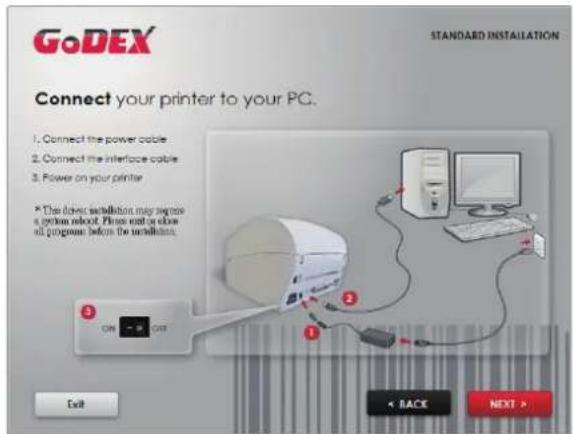
text_image
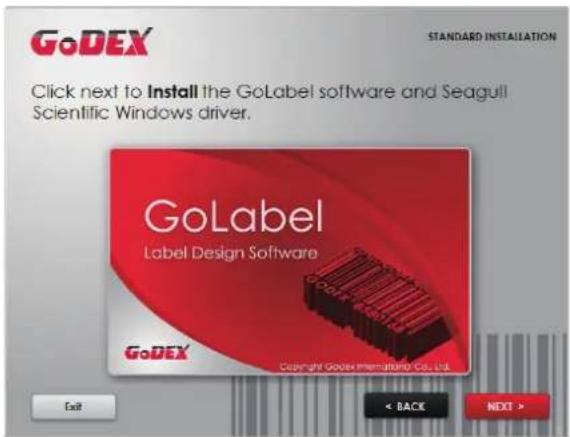
GoDEX STANDARD INSTALLATION Connect your printer to your PC. 1. Connect the power cable 2. Connect the interface cable 3. Power on your printer * The direct installation may require a print output. Please exit or close all programs before the installation. ① ON OFF ② ③ Exit < BACK NEXT >- The next screen you will see is, "Install the GoLabel Software and Windows driver". Click "NEXT" to continue.
text_image
GoDEX STANDARD INSTALLATION Click next to Install the GoLabel software and Seagull Scientific Windows driver. GoLabel Label Design Software GoDEX Copyright Godex International Co., Ltd. Exit < BACK NEXT >Note
* If the Super Wizard program did not run automatically, you can either turn on the "Auto-run" setting for your CD/DVD driver or double-click the icon of CD/DVD driver to run the program manually.
2
Printer Setup
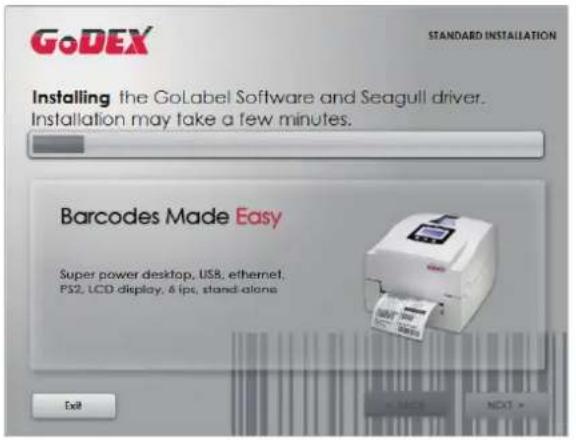
- As the printer driver and GoLabel are installing, a screen will display a progress bar. While downloading completed you will see Installation completed. Click "NEXT" to continue.
text_image
GoDEX STANDARD INSTALLATION Installing the GoLabel Software and Seagull driver. Installation may take a few minutes. Barcodes Made Easy Super power desktop, USB, ethernet, PS2, LCD display, 4 ips, stand-alone Exit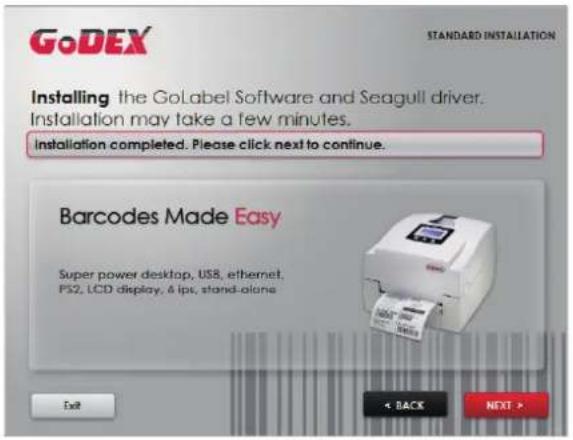
text_image
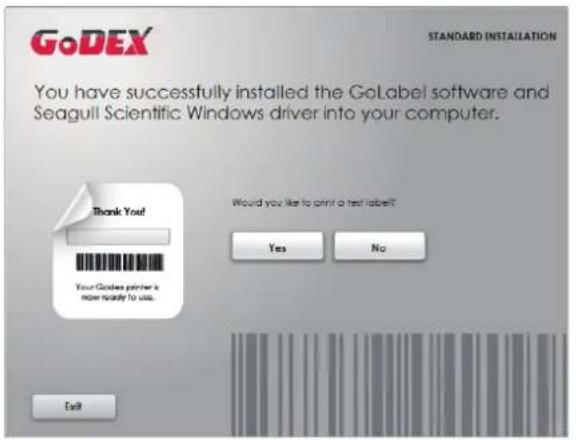
GoDEX STANDARD INSTALLATION Installing the GoLabel Software and Seagull driver. Installation may take a few minutes. Installation completed. Please click next to continue. Barcodes Made Easy Super power desktop, USB, ethernet, PS2, LCD display, & ips, stand-alone Exit < BACK NEXT >- You can also print a test label. If don't print a test label, the screen display as step 6.
text_image
GoDEX STANDARD INSTALLATION You have successfully installed the GoLabel software and Seagull Scientific Windows driver into your computer. Thank You! Your Goodes printer is now ready to use. Would you like to print a text label? Yes No Exit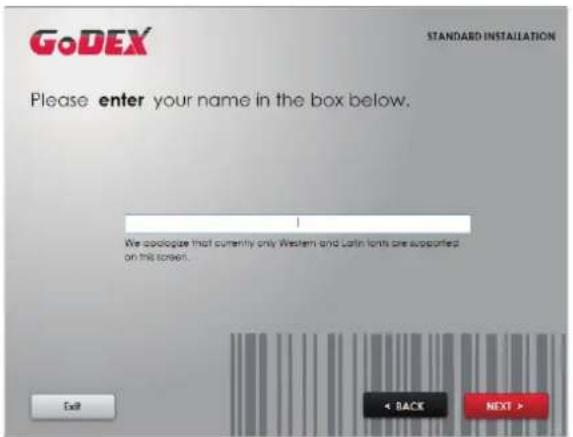
text_image
GoDEX STANDARD INSTALLATION Please enter your name in the box below. We apologize that currently only Western and Latin fonts are supported on this screen. Exit < BACK NEXT >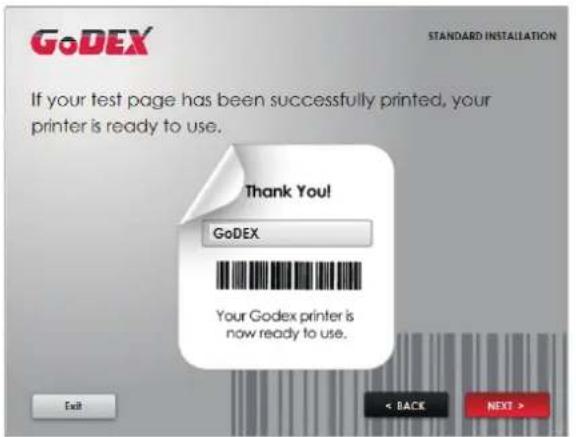
text_image
GoDEX If your test page has been successfully printed, your printer is ready to use. Thank You! GoDEX Your Godex printer is now ready to use. Exit < BACK NEXT >Note
* If you need more resources, tools or reference documents, you can also find them on Super Wizard CD. Just click "Other Choices" on the Welcome Screen to access the files.
2 Printer Setup
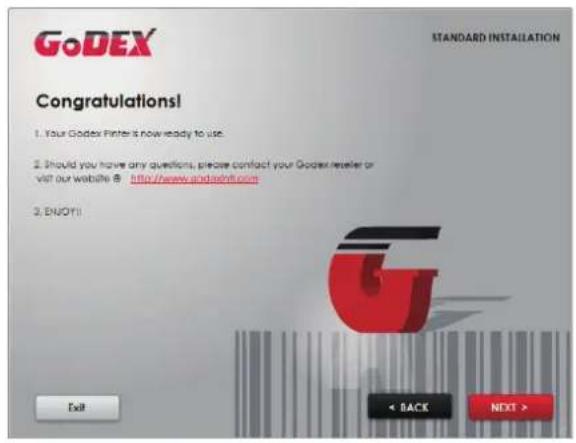
- Once the installation is complete, you can start to make and print labels with GoLabel or through the printer driver.
text_image
GoDEX STANDARD INSTALLATION Congratulations! 1. Your Godex Filter is now ready to use. 2. Should you have any questions, please contact your Godex reader or visit our website @ http://www. godex.net.com 3. ENJOY! Exit < BACK NEXT >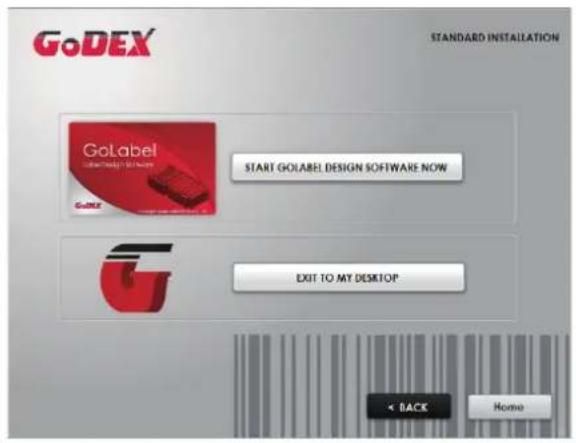
text_image
GoDEX STANDARD INSTALLATION GOLabel START GOLABEL DESIGN SOFTWARE NOW EXIT TO MY DESKTOP < BACK Home2 Printer Setup
2.6 Wizard CD Other Choice Installation
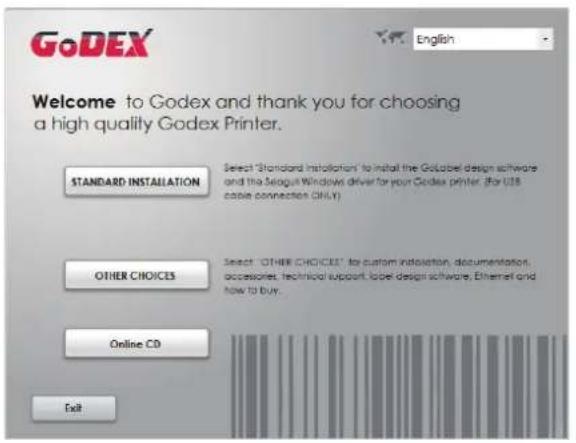
- Click "OTHER CHOICES" to next screen and select "PRINTER DRIVERS".
text_image
GoDEX English Welcome to Godex and thank you for choosing a high quality Godex Printer. STANDARD INSTALLATION Select "Standard Installation" to install the GoLabel design software and the Beagut Windows driver for your Godex printer (for USB cable connection ONLY) OTHER CHOICES Select "OTHER CHOICES" to custom installation, documentation, accessories, technical support, label design software, Ethernet and how to buy. Online CD Exit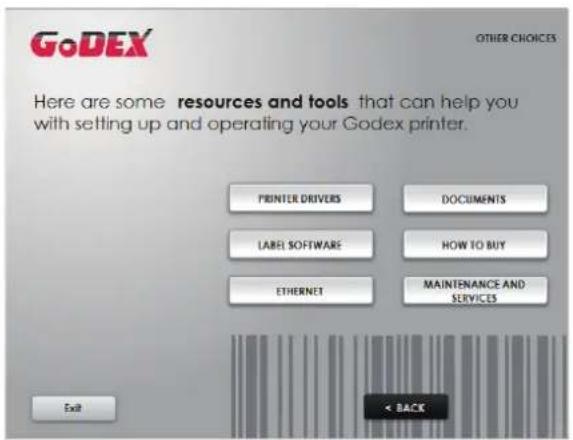
text_image
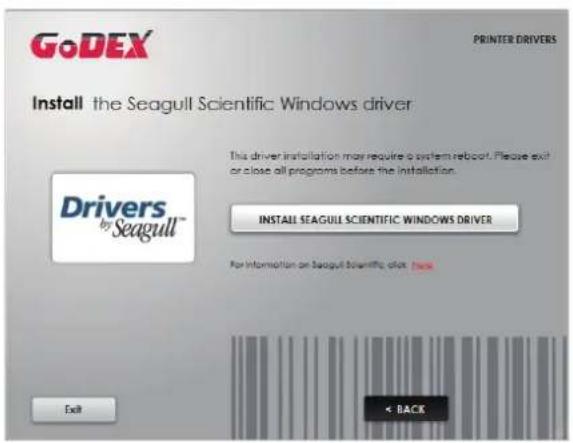
GoDEX OTHER CHOICES Here are some resources and tools that can help you with setting up and operating your Godex printer. PRINTER DRIVERS DOCUMENTS LABEL SOFTWARE HOW TO BUY ETHERNET MAINTENANCE AND SERVICES Exit < BACK- Click "INSTALL SEAGULL SCIENTIFIC WINDOWS DRIVER" to next screen, and click "NEXT".
text_image
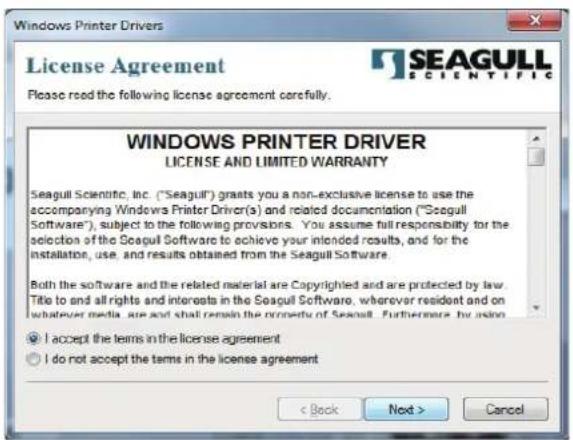
GoDEX UPRITER DRIVERS Install the Seagull Scientific Windows driver This driver installation may require a system reboot. Please exit or close all programs before the installation. DRIVERS by Seagull™ INSTALL SEAGULL SCIENTIFIC WINDOWS DRIVER For Information on Seagull Scientific, click Back Exit < BACK- Select "I accept the terms in the license agreement", and click "Next" · then click "Finish" to step 4.
text_image
Windows Printer Drivers License Agreement Please read the following license agreement carefully. WINDOWS PRINTER DRIVER LICENSE AND LIMITED WARRANTY Seagull Scientific, Inc. ("Seagull") grants you a non-exclusive license to use the accompanying Windows Printer Driver(s) and related documentation ("Seagull Software"), subject to the following provisions. You assume full responsibility for the selection of the Seagull Software to achieve your intended results, and for the installation, use, and results obtained from the Seagull Software. Both the software and the related material are Copyrighted and are protected by law. Title to end all rights and interests in the Seagull Software, wherever resident and on whatever media, are and shall remain the property of Seagull. Furthermore, by using ● I accept the terms in the license agreement ○ I do not accept the terms in the license agreement < Back Next > Cancel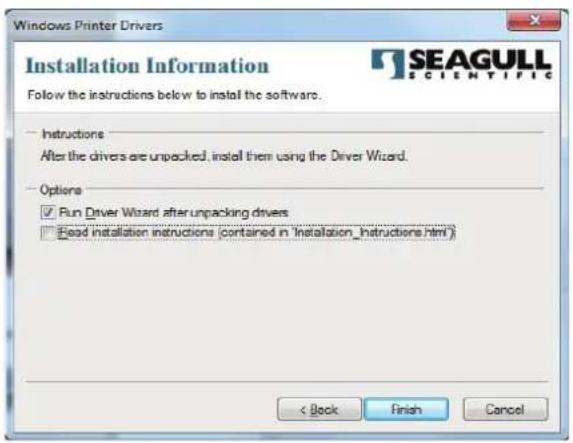
text_image
Windows Printer Drivers Installation Information Follow the instructions below to install the software. Instructions After the drivers are unpacked, install them using the Driver Wizard. Options ✓ Run Driver Wizard after unpacking drivers ☐ Read installation instructions (contained in 'Installation Instructions.html') < Back Finish Cancel2 Printer Setup
- The Driver Wizard will guide you through the installation procedure. Select "Install printer drivers" and click "Next".
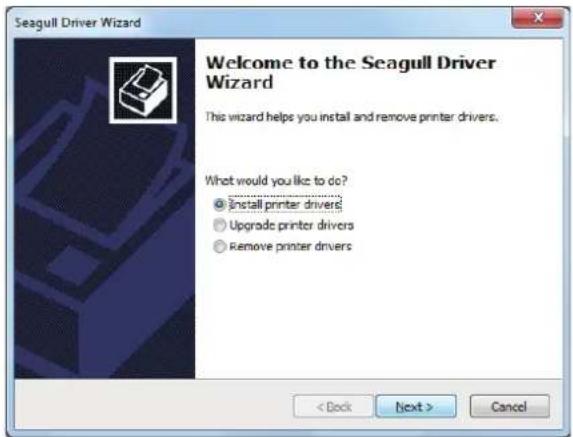
text_image
Seagull Driver Wizard Welcome to the Seagull Driver Wizard This wizard helps you install and remove printer drivers. What would you like to do? ● Install printer drivers ○ Upgrade printer drivers ○ Remove printer drivers < Dock Next > Cancel- With a USB connection, search models such as the right diagram printer device. Specify your printer model and click "Next".
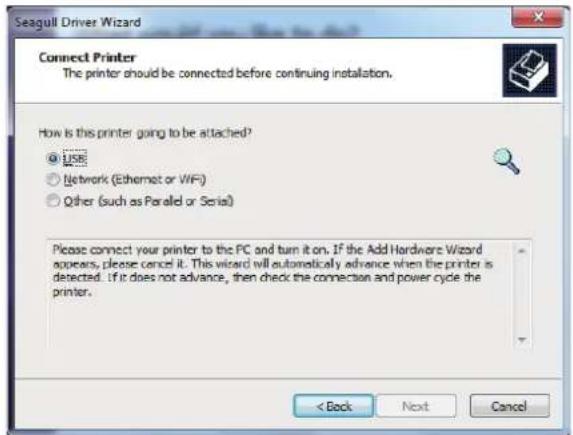
text_image
Seagull Driver Wizard Connect Printer The printer should be connected before continuing installation. How is this printer going to be attached? ● USB ○ Network (Ethernet or WiFi) ○ Other (such as Parallel or Serial) Please connect your printer to the PC and turn it on. If the Add Hardware Wizard appears, please cancel it. This wizard will automatically advance when the printer is detected. If it does not advance, then check the connection and power cycle the printer. < Back Next Cancel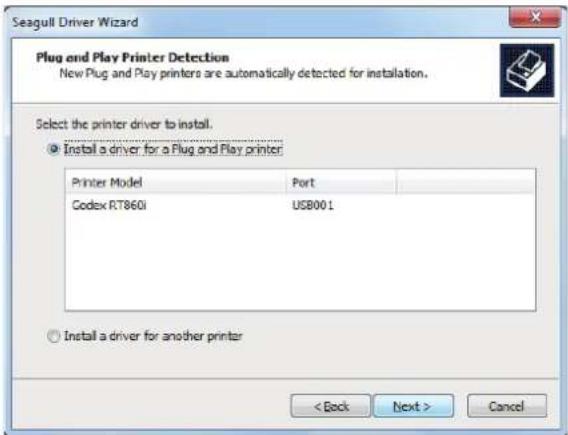
text_image
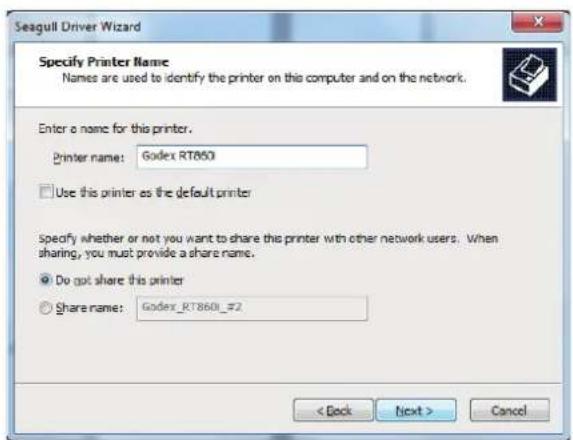
Seagull Driver Wizard Plug and Play Printer Detection New Plug and Play printers are automatically detected for installation. Select the printer driver to install. ● Install a driver for a Plug and Play printer Printer Model Port Codex RT860i USB001 ○ Install a driver for another printer < Back Next > Cancel- Enter the printer name (you can use default), then click "Next" to display as right diagram. Click "Finish" button to start installation.
text_image
Seagull Driver Wizard Specify Printer Name Names are used to identify the printer on this computer and on the network. Enter a name for this printer. Printer name: Godex RT860 Use this printer as the default printer Specify whether or not you want to share this printer with other network users. When sharing, you must provide a share name. Do not share this printer Share name: Godex_RT8601_22 < Back Next > Cancel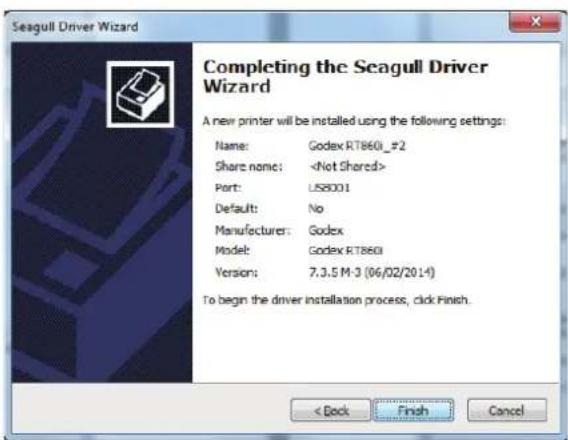
text_image
Seagull Driver Wizard Completing the Seagull Driver Wizard A new printer will be installed using the following settings: Name: Godex RT8601_2 Share name:2 Printer Setup
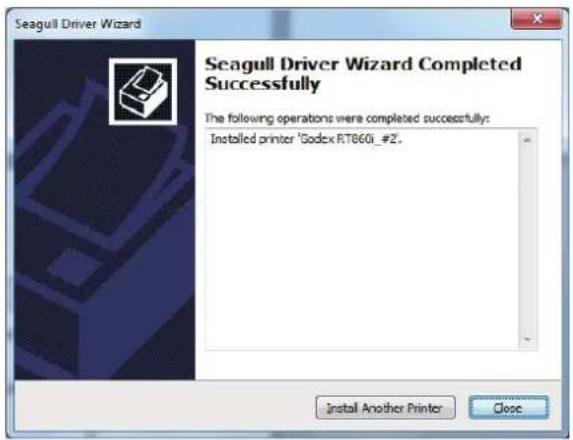
- Driver installation completed.
text_image
Seagull Driver Wizard Seagull Driver Wizard Completed Successfully The following operations were completed successfully: Installed printer 'Codex RT8601_#2.'3 Printer Setting and Control
3.1 Operation Panel
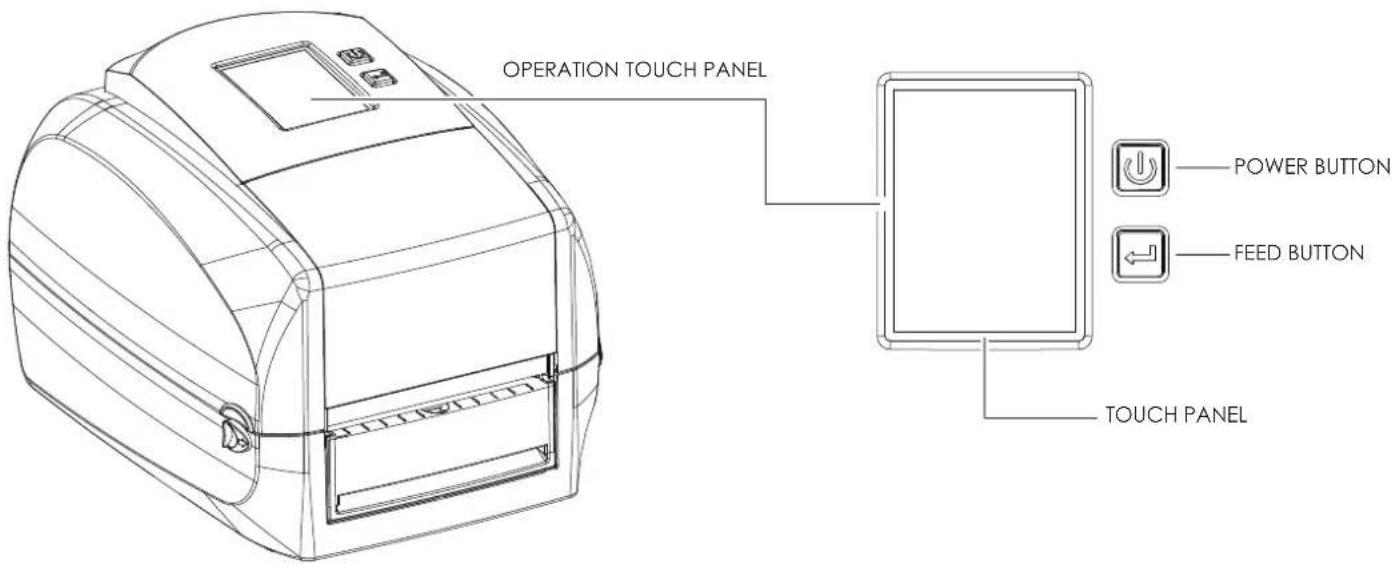
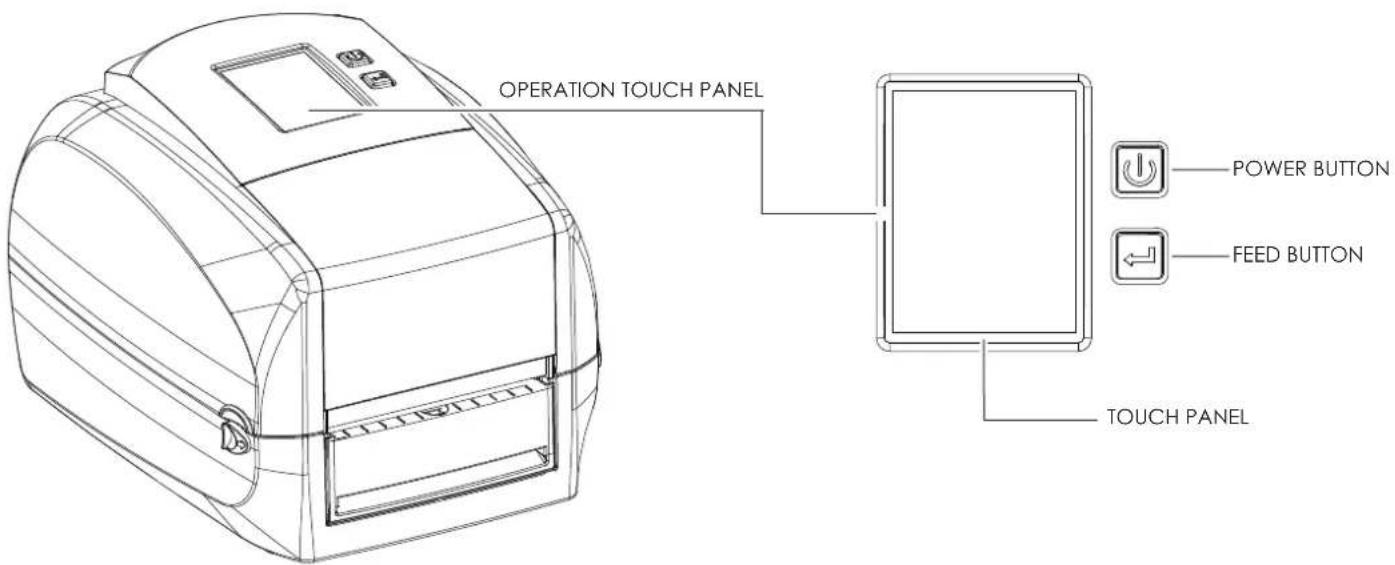
Press the POWER button to turn on the printer, and the START UP SCREEN appears. The printer is on "ready to print" status, the LCD screen should display the message "READY" on the screen.
When printer is turned on, hold and press down the POWER button for 3 second will turn the printer off.
FEED Button
When you press the FEED button, the printer will advance media until the FEED button is released.
If you are using continuous labels, pressing the FEED button will advance a length of media until the button is released.
If you are using media with gaps, pressing the FEED button once will advance only one label.
If the label does not stop at the correct position, you need to run the auto-detection function for your media.
please see Section 3.4 Label Calibration and Self-Test.
PAUSE PRINTING\_FEED Button
Pressing the FEED button during printing will interrupt printing, and the LCD display message "PAUSE...".
When the FEED button is pressed again, the printer resumes printing. Example: While a 10-label print job is running, you press the FEED button to pause the printer. Two of the labels have been printed. To resume printing and print the remaining eight labels, you will need to press the FEED button again.
CANCEL PRINTING\_FEED Button
Press and hold the FEED button for 3 seconds during printing, the current print job will be cancelled.
Example: While a 10-label print job is running, you press the FEED button. Two of the labels have been printed.
The print job is cancelled and the remaining eight labels will not be printed.
3
Printer Setting and Control
3.2 LCD Interface Introduction
Getting Started
Press the POWER button to turn on the printer, and the START UP SCREEN appears.
Power on


GoDEX
Barcodes Made Easy
2.004-140617
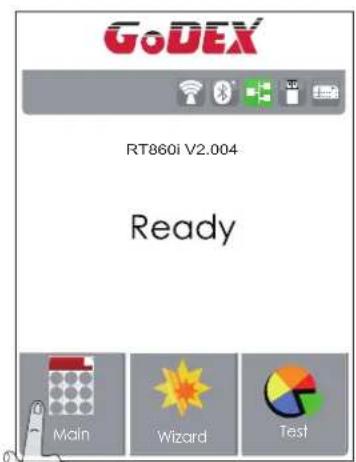
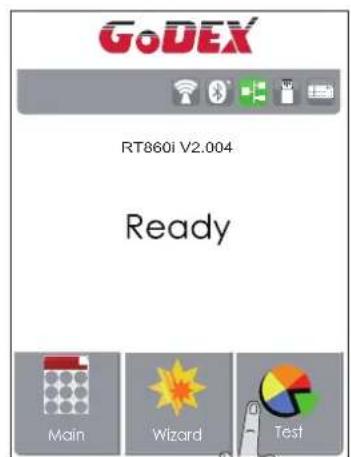
If the printer is on "ready to print" status, the LCD screen should display the message "Ready" on the screen. Use touch gestures to get around the main screen and other screen for setting.

text_image
GoDEX RT860i V2.004 Ready Main Wizard TestTap the screen with your finger when you want to select on screen items such as settings icons.
3
Printer Setting and Control
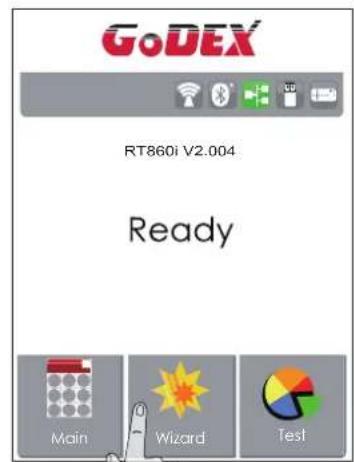
On the Ready Page, three function mode for setting. You can make various setting functions in FUNCTIONAL MODE.
text_image
GoDEX RT860i V2.004- Ready Main Wizard Test▶
text_image
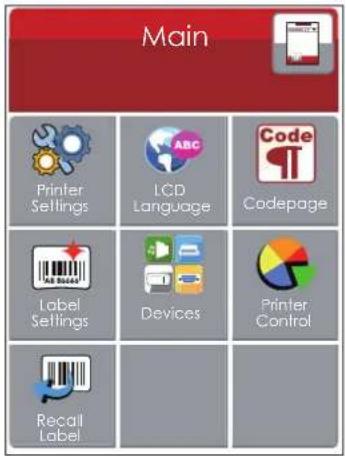
Main Printer Settings LCD Language Codepage Label Settings Devices Printer Control Recall LabelTap''Main''--
Screen could show more detail of "Main"
text_image
GoDEX RT860i V2.004 Ready Main Wizard Test▶
text_image
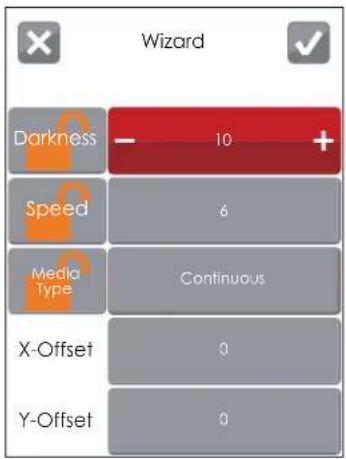
Wizard Darkness - 10 + Speed 6 Media Type Continuous X-Offset 0 Y-Offset 0Tap "Wizard --
Set up printer of "Darkness" "Speed"...
text_image
GoDEX RT860i V2.004 Ready Main Wizard Test▶
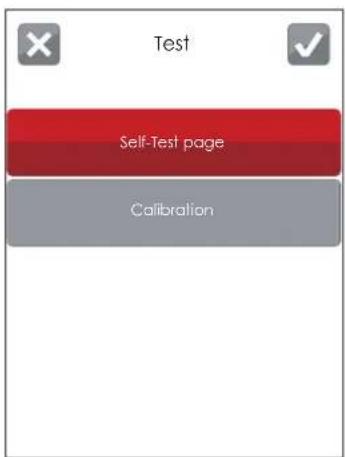
text_image
Test Self-Test page CalibrationTap"Test"--
Self-Test page and Calibration for setting.
3
Printer Setting and Control
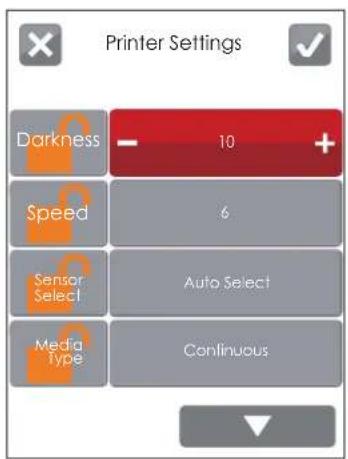
text_image
Printer Settings Darkness - 10 + Speed 6 Sensor Select Auto Select Media Type Continuous
finish setting tap back to Main page do not save, tap system back to Main page and would not save any changes.


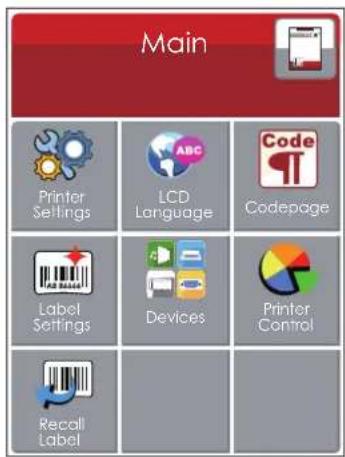
text_image
Main Printer Settings LCD Language Codepage Label Settings Devices Printer Control Recall Label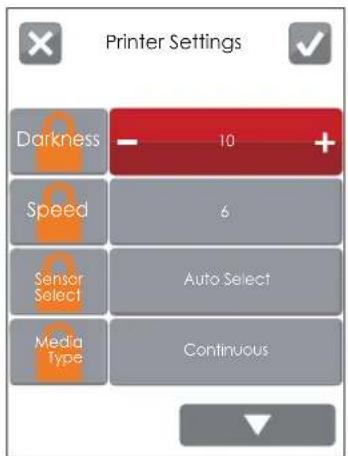
text_image
Printer Settings Darkness - 10 + Speed 6 Sensor Select Auto Select Media Type Continuous
UNLOCK

LOCK

If printer functions locked, printer can not modify settings from GoLabel or any devices.
3
Printer Setting and Control
Keyboard Mode
When plug-in an USB keyboard to the printer, LCD touch panel will display "Enter Standalone", press the "Y" key on keyboard to entering to the dialog for "Keyboard Mode" operation.
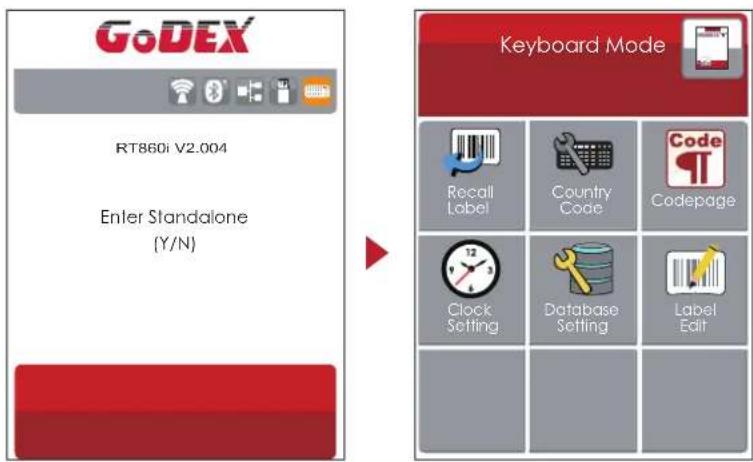
text_image
GoDEX RT860i V2.004 Enter Standalone (Y/N) Keyboard Mode Recall Label Country Code Codepage Clock Setting Database Setting Label EditPreview Label function
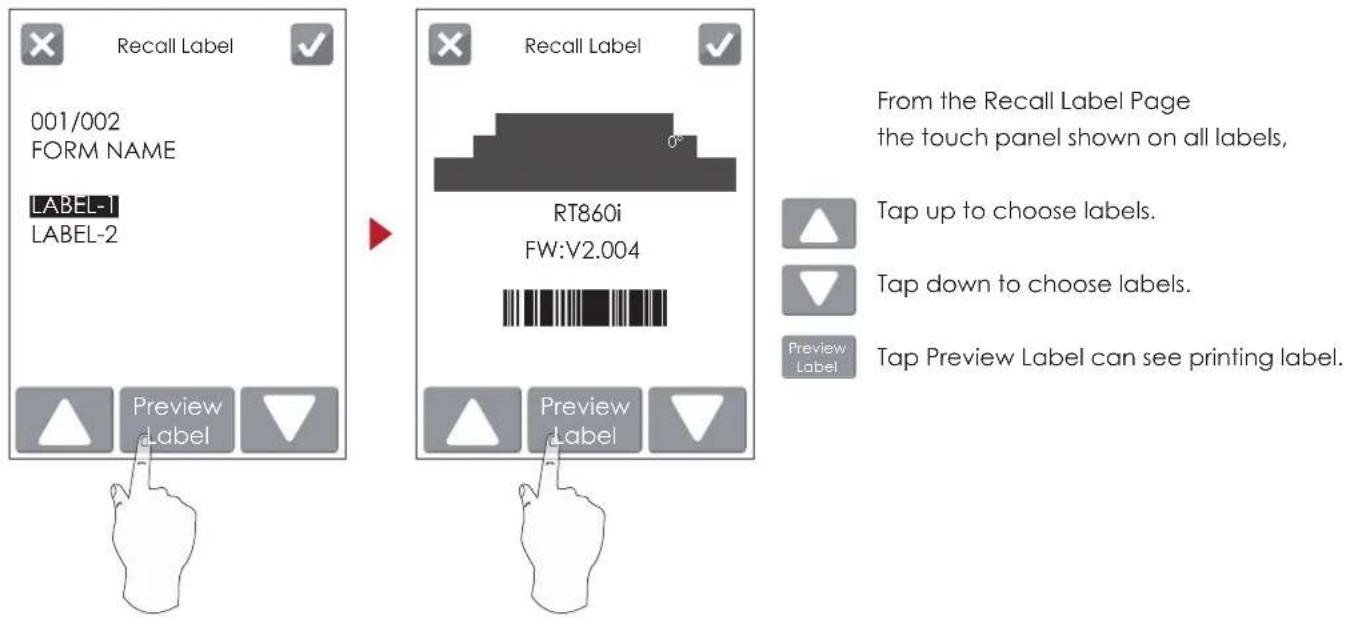
User can choose any labels to preview it before print it.
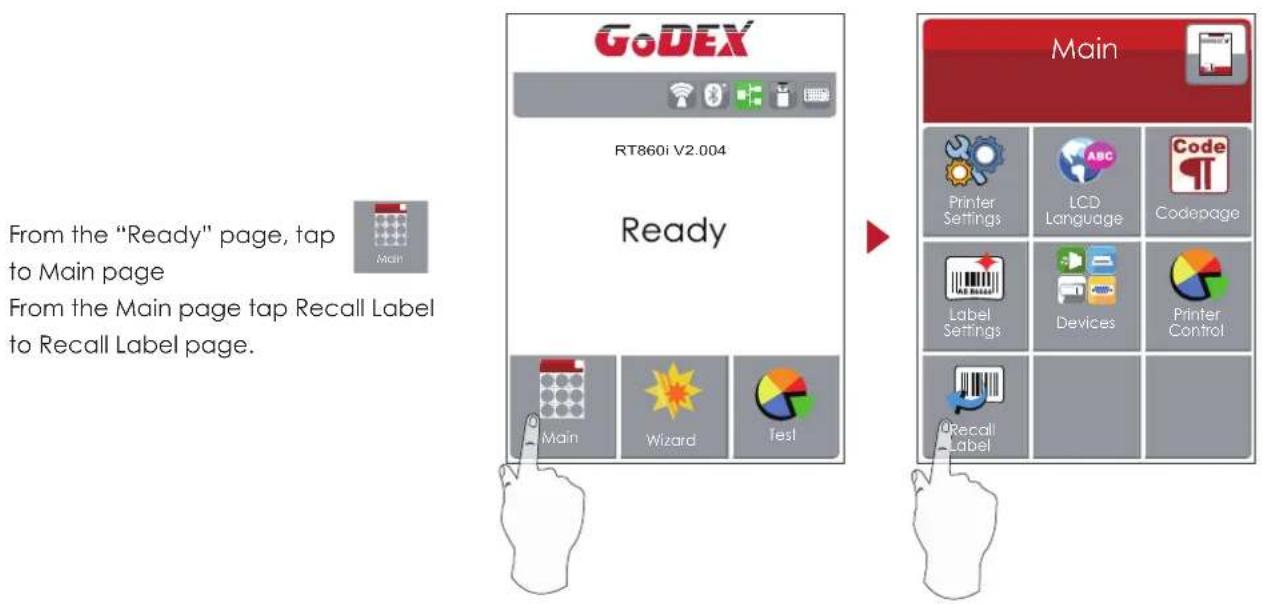
text_image
GoDEX RT860i V2.004 Ready Main Wizard Test From the "Ready" page, tap to Main page From the Main page tap Recall Label to Recall Label page. Main Printer Settings LCD Language Codepage Label Settings Devices Printer Control Recall Label3
Printer Setting and Control
text_image
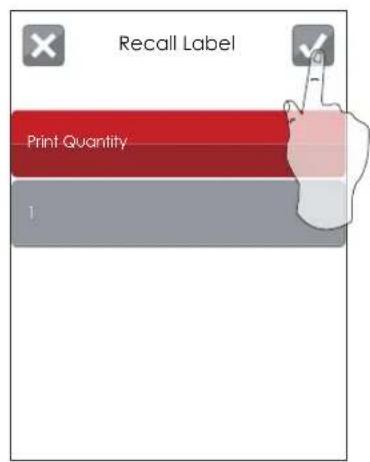
Recall Label 001/002 FORM NAME LABEL-1 LABEL-2 Preview Label From the Recall Label Page the touch panel shown on all labels, RT860i FW:V2.004 Tap up to choose labels. Tap down to choose labels. Preview Label Tap Preview Label can see printing label.Keeping tap √ to next page
text_image
Recall Label Print Quantity 1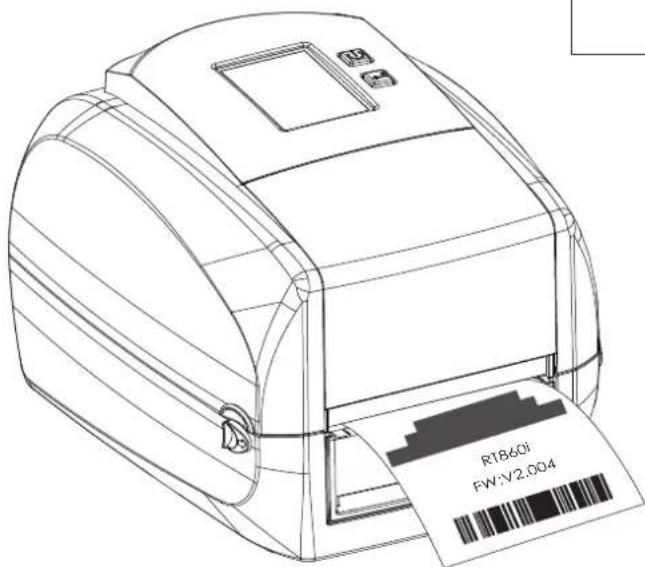
text_image
R1860i FW:V2.004Print out selected label.
3
Printer Setting and Control
3.3 LCD Interface Function
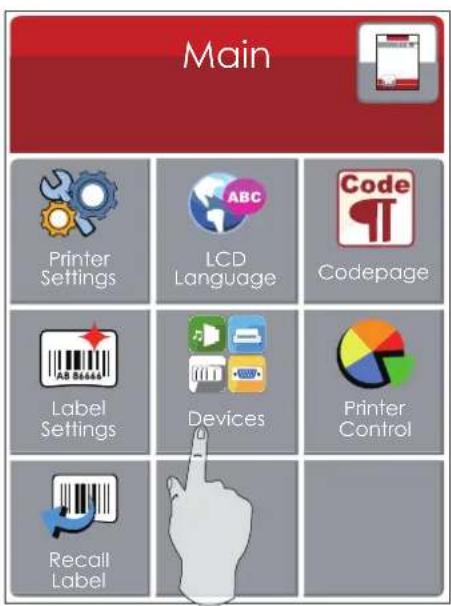
Main Page

text_image
Main Printer Settings LCD Language Codepage Label Settings Devices Printer Control Recall Label


Setting items for printer, ex. Printing speed, darkness. Also includes a Printing Wizard for your ease of printing.
10 languages for printer setting
It consists of a table of values that describes the character set for a particular language
Setting items for printing label, ex. Rotation, Printing position offset
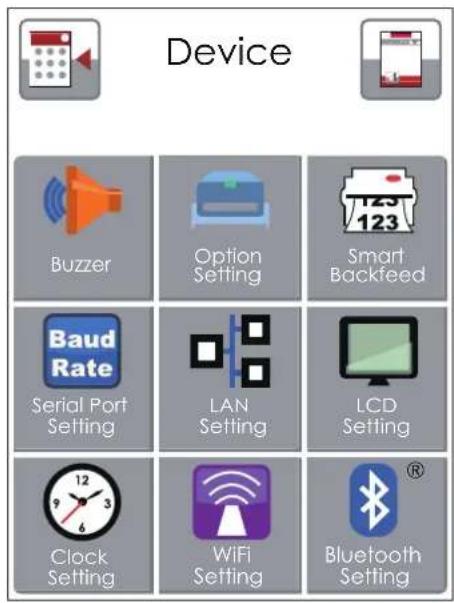
Providing Buzzer, Option Setting, Smart Backfeed, Serial Port Setting, LAN Setting, LCD Setting, Clock Setting, WiFi Setting, and Bluetooth Setting
Self-Diagnose functions for printer, ex. Calibration, Self-Test page and Clear Memory
Recall Label and preview label
Device Page
text_image
Main Printer Settings LCD Language Codepage Label Settings Devices Printer Control Recall Label
text_image
Device Buzzer Option Setting Smart Backfeed Baud Rate Serial Port Setting LAN Setting LCD Setting Clock Setting WiFi Setting Bluetooth Setting


Setting off or on for buzzer
Setting items for options, ex. Cutter, Label Dispenser, Applicator
Setting off or on for Preview Label
Setting items for Serial Port, ex. Baud Rate, Parity, Data Bits, Stop Bits.
Setting items for LAN, ex. DHCP, IP Address, Subnet Mask, Gateway
Setting items for LCD, ex. off or on for Password function, Correction
Setting items for Clock, ex. Year, Month, Day, Hour, Minute and off or on for Visible function
Setting Items in LCD Setting Mode
 | Printer Settings | Darkness | 0-19 |
| Speed | 2-3 | ||
| Sensor Select | Auto Select | ||
| See-Through | |||
| Reflective | |||
| Media Type | Label with Gaps | ||
| Label with Marks | |||
| Continuous | |||
| Printing Mode | Direct Thermal | ||
| Thermal Transfer | |||
| Tear-off Position | 0-40 | ||
| Top of Form | OFF | ||
| FULL | |||
| Door Open Only | |||
| Program Language | Auto | ||
| EZPL | |||
| GEPL | |||
| GZPL | |||
 | LCD Language | English | |
| Deutsch | |||
| Français | |||
| Español | |||
| Italiano | |||
| 簡體中文 | |||
| 繁體中文 | |||
| Türkçe | |||
| 日本語 | |||
| Русский | |||
 | Code Page | 850 | |
| 852 | |||
| 437 | |||
| 860 | |||
| 863 | |||
| 865 | |||
| 857 | |||
| 861 | |||
| 862 | |||
| 855 | |||
| 866 | |||
| 737 | |||
| 851 | |||
| 869 | |||
| Windows 1252 | |||
| Windows 1250 | |||
| Windows 1251 | |||
| Windows 1253 | |||
 | Windows 1254 | ||
| Windows 1255 | |||
| Windows 1257 | |||
| Label Settings | Rotation (0°、90°、180°、270°) | ||
| X-Offset (-100 ~ +100) | |||
| Y-Offset (-100 ~ +100) | |||
| Start Offset (-100 ~ +100) | |||
3
Printer Setting and Control



| Buzzer | OFF | ||
| ON | |||
| Option Setting | None | ||
| Cutter | |||
| Label Dispenser | |||
| Applicator | |||
| Smart Backfeed | OFF | ||
| ON | |||
| Devices | Serial Port Setting | Baud Rate | 4800 |
| 9600 | |||
| 19200 | |||
| 38400 | |||
| 57600 | |||
| 115200 | |||
| Parity | None | ||
| Odd | |||
| Even | |||
| Data Bits | 7 | ||
| 8 | |||
| Stop Bits | 1 | ||
| 2 | |||
| LAN Setting | DHCP | OFF / ON | |
| IP Address | 0.0.0.0 | ||
| Subnet Mask | 255.255.255.0 | ||
| Gateway | 192.168.0.254 | ||
| LCD Setting | Password | OFF / ON | |
| Correction | |||
| Clock Setting | Year | ||
| Month | |||
| Day | |||
| Hour | |||
| Minute | |||
| Visible | OFF / ON | ||
| Printer Control | Test | Configuration | |
| Directory | |||
| TPH Testing | |||
| Dump Mode | |||
| Sample Pattern | Self-Test page / Balance | ||
| Select Memory | Internal / External | ||
| Clear Memory | Label Format | ||
| Graphic | |||
| Bitmap Fonts | |||
| Ture Type Fonts | |||
| Asian Fonts | |||
| ALL | |||
| Calibration | |||
| Reset to Default | |||
| Wizard | Darkness | 0-19 | |
| Speed | 2-3 | ||
| Media Type | Label with Gaps | ||
| Label with Marks | |||
| Continuous | |||
| X-Offset | -100 ~ +100 | ||
| Y-Offset | -100 ~ +100 | ||
3
Printer Setting and Control
Status of LCD Interface
When printer is on standby status (ready to print), the LCD interface will display "Ready" on screen. You can only print when you see the "Ready" status.
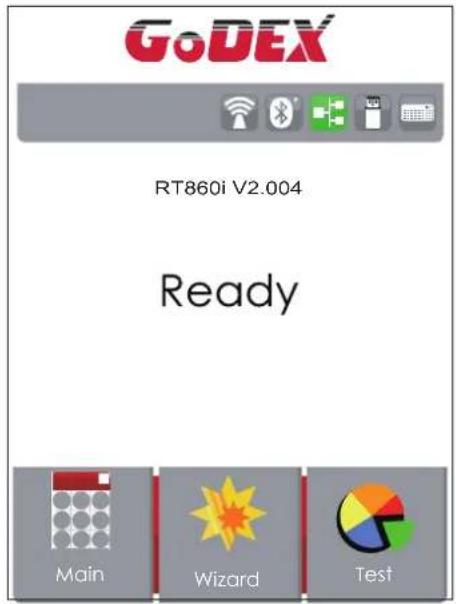
text_image
GoDEX RT860i V2.004 Ready Main Wizard TestIf there is any printers error, the LCD screen will display the error screen to show the type of error. You can fix the error according the notice or contact the supplier.
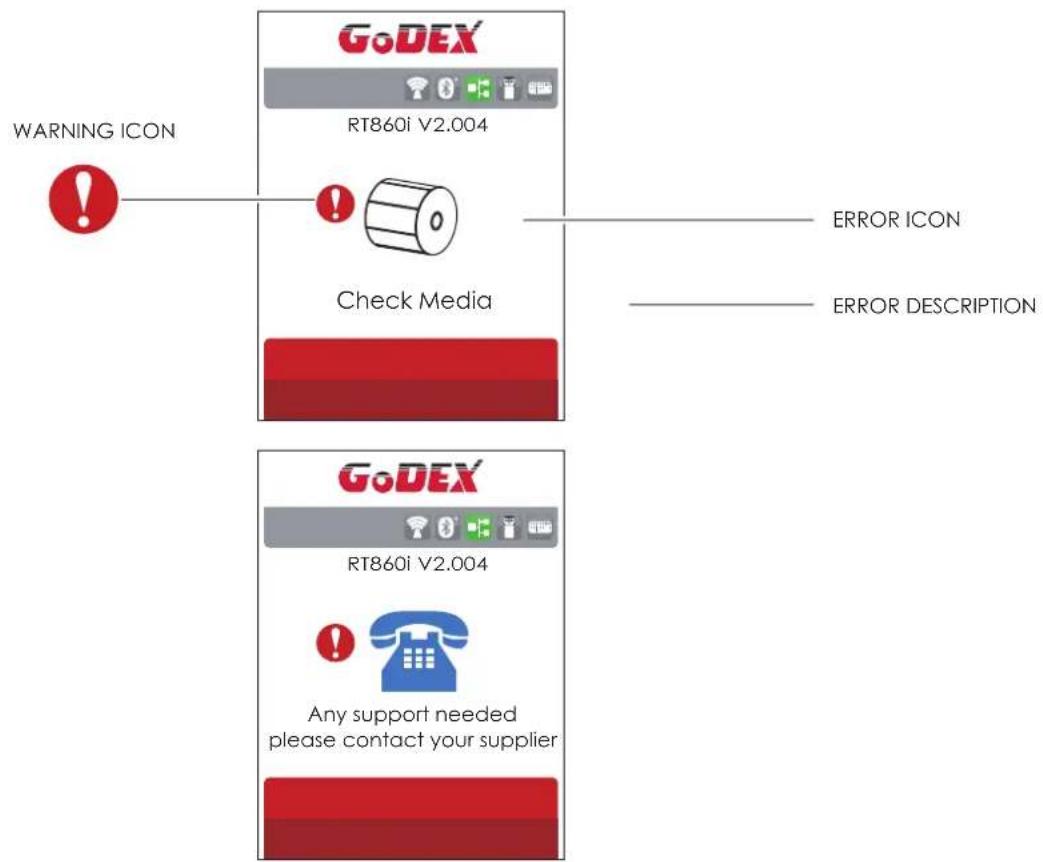
text_image
WARNING ICON GoDEX RT860i V2.004 Check Media ERROR ICON ERROR DESCRIPTION GoDEX RT860i V2.004 Any support needed please contact your supplier3 Printer Setting and Control
3.4 Label Calibration and Self Test
Label Calibration
The printer can automatically detect and store label height.
That means the host computer does not need to transmit the label height to the printer.
Self Test
Self-test function lets you check whether the printer is functioning normally.
Here is how you run the label size calibration and self test.
- Check that the label stock is loaded correctly.
- urn off the printer and pressing the FEED button.
-
Turn the printer on again, keeping the FEED button pressed. When the LED starts to flash red, release the FEED button. The printer will now measure the label stock and store the label height.
-
Once the printer has successfully measured the label stock, it will print a self-test label.
The contents of a self-test printout are listed below.
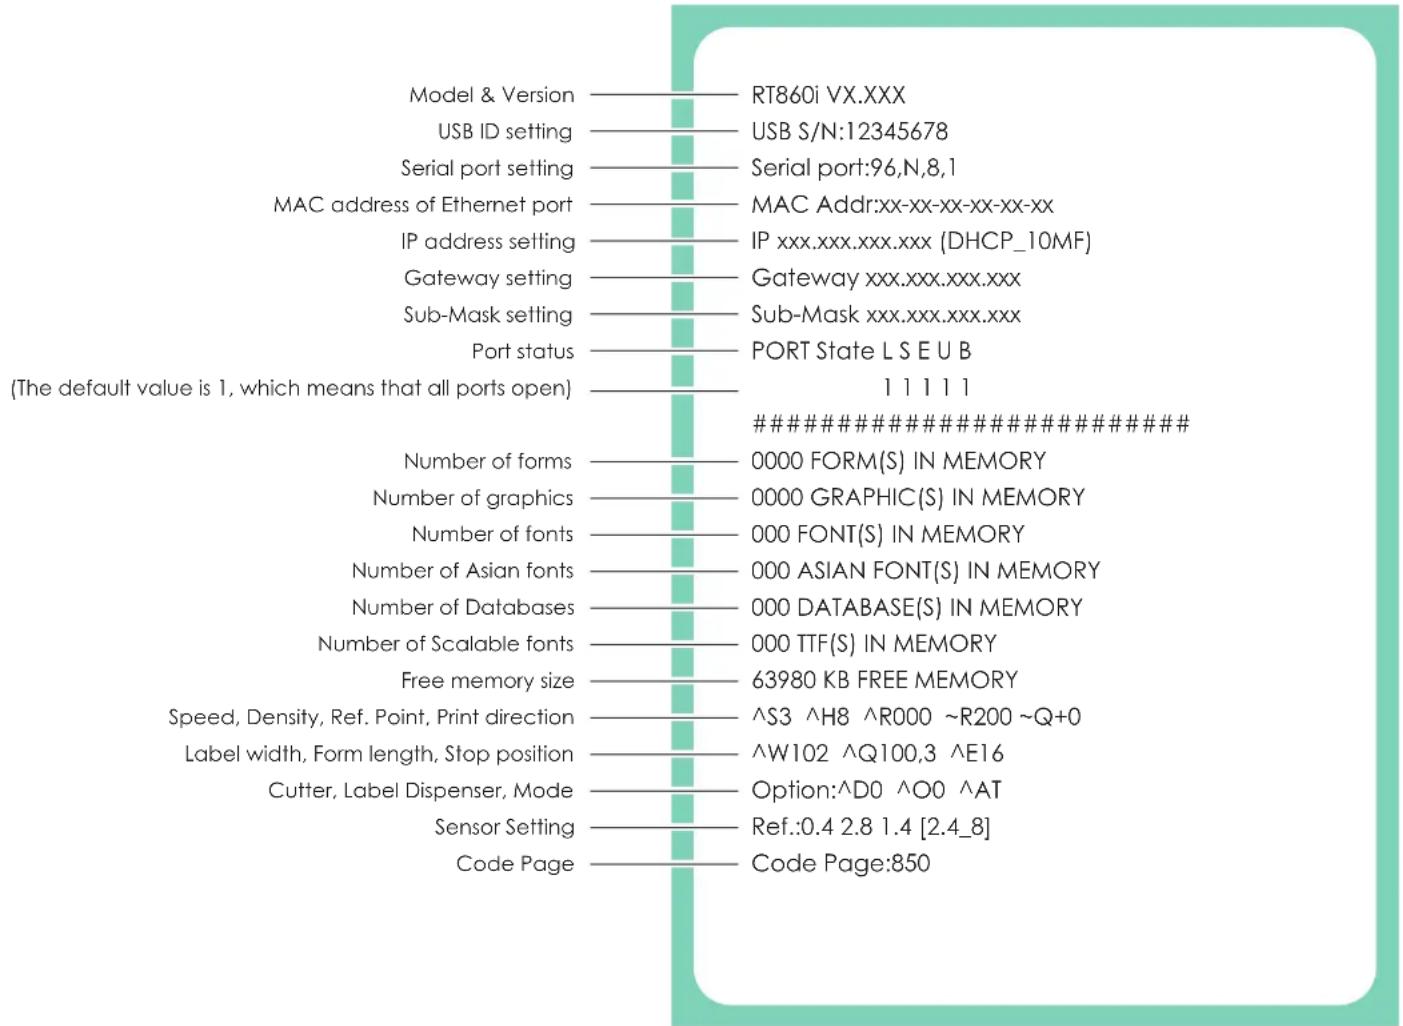
text_image
Model & Version USB ID setting Serial port setting MAC address of Ethernet port IP address setting Gateway setting Sub-Mask setting Port status (The default value is 1, which means that all ports open) RT860i VX.XXX USB S/N:12345678 Serial port:96,N,8,1 MAC Addr:xx-xx-xx-xx-xx-xx IP xxx.xxx.xxx.xxx (DHCP_10MF) Gateway xxx.xxx.xxx.xxx Sub-Mask xxx.xxx.xxx.xxx PORT State L S E U B 1 1 1 1 1 ########### Number of forms Number of graphics Number of fonts Number of Asian fonts Number of Databases Number of Scalable fonts Free memory size Speed, Density, Ref. Point, Print direction Label width, Form length, Stop position Cutter, Label Dispenser, Mode Sensor Setting Code Page ########### 0000 FORM(S) IN MEMORY 0000 GRAPHIC(S) IN MEMORY 000 FONT(S) IN MEMORY 000 ASIAN FONT(S) IN MEMORY 000 DATABASE(S) IN MEMORY 000 TTF(S) IN MEMORY 63980 KB FREE MEMORY ^S3 ^H8 ^R000 ~R200 ~Q+0 ^W102 ^Q100,3 ^E16 Option:^D0 ^O0 ^AT Ref.:0.4 2.8 1.4 [2.4_8] Code Page:8503
Printer Setting and Control
Label Calibration Button
A hardware button to make a Label Calibration while printer encountering "Media Error" during the cases when first-time printer start up or change label to another type, such as change using gap label to continuous or black mark labels.
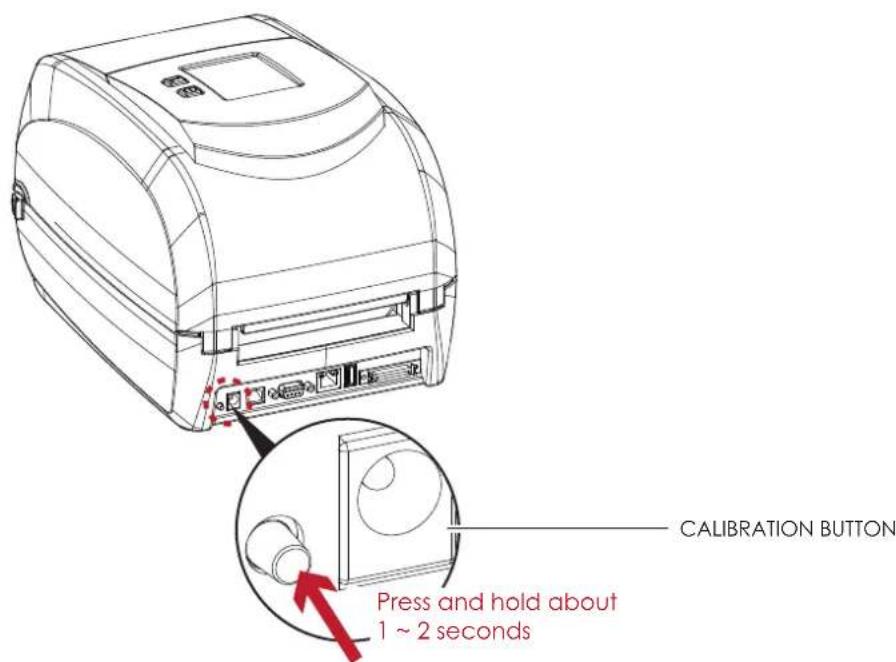
text_image
CALIBRATION BUTTON Press and hold about 1 ~ 2 secondsPress Calibration button for 1 \~ 2 seconds, it will make an auto-sensing to calibrate the label's parameters.
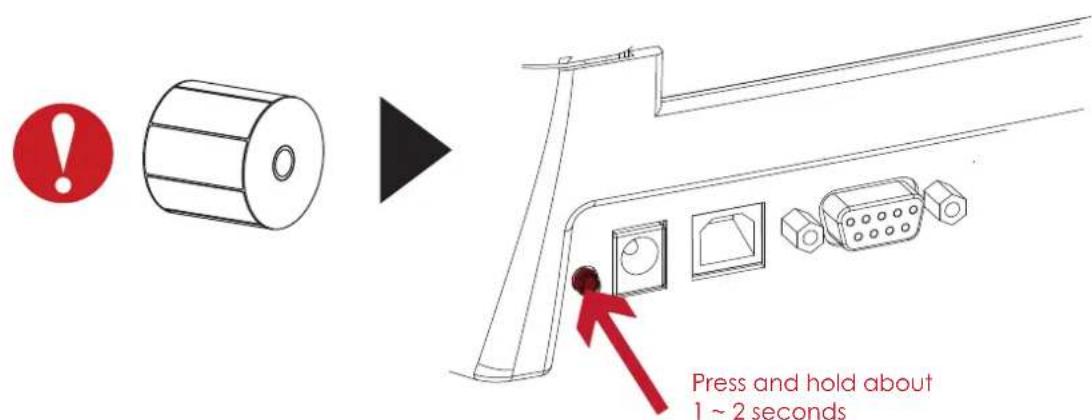
text_image
Press and hold about 1 ~ 2 secondsNote
* Press Calibration button is equivalent to the auto-sensing command "'\~S,SENSOR"' that will cancel on-printing-job and make the Label Calibration immediately.
3
Printer Setting and Control
3.5 Error Alerts
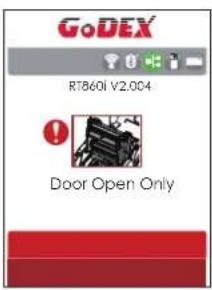
In the event of a problem that prevents normal functioning of the printer, you will see an error message on LCD screen and hear some beep signals. Please refer to below table for the error alerts.
Operation Panel Status
text_image
GoDEX RT860i V2.004 ! Door Open Only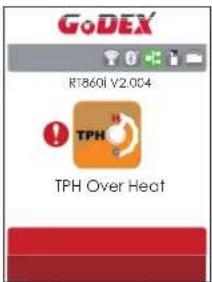
text_image
GoDEX R1860I V2.004 TPH TPH Over Heat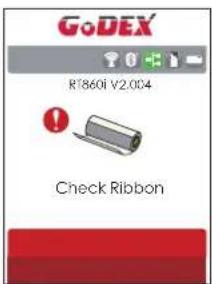
text_image
GoDEX RT860i V2.004 Check Ribbon| Type Beeps | Description Solution | ||
| Door Open Only | 2 x 4 beeps | The printing mechanism is not correctly closed. | Open the print mechanism and close it again. |
| TPH Over Heat None | High temperature at the print head. | Once the print head has cooled down, the printer switches to standby mode. | |
| Media Error 2 x 3 beeps | No ribbon is installed and the printer displays an error. | Make sure that the printer is set to direct thermal printing mode. | |
| The ribbon is finished or the label supply hub is not moving. | Replace the ribbon roll. |
3
Printer Setting and Control
| Operation Panel Status | Satus Beeps Description Solution | ||
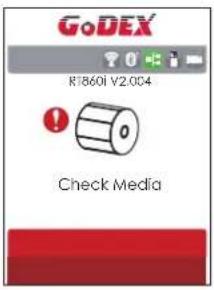 | Media Error 2 x 2 beeps | No paper is detected. | Make sure that the label sensor is positioned correctly. If the sensor still does not detect the paper, run the auto-detection function again. |
| Paper is finished. | Replace the label roll. | ||
| Printer feed problem. | Possible reasons: the print medium has become trapped around the rubber roll; the sensor cannot detect a gap or black mark between the labels; there is no paper. Please reset the sensor. | ||
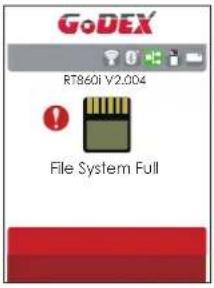 | File Error 2 x 2 beeps | The memory is full. The printer prints the message "File System full". | Delete unnecessary data or install additional memory. |
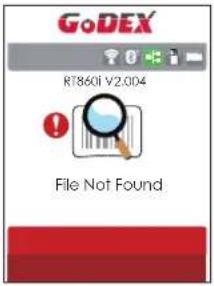 | Unable to find file. The printer prints the message "File not found" | Use the "~X4" command to print all files. Then check whether the files exist and whether the names are correct. | |
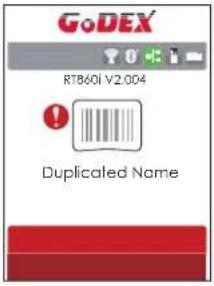 | A file of the same name already exists. The printer prints the message "Duplicated Name". | Change the name of the file and try storing it again. | |
3 Printer Setting and Control
3.6 USB Host
Definition : USB Host port supports either device : USB memory stick, USB keyboard or scanner.
Purpose
- USB memory stick: It extends the user memory space for Graphic, Font, Label Format, DBF and Command files downloading. The printer's Firmware also can be updating if copy new version of Firmware into USB memory stick.
- Connecting an USB keyboard to printer for "Keyboard Mode" mode operation.
- Plug-in an USB scanner to operate the printer in "Keyboard Mode".
Usage of Extended Memory
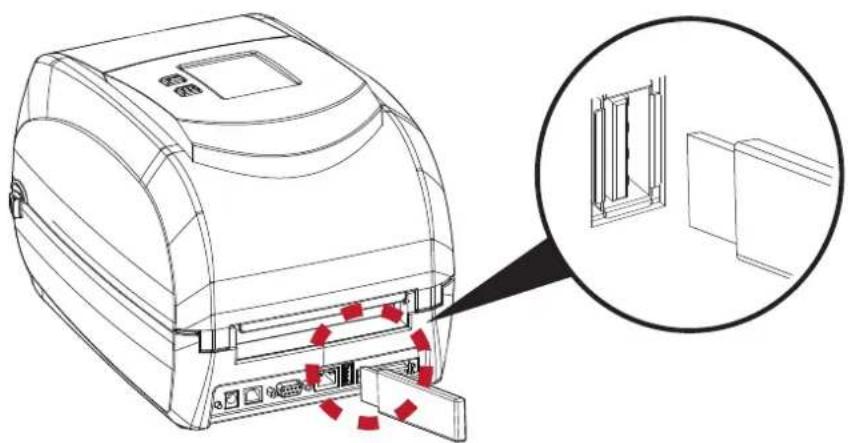
- USB memory stick : It supports hot-plugging function; printer will create a Folder “\LABELDIR” and switch “User Flash” to “Extended Memory” automatically while user plugs an USB memory stick into a GoDEX printer.
- Connect USB with the printer; To connect PC and printer through USB.
natural_image
Technical line drawing of a scanner device with red arrows indicating ports, shown with an inset magnified view of its internal structure (no text or symbols present)Usage of Firmware Update
- Remove USB memory stick from printer and plug-in it to a PC's USB port.
- Copy a new version of Firmware "xxxx.bin" to the Folder "\LABELDIR\FW"
- Remove USB from PC and plug-in back to the printer. The printer will update the Firmware automatically
- The "\ LABELDIR \ FW" directory allows only one file exists, if there are multiple files, the files will be confused.
- Don't remove the USB memory stick out while it's under updating with "Flash Writing..." message that displays on LCD panel.
3
Printer Setting and Control
USB Keyboard
- When plug-in an USB keyboard to the printer, LCD touch panel will display "Enter Standalone", press the "Y" key on keyboard to entering "Keyboard Mode" operation. Under this model can perform "Recall Label", set "Country Code", "Code Page", "Clock Setting", "Database Setting" and "Label Edit".
- Connect a USB keyboard to the printer, if not into the keyboard mode, press the "N" key to leave. Into Standalone mode of operation, to leave the Standalone operation, press "ESC" key to exit.
- After leaving the keyboard mode, for re-entry, press the keyboard "F1" key or reboot, you can follow the steps in the first step choose whether or not (Y / N) into the keyboard mode.
Scanner
- When plug-in an USB scanner to the printer, LCD touch panel will display "Enter Standalone", tap the "Feed" Key to entering "Keyboard Mode" operation.
Note
* The USB Host port on printer is not support "USB HUB" function.
* The USB Memory Stick supports with "FAT32" Disk Format and up to 32GB only. The certified vendors are Transcend, Apacer, ADATA, Patriot, Consair and Kingston.
* The USB Memory Stick only supports download through the printer, On a PC, user may copy entire folder "\LABELDIR" from USB memory stick to PC or vice-versa. Can not copy the data to USB Memory Stick via PC individually.
* External USB Host port is for power 500mA, is not recommended as electronics charging use.
4
NetSetting for Ethernet
4.1 Installing the NetSetting software
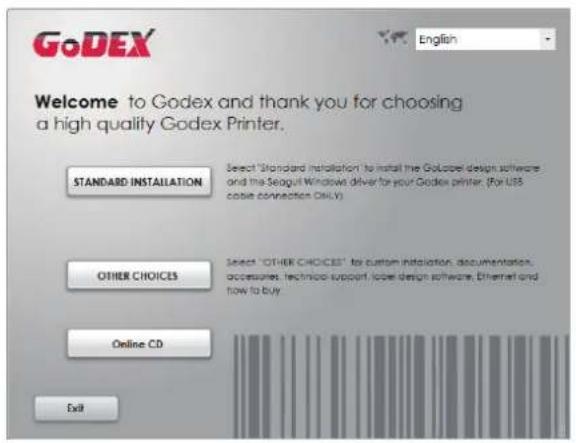
The NetSetting software is used to manage the network configurations when connecting the printer via Ethernet port. It is available on product CD or can be downloaded from official website. To install the NetSetting, please follow below steps.
- Insert the product CD in the CD/DVD drive, and click "OTHER CHOICES" button.
- Select "ETHERNET".
text_image
GoDEX English Welcome to Godex and thank you for choosing a high quality Godex Printer. STANDARD INSTALLATION Select "Standard Installation" to install the GoBoxel design software and the Seagull Windows driver for your Godex printer. (for USB code connection ONLY) OTHER CHOICES Select "OTHER CHOICES" for custom installation, documentation, accessories, technical support, laptop design software, Ethernet and how to buy Online CD Exit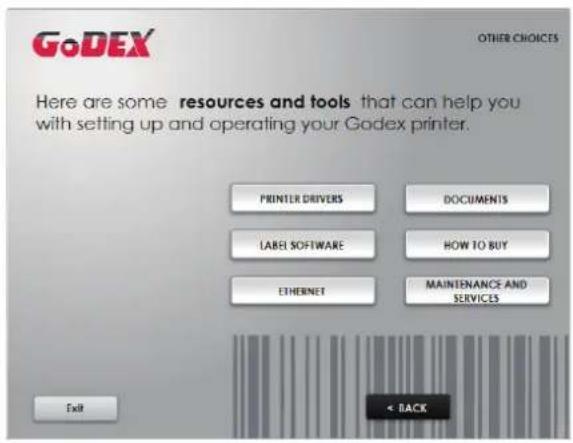
text_image
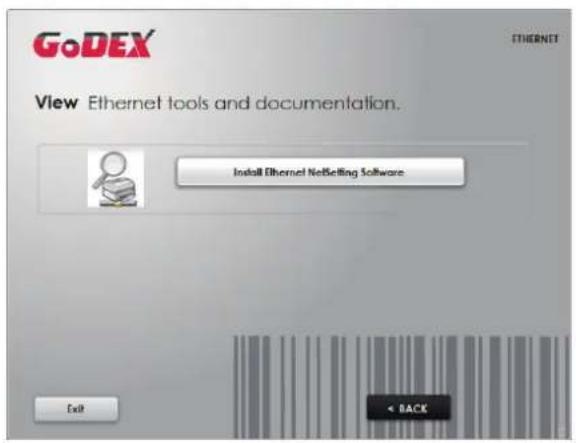
GoDEX OTHER CHOICES Here are some resources and tools that can help you with setting up and operating your Godex printer. PRINTER DRIVERS DOCUMENTS LABEL SOFTWARE HOW TO BUY ETHERNET MAINTENANCE AND SERVICES Exit < BACK- Click "Install Ethernet NetSetting Software", installation screen as right diagram, click "Next".
text_image
GoDEX View Ethernet tools and documentation. Install Ethernet NetBetting Software Exit ← BACK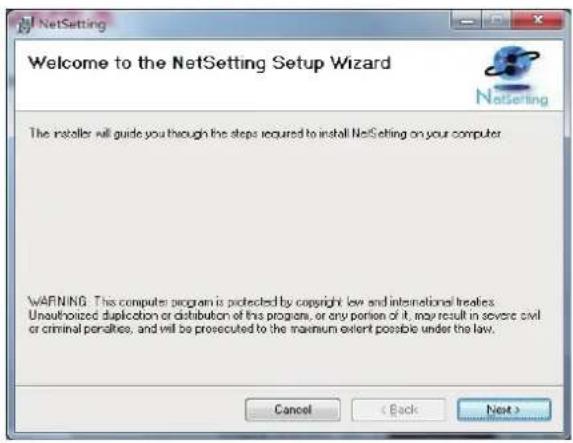
text_image
Welcome to the NetSetting Setup Wizard The installer will guide you through the steps required to install NetSetting on your computer. WARNING: This computer program is protected by copyright law and international treaties. Unauthorized duplication or distribution of this program, or any portion of it, may result in severe civil or criminal penalties, and will be prosecuted to the maximum extent possible under the law. Cancel (C back Next >- Specify the "Installation Folder", then click "Next" to installing.
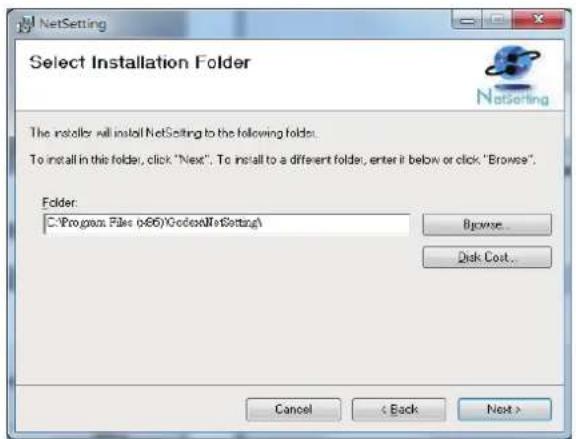
text_image
Select Installation Folder The installer will install NetSetting to the following folder. To install in this folder, click "Next". To install to a different folder, enter it below or click "Browse". Folder: C:\Program Files (0.66)\CodeNetSetting\ Browse... Disk Cost... Cancel < Back Next >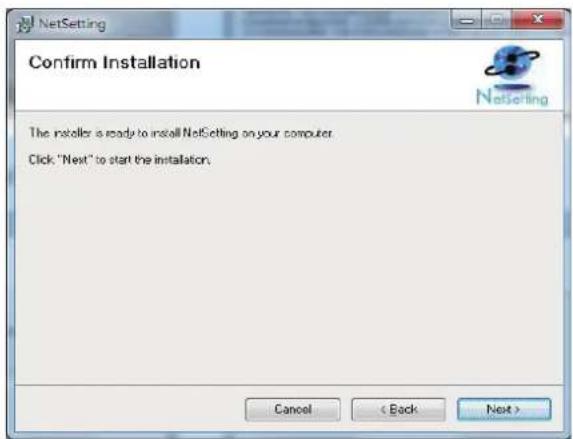
text_image
Confirm Installation The installer is ready to install NetSetting on your computer. Click "Next" to start the installation.4
NetSetting for Ethernet
- Once the installation is completed, you will see the NetSetting icon on your desktop as right diagram.
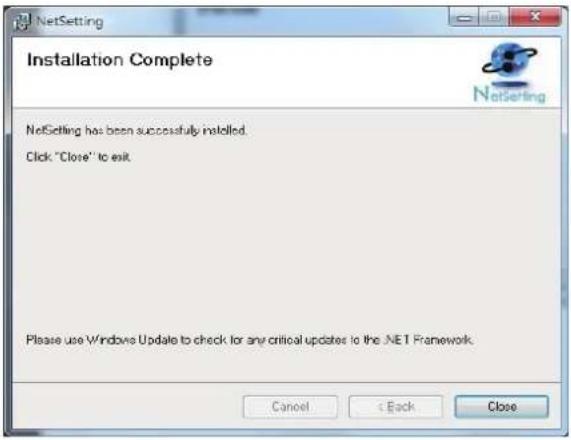
text_image
Installation Complete NetSetting has been successfully installed. Click "Close" to exit Please use Windows Update to check for any critical updates to the .NET Framework. Cancel C+Back Close
4
NetSetting for Ethernet
4.2 The Interface of NetSetting
GoDEX printer can also be used through a network connection (as a remote network printer), make sure the printer connected to the Internet and the power cord, you can use the Interface of NetSetting to search connected network printers.
- Click the NetSetting icon to start the program, you will see the start page as left diagram. Click the magnifier icon to search the Godex printers which are connected via Ethernet port in your network environment (as right diagram).
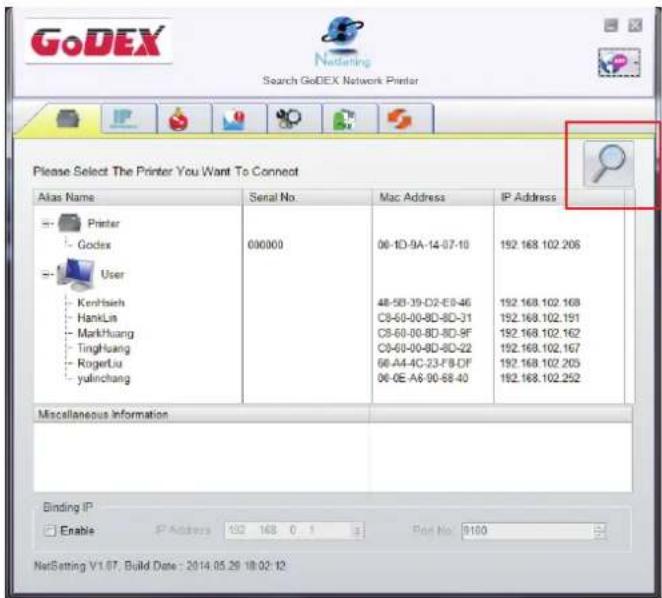
text_image
GoDEX Search GoDEX Network Printer Please Select The Printer You Want To Connect Alias Name Printer Godex User Kenhsieh HankLiu Markhuang TingHuang RogerJiu yulinchang Serial No. 000000 Mac Address 06-10-9A-14-07-10 48-58-39-D2-E9-46 C8-60-00-8D-8D-31 C8-60-00-8D-8D-9F C8-60-00-8D-8D-22 66-A4-4C-23-F8-DF 06-0E-A6-90-68-40 IP Address 192.168.102.206 192.168.102.168 192.168.102.191 192.168.102.162 192.168.102.167 192.168.102.205 192.168.102.252 Miscellaneous Information Binding IP Enable IP Address 192 168 0 1 3 Post No: 9100 NetSetting V1.07, Build Date : 2014.05.29 18:02:12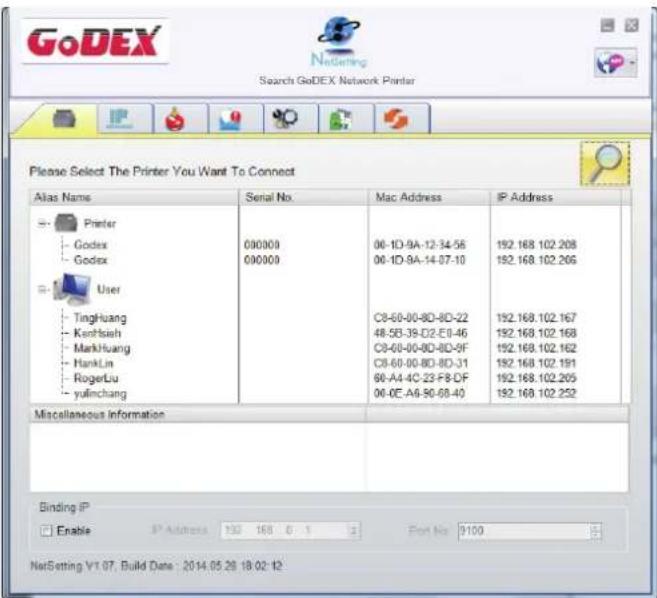
text_image
GoDEX Search GoDEX Network Printer Please Select The Printer You Want To Connect Alias Name Serial No. Mac Address IP Address Printer Godex 000000 06-1D-9A-12-34-56 192.168.102.208 Godex 000000 06-1D-9A-14-07-10 192.168.102.206 User TingHuang C8-60-00-8D-8D-22 192.168.102.167 KenHsieh 48-5E-38-D2-EI-46 192.168.102.168 MarkHuang C8-60-00-8D-8D-9F 192.168.102.162 HankLin C8-60-00-8D-8D-J1 192.168.102.191 RogerLiu 60-A4-4C-23-F8-DF 192.168.102.205 yulinchang 06-0E-A6-56-58-40 192.168.102.252 Miscellaneous Information Binding IP Enable IP Address 132 168 0 1 2 Port No: 9100 NetSetting VY 07, Build Date : 2014.05.28 18:02:42- There are six tabs on the top of interface which can configure different types of network settings. But for the data security reason, you need correct password to enter the configuration pages.
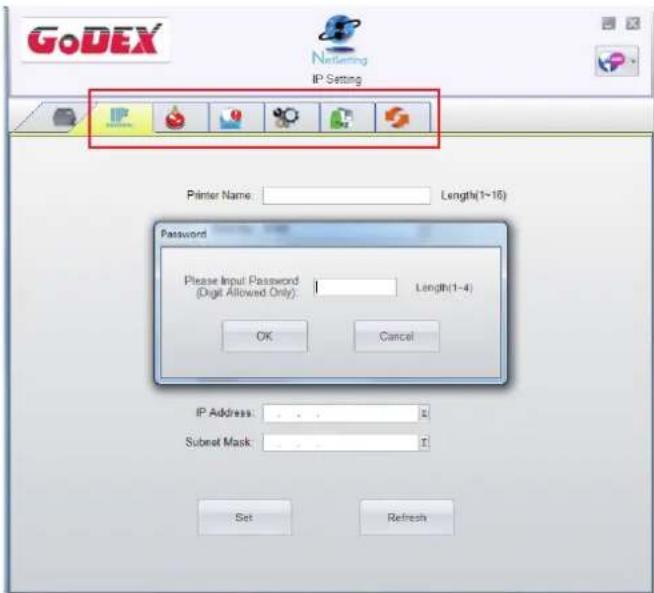
text_image
GoDEX Netting IP Setting Printer Name: Length(1~16) Password Please Input Password (Digit Allowed Only): Length(1-4) OK Cancel IP Address: 1 Submit Mask: 1 Set RefreshNote
* The default password is "1111", you can change the password later from the "IP Setting" tab.
4
NetSetting for Ethernet
IP Setting
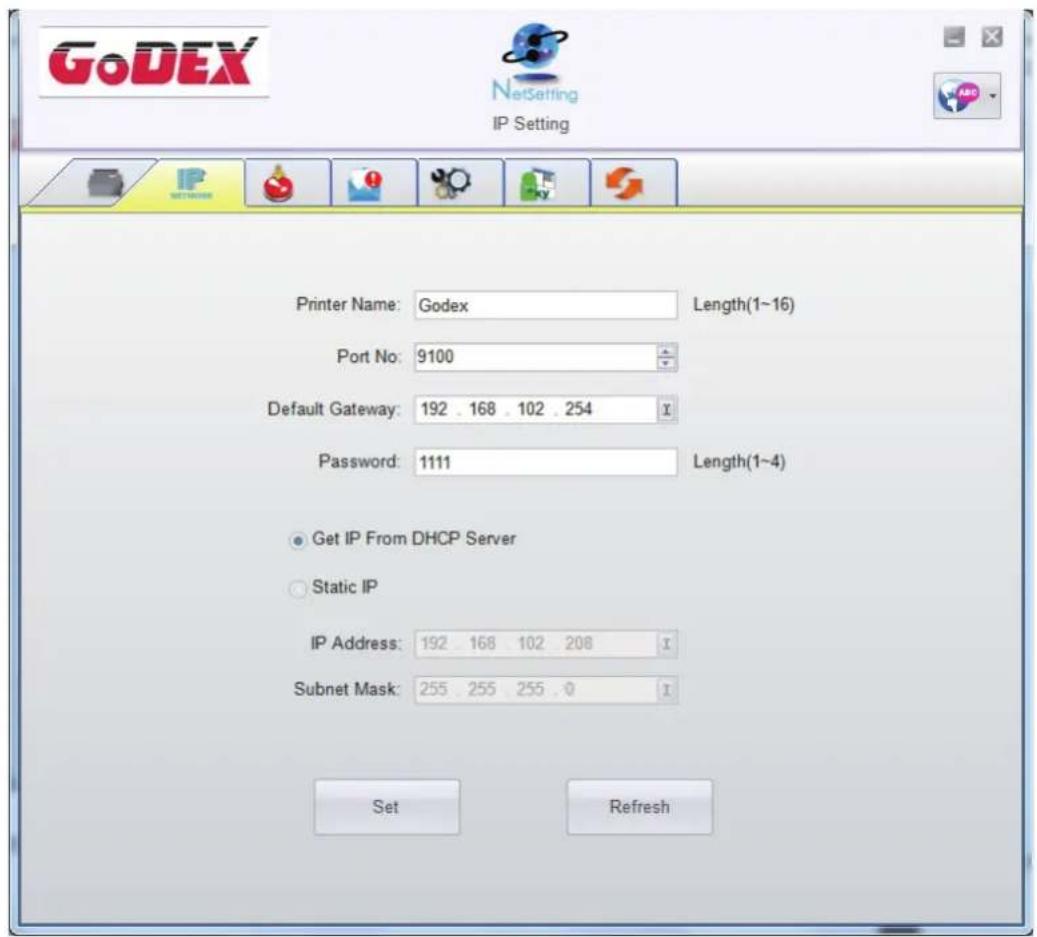
The IP Setting tab can change the printer name, Port number, Gateway setting and the password for configuring theprinter. You can also set the printer's IP address ether by DHCP or by Static IP.
text_image
GoDEX NetSetting IP Setting Printer Name: Godex Length(1~16) Port No: 9100 Default Gateway: 192 . 168 . 102 . 254 Password: 1111 Length(1~4) Get IP From DHCP Server Static IP IP Address: 192 . 168 . 102 . 208 Subnet Mask: 255 . 255 . 255 . 0 Set RefreshYou can press "Set" button to apply the settings and "ReGet" button to refresh the setting values.
4
NetSetting for Ethernet
Alert Path Setting
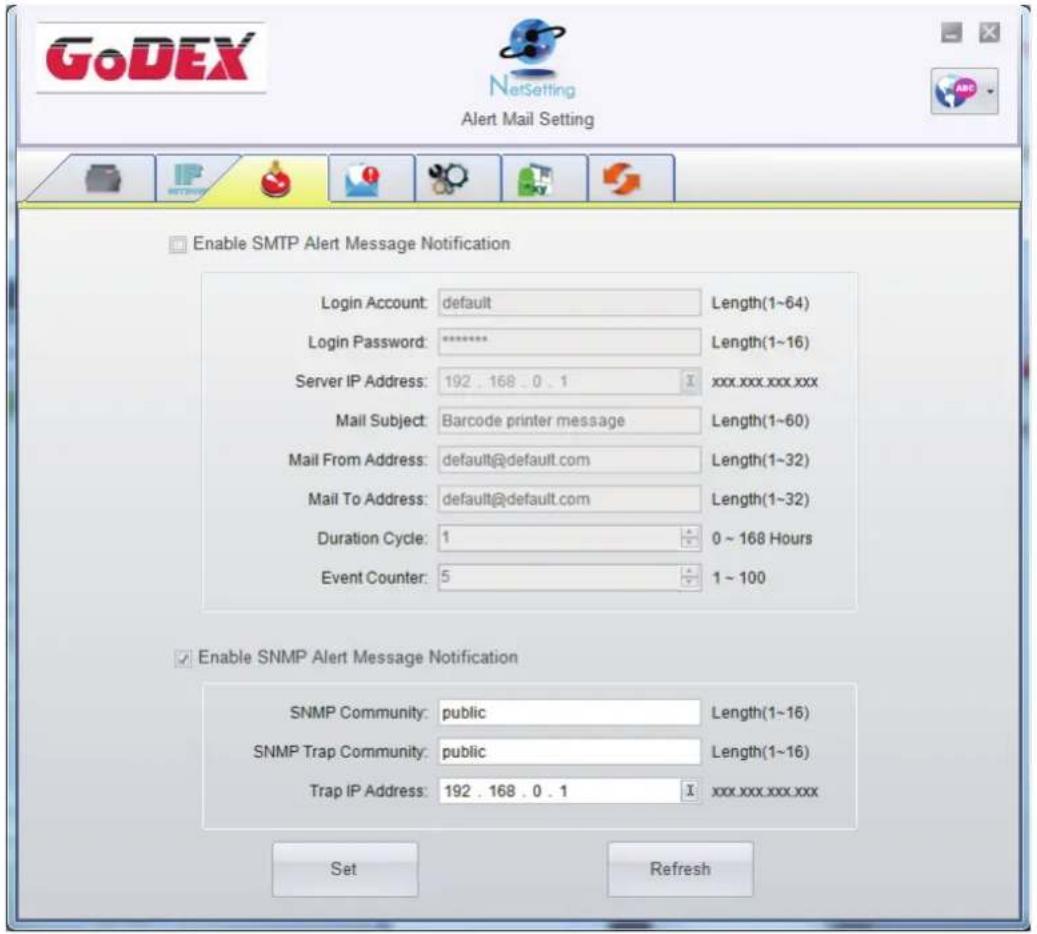
NetSetting will send the alert messages to designated mail account when the error happened on printer. The alertmessages are sent by SMTP (Simple Mail Transfer Protocol) or SNMP (Simple Network Management Protocol). You can set or change the configurations of SMTP and SNMP on this "Alert Path Setting" tab.
text_image
GoDEX NetSetting Alert Mail Setting Enable SMTP Alert Message Notification Login Account: default Length(1~64) Login Password: ******** Length(1~16) Server IP Address: 192 . 168 . 0 . 1 xxx.xxx.xxx.xxx Mail Subject: Barcode printer message Length(1~60) Mail From Address: default@default.com Length(1~32) Mail To Address: default@default.com Length(1~32) Duration Cycle: 1 0 ~ 168 Hours Event Counter: 5 1 ~ 100 Enable SNMP Alert Message Notification SNMP Community: public Length(1~16) SNMP Trap Community: public Length(1~16) Trap IP Address: 192 . 168 . 0 . 1 xxx.xxx.xxx.xxx Set RefreshYou can press "Set" button to apply the settings and "ReGet" button to refresh the setting values.
4
NetSetting for Ethernet
Alert Message Setting
For the alert message notification function, you can decide which error cases need to be sent out to the operator. Moreover, the alert messages can be set to be sent by SMTP, SNMP or both.
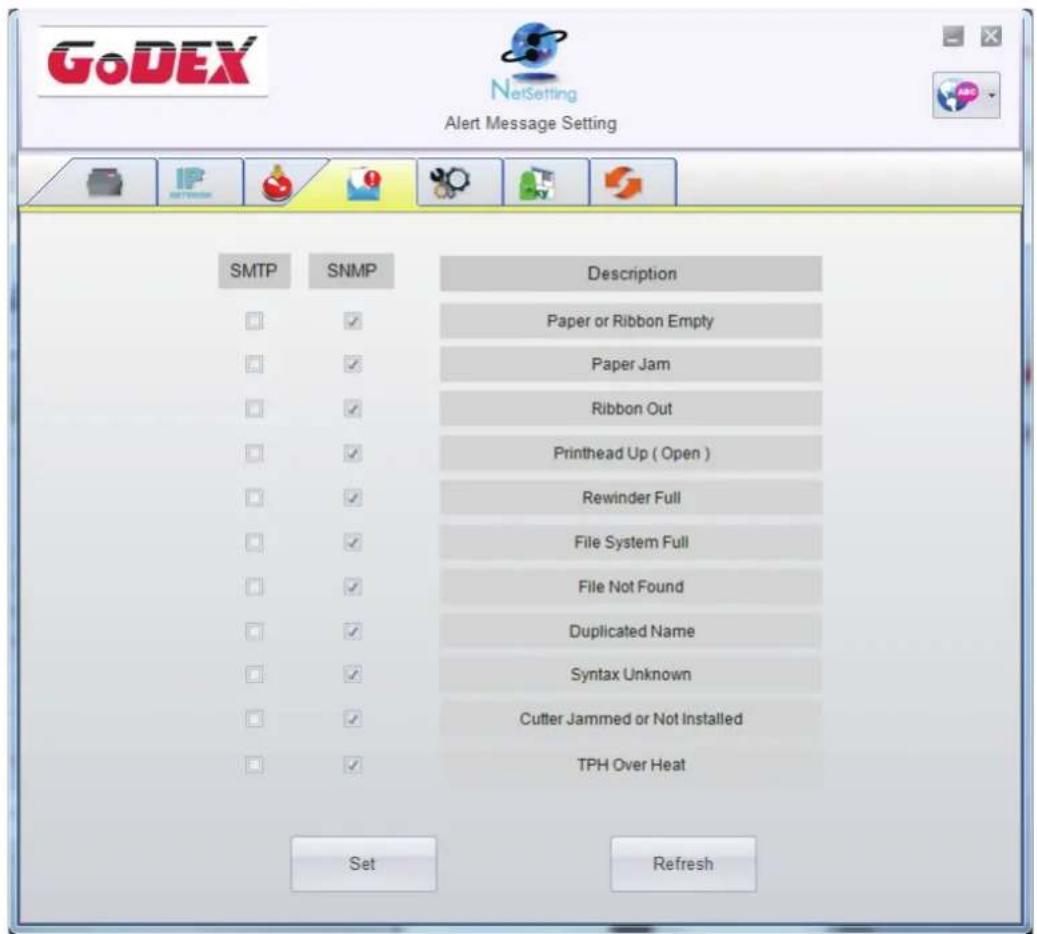
text_image
GoDEX NetSetting Alert Message Setting SMTP SNMP Description □ ✓ Paper or Ribbon Empty □ ✓ Paper Jam □ ✓ Ribbon Out □ ✓ Printhead Up ( Open ) □ ✓ Rewinder Full □ ✓ File System Full □ ✓ File Not Found □ ✓ Duplicated Name □ ✓ Syntax Unknown □ ✓ Cutter Jammed or Not Installed □ ✓ TPH Over Heat Set RefreshYou can press "Set" button to apply the settings and "ReGet" button to refresh the setting values.
4
NetSetting for Ethernet
Printer Configuration
Set or change the configurations of connected printer. Most of key settings for the printer operation can be done by this setting page.
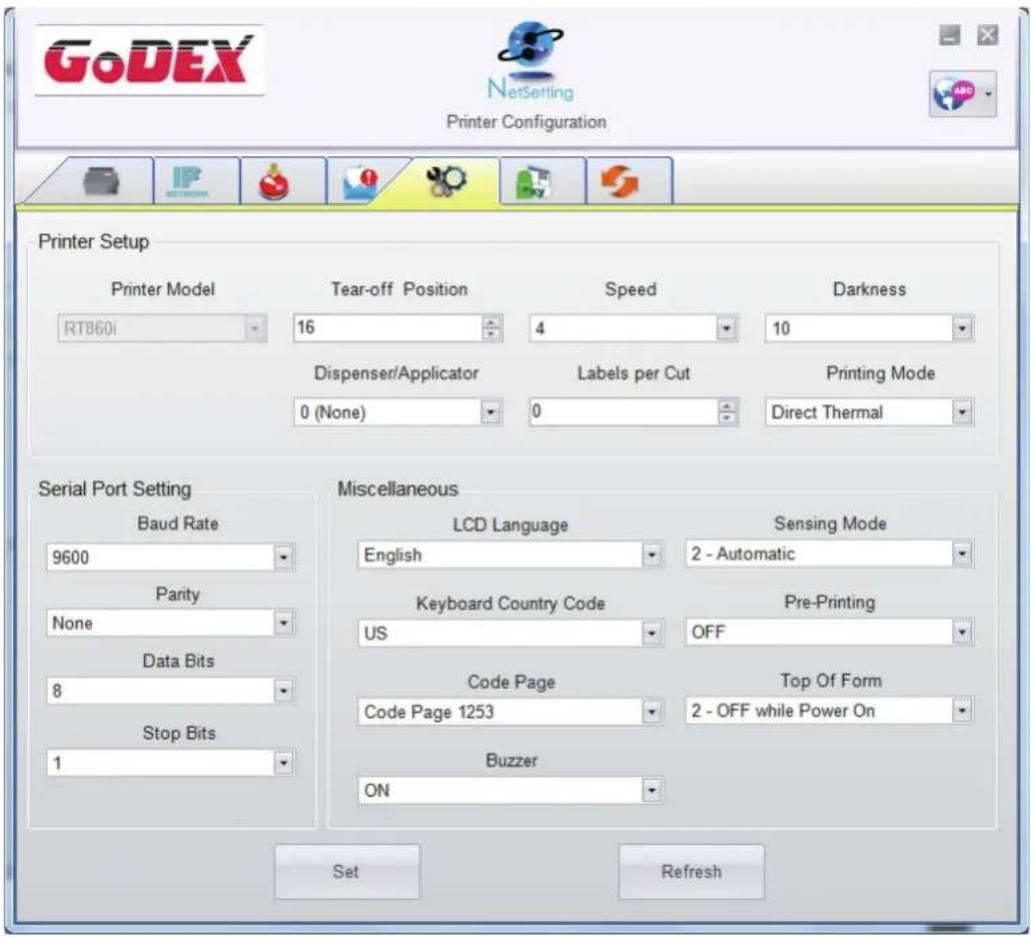
text_image
GoDEX NetSetting Printer Configuration Printer Setup Printer Model RT860i Tear-off Position 16 Speed 4 Darkness 10 Dispenser/Applicator 0 (None) Labels per Cut 0 Printing Mode Direct Thermal Serial Port Setting Baud Rate 9600 Parity None Data Bits 8 Stop Bits 1 Miscellaneous LCD Language English Sensing Mode 2 - Automatic Keyboard Country Code US Pre-Printing Code Page Code Page 1253 Top Of Form 2 - OFF while Power On Buzzer ON Set RefreshYou can press "Set" button to apply the settings and "ReGet" button to refresh the setting values.
4
NetSetting for Ethernet
User Command
The "User Command" tab provides a communication interface for operator to control the printer. Input printer commands in "Input Command" window and press "Send Command" button, the commands will be sent to the printer. For some commands that will return response message, the message will be displayed in "Output Message" window.
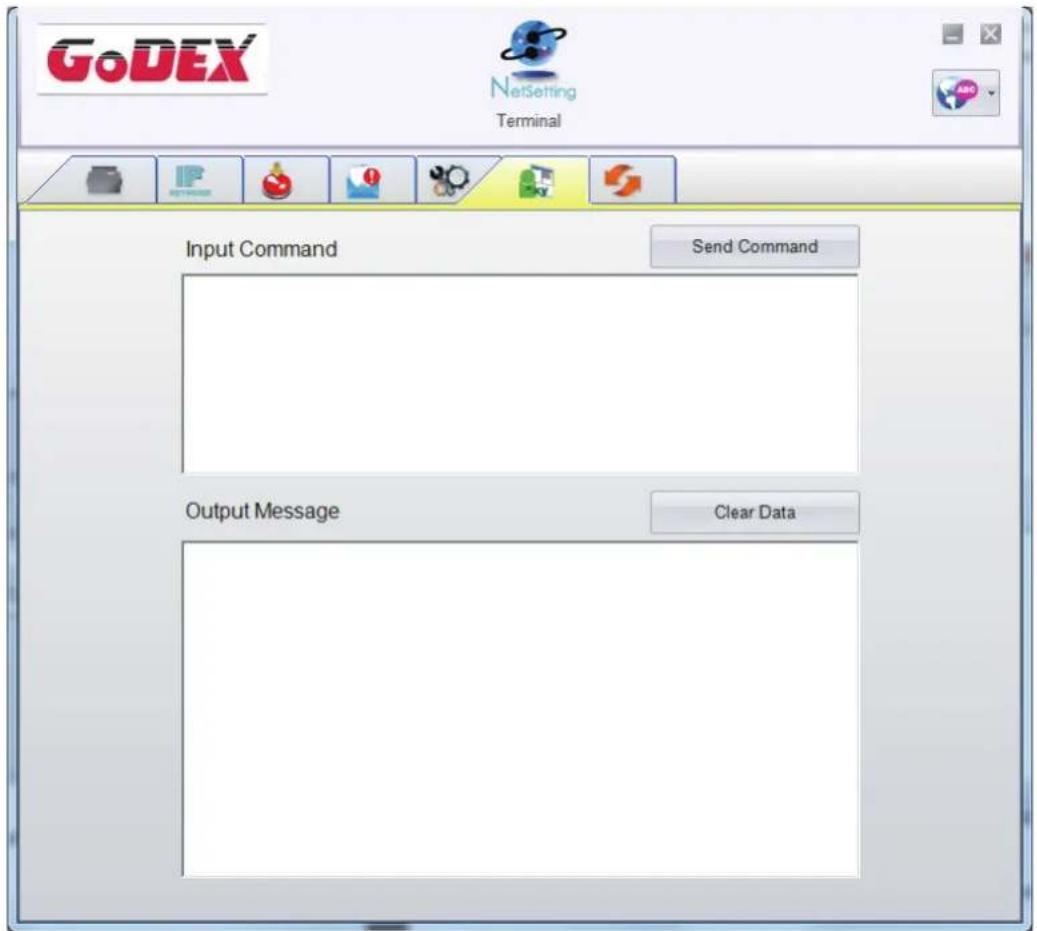
text_image
GoDEX NetSetting Terminal Input Command Send Command Output Message Clear DataYou can press "Send Command" button to send printer commands via Ethernet port and control the printer remotely.
4
NetSetting for Ethernet
Firmware Download
On "Firmware Download" tab, the current version of printer firmware will be showed on the screen. If you need to update the printer firmware, just specify the file location of firmware file and press "Start Download Firmware" button. The printer firmware then can be updated remotely.
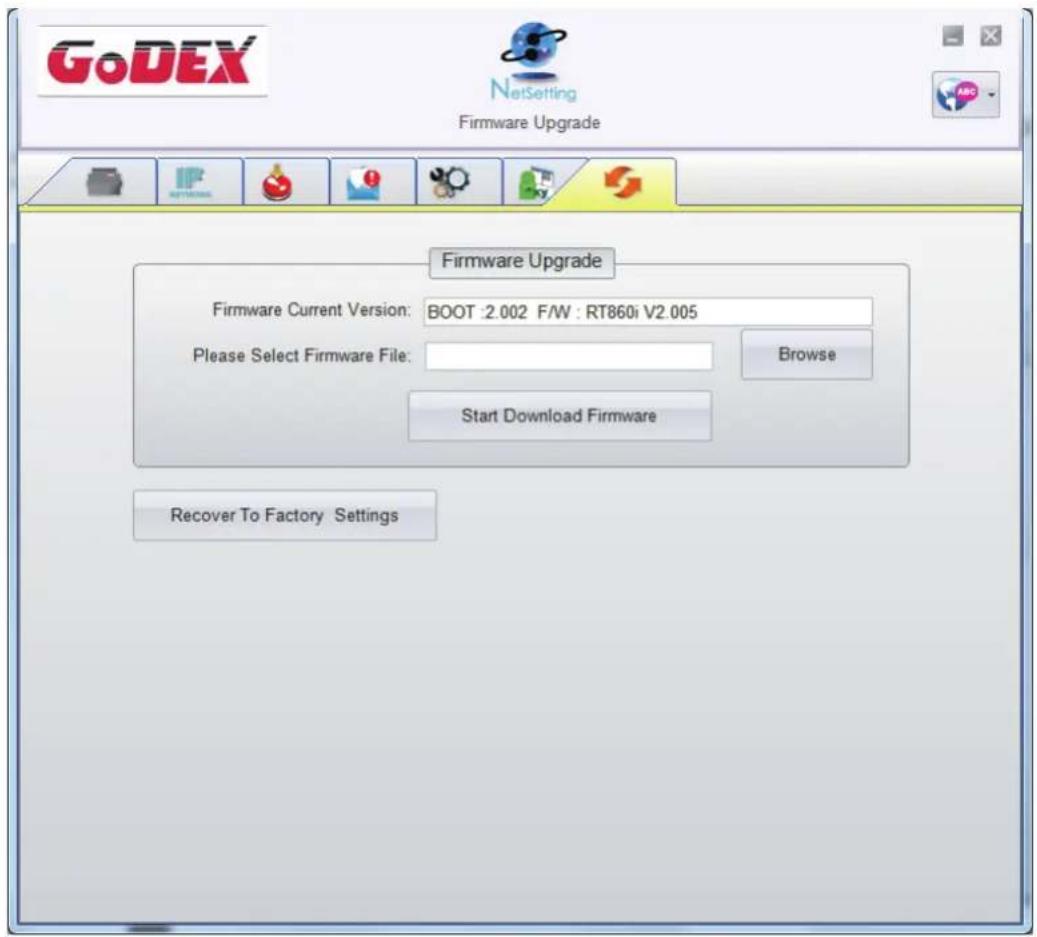
text_image
GoDEX NetSetting Firmware Upgrade Firmware Upgrade Firmware Current Version: BOOT :2.002 F/W : RT860i V2.005 Please Select Firmware File: Browse Start Download Firmware Recover To Factory SettingsIn addition to the firmware update, you can press "Recover To Factory Settings" button to restore the printer configurations back to factory default.
5 Accessories
5.1 Preparation Steps
Before installing the optional modules, please make some preparations as follows.
- Turn off the printer :
Remember to switch off the printer before installing any module.
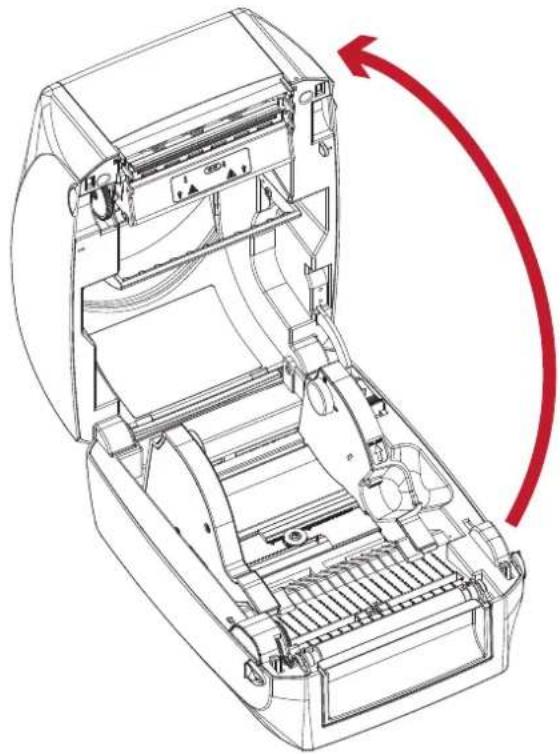
- Open the printer cover and the printing mechanism :
Open the printer cover by pulling the release catches on both sides of the printer and lift the cover. Please see the Section 2.1 for further information about Open the Printer.
natural_image
Technical line drawing of an open industrial machine with a red curved arrow indicating rotation or assembly (no text or symbols present)The printing mechanism is lifted up with the printer cover
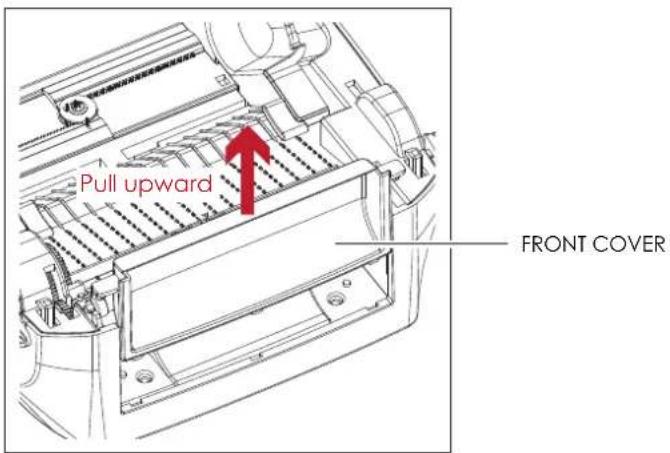
- Remove the front cover:
Please pull upward to remove the front cover.
text_image
Pull upward FRONT COVER5
Accessories
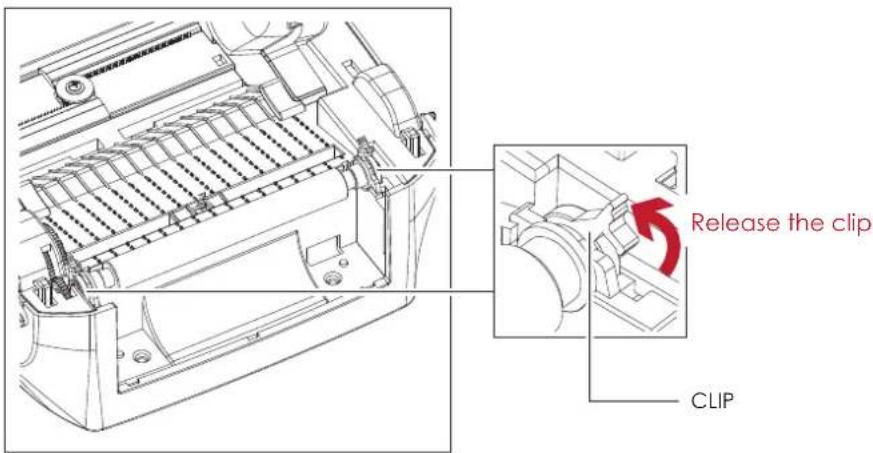
4. Remove the platen :
Lift up the release clips on both sides of the platen to release and pull upward the platen.
text_image
Release the clip CLIP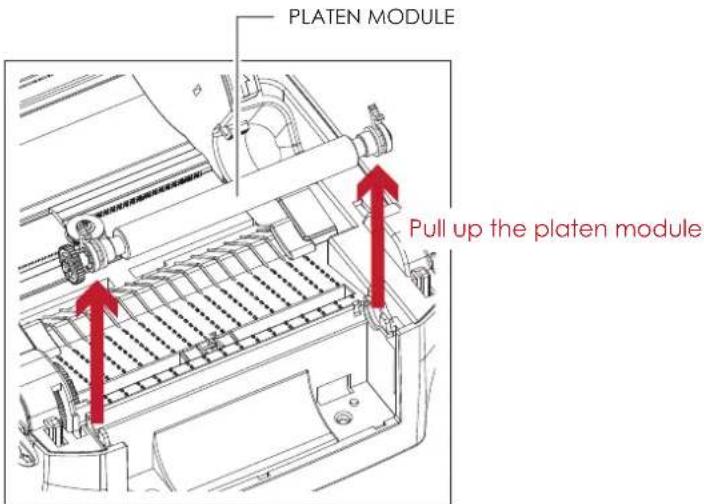
text_image
PLATEN MODULE Pull up the platen module5. Ribbon loading :
Please see the Section 2.2 for further information about Loading the Ribbon.
6. Label loading
Please see the Section 2.3 for further information about Loading the Label Roll Module.
5 Accessories
5.2 Installing the Label Dispenser
The Overview of the Label Dispenser
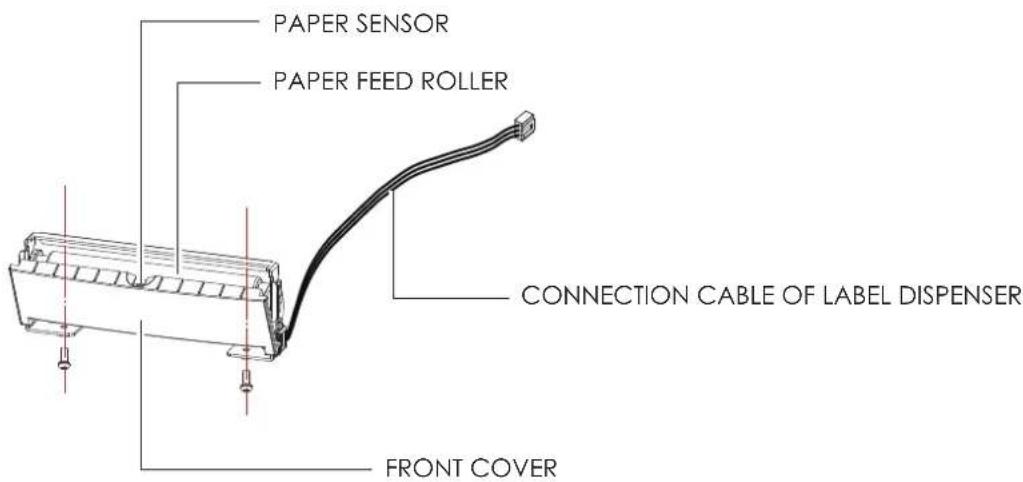
text_image
PAPER SENSOR PAPER FEED ROLLER CONNECTION CABLE OF LABEL DISPENSER FRONT COVERPreparation Steps
Please see the Section 5.1 Preparation Steps to complete the preparation steps before installing the label dispenser.
Installing the Label Dispenser
- Pass the connection cable through the slot of the printer.
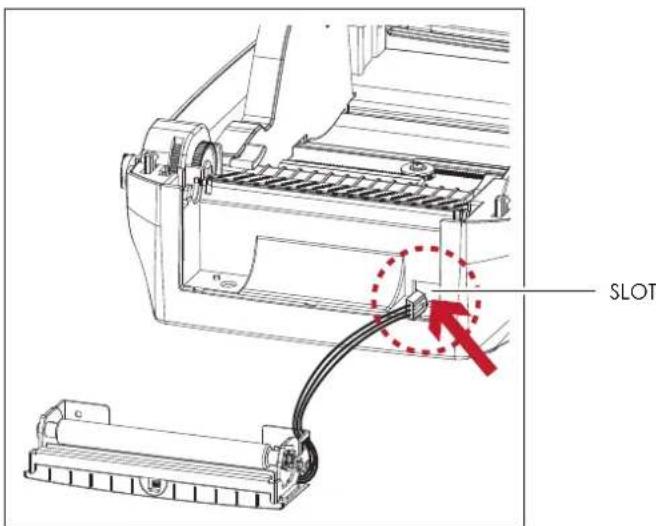
text_image
SLOTNote
* A label liner thickness of 0.06 mm ± 10% and a weight of 65 g/m² ± 6% are recommended.
** The label dispenser will take labels up to a max. width of 118 mm.
*** When using the label dispenser, set the stop position (printer command ^E) to 13.
5
Accessories
- Place label dispenser to align both holes of screw and then tighten the screws. (Screw holes on the front side of the bottom barcode Printer)
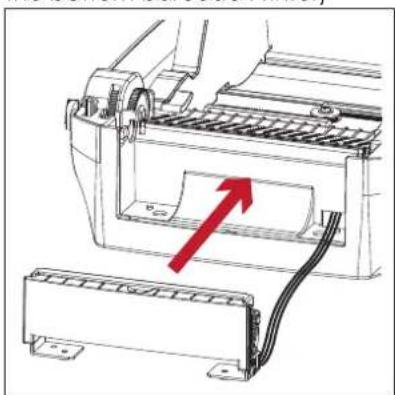
natural_image
Diagram of a printer or printer with a red arrow pointing to a paper sheet, no text or symbols present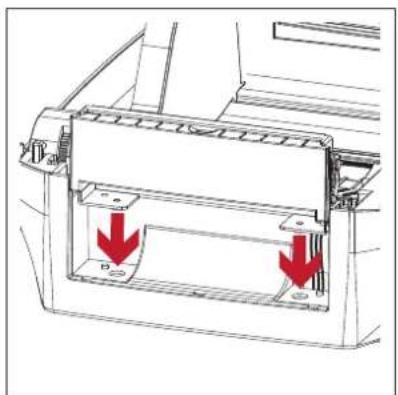
natural_image
Technical line drawing of a mechanical component with red arrows indicating downward motion (no text or symbols)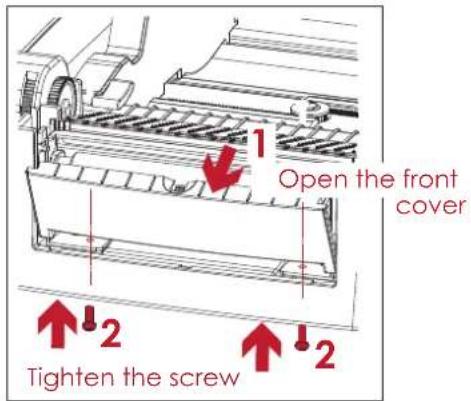
text_image
1 Open the front cover 2 Tighten the screw 2- Place the platen back to the printer and lock the clips.
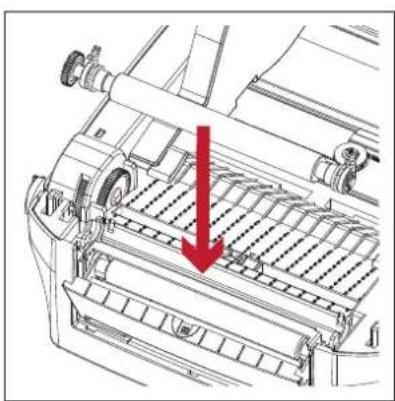
natural_image
Technical line drawing of a mechanical device with a red arrow pointing to a component (no text or symbols present)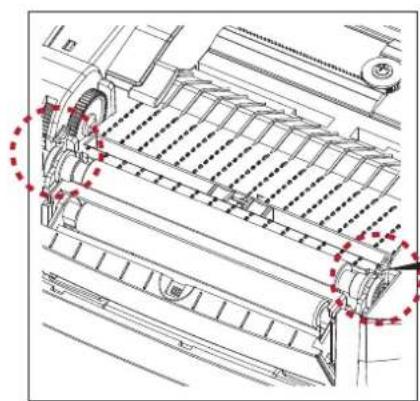
natural_image
Technical line drawing of a mechanical device with red dashed circles highlighting specific components (no text or symbols present)
text_image
Screw Hole Lock the clip CLIP- Close the printer cover and printing mechanism. Then to turn the printer upside down.
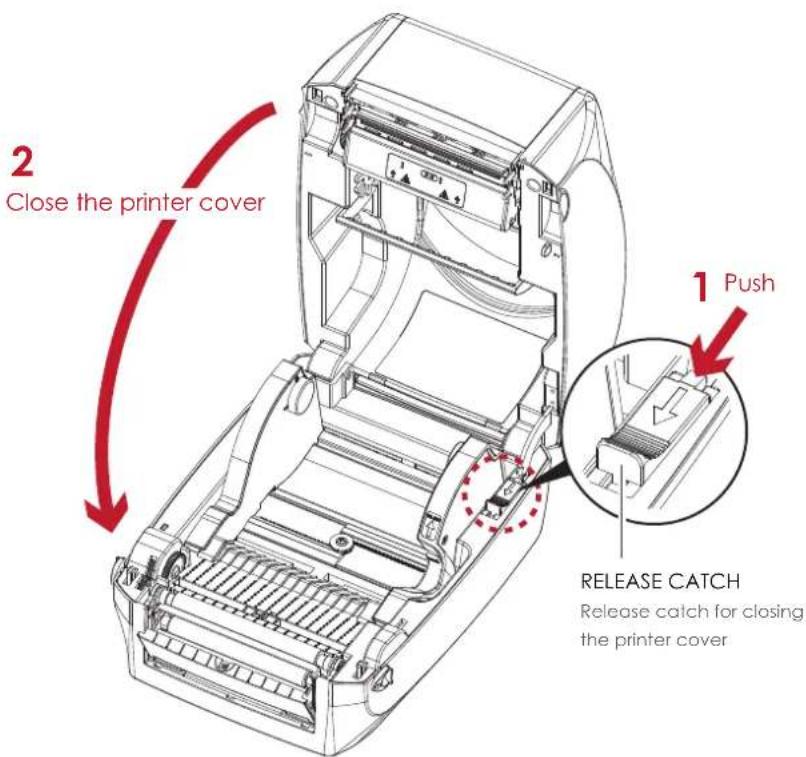
text_image
2 Close the printer cover 1 Push RELEASE CATCH Release catch for closing the printer cover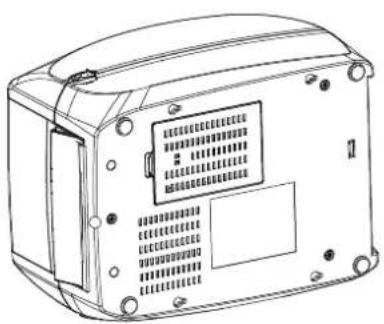
natural_image
Line drawing of a device casing with internal components and mounting holes (no text or symbols)5
Accessories
- Open the cover on the bottom of printer.
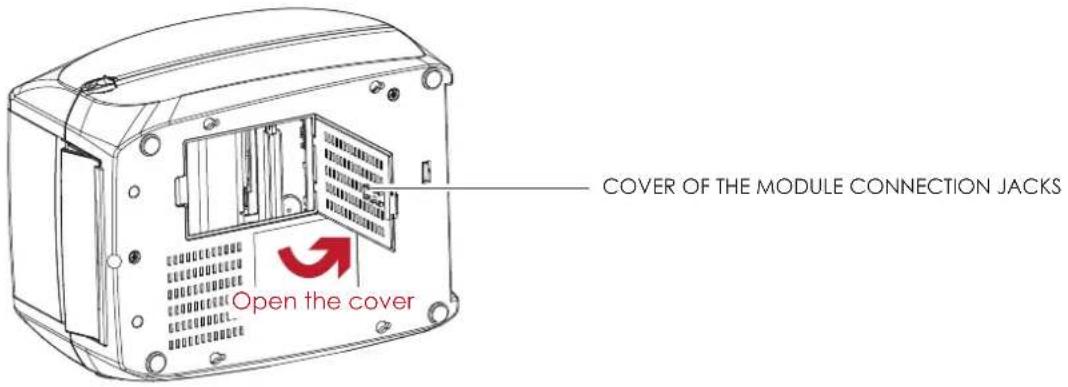
text_image
COVER OF THE MODULE CONNECTION JACKS Open the cover- Plug the connector fo the label dispenser to the jack.
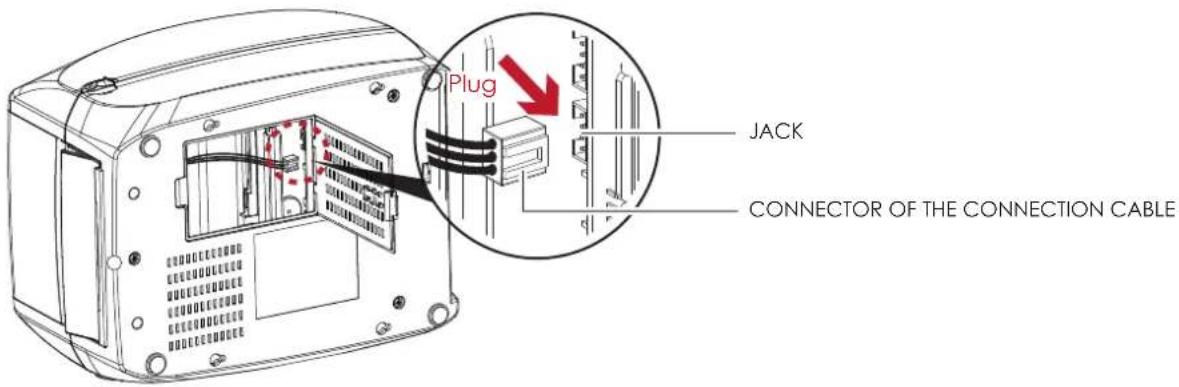
text_image
Plug JACK CONNECTOR OF THE CONNECTION CABLE- Close the cover of the module connection jacks.
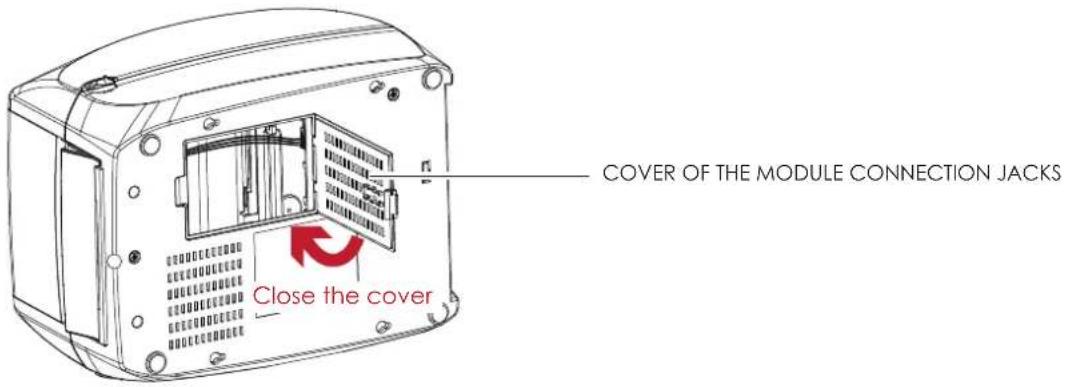
text_image
COVER OF THE MODULE CONNECTION JACKS Close the coverNote
* The printer must be switched off when plugging the connector, or the motherboard may be destroyed!
** There are 2 jacks : the lower jack for the label dispenser, the upper jack for the cutter.
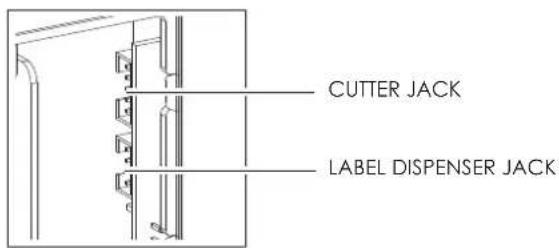
text_image
CUTTER JACK LABEL DISPENSER JACK5
Accessories
Loading Label Roll with the C Module
- Remove the first label from the label stock.
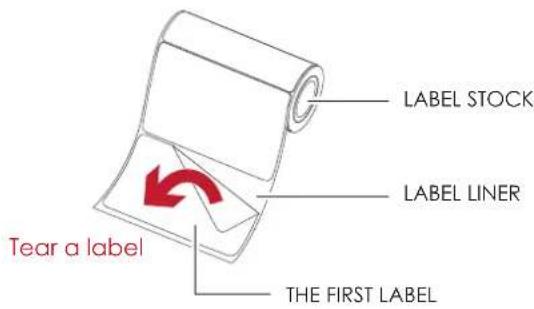
text_image
LABEL STOCK LABEL LINER Tear a label THE FIRST LABEL- Feed the Label stock through the label guides.
And pull the label liner through the platen and the steel of the label dispenser.
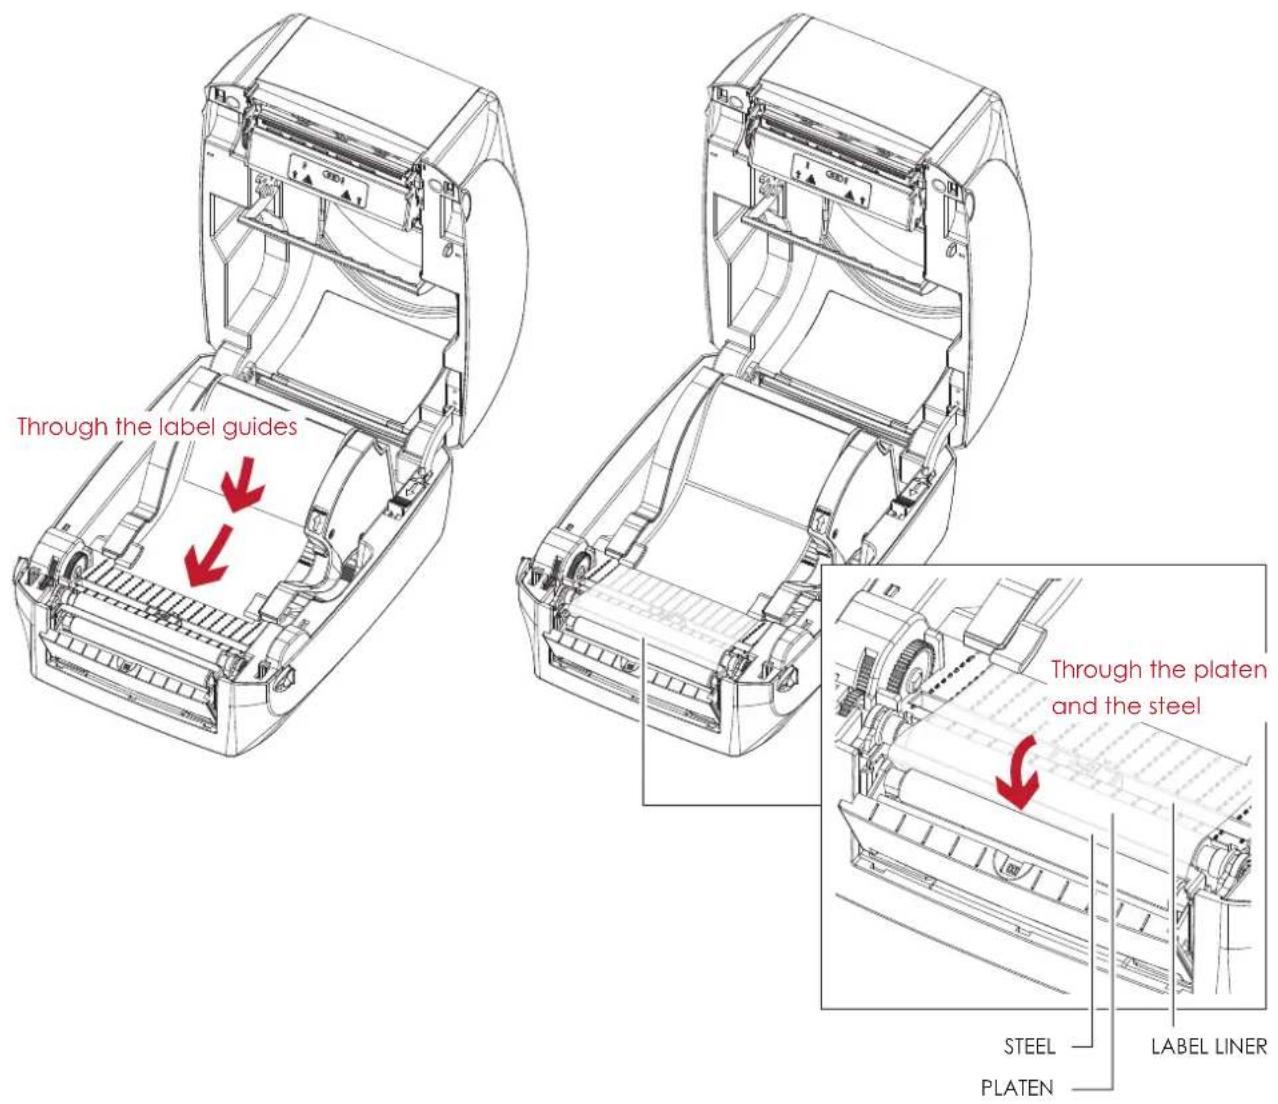
text_image
Through the label guides Through the platen and the steel STEEL PLATEN LABEL LINERNote
* With Label Dispenser, the labels should be at least 25 mm high.
5
Accessories
- The feeding path of label and liner should be as shown in below graphic.
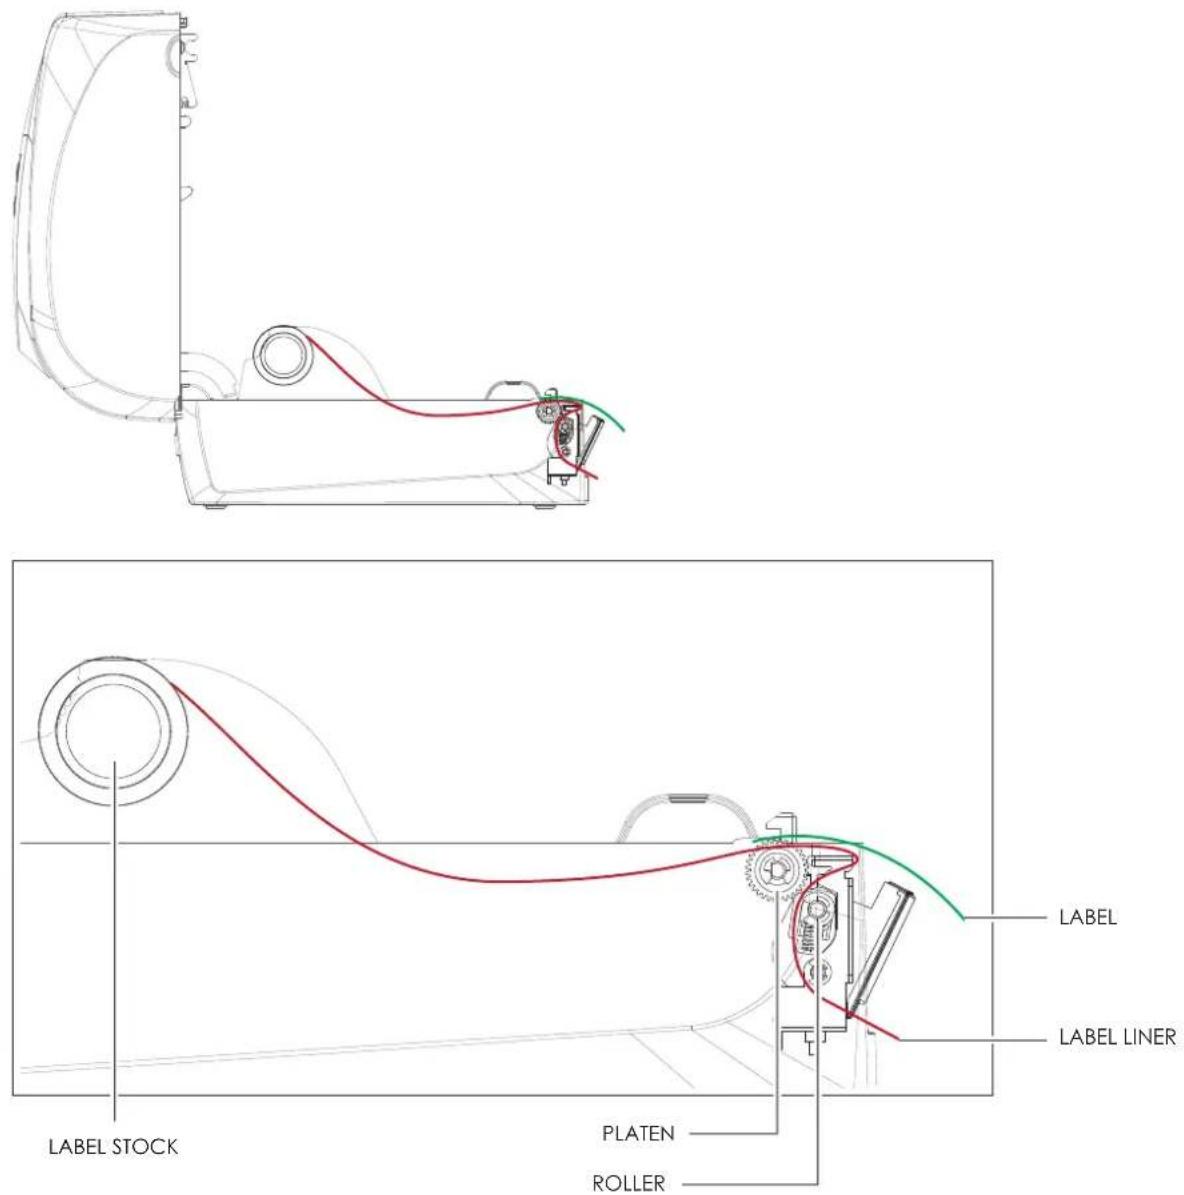
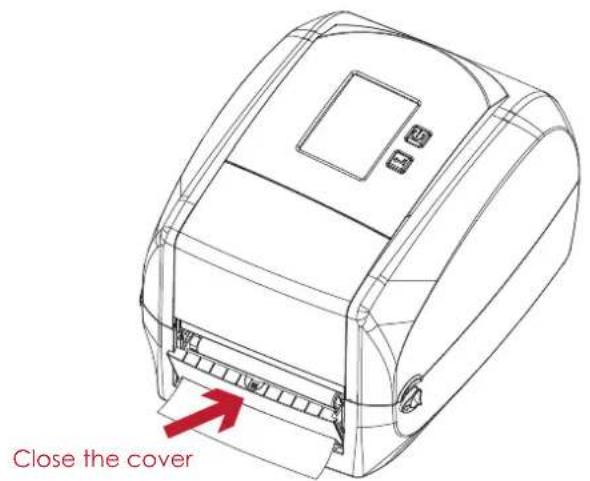
- Close the label dispenser and printer cover. The installation is completed now.
text_image
Close the cover5
Accessories
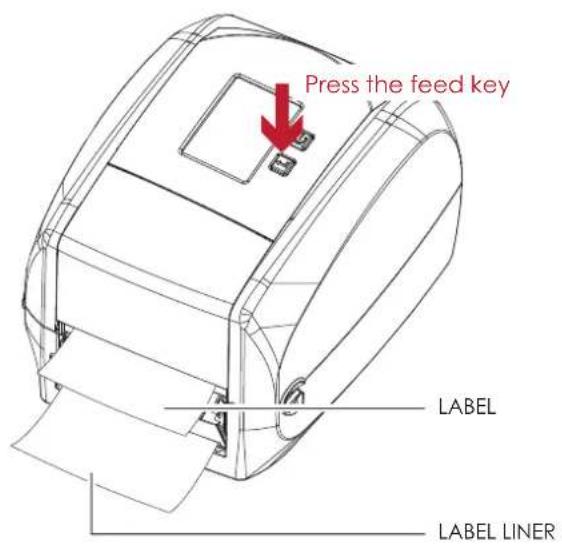
- Press the FEED button to feed the label. The label will be peeled from the liner while it passes through the label dispenser.
text_image
Press the feed key LABEL LABEL LINERNote
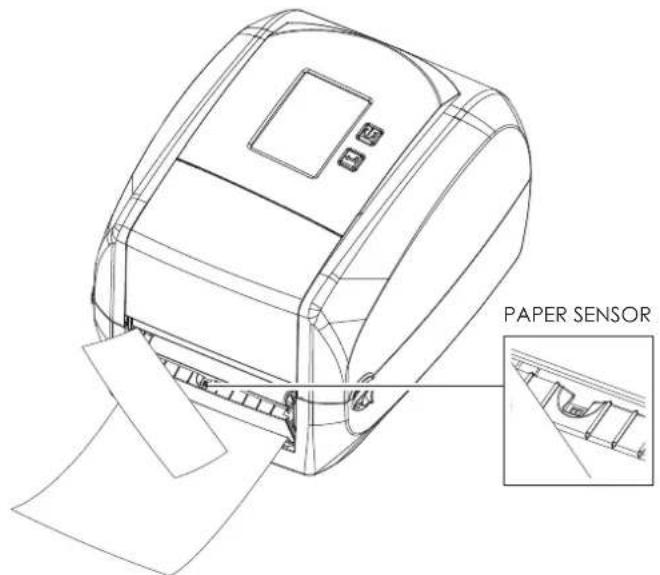
* There is a paper sensor on the Label Dispenser module. It will stop the printing if it is covered by label. Remove the last printed label and the printer will then continue to print next label.
text_image
PAPER SENSOR5 Accessories
5.3 Installing the Cutter
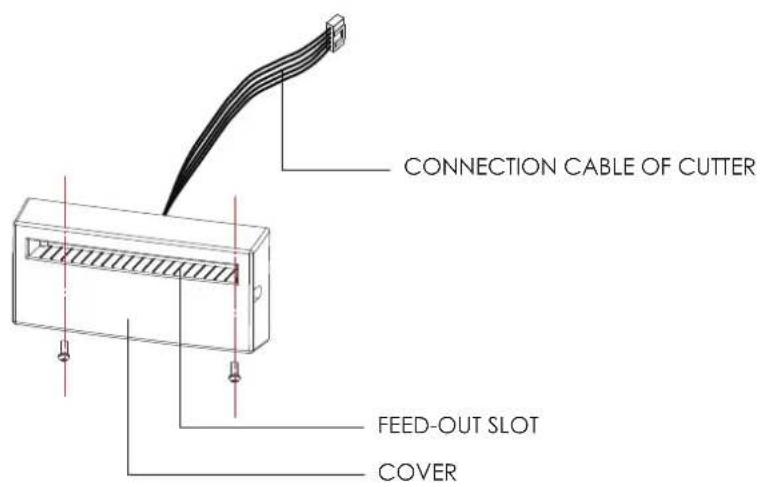
The Overview of the Cutter
text_image
CONNECTION CABLE OF CUTTER FEED-OUT SLOT COVERPreparation Steps
Please see the Section 5.1 Preparation Steps to complete the preparation steps before installing the cutter.
Installing the Cutter
- Pass the connection cable through the slot of the printer.
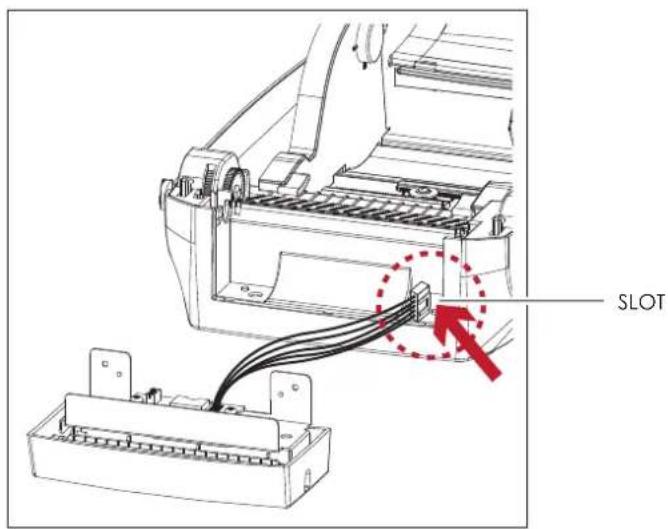
text_image
SLOTNote
* Remember to switch off the printer before installing the cutter.
** Do not use to cut adhesive labels! Glue residue will be left on the cutter blade and impair its functioning. The cutter has a blade life of 400,000 cuts when using paper liner which is 250μm thick and 76.2mm (3 inches) wide.
*** You can cut paper with a max. width of 118mm.
****With the cutter installed, set the stop position in Qlabel to 30, and the E value to 30.
5
Accessories
- Place the cutter to align both holes of screw and then tighten the screws. (Screw holes on the front side of the bottom barcode Printer)
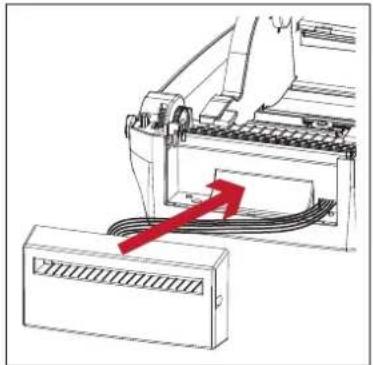
natural_image
Diagram of a mechanical device with a red arrow pointing to a component, no visible text or symbols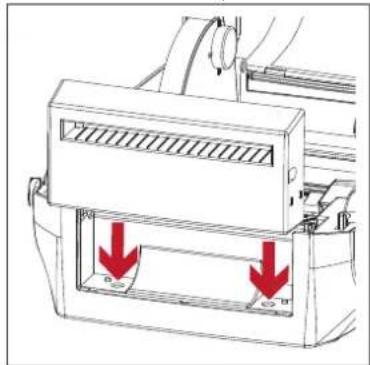
natural_image
Technical diagram of a mechanical device with two red arrows indicating downward motion or force, no text or symbols present.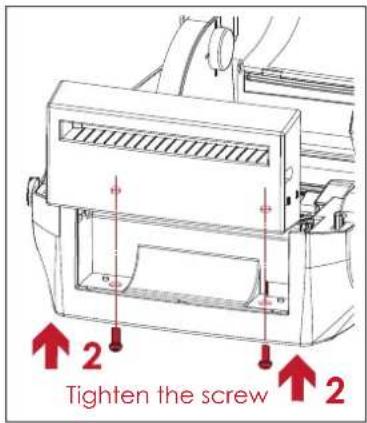
text_image
Tighten the screw- Place the platen back to the printer and lock the clips.

natural_image
Technical line drawing of a mechanical device with a red arrow pointing to a component (no text or symbols present)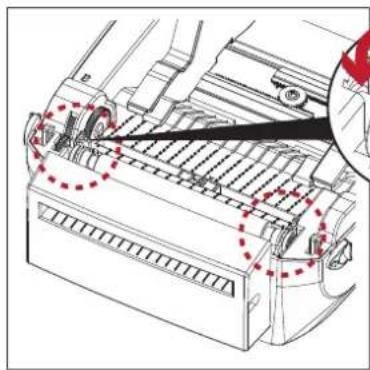
natural_image
Technical line drawing of a mechanical device with red dashed lines indicating internal components (no text or symbols)Screw Hole
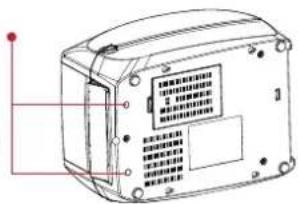
text_image
Technical diagram of a device casing with labeled components and red indicator points- Close the printer cover and printing mechanism. Then to turn the printer upside down.
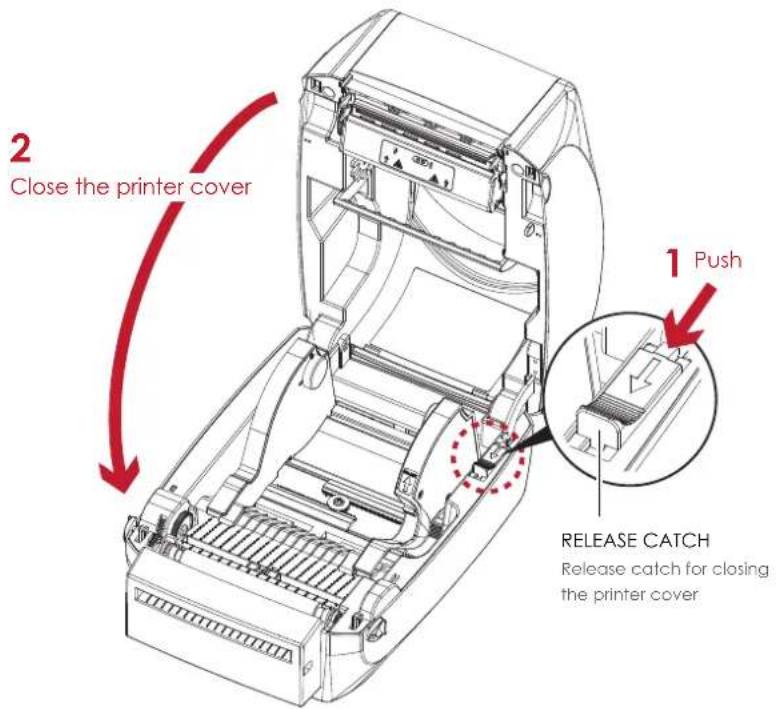
text_image
2 Close the printer cover 1 Push RELEASE CATCH Release catch for closing the printer cover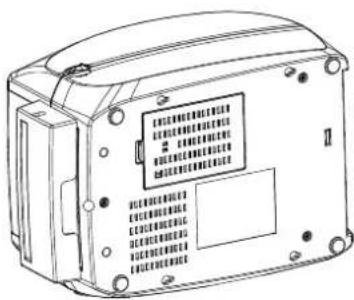
natural_image
Line drawing of a device casing with internal components and mounting holes (no text or symbols)5
Accessories
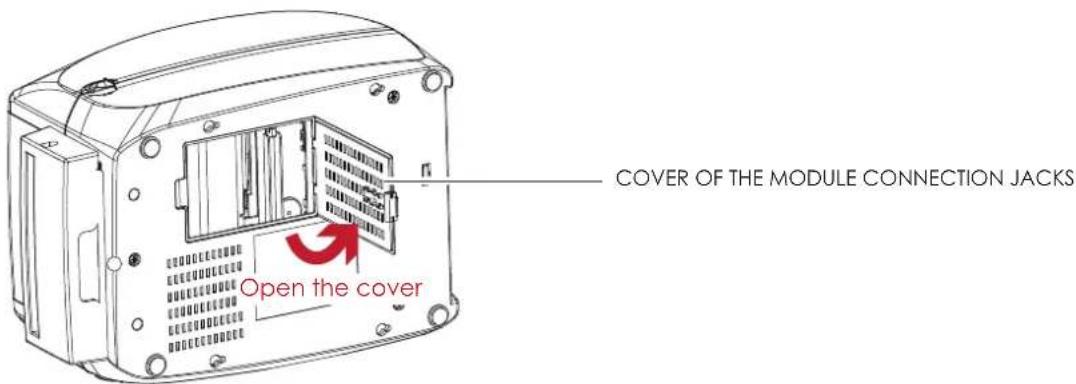
- Open the cover on the bottom of printer.
text_image
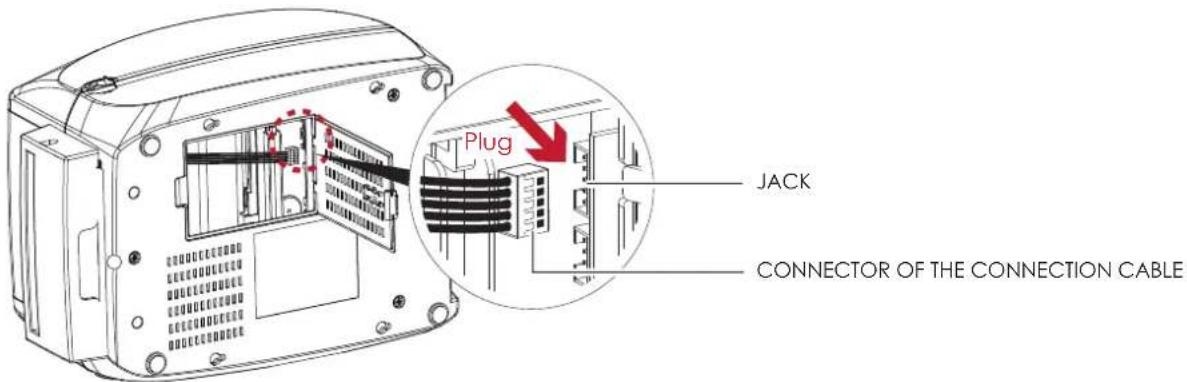
COVER OF THE MODULE CONNECTION JACKS Open the cover- Plug the connector for the cutter to the jack.
text_image
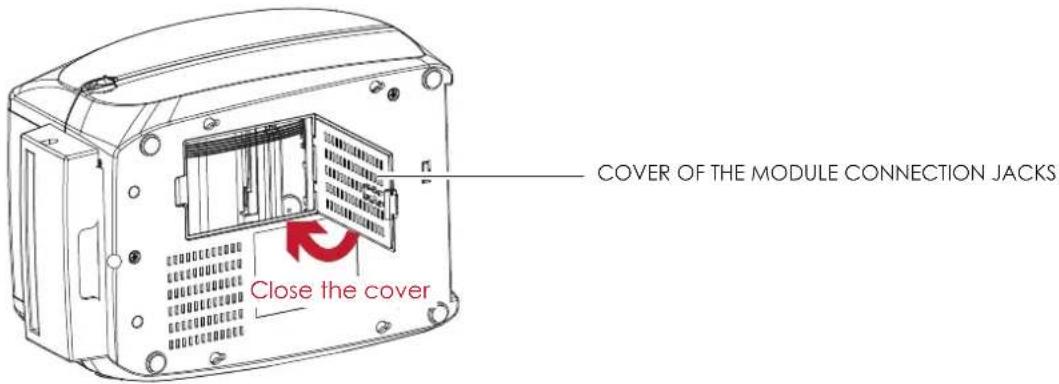
Plug JACK CONNECTOR OF THE CONNECTION CABLE- Close the cover of the module connection jacks.
text_image
COVER OF THE MODULE CONNECTION JACKS Close the coverNote
* The printer must be switched off, or the motherboard may be destroyed!
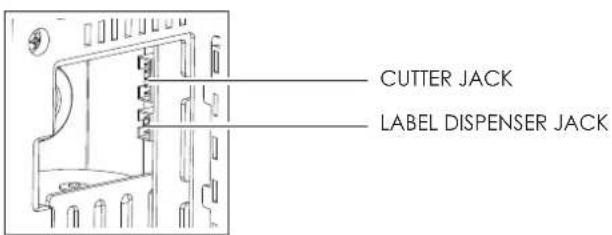
** There are 2 jacks : the lower jack for the label dispenser, the upper jack for the cutter.
text_image
CUTTER JACK LABEL DISPENSER JACK5
Accessories
Installing the Label Roll Module on the Printer
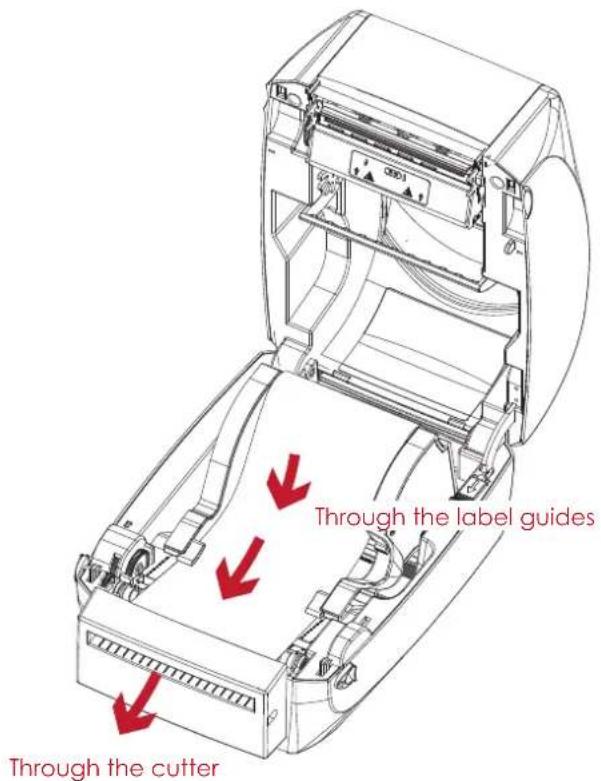
- Pass the labels through the guides and the cutter.
text_image
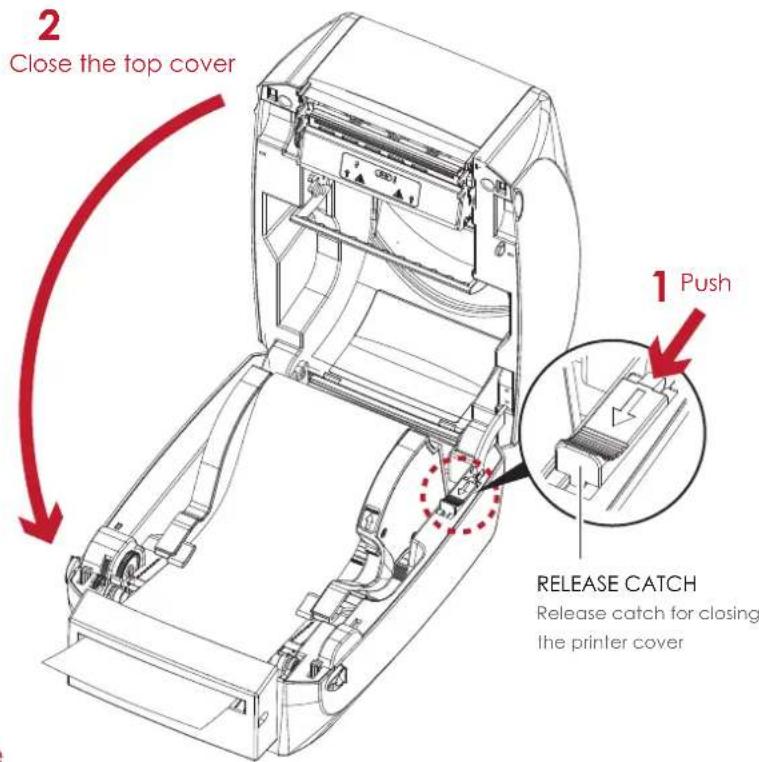
Through the label guides Through the cutter- Close the top cover and printing mechanism. To finish, press the FEED button to set the label position.
text_image
2 Close the top cover 1 Push RELEASE CATCH Release catch for closing the printer cover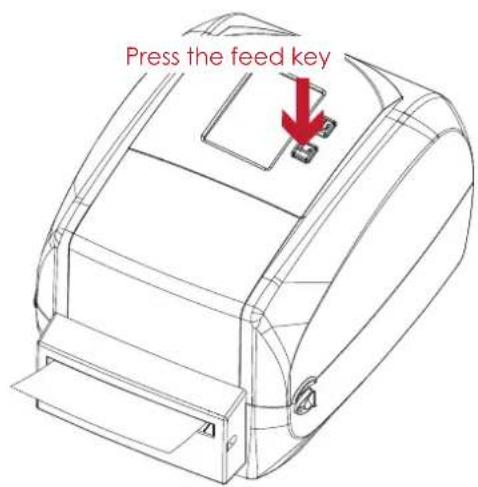
text_image
Press the feed key* We advise against using inside wound label stock.
** Labels should be at least 30 mm high. When using the printer with the cutter, you should set the stop position (^E) to 30.

Maintenance and Adjustment
6.1 Cleaning the Print Head
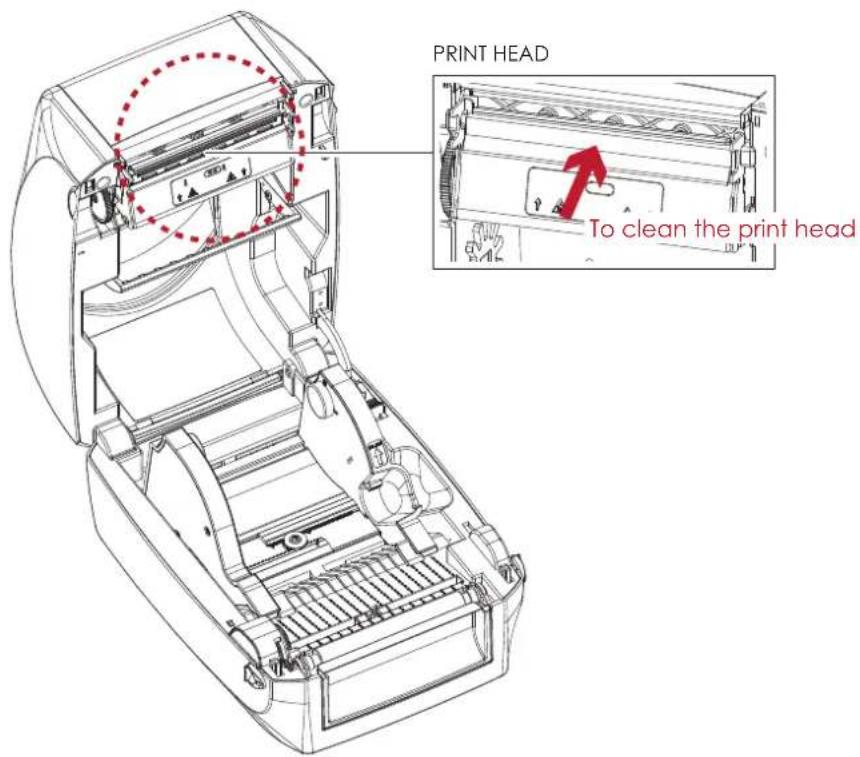
Dirt on the print head or ribbon may result in inadequate print quality (there are only partial images on the label). The printer cover should therefore be kept closed when possible. Keeping dirt and dust away from the paper or labels ensures a good print quality and a longer lifespan of the print head.
Cleaning Steps
- Switch off the printer.
- Open the printer cover.
- Remove the ribbon.
- To remove any label residue or other dirt from the print head (see Red arrow), please use a soft lint-free cloth dipped in alcohol to wipe.
text_image
PRINT HEAD To clean the print headNote
* Weekly to clean the print head one time. (Recommended)
** When cleaning the print head, please note that if there is attached to metal or hard on soft cloth, if using a dirty soft cloth made printer head damage is not covered under warranty conditions.
6.2 Troubleshooting
Problem Solution
| The printer is switched on but the LED does not light up. | ◆ Check the power supply.Please see the Section 2.4 |
| The LED lights up red and printing is interrupted. | ◆ Check the software settings (driver settings) or command codes.◆ Look for the error alert in the table in Section 3.3. Error Alerts.◆ Check whether the print mechanism is closed correctly.Please see the Section 3.3 |
| The label stock passes through the printer but no image is printed. | ◆ Please make sure that the label stock is loaded the right side up and that it is the suitable material.◆ Choose the correct printer driver.◆ Choose the correct label stock and a suitable printing mode. |
| The label stock jams during printing. | ◆ Clear the paper jam. Remove any label material left on the thermal print head and clean the print head using a soft lint-free cloth dipped in alcohol.Please see the Section 6.1 |
| There is no printed image on some parts of the label. | ◆ Check whether there is any label material or ribbon stuck to the thermal print head.◆ Check for errors in the application software.◆ Check whether the starting position has been set correctly.◆ Check the ribbon for wrinkles.◆ Check the power supply is correct |
| There is no printed image on part of the label or the image is blurred. | ◆ Check the thermal print head for dust or other dirt.◆ Use the internal “~T” command to check whether the thermal print head will carry out a complete print job.◆ Check the quality of the print medium. |
| The printed image is positioned incorrectly. | ◆ Check whether there is paper or dust covering the sensor.◆ Check whether the label stock is suitable. Contact your supplier.◆ Check the paper guide settings. |
| Skipping labels during printing. | ◆ Check the label height setting.◆ Check whether there is dust covering the sensor.◆ Run the auto-detection function.Please see the Section 3.2 |
| The printed image is blurred. | ◆ Check the darkness setting.◆ Check the thermal print head for dust or dirt.Please see the Section 6.1 |
| The cutter does not cut off the labels in a straight line. | ◆ Check whether the label stock is positioned straight. |
| The cutter does not cut off the labels completely. | ◆ Check whether the label is more than 0.2 mm thick. |
| When using the cutter, the labels are not fed through or cut off incorrectly. | ◆ Check whether the cutter has been correctly installed.◆ Check whether the paper guides are functioning correctly. |
| The label dispenser is not functioning normally. | ◆ Check whether there is dust on the label dispenser.◆ Check whether the label stock is positioned correctly. |
Note
PRODUCT SPENIFICATIONS
| Model Name | RT860i | |
| Print Method | Thermal Transfer / Direct Thermal | |
| Resolution | 600 (23.6 dot/mm) | |
| Print Speed | 3 IPS (76.2 mm/s) | |
| Print Width | 4.16" (105.6 mm) | |
| Print Length | Min. 0.16" (4 mm)** - Max. 15" (381 mm) | |
| Processor | ARM9 CPU | |
| Memory | Flash | 128 MB Flash (60 MB for user storage) |
| SDRAM | 32 MB | |
| Sensor Type | Adjustable reflective sensor (full range). Fixed transmissive sensor, central aligned. | |
| Media | Type | Continuous form, gap labels, black mark sensing, and punched hole; label length set by auto sensing or programming |
| Width | Min. 1" (25.4 mm) - Max. 4.64" (118 mm) | |
| Thickness | Min. 0.003" (0.06 mm) - Max. 0.008" (0.20 mm) | |
| Label roll diameter | Max. 5" (127 mm) | |
| Core diameter | 1" (25.4 mm), 1.5" (38.1 mm) | |
| Ribbon | Types | Wax, wax / resin, resin |
| Length | 360" (110 m) | |
| Width | Min. 1.18" (30 mm) - Max. 4.33" (110 mm) | |
| Ribbon roll diameter | 1.57" (40 mm) | |
| Core diameter | 0.5" (12.7 mm) | |
| Printer Language | EZPL, GEPL, GZPL auto switch | |
| Software | Label design software | GoLabel (for EZPL only) |
| Driver | Windows XP, Vista, Win7, Server 2003 & 2008 | |
| DLL | Windows XP, Vista, Win7, Server 2003 & 2008 | |
| Resident Fonts | Bitmap Fonts | 6, 8, 10, 12, 14, 18, 24, 30, 16X26 and OCR A&B |
| Bitmap fonts 90°, 180°, 270° rotatable, single characters 90°, 180°, 270° rotatable | ||
| Bitmap fonts 8 times expandable in horizontal and vertical directions | ||
| Scalable Fonts | 90°, 180°, 270° rotatable | |
| Download Fonts | Bitmap Fonts | Bitmap fonts 90°, 180°, 270° rotatable, single characters 90°, 180°, 270° rotatable |
| Asian Fonts | Asian fonts 90°, 180°, 270° rotatable and 8 times expandable in horizontal and vertical directions | |
| Scalable Fonts | Scalable fonts 90°, 180°, 270° rotatable | |
| Barcodes | 1-D Bar Codes | Code 39, Code 93, EAN 8 / 13 (add on 2 & 5), UPC A / E (add on 2 & 5), 12 of 5 & 12 of 5 with Shipping Bearer Bars, Codabar, Code 128 (Subset A, B, C), EAN 128, RPS 128, UCC 128, UCC / EAN-128 K-Mart, Random Weight, Post NET, ITF 14, China Postal Code, HIBC, MSI, Plessey, Telepen, FIM, GS1 DataBar |
| 2-D Bar Codes | PDF417, Micro PDF417, Datamatrix code, Maxicode, QR code, Micro QR code and Aztec code | |
| Code Pages | Codepage 437, 850, 851, 852, 855, 857, 860, 861, 862, 863, 865, 866, 869, 737 | |
| Windows 1250, 1251, 1252, 1253, 1254, 1255, 1257 | ||
| Unicode (UTF8 · UTF16) | ||
| Graphics | Resident graphic file types are BMP and PCX, other graphic formats are downloadable from the software | |
| Interfaces | Serial port: RS-232 (DB-9) | |
| USB 2.0 Device port (B-Type) | ||
| IEEE 802.3 10/100Base-Tx Ethernet port (RJ45) | ||
| USB Host (A-Type) | ||
| Parallel Port (Mini-Centronics) | ||
| Control Panel | 3.2" Touch Color LCD | |
| Calibration button | ||
| Control key: FEED | ||
| Power on/off button | ||
| Real Time Clock | Standard | |
| Power | Auto Switching 100-240V AC, 50-60Hz | |
| Environment | Operation temperature | 41°F to 104°F (5°C to 40°C) |
| Storage temperature | -4°F to 122°F (-20°C to °C) | |
| Humidity | Operation | 20-85%, non-condensing |
| Storage | 10-90%, non-condensing | |
| Agency Approvals | CE (EMC) · FCC Class A · CB · cUL · CCC | |
| Dimension | Length | 280 mm (11.0") |
| Height | 195 mm (7.7") | |
| Width | 210 mm (8.3") | |
| Weight | 5.9 lbs (2.7 Kg), excluding consumables | |
| Options | Label dispenser with label taken sensor module | |
| Cutler module | ||
| External label unwinder | ||
| External label rewinder | ||
| Bluetooth module (distributor install) | ||
| WiFi printer server module (distributor install) | ||
* Specifications are subject to change without notice. All company and/or product names are trademarks and/or registered trademarks of their respective owners.
** Minimum print height and maximum print speed specification compliance can be dependent on non-standard material variables such as label type, thickness, spacing, liner construction, etc. Godex is pleased to test non-standard materials for minimum print height and maximum print speed capability.
Pinout Description
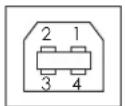
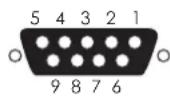
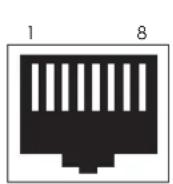
USB PortPower Jack Serial Port Ethernet Port USB Host Parallel Port
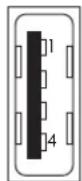
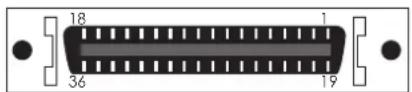
- USB Port
Connector Type : Type B
Pin NO. 1 2 3 4
NC D- D+ GND
- Serial Port
Default Settings : Baud rate 9600, no parity, 8 data bit, 1 stop bit, XON/XOFF Protocol and RTS/CTS
| RS232 Housing (9-pin to 9-pin) | ||||||||||
| Pin NO. | 1 | 2 | 3 | 4 | 5 | 6 | 7 | 8 | 9 | Type |
 | +5V, max 500mA | TXD | RXD | N/C | GND | RTS | CTS | RTS | N/C | DB9 Plug |
 | - | RXD | TXD | DTR | GND | DSR | RTS | CTS | RI | DB9 Socket |
- Ethernet Port
Type : RJ45
Pin NO. 1 2 3 4 5 6 7 8
TX+ TX- RX+ NC NC RX- NC NC
- USB Host
Connector Type : Type A
Pin NO. 1 2 3 4
VBUS D- D+ GND
- Parallel Port
Type : Centronics Female
| Pin NO. | 1 | 2 | 3 | 4 | 5 | 6 | 7 | 8 | 9 | 10 | 11 | 12 | 13 | 14 | 15 | 16 | 17 | 18 |
| BUZY | SELECT | ACK | FAULTN | LPT FERR | DATA0 | DATA1 | DATA2 | DATA3 | DATA4 | DATA5 | DATA6 | DATA7 | LPT INTN | STROB | SELIN | AUTO | NC | |
| Pin NO. | 19 | 20 | 21 | 22 | 23 | 24 | 25 | 26 | 27 | 28 | 29 | 30 | 31 | 32 | 33 | 34 | 35 | 36 |
| GND | GND | GND | GND | GND | GND | GND | GND | GND | GND | GND | GND | GND | GND | GND | GND | GND | 5V |
Note
* Serial port total output can not exceed the maximum current of 500mA
File Manipulation
The files in both devices (USB memory stick and printer internal Flash memory) are able to copy and move by the commands "'\~MCPY'" and "'MMOV'" that sends from GoLabel on a PC via either connection - USB or Ethernet ports.
- Copy
| Syntax ~MCPY,s:o.x,d:o.x | |
| Description | Copy file from USB memory stick to Flash memory, or vise-versa |
| Parameter s = source device of stored object;● “D” for USB memory stick; “F” for internal Flash memory d = destination device of stored object● “D” for USB memory stick; “F” for internal Flash memory o = object name (file name); the name “o” is substituted for “*” x = extension (file type), the type “x” is substituted by “*”, or following either one: D= database, A= Asia font, C= TTF font, E= Bit-Mapped font, F= label format, G= graphic, S= serial file, T= text, B= Unicode Table. | |
| Example ~MCPY,F:*.F,D:*.F(Copy entire “Label Format” files from Flash memory to USB memory stick)~MCPY,D:*.G,F:*.G(Copy entire “Graphic” files from USB memory stick to Flash Memory)~MCPY,D:*.*,F:*.*(Copy all object files from USB memory stick to Flash Memory) | |
- Move
| Syntax ~MMOV,s:o.x,d:o.x | |
| Description | Move files from USB memory stick to Flash memory or vise-versa |
| Parameter s = source device of stored object;● “D” for USB memory stick; “F” for internal Flash memory d = destination device of stored object● “D” for USB memory stick; “F” for internal Flash memory o = object name (file name); the name “o” is substituted for “*” x = extension (file type), the type “x” is substituted by “*”, or following either one: D= database, A= Asia font, C= TTF font, E= Bit-Mapped font, F= label format, G= graphic, S= serial file, T= text, B= Unicode Table. | |
| Example ~MMOV,F:*.F,D:*.F(Move entire “Label Format” files from Flash memory to USB memory stick)~MMOV,D:*.G,F:*.G(Move entire “Graphic” files from USB memory stick to Flash Memory)~MMOV,D:*.*,F:*.*(Move all object files from USB memory stick to Flash Memory) | |