
Maxi XLS ForU - Véhicule pour personnes handicapées KYMCO - Free user manual and instructions
Find the device manual for free Maxi XLS ForU KYMCO in PDF.


| Product Type | Mobility Scooter for Disabled Persons |
| Brand | Kymco |
| Model | Maxi XLS ForU |
| Dimensions (L x W x H) | 1200 mm x 600 mm x 900 mm |
| Weight | 80 kg (with batteries) |
| Maximum User Weight | 120 kg |
| Power Source | Electric, 2 x 12V 35Ah Lead-Acid Batteries |
| Charging Time | 8-10 hours |
| Range | Up to 30 km on full charge |
| Maximum Speed | 8 km/h (adjustable) |
| Motor | 500W DC motor |
| Ground Clearance | 80 mm |
| Turning Radius | 1200 mm |
| Tire Type | Pneumatic, 10-inch |
| Brakes | Automatic electromagnetic brake |
| Suspension | Front and rear coil springs |
| Main Functions | Adjustable tiller angle, swivel seat, LED headlight, speed selector, battery indicator |
| Safety Features | Anti-tip wheels, seat belt, anti-rollback system, reflective strips |
| Maintenance | Regular battery charging, tire pressure check, clean with damp cloth |
| Spare Parts Availability | Available via authorized Kymco dealers |
| Documents Included | User manual, warranty card, quick start guide |
Frequently Asked Questions - Maxi XLS ForU KYMCO
User questions about Maxi XLS ForU KYMCO
0 question about this device. Answer the ones you know or ask your own.
Ask a new question about this device
Download the instructions for your Véhicule pour personnes handicapées in PDF format for free! Find your manual Maxi XLS ForU - KYMCO and take your electronic device back in hand. On this page are published all the documents necessary for the use of your device. Maxi XLS ForU by KYMCO.
USER MANUAL Maxi XLS ForU KYMCO
natural_image
Exterior view of a modern electric scooter with silver and black body (no visible text or symbols)Maxi XLS
ForU
Owner's Manual PHT DEHP BBP DBP CE

natural_image
Abstract black-and-white logo design with stylized 'IC' letters inside an oval (no text or symbols)KYMCO
H E A L T H C A R E
KYMCO Healthcare UK Limited
Heol Mostyn
Village Farm Industrial Estate
Pyle
Bridgend
CF33 6BJ
TEL:01656 670095
FAX:01656 858353
www.kymcohealthcare.co.uk
Dear KYMCO ForU Maxi XLS Users:
Thank you for purchasing your Maxi XLS and welcome to the family of Maxi riders. To enjoy safe and pleasant riding, please become thoroughly familiar with this owner's manual before you ride the scooter. Your safety depends not only on your own alertness and familiarity with the scooter but also the Maxi mechanical condition.
A pre-ride inspection before every outing and regular maintenance are essential. The quality of each Maxi XLS is guaranteed.
Note: 1. The information and specifications stated in this manual are for reference only and subject to change without notice.
2. Your scooter may differ slightly in appearance from the images in this manual.
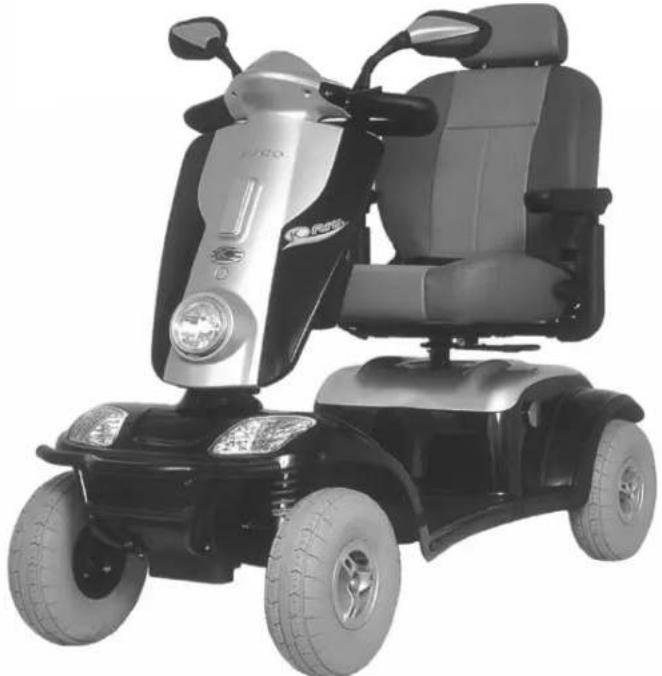
Maxi XLS ForU Model:
natural_image
Exterior view of a modern electric scooter with visible wheels and seat (no text or symbols)NOTE: Your scooter may differ slightly in appearance from the images in this manual.
CONTENTS
Safety Information 1-8 37-40
Versions 9 41
Components 10-11 44
Brief Instructions 12-14
Adjusting the seat height 15-16
Adjusting the seat position 17-20
Driving Information 21-26
Driving the Scooter 27-34
Pusing the Scooter
Charging the batteries
Maintenance and Inspection
Specifications
Transporting the ForU
42-43
35
Safety information
Symbols used
This instruction manual contains the following symbols which are used to highlight special hazards in dealing with the product or information for simplifying the handling.
This symbol identifies safety information which notifies you of hazards when dealing with the product.
NOTE:
You will also find information about dealing with the product under this symbol.
Intended use
The ForU mobility scooter is constructed for use both indoors and outdoors
It is intended to increase the mobility of persons who are both physically and mentally capable of assessing any driving situations correctly and reacting correspondingly to them at any time.
Safety information
General Information
Read the entire owner's manual thoroughly before using the Scooter!
Ensure that:
- The owner's manual is read by all people who drive, care for and service the scooter.
- All persons who drive, care for, service the scooter have access to the owner's manual at any time.
Risk of accidents:
- Do NOT use the scooter if your driving capability is impaired through consumption of medicine or alcohol.
- Only use the scooter for its correct intended use.
- Only use the scooter when it is in perfect working order.
- If any breakdowns occur, stop using the scooter immediately and secure it against unauthorised use.
- It is imperative that you always rectify any faults which could influence the function and safety of the scooter immediately.
- Observe maximum loading -- see Specifications
- Only use accessories and spare parts authorised by KYMCO Healthcare.
- The scooter is only authorised for transport of one person.
- Do not carry out any seat adjustments while driving.
Safety information
Tipping hazard:
- Do not adjust the seat if the scooter is standing on an incline.
- Do not lean out over the armrest to the sides or over the backrest to the rear.
Safety when driving:
Risk of accidents!
- Check correct functioning of the brakes and lighting unit (indicators, headlights) before every journey.
- Always use lights when visibility is restricted, either by day or by night.
- Check the tyre air pressure regularly.
- Always use the seat belts, if fitted when driving.
- Do not switch the scooter off while driving.
- Do not drive up or down gradients which are too steep, over obstacles on gradients or up and down ramps. Observe maximum climb angle--- see Specifications
- Only drive through restricted widths, around bends, inclines and ramps with reduced suitable speed.
- Only drive up or down inclines when the backrest has been adjusted to vertical.
- Don't drive too close to open waters.
Safety information
Tipping hazard:
- Do not carry out any seat adjustments while driving.
- Only drive over obstacles and up kerbstones at the lowest point and at right angles.
- Avoid sudden changes of direction and speed.
- Avoid steep gradients where there is a danger of skidding (ice, snow, wet surfaces etc.).
- Avoid loose surfaces whose characteristics you are not able to assess (woodlands, turf, beaches, gravel etc.)
- Always drive straight up and down gradients - do not drive in zigzags.
- Do not turn around on inclines.
- Do not drive down steps.
- Do not drive backwards down gradients, stairs or kerbstones, or over obstacles.
Danger due to unintentional movement:
Always turn the scooter off using the keyswitch if you:
- want to get on or off
- intend to stop for long periods
- you are putting the scooter away.
Safety information
Safety during transport, assembly and maintenance:
If the scooter is transported in the vehicle when fully assembled:
- no persons may be sitting on the scooter during loading!
- no persons may be sitting on the scooter during transport!
Clamping and crushing hazard:
Increased hazards due to clamping or crushing result due to the high component weight such as batteries during preparation for transport and maintenance work.
- Always carry out any work to be done with great care.
- Always try to get help from a second person, especially when stowing parts for transport.
- Only carry out any work described if you are used to working with the tools required.
- Only carry out work using suitable tools.

CAUTION
Safety information
Injury hazard due to improper assembly:
- Ensure that all components in the Scooter have been correctly assembled.
- After assembly, check that all locking devices are holding correctly.
Accident hazard due to incorrect bolted connections:
- If bolted connections have self-locking nuts, ensure that these are replaced when reassembling.
- Do not replace self-locking nuts with normal nuts.
- If bolted connections have lock washers, check lock washers when reassembling and replace if necessary.
Intended use
The KYMCO Healthcare scooter is constructed for use both indoors (Suggest general use: indoors) and outdoors.
This product's seat could include Phthalates material in surface. Phthalates are WHO officially announced as an environmental hormone, with the role of female hormones in the body can interfere with the body's endocrine system, advising pregnant women to avoid prolonged use of this product.
Advise pregnant women and children to avoid prolonged use of this product.

Safety information
Safety when handling batteries
Fire hazard:
- Do not cover the battery charger and ventilation slot while charging batteries.
- Only use the battery charger in well-ventilated rooms.
Risk of accidents:
- Only use the original battery charger (included in delivery).
- Let your dealer replace your battery.
- Only use batteries as detailed in the chapter entitled "Specifications".
- Observe warning information given by the battery manufacturer.
- Batteries are extremely heavy.
Burn hazard due to damaged batteries:
Batteries discharging acid can lead to serious burns.
- Do not touch damaged batteries with your bare hands. Use rubber gloves!
- If acid should contact your skin, wash the affected area immediately with plenty of water and contact a doctor.
- If acid should come in contact with your eyes, rinse them out immediately with lots of water and visit a doctor.
- Always change any clothing soiled with battery acid immediately.
Safety information
Safety - information about electronics:
Accident hazard due to failures:
Radio, television, radio transmission devices and mobile phones produce electromagnetic fields. These can negatively influence the scooter electronics functions.
- Do not drive close to strong radio or television transmitters (transmitter masts).
- Switch the scooter off if you are using your mobile phone.
Failure in outside devices:
The Scooter produces an electromagnetic field which can have a negative influence on the function of any other electrical devices in the immediate surroundings (such as medical devices, radio receivers, cellular phones).
Please note that there is a note on the side of the tyre "not suitable for highway use", this does not apply to KYMCO ForU mobility scooters.
Versions
Extent of delivery
After receiving your scooter, please check the following:
-
That the delivery is complete in accordance with the list below
-
The delivery condition using the inspection plan
If any faults are apparent or components are missing, please contact your supplier.
The following items are included in delivery in addition to the scooter
-
Shopping basket
-
Two vehicle keys for switching the scooter.
-
Battery Charger
-
Owner's Manual
Components
text_image
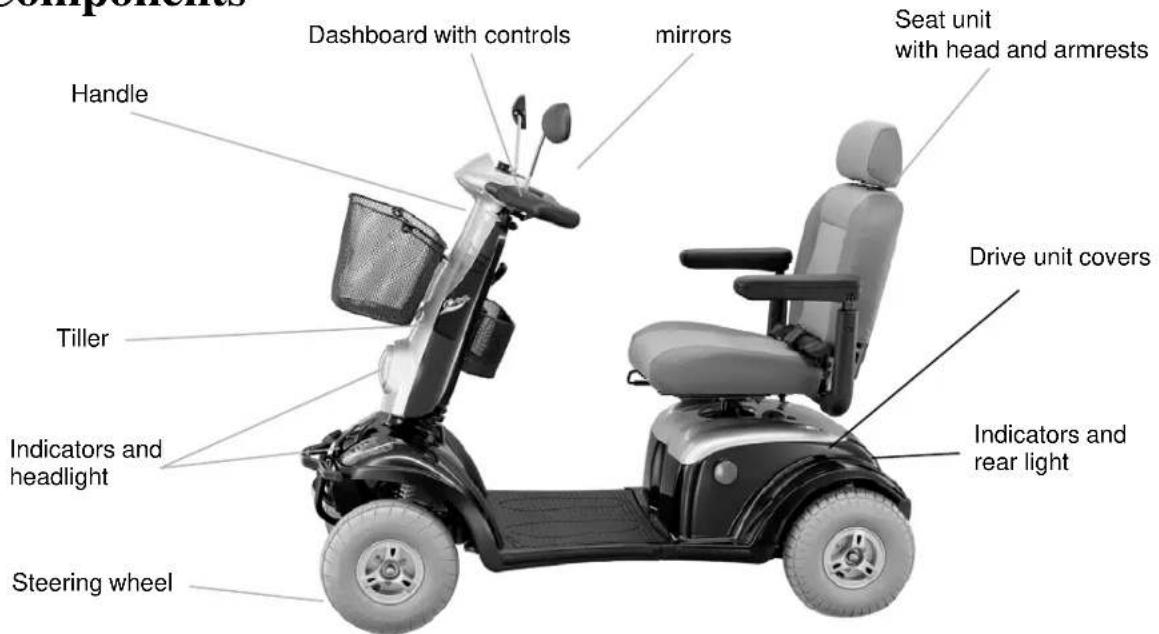
Compulsors Dashboard with controls mirrors Handle Tiller Indicators and headlight Steering wheel Seat unit with head and armrests Drive unit covers Indicators and rear lightNOTE: Your scooter may differ slightly in appearance from the images in this manual.
Components
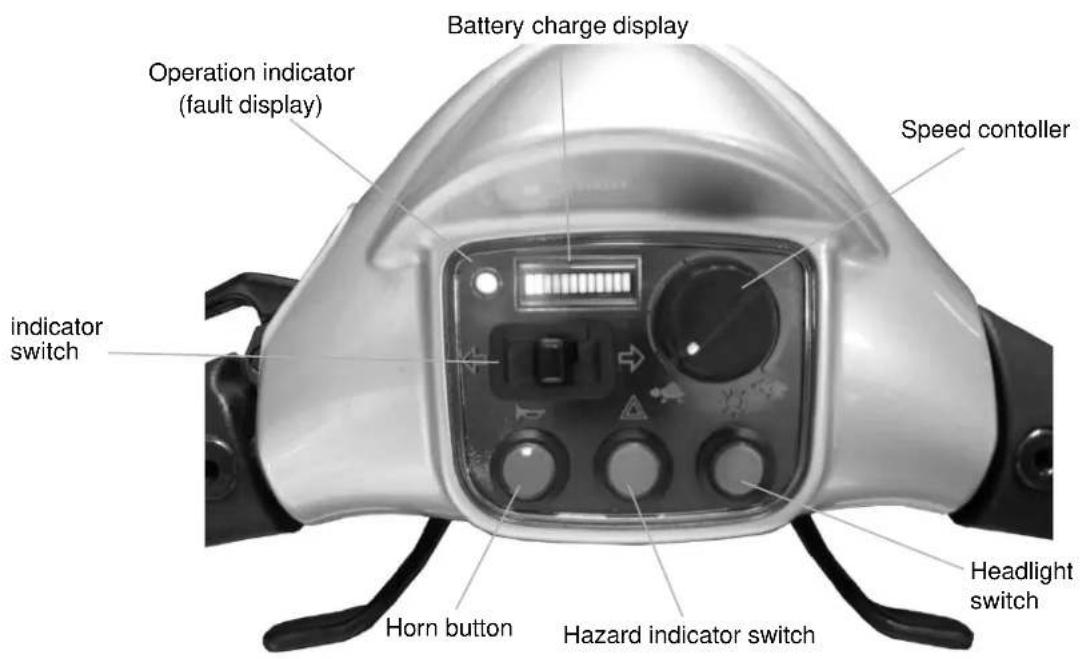
The dashboard - displays and controls
text_image
Battery charge display Operation indicator (fault display) Speed controller indicator switch Horn button Hazard indicator switch Headlight switchBrief instructions
- Turn the seat to the outside.
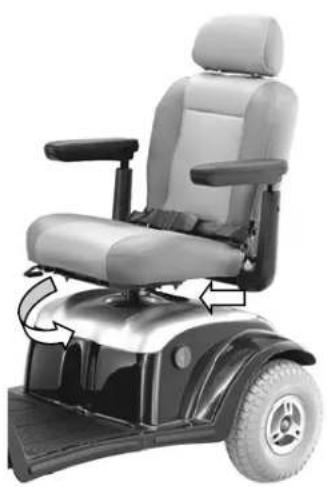
natural_image
Exterior view of a modern electric motor with visible wheels and seat (no text or symbols)2.Get in - turn the seat in the direction of travel
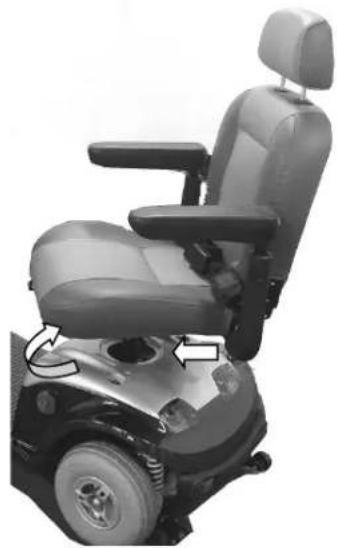
natural_image
Interior view of a modern electric vehicle with visible seat, steering wheel, and battery (no text or symbols)Brief instructions
- Fasten the seat belt.
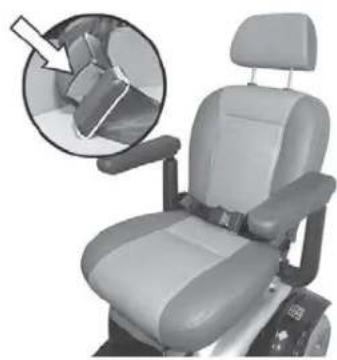
natural_image
Side view of a car seat with a highlighted inset showing internal components (no text or symbols visible)- Switch on the Scooter
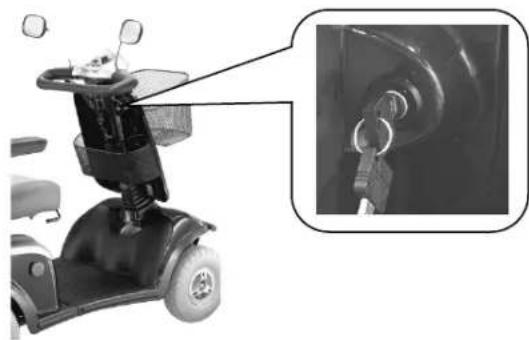
natural_image
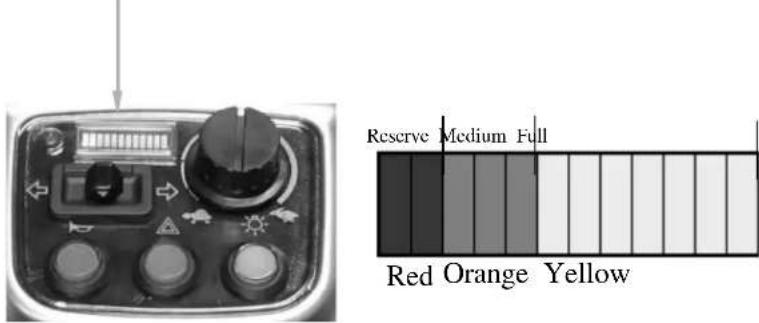
Exterior view of a motor scooter with attached steering wheel and head-mounted sensors (no text or symbols visible)- Check the battery charging state
text_image
Reserve Medium Full Red Orange YellowBrief instructions
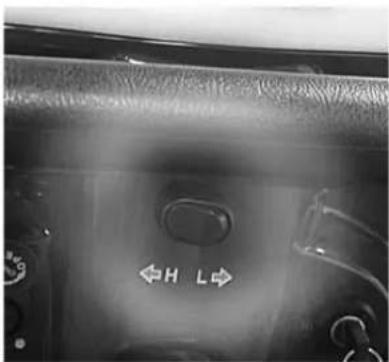
- Adjusting the drive level
H = 12.8 kph (8 mph) maximum driving speed L = 6.4 kph (4 mph) maximum driving speed
text_image
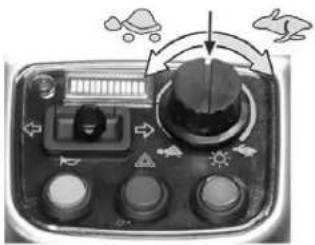
←H L→- Set the maximum speed

lowest possible driving speed

highest possible driving speed
natural_image
Close-up of a vintage analog oscilloscope with control knobs and indicator lights (no visible text or symbols)- Driving
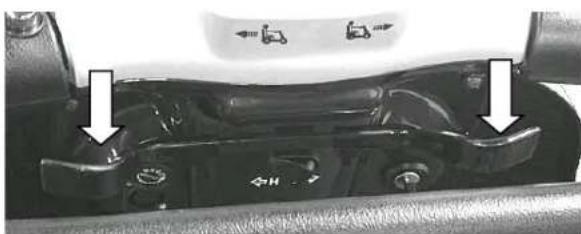
Operate the drive lever slowly until the required speed has been reached
The drive lever position controls the speed variably right up to maximum driving speed.
Forwards Reverse
natural_image
Close-up of a mechanical component with arrows pointing to specific parts (no visible text or symbols)Adjusting the seat height
Setting up the FORU scooter:
The following passage describes how to set up your scooter in order to ensure that you have a comfortable and safe drive.
Adjusting the seat height
NOTE:
The seat must be removed from the scooter in order to adjust the seat height. You should try to get help from a second person if possible or contact your dealer.
Removing the seat:
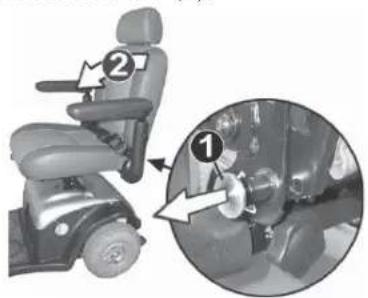
Tilt the backrest forwards.
First pull out the locking device (1) and then fold the backrest forward (2).
text_image
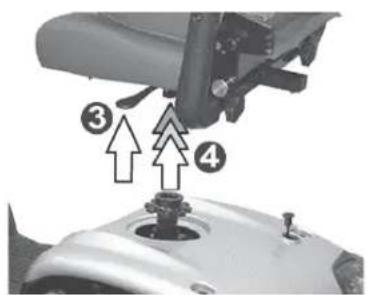
Diagram showing a motor seat with labeled parts and an inset close-up of the interior view.Lift the seat while pulling the seat lock (3) out of the seat support (4).
text_image
Diagram showing mechanical assembly with numbered components and directional arrows indicating motion or forceAdjusting the seat height
Inserting the seat:
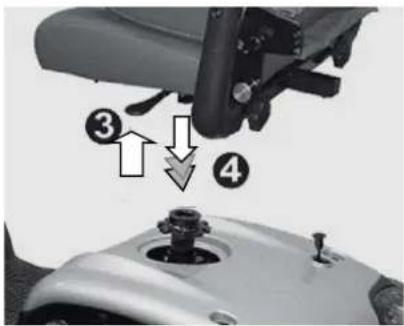
- Pull the seat lock (3) and guide the seat into the seat support (4) from above.
- Let go the seat lock and engage the rotational adjustment by turning the seat a little one way then the other.
text_image
Diagram showing mechanical assembly steps with numbered annotations indicating sequence of componentsNOTE:
If after inserting the seat it is not possible to turn the seat or to pull the seatlock, the seat is not properly locked.
Tilt the backrest backwards:
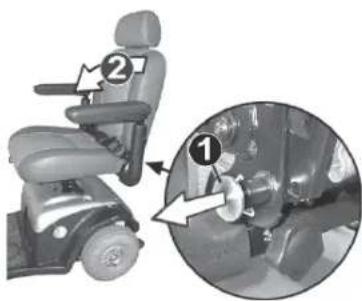
- Pull the locking lever (1) and move the backrest backwards to the required position (2).
- Let go of the locking lever and engage the locking mechanism by pushing the backrest slightly forwards and backwards.
text_image
Diagram showing a motor seat with labeled parts and an inset close-up of the wheel's seat, highlighting two numbered positions.Adjusting the seat position
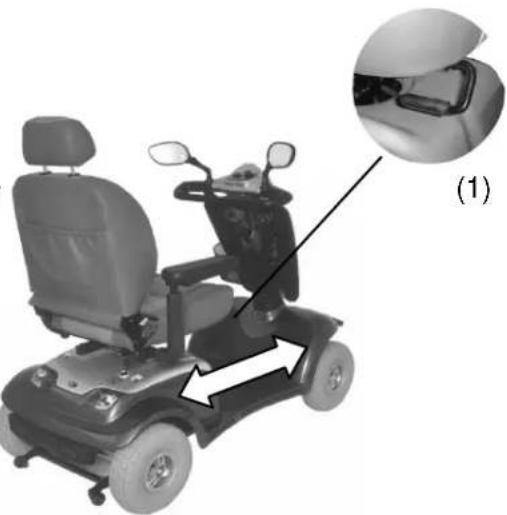
Adjusting the distance between seat and tiller-If seat slider fitted
- Pull the locking lever (1) upwards and move the seat forwards or backwards to the required distance.
- Let go of locking lever and engage the locking mechanism by pushing the seat slightly forwards and backwards. Moving the seat
NOTE:
Accident hazard due to non-engaged seat:
Ensure that the seat is properly engaged after adjustment by pushing the seat slightly forwards and then backwards.
natural_image
Exterior view of a motor scooter with an inset close-up showing the front wheel (no text or symbols visible)Adjusting the seat position
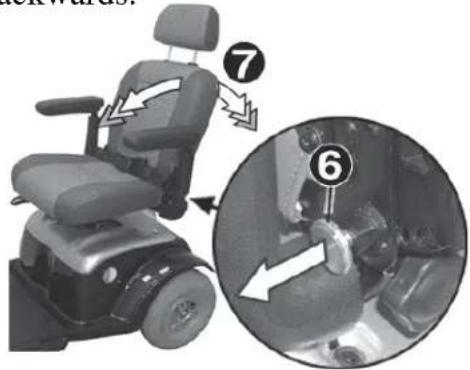
Adjusting the backrest angle-If fitted
The backrest angle can be adjusted in three locking stages.
- Pull the locking lever (6) and move the backrest forwards or backwards to the required position (7).
- Let go of the locking lever and engage the locking mechanism by pushing the backrest slightly forwards and backwards.
Accident hazard if backrest is not properly engaged!
Ensure that the backrest is properly engaged after adjustment by pushing it slightly forwards and then backwards.
text_image
Diagram showing motor seat assembly with numbered instructions and mechanical componentsAdjusting the seat position
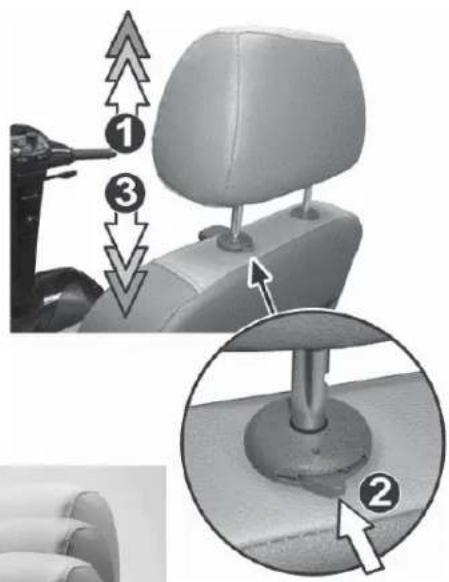
Adjusting the headrest height
Raising the headrest:
Pull the headrest upwards into the required position (1) until the lowering protection engages audibly.
Lowering the headrest:
- Press the locking lever (2) in and push the headrest down to the required position (3).
Release the locking lever, and engage the lowering protection by moving the headrest slightly.
text_image
Diagram illustrating the seatbelt mechanism with numbered steps and a magnified view of the base component.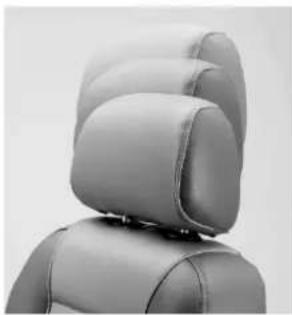
natural_image
Close-up of a car seat with two rear seats and a backrest, showing no text or symbols.Adjusting the seat position
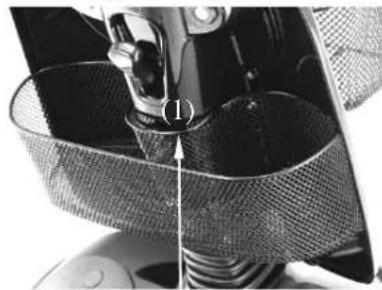
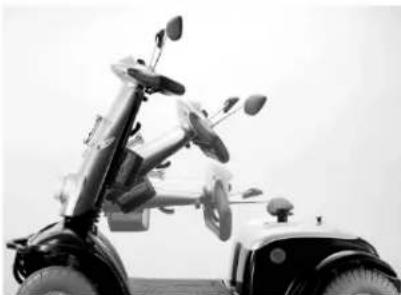
Adjusting the tiller angle:
Always adjust the tiller so that you can reach all displays and controls easily at any time. The tiller can be variably adjusted.
- Push or pull the locking lever (1)
- Push the tiller forwards or backwards into the required position(2)
- Release the locking lever/knob.
- Ensure that the tiller is engaged correctly by moving it backwards and forwards.
NOTE:
Accident hazard due to non-engaged tiller:
Ensure that the tiller is properly engaged after adjustment by pushing it slightly forwards and then backwards.
Locking Mechanism
natural_image
Close-up of a mechanical device with mesh components and a labeled component (1), no visible text or symbols.Push the locking lever -lock
Pull the locking lever -unlock
natural_image
Black and white photo of a vintage electric scooter with visible wheels and mirrors (no text or symbols)(2)
Driving information
Information about safe Scooter driving
NOTE:
Always carry out the safety information described in page 1 “Safety information”:
Driving the Scooter is very simple and after a few practice sessions you will find it very easy.
The following information should help you to drive safely through traffic:
-
Always match your speed to the driving situation in which you find yourself.
-
always reduce the speed when you are driving through:
- unclear areas
- narrow gaps
- tight curves
- inclines
- ramps
-
Take a trial run with the Scooter in an area with no pedestrians, or in a closed-off area
-
Always steer the Scooter using both hands on the handlebars
-
Always keep your feet in the foot area while driving the Scooter
Driving information
Driving up inclines and down slopes
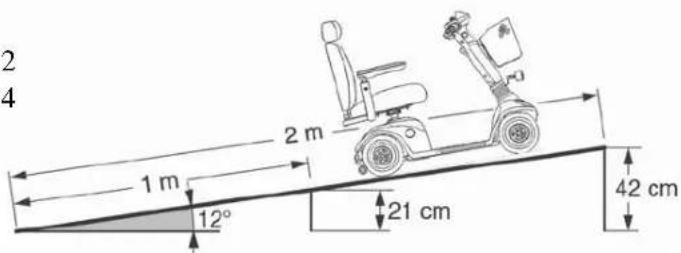
The Scooter can climb up inclines of up to 12^ without danger.
NOTE:
The maximum safe incline has been determined in accordance with the EN standards. The scooter is able, under the maximum specified load, to start, brake and turn. It is possible to negotiate some steeper inclines however we do not advise you to do so. The overload protection device could trip due to a combination of, incline driving duration, steepness of the incline and load applied to the vehicle.
The scooter will slow down to a safe reduced speed to protect the motor if in overload/ over heated conditions.
Please switch off and allow the motor to cool down before continuing your journey. You may need to choose an alternative more suitable route if overload trip re-occurs.
Climb angle examples:
a 1 metre long ramp should not be higher than 2 a 2 metre long ramp should not be higher than 4
text_image
2 4 1 m 2 m 12° 21 cm 42 cmDriving information
Avoid driving across an incline (always try to drive in the direction of the incline / decline).
There is an increased danger of tipping when climbing or descending gradients if:
the Scooter is loaded at the back and additionally
the backrest (captain's seat) is leant towards the back and the seat has been adjusted to its rear position.
You can achieve increased tipping safety if: you adjust the seat in a more forward position.
you adjust the backrest (captain's seat) to be vertical
you lean your upper body slightly forwards (see sketch)
Tipping hazard
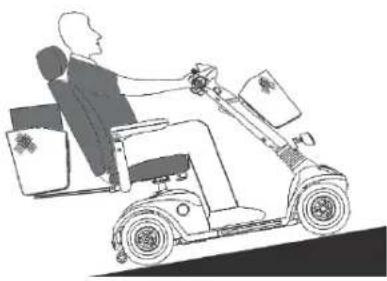
natural_image
Illustration of a person riding a motorized scooter with boxes, no text or symbols presentIncreased tipping safety
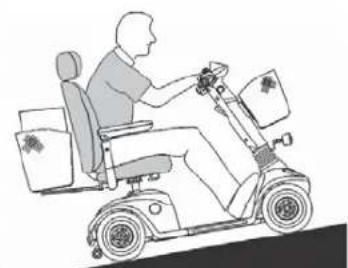
natural_image
Line drawing of a person riding a scooter with cargo boxes (no text or symbols)Driving information
Overcoming obstacles:
The Scooter can climb over obstacles such as kerbstones up to height of 10 cm without any problem. Please observe the following points to make sure that your Scooter doesn't tip over while climbing obstacles: don't try to drive over obstacles which are too high example: kerbstones remedy:always climb up kerbstones at lowered entry areas such as driveways
DO NOT try to climb an obstacle when on an incline approach the obstacle at a right angle try to clear the obstacle in one go DO NOT drive over the obstacle with just one wheel
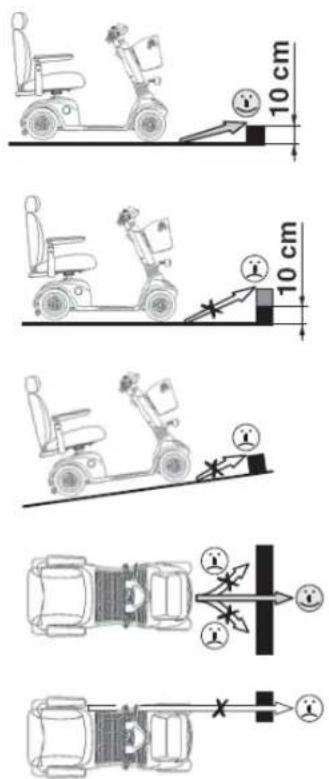
Driving information
DO NOT drive backwards over an obstacle
DO NOT drive backwards down a kerb
DO NOT drive down stairs or steps
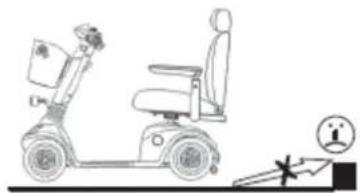
natural_image
Illustration of a motor and scooter with a warning sign (no text or symbols present)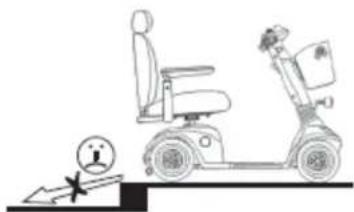
natural_image
Illustration of a person riding an electric scooter with a warning sign and directional arrow (no text or symbols)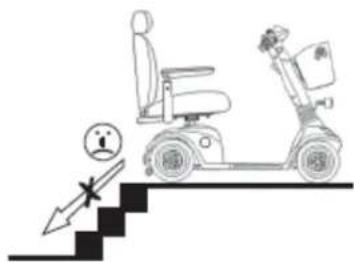
text_image
Diagram illustrating a person on an electric scooter with a warning sign and directional arrows indicating safety or risk.Driving information
Driving Information – Overcoming kerbs
NOTE:
Risk of accidents:
Neogating kerbs needs some practice.
Please observe the maximum obstacle heights of 8 cm.
Please start practicing kerb climbing with small kerbs.
-
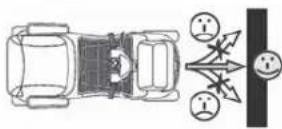
Approach the kerb at a right angle.
-
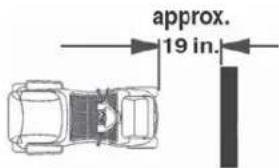
Stop approximately 0.5 Meter /19 inches in front of the kerb.
-
Adjust the speed controller to maximum speed.
-
Press the drive lever fully then start forward.
Approach at a right angle(1)
Stop in front of the kerb(2)
text_image
approx. 19 in.Adjust the speed-controller(3)
natural_image
Close-up of a control panel with buttons and indicators (no readable text or symbols)Driving the scooter
Seat belt -If fitted adjusting for length and fitting
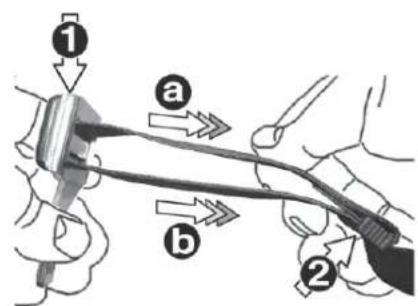
Adjusting for length:
Turn the seatbelt closer (1) at right angles to the seat belt.
Adjust the length by pulling the appropriate belt side.
(a) = shortening the belt length
(b) = lengthening the belt length
Tension the loose seatbelt end by pulling the belt holder (2).
Adjusting for length
text_image
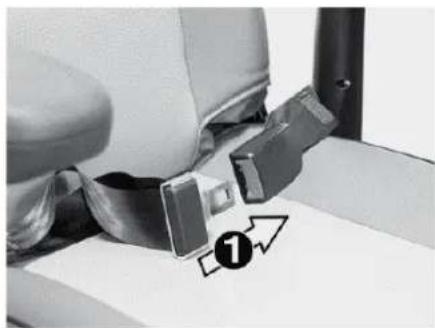
Diagram illustrating a mechanical or electrical device with labeled parts (a, b, 1, 2) and directional arrows indicating motion or force.Closing the seatbelt:
Press the closer (1) into the lock until it audibly engages.
natural_image
Close-up of a car seatbelt buckle being inserted, with a numbered arrow indicating the point of insertion (no text or symbols present)Driving the scooter
Turning the seat
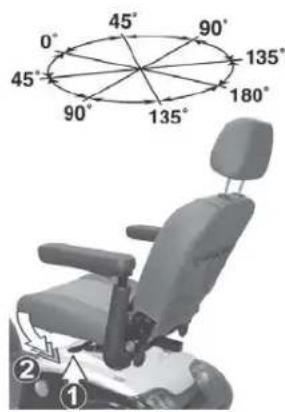
The seat can be turned to both sides of the angle, and firmly engaged in 8 positions (each position turns 45^ ).
Turning the seat:
Pull the turning lock (1), turn the seat in the required direction or position (2) and engage.
NOTE: Accident hazard due to incorrect seat position:
Always turn the seat to face forwards and engage it before driving.
If the seat has been turned, the possibility of tipping is increased.
Before turning the seat, always ensure that the scooter is on an even and solid surface.
Switching the scooter on
Insert the key into the switch and turn it to the right to switch the Scooter on.
text_image
0° 45° 90° 135° 180° 45° 90° 135° ② ①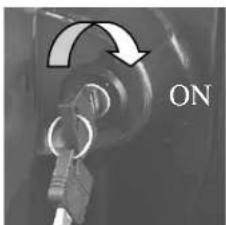
natural_image
Close-up of a mechanical switch with an arrow indicating rotation, labeled 'ON' (no other text or symbols)Driving the scooter
Operation indicator and fault display
Operation indicator on :
the Scooter is switched on and ready for driving.
Operation indicator blinking :
please contact your supplier.
Adjusting the speed
NOTE:
Use the adjustment facilities to adjust the speed to suit local conditions.
Select a lower speed if you are driving through narrow gaps, on inclines or through crowds.
Preselecting the drive level
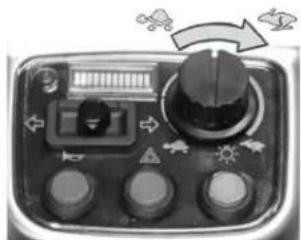
You can use the drive level selection switch to set the maximum driving speed.
Drive levels:
H = 12.8kph (8 mph) maximum driving speed L = 6.4kph (4 mph) maximum driving speed
Operation indicator

natural_image
Close-up of a control panel with buttons and indicator lights (no readable text or symbols)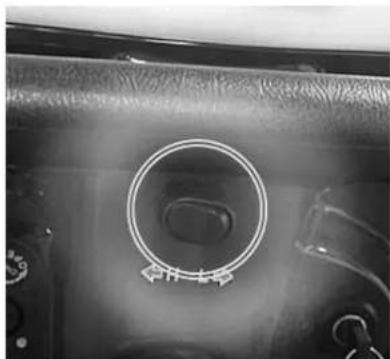
natural_image
Close-up of a car interior panel with a circular dial indicator and directional arrows (no readable text or symbols)Move the toggle switch to setting H or L to adjust the required maximum driving speed.
Driving the scooter
Adjusting the speed
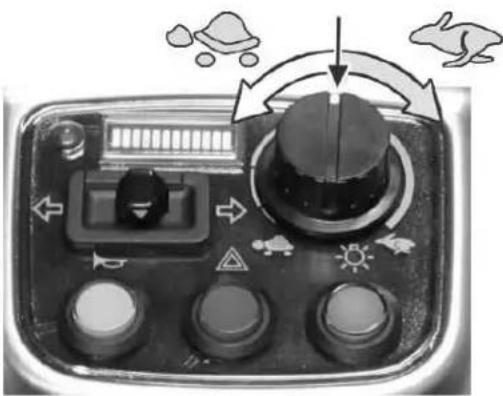
Your maximum driving speed can be variably adjusted using the speed controller.
Maximum driving speed = drive lever pressed as far as stop

Controller symbols:
= lowest possible maximum driving speed for the required drive level

= highest possible maximum driving speed for the required drive level
Adjust the required maximum driving speed by turning the speed controller.
Speed controller
natural_image
Close-up of a digital multimeter with rotary knob and control buttons, no visible text or symbolsDriving the scooter
Driving:
Hold the tiller firmly in both hands.
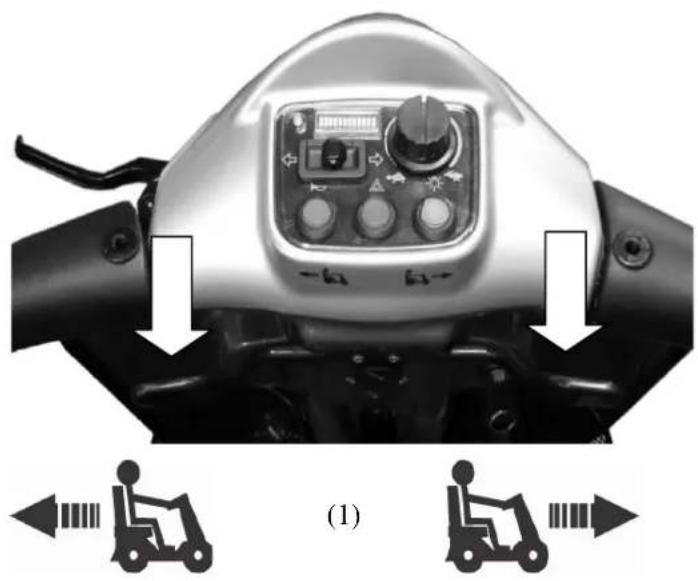
Press the drive lever (1) in the direction of travel until the required speed has been reached.
= driving forwards
= driving in reverse
Brakes:
Using the motor brake
Let go of the drive lever (1).
The drive lever stops in the central position
- the Scooter uses the motor to brake.
natural_image
Front view of a motorcycle's head panel with control buttons and two forklift icons below (no text or symbols on main body)NOTE: Emergency braking = let go of the drive lever:
The drive lever automatically returns to the central position if you let go, the Scooter automatically brakes using the motor.
Driving the scooter
Using the handbrake:
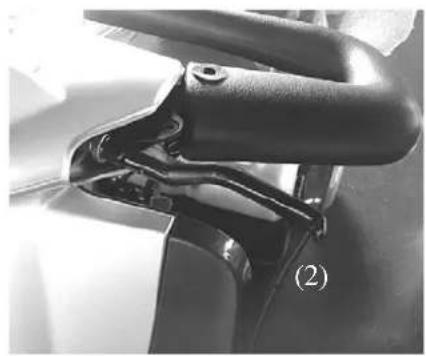
To use the handbrake, pull the brake lever (2) slowly towards the handlebar.
NOTE:
Tipping hazard
Pulling the brake lever too violently can cause the Scooter to tip over.
Pull the brake lever slowly in order to brake the Scooter.
natural_image
Close-up of a mechanical component with a black handle and mounting bracket, labeled (2) in the corner (no text or symbols on the object itself)(3)
Indicating
Toggle switch (3):
indicate right = toggle switch to the right indicate left = toggle switch to the left
When turning is completed, press the switch (3) to switch the indicators off.
Left

natural_image
Close-up of a mechanical component with directional arrows indicating movement or force (no visible text or symbols)Right
Driving the scooter
Switching on the headlights
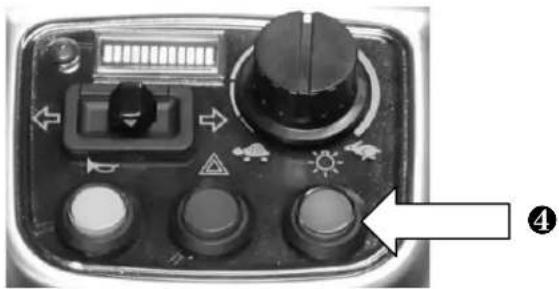
Pressure switch (4):
switch on = press switch once
switch off = press switch again
The switch indicator lamps shows whether the headlight is switched on or not.
natural_image
Close-up of a control panel with buttons and indicators (no readable text or symbols)NOTE:
If you drive with the headlights on, the Scooter driving range will be reduced.
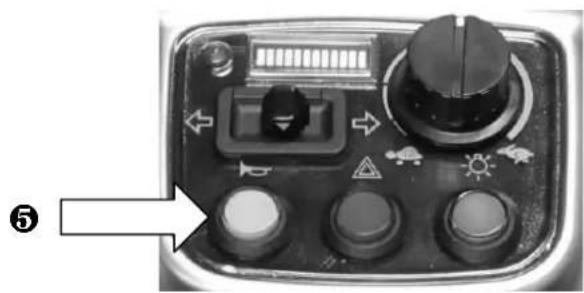
Using the horn
Press the horn button (5).
It will sound for as long as you hold the button down.
natural_image
Close-up of a control panel with buttons and indicators (no readable text or symbols)Driving the scooter
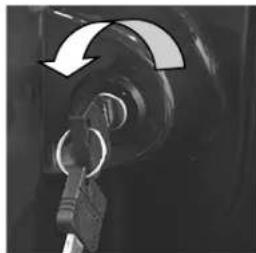
Switching off / parking the Scooter
Turn the key to the left to switch the Scooter off.
Always turn the Scooter off using the keyswitch if you:
-want to get on or off.
- intend to stop for long periods.
Always remove the key from the keyswitch if you:
-want to park the Scooter and get off.
Hazard lamps
Pressure switch :
switch on = press switch once
switch off = press switch again
The switch indicator lamps shows whether the hazard lamps are switched on or not.
NOTE:
Leaving the Scooter with the hazard lamps on uses up the battery.
OFF
natural_image
Close-up of a mechanical component with curved arrows indicating motion or direction (no visible text or symbols)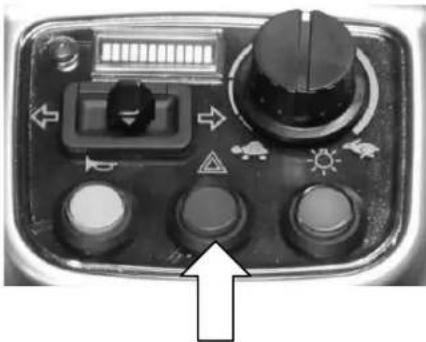
natural_image
Close-up of a black electronic device control panel with buttons and indicators (no readable text or symbols)6
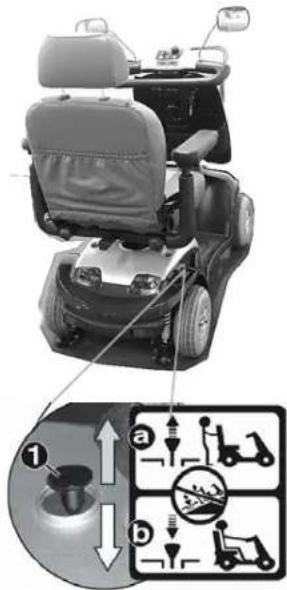
Pushing the scooter
In order to be able to push the Scooter, you must disengage the drive motor.
The disengaging lever (1) is located on the bottom right-hand side of the Scooter.
No one is permitted to sit on the Scooter when it is being pushed.
= Pushing (a):
Switch off the Scooter.
Pull the engaging lever (1) upwards as far as the stop (limit position).


= Driving (b):
Push the engaging lever (1) downwards as far as the stop (limit position).
NOTES:
- Always switch the Scooter off to push it.
- If a pre-set speed is exceeded while you are pushing the Scooter, the drive motor will switch on automatically and brake the scooter
text_image
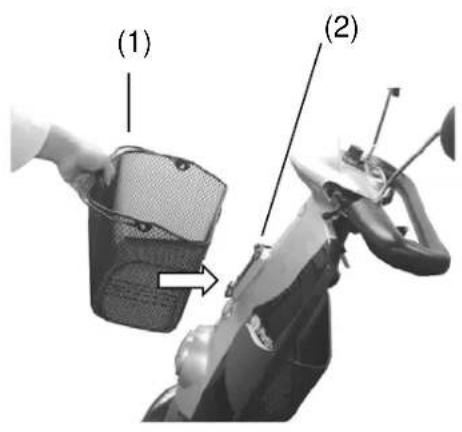
Diagram of a motor with labeled parts and safety instructions for vehicle use, including correct/incorrect actions and safety symbols.Attaching the shopping basket:
Push the shopping basket (1) from above into the basket holder receptacles (2) on the tiller.
NOTE:
Use the shopping basket only for small loading. .(approximate 3kg below)
text_image
(1) (2)Charging the batteries
Charging information:
The surrounding temperature should be between 10^ and 30^ Celsius.
The charging time will increase at lower temperatures.
Only use the original battery charger (included in delivery).
Only use the battery charger in a dry and well-ventilated room.
Do not cover the battery charger and ventilation slot while charging batteries.
The battery charger has an automatic switch-off device which prevents overcharging the batteries. Do not leave the battery charger connected to the scooter for more than 24 hours.
- The batteries can be charged overnight.
Switch the Scooter off before charging the batteries.
Charging times:
Between 8 and 9 hours depending on current battery charge state.
NOTE:
The battery charger is designed to be able to charge completely discharged batteries within eight hours to 80% of their capacity.
Preparing the battery charger
Plug the mains cable plug (1) into the jack socket (2) on the battery charger.
Charging the batteries
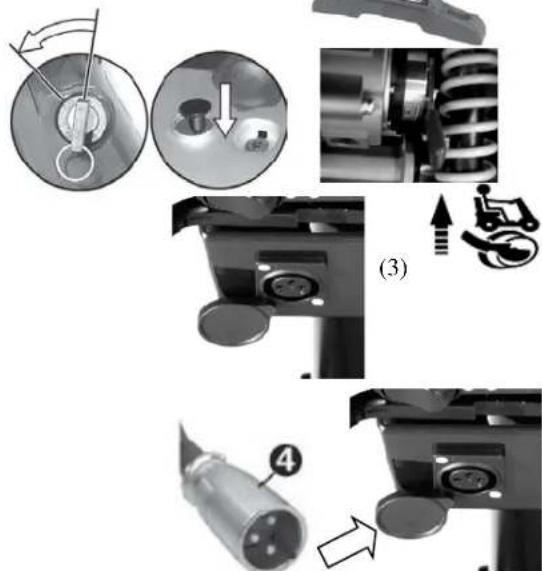
Switch the Scooter off.
Engage the engaging lever for push mode into the "drive" position.
It is imperative that you observe the sequence for connecting and disconnecting the battery charger.
The jack socket (3) for connecting the battery charger is located on the left of the tiller.
(1.) Connect the battery charger plug (4) to the scooter charging socket.
Switching off
text_image
Technical diagram illustrating mechanical assembly steps with labeled components and directional arrowsCharging the batteries
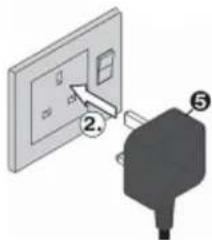
(2.) Connect the battery charger mains plug (5) to a mains socket and switch on.
LED information at battery charger during charging:
LED-> Color-> Meaning
1 --- Green--- battery charger switched on
2 --- Yellow--- charging in progress
3 --- Yellow--- charging 90%
4 --- Green--- complete charging, battery completely charged
text_image
Diagram showing a plug inserted into an electrical outlet with labeled parts and numbered annotations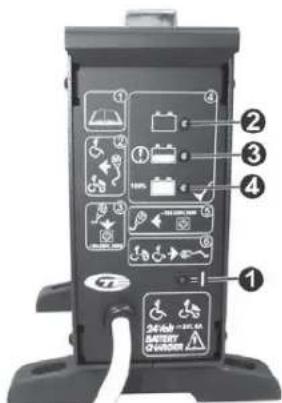
text_image
Diagram of a mobile phone control panel with labeled buttons and icons for battery, switch, and security functions.Charging the batteries
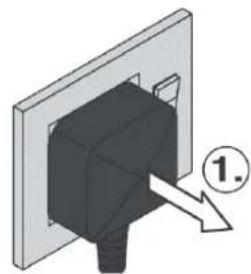
(1.) Switch off and Remove the battery charger plug from the mains socket.
(2.) Pull the battery charger jackplug out of the Scooter jack socket.
natural_image
3D diagram of a wall socket with a black component inserted, showing a downward arrow and number 1 (no text or symbols on the diagram itself)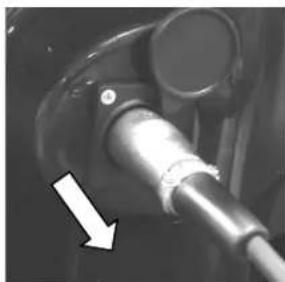
natural_image
Close-up of a mechanical component with a white arrow pointing to a cylindrical feature (no visible text or symbols)Maintenance and Inspection
Maintenance and Inspection
If you find any faults on your scooter during maintenance which are not covered by the repair information, please contact your dealer.
Always remove faulty scooters from operation and secure them against unauthorised use (remove key).
Daily maintenance before start of journey
Check the brakes by driving slowly and then braking.
Check that the lights and indicators are functioning correctly.
Make a visual check of wheels and tyres for damage and loss of pressure.
Weekly inspections / tyre pressure
NOTE: Danger of injury due to overpressurised tyres:
The tyres will burst if inflated with too much air pressure
Never inflate the tyres over the specified pressure.
Only use calibrated instruments to measure
the air pressure in the tyres (such as are available at filling stations).
natural_image
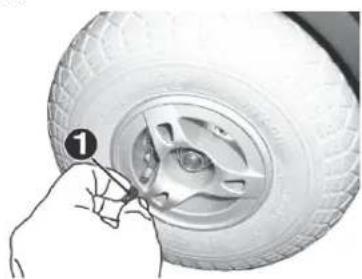
Hand adjusting a tire component with a numbered label (1) on the tire surface (no text or symbols on the tire itself)Remove valve cap (1) - check air pressure.
Inflation pressure = 25 -28 PSI
18 - 20 hPa
1.8 - 2.0 bar
Screw the valve cap back on.
Specifications
General data
Maxi XLS
Version....4-wheel version
Turning radius 1650mm
Speed 12.8 kph (8mph) Maximum
Range*...... approx. 57km(35 Mile)
Maximum climable incline.... 12°
Maximum climable obstacle.... 100 mm
Total weight(ready for driving incl. batteries) 138kg
Weight heaviest part 37kg
Maximum working load (user weight) 200kg (440lb)
Tyre size (4.00 - 5)
Tyre pressure 28Psi (2.0 bar)
Working voltage (battery voltage) 24Volt
Batteries....2 batteries of make--12V80 Ah*2
Batterie charger 240V/8A
LED:
Front position light 24V / 0.72W
Rear position light 24V / 072W
Front indicator 24V / 0.6W
Rear indicator 24V / 0.6W
Head light 24 V / 0.72W
Rear brake light 12V / 0.72 W(auxiliary brake version)
Theoretical range is calculated under test conditions in accordance with European standards. Actual range in normal use will depend on many factors, including the condition of the vehicle and its batteries, the weight of the driver, correct tyre pressure, ambient temperature, and the gradient and surface of the road or pavement.
Transporting the ForU
1. Transport information
Depending on the size of the transport vehicle, the ForU can be dismantled in a few steps so that it can also be easily transported in smaller vehicles.
When transporting, take particular care to ensure that the batteries are securely fastened and make sure components cannot tip over. No liability can be accepted for damage caused by transportation.
2. Transporting the complete scooter

No persons are permitted to sit on the scooter during loading! No persons are permitted to sit on the scooter during transport!
Drive or push the ForU up a ramp into the vehicle.
Switch the engaging lever to drive mode.
Secure the ForU against tipping over by fastening it to the transport vehicle with transport straps.
3. Preparation for transport - separating components

Clamping and crushing hazard!
Increased hazards due to clamping or crushing result due to the high component weight (such as batteries) during preparation for transport.
Always carry out any work to be done with great care. Always try to get help from a second person, especially when stowing parts for transport.
Revision Information
Maxi XLS-EQ40BC (UK version only)
| Item | Page | Before | Revised |
| Model name | Front cover | Maxi L ForU | Maxi XLS |
| Shopping basket | 36 | With shopping basket | Without shopping basket |
| Seat | 10,18 | Captain seat | Luxurious seat |
| LED | 43 | Bulbs | LED |
| Front panel | Front page | Without K logo and KYMCO label | With K logo and KYMCO label |
Revised date: April 2012
By KWANG YANG Motor Co., Ltd.
Fifth Edition, April.2012
All rights reserved. Any reproduction or
unauthorized use without the written permission of
KWANG YANG Motor Co., Ltd.
is strictly prohibited.
T300-EQ40BC -A1

•NO.35 Wan Hsing Street, San Min District Kaohsiung city, Taiwan, Republic Of China
•NO.61, Chung-Shan Sth Rd, Lu-Chu Village, Kaohsiung County, Taiwan, Republic Of China
Date printed:2012. APR