
DC E1000 - Camera BENQ - Free user manual and instructions
Find the device manual for free DC E1000 BENQ in PDF.


| Product Type | Digital Camera |
| Brand | BenQ |
| Model | DC E1000 |
| Megapixels | 10.0 MP |
| Optical Zoom | 3x |
| Digital Zoom | 4x |
| Display Size | 2.5 inches |
| Storage Media | SD / SDHC card |
| Battery Type | 2x AA alkaline or NiMH |
| Dimensions (W x H x D) | 94 x 62 x 31 mm |
| Weight (without battery) | 135 g |
| Interface | USB 2.0 |
| Main Functions | Photo capture, video recording, playback, face detection, scene modes |
| Care and Cleaning | Wipe with dry soft cloth; avoid liquids and direct sunlight |
| Safety | Keep away from water and extreme temperatures; use recommended batteries |
| Spare Parts and Repairability | Contact BenQ support; limited availability of spare parts |
| General Information | Compact digital camera with 10MP sensor and 3x optical zoom |
Frequently Asked Questions - DC E1000 BENQ
User questions about DC E1000 BENQ
0 question about this device. Answer the ones you know or ask your own.
Ask a new question about this device
Download the instructions for your Camera in PDF format for free! Find your manual DC E1000 - BENQ and take your electronic device back in hand. On this page are published all the documents necessary for the use of your device. DC E1000 by BENQ.
USER MANUAL DC E1000 BENQ
Copyright 2007 by BenQ Corporation. All rights reserved. No part of this publication may be reproduced, transmitted, transcribed, stored in a retrieval system or translated into any language or computer language, in any form or by any means, electronic, mechanical, magnetic, optical, chemical, manual or otherwise, without the prior written permission of this company.
Disclaimer
BenQ Corporation makes no representations or warranties, either expressed or implied, with respect to the contents hereof and specifically disclaims any warranties, merchantability or fitness for any particular purpose. Further, BenQ Corporation reserves the right to revise this publication and to make changes from time to time in the contents hereof without obligation of this company to notify any person of such revision or changes.
Taking care of your camera
- The camera operating temperature is between 0 and 40 degrees Celsius. It is normal for the operating time to be shortened when the temperature is low.
-
Do not use or store your camera in the environments listed below:
-
Direct sunlight
– High and dusty places
– Next to an air conditioner, electric heater or other heat sources
– In a closed car that is in direct sunlight
– Unstable locations -
If your camera becomes wet, wipe it with a dry cloth as soon as possible.
- Salt or seawater may cause severe camera damage.
- Do not use solvents, such as alcohol, to clean your camera.
- If the lens is dirty, use a lens brush or soft cloth to clean the lens. Do not touch the lens with your fingers.
- To prevent electric shock, do not attempt to disassemble or repair your camera by yourself.
- Water may cause a fire or electric shock. Therefore, store your camera in a dry place.
- Do not use your camera outdoors when it is raining or snowing.
- Do not use your camera in or near water.
- If a foreign substance or water gets in your camera, please turn the power off immediately and remove the batteries. Remove the foreign substance or water, and send it to the maintenance center.
- Transfer the data to the computer as soon as possible to avoid losing your images and / or video clips.
Disposal of Waste Electrical and Electronic Equipment by users in private households in the European Union.
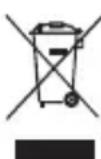
This symbol on the product or on the packaging indicates that this can not be disposed of as household waste. You must dispose of your waste equipment by handing it over to the applicable take-back scheme for the recycling of electrical and electronic equipment. For more information about recycling of this equipment, please contact your city office, the shop where you purchased the equipment or your household waste disposal service. The recycling of materials will help to conserve natural resources and ensure that it is recycled in a manner that protects human health & environment.
CE Regulatory Notice
Hereby, BenQ Corp. declares under our responsibility that the product is in conformity with the requirements set out in the Council Directive on the Approximation of the Laws of the Member States relating, Electromagnetic Compatibility Directives (89/336/EEC, 92/31/EEC) and Low Voltage Directive (73/23/EEC). A "Declaration of Conformity" in accordance with the above Directives has been made and is available from BenQ Corp. upon request.
FCC Statement
This equipment has been tested and found to comply with the limits for a Class B digital device, pursuant to Part 15 of the FCC Rules. These limits are designed to provide reasonable protection against harmful interference in a residential installation. This equipment generates, uses and can radiate radio frequency energy and, if not installed and used in accordance with the instructions, may cause harmful interference to radio communications. However, there is no guarantee that interference will not occur in a particular installation. If this equipment does cause harmful interference to radio or television reception, which can be determined by turning the equipment o. and on, the user is encouraged to try to correct the interference by one or more of the following measures:
- Reorient or relocate the receiving antenna.
- Increase the separation between the equipment and receiver.
- Connect the equipment into an outlet on a circuit different from that to which the receiver is connected.
- Consult the dealer or an experienced radio/TV technician for help.
Table of Contents
1. Touring Your Camera.... 1
1.1 Checking the package contents.... 1
1.2 Camera components .... 1
1.2.1 Front view 1
1.2.2 Rear view.... 2
1.2.3 LED indicators 2
2. Preparing Your Camera for Use 3
2.1 Installing the batteries.... 3
2.2 Charging the battery.... 4
2.3 Inserting and removing an SD memory card.... 4
3. Using the Camera 6
3.1 Navigator 6
3.2 LCD monitor information (REC mode)...... 6
3.3 Getting started....7
3.3.1 Turning the power on / off 7
3.3.2 Choosing the screen language 7
3.3.3 Setting the date and time....7
3.3.4 Snapshot mode....7
3.3.4.1 Getting started with capturing images 7
3.3.5 Using the flash.... 8
3.3.6 Using the self-timer and burst 8
3.3.7 Using the zoom function....9
3.3.8 Focus mode 9
3.4 Menu options.... 10
3.4.1 Changing the mode.... 10
3.4.1.1 Switching between REC mode and PLAY mode . 1 0
3.4.1.2 Selecting the Scene mode 10
3.4.2 Using the menus.... 11
3.4.2.1 REC menu list (still image) 11
3.4.2.2 REC menu list (movie).... 12
3.4.3 Setup menu 12
3.4.3.1 Setup menu list 13
3.5 Recording movie clips 14
3.6 Recording audio clips 14
3.7 Other recording functions 15
3.7.1 Setting the quality 15
3.7.2 Setting the metering 15
3.7.3 Setting the white balance.... 15
3.7.4 Setting the ISO 16
3.7.5 Setting the Exposure.... 16
3.7.6 Setting the AEB 16
3.7.7 Setting the highlight 16
3.7.8 Setting the sharpness 16
3.7.9 Setting the photo effect 16
3.7.10 Setting the date stamp.... 17
3.7.11 Setting Stabilizer.... 17
3.7.12 Setting Face tracking.... 17
3.7.13 Setting Photo Frame.... 17
3.7.14 Setting AF lamp 17
3.7.15 Setting Av/Tv/M 17
3.8 Playback.... 18
3.8.1 Playing back images.... 18
3.8.2 Playing back movie clips 18
3.8.3 Magnifying & trimming still images 18
3.8.4 Viewing in thumbnail 18
3.8.5 Playing a slide show.... 19
3.8.6 Deleting a single file or all files 19
3.8.7 Deleting multiple files.... 19
3.8.8 Setting the DPOF for printing 20
3.8.9 Other playback functions 20
4. PC Dependent Features 21
4.1 Bundled software 21
4.2 Transferring files to your computer.... 21
4.2.1 Step 1: Connect the digital camera to your computer 22
4.2.2 Step 2: Download images or video clips 22
-
Troubleshooting.... 23
-
Specifications 25
-
Service Information.... 26
Touring Your Camera
1.1 Checking the package contents
Carefully unpack your kit box and ensure that you have the following items.
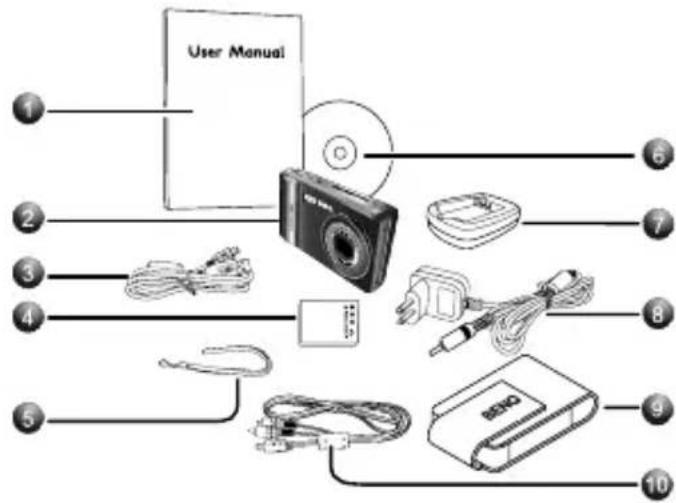
- User Manual
- Digital camera
- USB cable
- Lithium-ion battery
- Hand strap
- Software CD-ROM
- Battery charger
- AC power adapter
- Pouch
- AV cable
• Available accessories may vary depending on sales region.
- If any of the items are missing or appear to be damaged, contact your dealer. Save the packaging in case you need to ship your camera for service.
- All electronic accessories (such as USB, AV cable, adapter, charger, and battery) are designed to work with this BenQ Digital Camera only. Do not use them with other Digital Camera to avoid possible damage.
1.2 Camera components
1.2.1 Front view
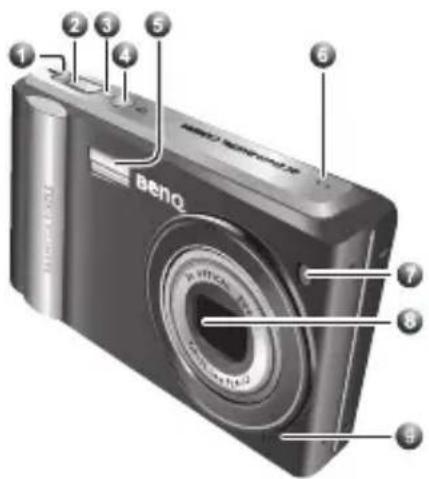
- Stabilizer
2.Shutter button - Status LED indicator
- Power button
- Built-in flash
- Speaker
- Self-timer LED/AF lamp
- Lens/Lens cover
- Microphone
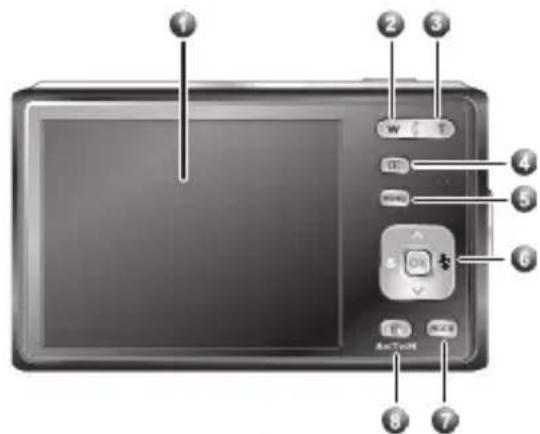
1.2.2 Rear view
-
LCD monitor
-
W Zoom-out or thumbnail
-
T Zoom-in
-
PLAY mode
-
Menu
-
Navigator -- four-way control and OK
-
MODE button
-
Delete / PASM (Av/Tv/M) mode
-
Tripod mount
-
PC (USB) / AV Out terminal
-
Battery/SD memory card cover
-
Strap eyelet
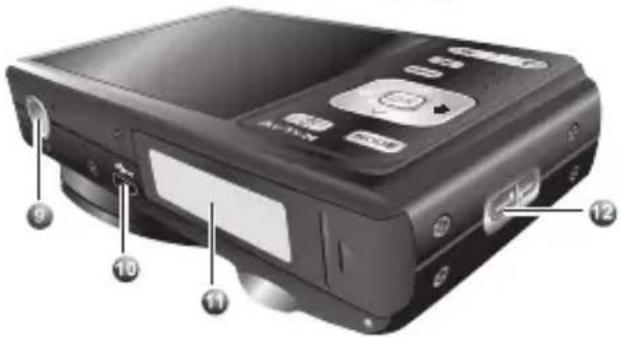
1.2.3 LED indicators
| Indicator State Description | ||
| Status LED | No light The digital camera is off. | |
| Solid green The digital camera is ready to capture images. | ||
| Blinking green | The flash is charging, or the digital camera is in a process. | |
| Self-timer LED Red Self-timer or AF lamp is in a process. | ||

- It is normal for the camera to become warm during operation, because camera casing can conduct heat.
- The LCD display on this camera is manufactured with sophisticated technology, and more than 99.99% of the pixels on the LCD display meet standard specifications. Yet, it is possible that less than 0.01% of the pixels on the LCD display may have some light spots or show unusual colors. This is normal and does not indicate display malfunction, nor will this affect the pictures you take with the camera.
Preparing Your Camera for Use
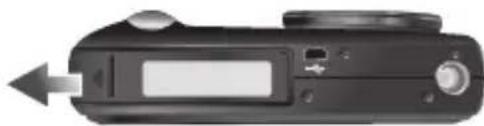
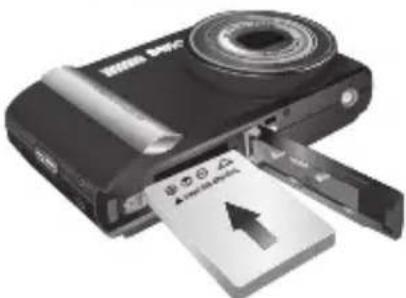
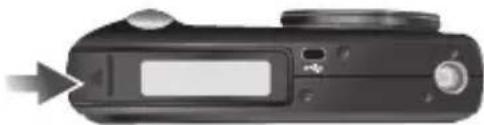
2.1 Installing the batteries
We highly recommend that you use only the specified rechargeable lithium-ion battery for your camera. Make sure that the power of the camera is off before inserting or removing the battery.
To insert the battery:
- Open the battery/SD memory card cover (A).
- Insert the battery in the correct direction shown (B).
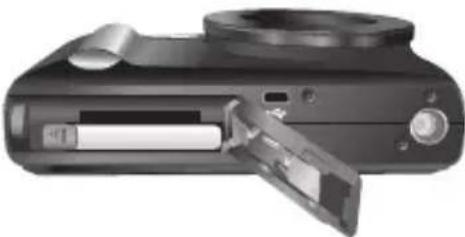
- Push the battery all the way down, until the battery lock lever clicks into place (C).
- Close the battery/SD memory card cover (D).
To remove the battery:
- Open the battery/SD memory card cover.
- Release the battery lock lever.
When the battery has come out a little, gently pull it out the rest of the way.
A
natural_image
Close-up of a black digital camera with a left-pointing arrow indicating left motion (no text or symbols visible)B
natural_image
Black digital camera with attached USB drive and a paper showing an upward arrow (no text or symbols visible)C
natural_image
Close-up of a black digital camera with a scroll wheel and attached clip (no visible text or symbols)D
natural_image
Close-up of a black digital camera with a screen and control buttons, showing no visible text or symbols.2.2 Charging the battery
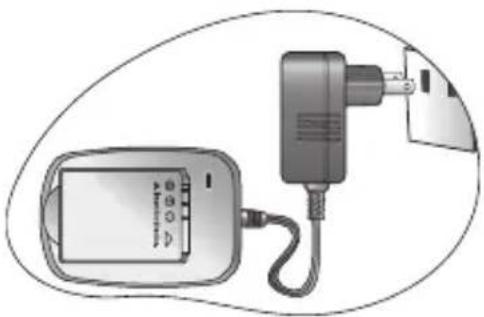
The battery charge status affects the performance of the camera. To maximize the performance and life of the battery, it is recommended that you fully charge the battery using the specified charger set (charger and AC power adapter), and then fully discharge it through the normal use at least one time. Make sure that the power of the camera is off before inserting the battery.
-
Insert the battery into the charger as shown in the illustration.
-
Connect one end of the AC power adapter to the charger.
-
Connect the other end of the AC power adapter to a wall outlet.
-
When the battery is being charged, the charger LED indicator lights up in red. When the battery is fully charged, it turns into green.
natural_image
Illustration of a device connected to a plug and a control panel (no text or symbols visible)The length of the charging time depends on the ambient temperature and the status of the battery.

- The camera must be used with the specified charger set. Damage caused by the use of an incorrect charger set is not covered under the warranty. Always make sure that the camera is off before removing the battery.
- The battery may be warm after being charged or used. This is normal and not a malfunction.
- When using the camera in cold environments, keep the camera and its battery warm by holding it inside your jacket or other warm protective environment.
2.3 Inserting and removing an SD memory card
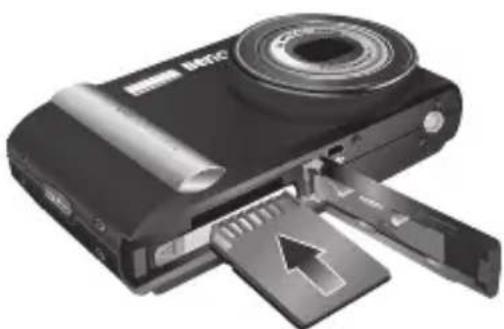
The camera is equipped with internal memory, allowing you to record video clips and capture images. You can also expand the memory capacity by using an optional SD (Secure Digital) memory card to store more files.
- Always make sure the camera is turned off before inserting or removing a memory card.
- Insert an SD memory card in the correct orientation as shown in the illustration.
- Close the battery / SD memory card cover. To remove the SD memory card, make sure the camera is turned off. Press lightly on the edge of the memory card and it will eject.
natural_image
Black and white photo of a digital camera with an open slot and cable, showing internal components (no text or symbols visible)
- Be sure to format the SD memory card with this camera before the initial use.
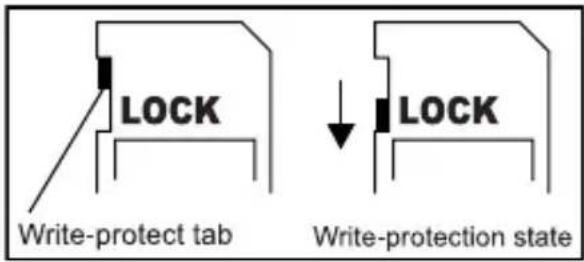
- To prevent valuable data from being accidentally erased from an SD memory card, you can slide the write-protect tab (on the side of the SD memory card) to "LOCK".
• To save, edit, or erase data on an SD memory card, you must unlock the card. - SD memory card in the following sizes are supported: 64 MB, 128 MB, 256 MB, 512 MB, 1 GB, 2GB and 4GB SDHC. The camera is compatible with SD memory cards manufactured by Panasonic, Toshiba, and Sandisk. Please contact your local dealer for purchase information.
Using the Camera
3.1 Navigator
You can use the Navigator with four-way control and one OK button to access numerous controls of your camera.
- Up or Play (video playback only)
- Focus mode or left
- Down
- Flash mode or right
- OK
3.2 LCD monitor information (REC mode)
P
9999
EV -10
A
ISO 100
- Scene mode 8. ISO
- Flash 9. White balance
- Focus 10. Metering
- Self-timer/Burst 11. EV compensation
- Resolution 12. Focus Area
- Quality 13. Histogram
- Shots remaining 14. Battery
3.3 Getting started
3.3.1 Turning the power on / off
- Press the [ 🔊 ] button until the digital camera turns on. Or, you can press the [ [ ] button when the camera is off to turn on the camera.
• To turn the power off, press the [ ] button again.
3.3.2 Choosing the screen language
- Press MENU, and then press [◀] / [▶] to move to the Setup menu ✗.
- Press [ ] ▲ [ ] to move to language, and then press [▶] or OK to select the language you want.
- Press OK.
3.3.3 Setting the date and time
- Press MENU, and then press [◀] / [▶] to move to the Setup menu.
- Press [ ] or [ ] to move to Date & Time, and then press [ ▶ ] or OK.
- Press [ ] ▲ [ ] to select Year, Month, Day, Time, and Format fields.
• To increase a value, press [ ]. ▲
• To decrease a value, press [ ]. ▼
• The time is displayed in 24 hour format.
- Press OK.
3.3.4 Snapshot mode
3.3.4.1 Getting started with capturing images
- Press the [ ] button for more than one second to turn on the camera.
- Compose your image in the LCD monitor under Snapshot Mode.
-
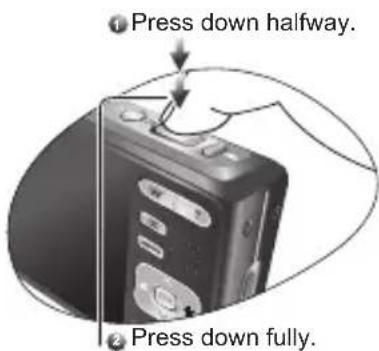
Press the shutter button down halfway (1), and then press it down fully (2).
-
Pressing the shutter button down halfway automatically focuses and adjusts the exposure.
- The focus area frame turns green when the camera is focused and the exposure is determined.
- When the focus or exposure is not suitable, the frame of the focus area turns red.

• To review the last captured image, press the button. Press the button to return to Snapshot mode.
- The LCD monitor darkens in strong sunlight or bright light. This is not a malfunction.
• To prevent your images from being blurred while pressing the shutter button, always hold the camera steady. This is especially important when you are shooting under low lighting conditions, under which your camera may reduce the shutter speed to ensure your images are properly exposed.
3.3.5 Using the flash
The flash is not only for taking pictures when there is insufficient light, but also when the subject is in shade or in backlight conditions. Pressing the flash button cycles your camera through the various flash modes. The flash will not activate when continuous shooting or movie recording.
- Turn the power on, and set the camera to the REC mode.
-
Pressing the flash button changes the flash mode. Each time the flash button is pressed, the flash icon changes.
-
Press the shutter button to take a picture.
| Icon Flash mode Description | ||
 | Auto flash Flash fires automatically when shooting conditions require extra lighting. | |
 | Red-eye reduction | Flash strobes to let the subject eyes adjust to the flash, then fires again to take the actual image. Your camera will detect the subject brightness and use the flash only when required. |
 | Force on Flash fires every time you take a photo, regardless of lighting conditions. | |
 | Slow sync Flash fires with a slow shutter speed. | |
 | Force off The flash never fires even in dark situation. | |
3.3.6 Using the self-timer and burst
Use the self-timer to set a delay from the time the shutter button is pressed to the time the image is shot. Use the burst to record continuous still images shooting.
-
Turn the power on.
-
Press the MENU button.
-
Press [ ] ▲[ ] to select Drive mode and then press [ ] or the OK button to launch the submenu.
-
Press [ ] ▲ [ ] to select an option and press the OK button to apply the setting. Press the MENU button to close the menu and the shutter button to take pictures.
| Icon | Drive mode | Description |
| - | Off | Record a single image. |
 | 2 sec. | The shutter release will be delayed for 2 seconds. |
 | 10 sec. | The shutter release will be delayed for 10 seconds. |
 | Double | Press and release the shutter. This will record the first image after 10 seconds, and then record the second one after another 2 seconds. |
 | Burst Keep pressing the shutter button fully to take a continuous shooting. Release the shutter button to stop shooting. Note that the LCD is temporarily turned off during shooting to save power. | |
 | Timer Burst Press and release the shutter. After a 2-second countdown, the camera will start taking a continuous shooting. This will stop when you press and release the shutter again, or until the memory card is full. | |
 | Speedy Burst Press and release the shutter. When the photo size you selected is 2M or VGA, Speedy Burst will take a continuous shooting at the speed of 12 shots per second. This will stop when you press and release the shutter again, or until the memory card is full. | |
3.3.7 Using the zoom function
Your camera has a combination of optical and digital zoom functions that allows you to zoom in on far away subjects or zoom out for a wide angle shot.
The optical zoom is achieved by mechanically adjusting the lens of the camera. The digital zoom enlarges or shrinks the image using a software process.
- Make the zoom setting, and point the camera at the subject.
- Press the zoom button (W/T) to compose the image.
[W]: zoom out for a wide-angle shot.
[T]: zoom in for a telephoto shot.
- When the zoom button is pressed, the zoom bar appears on the LCD monitor.
- When the optical zoom factor is at maximum, zooming stops temporarily. Press the [T] again, the camera switches to the digital zoom automatically and zooming continues.
-
You can use optical zoom in movie recording.
-
Press the shutter button to take a picture.
3.3.8 Focus mode
| Icon Flash mode Description | |
 | Auto focus Adjusts focus automatically. |
 | Macro Used when capturing images at close distance. |
 | Pan Focus Used when you want to capture everything (for example, fast-moving objects or subjects in the dark) from near to far in an acceptable focus. |
 | Infinity Used when capturing images at long distance. |
 | Super Macro Adds the digital zoom in addition to the optical zoom to provide better macro range without sacrificing image quality. |
3.4 Menu options
3.4.1 Changing the mode
You can record images and voices in the REC mode. And using the PLAY mode to replay, delete, or edit images on the LCD monitor.
3.4.1.1 Switching between REC mode and PLAY mode
- In REC mode, press the PLAY button to switch to the PLAY mode.
• In PLAY mode, press the PLAY or the MODE button to switch to the REC mode.
3.4.1.2 Selecting the Scene mode
-
Set the camera to the REC mode.
-
Press the MODE button to show the scene mode palette.
-
Use the four-way control to select a desired mode and press OK to confirm the setting.
| Icon Mode | Description | |
 | Program The camera makes settings suitable for the shooting conditions. | |
 | Movie For recording movie clips. | |
 | Shake-Free Reduces blur caused by camera vibration. A higher shutter speed is used in this mode, and the photo might become less brighter. | |
 | Landscape Used for the wide scenic views. | |
 | Sports Captures a fast-moving subject. | |
 | Backlight Shoots the image of backlight object by changing metering. | |
 | Night Scene Shoots the subject while keeping the background night scenery. | |
 | Night Scene Portrait | Keeps both the subject and the night scene clearly. |
 | Snow Used for the beach or snow scenes. | |
 | Fireworks | Uses a slow shutter speed to take fireworks exploding. |
 | Building | Enhances the edges of the subject. |
 | Soft Flowing Water | Captures the moments of motion blur on water. |
 | High ISO Portrait | Makes people stand out with the background out-of-focus even in a dark environment. In this mode, a higher ISO value (maximum 1600) is used. |
| Icon | Mode | Description |
 | Food Higher saturation makes food more appetizing. | |
 | Candle Light Makes a picture look warm, and thus captures the mood under candle light source. Flash is always off. | |
 | Party Captures the party atmosphere usually under indoor light source. | |
 | Text Enhances the black & white contrast. | |
 | Kids Takes a still image to capture moving kids. | |
 | Sunset Enhances the red hue for recording sunset images. | |
 | Soft Skin Enhances the tone of skin so that the facial skin appears smooth. | |
 | Sketch Uses a hand drawing effect to emphasize the outlines in the photo. | |
 | Oil Painting Simulates oil painting brushes to make an oil painting effect. | |
 | Photo Collage | Lets you take 2 or 4 shots, and then combines them into one photo as a photo collage. |
 | Voice REC | For recording audio. |

• The higher the ISO value, the grainer you might see in the image.
3.4.2 Using the menus
When a menu is displayed, the four-way control and the OK button are used to make the desired settings.
- Turn the power on, and set the camera to the REC mode.
- Press the MENU and then press the [◀] / [▶] to select the REC menu.
- Press [ ] ▲[ ] to select a menu item and then press [ ] or the OK button to launch the submenu.
- Press [ ] ▲[ ] to select an option and press the OK button to apply the setting.
- Press the MENU button to close the menu.
3.4.2.1 REC menu list (still image)
| Menu item | Available settings | |
| Resolution |  | |
| Quality | 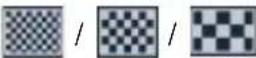 | |
| Metering | 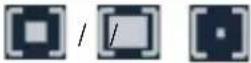 | |
| White Balance |  |  |
| ISO |  |  ISO 1600 ISO 1600 |
| Exposure | -2.0 EV ~ +2.0 EV | |
| Drive Mode |  / /  | |
| AEB | Off / On | |
| Highlight |  | |
| Sharpness | 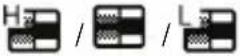 | |
| Effect | Normal/ B&W / Sepia / Negative / Red / Green / Blue | |
| Date Stamp | Off / Date / Date & Time | |
| Face Tracking | Off / On | |
| Photo Frame | Off / 1-10 frames | |
| AF Lamp | Off / On | |
| Digital Zoom |  |  |
- Turn the power on, and set the camera to the REC or PLAY mode.
- Press the MENU, and then press the [ ]/ [ ] to select the Setup menu.
- Press [ ] /▲] to select a menu item and then press [ ] or the OK button to launch the submenu.
- Press [ ] ▲[ ] to select an option and press the OK button to apply the setting.
- Press the MENU button to close the menu.
3.4.3.1 Setup menu list
| Menu item Functions | ||
| Sounds [Shutter] | Sets the shutter sound on and off. | |
| [Start-up] Sets a type of the start-up sound. | ||
| [Beep] Sets the operation sound on and off. | ||
| [Volume] Adjusts the volume of the shutter sound, start-up sound, beep and playback sound. | ||
| Auto Review [Off] | The captured image will not automatically display after shooting. | |
| [1 sec.] The captured image will display for 1 seconds after shooting. | ||
| [3 sec.] The captured image will display for 3 seconds after shooting. | ||
| [5 sec.] The captured image will display for 5 seconds after shooting. | ||
| LCD Save [Off] Always turns on the LCD backlight when the camera is on. | ||
| Power Save [1 min.] For power consumption, the camera is turned off automatically for a period of time. | ||
| Date & Time | Sets the date & time. | |
| Language | Select a language for display menus and other information. | |
| File No. | Use this function if the camera experiences a "Folder cannot be created" error or if you want to restart numbering, for example, after erasing all files. | |
| [Series] | Store the latest used file number no matter deleting files or inserting a new memory card. | |
| [Reset] Reset file | numbering each time the memory card is changed. Resetting the file number is useful for avoiding the file name duplication when images are downloaded to a computer. | |
| TV Out | You can review images on a television with a supplied AV cable.TV Out should be set to either NTSC or PAL depending on your region. For details about which system should be used, check with your local authorities. | |
| USB [Computer] | Sets the USB mode | to connect the camera with a printer or computer. |
| [Printer] | ||
| Start-up Image Sets a recorded image as the start-up image. | ||
| Format To erase all data stored in the memory card if you are using a card,or all data stored in the internal memory if there is no card inserted.A “Busy...please wait” message displays and the memory card is starting format.A “Completed” message displays when finish formatting.All data will be deleted including protected files. Be sure to download important files to your computer before formatting. | ||
| Reset All Resets the entire menu and button operation settings to initial default.The following settings do not change after Reset All:Date & Time settingLanguage settingTV out settingBattery Type | ||
3.5 Recording movie clips
- Turn the power on, and set the camera to the Movie mode.
-
Compose the subject on the monitor.
-
Aim the focus area to the subject that you want to take.
-
The LCD monitor displays the available recording time
-
Start recording.
-
Press the shutter button to start recording.
- Using the zoom button to adjust the image size.
- The White Balance is set and locked to the settings of the first frame.
- Sound cannot be recorded while pressing the zoom button.
- You can use optical zoom in movie recording.
-
Finish recording.
-
Press the shutter again to end recording.
- The camera will stop recording automatically when the memory capacity has been reached.
3.6 Recording audio clips
- Turn the power on, and set the camera to the Voice REC mode.
- Press the shutter button to start recording.
- The voices are recorded from the microphone of the camera. Be careful to avoid touching the microphone while recording.
- Press the shutter button again to end recording.
- The camera will stop recording automatically when the memory capacity has been reached.

3.7 Other recording functions
3.7.1 Setting the quality
| Compression Purpose | ||
 | Super Fine Shoot | higher quality images. |
| [CTHS] | Fine Shoot normal | quality images. |
 | Normal Shoot for | more images. |
3.7.2 Setting the metering
There are 3 different light metering options available on your camera.
| Icon Mode Description | |
 | Center Light is measured from the entire shooting screen, but gives more importance to the values near the center. |
 | Multi Selects an exposure based on readings from multiple points in the subject area |
 | Spot Selects an exposure based on a single reading taken from the center of your picture. |
3.7.3 Setting the white balance
Adjust the white balance to match different light sources such as sunlight, incandescent (tungsten) lighting or, fluorescent lighting.
| Icon Mode Description | ||
 | Auto Automatically corrects white balance. Ideal for general photography. | |
 | Daylight Adjusts for bright sun conditions, or natural light conditions. | |
 | Cloudy Adjusts for cloudy days or twilight conditions. | |
 | Tungsten | Adjusts for normal indoor lighting conditions. Corrects the orange hue of household light bulbs. Ideal for indoor photos under tungsten or halogen lighting without a flash. |
  | Fluor_H Fluor_L | Adjusts for fluorescent lighting. Corrects the green hue of fluorescent lighting. Ideal for indoor photos under fluorescent lighting without a flash. |
 | SH1 (Custom) | For more accurate adjustment or when the light source cannot be specified. When this option is highlighted, press the shutter button to enter the [Custom WB] mode. Then, point the camera at something white (for example, white paper) as the reference white color. Next, press OK to confirm the custom setting. |
3.7.4 Setting the ISO
With the initial settings, the ISO sensitivity is automatically set according to the brightness of the subject.

- A higher ISO value increases the image noise. To take clean images, use an ISO value as low as possible.
3.7.5 Setting the Exposure
Set the exposure value manually to compensate for unusual lighting conditions such as indirect indoor lighting, dark backgrounds, and strong backlighting.
3.7.6 Setting the AEB
Sets the auto exposure bracketing (AEB) to shoot 3 continuous images, each with a different exposure setting: correctly exposed, underexposed, and overexposed.
3.7.7 Setting the highlight
Make the subject stand out from its surroundings. The subject will be in focus in three
different ranges: √ √ .
3.7.8 Setting the sharpness
You can select whether you want the image to have sharp or soft outlines.
| Icon Mode Description | |
 | Hard The edges of the image are emphasized. The edges will become sharp, but noise may occur in the recording image. |
| [wyyw8] | Normal The edges of the image are sharp. This is suitable for printing. |
 | Soft The edges of the image are softened. This is suitable for editing images on PC. |
3.7.9 Setting the photo effect
You can add special effects to your images in REC or PLAY mode.
| Icon Description | |
| Normal No | effect is added to the image. |
| B&W Convert | image to black & white. |
| Sepia Recorded | image will be stored in a sepia tone. |
| Negative Opposite what they were in the original image. | |
| Red The image becomes reddish. | |
| Green | The image becomes greenish. |
| Icon Description |
| Blue The image becomes bluish. |
3.7.10 Setting the date stamp
The Date Stamp function can be used to add a date to your pictures as you take them.
3.7.11 Setting Stabilizer
Located beside the Shutter button, the Stabilizer uses a higher ISO value to avoid image blur caused by hand shake and/or subject movement.

- If the result is still blur in a low-light environment, please also select the Shake-Free scene mode to improve the result.
- The higher the ISO value, the grainer you might see in the image.
3.7.12 Setting Face tracking
Focuses on the people in your composition by automatically detecting and tracking human faces.
- Turn the power on, and then press MENU.
- Locate the Face Tracking mode and turn it on.
- Point the camera to where the people (your subjects) are located. Focus frames of Face Tracking will automatically detect faces (maximum 9) and show on the LCD screen.
- Press the shutter to capture the image.

- Due to environmental factors such as lighting, the number of detected faces might be different from that of the actual faces.
- To achieve the best result, ask your subjects not to turn their faces partially away from the lens.
3.7.13 Setting Photo Frame
You can add 10 kinds of frames to still images, making them more interesting.
3.7.14 Setting AF lamp
The AF Lamp function allows you to record images in low light conditions.
| Option Description |
| Off Disables the AF lamp while recording images. |
| On Turns on the AF lamp while pressing the shutter button down halfway. |
3.7.15 Setting Av/Tv/M
Pressing the Tv/Av/M button toggles among Aperture priority, Shutter priority, and Manual when determining the exposure value.
- Aperture priority: You can choose an aperture value, while the shutter speed is automatically determined by the lighting condition of the subject. Aperture priority is often used when shooting static subjects or emphasizing the depth of field. In general, use a smaller aperture if a greater depth of field is needed.
- Shutter priority: You can choose a shutter speed, while the aperture value is automatically determined by the lighting condition of the subject. Shutter priority is often used when shooting moving subjects. In general, use a shorter shutter speed to catch a fast-moving object.
- Manual: You can set both the shutter speed and the aperture value.
3.8 Playback
3.8.1 Playing back images
- Turn the power on, and set the camera to the PLAY mode.
• The latest recorded image appears on the LCD monitor.
- If there are no images stored, a message [No image] appears.
- Press the four-way control.
• [ ] displays the previous image.
• [ ] displays the next image.

- Holding down [] or [] scrolls images in a high speed.
3.8.2 Playing back movie clips
- Turn the power on, and set the camera to the PLAY mode.
- Press [ ] or [ ] to select a movie clip that you want to playback.
-
Start playing back.
-
Press [ ] to start playing the movie clip.
- Press [ ] to stop the movie clip, or press [ ] to pause it. When the movie paused, press [ ] again to resume.

- During movie playing back, press [] to fast forward or press [] to rewind it.
- Press the shutter to capture the still image from the movie clip while it had paused.
3.8.3 Magnifying & trimming still images
- Turn the power on, and set the camera to the PLAY mode.
-
Select an image.
-
Press [ ] or [ ] to select the image that you want to magnify or trimming.
-
Only still images can be magnified and trimmed.
-
Magnify the image.
-
Press [T] to magnify the image, and the central portion of the image is displayed. You can use the arrow button to view different parts of the magnified image.
-
Press the MENU button to return to the normal size.
-
Trim the image.
- Press the OK button to set the image trimming.
- Save the image.
- Press the OK button again to trim the selected image and save it as a new one.
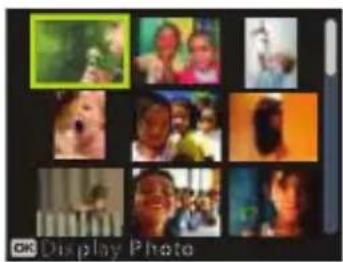
3.8.4 Viewing in thumbnail
- Turn the power on, and set the camera to the PLAY mode.
- Press the zoom button [W], a thumbnail screen is displayed.
- Use the four-way control to select the desired image, and press [T] or the OK button to show the selected image in full screen.
3.8.5 Playing a slide show
-
Turn the power on, and set the camera to the PLAY mode.
-
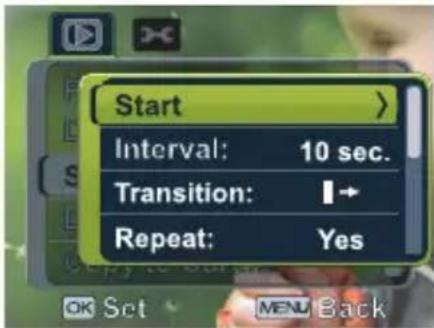
Enter the slide show.
- Press the MENU button and use the [ ] to select Slide Show and press [ ] or the OK button.
- Change the slide show settings.
- Use the four-way control to set the slideshow interval, music, transition and repeat.
- You can set the interval between 1\~10 seconds.
- Playing the slide show.
• Press the OK button to start the slideshow.
- During the slide show, press the OK button to pause the slideshow and press the OK button again to resume.
3.8.6 Deleting a single file or all files
-
Turn the power on, and set the camera to the PLAY mode.
-
Press [ ] or [ ] to select the image you want to delete.
-
Open the menu.
- Press the MENU button, then use the [ ]/ [ ] to select PLAY mode. - Press the [ ] / [ ] to select Delete and press the [ ] or OK button.
- Press [ ] or [ ] to select [Single], and press the [▶] or OK button.
• To delete all images, select [All] and press the [▶] or OK button.
- Select [Yes] and press OK button to delete the image.
• To quickly delete the current display image:
- Select the image you want to delete.
- Press the Delete button to show a confirmation.
- Press the OK button to delete the current display
- Protected images cannot be deleted with this function.
3.8.7 Deleting multiple files
-
Turn the power on, and set the camera to the thumbnail screen.
-
Open the menu.
- Press the MENU button, then press [] or [] to select to select Delete and the OK button.
- Press [ ] ▲r [ ] to select [Select], and then press the OK button.
• The frame of the selected image turns green.
- Select multiple images.
- Use the four-way control to select the image.
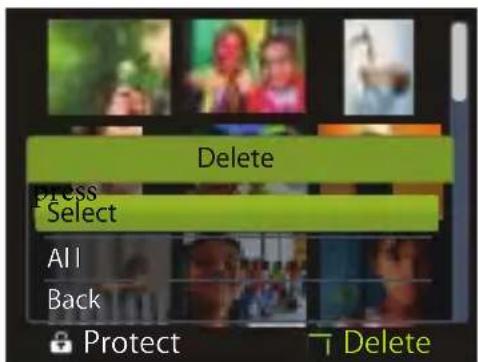
- Press the OK button toggles the 📄 on and off. Repeat this step until all images that you want to delete are displayed with an icon 🔍
- Delete images.
- Press the MENU button, then select [Yes] and press the OK button. All selected images will be deleted.
- To cancel delete, press the MENU button in this step.
3.8.8 Setting the DPOF for printing
The Digital Print Order Format (DPOF) setting allows you to select images on the memory card for printing and specify the number of print copies in advance using the camera. This is extremely convenient for sending the images to a photo developing service or for printing on a direct print function compatible printer.
-
Turn the power on, and set the camera to the PLAY mode.
-
Open the menu.
-
Press the MENU button, then use the [ ]/ [ ] to select PLAY mode.
-
Press the [ ] / [ ] to select DPOF and press the [ ] or OK button.
-
Press [ ] or [ ] to select [Single], then press the OK button.
• To set the DPOF setting for all images in a time, select [All] in this step.
- To reset all DPOF settings to initial default, select [Reset] in this step.
-
Press [ ] or [ ] to select the image you want to print out, then press the OK button.
-
Set the number of copies.
-
Press [ ] or [ ] to specify the number of copies.
• The number of copies can be set from 0 to 30.
• To cancel this image DPOF setting, set the number of copies to 0. -
Print the date stamp

- Press [ ] and then press [ ] or [◀] to set or cancel the date stamp of current image.
-
Repeat step 4\~6 to other images for printing.
-
Press [▼] to select [Back], and then press OK.
- After you finished all image settings, select [No] under [Select this photo?]. Next, press the OK and Menu buttons to complete the DPOF settings.
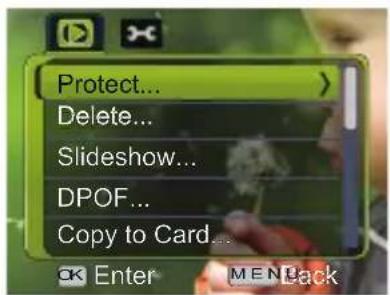
3.8.9 Other playback functions
You can also protect (lock) images from being deleted, edit images, copy files, or enter setup for more options. To do so, press theMENU button in the PLAY mode, and select a function.
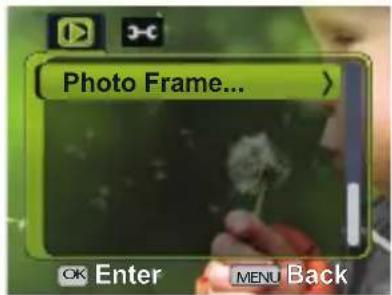
Using the Camera20
PC Dependent Features
4.1 Bundled software
The camera is supplied with the following software. To install the software, refer to the information supplied with respective CDs.
| ArcSoftPhotoImpression 5 | Combines photo editing with creative enhancement and sharing tools that maximize your digital media experience. |
| ArcSoftVideoImpression 2 | Creates multimedia presentations by combining photos and video clips with audio, text and scene transitions. |
4.2 Transferring files to your computer
After using USB cable to establish a USB connection between the camera and your computer, you can use your computer to share captured images or recorded video clips with your family or friends via e-mail or post them on the Web. Note that before you begin, you need to check your system according to the table as shown below.
| System Requirements (Windows) | |
| CPU Pentium III 600 MHz processor or higher | |
| Operating System Windows Me / 2000 / XP / Vista | |
| RAM 64 MB | |
| Hard Disk Space 128 MB hard disk space | |
| Required Devices A CD-ROM driveAn available USB port | |
| Display Color Monitor (800 x 600, 24-bit or higher recommended) | |
4.2.1 Step 1: Connect the digital camera to your computer
- Connect the supplied USB cable to the computer USB port and turn on the camera.
- The LCD screen turns off when the connection to the computer has been successfully completed.
4.2.2 Step 2: Download images or video clips
When the digital camera is turned on and connected to your computer, it is considered to be a disk drive, just like a floppy disk or CD. You can download (transfer) images by copying them from the “Removable Disk” to your computer hard drive.
Windows
Open the “Removable Disk” and double-click on the DCIM folder to open it to find more folders. Your images are inside these folder(s). Select the desired still images or video clips, and then choose “Copy” from the “Edit” menu. Open the destination location (folder) and choose “Paste” from the “Edit” menu. You may also drag and drop image files from the digital camera to a desired location.

- Memory card users may prefer to use a memory card reader (highly recommended).
- Video playback application is not included with the package. Make sure that video playback application has been installed in your computer.
Troubleshooting
Refer to the symptoms and solutions listed below before shipping your camera for service. If the problem persists, contact your local reseller or service center.
| Symptom Cause Solution | ||
| The camera cannot be powered up. | There is no battery or the battery is not inserted correctly. | Insert the battery correctly. |
| The battery has no power. Recharge your batteries or replace with new batteries. | ||
| The battery power is draining quickly. | The external temperature is extremely low. | — |
| Many shots are being captured in dark places, requiring a flash. | — | |
| The battery was not fully charged. The battery has not been used for an extended period of time after being charged. | Fully charge the battery and discharge it for at least one complete cycle before use. | |
| The battery or camera is warm. | The camera or flash was used continuously over a long period of time. | — |
| The flash does not fire. The flash does not recharge. | The camera flash is turned off. Set the flash to Auto Flash. | |
| The light source is sufficient. — | ||
| The flash is not available in some modes. | — | |
| Even though the flash fired, the image is dark. | The distance to the subject is greater than the flash's effective range. | Get closer to the subject and shoot. |
| The image is too bright or too dark. | The exposure is excessive or inadequate. | Reset exposure compensation. |
| I cannot format a memory card. | The memory card is write-protected. | Remove the write protection. |
| End of the memory card life. Insert a new memory card. | ||
| I cannot download images. | The free space on the hard disk of your computer is insufficient. | Ensure that the hard disk has enough space for running Windows and that the drive for loading image files has free space equal to or greater than the memory card in the camera. |
| There is no power being supplied to the camera. | Recharge your batteries or replace with new batteries if necessary. | |
| The camera does not shoot even when pressing the shutter button. | The battery is running low. Recharge | your batteries or replace with new batteries. |
| The camera is not in Shooting Mode. | Switch to Shooting Mode. | |
| The shutter button was not pressed all the way down. | Press the shutter button all the way down. | |
| The internal memory or memory card does not have any free space. | Load a new card or delete unwanted files. | |
| The flash is recharging. Wait until the | flash mode icon, indicated on the screen, stops flashing. | |
| The camera does not recognize the memory card. | Format the memory card before the initial use or before using with another camera. | |
| Colors of the images taken are not shown properly. | White Balance was not set properly when these images were taken. | Select a suitable White Balance setting before taking each picture. |
| After connecting the camera to a computer, an error message “Device not ready” or “Camera not ready” appears. | The computer runs on Windows 98 or earlier. | — |
| When connecting the camera to a computer, the computer freezes. | The memory card inside the camera may not be formatted. | Format the memory card to the FAT16 format using a card reader in Windows. |
| A memory error occurs. | The memory card may not be formatted correctly. | Re-format the memory card to the FAT16 format using a card reader in Windows. |
| Image Sensor 1/1.8- | inch CCD |
| Effective Pixels: 10.0 Mega pixels | |
| LCD Display 3.0” LTPS TFT LCD (230K dots) | |
| Lens Focal Length: f=7.4 (W)~22.2 (T) (35 mm film equivalent: 35.1 ~ 105.3 mm) | |
| Focusing TTL Auto Focus | |
| Shutter Mechanical Shutter: Up to 1/2000 sec. | |
| Flash | Modes: Auto/Red-eye reduction/Forced flash/Slow Sync/Flash off |
| Self-timer 2 sec./10 sec./10+2 sec. | |
| Exposure Compensation: ±2 EV (1/3 EV/step) | |
| ISO Auto/50/100/200/400/800/1200/1600 | |
| White Balance Auto/Daylight/Cloudy/Tungsten/Fluorescent H/Fluorescent L/MWB | |
| File Format Still Image: JPEG format (EXIF 2.2), DCFImage Size: 3584 x 2688 (10M) / 3648 x 2432 (3:2) / 3584 x 2016 (16:9) / 3328 x 2496 (8M) / 2560 x 1920 (5M) / 1600 x 1200 (2M) / 640 x 480 (VGA) | |
| Storage Built-in memory: 6MB/SD memory card compatible | |
| Image Play | Single image/AVI play/Thumbnails/Slideshow |
| Interface Digital output: USB 2.0 high-speed compatible Audio/Video output (NTSC/PAL) | |
| Power Source | Lithium-ion battery |
| Dimensions(W x H x D) | 96.1 x 58 x 22 mm |
| Weight | Approx. 135 (w/o battery, SD memory card) |
* Design and specifications are subject to change without notice.
Service Information
Technical Support
For free driver updates, product information and news releases, visit the following web site: http://www.BenQ.com
- Disclaimer
- Taking care of your camera
- CE Regulatory Notice
- FCC Statement
- Table of Contents
- Touring Your Camera.... 1
- Preparing Your Camera for Use 3
- Using the Camera 6
- Menu options.... 10
- Other recording functions 15
- Playback.... 18
- PC Dependent Features 21
- Touring Your Camera
- Checking the package contents
- Camera components
- Front view
- Rear view
- LED indicators
- Preparing Your Camera for Use
- Installing the batteries
- Charging the battery
- Inserting and removing an SD memory card
- Using the Camera
- Navigator
- LCD monitor information (REC mode)
- Getting started
- Turning the power on / off
- Choosing the screen language
- Setting the date and time
- Snapshot mode
- Getting started with capturing images
- Using the flash
- Using the self-timer and burst
- Using the zoom function
- Focus mode
- Menu options
- Changing the mode
- Switching between REC mode and PLAY mode
- Selecting the Scene mode
- Using the menus
- Recording movie clips
- Recording audio clips
- Other recording functions
- Setting the quality
- Setting the metering
- Setting the white balance
- Setting the ISO
- Setting the Exposure
- Setting the AEB
- Setting the highlight
- Setting the sharpness
- Setting the photo effect
- Setting the date stamp
- Setting Stabilizer
- Setting Face tracking
- Setting Photo Frame
- Setting AF lamp
- Setting Av/Tv/M
- Playback
- Playing back images
- Playing back movie clips
- Magnifying & trimming still images
- Viewing in thumbnail
- Playing a slide show
- Deleting a single file or all files
- Deleting multiple files
- Setting the DPOF for printing
- Other playback functions
- PC Dependent Features
- Bundled software
- Transferring files to your computer
- Step 1: Connect the digital camera to your computer
- Step 2: Download images or video clips
- Troubleshooting
- Service Information
- Technical Support
Brand : BENQ
Model : DC E1000
Category : Camera