Classic KS8990FR/3 - Fridge Fhiaba - Free user manual and instructions
Find the device manual for free Classic KS8990FR/3 Fhiaba in PDF.


User questions about Classic KS8990FR/3 Fhiaba
0 question about this device. Answer the ones you know or ask your own.
Ask a new question about this device
Download the instructions for your Fridge in PDF format for free! Find your manual Classic KS8990FR/3 - Fhiaba and take your electronic device back in hand. On this page are published all the documents necessary for the use of your device. Classic KS8990FR/3 by Fhiaba.
USER MANUAL Classic KS8990FR/3 Fhiaba
1 Important directions for safety and the environment
1.1 For your safety
1.2 Caring for the environment
1.3 Cleaning, sanitization and maintenance of the ice and/or water dispenser (if present)
2 Installation
2.1 Installation
2.2 Connection to the electrical power supply
2.3 Connection to the water system
3 Before starting
3.1 Know your appliance
3.2 Main components
3.3 Electronic Control
3.4 Main control panel
3.5 Fresco control panel
3.6 Electronic Control
3.7 Main control panel
3.8 Freezer control panel
4 Appliance switching on and off
4.1 Switching on and off
4.2 How to adjust the temperature for different requirements
4.3 Ice Maker activation
4.4 Information and malfunction messages on the display
5 Settings and Special Functions
5.1 Customization and language settings
5.2 Special functions activated through the Menu
5.3 Basic settings of the Menu
6 Internal Layout
6.1 Internal Layout (positioning, adjustment, removal)
7 Activation and use of the Ice Maker
7.1 Activation and use of the Ice Maker
7.2 Water Filter
8 Lighting
8.1 Lighting
9 Food Preservation
9.1 General directions
9.2 TriMode compartment
9.3 How to maintain good food quality
9.4 Recommendations for preserving fresh food
9.5 Recommendations for preserving frozen food
10 Recommended times for Food Preservation
11 Care and Cleaning
11.1 Care and Cleaning
11.2 Condenser cleaning
11.3 Internal cleaning
12 Troubleshooting Guide
12.1 Troubleshooting Guide
12.2 Malfunction messages appearing on the display
13 Before calling for service
13.1 Before calling for service
14 Menu Map
14.1 Functions
14.2 Setting
1 Important directions for safety and the environment
1.1 For your safety
text_image
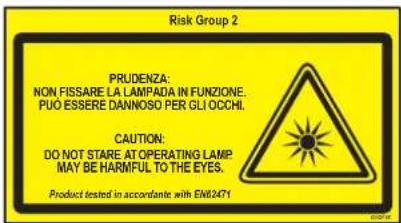
Risk Group 2 PRUDENZA: NON FISSARE LA LAMPADA IN FUNZIONE. PUO ESSERE DANNOSO PER GLI OCCHI. CAUTION: DO NOT STARE AT OPERATING LAMP MAY BE HARMFUL TO THE EYES. Product tested in accordante with EM12471If this appliance is replacing an existing appliance which must be removed or disposed of, make sure that it does not become a dangerous trap for children by cutting its power supply cable and rendering it impossible to close the door. Use the same caution at the end of the lifespan of the new appliance.
■ This appliance is designed to refrigerate beverages and foods and is intended for domestic use.
■ The appliance must be installed by following the instructions in the Installation Guide, particular care should be taken not to obstruct the vent openings of the appliance and of the built-in units.
■ The appliance features a concentrated lighting system with LED lamps. Do not stare into these lamps when they are on to avoid possible eyesight damage.
This warning is also contained on the label attached to the inside of the refrigerator door.
- When the freezer is functioning do not touch the inner surfaces in stainless steel with wet or damp hands, since skin may stick to the very cold surfaces.
- Do not use any type of electrical equipment inside of the food conservation compartments.
■ When positioning the shelves, do not place fingers in the shelf slide guides.
- Do not position containers of flammable liquids near the appliance.
■ Completely switch off the appliance and unplug the power supply cable during cleaning operations. If the plug is not easily reached, it is a good idea to turn off the breaker or remove the fuse that controls the socket that the appliance is connected to.
■ The packaging parts can be dangerous for children: do not allow children to play with the plastic bags, plastic film or Styrofoam.
■ Any repairs must be performed by a qualified Smeg Service technician.
This appliance is not intended for use by persons (including children) with reduced physical, sensory or lack of experience and knowledge unless they have been given supervision or instruction concerning use of the appliance by a person responsible for their safety. Children should be supervised to ensure that they do not play with the appliance.
■ Do not damage the appliance refrigerant circuit pipes.
- Do not store explosive substances such as aerosol cans with a flammable propellant in this appliance.

Notes
Recommendations for correct use of the appliance

Important
Directions for avoiding appliance damage

Warning
Indications for avoiding injury to people
1.2 Caring for the environment

■ Pay special attention to correct disposal procedure for all the packaging materials.
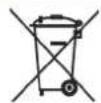
■ The appliance must not be disposed of with urban waste. Contact local waste disposal centres for on how to dispose of recyclable waste.
■ Prior to disposal, cut the power supply cord and make it impossible to close the door.
■ During disposal, avoid damage to the refrigeration circuit.
■ The appliance does not contain hazardous substances for the atmospheric ozone layer, neither in the refrigeration circuit nor in the insulation.
1.3 Cleaning, sanitization and maintenance of the ice and/or water dispenser (if present)
^e Failure to follow the instructions regarding sanitizing can compromise the hygienic safety of the water dispensed.
- When using the appliance for the first time and every time the filter is changed, it is recommended to let the water flow in the circuit using the "Manual Cleaning" and discard the ice produced in the first 24 hours.
If the water dispenser has not been used for more than 4/5 days, it is advisable to clean the circuit and run off the first litre of water.
■ Reposition the removable water dispenser (if present), ensuring your hands are hygienically clean.
■ Clean the ice bucket or drawer regularly but using only drinking water.
- The filter must be changed when indicated on the control panel or when the ice/water dispenser has not been used for more than 30 days.
- With each filter replacement, sanitise the ice and/or water distribution system using a food grade disinfectant (with sodium hypochlorite), which does not alter the characteristics of the materials. Rinse with at least 2 litres of water before use.
■ Only original spare parts supplied by the manufacturer should be used when replacing components in the ice and water dispenser.
■ Any work on the appliance must be carried out by a qualified technician or the After-sales Service.
2.1 Installation
Make sure that installation is performed correctly, adhering to all directions in the specific installation manual provided with the appliance.
2.2 Connection to the electrical power supply
natural_image
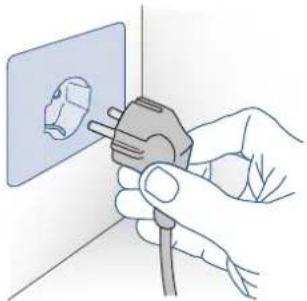
Illustration of hands using a power plug to install a wall socket (no text or symbols present)The appliance is equipped with a Schuko type 16A plug and must be connected to the electrical power supply through a corresponding Schuko socket.
Do not use extension cords and/or multiple adapters for the power supply connection.

Do not use extension cords and/or multiple adapters for the power supply connection.
If energy is supplied through an alternative energy power source (solar, geothermal, etc.) or if home automation systems are installed, it is necessary to install the Alternative Energy Kit to integrate the unit into the power grid.
2.3 Connection to the water system
natural_image
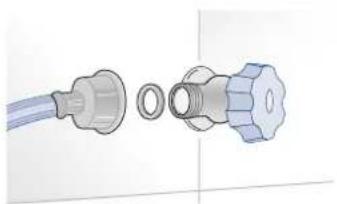
Illustration of a blue pipe fitting with a separate close-up view showing internal components (no text or symbols)The models provided with Ice Maker require a connection to the domestic water supply system. This can be executed through the provided water hose with 3/4" threading.
The system pressure must be between 0.05 MPa and 0.5 MPa (between 0.5 Bar and 5 Bar).
Differences pressures can cause malfunctions or leaks in the water system. The appliance should be supplied only with drinkable water.
Make sure that installation is performed correctly, according to all of the directions in the specific installation manual provided with the appliance.
Do not attempt to use a locally sourced garden hose threaded adapter or braided supply line. It will strip the threads on the appliance water connection solenoid.

3.1 Know your appliance
Congratulations for having purchased your new Fhiaba: from now on you can use our innovative conservation system, which will allow you to keep all of your food in the best way possible.
This manual will answer most of your questions about the product's features. Should you require further information, please check our website
www.fhiaba.com
or write us an e-mail at
care@fhiaba.com.
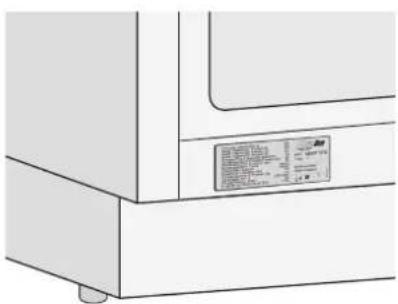
Before calling, write down the model type and serial number which are available on the warranty certificate and on the rating plate located on the bottom left-hand corner of the appliance, behind the bottom drawer and any messages which may have appeared on the display.
+39 0434 420 160
text_image
Technical diagram showing a cabinet or enclosure with a labeled panel indicating specifications and data.
The appliance should be supplied only with drinkable water.
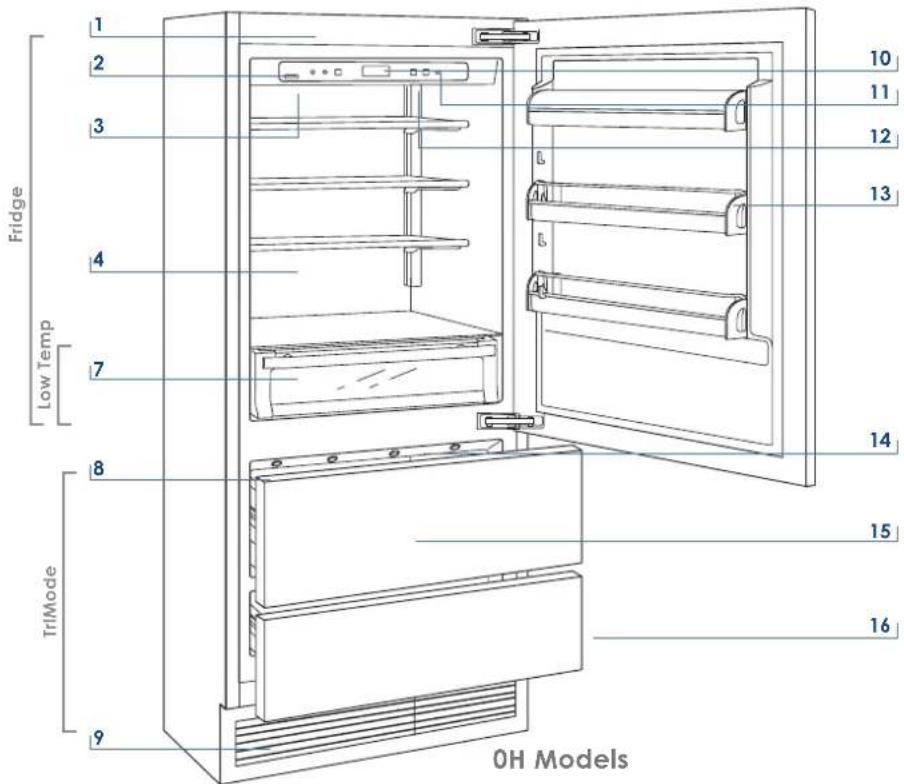
3.2 Main components
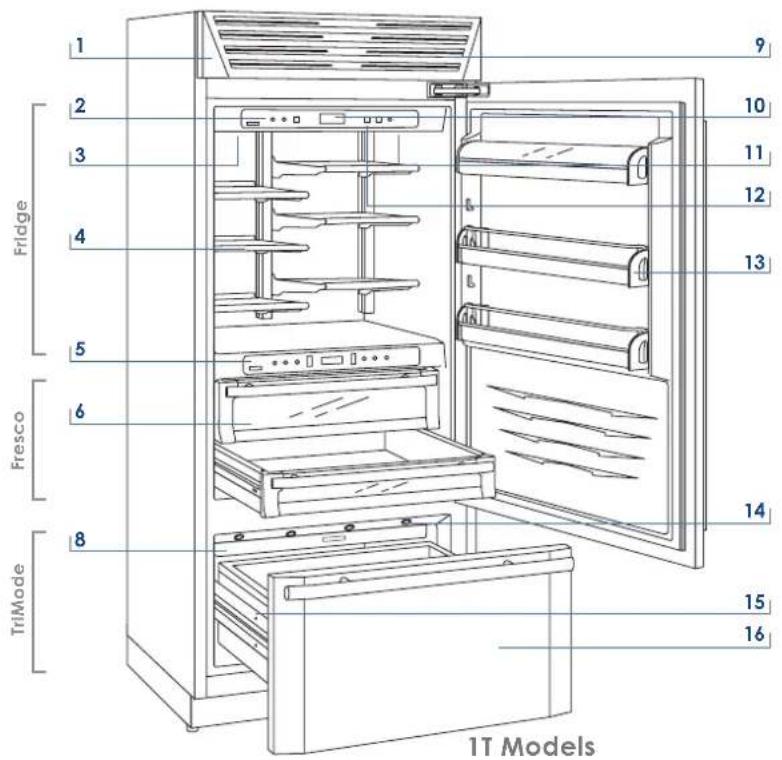
text_image
1 2 3 4 5 6 7 8 9 10 11 12 13 14 15 16 Fridge Fresco TriMode 1T Models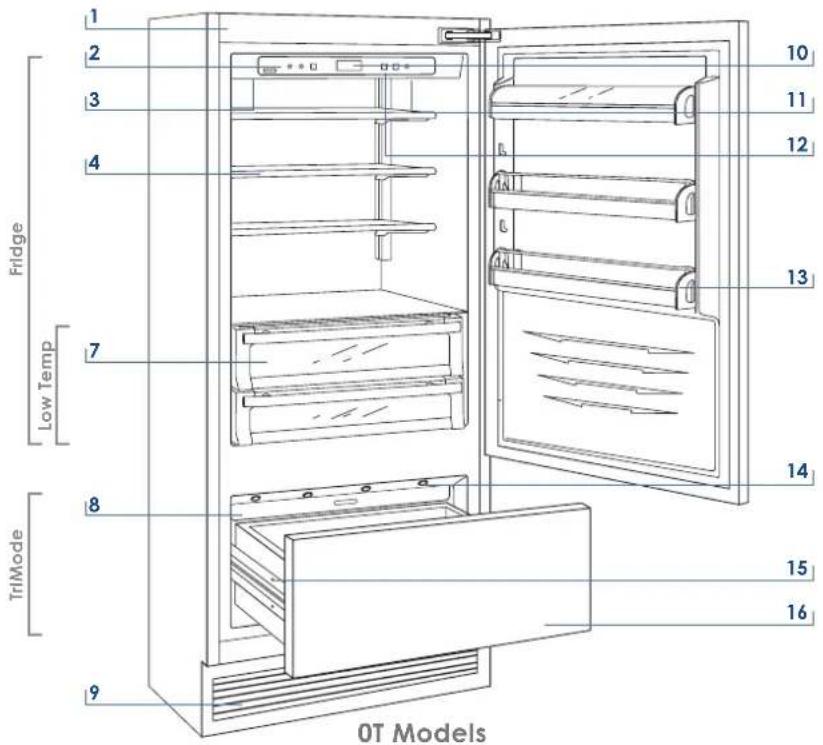
text_image
1 2 3 4 Fridge Low Temp 7 8 TriMode 9 10 11 12 13 14 15 16 OT Models1 Stainless steel structure with aluminum trim
2 Control panel with Menu
3 Water Filter
4 Patented shelf positioning system
5 Control panel, Fresco area
6 Fresco compartment with controlled humidity
7 "Low Temp" drawer with controlled humidity
8 Automatic icemaker
9 Double refrigeration system
10 Temperature display
11 Sound signals
12 Vacation function
13 Spacious door shelves
14 Innovative lighting
15 Automatic door and drawer closure
16 Freezer compartment that can be transformed into a refrigerator or Fresco compartment (TriMode function)
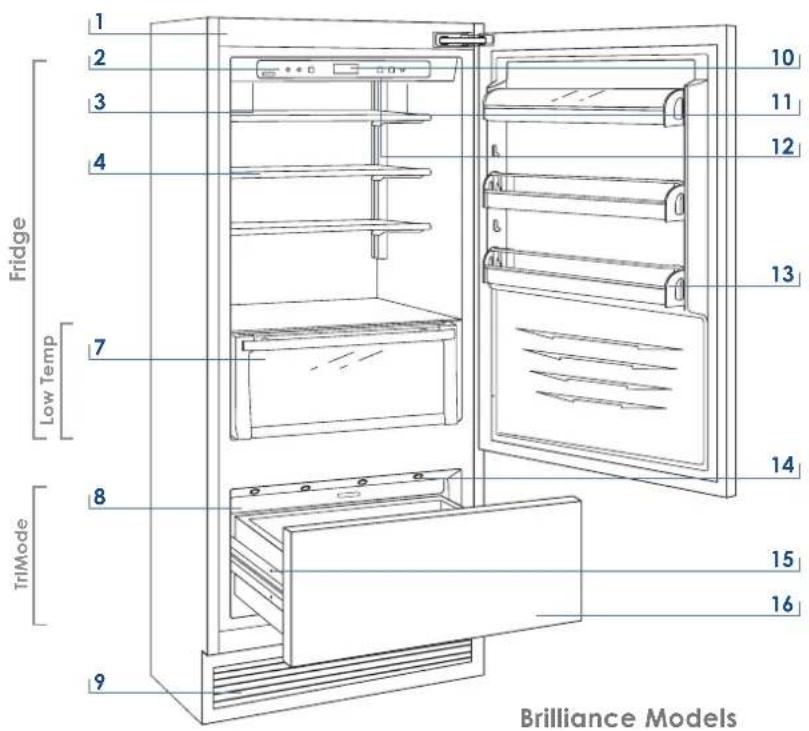
text_image
1 2 3 4 Fridge Low Temp 7 8 TriMode 9 10 11 12 13 14 15 16 Brilliance Models1 Stainless steel structure with aluminum trim
2 Control panel with Menu
3 Water Filter
4 Patented shelf positioning system
7 "Low Temp" drawer with controlled humidity
8 Automatic icemaker
9 Double refrigeration system
10 Temperature display
11 Sound signals
12 Vacation function
13 Spacious door shelves
14 Innovative lighting
15 Automatic door and drawer closure
16 Freezer compartment that can be transformed into a refrigerator or Fresco compartment (TriMode function)
text_image
Fridge Low Temp TriMode 1 2 3 4 7 8 9 10 11 12 13 14 15 16 OH Models3
Before starting
3.3 Main components
The innovative electronic control system designed by Fhiaba maintains constant temperature on the compartments and visualizes it on the control panel display.
It also allows user interaction making it possible to personalize settings of the various functions and to receive sound and/or visual messages should occur any malfunction in the appliance.
3.4 Main control panel
| 1 | 2 | 3 | 4 | 5 | 6 | 7 | 9 | ||
 | |||||||||
| 1 |  | Unit | Switches the appliance (all compartments) between ON and STAND BY (press for three seconds). | ||||||
| 2 |  | Fridge | Allows switching ON and OFF of only the refrigerator compartment (press for three seconds). | ||||||
| 3 |  | Menu | Allows access to the appliance function menu | ||||||
| 4 |  | Up/down Fridge | Using the Up and Down buttons, it is possible to change the set temperature of the refrigerator and navigate through the interactive menu. | ||||||
| 5 | 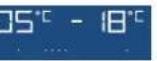 | Display | It shows the temperature of the refrigerator and freezer compartments, the date and time, Menu functions and visual messages. | ||||||
| 6 |  | Up/Down Freezer (TriMode) | By selecting Up/Down the preset temperature can be changed according to the selected function mode (freezer, refrigerator, Fresco) and navigate through the interactive menu. | ||||||
| 7 |  | Enter | Confirms activation or deactivation of the selections made in the Menu. | ||||||
| 8 |  | Ice maker | Allows activating or deactivating the automatic ice production. | ||||||
| 9 |  | Alarm | Blinks to signal user alerts such as door left open, also in combination with a sound signal which can be deactivated by pressing the button. | ||||||
3.5 Fresco control panel
 | |||
| 11 |  | Display | 101112 Shows the temperature of the Fresco compartment. |
| 12 |  | Up/Down | Using the Up and Down buttons, it is possible to change the temperature set for the Fresco compartment. |
| 13 |  | Crisper | Allows switching on and off of only the Fresco compartment (press for three seconds). |
text_image
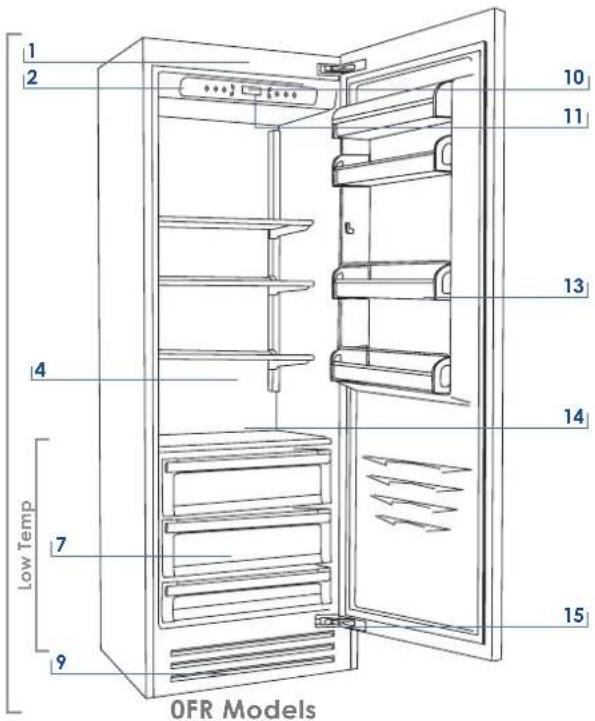
1 2 10 11 13 14 15 7 Low Temp 9 OFR Models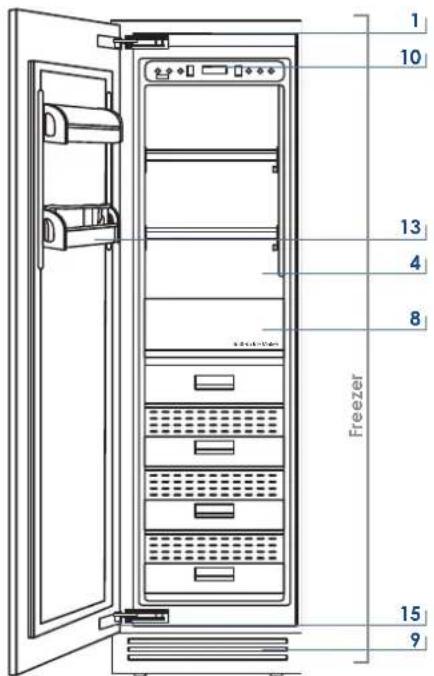
text_image
1 10 13 4 8 Freezer 15 9OFZ Models
Must be ordered in combination with Fridge column.
Single drawer Fridge
1 Stainless steel structure with aluminum trim
2 Control panel with Menu
4 Patented shelf positioning system
5 Control panel, Fresco area
6 Fresco compartment with controlled humidity
7 "Low Temp" drawer with controlled humidity
8 Automatic icemaker
9 Double refrigeration system
10 Temperature display
11 Sound signals
13 Spacious door shelves
14 Innovative lighting
15 Automatic door and drawer closure
16 Freezer compartment that can be transformed into a refrigerator or Fresco compartment (TriMode function)
3 Before starting
3.7 Main control panel
 | |||
| 1 | 2 | 3 | |
| 1 | Unit | Switches the appliance (all compartments) between ON and STAND BY (press for three seconds). | |
| 2 | Fridge | Allows switching ON and OFF of only the refrigerator compartment (press for three seconds). | |
| 3 | Menu | Allows access to the appliance function menu | |
| 4 | Up/down Fridge | Using the Up and Down buttons, it is possible to change the set temperature of the refrigerator and navigate through the interactive menu. | |
| 5 | Display | It shows the temperature of the refrigerator and freezer compartments, the date and time, Menu functions and visual messages. | |
| 6 | Up/Down Freezer | By selecting Up/Down the preset temperature and navigate through the interactive menu. | |
| 7 | Enter | Confirms activation or deactivation of the selections made in the Menu. | |
| 8 | Ice maker | Allows activating or deactivating the automatic ice production. | |
| 9 | Alarm | Blinks to signal user alerts such as door left open, also in combination with a sound signal which can be deactivated by pressing the button. | |
3.8 Freezer control panel

text_image
Fhiaba 1 1 00°C Display Shows the temperature of the Freezer compartment.4.1 Switching on and off
First startup
When the appliance is connected to the electrical power supply but has not yet been switched on, the display shows the message
Stand by
This is a safety message to warn that the appliance is connected to the mains, and all the panel buttons are off.
To switch on all the appliance compartments, press the Unit button @for three seconds.
Switching off the Refrigerator and Fresco compartments
When the appliance is first switched on the TriMode compartment is set to the "freezer" mode. After switching on it remains always on and can be switched off only by switching off the complete appliance.
Press Unit for three seconds.
Restarting
Use the same buttons to restart.
The freezer compartment always stays on and cannot be switched off except by completely switching off the appliance by pressing the Unit button for three seconds.
Switching off for long periods
During long absence periods it is recommended to switch off the refrigerator by pressing the Unit button Ⓞfor three seconds and disconnecting the electrical plug or the breaker controlling the socket.
Completely empty the refrigerator, clean and dry it and leave the doors and drawers partially open to prevent unpleasant odors.
4.2 How to adjust the temperature for different requirements
Each model has been carefully tested before leaving the factory and is adjusted in such a way to ensure high performance and low consumption. Usually, it is not necessary to modify the settings.
Nevertheless, according to special requirements, it is possible to modify the set temperatures as follows:
Refrigeration Compartment
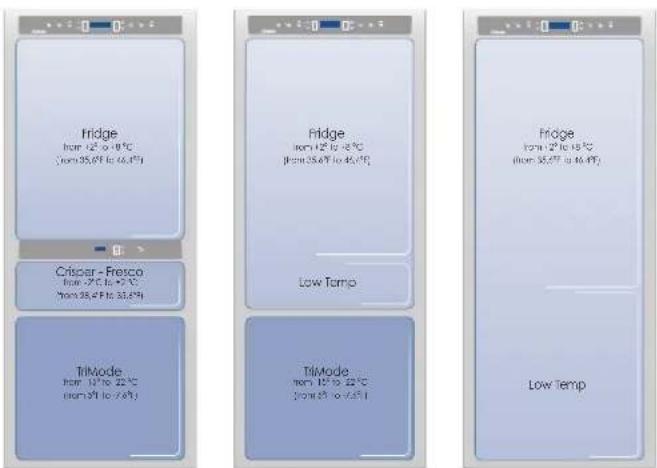
From +2°C to +8°C (from 35.6°F to 46.4°F), the recommended preset temperature is +5°C (41°F).
To adjust the temperature use the Up/Down buttons ▼ Upon touching these buttons the newly set temperature will appear in the display. To modify this temperature, use the buttons until reaching the desired temperature.
Fresco Compartment (1T models)
From -2^ to +2^ (from 28.4^ to 35.6^ ), the recommended preset temperature is 0^ ( 32^ ).
To adjust the temperature use the Up/Down buttons, Upon touching these buttons the newly set temperature will appear in the display. To modify this temperature, use the buttons until reaching the desired temperature.
Freezer Compartment (TriMode)
From -15^ to -22^ (from 5^ to -7.6^ ), the recommended temperature is preset at -18^ ( 0^ ).
To adjust the temperature use the Up/Down buttons, Upon touching these buttons the newly set temperature will appear in the display. To modify this temperature, use the buttons until reaching the desired temperature.
In case the compartment is used as refrigerator or Fresco compartment (TriMode function) the recommended and preset temperatures will correspond to those indicated for the respective compartments.

If at the first startup the Standby message does not appear, but another message appears, it means that the appliance has already started the cooling process. If this is the case, deactivate any possible sound signal by pressing the Alarm button
, close the door and wait until the set temperature is reached. During the first startup, it will not be possible to use the Menu to modify the factory settings until the preset temperature has been reached.
Each time the appliance is switched on it goes through a self-diagnosis procedure lasting three minutes before completely starting up.
If only the refrigerator compartment or the Fresco compartment is switched off, the specific fan will continue to operate to prevent the formation of unpleasant odours and mould.
Before switching off the appliance for a long period of time, remove all of the items inside and leave the doors and drawers open to prevent the formation of unpleasant odours and mould.

The temperature shown can vary slightly in respect to the set temperature following frequent openings of the doors or insertion of room temperature foods or large quantities of foods.
6 to 12 hours are necessary to reach the selected temperature.
4-5
Appliance switching on and off
4.3 Ice Maker Activation
The Ice Maker button ~ located on the main control panel permits activation of the automatic icemaker.
The button is illuminated when the icemaker is functioning.
A prewash of the hydraulic circuit should be performed before activating the Ice Maker for the first time. To do this touch at the same time buttons Enter and Ice Maker. After a few minutes the Ice Maker can be activated.

Do not activate the Ice Maker unless the appliance is connected to the water mains.
4.4 Information and malfunction messages on the display
An integrated control system provides information through lighted signals or text messages visualized on the display. The information signal is always visualized with a fixed text message, while a malfunction signal is visualized with blinking text.
The sound signal that accompanies some malfunction signals can be deactivated by pressing the Alarm button on the main control panel.
The list of malfunction signals is located at the back of this manual.
5.1 Customization and language settings
text_image
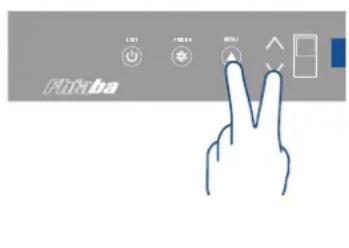
LIST FREE MINI FikabaTo prevent an inadvertent change to the settings the keypad is automatically locked after a certain period of time.
To re-activate the Menu function, press simultaneously the Menu button and the Down button for at least three seconds or just press the Menu button again for 3 seconds.
The key lock can be disabled through the specific function in the Settings menu.
It is possible to customized the functions of your Fhiaba to adapt it to diverse usage needs, resetting the main parameters (Settings) or activating special functions (Functions).
Functions are visualized on the main display by pressing the Menu button ⚠
The Up/Down buttons permit scrolling the available
functions, which can be selected by pressing the Enter button ☑The display visualizes the current functioning status.
Using the Up/Down buttons it is also possible to scroll through the selected function, activating or deactivating by pressing the Enter button . Once the function is confirmed, the display will automatically visualize the main menu to select other functions.
At any time it is possible to return to the previous selection through the FhiabaAccess button ⚠
The language of the messages appearing on the display can be changed by operating as follows:
Enter the Menu by pressing the Menu button ▲ select Settings via the Up/Down buttons ▲ and confirm via Enter √. Then select the Language function and the desired language.
5.2 Special functions activated through the Menu
To use special functions, select the Menu button ⬆ and use the Up/Down button ⬇ to access the menu, confirming the selection Functions
Shopping Fridge
The function lowers the refrigerator temperature to +2^ (35.6°F) for 12 hours, permitting more rapid cooling of food that has just been placed in. Once the 12 hours have expired, the function deactivates automatically, returning to the previously set temperature. It is possible to program a timed activation of the function. After a prolonged interruption of electrical current, it is necessary to reactivate the function.
How to activate
$$ \text { Functions } \rightarrow ⓥ \rightarrow \overset {\wedge} {\vee} \text { Shopping Fridge } \rightarrow Ⓩ \rightarrow \overset {\wedge} {\vee} $$
$$ \begin{array}{l}\text {Shopping Fridge ON / OFF} \rightarrow \checkmark \rightarrow \hat {\vee} \text {Shopping Fridge On }\\text {How to deactivate}\end{array} $$
$$ \text { Functions } \rightarrow \checkmark \rightarrow \hat {\vee} \text { Shopping Fridge } \rightarrow \checkmark \rightarrow \hat {\vee} $$
$$ \begin{array}{l}\text {Shopping Fridge ON / OFF} \rightarrow \checkmark \rightarrow \hat {\vee} \text {Shopping Fridge OFF }\\text { How to program timed activation }\end{array} $$
$$ \text { Functions } \rightarrow \checkmark \rightarrow \hat {\vee} \text { Shopping Fridge } \rightarrow \checkmark \rightarrow \hat {\vee} $$
$$ \text { Shopping Time } \rightarrow \checkmark \rightarrow \hat {\vee} \text { Set Hours: I } \rightarrow \checkmark $$
It is possible to program the function with a delay of 1 to 12 hours.

The various Shopping Modes help prepare the cooling, Fridge and TriMode compartments for the introduction of a heat load which can consist of fresh food or other items which may have warmed during transport. The more quickly an item can be cooled or frozen the better it will be preserved.
This mode can also be effective at maintaining compartment temperatures while entertaining when higher than average door and drawer openings are anticipated.
Vacation Fridge
This function (recommended in case of prolonged absences since it allows considerable energy savings) brings the refrigerator compartment temperature to +14°C (57.2°F). It is possible to program the duration, or it can be manually deactivated upon re-entry after a period of absence. This function remains active even if during the period of absence there is a prolonged interruption of electrical power.
$$ \begin{array}{l} \text { How to activate } \ \text { Functions } \rightarrow \checkmark \rightarrow \hat {\vee} \text { Vacation Fridge } \rightarrow \checkmark \rightarrow \hat {\vee} \ \begin{array}{l}\text {Vacation ON / OFF} \rightarrow \checkmark \rightarrow \hat {\vee} \text {Vacation Fridge On} \rightarrow \checkmark\\text {How to deactivate upon re - entry}\end{array} \ \text { Functions } \rightarrow \checkmark \rightarrow \hat {\vee} \text { Vacation Fridge } \rightarrow \checkmark \rightarrow \hat {\vee} \ \begin{array}{l}\text {Vacation ON / OFF} \rightarrow \checkmark \rightarrow \hat {\text {Vacation Fridge OFF}} \rightarrow \checkmark\\text {How to program the duration}\end{array} \ \text { Functions } \rightarrow \checkmark \rightarrow \hat {\vee} \text { Vacation Fridge } \rightarrow \checkmark \rightarrow \hat {\vee} \ \text { Vacation Time } \rightarrow ⓨ \rightarrow \bigwedge_ {\vee} \text { Set Days: } 1 \rightarrow ⓥ \ \end{array} $$
It is possible to program a period from 1 to 90 days.
Shopping TriMode
This function must be activated at least 24 hours before inserting room temperature items into the freezer, or several hours before placing into the freezer previously frozen items which have been subject to a slight temperature rise. This function is automatically deactivated when the programmed time period expires. It is possible o program timed activation of the function.
If interrupted by a prolonged interruption of the electrical power, it is necessary to reactivate the function.
$$ \begin{array}{l} \text { How to activate } \ \text { Functions } \rightarrow \checkmark \rightarrow \hat {\vee} \text { Shopping TriMode } \rightarrow \checkmark \rightarrow \hat {\vee} \ \begin{array}{l}\text {ShoppingTriModeON / OFF} \rightarrow \checkmark \rightarrow \hat {\vee} \text {ShoppingTriModeOn}\\text {How to deactivate}\end{array} \ \text { Functions } \rightarrow \checkmark \rightarrow \hat {\vee} \text { Shopping Fridge } \rightarrow \checkmark \rightarrow \hat {\vee} \ \begin{array}{l}\text {ShoppingTriModeON / OFF} \rightarrow \checkmark \rightarrow \hat {\vee} \text {Shopping TriMode Off}\\text {How to program timed activation}\end{array} \ \text { Functions } \rightarrow \checkmark \rightarrow \hat {\vee} \text { Shopping TriMode } \rightarrow \checkmark \rightarrow \hat {\vee} \ \text { Shopping Time } \rightarrow ⓨ \rightarrow \bigwedge \text { Set Hours: I } \rightarrow ⓥ \ \end{array} $$
It is possible to program the function with a delay of 1 to 12 hours.
Vacation TriMode
This function (recommended in case of prolonged absences since it allows considerable energy savings) brings the TriMode compartment temperature to -18°C (46.4°F). It is possible to program the duration, or it can be manually deactivated upon re-entry after a period of absence. This function remains active even if during the period of absence there is a prolonged interruption of electrical power.
$$ \begin{array}{l} \text { How to activate } \ \text { Functions } \rightarrow \checkmark \rightarrow \hat {\vee} \text { Vacation TriMode } \rightarrow \checkmark \rightarrow \hat {\vee} \ \text { Vacation ON / OFF } \rightarrow \checkmark \rightarrow \hat {\vee} \text { Vacation TriMode On } \rightarrow \checkmark \ \text { How to deactivate upon re - entry } \ \text { Functions } \rightarrow \checkmark \rightarrow \hat {\vee} \text { Vacation TriMode } \rightarrow \checkmark \rightarrow \hat {\vee} \ \begin{array}{l}\text {Vacation ON / OFF} \rightarrow \checkmark \rightarrow \hat {\text {Vacation TriMode Off}} \rightarrow \checkmark\\text {How to program the duration}\end{array} \ \text { Functions } \rightarrow \checkmark \rightarrow \hat {\vee} \text { Vacation TriMode } \rightarrow \checkmark \rightarrow \hat {\vee} \ \text { Vacation Time } \rightarrow ⓨ \rightarrow \bigwedge_ {\vee} \text { Set Days: } 1 \rightarrow ⓥ \ \end{array} $$
It is possible to program a period from 1 to 90 days.
Bottle Cooler
This function can be activated when it is necessary to cool off beverages quickly, by placing them inside the freezer compartment.
It is possible to select a duration of 1 to 45 minutes.
A sound signal will indicate when the optimal temperature has been reached. After removing the beverages, deactivate the sound signal by pressing the Alarm button.
$$ \text { How to activate } $$
$$ \text { Functions } \rightarrow \checkmark \rightarrow \hat {\vee} \text { Bottle Cooler } \rightarrow \checkmark \rightarrow \hat {\vee} $$
$$ \text { Bottle Cooler ON / OFF } \rightarrow \checkmark \rightarrow \hat {\vee} \text { Bottle Cooler On } \rightarrow \checkmark $$
$$ \text { How to deactivate } $$
$$ \text { Functions } \rightarrow \checkmark \rightarrow \bigwedge_ {\vee} \text { Bottle Cooler } \rightarrow \checkmark \rightarrow \bigwedge_ {\vee} $$
$$ \begin{array}{l}\text {Bottle Cooler ON / OFF} \rightarrow \checkmark \rightarrow \hat {\vee} \text {Bottle Cooler Off} \rightarrow \checkmark\\text {How to program the duration}\end{array} $$
$$ \text { Functions } \rightarrow \checkmark \rightarrow \hat {\vee} \text { Bottle Cooler } $$
$$ \text { Set Cooling Time } \rightarrow \textcircled {\checkmark} \text { Set time }: 2 0 \min \rightarrow \stackrel {\wedge} {\vee} \rightarrow \textcircled {\checkmark} $$
Ice Maker
The IceMaker function permits selecting the size of the ice cubes, by choosing between Large (base setting) or Medium, and activation of the SuperIce function, which increases the quantity of produced ice.
The Superlce function deactivates automatically after 24 hours.
5 Settings and Special Functions
How to activate the cube size function
$$ \text { Functions } \rightarrow ⓨ \rightarrow \bigwedge_ {\vee} \text { Ice Maker } \rightarrow Ⓩ \rightarrow \bigwedge_ {\vee} $$
$$ \begin{array}{c}\text {Set Cube Size} \rightarrow \checkmark \rightarrow \hat {\vee} \text {Size: Large} \rightarrow \hat {\vee} \rightarrow \checkmark\\text {How to deactivate}\end{array} $$
$$ \text { Functions } \rightarrow ⓨ \rightarrow \bigwedge_ {\vee} \text { Ice Maker } \rightarrow Ⓩ \rightarrow \bigwedge_ {\vee} $$
$$ \begin{array}{l}\text {Set Cube Size} \rightarrow \checkmark \rightarrow \hat {\vee} \text {Size: Medium} \rightarrow \hat {\vee} \rightarrow \checkmark\\text {How to activate the Superice function}\end{array} $$
$$ \text { Functions } \rightarrow \checkmark \rightarrow \hat {\vee} \text { Ice Maker } \rightarrow \checkmark \rightarrow \hat {\vee} $$
$$ \text { SuperIce ON / OFF } \rightarrow Ⓥ \rightarrow \bigwedge \text { SuperIce On } \rightarrow Ⓞ $$
$$ \begin{array}{c}\text {How to deactivate}\\text {Functions} \rightarrow \checkmark \rightarrow \hat {\vee} \text {Ice Maker} \rightarrow \checkmark \rightarrow \hat {\vee}\end{array} $$
$$ \text { SuperIce ON / OFF } \rightarrow ⓨ \rightarrow \bigwedge \text { SuperIce OFF } \rightarrow ⓥ $$
Sabbath Mode (Optional)
The function makes it possible to comply to certain religious observances requiring that the operation of the appliance is not affected by the opening or closing of the doors (the thermostatic control, the inner lighting and the ice maker are deactivated).
How to activate
$$ \text { Functions } \rightarrow ⓥ \rightarrow \bigwedge_ {\vee} \text { Sabbath Mode } \rightarrow Ⓩ \rightarrow \bigwedge_ {\vee} $$
$$ \begin{array}{l}\text {Sabbath Mode ON / OFF} \rightarrow \checkmark \rightarrow \hat {\vee} \text {Sabbath Mode On} \rightarrow \checkmark\\text {How to deactivate}\end{array} $$
$$ \text { Functions } \rightarrow ⓥ \rightarrow \bigwedge_ {\vee} \text { Sabbath Mode } \rightarrow Ⓩ \rightarrow \bigwedge_ {\vee} $$
$$ \text { Sabbath Mode ON / OFF } \rightarrow \checkmark \rightarrow \hat {\vee} \text { Sabbath Mode Off } \rightarrow \checkmark $$
Water Filter
The View Status function permits visualizing the time left before the filter needs to be replaced.
How to check the status of the filter
$$ \begin{array}{l}\text { Functions } \rightarrow \checkmark \rightarrow \hat {\vee} \text { Water Filter } \rightarrow \checkmark \rightarrow \hat {\vee} \text { Filter Status }\\rightarrow \checkmark \rightarrow \hat {\vee} \text { View Status } \rightarrow \checkmark\end{array} $$
Reset Filter
The Reset Filter function sets to zero the time left before the filter needs to be replaced. It is necessary to set the meter to zero each time the cartridge is replaced. As an alternative press for 5 seconds the Enter button √
How to set the filtered water meter to zero
$$ \begin{array}{l}\text { Functions } \rightarrow \checkmark \rightarrow \hat {\vee} \text { Water Filter } \rightarrow \checkmark \rightarrow \hat {\vee} \text { Filter Status }\\rightarrow \checkmark \rightarrow \hat {\vee} \text { Filter Reset } \rightarrow \checkmark\end{array} $$
Bypass Filter
This function is to be activated when it is not necessary to filter the water, because excellent quality water is already available from the home water system.
How to activate filter Bypass
$$ \text { Functions } \rightarrow ⓨ \rightarrow \bigwedge_ {\vee} \text { Water Filter } \rightarrow Ⓩ \rightarrow \bigwedge_ {\vee} \text { Filter Status } $$
$$ \begin{array}{l}\rightarrow \checkmark \rightarrow \hat {\vee} \text {Filter Bypass} \rightarrow \checkmark \rightarrow \hat {\vee} \text {Filter Bypass On} \rightarrow \checkmark\\text {How to deactivate filter Bypass}\end{array} $$
$$ \text { Functions } \rightarrow \checkmark \rightarrow \hat {\vee} \text { Water Filter } \rightarrow \checkmark \rightarrow \hat {\vee} \text { Filter Status } $$
$$ \rightarrow \checkmark \rightarrow \hat {\vee} \text { Filter Bypass } \rightarrow \checkmark \rightarrow \hat {\vee} \text { Filter Bypass Off } \rightarrow \checkmark $$
Manual Clean, Water Filter
If ice production has been disabled or unused for a long period it is recommended to perform a Manual Clean function to flush out water which has sat in the system during this period. Repeat the operation until the water is clean. Before proceeding it is important to turn off the ice maker by pressing button
How to manually clean the filter
$$ \text { Functions } \rightarrow ⓨ \rightarrow \hat {\vee} \text { Water Filter } \rightarrow ⓥ \rightarrow \hat {\vee} $$
$$ \text { Manual Clean } \rightarrow ⓨ \rightarrow \bigwedge_ {\vee} \text { Enter to confirm } \rightarrow ⓥ $$

Correctly position the ice tray or another suitable container under the IceMaker to collect water, then close the drawer. At the end of the operation, wash the tray.
5.3 Basic settings of the Menu
Select the Menu button ▲ and used the Up/Down button ^ to select Getx: 183
TriMode Options
The freezer compartment can, if required, be converted to the refrigeration o Fresco operating mode.
How to set the Fridge function
$$ \text { Settings } \rightarrow \checkmark \rightarrow \hat {\vee} \text { TriMode Options } \rightarrow \checkmark \rightarrow \hat {\vee} $$
$$ \begin{array}{l}\text { Fridge } \rightarrow \checkmark \text { Enter to confirm } \rightarrow \checkmark\\text { How to set the Fresco function }\end{array} $$
$$ \text { Settings } \rightarrow \checkmark \rightarrow \bigwedge_ {\vee} \text { TriMode Options } \rightarrow \checkmark \rightarrow \bigwedge_ {\vee} $$
$$ \begin{array}{l}\text { Fresco } \rightarrow \checkmark \text { Enter to confirm } \rightarrow \checkmark\\text { How to revert to the Freezer function }\end{array} $$
$$ \text { Settings } \rightarrow \checkmark \rightarrow \hat {\vee} \text { TriMode Options } \rightarrow \checkmark \rightarrow \hat {\vee} $$
$$ \text { Freezer } \rightarrow \checkmark \text { Enter to confirm } \rightarrow \checkmark $$
Default Setting
This offers the possibility to reset default factory settings and cancels any previous changes.
How to reset default settings
$$ \text { Settings } \rightarrow \checkmark \rightarrow \bigwedge \quad \text { Default Setting } \rightarrow \checkmark $$
$$ \text { Enter to confirm } \rightarrow ⓨ $$

ATTENTION: If the default settings are restored, the default mode of the TriMode compartment is freezer mode. If it was previously being used in refrigerator or Fresco mode be sure to set it back to your desired setting.
Date
Set Date
The display will show the date in the format dd:mm:yy (day:month:year), the day will blink. Use the Up/Down buttons vto modify the setting, confirm with Enter to go on to the next setting; once the year is confirmed the date will be set.
How to set the date
$$ \begin{array}{l} \text { Settings } \rightarrow \checkmark \rightarrow \bigwedge \text { Date } \rightarrow \checkmark \rightarrow \bigwedge \text { Set Date } \ \rightarrow \textcircled {✓} D A T E: 0 1 - 0 1 - 2 0 0 9 \rightarrow \textcircled {✓} \ \end{array} $$
Show Date
Using this function it is possible to deactivate/activate the date visualization on the display.
How to activate the date
$$ \begin{array}{l} \text { Settings } \rightarrow \checkmark \rightarrow \hat {\vee} \text { Date } \rightarrow \checkmark \rightarrow \hat {\vee} \text { Show Date } \ \rightarrow \textcircled {V} \rightarrow \stackrel {\wedge} {\vee} \text { DATE: 01 - 01 - 2009 On } \rightarrow \textcircled {V} \ \text { Settings } \rightarrow \checkmark \rightarrow \checkmark \text { Date } \rightarrow \checkmark \rightarrow \checkmark \text { Show Date } \ \rightarrow \checkmark \rightarrow \hat {\vee} \text { DATE: 01 - 01 - 2009 OFF } \rightarrow \checkmark \ \end{array} $$
How to deactivate the date
Time
Set Time
The display shows the hours and minutes in the format ^ hh:mm and with hh: blinking. Use the Up/Down buttons √ to modify the setting and then confirm by pressing Enter √ to go on to the next setting.
Once the minutes are confirmed, the time will be set.
How to set the time
$$ \text { Settings } \rightarrow \checkmark \rightarrow \bigwedge_ {\vee} \text { Time } \rightarrow \checkmark \rightarrow \bigwedge_ {\vee} \text { Set Time } $$
$$ \rightarrow \checkmark \text { TIME: } 0 1: 0 1 \rightarrow \checkmark $$
Set 12/24
This function selects the display at 12 or 24 h.
How to set the display to 12 h
$$ \text { Settings } \rightarrow \checkmark \rightarrow \hat {\vee} \text { Time } \rightarrow \checkmark \rightarrow \hat {\vee} \text { Set View } \rightarrow \checkmark \rightarrow \hat {\vee} $$
$$ \text { Set:12 } \rightarrow \checkmark \rightarrow \wedge $$
How to set the display to 24 h
$$ \text { Settings } \rightarrow \checkmark \rightarrow \hat {\vee} \text { Time } \rightarrow \checkmark \rightarrow \hat {\vee} \text { Set View } \rightarrow \checkmark \rightarrow \hat {\vee} $$
$$ \text { Set:24 } \rightarrow ⓨ \rightarrow \bigwedge $$
Show Time
Through this function it is possible to activate/deactivate the constant visualization of the time.
How to activate the permanent time
$$ \text { Settings } \rightarrow Ⓤ \rightarrow \bigwedge_ {\vee} \text { Time } \rightarrow Ⓩ \rightarrow \bigwedge_ {\vee} \text { Show Time } $$
$$ \rightarrow \checkmark \rightarrow \hat {\text { TIME }}: 0 1: 0 1 O n \rightarrow \checkmark $$
How to deactivate
$$ \text { Settings } \rightarrow \checkmark \rightarrow \hat {\vee} \text { Time } \rightarrow \checkmark \rightarrow \hat {\vee} \text { Show Time } $$
$$ \rightarrow \textcircled {✓} \rightarrow \bigwedge_ {\text { TIME: } 0 1: 0 1 \text { OFF }} \rightarrow \textcircled {✓} $$
Language
The function allows selection of the language for the display messages.
Italian
$$ \begin{array}{c}\text {Settings} \rightarrow \checkmark \rightarrow \bigwedge_ {\vee} \text {Language} \rightarrow \checkmark \rightarrow \bigwedge_ {\vee} \text {italiano} \rightarrow \checkmark\\text {English}\end{array} $$
$$ \text { Settings } \rightarrow \checkmark \rightarrow \hat {\vee} \text { Language } \rightarrow \checkmark \rightarrow \hat {\vee} \text { english } \rightarrow \checkmark $$
French
$$ \text { Settings } \rightarrow \checkmark \rightarrow \hat {\vee} \text { Language } \rightarrow \checkmark \rightarrow \hat {\vee} \text { français } \rightarrow \checkmark $$
German
$$ \begin{array}{c}\text {Settings} \rightarrow \checkmark \rightarrow \hat {\vee} \text {Language} \rightarrow \checkmark \rightarrow \hat {\vee} \text {deutsch} \rightarrow \checkmark\\text {Sanskich}\end{array} $$
Spanish
$$ \text { Settings } \rightarrow \checkmark \rightarrow \hat {\vee} \text { Language } \rightarrow \checkmark \rightarrow \hat {\vee} \text { español } \rightarrow \checkmark $$
Set °C/°F
This function permits visualizing the temperature in Centigrade or Fahrenheit degrees. Normally, the appliance is set for visualization in centigrade degrees.
How to set the temperature in Centigrade
$$ \text { Settings } \rightarrow \checkmark \rightarrow \hat {\vee} \text { Set } ^ {\prime} C / ^ {\prime} F \rightarrow \checkmark \rightarrow \hat {\vee} \text { Set } ^ {\prime} C \rightarrow \checkmark $$
How to set the temperature in Fahrenheit
$$ \text { Settings } \rightarrow Ⓤ \rightarrow \bigwedge_ {\vee} \text { Set } ^ {\prime} C / ^ {\prime} F \rightarrow Ⓩ \rightarrow \bigwedge_ {\vee} \text { Set } ^ {\prime} F \rightarrow Ⓩ $$
Keypad lock
Through this function it is possible to activate/deactivate the keypad lock.
How to activate
$$ \text { Settings } \rightarrow \checkmark \rightarrow \hat {\vee} \text { keypad lock } \rightarrow \checkmark \rightarrow \hat {\vee} \text { On } \rightarrow \checkmark $$
$$ \begin{array}{c}\text {How to deactivate}\\text {Settings} \rightarrow \checkmark \rightarrow \checkmark \text {keypad lock} \rightarrow \checkmark \rightarrow \checkmark \text {OFF} \rightarrow \checkmark\end{array} $$
6.1 Internal Layout (positioning, adjustment, removal)
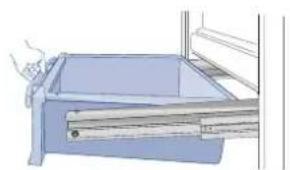
Fresco Drawer
Fixed to the slide guides with two thumbscrews.
■ to remove the drawer, unscrew the thumbscrews and remove the drawer.
natural_image
Illustration of a hand placing a drawer into a cabinet (no text or symbols visible)TriMode Drawer
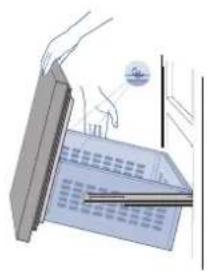
The upper TriMode can be removed using the same method used for the Fresco drawer
■ to remove the inner TriMode drawer unscrew the thumbscrews.
When replacing the drawers, make certain the back of the drawers engage under the clips on the slide guides.
natural_image
Illustration of a hand placing a small object onto a building facade with a ruler and pointer (no text or symbols)Ice Tray
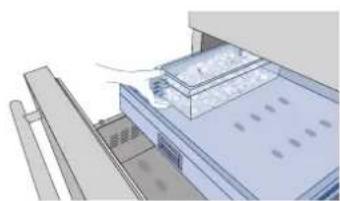
Located in the upper drawer of the freezer compartment after removal, make sure to reposition it correctly.
natural_image
Architectural elevation drawing showing a multi-level building structure with windows and balconies (no text or symbols)
Do not place hands or fingers near the Icemaker when in function.
Shelves
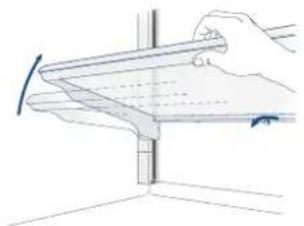
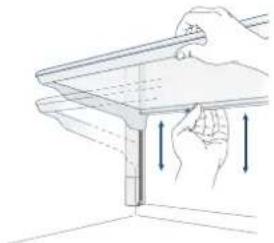
The shelves are sliding and can be easily re-positioned by the user as follows:
- release the locking knob by turning i anti-clockwise - lift or lower the shelf to the desired position
natural_image
Illustration of a hand holding a metal bracket with a curved handle, no text or symbols present■ re-tighten the locking knob ■ to remove a shelf it is necessary to slide it up to the top
natural_image
Illustration of a hand holding a shelf with arrows indicating movement or force (no text or symbols)Door Shelves
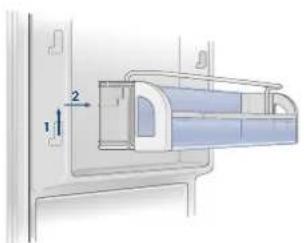
The door shelves can be easily removed for cleaning
- Hold the door shelf at the sides and push it upwards to release it from its seat, then pull it outwards. - Reverse the procedure to reinstall.
natural_image
Diagram of a mobile device with labeled components and directional arrows (no text or symbols)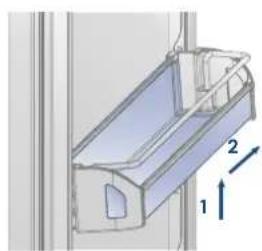
natural_image
3D diagram of a mechanical component with labeled parts (1, 2), no readable text or symbols present7.1 Activation and use of the Ice Maker
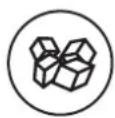

If the ice is not used frequently is advisable to empty the ice bin once every 8-10 days.
It is normal that some ice cubes stick to one another. If the ice is not frequently used, the older cubes can become opaque, and will have a strange flavour and become smaller.
The Icemaker automatically deactivates if the Vacation function is activated.
When the Icemaker is started for the first time, it is recommended to dispose of the first full bin of ice.
If the equipment has been switched off for a month or more, it is recommended to perform a water cleaning cycle.
The ice maker will only produce ice with the TriMode compartment set to Freezer Mode.
The ice maker will continue to operate even when the ice bin is not in position
To activate the Ice Maker after installation of the appliance, press the Icemaker button ⓤ
Please note that 12 to 24 hours are necessary before ice production may begin. The production is of 10 cubes per cycle in approximately 10 cycles in 24 hours.
The yield depends on the temperature set in the freezer, the room temperature and the frequency of door opening.
If the appliance is operating without being connected to the water system, make sure that the Icemaker is deactivated by pressing the button ☑
The Ice Maker produces ice until the ice tray is full and will automatically stop once the maximum level is reached.
With the SuperIce function, it is possible to increase the quantity of ice produced a 24 hours, while the Set Cube Size function permits selection of the size of the produced ice cubes.
At factory default settings Ice Maker can produce approx. 100 ice cubes within 24 hours.
Do the ice cubes have an unusual odour?
Ice is a porous material which can absorb odours from the environment. Ice cubes which have been in the ice cube container for a long time may absorb odours, stick together and slowly become smaller.
We recommend that old ice cubes not be used.
Other means of preventing odors:
The ice cube container should be cleaned occasionally with warm water. Make sure that you switch off the ice maker before clearing the container. Rinse out and wipe dry.
- Check the contents of the freezer for spoiled or out-of-date food. All odorous foods should be wrapped thoroughly or stored in airtight containers to prevent the build-up of odors.
- The water filter may have to be replaced in some models.
- In some cases the quality of the water connection in the house should be checked.
Operating noises
Quite normal noises
- Grumbling: refrigerating unit is running. Fan in the recirculating air system is running.
■ Bubbling, humming or gurgling noises: refrigerant is flowing through the tubes. - Clicking: motor is switching on or off. Solenoid valve on the water connection is opening/closing.
■ Rumbling: ice cubes are falling into the ice cube container.
Note: the appliance is powered by two independent compressors. It is therefore normal to always have one of two compressors in operation.

Do not place any bottles or food for rapid cooling in the ice cube container. The ice maker may become blocked and be damaged.
7.2 Water Filter
natural_image
Illustration of a baby being held by an adult in a hospital bed (no text or symbols visible)Reset water filter in the settings menu or by pressing the Enter button √ for 5 seconds.
The Water Filter makes available high-quality water for the production of ice cubes. It provides up to 3000 liters of water for a maximum time of 12 months.
When the filter is nearly expired the message "Replace Filter" will appear on the display.
Filter Replacement
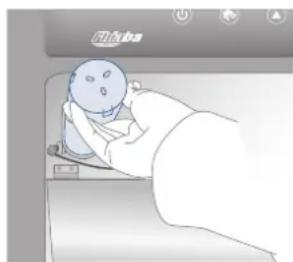
The filter is located inside the refrigerator compartment, above the top glass panel. Prior to changing the filter, switch off the Ice Maker by pressing the IceMaker button.
Open the top glass panel and carefully rotate the filter cartridge for a quarter rotation in a counter clockwise direction until it detaches from its housing. It is normal for a small quantity of water to come out. Remove the cap of the new cartridge and insert it into the housing by gently rotating it for a quarter rotation in a clockwise direction until it locks into place.
Then enter the Fhiaba Access Menu and set "Manual Clean" function. At the end of the cleaning cycle remove the water from the ice tray and wipe it dry.
8.1 Lighting
natural_image
Three identical vertical panels showing abstract light patterns on blue backgrounds, no text or symbols present.most effective and safe manner to keep your foods in the best way for as long as possible.
Bear in mind that the Crisper-Fresco area is the area for preserving the most delicate fresh foods, since it ensures constant average temperature near freezing.
Periodically check that all foods are in a perfect state of preservation. It is usually quite clear when a food item is deteriorated, due to mold, unpleasant odor and unpleasant aspect. Nevertheless, there are cases in which these conditions are not so evident. If you believe that a food item was kept for an excessive period of time and may be deteriorated, do not consume this item or even taste it, even if it seems to still be healthy, since the bacteria that cause deterioration of food can also cause poisoning and illness. When in doubt, throw the food away.
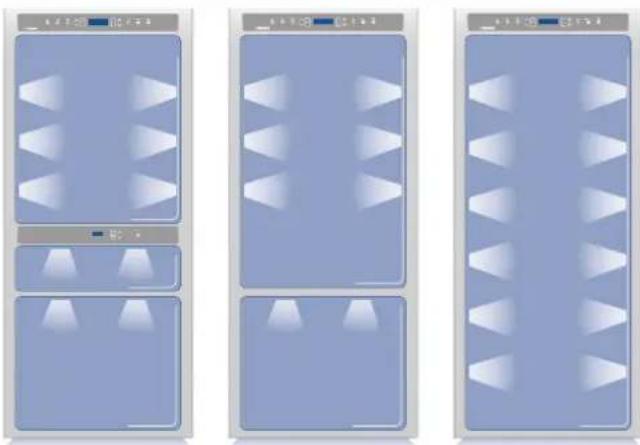
To provide optimum interior lighting, LED strips illuminate the refrigerator compartment from the top and sets of LED lights directly illuminate different areas of the refrigerator compartment, of the Crisper-Fresco drawers and the freezer drawer.
In case of malfunction and/or wearing out of the lighting system, the repair should be carried out by a qualified Fhi-aba Service technician.
9.1 General directions
Your Fhiaba is designed to ensure precise, constant temperatures and appropriate humidity levels in all compartments.
In addition, the double refrigeration ensures that frozen foods and ice do not absorb the odor of fresh foods and that the humidity in the refrigerator does not freeze and build up frost.
Nevertheless, to properly preserve all of your foods, it is not enough to have an excellent refrigerator. It is also necessary to know the rules for correct food preservation.
Do bear in mind that all foods will inevitably change their characteristics over the passage of time. This change begins long before the food is consumed, since foods contain micro organisms which multiply and can cause deterioration. This process occurs more rapidly due to improper handling, preservation temperatures and humidity levels.
It is therefore recommended to follow the directions presented below which will permit using your refrigerator/freezer in the
text_image
Fridge from 12°C to 18°C (from 35.6°F to 40.4°F) Fridge from 12°C to 18°C (from 35.6°F to 40.4°F) Low Temp Fridge from 12°C to 18°C (from 35.6°F to 40.4°F) Low Temp Criticar - Fresco from -7°C to +7°C (from 35.4°F to 33.6°F) TiiMode from 12°C to 22°C (from 35°F to 7.8°F)9.2 TriMode compartment
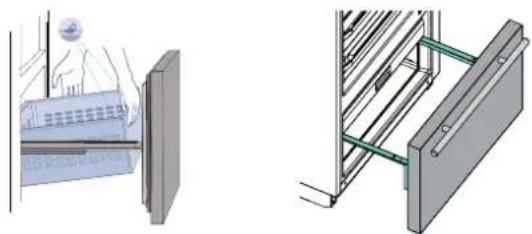
To fully use the capacity of the TriMode compartment:
■ remove the drawer
■ remove the top drawer
■ install the supports delivered with the units (on request)
natural_image
Technical diagrams showing two views of a building interior with structural elements (no text or symbols)9.3 How to maintain good food quality
When buying groceries
Always take the following precautions:
■ Place any packages of raw meat, fish or poultry in plastic bags so that they do not drip on other foods.
■ Purchase meat, poultry and fish last. Do not leave your groceries in a warm car after shopping. Keep a freezer bag in your car and use it in case of very high temperatures or long trips.
- Check the production dates and "best before" times on foods to be sure that they are fresh.
- Be very careful when buying fresh foods, and only buy a quantity that can be consumed during your planned preservation period.
- When possible, let warm foods adjust to room temperature for at least two hours before placing them in the refrigerator, unless you have activated the Shopping function before.
When placing foods in
Check the refrigeration temperature of the various compartments on the control panel:
■ The refrigerator temperature must be 8^ C ( 45^ F) or lower and the freezer temperature must be -18^ C ( 0^ F)
■ Follow the recommendations regarding the preservation times and temperatures indicated in the tables to follow.
- Keep raw meat, fish and poultry separate from other foods and avoid any possible drippings.
When placing foods in
- When placing in the refrigerator your meat, fish or poultry, leave these in their original packaging, unless the packaging is ripped or punctured. Repeated handling could introduce bacteria into these foods.
■ To keep food in the freezer is a good idea to use freezer containers, with plastic freezer bags or aluminum foil around the freezer containers, if you intend to preserve the food for more than two months. This will minimize dehydration and deterioration
■ Label and date the packages - To keep foods in the refrigerator, wrap these in plastic film or deposit them in plastic containers or vacuum packed containers to avoid drying. Always mark with the date the packages or containers.
- Be careful to correctly position the food items on the shelves in a way that does not obstruct the air circulation vents inside the compartment.
When preparing food
■ Wash all items that have come in contact with food
■ Carefully wash hands before and after contact with food
■ Sterilize containers, utensils and kitchen tools that have come into contact with meat, fish and poultry.
■ Sterilize sponges used to wash kitchenware weekly.
■ Use plastic gloves if you have any hand condition.
■ Defrost foods in the refrigerator or in the microwave oven, not on the countertop. If you use a microwave oven to defrost food, cook the food immediately.
■ Marinate food only in the refrigerator.
■ Rinse fish and poultry before cooking.
- Avoid contamination when preparing dishes. Keep raw meat, fish, poultry and their liquids away from other food items.
For example, do not use the same surface or the same uten-
sils for preparing meat, fish, poultry and vegetables.
- Keep your cutting boards perfectly clean, whether made from wood or plastic.
■ Wash cutting boards with warm water and soap, and rinse with a diluted disinfecting solution.
When cooking food
- Do not taste raw or partially cooked meat, poultry, fish and eggs.
■ Cook meat at a temperature of 75^ C ( 167^ F) or higher. For cuts of meat over 5 cm, use a meat thermometer to check the temperature. For thinner cuts of meat, to check if it is cooked, check the color of the juice and whether it is clear or pink.
If you are cooking meat which is not yet defrosted, increase the cooking time one and half times the normal duration. - Bear in mind that roasted meat and poultry, when cooked in the oven, need temperatures of 160°C (320°F) or higher.
■ Cook the egg whites and yolks until they are well done. - Do not use the same containers that have contained raw or partially cooked eggs.
If your oven or microwave is equipped with a probe for temperature control, use it - internal temperatures are the best gauge for determining cooking completion.
When you have leftovers
- Keep leftovers in the refrigerator or in the freezer in small closed containers. Before placing them in the refrigerator, make sure that they have cooled off. Therefore let at least two hours pass after cooking and make sure that there is adequate air circulation around the container, so that the food can cool off quickly - this practice avoids increasing the temperature in the fridge / freezer compartment and subsequent cooling cycles as a result.
- Date leftover containers and use them within the recommended time.
- Completely cover and heat leftovers before serving. - Boil sauces and soups. Consume leftovers after they have been heated to a temperature of at least 75°C (167°F).
■ If you think the food is gone bad, or when in doubt, throw it away.
A characteristic unique to Fhiaba products is the combination of micro beaded stainless steel crisper drawers and the main stainless steel interior liner that help generate and maintain optimum internal humidity levels for extended preservation of fruit and vegetables.
A natural condition that may occur, is the accumulation of water on the bottom of the refrigeration compartment below the bottom crisper. This is dependant on a number of factors, ambient temperature and humidity levels in the surrounding environment, moisture levels on fruit and vegetables placed in the refrigerator, frequency in which the main door is opened and exposed to the ambient environment.
This temporary presence of water on the bottom is the result of the high humidity environment maintained in the compartment and is absolutely normal, and under normal operating conditions should be eliminated. However, in rare occasions where there may be an excessive amount of condensation simply remove the bottom drawer and wipe access water away.

When a high level of humidity is present either in the environment or in the foods placed in the Fresco drawers, the bottom of the Fresco compartment might be covered with some water or ice (if the temperature is set between 0^ C and -2C^ ).
Such condition is normal and it is due to the high humidity levels of the Fresco compartment; high humidity together with low temperatures is what guarantees a longer preservation of foods.
Water or ice can disappear on its own if the air humidity level should lower; it is also possible to remove the water with a towel. If a thin layer of ice has formed, set the temperature of the Fresco compartment to +2°C and after one day remove the water with a towel.
If the layer of ice is thicker, it might be necessary to shut off the Fresco compartment for one day in order to melt it.
9.4 Recommendations for preserving fresh food

Vegetables
Wash vegetables in cold water and dry well. Place vegetables in vacuum packed containers, plastic containers or vegetable bags in a Fresco Drawer.

Fruit
Wash and dry fresh fruit. Pack very aromatic fruit in plastic bags.
Fruit should be placed in the high humidity Fresco compartment.

Packaged meat
Place in the refrigerator in its original packaging.
After opening, wrap the remaining food in plastic bags or aluminum foil.

Fresh meat, fish and poultry
Remove the original packaging, then put in plastic bags or containers and immediately place in the refrigerator.

Eggs
Place the eggs in their package or container into the refrigerator without washing them. Check the "best before" date and at any rate use the eggs within two weeks of purchasing.

Milk, cream and fresh cheeses
These should be kept in their original closed packaging. Place these on refrigerator shelves and consume these within five days of purchase.

Cheeses
Place these in the Fresco drawer in their original packaging. Once opened, close these hermetically in plastic bags or aluminum foil.
Leftovers
Let these cool off and cover hermetically with aluminum foil or place
in sealed containers to prevent drying or the spread of odors.
9.5 Recommendations for preserving frozen food

Frozen food
Place food in plastic bags for the freezer. These bags must be hermetically sealed against air and humidity. Do not refreeze defrosted meat.

Ice cream
The firmness of ice cream depends on the quantity of cream that it contains. In general, high-quality ice cream has large amounts of cream, therefore a very low temperature in the freezer will be necessary to maintain its firmness.
Consequently, ice cream without much firmness is not necessarily an indication of a temperature problem as raised above normal levels.
After a prolonged interruption of electrical power, once the electrical power is reactivated, an audible signal will indicate if the temperature has raised above normal levels. In addition to this the display will show for one minute the highest temperature detected inside the compartments, to allow the user to decide how to better use the food items.
After one minute the display will resume normal operation, while the Alarm button will continue to blink.
Press the Alarm button ⏻ to display the highest recorded temperatures.
| Fresh foods | Preservation area | Time |
Raw meats
Large cuts Fresco Compartment 4 days
Beef steaks, poultry and wild game Fresco Compartment 3 days
Ground meat Fresco Compartment 1-2 days
Carpaccio Fresco Compartment Immediately
Cooked meat
Boiled meat and roasted meat Refrigerator Compartment 2 days
Meat sauce Refrigerator Compartment 6 days
Fish
Raw and cooked fish Fresco Compartment 2 days
Other
Soups and broths Refrigerator Compartment 2 days
Pasta Refrigerator Compartment 2 days
Opened cold cuts Fresco Compartment 3 days
Fresh cheeses Fresco Compartment 2-3 days
Well sealed aged cheeses Refrigerator Compartment Several months
Eggs (fresh and unwashed)
Refrigerator Compartment 2 weeks
Opened cans
Refrigerator Compartment 2-3 days
Raw vegetables (in perforated bags)
Fresco Compartment 1 week
| Frozen foods | Preservation area | Time | |
| Beef, veal, lamb and goat meat | Freezer Compartment | (steaks) | 6-12 months |
| Beef, veal, lamb and goat meat | Freezer Compartment | (Meat with bone) | 4-6 months |
| Ground beef | Freezer Compartment | 1-2 months | |
| Pork | Freezer Compartment | (Without bones) | 4-6 months |
| Pork | Freezer Compartment | (With bones) | 2-3 months |
| Ground pork | Freezer Compartment | 1-2 months | |
| Meat leftovers | Freezer Compartment | 2-3 months | |
| Whole chicken and turkey | Freezer Compartment | 8-12 months | |
| Goose, duck and pheasant | Freezer Compartment | 4-8 months | |
| Fish | Freezer Compartment | 1-2 months | |
| Shellfish | Freezer Compartment | 2-3 months | |
| Cooked food | Freezer Compartment | 1-2 months | |
| Vegetables | Freezer Compartment | 8-12 months | |
| Fruit | Freezer Compartment | 6-12 months | |
| Desserts and cakes | Freezer Compartment | 2-3 months | |
11 Care and Cleaning
11.1 Care and Cleaning
To clean the parts made of steel use a microfiber cloth and the sponge provided in the kit with the appliance. Always use the cloth and sponge in the direction of the steel's satin finish.
Every now and then, to polish the steel, wipe with a slightly damp microfiber cloth.
Do not use the sponge on aluminium parts, such as the handles and the profiles of the glass shelves.
You should use special care to keep the ventilation openings in the appliance or in the cabinet that houses it free of obstructions.

Scrupulously follow the detailed directions that can be found in the provided kit and never use abrasive or metallic products which could scratch and damage the satin finishing on the appliance permanently.
Before performing any sort of cleaning, disconnect the appliance from the electrical power supply.
Make sure you do not damage the refrigerant circuit in any way.
11.2 Condenser cleaning
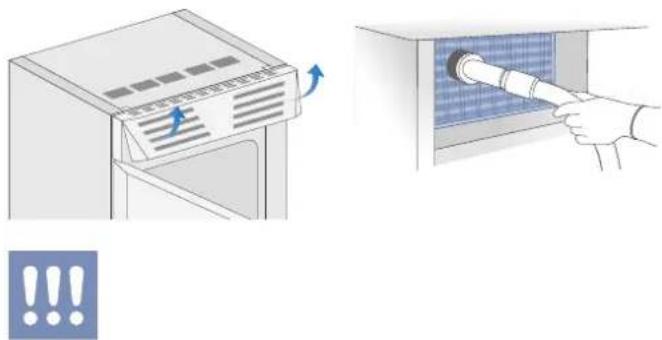
A ventilation grille is located either at the top of the appliance or at the bottom according to the model type.
To clean it use a vacuum cleaner with a soft brush attachment at maximum power, sweeping it along the vent slits. In case of a significant dust build up, the ventilation grille can be removed to allow a more accurate cleaning of the filter. Every 6 months the display shows the message "Check Cond", clean the condenser and press for 5 seconds the Enter button to reset.
Operate as follows:
■ Switch off the appliance by pressing the Unit button ☑ the main control panel for approx 3 seconds.
- Wait approx 30 minutes, until the finned condenser cools down to room temperature.
- On models with ventilation at the base remove the grille at the bottom (magnetically attached) and take it off. On models with ventilation lift the grille as shown in the picture.
■ Thoroughly clean the grille and the foam filter, by means of a vacuum cleaner and the soft brush attachment.
■ Clean it thoroughly from any dust build up as shown in the picture, taking care not to damage it.
■ Start up the appliance again, by pressing the Unit button ⏻ on the main
natural_image
Illustration showing a door with airflow indicators and a hand inserting a pipe into a cabinet (no text or symbols)The edges of the condenser are sharp, therefore use adequate protection for the hands and arms when cleaning the condenser.
11.3 Internal cleaning
Clean the internal and removable parts by washing them with a solution of lukewarm water, a small amount of dish-washing detergent.
Rinse and dry right away.
Do not use mechanical devices or other methods to speed up defrosting.

Do not use water on the electrical parts, lights and control panel.

Do not bring cold glass parts into contact with boiling water. Do not wash any parts of the refrigerator in a dishwashing machine since this could damage or irreparably deform the parts.
12.1 Troubleshooting Guide
If you notice malfunctions in your appliance, use this guide before calling for service: this guide can help you personally resolve the problem or could provide important information to be conveyed to the service technician to ensure rapid and effective repair.
Malfunction message
A malfunction is usually indicated by a message on the display.
Problems that cannot be solved by the user are signaled through a malfunction code.
The refrigerator or the freezer does not work
Is the appliance connected to the electrical power supply?
Is electrical power available at the electricity socket?
Is the Unit button activated?
Is the unit in 'Demo' Mode?
The refrigerator or the freezer
is warmer than usual
Does the display show a malfunction code?
Is the temperature adjusted correctly?
Were the doors or drawers open for a long period of time?
Were large quantities of food recently inserted?
Is the unit in 'Demo' Mode?
The appliance remains in function
for a long time period
Bear in mind that during very hot weather and with very high temperatures in the room it is normal that the compressor remains on for prolonged periods of time.
Were the doors or drawers open for a long period of time?
Were large quantities of food recently inserted?
Check that the doors are closed and that the food or containers do not obstruct the perfect closure of the door.
Is one or more compartments in Shopping Mode?
If you hear unusual noises
It is normal to hear noises from the ventilators or compressors during operation or during the defrost phase.
Noise could be more marked depending on the position of the appliance and the surrounding environment.
Condensation inside and outside
of the refrigerator
If the climate is very humid, the formation of condensation is normal. Opening the door or drawers for prolonged periods of time can contribute to the formation of condensation.
In any case, make sure that the doors are always perfectly closed.
Ice or frost build up inside the refrigerator
or freezer
Did you leave the doors open for a long period of time?
Do the doors close perfectly?
If the doors do not close perfectly, contact your installer.
In case of frost or ice build up in the Crisper-Fresco compartment, due to frequent and prolonged opening of the doors, deactivate the Crisper-Fresco function via the button on the control panel. Wait until the frost or ice melt, then remove the drawer and dry the sides and bottom of the compartment.
Unpleasant odors inside the refrigerator
Clean the appliance completely according to the instructions.
Hermetically cover all the food. Do not conserve food for prolonged periods of time.
The doors are difficult to open
The appliance is designed to ensure a fully hermetic closure. When the door is closed, a vacuum condition can occur: in this case it is necessary to wait a few seconds until the pressure balances before opening the door.
Appliance is cooling but lights and display
are not working
Check to see if the appliance was accidentally placed into Sabbath Mode
The Ice Maker does not work
Make sure that the Ice Maker is on (Icemaker button ☐on).
To switch on the Ice Maker press the button.
Make sure that the appliance is connected to the water supply.
The Ice Maker does not produce
sufficient amounts of ice
On average, the Ice Maker produces approximately 10 cubes of ice every two and half hours.
The ice cubes freeze into one block
If the ice is not used frequently, it is possible that blocks of ice may form. It is recommended to remove the block of ice cubes and then let the Ice Maker fill the ice tray again.
The ice has an unusual flavour or colour
When the Ice Maker is started for the first time, it is recommended to empty the first full tray of ice cubes.
If the refrigerator was switched off for more than one month or if the cartridge was not changed for more than six months, it could be necessary to replace the filter cartridge.
Contact a plumber or a water treatment expert to make sure that the problem is not due to the water supply.

If the unit you purchased was used as a showroom model it may be in a special energy-saving mode called Demo Mode where the appliance appears to be operating (lights work and false temperatures are displayed) but no cooling actually takes place. If you suspect your appliance is in Demo Mode please contact your point of purchase for assistance with disabling this feature.
12 Troubleshooting Guide
12.2 Malfunction indications appearing on the display
Display message Malfunction description
Power Failure!! Prolonged interruption of electrical power
the appliance resumes work automatically, the display shows the warmest temperatures achieved
Door Fridge OPEN Fridge door open
the message appears after few minutes from the door opening
TriMode OPEN Freezer door open
the message appears after few minutes from the door opening
Replace filter Replace filter cartridge
message appears when only 30% of filter capacity is left
Fridge too warm Fridge too warm
see Troubleshooting Guide
Fridge too cold Fridge too cold
wait for 12 hours: if malfunction persists call Customer Care for advice
Fresco too warm Fresco Compartment too warm
see Troubleshooting Guide
Fresco too cold Fresco Compartment too cold
wait for 12 hours: if malfunction persists call Customer Care for advice
TriMode too warm Freezer too warm
see Troubleshooting Guide
TriMode too cold Freezer too cold
wait for 12 hours: if malfunction persists call Customer Care for advice
Error Code... Functional problems
call Customer Care who may help you to salve the problem or put you in contact with the nearest Service Agent
13.1 Before calling for service
If our recommendations were not sufficient to solve the problem, please get in touch with our Customer Care Center for further support via our website at
www.fhiaba.com
or by sending an email to
care@fhiaba.com
You can also contact us on the phone at
+39 0434 420 160
If necessary, we will place you in contact with the Fhiaba Service Center nearest to you.
Before calling, write down the model type and serial number and any messages which may have appeared on the display.
This information is available on the warranty certificate and on the rating plate which is located on the cabinet's frame, on the bottom left side, behind the bottom drawer.
14 Fhiaba Access Menu Map
14.1 Functions
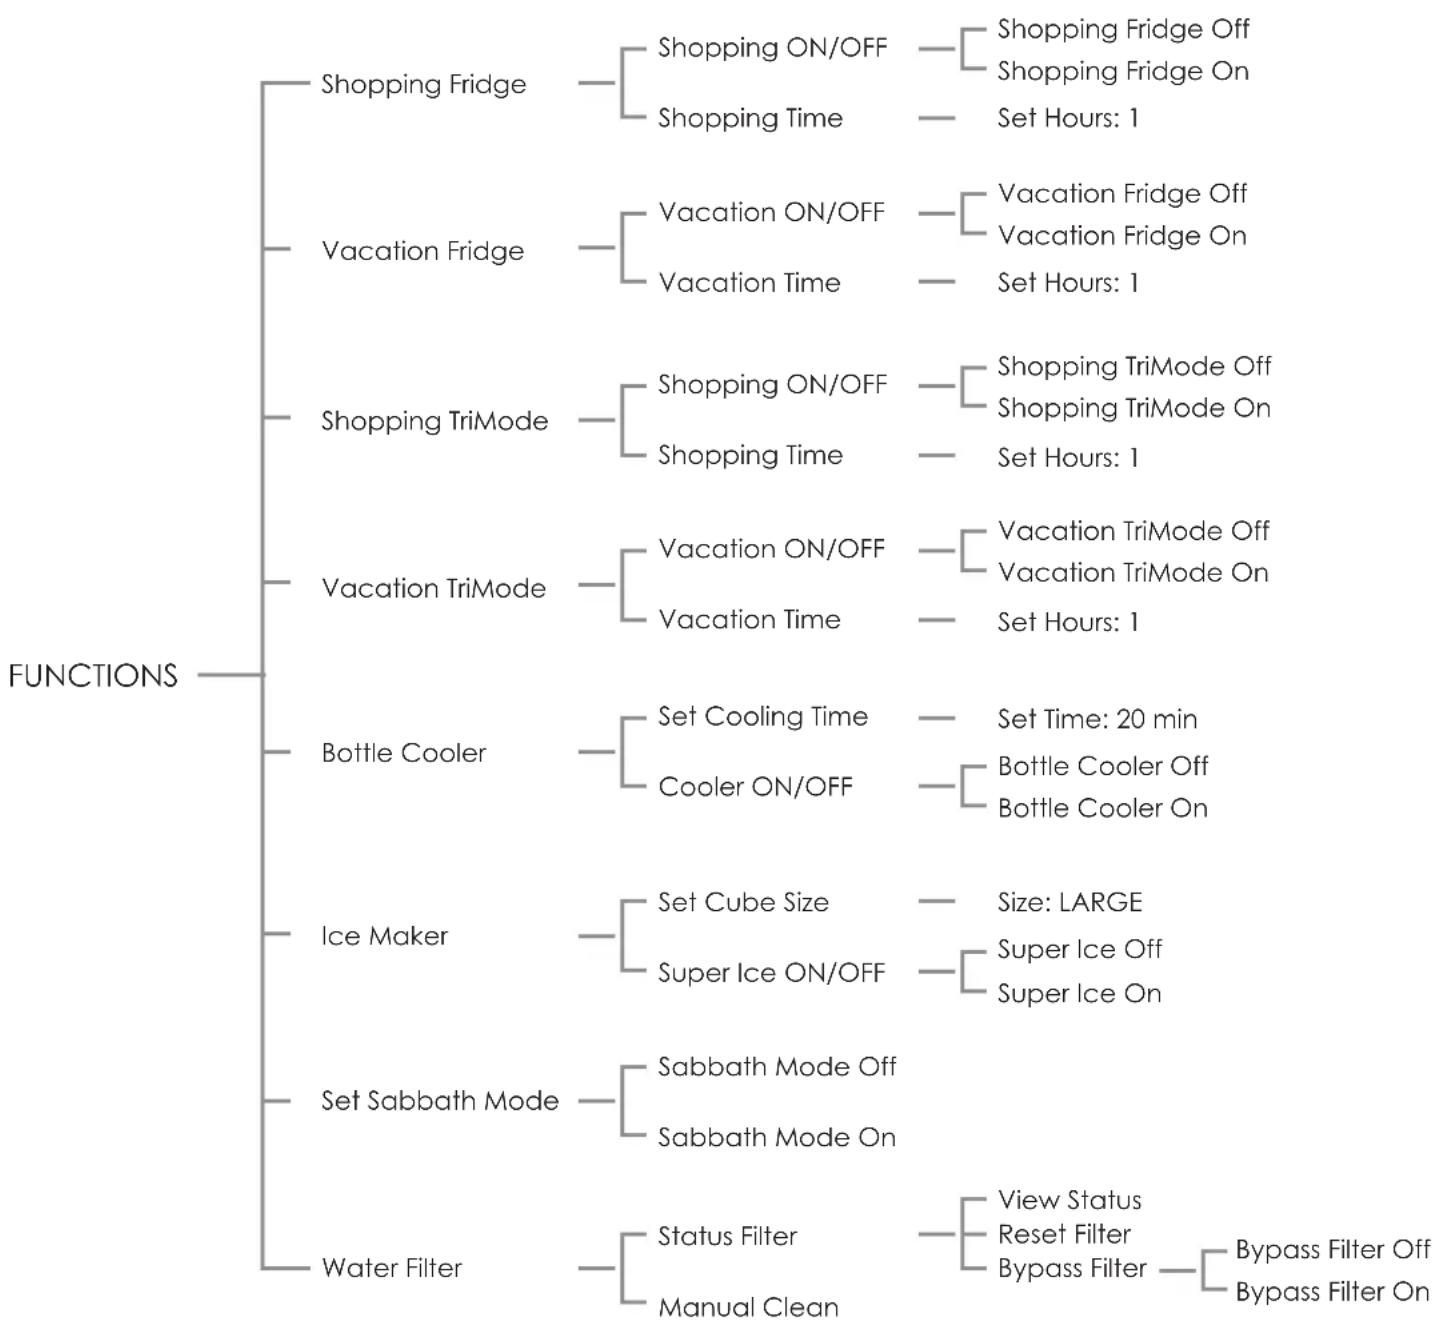
flowchart
graph TD
    A["FUNCTIONS"] --> B["Shopping Fridge"]
    A --> C["Vacation Fridge"]
    A --> D["Shopping TriMode"]
    A --> E["Bottle Cooler"]
    A --> F["Ice Maker"]
    A --> G["Set Sabbath Mode"]
    A --> H["Water Filter"]

    B --> I["Shopping ON/OFF"]
    B --> J["Shopping Time"]
    I --> K["Shopping Fridge Off"]
    I --> L["Shopping Fridge On"]
    I --> M["Set Hours: 1"]

    C --> N["Vacation ON/OFF"]
    C --> O["Vacation Time"]
    N --> P["Vacation Fridge Off"]
    N --> Q["Vacation Fridge On"]
    N --> R["Set Hours: 1"]

    D --> S["Shopping ON/OFF"]
    D --> T["Shopping Time"]
    S --> U["Shopping TriMode Off"]
    S --> V["Shopping TriMode On"]
    S --> W["Set Hours: 1"]

    E --> X["Set Cooling Time"]
    E --> Y["Cooler ON/OFF"]
    X --> Z["Set Time: 20 min"]
    X --> AA["Bottle Cooler Off"]
    X --> AB["Bottle Cooler On"]

    F --> AC["Set Cube Size"]
    F --> AD["Super Ice ON/OFF"]
    AC --> AE["Size: LARGE"]
    AC --> AF["Super Ice Off"]
    AC --> AG["Super Ice On"]

    G --> AH["Sabbath Mode Off"]
    G --> AI["Sabbath Mode On"]

    H --> AJ["Status Filter"]
    H --> AK["Manual Clean"]
    AJ --> AL["View Status"]
    AJ --> AM["Reset Filter"]
    AJ --> AN["Bypass Filter"]
    AL --> AO["Bypass Filter Off"]
    AL --> AP["Bypass Filter On"]
Setting 14.2
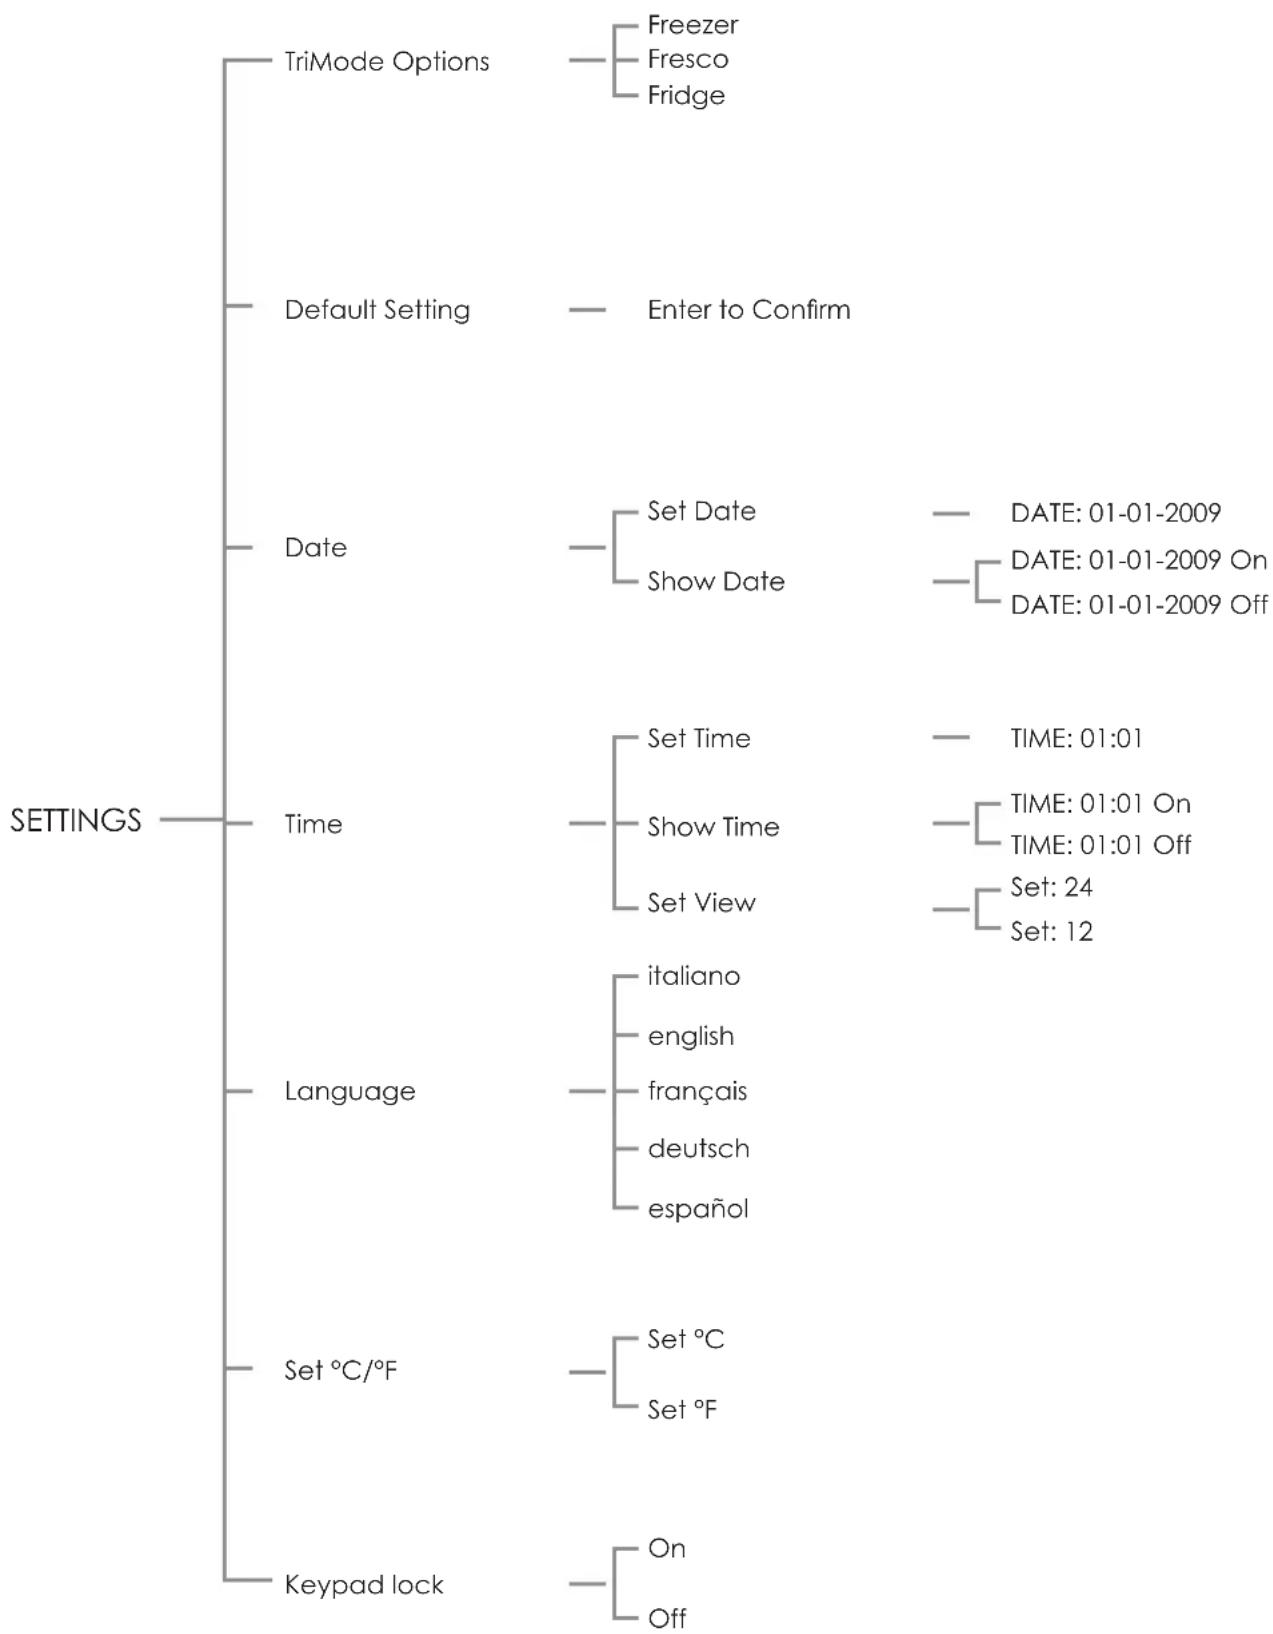
flowchart
graph TD
    A["TriMode Options"] --> B["Freezer"]
    A --> C["Fresco"]
    A --> D["Fridge"]
    E["Default Setting"] --> F["Enter to Confirm"]
    G["Date"] --> H["Set Date"]
    G --> I["Show Date"]
    J["Time"] --> K["Set Time"]
    J --> L["Show Time"]
    J --> M["Set View"]
    N["Language"] --> O["italiano"]
    N --> P["english"]
    N --> Q["français"]
    N --> R["deutsch"]
    N --> S["español"]
    T["Set °C/°F"] --> U["Set °C"]
    T --> V["Set °F"]
    W["Keypad lock"] --> X["On"]
    W --> Y["Off"]
EN