
AG56SB - Cooker BUSH - Free user manual and instructions
Find the device manual for free AG56SB BUSH in PDF.


User questions about AG56SB BUSH
0 question about this device. Answer the ones you know or ask your own.
Ask a new question about this device
Download the instructions for your Cooker in PDF format for free! Find your manual AG56SB - BUSH and take your electronic device back in hand. On this page are published all the documents necessary for the use of your device. AG56SB by BUSH.
USER MANUAL AG56SB BUSH
Operating Instructions – Please keep for future reference
AG56SW
AG56SS
AG56SB
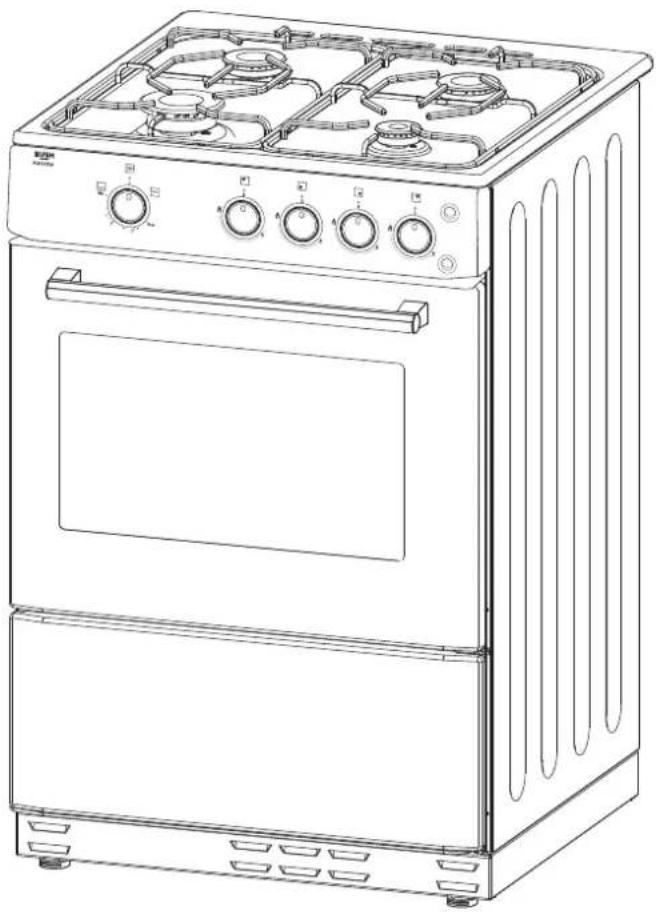
natural_image
Line drawing of a standard electric stove with four gas stove handles and open door (no text or symbols)Important – Please read these instructions fully before using
These instructions contain important information that will help you get the best from your appliance, ensuring safe and correct installation, use and maintenance.
If you need help or have damaged or missing parts, call the Customer Helpline on 0345 257 7271
Parts 3
Safety Information 4
Installation 5
User instructions 7-10
Using the hob 7
Using the oven and grill 9
Cleaning and Maintenance 11-12
Cleaning and Maintenance 11-12
Transporting the cooker 12
Trouble Shooting 13
Technical Specifications 14-15
Injector table 14
Guarantee 16

natural_image
Line drawing of a standard oven with control knobs and a horizontal plate (no text or symbols)Product code
AG56SW
AG56SS
AG56SB
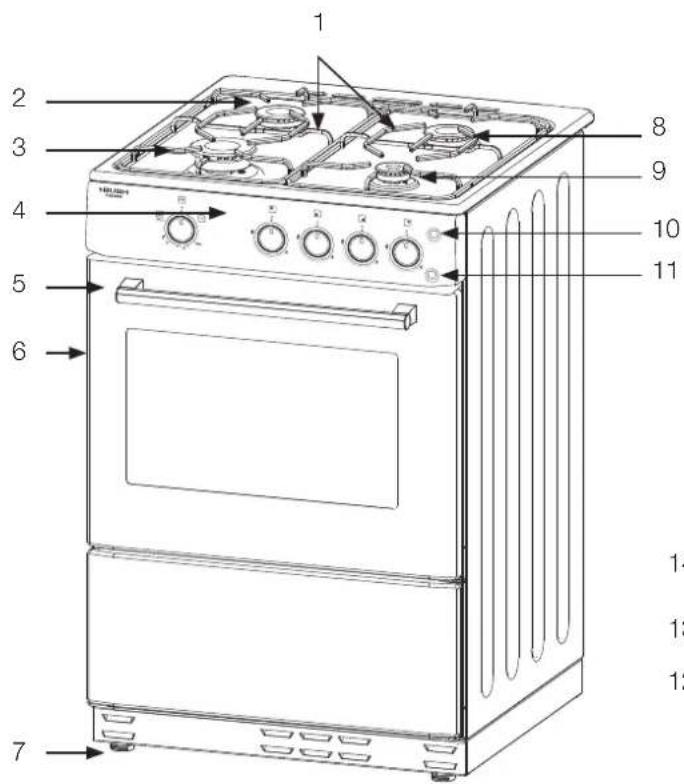
Please familiarise yourself with the parts and accessories listed below
text_image
1 2 3 4 5 6 7 8 9 10 11 12- Pan supports x 2
- Gas burner
- Rapid burner
- Control panel
- Oven handle
- Oven door
- Adjustable foot x 4
- Gas burner
text_image
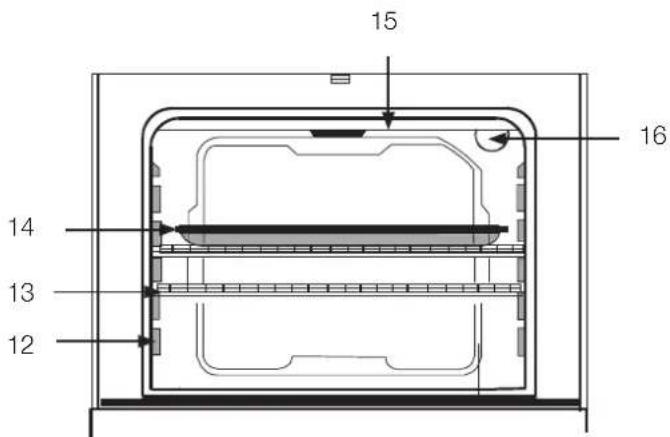
15 16 14 13 12- Auxiliary burner
- Ignition switch
- Light switch
- Oven rack support
- Ovenrackay
- Grilpark and handle set
- Grill heating element
- Oven light
Accessories
Grill pan and handle set
Grill heat shield
Important – Please read these instructions fully before installation
Your appliance is produced in conformity with all relevant safety regulations relating to electrical appliances. Maintenance and repair work must only be performed by authorised or suitably qualified service technicians. Installation and repair work performed without observing the rules may be dangerous.
IMPORTANT - This appliance has been designed for non-professional, domestic use only.
IMPORTANT - Carefully unpack and examine the appliance for any damage. If you think there is a defect, do not use the appliance and contact the authorised repair agent on 0345 257 7271.
IMPORTANT - Dispose of all packaging correctly and responsibly and in accordance with all local laws and regulations. Never leave packaging components within the reach of children as they can be a source of danger.
IMPORTANT - Before connecting the appliance to the household electrical supply, make sure the appliance is rated correctly for the type of electrical supply in your house by checking the information on the rating plate.
IMPORTANT - Make sure your electrical isolation switch is in an easily accessible position following installation.
IMPORTANT - Switches should be set to '0' when the appliance is not in operation.
IMPORTANT - Do not use steam cleaners for cleaning the cooking hobs and oven cavity.
IMPORTANT - In the event that the fl exible cable is damaged contact your authorised service agent for replacement - the cable fitted to this appliance may not be replaced by an unauthorised person.
WARNING - Whilst grilling, the oven door must be open. Never use the grill with the oven door closed.
WARNING - This appliance must be installed by an authorised technician prior to use. The manufacturer is not responsible for any damage that might be caused by installation not in accordance with these instructions.
WARNING - Accessible parts become hot during use, young children must be kept away.
WARNING - This appliance is not intended for use by persons (including children) with reduced physical, sensory and mental capabilities or lack of experience and knowledge, unless they have been given supervision or instructions concerning use of the appliance by persons responsible for their safety.
WARNING - Children should be supervised to make sure that they do not play with the appliance.
WARNING - When the oven door is open do not place anything on it. This could disturb the balance of the appliance or break the door.
WARNING - Make sure cables of other electrical devices cannot come into contact with the hot parts of this appliance.
WARNING - Protect your appliance from atmospheric effects. Do not expose to the effects of sun, rain, snow, dust etc.
CAUTION - Disconnect the appliance from the electrical supply before changing the oven lamp.
CAUTION - Make sure the appliance is turned off at the mains before cleaning.
CAUTION - Do not keep fl ammable materials close to the appliance when it is in operation.
CAUTION - Do not move away from the appliance while cooking with fat or oil. Flaring may occur in the case of overheating. Never pour water into flaring oil.
CAUTION: The use of a gas cooking appliance results in the production of heat, moisture an products of combustion in the room in which it is installed. Ensure that the kitchen is well ventilated especially when the appliance is in use, keep natural ventilation holes open or install a mechanical ventilation device(mechanical extractor hood).
CAUTION: This appliance is for cooking purposes only. It must not be used for other purposes, for example room heating.
Positioning & electrical connection
IMPORTANT - All Gas installations must be carried out by a suitably qualified person. For information on choosing a gas installer contact the 'Gas Safe Register'. For specific gas installation, refer to the separate installation guide.
Positioning
Make sure that there are no combustible or 1. fl ammable materials, such as curtains, in the vicinity of the installation.
Furniture and cabinets surrounding the2. oven must be of material resistant to temperatures greater than 100 °C.
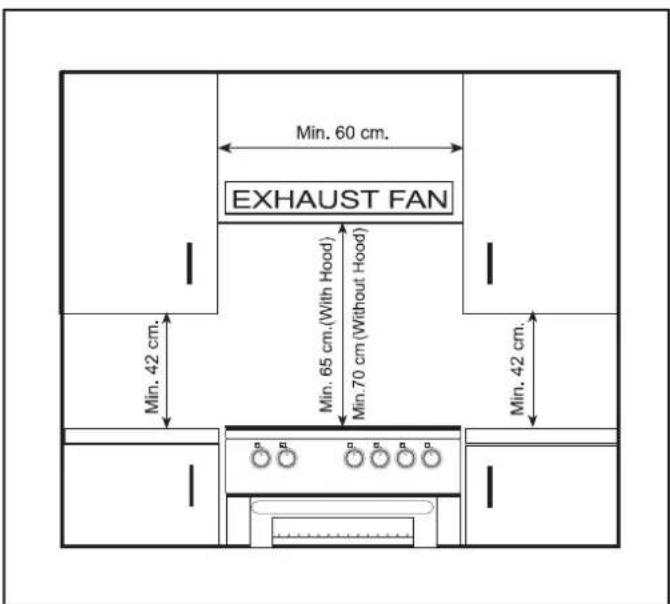
Surrounding furniture, cabinets and 3. extractor fans should be positioned in accordance with the diagram shown in figure 1.
There must be at least 2cm of free space4. between the back wall and the rear of the appliance to allow for ventilation and air circulation.
If fitted, the extractor fan must be at least 5.65cm above the hob. If no fan is fitted the minimum distance between the hob and any cabinet or other structure must be 70cm.
Feet height adjustment
The height and level of the appliance can1. be adjusted by rotating the feet located underneath the appliance at each corner as shown in figure 2.
Rotate in a clockwise direction to decrease2. the height and anti clockwise to increase the height.
Once the desired level has been achieved3. make sure to lift the appliance into its location. Do not drag it as this may cause damage to your floor and the appliance.
text_image
EXHAUST FAN Min. 60 cm. Min. 42 cm. Min. 65 cm.(With Hood) Min. 70 cm (Without Hood) Min. 42 cm.Figure 1

text_image
See detail A Detail AFigure 2
Positioning & electrical connection
IMPORTANT - Electrical connections must be carried out by a suitably qualified person and in accordance with all relevant local building and installation regulations.
Electrical connections
This appliance is fitted with fused plug which 1. should be inserted into a suitable mains socket.
It is recommended that the mains socket is2. located behind the appliance and is switched on and off via a separate switched Fused Connection Unit (FCU).
It is recommended that the switched FCU3. is located adjacent to the appliance within a maximum distance of 2m. The switched FCU must not be located above the appliance but should be easily accessible in case of an emergency.
Using the hob
Ignition of the burners
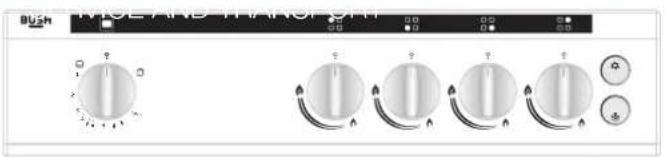
First identify the correct control knob by1. checking the symbols above each knob as shown in figure 3.
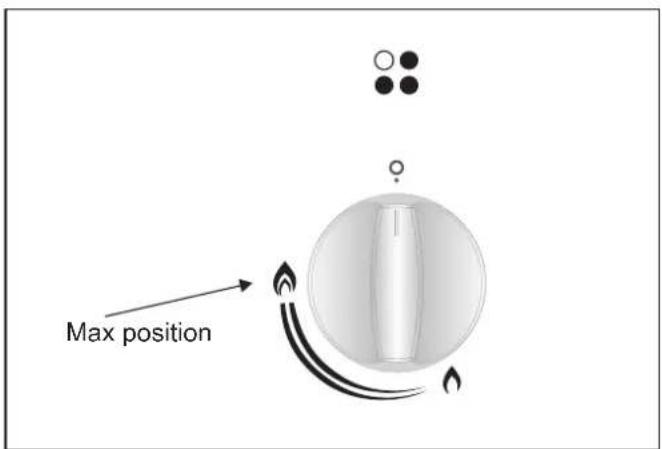
Turn the control knob fully clockwise to the2. 'Max' position whilst pressing in towards the control panel as shown in figure 4.
Simultaneously press and hold the ignition3. button until the gas burner is alight.
Continue to hold both the ignition button and4. the control knob inwards for at least 5 seconds.
In the event the burner or ring fails to light,5. repeat the process in steps 1-4 above. In the event this still fails to operate, wait at least 90 seconds before attempting to ignite the burner.
IMPORTANT6. – This appliance is equipped with a 'Flame Safe Device' (FSD). In the event that the oven burner or gas rings are accidentally extinguished the gas supply will be cut. Wait for at least 90 seconds before attempting to re-ignite the burners.
Control of the hob rings
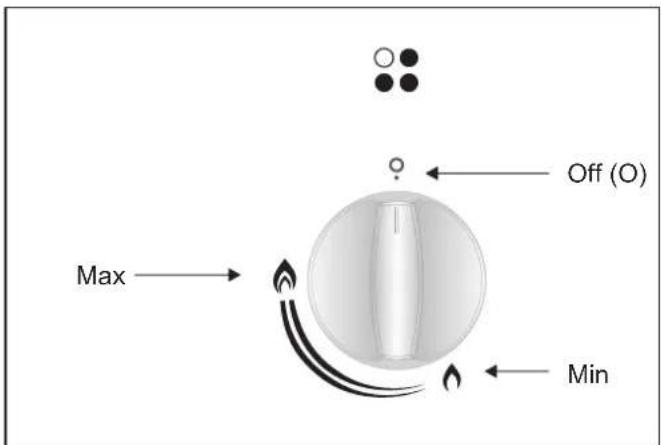
Each control knob has 3 main positions as1. shown in figure 5:
O• ff (0)
• Min
• Max
-
After ignition the control can be adjusted anywhere between the max and min positions to achieve the desired heat output.
-
To turn the hob off, rotate the control knob into the '0' position.
IMPORTANT – If the flame is seen to have a prolonged yellow colouration, turn off the burners and make sure the burner assembly is correctly positioned. Wait for 90 seconds before attempting to re-ignite the burner.
text_image
BUSH WILELAND TRANSPORTFigure 3 Figure 3
text_image
Max positionFigure 4
text_image
Max Off (O) MinFigure 5
Using the hob
Performance tips
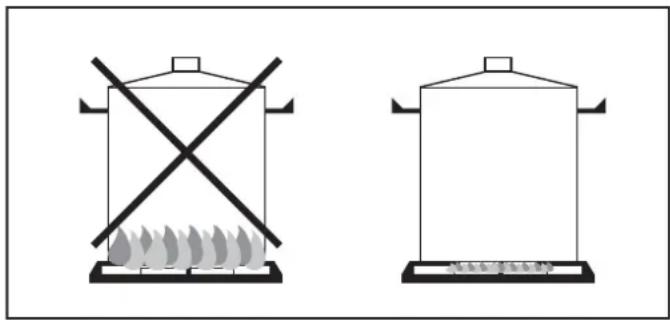
Always select pans that are correctly sized1. for the ring on which it is positioned to avoid unnecessary energy loss as shown in figure 6.
To avoid accidental spillage, make sure pans2, are centrally positioned and avoid allowing handles to overhang.
CAUTION - Do not allow the flame tips to spread around the edges of pans to avoid the pan handles and other external parts becoming hot.
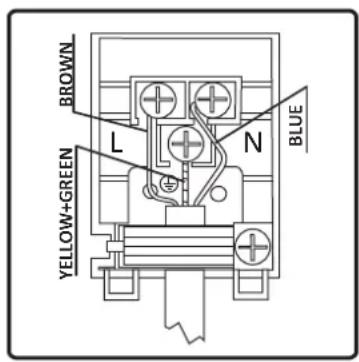
Electric connection and safety
During the electric connection, follow the instructions stated in the user manual.
- The earthing cable must be connected to the earth terminal.
- You have to ensure the power cord with suitable insulation to be connected to the power source during the connection. If there is no appropriate earthed electric outlet in accordance with regulations in the place where the appliance to be installed, contact to our authorized service. The earthed electric outlet must be close to the appliance.
- Do not use an extension cord
- The power cord must not touch to the hot surface of the product.
- In case the cord is damaged, contact Authorized Service to have it changed.
- Any wrong electric connection may damage your appliance, as well as endangering your safety, rendering your guarantee invalid
- The appliance is adjusted for 230V 50Hz electricity. If the mains electricity is different contact your authorized service.
- The supply cord should be kept away from hot parts of appliance. Otherwise, the cord may be damaged, causing short circuit.
- The manufacturer declares that it has no responsibility against any kind of damages and losses that are caused by improper connections that are performed by unauthorized people.
natural_image
Two identical diagrams of a cooking pot with a crossed-out box and fire flame, no text or symbols present.Figure 6
text_image
BROWN L N BLUE YELLOW+GREENUsing the oven and grill
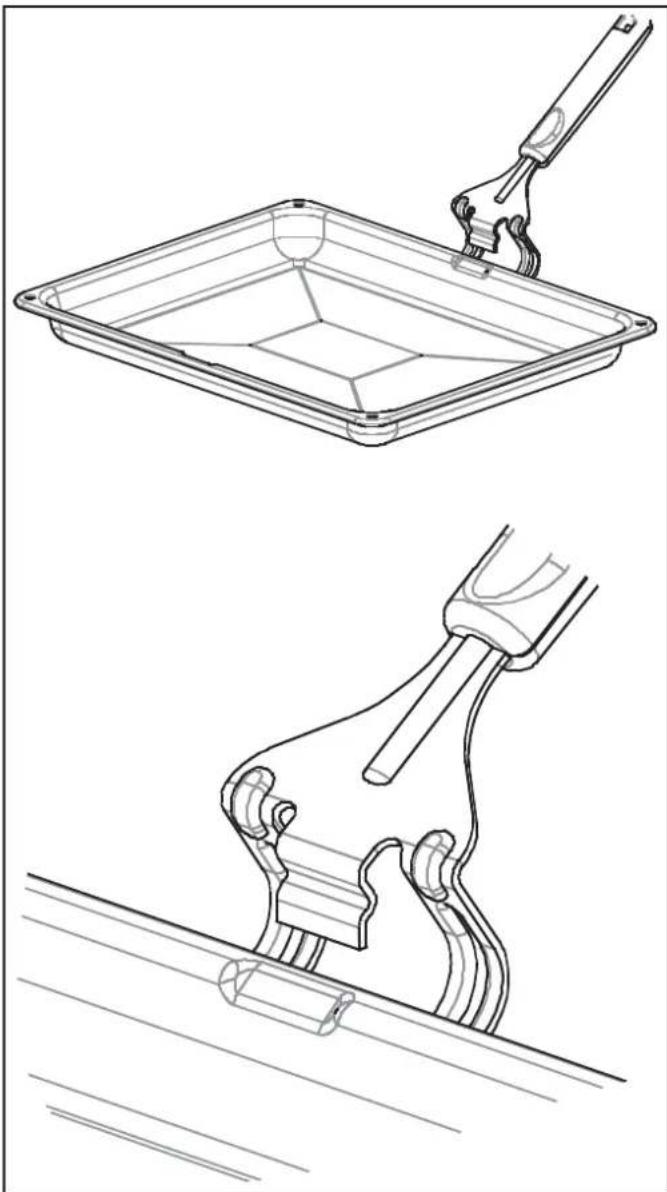
Using the grill pan and handle set
WARNING - Always use an oven glove to protect your hand when using the grill, as the metal parts can become very hot!
The grill pan has a detachable handle. When using the grill pan handle, make sure that it is centralised and secure, as shown in figure 7.
IMPORTANT - Do not leave the handle in position when grilling. If the handle is left in position, it will get very hot.
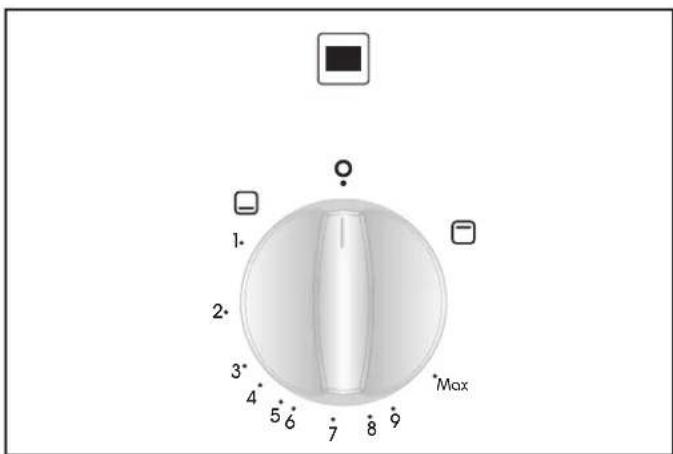
Oven control
The oven is controlled using the oven/grill1. control knob. The oven is ignited in the same way as the gas hob rings.
The temperature may be adjusted according2. to the markings on the control knob between gas marks 1 and 9. The table below gives approximate temperature equivalents for each gas mark setting.
| Oven | |
| Mark Temperature | |
| 1 140 °C | |
| 2 150 °C | |
| 3 170 °C | |
| 4 180 °C | |
| 5 190 °C | |
| 6 200 °C | |
| 7 220 °C | |
| 8 230 °C | |
| 9 240 °C | |
| MAX 270 °C | |
To turn the oven off, rotate the control knob4. anti-clockwise until the '0' position is selected as shown in figure 8.
natural_image
Technical line drawings of two mechanical components: a tray with handle and a tool, both without any text or symbols.Figure 7
text_image
1* 2* 3* 4 5 6 7 8 9 MaxFigure 8
Using the oven and grill
Grill set up and use
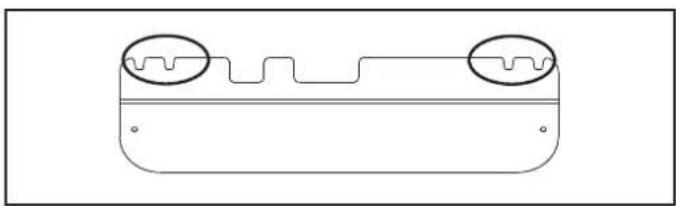
IMPORTANT - Before using the grill, make sure the heat shield is inserted in order to prevent damage and excess heating to the control panel and knobs.
Hold the heat shield so that the fold in the1. metal is facing upwards as shown in figure 9.
Offer up the slots in the heat shield to the two2, protruding screws between the oven door and underside of the control panel.
Make sure the heat shield is located securely3. by pushing it firmly towards the oven.
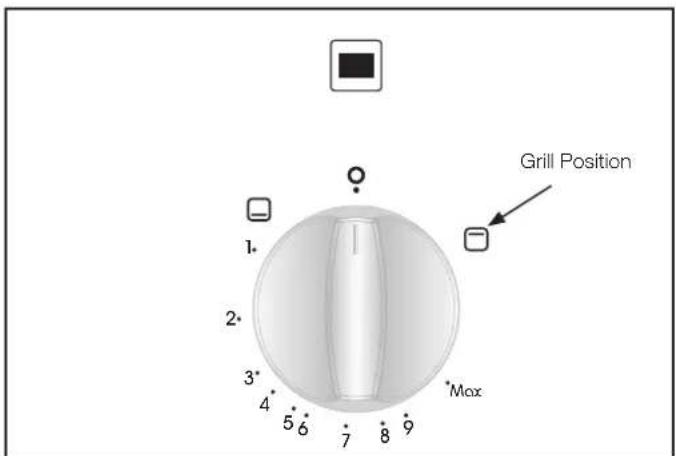
The grill is ignited in the same way as the hob4. rings. The Grill position on the oven/grill control knob is shown in figure 10.
The grill temperature can not be varied but5. provides a constant heat.
Make sure the oven rack is in the upper most6. position that ensures food does not touch the flame during use.
WARNING – Make sure the grill is turned off before closing the oven door.
natural_image
Pure technical drawing of a mechanical part with two circular features and centerlines (no text or symbols)Figure 9
text_image
Grill Position 1. 2. 3. 4. 5. 6. 7. 8 9 MaxFigure 10
Cleaning and maintenance
CAUTION - Make sure the oven and hobs are turned off prior to commencing any cleaning. Make sure all parts have been allowed to cool to prevent the risk of burning.
Interior cleaning
IMPORTANT - Do not use steam cleaners when cleaning the oven.
General cleaning of the interior surfaces may be conducted using a wet cloth and soapy water.
Avoid using harsh abrasive cream and/or powder based cleaners.
Use an approved oven cleaner periodically or when the oven interior is particularly dirty.
In order to prevent damage to your appliance• always test cleaners on small section fi rst and follow the manufactures instructions for use.
Exterior cleaning
Use a wet cloth and mild detergent on metallic• and enamelled surfaces.
Use a glass cleaner on the exterior surfaces of glass windows and doors.
Always follow the cleaner manufacturer's instructions.
IMPORTANT – Do not use abrasive cleaners or scouring pads as this may damage the enamel surfaces and shorten the life of the appliance.
Changing the oven light
Before replacing the bulb disconnect the1. appliance from the electrical supply.
Make sure that the oven has had suffi cient time2. to cool down before opening the oven door.
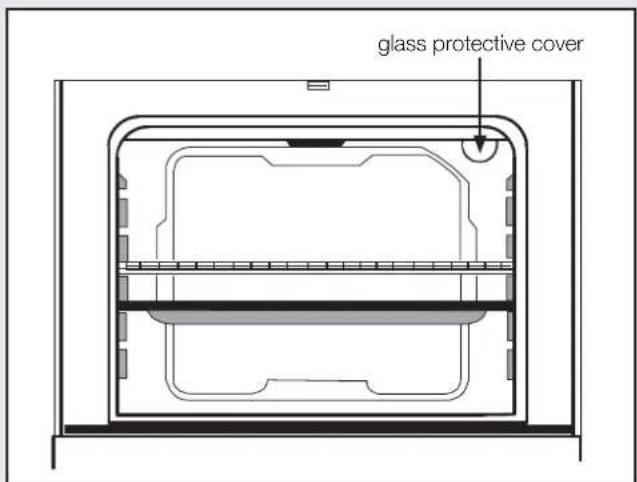
Remove the glass protective cover by twisting it3. anticlockwise, taking care not to let it drop.
Remove the lamp by twisting it anticlockwise,4. taking care not to let it drop.
text_image
glass protective coverFigure 11
-
The replacement lamp must conform to the following:
-
25 Watt 230V, 50 Hz, E14 resistant to high temperature (300°C)
• Part number 32011563 -Oven Light 230V. - This bulb can be purchased from your authorised service agent.
- Replace the lamp.
- Replace the glass protective cover.
- Check the light comes on when you use the oven.
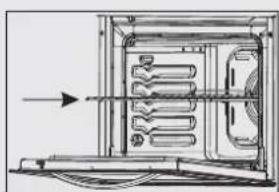
WARNING- Fit the grid correctly into any correspondingrack in the oven cavity and push it to the end.
natural_image
Technical line drawing of an internal device with ventilation slots and a directional arrow (no text or symbols)Cleaning and maintenance
Routine checks
Periodically inspect the gas connection pipe1. and electrical connections to make sure there are no signs of wear or damage.
In the event of any abnormality, contact an2. authorised service agent to carry out repairs.
Transporting the cooker
IMPORTANT – Before transporting the appliance, make sure the appliance has been disconnected from both the gas supply and mains electricity supply.
WARNING – All gas installation and disconnection must be performed by a Gas Safe registered engineer.
Remove all accessories, pan supports, oven1. trays and all other items which may become loose during transit.
Tape the oven door closed to prevent it2. opening.
Where possible, reuse the original packaging. If3. this is not available, protect the appliance from damage using suitable packaging materials.
Protect the external surfaces of the appliance4. using cardboard or paper. Particular attention should be paid to glass or painted surfaces.
Basic troubleshooting before contacting service
WARNING – If you smell gas, immediately turn of the gas supply at the mains and open all windows and doors to ventilate the area. Do not operate any electrical appliances including lighting switches and wall sockets. Call your authorised gas engineer.
| Problem Possible cause Solution | ||
| - Oven does not turn on.- Gas ring does not ignite. | - Power is turned off.- Gas supply is turned off.- FSD has just operated. | - Make sure both the electrical and gas connections are operational and that the gas tap and switches are set to the open/ on positions.- Wait for 90 seconds and re-ignite following the procedure on page 7. |
| No heat or oven does not warm up. | - Gas burner has extinguished.- Oven temperature control is incorrectly set.- Oven door has been left open. | - Follow the re-ignition procedure on page 7.- Check the oven temperature control knob is set correctly.- Make sure oven door is closed.Avoid opening frequently during cooking. |
| Oven light does not operate. | - Lamp has failed.- Electrical supply is disconnected or switched off. | - Replace lamp according to the instructions on page 11.- Make sure the electrical supply is turned on at wall socket outlet. |
| Gas rings have an uneven flame or flame is discoloured. | - Hob assembly is misaligned.- Dirt or moisture ingress inside the ring assemblies.- Gas supply is interrupted. | - Turn off and adjust the ring assemblies to make sure they are correctly seated.- Clean and dry the ring assemblies thoroughly and realign.- Call the customer helpline on 0845 600 4632 or consult a qualified gas installation engineer. |
| Cooking is uneven within the oven. | - Oven shelves are incorrectly positioned.- Gas burner is dirty or obstructed. | - Position the shelves towards the top or bottom of the oven following cooking guidelines. The top of the oven will be hotter than the bottom.- Clean the Gas burner carefully using a soft wet cloth and dry thoroughly before re-igniting.Important If problems persist call an authorised installation engineer or the customer helpline on 0345 257 7271. |
Technical Specifications
Customer Helpline 0345 257 7271
| Model/Item | AG56SW / AG56SS / AG56SB |
| Power supply | (230)V~ |
| Maximum power | 10,3 Kw |
| Size(H x W x D) | 900x500x600 |
| Net weight | 38.5 |
| Oven volume | 52.5 lt |
We apologise for any inconvenience caused by any minor inconsistencies in these instructions, which may occur as a result of product improvement and development.

Disposal information
natural_image
Symbol of a trash bin with crossed lines indicating no waste or discharge (no text or labels)The symbol on the product or on its packaging indicates that this product may not be treated as household waste. Instead it shall be handed over to the applicable collection point for the recycling of electrical and electronic equipment. By ensuring this product is disposed of correctly, you
will help prevent potential negative consequences for the environment and human health, which could otherwise be caused by inappropriate waste handling of this product. For more detailed information about recycling of this product, please contact your local city office, your household waste disposal service or the shop where you purchased the product.
text_image
ArgosProduct Guarantee
This product is guaranteed against manufacturing defects for a period of

text_image
1Year
This product is guaranteed for twelve months from the date of original purchase. Any defect that arises due to faulty materials or workmanship will either be replaced, refunded or repaired free of charge where possible during this period by the dealer from whom you purchased the unit.
The guarantee is subject to the following provisions:
- The guarantee does not cover accidental damage, misuse, cabinet parts, knobs or consumable items.
- The product must be correctly installed and operated in accordance with the instructions contained in this manual.
- It must be used solely for domestic purpose.
- The guarantee will be rendered invalid if the product is re-sold or has been damaged by inexpert repair.
- Specifications are subject to change without notice.
- The manufacturer disclaims any liability for the incidental or consequential damages.
- The guarantee is in addition to, and does not diminish your statutory or legal rights.
- In the event of a problem with the product with in the guarantee period call the Customer Helpline: 0345 257 7271.
Guarantor: Argos Ltd 489 - 499 Avebury Boulevard
Central Milton Keynes
MK9 2NW