
BUCF6082 - Freezer BUSH - Free user manual and instructions
Find the device manual for free BUCF6082 BUSH in PDF.


| Product Type | Freezer |
| Brand | Bush |
| Model | BUCF6082 |
| Dimensions (H x W x D) | 818 x 595 x 548 mm |
| Net Weight | 36 kg |
| Power Supply | 220-240 V, 50 Hz |
| Power Consumption | 96 W |
| Energy Consumption | 177 kWh/year |
| Energy Efficiency Class | A+ |
| Net Storage Volume | 93 L |
| Freezing Capacity | 9 kg/24h |
| Star Rating | 4 stars |
| Climate Class | SN (10°C - 32°C) |
| Noise Level | 44 dB(A) |
| Cooling System | Static |
| Defrosting | Manual defrosting required when frost exceeds 3-5 mm; use ice scraper, do not use sharp objects. |
| Temperature Control | Thermostat dial with positions 1-5, where 5 is coldest and "." switches off. |
| Door Reversible | Yes, instructions provided in manual. |
| Installation Type | Built-in (installation kit included) |
| Guarantee | 1 year from date of original purchase |
| Spare Parts Availability | 10 years from production (as per Ministry of Industry) |
| Safety Features | Earth connection required; keep ventilation clear; do not use electrical appliances inside; R600a refrigerant may be flammable; child lock removal if replacing old unit. |
| Accessories Included | Ice scraper, installation kit (screws, brackets, gasket, hang cover, etc.) |
Frequently Asked Questions - BUCF6082 BUSH
User questions about BUCF6082 BUSH
0 question about this device. Answer the ones you know or ask your own.
Ask a new question about this device
Download the instructions for your Freezer in PDF format for free! Find your manual BUCF6082 - BUSH and take your electronic device back in hand. On this page are published all the documents necessary for the use of your device. BUCF6082 by BUSH.
USER MANUAL BUCF6082 BUSH
Installation & User Instructions - Please keep for future reference
BUCF6082
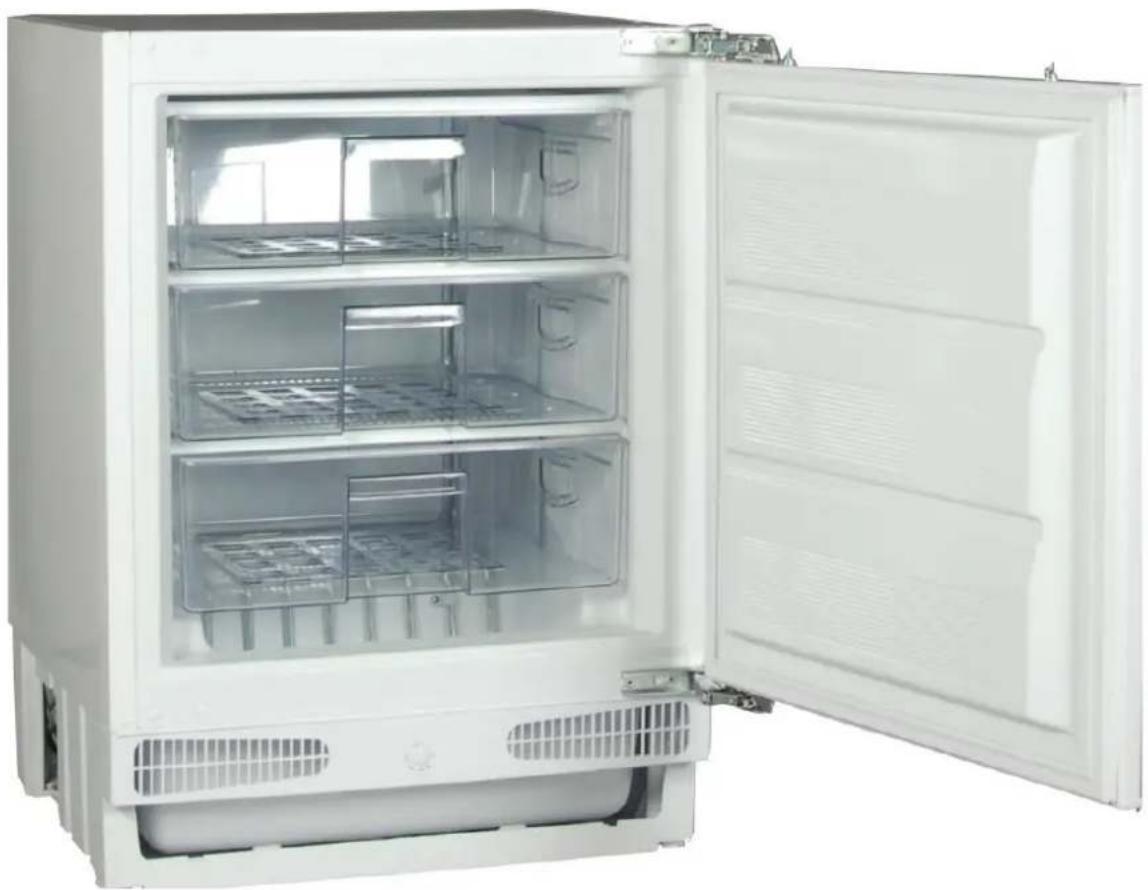
natural_image
Front view of a white stainless steel oven with open doors and internal compartments (no visible text or symbols)Important - Please read these instructions fully before installing or using
These instructions contain important information which will help you get the best from your appliance and ensure safe and correct installation, use and maintenance.
If you need help or have damaged or missing parts, call the Customer Helpline: 0345 257 7271
Presentation and Description of Product 4
Safety information 5
Recommendations 5
Before using the appliance 6
Switching on the appliance 6
Switching on the appliance 6
Switching on the appliance 7
Switching on the appliance 7
Installation 8
User Information 16
Thermostat settings 16
Food storage in the appliance 16
Accessories 17
Cleaning and maintenance 18
General Defrosting the freezer 18
Trouble Shooting 19
Technical Specifications 20
Tips for saving energy 21
Guarantee 23
Product code
BUCF6082
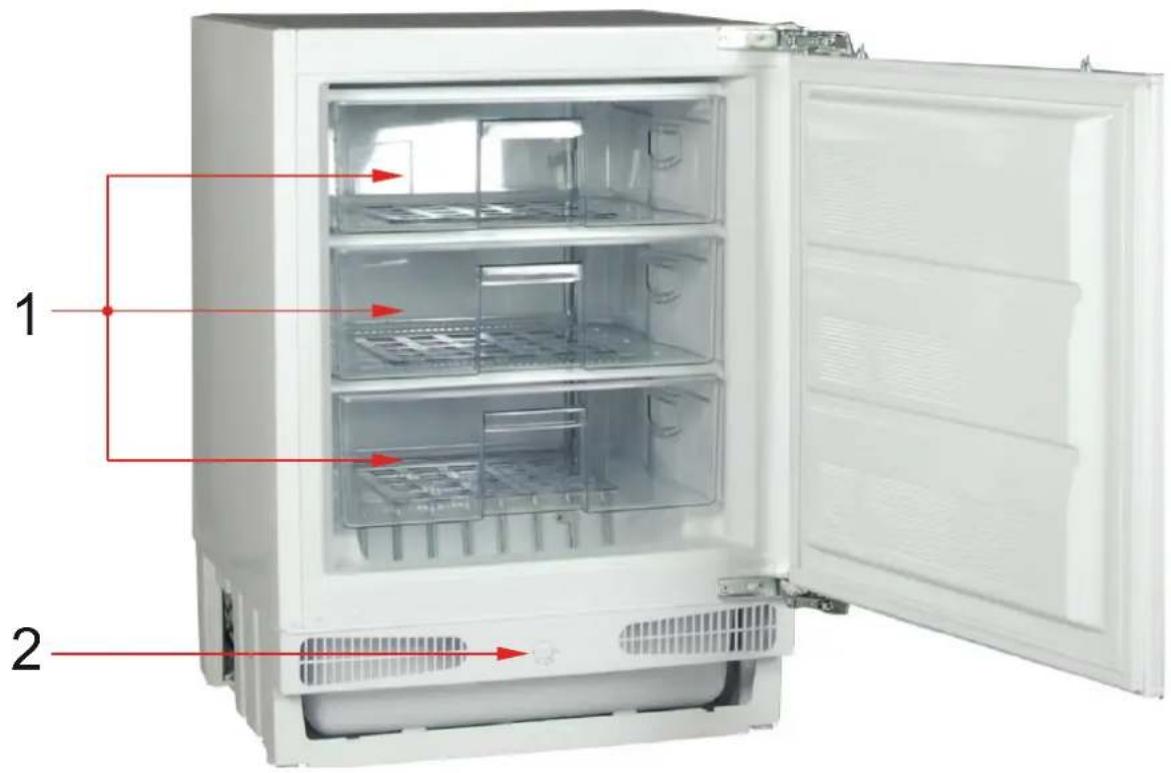
1) Freezer drawers
2) Thermostat dial
Important - Please read these instructions fully before installation
IMPORTANT - Please read this booklet before installing and switching on this appliance. The manufacturer assumes no responsibility for incorrect installation and usage as described in this booklet.
IMPORTANT - The plug must be accessible after installation.
IMPORTANT - Do not place bottles (glass or tin) containing liquids (especially sparkling liquids) into the freezer as they could burst during freezing.
IMPORTANT - If the supply cord is damaged it must be replaced by the manufacturer, service agent or appointed person.
WARNING - Keep ventilation openings (in appliance enclosure or building) clear from obstruction.
WARNING - Do not use mechanical devices or other artificial means to accelerate the defrosting process.
WARNING - Do not use electrical appliances in the freezer compartment of the appliance.
WARNING - If this appliance is to replace an old with a lock, break or remove the lock to protect children from locking themselves inside.
WARNING - Old freezers contain insulation gases and refrigerant, which must be disposed of properly. Entrust the disposal of a scrap unit to your local waste disposal service and contact your local authority or dealer if you have any questions. Please ensure that the refrigerator pipe is not damaged prior to collection by an appropriate waste disposal service.
WARNING - Do not allow children to play with the appliance. Children must never sit in the drawers or hang from the door.
WARNING - Do not use adapters or shunts, which could cause overheating or burning.
WARNING - Do not connect old, warped power supply cables.
WARNING - Do not twist and bend the cables, and keep them away from hot surfaces.
WARNING - Do not connect the power supply with wet hands.
WARNING - After installation, make sure that the power cable is not trapped underneath the appliance.
WARNING - Do not operate any electrical appliances inside the freezer.
WARNING - Do not eat ice that has just been removed from the freezer.
WARNING - The appliance is not intended for use by people (including children) with reduced physical, sensory or mental capabilities, or lack of experience and knowledge, unless they have been given supervision or instruction concerning use of the appliance by a person responsible for their safety. Children should be supervised to ensure that they do not play with the appliance.
CAUTION - If the model contains R600a (see name plate - coolant is isobutane) then it is environmentally friendly but also combustible. When transporting and installing the unit, care must be taken to ensure that none of the refrigeration circuit components become damaged. In the event of damage, avoid naked flames or ignition sources and ventilate the room in which the unit is placed for a few minutes.
CAUTION - Do not damage the freezing circuit. CAUTION - Do not defrost the appliance with other electrical devices (i.e. hair dryer) or other artificial means, and do not use sharp metal objects to remove the ice in the freezer, as this could cause damage to the freezing system.
Recommendations
- Before installation, read the instructions carefully.
• Fit the freezer in stable kitchen units only. - If necessary, reverse the door according to instructions.
Disposal of your old appliance
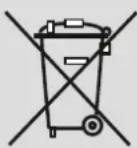
This symbol on the product or package implies that the product should not be treated as domestic waste. Instead, it should be delivered to applicable waste collection places recycling electrical and electronic equipment. You will contribute to avoid potential negative results regarding environment and human health, which will arise due to wrong waste procedure for the product by ensuring that this product is annihilated properly. Recycling materials will help natural resources be preserved. For more detailed information regarding recycling of this product, please contact local municipality, domestic waste annihilation service or the shop you have purchased the product.
Please ask your municipal authority about the disposal of the WEEE for the reuse, recycle and recovery purposes.
Switching on the appliance
- Before switching on, place the appliance in an upright position and wait at least three hours without moving the appliance. This will give the freezing circuit time to settle and operate efficiently.
- Clean the appliance thoroughly, especially the interior, before use (see Cleaning and Maintenance).
• Installation of the appliance and electrical connections must be carried out by a qualified technician in accordance with the installation manual and local regulations. - The procedure for installing the appliance into the kitchen unit is given in the installation manual. This product is only intended to be used in proper kitchen units.
- The appliance must be connected with a properly installed fused socket. Power supply (AC) and voltage at the operating point must comply with the details on the name plate of the appliance (the name plate is located on the inside-left of the appliance).
Switching on the appliance
- Insert the plug into a socket with an efficient ground connection. If the socket has no ground contact or the plug does not match, we suggest you to call an authorised electrician for assistance.
- In order to avoid a hazard, if the supply cord is damaged it must be replaced by an appointed service agent or similarly qualified person.
- The manufacturer is not responsible for failure to complete the ground connection as described in this booklet.
- There can be an odour when you first switch on the appliance. It will disappear after the appliance starts to cool.
Electrical Connection (For UK type plug)
For your safety please read the following information
Warning: This appliance must be earthed.
This appliance operates from 220-240 volts and should be protected by a 13 amp fuse in the plug.
The appliance is supplied with a standard 13 amp 3-pin mains plug fitted with a 13-amp fuse. Should the fuse require replacement, it must be replaced with a fuse rated at 13 amp and approved to BS1362.
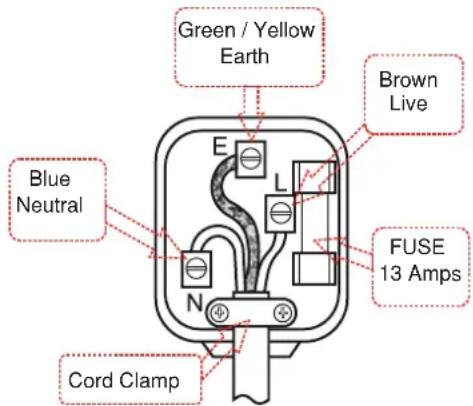
If the mains plug which is fitted is unsuitable for the socket outlet in your home or is removed for any other reason, please follow the instructions below on how to wire a 13 amp 3 pin plug..
How to wire a 13 amp plug. Important
Switching on the appliance
The wires in the mains lead on this appliance are coloured in accordance with the following code:
Green and Yellow – Earth
Blue – Neutral
Brown – Live
As the colours may not correspond with the markings identifying the terminals in your plug proceed as follows.
The green and yellow wire must be connected to the terminal in the plug which is marked with the letter E or with the earth symbol or coloured green and yellow.
The blue wire must be connected to the terminal marked N.
The brown wire must be connected to the terminal marked L.
You must make sure the lead is firmly secured under the cord clamp.
Switching on the appliance
- Before switching on your appliance for the first time, ensure it is positioned in it's desired final location and is in it's upright position for at least 3 hours before plugging in and switching on the power. Otherwise you may damage the compressor.
- You may experience a odour from the appliance when it is operated for the first time. This is normal and will fade when your appliance starts to cool.
Installation kit contents Tools required
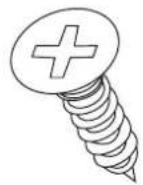
A. Wood screw x17
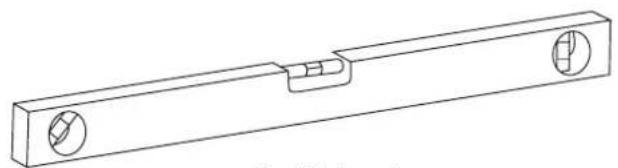
natural_image
Technical line drawing of a mechanical component with two circular holes and a central notch (no text or symbols)Spirit level
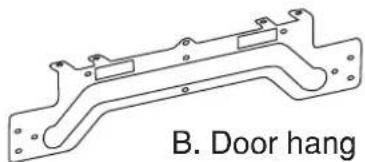
natural_image
Technical line drawing of a door frame structure (no text or symbols)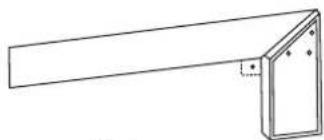
natural_image
Simple line drawing of a right-angle bracket with mounting holes (no text or symbols)Setsquare
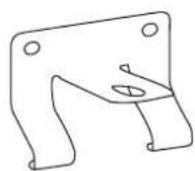
C. Door Bottom Fixings x2
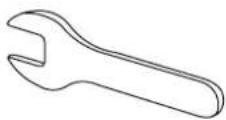
Wrench
natural_image
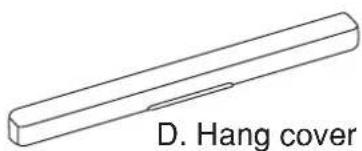
Simple line drawing of a cylindrical object with a slot, labeled 'D. Hang cover' (no other text or symbols)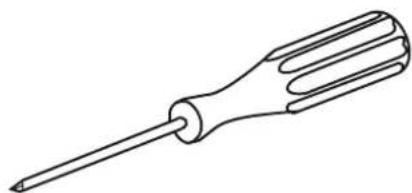
natural_image
Line drawing of a screwdriver with ridged handle and pointed tip (no text or symbols)Screwdriver
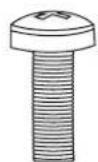
E. Screw
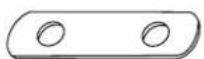
F. Top bracket
Dimensions for installation

Caution: 2 people are required to unpack and handle the larder. It is recommended that gloves are worn.
a: Carefully remove all packaging materials and dispose of correctly.
b: Make sure that the space available for the larder is large enough as per the dimensions (1).
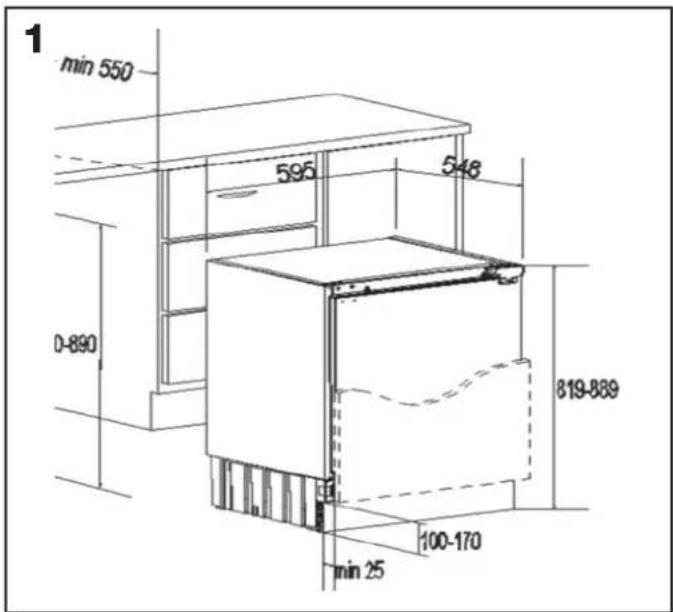
Installing top bracket
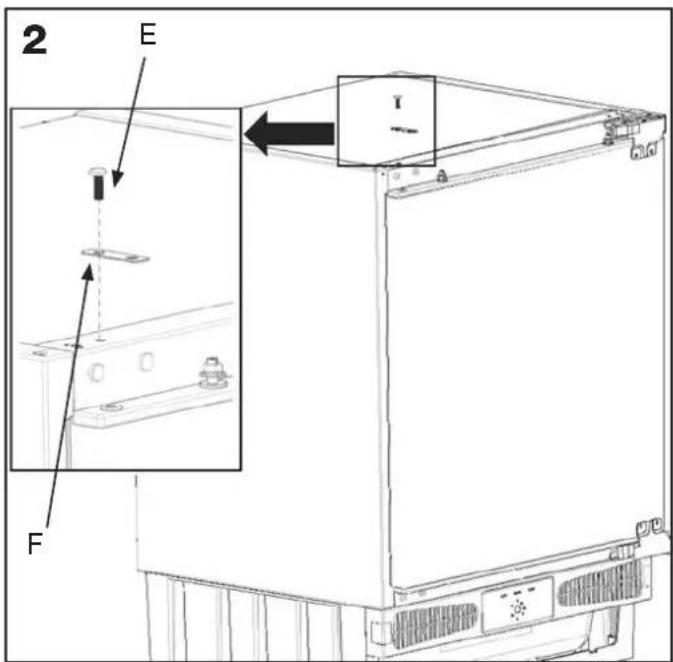
a: Remove the screw (E) on top of the larder, place the top bracket (F) in position and fix with the screw (E).
Fitting the door gasket
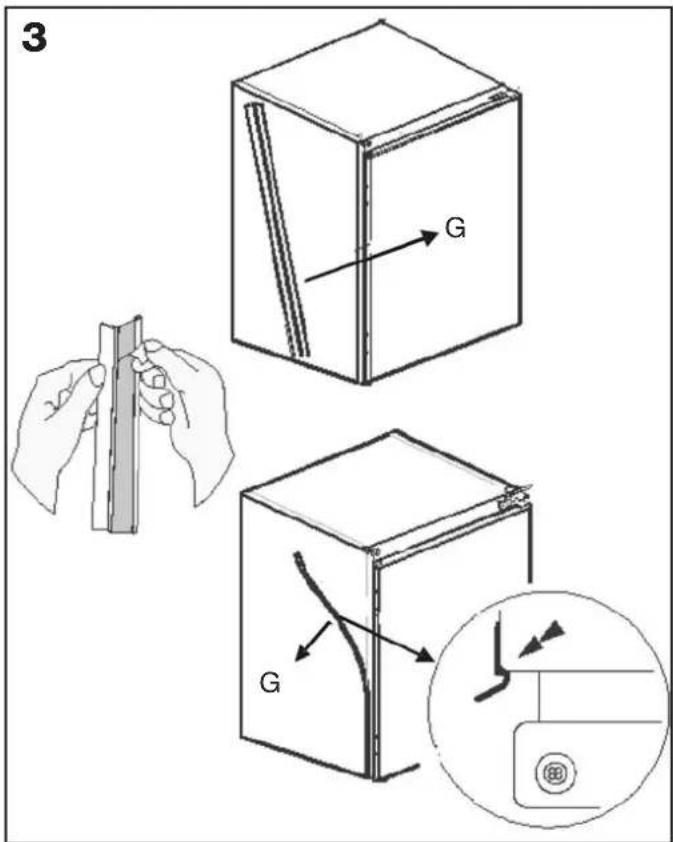
a: Take out the gasket (G) located on the side panel, and remove the protective tape.
b: Stick the gasket (G) on the larder side panel, on the opposite side to the door hinges, as shown (3).
Height adjustment
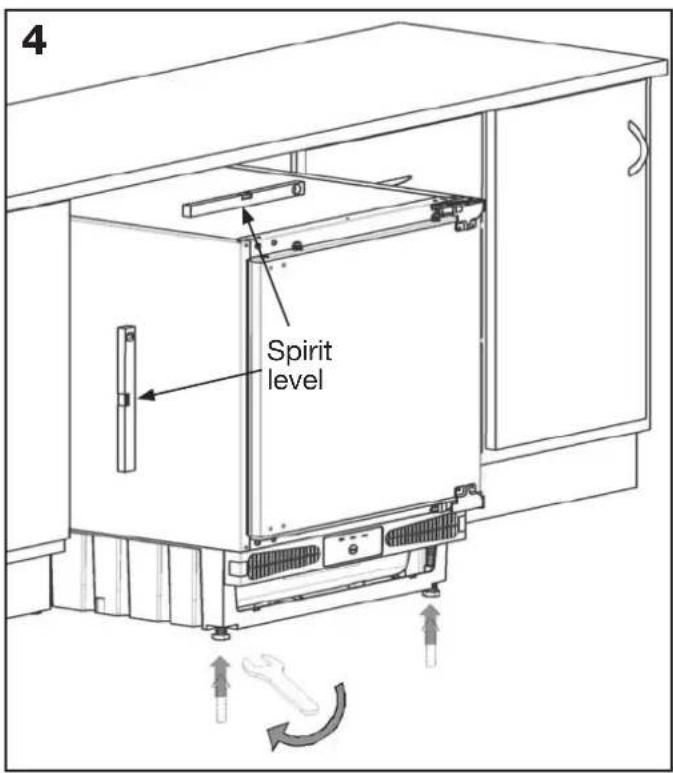
a: If necessary, the height of the larder can be adjusted, by loosening the locking nuts on the adjustable feet and screwing the feet in or out to the desired height. A wrench may be required to undo the locking nuts.
b: When the desired height is reached, re-tighten the locking nuts using the wrench to lock the adjustable feet in position.
Position the larder

Caution: The larder may require 2 people to handle it when pushing it into position.
a: Check behind the larder to make sure there are no tools or obstructions that may cause damage.
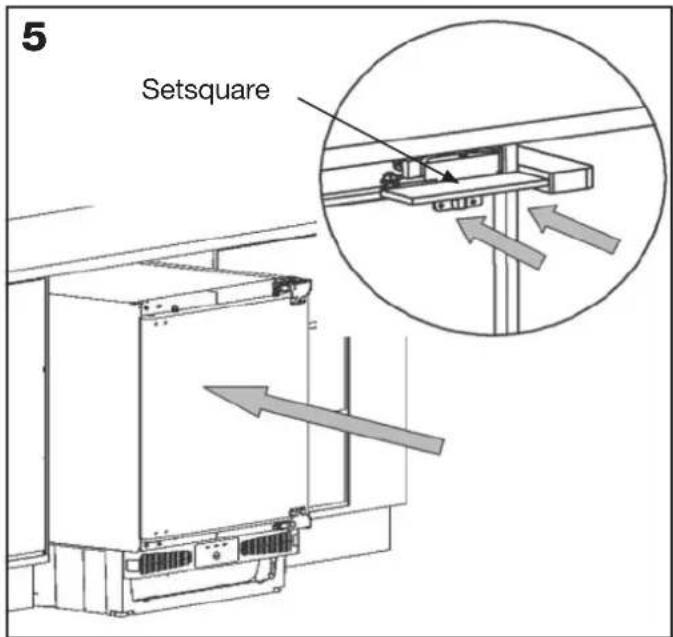
b: Carefully slide the larder into position until the hinge surface is aligned with the front surface of the kitchen unit.
c: Check that the larder is square using the setsquare.
Securing the larder
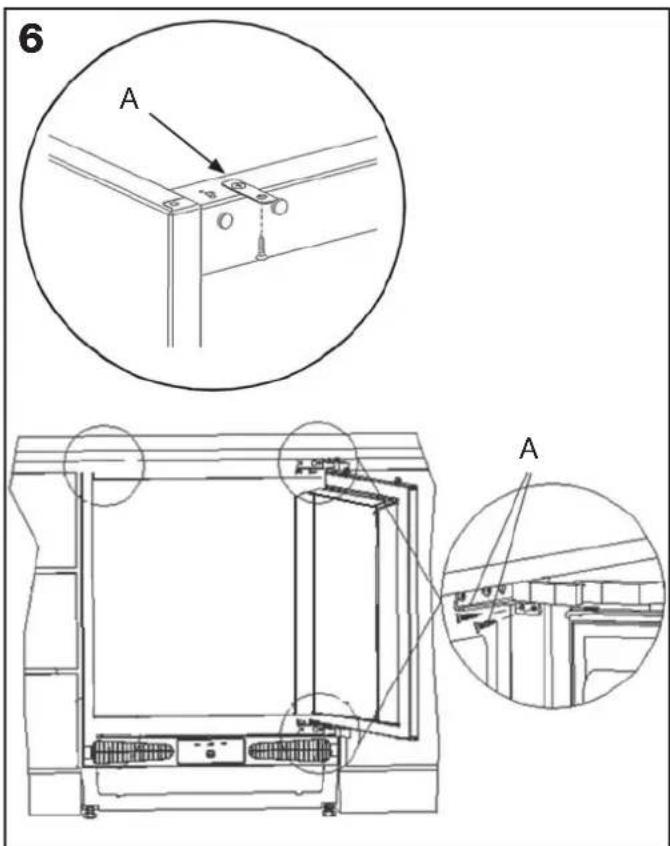
a: Secure the larder to the kitchen units using screws (A), through the top bracket (F) and through both the upper and lower door hinges as shown (6).
Fitting the cabinet door
a: Unscrew and remove the nuts and washers from the appliance door.
b: Place door hang on the appliance door by inserting the holes to adjustment bolts.
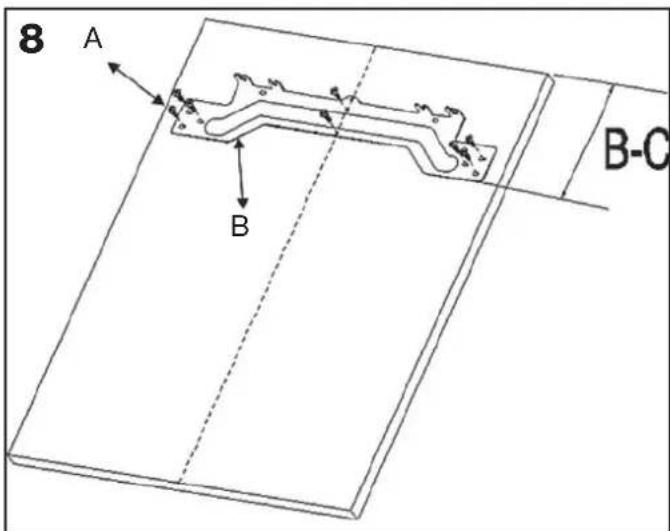
c: Dimension B= Measure from the underside surface of kitchen unit to the bottom of door hang. Dimension C= Measure from the underside surface of kitchen unit to the top of next unit door.
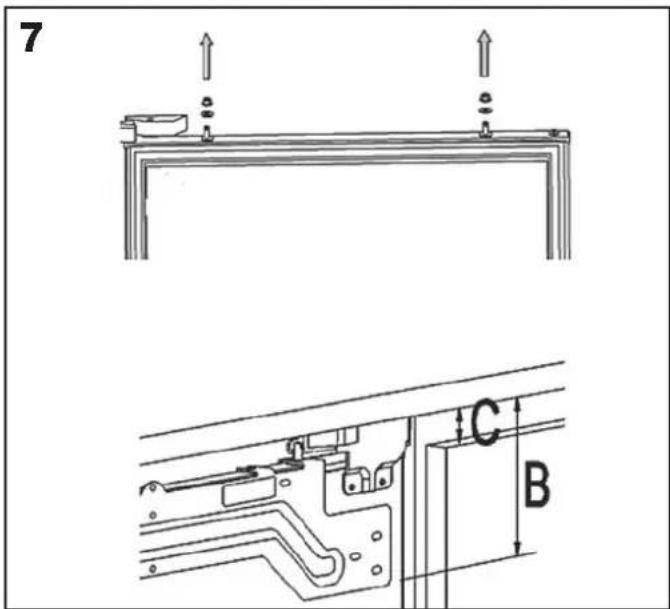
d: Subtract C from B and place door hang (B) using this dimension for vertical position and place to the centre for horizontal position.
e: Screw the door hang (B) using screws (A).
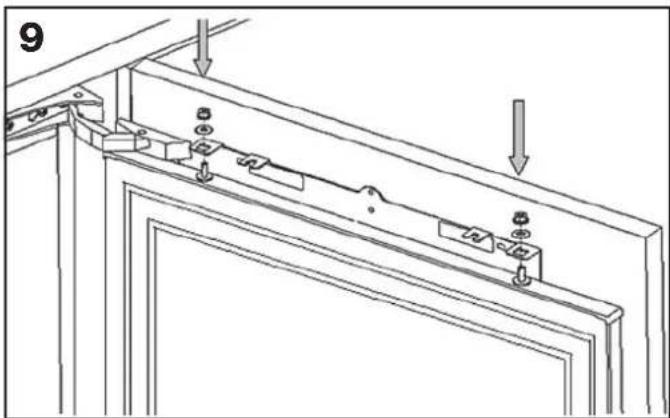
f: Place the cabinet door onto the appliance door by inserting adjustment bolts into the slots on the door hang.
g: Place the washers and screw the nuts onto the adjustment bolts.
natural_image
Technical line drawing of a mechanical assembly with mounting brackets and mounting holes (no text or symbols)Continued on next page
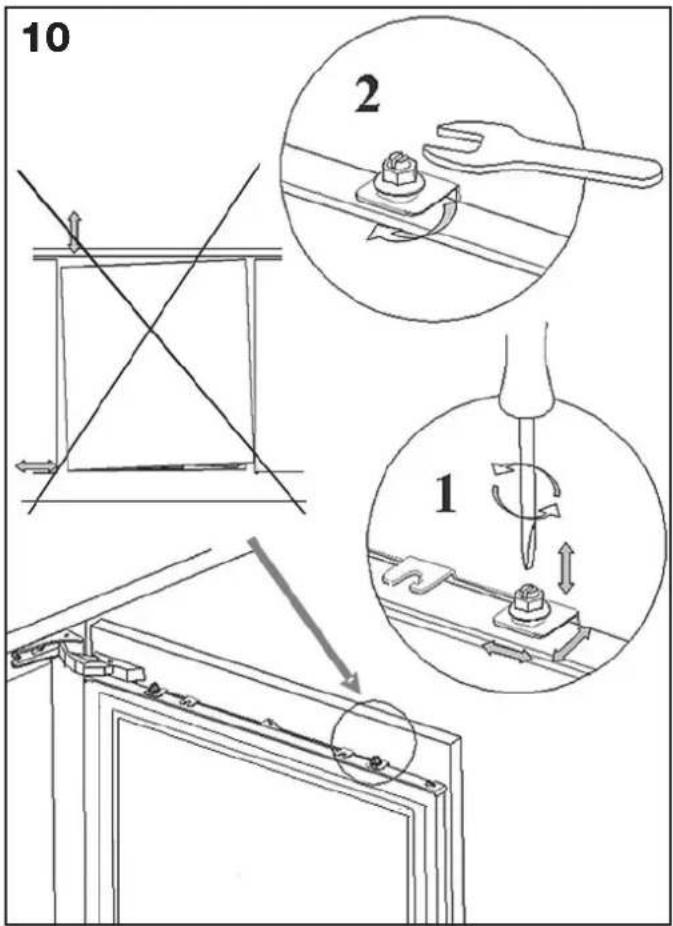
h: Close the door and check the alignment with the other cabinet doors.
i: Make the adjustment of the unit door by screwing or unscrewing the adjustment bolts for vertical adjustment and by the help of the slots on the door hang for other directions.
j: Tighten the nuts to fix the bracket.
k: Remove the screws at the bottom of the appliance door.
I: Place the door bottom fixings (C) and screw the fixings to the appliance door and the cabinet door using screws (A).
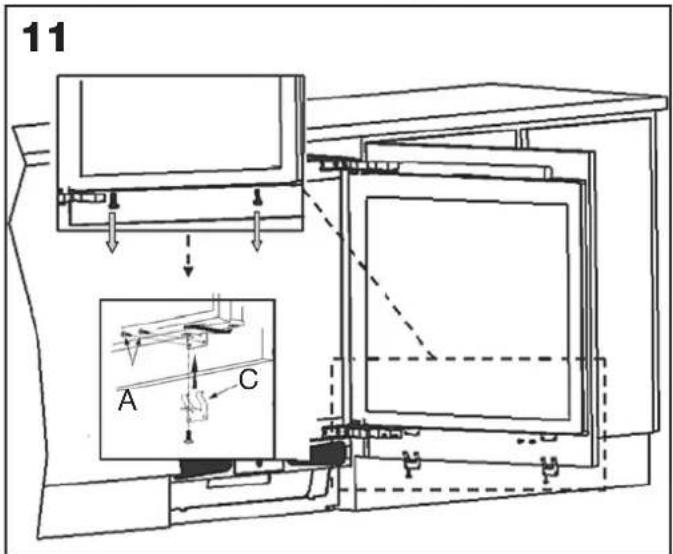
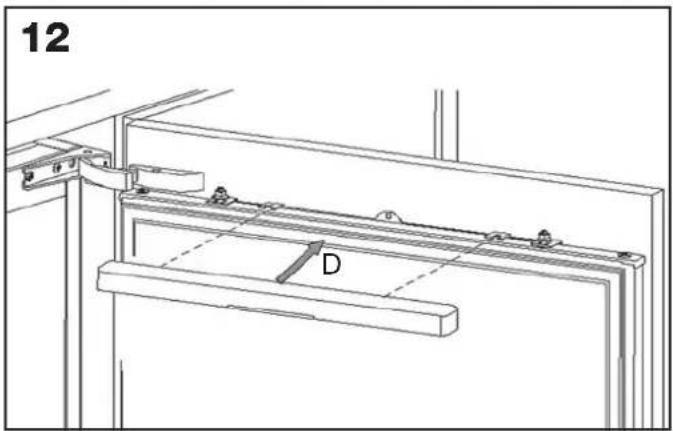
m: Slide the hang cover (D) onto the door hang (B).
Installing the plinth
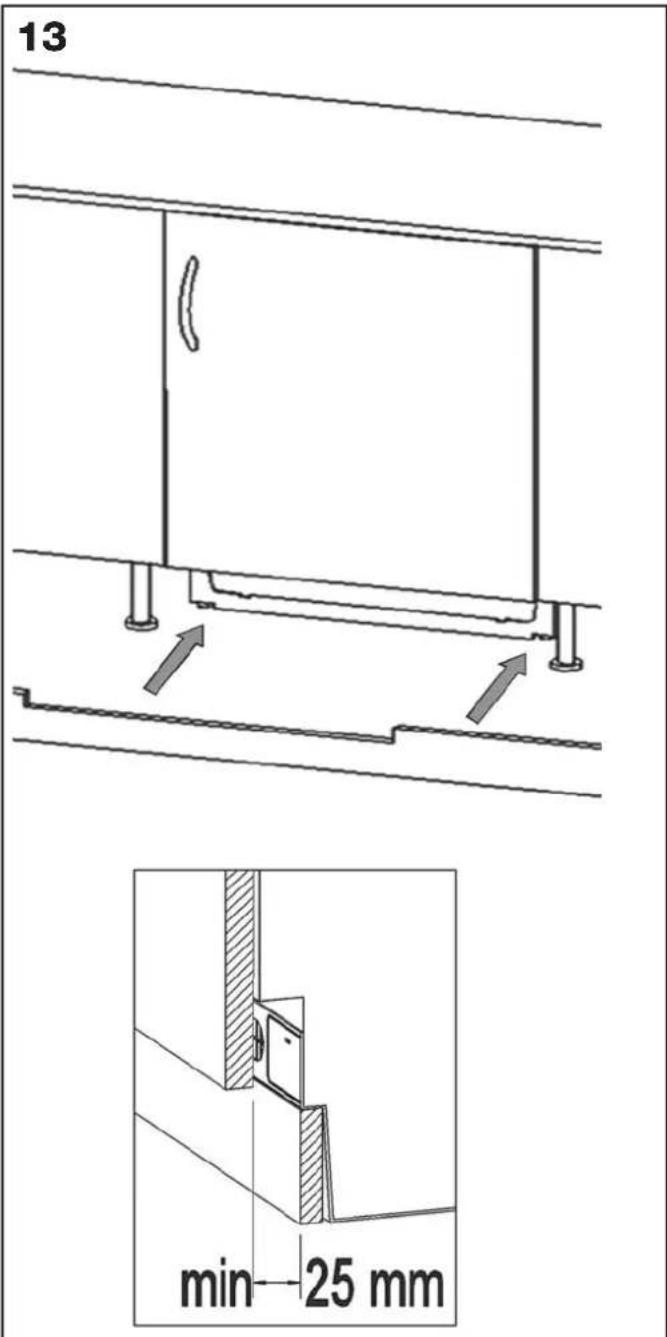
a: Position the plinth providing minimum 25 mm gap between the cabinet door and fix it.
Reversing the door
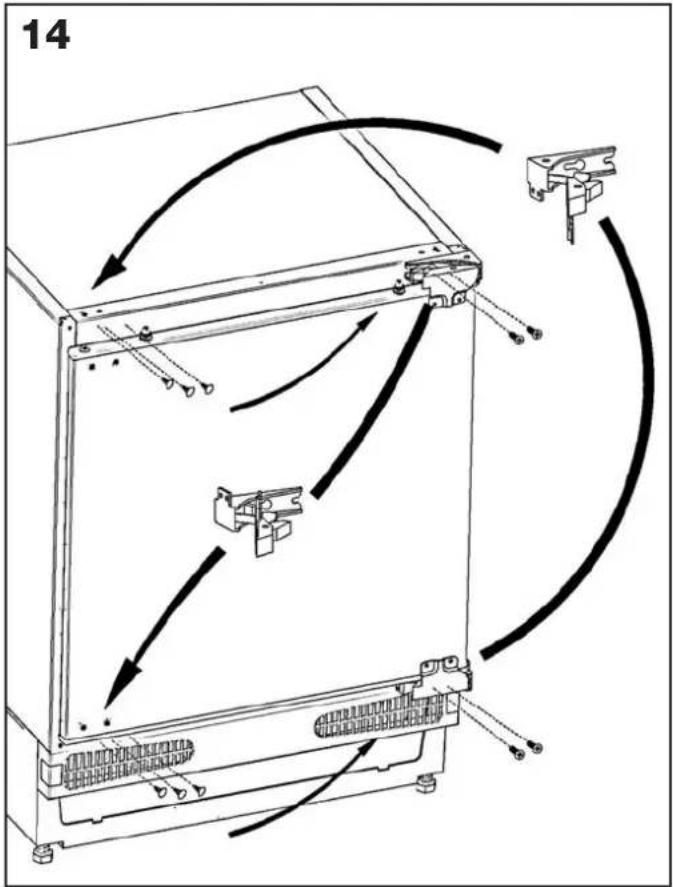
a: Unscrew the screws on the front surface of the appliance door. Take the appliance door to a safe place.
b: Move the hole plugs on the appliance door's front surface, to the holes on the reverse side.
c: Open the door upper hinge and door lower hinge, disassemble them.
d: Move the hole plugs to opposite side.
e: Assemble the door upper hinge and door lower hinge to the opposite corners of their original position.
f: Assemble the appliance door.
Thermostat settings
- Before switching on, place the appliance in an upright position and wait at least three hours without moving the appliance. This will give the freezing circuit time to settle and operate efficiently.
- Clean the appliance thoroughly, especially the interior, before use (see Cleaning and Maintenance).

Warning: Installation of the appliance and electrical connections must be carried out by a qualified technician in accordance with the installation manual and local regulations.
- The procedure for installation the appliance into the kitchen unit is given in the installation section of this information booklet. This product is only intended to be used in proper kitchen units.
- The appliance must be connected with a properly installed fused socket. Power supply (AC) and voltage at the operating point must comply with the details on the name plate of the appliance (the name plate is located on the inside-left of the appliance).
- Insert the plug into a socket with an efficient ground connection. If the socket has no ground contact or the plug does not match, we suggest you to call an authorised electrician for assistance.
- The manufacturer is not responsible for failure to complete the ground connection as described in this booklet.
- There can be an odour when you first switch.
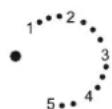
- The freezer thermostat automatically regulates the inside temperature of the compartments. By rotating the knob from positions 1 to 5, colder temperatures can be obtained. The "." position shows the thermostat is closed and no cooling will be available.
Freezer Thermostat Setting;
.: The appliance is switched off.
1-2: For short-term storage of food in the freezer compartment, set the knob between the minimum and medium position.
3-4: For long-term storage of food in the freezer compartment, set knob to the medium position.
5: For freezing fresh food. The appliance will run for colder temperatures.
If your freezer is not cold enough
Your freezer is designed to operate in the ambient temperature intervals according to the climate class stated on the information label. In terms of cooling effectiveness, we do not recommend operating your freezer outside of the stated temperature values.
| Climate Class | Ambient Temperature °C |
| T | Between 16 and 43 ( C) |
| ST | Between 16 and 38 ( C) |
| N | Between 16 and 32 ( C) |
| SN | Between 10 and 32 ( C) |
Food storage in the appliance
- The freezer is used for freezing fresh foods and for storing frozen foods for the period of time indicated on the packaging, and for making ice cubes.
- For freezing fresh food; wrap and seal fresh food properly - the packaging should be airtight and should not leak. Special freezer bags, aluminium foil (heavy grade; if in doubt doublewrap), polythene bags, and plastic containers are ideal.
- While freezing food, the maximum amount of fresh food (in kg) that can be frozen in 24 hours is indicated on the appliance label.
- For optimum appliance performance in maximum freezing capacity, turn knob to the "5" position when placing fresh food in the freezer.
Accessories
- After placing fresh food in the freezer, the 24 hours setting on the "5" position is generally sufficient. After 24 hours, reset the thermostat to the desired position (Recommendation).
- Attention: in order to save energy, when freezing small amounts of food the fast freeze function can be deactivated.
- Do not allow fresh food to be frozen to come into contact with already frozen food.
- Always mark the date and the content on the pack and do not exceed the stated storage time.
- In case of a power failure or malfunction, the freezer compartment will maintain a sufficiently low temperature for food storage. However, avoid opening the freezer door in order to slow down the temperature rise within the freezer compartment.
- The maximum amount of fresh foods that can be loaded in the freezer within 24 hours is indicated on the name plate (see Freezing Capacity).
- Never place warm food in the freezer compartment.
- When purchasing and storing frozen food products, ensure that the packaging is not damaged.
- Storage time and recommended temperature for storing frozen food is indicated on the packaging. For storing and usage, follow the manufacturer's instructions. If no information is provided, food should not be stored for more than 3 months.
- Following purchase, place frozen food in the freezer compartment as soon as possible.
- Once food is thawed it must not be refrozen; you must cook it as quickly as possible for consumption or freeze once again.
- When making ice cubes, fill the ice tray with water and place in the freezer compartment. After the water has completely turned into ice, twist the tray to get the ice cubes out.
Storage: if you want to use the freezer's maximum net capacity, remove the drawers and store the items directly on the cooling tubes. This will enable you to make use of the entire volume of the compartment.
General
- Do not pour water over the appliance.
- Clean the accessories separately with soap and water. Do not put them in the dishwasher.
- Do not use abrasive products, detergents or soaps. After washing, rinse with clean water and dry carefully. When the cleaning operations have been completed, reconnect the plug with dry hands.

Warning: never use sharp metal tools for this operation unless recommended by the manufacturer, as they can damage the freezing circuit.
General Defrosting the freezer
After a period of time, frost will build up in certain areas in the freezer compartment. The frost, accumulated in the freezer, should be removed periodically using the ice scraper (if available).
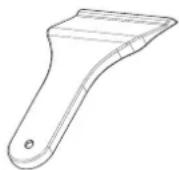
Ice scraper
To maintain the efficiency of the freezer, complete defrosting will become necessary if the frost layer exceeds 3-5mm.
- The day before you defrost, set the thermostat dial to position "5" to freeze the foods completely.
- During defrosting, frozen foods should be wrapped in several layers of paper and kept in a cool place. The inevitable rise in temperature will shorten their storage life. Remember to use these foods within a relatively short period of time.
- Set the thermostat knob to position “” and switch off the appliance.
- Leave the door open to accelerate defrosting. Remove the defrosted water from the compartment.
- If there is defrosted water on the freezer floor, you can clear it away by using a sponge.
- Clean the interior by hand with lukewarm water and a little detergent. Never use abrasive products or aggressive cleaning agents.
- Dry the inside of the unit, plug it into the mains, and set the thermostat knob to position "5". After 24 hours, reset the thermostat to the desired position.
If your freezer is not working properly there may be a minor problem, therefore check the following
| Problem Possible Causes Possible Solutions | ||
| The appliance does not operate | There is a power failureThe mains plug is not properly plugged in, or is looseThe thermostat setting is on position " . " | The socket is defective. To check this, plug in a fully operable appliance into the same socket |
| The appliance performs poorly You | have overloaded the applianceThe doors are not closed perfectly | There is not sufficient ventilation around the appliance |
| There is a noise The cooling gas | which circulates in the freezer circuit may make a slight noise (bubbling sound) even when the compressor is not running. Do not worry, this is quite normal. If these sounds are different check if;The appliance is installed firmly as described in the section of this instruction manualObjects on the appliance are vibrating | |
Important notes
- In case of a sudden power loss or disconnecting reconnecting of the plug to the electrical socket, the compressor's protective thermal element will be opened as the pressure of the gas in the cooling system of your freezer has not yet been balanced. 4 or 5 minutes later, your freezer will start to operate; this is normal. - If you will not be using your freezer for a long time (holiday, etc...), disconnect the plug from the socket. Clean your freezer as per page 16 of this document and leave the door open to prevent any humidification or odour formation.
If there is still a problem with your freezer despite following the instructions in this book, please consult your nearest authorized service center, or call the customer help line on 0345 257 7271.
Important notes
The life cycle of this product as determined and proclaimed by the Ministry of Industry (the period for making spare parts available for the product to be able to fulfill its functions) is 10 years.
| Supplier's name or trade mark | BUSH |
| Supplier's model BUCF6082 | |
| Type of appliance BGSN1650DOD | |
| The energy efficiency class A+ | |
| Voltage 220-240V / 50HZ | |
| Power 96 W | |
| Energy consumption 0,484 kW/24h / 177 kW/year | |
| Net storage volume of frozen food 93 lt. | |
| Star rating of frozen food storage compartment 4 | |
| Refrigeration system STATIC | |
| Power cut safe Z h' (25°C) 1080 mins (32 | °C) |
| Freezing capacity' 9 kg. / 24h | |
| Climate class' SN (10 | °C - 32°C) |
| Size (mm) (H x W x D) 818 x 595 x 548 | |
| Net weight 36 Kg. | |
| Noise' | 44 dB (A) |
We apologise for any inconvenience caused by minor inconsistencies in these instructions that may occur as a result of product improvements and development.
Conformity Information
- This appliance is designed for use at an ambient temperature within the 16°C - 43 °C range.
- The appliance is designed in compliance with the EN62552, IEC60335-1 / IEC60335-2-24, 2004/108/EC standards.
CE
- Install the appliance in a cool, well-ventilated room, but not in direct sunlight and not near a heat source (radiator, cooker etc.). Otherwise, use an insulating plate.
- Allow food and drink to cool down outside of the appliance.
- When placing food and drink inside the freezer open the appliance door as briefly as possible.
- Keep the different temperature compartment covers closed.
- The door gasket must be clean and pliable. Replace gaskets if worn.
- Occasionally clean the rear of the appliance with a vacuum cleaner or paint brush to prevent increased power consumption.
BUSH
Product Guarantee
This product is guaranteed against manufacturing defects for a period of

Year
This product is guaranteed for twelve months from the date of original purchase. Any defect that arises due to faulty materials or workmanship will either be replaced, refunded or repaired free of charge where possible during this period by the dealer from whom you purchased the unit.
The guarantee is subject to the following provisions:
- The guarantee does not cover accidental damage, misuse, cabinet parts, knobs or consumable items.
- The product must be correctly installed and operated in accordance with the instructions contained in this manual.
- It must be used solely for domestic purpose.
- The guarantee will be rendered invalid if the product is re-sold or has been damaged by inexpert repair.
- Specifications are subject to change without notice.
- The manufacturer disclaims any liability for the incidental or consequential damages.
- The guarantee is in addition to, and does not diminish your statutory or legal rights.
- In the event of a problem with the product with in the guarantee period call the Customer Helpline: 034562574727.1
Guarantor: Argos Ltd
489 - 499 Avebury Boulevard
Central Milton Keynes
MK9 2NW
- Important - Please read these instructions fully before installing or using
- Presentation and Description of Product 4
- Safety information 5
- Before using the appliance 6
- Installation 8
- User Information 16
- Cleaning and maintenance 18
- Trouble Shooting 19
- Technical Specifications 20
- Tips for saving energy 21
- Guarantee 23
- Important - Please read these instructions fully before installation
- Recommendations
- Disposal of your old appliance
- Switching on the appliance
- Electrical Connection (For UK type plug)
- How to wire a 13 amp plug. Important
- Installation kit contents Tools required
- Dimensions for installation
- Installing top bracket
- Fitting the door gasket
- Height adjustment
- Position the larder
- Securing the larder
- Fitting the cabinet door
- Installing the plinth
- Reversing the door
- Thermostat settings
- Freezer Thermostat Setting;
- If your freezer is not cold enough
- Food storage in the appliance
- Accessories
- General
- General Defrosting the freezer
- Important notes
- Conformity Information
- BUSH
- Product Guarantee
Brand : BUSH
Model : BUCF6082
Category : Freezer