
BFSBS - Freezer BUSH - Free user manual and instructions
Find the device manual for free BFSBS BUSH in PDF.


| Product Type | Fridge-Freezer Combination |
| Model | BFSBS |
| Brand | Bush |
| Total Net Storage Capacity | 527 litres (Fridge 344 L, Freezer 183 L) |
| Energy Efficiency Class | A+ |
| Annual Energy Consumption | 408 kWh/year |
| Freezer Star Rating | 4 stars |
| Climate Class | SN/N/ST (10°C to 38°C) |
| Noise Level | 43 dB(A) |
| Power Supply | 220-240 V ~ 50 Hz, 13 A fuse |
| Control Panel | Electronic with LED display, vacation mode, quick freeze, quick cool, lock/unlock |
| Interior Lighting | LED light (replaceable by service agent) |
| Defrost System | Automatic defrost in fridge compartment; manual defrost recommended for freezer |
| Door Reversibility | Yes, adjustable door height (max 5 mm) |
| Accessories Included | Ice cube tray x2, egg tray x1, wrench x1 |
| Refrigerant | R600a (flammable, environmentally friendly) |
| Weight | Approximately 70-80 kg (estimated based on capacity) |
| Dimensions (approx) | 895 mm width x 1714 mm height x 650 mm depth (estimated) |
| Minimum Operating Temperature | 10 °C |
| Warranty | 12 months |
Frequently Asked Questions - BFSBS BUSH
User questions about BFSBS BUSH
0 question about this device. Answer the ones you know or ask your own.
Ask a new question about this device
Download the instructions for your Freezer in PDF format for free! Find your manual BFSBS - BUSH and take your electronic device back in hand. On this page are published all the documents necessary for the use of your device. BFSBS by BUSH.
USER MANUAL BFSBS BUSH
natural_image
Geometric pattern composed of triangles and squares forming a grid (no text or symbols)
natural_image
Exterior view of a modern white stainless steel refrigerator with dual doors and side drawers (no visible text or symbols)The image contains a decorative zigzag pattern composed of repeating zigzag lines. No text, mathematical formulas, or symbols are present to process. Therefore, the correct OCR output is an empty string.
You'll soon be enjoying your new refrigerator.
It all begins here, with your instructions. Don't worry, there's nothing too technical coming up. Just simple, step-by-step guidance to get you up and running quickly. Sound good? Then let's get started
Help and Guidance
We're here to help you get the most from your refrigerator.Should you require any guidance,a simple solution can often be found online at.
www.argos-support.co.uk
If you assistance, call one of our experts on 0345 257 7271. still require further
Contents
1 Safety information
Safety information 6
2 Getting to know your refrigerator
Ready?Let's begin... 11
Plaarts
3 Installing your refrigerator
Transportation 15
Installation 15
Electrical Connection 17
4 Using your refrigerator
Before first use 20
Using your appliance 20
Useful information 22
5 Care and Maintenance
General 25
Power failure 25
Moving your appliance 25
Disassembly / assembly the door 26
Technical Specifications 27
Disposa linformation 27
6 Product support
Trouble Shooting 30
Help and assistance 31
Guarantee 32
Safety information
1

natural_image
Abstract geometric pattern composed of triangles and polygons on a grid background (no text or symbols)
Safety information
Important-Please read these instructions fully before installing or operating
Before use
The installation of this appliance is best carried out by 2 people.
- Dispose of all packaging carefully and responsibly.
- The appliance is designed for indoor use only and must be protected from rain, moisture and extreme temperature variations.
- This appliance is designed for house hold use. Do not use the appliance for industrial and commercial use, or any other purpose.
- The appliance MUST be positioned on a firm level base.
- Do not splash water on the appliance. It may cause electrical parts to fail and result in an electric shock.
- Leave the appliance in
its intended place of installation and in its correct orientation for at least 4 hours before switching on to allow the cooling system to settle before first use or after any transportation.
- Your appliance is an environmental friendly product and it contains non CFC/HFC gas substances in the cooling system (Called R600a) and in the insulation (Called cyclopentane) which are potentially flammable if exposed to fire. Therefore, take care not to damage, the cooling circuit/pipes of the appliance in transportation and in use. In case of damage do not expose the appliance to fire,

Safety information
Important-Please read these instructions fully before installing or operating
potential ignition source and immediately ventilate the room where the appliance is situated.
- Do not sit, stand or place any other heavy objects on top of the appliance. This could result in injury or damage to the appliance.
- Do not allow children to play with the appliance to avoid the risk of entrapment and suffocation.
- Keep ventilation opening, in the appliance enclosure or in the built-in structure, clear of obstruction. During use
• This appliance is not intended for use by persons (including
children) with reduced physical, sensory or mental capabilities, or lack of experience and knowledge, unless they have been given supervision or instruction concerning use of the appliance by a person responsible for their safety. Children should be supervised to ensure that they do not play with the appliance.
- This appliance is not intended for use by young children or infirm persons unless they have been adequately supervised by a responsible person to ensure that they can use the appliance safely. Young children should be supervised to ensure that they do not play with the appliance.
• Do not use mechanical,

Safety information
Important-Please read these instructions fully before installing or operating
electrical or chemical way to speed up the defrost process not recommended by the manufacturer.
- Do not use or place other electrical products inside the appliance not recommended by the manufacturer.
- Do not store liquids in glass containers in the freezer compartment as these may shatter.
- Do not store flammable materials such as alcohol, gasoline, LP gas or glue etc in the appliance.
- In case there is an inflammable gas leaking, open the window for air circulation and do not pull out the plug or
turn the temperature knob. Do not touch the appliance until the valve of gas is turned off. Otherwise, sparks may happen.
- This appliance can be used by children aged from 8 years and above and persons with reduced physical, sensory or mental capabilities or lack of experience and knowledge if they have been given supervision or instruction concerning use of the appliance in a safe way and understand the hazards involved. Children shall not play with the appliance. Cleaning and user maintenance shall not be made by children without supervision.
- Do not attempt to repair the appliance yourself. Contact the Customer Helpline:0345 257 7271.
Getting to know your refrigerator
2

natural_image
Abstract geometric pattern composed of triangles and squares on a grid background (no text or symbols)Getting to know your refrigerator
You'll be up and running in no time
Ready? Let's begin...
Please read these instructions carefully. They contain important information which will help you get the best from your refrigerator and ensure safe and correct installation and operation
If you require any further assistance, our technical experts are happy to help. For full details, refer to the product support section at the end of these instructions.
Getting to know your refrigerator
You'll be up and running in no etim
Parts

1.Fridge
2.Freezer
3.LED light
4.Freezer Balconies
5.Freezer Shelves
6.Freezer Tray
7.Leveling Feet
8.Fridge Crisper
9.Fridge Shelves
10.Fridge Balconies
11. LED light
Accessories included

Instructions x 1
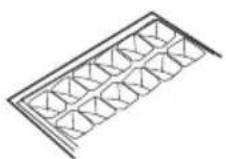
Ice-cube tray x 2

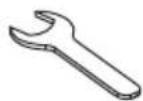
Egg tray x 1 Wrench x 1
Installing your refrigerator
3

natural_image
Abstract geometric pattern composed of intersecting lines and triangles on a grid background (no text or symbols)Installing your refrigerator
Bringing it all together
Transportation

C2 people are required to unpack and handle the appliance, it is
recommended that gloves are worn.
•The appliance should be transported only in an upright position. Do not tilt the appliance greater than 45 degrees. The packaging as supplied must be intact during transportation.
After transporting the appliance, leave it for at least 4 hours before switching on to allow the cooling system to settle. Failure to comply could result in damage to the appliance.
- Do not move the appliance by pulling the door or handle as it may damage your flooring and wall coverings etc.
• Empty any water in the drain tray before moving
• Make sure that the defrost water pipe at the back of the product is fixed to the plastic evaporating pan on the top of the compressor, to avoid defrost waterspillage on the floor.
- Ensure the electrical cable is not caught under the appliance during and after moving
• Carefully remove all packaging materials including the foam base, dispose of correctly
Installation
- Ensure sufficient spacing is provided for the appliance to be installed. Leave space on both sides (50cm), back (100cm) and above the appliance (50cm) to ensure proper ventilation and door opening. See fig. 1&2
• Do not place the appliance near a heat source or in direct sunlight
• Do not put any heavy objects on top of the appliance. It will damage the appliance. - Do not install the appliance in a moist or wet place. It should be installed on a smooth surface to avoid excessive vibra tion and noise.
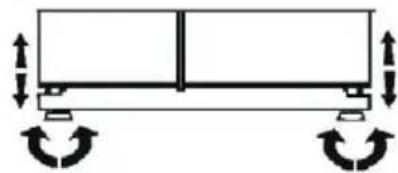
- Move the appliance to the desire location and adjust the two front levelling feet to fix the appliance.
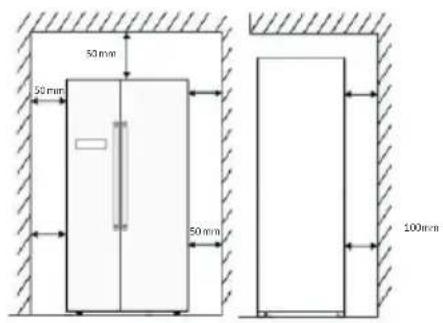
Fig.1
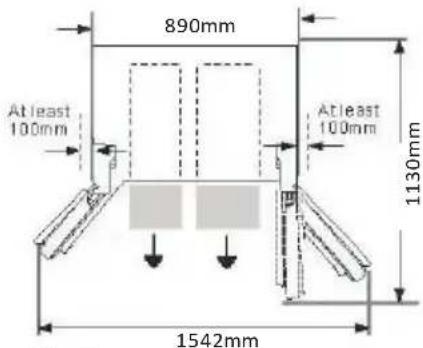
Fig.2
natural_image
Simple line diagram of a rectangular object with two vertical supports and bidirectional arrows indicating rotation or force (no text or symbols)Fig.3

Fig.4
Installing your refrigerator Bringing it all together
- Try some operations, i.e. Open/close door to confirm the appliance will not move under normal usage/operation. If the appliance moves, adjust the leveling feet again until it is fixed and do not move (See fig.3).
- If you need to relocate the appliance, please ensure the leveling feet on the frontside have been screwed upwards before you move the appliance.
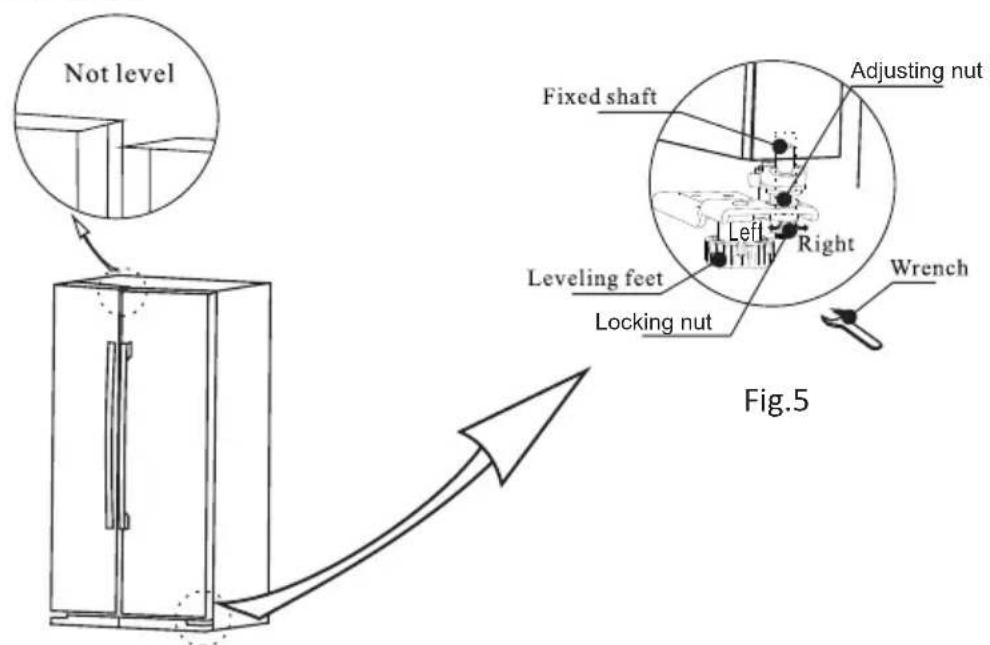
- If the doors of the appliance are not aligned then the height of right door can be adjusted, please follow the below steps.
Note: The maximum height adjustment is 5mm Rotate the locking nut clockwise (as shown in Fig.5) with a wrench for 2 full rotations to loose it. You can now rotate the adjusting nut(as
Fig.5) shown in to adjust the height of the right door. Once the door is set to your desired position, then tighten the locking nut by rotating it an ti-clockwise.
• Each appliance has a climate class (shown on the rating plate) that indicates the operating temperature range of the appliance. The appliance may not work properly if it is left for a long period at a temperature outside the specified range.
• Refer to section "Care and Maintenance" to prepare your appliance for use.
| Climate Class | Amb.T.(°C) | Amb.T.(°F) |
| SN | 10~32°C | 50~90°F |
| N | 16~32°C | 51~90°F |
| ST | 16~38°C | 61~100°F |
| T | 16~43°C | 61~110°F |
Installing your refrigerator
Bringing it all together
Electrical connection

Any electrical work that is required to install this appliance MUST be carried out by a qualified electrician.

Warning: THIS APPLIANCE MUST BE EARTHED
Before making any electrical connections, ensure that:
- Electrical safety is only guaranteed when the earth system of your house is in accordance with the related local regulations.
• Do not damage the refrigerant circuit.
- Do not bend, stretch or pull the supply cable to avoid electric shock.
- Do not use electrical appliances inside the food storage compartments of the appliance, unless they are of the type recommended by the manufacturer.
- Ensure the power socket is suitable for the maximum power of the machine (fuses in the power circuit must be 13 amp).
- The supply voltage should be the same as that indicated in the technical specifications and the appliance rating plate.
•The appliance should be earthed and in compliance with the applicable law.
- When installed, the power socket must be within easy reach.
- If the socket outlets in your home are not suitable for the plug supplied with this unit check with a qualified electrician for replacement.
- The use of adapters, multiple connectors or extension cables are not recommended.
- The appliance must be connected to a 220-240 volt 50Hz AC supply by means of a three pin socket, suitably earthed and protected by a 13 amp fuse.
- Should the fuse need to be replaced, a 13 amp fuse approved to BS1362 must be used.
- The plug contains a removable fuse cover that must be refitted when the fuse is replaced. If the fuse cover is lost or damaged, the plug must not be used until a replacement cover has been fitted or the plug is replaced.
- A damaged plug should be cut off as close to the plug body as possible, the fuse should be removed and the plug disposed of safely.
Plug replacement (UK & Ireland only)
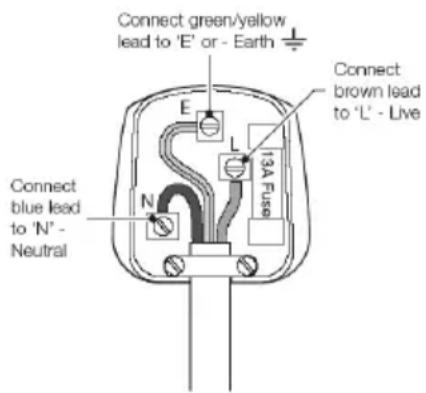
Should you need to replace the plug; the wires in the power cable are coloured in the following way:
Blue Neutral 'N'
Brown Live 'L'
Green & Yellow Earth 'E'
As the colours of the wires in the power cable may not correspond with the coloured markings identifying the terminals in your plug, and proceed as follows:
The green & yellow wire must be connected to the terminal in the plug that is marked with the letter E or by the earth symbol.
The blue wire must be connected to the terminal that is marked with the letter N.
The brown wire must be connected to the terminal that is marked with the letter L.
If the power supply cord is damaged, it must be replaced by the manufacturer or its service agent or a similar qualified person in order to avoid a hazard.
Using your refrigerator
4

natural_image
Abstract geometric pattern composed of interconnected triangles and squares, no text or symbols presentUsing your refrigerator
Getting the most from your appliance
Before first use
Final checks before operating the appliance
- Good air circulation around the appliance.
- The feet have been adjusted for perfect levelling.
- Clean the compartment per recommendation in seCater and Maintenance."
- Plug in the appliance and the interior light will come on when the door is open.

The compressor starts up and in operation may produce some
background noise .It is normal, this is not a defect.
Using your appliance
1. Control panel
•The control panel allows you to start and use all the functions of your refrigerator without opening the doors.

- Vacation mode icon
- Quick freeze mode icon
- Quick cool mode icon
- Lock/unlock icon
- Lock/unlock / confirm button
- Fridge compartment temperature adjustment button OFF mode icon7.
- Fridge compartment temperature
9.Freezer compartment temperature - Freezer compartment temperature adjustment button
- Mode function/setting button
2. Lock / Unloc k function
At lock state( ),press and hold Lock/unlock/ confirm button for 3 seconds,it will sound a beep and change to unlock state( ).
It will change from unlock state to lock state if the appliance is idle for 60 seconds. Or you can press the Lock/unlock/confirm button for 3 seconds, then it will change to lock state( ).
3. Function mode selection
To change the function mode, the appliance must be in unlock state(☐). Press the Lock/unlock/confirm button for 3 seconds to change to unlock state(☐).
Continue to press Mode button, it will switch the function from normal to other as cycle in the below.
Vacation→Quick-Freeze→Quick-cold and freeze→Quick-cold→Normal
| Program mode | Display | Freezer temperature | Fridge temperature | Remarks |
| Normal | / | -18°C | 5°C | For normal use, both freeze & fridge temperature can be adjusted. |
| Vacation | -18°C | OFF | For vacation use, both freeze & fridge temperature cannot be adjusted. | |
| Quick freeze | -24°C | Unchanged | For quick freeze use, only fridge temperature can be adjusted. | |
| Quick freeze + cool | -24°C | 2°C | For quick freeze + cool use, both freeze & fridge temperature cannot be adjusted. | |
| Quick cool | -18°C | 2°C | For quick cool use, only freezer temperature can be adjusted. |
Using your refrigerator
Getting the most from your appliance
First Use
- Allow to stand for a minimum of 4 hours before plugging in to the mains
Setting the temperature
- The temperature of the refrigerator is controlled electronically by the control panel.
- It will default at -18^ (freeze) and 5^ (fridge) at 1st use.
- Setting the temperature of the fridge and the freezer can be done manually by pressing the fridge compartment temperature adjustment button(6) and the freezer compartment temperature adjustment buttons(10) until the required temperatures are shown on the display.
- To change the temperature of the fridge compartment, continue to press the fridge temperature button(6) until the desired temperature is reached. Press Lock/unlock/confirm button to confirm. The temperature of the fridge can be set between 2°C and 8°C.
- To change the temperature of the freezer compartment, continue to press the freezer temperature button(10), until the desired temperature is reached. Press Lock/unlock/confirm button to confirm. The temperature of the freezer compartment can be set between -16^ and -24^ .
Hints and Tips
Storage of Fresh food
- Food should always be covered tightly with foil, wrapped in film, placed in an airtight bag or container. This will prevent it from dehydrating and prevent strong smells contaminating other food.
- Do not allow raw meat to come into contact with cooked foods.
- Fruit and vegetables should be stored in the bottom box with the glass cover in place.
• Space should be left between food items to allow free movement of cold air.
- Cool hot food down to room temperature before storing.
Storage of Frozen food
- Fresh foods such as fish and meat can be frozen to maintain freshness, and keep the nutrients in the food.
- Wrap food to be frozen or place it in an airtight container.
- Do not allow already frozen food into direct contact with food to be frozen.
- Ready frozen food should be placed it in freezer as soon as possible.
- Do not re-freeze food once it has thawed.
Quick Freeze
Quick Freeze the original freshness and nutrition constituent of foodstuffs can be retained. Fresh meat and fish to be stored for long time must be done by quick Freeze. (Quick freeze can continue operate for upto 26 hrs and then it will change back to normal mode.)
Using your refrigerator
Getting the most from your appliance
Useful information
The following guidelines and recommendations are suggested to obtain the best results and storage hygiene.
- Frequent door openings can cause internal temperature to rise so the door should be closed as soon as possible after use.
- For hygiene reasons, it is always a good practise to pack, wrap and cover the food before storing.
- Use a polythene bag to store raw meat and place on the lowest shelf. Avoid contact with cooked food to prevent contamination. For safety reasons, store raw meat for two to three days only.
• Cooked dishes must be stored in airtight covered containers. - Food and beverages should cool to room temperature before storing.
- Most vegetables should be blanched and chilled before freezing.
• Bottles can be placed in the door section.
• Some fruits and vegetables like pineapples, melons, tomatoes, and cucumbers should be wrapped in polythene bags. - Do not leave frozen food at room temperature to thaw. You could defrost the food by putting it in the fridge to thaw slowly. Make sure you avoid defrosting food dripping food juices onto other food.
Energy saving tips
- Place your fridge away from direct sunlight, your oven or any other heat sources. Allow 20 cm clear space on both sides and above, and a t lea st 5 cm b ehi nd.
- Cover all food stored, and arrange it so that cold air can circulate freely.
•Higher cold setting will use more energy. Do not set to maximum cold if it is not necessary.
•Cool the hot/warm food to room temperature before putting them into your fridge.
•Frequently opening and closing the door
would cause the internal temperature to rise and it will consume more energy.
- Close the door(s) properly, and make sure the seals and hinges are airtight. Check the seals by putting a sheet of paper between the door and the main body of the fridge. If the paper moves, your seals need replacing.
- Defrost regularly if your refrigerator is not a frost-free or cyclic defrost model.
Accumulated ice layer should not be more than 5 mm thick.
•The pre-set combination of drawers, baskets and shelves have already been set in the most efficient way for use of this product.
Defrosting
Fridge Compartment
- The fridge compartment defrosts automatically. The defrosting water runs through the drain port to the drain tray at the back of the appliance.
- In the case, that some droplets may remain inside the compartment and re-freeze, after the defrosting cycle, this is normal. Do not use pointed or sharp objects, i.e. knives or forks, to remove the droplets which have frozen.
- Check the collection channel to ensure that no food particles have blocked the drain channel.
Freezer Compartment
To help you make the most of the freezing process, here are some important hints:
• the maximum quantity of food which can be frozen in 24 hrs. is shown on the rating plate;
• the freezing process takes 24 hours. No further food, to be frozen should be added during this period;
- only freeze top quality, fresh and thoroughly cleaned, foodstuffs;
• prepare food in small portions to enable it to be rapidly and completely frozen and to make it possible to thaw only the quantity required;
Care and Maintenance 5

natural_image
Abstract geometric pattern composed of interconnected triangles and squares, no text or symbols presentCare and maintenance
Looking after your appliance
General

Important: Always unplug the appliance from the powersocket during cleaning
and maintenance.
- Never use any sharp instruments or abrasive substances, soap, household cleaner, detergent or wax polish for cleaning.
- Use luke warm waterto clean the cabinet of the appliance and wipe it dry.
- Never clean the appliance with flammable fluids. It could cause damage and a fire hazard.
• Clean the exterior of the appliance and door seal with a damp cloth and dry it through. - Avoid watergoing into the temperature control box.. Clean with adry cloth only.
- Clean the condenser(located atthe back of the appliance) with a vacuum cleaner. It is suggested to remove the dust every year.
• Shelves are all removable for cleaning purpose.

Important: Care must be taken while cleaning/carrying the appliance not to
touch the bottom of the condenser metal wires at the back of the appliance, as this could cause injury to fingers and hands.
Light bulb replacement
This appliance is equipped with an LED light. It can be used for a longtime. If the LED light is blown, it must be replaced by a qualified person to avoid any hazard. Contact the service agent at 0345257 7271.
Power failure
In case there is a powerfailure, you should contact the electricity supply company and take the following actions:
If it is less than 24 hours, keep the doors closed. This will allow the stored food to stay cold as long as possible.
If it is lasts more than 24 hours, it is advised to empty the freezer compartment and temporarily store the food in a portable freezer or using firepacks. Try to use up the food which is more easily perishable.
Remarks: A full appliance will stay cold longer than a partially filled one. If ice crystals are still visible on the food, it may be frozen again, although flavour and aroma may be affected. If food is found to be in a poor condition, it is best to throw it away.
Short vacation
There is noneed to disconnect the appliance from the mains if you will be away for two to three weeks. Use up the perishable food.
Long vacation
Remove all the food if you are away for three weeks or more. Unplug the appliance and leave the doors opened to provide air circulation to prevent odour and mould.
Moving your appliance
Moving
Refer to section n"Tradeportatio " "Installation"
Error code
What to do in case of such failure is happened.
| Error code | Possible issue Solution | |
| E1 | Temperature detect on circuit of cooler | Contact service provider |
| E2 | Temperature detect on circuit of freezer | Contact service provider |
| E5 | Freezer defrost rig temperature detect on circuit | Contact service provider |
| E6 | Communication fault | Contact service provider |
| E7 | Ambient temperature detect on circuit | Contact service provider |
Care and maintenance
Looking after your appliance
Disassembly / assembly the door
• In case, there is problem with a door, you can contact the service agent for a replacement or you can replace it by yourself.
•The size of the doors are, Freezer 395mm(W)x1714mm(H) and Fridge 500mm(W)x1714mm(H).

Warning: 2 people may be required to re-align poor.
• A Philips screw driver will be required for this task.
- Put a protective layer on the floor before taking off the door.
To disassemble the door.
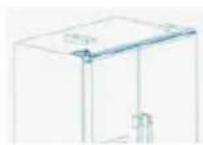
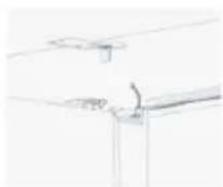
- Unscrew the screw fixing the top hinge cover (Fig.a).
- Remove the top hinge cover (Fig.b).
- Unscrew the screw that secures the top hinge (Fig.c)
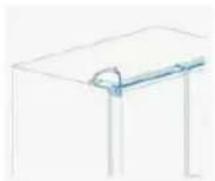
- Press on the lock of the cable connector (Fig.d) and separate the lead wire (Fig.e).
- One person should hold the door.
- Remove the top hinge (Fig.f) from the door. Take care of the lead wire to avoid any damage to the wire.
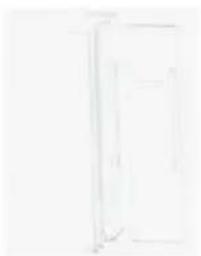
- Move the door upward to release it from the bottom hinge (Fig.g&h).
- Lay the door on the floor on a protective layer to avoid making scratching the surface.
To assemble the door
- Carefully lift the door. Align the hole in the lower corner of the door over the lower hinge. Lower the door onto the lower hinge.
- Insert the upper hinge into the hole on the upper edge of the door.
- One person should hold the door in place.
- Make sure the hinge is level between the upper hinge hole and the hole on the top of the cabinet.
- Reattach the hinge screws to secure the door.
- Reconnect the lead wires and refit the top hinge cover. Reattach the hinge cover with the screw.
Fig.a Fig.b
[Non-Text]
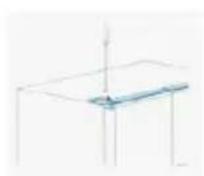
Fig.cFig.d
The Ground Truth image displays a single, solid horizontal line. According to Rule 2 (UNDERSCORE & LINE RULES), this is a stylistic or background line, not a placeholder underscore. Therefore, the OCR result must ignore it and output nothing or only meaningful text. The provided OCR content is "____", which consists of four underscores. This is an incorrect interpretation of the line as a placeholder, violating the rule that stylistic lines must be ignored. The OCR has hallucinated placeholder underscores where none should exist in the GT. This violates the rule that stylistic lines must be ignored. Therefore, the OCR result is inconsistent with the Ground Truth.
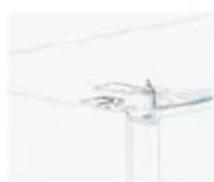
Fig.eFig.f
natural_image
Pure electrical circuit lines without any symbolsThe Ground Truth image displays a single, solid horizontal line. According to Rule 2 (UNDERSCORE & LINE RULES), this is a stylistic or background line, not a placeholder underscore. Therefore, the OCR result must ignore it and output nothing or only meaningful text. The provided OCR content is "____", which consists of four underscores. This is an incorrect interpretation of the line as a placeholder, violating the rule that stylistic lines must be ignored. The OCR has hallucinated underscores where none should exist based on the GT's visual context. Hence, the OCR result is inconsistent with the Ground Truth.

natural_image
Pure technical line drawing of a mechanical component without any text or symbolsFig.gFig.h
natural_image
Simple line drawing of a door with handle and frame (no text or symbols)Care and maintenance Looking after your appliance
Technical Specifications
| Model | BFSBS |
| Energy efficiency class | A+ |
| Energy consumption Kwh/year | 408 |
| Net storage volume fresh food (litres) | 344 |
| Net storage volume frozen food (litres) | 183 |
| Totalnet storage (litres) | 527 |
| Frozen foodcompartment rating | 4star |
| Climate class | SN/N/ST |
| Operating noise level dB(A) | 43 |
| Minimum Operation Temperature | 10 °C |
Disposal information
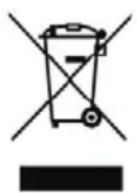
The symbol on the product or its packaging indicates that this product may not be treated as household waste. Instead it should be handed over to the applicable collection point for the recycling of electrical and electronic equipment, By ensuring this product is disposed of correctly, you will help prevent potential negative consequences for the environment and human health, which could otherwise be caused by inappropriate waste handling of this product. For more detailed information about recycling this product, please contact your local council office, your household waste disposal service or the shop where the product was purchased.
Remember: Old fridges must be disposed of carefully- older models contain CFC gases that are harmful- if indoubt, contact your local council for details on how to dispose of an old fridge.
Product support
6

natural_image
Abstract geometric pattern composed of interconnected triangles and squares, no text or symbols presentProduct support
Help is always at hand
Troubleshooting
If you have a problem with your product, these questions may be able to assist you?
Question- Appliance does not work.
Answer
Appliance is not switched on -Switch on the appliance.
Mains plug is not plugged in or is loose.-Insert mains plug.
Fuse has blown or is defective - Checkfuse, replace if necessary.
Socket is defective - Mainsmalfunctions are to be corrected by an electrician.
Question - Appliance cools too much.
Answer
Temperature is too cold - Change to a warmer setting in front control panel.
Question - The food is too warm.
Answer
Temperature is not properly adjusted - Change to a cooler setting.
Door was open for an extended period - Open the door only as long as necessary.
A large quantity of warm food was placed in the appliance - Change to a cooler setting.
Cool warmfood before placing in therefrigerator.
The appliance is near a heatsource - Position the refrigerator away from a heat source.
Question- Interior light does not work.
Answer
Light bulb is defective - Replace the LED light part by service agent.
Question-Heavy build up of frost, possibly also on the door seal.
Answer
Door seal is not air tight- Carefully warm the leaking sections of the door seal with a hair dryer (not hotter than approx 50 degree). At the same timeshape the warmed door seal by hand such that it sits correctly.
Question - Water on the floor or on storage shelves.
Answer
Water drainhole is blocked - Removefood residue or ice from the entrance of the drain hole.
Question - Appliance is making unusual noises
Answers
Appliance is not level - Readjust the front levelling feet.
Appliance is in contact with wall or other objects. - Push appliance away a short distance A part at the back of the appliance ega tube, is in contact with another appliance part or wall - Gentlybend this part away carefully if necessary
Product support
Help is always at hand
Help and assiance
If you require any technical guidance or find that your refrigerator is not operating as intended a simple solution can often be found in the Troubleshooting section of these instruction or online at www.argos-support.co.uk
If you still require further assistance, call one of our experts on 0345 257 7271. To help give us give you a fast and efficient service please have the following information ready.
Model Ref.
You can find these on the rating plate-a small information panel usually a sticker or metal plate)on the rear of your appliance
Serial number
Date of purchase
This will be shown on your receipt
Local call rates applies*
Line open 8am-7pm Monday to Saturday and 10am-4pm Sunday
*Calls to Argos enquiry lines may attract a charge and set up fee from residential lines depending on your call plan/tariff. Mobile and other providers costs may vary, see www.bt.com/pricing for details.
For security and training purpose, telephone calls to and from customer service centres may be recorded and monitored. Call from Republic of Ireland will attract international call charges.

This appliance complies with the following EEC directives:
2014/35/EEC Low voltage directive
2014/30/EMC directive
Product support
Help is always at hand
BUSH
Call us now and activate your 12 month guarantee
Thank you for choosing Bush. Your new product is guaranteed against faults and breakdowns for 12 months. Don't forget to register it with us today so we can provide you with our best possible after-sale service and useful updates.
www.bushregistration.co.uk
FREEPHONE\*
0800 597 8548
Lines are open 8am-8pm,365 days a year.*Call may be recorded and monitored.
Your Bush Guarantee
This product is guaranteed for twelve months from the date of original purchase. Any defect that arises due to faulty materials or workmanship will be repaired free of charge (or if applicable the product will be replaced or the purchase price refunded where possible during this period by the dealer from who your purchased unit.
The guarantee is subject to the following provisions
- The guarantee does not cover accidental damage, misuse cabinet parts, knobs or consumable items.
- The product must be correctly installed and operated in accordance with the instructions contained in the manual
- It must be used solely for domestic purposes. The guarantee will be rendered invalid if the product is
re-sold or has been damaged by inexpertrepair.
- Specifications are subject to change without notice.
- Bush disclaim any liability for loss or damage arising from the breakdown of the product
- This guarantee is in addition to and does not diminish your statutory or legal rights
Important Date Protection Information
If you provide us with information about another person, you confirm that they have appointed you to act for them to consent to the processing of their personal data including sensitive personal data and that you have informed them of our identity and the purpose as set out in the important Data Privacy notice displayed overleaf for which their personal data will be processed
You are entitled to ask for a copy of the information we hold about you we may charge a ) small fee a
any inaccuracies in your information corrected
For quality control and training purposes, we may monitor or record your communications with us.
If your personal details change if you change your mind about any of your marketing preferences or if you have any queries about how we use your information, please let us know by contacting our Date Protection
Officer, Domestic & General , Leicester
House 17 Leicester Street Bedworth, Warwickshire CV128JP
BUSH
Contact
www.argos-support.co.uk
Helpline:0345 257 7271
- Help and Guidance
- Contents
- Safety information
- Getting to know your refrigerator
- Installing your refrigerator
- Using your refrigerator
- Care and Maintenance
- Product support
- Safety information
- 1
- Before use
- Important-Please read these instructions fully before installing or operating
- Getting to know your refrigerator
- 2
- Ready? Let's begin...
- Installing your refrigerator
- 3
- Bringing it all together
- Transportation
- Installation
- Installing your refrigerator Bringing it all together
- Electrical connection
- Using your refrigerator
- 4
- Getting the most from your appliance
- Before first use
- Final checks before operating the appliance
- Using your appliance
- Control panel
- Lock / Unloc k function
- Function mode selection
- First Use
- Setting the temperature
- Hints and Tips
- Storage of Fresh food
- Storage of Frozen food
- Quick Freeze
- Useful information
- Energy saving tips
- Defrosting
- Fridge Compartment
- Freezer Compartment
- Care and Maintenance 5
- Care and maintenance
- Looking after your appliance
- General
- Important: Always unplug the appliance from the powersocket during cleaning
- and maintenance.
- Important: Care must be taken while cleaning/carrying the appliance not to
- Light bulb replacement
- Power failure
- Short vacation
- Long vacation
- Moving your appliance
- Moving
- Error code
- Disassembly / assembly the door
- To disassemble the door.
- To assemble the door
- Care and maintenance Looking after your appliance
- Disposal information
- Product support
- 6
- Help is always at hand
- Troubleshooting
- Question- Appliance does not work.
- Question - Appliance cools too much.
- Question - The food is too warm.
- Question- Interior light does not work.
- Question-Heavy build up of frost, possibly also on the door seal.
- Question - Water on the floor or on storage shelves.
- Question - Appliance is making unusual noises
- Help and assiance
- BUSH
- Call us now and activate your 12 month guarantee
- www.bushregistration.co.uk
- FREEPHONE\*
- 597 8548
- Your Bush Guarantee
- The guarantee is subject to the following provisions
- Important Date Protection Information
- Contact
Brand : BUSH
Model : BFSBS
Category : Freezer