M3015A - Washing machine SERVIS - Free user manual and instructions
Find the device manual for free M3015A SERVIS in PDF.


User questions about M3015A SERVIS
0 question about this device. Answer the ones you know or ask your own.
Ask a new question about this device
Download the instructions for your Washing machine in PDF format for free! Find your manual M3015A - SERVIS and take your electronic device back in hand. On this page are published all the documents necessary for the use of your device. M3015A by SERVIS.
USER MANUAL M3015A SERVIS
Safety Instructions 4 - 5
INSTALLATION
Unpacking instructions 6 - 7
Electrical information 8 - 10
Levelling the machine 11
Plumbing installation 12 - 14
OPERATION
Fabric guide 18
Programme descriptions 20 - 23
The controls 23 - 24
How to do a wash 25 - 28
Loading the machine 29
Detergents & additives 30
HINTS & ADVICE
Care of your machine 31 - 32
Stain removal 33 - 35
Troubleshooting 36 - 37
AFTER SALES SERVICE 38
TECHNICAL INFORMATION 39
THANK YOU FOR PURCHASING AN SERVIS AUTOMATIC WASHING MACHINE. THE RESPONSIBILITY FOR CORRECTLY INSTALLING YOUR WASHING MACHINE RESTS ENTIRELY WITH YOU, THE OWNER, SO DO READ THE SAFETY AND INSTALLATION INSTRUCTIONS CAREFULLY. THE IMPORTANCE OF CORRECT INSTALLATION CANNOT BE TOO STRONGLY EMPHASISED. REMEMBER, IT MAY BE NECESSARY FOR YOU TO PULL YOUR MACHINE FROM ITS WORKING POSITION, FOR SERVICING, SO DO NOT CUT SHORT THE ELECTRICAL CABLE.
DO NOT TAMPER WITH THE MACHINE UNTIL YOU HAVE FULLY READ ALL THE INSTRUCTIONS.
SAFETY INSTRUCTIONS
1 Please read the INSTALLATION and CONNECTION INSTRUCTIONS before tampering with the machine.
2 Ensure you have followed REMOVAL OF TRANSIT PACKAGING INSTRUCTIONS carefully.
3 You should run an initial wash cycle without laundry to remove residues of factory-applied grease from the drum and tub. We suggest a rinse and spin programme with a small amount of detergent.
4 It is important that when you have selected a rinse and spin programme, you attend the machine throughout the cycle, which will also ensure that all installation connections have been correctly made.
5 It is also recommended that, after seven days use, the connections to the outlet hoses are checked at the taps and the machine.
6 You may find small water deposits in the tub, this is the residue from the thorough testing which your machine was subjected to in the factory.
7 Please make sure before using your machine for the first time that the mains voltage and supply indicated on the rating plate (which is situated inside the filter door in the bottom right hand corner on the front of the machine) agree with the mains voltage where the machine is to be used.
SAFETY INSTRUCTIONS
8 Before cleaning, care and maintenance work, make sure that the appliance is switched off. We advise for safety reasons that you pull the mains plug out of the socket, switch off at the power point or completely remove the fuse in the fuse box servicing this circuit. (See Installation and Connection Instructions).
9 Never direct water onto the outer casing.
10 Never use the supply lead to pull the mains plug out of the socket.
11 Never operate the machine if the appliance shows visible damage to the control panel, worktop or plinth.
12 We advise that for your safety and the continued trouble free operation of your appliance, all repairs and maintenance should be carried out by experienced personnel using only genuine parts.
13 Children may not recognise the dangers of improper use of electrical appliances. Therefore please ensure that children are kept away at all times.
14 During certain programmes the glass on the porthole door could become very hot, please ensure therefore that children are kept away at all times.
15 When the day comes when you have to replace your washing machine please make sure that you inactivate the door lock and cut the electrical supply lead, (after disconnection) disposing of the lead and plug safely.
16 If you incorrectly operate this appliance or use it for any purpose other than that for which it is intended, we cannot assume liability for any possible damage.
17 When cleaning the stainless steel drum, never use any iron-containing scouring agents or steel wool.
UNPACKING INSTRUCTIONS
To protect your new washing machine during transit, several internal components have been secured using transit screws. These must be removed before using the machine.
NEVER remove the top or buck panel whilst the machine is plugged into the electricity supply.
PLEASE NOTE: The transit packaging must be removed before the machine is connected to the power supply.
Removal of the transit packaging
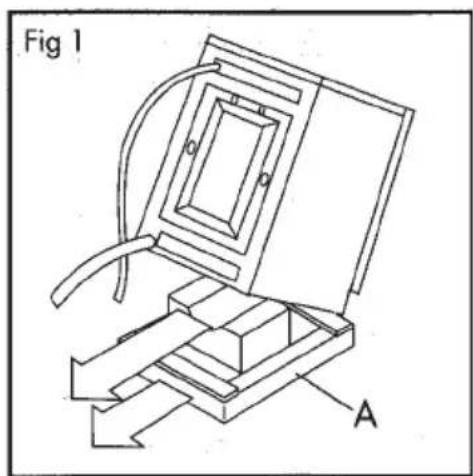
1 Remove all outer packaging from the machine.
2 Remove packaging base (A) (Fig 1)
3 Remove the four screws (A-B-C-D)
text_image
Fig 1 A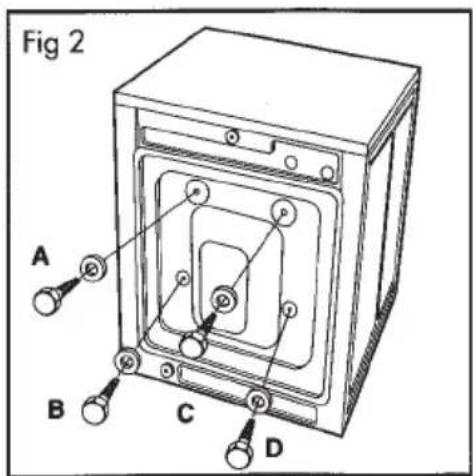
text_image
Fig 2 A B C DUNPACKING INSTRUCTIONS
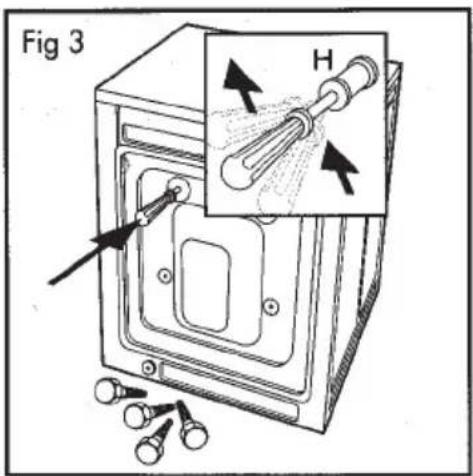
4 Insert a screwdriver in the holes that have been freed and tilt it to let the four spacers (H) fall
text_image
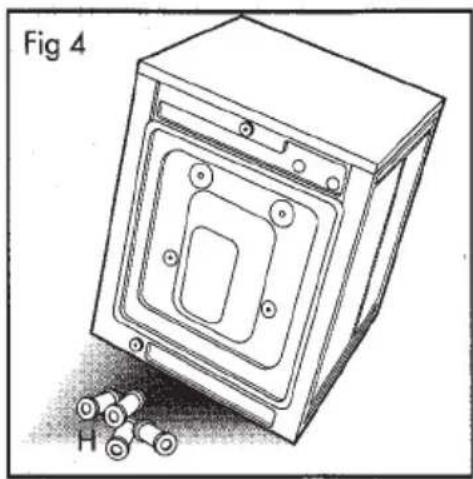
Fig 3 H5 Incline the machine and put the four spacers (H) aside, because if left in the appliance they could cause harm. (It may be possible that only three spacers were fitted in the factory, but, for safety reasons you must check). If this is not checked serious damage could occur to your machine when you commence usage To remove the back panel refer to point 2 below.
natural_image
Technical line drawing of a rectangular electronic component with concentric square layers and mounting holes, plus a separate cluster of 20-pin batteries labeled 'H' (no text or symbols on the diagram itself)Replacing the spacers
Should you need to move the machine to another location, the following steps should be taken prior h transportation.
1 Disconnect the appliance from the electricity supply.
2 Remove the eight screws from the back cover and remove the cover.
3 Insert screws A-B-C-D in the holes of the four rubber washers.
4 Insert the four spacers (H) on the inside of the cover on screws A-B-C-D and fasten them to the rubber washers.
5 Position the back cover on the appliance, centre it and screw in the four screws A-B-C-D.
6 Replace the eight screws (L) on the back cover.
ELECTRICAL INFORMATION
Before using this appliance ensure that the voltage in your home corresponds with the voltage indicated on the machine rating plate, which can be found inside the filter door?
Warning - This appliance must be earthed.
If the mains lead of the appliance is fitted with a BS 1363A 13amp fused plug, to change a fuse in this type of plug proceed as follows:
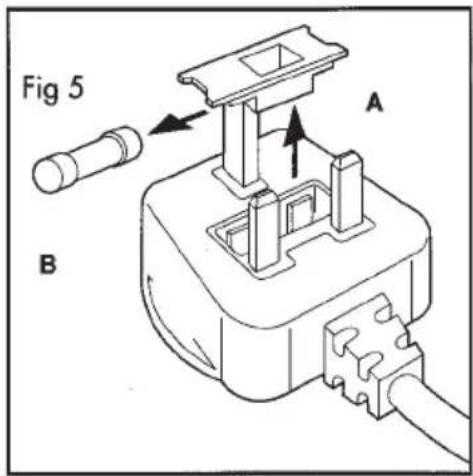
1 Remove the fuse cover (A) and the fuse. (Fig 5)
2 Fit a replacement fuse which should be a BS 1362 13amp ASTA item (B) (Fig 5)
text_image
Fig 5 A BImportant:
1 The fuse cover must be when changing a fuse.
2 In the event of a fuse cover being misplaced, the plug must not be used until a correct replacement is fitted.
3 Please ensure that the replacement fuse cover is of the same colour as the insert or, as the colour embossed in words on the base of the plug.
4 For replacement fuse covers please consult your local electrical store.
Please state the colour of your plug insert.
If the fitted plug is not suitable for your socket outlets, it should be cut off and disposed of, to avoid a possible shock hazard should it be inserted into a 13amp fuse elsewhere.
A suitable alternative plug should then be fitted to the cable.
ELECTRICAL INFORMATION
Warning - This appliance must be earthed.
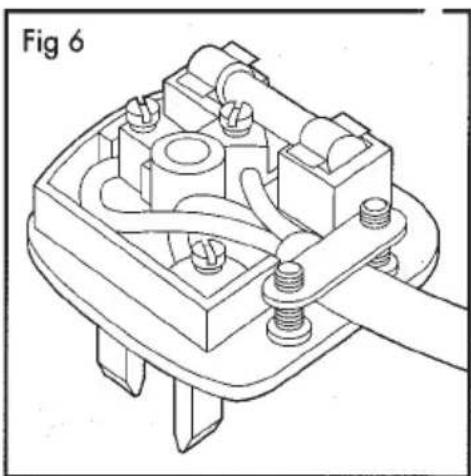
Important: The wires of the mains lead fitted to this appliance are coloured in accordance with the following code:
1 Green and yellow Earth
2 Blue - Neutral
3 Brown - Live
natural_image
Technical line drawing of a mechanical component with bolts and housing (no text or symbols)As the colour of the wires in the mains lead fitted to this appliance may not correspond with the coloured markings identifying the terminals in the plug proceed as follows:
1 The wire which is coloured green and yellow must be connected to the terminal in the plug which is marked with the letter 'E' or by the earth symbol 12 or coloured green or green and yellow.
2 The wire which is coloured blue must be connected to the terminal which is marked with the letter 'N' or coloured black.
3 The wire which is coloured brown must be connected to the terminal in the plug which is marked with the letter 'L' or coloured red.
If the terminals in the plug are unmarked or you are in any doubt as to the correct connections, consult a qualified electrician.
ELECTRICAL INFORMATION
For the Republic of Ireland only
The information given in respect of Great Britain will frequently apply, but a third type of plug and socket is also used, the 2-pin, side earth type. In this case, the wire which is coloured green and yellow must be connected to the earth contact, and the other two wires to the two pins, irrespective of colour. The supply to the socket must be fitted with a 16amp fuse.
For replacement fuse covers please consult your guarantee card for the address of your local service centre.
Please state the colour of the plug insert.
Warning
Do not plug a tumble dryer and washing machine into an adaptor for connection to a single socket outlet. Plug the dryer and washing machine into separate socket outlets.
LEVELLING THE MACHINE
Having completed the electrical connections, move your machine to its operating position. To minimise vibration and noise during spinning your machine must be in firm contact with a well supported or preferably solid floor. Failure to level the machine could lead to instability and consequent damage to adjacent equipment.
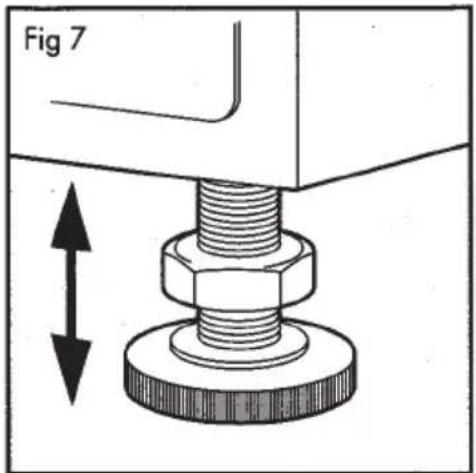
- One or both of the front feet should be adjusted in order to level the machine
2 Screw the foot up or down until the machine is level in both front to rear and side to side directions.
3 Lock the foot by screwing up the circular locking rings so that they are in firm contact with the underside of the machine.
text_image
Fig 7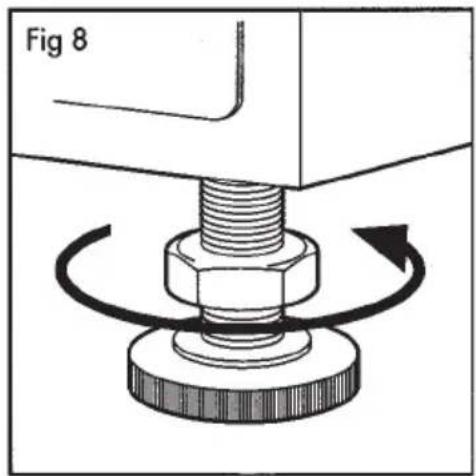
text_image
Fig 8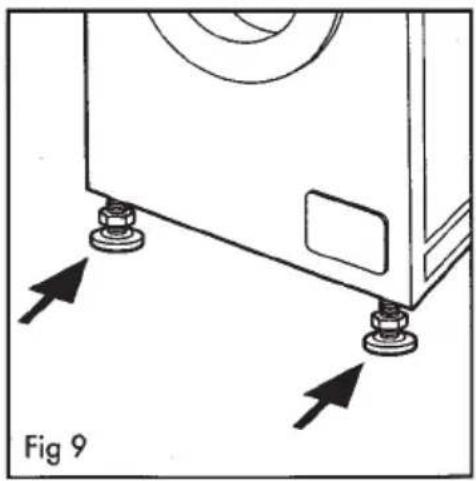
natural_image
Diagram of a washing machine with mounting screws and a circular component, labeled Fig 9 (no text or symbols on the diagram itself)PLUMBING INSTALLATION
Location
Modern washing machines spin at high speeds. To avoid excessive vibration during spinning install the machine on a properly supported floor Always leave approximately 5cm on each side of the machine to allow for possible vibration during spinning of unbalanced loads.
Space for servicing and fitting
Allow space on either side of the machine for access and servicing.
Water Board regulations
These instructions are intended only as a general guide and local by-laws and water Board regulations with respect to the water connections and drainage from the machine must be observed.
Water pressure
The machine will operate within a wide range of water pressures.
Hot water (if fitted) minimum 5 N/cm2 (0.5 bar) (7 psi) maximum 10 N/cm2 (1 bar) (15 psi)
Cold water minimum 5 N/cm2 (0.5 bar) (7 psi) maximum 100 N/cm2 (10 bar) (150 psi)
If the height of the storage tank in the house is a minimum of 8 feet above the top of the washing machine this will normally be sufficient to meet the minimum pressure requirements.
Water supply
1 Most domestic hot water systems are suitable.
2 Multi point gas heaters can be used if sufficient water pressure is available (Check with manufacturer).
3 Instantaneous gas water heaters MUST NOT BE USED.
4 If you are in any doubt about the suitability of your hot water system, consult the manufacturer of the heating appliance or the Gas or Electricity Board.
PLUMBING INSTALLATION
Water connections
All the connectors and adaptors mentioned in this section can be purchased from your local builder or plumber, from large DIY stores (Payless, Texas Homecare) or from electrical chain stores like Currys.
Filling hose
All our washing machines are supplied with special high pressure filling hoses fined with a 3/4" BSP (19mm) female coupling.

text_image
X Fig 10Important: Under no circumstances should this coupling be removed from the hose.
We will not accept any responsibility for failure of the hoses or water connections if the factory fitted couplings are removed. The hoses are designed to be long enough to stay connected while the machine is pulled forward for cleaning and servicing.
Fitting the hoses
Important: Before connecting the hoses be sure to fit the mesh filters in both ends of the inlet hoses.
Remove the hoses from their storage in the drum and fit them to the inlet valves situated on the rear panel of the machine. Remember to fit the red hose to the red valve and to insert the rubber washers into the couplings.
Insert the filter washers in the other end of the filling hoses as shown. Screw the red hose to the hot tap and the other hose to the cold tap.
PLUMBING INSTALLATION
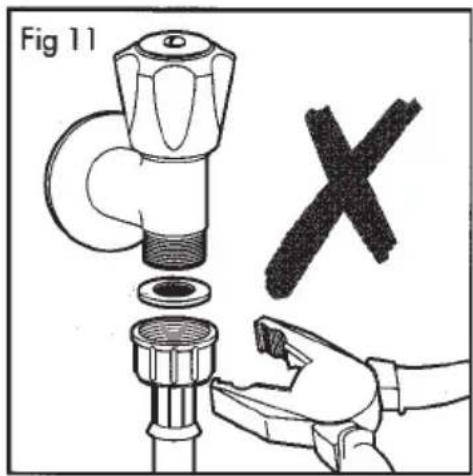
You should not need tools to effect a satisfactory seal, excessive force may damage the connections (Fig 11)
text_image
Fig 11Permanent plumbing
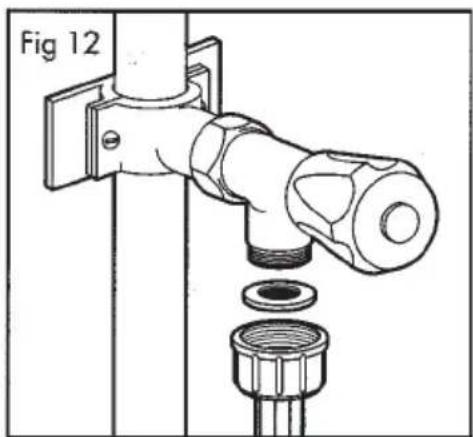
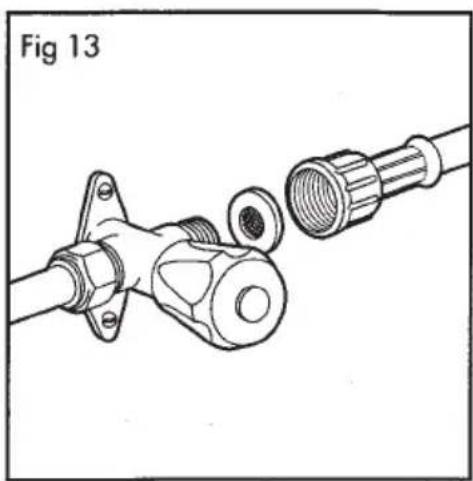
Please make provisions to shut off the water supply to the machine completely, this will:
- Avoid the possibility of flooding when the machine is not in use.
natural_image
Technical diagram of a pipe fitting assembly with a valve and fittings (no text or symbols)- Allow the machine to be moved for cleaning and servicing. If you do not have an existing installation for connecting your machine, consult a qualified plumber. There are various methods available.
natural_image
Technical illustration of a mechanical assembly with flanged components and threaded connectors (no text or symbols)PLUMBING INSTALLATION
Discharge into a standpipe
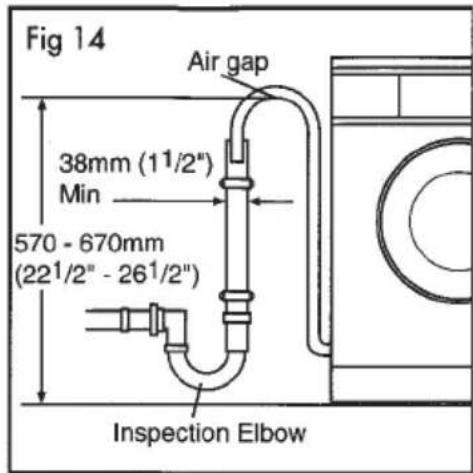
The top of the standpipe should be approximately 61 Omm (24") from the ground. The dimensions from the floor to the underneath of the bend in the drain hose, should be between 570-670mm (221/2" - 261/2") (Fig 13) The take off pipe must be capable of taking 6 gallons (27 litres) per minute
flow. The minimum diameter of the standpipe must be 3.81cm (11/2") and there must be an air gap around the washing machine drain hose when fitting into the standpipe
text_image
Fig 14 Air gap 38mm (11/2") Min 570 - 670mm (221/2" - 261/2") Inspection ElbowRecommended way to plumb in a washing machine from a combined waste trap Temporary connections
text_image
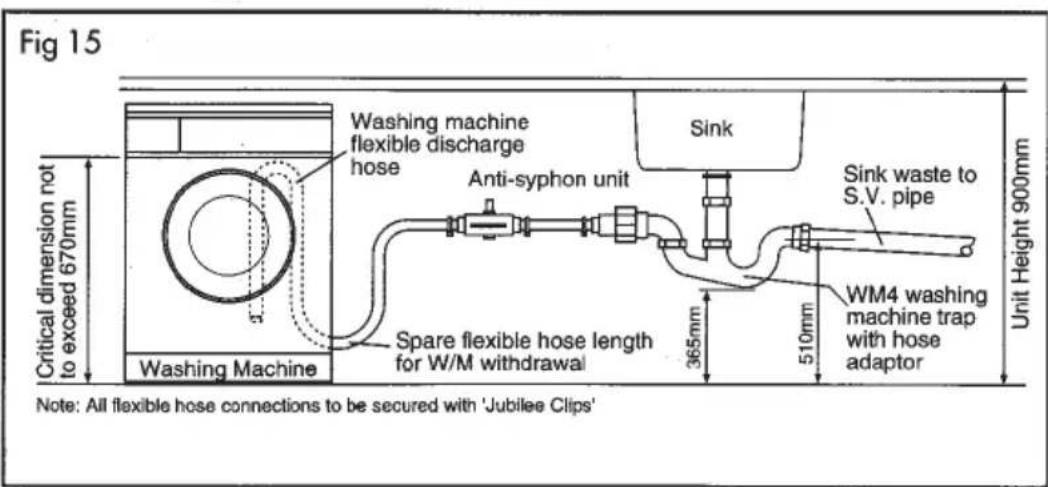
Fig 15 Critical dimension not to exceed 670mm Washing Machine Washing machine flexible discharge hose Anti-syphon unit SINK Sink waste to S.V. pipe 365mm 510mm 510mm Unit Height 900mm Spare flexible hose length for W/M withdrawal WM4 washing machine trap with hose adaptor Note: All flexible hose connections to be secured with 'Jubilee Clips'It is best to avoid temporary connections. When the machine runs from sink taps, it can mean that you are unable to use the sink for over an hour while the machine completes a programme. Also very hot water will be discharged from the drain hose into the sink and this could be a safety hazard, especially if you have children.
If you must execute a temporary connection be sure that you check the condition of your tap.
PLUMBING INSTALLATION
The closing of the water valve in automatic machines is instantaneous and will cause buck pressure to the tap. It is therefore essential that your taps are in good condition otherwise they may leak during use. Even though your taps may be adequate for everyday use it is advisable to check the spindle sealing gland of the tap before connecting your machine for the first time. To do this connect the machine fill hoses to the tap using your chosen adaptor, making sure the hose sealing washer is in place. If water escapes from the top of the tap the gland may need tightening or replacing .
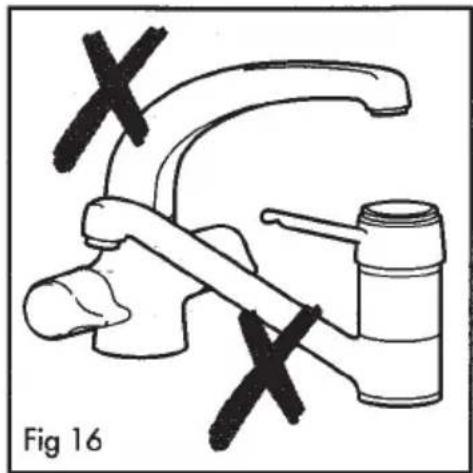
Mixer taps must not be used.
natural_image
Diagram of a faucet with two X marks indicating no change, labeled Fig 16 (no text or symbols on the diagram itself)Tap adaptors
Tap adaptors are available to fit the vast majority of tap designs. Always ensure that the rubber sealing washer is correctly positioned in the fill hose coupling.
Taps with threaded ends
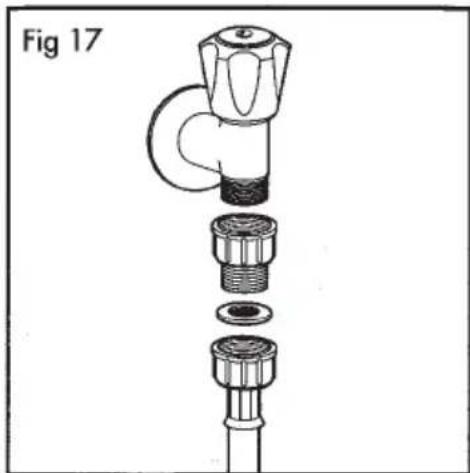
These taps are normally fitted with 5/8" BSP threads (17mm). An adaptor to convert the tap thread to the required 3/4 (19mm) is available from your local builder/plumber merchant.
natural_image
Exploded view diagram of a mechanical valve assembly (no text or labels)PLUMBING INSTALLATION
Drainage
If a plastic standpipe is used it should be of a high temperature resistant type and not less than 32mm (11/4") diameter. The height of the pipe must be between 60cm (24") and 90cm (35") above the floor. To avoid the possibility of siphoning it is essential that the drain hose IS NOT an airtight fit in the standpipe. The drain must have a capacity of 6 l/2 gallons (30 litres) per minute, otherwise it will overflow.
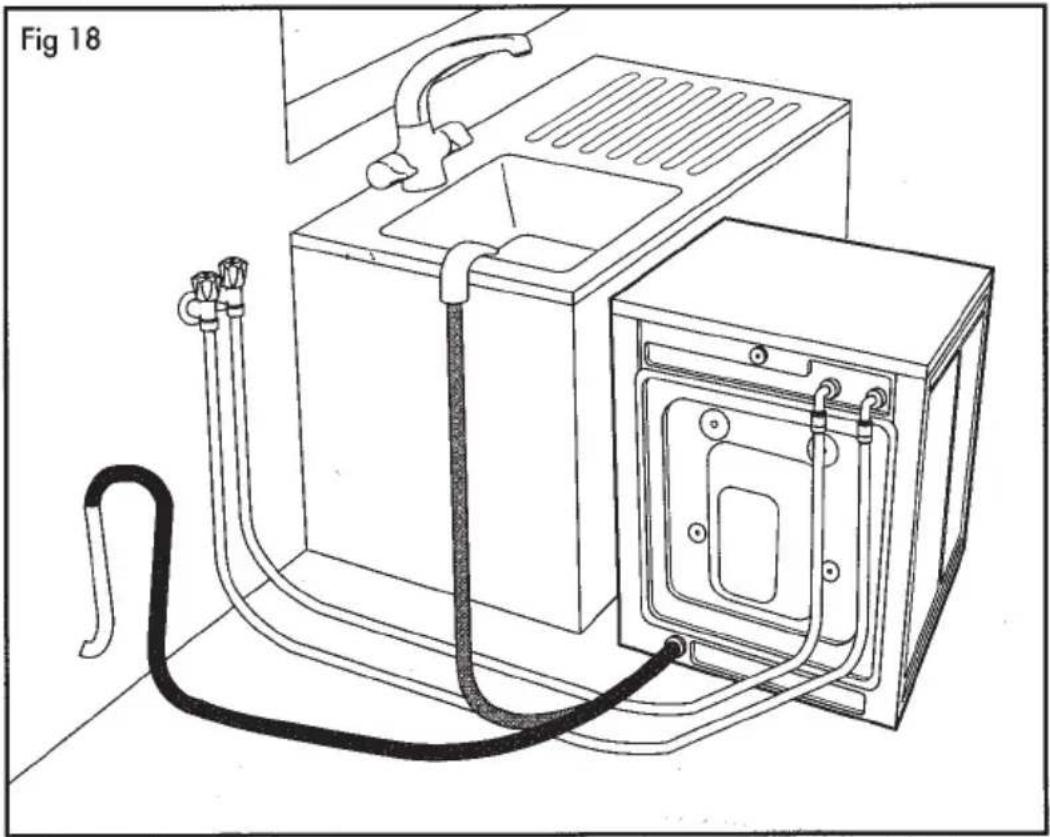
Temporary drainage connection
The end of the drain hose should be placed over the edge of the sink, ensure that:
1 The hose cannot be easily displaced (a piece of string or wire can be threaded through the hole in the plastic moulded hose crook and then attached to the tap).
2 The water level in the sink cannot cover the end of the drain hose.
3 The plug is removed and the water is able to drain.
4 Children are kept away from the sink while the machine is in operation as very hot water is pumped out of the machine.
natural_image
Line drawing of a washing machine with tubing and a sink, labeled Fig 18 (no text or symbols on the diagram itself)FABRIC GUIDE
Wash code symbols
These symbols appear on fabric labels, in order to help you choose the best way to treat your laundry.
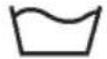 Normal Wash Normal Wash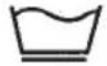 Delicate Wash Delicate Wash |  Max. wash temperature Max. wash temperature 95 95 | 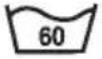 Max. wash temperature Max. wash temperature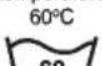 00 00 |  Max. wash temperature Max. wash temperature 40 40 |  Max. wash temperature Max. wash temperature 50 50 | 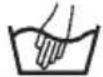 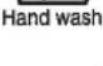 | 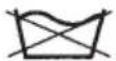 Do not wash at all Do not wash at all |
 Bleaching Bleaching |  Bleach in cold water Bleach in cold water |   | 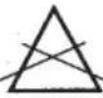 Do not bleach Do not bleach |
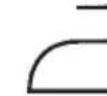 Ironing Ironing |  Hot iron max. 200°C Hot iron max. 200°C | 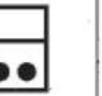 Warm iron max 150°C Warm iron max 150°C |  Luke warm iron max 110°C Luke warm iron max 110°C | 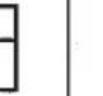 Do not iron Do not iron |
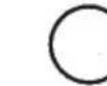 |  | 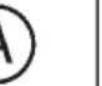 |  | [F] | 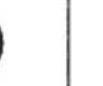 | Do not dry clean |
| Dry Cleaning | Dry cleaning in all solvents | Dry cleaning in perchloroethylene, petrol, pure alcohol, R111 and R113 | Dry cleaning in petrol, pure alcohol, and R113 | |||
 Drying Drying |  Flat Flat | 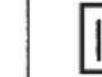 On the line On the line |  On clothes hangar On clothes hangar | High te  Low temperature Tumble Dry Low temperature Tumble Dry | 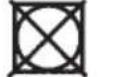 Do not tumble dry Do not tumble dry |
NOTE: You must always refer to the clothing care labels in all fabrics before selecting a wash.
THE CONTROLS
text_image
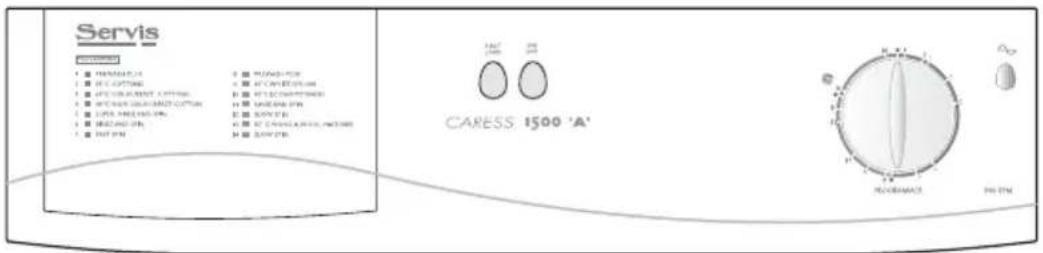
Servis ■ PENSERS ■ E. LOTTING ■ MTG OR RENT COTTING ■ MTG OR RENT COTTING ■ MTG MOUNTING ■ MOUNTING ON ■ MOUNTING ON ■ MOUNTING ON ■ MOUNTING ON ■ MOUNTING ON ■ MOUNTING ON ■ MOUNTING ON ■ MOUNTING ON ■ MOUNTING ON ■ MOUNTING ON ■ MOUNTING ON ■ MOUNTING ON ■ MOUNTING ON ■ MOUNTING ON ■ MOUNTING ON ■ MOUNTING ON ■ MOUNTING ON ■ MONTIEN ■ MONTIEN ■ MONTIEN ■ MONTIEN ■ MONTIEN ■ MONTIEN ■ MONTIEN ■ MONTIEN ■ MONTIEN ■ MONTIEN ■ MONTIEN ■ MONTIEN ■ MONTIEN ■ MONTIEN ■ MONTIEN ■ MONTIEN ■ MONTIEN ■ MORTIEN ■ MORTIEN ■ MORTIEN ■ MORTIEN ■ MORTIEN ■ MORTIEN ■ MORTIEN ■ MORTIEN ■ MORTIEN ■ MORTIEN ■ MORTIEN ■ MORTIEN ■ MORTIEN ■ MORTIEN ■ MORTIEN ■ MORTIEN ■ MORTIEN □ 1500 'A' RECORRANCE P.O. CARESS 1500 'A'The controls arranged on the fascia panel consist of (right to left):
1 Programme Selector
2 Options buttons: Half load,
3 Programme guide
| SPIN SPEED | |
| MODEL NORMAL DELICATE | |
| M 3015 1500 rpm approx. 500 |
PROGRAMME DESCRIPTION
1
95°C + PRE WASH (Normal fabrics)
Separate wash programme at 40 C followed by a 90 C normal wash. Ideal for very heavily soiled white cottons and linen without special finishes
Maximum wash load 4,5 Kg. (10lb). Programme includes fast spin.
OPTIONS AVAILABLE
HALF LOAD
2
95°C COLORFAST COTTONS
Normal soiled white cottons and linens.
Maximum wash load 4,5 Kg. (10lb). Programme includes fast spin.
OPTIONS AVAILABLE
HALF LOAD
3
60°C COLORFAST COTTONS
Cotton linen or viscose without special finishes where colours are fast at 60^ C.
By selecting this programme, you active class "A" as washing performance.
Maximum wash load 4,5 Kg. (10lb). Programme includes fast spin.
OPTIONS AVAILABLE
HALF LOAD
4
40°C NON COLORFAST COTTONS
Cotton, linen or viscose without special finishes where colours are fast at 40°C
Maximum wash load 4,5 Kg. (10lb). Programme includes fast spin.
OPTIONS AVAILABLE
HALF LOAD
PROGRAMME DESCRIPTION
 | SUPERINSE/SPIN | |
| Rinses and a long spin for natural fabrics. | ||
| Maximum wash load 4,5 Kg. (10lb).Programme includes fast spin. | OPTIONS AVAILABLE | |



RINSE/SPIN
Separate rinse/spin programme for natural fabrics. (Please refer to clothing care label first).
Maximum wash load 4,5 Kg. (10lb). Programme includes fast spin.
OPTIONS AVAILABLE
FAST SPIN
Separate spin programme for any hand wash articles which need a fast spin. (Please refer to clothing care label first).
Maximum wash load 4,5 Kg. (10lb). Programme includes fast spin.
OPTIONS AVAILABLE
60°C + PRE WASH (Delicate fabrics)
Separate wash programme at 40^ C for heavily soiled nylon and polyester and cotton mixtures followed by a 60^ C wash.
Maximum wash load 4,5 Kg. (10lb). Programme includes fast spin.
OPTIONS AVAILABLE
HALF LOAD
PROGRAMME DESCRIPTION
9
60°C WHITE NYLON
Ideal for normally soiled nylon, polyester cotton and viscose with special finishes, acrylic cotton mixtarest coloured/cotton mixtures.
Maximum wash load 2,2 Kg. (5 lb). Programme includes delicate spin.
OPTIONS AVAILABLE
HALF LOAD
10
40°C ECONOMY WASH
Shorter wash programme, ideal for acrylics, acetate and triacetate including mixtures with wools polyester/wool blends.
Maximum wash load 2,2 Kg. (5 lb). Programme includes delicate spin.
OPTIONS AVAILABLE
HALF LOAD
11
RINSE/SLOW SPIN
Separate rinse and spin for delicate fabrics.
Maximum wash load 2,2 Kg. (5 lb). Programme includes delicate spin.
OPTIONS AVAILABLE
12
SLOW SPIN
Separate spin programme for any 'hand wash' articles which need a slow spin. (Please refer to clothing care label first).
Maximum wash load 2,2 Kg. (5 lb). Programme includes delicate spin.
OPTIONS AVAILABLE
PROGRAMME DESCRIPTION
13
35°C WOOL/WOOL MIXTURES
Delicate programme for washable wool, including blankets and wool mixtures with cotton or viscose. Also ideal for silk.
Maximum wash load 2,2 Kg. (5 lb). Programme includes delicate spin.
OPTIONS AVAILABLE
14
SLOW SPIN
Delicate spin.
Maximum wash load 2,2 Kg. (5 lb). Programme includes delicate spin.
OPTIONS AVAILABLE
THE CONTROLS
The following option buttons are to be used in conjunction with wash programmes. They cannot be used on their own, before selecting any wash programmes or options you must always refer to the clothing care labels on your items of clothing.
text_image
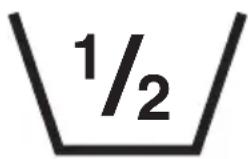
1/2HALF LOAD
Select this option to reduce water consumption on the rinse/wash cycle e when washing a smaller load of cottons or I linens.
AVAILABLE ON PROGRAMMES: 1, 2, 3, 4, 8, 9, 10.
THE CONTROLS
Programme selector dial
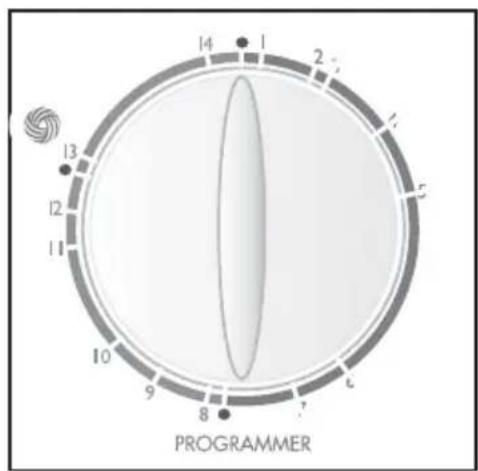
To select a programme, turn the selector dial in a clockwise direction until the required programme/number on the fascia is opposite to the indicator mark on the selector dial (Fig 19). To start a programme ensure that the taps are fully turned on, the door is closed and the mains supply is switched on. PRESS THE ON/OFF BUTTON, the programme will then start. The programme is complete when the programme selector dial is pointing to • the machine has stopped and the mains indicator light is not illuminated.
text_image
1 2 3 4 5 6 7 8 9 10 11 12 13 PROGRAMMERDo not attempt to move the programme selector dial during the programme cycle, if necessary switch off the machine before attempting to move the dial.
THE CONTROLS
Wash powder and conditioner compartment
The detergent dispenser is designed to automatically flush detergents and additives into your machine. It is divided into three compartment, which are as follows:
1 Pre-wash and bio powders
2 Main wash powders
3 Fabric conditioners
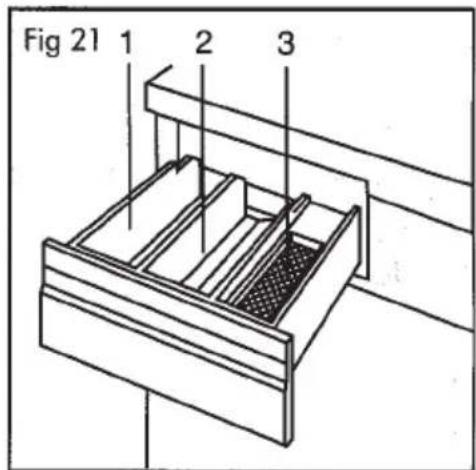
text_image
Fig 21 1 2 3NOTE: The detergent dispenser drawer and housing should be periodically cleaned to prevent a build up of detergent and fabric softener. The dispenser drawer is easily removed by pulling it out as far as it will go, then giving a sharp tug. Rinse the dispenser drawer under a tap, dry and replace by slotting the top drawer into the runners on the top of the opening and close in the normal way.
HOW TO DO A WASH
Before you commence washing sort the clothes into suitable groups (refer to section on laundry preparation). Check that the pockets are empty, zips, buttons and hooks are closed. Tie apron strings and mend any tears or rips Remember buttons that are not securely fitted could be removed during a wash and could cause damage to clothing and your machine. Always check clothing cure labels before you select a wash programme.
Load the laundry
Open the door by pulling the catch outwards. Load the items to be washed one at a time and close the door.
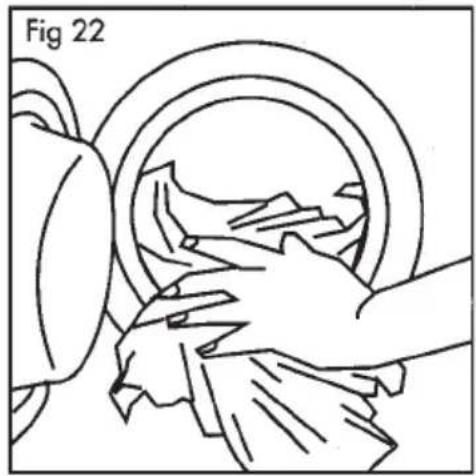
natural_image
Line drawing of hands cleaning a circular object with a cloth, labeled 'Fig 22' (no text or symbols on the diagram itself)Add the detergent
Measure the required quantities of washing powder and add into the detergent compartment or directly into the drum of the machine by use of a wash ball (refer to section on Detergents and Additives).
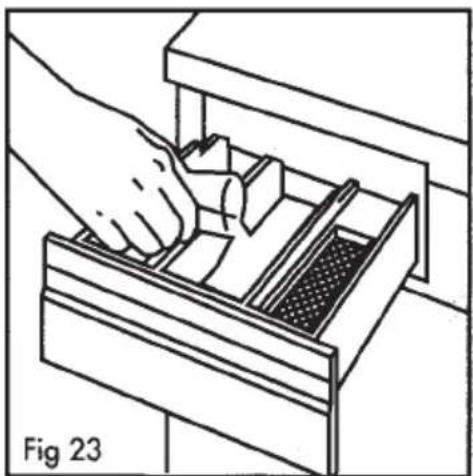
natural_image
Line drawing of a hand inserting into a drawer into a storage bin (no text or symbols)HOW TO DO A WASH
Add the conditioner
Pour the softener, if required into compartment 3 (see fig 24), do not exceed the MAX level (refer to section on Detergents and Additives). Close the drawer gently as it could cause the conditioner to enter the machine prematurely.
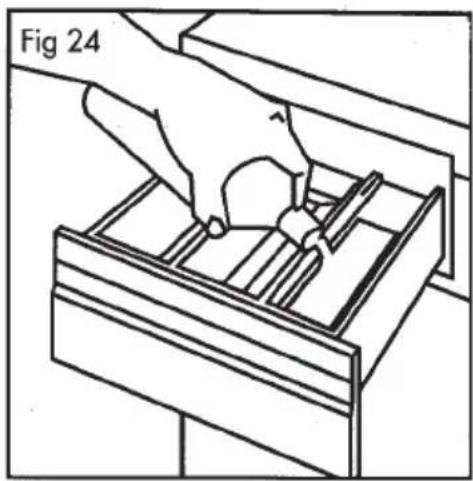
text_image
Fig 24Select the programme
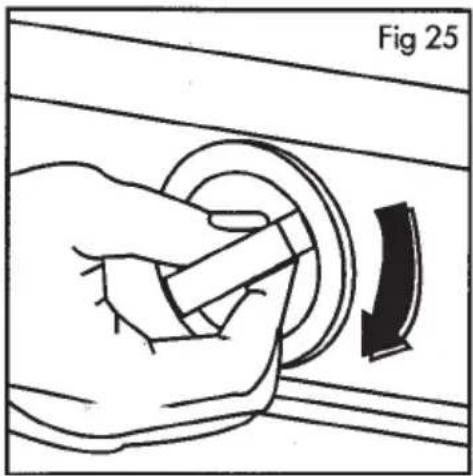
Turn the selector dial in a clockwise direction until the required programme/number is opposite to the indicator mark on the selector dial.
Select half load, if required.
natural_image
Illustration of a hand turning a circular component with an arrow indicating rotation (no text or symbols)Start up
Check that:
1 the appliance is plugged in
2 the water taps are on
3 the drain hose is correctly positioned. The push the ON/OFF buton to start. The programme is complete when the dial is pointing to •, the machine has stopped.
natural_image
Illustration of hands inserting a file into a drawer into a drawer holder (no text or symbols)HOW TO DO A WASH
The end
At the end of a programme the machine automatically stops. The door is controlled by a safety device which releases 1 - 2 minutes after the end of the programme. Open the door once the safety catch is released and remove all the articles of clothing. Push the ON/OFF buton to turn the machine OFF.
When the programme has finished you are advised to unplug the appliance and turn off the water taps.
NOTE: Do not attempt to rotate the programme selector dial anticlockwise. Should you turn past the required programme continue to dial to reset. Do not rotate the programme selector dial whilst the machine is switched on and working, if necessary switch off the machine before attempting to move the dial.
HOW TO DO A WASH
Laundry preparation
Before you commence washing, sort out your laundry into washing loads according to type of fabric, degree of soiling, colour fastness, drip dry, etc.. All the articles in a load must be able to be washed at the same temperature You will then obtain the best washing results.
NOTE: Clothing cure labels on all clothes must be adhered to at all times.
1 Check the clothing cure label on all articles, if in doubt refer to section Main wash programmes and fabric guide
2 Fasten zips - these can cause damage to other articles.
3 Tears and open seams should be mended before washing.
4 Secure loose buttons.
5 Empty pockets of all contents, coins, keys, etc. can cause internal damage to your machine.
6 Put lace, belts, childrens clothes (bootees, etc.) into a pillowcase to prevent tangling around clothes.
7 Treat any stains before washing (Refer to section on 'Stain removal').
8 If you are unsure about the colour fastness of fabrics, wash in low temperature at 40^ C.
9 New denims should be washed separately in case of colour run. Afterwards they can be washed according to instructions.
10 Bulky articles - sleeping bags, quilts etc. Wash on the wool programme to get best results. Wash one at a time.
LOADING THE MACHINE
How mush is in a load
Your Automatic will wash the following dry weights.
Cottons and Linens 4.5kg 10 lbs
Absorbent materials, towels, nappies flanelette 2.75kg 6 lbs
Man-made fibres 1.8kg 4 lbs
Machine washable woollens 1.8kg 4 lbs
A guide to the approximate dry weight of articles.
Double sheet 907gm Skirt 340gm ( ^3/_4 lb)
Single sheet 680gm Pyjamas 340gm ( ^3/_4 lb)
Table cloth 453gm Underwear 113gm ( ^3/_4 lb)
Bath towel 453gm Aprons 113gm ( ^3/_4 lb)
Hand towel 227gm Blouses 113gm ( ^3/_4 lb)
Tea towel 113gm Nighties 113gm ( ^3/_4 lb)
There are two typical loads.
Programme 2 (Load 10lbs) Programme 4 (Load 5lbs)
2 tea towels, 1 tablecloth, 5 pairs pants, 3 blouses,
2 bath towels, 2 hand towels, 2 nightdresses, 3 shirts,
1 single sheet, 2 double sheets. 2 pairs pyjamas, 1 apron.
IMPORTANT
Do not overload
Overloading will effect the efficiency of the wash and in the long run it can damage the machine. This is particularly important with machine washable wool, and with man made fibres, such as Acrilan, Bri-nylon, Terylene, Crimplene, Dralon, Trevira and Courtelle. They need plenty of room, so keep within the weight limit. Take them out of the machine as soon as possible after the wash programme is completed.
Do not underload
To ensure smooth running avoid spinning single heavy items. Spinning underloaded may cause excessive vibration. So if you don't have enough items in a particular group to make a reasonable load add a few towels.
DETERGENTS & ADDITIVES
Choosing the right washing powder
Always use a low lather powder. This is important as too much lather prevents the articles from being properly cleansed and you may damage the machine. For outstanding cleaning we recommend Ariel Ultra. Using the latest detergent technology with 30% less ingredients and 30% less packaging, Ariel Ultra gives immaculate cleaning from just half the amount of conventional powder.
Alternatively why not try Ariel Liquid. It contains built in stain removers and comes with the unique Treat'n'Wash pre treatment system enabling direct pre treatment of problem stains (Refer to section on 'Stain removal'). Ariel Ultra and Ariel Liquid work at lower temperatures too. For non biological cleaning, we recommend Fairy Ultra and Fairy Ultra Liquid.
We recommend Lenor fabric conditioner because quite simply it's the best fabric conditioner you can buy. Available in refill packs for extra convenience. Use Lenor to improve the softness and feel of your wash.
NOTE: Once you have added the conditioner to compartment '3' (Refer to section on Wash powder & fabric conditioner compartment') close the detergent dispenser by pushing it in gently. This is particularly important because if the drawer is slammed it will cause the conditioner to enter the machine prematurely.
TREAT'N'WASH BALL (Arielette/Arielator)
1 Fill the ball with the correct amount of liquid/powder, following the recommended dosage which can be found on every pack.
2 Place the ball upwards on tip of your laundry. Do not overfill the machine with laundry.
3 Select your main wash programme.
NOTE: Always follow the recommended dosages of detergent which can be found on every puck.
CARE OF YOUR MACHINE
Successful washing and smooth running of your machine depend on a series of routine maintenance operations which should be carried out from time to time.
IMPORTANT: You are advised to unplug the appliance before all cleaning and maintenance operations.
Decalcification
The water we normally use contains lime It is a good idea from time to time to use a water softening powder in the machine (more frequently in hard water areas) Add the powder according to the manufacturer's instructions. This will prevent the formation of lime deposits.
After each wash
Leave the door slightly ajar. This helps prevent mould and stagnant smells forming inside the machine. Turn the drum slowly so that no small items have been overlooked. Wipe the inside of the drum and door seal with a dry cloth. (It is normal if a certain amount of water has collected in the rim of the door seal).
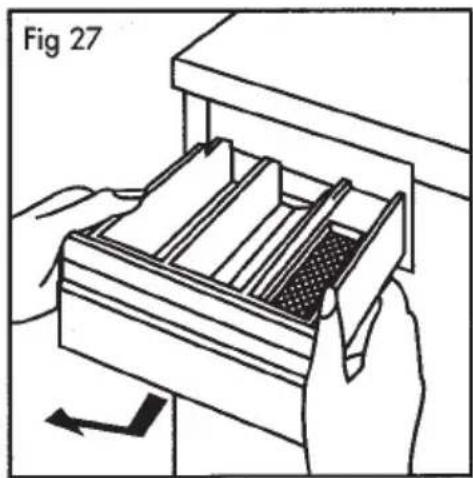
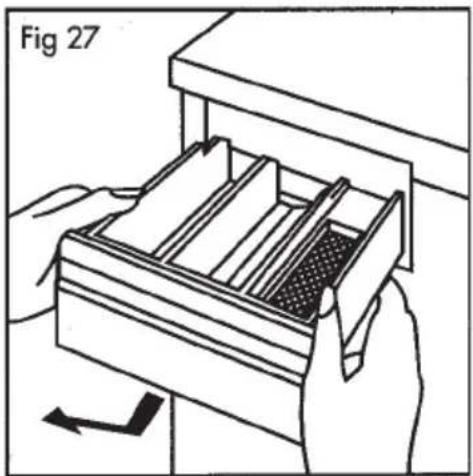
Remove the soap dispenser drawer by tilting slightly and then pulling out. Rinse, dry and replace (Fig.27).
natural_image
Illustration of hands inserting a file into a drawer into a storage bin (no text or symbols)External cleaning
Use soap and water only and then dry thoroughly.
CARE OF YOUR MACHINE
Cleaning the filter
A clean filter is important for correct functioning of the washing machine, and should therefore be cleaned periodically.
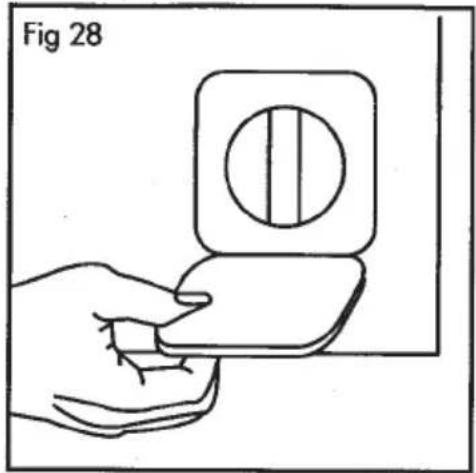
- Open the panel which is situated at the bottom right corner on the front of the machine and place a container underneath to catch any spillage. (It is normal for a certain amount of water to collect in the filter).
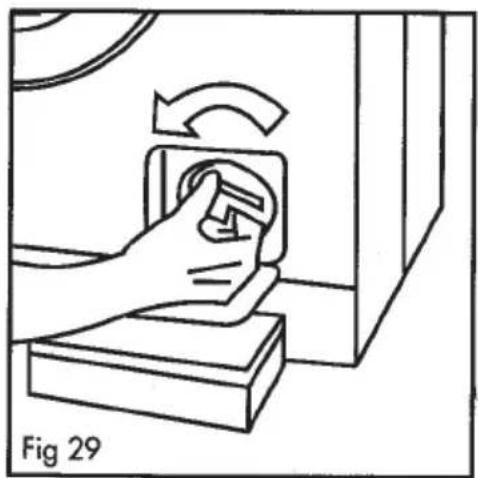
- Unscrew the filter - 2 turns anti-clockwise remove and rinse.
- Replace the filter carefully putting it on its guides, screw it in firmly.
natural_image
Line drawing of a hand holding a small object with a circular inset, labeled 'Fig 28' (no text or symbols on the object itself)If the filter is blocked and the machine is unable to drain, you will need to remove the water from the machine at this stage. To do this:
natural_image
Illustration of a hand pressing a button into a device, showing rotational motion (no text or symbols)1 Unhook the drain hose from the standpipe or sink.
2 Hold the end of the hose over the bowl on the floor. The water should drain by gravity into the bowl.
3 When the bowl is full, hook the hose back up and empty. Repeat the procedure until the water stops flowing.
4 Clean the filter in the normal way.
NOTE: Never remove the filter during a wash cycle, always wait until the washing machine has finished its cycle, and is empty. When replacing the filter ensure that it is securely retightened. This will prevent leaks and also stop young children from being able to undo the filter.
STAIN REMOVAL
Some common stains, their nature and the ideal reagent to use to remove the stain. A -absorbed, B - built up C - compound.
STAIN TYPE TREATMENT
Ballpoint Ink C Methylated Spirit
Beer A Hydrogen Peroxide, de dilute if necessary to avoid bleaching.
Blood C Soak in Washing Powder
Chocolate C Remove excess wash treat any remaining stains with Hydrogen Peroxide
Coffee A Soak in Washing Powder
Chewing Gun B Hold an ice cube against the gum until it can be crumbled away
Candle Wax B Scrape of excess iron between two sheets of white blotting paper. Treat with Methylated Spirit
Dyes A Methylated Spirit together with Ammonia.
Eggs C Soak in Washing Powder
Grass C Methylated Spirit
Gravy C Soak in Washing Powder
Grease or Oil C Methylated Spirit.
Ink A A cold dilute solution of Fairy Liquid.
Rust C Small stains - lemon juice Heavy stains - proprietary rust remover if suitable for material.
Lipstick C Fairy Liquid or Methylated Spirit.
Mildew C Hydrogen Peroxide.
Milk A Fairy Liquid or Washing Powder
Nail Varnish C Acetone (except on triacetates) on nail vamish remover; hand wash immediately before machine washing.
Paint C Emulsion - cold water or Polyclens, hand wash immediately before machine washing Gloss or undercoat - Polyclens hand wash immediately, before machine washing
Perspiration A Ammonia followed by Hydrogen Peroxide if any residual stains
Rubber C Methylated Spirits followed by dry cleaning
Scorch Marks C Rub in glycerine and soak for 10-15 mins, then wash followed by diluted Hydrogen Peroxide.
Soot C Fairy Liquid
Tar C Polyclens or Fairy Liquid wash then treat with Hydrogen Peroxide hand wash immediately, before machine washing.
Tea A Soak in Washing Powder rub in a little glycerine leave for 10-15 minutes before re-washing.
Wine A Souk in Fairy Liquid If coloured treat with Hydrogen Peroxide
Warning: Keep all chemicals out of reach of children.
STAIN REMOVAL
Dealing with stains
There are three types of stains:
1 Absorbed stains - caused by liquids which penetrate the garment easily, e.g. tea, coffee, wine, beer etc.
2 Built up stains - stay on the surface and do not flow into the fibres.
3 Compound stains - are absorbed into the fabric and also leave residue on the surface, e.g. blood and certain food stains.
Ground rules
1 Remove all stains as soon as possible after they occur, try to stop the stain setting in by soaking in cold water, NEVER hot water.
2 Blot off what you can with a clean cloth.
3 Identify the stain and fabric.
4 Try the simplest remedy first.
5 est the stain removal agent on an unseen part of the garment.
6 Local treatment is best.
Soaking can play a valuable part in the removal of many common stains.
Heavy duty washing products usually contain a bleaching ingredient which removes stains such as tea, coffee and fruit juice by oxidation, some also contain enzymes which break down protein stains such as blood, gravy, egg yolk and milk At lower temperatures, enzymes work by tackling protein stains which could be fixed by the use of hot water. Long soaking times allow the dirt to settle back into the fabric. Two halfhour soaks are better than one soak lasting an hour Works best at 40°C to 50°C.
When soaking
- Always check each individual garment's Clothing Care Label.
2 Make sure the stained article is suitable for soaking Whites and fast coloureds can usually be soaked.
3 NEVER soak silk, wool, leather, garments with metal fasteners or any article with a flame resistant finish.
STAIN REMOVAL
3 NEVER soak articles of doubtful colour fastness (refer to section on Testing for colour fastness).
4 Use a container such as a sink or plastic bowl (but NOT an enamel bath) large enough to hold the garments freely and fill it with warm water (40°C) where there are blood, gravy, egg or milk stains. Use hand hot water (50°C) for other soaking.
5 If using a powder (e.g. Ariel Ultra or Fairy Ultra) ensure that it is fully dissolved before putting articles in.
After soaking rinse the articles before continuing with the soaking NOTE Although modern detergents can deal with most household stains, once a stain has set it may be necessary to wash it two or three times.
6 Greasy or oily collar and cuff marks can be pre-treated with neat Ariel Ultra Liquid, work the liquid into the affected area using Treat N' Wash Ball, scrunch and rub in, then continue with a normal wash.
Testing for colour fastness
Always test a fabric for colour fastness before trying to remove a stain. Remember, too, that some dyes only stay fast for a limited number of washes. It is therefore well worthwhile to re-test a coloured fabric even if
you have previously found it to be colour fast, particularly if you are planning to use a prolonged contact time with the stain removal agent or washing solution.
1 Apply the stain removal solution to an inconspicuous part of the garment (e.g. inside the hem).
2 Place the treated area between two pieces of white cloth and press with a warm iron.
3 Examine the pieces of white cloth. If no colour has been transferred, the dye is fast and you can proceed.
4 If colour has been transferred, the dye is not fast, advice should be sought from a dry cleaner.
SOMETHING WRONG WITH YOUR MACHINE
If your machine fails to operate, to avoid unnecessary and possible expensive service calls, it is in your own interest before requesting service to make the following preliminary checks:
If the machine does not start
1 Is the electricity on (Check another appliance in the same socket)?
2 Is the plug firmly in the socket?
3 Is the fuse in the plug alright? (Try another fuse).
4 Is the door closed properly?
5 Is the programme selected properly?
6 Is the programme selector dial pulled out?
NOTE: If the machine has just Filled up with water it is probably just heating up wait a few minutes and it should continue.
If the does not drain or spin
1 Check that the drain hose is not kinked.
2 Check that the filter is clear
(Refer to section on Care of your machine).
3 Check that the outlet hose is correctly fitted and has not been kinked during installation, or if the appliance has moved.
If the machine does not fill with water
1 Check that the taps are turned on.
2 Check that the filling hoses are not kinked.
3 Check that the water filter inlet is clean.
NOTE: Your machine is designed to use less water, therefore do not worry if the water is not immediately visible.. (Wash results are not affected).
SOMETHING WRONG WITH YOUR MACHINE
If the machine is noisy or not sitting evenly on the floor.
1 Check that the adjustable feet are properly set and the lock nuts are tight. (Refer to the section on Levelling the machine).
2 Check that nothing has fallen down the buck or side of the machine.
3 Check that the machine is not touching any pipes or other appliances.
4 Check that the machine is not overloaded or underloaded.
5 Check that the machine is not unevenly loaded.
If the machine appears to be leaking.
1 Check that the water hose connections are tight.
2 Check that the soap dispenser is not blocked with unused powder.
3 Check that the drain hose is not kinked. 4 Have you remembered to fit the rubber washers to the water hoses?
If the machine still fails to operate, you must call for an engineer. In the event of a power cut during the spinning stage, switch off and reset the programme selector to the appropriate spin position when the power is restored again. This will ensure that the machine goes through the set balancing sequence using a slow spin to evenly distribute the laundry, which is necessary to achieve stability during the final spin.
AFTER SALES SERVICE
If you think your Automatic is not working properly ensure that you have referred to the following before you cull for service. The company reserves the right to charge for a service call if an inspection reveals that the machine is in fact in working order. We advise that for your safety and the continued trouble free operation of your appliance, all repairs and maintenance should be carried out by our authorised agents using only genuine parts.
For advice on the use of your machine and after-sales service calls, telephone with the following information:
1 Your name, address and postcode.
2 Your telephone number.
3 Model number for the machine
(Please refer to section on Technical data).
4 The date you purchased the machine.
5 Clear and concise details of the fault.
6 The guarantee only covers defects resulting from faulty workmanship or components.
7 To obtain your free in-guarantee service repair, proof of purchase must be provided or a charge will be made.
TECHNICAL INFORMATION
SERVIS CARESS
Dimensions Height 850mm (33.5")
Width 595mm (23.4")
Depth 530mn, (20.9")
Weigh M 3015 A 79 kg (174 lb) approx
Electricity supply 230V/240V AC 50Hz
Power cable Three core including earth leud
Fuse rating 13amp (BS1362) ASTA approved
Heater 1.95kw
Motor 150 watt
Pump 34 watt
Water intake Hot and cold fill or cold fill only
Maximum load 10lb
Spin speed M 3015 A (500/1500 rpm approx.)
Mobility 4 ad adjustable feet
Serial number Inside filter door
This appliance conforms to EEC Directive 82/499 EEC and BS800-1983 for radio interference. Our policy is one of continuous improvement. We reserve the right to change specifications (which are subject to manufacturers tolerances) prices or models without notice All claims result from manufacturer's tests.