
SW2050R - Washing machine SWAN - Free user manual and instructions
Find the device manual for free SW2050R SWAN in PDF.


| Product Type | Washing Machine |
| Brand | Swan |
| Model | SW2050R |
| Capacity | 7 kg |
| Dimensions (H x W x D) | 850 x 600 x 500 mm |
| Weight | 65 kg |
| Power Supply | 220-240 V, 50 Hz |
| Energy Class | A+++ |
| Maximum Spin Speed | 1200 rpm |
| Number of Programs | 15 |
| Functions | Delay Start, Child Lock, Quick Wash, Eco Wash |
| Noise Level (Wash/Spin) | < 75 dB / < 85 dB |
| Water Consumption per Cycle | 45 L |
| Annual Energy Consumption | 150 kWh |
| Maintenance | Clean detergent drawer and filter regularly |
| Safety Features | Overheat protection, water leakage protection |
| Spare Parts Availability | Available from authorized service centers |
| Repair Index | 7.5 / 10 |
Frequently Asked Questions - SW2050R SWAN
User questions about SW2050R SWAN
0 question about this device. Answer the ones you know or ask your own.
Ask a new question about this device
Download the instructions for your Washing machine in PDF format for free! Find your manual SW2050R - SWAN and take your electronic device back in hand. On this page are published all the documents necessary for the use of your device. SW2050R by SWAN.
USER MANUAL SW2050R SWAN
Swan Helpline No. 0845 610 4118
THE CONTENTS
SECTION 1: BEFORE USING
• Safety warnings
• Recommendations
SECTION 2: INSTALLATION
• Removal of transportation screws
• Ensure the washing machine is level
• Electrical safety
• Water supply connection
• Water drain connection
SECTION 3: TECHNICAL SPECIFICATIONS
SECTION 4: CONTROL PANEL
• Start/Pause button
• Function indicator lights
• Function buttons
- Program knob
• Spin speed selector
SECTION 5: WASHING YOUR LAUNDRY
• Before washing
• Running the machine
SECTION 6: INTERNATIONAL WASHING SIGNS
SECTION 7: MAINTENANCE AND CLEANING
SECTION 1: BEFORE USING
KEEP THIS MANUAL IN A CONVENIENT PLACE SO YOU CAN REFER TO IT FOR THE SAFE AND PROPER USE OF THE APPLIANCE
SAFETY WARNINGS
• Do not use a multiple socket or extension cord.
- Do not insert a plug with damaged or broken cord into the socket.
- If the cord is damaged it should be replaced by the manufacturer or appointed service agent in order to avoid a hazard.
- Never remove the plug from the socket by pulling the cord, always hold the plug.
• Do not plug in the power supply with wet hands.
- Never touch the machine with wet hands or feet.
- Never open the detergent drawer whilst the device is running.
- Never force open the door of the machine whilst the machine is running.
- Since the machine can reach high temperatures whilst running, do not touch the drain hose and water during draining.
- In case of any failure, first unplug the device and close the water tap. Do not attempt to repair. Please contact the Swan helpline.
- The packing material of your machine may be hazardous for children, therefore dispose of responsibly.
• Do not let your children play with the washing machine.
- Keep your pet away from your machine.
- Your machine should only be used by adults in conjunction with the
- If you do not use your machine for a long time, unplug, turn off the water supply and leave the door open in order to prevent the formation of unpleasant odours.
- As a result of the quality control procedures, a certain amount of water may remain in your machine. This is not harmful for your machine.
SECTION 2: INSTALLATION
Thank you for purchasing this swan washing machine. Please read the instructions carefully before use.
REMOVAL OF TRANSPORTATION SCREWS
- Transportation screws, which are located at the back of the machine, must be removed before running the machine. (DIAGRAM-1)
- Loosen the screws by rotating counter clockwise by a suitable wrench. (DIAGRAM-2)
- Remove the screws by pulling them. (DIAGRAM-3)
- Insert the plastic transport screw caps found in the accessories bag, into the holes. (DIAGRAM-4)
- The transportation screws, that have been removed from the machine should be kept in a safe place, and be reinserted if the item is moved at any time in the future.




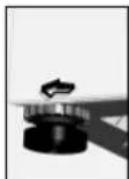
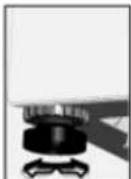
- There are adjustable feet under the bottom of the washing machine. Before use, they should be adjusted so that the washing machine is level. This will minimize vibrations and thus noise during.
• First, loosen the plastic adjustment nut. - Adjust by rotating the feet upwards or downwards.
• We recommend using a spirit level to check the item is level.
• Tighten adjustment nut by rotating it upwards.
Electrical Safety
THIS APPLIANCE MUST BE PLUGGED INTO AN EARTHED SOCKET.
Before switching on, make sure that the voltage of your electricity supply is the same as that indicated on the rating plate. This product is designed to operate on 220 - 240V AC; 50Hz. Connection to any other power source may damage the unit.
This product may be fitted with a non-rewireable plug. If it is necessary to
As the colours of the wires in the mains lead of this appliance may not correspond with the coloured markings identifying the terminals in your plug, proceed as follows (refer to the plug wiring diagram).
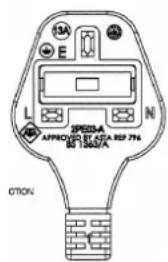
The wire which is colored BLUE must be connected to the terminal which is marked with the letter N or colored Black.
The wire which is colored BROWN must be connected to the terminal which is marked with the letter L or colored Red.
The wire which is coloured GREEN/YELLOW must be connected to the terminal which is marked E.
If a 13Amp (BS1363) plug is used, a 13Amp (BS1362) fuse must be fitted, or if any other type of plug is used, a 13Amp fuse must be fitted, either in the plug or adaptor, or on the Distribution Board.
Water Supply Connection
Inside the drum of the washing machine you will find water connection hose.
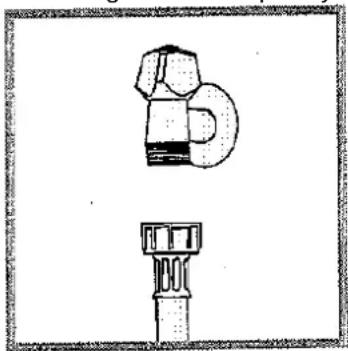
1) Connect the straight end of the hose to the cold water outlet at the installation location. The outlet must be fitted with a 3/4 " threaded connection. Ensure it is tightened adequately so that it does not leak.
Swan Helpline No. 0845 610 4118
2) Connect the curved end of the hose to the water inlet valve located at the rear right hand top corner of the unit. Ensure the connection is tightened adequately so that it will not leak.
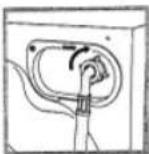
3) Make sure there a no kinks or bends in the hose.
4) Turn on the tap and check that there are no leeks from either connection.
! For the machine to work efficiently the water pressure must be 0.1-1
MPa
! Lengthening of the hose must only be done by an authorised Service Engineer.
Water Drain Connection
The drain hose is located on the rear of the machine.
- The drainage outlet must be located between 60 and 100 cm in height from the floor.
- Connect the drain hose to the drainage outlet
- Ensure the hose is not kinked or bent.

SECTION 3: TECHNICAL SPECIFICATIONS
| 49 LT | |
| Maximum dry laundry capacity (kg) 7 | |
| Recommended loading (kg) 6,5 | |
| Height (cm) 85 | |
| Width (cm) 59,6 | |
| Depth (cm) 54 |
Swan Helpline No. 0845 610 4118
SECTION 4: CONTROL PANEL
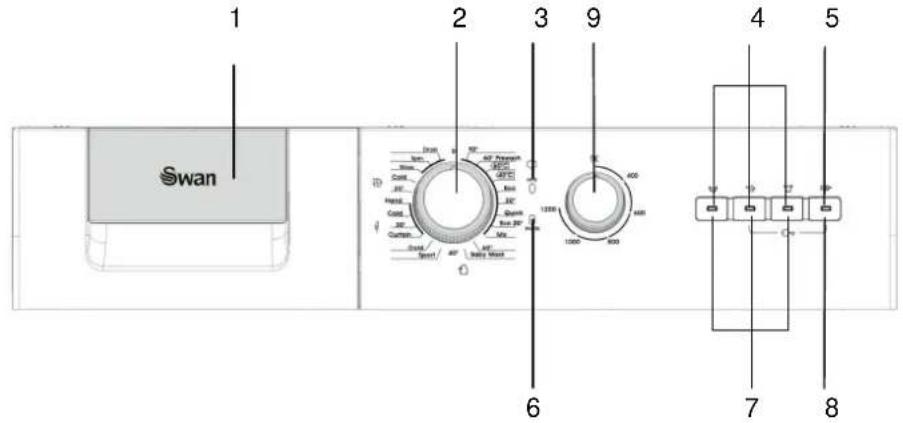
1- Detergent drawer 6- Program ready light
2- Program knob 7- Function buttons
3- Program end light 8- Start/pause button
4- Function indicator lights 9- Spin speed selector
5- Start/pause light
START/PAUSE BUTTON

Used to start a selected program or pause during running.
WARNING!
It is required for the program knob to be brought to O(off) position before selecting the program or changing a continuing program.
FUNCTION INDICATOR LIGHTS

When the start/pause button or any function button is pressed, the corresponding light turns on. The light turns off when the function button or start/pause button is re-pressed, or when the process the selected function is completed.
The function indicator lights are also used in failure detection system mentioned in section 9.
FUNCTION BUTTONS

Rinse hold
This function is recommended to be used when the clothes cannot be taken immediately after the end of the program. This will prevent occurrence of wrinkles. When this button is pressed, the last rinsing water is not drained. For the program to continue from the same point, repress the same button.
Swan Helpline No. 0845 610 4118
If you do not want your sensitive clothes to be spinned or you want them to be spinned sensitively, turn the program knob to I (off) position. Bring the program knob on one of the draining or spinning programs you desire and press the start/pause button. If the program you have selected is a drain program, your machine will draining the water inside. If you have selected a spinning program, your machine will perform a spinning operation and then end the program.

Easy ironing
This function reduces wrinkles in the clothes after a wash cycle.

Soak
Using this function will ensure better cleaning by leaving your clothes in water with detergent for a certain period of time before your machine takes in the initial water and starts washing. This function is recommended to be used for very dirty clothes.
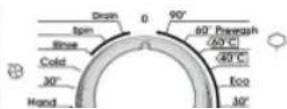
PROGRAM KNOB
The program knob also acts as the on/off switch. Position the indicator on the knob pointing towards I to turn the machine off.
The program knob is also used to select the required program. This is done by rotating the knob in a clockwise or anti-clockwise direction.
| PROGRAM | 13 SPORT CLOTHES |
| 14 SYNTHETIC COLD | |
| 1 COTTON 90' | 15 CURTAIN WASH |
| 2 COTTON 60' (POTTON ASH) | 16 DELICATE 30' |
SPIN SPEED SELECTOR
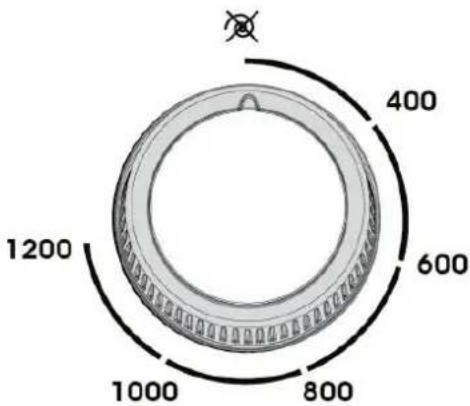
The spin speed selector allows you to adjust the spin speed of a program from no spin to 1200 rpm spin speed. This is useful if you are washing delicate items and you require a lower spin speed.
Swan Helpline No. 0845 610 4118
SECTION 5: OPERATING THE WASHING MACHINE
! Ensure the washing machine is plugged in and the water tap is on.
! There may be some residual water in the machine, when first opening the drum door. This is normal and is the result of factory testing.
! It is recommended that the washing machine is run without laundry in for the first time of use.
To do this:-
1) Open the dispenser draw
2) Pour in half a measuring cup household all purpose detergent into compartment 2.
3) Close draw.
4) Rotate the program knob to 90C (Program 1).
5) Press the start/pause button. After several seconds the cycle will start.
Preparing the laundry
- Sort out clothes according to fabric (cotton, synthetics, wool or silk) and to how dirty they are. Always follow advice on garment labels.
- Separate white clothes from coloured ones. Wash them first by hand to check if they fade or run.
- Empty pockets (keys, coins, etc.) and remove the harder decorative objects (e.g. broach).
- Garments without hems, underwear, finely woven textile such as fine curtains are to be put into washbag (it is better not to wash them in a washing machine).
- Close zippers and hooks, make sure the buttons are sewn on tightly and place small items such as socks, belts, bras, etc. in the wash bag.
• Unfold large pieces of fabric such as bed sheets, bedspreads, etc.
Selecting detergent
The washing efficiency and the performance is determined by the quality of detergent used. Special non-foaming detergent produces good washing results. Use specific detergents for synthetic and woollen goods.
Do not use dry cleaning agents such as trichloroethylene and similar products.
! Do not add more detergent than needed. Please follow the dosage recommendation on the detergent package.
Adding detergent
The quantity of the detergent that you use in the machine depends on the following criteria:
- Your detergent consumption will change according to how soiled Clothes are. For slightly dirty clothes, do not pre-wash and put a small amount of detergent in the compartment 2 of the detergent drawer.
- For your excessively dirty clothes, select a program with pre-washing (See table 1, page 14). Fill compartment 1 with a 1/4 portion of the total detergent amount and the pour the remaining portion into compartment 2.
- You made need to use more detergent than recommended if you live in a hard water area
- Do not exceed the MAX level on the softener compartment.

Starting a washing cycle
- Select the program and additional functions appropriate the laundry load from Table-1.
- Rotate the program knob, so that the indicator on the knob is pointing towards the required program mode (You should feel a slight click which will indicate when a program has been selected).
- The program ready light will illuminate.
- Press the start/pause button. After several seconds cycle will start.
Changing the program during use
If you have selected a program and you do not want to continue:
- Press the start/pause button.
- Rotate the program knob to I (This will turn the unit off).
- Adjust the program knob to the program you desire.
- The program ready light will illuminate.
- Press the start/pause button. After several seconds the new program cycle will start.
Cancellation of a Program
If you desire to end a running program early:
- Press the start/pause button.
- Rotate the program knob to I (This will turn the unit off).
- Turn the program knob to Drain or Spin programs. (Choose spin program to reduce the moisture of the laundry load).
- The program ready light will illuminate.
- Press the start/pause button. After several seconds the new program cycle will start.
Swan Helpline No. 0845 610 4118
At the end of the wash cycle
- Your machine will automatically stop when the program you have selected ends.
- The program end light will be on.
- Rotate the program knob to I (This will turn the unit off).
- The door will be unlock in approximately two minutes after the program ends. You can open the door by pulling the handle of the door towards yourself and take out your clothes.
- After you unload your clothes leave the door open to dry the interior of your machine.
- Unplug your machine.
- Close the water tap.
! If the power is interrupted during operation for any reason, once power is restored, the machine will automatically resume the program at the point where it had stopped.
Child lock
Child lock is used in order to protect the washing cycle from the effects of unwanted button activations during the cycle. Child lock is activated by pressing the first and third button on the control panel at the same time for more than 3 sec. When child lock is activated, LEDs on the function buttons blink to indicate that child lock is active. In order to deactive child lock, the same buttons (1st and 3rd) should be pressed again for more than 3 seconds. Deactivation of child lock is shown by blinking of LED on Start/Pause button.
Swan Helpline No. 0845 610 4118
| PROGRAM | DETERGENT COMPART. | TEMP (°C) | WASHING TIME (MIN.)** | WATER CONS.(10)** | ENERGY CONS.(2000)** | MAX DRY LOAD CAPACITY (kg) | TYPE OF LAUNDRY | EXPLANATIONS |
| 1 COTTON 90 | 2 | 90 | 180 | 89 | 2,42 | 7 | Dirty, wool, cotton and linen table | |
| 2 COTTON 40(PREW ASH) | 1+2 | 60 | 170 | 94 | 1,59 | 7 | Very dirty, cotton, coloured and limen table | |
| 3 COTTON 20 | 2 | 60 | 200 | 50 | 1,19 | 7 | Dirty, cotton, coloured and linen table | |
| 4 COTTON 20 | 2 | 40 | 190 | 55 | 0,89 | 7 | Dirty, cotton, coloured and linen table | |
| 5 ECO WASH | 2 | 40 | 125 | 58 | 0,45 | 7 | Dirty, cotton, coloured and linen table | Underwear, sheet, tabra cloth, 5 shirt, seat, towel (max.53 kg) |
| 6 COTTON 30 | 2 | 30 | 130 | 75 | 0,3 | 7 | Slightly dry, cotton, coloured and limen table | |
| 7 QUICK WASH | 2 | 30 | 30 | 54 | 0,11 | 3,5 | Slightly dry, cotton, coloured and limen table | |
| 8 ECO 20* | 2 | 20 | 102 | 46 | 0,20 | 7 | Less dirty, cotton and linen table | |
| 1/Under wear, lattech, lattech, towel max. 2 deg beeldock, etc. | ||||||||
| 9 MIX WASH | 2 | 40 | 87 | 49 | 0,47 | 3,5 | Dirty or very dirty, plain, cotton, coloured and linen table | |
| 10 SYNTHETIC 60 | 2 | 60 | 95 | 58 | 0,99 | 3,5 | Dirty, synthetic or synthetic mixture table | Nylon socks, blouse |
| 11 BABY WASH | 2 | 50 | 140 | 76 | 1,03 | 3,5 | Baby laundry | All baby laundry |
| 12 SYNTHETIC 40 | 2 | 40 | 80 | 50 | 0,58 | 3,5 | Slightly dirty, synthetic or synthetic mixture table | Nylon socks, blouse |
| PROGRAM | DETERGENT COMPART. | TEMP (°C) | WASHING TIME (MIN.)** | WATER CLOS (ft)** | ENERGY CONS. (MWh)* | MAX DRY LOAD CAPACITY (kg) | TYPE OF LAUNDRY | EXPLANATIONS |
| 13 SPORT CLOTHES | 2 | 40 | 92 | 51 | 0,47 | 3,5 | Sport clothes | All sport clothes and jeans |
| 14 SYNTHETIC COLD | 2 | COLD | 72 | 52 | 0,13 | 3,5 | Slightly dry, synthetic or synthetic mixture sensitive laundry Washed without heating the best water. | Nylon socks, blouse |
| 15 CURTAIN WASH | 1+2 | 40 | 141 | 74 | 0,76 | 2,5 | Tube and surf an. Barefoot laundry | Tube, surf an, dinner, drain |
| 16 DELICATE 30' | 2 | 30 | 80 | 73 | 0,26 | 2,5 | Slightly dry, custom coloured synthetic or synthetic mixture sensitive laundry | Silk mixture arm, blouse, polyester, polamid mixture textile |
| 17 DELICATE COLD | 2 | COLD | 75 | 75 | 0,12 | 2,5 | Very slightly dry, cold water within wash-coil, coloured, synthetic or synthetic mixture sensitive laundry | |
| 18 HAND WASH | 2 | 30 | 84 | 70 | 0,27 | 2,5 | Slightly dirty, warm in hand cotton, coloured synthetic or synthetic mixture laundry | Hand wash to an laundry |
| 19 WOOL 30' | 2 | 30 | 65 | 75 | 0,15 | 2,5 | Dirty, hand and machine to wash well laundry | At least laundry |
| 20 WOOL COLD | 2 | COLD | 60 | 70 | 0,03 | 2,5 | Very slightly dirty, cold water, hand and machine to wash well laundry | |
| 21 RINGING | - | COLD | 36 | 47 | 0,08 | ? | When you need an additional mixing to bedone to your clothes after the washing process, you can use this program for all kinds of clothes. | |
| 22 SPINING | - | - | 15 | - | 0,07 | ? | When you need an additional spinning to be done to your clothes after the washing process, you can use this program for all kinds of clothes. | |
| 23 DRAINING | - | - | 3 | - | 0,01 | - | This program is used with drain the dry waste inside after the washing process of your machines. If you want the water inside your machine to be dried before the program ends, you can use this program. |
(*) You can use softeners in all programs (please spanning and drawing programs) optionally. When you arrange the quantity of the softener, comply with the warning of the softener producer. Fill your softener in the (sulfones) compartment of the detergent drawer. ** Washing time, water consumption, energy consumption of the programme can change depending on the amount of the laundry, tap water, medium heat and the additional functions selected. ** If the half load system is activated, the values above will decrease.
SECTION 6: INTERNATIONAL WASHING SIGNS
 |  |  |  |
| Washing temperature. | Do not wash (hand wash) | Lukewarm iron. | Medium hot iron. |
 |  |  |  |
| Hot iron. Do not iron. | Do not tumble dry. | Hang to dry. | |
 |  |  |  |
| Drip dry. Dry flat. Do not bleach. Handy to bleach. | |||
| F | P | A |
| All of these are dry cleaning symbols. The letters are to instruct the cleaner what type of solvent to be used.Garments bearing these symbols should not be washed in your machine unless the label says otherwise. | ||
Swan Helpline No. 0845 610 4118
SECTION 7: MAINTENANCE AND CLEANING
• Unplug your machine.
- Close the water tap.
WATER INLET FILTERS
On the tap part of your machine's water inlet hose and at the ends of water inlet valves, there are filters to prevent entrance of the dirt and foreign materials in the water to the machine. If the machine is unable to receive sufficient water although your water tap is opened, these filters should be cleaned.
- Remove the water inlet hose.
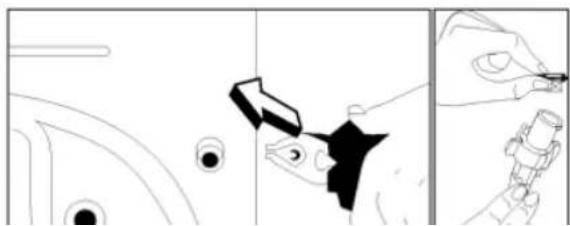
- Remove the filters found on the water inlet valves by using a pincer and wash thoroughly with a brush.
- Clean the filters of the water inlet hoses located on the tap side by removing manually together with the seal.
- After you clean the filters, you can fit them the same way as you have Removed them.
PUMP FILTER
! WARNING - The water inside the pump maybe hot, wait for it to cool before performing this task.
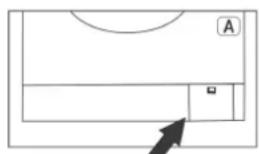
The filter system prevents lint from entering pump this will increase the pumps lifespan. It is recommended that the filter is checked and cleaned every month. To clean your pump filter:
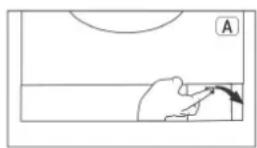
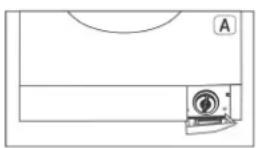
- Open the filter cover (Located in the bottom, front, right-hand corner) by pulling the handle (Diagram 2-A).
- Before opening the filter place a cup in front of the filter to collect residual water that may leak from the machine.
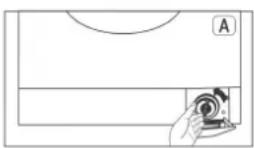
- Loosen the filter cover by rotating it counter clockwise and drain the water (Diagram 4-A)
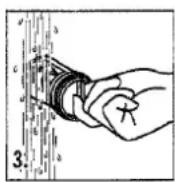
- Remove the foreign materials from the filter. We recommend you flush the filter clean with running water.
- Check for the rotation of the pump manually.
- After you have cleaned the pump, fit the filter by rotating clockwise.
- Replace the cover.
! If you do not fit in the filter cover properly, it will leak water
1-A!
2-A
3-A
4-A
5-A
Swan Helpline No. 0845 610 4118
DETERGENT DRAWER
Detergents may form a sediment in your detergent drawer or in housing of the detergent drawer over time. To clean the detergent drawer.
• Pull the detergent drawer to the end. (DIAGRAM-1)
- Lift the front of the drawer, press down the blue tab and continue to pull until the drawer is out. (DIAGRAM-2)
• Wash with an old toothbrush and water.
- Avoid dropping left over detergent into the machine.
• After drying the detergent drawer replace the drawer.
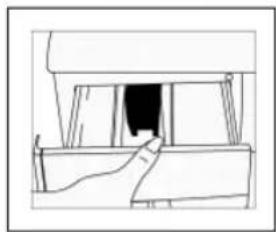
DIAGRAM-1

DIAGRAM-2
SIPHON PLUG
Pull out the detergent drawer. Remove the siphon plug and clean the residues of the softener thoroughly. Fit the cleaned siphon plug in its location. Check if it placed properly.
THE CABINET
Clean the exterior surface of the cabinet of your machine with lukewarm water and a cleaning substance that will not irritate the cabinet. After rinsing with clean water, wine it with a soft and dry cloth
- The program ready light will be on.
- Run the program by pressing the start/pause button.
- Unplug your machine when the program is over (program end light is on).
The remaining water inside the machine will be drained and thus formation of ice in the machine will be prevented. When you operate your machine again, be sure that the ambient temperature is above 0C.
THE DRUM
Do not leave metal parts like needles, staples or coins inside your machine. These pieces cause formation of rust stains in the drum.
Swan Helpline No. 0845 610 4118
SECTION 8: TROUBLE SHOOTING
| FAILURE | PROBABLE CAUSE | SOLUTION |
| Your machine does not operate. | It is unplugged. | Insert the plug into the socket. |
| Your fuse is defective. | Change your fuse. | |
| The power is off. | Check the power in household. | |
| Start/pause button has not been pressed. | Press the start/pause button. | |
| The program knob is set to off status. | Rotate the program knob to the desired program. | |
| The door is not shut properly. | Shut the door properly. You should hear a click. | |
| Your machine does not receive water. | Water tap is closed. Open water tap. | |
| The water inlet hose may be bent. | Check the water inlet hose. | |
| The water inlet hose is obstructed. | Clean the filters of water inlet hose. (*) | |
| The valve inlet filter is obstructed. | Clean the valve inlet filters. (*) | |
| The door is not shut properly. | Shut the door properly. You should hear the click. | |
| Your machine is not draining water. | The drain hose is obstructed or bent. | Check the drain hose. |
| The filter is obstructed. | Clean the filter. (*) | |
| The clothes are not placed inside the machine in a well-balanced manner. | Spread the clothes inside the machine in an orderly and well-balanced manner. | |
| Your machine is vibrating. | The machine is not level. | Adjust the feet. (**) |
| Transportation screws are not removed. | Remove transportation screws. (**) | |
(*)See section 7:maintenance and cleaning.
(**)See section 2:installation.
Swan Helpline No. 0845 610 4118
| FAILURE | PROBABLE CAUSE | SOLUTION |
| Your machine is vibrating. | There is a small amount of clothes in the device. | It does not prevent operation of the machine. |
| Excessive amount of clothes are filled in the machine or the clothes are not placed in a well-balanced manner. | Do not exceed the recommended quantity of clothes and spread your clothes in the machine in a well-balanced manner. | |
| Your machine touches another object. | Ensure the machine is not touching any other item. | |
| Excessive foam in the detergent drawer. | Too much detergent has been used. | Press the start/pause button.In order to stop the foam,dilute one table-spoon of softener in half liter of water and pour it in the detergent drawer.Press the start/pause button after 5-10 minutes. Ensure the correct amount of the detergent is used in the next washing process. |
| Wrong detergent has been used. | Use only the detergents designed for full automatic machines. | |
| The washing result is bad. | Your laundry is too dirty for the program you have selected. | Select a suitable program. (see Table-1) |
| The amount of detergent used is not sufficient. | Use more detergent according to the detergent instructions. |
Swan Helpline No. 0845 610 4118
| FAILURE | PROBABLE CAUSE | SOLUTION |
| The washing result is not good. | Clothes exceeding the maximum capacity has been filled in your machine. | Reduce the amount of laundry placed in the drum. |
| Your water may be hard. | Use the amount of detergent according to the declaration of the detergent producer. | |
| Distribution of the clothes in your machine is not well-balanced. | Spread the clothes inside the machine in an orderly and well-balanced manner . | |
| The water is drained from the machine as soon as it is filled. | The end of the water drain hose is too low. | Adjust the water drain hose to an appropriate height.(**) |
| There are residues of detergent on the clothes. | The pieces of some detergents which do not dissolve in water may stick to your clothes as white stains. | Use a program which has a rinse function. |
| There are gray stains on the clothes. | These stains may be caused by oil,cream or ointment . | In the next washing operation, use the maximum detergent amount declared by the detergent producer. |
(**) See section 2:installation.
Swan Helpline No. 0845 610 4118
SECTION 9: AUTOMATIC FAILURE DETECTION SYSTEM
Your machine is equipped with systems which will both take the necessary precautions and warn you in case of any failure by controlling it self constantly during the washing processes.
| FAILURE CODE | FAILURE INDICATOR | PROBABLE FAILURE | THE PROCESS TO BE DONE |
| Err 01 | The start/pause light blinks. | The door is not shut properly. | Shut the door properly so that you hear the click. If the problem persists, turn off the machine unplug and contact a service engineer. |
Swan Helpline No. 0845 610 4118
| FAILURE CODE | FAILURE INDICATOR | PROBABLE FAILURE | THE PROCESS TO BE DONE |
| Err 02 | The program ready light blinks. | There is no supply of water or the water pressure is too now. | Ensure the water tap is fully open and their is a constant flow of water.If the problem is still continuing,your machine will automatically stop after a while.Unplug your machine, turn off the tap and contact a service engineer. |
| Err 03 | The start/pause light and program ready light blinks . | The pump has failed or the filter is obstructed. | Clean the pump filter.If the problem persists, contact a service engineer. (*) |
(*) See section 7:maintenance and cleaning.
Swan Helpline No. 0845 610 4118
| FAILURE CODE | FAILURE INDICATOR | PROBABLE FAILURE | THE PROCESS TO BE DONE |
| Err 05 | The start/pause light and program end light blink. | The heater of your machine or the heat sensor has failed. | Shut down your machine and unplug. Turn off your tap and contact a service engineer. |
| Err 06 | The program ready light and program end light blink. | The motor has failed. | Shut down your machine and unplug. Turn off the tap and contact a service engineer. |
| Err 07 | The program start/pause light, ready light and program end light stays on permanently. | Configuration error. | Shut down your machine and unplug. Turn off the tap and contact a service engineer. |
| Err 08 | The start/pause light.program ready light and program end light blink. | Fault error | Shut down your machine and unplug. Turn off the tap and contact a service engineer. |
| Err 09 | The program ready light and program end light stays on permanently. | Power problem. | When the network voltage is recovered, your machine will continue its operation. |
Swan Helpline No. 0845 610 4118
Still not solved the problem?
If a visit is required and the conditions of the Guarantee are fully satisfied a repair may be offered without charge.
If a replacement appliance is required a charge may be made which reflects the wear and tear on the original appliance.
If no fault is found with the appliance a 'Call out Charge' will be made.
If you are unable to resolve the problem please telephone
The SWAN (White goods only) Help Line 0845 610 4118.
Monday-Friday 8am – 6pm. Saturday 9am – 5pm.
You will need to tell them
The Make: SWAN
The Model: See front page of this User Manual.
Guarantee
This product is guaranteed for 1 year from the date of original purchase. If any defect arises from faulty materials or workmanship, the unit will either be repaired, replaced or refunded at our discretion.
The following conditions apply:
- Proof of purchase will be required before repairs can be made under guarantee.
- Guarantee applies only when purchased from the Shop Direct Home Shopping Group.
- The product must be installed and used in accordance with the instructions contained in this instruction guide.
- It must be used only for domestic purposes.
- It does not cover wear and tear, damage or misuse.
- Valid in the UK and Eire only.
Swan Helpline No. 0845 610 4118
WASTE ELECTRICAL RECYCLING
This symbol indicates that this product is classed as Electrical or Electronic Equipment and should not be disposed of with other household waste.
The Waste Electrical and Electronic Equipment (WEEE) Directive has been introduced across the European Union:
- to recycle waste electrical products using the best available recovery and recycling techniques in order to minimize the impact on the environment
• to treat any hazardous substances and
• to avoid increasing landfill.
WEEE product should be disposed of by handing it over at a designated collection point.
For more information about where you can drop off your waste product for recycling please contact your local authority.
- THE CONTENTS
- SECTION 1: BEFORE USING
- SECTION 2: INSTALLATION
- SECTION 3: TECHNICAL SPECIFICATIONS
- SECTION 4: CONTROL PANEL
- SECTION 5: WASHING YOUR LAUNDRY
- SECTION 6: INTERNATIONAL WASHING SIGNS
- KEEP THIS MANUAL IN A CONVENIENT PLACE SO YOU CAN REFER TO IT FOR THE SAFE AND PROPER USE OF THE APPLIANCE
- SAFETY WARNINGS
- REMOVAL OF TRANSPORTATION SCREWS
- ELECTRICAL SAFETY
- WATER SUPPLY CONNECTION
- WATER DRAIN CONNECTION
- START/PAUSE BUTTON
- WARNING
- FUNCTION INDICATOR LIGHTS
- FUNCTION BUTTONS
- RINSE HOLD
- EASY IRONING
- SOAK
- PROGRAM KNOB
- SPIN SPEED SELECTOR
- SECTION 5: OPERATING THE WASHING MACHINE
- PREPARING THE LAUNDRY
- SELECTING DETERGENT
- ADDING DETERGENT
- STARTING A WASHING CYCLE
- CHANGING THE PROGRAM DURING USE
- CANCELLATION OF A PROGRAM
- AT THE END OF THE WASH CYCLE
- CHILD LOCK
- SECTION 7: MAINTENANCE AND CLEANING
- WATER INLET FILTERS
- PUMP FILTER
- DETERGENT DRAWER
- SIPHON PLUG
- THE CABINET
- THE DRUM
- SECTION 9: AUTOMATIC FAILURE DETECTION SYSTEM
- STILL NOT SOLVED THE PROBLEM
- THE SWAN (WHITE GOODS ONLY) HELP LINE 0845 610 4118
- MONDAY-FRIDAY 8AM – 6PM. SATURDAY 9AM – 5PM
- YOU WILL NEED TO TELL THEM
- GUARANTEE
- WASTE ELECTRICAL RECYCLING
Brand : SWAN
Model : SW2050R
Category : Washing machine