
EM-981 - Microwaves SANYO - Free user manual and instructions
Find the device manual for free EM-981 SANYO in PDF.


| Product Type | Microwave Oven with Convection & Grill |
| Model | EM-981 (EM-D981) |
| Power Supply | 230 - 240 V |
| Microwave Output Power | 900 W |
| Quartz Grill Power | 1300 W |
| Convection Heater Power | 1200 W |
| Oven Capacity | 1.1 cu. ft. (32 L) |
| Outside Dimensions (W x H x D) | 550 x 472 x 353 mm |
| Net Weight | 24 kg |
| Cooking Modes | Microwave (80-900W), Grill, Thermal Grill, Convection, Combination (Convection+Micro, Grill+Convection, Grill+Micro), Slow Cook, Auto Sensor, Multi-stage (3 stages), Child Lock/Demo |
| Control Type | Touch keypad with LED display |
| Turntable | Rotates clockwise and anticlockwise, returns to start position |
| Accessories Included | Turntable, Turntable Support, 2 Circular Metal Racks, 2 Square Slide In Shelves, Metal Drip Tray, Cook Book, Instruction Manual |
| Safety Features | Safety interlock system, child lock, auto shut-off (not specified, but typical) |
| Care and Cleaning | Clean cavity and accessories with mild detergent; avoid abrasive powders or pads; clean microwave outlet cover; drip tray is removable |
| Repairability | Do not attempt self-repair; contact SANYO Service Centre; specialized power cord required |
| Installation Clearance | Minimum 5 cm above, sides, and rear; minimum 85 cm above floor |
| Auto Sensor Programs | Baked Potato, Roast Chicken, Roast Meat Joint, Pizza, Casserole, Snacks, Fish, Reheat, Cake/Pudding (with sub-programs) |
| Defrost Function | Auto Sensor Defrost (0.1-2.0 kg) and manual defrost at 150W |
| Slow Cook | Two stages: Slow Cook High (30-40 min) then Slow Cook Low (3-9 hours) |
Frequently Asked Questions - EM-981 SANYO
User questions about EM-981 SANYO
0 question about this device. Answer the ones you know or ask your own.
Ask a new question about this device
Download the instructions for your Microwaves in PDF format for free! Find your manual EM-981 - SANYO and take your electronic device back in hand. On this page are published all the documents necessary for the use of your device. EM-981 by SANYO.
USER MANUAL EM-981 SANYO
Microwave Oven with Convection & Grill
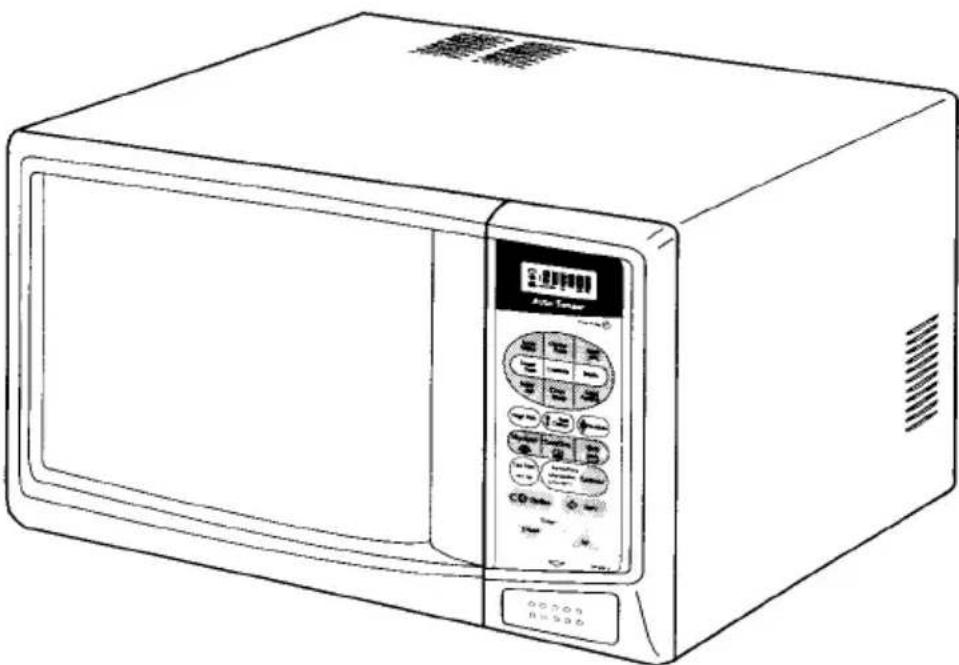
natural_image
Line drawing of a microwave oven with control panel and door (no text or symbols)TABLE OF CONTENTS
Oven Specification 4
Safety Instructions
How To Use Your Oven Safely 4 Other Important Safety Instructions 5

Setting Up & Getting To Know Your Oven
Installation 6
Oven Parts and Accessories 7
Oven Control Panel 8
Setting The Clock 9
Suitable Cookware 10-11
Child Lock Out / Demonstration Mode 12
Operating Instructions
Quick Reference Guide to 8 Way Cooking 13

Manual Operation
Microwave Cooking 14
Grill Cooking and Thermal Grill Cooking 15
Convection Cooking 16
Combination Cooking 17-18
Multi Stage Cooking 19
Automatic Operation
Auto Sensor Defrost & Charts 20-22 Defrosting Instructions Using 150W 23 Auto Sensor Cooking, Charts & Recipes 24-53 Slow Cooking & Recipes 54-61
Care Of Your Microwave Oven
Questions and Answers 62
Care and Cleaning 63
Before Calling For Service 63
Min. / Max. Weights to use with Auto 64 Sensor Programs Easy Use Chart 68
SPECIFICATIONS
| EM-D981 | |
| Power Source | 230 - 240 V |
| Maximum Output Power | 900 W* |
| Quartz Grill | 1300 W |
| Convection Heater | 1200 W |
| Oven Capacity | 1.1 cu. ft. (32 L) |
| Outside Dimensions (W x H x D) | 550 x 472 x 353 |
| Net Weight | 24 Kg |
*According to IEC 705 test procedures.
HOW TO USE YOUR OVEN SAFELY (MICROWAVE)
- When boiling water or other liquids, be sure to use a wide mouthed container, this will allow air bubbles to escape freely and prevent boiling over. Overheating the liquid beyond boiling point can occur without the evidence of bubbling. This could result in a sudden boil over of the hot liquid.
- Do not attempt to operate the oven while empty as this will cause damage.
- Do not deep fry in the microwave oven as the temperature of the oil cannot be controlled and it may overheat.
- Never completely seal containers in the microwave oven. Coverings are necessary but containers must not be airtight.
-
Small quantities of food with low moisture content or high fat or sugar content can burn, dry out or catch fire if cooked or re-heated too long. Please note that the heating / cooking period required is extremely short: for example it only takes approximately 15 seconds to heat one mince pie or similar.
-
Always pierce food which has a skin or membrane, for example, eggs, potatoes, tomatoes, apples, sausages etc. If you don't pierce them steam will build up inside and they may explode.
- When disposable containers of plastic, paper or other combustible materials are used to reheat food, it is advisable to check from time to time during the cooking cycle.
NOTE
It is quite normal for steam to be emitted around the door, for misting to occur on the door, or even for water droplets to appear below the door during the cooking cycle. This is merely condensation from the heat of the food and does not affect the safety of your oven. The door is not intended to seal the oven cavity completely but its special SANYO design contributes to the complete safety of the appliance.
ALTHOUGH YOUR OVEN IS PROVIDED WITH SAFETY FEATURES, IT IS IMPORTANT TO OBSERVE THE FOLLOWING:
a. Do not tamper with safety interlocks.
b. Do not place any object between the oven and the door or allow any food residue to accumulate on sealing surfaces. Wipe the door sealing area frequently with a mild detergent, rinse and wipe dry. Never use abrasive powders or pads.
c. When opened, the door must not be subjected to strain, for example, a child hanging on an opened door may cause the oven to fall forward resulting in injury.
d. If any damage is apparent, do not operate the oven. Contact your nearest SANYO SERVICE CENTRE.
OTHER IMPORTANT SAFETY INSTRUCTIONS
The following safety precautions should be followed when using this appliance:
- Read all instructions before first use.
- When operating your oven for the first time, select Convection cooking, set temperature to 250^ C and operate for 20 mins, with glass tray and support installed. This is necessary to ensure that any residue is burnt off. Smoke and / or a smell of burning are normal during this operation and do not indicate any failure of the unit. Before further use, please allow oven to stand for 30 minutes, in order to cool down.
- As with most cooking appliances, close supervision is necessary.
If a fire should start:
- Keep the oven door closed.
• Turn the oven off.
* Disconnect the power cord or shut off the power at the mains.
Other important safety points to remember are:
WHEN COOKING BY MICROWAVE:
- Do not use wire ties in the oven. Be sure to inspect purchased items for wire ties and remove before placing food in the oven.
-
It is important to keep the oven interior clean. Food particles left on the oven walls reduce the efficiency of the microwaves.
-
Do not heat foods or liquids in bottles or jars with lids on. Air must be allowed to escape from the container.
- Milk or food for babies should be heated on 450W. It should then be stirred thoroughly and tested to ensure that it is at the correct temperature before giving it to the baby.
- Care must be taken when removing cups of hot liquid from the turntable. Cups should be lifted not slid to the edge of the turntable to prevent tipping.
- Never microwave eggs in the shell since they may explode. The egg yolk may pop because of a build-up of steam inside the membrane. To prevent this, pierce the membrane before cooking it.
WHEN COOKING BY GRILL / CONVECTION:
- Take care not to spill water on the glass viewing window during or immediately after cooking as it may crack.
- Be sure to use an oven glove when loading and unloading the oven.
- Be careful not to touch the viewing window when loading or unloading the oven.
- The top of the cabinet gets very hot, therefore do not place items on the oven.
WARNING
(a) Do not adjust or repair microwave oven yourself. Do not operate the oven if it is damaged, until it has been repaired by a service engineer trained by the manufacturer.
(b) It is dangerous for anyone other than a properly qualified engineer trained by the manufacturer to carry out adjustments or repairs.
(c) If the power supply cord is damaged, it must be replaced by the manufacturer, as a specially prepared cord is required.
(d) On no account remove or interfere with any parts or screws.
THIS COULD PROVE VERY DANGEROUS.
SAVE THESE INSTRUCTIONS

INSTALLATION
OVEN POSITIONING
- Install the oven on a flat, level surface strong enough to safely bear the weight of the oven.
- Do not locate the oven near areas where heat and moisture are generated as this may lower oven efficiency.
- Covering the air vents may lead to malfunctioning, therefore a minimum clearance of 5cm is required above, to each side, and to the rear of the oven.
- This oven conforms to EMC Radio interference Directive 89/336/EEC, however some interference may occur if it is placed too close to a radio or TV, so keep them as far apart as possible.
- Microwave oven must be installed at minimum height of 85cms above floor level.
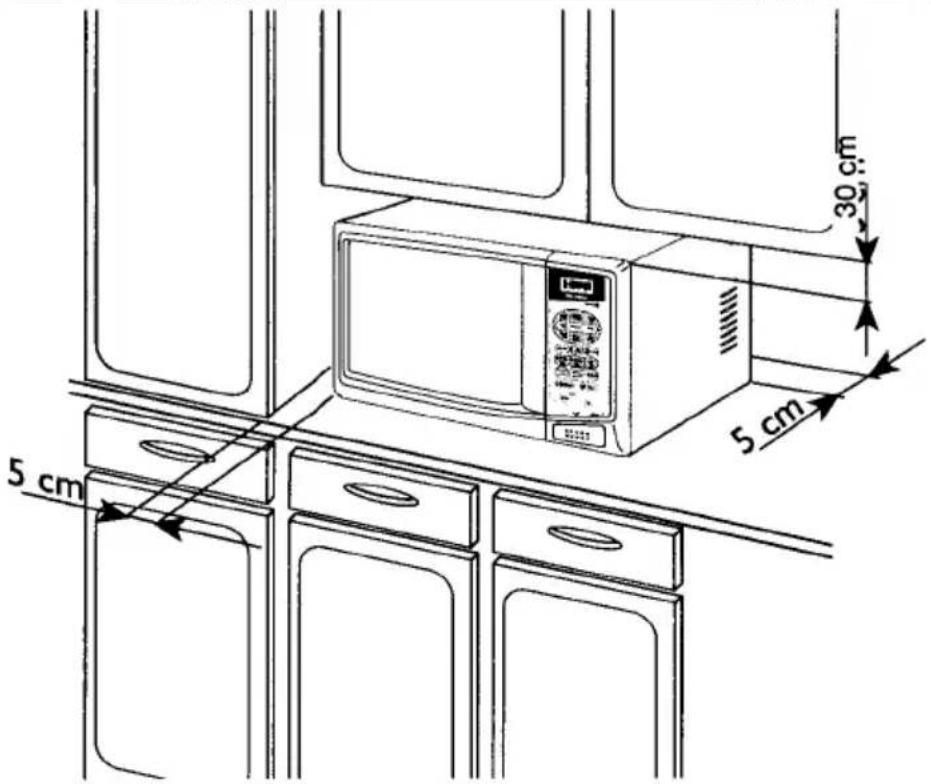
text_image
5 cm 30 cm 5 cmOVEN PARTS AND ACCESSORIES
Your oven is supplied with the following accessories:
| Turntable | 1 |
| Turntable Support | 1 |
| Circular Metal Rack | 2 |
| Cook Book | 1 |
| Square Slide In Shelf | 2 |
| Instruction Manual | 1 |
| Metal Drip Tray | 1 |
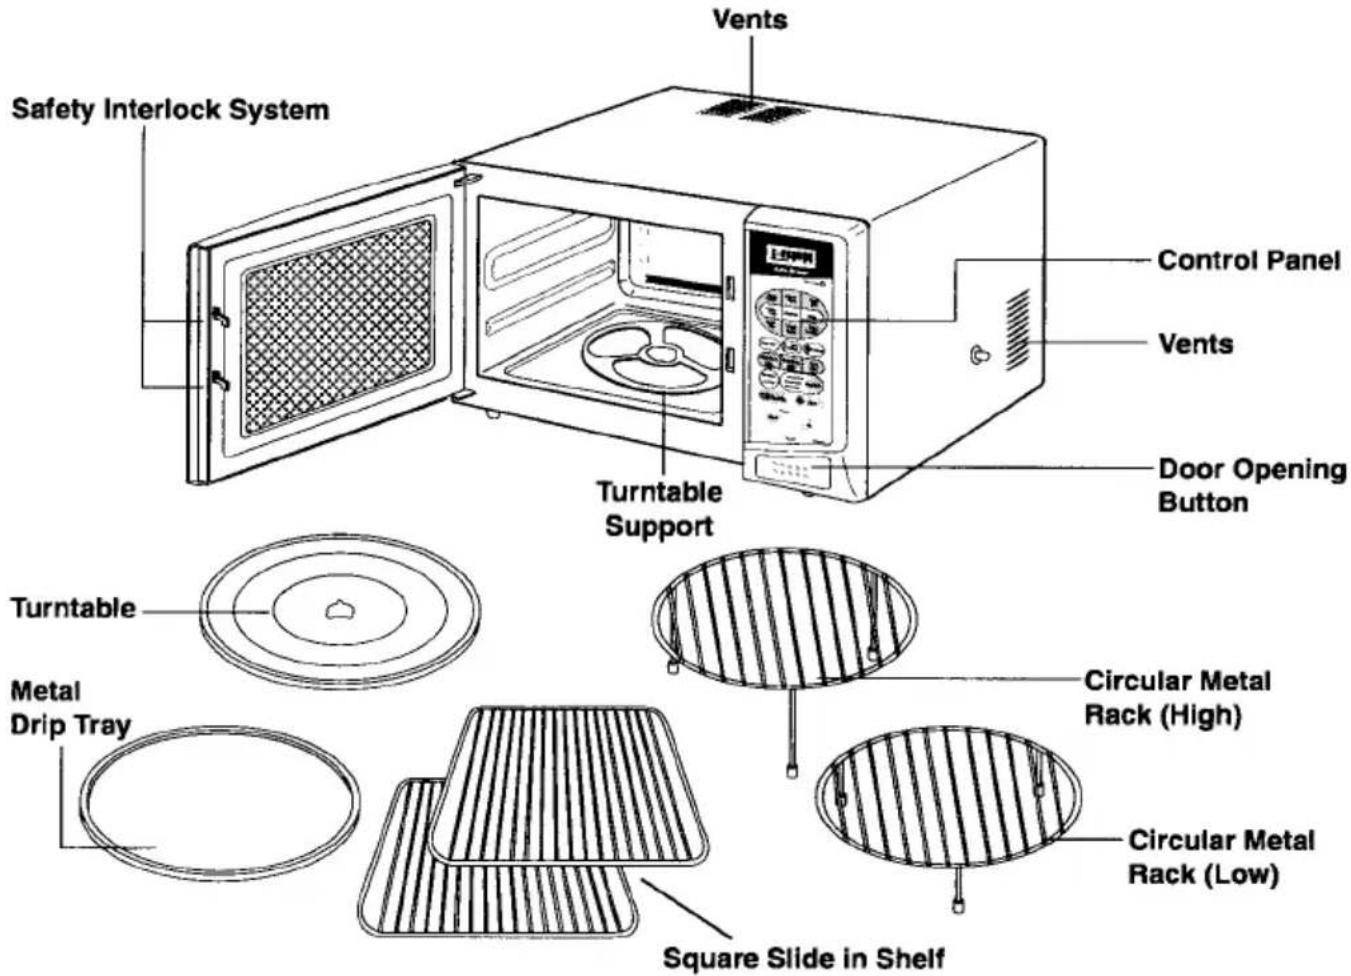
text_image
Vents Safety Interlock System Control Panel Vents Turntable Support Door Opening Button Turntable Metal Drip Tray Circular Metal Rack (High) Circular Metal Rack (Low) Square Slide in Shelf
TURNTABLE INSTALLATION
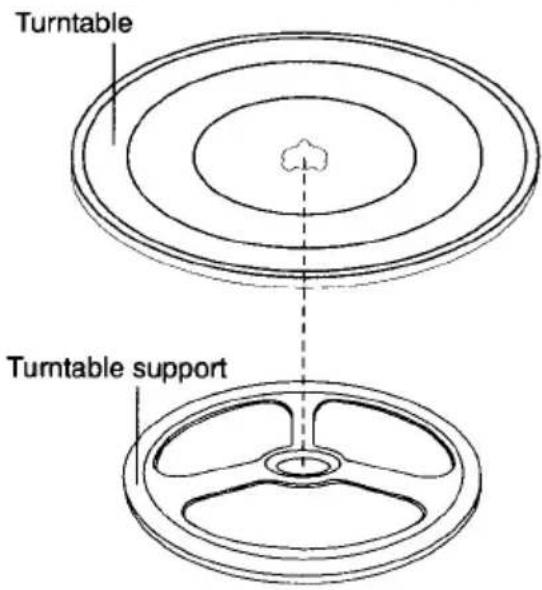
text_image
Turntable Turntable support- Locate the turntable support in central position.
- Place the turntable on top of the turntable support as shown in the diagram. Make sure the turntable support hub is securely locked in the turntable shaft. Never place the turntable upside down.
- Both turntable and turntable support must always be used during cooking.
- Food is always placed directly on the turntable or on a circular rack on the turntable for cooking. (The one exception to this is when convection cooking on two levels using the two Slide in Shelves.)
- This turntable rotates clockwise and anticlockwise; this is normal.
- This turntable returns to its original starting position when cooking is finished.
OVEN CONTROL PANEL
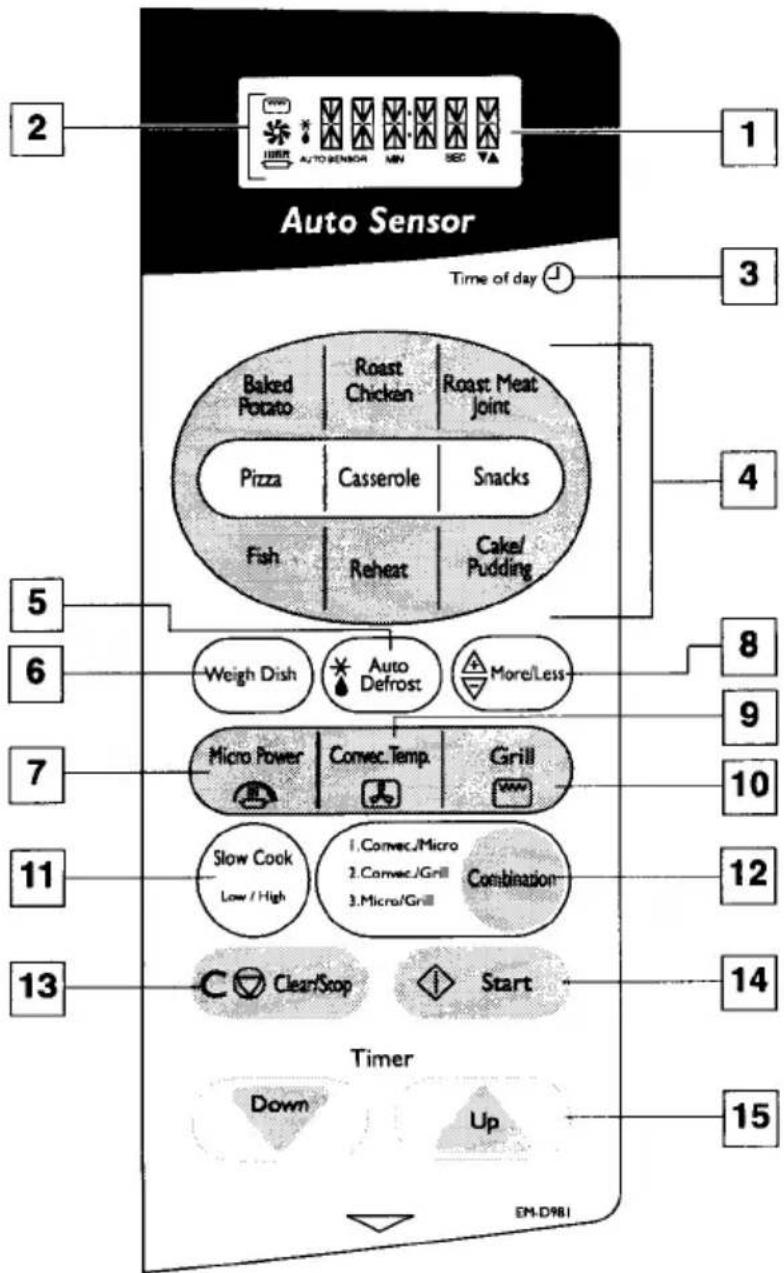
flowchart
graph TD
    A["2"] --> B["Auto Sensor"]
    B --> C["Time of day 1"]
    B --> D["3"]
    B --> E["4"]
    B --> F["5"]
    B --> G["6"]
    B --> H["7"]
    B --> I["10"]
    B --> J["11"]
    B --> K["13"]
    B --> L["14"]
    B --> M["15"]

    subgraph Sensor Components
        N["Baked Potato"] --> O["Roast Chicken"]
        P["Pizza"] --> Q["Casserole"]
        R["Fish"] --> S["Reheat"]
        T["Broast Meat Joint"] --> U["Snacks"]
        V["Cakes/Pudding"] --> W["Cakes/Pudding"]
        X["Weigh Dish"] --> Y["Auto Defrost"]
        Z["Micro Power"] --> AA["Convec.Temp."]
        AB["Grill"] --> AC["Combination"]
        AD["Slow Cook Low / High"] --> AE["1.Comec/Micro 2.Comec/Grill 3.Micro/Grill"]
        AF["Clean/Stop"] --> AG["Start"]
        AH["Down"] --> AI["Up"]
        AJ["EM-D981"] --> AK["Timer"]
    end
- Display Window.Cooking mode and short messages are displayed.
- Function Indicator.
- Clock Set.
- Auto Sensor Programs.
-
Auto Sensor Defrost.
-
Weigh Dish key. Use with automatic cook & defrost.
-
Microwave Power.
-
More / Less key.
Allows you to slightly increase or decrease cooking time of automatic programs.
- Convection Temperature.
10.Grill.
11.Slow Cook.
12. Combination Functions.
13.Clear / Stop.
14.Start.
15.Cooking Time Selector.
SETTING THE CLOCK
When your oven is plugged in for the first time or when power resumes after a power interruption, the display will show "WELCOME TO SANYO -REFER TO INSTRUCTIONS BEFORE USE."
After you press "Clear / Stop" the numbers in the display reset to 0:00.
To set the clock follow the guidelines opposite:
Example: To set 4:30:
1.
Press "Clear / Stop".
2.

Press "Clock" key.
3.
Down

To set hour;
Press "Down / Up" until 4: is indicated in the display window.
4.

Press "Clock" key.
5.
Down

To set minutes;
Press "Down / Up" until 4:30 is indicated in the display window.
6.

Press "Clock" key to lock in the time and start the clock running.
SUITABLE COOKWARE
| MATERIAL | MICROWAVE | GRILL / THERMAL GRILL ONLY | CONVECTION ONLY |
| Turntable | Yes | Yes | Yes |
| Circular Metal Racks | Yes | Yes | Yes |
| Square Metal Slide in Shelves | No | No | Yes |
| Drip Tray | No | Yes | Yes |
| Heat Resistant Ceramic & Glass e.g Pyrex, Corningware, Fire King. | Yes | Yes | Yes |
| China - Without Metal Decoration. | Yes | Yes | Yes |
| Plastic-microwave proof cookware. | Yes | No | No |
| Plastic cling film, microwave wrap, microwave roasting bags. (Do not use metal twist ties.) | Yes - With care.Pierce film.Do not fit film skin tight.Do not allow film to touch food. | No | No |
| Metal Cookware e.g baking tins, trays | No | Yes | Yes |
| Aluminum Foil | Yes - With care. Small pieces may be used for shielding. Over use may cause arcing. | Yes | Yes |
| Paper Greaseproof paper, Kitchen paper, plates or cups. | Yes - With care. Paper may be used to absorb moisture or fat. Overheating could cause fire. | No | Yes - With care. Greaseproof paper may be used to line dishes. |
| Wood / Straw | Yes - With care. For warming food for a very short time only. | No | No |
| MATERIAL | DUAL COOKING GRILL & MICROWAVE | DUAL COOKING CONVECTION & MICROWAVE | DUAL COOKING CONVECTION & GRILL |
| Turntable | Yes | Yes | Yes |
| Circular Metal Racks | Yes | Yes | Yes |
| Square Metal Slide in Shelves | No | No | No |
| Drip Tray | Yes | Yes | Yes |
| Heat Resistant Ceramic & Glass e.g Pyrex, Corningware, Fire King. | Yes | Yes | Yes |
| China - Without Metal Decoration. | Yes | Yes | Yes |
| Plastic-microwave proof cookware. | No | No | No |
| Plastic cling film, microwave wrap, microwave roasting bags. (Do not use metal twist ties.) | No | No | No |
| Metal Cookware e.g baking tins, trays | Yes - With care.Do not place metal cookware on metal racks or on metal drip tray. | Yes - With care.Do not place metal cookware on metal racks or on metal drip tray. | Yes |
| Aluminum Foil | Yes - With care.Small pieces may be used for shielding.Over use may cause arcing. | Yes - With care.Small pieces may be used for shielding.Over use may cause arcing. | Yes |
| Paper Greaseproof paper Kitchen paper, plates or cups. | No | Yes - With care.Greaseproof paper may be used to line dishes. | No |
| Wood / Straw | No | No | No |
CHILD LOCK-OUT / DEMONSTRATION MODE
This oven has a safety feature which prevents the accidental running of the oven by a child.
Note:
After the child lock has been set, the oven will appear to operate normally if the keys are pressed. However the oven will produce NO actual microwave, grill or convection power.
Demonstration Mode:
When in child lock mode, you can work through the cooking procedures without the oven operating.
To cancel Child Lock / Demonstration Mode simply repeat setting procedure. Indicator L disappears and clock display reappears.
To set:
1.

Press "Clear / Stop".
2.

Press "Clock" key.
3.

Press "Down / Up" until 11: is indicated in the display window.
4.

Press "Clock" key.
5.

Press "Down / Up" until 11:11 is indicated in the display window.
6.
Press "Start" key. Indicator L lights up and clock display reappears.
QUICK REFERENCE GUIDE TO 8 WAY COOKING
| COOKING MODE | ACCESSORIES TO USE | SUGGESTED USE |
| Microwave Only80, 150, 300, 450,750 & 900W. | Place dish directly on turntable. | Defrosting, reheating, cooking vegetables, rice, pasta, fish,casseroles, sponge puddings. |
| Grill Only(1 Setting) | Place circular high rack on turntable. | For toasting bread, muffins etc. |
| Thermal Grill(1 Setting) | Place circular high rack on metal drip tray on turntable. | For cooking small chops,sausages, fish fingers etc. |
| Convection Only(including 2 Level Convection Cooking.) (40 - 250°C) | Place dish directly on turntable,on circular low rack, or on metal slide in shelf.2 Level Convection - Place dishes/trays on 2 metal slide in shelves.Changeover position halfway through cooking for best result. | For cooking meringues, biscuits,scones, bread, Yorkshire Puddings, pastry items e.g pies,tarts etc.2 Level Convection - For batch baking of biscuits, scones, cakesetc. on two levels. |
| Thermal Grill(+80W, 150W, 300W,450W Microwave.) | Place circular high or low rack on metal drip tray on turntable. | For faster cooking of traditionally grilled foods e.g chops, sausages,chicken pieces etc. |
| Convection & Microwave(Variable combinations of convection temperature and microwave power.) | Place dish directly on turntableor on circular low rack. | For faster cooking of many traditionally baked foods e.g baked potatoes,pizza, roast poultry / joints, roast potatoes, some cakes, au gratin dishes, frozen crispy crumb convenience foods. For crisp reheating of pastry items. |
| Convection with Grill(100 - 250°C) | Place metal drip tray on circular high rack. | For fast cooking and crisping of small items e.g frozen potato products, fish fingers, chicken nuggets etc. |
| Two level Convection Cooking | Two metal slide in shelves. | For convection cooking only.For batch baking of cookies,scones, etc. |
(For details of suitable cookware please see pages 10 - 11.)
MICROWAVE COOKING
This basic microwave cooking method allows you to cook food for a desired time. In addition to the maximum power level, you can select different microwave power from 5 other levels, 80W to 750W for the foods that require slower cooking.
Foods with high moisture content should be cooked on maximum power, as this is the fastest cooking method and best maintains the natural flavour and texture of the foods.
Manual Defrosting
For manual defrosting (without using Auto Sensor Defrost feature), use 150W.
Example: To cook at 450W for 1 min 30 secs
1.
Press "Clear / Stop".
2.
Press "Micro Power" 3 times.
3.

Press "Down / Up" until 1min 30sec is indicated in the display window.
4.
Press "Start".
To set the variable microwave cooking levels the Power key should be touched as follows:
| 900W | ONCE |
| 750W | 2 TIMES |
| 450W | 3 TIMES |
| 300W | 4 TIMES |
| 150W | 5 TIMES |
| 80W | 6 TIMES |
| POWER SETTING | SUGGESTED USE |
| 80 W | Softening cream cheese. |
| 150 W | Keeping foods warm, defrosting. |
| 300 W | Completing the cooking cycle of pot roasts.Completing the cooking cycle of some casseroles and stews.Baked custards and cheese cakes. |
| 450 W | Roasting meats. |
| 750 W | Baking cakes.Reheating precooked foods. |
| 900 W | Boiling liquids.Baking fish, vegetables. |
GRILL COOKING
Grill 1
This method is ideal for toasting bread or muffins. Remember the oven will be hot. Place all food on the high circular rack. Grill cooking time can be set to a maximum of 90 minutes.
Example: To Grill for 15 minutes.
1.
Press "Clear / Stop".
2.
Press "Grill" key once. The grill indicator lights up and "Grill I" is displayed.
3.

Press "Down / Up" until 15min 00sec is indicated in the display window.
4.
Press "Start".
THERMAL GRILL COOKING
Grill 2
During thermal grill cooking, both fan and grill element operate together to circulate hot air around the food to assist the cooking process.
This method is ideal for small items such as sausages which you would usually grill. Place food on the high circular rack on the metal drip tray. Do not use thermal grill for toasting bread as the result will be rather dry. The grill cooking time can be set to a maximum of 90 minutes.
Example: To Thermal Grill for 15 minutes.
1.
Press "Clear / Stop".
2.
Press "Grill" key twice. The grill indicator lights up and "Grill 2" is displayed.
3.

Press "Down /Up" until 15min 00sec is indicated in the display window.
4.
Press "Start".
CONVECTION COOKING
This oven can be used as a conventional oven by using the fan assisted convection function. The temperature range is 40 - 250°C.
For recipes which require higher temperatures e.g pastries, scones or Yorkshire puddings, best results are obtained if the oven is preheated first.
Note:
If the cooking is not started immediately after preheating, the preheated oven temperature will continue to flash in the display and the temperature will be maintained for 15 minutes.
This function is ideal for cooking meringues, biscuits, scones, bread, Yorkshire puddings, large fruit cakes and all pastries. It can also be used for proving bread at 40°C. The convection cooking time can be set for a maximum of 90 minutes.
One or two level convection cooking;
Convection cooking can be done on one or two levels using the two square slide in shelves provided. If cooking on one level, place food on low circular rack or on one shelf. If cooking on two levels (ie batch baking) swap position of food halfway through cooking to get the most even result.
As there is no microwave energy being used you can place metal tins directly onto the metal racks with no danger of arcing.
(Note: The oven cannot be preheated to 40°C)
Example: To Preheat to 200°C.
1.
Press "Clear / Stop".
2.
Press "Convec.Temp" key twelve times. The Convection indicator lights up and "200 C" is displayed.
3.
Press "Start". The oven will now preheat. When the correct temperature is reached the oven will beep 3 times and "200 C" will appear in the display. You may now set the convection cooking temperature and time as below and begin cooking.
Example: To cook using Convection for 20 minutes, at 200°C. (After preheating has been completed).
4.
Open door. Place food in oven. Close door.
5.

Press "Down / Up" until 20min 00sec is indicated in the display window.
6.
Press "Start".
COMBINATION COOKING
This oven offers you a choice of three methods of Combination cooking;
- Convection + Microwave - For baking and roasting.
- Thermal Grill + Convection - For fast crisping.
- Thermal Grill + Microwave - For fast grilling.
1. Convection + Microwave
This function allows you to combine convection cooking with any one of four (80W, 150W, 300W, 450W) microwave power levels to produce traditional baked or roasted results in less time. This function has many uses, particularly roasting meat and poultry, cooking pizza, baked potatoes, roast potatoes, baking some cakes, frozen and crispy crumb foods and reheating pastries.
When cooking with dual convection + microwave it is not necessary to preheat the oven.
Food should be placed on the circular low rack or on the turntable.
Do NOT place metal cookware directly on the circular low rack when using this function as arcing may occur.
The Dual Convection + Microwave function can be set for a maximum of 90 minutes.
Example: To cook using Convection + Microwave for 15 minutes, at 210°C and 450W microwave power.
1.
Press "Clear / Stop".
2.
Press "Combination" key once. The Convection and Micro indicator light up and "COMBI I 200C 450W" are displayed.
3.
Press "Convec.Temp." once until "210°C" is displayed.
4.

Press "Down / Up" until 15min 00sec is indicated in the display window.
5.
Press "Start".
COMBINATION COOKING (CONT.)
2. Thermal Grill + Convection
This function allows you to combine convection operation with the thermal grill, and is ideal for cooking small foods which require crisping e.g frozen potato products such as oven chips, potato croquettes or waffles, fish fingers, chicken nuggets, beefburgers and sausages.
Food should be placed on the circular high rack which is on the turntable. Alternatively food maybe placed on the metal drip tray on the circular high rack.
The Dual Thermal Grill + Convection function can be set for a maximum of 90 minutes.
Example: To cook using Thermal Grill with Convection for 15 minutes, at 220°C.
1.
Press "Clear / Stop".
2.
Press "Combination" key twice. The Grill and Convection indicators light up and "COMBI 2 200 GRILL 2" is displayed.
3.
Press "Convec.Temp." key twice until "220 C" is displayed.
4.

Press "Down / Up" until 15min 00sec is indicated in the display window.
5.
Press "Start".
3. Thermal Grill + Microwave
This oven has four settings:
Thermal Grill + 80W
Thermal Grill + 150W
Thermal Grill + 300W
Thermal Grill + 450W
This function allows you to combine the speed of a microwave with the browning and crisping of a grill. Ideal for all foods that would usually be grilled e.g sausages, chops, chicken pieces etc.
The Dual Thermal Grill + Microwave function can be set for a maximum of 90 minutes.
Example: To cook using Thermal Grill with Microwave for 15 minutes, at 150W microwave power.
1.
Press "Clear / Stop".
2.
Press "Combination" key three times. The Grill and Microwave power indicators light up and "COMBI 3 GRILL 2 450W" is displayed.
3.
Press "Micro Power" key twice. "150W" is indicated.
4.

Press "Down / Up" until 15min 00sec is indicated in the display window.
5.
Press "Start".
MULTI-STAGE COOKING
Multi stage cooking is ideal for sequential cooking. It allows you to cook at different power levels and with different cooking modes for a set time.
Up to three stages may be set.
All the stages should be set before starting the oven.
The following table shows the combinations possible when cooking with multi-stages:
| 1st | 2nd | 3rd |
| Micro | Micro | Micro |
| Micro | Micro | - |
| Micro | Micro | Grill |
| Micro | Micro | Thermal grill |
| Micro | Micro | Convection |
| Micro | Micro | Combination |
| Micro | Grill | - |
| Micro | Thermal grill | - |
| Micro | Convection | - |
| Micro | Combination | - |
NOTE:
After grill, thermal grill, convection or combination cooking it is NOT possible to set microwave.
For three stage cooking, follow same procedure as shown, simply insert third stage at step 5, then press start.
Example: To Microwave on 450W for 10 minutes, and then Grill for 5 minutes.
1.
Press "Clear / Stop".
2.
Press "Micro Power" key 3 times. The Micro indicator lights up and "450W" is displayed.
3.

Press "Down / Up" until 10min 00sec is indicated in the display window.
4.
Press "Grill" key once. The Grill indicator lights up and "Grill 1" is displayed.
5.

Press "Down / Up" until 5min 00sec is indicated in the display window.
6.
Press "Start".
AUTO SENSOR DEFROST
The Auto Sensor Defrost Feature is an accurate defrosting method for frozen meat, poultry or fish in the weight range 0.1 - 2.0kg.
An adjust + or - key is used to increase or decrease the defrosting time as necessary.
PAUSE:
This feature has a built in pause mechanism to allow for checking and rearranging of food during defrosting. The oven stops at the end of the first defrost period (about 1/3 of the total time). If you do not open the door at the pause, the oven restarts after approx. 2 minutes and commences the second defrost period.
Shield any thin or delicate areas and any areas which become warm with small pieces of smooth foil.
Important:
Auto Sensor Defrosting chart appears on pages 21-22
Example: To Defrost meat
1.
Press "Clear /Stop".
2.
Press "Auto Defrost". The word message "Auto Defrost" is displayed.
3.
Place the empty dish on the turntable and close door. Press "Weigh Dish" key. The word message "PLEASE WAIT" is displayed.
4.
When the oven has weighed the dish, the oven will beep once. The word message "COMPLETED" is displayed. Now you can place the food in the dish, and place it on the turntable.
5.

Press "More / Less" key to increase / decrease defrosting time as desired.
6.
The Auto Sensor Defrost symbols will flash. After a few seconds the first stage time will begin to count down. At the pause rearrange or turn food over. Close door and press "Start".
AUTO SENSOR DEFROST CHART
Place the food to be defrosted on a microwave-proof plate on the turntable.
For best results follow the directions below;
| FOOD | MORE / LESS KEY | PREPARATION | PAUSE DIRECTIONS | STANDING TIME |
| BEEF Cubed | NO | Place in an even layer in a shallow dish. | Remove any thawed cubes and stir, ensuring that the frozen cubes are around the edge of the dish. | 10-15 min. |
| Minced | NO | Place in a shallow dish or plate. | Remove any thawed portions and turn over. | 10-15 min. |
| Beef Joint | + (MORE) | Shield thin areas and outer edges with smooth pieces of foil. | Remove foil from outer edges but leave on thin areas.Turn over. | 30-40 min. |
| Steak | NO | If frozen in a block, separate as soon as possible. Shield outer edges with smooth pieces of foil. | Remove foil and turn over. | 10-15 min. |
| LAMB Cubed | NO | Place in an even layer in a shallow dish. | Remove any thawed cubes and stir, ensure that the frozen cubes are around the edge of the dish. | 10-15 min. |
| Chops/Cutlets | NO | If frozen in a block separate as soon as possible. Arrange chops so the thinner ends are towards the centre of the turntable. Shield outer edges with smooth pieces of foil. | Remove foil and turn over. | 10-15 min. |
| Lamb joint | + (MORE) | Shield thin areas and outer edges with smooth pieces of foil. | Remove foil and turn over. | 30-40 min. |
| PORK Chops | NO | If frozen in a block, separate as soon as possible. Arrange chops so the thinner ends are towards the centre of the turntable. Shield thin areas and outer edges with smooth pieces of foil. | Turn over, shield outer edges and thin ends with foil. | 10-15 min. |
| Sausages | - (LESS) | If frozen in a block, separate as soon as possible. Shield both ends of the sausages with smooth pieces of foil. | Rearrange and remove any sausages that have thawed. | 10-15 min. |
AUTO SENSOR DEFROST CHART (CONT.)
| FOOD | MORE / LESS KEY | PREPARATION | PAUSE DIRECTIONS | STANDING TIME |
| Bacon | - (LESS) | Separate as soon as possible.Shield both ends of bacon with smooth pieces of foil. | Separate. Remove any thawed slices, arrange remaining slices in a single layer and shield both ends with smooth pieces of foil. | 10-15 min. |
| Spareribs | - (LESS) | If frozen in a block,separate as soon as possible.Shield both ends with smooth pieces of foil. | Remove foil.Turn over, rearrange and remove any thawed pieces. | 10-15 min. |
| Pork Joint | + (MORE) | Shield thin areas and outer edges with smooth pieces of foil. | Remove foil and turn over. | 30-40 min. |
| CHICKEN Whole | + (PLUS) | Place chicken breast side down.Shield wings,legs and neck with smooth pieces of foil. | Remove foil.Turn over and shield warm areas with foil. | 30-40 min. |
| Pieces | NO | Shield thin parts such as tips with smooth pieces of foil. Arrange so thicker parts are towards the outside of the dish. | Remove foil.Turn over, arrange so thicker parts are towards the outside of the dish. | 10-15 min. |
| DUCK Whole | NO | Place duck breast side down.Shield wings,legs and neck with smooth pieces of foil. | Remove foil.Turn over and shield warm areas with foil. | 30-40 min. |
| Pieces | NO | Shield thin parts with smooth pieces of foil. Arrange so thicker parts are towards the outside of the dish. | Remove foil.Turn over and shield any warm areas. | 10-15 min. |
| FISH Fish fillets | - (LESS) | Arrange fillets in an even layer.If frozen in a block,separate as soon as possible.Shield tail and thin ends with smooth pieces of foil. | Remove foil, turn over, rearrange and arrange tail ends under thicker parts of fish. | 10-15 min. |
| Fish steaks | - (LESS) | Arrange steaks in an even layer.If frozen in a block, separate as soon as possible.Shield outer edges of steaks with smooth pieces of foil. | Remove foil, turn over and rearrange. | 10-15 min. |
| Whole fish | - (LESS) | If more than one fish, arrange head to tail. Shield ends with smooth pieces of foil. | Remove foil, turn over and rearrange. | 10-15 min. |
DEFROSTING INSTRUCTIONS USING 150W
Some foods such as bread and fruit, will not defrost successfully using the Auto Sensor Defrost. However these foods can successfully be defrosted manually using the "150W" power setting.
| FOOD | PREPARATION | (150W) | STANDING TIME |
| BREAD Small loaf | Place on plate. Turn over halfway through defrosting time. | 8-10 min. | 10-15 min. |
| Sliced large loaf | Place on plate. Turn over halfway through defrosting time. | 10-13 min. | 10 min. |
| 2 Slices | Place on plate. | 45-60 sec. | 5 min. |
| 1 bread roll | Place on plate. | 45-60 sec. | 5 min. |
| 2 bread rolls | Place on plate. | 1 -1 12 min. | 5 min. |
| CAKES AND PASTRY | |||
| Gateau 450g/1 lb | Remove from packaging, place on plate. | 9-11 min. | 15-30 min. |
| Cheesecake 450g/1 lb | Remove from packaging, place on plate. | 7-9 min. | 15-30 min. |
| Pie (cooked) 450g/1 lb | Remove from packaging, place on plate. | 7-9 min. | 15-30 min. |
| Pastry 450g/1 lb | Remove from packaging, place on plate. | 7-9 min. | 15-30 min. |
| BUTTER 250g/8.8oz (1 packet) | If foil wrapped, remove from wrapper and place on a plate. | 3-4 min. | 5-10 min. |
| FRUIT 200g/8 oz Soft berry fruits | Place in a single layer in a shallow dish. | 5-6 min. | 5-10min. |
| 450g/1 lb Soft berry fruits | Place in a single layer in a shallow dish. | 7-8 min. | 5-10 min. |
| PLATED MEAL 400g/14 oz Plated meal | Cover with a plate or non P.V.C. cling film. To reheat, microwave on 900W for 3-4 minutes. | 7-8 min. | 5-10 min. |
| VEGETABLES | It is not necessary to defrost vegetables before cooking. All vegetables can be thawed and cooked on 900W. | ||
AUTO SENSOR COOKING
The Auto Sensor Cooking feature allows you to simply and automatically cook a range of popular foods. Your oven offers the following Auto Sensor programs:
| Baked Potato | Roast Chicken | Roast Meat Joint |
| Pizza | Casserole | Snacks |
| Fish | Reheat | Cake / Pudding. |
Operation is very easy. Simply touch the appropriate key the correct amount of times (see directions included in the chart). Place the appropriate empty container / accessories on the turntable and press "Weigh Dish" key. Then add food and press "Start".
The "More / Less" key can be used to adjust the end cooked results to personal taste.
PAUSE - The Roast Meat Joint and Casserole programs have a built in pause mechanism to allow for turning, stirring etc.
Please follow instructions in recipes and / or in display. Then press "Start" to complete the cooking process.
VERY IMPORTANT
For best results, please follow the guidelines in the Auto Sensor cooking chart on pages 24-28
Example: To cook a Pork Joint.
1.
Press "Clear / Stop".
2.
Press "Roast Joint" key twice. Word message "PORK JOINT...." is displayed.
3.

Place the empty drip tray and low circular rack on the turntable and close door, then touch "Weigh Dish" key. Word message "PLEASE WAIT" is displayed.
- When the oven has weighed the dish, the oven will beep once. The word message "COMPLETED" is displayed. Now you can place the food on the low circular rack, and place it on drip tray on the turntable.
5.

Press "More / Less" key if required.
6.
Press "Start".
The Auto Sensor symbol will flash. After a few seconds the first stage time will begin to count down.
Choose the required food category by touching the appropriate key several times as detailed below.
Please take note of the minimum and maximum food weights which you may use.
| Auto Sensor Programs | Press key | Food Category | Minimum weight of food | Minimum weight of food |
| Cake / Pudding | 1 | Sponge Pudding / Cake | 200 g | 1.3 kg |
| 2 | Light Fruit Cake | 400 g | 2.3 kg | |
| 3 | Chocolate Brownies | 200 g | 1.3 kg | |
| 4 | Flapjack | 200 g | 1.3 kg | |
| Roast Chicken | 1 | Whole Chicken | 800 g | 2.0 kg |
| 2 | Chicken Pieces | 100 g | 1.0 kg | |
| Fish | 1 | Baked Fish | 150 g | 1.5 kg |
| 2 | Steamed Fish | 100 g | 900 g | |
| Reheat | 1 | Soup | 200 g | 1.0 kg |
| 2 | Chilled Meal | 200 g | 650 g | |
| 3 | Canned Food | 200 g | 900 g | |
| 4 | Plated Meal | 200 g | 900 g | |
| Casserole | 1 | Beef Casserole | 300 g | 2.0 kg |
| 2 | Chicken Casserole | 300 g | 2.4 kg | |
| 3 | Curry | 300 g | 2.4 kg | |
| 4 | Minced Beef | 300 g | 2.0 kg | |
| Pizza | 1 | Fresh Pizza | 100 g | 600 g |
| 2 | Frozen Pizza | 100 g | 600 g | |
| 3 | Reheat Pizza | 80 g | 600 g | |
| Baked Potato | 1 | Baked Potato(es) | 150 g | 1700 g |
| Roast Meat Joint | 1 | Beef Joint | 450 g | 2.0 kg |
| 2 | Pork Joint | 450 g | 2.0 kg | |
| 3 | Lamb Joint | 450 g | 2.0 kg | |
| Snacks | 5 | Snacks | 50 g | 900 g |
AUTO SENSOR COOKING CHART
Important Note Re: Container / Accessories
After selecting program always place EMPTY container / accessories on turntable as directed and press "Weigh Dish" key BEFORE adding food.
| PROGRAM | FOOD WEIGHT | COOKING PROCEDURES |
| CAKE / PUDDING1. Sponge Pudding / Cake | 200 g - 1.3 kg | Place container on turntable.Refer to recommended recipes for details.(See pgs 30 - 33) |
| 2. Light Fruit Cake | 400 g - 2.3 kg | |
| 3. Chocolate Brownies | 200 g - 1.3 kg | |
| 4. Flapjack | 200 g - 1.3 kg | Place a container on low rack on turntable.Refer to recommended recipes for details.(pg 34) |
| ROAST CHICKEN1. Whole Chicken(chilled, unstuffed) | 800 g - 2.0 kg | 1. Remove giblets, wash and dry chicken. Brush with oil or melted butter. Tie legs together with string.2. Press “Roast Chicken” once.Place low circular rack on drip tray on turntable.Press “Weigh Dish” key.3. Place chicken breast side up on rack.Close door and press “Start”.4. After cooking allow chicken to stand in foil for 10 minutes. Refer to recommended recipes (pg 35-36) |
| 2. Chicken Pieces(chilled)For thighs and drumsticks | 100 g - 1.0 kg | 1. Wash and dry chicken. Brush with oil or melted butter. Season.2. Press “Roast Chicken” twice.Place low circular rack on drip tray on turntable.Press “Weigh Dish” key.3. Place chicken pieces skin side up on rack.Close door and press “Start”.Refer to recommended recipes (pg 37 -38). |
| FISH1. Baked Fish(chilled)For fish fillets, whole fish,stuffed fish, baked fish. | 150 g - 1.5 kg | 1. Gut, wash and dry fish, stuff etc. as required.2. Press “Fish” once3. Place empty micro and heatproof dish (or low circular rack for crisper fish) on turntable. Press “Weigh Dish” key.4. Place fish in dish (or on low rack), dot with butter and sprinkle with lemon juice. Do not cover.Close door and press “Start”.Use “Adjust Less” for fish steaks.Refer to recommended recipes (pg 39 - 40). |
| 2. Steamed Fish(chilled)For fish fillets and whole fish. | 100 g - 900 g | 1. Gut, wash and dry fish.2. Press “Fish” twice.3. Place empty shallow microwave proof dish on turntable. Press “Weigh Dish” key.4. Place fish in dish add 2-3 tblsps / 45 mls white wine, water or milk. Cover dish with plastic wrap.Close door and press “Start”.Refer to recommended recipes (pg 41). |
AUTO SENSOR COOKING CHART
| PROGRAM | FOOD WEIGHT | COOKING PROCEDURES |
| REHEAT1. Soup(chilled or room temp.) | 200 g - 1.0 kg | 1. Press “Reheat” once.2. Place empty microwave-proof soup cups or dish with lid on turntable. Press “Weigh Dish” key.3. Place soup in cups and cover with plastic wrap.(Or in dish with lid).4. Place on turntable, arrange cups evenly around edge of turntable. Press “Start”.5. After heating stir well.Use “Adjust More” for thick or cream soups.Use “Adjust Less” for thin consomme soups. |
| 2. Chilled Meal(chilled)For commercial chilled ready meal.One item only. | 200 g - 650 g | 1. Remove outer packaging, follow on pack instructions re; covering of food.2. Press “Reheat” twice.3. Place empty microwave-proof plate on turntable and press “Weigh Dish” key.4. Place chilled meal on plate. Press “Start”.5. After heating allow food to stand for 2 minutes.Stir if possible.Use “Adjust More” for compact foods e.g lasagne.Use “Adjust Less” for delicate foods e.g puddings, fish, vegetables.ENSURE FOOD IS PIPING HOT BEFORE SERVING. |
| 3. Canned Food(room temp.) | 200 g - 900 g | 1. Press “Reheat” three times.2. Place empty microwave-proof plate on turntable. Press “Weigh Dish” key.3. Place canned food in dish and cover with lid or plastic wrap.4. Place on turntable and press “Start”. After heating stir well. |
| 4. Plated Meal(chilled) | 200 g - 900 g | 1. Press “Reheat” four times.2. Place empty microwave-proof plate on turntable. Press “Weigh Dish” key.3. Place food in dish and cover with plastic wrap.4. Place on turntable and press “Start”. |
| CASSEROLE1. Beef Casserole2. Chicken Casserole3. Curry4. Minced Beef | 300 g - 2.0 kg300 g - 2.4 kg300 g - 2.4 kg300 g - 2.0 kg | Microwave-proof casserole with lid or Pyrex bowl covered with plate. Place on turntable.Please refer to recommended recipes for details. |
AUTO SENSOR COOKING CHART
| PROGRAM | FOOD WEIGHT | COOKING PROCEDURES |
| PIZZA1. Fresh Pizza(chilled) | 100 g - 600 g | 1. Remove packaging.2. Press “Pizza” once.3. Place circular low metal rack on drip tray on turntable. Press “Weigh Dish” key.4. Place pizza on rack. Press “Start”. |
| 2. Frozen Pizza(frozen) | 100 g - 600 g | 1. Remove packaging.2. Press “Pizza” twice.3. Place circular low metal rack on drip tray on turntable. Press “Weigh Dish” key.4. Place pizza on rack. Press “Start”. |
| 3. Reheat Pizza(chilled) | 80 g - 600 g | 1. Remove packaging.2. Press “Pizza” three times.3. Place circular low metal rack on drip tray on turntable. Press “Weigh Dish” key.4. Place pizza on rack. Press “Start”. |
| BAKED POTATO1. Baked Potato(room temp.) | 150 g - 1.7 kg | 1. Wash, dry and prick potatoes of a similar size with fork.2. Press “Baked Potato” key once.Place circular low metal rack on drip tray on turntable and press “Weigh Dish”.3. Arrange potatoes evenly around edge of low rack. When cooking one potato place on edge of rack. Press “Start”.4. After cooking allow potatoes to stand for 2 minutes. |
AUTO SENSOR COOKING CHART
| PROGRAM | FOOD WEIGHT | COOKING PROCEDURES |
| ROAST MEAT JOINT1. Beef Joint(chilled) | 450 g - 2.0 kg | 1. Wash and dry joint. Brush with oil or melted butter. Season.2. Press “Roast Joint” once.Press low rack and drip tray on turntable and press “Weigh Dish” key.3. Place meat joint on rack. Press “Start”.4. At pause remove any excess liquid. Turn joint over and baste. Shield any overcooking areas with small smooth pieces of foil.5. After cooking allow joint to stand wrapped in foil for 10-20 minutes. |
| 2. Pork Joint(chilled) | 450 g - 2.0 kg | 1. Wash and dry joint. Brush with oil or melted butter. Season.2. Press “Roast Joint” twice.Place low rack and drip tray on turntable and press “Weigh Dish” key.3. Place meat joint on rack.Use “Adjust More” for large or thick joint, e.g leg joint. Press “Start”.4. At pause remove any excess liquid. Turn joint over and baste. Shield any overcooking areas with small smooth pieces of foil.5. After cooking allow joint to stand wrapped in foil for 10-20 minutes. |
| 3. Lamb Joint(chilled) | 450 g - 2.0 kg | 1. Wash and dry joint. Brush with oil or melted butter. Season.2. Press “Roast Joint” three times.Place low rack and drip tray on turntable and press “Weigh Dish” key.3. Place meat joint on rack. Press “Start”.4. At pause remove any excess liquid. Turn joint over and baste. Shield any overcooking areas with small smooth pieces of foil.5. After cooking allow joint to stand wrapped in foil for 10-20 minutes. |
| SNACKS1. Snacks(for reheating fresh precooked individual pastry items approx. 100-200g each.e.g pasties, pies, sausage rolls, slices of pie or quiche) | 50 g - 900 g | 1. Remove food from packaging.(Remove all foil containers)2. Press “Snacks” once.3. Place low rack on turntable and press “Weigh Dish” key.4. Arrange food items around edge of rack.Use “Adjust Less” for smaller items.Press “Start”. |
AUTO SENSOR RECIPES
Cake/ Pudding Program
Choice of 4 Programs
The Cake / Pudding program offers a choice of 4 programs for cooking a range of cakes / puddings;
All recommended recipes are detailed in pages 30 - 34
Sponge Pudding /Cake
For cooking plain sponge cake or sponge pudding.
Recommended recipes for;
Sponge Pudding (+ variations) - Pg 30
Victoria Sandwich Cake (+ variations) - Pg 31
Fruit Cake
For cooking light fruit cake.
Recommended recipes for;
Light Fruit Cake (+variations) - Pg 32
Chocolate Brownies
For cooking chocolate brownies.
Recommended recipes for;
Chocolate Brownies (+ variations)- Pg 33
Flapjack
For cooking flapjack.
Recommended recipes for;
Flapjack (+variations) - Pg 34
AUTO SENSOR RECIPES
Cake / Pudding:
Sponge Cake
| Cookware / Ingredient | Small Size | Standard Size | Large Size |
| Microwave-proofRound Cake Dish(e.g Pyrex)greased and lined | 15 cm / 6 inch dia. | 18 cms / 7 inch diam. | 23 cm / 9 inch dia. |
| Butter | 50 g | 100 g | 200 g |
| Sugar | 50 g | 100 g | 200 g |
| Eggs, standard size | 1 | 2 | 4 |
| Self Raising Flour | 50 g | 100 g | 200 g |
| Baking Powder | 1/4 tsp 1.25 mls | 1/2 tsp / 2.5 mls | 1 tsp / 5 mls |
| Milk | 1 tblsp / 15 mls | 2 tblsp / 30mls | 4 tblsp / 60 mls |
Possible Variations:
Add ONE to the above basic recipe.
| Coffee-Instant Coffee | 1 tsp / 5 mls | 2 tsp / 10 mls | 4 tsp / 20 mls |
| Lemon or Orange Juice and grated rind | 1 oranges or lemons | 1 - 2 oranges or lemons | 3 - 4 oranges or lemons |
| Chocolate-Cocoa Powder | 1 tblsp / 15 mls | 2 tblsp / 30 mls | 4 tblsp / 60 mls |
Method
- Cream butter and sugar together.
Gradually add the beaten eggs.
Stir in flour and baking powder and mix well. Stir in enough milk to give a soft dropping consistency.
- Press "Cake / Pudding" once.
Place appropriate size of empty greased and lined microwave proof cake dish on the turntable and close the door. Press "Weigh Dish" key.
- When completed remove the dish from the oven
and add the mixture, level the surface.
Place on turntable and press "Start".
- After cooking allow cake to stand for 10 minutes before turning out onto a cooling rack. When cake is cold cut in half and sandwich together with jam or jam and butter cream. Sift icing sugar lightly over the top.
(Note: Line dish with a circle of greaseproof paper)
Variations
Coffee Cake
Dissolve the appropriate amount of instant coffee in a little warm water, add with the milk.
Lemon or Orange sponge
Omit the milk and add the appropriate amount of juice and rind.
Chocolate
Replace the appropriate amount of flour with cocoa powder. All quantities stated above.
AUTO SENSOR RECIPES
Cake / Pudding:
Sponge Pudding
| Cookware / Ingredient | Small Size | Standard Size | Large Size |
| Microwave-proof Bowl (e.g Pyrex) | 1.0 litre | 1.5 litre | 2.0 litre |
| Butter | 50 g | 100 g | 200 g |
| Sugar | 50 g | 100 g | 200 g |
| Eggs, standard size | 1 | 2 | 4 |
| Vanilla Essence | few drops to taste | few drops to taste | few drops to taste |
| Self Raising Flour | 50 g | 100 g | 200 g |
| Baking Powder | 1/4 tsp 1.25 mls | 1/2 tsp / 2.5 mls | 1 tsp / 5 mls |
| Milk | 1 tblsp / 15 mls | 2 tblsp / 30mls | 4 tblsp / 60 mls |
Possible Variations:
Add ONE to the above basic recipe.
| Golden Syrup | 11/2 tblsp / 23 mls | 3 tblsp / 45mls | 6 tblsp / 90 mls |
| Jam | 11/2 tblsp / 23 mls | 3 tblsp / 45mls | 6 tblsp / 90 mls |
| Stem Ginger(chopped finely) | 50 g | 100 g | 200 g |
| Lemon or Orange*Juice and grated rind | 1 orange or lemon | 1 - 2 oranges or lemons | 3 - 4 oranges or lemons |
| Chocolate**-Cocoa Powder | 1 tblsp / 15mls | 2 tblsp / 30 mls | 4 tblsp / 60 mls |
Method
- Cream butter and sugar together. Gradually add the beaten eggs and vanilla essence. Stir in flour and baking powder and mix well. Stir in enough milk to give a soft dropping consistency.
- Press "Cake / Pudding" key once. Place appropriate size of empty microwave proof bowl and plate on the turntable and close the door. Press "Weigh Dish" key.
- When completed remove the dish from the oven and add the mixture, level the surface and cover with plate. Place on turntable and press "Start".
- After cooking allow pudding to stand for 5 minutes before turning out onto a warm serving dish. Serve with custard.
Variations
Syrup / Jam Sponge
Place the appropriate amount of syrup or jam in base of bowl before adding sponge mixture.
Ginger Sponge
Stir the appropriate quantity of chopped stem ginger into the mixture.
Lemon / Orange Sponge
Omit the milk and add the appropriate amount of flour with cocoa powder. All quantities stated above.
Chocolate Sponge
Replace the appropriate amount of flour with cocoa powder.
AUTO SENSOR RECIPES (CONT.)
Cake / Pudding:
Light Fruit Cake
| Cookware / Ingredient | Small Size | Standard Size | Large Size |
| Heatproof Round Cake Tin greased and lined | 15 cm / 6 inch dia. | 20 cm / 8 inch dia. | 27.5 cm / 11 inch dia. |
| Butter | 100 g | 200 g | 400 g |
| Sugar | 75 g | 150 g | 300 g |
| Eggs, standard size | 1-2 | 3 | 5-6 |
| Self Raising Flour | 125 g | 250 g | 500 g |
| Mixed Dried Fruit | 100 g | 200 g | 400 g |
| Lemon Rind | 1/2 tsp 2.5 mls | 1 tsp / 5 mls | 2 tsp / 10 mls |
| Milk | 1 1/2 tblsp / 221/2 mls | 3 tblsp / 45mls | 6 tblsp / 90 mls |
Possible Variations:
Replace the dried fruit in the above recipe with one of the following:
| Glace Cherries, washed, dried and quartered | 100 g | 200 g | 400 g |
| Date and Walnut Dates, chopped Walnuts, chopped | 75 g 25 g | 150 g 50 g | 300 g 100 g |
| Banana, mashed Baking Powder | 1/2 ripe banana pinch | 1 ripe banana 1/4 tsp / 1.25 mls | 2 ripe banana 1/2 tsp / 2.5 mls |
| Orange Marmalade Orange Rind, grated | 1 heaped tblsp 1/2 orange | 2 heaped tblsps 1 orange | 4 heaped tblsps 2 orange |
(Important - use "Adjust Less" for best result when cooking any of the variations.)
Method
- Cream butter and sugar together.
Gradually add the beaten eggs. Stir in flour, fruit and lemon rind, mix well. Stir in enough milk to give a soft dropping consistency.
- Press "Cake / Pudding" key twice.
Place appropriate size of empty greased and lined cake tin on the turntable and close the door. Press "Weigh Dish" key.
-
When completed remove the dish from the oven and add the mixture, level the surface. Place on turntable and press "Start".
-
After cooking allow cake to stand for 10 minutes before turning out onto a cooling rack. Remove greaseproof paper.
-
When cool store in an airtight container.
(Note: Line tin with a circle of greaseproof paper)
AUTO SENSOR RECIPES (CONT.)
Cake / Pudding: Chocolate Brownies
| Cookware / Ingredient | Small Size | Standard Size | Large Size |
| Heatproof Square Cake Tin greased and lined | 15 cm x 15 cm (6" x 6") | 20 cm x 20 cm (8" x 8") | 22 cm x 22 cm (9" x 9") |
| Plain Chocolate, broken into pieces | 50 g | 100 g | 200 g |
| Butter | 50 g | 100 g | 200 g |
| Soft Brown Sugar | 50 g | 100 g | 200 g |
| Eggs, standard size | 1 | 2 | 4 |
| Self raising Flour | 50 g | 100 g | 200 g |
| Baking Powder | pinch | 1/4 tsp / 1.25 mls | 1/2 tsp / 2.5 mls |
| Walnuts, chopped | 25 g | 50 g | 100 g |
| Mixed Dried Fruit | 25 g | 50 g | 100 g |
| Vanilla Essence | few drops | few drops | few drops |
For the icing:
| Plain Chocolate,broken into pieces | 50 g | 100 g | 200 g |
| Butter | 6 g | 12 g | 25 g |
Method
- To make the cake mixture; Place the chocolate into a microwave safe bowl. Microwave on 900W for 1-2 minutes until melted. Mix well.
- Cream together the butter, sugar and vanilla essence. Stir in the beaten eggs, flour, baking powder and melted chocolate. Mix well. Fold in walnuts and fruit.
- Press "Cake / Pudding" key three times. Place appropriate size of empty greased and lined cake tin on the turntable and close the door. Press "Weigh Dish" key.
- When completed remove the dish from the oven and add the mixture, level the surface. Place on turntable and press "Start".
- After cooking allow cake to cool in tin. Do not ice until the brownies are cold.
- To make the icing; Place the chocolate in a microwave proof bowl. Microwave on 900W for 1-2 minutes until melted. Stir in the melted butter and mix well. Spread over cooled brownies. Allow to set then cut into squares. Store in an airtight container.
(Note: Line tin with a circle of greaseproof paper)
AUTO SENSOR RECIPES (CONT.)
Cake / Pudding: Flapjack
| Cookware / Ingredient | Small Size | Standard Size | Large Size |
| Heatproof Square Cake Tin greased and lined | 15 cm x 15 cm(6" x 6") | 20 cm x 20 cm(8" x 8") | 22 cm x 22 cm(9" x 9") |
| Butter | 75 g | 125 g | 250 g |
| Soft Brown Sugar | 50 g | 100 g | 200 g |
| Golden Syrup | 75 g | 125 g | 250 g |
| Rolled Oats | 125 g | 225 g | 450 g |
Variations: Add one of the following with the oats;
| Glace Cherries, quartered | 50 g | 100 g | 200 g |
| Rasins | 50 g | 100 g | 200 g |
Method
- Place the butter, sugar and syrup into a large microwaveproof bowl. Microwave on 900W for 1 - 2 1/2 minutes until melted. Mix well, stir in oats and mix well again.
- Press "Cake Pudding" key four times. Place appropriate size of empty greased and lined cake tin on the circular low metal rack on the turntable and close the door. Press "Weigh Dish" key.
- When completed remove the dish from the oven and add the mixture, press down lightly. Place on circular low rack on turntable and press "Start".
- After cooking allow to stand for 5-10 minutes before cutting into wedges.
- Store in an airtight container.
(Note: Line tin with a circle of greaseproof paper)
AUTO SENSOR RECIPES (CONT.)
Roast Chicken Program
Choice of 2 programs
The Roast Chicken program offers a choice of 2 programs for cooking either a whole chicken or pieces of chicken.
All recipes are for about 4 servings and are detailed on pgs 35 - 38
Whole Chicken
For cooking an unstuffed whole chicken.
Recommended recipes for;
Traditional Roast Chicken - Pg 35
Oriental Roast Chicken - Pg 35
Spicy Roast Chicken - Pg 36
Pieces Chicken
For cooking chicken wings, thighs, drumsticks, etc.
Recommended recipes for;
Spiced Chicken Wings - Pg 37
Hot & Spicy Grilled Chicken - Pg 37
Tandoori Chicken - Pg 38
Garlic Chicken - Pg 38
Whole Chicken:
Traditional Roast Chicken
Ingredients
1.1 - 1.4 kg whole chicken, washed, without giblets.
Marinade
25 g butter, melted
1 onion peeled, whole
1 lemon wedge
Streaky bacon rashers (optional)
Cookware
Low circular rack on drip tray on turntable.
Method
-
Place peeled onion & lemon wedge in body cavity. Brush chicken with melted butter. Place bacon rashers over breast.
-
Press "Roast Chicken" once. Place low circular rack on drip tray on turntable. Press "Weigh Dish" key.
-
Place chicken breast side up on low rack. Press "Start".
-
Remove from oven, and stand for 5 to 10 minutes.
Whole Chicken:
Oriental Roast Chicken
Ingredients
1.1 - 1.4 kg whole chicken, washed, without giblets.
Marinade
2 tsp / 10ml dark soy sauce
1 tsp / 5ml salt
1 tsp / 5ml honey
1 tsp / 5ml sesame oil
3 cloves garlic, crushed
2 tsp / 10ml grated ginger
Cookware
Low circular rack on drip tray on turntable.
Method
-
Combine marinade ingredients. Place chicken in a bowl and pour marinade over chicken inside and out. Marinate for 1 hour at least in the refrigerator.
-
Press "Roast Chicken" once. Place low circular rack on drip tray on turntable. Press "Weigh Dish" key.
-
Place chicken breast side up on low rack. Press "Adjust Less" key for best result. Press "Start".
-
Remove from oven and stand for 5 to 10 minutes.
AUTO SENSOR RECIPES (CONT.)
Whole Chicken: Spicy Roast Chicken
Ingredients
1.0 - 1.4 kg whole chicken, washed, without giblets.
Marinade
2 tbsp / 30ml sugar
2 tsp / 10ml five-spice powder
1/2 tsp / 2.5ml pepper
1 tbsp / 15ml milk
2 tbsp / 30ml light soy sauce
2 cloves garlic, crushed
2 tbsp / 30ml ginger juice
1 tsp / 5ml rice wine or chinese wine salt to taste
Cookware
Low circular rack on drip tray on turntable.
Method
- Combine marinade ingredients. Place chicken in a bowl and pour marinade over chicken inside and out. Marinate for 4 hours or overnight in the refrigerator.
- Press "Roast Chicken" once. Place low rack on drip tray on turntable. Press "Weigh Dish" key.
- Place chicken breast side up on low rack. Press "Start".
- Remove from oven and stand for 5 to 10 minutes.
AUTO SENSOR RECIPES (CONT.)
Chicken Pieces: Spiced Chicken Wings
Ingredients
500 - 600g chicken wings
Marinade
2 tbsp / 30ml dark soy sauce
2 tsp / 10ml grated ginger
2 cloves garlic, crushed
1 tbsp / 15ml rice wine or chinese wine
1 tbsp / 15ml honey
1 tsp / 5ml five-spice powder
Cookware
Circular low rack on drip tray on turntable.
Method
- Combine marinade ingredients in a bowl. Add chicken wings and marinate for 2 hours at least.
- Press "Roast Chicken" twice. Place low rack on drip tray on turntable. Press "Weigh Dish" key.
- Place chicken wings on low rack. Press "Start".
- Remove from oven.
Chicken Pieces: Hot & Spicy Grilled Chicken
Ingredients
600 - 800g chicken pieces (thighs or drumsticks)
Marinade
1 tsp / 5ml salt
1 tbsp / 15ml black pepper
2 tsp / 10ml chilli powder
1 medium onion, finely grated
2 cloves garlic, crushed
2 tbsp / 30ml dark soy sauce
2 tsp / 10ml sugar
2 tbsp / 30ml lemon juice
2 tbsp / 30ml oil
Cookware
Circular low rack on drip tray on turntable.
Method
- Pierce chicken skin with a fork.
- Combine marinade ingredients in a bowl. Add chicken pieces and marinate for 1 hour.
- Press "Roast Chicken" twice. Place low rack on drip tray on turntable. Press "Weigh Dish" key.
- Place chicken pieces skin side up on low rack. Press "Start".
- Remove from oven.

AUTO SENSOR RECIPES (CONT.)
Chicken Pieces: Tandoori Chicken
Ingredients
500 - 600g chicken breasts, cut into halves
Marinade
100ml plain yoghurt
1 medium onion, grated
1 tsp / 5ml grated ginger
1 clove garlic, crushed
1 tbsp / 15ml lemon juice
1 tsp / 5ml salt
20g curry powder
paprika, cummin, cardamon and nutmeg to taste
Cookware
Circular low rack on drip tray on turntable.
Method
- Pierce chicken skin with a fork.
- Combine marinade ingredients in a bowl. Add chicken breasts and marinate for 4 hours or overnight in the refrigerator.
- Press "Roast Chicken" twice. Place low rack on drip tray on turntable. Press "Weigh Dish" key.
- Place chicken breasts skin side up on low rack. Press "Start".
- Remove from oven.
Chicken Pieces: Garlic Chicken
Ingredients
600 - 800g chicken pieces (thighs or drumsticks)
Marinade
6 cloves garlic, crushed
1 tsp / 5ml salt
1 tbsp / 15ml pepper
2 tbsp / 30ml lemon juice
turmeric, coriander, mustard powder to taste
Cookware
Circular low rack on drip tray on turntable.
Method
- Pierce chicken skin with a fork.
- Combine marinade ingredients in a bowl. Add chicken pieces and marinate for 1 hour or overnight in the refrigerator.
- Press "Roast Chicken" twice. Place low rack on drip tray on turntable. Press "Weigh Dish" key.
- Place chicken pieces skin side up on low rack. Press "Start".
- Remove from oven.
AUTO SENSOR RECIPES (CONT.)
Fish Program
The fish program offers a choice of 2 programs for cooking baked or steamed fish.
All recipes are detailed in pages 39 - 41
Baked Fish
Recommend recipes for;
Trout with Almonds - Pg 39
Stuffed Baked Fish - Pg 39
Steamed Fish
Recommend recipes for;
Spicy Sauce Steamed Fish - Pg 41
Fish Fillets with Mushroom - Pg 41
Baked Fish
Trout with Almonds
Ingredients
1 - 4 medium trout, washed and gutted lemon juice
a few flaked almonds
butter
salt and pepper to taste
Cookware
Micro and heatproof dish.
Method
-
Press "Fish", once.
-
Place empty dish on turntable. Press "Weigh Dish" key.
-
When completed place prepared fish in dish and sprinkle with lemon juice, flaked almonds, salt and pepper. Dot with butter.
-
Place uncovered dish on turntable and press "Start".
Baked Fish
Stuffed Whole Fish
Ingredients
1 - 4 medium whole fish, washed and gutted
lemon juice
butter
salt and pepper to taste
1 quantity of stuffing (see recipes on next page)
Cookware
Micro and heatproof dish.
Method
-
Place stuffing into body cavity. Secure with cotton tied around fish (or secure with wooden cocktail sticks).
-
Press "Fish", once.
-
Place empty dish on turntable. Press "Weigh Dish" key.
-
When completed place prepared fish in dish and sprinkle with lemon juice, salt and pepper. Dot with butter.
-
Place uncovered dish on turntable and press "Start".
-
After cooking remove cotton and serve. (Note; Fish fillets maybe used in place of whole fish. Place stuffing on fillet and carefully roll up. Secure with cotton)
AUTO SENSOR RECIPES (CONT.)
Stuffings for Baked Fish
The recipes below make sufficient stuffing for 3-4 medium whole fish.
Simply mix all the ingredients together well and bind with the milk.
Prawn Stuffing
100g / 4oz fresh white breadcrumbs
1 level tblsp finely chopped fresh parsley (or 1/2 to 1 tsp dried)
1/2 tsp finely grated lemon rind
50g / 2oz peeled prawns, coarsely chopped
1/2 tsp salt
25g / 1oz melted butter
milk to bind
Orange and Herb Stuffing
1 small onion, very finely chopped or grated
finely grated rind and juice if 1 medium orange
2 level tblsps finely chopped parsley (or 1 tsp dried)
1/2 tsp salt
25g / 1oz melted butter
milk to bind
100g / 4oz fresh white breadcrumbs
Apple and Herb Stuffing
100g / 4oz fresh white breadcrumbs
1 eating apple - peeled, cored and finely chopped
finely grated rind and juice of 1 lemon
2 level tsp finely chopped fresh parsley (or 1 tsp dried)
25g / 1 oz melted butter
milk to bind
Celery and Tomato Stuffing
100g / 4oz fresh white breadcrumbs
2 level tblsps finely chopped celery
2 skinned and chopped tomatoes
1/2 tsp salt
dash of lemon juice
25g / 1oz melted butter
milk to bind
Lemon and Herb Stuffing
100g / 4oz fresh white breadcrumbs
1 level tblsp finely chopped fresh parsley (or 1/2 tsp dried)
1 level tsp finely grated lemon rind dash of lemon juice
1 level dstsp fresh thyme (or 1/2 tsp dried)
1/2 tsp salt
pinch of white pepper
25g / 1oz melted butter
milk to bind
AUTO SENSOR RECIPES (CONT.)
Steamed Fish: Spicy Sauce Steamed Fish
Ingredients
1 (300-500g) pomfret or sea / fresh water whole fish
1 red chilli, finely chopped
50g shallots or onion, finely chopped
4 cloves garlic, finely chopped
1 tsp / 5ml oil
2 tbsp / 30ml preserved soybean paste
1 tbsp / 15ml oyster sauce
1/2 tbsp / 7.5ml sugar
60ml water
Cookware
Microwave-safe oval casserole or deep dish, place on turntable.
Method
- Wash and gut fish, dry and set aside.
- Combine chilli, shallots, garlic and oil in a microwave-safe bowl. Microwave cook on 900W for 2 minutes.
- Add soybean paste, oyster sauce, sugar and water in hot mixture, stir and microwave cook on 900W for 1 minute.
- Press "Fish" twice, Place a empty microwave-safe oval casserole or deep dish on turntable. Press "Weigh Dish" key.
- Place fish in the casserole or dish. Pour hot mixture over fish. Cover with plastic wrap. Place in oven. Press "Start".
Steamed Fish:
Fish Fillets with Mushroom
Ingredients
450g fish fillets
2 tbsp / 30ml butter
2 tbsp / 30ml white wine
1/2 tsp / 2.5ml lemon juice
50g mushrooms, sliced
2 green onions, finely chopped
150g tomato, diced
1/2 tsp / 2.5ml salt
Cookware
Microwave-safe oval casserole or deep dish, place on turntable.
Method
- Press "Fish" twice, Place a empty microwave-safe oval casserole or deep dish on turntable. Press "Weigh Dish" key.
- Place fish fillets in the casserole or dish. Dot with butter.
- Combine wine and lemon juice and pour over fish. Sprinkle with mushrooms, green onion and tomato.
- Cover with plastic wrap. Place in oven. Press "Start".
AUTO SENSOR RECIPES (CONT.)
Casserole Program
Choice of 4 programs
The "Casserole" program offers a choice of 4 programs for cooking a range of casseroles.
All recipes are to be found on pages 42 - 53.
1. Beef Casserole
For cooking of stewing beef i.e longer, slower cooking to allow meat to tenderise.
Recommended recipes for; Beef Casserole - Pg 49 Hungarian Beef Goulash - Pg 49 Beef Borgignonne - Pg 50
2. Chicken Casserole
For cooking whole chicken portions with or without bone in sauce.
Recommended recipes for; Chicken Cacciatore- Pg 51 Coq Au Vin - Pg 51 Chicken and Herb Casserole - Pg 52
3. Curry
For boneless meat pieces in sauce.
Recommended recipes for; Beef Curry with Apricots - Pg 52 Sweet and Sour Chicken / Pork - Pg 53 Fruity Chicken Curry - Pg 53
4. Minced Meat
For savoury dishes based on minced beef.
Recommended recipes for; Savoury Mince - Pg 54 Chilli Con Carne - Pg 55 Beef Bolognese - Pg 55
Beef Casserole Program Beef Casserole
| Ingredients | 1 Serving | 2 Servings | 4 Servings | 6 Servings |
| Braising Steak, cubed | 100g | 175g | 350g | 500g |
| Seasoned flour (seasoned with a stock cube, salt and pepper.) | 2 tsps / 10 mls | 1 tblsp / 15 mls | 11/2 tblsp / 23 mls | 2 tblsp / 30 mls |
| Onion, peeled and sliced | 1/2 onion | 1 onion | 1 onion | 11/2 onion |
| Carrot, peeled and sliced | 1/2 carrot | 1 carrot | 1-2 carrots | 2 carrots |
| Canned Chopped Tomatoes | 75 g | 100 g | 200 g | 300 g |
| Beef Stock, hot | 100 mls | 150 mls | 300 mls | 450 mls |
| Worcester Sauce | dash | dash | dash | dash |
| Bouquet Garni | 1 | 1 | 1 | 1 |
| Salt and Black Pepper | to taste | to taste | to taste | to taste |
Method
- Preparation:
Toss meat in seasoned flour. - Press "Casserole", key once. Place large empty casserole dish or bowl AND lid onto turntable and press "Weigh Dish" key.
- When stage 2 is completed, place all ingredients into the large casserole dish or bowl and mix very well. Cover dish or bowl and mix very well. Cover dish and place on turntable, press "Start".
- At the pause:
Stir well. Recover dish and return to the oven.
Press "Start". - After cooking:
Stir well and serve.
Cookware
Large microwaveproof casserole dish or bowl with lid.
AUTO SENSOR RECIPES (CONT.)
Beef Casserole Program Hungarian Beef Goulash
| Ingredients | 1 Serving | 2 Servings | 4 Servings | 6 Servings |
| Braising Steak, cubed | 100g | 175g | 350g | 500g |
| Seasoned flour (seasoned with a stock cube, salt and pepper.) | 2 tsps / 10 mls | 1 tblsp / 15 mls | 11/2 tblsp / 23 mls | 2 tblsp / 30 mls |
| Onion, peeled and sliced | 1/2 onion | 1 onion | 1 onion | 1 1/2 onion |
| Green Pepper | 1/2 pepper | 1/2 pepper | 1 pepper | 1 1/2 pepper |
| Canned Chopped Tomatoes | 75 g | 100 g | 200 g | 300 g |
| Beef Stock, hot | 75 mls | 150 mls | 300 mls | 450 mls |
| Tomato Puree | 1 tsp / 5 mls | 2 tsps / 10 mls | 1 tblps / 15 mls | 1 tblps / 15 mls |
| Paprika | 1/2 tsp / 2.5 mls | 1 tsp / 5 mls | 2 tsps / 10 mls | 3 tsps / 15 mls |
| Nutmeg | pinch | pinch | pinch | pinch |
| Bouquet Garni | 1 | 1 | 1 | 1 |
| Salt and Black Pepper | to taste | to taste | to taste | to taste |
| Sour Cream | 25 mls | 50 mls | 100 mls | 150 mls |
Method
- Preparation: Toss meat in seasoned flour.
- Press "Casserole", key once. Place large empty casserole dish or bowl AND lid onto turntable and press "Weigh Dish" key.
- When stage 2 is completed, place all ingredients (except sour cream) into the large casserole dish or bowl and mix very well. Cover dish and place on turntable, press "Start".
- At the pause: Stir well. Recover dish and return to the oven. Press "Start".
- After cooking: Stir well and add sour cream, serve.
Cookware
Large microwaveproof casserole dish or bowl with lid.
AUTO SENSOR RECIPES (CONT.)
Beef Casserole Program Beef Bourgignonne
| Ingredients | 1 Serving | 2 Servings | 4 Servings | 6 Servings |
| Braising Steak, cubed | 100g | 175g | 350g | 500g |
| Seasoned flour (seasoned with a stock cube, salt and pepper.) | 2 tsps / 10 mls | 1 tblsp / 15 mls | 2 tblsps / 30 mls | 3 tblsps / 45 mls |
| Onion, peeled and sliced | 12 onion | 1 onion | 1 onion | 112 onion |
| Streaky Bacon, chopped | 1 rasher | 2 rasher | 3 rasher | 4 rasher |
| Garlic, crushed | 12 clove | 1 clove | 1 clove | 2 cloves |
| Mushrooms, sliced | 25 g | 50 g | 100 g | 150 g |
| Carrot, peeled and sliced | 12 carrot | 1 carrot | 112 carrot | 2 carrot |
| Beef Stock, hot | 75 mls | 150 mls | 300 mls | 450 mls |
| Tomato Puree | 1 tsp / 5 mls | 2 tsp / 10 mls | 1 tblsp / 15 mls | 112 tblsp / 15 mls |
| Red Wine | 75 mls | 150 mls | 300 mls | 75 mls |
| Bouquet Garni | 1 | 1 | 1 | 1 |
| Salt and Black Pepper | to taste | to taste | to taste | to taste |
Method
- Preparation: Toss meat in seasoned flour.
- Press "Casserole", key once. Place large empty casserole dish or bowl AND lid onto turntable and press "Weigh Dish" key.
- When stage 2 is completed, place all ingredients into the large casserole dish or bowl and mix very well. Cover dish and place on turntable, press "Start".
- At the pause: Stir well. Recover dish and return to the oven. Press "Start".
- After cooking: Stir well and serve.
Cookware
Large microwaveproof casserole dish or bowl with lid.
AUTO SENSOR RECIPES (CONT.)
Chicken Casserole Program Chicken Cacciatore
| Ingredients | 1 Serving | 2 Servings | 4 Servings | 6 Servings |
| Chicken Portions, skinned approx. 200g each | 1 portion @ 200g | 2 portions @ 400g | 4 portions @ 800g | 6 portions @ 1200g |
| Vegetable Oil | 1 tsp / 5 mls | 2 tsps / 10 mls | 1 tblsp / 15 mls | 112 tblsp / 23 mls |
| Onion, peeled and chopped | 12 onion | 1 small onion | 1 med. onion | 112 onion |
| Garlic, crushed | 12 clove | 1 clove | 2 cloves | 3 cloves |
| Plain Flour | 2 tsps / 10 mls | 1 tblsp / 15 mls | 2 tblsps / 30 mls | 3 tblsps / 45 mls |
| Mushrooms, sliced | 25 g | 50 g | 100 g | 150 g |
| Canned Chopped Tomatoes | 100g | 200g | 300 g | 400g |
| Tomato Puree | 2 tsps / 10 mls | 1 tblsp / 15 mls | 2 tblsps / 30 mls | 3 tblsps / 45 mls |
| Bay Leaves | 1 | 1 | 1-2 | 2 |
| Oregano, dried | pinch | 12 tsp / 2.5 mls | 1 tsp / 5 mls | 112 tsp / 7.5 mls |
| Basil, dried | pinch | 12 tsp / 2.5 mls | 1 tsp / 5 mls | 112 tsp / 7.5 mls |
| Sugar | pinch | pinch | pinch | pinch |
| Chicken Stock or White Wine | 75 mls | 100 mls | 150 mls | 225 mls |
| Salt and Black Pepper | to taste | to taste | to taste | to taste |
Method
- Preparation:
Place oil, onion and garlic into a microwaveproof bowl, cover and cook on 900W microwave for 2-3 minutes. Stir in flour and blend in stock and wine. Add all remaining ingredients EXCEPT chicken, mix well. Cover and cook on 900W microwave for 1-2 minutes.
-
Press "Casserole", key twice. Place large empty casserole dish or bowl AND lid onto turntable and press "Weigh Dish" key.
-
When stage 2 is completed, place chicken into the large casserole dish or bowl, add sauce and mix very well. Cover dish and place on turntable, press "Start".
-
At the pause:
Stir well. Recover dish and return to the oven. Press "Start".
- After cooking:
Stir well and serve.
Cookware
Large microwaveproof casserole dish or bowl with lid.
AUTO SENSOR RECIPES (CONT.)
AUTO SEM
Chicken Casserole Program Coq Au Vin
| Ingredients | 1 Serving | 2 Servings | 4 Servings | 6 |
| Chicken Portions, skinned approx. 200g each | 1 portion@ 200g | 2 portion@ 400g | 4 portion@ 800g | |
| Vegetable Oil | 1 tsp / 5 mls | 2 tsps / 10 mls | 1 tblsp / 15 mls | 112 l |
| Onion, peeled and chopped | 1/2 onion | 1 small onion | 1 med. onion | |
| Garlic, crushed | 1/2 clove | 1 clove | 1 - 2 cloves | |
| Streaky Bacon, chopped | 1 rasher | 2 rashers | 3 rashers | |
| Plain Flour | 1 tsp / 5 mls | 1 tblsp / 15 mls | 112 tblsp / 15 mls | 2 tbl |
| Mushrooms, sliced | 25 g | 50 g | 100 g | |
| Tomato Puree | 1 tsp / 5 mls | 2 tsps / 10 mls | 1 tblsp / 15 mls | 112 t |
| Bay Leaves | 1 | 1 | 1-2 | |
| Bouquet Garni | 1 | 1 | 1 | |
| Red Wine | 100 mls | 150 mls | 300 mls | |
| Chicken Stock, hot | 150 mls | 150 mls | 300 mls | |
| Salt and Black Pepper | to taste | to taste | to taste |
Method
- Preparation:
Place oil, onion and garlic into a microwaveproof bowl, cover and cook on 900W microwave for 2-3 minutes. Stir in flour and blend in stock and wine. Add all remaining ingredients EXCEPT chicken, mix well. Cover and cook on 900W microwave for 1-2 minutes. - Press "Casserole", key twice. Place empty large casserole dish or bowl AND lid onto turntable and press "Weigh Dish" key.
- When stage 2 is completed, place chicken into the large casserole dish or bowl, add sauce and mix very well. Cover dish and place on turntable, press "Start".
- At the pause: Stir well. Recover dish and return to the oven. Press "Start".
- After cooking: Stir well and serve.
Cookware
Large microwaveproof casserole dish lid.

| Ingredie |
| Beef Topside, cube |
| Vegetable Oil |
| Onion, peeled and |
| Garlic, crushed |
| Curry Powder, mild |
| Plain Flour |
| Tomato Puree |
| Lemon Juice |
| Mango Chutney |
| Sultanas |
| Dried Apricots, cho |
| Canned, chopped t |
| Beef Stock, hot |
Method
- Preparation: Place oil, onion & cook using micro in flour and curry
- Press "Casserol large casserole and press "Weig
- When stage 2 is into the large case well. Cover dish: "Start".
- At the pause: Stir well. Recove Press "Start".
- After cooking: Stir well and serv
AUTO SENSOR RECIPES (CONT.)
Chicken Casserole Program Chicken and Herb Casserole
| Ingredients | 1 Serving | 2 Servings | 4 Servings | 6 Servings |
| Chicken Portions, skinned approx. 200g each | 1 portion@ 200g | 2 portion@ 400g | 4 portion@ 800g | 6 portion@ 1200g |
| Vegetable Oil | 1 tsp / 5 mls | 2 tsps / 10 mls | 1 tblsp / 15 mls | 1_1/2 tblsp / 15 mls |
| Onion, peeled and chopped | 1/2 onion | 1 small onion | 1 med. onion | 1_1/2 onion |
| Garlic, crushed | 1/2 clove | 1 clove | 1 - 2 cloves | 2 cloves |
| Streaky Bacon, chopped | 1 rasher | 2 rashers | 3 rashers | 4 rasher |
| Plain Flour | 1 tsp / 5 mls | 1 tblsp / 15 mls | 1_1/2 tblsp / 15 mls | 2 tblsps / 30 mls |
| Mushrooms, sliced | 25 g | 50 g | 100 g | 150 g |
| Tomato Puree | 1 tsp / 5 mls | 2 tsps / 10 mls | 1 tblsp / 15 mls | 1_1/2 tblsp / 23 mls |
| Bay Leaves | 1 | 1 | 1-2 | 2 |
| Bouquet Garni | 1 | 1 | 1 | 1 |
| Red Wine | 100 mls | 150 mls | 300 mls | 450 mls |
| Chicken Stock, hot | 150 mls | 150 mls | 300 mls | 450 mls |
| Salt and Black Pepper | to taste | to taste | to taste | to taste |
Method
- Preparation:
Place oil, onion and garlic into a microwaveproof bowl, cover and cook on 900W microwave for 2-3 minutes. Stir in flour and blend in stock and wine. Add all remaining ingredients EXCEPT chicken, mix well. Cover and cook on 900W microwave for 1-2 minutes. - Press "Casserole", key twice. Place empty large casserole dish or bowl AND lid onto turntable and press "Weigh Dish" key.
- When stage 2 is completed, place chicken into the large casserole dish or bowl, add sauce and mix very well. Cover dish and place on turntable, press "Start".
- At the pause:
Stir well. Recover dish and return to the oven.
Press "Start".
- After cooking:
Stir well and serve.
Cookware
Large microwaveproof casserole dish or bowl with lid.
AUTO SENSOR RECIPES (CONT.)
Curry Program Beef Curry with Apricots
| Ingredients | 1 Serving | 2 Servings | 4 Servings | 6 Servings |
| Beef Topside, cubed | 125 g | 225 g | 450 g | 675 g |
| Vegetable Oil | 1 tsp / 5 mls | 2 tsps / 10 mls | 1 tblsp / 15 mls | 112 tblsp / 23 mls |
| Onion, peeled and chopped | 1/2 onion | 1 small onion | 1 med. onion | 112 onions |
| Garlic, crushed | 1/2 clove | 1 clove | 2 cloves | 3 cloves |
| Curry Powder, mild or medium | 1/2 tblsp / 7.5 mls | 1 tblsp / 15 mls | 2 tblsps / 30 mls | 3 tblsps / 45 mls |
| Plain Flour | 2 tsps / 10 mls | 1/2 tblsp / 7.5 mls | 1 tblsp / 15 mls | 112 tblsps / 23 mls |
| Tomato Puree | 1 tsp / 5 mls | 2 tsps / 10 mls | 1 tblsp / 15 mls | 112 tblsps / 23 mls |
| Lemon Juice | 1 tsp / 5 mls | 1/2 tblsp / 7.5 mls | 1 tblsp / 15 mls | 112 tblsps / 23 mls |
| Mango Chutney | 1/2 tblsp / 7.5 mls | 1 tblsp / 15 mls | 2 tblsps / 30 mls | 3 tblsps / 45 mls |
| Sultanas | a few | 1212 g | 25 g | 50 g |
| Dried Apricots, chopped | 1212 g | 25 g | 50 g | 75 g |
| Canned, chopped tomatoes | 100 g | 200 g | 400 g | 600 g |
| Beef Stock, hot | 50 mls | 100 mls | 200 mls | 300 mls |
Method
- Preparation: Place oil, onion and garlic into a bowl, cover and cook using microwave 900W for 1-2 minutes. Stir in flour and curry powder and mix well.
- Press "Casserole", key three times. Place empty large casserole dish or bowl AND lid onto turntable and press "Weigh Dish" key.
- When stage 2 is completed, place all ingredients into the large casserole dish or bowl and mix very well. Cover dish and place on turntable, press "Start".
- At the pause: Stir well. Recover dish and return to the oven. Press "Start".
- After cooking: Stir well and serve with rice.
Cookware
Large microwaveproof casserole dish or bowl with lid.
AUTO SENSOR RECIPES (CONT.)
Curry Program Fruity Chicken Curry
| Ingredients | 1 Serving | 2 Servings | 4 Servings | 6 Servings |
| Boneless Chicken Meat, cubed | 125 g | 225 g | 450 g | 675 g |
| Vegetable Oil | 1 tsp / 5 mls | 2 tsps / 10 mls | 1 tblsp / 15 mls | 112 tblsp / 23 mls |
| Onion, peeled and chopped | 1/2 onion | 1 small onion | 1 med. onion | 112 onions |
| Garlic, crushed | 1/2 clove | 1 clove | 2 cloves | 3 cloves |
| Curry Powder, mild or medium | 1/2 tblsp / 7.5 mls | 1 tblsp / 15 mls | 2 tblsps / 30 mls | 3 tblsps / 45 mls |
| Plain Flour | 2 tsps / 10 mls | 1/2 tblsp / 7.5 mls | 1 tblsp / 15 mls | 112 tblsps / 23 mls |
| Tomato Puree | 1 tsp / 5 mls | 2 tsps / 10 mls | 1 tblsp / 15 mls | 112 tblsps / 23 mls |
| Lemon Juice | 1 tsp / 5 mls | 1/2 tblsp / 7.5 mls | 1 tblsp / 15 mls | 112 tblsps / 23 mls |
| Mango Chutney | 1/2 tblsp / 7.5 mls | 1 tblsp / 15 mls | 2 tblsps / 30 mls | 3 tblsps / 45 mls |
| Sultanas | a few | 1212 g | 25 g | 50 g |
| Eating Apple, peeled and chopped | 1/2 apple | 1 small apple | 1 med. apple | 112 med. apple |
| Canned, chopped tomatoes | 100 g | 200 g | 400 g | 600 g |
| Chicken Stock, hot | 50 mls | 100 mls | 200 mls | 300 mls |
Method
- Preparation:
Place oil, onion and garlic into a bowl, cover and cook using microwave 900W for 1-2 minutes. Stir in flour and curry powder and mix well. - Press "Casserole", key three times. Place empty large casserole dish or bowl AND lid onto turntable and press "Weigh Dish" key.
- When stage 2 is completed, place all ingredients into the large casserole dish or bowl and mix very well. Cover dish and place on turntable, press "Start".
- At the pause: Stir well. Recover dish and return to the oven. Press "Start".
- After cooking: Stir well and serve with rice.
Cookware
Large microwaveproof casserole dish or bowl with lid.

AUTO SENSOR RECIPES (CONT.)
Curry Program Sweet and Sour Chicken / Pork
| Ingredients | 1 Serving | 2 Servings | 4 Servings | 6 Servings |
| Boneless Chicken or Pork, cubed | 125 g | 225 g | 450 g | 675 g |
| Cornflour | 2 tsp / 10 mls | 1 tblsp / 15 mls | 2 tblsps / 30 mls | 3 tblsps / 45 mls |
| Cold Water | 75 mls | 100 mls | 200 mls | 300 mls |
| Tomato Puree | 1 tsp / 5 mls | 2 tsps / 10 mls | 1 tblsp / 15 mls | 1_1/2 tblsp / 23 mls |
| Soft Brown Sugar | 2 tsps / 10 mls | 1 tblsp / 15 mls | 2 tblsps / 30 mls | 3 tblsps / 45 mls |
| Soy Sauce | 1 tsp / 5 mls | 2 tsps / 10 mls | 1 tblsp / 15 mls | 1_1/2 tblsp / 23 mls |
| Ginger, ground | pinch | pinch | pinch | pinch |
| Paprika | pinch | 1/2 tsps / 2.5 mls | 1 tsp / 5 mls | 1_1/2 tsps / 7.5 mls |
| Salt | to taste | to taste | to taste | to taste |
| Malt Vinegar | 1 tblsp / 15 mls | 1_1/2 tblsp / 23 mls | 3 tblsps / 45 mls | 4_1/2 tblsp / 67 mls |
| Pineapple chunks in own juice | 100 g | 200 g | 400 g | 600 g |
| Onion, peeled and chopped | 1/2 onion | 1 small onion | 1 med. onion | 1_1/2 onion |
| Green Pepper, deseeded and cut into strips | 1/2 pepper | 1 small pepper | 1 med. pepper | 1 large pepper |
| Carrots, peeled and cut into strips | 1/2 carrot | 1 carrot | 1-2 carrots | 2 carrots |
| Mushrooms, washed and sliced | 2 mushrooms | 2-3 mushrooms | 3-4 mushrooms | 4-5 mushrooms |
Method
- Preparation:
Drain juice from pineapple chunks. Blend the corn flour with the cold water and pineapple juice. Blend in the sugar, soy sauce, paprika, ginger, vinegar, salt and tomato puree. Microwave covered on 900W for 2-4 minutes until sauce becomes clear. Stir well with a whisk.
-
Press "Casserole", key three times. Place empty large casserole dish or bowl AND lid onto turntable and press "Weigh Dish" key.
-
When stage 2 is completed, combine all the meat and vegetables together with sauce in the large casserole dish or bowl and mix very well. Cover dish and place on turntable, press "Start".
-
At the pause:
Stir well. Recover dish and return to the oven. Press "Start".
- After cooking:
Stir well and serve with rice or noodles.
Cookware
Large microwaveproof casserole dish or bowl with lid.
AUTO SENSOR RECIPES (CONT.)
Minced Meat Program Savoury Minced Meat
| Ingredients | 1 Serving | 2 Servings | 4 Servings | 6 Servings |
| Minced Beef | 100 g | 225 g | 450 g | 675 g |
| Vegetable Oil | 1 tsp / 5 mls | 2 tsps / 10 mls | 1 tblsp / 15 mls | 112 tblsp / 15 mls |
| Onion, peeled and chopped | 12 onion | 1 small onion | 1 med. onion | 112 onions |
| Celery, chopped (optional) | 12 stick | 1 stick | 1-2 sticks | 2-3 sticks |
| Mixed Herbs, dried | 1 tsp / 5 mls | 2 tsps / 10 mls | 3 tsps / 15 mls | 4 tsps / 20 mls |
| Tomato Puree | 1 tsp / 5 mls | 2 tsps / 10 mls | 1 tblsp / 15 mls | 2 tblsps/ 30 mls |
| Mushrooms, sliced | 15 g | 25 g | 50 g | 75 g |
| Carrots, peeled and sliced | 1 | 2 | 3 | 4 |
| Beef Stock | 150 mls | 300 mls | 450 mls | 600 mls |
| Salt and Black Pepper | to taste | to taste | to taste | to taste |
| Cornflour | 1 tsp / 5 mls | 2 tsps / 10 mls | 3 tsps / 15 mls | 4 tsps / 20 mls |
Method
- Preparation:
Place minced beef, oil, onion and celery into a microwaveproof bowl, cover and cook on 900W microwave for 3-4 minutes. Stir twice and break up minced beef. - Press "Casserole", key four times. Place empty large casserole dish or bowl AND lid onto turntable and press "Weigh Dish" key.
- When stage 2 is completed, place all ingredients except cornflour, into the large casserole dish or bowl and mix very well. Cover dish and place on turntable, press "Start".
- At the pause: Stir well. Mix the cornflour to a smooth paste with a little cold water and stir into the meat mixture. Recover dish and return to the oven. Press "Start".
- After cooking: Stir well and serve. Serving suggestion - Cottage Pie - Top with mashed potato and crisp top under grill.
Cookware
Large microwaveproof casserole dish or bowl with lid.

AUTO SENSOR RECIPES (CONT.)
Minced Meat Program
Chilli Con Carne
| Ingredients | 1 Serving | 2 Servings | 4 Servings | 6 Servings |
| Minced Beef | 100 g | 175 g | 350 g | 500 g |
| Vegetable Oil | 1 tsp / 5 mls | 2 tsps / 10 mls | 1 tblsp / 15 mls | 112 tblsp / 15 mls |
| Onion, peeled and chopped | 12 onion | 1 small onion | 1 med. onion | 112 onions |
| Garlic, crushed | 12 clove | 1 clove | 1-2 cloves | 2 cloves |
| Canned Chopped Tomatoes | 50 g | 100 g | 200 g | 300 g |
| Green Pepper, cleaned, deseeded and chopped | 12 pepper | 1 small pepper | 1 medium pepper | 1-2 peppers |
| Chili Powder, mild | 1 tsp / 5 mls | 2 tsps / 10 mls | 3 tsps / 15 mls | 4 tsps / 20 mls |
| Tomato Puree | 2 tsps / 10 mls | 1 tblsp / 15 mls | 2 tblsps / 30 mls | 3 tblsps / 45 mls |
| Tabasco Sauce | dash | dash | dash | dash |
| Red Kidney Beans, canned drained | 50 g | 100 g | 200 g | 300 g |
| Cornflour | 1 tsp / 5 mls | 2 tsps / 10 mls | 2-3 tsps / 15 mls | 3-4 tsps / 20 mls |
Method
- Preparation:
Place minced beef, oil, onion and garlic into a microwaveproof bowl, cover and cook on 900W microwave for 3-4 minutes. Stir twice and break up minced beef.
-
Press "Casserole", key four times. Place empty large casserole dish or bowl AND lid onto turntable and press "Weigh Dish" key.
-
When stage 2 is completed, place all ingredients except cornflour, into the large casserole dish or bowl and mix very well. Cover dish and place on turntable, press "Start".
-
At the pause:
Stir well and add the canned red kidney beans. Mix the cornflour to a smooth paste with a little cold water and stir into the meat mixture. Recover dish and return to the oven. Press "Start".
- After cooking:
Stir well and serve with rice.
Cookware
Large microwaveproof casserole dish or bowl with lid.
AUTO SENSOR RECIPES (CONT.)
Minced Meat Program Beef Bolognese
| Ingredients | 1 Serving | 2 Servings | 3 - 4 Servings | 5 - 6 Servings |
| Minced Beef | 100 g | 175 g | 350 g | 500 g |
| Vegetable Oil | 1 tsp / 5 mls | 2 tsps / 10 mls | 1 tblsp / 15 mls | 112 tblsp / 15 mls |
| Onion, peeled and chopped | 12 onion | 1 small onion | 1 med. onion | 112 onions |
| Celery, chopped (optional) | 12 stick | 1 stick | 1-2 sticks | 2-3 sticks |
| Garlic, crushed | 12 - 1 clove | 1-2 cloves | 2-3 cloves | 3-4 cloves |
| Streaky Bacon, chopped | 1 rasher | 2 rashers | 3 rashers | 4 rashers |
| Canned Chopped Tomatoes | 50 g | 100 g | 200 g | 300 g |
| Green Pepper, cleaned, deseeded and chopped | 14 pepper | 12 pepper | 1 pepper | 112 peppers |
| Oregano, dried | 1 tsp / 5 mls | 2 tsps / 10 mls | 3 tsps / 15 mls | 4 tsps / 20 mls |
| Bay Leaves | 1 | 1 | 1 or 2 | 2 |
| Tomato Puree | 2 tsps / 10 mls | 1 tblsp / 15 mls | 2 tblsps / 30 mls | 3 tblsps / 45 mls |
| Mushrooms, sliced | 15 g | 25 g | 50 g | 75 |
| Beef Stock (or red wine) | 50 mls | 75 mls | 100 mls | 150 mls |
| Salt and Black Pepper | to taste | to taste | to taste | to taste |
| Cornflour | 12 tsp / 2.5 mls | 1 tsp / 5 mls | 2 tsps / 10 mls | 3 tsps / 15 mls |
Method
- Preparation:
Place minced beef, oil, onion and garlic into a microwaveproof bowl, cover and cook on 900W microwave for 3-4 minutes. Stir twice and break up minced beef.
-
Press "Casserole", key four times. Place empty large casserole dish or bowl AND lid onto turntable and press "Weigh Dish" key.
-
When stage 2 is completed, place all ingredients except cornflour, into the large casserole dish or bowl and mix very well. Cover dish and place on turntable, press "Start".
-
At the pause:
Stir well. Mix the cornflour to a smooth paste with a little cold water and stir into the meat mixture. Recover dish and return to the oven. Press "Start".
- After cooking:
Stir well and serve with pasta.
Cookware
Large microwaveproof casserole dish or bowl with lid.

SLOW COOKING
A choice of two slow cook programs are available;
Slow Cook High - 300W - for the first stage of the slow cooking process.
Slow Cook Low - 150W - for continuing the slow cooking process by gently simmering the food.
This feature is convenient for busy life styles and is ideal for cooking soups, casseroles and stews.
Slow Cook Low (150W) may also be used for keeping food which is already piping hot warm.
Do not attempt to slow cook meals using only Slow Cook Low (150W), always begin cooking on Slow Cook High (300W) to bring food to simmering temperature and then continue gently cooking using Slow Cook Low (150W).
Maximum Cooking Time
1 Stage Slow Cooking - 12 hrs 2 Stage Slow Cooking - 24 hrs
The cooking time in the display will count down increments if 1 minute.eg
0H20 indicates 20 minutes 5H00 indicates 5 hours 10H40 indicates 10 hrs 40 mins.
Example: To cook a casserole using slow cook function: Slow Cook High for 30 minutes, followed by Slow Cook Low for 8 hours.
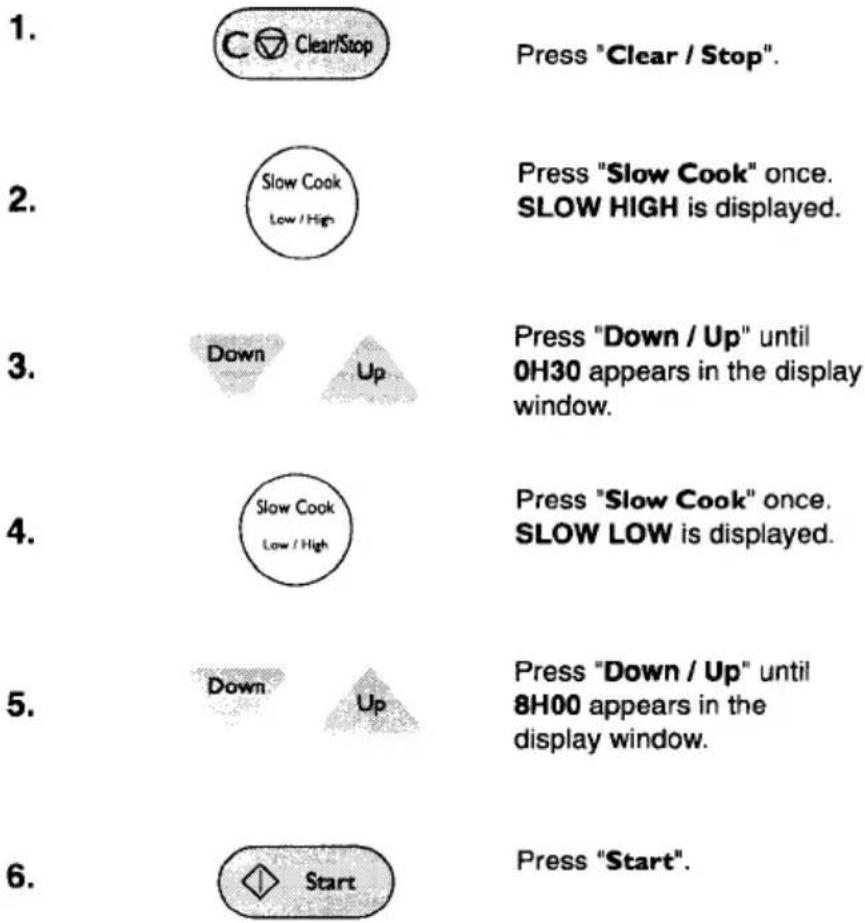
text_image
1. C Clear/Stop Press "Clear / Stop". 2. Slow Cook Low / High Press "Slow Cook" once. SLOW HIGH is displayed. 3. Down Up Press "Down / Up" until 0H30 appears in the display window. 4. Slow Cook Low / High Press "Slow Cook" once. SLOW LOW is displayed. 5. Down Up Press "Down / Up" until 8H00 appears in the display window. 6. Start Press "Start".You can set the slow cook cooking time in increments of 10 minutes.
SLOW COOKING (CONT.)
Important Tips for Best Results When Slow Cooking
Suitable foods for slow cooking;
Liquid dishes e.g casseroles and stews containing cubed meat or chicken joint pieces, soups, rice puddings. Root vegetables are particularly useful for slow cooking - cut into even sized pieces, the larger the size of the vegetables the longer cooking time they will require.
Most casseroles or soups are best cooked using 2 stage Slow Cooking - generally cook on Slow Cook High (300W for the initial 25 - 40 minutes, then simmer very gently on Slow Cook Low (150W) for several hours, usually a minimum of around 5 hours is required. You may stir if you wish but this is not essential.
Always ensure that the dish is covered by a close fitting lid to avoid drying out. Always ensure the dish is recovered after stirring.
Use sufficient liquid. Liquid may include water, stock, wine, fruit juice, beer or cider. The meat and vegetables should be immersed in the cooking liquid for best results and to avoid drying out.
Always use a large enough cooking dish - a large pyrex bowl covered with a microwave proof plate is ideal, this makes for easier mixing of ingredients and avoids the possibility of spillage.
Combine thickening agents e.g flour with the meat at the start of the cooking process or alternatively mix 1 - 2 tblsps of cornflour to a smooth paste with a little cold water and stir in 10 - 15 minutes before the end of cooking.
If adding cream or milk always do so at the end of cooking. Stir well after cooking.
Advantages of cooking casseroles / soups by Slow Cook:
You can start the cooking process early in the day, then go off to do other things and return to a cooked meal - there is little chance of the dish spoiling if your mealtime is a little delayed.
It is not essential to stir due to the gentle heating involved. (You may stir if you wish, it can only improve the cooking process). Due to the long, slow cooking process, tough meat is tenderised and flavours have time to fully develop.
Convenience and flexibility - meals are ready when you are - once food is thoroughly cooked and piping hot it can be kept warm using Slow Cook Low (150W).
Suggested Recipes
All recommended recipes for use with the Slow Cook feature, are detailed on the following pages.
French Onion Soup - pg 56
Tomato and Lentil Soup - pg 56
Winter Vegetable Soup - pg 57
Beef Casserole (serves 3 - 4) - pg 57
Beef Casserole (serves 2 - 3) - pg 58
Hungarian Beef Goulash - pg 58
Lamb and Vegetable Hotpot - pg 59
Chicken, Bacon and Tomato Casserole - pg 60
Pork Casserole with Cider - pg 61
Rice Pudding - pg 61
SLOW COOKING RECIPES
French Onion Soup
(Serves 6 - 8)
Ingredients
25g / 1oz butter
450g / 1lb onions, peeled and thinly sliced
900mls / 1 1/2 pints hot beef stock
5ml / 1 tsp worcester sauce
5ml / 1 tsp sugar
1 clove garlic, crushed - optional
30ml / 2tblsp flour
salt and pepper
1 bay leaf
5ml / 2 tsps dry sherry (optional)
Cookware
Large Pyrex bowl covered with a plate. Place on turntable.
Method
-
Place the butter into a large Pyrex mixing bowl, melt on '900W' power for 30 seconds. Stir in the onions and garlic, cover and cook on '900W' for 4 minutes. Stir in the flour and mix well. Pour on boiling stock and seasoning, except sherry. Mix well.
-
Cover and cook using 2 Stage Slow Cook - Slow Cook High for 30 - 35 minutes, followed by Slow Cook Low for 5 - 8 hours.
-
After stage 1 you may stir the soup, but this is not essential. Recover the dish and return to the oven.
-
After cooking stir well, remove bay leaf and stir in sherry.Serving idea; Sprinkle a little grated cheese onto slices of toasted french bread. Brown under grill. Add a slice of toast to each bowl of soup and serve immediately.
Variation
Cream of onion - stir in 150 mls / 1/4 pint double cream after cooking.
Tomato and Lentil Soup
(Serves 6 - 8)
Ingredients
25g / 1 oz butter
1 onion, peeled and finely chopped
2 rasher of streaky bacon, cut into small pieces
2 sticks celery, chopped
150g / 6 oz split red lentils
600mls / 1 pint hot vegetable or chicken stock
450mls / 3/4 pint tomato juice
2 carrots, peeled and chopped
salt and pepper
1 bay leaf
1 bouquet garni
Cookware
Large Pyrex bowl covered with a plate. Place on turntable.
Method
-
Place the butter into a large Pyrex mixing bowl, melt on '900W' for 30 seconds. Stir in onion and bacon, cover and cook on '900W' for 2 minutes. Stir in all remaining ingredients. Mix well.
-
Cover and cook using 2 Stage Slow Cook - Slow Cook High for 30 - 35 minutes, followed by Slow Cook Low for 6 - 9 hours.
-
After stage 1 you may stir the soup, but this is not essential. Recover the dish and return to the oven.
-
After cooking stir well, remove bay leaf and bouquet garni. Serve with fresh crusty bread. If a smoother result is required the soup may be liquidised after cooking.
SLOW COOKING RECIPES (CONT.)
Winter Vegetable Soup
(Serves 6 - 8)
Ingredients
Suggested Vegetables;
2 - 3 sticks celery, washed and chopped
1 large onion, peeled and sliced
2 - 3 carrots, peeled and sliced
1/2 swede, peeled and diced
(approx. 1 - 1 1/2 cm cubes)
1 potato, peeled and diced
(approx. 1 - 1 1/2 cm cubes)
50g / 2oz butter
50g / 2oz plain flour
400g / 16oz canned chopped tomatoes
750mls / 1 1/2 pints hot chicken stock
1 bay leaf
1 bouquet garni
1/2 tsp dried mixed herbs (optional)
salt and white pepper
Note:-
The total weight of the prepared vegetables should be approx. 900g / 2lb. Any winter root vegetables may be used and the proportions of each may be varied according to taste provided the total prepared weight remains around 900g / 2lb.
Cookware
Large microwave proof bowl e.g Pyrex mixing bowl covered with a plate. Place on turntable.
Method
- Melt the butter in a large microwave proof bowl on '900W' for 30 seconds. Add the prepared vegetables and mix well, so all vegetables are coated with butter. Stir in the flour and mix well so vegetables are evenly coated with flour. Stir in the tomatoes, seasoning and stock - stir well.
- Cover the bowl with microwave proof plate (to act as a lid). Place on turntable. Cook using 2 Stage Slow Cook - Slow Cook High for 40 minutes, followed by Slow Cook Low for 5 - 8 hours.
- After stage 1 you may stir the soup, but this is not essential. Recover the dish and return to the oven.
- After cooking stir well and remove bouquet garni and bay leaf before serving.
Basic Beef Casserole
(Serves 3 - 4)
Ingredients
350g / 3/4lb braising steak, cubed
40g / 1 1/2oz seasoned flour
(seasoned with an oxo cube, salt and pepper)
1 onion, peeled and sliced
1 carrot, peeled and sliced
400g / 16oz canned chopped tomatoes
300 mls / 1/2 pint hot beef stock
(or 1/4pint beef stock +1/4pint red wine)
15mls / 1 tblsp tomato puree
1 bouquet garni
1 bay leaf
salt and pepper to taste
Cookware
Large microwave proof casserole dish with lid, or a Pyrex bowl covered with a plate. Place on turntable.
Method
- Toss the beef in the seasoned flour until well covered.
- Place all the ingredients into a large microwave proof casserole dish or large pyrex bowl, stir well and cover with lid. Cook using 2 Stage Slow Cook - Slow Cook High for 40 minutes, followed by Slow Cook Low for 5 - 8 hours.
- After stage 1 you may stir the casserole, but this is not essential. Recover the dish and return to the oven.
- After cooking stir well and remove bouquet garni and bay leaf before serving.
SLOW COOKING RECIPES (CONT.)
Basic Beef Casserole
(Serves 2 - 3)
Ingredients
225g / 1/2lb braising steak, cubed
25g / 1oz seasoned flour
(seasoned with an oxo cube, salt and pepper)
1 onion, peeled and sliced
1 carrot, peeled and sliced
200g / 8oz canned chopped tomatoes
300mls / 1/2 pint hot beef stock
1 tblsp / 15mls tomato puree
1 bouquet garni
1 bay leaf
salt and pepper to taste
Cookware
Large microwave proof casserole dish with lid, or a large pyrex bowl covered with a plate. Place on turntable.
Method
-
Toss the beef in the seasoned flour until well covered.
-
Place all the ingredients into a large microwave proof casserole dish or large pyrex bowl, stir well and cover with lid. Cook using 2 Stage Slow Cook - Slow Cook High for 30 - 35 minutes, followed by Slow Cook Low for 5 - 8 hours.
-
After stage 1 you may stir the casserole, but this is not essential. Recover the dish and return to the oven.
-
After cooking stir well and remove bouquet garni and bay leaf before serving.
Hungarian Beef Goulash
(Serves 3 - 4)
Ingredients
350g / 3/4lb braising steak, cubed
40g / 1 1/2 oz seasoned flour
(seasoned with an oxo cube, salt and pepper)
1 onion, peeled and sliced
1 small green pepper, deseeded and chopped
400g / 16oz canned chopped tomatoes
2 tsp / 10mls paprika
300 mls / 1/2 pint hot beef stock
(or 1/4 pint beef stock + 1/4 pint red wine)
1 tblsp / 15mls tomato puree
pinch of nutmeg
1 bouquet garni
salt and pepper to taste
100mls sour cream (optional)
Cookware
Large microwave proof casserole dish with lid, or a large pyrex bowl covered with a plate. Place on turntable.
Method
-
Toss the beef in the seasoned flour until well covered.
-
Place all the ingredients (except sour cream) into a large microwave proof casserole dish or large pyrex bowl, stir well and cover with lid. Place on turntable. Cook using 2 Stage Slow Cook - Slow Cook High for 30 - 35 minutes, followed by Slow Cook Low for 5 - 8 hours.
-
After stage 1 you may stir the goulash, but this is not essential. Recover the dish and return to the oven.
-
After cooking stir well and remove bouquet garni before serving. If you wish you may stir in 100mls of sour cream just before serving.

SLOW COOKING RECIPES (CONT.)
Lamb and Vegetable Hotpot
(Serves 4)
Ingredients
350g / 3/4lb lean lamb, cubed
25g / 1oz seasoned flour
1 large onion, peeled and chopped
1 leek, chopped
2 carrots, peeled and chopped
1/2 small turnip, peeled and diced
1 bouquet garni
1 bay leaf
salt and pepper
30mls / 2 tblsps chopped parsley to garnish
Cookware
Large microwave proof casserole dish with lid or a large Pyrex bowl covered with a plate. Place on turntable.
Method
-
Toss the lamb in the seasoned flour until well covered.
-
Place all the ingredients into a large microwave proof casserole dish or large pyrex bowl, stir well and cover with a lid.
-
Cook using 2 Stage Slow Cook - Slow Cook High for 40 minutes, followed by Slow Cook Low for 6 - 8 hours.
-
After stage 1 you may stir the casserole, but this is not essential. Recover the dish and return to the oven.
-
After cooking stir well, remove bouquet garni and bay leaf. Garnish with fresh chopped parsley.
SLOW COOKING RECIPES (CONT.)
Chicken, Bacon and Tomato Casserole
(Serves 4)
Ingredients
4 chicken portions, skinned, total weight approx. 800g - 900g
5 rashers of streaky bacon, chopped
1 large onion, peeled and chopped
15g / 1/2 oz butter
1 clove garlic, crushed
400g / 16oz canned chopped tomatoes
1 small green pepper, deseeded and chopped
2 sticks celery, chopped
1 bouquet garni
pinch of mixed herbs salt and pepper
30 mls / 2 tblsps cornflour, mixed to a smooth paste with a little cold water
30 mls / 2 tblsps chopped parsley to garnish
Cookware
Large microwave proof casserole dish with lid or a large pyrex bowl covered with a plate. Place on turntable.
Method
-
Arrange the chicken portions in a large casserole dish.
-
Melt the butter in a large microwave proof bowl for approx. 30 seconds. Stir in the bacon and onion, cover and cook on '900W' microwave power for 3 - 4 minutes.
Sprinkle over the chicken.
-
Add all other remaining ingredients (except the cornflour) to the chicken and mix well.
-
Cover the dish and cook using 2 Stage Slow Cook - Slow Cook High for 40 minutes, followed by Slow Cook Low for 5 - 8 hours.
-
After stage 1 you may stir the casserole, but this is not essential. Recover the dish and return to the oven.
-
10 minutes before the end of cooking, stir in the cornflour paste, and cook for the remaining few minutes.
-
After cooking stir well, remove bouquet garni and garnish with fresh chopped parsley.
Variations
Replace the green pepper with 100g / 4oz button mushrooms or 1-2 carrots, sliced.
SLOW COOKING RECIPES (CONT.)
Pork Casserole with Cider
(Serves 4)
Ingredients
350g / 3/4lb lean pork, cubed
1 large onion, peeled and chopped
1 green pepper, deseeded and chopped
100g / 4oz mushrooms, peeled and sliced
1 tblsp tomato puree
400g / 16oz canned, chopped tomatoes
150mls / 1/4 pint cider
150mls / 1/4 pint hot stock
1 bay leaf
pinch mixed herbs
salt and pepper
30mls / 2 tblsps cornflour mixed to a smooth paste with a little cold water.
30mls / 2 tblsps chopped parsley to garnish
Cookware
Large microwave proof casserole dish with lid or a large Pyrex bowl covered with a plate. Place on turntable.
Method
- Place all the ingredients (except cornflour) into a large microwave proof casserole dish or large pyrex bowl, stir well and cover with a lid.
- Cook using 2 Stage Slow Cook - Slow Cook High for 40 minutes, followed by Slow Cook Low for 5 - 8 hours.
- After stage 1 you may stir the casserole, but this is not essential. Recover the dish and return to the oven.
- 10 minutes before the end of cooking, stir in the cornflour paste, and cook for the remaining few minutes.
- After cooking stir well, remove bay leaf. Garnish with fresh chopped parsley.
Rice Pudding
(Serves 4)
Ingredients
50g / 2oz pudding rice
600mls / 1 pint milk
25g / 1oz sugar
1 strip of lemon rind
pinch of nutmeg
Cookware
Large microwave proof casserole dish with lid or a large Pyrex Bowl covered with a plate. Place on turntable.

Method
- Place rice, milk, sugar and lemon rind into a large microwave proof dish or bowl. Stir together.
- Cover and cook using 2 Stage Slow Cook - Slow Cook 'High' for 30 minutes, followed by Slow Cook 'Low' for 3 - 4 hours.
- For best results stir well after stage 1.
- After cooking stir well and sprinkle with nutmeg.
Variations
Creamy Rice Pudding - Replace 1/2 pint of the milk with 1/2 pint full cream evaporated milk. Vanilla Rice Pudding - Replace the lemon with a few drops of vanilla essence. Orange Rice Pudding - Add the grated rind and juice of 1 orange. Honey and Sultana Rice Pudding - Add 1 tblsp / 15mls honey and 25g / 1oz sultanas.
QUESTIONS AND ANSWERS
OPERATION
Q. What is wrong when the oven light does not function?
A. Either:
- The door is not firmly closed. or:
• The light bulb has burned out.
Q. Why does steam come out of the air exhaust vent?
A. Steam is normally produced during cooking. The microwave oven has been designed to allow this steam to escape.
Q. Can the microwave oven be damaged if it is operated empty?
A. Yes. Never operate the oven while empty or without the turntable positioned correctly on the roller rest.
Q. Why does my oven produce smoke when I use grill, convection or dual cooking?
A. Any dirt or grease that builds up on the walls and roof of the oven will begin to smoke if not cleaned. Therefore it is vital to wipe out your oven after cooking.
Q. Instructions for aluminium foil use are confusing. When should foil be used?
A. It should be used to shield portions of food from becoming overcooked or overdefrosted. Use small flat pieces of foil for shielding.
Q. Why is standing time recommended after the cooking operation has been completed?
A. Standing time is very important. With microwave cooking, the heat is in the food, not in the oven. Many foods build-up enough internal heat to allow the cooking process to continue, even after the food is removed from the oven. Standing time for joints of meat, large vegetables and cakes is to allow the inside to cook completely, without overcooking the outside.
Q. Why do sparks and crackling (arcing) occur in the oven?
A. There may be several reasons why sparks and crackling within cavity (arcing) occur.
* A dish with metal parts or trim is being used. (silver or gold).
* A metal utensil has been left in the oven.
* Too much metal foil is being used.
* A metal twist-tie is present in the oven.
Q. Why does condensation appear in the oven?
A. This is normal and occurs because the food is cooking faster than the moisture can be removed from the oven. Always wipe out oven after use.
FOODS
Q. Can I check the preset oven temperature when cooking by convection?
A. Yes, you can check the set temperature by pressing "Convec. Temp." key. The temperature will then be shown in the display for 2 seconds.
Q. Why are scrambled eggs sometimes a little dry after cooking?
A. Eggs dry out if they are overcooked. You may need to vary the cooking time or power level for one of the following reasons:
* Eggs vary in size.
* The initial temperature of the egg may vary depending on where it is stored.
* The shape of cooking utensils vary, which makes it necessary to vary cooking time.
* Eggs continue cooking during standing time.
Q. How are liquids, soups or casseroles prevented from boiling over?
A. Use a larger utensil than usual for cooking. If you open the oven door or press "Clear Stop", the food will stop boiling.
Q. Why does the dish become hot when I microwave food in it?
A. As the food becomes hot it will conduct the heat into the dish. Use oven gloves to remove food after cooking.
Q. Does the density of a food affect its cooking time in the microwave?
A. Yes. A dense food such as meat will take longer to cook, reheat or porous, light and airy food such as bread, puddings and cakes. This is because microwaves cannot penetrate as deeply into denser, heavier foods.

CARE AND CLEANING
It is important to keep the oven cavity and accessories clean at all times. Always clean after use.
Wipe any spills and splashes inside and outside the oven with a mild detergent solution, rinse, and wipe dry. Any food particles left on the inside of the oven, especially on the microwave outlet cover (see illustration opposite) may cause arcing or sparking due to carbonisation. Never use abrasive powders or pads.
REMOVABLE PARTS
* The glass turntable, drip tray and metal turntable can be removed for cleaning. Wipe up any spillage with a paper towel or cloth prior to removal of turntable. Rinse drip tray after use to prevent deterioration of teflon surface.
* After cleaning the control panel, touch "Clear Stop" to clear any entries that may have been entered accidentally while cleaning the panel.
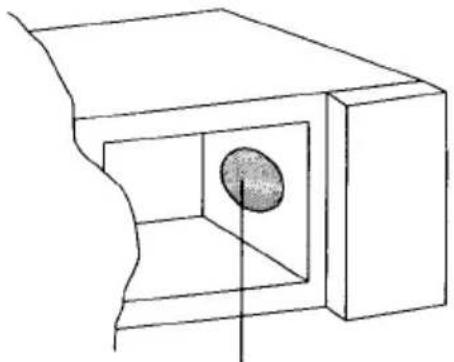
natural_image
Simple line drawing of a 3D geometric structure with an oval inside a rectangular cavity (no text or symbols)Microwave Outlet Cover
* Grill and convection heater may be stained with spattered oil while the oven is in use. Wait until the cavity cools down and wipe off the spattered oil
BEFORE CALLING SERVICE
You can often correct operating problems yourself. If your microwave oven fails to work properly, locate the operating problem in the chart below and try the solutions marked for each problem.
If the microwave oven still does not work properly, contact the nearest SANYO SERVICE CENTRE.
PROBLEMS
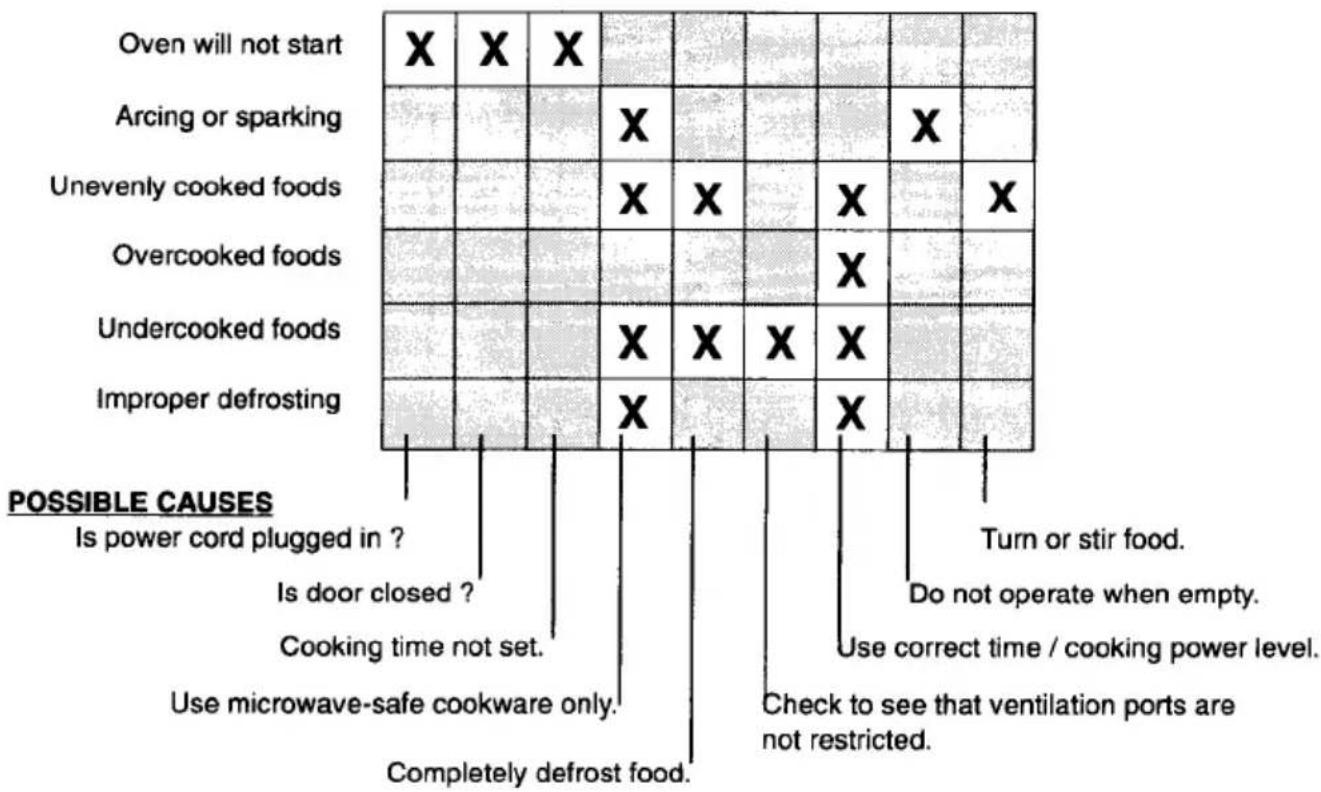
text_image
Oven will not start X X X Arcing or sparking X Unevenly cooked foods X X X X X Overcooked foods X Undercooked foods X X X X Improper defrosting X POSSIBLE CAUSES Is power cord plugged in ? Is door closed ? Cooking time not set. Use microwave-safe cookware only. Completely defrost food. Turn or stir food. Do not operate when empty. Use correct time / cooking power level. Check to see that ventilation ports are not restricted.Minimum / Maximum weights to use with Auto Sensor Programs
| Auto Sensor Programs | Press Key | Food Category | Minimum Weight | Maximum Weight |
| Cake / Pudding | 1234 | Sponge Pudding / CakeLight Fruit CakeChocolate BrowniesFlapjack | 200g400g200g200g | 1.3kg2.3kg1.3kg1.3kg |
| Roast Chicken | 12 | Whole ChickenChicken Pieces | 800g100g | 2.0kg1.0kg |
| Fish | 12 | Baked FishSteamed Fish | 150g100g | 1.5kg900g |
| Reheat | 1234 | SoupChilled MealCanned FoodPlated Meal | 200g200g200g200g | 1.0kg650g900g900g |
| Casserole | 1234 | Beef CasseroleChicken CasseroleCurryMinced Beef | 300g300g300g300g | 2.0kg2.4kg2.4kg2.0kg |
| Auto Sensor Programs | Press Key | Food Category | Minimum Weight | Maximum Weight |
| Pizza | 123 | Fresh PizzaFrozen PizzaReheat Pizza | 100g100g80g | 600g600g600g |
| Baked Potato | 1 | Baked Potato (es) | 150g | 1700g |
| Roast Meat Joint | 123 | Beef JointPork JointLamb Joint | 450g450g450g | 2.0kg2.0kg2.0kg |
| Snacks | 1 | Snacks | 50g | 900g |
Important: Always refer to the instruction manual when using automatic programs.
EASY USE CHART
SETTING THE CLOCK
- Press "Clear Stop".
- Press "Clock".
- Press "Down / Up" to set hour.
- Press "Clock".
- Press "Down / Up" to set minutes.
- Press "Clock".
TIME COOKING
- Press "Clear Stop".
- Press "Micro Power", 1-6 times to set power level.
- Press "Down / Up" to set cooking time.
- Press "Start".
AUTO SENSOR DEFROST
- Press "Clear Stop".
- Press "Auto Defrost".
- Place empty dish in oven and touch "Weigh Dish".
- Place the food in the oven.
- Press "More" or "Less" to adjust time if required.
- Press "Start".
SLOW COOKING
- Press "Clear Stop".
- Press "Slow Cook" once to set Slow Cook High for 1st stage.
- Press "Down / Up" to set cooking time for 1st stage.
- Press "Slow Cook" once again to set Slow Cook Low for 2nd stage.
- Press "Down / Up" to set cooking time for 2nd stage.
- Press "Start".
MULTI-STAGE COOKING
- Press "Clear Stop".
- Press "Micro Power" 1-6 times to set power level for 1st stage.
- Press "Down / Up" to set cooking time for 1st stage.
- Press "Micro Power" 1-6 times to set power level for 2nd stage.
- Press "Down / Up" to set cooking time for 2nd stage.
- Press "Start".
AUTO SENSOR COOKING
- Press "Clear Stop".
- Press desired Auto Sensor key.
- Place empty dish in oven and touch "Weigh Dish".
- Place the food in the oven.
- Press "More" or "Less" to adjust cooking time if required.
- Press "Start".
GRILL THERMAL/GRILL COOKING
- Press "Clear Stop".
- Press "Grill" once or twice.
- Press "Down / Up" to set cooking time.
- Press "Start".
COMBINATION COOKING
- Press "Clear Stop".
- Press "Combination" key once, twice or three times. Select Micro Power and Convection temperature as required.
- Press "Down / Up" to set cooking time.
- Press "Start".
CONVECTION COOKING
- Press "Clear Stop".
- Press "Convec.Temp.". 2 - 17 times, to select preheat temperature.
- Press "Start".
- After preheating place food in oven.
- Press "Down / Up" to set cooking time.
- Press "Start".
The word prompt display will lead you through all cooking programs.
EM-D981ESAP
EM-D981ENZ