SC-1 WR - Security Camera Tevion - Free user manual and instructions
Find the device manual for free SC-1 WR Tevion in PDF.


User questions about SC-1 WR Tevion
0 question about this device. Answer the ones you know or ask your own.
Ask a new question about this device
Download the instructions for your Security Camera in PDF format for free! Find your manual SC-1 WR - Tevion and take your electronic device back in hand. On this page are published all the documents necessary for the use of your device. SC-1 WR by Tevion.
USER MANUAL SC-1 WR Tevion
Instruction Manual Security Camera
with 4-channel receiver
24 infrared LED's, Water resistant* IP standard IP65
40620
natural_image
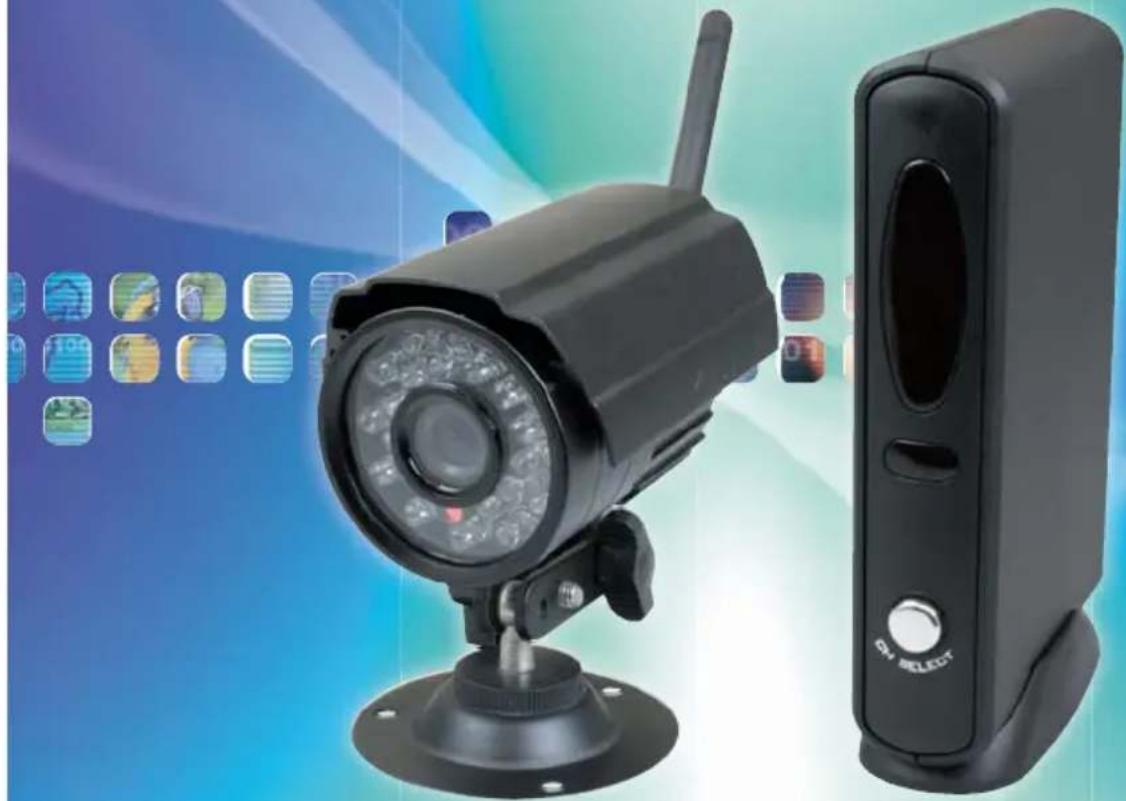
Black security camera and two black electronic devices against a blue gradient background (no visible text or symbols)* Only the camera unit is water resistant with IP standard IP65. Receiver, AC adaptors and other components are not water resistant.
AFTER SALES SUPPORT

1 800 270 5071
MODEL: SC-1 WR
• 4-channel receiver
• 2 AC adaptors
(for camera and receiver)
• A/V cable
• Instruction manual
• Warranty documents
3
YEAR WARRANTY
WARNING - To reduce a risk of fire or electric shock, do not expose the receiver and AC adaptors to rain or moisture.
TEVION®
TEVION®
Dear customer,
Congratulations on purchasing a high-quality TEVION® product. You have acquired a modern digital security camera with audio transmission and excellent technical features and respective accessories, which is particularly easy to operate. Please study this information in detail observing, in particular, the safety instructions.
The device comes with a 3-year warranty. You will need the enclosed warranty card and your sales receipt in the event of the camera developing a fault. Keep these in a safe place together with the Instruction Manual. Please include the Instruction Manual when passing on the camera to a third party.
1. Contents of box
Carefully remove camera from packaging and check that all of the below parts are contained in the box:
- TEVION® Security Camera SC-1 WR
- 4-channel receiver
- 2 AC adaptors (for camera and receiver)
- 2 screw-on aerials (for camera and receiver)
- Stand
- AV Cinch cable
- Fixing screws and dowels
- Instruction Manual
- Warranty and service documentation

Note:
- Caution! Keep plastic foil and bags away from babies and small children, there is a danger of suffocation.
After Sales Support

1 800 270 5071
MODEL: SC 1-WR

YEAR WARRANTY
TEVION®
2. Contents
1 Preface
1 1. Contents of box
2 2. Contents
4 3. Hazard, Safety and Warning notices
7 4. Your video camera
7 4.1. Parts
8 4.2. Installation of security camera
8 4.2.1. Fitting stand to camera
8 4.2.2. Marking for drilling
9 4.2.3. Fixing to stone/concrete
9 4.2.4. Fixing to timber
9 4.2.5. Completing the camera installation
10 4.3. Connecting the receiver
10 4.3.1. Connecting the receiver to the playback device
11 4.3.2. Completing the receiver installation
12 5. Operation
12 5.1. Operating and indicating elements
12 5.2. Automatic channel changing function
13 5.3. Infrared light
13 5.4. Positioning of security camera
14 5.5. Setting the channel on the security camera
15 6. Conformity
2
After Sales Support
1 800 270 5071
MODEL: SC 1-WR

YEAR WARRANTY
TEVION®
16 7. Care
16 8. Disposal
17 9. Fault removal (FAQ)
17 10. Warranty and Service
18 11. Technical Specification
18 11.1. Power supply
18 11.2. Security camera with integrated microphone
18 11.3. Receiver (2.4G radio AV receiver)
19 12. Index
After Sales Support

1 800 270 5071
MODEL: SC 1-WR

YEAR WARRANTY
TEVION®
3. Hazard, Safety and Warning notices
Incorrect use of the camera and accessories can be dangerous for you and others and can damage or destroy the camera. We therefore ask you to read and strictly observe the following hazard, safety and warning notices.
Intended use
This security camera with audio transmission is solely intended for the audio and image surveillance of interiors. The specified maximum range depends on the building structure and can be impaired by thick walls or reinforced concrete walls and ceilings.
You are responsible for ensuring that no personal rights of third parties are violated when using the security camera.
■ The surveillance set has solely been designed for private use. Up to four security cameras can be connected to the receiver.
Hazards for children and persons with limited ability to operate electronic equipment
■ The camera, accessories and packaging are not toys for children to play with and should therefore be kept away from children. There could be a risk of electrocution, poisoning and suffocation.
■ The camera and accessories may not be used by children or persons with a limited ability of operating equipment. The camera may not be used by persons (including children) with limited physical, sensory or mental capacities or limited experience and/or knowledge.
The camera, the receiver and mains adapter may only be used by persons that are physically or mentally able to operate the equipment safely, unless they are supervised by a person responsible for their safety or have been instructed by this person as to how to use the equipment. Children should be supervised to ensure that they are not playing with the equipment.
TEVION®
Hazard of electrocution in case of wet and humid conditions
■ The receiver and any supplied components may not be exposed to dripping or spray water. Containers filled with liquid, such as vases or glasses may also not be placed on or close to the receiver. Danger of fire and electrocution.
■ Do not use receiver and its components close to water and protect against moisture and humidity. Danger of fire and electrocution.
■ Do not use receiver and its components in areas exposed to high humidity, steam, smoke or dust. Danger of fire and electrocution.
Electrical hazard
■ Switch off camera or receiver if a foreign body or liquid has entered the camera or receiver. Wait until completely dry, there is a danger of fire and electrocution.
■ Switch off if camera or receiver has been dropped or if housing is damaged, there is a danger of fire and electrocution.
■ The camera and its components may not be dismantled, modified or repaired, there is a danger of fire and electrocution.
■ Only use the supplied power supplies type HL-12/2-8E6S or power supplies with the same specifications. Only connect power supplies to the mains voltage specified on the rating plate.
■ Do not use power supply or output cable if damaged. Replace with same type of power supply.
- Check that all used mains sockets are always accessible so that the power supply can be quickly interrupted when necessary. The device is disconnected from the mains by pulling out the plug from the mains socket.
■ The USB power supply may not be used during a thunder storm, there is a danger of electrocution.

Note:
- Only the camera unit is water resistant with IP standard IP65. Receiver, AC adaptors and other components are not water resistant.
After Sales Support
The image is too blurry to recognize any text content.
1 800 270 5071
MODEL: SC 1-WR

YEAR WARRANTY
TEVION®
Damage from heat – fire hazard
■ Do not leave camera and receiver in places that are susceptible to considerable increases in temperature (e.g. in a vehicle). The housing and internal parts may be damaged, which in turn could cause a fire.
■ Do not wrap up camera and receiver or place on textiles. This could produce a build-up of heat in the camera that could cause deformation of the housing and may represent a fire hazard.
Injuries and material damage
■ When setting up and installing the security camera and receiver ensure that there is a 4 inch gap on all sides in order to ensure adequate ventilation. In particular ensure that ventilation openings are not covered by newspaper, tablecloths or curtains.
■ Never place open ignition sources on or next to the camera or receiver.
■ Only use the power supply specified for the camera and receiver. No liability is accepted for damage caused by the use of an incorrect power supply.
Follow the steps listed in the Instruction Manual when connecting the receiver to a monitor or a TV.

■ Damage to the electronics, lens or accessory caused by external factors, such as impacts, falls or others are not covered by the warranty and are thus chargeable.
After Sales Support
1 800 270 5071
MODEL: SC 1-WR

YEAR WARRANTY
TEVION®
4. Your video camera
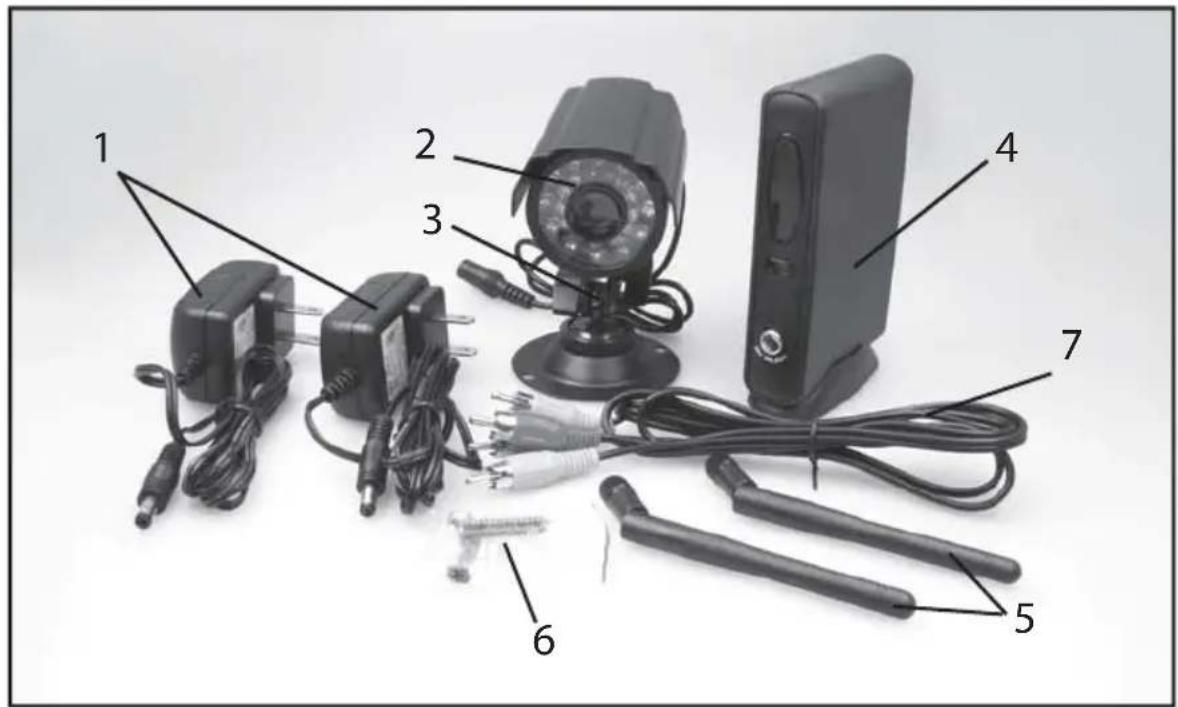
4.1. Parts
text_image
Labeled diagram of electronic devices including cameras, televisions, and sensors with numbered partsAC adaptors (2x)1.
Security camera2.
Stand3.
4-channel receiver including base4.
Aerials (2x)5.
Fixing material6.
AV Cinch cable7.
Instruction Manual (not shown)8.
After Sales Support

1 800 270 5071
MODEL: SC 1-WR

YEAR WARRANTY
TEVION®
4.2. Installation of security camera
Install the security camera in such a way that no sun light falls onto the lens. The stand can be connected to the underside or rear of the camera, depending on whether the camera is to be wall or ceiling mounted.
4.2.1. Fitting stand to camera
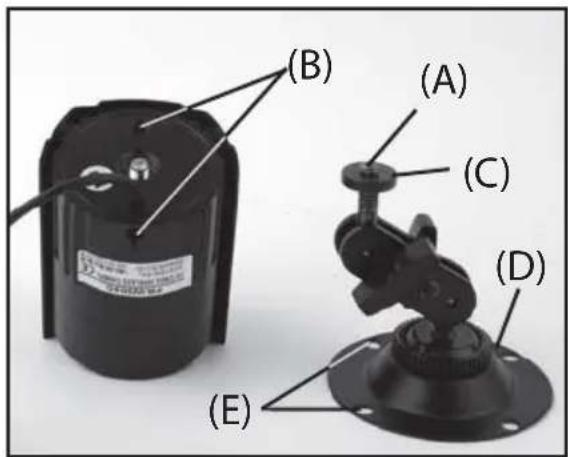
Screw the retaining screw (A) of the stand into one of the two threaded holes (B) and secure the stand by tightening the clamping nut (C) against the housing of the security camera.
text_image
(B) (A) (C) (D) (E)
Note:
- When selecting the installation site ensure that a mains socket is in close proximity. The connecting cables of the power supplies each have a length of approx. 4.9 feet.
4.2.2. Marking for drilling
Hold the base plate (D) of the stand against the surface of the selected place of installation and mark the location of the four holes (E) on the surface through the base plate.

Note:
- Caution! Prior to drilling ensure that no pipes are located behind the wall!
After Sales Support
1 800 270 5071
MODEL: SC 1-WR

YEAR WARRANTY
TEVION®
4.2.3. Fixing to stone/concrete
To drill suitable holes for dowels use a 14 " drill bit when installing in masonry or concrete surfaces. After drilling, push dowels into hole until flush with surface. Then secure the stand by using the screws supplied.
4.2.4. Fixing to timber
Use a 1/8" masonry drill for pilot drilling respective holes in timber. After drilling the holes, secure the stand using the supplied screws.
4.2.5. Completing the camera installation
Screw an aerial into the aerial connection at the rear of the camera. Then connect the security camera to one of the power supplies. Next, connect the power supply to the mains.
After Sales Support

1 800 270 5071
MODEL: SC 1-WR

YEAR WARRANTY
TEVION®
4.3. Connecting the receiver

Note:
- Caution! In order to prevent any damage, only connect the receiver to the power supply and switch on the playback device (monitor, TV) when all other parts have been connected.
4.3.1. Connecting the receiver to the playback device
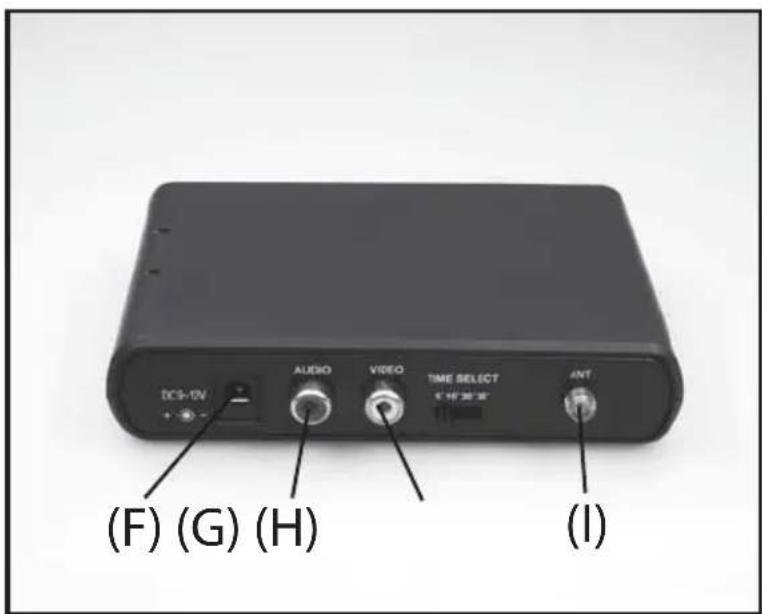
Using the yellow connector of the supplied AV Cinch cable connect the Video output (H) of the receiver to a suitable video input of your playback device.
Next, using the red connector of the AV Cinch cable, connect the audio output (G) of the receiver to the audio input of your playback device.
Ensure also to observe the notices and information of the Instruction Manual of your playback device.
text_image
DC3-12V AUDIO VIDEO TIME SELECT (14" 30' 25" (A) (F) (G) (H) (I)TEVION®
4.3.2. Completing the receiver installation
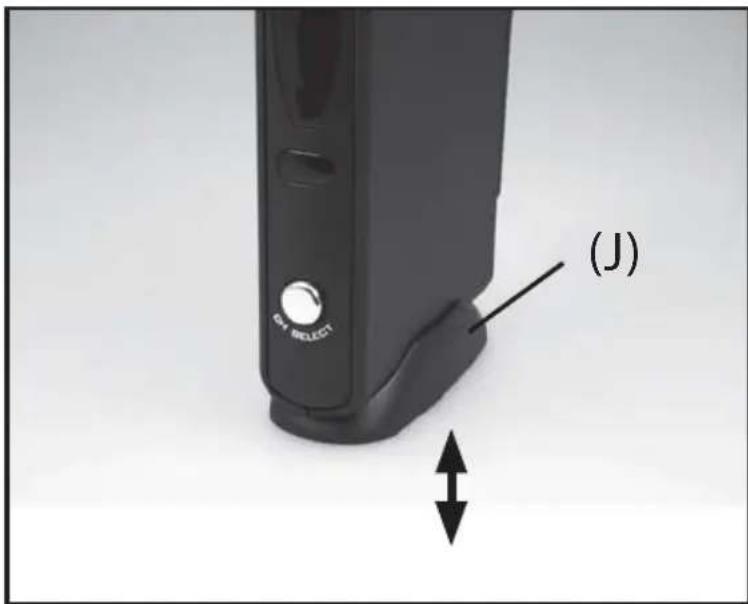
Screw an aerial into the aerial socket (I) at the rear of the receiver. The receiver can be operated standing upright on its stand or lying down horizontally. Remove foot (J) when using horizontally.
Connect the cable of the power supply to the socket of the receiver (F). Connect the power supply to the mains. Switch on your playback device and select the respective audio/video input to which the security camera is connected.
text_image
(J) G- SELECT
Note:
- The aerials of the camera and receiver should be arranged parallel to each other to ensure the best possible reception.
After Sales Support

1 800 270 5071
MODEL: SC 1-WR

YEAR WARRANTY
TEVION®
5. Operation

Note:
- The transmission frequencies of the security camera and receiver have been factory preset. The security camera transmits on the frequency of one of the available four reception channels of the receiver. After switch-on, the transmission channel of the used security camera must be selected on the receiver. The transmission channel of the security camera can be selected at the back of the receiver.
5.1. Operating and indicating elements
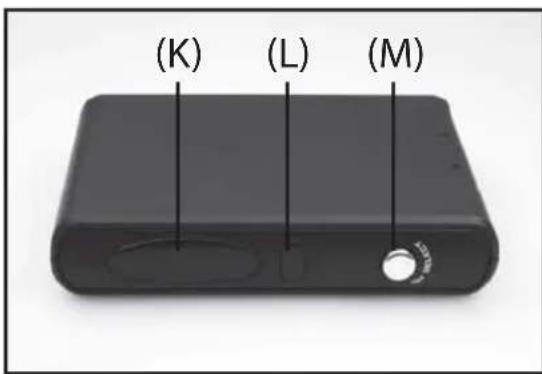
The front of the receiver contains two indicating panels (K) and (L) and a button (M) for changing the reception channels. The selected reception channel 1-4 is lit up in the indicating panel (K). The left LED (very left on page) is reception channel 1.
text_image
(K) (L) (M)The automatic channel change function is active if the LED of the small indicating panel (L) is lit. By pressing the CH SELECT (M) button, the reception channels 1-4 are selected in sequence after which the automatic channel changing function is activated. By pressing the button again, the automatic channel changing function is switched off and reception channel 1 is displayed again.
5.2. Automatic channel changing function
The radio monitoring facility can be extended by a further three cameras. Each camera must transmit to another channel (1-4).
After Sales Support
1 800 270 5071
MODEL: SC 1-WR

YEAR WARRANTY
TEVION®
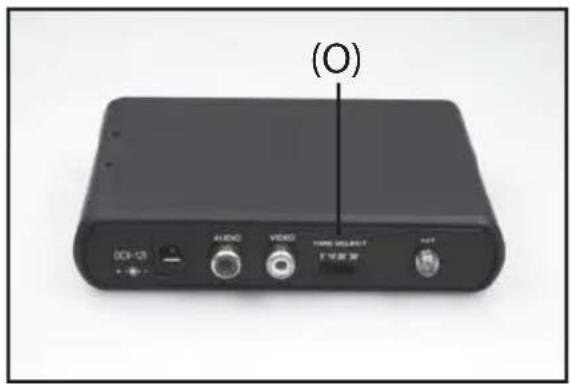
If the automatic channel changing function has been activated, the receiver changes reception channels at regular intervals so that alternating images of all connected cameras are shown on screen. Using the TIME SELECT (O) slide switch at the back of the receiver, channel changing intervals can be set. Available intervals are 5, 10, 20 and 30 seconds.
text_image
(O) DC-12 AUDIO VIDEO INFO SELECT T 100 MHz5.3. Infrared light
The security camera automatically adjusts to surrounding light conditions. An integrated brightness sensor activates the infrared LED during dusk or darkness, which illuminates an area of 59 ft. in front of the camera. Images can thus also be transmitted in dark conditions.
5.4. Positioning of security camera
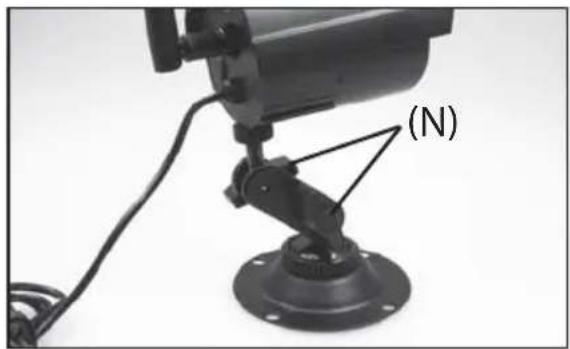
Once images are transmitted, the security camera can be positioned as required. Slightly loosen the two wing nuts (N) on the stand. Maintaining some tension facilitates alignment, as the camera is still being held in place. You can now move the security camera in nearly all directions until the best possible position has been found.
Once positioned correctly, retighten wing nuts on stand.
natural_image
Close-up of a surveillance camera mounted on a base with a labeled joint (N), no visible text or symbols beyond the label.
Note:
• Have a second person at the display unit help you with the positioning.
After Sales Support

1 800 270 5071
MODEL: SC 1-WR

YEAR WARRANTY
TEVION®
5.5. Setting the channel on the security camera

Note:
- When using several security cameras ensure that each camera transmits on a separate channel. As 4 channels are provided, a maximum of 4 security cameras can be connected. Even if only one camera is used, changing the transmission channel may improve reception.
- Caution! Always disconnect power supply of camera from mains prior to changing channel!
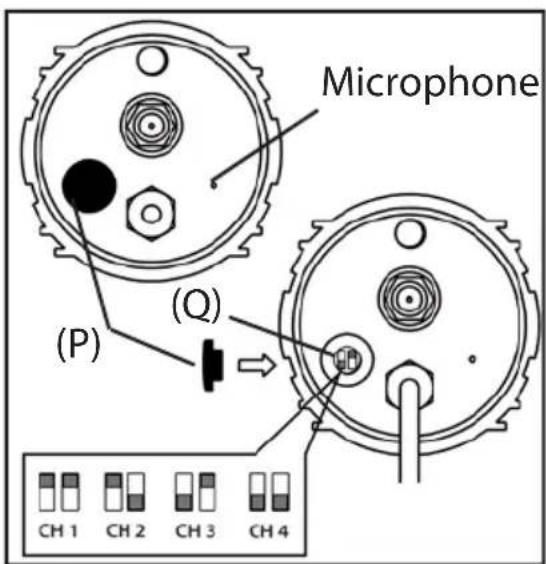
Remove sealing cap (P) covering the camera's channel changer.
Set the desired transmission channel (CH1, CH2, CH3 or CH4) by pushing both channel switches (Q) into the respective position using a pin, as shown in the below illustration.
Then replace sealing cap (P) on channel changer and reconnect the power supply to the mains.
text_image
Microphone (P) (Q) CH 1 CH 2 CH 3 CH 4After Sales Support
1 800 270 5071
MODEL: SC 1-WR

YEAR WARRANTY
TEVION®
6. Conformity (FCC-Statement)
This device complies with Part 15 of the FCC Rules. Operation is subject to the following two conditions:
(1) This device may not cause harmful interference.
(2) This device must accept any interference received, including interference that may cause undesired operation.
Changes or modifications not expressly approved by the party responsible for compliance could void the user's authority to operate the equipment.
NOTE: This equipment has been tested and found to comply with the limits for a Class B digital device, pursuant to Part 15 of the FCC Rules. These limits are designed to provide reasonable protection against harmful interference in a residential installation. This equipment generates, uses and can radiate radio frequency energy and, if not installed and used in accordance with the instructions, may cause harmful interference to radio communications.
However, there is no guarantee that interference will not occur in a particular installation. If this equipment does cause harmful interference to radio or television reception, which can be determined by turning the equipment off and on, the user is encouraged to try to correct the interference by one or more of the following measures:
- Reorient or relocate the receiving antenna.
- Increase the separation between the equipment and receiver.
-Connect the equipment into an outlet on a circuit different from that to which the receiver is connected. - Consult the dealer or an experienced radio/TV technician for help
After Sales Support
[NO TEXT]
1 800 270 5071
MODEL: SC 1-WR

YEAR WARRANTY
TEVION®
7. Care
The security camera and the receiver do not contain any serviceable components. Clean surfaces using a dry, soft cloth. In case of heavier soiling or for cleaning the lens of the security camera, use a moist soft cloth that has been well wrung out. Finally dry all parts with a soft, lint-free cloth. Do not use any corrosive cleaners, such as ethanol, thinners, etc.

Note:
- Caution! Always disconnect power supply of camera or of receiver from mains prior to cleaning.
8. Disposal
For disposal, separate packaging into different types and dispose of in supplied collection containers line in with environmental regulations.
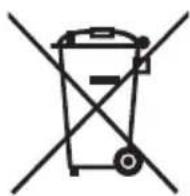
You product contains the symbol shown on the right. This means that electrical and electronic equipment may not be disposed of in domestic waste but must be recycled separately. By disposing of the equipment correctly you ensure that your equipment is correctly collected, treated and recycled. This prevents potentially harmful effects on the environment and health as a result of incorrect disposal. Dispose of the camera and accessories in accordance with the currently valid regulations. For further information contact the respective department of your local council.

After Sales Support
1 800 270 5071
MODEL: SC 1-WR

YEAR WARRANTY
TEVION®
9. Fault removal (FAQ)
| Fault Possible cause | use Remedy | |
| No transmission Connected to power? Check mains connection. | ||
| Distance between security camera and recipient too large? | ||
| Selected wrong channel? Change channel. | ||
| Display unit incorrectly set up? Check settings. | ||
| Bad reception Two cameras on one channel? Change transmission of camera to unassigned channel? | on channel of camera to unassigned channel. | |
| Interference on transmission channel? | ||
10. Warranty and Service
In the event of problems with the device, our Service department will be able to assist with all queries and problems. The device comes with a 3-year manufacturer's warranty. For details please see the enclosed warranty card.
Please contact our hotline before returning a defective device.
Service address:
Schenker INC.
TEVION® Service Center
601 Supreme Drive,
Bensenville, IL 60106-1157
USA
Manufacturer's address:
supra
11. Technical Specification
11.1. Power supply
Model: HL-12/2-8E6S
Input: 100-240 V \~ 50-60 Hz, 200 mA
Output: 12 V = 0.5 A
Protection class II

11.2. Security camera with integrated microphone
Model: SC FR-W304C
Input voltage: 12 V DC
System: NTSC
Transmission frequency 2.4 GHz
Infrared LEDs with automatic activation during dusk conditions.
Range: infrared light up to 59 ft.
Transmission range up to 328 ft. (in free fi eld)
Water resistant, IP standard IP65* (for camera unit only)
11.3. Receiver (2.4G Radio AV Receiver)
Model: PR FR-W802RX
Input voltage: 9-12V DC
Video output: 1Vp-p 75 Ω
Output signal: 2Vp-p600 Ω
Ambient conditions: 32°F-122°F, max. 95% relative humidity
* IP65: (IP = Ingress Protection Rating)
(6) Dust tight: No ingress of dust; complete protection against contact.
(5) Water jets: Water projected by a nozzle (0,24 inch) against enclosure from any direction shall have no harmful effects.
After Sales Support
1 800 270 5071
MODEL: SC 1-WR

YEAR WARRANTY
TEVION®
12. Index
A
Accessory 1,7
Aerial 7
Audio output 10
Automatic channel changing function 12
AV Cinch cable 7, 10
B
Base 11
Button CH SELECT 12
C
Camera (Technical Specification) 18
Care 16
Channel indicator panel 12
Channel setting 14
Channels, changing 12
Conformity 15
Connection of receiver 10
D
Disposal 16
Drilling 8
F
Fault removal 17
H
Hazard notices 4
|
Index 19
Indicating elements 12
Infrared light 13
Installation, camera 8ff
Installation, complete 9
Installation, masonry/concrete 9
Installation, receiver 10ff
Installation, timber 9
Intended use 4
0
Operating elements 12
Operation 12
P
Part names 7
Positioning of camera 13
Power supply 7, 18
R
Range (infrared) 18
Range (radio) 18
Receiver 7,10,18
Receiver, completing installation 11
Receiver, connect
S
Service 16
Stand 7,8
After Sales Support
1 800 270 5071
MODEL: SC 1-WR
3
YEAR
WARRANTY
TEVION®
T
Technical Specification
TIME SELECT 13
Time setting 13
V
Video output 10
W
Warning notices 4
Warranty 17
After Sales Support

1 800 270 5071
MODEL: SC 1-WR

YEAR WARRANTY
TEVION®
TEVION®
supra