
HD 600 - Satellite receiver MEGASAT - Free user manual and instructions
Find the device manual for free HD 600 MEGASAT in PDF.


| Product Type | Satellite Receiver |
| Brand | Megasat |
| Model | HD 600 |
| Weight | 239 g |
| Power Supply | AC 100-240V, 50/60Hz; DC 12V, 1A |
| Power Consumption (Operation) | Max 12 W |
| Power Consumption (Standby) | < 0.5 W |
| Tuner Type | DVB-S/DVB-S2, Frequency 950-2150 MHz |
| LNB Support | Universal, Single, Single S, C Band Broadband; Unicable (EN 50494/50607) |
| DiSEqC Support | 1.0, 1.1, 1.2, USALS |
| Video Outputs | HDMI (up to 1080p), SCART (RGB, CVBS) |
| Audio Output | Digital coaxial (S/PDIF) |
| USB Port | USB 2.0 for media playback (music, pictures, videos) |
| Other Interfaces | RS232, LNB input |
| Video Resolution | 576i, 576p, 720p, 1080i, 1080p |
| Aspect Ratio | 4:3, 16:9 |
| Favorite Channel Groups | Up to 8 groups |
| Child Lock | Yes, password protected |
| EPG | 7 days |
| Teletext / Subtitles | Supported |
| Multi-language Menu | Yes |
| Timer | 20 programmable timers |
| Media Formats Supported | MP3, JPEG, MP4 (via USB) |
| Games | Included |
| Cleaning | Unplug, use soft cloth with mild detergent; avoid solvents |
| Safety | Do not expose to liquids; ensure ventilation; do not remove cover; use only specified adapter |
| Repairability | Only qualified personnel should repair; contact dealer or service |
Frequently Asked Questions - HD 600 MEGASAT
User questions about HD 600 MEGASAT
0 question about this device. Answer the ones you know or ask your own.
Ask a new question about this device
Download the instructions for your Satellite receiver in PDF format for free! Find your manual HD 600 - MEGASAT and take your electronic device back in hand. On this page are published all the documents necessary for the use of your device. HD 600 by MEGASAT.
USER MANUAL HD 600 MEGASAT
Koaxialkabel
4. Hauptmenü
Safety instructions 03
1. Genaral
1.1 General features....04
1.2 Delivery....04
2. Designations and key assignment
2.1 Front side....05
2.2 Back side 05
2.3 Remote control....06
3. Connecting the set-top box
3.1 Connecting the set-top box....07
4. Main menu
4.1 Channel list....08
4.2 Installation 11
4.3 System....17
4.4 Network....19
4.5 Media Center....20
5. Additional information
5.1 Troubleshooting....23
5.2 Specifications....24
Safety instructions
Please read the manual thoroughly before operating the equipment. In case of incorrect or improper handling, the warranty becomes void.
Power supply:
Before start please check the correct operation voltage of the power point. The operating voltage of this device is AC 100\~240 V, 50/60Hz, 12 V DC, 1 A
Overload:
Do not overload a wall outlet, extension cord or adapter, neither use damaged power cord or touch it with wet hand as this may result in electric shock.
Liquid:
The device shall not be exposed to dripping or splashing water, and that no objects filled with liquids, such as base, shall be placed on the apparatus.
Ventilation: Keep the slots on top of the receiver uncover to allow sufficient airflow to the unit. Do not expose the receiver to direct light or do not place it near a heater or in humid conditions. Do no stack other electronic equipments on top of the receiver.
Risk of suffocation:
Do not let children play with films or other packaging components, there is a risk of suffocation.
Cleaning:
Plug out the receiver from the wall outlet before cleaning. Clean the receiver by a soft cloth or mild solution of washing-up liquid (no solvents).
Uncover: Do not remove the cover, to reduce the risk of electric shock. Contact qualified and licensed service personnel to repair the receiver, or contact your dealer.
1. General
1.1 General features
• DVB-S / DVB-S2 satellite compliant
• DiSEqC 1.0, 1.1, 1.2, USALS
- 4-digit display
• Support SCPC & MCPC reception from C / Ku-band satellite LNB
• Universal, Single, Single S & C Band Broadband LNB;
- Unicable suitable (EN 50494 / EN 50607)
- Sensitive Tuner
• PAL / NTSC conversion
- Variable aspect ratio (4: 3, 16: 9) with Pan Vector or Letter Box
• Resolution: 576p & 576i, 720p, 1080i & 1080p
• HDMI with upscale function to improve the picture quality
- Favorites lists
- Childlock
• Different sorting function for channels
- On-screen menu with full color resolution
- Teletext and Subtitle Support (OSD)
- 7 days EPG (Electronic Program Guide) for on-screen program information
- Multilingual menu
- Multi Channel sorting
• USB 2.0 port (media playback)
• Digital audio output (coaxial)
- RS232 interface
- Scart AV output
• 12/230 volt power supply connection
1.2 Delivery
- Megasat HD 6000 DS
- Remote control
- Batteries
- Power adapter
- User manual
2. Designations and key assignment
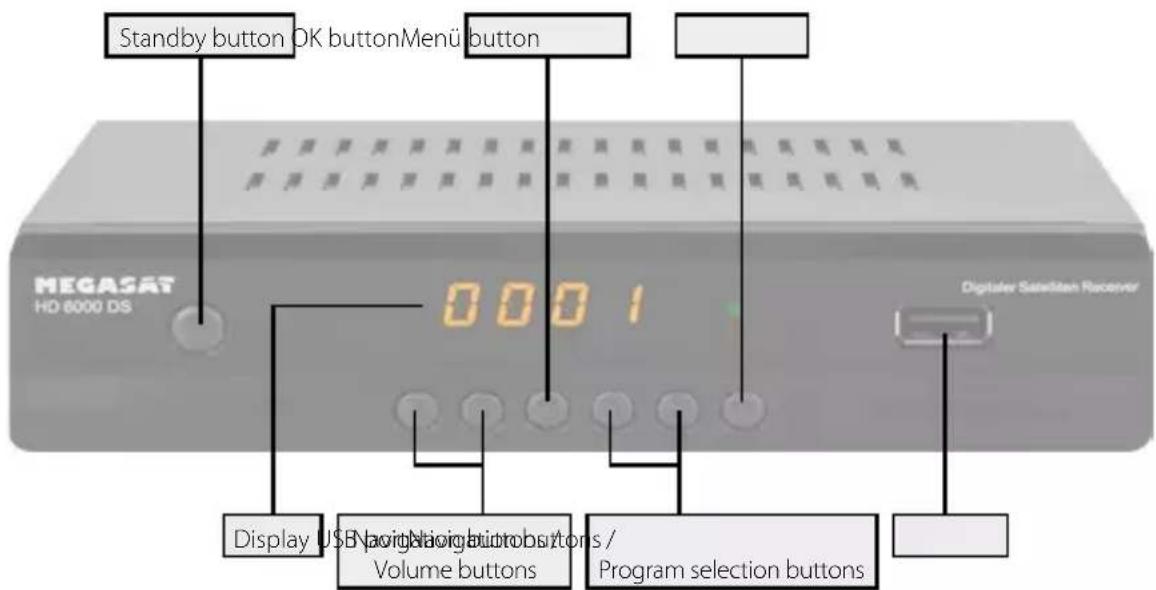
2.1 Front side
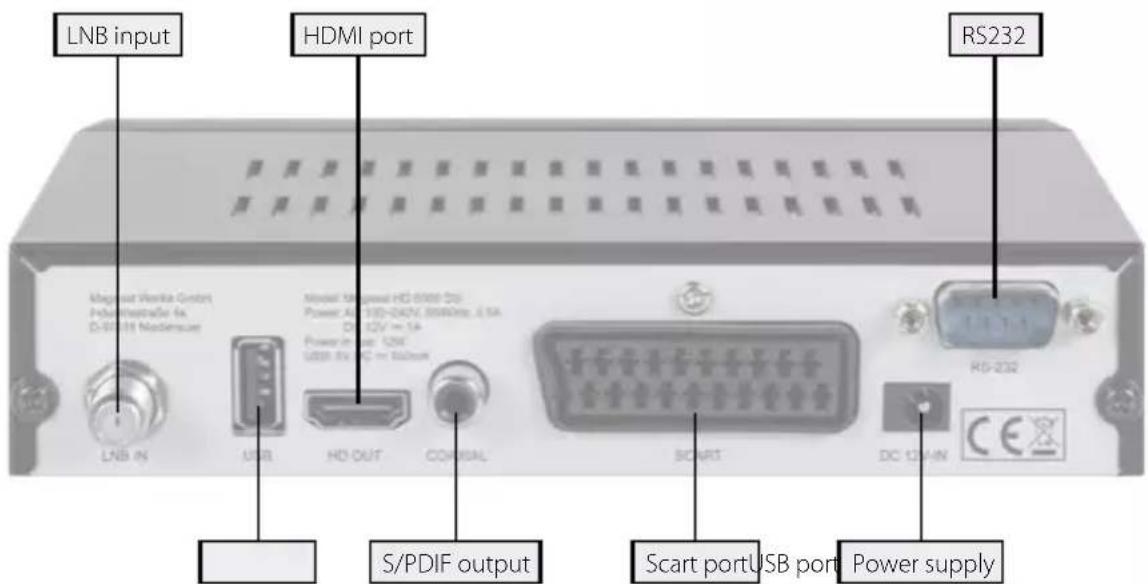
2.2 Back side
2. Designations and key assignment
2.3 Remote control
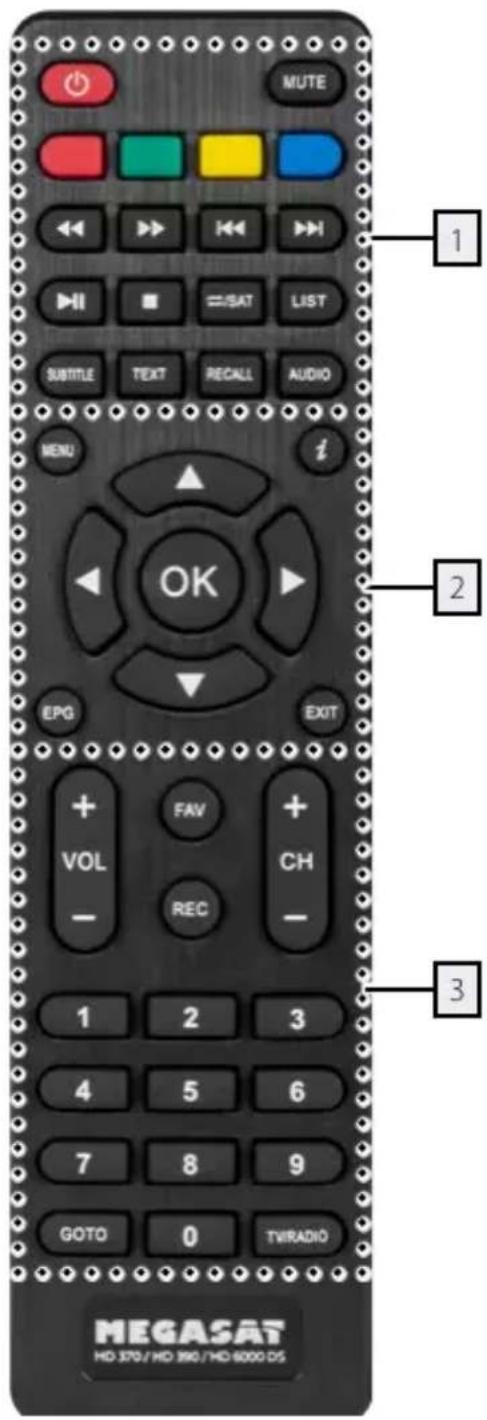
Area 1
POWER Turn on/off the unit (Standby)
MUTE Muting the sound
RED Function key
GREEN Function key
YELLOW Function key
BLUE Function key / Timer list
◀◀ / ▶▶ Fast forward / reverse
Chapter forward / backward
Start / Pause
■ Stop
REPEAT / SAT Repeat mode in media playback / Switches to the satellite selection
LIST Access to the recording menu (optional)
SUBTITLE Displaying subtitles (if available)
TXT Displays the teletext of the respective program
RECALL Changes between last and current program
AUDIO Selection or change the audio track
Area 2
MENU Enter the main menu
INFO Displays information about the current program (press again for more informations
◀ / ▶ Volume control / Navigation in the menu
▲/▼ Change TV/Radio programs (up/down) / Navigation in the menu
OK Confirm the current selection / opening the program list
EPG Displays the EPG (Electronic Program Guide)
EXIT Exits the current menu step by step
Area 3
VOL +/- Adjust the volume
CH +/- Switches TV / radio programs (up / down)
FAV Displays the favorite list (if favourites available)
REC Start recording (optional)
NUMERIC KEYS (0\~9) Program change / Enter numbers
GOTO Function key in different sub-menus
TV/RADIO Switches between TV and radio reception
3. Connecting the set-top box
3.1 Connecting the set-top box
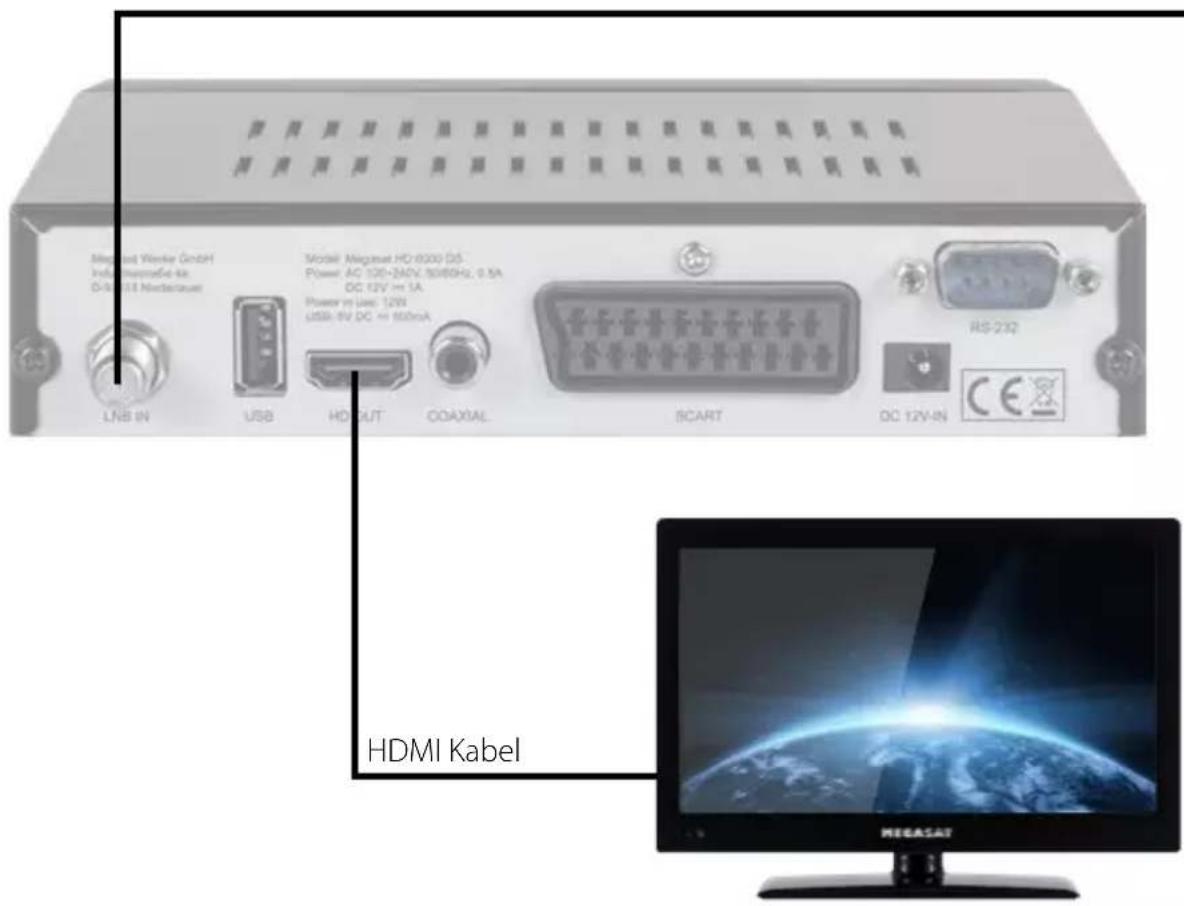
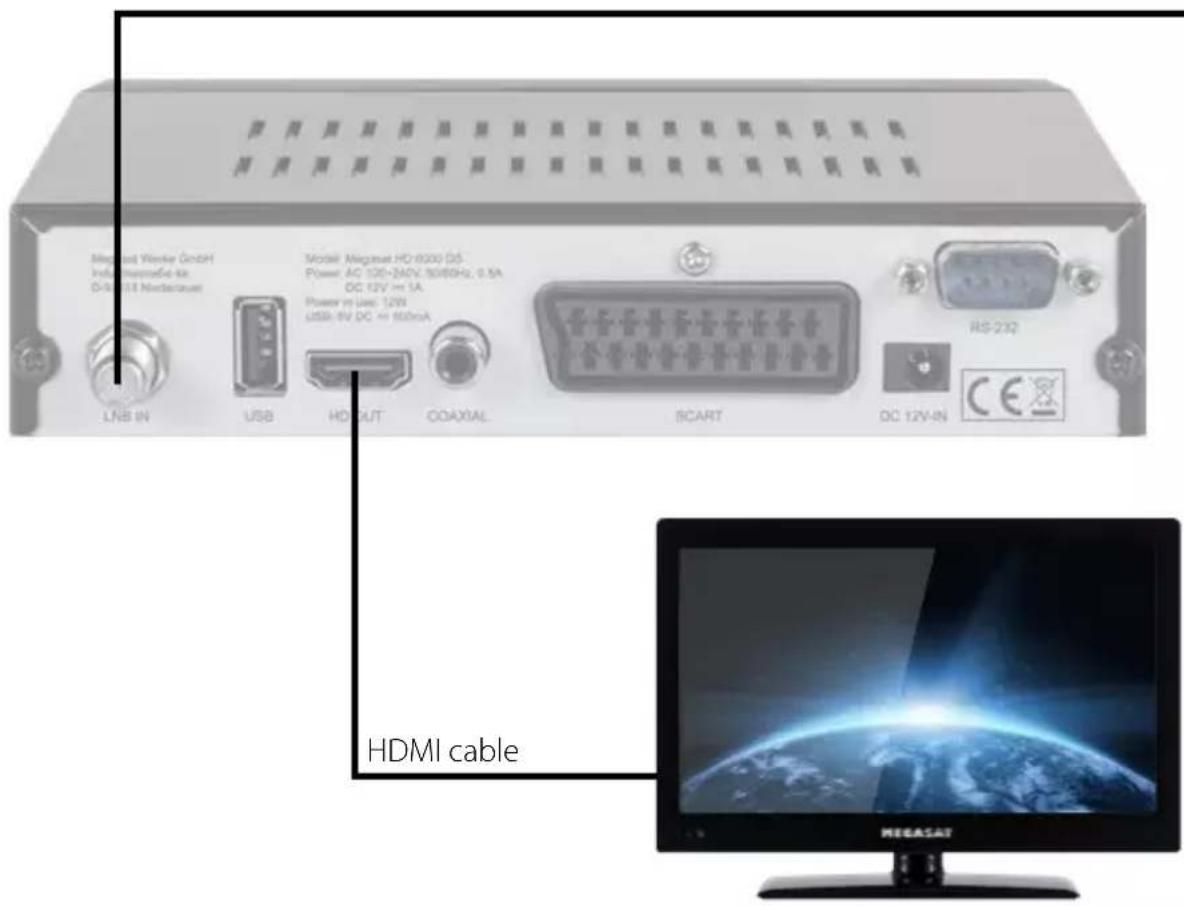
- Connect the coaxial cable to the LNB. (You can connect one LNB directly to LNB IN, or multiple LNBs over one DiSEqC switch or multi-switch.
- Connect the HDMI cable to your TV.
- Make sure your TV has the appropriate input channel selected (for example, HDMI 1).
- Now connect the power cord and start the receiver. The device is already factory-equipped with a station list and ready to use.
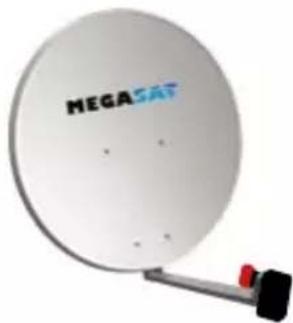
Coax cable
4. Main menu
Turn on the receiver. At initial start-up, you can select the desired language and time zone. Press EXIT to complete the initial installation and load the programmed station list. Now press the MENU button to enter the menu.
The main menu consists of:
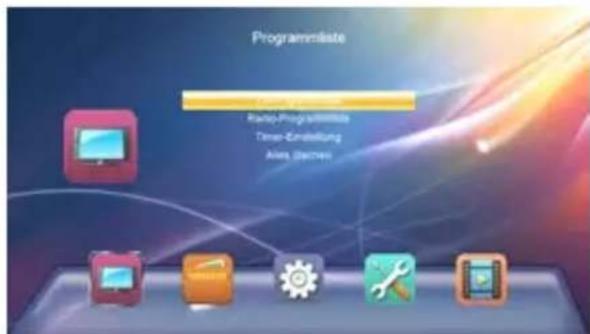
- Program list
- Installation
- System
- Network
• Media Center
With the ◀▶ keys you can choose between the respective menu items. Use the ▲▼ buttons to navigate through the submenus. If you want to exit the menu or a sub-menu, press the EXIT key to step out of the menus step by step.
4.1 Program list
The following submenus are available in the menu item Program List:
- TV channel list
- Radio channel list
- Timer setting
- Delete all
1. TV channel list
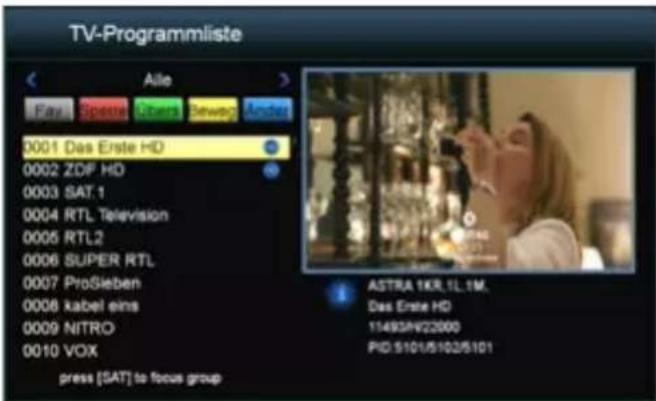
Select the TV channel list and press OK to confirm. When delivered, a TV station list is already set, you can change now.
Note: Press the SAT button to select your favorite satellites.
The following options are listed to change:
FAV (FAV button)
Press the FAV button to add the channels to a particular favorite group. Select a channel and press OK to confirm. A window will appear in which you can add the sender to one or more groups. Choose from favorite group 1 to 8 and confirm with OK. The selection is recognized by a heart symbol. Repeat the process until all desired channels to a favorite group were assigned. Press MENU to return to the TV channel list.
4. Main menu
LOCK (Red button)
Press the red button to activate the lock mode. Now select a channel you want to lock and press OK to confirm. You will see a password prompt. The default password is „0000“. After entering the password, the channel is locked. This is recognized by a lock icon. Repeat the process for all the channels you want to lock. From now on, you always enter the password when you switch to the channel. You can change the password in the MENU under System -> Child lock. Press MENU to return to the TV channel list.
SKIP (Green button)
Press the green button to activate the skip mode. Now select a channel you want to skip and press OK to confirm. This is recognized by a arrow icon. In future, the selected channel will be skipped when scroll in the channel list. Press MENU to return to the TV channel list.
MOVE (Yellow button)
Press the yellow button to activate the Move mode. Now select one or more channels that you want to move. This is recognized by a double arrow icon. Then proceed with the ▲▼ buttons to the desired position in the channel list. By pressing the yellow button again, the previously selected channels are moved to this position. Repeat the process with all the channels that you want to move. Press MENU to return to the TV channel list.
MORE (Blue button)
Press the blue button to make further settings.
Red button: To sort the channel e.g. A-Z, Z-A, free, Encrypted, ...
Green button: To rename a channel. With the colored buttons on the remote control, various functions are available.
Blue button: To delete channels. Select with OK all the channels that you want to delete from the list. This is indicated by an X icon. To delete the channel press exit. You will see a message box if you want to delete.
YES to delete, NO to cancel.
2. Radio channel list
The radio program list, you can edit in the same way as the TV program list.
4. Main menu
3. Timer settings
Here you can set one or more timers to call up the program you have selected at a certain time. The receiver automatically switches to this channel at the selected time.

Select the first timer slot and confirm with OK. Subsequently, a new window opens to set the data.
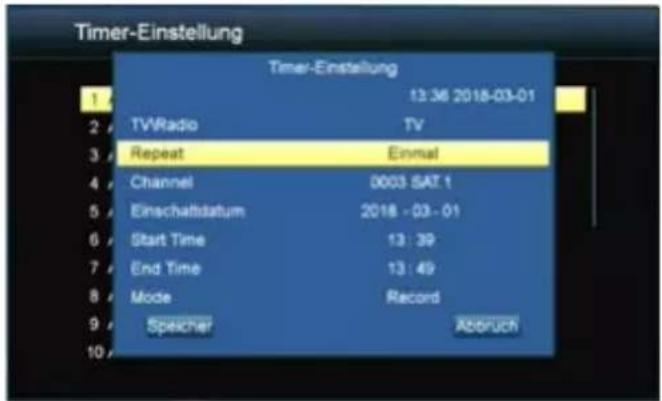
TV/Radio Select whether to turn on a TV or radio program.
Repeat Select when the timer should be active (Once, Daily, Weekly).
Channel Select which program the receiver should switch to.
Wakeup Select on which day (date) the timer should be active.
Start time Select when (time) the receiver should turn on.
End time Select when (time) the receiver should switch off again.
When you have made all the settings, press „Save“ at the bottom of the screen to transfer the timer to the timer list. Repeat the procedure if you want to set additional timers. There are a total of 20 different timers available.
4. Main menu
4. Delete all
Select this item to delete all programs. First you will be asked for the password. The password is in the delivery state: 0000.
You can change the password in the menu under „System“ ▶„Parental Control“.
Warning:
If you delete all programs, this process can not be undone!
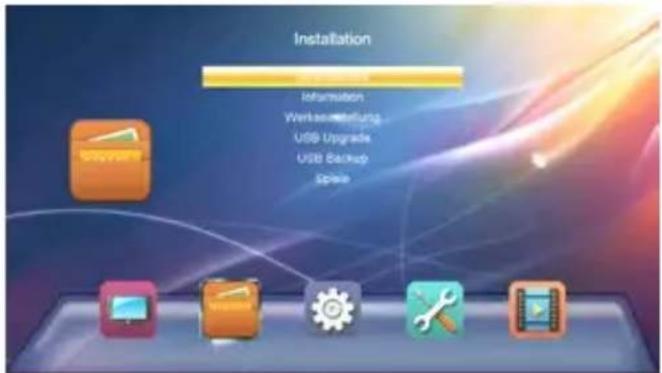
4.2 Installation
The following submenus are available in the menu item Installation ::
- Satellite list
- Information
- Factory setting
- USB upgrade
- USB backup
- Games
4. Main menu
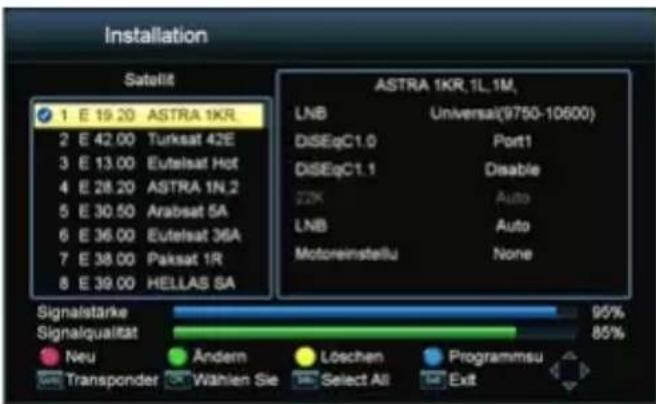
1. Satellite list
This menu lists all available satellites. Use the ▲▼ buttons to select one or more satellites that you want to receive with the receiver and confirm them with OK. The selection is marked with a hack symbol.
Add satellite
Press the red button to add a satellite. A window appears, enter a name and the longitude. With the colored buttons on the remote control, various functions are available.
Edit satellite
With the green button you can change a satellite. A window will appear where you can change the name and the longitude. With the colored buttons on the remote control, various functions are available.
Delete satellite
With the yellow button you can delete a satellite.
Transponder
Press the GOTO button on the remote control to add or edit a transponder. The list shows all available transponders of each satellite are listed. From time to time new transponder will be added or changed by satellite operators.
With the colored buttons on the remote control, various functions are available. The procedure is the (add, modify, or delete) the same as in the satellite.
4. Main menu
Channel search
With the blue button you can scan a satellite for programs. Here you can choose between single satellite search and multi-satellite search.
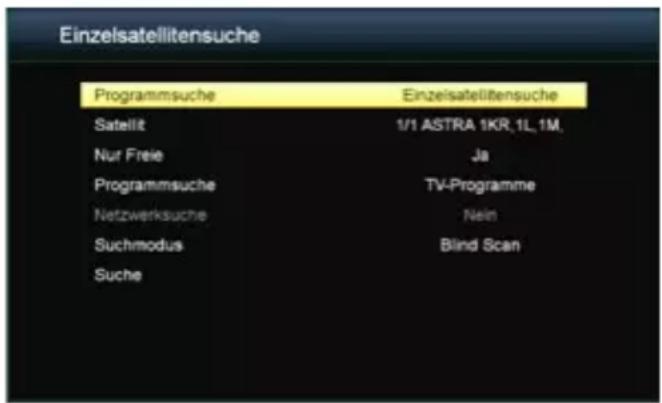
Satellit: Select the desired satellite (eg Astra 19.2° East).
Only free: Choose whether only free to air or all encrypted channels are to be searched.
Program search: Choose between TV or radio programs
Network Search: Select YES to look for transponders on satellites that are not contained in the transponder table. (The network search is only active when „Full Scan“ is selected in the search mode.
Multi satellite search
Here are all marked satellites can be searched simultaneously. The search settings above can also be applied here.
If you have made all desired settings, use the arrow keys to switch to „Search“ and confirm with OK to start the search.
4. Main menu
To make various settings according to your satellite system, select the desired satellite and then press the ▶ key to enter the right-hand setting window.
LNB
Here you can set the LNB type according to your satellite system. The default setting (Universal 9750-10600) is correct in most cases. If you select Unicable as LNB type, please follow the following settings:
Unicable (EN 50494 and EN 50607):
In the menu item LNB Type, you can make the settings for single-cable systems (Unicable, Unicable 2). The set-top box is programmable for different Unicable systems. Depending on the system, up to 32 set-top box can be connected.
Unicable A / B (EN 50494)
This setting is suitable for Unicable systems with up to 4 users. IF programs allow you to select up to 8 different programs, each IF program being assigned a frequency. Select the desired IF program (1-4). Then select the main frequency and confirm with OK. Now enter the frequency according to your Unicable system.
Use the Unicable A/B option to control up to 2 satellites.
This setting is suitable for Unicable 2 systems with up to 32 users. IF programs allow you to select up to 32 programs, each IF program being assigned a frequency. Select the desired IF program (1-32). Then select the main frequency and confirm with OK. Now enter the frequency according to your Unicable system.
Use the SCD A/B/C/D/E/F/G/H option to control up to 8 satellites.
Note:
Basically, one uses the lowest frequency for the longest cable path to the set-top box. Note that each frequency may only be present once in your system. The frequencies depend on your single-cable system and can not be allocated as desired. IF program and IF frequency must compulsorily match your Unicable system.
4. Main menu
DiSEqC 1.0 / DiSEqC 1.1
If the antenna is operated with a DiSEqC switch, here you can configure the DiSEqC input of the selected satellite.
22KHz
In case you are using two antennas connected to a 22KHz tone switch box. You can supply either 22KHz by setting "OFF" to select antenna.
LNB (Polarisation)
The polarization switches at Universal LNBs between the vertical and horizontal plane. The default setting (Auto) is correct in most cases.
Motor settings
If you operate your satellite dish with a motor, use the ◀▶ buttons to select between USALS, DiSEqC 1.2 or None. At the bottom of the screen other settings appear. Use the corresponding color buttons to get to the detailed engine settings.
USALS settings
BSet limit (red button): Choose between „Limitation off“, „West border“ and „East border“.
Limitation:
The mirror has no fixed limit to stop at a certain point.
West limit:
Press the t u buttons to turn the mirror to the east or west. Press until the desired position of the western boundary is reached. Then save the settings.
East border:
Press the t u buttons to turn the mirror to the east or west. Press until the desired position of the east border is reached. Then save the settings.
Go to reference:
Press OK to get to the 0° starting point.
Set limit (green button):
Set limit (red button): see USALS settings
Delete all (green button): Deletes all satellite positions of the motor.
4. Main menu
2. Information
Information about the software and hardware status of the receiver is displayed here.
3. Factory setting
With this feature you can set the set-top box to the delivery state. The first step is to enter a password to enter the submenu. The default password is „0000“. Note:
Note:
All data you have set will be lost!This action can not be undone!
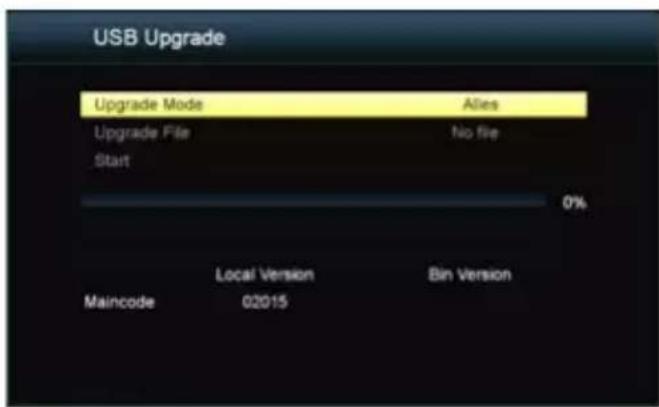
4. USB Upgrade
Copy the appropriate firmware to a USB stick and plug it into the USB port of the receiver. With the „Upgrade Mode“ you can choose to update ALL, only the program list or only the main code. Under „Upgrade File“ please select the new firmware. Start the upgrade process with „Start“. After the process, the receiver may restart.
5. USB Backup
With this function you can save your set data. With „Backup Mode“ you can choose to save ALL or just the program list.
To restore data, follow point „4. USB upgrade „.
6. Games
Various classic games for entertainment.
4. Main menu
4.3 System
The following submenus are available in the menu item Installation:
- Language
- Display settings
- Local time settings
- Childlock
- OSD setting
- Favorites list
- Sleep timer
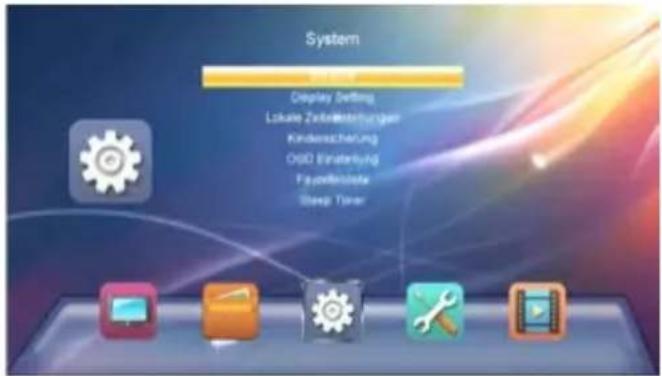
Set here the main language of the menu. Furthermore, the language of the first and second audio channel and subtitle language and teletext can be adjusted. With the ◀▶ buttons, the language can be selected. Save with MENU button and exit the submenu.
2. Display settings
TV setting: Select your TV system (Auto, PAL or NTSC)
Video resolution: Select the resolution of the set-top box (576i to 1080p)
Format: Select the screen size (Auto, 4:3 LB, 4:3 PS, 16:9)
Video effect: Select the sharpness of the image (sharp, normal or soft)
3. Local time settings
GMT Usage: Select if you want to use the automatic GMT setting.
GMT Difference: Select the time zone you are in
Summer time: Select whether daylight saving time should be activated or deactivated.
Date: Set the current date here (only if GMT usage is disabled)
Time display: Set the current time here (only with deactivated GMT usage)
4. Childlock
You can assign a password in different menu items or channels, to prevent children from changing the settings, or do not want to see programs.
The default password is „0000“ and can be arbitrarily changed here.
4. Main menu
5. OSD settings
With the ◀▶ keys you can change according to each point on your needs. It can be set as follows:
Subtitle: On or Off
OSD time: Menu display time (3-10 sec.)
OSD transparency: Menu transparency
6. Favorite liste
Here you will find a list of favorites that you can create in the channel list setting. The bookmark name can be changed arbitrarily. Access a list with the OK button and change the name using the color and number buttons on the remote control.
7. Sleep Timer
Set here when the receiver should turn off automatically when no operation is performed on the unit or on the remote control. You can turn off the sleep timer or choose between 1-6 hours.
4. Main menu
4.4 Network
The menu item Network contains optional functions which require an internet connection.
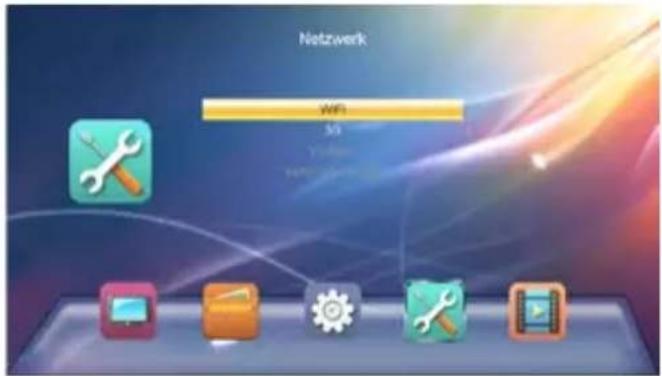
1. WiFi
The WiFi option is only available if a suitable WiFi USB stick has been inserted. You can then connect the receiver to your Internet router.
4. Network Update
The Network Update option is only available if you have connected the receiver to the Internet. Then you can download future firmware updates for the receiver via the Internet.
4. Main menu
4.5 Media Center
The following submenus are available in the menu item Media Center:
- Music
- Images
- Videos
- Storage format
- HDD information
Note:
The menu item Media Center can only be selected if a suitable USB stick has been inserted.

1. Music
On the left side of the screen you will see the contents of your USB storage device. Navigate with the ▲▼ buttons to select a folder in which you saved songs. Press the OK button to enter the folder.
Title playback:
Select a title with the ▲▼ buttons and start play-back by pressing OK. You can control the playback mode by pressing the „BLUE“ button on the remote control. Choose between the following playback modes:
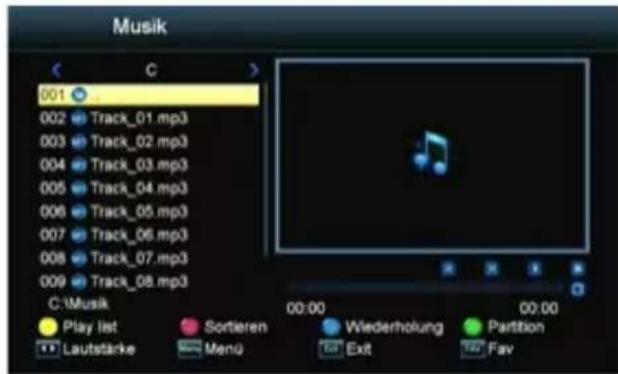
- Play the selected track 1x
- Repeat the selected track continuously
- Play all tracks randomly
The respective playback mode is indicated by the icon to the right of the playback bar.
4. Main menu
Sort tracks:
You can sort all tracks in the playlist by pressing the „RED“ button. Select between „Name A-Z“, „Name Z-A“ or the original arrangement (default).
Create a playlist:
Select a track from the playback with ▲▼ buttons. Press the „FAV“ button on the remote control to highlight the title as favorite. If you have selected all the titles as a favorite, you can enter the playlist with the „YELLOW“ button. Title can be deleted from the playlist by pressing the „YELLOW“ button. Highlight the title you want to remove and leave the playlist with EXIT. Do you want to delete the entire playlist, press the „GREEN“ button to select all tracks. Then exit the playlist with EXIT.
2. Pictures
On the left side of the screen you will see the contents of your USB storage device. Navigate with the ▲▼ buttons to select a folder in which you saved images. Then press the OK button to access the folder.
Start slideshow:
Select an image with the ▲▼ buttons and start playback by pressing OK. You can
change the slideshow settings by pressing the „BLUE“ button (Setup) on the remote control. Choose between the following options:
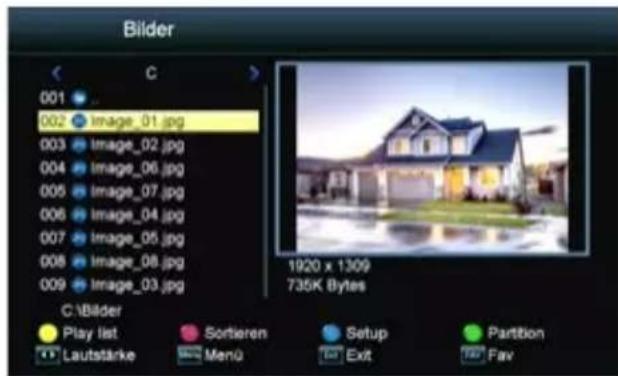
• Slideshow time: OFF, 1-9 sec. (Period until the next image)
• Slideshow repeat: ON or OFF
Note: If you set the slideshow time to OFF, only the selected image is displayed. You can now play all the images manually with ◀▶ buttons. With the ▲▼ buttons, the image can be rotated by 90°.
Sort pictures:
You can sort all pictures in the playlist by pressing the „RED“ button. Select between „Name A-Z“, „Name Z-A“ or the original arrangement (default).
4. Main menu
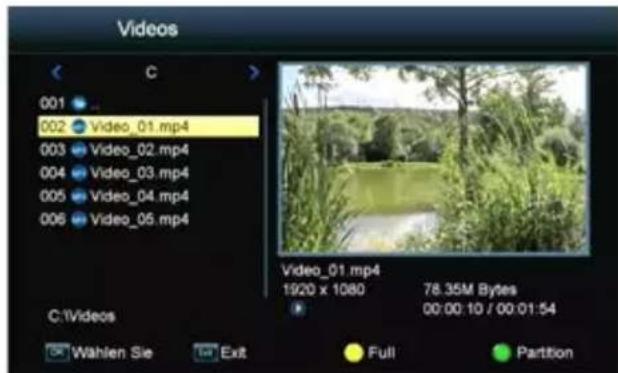
3. Videos
On the left side of the screen you will see the contents of your USB storage device. Navigate with the ▲▼ buttons to select a folder in which you saved videos. Then press the OK button to access the folder.
Select a video with the ▲▼ buttons and start playback by pressing OK. Playback look in advance in the small preview window. Press the „YELLOW“ button to play the video in full screen mode.
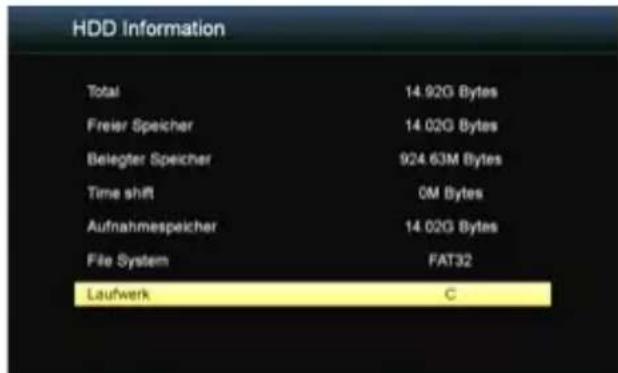
Hinweis:
Here you can see all the important information about the inserted USB drive.
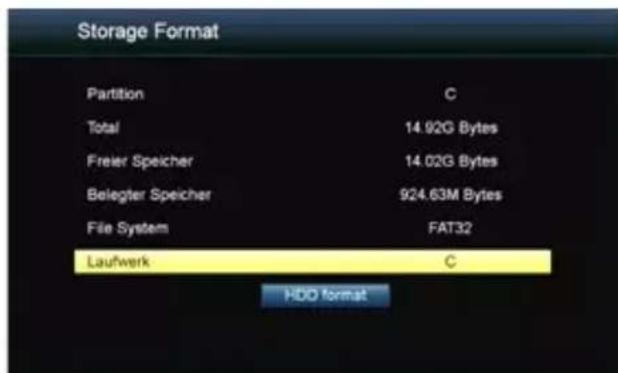
You can format the inserted USB drive. ATTENTION: All files they reside on the USB drive will be deleted irrevocably!
5. Additional information
5.1 Troubleshooting
You might meet abnormal working of this STB with various reasons. Check the following which may help you.
| Problem Possible causes What to do | ||
| The LED does not light up Power | cable is not connected Check that the power cable is connected properly. | |
| No picture or sound. The dish is | not properly aligned with the satellite and therefore receives a weak or no signal. The LNB or the coaxial cable is defective. You're not on the right channel. (AV or HDMI) | Adjust the dish. Check the signal strength indicator in one of the channels search submenus. Check the cable connections, LNB and other equipment connected to LNB & receiver, or adjust dish. Replace the LNB. Replace the cable. |
| Bad picture/blocking error Satellite | dish is not aiming to the satellite accurately. Signal too strong. Satellite dish is too small. LNB noise factor too high. The LNB is faulty. | Adjust the dish. Connect an attenuator to LNB input. Change to a larger dish. Change LNB with lower noise factor. Replace the LNB. |
| No startup menu on screen after turning on STB for the first time. | The system is connected by HDMI cable and the TV is not in HDMI mode. | Switch the TV to the appropriate HDMI input. |
| The remote control is not working. | Battery exhausted. Remote control is not aimed correctly STB is in standby mode. | Change the batteries (both). Aim the remote control at the STB. Check that nothing blocks the front panel. Check if LED indicator on the front panel is showing the time, press the power button to switch off standby mode. |
| You have forgotten your password. | Contact the dealer or Service Provider. They will help you set it up again. | |
5. Additional information
5.2 Specifications
| Tuner & Demodulator | |
| Frequency range 950 MHz to 2150 MHz | |
| Input connector F-Type, IEC 169-24, female | |
| Signal level -25 bis -65 dBm | |
| RF impedance 75 Ω, unbalanced | |
| IF bandwidth 55 MHz / 8 Hz (per 5 Msps) | |
| LNB Power and polarization Vertical : +13 V, 14 V +/-5 %Horizontal : +18 V, 19 V +/-5 %:max. 500 mA overload protection | |
| LNB tone wwitch 22 KHz +/- 2 KHz, 0.6 V +/- 0.2 V | |
| DiSEqC control Version 1.0/1.2 compatible, Tone Burst A/B | |
| Demodulation QPSK / 8PSK | |
| Symbol rate 1~45 Ms/s / SCPC, MCPC | |
| FEC Decode 1/2, 2/3, 3/4, 5/6 and 7/8 with constraint Length K=7 | |
| MPEG | |
| Transport stream MPEG-4/H.264, MPEG-2 ISO/IEC 13818 | |
| Profile level MPEG-4/AVC, MPEG-2 MP@ML, MP@HL | |
| Input rate | max. 15 Mbit/s |
| Image ratio | 4:3, 16:9 |
| Video resolution | 720 x 576, 720 x 480, 1280 x 720, 1920 x 1080 |
| Audio decoding MPEG / MusiCam Layer I & II | |
| Audio mode | Single channel / Dual channel / Joint Stereo / Stereo |
| Sampling | 32, 44.1 and 48 KHz |
| A/V and Data In/Out connector | |
| Audio output | S/PDIF coaxial |
| HDMI output | 576i, 576p, 720p, 1080i, 1080p |
| Scart output | RGB, CVBS |
| Service input | RS 232 |
| Power supply | |
| Input | 100 - 240 V AC, 50/60 Hz // DC 12 Volt, 1A |
| Consumption in operation | max. 12 W |
| Consumption in standby | < 0,5 W |
| Physische Spezifikationen | |
| Weight (net) | 239 g |
| Operating temperature | 0°C - to +40°C |
| Storage temperature | -40°C - to +65°C |
Note: Technical details are subject to change without notice.
Conformity information
Hereby declare the company Megasat Werke GmbH that the following devices is in compliance with the essential requirements and other relevant provisions of Directive 2014/30/EU and 2014/35/EU and Radio Equipment Directive 2014/53/EU:
Megasat HD 6000 DS (Art-No. 0201123)
The Declaration of Conformity for this product is located at the company: Megasat Werke GmbH, Industriestraße 4a, D-97618 Niederlauer
The declaration of conformity can be downloaded from our homepage: www.megasat.tv/downloads
Notes
Version: 1.1 (July 2018) // Technical changes, misprints and errors reserved.
Megasat Werke GmbH | Industriestraße 4a | D-97618 Niederlauer | www.megasat.tv | info@megasat.tv


- HAUPTMENÜ
- GENARAL
- DESIGNATIONS AND KEY ASSIGNMENT
- CONNECTING THE SET-TOP BOX
- MAIN MENU
- ADDITIONAL INFORMATION
- SAFETY INSTRUCTIONS
- POWER SUPPLY
- OVERLOAD
- LIQUID
- RISK OF SUFFOCATION
- CLEANING
- GENERAL
- 1.1 GENERAL FEATURES
- 1.2 DELIVERY
- 2.1 FRONT SIDE
- 2.2 BACK SIDE
- 2.3 REMOTE CONTROL
- AREA 1
- AREA 2
- AREA 3
- 3.1 CONNECTING THE SET-TOP BOX
- 4.1 PROGRAM LIST
- TV CHANNEL LIST
- FAV (FAV BUTTON)
- LOCK (RED BUTTON)
- SKIP (GREEN BUTTON)
- MOVE (YELLOW BUTTON)
- MORE (BLUE BUTTON)
- RADIO CHANNEL LIST
- TIMER SETTINGS
- DELETE ALL
- WARNING
- 4.2 INSTALLATION
- SATELLITE LIST
- ADD SATELLITE
- EDIT SATELLITE
- DELETE SATELLITE
- TRANSPONDER
- CHANNEL SEARCH
- MULTI SATELLITE SEARCH
- LNB
- NOTE
- DISEQC 1.0 / DISEQC 1.1
- 22KHZ
- LNB (POLARISATION)
- MOTOR SETTINGS
- USALS SETTINGS
- INFORMATION
- FACTORY SETTING
- USB UPGRADE
- USB BACKUP
- GAMES
- 4.3 SYSTEM
- DISPLAY SETTINGS
- LOCAL TIME SETTINGS
- CHILDLOCK
- OSD SETTINGS
- FAVORITE LISTE
- SLEEP TIMER
- 4.4 NETWORK
- WIFI
- NETWORK UPDATE
- 4.5 MEDIA CENTER
- MUSIC
- TITLE PLAYBACK
- SORT TRACKS
- CREATE A PLAYLIST
- PICTURES
- START SLIDESHOW
- SORT PICTURES
- VIDEOS
- HINWEIS
- 5.1 TROUBLESHOOTING
- 5.2 SPECIFICATIONS
- CONFORMITY INFORMATION
- NOTES
Brand : MEGASAT
Model : HD 600
Category : Satellite receiver