
HD570 - Satellite receiver MEGASAT - Free user manual and instructions
Find the device manual for free HD570 MEGASAT in PDF.


| Product Type | Satellite Receiver |
| Brand | Megasat |
| Model | HD570 |
| Dimensions (W x D x H) | 260 mm x 180 mm x 55 mm |
| Weight | 1.2 kg |
| Power Supply | AC 100-240V, 50/60Hz, 12V DC adapter |
| Power Consumption | 15 W (max) |
| Video Output | HDMI, SCART, Composite |
| Audio Output | HDMI, RCA, Digital Optical |
| Tuner | DVB-S2, MPEG-4, H.264 |
| Supported Satellite | Astra, Hotbird, etc. (DiSEqC 1.0/1.2) |
| Channel Memory | Up to 4000 channels |
| Display | LED indicator |
| Remote Control | Infrared, included |
| CI Slot | 1x Common Interface slot |
| USB Port | 1x USB 2.0 for PVR/Media playback |
| Ethernet | 10/100 Mbps (optional) |
| Main Functions | Digital satellite TV reception, electronic program guide (EPG), parental control, favourite lists, timer recording (via USB), teletext, subtitles |
| Accessories Included | Remote control, batteries, AV cable, power adapter, user manual |
| Maintenance | Clean with dry soft cloth; avoid liquids and direct sunlight |
| Safety | Operate in well-ventilated area; do not cover vents; keep away from moisture and heat |
| Spare Parts and Repairability | Remote control and power adapter available from Megasat; device is not user-serviceable; contact qualified technician |
| Environmental Information | RoHS compliant; disposal according to local electronic waste regulations |
Frequently Asked Questions - HD570 MEGASAT
User questions about HD570 MEGASAT
0 question about this device. Answer the ones you know or ask your own.
Ask a new question about this device
Download the instructions for your Satellite receiver in PDF format for free! Find your manual HD570 - MEGASAT and take your electronic device back in hand. On this page are published all the documents necessary for the use of your device. HD570 by MEGASAT.
USER MANUAL HD570 MEGASAT
Digitaler HD Satelliten Receiver Megasat HD570
Inhalt
Sicherheitshinweise! ! ! ! ! ! ! ! ! ! ! ! ! ! ! ! ... 3
natural_image
Diagram of a remote control unit with battery and cable connections (no text or symbols)Hinweise
Vorbereitung
Digital HD Satellite Receiver
Megasat HD570
Contents
Accessories----2
Safety Instructions-3-4
Precautions----4-5
Features----5
Front Panel----6
Rear Panel 6
About Remote Control 7
Start 8-9
Battery Installation----8
Service Life of Batteries----8
Operation Range of Remote Control----8
Fast Installation 9
Advanced Operation----9-14
Main Menu 9
Edit Channel 9-10
Installation----10-12
System Setup----12-13
Tools----13-14
Game 14
Appendix----15-17
Specifications 15
Troubleshooting 16-17
Accessories
After purchasing receiver, unpack it and check to make sure that all of the following items are included in the packaging.
Receiver one piece
Remote control one piece
User Manual one piece
Batteries (AAA) two pieces
Safety Instructions
Dear customer, thank you for purchasing this DVB Satellite Receiver. Please read this manual carefully before operating your product and pay close attention to the precautions which are mentioned below.
◆ This product only can be operated where the mains supply is \~230V, 50Hz.
◆ To avoid fire and electric shock, do not expose this equipment to rain or moisture.
The apparatus shall not be exposed to dripping or splashing and that no objects filled with liquid, such as vases, shall be placed on the apparatus.
◆ To reduce the chance of fire, electric shock, or annoying interference, use only the recommended accessories.
The mains plug is used as the disconnect device, the disconnect device shall remain readily operable.
◆ Keep not less than 5cm distances around the apparatus for sufficient ventilation.
◆ Keep the ventilation should not be impended by covering the openings with items such as newspapers, table-cloths, curtains, etc.
◆ No naked flame sources, such as lighted candles, should be placed on the apparatus.
◆ Batteries shall not be exposed to excessive heat such as sunshine, fire or the like.
◆ The label was silk-printed on the exterior of the bottom of the apparatus.
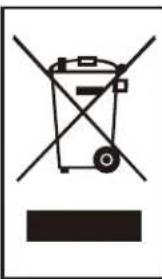
◆ Correct Disposal of this product.
◆ To reduce the chance of fire, electric shock, do not open the cover when it works.
natural_image
Symbol of a trash bin crossed with a diagonal line and a horizontal bar below (no text or labels)This marking indicates that this product should not be disposed with other household wastes throughout the EU. To prevent possible harm to the environment or human health from uncontrolled waste disposal, recycle it responsibly to promote the sustainable reuse of material resources. To return your used device, please use the return and collection systems or contact the retailer where the product was purchased. They can take this product for environmental safe recycling.
This product has been manufactured to conform to the International Safety Standards. Please peruse the following safety precautions before use.
OVERLOADING
Do not overload a wall outlet, extension cord or adapter as this may result in fire or electric shock.
CLEANING
Disconnect the product from the wall outlet before cleaning. Do not use any aerosol products to clean the product. Dust the outer surface with a cloth lightly dampened with water (no solvents).
CONNECTING TO ANTENNA
Disconnect the product from mains before connecting or disconnecting to antenna.
Otherwise, it may damage the product and antenna.
CONNECTING TO TV SET
Unplug the power cord when connecting or disconnecting to TV Set. Otherwise, it may damage the product and antenna
EARTHING
The antenna cable must be earthed to the antenna system and the Earthing System must comply with the local Electric Safety Standards.
LOCATION
The DVB-S is designed for indoor use only. Do not install the product where it may expose to bright light or direct sunlight.
Precautions
Peruse the following precautions before using.
Power Cord Protection
Please complaint the following regulations to avoid malfunction, fire and electric shock or other damage to human body.
☐ Make sure to connect and disconnect the power cord with holding the plug.
☐ Do not connect or disconnect the AC power with wet hands.
Separate the AC power cord from heating appliances as distance as possible.
Do not stack any heavy objects on the AC power cord
☐ Do not repair or reconstruct the AC power cord without authorization.
□ Clean the plug regularly.
☐ Cut off the power and disconnect the AC cord immediately if the product has been dropped or damaged.
☐ Cut off the power and disconnect the AC cord immediately if you find the product is smoking, burning or noisy.
Location
Do not install the product in following locations,
Where it may expose to direct sunlight or heat resources such as heat register and stove.
U Ambient temperature over 35°C or ambient atmospheric moisture over 90%.
□ Dusty place.
☐ Where it may influence by magnetic field or static electricity.
☐ Where it may subject to physical shock, vibration or dropping.
Non-use Periods
Switch the product to standby status or turn off the power when the product will not be used. Unplug the power cord from the AC outlet when the product will be idle for a long period of time.
Do not insert fingers or other objects into the product
It may damage the product or even hurt human body by touching any internal parts of the product because of high voltage.
Do not dismantle the product.
☐ Do not stack any object on the product.
Keep water and magnetic things away
Contact with liquid may cause serious damage, please keep the product away from it.
Keep product far away from magnetic things, such as speaker etc.
Position
Place the product on a horizontal surface. Do not stack heavy things on it.
Do not place the product beneath the magnifier or other devices that emit heat.
Signal Interference
Under the condition of TV signal receive situation, TV Set may get signal interference when you are watching a TV program with the DVB-S on. This is not means that the product or the TV Set is malfunction. Please turn off the DVB-S while watching the TV.
Features
□ Fully MPEG-2 / DVB-S/DVB-S2 Compliant
☐ C/Ku Band and Horizontal/Vertical Polarized Program
□ OSD Menu
Electronic Program Guide^EPGv
□ Multi-Programmable Channel (Favorite/Move/Lock/Delete/Sort)
□ Satellite Signals Display
Go-to-X
□ Support 22 KHz DisEqC1.0 and DisEqC1.2 control, Unicable
□ Editable for Satellites and Transponder!s information
☐ QPSK Demodulation Mode, SCPC and MCPC Compatible
□ Capacity of 6000 programs
□ Auto scan/ Manual Scan/NIT Scan
□ OSD/VBI Teletext Output
TV SCART
□ L/R Audio Output
Digital Coaxial Output
Power memory
USB
HMDI
□ LCN Short-Circuit Power Protection
☐ OTA & USB Upgrade
Front Panels
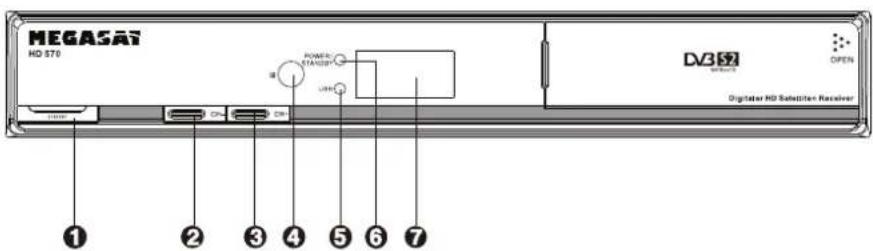
- Power/Standby Button
- CH- Button
- CH+ Button
- IR Receiver Window
- USB LED Indicator
- Power/ Standby LED Indicator
The LED indicator goes Green in POWER mode and goes Red in STANDBY mode. - Display Window
Rear Panel
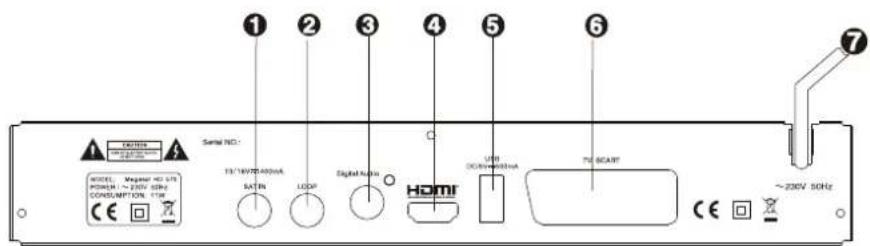
- SAT IN
- LOOP Out
- Digital Coaxial Output
- HDMI Socket
- USB Port
- TV SCART Socket
- AC IN
NOTE:
In order to avoid electric leakage and shock caused by scratched power cord, please unplug the power cord from the wall outlet and keep it orderly if the product is not going to be used for a long period time.
About Remote Control
| Remote control Name Descriptions | ||
| 1 Power | Switch your device on from standby mode. | |
| 2 F2 | ||
| 3 MODE | Change HDMI output resolution. | |
| 4 | Numeric Buttons | Select channel or programming parameters. Press numeric button 0 to switch to sleep mode. |
| 5 MENU Enter in setup interface. | ||
| 6 EXIT Exit from current menu. | ||
| 7 | Navigation Buttons | Move cursor. |
| 8 VOL+ Turn up volume. | ||
| 9 VOL - Turn down volume. | ||
| 10 | TXT Display teletext. | |
| 11 | SUB Display subtitle. | |
| 12 | USB Switch to USB mode. | |
| 13 | FIND | Enter in search interface. |
| 14 | LIST | Enter in video list. |
| 15 | AUDIO | Change audio track. |
| 16 | PREV | Back to previous. |
| 17 | NEXT | Skip to next. |
| 18 | SLOW | Slow down play speed. |
| 19 | PLAY/ PAUSE | Start playing. Make a pause. |
| 20 | STOP | Stop. |
| 21 | REC | No function |
| 22 | F.RWD | Fast backward. |
| 23 | F.FWD | Fast forward. |
| 24 | Zoom Zoom in or out. | |
| 25 | Recall | Back to previous channel or menu. |
| 26 | SLEEP | Switch in standby mode. |
| 27 | PAGE DOWN | Page down. |
| 28 | Mosaic | Grid show. |
| 29 | PAGE UP | Page up. |
| 30 | CH - | Skip to previous channel. |
| 31 | CH + | Skip to next channel. |
| 32 | OK | Display channel list on screen. Confirm selection. |
| 33 | INFO | Display information of current program. |
| 34 | SAT Shift satellites. | |
| 35 | EPG | Display Electronic Program Guide information of current channel. |
| 36 | FAV | Shift to favorite channels. |
| 37 | Timer | Enter in timer setup interface. |
| 38 | F1 Multifeed. | |
| 39 | MUTE Enable or disable the audio. | |
| 40 | TV/R | Shift between TV and radio. |
Start
Battery installation
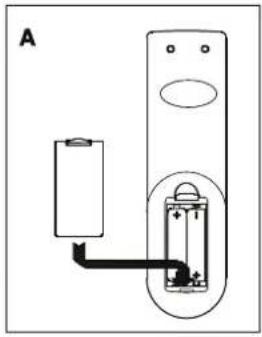
Install the batteries and make sure the positive (+) and negative (-) polarities match as shown in Figure A.
Service life of batteries
The batteries normally last for about one year despite that it depends on how often and in what way the remote control is operated.
◆ Replace the batteries if the remote control fails to work even when it is operated near the DVB-S receiver.
◆ Use 2 pieces of 7 (AAA/UM-4) batteries.
natural_image
Diagram of a remote control device with battery and switch (no text or symbols)Notes
◆ Do not use rechargeable (Ni-Cd) batteries.
Do not attempt to recharge, short circuit, disassemble, heat the batteries or dispose of in fire.
Do not drop or step on the remote control unit or subject it to shocks. Otherwise the parts of the remote and lead malfunction.
◆ Do not use the new and old batteries together.
Please remove the batteries if the remote control is not going to be used for a long period of time. Otherwise, it may cause electrolyte leakage and lead malfunction, even fire accidents. Carefully wipe the electrolyte out of the remote control compartment and replace with new batteries. If any electrolyte happens to touch your skin, wash it off thoroughly with clean water immediately.
Operation range of remote control
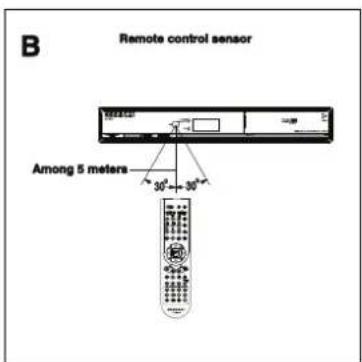
◆ Point the remote control to the IR receiver window. The remote control shall be effective within a distance of about 5 meters and an angle of about 60 degrees as shown in Figure B.
◆ The effective range may vary slightly with the brightness of the room.
Notes
◆ Do not shine bright light to the remote control sensor.
◆ The remote control unit may not work if there are obstacles between the remote control and the sensor.
◆ Do not recommend this remote control using for other products.
Start
Fast Installation
Connect this unit and other apparatus according to !BASIC CONNECTIONS". Plug the power cord, press [STANDBY] buttonano need for first connectionvto start.
- Plug the power cord and press [STANDBY] button to start
- Press [MENU] button to setup. Use [Ÿ/ż] buttons to select !Tools" and load factory default. Default password is !0000".
- Select !Installation" by using [Ÿ/ź] buttons and press [Ž] button to setup. Password: 0000.
A. Select !Satellite List" to choose satellite. Press [EXIT] button to exit after setup.
B. Select !Antenna Setup" and press [Z] to setup. Select !LNB Freq" to setup High Frequency and other parameters. Press [EXIT] button to exit after setup.
C. Select ! Single/Multi Satellite" and press [Ž] to setup. After setup, press [Ž] to start auto search.
Read Menu Operation Instruction for more details.
Advanced Operation
Menu Operation
Main Menu
Press MENU button to browse the Main Menu which includes 5 sub-menus are listed below:
Edit Channel
Installation
System Setup
Tools
Game
Press [Ÿ/ź] buttons to select menu item, press OK button to browse its submenu. Press [EXIT] button to return to the previous menu.
Notes:
- The four navigation buttons ( /// ), OK and EXIT buttons have same functions in all levels menus.
- Some buttons have different functions in different menus. Please find out according to the screen.
- Programmable buttons (which with color) functionality depends on the menu that is active at press moment. Please find out according to the screen.
1. Edit Channel
Select Edit Channel in Main menu and press [OK] button to enter in its submenu. There are 4 options to choose which are listed below.
TV Channel List
Radio Channel List
□ Delete All
□ Save as Default
1.1 TV Channel List
Move cursor to !TV Channel List" and press [OK] button to enter in its setup interface. Use [Ÿ/ż ] buttons and press [OK] button to confirm. Use programmable buttons (which with color) to set up according to screen.
Favor button is activated when the favorite channels have been set. Default Password is: 0000.
z FAV: Press [FAV] button to lift the !FAV" icon. Use [Ÿ/ź] buttons to select channel and press [OK] button to set chosen channel in 8 different favorite groups. Press [OK] button twice to cancel setup. Press [EXIT] button to quit.
z Lock: Press [RED] button to lift the !Lock" icon. Use [Ÿ/ż] buttons to select channel and press [OK] button to lock, press [OK] button again to cancel lock. Press [EXIT] button to quit current menu and save according to screen.
z Skip: Press [Green] button to lift the !Skip" icon. Use [Ÿ/ź] buttons to select channel and set the chosen TV program to be skipped when use [Ÿ/ź] buttons to shift channels.
z Move: Press [YELLOW] button to lift !Move" icon. Use [Ÿ/ż] buttons to select channel and press [OK] button to confirm selection. Use [Ÿ/ż] buttons to move and [OK] button to confirm movement. Press [EXIT] to quit current. Save according to screen.
z Edit: Press [BLUE] button to enter in !edit" interface. In !Edit" interface, press [RED] button to sort channels by Name (A-Z)/Name (Z-A)/Free/Scramble/Lock; press [GREEN] button to edit (rename) the chosen channel, Press [RED] button to shift alpha between capitalized and small, Press [GREEN] button to delete input, press [YELLOW] button to confirm, press [BLUE] button to cancel; press [BLUE] button to delete the chosen channel.
1.2 Radio Channel List
All found radio channels will be listed here.
Refer to the operation of TV Channel List (Item 1.1) for detailed operations.
1.3 Delete All
Delete all TV and radio programs according to screen.
1.4 Save as Default
Please operate according to screen.
2. Installation
Select installation in main menu and press [OK] button to enter in its submenu. There are 6 submenu items which are listed below.
Antenna Connection
Satellite List
Antenna Setup
☐ Single Satellite Search
□ Multi-Satellite Search
TP List
2.1 Antenna Connection
Fixed Antenna
Motor Antenna
2.2 Satellite List
Move cursor to !Satellite List" and press [OK] button to enter in its submenu. Use [Ÿ/ż] buttons to choose satellite.
z Edit: Press [RED] button to edit satellite. Please operate according to screen. Use [RED] button to shift alpha between capitalized and small. Use [GREEN] button to delete input. Use [YELLOW] button to confirm editor. Press [BLUE] button to cancel editor.
z Add: Press [GREEN] button add a satellite. Please operate according to chapter !Edit".
z Delete: Use [Ÿ/ż] buttons to select satellite and [OK] button to confirm selection. Press [BLUE] to delete the selected satellite. Press [EXIT] button to quit and save according to screen.
2.3 Antenna Setup
Move cursor to "Antenna Setup" and press [OK] button to enter in its submenu. Use [Ÿ/ż] buttons to select item and [Z/Ż] buttons to change parameters. Signal Intensity and Signal Quality will be displayed at bottom of the window.
Fixed Antenna
z Satellite: Choose a satellite.
z LNB Freq: Press [OK] button to select a proper LNB Frequency.
z Transponder: Press [OK] button to select a transponder.
z DiSEqC1.0: Press [OK] button to select a digital control port.
z 22K.Use [Ž/Ž] buttons to activate or deactivate 22K Hz tone switch.
z Polarity: Use [/] buttons to choose a polarity voltage: Auto, H (horizontal) and V(vertical).
Motor Antenna
z LNB Type: Press [OK] button to select a proper LNB Frequency.
z Motor Type: Use [Ž / Ž] buttons to select !USALS" or !DisEqC1.2".
z Local Longitude: Use [Z/Z] buttons to select !E" or !W" and numeric buttons to input. (It is only activated when !Motor Type" in !USALS" mode.)
z Local Latitude: Use [Z/Z] buttons to select !S" or !N" and numeric buttons to input. (It is only activated when !Motor Type" in !USALS" mode.)
z Delete All: Delete all LNB information.
z Mo tor Setting
A. Satellite: Choose a satellite.
B. Transponder: Press [OK] button to select a transponder.
C. Position No. & Save: Use [/] buttons to choose NO. for satellite and transponder.
D. Go-To-X: Press [OK] button to choose position of satellite.
E. Save: Use [Z/Z] buttons to move position of the motor antenna to West or East, operate according to signal quality and press [OK] button to save.
F. Recalculation: Update related information of automatic localizer.
z Limit Setup
A. Limit Setup: Use [/] buttons to choose limit setup mode: Disable/West Limit/East Limit.
B. Limit Setup: Long press [Ž/Ž] buttons to move motor antenna.
C. Go to Reference: Press [OK] button to go back to default position.
2.4 Single Satellite Search
z Satellite: Press [OK] button to choose satellite.
z FTA Only: Yes(Search the free channels only)/No (Search both free and paid channels)
z Scan Channel: TV Channel/Radio/TV + Radio
z Network Search: Yes/No (It is activated when !Scan Mode" is in !Preset Scan" mode.)
z Scan Mode: Auto Scan/Preset Scan
z Search: Start search.
2.5 Multi Satellite Search
z Satellite: Press [OK] button to choose satellites for search.
z FTA Only: Yes(Search the free channels only)/ No (Search all channels)
z Scan Channel: TV Channel/Radio/TV + Radio
z Network Search: Yes/No (It is activated when !Scan Mode" is in !Preset Scan" mode.)
z Scan Mode: Auto Scan/Preset Scan
z Search: Start search.
2.6 TP List
Move cursor to !TP List" and press [OK] button to enter in its submenu. Press [EXIT]
button to quit
Refer to !Satellite List" for detail operations of Edit/Add/Delete/Search.
3. System Setup
Select Setup in main menu and press [OK] button to enter in its submenu. There are
9 submenu items which are listed below.
Language
TV System
□ Display Setting
□ Local Time Setting
Timer Setting
☐ Parental Lock
□ OSD Setting
Favorite
□ Other
3.1 Language
z Language: English, French, Deutsch and etc.
z First Audio: English, French, Deutsch and etc.
z Second Audio: English, French, Deutsch and etc.
z Subtitle Language: English, French, Deutsch and etc.
z Teletext: English, French, Deutsch English, French, Deutsch and etc.
3.2 TV System
z Video Resolution: By Source/By Native
TV/480i/480p/576i/576p/720_50/720p_60/1080i_50/1080i_60/1080p_50/1080p_6
0/1080p_25/1080p_30/1080p_24
z Aspect Ratio : Auto/4:3 LB (Letter Box) / 4:3 PS( Pan Scan) / 16:9
z Video Out : RGB/HDMI
z D igital Audio Output : LPCM Out/ BS Out
3.3 Display Setting
z Brightness: 0-100
z Contrast: 0-100
z Saturation: 0-100
3.4 Local Time Setting
z GMT Usage
z GMT Offset
z Summer Time
z Date
z Time
3.5 Timer Setting
z Timer Mode: once/daily/weekly/monthly/off.
z Timer Service
z Wakeup Channel
z Wakeup Date
z On Time
z Duration
Note: Wake up function is not available in Standby mode.
3.6 Parental Lock
Default password: 0000
z Menu Lock: On/Off. Password will be required when auto scan or channel scan is activated if you choose !On" mode.
z Channel Lock: On/Off. Password will be required to watch locked programs.
z New Password: Set new password with numeric buttons.
z Confirm Password: Input the new password with numeric buttons.
3.7 OSD Setting
z Subtitle Display
z OSD Timeout: 1-10 seconds
z OSD Transparency: off/10%/20%/30%/40%
3.8 Favorite
There are 10 groups can be setup. Press [OK] button to rename the group.
z YELLOW: Switch capital and small letter
z RED: Cancel current input
z BLUE: Confirm input
3.9 Other
z LNB Power: OFF/ON
z Channel Play Type: Free/Scrambled/All
z BEEPER: Off/On
z Auto Standby: OFF/10/30/60/120/180 Min
z Sleep Timer: OFF/10/30/60/90/120 Min
4. Tools
Select Tools item and press [OK] button to enter in its submenu. There are 6 submenus which are listed below.
Information
□ F factory Setting
□ Upgrade by USB
Save to USB
USB
Remove USB Device Safely
4.1 Information
View the system information of this product.
4.2 Factory Setting
Default password is !0000"
4.3 Upgrade by USB
z Insert flash drive and load file named with !all*.abs".
z Enter in !Tools" menu and select !Upgrade by USB", press OK button to start upgrade.
z Select !ALL CODE", the upgrade file will be found automatically.
z Select !Start" to load the upgrade file and start upgrade.
Notes:
-
Do not cut off power supply during upgrade.
-
Factory default must be loaded after upgrade.
4.4 Save to USB
Insert flash drive and enter into ! Save to USB" interface.
z Save Mode: All code/Radio back/ Default db
z Save File
z Start
4.5 USB
Plug USB device and enter in !USB" interface. !USB" interface is deactivated without USB device. Press [USB] button to enter in !USB" interface directly while watching.
Press [EXIT] button to quit. MP3, JPEG and BMP formats are all supported. Use [Ÿ/ż] buttons to choose file and press [OK] button to enter in its submenu or play.
TI PS about JPEG Operations
z Press numeric button 1 to select all pictures in files which has JPEG documents and add to play list.
z Press numeric button 2 to open !Music/Image" play list window, use [Z/Z] buttons to select !Image" or !Music" and press [OK] button to enter in play list.
z Press numeric button 3 to set repeat mode.
z Press [INFO] button to set up play mode for pictures: Slide Show Time/Slide Show Repeat. Save according to screen.
z Press [REC] button to sort in Default/Name(A-Z)/Name(Z-A)/Image 1 sl /Music 1 st .
z Press [FAV] button to add chosen item to play list.
TIPS about MP3 Operations
z Press numeric button 0 to select all MP3 in files which has MP3 documents and add to play list.
z Press numeric button 2 to open !Music/Image" play list window, use [Ž/Ž] buttons to select !Image" or !Music" and press [OK] button to enter in play list.
z Press [FAV] button to add chosen item to play list.
z Press numeric button 3 to set repeat mode.
z Press [INFO] button to set up play mode for pictures: Slide Show Time/Slide Show Repeat. Save according to screen.
z Press [REC] button to sort in Default/Name (A-Z)/Name (Z-A)/Image 1 st /Music 1 st .
z Press [PLAY/PAUSE] button to pause while playing; Press [PLAY/PAUSE] button to play; Press [STOP] button to stop playing; Press [NEXT] button to skip to next MP3; Press [PREV] button to back to previous MP3; Press [F.RWD] button to fast backward; Press [F.FWD] button to fast far ward.
Please refer all operation according to screen.
4.6 Remove USB Device Safely
Move cursor to !Remove USB Device Safely" and press [OK] button, wait for few seconds and remove the USB device safely.
5. Game
Select !Game" in !Tools" menu and press OK button to enter in its submenu. There are 2 submenus which are listed below.
Othello
□ Sudoku
Appendix
Specifications
| Items Features | ||
| High Frequency Tuner | Input Frequency Range | 950~2150 MHz (C/Ku Compatible) |
| Input Signal Level | -65r-30dBm | |
| RF Input Connector | IEC169-2, Female | |
| Input Impedance 752 | ||
| Demodulation Mode | Demodulation | QPSK'Compatible SCPC & MCPC |
| Symbol Rate 2~45 Mbit/s | ||
| Code Rate 1/2, 2/3, 3/4, 5/6, 7/8 | ||
| Video Decoding | Video Decoding | ISO/IEC 13818-2 MPEG2^MP@MLv!ISO/IEC 14496 MPEG-4!MPEG-4AVC^H.264v |
| Video Resolution | 480i/480p/576i/576p/720p/1080i/1080p | |
| Video Input Code Rate | 72 Mbit/s Max | |
| Teletext | DVB-TXTETSI/EN300472 | |
| Audio Decoding | Audio Decoding | ISO/IEC13818-3 |
| Audio Track Stereo, Monophony (L, R), SPDIF | ||
| Audio Sample Rate | 32'44.1, 48KHz | |
| USB | USB Port USB2.0 | |
| Format MP3/JPEG/BMP | ||
| System FAT32, NTFS | ||
| Power Specifications | Power Range | ~176-264V'50Hz |
| Rated Power | ~230V, 50Hz | |
| Standby Power Consumption | 0.5 W | |
| Rated Consumption | 18 W | |
| Work Environment | Temperature | 0~40° |
| Humidity <90% | ||
| Dimensions | Weight | 1.5 Kg |
| Size | 266(W)u166(D)u39(H)mm | |
Note:
Weight and dimensions are not absolutely exact values.
Specifications are subject to change (by manufacturer) without notice.
Troubleshooting
Look through the trouble shooting information. Some simple checks or minor adjustment of the unit on your part may help resolve the problems. If the problems prove to beyond your capability, you had better hand it over to a professional qualified technician.
The integrated circuits are easily breakdown by static. Make sure the antistatic protection has been well taken before maintenance.
| Troubles Possible Causes Suggested Solutions | ||
| No power | The power cord has not been well connected | Plug the power cord into the outlet tightly and turn on the power; if no power still, turn off the power again, and turn it on in 5-10 minutes. |
| Can not scan programs | The antenna is not adjusted well | Adjust the antenna or use an outdoor antenna |
| Use antenna incorrectly | Use an antenna with 75 2 impedance input | |
| Parameter input incorrectly | Input Frequency, Bandwidth parameter correctly | |
| No picture | Output cord connect incorrectly Connect the output cord correctly. | |
| The video output mode of the unit is different from the mode of monitor | Reset the working system | |
| No Color | The video output system of the unit is different from the mode of monitor | Reset the color system |
| The remote control fails to work | Batteries incorrectly installed | Install the battery correctly |
| Batteries exhausted Replace the battery | ||
| Beyond the effective operation range | Operate within an normal range | |
| The remote sensor is pointed to by bright light | Place the unit elsewhere for a change | |
| Audio track and subtitle language are not the chosen items | Has not chosen the right sound track | Press the Audio button to shift the channel |
| No sound at all | The unit is in a mute status Cancel the mute | |
| Volume set at a too low level Augment the volume | ||
| Cable connected incorrectly Connect the cable correctly | ||
| No sound by chance | There might be a short circuit | Correct the output-cable connection, and turn on it. |
| In mute status Cancel the mute | ||
| In standby mode Turn on the unit | ||
| Serious distortion or cannot receive signal normally | Too much interferential signal Adjust the antenna. | |
| Flash drive can not be read | The flash drive has not been connected well | Connect the cable correctly. |
| The flash drive's current is too heavy, the product wouldn't afford it. | Provide external power source. | |
| The flash drive runs self-protection program because of external device short circuit. | Change the short circuit device and restart the product. | |
MEGASAT
DVB Deutsche Bank

- Inhalt
- Hinweise
- Vorbereitung
- Contents
- Accessories
- Safety Instructions
- OVERLOADING
- CLEANING
- CONNECTING TO ANTENNA
- CONNECTING TO TV SET
- EARTHING
- LOCATION
- Precautions
- Non-use Periods
- Do not insert fingers or other objects into the product
- Keep water and magnetic things away
- Position
- Signal Interference
- Features
- NOTE:
- Start
- Battery installation
- Service life of batteries
- Notes
- Operation range of remote control
- Fast Installation
- Advanced Operation
- Menu Operation
- Main Menu
- Notes:
- Edit Channel
- TV Channel List
- Radio Channel List
- Delete All
- Save as Default
- Installation
- Antenna Connection
- Satellite List
- Antenna Setup
- Fixed Antenna
- Motor Antenna
- Single Satellite Search
- Multi Satellite Search
- TP List
- System Setup
- Language
- TV System
- Display Setting
- Local Time Setting
- Timer Setting
- Parental Lock
- OSD Setting
- Favorite
- Other
- Tools
- Information
- Factory Setting
- Upgrade by USB
- Save to USB
- USB
- TI PS about JPEG Operations
- TIPS about MP3 Operations
- Remove USB Device Safely
- Game
- Appendix
- Troubleshooting
Brand : MEGASAT
Model : HD570
Category : Satellite receiver