
UFT 671 - Satellite receiver KATHREIN - Free user manual and instructions
Find the device manual for free UFT 671 KATHREIN in PDF.


| Product Type | Satellite Receiver |
| Brand | Kathrein |
| Model | UFT 671 |
| Dimensions (approx) | 280 x 170 x 40 mm |
| Weight (approx) | 0.8 kg |
| Power Supply | 12V DC via external adapter |
| Power Consumption | ≤ 15 W |
| Supported Tuner | DVB-S2 |
| Video Decoding | MPEG-4, H.264 |
| Output Resolution | Up to 1080p |
| Output Interfaces | HDMI, SCART (CVBS) |
| Audio Output | Digital optical, analog stereo |
| LNB Input | F-type, 75 Ohm |
| DiSEqC Support | DiSEqC 1.0 |
| Number of Tuners | 1 |
| Channel Storage | Up to 4000 channels |
| Electronic Program Guide | Yes |
| Parental Control | Yes |
| Remote Control | Included |
| Care & Cleaning | Wipe with a soft, dry cloth. Do not use liquid cleaners. |
| Safety Warnings | Keep away from moisture. Disconnect during thunderstorms. |
| Spare Parts Available | Remote control, power adapter |
| Repairability | Serviceable by qualified technician |
| General Information | Free user manual available for download on notice-facile.com |
Frequently Asked Questions - UFT 671 KATHREIN
User questions about UFT 671 KATHREIN
0 question about this device. Answer the ones you know or ask your own.
Ask a new question about this device
Download the instructions for your Satellite receiver in PDF format for free! Find your manual UFT 671 - KATHREIN and take your electronic device back in hand. On this page are published all the documents necessary for the use of your device. UFT 671 by KATHREIN.
USER MANUAL UFT 671 KATHREIN
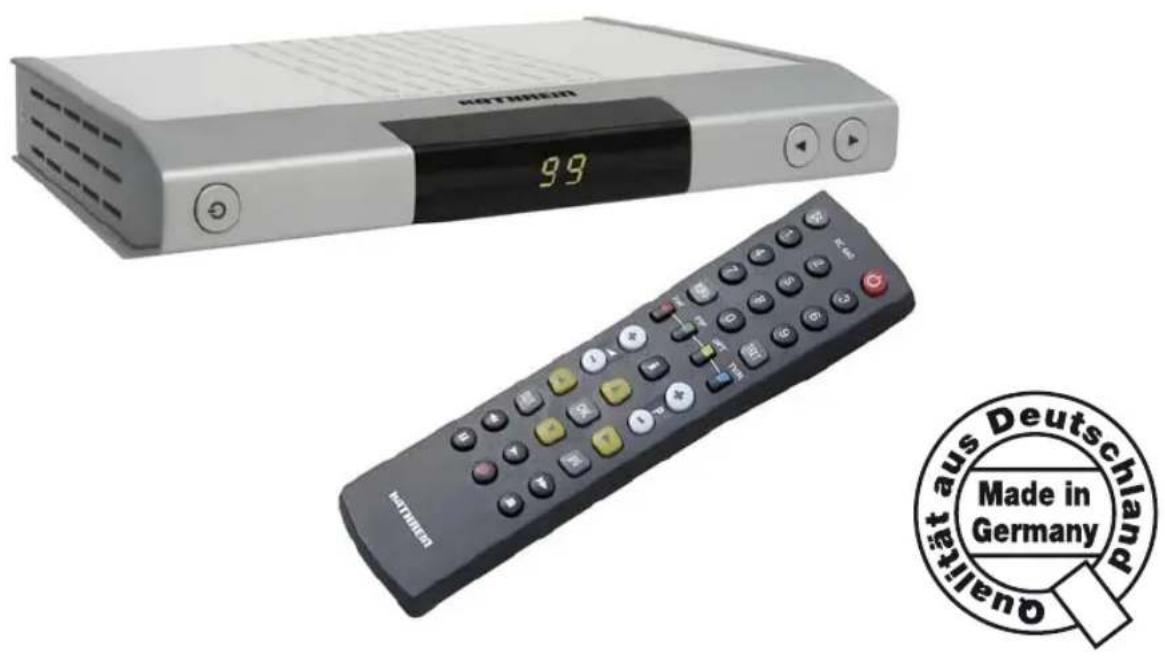
DVB-T Receiver UFT 671si
PREFACE
Dear customer, this Operating Manual is intended to help you make the fullest use of the extensive range of functions offered by your new DVB-T receiver. We have tried to make the operating instructions as easy as possible to understand, and to keep them as concise as possible.
You have chosen DVB-T, a TV standard which, even in combination with an adapted indoor antenna such as Kathrein's BZD-series, will provide you with optimum reception, with no ghosting or any of the other disadvantages of conventional TV viewing. If you will not be watching the television for a longer period, you should disconnect your equipment from the power supply to save energy. For shorter breaks, you can use the remote control to switch the equipment to stand-by, which uses only a minimal amount of power.
We wish you good reception and much pleasure using your new DVB-T receiver.
Your
KATHREIN team
IMPORTANT INFORMATION
The channels available are subject to continual change. Accordingly it is necessary to update the channel presets when changes are made. The information for this update can be found on the Internet or in relevant magazines.
Our equipment is factory fitted with the most recent software version. We are constantly working on adapting the software to the wishes of our customers and to developments in technology. The “Software Update” section provides more information on this aspect.
Please keep the original packaging in case you need to return the product at any time!
REFERENCE NOTE ON AUDIO MPEG INC. AND S.I.SV.EL, S.P.A:
This device employs legally protected technologies which are protected by patents in the USA as well as by intangible property laws in other countries.
Audio MPEG Inc. and Societa' Italiana per lo sviluppo dell'elettronica, S.I.SV.EL, S.P.A, have granted KATHREIN-Werke KG rights of use which are subject to certain restrictions. These restrictions must also be observed by you as a customer.
According to these, this device is only to be used by end customers for private, non-commercial purposes and for licensed content. Use for commercial purposes is not authorised. Utilisation of products or procedures sold or used with this device are not comprehended. With reference to licensed technologies, application of reversible procedures as well as dismantling of the device are both not permitted.
CONTENTS
Preface.... 2
Important Information.... 2
Contents 3
Safety Instructions 5
Receiver Features.... 6
Connection and Set-Up.... 7
Antenna Connection 7
TV Connection 7
Dolby connection 7
IR Receiver (Accessory, not supplied) 7
Inserting batteries into the remote control 8
Views and Connections 9
Frontal View.... 9
Rear View....9
Side View 9
Remote Control 10
Remote Control Function Buttons.... 10
first installation 11
Operation 14
Using the Remote Control 14
Channel Selection (TV and Radio) 14
Channel Selection From Channel List.... 14
Banner 15
teletext 15
Electronic Programme Guide (EPG) 16
Sort Order 16
Info (Additional Programme Information) 16
Programme Preview 17
Timer Programming From EPG.... 18
Audio 18
Main menu.... 19
Opening the Main Menu (MENU Button) 19
Channel Lists 20
Channel Lists Management.... 21
Deleting a Channel 21
Moving/Sorting a Channel 21
Favourite Lists 22
Adding a Channel to a Favourite List 22
Deleting a Channel From a Favourite List 22
Moving/Sorting a Channel 23
CONTENTS
Timers 24
Manual Timer Setting 24
Automatic Timer Setting 25
Deleting a Timer Event.... 25
Installation menu 26
User Preferences 27
Output Settings 28
Regional Settings 29
Language Settings 30
Access control 31
CHANNEL LOCK 31
Change PIN.... 32
Menu LOCK 33
SET parental lock.... 33
TV Reception & Channel Search.... 34
Signal RECEPTION 34
Antenna Power 35
CHANNEL SEARCH 36
MANUAL CHANNEL SEARCH 36
Update & FACTORY SETTINGS.... 37
FACTORY SETTINGS.... 38
System Information 39
Software Update 40
Software Update via Internet 40
Service.... 40
Functions and Technical Data.... 41
Technical data.... 42
Connection Diagram 43
SAFETY INSTRUCTIONS

This page contains important instructions for putting the device into service and installing and connecting it. Read these instructions with care before putting the device into service.
Power cable
Make sure you do not damage the power cable. Devices with damaged power cables must be disconnected (by pulling the plug) and repaired by a technician before being restored to service. Only use the supplied mains adapter (as intended)!
There is a danger of life-threatening electrical shocks!
Cleaning
Pull the power plug before cleaning the device. Use a dry cloth for cleaning and only clean the surface. Do not under any circumstances open the device.
There is a danger to life due to electrocution if components are touched within the device!
Playing children
Take care that children do not insert objects in the ventilation slits.
There is a danger of life-threatening electrical shocks!

Earth connection
The aerial system should be connected to earth or to the potential equalisation according to instructions. Observe EN 60728/11 and any national regulations in the process.
There is a danger due to overvoltage or lightning!
Mains voltage
Only operate the device with the specified mains voltage (on the back of the device or on the external mains adapter). The device may only be connected to the mains and switched on after establishing the connections to the aerial and the television set or to the cable network and the PC.
There is a danger of fire if the mains voltage is too high!
Repairs
Have your device repaired by qualified technicians only. No warranty claims will be accepted if the device is opened and an attempt is made to repair the device without any authorisation. The electrical safety of the device can be put at risk by handling the device inappropriately.
The manufacturer assumes no liability for any accidents of the user while the device is open!

Connections
Incorrect wiring of the connections can result in malfunctions or damage to the device!
Long periods of absence / Thunder storms
Always switch of the device at the mains switch in the event of long periods of absence or thunder storms. You can disconnect the device from the mains by pulling the power plug if your device does not happen to have a mains switch. This also applies to any other devices connected to the device. We also recommend disconnecting cable networks. Observe any timer programming procedures (receiver) and switch the device back on again in due time before recording begins.
Place of installation
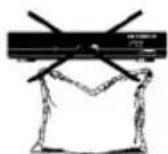
Every electronic device generates heat. The heat generated by the device is within an acceptable range however. Sensitive furniture surfaces and veneers may change their colour in the course of time due to the constant exposure to heat. In the same way, the feet of the device may cause treated furniture surfaces to change their colour. If necessary, place the device on an appropriate firm and flat base.
Ventilation
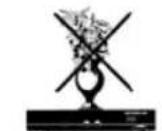
The heat generated in the device is discharged sufficiently. Nevertheless do not install the device in a cupboard or on a shelf with insufficient ventilation. Never cover the ventilation slits of the device!
Do not put any objects on the device and keep a clearance of at least 10 cm above the device so that the generated heat can be discharged without any difficulty.

Humidity, insulation, heat
Protect the device against humidity and dripping and splashing water. Do not place the device near the heating, expose it to the sun or operate it in damp rooms.
RECEIVER FEATURES
The UFT 671si receiver is suitable for the reception of FTA digital terrestrial TV and radio programmes. In addition to the high video and audio quality, the receiver also impresses with its modern housing design. It is equipped with an optical audio output for connection to a Dolby digital system that you can use to bring cinema sound to your living room. It powers an active DVB-T antenna without any additional power supply unit needed.
The UFT 671si receiver is available in silver.
CONNECTION AND SET-UP
This section is intended specifically for specialist dealers. You only need to refer to it if you are carrying out the installation yourself. The “Connection Diagram” section provides a sample configuration.
Do not connect the unit to the mains until all installation work has been properly carried out. Refer to the information in the “Safety Instructions” section.
ANTENNA CONNECTION
DVB-T TV was developed to enable you to receive a good quality TV picture anywhere, provided the signal is strong enough. Connect the receiver either to your conventional standalone or community antenna through which you receive all VHF/UHF signals, or use an antenna developed for DVB-T (such as the Kathrein BZD 30 for direct reception indoors or the BZD 40 for outdoors). DVB-T TV cannot work miracles however; you must be receiving a good quality signal. You may encounter problems in concrete buildings if you are using only an indoor antenna.

If you are using (or have to use) an active antenna - that is, an antenna with a pre-amplifier, you can power it from the receiver's antenna input. The default setting in the receiver is "OFF", to prevent any damage from occurring. Be sure to use an antenna designed for a 5 Volt supply (such as the Kathrein BZD 30).
TV CONNECTION
Connect the UFT 671si (TV Scart socket) and the TV set using a Scart cable. If your TV has a stereo feature, you can receive the sound in stereo via the Scart connection.
DOLBY CONNECTION
The Dolby Digital data stream output (AC 3) is intended for connection to a Dolby digital system.
IR RECEIVER (ACCESSORY, NOT SUPPLIED)
The infra-red receiver allows you to place the unit in a concealed location. Connect the infra-red receiver to the "IR REMOTE IN" socket and position it such that it has a visual connection to the remote control. On the use of the external infra-red sensor, it should be ensured the receiver's internal infrared sensor is not activated in parallel by the remote control, as otherwise the receiver will hang. You can place an order for the infra-red receiver with our service centre (see page 40).
CONNECTION AND SET-UP
INSERTING BATTERIES INTO THE REMOTE CONTROL
Remove the cover on the rear of the remote control.
Insert the two supplied batteries into the remote control. Ensure correct polarity of the batteries; the + and - markings are indicated inside the battery compartment.
Slide the cover back into the housing until it locks in place.

Used batteries are special waste!
Do not throw spent batteries into your domestic waste; take them to a collection point for old batteries!

Electronic equipment is not household waste - in accordance with directive 2002/96/EC OF THE EUROPEAN PARLIAMENT AND THE COUNCIL dated 27 th January 2003 on waste electrical and electronic equipment, it must be disposed of properly.
At the end of its service life, take this unit for disposal to an appropriate official collection point.
VIEWS AND CONNECTIONS
FRONTAL VIEW
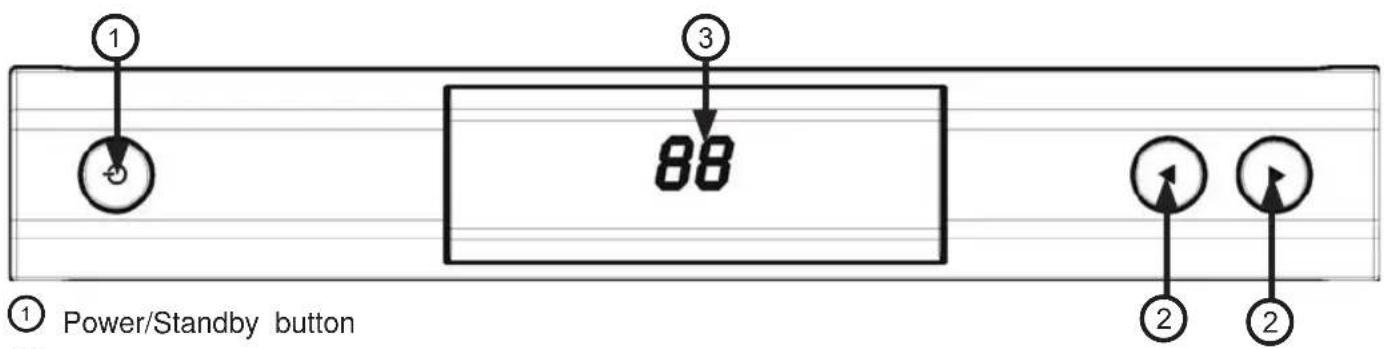
① Power/Standby button
② Channel select buttons
③ Channel display
REAR VIEW
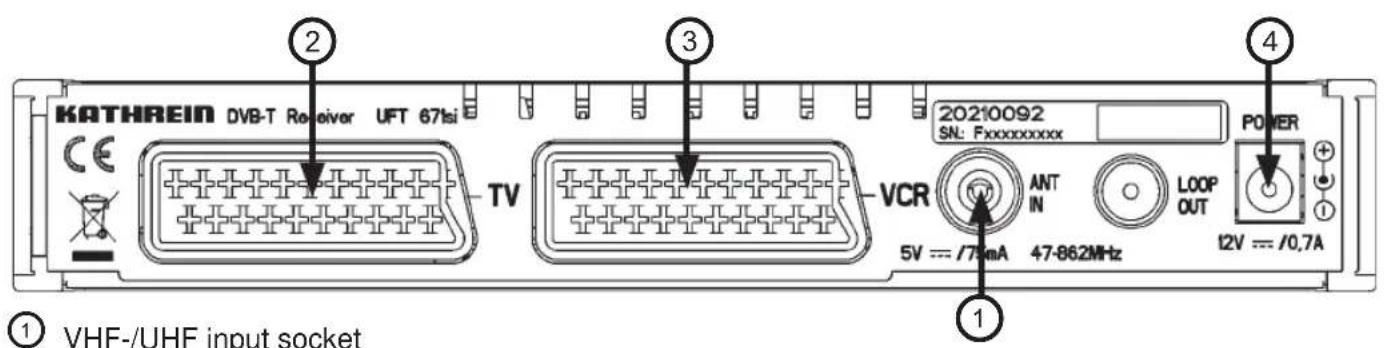
① VHF-/UHF input socket
② Scart connection for TV set
③ Scart connection for external recorder (DVR/VCR)
④ Mains power cable
SIDE VIEW
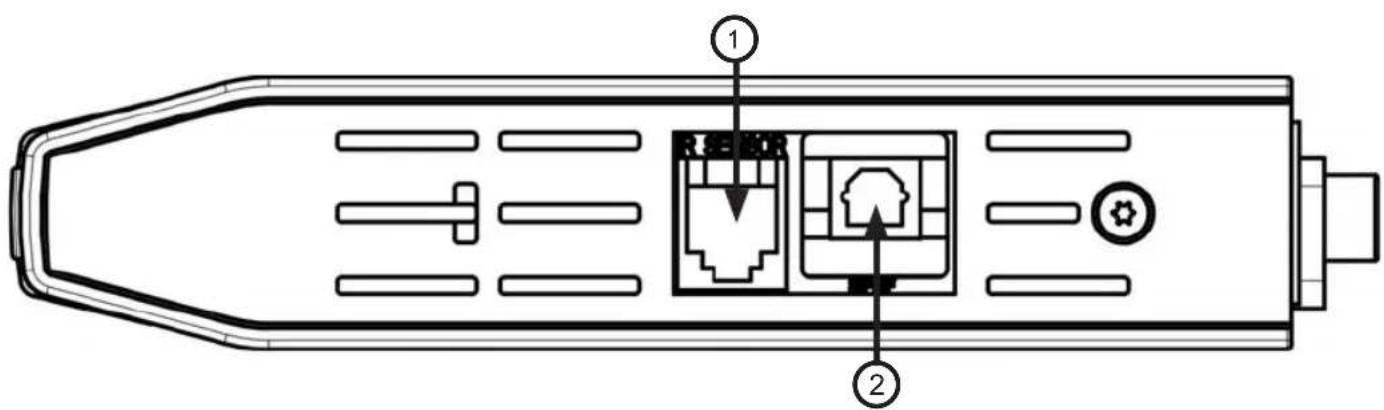
① RJ 11 interface for connection of infra-red receiver and null modem cable
② Optical S/PDIF connection for Dolby Digital system
REMOTE CONTROL
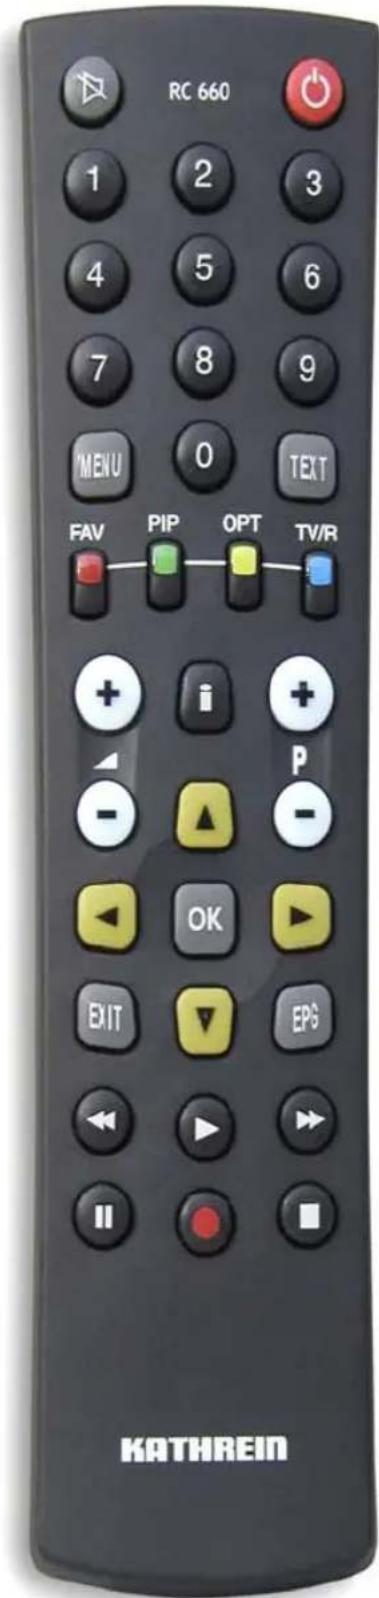
REMOTE CONTROL FUNCTION BUTTONS
The button symbols presented here can also be found in the description of the operating steps.


FIRST INSTALLATION

Before using your unit for the first time, read the "Safety Instructions" and "Connection and Setup" sections.
The "Connection Diagram" section provides a sample configuration.
Do not connect the unit to the mains until all installation work has been properly carried out.
The guidance given in the “First Installation” section assumes that the receiver has been properly connected, as per the “Safety Instructions” and “Connection and Set-Up” sections.
First switch your TV set on and select the AV channel position. Connect your receiver to the power supply. The following display appears:
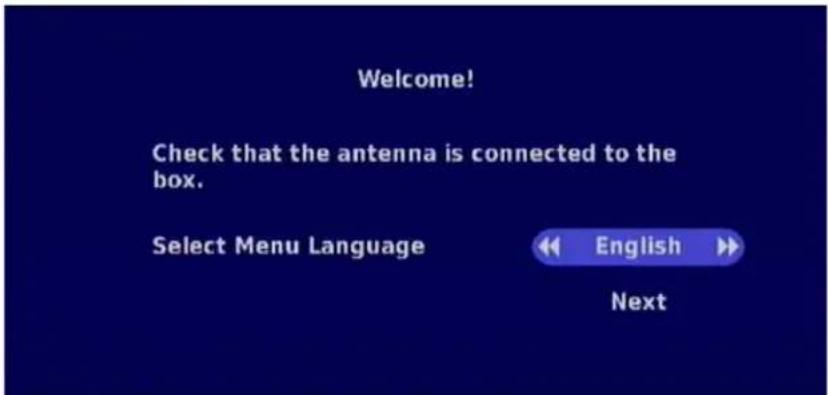
Select the menu language you want using the ▶▶ buttons.
Available options: German, English, French, Czech, Dutch, Portuguese, Spanish, Italian and Polish.
Select "Next" using the ▲▼ buttons and confirm your selection by pressing the ok button to open the next menu. The following display appears:
Note:
If you are unsure whether you chose the right option from a previous menu, you can go back a step at any time during the first installation process by selecting "Back" instead of "Next". You can then go back one step by pressing the OK button.
FIRST INSTALLATION
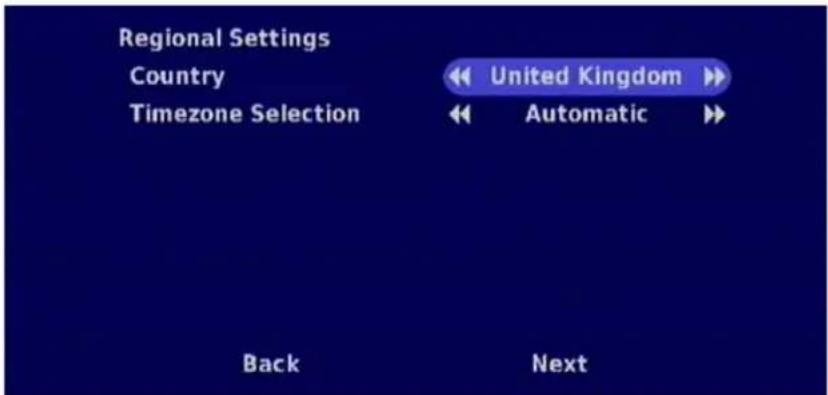
Select your country using the ▶▶ buttons. Then select “Time Zone Selection” using the ▶▼ buttons. Using the ▶▶ buttons, select your time zone (“0” = UMTC (formerly Greenwich Mean Time GMT), “+1” = Central European winter time, “+2” = Central European summer time). If the “Automatic” setting is used, the receiver selects the time zone based on the data transmitted.
Select "Next" using the ▲▼ buttons and confirm your selection by pressing the OK button to open the next menu. The following display appears:

If you do not know the settings or components used in your reception system, ask a specialist engineer!
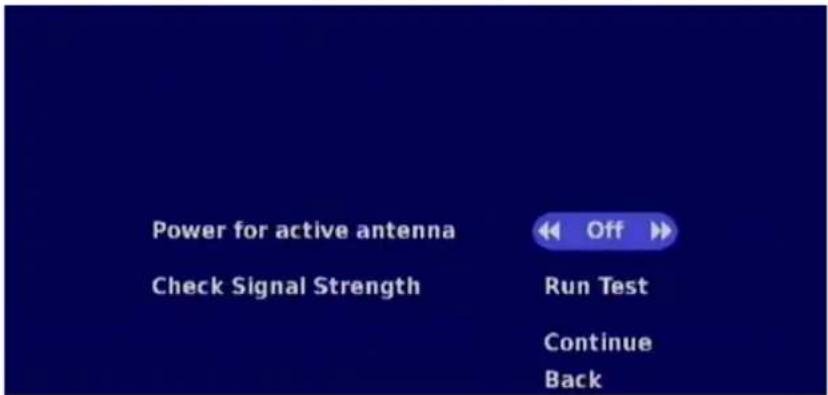
Select the “Off” setting using the ◀▶ buttons if you are not using an active antenna or the “On” setting if you are using an active antenna (such as BZD 30) for the reception of the DVB-T signals.
Change to the “Check Signal Strength” line using the ▲▼ buttons and press the OK button. A display appears where you can check your antenna settings again using the ◀▶▲▼ buttons.
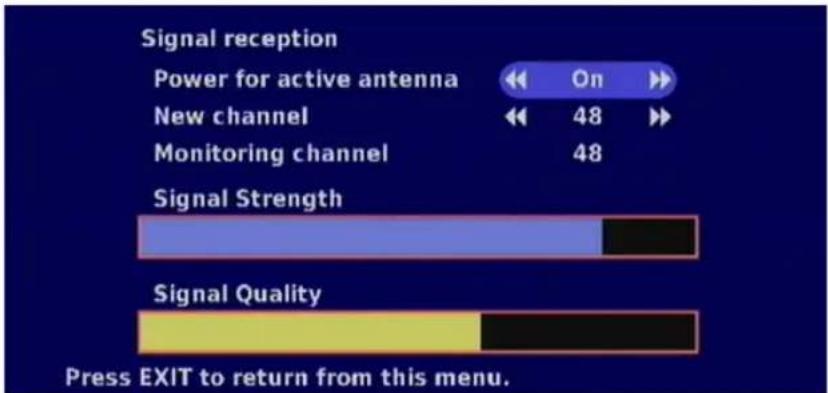
bar
| Metric | Value | | ------------------ | ----- | | Power for active antenna | On | | New channel | 48 | | Monitoring channel | 48 | | Signal Strength | | | Signal Quality | | | Press EXIT to return from this menu. | |You can see the actual quality of your DVB-T signal in the Signal Strength and Signal Quality bars. In the “New channel” line you can also test the signal on different channels. To leave the menu press the EXIT button.
Select "Continue" using the ▲▼ buttons and confirm your selection by pressing the OK button to open the next menu. The following display appears:
FIRST INSTALLATION
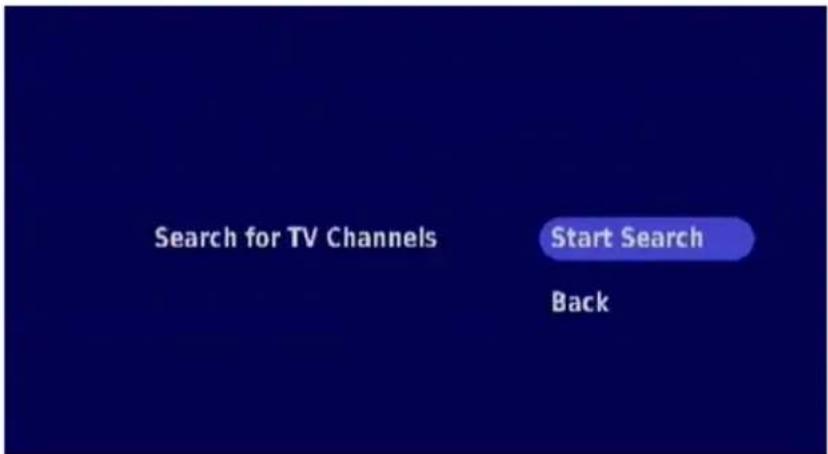
Press the OK button to start the channel search. The following display appears:
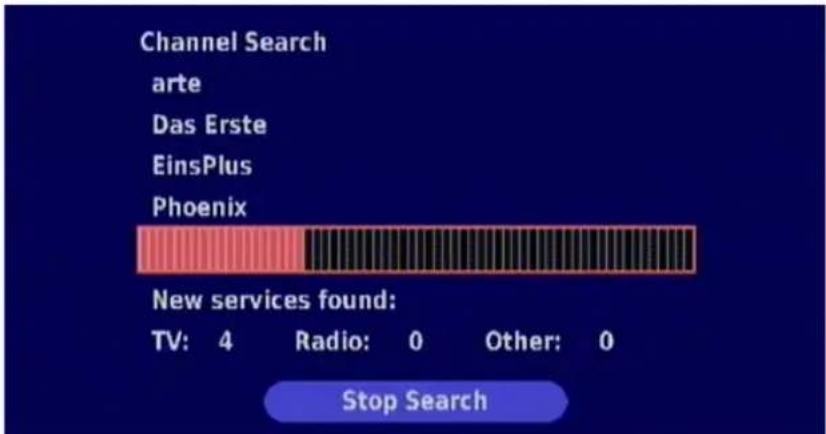
bar
| Channel | New services found | | :--- | :--- | | Channel Search | | | arte | | | Das Erste | | | EinsPlus | | | Phoenix | | New services found: TV: 4 Radio: 0 Other: 0 Stop SearchAfter completion of the search, you will see the following message:
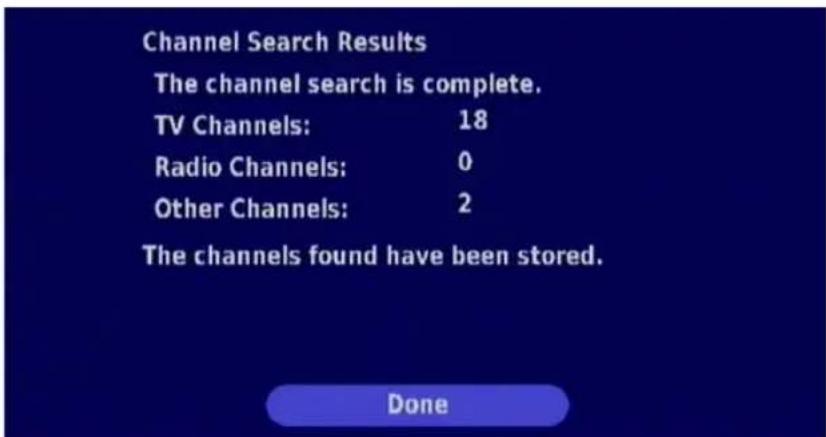
Complete the first installation by pressing the OK button twice. The receiver automatically jumps to the first channel saved.
OPERATION
USING THE REMOTE CONTROL
Press the OK button to confirm menu settings or to access lower menu levels. Change the settings line by line and confirm your entry by pressing the OK button. Press the EXIT button to quit the menu or to switch from a submenu to the next highest menu level.
Use the ▲▼ buttons to navigate through the menus. Use the ◀▶ buttons to edit the individual fields. You can also key in settings in the fields using the number pad.
The coloured buttons are used for the functions within the various sub-menus. These functions are displayed on-screen for the respective menus. In each menu a line is displayed at the bottom of the screen explaining the various functions available.
CHANNEL SELECTION (TV AND RADIO)
Press the TV button (blue) to switch between TV and radio channels. Channel selection is the same in both cases.
DIRECT CHANNEL SELECTION
You can select the channels directly in the order in which they are saved using the ⏻ buttons. You can only select between the channels in the currently selected channel list or favourite channel list.
CHANNEL SELECTION FROM CHANNEL LIST
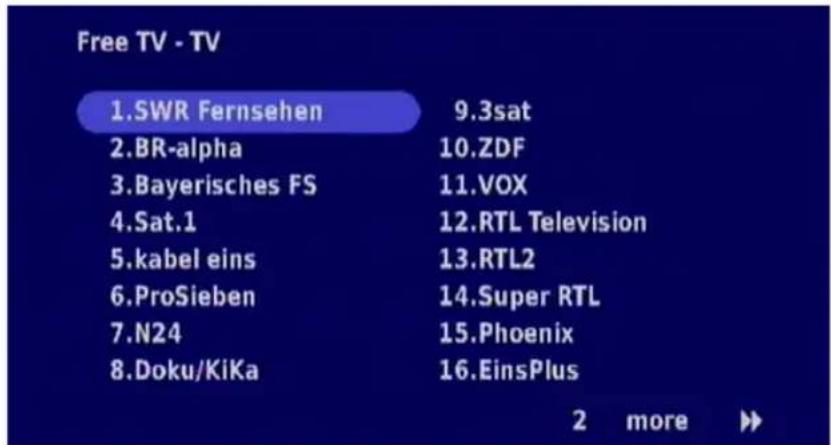
Open the currently selected channel list by pressing the OK button. The following display appears (example):
OPERATION
Select the required channel using the ▲▼◀▶ buttons and press the OK button.
Note: To be able to open a different channel list or favourite channel list using the OK button, you must select the required list on the "Channel Lists" menu (see "Channel Lists" section).
BANNER
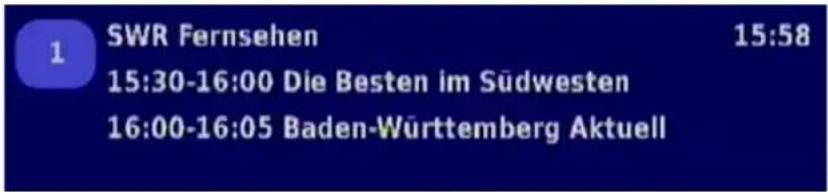
When you switch channels the following information is displayed on-screen:
- Currently selected channel list
- Channel position and channel name
- Current and next programme with start and end time
- Current time
Press the Ⓤ button to open teletext. You can open the required teletext page using the number pad. You can page forward or back one page using the ▲▼ buttons.
OPERATION
ELECTRONIC PROGRAMME GUIDE (EPG)
Press the EPG button to open the electronic programme guide. The following display appears (example):
![Sorts programmes by start time ( button, green ) Day of week with current time Sorts the current and following programmes by channel position button, red ) List of the current and next programmes with information on channel position and name, day of the week and programme start Shows, if available, additional information on the selected programme button ) Selects the programme marked and returns to the TV picture (OK button ) Copies the currently selected programme to the timer (● button, red dot ) Back to the TV picture (EXIT button ) Info OK Select Set Timer EXIT Return TV Guide Thu 15:59 Free TV [Channel] Time Preview 1 SWR Fernseh Thu 15:30 Die Besten im Südwesten 1 SWR Fernseh Thu 16:00 Baden-Württemberg Aktuell 2 BR-alpha Thu 15:45 Wissen macht Ah! 2 BR-alpha Thu 16:10 1. Oktober 1968 3 Bayerisches Thu 15:15 Der Hochschwab 3 Bayerisches Thu 16:00 Rundschau](/content/2026/05/778601/images/20c710ade257c37f8c812ed45b1c6281fee5eeac1bb9abc5a6572df196d7bdc7.jpg)
Select the required programme using the ▲▼◀▶ buttons. There is a light blue bar behind the selected programme. The EPG shows you, provided the information is available, the current programme and the next programme on each channel.
SORT ORDER
Press the 📄 button (red) to sort the programmes by channel position. Sort the programmes by their start time by pressing the 📄 button (green).
INFO (ADDITIONAL PROGRAMME INFORMATION)
Press the ⓘ button to obtain additional information on the selected programme (if available). The following display appears (example:)
OPERATION

Pay attention to the bar at the bottom of the on-screen display! This provides hints on what to do next.
TV Guide
Thu 16:02
Free TV
1 SWR Fernsehen
You can page through the additional information using the ▲▼ buttons (if there is more than one page). You can copy the selected programme to the timer by pressing the ● button (red dot) and quit the additional information by pressing the EXIT button or the i button.
PROGRAMME PREVIEW
Press the button (yellow) to see the programme preview for the currently selected channel. If the data are available, the following will be displayed (example):

Pay attention to the bar at the bottom of the on-screen display! This provides hints on what to do next.
TV Guide
Thu 16:04
Free TV
Channel
Time
[Preview]
Select the required programme using the ▲▼◀▶ buttons. There is a light blue bar behind the selected programme. You can copy the required programme to the timer by pressing the ● button (red dot).
OPERATION
TIMER PROGRAMMING FROM EPG
With this receiver you can copy a programme directly from the EPG, the programme preview, or the additional information, to the timer by pressing the Ⓞ button (red dot).
The following display appears (example):
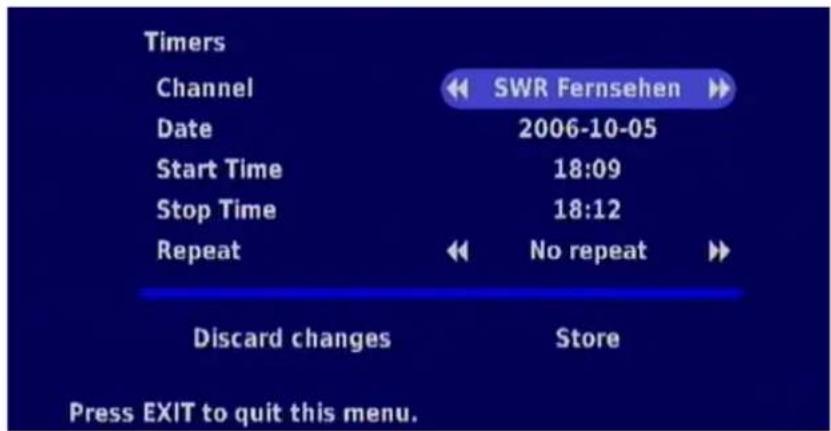
The receiver copies the data available from the EPG directly to the information for programming the timer. You can still change these settings using the ▲▼◀▶ buttons and the number pad (e.g. start recording five minutes earlier). You can also repeat a recording (every day or every week).
Select "Store" using the ▲▼ buttons and confirm the activation of the timer by pressing the OK button. The receiver automatically uses the next spare time position and returns to the EPG.
As in the majority of cases, VPS data are not transmitted in the digital signal, you must program your external recorder identically to the receiver.
AUDIO
Press the ⏻ button (yellow) to view the audio and subtitle language (TV or radio) broadcast over the channel received. Select the line to be changed using the ▲▼ buttons and make the required selection using the ◀▶ buttons. If the channel is not transmitting language information, the receiver displays “None”. Save the setting by pressing the ⏻ button (yellow) and return to the TV picture.
Scart Enable:
Select "SCART Enable" using the ▲▼ buttons. Switch off the signal on the TV Scart socket by pressing the OK button. You can reactivate the TV Scart socket by pressing any button on the remote control.
MAIN MENU
OPENING THE MAIN MENU (MENU BUTTON)
Press the ⏚ button to open the main menu. Select the required sub-menu using the ▲▼ buttons and press the OK button.

You can open sub-menus directly using the related button on the number pad.
Main Menu
- Channel Lists
- Channel Lists Management
- Favourite Lists
- Timers
- Installation & Settings
- System Information
- Guide
Press MENU/EXIT to quit this menu.
Seven sub-menus are available, as detailed below:
1) Channel Lists
Here you can define the channel list that can be opened from the TV picture by pressing the OK button
2) Channel Lists Management
Enables you to sort and delete channels
3) Favourite Lists
Enables you to manage favourite lists (add, remove and sort channels)
4) Timers
Menu for setting/programming recordings (TV picture on the selected channel is sent to an external recorder over the VCR Scart socket at the required time)
5) Installation & Settings
Here you can change the settings for the user preferences, output settings, regional settings, language settings, antenna configuration & channel search, update and factory settings, and the access control
6) System Information
Displays the current software version and hardware version
7) EPG
Opens the electronic programme guide (can be opened directly from TV picture by pressing the EPG button)
CHANNEL LISTS
On this menu you can define which channel list you want to be able to open directly on the TV screen by pressing the OK button.

Pay attention to the bar at the bottom of the on-screen display! This provides hints on what to do next.
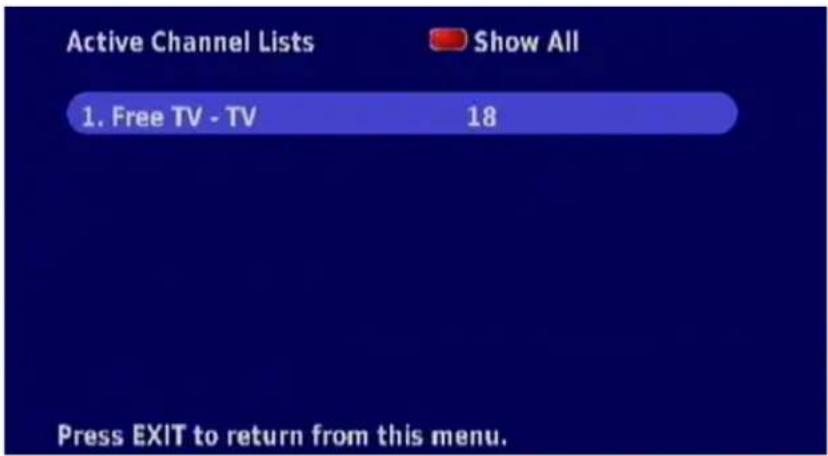
You can display all available channel lists and favourite lists by pressing the 🔒 button (red). The following display appears (example):
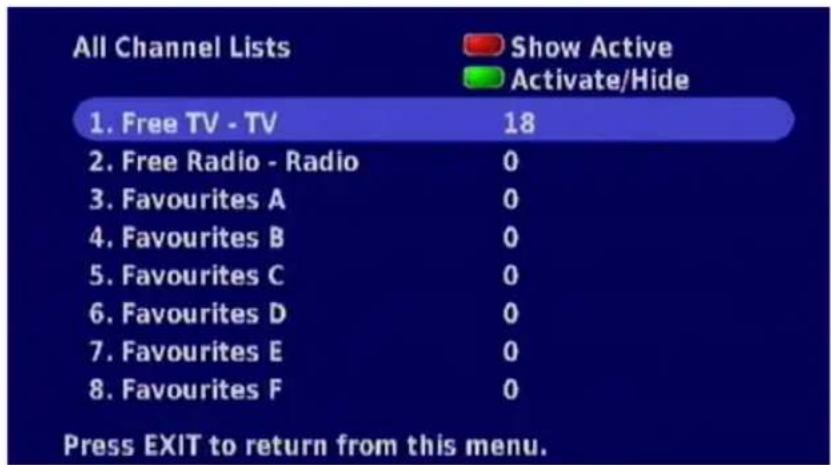
You can limit the list to the active channel lists (channel lists with channels assigned) by pressing the FAV button (red). You can hide channel lists/favourite lists you do not currently require by pressing the PIP button (green) and then display them again later.
Using the ▲▼ buttons, select the channel list/favourite list that you want to be able to open directly from the TV picture by pressing the OK button. The list is activated by pressing the OK button and you will see the channels assigned to the channel list/favourite list. Press the EXIT button to quit the menu and to save the setting.
CHANNEL LISTS MANAGEMENT
On this menu you can delete channels from the "All TV" and "All Radio" lists or change the sorting of the channels in the related list to suit your requirements. Open the list to be edited by pressing the TV button (blue).
![Channel Lists Management [digits] to go to a channel [P+/P-] to scroll up/down [OK] to select, [RED] to delete. Free TV - TV 1. SWR Fernsehen 2. BR-alpha 3. Bayerisches FS 4. Sat.1 5. kabel eins 6. ProSieben 7. N24 8. Doku/KiKa](/content/2026/05/778601/images/70147603246d0aa29a329ad17bbd48aba60eee981ccd14750b329445a3a9cf84.jpg)
DELETING A CHANNEL

Pay attention to the bar at the bottom of the on-screen display! This provides hints on what to do next.
Select the channel to be deleted using the ▲▼ or ⚙ buttons, or the number pad. Press the 🔊 button (red) and confirm the deletion by pressing the OK button. You can now delete other channels in the same way.
To quit the menu and save the changes, press the EXIT button.
Channels deleted from the "TV Channels"/"Radio Channels" lists can only be added back to the list with a new channel search.
MOVING/SORTING A CHANNEL

Pay attention to the bar at the bottom of the on-screen display! This provides hints on what to do next.
Open the list to be edited by pressing the ▲ button (blue). Select the channel to be moved using the ▲▼ or 🔊 buttons, or the number pad. Press the OK button (“>” appears between channel position and channel name) to mark the channel to be moved. Select the channel position where the channel is to be inserted using ▲▼ or 🔊 buttons or the number pad. Press the OK button twice to insert the channel in the required position. To quit the menu and save the changes, press the EXIT button.
FAVOURITE LISTS
On this menu you can allocate channels from the "TV Channels", "Radio Channels" lists to the six favourite channel lists and also delete channels added.
![Free TV - TV 1. SWR Fernsehen 2. BR-alpha 3. Bayerisches FS 4. Sat.1 5. kabel eins 6. ProSieben 7. N24 8. Doku/KiKa [OK] to add current channel to favourite list.](/content/2026/05/778601/images/da52422ff11d627f1424f9df7423bbbc86845095405f3e3658011ec7e4dd96d9.jpg)
Change between the “TV Channels” and “Radio Channels” lists by pressing the 📄 button (green). You can select/page through the six favourite channel lists available by pressing the 📄 button (blue). Change between the left and right column using the ◀▶ buttons. Select a channel using the ▲▼ buttons.
ADDING A CHANNEL TO A FAVOURITE LIST

Pay attention to the bar at the bottom of the on-screen display! This provides hints on what to do next.
Select the channel to be copied on the "TV Channels" or "Radio Channels" list using the ▲▼ buttons. Press the TVR button (blue) to select the favourite channel list to which the channel is to be copied.
Press the OK button. The channel is added to the end of the favourite channel list displayed.
To quit the menu and save the changes, press the EXIT button.
DELETING A CHANNEL FROM A FAVOURITE LIST

Pay attention to the bar at the bottom of the on-screen display! This provides hints on what to do next.
Press the TVR button (blue) to select the favourite channel list from which the channel is to be deleted. Change between the left and right column using the ◀▶ buttons. Select a channel using the ▲▼ buttons. Press the FAV button (red) and confirm the deletion by pressing the OK button. You can now delete other channels in the same way.
To quit the menu and save the changes, press the EXIT button.
FAVOURITE LISTS
MOVING/SORTING A CHANNEL

Pay attention to the bar at the bottom of the on-screen display! This provides hints on what to do next.
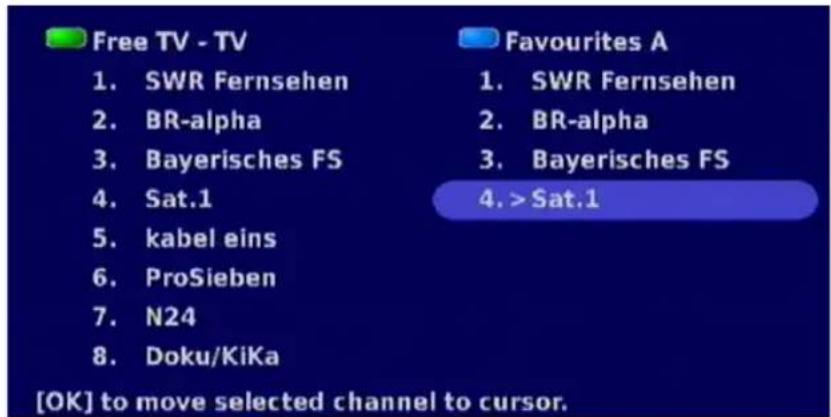
Open the list to be edited by pressing the ☐ button (blue). Change between the left and right column using the ◀▶ buttons. Select the channel to be moved using the ▲▼ or ➕ buttons, or the number pad. Press the OK button (“>” appears between channel position and channel name, see picture below) to mark the channel to be moved. With the aid of the ▲▼ or ➕ buttons or the number pad, select the channel position where the channel is to be inserted. Press the OK button twice to insert the channel in the required position.
To quit the menu and save the changes, press the EXIT button.
Press the ⏚ button to open the main menu. Select the “Timers” menu using the ▲▼ buttons and press the OK button. The following display appears (see example below):
Note: As in the majority of cases, VPS data are not transmitted in the digital satellite signal, you must programme your external recorder identically to the receiver.
If timer recording is started in stand-by mode, the unit switches back to stand-by when recording is finished.
MANUAL TIMER SETTING

You can program a maximum of eight timer events!
![Timers 1: 2006-10-05 17:00-17:05 Once, SWR Fernsehen 2: 2006-10-05 19:00-19:30 Once, Bayerisches FS 3: - 4: - 5: - 6: - 7: - 8: - [OK] Edit, [RED] Remove, [EXIT] Quit this menu.](/content/2026/05/778601/images/1bbc8abb7a589311b0998353995b3458ee4845ee8ff0ff7eb1d0c2941bb76366.jpg)
Select the line you want to change using the ▲▼ buttons. Make the changes using the ◀▶ buttons.
Channel:
Set here the channel on which the programme to be recorded is broadcast.
Date:
Set the date for the recording here.
Start Time:
Set the time when the recording is to start here.
Stop Time:
Set the time when the recording is to stop here.
Repeat:
Set here whether this timer is to be used only once “No repeat” or several times “Every day” or “Every week”.
Once you have made all the settings, select "Store" using the ▲▼ buttons and confirm timer entries by pressing the OK button. You can now program further timer events in the same way or leave the Timers menu by pressing the EXIT button.
TIMERS
AUTOMATIC TIMER SETTING
You can copy the data for the timer directly from the EPG (see “Operation” section, “Timer Programming From EPG”).
DELETING A TIMER EVENT
To delete a timer event, select the timer line to be deleted using the ▲▼ buttons and then press the □ button (red).
INSTALLATION MENU
Press the ⏚ button to open the main menu. Select the Installation & Settings menu using the ▲▼ buttons and press the OK button. The following display appears:
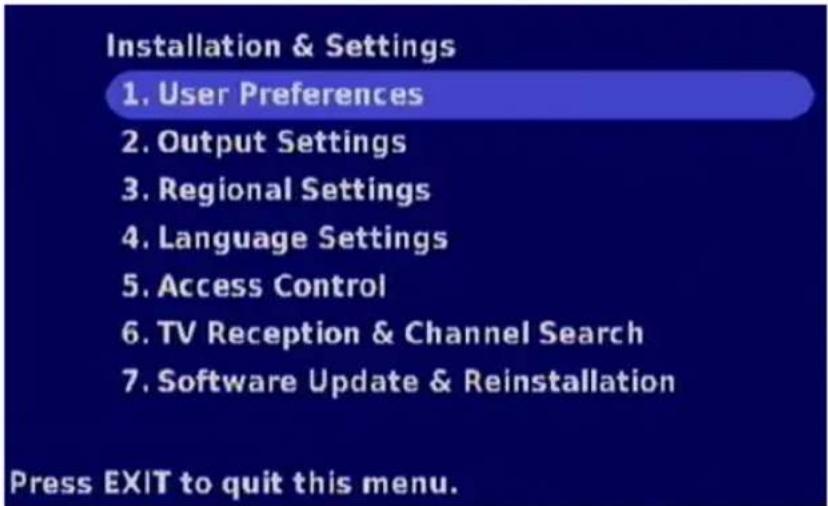
Seven sub-menus are available, as detailed below:
1) User Preferences
Definition of the user-defined display settings
2) Output Settings
Definition of the video & audio settings
3) Regional Settings
Defi nition of the time zone
4) Language Settings
Definition of menu, subtitle and audio language
5) Access Control
Channel and menu locking, PIN code change and juvenile protection (FSK)
6) TV Reception & Channel Search
For checking the antenna signal (signal reception), search (complete and manual) and active antenna
7) Software Update & Factory Settings
Software update and reset to factory settings
Select the required sub-menu using the ▲▼ buttons and press the OK button.
INSTALLATION MENU
USER PREFERENCES
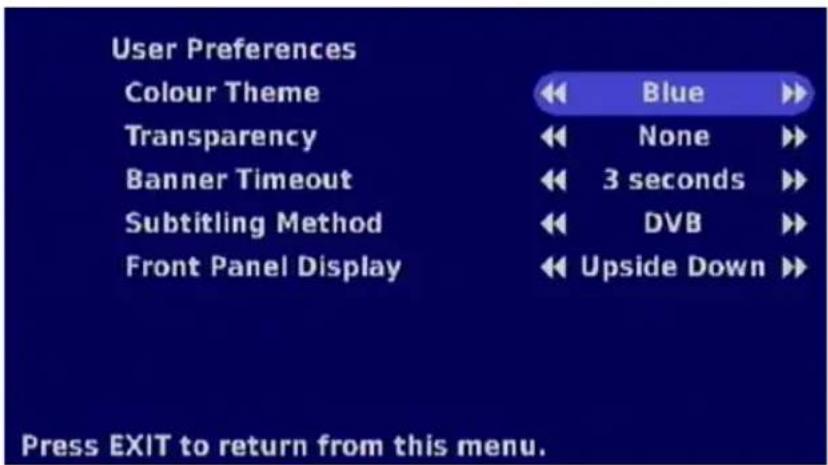
Select the line you want to change using the ▲▼ buttons. Make the changes using the ◀▶ buttons.
Colour Theme (on-screen displays):
You can choose between the following settings: Blue, Green, Red and Magenta
Transparency (on-screen displays):
You can choose between the following settings: None, Low, Normal and High
Banner Timeout:
You can choose between the following settings: 1 second in second steps up to 10 seconds
Subtitling Method:
You can choose whether you want to receive the subtitles via the teletext or via the DVB data stream (select by pressing the 📄 button directly from the TV picture).
Front Panel Display:
Here you can select whether the display on the receiver is to be switched on or off and whether the information on the display is to be displayed rotated by 180° (depending on how the receiver is installed).
To quit the menu and save the changes, press the EXIT button.
INSTALLATION MENU
OUTPUT SETTINGS
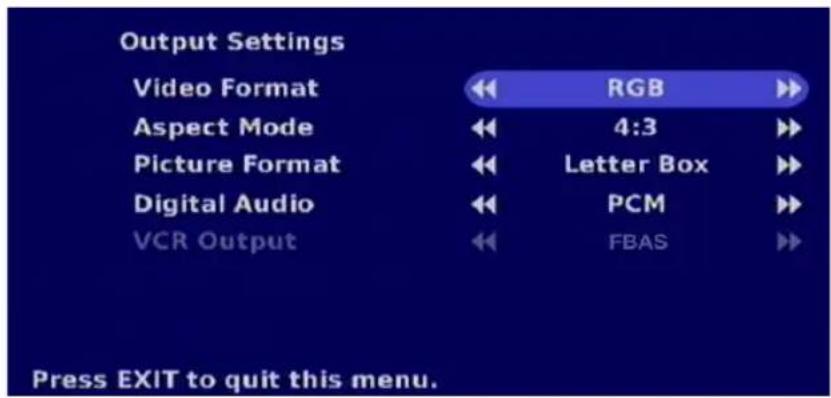
Select the line you want to change using the ▲▼ buttons. Make the changes using the ◀▶ buttons.
Video Format:
Select the type of video signal at the Scart socket here. Select the signal that your TV set can process.

Refer to the operating instructions for your television set!
You can choose between the following settings: RGB (Red/Green/Blue signal), S-Video (luminance/chrominance) and CVBS (Colour Video Baseband Signal)
Aspect Mode:
Select your TV's format here. Either 4:3 or 16:9 format
Picture Format:
Select the screen display mode here. Either: Pan & Scan or Letterbox
Digital Audio:
Select here the type of digital audio that is to be present on the S/PDIF socket on the right side of the receiver. Either Dolby Digital or PCM (MPEG stereo, digital stereo audio). If you have selected Dolby Digital, but the programme is not broadcast in Dolby Digital, PCM is automatically output on the S/PDIF socket.

It is imperative you always follow the operating instructions for your Dolby Digital system!
INSTALLATION MENU

For system reasons you can only change this setting if the video format is not RGB! In this case CVBS is automatically output on the VCR Scart socket.
VCR Output:
Select the type of signal that is to be output on the VCR Scart socket. Either S-Video (luminance/chrominance) or CVBS (Colour Video Baseband Signal)
Refer to the operating instructions for your external recorder!
To quit the menu and save the changes, press the EXIT button.
REGIONAL SETTINGS
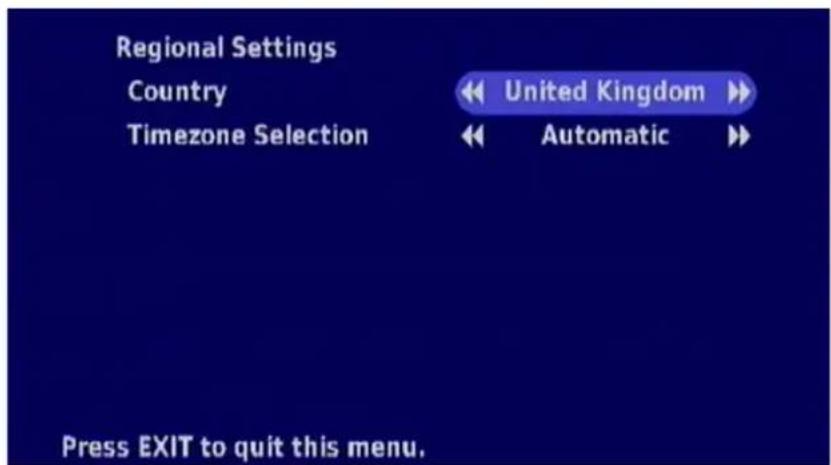
Select your country using the ▶▶ buttons. Then select "Time Zone Selection" using the ▲▼
buttons. Using the ◀▶ buttons, select your time zone ("0" = UMTC (formerly Greenwich Mean Time GMT), "+1" = Central European winter time, "+2" = Central European summer time), or use the "Automatic" setting (receiver obtains time from the DVB data stream).
To quit the menu and save the changes, press the EXIT button.
INSTALLATION MENU
LANGUAGE SETTINGS
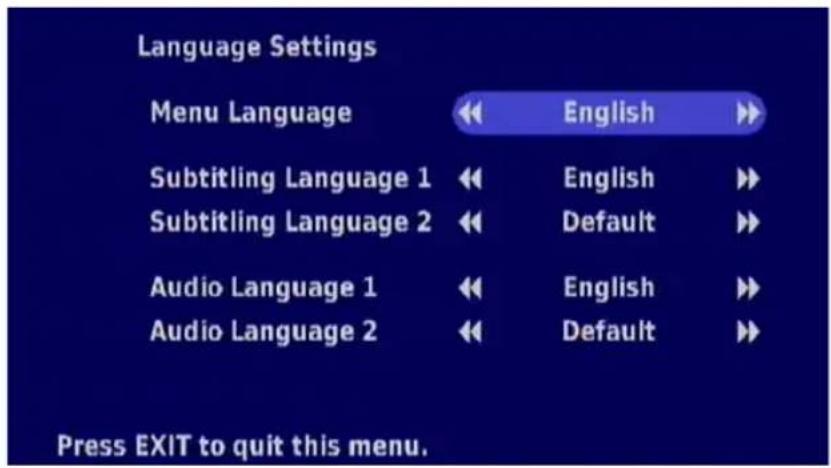
Select the line you want to change using the ▲▼ buttons. Make the changes using the ◀▶ buttons.
Menu Language:
Select the required language for the menus.
Subtitling Language 1:
Select here the language required for the subtitles.
Subtitling Language 2:
Select here the language required for the second language if subtitles are broadcast in several languages.
Audio Language 1:
Select here the required audio language.
Audio Language 2:
Select here the second language required in case of broadcasts in more than one language.
To quit the menu and save the changes, press the EXIT button.
INSTALLATION MENU
ACCESS CONTROL
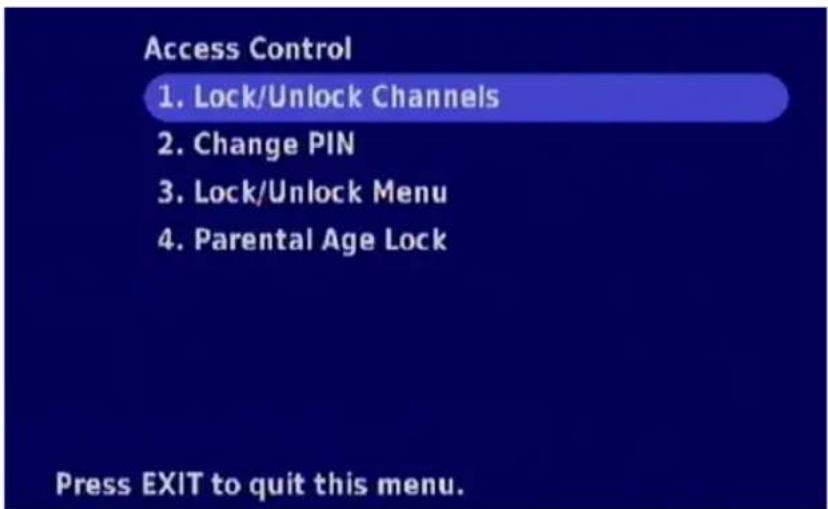
Select the required sub-menu using the ▲▼ buttons and press the OK button. The following display appears:
CHANNEL LOCK
![Channel Lock Select channels to lock/unlock by pressing [OK]. Next List Previous List Press EXIT to quit this menu. Free TV - TV x 1.SWR Fernsehen 2.BR-alpha 3.Bayerisches FS 4.Sat.1 5.kabel eins 6.ProSieben 7.N24 8.Doku/KiKa](/content/2026/05/778601/images/c46298a56bb540287b681317f5439c08a6b775aec00da2c9ad824f4dafb490d8.jpg)
First select the required list with the channels to be locked using the ☐ button (green) or the ☐ button (red). Select the channel to be locked using the ▲▼ buttons. Now press the OK button. An "X" appears in front of the channel. The channel is now locked and can only be viewed by entering the four-digit PIN (factory setting: "0000"). The lock is removed by pressing the OK button again and the "X" disappears.
To quit the menu and save the changes, press the EXIT button.
INSTALLATION MENU
CHANGE PIN
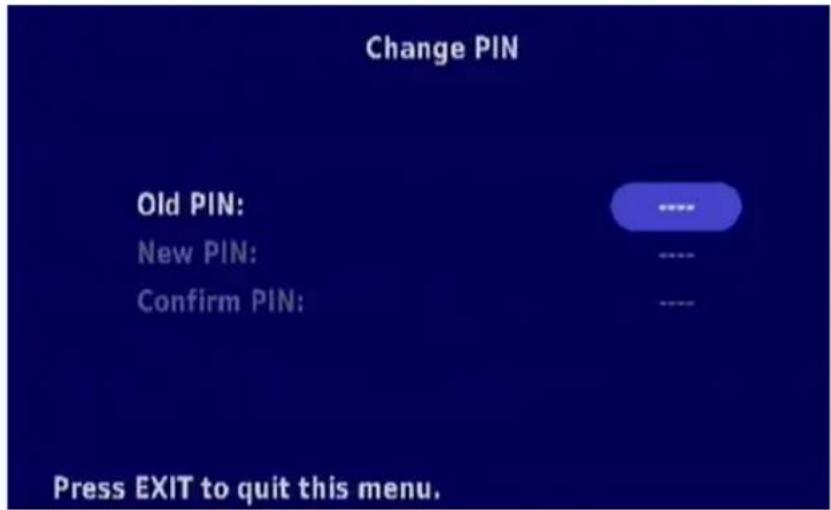
Enter the old PIN using the number pad (factory setting: "0000"). The receiver automatically jumps to the "New PIN" field. Enter the new PIN (four digits) using the number pad and confirm the new PIN in the "Confirm PIN" field. The following display appears:
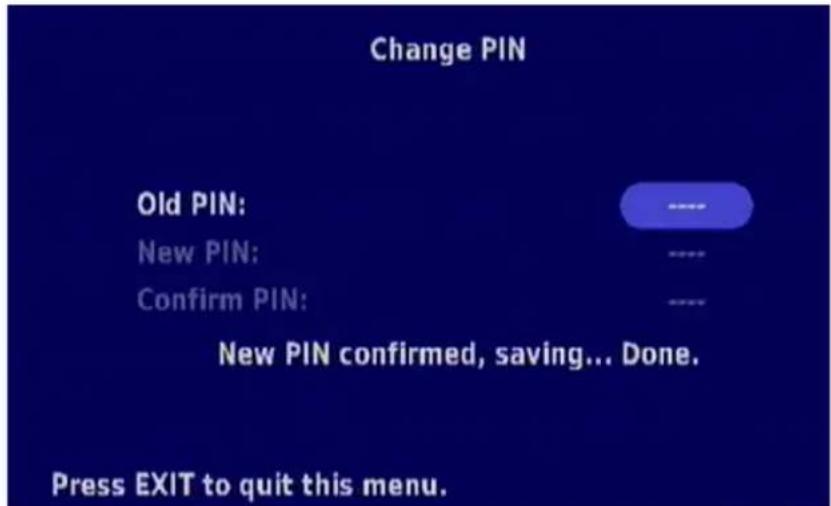

Keep your PIN (password) in a safe place, so that you always have access to your channels should you ever forget it.
It is imperative you make a note of the password. If you forget your password the unit will require reprogramming in the factory, which is not covered by warranty.
Press the EXIT button to quit the menu.
INSTALLATION MENU
MENU LOCK
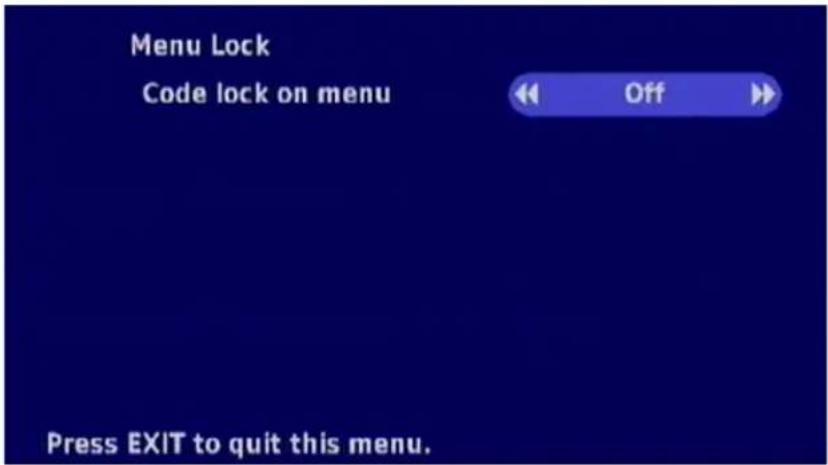
On this menu you can lock the "Installation & Settings menu" against unauthorised access.
Select the required setting (On/Off) using the ▶▶ buttons.
It is then only possible to access the Installation & Settings menu by entering the PIN.
To quit the menu and save the changes, press the EXIT button.
SET PARENTAL LOCK
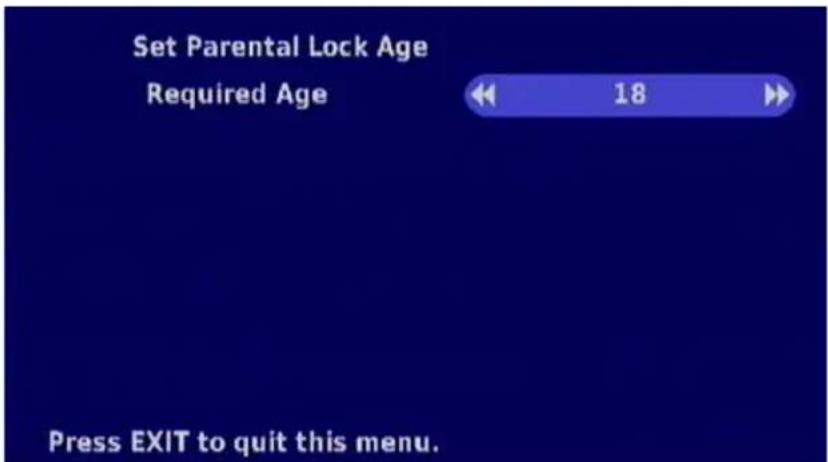
On this menu you can set an age lock. However, this lock function is only effective if the related lock signals are provided by the channel provider.
Select the required setting (4, 5, 6 ...18) using the ◀▶ buttons.
The channel is now locked for broadcasts that exceed the age limit you have selected and can only be viewed by entering the four-digit PIN (factory setting: "0000").
To quit the menu and save the changes, press the EXIT button.
INSTALLATION MENU
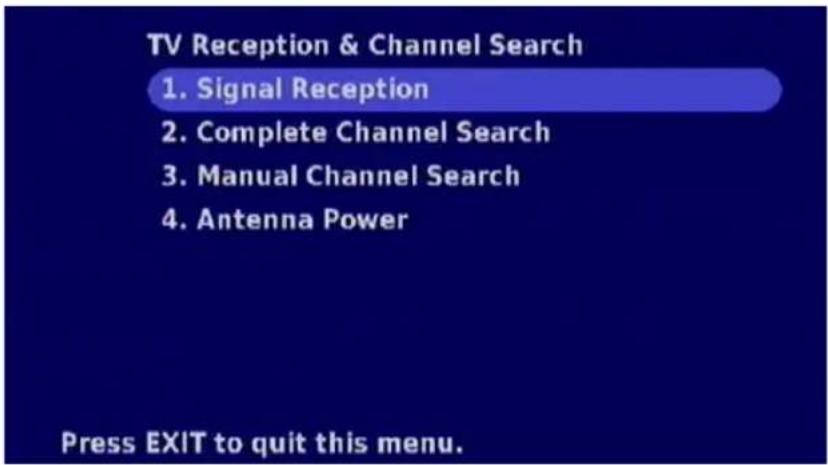
TV RECEPTION & CHANNEL SEARCH
Select the required sub-menu using the ▲▼ buttons and press the OK button. The following display appears:
SIGNAL RECEPTION
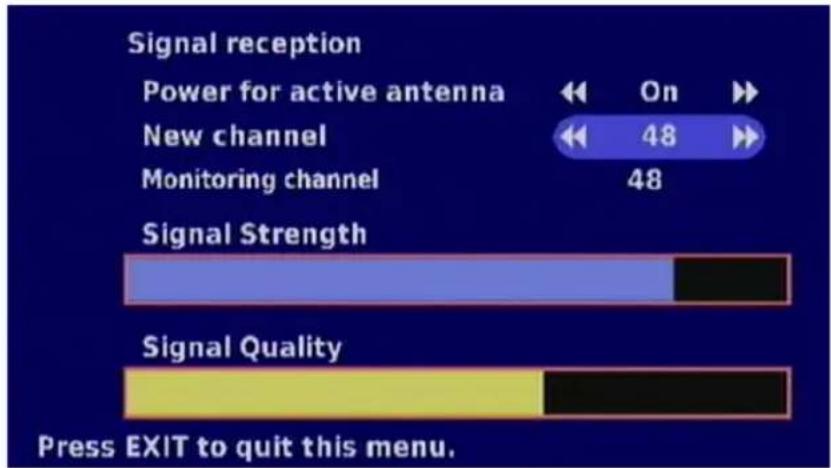
On this menu you can see the signal strength and signal quality of the channel currently selected. On this menu you can also switch on and off the active power supply for your DVB-T antenna (5-V power supply).
bar
| Metric | Value | |---|---| | Power for active antenna | On | | New channel | 48 | | Monitoring channel | 48 | | Signal Strength | | | | | | | | | | | | | | | | | | | | | | | | | | | | | | | | | | | | | | | | | | | | | | | | | | | / | | | | | | | | | | | | | | | | | | | | | | | | | | | | | | | | | | | | | | | | | | | | | | | | | \ | | | | | | | | | | | | | | | | | | | | | | | | | | | | | | | | | | | | | | | | | | | | | | | | | ) | | Signal Strength | | | | | | | | | | | | | | | | | | | | | | | | | | | | | | | | | | | | | | | | | | | | | | | | | | | | | | | | | | | | | | | | | | | | | | | | | | | | | | | | | | | | | | | | | | | | | | | | | | | | | | | | | | |\ | | | | | | | | | | | | | | | | | | | | | | | | | | | | | | | | | | | | | | | | | | | | | | | | | | | | | | | | | | | | | | | | | | | | | | | | | | | | | | | | | | | | | | | | | | | | | | | | | | | |\ :\ ! : : : : : : : : : : : : : : : : : : : : : : : : : : : : : : : : : : : : : : : : : : : : : : : : : : : : : : : : : : : : : : : : : : : : : : : : : : : : : : : : : : : : : : : : : : : : : : : : : : : : |Select the line to be changed using the ▲▼ buttons. Make the changes using the ◀▶ buttons.
You can also check the signal strength and signal quality of other channels. Go to the "New channel" line using the ▲▼ buttons and select the required channel using the ◀▶ buttons.
To quit the menu and save the changes, press the EXIT button.
INSTALLATION MENU
ANTENNA POWER
On this menu you can switch on and off the active power supply for your DVB-T antenna (5-V power supply) and in "Power for active antenna in standby" select whether the active power supply for the antenna is also to be maintained in standby mode (if the DVB-T signal is looped through to a second receiver).

Select the line to be changed using the ▲▼ buttons. Make the changes using the ◀▶ buttons. To quit the menu and save the changes, press the EXIT button.
INSTALLATION MENU
CHANNEL SEARCH
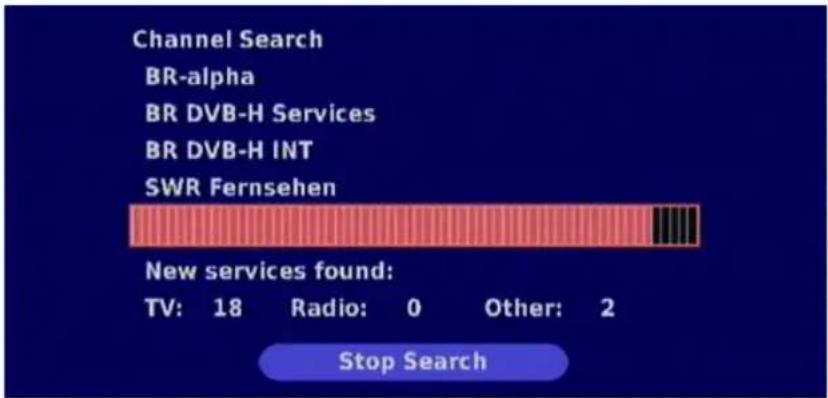
After you have selected the "Complete Channel Search" submenu and pressed the OK button, the search of all the channels starts:
bar
| Category | Value | |---|---| | Channel Search | | | BR-alpha | | | BR DVB-H Services | | | BR DVB-H INT | | | SWR Fernsehen | 18 | | New services found: TV: 18 Radio: 0 Other: 2 Stop Search Stop SearchAfter completion of the search, you will see the following display:
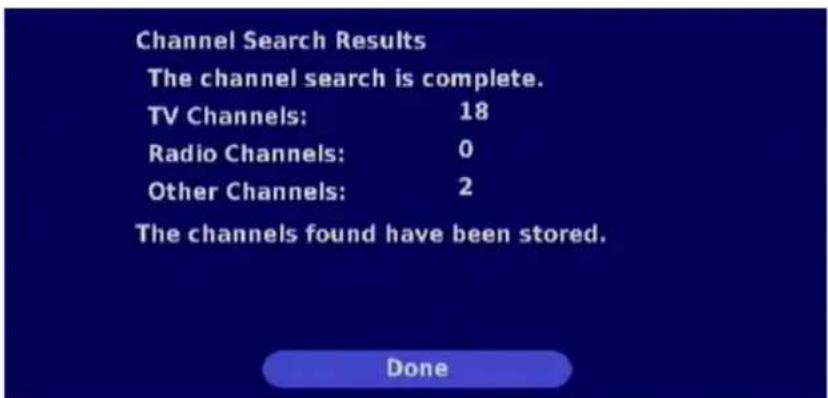
The channels are saved by pressing the OK button and the normal TV image is displayed.
MANUAL CHANNEL SEARCH
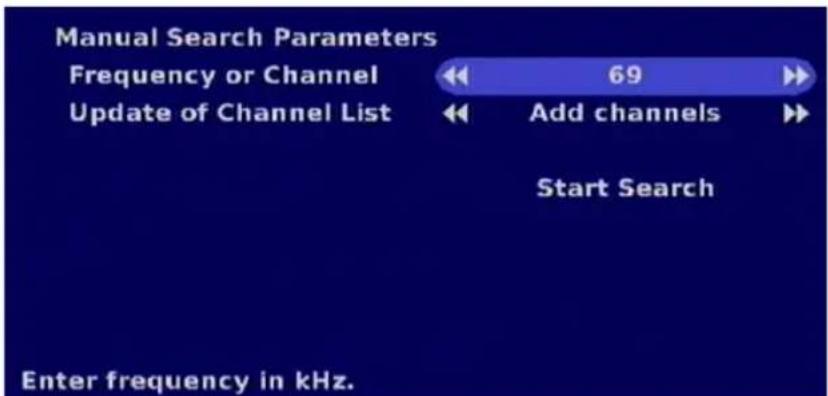
On this menu you can make various settings for the manual channel search:
INSTALLATION MENU
Make the settings for the manual channel search here. Select the line you want to change using the ▲▼ buttons. Make the changes using the ◀▶ buttons or the number pad.
Frequency or Channel:
Select here the required channel or enter the required frequency using the number pad.
Update of Channel List:
Using the ▶▶ buttons enter the type of update required ("Add channels", "Replace channels" and "Erase channel list").
Then select "Start Search" using the ▲▼ buttons and confirm the start of the search by pressing the OK button or cancel the action by pressing the EXIT button.
UPDATE & FACTORY SETTINGS
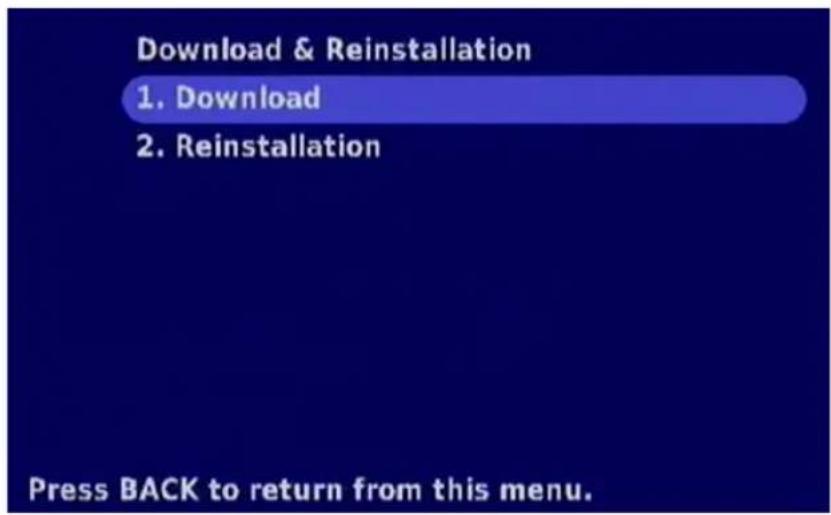
Select the required sub-menu using the ▲▼ buttons and press the OK button. The following display appears:
INSTALLATION MENU
FACTORY SETTINGS
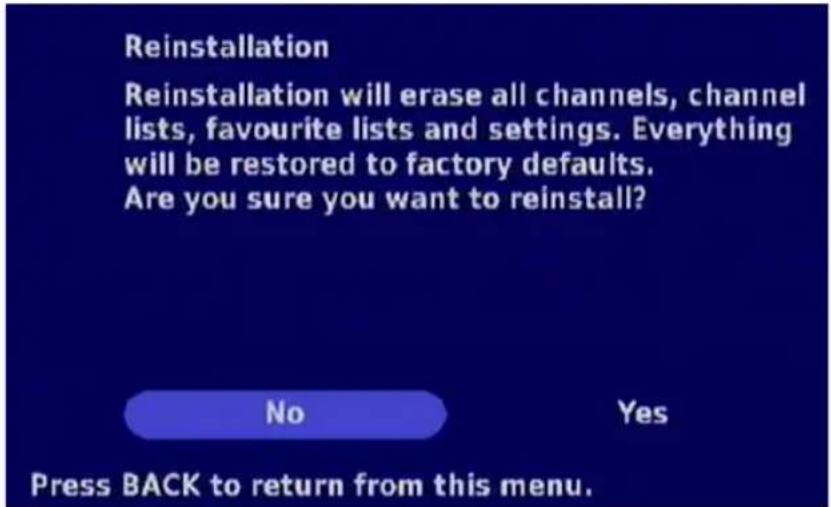
Here you can reset all the settings to the pre-programmed factory settings.

All your personal settings are deleted (favourite lists, channel sort, etc.)!
Select "Yes" using the ◀▶ buttons and confirm the reset by pressing the OK button.
SYSTEM INFORMATION
Press the ⏚ button to open the main menu. Select “System Information” using the ▲▼ buttons and press the OK button. The following display appears:
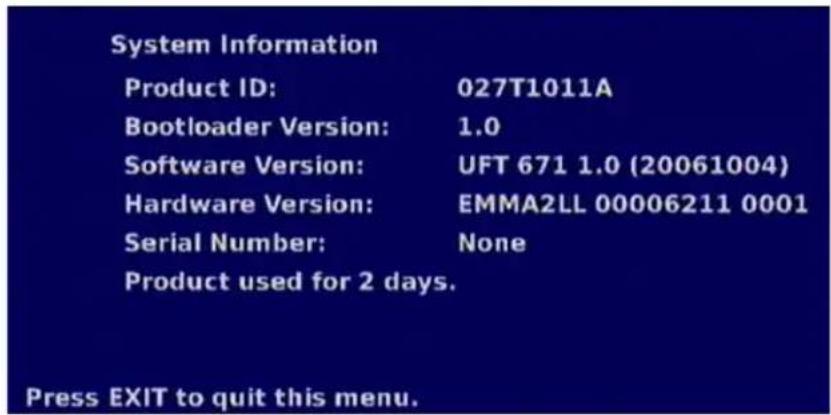
Here, among other aspects, you can see the current version of the software in the receiver under "Software Version". These data are fixed and for information only, for this reason you cannot change them.
SOFTWARE UPDATE
SOFTWARE UPDATE VIA INTERNET
CAUTION: Updating requires a PC and a software cable (RJ 11 to Sub-D 9-pin)!
If there is a new software release for your DVB-T receiver you can download it from:
http://www.kathrein.de (Service → Software und Download → Receiver)
The website also provides information and tips on software updating via the receiver's RJ 11 data interface. The required cable (RJ 11 to RS 232) can be ordered from our service centre, ESC in Grassau, at the following address:
ESC Electronic Service
Chiemgau GmbH
Bahnhofstraße 108
83224 Grassau
Tel.: +49 8641 9545-0
Fax.: +49 8641 9545-35 & 9545-36
E-mail: service@esc-kathrein.de
Note: A factory settings reset is required following a successful software download.
SERVICE
If, despite reading through this operating manual, you still have questions about getting started with the unit or using it correctly, or if unexpected problems occur, please contact your specialist dealer.
FUNCTIONS AND TECHNICAL DATA
● Reception of FTA digital terrestrial TV and radio programmes
● Tuner with loop-through output
● 1000 channel memory positions
- Menu-guided fi rst installation
Electronic programme guide (EPG) with short programme descriptions 1)
● 8 timers; can also be programmed with the EPG
● Software download via PC (RS 232/RJ 11)
● 6 favourite channel lists
● Automatic date and time generation via DVB data stream
● On-screen display (OSD) in 9 languages (D, GB, F, I, E, P, NL, CZ, PL)
- LED display
● Language selection for multilingual broadcasts
● Optical audio output for Dolby Digital data stream (AC 3)
● CVBS, Y/C and RGB signal output programmable via the Scart socket
● Automatic 4:3 and 16:9 format recognition (choice of viewing format)
- Channel search
● Channel position sort function
● 12-V power supply for mobile use
● 230V power supply for stationary use
● An additional IR sensor can be connected
- Infra-red remote control
● Remote feeding of an active DVB-T antenna (e.g. BZD 30, BZD 40) via the RF input
- Teletext decoder with memory for 800 pages and teletext generation (for replay via receiver and TV set)
FUNCTIONS AND TECHNICAL DATA
TECHNICAL DATA
| Type | UFT | 671si | |
| Order no./colour 20210092/Silver | |||
| RF properties | |||
| Input frequency range MHz 174-230 and 470-862 | |||
| Loop through range MHz 47-862 | |||
| Channel bandwidth MHz 7/8, automatic switch-over | |||
| Modulation type COFDM 2k, 8k | |||
| Mapping | QPSK, 16 QAM, 64 QAM | ||
| Guard interval | 1/4, 1/8, 1/16, 1/32 | ||
| FEC | 1/2, 2/3, 3/4, 5/6, 7/8 | ||
| Input level range | dBμV 28-86 (with 16 QAM) | ||
| TV system, Video | |||
| Modulation, FEC, demultiplexer | DVB-T standard | ||
| Video resolution | CCIR 601 (720 x 576 lines) | ||
| Input data rate | MSymb/s | 5-32 | |
| Video decoding | MPEG-1 and 2 compatible | ||
| Bit rate | MBit/s | 1.5-15 | |
| Frequency range | MHz | 0.02-5 | |
| Output voltage | Vpp | 1 | |
| S/N | dB | >53 | |
| TV system, Audio | |||
| Audio decoding | MPEG-1 and 2, layer 1 and 2 | ||
| Sampling rate kHz | 32/44.1/48 | ||
| Frequency range | kHz 0.04-20 | ||
| Output voltage | mVpp | 770 (TV-Scart) | |
| S/N | dB | >65 | |
| Memory | |||
| Flash-RAM/SDRAM | MB | 2/8 | |
| Processor clock speed | MHz 150 | ||
| Power supply | |||
| Mains voltage | V/Hz | 230 (+10%/-15%)/50 | |
| Power consumption (power/standby) | W < 10/5 | ||
| Remote feeding | V/mA | 5/75 | |
| Connections | |||
| RF input/output (loop through) | IEC socket/pin | ||
| TV/VCR output | 2 x Scart sockets | ||
| Audio digital output (optical) | Standard fibre-optic | ||
| Data interface | RJ 11 | ||
| General | |||
| Permissible ambient temperature | °C | +5 to +40 | |
| Device dimensions (W x H x D)/weight | mm/kg | 194 x 30 x 140/0.85 | |
CONNECTION DIAGRAM
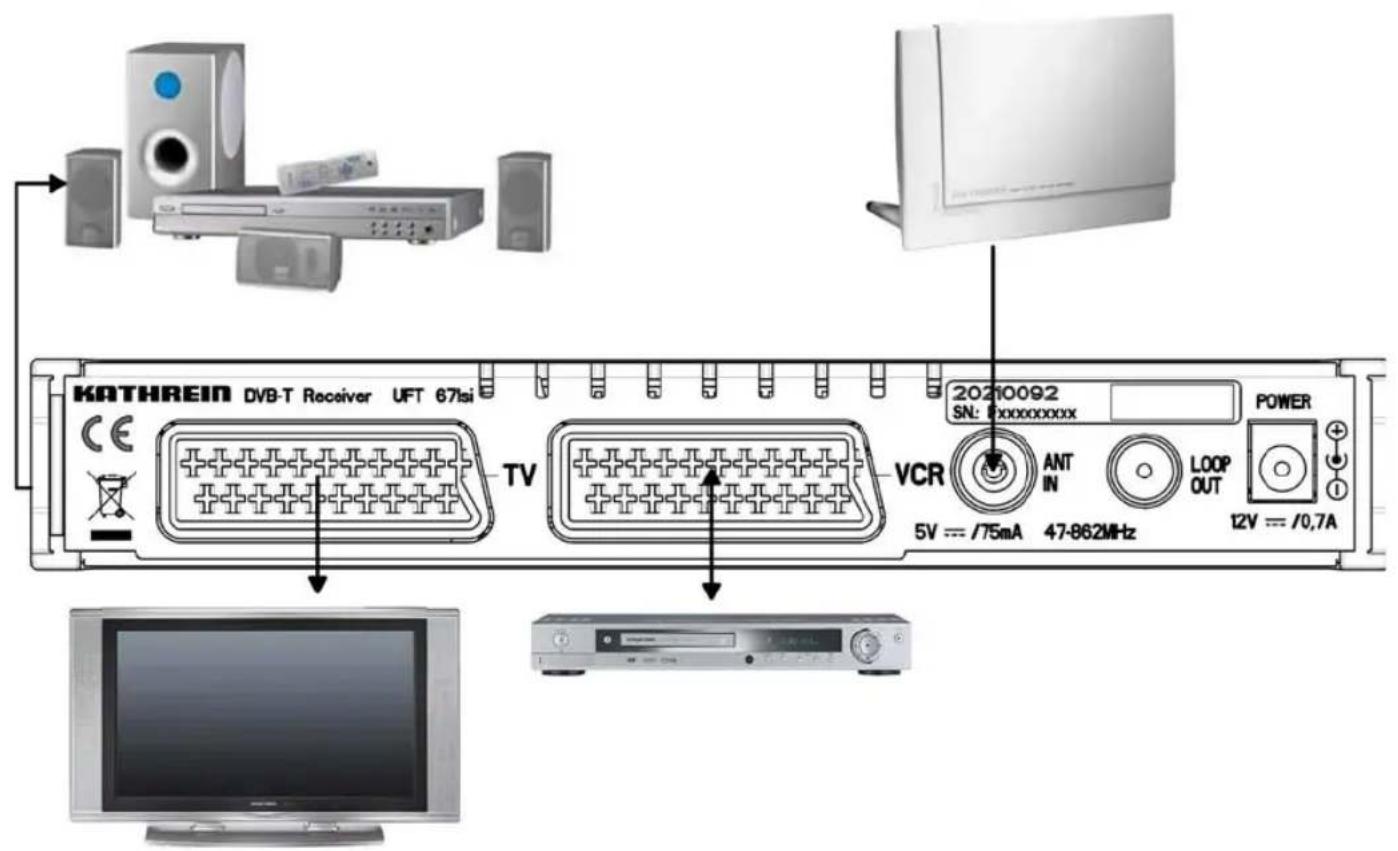


- DVB-T Receiver UFT 671si
- PREFACE
- IMPORTANT INFORMATION
- REFERENCE NOTE ON AUDIO MPEG INC. AND S.I.SV.EL, S.P.A:
- CONTENTS
- Preface.... 2
- Contents 3
- Safety Instructions 5
- Receiver Features.... 6
- Connection and Set-Up.... 7
- Views and Connections 9
- Remote Control 10
- first installation 11
- Operation 14
- Main menu.... 19
- Channel Lists 20
- Channel Lists Management.... 21
- Favourite Lists 22
- Timers 24
- Installation menu 26
- System Information 39
- Software Update 40
- Functions and Technical Data.... 41
- Connection Diagram 43
- SAFETY INSTRUCTIONS
- Power cable
- Cleaning
- Playing children
- Earth connection
- Mains voltage
- Repairs
- Connections
- Long periods of absence / Thunder storms
- Place of installation
- Ventilation
- Humidity, insulation, heat
- RECEIVER FEATURES
- CONNECTION AND SET-UP
- ANTENNA CONNECTION
- TV CONNECTION
- DOLBY CONNECTION
- IR RECEIVER (ACCESSORY, NOT SUPPLIED)
- INSERTING BATTERIES INTO THE REMOTE CONTROL
- Used batteries are special waste!
- VIEWS AND CONNECTIONS
- REMOTE CONTROL
- REMOTE CONTROL FUNCTION BUTTONS
- FIRST INSTALLATION
- Note:
- OPERATION
- USING THE REMOTE CONTROL
- CHANNEL SELECTION (TV AND RADIO)
- DIRECT CHANNEL SELECTION
- CHANNEL SELECTION FROM CHANNEL LIST
- BANNER
- ELECTRONIC PROGRAMME GUIDE (EPG)
- SORT ORDER
- INFO (ADDITIONAL PROGRAMME INFORMATION)
- SWR Fernsehen
- PROGRAMME PREVIEW
- TIMER PROGRAMMING FROM EPG
- AUDIO
- Scart Enable:
- MAIN MENU
- OPENING THE MAIN MENU (MENU BUTTON)
- 1) Channel Lists
- 2) Channel Lists Management
- 3) Favourite Lists
- 4) Timers
- 5) Installation & Settings
- 6) System Information
- 7) EPG
- CHANNEL LISTS
- CHANNEL LISTS MANAGEMENT
- DELETING A CHANNEL
- MOVING/SORTING A CHANNEL
- FAVOURITE LISTS
- ADDING A CHANNEL TO A FAVOURITE LIST
- DELETING A CHANNEL FROM A FAVOURITE LIST
- MANUAL TIMER SETTING
- Channel:
- Date:
- Start Time:
- Stop Time:
- Repeat:
- TIMERS
- AUTOMATIC TIMER SETTING
- DELETING A TIMER EVENT
- INSTALLATION MENU
- USER PREFERENCES
- OUTPUT SETTINGS
- Video Format:
- Refer to the operating instructions for your television set!
- Aspect Mode:
- Picture Format:
- Digital Audio:
- REGIONAL SETTINGS
- LANGUAGE SETTINGS
- ACCESS CONTROL
- CHANNEL LOCK
- CHANGE PIN
- MENU LOCK
- SET PARENTAL LOCK
- TV RECEPTION & CHANNEL SEARCH
- SIGNAL RECEPTION
- ANTENNA POWER
- CHANNEL SEARCH
- MANUAL CHANNEL SEARCH
- UPDATE & FACTORY SETTINGS
- FACTORY SETTINGS
- SYSTEM INFORMATION
- SOFTWARE UPDATE
- SOFTWARE UPDATE VIA INTERNET
- SERVICE
- FUNCTIONS AND TECHNICAL DATA
- CONNECTION DIAGRAM
Brand : KATHREIN
Model : UFT 671
Category : Satellite receiver