
OT 15 - Oven TEAM - Free user manual and instructions
Find the device manual for free OT 15 TEAM in PDF.


| Brand | TEAM |
| Model | OT 15 |
| Product type | Built-in oven |
| Dimensions (W x H x D) | 59.5 x 59.5 x 55 cm |
| Net weight | 28 kg |
| Power supply | 220-240 V, 50/60 Hz |
| Total power | 2500 W |
| Usable capacity | 65 liters |
| Energy class | A |
| Main functions | Convection, natural convection, grill, defrost |
| Temperature range | 50°C to 250°C |
| Timer | Programmable up to 120 minutes |
| Interior lighting | Yes, halogen lamp |
| Door | Removable double glazing, hinged opening |
| Cleaning | Pyrolytic (self-cleaning) |
| Safety | Child lock, automatic shut-off in case of overheating |
| Spare parts available | Heating elements, fan, door gaskets |
| Repairability | Repairability index 8.2/10 |
| Included accessories | Grid, drip tray, rotisserie spit |
Frequently Asked Questions - OT 15 TEAM
User questions about OT 15 TEAM
0 question about this device. Answer the ones you know or ask your own.
Ask a new question about this device
Download the instructions for your Oven in PDF format for free! Find your manual OT 15 - TEAM and take your electronic device back in hand. On this page are published all the documents necessary for the use of your device. OT 15 by TEAM.
USER MANUAL OT 15 TEAM
natural_image
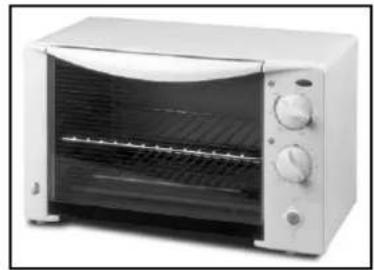
White microwave oven with closed lid and control knobs (no visible text or labels)Minibackofen
Mini-Oven
Mini-Four
Mini-Bakoven
Mini-Horno
Mini-Forno
Mini-Forno
CE
I/B Version 030908
TEAM OT 15
230 V \~ 1200 W

D
- Door handle
- Door
- Heating elements
- Grid
- Timer
- Pilot light
- Function selector
- Thermostat control
- Locking of the door
F
☐ Please read these instructions carefully before using the appliance.
☐ Check that your mains voltage corresponds to that stated on the appliance.
☐ Never leave the appliance unsupervised when in use. Keep out of reach of children or incompetent persons.
From time to time check the cord for damages. Never use the appliance if cord or appliance show any signs of damage.
☐ Only use the appliance for domestic purposes and in the way indicated in these instructions.
☐ Never immerse the appliance in water or any other liquid for any reason whatsoever. Never place it into the dishwasher.
□ Never use the appliance near hot surfaces.
Should the cord be damaged, it must be replaced by a competent qualified electrician (1).
Before cleaning, always unplug the appliance from the power supply.
☐ All repairs should be made by a competent qualified electrician (1).
☐ Never use the appliance outside and always place it in a dry environment.
☐ Never use accessories that are not recommended by the producer. They could constitute a danger to the user and risk to damage the appliance.
☐ Never move the appliance by pulling the cord. Make sure the cord cannot get caught in any way. Do not wind the cord around the appliance and do not bend it.
□ Stand the appliance on a table or flat surface.
☐ Make sure the appliance has cooled down before cleaning and storing it.
Only cook consumable food. Do not place large pieces of food or metallic utensils in the mini-oven in order to avoid all risk of fire or electrocution. Also never place the following materials in the oven: paper, cardboard or plastic...
It is absolutely necessary to keep this appliance clean at all times as it comes into contact with food.
☐ Make sure the cord never comes into contact with the hot parts of the appliance.
During use, the metal parts of the oven, as well as the door can reach very high a temperature. Never touch these hot parts of the appliance. Always use gauntlets when handling the appliance.
☐ Make sure the hot parts of the appliance never come into contact with inflammable materials, such as curtains, cloth, etc. ... when it is in use, as a fire might occur. Also make sure not to cover the appliance and do not put anything on top of it. Make sure nothing comes into contact with the heating element of the appliance.
It is advised to place a heat resistant coating between your table and the appliance (this way you don't get burned).
☐ Be extremely cautious as oil and fat preparations might catch fire if overheated.
☐ Do not stare at the quartz elements when the oven is in use.
☐ Please do not pass 10 min using your toaster, as otherwise your bread will be burned. This remark is important as the maximum time is 15 minutes but this period of time should be used for other things than re-heating your bread.
1) Competent qualified electrician: after sales department of the producer or importer or any person who is qualified, approved and competent to perform this kind of repairs in order to avoid all danger. In any case you should return the appliance to this electrician.
UK STYLE PLUG WIRING INSTRUCTIONS (IN THE UK ONLY)
This product must only be used from a 13 amp power socket. If a BS1363 approved 13 amp plug is used, it should be fitted with a 13 amp fuse. The wires on the power cord are colour coded:
blue = neutral, brown = live, green or green & yellow = earth.
The blue wire must be connected to the terminal marked N or coloured in black.
The brown wire must be connected to the terminal marked L or coloured in red.
The green (& yellow) wire must be connected to the terminal marked E or coloured in green (& yellow).
BEFORE USING
• Unpack the appliance and accessories, then wash and wipe these accessories.
- It is normal if some smoke or smell emanates from the appliance when using it for the first time. Operate the appliance for 15 minutes, putting the thermostat on 250°C.
COOKING SELECTION

Upper cooking

Upper & lower cooking
OPERATING INSTRUCTIONS
- When using for the first time, clean the surface of the tray with a damp cloth and wipe dry. Then grease the tray with butter, margarine or cooking oil.
- Plug the unit into the power supply socket.
- Select the cooking temperature using the thermostat knob.
- Depending on the kind of food to heat/cook, choose the adequate position on the selector.
- In general, you should start cooking with the selector in the position.
• After that, turn the selector to
- Then, turn the timer knob to choose the required time. The heating elements will not turn ON until you have selected the cooking time.
• The mini-oven will switch off automatically when the timer stops.
- When the timer stops, a bell will ring.
- If you want to stop before the selected time is over, place the function selector in "0" position.
- Carefully open the door, preferably using "an oven glove".
- Remove the food using wooden utensils.
• After use, remove the plug from the wall socket.
USER MAINTENANCE INSTRUCTIONS
Before cleaning, unplug the appliance from outlet and allow to cool.
Inside cleaning
- Wipe trays with absorbent paper towelling or a soft cloth. To remove baked on food pour a little cooking oil on the food and allow to stand for five to ten minutes.
- This should soften the food and allow it to be removed with absorbent paper towelling or a soft cloth. If the above method fails to remove the food we suggest wiping the trays with a damp cloth and a little detergent.
Outside cleaning
- Wipe clean with a soft dry cloth.
- Do not use steel wool, scouring pads or abrasive cleaners.
- Do not immerse in water or any other liquid.
• This appliance is for household use only.
SHORT CORD INSTRUCTIONS
A short power supply cord is provided to reduce the risk resulting from becoming entangled in, or tripping over a longer cord. Extension cords may be used if care is exercised in their use.
• The electrical rating of the extension cord should be at least that of the appliance.
- The longer cord should be arranged so that it will not drape over the counter top or tabletop where it can be pulled on by children or tripped over.
FR MODE D'EMPLOI
POUR VOTRE SÉCURITÉ
Generated by Unregistered Batch DOC TO PDF Converter 2011.3.804.1511, please register!
Copies of the I/B. Please reproduce them without any changes except under special instruction from Team International BELGIUM. The pages must be reproduced and folded in order to obtain a booklet A5 (+/- 148.5 mm width x 210 mm height). When folding, make sure you keep the good numbering when you turn the pages of the I/B. Don't change the page numbering. Keep the language integrity.

Fax +32 2 359 95 50
Generated by Unregistered Batch DOC TO PDF Converter 2011.3.804.1511, please register!
Copies of the I/B. Please reproduce them without any changes except under special instruction from Team International BELGIUM. The pages must be reproduced and folded in order to obtain a booklet A5 (+/- 148.5 mm width x 210 mm height). When folding, make sure you keep the good numbering when you turn the pages of the I/B. Don't change the page numbering. Keep the language integrity.

Fax +32 2 359 95 50
Generated by Unregistered Batch DOC TO PDF Converter 2011.3.804.1511, please register!
Copies of the I/B. Please reproduce them without any changes except under special instruction from Team International BELGIUM. The pages must be reproduced and folded in order to obtain a booklet A5 (+/- 148.5 mm width x 210 mm height). When folding, make sure you keep the good numbering when you turn the pages of the I/B. Don't change the page numbering. Keep the language integrity.
TEAM OT 15

| Deutsch | 4 |
| English | 7 |
| Français | 10 |
| Nederlands | 13 |
| Español | 16 |
| Português | 19 |
| Italiano | 22 |

Brand : TEAM
Model : OT 15
Category : Oven