Azor GSM Mini - Security Camera Joblotron - Free user manual and instructions
Find the device manual for free Azor GSM Mini Joblotron in PDF.


User questions about Azor GSM Mini Joblotron
0 question about this device. Answer the ones you know or ask your own.
Ask a new question about this device
Download the instructions for your Security Camera in PDF format for free! Find your manual Azor GSM Mini - Joblotron and take your electronic device back in hand. On this page are published all the documents necessary for the use of your device. Azor GSM Mini by Joblotron.
USER MANUAL Azor GSM Mini Joblotron
natural_image
Blue circular icon with a white mobile phone symbol and the text 'GSM' below it (no additional text or symbols)Azor GSM MINI ALARM
natural_image
Yellow circular icon with a white stylized icon of a keyhole or connector, labeled 'RFID' below (no additional text or symbols)
natural_image
Orange circular icon with white wireless signal wave symbol and 'RF' text below (no additional symbols or text)
natural_image
A young girl sitting beside a large beige Labrador Retriever dog, with an orange circular icon labeled 'RF' in the top-left corner (no text on the dog or background)Contents
Description ....3
AZOR kit contents....4
AZ-10K GSM control unit 4
AZ-10D RFID tag reader 5
AZ-10M door-opening detector 5
AZ-10P motion detector 6
Installation....7
Door-opening detector installation 7
Motion detector installation 8
RFID tag reader installation 9
Switching the GSM control unit on for the first time....9
Installation of the GSM control unit and its antenna 11
Tamper detector....11
Enrollment of a telephone 12
Communication test....13
Control 14
Switching Azor on/off....14
Setting Azor....14
Unsetting Azor....15
Alarm....15
Listening in 16
Informative SMS....16
Settings....17
Computer connection....17
Firmware update 17
System extension 18
AZ-10T RFID tag 18
AZ-10M door-opening detector 18
AZ-10P motion detector 19
AZ-10R remote control....19
AZ-10B doorbell button 19
AZ-10S optical smoke detector....20
Other information....21
Time synchronization with a GSM network....21
Emergency unlocking of settings 21
SMS message forwarding ....21
Technical specifications 21
Troubleshooting....23
Battery replacement....23
Description
Azor is a wireless alarm for monitoring against burglars. It has been designed for small houses, flats, offices, shops, etc. It can also be supplemented with a optical smoke detector.
Guarding can be simply SET or UNSET using an RFID tag. You just need to press the switch at the door and use the RFID tag. The system can also be controlled with a telephone – via voice menu options.
When an alarm is triggered, Azor can call a security agency (Alarm Receiving Centre). However, it can also report events by SMS messages and by phone calls. You can define which information you are interested in (alarms, power supply failure, who set or unset the system and when, etc.).
If you decide to adjust Azor's behaviour to suit your needs, you just need to connect it to a PC and use the included user-friendly ALink software.
Features:
— up to 10 wireless detectors (motion, door opening, window opening, fire, panic)
— up to 10 users authorized to control the setting/unsetting
– voice menu for control via a telephone
– SMS and voice reporting of events to users (individual settings)
– transmission of information to an Alarm Receiving Centre (including connection checks)
– possibility of listening in to the guarded premises
– siren to scare burglars (silent alarm can be set as well)
- tamper alarm for reporting an attempt to damage any part of the system
– 1 year battery lifetime (in detectors and remote controls)
– backup battery in the communicator (for power failures)
- automatic checking of the functioning of all parts of the system (including battery status checks)
- USB port for connection to a PC (setup does not require SW installation)
— event memory of up to 1000 events
- false alarm filter
- optional door opening "chime" function
- optional wireless doorbell button function
— future product updates for new functions
— meets EN-50131-1, security grade 1, environment class I
AZOR kit contents
AZ-10K GSM control unit
The GSM control unit, a wireless alarm control panel, processes information from all detectors in the system. It is usually installed in a hidden place.
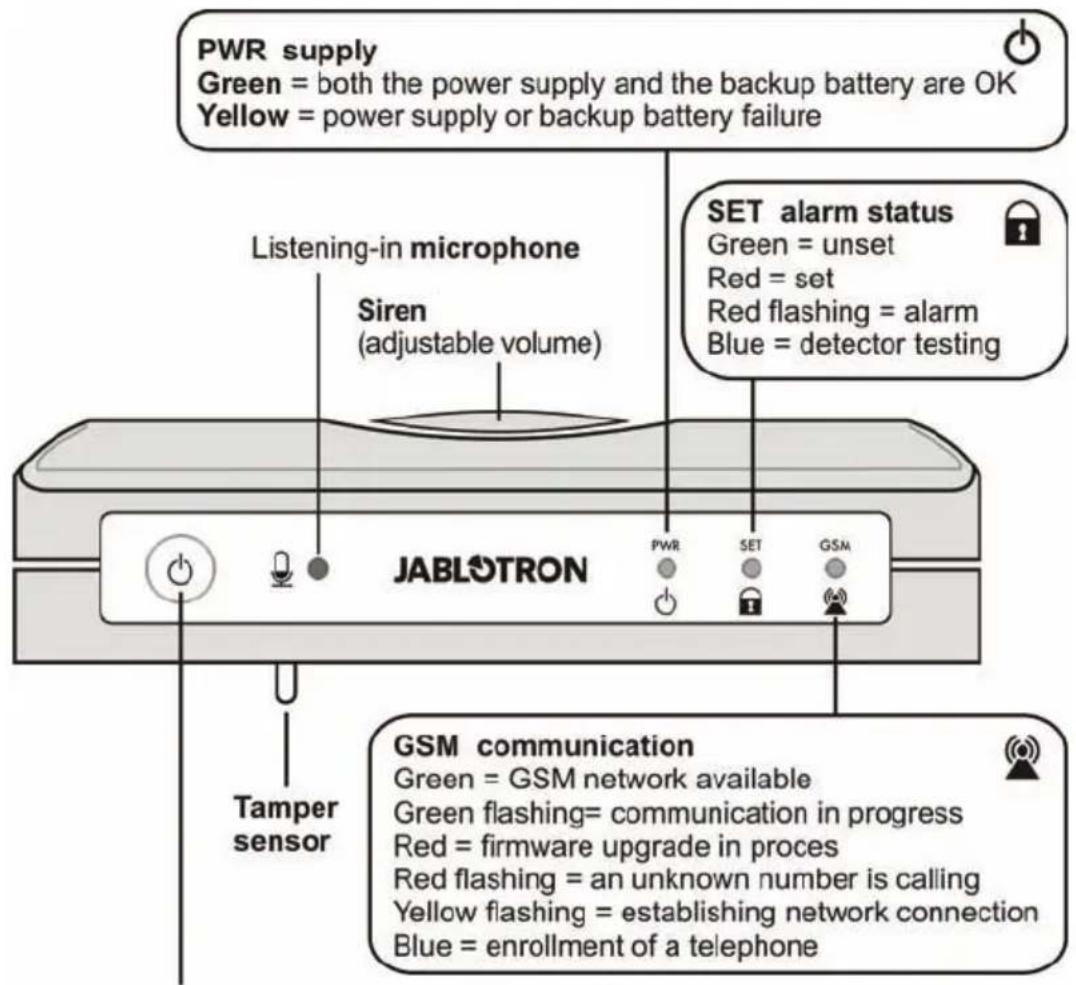
text_image
PWR supply Green = both the power supply and the backup battery are OK Yellow = power supply or backup battery failure LISTING-in microphone Siren (adjustable volume) SET alarm status Green = unset Red = set Red flashing = alarm Blue = detector testing JABLOTRON Tamper sensor GSM communication Green = GSM network available Green flashing= communication in progress Red = firmware upgrade in proces Red flashing = an unknown number is calling Yellow flashing = establishing network connection Blue = enrollment of a telephoneButton - Azor can be switched on/off by pressing and holding the button
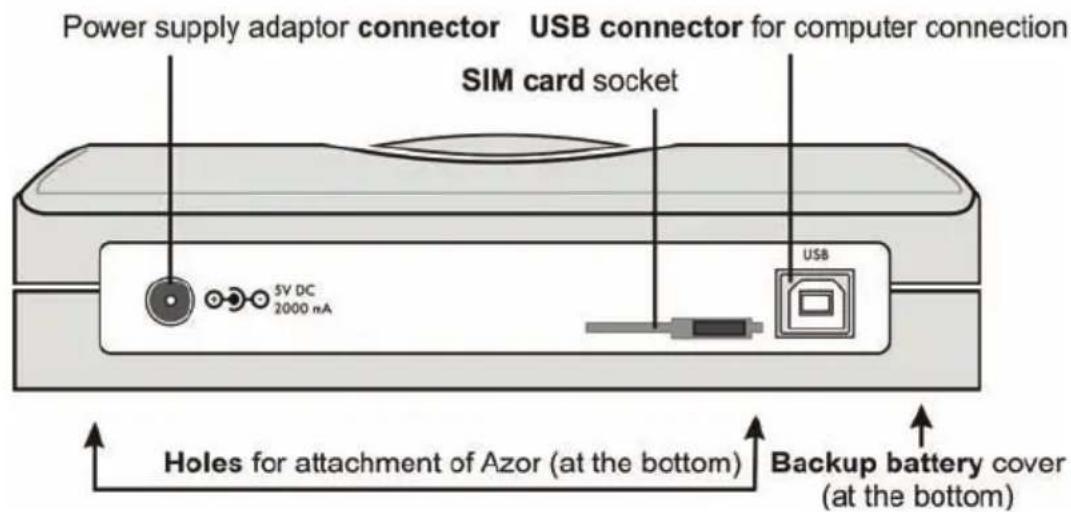
text_image
Power supply adaptor connector USB connector for computer connection SIM card socket 5V DC 2000 nA USB Holes for attachment of Azor (at the bottom) Backup battery cover (at the bottom)AZ-10D RFID tag reader
Serves for setting and unsetting. It is usually installed at the entrance door.
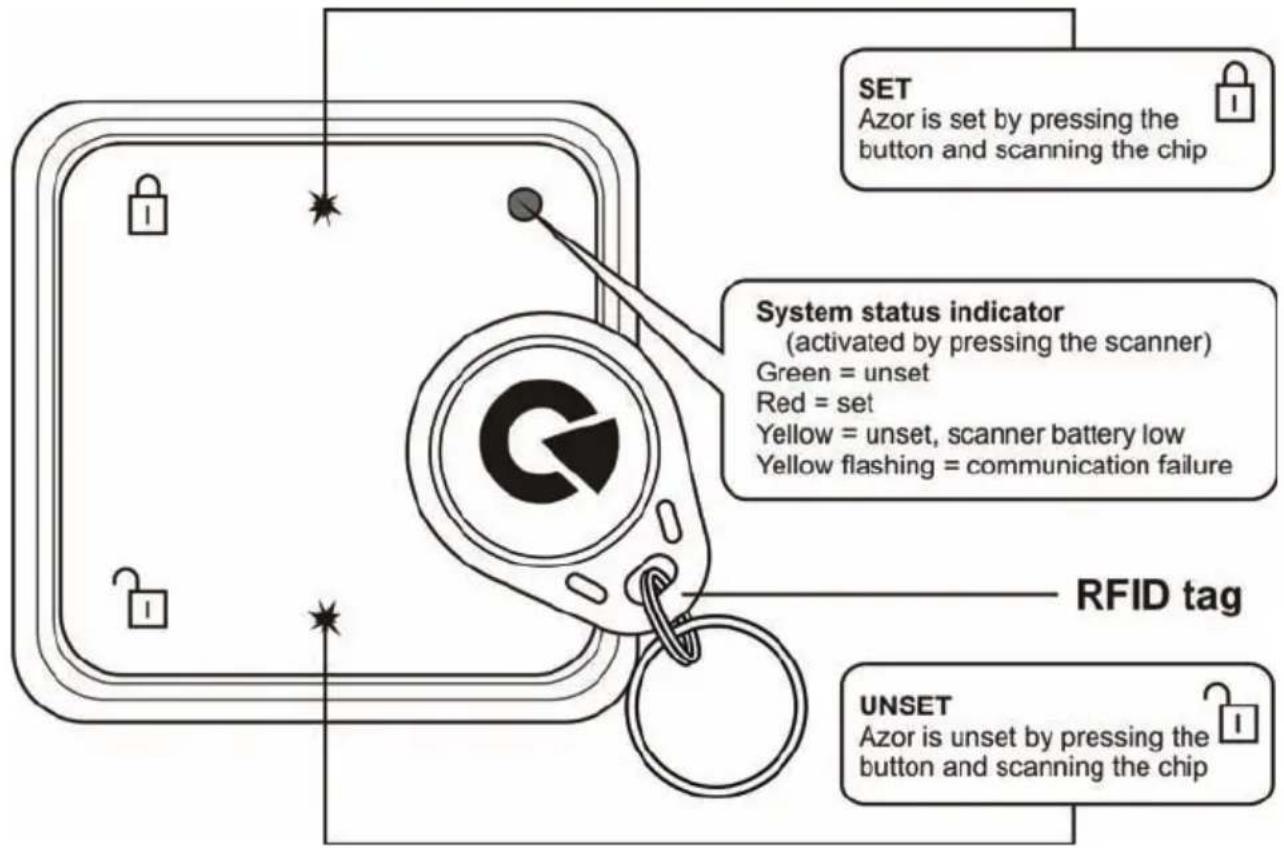
flowchart
graph TD
    A["SET<br>Azor is set by pressing the button and scanning the chip"] --> B["System status indicator<br>(activated by pressing the scanner)<br>Green = unset<br>Red = set<br>Yellow = unset, scanner battery low<br>Yellow flashing = communication failure"]
    B --> C["RFID tag"]
    C --> D["UNSET<br>Azor is unset by pressing the button and scanning the chip"]
AZ-10M door-opening detector
Reports opening doors, windows, etc.
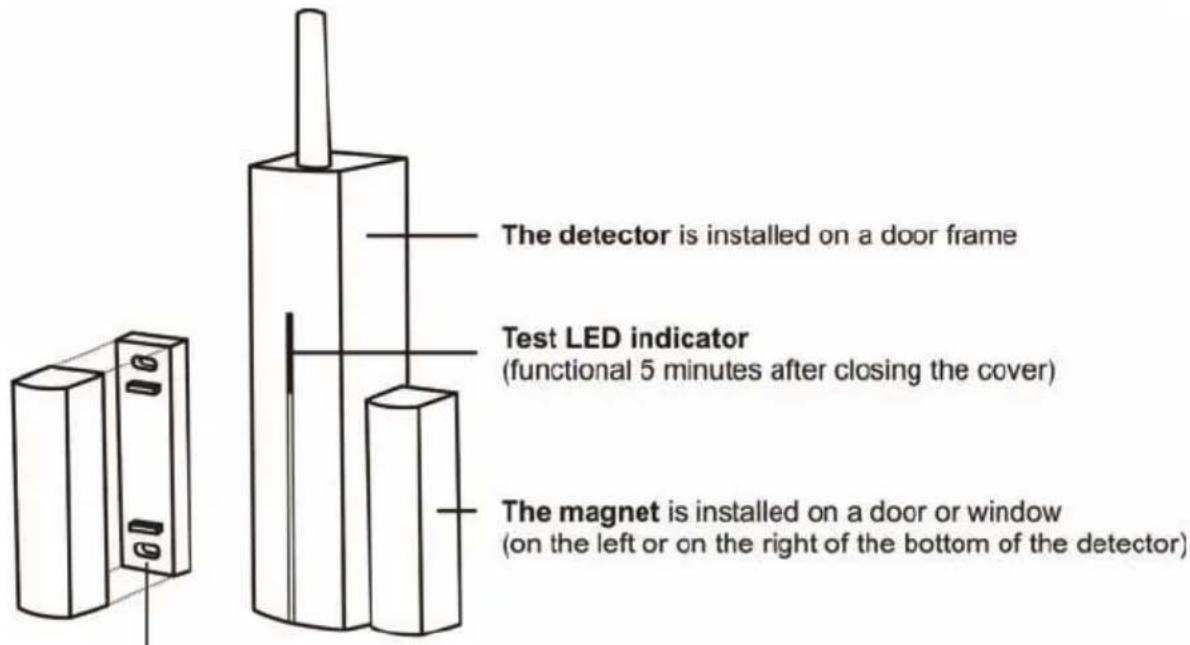
text_image
The detector is installed on a door frame Test LED indicator (functional 5 minutes after closing the cover) The magnet is installed on a door or window (on the left or on the right of the bottom of the detector)Magnet pads (use when installing on a metal surface, they protect the magnetic field from a "short circuit")
AZ-10P motion detector
Reports human motion
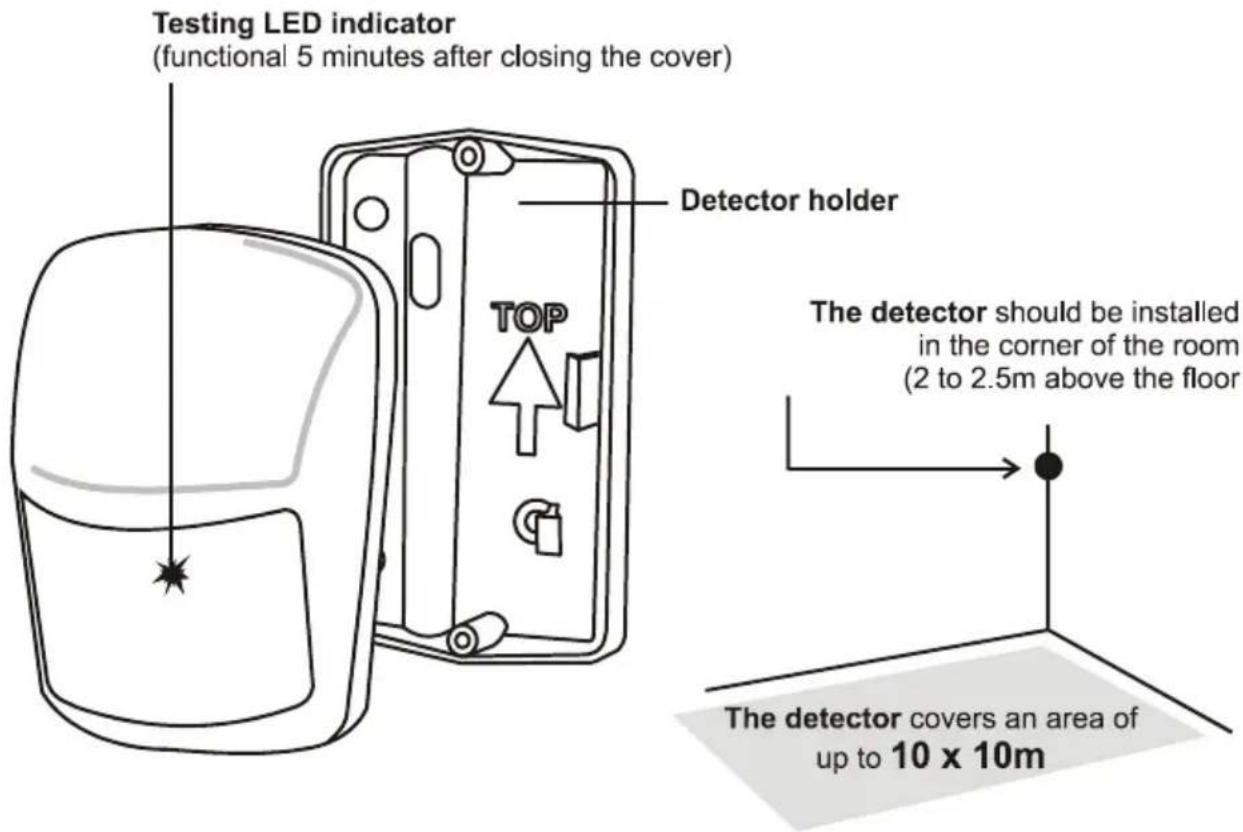
text_image
Testing LED indicator (functional 5 minutes after closing the cover) Detector holder TOP The detector should be installed in the corner of the room (2 to 2.5m above the floor The detector covers an area of up to 10 x 10mInstallation
First attach the detectors temporarily with double-sided adhesive tape. The screws can only be used after the communication test. If the surface is smooth and cohesive, it is possible to attach the detectors with only adhesive tape.
The distance between a detector and the GSM control unit must not exceed 20m. Note: the radio signal can be blocked by metal objects, wet walls, and wall and ceiling supporting structures, etc.
Door-opening detector installation
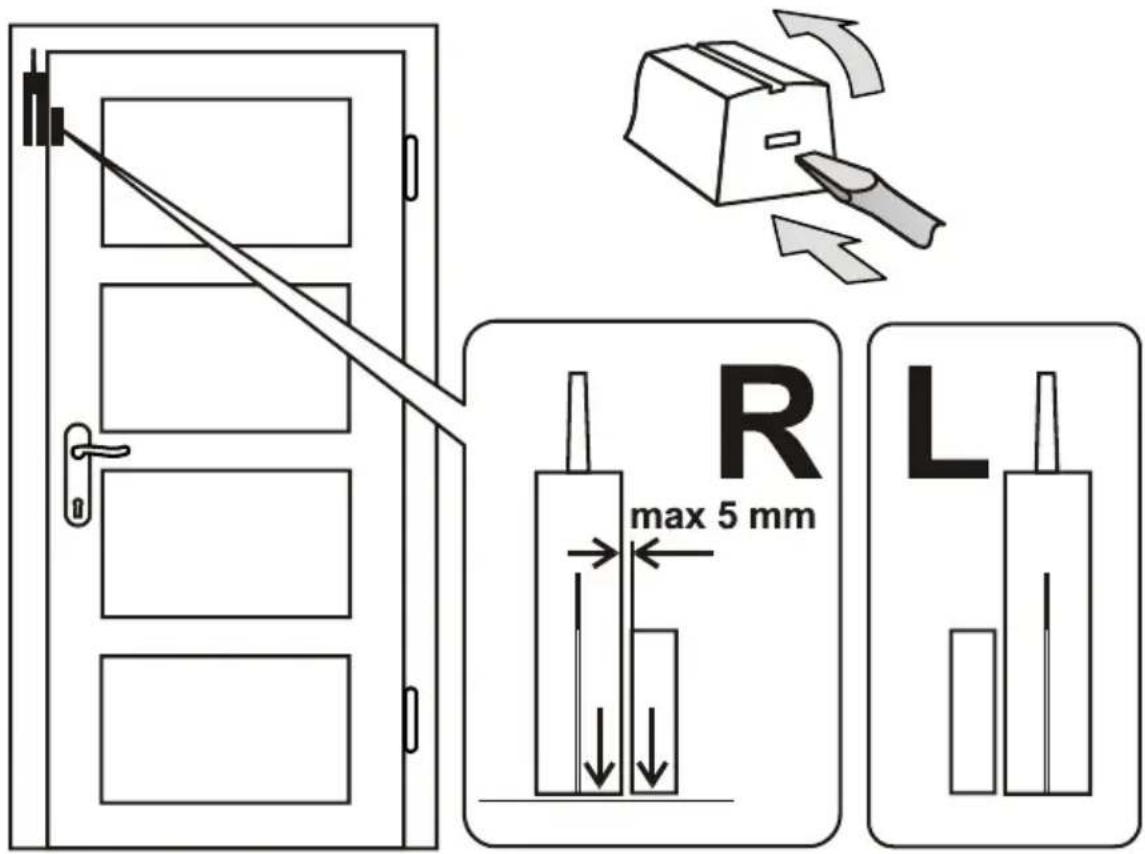
text_image
R max 5 mm L- Attach the detector to a door frame (solid part); the antenna should point upward.
- Attach the magnet to the door (if it is made of metal, use a plastic pad underneath).
- When the door is closed, the magnet unit must almost touch the bottom part of the detector (on the left or on the right).
- Connect the batteries (leave the internal switches in the 1 DEL and 2 MG EN positions).
- Close the detector (the tamper contact spring must be compressed).
- When the door is opened, the detector indicator light should flash. You can test the function for 5 minutes and then the indicator light goes off. You can repeat the test by opening and closing the detector housing (a tamper activation).
Motion detector installation
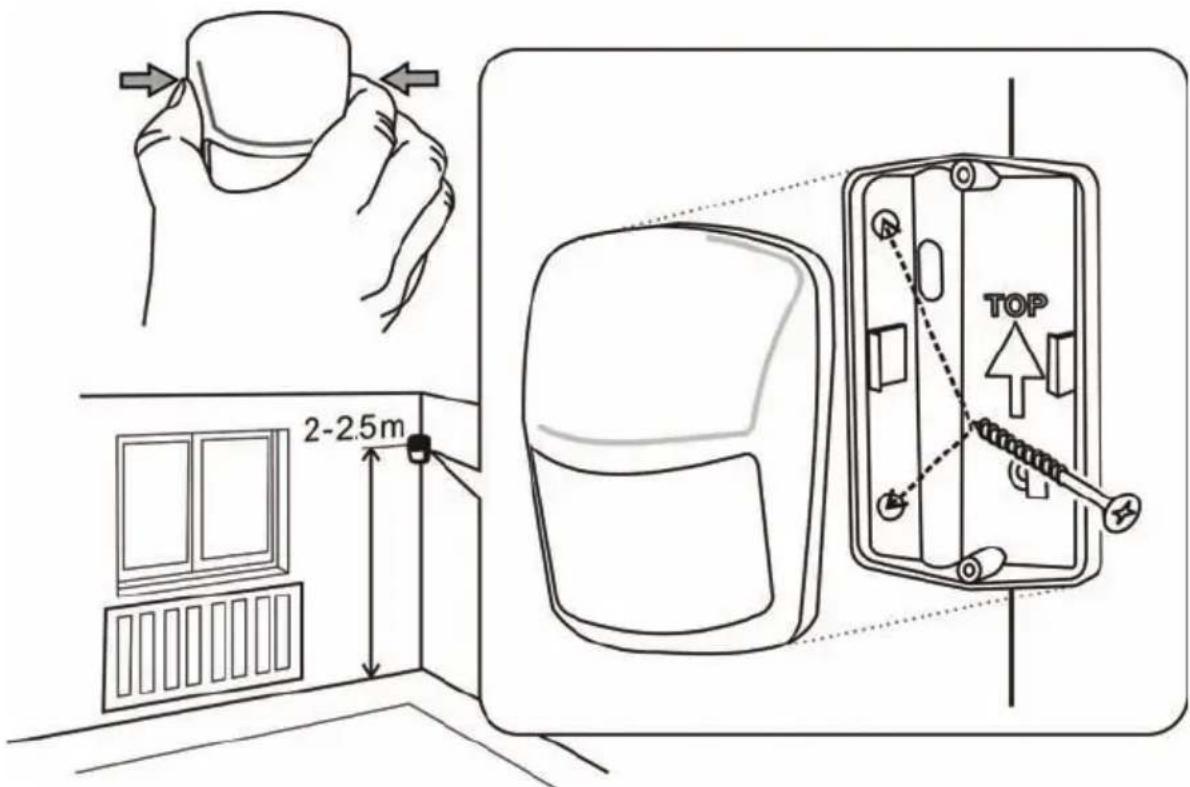
text_image
2-2.5m TOP- The detector should be installed in the corner (facing the room), 2 to 2.5 ~m above the floor. The detector is able to cover an area of up to 10 × 10 ~m^* .
- The detector holder should be fixed so that the sensor window points diagonally into the room (the arrow in the holder should point upwards).
- Open the detector cover (by pressing the sides along the window).
- Connect the batteries (leave the internal switches in the 1 STANDARD and 2 DELAY positions).
- Close the detector and push it on to the holder.
- Wait until the indicator light goes off (calibration is completed) and test whether the detector reacts to human motion.
- Detected motion is indicated with flashing. You can test for 5 minutes and then the indicator light goes off. You can repeat the test by opening and closing the detector housing.
Tips and specifications
*) The detector must have an unrestricted view of the room. To avoid false alarms:
- the detector must not be located opposite radiators or other sources of heat with curtains hanging above them.
- it should not be aimed at the windows.
- it must not be located near open windows, doors or ventilators (it can react to draughts).
- there must not be any things or animals with a temperature around 36°C (pets, rodents, warm air from electric appliances, radiator grilles, etc.) in the guarded area.
RFID tag reader installation
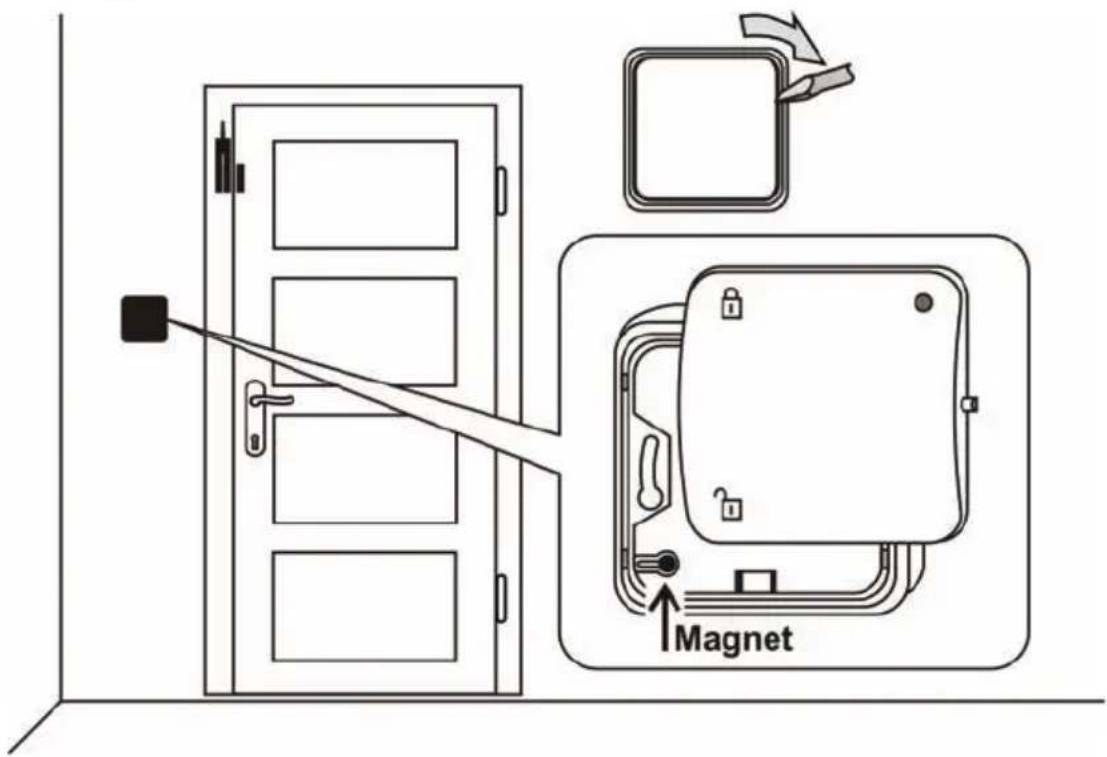
text_image
Magnet- Install the RFID tag reader at the door (the magnet should be in the bottom left corner of the bottom frame). If the reader is to be installed in a concealed box, insert the magnet in the top frame of the reader.
- Connect the batteries and close the reader (the LED indicator should be at the top).
- Switch on the GSM control unit and test its functioning.
Switching the GSM control unit on for the first time
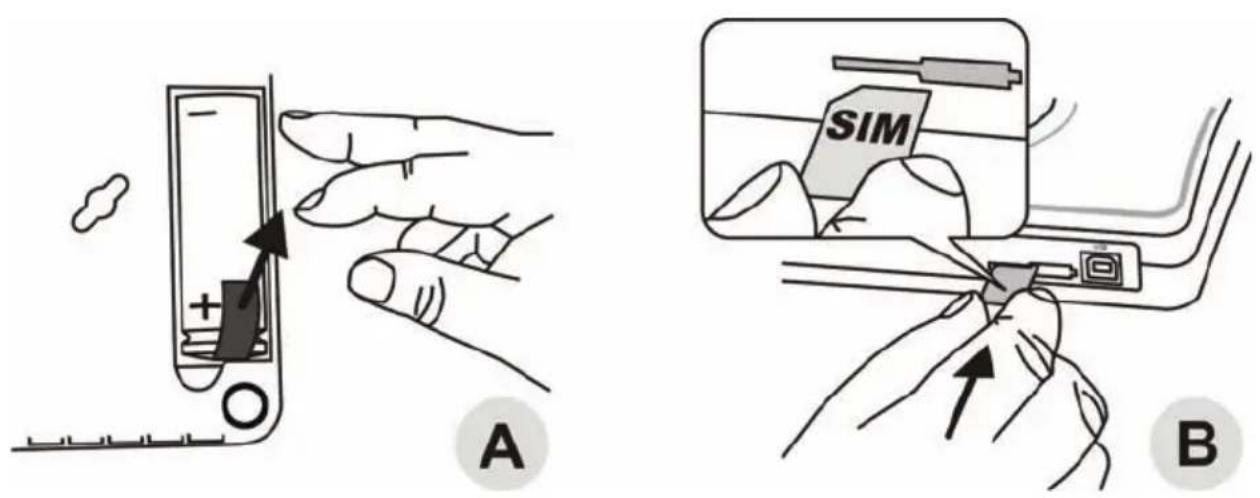
text_image
Diagram illustrating two-step battery application: (A) hand inserting a positive charge into a device, (B) SIM inserting a close-up of the device.- Find a concealed place near a socket.
-
Open the battery cover, remove the insulation strip and close the cover (A).
-
Use your telephone to verify the functioning of the SIM card you use in Azor. The card must have the PIN disabled and there must be high quality GSM coverage in the selected area.
-
Insert a SIM card into the GSM control unit (B).
natural_image
Illustration of a hand holding a tool with an arrow indicating direction (no text or symbols)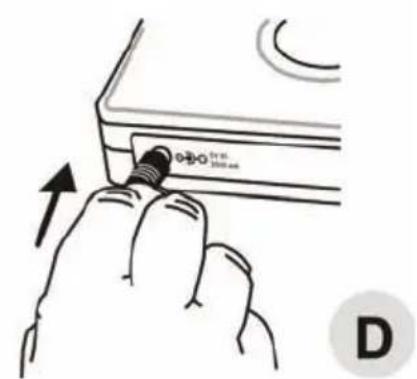
text_image
OBO 31.00 2000.46 D-
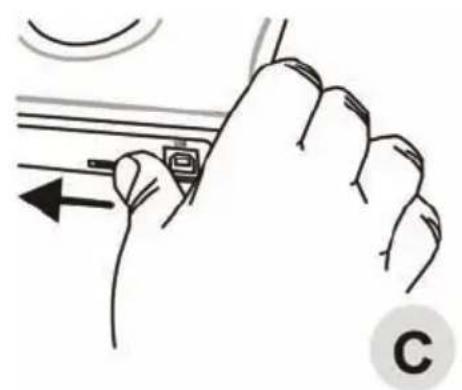
Secure the SIM card with the latch in the direction of the arrow (C).
-
Connect the mains adaptor (D).
text_image
JABLÖTRON E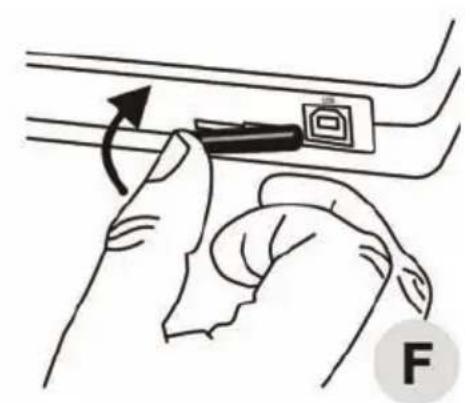
natural_image
Illustration of a hand holding a device with an arrow indicating rotation (no text or symbols)-
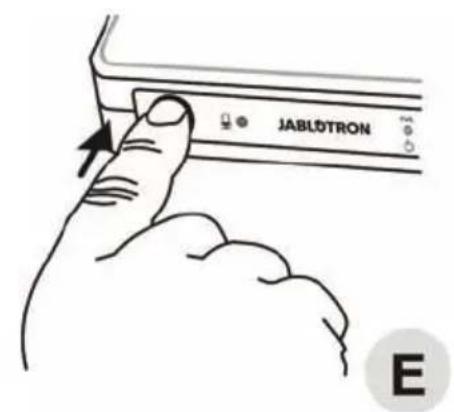
Press the GSM control unit button (E) and hold it for about 2 seconds (Azor will light up).
-
Wait until all three green LED indicators light up.
-
If any of the LED indicators fails to light up, check what Azor signals (see description in the manual beginning).
-
Secure the SIM card in the GSM control unit with the plastic cap (F) when you have finished the installation.
Installation of the GSM control unit and its antenna
- The GSM control unit should be installed in a concealed place. There must be a mains socket for the connection of the supplied mains adaptor within reach.
- If the LED indication on the front panel of the control unit is unwanted (may show the place of unit installation) it is possible to switch it off using A-Link. The LED indication is switched off within 15 minutes. If you need to check the indication briefly press the button on the unit and the indication will appear for 15 minutes. In the case of power trouble the LED indication is always on.
- No other electronic appliances should be near the GSM control unit (e.g. audio systems, antenna cables) which may be influenced by the GSM transmitter in the control unit.
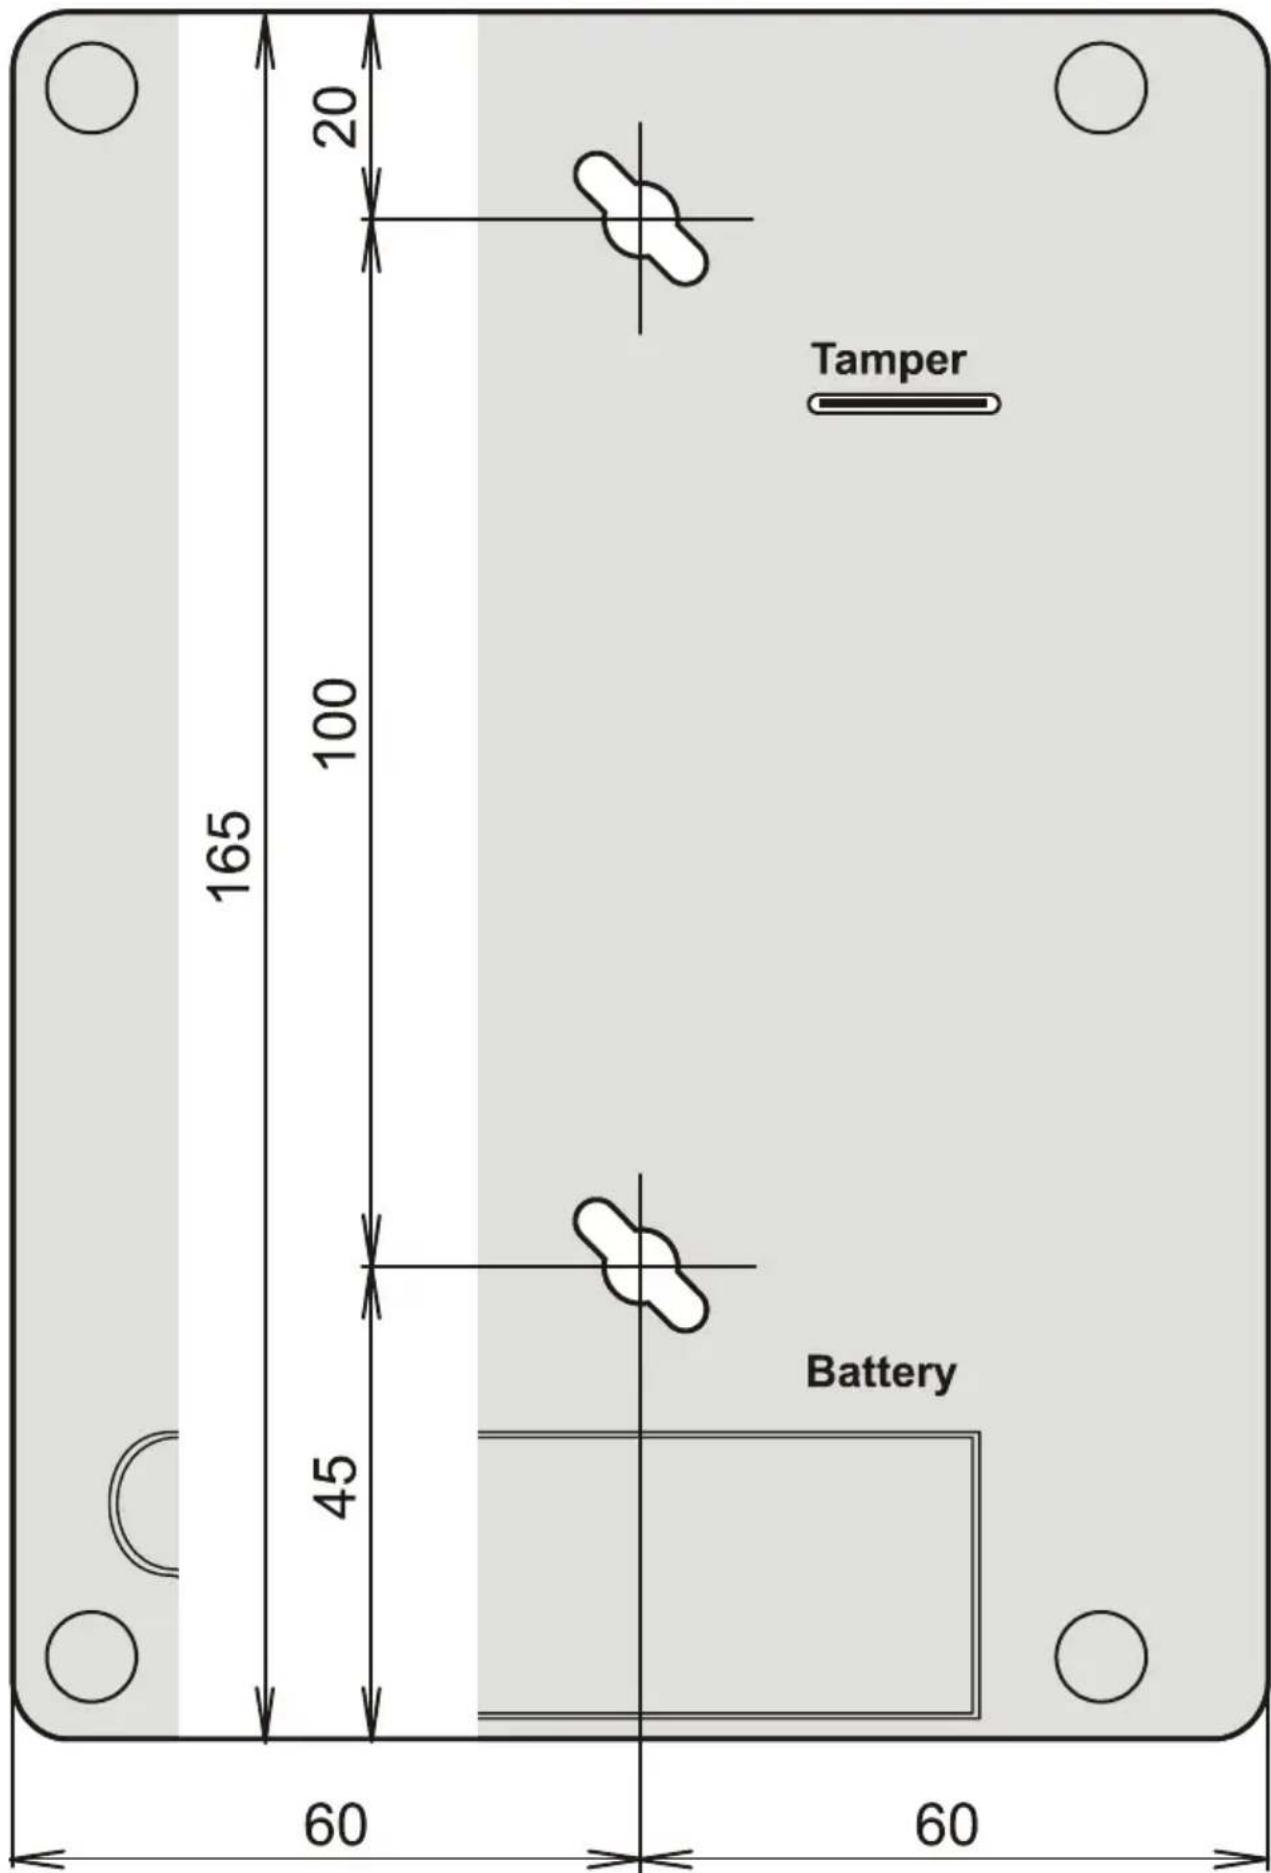
- You can use the template at the rear of the manual to mark the spots where you want to fix Azor to the wall. The screws should protrude a bit so that the electronic box can be put on the screw heads and secured by moving it sideways.
Tamper detector
The GSM control unit has a sensitive tamper-switch at the bottom (a plastic lever). Based on its activation by picking up the GSM control unit, the system sends a tamper activation report to the user or ARC if enabled.
Enrollment of a telephone
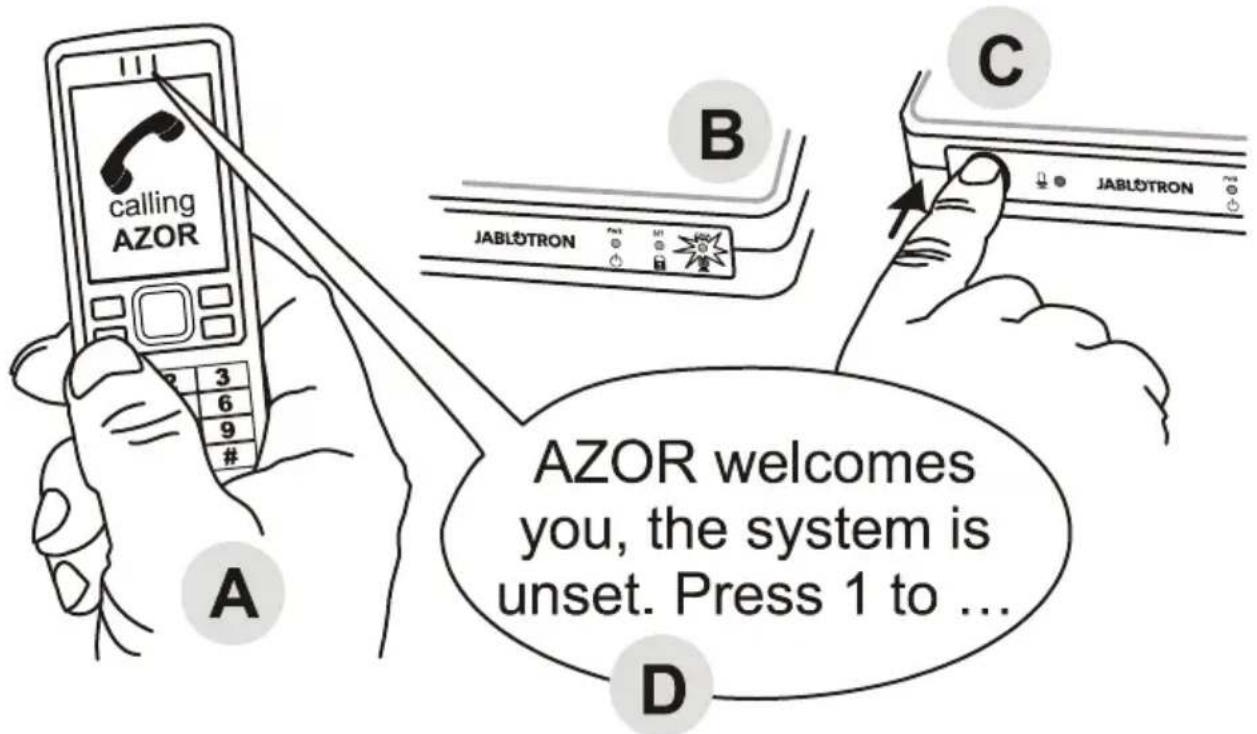
text_image
calling AZOR B JABLÖTRON C AZOR welcomes you, the system is unset. Press 1 to ... A D- The GSM control unit must be switched on and all its indicator lights must be flashing green.
- Call Azor (its SIM card number) from the telephone (A)
- As soon as the GSM LED indicator starts flashing red (B), press the GSM control unit button (C) for a short time.
- The GSM LED indicator should confirm call reception by flashing blue.
– Azor then plays the voice menu to the telephone (D).
- Test the menu functions and end the call.
- In order to access the menu repeatedly, just call Azor again (from the same telephone number).
Tips and specifications
- Only one telephone without a hidden number can be enrolled.
- When the telephone is being enrolled, Azor must be unset.
- Only the first user's telephone can be enrolled in the above-mentioned way.
- You can use the same way to replace the first user's telephone number with another one. The originally enrolled telephone number is then deleted (Azor will send an SMS notification – including the number of the newly set telephone).
- Azor should set the language automatically based on your country calling code.
For the setting of other users' telephones and their locking, see the Settings.
Communication test
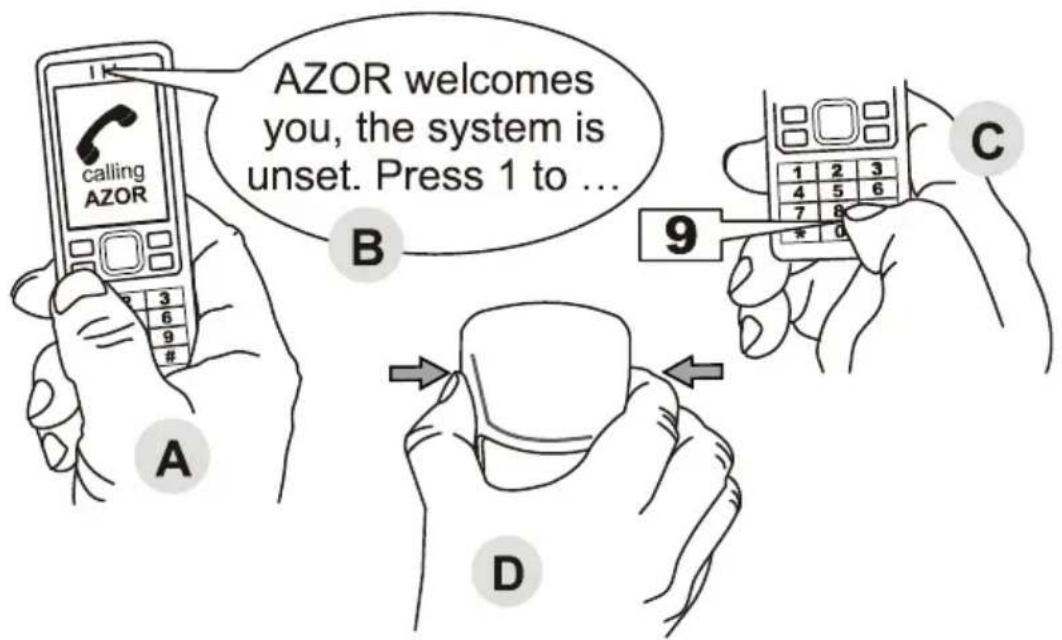
text_image
AZOR welcomes you, the system is unset. Press 1 to ... A B C D calling AZOR 1 2 3 4 5 6 7 8 * 0- Call Azor from an enrolled telephone (A).
- Press 9 (C) in the voice menu (B).
- Detector testing mode should be activated.
-
Activate the detectors and the RFID tag reader one after another (D).
-
Test a motion detector by opening and closing its cover.
- Test a door-opening detector by opening and closing its cover.
- Press the UNSET button to activate the RFID tag reader.
- Azor will confirm detector activation with a voice message to the user's telephone number.
- End the call to finish testing or press # on the phone keypad.
Tips and specifications
■ The test can start only when Azor is unset
■ If Azor fails to send a report confirming detector activation, check:
- whether the detector batteries have been installed properly.
- whether radio communication is shielded by a metal obstacle.
- whether the distance between the detector and the GSM control unit is too far (try a different location).
- whether the detector has been enrolled correctly (by connecting to a computer and checking the registration code).
- it is not possible to set the system during test mode and no alarm can be triggered
Azor regularly checks its connection to the detectors and the RFID tag reader. If the connection is lost, a report is sent to the user (must be set) and information is also stored in the event memory. In such a case please check the batteries in the detector or RFID tag reader concerned and check the signal level (it may be influenced e.g. by changes in the room arrangement).
Control
The following description applies to Azor's default settings. However, you can adjust its behaviour as you wish – see the Settings.
A RFID tag reader is usually used to control Azor at the protected premises. Users whose telephone has been enrolled to the system can also control Azor via the voice menu. The access to the menu can be protected with a personal User's code – see the Settings.
Switching Azor on/off
Azor can be switched on/off by holding the GSM control unit button. Azor reports its switching on/off (to the ARC and also with an SMS message).
Setting Azor
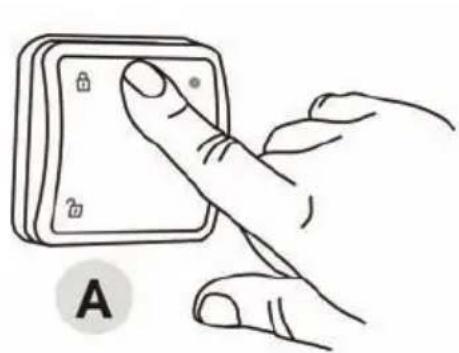
natural_image
Hand pressing a button on a wall-mounted device (no text or symbols visible)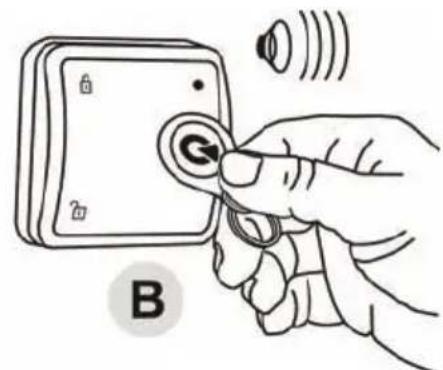
text_image
B- Press the SET button on the RFID tag reader (A) and scan the RFID tag (B)
- The red LED indicator in the reader lights up and a 1 minute exit delay is launched
– Detector activation will not trigger an alarm in this time - Azor will confirm its setting with a longer beep
Tips and specifications
- The system can also be set via the telephone voice menu.
- A different exit delay can be set (see the Settings).
If you press the RFID tag reader button in a set state, a red LED indicator lights up. - When a detector is activated in the set state, an alarm is triggered. However, a 30 second entry delay during which the user can unset the system is launched first (a different delay can be set or it can be disabled for individual detectors – see Settings).
- If there is any unauthorized manipulation of any part of the system in the set state, a tamper alarm is triggered.
If the user has enabled SMS reporting when the system is set, no report is sent to them if they set the system themselves by own remote control or RFID tag. An RFID tag marked by a colour label on it is for the user whose phone number was enrolled as the first one. No setting is reported when it is cancelled during the exit delay. This reduces unnecessary SMS messages if you forget something when exiting the place and you have to return for it.
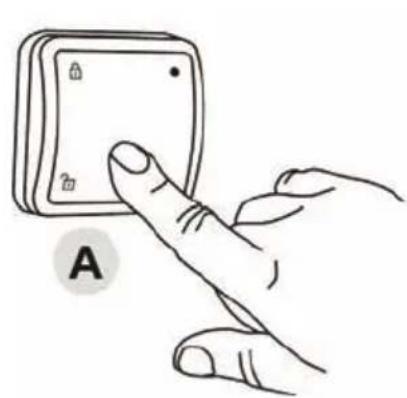
Unsetting Azor
natural_image
Hand pressing a square button labeled 'A' (no text or symbols on the button itself)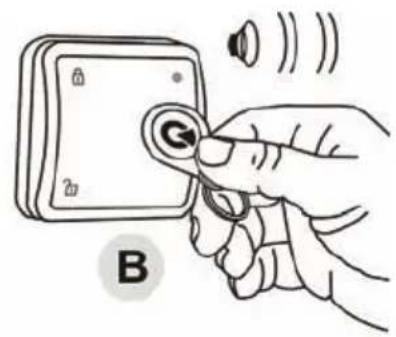
text_image
B- Press the UNSET button on the RFID tag reader (A) and scan the RFID tag (B)
- The green LED indicator lights up and the reader confirms its unsetting (2 beeps).
Tips and specifications
- The system can also be unset via the telephone voice menu.
If you activate a detector prior to unsetting (e.g. when you open the door) a warning tone is sounded and then AZOR waits silently for unsetting for 30 seconds. If the system is not unset in time, an alarm is triggered.
■ If you press the RFID tag reader button in the unset state, a green LED indicator lights up. - If three beeps are sounded during unsetting, there has been an alarm when you were not present.
In the event of unauthorized manipulation of some of the parts of the system in an unset state a warning beep is sounded and an SMS tamper report is sent. The SMS report is sent only on the first occasion of tampering with the device.
If the user has enabled SMS reporting when the system is unset, no report is sent to them if they unset the system themselves by own remote control or RFID tag. The RFID tag corresponding to the user (its phone number) must be used.
Alarm
When an alarm is triggered, the system informs the ARC immediately*. It concurrently activates a siren, sends alarm SMS messages to users and subsequently calls the users.
An alarm can be cancelled by pressing the UNSET button on the reader and scanning a RFID tag, or by using a telephone and the voice menu.
Tips and specifications
If you receive an alarm call, Azor does not call the other users. If no one receives the alarm call, Azor tries to call all the users once more.
- If you do not cancel the alarm, the siren sounds for 3 minutes and then switches off. Azor keeps guarding.
If an identical detector triggers an alarm three times in a row (e.g. when you forget to close a window and the wind moves a curtain in front of the detector), such a detector is bypassed and other detectors keep guarding. A bypassed detector will be included again by unsetting.
■ A tamper alarm (unauthorized handling of a detector or GSM control unit) is sent just once.
■ Besides alarm information, Azor also sends SMS reports when it is switched off or if there is a failure (e.g. power supply failure exceeding half an hour, low battery in a detector, communication loss to a detector or RFID tag reader, etc.).
Listening in
You can trigger listening-in via the voice menu (must be enabled for each user). You can listen to what is happening in the guarded premises for up to 3 minutes.
Tips and specifications
- Do not test listening-in from the same room as the GSM control unit is installed. There is a risk of strong audio feedback between the telephone receiver and Azor's microphone (listening-in is very sensitive).
- You can only listen, it is not possible to speak to the premises.
If an alarm is triggered during the listening-in, the listening-in is interrupted automatically. - If the listening in is started during the alarm, the siren is blocked and reports are sent immediately after the end of the call.
Informative SMS
You can request sending an informative SMS in the voice menu. This message contains:
- Azor's current status
- power supply status
- GSM control unit backup battery status
- GSM signal strength in percent
- system operation time since the last switching on
-
registration code (serial number) of Azor
-
last event saved in the memory (e.g. who set the system, what kind of alarm was triggered, etc.)
Tips and specifications
- If the GSM network provides an exact time function, the informative SMS comprises of time as well. Azor's internal clock can also be set from a connected PC – see the Settings.
Settings
Azor's properties can be set using a computer with MS Windows XP or higher.
Computer connection
You can use a USB cable to connect Azor to the computer. If the computer fails to open the setting program automatically within a certain time after the connection has been established, search for a USB disk named AZOR-USB and launch the A-Link file (click the icon 📋) located on the disk. The ALink setting program is equipped with comprehensive help for each feature.
The program options are divided into individual tabs where you can fill in individual setting items, user names and telephone numbers, enrolling detectors using a code, and set GSM control unit properties, etc.
Press the Save button to save the changes (in blue) in the tab into the Azor alarm.
When you press the Cancel button, the changes in the tab are not saved and previous values are used.
Tips and specifications
- The first time Azor is connected, the computer needs extra time (up to several minutes) to set up USB communication. Once the connection has been established, you will find a USB disc named AZOR-USB in the computer. Further connections will be significantly faster.
- If Azor is connected to an ARC, access to the setup page can be blocked. In such a case ask the ARC operators to help you change the settings.
- If you protect the settings with a code in the Settings window, Azor will require the code every time a computer is connected to it.
Firmware update
You can transfer new version of Azor's firmware (FW) into Azor using a computer. The file containing the firmware can be downloaded from the manufacturer's website. Open the file using the options Control panel and Firmware upgrade in the A-Link menu. Wait until the end of the installation procedure. All GSM control unit LED indicators should flash red for a while during FW installation. When restarted after FW installation has finished, (switch it off and on) Azor should behave according to the new firmware.
Tips and specifications
Before you start installing a new firmware version read its description thoroughly and make sure your product version is compatible with the new FW. It is recommended to make a backup of the settings using the Export option.
- Both the backup battery and the mains adaptor must be connected to the GSM control unit when the FW is being installed. There is a risk of irreversible damage if there is a power supply failure while the FW update is in progress.
- When you have installed the new FW, check its settings on your computer (the A-Link settings program can look different with different program versions). You should also test all system functions properly.
System extension
Individually bought devices should be enrolled to Azor using a registration code. The code consists of ten digits and it is in the following format: 123-4567-890. Enrollment (or removal) of a device is performed with a computer. The registration code can be filled into the Serial Number box on the Detectors page. If the registration code is unknown (e.g. damaged label) please use A-Link. Choose the wanted field for enrolling the device and click the Enroll button. Insert the battery into the device. As a confirmation of successful enrollment the registration code is displayed in the field.
AZ-10T RFID tag
There is a sticker with a registration code on a new RFID tag. If the RFID tag code is no longer legible, please use the RFID tag reader and A-Link software for enrolling it. Choose the Tag number field in the Users window and click the Enroll button. The code is enrolled after pressing SET on the AT-10D RFID tag reader and scanning the RFID tag. As a confirmation of successful enrollment the registration code is displayed in the field.
Note: Azor uses special security RFID tags. No other RFID tags can be enrolled to it.
AZ-10M door-opening detector
Besides detecting door and window opening, the detector can also report e.g. the movement of objects etc. You can also connect an external sensor to it.
Terminals:
INPUT serves for connecting external alarm sensors. When the GROUND terminal is disconnected an alarm signal is sent (identical to that of reporting door opening).
TAMPER serves for connecting external tamper sensors. When the GROUND terminal is disconnected a tamper signal is sent (identical to that of reporting detector opening).
GROUND common terminal. If the INPUT or TAMPER terminal is not used, it must be permanently connected to this terminal.
Internal switches:
1 DEL the detector provides an entrance delay*
INST the detector does not provide an entrance delay*
2 MG EN the built-in magnetic sensor is enabled
MG DIS the built-in magnetic sensor is disabled (only INPUT terminal activation is reported)
*) applies only if a "default" reaction is set for the detector
Battery-low signalling
When the detector batteries are low, Azor sends an informative message. Besides that the detector LED flashes when you open the door (outside test mode).
AZ-10P motion detector
Internal switches:
1 HIGHER ANALYSIS the detector has increased resistance to false alarms and a slower reaction
STANDARD ANALYSIS the detector has standard resistance to false alarms and a standard reaction speed
2 INSTANT REACTION the detector does not provide an entrance delay*
DELAY REACTION the detector provides an entrance delay*
*) applies only if a "default" reaction is set for the detector – see the A-Link settings
Frequent movement detection restriction
When in normal operation the detector saves energy by switching the sensor off for 1 minute each time it detects motion. This ensures that it does not transmit too frequently if there is frequent movement in the premises.
Battery-low signalling
When the detector batteries are low, Azor sends an informative message. Besides that, the detector LED flashes when movement is detected (outside test mode).
AZ-10R remote control

natural_image
Simple line drawing of a car with a keychain and facial features (no text or symbols)The remote control can be used for setting and unsetting. It can also send a panic alarm – by pressing both buttons at the same time. The panic alarm function is optional – see the Settings. The remote control battery should last approx. 2 years. The enrollment code is sent when both buttons are pressed for more than 3 seconds.
The remote control cannot be used close to the control unit!
AZ-10B doorbell button
natural_image
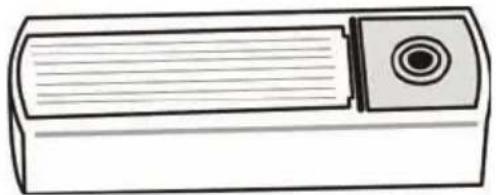
Simple line drawing of a rectangular electronic device with a circular button and horizontal lines (no text or symbols)One doorbell button can be enrolled. You can choose a melody (see the Settings). The doorbell button battery should last approx. 1 year.
The button should be protected from rain (it is supplied with a plastic roof).
The button cannot be used close to the GSM control unit.
AZ-10S optical smoke detector
text_image
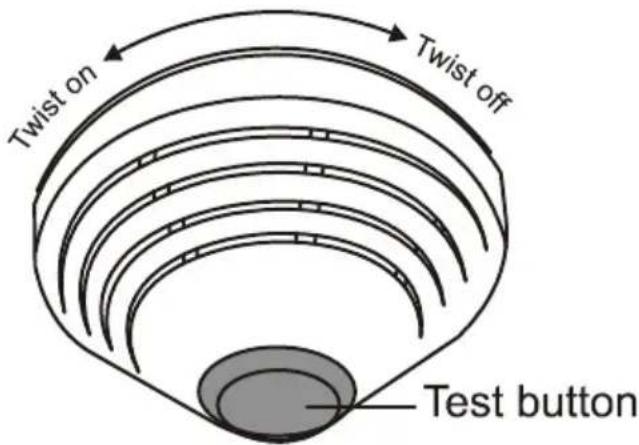
Twist on Twist off Test buttonThe detector reports fire hazards. It is activated by the presence of smoke or an abnormal temperature increase. Besides sending a report to the system, it also triggers its own siren during an alarm.
- Screw the detector holder to the ceiling
- Use the computer to enroll the detector to the system (see the Settings)
- Connect the battery and twist the detector onto the holder
- Wait until the detector LED indicator goes off (calibration is in progress)
- Test the detector – see the Communication test chapter. Activate the detector by pressing and holding its testing button.
Tips and specifications
- The detector cannot be twisted onto the holder if no battery is connected.
- Install the detector onto the ceiling in a place with good air circulation (i.e. avoid corners, hollows, tops of inclined ceilings, etc.).
- If the space (or ceiling) is divided by partitions which prevent free air movement, each section should have its own detector.
- The detector should not be installed close to ventilators, heaters, ventilation openings or in dusty premises.
- It is not recommended to install the detector close to cookers, hot plates or anywhere where steam is produced.
- A suitable place to install an optical smoke detector is a ceiling above the staircase in the house.
- Never test the detector with fire; use a special spray designed for smoke detector testing to simulate fire.
- When an alarm is indicated, the siren can be switched off by pressing and holding the test button.
- The detector siren can be disconnected completely – by disconnecting its cable connector (near the negative pole of the battery).
If people smoke in the room during normal operation, you can program Azor to react only when set – see the Settings. In such a case disconnect the siren in the detector as well. Do not forget to ventilate the premises before setting the alarm. - All jumpers in the detector must remain disconnected.
Battery-low signalling
When the detector battery is low, Azor sends an informative message. Besides that, the smoke detector flashes and beeps approx. every 45 s.
Other information
Time synchronization with a GSM network
Azor is equipped with the function of the automatic adjustment of the internal clock via a GSM network. The time is saved in the event memory and sent in an informative SMS.
Warning: some GSM networks do not provide an exact time signal. In such a case Azor's internal clock must be set manually from a PC via A-link. If the clock is not set, no time will be stated in the informative SMS.
Emergency unlocking of settings
If you lock Azor's settings and forget your Service PIN, proceed as follows:
- Unset Azor
- Disconnect the mains adaptor from the GSM control unit.
- Open the backup battery cover and disconnect the battery.
- Press and hold the GSM control unit button.
- Connect the mains adaptor (keep the button pressed).
- As soon as all LED indicators start flashing yellow, you can release the button.
- Connect the backup battery again and put its cover back.
- Your original code is deleted and you will be allowed to access the Settings without having to enter the Service PIN code.
- When you have finished the settings, you can define a new code.
SMS message forwarding
Azor automatically forwards all received SMSes to the first phone number. An SMS message is also sent to this number when the limit of sent SMS messages has been exceeded.
Technical specifications
AZ-10K GSM control unit
GSM control unit power supply = 5V 2.5A max.
backup battery LI18650 = 3.7V / 2.2 Ah (usual battery lifetime is approx. 5 years)
the backup time of the control unit is 12 hours
number of users up to 10 (each may have one RFID tag and one remote control)
number of detectors up to 10
number of RFID tag readers 1
number of doorbell buttons 1
dimensions 165 x 120 x 40 mm
AZ-10D RFID tag reader
power supply 2x AAA 1.5V / 1200 mAh alkaline batteries
(battery lifetime is approx.1 year)
dimensions 80 x 80 x 30 mm
AZ-10P motion detector
power supply 2x AAA 1.5V / 1200 mAh alkaline batteries (battery lifetime is approx.1 year) coverage detection angle 120°, covers an area of 10 x 10 m dimensions 65 x 95 x 60 mm
AZ-10M door-opening detector
power supply 2x AAA 1.5V / 1200 mAh alkaline batteries (lifetime is approx.1 year) reacts to the magnet being withdrawn by 20 mm dimensions 32 x 145 x 25 mm + 15 x 55 x 55 mm
AZ-10S optical smoke detector
power supply AA 1.5V / 2600 mAh alkaline battery (lifetime is approx.1 year) reacts to smoke in the premises or an increased temperature over 60 to 70°C dimensions diameter 125 x 65 mm
AZ-10R remote control
power supply L1016 6V alkaline battery (battery lifetime is approx.2 years) dimensions 55 x 40 x 15 mm
AZ-10B wireless doorbell button
power supply L1016 6V / 35 mAh alkaline battery (lifetime is approx. 1 year) dimensions 80 x 28 x 16 mm
Mains adaptor
Power supply voltage \~110 - 230 V / 50 Hz, 0.2 A, protection class II; output voltage = 5 V, 3 A
Specifications common to all parts
Environment according to EN 50131-1 indoor general Operating temperature range +5 to +40 °C Classification Grade 1 according to EN 50131-1, EN 50131-3, EN 50131-6, EN 50131-5-3, EN 50131-2-2, EN 50131-2-6, EN 50134-2 Also complies with ETSI EN 300220, ETSI EN 300330, ETSI EN 301419-1, EN 301511, EN 50130-4, EN 55022, ETSI EN 301489-7, EN 60950-1
Can be operated according to ERC REC 70 03

JABLOTRON ALARMS a.s. hereby declares that the device is in compliance with the essential requirements and other relevant provisions of Directive 1999/5/EC if used for the purpose it has been designed for. The original of the conformity assessment can be found at www.jablotron.com - Technical Support section
Note: Although this product does not contain any harmful materials we suggest you return the product to the dealer or directly to the producer after use. More detailed information can be found at www.jablotron.com
JABLOTRON
JABLOTRON ALARMS a.s.
Pod Skalkou 4567/33
46601 Jablonec nad Nisou
Czech Republic
Tel.: +420 483 559 911
Fax: +420 483 559 993
If the batteries in any detector are low, Azor sends an SMS message and it is optically signalled by the detector. Azor must be unset during battery replacement. When you open the detector (or reader) cover, Azor emits a warning beep and sends an informative SMS with a tamper warning. The siren is not activated though.
The SMS report is sent only when the cover is open for the first time. If you open the same detector cover repeatedly, only an informative beep is sounded. When you have finished replacing the batteries, test the detector – see the Communication test chapter.
If your system is guarded by an ARC, do not replace the batteries without consulting the ARC operator first.