
MT-90U - Hi-Fi System ROLAND - Free user manual and instructions
Find the device manual for free MT-90U ROLAND in PDF.


| Product Type | Hi-Fi System |
| Model | MT-90U |
| Brand | Roland |
| Dimensions (W x H x D) | 430 mm x 100 mm x 300 mm |
| Weight | 5.0 kg |
| Power Supply | AC 100–240 V, 50/60 Hz |
| Power Consumption | 30 W |
| Audio Output | 2 x 20 W (stereo) |
| Supported Media | CD, CD-R/RW, MP3 (via USB) |
| Tuner | FM stereo, 87.5–108 MHz |
| Connectivity | USB 2.0, AUX input (3.5 mm), headphone output |
| Playback Features | Program play, random, repeat, skip |
| Additional Functions | Timer, sleep mode, equalizer presets |
| Maintenance | Wipe with dry cloth; avoid solvents |
| Safety | Keep away from water, heat sources; use original power cord |
| Spare Parts & Repairability | Contact Roland service centers for replacement parts |
| Manual Language | English, Japanese, and others via request |
Frequently Asked Questions - MT-90U ROLAND
User questions about MT-90U ROLAND
0 question about this device. Answer the ones you know or ask your own.
Ask a new question about this device
Download the instructions for your Hi-Fi System in PDF format for free! Find your manual MT-90U - ROLAND and take your electronic device back in hand. On this page are published all the documents necessary for the use of your device. MT-90U by ROLAND.
USER MANUAL MT-90U ROLAND
Thank you, and congratulations on your choice of the Roland MT-90U.
Before using this unit, carefully read the sections entitled: "USING THE UNIT SAFELY" and "IMPORTANT NOTES" (p. 2; p. 4). These sections provide important information concerning the proper operation of the unit. Additionally, in order to feel assured that you have gained a good grasp of every feature provided by your new unit, Owner's manual should be read in its entirety. The manual should be saved and kept on hand as a convenient reference.
USING THE UNIT SAFELY
INSTRUCTIONS FOR THE PREVENTION OF FIRE, ELECTRIC SHOCK, OR INJURY TO PERSONS
About ⚠️ WARNING and ⚠️ CAUTION Notices
 | Used for instructions intended to alert the user to the risk of death or severe injury should the unit be used improperly. |
 | Used for instructions intended to alert the user to the risk of injury or material damage should the unit be used improperly.* Material damage refers to damage or other adverse effects caused with respect to the home and all its furnishings, as well to domestic animals or pets. |
About the Symbols
| (ausual) | The △ symbol alerts the user to important instructions or warnings. The specific meaning of the symbol is determined by the design contained within the triangle. In the case of the symbol at left, it is used for general cautions, warnings, or alerts to danger. |
| (busual) | The ⊗ symbol alerts the user to actions that must never be carried out. The specific thing that must not be done is indicated by the design contained within the circle. In the case of the symbol at left, it means that the unit must never be disassembled. |
| (cusual) | The ● symbol alerts the user to actions that must be carried out. The specific action that must be done is indicated by the design contained within the circle. In the case of the symbol at left, it means that the power-cord plug must be unplugged from the outlet. |
ALWAYS OBSERVE THE FOLLOWING
WARNING
- Do not open (or modify in any way) the unit or its AC adaptor.

- Do not attempt to repair the unit, or replace parts within it (except when this manual provides specific instructions directing you to do so). Refer all servicing to your retailer, the nearest Roland Service Center, or an authorized Roland distributor, as listed on the "Information" page.

- Never use or store the unit in places that are:


- Subject to temperature extremes (e.g., direct sunlight in an enclosed vehicle, near a heating duct, on top of heat-generating equipment); or are
- Damp (e.g., baths, washrooms, on wet floors); or are
- Humid; or are
- Exposed to rain; or are
- Dusty; or are
- Subject to high levels of vibration.
- Make sure you always have the unit placed so it is level and sure to remain stable. Never place it on stands that could wobble, or on inclined surfaces.

WARNING
- Be sure to use only the AC adaptor supplied with the unit. Also, make sure the line voltage at the installation matches the input voltage specified on the AC adaptor's body. Other AC adaptors may use a different polarity, or be designed for a different voltage, so their use could result in damage, malfunction, or electric shock.

- Use only the attached power-supply cord. Also, the supplied power cord must not be used with any other device.

- Do not excessively twist or bend the power cord, nor place heavy objects on it. Doing so can damage the cord, producing severed elements and short circuits. Damaged cords are fire and shock hazards!

- This unit, either alone or in combination with an amplifier and headphones or speakers, may be capable of producing sound levels that could cause permanent hearing loss. Do not operate for a long period of time at a high volume level, or at a level that is uncomfortable. If you experience any hearing loss or ringing in the ears, you should immediately stop using the unit, and consult an audiologist.

WARNING
- Do not allow any objects (e.g., flammable material, coins, pins); or liquids of any kind (water, soft drinks, etc.) to penetrate the unit.


- Immediately turn the power off, remove the AC adaptor from the outlet, and request servicing by your retailer, the nearest Roland Service Center, or an authorized Roland distributor, as listed on the "Information" page when:

- The AC adaptor, the power-supply cord, or the plug has been damaged; or
- If smoke or unusual odor occurs
- Objects have fallen into, or liquid has been spilled onto the unit; or
- The unit has been exposed to rain (or otherwise has become wet); or
- The unit does not appear to operate normally or exhibits a marked change in performance.
- In households with small children, an adult should provide supervision until the child is capable of following all the rules essential for the safe operation of the unit.

WARNING
- Protect the unit from strong impact. (Do not drop it!)

- Do not force the unit's power-supply cord to share an outlet with an unreasonable number of other devices. Be especially careful when using extension cords—the total power used by all devices you have connected to the extension cord's outlet must never exceed the power rating (watts/amperes) for the extension cord. Excessive loads can cause the insulation on the cord to heat up and eventually melt through.

- Before using the unit in a foreign country, consult with your retailer, the nearest Roland Service Center, or an authorized Roland distributor, as listed on the "Information" page.

- Keep lithium batteries out of reach of small children. If a child has accidentally swallowed a battery, see a doctor immediately.

- Lithium batteries must never be recharged, heated, taken apart, or thrown into a fire or water.

- DO NOT play a CD-ROM disc on a conventional audio CD player. The resulting sound may be of a level that could cause permanent hearing loss. Damage to speakers or other system components may result.

- Never expose Lithium Battery to excessive heat such as sunshine, fire or the like.


CAUTION
- The unit and the AC adaptor should be located so their location or position does not interfere with their proper ventilation.

- Always grasp only the plug on the AC adaptor cord when plugging into, or unplugging from, an outlet or this unit.

- At regular intervals, you should unplug the AC adaptor and clean it by using a dry cloth to wipe all dust and other accumulations away from its prongs. Also, disconnect the power plug from the power outlet whenever the unit is to remain unused for an extended period of time. Any accumulation of dust between the power plug and the power outlet can result in poor insulation and lead to fire.

- Try to prevent cords and cables from becoming entangled. Also, all cords and cables should be placed so they are out of the reach of children.

- Never climb on top of, nor place heavy objects on the unit.

- Never handle the AC adaptor or its plugs with wet hands when plugging into, or unplugging from, an outlet or this unit.

- Before moving the unit, disconnect the AC adaptor and all cords coming from external devices.

- Before cleaning the unit, turn off the power and unplug the AC adaptor from the outlet (p. 12).

CAUTION
- Whenever you suspect the possibility of lightning in your area, disconnect the AC adaptor from the outlet.

- If used improperly, batteries may explode or leak and cause damage or injury. In the interest of safety, please read and observe the following precautions (p. 16).

- Carefully follow the installation instructions for batteries, and make sure you observe the correct polarity.

- Remove the batteries whenever the unit is to remain unused for an extended period of time.

- Never keep batteries together with metallic objects such as ballpoint pens, necklaces, hairpins, etc.
- Used batteries must be disposed of in compliance with whatever regulations for their safe disposal that may be observed in the region in which you live.

- Use only the specified type (model no. CR2025) of lithium battery (p. 16). Be sure to insert it as directed (to ensure correct polarity).

- Used lithium batteries must be disposed of in compliance with whatever regulations for their safe disposal that may be observed in the region in which you live.

- Should you remove the grounding terminal screw, lithium battery and battery case, keep them in a safe place out of children's reach, so there is no chance of them being swallowed accidentally.

Power Supply: Use of Batteries
- Do not connect this unit to same electrical outlet that is being used by an electrical appliance that is controlled by an inverter (such as a refrigerator, washing machine, microwave oven, or air conditioner), or that contains a motor. Depending on the way in which the electrical appliance is used, power supply noise may cause this unit to malfunction or may produce audible noise. If it is not practical to use a separate electrical outlet, connect a power supply noise filter between this unit and the electrical outlet.
- The AC adaptor will begin to generate heat after long hours of consecutive use. This is normal, and is not a cause for concern.
- Before connecting this unit to other devices, turn off the power to all units. This will help prevent malfunctions and/or damage to speakers or other devices.
Placement
- Using the unit near power amplifiers (or other equipment containing large power transformers) may induce hum. To alleviate the problem, change the orientation of this unit; or move it farther away from the source of interference.
- This device may interfere with radio and television reception. Do not use this device in the vicinity of such receivers.
- Noise may be produced if wireless communications devices, such as cell phones, are operated in the vicinity of this unit. Such noise could occur when receiving or initiating a call, or while conversing. Should you experience such problems, you should relocate such wireless devices so they are at a greater distance from this unit, or switch them off.
- Do not expose the unit to direct sunlight, place it near devices that radiate heat, leave it inside an enclosed vehicle, or otherwise subject it to temperature extremes. Excessive heat can deform or discolor the unit.
- When moved from one location to another where the temperature and/or humidity is very different, water droplets (condensation) may form inside the unit. Damage or malfunction may result if you attempt to use the unit in this condition. Therefore, before using the unit, you must allow it to stand for several hours, until the condensation has completely evaporated.
- Depending on the material and temperature of the surface on which you place the unit, its rubber feet may discolor or mar the surface. You can place a piece of felt or cloth under the rubber feet to prevent this from happening. If you do so, please make sure that the unit will not slip or move accidentally.
Maintenance
- For everyday cleaning wipe the unit with a soft, dry cloth or one that has been slightly dampened with water. To remove stubborn dirt, use a cloth impregnated with a mild, non-abrasive detergent. Afterwards, be sure to wipe the unit thoroughly with a soft, dry cloth.
- Never use benzine, thinners, alcohol or solvents of any kind, to avoid the possibility of discoloration and/or deformation.
Additional Precautions
- Use a reasonable amount of care when using the unit's buttons, sliders, or other controls; and when using its jacks and connectors. Rough handling can lead to malfunctions.
- Never strike or apply strong pressure to the display.
- When connecting / disconnecting all cables, grasp the connector itself—never pull on the cable. This way you will avoid causing shorts, or damage to the cable's internal elements.
- To avoid disturbing your neighbors, try to keep the unit's volume at reasonable levels. You may prefer to use headphones, so you do not need to be concerned about those around you (especially when it is late at night).
- When you need to transport the unit, package it in the box (including padding) that it came in, if possible. Otherwise, you will need to use equivalent packaging materials.
Handling Floppy Disks
- Floppy disks contain a plastic disk with a thin coating of magnetic storage medium. Microscopic precision is required to enable storage of large amounts of data on such a small surface area. To preserve their integrity, please observe the following when handling Floppy disks:
- Never touch the magnetic medium inside the disk.
- Do not use or store Floppy disks in dirty or dusty areas.
- Do not subject Floppy disks to temperature extremes (e.g., direct sunlight in an enclosed vehicle). Recommended temperature range: 10 to 50^ (50 to 122^ ).
- Do not expose Floppy disks to strong magnetic fields, such as those generated by loudspeakers.
- Floppy disks have a "write protect" tab which can protect the disk from accidental erasure. It is recommended that the tab be kept in the PROTECT position, and moved to the WRITE position only when you wish to write new data onto the disk.
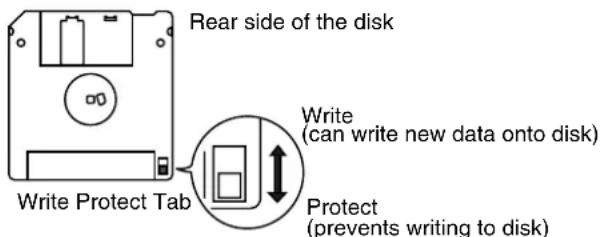
- The identification label should be firmly affixed to the disk. Should the label come loose while the disk is in the drive, it may be difficult to remove the disk.
- Store all disks in a safe place to avoid damaging them, and to protect them from dust, dirt, and other hazards. By using a dirty or dust-ridden disk, you risk damaging the disk, as well as causing the disk drive to malfunction.
Using USB Memory
- Carefully insert the USB memory all the way in—until it is firmly in place.
- Never touch the terminals of the USB Memory. Also, avoid getting the terminals dirty.
- USB Memory are constructed using precision components; handle the cards carefully, paying particular note to the following.
- To prevent damage to the cards from static electricity, be sure to discharge any static electricity from your own body before handling the cards.
- Do not touch or allow metal to come into contact with the contact portion of the cards.
- Do not bend, drop, or subject cards to strong shock or vibration.
- Do not keep cards in direct sunlight, in closed vehicles, or other such locations (storage temperature: -25 to 85° C).
- Do not allow cards to become wet.
- Do not disassemble or modify the cards.
Handling CD-ROMs
- Avoid touching or scratching the shiny underside (encoded surface) of the disc. Damaged or dirty CD-ROM discs may not be read properly. Keep your discs clean using a commercially available CD cleaner.
* GS () is registered trademark of Roland Corporation.
* Microsoft and Windows are registered trademarks of Microsoft Corporation.
* Windows® is known officially as: "Microsoft® Windows® operating system."
* Apple and Macintosh are registered trademarks of Apple, Inc.
* Mac OS is a trademark of Apple Inc.
* All product names mentioned in this document are trademarks or registered trademarks of their respective owners.
* MPEG Layer-3 audio compression technology is licensed from Fraunhofer IIS Corporation and THOMSON Multimedia Corporation.
USING THE UNIT SAFELY....2
Important Notes...... 4
Panel Descriptions....8
Front Panel....8
Rear Panel 9
Remote Control....10
Screen....11
Basic Screen 11
Marker Screen 11
16 Track Screen 11
Settings Screen....11
Folder Screen 11
MT-90U Basic Operation 12
Setting Up....12
Connecting the AC Adaptor 12
Turning the Power On and Off 13
Adjusting the Volume 14
Connecting Headphones....14
Adjusting the Display Brightness 15
Connecting the Microphone....15
Using the Remote Control 16
Tuning with the MT-90U 17
Listening to Music 19
Connecting the USB Memory 19
Playing Songs 20
Repeating One Song 22
Repeating All Songs (All Song Play) 23
Changing the Tempo....24
Changing the Tempo by Beat....24
Changing the Tempo by Tapping (Tap Tempo).... 25
Using the Metronome 26
Changing the Tempo of the Metronome 26
Changing the Volume of the Metronome 27
Changing the Metronome's Time Signature....27
Practicing with a Song (Track Buttons) 28
Counting in to a Song 29
Marking a Section to Repeat for Practice 30
Playing a Marked Section....31
Erasing a Marker 31
Repeating a Marked Section....32
Moving a Mark....33
Removing Tempo Changes for Practice....35
Changing the Key (Transposition) 36
Changing Reverb Effects 37
Changing Playback Sound Quality (Sound Control) 38
Listening to Specific Instrument Parts 39
Playing Only One Part (Solo) 39
Turning Off Specific Parts (Mute) 40
Displaying the Tone Names of Parts....41
Playing Audio Files 42
Playing Audio Files from USB Memory 43
Playing a Music CD from the CD Drive (Sold Separately) 43
Singing Karaoke with Audio Files or a Music CD (Center Cancel) 44
Changing the Key (Playback Transpose)....44
Changing the Tempo (Time Stretch)......45
Creating a List of Your Favorite Songs (Song List) 46
Other Functions 47
Changing the Metronome Settings 47
Changing Count Settings 48
Marking the Middle of a Measure 49
Changing Lyric Display Settings....49
Canceling Lyric Display 50
Playing Songs in Random Order....50
Assigning Parts to Track Buttons (Track Assign) 51
Adjusting the Volume of Audio Files 51
Changing USB Memory Settings 52
Changing USB Driver Settings 52
Returning to the Factory Default Settings (Factory Reset) 53
Operating the Pedal Switch (Sold Separately) 53
Connecting a MIDI Device 54
Connecting an External Audio Device 54
Connecting and Using a Digital Piano.... 54
Connecting a Floppy Disk Drive (Sold Separately)....55
Copying Data from a Floppy Disk to USB Memory....55
Connecting a CD Drive (Sold Separately) 56
About Music Files.... 57
The MT-90U Allows You To Use the Following Music Files....57
Formatting the USB Memory....58
Copying Music Files from a Computer to USB Memory....58
Troubleshooting....59
Errors and Other Displays 60
Demo Song List....61
MIDI Implementation Chart.... 62
Main Specifications....63
Index 65
Front Panel
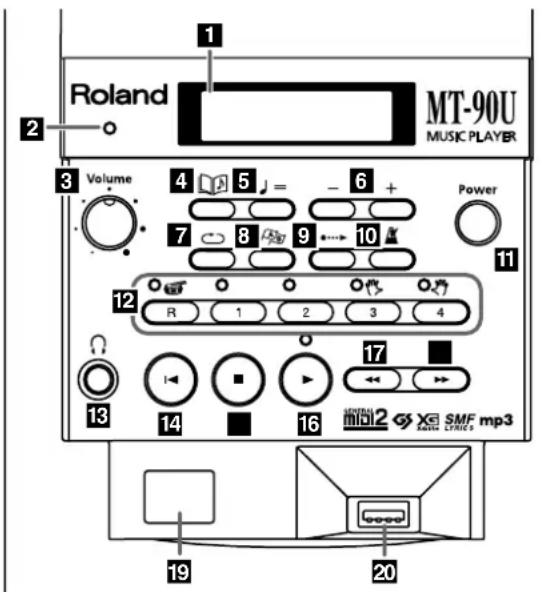
1. Display
Displays information relating to the operations you perform (p. 11).
2. Beat Indicator
Flashes in time with the beat of the song or metronome.
3. [Volume] Knob
Adjust the volume level (p. 14).
4. [ ] (Song)] Button
Press to select a song (p. 19), or to return to the basic screen (p. 11).
5. [ J = (Tempo)] Button
Press this button to adjust the tempo (p. 24).
6. [+ (Inc)] [- (Dec)] Buttons
Adjust the value of selected items.
Pressing both buttons at the same time returns the setting to its default value.
7. [ (Repeat)] Button
Press to repeat a specified song or section (p. 22, p.32).
8. [A B (Mark)] Button
Press to place a marker in a song (p. 31) and to access the marker screen (p. 11).
9. [●●●▶ (Count In)] Button
Press to play a count sound before a song starts or with the end of a song's intro (p. 29).
10.[ (Metronome)] Button
Turns on the built-in metronome (p. 26).
11.Power Button
Turn the power on and off (p. 13).
12. Track Buttons
The five buttons below are called the Track buttons. Use these buttons to select and play a song's performance parts (tracks) (p. 28).
[R] Button
[1] Button
[2] Button
[3] Button
[4] Button
13. Headphones Jack
Allows you to connect headphones (sold separately) (p. 14).
14.[◀(Reset)] Button
Returns you to the beginning of a song.
15.[■(Stop)] Button
Press to stop song playback.
16.[(Play)] Button
Press to start song playback.
17.[◀(Bwd)] Button
Press to rewind a song.
18.[▶▶(Fwd)] Button
Press to fast forward a song.
19.Remote Sensor
This area receives signals from the remote control (p. 16).
20.USB Connector
Allows you to connect the USB memory, floppy disk drive, or CD-ROM drive (p. 19).
(USB memory, floppy disk drive, and CD drive options are sold separately.)
Rear Panel
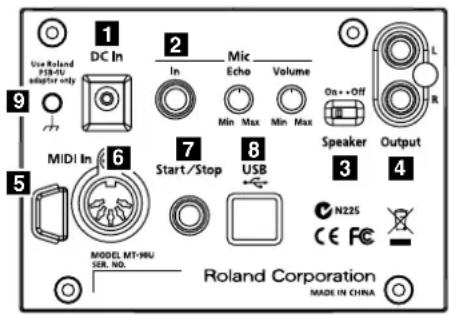
1. DC In Jack
Connect the supplied AC adaptor here (p. 12).
2. Mic
Mic In Jack
Connect a microphone here (sold separately) (p. 15).
Mic Echo Knob
Adjusts the echo effect applied to the microphone (p. 15).
Mic Volume Knob
Adjusts the microphone volume (p. 15).
3. Speaker Switch
Turn the MT-90U speakers on and off.
4. Output L/R Jacks
Here is where you can connect an external instrument, such as an electric piano, using an audio cable (sold separately) (p. 54).
5. Cord Hook
Wrap the AC adaptor cord around this hook. By doing so, you can avoid placing undue stress on the DC In jack and prevent the loss of power should you accidentally pull on the AC adaptor's cord.
6. MIDI In Connector
Here is where you can connect an external MIDI device using a MIDI cable (sold separately) (p. 54).
7. Start/Stop Jack
Connect the pedal switch (sold separately). Once connected, you can start and stop song playback using the pedal (p. 53).
8. USB Connector
Allows you to connect the MT-90U to a computer using a USB cable. Once connected, you can receive MIDI data through your computer.
9. Grounding Terminal
Depending on the circumstances of a particular setup, you may experience a discomforting sensation, or perceive that the surface feels gritty to the touch when you touch this device, microphones connected to it, or the metal portions of other objects, such as guitars. This is due to an infinitesimal electrical charge, which is absolutely harmless.
However, if you are concerned about this, connect the ground terminal (see figure) to an external ground. When the unit is grounded, a slight hum may occur, depending on the particulars of your installation. If you are unsure of the connection method, contact your nearest Roland Service Center, or an authorized Roland distributor, as listed on the "Information" page.
Do not connect the MT-90U near:
• Water pipes (may result in shock or electrocution)
• Gas pipes (may result in fire or explosion)
- Telephone-line ground or lightning rod (may be dangerous in the event of lightning)
Remote Control
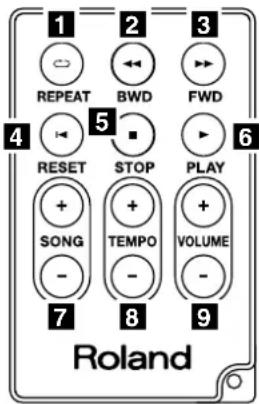
1. [ (REPEAT)] Button
Repeats a specified song or section. This button performs the same function as the [ (Repeat)] button on the MT-90U's front panel.
2. [◀ (BWD)] Button
Rewinds a song. This button performs the same function as the [ ◀◀ (Bwd)] button on the MT-90U's front panel.
3. [▶ (FWD)] Button
Fast forwards a song. This button performs the same function as the [▶▶ (Fwd)] button on the MT-90U's front panel.
4. [I◀ (RESET)] Button
Returns you to the beginning of a song. This button performs the same function as the [◀ (Reset)] button on the MT-90U's front panel.
5. [■ (STOP)] Button
Press to stop song playback. This button performs the same function as the [■ (Stop)] button on the MT-90U's front panel.
6. [▶ (PLAY)] Button
Press to start song playback. This button performs the same function as the [▶ (Play)] button on the MT-90U's front panel.
7. SONG [+] [-] Buttons
Press to select a song.
8. TEMPO [+] [-] Buttons
Adjust the song tempo. Pressing the [+] button speeds up the tempo. Pressing the [-] button slows down the tempo.
9. VOLUME [+] [-] Buttons
Adjust the volume. Pressing the [+] button raises the volume. Pressing the [-] button lowers the volume.
When you adjust the volume with the remote, the volume changes without affecting the position of knob on the MT-90U's front panel. When you adjust the volume again using the front panel knob, volume adjustments made with the remote become ineffective and the volume returns to the actual level indicated by the knob.
Screen
Basic Screen
When you turn the power on, the following screen appears.
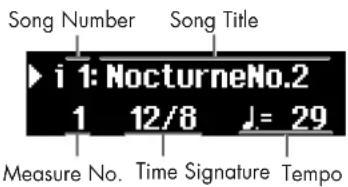
When in other screens, pressing the [Song] button one or more times takes you back to the basic screen, after you've navigated to other screens.
Marker Screen
Press the [ (A#rk)] button and the marker screen appears. This screen is where settings for makers are mode (p. 30).
![Marker 1 [ A ] 5 [B] 9 Measure No. Marker A Marker B](/content/2026/05/778112/images/ba95e7efe76dcc8f432427c1045f4004de3b8205ac43592ae2d7e1ccc4cb137d.jpg)
16 Track Screen
Press button [2] while pressing the [Song] button, and the 16 track screen appears (p. 39).
You can work on each part of the song individually from this screen.
Settings made in this screen become ineffective when you return to the basic screen.
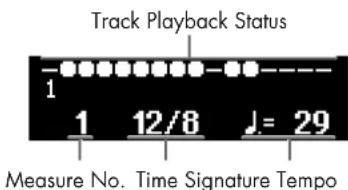
Settings Screen
A variety of settings can be made in this screen (p. 47). When the setting contains multiple items that you can change, arrows appear in the upper right-hand corner of the screen. Press the [◀◀ (Bwd)] or [▶▶ (Fwd)] button to select an item, and then use the [+] or [-] button to change its value.
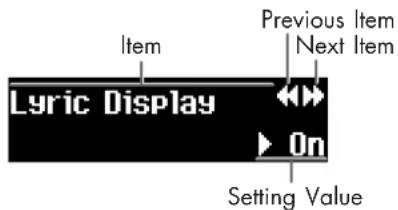
If a number preceded by the word "Error" appears, such as [Error : 00], see "Errors and Other Displays" (p. 60).

Please note that this manual explains various functions using screen depictions. However, the unit's factory default settings, including tone names, and the settings appearing in the screens depicted in this manual may differ.
Folder Screen
Select a folder and the following screen appears (p. 20). Press the [▶ (Play)] button to go inside the folder.
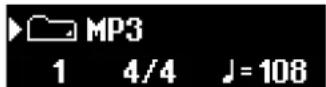
To move up one folder level, press and hold [-] until "Up" appears, and then press the [Play)] button.
Setting Up
Connecting the AC Adaptor
- Connect the supplied AC adaptor and power cord.
- Connect the AC adaptor to the DC In jack on the MT-90U's rear panel.
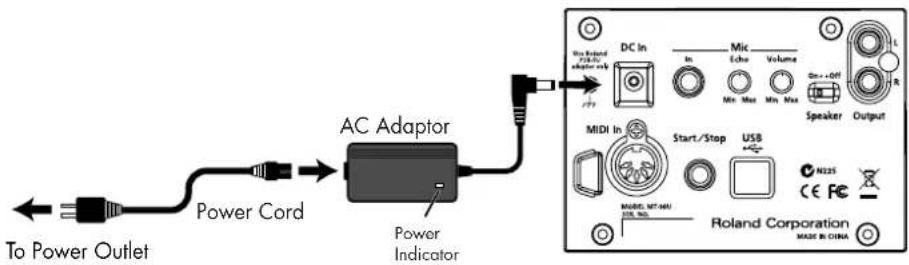
Place the AC adaptor so the side with the indicator (see illustration) faces upwards and the side with textual information faces downwards.
* The indicator will light up when you plug the AC adaptor into an AC outlet.
- Secure the power cord with the cord hook as shown below.

To prevent the inadvertent disruption of power to your unit (should the plug be pulled out accidentally), and to avoid applying undue stress to the AC adaptor jack, anchor the power cord using the cord hook, as shown in the illustration.
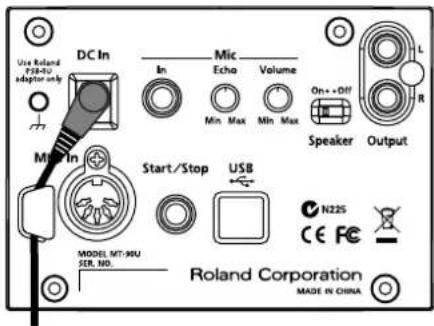
- Plug the power cord into a power outlet.
Be sure to use the AC adaptor and power cord supplied with the MT-90U.
Turning the Power On and Off
Once the connections have been completed (p. 12), turn on power to your various devices in the order specified. By turning on devices in the wrong order, you risk causing malfunction and/or damage to speakers and other devices.
Turning the power on
1. Set the volume to its lowest level by turning the [Volume] knob all the way to the left.
Turn down the volume and then turn on the power.
![ROLAND MT-90U - Set the volume to its lowest level by turning the [Volume] knob all the way to the left. - 1](/content/2026/05/778112/images/9222621c32087e9bc84b615f64723e623535f5456c969d235e212df5636ec1e5.jpg)
Even when the volume is turned down completely, you will hear a sound when the power is turned on. This is not a problem.
![ROLAND MT-90U - Set the volume to its lowest level by turning the [Volume] knob all the way to the left. - 2](/content/2026/05/778112/images/30bed11c15ec882875b29304eedcbb971cb7bcff2a3015adff3c12030b4d41da.jpg)
2. Press the [Power] button to turn on the power.
![ROLAND MT-90U - Press the [Power] button to turn on the power. - 1](/content/2026/05/778112/images/8b39a9485422076a51f71311a464cf993deb32cb9f351a0796ab94dae77cd05f.jpg)
Adjust the volume to an appropriate level after turning on the power.
To protect the circuits, the MT-90U does not operate for a short time after the power is turned on. This unit is equipped with a protection circuit. A brief interval (a few seconds) after power up is required before the MT-90U will operate normally.
Turning the power off
1. Set the volume to its lowest level by turning the [Volume] knob all the way to the left.
![ROLAND MT-90U - Set the volume to its lowest level by turning the [Volume] knob all the way to the left. - 1](/content/2026/05/778112/images/9b55a638a2360ca61b38c8bfdb09e3f84ad274d53d1fc7ddb501750f406491d5.jpg)
2. Press the [Power] button to turn off the power.
If you are not going to use the MT-90U for a while, remember to disconnect the USB device (memory, floppy disk or CD drive) to prevent it from being bumped or damaged during transport.
Adjusting the Volume
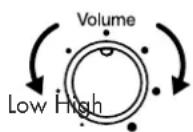
1. Use the [Volume] knob to adjust the volume.
Turn the knob to the right to raise the volume. Turn the knob to the left to lower the volume.
Connecting Headphones
Front Panel
natural_image
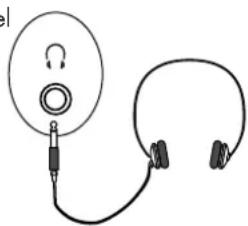
Simple line drawing of a ear ear connected to a headband (no text or symbols)1. Connect headphones to the headphones jack.
When headphones are connected, the speakers do not produce sound. Sound only comes through the headphones. Adjust the headphone volume using the volume knob on the MT-90U.

Use stereo headphones for the best sound.
Some notes on using headphones
- Make sure you handle the headphones, headphone cord, and jack appropriately to avoid cord damage.
- When you connect your headphones, they can be damaged if the volume is set too high on the device. Be sure to connect your headphones after turning the volume all the way down.
- Too much input into the headphones not only causes sound distortion and pain in your ears, but also puts extra stress on the headphones. Be sure to use your headphones at an appropriate volume.
Adjusting the Display Brightness
- Press button [4] while pressing the [ ] (Song)] button.
- Press the [◀◀ (Bwd)] or [ (Fwd)] button until "LCD Contrast" appears.
- Press the [+] or [-] button to adjust the brightness. Raising the value increases the brightness of the display. Lowering the setting value decreases the display's brightness.
- Press the [ ] (Song)] button to return to the basic screen when you have finished making settings.
Connecting the Microphone
You can connect a microphone to the MT-90U and sing karaoke.
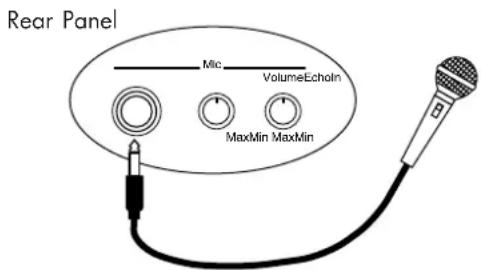
- Connect a microphone to the Mic In jack on the rear panel.
- Adjust the volume using the [Mic Volume] knob.
- Adjust the echo effect for the microphone using the [Mic Echo] knob.
MEMO You cannot use the Volume knob on the front panel to adjust the microphone volume.
NOTE You can use a microphone, such as the Roland DR-30 or 50 (sold separately). For details about purchasing one of these models, visit your nearest Roland dealer.
Some notes on using a microphone
- Be aware of others and lower the volume when using the microphone late at night or early in the morning.
- Lower the volume before connecting the microphone to the MT-90U the speakers will produce a loud noise when the microphone is connected if the volume is high.
- Depending on the position of the microphone and speakers, feedback (a screeching noise) can occur. If feedback occurs, try the following remedies:
- Change the microphone direction.
- Move the microphone further away from the speaker.
- Lower the microphone volume.
Using the Remote Control
Preparing the remote control
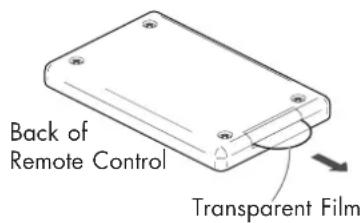
- Remove the transparent film inserted in the battery holder.
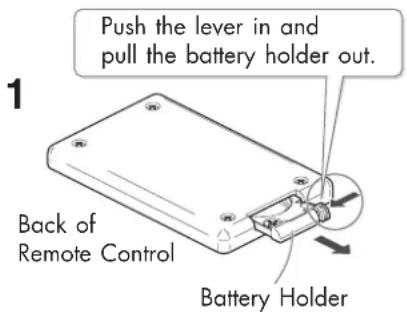
Changing the remote control's battery
- While pressing the small lever in the direction of the arrow (shown below), pull the battery holder out.
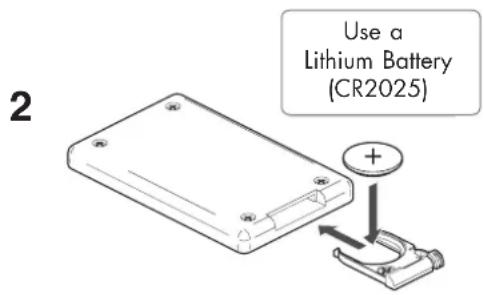
- Place the new battery in the holder with the positive side facing up, and then replace the holder.
When using the remote control
1. To use the remote control, point the remote control toward the MT-90U's sensor and operate it within the specified operating range.
NOTE The operating range is about 4 meters away from and 30 degrees to the right and left of the sensor.
Some notes on using the remote control
- The remote control does not function when two or more buttons are pressed at the same time.
- Even within the sensor range, the remote control may not function if something is obstructing the sensor path, or if the remote is held at an awkward angle.
- Using the remote near other devices that use infrared rays, or using a remote other than the one supplied with the MT-90U can cause malfunction.
- Battery life varies depending on how the remote is used. When the battery wears down, the sensor range decreases. The battery should be replaced when this happens.
- If you are not going to use the remote control for a long period of time, take the battery out and store it somewhere for use later.
- Shining a bright light, such as a spot light, on the remote sensor can decrease the sensor's responsiveness.
- Use only the specified type (model no. CR2025) of lithium battery. Be sure to insert it as directed (to ensure correct polarity).
Tuning with the MT-90U
Match the pitches of the instruments you are using to a standard pitch with the MT-90U for a beautiful, resonant sound. Matching instruments to a standard pitch is called "tuning."

What is standard pitch?
The middle A note (440Hz), also known as "concert A," is the standard tuning pitch.

You cannot use an audio file as the MT-90U's standard pitch.
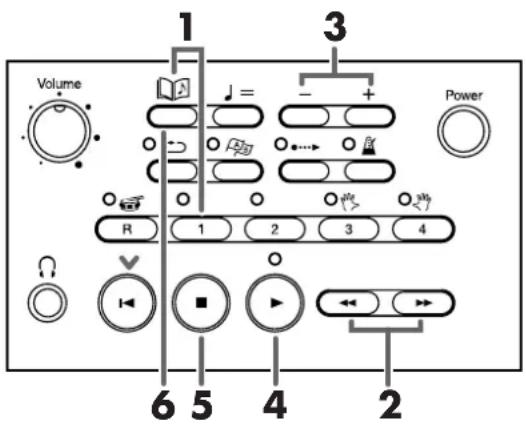
1. Press button [1] while pressing the [(Song)] button.
The tuning screen appears, as shown below.
![ROLAND MT-90U - Press button [1] while pressing the [(Song)] button. - 1](/content/2026/05/778112/images/9c505d62954fd679bef36cba3c8f851eb7baacbd8ae623d697d1a78bb3330aa0.jpg)
2. Press the [◀◀ (Bwd)] or [ (Fwd)] button to select the item to be set.
The item's name appears on the left side of the lower line on the display.
| Setting | Description Value | |
| Tune | Select the standard pitch | 415.3 Hz – 466.2 HzPitch is set to 440.0 Hz when you turn the power on. |
| Key | Select the note to use for tuning | A3 – A5Note is set to A4 when you turn the power on. |
| Sound | Select the tuning sound | Sine, Oboe |
3. Press the [+] or [-] button to change the setting's value.
Pressing both buttons at the same time returns the setting to its original value.
4. Press the [▶ (Play)] button to start playing the tuning pitch.
If a song is playing, press the [■ (Stop)] button to stop the song, and then press the [▶ (Play)] button to start playing the tuning pitch.
Play the same note on your instrument and match its pitch to the MT-90U's pitch.
5. Press the [■ (Stop)] button to stop playing the tuning pitch.
The tuning pitch stops.
6. When you have finished tuning, press the [ ] (Song)] button.
The basic screen appears.
These settings will remain stored even while the power is turned off. To return to the default settings, see "Returning to the Factory Default Settings (Factory Reset)" (p. 53).
Shortcut: changing the tuning pitch
1. Press the [+] or [-] button while pressing the [(Song)] button.
The tuning screen appears.
The tuning screen appears as long as the [ (Song)] button is pressed.
Press the [-] button to lower the pitch. Press the [+] button to raise the pitch.
Release the [Song)] button and the basic screen reappears.
Listening to Music
The following explains how to connect a USB memory to the USB connector on the front panel and listen to saved standard MIDI files (SMF music files) on the MT-90U.
Connecting the USB Memory
- Turn the power off (p. 13).
- Connect the USB memory to the USB connector on the front panel as shown.
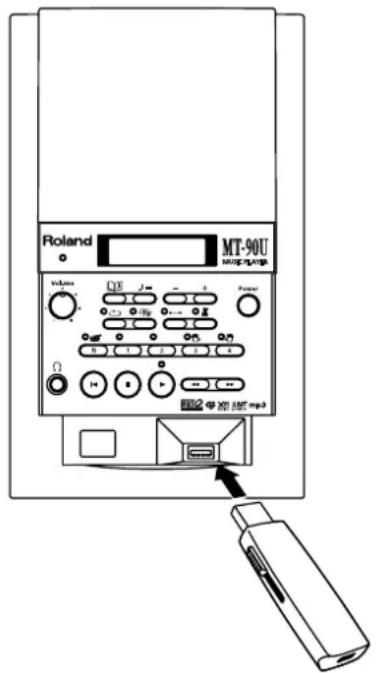
- Turn the power on (p. 13).
NOTE When using a USB cable for transferring music files, use the shortest cable possible.
NOTE Never insert or remove the USB memory while this MT-90U's power is on. Doing so may corrupt the unit's data or the data on the USB Memory.
NOTE Carefully insert the USB memory all the way in—until it is firmly in place.
If you move the MT-90U while the USB memory is still connected, the MT-90U and the USB memory may both be damaged. Make sure you always remove the USB memory before you move the MT-90U.
The MT-90U has 14 demo songs. Even without USB memory, you can still play music files.
Playing Songs
Playing a song on the MT-90U is called "playback." Some basic playback operations include rewinding and fast forwarding a song, as well as repeating one song or all the songs in the USB memory or folder.
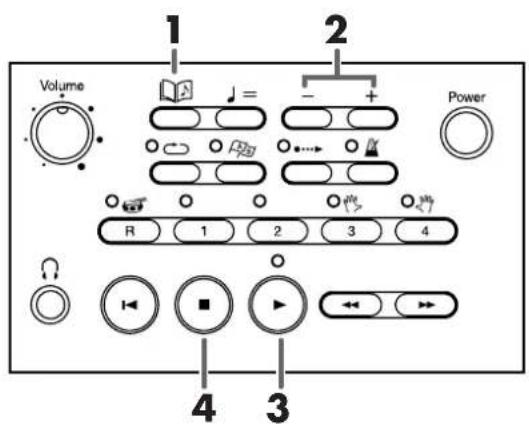

To hide lyrics while playing a music file that contains lyric information, press the
[ (Sang)] button. When you want to see the lyrics again, press the [ (Play)] button.
1. Press the [ ] (Song)] button.
The song name and number appear in the upper line of the basic screen.
![ROLAND MT-90U - Press the [ ] (Song)] button. - 1](/content/2026/05/778112/images/d9aadc58fa2ba373815852906ac5abb029c3da5f0a5d25021ddf972673396c67.jpg)
“+” Indicates that the song is stopped in the measure
2. Press the [+] or [-] button to select a song.
Depending on the connected device or type of song, the song number and title display changes.
| Display | Description |
| 1: Nocturne(song number: title) | Song from an external source (e.g. USB memory) |
| i 1: NocturneNo.2("i" appears before song number) | Internal demo song (p. 61) |
1> Nocturne(song number > title)![ROLAND MT-90U - Press the [+] or [-] button to select a song. - 1](/content/2026/05/778112/images/6bd52a7a598f20ddf9b706d7b67b82ff82fe8ff0aedc1a5642e5ba202b81f7ad.jpg) | Song from the Song List (p. 46)FolderPress the [play] button to enter the folder. |
![ROLAND MT-90U - Press the [+] or [-] button to select a song. - 2](/content/2026/05/778112/images/e8248e7bc4743021d8aa3f2b8c75e533090cc29b62f16d2eb0ddd10cdab802f0.jpg) | Up one folderPress the [play] button to move up one folder. |
![ROLAND MT-90U - Press the [+] or [-] button to select a song. - 3](/content/2026/05/778112/images/1ffab6136c1a647a4922793e1fb4c10fffbcc5572a54b307c1e8ee0910c3737b.jpg)
When the song has a pick up measure (notes start before the first full measure), "PU" appears in the display and then the measure numbers appear.
3. Press the [ (Play)] button.
The song starts playing. The song automatically plays until the end and then stops.
4. To stop playing the song, press the [■ (Stop)] button.
When the song is stopped, a [+] appears next to the measure number at which it is stopped.
![ROLAND MT-90U - To stop playing the song, press the [■ (Stop)] button. - 1](/content/2026/05/778112/images/b342844a641163dc58895588cd452af247c42de66e645d9b15a812841752a134.jpg)
If you connect a pedal switch (Roland DP-2, sold separately) to the Start/Stop connector on the rear panel, you can start and stop playing a song by simply pressing the pedal (p. 53).
Rewinding and fast forwarding a song
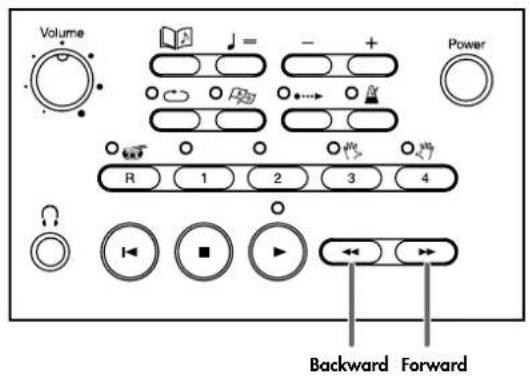
1. Press the [◀◀ (Bwd)] or [ (Fwd)] button to move to the sections and measures of music you want to hear.
Press the [◀◀ (Bwd)] or [▶▶d)] button once and the song moves backward or forward one measure at a time.
Press and hold the buttons to rewind or fast forward through a song. You can also rewind or fast forward a song while it is playing.
![ROLAND MT-90U - Press the [◀◀ (Bwd)] or [ (Fwd)] button to move to the sections and measures of music you want to hear. - 1](/content/2026/05/778112/images/70054abc123cece99b8c1fa1e082d52334df811954f1d9d79e70760579611c8b.jpg)
When a song starts to play, the measure number on the display flashes. This flashing indicates that the MT-90U is reading the data from the USB memory. While the number is flashing, you cannot rewind or fast forward. Wait a short while and then try again.
Moving to the beginning or end of a song
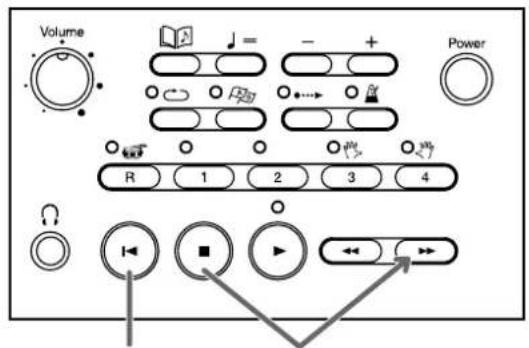
Return to the beginning Go to the end
- Press the [1◀ (Reset)] button to return to the beginning of a song.
- Press [▶▶ (Fwd)] while pressing [■op)] to move to the end of a song.

When playing an MP3 file, it may take some time to fast forward a song. This is not a problem.
Repeating One Song
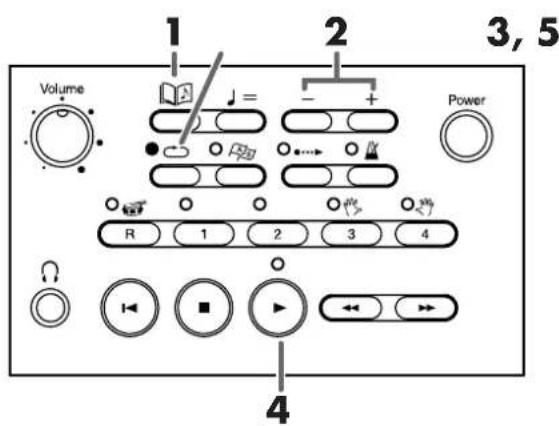
- Press the [ (Song)] button.
- Press the [+] or [-] button to select a song.
- Press the [ ⟶ (Repeat)] button.
The indicator is lit and the selected song is set to repeat.
- Press the [▶ (Play)] button.
The song begins playing and repeats at the end.
- To turn off Repeat, press the [ ⟶ (Repeat)] button again.
The indicator turns off and repeat is cancelled.
NOTE When you press the [ (Repeat)] button the sound stops briefly.
Repeating All Songs (All Song Play)
You can play all the songs from the folder or Song List repeatedly in order. When the last song has finished playing, all the songs start playing again from the first song. This feature is called "All Song Play."

You can also play all the songs in random order. For details, see "Playing Songs in Random Order" (p. 50).
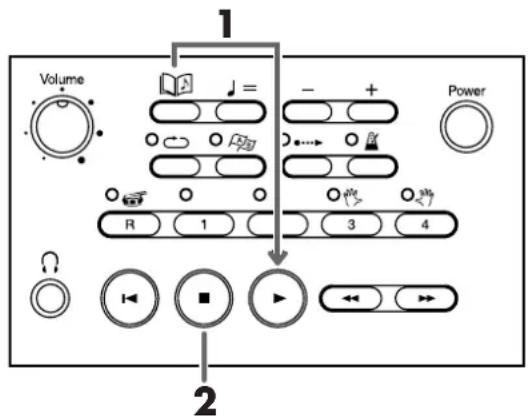
1. Press the [ (play)] button while pressing the [ (Song)] button.
The selected song begins to play, followed by the other songs. When the last song has finished, all the songs repeat in order from the first song.
During All Song Play, the song number and "ALL" are displayed alternately.
![ROLAND MT-90U - Press the [ (play)] button while pressing the [ (Song)] button. - 1](/content/2026/05/778112/images/79028f0d3296b399a18df33a824395a81b335dda328bb7bc7b9bd9f2ede20844.jpg)
2. Press the [■ (Stop)] button to stop playing the songs.
When you stop playing the songs, All Song Play is cancelled.
Changing the Tempo
A piece of music with a fast tempo is difficult to practice at first. Start practicing at a slower tempo with the MT-90U and gradually increase the tempo as you improve for more effective practice. On the MT-90U, changing the tempo does not change the pitch of the notes. You can also change the tempo while the song is playing.
Changing the Tempo by Beat
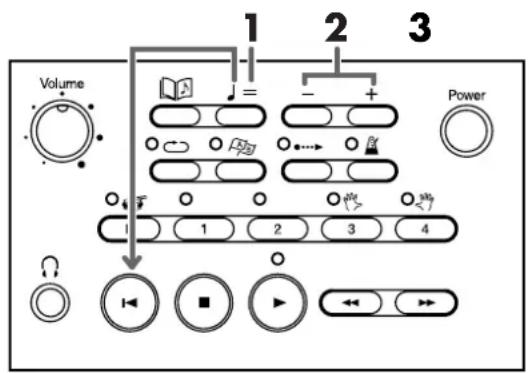
1. Press the [ J = (Tempo)] button.
The display cursor moves to the tempo indicator.
![ROLAND MT-90U - Press the [ J = (Tempo)] button. - 1](/content/2026/05/778112/images/d8604b2fbe6e7c10a8e7556ff7914ad7c7f2a01c777791565e8483b24cbc7cf7.jpg)
When playing audio files, a percentage appears. You can specify a setting value between 75 and 125%.
i 1: NocturneNo.2
1 12/8 ▶J= 29
2. Press the [+] or [-] button to adjust the tempo.
Press the [+] button once and the tempo increases one beat at a time. Press and hold the [+] button and the tempo increases quickly.
Press the [-] button once and the tempo decreases one beat at a time. Press and hold the [-] button and the tempo decreases quickly.
3. To return to the original tempo, press the [ I◀ (Reset)] button while pressing the [ J = (Tempo)] button.
Pressing the [+] and [-] buttons at the same time also returns the song to its original tempo.
Changing the Tempo by Tapping (Tap Tempo)
You can change the tempo by tapping a steady beat on the tempo button. This feature is called "Tap Tempo."

The Tap Tempo feature does not work for audio files.
1. Repeatedly tap on the [Tempo] button at the tempo you want to set.
The tempo is set at the rate which you tapped on the tempo button.
Using the Metronome
You can start and stop the metronome with one button. Practice with the metronome when the tempo of a piece of music is hard to grasp. The metronome can sound while a song is playing, either in time with the song's tempo or with the song's time signature.

This feature does not work for audio files.

You can change the metronome sound and the way beats are marked. For details, see "Changing the Metronome Settings" (p. 47).
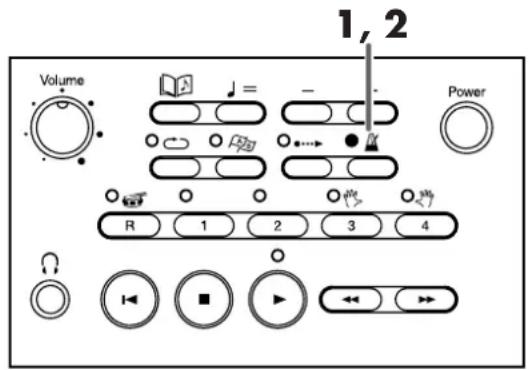
- Press the [ (Metronome)] button.
The metronome indicator is lit and the metronome sounds.
- To stop the metronome, press the [ (Metronome)] button again.
The metronome indicator turns off and the metronome sound stops.
Changing the Tempo of the Metronome
- Press the [ J = (Tempo)] button.
The screen cursor moves to the tempo indicator.
i 1: NocturneNo.2
1 12/8 ▶J= 29
- Press the [+] or [-] button to adjust the tempo.
Press the [+] and [-] buttons at the same time to return to the original tempo.
- Press the [ Ex (Metronome)] button.
The metronome sounds at the specified tempo.
Changing the Volume of the Metronome

The metronome volume setting also applies to the count volume (p. 29).
1. Press the [+] or [-] button while pressing the [ A (Metronome)] button.
While you hold the [ ▲ (Metronome)] button, the following metronome setting screen appears.
![ROLAND MT-90U - Press the [+] or [-] button while pressing the [ A (Metronome)] button. - 1](/content/2026/05/778112/images/47d4231e6a9e71af8788997f5c7c2d7510aa54e41020467d37a86da538c43c09.jpg)
Press the [+] button to raise the volume. Press the [-] button to lower the volume.
When you release the [Metronome)] button, the basic screen appears.
Changing the Metronome's Time Signature

The time signature cannot be changed while a song is playing. Also, the metronome plays the song's time signature if turned on while a song is playing.
1. Press the [ (Bvd)] or [ (Fwd)] button while pressing the [ (Metronome)] button to select a time signature.
If a song is playing, press the [■ (Stop)] button before changing the metronome's time signature.
While you hold the [Metronome)] button, the following metronome setting screen appears. When you release the [ (Metronome)] button, the basic screen appears.
![ROLAND MT-90U - Press the [ (Bvd)] or [ (Fwd)] button while pressing the [ (Metronome)] button to select a time signature. - 1](/content/2026/05/778112/images/0918f9ec6b2fc90710d619674043d8874a66f5fb74c1bd94e1c5d517b7f8dc02.jpg)
Available Time Signatures
2/2, 0/4 (up beat sound only), 2/4, 3/4, 4/4, 5/4, 6/4, 7/4, 3/8, 6/8, 9/8, 12/8
Shortcut: changing the metronome's time signature
1. Press the [ (Metronome)] button.
If a song is playing, press the [Stop)] button before changing the metronome's time signature.
The screen cursor moves to the time signature indication.
![ROLAND MT-90U - Press the [ (Metronome)] button. - 1](/content/2026/05/778112/images/c7ac6c4e8eb7f4e8d163f021b452dfaec2e773fc114875915838c7ec4b96a127.jpg)
2. Press the [+] or [-] button to select the time signature.
Practicing with a Song (Track Buttons)
The MT-90U comes with piano songs that allow the performance for the parts for each hand separately. You can select which tracks to play and match your right hand to the left hand track or match your left hand to the right hand track. This is great for practicing playing each hand separately. This function, which temporarily stops a track from being played, is called "Mute."
The preset piano songs are divided into the following five tracks.
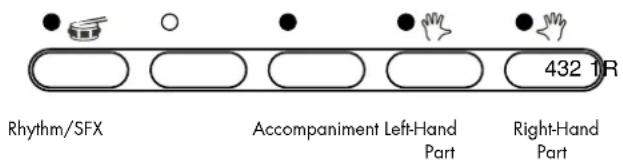
The indicator above a track button lights in green when the track is selected.
The indicator is off when a track is not selected.

If you have not made any track selections, all of the track indicators are lit until a song is played. When a song starts playing, only the selected tracks' indicators are lit.
- Press the button of the track you want to turn off so the track indicator turns off. For example, when you want to practice the right hand, turn off the right hand track.
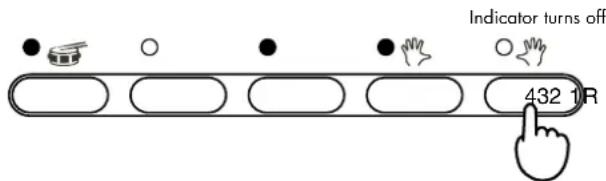
Right-hand part doesn't play back

When a screen other than the basic screen is shown, such as the 16 track display, you cannot mute tracks with the track buttons.
- Press the [▶ (Play)] button.
Tracks with lit indicators are played back, and tracks without lit indicators are not.
- To play a track that was muted, press the track button so the indicator is lit.
The track plays.
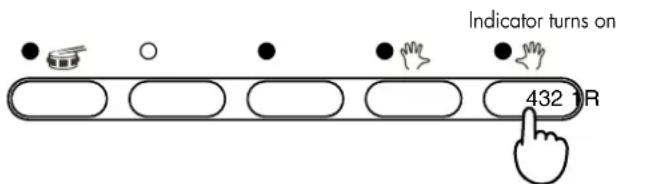
Right-hand part plays back
- Press the [■ (Stop)] button to stop playing the song.
Counting in to a Song
The MT-90U can play a count sound before a song begins. This is called a "Count In." You can also hear a count during the lead-in to a song, before the melody begins. This feature is called the "Intro Countdown." When you want your playing to match the song, counting in to the song with this feature makes it easier for you to get your timing right.

This feature is not available for audio files.

You can set the MT-90U to play only the Count In or only the Intro Countdown. For details, see "Changing Count Settings" (p. 48).

Intro Countdown can only be heard on songs with a lead-in.

Intro Countdown begins once the melody is detected. If you cannot hear the Intro Countdown well, try specifying a different melody track (or part). For details, see "Changing Count Settings" (p. 48).
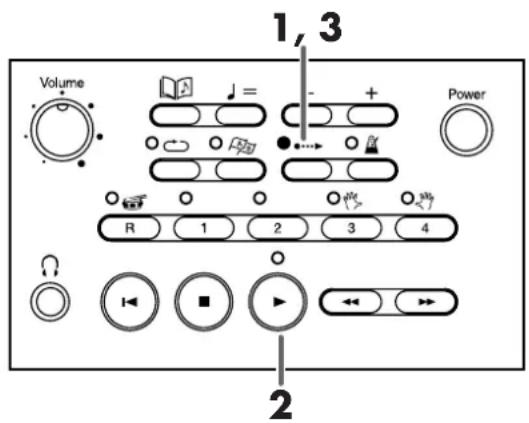
- Press the [ •••• (Count In)] button.
The count indicator is lit.
- Press the [▶ (Play)] button.
The song begins after two measures are counted in. The count sound counts through the song's lead-in until the melody begins.
- To turn off the count sound, press the [●●●► (Count In)] button.
The count indicator goes out.

You can change the number of measures to count in and the type of sound used. For details, see "Changing Count Settings" (p. 48).

The metronome volume setting (p. 27) also applies to count volume setting.
Marking a Section to Repeat for Practice
By marking a song, you can easily move to the sections of the song that you want to play for practice and repeat the sections that have been marked.
You can mark up to two places using marker A and marker B.

Use the marker screen to mark places in a song. When you have finished marking a section, press the [ ] (Song)] button to return to the basic screen.
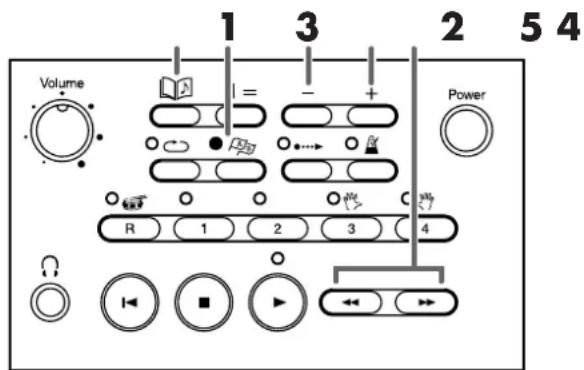
- Press the [A B (Mark)] button.
The marker screen appears.
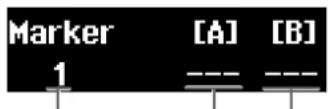
Measure No. Marker A Marker B
- Press the [◀◀ (Bwd)] or [ (Fwd)] button to move to the place where you want to place a marker.
- Press the [-] button to place marker A.
- Move to the next place you want to mark and press the [+] button to place marker B. You cannot place marker B in the same measure as, or in any measure before marker A.
| Marker | [A] | [B] |
| 1 | 5 | 9 |
You can also press the [-] and [+] buttons to place markers as a song is playing. When a song is marked, the [A B (Mark)] button indicator lights up.
- Press the [ ] (Song)] button to return to the basic display.
A marker is usually placed at the beginning of a measure. However, you can also place a mark in the middle of a measure. For details, see "Marking the Middle of a Measure" (p. 49).
NOTE When marking audio files, place markers in terms of the time (in seconds) instead of the measure.
NOTE When you select a different song, the markers are erased.
Playing a Marked Section
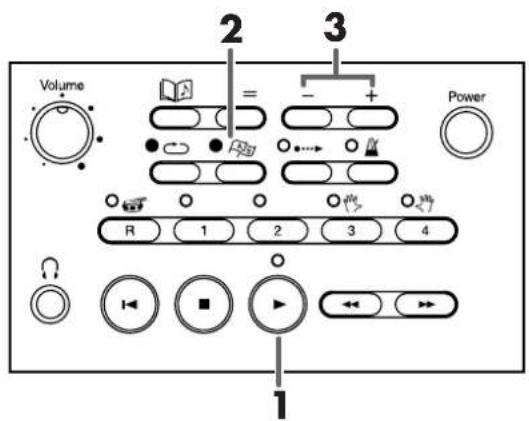
- Press the [▶ (Play)] button to play the song.
- Press the [AB (Mark)] button.
The marker screen appears.
Place marker A and marker B beforehand (p. 30).
![Marker 1 [ A ] 5 [ B ] 9 Measure No. Marker A Marker B](/content/2026/05/778112/images/f6991f8298b1cb312aa8e43de84f04ff10c66dd88d470e53dd19eda46298e324.jpg)
- Press the [-] button to play the song from marker A, or press the [+] button to play the song from marker B.
Erasing a Marker
![Volume 1 2 - + Power R 1 2 3 4 [-] Erases marker A [+] Erases marker B](/content/2026/05/778112/images/eaadda18079d91c1c97a7c6e50217f9287e8d952f73927869a968a691d8ae028.jpg)
- Press the [AB (Mark)] button.
The marker screen appears.
- While pressing the [ (Mark)] button, press the [-] button to erase marker A, or press the [+] button to erase marker B.
Repeating a Marked Section
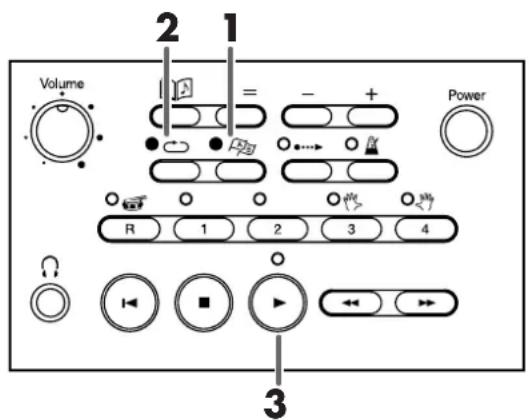

When the [●●●▶ (Count In)] indicator is lit, the count down plays only the first time the section is played. You can set the count down to play each time the section is repeated. For details, see "Changing Count Settings" (p. 48).
- Press the [ (Mark)] button.
The marker screen appears.
Place marker A and marker B beforehand (p. 30).
- Press the [ ⟶ (Repeat)] button so the indicator is lit.
The section is set to repeat.
- Press the [▶ (Play)] button to begin playing the song.
The section between marker A and marker B plays repeatedly.
When only A is marked
The song plays from marker A to the end repeatedly.
When only B is marked
The song plays from the beginning to marker B repeatedly.
Moving a Mark
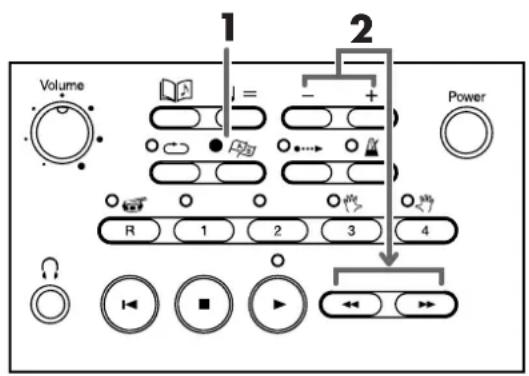
- Press the [AB (Mark)] button.
The marker screen appears.
- To move marker A, press the [◀ (Bwd)] or [ (Fwd)] button while pressing the [-] button.
- To move marker B, press the [◀◀ (Bwd)] or [ (▶▶d)] button while pressing the [+] button.
Pressing the [ ◀◀ (Bwd)] or [ (▶▶d)] button once moves the marker one measure at a time. Holding the button down moves the marker quickly.

When marking audio files, move each marker one second at a time.
Moving markers A and B together
1. Press the [◀ (Bwd)] or [ (Fwd)] button while pressing the [ (Mark) button.
The marker screen appears and markers A and B both move at the same time.
Example: Marker A is placed at measure 5 and marker B is placed at measure 9. Press the [(Bnd)] button to move both markers 4 measures back. Marker A moves to measure 1 and marker B moves to measure 5.

Press the [▶▶ (Fwd)] button to move both markers 4 measures forward. Marker A moves to measure 9 and marker B moves to measure 13.

![ROLAND MT-90U - Press the [◀ (Bwd)] or [ (Fwd)] button while pressing the [ (Mark) button. - 3](/content/2026/05/778112/images/59b31990708729475d78b7fabbd83a0a1613aa5b0b40aa17f2fd0733c6259cb6.jpg)
When marking audio files, place markers by time (in seconds) instead of measure number.
Shortcut: moving marker A and marker B together
- While the marker screen is visible, press and hold both [+] and [-] buttons, and then press the [ (Bwd)] or [ (Fwd)] button.
Marker A and marker B both move at the same time.
Removing Tempo Changes for Practice
For practice purposes, you can set the MT-90U to steady the tempo of a song that has many tempo changes. Removing the tempo changes and playing the song with a steady tempo is called "Tempo Mute."
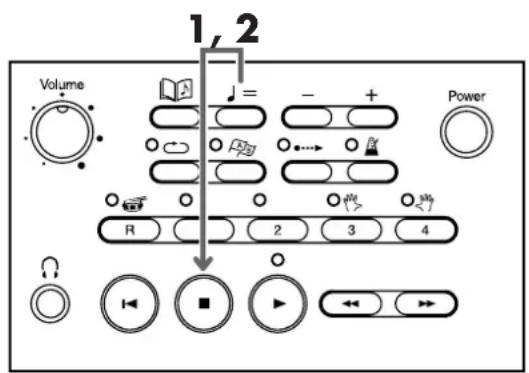
1. Press the [■ (Stop)] button while pressing the [Tempo] button.
The screen appears as shown below and the song plays at a steady tempo.
i 1: NocturneNo.2
1 12/8 ▶J. 29
“=” Disappears from the display during tempo mute
Set a tempo that is easy to play, and then begin practicing.
2. To cancel Tempo Mute, press the [■ (Stop)] button while pressing the [Tempo] button again.
Pressing the [▶ (Play)] button while pressing the [Tempo)] button also cancels Tempo Mute.
![ROLAND MT-90U - To cancel Tempo Mute, press the [■ (Stop)] button while pressing the [Tempo] button again. - 1](/content/2026/05/778112/images/0d014b814fc658b2004e2bf774200a09485a8ffb52c49597fe60d9f897ff2432.jpg)
When you select a different song, Tempo Mute is cancelled.
Changing the Key (Transposition)
Here's how to transpose and play a song on the MT-90U when your sheet music or music files are in a different key. This way you can easily practice the music you have even if the key is different.

Turning off the power or selecting another song sets the transposed song back to its original key.
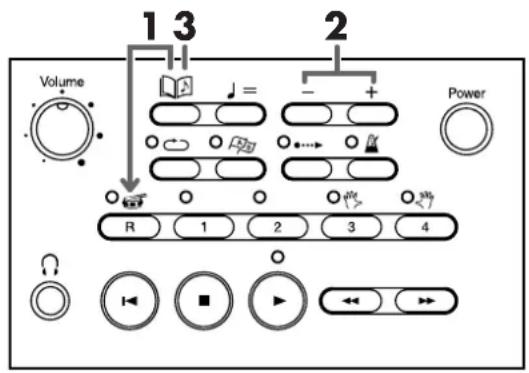
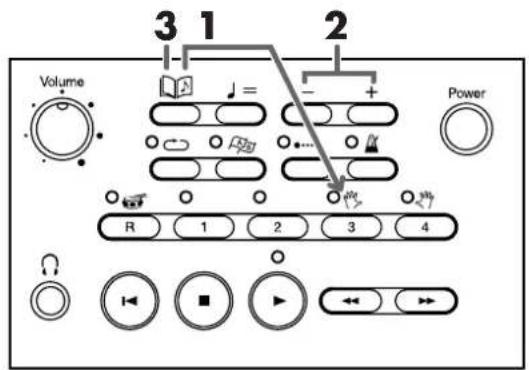
- Press the [R] button while pressing the [ ] (Song)] button.
The following screen appears.
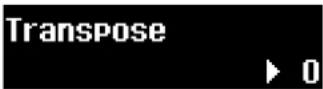
- Press the [+] or [-] button to specify the transposition value.
Set a value from -6 to +5 in semitone steps.
Example: To transpose a song in D major to C major, set the transposition value to -2. Press the [-] and [+] buttons at the same time to return to "0."
- Press the [Sang] button to return to the basic display.
Changing Reverb Effects
You can select which reverb effect is applied when playing music files.

Some music files cannot apply reverb effects.
What is a reverb effect?

Sound reverberation is called "reverb." When you apply reverb effects, the sound reverberates as if you are playing in a concert hall, which gives your performance a richer sound.

You can't apply reverb effects to audio files.
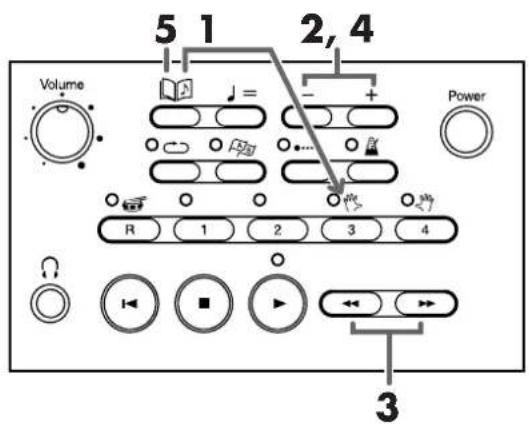
- Press button [3] while pressing the [ ] (Song)] button, and then press either the [ ← (Bwd)] or [ (Fwd)] button until "Reverb Type" appears.
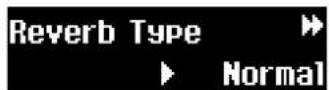
- Press the [-] or [+] button to select the reverb effect.
| Setting | Description |
| Listening | Apply reverb that is suitable for appreciating a song |
| Normal | Apply reverb effects as specified in the music files |
| Lesson | Apply reverb that is suitable for practicing and lessons |
- Press the [ ] (Song)] button to return to the basic display.

Reverb effects return to their original settings when you select a different song.
Shortcut: changing reverb effects
- Press the [ (Bwd)] or [ (Fwd)] button while pressing the [ (Song)] button.

The reverb screen appears while the [song] button is pressed.
Release the [ ] (song)] button and the basic screen reappears.
Changing Playback Sound Quality (Sound Control)
You can enhance the sound's presence and add to its clarity. This feature is called "Sound Control."
- Press button [3] while pressing the [ (Sohg)] button, and then press either the [ ◀◀ (Bwd)] or [ (Fwd)] button until "Sound Control Switch" appears.
- Press the [-] or [+] button to turn sound control ON.
- Press the [◀ (Bwd)] or [ (Fwd)] button until "Sound Control Type" appears.
- Press the [-] or [+] button to select the sound control type.
| Setting | Description |
| Sharp | Emphasize high and low notes |
| Clear | Hear low notes and chords precisely |
| Power | Emphasize low notes |
- Press the [ ] (Song)] button to return to the basic screen.
Listening to Specific Instrument Parts
Commercial SMF data usually has up to 16 parts, each part being a different musical instrument recording. You can choose which of these 16 parts to play back or mute. (Muting a single part during playback is referred to as "Minus One."

Use the 16 track screen. When you have finished all operations (settings, playing, and resetting specific parts), press the [Song] button to return to the basic screen. However, when you leave the 16 track screen, solo and mute settings are cancelled.
Playing Only One Part (Solo)
You can select a part and choose to play back only that part. Selecting and listening to an instrument in the accompaniment is helpful for practicing. Playing back only one part on the MT-90U is called "Solo."
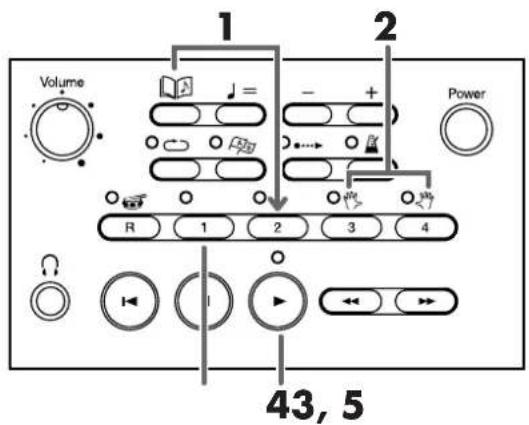
- Press button [2] while pressing the [ ] (Song)] button. The 16 track screen appears.
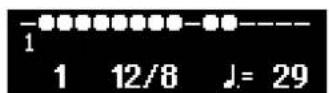
| Setting | Description |
| ● (filled in circle) | The part is played back |
| ○ (empty circle) | The part is not played back |
| - | There is no data on this track |
- Press buttons [3] or [4] to move to the part that you want to play.
3. Press button [1].
The part displays a [●] above the track number, which signifies that only this part is set to play.
![ROLAND MT-90U - Press button [1]. - 1](/content/2026/05/778112/images/dca0214ec9bd74d23e0e7fe0c58236e376fea442007c4f007ee0f30c9ab40813.jpg)
If you want to change the solo part after pressing button [1], press buttons [3] or [4] to change parts and the solo setting moves as well.
4. Press the [▶ (Play)] button to begin playing the song.
Only the selected part begins to play.
5. To cancel solo play, press button [1] again.
All parts begin to play.
Turning Off Specific Parts (Mute)
Here's how to specify which parts to play and which parts to mute.
NOTE Solo and mute settings are cancelled when you leave the 16 track screen.
1. Press button [2] while pressing the [ (Song)] button.
The 16 track screen appears.
![ROLAND MT-90U - Press button [2] while pressing the [ (Song)] button. - 1](/content/2026/05/778112/images/a2f29c9ccf71c01c9fe52fd492a53b120149bac35fe24fd79487342557420ede.jpg)
2. Press buttons [3] or [4] to move to the part that you want to play.
3. Press button [2] to set parts to [●] (play) or [○] (mute).
Pressing button [2] switches the screen between play [●] and mute [○].
You can also press the [-] button to mute the part [O], or press the [+] button to play the part [●].
![ROLAND MT-90U - Press button [2] to set parts to [●] (play) or [○] (mute). - 1](/content/2026/05/778112/images/2d85f65bb3b3cb8003e9e261b010903423478b45f53f2390d541d6f26c1b2a65.jpg)
4. Press the [▶ (Play)] button and the specified parts of the song play.
Muted parts [O] do not play. These are the parts that you can play to gain practice.
Displaying the Tone Names of Parts
You can display the tone name of each part in the music file.
- Press button [2] while pressing the [ ] (Song)] button.
The 16 track display appears.
- Press the [R] button to display the tone name.
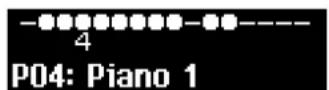
The tone name appears for a few seconds, and then you're returned to the original screen.

Change parts by pressing buttons [3] or [4], and the tone name of each part appears for a few seconds.
Playing Audio Files
The MT-90U can play audio files stored on USB memory or play a commercial music CD when the CD drive (sold separately) is connected.
NOTE Features such as Metronome and Count In do not work for audio files.
Supported audio file formats
The MT-90U can play the following audio file formats.
| WAV(.wav) | Sampling frequency | 44.1 kHz |
| Bit depth 16 bit | ||
| Channels 1 (mono) / 2 (stereo) | ||
| AIFF(.aif) | Sampling frequency | 44.1 kHz |
| Bit depth 16 bit | ||
| Channels 1 (mono) / 2 (stereo) | ||
| MP3(.mp3) | Format | MPEG-1 audio layer 3 |
| Sampling frequency | 44.1/32/40/48/56/64/80/96/112 kHz | |
| Bit rate | 128/160/192/224/256/320 kbps |
The maximum number of audio files that the MT-90U can handle within a single folder is 99. If you intend to copy more than 99 files onto the USB memory, create new folders and save up to 99 files within each folder.
You cannot use a period (.) at the beginning of the file name.
NOTE You cannot use the following characters in the file name. \ / : , ; * ? " <>
When naming a file, use only letters and numbers.
Make sure that WAV format files end with ".wav," AIFF format files end with ".aif," and MP3 files end with ".mp3." Any other file name extensions cannot be read.
Playing Audio Files from USB Memory
- Insert the USB memory with stored audio files into the USB connector on the MT-90U's front panel.
You can select a folder in the folder selection screen (p. 20).
- Press the [ ] (Song)] button.
The song number and name appear in the upper row of the basic screen.
For WAV
For MP3
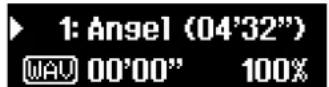
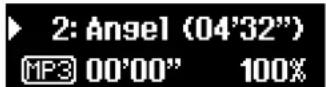

AIFF files are displayed in the same way as WAV files.
- Press the [-] or [+] button to select a song.
- Press the [Play] button.
The song begins playing. The song automatically plays until the end and then stops.
- To stop playing a song, press the [■ (Stop)] button.
When playing audio files, the time signature, tempo, and measure number are not displayed.
Playing a Music CD from the CD Drive (Sold Separately)
- Connect the CD drive to the MT-90U (p. 56).
- Press the [ ] (Song)] button.
The song number and name appear in the upper row of the basic screen.
- Press the [-] or [+] button to select a song.
- Press the [▶ (Play)] button.
The CD begins playing. The song automatically plays until the end and then stops.
- To stop playing a song, press the [■ (Stop)] button.
When playing a music CD, the time signature, tempo, and measure number are not displayed.
Singing Karaoke with Audio Files or a Music CD (Center Cancel)
Here's how to lower the volume of the vocal part of an audio file or music CD and sing the part yourself. This feature is called "Center Cancel" and works great for singing karaoke with your favorite song or practicing a vocal part.
NOTE Depending on the song, you may not be able to completely eliminate the vocal part.
- Insert the USB memory into the USB connector and then turn the power on (p. 13).
- Press the [ (Song)] button.
The song number and name appear in the upper row of the basic screen.
- Press the [-] or [+] button to select a song.
- Press button [4] to turn Center Cancel on.
When the Center Cancel function is turned on, the track [4] button indicator is turned off.
- Press the [▶ (Play)] button.
When the song begins playing, the volume of the vocal part is lowered. Sing or play the melody yourself.
Changing the Key (Playback Transpose)
Just as with music files, you can transpose audio files and play a song in a different key.
NOTE Turning off the power or selecting another song sets the transposed song back to its original key.
- Press the [R] button while pressing the [ ] (Song)] button.
The following screen appears.
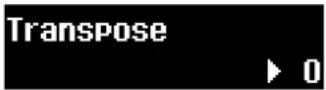
- Press the [+] or [-] button to specify the transposition value.
You can set the value from -6 to +5 in semitone steps.
Example: To transpose a song in D major to C major, set the transposition value to -2.
Pressing both [+] and [-] buttons at the same time returns the song to its original key.
- Press the [ ] (Song)] button to return to the basic screen.
Changing the Tempo (Time Stretch)
Just as with music files, you can change the tempo of an audio file and play the song at a different speed. Changing the tempo does not change the pitches of notes. You can also change the tempo while the song is playing. You can specify a value between 75% and 125%.
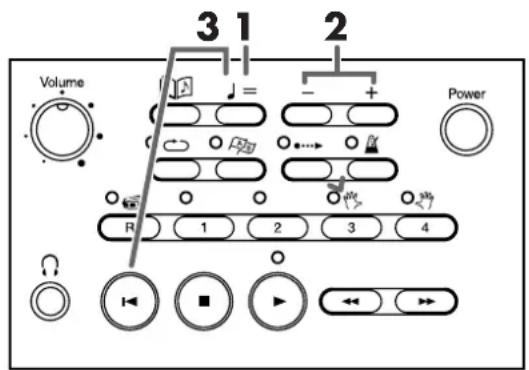
1. Press the [ J = (Tempo)] button.
The display cursor moves to the playback speed indicator.
![ROLAND MT-90U - Press the [ J = (Tempo)] button. - 1](/content/2026/05/778112/images/e359b977981c85ab5df8becdde852d283e423876d13ef7604d6a11ef0e5cb38e.jpg)
![ROLAND MT-90U - Press the [ J = (Tempo)] button. - 2](/content/2026/05/778112/images/565d406a5381ded7763f8e3646cc304208b1ce3fb5a223d1454ebe7c1b946733.jpg)
When playing audio files, the tempo indicator becomes the playback speed indicator.
Turning off the power or selecting another song sets the playback speed to 100% (original speed).
2. Press the [+] or [-] button to adjust the tempo.
Each press of the [+] button increases the tempo by 1%. Press and hold the [+] button and the tempo increases quickly.
Each press of the [-] button decreases the tempo by 1%. Press and hold the [-] button and the tempo decreases quickly.
3. To return to the original tempo, press the [I◀ (Reset)] button while pressing the [♩ = (Tempo)] button.
Pressing the [+] and [-] buttons at the same time also returns the song to its original tempo.
Creating a List of Your Favorite Songs (Song List)
You can create a list of your favorite songs selected from all of the songs saved on USB memory.
Aside from making it easier to search for and play your favorite songs, you can also play them back and listen to them one after another with All Song Play.
Some music files cannot apply reverb effects.

The Song List is saved on USB memory.

You cannot include the MT-90U's demo songs in the Song List. Songs from a floppy disk (when the floppy disk drive is connected) or songs from a music CD or CD-ROM (when the CD drive is connected) also cannot be included in the Song List.
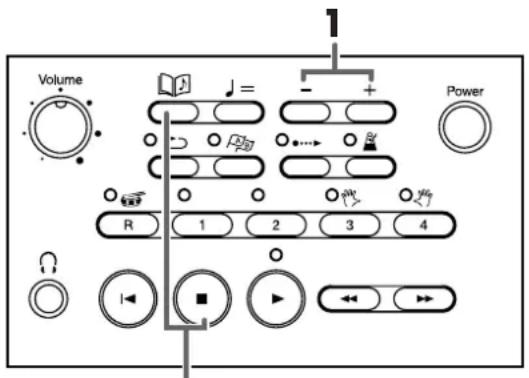
2
- Press the [+] and [-] buttons to select a song that you want to include in the Song List.
- Press the [■ (Stop)] button while pressing the [ (Song)] button.
The song is added to the Song List.

You can register up to 99 songs in the Song List.
Deleting a Song from the Song List
Select the song that you want to delete and press the [ (Rset)] button while pressing the [ (Song)] button.
Changing the Metronome Settings
Here's how to change metronome settings such as tone and volume.
1. Press the [ (Metronome)] button while pressing the [ (Song)] button.
The metronome settings screen appears.
![ROLAND MT-90U - Press the [ (Metronome)] button while pressing the [ (Song)] button. - 1](/content/2026/05/778112/images/71950a5b073737502bf429d85fccfb2be5dc44b84c3ac16581c717001efb5e9b.jpg)
2. Press the [◀◀ (Bwd)] or [ (Fwd)] button to select the items you want to set.
| Setting | Description |
| Volume | Adjust the metronome volume. |
| Beat Select a time signature. | |
| Sound Select the metronome sound. | |
| Pattern Select how the metronome marks the beat. | |
3. Press the [-] or [+] button to change the value of the setting.
The values available to be set for each item are listed in the table below.
| Setting | Value Description | |
| Volume | 0–10 | The higher the number the higher the volume becomes. Turn the volume down to "0" and there is no sound. The volume is set to "5" when you turn the power on. |
| Beat | 2/2, 0/4, 2/4, 3/4, 4/4, 5/4, 6/4, 7/4, 3/8, 6/8, 9/8, 12/8 | Set the beat to 0/4 to hear only the upbeat. |
| Sound | Click Standard metronome sound | |
| Elec. Electronic metronome sound | ||
| VoiceJ Counts "1, 2, 3..." in Japanese | ||
| VoiceE Counts "1, 2, 3..." in English | ||
| Animal Dog and cat sounds | ||
| Woodblk Woodblock sound | ||
| Setting | Value Description | |
| Sound | Triangle Triangle | and castanet sound |
| Handclap Hand | clap sound | |
| Pattern | Normal Standard pattern | |
| Beat starts at the top of the measure and sounds in intervals of dotted half-note upbeats. | ||
| Beat starts at the top of the measure and sounds in intervals of half-note upbeats. | ||
| Beat starts at the top of the measure and sounds in intervals of dotted quarter-note upbeats. | ||
| Beat starts at the top of the measure and sounds in intervals of quarter-note upbeats. | ||
| Beat starts at the top of the measure and sounds in intervals of dotted eighth-note upbeats. | ||
| Beat starts at the top of the measure and sounds in intervals of eighth-note upbeats. | ||
| Beat starts at the top of the measure and sounds in intervals of sixteenth-note upbeats. | ||
| +Doubl | The metronome plays the beat and backbeat. | |
| +Tripl | The metronome plays the beat and triplets. | |
| +Shufl | Metronome plays a “shuffle” beat. | |
4. Press the [ ] (Song)] button to return to the basic screen.
→ See "Using the Metronome" (p. 26)
* When [+Doubl] is selected for waltz beats (6/8, 9/8, 12/8) the metronome plays triplets and sounds the same as when set to [+Tripl].
* Only the metronome sound setting remains stored even while the power is turned off. When you want to return to the factory default settings, see "Returning to the Factory Default Settings (Factory Reset)" (p. 53).
* The metronome volume setting applies to the count volume "Counting in to a Song" (p. 29) as well.
Changing Count Settings
You can change the Count In and Intro Countdown settings.
1. Press the [●●●▶ (Count In)] button while
pressing the [ ] (Song)] button.
The count in/down settings display appears.
![ROLAND MT-90U - Press the [●●●▶ (Count In)] button while - 1](/content/2026/05/778112/images/494b26f405bacaeff3043102f35c3f013ec280c0f39a2c0da6a8d5484f8a7927.jpg)
2. Press the [ ◀◀ (Bwd)] or [ ▶▶ (Fwd)] button to select the items you want to set.
| Setting | Description |
| Count In/Down Mode | Specify when the count sound occurs. |
| Count Down Sound | Select the intro countdown sound. |
| Count Down Trk/Part | Specify track (or part) settings for detecting melody when intro countdown is set. |
| Count InSound Select | the count in sound. |
| Count InMeasure | Specify the number of measures to count in. |
| Count InRepeat Specify count in repeat settings. | |
3. Press the [-] or [+] button to change the setting value.
Possible setting values for each item are listed in the table below.
| Setting | Value Description | |
| Count In/Down Mode | Both | Count in before the song begins and at the end of the lead-in. |
| Count In | Play the count in before a song only. | |
| Count Down | Play the count down from the lead-in only. | |
| Count Down Sound | VoiceJ | Counts "1, 2, 3..." in Japanese. |
| VoiceE Counts "1, 2, 3..." in English. | ||
| Setting | Value Description | |
| Count Down Trk/Part (This setting returns to "Trk3+4" when you select a different song.) | Trk3+4 | Count down to both the left-hand and right-hand parts. This setting is selected when you turn the power on. |
| Trk3 Count | down the left-hand part. | |
| Trk4 | Count down the right-hand part. | |
| Part 1-16 | Count down parts 1 through 16. | |
| Count In Sound | Sticks Stick | hitting sound |
| Click Bell and clicking sound | ||
| Elec. Electronic sound | ||
| VoiceJ | Counts "1, 2, 3..." in Japanese. | |
| VoiceE Counts "1, 2, 3..." in English. | ||
| Woodblk Woodblock sound | ||
| Triangle Triangle and castanet sound | ||
| Handclap Hand clap sound | ||
| Animal Dog and cat sounds | ||
| Count In Measure | 1 Count in one measure. | |
| 2 | Count in two measures. This setting is selected when you turn the power on. | |
| Count In Repeat | First | Count in only the first time the song or section is played. This setting is selected when you turn the power on. |
| Every | Count in every time the song or section is played. | |
4. Press the [ ] (Song)] button to return to the basic screen.
- See "Counting in to a Song" (p. 29) or "Marking a Section to Repeat for Practice" (p. 30).
* Count in settings remain stored even while the power is turned off (except for [Count Down Trk/Part] setting). When you want to return to the factory default settings, see "Returning to the Factory Default Settings (Factory Reset)" (p. 53).
* When the measure number is flashing (meaning that music file is being read), the song may play from the beginning after the [Count Down Sound] setting is changed.
Marking the Middle of a Measure
Markers are usually placed at the beginning of a measure. However, you can change the setting so markers can be placed in the middle of a measure (on the beat).
1. Press the [A B (Mark)] button while pressing
the [ ] (Song)] button.
The following screen appears.
![ROLAND MT-90U - Press the [A B (Mark)] button while pressing - 1](/content/2026/05/778112/images/21cb9af0bffdb80fa316e1acd3634abc64f672b835556ea9889f8591622b9117.jpg)
2. Press the [+] or [-] button to change the setting.
| Setting | Description |
| Measure | Place markers at the beginning a measure. |
| Beat Place markers | on the beat. |
3. Press the [ ] (Song)] button to return to the basic screen.
To place markers on the beat (when [Beat] is specified), place them while the song is playing.
→ See "Marking a Section to Repeat for Practice" (p. 30).
Changing Lyric Display Settings
Here's how to specify the language to use for the display of lyrics when they are included in the music files. If the lyrics appear strange, try changing this setting. This setting also applies to the song name display.
1. Press button [4] while pressing the
[ ] (Song)] button.
The function screen appears.
2. Press the [◀ (Bwd)] or [▶ (Fwd)] button until "Lyric Language" appears.
The following screen appears.
![ROLAND MT-90U - Press the [◀ (Bwd)] or [▶ (Fwd)] button until "Lyric Language" appears. - 1](/content/2026/05/778112/images/e9ea20038223cc6cf0619e959f02449b6a9f974a8ca9410299c3c531dd835dcb.jpg)
3. Press the [+] or [-] button to change the setting.
| Setting | Description |
| Japanese | Display lyrics in Japanese. |
| English | Display lyrics in English. This setting also supports languages with phonetic marks such as umlauts. |
4. Press the [ ] (Song)] button to return to the basic screen.
→ Lyric display settings remain stored even while the power is turned off. When you want to return to the factory default settings, see "Returning to the Factory Default Settings (Factory Reset)" (p. 53).
* If this setting is "English," the characters may not be shown correctly when displaying Japanese lyrics or song titles. Conversely, if this setting is "Japanese," the display of English lyrics or song titles may be incorrect.
Canceling Lyric Display
Karaoke music files include lyrics which are displayed on the screen. If you prefer not to display the lyrics, you can cancel lyric display.
1. Press button [4] while pressing the
[ ] (Song)] button.
The function screen appears.
2. Press the [◀ (Bwd)] or [ (Fwd)] button until "Lyric Display" appears.
The following screen appears.
![ROLAND MT-90U - Press the [◀ (Bwd)] or [ (Fwd)] button until "Lyric Display" appears. - 1](/content/2026/05/778112/images/be61c9c52707ae4da2f506aaec90f557c5d5f7e8e7aceea9959ce4838cb54a8e.jpg)
3. Press the [+] or [-] button to change the setting.
| Setting | Description |
| ON | Lyrics are displayed (when included in the data). |
| OFF Lyrics are not displayed. | |
4. Press the [ ] (Song)] button to return to the basic screen.
You can also press the [ ] (Song)] button while a song with lyric data is playing to cancel lyric display. To display lyrics again, press the [ ▶ (Play)] button.
Playing Songs in Random Order
Repeatedly playing all of the songs in a particular folder or the Song List in order is called All Song Play. You can also set All Song Play to play all the songs in random order.
1. Press button [4] while pressing the [ ] (Song)] button.
The function screen appears.
2. Press the [◀ (Bwd)] or [ (Fwd)] button until "All Song Play" appears.
The following screen appears.
![ROLAND MT-90U - Press the [◀ (Bwd)] or [ (Fwd)] button until "All Song Play" appears. - 1](/content/2026/05/778112/images/facc65aa5fce2fe9f2ffc9ce6c292e3a6337bd81ca1c216b88be6cf17e7420cf.jpg)
3. Press the [+] or [-] button to change the setting.
| Setting | Description |
| Normal | Play all songs in Song List order. |
| Random Play all songs in random order. | |
4. Press the [ ] (Song)] button to return to the basic screen.
→ See "Repeating All Songs (All Song Play)" (p. 23).
Assigning Parts to Track Buttons (Track Assign)
When playing Roland digital piano supported SMF data (see "The MT-90U Allows You To Use the Following Music Files" (p. 57)), the left-hand part and right-hand part are usually assigned to tracks [3] and [4], respectively (p. 28). However, the track assignments in the SMF data can sometimes differ. If the track buttons don't effectively control the left-hand and right-hand parts when this is set to "Auto", then change the setting to "2/1 Part" or "3/4 Part."
1. Press button [4] while pressing the
[ ] (Song)] button.
The function screen appears.
2. Press the [◀◀ (Bwd)] or [ (Fwd)] button until "Track Assign" appears.
The following screen appears.
![ROLAND MT-90U - Press the [◀◀ (Bwd)] or [ (Fwd)] button until "Track Assign" appears. - 1](/content/2026/05/778112/images/a0fc795ee45bde9435c31537598efa2711a1dbb754bfd2314cb0048e5defbd73.jpg)
3. Press the [+] or [-] button to change the setting.
| Setting | Description |
| Auto | The MT-90U automatically specifies parts to track buttons according to the music file. |
| 2/1 Part | Assign part 1 to track [4], part 2 to track [3], and part 3 to track [1]. |
| 3/4 Part | Assign part 4 to track [4], part 3 to track [3], and part 1 to track [1]. |
4. Press the [ ] (Song)] button to return to the basic screen.
After changing track parts, select the song again before playing it.
* Track assignment settings remain stored even while the power is turned off. When you want to return to the factory default settings, see "Returning to the Factory Default Settings (Factory Reset)" (p. 53).
Adjusting the Volume of Audio Files
If the volume of an SMF and audio file do not match, use the following procedure to adjust the audio file volume.
- Press button [4] while pressing the [ (Song)] button.
- Press the [◀◀ (Bwd)] or [▶▶ (Fwd)] button until "Audio Volume" appears.
- Press the [+] or [-] button to change the setting.
| Setting | Description |
| 0–127 | Audio file volumeRaising the value increases the volume. |
- Press the [ ] (Song)] button to return to the basic screen.
Changing USB Memory Settings
If reading USB memory data takes a long time, or if the data is not properly read, changing the USB memory setting may improve USB memory function.
1. Press button [4] while pressing the
[ ] (Song)] button.
The function screen appears.
2. Press the [◀ (Bwd)] or [ (Fwd)] button until "External Memory" appears.
The following screen appears.
![ROLAND MT-90U - Press the [◀ (Bwd)] or [ (Fwd)] button until "External Memory" appears. - 1](/content/2026/05/778112/images/98b9b25e124b649c1a7c084f36cc0a2e9062968a93169a40c4d1e9395b8d81bb.jpg)
3. Press the [+] or [-] button to change the setting.
| Settings | |
| Mode 1, Mode 2 |
4. Press the [ ] (Song)] button to return to the basic screen.
* USB memory settings remain stored even while the power is turned off. When you want to return to the factory default settings, see "Returning to the Factory Default Settings (Factory Reset)" (p. 53).
Changing USB Driver Settings
When you use the USB connector on the rear panel to connect to a computer, you need to specify the USB driver that the computer is using.
For general purposes, use the "Generic" setting, which uses the driver that most computers are equipped with.
If the computer does not recognize the MT-90U correctly, or if transmission errors occur frequently, change the driver settings to "Original" in order to use the original driver. The original driver must be installed on the computer before use.
For details about obtaining and installing the original driver, visit the Roland website.
http://www.roland.com/
1. Press button [4] while pressing the
[ ] (Song)] button.
The function screen appears.
2. Press the [◀ (Bwd)] or [ (Fwd)] button until "USB Driver" appears.
The following screen appears.
![ROLAND MT-90U - Press the [◀ (Bwd)] or [ (Fwd)] button until "USB Driver" appears. - 1](/content/2026/05/778112/images/f2e99efee098fd2dad4cf261f9802c333110b08432a3328d5679657ac9ee4c32.jpg)
3. Press the [+] or [-] button to change the setting.
| Setting Description | |
| Generic | Use the general driver that most computers are equipped with. Driver installation is unnecessary. Use this mode for general purposes. |
| Original Use the Roland Original Driver. | |
4. Press the [ ] (Song)] button to return to the basic screen.
5. Turn the power off, and then on again.
* USB memory settings remain stored even while the power is turned off. When you want to return to the factory default settings, see "Returning to the Factory Default Settings (Factory Reset)" (p. 53).
Returning to the Factory Default Settings (Factory Reset)
After performing the following procedure, you cannot return to the previous settings even after turning off the power. This procedure returns the following settings to their factory default values. Returning to the factory default settings is called "Factory Reset."
Target Settings
- Tuning settings (p. 17)
- Metronome sound (p. 47)
- Count settings (except for [Count Down/Trk Part]) (p. 48)
• Lyric Display Language setting (p. 49) - USB Memory setting (p. 52)
- USB Driver setting (p. 52)
1. Press button [4] while pressing the
[ ] (Song)] button.
The function screen appears.
2. Press the [◀ (Bwd)] or [ (Fwd)] button until "Factory Reset" appears.
The following screen appears.
![ROLAND MT-90U - Press the [◀ (Bwd)] or [ (Fwd)] button until "Factory Reset" appears. - 1](/content/2026/05/778112/images/0eb545bad0c23b3acc152f1879a3404412d4392059b19b4d9dc349f3aa9466f0.jpg)
To cancel factory reset and return to the previous screen, press the [Spng] button.
3. Press the [+] button.
The following screen appears and the [▶ (Play)] button indicator begins flashing.
![ROLAND MT-90U - Press the [+] button. - 1](/content/2026/05/778112/images/46b366d6590ae89c5b754c735ae34826ba204da4ca5a20f5782f7e4b1f5a63c6.jpg)
To cancel factory reset, press the [■op)] button.
4. Press the [▶ (Play)] button to reset settings.
5. Turn the power off, and then on again.
Operating the Pedal Switch (Sold Separately)
If you connect a pedal switch (DP-2; sold separately), you can start and stop songs by stepping on the pedal.
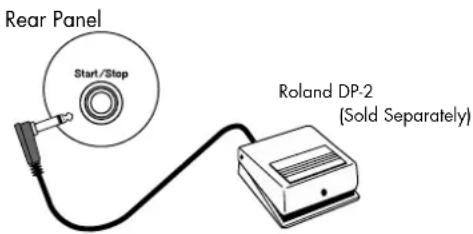
- Connect the pedal switch to the Start/Stop connector on the rear panel.
- Step on the pedal to start playback.
- Step on the pedal again to stop playback.
* The Roland DP-2 pedal switch is sold separately. For details about purchasing the pedal, visit your nearest Roland dealer.
Connecting a MIDI Device
If you connect an external MIDI device, such as a MIDI keyboard or pad controller, you can use the MT-90U (its built-in instrumental sounds) as a sound module.
* When connecting an external MIDI device and using it to operate the MT-90U, the device's MIDI settings must be specified. For details, refer to the owner's manual that came with the MIDI device.
What is MIDI?
The Musical Instrument Digital Interface (MIDI) is the standardized protocol for communication between electronic music devices and computers. Use a MIDI cable to connect devices that have a MIDI connector, and you can send and receive music files.
MIDI In Connector
Rear Panel

Using a MIDI cable (sold separately), connect this with the external device's MIDI Out connector.
The MT-90U receives MIDI data from the external MIDI device. The MT-90U then performs operations in response to the received data, such as playing notes or changing the sound that's used.
Connecting an External Audio Device
By connecting the MT-90U to an external audio device, you can listen to the MT-90U's sounds through different audio speakers or record a performance on a recording device such as a tape recorder.
Use a cable with RCA phono plugs, such as the PJ-1M (sold separately), to connect to external audio devices.
Output R/L Connector
Rear Panel
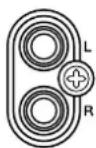
You can connect to an external audio device with an audio cable (sold separately) and play the MT-90U's sounds through the device's speakers.
When you are not using the MT-90U's speakers, remember to turn the speaker switch off.
Connecting and Using a Digital Piano
Connecting a digital piano
You can connect a digital piano and use its speakers to play sounds from the MT-90U.
* To prevent malfunction and/or damage to speakers or other devices, always turn down the volume, and turn off the power on all devices before making any connections.
- Connect the MT-90U's Output L/R jacks on the rear panel to the piano's Input L/R jacks using an audio cable (sold separately).
Sound from the MT-90U can now be heard through the piano's speakers.
- Turn off the speaker switch on the MT-90U's rear panel.
The MT-90U's speakers stop producing sound. Turn the speaker switch on, and sound will be produced by the MT-90U's speakers.
Connecting a Floppy Disk Drive (Sold Separately)
If you connect a floppy disk drive (FD-01 series; sold separately) to the MT-90U, you can play music files saved on a floppy disk.
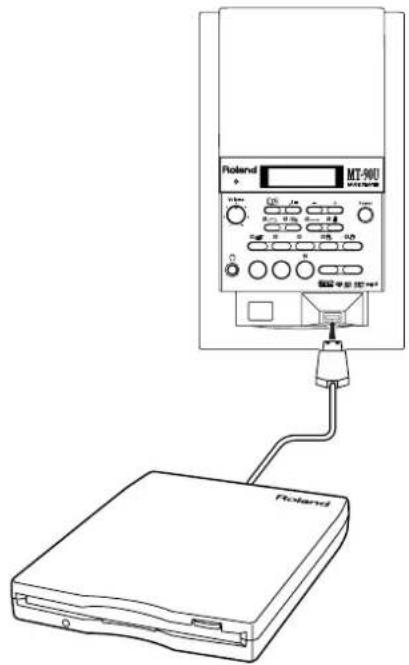
Connecting a floppy disk drive
- Turn off the MT-90U.
- Connect the floppy disk drive's USB cable to the USB connector on the MT-90U's front panel.
- Turn on the MT-90U.
- Insert a floppy disk into the drive.
You can play music files saved on a floppy disk just like data from USB memory (p. 20).
Copying Data from a Floppy Disk to USB Memory
You can copy data from a floppy disk to USB memory without using a computer.
- Press button [4] while pressing the
[ ] (Song)] button.
The function screen appears.
- Press the [◀◀ (Bwd)] or [ (Fwd)] button until "Backup Floppy Disk" appears.
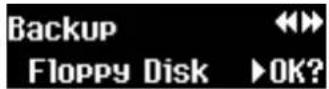
- Press the [Play] button.
- The following screen appears.
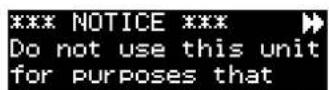
This is a warning regarding the duplication of copyrighted music.
- Press the [▶▶ (Fwd)] button to read the entire warning, until "Backup FD" appears.
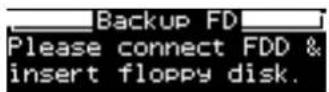
- Connect the floppy disk drive's USB cable to the MT-90U USB connector.
- Insert a floppy disk with music you want to copy into the disk drive.
- When the disk is inserted the following screen appears.
Press the [play] button to start copying the data.
Press the [ ] (Song)] or [ (■bp)] button to stop copying and return to the basic screen.
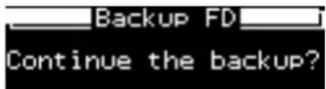
* Do not remove the disk during operation. If you attempt to remove it, the disk could get scratched, rendering it unusable.
- When the MT-90U has finished reading the disk, the following screen appears. Remove the floppy disk, and then disconnect the floppy disk drive. Connect the USB memory to the MT-90U.
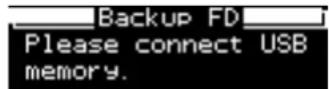
* To avoid losing data, do not connect the USB memory to the MT-90U while the power in on, except for when performing this procedure.
- When the USB memory is connected, the following screen appears.
Press [▶ (Play)] to begin writing data.
Press [Sing] or [Stop] to stop writing and return to the basic screen.
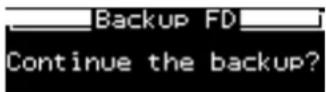
* Do not remove the USB memory during writing. This may result in the loss of data.
- When the MT-90U has finished writing data, the following screen appears.
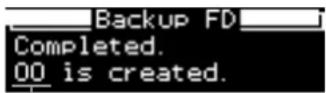
Name of newly created folder
A new folder is created and data copied from the floppy disk is written into this folder.
The folder name appears in the "Backup Complete" screen.
Press the [Sphg)] button to return to the basic screen.
* If "Uncompleted" appears on the screen, back up was unable to be completed due to an error.
This completes the copy of music files.
Connecting a CD Drive (Sold Separately)
You can connect a commercially available CD drive and play music CDs or SMF music files saved on CD-ROMs.
You can also play Roland's VIMA CD-ROMs (VIMA Tunes).
Some notes on using CDs
- The MT-90U cannot play music tracks on CD-R/RW discs, or CDs that contain both music files and tracks (CD extra)
- The MT-90U only supports commercial discs that have the formal CD standard logo, COMPACT disc DIGITAL AUDIO, printed on them.
- The operation and sound quality of non-standard music CD formats, such as CDs that use copyright protection technology, is not guaranteed.
- For details about music CDs that use copyright protection technology, contact the producer of the disc.
- The MT-90U cannot save songs to, or delete songs from a CD. Also, the unit cannot format CDs.
Connecting a CD drive
- Turn off the power to the MT-90U and the CD drive.
- Connect the USB cable that was supplied with the CD drive, to the USB connector on the MT-90U.
- Turn on the MT-90U.
- Turn on the connected CD drive.
* The MT-90U cannot operate a CD drive on USB bus power.
* For details on turning the CD drive ON and OFF, or inserting and removing a CD, refer to the user manual that came with the CD drive.
* Visit the Roland website to check CD drive operation information.
http://www.roland.com/
What are Music Files?
Music files contain musical information such as how long a pitch is played, the force applied to the key or note played, and other such information. Performance data is transmitted to the MT-90U from music files saved in USB memory, and played back as songs. This is different from an audio CD, since the music file does not contain a recording of the sound itself. This makes it possible to change the tempo and key freely, allowing you to use the data in many different ways.
Regarding Copyright
Use of the internal songs and audio files for any purpose other than private, personal enjoyment without the permission of the copyright holder is prohibited by law. Additionally, this data must not be copied or used in a secondary copyrighted work without the permission of the copyright holder. Please be aware that if you create derivative works that are based on existing copyrighted material, such as commercially available SMF music files, such works may violate copyright law if used for any purpose other than personal enjoyment. Roland takes no responsibility for any copyright violation you may commit by creating such works.
The MT-90U Allows You To Use the Following Music Files
VIMA TUNES

VIMA TUNES is a Roland specification for music files that contain image and lyric data, allowing you to enjoy songs with lyrics and images simultaneously. When data bearing the "VIMA TUNES" logo is played back on a device that bears the same logo, lyrics can be shown on the screen of a connected external display or television, letting you enjoy karaoke or watch a slide show.
* This unit (MT-90U) cannot play back VIMA TUNES images.
SMF Music Files
SMFs (Standard MIDI Files) use a standard music file format that was formulated so that media containing music files could be widely compatible, regardless of the manufacturer of the listening device. An enormous variety of music is available, whether it be for listening, practicing musical instruments, or karaoke, etc.
SMF with Lyrics

"SMF with Lyrics" refers to a SMF (Standard MIDI File) that contains lyrics. When Music Files carrying the "SMF with Lyrics" logo are played back on the MT-90U, the lyrics will appear in its display.
General MIDI

General MIDI is a set of recommendations which seeks to provide a way to go beyond the limitations of proprietary designs and standardize the MIDI capabilities of sound generating devices. Sound generating devices and music files that meet the General MIDI standard bear the General MIDI logo. Music files bearing the General MIDI logo can be played back using any General MIDI sound generating unit to produce essentially the same musical performance.
General MIDI 2

The upwardly compatible General MIDI 2 recommendations pick up where the original General MIDI left off, offering enhanced expressive capabilities and even greater compatibility. Issues that were not covered by the original General MIDI recommendations, such as how sounds are to be edited, and how effects should be handled, have now been precisely defined. Moreover, the available sounds have been expanded. General MIDI 2 compliant sound generators are capable of reliably playing back music files that carry either the General MIDI or General MIDI 2 logo. In some cases, the conventional form of General MIDI, which does not include the new enhancements, is referred to as "General MIDI 1" as a way of distinguishing it from General MIDI 2.
GS Format

The GS Format is Roland's set of specifications for standardizing the performance of sound generating devices. In addition to including support for everything defined by the General MIDI, the highly compatible GS Format additionally offers an expanded number of sounds, provides for the editing of sounds, and spells out many details for a wide range of extra features, including effects such as reverb and chorus. Designed with the future in mind, the GS Format can readily include new sounds and support new hardware features when they arrive. Since it is upwardly compatible with General MIDI, Roland's GS Format is capable of reliably playing back GM Scores equally as well as it plays back music files that have been specifically created with the GS Format.
XGlite

XG is YAMAHA Corporation's tone generator format. It defines the ways in which voices are expanded or edited, along with the structure and type of effects, in addition to the General MIDI 1 specification. XGlite is a simplified version of XG tone generation format. You can play back any XG music files using an XGlite tone generator. However, keep in mind that some music files may play back differently compared to the original files, due to the reduced set of control parameters and effects.
Formatting the USB Memory
Setting up USB memory so that it is compatible for use on the MT-90U is called formatting. If the USB memory and MT-90U format do not match, you cannot use the USB memory with the unit. You need to format new USB memory before using it with the MT-90U.
We recommend using Roland USB memory. We cannot guarantee that other commercially available USB memory will operate correctly with the unit.
* When you format the USB memory, all previous content is erased.
* If you are reusing a USB memory, make sure that the memory doesn't contain any data that you don't want to lose.
* USB memory that you have formatted with a computer may not work with the MT-90U. For this reason, make sure you format the USB memory with the MT-90U before using it.
- Connect the USB memory to the MT-90U.
- Press [4] while pressing the [ ] (Song) button.
The settings screen appears.
- Press the [ (Bwd)] or [ (Fwd)] button until "Format Memory" appears.
The following screen appears.
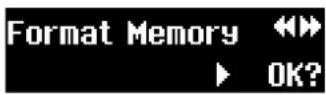
- Press the [+] button.
The following screen appears and the [▶ (Play)] button indicator flashes.
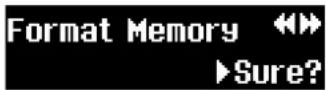
To cancel formatting and return to the previous screen, press the [ ] (Song)] button.
- Press the [▶ (Play)] button to begin formatting.
"Formatting..." appears on the display. When formatting is finished the previous screen appears.
* If the power is turned off during formatting, do not remove the USB memory from the MT-90U. Doing so may damage the unit.
Copying Music Files from a Computer to USB Memory
You can copy music files from a computer to USB memory and play them on the MT-90U.
- Connect the MT-90U-formatted USB memory to the computer.
- Copy music file files onto the USB memory.
When you connect the USB memory to the MT-90U, you can play the music file.
Some notes on copying music files
- Save music files in SMF format.
- Up to eight alphanumeric characters can be used in the file name.
- Make sure the file extension is ".MID." If the extension is incorrect or unspecified, the MT-90U will not recognize the file.
- Convert the SMF format to "0." If format 1 is used, the file may not play normally.
- If you copy music files all at once from the computer to the USB memory, the song order may change. When you want save files on the USB memory in song order, copy the music files one at a time in the order that you want.
NOTE The MT-90U may not be able to play files that are too large.
NOTE Roland does not guarantee restoration and disclaims any responsibility for the loss of data while using the MT-90U.
| Problem | Cause / Solution Page | |
| Cannot turn the power on. | Are the AC adaptor and power cord connected? | p. 12 |
| Cannot hear any sound from the MT-90U. | Is the volume knob turned all the way to the left? | p. 14 |
| Are headphones connected? p. 14 | ||
| Is the speaker switch turned off? p. 9 | ||
| Is the MT-90U correctly connected to the external device? p. 54 | ||
| Are all the devices turned on? | ||
| Has the volume been lowered to "0" with the remote control? | ||
| Notes drop out. | The maximum polyphony of the MT-90U is 128 notes. When performing with a song or when using the pedal a lot during a performance, the number of notes being expressed at any one moment may exceed 128. When the total exceeds 128 notes, then some will be omitted. | |
| The song doesn't play. | Is the track button's indicator on?Tracks do not play when the track indicator is not lit. Press the track button so the indicator is lit. | p. 28 |
| Is the music file in an MT-90U supported file format? p. 42 | ||
| The song doesn't play immediately. | SMF data has two formats, format 0 and format 1. If the data is in format 1, it may take some time until the song plays. To determine the type of format you are using, see the documentation that came with the data. | |
| Certain instrument sounds are missing. | Is the song set to play only specific parts? | p. 28, p. 39 |
| Is Center Cancel turned on? p. 44 | ||
| Cannot rewind or fast forward. | You cannot rewind or fast forward while the MT-90U is reading data from the USB memory. | p. 20 |
| If the song's file size is very large, you may not be able to rewind or fast forward. | ||
| Cannot return to the beginning of the song even after pressing [ I◀ (Reset)]. | Some music files contain data that may be set to stop in the middle of the song. Such files return to the set stop point when you press [ I◀ (Reset)]. However, if you continue to press [ I◀ (Reset)] a number of times, the song will return to the beginning. | |
| The song goes out of tune or the pitch drifts. | Has the song been transposed? | p. 36 |
| Are the tuning settings set appropriately? p. 17 | ||
| The track buttons aren't working. | Is the 16 track screen on the display?When the 16 track screen is shown, the track buttons do not work. | p. 39 |
| The pedal doesn't work or is stuck. | Is the pedal connected correctly?Connect the pedal to the Start/Stop jack on the rear panel. | p. 53 |
| The lyrics aren't displayed properly on the screen. | Some music files don't contain lyric data, so they don't display lyrics. | |
| Change the lyric display language and the lyrics may appear normally. p. 49 | ||
| Try displaying the lyrics again. Press [ [Song]] while the lyrics are displayed and lyric display is cancelled. Press [ ▶ (Play) to display the lyrics again. | ||
| Cannot use the metronome, count in, part, mute, or solo functions. | You cannot use these functions when playing audio data. |
| Indication | Description |
| PU | When the song has a pick up measure (notes start before the first full measure), “PU” appears on the display, and then measure numbers appear. |
| Error: 2 | An error occurred while writing the data. The memory protect tab on the floppy disk or the USB memory is set to the “protect” position (cannot write data). Move the tab to the “write” position (can write data) (p. 4). |
| Error: 10 | There is no media (floppy disk, USB memory, or CD) inserted in the drive. Insert media into the drive, and then try again. |
| Error: 11 | There is not enough space to save the data.Insert different media (USB memory or floppy disk) or delete unnecessary data, and then try again. |
| Error: 14 | An error occurred while reading the data. The media may be damaged. Insert different media (USB memory, floppy disk, or CD), and then try again. Alternatively, reformat the USB memory or floppy disk. |
| Error: 15 | Cannot read the music file. This is an unsupported format. |
| Error: 16 | The MT-90U could not read the data in time. Wait a few seconds, press the [▶(Play)] button again, and the song should begin to play. |
| Error: 18 | This is an unsupported audio format. The MT-90U supports WAV, AIFF, or MP3 audio formats. |
| Error: 30 | The MT-90U’s internal memory is full. |
| Error: 40 | The MT-90U could not process the data because the external MIDI device sent too much at one time. Decrease the amount of MIDI data sent to the MT-90U. |
| Error: 41 | A communication error occurred, such as the MIDI cable being disconnected. Check that the MIDI cable is connected correctly. |
| Error: 43 | A MIDI communication error occurred.Check the MIDI cable or external MIDI device. |
| Error: 51 | A system error occurred. Perform the operation again. If this message persists, contact the nearest Roland service center. |
| Error: 65 | A power surge was detected through the external memory connector. Check the external device for any malfunctions, and then turn the power to the external device off and then on again. |

External memory: USB memory, etc.

When an error message is displayed, press the [Song] button to return to the previous screen.
| No. | Song Title Melodic Instrument | |
| 1 | Sonata No. 2 | Piano |
| 2 | Menuett (Bach) | Piano |
| 3 | Gavotte | Piano |
| 4 | La Cumparsite | Accordion |
| 5 | Home on the Range | Harmonica |
| 6 | Alhambra | Guitar |
| 7 | Minuet (Boccherini) | Violin |
| 8 | Le Cynge | Cello |
| 9 | When the Saints Go Marching In | Trumpet |
| 10 | Little Brown Jug | Saxophone |
| 11 | Thais | Flute |
| 12 | Clarinet Polka | Clarinet |
| 13 | Rondo | Recorder |
| 14 | Koujou no Tsuki | Taisho Goto (Japanese Harp) |
The MT-90U is equipped with the 14 demo songs listed above which you can play back with different tempo and pitch.
Press the [▶ (Play)] button to play back a selected song. Pressing button [4] mutes the melody, which you can play for practice.

All rights reserved. Unauthorized use of this material for purposes other than private, personal enjoyment is a violation of applicable laws.

No data for the music that is played will be output from USB MIDI OUT.
MIDI Implementation Chart
Date : Feb. 1, 2008
Version : 1.00
| Function... | Transmitted Recognized Remarks | |||
| Basic Channel | Default Changed | X X | 1 - 16 1 - 16 | |
| Mode | Default Messages Altered | X X********** | Mode 3 Mode 3, 4 (M=1) | *2 |
| Note Number : True Voice | X********** | 0 - 127 0 - 127 | ||
| Velocity | Note ON Note OFF | X X | O O *1 | |
| After Touch | Key's Ch's | X X | O *1 O *1 | |
| Pitch Bend | X | O *1 | ||
| Control Change | 0, 32 1 5 6, 38 7 10 11 64 65 66 67 84 91 93 98, 99 100, 101 | X X X X X X X X X X X X X X X X | O *1 O *1 O *1 O *1 O *1 O *1 O *1 O *1 O *1 O *1 O *1 O *1 O *1 O *1 O *1 O *1 O *1 O *1 O *1 O *1 O *1 O *1 O *1 O *1 O *1 O *1 O *1 O *1 O *1 O *1 O *1 O *1 O *1 O *1 O*1 O *1 O *1 O *1 O *1 O *1 O *1 O *1 O *1 O *1 O *1 O *1 O *1 O *1 O *1 O *1 O *1 O *1 O *1 O *1 O *1 O *1 O *1 O *1 O *1 O *1 O *1 O *1 O *1 O *1 O *1 O *1 O *1 O * 1 O *1 O *1 O *1 O *1 O *1 O *1 O *1 O *1 O *1 O *1 O *1 O *1 O *1 O *1 O *1 O *1 O *1 O *1 O *1 O *1 O *1 O *1 O *1 O *1 O *1 O *1 O *1 O *1 O *1 O *1 O *1 O *1 O *2 Recognized as M=1 even if M≠1 | |
| Prog Change : True # | X********** | O *1 O - 127 | Program number 1-128 | |
| System Exclusive | X | O | ||
| System Common : Song Pos : Song Sel : Tune | X X X | X X X | ||
| System Real Time : Commands | X X | X X | ||
| Aux Message : All sound off : Reset all controllers : Local Control : All Notes OFF : Active Sensing : Reset | X X X X X X | O(120, 126, 127) O X O(123-125) O X | ||
| Notes | *1 O x is selectable by SysEx *2 Recognized as M=1 even if M≠1 | |||
Mode 1 : OMNI ON, POLY
Mode 2 : OMNI ON, MONO
O: Yes
Mode 3 : OMNI OFF, POLY
Mode 4 : OMNI OFF, MONO
X: No
MT-90U Music Player
- External Memory
USB Memory (sold separately)
Floppy Disk
* Read only
* USB 3.5 in. floppy disk drive (FD-01 series) required (sold separately)
CD-ROM
Audio CD
* Read only
* Commercial USB CD drive required
• Supported Data
Standard MIDI Files (format 0/1)
Roland Original Format
Audio files
(WAV; 44.1 kHz, 16bit linear format, MP3; 44.1 kHz, 32 to 320 kbps)
Audio CD
* Commercial USB CD drive required
- Tracks
16 tracks
- Control
Reset, Stop, Play, Bwd, Fwd, Repeat, Marker, Song, Tempo, [+], [-], Track Selection, Count In, Metronome (MIDI only)
Center Cancel (audio only)
- Tempo
Quarter note = 10 to 500 (MIDI only)
75 to 125% (audio only)
- Resolution
120 ticks per quarter note (MIDI only)
- Transpose
Transpose: -6 to +5 (semitones)
- Demo Songs
14 songs
- Max. Polyphony
128 voices (MIDI only)
- Tones
348 tones (including 8 drum sets, 1 effects set)
- Internal Sounds
Conforms to GM2 system/GS format/XGlite supported
- Master Tuning
415.3 Hz - 466.2 Hz (0.1 Hz units)
- Effects
Reverb (MIDI only)
Chorus (MIDI only)
Sound Control: Sharp, Clear, Power
- Metronome
Time Signatures: 2/2, 0/4, 2/4, 3/4, 4/4, 5/4, 6/4, 7/4, 3/8, 6/8, 9/8, 12/8
Volume: 11 levels
Pattern: 11 patterns
Infrared Transmission
Mic Echo
Song List
Floppy Disk Backup
- Display
Beat Indicator
122 x 32 dot, Graphic LCD (with backlight)
- Language
Japanese (song title, lyrics), English
- Lyric Display
Yes (LCD display)
- Controls
Volume
Mic volume
Mic echo
Speaker switch
- Rated Power Output
5 W
- Speakers
10 cm x 1
- Connectors
External memory connector: USB type A USB connector: USB type B
Output jack (R/L): RCA pin type
Microphone jack (Mono): Standard type
Headphones jack: Stereo, mini type
MIDI In connector
Start/Stop jack
- Power Supply
DC 9 V: AC adaptor
- Current Draw
2000 mA
- Measurements
165 (W) × 186 (D) × 270 (H) mm 6-1/2 (W) × 7-3/8 (D) × 10-11/16 (H) inches
- Weight
2.5 Kg / 5 lbs. 9 oz.
- Accessories
Owner's manual, Power cord, AC adaptor, Remote control, Lithium battery (CR2025)
- Options (sold separately)
USB Memory (M-UF1GB) Floppy Disk Drive (FD-01 series) Roland Microphone (DR-10/20) Pedal Switch (DP-2)
* In the interest of product improvement, the specifications and/or appearance of this unit are subject to change without prior notice.
A
All Song Play 23
Random 50
Audio Files 42, 46
B
Backward 21
Basic Display 11
C
Center Cancel 44
Connecting
AC Adaptor 12
Audio Device 54
CD Drive 56
Digital Piano 54
Floppy Disk Drive 55
MIDI Device 54
USB Memory 19
Copy
From computer 58
From floppy disk 55
Count In 29
D
Display Brightness 15
F
Factory Reset 53
Forward 21
G
General MIDI/General MIDI 2 57
GS Format 57
H
Headphones 14
|
Intro Countdown 29
L
Lyric Display
Cancel 50
Language 49
M
Marker 30
Erase 31
Middle of a measure 49
Move 33
Playback 31
Repeating playback 32
Metronome 26
Settings 47
Tempo 26
Time signature 27
Volume 27
Microphone 15
Echo 15
MIDI 54
Minus One 39
Music Files 57
Mute 28,40
P
Part
16 track display 39
Mute 40
Pedal Switch 53
Playback 20
Audio files 43
Each part 28
Marked section 31
Repeat all songs 23
Repeat one song 22
Track 39
Playback Transpose 44
Power
On 13
R
Remote Control 16
Repeat
All songs (in order) 23
All songs (random) 50
One song 22
Reset 22
Reverb Effects 37
S
SMF Music Files 57
Solo 39
Sound Control 38
Standard Pitch 17
T
Tap Tempo 25
Tempo 24
Tempo Mute 35
Time Signature 27
Time Stretch 45
Track 39
Track Assign 51
Track Buttons 28
Transposition 36
Tuning 17
U
USB Driver 52
USB Memory 19
Format 58
Setting 52
V
VIMA TUNES 57
Volume
Audio files 51
Headphones 14
Master 14
Metronome 27
Microphone 15
X
XGlite 57
MEMO
MEMO
IMPORTANT: THE WIRES IN THIS MAINS LEAD ARE COLOURED IN ACCORDANCE WITH THE FOLLOWING CODE.
BLUE: NEUTRAL
BROWN: LIVE
As the colours of the wires in the mains lead of this apparatus may not correspond with the coloured markings identifying the terminals in your plug, proceed as follows:
The wire which is coloured BLUE must be connected to the terminal which is marked with the letter N or coloured BLACK. The wire which is coloured BROWN must be connected to the terminal which is marked with the letter L or coloured RED.
Under no circumstances must either of the above wires be connected to the earth terminal of a three pin plug.
For EU Countries
Apparatus containing Lithium batteries
ADVARSEL!
Danger of explosion if battery is incorrectly replaced. Replace only with the same or equivalent type recommended by the manufacturer. Discard used batteries according to the manufacturer's instructions.
WARNING
This product complies with the requirements of EMC Directive 2004/108/EC.
For the USA
FEDERAL COMMUNICATIONS COMMISSION RADIO FREQUENCY INTERFERENCE STATEMENT
This equipment has been tested and found to comply with the limits for a Class B digital device, pursuant to Part 15 of the FCC Rules. These limits are designed to provide reasonable protection against harmful interference in a residential installation. This equipment generates, uses, and can radiate radio frequency energy and, if not installed and used in accordance with the instructions, may cause harmful interference to radio communications. However, there is no guarantee that interference will not occur in a particular installation. If this equipment does cause harmful interference to radio or television reception, which can be determined by turning the equipment off and on, the user is encouraged to try to correct the interference by one or more of the following measures:
- Reorient or relocate the receiving antenna.
— Increase the separation between the equipment and receiver. - Connect the equipment into an outlet on a circuit different from that to which the receiver is connected.
- Consult the dealer or an experienced radio/TV technician for help.
This device complies with Part 15 of the FCC Rules. Operation is subject to the following two conditions:
this device may not cause harmful interference, and
this device must accept any interference received, including interference that may cause undesired operation.
Unauthorized changes or modification to this system can void the users authority to operate this equipment.
This equipment requires shielded interface cables in order to meet FCC class B Limit.
For Canada
NOTICE
This Class B digital apparatus meets all requirements of the Canadian Interference-Causing Equipment Regulations.
AVIS
DECLARATION OF CONFORMITY Compliance Information Statement
Model Name : MT-90U
Type of Equipment :
Responsible Party :
Music Player
Roland Corporation U.S
5100 S. Eastern Avenue, Los Angeles, CA 90040-2938
Telephone :
(323) 890-3700
For EU Countries


This symbol indicates that in EU countries, this product must be collected separately from household waste, as defined in each region. Products bearing this symbol must not be discarded together with household waste.

Al Fanny Trading Office 9, EBN Hagar Al Askalany Street, ARD E1 Golf, Heliopolis, Cairo 11341, EGYPT TEL: (022)-418-5531
REUNION
Maison FO - YAM Marcel 25 Rue Jules Hermann, Chaudron - BP79 97 491 Ste Clotilde Cedex, REUNION ISLAND TEL: (0262) 218-429
SOUTH AFRICA
T.O.M.S. Sound & Music (Pty)Ltd.
2 ASTRON ROAD DENVER JOHANNESBURG ZA 2195, SOUTH AFRICA TEL: (011)417 3400
Paul Bothner(PTY)Ltd. Royal Cape Park, Unit 24 Londonderry Road, Ottery 7800 Cape Town, SOUTH AFRICA TEL: (021) 799 4900
ASIA
CHINA
Roland Shanghai Electronics Co., Ltd. 5F. No.1500 Pingliang Road Shanghai 200090, CHINA TEL: (021) 5580-0800
Roland Shanghai Electronics Co., Ltd. (BEIJING OFFICE) 10F. No.18 3 Section Anhuaxil Chaoyang District Beijing
100011 CHINA TEL: (010) 6426-5050
HONG KONG
Tom Lee Music Co., Ltd. Service Division 22-32 Pun Shan Street, Tsuen Wan, New Territories, HONG KONG TEL: 2415 0911
Parsons Music Ltd. 8th Floor, Railway Plaza, 39 Chatham Road South, T.S.T, Kowloon, HONG KONG TEL: 2333 1863
INDIA
Rivera Digitec (India) Pvt. Ltd. 411, Nirman Kendra Mahalaxmi Flats Compound Off. Dr. Edwin Moses Road, Mumbai-400011, INDIA TEL: (022) 2493 9051
INDONESIA
PT Citra IntiRama Jl. Cideng Timur No. 15J-15O Jakarta Pusat INDONESIA TEL: (021) 6324170
KOREA
Cosmos Corporation 1461-9, Seocho-Dong, Seocho Ku, Seoul, KOREA TEL: (02) 3486-8855
MALAYSIA
Roland Asia Pacific Sdn. Bhd. 45-1, Block C2, Jalan PJU 1/39, Dataran Prima, 47301 Petaling Jaya, Selangor, MALAYSIA TEL: (03) 7805-3263
VIET NAM
Suoi Nhac Company, Ltd 370 Cach Mang Thang Tam St. Dist.3, Ho Chi Minh City, VIET NAM TEL: 9316540
PHILIPPINES
G.A. Yupangco & Co. Inc. 339 Gil J. Puyat Avenue Makati, Metro Manila 1200, PHILIPPINES TEL: (02) 899 9801
SINGAPORE
SWEE LEE MUSIC COMPANY PTE. LTD. 150 Sims Drive, SINGAPORE 387381 TEL: 6846-3676
TAIWAN
ROLAND TAIWAN ENTERPRISE CO., LTD. Room 5, 9fl. No. 112 Chung Shan N.Road Sec.2, Taipei, TAIWAN, R.O.C. TEL: (02) 2561 3339
THAILAND
Theera Music Co., Ltd. 100-108 Soi Verng Nakornkasem, New Road, Sumpantawongse, Bangkok 10100 THAILAND TEL: (02) 224-8821
AUSTRALIA/ NEW ZEALAND
AUSTRALIA/
NEW ZEALAND Roland Corporation
Australia Pty., Ltd. 38 Campbell Avenue Dee Why West. NSW 2099 AUSTRALIA
For Australia Tel: (02) 9982 8266 For New Zealand Tel: (09) 3098 715
CENTRAL/LATIN AMERICA
ARGENTINA
Instrumentos Musicales S.A. Av.Santa Fe 2055 (1123) Buenos Aires ARGENTINA TEL: (011) 4508-2700
BARBADOS
A&B Music Supplies LTD 12 Webster Industrial Park Wildey, St.Michael, Barbados TEL: (246)430-1100
BRAZIL
Roland Brasil Ltda. Rua San Jose, 780 Sala B Parque Industrial San Jose Cotia - Sao Paulo - SP, BRAZIL TEL: (011) 4615 5666
CHILE
Comercial Fancy II S.A. Rut.: 96.919.420-1
Nataniel Cox #739, 4th Flo Santiago - Centro, CHILE TEL - (02) 688-9540
COLOMBIA
Centro Musical Ltda. Cra 43 B No 25 A 41 Bododega 9 Medellin, Colombia TEL: (574)3812529
COSTA RICA
JUAN Bansbach Instrumentos Musicales Ave.1. Calle 11, Apartado 10237, San Jose, COSTA RICA TEL: 258-0211
CURACAO
Zeelandia Music Center Inc. Orionweg 30 Curacao, Netherland Antilles TEL:(305)5926866
DOMINICAN REPUBLIC
Instrumentos Fernando Giraldez Calle Proyecto Central No.3 Ens.La Esperilla Santo Domingo, Dominican Republic TEL:(809) 683 0305
ECUADOR
Mas Musika Rumichaca 822 y Zaruma Guayaquil - Ecuador TEL:(593-4)2302364
EL SALVADOR
OMNI MUSIC 75 Avenida Norte y Final Alameda Juan Pablo II, Edificio No.4010 San Salvador, EL SALVADOR TEL: 262-0788
GUATEMALA
Casa Instrumental Calzada Roosevelt 34-01, zona 11 Ciudad de Guatemala Guatemala TEL:(502) 599-2888
HONDURAS
Almacen Pajaro Azul S.A. de C.V. BO.Paz Barahona 3 Ave.11 Calle S.O San Pedro Sula, Honduras TEL: (504) 553-2029
MARTINIQUE
Roland Ireland G2 Calmount Park, Calmount Avenue, Dublin 12 Republic of IRELAND TEL: (01) 4294444
ITALY
Roland Italy S. p. A. Viale delle Industrie 8, 20020 Arese, Milano, ITALY TEL: (02) 937-78300
NORWAY
Roland Scandinavia Avd.
Kontor Norge Lilleakerveien 2 Postboks 95 Lilleaker N-0216 Oslo NORWAY TEL: 2273 0074
POLAND
ROLAND POLSKA SP. Z O.O. UL. Gibraltararska 4. PL-03 664 Warszawa POLAND TEL: (022) 679 4419
PORTUGAL
Roland Iberia, S.L. Portugal Office Cais das Pedras, 8/9-1 Dto 4050-465, Porto, PORTUGAL. TEL: 22 608 00 60
ROMANIA
FBS LINES Piata Libertatii 1, 535500 Gheorgheni, ROMANIA TEL: (266) 364 609
RUSSIA
MuTek Dorozhnaya ul.3,korp.6 117 545 Moscow, RUSSIA TEL: (095) 981-4967
SLOVAKIA
MOCO INC. No.41 Nike St., Dr.Shariyati Ave., Roberoye Cerahe Mirdamad Tehran, IRAN TEL: (021)-2285-4169
ISRAEL
Halilit P. Greenspoon & Sons Ltd. 8 Retzif Ha'alia Hashnia St. Tel-Aviv-Yafo ISRAEL TEL: (03) 6823666
JORDAN
Zak Electronics & Musical Instruments Co. L.L.C. Zabeel Road, Al Sherooq Bldg., No. 14, Ground Floor, Dubai, U.A.E. TEL: (04) 3360715
NORTH AMERICA
CANADA
Roland Canada Ltd.
(Head Office)
5480 Parkwood Way Richmond B. C., V6V 2M4 CANADA TEL: (604) 270 6626
Roland Canada Ltd.
(Toronto Office)
170 Admiral Boulevard Mississauga On L5T 2N6 CANADA TEL: (905) 362 9707
U.S.A.
Roland Corporation U.S. 5100 S. Eastern Avenue Los Angeles, CA 90040-2938, U. S. A. TEL: (323) 890 3700
- USING THE UNIT SAFELY
- INSTRUCTIONS FOR THE PREVENTION OF FIRE, ELECTRIC SHOCK, OR INJURY TO PERSONS
- ALWAYS OBSERVE THE FOLLOWING
- WARNING
- CAUTION
- Power Supply: Use of Batteries
- Placement
- Maintenance
- Additional Precautions
- Handling Floppy Disks
- Using USB Memory
- Handling CD-ROMs
- USING THE UNIT SAFELY....2
- Important Notes...... 4
- Panel Descriptions....8
- MT-90U Basic Operation 12
- Other Functions 47
- About Music Files.... 57
- Troubleshooting....59
- Errors and Other Displays 60
- Demo Song List....61
- MIDI Implementation Chart.... 62
- Main Specifications....63
- Index 65
- Front Panel
- Display
- Beat Indicator
- [Volume] Knob
- [ ] (Song)] Button
- [ J = (Tempo)] Button
- [+ (Inc)] [- (Dec)] Buttons
- [ (Repeat)] Button
- [A B (Mark)] Button
- [●●●▶ (Count In)] Button
- 10.[ (Metronome)] Button
- 11.Power Button
- Track Buttons
- Headphones Jack
- 14.[◀(Reset)] Button
- 15.[■(Stop)] Button
- 16.[(Play)] Button
- 17.[◀(Bwd)] Button
- 18.[▶▶(Fwd)] Button
- 19.Remote Sensor
- 20.USB Connector
- Rear Panel
- DC In Jack
- Mic
- Mic Echo Knob
- Mic Volume Knob
- Speaker Switch
- Output L/R Jacks
- Cord Hook
- MIDI In Connector
- Start/Stop Jack
- USB Connector
- Grounding Terminal
- Remote Control
- [ (REPEAT)] Button
- [◀ (BWD)] Button
- [▶ (FWD)] Button
- [I◀ (RESET)] Button
- [■ (STOP)] Button
- [▶ (PLAY)] Button
- SONG [+] [-] Buttons
- TEMPO [+] [-] Buttons
- VOLUME [+] [-] Buttons
- Screen
- Basic Screen
- Marker Screen
- Track Screen
- Settings Screen
- Folder Screen
- Setting Up
- Connecting the AC Adaptor
- Turning the Power On and Off
- Turning the power on
- Set the volume to its lowest level by turning the [Volume] knob all the way to the left.
- Press the [Power] button to turn on the power.
- Turning the power off
- Press the [Power] button to turn off the power.
- Adjusting the Volume
- Use the [Volume] knob to adjust the volume.
- Connecting Headphones
- Connect headphones to the headphones jack.
- Some notes on using headphones
- Adjusting the Display Brightness
- Connecting the Microphone
- Some notes on using a microphone
- Using the Remote Control
- Preparing the remote control
- Changing the remote control's battery
- When using the remote control
- To use the remote control, point the remote control toward the MT-90U's sensor and operate it within the specified operating range.
- Some notes on using the remote control
- Tuning with the MT-90U
- Press button [1] while pressing the [(Song)] button.
- Press the [◀◀ (Bwd)] or [ (Fwd)] button to select the item to be set.
- Press the [+] or [-] button to change the setting's value.
- Press the [▶ (Play)] button to start playing the tuning pitch.
- Press the [■ (Stop)] button to stop playing the tuning pitch.
- When you have finished tuning, press the [ ] (Song)] button.
- Shortcut: changing the tuning pitch
- Press the [+] or [-] button while pressing the [(Song)] button.
- Listening to Music
- Connecting the USB Memory
- Playing Songs
- Press the [ ] (Song)] button.
- Press the [+] or [-] button to select a song.
- Press the [ (Play)] button.
- To stop playing the song, press the [■ (Stop)] button.
- Rewinding and fast forwarding a song
- Press the [◀◀ (Bwd)] or [ (Fwd)] button to move to the sections and measures of music you want to hear.
- Moving to the beginning or end of a song
- Repeating One Song
- Repeating All Songs (All Song Play)
- Press the [ (play)] button while pressing the [ (Song)] button.
- Press the [■ (Stop)] button to stop playing the songs.
- Changing the Tempo
- Changing the Tempo by Beat
- Press the [ J = (Tempo)] button.
- i 1: NocturneNo.2
- Press the [+] or [-] button to adjust the tempo.
- To return to the original tempo, press the [ I◀ (Reset)] button while pressing the [ J = (Tempo)] button.
- Changing the Tempo by Tapping (Tap Tempo)
- Repeatedly tap on the [Tempo] button at the tempo you want to set.
- Using the Metronome
- Changing the Tempo of the Metronome
- Changing the Volume of the Metronome
- Press the [+] or [-] button while pressing the [ A (Metronome)] button.
- Changing the Metronome's Time Signature
- Press the [ (Bvd)] or [ (Fwd)] button while pressing the [ (Metronome)] button to select a time signature.
- Shortcut: changing the metronome's time signature
- Press the [ (Metronome)] button.
- Press the [+] or [-] button to select the time signature.
- Practicing with a Song (Track Buttons)
- Counting in to a Song
- Marking a Section to Repeat for Practice
- Playing a Marked Section
- Erasing a Marker
- Repeating a Marked Section
- When only A is marked
- When only B is marked
- Moving a Mark
- Moving markers A and B together
- Press the [◀ (Bwd)] or [ (Fwd)] button while pressing the [ (Mark) button.
- Shortcut: moving marker A and marker B together
- Removing Tempo Changes for Practice
- Press the [■ (Stop)] button while pressing the [Tempo] button.
- To cancel Tempo Mute, press the [■ (Stop)] button while pressing the [Tempo] button again.
- Changing the Key (Transposition)
- Changing Reverb Effects
- Shortcut: changing reverb effects
- Changing Playback Sound Quality (Sound Control)
- Listening to Specific Instrument Parts
- Playing Only One Part (Solo)
- Press button [1].
- Press the [▶ (Play)] button to begin playing the song.
- To cancel solo play, press button [1] again.
- Turning Off Specific Parts (Mute)
- Press button [2] while pressing the [ (Song)] button.
- Press buttons [3] or [4] to move to the part that you want to play.
- Press button [2] to set parts to [●] (play) or [○] (mute).
- Press the [▶ (Play)] button and the specified parts of the song play.
- Displaying the Tone Names of Parts
- Playing Audio Files
- Supported audio file formats
- Playing Audio Files from USB Memory
- Playing a Music CD from the CD Drive (Sold Separately)
- Singing Karaoke with Audio Files or a Music CD (Center Cancel)
- Changing the Key (Playback Transpose)
- Changing the Tempo (Time Stretch)
- To return to the original tempo, press the [I◀ (Reset)] button while pressing the [♩ = (Tempo)] button.
- Creating a List of Your Favorite Songs (Song List)
- Deleting a Song from the Song List
- Changing the Metronome Settings
- Press the [ (Metronome)] button while pressing the [ (Song)] button.
- Press the [◀◀ (Bwd)] or [ (Fwd)] button to select the items you want to set.
- Press the [-] or [+] button to change the value of the setting.
- Press the [ ] (Song)] button to return to the basic screen.
- Changing Count Settings
- Press the [●●●▶ (Count In)] button while
- Press the [ ◀◀ (Bwd)] or [ ▶▶ (Fwd)] button to select the items you want to set.
- Press the [-] or [+] button to change the setting value.
- Marking the Middle of a Measure
- Press the [A B (Mark)] button while pressing
- Press the [+] or [-] button to change the setting.
- Press the [ ] (Song)] button to return to the basic screen.
- Changing Lyric Display Settings
- Press button [4] while pressing the
- Press the [◀ (Bwd)] or [▶ (Fwd)] button until "Lyric Language" appears.
- Press the [+] or [-] button to change the setting.
- Canceling Lyric Display
- Press the [◀ (Bwd)] or [ (Fwd)] button until "Lyric Display" appears.
- Playing Songs in Random Order
- Press button [4] while pressing the [ ] (Song)] button.
- Press the [◀ (Bwd)] or [ (Fwd)] button until "All Song Play" appears.
- Assigning Parts to Track Buttons (Track Assign)
- Press the [◀◀ (Bwd)] or [ (Fwd)] button until "Track Assign" appears.
- Adjusting the Volume of Audio Files
- Changing USB Memory Settings
- Press the [◀ (Bwd)] or [ (Fwd)] button until "External Memory" appears.
- Changing USB Driver Settings
- Press the [◀ (Bwd)] or [ (Fwd)] button until "USB Driver" appears.
- Turn the power off, and then on again.
- Returning to the Factory Default Settings (Factory Reset)
- Target Settings
- Press the [◀ (Bwd)] or [ (Fwd)] button until "Factory Reset" appears.
- Press the [+] button.
- Press the [▶ (Play)] button to reset settings.
- Operating the Pedal Switch (Sold Separately)
- Connecting a MIDI Device
- What is MIDI?
- MIDI In Connector
- Connecting an External Audio Device
- Output R/L Connector
- Connecting and Using a Digital Piano
- Connecting a digital piano
- Connecting a Floppy Disk Drive (Sold Separately)
- Connecting a floppy disk drive
- Copying Data from a Floppy Disk to USB Memory
- Connecting a CD Drive (Sold Separately)
- Some notes on using CDs
- Connecting a CD drive
- What are Music Files?
- Regarding Copyright
- The MT-90U Allows You To Use the Following Music Files
- VIMA TUNES
- SMF Music Files
- SMF with Lyrics
- General MIDI
- General MIDI 2
- GS Format
- XGlite
- Formatting the USB Memory
- Copying Music Files from a Computer to USB Memory
- Some notes on copying music files
- MT-90U Music Player
- - External Memory
- • Supported Data
- - Tracks
- - Control
- - Tempo
- - Resolution
- - Transpose
- - Demo Songs
- - Max. Polyphony
- - Tones
- - Internal Sounds
- - Master Tuning
- - Effects
- - Metronome
- - Display
- - Language
- - Lyric Display
- - Controls
- - Rated Power Output
- - Speakers
- - Connectors
- - Power Supply
- - Current Draw
- - Measurements
- - Weight
- - Accessories
- - Options (sold separately)
- A
- B
- C
- D
- F
- G
- H
- |
- L
- M
- P
- R
- S
- T
- U
- V
- X
- MEMO
- Apparatus containing Lithium batteries
- ADVARSEL!
- FEDERAL COMMUNICATIONS COMMISSION RADIO FREQUENCY INTERFERENCE STATEMENT
- NOTICE
- AVIS
- DECLARATION OF CONFORMITY Compliance Information Statement
- For EU Countries
- REUNION
- SOUTH AFRICA
- ASIA
- CHINA
- HONG KONG
- INDIA
- INDONESIA
- KOREA
- MALAYSIA
- VIET NAM
- PHILIPPINES
- SINGAPORE
- TAIWAN
- THAILAND
- AUSTRALIA/ NEW ZEALAND
- AUSTRALIA/
- NEW ZEALAND Roland Corporation
- CENTRAL/LATIN AMERICA
- ARGENTINA
- BARBADOS
- BRAZIL
- CHILE
- COLOMBIA
- COSTA RICA
- CURACAO
- DOMINICAN REPUBLIC
- ECUADOR
- EL SALVADOR
- GUATEMALA
- HONDURAS
- MARTINIQUE
- ITALY
- NORWAY
- POLAND
- PORTUGAL
- ROMANIA
- RUSSIA
- SLOVAKIA
- ISRAEL
- JORDAN
- NORTH AMERICA
- CANADA
- U.S.A.
Brand : ROLAND
Model : MT-90U
Category : Hi-Fi System