AOK-5056 - Weather Station Renkforce - Free user manual and instructions
Find the device manual for free AOK-5056 Renkforce in PDF.


| Product Type | Wireless Weather Station |
| Brand | Renkforce |
| Model | AOK-5056 |
| Dimensions (Weather Station) | 171 x 123 x 50 mm (W x H x D) |
| Weight (Weather Station) | 300 g (without batteries) |
| Dimensions (Outdoor Sensor) | 370 x 230 x 198 mm (W x H x D) |
| Weight (Outdoor Sensor) | 490 g (without batteries) |
| Power Supply (Weather Station) | 2 x AA/Mignon batteries |
| Power Supply (Outdoor Sensor) | Solar cell (if sufficient light) or 4 x AA/Mignon batteries |
| Transmission Frequency | 868 MHz |
| Range | Up to 100 m (open area) |
| Indoor Temperature Range | -9.9 °C to +50 °C |
| Outdoor Temperature Range | -50 °C to +70 °C |
| Indoor Humidity Range | 20% to 95% (relative) |
| Outdoor Humidity Range | 20% to 95% (relative) |
| Air Pressure Range | 850 - 1050 hPa |
| Wind Speed Range | 0 - 255 km/h |
| Rainfall Range | 0 - 999.9 mm |
| Key Features | DCF-77 radio time, dual alarms, indoor/outdoor temperature & humidity, wind direction & speed, rainfall, UV index, air pressure history, weather forecast, moon phase, comfort indicator, backlight |
| Maintenance | Clean with dry soft cloth; remove leaves from rain sensor occasionally |
| Safety | Do not open device; use only in dry indoor locations for weather station; outdoor sensor suitable for outdoor use but not underwater |
| Spare Parts & Repairability | No user-serviceable parts; replace batteries as needed; outdoor sensor mounting hardware included |
| General Information | Manufacturer: Conrad Electronic SE; intended for personal use; CE compliant; Declaration of Conformity available at www.conrad.com |
Frequently Asked Questions - AOK-5056 Renkforce
User questions about AOK-5056 Renkforce
0 question about this device. Answer the ones you know or ask your own.
Ask a new question about this device
Download the instructions for your Weather Station in PDF format for free! Find your manual AOK-5056 - Renkforce and take your electronic device back in hand. On this page are published all the documents necessary for the use of your device. AOK-5056 by Renkforce.
USER MANUAL AOK-5056 Renkforce
natural_image
Abstract geometric star-like pattern with five petal-like shapes and dot patterns (no text or symbols)renkforce
GB Operating Instructions
Wireless Weather Station
Item No. 1341307 Page 28 - 53
Seite
www.business.conrad.at
- Introduction......30
- Explanation of symbols 30
- Intended use 31
- Package contents....31
- Safety instructions....32
- Notes on batteries/rechargeable batteries....33
- Features and Functions....34
a) Weather station....34
b) Outdoor sensor ....34
- Control elements on the weather station....35
- Control elements on the outdoor sensor....37
- Installation of the outdoor sensor....38
- Starting up....40
a) Outdoor sensor .... 40
b) Weather station....40
- Operation....42
a) Starting the DCF signal reception manually....42
b) Starting the search for outdoor sensors manually....42
c) Setting the 12h-/24h mode, time zone, date and time, Language for weekday indicator and measuring units....42
d) Alarm function....43
Viewing the alarm time....44
Setting the alarm time....44
Switching the alarm on or off 44
Activate snooze alarm or exit alarm....44
e) Maximum/minimum values....45
Show values....45
Delete/reset values 45
f) Trend indicator....45
g) Comfort indicator....45
h) Moon phases....45
i) Rainfall....46
Change the time span for the measurement indicator....46
Delete/reset values....46
j) Weather forecast....46
k) Indicator of the wind direction....47
Page
I) Indicator of the wind speed....47
m) Indicator of air pressure....47
n) Graphical development display for the air pressure 47
o) UV-index indicator....48
p) Dew point temperature and feels-like temperature 48
q) Wind chill temperature and heat index 48
r) Backlight....48
-
Battery replacement....49
-
Troubleshooting....50
-
Range 51
-
Maintenance and Care ....52
-
Disposal 52
a) General....52
b) Batteries and rechargeable batteries....52
-
Declaration of Conformity (DOC)......53
-
Technical data....53
a) Weather station....53
b) Outdoor sensor 53
1. Introduction
Dear Customer,
Thank you for purchasing this product.
This product complies with the applicable statutory, national and European regulations.
You as the user are required to observe these operating instructions in order to keep it in that condition and to ensure safe operation!

These operating instructions are part of this product. They contain important information regarding operation and handling. Keep this in mind when passing the product on to any third party.
Please keep these operating instructions for future reference!
All names of companies and products are the trademarks of the respective owners. All rights reserved.
If there are any technical questions, please contact:
International: www.conrad.com/contact
United Kingdom: www.conrad-electronic.co.uk/contact
2. Explanation of symbols

An exclamation mark in a triangle alerts you to important instructions in this operating manual, which you are required to follow.

The „arrow“ symbol is used where special tips and notes on operation are provided.
3. Intended use
The weather station allows you to display various readings for indoor/outdoor temperature, indoor/outdoor humidity, air pressure, the amount of rainfall, wind speed and wind direction, for example.
The measurement data of the outdoor sensor are transmitted wirelessly by radio to the weather station.
The weather station also calculates a weather forecast for the next 12 - 24 hours, which is then represented by graphic symbols on the display, by means of an internal air pressure sensor and recorded air pressure changes.
Time and date are set automatically via the DCF signal; however, in case of reception issues, a manual adjustment is made possible. There is also an alarm function with sleep timer ("Snooze") built-in.
The weather station is powered by two batteries of the type AA/Mignon. The outdoor sensor is powered by an integrated solar cell, if the ambient light is sufficient. Four batteries of the type AA/Mignon ensure ongoing operation when the light is not sufficient.
Always observe the safety instructions and all other information included in these operating instructions.
Any use other than described above is not permitted and may damage the product. Moreover, it may involve dangers caused by short circuits, fire etc.
This product complies with the applicable statutory, national and European regulations. All names of companies and products are the trademarks of the respective owners. All rights reserved.
4. Package contents
- Wireless weather station
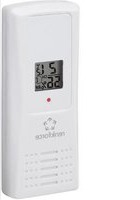
- Outdoor sensor
- Metal tube
- Fixing material
- Operating instructions

rarranty/guarantee will be void in the event of damage caused by the failure to observe these safety instructions. We do not assume any liability for any resulting damage!
We do not assume any liability for personal injuries and material damages caused by the improper use or non-compliance with the safety instructions. In such cases, the warranty/guarantee will be null and void!
- The unauthorized conversion and/or modification of the product is not permitted for safety and approval reasons (CE). Do not open/disassemble the product (except when you need to insert/change the batteries as described in this manual).
- Do not use this product in hospitals or medical institutions. Although the outdoor sensor emits only relatively weak radio signals, these may cause life-support systems to malfunction. The same may potentially be applicable to other areas.
- The manufacturer assumes no responsibility for any incorrect readings, measurements or weather forecasts and any consequences that might arise from them.
- The product is intended for personal use; it is not suitable for medical purposes or for public information.
- The product is not a toy; it does not belong in the hands of children. The product contains small parts, glass (display) and batteries. Place the product so that it is out of the children's reach.
- The weather station is suitable only for dry, closed interiors. Do not expose it to direct sunlight, extreme heat, cold, humidity or moisture; it may get damaged otherwise.
The outdoor sensor is suitable for outdoor use. However, do not use it in or under water, or it will be ruined.
Condensation may form if the product is taken from a cold space to a warm one (e.g. during transport). This may damage the product. Allow the product to reach room temperature before using it. This may take several hours.
- Do not leave packaging material lying around unattended. It may become a dangerous plaything for children.
- Handle the product with care; impacts, blows, or accidental falls, even from a low height, may damage the product.
- If you have any questions that are not answered in these operating instructions, please contact us or consult any other technician.
6. Notes on batteries/rechargeable batteries
- Batteries/rechargeable batteries do not belong in the hands of children.
- Do not leave batteries lying around unattended. They pose a hazard for children and pets that may swallow them. Consult a doctor immediately in case of swallowing.
- Replace dead batteries promptly, because flat or old batteries may leak.
- If your skin comes into contact with leaking or damaged batteries, you may suffer burns. For this reason, you should use appropriate protective gloves.
- Liquids leaking from rechargeable batteries are very chemically aggressive. Objects or surfaces coming into contact with these liquids may suffer considerably. Thus, keep batteries safe and store them in an appropriate location.
- Do not short-circuit batteries, do not take them apart and do not throw them into fire. Risk of explosion!
- Do not recharge conventional non-rechargeable batteries; risk of explosion!
- Do not combine non-rechargeable and rechargeable batteries.
- Do not mix batteries of different charge states (e.g. fully and half charged batteries).
• Always replace the entire set of batteries. - When you insert the batteries, observe the correct polarity (plus/+ and minus/−).
→ You can power the weather station and/or outdoor sensor by rechargeable batteries. However, due to the lower voltage (battery = 1.5V, rechargeable battery = 1.2V), the operating time and the contrast of the display will be reduced significantly.
Rechargeable batteries are also very temperature-sensitive, which may result in even greater reduction in the outdoor sensor's operating time when the ambient temperature is low.
We recommend therefore using only high-quality alkaline batteries for the weather station and the outdoor sensor and refraining from using rechargeable batteries.
7. Features and functions
a) Weather station
- Adjustment of time and date via DCF signal; manual adjustment possible
- Switchable 12/24 hour time format
• Day of the week in 7 user-selectable languages - Alarm function with two different alarm times; including snooze timer ("Snooze")
- Display of indoor temperature (with option to toggle between dew point temperature and feels-like temperature)
- Display of outdoor temperature (with option to toggle between wind chill temperature and heat index)
• Display of indoor and outdoor humidity - Display of wind direction and wind speed ("kmh" or "mph")
- Display of air pressure (with option to toggle between "hPa" and "inHg") and air pressure of the last 12 hours
- Display of UV index
- Display of rainfall for 1h, 24h and total amount of rainfall ("mm" or "inch")
• Display of current moon phase - Option to toggle between the temperature units °C (degrees Celsius) and °F (degrees Fahrenheit)
- Trend indication for indoor/outdoor humidity by arrows icons
• Memory for maximum and minimum values of indoor/outdoor temperature and indoor/outdoor humidity - Weather forecast for the next 12 - 24 hours by graphical icons
- Comfort indicator for dry, humid or optimal indoor climate
- Can be set up on a table using the base, which is an integral part of the case, or wall-mounted
- Powered by 2 AA/Mignon batteries
• Use in dry indoor locations - Backlighting for LCD screen at the push of a button
b) Outdoor sensor
- Wireless radio transmission of measurement data to the weather station
- Powered by solar cell (if ambient light is sufficient) or 4 AA/Mignon batteries
- Mounted on included pole mount brackets
- Works outdoors
- Readings of temperature, humidity, solar radiation (UV light), rainfall, wind direction and wind speed
-
Integrated bubble level for optimal horizontal orientation
-
Control elements on the weather station
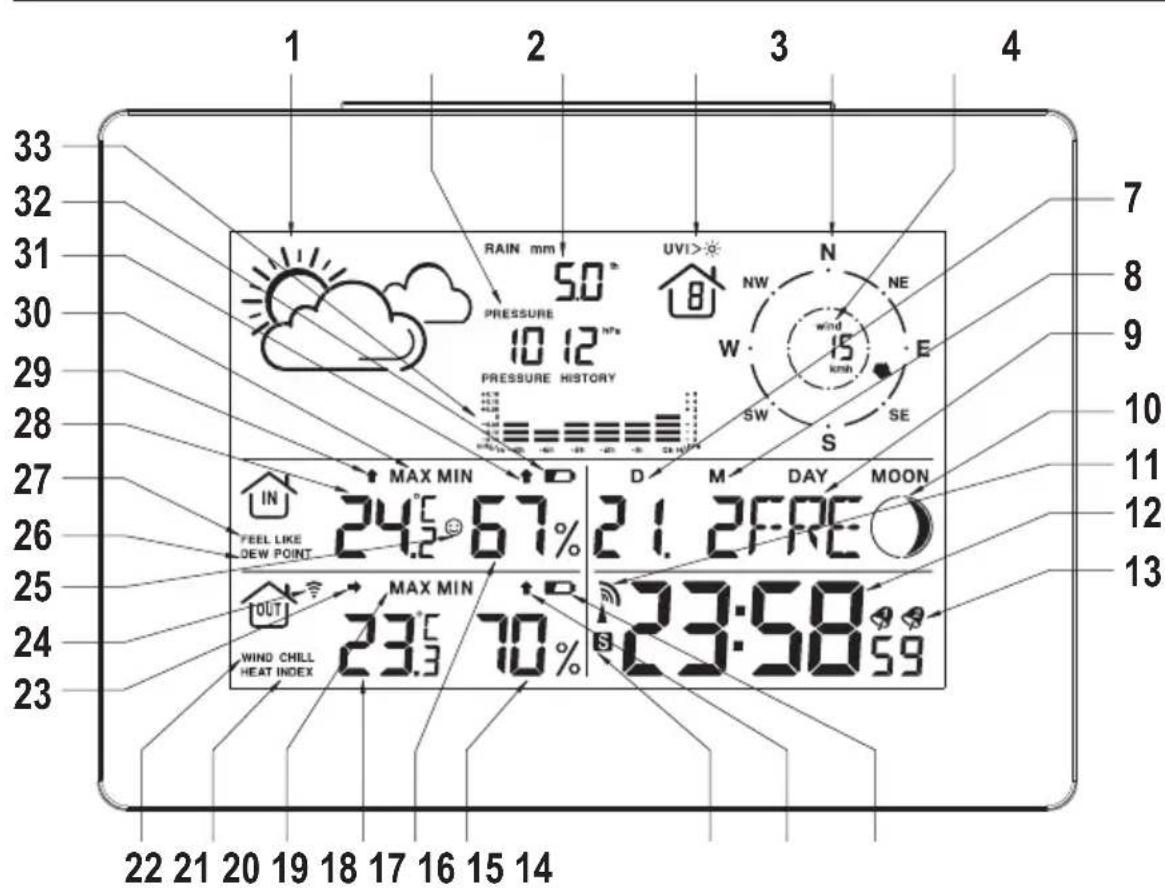
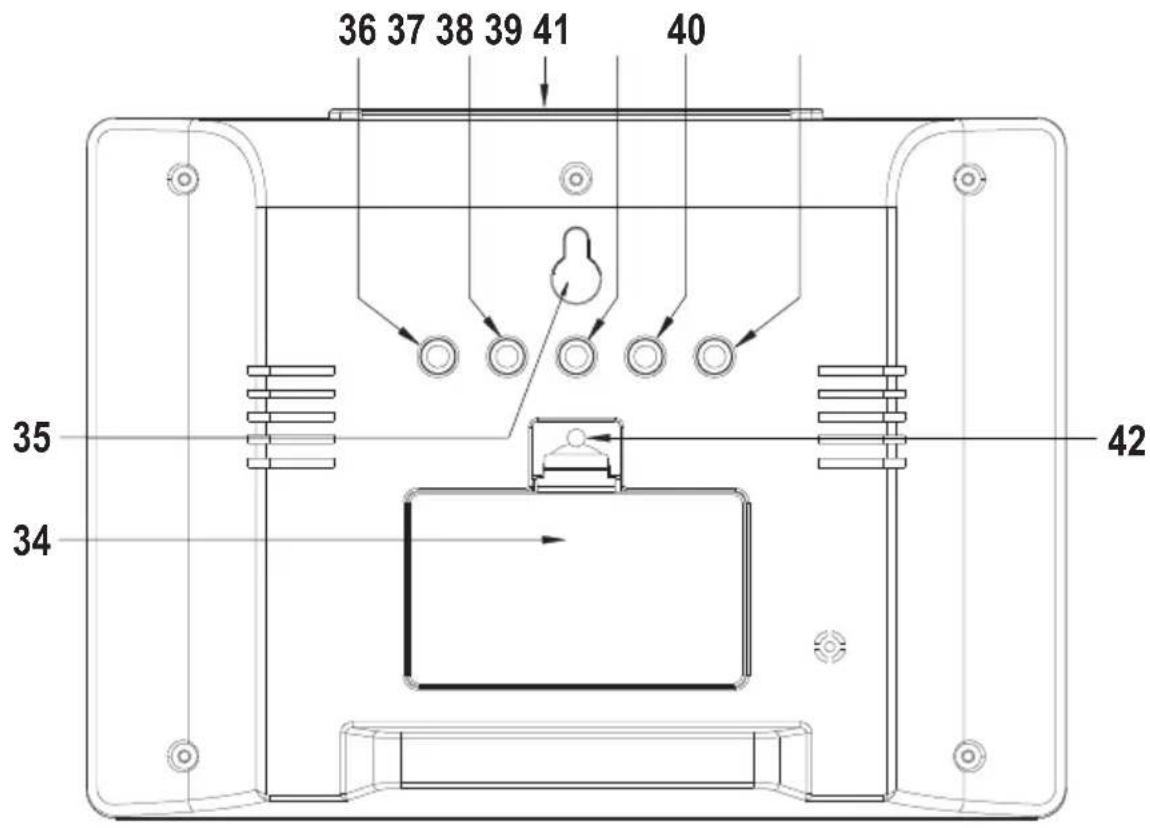
1 Icon for weather forecast for the next 12 - 24 hours
2 Air pressure
3 Amount of rainfall
4 UV index
5 Wind direction
6 Wind speed
7 Date (can be switched to month)
8 Month (can be switched to date)
9 Weekday (language user-selectable)
10 Moon phase
11 Radio tower symbol for DCF reception
12 Time
13 Icons for alarm function 1 and 2
14 "Battery low" icon for the outdoor sensor
15 Outdoor humidity tendency
16 Icon "S" for daylight saving time
17 Outdoor humidity
18 Indoor humidity
19 Outdoor temperature
20 Icon "MAX" or "MIN" for maximum/minimum display
21 Heat index (indicator "HEAT INDEX")
22 Wind chill temperature (indicator "WIND CHILL")
23 Outdoor humidity trend
24 Outdoor sensor icon for radio controlled reception
25 Comfort indicator
26 Dew point temperature (indicator "DEW POINT")
27 Feels-like temperature (indicator "FEELS LIKE")
28 Indoor temperature
29 Indoor temperature trend
30 Icon "MAX" or "MIN": maximum/minimum indicator
31 Indoor humidity tendency
32 Outdoor sensor icon "Battery low"
33 Air pressure with 12 hour history graph
34 Battery compartment
35 Hole for wall mount
36 "MODE" button
37 "+" button
38 "SNOOZE/LIGHT" button
39 "-" Button
40 "IN" button
41 "OUT" Button
42 "RESET" button
9. Control elements on the outdoor sensor
A Battery compartment
B ON/OFF switch
C Bubble level (for horizontal orientation)
D UV sensor
E Rain sensor
F "CHANNEL" button
G Solar cell
H Weather vane for wind direction sensor
I Temperature/humidity sensor
J U-shaped notch
K Mounting hole
L Metal tube
M Rotor for wind speed sensor
N "N" marking for outdoor sensor alignment to the north


10. Outdoor sensor installation
→ Consider the following when choosing the location:
The site of the location must be unobstructed, so that the sensors for wind direction and wind speed will display true readings. A minimum distance of 10 meters to buildings is recommended.
Also, do not mount the outdoor sensor near ground level, but at least at a height of 2 - 3 m above the ground. Optimally, mount it on a flat garage or a carport, for instance.
Do not mount the outdoor sensor under or near trees and shrubs, as the foliage falling down can block the opening in the rain sensor.
The range between the transmitter in the outdoor sensor and the weather station in open space (with line of sight between transmitter/receiver) is up to 100 m.
However, the true range is lower due to walls, furniture, windows or plants that stand between the outdoor sensor and the weather station.
Another impact of interference which can reduce the range significantly is the proximity to metal parts, electrical/electronic devices or cables. Reinforced concrete ceilings, metalized insulating glass windows or other devices on the same transmission frequency (868 MHz) are also troublesome issues.
Before affixing the metal tube permanently to the outdoor sensor, test the functions and check reception. After you have inserted the batteries into the outdoor sensor and the weather station, corresponding readings should show up on the weather station's display after a few minutes; see chapter 11.
Important! The mark "N" for t
The mark "N" for the compass direction's "north" is located on the case of the outdoor sensor near the wind direction sensor.
Affix the outdoor sensor so that the marking "N" points due north. The proper direction can be identified by using a compass (for example, some smartphones feature an integrated app or it can be downloaded).
If you do not own a compass, you can perhaps use a map or map data from the Internet for at least an approximate alignment.
If this is ignored, the weather station's wind direction indication will be incorrect.
- The included metal tube (L) has a hole (K) and a small U-shaped opening (J) on one side. Slide this end of the metal tube onto the corresponding bracket down on the outdoor sensor.
The metal tube fits onto the bracket only in one direction. Make sure that the U-shaped opening (J) sits precisely on the plastic lug of the bracket.
- The single screw and the hexagon nut are used to fix the metal tube to the outdoor sensor's bracket. However, do not apply force!
- Loosen the 4 screws on the battery compartment and remove the cover. Insert 4 AA/Mignon batteries with the correct polarity into the battery compartment of the outdoor sensor (take note of plus/+ and minus/-).
- Turn on the outdoor sensor with the I/O switch (B) (switch on position "ON").
- Close the battery compartment.
- Now the outdoor sensor can be mounted on a suitable place, e.g. laterally on a carport or on a pole. Use screws and, if necessary, anchors that are appropriate for the installation site.

A small bubble level (C) is built-in on top of the outdoor sensor to facilitate horizontal alignment. Mount the outdoor sensor so that the small air bubble in the level sits right in the middle of the circle.

11. Getting Started
→ Put the outdoor sensor into operation first and only then start the weather station.
a) Outdoor sensor
- Loosen the 4 screws on the battery compartment and remove the cover. Insert 4 AA/Mignon batteries with the correct polarity into the battery compartment of the outdoor sensor (take note of plus/+ and minus/-).
→ If the outdoor sensor is already permanently fixed, replacing the batteries becomes easier when you unscrew the outdoor sensor from the metal tube (the battery compartment is located on the bottom side of the outdoor sensor). - Switch on the outdoor sensor with the I/O switch (B) (switch on position "ON").
- Close the battery compartment.
→ After batteries have been replaced, turn off the outdoor sensor for a few seconds and then on again. Doing this resets the outdoor sensor. The weather station may not detect the outdoor sensor otherwise.
b) Weather station
- Open the battery compartment on the rear side of the weather station and insert two AA/Mignon batteries with the correct polarity (take note of plus/+ and minus/-).
- Close the battery compartment.
- Immediately after the batteries have been inserted into the weather station, all segments of the display are briefly shown, the backlight of the display is activated and a beep sounds.
- The display shows the initial readings (e.g. indoor temperature/humidity, air pressure). The backlight turns off.
→ If only gibberish is displayed, press the "RESET" button (42).
Alternatively, you can remove the batteries from the weather station and reinsert them after a few seconds.
- Now the reception symbol for the outdoor sensor (24) is flashing. The measuring data of the outdoor sensor (e.g. outdoor temperature and humidity) should be shown on the display after no more than 3 minutes. Do not move weather station or outdoor sensor; do not press any button on the weather station.
To speed up the search for the outdoor sensor, you can press and hold the "CHANNEL" (F) button on the outdoor sensor for about 3 seconds. This causes a data packet with the measured values to be sent instantly.
- Once the weather station has detected the outdoor sensor, searching for the DCF signal begins. The radio tower symbol (11) flashes and indicates the reception of the DCF signal.
Good DCF signal reception
No signal
Searching for the DCF signal may take several minutes. Do not move the weather station at this stage; do not press any button.
Do not place the weather station next to electronic devices, metal parts, cables, etc. A poor reception is also expected where metalized insulated glass, reinforced concrete and coated special wallpaper are present, or in basements.
The DCF signal is a signal which is emitted by a transmitter situated in Mainflingen (near Frankfurt/Main). Its range is up to 1500 km, and under ideal reception conditions even up to 2000 km.
The DCF signal includes, among other data, the exact time and date.
Of course, the cumbersome manual adjustment of summer and winter time is also no longer required.
- Once the weather station has read the DCF signal properly, the current time, date, month, the day of the week and the moon phase are shown.

The radio tower symbol (11) stops flashing.
→ During the daylight saving time a small "S" symbol (16) is shown next to the time on the right.
- Every day between 1:00 AM and 5:00 AM (on the hour) the weather station initiates attempts to receive the DCF signal. If, for instance, no proper DCF signal was detected at 01:00 AM, the weather station will start a new reception attempt at 02:00 AM.
One single successful signal reception daily is already enough to keep the deviation of the integral clock below one second.
- Change the location of the weather station if, after roughly 7 minutes, the display of the weather station is still not showing the current time (the radio tower symbol (11) disappears).
Press the both buttons "+" (37) and "-" (39) simultaneously to restart the DCF reception attempt.
Alternatively, you can set time and date on the weather station manually, if the weather station is used in a place where DCF reception is not possible, for instance.
- The weather station can be set up on a flat, solid surface due to the base, which is an integral part of the case. Protect valuable furniture surfaces with a suitable underlay against scratch marks. You can also hang the weather station on the wall on a hook, a screw or nail by the opening on the rear side (35).
Choose a site where the weather station is not exposed directly to the sun or near a heater. This will lead to false temperature and humidity readings.
• The weather station is now ready to use.
12. Operation
a) Starting the DCF signal reception manually
- Press the two buttons "+" (37) and "-" (39) simultaneously to restart the DCF reception attempt. The radio tower symbol (11) will flash and indicate the reception of the DCF signal.


- Searching for the DCF signal may take several minutes. Do not move the weather station at this stage, do not press any button.
Do not place the weather station next to electronic devices, metal parts, cables, etc. A poor reception is also expected where metalized insulated glass, reinforced concrete and coated special wallpaper are present, or in basements.
- In order to abort the search, press and hold both buttons, “+” (37) and “-” (39), until the radio tower symbol (11) disappears.
b) Starting the search for outdoor sensors manually
- Press and hold the "OUT" button (41) for about 3 seconds until the reception icon (24) for the radio signal of the outdoor sensor is flashing.
- Searching for the sensor may take several minutes. Do not move the weather station or the outdoor sensor at this stage; do not press any button.
To speed up the search for the outdoor sensor, you can press and hold the "CHANNEL" (F) button on the outdoor sensor for about 3 seconds. This causes a data packet with the measured values to be sent instantly.
c) Setting the 12h/24h mode, time zone, date and time, language for the weekday display and measuring units
→ Please note:
Use the buttons "+" (37) and "-" (39) to change the settings. Press and hold the button a little longer for fast adjustment.
However, if you do not press any button for about 20 seconds during the process of programming, the current settings made so far will be saved and the programming mode will quit.
Proceed as follows:
- To enter set mode, press and hold the "MODE" button (36) for about 3 seconds until "12Hr" or "24Hr" for the 12-hour/24-hour format (display mode for the clock) is flashing.
- With the “+” (37) or “-” (39) buttons, you can choose between the 12h- or 24h-format.
The 12h-mode displays "AM" on the left next to the time during the first half of the day and "PM" during the second half of the day.
- If you press the "MODE" (36) button briefly, the time zone will begin flashing; use the button "+" (B) or "-" (C) to adjust the time zone within the range of -12 to 12.
- If you press the "MODE" (36) button briefly, "M D" or "D M" for the sequence of date and time will begin flashing on the display at the top left. With the "+" (37) or "-" (39) buttons, you can toggle between the formats "M D" (month/date) or "D M" (date/month).
- If you press the "MODE" (36) button briefly, the year will begin flashing; use the button "+" (37) or "-" (39) to set the year.
- If you press the "MODE" (36) button briefly, the month will begin flashing; use the button "+" (37) or "-" (39) to set the month.
- If you press the "MODE" (36) button briefly, the date will begin flashing; use the button "+" (37) or "-" (39) to set the date.
- If you press the "MODE" (36) button briefly, the hours will begin flashing; use the button "+" (37) or "-" (39) to set the hour.
- If you press the "MODE" (36) button briefly, the minutes will begin flashing; use the button "+" (37) or "-" (39) to set the minutes.
→ Each time you press a button when adjusting the minutes, the seconds will also automatically reset to "00".
- If you press the "MODE" (36) button briefly, the language with the abbreviation for the weekday will begin flashing; use the button "+" (37) or "-" (39) to set the language.
GER = German
ENG = English
ITA = Italian
FRE = French
DUT = Dutch
SPA = Spanish
DAN = Danish
- If you press the "MODE" (36) button briefly, the unit "°C" or "°F" for the temperature will begin flashing on the display; use the button "37" (B) or "-" (39) to choose the desired temperature unit.
- If you press the "MODE" (36) button briefly, the unit "hPa" or "inHg" for the air pressure will begin flashing on the display; use the button "+" (37) or "-" (39) to choose the desired pressure unit.
If you press the "MODE" (36) button briefly, the unit "kmh" or "mph" for the wind speed will begin flashing in addition to the unit "mm" or "inch" for the amount of rain. With the "+" (37) or "-" (39) buttons, you can toggle between the desired formats (only the two combinations "kmh/mm" or "mph/inch" are possible).
- If you press the "MODE" (36) button briefly, set mode is exited.
d) Alarm function
The weather station features two different wake-up alarms You can, for instance, set an alarm for weekdays and a second one for weekends or holidays, or you could also set two alarms per day, such as 07:00 AM and 09:00 AM.
Viewing the wake-up time
Press the "MODE" button several times to toggle between the following displays:
- Alarm 1 (indicator "A1" to the right of the wake-up time)
- Alarm 2 (indicator "A2" to the right of the wake-up time)
- Time
Setting the wake-up time
- Press the button "mode" several times, until either Alarm 1 (indicator "A1" to the right of the wake-up time) or Alarm 2 (indicator "A2" to the right of the wake-up time) is shown in the display.
- Press and hold the "MODE" button (36) for about 3 seconds until the hour of the alarm is flashing on the screen.
- Use the button "+" (37) or "-" (39) to set the hour. Press and hold the button a little longer for fast adjustment.
- If you press the "MODE" (36) button briefly, the hours of the alarm will begin flashing; use the button "+" (37) or "-" (39) to set the hour. Press and hold the button a little longer for fast adjustment.
- If you press the "MODE" (36) button briefly, set mode is exited.
Switching the alarm on or off
- Press the "MODE" button (36) repeatedly, until either Alarm 1 (indicator "A1" to the right of the wake-up time) or Alarm 2 (indicator "A2" to the right of the wake-up time) is shown in the display.
- Press the “-” button (39) briefly to turn the selected alarm function on or off. When the alarm function is turned on, the bell icon will appear above the associated indicator “A1” or “A2”:
Icon "1" Alarm function with Alarm 1 turned on
Icon "2" Alarm function with Alarm 2 turned on
Icon " Alarm function with both alarms active
No display: Alarm turned off
Activating the snooze alarm or cancelling the alarm signal
- At the time set for the alarm, the wake-up signal is activated and the bell icon “!” (for Alarm 1) or “” (for Alarm 2) is flashing.
- Press the "SNOOZE/LIGHT" button (38) on top of the weather station to stop the alarm signal for 5 minutes. During this pause, the bell icon keeps on flashing.
Then the alarm signal will sound again. This procedure can be repeated multiple times. - To cancel the alarm (or the snooze mode), press any button except the "SNOOZE/LIGHT" (38) button.
→ If no button is pressed, the alarm will stop automatically after 2 minutes.
e) Maximum/minimum values
Show values
The weather station saves the extreme values of the indoor/outdoor temperature and indoor/outdoor humidity. Press the "+" button(37) repeatedly to toggle between the following displays:
• Maximum values ("MAX" appears on the display)
- Minimum values ("MIN" appears on the display)
- Current readings
→ If no button is pressed, the display will switch from the maximum/minimum value mode to the current readings automatically after 5 seconds.
Delete/reset values
If you press and hold the "+" button (37) for about 3 seconds, the maximum/minimum values will be deleted/reset.
f) Trend indicators
On the screen, the indoor temperature, outdoor temperature, indoor humidity and outdoor humidity are shown as arrow icons which indicate the likely trend in changes of the readings that can be expected.

g) Comfort indicator
Between the indicators for indoor temperature and indoor humidity, you will find the comfort indicator. This indicator shows you the current room climate:


h) Moon phases
The moon phase is based on the current calendar date and is graphically represented on the display on the right.

i) Rainfall
At the top center the screen, the weather station shows the amount of rainfall.
→ You can set the unit to "mm" (millimeters) or to "inch" (inches) as described in Chapter 12. c).
Change the time span for the measurement indicator
Press the button “-” (39) repeatedly to toggle between the following displays:
- Amount of rain of the last hour (to the right next to rainfall, "1h" is shown)
- Amount of rain of the last 24 hours (to the right next to rainfall, "24h" is shown)
- Amount of rain since last Reset (to the right next to rainfall, "Total" is shown)
Clear/reset values
If you press and hold the “-” button (39) for about 3 seconds, the indicator for rainfall will be cleared/reset.
→ Only the currently displayed rainfall value ("1h", "24h" or "Total") is cleared/reset. Other values remain unaffected.
The maximum value for the overall rainfall ("Total") is 999.9 mm (or 99.99 inch). Make sure you reset the indicator in time, or else the value cannot be updated.
j) Weather forecast
The weather station calculates a weather forecast for the next 12 - 24 hours by means of the air pressure history of the last hours/days. The achievable accuracy is roughly 70%.
Please note:
- If "Sunny" is displayed at night time, it means a clear, starry night.
- The indication does not show the actual weather condition but is rather a projection for the next 12 to 24 hours.
- The calculation of the weather forecast is based on the air pressure and results in a maximal accuracy of about 70% only. Therefore, the actual weather condition on the following day might be completely different. Because the air pressure measured is valid only for an area with a span of about 50 km, the weather can also quickly change. This is particularly the case in mountainous or high mountain regions.
Therefore, do not rely on the weather station's weather forecast; rather, obtain information locally instead, if you plan a mountain hike, for example.
- In the case of sudden and major changes in air pressure, the indicator icons will update to reflect the change in the weather condition. If the icons do not change, the air pressure has not changed or the change is happening so gradually that it is not recorded by the weather station.
- If the weather forecast shows "Sunny" or "Rainy", the indications may not change even though the weather is improving ("Sunny" icon) or worsening ("Rainy" icon), because the icons are already featuring the extremes.
Icons showing that the weather is improving or worsening do not actually mean, as indicated by the symbols, that the weather will be sunny or rainy.
- Ignore the weather forecast for 12 to 24 hours after you have inserted the batteries for the first time. The weather station needs to collect air pressure data over a period of time at a constant level in order to generate a more accurate forecast. Setting the current weather condition (see previous chapter) may shorten this time.
- If the weather station is moved to another location that lies significantly higher or lower than the initial location (e.g. from the ground floor to the upper floor of a house), the weather station may report this as a change in weather.
k) Indication of the wind direction
The weather station shows the wind direction, represented by a compass rose with arrows, on the top right of the display.

Important!
In order to show the wind direction correctly, the outdoor sensor must be aligned accordingly.
On the wind direction sensor are markings for the compass “north” (sticker or imprint “N” on the case).
Affix the metal tube with the outdoor sensor such that the marking "N" points due north. The direction can be determined with the use of a compass (for example, as an app integrated in some smartphones or downloadable).
If you do not own a compass, you can perhaps use a map or map data from the Internet for an approximate alignment.
I) Indicator of the wind speed
The wind speed is shown in the center of the compass rose (top right of the display).
→ You can set the unit to "kmh" (kilometers per hour) or to "mph" (miles per hour) as described in Chapter 12. c).
m) Indicator of air pressure
The currently measured air pressure is shown at the top of the screen.
→ You can set the unit to "hPa" (hectopascal) or to "inHg" (inch of mercury) as described in Chapter 12. c).
The air pressure reading is the absolute measured value; it is not corrected to sea level.
n) Graphical development display for the air pressure
At the top center of the screen, the weather station shows the history of the air pressure from the last 12 hours. Each mark stands for 2 hPa (or 0.06 inHg).
o) UV-index indicator
The UV sensor (D) of the outdoor sensor measures the UV radiation from the sun. The weather station then calculates the UV Index which is shown up on the screen between rainfall and wind direction.
p) Dew point temperature and feels-like temperature
Press the button "IN" (40) repeatedly briefly to toggle between the following displays:
- Dew point temperature (indicator "DEW POINT" on the left next to the indoor temperature)
- Feels-like temperature (indicator "FEELS LIKE" on the left next to the indoor temperature)
- Indoor temperature
q) Wind chill temperature and heat index
Press the "OUT" button (41) repeatedly to toggle between the following displays:
- Wind chill temperature (indicator "WIND CHILL" on the left next to the outdoor temperature)
- Heat index (indicator "HEAT INDEX" on the left next to the outdoor temperature)
- Outdoor temperature
r) Backlight
Briefly press the "SNOOZE/LIGHT" button (38) to activate the backlight. To save power, the backlight will turn off automatically after about 10 seconds.
13. Battery replacement
- When the batteries of the weather station are empty, a battery symbol “☐” appears to the right of the indoor humidity indicator. The contrast of the display also greatly decreases when the batteries are weak.
Replace the batteries with new ones.
All settings and measurement data are lost when replacing the batteries. Proceed as described in Getting started.
- When the batteries of the outdoor sensor are empty, a battery symbol “☐” appears to the right of the indoor humidity indicator. When the batteries are weak, the radio range of the outdoor sensor also decreases, and when the batteries are empty, the weather station will stop showing the readings of the outdoor sensor.
Replace the batteries with new ones.
→ After replacing the batteries, it is necessary to initiate a manually search for the outdoor sensor on the weather station, see chapter 12. b).
If the weather station cannot find the outdoor sensor, turn the outdoor sensor off for a few seconds using the I/O switch (B), then turn it on again. This will reset the outdoor sensor (Reset).
14. Troubleshooting
No DCF signal
- Do not place the weather station next to electronic devices, metal parts, cables, etc. A poor reception is also expected where metalized insulated glass, reinforced concrete and coated special wallpaper are present or in basements.
Test the weather station by putting it near a window and start manually searching for the DCF signal (see Chapter 12 a). - The reception is contingent on the distance to the transmitter of the DCF signal (in Mainflingen near Frankfurt am Main). Its range is up to 1500 km, and under ideal reception conditions even up to 2000 km.
Both the current weather conditions as well as local conditions (mountains/valleys, broadband interference from powerful transmitters, etc.) may adversely affect the range. - At night, when less interference can be expected, the weather station will automatically start several attempts to receive the DCF signal.
- Set the time and date manually.
The weather station does not find the outdoor sensor
- Start searching for the outdoor sensor manually; see Chapter 12. b).
To speed up the search for the outdoor sensor, you can press and hold the "CHANNEL" (F) button on the outdoor sensor for about 3 seconds. This causes a data packet with the measured values to be sent instantly.
• Refer to chapter 15 for the range.
- Reduce the distance between weather station and outdoor sensor.
- Check the outdoor sensor's batteries. Are the batteries inserted correctly (polarity) or are the batteries weak or dead?
Try replacing the batteries with new batteries for testing purposes.
- Do not use rechargeable batteries in the outdoor sensor. The lower voltage of rechargeable batteries (primary battery = 1.5 V, secondary battery = 1.2 V) can reduce the operating time or functionality significantly.
Conventional NiMH batteries have a relatively high self-discharge potential. Rechargeable batteries are also very temperature-sensitive. This may result in even more reduction of the operating time when the ambient temperatures are low.
- Turn the outdoor sensor off for a few seconds using the I/O switch (B), then turn it on again. This will reset the outdoor sensor (Reset).
Gibberish displayed on the weather station
- Remove the batteries from the weather station and re-insert them after a few seconds, if no decent indications are shown.
- Replace the batteries with new ones.
- Use high-quality alkaline batteries instead of rechargeable batteries.
- Press the „RESET“ button (42) using a toothpick.
False weather forecasting
• Refer to the information contained in Chapter 12. j).
Incorrect values of wind or rain sensor
- If you intend to compare the readings of the wind and rain sensors to other weather stations or with data from the Internet, please take into account that local conditions influence readings significantly.
Deviations in wind speed and wind directions are caused by buildings and trees, for example. The same goes for rain.
- Check the rain sensor to see whether a leaf or two have fallen into the collection funnel, and if so, remove them.
- Check whether the marking „N“ on the wind direction sensor points to the north.
- Check the fixture of the outdoor sensor; it may have twisted by the impact of wind (such as a storm). The wind direction is no longer true in that case.
15. Range
The range of transmission of radio signals between outdoor sensor and weather station is up to 100 m under optimal conditions.
The range specification is the so-called "free field range" (range in line of sight between transmitter and receiver, without interfering obstacles).
In practice, however, there are walls, ceilings, etc. between the transmitter and receiver, which will reduce the range accordingly.
Due to the various influences on the radio transmission, no certain range can be guaranteed. However, the operation in a single-family house is usually trouble-free.
The range may be considerably reduced by:
- walls, reinforced concrete ceilings, dry walls with metal framework
• coated/metalized insulated glass windows - proximity to metallic & conductive objects (such as heaters)
• proximity to the human body - other devices on the same frequency (such as wireless headphones, wireless speakers)
• proximity to electric motors/appliances, transformers, power supplies, computers
16. Maintenance and Care
The product is maintenance-free for you except for an occasional battery replacement. Maintenance or repair work may be performed only by a specialist or specialist workshop. No serviceable parts are inside the product. Therefore, do not open it (except when inserting/changing the batteries following the procedure described in this manual).
A dry, soft and clean cloth is sufficient for cleaning the weather station. Do not press too hard on the screen. This can lead to scratch marks, malfunctioning of the display readout or even a ruined screen.
Dust can be easily removed with a long-haired, soft, clean brush or a vacuum cleaner.
The outdoor sensor can be wiped with a damp cloth.
Regularly check whether any leaves have dropped into the collection funnel of the rain sensor, and remove them.

Do not use scouring agents, rubbing alcohol or other chemical solutions as they may mark the casing (discoloration) or even impair functionality.
17. Disposal
a) General

The product does not belong in the normal household waste!
Dispose of the product at the end of its service life in accordance with the applicable legal regulations.
Remove any batteries or rechargeable batteries and dispose of them separately from the product.
b) Batteries and rechargeable batteries
You as the consumer are required by law (Battery Ordinance) to return all used batteries and accumulators; Disposal in the household waste is prohibited.

Batteries and rechargeable batteries contain hazardous material and are marked with this symbol to notify you that it is prohibited to dispose of in the household waste. The designations for the relevant heavy metals are Cd = Cadmium, Hg = Mercury, Pb = Lead.
You can return used batteries, rechargeable batteries and button cells at the collection points in your municipality, our stores, or wherever batteries/accumulators/button cells are sold, free of charge.
You are thus fulfilling your statutory obligations and are contributing to the protection of the environment.
18. Declaration of Conformity (DOC)
We, Conrad Electronic SE, Klaus-Conrad-Straße 1, D-92240 Hirschau, hereby declare that this product is in compliance with the necessary requirements and other relevant provisions of Directive 1999/5/EC.
→ The Declaration of Conformity for this product is available at:
www.conrad.com
19. Technical data
a) Weather station
Power supply 2x AA/Mignon type battery
Measuring range....Indoor temperature -9.9 °C to +50 °C
Indoor air humidity 20% to 95% (relative)
Dimensions....171 x 123 x 50 mm (W x H x D)
Weight 300 g (without batteries)
b) Outdoor sensor
Power supply......solar cell (if light is sufficient) or 4x AA/Mignon type batteries
Measuring range....Outdoor temperature -50 °C to +70 °C
Outdoor air humidity 20% to 95% (relative)
Air pressure: 850 - 1050 hPa
Wind speed: 0 - 255 km/h
Rainfall: 0 - 999.9 mm
Transmission frequency 868 MHz
Range up to 100 m (in open area, see Chapter "Range")
Dimensions....370 x 230 x 198 mm (W x H x D)
Weight 490 g (without batteries, excl. mounting material)
D Impressum
© Copyright 2015 by Conrad Electronic SE.
GB Legal Notice
This is a publication by Conrad Electronic SE, Klaus-Conrad-Str. 1, D-92240 Hirschau (www.conrad.com).
All rights including translation reserved. Reproduction by any method, e.g. photocopy, microfilming, or the capture in electronic data processing systems require the prior written approval by the editor. Reprinting, also in part, is prohibited. This publication represents the technical status at the time of printing.
© Copyright 2015 by Conrad Electronic SE. V1_0615_01_DT


- renkforce
- Wireless Weather Station
- Seite
- Page
- Introduction
- Explanation of symbols
- Intended use
- Package contents
- Notes on batteries/rechargeable batteries
- Features and functions
- a) Weather station
- b) Outdoor sensor
- Control elements on the outdoor sensor
- Outdoor sensor installation
- Important! The mark "N" for t
- Getting Started
- a) Outdoor sensor
- b) Weather station
- Operation
- a) Starting the DCF signal reception manually
- b) Starting the search for outdoor sensors manually
- c) Setting the 12h/24h mode, time zone, date and time, language for the weekday display and measuring units
- Proceed as follows:
- d) Alarm function
- Viewing the wake-up time
- Setting the wake-up time
- Switching the alarm on or off
- Activating the snooze alarm or cancelling the alarm signal
- e) Maximum/minimum values
- Show values
- Delete/reset values
- f) Trend indicators
- g) Comfort indicator
- h) Moon phases
- i) Rainfall
- Change the time span for the measurement indicator
- Clear/reset values
- j) Weather forecast
- Please note:
- k) Indication of the wind direction
- Important!
- I) Indicator of the wind speed
- m) Indicator of air pressure
- n) Graphical development display for the air pressure
- o) UV-index indicator
- p) Dew point temperature and feels-like temperature
- q) Wind chill temperature and heat index
- r) Backlight
- Battery replacement
- Troubleshooting
- No DCF signal
- The weather station does not find the outdoor sensor
- Gibberish displayed on the weather station
- False weather forecasting
- Incorrect values of wind or rain sensor
- Range
- The range may be considerably reduced by:
- Maintenance and Care
- Disposal
- a) General
- b) Batteries and rechargeable batteries
- Declaration of Conformity (DOC)
- Technical data
- D Impressum
- GB Legal Notice
Brand : Renkforce
Model : AOK-5056
Category : Weather Station