
CP205 - Keyboard KAWAI - Free user manual and instructions
Find the device manual for free CP205 KAWAI in PDF.


| Product Type | Digital Ensemble Piano |
| Model | CP205 |
| Brand | Kawai |
| Keyboard | 88 weighted keys (simulated), velocity sensitive |
| Sound Generation | Over 900 instrument and drum sounds, 15 categories |
| Polyphony | 64 voices (estimated) |
| Accompaniment Styles | 220 built-in styles covering various genres |
| Effects | Reverb (7 types), Chorus (4 types), Effects (16 types including Delay, Rotary, etc.) |
| Recording | 16-track sequencer, Easy Recorder, Advanced Recorder with step recording and editing |
| CD-R Drive | Built-in CD-R drive for audio CD playback and recording (CP205 only) |
| Floppy Disk Drive | 3.5-inch floppy disk drive for data storage and loading |
| Connectivity | MIDI In/Out, USB (MIDI-USB switch), Line Out (stereo), Line In (stereo), Headphone jacks (2), Microphone input with volume, Expression pedal, Video Out, Pedal connector |
| Pedals | Soft, Sostenuto, Sustain (all assignable) |
| Display | Large LCD screen with graphic capability |
| Concert Magic | Built-in songs playable by tapping any key |
| Song Stylist | 700 song titles with automatic panel setups |
| Registration | 160 preset registrations (20 groups x 8), user definable |
| Power Supply | AC 120V (US) or 230V (EU), detachable power cord |
| Dimensions (approx.) | 135 cm (W) x 40 cm (D) x 90 cm (H) with stand |
| Weight (approx.) | 55 kg |
| Included Accessories | Owner's manual, power cord, pedal unit |
Frequently Asked Questions - CP205 KAWAI
User questions about CP205 KAWAI
0 question about this device. Answer the ones you know or ask your own.
Ask a new question about this device
Download the instructions for your Keyboard in PDF format for free! Find your manual CP205 - KAWAI and take your electronic device back in hand. On this page are published all the documents necessary for the use of your device. CP205 by KAWAI.
USER MANUAL CP205 KAWAI
Concert Performer Series Digital Piano
Owner's Manual
Model: CP205/CP185
All descriptions and specifications in this manual are subject to change without notice.
Important Safety Instructions
SAVE THESE INSTRUCTIONS
INSTRUCTIONS PERTAINING TO A RISK OF FIRE, ELECTRIC SHOCK, OR INJURY TO PERSONS

CAUTION
RISK OF ELECTRIC SHOCK DO NOT OPEN

AVIS : RISQUE DE CHOC ELECTRIQUE - NE PAS OUVRIR.
TO REDUCE THE RISK OF ELECTRIC SHOCK, DO NOT REMOVE COVER (OR BACK). NO USER-SERVICEABLE PARTS INSIDE. REFER SERVICING TO QUALIFIED SERVICE PERSONNEL.

The lighting flash with arrowhead symbol, within an equilateral triangle, is intended to alert the user to the presence of uninsulated "dangerous voltage" within the product's enclosure that may be of sufficient magnitude to constitute a risk of electric shock to persons.

The exclamation point within an equilateral triangle is intended to alert the user to the presence of important operating and maintenance (servicing) instructions in the literature accompanying the product.
Examples of Picture Symbols

denotes that care should be taken. The example instructs the user to take care not to allow fingers to be trapped.

denotes a prohibited operation. The example instructs that disassembly of the product is prohibited.

denotes an operation that should be carried out. The example instructs the user to remove the power cord plug from the AC outlet.
Read all the instructions before using the product.
WARNING - When using electric products, basic precautions should always be followed, including the following.

WARNING
Indicates a potential hazard that could result in death or serious injury if the product is handled incorrectly.
Do not use this product near water - for example, near a bathtub, washbowl, kitchen sink, in a wet basement, or near a swimming pool, or the like.
Do not touch the power plug with wet hands. There is a risk of electrical shock. Treat the power cord with care as well. Stepping on or tripping over it can break or short-circuit the wire inside.

The product should be connected to a power supply only of the type described in the operating instructions or as marked on the product.

Pulling the AC power cord itself may damage the cord, causing a fire, electric shock or short-circuit.
When disconnecting the AC power cord's plug, always hold the plug and pull it to remove it.
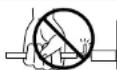

Do not attempt to service the product beyond that described in the user-maintenance instructions. All other servicing should be referred to qualified service personnel.

This product in combination with an amplifier and headphones or speakers, may be capable or producing sound level that could cause permanent hearing loss. Do not operate for a long period of time at a high volume level or at a level that is uncomfortable. If you experience any hearing loss or ringing in the ear, you should consult an audiologist.

This product may be equipped with a polarized line plug (one blade wider than the other). This is a safety feature. If you are unable to insert the plug into the outlet, contact an electrician to replace your obsolete outlet. Do not defeat the safety purpose of the plug.


CAUTION
Indicates a potential hazard that could result in injury or damage to the product or other property if the product is handled incorrectly.
Do not use the product in the following areas.
- Areas, such as those near windows, where the product is exposed to direct sunlight
- Extremely hot areas, or close to heat sources such as radiators, heat registers, or other products that produce heat.
• Extremely cold areas, such as outside
• Extremely humid areas - Areas where a large amount of sand or dust is present
- Areas where the product is exposed to excessive vibrations
Using the product in such areas may result in product breakdown.
Always turn the power off when the instrument is not in use. The product is not completely disconnected from the power supply even when the power switch is turned off. The power supply cord of the product should be unplugged from the outlet when left unused for a long period of time.
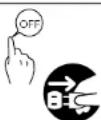
Before connecting cords, make sure that the power to this product and other devices is turned OFF. Failure to do so may cause breakdown of this product and other devices.
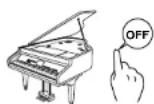
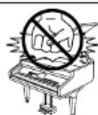
Do not stand on the product or exert excessive force.
Doing so may cause the product to become deformed or fall over, resulting in breakdown or injury.
The product should be located so that its location or position does not interfere with its proper ventilation.
Keep the instrument away from electrical motors, neon signs, fluorescent light fixture, and other sources of electrical noises.

Care should be taken so that objects do not fall and liquids are not spilled into the enclosure through openings. The product shall not be exposed to dripping or splashing. No objects filled with liquids, such as vases, shall be placed on the product.

When connecting the AC power cord and other cords, take care not to get them tangled. Failure to do so may damage them, resulting in fire, electric shock or short-circuit.

Take care not to drop the product. Please note that the product is heavy and must be handled by more than one person. Dropping the product may result in breakdown.
Do not lean against the product. Doing so may cause the product to move unexpectedly, resulting in injury.

Do not wipe the product with benzene or thinner. Doing so may result in discoloration or deformation of the product.
When cleaning the product, put a soft cloth in lukewarm water, squeeze it well, then wipe the product.

To reduce the risk of injury, close supervision is necessary when a product is used near children.
Close the topboard when the instrument is not in use.
The product should be serviced by qualified service personnel when:
- The power supply cord or the plug has been damaged.
- Objects have fallen, or liquid has been spilled into the product.
• The product has been exposed to rain. - The product does not appear to operate normally or exhibits a marked change in performance.
- The product has been dropped, or the enclosure damaged.
Should an abnormality occur in the product, immediately turn the power OFF, disconnect the power cord plug, and then contact the shop from which the product was purchased.
CAUTION:
To prevent electric shock, match wide blade of plug to wide slot, fully insert.
ATTENTION:
Instruction for AC power cord (U.K.)
Do not plug either terminal of the power cord to the ground of the AC outlet on the wall.
FCC Information
This equipment has been tested and found to comply with the limits for a Class B digital device, pursuant to Part 15 of the FCC Rules. These limits are designed to provide reasonable protection against harmful interference in a residential installation. This equipment generates, uses and can radiate radio frequency energy and, if not installed and used in accordance with the instructions, may cause harmful interference to radio communications.
If this equipment does cause harmful interference to radio or television reception, which can be determined by turning the equipment off and on, the user is encouraged to try to correct the interference by one or more of the following measures:
¥ Reorient or relocate the receiving antenna.
¥ Increase the separation between the equipment and receiver.
¥ Connect the equipment into an outlet on a different electrical circuit from the receiver.
¥ Consult the dealer or an experienced radio/TV technician for help.
Canadian Radio Interference Regulations
This instrument complies with the limits for a class B digital apparatus, pursuant to the Radio Interference
Regulations, C.R.C., c. 1374.
Introduction
Thank you for purchasing the Kawai Concert Performer (CP) Series Ensemble Digital Piano.
The CP Series piano has been designed to provide you with the ultimate musical experience, no matter your skill level. Featuring superbly realistic instrument tones and the most finely crafted keyboard in its class, the CP is a unique musical instrument resulting from the combination of Kawai's seventy-plus years experience in making acoustic pianos along with cutting-edge digital music technologies.
With over 900 different instrument and drum sounds at your disposal, you will have the flexibility to perform any kind of music ranging from traditional to contemporary. The Auto-Accompaniment Styles provides the enjoyment of playing rich, fully orchestrated music in hundreds of musical genres. Thanks to the Song Stylist feature, you will never have to worry about finding the best sounds and style to perform a particular song.
The Concert Performer incorporates many professional features, such as a 16-track Recorder, Microphone Input, and a 3.5-inch Floppy Disk Drive. For the non-player, Kawai's unique Concert Magic feature creates the thrill of being a performing musician simply by tapping any key on the keyboard.
Finally, the CP205 is the world's first ensemble piano with a CD-R drive, allowing anyone to make their own audio CD recordings right on the instrument. The Concert Performer offers tremendous opportunities for anyone who is interested in learning, playing, and listening to music. Please read this manual thoroughly and keep it handy as a reference so that you can get the most out of this incredible instrument.
We hope you enjoy every moment that you spend with your Concert Performer.
Table of Contents
Parts and Names 2
Overview
LCD Screen 6
Select Buttons....6
Dial 8
Basic Controls
Selecting a Part to Play 9
Splitting the keyboard. 10
Selecting Sounds 11
Mixer 13
Effects 15
Effect Types 19
Effect Priority Guidelines 20
Transpose and Octave Shift 22
Metronome 24
Piano Only 25
Using a Style
Selecting and Playing a Style 26
Fill-In and Variation 28
Auto Accompaniment System 28
Bass Inversion 29
1-2 Play 30
Registration 31
Registration Groups 31
Style Lock 35
Song Stylist 36
Harmony 40
Recording a Song
Easy Recording 42
Part Status 44
Saving the song 45
Erasing the song 45
Advanced Recording 47
Real-time Recording 48
Mixer 49
Track Settings 51
Loop Settings 52
Style Paste 53
Punch-In Recording 54
Step Recording 57
Song Edit 60
Bar Editing 61
Event Edit 74
Creating Your Own Styles
Conductor 76
Making a New Style 82
Auto-accompaniment System 86
Making a Style with Phrase Combination ..... 89
Style Convert 92
Editing Sounds
Editing the Preset Effect Settings 96
Making a User Sound 98
Playing Songs from a Floppy Disk
About songs on Floppy Disk 102
Selecting a Song from Disk 103
Controlling Playback of a Song ..... 105
Playing with Concert Magic
Selecting a Concert Magic Song 108
Performing a Concert Magic Song 109
Concert Magic Song Arrangements ..... 113
Creating a Concert Magic Song 114
System Menu
Tuning 118
Touch Curve 119
System EQ 122
Virtual Voicing 124
Resonance 125
Concert Magic Sound 126
Pedal Assign 127
Fill-in Mode 130
Solo Settings 131
Video Out 132
Effect for Sound 133
Temperament 134
MIDI Menu 138
Power Up Settings 143
Soft Reset 144
Software Version 145
Display Control 146
Mic Harmony and Effect
Mic Harmony 148
About Mic Harmonis 150
Mic Effect 152
Floppy Disk Operations
Disk Menu 156
Saving Data to a Floppy Disk 157
Loading Data from a Floppy Disk .... 160
Erasing Data from a Floppy Disk 163
Formatting a Floppy Disk 164
CD-R Operations (CP205 only) ....
Playing an audio CD 167
Recording onto a CD 169
Closin (Finalizing) Your CD 171
Getting Assistance: Using Help and Demo
Using the Help 172
Using the Demonstrations 174
Playing Piano Music 177
Appendices
List of Preset Sound 180
List of Style 185
List of Song Stylist 187
Concert Magic Songs 192
Table of Chord Form 196
Example of Connection 198
USB 200
MIDI Data Format 201
MIDI Implementation Chart 206
Specifications 207
Parts and Names
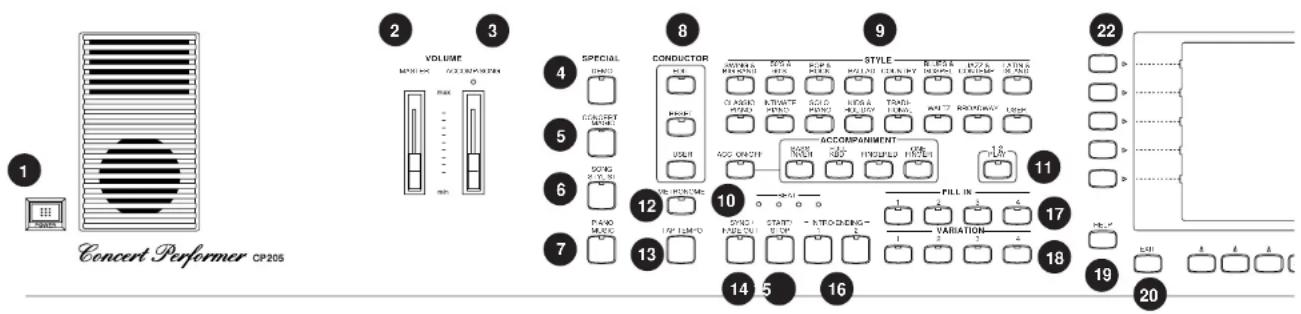
- Power
Turns the piano on/off.
- Master Volume Slider
This slider is used to adjust the overall volume level of the instrument.
- Accomp/Song Volume Slider
This slider is used to adjust the volume level of the Auto Accompaniment Styles. Also used to adjust the volume level of a song played from the CP Recorder or directly from a floppy disk. This slider does not affect the Master Volume Slider setting.
- Demo (page 174)
This button is used to select the built-in demo songs and function demos which explain important features of the CP piano.
- Concert Magic (page 108)
This button is used to select the built-in Concert Magic songs.
- Song Stylist (page 36)
This button is used to select the Song Stylist Registrations.
- Piano Music (page 177)
This button is used to select the built-in piano music.
These buttons are used to modify or create your own Accompaniment Styles.
- Style (page 26)
These buttons are used to select an Accompaniment Style to play along with.
- Accompaniment (page 28)
These buttons are used to turn the Auto-Accompaniment function on/off, and select the Auto-Accompaniment mode.
- 1-2 Play (page 30)
This button is used to automatically choose an appropriate sound and setup for the selected style.
- Metronome (page 24)
This button is used to turn the Metronome on/off.
- Tap (page 24, 26)
This button is used to tap in the desired tempo for a song or Style.
- Sync/Fade out (page 27)
When active, the accompaniment style will start as soon as you play a note or chord on the keyboard. Press this button while a Style is playing to fade in or out of the Style.
- Start/Stop (page 27)
This button is used to start and stop the accompaniment style.
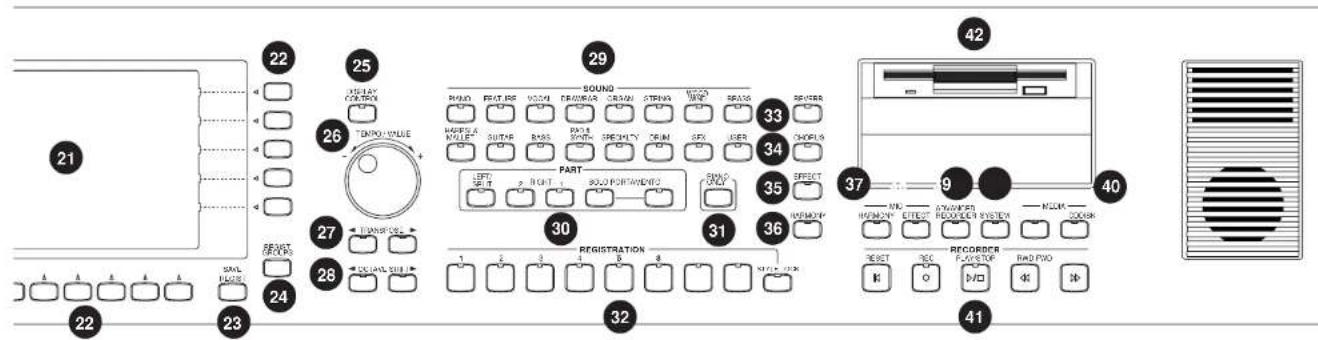
16. Intro/Ending (page 27)
These buttons are used to play an intro section that leads into the style. If you press this button while the style is playing an ending section will be played before stopping.
17. Fill-in (page 28)
These buttons are used to select one of the four short fill-in sections that embellish the style and lead into the different variation sections of the Style.
18. Variation (page 28)
These buttons are used to select one of the four variation sections within the chosen Style.
19. Help (page 172)
These buttons are used to access Help menus which contain explanations of the CP piano's features.
20. Exit
This button is used to back up to the next-higher screen level. Repeatedly pressing the Exit button from any screen on the CP will bring you back to the CP's main play screen.
21. LCD Screen
Displays information about the CP's current sound selections, settings, options, etc.
22. Select Buttons
These buttons are used to select items displayed on the LCD screen.
23. Save Regist
This button is used to save up to 160 of your own favorite panel settings.
24. Regist Groups (page 31)
This button is used to select one of the 20 groups of preset and user sound registrations.
25. Display Control (page 146)
This button is used to access and adjust settings for the LCD screen.
26. Tempo/Value Dial (page 8)
This dial is used to adjust tempo, scroll through different selections, and adjust data values for items on the LCD screen.
27. Transpose (page 22)
This button is used to change the overall pitch of the CP in half-note steps.
28. Octave Shift (page 22)
These buttons are used to change the overall pitch of the CP in octave steps.
29. Sound Selection (page 11)
These buttons are used to select the desired sound category. Use the SELECT buttons or the DIAL to select a sound within the category.
30. Part (page 9)
Selects which of the four parts (Left/Split, Right 1, Right 2, Solo) are active and ready to be played with the sounds assigned to them.
natural_image
Simple line drawing of a three-tiered container with two side compartments and a numbered label (43) below, no text or symbols present.31. Piano Only (page 25)
This button is used to automatically assign the Concert Grand sound to the Right 1 part.
32. Registrations (page 31)
These buttons are used to recall one of the eight panel settings available in the currently selected Registration group.
33. Reverb (page 15)
This button turns on/off the Reverb. Press and hold the button to select the Reverb settings menu.
34. Chorus (page 16)
This button turns on/off the Chorus. Press and hold the button to select the Chorus settings menu.
35. Effects (page 18)
This button turns on/off the Effects. Press and hold the button to select the Effect settings menu.
36. Harmony (page 40)
This button turns on/off the Harmony for the instrument sounds. Press and hold the button to select the Harmony settings menu.
Front TerminalsPedals

37. MIC Harmony/Effect (page 148)
This button turns on/off the MIC Harmony/Effect for the Microphone jack. Press and hold the button to select the MIC Harmony/Effect settings menu.
38. Advanced Recorder (page 47)
This button is used to access the Advanced Recorder functions.
39. System (page 116)
This button is used to access the system settings menu.
40. Media Disk/CD (page 102, 156, 166)
These buttons are used to access the Floppy Disk functions and CD-R Drive functions (CP205 only).
41. Recorder (page 42)
Used to record and play back a song.
42. Disk Drive
Reads and writes data to a standard 3.5" floppy disk..
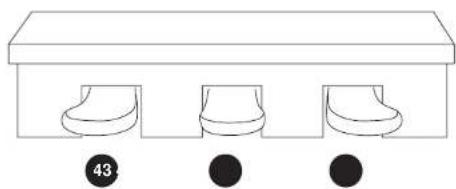
43. Soft Pedal
Depressing this pedal softens the sound and reduces its volume. This pedal can also be assigned to control other functions. (See page 127)
Rear Terminals

natural_image
Line drawing of a grand piano with a horizontal support and vertical legs, showing no text or symbols.
44. Sostenuto Pedal
Depressing this pedal after playing the keyboard and before releasing the keys sustains the sound of only the keys just played. This pedal can also be assigned to control other functions. (See page 128)
45. Sustain Pedal
Sustains the sound after lifting your hands from the keyboard. The sustain pedal is capable of responding to half pedaling.
46. Headphone Jacks
These jacks are used to connect up to two headphones to the CP piano.
47. Mic In Volume
This knob adjusts volume level of the microphone input.
48. Microphone Jack
This jack is used to connect a microphone or other comparable mic-level sound source.
49. EXP Pedal
This jack is used to connect an optional expression pedal.
50. Video Out
This jack is used to connect the CP to a TV set or external monitor display.
51. Line Out Jacks
These jacks are used to provide stereo output of the CP's sound to amplifiers, tape recorders or similar equipment. The audio signal coming through the LINE IN jacks is also routed to these jacks.
52. Line In Jacks
These jacks are used to connect stereo outputs from other audio equipment or electronic instruments to the CP's speakers. The audio signal coming through these jacks bypasses the CP's volume control.
53. MIDI-USB Switch
Switches between the MIDI jacks and USB jack.
54. MIDI Jacks
These jacks are used to connect external MIDI devices to the CP. Enabled only when the MIDI-USB switch is set to MIDI.
55. USB Jacks
This jack is used to connect a personal computer to the CP. Enabled only when the MIDI-USB switch is set to USB.
56. Receptacle for Pedal Cable
This jack is used to connect the cable from the pedal unit.
Overview
This manual provides you with all the information you will need in order to take full advantage of the Concert Performer's potential. Before you begin learning how to use the specific features, it is important to understand some of the basic ideas behind the instrument's design.
The Concert Performer has been designed to have an easy and intuitive user interface. However, the instrument has so many
features that it is simply impractical to have a dedicated button for every single one. As a result, many features and functions are selected by choosing them from lists, or "menus", that are presented to you on the CP's large display screen. Often times selecting an item from a menu may access another "sub-menu" of options specific to that item. This system of menus and sub-menus keeps everything logical and straightforward and becoming familiar with how to make your way through them is very easy.
LCD Screen
The LCD Screen is the window through which the Concert Performer communicates with you. The large display size allows many items to be clearly displayed at the same time, allowing for not only words but graphics to be shown as well.
Select Buttons
Most of the buttons on the front panel are used to directly select a function on the CP that you would like to work with. In most cases, the specific function name is printed on the front panel directly above the button. For example, there are buttons labeled 1-2 PLAY, FILL-IN, and so on. In this manual, references to these buttons are always printed in capital letters for clarity. Most of these buttons have an LED Indicator (small light) on them. This Indicator will be turned ON when a function is in use so that you can quickly see if that function is active.
There are 17 SELECT buttons surrounding the LCD screen that do not have labels printed next to them because they do not have predetermined functions. Instead, they are used to select whatever items are currently displayed next to them on the LCD screen. For example, a SELECT button might be used to select an instrument sound on one screen, while on another screen the same SELECT button might serve to activate a feature related to Floppy Disk or CD-R Drive operation.
To keep things simple, this manual will refer to the five SELECT buttons along the left side of the LCD screen as L1-L5. Likewise, the five SELECT buttons along the right side of the screen will be referred to as R1-R5. The seven SELECT buttons along the bottom of the screen, which are also known as function buttons, will be referred to as F1-F7.
In some cases when you see an item displayed on the screen and press the L or R button next to it, that item on the screen will become highlighted (shown in reverse color) to indicate you have selected that item. Sometimes a submenu screen relating to that item will be displayed and present you with further options.
When you press one of the F buttons, the corresponding function on the LCD screen will be highlighted to indicate that it has been selected.
L1 Selects Style. Use the F2,F3 buttons, Style buttons, or the Dial to change the active Style.
L2 Selects Tempo. Use the Dial or the TAP TEMPO button to change the Tempo
L3 Selects the LEFT Part. Use the F6, F7 buttons, Sound buttons, or the Dial to change the Sound.
No functions are assigned to the L4 and L5 buttons on this screen.

F1 Takes you to the MIXER settings screen.
F2, F3 Selects a Style.
F4, F5 Adjusts the volume level for the Part currently selected.
F6, F7 Selects a sound for the selected Part. "Sound" is highlighted to indicate this graphic button is active.
R1 Selects the SOLO Part. Use the F6, F7 buttons, Sound buttons, or the Dial to change the Sound.
R2 Selects the RIGHT1 Part. Use the F6, F7 buttons, Sound buttons, or the Dial to change the Sound.
R3 Selects the RIGHT2 Part. Use the F6, F7 buttons, Sound buttons, or the Dial to change the Sound.
No functions are assigned to the R4 and R5 buttons on this screen.
*RIGHT1* is highlighted to indicate that this Part is now selected.

Dial
The Dial is used to change data values and scroll through options that are displayed on the LCD screen.
When you turn the Dial, you will notice that whatever item on the LCD screen is currently selected (highlighted) will be affected. Or in some cases when the screen presents you with a list of choices, turning the Dial will allow you to quickly scroll through the list until you arrive at your choice. It can also be used instead of the L, R, and F buttons as another way of selecting or changing an item or value on the LCD screen.
Basic Controls
This chapter discusses the basic operations that are used to play the Concert Performer, such as sound selection, Part configuration and effect settings.
Selecting a Part to Play
When the CP's main play screen is displayed (For example, when the CP is first turned on), you are presented with four sound Parts that can be played from the keyboard. These four Parts are named LEFT/SPLIT, RIGHT 1, RIGHT 2, and SOLO, and each one has an instrument sound assigned to it. You can selectively turn on/off any combination of these four Parts, allowing you to have up to four different sounds at the same time across the keyboard.
Sounds assigned to Parts RIGHT 1, RIGHT 2 and SOLO will be layered on top of each other when all three Parts are active at the same time. Activating the LEFT/SPLIT Part automatically splits the keyboard so that only the sound that is assigned to the LEFT/SPLIT Part is heard when you play in the lower octave keys. Each Part has a dedicated button on the front panel that selects and turns on/off that Part. You can also select a Part by pressing the appropriate L or R button.
Selecting a Part is easy:
1) Press the PART button for the Part you wish to activate. The PART button LED will light. 2) Press the PART button again to turn that Part off.
- If the LCD screen is currently showing the main play screen, you can tell which Parts are active by looking at the name of the sound assigned to it. If the name of a sound is in large typeface, then the Part it is assigned to is active. If the sound name is displayed in small typeface, then the Part is not active.
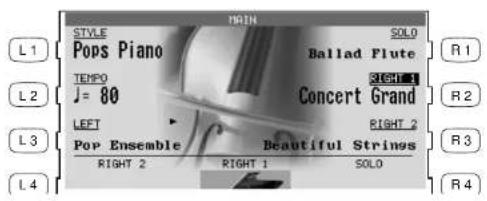
This example indicates:
RIGHT1 is currently active
SOLO, RIGHT2, LEFT are inactive.
Splitting the keyboard.
When the LEFT/SPLIT Part is activated, the CP automatically splits the keyboard and only the sound assigned to the LEFT/SPLIT Part will be heard when you play below a specified key (split point) on the keyboard. The default split point is between F2 and F#2 but you can freely change the split point to any key on the keyboard.
To change the split point:
1) Press the LEFT/SPLIT button to activate the LEFT/SPLIT Part. The LEFT/SPLIT button LED will light and the LCD screen will display a diagram of the CP's 88 note keyboard.
2) Press the LEFT/SPLIT button again, and while holding it down, press the desired key on the keyboard that you want to serve as the split point. The key you press will become the lowest note the Right hand Parts will play (RIGHT1, RIGHT2, and SOLO). The LEFT/SPLIT sound will be heard when keys below the split point are played.
You may also use the L4 and R4 buttons to move the split point. On the LCD screen the split point marker will move across the 88 note keyboard diagram as you press these buttons.
L4 Lowers the split point.
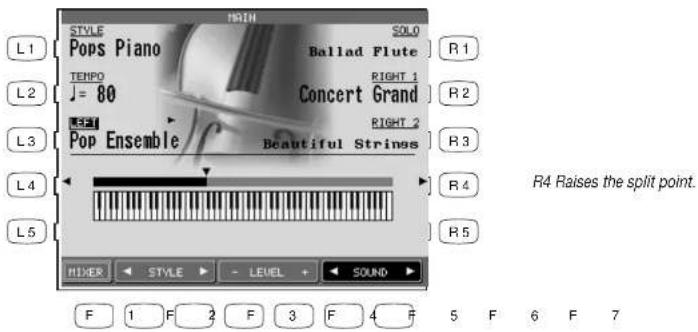
- Moving the split point completely to the LEFT end of the keyboard will allow the LEFT/SPLIT Part to function as a layer with the three right hand Parts. In this manner you can create four part layered across the entire keyboard.
Portamento for the Solo Part
The Solo Part is monophonic (only plays one note at a time) regardless of which sound is assigned to it. You can use Portamento on this Part. Portamento is a gradual slide in pitch from one note to the next, and is useful for adding very expressive qualities to many instruments.
To use Portamento:
1) Press the PORTAMENTO button. The PORTAMENTO button LED will light.
2) Press the button again to turn Portamento off.
You can adjust the Portamento Time, which determines how quickly the pitch will slide from one note to the next. You can also set the note priority for Portamento. (See "Solo Settings" on page 131).
Selecting Sounds
The Concert Performer has over 900 instrument and drum sounds available from the front panel. You can freely assign any of these sounds to the four Parts. Remember that there is always a sound assigned to each of the Parts, even if some of the Parts are not currently active.
The sounds span a tremendous variety of instruments, ranging from traditional acoustic sounds to modern electronic tones. To help you quickly find the sound that you want, the sounds have been organized into 15 categories. Each category has a dedicated Sound Selection button on the front panel.
To select a Sound:
1) In the main play screen, select the Part to which you wish to assign a new sound using the L3, or R1-R3 buttons. The selected Part will become highlighted.

The USER button lets you select any sounds that may be stored in the User Sound category.
2) Press the SOUND button for the sound category that your are interested in. The first page of sounds in that category will be displayed. There are at least three pages of sounds in each category (except User). Use the F1-6 buttons to view the other pages in a category.
3) Select a sound by pressing the L or R button that is next to the displayed name.
4) Press the F1-F6 buttons to show the Sounds on the other pages for the same category.
5) You can also use the Dial to scroll through all of the categories and sounds one by one.

Use the L or R buttons to select your desired Sound.
F1-F6 Selects the different pages of Sounds within a category.
F7 Takes you to the Sound Edit menu. (See "Editing Sounds" on page 96.)
6 F 7
Mixer
This Mixer screen allows you to change the volume, panning, reverb and chorus levels, as well as turn the effect on/off for each Part.
To use the Mixer:
1) Press the MIXER button (F1) while on the main play screen.
2) Use the F2–F7 buttons to select which Part you wish to adjust.
3) Use the L and R buttons to select a setting to change.
4) Use the Dial to change the value.
L1 Selects the Effect On and Off.
L2 Selects reverb level.
L3 Selects chorus level.
L4 Selects Panning.
L5 Selects volume level.
After you make your desired selection, use the Dial to change the value.

F1 Takes you to the next page of the Mixer.
F2-F6 Selects the part to change.
F7 Adjusts the volume level for the Harmony.
• Volume level can be also adjusted from the main play screen, using the VOLUME buttons (F4, F5).
The Mixer not only lets you set the overall volume level for the Style, but set individual volume levels for the 6 Sections within a Style.
To adjust the individual Section level:
1) On the Mixer screen, press the STYLE MIXER button (F1). The Style Mixer screen will be selected.
2) Use the F2–F7 buttons to choose a Section, then use the Dial to change the volume.
3) Press the BACK button (F1) to go back the previous Mixer screen, or press the EXIT button to go back to the main play screen.

F1 Takes you to the previous Mixer screen.
F2–F7 Selects the Section that you wish to change.

Effects
You might have noticed that when you select some of the sounds, the LED indicator for the REVERB, CHORUS, or EFFECTS button is turned on. The reason for this is some of the sounds are set up with one or more of these effects on as part of their initial setting.
Adding an effect to the sound enhances tonal quality and improves acoustical realism. The CP piano is provided with three separate groups of effects. The first is REVERB, the second is CHORUS, and third group EFFECTS contains other useful effects such as Delay, Phaser, Rotary Speaker etc. There is a dedicated button on the front panel for each Effects group and each of the three Effect groups can be turned on/off separately or used in combination for each part. The Concert Performer has a selection of 27 different Reverb, Chorus, and Effect types that can be used to enhance or even dramatically alter the instrument sounds. Each of the over 900 instrument and drum sounds has already been assigned a REVERB and CHORUS setting and an additional EFFECT that suits that particular type of instrument. For example, a moderate Delay effect is used on the Church Organ to recreate the sense of being in a large church, and a Rotary speaker effect is used on the Drawbar organ to give it an authentic, vintage feel.
If you wish, you can change any of these effect settings to suit your tastes separately for each sound save them as the new Preset effect settings for that Sound (See Sound Edit on page 96). In addition, by setting the Effect For Sound function in the System to "Panel" the CP will ignore the preset effects settings for each Sound (see Effect For Sound on page 133).
(The CP piano can also remember your Effect settings as part of a Registration. See Registration on page 31.)
To add Reverb :
1) Press the REVERB button. The REVERB button LED will light.
2) If you wish to edit the settings, hold down the REVERB button for a moment until the Reverb Settings screen is displayed.
3) Use the F3-F7 buttons to select the Part you want to edit.
4) Use the L2-L4 buttons to select the specific setting that you wish to change.
5) Use the Dial to change the value.
6) Press the EXIT button to leave the Reverb Settings menu.
7) If you wish to turn the reverb effect off, press the REVERB button again.
L2 Selects the Reverb type. Use the Dial to choose one of the 7 Reverb types.
L3 Selects Reverb on/off. Use the Dial to turn the Reverb on/off for the selected Part.
L4 Selects Reverb depth. Use the Dial to change the Reverb depth for the selected Part.

F3-F6 Selects the Part you want to change. Repeatedly pressing the appropriate button also turns the Reverb on/off for that Part.
Type of Reverb
Hall 1, Hall 2 Simulates the ambiance of a concert hall or theater.
Stage 1, Stage 2 Simulates the ambiance of a small hall or live house.
Room 1, Room 2 Simulates the ambiance of a living room or small rehearsal room.
Plate Simulates the sound of a metallic plate reverb.
- The LED Indicator on the REVERB button will be lit whenever Reverb is turned on for the any Part except ACC (regardless of each part's Effect Priority). See "Effect Priority Guidelines" later in this chapter for an explanation of Effect Priority.
To add Chorus:
1) Press the CHORUS button. The CHORUS button LED will light.
2) If you wish to edit the settings, hold down the CHORUS button for a moment until the Chorus Settings screen is displayed.
3) Use the F3-F6 buttons to select the Part you want to edit
4) Use the L2-L4 buttons to select the specific setting that you wish to change.
L2 Selects the Chorus type. Use the Dial to choose one of the 4 Chorus types.
L3 Selects Chorus on/off. Use the Dial to turn the Chorus on/off for the selected Part.
L4 Selects Chorus depth. Use the Dial to change the Chorus depth for the selected Part.
5) Turn the Dial to change the value.
6) Press the EXIT button to leave the Chorus Settings menu.
7) If you wish to turn the chorus off, press the CHORUS button again.

F3-F6 Selects the Part you want to change. Repeatedly pressing the appropriate button also turns the Chorus on/off for that Part.
- The Indicator light on the CHORUS button will be lit only when Chorus is turned on for the active "Priority Part". See "Effect Priority Guidelines" later in this chapter for an explanation of this.
- You can select from four chorus types when in the Chorus Settings menu. There is a fifth chorus type which is assigned as an Effect from the Effect Settings menu. In this way, you can actually have two chorus effects active if so desired.
To add an Effect:
1) Press the EFFECT button. The EFFECT button LED will light.
2) If you wish to edit the settings, hold down the button for a moment until the Effect Settings screen is displayed.
3) Use the F3-F6 button to turn ON/OFF the Effect for each part.
4) Use the L2–L5, R3 buttons to select the specific setting that you wish to change.
5) Turn the Dial to change the value.
6) Press the EXIT button to leave the Effect Settings screen.
7) If you wish to turn the Effect off, push the EFFECTS button again.
L2 Selects Effect type. Use the Dial to choose one of the 16 Effect types.
L3 Selects Wet Balance. Use the Dial to change the value.
L4 Selects a different editable setting for each Effect type. Use the Dial to change the value.

R3 Selects a different editable setting for each Effect type. Use the Dial to change the value.
F3-F6 Turns the Effect on/off for each Part.
Effect Types
Chorus Simulates the rich character of a vocal choir or string ensemble, by layering a slightly detuned version of the sound over the original to enrich it.
Flanger Creates a shifting comb-filter, which adds motion and a "hollow" tone to the sound.
Celeste A three-phase chorus without modulation.
Ensemble A three-phase chorus with a slight modulation to each phase.
Delay 1-3 Adds echoes to the sound. The three types differ in the length of time between the echoes.
Auto Pan Moves the sound left and right across the stereo field at a variable rate.
Tremolo Modulates the volume of the sound. This is a vibrato type effect.
Tremulant A combination of Tremolo and Vibrato. It simulates the tremulant pipes of a church organ.
Phaser Creates a phase change, adding motion to the sound.
Rotary 1-2 This effect simulates the sound of the Rotary Speaker cabinet commonly used with electric organs. Rotary 2 adds distortion. The soft pedal is used to change the speed of the rotor between SLOW and FAST.
Auto Wah Sweeps a tone filter up and down at the beginning of a note, recreating the popular vintage wah wah pedal sound.
Enhancer Emphasizes high frequencies to make a sound more easily discernible in a mix.
Distortion Adds frequencies that were not present in the original sound, resulting in a "fuzzy" or warmer tone.
Effect Priority Guidelines
Reverb and Chorus are global effects. In other words, all of the Parts and the Accompaniment Style must share the same Reverb and Chorus type. However each of these Parts can have a different amount of Reverb and Chorus applied to them. In addition Reverb and Chorus can be independently turned on/off for each part. However, since the CP's EFFECT section can only have one Effect turned on at a time (in addition to the REVERB and CHORUS), what happens if you have two (or more) Parts active, with entirely different sounds, each with a different Effect setting?
In these cases, the CP's Effects section can only use the Effect settings for one of the Parts. The EFFECT section chooses which Effect settings to use based upon a predetermined priority order for each of the Parts. The Priority order is SOLO > RIGHT 1 > RIGHT 2 > LEFT/SPLIT. The preset effect settings for the Priority Part will be used and the other Parts will either share these settings or may have their Effects automatically turned off.
This “Priority Part” depends on the current situation. If you only have one Part active, regardless of which Part it is, the preset effect settings for that sound will be used. If you have two or more Parts active, then the CP will treat one of them as the Priority Part, and ignore the settings of the other(s).
If the the Effect For Sound is set to "Panel" in the System then the Preset effect settings for each Sound will be ignored and the Part Priority will be ignored. (See Effect For Sound on page 131).
Here are some guidelines for Effect Priority:
- Priority is given to the Parts in the following order: SOLO>RIGHT1>RIGHT2>LEFT. This means that anytime the SOLO Part is active, its Effect settings will be used, not only for its sound but for any sound in any other Part, that you want to add effects to. Likewise, the only time an active LEFT Part's settings will be applied is if the other 3 Parts are inactive.
- Unlees you change them, the Effect settings will only change in response to a change in the Priority Part being activated/deactivated, or a new sound is assigned to an active Priority Part. In the latter case, the new Effect settings will reflect the Preset effect settings for the new sound.
- When the Effect settings change for the Priority Part, the Effects will be automatically turned off for the other Parts. (This is so that your Flute sound on RIGHT2 doesn't suddenly get effected by the Distortion settings of the Electric Guitar that you've just assigned to the SOLO Part!)
- You can, however, turn the effect on for any Part by adjusting the Effect On/Off option in the display for that Part.
- The LED Indicator on the EFFECT and CHORUS buttons will be on only when the active Priority Part has these effects turned on.
Example
Assume that your CP is set up according to the following chart:
SOLO RIGHT1 RIGHT 2 LEFT INDICATOR
Part Inactive Active Inactive Active
Effect On On Off On On
If you then select a different sound for RIGHT1, the Effect setting for the SOLO, RIGHT2, LEFT will be turned off automatically. This is because RIGHT1 is the Priority Part (note that the SOLO Part is NOT the Priority Part because it was inactive).
The chart would now look like this:
SOLO RIGHT1 RIGHT 2 LEFT INDICATOR
Part Inactive Active Inactive Active
Effect Off On Off Off On
Even if you now assign a new sound to the SOLO Part, the Effect settings for the other Parts won't change, because SOLO is still inactive, so therefore would not have priority.
Once you make the SOLO Part active, however, it would now be considered the Priority Part. The Effect settings for the other Parts will again be turned off. The Indicator light on the EFFECT button will now reflect the Effect status for the sound assigned to SOLO.
SOLO RIGHT1 RIGHT 2 LEFT INDICATOR
Part Active
Effect
Active Inactive Active
Off
Off
Off
Off
Off
At this point, if the Effect that has been called up along with the SOLO sound is one that you'd like to use for the other Parts, simply select Effect On in the LCD display for those Parts.

Transpose and Octave Shift
Transpose raises or lowers the CP's pitch in half-step increments. Octave Shift does the same but in octave increments.
Transpose can be especially useful when you have learned a song in one key and have to play it in another key. The transpose feature allows you to play the song in the original key, but hear it in another key. You can transpose the Concert Magic songs, the Accompaniment Styles, any songs played back by the Easy/Advanced Recorder and any of the over 900 instrument and drum sounds available in the CP. Songs recorded on the CD-R Drive cannot be transposed once they have been recorded.
Octave shift can be very useful when you are playing multiple sounds across the keyboard. You may want to use the octave shift to adjust a bass sound assigned to the LEFT/SPLIT Part to play in the proper pitch range, or to set one sound in a layer to play in a different octave so that it mixes well with other sounds in the layer. Octave shift is only available for the four Parts: LEFT/SPLIT, RIGHT1, RIGHT 2, and SOLO.
To Transpose:
1) Press either the ◀ or ▶ TRANSPOSE buttons. The LCD screen shows you a number telling you how many half steps up or down you have transposed the piano. -5, for example, represents a transposition that is 5 half steps lower.
2) To cancel the Transpose setting, press both the ◀ and ▶ buttons at the same time. The transpose amount will disappear from the LCD screen, indicating that the CP is now back to its original setting.
To use the Octave Shift:
1) Select the Part that you would like to apply the shift to.
2) Press either the ◀ or ▶ OCTAVE SHIFT buttons. The number of shifted octaves (up or down) will be displayed with an “◀” in the LCD screen.
3) To cancel the octave shift, press both the ◀ and ▶ buttons at the same time. The symbols will disappear from the screen, indicating that the selected Part is back to its normal octave range.
L3 Selects the LEFT Part to be Transposed or Octave Shifted.

R1 Selects the SOLO Part to be Transposed or Octave Shifted.
R2 Selects the RIGHT1 Part to be Transposed or Octave Shifted.
R3 Selects the RIGHT2 Part to be Transposed or Octave Shifted.
The number of octaves shifted is represented by the number of triangles shown above the sound name for each Part.
Transpose amount is shown at the bottom of the screen.
- The Octave Shift has a range of four octaves in each direction. However, some on board sounds may have a limited range in which they play properly. If you shift too far out of this range, the instrument may sound strange or may not play at all. This has no affect on the CP's proper function though, and you should feel encouraged to use this feature as a means of getting interesting tonal variations out of the preset Sounds.
Metronome
Rhythm is one of the most important elements when learning music. It is important to practice playing the piano at the correct tempo and with a steady rhythm. The CP piano's metronome is a tool that helps you to achieve this by providing a steady beat for you play along with.
To use the Metronome:
1) Press the METRONOME button. The CP piano will start counting with an audible steady beat. You will see Volume level, Beat (time signature), as well as the Metronome icon appear in the LCD screen next to the Tempo value.
2) Use the BEAT, VOLUME, or TEMPO buttons (F2–F7) to select the setting you wish to change.
3) Use the F buttons (F2-F7) or the Dial to change the values.
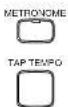
You can also adjust the tempo by tapping on the TAP TEMPO button. Simply tap on the button with your finger three or more times at the desired tempo, and the CP will automatically translate that into a tempo value on the screen!
4) To stop the metronome, press the METRONOME button again.

F1 Takes you to the Mixer menu.
F2, F3 Changes the Beat. Choose from 1/4, 2/4, 3/4, 4/4, 5/4,
6/8, 7/8, 9/8 and 12/8 time signatures.
F4, F5 Adjusts the volume level.
F6, F7 Adjusts the tempo.
Piano Only
The Piano Only button provides a way to quickly set the Concert Performer up to play the Concert Grand piano sound. Pressing the Piano Only button immediately turns off all Parts except the Right 1 part and sets the Right 1 sound to Concert Grand.
The Piano Only button also turns off all auto-accompaniment functions and stops the Easy/Advanced Recorder. Additionally, pressing the Piano Only button will cause the CP to exit any function or editing screen (except for Concert Magic) and immediately return to the Main Screen.
We you are using Concert Magic, pressing the Piano Only button will change the Concert Magic song's preset sounds to Concert Grand piano.
- You can also use the Piano Only button as a “panic button” to immediately stop any unintended accompaniment style or recording, or to quickly exit any confusing situation and return to a familiar piano sound.
To use Piano Only:
Press the PIANO ONLY button. The Main Screen is displayed and the Concert Grand sound is assigned to RIGHT1.

Using a Style
The Concert Performer contains 220 built-in Styles for you to play along with covering a wide variety of musical genres. You can choose from a simple drum or percussion accompaniment or add in a fully orchestrated arrangement. In addition to the Full Styles which provide a full musical arrangement including Drums, Bass, and other accompanying instruments there are Intimate Styles with simpler more "Intimate" arrangements. There is also a selection of
Solo Piano Styles if you just want to play along with a piano accompaniment. If the on board variety of styles is not enough, or if you have creative ideas of your own, the CP contains other features such as Style Maker and Conductor to help you edit or create your own custom Styles. These features are explained in the section of this manual "Creating Your Own Styles", page 76.
Selecting and Playing a Style
Just like the Sounds the Styles are organized into 15 categories, each with a dedicated STYLE SELECT button on the front panel.
To select a Style:
1) Press the STYLE button for the category of your choice. The LCD screen will display the first Style Selection page for that category.
2) Press the L or R button next to the on-screen name of the Style you wish to select.
3) Each Style category has two pages of styles. If you don't see your desired Style on the currently displayed page, you can use the F1-F2 buttons to select the other page. Press another STYLE button to jump to another category, or turn the Dial to scroll through all the Styles one by one.
4) If you wish play the selected Style, press either the START/STOP button to start the Style playing immediately, or the INTRO/ENDING button to start the Style with an Intro pattern.
You can also press the SYNC/FADE OUT button before starting a Style or pressing the INTRO/END buttons. When the SYNCFADE OUT button is pressed, the Style will not start until you play a note or chord on the keyboard.
5) To adjust the tempo of the Style, select Tempo on the main play screen and use the Dial to change the Tempo.
You can also use the TAP TEMPO button. Tap the button three or more times at the desired tempo and the CP will automatically translate your taps into an on-screen Tempo value.
6) To stop the Style, press either,
the START/STOP button to stop the Style immediately,
or the INTRO/ENDING button to stop with an ending pattern,
You can also press the SYNC/FADE OUT button and have the Style fade out gradually.

Use the L or R buttons to select your desired Style.
F1, F2 Select the different pages within a Style category.

When this button is pressed before starting a Style or before pressing the INTRO/ENDING button, the Style will not start until you play a note or chord on the keyboard. When this button is pressed while the Style is running the Style will gradually fade out. When this button is pressed during a fade out the Style will gradually fade back in and you may resume playing the Style. You can press the SYNC/FADE OUT button at any time while any of the patterns (Intro, Variation, Ending) in the Style are running to fade in or out of the Style.

Starts or stops the Style immediately.

When one of these buttons is pressed to start a Style the selected Intro pattern will be played before the selected Variation pattern plays. There are both major and minor versions for each Intro. The Auto-accompaniment System will decide which Intro to use based upon the first Chord you play (major or minor). The LCD screen will display a countdown in bars to show how many bars you have until the the variation begins playing. When one of these buttons is pressed while the Style is running the selected Ending pattern will be played before the Style stops. There are major and minor versions for each Ending.
- When you are in the main play screen, you can select a Style by just using the Dial. Press the L1 button or F2-F3 (STYLE) and "Style" will become highlighted. Use the Dial or press the F2-F3 button to select another Style.


- The CP remembers the last Style selection that you made within each category while the power is on. When you press a STYLE button, the CP will automatically select the Style previously chosen in the same category.
- When you switch from one Style to another while it is running, the new Style will wait until the beginning of the next measure before it begins to play.
Fill-In and Variation
Each Style is made of four Variation patterns and four Fill-in patterns.
Fill-ins are short patterns that temporarily embellish the Style. Fill-ins can add excitement and rhythmic change to the Style and be used as a musical lead in between the Variations. To use a Fill-in, just press one of the FILL IN buttons. You will hear the fill-in begin playing immediately from a musically appropriate spot.
Fill-ins can also be used as a short intro. First press the SYNC/FADE OUT button then press one of the FILL-IN buttons to select a desired Fill-in. Press any key on the keyboard to start the style. After the Fill-in plays, the selected Variation will play.
To select a Variation, press one of the four VARIATION buttons to select the desired Variation. The Selected VARIATION button LED will light.
- You can set the CP to automatically play a Fill-in anytime you press a VARIATION button as you switch from one Variation to another. Select your preferred option in the Fill-in mode. (See page 130)
Auto Accompaniment System
The Auto-accompaniment System (ACC) is a powerful feature that determines how the Styles will interact with you as you play. The ACC System analyzes your playing and adjusts the notes the Style plays to follow the Chords that you play on the keyboard. The ACC System is capable of recognizing single finger as well as more complex chord voicings. The CP recognizes 61 chord types as well as most of their inversions. (See page 196 for a chord table.) There are three modes of key recognition—One Finger, Fingered, and Full Keyboard. Your choice of which mode to use depends on your skill level and the selected musical style.
| Fingered | The player must play at least three notes of a chord below the split point (LEFT/SPLIT Part) before the ACC System will recognize the chord type. (See page 196 for chord table.) |
| One Finger | Uses a simplified chord method that allows beginners to specify a chord type by playing only one or two notes below the split point. The types of chords that can be recognized in this manner are limited to Major, Minor, 7th and Major 7th. While the player can trigger basic chords with as little as one finger, the ACC System will recognize more complex chord types if you play them, even you are in the One Finger mode. |
| Full Keyboard | The player must play at least three notes of a chord anywhere across the 88 keys before the ACC System will recognize the chord type. This mode is similar to Fingered however, Full Keyboard recognizes chord types from three or more notes played anywhere across the 88 keys not just below the split point. |
Bass Inversion
When Bass Inversion is on, the Bass Section of the Style will follow the lowest note of the chord voicing played on the keyboard. With Bass Inversion on it is possible to specify a chord over a certain bass note by the chord voicing you play. For example, a C chord over a G bass, or a Bb7 chord over a C Bass. Bass Inversion will work with all three key recognition modes but when in One Finger mode, you play at least two notes of a chord for Bass Inversion to function.
To turn Auto-accompaniment (ACC) on:
1) Select a Style that you would like to play.
2) Press one of the ACCOMPANIMENT buttons to select the Key Recognition mode. The selected Key recognition mode will be displayed at the bottom of the LCD screen if you're on the main play screen.
3) Press the BASS INVERSION button if you would like to turn it on.
4) Press the ACC ON/OFF button to activate the Auto-accompaniment System (ACC).
5) Press the START/STOP button to start the Style, and play some chords in the LEFT/SPLIT Part. You will hear the Style start and also change keys and chord types as you play different chords.
6) If you want to cancel or stop the Auto-accompaniment, press the ACC ON/OFF button again. If you turn the ACC off without stopping the Style the drum rhythms will continue to play.
- When you play along with the Auto-accompaniment using the Fingered or Full Keyboard modes, you may hear two sounds playing the chords: one is selected by the front panel and the other is pre programmed for the Style. This is because the sounds used by the Auto-accompaniment Style are independent of the Left and Right Part sound settings. Therefore you will hear the instrument sounds played by your hand as well as those generated by the accompaniment.
In most cases, these are just duplicate notes being played using different sounds. In some cases however, you may hear different notes or an unexpected chord inversion. If the overall musical effect is undesirable, try turning the LEFT/SPLIT Part off and let the accompaniment play alone.
- You can use the Auto-accompaniment (ACC) System without the Style running. In this way you can make use of the chord recognition without having the pre programmed rhythms or patterns playing. Just turn the ACC on and play without starting the Style. You will hear the bass and chord parts only. This may be useful when you play a musical piece that is not played with drums. The accompaniment sounds are pre programmed to best suit the different Styles, and you cannot alter them. When playing in One Finger mode, however, you can replace the chord sound with the sound chosen for the LEFT/SPLIT Part. Assign your preferred sound and make the LEFT/SPLIT Part active.
You can also start a Style without the ACC on. In this way you can have just drums and percussion accompany you.
1-2 Play
If you want to play using an Accompaniment Style, but have no idea as to what sounds you should use for the right and left-hand parts, try using the 1-2 Play feature. This feature gives you a preprogrammed panel setup with appropriate sounds and settings for the Style you have chosen.
To use 1-2 Play:

1) Select the Style you would like to play.
2) Press the 1-2 PLAY button. The 1-2 Play indicator will become lit, and the words "1-2 Play" are displayed in the Main Screen. The SYNC button is activated as well.
3) Activate one of the INTO/ENDING buttons if you want the Style to begin with an introduction. Start the Style by playing a key on the left side of the keyboard, or by pressing the START/STOP button.
4) Press the 1-2 PLAY button again to turn it off.
- Among the settings contained in the 1-2 Play setting are the Sounds assigned to the keyboard Parts (Solo, Right 1/2, Left), Tempo, and Mixer settings.
Registration
A Registration is a setup that remembers the panel settings along with many other performance functions so that you can recall them at the touch of a button. This lets you begin to play quickly instead of spending a lot of time programming all the settings and values manually.
There are 8 Registration buttons on the panel of the Concert Performer. Each button contains a different registration. Pressing any of the Registration buttons activates the setup stored there. Pressing another Registration button changes to the registration stored in that button. Pressing the active Registration button again deactivates the registration and returns you to the original panel setup.
Registration Groups
There are 20 Registration Groups in the Concert Performer. Each group contains settings for the 8 Registration buttons on the panel. Each group represents a "family" of settings for the CP. The sound and performance capability of the Concert Performer is remarkable, and each registration group is designed to take full advantage of certain types of sounds available in the instrument. Switching from one Registration Group to another instantly changes the Registration buttons from Pipe Organ settings to Orchestra settings, for example.
- The default Registration Group is “American Pop”, a family of registrations designed to play popular music from the 1940’s through today.
With 8 Registration buttons and 20 Registration Groups, you have a total of 160 preprogrammed Registrations available. Plus, you can overwrite any registration with your own unique setups.
To use a Registration:

1) Press the REGIST GROUP button. Ten Registration Groups will be displayed.
2) Press the F1 and F2 buttons to view the Registration Groups on the other page.
3) Highlight any Group from the list by using the L and R buttons.
4) Press one of the eight REGISTRATION buttons to activate a Registration from your selected Registration Group.
5) To return to the Main Screen, press the EXIT button.

Use the L and R buttons to select the Group. Then press one of eight REGISTRATION buttons to call the desired setup.
F1, F2 Searches for the Registration Groups on the other pages. F6, F7 Takes you to the Registration Group Name screen.
- The CP remembers how the front panel was setup before you chose a Registration so that after exiting the Registration, the prior settings will be restored.
- It is not necessary to always begin with the REGIST GROUP button when selecting a Registration. If the group you want to use is already selected, pressing one of the REGISTRATION buttons will activate a setup from that group. The CP will remember the Registration Group last chosen as long as the power remains on.
- You cannot use the 1-2 Play function and Registrations at the same time. Choosing one always cancels the other.
To create your own Registration:
1) Set up the panel and functions in the way that you'd like to save them.
2) Press the SAVE REGIST button. Use the R1 – R4 buttons to select the Registration Group in which to save your setup. Use the F1 – F4 buttons to view the 20 Registration Groups in sets of five.
3) Press one of the 8 REGISTRATION buttons to specify which location you'd like to save your Registration to.

R1-R5 Selects the Registration Group to save in.
F Press the F1-F4 buttons to display the Registration Groups on the other pages.
Press the specific REGISTRATION button where you'd like to save to.
- The following settings can be stored in a Registration: Sounds (Solo, Right1, Right2, Left), Split Point, Style and Variation, Fill-in mode, Tempo, Accompaniment settings, Mixer settings, Chorus settings, Effect settings, Harmony settings, Voicing, Detune, Resonance, Left Pedal functions, Mic Harmony, and Mic Effect
- You can save your Registrations on a floppy disk and load them into the CP later. (See page 156.)
To rename the Registration Group:
1) Press the REGIST GROUPS button.
2) Use the F1, F2, L and R buttons to select the Group to rename.
3) Press the NAME (F6, F7) button.
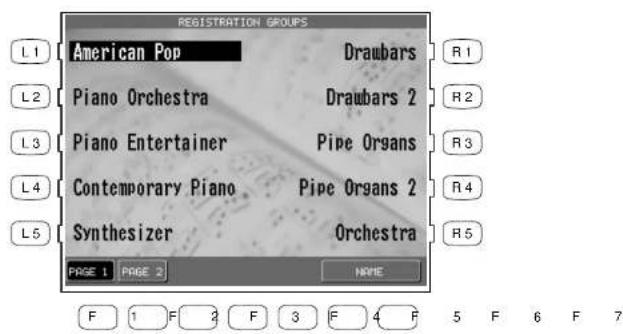
Use the F1, F2, L and R buttons to select the Group to rename.
4) In the Registration Group Name screen, use the CURSOR (F2, F3) buttons and the CHARACTER (F4, F5) buttons to change the name. You can also use the Dial to change the characters.
5) Press the SAVE (F6, F7) button to confirm the name.
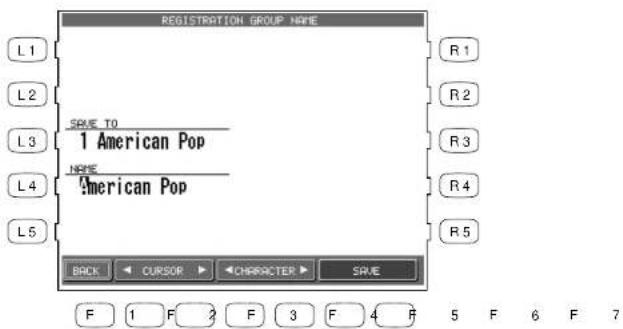
F1 Takes you to the previous menu.
F2, F3 Moves the cursor over the characters in the name.
F4, F5 Selects a character.
F6, F7 Saves the name.

Style Lock
Pressing the STYLE LOCK button keeps the current Style, even if another Registration is selected. This allows you to change Sounds and settings by the Registration button while keeping the Style as-is. As long as the STYLE LOCK button is on, changing registrations will not change the style. However, you can always manually change the style, even if the Style Lock is on.
Press the STYLE LOCK button again to turn it off.

Song Stylist
With over 900 Sounds and 220 Styles, it can sometimes be difficult to decide the best settings with which to play a song. Even if you are very familiar with the Concert Performer, you may want a quick way to change the CP's setup to play another song. The Song Stylist feature was created to handle this situation for you. You simply pick the name of the song you want to play and the Concert Performer sets up everything for you.
The Song Stylist contains a list of 700 popular song titles. In the Song Stylist, there is an appropriate setup for each of those songs. You may search for your favorite title either alphabetically by song name, or by category of musical genre. Once you've found the song you want to play, simply press one button and the CP is immediately setup for that song and ready for you to begin.
- The Song Stylist contains no prerecorded music, only the setup to play the chosen song. You must play the actual music yourself.
To use the Song Stylist:
1) Press the SONG STYLIST button. The Category list appears, showing the different musical genres for the SONG STYLIST.
2) Use the SEARCH BY CATEGORY buttons (F1, F2) to display the Category choices on the other page. When you have found the category you want, use the L and R buttons to select it. A list of songs within that musical category appears.

Use the L, R buttons to select your desired category.
F1, F2 Shows the other categories.
F3. F4 Shows the song list in alphabetical order.
F6 Searches for a title from a floppy disk.
3) Use the PAGE buttons (F1, F2) to display the Song Titles on the other pages in the same category.
4) Use the L and R buttons to select one of the ten songs displayed in the screen. The CP automatically returns to the Main Screen ready with all of the settings for that song.
5) You may start and play the song in your usual manner. You can operate the CP normally and make any changes to the Song Stylist setup that you wish.
6) To play another song, press the Songlist (F7) button. To exit, press the SONG STYLIST button again or press the EXIT button.
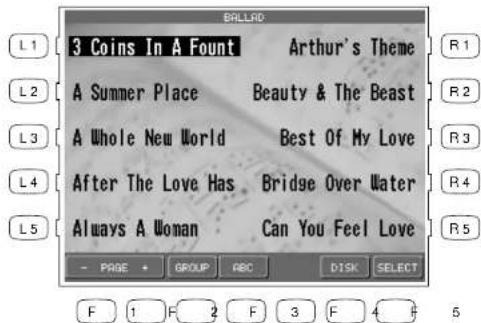
Use the L or R buttons to select your desired song.
F1, F2 Searches for a title on the other pages.
F3 Jumps to the Song Stylist Category menu.
F4 Searches for a title listed in alphabetical order.
F6 Searches for a title from a floppy disk.
F7 Selects the song.
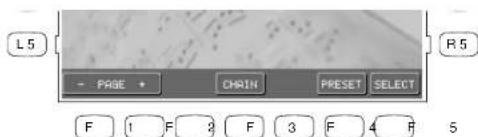
6 F 7
F1, F2 Searches for a title on the other page.
F4 Starts the Chain Play.
F6 Searches for a title from the internal presets.
F7 Selects the song.
Selecting a song from a floppy disk.
L1 Highlights the Style.
L2 Adjusts the Tempo.
L3 Highlights the LEFT Part.
L4 Changes the split point.
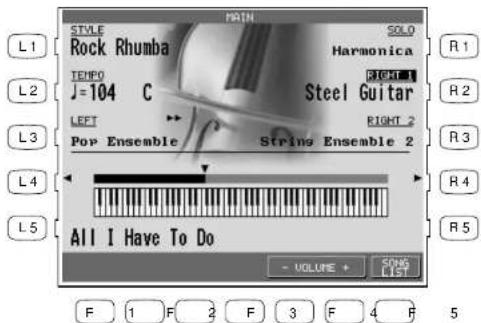
R1 Highlights the SOLO Part.
R2 Highlights the RIGHT 1 Part.
R3 Highlights the RIGHT 2 Part.
R4 Changes the split point.
F1, F2 Tums on the Auto Chord Progression (if available).
F3, F4 Tums on the Melody part (if available).
F5, F6 Adjusts the volume level for the sound
F7 Takes you back to the Song Stylist menu.
- You may use different Sounds, Styles, Tempo and other settings to customize to your taste.
- When choosing a Song Stylist created by you (or someone else) and saved to floppy disk, there may be a recorded melody and chord track available. The chord track, called the Auto Chord Progression, will provide you with the chord changes to the song.
You may also find a song title by searching the list alphabetically.
To search the Song Stylist by Song Title:
1) Press the SONG STYLIST button. The Category list appears, showing the different musical genres for the SONG STYLIST.
2) Press the SEARCH BY NAME (F3, F4) buttons. In the Name Menu, press the L or R buttons to take you to the first letter of the name of the song. For example, if your song title starts with "G", press the L4 button.
3) Use the PAGE (F1, F2) to search for the name of your song. When you find the song, press the corresponding L or R button. The CP automatically returns to the Main Screen ready with all of the settings for that song.

Harmony
When the Auto-Accompaniment is on, you can use Harmony function. The Harmony function automatically adds notes to your right hand (melody) part to help you sound more professional. This function analyzes the notes you play and automatically adds notes from the Accompaniment chord (shown in the Main Screen when the Accompaniment is on), creating a "harmony" part (even if you are only playing single notes in the left and right hands).
There are 10 types of Harmony.
Block Adds three or four notes based on the chord.
Open Adds three or four notes based on the chord. Harmony notes may extend over one octave below the lowest right-hand note.
Jazz Adds three or four notes based on the chord.
Rockn' Adds a note at a fifth (or fourth) interval to the lowest note played in the RIGHT Part.
Dynamic Adds three or four notes based on the chord. Harmony notes are played within one octave below the lowest note played in the right hand.
Duet Adds a note according to the lowest note played in the right hand and based on the chord.
Octave Takes the highest note played in the right hand and doubles it an octave down.
Octave Duet Adds an Octave note and a Duet note.
Vocal 1 Adds a single note above the top note of the right hand based on the chord.
Vocal 2 Adds three notes based on the chord. The lowest note will always be the root of the chord.
To use Harmony:
1) Press the HARMONY button. The button will be lit to show that it is active. The Harmony symbol will also appear in the Main Screen.
2) To change the Harmony type, hold down the Harmony button for a moment until the Harmony Select menu is displayed.
3) Choose the Harmony type using the L and R buttons.
4) Press the EXIT button to leave the Harmony Select menu.
5) To turn off the Harmony, press the HARMONY button again.

Use the L or R buttons to select your desired Harmony type.
- The additional notes created by Harmony are added to the RIGHT 1 Part, if that part is on. If the RIGHT 1 Part is off, the additional notes are added to the RIGHT 2 Part. If both parts are off, there will be no Harmony even though the HARMONY button is lit. The Harmony notes are played with the same sound as the part they are added to.
- You can volume mix the Harmony separately in the MIXER screen.
- If the Accompaniment in not on, you will not be able to activate Harmony
Recording a Song
The CP has built-in recording capabilities that allow you to record and play back your performances. Since the CP records your performances as digital data not audio data you can easily edit your performances after recording them. There are two ways to use the CP's recording feature:
Easy Recorder records your playing much like a tape recorder and is just as easy to use. The CP will record all of your playing as well as any changes you make to the front panel settings during the recording.
Advanced Recorder is useful for creating more complex recordings. Advanced Recorder gives you the ability to record on
up to 16 independent tracks separately. In addition, with Advanced Recorder you can edit your recorded data one measure or even one note at a time. There is also a step recording mode in which you can enter notes or other MIDI data events one step at a time for even more accurate control.
Song data created on other instruments in the Standard MIDI File format (SMF) can also be loaded into the CP's recorder to be played or edited. The CP's recorder can read both Type 1 and 0 SMF files.
Please read the following sections carefully to learn more about the capabilities of the Easy and Advanced recorder.
Easy Recording
The Easy Recorder will record all of your playing as well as any settings you have made on the front panel or in the mixer screen at the touch of a button. Simply press the REC button and the CP will begin recording with the first note you play. You can also record a Style along with your playing if you like. Before you begin recording its a good idea to select your desired sound(s) and make any panel settings you would like to record.
To record:

1) Press the REC button. The REC button LED will blink and the LCD screen will show Rec Ready. If you want to, you can still change sounds or panel settings before proceeding.
2) Start recording in one of the following ways:
A. Play the keys and the CP will automatically start recording with the first note you play.
B. If you are recording with a Style, press the START/STOP button to start the recorder with the Style. Pressing the INTRO/ENDING button will include an Intro phrase at the beginning of the recording.
C. You can also press the SYNC button to begin recording the Style and your own playing together.
D. Press the PLAY/STOP button to start with a 2-bar countdown to help you get ready.
3) When you are finished recording, press the PLAY/STOP button.
You may resume recording from the point where you stopped by repeating these steps from step 2.
The current bar number is displayed.
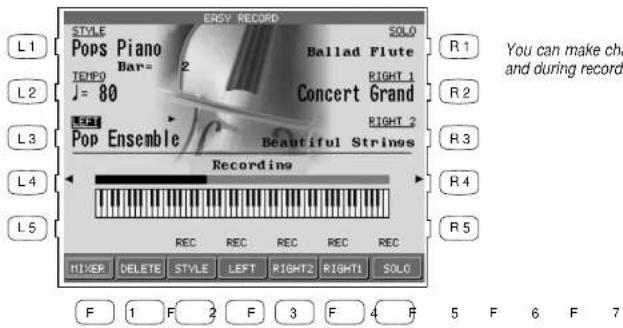
F1 Takes you to the Mixer menu. F2 Deletes the recorded song data F3-F7 Changes the part status.
- You may resume recording from the bar where you stopped by repeating these steps. You can also change sounds, tempo, and make other changes to the panel settings before you continue recording.
- To Re-record or make other changes to a previously recorded section of a song, please read the section titled "Re-recording or adding another Part" on page 44.
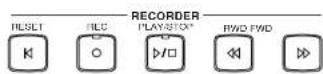
To play back the recorded song:
1) Press the RESET button in the RECORDER section of the front panel to return to the first bar of the song.
2) Press the PLAY/STOP button to play back the song.
3) Press the PLAY/STOP button again to stop at any time.
4) Pressing the PLAY/STOP button again resumes the playback from the bar where you stopped.
5) Use the RWD or FWD buttons to rewind or fast-forward through the recording.
Part Status
The playback and record status for the RIGHT/LEFT Parts and the Style are displayed at the bottom of the LCD screen. Whether you are in the process of recording or playing back your song it is helpful to know the status for each of these Parts.
The LCD screen will show the following Part status messages at the bottom of the screen:
REC This Part is ready to be recorded. This message is only displayed after the REC button has been pressed.
PLAY This Part has been recorded and will be heard both on playback and while recording. MUTE This Part has been recorded but will be silent both on playback and while recording. --- This part has not been recorded.
After you have recorded a song you can change the status for a Part by pressing the appropriate button, F3-7 below the LCD screen. Pressing the F buttons during playback will select PLAY or MUTE. REC can only be selected after you press the REC button but before you begin recording. During recording you can however set any Part to PLAY or MUTE by pressing the appropriate F button.
You can record all RIGHT/LEFT Parts as well as the Style simultaneously or only certain Parts as you choose. When you first record a song all Parts and the Style will be automatically set to REC but only the active Parts and the Style will be recorded. When you are finished recording the status for any active Parts and the Style will automatically change from REC to PLAY. After recording, the status for any RIGHT/LEFT Parts that were not active during recording will be automatically changed to --- to show they have not been recorded yet.
When you press the PLAY/STOP button to listen to your song any Parts set to PLAY status will be heard.
Re-recording or adding another Part
After you have recorded a song you can Re-record a Part or add (overdub) other Parts if you like with the following procedure. Re-recording a Part completely erases the previous performance for that Part automatically.
To Re-record or add a Part:
1) Make sure the Part(s) you wish to Re-record are active, then select any sounds or change panel settings as desired.
2) Press the REC button.
3) Press the appropriate F button(s) below the LCD screen to set the desired Part(s) to REC.
4) Begin recording by following step 2 in the "To Record" section on page 42.
Remember Re-Recording a Part completely erases the previously recorded performance for that Part. You can Re-record or add any of the RIGHT/LEFT Parts as many times as you like but you can only have one performance/sound for each RIGHT/LEFT Part.
Saving the song
Once you finish recording a song you should save it to disk before you turn the power OFF. Once the power is turned OFF your song data will be lost.
See the section titled "Saving Data to a Floppy Disk" on page 157.
- If you press the EXIT button to get out of the Easy Recorder, the CP will automatically prompt you to save your work.
Erasing the song
Whenever a Part is selected for recording, the new performance is written right over any existing one that may be there for that Part. In this sense, the Easy Recorder is just like a tape machine. A new song will simply erase the old song during the recording process.
However, if you wish to simply erase all the Parts and the Style in a song at once you can use the Delete function.
To delete a song:
1) Press the DELETE button (F2) while the Recorder is not recording or currently ready to record. The CP will ask if you are sure.
2) Use either the YES (F7) button to proceed or NO (F1) to cancel.
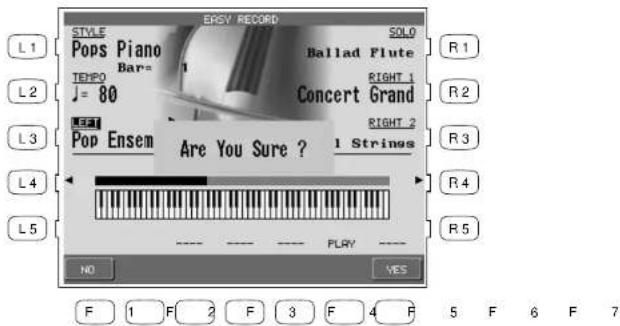
F1 Cancels erasing the song.
F7 Proceeds with erasing the song.
- DELETE erases all of the performance data for all Parts and the Style in the song. The panel setup, such as Style, Tempo, and Sound settings are not erased by the DELETE function.

Advanced Recording
The Advanced Recorder is a full featured sixteen track MIDI recorder that includes many of the same professional features found on dedicated MIDI sequencing (recording) devices. In addition to sixteen MIDI tracks the CP Advanced recorder provides a separate Style, chord, and tempo track for even more flexibility.
Even though you can create recordings of great musical complexity using the Advanced recorder you will find that it is still very straightforward and easy to use.
Using the Advanced Recorder allows you much greater control over the recording and compositional process than that offered by the Easy Recorder. However, songs created using the Easy Recorder can also be edited using the Advanced Recorder by simply pressing the ADVANCED RECORDER button.
To go to the Advanced Recorder Menu:
Press the ADVANCED RECORDER button. The recording options will be displayed on the screen.
L1 Change the Reverb, Effect, Panning, Volume level and Chorus for each of the 16 tracks.
L2 Prepares the track for real-time recording.
L3 Re-record specific measures within your song.
L4 Record by entering data note by note.
L5 Select the sound to be assigned to each of the 16 tracks, and change the track's recording and play back status.

R1 Edit loop settings for the song.
R2 Edit the general settings for the song.
R3 Edit the song by bars.
R4 Edit the song by MIDI events.
R5 Create your own new user Style.
F1 Converts recorded Style data into MIDI note data that can then be edited in the Advanced Recorder. Style Paste will only be displayed if the current song was recorded using a Style.
Real-time Recording
With Real-time record, the CP records your performance as you are playing it, in real-time. You can select any of the sixteen instrument tracks or the Style and tempo tracks to record, but you can only record on one track at a time. Since the Advanced Recorder only records on one track at a time, only the RIGHT 1 Part is active in the Advanced Recorder. Any other active Parts are automatically turned OFF when the ADVANCED RECORDER button is pressed. In addition to selecting the desired track to record, the Real-time recording screen provides many other useful Real-time recording functions.
To use Real-time recording:
1) From the Advanced Recorder menu, press the L2 button to select "Real Time REC", or simply press the REC button. The REC button LED will blink and the LCD screen will display the "Real Time REC" screen.
2) Use the F, L and R buttons to select a function to edit. Use the Dial to change the values.
3) If necessary, you can go to the Mixer and Track Settings screens by pressing the appropriate F buttons.
L1 Selects the track on which you want to record. There are 16 Instrument tracks, 1 Tempo track, and 1 Style track.
L2 Selects the sound or Style that you want to record with.
L3 Shows the current bar and beat number.
L4 Selects the starting bar for the Loop feature. This function is a available only when Loop is turned ON.

R1 Changes the time signature.
R3 Selects the recording mode. REPLACE erases the previous data and records the new data in its place. OVERDUB mixes the new data with the previous data so that both are heard together. Repeatedly pressing the R3 button switches between the REPLACE and OVERDUB.
R4 Selects the ending bar for the Loop feature. This function is available only when Loop 6 Is turned on.
F1 Cancels the real-time recording setup and returns you to the Advanced Recorder menu.
F2 Takes you to the Mixer menu.
F4, F5 Takes you to the Track Settings menu.
F6 Turns the Loop feature on/off
4) Start recording by pressing the PLAY/STOP button while the REC button LED is blinking. There is an automatic two bar count in before the CP begins recording. If you are recording on the Style track you must press the START/STOP or INTRO buttons instead of the PLAY/STOP button. When recording a Style there is no two bar count in, recording begins immediately. You can cancel recording at anytime by pressing the REC button again or by pressing the F1 button to return to the Advanced Recorder menu.
- When you select a Style to record the default tempo for that Style is ignored. The Style will use the current tempo setting for the song instead. You can set the desired tempo on the Real-time record screen before recording or change the tempo after you have recorded in Song Edit or on the tempo track in Event Edit.
- When you are recording on the Style track only the Style will be recorded. The style track will record any chords (to the chord track) you play but the actual notes you are playing will not be recorded.
- When the recording is done, the Mixer screen will automatically be displayed.
To play back the recorded song:
1) Press the RESET button in the RECORDER section of the front panel to return to the first bar of the song.
2) Press the PLAY/STOP button to play back the song.
3) Press the PLAY/STOP button again to stop at any time.
4) Pressing the PLAY/STOP button again resumes the playback from the bar where you stopped.
5) Use the RWD or FWD buttons to rewind or fast-forward through the recording.
Mixer
On the Mixer screen, you can change the following settings for each of the 16 tracks: Reverb level, Chorus level, Effect on/off, Panning, Track mute, Volume level.
To use the Mixer:
1) Use the TRACK buttons (F2, F3) to select which of the 16 tracks you wish to make changes to.
2) Use the L1 and L5 buttons to choose the track setting that you want to change.
3) Use the Dial to change the value.
4) At this point, you can start recording or go to another menu to continue setting up.
- You can make changes on the Mixer screen at any time except while the CP is busy recording. The Mixer screen is accessible from the Advanced Recorder menu, Track Settings screen and Real-time Rec screen.
- You can save any changes you have made to the settings on the Mixer screen at any bar or beat in your song. Simply play back the song or press the FWD/RWD buttons until you reach the exact bar and beat where you want to make changes to the Mixer settings and stop the song. Make any changes on the Mixer screen, then press the SAVE button (F7). You can do this as many times and in as many places within your song as you wish.
Note
"Saving" here only means any changes you made on the Mixer screen were saved as part of the song. Once you finish recording a song or after you make any important changes you should save it to disk before you turn the power OFF. Once the power is turned OFF your song data and any changes you have made will be lost.
See the section titled "Saving Data to a Floppy Disk" on page 157.
L1, L5 Used to select the track setting you want to change. Use the Dial to change the value.

F1 Returns you to the Advanced Recorder menu. F2, F3 Selects the track that you wish to edit. F4, F5 Takes you to the Track Settings menu. F6 Tums Loop ON/OFF. F7 Saves the Mixer settings as part of the song.
Track Settings
The Track Settings screen shows you the Play, Record, and Mute status for each track. In addition it shows you what sound is assigned for the sixteen instrument tracks. You can change the track status or select a different sound for each track.
The Track Status screen will show the following Status messages.
Rec This track is ready to be recorded.
Play This track has been recorded and will be heard both on playback and while recording.
MIDI Rec MIDI Rec enables the CP to record incoming MIDI data from an external MIDI instrument connected to the MIDI jacks. You can set more than one track to MIDI Rec, enabling the CP to record on several tracks simultaneously over MIDI.
Mute This track has been recorded but will be silent both on playback and while recording.
Empty This track has not been recorded.
After you have recorded a song you can change the status for a track by pressing the STATUS button (F3) below the LCD screen. Pressing the STATUS button during playback will select Play or Mute. Pressing the STATUS button after entering Real-time record but before recording begins, will select Play, MIDI Rec, or Mute. Rec can only be selected from the Real-time Record screen. The Track settings screen cannot be accessed during recording.
To use the Track Settings screen:
1) Press the TRACK SETTINGS button (L5) on the Advanced Recorder menu.
2) Press the L3 and L4 buttons to select the track that you wish to edit. If you wish to select tracks 10-16, the Style, or Tempo tracks, press the L5 button to jump to these tracks. Press the L2 button to return to tracks 1-9.
3) Press the STATUS button (F3) to change the status to PLAY, MUTE or MIDI REC.
4) If you wish to change the sound assigned to the track, press the SOUND buttons (F5, F6). You can also select sounds by pressing any of the SOUND buttons.
5) When you are finished, press the MENU button (F1) to return to the Advanced Recorder menu or press the MIXER button (F2) to go to the Mixer menu.
L2 Jumps to tracks 1-9.
L3, L4 Selects the tracks one at a time.
L5 Jumps to tracks 10-16, Tempo, and Style.

F1 Returns you to the Advanced Recorder menu.
F2 Takes you to the Mixer.
F3 Changes the track's status.
F5, F6 Selects a different sound for the track.
F7 Saves the Track settings as part of the song.
- As discussed in the above section, MIDI Rec enables the CP to record incoming MIDI data from an external MIDI instrument connected to the MIDI jacks. You can set more than one track to MIDI REC, enabling the CP to record on several tracks simultaneously over MIDI. Each MIDI Rec track will record on the incoming MIDI channel that corresponds to its track number. Track 1 records MIDI channel 1 and so on.
Loop Settings
The Loop function lets you specify certain bars or your entire song to repeat over and over. Loop is a global function and all tracks will be looped equally. You cannot have different loop settings for each track.
To set the Loop:
1) Go to the Loop Settings screen by pressing the R1 button in the Advanced Recorder menu.
2) Use the L2-L4 buttons to select the different settings, then use the Dial to change the values.
3) Press the L2 button to turn the Loop ON/OFF.
4) Press the L3 button to specify the bar where you want the Loop to start.
L2 Turns the Loop ON/OFF.
L3 Specifies the starting bar.
L4 Specifies the ending bar.
5) Press the L4 button to specify the bar where you want the Loop to end.
6) Press the MENU button (F1) to return to the Advanced Recorder menu when you are finished.

F1 Takes you back to the Advanced Recorder menu.
- You can turn looping on and off in the Mixer menu. However, you still have to set the Start and End Bar from the Loop Settings menu.
- You can set up looping for recording in the Real-time REC menu as well. In the Real-time REC menu, when you turn on the looping, the Start Bar and End Bar information will be automatically copied from the Loop Settings menu.
Style Paste
When you record a Style as part of your song, the Style data is automatically recorded on the Style track. This data is unique to the CP, and cannot be used with any other musical instruments. Additionally the instrument tracks that are part of the Style cannot be edited individually.
Style Paste converts any Style data recorded on the Style track into MIDI note and event data and places it on separate tracks (Trks 9-16). Once the Style data is converted into actual note data, you can view and edit the individual Style tracks as if you had recorded the data yourself. Also your song including the Style can now be played back by any other MIDI instrument that reads Standard MIDI File (SMF) format song data.
- Before you use Style Paste, you need to make sure Tracks 9-16 are empty or don't contain important data. When the Style is pasted, the data from the Style track will be pasted into these tracks and will replace any existing data.
To use Style Paste:
1) Press the STYLE PASTE button (F1) while you are in the Advanced Recorder menu. The LCD screen will prompt you for confirmation.
2) If you would like to proceed, press the YES button (F7), or press the NO button (F1) to cancel.

F1 Cancels the Style Paste.
F7 Proceeds with Style Paste.
Punch-In Recording
Punching In means being able to automatically start recording right in the middle of a track that is playing back, continue recording new data on that track for a specified number of measures, and then automatically stop recording at a specific measure and hear the rest of the track play to the end. This tool is very valuable if you wish to record over some misplayed notes in the middle of a track, but would like to preserve the music in the measures leading up to, and following, the trouble spot.
To use Punch-in recording:
1) Select Punch In/Out in the Advanced Recorder menu.
2) Use the L and R buttons to select the options and change their values using the Dial. Select AUTO with the R5 button to have the CP automatically handle the punching in/out while you play.
3) Press the REHEARSAL button (F4, F5) to listen to the song for rehearsal. If you need to adjust mixing or if you would like to loop the song, use the MIXER (F2) or LOOP ON/OFF (F6) button.
4) When you are ready to record, press the REC button and then the PLAY button. The music will start immediately from the Start Bar that you have chosen. Once the song reaches the Punch In Bar, any notes that you play on the keyboard will be recorded.
Recording will stop when the song reaches the Punch-Out Bar, but the CP will keep playing back the song to the end unless you press the STOP button.
You can repeat the punch-in/out section by turning the looping on with the F6 button.
5) Listen to what you have recorded and re-record if necessary.
L1 Selects the track to Punch in on.
L3 Selects the measure in the song from where you want the CP to start playing.
L4 Selects the measure where the CP will punch-in and start recording.
L5 Selects the measure where the CP will punch-out and stop recording.

F1 Takes you to the Advanced Recorder menu.
F2 Takes you to the Mixer Settings menu.
F4, F5 Plays the song for rehearsal.
F6 Turns Loop on/off.
R1 Changes the time signature.
R3 Selects the recording mode. REPLACE erases the previous data and records the new data in its place. OVERDUB mixes the new data with the previous data so that both are heard together. Repeatedly pressing the R3 button switches between the REPLACE and OVERDUB.
R5 Selects the Punch-in method, Auto or Pedal. 6 F Repeatedly pressing the R5 button switches between the Auto and Pedal.
- If you set the CP to Punch-In at the very first measure of the song, the metronome will automatically play a two-measure intro to assist you with the timing. These “ticks” will not be recorded as part of the track.
Punch-In recording using the pedal
Instead of specifically setting an automatic Punch-In and Punch-Out Bar, you can use the center pedal to manually Punch In and Out.
- You can punch in and out with pedal one time for each pass over the track that you make.
To use the pedal to Punch-In/Out:
1) Use the R5 button to select Pedal in the Punch In/Out menu.
2) Use the L and R buttons to set up other recording options.
3) Press the REC button to start. The song will start playing.
4) When the song reaches the bar where you wish to punch in, press the center pedal and play the keyboard.
5) When you reach the bar where you wish to punch out, press the pedal again to stop recording. Notice that the song keeps playing to the end (it's just no longer recording) or until you press STOP.
L1 Selects the track to Punch in.
L3 Selects the measure in the song from where you want the CP to start playing.

F1 Takes you to the Advanced Recorder menu.
F2 Takes you to the Mixer Settings menu.
F4, F5 Plays the song for rehearsal.
F6 Turns Loop on/off.
R1 Changes the time signature.
R3 Selects the recording mode. REPLACE erases the previous data and records the new data in its place. OVERDUB mixes the new data with the previous data so that both are heard together. Repeatedly pressing the R3 button switches between the REPLACE and OVERDUB.
R5 Selects Auto or Pedal as the Punch-In method. Repeatedly pressing the R5 button switches between the Auto and Pedal.
Step Recording
Step Recording is a method of recording a song by manually entering notes one after another as data, instead of playing the keyboard in real-time. This method may be useful when trying to create a phrase with a precise rhythm, or when recording a phrase that is beyond your playing skill level.
To set up Step recording:
L1 Selects the recording track.
L2 Selects which sound is assigned to the track.
L3 Selects which measure you'd like to start recording at.
1) In the Advanced Recorder menu select Step Rec (L4). The Step Record menu will be displayed.
2) Use the L and R buttons and the Dial to set up recording options.
3) Press the START button (F7). You will be presented with the data entry screen.

R1 Changes the time signature.
R3 Selects recording mode. REPLACE erases the previous data and records the new data in its place. OVERDUB mixes the new data with the previous data so that both are heard together. Repeatedly pressing the R3 button switches between the REPLACE and OVERDUB.
F1 Cancels Step recording and takes you to the Advanced Recorder menu.
F7 Proceeds to the data entry screen of the Step Record menu.
To use the Step Recorder:
1) Use the F1–F3 buttons to select a setting (Note value, Note length, Velocity) and use the Dial to change its value. The value will be displayed above the buttons at the bottom of the screen. Velocity value can be entered by actually hitting a key on the keyboard. To enable this, select "Key" for the Velocity value instead of a number.
2) To enter a note event, play the note using the keyboard. The note data will be displayed on the screen. Continue entering as many notes as you wish; notice how previously entered notes continue to be displayed as a list, screen room permitting. The graphic navigator near the bottom of the screen gives you feedback as to what bar you are in.
3) If you enter a wrong note and wish to delete it, press the L2 button. When you are using the REPLACE mode for recording, every time you press L2 the list of your entered notes on the screen scrolls back one event, and that event is erased immediately. Therefore, if you scroll back to the first beat of bar 5 of a 10-bar list of notes, everything from bar 5 on will be erased. In OVERDUB mode, however, you can delete only the most recently added note, and scrolling back over the list using L2 will not automatically erase events. When using OVERDUB, you need to press the Delete button (R1) to erase the event.
L2, L3 Moves the cursor up and down the list of entered notes in OVERDUB mode.

F1 Selects the note value.
F2 Adjusts the note length.
F3 Selects the velocity value. Values are from 1–127 or Key.
F4 Enters Tied note values.
F5 Enters a rest.
F6 Takes you to the beginning of the next measure.
F7 Stops recording.
Note Rest Clock value
4) If you would like to enter a rest, press the REST button (F5). This moves the cursor to the next beat without entering any data. The rest value is same as the note value selected for the F1 button. If you would like to enter a rest for the remainder of the measure, press the NEXT BAR button (F6). This will bring the cursor to the top of the next measure.
5) When you like to tie notes, press the TIE button (F4) while holding down the key. This doubles the length of the note. If you press the TIE button twice while holding down the key, the length of the note is tripled.
6) In OVERDUB mode, if you go back to certain point to enter a note, use the L2 and L3 buttons to move the cursor up and down to get to the event time where you want to insert the new data.
7) Press the STOP (F7) button or the PLAY/STOP button to stop recording.
- Transpose and Octave Shift can be in effect as you are entering notes. The transposed pitches are the note values that are recorded.
- The navigator graphic represents the current bar that you are recording. The partitions represent each beat, and thus the number of partitions matches the time signature of the music. For example, there would be 4 partitions if the time signature is 4/4 , and 6 partitions if it is 6/8 . Each partition consists of a number of spaces where dots (dot) will be displayed to mark time. Each space represents 24 clock pulses. Therefore the number of displayed spaces per partition represents the duration of the beat.
For example, if you choose the 4/4 time signature in the Step Recording settings, the navigator should look as illustrated below.

4 partitions: 4 beat rhythm
4 dot spaces: 4 x 24 = 96 clock pulses = a quarter note rhythm
The dots do not represent the duration of the notes. They just tell you where they are.
For a further explanation of the CP's Clock, and what is meant by "clock pulses" see the Clock Move description in the Bar Edit section.
Song Edit
Song Edit lets you name, transpose, and change initial tempo settings for your song.
To edit the song:
1) Select Song Edit from the Advanced Recorder menu. The Song Edit screen is displayed.
2) Use the L and R buttons to select the setting that you wish to change, then use the Dial to change the value.
3) To name to the song, use the F2 and F3 buttons to move the cursor over the characters in the name, then use the Dial to select characters.
4) Press the L3 button to set the transpose amount. You can transpose your song +/- 24 in half step increments.
5) Press L4 to change the initial tempo setting of the song.
6) When you are finished, press the MENU button (F1) to return to the Advanced Recorder menu.
L2 Names the song.
L3 Adjusts transposition.
L4 Sets the initial tempo of the song.

F1 Takes you to the Advanced Recorder menu.
F2, F3 Moves the cursor over the characters when naming the song.
Bar Editing
Bar Edit contains many useful editing functions. You can edit your song one bar or any number of bars at a time.
To use Bar Edit:
1) In the Advanced Recorder menu select Bar Edit (R3). The Bar Edit screen will be displayed.
2) Use the L and R buttons to select the desired editing function. The editing screen for that function will be displayed.

Use the L and R buttons to select the desired edit function.
5 F 6 F 7
F1 Takes you to the Advanced Recorder menu.
Quantize
Quantize automatically shifts the timing of a note. This can be used to correct imperfect timing in a performance by shifting notes that were played either too early or too late so they will fall exactly on the correct beat. For example, you can accurately align any out of time notes to the nearest 8th-or 16th-note beat depending on the type of song you are quantizing. Sometimes quantizing all of your notes to exactly the same beat can make your playing sound too stiff. The Advanced Recorder quantize function allows you to set a quantize "Range" so only the notes that were very early or late are quantized. Notes that were almost perfect are not quantized thus keeping more of the original feeling in your music.
L1 Selects the track that you wish to quantize.
L2, L3 Selects the bar range that you want to quantize. Use the Dial to set the bar numbers.
L4 Selects the lowest note that you want to quantize. Use the Dial to change the note value.
L5 Selects the highest note that you want to quantize. Use the Dial to change the note value.
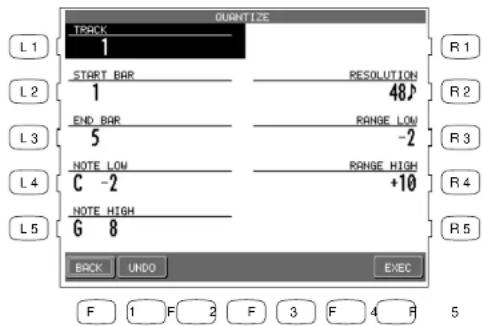
R2 Selects the note Resolution for quantization. Use the Dial to change the value.
R3, R4 Sets the Low and High Range for quantization. Use the Dial to change the value.
F1 Returns you to the Advanced Recorder menu.
F2 Undoes the quantization which was just applied. This option is not always available.
F7 Applies the quantization to your recording.
- Resolution determines the timing value the quantize function will use to shift the notes you want to quantize. For example, setting a quarter note resolution will shift all of the quantized notes to the nearest quarter beat. Setting an eighth note resolution will shift all of the quantized notes to the nearest eighth beat and so on. In the Advanced Recorder, quantize values are expressed in note values and as a number that indicates how many clock beats each note value contains. The Advanced Recorder divides each beat in a bar into 96 smaller clock beats. A Quarter note is 96 clock beats, an eighth note is 48 clock beats, and a sixteenth note is 24 clock beats and so on. The quantize resolution range is from quarter notes (96 clocks), to 64th note triplets (4 clocks).
- Range sets up timing "borders" around the Resolution value you specify. Notes within these borders will not be quantized and notes outside the borders will be moved to the nearest beat specified by the resolution value (Quarter note, Eighth note, etc.). The negative value represents the placement of the "border" before the beat, and the positive value represents the placement the "border" after the beat. Together, these two "borders" form a timing "range" around the specified beat.

By experimenting with Resolution and Range settings, you can correct the timing of the notes in your recording while still allowing for a natural, human feel.
Copy
The Copy function allows you to copy a section or all of the data on a track to another location. The destination may be on the same track, or it can be on another track.
• The destination of the copied data must either be:
1) A location that already has data in it.
2) The first blank bar after the end of a track (Bar 1 if the destination track is empty).
For example, if a track only has 10 bars in it, you cannot copy data onto bar 20. You can, however, copy data to bars 1 through 11.
- Copied data replaces any current data that may be at the destination.
L2 Selects the track to be copied. Use the Dial to select the track numbers 1-16, Tempo, or Chord.
L3 Selects the bar where the data that you are copying starts. Use the Dial to change the bar number.
L4 Selects the bar where the data that you are copying ends. Use the Dial to change the bar number.

R2 Selects the destination track. Use the Dial to select the track number 1-16, Tempo, or Chord.
R3 Selects the bar in the destination track where the copied data will be placed.
F1 Returns you to the Advanced Recorder menu.
F2 Undoes the copying. This option is not always available.
F7 Proceed with copying.
Delete
Delete completely erases and removes the bars that you specify.
L2 Selects the track to be deleted. Use the Dial to choose 1-16, Tempo, Chord or All.
L3 Selects the first bar that has the data you want to delete. Use the Dial to change bars.
L4 Selects the last bar that contains the data that you want to delete. Use the Dial to change bars.

F1 Returns you to the Advanced Recorder menu. F2 Undoes the deletion. This option is not always available. F7 Proceed with the deletion.
Insert
The Insert function duplicates data from specified bars and copies it to a certain location. However, the current data at the destination is not erased, but instead is pushed back to make room for the copied data.
L2 Selects the track that contains the data you wish to duplicate. Choose from 1-16, Tempo, Chord or All.
L3 Selects the first bar that has the data you want to duplicate.
L4 Selects the last bar that has the data you want to duplicate.

flowchart
graph TD
    A["LEFT TRACK"] --> B["1"]
    B --> C["START BAR"]
    C --> D["END BAR"]
    D --> E["5"]
    E --> F["R1"]
    E --> G["R2"]
    E --> H["R3"]
    E --> I["R4"]
    E --> J["R5"]
    K["BACK"] --> L["UNDO"] --> M["INSERT BAR"] --> N["EXEC"] --> O["F 1 F 2 F 3 F 4 R 5"]
R2 Selects the destination track where you want this data inserted. Choose from 1-16, Tempo, Chord or All.
R3 Selects the bar in the destination track where you want this data inserted.
F1 Takes you to the Advanced Recorder menu.
F2 Undoes the Insert. This option is not always available.
F3, F4 Takes you to the Insert Bar menu.
F7 Proceeds with the Insert.
- If you just wish to insert empty bars into a track, select INSERT BAR (F3 or F4), and a sub-menu will be displayed. You can insert empty bars into a track between bars that have data, or at the first blank bar at the end of the track.
L2 Selects the number of empty bars you wish to insert. Use the Dial to change the value.
L3 Selects the time signature for the bars that are going to be inserted. Use the Dial to change the value.

R2 Selects the track where the empty bars are going to be inserted. Choose 1-16, Tempo, Chord or All.
R3 Selects the location in the destination track where you want the empty bars inserted. Use the Dial to choose the location.
F1 Takes you to the previous menu.
F2 Undoes the Insert. This option is not always available.
F7 Proceeds with the Insert.
Erase
Erases data in the bars that you specify, and leaves them as empty bars.
L2 Selects the track that has the bars you want to erase. Choose 1-16, Tempo or Chord.
L3 Selects the first bar to be erased. Use the Dial to change the bar.
L4 Selects the last bar to be erased. Use the Dial to change the bar.

F1 Takes you to the Advanced Recorder menu. F2 Undoes the Erase. This option is not always available. F7 Proceeds with the Erase.
Merge
Merge combines data from two tracks. You can make complex musical phrases using several tracks, then combine them together on one track. Remember that there can only be one instrument sound assigned to each track, so the resulting merged track will play all the combined data using one instrument sound. Merge can be useful for making rhythm patterns by first recording different drum/ percussion parts using the same drum kit on several tracks for easy editing of each instrument, or recording the right and left hand parts of a piano piece and combining them later on one track to free up extra tracks for more recording.
- Merge does not automatically erase the track from where you copied the data.
L2 Selects the track from where you want to copy data. Choose 1-16.

F1 Takes you to the Advanced Recorder menu. F2 Undoes the Merge. This option is not always available. F7 Proceed with the Merge.
Gate Time Modify
Gate time refers to the length of a note as a percentage. Whatever the length of a note is when it is first recorded, this value is considered as its Gate time of 100%. By editing the length of the note, you can shorten it to 10% or lengthen it to 300% of the original value.
| L1 | R1 | ||||||||||||
| L2 Selects the track in which you want to modify Gate times. Use the Dial to choose the track. | L2 | R2 | R2 Adjusts the Gate time in 10% increments. Use the Dial to select a value from 10%-300%. | ||||||||||
| L3 Selects the first bar of the data that you want to modify Gate times for. Use the Dial to change bars. | L3 | R3 | |||||||||||
| L4 | R4 | ||||||||||||
| L4 Selects the last bar of the data that you want to modify Gate times for. Use the Dial to change bars. | L5 | R5 | |||||||||||
| F | 1 | F | 2 | F | 3 | F | 4 | F | 5 | F | 6 | ||
F1 Takes you to the Advanced Recorder menu.
F2 Undoes the Gate time adjustment. This option is not always available.
F7 Proceeds with applying the Gate time adjustment.
Velocity Modify
Velocity refers to how hard a key is struck, which translates into the dynamics of how loud the produced sound is.
A note's Velocity is a numerical value from 1-127. When editing the note Velocities in your recording, you can change them within a +/-100 range of their original values.
L2 Selects the track in which you want to adjust Velocity.
L3 Selects the bar where the data you want to adjust starts.
L4 Selects the bar where the data you want to adjust ends.
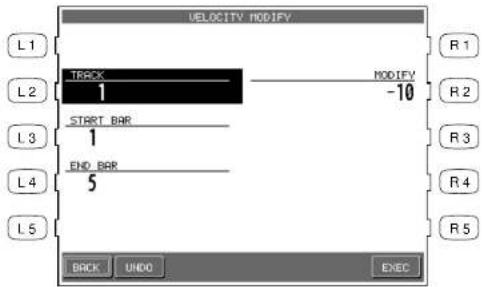
R2 Adjusts Velocity from -100 to +100 of their current values.
F 1 F 2 F 3 F 4 F 5 F 6 F 7
F1 Takes you to the Advanced Recorder menu.
F2 Undoes the Velocity adjustment. This option is not always available.
F7 Proceeds with adjusting the Velocity values.
Clock Move
In the Resolution section of this manual we learned that the CP Advanced recorder divides each beat in a bar into 96 clock beats, also expressed as a quarter note. Therefore there are 48 clocks per eighth note, and 24 clocks per sixteenth note and so on. This relationship holds true regardless of the song's tempo.
On the CP, you can shift the timing of all notes in a track by shifting the entire track ahead (negative values) or behind (positive values) the beat by a certain clock value. Clock move is useful for adjusting the overall timing of a track. For example, if a certain sound you recorded responds slowly and sounds behind the beat, you could shift the timing of the notes ahead of the beat to compensate for the sounds slow response and make its timing feel more natural.
L2 Selects the track that you wish to move. Choose from 1-16.

R2 Sets how many clocks you wish to move the track. Choose from -999 to +999.
F1 Takes you to the Advanced Recorder menu.
F2 Undoes the clock move. This option is not always available.
F7 Proceeds with applying the clock move.
Transpose
This will transpose the notes within a specified bar(s) up or down in half-step increments.
L2 Selects the track that has the notes you want to transpose. Choose from 1-16.
L3 Selects the bar where the notes you want to transpose start.
L4 Selects the bar where the notes you want to transpose end.
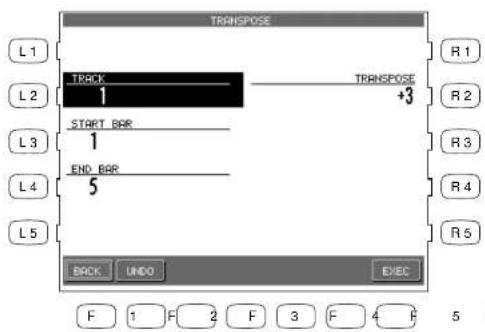
R2 Adjusts transposition amount in half-step increments from -24 to 24.
F1 Takes you to the Advanced Recorder menu.
F2 Undoes the transposition. This option is not always available.
F7 Proceeds with applying the transposition.
Event Edit
Event Edit enables you to examine and edit your performance note by note.
To use Event Edit:
1) Select Event Edit in the Advanced Recorder menu. The Event Edit screen will be displayed.
2) Choose the track that you want to edit using the TRACK buttons (F3, F4). Note that Style, Chord, and Tempo track can be edited as well.
3) Use the L buttons to scroll up or down the event list until you find the specific event that you want to edit. You can also use the Dial to scroll through the event list. You will hear the individual events being played as you scroll over them.
4) Use the CURSOR buttons (F5, F6) buttons to determine how you want to scroll through the event list. Selecting Bar scrolls through the event list bar by bar, selecting Beat scrolls through the event list beat by beat and so on. The selection will become highlighted.
L2 Moves the cursor to the previous bar.
L3 Moves the cursor up the event list.
L4 Moves the cursor down the event list.
L5 Moves the cursor to the next bar.

F1 Takes you to the Advanced Recorder menu.
F3, F4 Selects the track to work with.
F5, F6 Moves the cursor across the columns in the event list.
F7 Starts playing the Track.
5) Select the function that you would like to apply to this event. You can select DELETE (R1) to remove the event, INSERT (R2) to create a new event at any specified location, or REPLACE (R3) to change the existing event. Enter new values in the pop up Entry Box when you select INSERT or REPLACE. When Inserting or Replacing an event, use the CURSOR buttons to select the specific part of the event you want to edit. Use the Dial to change the value.
6) Press the EXEC (F7) button to proceed, or press CANCEL (F2). The CP will prompt you for confirmation.
7) Use the MENU button (F1) to return to the Advanced Recorder menu when you are done editing.
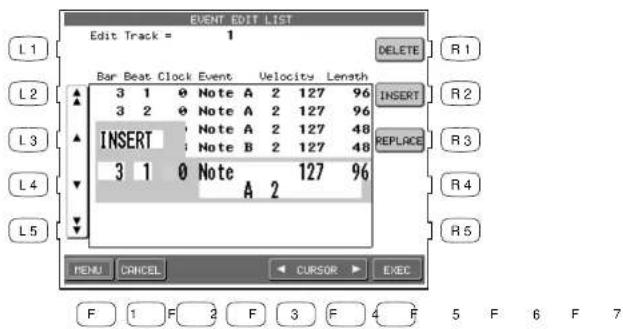
FI Takes you to the Advanced Recorder Menu.
F2 Cancel the edit.
F5, F6 Moves the cursor across the columns in the event list.
Creating Your Own Styles
The Concert Performer contains 220 built-in Styles covering a wide variety of musical genres. There are two powerful features that allow you to edit any of these Styles to better suit your musical tastes, or even create your own Style entirely from scratch! These are the Conductor and the Style Maker.
The Conductor allows you to edit the Style data and personalize it to your taste. The Conductor offers two ways to edit: Easy Edit and Advanced Edit.
The Style Maker allows you to create Styles of your own. There are three ways of using this feature: Make a New Style, Edit an Existing Style, and Phrase Combination.
The CP can store up to 20 User Styles on board at one time. However since you can also save your original Styles onto a floppy disk, your library of Styles is virtually unlimited.
Thanks to the Style Convert Software developed by EMC Software, you can also convert style data from many other manufacturers for use on the CP. That way you can take advantage of the hundreds of Style disks that are available on the market!
Conductor
The Conductor is used to edit Preset or User Style data. There are two editing methods offered by the Conductor
Easy Style Edit
This is an easy way to edit the Style data. The CP built-in styles are comprised three different types, Full, Intimate, and Solo Piano Styles. A Full Style consists of six instrument tracks called Sections. These are the Drums, Bass, and four Accompaniment tracks. The Intimate Styles have four Sections, Drum, Bass, And Two Accompaniment tracks. The Solo piano Styles have two Accompaniment Tracks (Right and Left hand) and no Drum or Bass tracks.
When you play a Style, each of these sections plays a musical Phrase composed for that type of instrument. Each section can play one of four different musical phrases, one for each of the four variations within a Style. Easy Edit lets you assign which of these four Phrases will be played by each section for each of the four variations within the style. This means you can mix and match the different phrases for each section to create your own unique arrangements. Once you are satisfied with your edits, you can save your Easy Style edits to the PRESET STYLE.
Advanced Style Edit This allows you to edit the finer details within a Style. You have control over each Section's Sound Assignment, volume level, panning, chorus, and reverb settings. Once you are satisfied with your edits, you can save your Advanced Style edits to the USER CONDUCTOR.
To use Easy Edit:
L2-L5 Selects a Phrase for the Section.
1) Select the Style and the Variation (1–4) that you would like to edit.
2) Press the EDIT button. The LCD screen will display the Easy Style Edit screen.
3) Use the F2-F7 buttons to select a Section to edit.
4) Use the L buttons to select the desired Phrase (1-4) for each Section. You can edit while the Style is running to hear your changes.
5) To mute a Section, press the corresponding F button. Pressing the F button again will un-mute the section.
6) If you would like to save your edits, press the SAVE TO PRESET (R1) button. The saved contents will be written to the PRESET STYLE. If you don't save your edits, they will be lost when you turn the power OFF.
7) Press the MORE (F1) button to go to the Advanced Style Edit screen.
8) Press the EXIT button to leave the Easy Style Edit screen.

F1 Go to Advanced Edit section.
F2–F7 Selects which Section is being changed. Pressing again will mute the Section.
- Pressing the SAVE button will save all Styles at one time. You cannot save individually.
- For Intimate Styles the ACC 3/4 Sections are not used and cannot be edited.
- For Solo Piano Styles the Drum, Bass, and ACC 3/4 Sections are not used and cannot be edited.
Resetting the Style
The CP always remembers the original Preset Style settings. If you wish to restore those factory settings before saving your edits, simply press the RESET button in the Conductor.
- If you would like to revert all Styles back to their original factory settings, after you have pressed the SAVE button, use reset Conductor on the Soft Reset screen. See the section titled "Soft Reset" on page 144.
Note:
Easy Edit doesn't allow you to edit the Intro, Ending and Fill-ins. However, muting a Section in the Style will result in automatic muting of the same Section in the Intro, Ending and Fill-ins. If you mute a certain Section, you need to consider what effect it will have on the overall Style.
To use Advanced Edit:
L1 Selects a sound for the Section.
L2 Adjusts the Reverb level.
L3 Adjusts the Chorus level.
L4 Adjusts panning.
L5 Adjusts the volume level.
1) Select the Style and the Variation (1-4) that you would like to edit.
2) In the EASY STYLE EDIT screen, press the MORE button (F1). The Advanced Style Edit screen will be displayed.
3) Use the F2-F7 buttons to select a Section to edit.


R1 Saves the changes to the User Conductor.

F1 Back to the EVENT STYLE EDIT settings.
F2–F7 Selects the Section to change. Pressing again will mute the Section.
4) Use the L buttons to select a setting and use the Dial to change its value. You can make your edits while the Style is playing to hear your changes.
5) Press the BACK (F1 button) to return to the Easy Style Edit screen.
L3 Selects the memory location (1 through 40) where you wish to save your User Conductor Style.
L4 Names your Style.
6) If you would like to save your edits, press the SAVE TO USER (R1) button. Your edits will be written to the USER CONDUCTOR. If you don't save your edits, they will be lost as soon as you exit the Advanced Style Edit screen.
7) Press the EXIT button to exit the Advanced Style Edit screen.

F1 Back to the Advanced Style Edit
F2, F3 Moves the cursor over the characters in the Style name.
F4, F5 Selects a character to enter as part of the name.
F7 Proceeds with saving the Style.
Important Note:
If you are using a User Style as the Source Style of your User Conductor, that User Style must always be kept at the same location in the CP, or else the User Conductor will not be able to locate it.

Resetting the Style
You can restore the original Style settings by pressing the RESET button. This will completely clear the changes made to the Styles except any data already saved as a User Conductor Style. You can also instantly discard the current changes by pressing the EXIT button to leave the Advanced Edit screen.
To use a saved User Conductor Style:
1) Press the USER CONDUCTOR button. If there are any User Conductor Styles available, they will be displayed.
2) Use the F1-F4 buttons to select the page that contains your desired User Conductor Style.
3) Use the L or R button to select the desired User Conductor Style.

Use the L or R buttons to select your desired User Conductor Style.
F1-F4 Search for User Conductor Styles on the other pages.
F7 Deletes the selected User Conductor Style.
Making a New Style
This is the most flexible way to create a new Style.
You can make a completely new style from scratch or edit an existing style. First, read the explanation below about the configuration of a style and understand how a style is made.
Configuration of a Style
A complete Style consists of the following patterns:
Basic pattern 4 patterns (Variation 1–4) Max 16 measures
Fill-in 4 patterns (Fill-In 1–4) 1 or 2 measures
Intro Major 2 patterns Max 16 measures
Intro Minor 2 patterns Max 16 measures
Ending Major 2 patterns Max 16 measures
Ending Minor 2 patterns Max 16 measures
• Each of these patterns in a Full Style is made up of six Sections—Drum, Bass, ACC1, ACC2, ACC3 and ACC4. In an Intimate Style there are four Sections—Drum, Bass, ACC1, ACC2. In a Solo Piano Style there are two Sections—ACC1, ACC2. You can use up to six sections in a User Style but you don't necessarily have to use all of the sections to create a Style. For example, just like the Intimate and Solo Piano Styles you may not need to use some Variations or Sections to accomplish your musical idea. These unused sections or variations may be left blank.
- The different Sections can be of varying bar lengths as long as they stay within the limit. Having them all the same length may make the Style easier to use in a song, but you may find that having uneven bar lengths among the Sections can create interesting musical results.
- For simplicity's sake it is advisable to record your new style in the key of C.
To create a Style:
1) Press the ADVANCED RECORDER button. The LCD screen will display the Advanced Recorder menu.
2) In the Advanced Recorder menu, press the Style Maker button (R5). The LCD screen will display the first Style Maker screen.
3) To make a completely new Style, press the Make New Style button (L1) and use the Dial to select the time signature for the style you are going to make. To edit an existing style, press the Edit Existing Style button (L3) and use the Dial to select the style you want to edit.
L1 Selects Make New Style.
L3 Selects Edit Existing Style.
L5 Selects Phrase Combination.
L3 Selects an Intro and Ending to record.
L4 Selects a Variation and Fill-in to record
L5 Copies a phrase from another pattern.
4) Press the ENTER button (F7). The Style Maker Record screen will be displayed.
![STYLE MAKER L1 [Make New Style] 4/4 L2 L3 Edit Existing Style Fast Big Band L4 L5 Phrase Combination INITIAL STYLE Fast Big Band PENU ENTER F 1 F 2 F 3 F 4 F 5 F 6 F 7 R1 Changes the Time Signature. R2 R3 Selects the Style you want to edit. R4 R5 Selects the Initial Style.](/content/2026/05/777441/images/f437e0c85b1094eaeec9420dfaef4e65e666dcde185ff12eb02442afc4364dee.jpg)
F1 Go to the Advanced Recorder menu.
F7 Enters the selected Style Maker menu.
5) Use the L and R buttons to select which pattern to record.
6) Press the Bar Length button (R1) and use the Dial to change the bar length of the pattern.
7) Press the REC button (F7). The Style Maker Record screen will be displayed.

F1 Takes you to the Style Maker menu.
F7 Takes you to Style Maker Record screen.
8) Use the L, R and F buttons to select the different record functions. Use the Dial to change the values.
9) Press the REC START button (R4) to start recording. There will be an automatic 2-bar count in.
10) Start playing on the keyboard. The recording is looping, which means when it comes to the end of the last bar, it automatically goes back to the beginning of the first bar. In the Edit Existing Style, the existing style will play.
L1 Selects the Part to be recorded.
L2 Sets the recording tempo.
L5 Takes you to the Detail Setting menu.
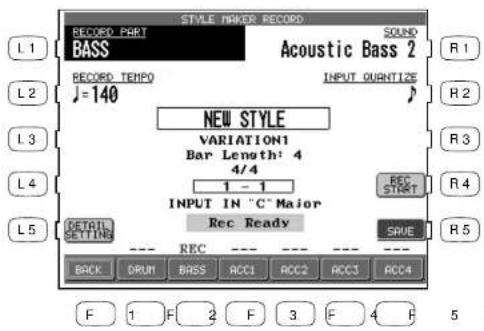
R1 Selects the Sound for the selected Part.
R2 Selects the Quantize resolution. This is input Quantize and your playing will automatically be Quantized as you play.
R4 Starts the recording.
R5 Saves the Style to User Style.
F1 Takes you to the Style Maker menu. F2-F7 Switches between Play and Mute for the recorded Part.
Note:
Press the Detail Setting button (L5) to edit the detail settings for the Auto-accompaniment system. See page 87 for an explanation of the Detail Settings.
11) To erase any unnecessary or incorrect notes, use the ERASE (F1) button. While the pattern is still recording the notes will be erased as long as you press and hold the button.
12) When finished recording, press the REC STOP button (R4).
13) Follow the above procedure to record any other desired patterns as needed.
14) To save the recorded Style, press the SAVE button (R5). The Style Save screen will be displayed.
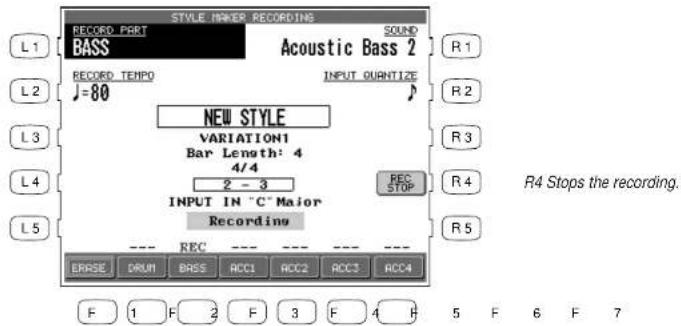
F1 Erases the recorded notes.
15) Press the PRESET TEMPO button (L1) and use the dial to set the default tempo for the style.
16) Press the SAVE TO button (L3) and use the Dial to select the location to save your new Style.
17) Press the NAME button (L4). Use the F2 and F3 buttons to move the cursor and use the F4 and F5 buttons or the Dial to select the characters to name the style.
18) Press the SAVE button (F7).
L1 Sets the default tempo for the style.
L3 Selects the location to be saved.
L4 Names the style.
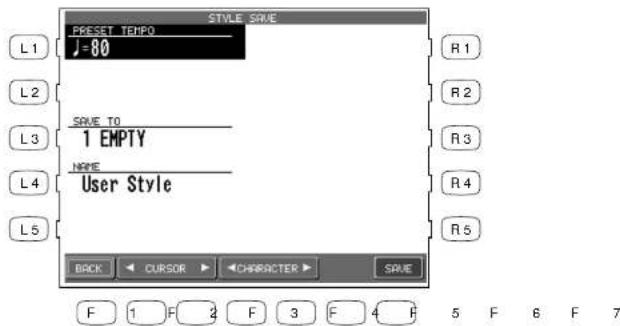
F1 Takes you to the Style Maker Record screen.
F2, F3 Moves the cursor.
F4, F5 Selects the characters.
F7 Saves the style to User Style.
Auto-accompaniment System
The Concert Performer Auto-Accompaniment System (ACC) analyzes your playing and adjusts the note data recorded in the different Phrases in a pattern to match the root key and chord type you are playing. The ACC System also shifts the octave for each phrase to keep each section playing within its musically useful range. To get the most out of this System, any new Style you create can benefit from some fine tuning of these settings.
When you press the DETAIL SETTINGS button (L5) on the Style Maker Record screen, the Style Maker Detail Settings screen will be displayed.
Accompaniment Type (ACC Type)
This setting determines how Phrases being played by a particular section in a pattern will be analyzed by the Auto-accompaniment (ACC) System. There are Two Accompaniment Types: Chordal and Scalic (melodic). Chordal Phrases usually consist of block chords or arpegiated chords. You should set this kind Phrase to Chordal. Scalic Phrases usually play melodic phrases that serve to add interest to the style as well as provide counter melodies and riffs. Melodic Phrases or Phrases that contain chromatic passages should be set to Scalic. Scalic Phrases can also contain chords but they will be analyzed differently than chords in a Chordal Phrase. The Bass section is automatically set to Scalic since it will rarely if ever play chords.
The terms Open and Close apply to Chordal Phrases, and refer to how the CP will regulate the voicing of a Chordal Phrase. Setting a Section to Open will allow for open-voiced chords, which might be good for guitar and string sounds. Setting a Section to Close maintains closed voiced chords, which are better suited to piano parts and other chording or comping instruments.
Range
This determines the chord inversions that a Chordal Phrase will play.
The term "range" here has nothing to do with the span of actual chord notes. It selects which note in the chord will serve as the basis of the chord inversion.
HI is the initial setting and is recommended as a starting point. MID plays an inversion based on the next lower note in relation to HI, while LO plays an inversion based two-notes lower.
Crossover
This determines the point where a Scalic Phrase will be transposed to keep the notes in a musically useful range. When notes in a Scalic Phrase fall below the Crossover point you select they will be transposed up one octave by the Accompaniment System. For example if you set the Crossover
point to E, the Phrase would begin to be transposed up one octave whenever you play a chord with an E as the root.
Experiment with the different Chordal and Scalic settings to find the one that works best with each Phrase.
Bass Limit
This is an option for the Bass section and sets the limit for the lowest note the Bass will play. If a note in a Bass Phrase falls below the limit, it will automatically be transposed up an octave.
To adjust the auto-accompaniment system:
1) Use the L2-L4 buttons to select the setting you wish to change.
2) Use the F3-F7 buttons to select the Section.
3) Use the Dial to select or change a value.
4) When done, press the BACK button (F1) to go back the previous menu. Then save the Style if necessary.
L2 Changes ACC Type.
L3 Changes RANGE.
L4 Changes CROSS OVER.
L5 Changes BASS LIMIT.

F1 Takes you to the previous menu.
F2 Plays the style.
F3-F7 Selects the Section.
Making a Style with Phrase Combination
Phrase Combination is similar to Easy Style Edit in the Conductor. Phrase Combination however, lets you not only combine Phrases from within the selected Style but you can also combine Phrases from any of the Styles in the CP to create a new Style. Additionally you can edit Fill-ins and basic patterns (Variations).
- You cannot change the Intro and Ending Phrases. These will remain the same as in your selected Style.
To use Phrase Combination:
1) In the Advanced Recorder menu, press the Style Maker button (R5). The LCD screen will display the first Style Maker screen.
2) Press the Phrase Combination button (L5) and use the dial to select the initial style.
3) Press the ENTER button (F7) to proceed to the next screen.
4) Use the L2 and L3 buttons to select which of the four Fill-ins and Variations you would like to change.
5) Use the L3 and L5 buttons to select the Section to change.
6) Use the F4 and F5 buttons to move the cursor between the Style and Phrase column.
7) Use the Dial to change the current Style or Phrase. You can jump to the desired Style category by pressing the Style select buttons directly.
8) Press the PLAY button (F2) to listen to the new Style.
9) Press the SAVE button (F7) to save the new Style.
L2 Selects the pattern to change. Choose Variation 1-4 or Fill-in 1-4.
L3, L5 Selects the Section to be modified.

R2 Selects the pattern to change. Choose Variation 1–4 or Fill-in 1–4.
F1 Takes you to the previous menu.
F2 Plays the new style.
F4, F5 Moves the cursor between the Style and Phrase columns.
F7 Saves the modified data as a new Style.
10) Press the PRESET TEMPO button (L1) and use the dial to set the default tempo for the style.
11) Press the SAVE TO button (L3) and use the Dial to select the location to be saved.
12) Press the NAME button (L4). Use the F2 and F3 buttons to move the cursor and use the F4 and F5 buttons or the Dial to select the characters to name the style.
13) Press the SAVE button (F7).
L1 Sets the default tempo for the style.
L3 Selects the location to be saved.
L4 Names the style.

F1 Takes you to the Style Maker Record screen.
F2, F3 Moves the cursor.
F4, F5 Selects the characters.
F7 Saves the style to User Style.
Style Convert
Style Convert is a technology originally developed for personal computers by EMC Software. Kawai is proud to have licensed it for use in our musical instruments. This software reads many of the commercially available Style data disks made by several popular keyboard manufacturers and converts them for use with the Concert Performer. This conversion process is extremely easy, and once converted the Style can be re saved in The CP's own Style format.
To use the Style Convert Program:
1) Make sure that there is an empty location in the User Style area to hold the converted Style. The Style Convert program will automatically save the converted Style there.
2) Press the DISK button. The LCD screen will display the Disk Menu.
3) Press the STYLE CONVERT button (R4) on the DISK menu. The Style Convert screen will be displayed and prompt you to insert the Style Convert program disk in the floppy drive.
4) Insert the program disk in the drive and then press the F7 button to continue. Press the F1 button to cancel the Style Convert process.

F1 Cancels conversion process and goes back to the DISK menu.
F7 Proceeds with the conversion.
L2, L4 Selects a Style format.
5) After the CP reads the program, it will display a list of the manufacturers Style formats that can be converted. Use the L2 and L4 buttons to select the format you would like to convert. Press the F7 button to continue.

F1 Takes you to the previous screen. F7 Proceeds with the conversion.
6) Insert the appropriate manufacturers Style disk when you are asked to do so. Press the EXEC button to proceed.
7) Select the desired Style to convert and press EXEC button. The CP will begin converting that Style.
L2, L4 Selects the desired Style from the disk.
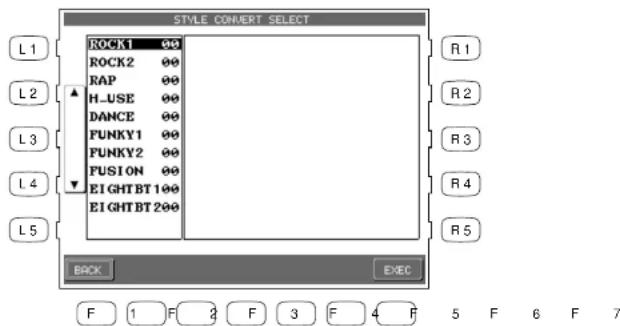
F1 Takes you to the previous menu.
F7 Proceeds with the conversion.
8) When the conversion is complete, the SAVE USER STYLE screen will be displayed. Save the new converted Style using the same procedure as saving a new User Style.
- You have just learned the basic procedure to convert other manufacturers Style formats. For detailed information on the Style Convert program, read the instruction sheet that comes with the software. There you will find a list of which manufacturers formats are supported. For technical information contact EMC Software directly at the location listed on the instruction sheet.
- An optional style conversion software package for use with a personal computer is also available from EMC software. It is called "Style Works 2000 Kawai". It offers more features than the internal conversion program. To inquire about obtaining it, contact your local Kawai dealer or distributor.
Editing Sounds
Even though the Concert Performer has over 900 high quality instrument and drum sounds built-in, there may be times when you would like to change some of the qualities of a sound to really get the tonal character that you have in mind. The CP allows you edit certain settings for individual sounds. You can choose to change subtle nuances of the sound or even drastically change the sound's
character to the point where you can no longer recognize what it was originally! Once you have made these changes, you can save up to 20 User Sounds in the User Sound Category, or a virtually unlimited number onto floppy disks.
Editing the Preset Effect Settings
Each of the CP instrument Sounds has preset Chorus and Effect settings that are applied automatically whenever that sound is selected.
You can change these settings to suit your tastes and save them so they become the preset settings for that Sound.
To adjust the settings:
1) Select the sound you want to edit and press the SOUND EDIT button (F7). The LCD screen will display the Sound Edit Menu.
2) Press the L2 button to select Edit Preset Sound Settings. The Preset Sound Settings screen will be displayed.
L2 Selects Edit Preset Effect Settings
L3 Selects Make User Sound.
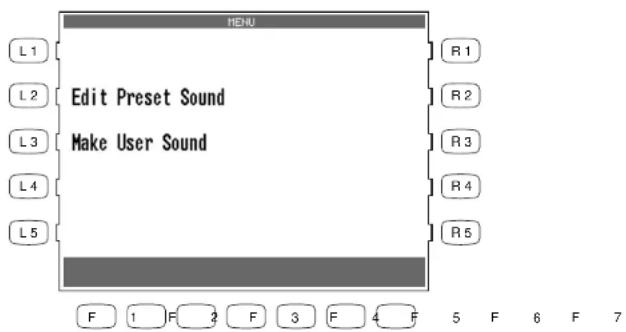
L1 Selects the preset sound to edit.
L2 Turns the Chorus on/off.
L3 Turns the Effect on/off.
L4 Selects an effect type.
L5 Adjusts the effect setting.
3) Press the L1 button and then turn the Dial to select which preset sound you wish to modify.
4) Use the L and R buttons to select the different effect settings and use the Dial to change their value.
5) When you are finished, press the SAVE button (F7) to save your settings.

R2 Adjusts the chorus level.
R4, R5 Adjusts the effect setting.
F1 Takes you to the previous menu.
F7 Saves the settings.
- Pressing the SAVE (F7) button will save all changes made in the Preset Effect Settings menu. If you exit the Preset Effect Settings menu without saving your changes, the settings will remain unchanged.
Making a User Sound
There are two steps to making a User Sound: Editing the effect settings—same as described in the previous section—and editing the sound's character.
You can adjust six parameters of the sound character: Vibrato Depth, Brightness, Attack, Decay, Sustain, and Release.
Brightness controls the Strength of the high frequencies. Higher values produce a brighter sound, lower values produce a darker sound.
Vibrato Depth controls the depth of the Vibrato effect. Positive values produce a deeper Vibrato. Negative values produce a shallower Vibrato. The actual speed of the vibrato is preset for each sound.
Attack determines how quickly a sound reaches its maximum volume after you press a key. Positive values produce a slower attack that is more gradual and smooth, while negative values produce a faster attack that is more percussive in nature.
Decay determines how quickly the volume of the sound decreases after it reaches it maximum volume while the key is still held down. Positive values produce a slower decay, while negative values produce a faster decay.
Sustain determines the volume level of the sound after the decay portion of the sound is complete. Positive values produce a louder volume, while negative values produce a softer volume.
Release determines how long it takes for the sound to fade away to silence after you release the key. Positive values produce a slower fade, while negative values produce a faster fade.
Note:
For some sounds, changing the values for these parameters may have no effect. Each sound has a pre-programmed setting for each of these parameters. When you change the values you are increasing or decreasing the value from the pre-programmed setting. If the setting for a certain sound parameter is 0 for example, then changing the value will have no effect.
To make a User Sound:
1) Select the sound you want to edit and press the SOUND EDIT button (F7). The LCD screen will display the Sound Edit Menu.
2) In the Sound Edit menu, select Make User Sound (L3). The User Sound Settings screen will be displayed.
3) You can edit the settings for Vibrato, Brightness, Attack, Decay, Sustain and Release.
4) Use the F3 and F4 buttons to select a setting and use the Dial to change its value. You can always play the keys as you edit the sound, enabling you to hear what changes are being made.
5) Press the MORE button (F2) to edit the Effect Settings for your new sound, which is the same screen as described in the previous section.
6) If you would like to save the changes you have made, press SAVE (F7). Otherwise press BACK (F1) to return to the previous menu or use the EXIT button to go back to the main Sound Edit menu.

F1 Takes you to the previous menu.
F2 Takes you to the Preset Effect Settings menu.
F3, F4 Move the cursor.
F7 Proceeds with saving the sound.
7) If you press SAVE (F7), the Save To User Sound screen will be displayed. Use the L3 button to select Save to User Sound on the screen. Use the Dial to select the User Sound location number where you want to save your new Sound. You can name the sound by using the F2-F5 buttons. Pressing the SAVE button (F7) one more time will save the sound.
L3 Selects the location where the sound will be saved.
L4 Names the Sound

F1 Takes you to the previous menu.
F2, F3 Moves the cursor.
F4. F5 Selects the character.
F7 Saves the edited sound to User Sound.
- To select and play your new User Sound, press the USER SOUND button located in the SOUND section of the front panel, then select the desired User Sound.
Playing Songs from a Floppy Disk
The Concert Performer's floppy disk drive provides a convenient way to playback songs recorded in the CP's Internal Format or Standard MIDI File (SMF) format. Songs in the CP's internal format typically are ones that you have recorded on your own instrument. There are many sources of SMF songs, including disks for sale from professional musicians and publishers, songs shared among musicians and hobbyists, and Internet sites that feature SMF songs available for download.
If you wish to play a song without any intentions to make permanent changes or additional recordings, you can use the CP's Disk Song Play function to load the song very quickly for playback. Using the disk drive in this way makes the Concert Performer an enjoyable source of entertainment for parties and other social events, as well as a great tool for the professional musician or music educator.
About songs on Floppy Disk
If you will use a blank disk to store and play your own compositions made on the Concert Performer, there isn't much to worry about. The CP can format the disk (if it isn't already formatted), and the CP's internal song format remembers everything about your song, including which sounds to use with the recorded tracks. However, if you wish to purchase a disk of songs from your music store or publisher, play a disk given to you by someone else, or play songs downloaded from the Internet, you will need to remember a few simple points:
- The CP reads only DOS formatted disks, either double-sided double-density (720KB) or high density (1.4MB). These are the most commonly used disk formats in both computers and musical instruments.
- The CP recognizes song files written in the Standard MIDI File format as long as they have DOS file names ending with ".MID". There are two types of Standard MIDI File formats, Format 0 and 1. The CP can read the song data of both formats, however it will only display the lyrics of a song written as format 0.
- Songs that have been composed with the General MIDI (GM) standard will sound fine without any additional work, because data in the files will inform the CP as to what sounds to use when playing the song. If the song was not composed to the GM standard, you may find it necessary to edit the song to assign the correct sounds to the various tracks. Fortunately, almost all commercially available MIDI files adhere to the General MIDI standard.
- The CP can also recognize most songs formatted for the PianoDisc player piano system and songs formatted for Yamaha's Disk Orchestra Collection. (Please check with your Kawai dealer or distributor for further information).
Selecting a Song from Disk
A single floppy disk can store dozens of song files at one time, depending on the length of the songs.
To select a song:

1) Put the disk in the Floppy Disk Drive and press the DISK button. In the Disk menu, select Song Play (R3). After the CP searches the disk it will display the first ten available songs. If there are more than ten songs on the disk, use the SEARCH buttons (F2, F3) to list the additional songs.
2) Use the L and R buttons to select the song you want to hear. You can also select a song by using the Dial.
3) Once your desired song is highlighted, press PLAY/STOP to have the CP load the song and automatically start playing. You may also press SELECT (F7) to have the CP load the data and wait for you to start it manually.
4) Press the SONG CHAIN (F4, F5) buttons to have the CP automatically play all songs, one after another.
5) When your selected song is ready to play, the Disk Song Play screen is displayed. Use the Recorder control buttons on the left side of the panel to control the playback of the song.

The L and R buttons select the song you want to hear.
F1 Takes you to the Disk menu.
F2, F3 Lists the next or previous ten titles.
F4, F5 Starts the Chain Play.
F7 Selects the song and takes you to the Disk Song Play screen.
Controlling Playback of a Song
As the song plays, you can adjust the tempo, play or sing along with on the keyboard, and even turn on/off the different instrument parts (tracks) in the song.
The status of the song parts is displayed at the bottom of the LCD screen. You will see the parts referred to as the CP's four Parts + Style if the song was created on the CP, or as Channels (ch 1-16) if the song is a MIDI file. Displayed above each part is its current status:
PLAY The part will be heard when you play the song.
MUTE The part has data, but it won't be heard when you play the song.
---- The part has no data to play.
- Transpose and Octave Shift are available when a song is playing. Octave Shift affects only the notes you play "live" on the keyboard, not the music playing from the song file. Transpose can be applied separately to the keyboard sound and the song sounds. This lets you play the keyboard in your preferred key along with a song recorded in a different (or more difficult) key. Use the front panel's dedicated TRANPOSE buttons to affect the keyboard sound. Use the Song Transpose option (R4 and R5) in the Disk Song Play menu to affect the song data.
- The Song Transpose option is available only for the song data in Standard MIDI file.
To make adjustments to the song:
1) In the Disk Song Play screen, use the R1, R2, R3, and L3 buttons to highlight and assign sounds to the CP's four keyboard Parts. These will be the sounds that you can play live from the keyboard as the song is playing. Once a Part is highlighted, press any of the Sound category buttons to select a new sound.
2) Use the F buttons to play and mute any of the song's instrument parts.
3) Press the L4 button to use the Mixer to make adjustments to the song's instrument parts. (See page 49 for the Mixer function.)
4) Use the R4 and R5 buttons to transpose the song data.
5) Use the panel TRANSPOSE and OCTAVE SHIFT buttons to adjust the CP's keyboard Parts.
6) Press the PLAY/STOP button to start the song.
7) To adjust the tempo, press the L2 button and use the Dial to change values.
8) Press the PLAY/STOP button again to stop the song.
L2 Adjusts the song's tempo.
L3 Highlights the LEFT Part.
L4 Takes you to the Mixer screen.
L5 Displays the song's lyrics (if available in the data).
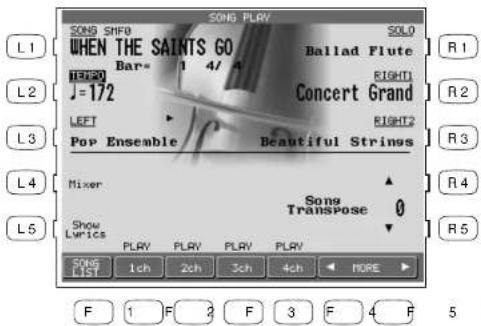
R1 Highlights the SOLO Part.
R2 Highlights the RIGHT1 Part.
R3 Highlights the RIGHT2 Part.
R4, R5 Transposes the song (but not the keyboard).
F1 Takes you to the Disk Song Select menu.
F2-F5 Turns the song part on/off.
F6, F7 Displays the status of the next set of 4 song parts. (Ch 5–8,
Ch9-12, Ch 13-16).
If the song you are playing has lyrics included in the data, the Show Lyrics (L5) button will appear on the Song Play screen. If you press the Show Lyrics button, the song's lyrics will then appear inside a box. You can follow a ball moving over the lyrics as the song plays. Press the Full Screen (R5) button to expand the lyrics display to the full screen. Press the Normal Screen (F1) button to return to the normal lyrics screen.
In the normal lyrics screen, press the F1 button to return to the Song Play screen
L2 Adjusts tempo.

F1 Returns to the Song Play screen.
F2-F5 Turns the song parts on/off.
F6, F7 Displays the status of the next set of 4 song parts (Ch 5–8, Ch9–12, Ch 13–16).
- You cannot record or permanently edit the song while using the Disk Song Play function. If you would like to record your live performance along with the song from the disk, or if you want to make detailed and permanent edits to the song, you will need to load the song's data into the Recorder using the Disk Load function. See the chapter "Recording a Song" (page 42) for details on how to record a song, and "Floppy Disk Operations" (page 156) for an explanation of how to load a song into the Recorder.
Playing with Concert Magic
Thanks to Kawai's innovative CONCERT MAGIC (CM) feature, absolutely anyone can sit at the Concert Performer and experience the joy of being a real performing musician... even if they have never touched a musical instrument in their life!
Concert Magic allows you to play a song by simply tapping any key on the keyboard. Regardless of what keys you play, the notes that are heard will be the correct ones for the song. However, what makes this really exciting is that you control the timing of the notes, as well as their dynamics. This lets you add a level of expressiveness and individuality to the song that makes it real musical performance.
As you play a CM song, a handy Note Navigator display helps you keep track of where you are in the music, as well as suggesting how the rhythm of the song should be tapped out on the keys.
Many of the CM songs have lyrics that can be displayed as the song is being performed. As the song is played, a Bouncing Ball makes its way over the lyrics, following the player's performance and encouraging everyone around the instrument to sing along.
The Concert Performer can also automatically play any of the Concert Magic songs. Listening to the song first can make it easier to play. There is also a Chain Play mode, giving you options to listen to groups of CM songs.
Selecting a Concert Magic Song
The 176 on-board Concert Magic songs are divided into eight groups by song category: Children's Songs, American Classics, Patriotic Songs, Christmas Songs, Hymns, Classics, Special Occasions, and International songs.
- In addition, you can create and play your own Concert Magic songs using the floppy disk drive.
To select a song:

1) Press the CONCERT MAGIC button. The song selection menu will be displayed.
2) Ten song titles from the Children's Songs category will be displayed. The category name is displayed at the very top of the screen. If you want to go to another song category, press SEARCH BY CATEGORY (F1, F2). You can also search for a specific title by using SEARCH BY NAME (F3, F4), which will list all 176 song titles in alphabetical order. You may also use the Dial to scroll through all the titles one after another.
- If you wish to play a CM song from floppy disk, press the DISK button (F6) to see the list of songs on disk.
3) When you have found the song that you want to play, use the L or R buttons to move the box over the title. Press the SELECT button (F7) to choose it. The Note Navigator screen will be displayed, and you are ready to perform!

The L and R buttons select the desired song.
F1, F2 Searches by song category.
F3, F4 Searches by song name.
F5 Enters the Chain Play mode of the Concert Magic.
F6 Searches for a song on floppy disk.
F7 Can also select the song.
Performing a Concert Magic Song
Playing the Concert Magic song you've selected is very easy. Just begin tapping any key on the keyboard and the song will play. Concert Magic plays the correct notes of the song, but you must provide the rhythm. Being familiar with how a particular song sounds does make it easier, but watching the Note Navigator screen can help you play a song that you've never heard before.
The Note Navigator provides an outline of the song's rhythm that looks a lot like the real music. The dots (•) in the display are the notes that you play. The spacing of the notes gives a clue to the timing (rhythm) of the notes. Notes that are closer together are played faster; notes that are farther apart are played longer. Notes that are evenly spaced are played evenly, and so on.
Up to four lines of music are displayed. After you've played past a note in the song, the dot becomes a cross (+) to help you keep track of where you now are. When you get to the bottom of the screen, the top lines change to show the next lines of music, as if you had turned the page. When you get to the end of the song you will see a double line, and then the song will reset to the beginning.
To play a selected CM song:
1) In the Note Navigator screen press START (F4) if you want to first listen to the song. The CP will play the song. Press the STOP (F4) button to stop. Notice how the Note Navigator displays the rhythm as the song is playing.
2) If you wish to play the CM song yourself, start tapping any of 88 keys while the song is stopped, and the song will play.
3) Press the RESET (F4) button at any time to start at the beginning of the song again.
4) To play another song, press the SONG LIST buttons (F6, F7) to display the list.
5) If you have selected a song that has lyrics, you may view them by pressing the LYRICS button (F1, F2)
6) If you would like to play any song by steady tapping (instead of following the original rhythm), press the STEADY BEAT button (F3).
7) To exit Concert Magic, simply press the CONCERT MAGIC button again.

F1. F2 Displays the selected song's lyrics, if available.
F3 Allows you to play any song by steady tapping.
F4 Starts and stops the song. Also used to reset the song when performing.
F5 Saves the changed Sounds.
F6, F7 Selects another song.

F1, F2 Returns to the Note Navigator screen.
F3 Allows you to play any song by steady beat tapping.
F4 Starts and stops the song. Also used to reset the song when performing.
F5 Saves the changed Sounds.
F6, F7 Selects another song.
- When you reach the end of the song, press any key one more time. This will not produce sound, but instead resets the song to the beginning for another performance.
- The Bouncing Ball only works with song files that are specifically designed for Concert Magic to take advantage of this feature.
- A Concert Magic song is made of two parts - a melody part and accompaniment part. Many of the songs have different instrument sounds assigned each part to make the music more interesting. You can select different sounds for each part separately. The RIGHT1 Part plays the melody. To change its sound, press any Sound category button and select a new sound. The LEFT Part handles the accompaniment. To change its sound, first turn off the RIGHT1 Part and then press any Sound category button to select a new sound. Don't forget to turn the RIGHT1 Part back on before you begin to play.
- You can use the PIANO ONLY button to quickly change the sound for both parts to the Concert Grand piano.

- You can also activate the RIGHT2 Part to use as a layer (additional sound) for the melody. In addition, if you know the melody to a Concert Magic song you can play along by activating the SOLO Part. Remember, you must play the notes of the melody when the SOLO sound is active. You can also select any new sound for the RIGHT2 and SOLO parts. Turn off all Parts except the one you wish to change, and then select the new sound. Don't forget to turn all necessary Parts back on before you begin to play.
- You can save your new sound settings by pressing the SAVE button (F4). The Soft Reset function will be required to return the sounds to their original settings (see page 144).
- You can transpose the song by pressing the TRANSPOSE buttons.
To enter the Chain Play mode of the Concert Magic:
1) Press the CONCERT MAGIC button. The song selection menu will be displayed.
2) Press the CHAIN PLAY button (F4). The Chain Play menu will be displayed.
3) Use the L and R buttons to highlight a setting, then turn the Dial to change that setting. You can choose to play songs from any one category, or to play all 176 CM songs. You can also choose to use each song's preset sounds, or to play the songs using the Concert Grand piano sound only.
4) Press the PLAY button (F4) to start playing the songs.
5) To exit Concert Magic, press the CONCERT MAGIC button again.
L2 Selects Play mode.
L4 Selects Sound mode.

F4 Starts the chain play.
F6, F7 Returns to the song list.
Concert Magic Song Arrangements
Concert Magic songs are specially arranged so that they will work well with your key tapping. Each of the 176 CM songs falls into one of three categories of musical arrangements of varying difficulty.
EASY BEAT
These are the easiest songs to play. To perform them, simply tap any key with a constant beat. You can easily see which songs are Easy Beat songs when you look at the Note Navigator. The dots will line up at a constant interval in the screen, indicating a constant beat.
MELODY PLAY
These songs are also quite easy to play, especially if you are familiar with them. To perform them, tap the keys to the rhythm of the melody (as if you were singing).
SKILLFUL
These songs are more challenging. To perform them, carefully follow the rhythm as shown in the Note Navigator. It may require some practice to successfully play these songs. Even skilled players will enjoy the challenge that these songs offer.
Steady Beat Play
After you choose a song, you can press the STEADY BEAT button (F3) to play the song by steady tapping instead of the original rhythm. You can play any song from any arrangement category by tapping steady beats.
Creating a Concert Magic Song
You can also use Concert Magic to play a song that isn't one of the 176 built-in titles. You can record a new song using the Concert Performer's Recorder and then save on a floppy disk as a Standard MIDI File (SMF). The song can now be selected by pressing the DISK button when you are in the Concert Magic song selection screen.
- You can also record a song for Concert Magic by using an external sequencer. Remember to save it to a floppy disk as a Standard MIDI File.
As you might imagine, getting your song to sound exactly the way you want it to in Concert Magic may require a few adjustments to the original arrangement. The most important consideration is to keep the musical arrangement as simple as possible. Concert Magic “pauses” the song after every note as it waits for you to tap the next key. If there are complex rhythm patterns that have many notes per beat, the song may become overly difficult to play. Here are some suggestions for creating a Concert Magic song:
1) Record the melody first using the RIGHT 1 Part in the Easy Recorder (or Track 2 in the Advanced Recorder).
2) Then record the accompaniment using the LEFT Part in the Easy Recorder (or Track 4 in the Advanced Recorder).
3) Arrange the accompaniment so that its notes fall on the same beats as the melody. (This creates a Melody Play arrangement.)
4) If you want to be a little more adventurous, insert a few carefully placed accompaniment notes in between melody notes. (This creates a Skillful arrangement.)
5) If you are recording your song using an external sequencer, record the melody on channel 2 and the accompaniment on channel 4.
6) For best results, you should quantize your parts.
- Of course, these are merely suggestions. There are no steadfast rules for how to compose your CM song. In fact, very rewarding musical experiences may come out of simple trial and error.
System Menu
The System Menu contains all of the functions that affect the overall performance of the CP piano. This includes functions such as the System settings, tuning, and MIDI Setup. By adjusting these settings you can tailor the CP's performance to your taste.

To use the System menu:
1) Press the SYSTEM button. The SYSTEM button LED will light and the System menu is displayed.
2) Use the F1 and F2 buttons to access the System Menu pages.
3) Use the L, R and F buttons to select the function you wish to change. A sub-menu with further options for that function will be displayed.
4) Use the L, R and F buttons to choose a setting from the sub-menu and use the Dial to change its value.
- If you would like to have the CP remember your settings and have them immediately applied every time you turn the instrument on, select Power Up Setting (Page 2-R1) from the System menu, and choose "Save Current Settings" (L2).
- For further details on resetting data, see page 144.
L1 Selects the overall tuning of the CP.
L2 Selects the Touch Curve (Key velocity sensitivity).
L3 Selects the Equalizer settings for the CP.
L4 Selects the Voicing settings.
L5 Selects the Resonance effect for the sustain pedal.

F1, F2 Selects the different System Menu pages.
L1 Selects the Effect priority settings.
L2 Selects the Temperament settings.
L3 Selects the MIDI settings.

F1, F2 Selects the different System Menu pages.
Tuning
Tuning allows you to adjust the CP's pitch. You may need to adjust the tuning when you play with other instruments.
The master pitch is displayed in Hertz. The range of adjustment is from 427.0 to 453.0 Hz. The factory preset value is set to the modern standard A = 440.0 Hz.
- You can also adjust the tuning for each Part separately. This can be used to simulate a chorus-like effect by layering the same sound in RIGHT1 and RIGHT2 and slightly detuning them. Each Part can be raised or lowered by up to 50 cents. (50 cents = 1/4 tone).
L2 Selects the master pitch.
L3 Selects the pitch for the LEFT Part.
L4 Selects the pitch for the SOLO Part.

F1 Takes you to the System menu.
Touch Curve
When playing a piano, the volume of the sound produced increases in direct relation to how hard a key is struck. The CP's Normal Touch curve offers the standard feel of an acoustic piano for practicing music. The CP offers six other touch curves ranging from light to heavy. You can also create your own touch curves tailored to your personal playing style.
Normal This is the standard touch of an acoustic piano.
Light 1, 2 For those still developing finger strength, such as a child, a louder sound is produced even when the piano is played with a soft touch. Light 2 is lighter than Light 1.
Heavy 1, 2 Perfect for those with strong fingers. Requires a heavier touch to produce a loud volume. Heavy 2 is heavier than Heavy 1.
Off A constant volume is produced regardless of how hard the keys are struck. This setting is suitable for sounds that have a fixed dynamic range such as Organ or Harpsichord.
User 1, 2 You can create two of your own custom touch curves.
- LIGHT and HEAVY do not represent the physical weight of the keys. These are settings that affect the sensitivity of the keys, which determines the volume level in response to the key movement.
L1 Selects the normal setting.
L2 Selects a moderately light touch.
L3 Selects a light touch.
L4 Selects a moderately heavy touch.
L5 Selects a heavy touch.
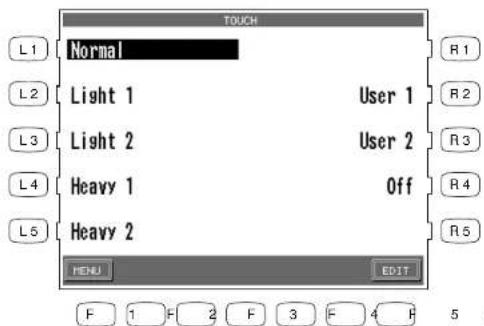
R2 Selects the User 1 touch.
R3 Selects the User 2 touch.
R4 Turns off the Touch sensitivity entirely.
F1 Takes you to the System menu.
F7 Takes you to the User Touch Curve screen.
User Touch Curve
You can create your own custom touch curve to fit your playing style. Two User Touch curves can be saved.
To create a User Touch Curve:
1) Press the EDIT button (F7) in the Touch Curve screen. The LCD screen will display the User Touch screen.
2) Now start playing dynamically from soft to loud in order to let the CP analyze your playing style. While you are playing, a musical note ♪ will blink in the right corner of the LCD display.
3) Press the CREATE button (F7) when you finish playing. The CP will analyze your playing and create a custom touch curve for you based upon your playing style. The User Touch Exec screen will be displayed.

F1 Takes you to the previous menu. F7 Creates a user touch curve.
4) Use the Dial to select either User 1 or User 2 as the location for your new touch curve.
5) Press the EXEC button (F7) to save your new touch curve.
6) The CP will ask for your confirmation. Press YES (F7) to confirm.

Use the Dial to select either User 1 or User 2 as the location for your new touch curve.
F1 Cancels the saving procedure. F7 Proceeds with saving procedure.
- The user touch curve data is saved automatically even after the power is turned off. However, You must re select the user touch curve each time the power is turned on unless you make your User touch curve the default by selecting "Save Current Settings" from the Power Up Settings screen (See Power Up settings on page 143).
System EQ
The System EQ allows you to adjust the tone character of the CP piano to your taste. In addition to a Flat EQ setting (no EQ), there are four special EQ settings optimized for each of the CP models and four general purpose EQ settings. There is also a User EQ, that allows you to edit the existing EQ settings or create your own EQ settings.
- The System EQ affects the overall tone character of the CP speakers and the Line Out Jacks (The CD-R Drive is not affected by the System EQ). The special CP EQ's are optimized for the speaker systems on different CP models. When connecting the Line Out Jacks to an external source the Flat EQ setting is recommended.
- The Flat EQ setting is the default. If you want to save a different EQ setting as the default you must select the "Save Current Settings" on the Power Up Settings screen (See Power Up Settings, page 143).
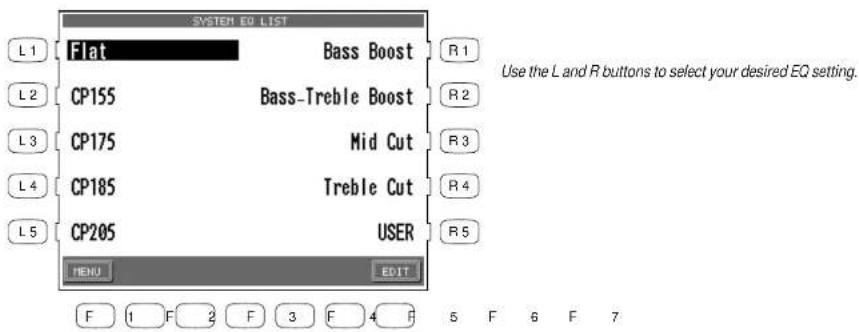
F1 Takes you to the previous menu. F7 Takes you to the User System EQ screen.
To create a User EQ:
1) Select one the ten EQ settings to edit and press the EDIT button (F7). The LCD screen will display the User System EQ screen.
2) Use the F2, F3 buttons to move the cursor and use the Dial to change the value.
3) Press the SAVE button (F7) to save the edited EQ settings to the User EQ.

F1 Takes you to the System EO menu.
F2, F3 Moves the cursor.
F7 Saves the edited EQ settings to User EQ.
Virtual Voicing
Voicing is a technique used by piano technicians to mold the character of a piano's sound. The Voicing function lets you change the CP piano's tone quality by choosing one of four types of voicings.
Normal Produces the normal timbre of an acoustic piano throughout the entire dynamic range. This is the default setting.
Bright Produces a brighter tone throughout the entire dynamic range.
Mellow Produces a mellower tone throughout the entire dynamic range.
Dynamic The tone will change dramatically from mellow to bright according to your playing.
- The current voicing selection is global for all the instrument Sounds. You can not have an individual setting for each Sound.
- While voicing is a technique used for optimizing the tone of an acoustic piano, this function can be used on all the Sounds on the CP piano.
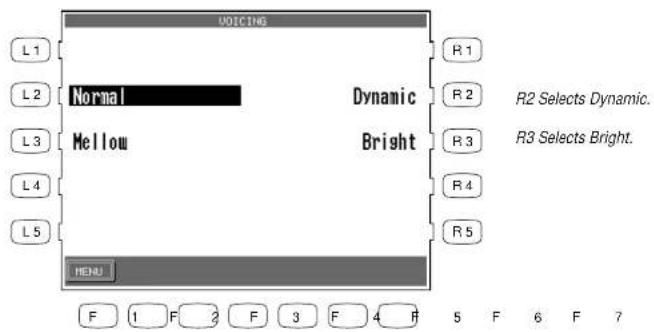
F1 Takes you to the System menu.
L2 Selects Normal.
L3 Selects Mellow.
Resonance
When the sustain pedal is depressed on an acoustic piano, all the dampers are lifted up allowing the strings to vibrate freely. In this condition, when you play a note not only will the strings for the note you played vibrate but other strings will vibrate due to sympathetic resonance. The Resonance function simulates this phenomenon. You can select from three levels of Resonance.
Off No resonance.
Normal Simulates the natural resonance characteristics of an acoustic piano.
Deep Produces a more intense resonance.
L2 Selects normal resonance.
L3 Selects deep resonance.
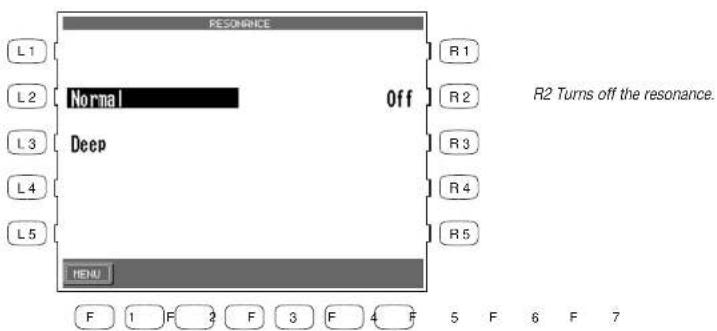
F1 Takes you to the System menu.
Concert Magic Sound
This function determines which sounds the Concert Magic songs will be played with.
Preset Plays all the Concert Magic songs with the Preset Sounds assigned to each song. Piano Plays all the Concert Magic songs with the Concert Grand piano.
L2 Selects Preset sounds.
L3 Selects Piano sound.

F1 Takes you to the System menu.
Pedal Assign
The Soft and Sostenuto pedals on the Concert Performer function as much more than just traditional piano pedals. These pedals can be assigned to control various other functions on the CP piano. With an optional expression pedal connected to the EXP pedal jack, you can also control the volume for each Part.
Damper Pedal (Right)
Sustain only Can be activated or deactivated separately for each Part.
Pedal assignment options for Soft Pedal (Left) and Sostenuto Pedal (Center)
Soft Softens the sound and reduces its volume.
Sostenuto Sustains only notes that were held when pedal was depressed.
Start/Stop Controls start/stop for Styles and Songs.
Harmony on/off Turns the instrument Harmony function on/off.
Registration Switches from one Registration to another. You may choose the order, 1 to 8 or 8 to 1.
Style Variation Switches from one Style Variation to another. You may choose the order, 1 to 4 or 4 to 1.
Intro/Ending Plays the Intro or Ending.
Fill In Plays the Fill-in currently selected.
Break Interrupts the whole Style.
Drums Only Interrupts the Style except Drum part.
Sync/Fade Out Controls the SYNC/FADE OUT button.
Glide Bends the pitch up and down as programmed by you.
Modulation Applies programmable vibrato to the sound.
Rotary Fast/Slow Controls the speed of rotary speaker effect. This function will be automatically assigned to the Soft Pedal (Left) when a sound that has the rotary effect turned on is selected as the Priority Part.
Left Hand Hold Holds the notes played in the LEFT/SPLIT Part as long as the pedal is depressed.
Panel Lock Locks all buttons on the panel to prevent them from being tampered with or pressed accidentally while you are playing. Press the assigned pedal once to lock the panel buttons. Press the assigned pedal again to unlock the panel buttons.
EXP Pedal (Optional)
Expression The Expression pedal controls the volume of Parts. Expression can be activated or deactivated separately for each Part.
- The pedal assignments made to the Left pedal will be saved as part of a Registration. The pedal assignments made to the Center pedal are global and are not saved as part of a Registration.
1) Select the Pedal Assign (R2) option in the System menu (page 1). The LCD screen will display the Pedal Assign screen. Use the L buttons to select which pedal you want to make assignments for.
L1 Selects the Right pedal (Damper).
L2 Selects the Center pedal (Sostenuto).
L3 Selects the Left pedal (Soft).
L4 Selects the Expression pedal.

F1 Takes you to the System menu.
2) Use the L and R buttons to select the setting and use the Dial to change its value.
L2 Selects a function to assign to the pedal.

Use the other L and R buttons to adjust parameters.
F1 Back to the pedal Assign menu. F3-F6 Selects the different pedals.
Fill-in Mode
This determines whether or not a Fill-in will be automatically played each time a VARIATION button is pressed.
There are two options.
Normal A Fill-in will not be automatically played each time a VARIATION button is pressed. Fill ins will only be played if a FILL button is pressed.
Auto A Fill-in will be played each time a VARIATION button is pressed. The Fill-in that is played will be the one that accompanies the Variation that you are leaving. For example, if Variation 1 is currently active, and you select Variation 2, the Fill-in for Variation 1 will be played.
L2 Selects Normal mode.
L3 Selects Auto mode.

F1 Takes you to the System menu.
Solo Settings
This configures the special settings for the Solo part.
Since the Solo part allows you to play only one note at a time (monophonic), it is important to select which note will be played by the SOLO Part when more than one key is played at a time. There are three options.
Top Note The SOLO Part plays only the highest note among the notes played at one time.
Last Note The SOLO Part plays only the last key played among the notes played at one time. When the last key is released, the SOLO Part will play the last previous key played and so on.
No Retrigger The SOLO Part plays only the last key played among the notes played at one time, but when that key is released the SOLO Part will stop playing.
When using Portamento, you can adjust Portamento Time which determines how long it takes for the pitch to slide up or down from one note to the next.
L2 Selects the note priority.
L3 Adjusts Portamento time.

F1 Takes you to the previous menu.
- You can access this screen by holding down the PORTAMENTO button for a few seconds.
Video Out
This function is used to select the type of video signal that will be output by the Video Out Jack.
NTSC The TV video signal system mainly used in North American countries and Japan.
PAL The TV video signal system mainly used in the European countries.
OFF The video signals are not output.
L2 Selects NTSC.
L3 Selects PAL.
L4 Selects OFF.

F1 Takes you to the System menu.
Effect for Sound
This function determines whether or not the Preset Effects settings assigned to each Sound will be used or not.
Preset The Preset Effect settings for each Sound will be used. This is the default setting.
Panel The Preset Effect settings for each Sound will not be used. In other words, changing the Sounds will not change the Effect types and other settings for the Effects. This allows you to set each Effect section (REVERB, CHORUS, and EFFECTS) to your own taste and use your Effect settings for all sounds. The Panel setting is very useful if you only want to use certain Effects at all times or if you want to prevent the Effects from constantly changing each time you select a new Sound.
L2 Selects Preset.
L3 Selects Panel.
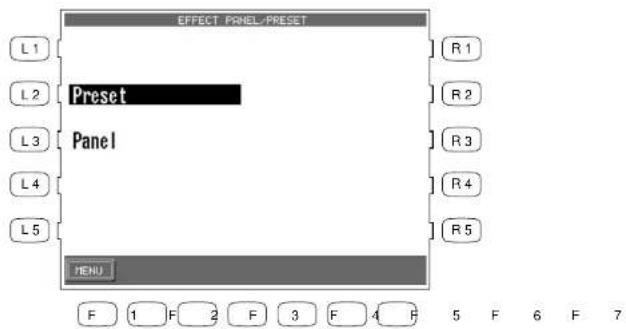
F1 Takes you to the System menu.
Temperament
The CP offers not only equal temperament (the modern standard) but also immediate access to temperaments popular during the Renaissance and Baroque periods.
You can also create your own User tuning Temperament as well.
1) Select Temperament form the System Menu. The LCD screen will display the Temperament screen.
2) Select your desired Temperament with the L and R buttons.
3) Set the Temperament Key with the F2 and F3 buttons.
4) If you select Equal temperament, use the F5 and F6 buttons to set Stretch Tuning to On, Off, or Piano Only. (For an explanation of Equal and Equal Stretched tuning see page 135).
Stretch=On: Applies the Stretched Tuning to all instrument Sounds.
Stretch=Off: Stretched Tuning is turned Off for all the instrument Sounds Off.
Stretch=Piano (only): Applies the Stretched Tuning only to the Piano Sound. The tuning for any other active sounds layered with a piano sound will be stretched to match the piano. If no piano sound is active the tuning for any active sounds will not be stretched.
L1 Selects Equal.
L2 Selects Meantone.
L3 Selects Pure Major.
L4 Selects Pure minor.
L5 Selects Pythagorean.

F1 Takes you to the System menu.
F2, F3 Selects the Temperament Key.
F5 Selects the Stretch tuning type On/Off/Piano.
F7 Takes you to the User Temperament screen.
Brief explanation of temperaments
Temperament Keys
Limitless modulation of the key became available only after the invention of Equal temperament. When you use a temperament other than Equal temperament, you must carefully choose the key to play in. For example, if the song you are going to play is written in D major, choose "D" to set the temperament key.
Equal Temperament (Flat)
This is an “unstretched” equal temperament that divides the scale into twelve equal semitones. This produces the same chordal intervals in all twelve keys, and has the advantage of limitless modulation of the key. However the tonality of each key becomes less characteristic and no chord is in pure consonance.
Equal Temperament (Stretched)
This is the most popular piano temperament and is the initial setting. The hearing ability of a human is uneven and is not as accurate with high frequency and low frequency as it is with the middle range. This temperament's tuning is stretched to compensate for this so the sound will be heard naturally to the ears. This "Stretched" equal temperament is a practical variation of the "unstretched" equal temperament which was invented on a mathematical basis.
Pure Temperament
This temperament, which eliminates dissonances for thirds and fifths is still popular for choral music because of its perfect harmony. You need to be aware what key you are playing in with this temperament. Any key modulation will result in dissonances. When you play music in a particular key, you need to match the key of the temperament as well.
Pythagorean Temperament
This temperament, which uses mathematical ratios to eliminate dissonance for fifths, is very limited for use with chords, but it produces very characteristic melodic lines.
Meantone Temperament
This temperament, which uses a mean between a major and minor whole tone to eliminate dissonance for thirds, was devised to eliminate the lack of consonance's experienced with certain fifths for the Pure temperament. It produces chords that are more beautiful than those with the equal temperament.
These two temperaments are placed in between Meantone and Pythagorean. For music with few accidentals, this temperament produces the beautiful chords of the mean tone, but as accidentals increase, the temperament produces the characteristic melodies of the Pythagorean temperament. It is used primarily for classical music written in the Baroque era to revive the original characteristics.
Arabic
Some oriental scales, including the Arabic, are characterized for "quarter-tone" which is half of a half-tone (50 cents). This makes the music sound very different from traditional western music. The CP Piano provides two of the most popular Arabic scales, although you can create more variations with the User Temperament function. With Arabic 1, the notes B and E are a quartertone lower than the Occidental Scale, while the notes A and E are lower with Arabic 2.
To create a User Temperament:
1) On the Temperament screen, press the EDIT button (F7). The User Temperament screen will be displayed.
2) Use the KEY buttons (F3, F4) to select the note to edit.
3) Use the Dial or TUNE buttons (F5, F6) to change the value. The value is represented in cents above or below Equal temperament and ranges from -50 to +50.
4) Press the SAVE button (F7) to save the User Temperament.

F1 Takes you to the Temperament menu.
F3, F4 Selects the note to edit.
F7 Saves the User Temperament.
- The User Temperament alters the tuning for each octave equally. In other words, you cannot alter the tuning of different sections of the CP's keyboard range separately.
MIDI Menu
The letters MIDI stand for Musical Instrument Digital Interface, an international standard for connecting MIDI equipped synthesizers, drum machines, and other electronic instruments so that they can exchange data. Personal computers can also be equipped for MIDI communication. Electronic instruments equipped with MIDI can transmit and receive performance data such as, notes, what sound to play, pedal information, volume, etc. through the MIDI In/Out/Thru Jacks. This data can be recorded with a device like a sequencer or a computer.
- In this manual we will only discuss the basic MIDI functions that pertain directly to the CP. For detailed literature on MIDI, please visit the music department of your local bookstore.
On page one of the MIDI Settings menu you can configure the following settings.
Right Transmit Channel
Sets the MIDI Transmit Channel for the RIGHT hand Parts. You can select MIDI Channels 1-16.
Left Transmit Channel
Sets the MIDI Transmit Channel for the LEFT/SPLIT Part. You can select MIDI Channels 1-16.
Chord Transmit Channel
Sets the MIDI Transmit channel the Chord data created by the Accompaniment System when it analyzes the notes you play in the lower section of the keyboard. You can select MIDI Channels 1-16 and OFF. OFF disables MIDI transmission of the chord data.
Chord Detect Channel
Sets the MIDI receive channel for chord data being sent to the CP. The Accompaniment System can be controlled remotely on this MIDI channel by an external MIDI controller. You can select MIDI channels 1-16, OFF, All, or MIDI Accordion. When set to ALL the Accompaniment System will respond to any chord data it receives on ANY MIDI channel.
Local Control ON/OFF
This determines whether the CP's sound will be played from the piano's keyboard ("ON") or only from an external MIDI instrument ("OFF"). Even with local control "off" the CP's keyboard will still transmit to an external MIDI instrument or personal computer.
Clock
Clock is a data code that a MIDI instrument uses as the reference for its Tempo settings as well as Style Start/Stop commands. When it is set to INTERNAL, the CP uses its own built-in clock to control tempo settings. When set to EXTERNAL, the CP reads the clock data that it receives via MIDI and uses this data to control the Tempo.
To configure the MIDI Settings:
1) On page 2 in the System menu, press the MIDI (L3) button. The LCD screen will display the first MIDI page.
2) Use the L and R buttons to select the setting and use the Dial to change the values.
L2 Selects Transmit channel for the RIGHT Part. Choose 1–16.
L3 Selects Transmit channel for the LEFT Part. Choose 1–16.
L4 Selects Transmit channel for the chord data. Choose 1-16 or OFF.
L5 Selects the chord detect Receive channel. Choose 1–16, OFF, All, or MIDI Accordion.
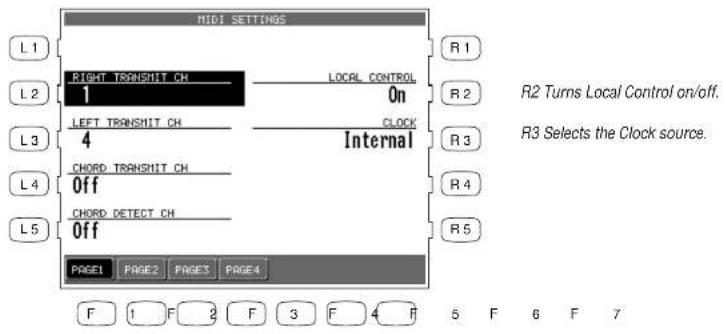
F1-F4 Selects the other MIDI Settings pages.
Transmit MIDI Data
On page two of the MIDI Setting menu you can determine what MIDI data will be transmitted from the CP.
"Keyboard = On/Off" Determines whether or not note data that is generated by the keys being played will be transmitted.
"Program = On/Off" Determines whether or not the CA piano will transmit program change information when a Sound is selected on the CP.
"Control = On/Off" Determines whether or not changes in controllers (such as the pedals being depressed) will be transmitted.
"Expression = Key/Acc/Both" Determines whether or not the Expression data (CC# 11) for notes played on the keyboard, by the Auto Accompaniment System, or both should be transmitted.
“System Exclusive = On/Off” Determines whether or not all of the CP’s settings will be transmitted in a special format that is understood by another CP.
"Clock = On/Off" Determines whether or not the CP's Clock data will be transmitted.
“ACC = On/Off” Determines whether or not the data from the Auto Accompaniment System will be transmitted.
L2 Selects whether note data is transmitted.
L3 Selects whether Bank and Program Change data is transmitted.
L4 Selects whether Controller data is transmitted.
L5 Selects whether Expression data is transmitted

R2 Selects whether System Exclusive data is transmitted.
R3 Selects whether Clock data is transmitted.
R4 Selects whether Auto-accompaniment data is transmitted.
F1-F4 Selects the other MIDI Settings pages.
On page three of the MIDI Settings menu, you can determine which MIDI channels the CP will receive MIDI data on. The CP can receive MIDI data on all 16 MIDI channels at once or only certain MIDI channels.
Channel Receive On/Off
Each of the 16 MIDI channels can be set separately to On or Off.
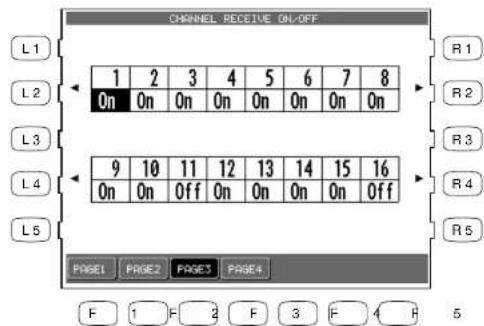
Use the L2, R2, L4 and R4 buttons to select the channel and use the Dial to change the setting, On and Off.
F1-F4 Selects the other MIDI Settings pages.
MIDI Accordion
On page four of the MIDI Settings Menu you can configure the CP to be played from a MIDI Accordion.
L2 Selects receive channel for the Solo (Solo) part. Choose 1-16.
L3 Selects receive channel for the Melody (Right1) part. Choose 1-16.

R2 Selects receive channel for the Bass (Right2) part. Choose 1-16.
R3 Selects receive channel for the Chord (Left) part. Choose 1-16.
F1-F4 Selects the other MIDI Settings pages.
Power Up Settings
This determines whether the CP stores your preferred panel and system settings as the default settings and applies them automatically when the instrument is turned on.
Select Save Current Settings (L2) in the Power Up Setting menu to save the current panel settings automatically as the default settings when the CP is turned on.
Select Restore Factory Settings (L3) to return the CP to the factory default settings. The original factory settings will now be used by the CP when it is turned on.
- The CP never automatically stores Panel and System settings. If you make any new changes that you want to save, you must use the Save Current Settings (L2) command.
L2 Saves the current settings.
L3 Restores the initial factory settings.
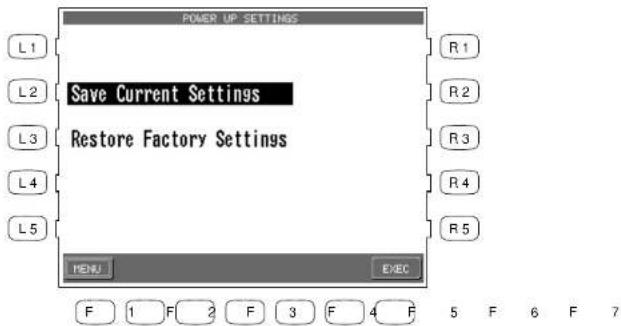
F1 Takes you to the System menu.
F7 Applies the selected settings.
Soft Reset
The Soft Reset function allows you to return all of the User Settings back to the original Factory Settings. You can instantly reset all of the user settings or only the ones you want to Reset at the touch of a button.
To perform a Soft Reset:
1) Press SOFT RESET button (R2) on Page two in the System menu. The Soft Reset screen will be displayed.
2) Use the L and R buttons to choose type of data you want to reset.
3) Press EXEC button (F7).
4) Press YES (F7) to proceed, or NO (F1) to back out.
L1 Selects Regist Groups.
L2 Selects Conductor.
L3 Selects Sound Settings.
L4 Selects Concert Magic.
L5 Selects System Settings.

F1 Takes you to the System menu without resetting data.
F7 Proceeds with the Reset.
Software Version
This function is used to show what system software version is currently installed in the CP.
To show the software version:
1) Press the Software Version button (R3) on page two in the System menu.
2) The software version will appear in the LCD screen.

F1 Takes you to the System menu.
Display Control
This function controls the background screen design, brightness and Screen Hold of the display.
Screen Hold
Most of the on-screen menus that you work with on the Concert Performer will remain displayed until you select something or press a particular button. However, some screens may be displayed only temporarily, switching back to a main screen if you allow the CP to sit idle without pressing any buttons. You can adjust a time setting for how long these screens stay displayed before switching, or even choose to have them hold without switching.
This adjustable time function is effective with the following menus:
- Sound Select menu
- Style Select menu
- Solo Settings menu called up by holding down the PORTAMENTO button.
- Effect Settings menu called up holding down the EFFECT button.
- Chorus Settings menu called up by holding down the CHORUS button.
- Harmony Settings menu called up by holding down the HARMONY button.
1) Press the DISPLAY CONTROL button on the panel.
2) Use the L and R buttons and the Dial to change the settings.
L1-L3 TSelects the background screen design.
L4 Adjusts the brightness of the screen (0-9).

R1-R3 Selects the background screen design.
R4 Turns the Screen Hold On and Off.
R5 Adjusts the time before switching when the Screen Hold is Off (5-20 seconds).
Mic Harmony and Effect
The Concert Performer has a microphone input jack. You can plug in a microphone and sing while playing on the CP. You can also "mic" other instruments or plug other electric instruments into the microphone input. The Mic Harmony and Effect buttons add various harmonies and effects to your mic input.
Mic Harmony
This function adds many types of harmony to your mic input coming into the microphone input of the CP.
Type of Harmony
Vocorder Trio (Sub) Octave Duet (Sub)
Gender Male to Female Trio Mix (Sub) Octave Duet Up (Sub)
Gender Female to Male Duet Octave Up
Quartet Duet Spread Octave Down
Quartet Mix Duet Close Octave Up (Sub)
Quartet with Bass Duet Up Octave Down (Sub)
Jazzy Quartet Duet (Sub) 2 Octaves Down
Jazzy Qurtet Mix Duet Spread (Sub) 2 Octaves Down (Sub)
Chorale
Duet Close (Sub)
Double
Trio
Duet Up (Sub)
Stereo Double
Trio Mix
Octave Duet Double (Sub)
Trio Up
Octave Duet Up
Lead Substitution
To add Mic Harmony:
1) Press the MIC HARMONY button. The button's indicator light will show that it has been activated.
2) If you wish to change the Harmony type, hold down the MIC HARMONY button for a moment until the Mic Harmony types are listed in the LCD display.
3) Use the L and R buttons to choose Harmony type. If you want to edit the settings, press EDIT (F7) button. Use the L buttons and the Dial to change the settings.
4) Use the F1-F4 buttons to list more Harmony types on the other pages.

Use the L and R buttons to choose a Harmony type.
F1-F4 Searches for a Harmony type on the other pages. F7 Enters the detailed settings.
L2 Adjusts the Harmony level.
L3 Selects the source of chord recognition if the Vocoder harmony is selected.

F1 Back to Mic Harmony menu.
About Mic Harmonies
Many of the microphone harmonies rely upon chord information generated by the Auto-Accompaniment style system. For these harmonies to operate, the ACC button music be ON. Other harmonies do not rely on the Auto-Accompaniment system for chordal information. These harmonies will operate whether or not the ACC is ON.
Non-Chordal Harmonies
These harmonies do not rely on chordal information from the ACC system. They include the Vocoder, Gender, Octave, Double, and Lead Substitution harmonies. In the case of the Vocoder, the harmonies created are taken from the notes actually played on the keyboard, or the notes actually found in a chosen sequencer track.
Use the EDIT button to choose the KEYBOARD or SEQUENCER TRACK to use as the harmony source.
The Gender Male to Female and Gender Female to Male harmonies actually change the pitch and quality of your voice as indicated by the harmony names. The various Octave harmonies add a voice up or down as indicated by the harmony names.
The Double harmonies add a recording studio quality effect to your voice to make it thicker and smoother sounding. The effect is similar to the “double-tracking” vocal technique performed in professional recordings. The Lead Substitution harmony replaces your voice with one that has been pitch-corrected.
Chordal Harmonies
All other harmonies rely on chordal information from the Auto-Accompaniment system to operate. If the ACC button is ON, then you will hear harmony based upon the note that you are singing, chord you are playing and the harmony that is chosen. The active chord will be indicated in the upper left-hand portion of the display. You can play chords in the Single Finger, Fingered, or Whole Kybd Modes of the ACCOMPANIMENT system.
Duet Harmonies create one harmony note in addition to the lead note. Trio harmonies create two harmony notes in addition to the lead note. Quartet harmonies create three harmony notes in addition to the lead note. Octave Duet harmonies create one harmony note and one octave note in addition to the lead note.
The lead note will be your own voice, unless the harmony name contains the word (Sub). In this case, your voice will be substituted with one that is pitch-corrected.
Note:
If you have chosen a chordal harmony but do not turn on the ACC ON/OFF button, the instrument will substitute the Vocoder harmony. Once you turn on the ACC ON/OFF button, the harmony will switch to the one you have actually chosen.
Tips and Suggestions
Don't be afraid to experiment with different harmony types. After a little trial and error, you will begin to learn which harmony type will be most appropriate for a particular musical setting. The Harmony names will help you find the appropriate harmony type. For a fuller harmony effect, choose one of the Quartet harmonies.
For lighter harmonies, choose a Trio or Duet harmony. Words such as "Mix", "Up", and "Spread" will give you further clues to the function and sound of the harmony.
Make sure to adjust both your mic input volume (found beside the Mic Input Jack) and the Mic Level parameter in the Mic Effects menu. Also, adjust the Harmony Level (found by pressing the EDIT button in the Harmony Type screen) for the best results.
All Mic Harmony and Effects settings are saved in a Registration. This makes recalling any Mic Harmony and Effects quick and easy.
Mic Effect
There are six different Mic Effects available to enhance the audio signal (Voice or instrument sound) coming from the microphone jack. All effects, except the Echo/Vibrato, operate independently of one another. The Mic Effect function is separate from the Effects assigned to the keyboard Parts. Therefore, you can use different effects on the keyboard sounds and on Vocal/instrument sounds from the microphone.
Type of Effect
Equalizer
The equalizer allows you to adjust the tonal Character of the Mic input (voice, instrument, etc) by raising or lowering the volume level of the High, Mid and Low frequencies separately. Raising the Values increases the level of the frequency. Lowering the values reduces the level of the frequency.
Gate
This effect mutes the signal from the Mic input (Voice, Instrument, etc) when the input level (volume) falls below a specified setting. This is useful for cutting out softer, extraneous background noise (cars, air conditioners, etc) while still allowing the desired, louder signal (Vocal, instrument etc.) to be heard. This can be very useful for recording to the CD-R in a noisy room.
Higher Gate settings cut out more background noise. 0 - All sounds are heard. 100 - Almost no sound is heard.
Compressor
This effect reduces the volume of very loud input levels above the specified threshold. Reducing the loud input levels can enhance soft signal levels that are weak and helps to smooth out the overall volume level of a performance.
Threshold - Determines how loud the input must be before it is compressed. Higher settings provide less compression. 0 - All input levels are compressed. 100 - No input level is compressed. Setting Threshold to 50 will compress only the louder input levels for more natural compression.
Ratio - Determines how much the input level will be compressed (reduced). Higher values produce more compression. Compression ratios between 1.6 and 5 are best for Vocals.
Note:
The suggestions given for the Gate and Compressor should be considered starting points. By experimenting you will find the settings that work best for you. Remember often times it is not necessary to use any Gating or Compression at all.
Echo
Adds delay or echoes to the sound.
Time - Determines the delay time between each echo. Higher values add longer delays.
Level - Determines the volume of the first echo. Each echo will become softer after that. Higher values create louder echoes.
Feedback - Determines how many echoes will be heard after the first echo. Higher settings produce more echoes.
Vibrato
Adds a controlled vibrato to the sound.
Rate - Determines how fast the vibrato will be. Higher values produce faster vibrato.
Depth - Determines how strong the vibrato effect will be. Higher values produce deeper vibrato.
Note:
Echo and Vibrato cannot be used together.
Reverb
Adds reverberation to the sound simulating the ambience of a stage or concert hall. Reverb can be used along with the above effects. Higher settings add more Reverb.
Mic Effect Parameters
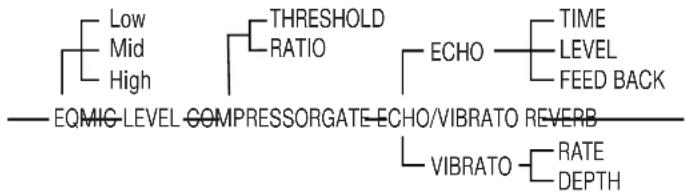
flowchart
graph TD
    A["Low"] --> B["Mid"]
    B --> C["High"]
    D["THRESHOLD RATIO"] --> E["ECHO"]
    F["TIME LEVEL FEED BACK"] --> G["TIME"]
    G --> H["LEVEL"]
    G --> I["FEED BACK"]
    J["EQMIG-LEVEL-COMPRESSORGATE-ECHO/VIBRATO REVERB"] --> K["VIBRATO"]
    L["RATE DEPTH"] --> M["RATE"]
    M --> N["DEPTH"]
To add Mic Effect:
L2 Adjusts the Mic level.
L3 Turns the EQ On and Off.
L4 Adjusts the Gate time.
1) Press the MIC EFFECT button. The button's indicator light will show that it has been activated. Any effect that is active in the Mic Effect menu will be turned on.
2) If you wish to change or edit the effect types, hold down the MIC EFFECT button for a moment until the Mic Effect menu is displayed.
3) Use the L and R buttons to highlight the Effect types. Use the DIAL to adjust the value of the highlighted effect.
4) If you want to edit the settings of a highlighted effect, press EDIT (F7) button. Use the L buttons and the Dial to change the settings.

F7 Edits the chosen Effect.

F1 Back to Mic Effect menu.
F2, F3 Selects Low Range.
F4, F5 Selects Mid Range.
F6, F7 Selects High Range
Floppy Disk Operations
The Concert Performer has a built-in 3.5" floppy disk drive that can read and write to double-density (720KB) or high-density (1.4MB) disks. These are the exact same disks that are used with your personal computer. You can use floppy disks to quickly and easily build up an extensive library of Concert Performer data that can be shared with other CP owners.
There are many companies who specialize in just making MIDI song files of popular and traditional tunes that can be purchase on floppy disk. In fact, these days almost any popular song that you can think of has probably been turned into a MIDI file by someone! Many publishers of piano lesson books now provide the music on floppy disk so the student may play along. This can greatly assist the learning process. Finally, there are numerous sites on the World Wide Web dedicated to the sharing and selling of MIDI music that can be downloaded and played on your Concert Performer instrument. For instructions on how to use one of these Song Disks on your CP, see "Playing Songs from a Floppy Disk" on page 102.
The CP comes with a special program called Style Converter on a floppy disk. This allows you to convert Styles that were made for a number of other manufacturers' machines, and use them as if they were designed for the CP. See the separate instructions that came with the Style Converter disk for additional information.
Disk Menu
The Disk menu is where you can work with various disk operations. There are six functions that you can choose from, including access to the Style Converter feature.
To work with a disk:

1) Press the DISK button. The Disk menu will be displayed.
2) Use the L and R buttons to select the preferred function.
L2 Loads data from a floppy disk.
L3 Saves data onto a floppy disk.
L4 Erases data from a floppy disk.

Saving Data to a Floppy Disk
This important function stores your custom data to disk so that you can retrieve it at a later time. You can save the following data:
Song Song data currently in the Recorder. You can save it as the CP's own unique format (Internal) or as Standard MIDI File format (SMF) or Stylist format (Internal format plus Registration setting).
User Style Each User Style or all 20 User Styles at once.
User Conductor Each User Conductor setting or all 40 User Conductor settings at once.
User Sound Each User Sound or all 20 User Sounds at once.
Regist Group Each Registration Group, containing 8 Registrations, or all 20 Registration Groups at once.
User Touch Two User Touch Curve settings.
User System EQ One User System EQ setting.
Temperament One User Temperament setting.
All Settings This allows you to save the current settings of all 8 of the above data types at once, as a single file.
To save your data:
1) In the Disk menu, select SAVE (L3). The Disk Save menu will be displayed.
2) Use the L and R buttons to select the type of data to save. Then the particular sub-menu for that data type will be displayed.

F1 Takes you to the Disk menu.
3) Use the appropriate L button, CURSOR buttons (F2, F3) and CHARACTER buttons (F4, F5) to give the data file a name.
When saving a Song, use the L3 button and the Dial to select whether the song data file will be in the INTERNAL (CP's unique) format, or SMF (Standard MIDI File) format or Stylist format.
- The data saved in Stylist format can be called up only in Song Stylist mode.
- When you select SMF format, data in the style track will be automatically pasted to tracks 9-16. This will erase any existing data on tracks 9-16.
4) Make sure that a formatted floppy disk is in the drive. Then press the SAVE button (F6, F7) to save the selected data to the disk.
Example: Saving a Style
L3 Selects which file you would like to save, or if all files are to be save as a single "all" file.
L4 Names the data file.

F1 Takes you to the previous menu.
F2. F3 Moves the cursor over the characters in the name.
F4, F5 Selects a character to use in the name.
F7 Saves the data file to floppy disk.
Example: Saving a Song
L2 Names the data file.
L3 Selects which format the data should be saved as.

Loading Data from a Floppy Disk
This function allows you to retrieve the stored data from disk.
Song One Song can be loaded into the Recorder from disk.
User Style Up to 20 Styles can be loaded from disk. This number varies depending on the size of the data contained in the Styles.
User Conductor Up to 40 User Conductor setups can be loaded from disk.
User Sound Up to 20 User Sounds can be loaded from disk.
Regist Group Up to 20 Groups, containing 8 Registrations each, can be loaded from disk.
User Touch Two User Touch Curves can be loaded from disk.
User System EQ One User System EQ can be loaded from disk.
Temperament One User Temperament can be loaded from disk.
All Settings Loads the "All Settings" file on disk.
To load the data from a disk:
1) In the Disk menu, press LOAD (L2). The Disk Load menu will be displayed.
2) Insert your floppy disk into the drive.
3) Use the L and R buttons to select the type of data to load. Then a sub-menu will be displayed that lists all available files of that type.

F1 Takes you to the disk menu.
4) When loading User Style, User Conductor, User Sound or Registration data, you can choose whether to load data that was stored individually or to load all the data that was saved as an "All" file. Press ALL (F4) to load data that was saved as an "All" file. Press EACH (F5) if data files were saved individually.
5) Use the L and R buttons to select the data to load. Use the PAGE (F1, F2) buttons to display more data, if available.
6) Press the EXEC (F7) button to proceed. The screen will display the destination where the data will be loaded.
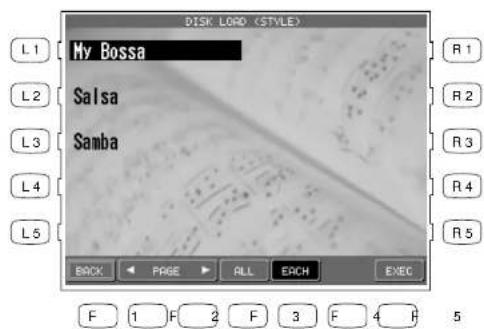
Erasing Data from a Floppy Disk
This lets you erase unnecessary data from the floppy disk. You can erase Song, User Style, User Conductor, User Sound, Registrations, User Temperament and ALL.To erase the data from a disk:
1) In the Disk menu press DELETE (L4). The Disk Delete menu will be displayed. 2) Insert the floppy disk into the drive. 3) Use the L and R buttons to select the type of data to erase. A sub-menu of file names will be displayed. 4) When you erase User Style, User conductor, User Sound or Registration, determine whether you are going to erase individual data files by pressing EACH (F5) or the "All" data file by pressing ALL (F4). 5) Press EXEC (F7) to erase the selected data from the disk. Or press BACK (F1) to cancel erasing and go back to the previous menu.  Use the L and R buttons to select the data. F1 Takes you to the previous menu. F2, F3 Displays more selections. F4 Displays the "All" data file if present. F5 Displays individual files. F7 Proceeds to the next screen.Formatting a Floppy Disk
Before a floppy disk can be used to save data for the first time, it will need to be formatted. This simply means that the disk must be "prepared" to hold data. The Concert Performer can read and write to MS-DOS formatted disks. You can purchase preformatted floppy disks from any computer or office supply store. Floppy disks may also be formatted on a PC computer, or the CP can format them itself. There are two types of 3.5" floppy disk in the market, 2DD (which can hold 720KB of data) or 2HD (which can hold 1,440KB or 1.44MB of data). Both can be used in the exact same fashion with the Concert Performer. \- You can always re-format a disk at any time. Keep in mind, though, that every time you format a disk, all data that is currently on it will be erased. Re-formatting is a good way to completely erase a disk that might have been used previously on a computer, since there may be all sorts of irrelevant data files left on it otherwise.To format a disk:
1) In the Disk menu, press FORMAT (R2). The Disk Format menu will be displayed. 2) Insert the floppy disk into the drive. 3) Use the L2 or L3 buttons to select the size of disk you are using, 2HD or 2DD. 4) Press EXEC (F7) to proceed. The screen prompts you for confirmation. 5) Press YES (F7) again to start formatting. Or press NO (F1) to cancel formatting and go back to the previous menu. \- It takes about a minute to format a floppy disk. Once the formatting is complete, the LCD screen returns to the Disk menu automatically. L2 Formats a 2HD disk. L3 Formats a 2DD disk.  F1 Cancels formatting and takes you to the Disk menu. F7 Starts formatting the disk.CD-R Operations (CP205 only)
With the Concert Performer's built-in CD-R drive, you can record your performances to CD-R and CD-RW discs. You can record a "live" keyboard performance, a pre-recorded song from the Recorder, or both. Even your live vocal performance can be recorded to CD. Your finished CD can be played in any audio CD player. The Concert Performer can also playback CD-R and CD-RW discs, along with any regular audio CD, including commercial CD's. 1) Insert a blank CD-R or CD-RW into the CD-R drive and press the CD button on the panel. 2) The LCD screen shows the CD menu. 3) Use the L and R buttons to select your desired function. - When you insert a blank CD into the drive, only the Record option will be available in the menu. Unavailable options will be shown in gray. After your first recording, all options will be available. - When a Closed (finalized) audio CD is in the CD drive, pressing the CD button will automatically jump to the CD Play menu in the LCD screen. You can return to the CD menu by pressing the MENU button. L2 Shows CD Play screen. L3 Shows CD Record screen.  R2 Shows Close CD screen. R3 Plays the CD only from the headphone jack on the CD drive unit.Playing an audio CD
The operation of the Concert Performer's CD is similar to a regular CD player. 1) Insert an audio CD in the CD drive and press the CD button on the panel. If the CD is closed (finalized), then the LCD screen will jump to the CD Play screen. If the CD is open (not finalized), then press the Play (L2) button in the menu to go to the Play screen. 2) Press the F3 button to start the CD. 3) Use the L, R and F buttons to select the various CD songs and functions. Use the Dial to change the value. L1 Turns the Repeat mode On and Off. L2 Selects the track number. L3 Adjusts the CD volume.  R1 Selects the Play mode. All = Plays all tracks. Select = Plays the selected track only. Random = Plays all tracks at random. Program = Plays the tracks in programmed order. R3 Shows the Play Time. F1 Returns to the CD menu. F2 Stops the CD. F3 Plays the CD. F4 Returns to the beginning of the playing track or goes back to the previous track. F5 Rewinds the CD. F6 Forwards the CD. F7 Skips to the next track. \- Some of the copy protected CD's may not play in the CD drive of the Concert Performer. To program the playing order: 1) Press the R1 button in the menu and use the Dial to change the play mode to Program. 2) Press the L2 button and use the Dial to select the first playing track. 3) Press the F7 button to move the cursor to the next position and use the Dial to select the second track. 4) Repeat step #3 to program up to ten tracks. Use the F7 button and the Dial to program. Recording onto a CD
You can record any performance on the Concert Performer directly onto a CD-R or CD-RW disc. Your performance can be "live" playing with or without auto-accompaniment styles. It can also be a previously recorded song playing from the Easy or Advanced Recorder, and even a voice or instrument from the Mic input. Any, and all, of these performances can be recorded onto the CD. You must record vocals, or any instrument using the Mic Input, directly to the CD. (The Easy/Advanced Recorder cannot record from the Mic Input) Multiple songs (tracks) can be recorded onto CD, up to the full time capacity of the disc. Once a song is recorded to CD, the Concert Performer cannot erase it. 1) Insert a blank or open CD in the CD drive and press the Record button (R3) in the CD menu. The CD Record screen will be displayed in the LCD screen. 2) The Concert Performer will check the CD and automatically set the recording track number. 3) Press the REC button (F3). The CD is ready to start recording. 4) If you start an Accompaniment Style, or start the Recorder, the CD recording will automatically start. 5) You can manually start the recording by pressing the PLAY button (F5) in the screen. L1 Shows the recording track number. L2 Adjusts the volume for the Style. L3 Adjusts the Tempo. L4 Adjusts the volume for the LEFT Part.  R1 Shows the remaining time available for recording. R2 Adjusts the volume for the SOLO Part. R3 Adjusts the volume for the RIGHT 1 Part. R4 Adjusts the volume for the RIGHT 2 Part. F1 Takes you to the CD menu. F2 CD Record button (Record Ready) F4 Stops the recording F5 Starts the CD recording.Recording Tips and Suggestions
- Anyone can have fun making CD recordings and sharing them with family and friends. You do not have to be a professional musician to record your own CD. If you are not a great player, you can first record your song using the Concert Performer's Easy Recorder. You can record the song slowly and speed it up later. You can even re-record it if you make a mistake. Advanced users can edit mistakes and add extra tracks in the Advanced Recorder. When your song is perfect, set the CD to Record and press Play on the Recorder. Your perfected performance will be recorded to the CD. - If you want to begin your CD recording with live playing or vocals, you will need to press the PLAY button (F5) to manually start the recording. (See steps #4 and #5 above). If you want to begin with a Style or Recording, press the Play or Start button in the corresponding areas of the panel. - Vocals can be sung along with the Easy/Advanced Recorded songs and/or live keyboard performances while recording onto the CD. In other words, you can play up to a 16-part sequence (from the Easy/ Advanced Recorder), play along with the sequence on the keyboard, and sing into the microphone at the same time. All of this will be recorded to the CD. - The Style Start/Stop and Recorder Play/Stop functions are independent from the CD Record Start/Stop functions. You can start and stop Styles and Recordings while continuing to record to CD. - While recording to CD, the panel of the Concert Performers operates normally. You can add and change sounds, balance the volumes, and change accompaniment styles during your CD recording. Highlight a Part or Style field with the L and R buttons, then turn the Dial to change the volume. Press any SOUND category button to change the sound for a highlighted part. Press any STYLE category button to change the Style. - You can also change Registrations while recording to CD. This is a quick and easy way to make lots of changes to sounds and styles while recording to CD. - Advanced Users with computer sequencers can even record an external sequence into the CD using the Concert Performer's internal sounds. - It may take a few experimental recordings to get volumes mixes and settings perfected for a good result. This is especially true if you plan to sing and play or play "live" along with the Easy/Advanced Recorder.Closing (Finalizing) Your CD
To listen to your recorded CD in a regular (audio) CD player, you must first Close (finalize) the CD. Until you close the CD, you can listen to it only with the CD drive on the Concert Performer. Once you close the CD, you cannot record on it any more. 1) Press the Close CD button (R2) in the CD menu. 2) Press the EXEC button (F7) to close the CD. Press the MENU button (F1) to cancel and go back to the CD menu.  F1 Cancels and goes back to the CD menu. F7 Closes the CD-RTips and Suggestions
- A Closed CD can be played on any audio CD player, including car stereo and personal computers. You can give your CD to friends, family, or anyone. - If you have a personal computer with the appropriate CD drive and software, you can save your CD recordings to computer. You can then make duplicate CD copies to send to others, deleting any bad tracks (songs), or mixing and matching songs from other CD's that you've recorded. - The Concert Performer's CD drive records and plays audio CD's only. You cannot play or record other forms of CD's, including CD-ROM's and data CD's. - A song recorded on a CD-RW disc can be erased by a personal computer with the appropriate CD drive and software, or by a stand-alone CD-RW recorder/player.Getting Assistance: Using Help and Demo
The first time you sit at the Concert Performer, you may feel overwhelmed by the wealth of features and options that it offers. You will find, though, that if you keep this Owner's Manual handy you can learn to use the different functions as you need them, at your own pace. And, there is certainly nothing wrong with only using a few basic features, and thoroughly enjoying them. After all, the Concert Performer is first and foremost a musical instrument, and its whole purpose is to provide you with the tools for musical expression and fun no matter your skill level. There are times when you might not have the Owner's Manual at your side, and you need an explanation of a button or feature. Fortunately, there are built-in Help guides to give you a hand. The Help function provides a basic introduction and overview of most of the features found in the CP. There are also many built-in Demostration songs that really show of the musical potential of the Concert Performer. These songs were composed by some of the top musicians in the music industry, and will undoubtedly impress and inspire you.Using the Help
To get Help, simply press the HELP button to the left of the display. The display will show an explanation on the function or feature that you are presently working on. Help is available at any time, except when the CP is busy recording your performance or accessing a floppy disk.To use the Help:
1) Press the HELP button. The Help text will be displayed in the LCD screen. 2) If the text is not what you are looking for, press the INDEX (F1) button to list the HELP topics. Use the F1 and F2 buttons to list more topics on the other pages. 3) Use the appropriate L or R button to select the topic, and the text will be displayed. 4) Use the F3 or F4 button to change the language. English, German, French, and Spanish are available. 5) To leave Help, press the EXIT button.   Use the L and R buttons to select a Help topic. F1, F2 Searches for more Help topics on the other pages.   F1 Takes you to the Help menu. F3, F4 Selects the language.Using the Demonstrations
There are five types of Demonstrations programmed in the CP piano.Main Demo
An exciting and entertaining long song that shows off the CP's musical potential as a whole.Function Demos
Songs, Text, and Graphics that help explain the most important features and functions of the Concert Performer.Sound Category Demos
Each Sound category has a song, or songs, that demonstrate the sound choices and capabilities found in the category.Style Category Demos
Each Style category has a song, or songs, that demonstrate how the Auto-Accompaniment Styles can be used.Piano Music
The initial DEMO menu screen will play Classical and Contemporary piano music as long as you remain in that screen. The songs are randomly selected from the Piano Music feature.To listen to a Main/Sound/Style Demo:
 1) Press the DEMO button. The Demonstration menu will be displayed. 2) Select your preferred Demo piece by either, pressing the Main Demo Song button (F2, F3) to select the Main Demo, or pressing any of the SOUND category buttons to select a Sound Demo, or pressing any of the STYLE category buttons to select a Style Demo. Sound or Style categories may have more than one demo songs played in sequence. Press the Sound or Style button repeatedly to skip to the next demo song. 3) To exit, press the EXIT, PLAY/STOP or the DEMO button.  F2, F3 Plays the Main Demo. F5, F6 Enters the Function Demo menu.  The SOUND category buttons are used to select the demo for that sound category.  The STYLE category buttons are used to select the demo for that Style category. \- When a selected Demo song ends, another song of the same type will be randomly chosen from another category and played. You can select another demo song at any time by pressing the appropriate button. To listen to a Function Demo: 1) Press the DEMO button. The Demonstration menu will be displayed. 2) Enter the Function Demo menu by pressing the Function Demo button (F4 or F5). 3) Use the L and R buttons to select the topic you want to see. The selected topic's text and graphics are displayed in the LCD screen. 4) To exit, press the EXIT, PLAY/STOP or the DEMO button.  Use the L and R buttons to select the topic you like to see. F2. F3 Plays the Main Demo.  5 F 6 F 7Playing Piano Music
The Concert Performer has over five hours of prerecorded Piano Music available for your listening pleasure. The Piano Music is divided into three sections: Classical, Contemporary, and Holiday music. You can listen to all selections in a category, or you can program a list of your favorite ten selections from each category.To listen to the Piano Music:
1) Press the PIANO MUSIC button. The Piano Music menu will be displayed. 2) Select your preferred category, CLASSICAL (F1, F2), CONTEMPORARY (F3, F4) or HOLIDAY (F5, F6).  F1, F2 Selects the Classical category. F3, F4 Selects the Contemporary category F5, F6 Selects the Holiday category. 3) Use the L and R buttons to select the song you like to listen. 4) Use the F1 and F2 buttons to search more songs on the other pages. 5) Press the PLAY button (F7) to start the song. When the song is finished, another song from that will be played at random. Songs from the category will continue to play randomly until you exit the screen. 6) Press the F7 button to pause the song. Press the F5 and F6 buttons to return to category's song list. 7) To exit, press the EXIT, PLAY/STOP, or PIANO MUSIC button.  Use the L and R buttons to select the song you like to listen. F1, F2 Searches more songs on the other pages. F3, F4 Takes you to the category selection menu. F5, F6 Enters the Favorites menu. F7 Plays the selected song.   F5.F6 Displays the song list. F7 Pauses the playback.Making your Favorites list
You can make your Favorites list for each Piano Music category. Ten songs can be programmed in the order of playback.NOTE:
You cannot select between songs in different categories. To make your Favorites list: 1) Select one of the three Piano Music categories. Press the FAVORITES button (F5 or F6) in the Category song screen. A default list is displayed in the LCD screen. 2) Use the L and R buttons to highlight one of the ten locations. Use the Dial or the SELECT SONG buttons (F2, F3) to select a new song for that location. 3) Repeat step #2 to program your ten favorite songs in any order you wish. 4) Press the SAVE button (F1) to save the edited list.  F1 Saves the edited list. F2, F3 Selects a song. F5. F6 Goes back to the song list in the selected category. F7 Plays the song. Use the L and R buttons to select a location to edit.Appendices
Preset Sounds
PIANO
PAGE 1 PAGE 2 PAGE 3 PAGE 4 PAGE 5
Concert Grand Mellow Grand Jazz Grand New Age Piano Piano & Vibes Studio Grand Rock Grand Crystal EP New Age Piano 2 Piano & Guitar 2 Modern Piano Hony Tonk Piano & Guitar New Age Piano 3 Piano & Organ 3 Electric Grand Electric Grand 2 Mono Grand New Age EP EP Dolce Piano Octaves Piano Octaves 2 Wide Honky Tonk New Age EP 2 Toy Piano Classic EP Classic EP 2 Piano & EP New Age EP 3 Modern EP Classic EP 3 Piano & EP 2 Modern EP 2 Modern EP 3 Piano & EP 3 60's EP EP Legend Piano & Organ Tremolo EP EP Phase Piano & Organ 2FEATURE
PAGE 1 PAGE 2 PAGE 3 PAGE 4 PAGE 5 PAGE 6
| Plunger Trumpet | Lead Trumpet | Lead Flugel Horn | Exp Guitar 2 | Flugel & Tenor | Cello Up Bow |
| Trumpet Shake | Harmon Mute Tpt | Exp Trumpet | Ballad Guitar | Mute Tpt & Bone | Cello Down Bow |
| Lead Trombone | Ballad Trumpet | Closed Mute Tpt | Pick Nylon Gtr | Flugel & Mute Tpt | Violin Upbow |
| Exp Guitar | Exp Trombone | Plunger Trombone | Finger Nylon Gtr | Soft Tpt & Bone | Violin Downbow |
| Exp Nylon Guitar | Ballad Trombone | Closed Mute Bone | Ac Gtr Harmonics | Medium Tpt & Alto | Exp Brass |
| Exp Flute | Lead Soprano | Ballad Flute | Classical Violin | Soft Tenor & Alto | Exp Saxes |
| Soft Alto | Exp Alto | Flute Overblow | Dolce Violin | Med Tenor & Alto | |
| Ballad Tenor | Exp Tenor | Flute Flutter | Classical Cello | Lead Tenor & Alto | |
| Passionate Violin | Breathy Tenor | Lead Alto | Dolce Cello | Lead Bone & Tenor | |
| Passionate Cello | Growl Tenor | Quartet | Tpt & Bone & Tenor |
VOCAL
PAGE1| Jazz Ensemble | 40's Auto | 40's Dah Bah | Male Aah | 50's Shoo | 40's Doo |
| Female Scat | 50's Auto | 40's Doo Dah | Male Ooh | 50's Bee | 40's Dah |
| 50's Ensemble | Jazz Doo Dao | Slow Choir | Male/Female Aah | 50's Doo | 40's Bee |
| 50's Females | Jazz Doo Bop | Choir & String | Male/Female Ooh | 50's Hey | 40's Bah |
| Jazz Auto | Jazz Bah Bop | Ooh | 60's Ooh | 50's La | 40's Shoo |
| 60's Ensemble | Contemp Males | Bass Vocal | Pop Ooh | 50's Ooh | Choir Aahs 2 |
| 60's Ensemble 2 | 60's Ooh Wah | Choir Aahs | Pop Aah | 50's Aah | Choir Aahs 3 |
| Pop Ensemble | 50's Doo Wop | Breathy Choir | Pop Wah | Female Doo | Choir Aahs Sfz |
| Pop Ensemble 2 | 50's Ooh Aah | Voice Oohs | 60's Wah | Female Dao | Voice |
| Contemp Ensemble | 40's Doo Bee | Humming | 60's Bop | Female Duya | Choir |
DRAWBAR
PAGE 1 PAGE 2 PAGE 3 PAGE 4
Be 3 Be More Drawbar Bass Jazz Organ Jazzer Be Nice 16' Drawbar Jazz Organ 2 Hi-Lo Odd Man 8' Drawbar Rock Organ Full Organ Screamin' 5 1/3' Drawbar Mellow Drawbar Percussive Organ Percussive Organ 2 4' percussion 2 2/3' percussion Hollow Drawbar 2 Percussive Organ 3 Drawbar 3 Soft Solo 1 1/3' Drawbar Key Click Pedal Percussion 4' Drawbar Pedal Percussion 2 2 2/3' Drawbar 2' Drawbar 1 3/5' Drawbar 1' DrawbarORGAN
PAGE 1 PAGE 2 PAGE 3 PAGE 4 PAGE 5 PAGE 6
Full Pipes Small Ensemble 8' Celeste Church Organ Church Organ 2 Electronic Organ Mixer Theater Organ Theater Organ 2 Reeds Baroque Mix 8' Diapason Church Organ 3 Puff Organ Electronic Organ 2 60's Organ Reed Organ Theater Organ 3 Theater Organ 4 8' Diapason 2 8' Reed 8' Flute Celeste 8' Flute Chiff 2 2/3' Flute Chiff 8' Flute 8' & 2' Flute 4' & 2' Flute 2 2/3' Flute 1 3/5' Flute 8' Diapason 3 Stopped Pipe Principal Pipe Princial Choir 8' & 4' Diapason Small Ensemble 2 Reed Pipes Posaune Bass Pipe Bass Pipe 2 Cornopean Pipe Ensemble Resultant Contra Gambe Kinura Post Horn Vox Celeste 8 Chiffy Tibia Full Pipes 2 Baroque Pump Organ Pedal Mixer Pedal Pedal 2 Pedal 3 Pedal 4 Theater Organ 5 Theatre Full Theatre Tibia Theatre VoxSTRING
PAGE 1 PAGE 2 PAGE 3 PAGE 4 PAGE 5
Beautiful Strings String Ensemble String Ensemble 2 Synth Strings Synth Strings 2 Passionate Violin Passionate Cello Full Orchestra Small String Ens Harp String Quartet Strings & Brass Warm Strings Synth Strings 3 60's Strings Violin Viola Cello Contrabass Pizzicato Violin Ensemble Cello Ensemble String Bass Ens Mono Strings Octave Strings Strings & Bell Strings & Piano Strings & Piano 2 Slow Cello Synth String Orch Harp Sweep Up Harp Sweep Down Harp Cascade Up Harp Cascade Down String & Harp Slow Violin Tremolo Strings String Quartet 2 Orchestra Hit Warm Strings 2 Warm Strings 3 Strings Sustaining Strings SforzandoWOODWIND
PAGE 1 PAGE 2 PAGE 3 PAGE 4 PAGE 5 PAGE 6
Ballad Tenor Alto Sax Flute & Mute Tpt Classic Alto Sax Recorder 2 Pan Flute Exp Alto Tenor Sax Flute & Strings Alto Sax 2 Oboe & Bassoon Slow Pan Flute Baritone Sax Soft Alto Sax Octave Saxes Alto Sax Bend Soprano Sax Soft Tenor sax Big Band Winds 2 Tenor Sax 2 Big Band Winds Breathy Tenor Sax Orchestral Flute Tenor Sax 3 Exp Flute Jazz Flute Orch Clarinet Piccolo Flute Jazz Clarinet Orchestral Winds 2 Clarinet 2 Clarinet Recorder Reeds Ensemble Bass Clarinet Oboe English Horn Reeds Ensemble 2 Oboe 2 Orchestral Winds Bassoon Sax Section Bassoon 2 Bassoon & Euphonium Pan Flute 2 Clarinet & Bassoon Recorder 3 Jazz Clarinet 2 Piccolo 2 Flute & Clarinet Clarinet 3 Oboe & Clarinet Flute Key ClickBRASS
PAGE 1 PAGE 2 PAGE 3 PAGE 4 PAGE 5
Trumpet Shake Flugel Horn Bright Solo Tpt Cornet Brass Section 3 Lead Trombone Muted Trumpet 2 Trumpet Ensemble Classic Trumpet Brass Section 4 Solo Trumpet Cup Mute Trombone Trumpet & Alto Dixieland Trumpet Synth Brass 3 Muted Trumpet Bright Trombone Trombone & Tenor Trumpet 2 Synth Brass 4 Cup Mute Trumpet Trombone 2 Brass & Sax Sentimental Bone Trombone & Tpt French Horns Warm French Horn Brass Pad Euphonium Trombone & Tpt 2 Tuba Jump Brass Mute Brass Ens Sousaphone Wide Horn Section Trumpet Brass Section 2 Brass & Synth Tuba 2 Trombone Synth Brass Brass & Synth 2 Brass Section Synth Brass 2 French Horn & StrgHARPSI & Mallet
PAGE 1 PAGE 2 PAGE 3 PAGE 4
Harpsichord Harpsichord Octave Soft Marimba Harpsi & Strings Clavi Synth Clavi Wide Marimba Harpsi & Strings 2 Celeste Glockenspiel Wide Vibraphone Harpsi & Pipes Hand Bells Carillon Harpsichord 2 Harpsi & Pipes 2 Church Bells Tubular Bells Wide Harpsichord Bells Steel Drums Rolling Steel Drum Muted Handbells Bell Lyra Vibraphone Rolling Vibes Vibes & Guitar Hand Bells 2 Marimba Rolling Marimba Octave Vibes Music Box 2 Xylophone Synth Mallet Steel Drums 2 Music Box Hard MarimbaGUITAR
PAGE 1 PAGE 2 PAGE 3 PAGE 4 PAGE 5
Exp Guitar Nylon Acoustic 3 Mellow Steel Strg Spanish Guitar Electric Guitar 4 Exp Nylon Guitar Steel String 2 Lazz Guitar 2 Folk Guitar Electric Guitar 5 Nylon Acoustic 12 String Nylon Electric Folk Guitar 2 Delayed Elec Gtr Nylon Acoustic 2 Electric Guitar 2 Guitar & Strings Delayed Folk Gtr Steel Guitar Electric Guitar 3 Guitar Pad Pedal Steel 2 Pedal Steel Hawaiian Guitar Guitar Feedback Delay Pedal Steel Country Lead Rhythm Guitar Dynamic Overdrive Jazz Guitar 3 Jazz Guitar Ukulele Dist Feedback Muted Guitar 2 Electric Guitar Cutting Guitar Dist Rhythm Muted Electric Elec Gtr Harmonics Gtr Fret Noise Distortion Gtr Cutting NoiseBASS
PAGE 1 PAGE 2 PAGE 3| Acoustic Bass | Acoustic Bass 2 | Octave Fretless |
| Electric Bass | Finger Slap Bass | Poly Synth Bass |
| Finger Bass | Warm Synth Bass | Clavi Bass 2 |
| Pick Bass | Clavi Bass | Electric Bass 2 |
| Fretless Bass | Hammer Bass | Finger Bass 2 |
| Ac Bass & Ride Elec | Bass & Ride | Ac Bass & Piano |
| Slap Bass | Slap Bass 2 | Elec Bass & Piano |
| Synth Bass Synth Bass 3 | Acoustic Bass 3 | |
| Synth Bass 2 | Synth Bass 4 | Acoustic Bass 4 |
| Attack Bass | Rubber Bass | Ac Bass Slap |
PAD & SYNTH
PAGE 1 PAGE 2 PAGE 3 PAGE 4 PAGE 5 PAGE 6| Itopia | Bowed | Classic Synth | Classic Synth 3 | Multi Sweep | Echoes |
| Warm Pad | Metallic | Classic Synth 2 | Fifth | Warm Sweep | Sci-Fi |
| Brightness | Soundtrack | Square | Square 2 | Bowed 2 | Goblin |
| Atmosphere | Analog Voice | Sine | Sequenced Analog | Saw Pad | Echo Pan |
| New Age | Halo 2 | Chiff | Charang | Analog Brass 3 | New Age 3 |
| Sweep | Bright Warm Pad | Bass & Lead | Lead | Big Saw | New Age 4 |
| Polysynth | Metallic Pad 2 | Wire Lead | Soft Wire Lead | Octave Saw | Saw Comp |
| Sine Pad | Polysynth 2 | Crystal | Echo Bell | Clean Square | Square Comp |
| Halo | New Age 2 | Rain Pad | Caliope | Square Lead | Saw Comp 2 |
| Synth Vocal | Brightness 2 | Analog Brass | Analog Brass 2 | Square Pad | Chiff Comp |
SPECIALTY
PAGE 1 PAGE 2 PAGE 3 PAGE 4 PAGE 5 PAGE 6
Strumming Ac Gtr Picking Elec Gtr Accordion Shakuhachi Bag Pipe Kokyu Strumming Ac Gtr 2 Pick/Strum Gtr French Accordion Sitar Balalaika Sho Picking Ac Gtr Picking Ac Gtr 2 Mandolin Banjo Picking Banjo Harmonica Fiddle Strumming Elec Gtr Pick/Strum Gtr 2 Strumming Mandolin Strumming Banjo Blues Harmonica Wah Harmonica Wah Harmonica 2 Dulcimer Slow Fiddle Tango Accordion French Accordion 2 Accordion 2 Celtic Harp Mellow Mandolin Hammer Dulcimer Banjo 2 Whistle Blown Bottle Koto Kalimba Ocarina Shamisen Sitar 2 Shanai Taisho Koto Ryuteki Nokan Biwa Kenban Harmonica Mandolin 2 Celtic Harp 2 Cordovox Whistlers Hichiriki Atarigane Mokugyo Tsuzumi Ainote Euro Hit 6th Hit Bass Hit PlusDRUM
PAGE 1 PAGE 2 PAGE 3 PAGE 4 PAGE 5
Standard Kit Jazz Kit Brush kit Room Kit Power Kit Analog Kit Dance Kit Electric Kit Orchestra Kit Standard Kit 2 Marching Set Nogaku Set Taiko Drums Melodic Toms Concert Bass Drum Woodblock Agogo Tinkle Bell Castanet Reverse Cymbal Sleigh Bells Triangle Repeating Castanet Cym & Bass Drum Snare Roll Melodic Tom 2 Synth Drum Rhythm Box Tom Electric Drum Snare Roll 2 Timpani Rolling Timpani Soft Timpani Soft Timpani Roll Orch Cymbal & BD Finger Snap Hand Clap Metronome Conga Tambourine Bass Drum Talking Drum Slit Drum Room Tom Brush Tom Cymbal Roll Ride Cymbal Crash Cymbal Splash Cymbal Crash Cymbal MuteSFX
PAGE 1
SFX Kit SFX Kit 2 Nature Transportation War Games Animal Farm Mystery Theatre Game Show Counting Trip to JapanPAGE 2
Applause Seashore Stream Rain Thunder Wind Bird Tweet Laughing Screaming TelephonePAGE 3
Helicopter Gunshot Explosion Machine Gun Siren Foot Step Door Slam Dog Barking Telephone 2 Wind ChimePAGE 4
Car Passing Car Stopping Breath Noise Cat Horse Gallop Crow Plane Door Creak Car Engine Car CrashPAGE 5
Train Jet plane Crickets Crickets 2 Cu-Coo Starship Punch Heartbeat Laser Gun KissPAGE 6
Latin "Huh" Scratch Rooster Trolley Bell Typewriter Whistle Down Whistle Up Organ Bell Cow BubbleList of Styles
SWING & BIG BAND 50'S & 60'S POP & ROCK
PAGE 1 PAGE 2 PAGE 1 PAGE 2 PAGE 1 PAGE 2
Fast Big Band Night Club 50's Rock 50's Rock 3 Philly Soul Disco Fast Big Band 2 Jitterbug 50's Rock 2 60's Rock 70's R&B Disco 2 Medium Big Band Big Band Samba 50's Rockabilly 60's Rock 2 70's R&B 2 Disco 3 Sing It Big Band Cha Cha 50's Folk Jump Swing Big Band Foxtrot Rock Rhumba 60's Pop 2 Medium Swing Slow Big Band 60's Beach 60's R&B Nice and Easy Medium Swing 2 Surf Rock 60's R&B 2 Slow Swing Slow Swing 2 60's Pop Motown Motown 2BALLAD
PAGE 1 PAGE 2 PAGE 1 PAGE 2 PAGE 1
Cont R&B Ballad Modern Ballad 2 Modern Ballad Modern Ballad 3 Pop Ballad Pop Ballad 2 R&B Ballad R&B Ballad 2 70's Pop Ballad 70's Rock Ballad Mod Country Ballad Country Ballad Country Pop Ballad Rock Ballad 6/8 Ballad Folk Rock Ballad 50's Ballad 50's Ballad 2 50's Orch BalladCOUNTRY
Country Shuffle Bluegrass Country Stomp Texas Swing Boot Scootin Country Pop Train Beat Country Two Beat Mod Country Shuffle Country Rock 2 Redneck Rock Country Rock Modern Train BeatJAZZ & CONTEMP
PAGE 1 PAGE 2 PAGE 1 PAGE 2 PAGE 1
Smooth Jazz Smooth Jazz 3 Smooth Jazz 2 Jazz R&B Jazz / Pop Latin Jazz 2 Latin Jazz Cont 16 Beat 2 Cont 16th Shuffle Cont 8 Beat Cont 16 Beat Cont 8 Beat 2 Jammin Organ 5/4 JazzLATIN & ISLAND
Bossa Nova Modern Bossa Bossa Nova 2 Bolero Salsa Salsa 2 Samba Salsa 3 Beguine Balenato Hawaiian Bachata Reggae Reggae 2 Toons Calypso Gypsi Mambo Rhumba Cont Pop 80's Dance Pop / Funk 80's Dance 2 Latin Rock Classic Rock 80's Rock 70's Country Rock Pop / Rock Rock Shuffle Folk Rock Pop Shuffle Slow Rock 70's PopBLUES & GOSPEL
KC Blues Slow R&B Fast R&B Blues / Rock Slow Blues Gospel Shuffle Southern Gospel Fast Gospel Slow Gospel 6/8 GospelCLASSIC PIANO
Showman Pops Piano Table for Two Ragtime Country Piano Rock Legend BoogieINTIMATE PIANO SOLO PIANO KIDS & HOLIDAY
PAGE 1 PAGE 2 PAGE 1 PAGE 2 PAGE 1 PAGE 2
Pop Ballad Rock Swing Fast Show Kids March Holiday 4/4| Rock Ballad | Blues | Two Beat | Swing Standard | Kids 6/8 March | Holiday Two Beat |
| Country Ballad | Pop | Two Beat Shuffle | Standard Ballad | Kids 2 Beat | Holiday Shuffle |
| Swing Ballad | Bossa | Pop Waltz | Kids 2 Beat Shuffle | Holiday Rock | |
| Pop / Rock Shuffle | Boogie | Jazz Waltz | Kids 3/4 | Holiday Waltz | |
| Pop 3/4 | Pop | Country Ballad | Kids Folk 2 Beat | Holiday Waltz 2 | |
| Bossa | Pop Ballad Country Waltz | 3/4 Lullaby Holiday Waltz 3 | |||
| Medium Swing | 3/4 Standard | New Age 2 | 4/4 Lullaby | Holiday Waltz 4 | |
| Dixieland | New Age 3 | ||||
| New Age | 6/8 Pop / Rock | ||||
TRADITIONAL
PAGE 1 PAGE 2 PAGE 1| Foxtrot | Foxtrot 2 | Orchestral Waltz | Medium Show Beat | |
| Soft Shoe | Polka 2 | Classic Waltz | Fast Show Beat | |
| Polka | Polka 3 | Traditional Waltz | Fast Show Beat 2 | |
| Cha Cha | Cha Cha 2 | French Waltz | Medium Show Swing | |
| Dixieland | Tango 2 | European Waltz | Medium Show Beat 2 | |
| Ballroom | Dixieland 2 | Country Waltz | Slow 12/8 | |
| Tango March 3 | Country Waltz 2 | Slow Show | ||
| Jive | Alps March | Modern Waltz | Dixieland 4/4 | |
| March 1 | Jazz Waltz | 3/4 Show | ||
| March 2 | Vienna Waltz | Fast 6/8 | ||
List of Song Stylists
16 Tons 3 Coins In A Fount 76 TrombonesA
A Summer Place A Whole New World Achy Breaky Heart Across the Alley After The Love Has Ain't Misbehavin' Ain't No Woman Ain't Too Proud All I Have To Do All I Wanna Do All Of Me All Shook Up Alley Cat Aloha Oe Always A Woman Always On My Mind Amapola Amazing Grace American Pie Annie's Song Anniversary Waltz Anything Goes April Showers Around The World Arrivederci Roma Arthur's Theme As Long As He Need As Tears Go By As Time Goes By At The Hop Auld Lang Syne Autumn Leaves Away In A MangerB
Baby Face Bad Leroy Brown Ballad Davy Crockt Beautiful Morning Beauty & The Beast Beer Barrel Polka Begin The Beguine Behind Closed Door Benny And The Jets Best Of My Love Bewitched Bill Bailey Billie Jean Bingo Blue Bayou Blue Bossa Blue Moon Blue Suede Shoes Blue Velvet Blueberry Hill Body And Soul Boogie Bugle Boy Boot Scootin' Boy From NY City Breeze & Brick House Bridge Over Water Brown Eyed Girl Brown Eyes Blue But Beautiful Button Up Overcoat By The Time I Get Bye Bye LoveC
Cabaret California Dreamin California Girls Can You Feel Love Canadian Sunset Candle In The Wind Candy Can't Get Enough Can't Get Started Can't Help Falling Can't Hurry Love Can't Smile Can't Stop Loving Cara Mia Careless Whisper Celebration C'est Si Bon Chain Of Fools Chances Are Change The World Chantilly Lace Chapel of Love Chatahoochee Chatt. Choo Choo Cherish Cherry Pink&Apple Chicago Christmas Song Clementine Climb Ev'ry Mtn Close To You Colors Of The Wind Come In From Rain Come Rain Or Shine Comin Up Roses Consider Yourself Copacabana Corcovado Could I Have Dance Could It Be I'm Could've Been Country Roads Coward Of County Cracklin Rose Crazy Crazy Little Thing Cruisin Down River Crusin Cry Cry Me A River Crying In ChapelD
Daddy Dance To The Music Dancin' In Street Daniel Daydream Days Of Wine Roses Deck The Halls Deep Purple Deja Vu Desafinado Desparado Didn't We Almost Do Re Mi Do Your Ears Hang Dock Of The Bay Domonique Don't Be Cruel Don't Cry For Me Don't Fall In Love Don't Fence Me In Don't Get Around Don't Let The Sun Don't Worry B Happy Downtown Dream Dueling Banjos Dust In The WindE
Earth Angel Ebony & Ivory Edelweiss Elvira End Of The Road Endless Love Evergreen Every Breath You Every Rose Has Its Everybody Plays Everything I Do Everything Is Beau Evil Ways Exodus Song, The Eyes Of LoveF
Falling In Love Farmer In The Dell Fascinating Rhythm Fascination Fast Car Feelings Feels So Good Feels So Right Ferry Cross Mersey Fever Fields Of Gold Fire & Rain First Time Ever I Flashdance Fly Me To The Moon Foggy Day, A Folsom Prison For All We Know Forever And Ever Free Bird Free Ride Freeway Of Love Friends Are For Friends Low Places Friends See Me Now From A Distance Frosty The Snowman Fun, Fun, FunG
Gambler, The G'bye Yellow Brick Georgia On My Mind Georgy Girl Get Down Tonight Getting To Know U Gimme Some Lovin Girl From Ipanema Give My Regards To Glory Of Love, The Glow Worm God Bless Child Goin Out Of My Hed Good Golly MsMolly Good Morning Good Thing Got My Mind Set Granpa's Farm Great Balls O Fire Green Door, The Greatest Love The Greatest Love Green Green Grass Green Onions Groovin Guitars, CadillacsH
Handy Man Hang On Sloopy Happy Birthday Happy Together Happy Trails Harbor Lights Hard Days Night Hard Habit Harlem Nocturne Have I Told You Hawaiian Wedding Heard It Grapevine Heart Will Go On Heartbreak Hotel Heat Is On Heatwave Heaven Hello Dolly Hello Mary Lou Help Help Me Make It Here Comes Santa Here's Rainy Day Hey Jude Hold Your Hand Holly Jolly Xmas Home For Holidays Honesty Honey Honeysuckle Rose Honky Tonk Man Honky Tonk Woman Hound Dog How Am I Supposed How Are Thing In How Can You Mend How Deep Is Love How Great Thou Art How High The Moon How Insensitive How Sweet It Is Hurts So Good Hustle The Hustle|
I Believe I Could Have Dance I Could Write Book I Don't Know How I Don't Want 2 Set I Fall To Pieces I Get Around I Got A Name I Got Rhythm I Just Called To I Love Paris I Love Rock n Roll I Love You I Need Your Lovin I Only Have Eyes I Saw Mommy Kiss I Shot The Sheriff I Talk To Trees I Walk The Line I Want To Know I Will Always Love I Will Survive I Write The Songs If I Had A Hamme If I Were Carpentr If You Don't Know I'll Be Around I'll Be Home Xmas I'll Be Loving You I'll Be There I'll Fly Away I'll Remember April I'm A Believer I'm A Country Boy I'm A Little Teapt I'm Beginning 2See Imagination Imagine In The Mood Islands In Stream Isn't It Romantic Isn't She Lovely It Had To Be You It's A Grand Night It's A Small World It's All In Game It's Beginning To Its Matter Of Time It's My Party It's Not For Me It's Not Unusual It's Now Or Never It's Too Late It's Unusual Day Itsy Bitsy Spider I've Been WorkingJ
Jailhouse Rock Jambalaya Jingle Bell Rock Jingle Bells Jive Talkin John Jacob Jingle Johnny B. Goode Joy To The World Juke Box Sat. Nite Jump June Is Bustin' Just a Closer Walk Just a Gigolo Just As I Am Just In Time Just My Imagine... Just Once Just The Two Of Us Just Way You AreK
Kansas City King Of The Road Knock 3 Times KokomoL
La Bamba Lady Lady Is A Tramp Last Dance Last Date Last Time Saw Pari Laughter In Rain Lay Down Sally Layla Leaving Jet Plane Let It Be Let It Snow! Lets Get It On Let's Stay Together Light My Fire Lilli Marlene Little Dog Gone Little Green Apples Locomotion Lollipop London Bridge Long Winding Road Look Of Love Lose My Faith Lost In Your Eyes Love Boa The Love Boat Love First Degree Love Is A Many Love In Blue Love Me Tender Love Will Keep Us Loves Me... Rock Love's Theme Lovin' Feeling Luchenbach Texas Lucille Lyn EyesM
Macho Man Mack The Knife Maizry Doats Mammas Don't Let Man In The Mirror Managua Nicaragua Mandy Maniac Margaritaville Mary Little Lamb Me And Bobby McGee Me And My Shadow Meditation Memory Mercy Mercy Me Merry Little Xmas Miami Vice Midnight Hour Midnight Train-GA Misty Monday Monday Moon River Moolight In VT More Morning Dance Most Wonderful Time Mr. Bojangles Mr. Wonderful Mrs. Robinson Muffin Man Music Box Dancer Music Music Music Music Of The Night My Cherie Amore My Coloring Book My Cup Runneth Ovr My Favorite Things My Funny Valentine My Girl My Life My Love My Wild Irish RoseN
Na Na Hey Hey Gbye Nadia's Theme New Kid In Town New York, New York Night And Day Night Fever Nightingale Sang Nights In White SatinO
Oh My Pa-Pa Oklahoma Old Cape Cod Old Devil Moon Old Lamplighter Old MacDonald Old Rugged Cross Old Soft Shoe Old Time R & R Old Time Religion On Street Where U On The Road Again On Top Ole Smoky One (Chorus Line) One More Try One Tin Soldier Only You Ooh Baby Baby Open Arms Opus One Orange Blossom Our Day Will Come Over The RainbowP
Paper Roses Party's Over, The Peace in Valley Peaceful Easy Feel Peanuts' Theme Peg Penn. 6-5000 People People Will Say Physical Piano Man Pink Panther The Pink Panther Please Mr. Postman Please Please Me Poinciana Polka Dots Moonbms Pop Goes Weasel Precious Memories Pretty Woman Proud Mary Puff Magic DragonQ
Quando, Quando Que Sera, SeraR
Rag Mop Rainbow Connection Red Red Wine Red Roses Red Sails Sunset Release Me Rescue Me Respect Reunited Rhinestone Cowboy Rock A Bye Baby Rock Around Clock Rock This Town Rocket Man Rockin' Xmas Tree Rocky Mtn High Rocky Top Rose The Rose Rose Garden Row Your Boat RudolfS
Sailing Saints Go Marching San Francisco Sara Sara Smile Sat Nile Is Loneli Satin Doll Satisfaction Save Best For Last Seasons In The Sun Seems Like Old Tms Sentimental Reason September SF Flowers In Hair Shadow Your Smile Shake Your Booty Shake, Rattle, Roll Sh-Boom She Believes in Me She Loves You She'll Be Coming She's In Love She's Like Wind Shoo Fly Pie Shop Around Show Business Signed Sealed Del. Silent Night Silly Love Songs Silver Bells Singing In Rain Sleigh Ride Smile Smoke Gets In Eyes Smooth Operator Snow Bird So In Love Soldier Of Love Some Day My Prince Some Enchanted Eve Something Something To Talk Sometimes When We Somewhere Somewhere Out Ther Song Sung Blue Soul Man Sound Of Music Spanish Eyes Spanish Harlem Speak Low St. Elmo's Fire St. Thomas Stand By Me Stand By Your Man Stangers In Night Stardust Starting Over Stayin Alive Stompin' Savoy Stormy Weather Street Where U Liv String Of Pearls Summer Breeze Summer Samba Summertime Summertime Blues Sunday Kind Love Sunny Sunny Gets Blue Sunny Side Street Sunrise, Sunset Surfin USA Surrey With Fringe Sweet Caroline Sweet Home Alabama Swingin On A StarT
Take Five Take It Easy Take Me Out Take The A Train Take This Job And Takin' Care Of Tammy Tea For Two Tears In Heaven Tell Her About It Tempted Tennessee Waltz Tequila Tequila Sunrise Thanks For Memory That Kind Of Girl That'll Be The Day That's Amore That's Life That's The Way The Christmas Song The Greatest Love The Hustle The Love Boat The Pink Panther The Rose The Way We Were The Way You Do Then Came You There Must Be Way There'll Be Sad These Dreams They Call The Wind Things Things We Did Last Think Third Man Theme This Masquerade This Ole Man Those Were The Days Three Times A Lady Through The Years Tico Tico Time After Time Time In A Bottle Tiny Bubbles To All The Girls Tom Dooley Tomorrow Tonight Top Of The World Total Eclipse Trouble True Love Try To Remember Tum Tum Tum Tutti Frutti Tuxedo Junction Twinkle Twinkle Twist & Shout Twist, The U Unchained Melody Under Boardwalk Unforgettable Up On Housetop Up Up & Away Up Where We Belong V Vaya Con Dios Ventura Highway W Wake Little Susie Wake Me Up Walk On By Walkin' Midnight Wasted Days and Watch What Happens Wave Way We Were The Way We Were Way You Do The Way You Do Wayward Wind, The We Are Family We Are The World We Built This City We Didn't Start We Wish You We're In This Love We've Got Tonight (Rock Ballad) We've Got Tonight (Modern Country) We've Only Begun What A Friend What Child Is This What I Did 4 Love What Kind Of Fool What Would U Think Wheel Of Fortune Wheels On The Bus When A Man Loves A When Can I See You When I Fall n Love When I'm 64 When Irish Eyes When You're Smiling Where Did Love Go Where Flowers Gone White Christmas Whiter Shade Pale Who Can I Turn To Whole New World Why Do Fools Fall Wide Open Spaces Wind Beneath Wings Winter Wonderland Wipe Out Wish Upon A Star With A Little Help With Or Without U Woman Wonderful Wonderful Wonderful World Wooden Heart World On A String Wunderbar Y Yakety Sax Yesterday Yesterday When I YMCA You Can't be True You Don't Bring Me You Light Up Life You Make Me Young You Needed Me You Send Me You'd Be So Nice You'll Never Walk Young At Heart Your Cheatin Heart Your Song You're 16 You're So Vain You've Got FriendConcert Magic Songs
The words in bold type are the title displayed in the LCD screen. Song Title Type Lyrics Children's Songs Twinkle, Twinkle, Little Star. MP √ I'm A Little Teapot .... MP √ This Old Man .... MP √ Mary Had A Little Lamb. MP √ London Bridge MP √ Row, Row, Row Your Boat .... MP √ Hickory Dickory Dock MP √ Pop Goes The Weasel MP Good Morning To You MP √ Frère Jacques MP √ The Farmer In The Dell MP √ Bingo MP √ Itsy, Bitsy Spider MP √ Where, O Where Has My Little Dog Gone? . . . . . . . . . . . . . . . . . . . . . . . . . . . . . . . . . . . . . . . . . . . . . . . . . . . . . . . . . . . . . . . . . . . . . . . . . . . . . The Muffin Man MP √ Three Blind Mice MP √ Old MacDonald Had A Farm MP √ Did You Ever See A Lassie? MP √ Ten Little Indians. MP Brahm's Lullaby.... SK √ Rock A Bye Baby MP √ Here We Go Round The Mulberry Bush.... MP √ Little Brown Jug MP √ She'll Be Comin' Around The Mountain . . . . . . . . . . . . . . . . . . . . . . . . . . . . . . . . . . . . . . . . . . . . . . . . . . . . . . . . . . . . . . . . . . . . . . . . Whistler And His Dog SK Polly Wolly Doodle MP √ Song Title Type Lyrics Christmas Songs Hark The Herald Angels Sing MP √ Jingle Bells MP √ Deck The Halls MP √ O Come All Ye Faithful .... MP √ Joy To The World.... MP √ The First Noel .... MP √ Silent Night MP √ We Wish You A Merry Christmas.... MP √ What Child Is This? MP √ Angels We Have Heard On High. MP √ It Came Upon A Midnight Clear.... MP √ Away In A Manger MP √ O Holy Night EB √ O Tannenbaum (O Christmas Tree) .... MP √ The Twelve Days Of Christmas (12 Days of Christmas) ..... MP √ We Three Kings Of Orient Are .... MP √ O Little Town Of Bethlehem . . . . . . . . . . . . . . . . . . . . . . . . . . . . . . . . . . . . . . . . . MP √ Ave Maria.... SK Patriotic Songs My Country 'Tis Of Thee .... MP √ Battle Hymn Of The Republic.... MP √ America The Beautiful MP √ Yankee Doodle.... MP √ Hail To The Chief .... MP √ Washington Post March.... SK Song Title Type Lyrics You're A Grand Old Flag .... EB √ Stars And Stripes Forever SK Anchors Aweigh SK √ Under The Double Eagle .... SKAmerican Classics
Danny Boy EB √ Down In The Valley .... EB √ Let Me Call You Sweetheart .... EB √ Home Sweet Home .... EB √ My Bonnie Lies Over The Ocean MP √ In The Good Old Summertime.... EB √ For He's A Jolly Good Fellow.... MP √ Bill Bailey Won't You Please Come Home . . . . . . . . . . . . . . . . . . . . . . . . . . . . . . . . . . . . . . . . . . . . . . . . . . . . . . . . . . . . . . . . . . . . . . . . . . . . . . . . . . . . . . . . . . . Give My Regards To Broadway . . . . . . . . . . . . . . . . . . . . . . . . . . . . SK √ Clementine MP √ Fascination.... SK Home On The Range MP √ Take Me Out To The Ballgame .... EB √ Auld Lang Syne MP √ Michael Row The Boat Ashore . . . . . . . . . . . . . . . . . . . . . . . . . . . . . . . . . . . . . . . . . . MP √ Oh, Susanna SK √ On Top Of Old Smokey.... EB √ Bicycle Built For Two.... EB √ The Camptown Races .... MP √ The Band Played On .... EB √ When Johnny Comes Marching Home .... MP √ When The Saints Go Marching In .... EB √ Song Title Type Lyrics Beautiful Dreamer.... EB √ Ta Ra Ra Boom De Ay MP √ Turkey In The Straw SK Blue Bells Of Scotland .... MP √ Down By The Riverside.... SK √ By The Light Of The Silvery Moon .... SK Shine On Harvest Moon.... SK √ American Patrol March MP Dixie SK √ Yellow Rose Of Texas SK √ I Love Coffee, I Love Tea (Java Jive) .... MP √ Arkansas Traveler MP √ Old Kentucky Home .... SK √ Red River Valley EB √ The Entertainer.... SK Old Folks At Home.... SK √ Maple Leaf Rag SK After The Ball Is Over .... SK √ After You've Gone .... EB √ Thunder And Blazes.... SK Annie Laurie MP √ Wabash Cannonball SK √ I've Been Working On The Railroad.... EB √ Grandfather's Clock.... EB √ (continue) EB: Easy Beat, MP: Melody Play, SK: Skilfull Concert Magic Songs| Song Title | Type | Lyrics | Song Title | Type | Lyrics |
| Savior Like A Shepherd Lead Us | MP | √ | |||
| Favorite Hymns | Stand Up, Stand Up For Jesus | MP | √ | ||
| Fairest Lord Jesus | MP | √ | Onward Christian Soldiers | MP | √ |
| Amazing Grace | MP | √ | All Hall The Power Of Jesus Name | MP | √ |
| Doxology | MP | √ | To God Be The Glory | MP | √ |
| For The Beauty Of The Earth | MP | √ | |||
| O Worship The King | MP | √ | Classical Selections | ||
| The Old Rugged Cross | MP | √ | Andante from Symphony No. 94 by Haydn | MP | |
| Holy, Holy, Holy | MP | √ | Fur Elise by Beethoven | EB | |
| What A Friend We Have In Jesus | MP | √ | An Die Freude (Ode To Joy) | MP | |
| Rock Of Ages | MP | √ | Clair De Lune by Debussy | SK | |
| Trust And Obey | MP | √ | Skater's Waltz | SK | |
| Sweet Hour Of Prayer | MP | √ | Peter And The Wolf | SK | |
| Just As I Am | MP | √ | Minuet In G by J.S. Bach | SK | |
| Jesus Loves The Little Children | MP | √ | Romeo And Juliet | SK | |
| How Great Thou Art | MP | √ | Blue Danube Waltz | SK | |
| Great Is Thy Faithfulness | MP | √ | Sleeping Beauty Waltz | EB | |
| A Mighty Fortress | MP | √ | Gavotte by Gossec | SK | |
| Christ The Lord Is Risen Today | MP | √ | Waltz Of The Flowers | SK | |
| It Is Well With My Soul (When Peace Like) | MP | √ | Toreador Song from “Carmen” by Bizet | SK | |
| Crown Him With Many Crowns | MP | √ | “Fledermaus” by J. Strauss | EB | |
| Blest Be The Tie That Binds | MP | √ | Norwegian Dance by Grieg | SK | |
| Come Thou Almighty King | MP | √ | William Tell Overture | SK | |
| My Jesus, I Love Thee | MP | √ | Can Can | SK | |
| The Church's One Foundation | MP | √ | Emperor Waltz | SK | |
| Gloria Patri | MP | √ | March Militaire by Chopin | SK | |
| The Solid Rock | MP | √ | Grand March from “Aida” by Verdi | SK | |
| Standing On The Promises | MP | √ | Gymnopedie by Sati | SK | |
| I Need Thee Every Hour | MP | √ | Gypsy Chorus from “Carmen” by Bizet | SK |
Special Occasions
Bridal Chorus from "Lohengrin" by Wagner . . . . . . . . . . . . MP √ Wedding March from "Midsummer Night's Dream" ..... by Mendelssoh.... SK Pomp And Circumstance SK Mazel Tov.... EBInternational Songs
When Irish Eyes Are Smiling .... EB √ Hatikvah.... MP √ My Wild Irish Rose .... MP √ Hava Nagilah .... EB √ Ich Bin Ein Musikant .... SK Chiapenacas SK Funiculi Funicula.... SK √ La Marseillaise .... MP √ La Paloma SK √ Santa Lucia SK √ Habanera SK La Bamba.... SK EB: Easy Beat, MP: Melody Play, SK: SkilfullTable of Chord Types
This table describes the fingering of 61 types of chords, including inversions, that the CP piano recognizes. All these are represented here in the key of C, but of course any transposition of these chords to other keys apply. Entries on the chart with an asterisk (\*) are easy fingerings that can be recognized in the One-Finger mode.  Kawai Concert Performer Series Digital Piano P. 196 Connection Examples
A. Using External Speakers
The Concert Performer has an amplifier and built-in speakers and together, they produce a powerful sound. However, for larger venues or outdoor performances, you may need to use additional amplification and speaker systems. Standard 1/4-inch audio cables can be plugged into the CP's stereo Line Out jacks for this purpose. The CP's Master Volume will affect the signals levels output from the Line Out Jacks.B. Using the Concert Performer with Your Home Audio System
You can connect audio cables from your stereo system or another source to the CP's Line In jacks. The sound of your stereo playing a tape, CD, or even radio will be heard through the CP's speaker system and mixed in with any sounds from the CP itself, enabling you to play along with your favorite songs! Connect the CP with your CD player or other device as illustrated.C. Recording Your Performance with Your Tape Recorder
Even though the CP185 do not have a CD-R Drive you can still make a recording from your CP using the Line out Jacks. Simply connect an external CD-R recorder or other recording device (Cassette, Audio software from a personal computer etc.) to the CP's Line Out Jacks. Everything that you hear coming out of the CP's built-in speaker system is also sent out through the Line Out Jacks and can be recorded. You can also record anything that is connected to the Line In Jacks along with anything being played by the CP.  Kawai Concert Performer Series Digital Piano P. 198D. Using the Concert Performer with an External MIDI Instrument
MIDI lets you expand the creative possibilities of the CP by connecting it to an external MIDI device or personal computer. Use a MIDI cable to connect the CP's MIDI Out jack to the other device's MIDI In. Likewise, connect the MIDI Out jack of the other device to the CP's MIDI In.E. Using The Concert Performer with Your Personal Computer
Your personal computer can be used as a MIDI device as well. In order to connect your computer to the CP you will need a MIDI interface. Check with your local music store or computer dealer for more information about particular models of these interface devices. Once you have your computer connected to your Concert Performer, you can think of it as a powerful extension of the CP's own music processing abilities. There are hundreds of software programs available that you can use to do everything from learn the basics of piano playing, to creating film scores for your home movies, to composing the next great digital symphony. If you don't wish to purchase a MIDI interface device for your computer, the Concert Performer has a special type of interface built in to it that may make the connection easier. The CP can be connected directly to the back of your computer via a USB cable.  In order for the CP and your computer to properly communicate over this USB cable, you first need to set the MIDI-USB switch located next to the MIDI jacks to USB. Also your computer must have a USB driver installed. Please read the instruction on the next page for the details about the USB driver.USB
The Concert Performer can be connected with a personal computer with a USB cable for exchanging MIDI data. You need a USB driver installed in your computer. [For Windows XP/Me users] A standard USB driver is already installed in your computer. You don't need to install a new driver. [For Windows 2000/98SE users] You need to install the designated driver in your computer. Visit the KAWAI web site at http://www.kawai.co.jp/english/Download1.html and download the program. [For Macintosh users] Currently we don't have a USB driver available for Macintosh computers. Please use an appropriate MIDI interface and MIDI cables when connecting the Concert Performer to a Macintosh computer.NOTE:
When both MIDI jacks and USB jack are connected, USB has priority. When connecting USB cable to the Concert Performer, first connect the USB cable and then turn the power of the Concert Performer on. It may take some time to start communication when the Concert Performer is connected to the computer via USB. When USB communication is unstable with connection via hub, connect the USB cable directly to the USB port of the computer. Turning the power of the Concert Performer on/off or disconnecting the USB cable while the following actions may cause unstable communication. while installing USB driver while booting up the computer while MIDI application is working while communicating with the computer while the computer is in energy saver mode \* If you have any problem with USB communication, consult the instruction manual of your computer and check your computer set up. \* Windows is registered trademark of Microsoft Corporation. \* Macintosh is registered trademark of Apple Computer, Inc.MIDI Data Format
3. Exclusive data
3.1 UNIVERSAL REALTIME SYSTEM EXCLUSIVE MESSAGE
3.1.1 Master Volume
Format: F0 7f 7f 04 01 <ll> <mm> F7
<ll>: VALUE LSB (*round up numbers of live and above and drop anything under live)
<mm>: VALUE MSB
00 00 - 7f 7f (-∞ ~ 0dB) Default = 7fH/7fH
3.1.2 Master Fine Tune
Format: F0 7f 7f 04 03 <ll> <mm> F7
<ll>: VALUE LSB
<mm>: VALUE MSB
00 00 - 40 00 - 7f 7f (-100cent ~ 0 ~ +100cent) Default = 40H/00H
*transmitting by Tuning setting: 1e/62 - 40/00 - 60/21 (427.0Hz - 440.0Hz - 453.0Hz )
3.1.3 Master Coarse Tune
Format: F0 7f 7f 04 04 00 <mm> F7
<mm>: VALUE
28H - 40H - 58H (-24semitone ~ 0 ~ +24semitone) Default = 40H
*transmitting by Transpose setting: 34H - 40H - 4CH (-12 ~ 0 ~ +12)
3.1.4 Global Parameter Contorl
3.1.4.1: Reverb
Format: F0 7f 7f 04 05 01 01 01 01 01 [pp vv] ... F7
[pp vv]: pp vv ____
a: Reverb Type Default = 4
    00H 0 = Small Room, 1 = Medium Room, 2 = Large Room, 3 = Medium Hall, 4 = Large Hall, 5 or 8 = Plate *transmitting by Reverb Type Select
b: Reverb Time
    01H 0 - 64 - 127 (0.36 ~ 1.8 ~ 9 sec) Default = {Preset value}
3.1.4.2: Chorus
Format: F0 7f 7l 04 05 01 01 01 01 02 [pp vv] --- F7
[pp vv]: pp vv — —
a: Chorus Type
Default = 2
00H 0 = Chorus1, 1 = Chorus2, 2 = Chorus3, 3 = Chorus4, 4 = FB chorus, 5 = Flanger *transmitting by Chorus Type Select
b: Chorus Rate
01H 0 - 127 (0 ~ 15.5Hz) Default = (Preset value)
c: Chorus depth
02H 0 - 127 (0.31 ~ 40 msec p-p) Default = (Preset value)
d: Feedback
03H 0 - 127 (0 ~ 97%) Default = (Preset value)
e: Chorus Send to Reverb
04H 0 - 127 (0 ~ 100%) Default = (Preset value)
3.1.5 Controller Destination Setting
3.1.5.1: Channel Pressure (After Touch)
Format: F0 7f 7f 09 013.1.5.2: Controller (Control Change)
Format: F0 7f 7f 09 033.1.6 Key-Based Instrument Controllers
Format: F0 7f 7f 0a 013.2 UNIVERSAL NON-REALTIME SYSTEM EXCLUSIVE MESSAGE
3.2.1 Scale/Octave Tuning Adjust(non-realtime/1byte format)
Format: F0 7e 7f 08 083.2.2 GM System Messages
3.2.2.1: GM2 System On
Format: F0 7e 7f 09 03 F73.2.2.2: GM1 System On
Format: F0 7e 7f 09 01 F7 \*transmitting when POWER ON3.3 CP155/175/185/205 EXCLUSIVE MESSAGE
FOH Sys-Ex 40H kawai - ID 7FH channel (7f: Global) 33H function (33: Common Parameter) ggH group-ID (04: Electronic Piano, 7f: Global) \*ignore mmH machine-ID (06: CPxx5, 7f: Global) \*ignore IIH sub-command data \~ \~data F7h Eox function sub-command 33H 01H Common Function mode1 33H 03H Common Function mode2 33H 10H Drum KIT Select for Rhythm Channel 33H 20H Effect Settings 33H 21H Tuning 33H 30H Sound Control 33H 40H Accompaniment Control 33H 41H Chord Change 33H 42H Acc. Mixer Volume 33H 43H Acc. Mixer Reverb Depth3.3.1.Common Function mode1
Format: F0 40 7F 33 gg mm 03 F73.3.2.Drum KIT Select for Rhythm Channel
Format: F0 40 7F 33 gg mm 10 ch tp kk F73.3.3.Effect Settings
3.3.3.1.Panel Effects Settings Format: F0 40 7F 33 gg mm 20 05 pp vv F7 [pp vv]: pp vv a: Type 00H Effect Type No. b: Wet-Balance [Non-Text] c: Parameter1 [Non-Text] d: Parameter2 [Non-Text] 03H 0 - 7FH e: Send To Re /verb 04H 0 - 7FH f: Send To Chorus rus 05H 0 - 7FH g: MIDI Ch ON/OFF /OFF 06H 1xH = ON / 0xH = OFF, x = 0-f (1-16ch)3.3.4. Stretch Tuning Curve On Off
3.3.4.1. Stretch tuning On Off Format: F0 40 7F 33 gg mm 21 00 ff gg hh nn F73.3.4.2. Stretch tuning Part On Off
Format: F0 40 7F 33 gg mm 21 01 ch nn F7- Owner's Manual
- Important Safety Instructions
- SAVE THESE INSTRUCTIONS
- Examples of Picture Symbols
- WARNING
- CAUTION
- CAUTION:
- ATTENTION:
- Instruction for AC power cord (U.K.)
- FCC Information
- Canadian Radio Interference Regulations
- Introduction
- Table of Contents
- Parts and Names
- Intro/Ending (page 27)
- Fill-in (page 28)
- Variation (page 28)
- Help (page 172)
- Exit
- LCD Screen
- Select Buttons
- Save Regist
- Regist Groups (page 31)
- Display Control (page 146)
- Tempo/Value Dial (page 8)
- Transpose (page 22)
- Octave Shift (page 22)
- Sound Selection (page 11)
- Part (page 9)
- Piano Only (page 25)
- Registrations (page 31)
- Reverb (page 15)
- Chorus (page 16)
- Effects (page 18)
- Harmony (page 40)
- MIC Harmony/Effect (page 148)
- Advanced Recorder (page 47)
- System (page 116)
- Media Disk/CD (page 102, 156, 166)
- Recorder (page 42)
- Disk Drive
- Soft Pedal
- Sostenuto Pedal
- Sustain Pedal
- Headphone Jacks
- Mic In Volume
- Microphone Jack
- EXP Pedal
- Video Out
- Line Out Jacks
- Line In Jacks
- MIDI-USB Switch
- MIDI Jacks
- USB Jacks
- Receptacle for Pedal Cable
- Overview
- LCD Screen
- Select Buttons
- Dial
- Basic Controls
- Selecting a Part to Play
- Selecting a Part is easy:
- Splitting the keyboard.
- To change the split point:
- Portamento for the Solo Part
- To use Portamento:
- Selecting Sounds
- To select a Sound:
- Mixer
- To use the Mixer:
- To adjust the individual Section level:
- Effects
- To add Reverb :
- Type of Reverb
- To add Chorus:
- To add an Effect:
- Effect Types
- Effect Priority Guidelines
- Example
- Transpose and Octave Shift
- To Transpose:
- To use the Octave Shift:
- Metronome
- To use the Metronome:
- Piano Only
- Using a Style
- Selecting and Playing a Style
- To select a Style:
- Fill-In and Variation
- Auto Accompaniment System
- Bass Inversion
- To turn Auto-accompaniment (ACC) on:
- 1-2 Play
- To use 1-2 Play:
- Registration
- Registration Groups
- To use a Registration:
- Style Lock
- Song Stylist
- To use the Song Stylist:
- To search the Song Stylist by Song Title:
- Harmony
- Recording a Song
- Easy Recording
- To record:
- To play back the recorded song:
- Part Status
- Re-recording or adding another Part
- Saving the song
- Erasing the song
- To delete a song:
- Advanced Recording
- Real-time Recording
- To use Real-time recording:
- Note
- Track Settings
- To use the Track Settings screen:
- Loop Settings
- To set the Loop:
- Style Paste
- To use Style Paste:
- Punch-In Recording
- Punch-In recording using the pedal
- To use the pedal to Punch-In/Out:
- Step Recording
- To set up Step recording:
- To use the Step Recorder:
- Song Edit
- To edit the song:
- Bar Editing
- To use Bar Edit:
- Quantize
- Copy
- Delete
- Insert
- Erase
- Merge
- Gate Time Modify
- Velocity Modify
- Clock Move
- Transpose
- Event Edit
- To use Event Edit:
- Creating Your Own Styles
- Conductor
- Easy Style Edit
- To use Easy Edit:
- Resetting the Style
- Note:
- To use Advanced Edit:
- Important Note:
- To use a saved User Conductor Style:
- Making a New Style
- Configuration of a Style
- To create a Style:
- Auto-accompaniment System
- Accompaniment Type (ACC Type)
- Range
- Crossover
- Bass Limit
- To adjust the auto-accompaniment system:
- Making a Style with Phrase Combination
- To use Phrase Combination:
- Style Convert
- Editing Sounds
- Editing the Preset Effect Settings
- To adjust the settings:
- Making a User Sound
- Playing Songs from a Floppy Disk
- About songs on Floppy Disk
- Selecting a Song from Disk
- To select a song:
- Controlling Playback of a Song
- To make adjustments to the song:
- Playing with Concert Magic
- Selecting a Concert Magic Song
- Performing a Concert Magic Song
- Concert Magic Song Arrangements
- EASY BEAT
- MELODY PLAY
- SKILLFUL
- Steady Beat Play
- Creating a Concert Magic Song
- System Menu
- To use the System menu:
- Tuning
- Touch Curve
- User Touch Curve
- To create a User Touch Curve:
- System EQ
- To create a User EQ:
- Virtual Voicing
- Resonance
- Concert Magic Sound
- Pedal Assign
- Damper Pedal (Right)
- Pedal assignment options for Soft Pedal (Left) and Sostenuto Pedal (Center)
- EXP Pedal (Optional)
- Fill-in Mode
- Solo Settings
- Video Out
- Effect for Sound
- Temperament
- Brief explanation of temperaments
- Temperament Keys
- Equal Temperament (Flat)
- Equal Temperament (Stretched)
- Pure Temperament
- Pythagorean Temperament
- Meantone Temperament
- Arabic
- To create a User Temperament:
- MIDI Menu
- Right Transmit Channel
- Left Transmit Channel
- Chord Transmit Channel
- Chord Detect Channel
- Local Control ON/OFF
- Clock
- To configure the MIDI Settings:
- Transmit MIDI Data
- Channel Receive On/Off
- MIDI Accordion
- Power Up Settings
- Soft Reset
- To perform a Soft Reset:
- Software Version
- Display Control
- Screen Hold
- Mic Harmony and Effect
- Mic Harmony
- Type of Harmony
- To add Mic Harmony:
- About Mic Harmonies
- Non-Chordal Harmonies
- Chordal Harmonies
- Tips and Suggestions
- Mic Effect
- Type of Effect
- Equalizer
- Gate
- Compressor
- Echo
- Vibrato
- Reverb
- Floppy Disk Operations
- Disk Menu
- Saving Data to a Floppy Disk
- Loading Data from a Floppy Disk
- Erasing Data from a Floppy Disk
- To erase the data from a disk:
- Formatting a Floppy Disk
- To format a disk:
- CD-R Operations (CP205 only)
- Playing an audio CD
- Recording onto a CD
- Recording Tips and Suggestions
- Closing (Finalizing) Your CD
- Getting Assistance: Using Help and Demo
- Using the Help
- To use the Help:
- Using the Demonstrations
- Main Demo
- Function Demos
- Sound Category Demos
- Style Category Demos
- Piano Music
- To listen to a Main/Sound/Style Demo:
- Playing Piano Music
- To listen to the Piano Music:
- Making your Favorites list
- Appendices
- Preset Sounds
- PIANO
- PAGE 1 PAGE 2 PAGE 3 PAGE 4 PAGE 5
- FEATURE
- PAGE 1 PAGE 2 PAGE 3 PAGE 4 PAGE 5 PAGE 6
- VOCAL
- DRAWBAR
- PAGE 1 PAGE 2 PAGE 3 PAGE 4
- ORGAN
- STRING
- WOODWIND
- BRASS
- HARPSI & Mallet
- GUITAR
- BASS
- PAD & SYNTH
- SPECIALTY
- DRUM
- SFX
- PAGE 1
- PAGE 2
- PAGE 3
- PAGE 4
- PAGE 5
- PAGE 6
- List of Styles
- SWING & BIG BAND 50'S & 60'S POP & ROCK
- PAGE 1 PAGE 2 PAGE 1 PAGE 2 PAGE 1 PAGE 2
- BALLAD
- PAGE 1 PAGE 2 PAGE 1 PAGE 2 PAGE 1
- COUNTRY
- JAZZ & CONTEMP
- LATIN & ISLAND
- BLUES & GOSPEL
- CLASSIC PIANO
- INTIMATE PIANO SOLO PIANO KIDS & HOLIDAY
- TRADITIONAL
- List of Song Stylists
- A
- B
- C
- D
- E
- F
- G
- H
- |
- J
- K
- L
- M
- N
- O
- P
- Q
- R
- S
- T
- Concert Magic Songs
- American Classics
- Special Occasions
- International Songs
- Table of Chord Types
- Connection Examples
- Using External Speakers
- Using the Concert Performer with Your Home Audio System
- Recording Your Performance with Your Tape Recorder
- Using the Concert Performer with an External MIDI Instrument
- Using The Concert Performer with Your Personal Computer
- USB
- MIDI Data Format
- Exclusive data
- UNIVERSAL REALTIME SYSTEM EXCLUSIVE MESSAGE
- Master Volume
- Master Fine Tune
- Master Coarse Tune
- Global Parameter Contorl
- 3.1.4.1: Reverb
- 3.1.4.2: Chorus
- Controller Destination Setting
- 3.1.5.1: Channel Pressure (After Touch)
- 3.1.5.2: Controller (Control Change)
- Key-Based Instrument Controllers
- UNIVERSAL NON-REALTIME SYSTEM EXCLUSIVE MESSAGE
- Scale/Octave Tuning Adjust(non-realtime/1byte format)
- GM System Messages
- 3.2.2.1: GM2 System On
- 3.2.2.2: GM1 System On
- CP155/175/185/205 EXCLUSIVE MESSAGE
- 3.3.1.Common Function mode1
- 3.3.2.Drum KIT Select for Rhythm Channel
- 3.3.3.Effect Settings
- Stretch Tuning Curve On Off
- Stretch tuning Part On Off
- KAWAI
Brand : KAWAI
Model : CP205
Category : Keyboard