CORSAIR CL-9011107-WW - Computer and Peripheral Cables

CL-9011107-WW - Computer and Peripheral Cables CORSAIR - Free user manual and instructions

Find the device manual for free CL-9011107-WW CORSAIR in PDF.

📄 15 pages English EN Download 💬 AI Question 10 questions ⚙️ Specs
Notice CORSAIR CL-9011107-WW - page 1
Pick your language and provide your email: we'll send you a specifically translated version.
Product TypeCorsair Link Commander Mini
InterfaceUSB 2.0 (Type A to mini-USB)
Compatible DevicesHydro Series coolers, fans, LEDs, digital PSUs
PWM Fan ControlUp to 4 fans
Temperature Sensors4 thermistor inputs
RGB LED SupportUp to 2 LED channels
SoftwareCorsair Link v2.x
OS CompatibilityWindows 7, 8, 10
Power SupplyUSB powered (5V)
Dimensions65 mm x 50 mm x 15 mm
Weight50 g
Included Cable1 m USB cable
Firmware UpdateVia Corsair Link software
MonitoringPSU voltage, current, efficiency (with compatible PSU)

Frequently Asked Questions - CL-9011107-WW CORSAIR

How do I place devices on the chassis in Corsair Link?
Drag and drop devices from the left-hand column onto the chassis image. You can also change the background image by double-clicking on it.
How can I change the properties of a device?
Right-click or double-click on the device icon to open the properties panel on the right. You can rename the device and adjust settings such as temperature thresholds and notifications.
How do I configure a temperature sensor?
Double-click the temperature sensor icon. In the configuration panel, you can set a custom name, enable notifications, and define minimum and maximum temperature warnings.
What fan modes are available?
You can choose from Quiet (low noise), Balanced, High Performance, Custom (adjustable curve), Fixed RPM, or Maximum Speed. Right-click the fan and select the desired mode.
How do I create a custom fan curve?
Select Custom mode for the fan. A curve editor will appear where you can set temperature vs. RPM points. Drag the points to define your preferred curve.
Can I change the color of the LEDs?
Yes. Right-click the LED device. In the configuration panel, choose Normal (static color) or Cycling (color change). Adjust the RGB sliders or link the LED to a temperature group for dynamic color changes.
How do I save my settings as a profile?
Go to the Options tab, under Profiles click New. Name your profile and then click Save. You can load, rename, or remove profiles from the same menu.
How do I update the firmware of a Corsair Link device?
Open the Devices tab, click Update Firmware. Select the device from the dropdown, then click Start after choosing the firmware file. Do not turn off your PC during the update.
How can I log data from sensors?
In the Logging tab, select the devices you want to log. Set the logging interval and choose a file location. Click Start Logging to begin, and Stop Logging to end.
What should I do if the fan RPM reading seems wrong?
Enable the RPM divider in the device configuration. Some motherboards report RPM differently. For Corsair pumps, a divider of 2 is typically used.

User questions about CL-9011107-WW CORSAIR

0 question about this device. Answer the ones you know or ask your own.

Ask a new question about this device

The email remains private: it is only used to notify you if someone responds to your question.

No questions yet. Be the first to ask one.

Download the instructions for your Computer and Peripheral Cables in PDF format for free! Find your manual CL-9011107-WW - CORSAIR and take your electronic device back in hand. On this page are published all the documents necessary for the use of your device. CL-9011107-WW by CORSAIR.

USER MANUAL CL-9011107-WW CORSAIR

Placing devices within the chassis

When you rst start up Corsair Link, there will be a list of auto-detected devices on the left column. You can drag and drop the devices listed from the le-hand side of the screen and place them anywhere on the chassis.

To do this, simply le-click and hold on the device you wish to move, and then drag and drop the icon to the locaon you wish to place it. It may help you for ease of use later to group devices and their associated funcons in the approximate locaon of that device within the chassis. For example, place the CPU device and monitoring tools where the CPU exists within the case.
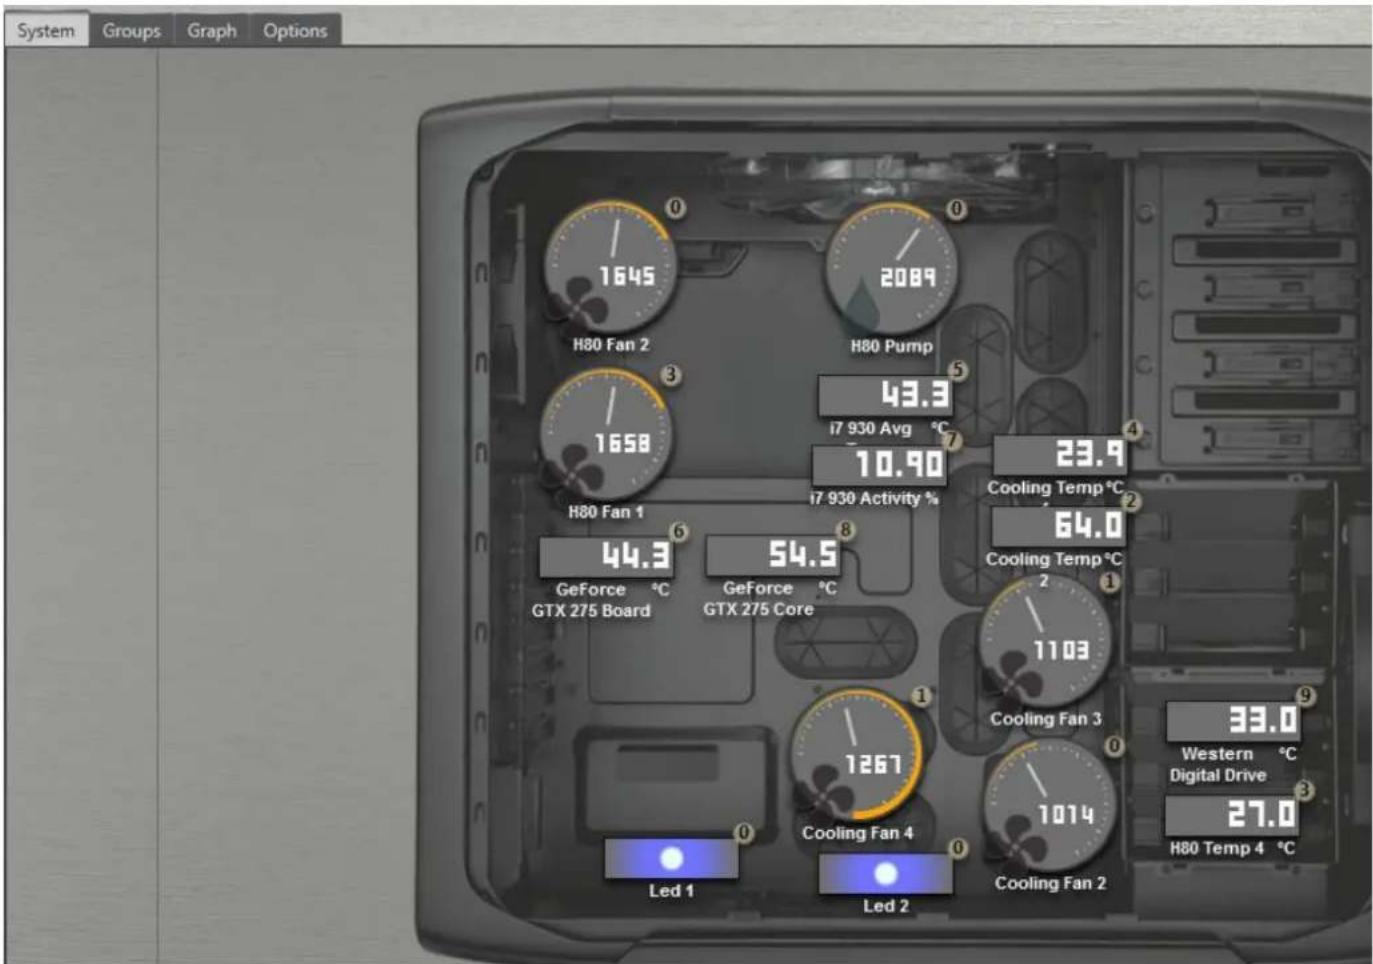
System Groups Graph Options H80 Fan 2 H80 Pump 43.3 i7 930 Avg °C 10.90 i7 930 Activity % H80 Fan 1 44.3 GeForce °C GTX 275 Board GeForce °C GTX 275 Core Cooling Temp °C 64.0 Cooling Temp °C 1103 Cooling Fan 3 33.0 Western °C Digital Drive 27.0 H80 Temp 4 °C Led 1 Led 2 Cooling Fan 4 1267 Led 2 Cooling Fan 2

You do not have to use the default chassis image and can change this to a range of pre-loaded images. To change the background image of the chassis, double or right click anywhere on the chassis image and then select a new image from the list that appears. You can also upload your own, with the "Upload a Custom Image" funcon.
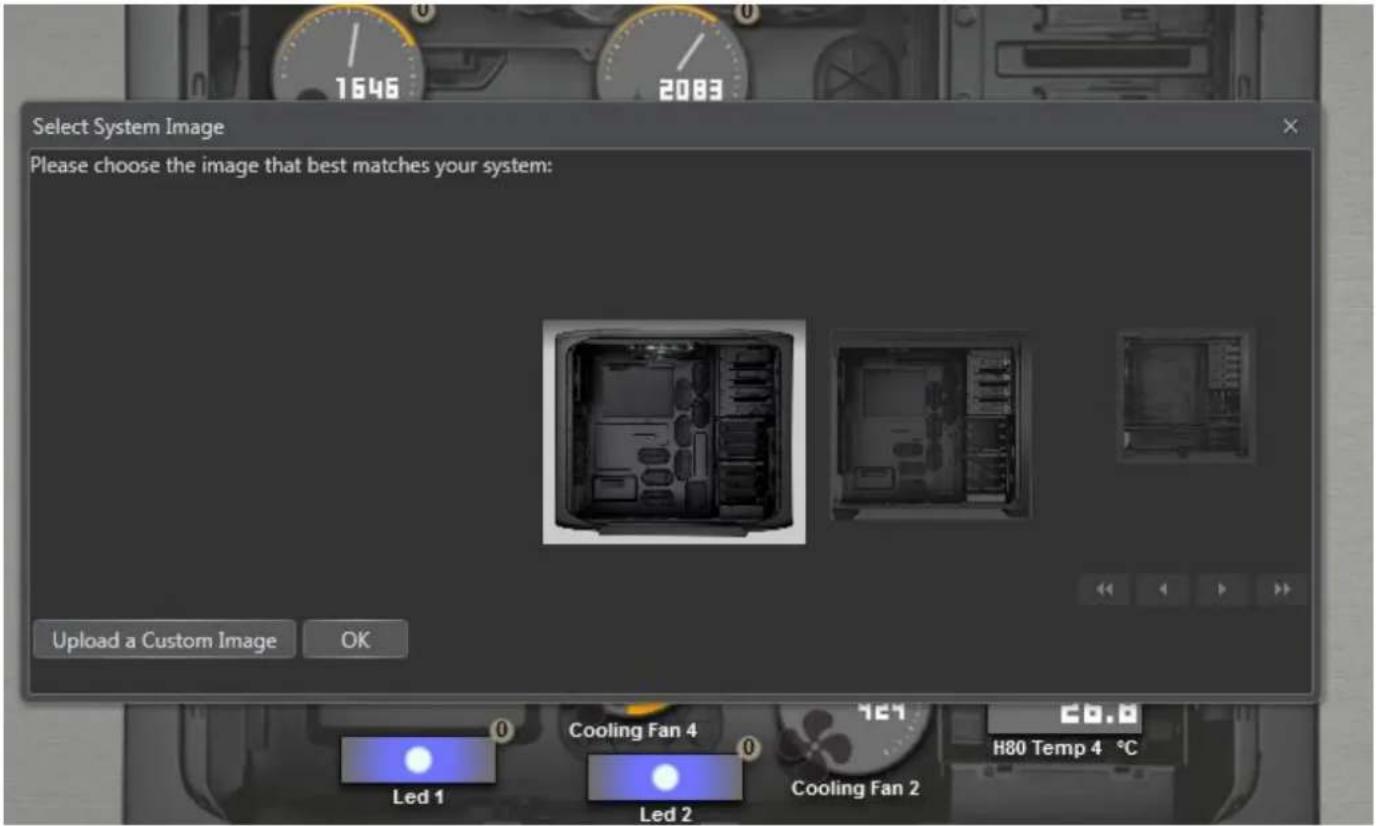
Select System Image Please choose the image that best matches your system: Upload a Custom Image OK Led 1 Cooling Fan 4 724 Co.0 Led 2 Cooling Fan 2 H80 Temp 4 °C

Changing device properes

Temperature Sensor Conguraon

To change the properes of any device or monitoring funcon, simply right click or double click on any device icon. This will bring up the properes window on the right hand side. Here you can change the properes of the device using the drop down menus. You can see here we are adjusng the conguraon for Cooling Temp 1. These devices can also be renamed.
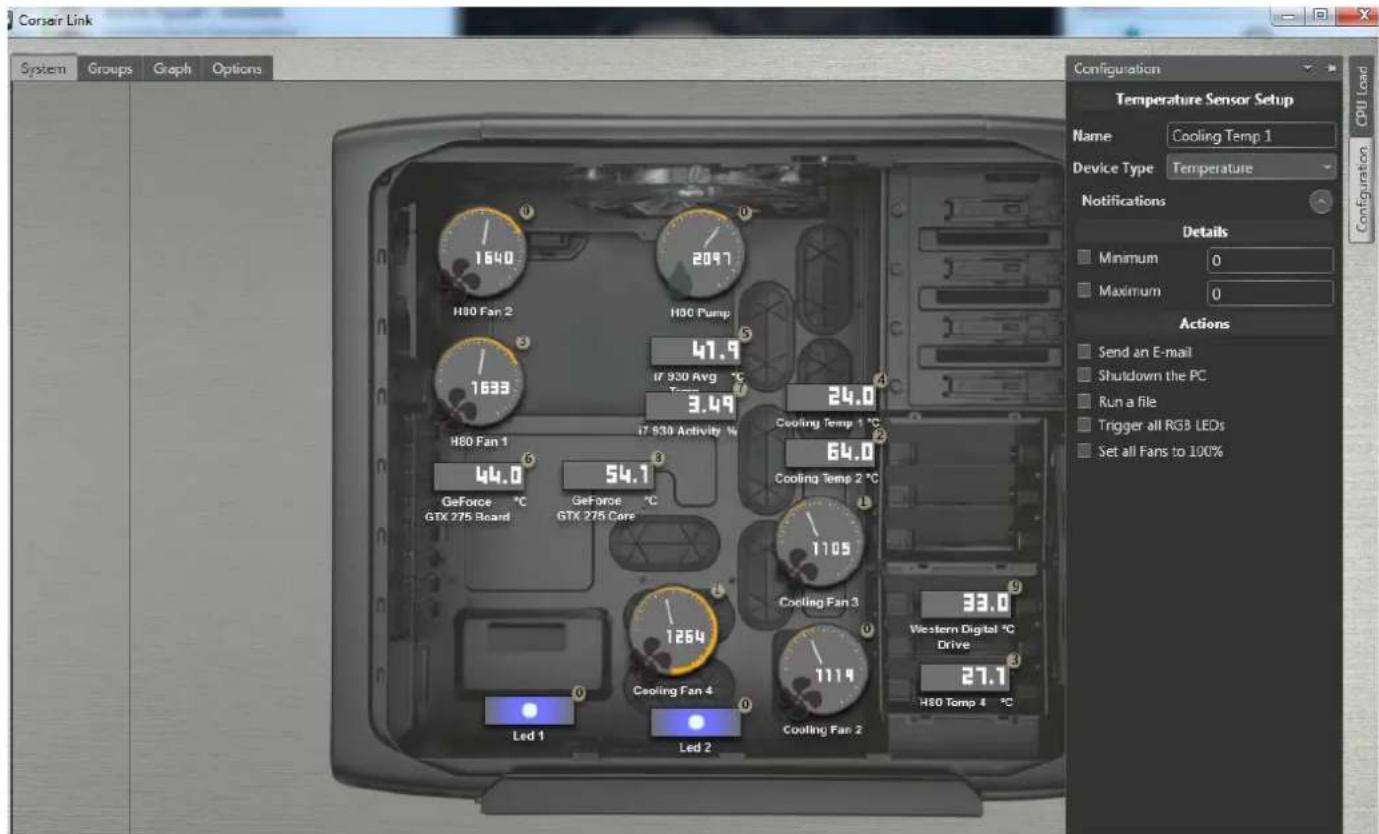
Corsair Link System Groups Graph Options Configuration Temperature Sensor Setup Name Cooling Temp 1 Device Type Temperature Notifications Details Minimum 0 Maximum 0 Actions Send an E-mail Shutdown the PC Run a file Trigger all RGB LEDs Set all Fans to 100% H80 Fan 2 H80 Pump 47.9 If 930 Avg °C Temp 3.49 24.0 H80 Fan 1 If 830 Activity °C 44.0 54.1 GeForce °C GeForce °C GTX 275 Board GTX 276 Cars 1105 Cooling Fan 3 33.0 Western Digital °C Drive 27.1 H80 Temp 4 °C Led 1 Led 2 Cooling Fan 4 Led 1 Led 2

Device Conguraon

Because some motherboards report RPM speeds dierently depending on the chipset being used, it may be necessary to set a speed divider for the pump RPM as needed. If the RPM seems abnormally high or low compared to what you have, enable the speed divider.
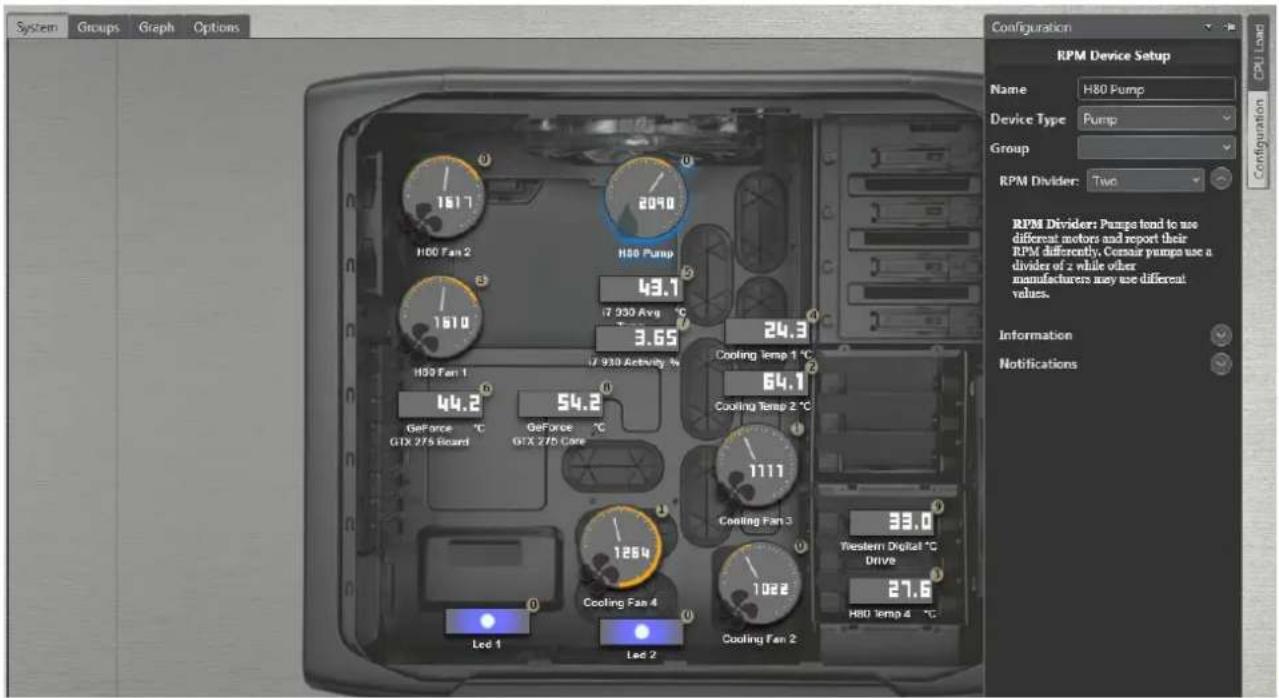
System Groups Graph Options Configuration RPM Device Setup Name H80 Pump Device Type Pump Group RPM Divider: Two RPM Dividers: Pumps tend to use different motors and report their RPM differently. Cormair pumps use a divider of 2 while other manufacturers may use different values. Information Notifications 1617 2090 H80 Fan 2 H80 Pump 43.1 7 930 Avg °C 3.65 24.3 H80 Fan 1 7 930 Activity % 44.2 54.2 GeForce °C GeForce °C GTX 275 Board GTX 275 Core 1111 Cooling Fan 3 1264 Cooling Fan 4 1022 Led 1 Led 2 Cooling Fan 2 33.0 Western Digital °C Drive 27.6 H80 Temp 4 °C

Fan Conguraon

Selecng a fan will enable several opons in the drop down menus on the right hand panel

  1. Low Noise - If you require your system to be as quiet as possible, select Quiet mode to run the fan at low speeds regardless of the temperature. This will result in very low noise levels but higher temperatures.
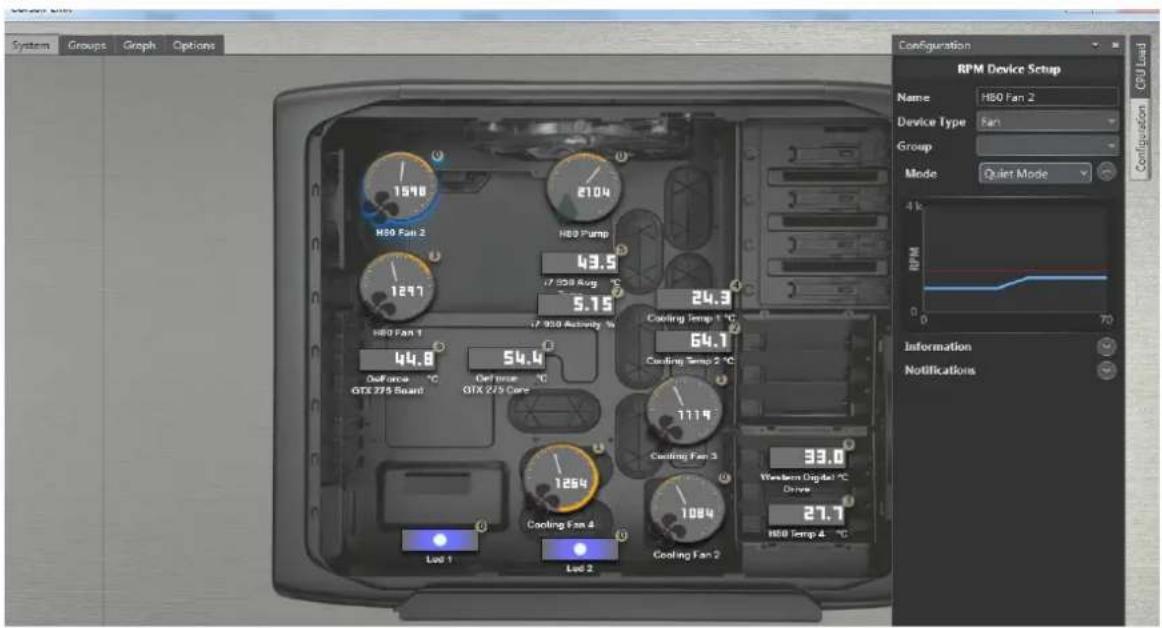
System Groups Graph Options System Groups Configuration RPM Device Setup Name HB0 Fan 2 Device Type Fan Group Mode: Quiet Mode CPU Load 1548 HBO Fan 2 HBO Pump 43.5 17 9500 Aug 5.15 HBO Fan 1 17 9500 Activity % 44.8 Defiance °C QTX 275 Board Defiance °C QTX 275 Core 54.4 1264 Lod 1 Lod 2 Cooling Temp 1 °C 64.7 Cooling Temp 2 °C 1114 Cooling Fan 3 33.0 Western Digital °C Drive 27.7 HBO Temp 4 °C

  1. Balanced - Balanced mode is a pre-set mode that is designed to balance the performance and noise levels of the fans. Typically this is a very low noise level and RPM at low loads, and a faster, but not obnoxious noise level at higher loads.
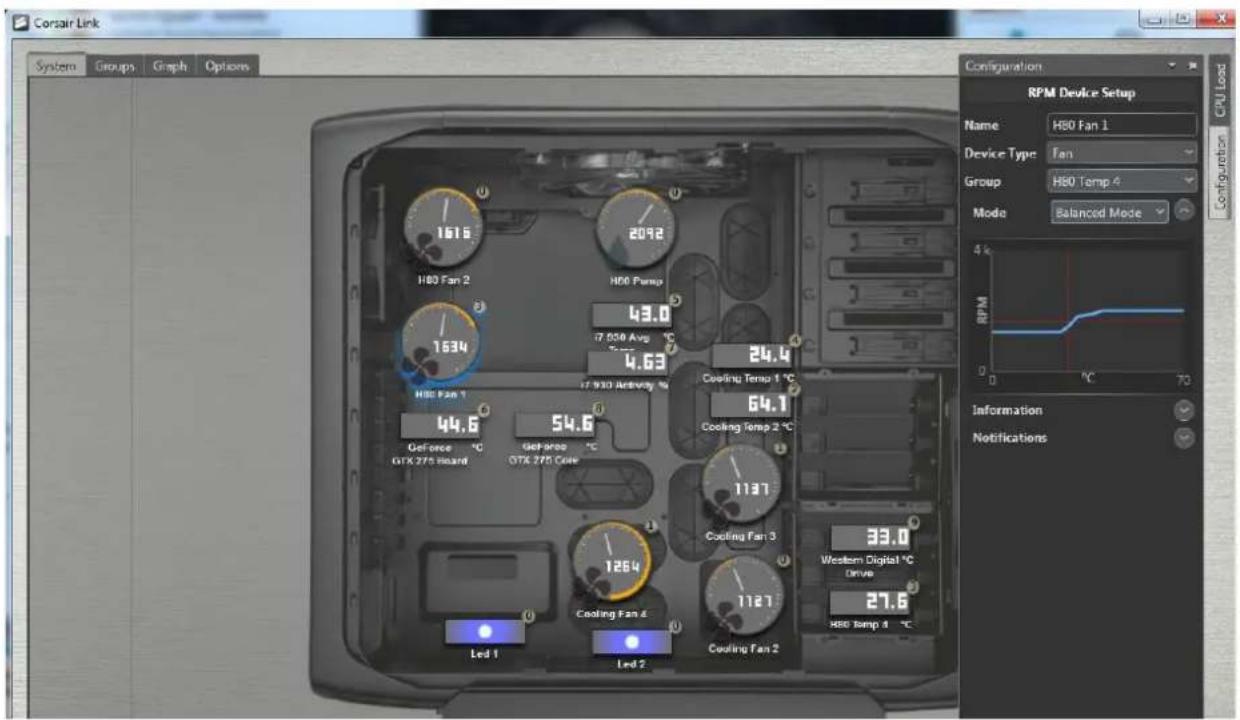
Corsair Link System Groups Graph Options Configuration RPM Device Setup Name H80 Fan 1 Device Type Fan Group H80 Temp 4 Mode Balanced Mode 4k RPM 0 70 0 70 43.0 43.0 46.3 24.4 64.1 1137 33.0 27.6 H80 Temp 4 °C LED 1 Led 2 H80 Fan 2 H80 Pump 1534 17 930 Antivirus 44.6 54.6 Deforce °C Deforamp °C GTX 275 Record GTX 270 Core Cooling Temp 1 °C 64.1 Cooling Temp 2 °C 1264 1127 Cooling Fan 3 Western Digital °C Drive 27.6 H80 Temp 4 °C Configuration CPU Load

  1. High Performance - Select this mode to allow the fan speeds to increase to their maximum as the temperature rises. This is the noisiest, but best performing onpon.
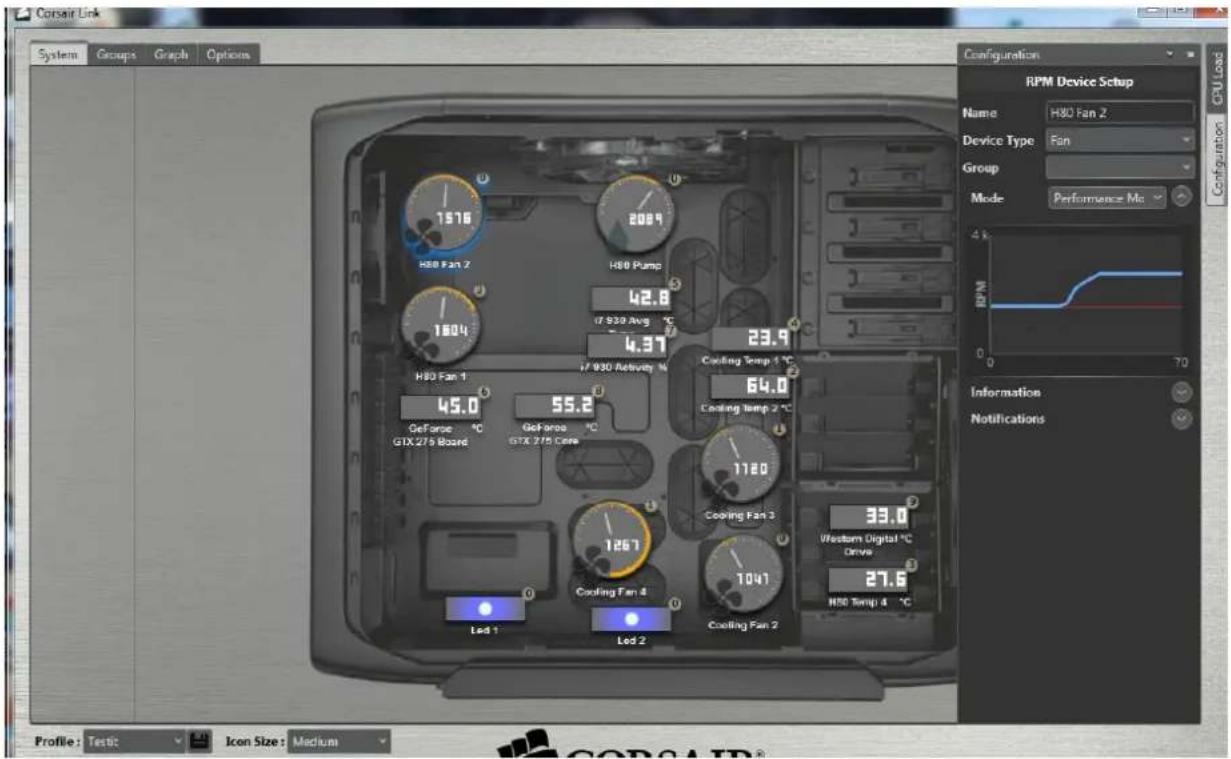
Consair Link System Groups Graph Options Configuration RPM Device Setup Name H30 Fan 2 Device Type Fan Group Mode Performance Mo 4 k RPM 0 70 Information Notifications Profile: Testic Icon Size: Medium 1576 2084 H30 Fan 2 H30 Pump 17 930 Avg °C 42.8 4.37 H30 Fan 1 17 930 Activity % 45.0 GeForce °C GeForce °C GTX 275 Board GTX 275 Cone 55.2 1120 Cooling Temp 1 °C 64.0 Cooling Temp 2 °C 1267 Cooling Fan 3 33.0 Western Digital °C Drive 27.6 H30 Temp 4 °C Led 1 Led 2

  1. Custom - This seng will allow you to fully customize the fan speed based of temperature thresholds and ranges. For a CPU cooler, make sure each fan is ed to your CPU temperature or Coolant Temperature, and then you can personalize the fan performance prole to your liking.
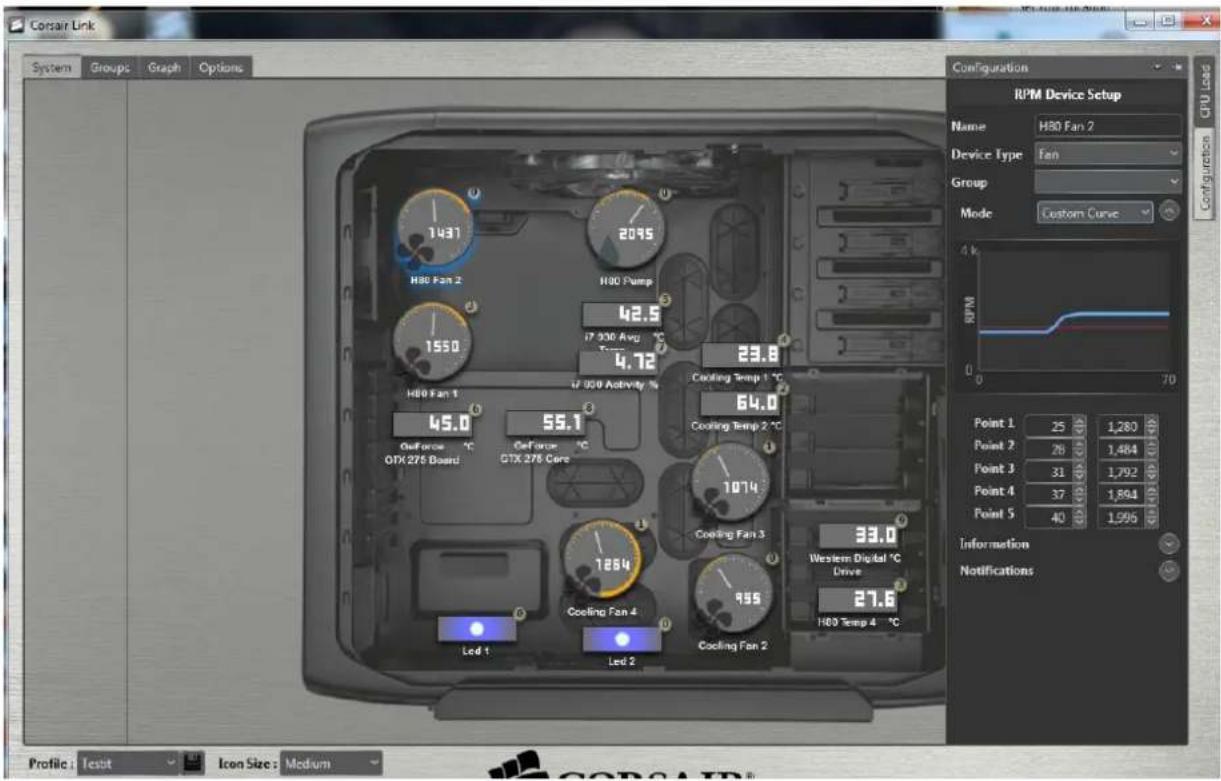
Corsair Link System Groups Graph Options Configuration RPM Device Setup Name H80 Fan 2 Device Type Fan Group Mode Custom Curve 4 k RPM 64.0 64.0 64.0 64.0 64.0 64.0 64.0 64.0 64.0 64.0 64.0 64.0 64.0 64.0 64.0 64.0 64.0 64.0 64.0 64.0 64.1 64.1 64.1 64.1 64.1 64.1 64.1 64.1 64.1 64.1 64.1 64.1 64.1 64.1 64.1 64.1 64.1 64.1 64.1 64.1 64.2 64.2 64.2 64.2 64.2 64.2 64.2 64.2 64.2 64.2 64.2 64.2 64.2 64.2 64.2 64.2 64.2 64.2 64.2 64.2 64.3 64.3 64.3 64.3 64.3 64.3 64.3 64.3 64.3 64.3 64.3 64.3 64.3 64.3 64.3 64.3 64.3 64.3 64.3 64.3 64.2 64.2 64.2 64.2 64.2 64.2 64.2 64.2 64.2 64.2 64.2 64.2 64.2 64.2 64.2 64.2 64.2 64.2 64.2 65. 799999999999999999999999999999999999999999999999999999999999999999999999999999999999999999999999999998888888888888888888888888888888888888888888888888888888888888888888888888888888888888888888888888888 7 7 7 7 7 7 7 7 7 7 7 7 7 7 7 7 7 7 7 7 7 7 7 7 7 7 7 7 7 7 7 7 7 7 7 7 7 7 7 7 7 7 7 7 7 7 7 7 7 7 5 5 5 5 5 5 5 5 5 5 5 5 5 5 5 5 5 5 5 5 5 5 5 5 5 5 5 5 5 5 5 5 5 5 5 5 5 5 5 5 5 5 5 5 5 5 5 5 5 5 3 3 3 3 3 3 3 3 3 3 3 3 3 3 3 3 3 3 3 3 3

  1. Fixed RPM - Select this opon to set the fan speed at your desired RPM regardless of the temperature readings. The fan will run at a constant speed, and will not adjust based on temperature.
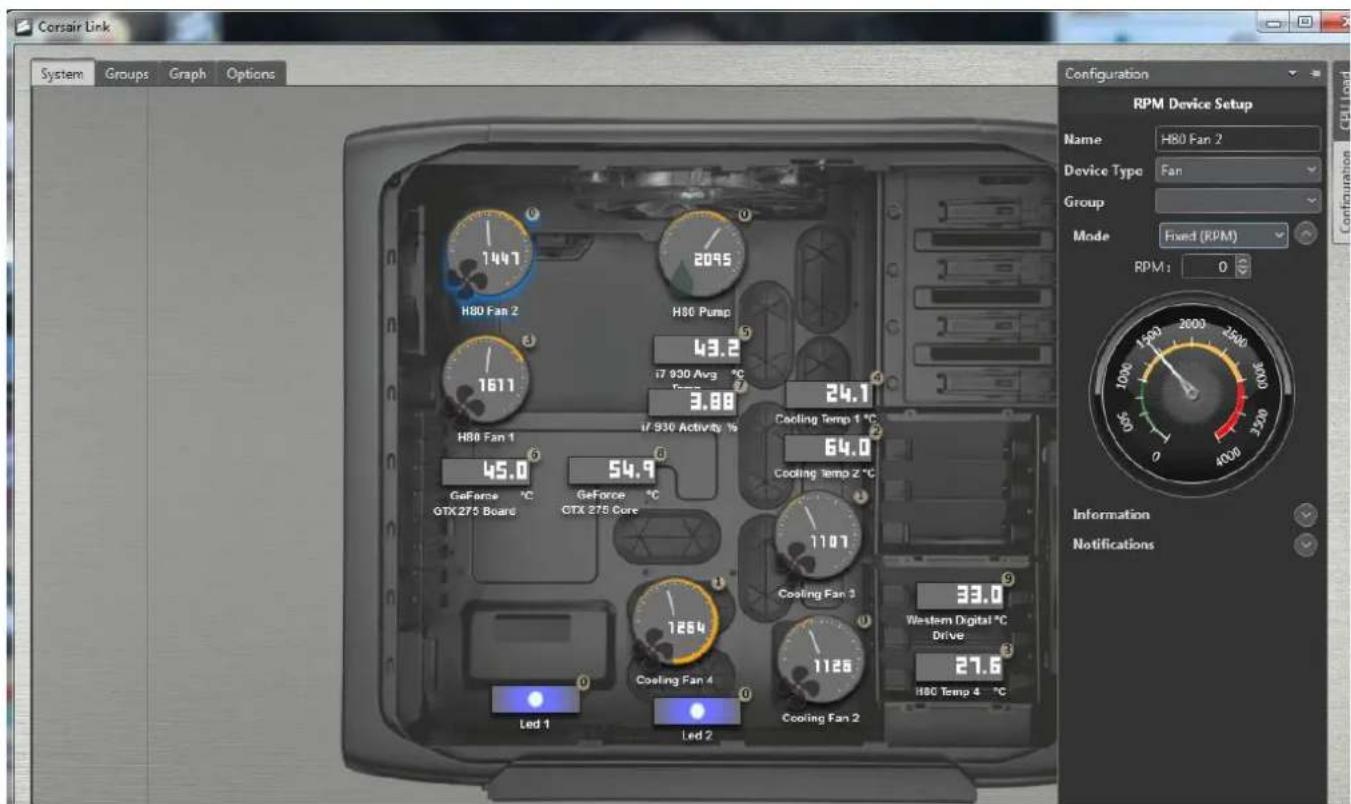
Corsair Link System Groups Graph Options Configuration RPM Device Setup Name H80 Fan 2 Device Type Fan Group Mode Fixed (RPM) RPM: 0 Information Notifications 1447 2095 H80 Fan 2 H80 Pump 43.2 17 930 Avg °C 3.88 H80 Fan 1 17 930 Activity % 45.0 54.9 GeForce °C GeForce °C GTX 275 Board GTX 275 Core Led 1 Led 2 Cooling Temp 1 °C 64.0 Cooling Temp 2 °C 1107 Cooling Fan 3 33.0 Western Digital °C Drive 27.6 H80 Temp 4 °C

  1. Maximum RPM - This opon overrides any custom settings and runs the fan at it maximum speed, regardless of temperature.
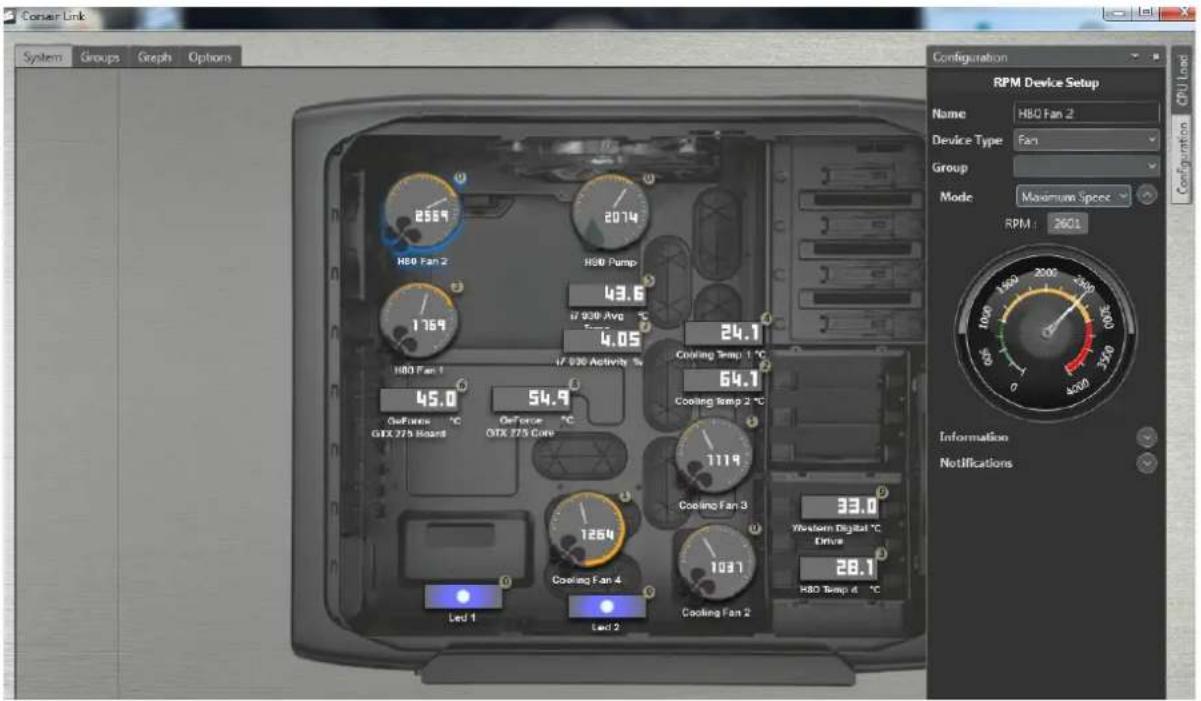
System Groups Graph Options System Groups Configuration RPM Device Setup Name HBO Fan 2 Device Type Fan Group Mode: Maximum Speed SPM: 2601 CPU Load 45.0 45.0 54.9 54.9 64.1 64.1 7119 7119 83.0 83.0 Led 1 Led 2 HBO Fan 2 HBO Pump 43.6 930 Avg °C 4.05 HBO Fan 1 HBO Activity % Coating Temp 1 °C Coating Temp 2 °C Coating Fan 3 Coating Fan 4 Coating Fan 2 Western Digital °C Drive HBO Temp at °C Information Notifications

LED Setup

Selecng the LEDs (if equipped) allows you to customize the LED lighng within your case. You can choose the color and whether or not to have normal or cycling lighng.
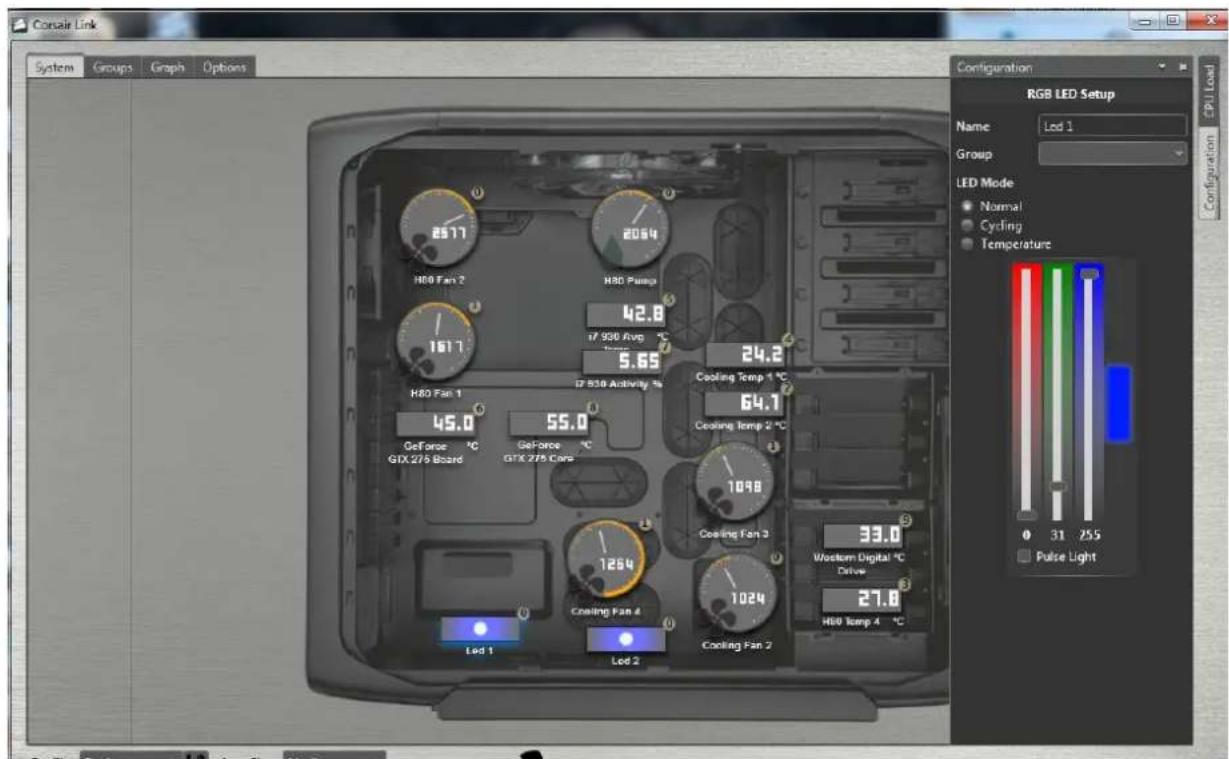
Console Link System Groups Graph Options Configuration RGB LED Setup Name Lod 1 Group LED Mode Normal Cycling Temperature 0 31 255 Pulse Light H80 Fan 2 H80 Pump 42.8 #956 Avg °C 5.65 H80 Fan 1 #956 Activity % 45.0 55.0 GeForce °C GeForce °C GTX 275 Board GTX 275 Cars Led 1 Led 2 Cooling Fan 4 Cooling Fan 2 1264 1098 33.0 1024 27.8 H80 Temp 4 °C

You can add LEDs to device groups and then link the colors to trigger events within the group, for example, if a certain temperature goes too high, you can have the LEDs change color to signify that.

You can manually select colors by simply selecng the appropriate "strength" of the RGB (Red, Green, and Blue) channels. Full blue is shown below.
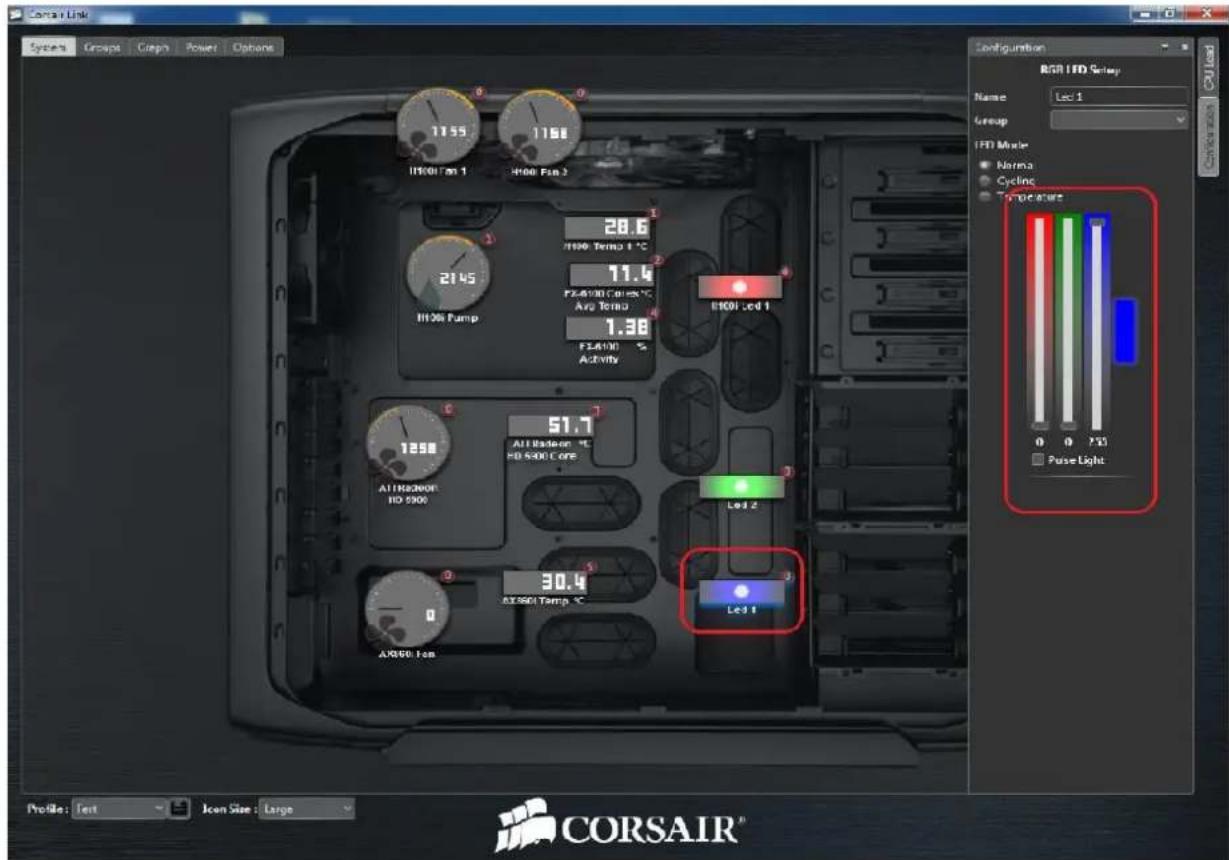
Corsair Link System Groups Creaps Power Options 11:55 11:00 H10017an 1 H100 Fsn 2 28.6 H100 Temp 1 °C 21.45 F54900 Cores 1°C Ara Temp F54900 S Activity E1001 led 1 12:50 51.7 A11Raz3000 HD 5900 All radiation °C HD 5900 Core Led 2 30.4 EX3501 Temp 1°C Led 1 AX9500 Tin Configuration RGB/LED Setup Name Led 1 Group LED Mode Norma Cycling Temperature 0 0 723 Fuse Light Profile: Text Icon Size: Large CORSAIR®

Or, if you want to have the LED change colors based on temp, select the LED you want to control, and then add it to a group using the drop down menu.

Select the “trigger” temperatures for the LED in that temperature zone, then select a color for each trigger temperature right underneath. The LED will then automatically fade from one color to the next as it crosses over the zones. In the image below, if the temperature is at 30C, it will be a dark blue, and at 45C it’ll be a greenish yellow. This is not a hard and fast transition, but gradual, so between 30C and 45C, the colors eventually shi to the target color.
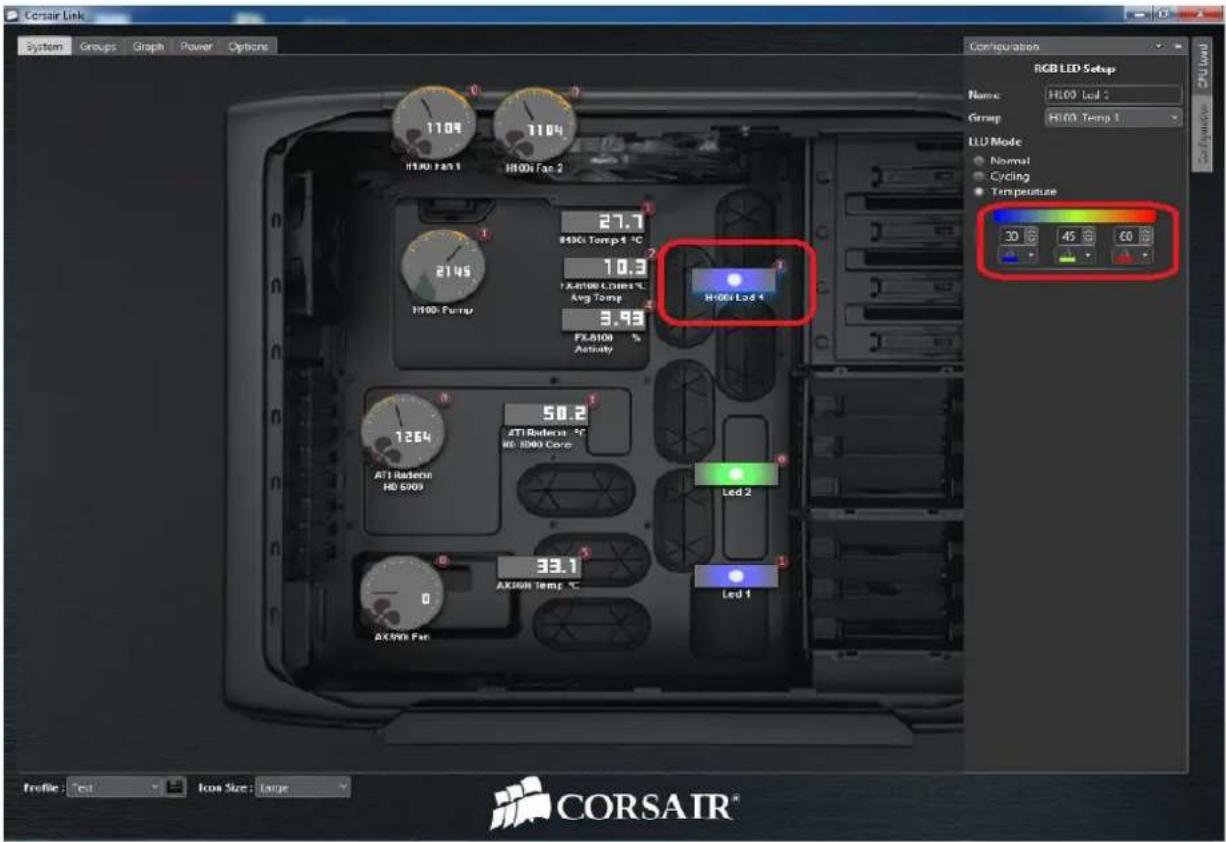
Corsair Link System Groups Graph Power Options Configuration RGB LED Setup Name: H1001 Led 2 Group: H1001 Temp 1 Liu Mode Normal Cycling Temperature 30 45 60 LED Mode Normal Cycling Temperature H1001 Led 4 27.7 8490i Temp 4 °C 10.3 FX-8100 Colors °C Avg Temp 3.93 FX-8100 % Activity 1264 ATI Radiocell HD 5009 50.2 ATI Radiocell HD 5000 Core Led 2 33.1 AX-8100 Temp °C Led 1 CX-900x Fan CX-900x Fan CX-900x Fan CX-900x Fan

LED Custom Name.

You can customize the LED name by pung your own preferred label. Click the box right next to "Name" under Conguraon panel. In this example we have re-labelled LED1 to Case LED. This feature applies to any device.
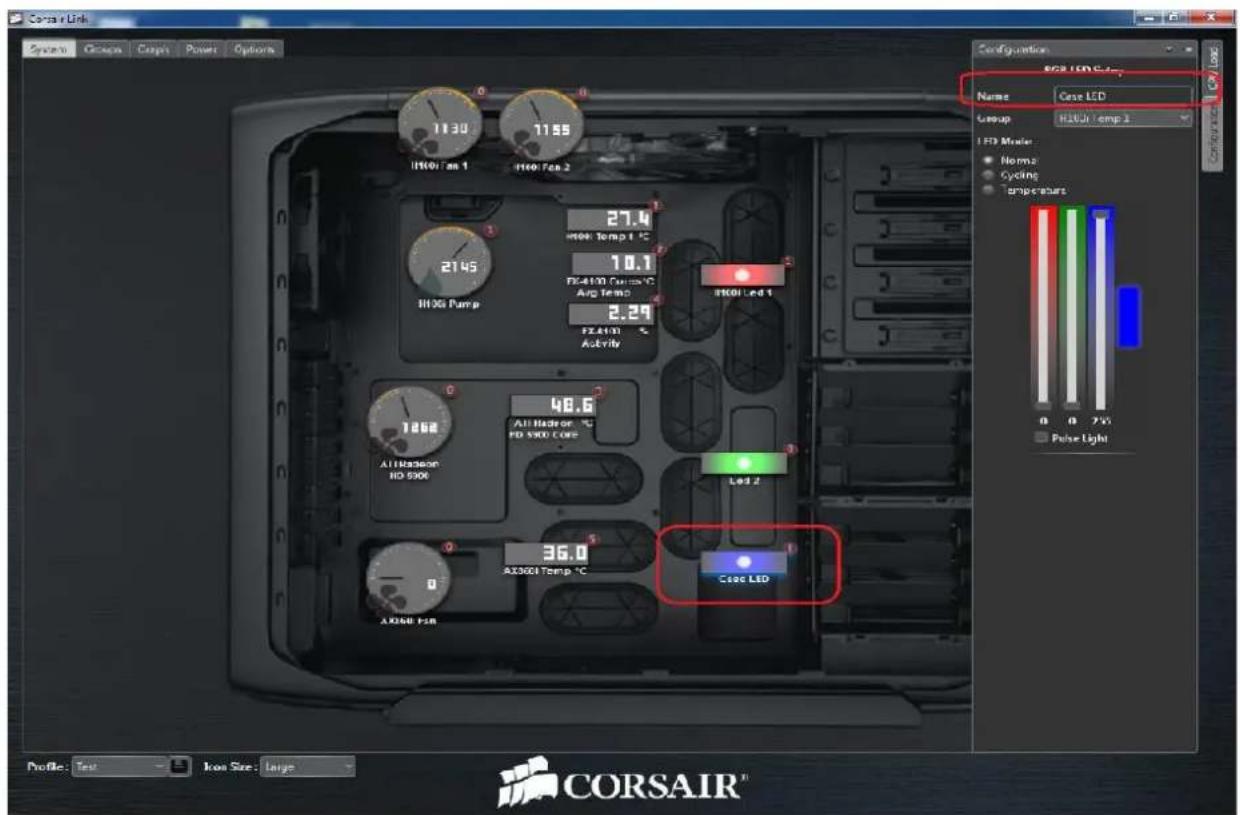
Corsoa Link System Genes Craps Power Options 1130 1155 H100i Fan 1 H100i Fan 2 27.4 Temp 1 °C 10.1 FX4100 Current °C Avg Temp 2.29 FX4101 Active H100i Pump 1268 All Hason 1 °C FD 5000 Core 48.6 LED 2 ALLHason HD 5000 36.0 AX3001 Temp °C Case LED CX200 FAN CX200 FAN Configuration BOSI LED S- Name Case LED Group H100i Temp 2 LED Model: Norms Cycling Temperatures 0 0 75% Pulse Light Profile: Test Icon Size: Large CORSAIR™

Adding a device to a control group

In the Groups tab, you can group devices together using the drag and drop method and assign them to control groups.

Simply drag devices from the right hand column into the control group you want them to be in. In the image below LED1 is assigned the temperature group, so the fans and LED will act as one device dependent upon the sengs for the devices within the group. LED2 will vary according to its own set of properes as it is not assigned to a group.
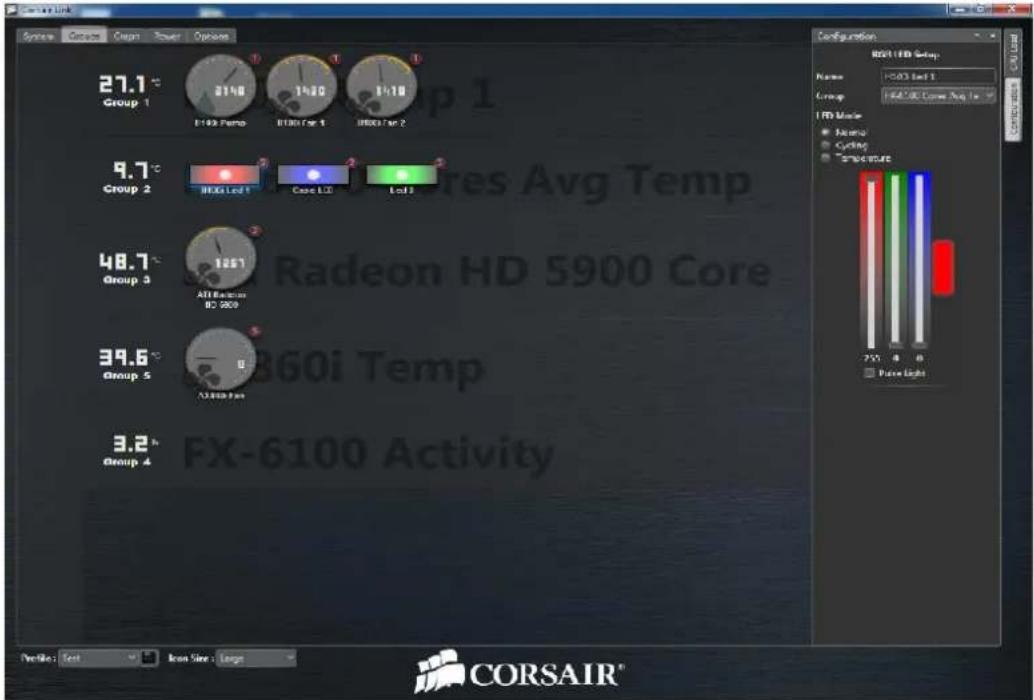
27.1 °C Group 1 3140 1420 1410 F199 Pump RDCI Fan 1 RDCI Fan 2 9.7 °C Group 2 RDCI Load 1 Case Load Load 1 48.7 °C Group 3 All Resistors BD 2009 39.6 °C Group 5 0 3.2 °C Group 4 FX-6100 Activity Configuration RGB LED Setup Name: >031 Intel 1 Group: Full Cell Cover Avg 1x LED Mode: ● Normal ● Cycling ● Temperature: 755.4 8 Pure Light Portfolio: End Iron Size: Large CORSAIR®

Graph tab

At rst, the graph tab will be blank. Click on the screen and the Graphing Conguraon Panel will show up on the right hand side of the screen. You can view the status of your devices and system over me with the Graph Tab. To see individual devices, select or deselect them from the conguraon panel on the right.
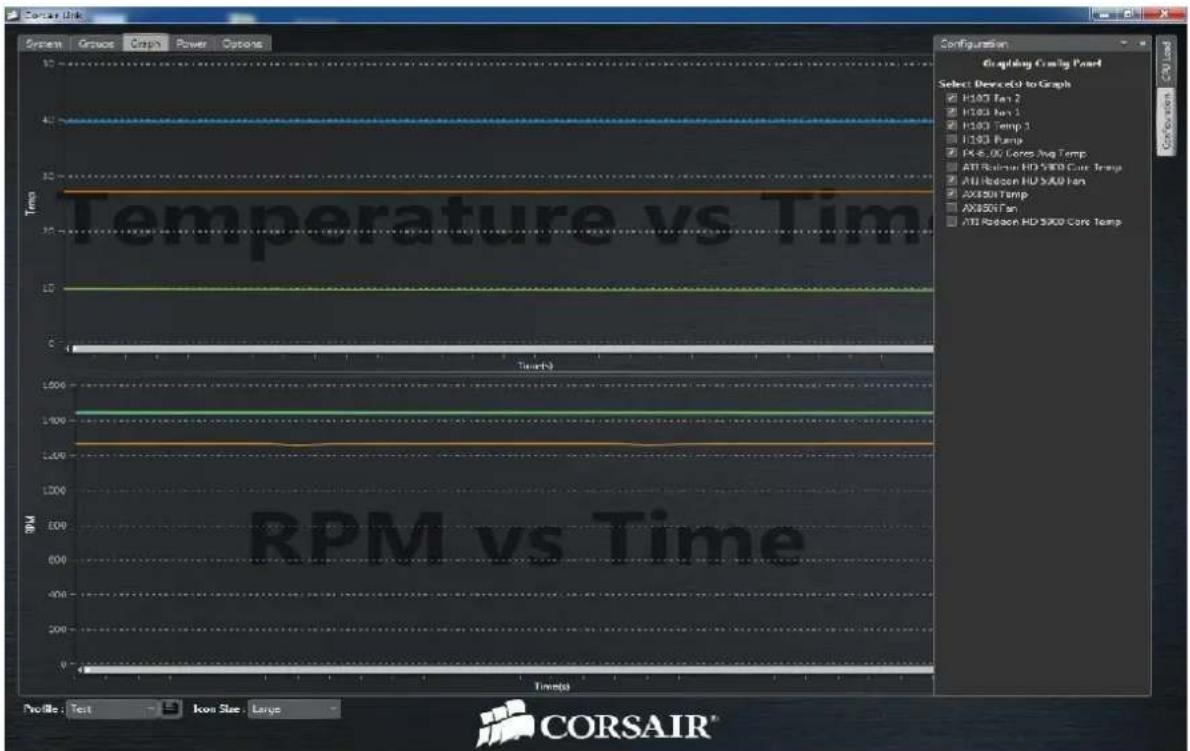
Temperature vs Time Temperature CPU Load Configuration Displaying Ctrl+ Panel Select Devices to Graph H1007 Tin 2 H1003 Tin 1 H1003 Temp 1 H1003 Pump P4.6.0K Cores Avg Temp ATI Radion HD 5000 Core Temp ATI Radion HD 5000 Torr AX8501 Tin AX8501 Tin ATI Radion HD 5000 Core Temp RPM vs Time Profile: Test Icon Size: Large CORSAIR®

Closing the conguraon panel shows the device color key.
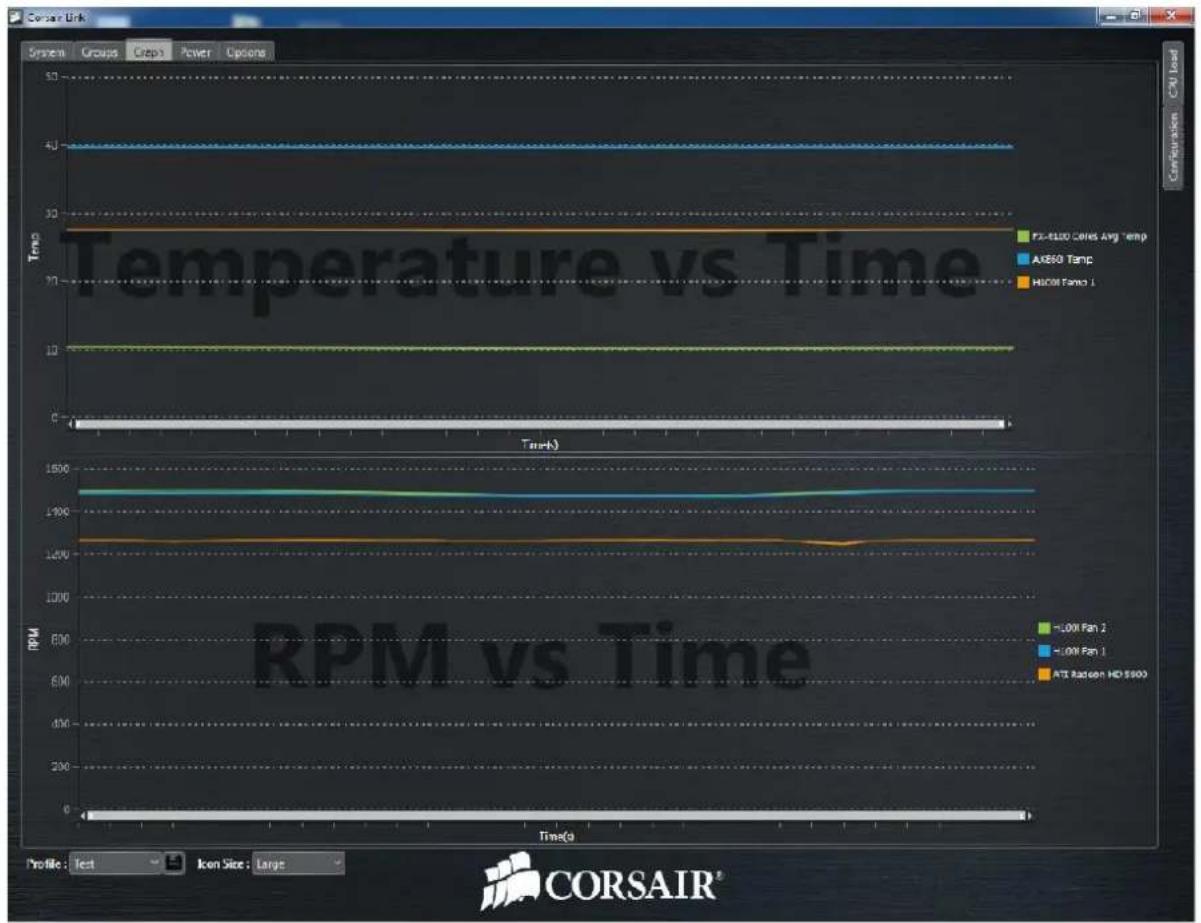
CORSAIR CL-9011107-WW - Graph tab - 2

line | Truck | Temperature (°C) | RPM (rpm) | |-------|------------------|---------| | FX-1000 Series Avg Temp | 41 | 1300 | | Ax860 Temp | 41 | 1300 | | H2007 Series I | 41 | 1300 |

Saving a Prole

You can save your prole, load exisng proles or create new proles from the File menu. You can have mulple proles for dierent uses, such as quiet, low power compung or full performance for gaming.
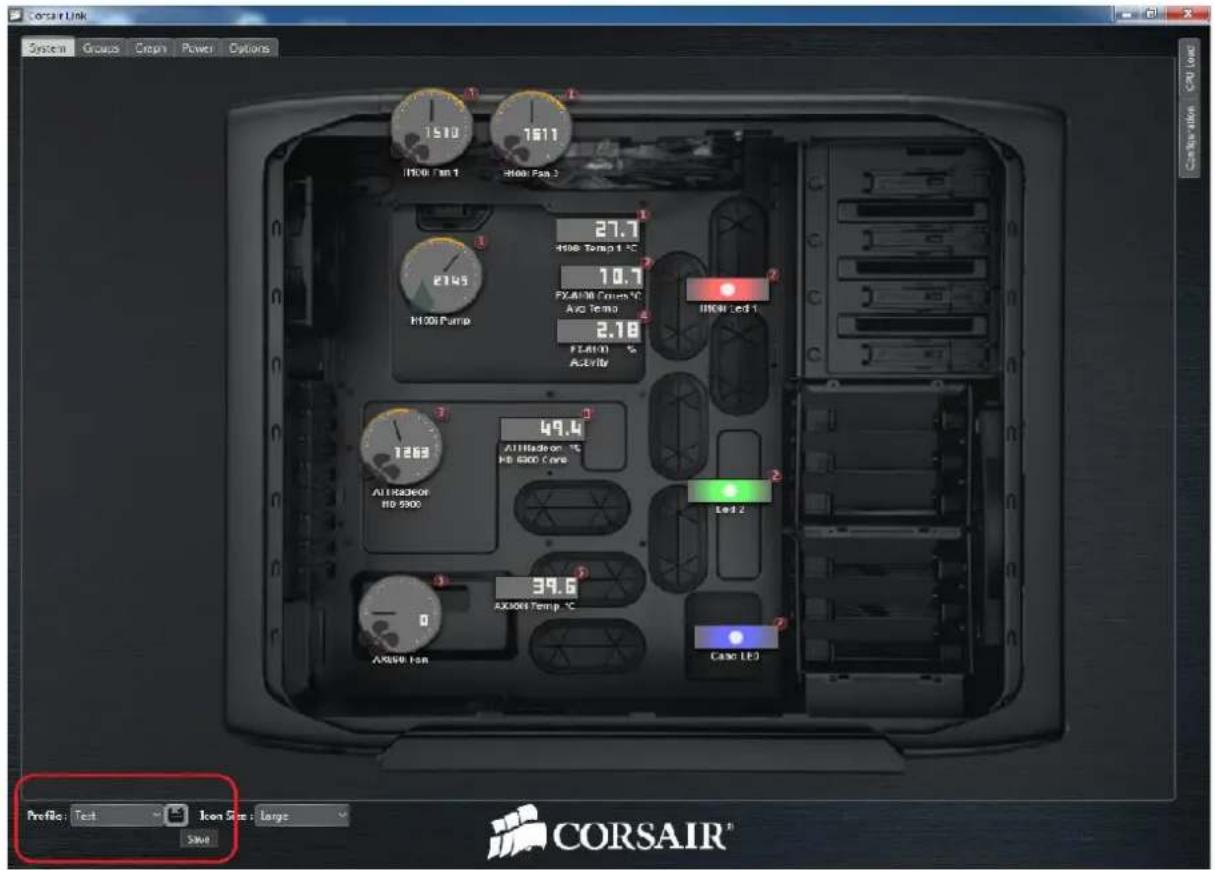
Corsair Link System Groups Clean Power Options 1510 1611 1 1000 Fan 1 High Fan 2 27.7 4900 Temp 1 °C FX4000 Current °C Avg Temp 2.18 FL4000 % Active 2143 M1000 Pump 1 49.4 All Hadoop - °C HD 6000 Core LED 2 ALLHADON HD 5900 39.6 AX3000 Temp °C AX3000 Fan Case LED Profile: Test Icon Size: Large Save CORSAIR®

To create a new prole, go to Opons tab and under Prole secon click new. A window will pop up where you can name of the prole you would like to create then save it.
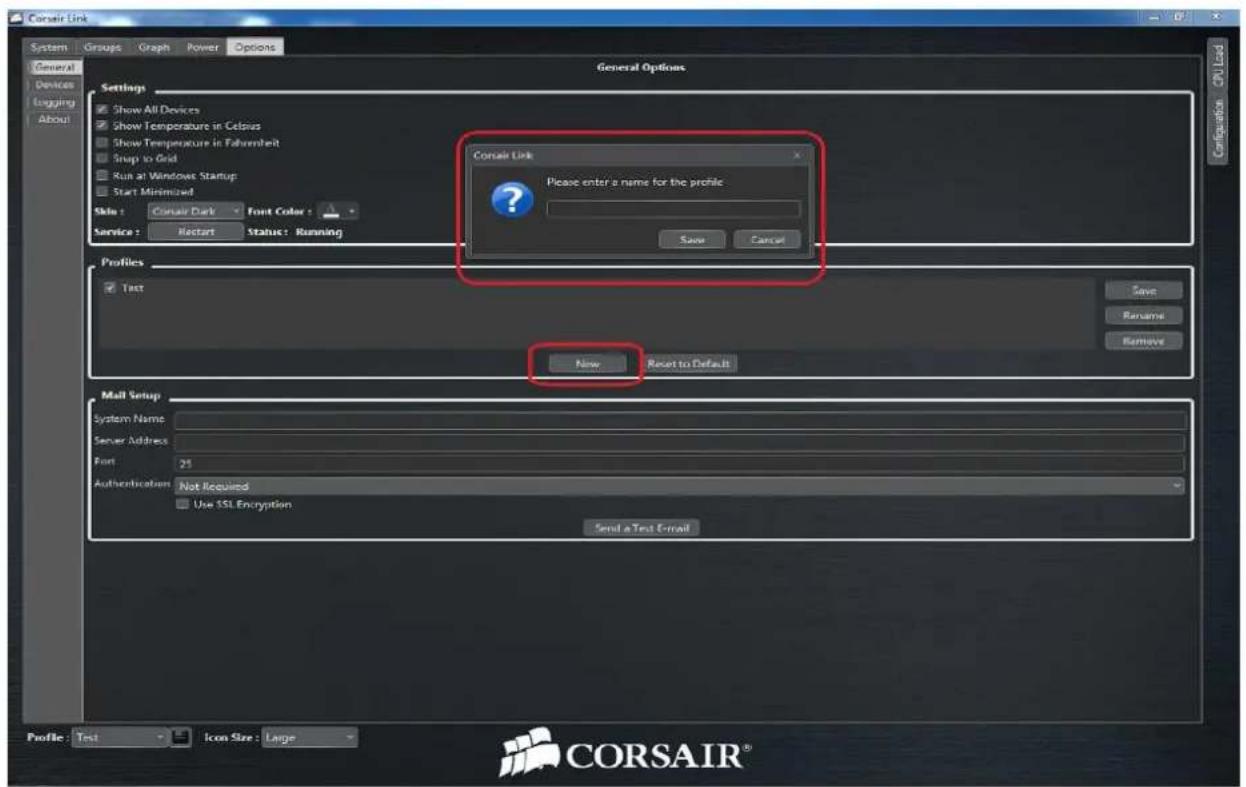
General Options Settings Show All Devices Show Temperature in Celsius Show Temperature in Fahrenheit Snap to Grid Run at Windows Startup Start Minimized Skis: Corsair Dark Font Color: Service: Restart Status: Running Profiles Test Save Rename Remove New Reset to Default Mail Setup System Name Server Address Port: 25 Authentication: Not Required Use SSL Encryption Send a Text E-mail Profile: Test Icon Size: Large CORSAIR®

Power Tab

The Soware will automatically detect a Corsair PSU that is compatible with Corsair Link. If a Corsair Link enabled PSU is detected, the power tab menu will be populated with informaon that is outpued by the PSU. In the

example below, Eciency in percentage and Power in/Power out values are available for monitoring. Voltage on each of the PSU rails is displayed as well.
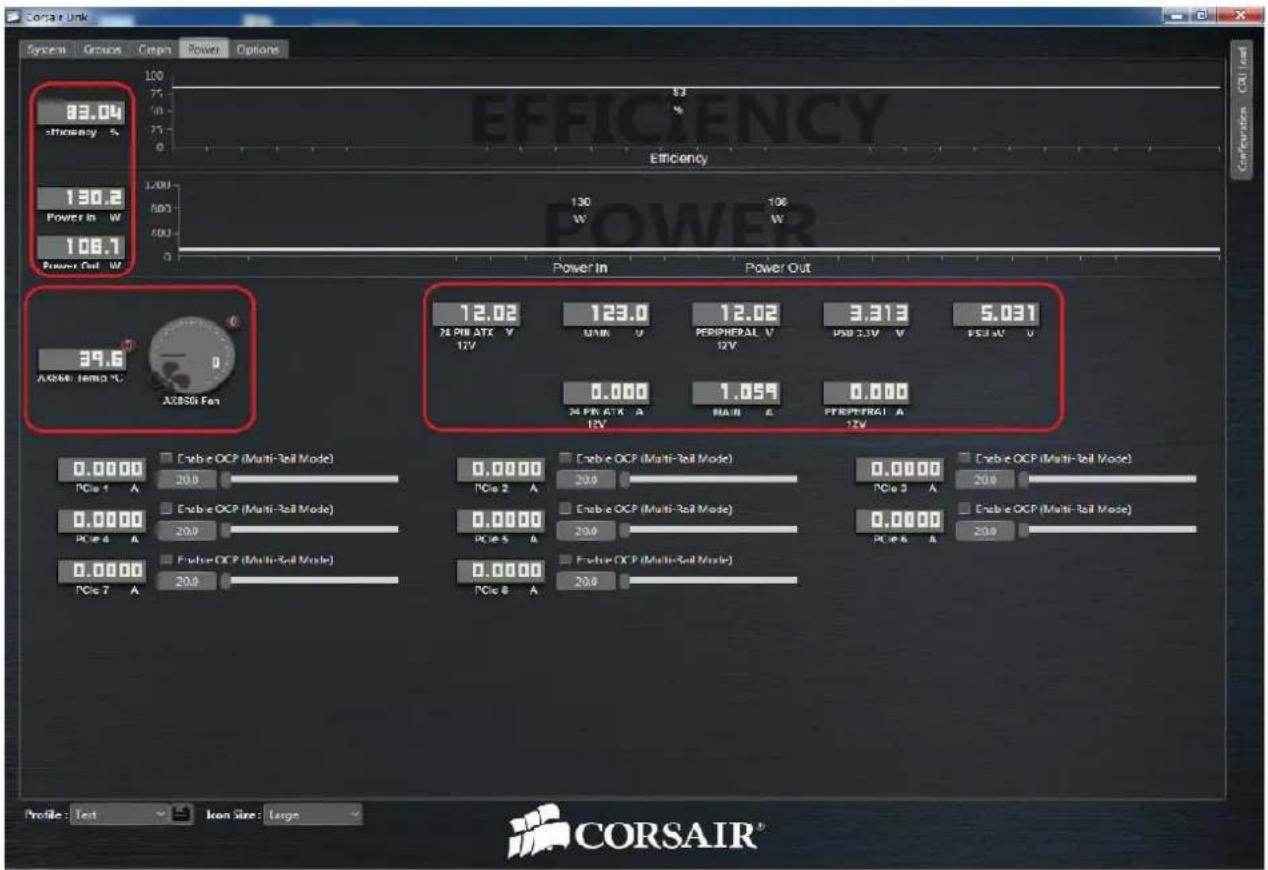
83.04 efficiency % 130.2 Power In W 108.1 Power Out W Efficiency 130 100 W Power In Power Out 12.02 24 PIN ATK V 12V 123.0 MAIN V 12.02 PERIPHERAL V 12V 3.313 PSB 2.3V V PSB 4V V 5.031 39.6 AX856 Fan 0.0000 24 PIN ATK A 12V 1.059 MAIN E 0.000 PERIPHERAL A 12V Enable OCP (Multi-Roll Mode) PCis 1 A Enable OCP (Multi-Roll Mode) PCis 4 A Enable OCP (Multi-Roll Mode) PCis 7 A Enable OCP (Multi-Roll Mode) PCis 8 A Enable OCP (Multi-Roll Mode) PCis 2 A Enable OCP (Multi-Roll Mode) PCis 5 A Enable OCP (Multi-Roll Mode) PCis 6 A Enable OCP (Multi-Roll Mode) PCis 9 A Enable OCP (Multi-Roll Mode) PCis 2 A Enable OCP (Multi-Roll Mode) PCis 5 A Enable OCP (Multi-Roll Mode) PCis 8 A Profile: Text Icon Size: Large CORSAIR®

The OCP secon.

This will allow you to select a check box and enable Over Current Protecon (OCP) or Mul-Rail Mode on some PSUs. The slider rail is acvated upon selecon of the check box and you can then adjust the OCP seng from 20A to 40A. This selecon is automatically wrien back to the PSU upon data point adjustment. If this threshold is crossed the PSU will shut itself down to prevent itself from crossing the user-dened safety threshold.
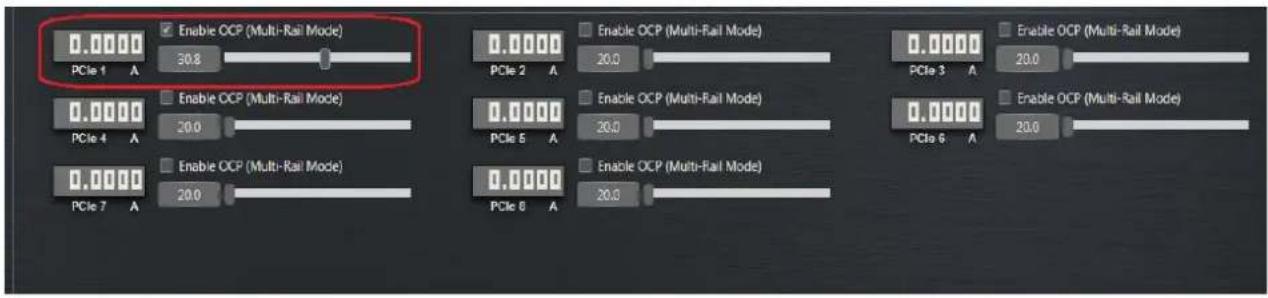
Enable OCP (Multi-Rail Mode) PCIe 1 A 30.8 Enable OCP (Multi-Rail Mode) PCIe 4 A 20.0 Enable OCP (Multi-Rail Mode) PCIe 7 A 20.0 Enable OCP (Multi-Rail Mode) PCIe 2 A 20.0 Enable OCP (Multi-Rail Mode) PCIe 5 A 20.0 Enable OCP (Multi-Rail Mode) PCIe 6 A 20.0 Enable OCP (Multi-Rail Mode)

Opons Tab

General Opons

This secon is where you can manage Corsair Link sengs. You can select whether you want to have your temperature scale measured in °C or °F values. You will have the opon to run Corsair Link during Windows start up or you simply run it manually once Windows has fully loaded. Selecng skins, font color, and restarng the service will be under this secon as well. Clicking “Reset to Default” box will set all values and sengs back to default prole.
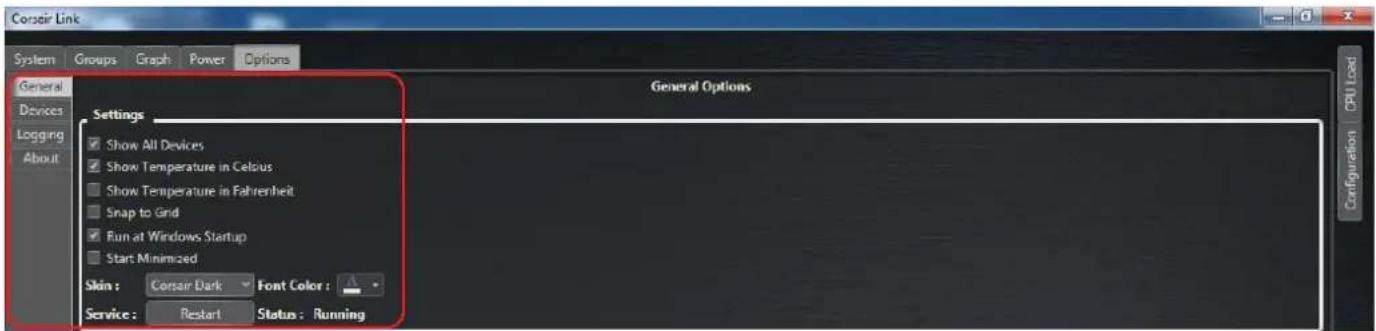
Corexir Link System Groups Graph Power Options General Devices Logging About Settings Show All Devices Show Temperature in Celsius Show Temperature in Fahrenheit Snap to Grid Run at Windows Startup Start Minimized Skin: Corsair Dark Font Color: Service: Restart Status: Running General Options CPU Load Configuration

Devices

This part of the soware is where you can see all the informaon that you would like to nd out about each device. It will display valuable informaon, such as device rmware version, CPU info, Motherboard info, and more. Simply click the arrow buon below the name of the device and the informaon will be shown via drop down text. The Device Management tab also allows you to install updated rmware.
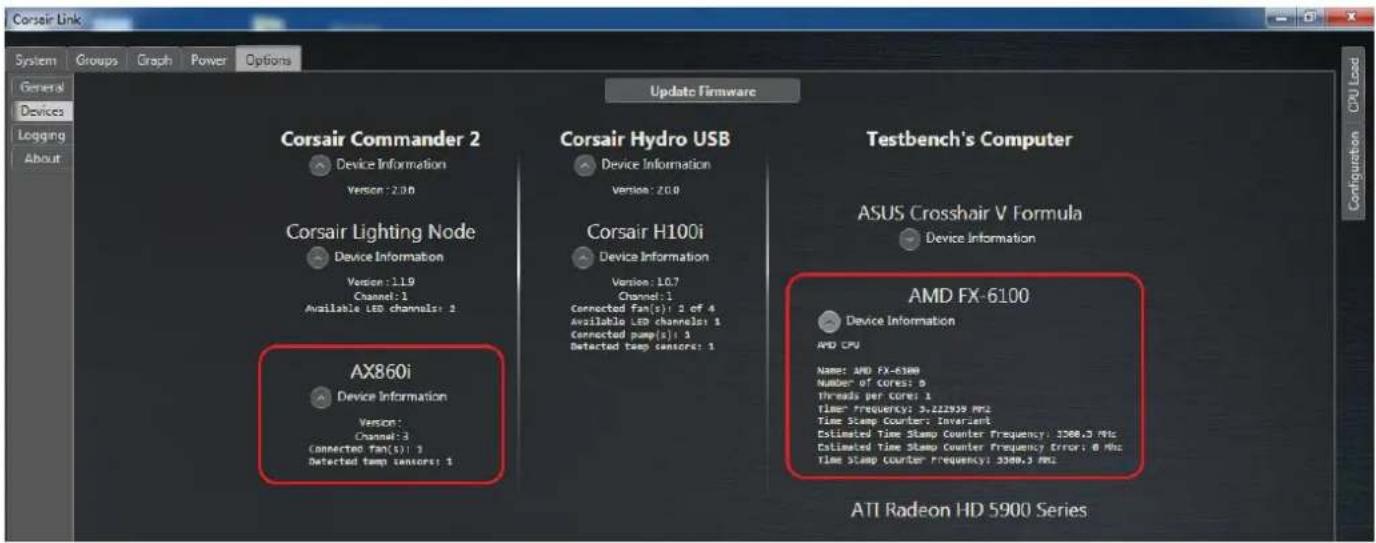
Corsair Link System Groups Graph Power Options General Devices Logging About Update Firmware Corsair Commander 2 Device Information Version: 2.00 Corsair Lighting Node Device Information Version: 1.19 Channel: 1 Available LED channels: 1 AX860i Device Information Version: Channel: 3 CONNECTED Fan(s): 3 Detected temp sensors: 1 Corsair Hydro USB Device Information Version: 20.0 Corsair H100i Device Information Version: 10.7 Channel: 1 Connected Fan(s): 2 of 4 Available LED channels: 1 Connected pump(s): 3 Detected temp sensors: 1 Testbench's Computer ASUS Crosshair V Formula Device Information AMD FX-6100 Device Information AMD CPU Name: AMD FX-6100 Number of cores: 0 Threads per core: 1 Time* frequency: 5.222939 MHz Time Stamp Counter: Invariant Estimated Time Stamp Counter Frequency: 3300.3 MHz Estimated Time Stamp Counter Frequency Error: 0 MHz Time Stamp Counter Frequency: 3300.3 MHz ATI Radeon HD 5900 Series

Firmware Update:

The Opon/Device tab will allow you to install the latest rmware update. Click the "Update Firmware" box, a window will appear. Select the device that you need to update from the drop down menu.

Circuit Link System Groups Graph Power Options General Server Logberg About Corsair Commander 2 Device Information Corsair Lighting Node Device Information AX860i Device Information Corsair IBM / Hostless Hossear Update Corsair H80/100s Prior update request R/ Start Close Status Ready Update Hossear Corsair Hydro USB Device Information Version: 2000 Corsair H100i Device Information Version: 1000 Parameter: 3.5" or 4" Testbench's Computer ASUS Crosshair V Formula Device Information Maintenance MODEL Version: 0.7 With HMI/100s hardware version: 1000 Model: 1000 System manufacturer: to be filled by 0.x.x. system name: to be filled by 0.x.x. System version: to be filled by 0.x.x. Maintenance manufacturer: custom COMPUTER INC. Maintenance System: Crosshair V Formula Maintenance Version: No. 5.0 Maintenance Manufacturer: com Provider version: 200 (R19L-438) to care Processor Maintenance Core Users: 5 Processor Core Units: 4 Maintenance Desktop Count: 4 Processor Internal Clock: 386 MHz Hardware Device: [ ] Manufacturing Manufacturers Hardware Device: [ ] Part Number: [ ] Micro Manufacturers Hardware Device: [ ] Divers LCaser: [ ] GDDR Hardware Device: [ ] Band LCaser: [ ] BPSB Hardware Device: [ ] Speed: 8 MHz Hardware Device: [ ] Manufacturing Manufacturers Hardware Device: [ ] DFT, Master, Other, Micro Manufacturers Hardware Device: [ ] Divers LCaser: [ ] GDDR Hardware Device: [ ] Band LCaser: [ ] BPSB Hardware Device: [ ] Standard: [ ] 122 MHz Hardware Device: [ ] Manufacturing Manufacturers

Once the device is selected, click the box next to the le tab, then select the Firmware le update you have downloaded and click open. Select start to initiate the rmware update.
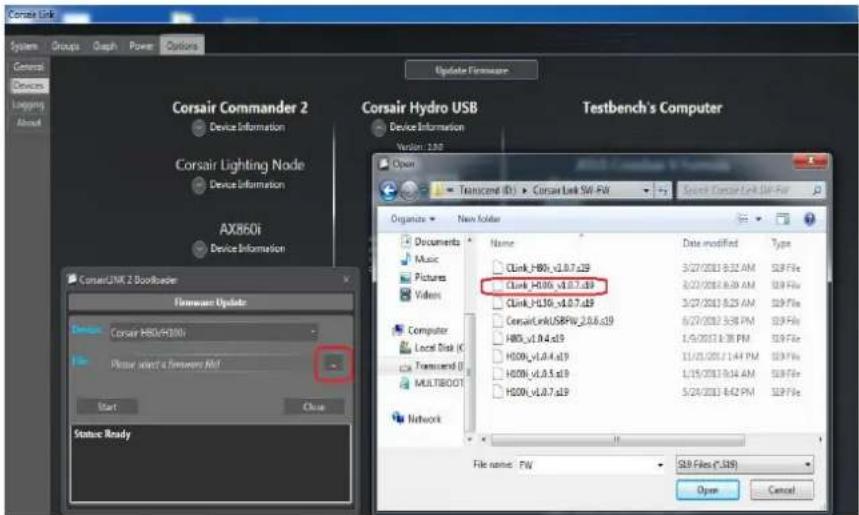
Corsair Link System Groups Graph Power Options General Devices Logging About Update Firmware Corsair Commander 2 Device Information Corsair Lighting Node Device Information AX860i Device Information ConsairLINK 2 Bookloader Hardware Update Design Corsair HBO/H300 Please start a software Iraq Start Close Status Ready Corsair Hydro USB Testbench's Computer Device Information Version: 198 Open Transcmd (D:) > Corsair Link SW-FW Organize New folder Documents Name Date modified Type Music CLink_H300_v1.0.7.a19 3/27/2013 9:32 AM SLP File Pictures CLink_H300_v1.0.7.a19 3/27/2013 8:30 AM SLP File Videos CLink_LKBUSBFW_2.0.6.a19 3/27/2013 8:25 AM SLP File Computer CLink_LKBUSBFW_2.0.6.a19 6/27/2013 9:38 PM SLP File Local Disk CLink_LKBUSBFW_2.0.6.a19 1/5/2013 1:38 PM SLP File Transcmd CLink_LKBUSBFW_2.0.6.a19 11/15/2013 1:44 PM SLP File MULTIBOOT CLink_LKBUSBFW_2.0.6.a19 1/15/2013 9:14 AM SLP File Network CLink_LKBUSBFW_2.0.6.a19 5/24/2013 8:42 PM SLP File File name: FW SLP Files (*.SIP) Open Cancel

The progress of the upgrade will be shown as a percentage in the dialogue box. Once the update is complete, simply close the dialogue box using the X in the top right corner or the "Close" buon in the dialog box.
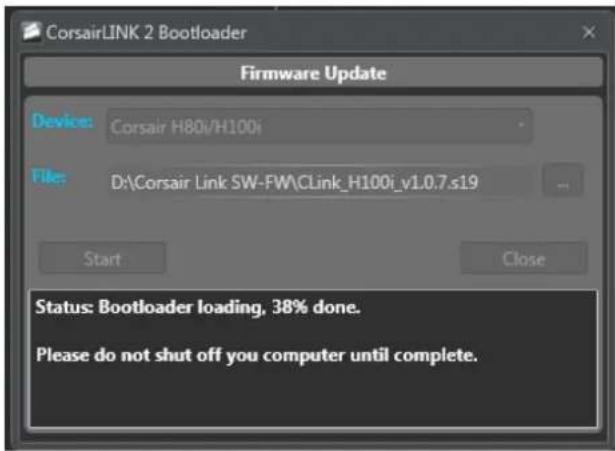
CorsairLINK 2 Bootloader Firmware Update Device: Corsair H80i/H100i File: D:\Corsair Link SW-FW\CLink_H100i_v1.0.7.s19 Start Close Status: Bootloader loading, 38% done. Please do not shut off you computer until complete.

Logging tab

You can choose to log the data output from any combinaon of devices and also set where the logs are saved.
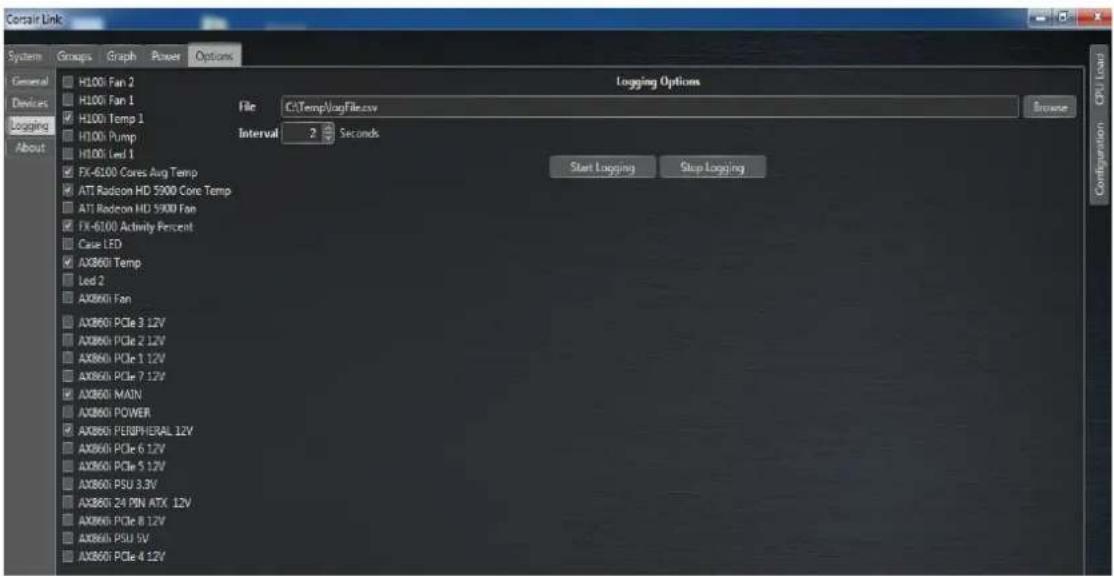
Corsair Link System Groups Graph Power Options General H100 Fan 2 H100 Fan 1 H100 Temp 1 H100 Pump H100 Led 1 FX-6100 Cores Avg Temp ATT Radeon HD 5900 Core Temp ATI Radeon HD 5900 Fan FX-6100 Activity Percent Case LED AX860i Temp Led 2 AX860i Fan AX860i PCIe 3.12V AX860i PCIe 2.12V AX860i PCIe 1.12V AX860i PCIe 7.12V AX860i MAIN AX860i POWER AX860i PERIPHERAL 12V AX860i PCIe 6.12V AX860i PCIe 5.12V AX860i PSU 3.3V AX860i 24 PN ATX 12V AX860i PCIe 8.12V AX860i PSU 5V AX860i PCIe 4.12V Logging Options File C:\Temp\VoqFile.csv Browse Interval 2 Seconds Start Logging Stop Logging Configuration CPU Load

To view details of the soware version as well as contact Corsair, click the About Tab
CORSAIR LINK DIGITAL Computer is built for your updates Corsair Link Version 2.4.0.048 Copyright at https://www.corsair.com/ Profile: Text Icon Size: Large CORSAIR®

Manual assistant
Powered by Anthropic
Waiting for your message
Product information

Brand : CORSAIR

Model : CL-9011107-WW

Category : Computer and Peripheral Cables