F16 - Véhicule pour personnes handicapées Sunrise Medical - Free user manual and instructions
Find the device manual for free F16 Sunrise Medical in PDF.


User questions about F16 Sunrise Medical
0 question about this device. Answer the ones you know or ask your own.
Ask a new question about this device
Download the instructions for your Véhicule pour personnes handicapées in PDF format for free! Find your manual F16 - Sunrise Medical and take your electronic device back in hand. On this page are published all the documents necessary for the use of your device. F16 by Sunrise Medical.
USER MANUAL F16 Sunrise Medical
natural_image
Line drawing of a three-wheeled electric vehicle with visible wheels and control panel (no text or symbols)Owner's Manual
natural_image
Line drawing of a modern electric wheelchair with wheels and control panel (no text or symbols)How to use this manual
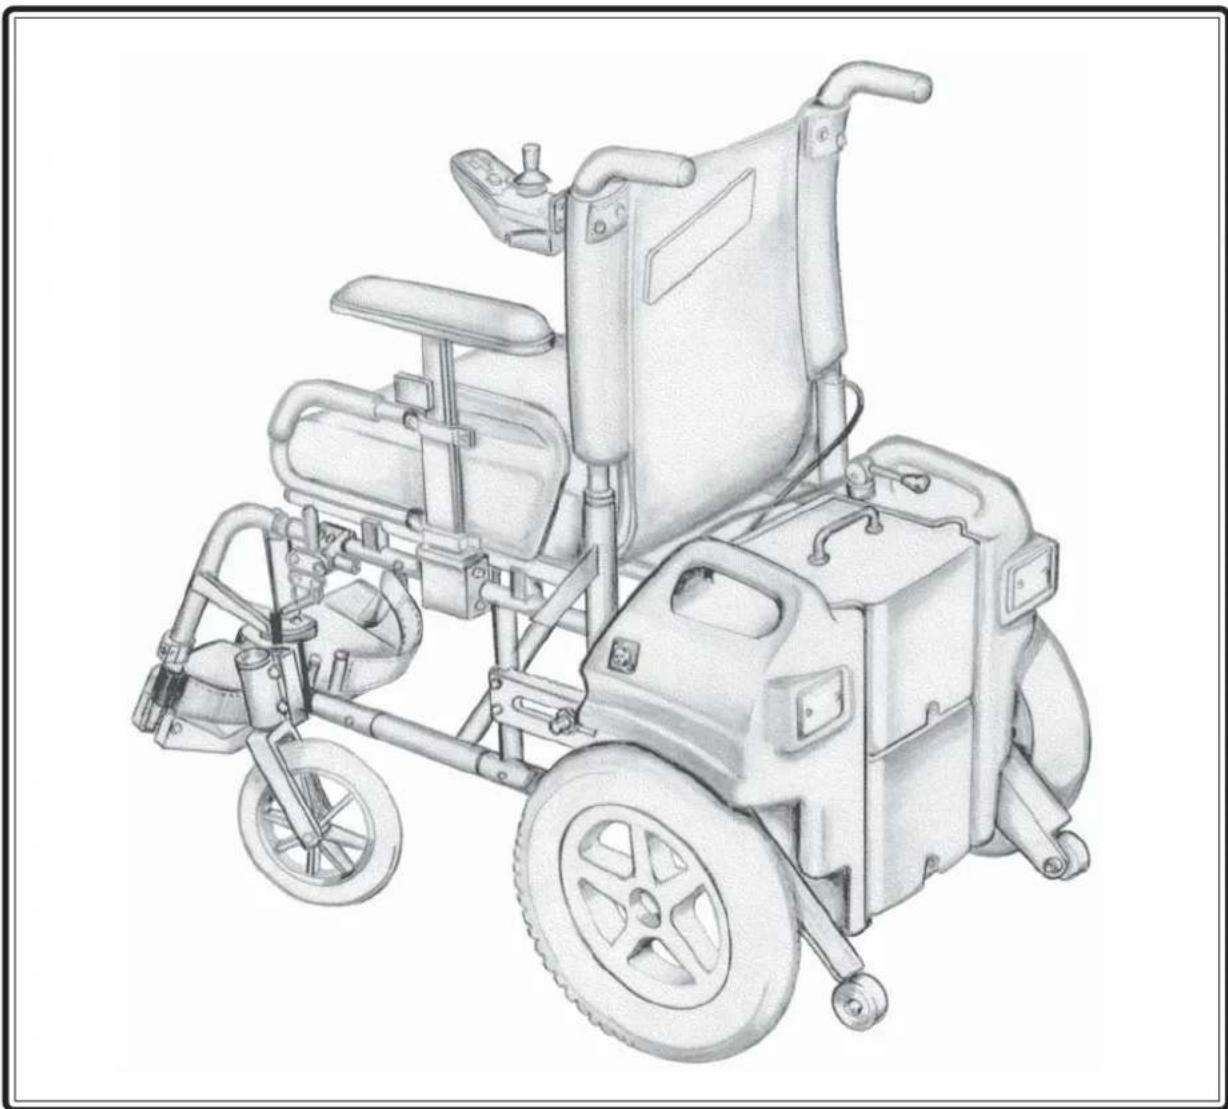
We at Sunrise Medical want you to get the best out of your F16 wheelchair. This Owner's Manual will familiarise you with the chair and its features. It contains hints on everyday usage and general care in addition to information on the high quality standards which we adhere to and details about the guarantee. There are a wide range of components and adjustments available on the F16 for further information about these you should contact your wheelchair prescriber/supplier.
Your wheelchair will reach you in excellent condition having been personally inspected before leaving our factory. By following the guidelines for maintenance and cleaning on page 38 your wheelchair will maintain its first class condition and give you complete satisfaction.
Contents
Introduction page 1
Guarantee page 2
Features and options page 3
Safety tips page 4 - 6
Preparing your wheelchair for use page 7 - 12
Pilot control page 13 - 15
The Penny and Giles Pilot + control pod page 16 - 23
Parallel Swing-Away page 24
Batteries and charging page 25 - 33
User tips page 34 - 36
Transporting your chair page 37 - 38
Lap belt instructions page 39 - 41
Maintenance page 42 - 43
Service history page 44
Sunrise Medical page 45
Introduction
The F16 has been designed for use by an individual on a daily basis. It is suitable for both indoor and outdoor use. It is only intended for use as a pavement vehicle, but may also be used when crossing between pavements.
This vehicle has been designed for a single occupant of limited mobility up to the weight of 118Kg, who has the cognitive, physical and visual ability to control the vehicle safely. If you are in any doubt as to the suitability of the powerchair, contact your local Sunrise approved dealer for clarification, prior to commencing use.
It is very important to read the relevant section of the Owner's Manual when making any adjustments. If you have any queries about the use, maintenance or safety of your wheelchair, please contact your local approved Sunrise Medical service agent. If you do not know of an approved dealer in your area, or have any other questions please write or telephone:
SUNRISE MEDICAL LIMITED
HIGH STREET WOLLASTON
WEST MIDLANDS DY8 4PS
ENGLAND
Telephone 01384 44 66 88 Fax. 01384 44 66 99
International Telephone +44 1384 44 66 88 Fax.+44 1384 44 66 99
www.sunrisemedical.co.uk
Sunrise Medical is ISO 9001 certified, which ensures quality at all stages of the development, and production of this wheelchair.
This product is manufactured to comply with the radio
interference requirements of EEC directive 89/336/EEC
Medical Device Directive 93/42/EEC
CE
Sunrise is dedicated to providing products of exacting quality which conform fully and reliably to the requirements of their intended use. Sunrise is accredited to B.S. EN ISO 9001, which is the internationally recognised standard for quality management systems. This approval ensures we provide quality in all areas of our business, from development through to final delivery.
SERIAL Number: INSPECTED BY:
Guarantee
Your guarantee
The guarantee form is included in the Sunrise Pack, please fill in the relevant details and return to us to register your entitlement.
THIS IN NO WAY AFFECTS YOUR STATUTORY RIGHTS.
Warranty conditions
- The repair or replacement will be carried out by an authorised Sunrise Medical dealer/service agent.
- To apply the warranty conditions, should your wheelchair require attention under these arrangements, notify the designated Sunrise Medical service agent immediately giving full information about the nature of the difficulty. Should you be operating the wheelchair away from the locality of the designated Sunrise Medical service agent work under the "Warranty Conditions" will be carried out by any other service agent designated by the manufacturer.
- Should any part of the wheelchair require repair or replacement, as a result of a specific manufacturing or material defect, within twelve months from the date on which the possession of the wheelchair was transferred to the original purchaser, and subject to it remaining within that ownership, the part or parts will be repaired or replaced completely free of charge if returned to the authorised service agent.
Note: This guarantee is not transferable.
-
Any repaired or replaced part will benefit from these arrangements for the balance of the warranty period applicable to the wheelchair.
-
Parts replaced after the original warranty has expired are covered for a further twelve months.
-
Items of a consumable nature will not generally be covered during the normal warranty period, unless such items have clearly suffered undue wear as a direct result of an original manufacturing defect. These items include amongst others upholstery, tyres, inner tubes, and similar parts.

SUNRISE MEDICAL
Sunrise Medical Limited
High Street Wollaston West Midlands DY8 4PS
England
Tel 01384 4466 88 Fax 01384 44 66 99
www.sunrisemedical.co.uk
-
The above warranty conditions apply to all wheelchair parts, for models purchased at full retail price.
-
Under normal circumstances, no responsibility will be accepted where the wheelchair has required repair or replacement as a direct result of:-
a The wheelchair or part not having been maintained in accordance with the manufacturer's recommendations, where such exist. Or failing to use only the specified original equipment parts.
b The wheelchair or part having been damaged by neglect, accident or improper use.
c The wheelchair or part having been altered from the manufacturer's specifications, or repairs having been attempted prior to the service agent being notified.
Please keep a note of your local service agent's address and telephone number in the space below. In the event of a breakdown, contact them and try to give all relevant details so they can help you quickly.
The wheelchairs shown and described in this manual may not be exactly the same in every detail as your own model. However, all instructions are still entirely relevant, irrespective of detail differences.
The manufacturer reserves the right to alter without notice any weights, measurements, or other technical data shown in this manual. All figures, measurements, and capacities shown in this manual are approximate, and do not constitute specifications.
Your local dealer
Your local dealer
Please remember to fill in and post the guarantee registration card enclosed with this manual. Sunrise Medical Limited recommend that you do not undertake maintenance tasks other than those explained in this manual. Your local approved Sunrise Medical service agent is fully trained by Sunrise Medical to carry out detailed maintenance as and when required. Use only genuine Sunrise Medical replacement parts.
Features and options
text_image
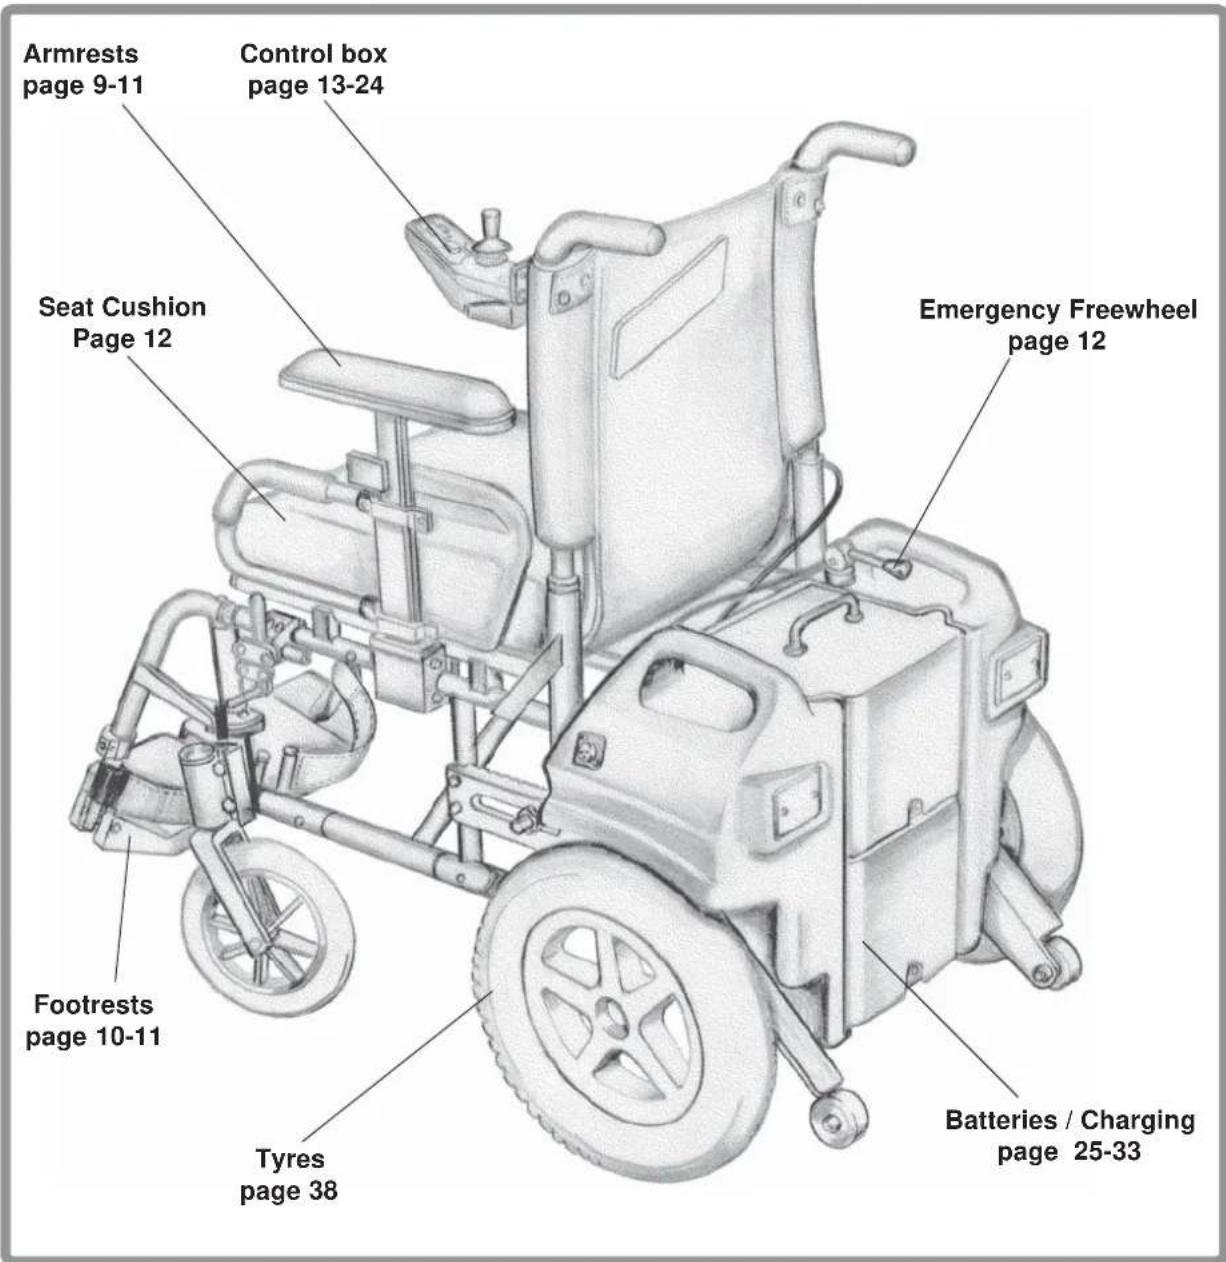
Armrests page 9-11 Control box page 13-24 Seat Cushion Page 12 Emergency Freewheel page 12 Footrests page 10-11 Tyres page 38 Batteries / Charging page 25-33The F16 has been designed for use by an individual, on a daily basis. It is suitable for both indoor and outdoor use. It is only intended for use as a pavement vehicle, but may also be used when crossing between pavements.
This vehicle has been designed for a single occupant, of limited mobility, up to the weight of 118Kg, who has the cognitive, physical and visual ability to control the vehicle safely. If you are in any doubt as to the suitability of the powerchair, contact your local Sunrise approved dealer for clarification, prior to commencing use.
Some of the options shown in this manual may not be available in your country. For further information please consult your Sunrise supplier.
Safety warning and user tips
Safety warnings
Safety is a very important with any vehicle that is power driven, here are some helpful tips to safeguard your use.
General
Always ensure that your wheelchair is switched off before attempting to mount or dismount.
Always ensure that you are able to operate all controls from a comfortable position. Paying attention to your posture is essential to ensure your continued comfort and well being.
Always make sure that you can be seen clearly, especially if you intend using your wheelchair in poor light.
Kerbs
Never descend a kerb forwards.
Please read carefully the section on kerb climbing in this manual before attempting to mount and dismount any kerbs in your wheelchair.
Do not attempt to climb or dismount a series of steps. It is unsafe to do so and could cause personal injury or damage the chair. The F16 has only been designed to climb a single step or kerb.
Routine service
Like most things in life a little care and attention goes a long way and your chair is no exception. The recommended service interval is one year. (See service history on later page).
Emergency freewheel
Please remember that you have no braking facility when the freewheel lever is moved from the normal drive position to the freewheel position.
The wheelchair must never be left with the lever in the freewheel position. For a fuller description of this facility and its limitations to use please see later section.
Emergency braking
The simplest and safest way to stop the wheelchair is to release the joystick control lever (see Control pod section). This will bring the chair to halt in a controlled manner.
Switching the control system off whilst the chair is in motion will also bring the chair to a halt. This latter method is not recommended as the stopping action is very abrupt.
Sharp turns
Full speed turns should not be attempted. If you need to turn sharply you must reduce your speed with the joystick or speed setting. This is particularly important when travelling across or down a slope. Disregarding this advice could lead to your wheelchair tipping over.
Safety warning and user tips
Batteries
Your wheelchair is supplied as standard from Sunrise Medical with maintenance-free batteries. These only require regular charging.
Do not, under any circumstances, tamper with the batteries. If in any doubt contact your local service agent.
Do not connect the battery charger to the mains supply until after you have connected the charger to the wheelchair. Before charging, please read the relevant section in this manual. Take care with battery acid which is very dangerous. It can cause burns to the skin as well as damage to floors, furniture and your wheelchair. If it comes into contact with the skin or clothing, wash immediately with soap and water. If it comes into contact with the eye, immediately flood the eye with running cold water for at least 10 minutes and seek medical attention immediately. Acid can be neutralised with baking soda and water. Take care to keep batteries upright at all times, especially when transporting your wheelchair.
Note: Before using your vehicle for the very first time, please charge your batteries for a period of 24 hours.
Tyres
Your wheelchair tyres can wear depending on use. Check them regularly in accordance with the service instructions in this manual, especially the pressure of the tyres.
NEVER inflate the tyres using a garage forecourt airline, always use the pump provided.
Cleaning seating
This is important should the wheelchair be used by more than one person to ensure there is no cross infection.
Cleaning controls
Should the control of your wheelchair become soiled or dirty, it can be wiped with a damp cloth with a dilute disinfectant until clean. This is important should the wheelchair be used by more than one person to ensure there is no cross infection.
Wheelchair motors
After prolonged use, the motors will produce heat which is radiated through the motors outer casing. Do not touch the motors outer casing for at least 30 minutes after using the wheelchair, to allow it to cool.
Safety warnings
Wheelchair range
The range of your wheelchair can be affected by many factors such as user weight, terrain, ambient temperature and battery condition. The stated range in the sales literature should be seen as the theoretical maximum and may not be attained by every user.
We recommend that every user initially limit their journey to half the stated range, until they have confidence in the actual range their wheelchair can attain. If your battery indicator is showing a low charge then do not attempt a long journey unless you are confident in reaching your destination and also returning to your home without the risk of being left stranded.
Use on a slope
Your wheelchair has been designed and tested to allow its use on slopes or gradients of up to 10^ . However, if you have the option of adjusting the angle of seating with either tilt seat or recline back, then in certain circumstances your wheelchair could become unstable. Before attempting to climb or decline a slope, we strongly recommend that you return the seat and back to an upright position.
Use on a slope (continued)
Failure to do this may cause the wheelchair to become unstable. If you are in any doubt about the capabilities of wheelchair on a slope then do not attempt to drive up or down the slope, try to find an alternative route.
Mobile telephones and two - way radios.
When operating cordless or mobile telephones, two way radios, walkie-talkies, C.B. Amateur Radio or other transmitting devices, the following must be noted:
Mobile telephones or two - way radios devices must not be used while operating the vehicle.
Use of Mobile Phones or Two Way Radios can cause excessively strong electromagnetic fields. This may interfere with the vehicles electronic systems. If Mobile Phones or Two Way Radios are required to be used, the vehicle must be brought to a halt and the power turned off before any such device is switched on or used.
Preparing your wheelchair for use
Assembling the batteries
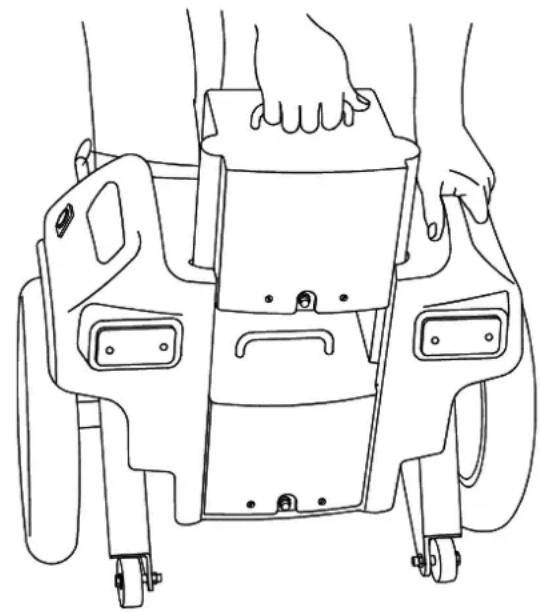
Slide in both batteries into the motor unit as shown in Fig. 1.
Note: the batteries are shaped to ensure that they cannot be incorrectly fitted.
Battery boxes being fitted to motor unit
natural_image
Line drawing of a mechanical device with hands holding parts, no text or symbols presentFig. 1
Connecting the batteries
The batteries are connected with two plugs which are located at the front of the motor unit (Fig. 2).
Note: Before using your vehicle for the very first time, please charge your batteries for a period of 24 hours.

natural_image
Line drawing of a hand adjusting a car wheel assembly with sensors and wiring (no text or symbols)Battery connection plugs
Fig. 2
Preparing your wheelchair for use
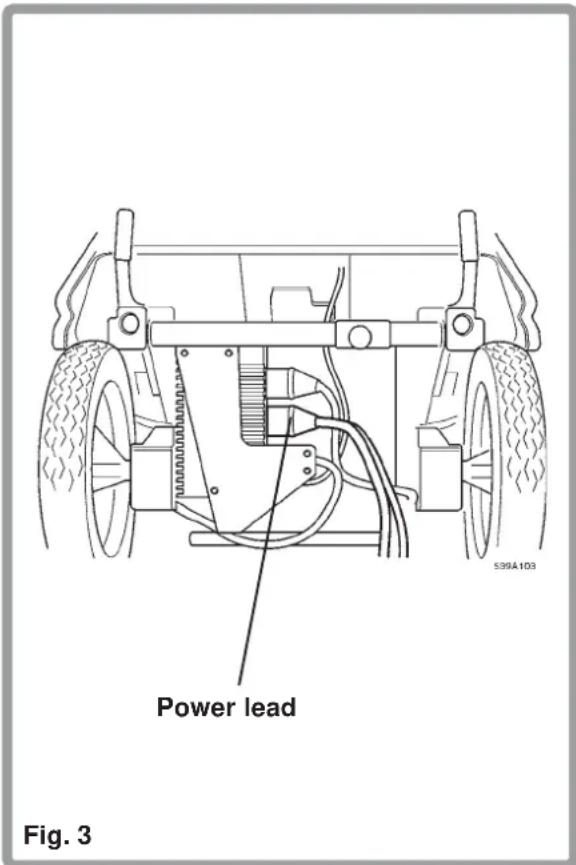
Connecting the batteries to the control unit
The batteries must next be connected to the control unit which is located at the front of the motor unit.
text_image
Power lead Fig. 3Control pod/control box connection
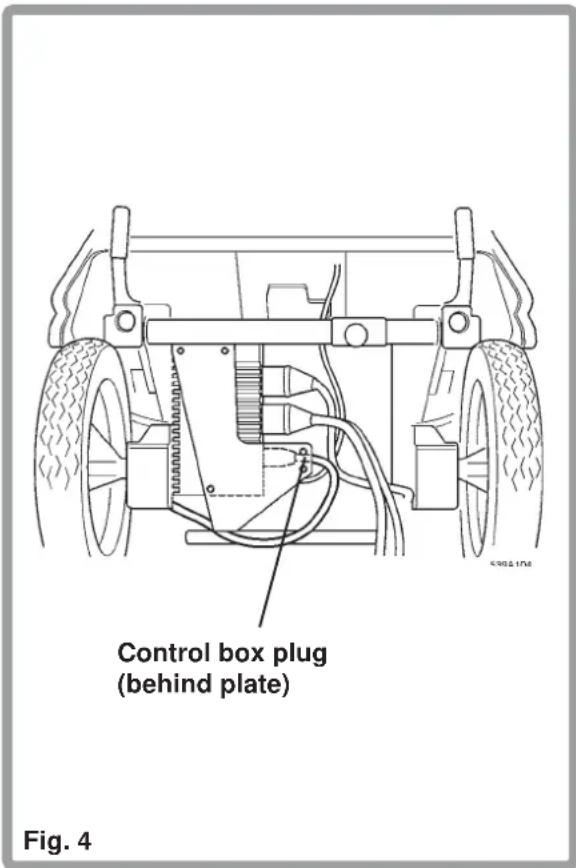
Connect the control pod plug into the control box (Fig. 4).
In this state the power unit can be driven carefully when switched on and manoeuvred into a convenient position to attach it to the frame, ensuring that the control pod lead is held safely to protect it from damage.
text_image
Control box plug (behind plate) Fig. 4Preparing your wheelchair for use
Assembling the motor unit and wheelchair
Remove the manual wheelchair quick release wheels.
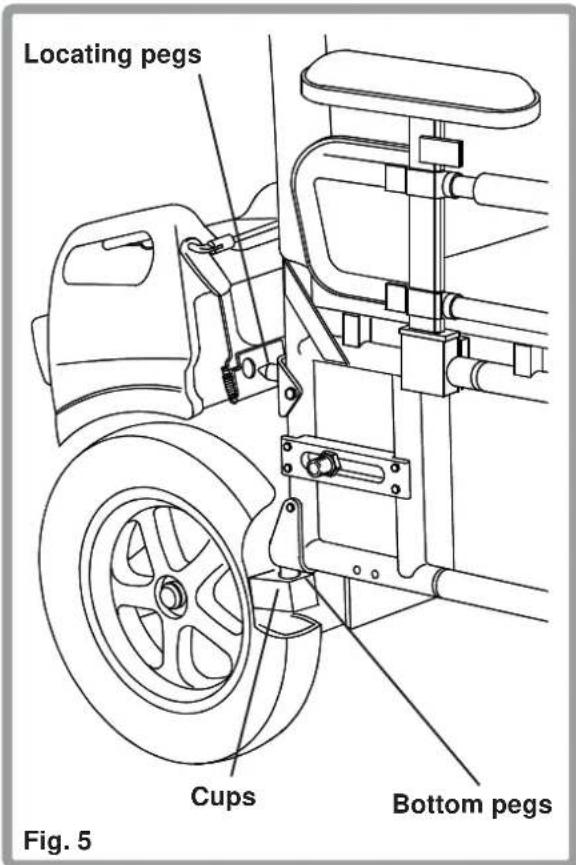
Connect the power unit to the frame by locating the bottom pegs on the frame (Fig. 5) into the cups on the motor unit, and rotating the motor unit towards the frame until the locating pegs on the frame lock into the holes in the motor unit. Ensure the control pod lead is protected during this process.
Note: the wheel and tyre have been cut away in the illustration for clarity.
text_image
Locating pegs Cups Bottom pegs Fig. 5Armrests
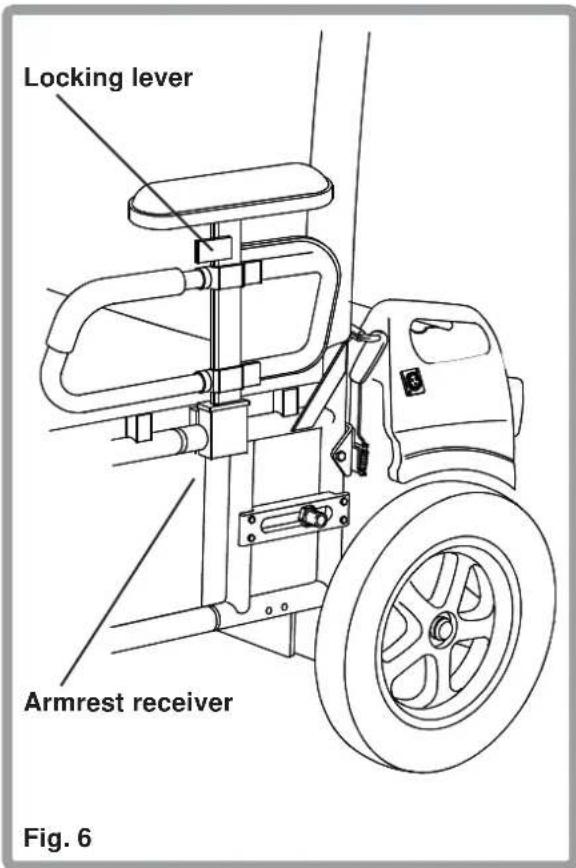
The armrests on both sides of the wheelchair can now be fitted. Lower the armrests into their receivers until they reach the required position and push the locking lever into the locked position (Fig. 6).
text_image
Locking lever Armrest receiver Fig. 6Preparing your wheelchair for use
Control Box
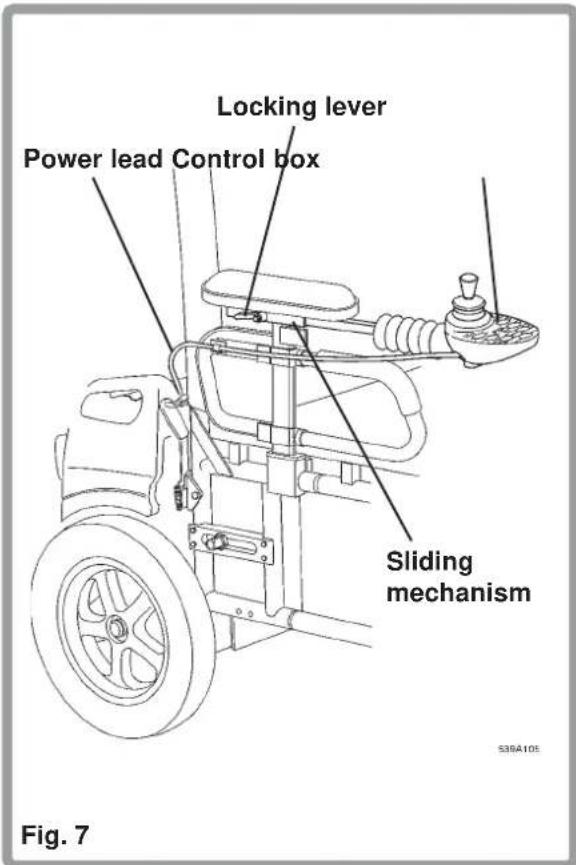
The control box is mounted on a sliding mechanism which enables the control to be moved forwards and backwards (Fig 7). Slide the extension arm into the sliding mechanism and secure the slider by tightening the locking lever. The locking lever can be moved, if it is inconveniently positioned by pushing the centre knob and rotating the lever to a less obtrusive position.
Ensure the locking lever is fully tightened prior to use and especially when transporting your wheelchair.
text_image
Locking lever Power lead Control box Sliding mechanism Fig. 7Fitting footrests
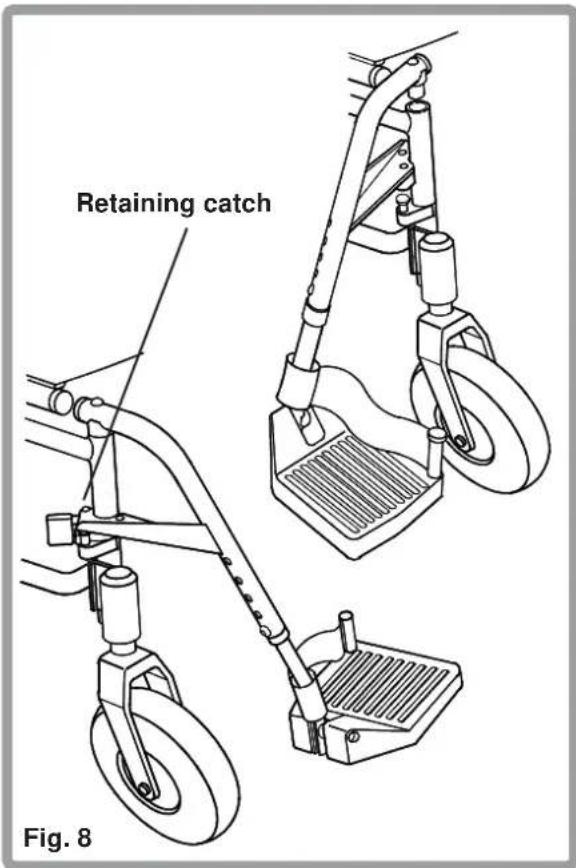
Firstly, offer the footrest assembly at right angles to the frame (Fig 8), locate the stem into the frame tube and swing assembly forward to lock in position. To swing away the footrest, simply depress the retaining catch and turn the footrest out. This can now be lifted out if required.
text_image
Retaining catch Fig. 8Preparing your wheelchair for use
Adjusting footrest height
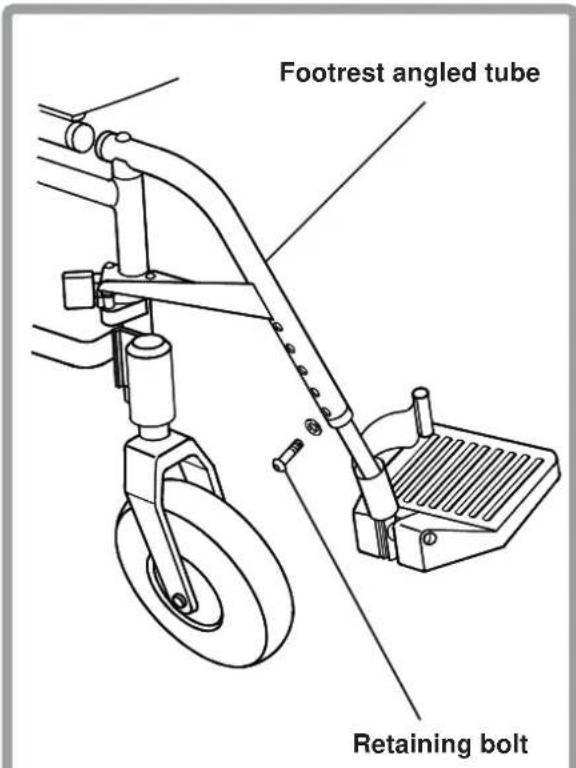
The footplate may be adjusted for height (Fig. 9). To adjust, take out the retaining bolt as shown with a 6mm Allen key and select a comfortable position through one of the adjustment holes in the angled tube.
Refit the bolt and tighten securely prior to use.
text_image
Footrest angled tube Retaining boltFig. 9
Adjusting armrest height/removing
The armrest can be adjusted for height whilst you are seated in the wheelchair.
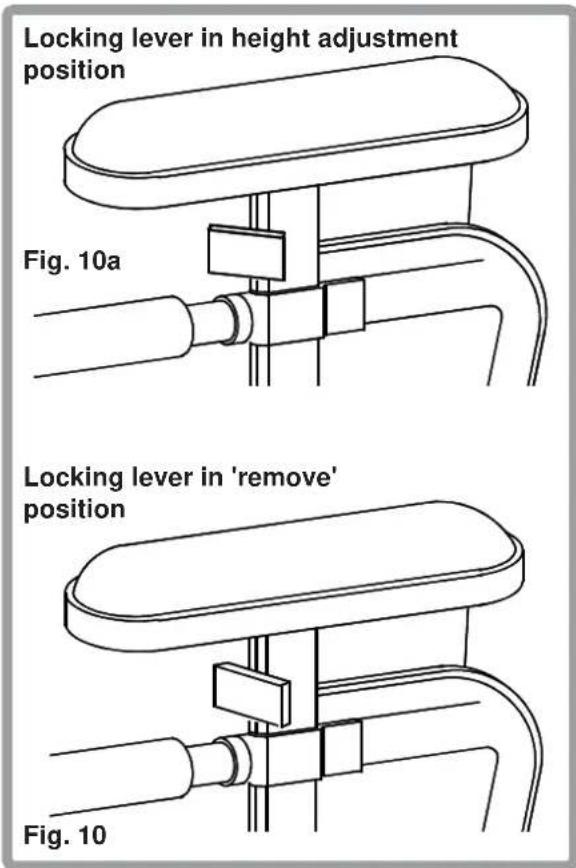
Move the locking lever to the position shown in Fig. 10a and slide the armrest pad to the desired position, and rotate the lever to its locked position.
To remove the armrest move the locking lever to the position shown in Fig. 10 and slide the complete armrest upwards until it clears its receiver.
text_image
Locking lever in height adjustment position Fig. 10a Locking lever in 'remove' position Fig. 10Preparing your wheelchair for use
Emergency freewheel
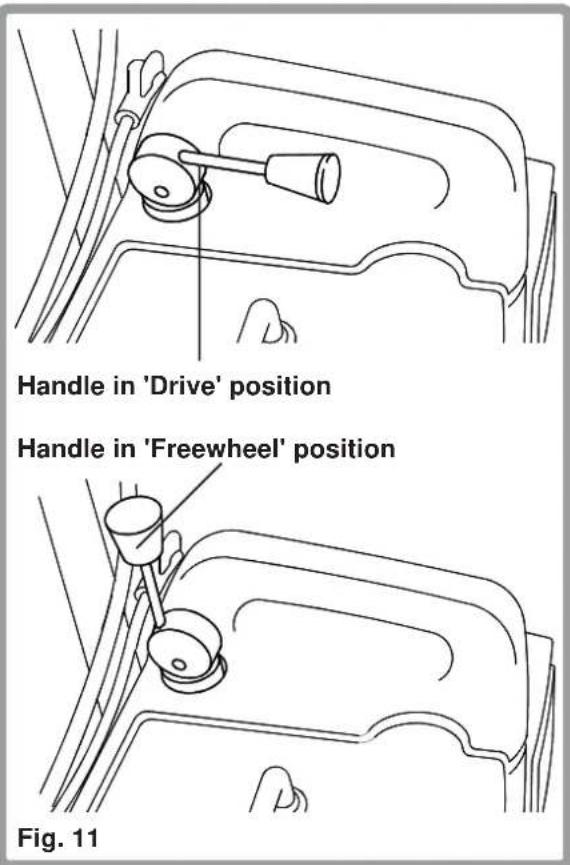
This is a mechanism which enables the drive to be disconnected from the motors in an emergency. By lifting the handle upwards, the drive becomes disconnected from the motors (Fig. 11). This may only be used in an emergency, or if you need to manually push your wheelchair.
It is not intended for permanent use.
REMEMBER: the chairs automatic braking system will not work unless the handle on the right hand side of the power pack is pushed down.
ALWAYS RE-ENGAGE THE EMERGENCY FREEWHEEL AFTER USE
Seat sling tensioning
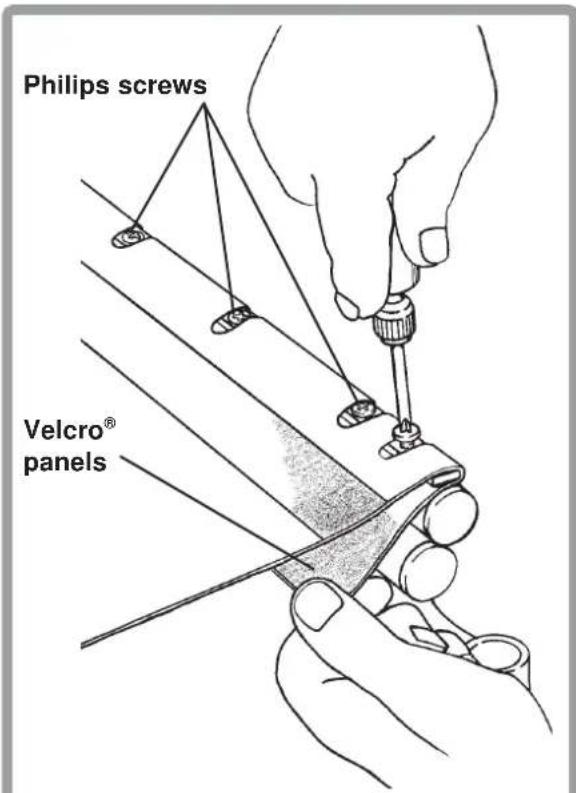
Your F16 wheelchair is fitted as standard with a retensionable seat (Fig. 12).
The seat sling can be re-tensioned through the use of Velcro® panels underneath the seat. Remove the No 2 Philips screws retaining the left side of the seat sling with a No 2 Philips screwdriver, re-adjust the Velcro® to bring the sling to its correct tension. Replace the screws.
text_image
Philips screws Velcro® panelsFig. 12
Pilot control
Proportional control
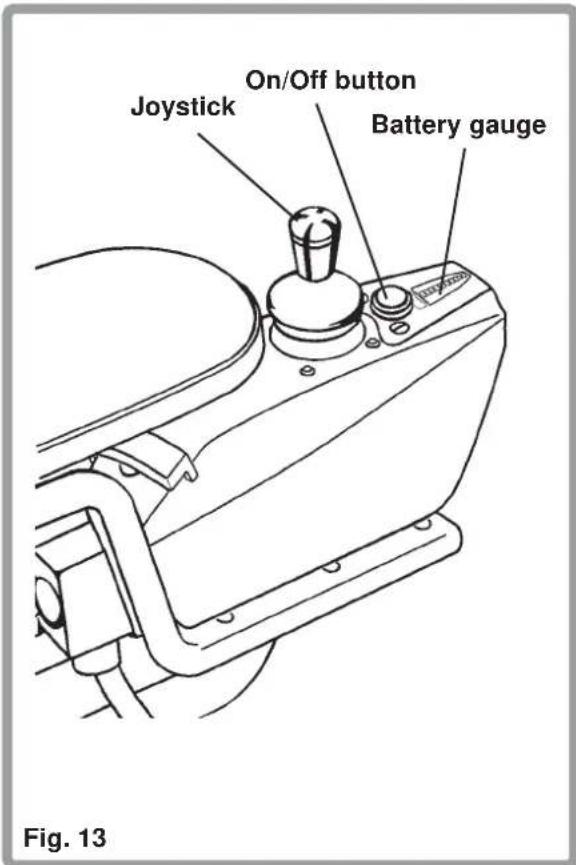
Your wheelchair is fitted as standard with a side mounted proportional control (Fig. 13). This supplies a smooth flow of electrical power to your motors via the movement of the joystick. Push the joystick gently forward to increase forward speed.
When the joystick is at its full extent your powerchair is travelling at full speed as set by the speed setting lever on the rear of the control box. As the joystick is released the wheelchair will automatically engage motor brakes and stop. In front of the joystick is a green push-button switch which turns the controller on and off. Do not use this switch to stop the wheelchair except in an emergency.
Adjustable speed setting
The maximum power and speed of your wheelchair can be adjusted by turning the power setting control lever anticlockwise to reduce speed, and clockwise to increase speed, this is useful when learning or in tight situations (Fig. 14).
text_image
Joystick On/Off button Battery gauge Figure 13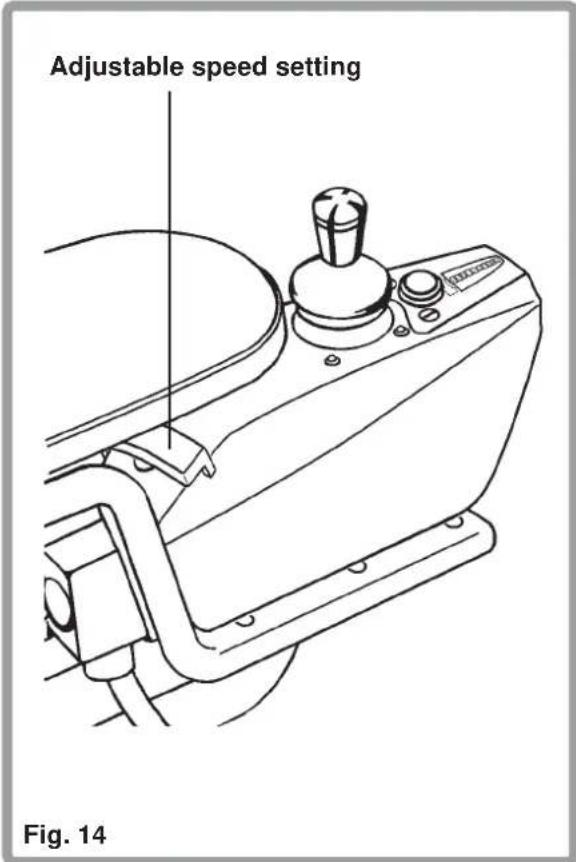
text_image
Adjustable speed setting Fig. 14Pilot control
Operating the control joystick
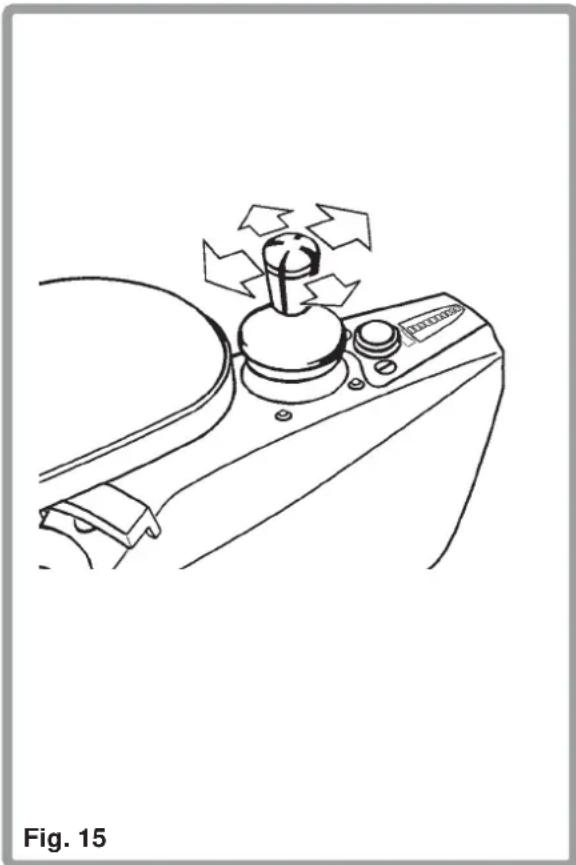
When engaging the main on/off switch, allow a few seconds prior to moving the joystick. This allows the system to self check. If you move the joystick too soon, the battery level indicator display will flash, disabling drive to your wheelchair. Whilst this is not harmful to your wheelchair, you will need to switch off and then back on to clear the system (Fig. 15). To steer, simply move the joystick in the direction you wish to go. Proceed slowly at first, i.e. do not push the joystick too far forwards. Anticipation of the direction of travel is soon acquired and correction is then made instinctively in the same way that a car driver always turns the steering wheel in the direction he wants to go, even though the car and wheel may want to go another way. Look ahead when you are driving, and not at the control but do remember that only practice will enable you to become proficient. Brakes will operate as soon as the joystick is released and allowed to return to its centre position. On level ground, this should bring you to a halt within one chair's length. On a steep hill, it may travel slightly further and you will notice the brakes being automatically applied when the chair is nearly stationary.
natural_image
Line drawing of a mechanical lever mechanism with directional arrows indicating motion (no text or symbols)Once the brakes have been applied, switching off will make no difference to the brakes, although it is always safer when remaining stationary for a period of time to switch off.
If you need to do an emergency stop, then switch off the on/off switch. This will immediately apply full braking and bring the chair to a rapid halt.
Pilot control
Summary
- To steer, simply move the joystick in the direction you wish to go.
- The further you move the joystick, the faster you will go.
- The speed setting knob combined with the fast slow switch adjusts the minimum and maximum speed of the wheelchair. Useful when learning or in tight situations.
- The brakes will automatically stop the wheelchair from any speed when the joystick is released.
- Switching off immediately applies braking.
- It is important that the chair is stationary when changing direction from reverse to forward.
- Always switch to off before getting out of the chair.
TruCharge battery gauge (Pilot Control only)
This is a 10 segment illuminated display which indicates if the controller is turned on and also gives the status of the battery, the controller and the wheelchair electrical system (Fig. 16).
Red, yellow and green bars lit:
Battery charged; controller and electrical system OK.
Red and yellow bars lit:
Charge battery if possible; controller and electrical system OK.
Red bars only lit or slow flash:
Charge battery as soon as possible; controller and electrical system OK.
Rapid flash of bars:
Indicates a fault in the controller or electrical system. See inset for fault diagnostics.
Ripple up and down of bars:
Joystick displaced at turn on.
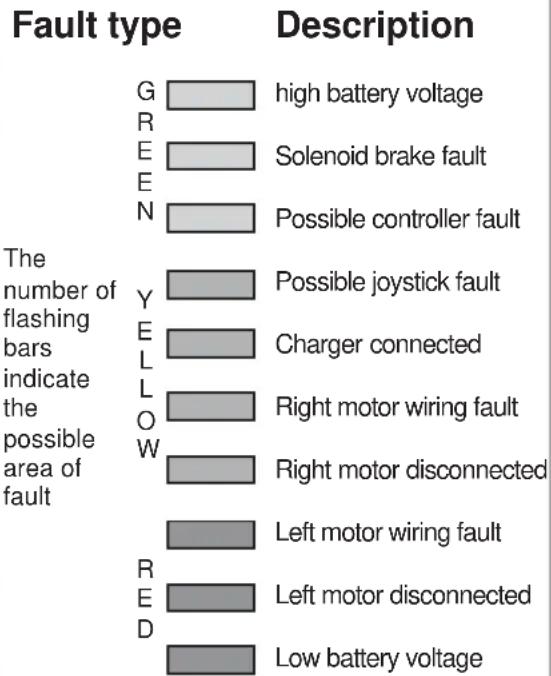
bar
Fault type | Description | | :--- | :--- | | G | high battery voltage | | R | Solenoid brake fault | | E | Possible controller fault | | N | Possible controller fault | | Y | Possible joystick fault | | E | Charger connected | | L | Right motor wiring fault | | O | Right motor disconnected | | W | Right motor disconnected | | R | Left motor wiring fault | | E | Left motor disconnected | | D | Low battery voltage |Fig. 16
The Penny and Giles Pilot + control pod
Control pod
The control pod is mounted on a sliding mechanism, which enables the control to be moved forward or backwards (Fig. 17). When the most comfortable position has been selected, secure the slider by tightening the locking Allen screw, using an Allen key.
Ensure the locking screw is fully tightened prior to use and especially when transporting your wheelchair.
The pod can also be swung away at right angles to the armrest to allow the chair to move close to tables.
Power lead attachment
The power lead must also be plugged into the socket as shown in Fig. 18.
Note: When unplugging the power lead pull off by gripping the outer plastic cover.
Never pull the cable to disconnect the plug.
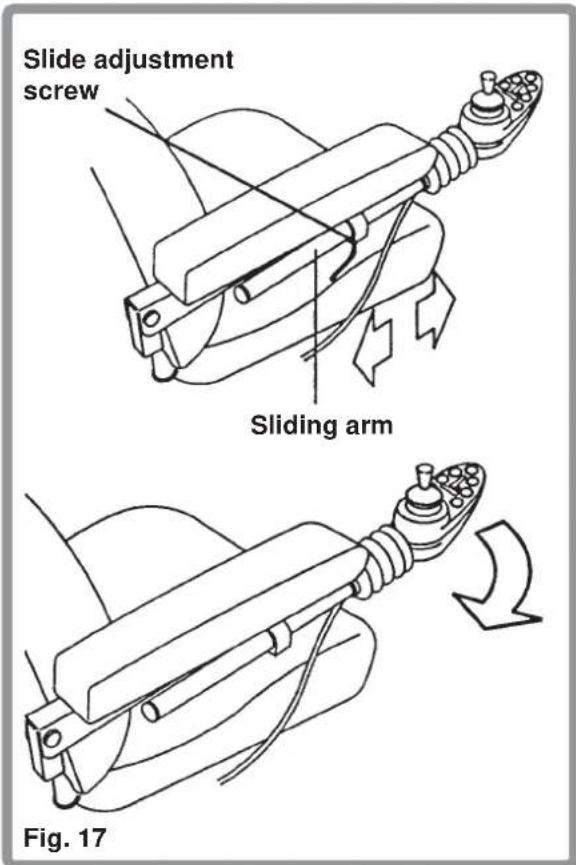
text_image
Slide adjustment screw Sliding arm Fig. 17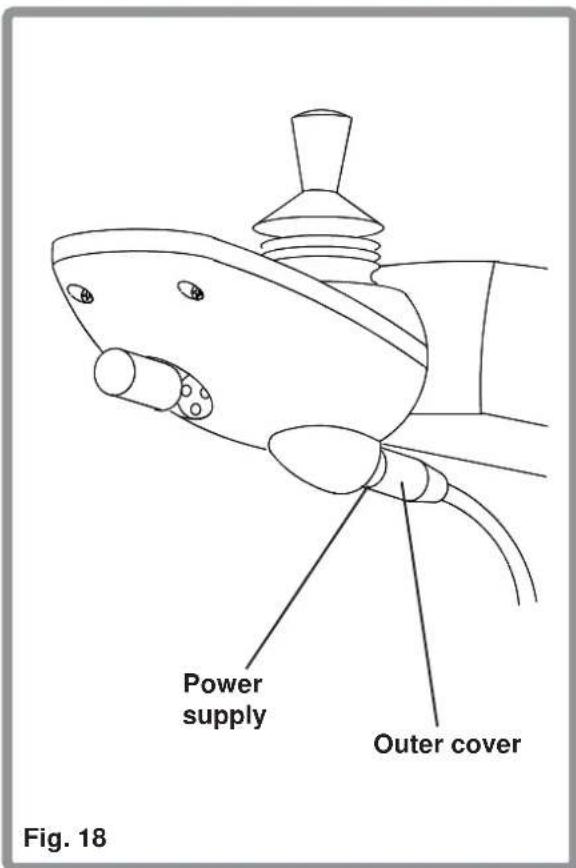
text_image
Power supply Outer cover Fig. 18The Penny and Giles Pilot + control pod
Power supply
Ensure the power lead is connected correctly into its socket on the rear of the control pod (Fig.19).
The immobiliser plug
When this is activated the chair will not function, other than the hazard warning light system. This may be useful if you wish to leave your wheelchair unattended (Fig.19).
To activate the immobiliser
- Insert the immobiliser plug into the charger/programmer socket located on the front of the control pod.
- Turn on remote.
- Pull out immobiliser plug.
- Your chair should now be immobilised.
To de-activate the immobiliser
- Turn on remote.
- Insert the immobiliser plug.
- Pull out after a few seconds.
- Your chair should now be ready to use.
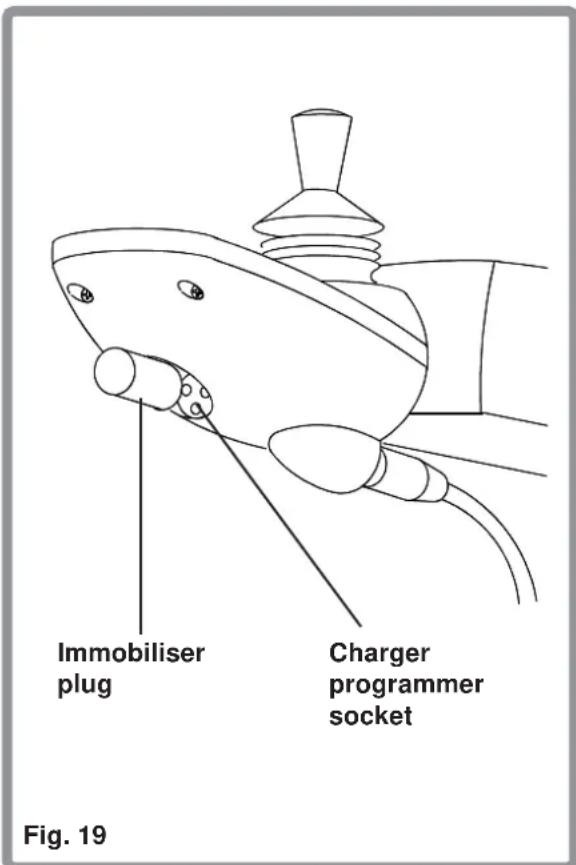
text_image
Immobiliser plug Charger programmer socket Fig. 19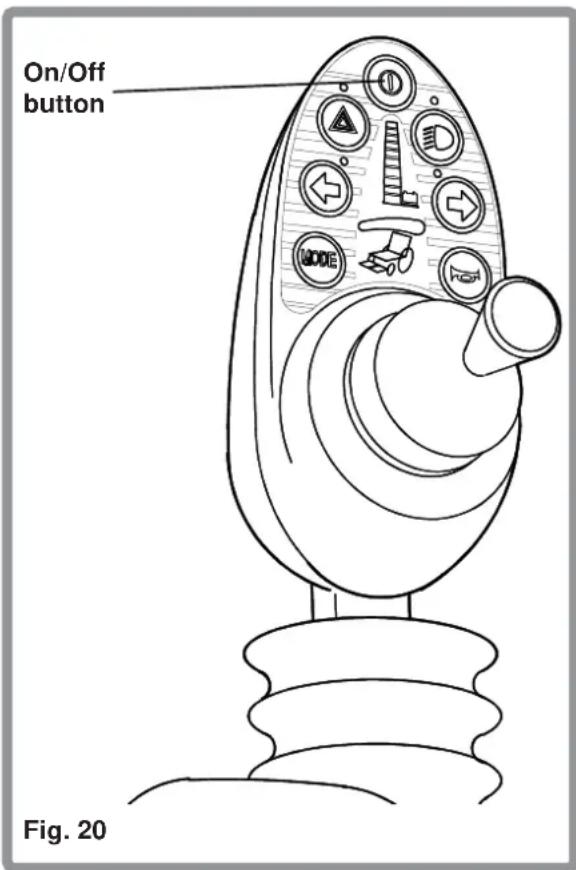
text_image
On/Off button Figure 20The Penny and Giles Pilot + control pod
Adjustable speed setting
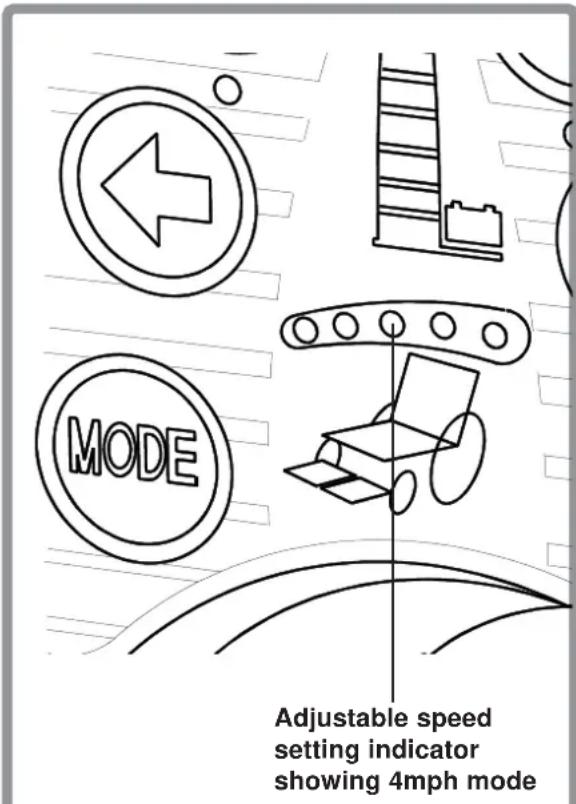
Your controller has five speed settings.
To adjust:
- Press the mode button until the speed settings indicator is flashing (Fig.21)
- Increase or decrease the speed setting by pushing the joystick to the left or right respectively, until the required setting is obtained. To activate the setting either push the joystick forwards to drive or press the mode button until the flashing lights are no longer flashing.
- When the third or middle speed indicator light is selected on a 10 km/h chair the vehicle is set at 4mph. Please note that this is the maximum speed permitted for pavement use.
Battery level indicator
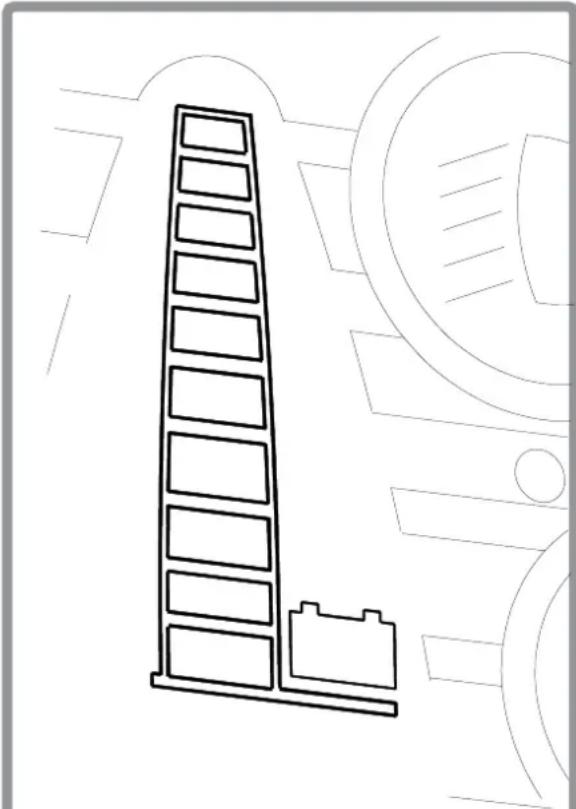
This has ten colour coded lights, 3 red, 4 orange, and 3 green, and denotes the state of charge of the batteries (Fig.22). Green is high, Orange is low, and Red is dangerously low. The most accurate reading is attained when the chair is stationary and on a level surface. The lights also help indicate the position of a fault (should the need arise). When in fault the light will flash quickly. Noting the number of lights flashing may help your service agent in simple fault finding.
text_image
MODE Adjustable speed setting indicator showing 4mph modeFig. 21
natural_image
Architectural line drawing of a building facade with a vertical column and adjacent structure (no text or symbols)Fig. 22
The Penny and Giles Pilot + control pod
Indicators
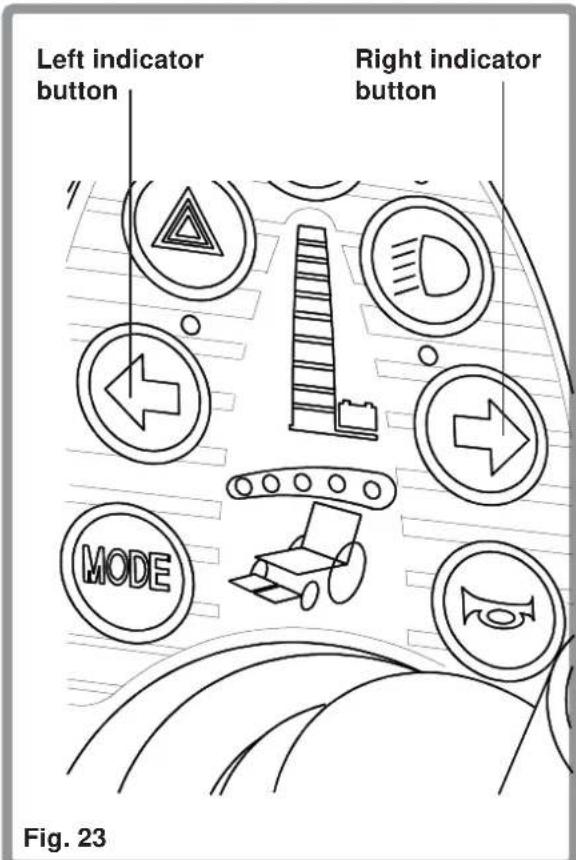
The right hand button operates the right side, front and rear indicators, the left button operates the left side, front and rear indicators. To cancel press the button again (Fig.23).
text_image
Left indicator button Right indicator button MODE Fig. 23The horn button
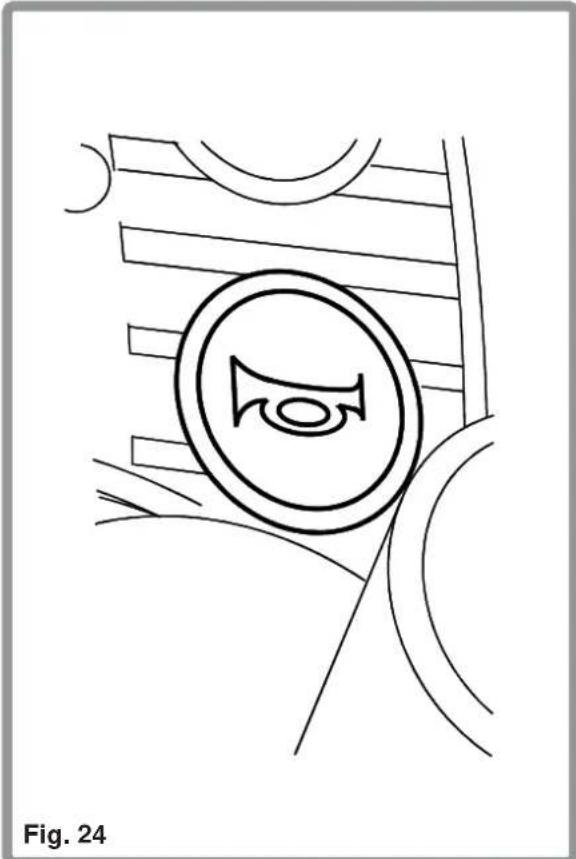
When pressed the horn buzzer will sound, it stops when you release the button (Fig.24).
natural_image
Line drawing of a stylized eye symbol inside a circular frame, with curved lines and a crescent moon in the background (no text or symbols)The Penny and Giles Pilot + control pod
Hazard lights
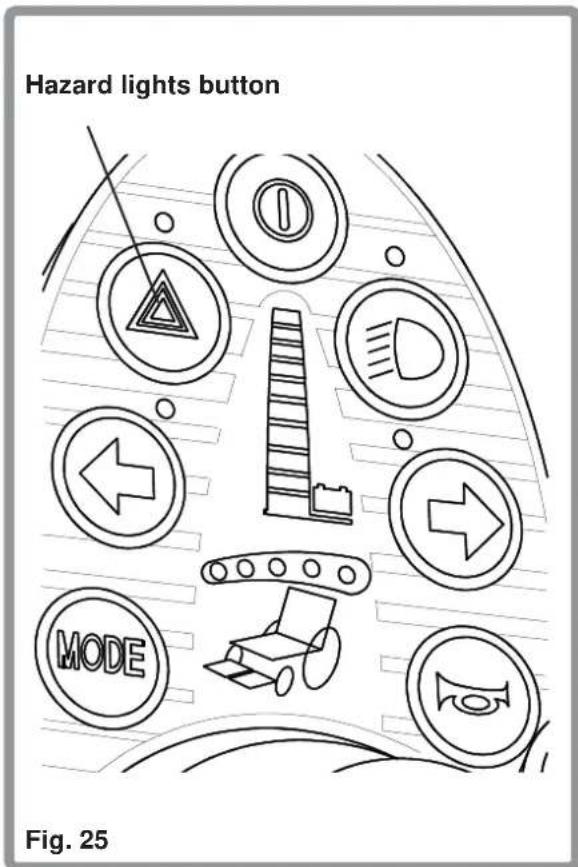
Depressing the button will operate the front and rear hazard lights. This is effective either when the chair is switched On or Off. The two indicators will flash intermittently until cancelled by pressing the button again (Fig.25).
text_image
Hazard lights button MODE Fig. 25Main lights
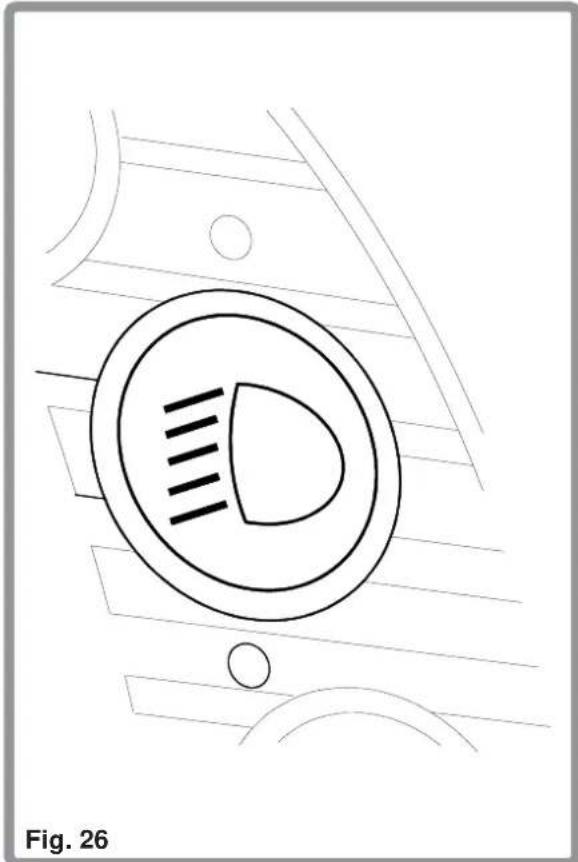
Depressing this button will operate the lights (Fig.26) only when the chair is switched on. Pressing it again will switch the lights off.
text_image
Fig. 26The Penny and Giles Pilot + control pod
Actuator mode function
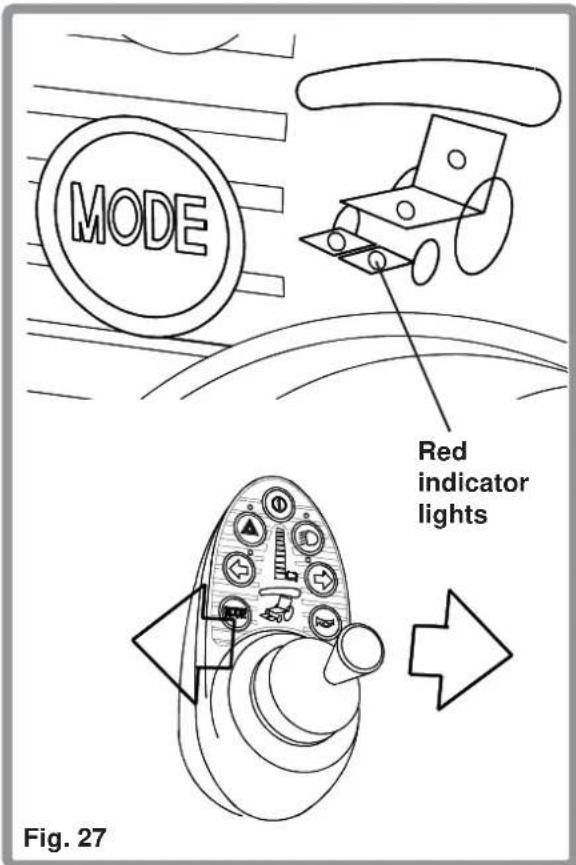
This will be included on your remote control pod if you have one or more electric options fitted to your chair. Refer to Fig.27.
Menu select
To chose an electric option press the mode button until the red lights are visible on the wheelchair diagram next to the joystick. Move the joystick to the left or right to indicate which function can be used
Legrest left Backrest recline Seat tilt
Legrest right Both legrests
When the desired function has been chosen you can activate the electric actuator system. If you attempt to operate the electric functions when driving, the chair will automatically come to a safe stop. We recommend you only use the electric options whilst stationary.
Up/down movement
Once the relevant electric option has been chosen the required movement is achieved by moving the joystick forwards or backwards.
Programme port
This will enable an approved service agent to reprogramme your chair and also gain useful information when tracing any faults (Fig.28).
text_image
MODE Red indicator lights Fig. 27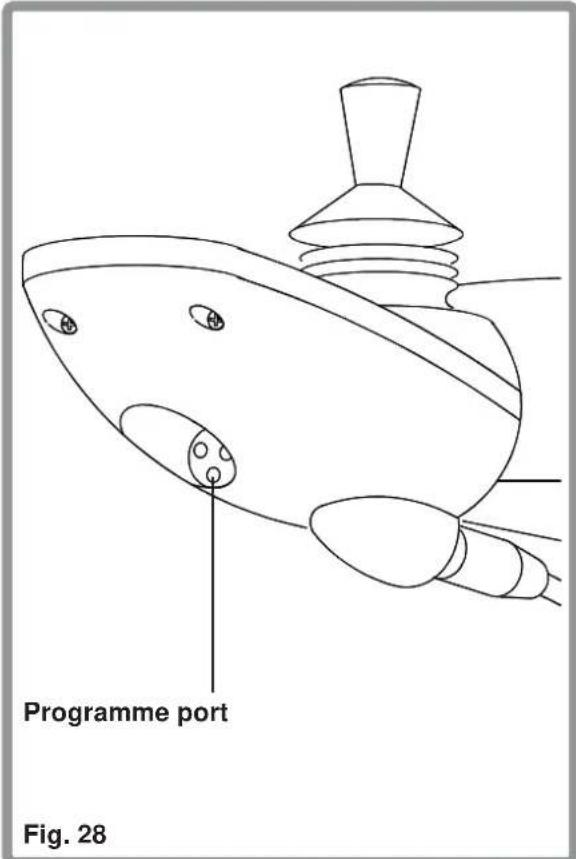
text_image
Programme port Fig. 28The Penny and Giles Pilot + control pod
Charging socket
See section on charging.
Operation the control joystick
When engaging the main On/Off switch, allow a few seconds prior to moving the joystick. This allows the system to self check. If you move the joystick too soon, the battery level indicator display will flash, disabling drive to your wheelchair. Whilst this is not harmful to your wheelchair, you will need to switch off and then back on to clear the system.
To steer, simply move the joystick in the direction you wish to go. Proceed slowly at first, i.e. do not push the joystick too far forward.
Brakes will operate as soon as the joystick is released and allowed to return to its centre position. On level ground, this should bring you to a halt within one chair's length (6 km/h model). On a steep hill, it may travel slightly further and you will notice the brakes being automatically applied when the chair is nearly stationary. Once the brakes have been applied, switching off will make no difference to the brakes, although it is always safer when remaining stationary for a period of time to switch off.
Note: If you need to stop in an emergency, the simplest and safest way is to just release the joystick. This will being the chair to halt in a controlled manner.
A second means of bringing the chair to a halt is to press the On/Off switch. This method is not recommended as the chair will stop very abruptly and will cause unnecessary wear in the chairs braking system.
The Penny and Giles Pilot + control pod
Summary
-
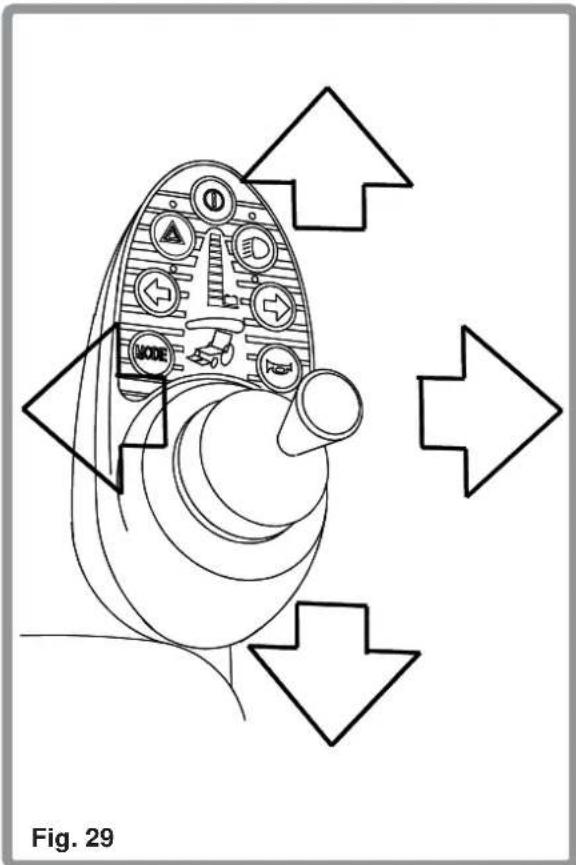
To steer, simply move the joystick in the direction you wish to go (Fig. 29).
-
The further you move the joystick, the faster you will go.
-
New users should use slower speeds until they are confident when driving the power chair. Adjust the speed range as explained on the previous pages.
-
The brakes will automatically stop the wheelchair from any speed when the joystick is released.
-
Switching off immediately applies braking and is not recommended for normal use.
-
It is important that the chair is stationary when changing direction from reverse to forward.
-
Always switch to off before getting into or out of the chair.
text_image
FIG. 29Parallel Swing Away Arm
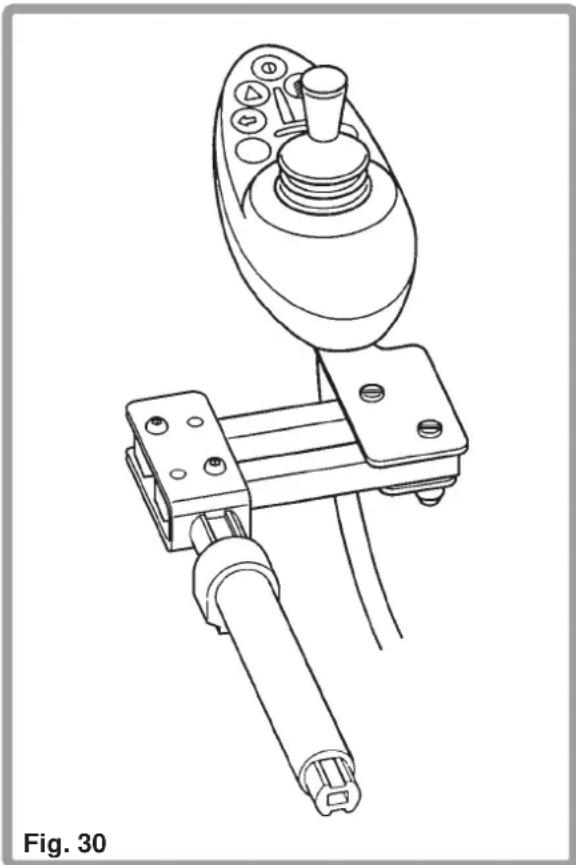
Before adjusting the swing-away arm, switch off the controller to avoid accidental displacement of the joystick which would cause unwanted movement of your wheelchair.
Gently apply pressure to the side of the controller nearest the user and as close as possible to the front of the controller.
The controller will move outward and then backward before reaching its fully back position.
Keep your fingers and clothing, etc., clear while operating the swing-away mechanism.
If required, your wheelchair can be operated with the swing-away mechanism in its fully back position, but only for slow manoeuvering such as positioning the wheelchair closer to table tops, etc.
To revert to the normal driving position, switch off the power and pull the arm outwards and then forwards before returning the arm to its ‘home’ position. Make sure the controller is fully engaged in its home position before switching on and operating the wheelchair in the normal manner.
Caution
Do not hang any items on or over the parallel swing-away remote assembly as this could damage the swing-away mechanism.
When transferring to and from the wheelchair do not use the remote as a means of support.
natural_image
Technical line drawing of a mechanical device with no visible text or symbolsWarning
Keep fingers, clothing, etc., clear of the swing-away mechanism at all times.
Ensure the power is switched off while adjusting the parallel swing-away arm.
Only operate the wheelchair at low manoeuvring speed when the parallel swing-away is in use.
Batteries and charging
Batteries
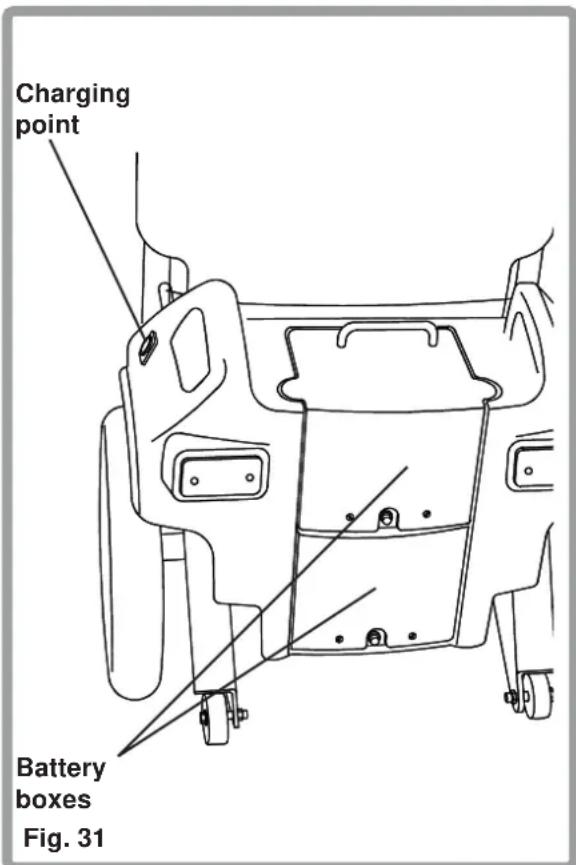
Your Sunrise Medical wheelchair batteries are supplied as standard in two battery boxes, housed in the motor unit behind the seat (Fig. 31). They do not have to be removed for charging.
text_image
Charging point Battery boxes Fig. 31Safety cut-out switches
In the event of a short circuit there are safety systems built into your wheelchair to safeguard your electrical circuits. Cut-outs are positioned on both battery boxes (Fig. 32) and automatically cut off the power. Inspect the cut-out buttons and you will see which has tripped by the extension of the button. After a few seconds push the button in to resume. If problems persist contact your local Sunrise Medical Service dealer.
text_image
Safety cut out push buttons Fig. 32Batteries and charging
General information
Batteries are the power source for almost all of the modern mobility products available today. The design of batteries used in mobility products is significantly different to the batteries used to start a car for example. Car batteries are designed to release a large amount of power over a short period of time, whilst mobility batteries (commonly called deep cycle batteries) release their power evenly, over a long period of time. Therefore, due to the lower production volumes and increased technological requirements, mobility batteries are typically more expensive.
Commonly two 12 volt batteries are used together in a mobility product, giving a total voltage of 24 volts. The size of the battery, (e.g. its available power) is expressed in amps per hour e.g. 30amp/hr. The higher the number, the bigger the battery size, weight and, potentially, the greater the distance you can travel.
Sunrise Medical only fit as standard maintenance free batteries into this type of wheelchair.
Maintenance free batteries
This type of battery uses a method of carrying the electrolyte commonly referred to as ‘gel’, that is held within the battery case. As the name implies, no maintenance is required other than regular charging. You can safely transport this type of battery without fear of acid spilling.
Furthermore, they are approved for transportation on aircraft.
Battery care
Below is set out a battery care plan for maintenance free batteries. This has been agreed between Sunrise Medical and the battery manufacturers, to enable you to get the best out of your batteries. If a different care plan is followed, this may result in lower than expected performance from your mobility vehicle.
Batteries and charging
Maintenance free battery care plan
1 Only use an approved Sunrise Medical charger compatible with the vehicle to be charged.
2 Charge your batteries every night, regardless of the amount of use your mobility device has had during the day.
3 Do not interrupt the charging cycle.
4 If your mobility device is not required for use, it should remain connected to the charger until required. This will not damage your batteries, so long as the mains socket/plug is left switched on. Turning the mains socket/plug off, but leaving the mains cable plugged in will eventually deplete your battery charge.
5 If you leave your vehicle for an extended period (more than 5 days) disconnect the main battery lead.
6 Failure to allow for recharge will damage the batteries and can lead to shortened distances and premature failure.
7 Do not top up the charge of your batteries during the day. Wait until the evening for a full overnight charge.
8 As a general rule, maintenance free batteries take longer to fully charge than lead acid batteries.
9 The battery terminals need to be checked regularly for signs of corrosion. If any corrosion is apparent, then clean the terminals completely (a wire brush is ideal) and re-grease the terminal using Vaseline petroleum jelly, not ordinary grease. Ensure that the terminal nut and bolt, cable clip and exposed cable are completely covered with jelly.
10 Following all the points above should result in a healthier battery, greater range for the vehicle user and a longer life for your batteries.
Do not expose any part of the battery to direct heat (i.e. naked flame, gas fire).
When charging always place on a hard surface in a room with good ventilation.
You should not charge your batteries in outdoor conditions
Batteries and charging
General
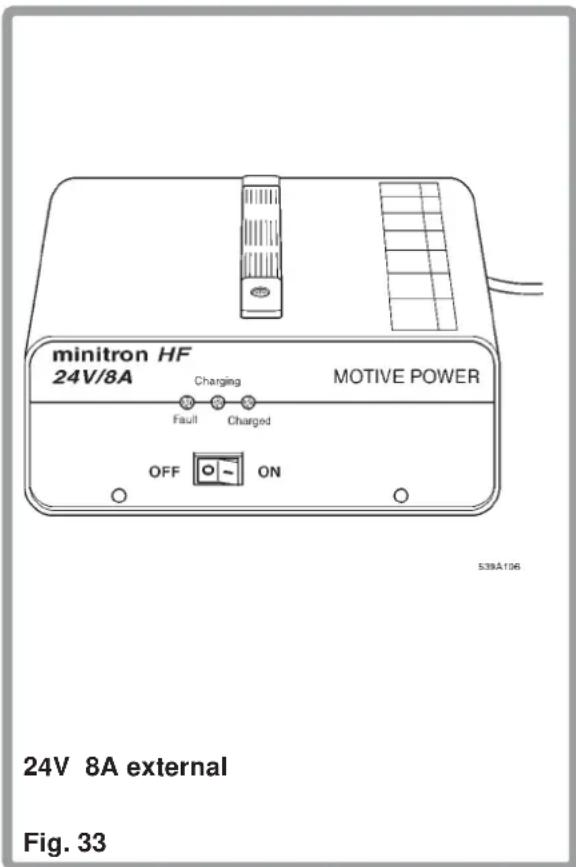
The external charger (Fig. 33) has been designed to charge two 12 volt Sonnenschien Dryfit Gel type batteries.
Safety features
The chargers have features which prevent hazards or accidents occurring as a result of connecting batteries the wrong way round, overheating caused by fault conditions, or attempting to charge wrong voltage batteries.
The majority of charger sizes are electrically double insulated and no earth connection is required. Some larger sizes may be electrically earthed and this will be clearly stated on the label.
The 3 pin UK mains input plug contains a replaceable fuse. The rating of this fuse is shown on the charger label. Always replace with the same type and size of fuse as specified. Fitting of different fuses can result in damage to the charger or failure of the charger to operate properly.
If your charger has been specified for use in Continental Europe it will contain a European two pin plug which does not have a fuse. In this case the fuse is located in the fascia panel of the charger.
text_image
minitron HF 24V/8A Charging Fault Charged OFF ON MOTIVE POWER 539A106 24V 8A external Fig. 33Batteries and charging
24V 8A charger indicator lights
The charger has 3 light indicators, each clearly marked on the label to show their function (Fig. 34).
Yellow - charging
This will illuminate a few seconds after connection, indicating that charging of the batteries is taking place.
Green - charge complete
This will illuminate when the battery is fully charged. This can be anywhere from 8.5 hours to 14.5 hours after commencement of charging, depending on how discharged the batteries were. The ‘mains’ light will remain on. Please note that after the charge complete light has illuminated, the charger will continue to charge the batteries. However the charging and ‘bulk charge’ complete light will not be illuminated at this point. Following a further period of time the charger will switch to a ‘float voltage’ setting. It can therefore be left on indefinitely.
Red - fault light
Battery voltage too low, try again after 30 mins.
Fault finding guide for 24V 8A charger
DANGER! DO NOT REMOVE THE UNIT COVER, SPECIALIST SKILLS AND EQUIPMENT ARE NECESSARY FOR REPAIR.
Fault: The yellow "charging" lamp is not illuminated
Check that the 13A mains plug is properly mated with the mains outlet socket and that the mains supply is switched on. If the lamp remains off consult Sunrise Medical or your local Sunrise Medical dealer.
Fault: The charger is switched on but the red "failure" lamp is illuminated
Check that the charger connections are correct and that the plugs are fully mated in the sockets. If the lamp remains illuminated it is possible there is a fault in the battery, consult Sunrise Medical or your local Sunrise Medical dealer.
Fault: The red "failure" lamp blinks
The battery voltage is too low, try again after approximately 30 minutes. If the lamp continues to blink consult Sunrise Medical or your local Sunrise Medical dealer.
Batteries and charging
Procedure for connecting the charger
1 Plug into the three pin charging point under the front of the control box (Fig. 34).
2 Connect the charger to the mains supply by means of the mains plug and switch on (Fig.34). The yellow ‘mains on’ indicator should light up immediately (Fig. 35), followed shortly afterwards by the orange ‘charging’ indicator.
3 The battery is fully charged when the green ‘charge complete’ light illuminates. if not needed for use the battery may be left charging indefinitely without risk of damage.
4 If the chair is required for use before the ‘charge complete light’ shows, then it is possible to obtain restricted use once the ‘bulk charge’ light has illuminated. At that point the battery is about 85% - 90% charged. It is essential to provide a full recharge at the first opportunity.
5 Do not leave the charger connected to the battery with the mains disconnected or switched off. This could result in damage to your battery being caused by deep discharge over a period of time.
6 Always switch off at the mains before disconnecting the batteries.
text_image
Control box Charger socket Fig. 34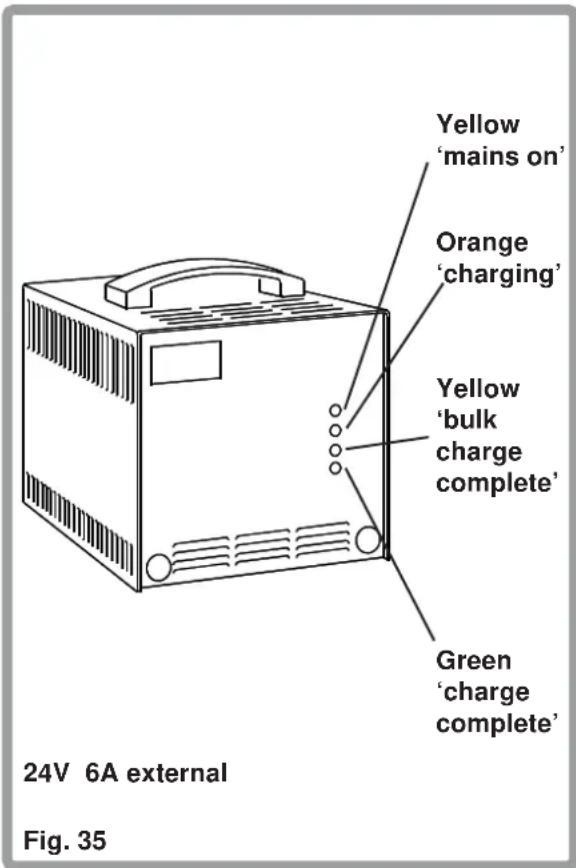
text_image
Yellow 'mains on' Orange 'charging' Yellow 'bulk charge complete' Green 'charge complete' 24V 6A external Fig. 35Batteries and charging
Safety and caution notes
1 The charger is designed for indoor use. Do not use outdoors or expose to rain, snow, spray or moisture.
2 Use only with Sonnenschein dryfit Gel type batteries of the A200, A500 or A500C groups when employed in cyclic mode.
3 The charger may be used with other brands of Gel type batteries, subject to written confirmation from the Technical Department of Sunrise Medical.
4 Do not smoke, or create sparks or flames in the vicinity of the batteries.
5 Avoid standing the charger on carpets or rugs during use and do not cover the ventilation slots of the charger or allow objects to rest on the case.
6 Do not attempt to recharge other types of batteries such as car batteries, non-rechargeable batteries, AGM sealed batteries, wet electrolyte batteries or batteries of the wrong voltage.
7 Repairs should only be carried out by Sunrise Medical.
8 The charger is designed for mains input voltages of 220V AC to 240V AC, for chargers to operate with 110V AC (in countries such as USA or North America), a different charger will be needed, please consult local Sunrise Medical Dealer.
9 Use of an attachment, not recommended or sold by Sunrise Medical, may result in a risk of fire, electric shock or injury to persons. To reduce the risk of damage to electric plug and cord, pull by the plug rather than the cord when disconnecting the charger. Make sure the cord is located so that it will not be stepped on, tripped over, or otherwise subjected to damage or stress. An extension cord should not be used unless absolutely necessary. Use of an improper extension cord could result in a risk of fire and electric shock. If any extension cord must be used, make sure the pins on the plug of the extension cord are the same number, size and shape as those of the plug on the charger; and that the extension cord is properly wired and in good electrical condition.
Batteries and charging
Important!
Do not rest a battery on top of the charger.
Do not stand the charger on a carpet or other soft surface. Always place it on a hard surface.
Do not operate the charger if it has received a sharp blow, been dropped or otherwise damaged in any way, take it to a qualified technician.
Do not disassemble charger; only have it repaired by the manufacturers. Incorrect re-assembly may result in a risk of electric shock or fire. To reduce the risk of an electric shock, unplug the charger from the outlet before attempting any maintenance or cleaning.
Turning off the controls will not reduce the risk.
Never place the charger directly above the battery being charged; gases from the battery will corrode and damage the charger.
Never Smoke or allow a spark or flame in the vicinity of battery or charger. Be extra cautious to reduce the risk of dropping a metal tool on to the battery. It could spark or short circuit the battery or other electrical parts, that may cause an explosion. Also take off all personal metal effects and dangling objects when working on the battery.
Never Charge a frozen battery. A fully charged battery will rarely freeze but the electrolyte of a discharged battery can freeze at 16° Fahrenheit (-9° centigrade), any battery that is suspected of being frozen should be thawed completely before charging.
Note: when buying replacement batteries always consult your sunrise medical service agent.
Note: Before using your vehicle for the very first time, please charge your batteries for a period of 24 hours.
Battery warranty
Battery warranties are subject to periods set by the manufacturers, however, most of these warranties are subject to a wear and tear clause, and if you genuinely wear out your batteries in 6 months, it will not be possible to obtain a replacement under warranty.
Batteries and charging
The range of your vehicle
Most manufacturers of mobility products state the range of their vehicles either in the sales literature or within the Owners Manual. The range stated sometimes differs from manufacturer to manufacturer even though the battery size is the same. Sunrise Medical measure the range of their vehicles in a consistent and uniform manner, but variances still occur due to motor efficiencies and overall product load weight.
The range figures are calculated to I.S.O. Standard 7176. Part 4: Wheelchair Energy Consumption Theoretical Range
This test is carried out in controlled conditions with new, fully charged batteries, on a level test surface and a user weight of 75kg. The range figures stated should be seen as a theoretical maximum and could be reduced if any single, or combination, of the following circumstances occur:
1 User weight heavier than 75kg.
2 Batteries whose age and condition are less than perfect.
3 The terrain is difficult e.g. very hilly, sloping, muddy ground, gravel, grass, snow and ice.
4 The vehicle climbs kerbs regularly.
5 The ambient temperature is very hot or very cold.
6 Incorrect tyre pressures in one or more tyres.
7 Lots of start/stop driving.
8 Also thick pile carpets within the home can affect range.
All this technical information may seem complicated and a little daunting, but please remember, that the battery sizes available on each Sunrise Medical product should give sufficient range to cope with the majority of customer's lifestyles.
Myths and legends
Over the years, battery technology has moved forward but, unfortunately, some of the advice given on battery care has not. This has resulted in a number of confused and at times contradictory instructions on the ‘best’ way to care for your batteries. This section will help to dispel some of these myths and legends.
1 Batteries can be charged immediately after use. You do not need to allow them to cool prior to charging.
2 Mobility batteries do not develop a memory from using a repetitive charge and discharge cycle. This only applies to nickel cadmium batteries commonly found in products such as camcorders.
3 Batteries when new do not require any special attention with regard to their charge and discharge cycle. Following the relevant ‘care plan’ is the best advice we can give.
User tips
Caution
Please show the utmost consideration for the other traffic on the road.
Remember that the last thing a car or lorry driver expects to see is a wheel chair backing off the kerb into the road. If in any doubt, do not risk crossing the road until you are certain that it is safe.
Always cross the road as quickly as possible; there may be other traffic.
Adverse conditions
Please be aware that when driving your wheelchair in adverse conditions, e.g. on wet grass, mud, ice, snow, or other slippery surfaces you may experience a reduction in the grip and traction of your wheelchair. We recommend you take extra precautions in these conditions, particularly on hills and slopes, your wheelchair could become unstable or skid causing possible injury. Extreme variances in temperature may trigger the self protect mechanism in the control system. If this occurs the control system will temporarily shut down to prevent damage to the electronics or the chair.
Ramps
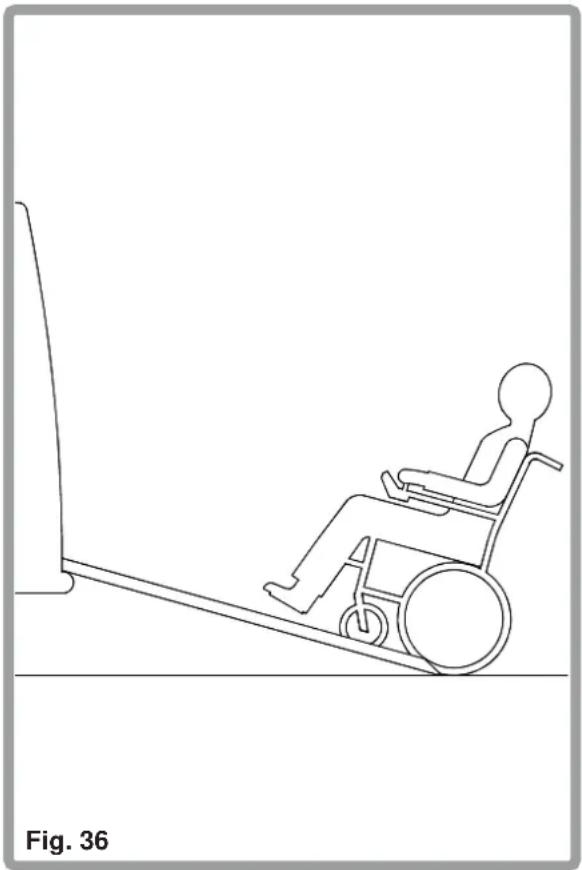
When using a ramp, please ensure that is capable of taking the combined weight of the powerchair and yourself. If a ramp is being used to load a chair into a vehicle, please ensure the ramp is properly secured to the vehicle. Always approach the ramp head-on and exercise caution (Fig. 36).
natural_image
Line drawing of a person in a wheelchair using a mobility platform, labeled 'Fig. 36' (no text on diagram)User tips
Transfer to and from the chair
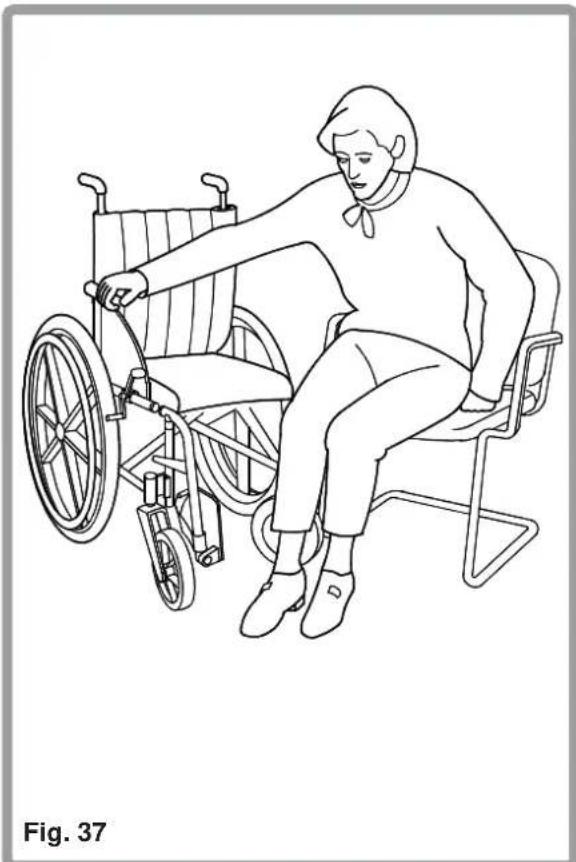
Sunrise Medical recommend that you consult your healthcare professional for assistance in developing your personal front or side transfer technique to best suit your needs, and avoid any personal injury (Fig. 37 and 38).
natural_image
Line drawing of a person in a wheelchair using a bicycle (no text or symbols)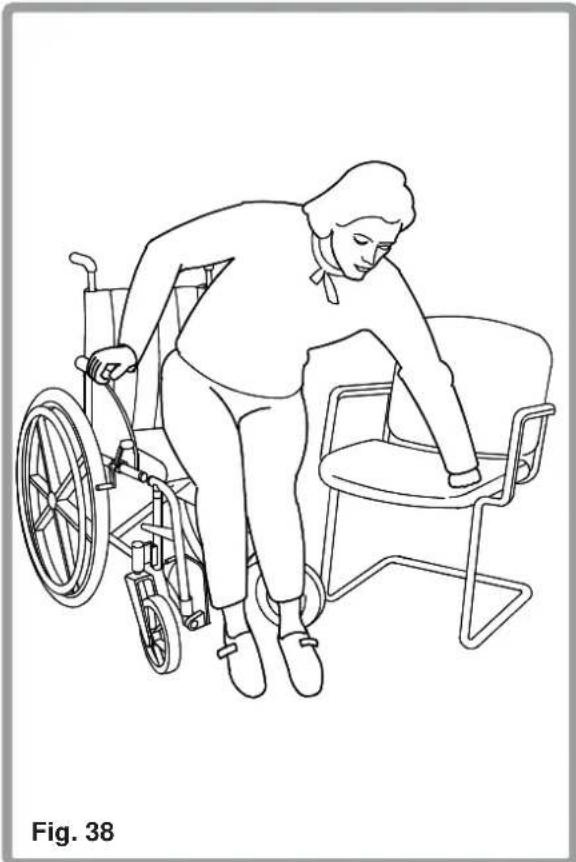
natural_image
Line drawing of a person in a wheelchair assisting another person seated on a chair (no text or symbols)User tips
Gradients: ascents
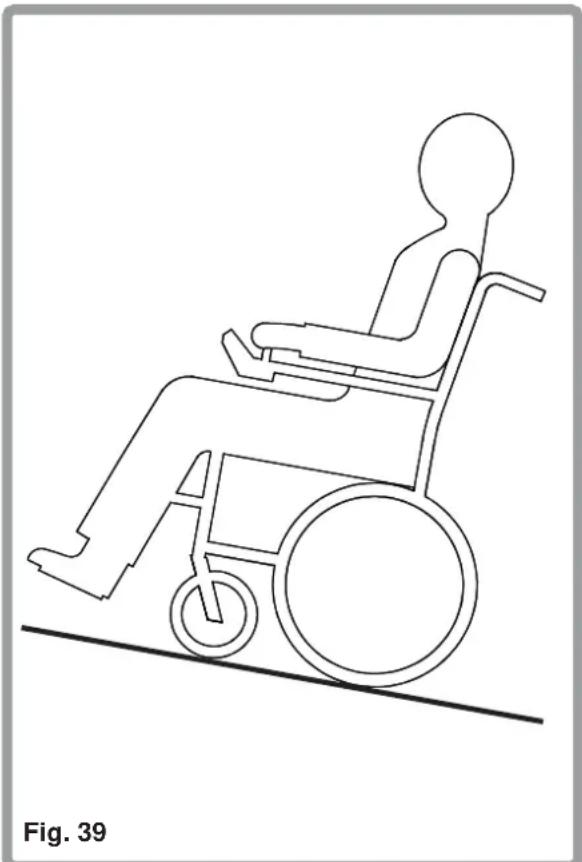
When going uphill, keep the chair moving. Keep the joystick pushed well forward and steer by moving it from side to side. If you have stopped on a hill, then you should start slowly, and if necessary lean forward to obviate the tendency for the front wheels to lift (Fig. 39).
natural_image
Line drawing of a person in a wheelchair on a slope, labeled 'Fig. 39' (no text or symbols on the diagram itself)Gradients: descents
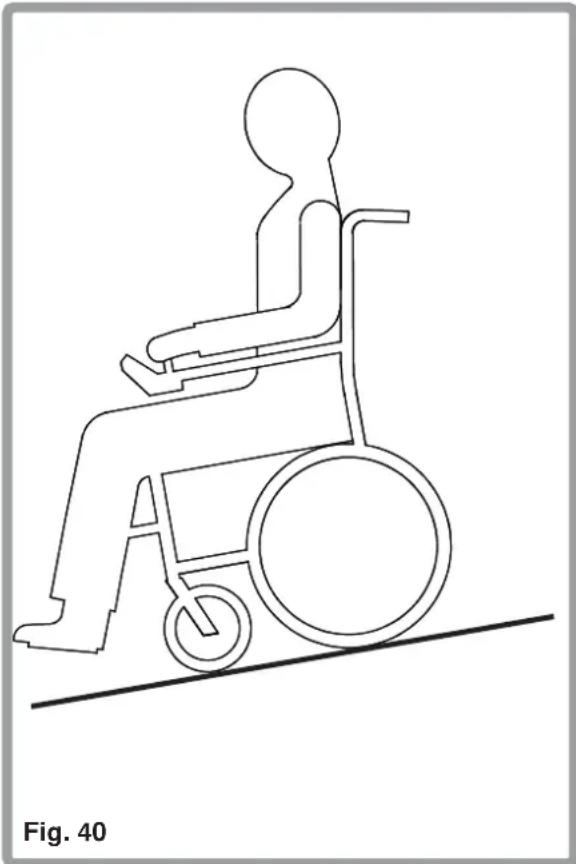
On descents, it is important not to let the wheelchair accelerate beyond its normal level of ground speed. In fact, it is safer to proceed slowly down steep descents and stop immediately if any anxiety arises regarding directional control. If the chair picks up speed, centre the control to slow it or to stop all forward movement, then restart slowly and do not allow the speed to increase. The solid state controller has the benefit of a logic system, that will help compensate when driving along a camber or up a hill. This is an added safety feature on your wheelchair. In addition of course, you may control the wheelchair speed by using the speed control (Fig. 40).
natural_image
Line drawing of a person in a wheelchair on a diagonal line, labeled 'Fig. 40' (no text or symbols on the diagram itself)Transporting your chair
Disassembly
Your F16 can be disassembled for transporting, this is performed in the opposite method of assembly and should be done in the following sequence:
1 Remove the footrests (see page 10).
2 Remove the control pod by loosening the locking lever (see page 10) and sliding the assembly out of the sleeve.
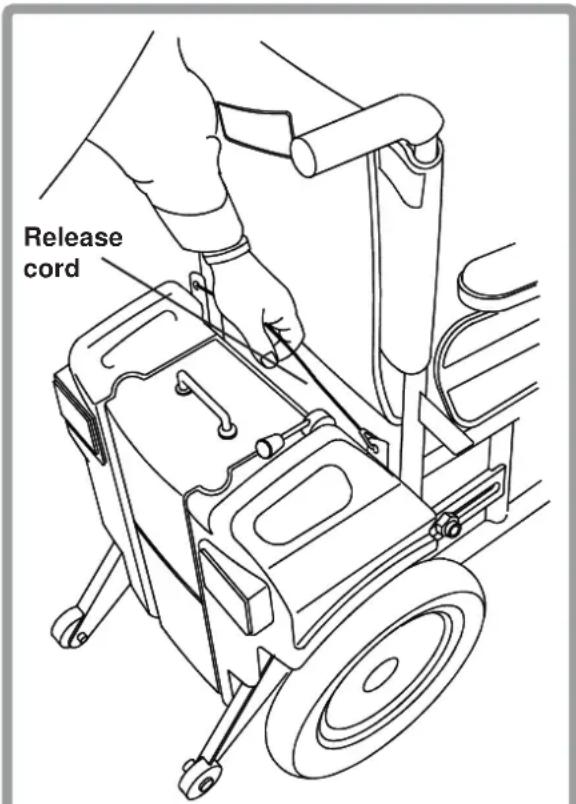
3 Remove the motor/battery unit by pulling the release cord (Fig. 41) and holding the frame and rolling the frame away from the power unit. Allow the power unit to slowly rock back on to the stabiliser wheels.
Note: Do not stand too close to the power unit when the motor unit rocks back.
4 Fold the frame by standing to one side and pulling the side rails together. This may now be stowed.
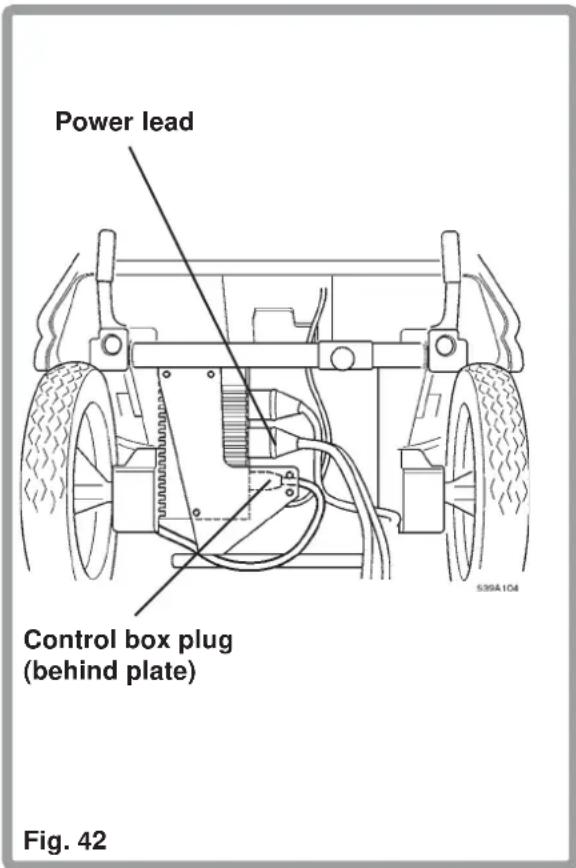
5 Disconnect the control pod from the power unit by unplugging the control cable from the control box (Fig. 42).
N.B. never pull the plug using the cable, always grip the plug body.
6 You may now stow or transport the wheelchair.
If you wish to complete the disassembly follow the next instructions.
7 Disconnect both battery plugs (Fig 42).
8 Slide out both batteries.
text_image
Release cordFig. 41
text_image
Power lead Control box plug (behind plate) Fig. 42Transporting your chair
Transportation in vehicles
Users should not sit in the wheelchair while riding in any and all means of transportation.
Only permanently installed car seats and seat belts will offer sufficient protection in hazardous situations. When vehicles are in motion, unoccupied wheelchairs should be secured using appropriate means.
Lap belt instructions
⚠️ Before using your wheel-chair ensure the seat belt is worn and correctly adjusted before use.
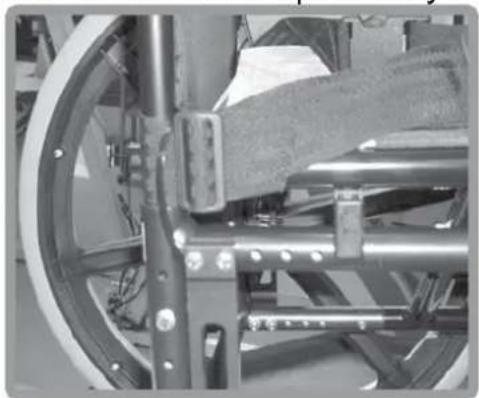
The lap belt is fitted to the wheelchair as shown in the illustrations. The lap belt is fitted between the armrest support and the backrest tube. The belt should then be run across the outside of the back upholstery.
natural_image
Close-up of a mechanical assembly with visible gears and bolts (no text or symbols)⚠ It is important that the belt is routed around the back of the wheelchair. The buckle end can be fed between the arm-rest and backrest.
Adjust the lap belt to suit the user's needs as follows:
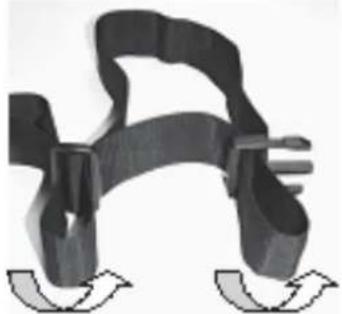
To increase the belt length:
natural_image
Mechanical clamp or bracket component (no visible text or symbols)Feed the belt through slide adjusters and male buckle to provide more belt length.
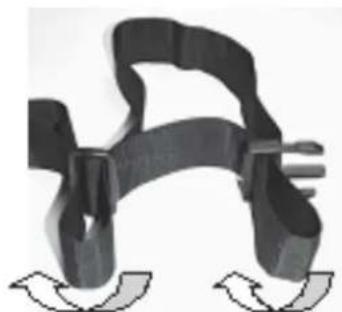
To reduce the belt length:
natural_image
Mechanical clamp or bracket component with curved arrows indicating motion (no text or symbols)Feed the belt back through male buckle and slide adjusters.
natural_image
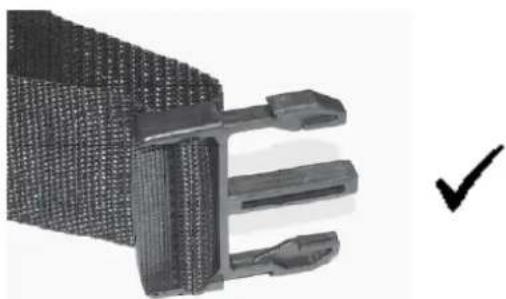
Close-up of a black textured mechanical component with a checkmark indicating selection (no text or symbols present)Ensure the belt is not looped at the male buckle
Lap belt instructions
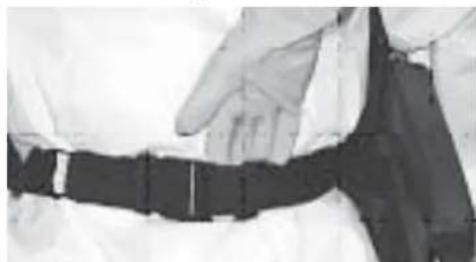
When fastened check space between the lap belt and the user, when correctly adjusted it should be possible to insert the flat of the hand between the lap belt and the user.
natural_image
Close-up of a person wearing a black and white safety belt, hand resting on chest (no visible text or symbols)Generally the Lap Belt should be fixed so that the straps sit at an angle of approximately 45^ , and when correctly adjusted should not allow user to slip down in the seat.

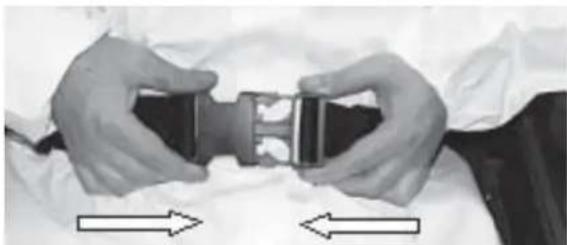
natural_image
Close-up of hands adjusting a black and silver belt buckle (no text or symbols visible)To fasten buckle: -
Firmly push the male buckle into female buckle
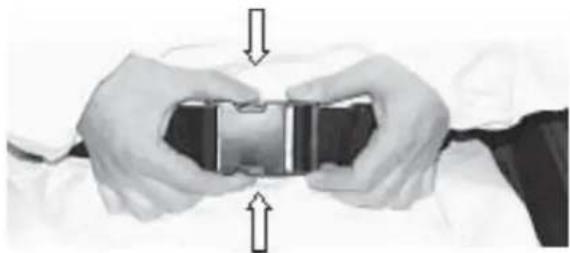
natural_image
Close-up of hands holding a black belt buckle, with arrows indicating compression or lifting (no text or symbols)To release belt: -
Press the exposed sides of the male buckle and push towards the centre whilst gently pulling apart.
Do not rely on the lap belt only when the wheelchair and occupant are transported in a vehicle, use the separate occupant lap and diagonal restraints provided in the vehicle.
Advice to Client
The lap belt must be checked on a daily basis to ensure it is adjusted correctly and it is free from any obstruction or adverse wear.
⚠️ Failure to make sure that the lap belt is secure and adjusted prior to use could cause serious injury to the user. E.g. too loose a strap may allow the user to slip down in the chair and risk suffocation. Maintenance
Check lap belt, and securing components; at regular intervals for any sign of fraying or damage. Replace if necessary.
Clean the lap belt with warm soapy water and allow to dry.
Lap belt instructions
Note
The lap belt should be adjusted to suit the end user as detailed above
Sunrise Medical also recommend that the length and fit of the belt is checked on a regular basis to reduce the risk of the end user inadvertently re-adjusting the belt to an excessive length
⚠️If in doubt about the use and operation of the seat belt then ask your healthcare professional, wheelchair dealer, carer or attendant for assistance.
Maintenance
Cleaning
The wheelchair should be wiped over once per week with a slightly damp, not wet, cloth and any fluff or dust that has accumulated around the motors should be blown or dusted away.
Tyre pressures
If pneumatic tyres are fitted to your wheelchair it is important to regularly check the air pressure and for signs of wear.
The correct pressures are between the minimum of 137 kiloPascals (20 psi, 1.37bar) and the maximum 241 kiloPascals (35 psi, 2.41bar) for rear wheels, and 102 kiloPascals (15 psi, 1.02 bar).
The pressure will need to vary, depending on the weight of the user. IT IS IMPORTANT that front wheels are inflated to the same pressure as a pair, and likewise the rear. The inflator pump provides the safest method of inflating your wheelchair tyres and the pressure can be checked with a standard motor vehicle pressure gauge.
Do not inflate beyond the maximum tyre pressure.
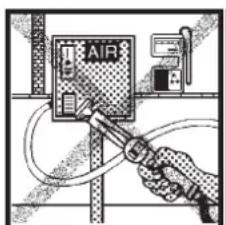
text_image
AIRPLEASE NOTE - NEVER INFLATE THE TYRES USING A GARAGE FORECOURT AIRLINE, ALWAYS USE THE PUMP PROVIDED.
Electrical connections
When inspecting electrical connections, pay attention to the battery connections, the connection of batteries to power loom and plug in sockets for the joystick, control box and lights and indicators.
Tyre wear
When inspecting the tyres for signs of wear, look for significant scuff marks, cuts and a diminished tyre tread. Tyres will need to be changed when the tread cannot be seen over the complete surface of the tyre.
Upholstery/seating
Tears, dents, wearing or slackening of upholstery particularly near to metal could result in poor posture or lower levels of comfort and pressure relief.
Authorised Sunrise Medical service agents
The annual full service must be performed by an approved Sunrise Medical Service Agent. For a list of approved service agents in your area please contact Sunrise Medical on this telephone number: 01384 44 66 88
Storage
When storing your powerchair for long periods of time (in excess of one week), first fully charge, and then disconnect the batteries, to minimise battery discharge.
Maintenance
| F16 maintenance and routine inspection | SIX MONTHLY | ||||||
| WEEKLY | MONTHLY | QUARTERLY | ANNUALLY | ||||
| Charge batteries | ● | ||||||
| Check battery level indicator | ● | ||||||
| Ensure all removable parts are securely fastened | ● | ||||||
| Electrolyte level check (wet batteries only) SAFETY MUST BE OBSERVED! | ● | ||||||
| Ensure all electrical connections are made, and firm | ● | ||||||
| Wipe vehicle with a damp cloth | ● | ||||||
| Check tyre pressures | ● | ||||||
| Ensure lights and indicators are operational and clean | ● | ||||||
| Check tyres for wear | ● | ||||||
| Battery terminals inspection. Clean and protect with petroleum jelly. SAFETY MUST BE OBSERVED! | ● | ||||||
| Check condition of upholstery and seating | ● | ||||||
| Complete inspection, safety check and service should be made by an authorised Sunrise Medical agent. | ● | ||||||
To order spare parts.
PLEASE QUOTE THE
FOLLOWING:
- Model of chair
2.Serial number of chair - Left hand or right hand control
- Part number and description and quantity of items required
- State colour when ordering upholstery or frame parts.
Service history
This section is designed to assist you in keeping a record of any service and repairs to your Wheelchair. Should you decide to sell or exchange your vehicle in the future, this will prove most helpful to you. Your Service Agent will also benefit from a documented record and this manual should accompany the Wheelchair when service or repair work is carried out. The Service Agent will complete this section and return the manual to you.
| Customer Name.____ | Date chair purchased ____ | ||||||||
| Address____ | Model ____ | ||||||||
| Colour ____ | |||||||||
| Postcode____ | Serial No. ____ | ||||||||
| YEAR 1 2 3 4 | YEAR 1 2 3 4 | ||||||||
| Service dates | Service dates | ||||||||
| Controller | Upholstery | ||||||||
| On/off switch | Seat | ||||||||
| Output plug | Back | ||||||||
| Operation | Armpads | ||||||||
| Dynamic braking | Electrics | ||||||||
| Programmable settings | Condition of loom | ||||||||
| Batteries | Connections | ||||||||
| Levels | Lights (where fitted) | ||||||||
| Connections | |||||||||
| Discharge test | Test run | ||||||||
| Wheels/tyres | Forwards | ||||||||
| Wear | Reverse | ||||||||
| Pressure | Emergency stop | ||||||||
| Bearings | |||||||||
| Wheel nuts | Left turn | ||||||||
| Motors | Right turn | ||||||||
| Wiring | Up/down slope | ||||||||
| Noise | Over obstacles | ||||||||
| Connections | Parking brake (where fitted) | ||||||||
| Brake | |||||||||
| Brushes | List items repaired/adjusted | ||||||||
| Chassis | |||||||||
| Condition | |||||||||
| Steering | |||||||||
| Dealer stamp | Dealer stamp | ||||||||
| Date: Signed: | Date: Signed: | ||||||||
| Dealer stamp | Dealer stamp | ||||||||
| Date: Signed: | Date: Signed: | ||||||||
Sunrise Medical
Your new F16 wheelchair is manufactured in the West Midlands by Sunrise Medical. With over 30 years experience, we are one of the longest established mobility equipment manufacturers in the UK. All our Scootas, Wheelchairs, Powerchairs and Stairlifts undergo rigorous tests to ensure that they meet our requirements of comfort, safety and durability. Our success is based on the strong traditions of quality, value for money and genuinely caring for our customers.
We pride ourselves not only on designing and building the most innovative products, but also on our commitment to offer an excellent standard of customer service both during and after sale.

natural_image
Aerial black-and-white view of a large industrial warehouse with multiple roof-covered buildings and surrounding greenery (no visible text or signage)In addition to your new F16 wheelchair, Sunrise also manufactures oxygen concentrators, nebulizers and hoists. We have a vast range of aids to daily living which include the Merlin Bath Lifter, bed accessories and walking sticks.
Should you require any information on our full range of products please call us on 01384 44 66 88 or contact us at:
Sunrise Medical Limited
High Street Wollaston West Midlands DY8 4PS
www.sunrisemedical.co.uk