
SRT 6502 - Satellite receiver STRONG - Free user manual and instructions
Find the device manual for free SRT 6502 STRONG in PDF.


| Product Type | Satellite Receiver |
| Brand | Strong |
| Model | SRT 6502 |
| Dimensions (approx.) | 250 x 160 x 50 mm |
| Weight | 500 g |
| Power Supply | 12V DC, 1A |
| Power Consumption | < 15 W |
| Tuner Type | DVB-S / DVB-S2 |
| Video Outputs | HDMI, SCART, Composite (RCA) |
| Audio Outputs | HDMI, Digital Optical, Analog (RCA) |
| Satellite Channels | Up to 5000 |
| LNB Power Supply | 13/18V, 400mA |
| DiSEqC Support | DiSEqC 1.0, 1.1, 1.2, USALS |
| File Playback | USB media playback (MP3, JPEG, AVI) |
| Electronic Program Guide (EPG) | Yes (7 days) |
| Parental Lock | Yes (PIN controlled) |
| Software Update | Via USB or satellite OTA |
| Remote Control | Infrared (included) |
| Maintenance | Clean with soft dry cloth; avoid liquids |
| Safety | Do not expose to rain or moisture; use only supplied power adapter |
| Spare Parts & Repairability | Contact authorized service center; user-replaceable parts: none |
Frequently Asked Questions - SRT 6502 STRONG
User questions about SRT 6502 STRONG
0 question about this device. Answer the ones you know or ask your own.
Ask a new question about this device
Download the instructions for your Satellite receiver in PDF format for free! Find your manual SRT 6502 - STRONG and take your electronic device back in hand. On this page are published all the documents necessary for the use of your device. SRT 6502 by STRONG.
USER MANUAL SRT 6502 STRONG
Digital Satellite Receiver with Embedded CryptoWorks SRT 6502
User Manual
TABLE OF CONTENTS
1.0 INTRODUCTION 2
1.1 Overview 2
1.2 Main Features 2
2.0 SAFETY/PRECAUTIONS 2
2.1 Safety Instructions 2
2.2 Storage 3
2.3 Equipment Set-up 3
3.0 ACCESSORIES 3
4.0 CONTROLS/FUNCTIONS 4
4.1 Front Panel 4
4.2 Rear Panel 4
4.3 Remote Control 5
5.0 USING THE REMOTE CONTROL 6
5.1 Batteries 6
5.2 Range Of Operation 6
6.0 CONNECTING THE RECEIVER 7
6.1 To a TV set, using TV SCART connection. 7
6.2 To a Hi-Fi system and a TV set, using both A/V connections 7
6.3 To a Video or DVD recorder and a TV set, using both SCART connections 8
7.0 STARTING UP FOR THE FIRST TIME 8
8.0 SETUP AND OPERATION 9
8.1 Before Setup 9
8.2 Setup Menu 9
8.3 Main Menu Settings 12
8.4 General Viewing Information 15
A.1 PROBLEM SOLVING 19
A.2 SPECIFICATIONS 19
1.0 INTRODUCTION
1.1 Overview
This satellite receiver was designed for Digital satellite receiver with CryptoWorks embedded. It enables you to tune in on the hundreds of digital te
technology. It performs numerous functions to provide you with a variety of services.
1.2 Main Features
■ Embedded Smartcard Reader to watch programmes encrypted by CryptoWorks Conditional Access*
■ For all digital Free-To-Air TV and Radio channels via satellite
■ Pre-programmed with most popular channels
■ Excellent Audio & Video quality
■ Quick and easy installation & user-friendly menu
■ Over 3 000 TV channel memory capacity and 1 000 radio channel memory capacity
■ Digital sound through coaxial output (S/PDIF) by connecting to digital amplifier
■ Parental lock function for menu and selectable per channel
■ 5 Favourite lists for TV-and Radio channels
■ Teletext via receiver and TV remote control
■ Display showing channel number or time
Power switch
Electronic TV Programme Guide (EPG) for on screen programme information of present/following event information up to 4 days
■ Subtitle and Timer function (sleep, awake)
■ Multi-lingual audio track support
■ Multi-lingual support on screen menu (OSD), such as English, German, Czech, Slovak, Hungarian, Bulgarian, Turkish
■ Edit function for TV and radio programme name, favourite group name, and transponder information
■ Future-proof: Software update via satellite (OTA)
■ Signal strength bar for digital transponders
■ Automatic and manual channel scan options
■ Power on with last viewed channel
■ User-friendly remote control with coloured function buttons (Infrared up to 7 metres)
■ Supports DiSEqC 1.0 and DiSEqC 1.2
■ PAL/ NTSC/ SECAM compatible
■ Connectors: SAT IN, SAT OUT, 1 TV SCART (RGB, CVBS, Y/C, Audio), 1 VCR SCART (CVBS, Y/C, Audio), 2 RCA (Audio L&R), coaxial Digital Audio: S/PDIF, Separate power switch
* Precondition is an activated and valid CryptoWorks smartcard
2.0 SAFETY/PRECAUTIONS
2.1 Safety Instructions
DO NOT INSTALL YOUR RECEIVER:
In a closed or poorly ventilated cabinet; directly on top of or under any another equipment; on a surface which might obstruct the ventilation slots
DO NOT EXPOSE THE RECEIVER OR ITS ACCESSORIES:
■ To direct sunlight or near any other equipment that generates heat; to rain or intense moisture; to intense vibration or to any shock which may cause permanent damage to your receiver or to any magnetic objects, such as loudspeakers, transformers, etc.
- Do not use a damaged power cord. It may cause a fire or an electrical shock. Do not touch the power cord with wet hands. It may cause an electric shock
■ Never open the cover. It is dangerous to touch the inside of the receiver due to high voltage, currents and possible electrical hazards. Your warranty will be void if the receiver has been opened
■ When the receiver is not used for a long period of time, you should switch OFF the receiver (Power Switch) and unplug the power cord from the wall socket
- Do not use alcohol or ammonia based liquids to clean the receiver. If you wish, you may clean your receiver with a soft lint-free cloth slightly made damp with a mild soap solution, only after disconnecting from the main power supply. Make sure no foreign objects fall through the ventilation slots because this could cause fire or an electric shock
■ Do not place any objects on top of the receiver because this might prevent proper cooling of the components inside
Safety Precautions
- Do not open the receiver cover, as you will be exposed to a shock hazard. It will also void your warranty. Refer all maintenance or servicing to qualified personnel
- When you are connecting the cables, be sure that the receiver is disconnected from the main power supply. Wait a few seconds after switching off the receiver before you move the receiver or disconnect any equipment
It is a necessity that you only use an approved extension and compatible wiring that is suitable for the electrical power consumption of the installed equipment. Please ensure that the electrical power supply corresponds with the voltage on the electrical identification plate at the back of the receiver
If the receiver does not operate normally even after strictly following the instructions in this user manual, it is recommended to consult your dealer
2.2 Storage
Your
When un
from one
accessories. Failing to comply with such packaging procedures could void your warranty.
2.3 Equipment Set-up
We recommend you consult a professional installer to set up your equipment. Otherwise, please follow the instructions below:
■ Refer to the user manual of your TV and your antenna.
■ Make sure that the SCART cable and outdoor components are in a good condition and the SCART connections are well shielded
This manual provides complete instructions for installing and using this receiver. The following symbols will serve as follow.

Warning Indicates warning information.
Tips Indicates any other additional important or helpful information.
MENU Represents a button on the remote control or the receiver
Move to Represents a menu item within a window
3.0 ACCESSORIES
The following have been packed in your receiver box:
■ User's manual: 1 Pc.
■ Remote control: 1 Pc.
■ Batteries (AAA Type): 2 Pcs.

Note: If any accessory listed above is missing, contact the point of purchase.
4.0 CONTROLS/FUNCTIONS
4.1 Front Panel
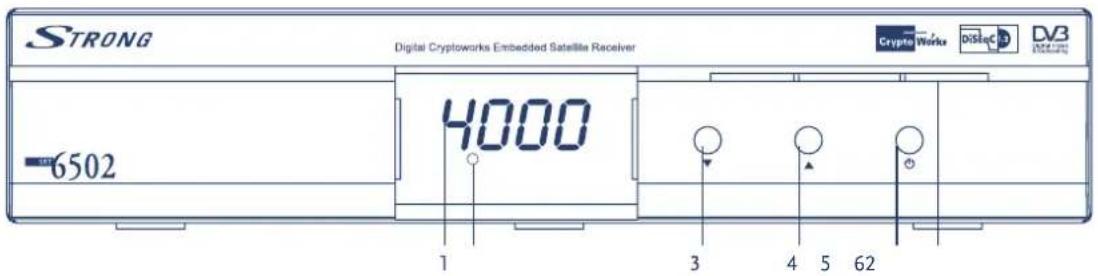
- LED (4 Digit)
Displays the time in "Stand-By" mode and the channel number when the unit is operating.
- IR Sensor
Detects the infra-red command signals generated by the remote control handset
3 & 4. Channel ▲ & ▼
Move the cursor Up or Down in an application screen or change channels sequentially Up or Down in normal operation.
- Power Button
Switches the receiver between "Stand-By" and "On" modes
- Smart card reader
Insert your CryptoWorks smart card with golden contacts facing down.
4.2 Rear Panel
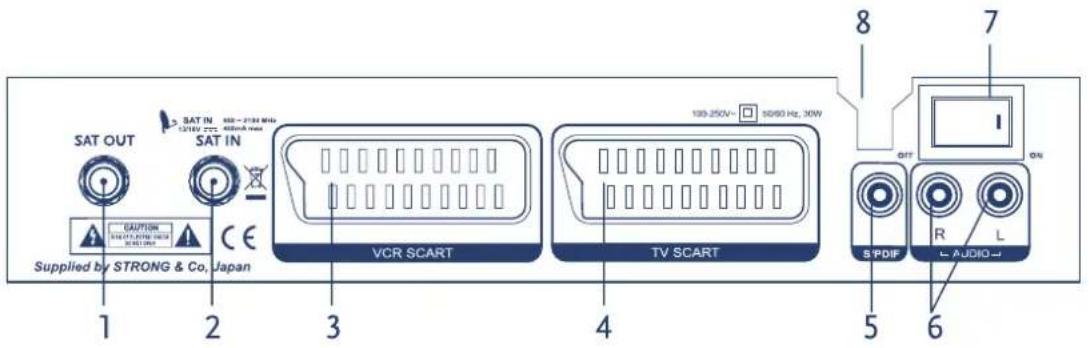
- SAT OUT
Gives you the possibility to connect an extra receiver (analogue or digital).
- SAT IN
Connect the cable from your LNB on the satellite dish to this connector.
- VCR SCART
To connect your receiver to your video recorder using a scart cable. Your video signal will now be looped through your receiver to your TV set.
- TV SCART
To connect your receiver to your TV set using a SCART cable.
- S/PDIF Digital audio output
Use this coaxial output to connect your receiver to the input of your digital audio amplifier
- AUDIO-R and AUDIO-L
Audio Right (RED) and Audio Left (White) RCA connectors to connect to audio amplifier
-
Power On/Off switch
-
Power Cord
Your receiver requires a current of 90 - 250 V AC (Auto-selectable), 50/60 Hz +/-5%.
Make sure to check the power specification before connecting your receiver to the wall outlet.
4.3 Remote Control
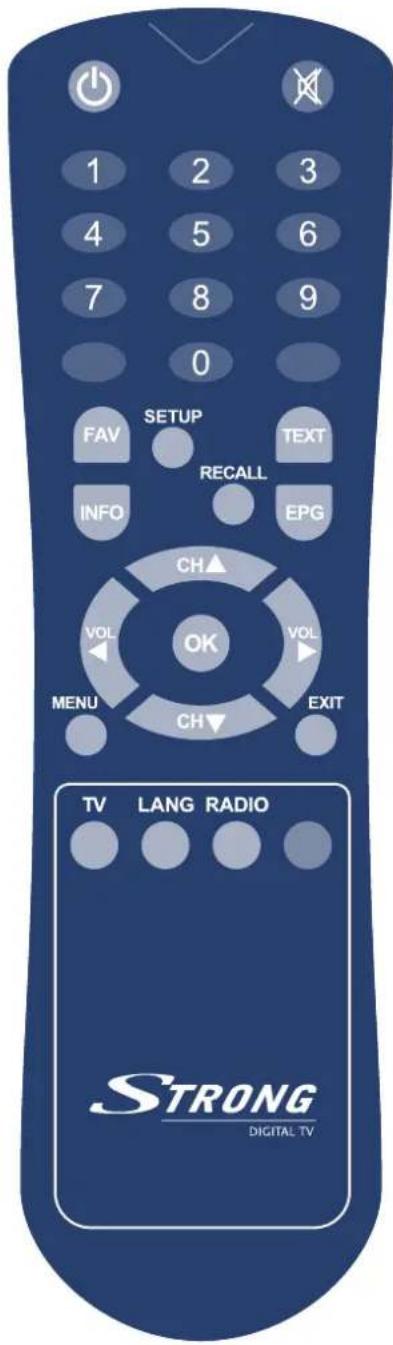
- Power

Switches the receiver between Stand-By & On modes
- Mute

Mutes the audio output
- Numeric Keys (0\~9)
For direct entry of channel number or input of alphanumeric characters
- FAV
Displays the current favorite channels list
- INFO
Displays the available information on the viewed channel
- SETUP
Accesses the receiver set-up menu
- RECALL
Goes back to the previously viewed channel
- TEXT
Displays the teletext contents of the viewed channel, if teletext is transmitted
- EPG (Electronic Program Guide)
Provides program content information. Press again to return to viewing mode
- CH ▲/▼
Change channels sequentially up or down in viewing mode and move the cursor up or down in an application screen
- VOL ◀/▶
Alter the audio output level up or down in viewing mode and change the selected item's setting in an application screen
- OK
Selects an item or confirms a choice
- MENU
Accesses the main menu
- EXIT
To return to previous status or menu
- TV
Switches to TV channel list
- LANG
Select sound mode or audio language
- RADIO
Switches to Radio channel list
5.0 USING THE REMOTE CONTROL
5.1 Batteries
How to insert the batteries
■ Open the cover at the top of the rear side of the handset
■ Insert two 'AAA' type batteries (1.5 V), respecting the indicated polarity +/- signs
■ Close the cover
When to replace the batteries
- When the operational range of the handset gets smaller, or when the receiver no longer responds to each and every command. Always replace both batteries at the same time.
Accident prevention
■ Do not recharge, heat or disassemble the batteries
■ Make sure the intended polarity alignment is respected
■ If the handset is not going to be used for some time, take the batteries out. If not, the batteries may leak and cause damage to the handset
5.2 Range Of Operation
■
■ Transmission distance does not exceed 7m

Note: When the handset is not operational
Replace the batteries and make sure the receiver is connected to the power supply

Note: Abnormal operation
Disturbance from peripheral devices may occur. You will need to move the object that is generating the disturbance.

Note: Notes for handling
In the event the receiver is exposed to heat or water, operating it could be dangerous. Have the unit checked by a qualified technician prior to operating it again
6.0 CONNECTING THE RECEIVER
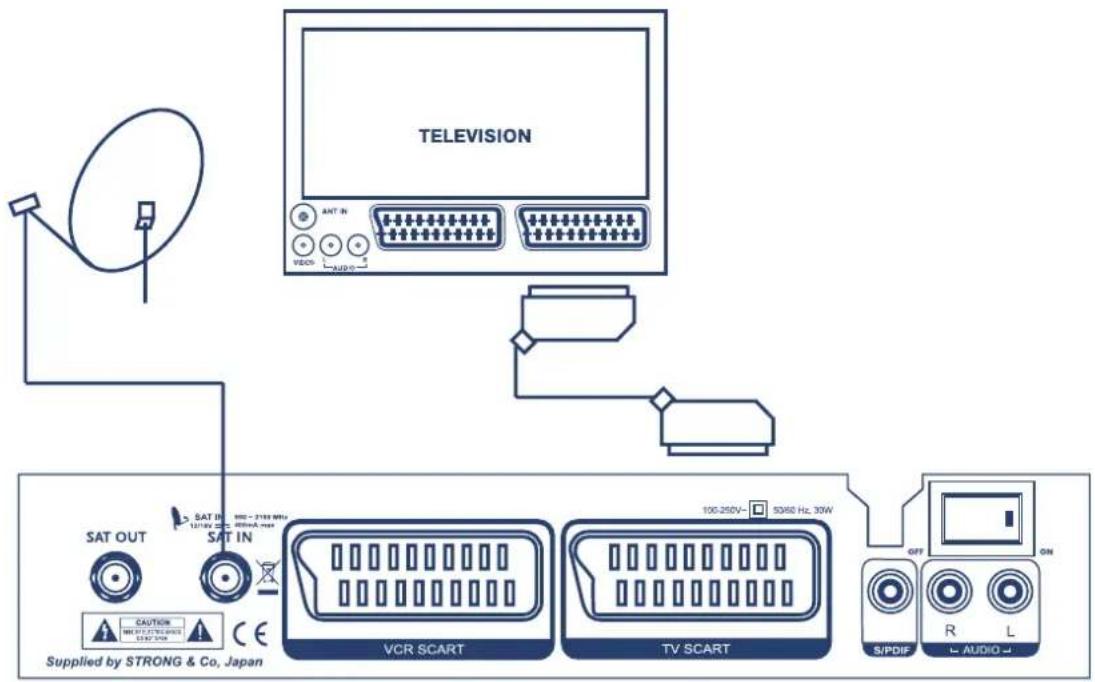
6.1 To a TV set, using TV SCART connection.
6.2 To a Hi-Fi system and a TV set, using both A/V connections
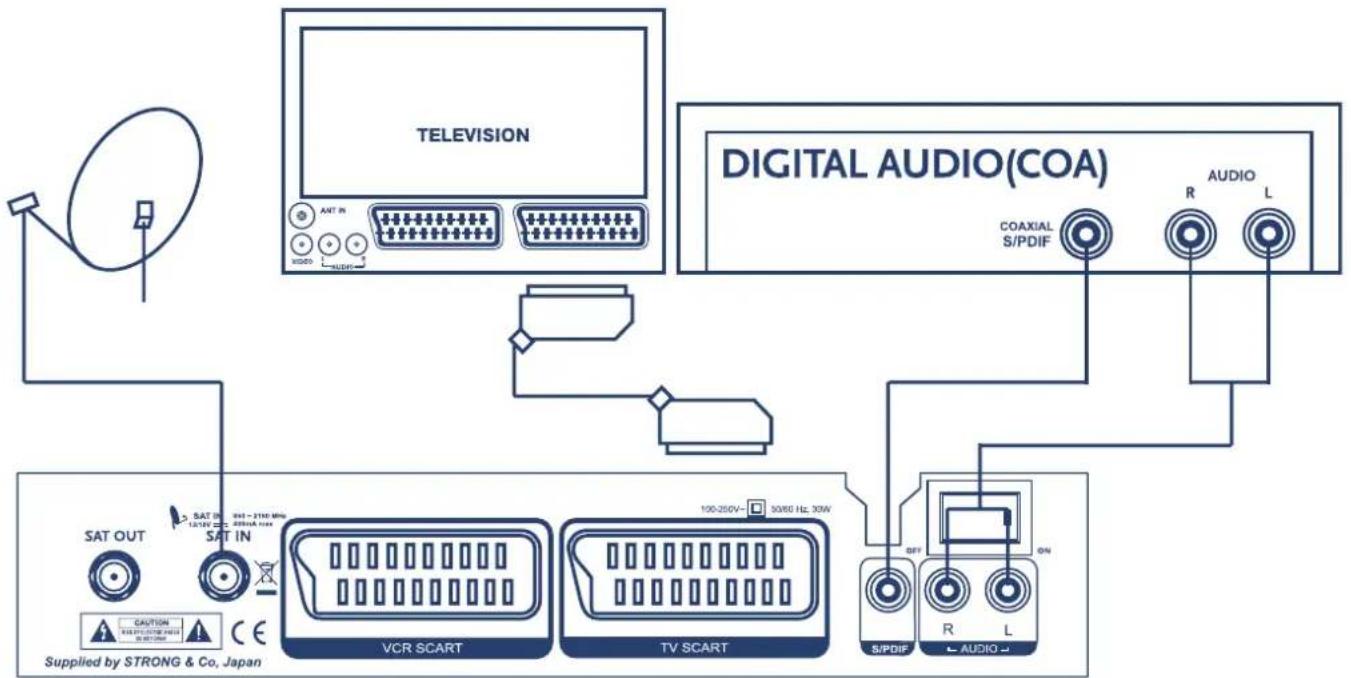
flowchart
graph TD
    A["Sat OUT"] --> B["Sat IN"]
    B --> C["VCR SCART"]
    C --> D["TV SCART"]
    D --> E["S/PDIF"]
    E --> F["L AUDIO"]
    G["TELEVISION"] --> H["ANT IN"]
    H --> I["100-250V~ 30/60 Hz 30W"]
    J["DIGITAL AUDIO(COA)"] --> K["COAXIAL S/PDIF"]
    K --> L["R"]
    K --> M["L"]
    N["Supplied by STRONG & Co, Japan"] --> O["CAUTION"]
    O --> P["100-250V~ 30/60 Hz 30W"]
    Q["ON"] --> R["S/PDIF"]
    R --> S["R"]
    R --> T["L"]
6.3 To a Video or DVD recorder and a TV set, using both SCART connections
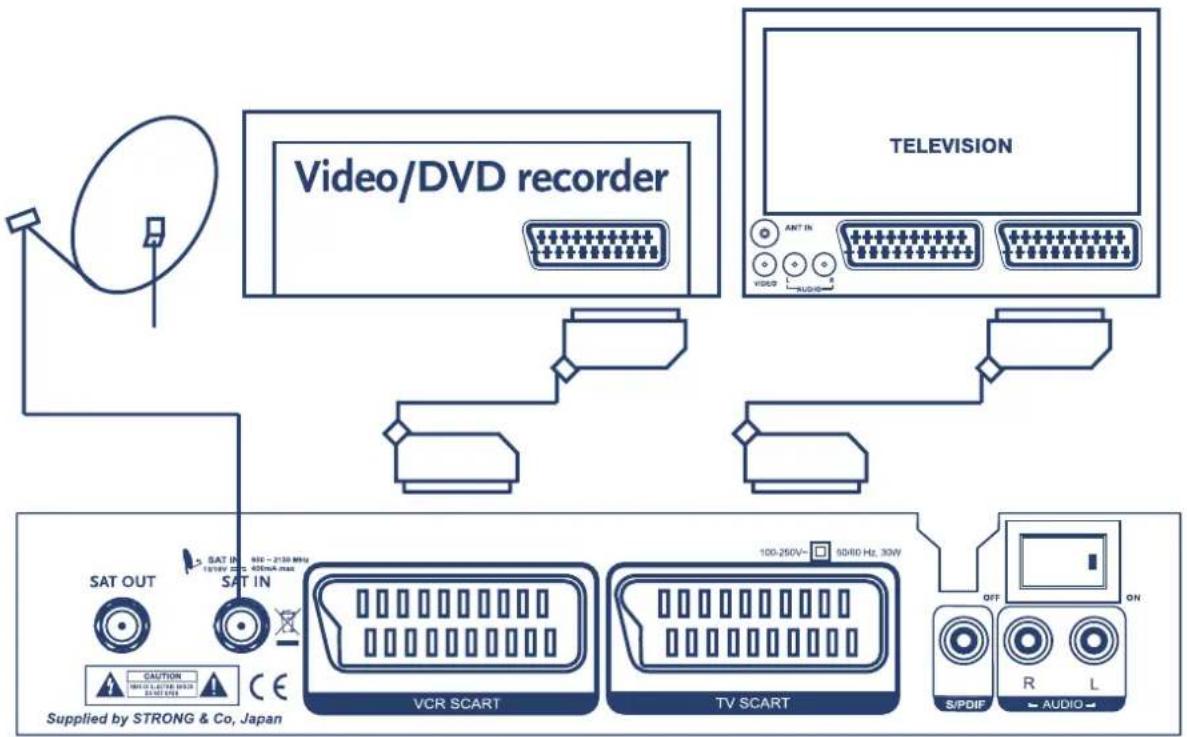
flowchart
graph TD
    A["Sat OUT"] --> B["Sat IN"]
    B --> C["VCR SCART"]
    C --> D["TV SCART"]
    D --> E["S/PDIF"]
    E --> F["ON"]
    G["Video/DVD recorder"] --> H["TELEVISION"]
    H --> I["ANT IN"]
    H --> J["VIDEO"]
    H --> K["AUDIO"]
    L["Supplied by STRONG & Co, Japan"] --> M["CAUTION"]
    M --> N["100-250V~ 90kHz Hz, 30W"]
    O["100-250V~ 90kHz Hz, 30W"] --> P["OFF"]
    Q["100-250V~ 90kHz Hz, 30W"] --> R["R"]
    S["100-250V~ 90kHz Hz, 30W"] --> T["L"]
7.0 STARTING UP FOR THE FIRST TIME
Ensure th . Check
if all connections are done in correct way. If you are not sure about this then ask your local Strong dealer to check your installation or satellite signal.
Once you start the receiver for the first time a country selection dialog will be displayed. Select your country from the list using VOL ◀/▶ buttons. If your country is not in the list select "Other".
After selection of country a specific settings for selected country will be loaded.
For each country we have pre-loaded most popular channels.
If your antenna is primed to your selected satellite, you will get a picture and sound on your TV, otherwise the message "Invalid or no signal" will appear on your TV screen.
In this case do following steps:
- Press OK button on your remote control. Channel list will be displayed
- Press EXIT button. This will move focus to the field with name of satellite
- Using VOL ◀/▶ buttons select satellite where your antenna is pointed and press OK
- Focus will be moved back to channel list. Select channel of your choice and press OK button to confirm.
It ca
installation as described below in "8.2 Setup menu". See "8.2.2 Antenna setup" and "8.2.3 Channel search".
8.0 SETUP AND OPERATION
8.1 Before Setup
Information
A menu is a field of text, displayed on the TV screen. Selectable menu items are generally highlighted. Items that are not highlighted cannot be selected. Most menus display explanatory information at the bottom of the screen.
8.2 Setup Menu
To install the receiver properly you have to perform a "Setup Procedure". After you finish the setup procedure, you can start watching TV or listening to Radio. During the basic settings, the short information is displayed at the bottom of the menu screen.
■ Turn on your TV and receiver
- Press the SETUP button to display the setup mode. You will be asked to enter PIN code. Using numeric buttons enter PIN code "1234". This is default PIN code and it can be changed later, as described in "Setup Lock/PIN"
■ Use the CH ▲/▼ and VOL ◀/► buttons to move across a menu page
■ When you have reached the required item, press the OK button to confirm your choice
■ Press EXIT to return to quit the mode
8.2.1 System Setup
Press the OK button on 'System Setup' in the Setup Menu.
Set the Video Format, TV Type, Scart RGB output, GMT Offset, Positioner, LNB Reference and Summer Time.
■ Use CH ▲/▼ to move up and down in the list.
■ Use VOL ◀/▶ to change the setting.
Video Format: MULTI / PAL I, B, G or K / SECAM / NTSC
TV Type: Standard (4:3) / Wide (16:9) and aspect conversion PAN SCAN/Letter box
Scart RGB: On / Off
Positioner: Yes / No
Teletext type: STB/VBI
GMT Offset: +12:00 \~ -12:00
Summer Time: On / Off
■ Upon reaching the required settings, press OK to store the setting.
■ Press EXIT to go back to the previous mode.
8.2.2 Antenna Setup
Press OK on 'Antenna Setup' in the Setup Menu.
Set the satellite, LNB Frequency, 22 kHz Tone, DiSEqC mode, LNB Power and Positioner setup.
■ Use CH ▲/▼ to move up and down the list.
■ Use VOL ◀/▶ to change the setting.
SAT: select satellite from the stored list. To include satellite to the list of satellites available for Channel search you need to select it with OK button. Selected satellites marked with symbol. If you want to rename selected satellite – press INFO button.
LNB Type: select between Universal / Wide Band / OSC C- Band / C-Band / Ku-Band / Unicable / Standard Sat. Make your selection depending from installed LNB.
High L.O.: enter the frequency of Local Oscillator for High band. Refer to your LNB manual.
Low L.O.: enter the frequency of Local Oscillator for Low band. Refer to your LNB manual.
22 kHz Tone: On / Off / Auto - Make your selection depending from installed LNB.
DiSEqC: Off / DiSEqC A, B. C or D / Tone A or B. If you have DiSEqC 1.0 or Tone Burst switch installed
LNB Power: H/V / 14V / 18V / Off
Positioner: None / DiSEqC 1.2 / USALS. If you use antenna mounted on the DiSEqC 1.2 positioner then select "DiSEqC 1.2". If your positioner is USALS compatible then select "USALS".
8.2.2.1 DiSEqC 1.2 positioner setup
Mount
installed by a professional.
In "Antenna Setup" menu set "Positioner" to "DiSEqC 1.2" and press OK button to enter to "Antenna position" menu.
■ Use CH ▲/▼ to move up and down in the list.
■ Use VOL ◀/▶ to change the setting.
Satellite: select satellite position of which you would like to setup.
Transponder: select reference transponder which should be used for signal quality indication.
Move: when this item is highlighted press VOL ◀/▶ to move dish in East/West direction accordingly.
Save position: highlight this item and press OK to store current position of the dish for selected satellite. The symbol shown near menu item once position is stored.
Reference position: highlight this item and press OK if you need to turn dish to reference position (0 degree position).
Function: Set west limit / Set east limit – select it and press OK if you want to store current position of the dish as west / east limit; Disable limit / Enable limit – select and press OK to disable / enable limits; Recalculate – select and press OK to recalculate positions of all satellites based on adjustment for current satellite; Nudge west / Nudge east – select and press OK for fine adjustment of the dish position; Nudge tilt up / Nudge tilt down – use this command if your positioner support adjustment of elevation.
Antenna status: show you current status of the antenna (stopped, moving to East/West).
Signal Quality: show quality of signal for selected reference transponder. Adjust antenna position in order to get maximum level of the Signal Quality.
■ Press EXIT to go back to the previous mode.
8.2.2.2 USALS positioner setup.
installed by a professional.
In "Antenna Setup" menu set Positioner to "USALS" and press OK button to enter to "Antenna position" menu.
■ Use CH ▲/▼ to move up and down in the list.
■ Use VOL ◀/▶ to change the setting.
Satellite: select satellite position of which you would like to setup.
Transponder: select reference transponder which should be used for signal quality indication.
My longitude: set longitude of your location.
My latitude: set latitude of your location.
Move: highlight this item and press ◀ button to turn dish to the position corresponded to the selected satellite. Press ▶ button to stop dish.
Reference position: highlight this item and press OK if you need to turn dish to reference position (0 degree position).
Signal Level and Quality: show level and quality of signal for selected reference transponder. Adjust longitude and latitude of your location in order to get maximum values of the Signal Level and Quality indicators.
■ Press EXIT to go back to the previous mode.
8.2.3 Channel Search
Press OK on 'Channel Search' in the Setup Menu.
Set the Satellite, Tune Method, Transponder, Frequency, Symbol Rate, FEC and Function.
■ Use CH ▲/▼ to move up and down the list.
■ Use VOL ◀/▶ to change the setting.
Satellite Name: choose from the list of satellites selected in "Antenna setup" menu.
Tune Method: Main options are:
"Sat" – receiver will search channels according to stored list of transponders.
"Sat – NIT" - receiver will search channels according to stored list of transponders and in addition use network information.
This mode allows you to find all channels, even from new appeared transponders.
"TP" – this method is to search channels from one transponder.
“TP – NIT” – receiver will search channels from one transponder and in addition use network information. This mode recommended if you want to search channels of particular broadcaster only.
Sub options are:
"Free" – receiver will search only Free To Air channels
"Free+Scr" – receiver will search for all channels
Transponder: select index from the stored list
Frequency: value of transponder frequency in MHz
Symbol Rate: value of symbol rate in kSymbols Per Second
Polarity: Horizontal / Vertical / Right / Left
FEC: Auto, 1/2, 2/3, 3/4, 5/6, 7/8
Function: Append/Delete/Change
AGC Signal: Indicates received signal strength level
8.2.3.1 How to search for channels:
Highlight "Tune method" field and press OK. Receiver will start channel scan. Names of the found channels will be shown in the two columns: for TV and Radio separately.
You can interrupt search process by pressing to OK or Exit button.
If you press OK button: search process will be interrupted and you can select one of the following options:
■ Save – to save all found channels
- Unselect – to unselect some unwanted channels from the list. Use OK button to unselect channels and VOL ◀/▶ buttons to switch between TV and Radio list. Once you finish – press EXIT button, select “Save” and press OK. Only selected channels will be stored in the memory
- Cancel – to cancel result of search. No channels will be stored in the memory
If you press EXIT button: search process will be interrupted and no channels stored in the memory.
8.2.3.2 How to add new transponder:
■ set "Tune method" to "TP" or "TP+NIT"
■ move focus to "Frequency" and enter value in MHz
■ move focus to "Symbol rate" and enter value in kSPS
■ move focus to "Polarity" and select value
■ move focus to "FEC" and select value or set "Auto"
■ move focus to "Function" select "Append" and press OK. Message "Saving data..." will be shown on screen. New transponder will be added to the end of the list
8.2.3.3 How to delete present transponder:
■ set "Tune method" to "TP" or "TP+NIT"
■ move focus to "Transponder" and choose transponder you want to delete
■ move focus to "Function" select "Delete" and press OK. Message "Saving data..." will be shown on screen. Selected transponder deleted from the list
8.2.3.4 How to correct/edit parameters of the transponder:
■ set "Tune method" to "TP" or "TP+NIT"
■ move focus to "Transponder" and choose transponder you want to modify
■ move focus to "Frequency" and enter value in MHz
■ move focus to "Symbol rate" and enter value in kSPS
■ move focus to "Polarity" and select value
■ move focus to "FEC" and select value or set "Auto"
■ move focus to "Function" select "Change" and press OK. Message "Saving data..." will be shown on screen. Modified data are stored in the memory.
■ Press EXIT to go back to the previous mode.
8.2.4 Setup Lock/PIN
Press OK on 'Setup Lock/PIN' in the Setup Menu. Set the Menu Lock, Change the PIN, enter the New PIN and confirm the Confirm PIN.
■ Use CH ▲/▼ to move up and down the list.
■ Use VOL ◀/▶ to change the setting.
Menu Lock: On/Off
Change PIN: Press OK if you want to change.
New PIN: Enter your new 4-digit code
Confirm PIN: Confirm your new 4-digit code

Note: The default PIN is '1234'
Press EXIT to go back to the previous mode.
8.2.5 Time Setting
Press OK on 'Time Setting' in the Setup Menu. Set the Local Time, Sleep Time, Timer Status and Program the Timer.
■ Use CH ▲/▼ to move up and down the list.
■ Use VOL ◀/▶ to change the setting.
Local Time: if you want to correct time and date then enter in format dd/mm/yyyy - day - hh:mm
Sleep Time: 0 \~ 180 min. Receiver will be turned off after selected time interval.
Timer: select timer number
Status: Disabled/Enabled. If Enabled – receiver will be turned on within selected channels at defined “start time” and turned off after “duration” interval
Channel type: TV/Radio.
Channel number: enter channel number. If you use multi satellite installation – make sure to enter channel number in "All satellites" mode.
Channel name: displayed automatically and depends from channel number.
Start time: enter start time in format dd/mm/yyyy - day - hh:mm
Duration: enter duration in hh:mm format.

Note: Timer also can be programmed from EPG. See "Program Guide" chapter of this manual.
■ Press OK to store settings and go back to the previous mode.
8.2.6 Factory Default
Press OK on 'Factory Set' in the Setup Menu. Confirm whether you wish to go back to the factory default settings.
This function wi
the memory.
8.3 Main Menu Settings
From the Main Menu you can access to the Program Guide, Channel Sorting,, Language Preference Settings, Favorites Editing, Channel Editing, Smart card information and Software Version information.
■ Press MENU
■ Use CH ▲/▼ to move up and down the list
■ Use VOL ◀/▶ to change the setting
■ Upon reaching the required menu line, press OK to enter the setting
■ Press EXIT to go back to the previous mode
8.3.1 Program Guide
This menu displays same information as described in chapter 8.4.4. Press OK on 'Program Guide' in the Main Menu.
8.3.2 Sort Channels
Press OK on 'Program Search' in the Main Menu.
■ Use VOL ◀/▶ to select an alphabetical letter.
■ Press OK to confirm your choice.
■ Use CH ▲/▼ to move up and down in the list.
■ Use VOL ◀/▶ to scroll pages Down or Up.
- Pressing OK on the highlighted channel calls that channel and closes this menu.
■ Press EXIT twice to go back to the previous mode.
8.3.3 Language
Press OK on the 'Language Preference'. Select the menu language and Logo for Radio channel Menu Language: Available English / Hungarian / Czech / Slovak / Bulgarian / Turkish / German Radio Ch Logo: enable or disable logo for Radio channels
■ Use CH ▲/▼ to move upwards and downwards in the menus.
■ Use VOL ◀/▶ to change the values in the alternatives.
■ When you have reached the required subject menu, press OK to confirm your selection.
■ Press EXIT to go back to the previous mode.
8.3.4 Edit Channels
Press OK on the 'Edit Channel'.
Select the Edit channel menu.







Use EXIT button to toggle between channel lists and function selection.
To toggle between TV and Radio lists highlight function and use CH ▲/▼ to select list.
To return to menu press EXIT button when any function is highlighted. You will be required to confirm or discard changes that you have made.
8.3.4.1 Move channel
To move channel highlight 🧑 icon and press OK. Highlight the channel which you want to move and press OK. If you want to move group of channels – highlight and select with OK button all channels that you want to move. Once you finish selection of channels, select position in the channel list where to move selected channels and press RECALL button. Press EXIT to return to function selection or continue to move other channels if you want.
8.3.4.2 Add to favourite list
To add channel to favourite list highlight 🤖 icon and press OK. Highlight the channel which you want to add to favourite group and press OK. List of favourite groups will be displayed on screen. Select group of your choice and press OK. Continue to add other channels if you wish. If you wish to remove channel from favourite group select group “[0] – unselect”. Press EXIT to return to function selection.
8.3.4.3 Lock channel
Lock fun
example)
To lock channel highlight icon and press OK. Highlight the channel which you want to lock and press OK. If you wish to unlock channel then repeat selection with OK button. Press EXIT to return to function selection.
8.3.4.4 Delete channel
To delete channel highlight icon and press OK. Highlight the channel which you want to delete and press OK. Continue to select other channels that you wish to delete. If you wish to unlock channel then repeat selection with OK button. Press EXIT to return to function selection.
8.3.4.5 Add channel
channel. Before use this function you need to know details of channel which want to add.
To add new channel highlight ✿ icon and press OK. Below menu will be displayed.
Select satell
this menu. Highlight "Channel name" and press OK. Enter channel name with keypad displayed. Enter value of Audio, Video and PCR PID and press OK. Press EXIT to return to function selection.
8.3.4.6 Edit channel name
To edit channel name highlight 📄 icon and press OK. Select channel which name you wish to edit and press OK. Use displayed keyboard to edit the name, select Save function to store new name or Cancel to discard changes. Press EXIT to return to function selection.
8.3.5 Smart Card
You can enjoy not only Free-To-Air services but also CryptoWorks embedded service channels. To view CryptoWorks embedded service channels, just insert Smart card into slot. Once you insert the smart card, you will see CryptoWorks embedded service channels. If you need further information, contact your service provider or distributor.
General Card Information: Card Label and Additional Info/ Set Maturity Rating/ Smart Card Pin Code Change/ Available Program Providers
Available Entitlements: in this menu you can check validity period of your smart card.
Profile Information: Current Mode/Profile/ Image ID/ Hardware Version/ Loader Version
8.3.5.1 General Card Information
Choice General Card information, you can find information of Smart Card as followings
Card Label and Additional Info: to check following information Card Label/Smart Card Address /Card Valid until/Current Maturity Rate
Set Maturity Rating: Current Maturity Rate/Set Maturity Rate.
Your broadcaster can assign maturity rating for each program.
If you have children and want to deny their access to the programs with maturity rate above their age set maturity rating value to age of your children.
You, or your children, will be asked to enter smart card PIN code in case when maturity rating of program content is above of maturity rating that you have set in this menu.

Note:
We recommend to use different PIN codes for the smart card and for the receiver.
Smart Card Pin Code Change: Enter Old Pin / Enter New Pin / Confirm New Pin. In this menu you can change PIN code of your smart card. Available Program Providers: information about program providers.
8.3.6 About
Press OK on the 'About'.
It shows model name, application Ver., and device version.
System software update.
To download latest software version highlight "Update" and press OK.
Receiver will check if newest version is available. In case it is available you will be asked to confirm update. In case no new software is available you will get corresponded message.
■ Press EXIT to go back to the previous mode.
8.4 General Viewing Information
8.4.1 Program Information
Information on the currently viewed program appears for a few seconds, when you press INFO.
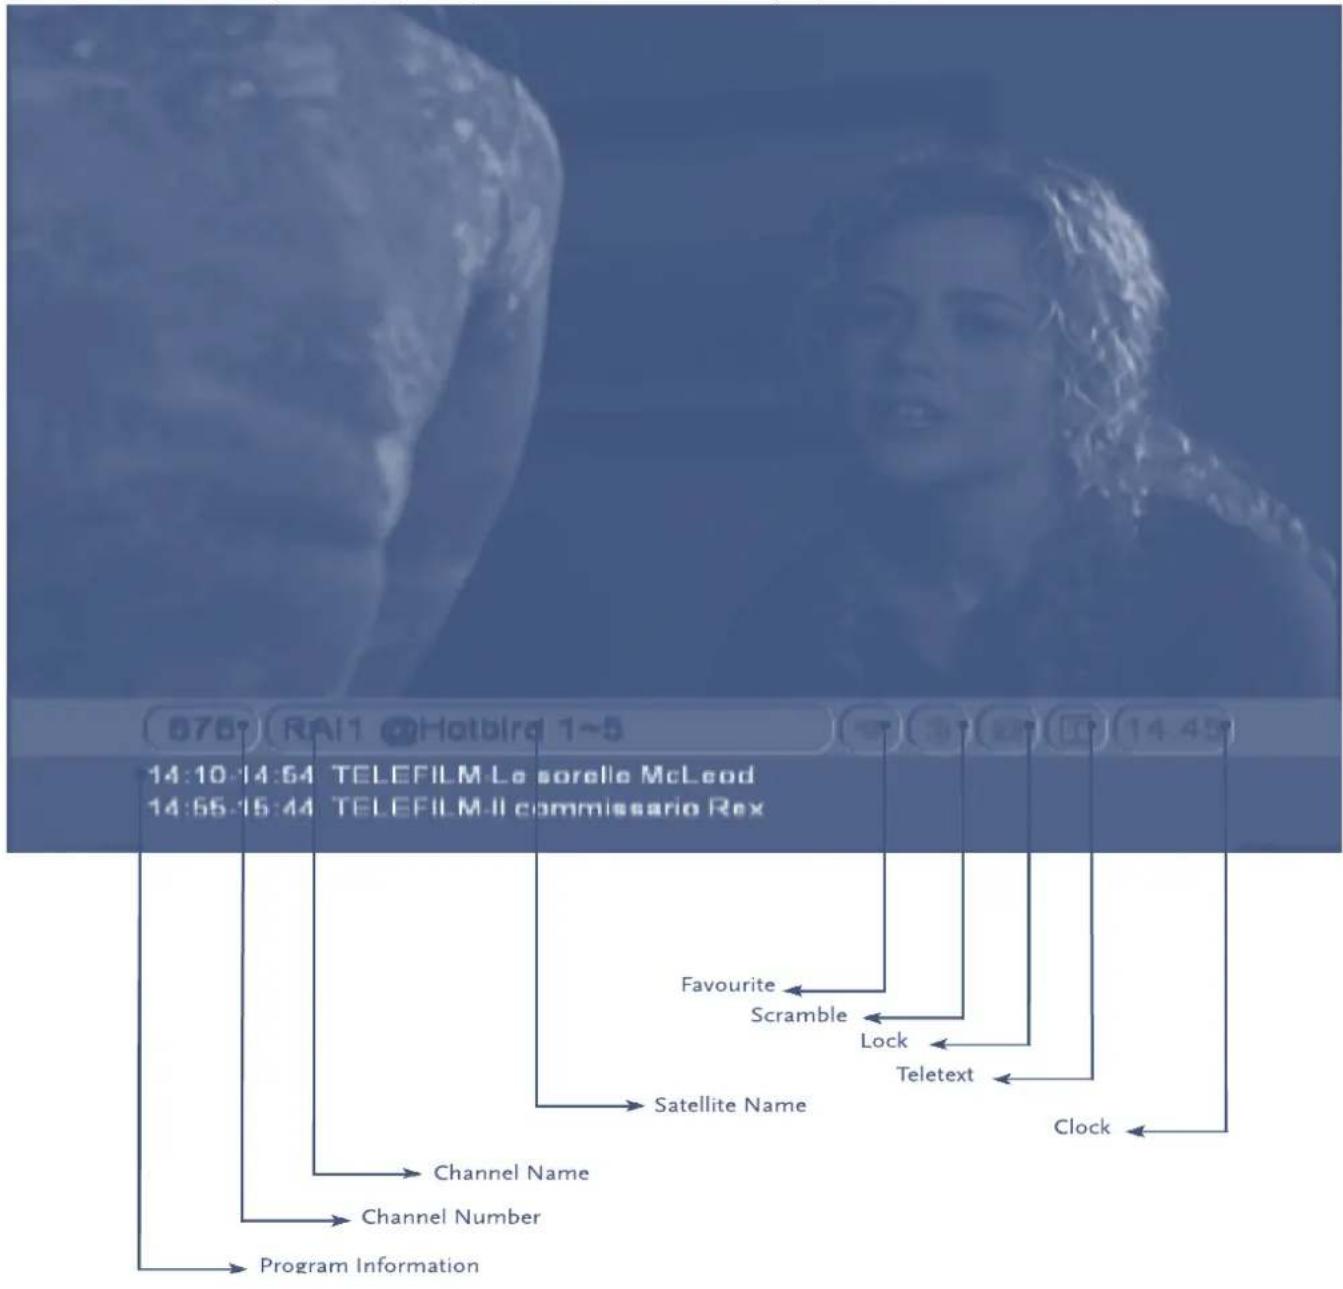
8.4.2 TV/Radio Channels List
While watching TV or listening to Radio you can call the channel list by pressing TV/RADIO or OK button. The picture in the preview screen is that of the highlighted channel, which can be changed with the CH ▲/▼. VOL ◀/▶ scrolls Channel List pages Down or Up. Pressing OK on a highlighted channel calls that channel and exits the Channel List.
To sort channels in various modes press EXIT while focus of the list is pointed to the channels.
If you have multi satellite installation then field with satellite name will be highlighted. Use VOL ◀/▶ to select satellite of your choice. Press OK to return to the channel list.
Highlight "List" to sort channels by alphabet, number of FTA.
■ mode "ALL (1,2,3..)" is to display all channels from current satellite in channel number order
■ mode "ALL (A.B.C.)" is to display all channels from current satellite in Alphabet order
■ mode "Free (1,2,3..)" is to display only FTA channels from current satellite in channel number order
■ mode "Free (A.B.C.)" is to display only FTA channels from current satellite in Alphabet order
Press OK to return to the channel list.
To exit from the channel list press OK when channel is highlighted or press EXIT button twice.
TV Channel List – satellite selection
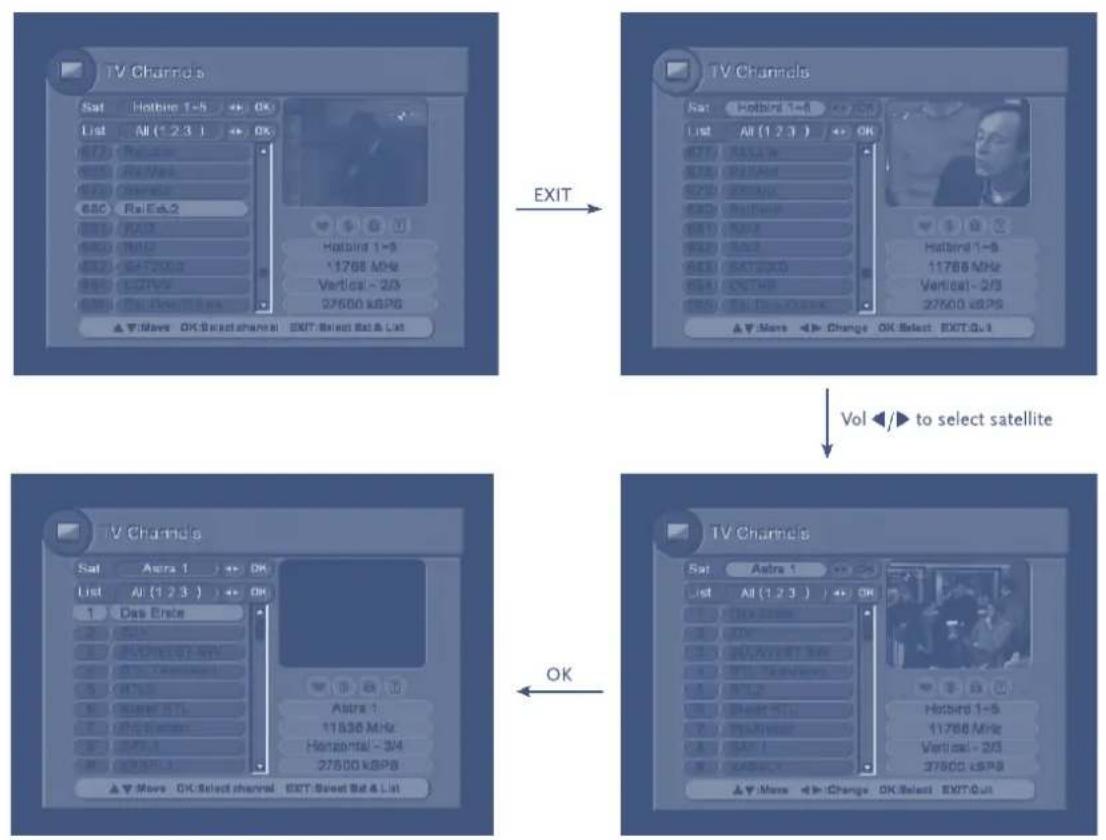
flowchart
graph TD
    A["TV Channels"] --> B["EXIT"]
    B --> C["Vol to select satellite"]
    C --> D["OK"]
    D --> E["OK Select Sat & List"]
TV Channel List – channels sorting
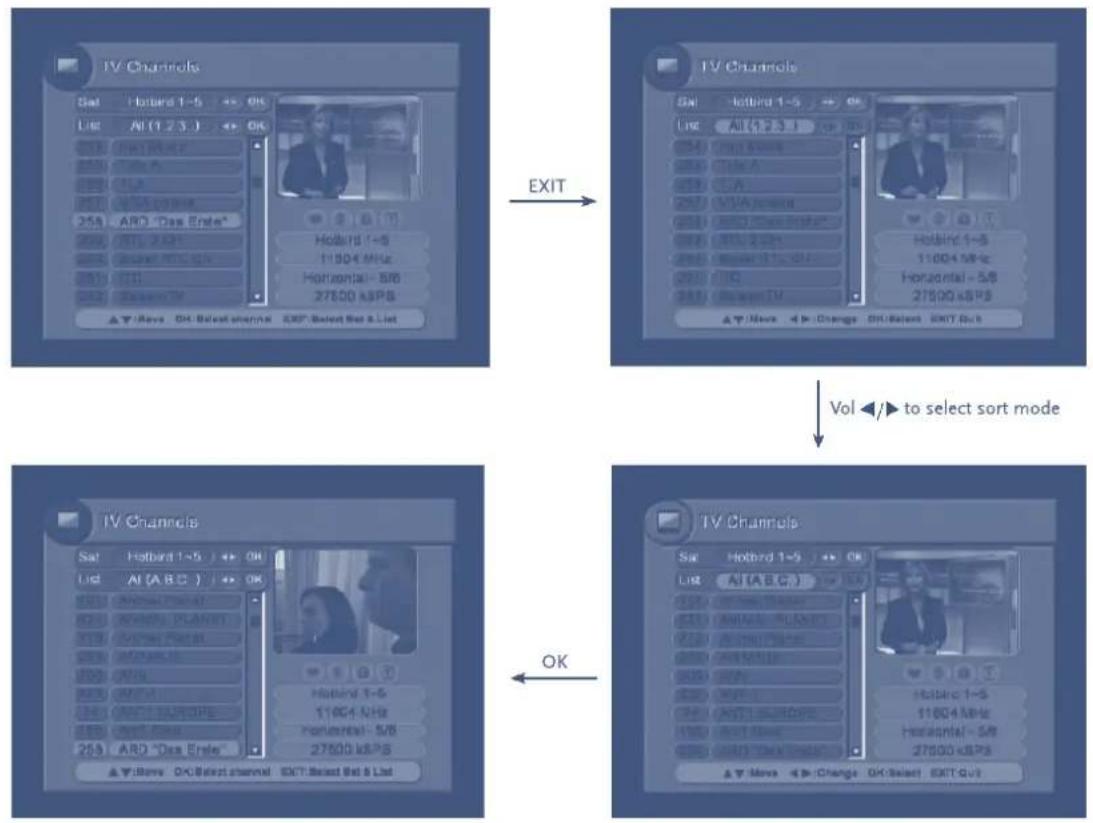
flowchart
graph TD
    A["Exit"] --> B["Format Conversion"]
    B --> C{Sort Mode}
    C --> D["Select Sort Mode"]
    D --> E{Vol to Select Sort Mode}
    E --> F["OK"]
    F --> G["Select Sort Mode"]
Radio list is similar to TV list. To select between TV and Radio list use TV/RADIO button while channel list is displayed on screen.
8.4.3 Favorite Channels Lists
While watching TV or listening to Radio you can call the respective favorite channels list by pressing FAV. If you press FAV button while watching TV channel – the list of TV Favourite channels will be displayed. If you press FAV button while listening to Radio – the list of Radio Favourite will be displayed. In case you didn't add any channels to Favourite lists, it would not appear.
To change between Favourite lists you can use FAV button or press EXIT button while Favourite list is displayed. The "List" field will be highlighted. Use VOL ◀/▶ to select Favourite list and press OK once finished.
To return back to ALL channels mode press TV/RADIO button.
8.4.4 Program Guide
Press EPG to access the electronic program guide, if available from the broadcaster.
Once you enter to Program Guide the "Now & Next" mode is selected. You can select mode "Schedule" if press VOL ▶ or you can change between TV and Radio list if press VOL ◀ button.
Now & Next mode
Select "Now & Next" and press OK. Select channel of your choice using CH ▲/▼ buttons. Select program information using VOL ◀/▶ buttons. Below channel list you can see extended description of the highlighted program.
To view detailed description of the program press OK button.
Schedule mode
This mode displays scheduled program information for current channel
Select "Schedule" and press OK. Select program of your choice and press OK to see detailed program information.
To reserve Timer for selected program press RECALL button and confirm timer settings.
To view scheduled information for another channel exit from schedule mode, select channel in "Now & Next" mode and finally select schedule mode.
8.4.5 Selection of alternate audio track or audio mode
Press LANG to access the audio language selection screen.
■ Use CH ▲/▼ to move up and down the list.
■ Use VOL ◀/▶ to change the setting.
Track: 1 of 1,2... Select
Mode: Stereo / Mono Left / Mono Right
Level: Normal / High / Low
Language: displays name of the audio track if available
Subtitle: Select subtitle language if available (broadcaster dependent).
■ Press OK to confirm your selection and close this menu.
8.4.6 Recall
Press RECALL to recall the previous channel.
8.4.7 Teletext
Press TXT to access the Teletext service if available from the broadcaster.
A.1 PROBLEM SOLVING
There may be various reasons for the abnormal operation of the unit. Therefore, if the unit does not work properly, check it according to the procedures shown in the table below:
| Symptom Cause Remedy | ||
| The display on front panel does not light up. | The power cord is not plugged in. Check that the power cord is plugged in to the wall outlet. | |
| No picture or sound Wrong connection of the Audio/Video output of the receiver to TV. | Connect the Audio/ Video output of the receiver to TV correctly. | |
| Audio muting. | Press the Mute button | |
| TV power off. | Turn TV on. | |
| No picture The receiver can't receive the signal | Incorrect values of some tuner parameters. | Check the antenna cable, replace the cable, or connect the cable to the receiver tightly. |
| Wrong direction of the dish | Set the values of the tuner parameters correctly in the installation menu. | |
| Check the signal strength with a spectrum analyzer and adjust your dish correctly. | ||
| The remote control does not work The batteries of the remote controller are not inserted or exhausted | The batteries of the remote controller are not inserted or exhausted | Check whether the batteries are inserted correctly in your remote control. Check the batteries, and if exhausted replace the batteries in the remote control. |
A.2 SPECIFICATIONS
Tuner
Input Frequency Range: 950 \~ 2150 MHz
Input signal level: -65 \~ -25dBm
LNB Power: 14/18 V DC, max. 400 mA
LNB switch control: 22 kHz
DiSEqC Version 1.0 & 1.2 compatible
Demodulator
Modulation: QPSK
Input Symbol Rate: 2 \~ 45 Ms/s
SCPC & MCPC signals from C & KU band satellites
Video Decoder
Profile level: MPEG-2 Main profile @ Main level
Data Rate: Up to 15 Mbit/s
Video Resolution: 720 x 576, 720 x 480
Video Format: NTSC, PAL, SECAM
Aspect Ratio: 4:3, 16:9
Audio Decoder
MPEG 1/MusiCam Layer I & II;
Audio mode: Mono, Dual mono, Stereo
Sampling Rate: 32, 44.1, 48 kHz
Connectors
SAT IN
SAT OUT
1 TV SCART (RGB, CVBS, Y/C, Audio)
1 VCR SCART (CVBS, Y/C, Audio)
2 RCA (Audio L & R)
Coaxial Digital Audio: S/PDIF
Power switch
System & Memory
Main Processor: STi5518
Flash Memory: 2 MBytes
SDRAM: 8 MBytes
General Data
Supply Voltage: 100 - 250 V AC (SMPS) 50/60 Hz
Power Consumption: 14 W
Stand-by Mode: <13 W
Operating Temperature: +5 \~ +45 °C
Storage Temperature: 0 \~ +50 °C
Humidity: 25 \~ 70 %
Size (WxHxD) in mm: 214 x 42 x 153
Weight: 0.93 kg
Subject to alterations. In consequence of continuous research and development technical specifications, design and appearance of products may change. ASTRA is a registered trade mark of SES ASTRA, Eutelsat and HOT BIRD are registered trade marks of Eutelsat Communications, CryptoWorks is a trademark of Irdeto Access B.V., all other product names are trademarks or registered trademarks of their respective owners.
© STRONG 2008. All rights reserved. 06/2008
ENVIRONMENTAL ISSUES
STRONG is committed to reducing the impact of its products on the environment.
To maximise the benefits of our design enhancements, your co-operation is required.
Electronic product recycling
Do not dispose of this product with your domestic rubbish.
At the end of its useful life, this product contains materials which when processed correctly can be recovered and recycled. By participating in the responsible recycling of this product you will be reducing the requirement for new raw materials and reducing the amount of material that would otherwise end up in landfill.
When you purchase a new, similar product your retailer may offer to take this old one off you. Alternatively, you can take it to your local recycling centre. Your retailer or local municipal authority will advise you of the collection facilities available for waste electronically products in your area. User of this service will be free to you.
Within the scope of the European legislation on Waste Electrical and Electronic Equipment (Directive 2002/96/EC valid as of August 2005) STRONG provides a recycling system free of charge for consumers to returning products after end of life. For more information about STRONG's environmental policy to you:
www.strong.tv - select "About us" and "Environmental Policy" from the submenu.

Packaging
When disposing of this product packaging, please ensure that it is recycled. Packaging material is to be depolluted in waste separation.

Power Saving
To save power and money, please put the product into standby mode when not in use. We also recommend disconnection from mains supply when not in use for longer periods of time.

Batteries
Do not dispose of the batteries from your handset with your domestic waste.

Where they are available, participate in your local municipal or retailer collection schemes for spent batteries. Batteries discarded in landfill sites or incinerated increases the chances of pollutants being dispersed into the atmosphere.
Alternations reserved 03/2008
- Digital Satellite Receiver with Embedded CryptoWorks SRT 6502
- TABLE OF CONTENTS
- INTRODUCTION 2
- SAFETY/PRECAUTIONS 2
- ACCESSORIES 3
- CONTROLS/FUNCTIONS 4
- USING THE REMOTE CONTROL 6
- CONNECTING THE RECEIVER 7
- STARTING UP FOR THE FIRST TIME 8
- SETUP AND OPERATION 9
- A.1 PROBLEM SOLVING 19
- A.2 SPECIFICATIONS 19
- INTRODUCTION
- Overview
- Main Features
- SAFETY/PRECAUTIONS
- Safety Instructions
- Safety Precautions
- Storage
- Equipment Set-up
- ACCESSORIES
- CONTROLS/FUNCTIONS
- Front Panel
- Rear Panel
- Remote Control
- USING THE REMOTE CONTROL
- Batteries
- How to insert the batteries
- When to replace the batteries
- Accident prevention
- Range Of Operation
- CONNECTING THE RECEIVER
- To a TV set, using TV SCART connection.
- To a Hi-Fi system and a TV set, using both A/V connections
- To a Video or DVD recorder and a TV set, using both SCART connections
- STARTING UP FOR THE FIRST TIME
- SETUP AND OPERATION
- Before Setup
- Information
- Setup Menu
- System Setup
- Antenna Setup
- DiSEqC 1.2 positioner setup
- USALS positioner setup.
- Channel Search
- How to search for channels:
- How to add new transponder:
- How to delete present transponder:
- How to correct/edit parameters of the transponder:
- Setup Lock/PIN
- Time Setting
- Factory Default
- Main Menu Settings
- Program Guide
- Sort Channels
- Language
- Edit Channels
- Move channel
- Add to favourite list
- Lock channel
- Delete channel
- Add channel
- Edit channel name
- Smart Card
- General Card Information
- Note:
- About
- System software update.
- General Viewing Information
- Program Information
- TV/Radio Channels List
- TV Channel List – channels sorting
- Favorite Channels Lists
- Program Guide
- Now & Next mode
- Schedule mode
- Selection of alternate audio track or audio mode
- Recall
- Teletext
- A.1 PROBLEM SOLVING
- A.2 SPECIFICATIONS
- Tuner
- Demodulator
- Video Decoder
- Audio Decoder
- Connectors
- System & Memory
- General Data
- ENVIRONMENTAL ISSUES
- Electronic product recycling
- Packaging
- Power Saving
- Batteries
Brand : STRONG
Model : SRT 6502
Category : Satellite receiver