
SRT 8502 - Satellite receiver STRONG - Free user manual and instructions
Find the device manual for free SRT 8502 STRONG in PDF.


| Product Type | Digital Terrestrial Satellite Receiver |
| Brand | STRONG |
| Model | SRT 8502 |
| Dimensions (W x D x H) | 190 x 177 x 45 mm |
| Weight | 0.59 kg |
| Power Supply | External adaptor: AC 100-240 V ~ 50/60 Hz, output DC 12 V, 1.0 A |
| Power Consumption | Max 10 W (with USB device); standby 1.00 W |
| Video Decoder | MPEG-2 MP@ML/HL, MPEG-4 H.264/AVC; resolution up to 1080p |
| Audio Decoder | MPEG-1 Layer 1&2, AAC; stereo, mono |
| Demodulation | DVB-T/T2; QPSK, 16/64/256 QAM; bandwidth 7/8 MHz |
| Input Frequency Range | VHF: 177.5 – 226.5 MHz; UHF: 474 – 858 MHz |
| Antenna Power | 5 V DC, max 50 mA, short circuit protected |
| Connectors | Antenna IN/OUT, HDMI (v1.3 with HDCP), composite video, stereo audio, S/PDIF coaxial, USB 2.0 (Type A) |
| Conditional Access | Irdeto CCA; 1 smart card slot (ISO 7816) |
| Memory | Flash: 8 MB; System RAM: 128 MB |
| Remote Control Range | Up to 7 m, 60° angle |
| Battery Type | 2 x AAA (alkaline recommended; rechargeable NiMH low self-discharge possible) |
| Operating Temperature | 0 °C to +40 °C |
| Storage Temperature | -10 °C to +50 °C |
| Operating Humidity | 10% – 85% RH, non-condensing |
| Accessories Included | Remote control, power adaptor, 3RCA-3RCA cable, AAA batteries, user manual |
| Safety Instructions | Do not install in closed cabinet; avoid heat, moisture, vibration; use only original adaptor; do not open cover |
| Cleaning | Disconnect from mains; clean with soft, lint-free cloth slightly dampened with mild soap solution; no alcohol or ammonia |
| Spare Parts / Repairability | Only use original power adaptor; no user-serviceable parts inside; refer to qualified personnel for service |
| General Information | CE compliant; subject to alterations due to continuous research; Irdeto is a registered trademark |
Frequently Asked Questions - SRT 8502 STRONG
User questions about SRT 8502 STRONG
0 question about this device. Answer the ones you know or ask your own.
Ask a new question about this device
Download the instructions for your Satellite receiver in PDF format for free! Find your manual SRT 8502 - STRONG and take your electronic device back in hand. On this page are published all the documents necessary for the use of your device. SRT 8502 by STRONG.
USER MANUAL SRT 8502 STRONG
natural_image
Simple line drawing of a rectangular object with an arrow indicating rotation, no text or symbols present.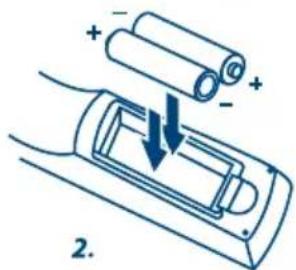
natural_image
Simple line drawing of a rectangular object with an arrow indicating rotation, labeled '3.' (no text or symbols on the object itself)Мал./Рус. 5
1.1 Safety Instructions 2
1.2 Storage 2
1.3 Equipment Set-up 2
1.4 Accessories 3
2.0 YOUR RECEIVER 3
2.1 Front panel 3
2.2 Rear panel 3
2.3 Remote control 4
2.4 Installing thebatteries 4
2.5 Management of the receiver using the remote control 4
3.0 CONNECTING THE RECEIVER 5
3.1 Connecting the antenna 5
3.2 Connecting to TV 5
3.3 Connecting to a digital audio amplifier. 5
3.4 Connecting an external USB drive. 5
4.0 THE FIRST INSTALLATION 5
4.1 Activation of the receiver in the digital terrestrial TV operator's network 6
5.0 DAILY OPERATIONS 6
5.1 Switching on and off the receiver 6
5.2 Changing channels 6
5.3 Adjustingthe volume 7
5.4 Viewing the program information 7
5.5 Checksignal level and quality 8
5.6 Selecting the audio language 8
5.7 Selecting the subtitle language 8
5.8 Viewing the Teletext 8
5.9 Use of external USB drives 8
6.0 MAIN MENU 9
6.1 Channel Manager 9
6.2 Installation 10
6.3 Timer 12
6.4 Receiver Information 14
6.5 Conditional Access 15
7.0 TROUBLESHOOTING 15 8.0 TECHNICAL SPECIFICATION 16
STRONG declares that this item complies with the basic requirements and other relevant regulations of directives CE 2004/108/EC and 73/23/EC, RoHS 2002/95/EC Subject to alterations. In consequence of continuous research and development technical specifications, design and appearance of products may change. Irdeto is a registered trademark of Irdeto Access BV. All other product names are trademarks or registered trademarks of their respective owners. © STRONG 2012. All rights reserved.
1.0 INTRODUCTION
1.1 Safety Instructions
DO NOT INSTALL YOUR RECEIVER:
In a closed or poorly ventilated cabinet; directly on top of or under any other equipment; on a surface which might obstruct the ventilation slots.
DO NOT EXPOSE THE RECEIVER OR ITS ACCESSORIES:
■ To direct sunlight or any other equipment that generates heat; to rain or intense moisture; to intense vibration and to any shock which may cause permanent damage to your receiver or to any magnetic objects, such as loudspeakers, transformers, etc.
■ Do not use a damaged power cord. It may cause a fire or an electrical shock. Do not touch a power cord with wet hands. It may cause an electric shock.
■ When the receiver is not used for a long period of time, you should unplug the power cord from the wall socket.
■ Do not use alcohol or ammonia based liquids to clean the receiver. If you wish, you may clean your receiver with a soft lint-free cloth slightly made damp with a mild soap solution, only after disconnecting from the mains voltage supply. Make sure no foreign objects fall through the ventilation slots because this could cause fire or an electric shock.
■ Do not place any objects on top of the receiver because this might prevent proper cooling of the components inside.
Safety Precautions
■ Never open the receiver cover. It is dangerous to touch the inside of the receiver due to high voltage currents and possible electrical hazards and your warranty will be void. Refer all maintenance or servicing to suitably qualified personnel.
■ When you are connecting cables, be sure that the receiver is disconnected from the mains supply voltage. Wait a few seconds after switching off the receiver before you move the receiver or disconnect any equipment.
It is a necessity that you only use an approved extension and compatible wiring that is suitable for the electrical power consumption of the installed equipment. Please ensure that the electrical power supply corresponds with the voltage on the electrical identification plate at the back of the receiver.
■ Disconnected device. Where the MAINS plug or an appliance coupler is used as the disconnect device, the disconnect device shall remain readily operable
If the receiver does not operate normally, even after strictly following the instructions in this user manual, it is recommended to consult your local dealer or contact the appropriate service.
1.2 Storage
Your receiver and its accessories are stored and delivered in a packaging designed to protect against electric shocks and moisture. When unpacking it, make sure that all the parts are included and keep the packaging away from children. For transporting the receiver from one place to another or if you are returning it under warranty conditions, make sure to repack the receiver in its original packaging with its accessories. Failing to comply with such packaging procedures could void your warranty.
1.3 Equipment Set-up
We recommend you consult a professional installer to set up your equipment. Otherwise, please follow the instructions below:
■ Refer to the user manual of your TV and your antenna.
■ Make sure that the 3RCA/HDMI cable and outdoor components are in a good condition and the 3RCA/HDMI connections are well shielded and from good quality.
This manual provides complete instructions for installing and using this receiver. The following symbols will serve as follow.
WARNING: Indicates warning information.
NOTE Indicates any other additional important or helpful information.
MENU Represents a button on the remote control or the receiver.
(Bold Character)
Move to Represents a menu item within a window. (Italic Character)
1.4 Accessories
■ Receiver- 1 pc.
■ Power adaptor – 1 pc.
■ User's Manual- 1 pcs.
■ Remote control -1 pc.
■ Cabletype 3RCA-3RCA -1 pc.
■ Batteries (AAA) - 2pcs.
NOTE batteries are not subject to charge, you can't use sparse, short-
circuited, batteries of different types. If you plan to use rechargeable batteries instead of batteries, it is recommended to use NiMH battery type with low self-discharge for long-term operation of the remote control.
2.0 YOUR RECEIVER
2.1 Front panel
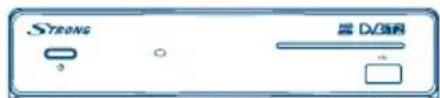
Fig. 1
- Stand-by button: Switches the receiver between Standby (off) and the operating mode.
- Remote sensor: Receives signals from remote control.
- Slot for smart card: It is intended only for the service functions and is not used during the operation by the user.
- Stand-by indicator: Lights up in green in the operating mode and red in standby mode.
- USB port: To connect USB storage device.
2.2 Rear panel
Fig. 2
- ANT IN connector (input)
to connect to the antenna. -
ANT OUT connector
to connect your TV or additional receiver. -
HDMI connector
for connecting to an HDTV.
- VIDEO Connector (output) Video.
To connect to the corresponding input of the TV.
- S/PDIF connector (output, coaxial)
for connecting a digital audio amplifier/home theater.
- AUDIO L/R Connector (output) Audio.
The left (white) and right (red) channels of audio for connection to respective inputs of the TV or stereo system.
- Power adaptor plug
is used to connect power adaptor supplied with the receiver. Please, use only original adaptor.
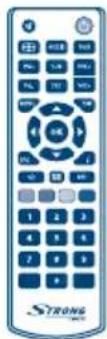
2.3 Remote control
Fig. 3
- ⏻ To switch the receiver between the working and standby modes.
- Enable / disable audio output of the receiver.
- To change output format.
- AUDIO to select the menu track audio support.
- TV/R to switch between watching TV and listening to radio channels.
- PG + / PG- in view: to switch channels. In Menu mode, and the lists: turning to page
- SUB to select a subtitle language (if broadcast subtitles).
- TXT to switch to Teletext browse mode.
-
VOL + / VOL- To control the volume level.
-
MENU to access the main menu of the receiver.
-
EXIT to return to the previous menu level.
-
▲▼ In Menu mode, and lists of channels: the menu to move the pointer up / down. In the view: to switch channels.
-
◀ mode menu to select the current option. In the view: to control the volume
-
OK mode menu to confirm. While browsing: to display the channel list.
-
EPG to enter the TV Guide for program guide.
-
i to display information about the current channel.
-
↻ to switch between 2 last viewed chanels.
-
☒ to display operator messages.
-
FAV to display the list of favorite channels.
-
Colored buttons function depend from menu context.
-
0-9 in view mde: to switch to the channel by its number. In the menu to enter numeric values.
2.4 Installing thebatteries
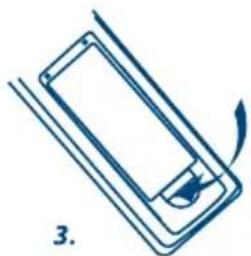
Open the cover on the remote control and insert 2 AAA batteries into the compartment. Correct position of the polar diagram shows the batteries inside the compartment.
- Open the cover
- Insert the batteries
- Close the lid
Fig.4
NOTE: Do not use batteriesthat arerecharged,have beena short circuit,expired. Do not insertbatteriesof different types.
2.5 Management of the receiver using the remote control
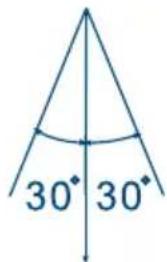
Point the remotedirectly at the front of the receiver. The rangeof the remoteis not more than 7 meters at an angle of 60 degrees.
Fig.5
NOTE: Managing the receiver will be limited or not possible if there are obstacles between the remote control sensor on the front panel of the receiver and remote control.
NOTE: Direct sunlight and very bright light reduces the distance of the remote control.
3.0 CONNECTING THE RECEIVER
Before you make any connection to the receiver to other devices or equipment, make sure that the receiver is connected to all attached devices are disconnected from their sources of supply.
3.1 Connecting the antenna
Connect the cable from the terrestrial antenna (internal or external) to the ANT IN connector located on the rear panel of the receiver. This connector marked as "AHT BXID".
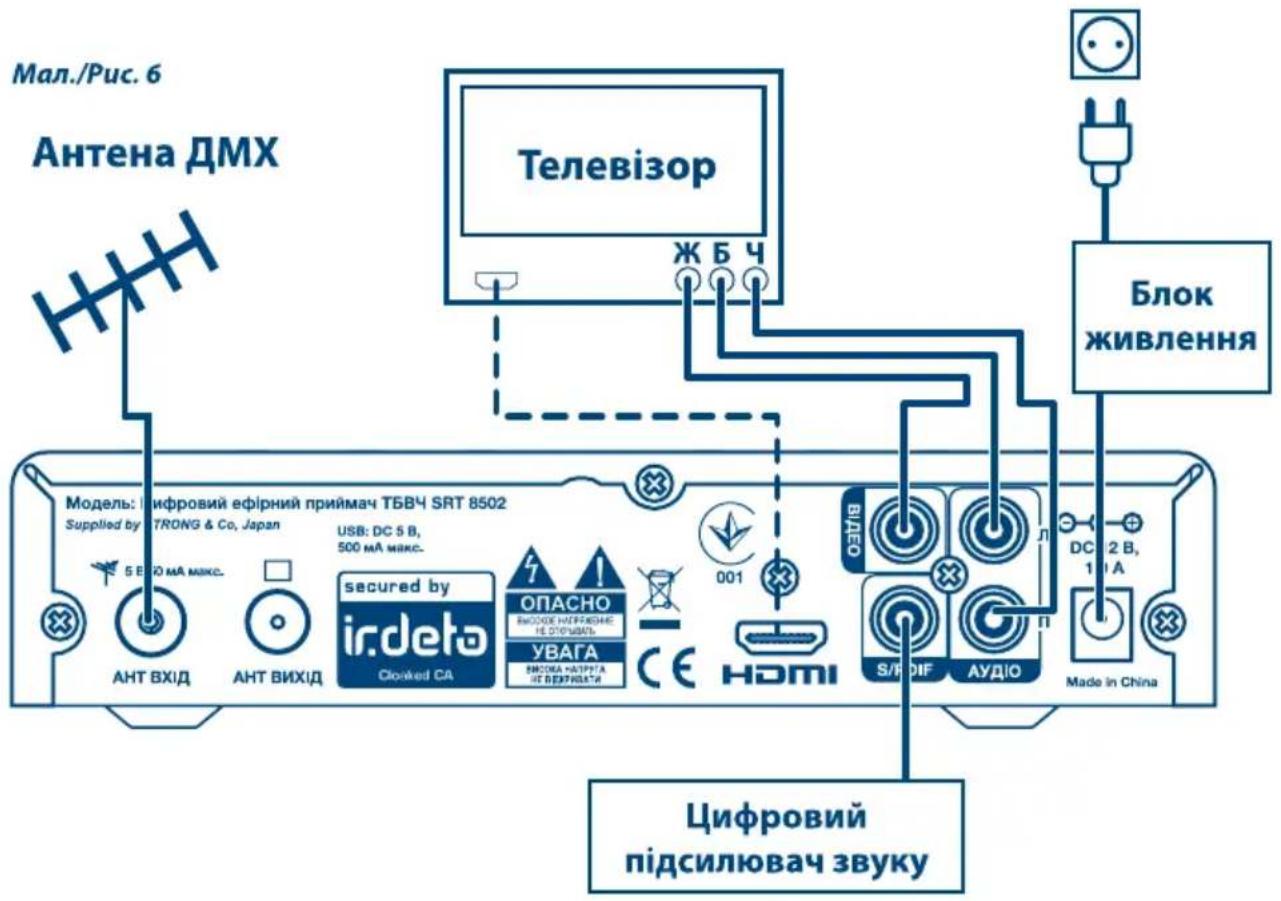
3.2 Connecting to TV
This receiver can be connected to a TV in one of two ways.
- With the cable 3RCA-3RCA (included).
Connect the cable from one side to the terminals (outputs) of the receiver, on the other hand, to the connectors (inputs) of TV set. The connection should be done in accordance with the color-coded connectors.
- With cable HDMI (not included)
Connect one side of the cable to the connector on the receiver. The second side of the cable to the appropriate connector on the TV.
Fig. 6
3.3 Connecting to a digital audio amplifier.
Connect the (output) S / PDIF receiver to the appropriate connector (input) digital audio amplifier.
Fig.6
3.4 Connecting an external USB drive.
Make sure the plug-in USB drive consumes less than 500 mA. If your hard drive consumes more than this value, use an external power supply for the USB drive. If you use a USB flash drive with an external power source, you must first connect a USB storage device to a power source, then connect the drive to the receiver.
Fig. 7
4.0 THE FIRST INSTALLATION
After completing all the necessary connections, turn on the TV. Check the connection of the receiver to the TV and the wall outlet, turn on the receiver. Wait for the menu on the TV screen „Installation wizard“. You should do the necessary settings.
OSD Language: Use the ◀▶, select the OSD language.
Country: displayed for information
Subtitle Display: Use the ◀▶ to enable / disable subtitles.
Press BLUE button to move to the next screen.
Aspect Ratio:
Using the buttons ◀▶, select the aspect ratio depending on the connected TV 4:3 or 16:9.
Conversion: Use buttons ◀▶, to change aspect conversion.
HDMI Resolution:
Use the ◀▶, select the resolution according to the characteristics of the connected TV.
After pressing the BLUE button on the remote you get to the next window Channel Search, which will allow you to adjust the antenna for good reception of signals and to scan channels.
In this menu:
Channel: select a frequency channel, which is being broadcast in the region
where you live.
Adjust the antenna so as to achieve the best indicators of level and quality of the signal displayed on the screen.
Frequency (MHz) shows the frequency of the selected channel,
Antenna Power:
Use the ◀ to turn antenna power on / off/. Before connecting the antenna, please read the User Guide for the antenna. If you use an active internal or external antenna that requires power supply voltage of 5 V DC and consumes less than 50 mA, then set it to On. Otherwise, set it to Off.
After all settings are made (including the adjustment of the antenna), press BLUE button on the remote control to start scanning for channels.
The receiverwill start searching forchannels. On the screenwill be displayed information about the scannedfrequency,foundTV and Radiochannels andchannel searchprogress. Once thechannel scanis complete, the receiverwill turnon the first channel, whichis in the list.
NOTE: If at the end of the search the receiver did not found channels, it is
possible that your antenna is not correctly installed/aligned. To ensure good results and the proper antenna configuration, refer to qualified professionals.
4.1 Activation of the receiver in the digital terrestrial TV operator's network
IMPORTANT Your receiver comes pre-activated to view most of the encoded
digital terrestrial channels broadcast by the operator on a free basis to subscribers. However, watching some channels may require fee. To gain access to paid channels, you should contact Customer Support. Information required to contact the Customer Support are in the additional instructions that came with the documentation supplied with the receiver.
After the first turn the receiver will automatically receive additional information from the digital broadcasts. The process of obtaining the data may take several minutes, during which the receiver will display a message that there is no right to watch a channel. At this time, do not change channels. Wait for the image of the transmitted channel.
5.0 DAILY OPERATIONS
In this section of the manual sets out the most frequently used functions the receiver.
5.1 Switching on and off the receiver
To switch your receiver ON and OFF, use the button marked with ⏻. This button is located on the remote control and front panel of the receiver.
Press on this button to switch the receiver into standby mode that consumes no more than 1.00 watts of power. Press the button again to turn receiver to operating mode.
If you plan not to use the receiver for a long time, unplug it from the mains by unplugging the power adaptor from the outlet.
5.2 Changing channels
5.2.1 Switch channels in the view mode
For the sequential switching of channels in the view mode you can use buttons ▲▼ or PG+ / PG-. For direct switching to a channel with a certain number you can dial the channel number using buttons 0-9.
5.2.2 Switch channels through the channel list
To switch between the channels through the channel list, do the following:
In view mode, press OK - on the TV screen will be displayed a list of channels.
■ Using the button ▲▼ select from the list a channel you are interested to watch and press OK-channel list will disappear from the screen and the receiver will show the chosen channel.
5.2.3 Switching between TV, Radio and Favorite channels
The receiver supports the following lists of channels:
■ List of TV channels.
■ List of Radio channels.
■ 6 favorite lists of channels: Movies, News, Sports, Kids, Culture and Shopping. How to prepare lists of favorite channels, see § 6.1.1.
To switch between TV and Radio channels:
■ When viewing a channel, use the button TV / R.
■ To select a favorite channel list, press FAV from the view mode and, using the buttons ▲▼, select the desired list, then use the ▲▼ to select the channel and the OK to confirm. To return to all channel list press FAV button, then press ◀ button.
5.3 Adjusting the volume
To adjust the volume you can use the VOL + / VOL- or ◀. To temporarily mute audio output, use the ☑, to enable audio output, click this button again.
5.4 Viewing the program information
5.4.1 The Information banner
Every time you switch the channel, the screen displays the information banner. Additionally, this banner can be accessed by clicking on i from the view mode.
This bannerdisplays the followinginformation:
■ Channel number and name
■ Current date and time
■ The beginning and end of the current program*
■ The beginning and end of the next program* (to access press ▶ button)
■ Graphics, showing the presence of any additional services provided by the channel and some properties of the channel.
Information banneris automatically removed from the screen after a time interval specified by you (see §6.3.3).
Adopted the following notation:

lays resolution of current channel broadcast.

of green color mean presence of teletext information on current channel.

of green color mean mean presence of subtitles on current channel.

of green color mean that channel is encrypted.

mean that program broadcasted in 4:3 aspect ratio.

mean that program broadcasted in 16:9 aspect ratio.

of green color mean presence of Dolby Digital audio track on current channel.

of green color mean presence of more then 1 audio tracks on current channel.

displays parental rating of current program.
^* the availability of information depends on the operator.
5.4.2 Extended information panel
To display on-screen extended information panel press from the channel view mode button twice.
Extended information panel, additionally to standard, displays the following information:
The beginning and end of the current program, the name and description*. If the description of the program does not fit in the display area, you can use the ▲▼ to scroll through the information. To view information about the next program, use the button ◀▶.
To exit from the extended information panel, clicki or EXIT.
5.4.3 TV Guide
TV Guide provides the possibility to view the program schedule for 7 days. Availability of information about transmission and the period depends on the operator of digital terrestrial television.
To enter the TV Guide menu, press EPG.
This displays a list of channels (left) and the program guide on the right (for the selected channel and on a certain date). At the bottom of the screen will be given more information about the selected program. Navigation between the channels in the EPG by the buttons ▲▼. Navigation between windows of TV Guide buttons ◀▶. Browse the program guide for a channel by keys ▲▼. In the lower part of TV Guide displayed information about the program, to which you set the pointer. This information includes:
■ The beginning and end of transmission.
■ The name of the program.
To display information about the ordered timers for the programs of interest, clicki. To exit the timer list, press EXIT.
To view information about the programs, which will be broadcast the next day, press BLUE button.
To return to the previous day, press the YELLOW button. View information about past programs is not supported.
Directly from the TV Guide you can reserve a timer to turn the receiver on the program interested you. To setup Timer from TV Guide press RED button. Detailed backup timer is described in Section 6.3.2.
5.5 Checksignal level and quality
Information about thesignal level and qualityis displayed in the extended information as described in §6.4.1.
5.6 Selecting the audio language
To display a list of available audio languages press AUDIO in channel viewing mode. Use the ▲▼ to select the language and confirm by pressing the OK.
5.7 Selecting the subtitle language
To display a list of available subtitles languages press SUB in channel viewing mode. Use the ▲▼ to select the subtitle language and confirm by pressing the OK.
5.8 Viewing the Teletext
To view the teletext, press TEXT in channel viewing mode. In Text mode to navigate between pages, use the colored buttons (in accordance with a prompt at the bottom of the screen Teletext), and the 0-9 to enter the page numbers of teletext. To exit from viewing teletext, press EXIT.
5.9 Use of external USB drives
Your receiver is equipped with connector for external USB drives. When using USB drives it is necessary to follow below recommendations and to consider some limitations.
- Use drives compliant to USB 2.0 specification. If your drive is not compatible with this standard, the manufacturer can't guarantee the satisfactory operation of functions such as multimedia playback and software upgrade.
■ Make sure that the file system used by the drive is FAT or FAT32. The NTFS file system is not supported.
The manufacturer can't guarantee compatibility with all types of external USB drives.
■ When using an external hard drive with USB interface, be aware that the drive voltage should not exceed 5 V, and current consumption should not exceed 500 mA. It is strongly recommended to use an additional power adapter for external hard drives.
It is strongly recommended not to store sensitive data (information) on the external drive that is used with a receiver. Always make a backup copy of data stored on an external drive before you use it with the receiver. The manufacturer will not accept claims for loss or damage to data, as well as for the consequences caused by the loss of or damage to data.
6.0 MAIN MENU
Through the functions of the main menu of the receiver you can make all necessary adjustments of the receiver, manage the lists of channels and access information about the state of integrated lrdeto conditional access system.
The main menu contains the followingsubmenus: Channel Manager, Timer, Installation, Receiver Information and Irdeto CA Status.
To access the main menu of the receiver, press MENU, to exit press EXIT.
6.1 Channel Manager
Press the MENU, using the buttons ◀▶ select Channel Manager.
The screen displays a list of submenus: TV Channels, Radio Channels and TV Program Guide.
6.1.1 TV Channels
From this menu you can create lists of favorite channels, delete, move or block the channels.
Move.
This feature is not available for the channels, the numbering of which is given by the operator. To move a channel from the list to another position necessary:
Press YELLOW button to activate the move. The sign "Move" will appear in the header of the list, which means that the move function is activated;
Select a channel you would like to move press OK. This channel will be marked with the symbol ♦;
Use the ▲▼ to move the marker to the wished position in the channel list and click OK to confirm move of the channel.
Lock.
Watching of blocked channel will be possible only after entering a PIN. Thus, you can block certain channels from being viewed children. To lock a channel is necessary:
Press BLUE button to activate the lock function. The Lock will appear on the list header;
Select a channel you would like to move press OK.
This channel will be marked with the symbol 🔒.
To unlock a channel, select it from the list and re-press BLUE button and remove the lock by pressing the OK.
Delete.
This feature is not available on channels, the numbering of which is given by the operator. To remove a channel from the list:
Press RED button to activate the Delete function. The Delete channel(s) will appear in the list header; Select a channel you would like to delete and press OK;
This channel will be marked with the symbol ✗.(To delete multiple channels, select them and press OK to mark by ✗);
Press the EXIT to exit the Delete channel;
The pop-up window appear to confirm the deletion of channels: choose OK to confirm delete or CANCEL to cancel the deletion.
To delete all channels need to:
Double-click RED button to activate the Delete ALL. The Delete All will appear in the list header;
Press the OK. All channels will be marked with the symbol ✗;
Press the EXIT to exit the Delete all;
The pop-up window appear to confirm the deletion of channels: choose OK to confirm delete or CANCEL to cancel the deletion.
Using the Delete ALL will delete all channels and generated lists of favorites.
Add to your favorites list.
You can create up to 6 lists of favorite channels: Movies, News, Sports, Children, Culture and Shopping. To add channels to a favorite list:
Select a channel you would like to add to favorite list;
Press GREEN button – each press to this button will change target favorite group. The name of the favorite appears in the header of the list at the right side of the screen;
Press OK to add the channel to one or more groups of Favorites. Channel name will appear in the list of channels of target favorite list.
To exit from the favorite list prepare, press EXIT.
To exclude the channel from the favorite list to:
Press GREEN button - select the group from which the favorite channel to be removed;
Select a channel, which you would like to remove from this group. To do this, move the marker to the right of the screen by pressing ▶ buttons and ▲▼ select a desired channel;
Press RED button to delete the channel from the group favorite.
To exit from the FAV list, press EXIT.
To move a favorite channel in the list:
Press GREEN button - select the group in which you wish to move the channel;
Move the marker to the channel list of the selected group by pressing the ▶
Press YELLOW button to activate the move;
Select a channel from the list and press OK. This channel will be marked with the symbol ♦;
Use the ▲▼ to move the marker to the selected position in the channel list and press OK to confirm the move.
To exit from the favorite list, press EXIT.
6.1.2 Radio channels
All functions are similar to the functions available for TV channels. See described in part 6.1.1
6.1.3 TV Program Guide
All functions are described in part 5.4.2 TV Guide
6.2 Installation
Press theMENU, using the buttons ◀▶ select Installation.
The screendisplays a list of submenus: Channel Search, Video Setting, System Settings, ParentalLock and Factory Reset.
6.2.1 Channel Search
In the menu Channel Search you can customize your search and make automatic or manual channel search.
Channel: select a frequency channel, which is being broadcast in the region where you live.
Frequency (MHz) shows the frequency of the selected channel.
Antenna Power: Use the ◀ to turn antenna power to On or Off.
If you use an active indoor or outdoor antenna that requires supply power voltage of 5 V DC and consumes less than 50 mA, then set it to On. Otherwise, set it to Off.
Auto Search
After selecting this menu item and pressing the OK, the receiver will perform an automatic search for a channels at all frequencies and update the channel list. During search process the receiver will display the progress of the search, the current frequency and name of found TV and Radio channels. At the end of the auto search the receiver will propose to exit menu to view mode or return back to Channel search menu.
Manual Search
Using this mode you can search for channels on a particular frequency channel. This function requires knowledge of the parameters of broadcast in your area.
Indicators of signal level and quality will help you make sure you have a signal on the selected frequency, as well as to adjust the antenna, if necessary.
After you select manual search and other necessary parameters, press OK. The receiver will search for channels and install them in the case of broadcast with the specified parameters is available.
NOTE: If at the end of the search the receiver did not install any channels
it is possible that your antenna is not correctly installed. To ensure good results and the proper antenna configuration, refer to qualified professionals.
6.2.2 Video setting
In this menu you can set the output parameters of the receiver according to a connected TV.
TV Ratio: Set in accordance with an aspect ratio of the connected TV (4:3 or 16:9)
Conversion: Set preferred aspect ratio conversion.
If connected to a TV with 4:3 aspect ratio, the most appropriate mode will be 4:3 Letter Box. In this mode, the video in 4:3 format will not be converted and 16:9 video format will be converted so as to display it in full and without geometric distortion (the top and bottom of the screen will appear black horizontal stripes).
If connected to a TV with a 16:9 aspect ratio, the most appropriate mode will be 16:9 Pillar Box. In this mode, the video 4:3 will be shown without geometric transformations (but on the left and right of the image will appear black vertical bars) and 16:9 video format will be displayed without transformation, and occupy the entire screen. Experiment with this setting and find the option that best suits you. Do not forget about the possibility of control the format of the menu of your TV (depending on the model of your TV).
HDMI Resolution: allows you to change the resolution output HDMI. If the connected TV
does not support the new set point, then you will see a black screen. In this case, wait for 10-15 seconds without pressing any button on the remote control of receiver, and the previous value will be returned automatically.
6.2.3 System Settings
In this menu you can set the preferred language for menus, audio and subtitle.
OSD Language: set according to your preferences.
Audio Language: Digital TV allows the operator to transmit more than one audio track.
If the operator carries multiple tracks of audio, then the receiver will automatically select the appropriate audio track to your preferences.
Subtitle Language: Digital TV allows the operator to transfer the subtitles on one or more
languages. Select your preferred subtitle language and the receiver will automatically display the subtitles in that language (in the case of
| Start up channel: | a broadcast by the operator). If you do not want the receiver to display the subtitles, then set the value to Off. Note that many programs being subtitled "the built in" in the video subtitles and such can't be disabled. if you selectLast Watched then the receiverwill alwaysstart-up with last watched channel.If you select Fixed channel - after the power on the receiver will always start on your selected channel. To selecta fixed channel - select this option andpress OK. In the proposed list, select a channel and press OK to confirm. The name of this channel will appear in the menu on the channel. |
Banner display time: the duration of the bannerdisplaycan be set from 1 to 20 seconds.
OSD Transparency: setaccording to yourpreferences.
6.2.4 Parental Lock
In this menu you can control the blocking of individual programs to restrict viewing and access to certain menu options.
Current PIN-code: to change the settings in this menu, you must enter a valid PIN (Default - 0000).
Channel Lock: If you set ON, you will need to enter a PIN code to view the blocked channel.
Lock menu: when ON will need to enter a PIN code to enter into such menus as TV channels, Radio Channels, Channel Search and System Setup.
Age level: the work function of age limits is largely dependent on the information transmitted by the operator. The operator can set the age limit for viewing transfers in accordance with the laws of the country, which is being broadcast. Set Menu age limit age of the youngest child with access to television viewing with this receiver. Now, in the presence of a broadcast transmission with age limits set by the operator to view the broadcasts, not intended for viewing by persons under a prescribed age, will need to enter a PIN receiver.
New PIN: Enter the new PIN.
Confirm PIN: to confirm re-enter the PIN.
6.2.5 Factory Reset
Foryour conveniencewe have included in themenu of the receiver function to return to the factory settings. After selecting this menu item, entera PINreceiver and all the settings, channels, and their lists will be returned to the factory.
PINreceiverwill also bereturned to thefactory setting: - 0000.
If necessary, change thePINfrom the menuParentallock.
6.3 Timer
Menu Timer submenu contains: Time adjust and Timer.
6.3.1 Time adjust
In this menu you can select mode of time and date synchronization, set time and date in manual mode, turn on auto update function and set auto stand-by mode.
| Auto time setting: | set it to On to automatically synchronize time and date with operator. |
| If you select Off, date and time zone can be set manually. | |
| GMT Offset: | change the time zone will be available only if Auto time setting is set to Off. You can set the time zone in accordance with the country of residence, if the automatic settings for your region are absent. |
| Summer Time: | the transition from winter to summer may need to set the period of daylight saving time or shut it down. |
Current Date: Select the current date in the submenu that opens after you click OK. This option is available, if Auto time setting is set to Off.
Current Time: set the current time using the number buttons. This option is available, if Auto time setting is set to Off.
Auto channel update: if set to On the receiver will update the channel settings in the standby mode. Upon detection of new channels on the air receiver will offer to add them to the list of channels. Click OK. To save the changes.
Auto stand-by: This feature allows you to set the time period over which the receiver automatically switches to standby if during this period, the receiver did not receive any commands. You can refuse to use this feature by setting the Off, for example, to activate the receiver or replace the software by aerial signal. Also, you can change the auto disconnection from 1 to 12 hours.
6.3.2 Set Timer
The timer function allows you to adjust the receiver on and off on schedule. Setting the timer from the TV Guide is the most convenient solution, however, you can set timers manually.
In the menu Timer to select the submenu Set the timer. After clicking OK appears on the screen list of timers, which displays a summary of the configured timers: number, channel name, date, start and end times, repeating timer, and his status.
NOTE: if there are no timers are configured, then the timer list will be empty.
You can add, change or delete the timer.
To add a timer, press RED button. In the menu that appears, set the timer, the required parameters:
Channel: To select a channel, press OK in the proposed list, select a channel and press OK to confirm. The name of this channel will appear in the options Channel:
Loop: select a repeat of the cycle timer. Once - the timer will be executed once, after which it will be removed from the list of timers. Daily - the timer will run at a specified time each day. Weekly - the timer will run once a week at this time. In this day of the week will match the day of the week the date specified in the date.
Date: Enter the date when the timer should enable the receiver. The date format "day / month / year."
Time: Enter the time, turn the receiver on a timer.
Duration: Enter the time during which you wish to make viewing the program timer.
Activate, select Yes to activate the timer
After pressing the EXIT on the list of displayed timers installed a timer is added to the list of timers. Upon occurrence of the start of the timer unit will operate according to the current regime:
If the receiver is turned on, then 10 seconds before the start of the timer unit will notify you of an event timer. You can take the timer by pressing the OK, or to abandon the timer by pressing the EXIT. At the end of the timer unit will be switched to the channel you viewed before the timer.
If the receiver is in standby mode, it automatically turns on and off at set times.
To edit a timer, buttons ▲▼ note marker in the list of timer that you want to edit and press OK button on the remote. In the menu, timer, make the necessary changes and press the EXIT. All changes will be saved in the timer list.
To remove the timer, buttons ▲▼ note marker in the list of timer that you want to delete and press BLUE button on the remote. This timer will be removed from the list of timers.
6.4 Receiver Information
6.4.1 Signal Information
6.4.2 Receiver Information
6.4.3 Updating the software using a USB flash drive
Updating the software (the software) from the USB drive is optional. Typically, a receiver software is automatically updated via a signal provided by the operator of digital terrestrial television. However, the update signal available for a limited time and maybe your receiver has not received updates via terrestrial signal.
Before you start the software update from a USB drive, make sure that you comply with the following requirements:
■ Make sure that your receiver does require a software update. Check the software version of the receiver (see § 6.4.2) and find out what version of software available for upgrade.
Information about the latest available version of the software you can have from your dealer or manufacturer's web site on the Internet. If the version of the software in your receiver and the software version that is available to update are the same, there is no need to update the software receiver.
■ USB drive must be formatted with the FAT or FAT32 file system.
■ A file with a software upgrade should be placed in the root folder of the USB drive.
■ Do not change the name of the file with a software upgrade.
Connect the USB storage device to the receiver, wait for the message on the TV screen confirming that the external drive is connected and recognized by the receiver. Press the MENU to enter the main menu of the receiver, go to the Tools menu and press OK. In the menu that appears, select USB Upgrade and press OK.
These actions will lead to a transition of the receiver to the boot mode, which is available in English only. The loader will perform several operations with the software update file and starts updating. The update process will be displayed in the form GREEN indicator to the left of which will be shown as a percentage progress bar. After upgrading the receiver will reboot automatically and tune to the last viewed channel.
NOTE: After starting the upgrade process wait for its completion. Do not take
any action until receiver restarts after the upgrade process or until the error message.
■ Do not unplug the receiver from the mains until the software update is completed.
■ Do not disconnect the USB drive from the receiver until the software update is completed.
Non-compliance with the above instructions may result in damage to the receiver and, consequently, to a denial of warranty from the manufacturer.
6.4.4 Software update via terrestrial signals
The operator of digital broadcasting can use several options for updating the software receiver via terrestrial signal.
If the operator is forced to update the software, while you are watching TV or Radio channel, the receiver automatically switches to the loader mode, available in English only.
In any case, the update is displayed in the form GREEN indicator to the left of which will be shown as a percentage progress bar. After upgrading the receiver will reboot automatically and tune to the last viewed channel.
NOTE: After starting the upgrade process wait for its completion. Do not take
any action until receiver restarts after the upgrade process or until the error message.
■ Do not unplug the receiver from the mains until the software update is completed.
- Do not disconnect the antenna cable from the receiver until the software update is completed. Non-compliance with the above instructions may result in damage to the receiver of the system and, consequently, to a denial of warranty from the manufacturer.
6.5 Conditional Access
Menu Conditional Access is intended primarily for professionals, includes hard translatable terms and abbreviations. In this regard, many options are displayed in English. However, under some circumstances, you may need to read the information contained in this menu.
6.5.1 Irdeto CA Status
Service status This menu displays information about the state of service
management decoding.
Loader Status This menu displays information about the state of the loader software,
the date and time of last update.
Product Status This menu displays information about the state of the operator
product for which you have subscribed, the beginning of the
subscription period and the duration of the subscription.
Client Status This menu displays the status of the receiver as the client's of
conditional access system, a unique identifier receiver and built-in
conditional access systems.
6.5.2 Mail
In this menu you can read mails received from operator.
7.0 TROUBLESHOOTING
There may be many reasons that affect the correct operation of your receiver. If the receiver does not work as you expect, please follow the steps outlined below. If after performing these operations, the receiver does not work well, contact your dealer or service center in your area. Do not open the receiver cover. This action will damage the warranty seals and you are denied warranty repairs.
| Problem Possible reason Remedy | ||
| Mode indicator does not light up | Power adaptor is not connected to outlet | Check connection of the receiver to the power adaptor and adaptor to the mains. |
| The power adaptor of receiver is connected to mains through extender and power switch on extender is in OFF position. | Turn power switch to ON position. | |
| No signal Antenna is disconnected | Check antenna cable. | |
| Antenna damaged or not aligned. | Check antenna and position of the antenna. | |
| Cable between antenna and receiver is damaged. Possible bad connections in the cable system. | Make sure that cable is in good conditions. Check proper connections. | |
| On the territory digital terrestrial broadcast is absent | Check with your dealer. | |
| Connected active antenna which requires power. | Make sure to enable antenna power from receiver menu (see § 6.2.1) or use external power supply for the antenna. | |
| No video or audio On TV set selected not correct input. | Select correct input source on your TV.Check correct connection. | |
| Connection done not properly. Make sure connectors are of good quality. Disconnect receiver and TV set from the main power. Disconnect cable, connecting receiver and TV set from the both devices. Connect the cable to both devices, making sure proper connection. | ||
| Video is “mosaic”, sound is noisy or disappear time to time | Low signal level due to bad weather conditions. | For stable reception of the signal you may need to replace antenna to the better one. |
| Antenna damaged or covered by ice (winter time). Damaged cable from antenna to receiver. | Check antenna and cable. | |
| Indoor antenna has been moved from good position and not provide necessary level of signal. | Setup antenna to good point.Check signal level and quality (see § 5.5) | |
| Power of indoor active antenna is disabled. | Enable antenna power as described in § 6.2.1 | |
| Message “No rights” or “Pay TV channel” | Channel is encrypted. Possible this channel belongs to the package you are not subscribed to. Consult to Customer support of operator. | |
| Not possible to control receiver by remote control | Batteries life time is ended. Replace the batteries. | |
| IR sensor is closed by some object (obstacle between RCU and receiver). | Remove obstacles.Point your RCU to the receiver. | |
| The receiver is switched off. Turn receive ON. | ||
| Forget your PIN code Consult to service in your region | or send e-mail to support through www.strong.tv | |
8.0 TECHNICAL SPECIFICATION
Tuner
Input connector: IEC60169-2, female, 75 Ohm nominal
Input frequency range: VHF: 177.5 \~ 226.5 MHz
UHF: 474 \~ 858 MHz
Input signal level: -82 \~ -25 dBm
Antenna power: 5 V DC, max. 50 mA, short cut protected
Demodulation DVB-T/T2
Demodulation:
Compliant to DVB-T (EN 300 744), DVB-T2 (EN 302 755)
Demodulation modes:
QSPK, 16/64/256 QAM
Bandwidth:
7 or 8 MHz
FFT mode:
1K, 2K, 4K; 8K, 16K, 32K and extended normal
Guard interval: DVB-T: 1/32, 1/16, 1/8, 1/4;
DVB-T2: 1/128, 1/32, 1/16, 19/256, 1/8, 19/128, 1/4
Forward Error Corrections: DVB-T: 1/2, 2/3, 3/4, 5/6 7/8;
DVB-T2: 1/2, 3/5, 2/3, 3/4, 4/5 5/6
Video decoder
Profile: MPEG-2 MP @ ML, MP @ HL, MPEG-4 H.264/AVC
Input bit rate: Up to 30 Mbit / s
Aspect ratio: 4:3 and 16:9, Letterbox, Pan & Scan, Auto
Frame rate: 25 Hz for PAL
Video resolution: 576p, 720p, 1080i, 1080p
Audio decoder
Audio support: MPEG-1 Layer 1 & 2, AAC
Audio mode: Mono L / R, Stereo
Frequency response: 20 Hz \~ 20 kHz, unevenness in the frequency range
60 Hz \~ 18 kHz + / - 0.5 dB
Sampling rate: 32, 44.1, 48 kHz
Conditional Access System
System: Irdeto CCA
Card reader: 1 slot, conforming to ISO 7816
System and memory
Processor: STH251
Flash memory: 8 MBytes
System memory: 128 MBytes
Connectors
Antenna Input
Antenna output
RCA (Composite Video, Audio Left and Right)
S/PDIF (coaxial)
USB 2.0, Type A connector
HDMI Type A, version 1.3 with HDCP
General data:
External power adaptor: Input power rate: AC 100 – 240 V \~ 50/60 Hz
Output power rate: DG-12 V, 1.0 A
Power consumption: 10 W max. (with USB device connected)
Power consumption in standby: 1.00 W (without USB device connected)
Operating temperature range: 0 \~ +40 °C
Storage temperature: -10 \~ +50 °C
Operating humidity range: 10 \~ 85 % RH, non-condensing
Dimensions (W x D x H) in mm: 190 x 177 x 45
Weight: 0.59 kg
- YOUR RECEIVER 3
- CONNECTING THE RECEIVER 5
- THE FIRST INSTALLATION 5
- DAILY OPERATIONS 6
- MAIN MENU 9
- TROUBLESHOOTING 15 8.0 TECHNICAL SPECIFICATION 16
- INTRODUCTION
- Safety Instructions
- DO NOT INSTALL YOUR RECEIVER:
- DO NOT EXPOSE THE RECEIVER OR ITS ACCESSORIES:
- Safety Precautions
- Storage
- Equipment Set-up
- (Bold Character)
- Accessories
- YOUR RECEIVER
- Front panel
- Rear panel
- Remote control
- Installing thebatteries
- Management of the receiver using the remote control
- CONNECTING THE RECEIVER
- Connecting the antenna
- Connecting to TV
- This receiver can be connected to a TV in one of two ways.
- Connecting to a digital audio amplifier.
- Connecting an external USB drive.
- THE FIRST INSTALLATION
- In this menu:
- Activation of the receiver in the digital terrestrial TV operator's network
- DAILY OPERATIONS
- Switching on and off the receiver
- Changing channels
- Switch channels in the view mode
- Switch channels through the channel list
- Switching between TV, Radio and Favorite channels
- The receiver supports the following lists of channels:
- To switch between TV and Radio channels:
- Adjusting the volume
- Viewing the program information
- The Information banner
- This bannerdisplays the followinginformation:
- Adopted the following notation:
- Extended information panel
- Extended information panel, additionally to standard, displays the following information:
- TV Guide
- Checksignal level and quality
- Selecting the audio language
- Selecting the subtitle language
- Viewing the Teletext
- Use of external USB drives
- MAIN MENU
- Channel Manager
- TV Channels
- Move.
- Lock.
- Delete.
- To delete all channels need to:
- Add to your favorites list.
- To exclude the channel from the favorite list to:
- To move a favorite channel in the list:
- Radio channels
- TV Program Guide
- Installation
- Channel Search
- Auto Search
- Manual Search
- Video setting
- System Settings
- Parental Lock
- Factory Reset
- Timer
- Time adjust
- Set Timer
- Receiver Information
- Signal Information
- Receiver Information
- Updating the software using a USB flash drive
- Software update via terrestrial signals
- Conditional Access
- Irdeto CA Status
- TROUBLESHOOTING
- TECHNICAL SPECIFICATION
- Tuner
- Demodulation DVB-T/T2
- Video decoder
- Audio decoder
- Conditional Access System
- System and memory
- Connectors
- General data:
Brand : STRONG
Model : SRT 8502
Category : Satellite receiver