AM152 - Sanitary Eago - Free user manual and instructions
Find the device manual for free AM152 Eago in PDF.


User questions about AM152 Eago
0 question about this device. Answer the ones you know or ask your own.
Ask a new question about this device
Download the instructions for your Sanitary in PDF format for free! Find your manual AM152 - Eago and take your electronic device back in hand. On this page are published all the documents necessary for the use of your device. AM152 by Eago.
USER MANUAL AM152 Eago
text_image
Installation Instruction of AM152 TS-series Control panelInstallation Instruction of AM152 TS-series Control panel
Safety Information
-
Please read carefully and follow all instructions when operating.
-
Qualified earth leakage circuit-breaker must be installed and tested with trial jump to certify the device is qualified and safety before using the product.
-
To avoid electrical shock, the replacing of the wire must be done by the electrical engineer or the ratelier. Customer could not replace by yourself.
-
Ground wire of massage water pump and air pump must be connected to ground well, the minimum size copper wire of ground wire must not be less than 1.5mm ^2 .
-
It is forbid to remodel, add or take part products.
-
Please don't use this product after alcohol or drugs.
-
The children shall be closely supervised by parents to use product.
-
All the electrical spere parts except the remote control must be put suitable and stable to avoid slip into the tub.
-
Warning: the mixed water temperature shall never exceed 60 degree pentigrade.
-
Don't use sulphuric acid, hydrochloric acid, lye and other mixed strong corrosive chemical liquid to clean product.
-
The water pump would be very hot when running. Please don't touch the surface of the machine to avoid scald.
-
The water level must be higher than the jet before turning on the product.
-
Please don't drop anything in or insert water pump and the opening hole of machine. The socket position should be suitable.
-
Warning - To prevent risk of electric shock, please connect the GFCI / RCD (earth leakage protection device) socket.
-
Warning - To prevent electric shock, please do not connect any extension cord to the power supply.
16 Caution - please use the product under the following condition: water pressure is 0.15 0.40MPa , the ground must have the ability to support the estimated load, water can not exceed the overflow level, the washroom need to reserve enough space for proper to handle the overflow of water.
- WARNING - for bathtub to be used normally please do not grasp the hand wheel drainer, nozzles, piping, handrails, etc. to cause any leakage and other problem when unpacking the product.
Maintenance instruction
1. Clean the acrylic surface:
Clean acrylic surface with cotton fennel or sponge and water in daily life. If there is scratch on the surface, please use No. 1500 water abrasive cloth polishing slightly to clear awy scratches, and then polish with toothpaste, cotton fennel. Please don't use strong aerobic chemical liquid, such as sulphuric acid, hydrochloric acid, lye during maintenance.
2. Plated item maintenance:
Clean the surface of plated item with cotton flannel, please don't use coarse cloth.
3. Suction net cleaning:
Turn the screw out and take the suction net out to clean dirt, to keep the water going through smoothly. Don't use strong causticity chemical liquid to clean the product, such as sulphuric, hydrochloric acid, lyso and as on.
CONTENTS
01 Component Struction
02 Water and wire line instruction diagram
03 Installation steps
04 Faucet's usage instruction
05 Wire connection diagram for computer box
06-09 Control panel usage instruction
10 Troubleshooting
11-12 Maintenance Card
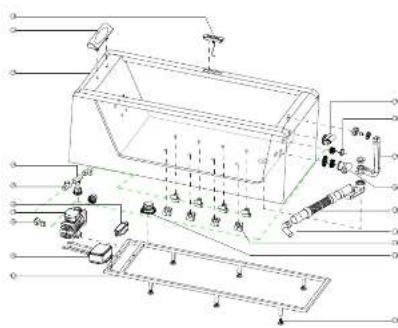
AM152JDTSZ Component Struction
text_image
Technical diagram of a vehicle assembly with labeled components and directional arrows indicating motion or movement.| No. | Name No. | Name | ||
| 1 | PC control panel | 19 | ||
| 2 | Pillow | 20 | ||
| 3 | Bathtub | 21 | ||
| 4 | Longened plastic | 22 | ||
| 5 | 1 inch three way | 23 | ||
| 6 | Junction box | 24 | ||
| 7 | Water pump | 25 | ||
| 8 | 1 inch medium pipe | 26 | ||
| 9 | Power box | 27 | ||
| 10 | Stainless steel bracket | 28 | ||
| 11 | Bathtub leg | 29 | ||
| 12 | Speaker | 30 | ||
| 13 | Back jet | 31 | ||
| 14 | Drain elbow | 32 | ||
| 15 | Deadbrushed drain | 33 | ||
| 16 | Suction | 34 | ||
| 17 | Drain | 35 | ||
| 18 | Bottom light | 36 |
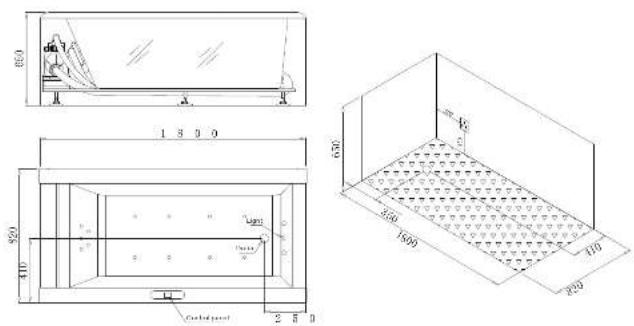
Am152 Water and wire line instruction diagram
text_image
850 1 3 0 0 920 410 Cuboidal panel 650 1500 410 250Installation Instruction 32
Installation Steps
The product adopts standard accessories, please follow product specifications to install product:
-
Confirm product installation place →2. adjust product to level →3. connect water inlet and drainage pipes →4. connect power →5. check and clean →6. reset →7. test with water.
-
Confirm product installation place
Please refer product specifications to arrange sewage pipes, power socket and water inlet pipe, then check if
there is enough space to connect
-
Adjust product to level Adjust movable ground leg of product till level
-
Connect water inlet and drainage pipes
Drainage pipe is in the bottom of tub, the diameter of water drainage outlet is 38mm, and pipe could be bended and stretched; inserting drainage pipe elbow of tub into customer's drainage system pipe with adhesive tape or glass cement during connection. In case of influencing draining water, pipe could not be folded or squashed.
- The Power Connection
The product is adequate for all purchasing requirement power, please follow technical parameter to install power socket and prevent from water, put plug into power socket. (Note: yellow & green wire of water pump are ground wires, diameter of ground wire is 8mm)
- Check and clean
After above steps, please check that if the each joint is sealed well, and then clean up sundries of tub. Open drainer to clean tub with water. To prevent sundries or floating objects stuck in water pump from pipes and nozzle jamming; please clean sundries out from tub.
- Reset
Move product to installation place.
- Test with water
Please confirm the tub is cleaned up, and then close drainer to store water. Check if there is leakage during water test. Till water is higher than water level probe, follow functions instruction of control panel to operate product.
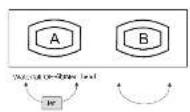
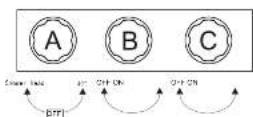
Faucet switch diagram
Instruction
Two sets of the faucet:
A. The faucet is the function conversion. Turn 90° left is the pipe cleaning function while 90° right is the shower head.
B. The cold-hot water inlet valve is both for hot and cold water. The one with red label or with H mark is for hot water, while the one with blue label or with C mark is for cold water. You could adjust the label on the faucet to get your wanted temperature.
Instruction
Three sets of the faucet:
A. Function conversion value. Turn 90° left is the pipe cleaning function while 90° right is the shower head.
B. The water-in pipe where with blue label is cold water, and the hand-hole faucet with label C is also cold water. Turning left could alternate the volume of the cold water. The maximum is 90° to the left.
C. The water-in pipe where with red label is hot water, and the hand-hold faucet with label H is also hot water. Turning left could alternate volume of the hot water. The maximum is 90° to the left.
The product designs for water going in from nozzle, also could be used to adjust shower head water in or water in from water outlet faucet. Water in from shower head is usually for body, head cleaning or etc. places.
TS Wiring Diagram
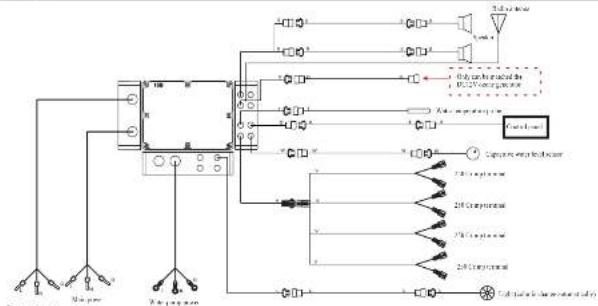
flowchart
graph TD
    A["Power Source"] --> B["Transformer"]
    C["Power Source"] --> B
    B --> D["Capacitor"]
    D --> E["Switch"]
    F["Switch"] --> G["Inductor"]
    G --> H["Ground"]
    I["Ground"] --> J["Inductor"]
    K["Inductor"] --> L["Ground"]
Electric parameter
| Name and Parameter | Variance range | Core generator | Cohort stage | Intermediates | Cohort regeneration value | Correlation | Symbol | Value |
| Pw. w. W. W. | AC125-100/0.96782 | AC135V | DC125V | AC125/0.96782 | DC125V | AC125/0.96782 | ||
| Pw. w. W. W. | AC115-100/0.96782 | AC135V | DC125V | AC125/0.96782 | DC125V | AC125/0.96782 | ||
| Coh. W. W. | 11/4/08 | 3.0V | 3.0V | 11/4/08 | 3.0V | 1.0V |
05
TS Control panel instruction

text_image
AUXKey instruction

Borom light

Massage power adjustment

Bubble

Ozom

Surfing water pump

Heifer

Volume decrease Channel decrease Previous

Secting

Volume increase Channel increase Next

Blueforth

Radio

Chiff
Installation Instruction 68
The characteristics of the control system electrical box
1) Rated voltage: A0220V-240V/A0110V-120V 2) Rated frequency: 50HZ/60HZ 3) Standby Power: <10W (All load is closed)
4) Ambient temperature + 5°C - 4.0°C
Devices being controlled by control system
1) Surfing water pump: 2HP 2) Heater: 1500A 3) Bottomlight: DC12V/1A 4) Electromagnetism valve: 4*DC12V/6N 5) Drone generator: DC12V/6N 6) Speaker: 8Q/10N (Maximum)
Control panel operation instruction
-
Press any key a buzzer would let out
-
- (1) - On/OH
2.1 The control system starts operation when touch this key, the bottom lights would turn on at the same time; press this key again to turn off the control system.
2.2 The control system would turn off automatically when it is turn on 60 minutes later, and all the load would turn off.
-
Child lock The control system would lock all keys automatically when you do not use the control panel in 5 minutes. The LCD shows "LOCK" icon. To unlock the control panel by pressing any key, the "LOCK" icon disappears.
-
" Bottom light
Each time to touch " [REDACTED] " the bottom lights would change to another color, the LCD shows a light icon when the control system turns on: the bottom lights colors would change circulationly when touch " [REDACTED] " for the seventh times; the bottom lights would turn off when touch " [REDACTED] " for the eighth times.
- " Surfing water pump
5.1 There is water level sensor in the control system to prevent water pump from running idle to damage water pump under less water or without water. 5.2 The surfing function would turn on when blocks "the LCD shows" "from the water pump would not work when the water level sensor test the water level is below these value, the "from breaks." The water pump would start to work when the water level sensor test the water level reaches to the rest value, the "toes dynamic." 5.3 Touch "to turn off the water pump when the surfing function is turn on and the surfing water pump icon would disappear. Also the heater would turn off (if the heater is turn on).
TS Control panel instruction TS Contr
- " (2) Water pump for inlet
Touch " " to turn on the water pump, one admission valve works, touch " " for the first time, two admission valves work, touch " " for the second time, three admission valves work, touch " " for the third time, four admission valves work, touch " " for the fourth time, four admission valves turn off, so the cycle to repeat.
7." Massage power adjustment
Touch " " to turn on the water pump, one admission valve works, touch " " for the first time, air inlet circular with 3 seconds interval. The order is one admission valve, two admission valves, three admission valves, four admission valves, three admission valves, five admission valves, one admission valve. Touch " " for the second time, four admission valves work for 2 seconds, ventrum off for 1 second. Six the cycle to repeat. Touch " " for the third time, four admission valves run off. So the cycle to repeat.
S." Radio
8.1 Touch the "☐" to turn on the radio when the control system is turn on, the LCD shows the current frequency and "☐" to turn on the main, the current frequency and "☐" to turn on the LCD displays.
S2 FM broadcast receiving frequency range is 87.5MHz—108.0MHz
8.3 Frequency increase
Touch “○” to increase stop length (1 stop length = 30KJHz) tuned frequency when the radio turns on. Touch this key for more than 2 seconds, the system would search FM program upwards, digital back would lock the program automatically. LCD shows the corresponding frequency; when it reaches upper limit 100.0MHz and touch this key; the frequency will turn to 87.5MHz.
8.4 Frequency decrease
Touch “①” to decrease a step length (1 step length = 50KHz) tuned frequency when the radio turns on. Touch this key for more than 2 seconds, the system would search FM program downwards, digital lock would lock the program automatically, LCD shows the corrispective frequency; where it reaches lower limit 87.5MHz and touch this key, the frequency will run to 198.0MHz.
8.5 Volume adjustmezz
Touch " when radio turns on, LCD flicker "VOL" and number means the volume can be adjusted. Touch " to increase the volume, touch " in decrease volume. The volume range is 0-20.
8.6 Channel saving/channel picking out 8.6.1 Channel saving: select the channel need to save when the radio turns on, touch "the LCD Ficker "CL" icon, touch "or" to choose the saving position, the channel can be saved in this position when touch "for 2 seconds again.
Installation Instruction 38
TS Control panel instruction
8.6.2 Channel picking out: touch - "when the radio turns on, the LCD shows the correlative channel and "CH" icon, touch
“or” “to pick out the correspensive channel.
9. Blufoach
9.1 What the control system turns on and the radio turns off, touch " ⑧ " for 2 seconds to disconnect the correlative device and search the new device again.
9.2 When the control system turns on and touch "to turn on the bluetooth music playing function, LCD shows 'BT-C'; touch again to turn off the bluetooth music playing function, "BT-C" disappear."
9.3 If the blu,zoont pairing failat, LCD flicker shows "BT-C7", if successful, LCD constant shows "BT-C7".
9.4 When the bluetooth music playing function turns on, touch " ( ) " or " " to choose previous or next music.
9.5 When the bluetooth music: playing listener turns on touch " [icon] to play or pause music."
96. Touch "bluclith maxine playing function taxes on, I CD blocker "VOL" and number means the volume can be adjusted. Touch "or" to adjust volume.
10. Heater
10.1 The heater can not be turned on until the surfing water pump turns on.
10.2 Touch " "to turn on the heater function, LCD constant shows" "icon. The heater would start or stop to work according to the
temperature inside the bathtub and the setting temperature is 370.
(10.3) Touch " again to turn off the heater
10.4 Temperature √s/line
10.4.1 Turn on the heater and touch "C", LCD flicker shows temperature and "C", touch "C" or "C" to set the temperature. The
LCD shows the comparative temperature. Each time to touch "①" the temperature would raise 1°C; each time to touch "②"
the temperature would drop 1^ ; the temperature would disappear when you do not touch these two keys 5 seconds later.
Temperature range: 30°C–45°C
11. Ozone
Touch " (102) " to turn on the ozone. It would turn off automatically when it works for 10 minutes; touch " (103) " to turn off the ozone manually.
Troubleshooting Instructions
| Problem | Cause | Solution | Problem | Cause | Solution |
| Bathhtub, shaking anomaly and loud noise | 1. The bottom frame of bathtub is imbalance, but is not screwed down.2. Fixed speeds of motor and shockpoint gas are not enough or fall off.3. Water stir.4. Motor failures. | 1. Put the bathtub on a level surface, adjust bottom frame till level, and screw out tight.2. There should 4 screws and 4 shockpoint rubber gaskets to the mortar, tighten the screws.3. Add water to required level–water level is higher than probe screw.4. Contact distributor or EAGO company. | Chromatic lamp off. | 1. Plug off.2. Control circuit panel failure | 1. Reconnect plug.2. Contact distributor or EAGO after suitable discharge.3. Check water pressure of water inlet pipe.2. Clean filter.4. Replace a new one |
| Insufficient water flow. | 1. Water pressure of water inlet pipe is too low.2. Water inlet pipe is struck | ||||
| Shunt valve hollow. | 1. Rubber gasket of valve broken | ||||
| Motor runs normally but no water spray out or abnormal pressure of nozzle (water pressure) is not enough? | 1. Part of backwater not a liquid.2. Water level is too low.3. Hydraulic governor is off.4. There is air during water into water pump.5. Others. | 1. Take apart backwater not to clean with screwdriver and clear assembly currents in deep water press through fluency.2. Add water to normal requirement – higher than probe screw.3. Turn on hycaustic governor.4. All turn on cleaning function valve to be able.5. To breveen air in pipe, tighten water inlet pipe components of water pump.6. Water drop and air pipe are connected Costaently, please contact professional personnel to menil. | No air out from masslessness. | 1. Sunsets knock in air pipe.2. Air pump is off.3. All pump clean not work. | 1. Take off nozzle and dragage little air pipe with iron wire.2. Turn on air pump.3. Follow air pump function failure steep to check. |
| Water exhaust device doesn't bounce or wait water. | 1. Speeds become loose and adjust too low.2. Terpe of water exhaust device is broken.3. Rubber gasket is not flat. | 1. Take off water exhaust device, tighten screw or readjust screw to suitable pace.2. Replace whole set it is true.3. Level up water exhaust device and roll/sell it. | |||
| Massage motor or air pump does not work. | Some water leave pipes. | Because specific structure of some individual massage bathtub, it is not equipped with water exhaust function. | |||
| 1. Abnormal voltage or power conversion failure.2. Fuse hours dow or nor/#reeping switch/tripping operation.3. Nothing displays on circuit panel.4. No water level probe signal.5. Salow switch broken. |
Installation Extraction 10
| Maintenance Record | |||
| Maintenance Date | Maintenance Item | Maintenance Department | Maintenance Staff Signature |
| Service Card | |||
| Model | |||
| Serial number | Purchasing date | ||
| Tel | |||
| Province | City | Distributor Name | |
| Maintenance Regulations | |||
| 1.From the date of purchasing this series products, the length of warranty is one year. However, the following situation is beyond maintenance range.A.Product is damaged for inappropriate usage, maintenance, keeping by customer B.For the damage of product is not installed or maintenance by EAGO distributor or appointed installation organization of services. (Concluding the damage is caused by customer's installation, asking apart, transportation and maintenance.) C.Without these guarantees of quality warranty, effective invoice or proof of purchase. D.Effective evidential documents and maintenance evidential documents can not be allowed. E.The damaged is caused by force seizure or natural disaster. | |||
| 2.It the damage is caused by quality of product, repair and parts replacement will be provided for free. | |||
| 3. It is not damaged by the quality of product, or product exceeds production period, cost expenses of repair and parts should be paid. | |||
The first page keeping by customer.
| Maintenance Card | |
| Model | |
| Serial number | |
| Customer name | |
| Tel | |
| Address | |
| Distributor Name | |
| Tel | |
| Purchasing date | |
The second page sending back to EAGO Sanitary Ware Co., Ltd.