
P-51D Mustang 280 BNF - Remote control toy E-flite - Free user manual and instructions
Find the device manual for free P-51D Mustang 280 BNF E-flite in PDF.


| Product Type | Remote Control Airplane (ARF/BNF) |
| Model | P-51D Mustang 280 BNF |
| Brand | E-flite |
| Wingspan | 780 mm (30.7 in) |
| Length | 690 mm (27.2 in) |
| Flying Weight | 200 g (7.1 oz) |
| Motor | 280-size brushless outrunner (installed) |
| Battery | 2S 7.4V 300-450mAh LiPo (not included) |
| ESC | 10A brushless ESC (installed) |
| Transmitter | Spektrum DSMX compatible (not included) |
| Receiver | Spektrum AR630 (installed) |
| Servos | 3x micro servos (installed) |
| Functions | Throttle, aileron, elevator, rudder |
| Flight Time | Approximately 5-7 minutes |
| Assembly Required | Minimal (attach wings, landing gear, bind) |
| Skill Level | Intermediate |
| Safety | Not for children under 14 years |
| Maintenance | Clean with dry cloth; store in dry place |
| Spare Parts | Available from E-flite or authorized dealers |
| Repairability | Modular construction allows easy part replacement |
Frequently Asked Questions - P-51D Mustang 280 BNF E-flite
User questions about P-51D Mustang 280 BNF E-flite
0 question about this device. Answer the ones you know or ask your own.
Ask a new question about this device
Download the instructions for your Remote control toy in PDF format for free! Find your manual P-51D Mustang 280 BNF - E-flite and take your electronic device back in hand. On this page are published all the documents necessary for the use of your device. P-51D Mustang 280 BNF by E-flite.
USER MANUAL P-51D Mustang 280 BNF E-flite
All instructions, warranties and other collateral documents are subject to change at the sole discretion of Horizon Hobby, Inc. For up-to-date product literature, visit www.horizonhobby.com and click on the support tab for this product.
Meaning of Special Language:
The following terms are used throughout the product literature to indicate various levels of potential harm when operating this product:
NOTICE: Procedures, which if not properly followed, create a possibility of physical property damage AND little or no possibility of injury.
CAUTION: Procedures, which if not properly followed, create the probability of physical property damage AND a possibility of serious injury.
WARNING: Procedures, which if not properly followed, create the probability of property damage, collateral damage, and serious injury OR create a high probability of superficial injury.

WARNING: Read the ENTIRE instruction manual to become familiar with the features of the act before operating. Failure to operate the product correctly can result in damage to the product, normal property and cause serious injury.
This is a sophisticated hobby product. It must be operated with caution and common sense and requires some basic mechanical ability. Failure to operate this product in a safe and responsible manner could result in injury or damage to the product or other property. This product is not intended for use by children without direct adult supervision. Do not use with incompatible components or alter this product in any way outside of the instructions provided by Horizon Hobby, Inc. This manual contains instructions for safety, operation and maintenance. It is essential to read and follow all the instructions and warnings in the manual, prior to assembly, setup or use, in order to operate correctly and avoid damage or serious injury.
WARNING AGAINST COUNTERFEIT PRODUCTS: If you ever need to replace your Spektrum receiver found in a Horizon Hobby product, always purchase from Horizon Hobby, Inc. or a Horizon Hobby authorized dealer to ensure authentic high-quality Spektrum product. Horizon Hobby, Inc. disclaims all support and warranty with regards, but not limited to, compatibility and performance of counterfeit products or products claiming compatibility with DSM or Spektrum.
Age Recommendation: Not for children under 14 years. This is not a toy.
Safety Precautions and Warnings
- Always keep a safe distance in all directions around your model to avoid collisions or injury. This model is controlled by a radio signal subject to interference from many sources outside your control. Interference can cause momentary loss of control.
- Always operate your model in open spaces away from full-size vehicles, traffic and people.
- Always carefully follow the directions and warnings for this and any optional support equipment (chargers, rechargeable battery packs, etc.).
• Always keep all chemicals, small parts and anything electrical out of the reach of children. -
Always avoid water exposure to all equipment not specifically designed and protected for this purpose. Moisture causes damage to electronics.
-
Never place any portion of the model in your mouth as it could cause serious injury or even death.
- Never operate your model with low transmitter batteries.
• Always keep aircraft in sight and under control.
• Always use fully charged batteries. - Always keep the transmitter powered on while aircraft is powered.
- Always remove batteries before disassembly.
• Always keep moving parts clean.
• Always keep parts dry.
• Always let parts cool after use before touching.
• Always remove batteries after use. - Always ensure failsafe is properly set before fl ying.
- Never operate aircraft with damaged wiring.
- Never touch moving parts.
Thank you for purchasing this exciting addition to the E-fl ite lineup. The E-fl ite P-51D Mustang 280 BNF Basic is right at home in the line of 280- to 300-size E-fl ite warbirds. Fitted with the proven power system from the Edge 540QQ, this Mustang will deliver speed and performance not commonly seen in warbirds of this size. P-51 fans will love the scale accuracy; from the outline of the airframe to the scale details such as panel lines and cowling screws, the details are what give this Mustang a scale presence to go along with its performance. Before you fly your new Mustang, be sure to take the time to read this manual. It contains prefl ight information that is important to ensure your success from the fi rst fl ight on.
Box Contents
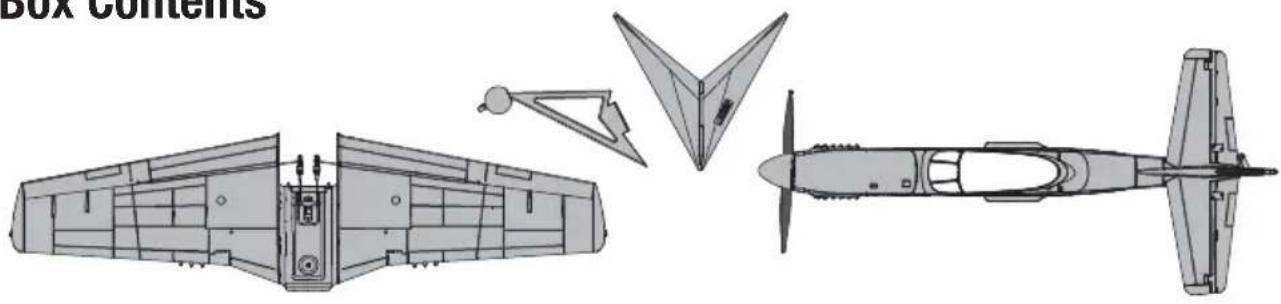
natural_image
Technical line drawing of an aircraft showing top, front, side, and side views (no text or symbols)Table of Contents
Battery Charging 4
Charging Warnings....4
Preflight Checklist 4
Wing Installation 5
Low Voltage Cutoff (LVC) 5
Transmitter and Receiver Binding 6
Battery Installation 7
ESC Arming 7
Control Direction Test 8
Control Centering 8
Control Horn and Servo Arm Settings ....8
Dual Rates and Expos 9
Center of Gravity (CG) 9
Display Stand Assembly and Installation .....9
Flying Tips and Repairs 10
Post Flight Checklist ....10
Service of Power Components ....11
Troubleshooting Guide 12
Limited Warranty 13
Warranty and Service Contact Information .....14
FCC Information 14
Compliance Information for the European Union ..14
Replacement Parts 54
Optional Parts and Accessories ....55
Specifications
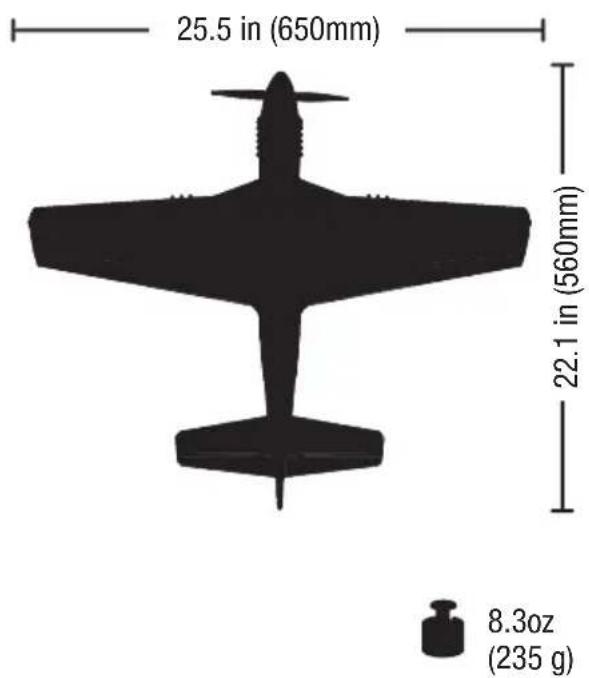
other
| Dimension | Value | | ----------------- | ------- | | Height (in mm) | 25.5 | | Width (in mm) | 22.1 | | Weight (g) | 8.3 |Installed

BL 280 Outrunner Motor, 1800Kv (EFLM7010)
BL Controller, 10A (EFLA7300)
AR6310 DSMX Nanolite 6-Channel Receiver, Air (SPMAR6310)
(3) 3.5 g Digital Servo (EFLR7100)

Included
450mAh 3S 11.1V 30C Li-Po, 18AWG JST (EFLB4503SJ30)
Needed to Complete

Recommended Battery Charger: Celectra™ 80W AC/DC Multi-Chemistry Battery Charger (EFLC3025)
Recommended Transmitter: Full Range DSM2®/DSMX® technology with adjustable dual rate and exponential (DX4e and up)
Battery Charging
Choose a charger designed to balance charge 3S Li-Po batteries. We recommend the Celectra 80W AC/DC Multi-Chemistry Battery Charger. Refer to your charger manual for charging instructions.
Charging Warnings

CAUTION: All instructions and warnings must allowed exactly. Mishandling of Li-Po batteries result in a fi re, personal injury and/or property ge.
- By handling, charging or using the included Li-Po battery, you assume all risks associated with lithium batteries.
- If at any time the battery begins to balloon or swell, discontinue use immediately. If charging or discharging, discontinue and disconnect. Continuing to use, charge or discharge a battery that is ballooning or swelling can result in fi re.
- Always store the battery at room temperature in a dry area for best results.
- Always transport or temporarily store the battery in a temperature range of 40–120°F (5–49°C). Do not store the battery or model in a car or direct sunlight. If stored in a hot car, the battery can be damaged or even catch fire.
-
Always charge batteries away from fl ammable materials.
• Always inspect the battery before charging. -
Always disconnect the battery after charging, and let the charger cool between charges.
- Always constantly monitor the temperature of the battery pack while charging.
- ONLY USE A CHARGER SPECIFICALLY DESIGNED TO CHARGE LI-PO BATTERIES. Failure to charge the battery with a compatible charger may cause a fire resulting in personal injury and/or property damage.
- Never discharge Li-Po cells to below 3V under load.
- Never cover warning labels with hook and loop strips.
- Never leave charging batteries unattended.
- Never charge batteries outside recommended levels.
- Never charge damaged batteries.
- Never attempt to dismantle or alter the charger.
- Never allow minors to charge battery packs.
- Never charge batteries in extremely hot or cold places (recommended between 40–120° For (5–49°C) or place in direct sunlight.
Preflight Checklist
| √ | |
| 1. Charge fl ight battery. | |
| 2. Install fl ight battery in aircraft (once it has been fully charged). | |
| 3. Bind aircraft to transmitter. | |
| 4. Make sure linkages move freely. | |
| 5. Perform Control Direction Test with transmitter. | |
| √ | |
| 6. Adjust center of gravity. | |
| 7. Perform a radio system Range Check. | |
| 8. Find a safe and open area. | |
| 9. Plan fl ight for fl ying fi eld conditions. | |
Wing Installation
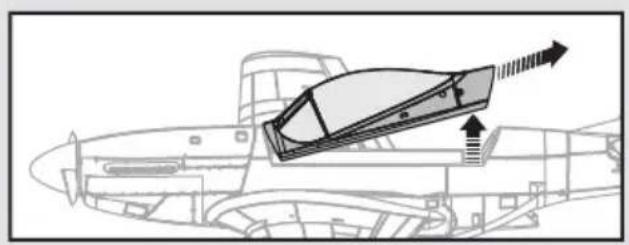
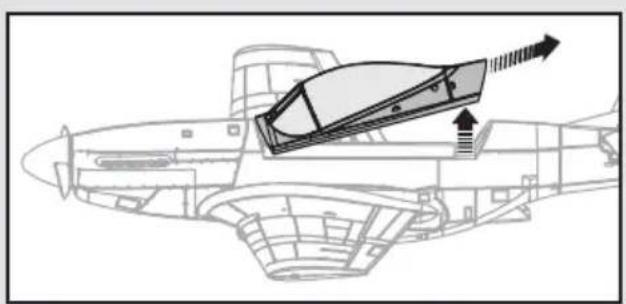
- Remove the canopy by pulling it up, then back to disengage the canopy's guide pins from the fuselage.
- Turn the model over so the bottom of the fuselage faces up.
- Guide the aileron servo wire (A) through the hole on the bottom of the fuselage.
- Carefully install the wing on the fuselage by guiding the aileron torque rods into the slot in the fuselage, then fully install the wing. Ensure the two guide pins are fully seated.
- Secure the wing to the fuselage using 1 M3x25mm screw (B).
- Turn the model over and carefully install the micro connector of the aileron servo into the AIL port of the receiver.
- Replace the canopy on the fuselage.
When needed, disassemble in reverse order.
NOTICE: When disconnecting the servo connectors, do not pull on the servo wires. Use a screwdriver or pliers to break the friction fi t of the servo connectors. Failure to do so could result in damage to the servo wiring.
natural_image
Technical line drawing of a submarine with internal components and directional arrows indicating flow or movement (no text or symbols)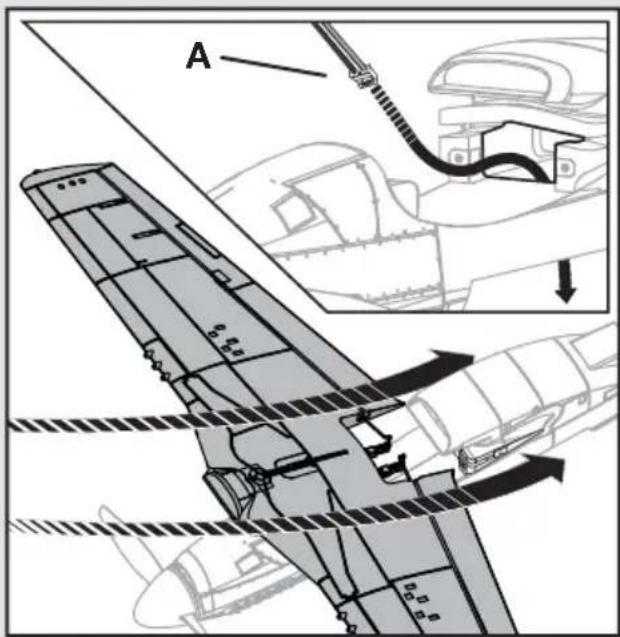
text_image
A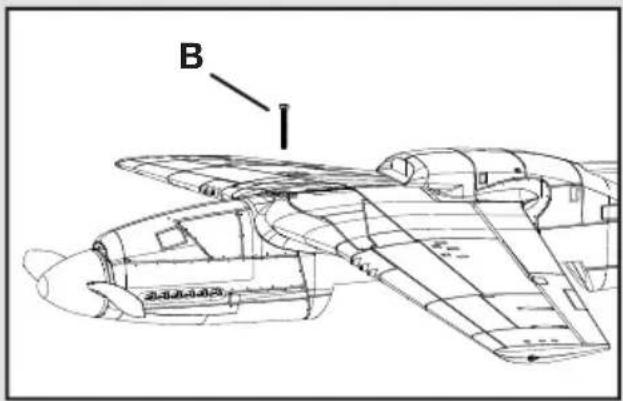
text_image
B ILow Voltage Cutoff (LVC)
When a Li-Po battery is discharged below 3V per cell, it will not hold a charge. The aircraft's ESC protects the flight battery from over-discharge using Low Voltage Cutoff (LVC). Once the battery discharges to 3V per cell, the LVC will reduce the power to the motor in order to leave adequate power to the receiver and servos to land the airplane.
When the motor power decreases, land the aircraft immediately and replace or recharge the flight battery.
Always disconnect and remove the Li-Po battery from the aircraft after each flight. Charge your Li-Po battery to about half capacity before storage. Make sure the battery charge does not fall below 3V per cell. Failure to unplug a connected battery will result in trickle discharge.
For your first flights, set your transmitter timer or a stopwatch to 5 minutes. Adjust your timer for longer or shorter flights once you have fl own the model. Flights of 7 minutes are achievable if using proper throttle management.
NOTICE: Repeated fl ying to LVC will damage the battery.
Transmitter and Receiver Binding
Binding is the process of programming the receiver to recognize the GUID (Globally Unique Identifi er) code of a single specifi c transmitter. You need to 'bind' your chosen Spektrum™ DSM2/DSMX technology equipped aircraft transmitter to the receiver for proper operation.
Any full range Spektrum DSM2/DSMX transmitter can bind to the DSM2/DSMX receiver. Please visit www.bindnfl y.com for a complete list of compatible transmitters.
CAUTION: When using a Futaba transmitter with a Spektrum DSM® module, you must reverse the throttle channel and rebind. Refer to your Spektrum module manual for binding and failsafe instructions. Refer to your Futaba transmitter manual for instructions on reversing the throttle channel.

Binding Procedure
| 1. Refer to your transmitter's unique instructions for binding to a receiver (location of transmitter's Bind control). |
| 2. Make sure the fl ight battery is disconnected from the aircraft. |
| 3. Power off the transmitter. |
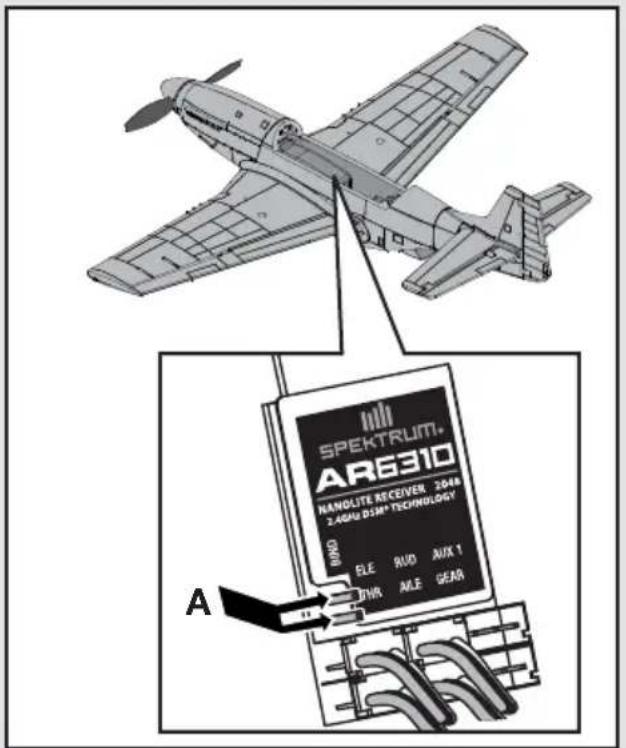
| 4. Bind the AR6310 receiver to a DSM2/DSMX transmitter by shorting the bind pins (A) with tweezers, a hemostat or small needle-nose pliers. Metal to metal contact is needed to complete the circuit. Do not bend the bind pins. |
| 5. Connect the fl ight battery to the aircraft. Short the pins until the receiver LED begins to fl ash rapidly (typically after 5 seconds). |
| 6. Ensure that control surface trims are centered and the throttle and throttle trims are in the low position to correctly set the failsafe. |
| 7. Put your transmitter into bind mode. Refer to your transmitter's manual for binding button or switch instructions. |
| 8. After 5 to 10 seconds, the receiver status LED will become solid, indicating that the receiver is bound to the transmitter. If the LED does not turn solid, refer to the Troubleshooting Guide at the back of the manual. |
text_image
SPEKTRLIM. ARE310 HANOLITE RECEIVER 2048 2.40Hz DIM*TECHNOLOGY BENO ELE RUS AUX 1 TINK ALE GEAR AFor subsequent fl ights, power on the transmitter before connecting the fl ight battery.
Battery Installation
- Remove the canopy.
- Install the battery (A) in the battery cavity towards the front of the fuselage. Refer to the Center of Gravity instructions for the battery's position.
- Connect the fully charged flight battery to the ESC. Refer to the ESC Arming instructions for correct connection of the battery to the ESC.
- Replace the canopy on the fuselage.

CAUTION: Always disconnect the Li-Po battery from the ESC when not flying to eliminate power supplied to the motor. The ESC does not have an arming switch and will respond to any transmitter input when a signal is present.

CAUTION: Always disconnect the Li-Po battery from the ESC when not fl ying to avoid over-discharging the battery. Batteries discharged to a voltage lower than the lowest approved voltage may become damaged, resulting in loss of performance and potential fi re when batteries are charged.
natural_image
Technical line drawing of a mechanical component with internal structure and directional arrows (no text or symbols)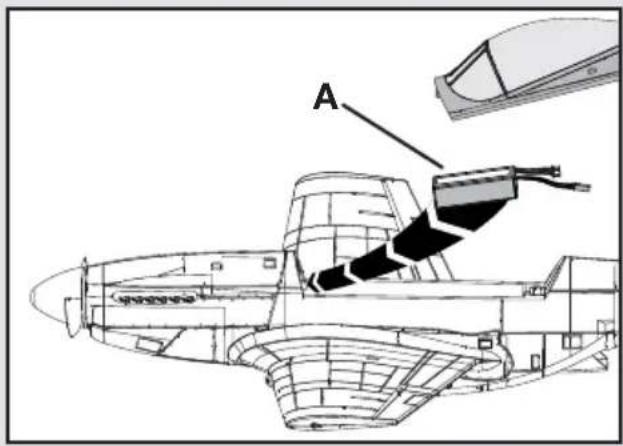
text_image
AESC Arming
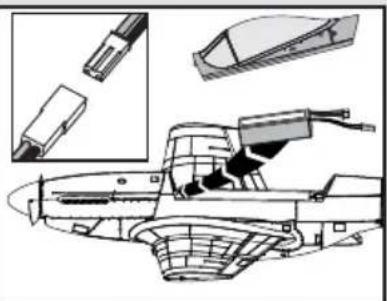
Arming the ESC also occurs after binding as previously described, but subsequent connection of a flight battery requires the steps to the right.
Tip: If the ESC sounds a continuous double beep after the flight battery is connected, recharge or replace the battery.
If you accidentally connect the battery while the throttle is opened, a musical tone will sound after 5 seconds and the ESC will not arm until the throttle is returned to the off position.

CAUTION: Always keep hands away from the propeller. When armed, the motor will turn the propeller in response to any throttle movement.
1
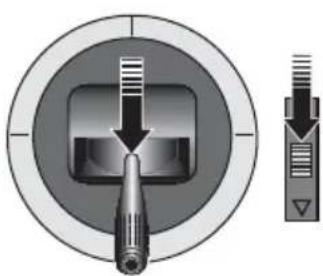
Lower throttle and throttle trim to lowest settings.

Power ON the transmitter
natural_image
Diagram of a mechanical component with a threaded rod and internal structure, shown in cross-section (no text or symbols)2
Remove the canopy and install the battery in the battery cavity, then connect the battery to the ESC, noting proper 7 polarity.
natural_image
Technical line drawing of a mechanical assembly with exploded view and close-up details (no text or symbols)3

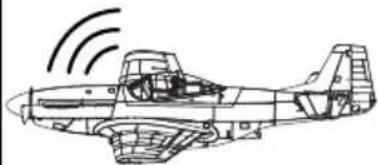
Series of tones

Continuous receiver LED.
natural_image
Line drawing of a vintage military aircraft with visible propellers and signal waves (no text or symbols)FLY...
Control Direction Test
Bind your aircraft and transmitter before doing these tests. Move the controls on the transmitter to make sure the aircraft control surfaces move correctly and in the proper direction.
Always keep throttle at the low position during testing.
Make sure the tail linkages move freely and that paint or decals are not adhered to them.
Control Centering
Before the first lights, or in the event of an accident, make sure the light control surfaces are centered. Adjust the linkages mechanically if the control surfaces are not centered.
- Reset sub-trims to zero. Ensure the servo arms are as perpendicular to the servo case as possible. Use sub-trim to fine-tune as needed.
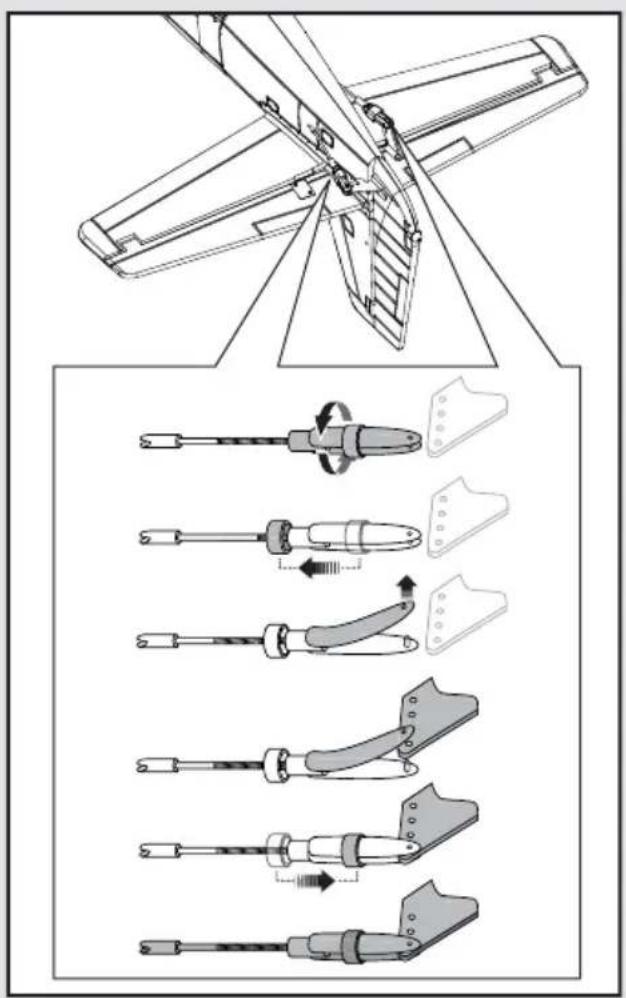
- When an adjustment of linkages is needed, pull the tube from the clevis to the linkage.
- Carefully spread the clevis and adjust the length of the linkage by screwing the clevis in or out. Reattach the clevis in the proper hole in the control horn.
- Move the tube to tighten the clevis onto the control horn.
Centering Controls After First Flights
If the model requires excessive transmitter trim, return the transmitter trim to zero and adjust the linkages mechanically so that the control surfaces are in the flight trimmed position.
text_image
Technical diagram illustrating the assembly of a mechanical tool with labeled parts and directional arrows indicating motion or movement.Control Horn and Servo Arm Settings
This illustration shows the factory settings for linkages on the control horns and servo arms. After fl ying, you may choose to adjust the linkage positions for the desired control response.
| Horns Servo Arms | ||
| Elevator | 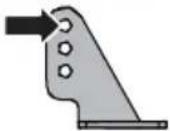 | 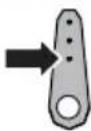 |
| Rudder | 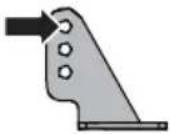 | 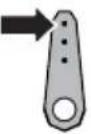 |
| Ailerons | 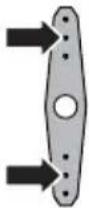 | |
Dual Rates and Expos
We recommend using a DSM radio capable of dual rates and expo. The settings to the right are recommended starting settings for intermediate pilots. Adjust according to individual preferences after the initial flight.
Tip: For the first flight, fly the model at LOW RATE.
| High Rate Low Rate | ||
| Aileron 10mm / ▲7mm / | ▲ ▼ | |
| Elevator 9mm ▲/ ▼mm | / ▲ ▼ | |
| Rudder 10mm ◀/ ▶ | ||
| Aileron 25% / ▲ ▼20% | / ▲ ▼ | |
| Elevator 25% ▲/10% ▼5% | /0% ▼ | |
| Rudder 15% ◀/ ▶ | ||
Center of Gravity (CG)
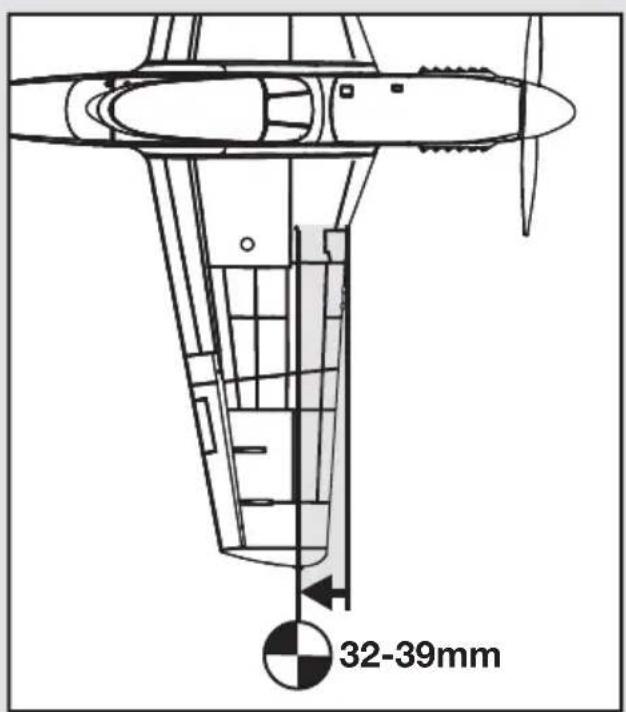
The CG location is 32-39mm back from leading edge of wing at fi llet
The battery compartment is oversized to allow for Center of Gravity adjustment. Start by installing the battery fully forward with the connectors facing the rear of the aircraft. Adjust as needed by sliding the battery back.
text_image
32-39mmDisplay Stand Assembly and Installation
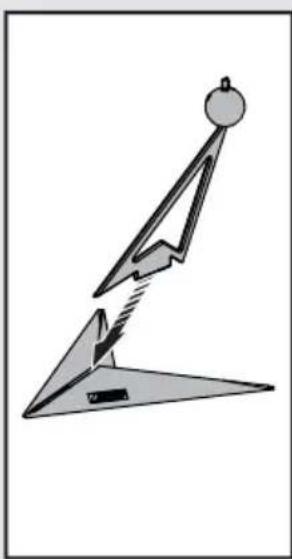
Glue is not required for the assembly of the display, but may be used if the display will not be disassembled.

CAUTION: Always remove the battery before paying the model.
NOTICE: Always remove the model from the stand before adjusting the display. Failure to do so may result in damage to the model or the stand.
natural_image
Simple line drawing of a mechanical device with a fulcrum and base plate (no text or symbols)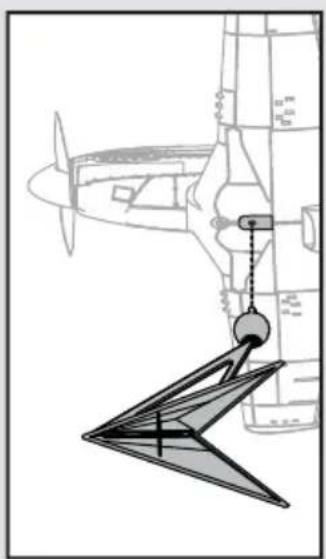
natural_image
Line drawing of a propeller with a triangular structure suspended from a crane (no text or symbols)Flying Tips and Repairs
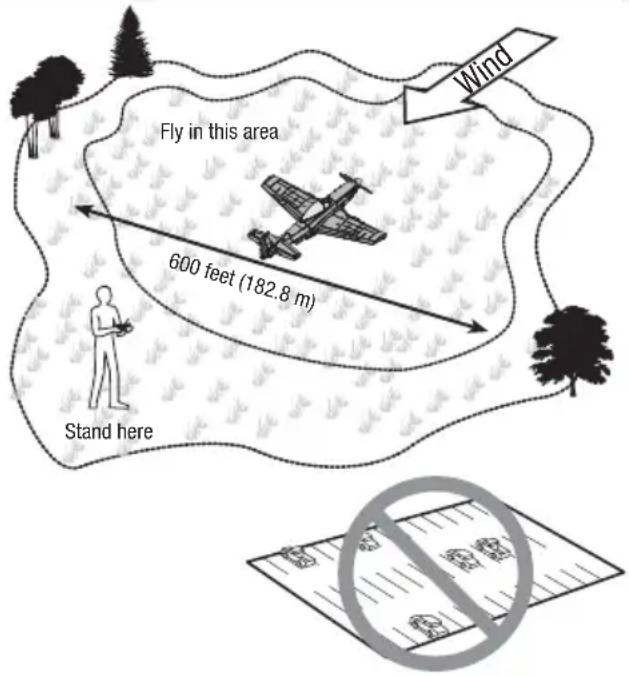
Consult local laws and ordinances before choosing a location to fly your aircraft.
We recommend fl ying your aircraft outside in no greater than moderate winds or inside a large gymnasium.
Always avoid fl ying near houses, trees, wires and buildings. You should also be careful to avoid fl ying in areas where there are many people, such as busy parks, schoolyards or soccer fi elds.
Range Check Your Radio System
After fi nal assembly, range check the radio system with the aircraft. Refer to your specifi c transmitter and receiver instruction manuals for range test information.
Flying
This aircraft is extremely responsive to control input. Fly at low rate settings until you are familiar with its response.
Fly your first attempts at high rate settings at high altitude and slow speeds.
Hand Launching
When hand-launching your aircraft alone, hold the aircraft in one hand and the transmitter in the other. Hold the aircraft by the fuselage under the wings. Firmly throw the aircraft directly into the wind, angled slightly up (5 to 10 degrees above the horizon) with full throttle. Climb to check trim. Once trim is adjusted, begin exploring the flight envelope of the aircraft.
Landing
Make sure to land on a soft surface, like grass. Fly the aircraft into the wind approximately 36 inches (90cm) or less above the surface, using a small amount of throttle for the entire descent. Keep the throttle on until the aircraft is ready to fl are. During fl are, keep the wings level and the aircraft pointed into the wind. Gently lower the throttle while pulling back on the elevator to bring the aircraft down on its belly. Fully lower the throttle just before the aircraft lands to avoid propeller damage.
NOTICE: If a crash is imminent, reduce the throttle and trim fully. Failure to do so could result in extra damage to the airframe, as well as damage to the ESC and motor.
NOTICE: Crash damage is not covered under warranty.
Repairs
Repair this aircraft using foam-compatible CA (cyanoacrylate adhesive) glue or clear tape. Only use foam-compatible CA glue as other types of glue can damage the foam.
When parts are not repairable, see the Replacement Parts List for ordering by item number.
For a listing of all replacement and optional parts, refer to the list at the back of this manual.
NOTICE: Use of foam-compatible CA accelerant on your aircraft can damage paint. DO NOT handle the aircraft until accelerant fully dries.
NOTICE: When you are fi nished fl ying, never keep the aircraft in the sun. Do not store the aircraft in a hot, enclosed area such as a car. Doing so can damage the foam.
text_image
Fly in this area 600 feet (182.8 m) Stand here WindPost Flight Checklist
| √ | |
| 1. Disconnect fl ight battery from ESC (Required for safety and battery life). | |
| 2. Power off transmitter. | |
| 3. Remove fl ight battery from aircraft. | |
| 4. Recharge fl ight battery. | |
| √ | |
| 5. Store fl ight battery apart from aircraft and monitor the battery charge. | |
| 6. Make note of fl ight conditions and fl ight plan results, planning for future fl ights. | |
Service of Power Components
Disassembly

CAUTION: Always disconnect the battery before handling or adjusting the propeller rotor. Failure to do so could result in personal injury.
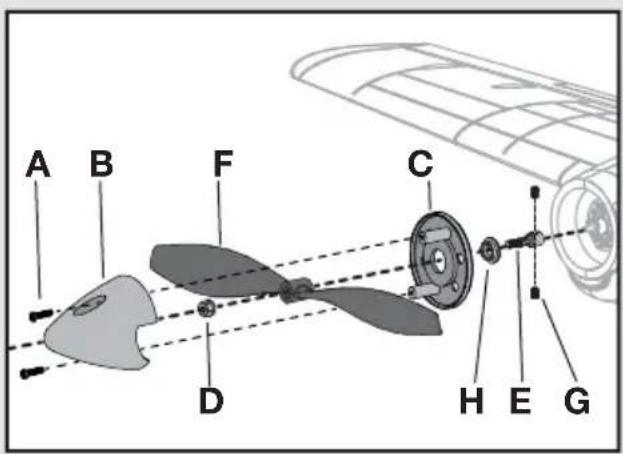
Propeller
- Remove the 2 screws (A) from the spinner (B). Carefully separate the spinner from the back plate (C).
- Remove the lock nut (D) from the propeller shaft (E), then remove the propeller (F) and back plate.
- Loosen the 2 setscrews (G) and remove the washer (H) before removing the propeller shaft from the motor.
Motor and Firewall
- Remove the 4 screws (J) and motor mount (K) from the fuselage.
- Disconnect the motor wires from the ESC.
- Loosen the 2 setscrews (L) and remove the motor (M) from the motor mount.
Assemble in reverse order.
text_image
A B F C D H E G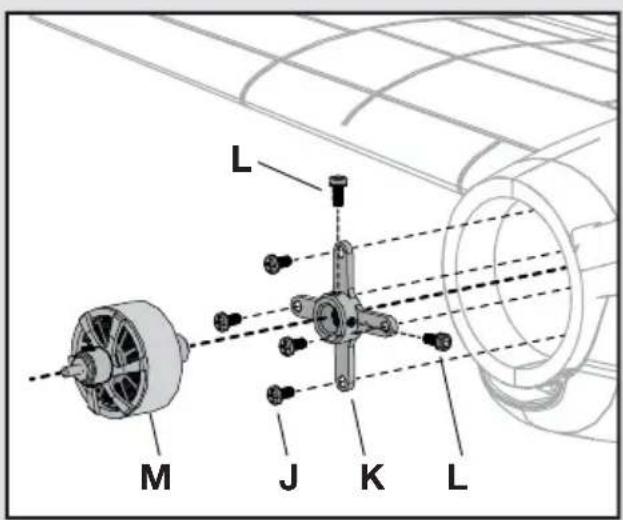
text_image
L M J K LAssembly Tips
- Correctly align and connect the motor wire colors with the ESC wires.
- The propeller size numbers (6.8 x 3.5) must face out from the motor for correct propeller operation.
- Ensure the spinner is fully connected to the spinner back plate for safe operation.
Troubleshooting Guide
| Problem Possible Cause Solution | ||
| Aircraft will not respond to throttle but responds to other controls | ESC did not arm because throttle stick and/or throttle trim too high | Lower throttle stick and throttle trim to lowest setting |
| Throttle channel is reversed Reverse throttle channel | on transmitter | |
| Motor disconnected from ESC Make sure motor is connected to the ESC | ||
| Servo travel setup is less than 100% Adjust servo travel to 100% or slightly greater | ||
| Extra propeller noise or extra vibration | Damaged propeller, spinner or motor Replace damaged parts | |
| Prop nut is too loose Tighten the prop nut | ||
| Prop is out of balance Remove and balance propeller | or replace with a balanced propeller | |
| Spinner is not tight or fully seated in place Tighten the | spinner or remove the spinner and turn it 180 degrees | |
| Reduced fl ight time or aircraft underpowered | Flight battery charge is low Completely recharge fl ight battery | |
| Propeller installed backwards Install propeller properly | ||
| Flight battery damaged Replace fl ight battery and follow fl ight battery instructions | ||
| Flight battery is too cold Make sure battery is warm before use | ||
| Battery capacity too low for power drawn Replace battery or use a larger capacity battery | ||
| Aircraft will not Bind (during binding) to transmitter | Transmitter too near aircraft during binding process | Power off transmitter, move transmitter a larger distance from aircraft, disconnect and reconnect fl ight battery to aircraft and follow binding instructions |
| Bind switch or button not held long enough during bind process | Power off transmitter and repeat bind process. Hold transmitter bind button or switch until receiver is bound | |
| Flight battery/Transmitter battery charge is too low | Replace/recharge batteries | |
| Bind pins on receiver are not correctly connected | Connect receiver bind pins as instructed and bind transmitter to receiver | |
| Aircraft or transmitter is too close to large metal object, wireless source or another transmitter | Move aircraft and transmitter to another location and attempt binding again | |
| Aircraft will not connect (after binding) to transmitter | Transmitter too close to aircraft during connecting process | Power off transmitter, move transmitter a larger distance from aircraft, disconnect and reconnect fl ight battery to aircraft |
| Flight battery/Transmitter battery charge is too low | Replace/recharge batteries | |
| Aircraft bound to different model memory (ModelMatchTM radios only) | Select correct model memory on transmitter | |
| Transmitter may have been bound to a different aircraft using different DSM protocol | Bind aircraft to transmitter | |
| Bind pins on receiver are connected | Ensure bind pins on receiver are not connected | |
| Aircraft or transmitter is too close to large metal object, wireless source or another transmitter | Move aircraft and transmitter to another location and attempt connecting again | |
| Control surface does not move | Control surface, control horn, linkage or servo damage | Replace or repair damaged parts and adjust controls |
| Servo wire damaged or connections loose | Do a check of wires and connections, connect or replace as needed | |
| Flight battery charge is low Fully recharge fl ight battery | ||
| Control linkage does not move freely | Make sure control linkage moves freely | |
| Controls reversed | Transmitter settings reversed | Adjust controls on transmitter appropriately |
| Motor power quickly decreases and increases then motor loses power | Battery voltage is down to the point of receiver/ESC Low Voltage Cutoff (LVC) | Recharge fl ight battery or replace battery that is no longer performing |
Limited Warranty
What this Warranty Covers
Horizon Hobby, Inc. (“Horizon”) warrants to the original purchaser that the product purchased (the “Product”) will be free from defects in materials and workmanship at the date of purchase.
What is Not Covered
This warranty is not transferable and does not cover (i) cosmetic damage, (ii) damage due to acts of God, accident, misuse, abuse, negligence, commercial use, or due to improper use, installation, operation or maintenance, (iii) modification of or to any part of the Product, (iv) attempted service by anyone other than a Horizon Hobby authorized service center, (v) Product not purchased from an authorized Horizon dealer, or (vi) Product not compliant with applicable technical regulations.
OTHER THAN THE EXPRESS WARRANTY ABOVE, HORIZON MAKES NO OTHER WARRANTY OR REPRESENTATION, AND HEREBY DISCLAIMS ANY AND ALL IMPLIED WARRANTIES, INCLUDING, WITHOUT LIMITATION, THE IMPLIED WARRANTIES OF NON-INFRINGEMENT, MERCHANTABILITY AND FITNESS FOR A PARTICULAR PURPOSE. THE PURCHASER ACKNOWLEDGES THAT THEY ALONE HAVE DETERMINED THAT THE PRODUCT WILL SUITABLY MEET THE REQUIREMENTS OF THE PURCHASER'S INTENDED USE.
Purchaser's Remedy
Horizon's sole obligation and purchaser's sole and exclusive remedy shall be that Horizon will, at its option, either (i) service, or (ii) replace, any Product determined by Horizon to be defective. Horizon reserves the right to inspect any and all Product(s) involved in a warranty claim. Service or replacement decisions are at the sole discretion of Horizon. Proof of purchase is required for all warranty claims. SERVICE OR REPLACEMENT AS PROVIDED UNDER THIS WARRANTY IS THE PURCHASER'S SOLE AND EXCLUSIVE REMEDY.
Limitation of Liability
HORIZON SHALL NOT BE LIABLE FOR SPECIAL, INDIRECT, INCIDENTAL OR CONSEQUENTIAL DAMAGES, LOSS OF PROFITS OR PRODUCTION OR COMMERCIAL LOSS IN ANY WAY, REGARDLESS OF WHETHER SUCH CLAIM IS BASED IN CONTRACT, WARRANTY, TORT, NEGLIGENCE, STRICT LIABILITY OR ANY OTHER THEORY OF LIABILITY, EVEN IF HORIZON HAS BEEN ADVISED OF THE POSSIBILITY OF SUCH DAMAGES. Further, in no event shall the liability of Horizon exceed the individual price of the Product on which liability is asserted. As Horizon has no control over use, setup, fi nal assembly, modifi cation or misuse, no liability shall be assumed nor accepted for any resulting damage or injury. By the act of use, setup or assembly, the user accepts all resulting liability. If you as the purchaser or user are not prepared to accept the liability associated with the use of the Product, purchaser is advised to return the Product immediately in new and unused condition to the place of purchase.
Law
These terms are governed by Illinois law (without regard to conflict of law principals). This warranty gives you specific legal rights, and you may also have other rights which vary from state to state. Horizon reserves the right to change or modify this warranty at any time without notice.
WARRANTY SERVICES
Questions, Assistance, and Services
Your local hobby store and/or place of purchase cannot provide warranty support or service. Once assembly, setup or use of the Product has been started, you must contact your local distributor or Horizon directly. This will enable Horizon to better answer your questions and service you in the event that you may need any assistance. For questions or assistance, please visit our website at www.horizonhobby.com, submit a Product Support Inquiry, or call the toll free telephone number referenced in the Warranty and Service Contact Information section to speak with a Product Support representative.
Inspection or Services
If this Product needs to be inspected or serviced and is compliant in the country you live and use the Product in, please use the Horizon Online Service Request submission process found on our website or call Horizon to obtain a Return Merchandise Authorization (RMA) number. Pack the Product securely using a shipping carton. Please note that original boxes may be included, but are not designed to withstand the rigors of shipping without additional protection. Ship via a carrier that provides tracking and insurance for lost or damaged parcels, as Horizon is not responsible for merchandise until it arrives and is accepted at our facility. An Online Service Request is available at http://www.horizonhobby.com/content/_service-center_render-service-center. If you do not have internet access, please contact Horizon Product Support to obtain a RMA number along with instructions for submitting your product for service. When calling Horizon, you will be asked to provide your complete name, street address, email address and phone number where you can be reached during business hours. When sending product into Horizon, please include your RMA number, a list of the included items, and a brief summary of the problem. A copy of your original sales receipt must be included for warranty consideration. Be sure your name, address, and RMA number are clearly written on the outside of the shipping carton.
NOTICE: Do not ship LiPo batteries to Horizon. If you have any issue with a LiPo battery, please contact the appropriate Horizon Product Support offi ce.
Warranty Requirements
For Warranty consideration, you must include your original sales receipt verifying the proof-of-purchase date. Provided warranty conditions have been met, your Product will be serviced or replaced free of charge. Service or replacement decisions are at the sole discretion of Horizon.
Non-Warranty Service
Should your service not be covered by warranty, service will be completed and payment will be required without notifi cation or estimate of the expense unless the expense exceeds 50% of the retail purchase cost. By submitting the item for service you are agreeing to payment of the service without notifi cation. Service estimates are available upon request. You must include this request with your item submitted for service. Non-warranty service estimates will be billed a minimum of 12 hour of labor. In addition you will be billed for return freight. Horizon accepts money orders and cashier's checks, as well as Visa, MasterCard, American Express, and Discover cards. By submitting any item to Horizon for service, you are agreeing to Horizon's Terms and
Conditions found on our website http://www.horizonhobby.com/content/_service-center_render-service-center.
ATTENTION: Horizon service is limited to Product compliant in the country of use and ownership. If received, a non-compliant Product will not be
serviced. Further, the sender will be responsible for arranging return shipment of the un-serviced Product, through a carrier of the sender's choice and at the sender's expense. Horizon will hold non-compliant Product for a period of 60 days from notifi cation, after which it will be discarded.
Warranty and Service Contact Information
| Country of Purchase | Horizon Hobby Phone Number/Email Adress Address | ||
| United States of America | Horizon Service Center (Repairs and Repair Requests) | servicecenter.horizonhobby.com/RequestForm/ | 4105 Fieldstone Rd Champaign, Illinois 61822 USA |
| Horizon Product Support (Product Technical Assistance) | www.quickbase.com/db/bghj7ey8c?a=GenNewRecord 888-959-2305 | ||
| Sales | sales@horizonhobby.com 888-959-2305 | ||
| United Kingdom | Service/Parts/Sales: Horizon Hobby Limited | sales@horizonhobby.co.uk +44 (0) 1279 641 097 | Units 1–4 , Ployters Rd, Staple Tye Harlow, Essex, CM18 7NS, United Kingdom |
| Germany | Horizon Technischer Service | service@horizonhobby.de +49 (0) 4121 2655 100 | Christian-Junge-Straße 1 25337 Elmshorn, Germany |
| Sales: Horizon Hobby GmbH | |||
| France | Service/Parts/Sales: Horizon Hobby SAS | infofrance@horizonhobby.com +33 (0) 1 60 18 34 90 | 11 Rue Georges Charpak 77127 Lieusaint, France |
| China | Service/Parts/Sales: Horizon Hobby – China | info@horizonhobby.com.cn +86 (021) 5180 9868 | Room 506, No. 97 Changshou Rd. Shanghai, China 200060 |
FCC Information
Operation is subject to the following two conditions: (1) This device may not cause harmful interference, and (2) this device must accept any interference received, including interference that may cause undesired operation.
CAUTION: Changes or modifications not expressly approved by the party responsible for compliance could void the user's authority to operate the equipment.
This product contains a radio transmitter with wireless technology which has been tested and found to be compliant with the applicable regulations governing a radio transmitter in the 2.400GHz to 2.4835GHz frequency range.
Compliance Information for the European Union
Declaration of Conformity
(in accordance with ISO/IEC 17050-1)
No. HH2013070301

Product(s): P-51D Mustang 280
Item Number(s): EFL6150
Equipment class: 1
The object of declaration described above is in conformity with the requirements of the specifications listed below, following the provisions of the European R&TTE directive 1999/5/EC and EMC Directive 2004/108/EC:
EN 301 489-1 V1.9.2: 2012
EN 301 489-17 V2.1.1: 2009
EN55022:2010 + AC:2011
EN55024:2010
Signed for and on behalf of:
Horizon Hobby, Inc.
Champaign, IL USA
Jul 03, 2013

Steven A. Hall
Executive Vice President
and Chief Operating Officer
International Operations and Risk Management
Horizon Hobby, Inc.
Instructions for disposal of WEEE by users in the European Union
This product must not be disposed of with other waste. Instead, it is the user's responsibility to dispose of their waste equipment by handing it over to a designated collections point for
the recycling of waste electrical and electronic equipment. The separate collection and recycling of your waste equipment at the time of disposal will help to conserve natural resources and ensure that it is recycled in a manner that protects human health and the environment. For more information about where you can drop off your waste equipment for recycling, please contact your local city offi ce, your household waste disposal service or where you purchased the product.
© 2013 Horizon Hobby, Inc.
E-fl ite, Celectra, DSM, DSM2, DSMX, ModelMatch, Bind-N-Fly and the Bind-N-Fly logo are trademarks or registered trademarks of Horizon Hobby, Inc.
The Spektrum trademark is used with permission of Bachmann Industries, Inc.
Futaba is a registered trademark of Futaba Denshi Kogyo Kabushiki Kaisha Corporation of Japan.
Patents pending.
www.e-fl iterc.com