DAB-89.215DB - Fridge Dunavox - Free user manual and instructions
Find the device manual for free DAB-89.215DB Dunavox in PDF.


| Product Type | Refrigerator |
| Model | DAB-89.215DB |
| Brand | Dunavox |
| Climate Class | N |
| Energy Efficiency Class | A+ |
| Annual Energy Consumption | 150 kWh |
| Total Gross Capacity | 89 L |
| Refrigerator Net Capacity | 85 L |
| Freezer Compartment | Not available |
| Noise Level | 38 dB |
| Dimensions (H x W x D) | 85 x 60 x 55 cm |
| Weight | 30 kg |
| Power Supply | 220-240 V / 50 Hz |
| Refrigerant | R600a |
| Defrost Type | Automatic |
| Door Reversibility | Yes |
| Number of Shelves | 3 |
| Temperature Range | 0 to 10 °C |
| Control Type | Mechanical dial |
| Interior Light | LED |
| Maintenance | Clean with mild detergent; avoid abrasive cleaners |
| Spare Parts Availability | Contact Dunavox support or authorized dealers |
| User Manual | Downloadable in PDF from notice-facile.com |
Frequently Asked Questions - DAB-89.215DB Dunavox
User questions about DAB-89.215DB Dunavox
0 question about this device. Answer the ones you know or ask your own.
Ask a new question about this device
Download the instructions for your Fridge in PDF format for free! Find your manual DAB-89.215DB - Dunavox and take your electronic device back in hand. On this page are published all the documents necessary for the use of your device. DAB-89.215DB by Dunavox.
USER MANUAL DAB-89.215DB Dunavox
CONNECTION TO THE MAINS SUPPLY
PRODUCT FEATURES
INSTALLATION
OPERATING YOUR APPLIANCE
CARE AND MAINTENANCE
TROUBLESHOOTING GUIDE
WARRANTY

Please read this manual carefully before installing and starting up, and store it in a safe place. If you pass on the product to another person, hand over this instruction manual along with it.
IMPORTANT SAFEGUARDS
When using an electrical appliance, basic precautions should always be followed to reduce the risk of fire, electric shock, and injury to persons, including the following:
FOR YOUR SAFETY
Read all instructions carefully, even if you are quite familiar with the appliance.
- The appliance is intended to be used for the storage of wine. Use this appliance only as described in this manual. Other uses not recommended may cause fire, electric shock or personal injury.
- This appliance can be used by children aged from 8 years and above and persons with reduced physical, sensory or mental capabilities or lack of experience and knowledge if they have been given supervision or instruction concerning use of the appliance in a safe way and understand the hazards involved. Children shall not play with the appliance. Cleaning and user maintenance shall not be made by children without supervision.
- Electrical devices are not toys. Always keep the device out of the reach of children. Keep the mains cord out of the reach of children. Do not let the mains cord hang over the edge of the table or worktop on which the appliance stands.
- To protect against the risk of electric shock, DO NOT IMMERSE the unit, cord, or plug in water or spray any other liquid.
- Unplug the appliance from the plug socket when not in use, when moving from one location to another and before cleaning.
- To disconnect the appliance, grip the plug and pull it from the wall outlet. Never pull by the cord.
- WARNING: Please keep the appliance away from substance, which can cause ignition. Do not operate the appliance in the presence of explosive and/or flammable fumes.
- Do not place the appliance or any of its part near an open flame, cooking or other heating appliance.
- Do not operate the appliance with a damage cord or plug, if the product malfunctions, or if it is dropped or damaged in any manner. If the supply cord is damaged, it must be replaced by the manufacturer, or an authorized service centre or similarly qualified persons in order to avoid a hazard.
- The use of attachments not recommended by the manufacturer may be hazardous.
- Place the unit on a dry level surface.
- Do not operate if the housing is removed or damaged.
- A loose fit between the AC outlet (receptacle) and plug may cause overheating and a distortion of the plug. Contact a qualified electrician to replace loose or worn outlet.
- Locate the unit away from direct sunlight and sources of heat (stove, heater, radiator, etc.).
- WARNING: This appliance is CFC- and HFC-free and contains small quantities of Isobutane (R600a) which is environmentally friendly, but flammable. It does not damage the ozone layer, nor does it increase the greenhouse effect. Care must be taken during transportation and setting up of the appliance that no parts of the cooling system are damaged. Leaking coolant can ignite and may damage the eyes. In the event of any damage:
- Avoid open flames and anything which creates a spark,
- Disconnect from the mains,
- Air the room in which the appliance is located for several minutes and
- Contact the Service Department for advice.
- The more coolant there is in an appliance, the larger the room it should be installed in. In the event of a leakage, if the appliance is in a small room, there is the danger of combustible gases building up. For every 8 g of coolant at least 1 cubic meter of room space is required. The amount of coolant in the appliance is stated on the data plate inside the appliance. It is hazardous for anyone other than an Authorised Service Person to carry out servicing or repairs to this appliance. In Queensland of Australia the authorized person must hold a Gas Work Authorisation for hydrocarbon refrigerants, before carrying out servicing or repairs which involve the removal of covers.
- WARNING: Keep ventilation openings, in the
appliance enclosure or in the built-in structure, clear of obstruction. No liability will be accepted for any damage incurred owing to misuse of the appliance or as a result of repairs carried out by unqualified personnel. In this case neither the guarantee nor any other liability claims will apply.
- WARNING: Do not use mechanical devices or other means to accelerate the defrosting process, other than those recommended by the manufacturer.
- WARNING: Do not damage the refrigerant circuit. Never use an appliance with a damaged circuit.
- WARNING: Do not use any electrical appliance inside the food storage compartment of the appliance, unless they are of the type recommended by the manufacturer.
- WARNING: To avoid a hazard due to instability of the appliance, it must be fixed in accordance with the instructions.
- CAUTION: Please keep the products away from the fire or similar glowing substance before you dispose the refrigerator.
- Do not store explosive substances such as aerosol cans with a flammable propellant in this appliance.
- This appliance is intended to be used in household and similar applications such as
- staff kitchen areas in shops, offices and other working environments;
- farm houses and by clients in hotels, motels and other residential type environments;
- bed and breakfast type environments;
- catering and similar non-retail applications.
- Do not attempt to repair or replace any part of your appliance unless it is specifically recommended in this manual. All other servicing should be referred to a qualified technician.
- Replace all panels after service before operating.
- Use two or more people to move and install the appliance. Failure to do so can result in back or other injury.
- Never clean appliance parts with flammable fluids. These fumes can create a fire hazard or explosion. And do not store or use gasoline or other flammable vapors and liquids in the vicinity of this or any other appliance. The fumes can create a fire hazard or explosion.
- Do not connect or disconnect the electric plug when your hands are wet.
- It is recommended that a separate circuit, serving only your appliance be provided. Use receptacles that cannot be turned off by a switch
or pull chain.
- If you have a lockable appliance, do not keep the key near the appliance or within reach of children.
WARNING: To reduce the risk of fire, electric shock or personal injury, unplug or disconnect the appliance from the power supply before servicing.
SAVE THESE INSTRUCTIONS
If you are experiencing problems, check the Troubleshooting Guide at the back of this manual. It lists causes of minor operating problems that you can correct by yourself.
DISPOSAL
Dispose of your appliance packaging properly. Ensure that any plastic wrappings, bags etc. are disposed of safely and kept out of the reach of babies and young children. Danger of suffocation!
Refrigeration equipment must be properly disposed of in a professional and appropriate way, in accordance with the current local regulations and laws which protects the environment this applies to your old appliance and to your new unit once it has reached the end of its service life.
WARNING: Please ensure that old, worn appliances are rendered unusable before disposal by removing the doors, removing the plug, cutting the network cable, and removing or destroying any snap fastenings or bolts. You will thus prevent children from locking themselves in the appliance during play (risk of suffocation) or endangering their lives in any other way. DO NOT dispose of the appliance in landfill as the insulation (Cyclopentane) and refrigerant gas (R600a) contained in these appliances are flammable.
Disposal instructions:
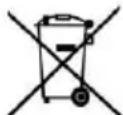
- The appliance must not be disposed of in the dustbin or with normal household rubbish.
- The coolant circuit, particularly the heat exchanger at the back/bottom of the unit, must not be damaged.
- The symbol on the product or its packaging indicates that this product is not to be handled as normal household waste but is to be taken to a recycling collection point for electrical and electronic goods. By correctly disposing of this product you are contributing to the protection of the environment and to the health of your fellow human beings. Improper disposal endangers
health and the environment. Further information about the recycling of the product may be obtained from your town hall, refuse collection department or the store where you purchased the product.
CONNECTION TO THE MAINS SUPPLY UK, IRL, HK, SINGAPORE
Check that the voltage marked on the product corresponds with your supply voltage.
This product is fitted with a 13A plug complying with BS1363. If this plug is unsuitable or needs to be replaced, please note the following:
WARNING: THIS APPLIANCE MUST BE EARTHED.
Important: The wires in the mains lead are coloured in accordance with the following code:
text_image
Earth (Green/Yellow) Neutral (Blue) Live (Brown) 13 AMPThis appliance is equipped with a plug fitted with a 13 amp fuse. Should the fuse fail, then it must be replaced with an ASTA approved fuse (conforming to BS1362) of the same rating. If you need to replace the plug or if the plug is of the incorrect type for your socket, remove it and replace it with an appropriate type. Dispose of the old plug safely.
As the colours of the wires in the mains lead of this appliance may not correspond with the coloured markings identifying the terminals in your plug, proceed as follows: The GREEN/YELLOW wire is the EARTH and must be connected to the terminal which is marked with the letter 'E' or by the earth symbol or coloured GREEN or GREEN/YELLOW.
The BLUE wire is the NEUTRAL and must be connected to the terminal which is marked with the letter 'N' or coloured BLACK.
The BROWN wire is the LIVE wire and must be connected to the terminal which is marked with the Letter 'L' or coloured RED.
Always ensure that the plug cord grip is fastened correctly.
If in doubt consult a qualified electrician who will be pleased to do this for you. This product conforms to EC Directive 92/31 /EEC with respect to Electromagnetic Compatibility.
NON-REWIREABLE MAINS PLUG
If your appliance is supplied with a non-rewireable plug fitted to the mains lead, you will find that it incorporates a fuse, the value of which is indicated either on the base of the plug or on the fuse carrier. Should the fuse need replacing, you must use an ASTA approved one (conforming to BS1362) of the same rating.
If the fuse cover is lost, the plug must not be used until a replacement is obtained from an electrical supplier.
If you need to remove the plug, cut it from the mains lead and immediately dispose of it. Never attempt to re-use this plug or insert it into a socket outlet as there is a very great risk of an electric shock.
DANGER
Electric Shock Risk
CE
The Ground Truth image displays a single, solid horizontal line. According to Rule 2 (UNDERSCORE & LINE RULES), this is a stylistic or background line, not a placeholder underscore. Therefore, the OCR result must ignore it and output nothing or only meaningful text. The provided OCR content is "____", which consists of four underscores. This is an incorrect interpretation of the line as a placeholder, violating the rule that stylistic lines must be ignored. The OCR has hallucinated underscores where none should exist based on the GT's visual context. Hence, the OCR result is inconsistent with the Ground Truth.
PRODUCT FEATURES
- Built-in or Free-standing installation with single, dual or three temperature zone, depending on your model.
- Continuously variable electronic temperature control with digital display and touchpad input.
- Temperature can be set from 5° to 22°C (40° to 72°F) for either compartment and can be displayed in either Fahrenheit or Celsius degree.
- Can be set to the long time storage maturing temperature or a specific serving temperature for red/white/sparkling wines.
- Cooling and Heating to maintain the perfect storaging and/or service condition.
- Dynamic compressor type cooling to ensure interior air circulation with even distribution of temperature and humidity.
- Soft white LED Interior Light with ON/OFF switch – Function mode and Showcase mode.
- Open-door and malfunction warning system.
- Sabbath mode will allow the lights to remain off during certain religious observances.
- Temperature memory function - If power is interrupted (power surge, breaker switch, etc.) and then powered up again, the unit will operate with the last temperature set-point.
• Automatic defrosting with defrost water evaporation. - Reversible tempered double/triple pane smoked glass door protects your wine from UV light and creates an attractive display with few condensation and low noise.
- Black coated matte steel outer frame and black plastic interior liner offer lifetime performance and stability. The black liner prevents excessive light from damaging the maturity process.
- Optional stainless steel-framed glass door with stainless steel handle.
- Optional roll-out and adjustable solid varnished beech shelves allow for maximum convenience and flexibility to accommodate various size bottles.
- Environmentally friendly refrigerant and foaming insulation gas.
- Optional security lock system with keys.
- Optional humidity control system (Humidity Box).
- Optional active charcoal air filter.
NOTE: Features and specifications are subject to change without notice.
INSTALLATION
BEFORE USING YOUR APPLIANCE
- Remove all exterior and interior packing. Clean the interior surface with lukewarm water using a soft cloth. The unit may have residual odors at first, they will disappear as the unit cools.
- Before connecting the appliance to the power source, let it stand upright for at least 24 hours. This will reduce the possibility of a malfunction in the cooling system caused by handling during transportation. During this time we recommend that you leave the door open to clear any residual odors.
- The door on this appliance can be opened from either the left or the right side. The unit is delivered with the door opening on the left side. Should you wish to open the door from the right, follow the instructions 'Reversing the door hinge'.
• Install the handle on the door if necessary.
INSTALLATION OF YOUR APPLIANCE
- The appliances are designed to be built-in or recessed or free standing installation.
- WARNING: Do not store or install the appliance outdoors. The unit is for indoor use only.
- WARNING: Do no install the appliance in the laundry. Avoid locating the unit in damp areas.
- Place your appliance on a floor that is strong enough to support it when it is fully loaded. To level your unit, adjust the front leveling leg at the bottom of the unit.
- For freestanding installation, 100mm of space between the back and sides of the unit are suggested, which allows the proper air circulation to cool the compressor and condenser for energy saving. Even for built-in installation, it is a must to keep 5mm space on each side and at the top to ensure proper service access and ventilation. Take care that the air vent at the front of the appliance must never be covered or blocked in any way.
- Locate the unit away from direct sunlight and sources of heat (stove, heater, radiator, etc.). Direct sunlight may affect the acrylic coating and heat sources may increase electrical
consumption. Extreme cold ambient temperatures may also cause the unit not to perform properly.
- Plug the unit into an exclusive, easily accessible plug socket. Any questions concerning power and/or earthing should be directed towards a qualified electrician or an authorized products service centre.
- The appliance must be installed to all electrical, plumbing, water and drain connections in accordance with state and local codes.
• IMPORTANT: HIGH HUMIDITY CLIMATE.
During periods of high humidity, some condensation may appear on outside surfaces of glass door. This condensation will disappear when humidity levels drop. For prevention, it is advisable to install the appliance with sufficient ventilation in a dry and/or an air-conditioned place.
NOTE: The appliance must be positioned so that the plug is accessible.
BUILT-UNDER INSTRUCTIONS
Make sure your installation does not block the front ventilation grille. The unit is designed to fit under worktops between 820 and 890mm in height, using the adjustable ventilation grille to ensure that the feet are concealed from front view. Remove the adjustable ventilation grille screws and slide it to the required height. Tighten the screws to lock the grille in position.
If the unit is fully integrated to be installed for fitting kitchen plinth, make sure that the ventilation gaps in the plinth are at least 300 square centimeters and remove the ventilation grilles, so that warm air can disperse unhindered. Otherwise the appliance has to work harder, resulting in an increase in electricity consumption.
NOTE: When pushing the appliance into the niche, make sure that the mains cable does not get trapped.
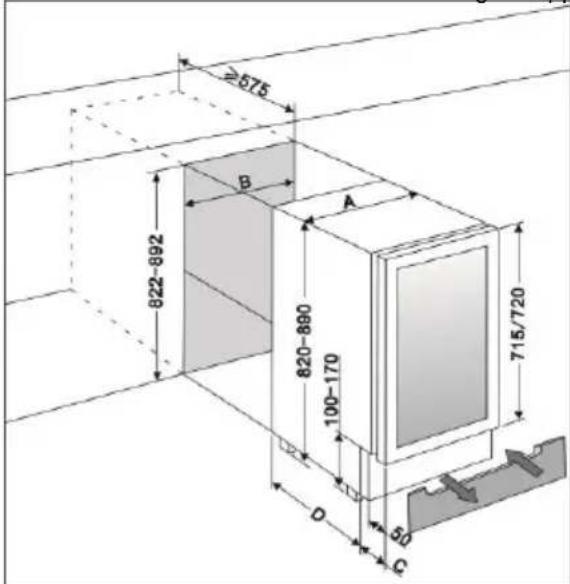
text_image
≥575 822-892 B A 820-890 100-170 D C 715/720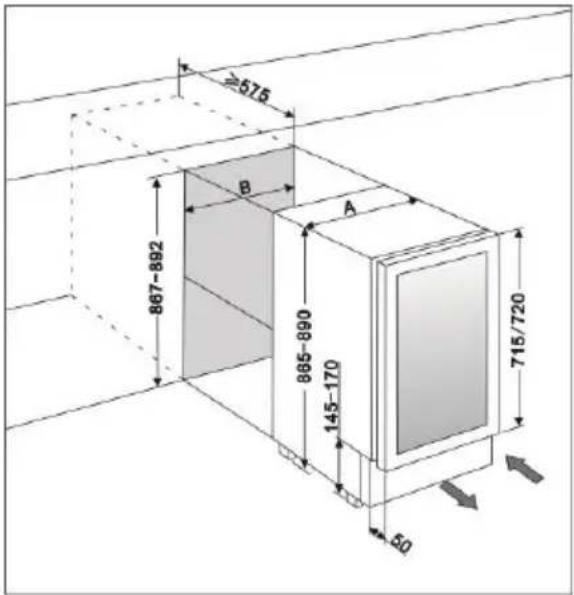
text_image
≥575 867-892 B A 865-890 145-170 715/720 50| A(mm) | B(mm) | C(mm) | D(mm) | |
| 15cmWide | 148 | 150 | 75 | 450 |
| 30cmWide | 295 | 300 | 110 | 460 |
| 60cmWide | 595 | 600 | 110 | 460 |
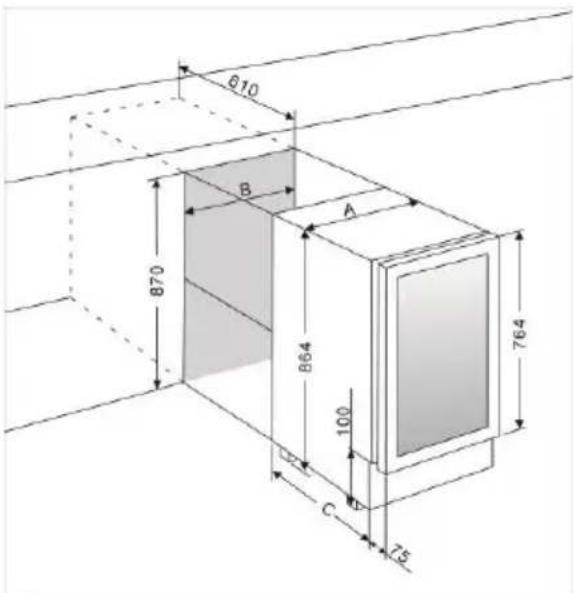
text_image
810 B A 870 864 100 C 75 764| A (mm) | B (mm) | C (mm) | |
| 37.5cmWide | 375 | 380 | 495 |
| 60cmWide | 595 | 610 | 520 |
FULLY INTERGRATED BUILT-IN-COLUMN INSTRUCTIONS
The unit door seals the installed unit almost completely, so an air vent must be provided in the base of the housing. Warmed air must be conducted via the ventilation shaft to the rear wall of the housing and then expelled upwards. The ventilation channels should measure at least 200 square centimeters in cross-section.
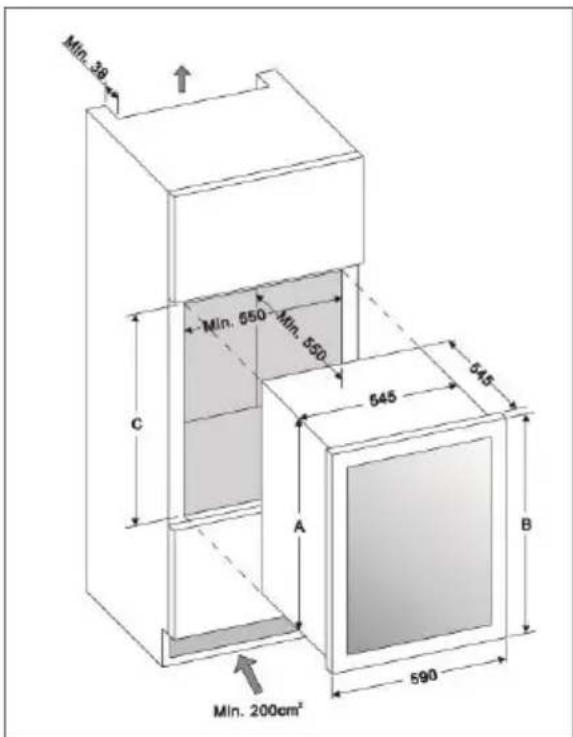
text_image
Min. 39 C Min. 550 Min. 550 545 A B 590 Min. 200cm²| A (mm) | B (mm) | C (mm) | |
| 45cm H | 444 | 455 | 450 |
| 60cm H | 584 | 595 | 590 |
| 88cm H | 874 | 885 | 874-880 |
| 122cm H | 1223 | 1234 | 1223-1230 |
| 177cm H | 1773 | 1784 | 1773-1780 |
Remark: The dimension A does not include the adjustable legs and the units are permitted to be installed without the adjustable legs.
WARNING: To ensure the proper functioning of the appliance, air vents should never be blocked or covered.
BUILT-IN CABINETRY INSTRUCTIONS
Make sure your installation does not block the front ventilation grille. And be sure the door will open and close properly in the chosen location.
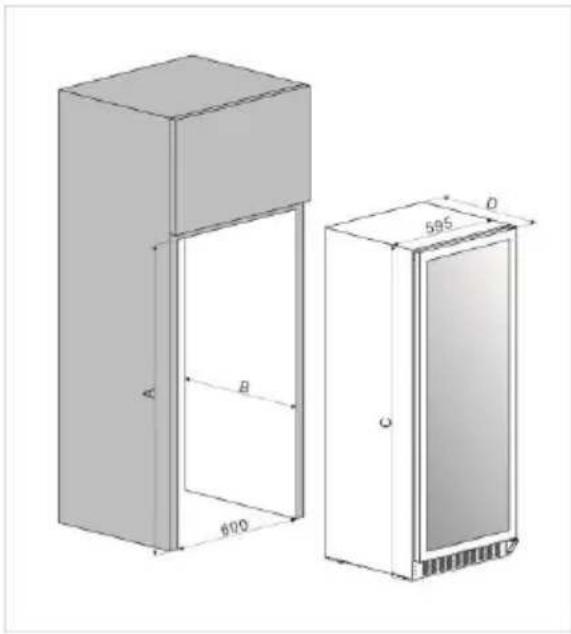
text_image
A B 690 C D 595| A (mm) | B (mm) | C (mm) | D (mm) | |
| 100 | 1480 | 550 | 1476 | 570 |
| 125 | 1772 | 550 | 1768 | 570 |
| 170 | 1772 | 660 | 1768 | 680 |
ELECTRICAL CONNECTION
WARNING: Improper use of the grounded plug can result in the risk of electrical shock. If the power cord is damaged, have it replaced by a qualified electrician or an authorized service center.
All electrical work should be carried out by a suitably qualified and competent person in accordance with local and national safety regulations.
Check that the voltage marked on the product corresponds with your supply voltage.
Connect this appliance to a separate at least 13A circuit.
Connection should be made via a suitable switched socket which is easily accessible. For extra safety it is advisable to install a residual current device (RCD) with a trip current of 30mA.
Have the receptacle and the circuit checked by a qualified electrician to ensure that the socket is grounded correctly.
Note: In locations where there is frequent lightning, it is advisable to use surge protectors.
Do not connect the appliance to the mains electricity supply by an extension lead. Extension leads do not
guarantee the required safety of the appliance (e.g. danger of overheating).
The appliance must not be connected to an inverter and must not be used with a plug adapter as these can cause damage to the appliance's electronic unit.
The cord must rest securely behind the appliance and not be allowed to lie or hang unprotected.
WARNING:
THIS APPLIANCE MUST BE EARTHED.
INSTALLING THE HANDLE
IMPORTANT: Do not overtighten the screws & do not use power tools to install the handle.
DESIGN 1 –
1 2 3
Locate the handle ○,1 over the fixing pins ○,3 of the door and using the supplied allen key, tighten the securing grub screws ○,2 to fix the handle.
DESIGN 2 –
1
2
3
4
5
- Remove the door gasket ○,1 on the side you wish to install the handle - you can see two designated holes for handle installation.
- Install the handle ○,4 tightly as shown above with two screws ○,3 and flat washers ○,2 provided.
- Replace the door gasket.
REVERSING THE DOOR HINGE
It is possible to reverse the door on this appliance, if required.
To do so, follow the steps below:
Note: All parts removed must be saved to do the reinstallation of door.
DESIGN 1 – For built-under models
- Remove the ventilation grille ○,2 and the adjustable ventilation grille ○,1 by unscrewing the screws ○,3 & ○,4. (Fig. 1) NOTE: For some models without adjustable ventilation grille, the step is not needed.
- Remove the bottom hinge ○,5 by unscrewing the four lock screws ○,6. Be careful to hold the glass door firmly after removing the screws. (Fig. 2)
- Gently pull down to remove the glass door from the right top hinge and place it on a padded surface to avoid the risk of damage. Then remove the right top hinge ○,9. (Fig. 4)
- Unscrew and transfer hinge pin ○,7 and/or door stopper ○,8 of the bottom hinge to the opposite side. (Fig. 3)
- Pop out the cover caps on the left side of cabinet and use them to cover the screw holes on the right hand side.
- Screw the alternative left top hinge ○,11, included in the fittings, on the left hand side of cabinet. (Fig. 4)
- Unscrew and transfer the holes cover ○,12 and lock catch ○,13 to the opposite side of glass door. (Only for models with lock on the ventilation grille) (Fig. 5)
- Rotate the door 180° (No need for models with
lock on the door) and relocate the door to the designated position. Then screw the bottom hinge assembly on the left designated position and tighten it after the door is leveled.
- Transfer the handles & plugs to the opposite positions and then reassembly the ventilation grilles if need.
DESIGN 2 – For fully integrated models
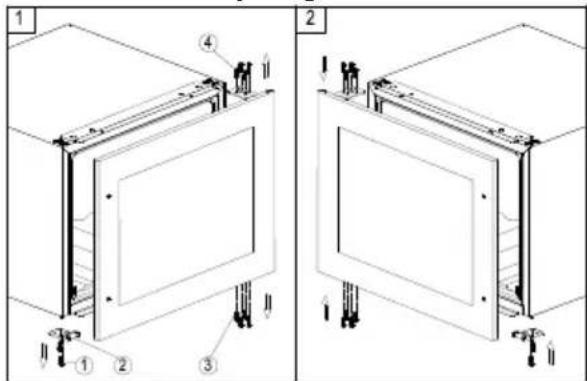
text_image
Technical diagram showing two views of a door frame assembly with numbered components and mounting hardware.- Remove the glass door by unscrewing the eight lock screws ○,3 and ○,4. Be careful to hold the glass door firmly after removing the screws and place it on a padded surface to avoid the risk of damage.
- Unscrew and transfer the door supporter ○,2 to the opposite side.
- Rotate the glass door 180° and refit the glass door to the opposite side. Then screw and tighten it after the door is leveled.
DESIGN 3 – For tall models
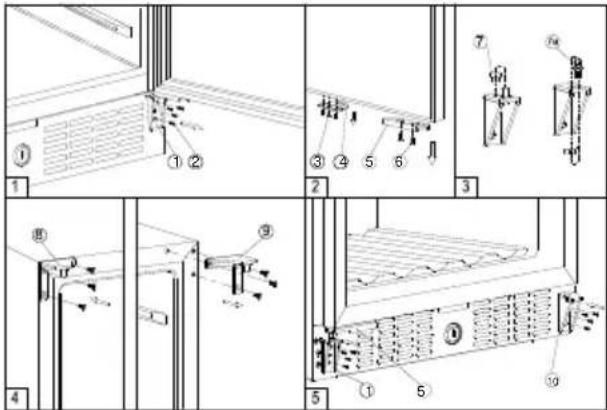
text_image
Technical diagram showing labeled components of a wall-mounted air conditioner unit with numbered parts and assembly instructions.- Remove the bottom hinge ○,1 by unscrewing the four lock screws ○,2. Be careful to hold the glass door firmly after removing the screws. (Fig. 1)
-
Gently pull down to remove the glass door from the right top hinge and place it on a padded surface to avoid the risk of damage. Then remove the right top hinge ○,9. (Fig. 4)
-
Pop out the cover caps on the left side of cabinet and use them to cover the screw holes on the right hand side.
- Screw the alternative left top hinge ○,8, included in the fittings, on the left hand side of cabinet. (Fig. 4)
- Unscrew and transfer door supporter ○,10 to the opposite side. At the same time remove the stopper pin ○,7 of bottom hinge to the opposite designated position or unscrew and transfer the hinge pin ○,7a of bottom hinge to the opposite designated position. (Fig. 5 & 3)
- Unscrew and transfer the door adapter ○,5 and lock catch ○,4 to the top designated position of glass door. (Fig. 2)
- Rotate the door 180^ and relocate the glass door to the designated position. Then screw the bottom hinge on the left designated position and tighten it. (Fig. 5)
- Recheck and adjust the door alignment by loosening the screws ○,6and moving the door adapter ○,5. Tighten the screws ○,6 after the door is levelled. (Fig. 5)
DESIGN 4 – For double door models
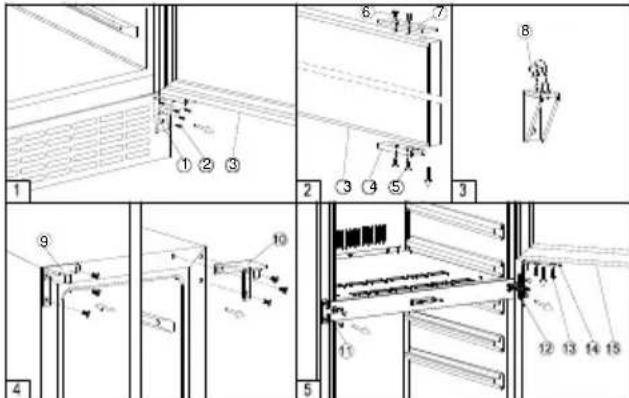
text_image
Technical diagram showing structural components and assembly steps with numbered labels and annotations- Remove the bottom hinge ○,1 by unscrewing the four screws ○,2. Be careful to hold the lower glass door ○,3 firmly after removing the screws. And then gently pull down to remove the lower glass door from the middle hinge and place it on a padded surface to avoid the risk of damage. (Fig. 1)
- Unscrew and transfer the door adapter , 4 and , 7 to the designated opposite position of lower glass door. (Fig. 2)
- Remove the door adapter ○,14 by unscrewing the two lock screws ○,13. Be careful to hold the upper glass door firmly after removing the
screws. And then gently pull down to remove the upper glass door ○,15 from the top hinge and place it on a padded surface to avoid the risk of damage. Then remove the right top hinge ○,10. (Fig. 5 & 4)
- Unscrew and transfer the middle hinge ○,12 and the middle fixing plate ○,11 to the opposite position. (Fig. 5)
- Pop out the cover caps on the left side of cabinet and use them to cover the screw holes on the right hand side.
- Screw the alternative left top hinge ○,9, included in the fittings, on the left hand side of cabinet. (Fig. 4)
- Relocate the door adapter ○,14 on the middle hinge.
- Set the upper glass door to the designated position and install the two lock screws to connect the door adapter ○,14 with the upper glass door and tighten them before the door is leveled.
- Set the lower glass door to the designated position and reassemble the bottom hinge.
- Recheck and adjust the lower door alignment by loosening the screws ○,5 & ○,6 and moving the door adapter○,4&○,7. Tighten the screws ○,5 & ○,6 after the door is levelled. (Fig. 5)
- Transfer the handles and plugs to the opposite positions.
OPERATING YOUR APPLIANCE
This appliance is designed for operation at certain ambient temperatures. The climate class is specified on the rating plate.
The appliance may not work properly if it is left for a long period at a temperature outside the specified range. For example, placing your unit in extreme cold or hot conditions may cause interior temperatures to fluctuate. The range between 5°C and 22°C (41°F and 72°F) may not be reached.
| Climate class | Ambient room temperatures |
| SN | +10°C to +32°C |
| N | +16°C to +32°C |
| ST | +16°C to +38°C |
| T | +16°C to +43°C |
NOTE: Units with no heater will not raise its internal temperature if the ambient temperature where the unit is located is lower than the set temperature.
NOTE:
- When you use the appliance for the first time or restart the appliance after having been shut off for a long time, there could be a few degrees variance between the temperature you select and the one indicated on the LED readout. This is normal and it is due to the length of the activation time. Once the unit is running for a few hours everything will be back to normal.
- If the unit is unplugged, power lost, or turned off, you must wait 3 to 5 minutes before restarting the unit. If you attempt to restart before this time delay, the unit will not start.
USE AND CONTROL – SINGLE ZONE
The Controls of Your Unit
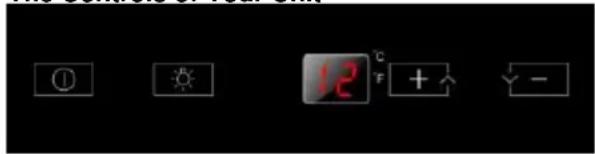
text_image
Camera control panel interface with display, settings, and adjustment iconsPOWER
To turn the appliance on/off, press and hold the key for 5 seconds until the temperature display lights up or goes out.
NOTE: Pressing the key once can switch off the audible alarm when the alarm is on.
LIGHT
Used to turn the inner light on/off.
UP +^
Used to increase (warm) the set temperature by 1^ C/ 1^ F.
DOWN - ∨
Used to decrease (cool) the set temperature by 1^ C/ 1^ F.
Display
Display the digital temperature and service indicators.
Indicator Light
The indicator light is located at the right lower corner of the display. The indicator light will be on when the multi-key function is selected. To perform the multi-key function, press and hold the first key, then press the rest key for at least 5 seconds and then release all the keys.
°F/°C Selector
Select the temperature display setting in Fahrenheit or Celsius degree. To change the temperature from Fahrenheit to Celsius or from Celsius to Fahrenheit, press and hold the LIGHT key for 5 seconds.
Key Lock (Only for models with outside controls)
If in 2 minutes or longer without pressing any key, the key lock will be activated automatically. To remove the lock, press the UP and DOWN keys at the same time for at least 5 seconds and the indicator light will flash three times to confirm the action.
Setting the Temperature Control
- The unit has single temperature zone. The temperature can be set between 5°C and 22°C (41°F and 72°F) which is ideal for storing red, white or sparkling wine.
- When the unit is plugged in for the first time, the unit will power up automatically to the preset defaults. The temperature preset at the factory is 12°C (54°F).
- You can set the temperature as required by pressing the UP or DOWN key. When you press the two keys at the first time, the display will show the last temperature set previously. The temperature will increase 1°C/1°F if you press the UP key once, or the temperature will decrease 1°C/1°F if you press the DOWN key once. The display flashes while you make the setting.
- After the temperature has been set, the display shows the current inner temperature.
- To view the set temperature at any time, press the UP or DOWN key, the set temperature will temporarily flash in the display for 5 seconds.
Then the display shows the current inner temperature again.
USE AND CONTROL – DUAL ZONE
The Controls of Your Unit
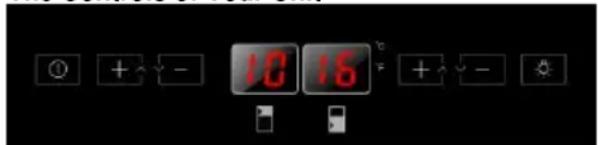
text_image
10 16 + - + - -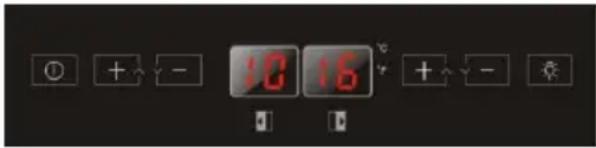
text_image
10 16 + - + -POWER
To turn the appliance on/off, press and hold the key for 5 seconds until temperature display lights up or goes out.
NOTE: Pressing the key once can switch off the audible alarm when the alarm is on.
UP +^
To increase (warm) the set temperature by 1^ C or 1^ F.
DOWN — √
To decrease (cool) the set temperature by 1^ C or 1^ F.
LIGHT
Used to turn the inner light on/off.
Display
Display the digital temperature and service indicators.
☐ is for UPPER temperature zone and is for LOWER temperature zone.
is for LEFT temperature zone and is for RIGHT temperature zone.
Indicator Light
The indicator light is located at the right lower corner of the display. The indicator light will be on when the multi-key function is selected. To perform the multi-key function, press and hold the first key, then press the rest key for at least 5 seconds and then release all the keys.
°F/°C Selector
Select the temperature display setting in Fahrenheit or Celsius degree. To change the temperature from Fahrenheit to Celsius or from Celsius to Fahrenheit, press and hold the LIGHT key for 5 seconds.
Key Lock (Only for models with outside controls)
If in 2 minutes or longer without touching any key, the key lock will be activated automatically. To remove the lock, press the UP and DOWN keys at the same time for at least 5 seconds and the indicator light will flash three times to confirm the action.
Setting the Temperature Control
- The unit has two separate temperature zones. The temperature of both zones can be set between 5°C and 22°C (41°F and 72°F). The LOWER/RIGHT temperature zone is ideal for storing white and red wine at a setting of 13°C to 22°C (55°F to 72°F). The UPPER/LEFT temperature zone is suitable for storing champagne and white wine at a setting of 5°C to 13°C (41°F to 55°F).
- When the unit is plugged in for the first time, the unit will power up automatically to the preset defaults. The preset temperature at the factory for UPPER/LEFT temperature zone is 10°C (50°F) and for LOWER/RIGHT temperature zone is 16°C (60°F).
- You can press the left side UP and DOWN keys to control the internal temperature of the UPPER/LEFT temperature zone and press the right side UP and DOWN keys to control the internal temperature of the LOWER/RIGHT temperature zone. When you press the two keys at the first time, the display will show the last temperature set previously.
- IMPORTANT: The temperature set for the LOWER temperature zone must always be just as high or higher than that in the UPPER temperature zone. For optimal performance, the set temperature of the two zones should differ by at least 4°C.
- The temperature that you desire to set will increase 1°C or 1°F if you press the UP mark once, on the contrary the temperature will decrease 1°C or 1°F if you press the DOWN mark once. The display flashes while you make the setting.
- After the temperature has been set, the display shows the current inner temperature of the particular temperature zone.
- To view the set temperature at any time, press the UP or DOWN key, the set temperature will temporarily flash in the display for 5 seconds. Then the display shows the current inner temperature again.
USE AND CONTROL – THREE ZONE
The Controls of Your Unit Upper Control Unit
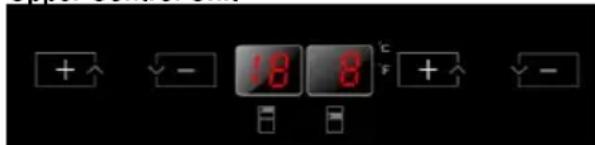
text_image
+ - 18 8 °C + -Lower Control Unit
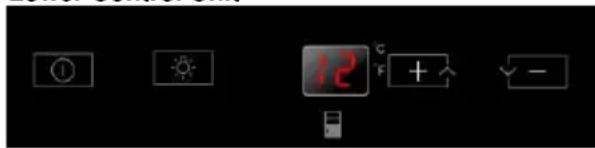
text_image
12 °C + -POWER
To turn the appliance on/off, press and hold the Ⓞ key for 5 seconds until temperature display lights up or goes out.
NOTE: Pressing the ☐key once can switch off the audible alarm when the alarm is on.
LIGHT
Used to turn the inner light on/off.
UP +^
Used to increase (warm) the set temperature by 1^ C or 1^ F.
DOWN — √
Used to decrease (cool) the set temperature by 1^ C or 1^ F.
Display
Display the digital temperature and service indicators. ☐ is for UPPER temperature zone, ☐ is for MIDDLE temperature zone and ☐ for LOWER temperature zone.
Indicator Light
The indicator light is located at the right lower corner of the display. The indicator light will be on when the multi-key function is selected. To perform the multi-key function, press and hold the first key, then press the rest key for at least 5 seconds and then release all the keys.
°F/°C Selector
Select the temperature display setting in Fahrenheit or Celsius degree. To change the temperature from Fahrenheit to Celsius or from Celsius to Fahrenheit, press and hold the LIGHT key for 5 seconds.
Setting the Temperature Control
- The unit has three temperature zones. The temperature of all zones can be set separately.
- The temperature settings of UPPER temperature zone are adjustable with the range
11°-22°C (52°-72°F). The preset temperature at the factory is 18°C (65°F).
- The temperature settings of MIDDLE temperature zone are adjustable with the range 5°-11°C (41°-52°F). The preset temperature at the factory is 8°C (46°F).
- The temperature settings of LOWER temperature zone are adjustable with the range 11°-13°C (52°-56°F). The preset temperature at the factory is 12°C (54°F).
- Temperature control for UPPER and MIDDLE temperature zones is at upper control unit. Temperature control for LOWER temperature zone is at lower control unit.
- When you press the two keys at the first time, the display will show the last temperature set previously. The temperature will increase 1°C or 1°F if you press the UP key once, on the contrary the temperature will decrease 1°C or 1°F if you press the DOWN key once. The display flashes while you make the setting.
- After the temperature has been set, the display shows the current inner temperature of the particular temperature zone.
- To view the set temperature at any time, press the UP or DOWN key, the set temperature will temporarily flash in the display for 5 seconds. Then the display shows the current inner temperature again.
TEMPERATURE DISPLAY
During normal operation, the temperature display on the control panel shows the temperature inside the appliance. The temperature display will flash if
- A different temperature is being set,
- The temperature in the zone deviates by more than 5^ C from the set temperature.
The temperature display flashing ensures that the temperature can not rise or fall un-noticed and impair the wine.
TEMPERATURE MEMORY FUNCTION
In the event of a power interruption (power surge, breaker switch, etc.), the unit remembers the previous temperature settings. When the power is recovered, the cabinet temperature will go back the same setting temperature as before the power interruption.
TEMPERATURE ALARM
An alarm will sound if the temperature in one of the zones rises or falls outside the temperature range.
The relevant temperature display will flash at the same time.
The temperature the appliance is set at determines the temperature the appliance recognises as being too warm or too cool.
The alarm will sound and the temperature display will flash:
- When you switch the appliance on, if the temperature inside the appliance is very different from the temperature set.
- When there has been a lengthy interruption to the power supply.
- When too many items have been put into the unit at one time.
- When the door is not closed tightly.
DOOR ALARM
If the door has been left open for more than 60 seconds, the alarm will sound.
Once the set temperature has been reached in the appliance, the alarm stops and the relevant temperature display stops flashing. However, if the noise disturbs you, you can switch the alarm off before this if you wish by pressing the POWER key once. The alarm will stop. The relevant temperature display continues to flash until the set temperature has been reached. The display then lights up constantly, and the alarm system is fully active again.
INTERIOR LIGHT
The interior light makes it easy to view your wine labels and enhances the display of your collection. Touching the LIGHT mark toggles between 2 modes of operation for the internal lights: functional (default) mode and showcase mode. If you are in functional (default) mode, the lights will turn on only when the door is open. If you are in showcase mode, the lights will be on whether or not the door is open.
The unit is equipped with a LED light fitting system. To change the LED light fitting pls contact the service department.
NOTE: Please use only the original LED light fittings provided by the manufacturer.
BOTTLE RACKS AND STORAGE
WARNING: Do not pull out more than one loaded shelf at a time as this may cause the unit to tilt forward.
WARNING: Do not try to slide the shelves outwards beyond the fixed position to prevent the bottles from falling.
WARNING: To prevent damaging the door gasket, make sure the door is fully open when pulling shelves out of the compartment.
All the wine racks slide out for easy access, except for the bottom shelf. For easy access to the bottles stored, pull the rack out gently until it stops. The shelves are designed with an emergency stop to prevent them being removed too far when loaded.
Many bottles may differ in size and dimensions. As such the actual number of bottles you may be able to store may vary.
Bottle capacities are approximate maximums when storing traditional Bordeaux 750 ML bottles and include bulk storage.
You may load your wine bottles in single row or by stacking while taking note of the following - if you do not have enough bottles to fill your wine cellar, it is better to distribute the load throughout the wine cellar so as to avoid “all on top” or “all below” type loads.
- Do remove or relocate adjustable wooden racks to accommodate larger type of bottles or increase the capacity of the cellar by stacking the bottles up when necessary. (See removing shelves)
- Keep small gaps between the walls and the bottles to allow air circulation. Like an underground cellar air circulation is important to prevent mould and promote a better homogeneous temperature.
- Do not over load your wine cellar to facilitate air circulation.
- Lay the bottles flat.
- Avoid obstructing the internal fans (located inside on the back panel of the unit).
- Do not cross contaminate. Store only wine in your unit to ensure that the environment is odor free.
- Only store wine in unopened bottles. Storing opened bottles may result in spillage.
DYNAMIC CLIMATE / SILENT MODE
This Dynamic Climate mode enables the relative humidity inside the unit and the temperature to be distributed evenly around the interior so you can store all your wine under exactly the same excellent conditions. If you would like to use the unit to store wine long term, the dynamic climate mode is a must. This will create a continuous climate in the cabinet which imitates that of a wine cellar.
In the Dynamic Climate mode, the interior fan circulates the inside air evenly even the set temperature is reached. Dynamic Climate mode is NOT the factory preset mode because of creating noises and more energy consumption. To change to Dynamic Climate mode, touch and hold the DOWN key for approximately five seconds. The wine cellar will beep five times to confirm Dynamic Climate mode is on. To change back to default (Silent) mode (Also named as energy saving mode), touch and hold the UP key for approximately five seconds. The wine cellar will beep three times to confirm
default (Silent) mode is on.
SABBATH MODE
Sabbath mode is available for the observance of certain religious holidays. This mode turns off the displays, interior light and audible alarms and prevents them from turning on again. Normal cooling operations will still take place.
To initiate Sabbath mode, press the POWER and LIGHT keys at the same time for at least 5 seconds. The indicator light will flash four times and confirm the Sabbath mode is ON.
Sabbath mode can be exited by repeating the above process. The Sabbath Mode will automatically exit after 96 hours.
ECO DEMO MODE
Eco Demo mode can be activated by presenting the appliance at exhibitions or in salesrooms. In Eco Demo mode, the compressor and all fan motors are switched OFF.
By pressing and holding the "UP"&"DOWN" (The controls of lower zone for dual zone & three zone models) and "LIGHT" keys at the same time for at least 5 seconds, the indicator light will flash five times to confirm the input and the unit will operate in Eco Demo mode. Eco Demo mode can be exited by repeating the above process.
OPERATING NOISES
The unit is cooled by a compressor (refrigeration aggregate). The compressor pumps coolant through the cooling system, producing operating noise. Even when the compressor cuts out, noises caused by changes in temperature and pressure are unavoidable. Operating noise will be most audible immediately after the compressor cuts in. It becomes quieter as the operating period continues.
The following noises are normal and occur from time to time:
- Gurgling sound, caused by the refrigerant flowing through the appliance's coils,
- Humming noise made by the motor compressor. This noise can get louder for brief periods when the motor is switching on.
- Cracking/popping sounds, resulting from the materials contraction and expansion due to temperature variations,
- Fan operating sound, to circulate the air within the wine cabinet.
Unusual noise is normally the result of improper installation. Under no circumstances must tubing come into contact with a wall, other furniture or with other tubing.
Where the unit is installed in open-plan kitchen or in
partition walls, the level of operating noise will be heard more acutely. However, this is due to the surrounding architecture and not to the unit.
An individual's perception of noise is directly linked to the environment in which the unit is located, as well the specific type of models. Our appliances are in line with international standards for such appliance and in line with the latest technical developments. But please remember that the noise of the compressor and the coolant circulating in the system is unavoidable.
DEFROSTING / HYGROMETRY / VENTILATION
Your unit is designed with an automatic defrost system. During the "Off-cycle" the evaporator behind the rear wall of the unit defrosts automatically. The condensate collects in the drain trough behind the rear wall of the unit, and part of it flows through the drainage hole into the drip tray by/above the compressor. The heat is transferred from the discharge pipe or compressor and evaporates any condensation that has collected in the tray. Part of the remaining water is collected within the unit for humidity purposes.
This system enables the creation of the correct humidity level inside your unit required by the natural cork to maintain a long lasting seal.
The appliance is not totally sealed: fresh air admission is permitted through the drainpipe. Air is circulated through the unit by means of a fan / fans and the hollow shelves.
NOTE: Frost may be accumulated on the evaporator if the unit is repeatedly opened in a high heat or high humidity location. If this frost pattern does not clear within 24 hours, your unit will require manual defrosting.
WINE SERVING TEMPERATURE CHART
All wines mature at the same temperature, which is a constant temperature set between 11^ C to 14^ C. The below chart is an indicative temperature chart to indicate the best temperature for drinking purposes.
| Wine Style | °C | °F |
| Champagne NV, Sparkling, Spumante | 6 | 43 |
| Dry White Semillon, Sauvignon Blanc | 8 | 46 |
| Champagne Vintage | 10 | 50 |
| Dry White Chardonnay | 10 | 50 |
| Dry White Gewürztraminer, Riesling, Pinot grigio | 10 | 50 |
| Sweet White Sauternes, Barsac, Montbazillac, Ice Wine, Late Harvest | 10 | 50 |
| Beaujolais | 13 | 55 |
| Sweet White Vintage:Sauternes... | 14 | 57 |
| White Vintage Chardonnay | 14 | 57 |
| Red Pinot Noir | 16 | 61 |
| Red Grenache, Syrah | 16 | 61 |
| Red Vintage Pinot Noir | 18 | 65 |
| Cabernet & Merlot: French,Australian, New Zealand,Chilean, Italian, Spanish,Californian, Argentinean... | 20 | 68 |
| Vintage Bordeaux ... | Room temperature not exceeding 20°C/68°F | |
IMPORTANT INFORMATION ABOUT TEMPERATURE
Your unit has been designed to guarantee optimum conditions for storing and/or serving your wines.
Fine wines require long and gentle developments and need specific conditions in which to reach their full potential.
All wines mature at the same temperature, which is a constant temperature set between 11°C to 14°C. Only the temperature of “dégustation” (wine appreciation) varies according to the type of wines (see “Wine Serving Temperature Chart” above). This being said and as it is for natural cellars used by wine producers for long period of storage, it is not the exact temperature that is important, but its consistency. In other words, as long as the temperature of your wine cellar is constant (between 11°C to 14°C) your wines will be stored in perfect conditions.
Not all wines will improve over the years. Some should be consumed at an early stage (2 to 3 years) while others have tremendous ageing capability (50 and over). All wines have a peak in maturity. Do check with your wine merchant to get the relevant information.
CARE AND MAINTENANCE
WARNING: Failure to unplug the appliance during service and cleaning could result in electrical shock or other personal injury.
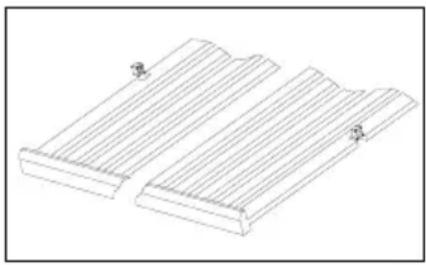
REMOVING SHELVES
To remove any of the shelves from the rail compartment, move the shelf to the position where the notch of wooden shelf is exactly under the plastic post and then lift it up and out.
In order to replace the shelf, repeat steps described above in reverse. And make sure to engage the shelves with the small pegs of the extended rails when the model is equipped with roller system.
natural_image
Isometric line drawing of two rectangular slatted panels with side markers (no text or symbols)HUMIDITY CONTROL
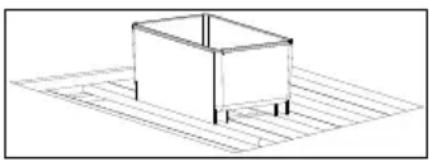
The appliance is equipped with a system for maintaining the correct level of humidity. Under extremely dry environmental conditions, you may have to add some water into the humidity box provided with your wine cellar.
Fill the small plastic reservoir (humidity box) 34 full with water, and fit onto the runners found on the top shelf of the appliance. Check the water level regularly and refill as necessary.
Please ensure the reservoir is positioned correctly on the runners on the top shelf to avoid the possibility of water spillage.
natural_image
3D wireframe diagram of a rectangular box placed on a grid base (no text or symbols)ACTIVE CHARCOAL AIR FILTER
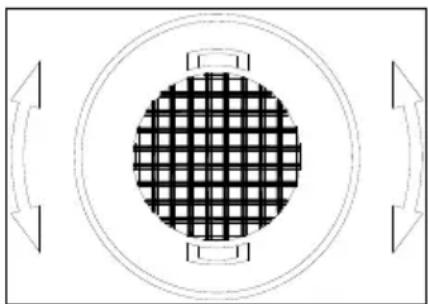
The active charcoal air filter is located in the back of compartment. Replace it with a new one once a year. It can be purchased from your dealer or from the Spare Parts Department.
- Remove the shelf in front of the filter.
- Grip the filter and turn it 90°clockwise or anticlockwise to remove.
- Insert the new filter in the vertical position and
turn it 90° clockwise or anti-clockwise until it clicks into position.
natural_image
Circular diagram with a grid pattern inside, flanked by two curved arrows (no text or symbols)DOOR LOCK
If the unit is provided with a lock system, the keys are located inside the plastic bag that contains the Owner's Manual. Insert the key into the lock, push in and turn it counterclockwise to unlock the door. To lock the door do the reverse operation making sure metal pin is engaged completely. Remove the key and place it in a secure place for safekeeping.
CLEANING YOUR APPLIANCE
Turn off the power, unplug the appliance, and remove all items including shelves and rack.
Wash the inside surfaces with a warm water and baking soda solution. The solution should be about 2 tablespoons of baking soda to a pint of water.
Wash the shelves with a mild detergent solution.
Wring excess water out of the sponge or cloth when cleaning any area of the controls.
Wash the outside cabinet with warm water and mild liquid detergent. Rinse well and wipe dry with a clean soft cloth.
Do not clean the stainless steel with steel wool pads. Suggest to using an all-in-one stainless steel cleaner to clean the stainless steel and always clean in the direction of grain.
POWER FAILURE
In the event of a power interruption, all previous temperature settings are automatically memorized. If power is interrupted (power surge, breaker switch, etc.) and then powered up again, the unit will operate with the last temperature set-point.
Most power failures are corrected within a few hours and should not affect the temperature of your appliance if you minimize the number of times the door is opened. If the power is going to be off for a longer period of time, you need to take the proper steps to protect your contents.
NOTE: Irrespective of the cause, if you notice either abnormal temperature or humidity levels inside your unit, be reassured that only long and frequent exposure to these abnormal conditions can cause a detrimental effect on your wines.
VACATION TIME
Short holidays: Leave the unit in operation for holidays of less than three weeks.
Long absences: If the appliance will not be used for several months, remove all items, turn off the appliance and unplug. Clean and dry the interior thoroughly. To prevent odour and mold growth, leave the door open slightly: blocking it open if necessary.
MOVING YOUR APPLIANCE
Unplug the power plug from the electrical outlet.
Remove the contents from the racks and all moving parts from inside.
Raise the adjustable legs up to the base to avoid damage.
Tape the door shut and lock it if with a lock system.
Transport the wine cellar only in the upright position. Also protect the outside of the appliance with a blanket or similar item.
ENERGY SAVING TIPS
Should the unit be left empty for long periods of time, it is suggested that the appliance is unplugged, and after careful cleaning, leave the door ajar to allow air to circulate inside the cabinet in order to avoid possible condensation, mold or odors forming.
The appliance should be installed in the coolest area of the room, away from heat producing appliances, and out of the direct sunlight.
Ensure that the unit is adequately ventilated. Never cover air vents. Clean dust and dirt from the condenser at regular intervals.
Only open the door for as long as necessary and for as short a time as possible.
Store the content in an organised way.
Do not over-fill the appliance to allow air to circulate.
PROBLEMS WITH YOUR APPLIANCE
You can solve many common problems easily, saving you the cost of a possible service call. Try the suggestions below to see if you can solve the problem before calling customer service.
TROUBLESHOOTING GUIDE
| PROBLEM | POSSIBLE CAUSE | REMEDY |
| Appliance does not operate. | ·Appliance is not connected to a power supply.·The appliance is turned off.·The circuit breaker tripped or a blown fuse. | ·Connect the appliance.·Switch on the appliance.·Switch on circuit breaker or replace fuse. |
| Appliance is not cold enough. | ·The temperature is not set correctly.·The ambient temperature could require a higher temperature setting.·The door was opened too often.·The door was not closed completely.·Door is not hermetically-sealed.·The condenser is too dirty.·The ventilation opening is blocked or too dusty. | ·Check the set temperature.·Set a higher temperature.·Do not open the door more often than necessary.·Close door properly.·Check the door seal and clean or replace.·Clean the condenser when necessary.·Clear the obstructions and clean the dust. |
| Appliance turns itself on and off frequently. | ·The room temperature is higher than average.·A large amount of bottles has been added to the unit.·The door is open too often.·The door is not closed completely.·The door gasket does not seal properly. | ·Put the appliance in a cooler place.·Leave the appliance to work for a while until the set temperature has been reached.·Do not open the door more often than necessary.·Close door properly.·Check the door seal and clean or replace. |
| The light does not work. | ·Appliance is not connected to a power supply.·The circuit breaker tripped or a blown fuse.·The light was switched off on the control panel. | ·Connect the appliance.·Switch on circuit breaker or replace fuse.·Switch on the light. |
| Vibrations. | ·The appliance is not properly level. | ·Level the appliance with the adjustable feet. |
| The appliance seems to make too much noise. | The rattling noise may come from the flow of the refrigerant, which is normal. As each cycle ends, you may hear gurgling sounds caused by the flow of refrigerant in your appliance.If temperature fluctuations occur, the contraction and expansion of the inner walls may cause popping and cracking noises. | |
| ·The appliance is not properly level. | ·Level the appliance with the adjustable feet. | |
| The door will not close properly. | ·The appliance is not properly level.·The door was reversed and not properly installed.·The gasket is dirty.·The shelves are out of position. | ·Level the appliance with the adjustable feet.·Check the door hinge and reassemble correctly.·Clean the door gasket.·Check the shelves and refit correctly. |
| Display “E0”, “E1”.“E2”, “E3”, “E4”,“E5”, “E6” or “E7”. | ·“E0” indicates the communication error for 3 zone models.·“E1” or “E2” indicates that the air temperature sensor is failed.·“E3” or “E4” indicates that the defrost | ·Call for service. |
| sensor in the evaporator is failed.“E5” indicates the defrost heater failure.“E6” indicates the solenoid valve failure.“E7” indicates the door switch failure. | ||
| The alarm sounds and the temperature display flashes. | Has the appliance door been open for longer than 60 seconds? If not, then the temperature has risen higher or fallen lower than the temperature that has been set. This could be due to:The appliance door being opened too often.The ventilation opening being covered or too dusty.A lengthy interruption to the power supply.A large amount of bottles has been added to the unit. | If yes, close the door.Do not open the door more often than necessary.Clear the obstructions and clean the dust.Leave the appliance to work for a while until the set temperature has been reached. |
| The icon “--” is lit up and flashing in the temperature display. | The display temperature is out of the range. | Only temperatures within the range 0~99°F/-9~37°C the appliance can display will be shown. If the temperature is not within this range, the icon “--” will be displayed instead. That is normal. |
WARRANTY
The statutory warranty period applies. If the product is defective, please contact your local distributor.
In case you need any services, please include the following documents when you send in the device:
- A copy of the receipt with purchasing date.
- A reason for the claim or description of the fault.
The warranty does not cover:
- Damage in transit or when moving the appliance.
- Any damages caused from negligence, accident, improper use, improper installation/service or use for purposes other than those described in the instruction manual.
- Damage caused by connecting your product to the wrong power source.
- Damage from power failure.
- Faulty installation or modification made during installation.
- Damage caused by unauthorized repair.
- Any damages resulting from force majeure, fire disaster or natural disaster.
- Alterations to the product without express permission from the manufacturer.
- Parts such as light, removable shelves, or plastic.
- Any spoilage or damage to wines or any other contents incidental or consequential to possible defects of the unit.
NOTE: The warranty clauses and specifications are subject to change without notice.