KW55293 - Router Kasda - Free user manual and instructions
Find the device manual for free KW55293 Kasda in PDF.


User questions about KW55293 Kasda
0 question about this device. Answer the ones you know or ask your own.
Ask a new question about this device
Download the instructions for your Router in PDF format for free! Find your manual KW55293 - Kasda and take your electronic device back in hand. On this page are published all the documents necessary for the use of your device. KW55293 by Kasda.
USER MANUAL KW55293 Kasda
KW55293 Wireless Router User Manual
NOTICE
This document contains proprietary information protected by copyright, and this Manual and all the accompanying hardware, software, and documentation are copyrighted. All rights are reserved. No part of this document may be photocopied or reproduced by mechanical, electronic, or other means in any form.
The manufacturer does not warrant that the hardware will work properly in all environments and applications, and makes no warranty or representation, either expressed or implied, with respect to the quality, performance, merchantability, or fitness for a particular purpose of the software or documentation. The manufacturer reserves the right to make changes to the hardware, software, and documentation without obligation to notify any person or organization of the revision or change.
All brand and product names are the trademarks of their respective owners.
© Copyright 2014
All rights reserved.
Content
1.1 MAIN FEATURES....2
1.1.1 Wireless 2
1.1.2 Network Protocol and Features....2
1.1.3 Firewall 2
1.1.4 Management Support .... 3
1.1.5 Operang System Support....3
1.1.6 Environmental 3
1.2 PACKET CONTENTS.... 3
1.3 SYSTEM REQUIREMENTS.... 3
1.4 FACTORY DEFAULTS 4
1.5 WARNINGS AND CAUTIONS......4
2 HARDWARE DESCRIPTION....5
3 HARDWARE INSTALLATION....7
4 LOCAL PC CONFIGURATION IN WINDOWS 95, 98, ME, XP,7....8
5 CONFIGURING THE ROUTER....9
5.1 WEB-BASED MANAGEMENT GUIDE ...... 9
5.1.1 Login....9
5.1.2 Network (WANSengs) 12
5.1.3 DHCP 12
5.1.4 Stac IP 13
5.1.5 PPPOE 14
5.1.6 LAN Sengs....15
5.2 WIRELESS SETTINGS.... 16
5.2.1 Basic Wireless Sengs....16
5.2.3 MBSSID....18
5.2.3 WPS 18
5.2.4 Wireless Advanced....19
5.3 DHCP SETTINGS.... 20
5.4 FACTORY DEFAULT....21
APPENDIX: FREQUENT ASKED QUESTIONS ......22
Introduction
Thank you for choosing our product. The KW55293 Wireless Router uses REALTEK's CPE solution that fully complies with IEEE802.11b/g/n standards. It will provide your SOHO with convenient Internet.
1.1 Main Features
1.1.1 Wireless
● Fully IEEE 802.11b & IEEE 802.11g&IEEE 802.11n compatible.
● Wireless data rate up to 300 Mbps
- Operating in the unlicensed 2.4 GHz ISM band
● Supports 64/128 bits WEP, WPA, WPA2, WPA/WPA2-PSK, 802.1x
1.1.2 Network Protocol and Features
- Ethernet to ADSL Self-Learning Transparent Bridging
- Internet Control Message Protocol (ICMP)
- IP Static Routing
● Routing Information Protocol (RIP, RIPv2)
● Network Address Translation (NAT)
● Virtual Server, Port Forwarding
● Dynamic Host Configuration Protocol (DHCP) - DDNS
● Simple Network Time Protocol (SNTP)
● VPN pass-through (IPSec/PPTP/L2TP) - Parent control
1.1.3 Firewall
● Built-in NAT
- MAC Filtering
- Packet Filtering
● Stateful Packet Inspection (SPI)
- Denial of Service Prevention (DoS)
- DMZ
1.1.4 Management Support
- Web Based GUI
- Upgrade or update via FTP/HTTP
- Command Line Interface via Telnet
- Diagnostic Test
● Firmware upgrade-able for future feature enhancement
1.1.5 Operating System Support
● WINDOWS 98/SE/ME/2000/XP/VISTA/7/8
- Macintosh
- LINUX
1.1.6 Environmental
- Operating humidity: 10%-90% non-condensing
● Non-operating storage humidity: 5%-95% non-condensing
1.2 Packet Contents
The packet contents are as the following:
- ROUTER x 1
● Power Adapter x 1
CD
x 1
1.3 System Requirements
● Broadband Internet Access Service (DSL/Cable/Ethernet)
- One DSL/Cable Modem that has an RJ45 connector (which is not necessary if the Router is connected directly to the Ethernet)
- PCs with a working Ethernet Adapter and an Ethernet cable with RJ45 connectors
- TCP/IP protocol on each PC
- Web browser, such as Microsoft Internet Explorer, Mozilla Firefox or Apple Safari
1.4 Factory Defaults
The device is configured with the following factory defaults:
● IP Address: 192.168.1.1
- Subnet Mask: 255.255.255.0
1.5 Warnings and Cautions
● never use the product near water.
- To prevent dangerous overloading of the power circuit, be careful about the designed maximum power load ratings. Not to follow the rating guideline could result in a dangerous situation.
- Please note that telephone line on modem must adopt the primary line that directly outputs from junction box. Do not connect Router to extension phone. In addition, if your house developer divides a telephone line to multi sockets inside the wall of house, please only use the telephone that has connected with the splitter of ADSL Router when you access the Internet. Under the above condition, if you also install telephone with anti-cheat-dial device, please pull out this kind of telephone, otherwise ADSL Router may occur frequently off-line.
2 Hardware Description
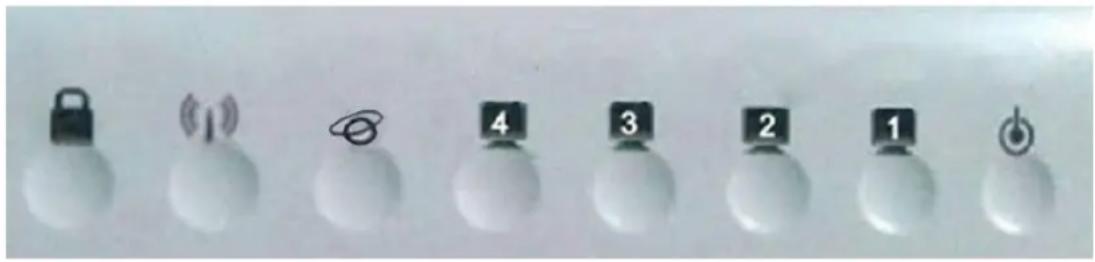
Front Panel
text_image
Cropped image showing a row of labeled buttons or indicators, including lock, Wi-Fi, sensor, and power button symbols.| LED | Color | Function |
 | Green | On: Power onOff: No power |
 | Green | On: LAN link established and active via LAN portBlinking: ADSL data activity occursOff: No LAN link via LAN port |
 | Green | On: The wireless module is ready and idleBlinking: Data transmitting or receiving over WLANOff: The wireless function is off |
 | Green | On: The WAN port has detected a link with an attached deviceBlinking: Data is being transmitted or received by the WAN portOff: No WAN link via the WAN port |
 | Green | On: WPS connection is establishedBlinking: Trying to establish a WPS connectionOff: WPS function is off or no WPS connection |
Rear panel

text_image
ON/OFF Power Reset ETH1 ETH2 ETH3 ETH4 WAN WPS| Port | Function |
| WAN | Connect the device to a cable or DSL modem |
| ETH1,2,3,4 | Connect the device to your PC's Ethernet port, or to the uplink port on your hub/switch, using a RJ-45 cable |
| RESET | System reset or reset to factory defaults |
| WPS | A convenient way for WPS set. |
| ON/OFF | Switch it on or off |
| POWER | Connect to the supplied power adapter |
3 Hardware Installation
This chapter shows you how to connect Router. Meanwhile, it introduces the appropriate environment for the Router and installation instructions.
-
Using an Ethernet Cable to connect the WAN port of the ROUTER to a cable or DSL modem.
-
Using an Ethernet Cable to connect the LAN port of the ROUTER to your LAN or a PC with network card installed.
-
Connect the power cable to the PWR connector on ROUTER, then plug in the power adapter to the AC power outlet, and then press the on-off button.

flowchart
graph TD
    A["ON/OFF"] --> B["Power"]
    B --> C["Reset"]
    C --> D["ETH1"]
    C --> E["ETH2"]
    C --> F["ETH3"]
    C --> G["ETH4"]
    C --> H["WAN"]
    I["Power Adapter"] --> J["Power Outlet"]
    K["PC"] --> L["PC"]
    M["RJ11"] --> N["DSL / Cable Modem"]
    O["Connect to wireless Unit"] --> P["CARDUS"]
    Q["Windows Unit"] --> R["USB"]
    S["MINIPCI"] --> T["MINIPCI"]
4 Local PC Configuration in Windows 95, 98, ME, XP,7
- In the Windows task bar, click the "Start" button, point to "Settings", and then click "Control Panel".
- Double-click the "Network" icon.
- On the "Configuration" tab, select the TCP/IP network associated with your network card and then click "Properties".
- In the "TCP/IP Properties" dialog box, click the "IP Address" tab. Set the IP address as 192.168.1.x (x can be a decimal number from 2 to 254.) like 192.168.1.2, and the subnet mask as 255.255.255.0.
- On the "Gateway" tab, set a new gateway as 192.168.1.1, and then click "Add".
- Configure the "DNS" tab if necessary. For information on the IP address of the DNS server, please consult with your ISP.
- Click "OK" twice to confirm and save your changes.
- You will be prompted to restart Windows. Click "Yes".
5 Configuring the Router
5.1 Web-based Management Guide
In order to use the web-based management software, it will be necessary to use a computer that occupies the same subnet as the Router. The simplest way to do this for many users will be to use DHCP server that is enabled by default on the Router.
5.1.1 Login
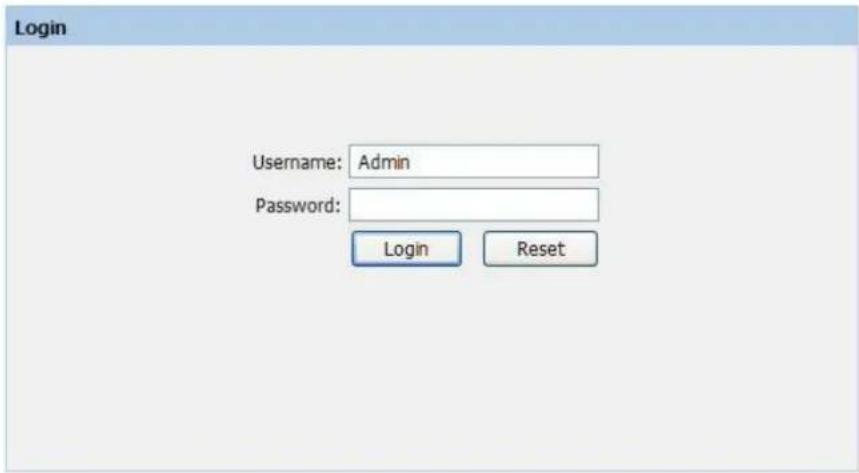
Launch a web browser, such as Internet Explorer, and then use http://192.168.1.1 to log on to the setting pages. Enter username “Admin”
Then click "Login" button login.
text_image
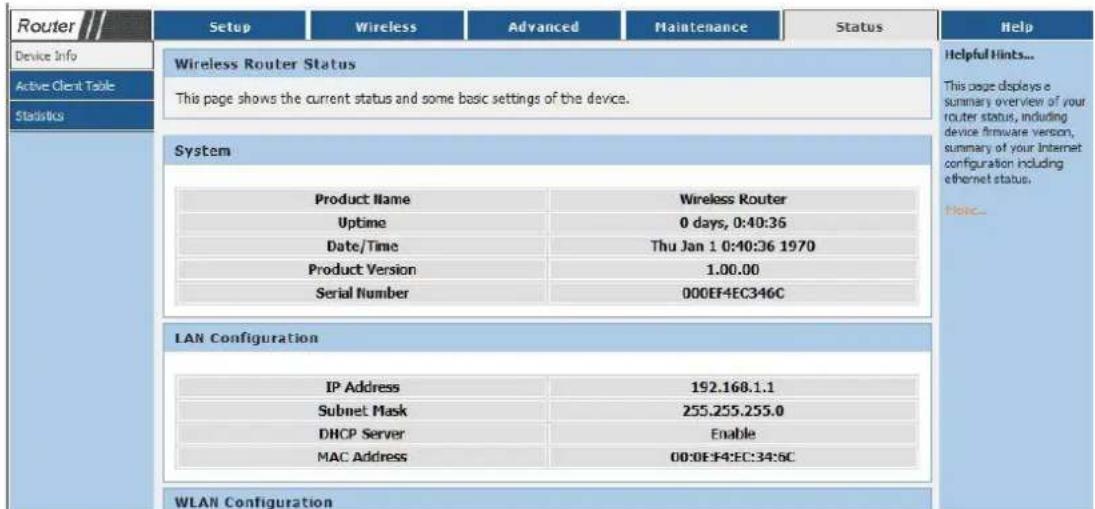
Login Username: Admin Password: Login ResetAfter log on, you will see the following screen:
text_image
Router Setup Wireless Advanced Maintenance Status Help Device Info Wireless Router Status This page shows the current status and some basic settings of the device. Helpful Hints... Active Client Table Statistics System Product Name Wireless Router Uptime 0 days, 0:40:36 Date/Time Thu Jan 1 0:40:36 1970 Product Version 1.00.00 Serial Number 000EF4EC346C LAN Configuration IP Address 192.168.1.1 Subnet Mask 255.255.255.0 DHCP Server Enable MAC Address 00:0EF4EC346C WLAN Configuration3.2 Quick Installation Guide
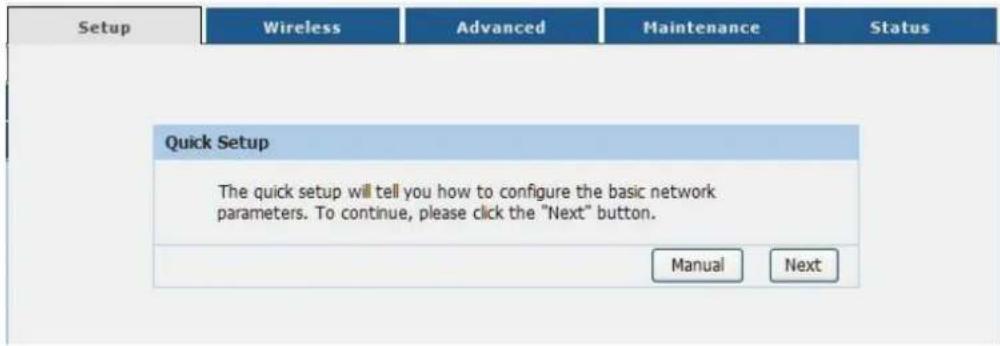
After successfully log in, you can click "Setup" configure your router, we can select "Manual" or "Next" button setup KW55293, Next will guide us for a basic setting step by step, and the Manual will guide us to home page for more detailed setup. Here we Choose next enter quick setup mode to quickly configure your Router.
text_image
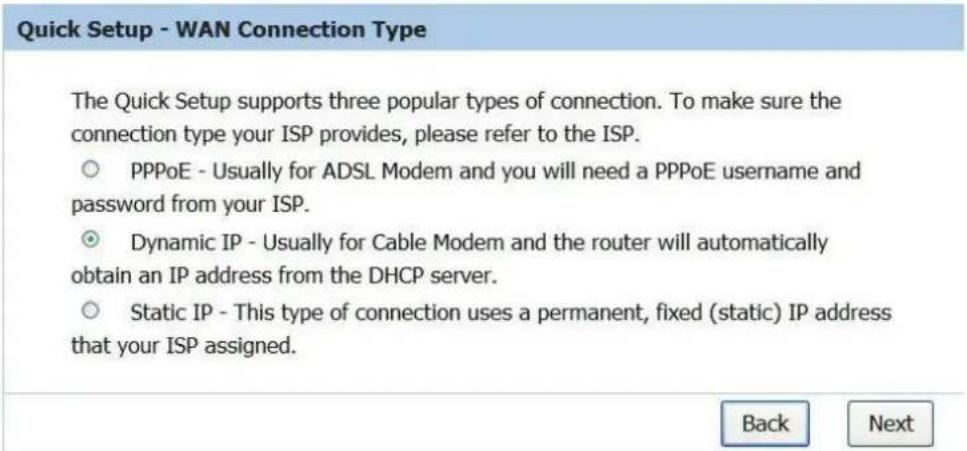
Setup Wireless Advanced Maintenance Status Quick Setup The quick setup will tell you how to configure the basic network parameters. To continue, please click the "Next" button. Manual NextThen WAN Connection Type page will appear, shown as bellow. The Router provides three popular ways PPPoE, Dynamic IP, Static IP to connect to the Internet. If you are sure of what kind of connection type your ISP provides, you can select the very type and click Next to go on configuring.
text_image
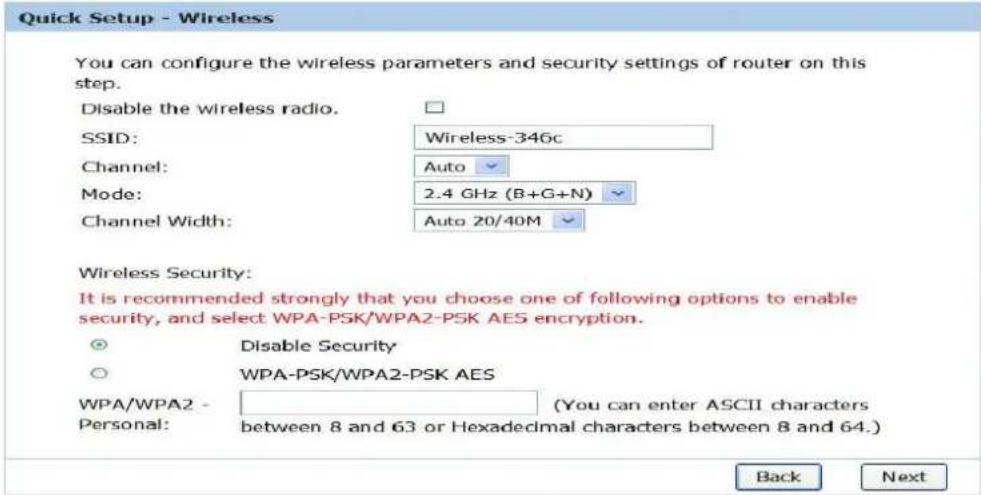
Quick Setup - WAN Connection Type The Quick Setup supports three popular types of connection. To make sure the connection type your ISP provides, please refer to the ISP. ○ PPPoE - Usually for ADSL Modem and you will need a PPPoE username and password from your ISP. ○ Dynamic IP - Usually for Cable Modem and the router will automatically obtain an IP address from the DHCP server. ○ Static IP - This type of connection uses a permanent, fixed (static) IP address that your ISP assigned. Back NextAfter finishing WAN Connection Type selection, Click "Next" to continue. Configure the basic parameters for wireless network in the following screen as shown:
text_image
Quick Setup - Wireless You can configure the wireless parameters and security settings of router on this step. Disable the wireless radio. SSID: Wireless-346c Channel: Auto Mode: 2.4 GHz (B+G+N) Channel Width: Auto 20/40M Wireless Security: It is recommended strongly that you choose one of following options to enable security, and select WPA-PSK/WPA2-PSK AES encryption. Disable Security WPA-PSK/WPA2-PSK AES WPA/WPA2 - (You can enter ASCII characters Personal: between 8 and 63 or Hexadecimal characters between 8 and 64.) Back NextEnter the SSID what you want to use, and conjure the security sengs of your wireless network. then click Next.
Quick Setup
Click the "Finish" button to finish the Quick Setup.
Tips: Please click "Setup" on the Menu, and then click "Internet Setup" for detail settings if the router still can not access the internet.
Back
Finish
Click Finish to save you settings.
5.1.2 Network (WANSettings)
KW55293 supports three types WAN connection.they are DHCP,Static IP,PPPOE, Select any of them you will be able to configure the corresponding connection of WAN. Choose menu “Setup →Internet Setup”, you can configure the IP WAN parameters
5.1.3 DHCP
If your ISP provides the DHCP service, please choose Dynamic IP type, and the Router will automatically get IP parameters from your ISP. You can see the page as follows. This page displays the WAN IP parameters assigned dynamically by your ISP, including IP address, Subnet Mask, Default Gateway,
Host Name - This option specifies the Host Name of the Router.
Domain Name - If your ISP gives you one or two DNS addresses, enter the addresses into the correct fields. Otherwise, the DNS servers will be assigned dynamically from your ISP.
MTU Size - The normal MTU (Maximum Transmission Unit) value for most Ethernet networks is 1500 Bytes. It is not recommended that you change the default MTU Size unless required by your ISP.
Click the Apply Changes button to save your settings.
5.1.4 Static IP
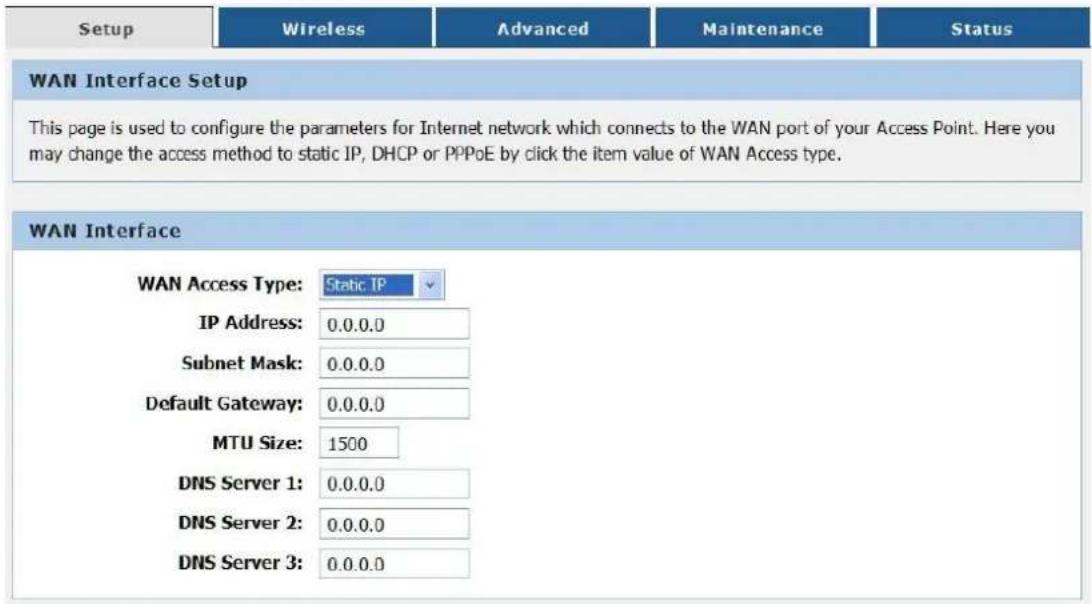
If your ISP provides a static or fixed IP Address, Subnet Mask, Gateway and DNS setting, select Static IP. The Static IP settings page will appear.
text_image
Setup Wireless Advanced Maintenance Status WAN Interface Setup This page is used to configure the parameters for Internet network which connects to the WAN port of your Access Point. Here you may change the access method to static IP, DHCP or PPPoE by click the item value of WAN Access type. WAN Interface WAN Access Type: Static IP IP Address: 0.0.0.0 Subnet Mask: 0.0.0.0 Default Gateway: 0.0.0.0 MTU Size: 1500 DNS Server 1: 0.0.0.0 DNS Server 2: 0.0.0.0 DNS Server 3: 0.0.0.0IP Address: Enter the IP address in dotted-decimal notation provided by your ISP.
Subnet Mask: Enter the subnet Mask in dotted-decimal notation provided by your ISP, usually is 255.255.255.0.
Default Gateway:(Optional) Enter the gateway IP address in dotted-decimal notation provided by your ISP.
Host Name - This option specifies the Host Name of the Router.
Domain Name - If your ISP gives you one or two DNS addresses, enter the addresses into the correct fields. Otherwise, the DNS servers will be assigned dynamically from your ISP.
MTU Size : The normal MTU (Maximum Transmission Unit) value for most Ethernet networks is 1500 Bytes. It is not recommended that you change the default MTU Size unless required by your ISP.
DNS1/DNS2(Optional) /DNS3(Optional) : Enter one or two DNS addresses in dotted-decimal notation provided by your ISP.
Click the Apply Changes button to save your settings.
5.1.5 PPPOE
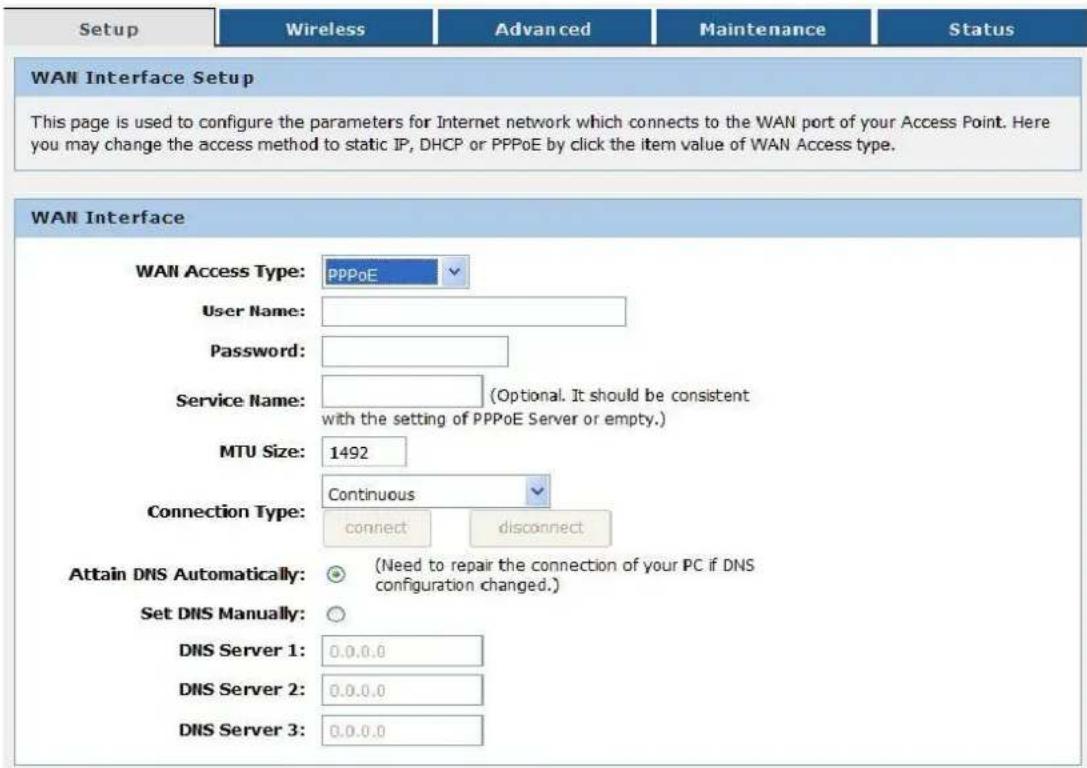
If your ISP provides a PPPoE connection, select PPPoE option. And you should enter the following parameters.
text_image
Setup Wireless Advanced Maintenance Status WAN Interface Setup This page is used to configure the parameters for Internet network which connects to the WAN port of your Access Point. Here you may change the access method to static IP, DHCP or PPPoE by click the item value of WAN Access type. WAN Interface WAN Access Type: PPPoE User Name: Password: Service Name: (Optional. It should be consistent with the setting of PPPoE Server or empty.) MTU Size: 1492 Connection Type: Continuous connect disconnect Attain DNS Automatically: (Need to repair the connection of your PC if DNS configuration changed.) Set DNS Manually: DNS Server 1: 0.0.0.0 DNS Server 2: 0.0.0.0 DNS Server 3: 0.0.0.0User Name/Password - Enter the User Name and Password provided by your ISP. These fields are case-sensitive.
Connection Type: there are three connection ways, as following:
Continuous: Connected all the time
Connect on Demand: In this mode, the Internet connection can be terminated automatically after a specified inactivity period (Max Idle Time) and be re-established when you attempt to access the Internet again. If you want your Internet connection keeps active all the time, please enter "0" in the Max Idle Time field. Otherwise, enter the number of minutes you want to have elapsed before your Internet access disconnects.
Manually - You can click the Connect/Disconnect button to connect/disconnect immediately. This mode also supports the Max Idle Time function as Connect on Demand mode. The Internet connection can be disconnected automatically after a specified inactivity period and re-established when you attempt to access the Internet again. Click the Connect button to connect immediately. Click the Disconnect button to disconnect immediately.
Server Name - This option specifies the Server Name of the Router.
Domain Server - If your ISP gives you one or two DNS addresses, enter the addresses into the correct fields. Otherwise, the DNS servers will be assigned dynamically from your ISP.
MTU Size - The normal MTU (Maximum Transmission Unit) value for most Ethernet networks is 1500 Bytes. It is not recommended that you change the default MTU Size unless required by your ISP.
Click the Apply Changes button to save your settings.
5.1.6 LAN Settings
Choose menu "Setup → Local Network", you can configure the IP parameters of the LAN on the screen as below.

text_image
Router Subnet Local Network Internal Setup LAN Interface Setup This page is used to configure the LAN interface of your Windows Router. Here you may change the setting for IP address, submit mail, etc. The page can be used to config the DHCP mode line on DHCP Server. (1)Enable the DHCP server if you are using this device as a DHCP server. This page lists the IP address points available to hosts on your LAN. The device distributes numbers in the point to hosts on your network so they request Internet access. If you choose "Pane", then the router will do nothing when the hosts request a IP address. (2)This page hits the load (BNC) address on your LAN. The device distributes the number configured to hosts on your network so they request Internet access. LAN Interface Setup IP Address: 282.348.1.1 Subset Mask: 285.205.256.0 Apply Changes DHCP Server Settings DHCP Mode: DHCP Server Helpful Items... The IP address of your router is the same IP address you will be to access the web management interface of your router. If you already have a DHCP server in your network to be waiting, it allows or all the devices on your network, which DHCP Node must not match the following: If you have devices on your network that should always have first IP address, add an such DHCP for each other device.IP Address: Enter the IP address of your Router or reset it in dotted-decimal notation (factory default: 192.168.0.1).
Cubmat Hanks: An additive and that determines the aim of the nature. Macrombius
5.2 Wireless Settings
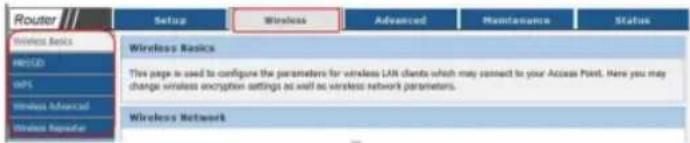
There are five submenus under the Wireless menu (shown as bellow): Wireless Basic MBSSID ,WPS, Wireless Advanced, Wireless Repeater. Click any of them, and you will be able to configure the corresponding function.
text_image
Router Wireless Basics WIREO WPS Wireless Advanced Wireless Router Setup Wireless Advanced Maintenance Status Wireless Basics This page is used to configure the parameters for wireless LAN clients which may connect to your Access Point. Here you may change wireless encryption settings as well as wireless network parameters. Wireless Network5.2.1 Basic Wireless Settings
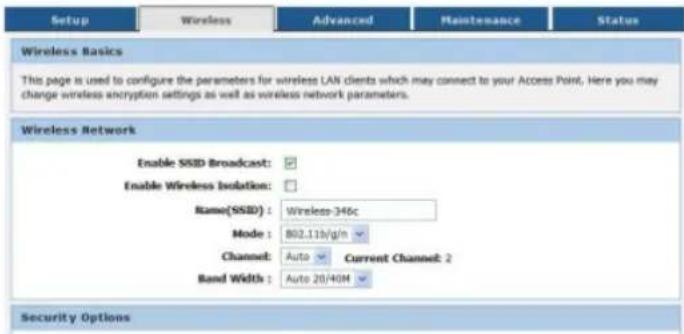
Choose menu "Wireless→Wireless Basics", you can configure the basic settings for the wireless network on this page.
text_image
Setup Wireless Advanced Maintenance Status Wireless Basics This page is used to configure the parameters for wireless LAN clients which may connect to your Access Point. Here you may change wireless encryption settings as well as wireless network parameters. Wireless Network Enable SSSD Broadcast: Enable Wireless Isolation: Name(SSID) : Wireless-346c Mode : 802.11b/g/n Channel: Auto Current Channel: 2 Band Width : Auto 20/40M Security OptionsSecurity Opon: You can congregate the security sengs of your wireless network. There are six wireless security modes supported by the Router: WEP,802.1X,WPA, WPA2-PSK, WPA2, WPA2-PSK. Dierent item leads dierent web page sengs. Please read the following informaon carefully:
Done :If you do not want to use wireless security, check this radio buon. But it's strongly recommended to choose one of the following modes to enable security.
WEP open and WEP shared — WEP is an encrypon scheme that is used to protect user's wireless data communicaons. WEP uses a combinaon of 64-bit keys or 128-bit keys to provide access control to user's network and encrypon security for every data transmission. To decode a data transmission, each wireless client on the network must use an idencal 64-bit or 128-bit key. WEP is an older wireless encrypon method that is not as hard to break as the more-recent WPA.
802.1x — In 802.1x (also known as RADIUS), a separate machine called an authencaon server receives a user ID and password. It grants or denies access based on whether the ID and password match any entries in its account list. User can oponally enable WEP encrypon with this opon. Because it requires a separate machine acng as the authencaon server, 802.1x is most oen used in business environments.
WPA — WPA is a more recent encrypon method that addresses many of the weaknesses in WEP. Any client capable of WPA encrypon should use it instead of WEP.
WPA (PSK) — This is WPA encrypon combined with a pre-shared key (PSK), which is a text string known only to the gateway and authorized wireless clients. The gateway rejects the login if the client's PSK does not match.
WPA2 — WPA2 is a more advanced encrypon method than WPA. Because it is a more recent standard, some of user's wireless devices might not be able to use it.
WPA2 (PSK) — This opon uses WPA2 with a pre-shared key.
WPA2 and WPA — This opon supports WPA2/WPA encrypon for devices capable of one or the other standard. The gateway automacally detects whether a parcalar device can use WPA2 or WPA.
WPA2 AND WPA (PSK) — This has WPA2 or WPA encrypon based on client abilities, as well as a pre-shared key.
Click the Apply Changes button to save your settings.
5.2.3 MBSSID
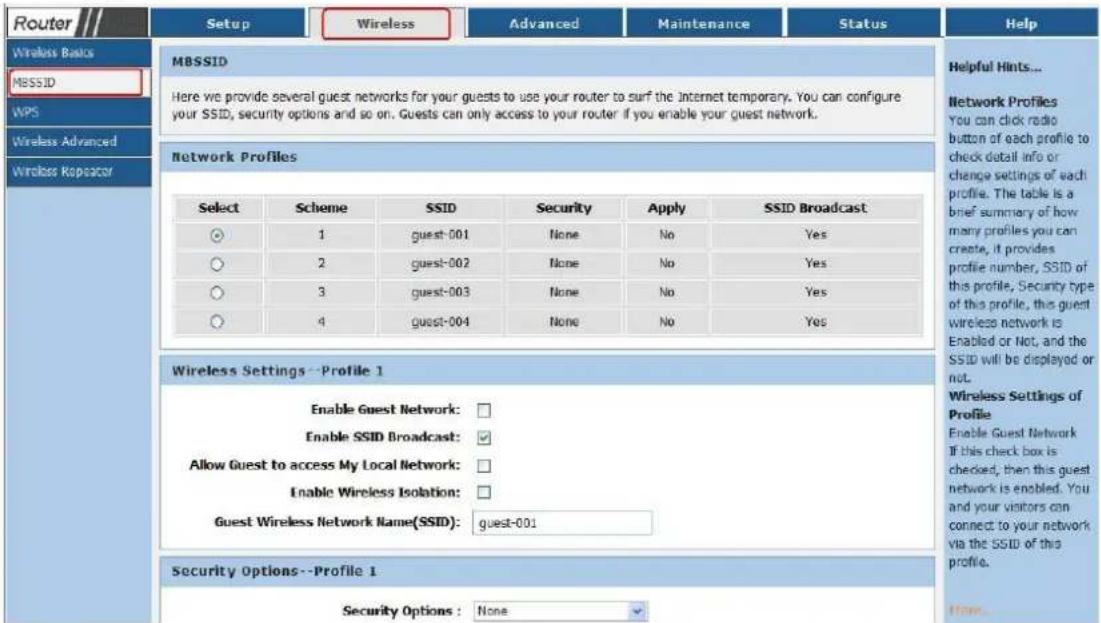
Choose menu "Wireless→MBSSID", you can congregate the Guest Network Wireless Sengs on the page as shown:
text_image
Router Wireless Bails MBSSID WPS Wireless Advanced Wireless Repeater Setup Wireless Advanced Maintenance Status Help MBSSID Here we provide several guest networks for your guests to use your router to surf the Internet temporary. You can configure your SSID, security options and so on. Guests can only access to your router if you enable your guest network. Network Profiles Select Scheme SSID Security Apply SSID Broadcast ○ 1 guest-001 None No Yes ○ 2 guest-002 None No Yes ○ 3 guest-003 None No Yes ○ 4 guest-004 None No Yes Wireless Settings -- Profile 1 Enable Guest Network: Enable SSID Broadcast: Allow Guest to access My Local Network: Enable Wireless Isolation: Guest Wireless Network Name(SSID): guest-001 Security Options--Profile 1 Security Options : None Helpful Hints... Network Profiles You can click radio button of each profile to check detail info or change settings of each profile. The table is a brief summary of how many profiles you can create, it provides profile number, SSID of this profile, Security type of this profile, this guest wireless network is Enabled or Not, and the SSID will be displayed or not. Wireless Settings of Profile Enable Guest Network If this check box is checked, then this guest network is enabled. You and your visitors can connect to your network via the SSID of this profile. None...Enable Guest Network :You can on or o MBSSID funcon
Total Guest Allowed: You can congregate the number of guest
Enable SSID Broadcast: Enable or Disable the SSID Broadcast
Allow Gust to access My Local Network: If enabled, guests can communicate with hosts.
Security Opon: Can set password for guest network
Click the Save Changes button to save your settings.
5.2.3 WPS
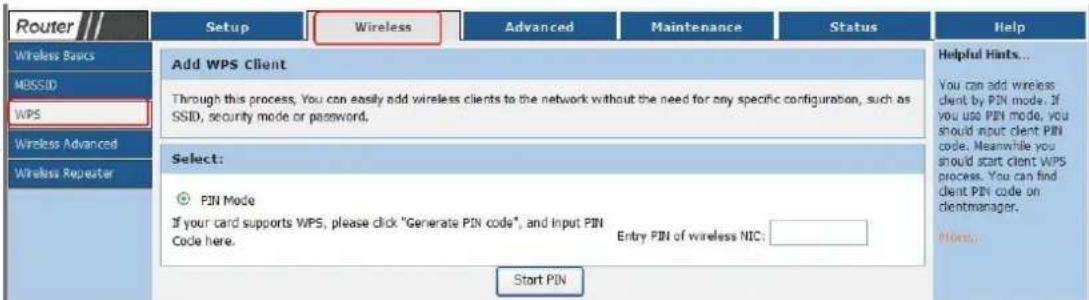
Choose menu "Wireless→WPS", you can congregate the WPS Sengs on the page as shown:
WE can enter PIN code in the area of PIN then click Start Pin enabled the WPS funcon.
text_image
Router Add WPS Client Through this process, You can easily add wireless clients to the network without the need for any specific configuration, such as SSID, security mode or password. Select: PIN Mode If your card supports WPS, please click "Generate PIN code", and Input PIN Code here. Entry PIN of wireless NIC: Start PIN Wireless Baccs MBSSID WPS Wireless Advanced Wireless Repeater Helpful Hints... You can add wireless client by PIN mode. If you use PIN mode, you should input client PIN code. Meanwhile you should start client WPS process. You can find client PIN code on clientmanager. More...Click the Apply Changes button to save your settings.
5.2.4 Wireless Advanced
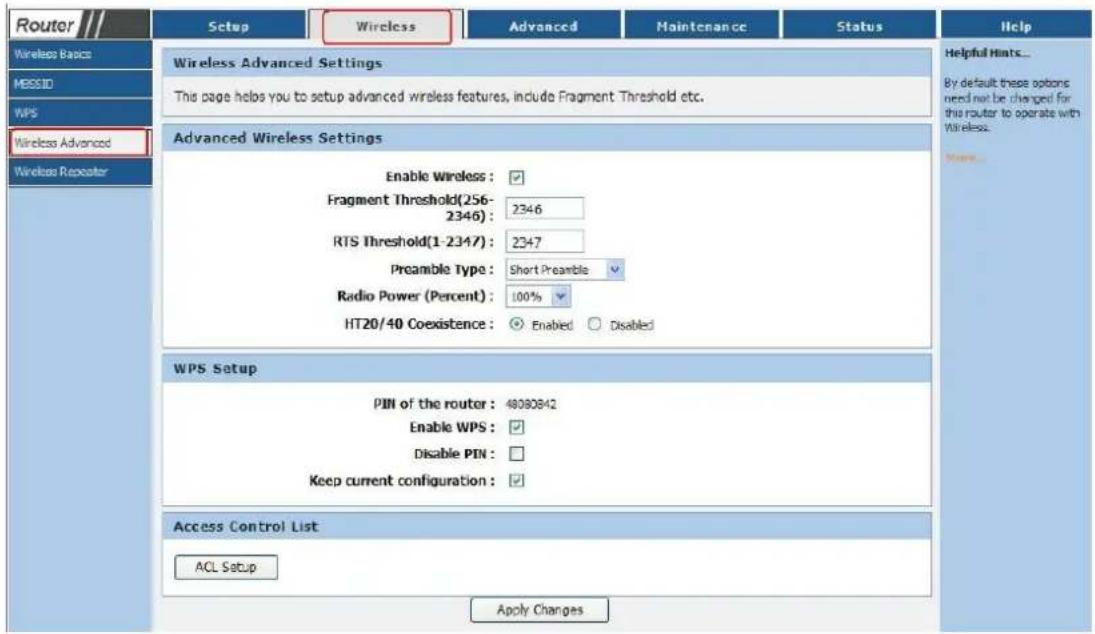
Choose menu "Wireless → Wireless Advanced", you can congregate the wireless advanced Sengs on the page as shown:
text_image
Router Wireless Advanced Settings This page helps you to setup advanced wireless features, include Fragment Threshold etc. Advanced Wireless Settings Enable Wireless : ✓ Fragment Threshold(256- 2346) : 2346 RTS Threshold(1-2347) : 2347 Preamble Type : Short Preamble ✓ Radio Power (Percent) : 100% ✓ HT20/40 Coexistence : ✓ Enabled ✓ Disabled WPS Setup PIN of the router : 48080842 Enable WPS : ✓ Disable PIN : ✓ Keep current configuration : ✓ Access Control List ACL Setup Apply Changes Helpful Hints... By default these options need not be changed for the router to operate with Wireless... More...Enabled Wireless: Enabled or Disabled wireless funcon
Fragmentaon Threshold - This value is the maximum size determining whether packets will be fragmented. Seng the Fragmentaon Threshold too low may result in poor network performance because of excessive packets. 2346 is the default seng and is recommended.
RTS Threshold :Here you can specify the RTS (Request to Send) Threshold. If the packet is larger than the specied RTS Threshold size, the Router will send RTS frames to a parcular receiving staon and negotiate the sending of a data frame. The default value is 2346.
Radio Power :can guarantee the packets with high-priority messages being transmied preferenally. It is strongly recommended.
Enable WPS: Enable or disable WPS funcon
Enable PIN: Enable or disable PIN funcon
Click the Apply Changes button to save your settings.
5.3 DHCP Settings
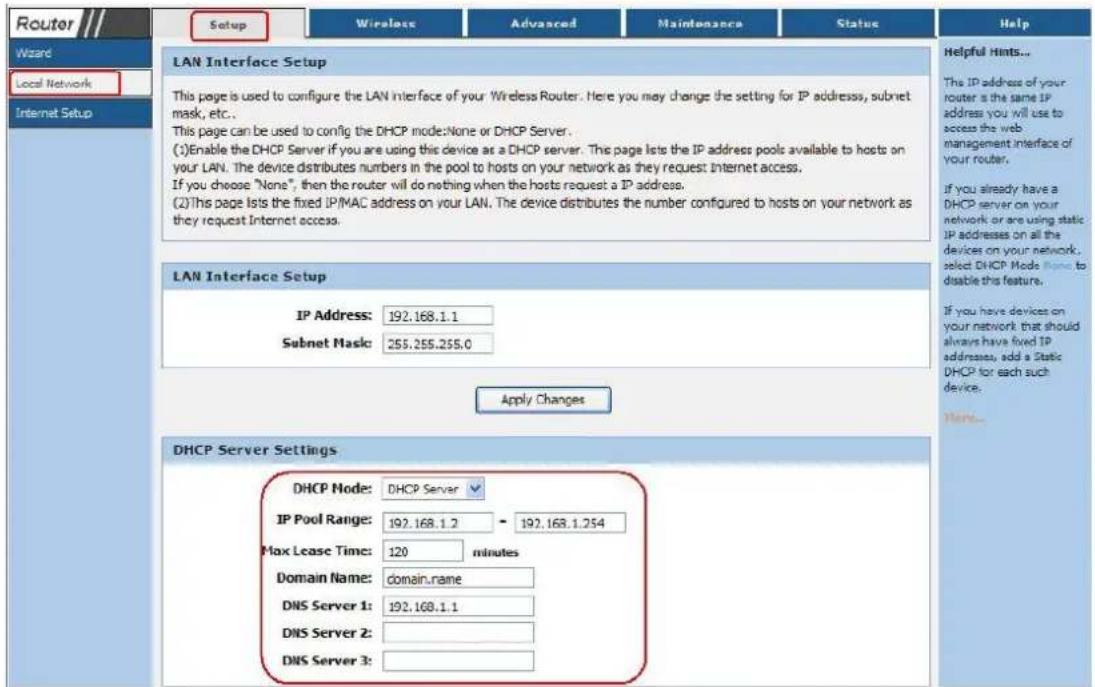
Choose menu "Setup→Local Network→DHCP Server Sengs", you can conjure the DHCP Server on the page as shown below. The Router is set up by default as a DHCP (Dynamic Host Conguraon Protocol) server, which provides the TCP/IP conguraon for all the PC(s) that are connected to the Router on the LAN.
text_image
Router Wizard Local Network Internet Setup Setup Wireless Advanced Maintenance Status Help LAN Interface Setup This page is used to configure the LAN interface of your Wireless Router. Here you may change the setting for IP addresses, subnet mask, etc.. This page can be used to config the DHCP mode:None or DHCP Server. (1)Enable the DHCP Server if you are using this device as a DHCP server. The page lists the IP address pools available to hosts on your LAN. The device distributes numbers in the pool to hosts on your network as they request Internet access. If you choose "None", then the router will do nothing when the hosts request a IP address. (2)This page lists the fixed IP/MAC address on your LAN. The device distributes the number configured to hosts on your network as they request Internet access. LAN Interface Setup IP Address: 192.168.1.1 Subnet Mask: 255.255.255.0 Apply Changes DHCP Server Settings DHCP Mode: DHCP Server IP Pool Range: 192.168.1.2 - 192.168.1.254 Max Lease Time: 120 minutes Domain Name: domain.name DNS Server 1: 192.168.1.1 DNS Server 2: DNS Server 3:DHCP Server: Enable or Disable the DHCP server. If you disable the Server, you must have another DHCP server within your network or else you must congregate the computer manually.
IP Poor Range: Specify an IP address for the DHCP Server to start with when assigning IP addresses. 192.168.1.2 is the default start address. And Specify an IP address for the DHCP Server to end with when assigning IP addresses. 192.168.1.254 is the default end address.
Max Lease Time: The Address Lease Time is the amount of me a network user will be allowed conncon to the Router with their current dynamic IP Address. Enter the amount of me in minutes and the user will be "leased" this dynamic IP Address. Aer the me is up, the user will be automacally assigned a new dynamic IP address.
Click the Apply Changes button to save your settings.
5.4 Factory Default
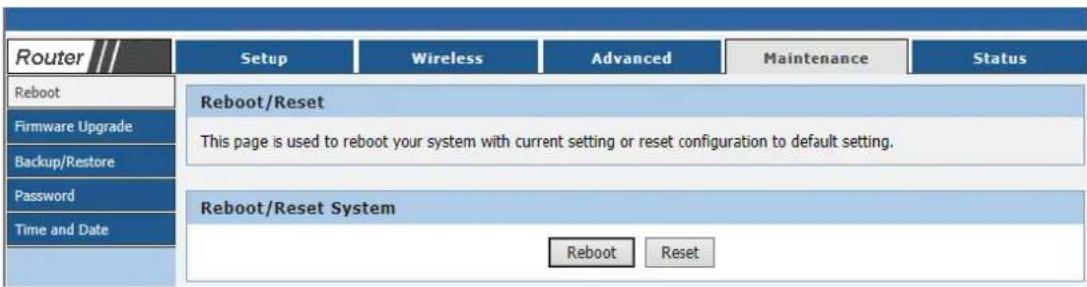
Choose menu "Maintenance→ Reboot", and then and you can restore the conguraons of the Router to factory defaults on the following screen
text_image
Router Setup Wireless Advanced Maintenance Status Reboot Firmware Upgrade Backup/Restore Password Time and Date Reboot/Reset This page is used to reboot your system with current setting or reset configuration to default setting. Reboot/Reset System Reboot ResetClick the Reset buon to reset all conguraon sengs to their default values.
The default User Name: Admin
The default Subnet Mask: 255.255.255.0
Note:
All changed settings will be lost when defaults are restored.
Appendix: Frequent Asked Questions
Q: None of the LEDs are on when user power on the ADSL router?
A: Please make sure what user use is the power adaptor attached with the ADSL router package, and check the connection between the AC power and ADSL router.
Q: DSL LED does not turn on after connect telephone line?
A: Please make sure what user use is the standard telephone line (as attached with the package), make sure the line is connected correctly and check whether there is poor contact at each interface. Wait for 30 seconds to allow the ADSL router establishes connection with user ADSL operator.
Q: DSL LED is in the circulation of slow-flashing and fast-flashing after connect telephone line?
A: This situation means the ADSL router is in the status of failing to establish connection with Central Office. Please check carefully and confirm whether the ADSL router has been installed correctly.
Q: LAN LED does not turn on after connect Ethernet cable?
A: Please make sure Ethernet cable is connected hub/PC and ADSL router correctly. Then please make sure the PC/hub have been power on.
Please make sure that user use parallel network cable to connect UpLink port of hub, or use parallel network cable to connect PC. If connect normal port of hub (not UpLink port), user must use cross-cable. Please make sure that user's network cables meet the networking requirements above.
Q: PC cannot access the Router?
A: Please make sure that all devices communicating with the device must use the same channel (and use the same SSID). Otherwise user's PC will not find the wireless Router.
Q: PC cannot access the Internet?
A: First check whether PC can ping the interface Ethernet IP address of this product successfully (default value is 192.168.1.1) by using ping application. If ping application fails, please check the connection of Ethernet cable and check whether the states of LEDs are in gear.
If the PC uses private IP address that is set manually (non-registered legal IP address), please check:
-
Whether IP address of the PC gateway is legal IP address. Otherwise please use the right gateway, or set the PC to Obtain an IP address automatically.
-
Please confirm the validity of DNS server appointed to the PC with ADSL operator. Otherwise please use the right DNS, or set the PC to Obtain an IP address automatically.
-
Please make sure user have set the NAT rules and convert private IP address to legal IP address. IP address range of the PC that user specify should meet the setting range in NAT rules.
-
Central Office equipment may have problem.
-
The country or the wireless network type user selected is wrong.
Q: PC cannot browse Internet web page?
A: Please make sure DNS server appointed to the PC is correct. User can use ping application program to test whether the PC can connect to the DNS server of the ADSL operator.
Q: Initialization of the PVC connection failed?
A: Be sure that cable is connected properly from the DSL port to the wall jack. The DSL LED on the front panel of the ADSL router should be on. Check that user's VPI, VCI, type of encapsulation and type of multiplexing setting are the same as what user collected from user's service provider, Re-configure ADSL router and reboot it. If user still can not work it out, user may need to verify these variables with the service provider.
If the cause is not above given, please contact user's local service provider!