
DVR-DC600HD - Electric cooler ORION - Free user manual and instructions
Find the device manual for free DVR-DC600HD ORION in PDF.


| Product Type | Car Video Recorder (Dashcam) |
| Model | DVR-DC600HD |
| Brand | Orion |
| Screen | 2.7-inch LCD |
| Front Lens Angle | 140 degrees |
| Rear Lens Angle | 90 degrees |
| Video Resolution (Front) | 1280x720 |
| Video Resolution (Rear) | 720x490 |
| Video Format | MOV |
| Video Compression | H.264 |
| Photo Resolution | 3M, 2M, 1M |
| Photo Format | M-JPG |
| Digital Zoom | 4x |
| G-Sensor | Built-in |
| Motion Detection | Yes |
| Memory Card Support | TF (microSD) up to 32GB |
| Microphone | Built-in |
| IR Lights (Night Vision) | Yes |
| Video Output | HDMI, AV (PAL/NTSC) |
| Power Supply | Car power adaptor DC 12-24V, built-in battery 3.7V 600mAh |
| Dimensions (Product) | 89 x 52 x 15 mm |
| Net Weight | 71 g |
| Dual Lens Recording | Yes, front and rear simultaneously |
| Safety | Use only the provided car charger; avoid moisture and extreme temperatures. |
| Included Accessories | Car DVR, mount, USB cable, car charger, external camera, instruction manual, warranty card |
Frequently Asked Questions - DVR-DC600HD ORION
User questions about DVR-DC600HD ORION
0 question about this device. Answer the ones you know or ask your own.
Ask a new question about this device
Download the instructions for your Electric cooler in PDF format for free! Find your manual DVR-DC600HD - ORION and take your electronic device back in hand. On this page are published all the documents necessary for the use of your device. DVR-DC600HD by ORION.
USER MANUAL DVR-DC600HD ORION
"SMART PEOPLE CHOOSE ORION"
CAR VIDEO REGISTRATOR
natural_image
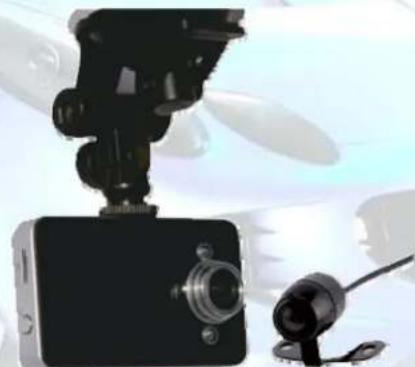
Close-up of a black camera module and a small camera with a propeller, against a blurred background (no text or symbols visible)INSTRUCTION MANUAL MODEL: DVR-DC600HD
English
Dear customers! Thank you for purchasing ORION products. Before operation, please read this instruction manual. Save it for future reference.
1. CONTROLS AND CONNECTORS
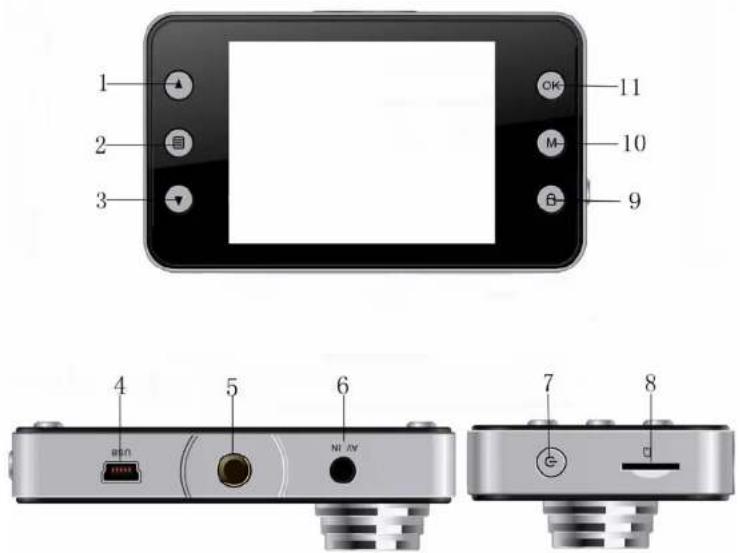
- UP 7. POWER
- MENU 8. TF slot
- DOWN 9. HOLD
- USB 10. MODE
- Bracket hole 11. OK
-
AV port
-
DESCRIPTION OF FUNCTION KEYS
| UP | – In standby mode, short press “UP” for changing recording mode only front lens or rear lens or the two together.– LCD display shows A when front lens working, shows B when rear lens working, A+B for dual lens working. |
| MENU | – Short press: Setting menu.– Long press: change setting options. |
| DOWN | – In menu status, down to select options keys.– In dual camera working status, short press to switch recording mode between front lens and rear lens. |
| USB | – USB Data Interface, ☑Connecting PC to transfer data; ☑Connecting external power for charging or working; |
| AV Port | – Analog video signal input interface, for connecting external analog signals. |
| OK | – Video and photographs confirmation button. Video mode, short press to start recording, press again for ending.– Photograph mode, short press to take photos.– Menu mode, press ok to confirm. |
| Power | – Long press to turn device on/off. Short press to turn on/off the night vision led lights. |
| HOLD | – Press this button when recording, the current video is saved and can not be deleting. |
| MODE | – Short press to switch recording/photographing/replay |
3. HOW TO USE
Power on/off
Press on one time to start, Blue indicator light will shine when power on
Then press again on ⏻ to shutdown and the blue indicator light go out
Notice: video instrument will automatically power off after waning of low battery
REC mode
Short press on Ⓜ shift to REC mode, REC icon is on the top left corner
Short press on OK to start recording, recording icon and indicator light shining indicate the recording is on the way
Photo mode
Short press on Ⓜ shift to photo mode, an photo icon is on the top left corner
Then short press on OK to take a photo, screen flash one time means photo completed
Video/photo playback
Short press on , shift to playback mode , playback icon is on the top left corner
Short press on key can choose files up
Short press on key can choose files down
Short press on to play the selected video files
Menu setting
Short press on enter video set status, re-press to shift among "resolution" "video duration" "setting"
Press or keys to choose up and down in setting items.
Select the items which needed change, short press OK to modify.
Time settings
Continuous short press 📄 to enter "setting item", here short press on 🔗 to choose Time Setting, short press on OK to enter, then short
press 📂 can make shifts among year/month/date/hour/minutes/second. Adjust figure through 🔊 buttons, then press “OK” button to confirm modification. Display switchover In A+B REC mode, short press 🔊 button can switch between front and rear lens.
USB mode
Separate USB cable and computer, press "power on" button, car DVR will automatically show USB menu, there are three modes available:
1 : USB-Disk
In this mode we can access video files and photo files
2 : PC-Camera
In this mode USB video equipment are shown, can take photo or make video chat
3.REC-Mode
Choose this mode can take video recording when connected to PC
Battery instruction
Battery indication image :
Full b slightly lo very low battery empty
- TECHNICAL CHARACTERISTICS
| Screen: 2.7" LCD | |
| CPU: | Allwinner |
| Lens: Front lens: 140 Rear lens: 90 | |
| Zoom: 4x digital zoom | |
| Video resolution: | 1280x720 (front camera), 720x490 (rear camera) |
| Video format: MOV | |
| Video compression: H.264 | |
| Picture resolution: 3M, 2M, 1M | |
| Picture format: M-JPG | |
| G-sensor: | built in |
| Motion detection: yes | |
| Card support: TF (up to 32Gb) | |
Mic: yes
IR lights: yes
Video out: HDMI
TV out: PAL/NTSC
Frequency: 50Hz/60Hz
Nominal voltage/power/current: DC 5V/5W/1A
Car power adaptor: DC 12-24V
Battery: built-in rechargeable battery 3,7V 600mAh
Product size: 89x52x15mm
Box size: 175x135x85mm
Net/gross weight: 71g/480g
Product color: black
Note: the manufacturer reserves the right to make changes to the product. Design, software, technical specifications are subject to change without notice.
5. PACKAGE CONTENTS
- Car DVR
- Mount
- USB cable
- Car Charger
- External camera
- Instruction manual
- Warranty Card
natural_image
Front-side view of a light-colored convertible sports car with visible license plate and grille (no text or symbols on body)Published by ORION Electronics Ltd.
(c) 2013 ORION Electronics Ltd.
Brand : ORION
Model : DVR-DC600HD
Category : Electric cooler