
WMA 6510 J - Washing machine Arçelik - Free user manual and instructions
Find the device manual for free WMA 6510 J Arçelik in PDF.


User questions about WMA 6510 J Arçelik
0 question about this device. Answer the ones you know or ask your own.
Ask a new question about this device
Download the instructions for your Washing machine in PDF format for free! Find your manual WMA 6510 J - Arçelik and take your electronic device back in hand. On this page are published all the documents necessary for the use of your device. WMA 6510 J by Arçelik.
USER MANUAL WMA 6510 J Arçelik
We wish that this product, manufactured at modern facilities with total quality notions, will deliver you the best performance. In order to guarantee this, please read this instruction manual thoroughly and keep it for your future reference.
www.arcelik.com.tr

CONTENTS
Part 1:
Steps before operating Fullautomatic
Washing Machine and safety precautions.
Part 2:
Technical features.
Part 3:
Determining location and installation
Part 4:
Program selection and washing operations.
Part 5:
Care and Maintenance.
Part 6:
Helpful tips on stain removal
Part 7:
Before calling service.
Part 1: | Steps before operating Fullautomatic Washing Machine and safety precautions
The current requirement in order for safe operation of this machine is 16 Ampheres. You will need to have a certified electrician to connect a 16 Amp fuse, if there is not enough current load.
Your washing machine is set to 230 Volts.
Do not forget to check the grounding in all cases of use with or without the transformer. Our company will not be responsible for any damages caused by operations without grounding.
In order to bring the machine to ready before use, please call your service technician or a certified plummer.
Your washing machine's front door is designed reversible. To change the front door's opening direction please call your service.
Please perform the first wash with detergent and do not place clothing inside your washing machine. This will ensure that any left over dirt from production will be cleared from inside of your machine.
The performance of the washing machine depends on the effectiveness of the cleaning agent. Stains can be permanent if low quality detergents are used. Please take necessary effort to clean the stained clothes as described in following pages before washing them in the machine.
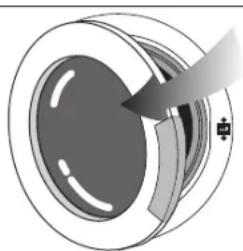
To open the front door
natural_image
Diagram of a mechanical component with a circular body and internal structure, showing a force or motion indicator (no text or symbols)Make sure the on/off switch is in the off position and always allow one to two minutes for the door safety lock to release the lock. Pull the handle to open the door.

Due to the quality control processes during production, there may be some water left over in your machine. This does not cause any damage to your product.
Part 2:
Technical features
text_image
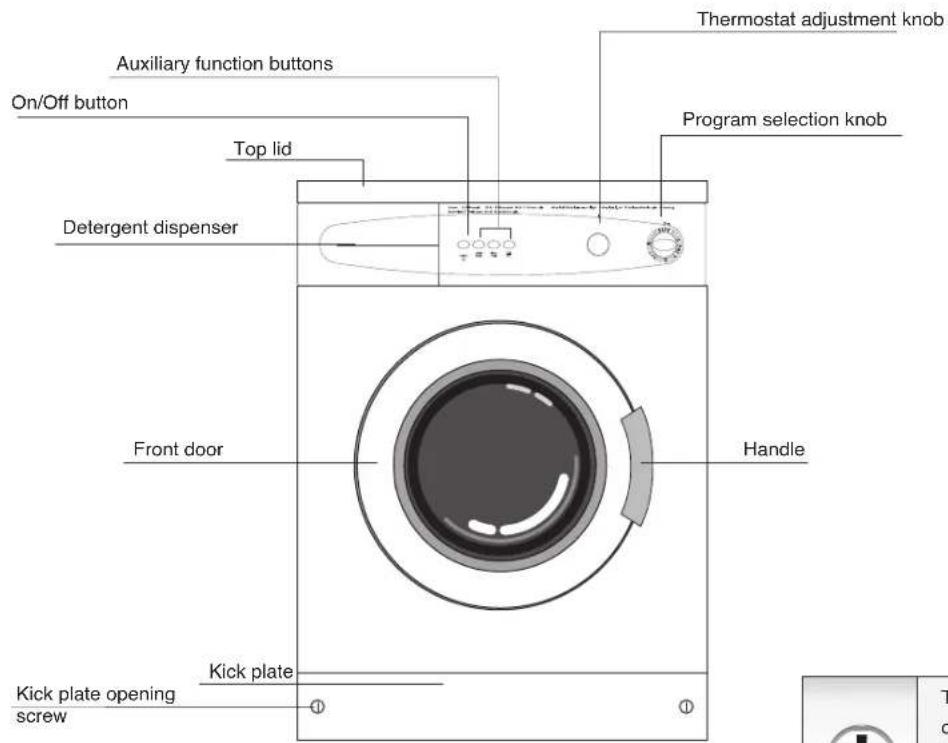
Auxiliary function buttons On/Off button Top lid Detergent dispenser Thermostat adjustment knob Program selection knob Front door Handle Kick plate Kick plate opening screw ① ①| Capacity (dry fabric) | 5 kg. (11.1 lbs) |
| Height | 85 cm. |
| Width | 60 cm. |
| Depth | 54 cm. |
| Net weight | 60 kg. |
| Power requirement | 230 V, 50 Hz. |
| Nominal current | 10 A. |
| Total power | 2350 Watts. |
| Washing speed | 52 rpm. |
| Spin speed (WMA 6506 D) | 600 rpm. (max.) |
| Spin speed (WMA 6508 J) | 800 rpm. (max.) |
| Spin speed (WMA 6510 J) | 1000 rpm. (max.) |

The appearance and specifications are subject to change without notice to raise the unit quality. The graphics shown in the manual are schematic and it is possible that they not conform with your washing machine.

Part 3:
Determining location and installation
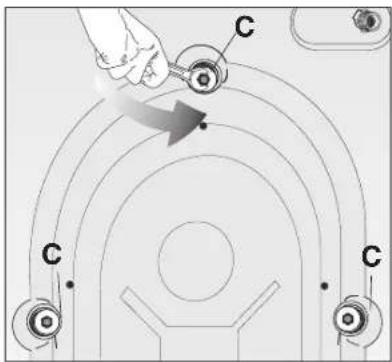
1. Removing transport safety bolts at the rear of the machine
text_image
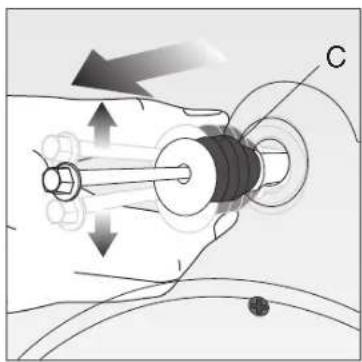
Diagram showing a hand adjusting a circular component labeled 'C' with directional arrows, likely illustrating a mechanical or electrical concept.The transport safety bolts must be removed before any operation of the machine. Bolt heads, marked "C".
text_image
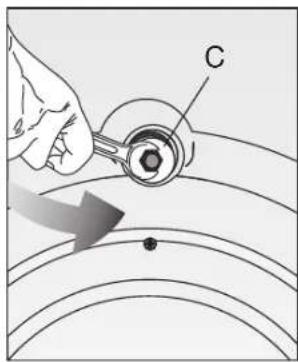
C"C", should be turned in a anti clockwise direction until the bolt can be partially withdrawn.
text_image
Diagram illustrating mechanical assembly with labeled component C and directional arrows indicating motion or forceRemove transport safety bolts and rubber bushes by pulling outwards. (A up/down action and a small squirt of washing up liquid should ease removal.)
natural_image
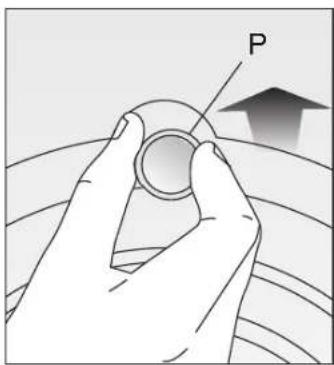
Hand holding a circular object with an arrow pointing upward, no text or symbols presentPlastic plugs, supplied inside the protective bag and designated as "P", should be placed in the safety bolt holes according to the direction shown.

Attention!
Please keep the safety bolts for future transportation and reinstate them before transporting your machine. Never transport your machine without the transport bolts in position.
Never place your machine on a carpet. This prevents air circulation. The electrical components of the machine may overheat and may cause damage.
2. Feet adjustment
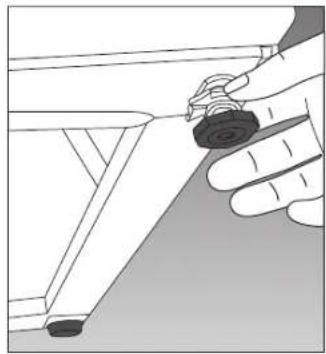
In order for quiet and stable operation, the machine should be placed properly and leveled on its feet. Your machine comes with two adjustable feet. If the machine is unstable, loosen the plastic counternut and screw or unscrew the adjustable foot until the machine is leveled perfectly. After positioning, tighten the counternut for stability.
natural_image
Illustration of a hand holding a small mechanical component, no text or symbols present3. Water connections
a) Water inlet hose
Water supply
For proper operation, the pressure of water should be between 1 and 10 atm. (1 atm corresponds to more than 8 liters per minute flow rate at fully open tap.)
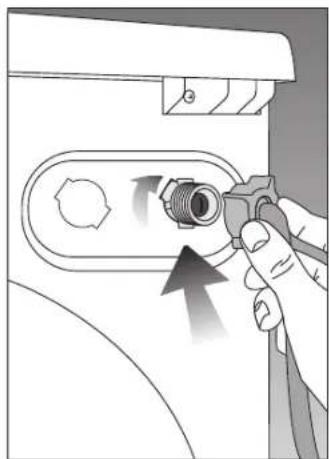
To prevent water leaks sealing washers are supplied with the water inlet hose inside the machine, place these on each of the hose ends and tighten both ends fully.
In order to prevent any water leak damages, keep the water taps closed when not in use. Connect the cornered end of the hose to the machine water inlet.
natural_image
Hand holding a tool interacting with a mechanical component, showing a valve mechanism (no text or symbols visible)
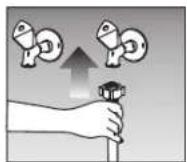
Connect the cold water using the hose with blue printing and connect the hot water using the hose with red printing.
b) Water drain hose
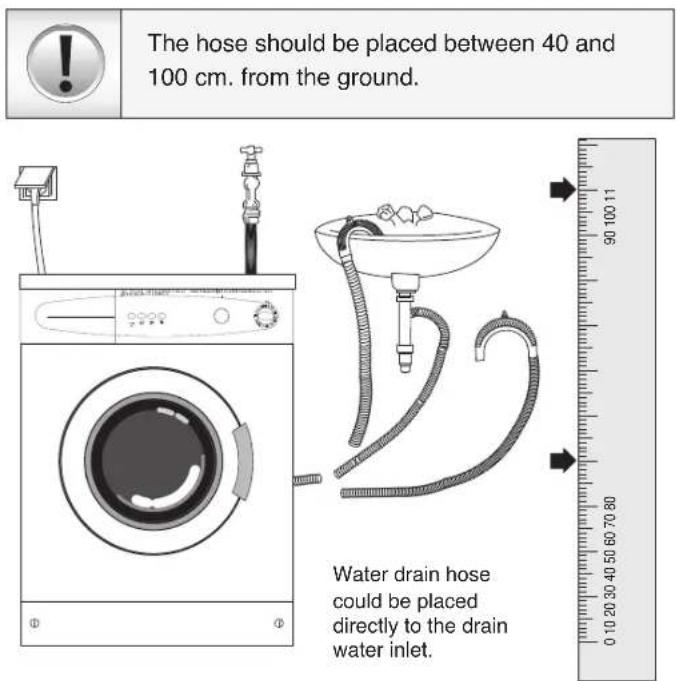
Water drain hose could be placed either at the side of the bath tub, or directly to the drain. The hose should not be bent. Water drain hose should be secured with the elbow so that it would not fall down on the ground.
text_image
The hose should be placed between 40 and 100 cm. from the ground. Water drain hose could be placed directly to the drain water inlet.4. Electrical connection
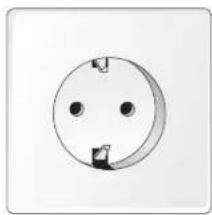
Connect the power cord to the appropriate electrical system which is being supported by the maximum voltage and current rating indicated on the rating plate placed inside the kick plate.
Look! Page 1, Steps before operating Fullautomatic Washing Machine and safety precautions.
natural_image
Simple line drawing of a circular electrical socket with three dots and a small square on the side (no text or symbols)Make sure that you have grounded power outlet.
| Attention! Before any operation of the machine check the following. | |||
| Did you close the front door?Is the tap open? | Is water drain hose placed properly?Is power connected? | ||
Control Panel

text_image
On/off switch Cotton A: Fresh wash 10-30 B Main wash 20-30 C Cotton spin Washer % Delicate wash 5-40 J Washer 5-40 C Delicate/Wheeling pin P Drating Synthetic # P Main wash 20-30 H Synthetic Spin Detergent drawer Led indicator On/off switch Rinse hold Quick wash On/off switch Temperature adjustment knob Program selection knob WMA 6506 D WMA 6508 J WMA 6510 J Led indicator Spin speed selection Detergent drawer On/off switch Rinse hold Quick wash On/off switch On/off switch Spin speed selection Detergent drawer On/off switch Rinse hold On/off switch On/off switch On/off switch On/off switch On/off switch On/off switch On/off switch On/off switch On/off switch On/off switch On/off switch On/off switch On/off switch On/off switch On/off switch On/off switch On/off switch On/off switch On/off switch On/off switch On/off switch On/off switch On/off switch On/off switch On/off switch On/off switches On/off switches On/off switches On/off switches On/off switches On/off switches On/off switches On/off switches On/off switches On/off switches On/off switches On/off switches On/off switches On/off switches On/off switches On/off switches On/off switches On/off switches On/off switches On/off switches On/off switches On/off switches On/off switches On/off switches On/off switches On/off consoles: On/off consoles: On/off consoles: On/off consoles: On/off consoles: On/off consoles: On/off consoles: On/off consoles: On/off consoles: On/off consoles: On/off consoles: On/off consoles: On/off consoles: On/off consoles: On/off consoles: On/off consoles: On/off consoles: On/off consoles: On/off consoles: On/off consoles: On/off consoles: On/off consoles: On/OFF/ON/OFF/ON/OFF/ON/OFF/ON/OFF/ON/OFF/ON/OFF/ON/OFF/ON/OFF/ON/OFF/ON/OFF/ON/OFF/ON/OFF/ON/OFF/ON/OFF/ON/OFF/ON/OFF/ON/OFF/ON/OFF/ON/OFF/ON/OFF/ON/OFF/ON/OFF/ON/OFF/ON/OFF/ON/OFF/OSO/ Lod indicator Spin speed selectionPreparation

Loading the machine
Place the fabrics uniformly inside the machine. Hand knits should be placed inside out in the machine. Make sure that there is no clothing at the side of the door. Close the door by pushing lightly. If the door does not close completely, the machine could not be started-a safety measure. Front door is locked until the end of the washing program and it will not be opened about 2 minutes following the end of the program.

Sorting laundry
Sort the laundry according to the following groups and wash them separately:
- white and resistant colored fabrics,
- colored fabrics,
- delicate fabrics (silk, rayon etc.),
- wool.
Be sure to empty pockets and remove any belts, buttons, pins, etc. from the clothing. You can place little clothing materials (baby socks, etc) inside of pillow cases to avoid them slip into the pump and filter. For stained fabrics, refer to the “Practical information” section of the operating manual.

Detergent and softener selection
Choose the appropriate detergent specifically used at the full automatic washing machines. Suggested amount is given on the detergent cover.
Do not attempt to use detergents and bleaching elements that contain chlor and sulphur. The amount of the detergent depends on the dirt level of fabric, the amount of fabric and the softness of the water.
Program selection
COTTONS
A, B, C Programs
These programs are used for white and color cotton fabrics.
A: Program with pre-wash (pre-wash, main wash, 3 rinses, spin)
B: Program with main wash (main wash, 3 rinses spin)
C: Spin
Spin program is applied automatically in A and B programs. Should an extra spin is desired, program selection knob should be brought to C.
SYNTHETICS
F, H Programs
These programs are designed for synthetic fabrics, naylon clothing, curtains and iron free wool fabrics. Clothing are washed with more water delicately.
F: Program with main wash (main wash, 3 rinses; delicate spin)
H: Delicate spin program is applied automatically at the end of F washing program if the Rinse hold button is not selected. If additional delicate spin is desired, the program selection knob should be brought to H.
DELICATES
N: Delicate program is used for washing delicate cloths like curtain or silk fabrics. This program is without prewash and exists of main wash, 3 rinses and delicate spin. Rinse Hold button can be selected during the washing program if desired.
WOOLLENS
J: With program selection, which is without pre-wash, wool fabrics are washed throughly. Main wash, 3 rinses, woollen spin. Rinse hold button can be selected during the washing program if desired.
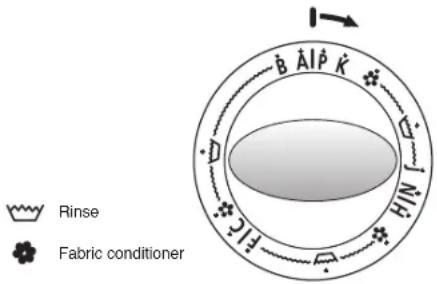
K: Delicate spin program. If rinse hold button is not selected during J program, 600 rpm delicate spin is applied after the wash cycle. K delicate spin program will be applied if delicate program (N) is chosen. Similarly woollen spin will be applied if woollen program (W) is selected. If additional delicate spin is desired, the program selection knob should be brought to K.
P: If Rinse hold button is selected during the wash programs F, N, J and spin is not desired, water in the machine can be discharged by bringing the program selection knob to P.
text_image
B AlP K D Rinse Fabric conditioner
Warning! Before turning the program selection knob you should first turn off the machine, then make your selection, and then turn on the machine by pushing the on/off button. Before any washing operation, make sure the power cord is plugged and the tap is on. Also be sure that the discharge hose is placed properly and the front door is closed.
Detergent dispenser
text_image
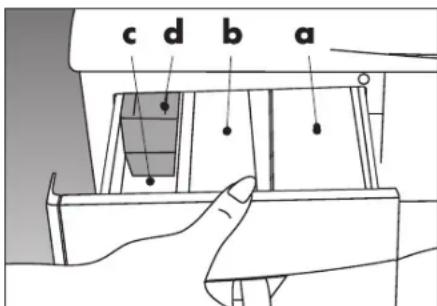
c d b aa. Compartment I. detergent compartment for prewash cycle.
b. Compartment II. detergent compartment for wash cycle.
c. "♣" Compartment for fabric conditioner.
d. Siphon.
Fill the fabric softener to the marking. Any excess amount of softener will mix into the wash water and you will have to re-fill the compartment. Hardened softener may clogg the siphon, in this case add some water to the softener.
Quick wash
Shortens washing time for lightly soiled fabrics. This function can be used for cotton and synthetic programs for temperatures below 60^ C.
Rinse hold
If you desire to leave your synthetic and wool fabrics in the machine after the wash program you may select the Rinse hold button to prevent them getting wrinkled. To continue the program, you can either press the Rinse hold button again or select P on the program selection knob to discharge the water.
800 Spin speed selection switch (only for WMA 6508 J)
500 When you want to reduce the spin speed to 500 rpm, press this button.
1000 Spin speed selection switch (only for WMA 6510 J)
500 When you want to reduce the spin speed to 500 rpm, press this button.
Part 4: Program selection and machine operation
Program selection table
| FABRIC TYPE | PROGRAM | PROGRAM NAME | TEMPERATURE (°C) | DISPENSER COMPARTMENT | PREWASH | QUICK WASH | RINSE HOLD | LOAD kg. | |
| WHITE SOLOURED | |||||||||
| Heavy soiled cottons and linens | A | Cotton with prewash | 50-90 | 40-50 | I + II | * | * | 5 kg. | |
| Normally soiled cottons and linens | B | Cotton main wash | 30-90 | 30-40 | II | * | 5 kg. | ||
| Spin for cottons and linens | C | Cotton spin | |||||||
| Heavy and normally soiled synthetics and synthetic mixture | F | Synthetic main wash | 30-60 30-40 | II | * | * | 2.5 kg. | ||
| Spin for synthetics | H | Synthetic spin | |||||||
| Delicates | N | Delicate wash | -40 | -40 | II | * | 2 kg. | ||
| Woolens | J | Woolen wash | -40 | -30 | II | * | 1.5 kg. | ||
| Spin for woolens and delicates | K | Delicate/ Woolen Spin | |||||||
| Discharging | P | Drainage | |||||||
* Options available
I Detergent compartment for prewash cycle
II Detergent compartment for wash cycle
Machine operation
text_image
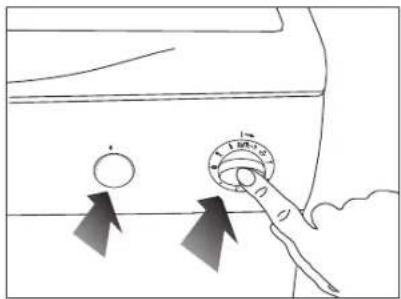
Diagram showing a hand pressing down on a rotary dial with directional arrows indicating motion or adjustment.Place your clothes into the machine and close the front door. Select the program after referring to the program selection table. Turn the program selection knob clockwise and bring the program letter on top.
natural_image
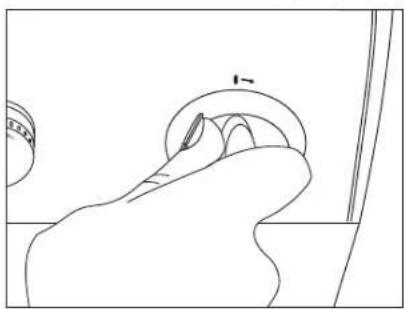
Line drawing of a hand pressing down on a curved object, no text or symbols presentAdjust the thermostat knob clockwise to set the desired temperature. When the knob is at “” the wash cycle is completed with the tap water temperature. Put powder detergent and the fabric softener to the compartments and close the detergent dispenser.
natural_image
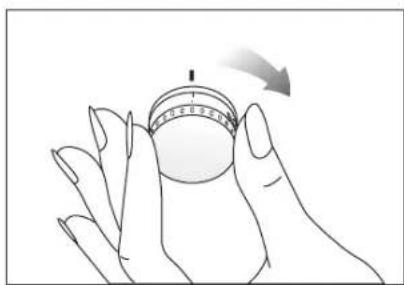
Illustration of a hand holding a circular object with a curved arrow indicating rotation (no text or symbols)Push out the knobs before selecting the program and the temperature. After you have finished the adjustment, you can push the knobs in. This will prevent the knobs from being played by your children.
Program operation
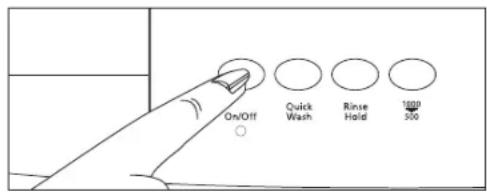
Program can be started by pushing the On/Off button. Front door will be locked and the led indicator will go on.
You can start the program by pushing On/Off button. Front door will be locked and the led indicator will go on. When machine is on, the program selection knob turns clockwise and takes water in. In B program the program selection knob turns fastly 4 steps forward. This does not mean a failure, it is necessary to allow the washing machine to take the needed amount of water.
text_image
On/Off Quick Wash Rinse Hold 1000 /300If fabric softener is added in the softener compartment, it will be used in the last rinse cycle. If rinse hold is selected, by re-pressing this button, you can continue the program. If no spin is desired, you may leave the rinse hold button pushed. Turn off the machine, select the letter P on the program selection knob and turn on the machine. With this operation, water in the machine will be discharged.
During cotton, synthetic and woolen programs the washing action will stand still on a step before rinse and wash from a period of 10 minutes up to 55 minutes according to the chosen program. This waiting period does not mean a failure.
End of the program
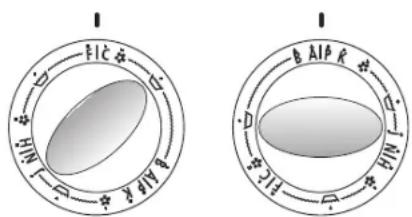
Wash programs A, B and C is finished when the solid line after C on the program selection knob is on top. If rinse hold button is not pushed, the wash program F end after delicate spin H and the wash programs N, J end after delicate spin K.
text_image
FIC HIN B AIP R HINUnloading the machine
Machine stops automatically after the programs are completed. Press the On/Off button to turn off your machine. Front door can be opened 1-2 minutes after the On/Off button is pushed. Turn off the tap. Unload the machine and leave the front door open to air the machine.
Part 5:
Care and maintenance

Detergent dispenser
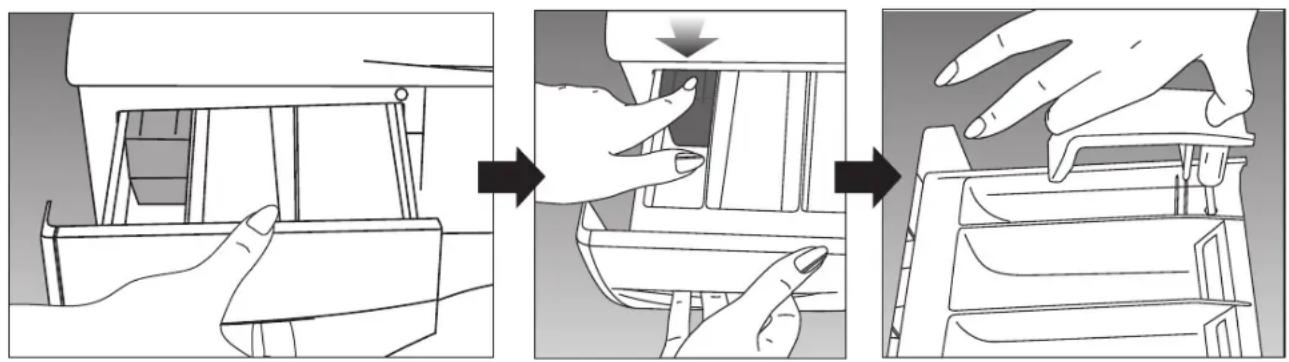
To clean the detergent residues, remove the detergent dispenser from its place by pressing on the area marked on siphon. Wash the dispenser with water and also clean the dispenser housing before inserting the dispenser to its place.

Siphon
Clean the siphon (coloured piece in the dispenser) every 30-40 washes. Pull out the siphon by holding from its edges. To prevent clogging, clean the softener residues thoroughly and make sure that the siphon fits into its place completely before any operation.
natural_image
Three-step diagram showing hand positioning of a mechanical device, no text or symbols present
Hoses
To prevent any leakage, have a technician to control the hoses every two years. If the machine is placed at cold ambient temperatures, the water remaining inside the pump and hoses should be removed from the filters. Also to prevent freezing, empty the water intake hoses by disconnecting from taps.

Water intake filter
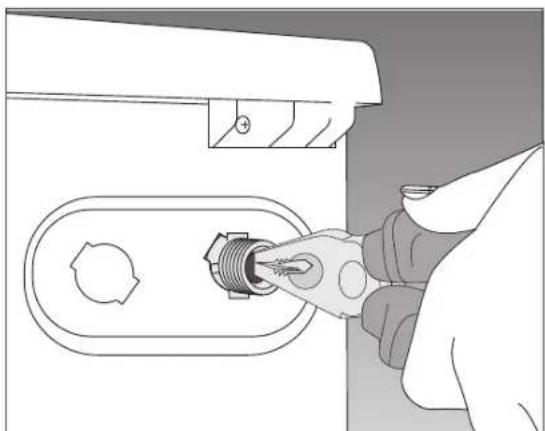
At the end of the water intake connection module and water inlet hose-tap side, there exists filters. These filters prevent any dirt and objects passing into the machine. It is advisable that these filters should be cleaned every 30-40 washes. To clean the filter, first turn the tap off. Then, disconnect the hose and clean the filter with a thin brush. If the filter is very dirty, you may clean it by pulling out with pliers. To clean the filter at the tap side of the hose, pull it out by hand and clean the filter under the tap water.

Drum
Do not leave any metal objects (pins, needles, etc.) inside the drum. These objects may cause rust on the drum surface. Do not clean the drum with scratching elements.

natural_image
Line drawing of a hand using a tool to insert a component into a device (no text or symbols present)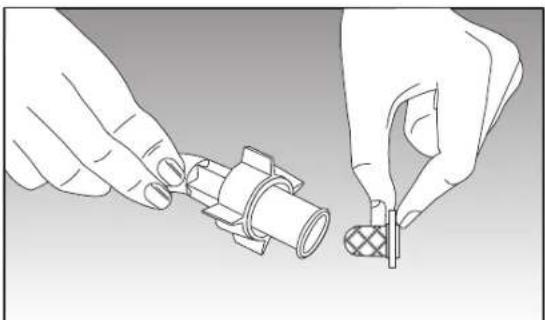
natural_image
Illustration of hands assembling a mechanical component with a tool (no text or symbols visible)Cleaning the pump filter
To prevent objects entering to the pump, your machine comes with a filter system that extends the pump life. It is advisable that you should clean the filter at every 30-40 washes. Before opening the filter door, disconnect the power. Turn the opening of kick plate screws 90° with a help of screw driver or a coin. Place a little pan infront of the filter door to prevent a little amount of water spilling from the machine. Remove the filter by turning it counter-clockwise direction. After cleaning the objects on the filter, place it by turning clockwise and make sure that it is closed firmly. Place the kick plate and secure it by locking the screws.

Attention! If the filter does not fit into its place, water will leak out from the filter.
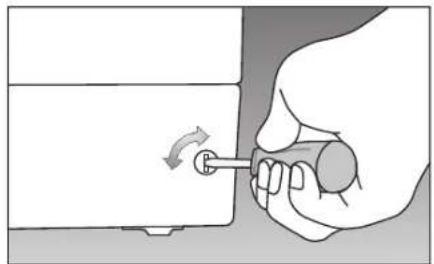
natural_image
Hand turning a button into a device with an arrow indicating rotation (no text or symbols)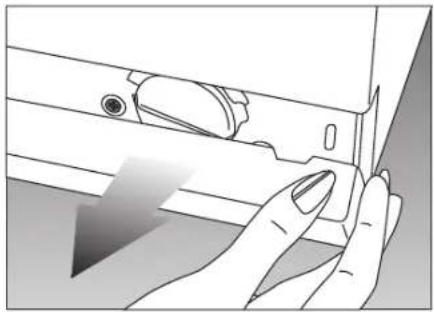
natural_image
Illustration of a hand pressing down on a device component (no text or symbols visible)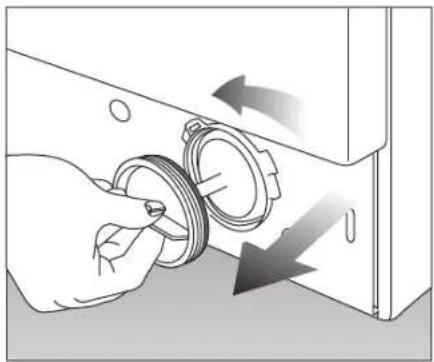
natural_image
Illustration of a hand adjusting a mechanical component with directional arrows indicating motion (no text or symbols)Part 6:
Helpful tips on stain removal
The following stain removing tips are approximate and can only be used at the washable fabrics. Please consult the washing information of the fabric manufacturer.
Ratios are approximated.

Alcoholic baverages: Wipe the fabric first with water, then water-glycerine solution and rinse with vinegar-water solution.

Shoe polish: Without harming the fabric, remove the stain carefully and grind it with detergent. If this doesn't help, prepare a water to alcohol solution (2 to 1) and rub the fabric, then wash it with warm water.

Tea and coffee: Pour hot water on to the stain and the fabric is white, pour some bleach and rinse it with water.

Bubblegum: Harden the gum stain by putting an ice on it. Then scrape off the stain carefully.

Chocolate and cocoa: Place the fabric into cold water for a period of time. Rub it with soap or detergent and wash it with the warmest water that the fabric can withhold. If any grease stain leftover wipe it with oxygen water.

Tomato paste: Scrape the hardened paste and leave the fabric for 40 minutes into cold water. Rub it with detergent and wash.

Egg stain: If the stain is hardened scrape the stain and wipe it with wet sponge or a soft cloth. Rub it with detergent and wash with cold water.

Grease stain: Scrape the stain and rub it with detergent. Then wash the fabric with warm water.

Mustard: Use glycerin and rub the fabric with detergent. If unsuccessful, wipe the stain with alcohol. (Colored and synthetic fabrics need 2 cups water and 1 cup alcohol solution.)

Blood stain: Leave the fabric for 30 minutes in the cold water. Use ammonia solution to remove the stain. (4 liters water-3 spoonful of ammonia.)

Ice-cream, milk and cream: Place the fabric into cold water for a period of time. Rub it with soap or detergent and wash it with the warmest water that the fabric can withhold. If any grease stain leftover wipe it with oxygen water.

Mildew: Do not let mildew stains stay for long periods of time. Place the fabric into cold water for a period of time. Rub it with soap or detergent and wash it with the warmest water that the fabric can withhold. If any grease stain leftover wipe it with oxygen water.

Fruit: Pour cold water on to the stain and do not use warm water to rinse. Let it sit for 2 hours and wipe it with white vinegar and rinse.

Ink: Let the cold water run on the stain and wait until the stain is gone. Later rub it with lemon juice and detergent, let the stain stay for five minutes and rinse the fabric.

Grass stain: Rub the stain with detergent. If the fabric lets, use bleaching element. Wools should be wiped with alcohol.

Paint: Use thinner to remove the stain. Put a cotton cloth on the wool fabrics. Rub the stain with detergent and rinse with cold water.

Burnt stains: Use bleach if permissible. For wool fabrics place a oxygen water inserted cotton cloth on the stain and iron. Rinse completely and wash the fabric.
Part 7:
Before calling service

You turned the machine on, but the leds are off on the panel.
Check the grounding on the power cable or a blown fuse. Check the front door proper closure.

Water coming from beneath the machine.
Check the water intake and drain hoses. Tighten the connections. The washers of the hoses may be worn out. If non of the both, the pump filter is not closed properly.

Machine does not take water.
Check the front door for proper closure. Either taps are closed or water intake filters are clogged.
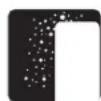
Foam coming out of the detergent dispenser.
Check whether your detergent is suitable for automatic machines. Next time use less detergent.

Taken water is directly discharged.
Check if the discharge hose placed as described in the users manual or not.

Pump does not drain water.
Clean the pump filter. Check whether the drain hose is bent or not. If there is need to clean the pump filter, refer to the pump filter cleaning section of the manual.
Descriptions of the international textile care label (ITCL) symbols
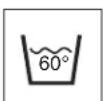
Washing temperature
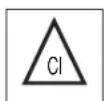
Bleach can be used

Do not use bleach
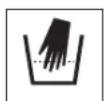
Do not machine wash

Dry on horizontal surface

Do not wash Dry clean
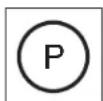
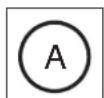
Chemicals can be used

No dry cleaning

No spin
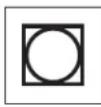
Can be washed at centrifugal machine
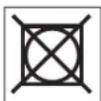
Do not wash centrifugal machine

Line dry

Iron permitted Do not iron


Warm iron
This product has been manufactured at environmental friendly modern facilities.