P-3000 - Mp3 player EPSON - Free user manual and instructions
Find the device manual for free P-3000 EPSON in PDF.

| Product Type | Multimedia Viewer / Portable Media Player |
| Brand / Model | Epson P-3000 |
| Display | 4-inch Photo Fine Ultra LCD, 640x480 pixels, approx. 16.77 million colors, Adobe RGB color gamut |
| Storage Capacity | 40GB 2.5-inch hard drive (FAT12/16/32) |
| Dimensions (HxWxD) | 3.5 × 5.9 × 1.3 in (88.7 × 150 × 33.1 mm) |
| Weight (with battery) | 15.0 oz (426 g) |
| Power Source | Rechargeable lithium-ion battery (model D111A, 3.7V, 2600mAh) and AC adapter (model A351H, input 100-240V, output 5V 2.3A) |
| Battery Life | Approx. 3 hours slideshow, 3 hours video playback (MPEG4, 2Mbps, headphones), 6 hours audio playback (MP3, 128kbps, headphones) |
| Supported Image Formats | JPEG (up to 30MP), RAW (ARW, MRW, CR2, CRW, NEF, ORF, DNG, PEF, ERF, RAF) with zoom |
| Supported Audio Formats | MP3, AAC (M4A), WMA (non-DRM, up to 320kbps, 48kHz stereo) |
| Supported Video Formats | MPEG4 (AVI, MOV, MP4, ASP), Motion JPEG, DivX (Home Theater Profile), H.264 (Baseline Profile Level 1.2), WMV9, MPEG1/2, VOB, MOD; up to 720×576, 30fps, 8Mbps |
| Memory Card Slots | CompactFlash Type I/II (including Microdrive) and SD/SDHC/MMC; CF adapter for other cards (xD, Memory Stick, SmartMedia) |
| Connectivity | USB 2.0 (Host for USB devices, Device for computer), A/V out (3.5mm mini-jack to composite video/stereo audio), headphone out |
| Direct Printing | PictBridge-compatible printers; supports border/borderless, various paper sizes (4x6, 5x7, 8x10, Letter, A4) |
| Additional Features | Slideshow with music, photo rating (1-5 stars), private folders with password, equalizer, playlist creation, TV output (NTSC/PAL), screen saver |
| Included Accessories | Lithium-ion battery, AC adapter, USB cable, strap, P-3000/P-5000 Basics Guide, software CD (Epson Link2) |
| Cleaning Instructions | Turn off and unplug; wipe with a clean, dry cloth; do not use harsh or abrasive cleaners |
| Safety & Regulatory | FCC Part 15 Class B, CAN/CSA CISPR22 Class B, UL60950 (adapter), UL2054 (battery); operate at 41-95°F, 30-80% humidity |
| Replacement Parts | Battery (model D111A, product code B32B818262) available from Epson authorized resellers or epsonstore.com |
Frequently Asked Questions - P-3000 EPSON
User questions about P-3000 EPSON
0 question about this device. Answer the ones you know or ask your own.
Ask a new question about this device
Download the instructions for your Mp3 player in PDF format for free! Find your manual P-3000 - EPSON and take your electronic device back in hand. On this page are published all the documents necessary for the use of your device. P-3000 by EPSON.
USER MANUAL P-3000 EPSON
natural_image
Digital camera display showing a green frog on a tree branch, with no visible text or symbols on the device itself.User's Guide
All rights reserved. No part of this publication may be reproduced, stored in a retrieval system, or transmitted in any form or by any means, electronic, mechanical, photocopying, recording, or otherwise, without the prior written permission of Seiko Epson Corporation. The information contained herein is designed only for use with this Epson product. Epson is not responsible for any use of this information as applied to other products.
Neither Seiko Epson Corporation nor its affiliates shall be liable to the purchaser of this product or third parties for damages, losses, costs, or expenses incurred by the purchaser or third parties as a result of accident, misuse, or abuse of this product or unauthorized modifications, repairs, or alterations to this product, or (excluding the U.S.) failure to strictly comply with Seiko Epson Corporation's operating and maintenance instructions.
Seiko Epson Corporation shall not be liable for any damages or problems arising from the use of any options or any consumable products other than those designated as Original Epson Products or Epson Approved Products by Seiko Epson Corporation.
Seiko Epson Corporation shall not be held liable for any damage resulting from electromagnetic interference that occurs from the use of any interface cables other than those designated as Epson Approved Products by Seiko Epson Corporation.
Trademarks
Epson is a registered trademark and USB DIRECT-PRINT, Photo Fine, and Exceed Your Vision are trademarks of Seiko Epson Corporation.
Photo Enhance is a trademark of Epson America, Inc.
QuickTime and the QuickTime logo are trademarks or registered trademarks of Apple, Inc., used under license.
DivX, DivX Certified, and associated logos are trademarks of DivX, Inc. and are used under license.
CompactFlash is a registered trademark of SanDisk Corporation.
SD is a trademark of SD Card.
This product is protected by certain intellectual property rights of Microsoft. Use or distribution of such technology outside of this product is prohibited without a license from Microsoft.
This product is licensed under the MPEG-4 Visual Patent Portfolio License for the personal and non-commercial use of a consumer for (i) encoding video in compliance with the MPEG-4 visual standard (MPEG-4 Video) and/or (ii) decoding MPEG-4 Video that was encoded by a consumer engaged in a personal and non-commercial activity and/or was obtained from a video provider licensed by MPEG LA to provide MPEG-4 Video. No license is granted or shall be implied for any other use. Additional information including that relating to promotional, internal and commercial uses and licensing may be obtained from MPEG LA, L.L.C. (See www.mpegla.com)
This product is licensed under the AVC Patent Portfolio License for the personal and non-commercial use of a consumer to (i) encode video in compliance with the AVC standard (AVC Video) and/or (ii) decode AVC Video that was encoded by a consumer engaged in a personal and non-commercial activity and/or was obtained from a video provider licensed to provide AVC Video. No license is granted or shall be implied for any other use. Additional information may be obtained from MPEG LA, L.L.C. (See www.mpegla.com)
MPEG Layer-3 audio coding technology is licensed from Fraunhofer IIS and Thomson.
Any use of this product other than consumer personal use in any manner that complies with the MPEG-2 standard for encoding video information for packaged media is expressly prohibited without a license under applicable patents in the MPEG-2 patent portfolio, which license is available from MPEG LA, L.L.C., 250 STEELE STREET, SUITE 300, DENVER, COLORADO 80206.
DivX, DivX Certified, and associated logos are trademarks of DivX, Inc. and are used under license.
General Notice: Other product names used herein are for identification purposes only and may be trademarks of their respective owners. Epson disclaims any and all rights in those marks.
Patents:
5,809,336
5,784,584
6,598,148
© 2007 Epson America, Inc. 3/07


Contents
Introduction
Features. 7
Using the Documentation....7
Chapter 1 Getting Started
Parts 8
Lights and Buttons 9
Installing the Battery 10
Charging the Battery.... 10
Removing the Battery 11
Turning On the Power 12
Setting the Language, Date, and Time 12
Locking the Buttons 13
Using the Home Screen 14
Turning Off the Power 15
Saving Power.... 15
Chapter 2 Using Memory Cards
Inserting and Removing Memory Cards ..... 16
Using the CF Card Slot 17
Using the SD Card Slot 18
Copying Files From a Memory Card.... 19
Copying All Files 19
Copying Selected Files 20
Copying Files to a Folder 21
Creating a New Folder and Copying Files 22
Chapter 3 Viewing Photos and Videos
Using the Viewer Screen 23
Changing the Display.... 24
Using the Pop-up Menu 24
Supported Image Formats 25
Viewing Images 26
Zooming an Image 27
Displaying Information 27
Displaying a Wider Color Gamut. 28
Displaying Images as a Slide Show 28
Rotating an Image 29
Viewing Videos 30
Supported Video Formats 30
Playing Videos 31
Setting the Display Mode. 32
Viewing Files on a TV.... 32
Chapter 4 Playing Music
Copying Music From Your Computer 34
Supported Audio Formats 36
Playing Audio Files 36
Setting Repeat and Shuffle Options. 38
Creating a Playlist 38
Creating a Playlist on the Viewer 39
Adding Tracks to an Existing Playlist 40
Removing Tracks From a Playlist 40
Changing the Order of a Playlist 40
Using the Equalizer 41
Deleting Audio Files From the Viewer 41
Chapter 5 Managing Files
Copying Files To and From Your Computer.... 42
Backing Up Files to Your Computer.... 43
Copying Files From Your Computer to the Viewer .. 44
Disconnecting the Viewer From Your Computer .... 44
Setting Backup and Conversion Preferences ..... 45
Using the Viewer With USB Devices 46
Connecting a USB Device 47
Copying Files to the Viewer 47
Copying Files to the USB Device 48
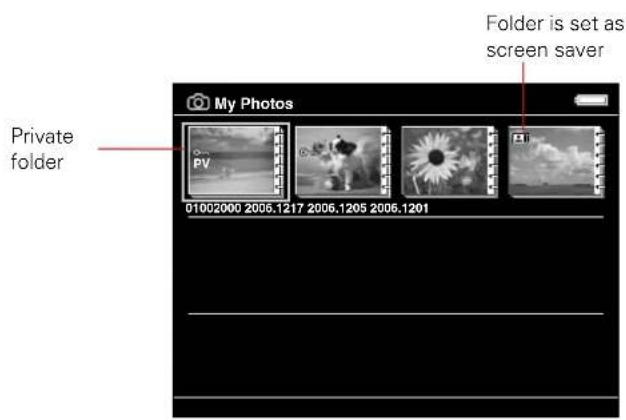
Setting Folders as Private 49
Renaming a Folder 51
Deleting Files and Folders 51
Locking Files and Folders 53
Setting a Folder Icon or Home Screen Wallpaper ..... 54
Rating Photos 54
Selecting a Screen Saver.... 55
Chapter 6 Printing
Connecting the Viewer to a Printer 56
Printing Your Photos. 57
Printing Your Videos. 59
Chapter 7 Customizing Settings
Hard Drive Capacity.... 60
Power Save 60
File Operation.... 61
Movie Setting 61
Slide Show 61
Sound 62
View Mode 62
Date and Time 62
Language. 62
Firmware Version 62
Chapter 8 Maintenance and Troubleshooting
Cleaning the Viewer 63
Error Messages 63
Problems and Solutions.... 64
Power Problems 64
File Viewing Problems 65
File Operation Problems 66
Printing Problems 67
Updating the Firmware and Printer Driver 67
Uninstalling Software 67
Windows 67
Macintosh 68
Resetting the Viewer 68
Replacing the Battery.... 69
Where To Get Help 69
Internet Support. 69
Speak to a Support Representative.... 69
Appendix A Notices and Specifications
System Requirements 70
Windows System Requirements 70
Macintosh System Requirements 70
Safety Instructions.... 71
Standards and Approvals 76
Specifications. 77
Index 79
Introduction
With the Epson® P-3000 multimedia viewer, you can enjoy photos, videos, and music wherever you go. Your images are displayed on Epson's exclusive 4-inch Photo Fine™ Ultra LCD in brilliant color and detail.
Features
Large 4-inch LCD with true Adobe ^ RGB color gamut
- Support for JPEG and RAW files (including zoom)
- Support for MP3 and AAC audio, with music playlists
- Support for MPEG4, Motion JPEG, and DivX ^ (with DRM) video
○40GB hard drive
- Two slots for CompactFlash ^ and SD ^TM memory cards
○Hi-speed USB 2.0 interface for PC or Macintosh ^®
- Software for convenient file conversion and transfer
Direct printing to PictBridge ^® printers
○Lithium-ion battery and AC adapter
○ Video output to display pictures on a TV or projector
Using the Documentation
This guide provides information and instructions for all the viewer features, including troubleshooting tips.
Make sure you read and follow all the "Safety Instructions" on page 71. Please follow these guidelines:
Warning:
Must be followed carefully to avoid bodily injury.
Caution:
Must be observed to avoid damage to your equipment.
Note:
Contains important information and useful tips on the operation of your product.
If you need assistance using your viewer, see “Where To Get Help” on page 69.
Your package also includes a P-3000/P-5000 Basics Guide. Keep it with the viewer for handy reference.
Chapter 1
Getting Started
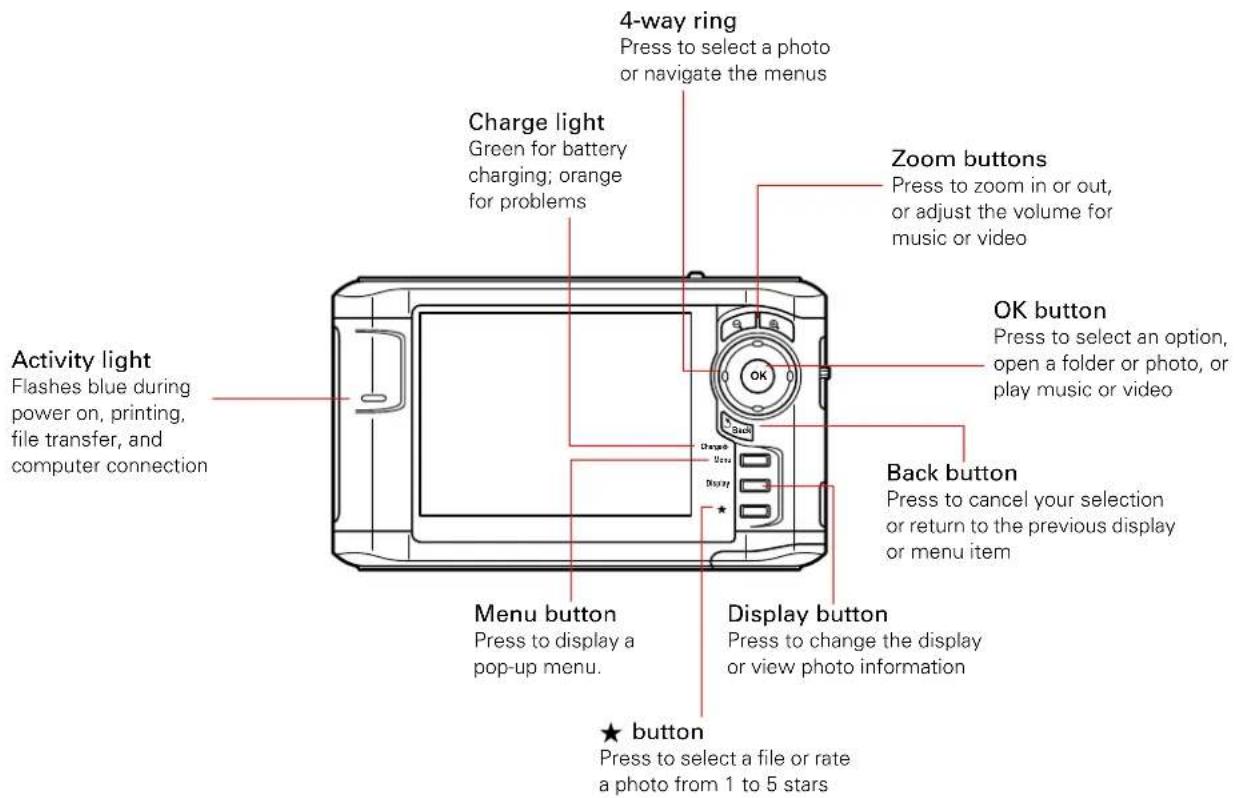
Parts
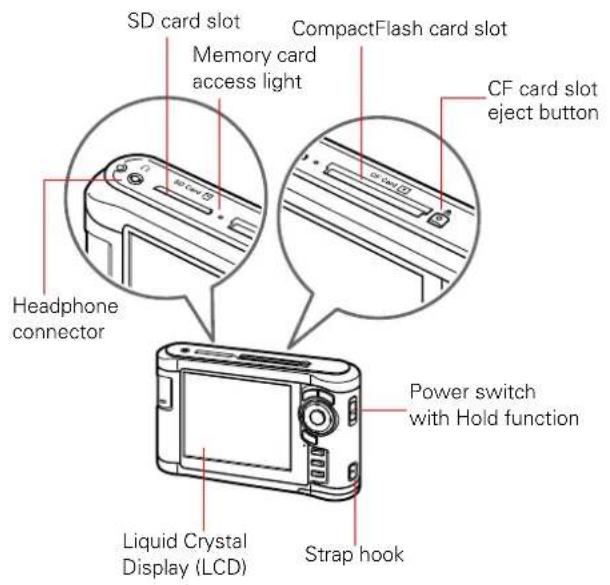
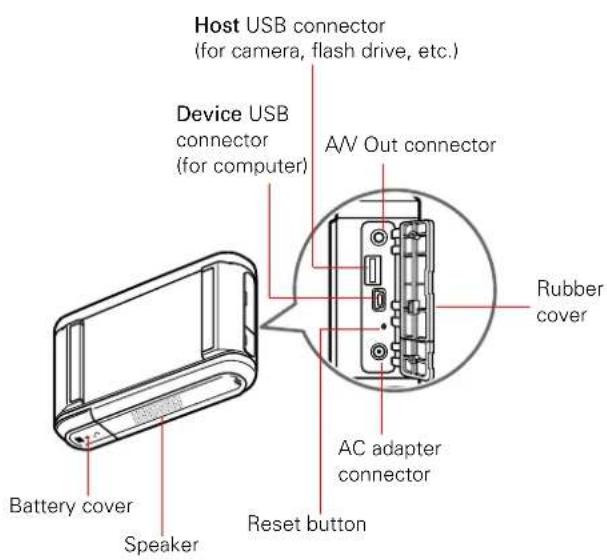
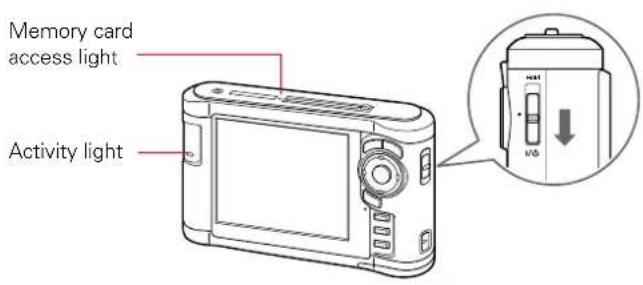
Lights and Buttons
Installing the Battery
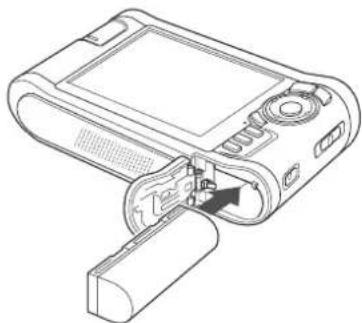
The viewer comes with a lithium-ion battery.
1 Turn the viewer upside down.
2Slide the battery cover to the right to open it.
natural_image
Line drawing of a portable electronic device with ports and a scroll, showing no text or symbols.3 Insert the battery into the compartment in the direction of the arrow on the battery.
natural_image
Line drawing of a handheld electronic device with an open lid and battery port (no text or symbols)4Close the battery cover and slide it to the left until it clicks.
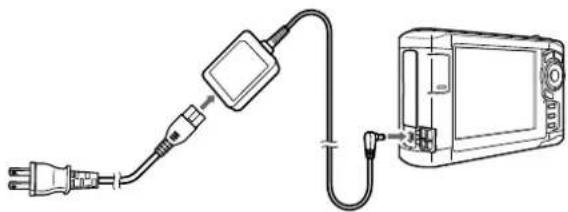
Charging the Battery
After installing the battery, you need to charge it using the AC adapter. It takes about 3.5 hours to fully charge the battery when the viewer is off, and longer when the viewer is on.
The Charge light is green while the battery is being charged. When the battery is fully charged, the light turns off.
To charge the battery, connect the AC adapter as shown below. Connect the other end to the power cord, and plug it into an electrical outlet.
natural_image
Line drawing of a power cord connected to a device via cable and plug (no text or symbols)Caution:
Do not connect the AC adapter when the battery is not installed; this can damage the viewer. Turn off the viewer before disconnecting the AC adapter.
The battery status is displayed in the top right corner of the LCD screen when the viewer is on.
| Battery is fully charged. | |
| Battery power is about half full. | |
| Battery power is low. | |
| Battery power is running out. Charge the battery using the AC adapter. | |
| Battery is charging. |
Note:
The battery may become hot when the viewer is operated during charging. Charging will stop until the battery cools down.
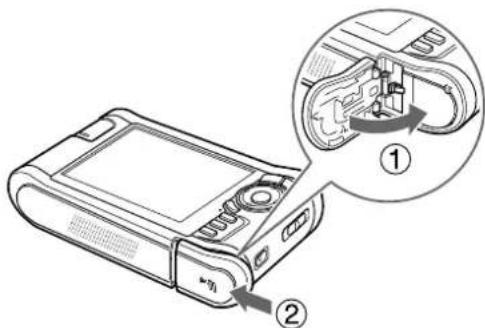
Removing the Battery
If you plan to store the viewer for an extended period of time, you should remove the battery.
1 Make sure the viewer is turned off.
Caution:
Remove the AC adapter if it is connected to the viewer.
Never remove the battery while the viewer is turned on.
Doing so may cause files to be lost or damaged.
2Open the battery cover.
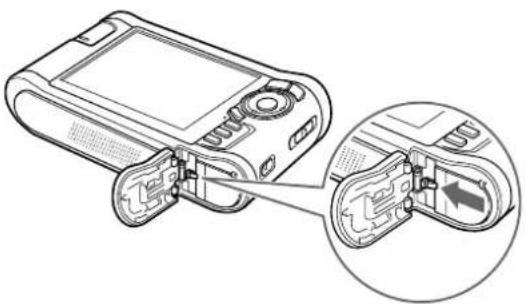
3Push the latch down. The battery pops out.
natural_image
Diagram of a handheld electronic device with an inset showing internal components (no text or symbols)4Pull out the battery. Then close the battery cover.

natural_image
Line drawing of a handheld electronic device with a scroll wheel and control panel (no text or symbols)Turning On the Power
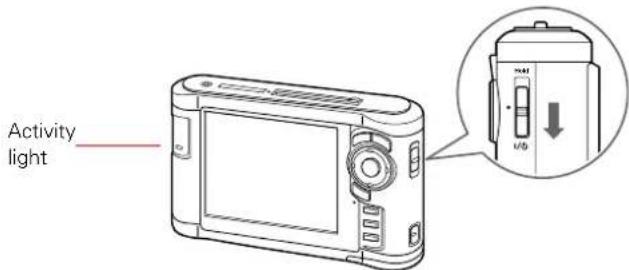
Slide the power switch down as shown below, then release it. The activity light flashes for a moment then turns off.
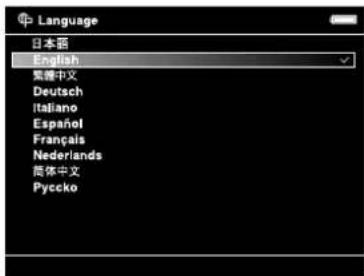
Setting the Language, Date, and Time
The first time you turn on the viewer, you see the Language setting screen:
Note:
If you see the Home screen instead (as shown in "Using the Home Screen" on page 14), the language has already been selected. To change it or check the date and time, select Settings on the Home screen. Then follow the instructions in "Date and Time" or "Language" on page 62.
1 Press OK to select English. You see a message about setting the date.
2 Press OK. You see the Date and Time screen:

3Press up or down on the 4-way ring to change the value for the selected item (such as the year).
4To go to the next option ( Month or Day, for example) press right or left.
5After setting the date, set the date format.
6When you finish, highlight Complete and press OK. You see the Home screen. See "Using the Home Screen" on page 14 for details.
Note:
If you remove the battery, the date and time settings will be erased after about one day. The next time you turn on the viewer, the date and time setting screen will be displayed.
Locking the Buttons
You can lock the buttons on the viewer. This allows you to place the viewer in a purse or backpack and use it with headphones without accidentally pressing the buttons.
To lock the buttons, slide the power switch to Hold.
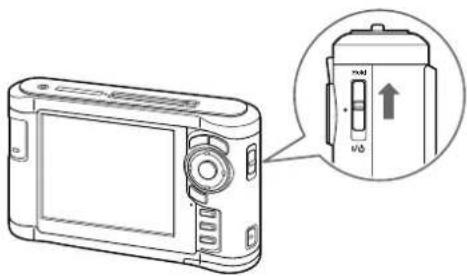
To unlock the buttons, slide the power switch back to the middle position.
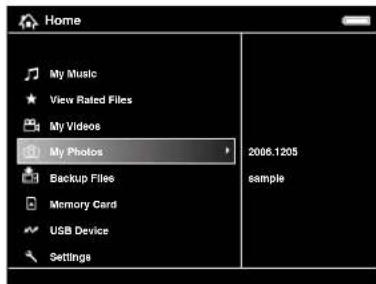
Using the Home Screen
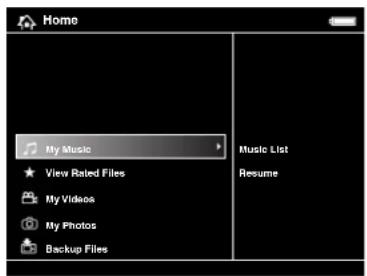
Whenever you turn on the viewer, the Home screen appears. All operations can be started from this screen.
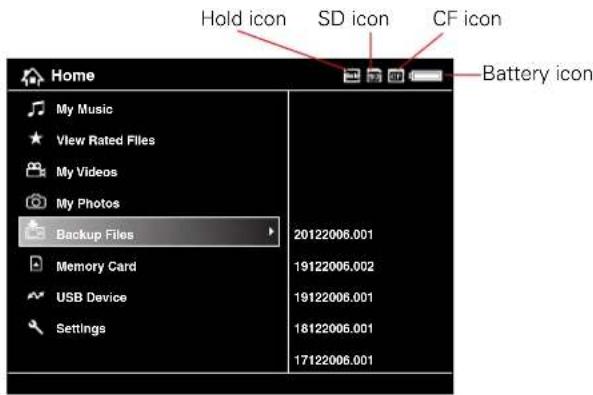
The following table summarizes the Home screen.
| Icon Function | |
| Battery icon | Indicates the remaining charge in the battery. See "Charging the Battery" (page 10). |
| CF icon | Indicates that a CompactFlash memory card is inserted. |
| SD icon | Indicates that an SD memory card is inserted. |
| Icon Function | |
| Hold icon | Indicates that the buttons are locked. See “Locking the Buttons” (page 13). |
| My Music | Listen to music copied from your computer. See “Playing Audio Files” (page 36). |
| View Rated Files | View files that you have rated with one or more stars. See “Rating Photos” (page 54). |
| My Videos | View folders and play videos that you have copied into the Videos folder. See “Viewing Videos” (page 30). |
| My Photos | View folders and files that you have copied into the Photos folder. See “Viewing Images” (page 26). |
| Backup Files | View folders and files backed up from memory cards or USB devices. |
| Memory Card | View files on memory cards or copy the files to the viewer. See “Copying Files From a Memory Card” (page 19). |
| USB Device | Copy files to or from a USB device. See “Using the Viewer With USB Devices” (page 46). |
| Settings Check and adjust viewer settings. See “Customizing Settings” (page 60). | |
Turning Off the Power
Before you turn off the viewer, make sure the memory card access light is off. Then slide the power switch as shown below, and hold it down for a few seconds until the activity light flashes and the viewer turns off.
Saving Power
When you are not using the viewer, it goes into one of the power-saving modes listed below. You can adjust the timing for all of the power-saving modes; see “Power Save” on page 60 for more information.
The LCD screen turns dark after one minute of inactivity. Press any button to turn it on.
The LCD screen turns off after five minutes of inactivity. Press any button to turn it on.
The viewer turns off automatically after 10 minutes of inactivity. Slide down the power switch to turn it back on.
When the AC adapter is connected, the viewer plays a screen saver instead of turning off.
To customize the screen saver, see "Selecting a Screen Saver" on page 55.
Chapter 2
Using Memory Cards
The viewer has two memory card slots: one for CompactFlash cards and one for SD (Secure Digital) cards.
This chapter explains how to insert and remove memory cards and how to display and copy files.
Inserting and Removing Memory Cards
The viewer supports the following types of memory cards:
| Memory card type Maximum Capacity | |
| CompactFlash Card(Type I and Type II) | 8GB |
| MicrodriveTM | 4GB |
| SD (Secure Digital) and SD High Capacity Card | 2GB |
| MultiMedia Card and Multimedia Card Plus | 1GB |
With a CompactFlash adapter, you can use the memory cards listed below (up to 8GB) in the C/F Card slot:
OminiSD ^TM Card OMemory Stick PRO Duo ^TM
○Memory Stick ™
○xD-Picture Card ™
○Memory Stick Duo ™ ○SmartMedia Card
○Memory Stick PRO ™ ORS-MMC Card
Caution:
Make sure you follow all instructions included with your memory card.
Never remove a memory card, or shake or drop the viewer while the memory card access light is flashing. Doing so may cause files to be lost or damaged.
Do not put labels or stickers on memory cards. The sticker may peel off, preventing the card from being ejected and damaging the viewer.
Avoid using or storing cards in direct sunlight, or in places that are extremely hot, humid, or dusty.
Using the CF Card Slot
You can use Type I and Type II CompactFlash cards or Microdrive cards in the CF Card slot. If you have a CompactFlash adapter, you can also use other types of cards, as described in "Inserting and Removing Memory Cards" on page 16.
Insert the memory card into the slot with the label facing forward. Then push the memory card all the way into the slot.
If you are using a CompactFlash adapter, put the card into the adapter and insert the adapter into the slot.
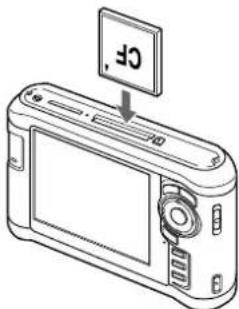
Caution:
Make sure you insert memory cards in the correct orientation. Otherwise, the card and viewer may be damaged.
To remove a card from the CF Card slot, first make sure the memory card access light is off. Then press the eject button and pull out the card.
If the button is not sticking out, press it once to pop it out, then press it again to eject the card.

Note:
If you are using a CompactFlash adapter, remove the adapter from the viewer; do not remove only the memory card.
Using the SD Card Slot
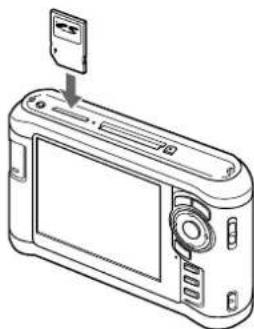
You can use Secure Digital or MultiMedia cards in the SD Card slot.
Insert the memory card into the slot as shown below. Then push the memory card all the way into the slot.
natural_image
Line drawing of a digital camera with an attached display panel (no text or symbols)Caution:
Make sure you insert memory cards in the correct orientation. Otherwise, the card and viewer may be damaged.
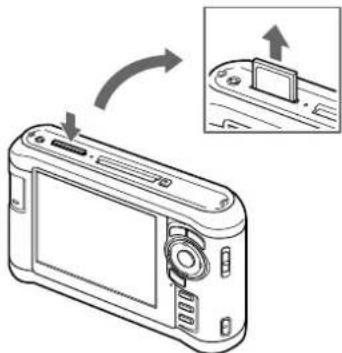
To remove a card from the SD Card slot, first make sure the memory card access light is off. Then press in on the top of the card.
natural_image
Line drawing of a digital camera with an inset showing the camera's screen and scroll (no text or symbols)When the card pops up, pull it out of the slot.
Copying Files From a Memory Card
After you insert a memory card, you can browse the files and decide what you want to do with them, or simply copy all the files on the card to the viewer.
Note:
If the battery power is low, copying may not be completed. Use the AC adapter if this happens.
Copying All Files
1 Insert a memory card.
If the Memory Card Menu doesn't open automatically, select Memory Card in the Home screen, then press OK. You see the following menu:
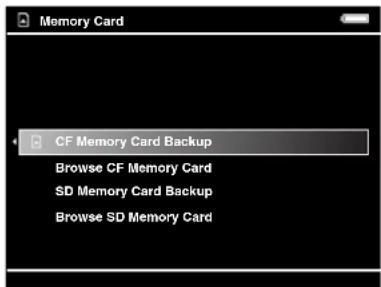
2Select CF Memory Card Backup or SD Memory Card Backup. Then press OK.
The files are copied to a folder that is automatically created in the Backup Files folder on the viewer. The folder is named according to the date and the date format you selected, for example, 12252006.001. Folders are numbered in the order they are copied.
If you want to change the name, see “Creating a New Folder and Copying Files” on page 22.
When the backup is complete, you see thumbnail images of the copied photos.
Note:
The files on the memory card can be automatically deleted after copying is complete. For details, see "File Operation" on page 61.
To check the copied files, select Backup Files in the Home screen, then press OK. Press OK again to select the folder you just copied and display the files.
Copying Selected Files
1 Insert a memory card. If the Memory Card Menu doesn't open automatically, select Memory Card in the Home screen, then press OK.
2In the Memory Card menu, select Browse CF Memory Card or Browse SD Memory Card.
3Press OK. The files on the memory card appear in thumbnail view.
![CF Memory Card [EPSON_DSC] Resort.JPG Beach 1.JPG Beach 2.JPG Beach 3.JPG Stream.jpg Lake.jpg Sunflowers.jpg Flower 1.JPG Flower 2.JPG Flower 3.JPG Flower 4.JPG Visa.JPG](/content/2026/05/773926/images/0a225013d53ae5bde52e9dbafe8ab04319462dba4adf0aac592c465e56c331f2.jpg)
4Press the Menu button to display the pop-up menu.
5Select Backup, then press OK.
Small white check boxes appear on each thumbnail image.
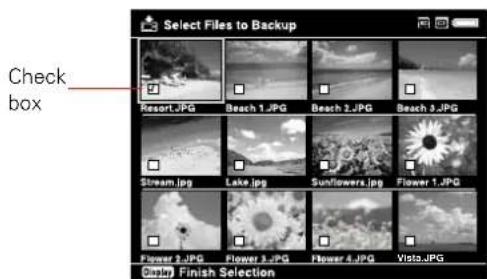
6Use the 4-way ring to highlight each photo you want to copy, then press the ★button to select it. The selected items are displayed with red √check marks.
7 When you are finished selecting photos, press OK.
The files are copied to a folder that is automatically created in the Backup Files folder on the viewer. The folder is named according to the date and the date format you selected, for example, 12252006.001. Folders are numbered in the order they are copied.
If you want to change the name, see “Creating a New Folder and Copying Files” on page 22.
Copying Files to a Folder
You can copy selected files directly from a memory card to a new or existing folder in My Videos or My Photos.
1 Insert a memory card.
If the Memory Card Menu doesn't open automatically, select Memory Card in the Home screen, then press OK.
2In the Memory Card menu, select Browse CF Memory Card or Browse SD Memory Card.
3Press OK. The files on the memory card appear in thumbnail view.
4Press the Menu button to display the pop-up menu.
5Select Copy/Move, press OK, then press OK again to select Copy to Folder.
Check boxes appear on each thumbnail image.
6Use the 4-way ring to highlight each photo you want to copy, then press the ★button to select it. The selected items are displayed with red √check marks.
Note:
To select all files and folders, press Menu and choose Select All. To select more than one file or folder, you must view them on the thumbnail, mini-tholumn, or detailed list screen. For more information, see "Changing the Display" on page 24.
7Press OK.
8Use the 4-way ring to select the folder where you want to copy the items. Then do one of the following:
To copy the items into the selected folder, press OK. Your items are copied.
To copy the items into a new folder, highlight Create New Folder and press OK. Then see the next section to enter a name for the new folder and copy the items.
Note:
It's easier to manage your files if you to copy them into a folder you've named, instead of placing them in the root of a main folder (such as My Photos or My Videos).
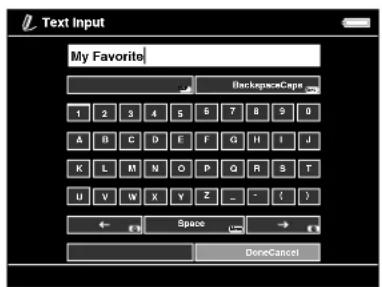
Creating a New Folder and Copying Files
You can create a folder and copy files to it from a memory card, USB device, or from Backup Files.
1 To copy items to a new folder, follow the steps in the previous section.
When you select Create New Folder and press OK, the on-screen keyboard appears with the current date entered as the default name for the folder.
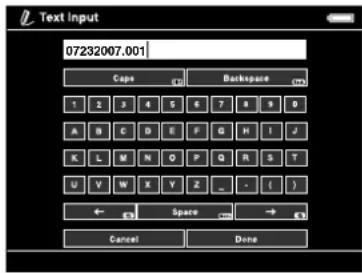
You can either keep the name or enter a new one.
2To keep the current name, highlight Done and press OK. Your files are copied to the new folder.
3To enter a new name, use the Back (backspace) button to clear the current name. Then enter a new name using the 4-way ring (highlight each character and press OK to enter it).
To move the cursor forward or backward, press or ⊕.
To delete the last letter input, press Back.
To enter a space, press Menu.
To switch between upper- and lowercase, press Display.
To cancel the name, highlight Cancel and press OK.
4 After entering the name, highlight Done and press OK. Your files are copied to the new folder.
Chapter 3 Viewing Photos and Videos
After you have copied files from a memory card, you can view or play them in various ways. This chapter explains how to view photos and video files on your viewer and on a TV or projector.
Using the Viewer Screen
The following illustrations identify the icons that appear on the screen:
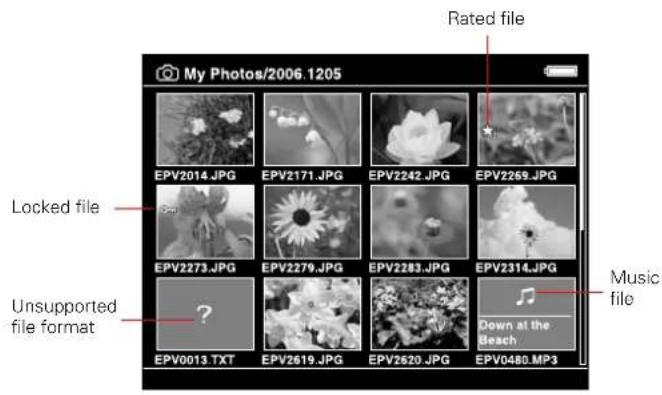
By default, unsupported files are not displayed. If you want to change this setting, see "File Operation" on page 61.
O Thumbnails of video files that have not been played back, or have not been played back completely, are displayed with NEWr N) respause.cfa(not shown in mini-tholumn view).
☐ Thumbnails of folders that have been backed up on your computer in Backup Files are displayed with the icon.
- Files in unsupported formats or with names that contain unsupported characters may be displayed as “?”, and may not be accessible.
Changing the Display
You can change the file view by pressing the Display button while in a folder.
| Thumbnails(12 per screen) | 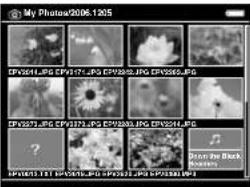 |
| Mini-thumbnails(64 per screen) | 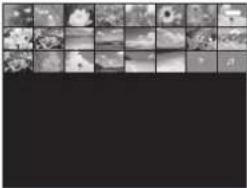 |
| Details(file name, date modified,and file size) |  |
Using the Pop-up Menu
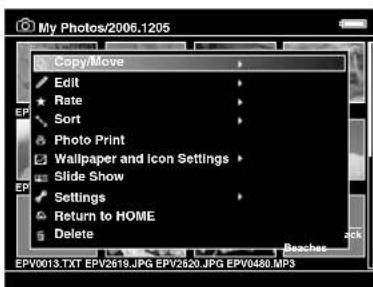
Press the Menu button at any time to display a menu of the options currently available. These options vary, depending on what you are doing with the viewer.
The following table summarizes the menu functions:
| Audio Track Setting | Selects the audio track for DivX videos that have multiple tracks. |
| Copy/Move Copies | or moves files or folders. See page 21. |
| Delete Deletes | files or folders. See page 51. |
| Display mode | Selects modes for various types of videos. See page 32. |
| Display photo enhance | Displays photo images using a wider color gamut. See page 28. |
| Edit Locks files or | folders (page 53),renames folders,(page 51),or rotates photos (page 29). |
| Rating Rates files | from one to 5 stars.See page 54. |
| Photo Print Prints | photo images.See page 57. |
| Play Settings Sets | the display size for videos,or returns to the beginning of the video.See page 31. |
| Settings Adjusts | LCD brightness,turns the key beep on or off,and sets display options for private folders and unsupported files.See pages 61 to 62. |
| Set as Screen Saver | Creates a screen saver from the images in a folder.See page 55. |
| Slide Show Starts | displaying the images in a folder as a slide show.See page 28. |
| Sort Organizes the files in a folder by date,name,or file extension. | |
| Subtitle Setting | Selects subtitles for DivX videos that include them. |
| Video Print Prints | video images.See page 59. |
| Wallpaper and Icon Settings | Selects an image to be used as background for a folder or the Home screen.See page 54. |
Supported Image Formats
| Image files | Extension Details | |
| JPEG .jpg | .jpeg | Minimum size: 72 × 72 pixelsMaximum size: 30 megapixelsMaximum image aspect ratio: 3:1 |
| RAW .arw | .mrw | JPEG data stored in the header of RAW files is displayed. |
| .cr2 .nef | ||
| .crw .orf | ||
| .dng .pef | ||
| .erf .raf | ||
Note:
TIFF files and progressive JPEG files are not supported.
For DNG files, the viewer supports only the JPEG preview embedded in files saved with Adobe DNG Converter or Adobe Photoshop.®
Viewing Images
After you have copied files from a memory card you can view them in various ways. You can display the images at full screen, zoom in, or show several types of photographic information.
1 Use the 4-way ring to select My Photos or Backup Files.
2Press OK.
3Select the folder containing the images you want to view, then press OK.
You see a screen like this:

To move to the next screen, press and hold the bottom of the 4-way ring.
4Use the 4-way ring to select the image you want to view, then press OK. The selected image is enlarged to fill the screen.
Zooming an Image
You can zoom RAW images up to 100% and JPEG images up to 400%.
To zoom in on an image, press the button. Keep pressing it to zoom in up to 400%.
To zoom out, press the button. Continue pressing it to zoom all the way out.
To pan around a zoomed image, use the 4-way ring.
To return to the normal full-screen view, press Back.
To select an area to zoom in, press OK when a full-screen image is displayed. Use the 4-way ring to move the red box to the area you want to zoom, then press OK again.
When you are viewing a zoomed-in image, you can display the next or previous photo without changing the zoom. Press Menu to display the pop-up menu, then select Next Photo or Previous Photo and press OK.
Displaying Information
You can view metadata and Exif information, a histogram, and a visual alert indicating poorly exposed highlight and shadow areas of your photos.
1 To view the file name and date for a full-screen image, press the Display button.
2To view metadata, Exif information, and a histogram, press Display again:
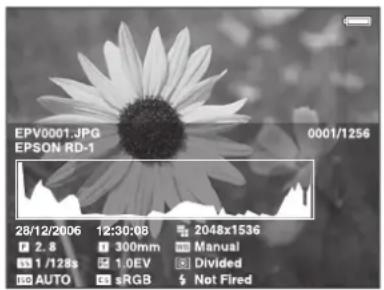
3To view the over- and under-exposure preview, press Display a third time:

natural_image
Black and white close-up of a daisy-like flower with visible petals and stamens (no text or symbols)In the preview, poorly exposed highlight and shadow areas show graduated tone reversal. The brightest 6% of the image shows 4 levels of black, and the darkest 6% shows 4 levels of white.
4To return to normal display, press the Display button again.
Displaying a Wider Color Gamut
Images are displayed in the color space they were captured in: either sRGB or AdobeRGB. You can also display images in a wider color gamut and correct color casts, backlighting, underexposure, and low-contrast images with Display Photo Enhance.
Note:
Display Photo Enhance affects only the image shown on the viewer, and does not change the file itself. The Menu, Display,
★, + and buttons are not available in this mode.
1 When you are viewing a full-screen image, press Menu and select Display Photo Enhance. You can use the 4-way ring to view the next or previous photo in Display Photo Enhance.
2To return to the normal display, press Back.
Displaying Images as a Slide Show
You can display images in My Photos as a slide show and select transition effects, timing, and background music.
1 Select a folder you want to display as a slide show.
2Press the Menu button to display the pop-up menu:
3 Select Slide Show and press OK. The slide show starts.
4To adjust the timing, effects, and music, press Menu while the slide show is playing.
5Select one of the following, then press OK and adjust the settings as noted.
○ LCD Brightness: Choose from 10 brightness levels.
- Slide Show Duration: Choose the time between slide transitions, from 1 to 30 seconds.
- Slide Show Music: Choose from three preset music selections or a playlist that you have created. You can use the ⏻ and button tons to adjust the volume while the slide show is playing.
- Slide Show Effects: Choose from 4 transition effects, or choose None to move through your images without transitions.
- Return to Home: End the slide show and return to the Home screen.
You can also adjust slide show options by selecting Settings on the Home screen. See “Slide Show” on page 61 for details.
Rotating an Image
Images that contain rotation information are automatically rotated on the viewer. You can also rotate an image manually in My Photos.
1 Select the image in thumbnail view, then press the Menu button to display the pop-up menu.
2Select Edit, then press OK.
3Select Rotate Right rotate the image 90° clockwise, or Rotate Left to rotate it 90° counterclockwise. Then press OK. You see your photos displayed with white check boxes.
4Use the 4-way ring to highlight each photo you want to highlight, and press ★to select it. The selected items are displayed with red check marks.
5Press OK to rotate the photos.
Note:
To rotate a photo displayed full-screen, press Menu, select Edit, then select Rotate and press OK. Then select Right or Left and press OK. To rotate other photos in the folder, press right or left on the 4-way ring.
You can turn off the Auto-Rotation feature. See "File Operation" on page 61 for details.
Viewing Videos
The viewer supports video files in resolutions ranging from 320 × 240 pixels to 720 × 576 pixels, with file sizes up to 2GB.
Supported Video Formats
| File format | Video codec Audio codec | Detail | |
| .avi MPEG-4(Advanced Simple Profile) | AAC,G.711,PCM,ADPCM | 30 fps: 720 × 48025 fps: 720 × 5768 Mbps (peak)4 Mbps (avg.) | |
| Motion JPEG G.711,PCM,ADPCM | 30 fps: 720 × 48025 fps: 720 × 57660 fps: 320 × 240 | ||
| .avi.divx | DivX (Home Theater Profile) | MPEGAudio,PCM,ADPCM | 30 fps: 720 × 48025 fps: 720 × 5768 Mbps (peak)4 Mbps (avg.) |
| .mov MPEG-4(Advanced Simple Profile) | AAC, PCM 30 fps: 720 × 48025 fps: 720 × 5768 Mbps (peak)4 Mbps (avg.) | ||
| Motion JPEG G.711,PCM,ADPCM | 30 fps: 720 × 48025 fps: 720 × 57660 fps: 320 × 240 | ||
| File format | Video codec Audio codec | Detail |
| .mp4 MPEG-4(Advanced Simple Profile) | AAC, PCM 30 | fps: 720 × 480 25 fps: 720 × 576 8 Mbps (peak)4 Mbps (avg.) |
| .mov.mp4.m4v | H.264/AVC(Baseline Profile Level 1.2) | fps: 320 × 240 850 kbps (peak)768 kbps (avg.) |
| .wmv W | Windows®Media Video 9(MP@LL) | Windows MediaAudio 9/9.1 |
| .mpg.mpeg | MPEG1 MPEG2(MP@ML) | PCM,MPEGAudio |
| .vob.mod | MPEG2(MP@ML) | PCM,MPEGAudio |
| .asf MPEG-4(Advanced Simple Profile) | ADPCM 30 fps: 720 × 480 25 fps: 720 × 576 8 Mbps (peak)4 Mbps (avg.) | |
Note:
DVD-Video, DivX menu, and WMV DRM are not supported.
To display your viewer's DivX VOD registration code, see "Movie Setting" on page 61.
Playing Videos
You can transfer video files directly from memory cards as described in “Copying Files From a Memory Card” on page 19. Or you can copy and convert video files from your computer, as described in “Copying Files From Your Computer to the Viewer” on page 44.
1 Use the 4-way ring to select Videos, then press OK.
Backup Files or My
2Select the folder containing the video you want to play, then press OK.
3Use the 4-way ring to select the video you want to play, then press OK.
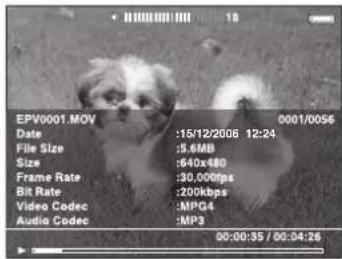
Note:
You can set the video screen size by selecting Play at Full Screen or Play at Original Size from Play Settings in the pop-up menu. Setting Play at Full Screen displays the image by adjusting the longest side to the LCD display without changing the aspect ratio.
To play or pause the video, press OK.
To adjust the audio volume, press on.
To rewind or fast-forward, press left or right on the 4-way ring. Press repeatedly to increase the speed. (This function may not work with some videos, such as .mov).
To stop the video and return to the previous screen, press Back.
The viewer remembers where you stopped. When you resume, playback starts 3 seconds before the stop point (for videos longer than 1 minute). If you want to play the video from the beginning, press Menu, select Play Settings, then select Play from Beginning.
To view information about the video, press Display. You see a progress bar on the video. Press Display again to view information including frame rate, bit rate, and video and audio codecs:
Setting the Display Mode
You can choose from five different modes to adjust the color, brightness, and contrast for various types of videos.
1 While a video is playing, press the Menu button to display the pop-up menu.
2Select Display mode, then press OK.
3Select one of the following:
Home video: for camcorder video (the default setting)
○ Cinema: for increased contrast and color saturation
Nature: to display video in a wider color space than sRGB
Power saving: to lower the backlight and save battery life
○Original: to display video with the most accurate color and brightness
4Press OK to return to the video.
Viewing Files on a TV
You can connect the viewer to a TV or projector and view your images, videos, and slide shows.
You will need a camcorder AV cable (3.5-mm mini-plug to 3 RCA plugs), available at many electronics stores.
1Connect the three RCA plugs to the video and audio in jacks on your TV or projector.
2Connect the mini-plug on the other end to the A/V Out jack on the side of the viewer.
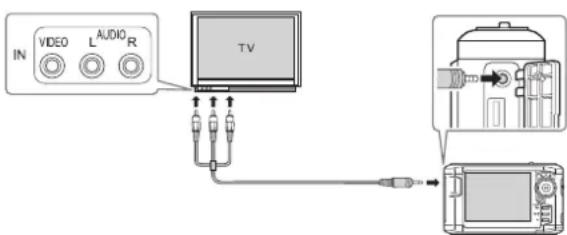
The viewer's LCD screen turns off.
3Set the TV or projector to display video input from the viewer.
You can use all of the viewer's controls to play slide shows, photos, and videos on your TV or projector.
Note:
You may need to set the Video Out setting to match your TV (see page 62).
Some TVs may crop your images on the top and bottom, or you may notice some flickering, for example, near the edges of the screen. This is a normal result of your viewer's high image resolution.
Chapter 4 Playing Music
You can transfer audio files from your computer and play them on the viewer. You can create playlists using the Epson Link2 software on your computer, or using the viewer itself.
This chapter describes how to transfer and play music, and how to manage your audio files on the viewer.
Copying Music From Your Computer
First, make sure you have installed the Epson Link2 software, following the instructions in your P-3000/P-5000 Basics guide.
If you want to copy files from a music CD, you first need to convert the file format to MP3 or M4A using CD copying software on your computer. You can also use this software to change the song and artist names displayed on the playlist if necessary.
WMA and WAV files are automatically converted to M4A when they are transferred. You can specify conversion settings if necessary; see “Setting Backup and Conversion Preferences” on page 45 for instructions.
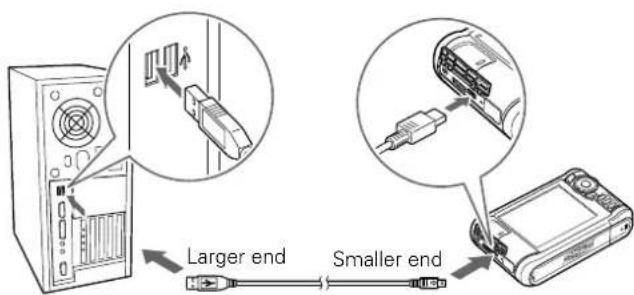
1Connect the AC adapter to the viewer and plug it in.
2Turn on the viewer and your computer.
3Use the included USB cable to connect the viewer to your computer.
The LCD screen turns off.
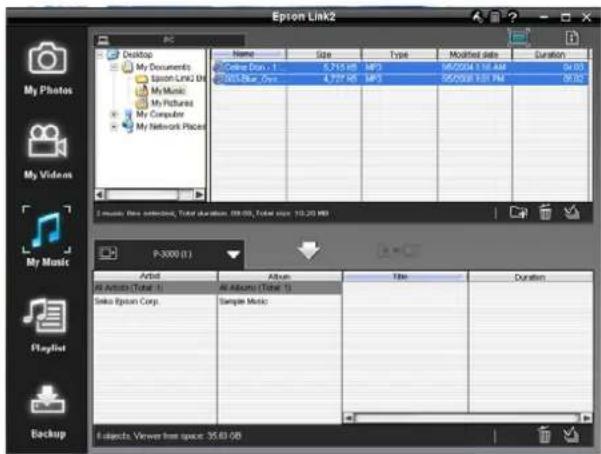
4 Double-click the Epson Link2 icon on your desktop to open the program.
5Click My Music on the screen, then locate the audio files you want to copy from your computer.
Caution:
Epson Link2 uses ID3 tags to organize your music files. If the ID3 tag information is missing, these items will appear as "unknown." The viewer will rename your files to make them playable. Always keep backup copies of your songs, and never transfer your only copies to the viewer.
6Click the down arrow in the center of the screen to transfer the files to your viewer.
7 Disconnect the viewer from your computer:
Windows: Right-click the icon in the lower right corner of your screen and select Safely Remove Hardware or Unplug or Eject Hardware. Then remove the USB cable.
Macintosh: Drag and drop the viewer icon to the trash, then remove the USB cable.
8If you see a message on the viewer asking you to update the music list, click OK.
Note:
Only audio files transferred from a computer can be displayed in My Music. If you want to play a music file copied from a memory card, select it in Backup Files, then press OK to play it.
Supported Audio Formats
The viewer can store up to 10,000 audio files. It supports the following audio formats without copyright protection and with a maximum file size of 100MB:
| Audio file extensions | Audio codec Details | |
| .m4a AAC (MPEG4) Maximum bit rate: | 320 kbps(48 kHz, 16 bit Stereo) | |
| .mp3 MP3 (MPEG 1/2/2.5 - Layer 3) | ||
| .wma Windows Media Audio 9 | Bit rate: 48 to 192 kbps(48kHz, 16 bit Stereo) | |
Note:
The viewer supports non-lossless-compliant M4A and WMA files. Some files may not be played, even if the formats are supported.
Playing Audio Files
You can connect headphones to the lock on top of the viewer, or listen through the viewer's built-in speaker.
1 Select My Music on the Home screen using the 4-way ring, then press OK.
2Select Music List, then press OK.
3 Select a category to start playing, then press OK.
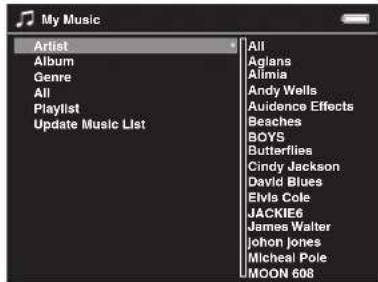
You can narrow your search by selecting one of the categories and navigating its subcategories using the 4-way ring. Select All to include all items in the list.
○Artist - Artist name - Album name - Track name
○Album - Album name - Track name
○Genre - Genre name - Artist name - Album name - Track name
○All - Track name
○Playlist - Playlist name - Track name (for details, see "Creating a Playlist" on page 38)
○Update Music List (to update audio data after transferring from your computer.)
- Select the desired track using the 4-way ring, then press OK.

You can do the following while listening to music or audio files.
To play or pause music, press OK.
To adjust the volume, press o#.
To skip back or forward, press left or right on the 4-way ring. Press and hold to rewind or fast-forward.
To return to the previous screen (without stopping the audio), press Back. (If you are not in My Music, the audio stops when you press Back.)
To display information about the audio file such as codec, bit rate, and sampling rate, press Display.
Setting Repeat and Shuffle Options
In My Music, press the Menu button and select Play Mode. Set the following items using the 4-way ring, then press OK.
First select either Shuffle or Normal Play Order to set the playback order, then select the desired repeat play mode.
| To play... Select... | |
| Current category once. No Repeat | |
| Current track repeatedly. Repeat One Song | |
| Current category repeatedly. Repeat All | |
| Current category in random order. Shuffle | |
| Current category in normal order repeatedly. | Normal Play Order |
Creating a Playlist
You can create playlists using the Epson Link2 software, or on the viewer itself. Follow the steps below to create a playlist using Epson Link2, or see “Creating a Playlist on the Viewer” on page 39.
1 Connect the viewer to your computer as described on page 34.
2Double-click the Epson Link2 icon on your desktop to open the program.
3Click Playlist on the left side of the screen.
4Click the icon in the lower right corner.
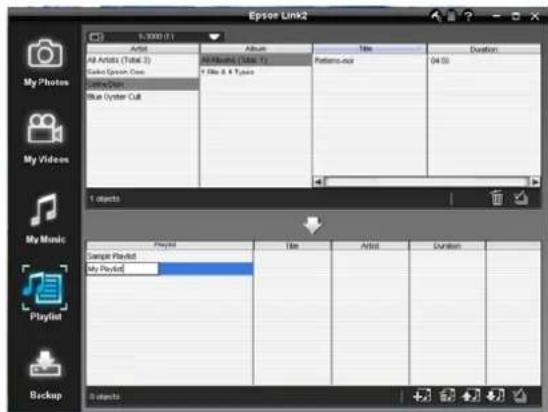
5Enter a name for the playlist.
6Select the songs you want to add. If you want to add all the songs from an album or by an artist, you can select the album or artist.
7Click the down arrow in the center of the screen to add the songs to your playlist.
After you have created playlists, you can use the buttons in the lower right corner of the screen to rearrange the songs and edit the lists.
Creating a Playlist on the Viewer
You can also create and edit playlists on the viewer.
1 In My Music, press the pop-up menu.
Menu button to display the
2Select Add to Playlist, then press OK.
3Select Create New Playlist, then press OK.
The on-screen keyboard appears, with Playlist001 as the default name.
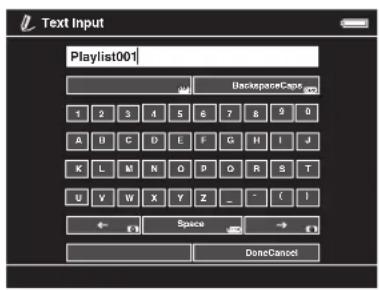
4To use this name, highlight Done and press OK.
To enter a new name, use the Back (backspace) button to clear the current name. Then enter a new name using the 4-way ring (highlight each character and press OK to enter it).
To move the cursor forward or backward, press or .

To delete the last letter input, press Back.
To enter a space, press Menu.
To switch between upper- and lowercase, press Display.
To cancel the name, highlight Cancel and press OK.
5 After entering the name, select Done, then press OK.
6Select the tracks for the playlist using the 4-way ring and the ★button. The selected files are displayed with red √check marks.
If you want to select all the tracks displayed, press Menu and select Select All.
7 When you have selected all the tracks you want, press OK.
Note:
To delete a playlist, select it in My Music, press Menu, then select Delete this Playlist.
Adding Tracks to an Existing Playlist
1 Display a list of songs in My Music, then press Menu.
2Select Add to Playlist, then press OK.
3Select the list you want to add to, and press OK.
4Select the tracks for the playlist using the 4-way ring and the ★button, then press OK.
Removing Tracks From a Playlist
1 Select a playlist in My Music, then select a track you want to remove.
2Press Menu, select Delete, and press OK.
3Select each file you want to remove using the 4-way ring and the ★button, then press OK.
The tracks are removed from the playlist, but not deleted from the viewer.
Changing the Order of a Playlist
1 Select a playlist in My Music, then select a track you want to move.
2Press Menu, then select Change Song Order.
3Press up or down on the 4-way ring to move the track within the playlist.
4 When the list is in the order you want, press OK.
Using the Equalizer
You can use the equalizer to select from 7 genre settings or create a customized setting of your own.
1 In My Music, press the pop-up menu.
Menu button to display the
2Select Audio Equalizer Setting.
3Select the setting you want and press OK.
Normal Pop
○Jazz ○Live
○Classical ○Full Bass
○Rock
To create a custom setting, select Custom and press OK.
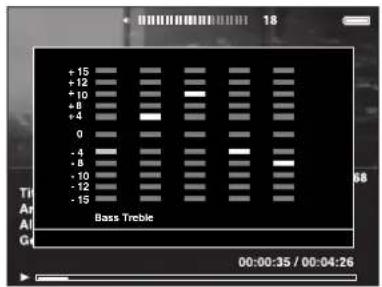
4Adjust the level of each frequency using the 4-way ring, then press OK.
Note:
You may need to listen with headphones to hear the effects of the various settings.
Deleting Audio Files From the Viewer
1 In My Music, press the Menu button to display the pop-up menu.
2Select Delete.
3Select audio files to delete using the 4-way ring and the ★ button.
4Once you have selected all the files you want to delete, press OK. You see a confirmation message.
5Select Yes, then press OK.
Chapter 5 Managing Files
You can back up files from the viewer to your computer, and copy files from your computer to the viewer. You can also transfer files to and from USB devices.
This chapter explains how to work with the files and folders on your viewer and transfer them between the viewer and other devices.
Copying Files To and From Your Computer
You can use the Epson Link2 software to back up files from the viewer to your computer and copy files from your computer to the viewer. Make sure you have installed the software, following the instructions in your P-3000/P-5000 Basics guide.
1 Connect the AC adapter to the viewer and plug it in. Then turn on the viewer and your computer.
2 Use the included USB cable to connect the viewer to your computer.
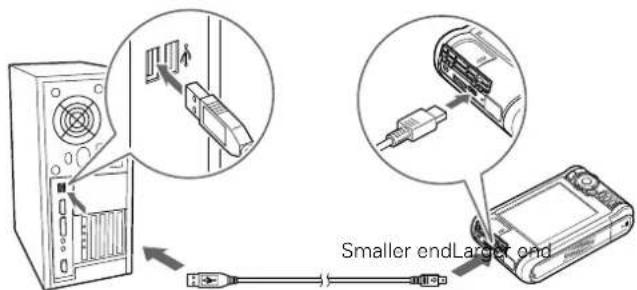
The LCD screen turns off.
Note: Although your computer may recognize the viewer as a removable drive, it is best to transfer files using the Epson Link2 software.
Caution:
When the viewer is connected to a computer, do not connect a USB device to the Host USB port on the viewer. Do not change the names of any folders on the viewer from your computer, or the viewer may become unusable.
Backing Up Files to Your Computer
You can back up files to your computer automatically or manually. First, make sure you connect the viewer as described on page 42.
1 Double-click the

Epson Link2 icon on your desktop
to open the program.
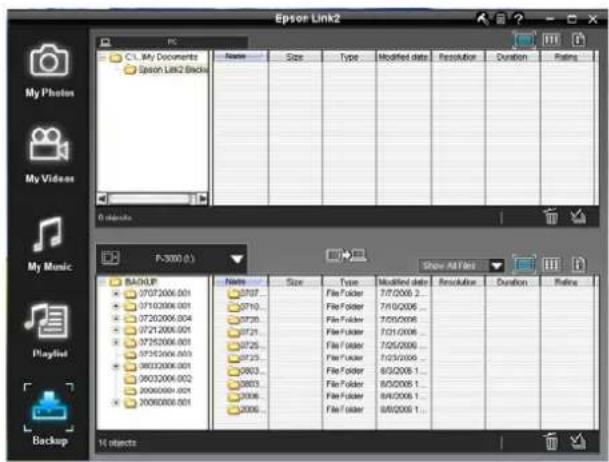
2If you see a message that Epson Link2 has found files in your viewer's Backup Files folder, click Yes to back up the files automatically.
Note:
Only files that haven't already been copied will be transferred.
3 To transfer files manually, click the Backup icon on the left side of the screen, then click the 📄 in the middle of the screen.
All the files in the Backup Files folder of the viewer are copied to your computer.
By default, the files are copied to the Epson Link2 Backup folder in Documents or My Documents.
If you want to change the location or turn off the automatic backup feature, see "Setting Backup and Conversion Preferences" on page 45.
4If a confirmation dialog box is displayed, select whether to delete or keep the transferred files in the viewer.
Note:
You can also select individual video or photo files to transfer from the viewer to your computer. For instructions, click the ? in the upper right corner of the Epson Link2 screen.
Copying Files From Your Computer to the Viewer
You can copy photos, videos, and music from your computer to the viewer. For instructions on copying music, see “Copying Music From Your Computer” on page 34.
WMV files are automatically converted to MP4 when they are transferred, and videos that exceed 2GB are automatically divided into multiple files.
If you want to specify conversion settings, see “Setting Backup and Conversion Preferences” on page 45.
1Connect the viewer to your computer as described on page 42.
2Double-click the Epson Link2 icon on your desktop to open the program.
3Select Photos, Videos, or Music, depending on the type of files you want to transfer.
4Select the files to transfer in the Computer window, then click the down arrow in the center of the screen. The files are transferred to the viewer.
Note:
You can also transfer files by dragging and dropping them into the lower contents window. For more information, click the ? in the upper right corner of the Link2 screen.
Disconnecting the Viewer From Your Computer
When you are finished transferring files between your computer and the viewer, make sure you follow these steps to disconnect.
1 Do one of the following:
Windows: Right click the USB Device icon in the System Tray (lower right corner of your screen) and select Safely Remove Hardware or Unplug or Eject Hardware.
Macintosh: Drag and drop the viewer icon to the trash.
2Remove the USB cable from your computer.
3Remove the USB cable from the viewer.
Setting Backup and Conversion Preferences
You can use the Settings window in Epson Link2 to change the folder where files from the viewer are saved on your computer.
You can also change the conversion settings for video files transferred from your computer to the viewer. In Windows, you can also change the conversion settings for audio files.
1 Double-click the

Epson Link2 icon on your desktop.
2Click the settings icon in the upper right corner of the screen.
The Settings window appears.
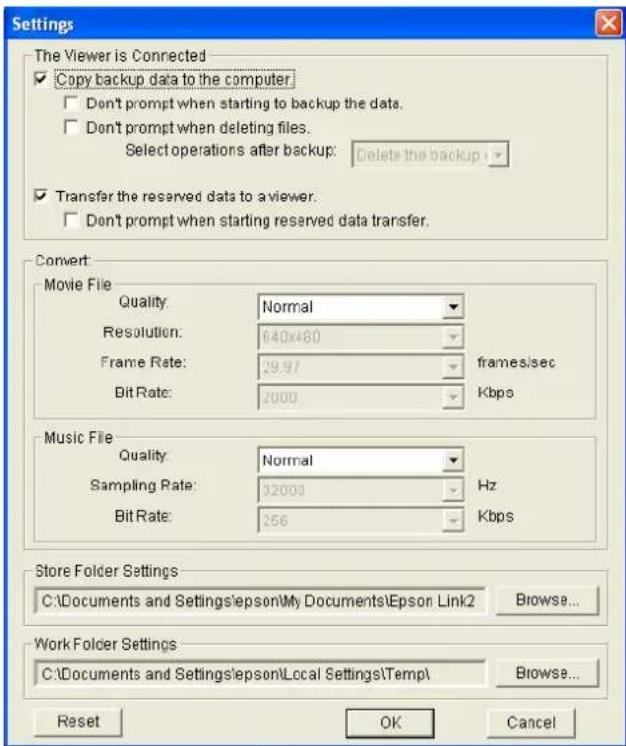
3If you don't want to have files from the viewer automatically backed up on your computer, deselect the Copy backup data to the computer check box. You can still back up files manually, as described on page 43.
4If you want to specify the conversion settings for video files, click the arrow next to Normal in the Movie File box.
Select Normal, High Quality, High Compression, Custom, or No Conversion.
Selecting Custom allows you to specify the resolution, frame rate, and bit rate.
Choose higher settings for improved video quality, or lower settings for reduced file sizes. Frame rates lower than 29.97 may cause flicker or poor quality video.
5If you want to specify the conversion settings for music files, click the arrow next to Normal in the Music File box (Windows only).
Select Normal, High Quality, High Compression, or Custom.
Selecting Custom allows you to specify the sampling rate and bit rate. Choose higher settings for improved audio quality, or lower settings for reduced file sizes.
6If you want to change the folder where files are backed up on your computer, you can adjust the Store Folder Settings. The default folder is Epson Link2 Backup in My Documents (Windows XP or 2000) or Documents (Windows Vista™ or Macintosh).
7 When you are finished, click OK.
For more information about backup and conversion settings in Epson Link2, click the ? in the upper right corner of the Epson Link2 screen.
Using the Viewer With USB Devices
You can connect a flash memory drive or other USB device to your viewer and copy files to or from the device.
The viewer supports devices that are compatible with the USB Mass Storage specification, including:
Digital cameras
○Flash memory drives
○Memory card readers
○External hard drives
- Epson multimedia storage viewers
Note:
USB hubs are not supported, and some USB devices may not work without a power connection. Epson cannot guarantee the compatibility of any device.
Connecting a USB Device
Before you connect a USB device, connect the AC adapter to the viewer and plug it in if possible. If your USB device has an AC adapter, use it to prevent the possible loss of files during transfer.
1 Open the connector cover on the side of the viewer.
2Plug the device into the Host USB connector on the side of the viewer.
If the device has a USB cable, connect one end of the cable to the device and the other end to the Host USB connector on the viewer.
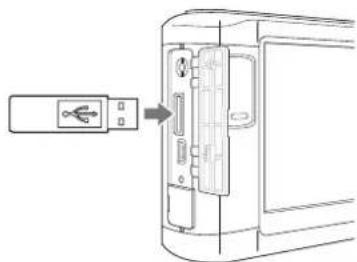
natural_image
Diagram showing a device with an attached USB port and internal ports, no text or symbols presentNote:
To prevent a possible malfunction, do not use both USB connectors on the viewer at the same time.
3Turn on the viewer and the USB device if necessary.
Copying Files to the Viewer
After you connect a USB device, you can copy all the files to the viewer, or select individual files to copy.
1 On the Home screen, use the 4-way ring to highlight USB Device, then press OK. You see the USB Device menu:
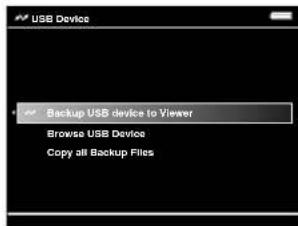
2Do one of the following:
To copy all files, select Backup USB device to Viewer, then press OK. The files are copied to a folder that is automatically created in the Backup Files folder on the viewer.
The folder is named according to the date, for example, 12252006.001. You can change the date format by selecting Settings > Date and Time on the Home screen (see page 11). Folders are numbered in the order they are copied.
Skip to step 7.
To copy selected files, select Browse USB Device in the USB Device menu, then press OK. You see your files displayed in thumbnail view.
Continue with the steps below.
3Press the Menu button to display the pop-up menu.
4Select Backup, then press OK. Small white check boxes appear on each thumbnail image.
5Use the 4-way ring to highlight each file you want to copy, then press the ★button to select it. The selected items are displayed with red check marks.
6 When you are finished selecting files, press OK. The files are copied to a folder that is automatically created in the Backup Files folder on the viewer.
7 Wait until all the files are copied, then disconnect the USB device.
Copying Files to the USB Device
You can copy all the files or selected files from the viewer to a USB device.
If your USB device has an AC adapter, connect the adapter and plug it in before starting.
Backing Up All Files to a USB Device
This process may take some time, depending on the volume of data in the viewer.
1 Follow the instructions on page 47 to connect the USB device.
2On the Home screen, use the 4-way ring to highlight USB Device, then press OK.
3In the USB Device menu, select Copy all Backup Files.
4 Press OK, then wait while the files are copied.
Copying Selected Files to a USB Device
You can select individual files or folders to copy.
1 Follow the instructions on page 47 to connect the USB device.
2Select the file or folder you want to copy.
3Press the Menu button.
4Select Copy/Move, then press OK.
5Select Copy to USB Device, then press OK.
☐If you selected a folder, all the files are copied to the USB device. Wait until all the files are copied, then disconnect the device.
○If you selected an individual file, you see your photos displayed with white check boxes.
Continue with steps 6 and 7 below.
6Use the 4-way ring to highlight each photo you want to copy and press ★to select it. The selected items are displayed with red check marks.
7 When you are finished selecting photos, press OK. Your files are copied to the USB device. When the copy is complete, you can disconnect the device.
Setting Folders as Private
You can select and hide folders so that other people cannot view the files.
Note:
Even if folders are set as private folders on the viewer, they may still be viewed on a computer, depending on the computer setting.
1 Using the 4-way ring, select a folder you want to hide.
2Press the Menu button, select Settings, then press OK.
3Select Show Private Folders, then press OK.
You see the Password screen:
4If you have already set a password for your viewer, enter the 4-digit password number using the 4-way ring, then press OK.
If you have not set a password, leave the password at the default setting, 0000, and press OK. For instructions on setting a password, see "File Operation" on page 61.
5 Repeat step 2, then select Set/Unset as Private and press OK.
You see your folders displayed:
6Use the 4-way ring to highlight each folder you want to set as private, and press ★o select it. The selected items are displayed with red check marks.
7 Once you have selected all the folders you want to set as private, press OK.
Note:
You can press Menu and select either Select all or Deselect all, then press OK, or select Apply from the pop-up menu.
8When you see the Password screen, enter a 4-digit password number using the 4-way ring, then press OK.
Note:
To hide the folder set as a private folder, select Hide Private Folders in step 3. To show private folders, select Show Private Folders in step 3.
Renaming a Folder
1 Using the 4-way ring, select a folder to rename.
2Press Menu, select Edit, then press OK.
3Select Rename, then press OK. You see the on-screen keyboard:
4Use the Back (backspace) button to clear the current name. Then enter a new name using the 4-way ring (highlight each character and press OK to enter it).
To move the cursor forward or backward, press or .
To delete the last letter input, press Back.
To enter a space, press Menu.
To switch between upper and lower case, press Display.
To cancel the name, highlight Cancel and press OK.
5After you enter the name, select Done, then press OK.

Deleting Files and Folders
You can delete files and folders from the viewer using the menu and buttons as described below. To use the Link2 software for deletion, click the ? in the upper right corner of the Link2 screen.
1 Select a folder or file to delete.
2Press Menu, select Delete, then press OK.
Check boxes appear on each thumbnail image:

3Use the 4-way ring to highlight each file or folder you want to delete, and press ★to select it. The selected items are displayed with red check marks.
4Press OK.
Note:
You can press Menu in the thumbnail screen and select Select all, Deselect all, or Apply.
If you are viewing a full-screen photo, press Menu and select Delete to enter deletion mode.
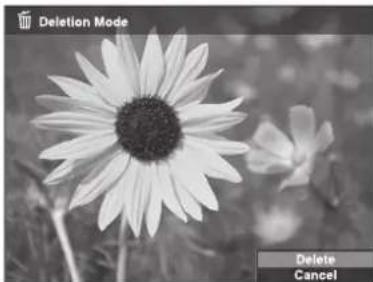
natural_image
Black and white close-up of a daisy flower with visible petals and center, no text or symbols present.Select Delete again, then press OK. You can display additional photos to delete by pressing right or left on the 4-way ring. To cancel deletion mode, select Cancel and press OK, or press the Back button.
5 When the confirmation message appears, select Yes, then press OK.
Locking Files and Folders
You can lock selected files or folders so they cannot be deleted or rotated. When a file or folder is locked, the icon is displayed.
1 Select a folder or file to lock.
2Press the Menu button to display the pop-up menu.
3Select Edit, then select Lock/Unlock and press OK. Check boxes appear on each thumbnail image:
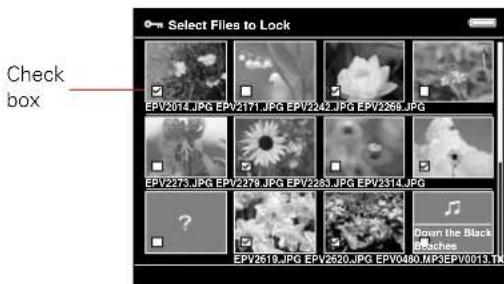
4Use the 4-way ring to highlight each file or folder you want to lock, and press ★o select it. The selected items are displayed with red check marks.
Note:
In the thumbnail screen, you can press Menu and select Select all, Deselect all, or Apply.
5 Press OK to lock the files or folders.
If you are viewing a full-screen photo, press Menu, select Edit, then select Lock/Unlock to enter lock mode.
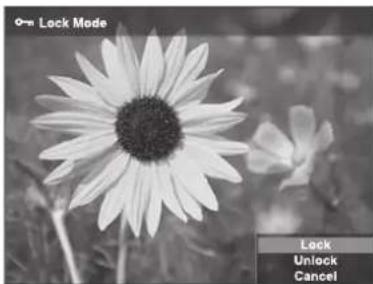
natural_image
Black and white close-up of a daisy flower with a 'Lock Mode' menu overlay (no other text or symbols)Select Lock or Unlock then press OK. You can display additional photos to lock by pressing right or left on the 4-way ring. To cancel, select Cancel and press OK or press the Back button.
Note:
The lock on the folder or file remains in effect until you unlock it, even if you turn off the viewer.
Setting a Folder Icon or Home Screen Wallpaper
You can set your favorite file as an icon for the folder or "wallpaper" for the Home screen.
1 Select the file you want to use.
2Press Menu, then select Wallpaper and Icon Settings, then press OK.
3Select Set as Folder Icon or Set as Wallpaper of HOME, then press OK.
Rating Photos
You can rate your photos from one to five stars. This lets you quickly view your best photos from View Rated Files in the Home screen. You can rate up to 3000 photos.
When you copy a rated file to your computer, you must use the Epson Link2 software to copy the rating information. You can then move your rated files into Adobe Bridge.
To rate a single photo, select it in My Photos or Backup Files, then press the ★button to rate it. Continue pressing the button to increase the rating up to ★5, or remove the rating.
You can use the menu to rate multiple photos or folders:
1 Select a photo or folder you want to rate.
2Press Menu, select Rate, then press OK.
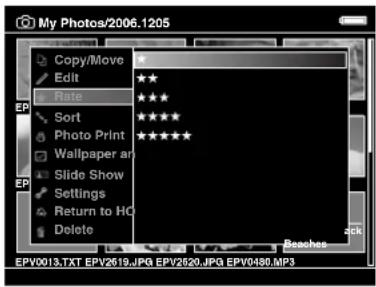
3Select the number of stars you want to assign, then press OK.
4Use the 4-way ring to highlight each file or folder you want to rate, and press ★to select it. The selected items are displayed with red check marks.
Note:
In the thumbnail screen, you can press Menu and select Select all, Deselect all, or Apply.
5 Once you are done selecting files, press OK.
Note:
If you delete a file from My Photos, My Videos, or Backup Files, the corresponding rated file will also be deleted from View Rated Files.
Selecting a Screen Saver
You can select a folder to be used as a screen saver. The photos in the folder will be displayed as a slide show when the viewer is plugged in using the AC adapter and is inactive for 3 minutes.
If you want to change the timing for the screen saver, see "Power Save" on page 60. If you want to change the transition effects, see "Slide Show" on page 61.
1 Select a folder, then press Menu to display the pop-up menu.
2Select Set as Screen Saver, then press OK.
Note:
To cancel the setting, select Don't Use as Screen Saver.
Chapter 6 Printing
You can print photos or videos by connecting the viewer to a PictBridge-compatible printer, such as the Epson R260, R380, or RX580.
Check the Epson web site to get the latest information on supported printers. See "Where To Get Help" on page 69.
Depending on your printer model and settings, you can use the following sizes and types of paper.
| Paper Size | |
| Epson Ultra Premium Photo Paper Glossy | 4 × 6 in., Letter |
| Epson Premium Photo Paper Glossy | 4 × 6 in., 5 × 7 in., 8 × 10 in., Letter |
| Epson Premium Photo Paper Semigloss | 4 × 6 in., Letter |
| Epson Photo Paper Glossy 4 | × 6 in., Letter, A4 |
Note: For details about paper, see your printer documentation.
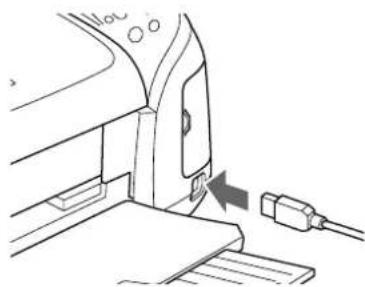
Connecting the Viewer to a Printer
Refer to your printer manual to locate the external device USB connector on the printer, which may be labeled for EXT. I/F.
1 Connect the AC adapter to the viewer and turn it on.
2Connect the small end of the USB cable to the Device USB connector on the viewer.

natural_image
Line drawing of a camera module with labeled ports and cables (no text or symbols)3Connect the other end of the cable to the USB connector on the printer.
natural_image
Line drawing of a mechanical device with a cable inserted, showing a close-up of the component (no text or symbols)Note:
Disconnect the USB cable from the viewer when not operating with a computer or printer.
Printing Your Photos
Make sure the printer is turned on and has paper and ink. Make sure the AC adapter is connected to the viewer before you print.
1 Using the viewer, highlight an image you want to print.
Note:
You cannot print a JPEG file if the vertical or horizontal size of the image exceeds 4600 pixels.
2 Press Menu to display the pop-up menu.
3Select Photo Print, then press OK.
The number of prints is shown for each photo.
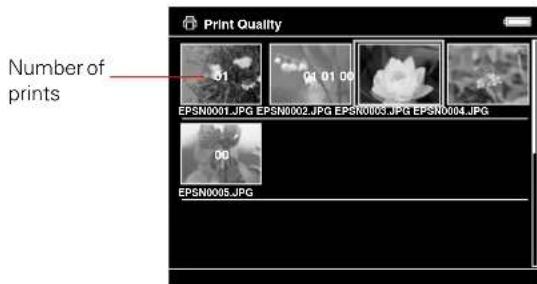
4Select the number of prints you want for each photo using that or button.
If you are printing a full-screen photo, you can set the number of prints you want, then display the other photos in the folder by pressing right or left on the 4-way ring.
To display a preview of the color when you print with PhotoEnhance ^™ on an Epson printer, press Display.

natural_image
Black and white close-up of a daisy flower with visible petals and center, no text or symbols present.Press Back to return to the normal display.
5Once you have selected all of the photos and set the number of prints for each, press OK. The viewer checks the printer connection, and you see the Print Settings screen.
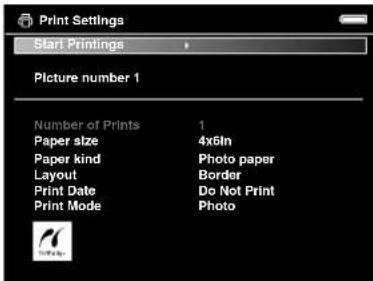
6In the Print Settings screen, specify the settings using the 4-way ring, then press OK.
You can adjust the following settings:
| Setting Description | |
| Number of Prints | Set the number of prints (video only). |
| Paper size Choose the paper size loaded in the printer. | |
| Paper kind Choose type of paper loaded in the printer. | |
| Layout Choose Border or Borderless. | |
| Print Date Print the date when the photo was taken. If the photo does not include date information, the printing date is added. | |
| Print Mode | Choose Photo, High speed, or Best Photo. |
Note:
Depending on the printer, the paper settings may be limited or set to Automatic. The settings will be cleared once the image has been printed.
7 Select Start Printing, then press OK.
Printing Your Videos
You can print images from video files at 12 frames per sheet on 4 × 6-inch paper only.
Make sure the printer is connected and has paper and ink, and the AC adapter is connected to the viewer.
1 Start playing the video.
2 When you see the frame you want to print, press OK to pause the video. You can press left or right on the 4-way ring to search for the frames you want to print.
3Press Menu to display the pop-up menu.
4Select Video Print, then press OK.
5Select a Frame Interval (Long, Medium, or Short) to take still images from the video.
6Select the frame where you want to start printing by pressing right or left on the 4-way ring, then press OK.
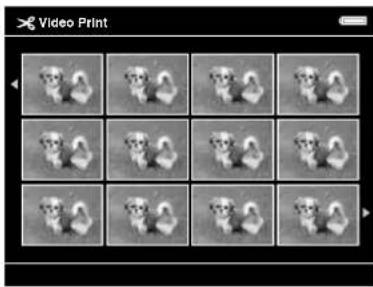
natural_image
Grid of 12 grayscale images showing two small, rounded objects, arranged in a 3x3 pattern (no text or symbols)7In the Print Settings screen, specify the settings by pressing up or down on the 4-way ring, then press OK. See page 58 for more information.
8Select Start Printing, then press OK.
Chapter 7
Customizing Settings
You can change settings for displaying images, copying files, controlling the viewer's sounds, and other functions.
From the Home screen, select Settings and press OK. You see this screen:
Use the 4-way ring to select and change any of the settings described below.
Hard Drive Capacity
Use this option to check the available space on the viewer's hard drive and also on any memory cards that are loaded in the viewer. The total file size is also given for all files in the Backup, My Photos, My Videos, and My Music folders.
Power Save
Use the following options to adjust how the viewer saves power:
- Backlight Timer to set when the LCD screen turns dark during inactivity. You can select 1, 3, 5, 10, or 15 minutes.
Sleep Timer to set when the LCD turns off during inactivity. You can select 1, 3, 5, 10, or 15 minutes.
Power Off Timer to set when the viewer turns off during inactivity. If the AC adapter is connected to the viewer, it will not turn off but will play a screen saver instead. You can select 1, 3, 5, 10, or 15 minutes.
Screen Saver to set when the screen saver begins during inactivity (if the AC adapter is connected). You can select 1, 3, 5, 10, or 15 minutes. See “Slide Show” (below) to control the features of the screen saver.
File Operation
Use these options to change how the viewer handles various file-related operations:
Auto-Rotation to determine whether the viewer auto-rotates images according to Exif information included in the file by the camera that took the photo.
- Unsupported Files to set whether unsupported files are displayed on the viewer. If you select Show, unsupported files appear as gray boxes with ? question marks inside.
Delete After Copying to set whether files are deleted after copying them. Select Delete to clear the files from their original location automatically after copying them, or Confirm to ask each time if you want to clear them. Or select Do Not Delete to copy files without deleting them from their original location.
Set Password to set a password for private folders. The default password is 0000.
Movie Setting
Use these options for movies played on the viewer:
DivX Reg. Code to display the DivX registration code. This code is required when you buy copyright-protected DivX VOD video content for downloading.
Play Settings to adjust the screen size of a video. You can select Play at Full Screen or Play at Original Size.
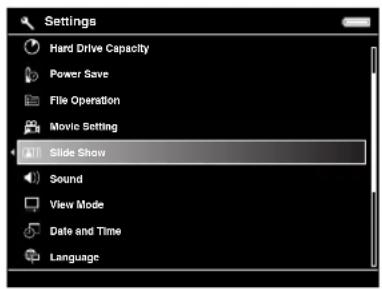
Slide Show
Use these options to select effects, timing, and background music for slide shows. These settings also control the features of your screen saver.
- Effects to choose one of five slide transition effects.
- Duration to choose the time between slide transitions. You can select from 1 to 30 seconds.
- Slide Show Music to choose background music for the slide show. You can select none, one of three presets, or a music playlist that you've created.
- Clock to choose whether to display the current time in the corner of the screen.
Sound
Use these options to control the default volume for movies and music, and to set audible alerts.
Key Beep to turn on or off sounds made by the viewer when you press the buttons.
- Backup Complete Sound to select one of several preset sounds to alert you when the viewer finishes backing up files.
Volume to set the default volume for music and videos. You can change the volume when playing music or videos by pressing 📐r . 🔒
View Mode
Use these options to adjust the LCD screen and how the viewer displays images:
○ LCD Brightness to control the brightness of the screen.
Video Out to select NTSC or PAL according the type of TV system or external display connected to the viewer.
○ Color Space to set the color space, if color space information in the image is unspecified. Select sRGB or AdobeRGB.
Date and Time
If you remove the battery, the date and time settings will be erased after about one day. Use this screen to re-enter the date and time, if necessary.
- Enter the Year, Month, Day, Hour, and Minute.
Use Date Format to change the format of the file dates shown on the Details screen. Folders created in Backup Files are also named according to the selected format.
Language
Lets you choose one of ten languages.
Firmware Version
Displays the viewer's firmware version.
Chapter 8
Maintenance and Troubleshooting
This chapter describes how to clean the viewer and solve problems.
Cleaning the Viewer
Follow these guidelines to clean the viewer:
○Turn off the viewer and unplug the AC adapter before cleaning.
○Use a clean, dry cloth to wipe it clean.
- Do not use harsh or abrasive cleaners.
Error Messages
When a problem occurs, an error message or icon may appear on the LCD. Refer to the following table to diagnose an error message. For more assistance, see “Problems and Solutions” on page 64.
| Error message Description | |
| Unable to access file. Wait | until the memory card access light turns off, then reinsert the memory card and try again. |
| An error occurred during verification. Files were not deleted from the memory card. | Some files failed to be copied. Check the files and try again. |
| Cannot access the hard drive. There may be a problem with the hard drive, or it may not be formatted as FAT32. | Backup all the data to the computer and contact Epson as described in “Where To Get Help” on page 69. |
| No response from the printer. Please check the printer. | Make sure your printer is on and the USB cable is connected correctly. Check the printer's manual to make sure it's PictBridge-compatible. |
 | Turn off the viewer and wait until it cools down. |
 | The battery power is running out. Charge the battery. For details, see “Charging the Battery” on page 10. |
 | Press the reset button.See “Resetting the Viewer” on page 68. |
Problems and Solutions
Use the information in this section to diagnose problems and find solutions.
Power Problems
| The power does not turn on. | |
| Cause What to do | |
| The battery has run out. When the icon appears on the top right corner of the LCD, the battery has run out. See “Charging the Battery” on page 10 and charge the battery. | |
| The battery is not installed correctly. | Make sure the battery is installed correctly. See “Installing the Battery” on page 10. |
| The viewer may have shut off automatically to save battery power. | Slide the power switch down to turn the viewer back on. |
| The battery may need to be replaced. | See “Replacing the Battery” on page 69. |
File Viewing Problems
The image is not displayed.
| Cause What to do | |
| The image format is not supported. | If an image doesn’t appear or appears as ?, it may not be in a supported file type. See “Supported Image Formats” on page 25. |
| The image data is corrupted. | Copy the image again. |
| The video or audio file is not supported. | See “Supported Video Formats” on page 30 or “Supported Audio Formats” on page 36. |
The LCD is too dark. Adjust the LCD brightness. See "View Mode" on page 62. The screen may have turned off automatically to save power. Press any button to turn the screen on. If you've connected the viewer to your TV or computer, the LCD screen turns off.
You've connected the viewer to your TV and the image is cut off or flickering.
Some TVs may crop your images at the top and bottom, or you may notice some flickering near the edges of the screen. This is a normal result of your viewer's high image resolution.
The video is not displayed clearly or stops abruptly.
| Cause What to do | |
| The bit rate of the video is too high. | Check the bit rate. See “Supported Video Formats” on page 30 for details. |
Sound breaks off when the video or audio is played.
| Cause What to do | |
| The bit rate of the file is too high. | Check the bit rate. See “Supported Video Formats” on page 30 or “Supported Audio Formats” on page 36 for details. |
No sound comes out when a video is played.
Cause What to do
The Audio Codec of the file is not supported.
Check the file format. See "Supported Video Formats" on page 30 or "Supported Audio Formats" on page 36 for details.
File Operation Problems
You cannot copy a file or files.
Cause What to do
There is not enough space available on the hard drive to copy all of the files on the memory card.
Check the hard drive space. See "Hard Drive Capacity" on page 60. Delete unnecessary files or reduce the number of files to copy from the memory card.
The viewer's hard drive space doesn't increase, even though data has been deleted.
If you've connected the viewer to your computer, it's best to delete files using the Link2 software, or data may not be removed completely. Check the Recycle Bin (Windows) or Trash (Macintosh) and empty it to clear any files.
You cannot copy files from an external USB device.
Connect the AC adapter to the viewer. If the external USB device has its own power adapter, connect it too.
You cannot delete a file.
Cause What to do
The file is locked. Unlock the file and then delete it. See "Locking Files and Folders" (page 53) and "Deleting Files and Folders" (page 51).
You cannot use the buttons on the viewer.
Cause What to do
The buttons are deactivated because the power switch is set to Hold.
Slide the power switch back to the middle position.
You cannot set/unset a folder as private.
Cause What to do
The password is incorrect. If you forget the password, enter 5555, 7777, then 3333 to reset it to the default (0000).
Printing Problems
You cannot print.
Cause What to do
The printer is not supported. Make sure your printer is supported. See page 56.
The printer's power is off. Turn on the printer.
The USB cable is not connected correctly.
See “Connecting the Viewer to a Printer” on page 56 and reconnect the cable.
You cannot print a JPEG image.
Make sure the JPEG image does not exceed 4600 pixels in either the vertical or horizontal direction.
If you connect the viewer to a printer with the Home screen displayed, the printer may be recognized as a computer.
Connect the viewer to the printer after selecting an image to print.
Updating the Firmware and Printer Driver
Epson will occasionally update the viewer firmware. You can download the latest firmware for the viewer from Epson's support website. Instructions for updating the firmware are provided online.
Uninstalling Software
If you need to uninstall the Epson Link2 software, follow the procedure below for Windows or on page 68 for Macintosh. Be sure to back up any viewer installation data before deleting.
Windows
1 Click Start, point to All Programs (or Programs), then select EPSON. Select Epson Link2, then click Uninstaller.
Note:
For Windows Vista, when you see the User Account Control screen, click Allow.
2 After the confirmation dialog box appears, click Yes.
3 When you see a message that uninstallation is complete, click Finish.
4 If you see a message asking you to restart, click Restart Now.
Macintosh
1Connect the viewer to your Macintosh.
2Double-click the P-3000 drive on your desktop.
3Double-click the installation software.
4Select Custom Install.
5 Select Epson Link2.
6On the software installation screen, select Uninstall.
7 When you see a message asking you to restart, click Restart Now.
Resetting the Viewer
If the viewer stops working, or you want to restore its default settings, you can reset it.
Gently insert the end of a paper clip into the Reset button next to the viewer's USB ports.
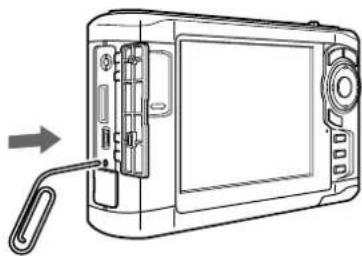
natural_image
Line drawing of a portable electronic device with a scroll wheel inserted, showing internal components and a scroll wheel (no text or symbols)The viewer shuts off, resets to its default settings, and comes back on.
Replacing the Battery
You can purchase a replacement lithium-ion battery (B32B818262) from an Epson authorized reseller. To find the nearest reseller, call 800-GO-EPSON (800-463-7766). Or you can purchase online at www.epsonstore.com (U.S. sales) or www.epson.ca (Canadian sales).
Where To Get Help
Epson provides these technical support services:
Internet Support
Visit Epson's support website for solutions to common problems with your viewer. You can download software and documentation, get FAQs and troubleshooting advice, or e-mail Epson with your questions.
Speak to a Support Representative
Before you call Epson for support, please have the following information ready:
○Product name (Epson P-3000)
○Product serial number (located on the bottom of the viewer)
- Proof of purchase (such as a store receipt) and date of purchase
○Computer configuration
○Description of the problem
Then call:
U.S.: (562) 276-4303, 6 AM to 6 PM, Pacific Time, Monday through Friday.
Canada: (905) 709-3839, 6 AM to 6 PM, Pacific Time, Monday through Friday.
Toll or long distance charges may apply.
Appendix A
Notices and Specifications
System Requirements
Windows System Requirements
To use your viewer software, your system should have:
OA Microsoft ^ Windows compatible PC with a Pentium ^ III processor (1 GHz or faster recommended)
Microsoft Windows 2000 Professional (SP3 or later), Windows XP Home, Windows XP Professional, Windows XP Professional x64 Edition, or Windows Vista
○At least 256MB RAM
○100MB free hard disk space for installation, 2GB required for operation
OSVGA monitor (800 × 600), 16-bit color or higher
○USB type A connector
Macintosh System Requirements
To use your viewer software, your system should have:
O700 MHz G4 processor or higher (PowerPC ^ or Intel ^ CoreDuo)
○Macintosh OS X 10.2.8 to 10.4.x
○At least 512MB RAM
O150MB free hard disk space for installation, 2GB required for operation
OSVGA monitor (800 × 600), 32000 colors or more
○USB type A connector
Safety Instructions
Read all these instructions before using the viewer, and keep this guide handy for later reference. Follow all warnings and instructions marked on the viewer and any options.
Using the Viewer
Caution:
Do not drop the viewer or expose it to any impact, to avoid damaging the internal hard disk and losing stored files. Do not format the hard disk from your computer, or the viewer will be unusable.
Epson is not responsible for backing up or recovering data. It is strongly recommended that you make your own backup files.
- Follow all warnings and instructions marked on this product.
Use only AC adapter model A351H and lithium-ion battery model D111A with this product.
When connecting the viewer to a computer or other device with a cable, ensure the correct orientation of the connectors. Each connector has only one correct orientation. Inserting a connector in the wrong orientation may damage both devices connected by the cable.
Do not insert objects into the slots or openings on the viewer.
Do not touch the components inside the viewer unless instructed to do so in the documentation. Never force the viewer's components into place. Although the viewer is designed to be sturdy, rough handling can damage it.
○Never spill liquid onto the viewer.
If the viewer emits unusual noises, odors, or smoke, cancel the current operation and turn it off immediately. Remove the battery and disconnect the AC adapter from the viewer, then unplug the AC adapter from the power outlet. Contact Epson.
Do not use your headphones for long periods at high volume as this can cause permanent hearing loss.
Do not use your headphones while operating a vehicle or performing an activity that requires attention to external sound. When wearing your headphones, we strongly recommend setting the volume so that you can hear your normal speaking voice.
Do not stand the device upright as it may fall over and be damaged.
Do not use the viewer after moving it between extreme temperatures, which may cause condensation to form on electronic parts.
If you use the viewer in places where the use of electronic devices is limited, such as in airplanes or hospitals, follow all instructions in those places.
Do not use the viewer outdoors during a thunderstorm.
To prevent fire or electric shock, do not cover the viewer with a blanket or other covering that may give off a static electric shock.
To prevent fire or electric shock, do not expose the viewer or its options to rain or moisture.
To prevent fire or explosion, do not use the viewer where flammable or volatile gas is stored.
Using the Battery
Caution:
There is a risk of explosion if the battery is replaced by the incorrect type. Use the specified new batteries only. Dispose of used batteries according to the instructions.
If battery acid gets into your eyes or on your skin, immediately rinse the affected area thoroughly with water and seek medical treatment. If a battery is swallowed, seek medical treatment immediately.
Use only an Epson lithium-ion battery for the viewer according to the instructions in this manual.
Use only AC adapter model A351H and the viewer (Model G961A/G961B) to charge batteries.
Do not use the battery that comes with the viewer for other devices.
To protect against short-circuiting, do not remove the outside sleeves of the battery.
- Do not handle the battery with wet hands or use it near water.
- Do not expose the battery to water or high humidity.
Do not drop, puncture, disassemble, mutilate, or short-circuit the battery.
○Do not place the battery near or into fire or water.
Do not use batteries that are leaking or damaged in any way.
○Do not charge the battery on devices except the viewer.
Do not charge the battery near open flame or in very hot locations.
- Keep batteries away from heat sources.
Do not leave the battery in a vehicle to prevent the battery from overheating.
Do not insert objects into any openings as they may touch dangerous voltage points or short-circuit components.
- Prevent the battery from coming into contact with metal objects that could short-circuit it, such as coins or keys.
Do not insert the battery into power outlets or other power sources such as car cigarette lighter sockets. - Do not solder wires or terminals directly to the battery.
Do not touch battery terminals.
Keep batteries away from open flame if they leak or smell strange.
○If overheating, discoloration, or distortion occur, remove the battery from the viewer and do not use it.
○Charge the battery before using it if it has not been used for a long period.
Storing the Battery
When not using this device for a long period, remove the battery from the viewer and store it separately.
Do not store batteries where the temperature or humidity is very high.
- Store batteries out of children's reach.
Disposing of the Battery
Before disposing of the battery, make sure you discharge it completely.
Warning:
Be sure to securely cover the end of the battery with tape to prevent combustion or explosion when disposing.
Do not incinerate or dispose of the battery in fire.
Do not dispose of batteries as ordinary refuse. Instead, dispose of them in a collection or recycle box in accordance with local laws.
For users in North America and Canada:

This mark indicates that the battery will be recycled by the RBRC. When you are ready to dispose of the battery, contact the RBRC at (800) 822-8837.
Using the AC Adapter
- Use only the type of power source indicated on the AC adapter's label, and always supply power directly from a standard, domestic power outlet with a power cord that meets the relevant local safety standards.
- Place the AC adapter near an electrical outlet where the power cord can be easily unplugged.
The AC adapter and power cable provided are designed for use with the viewer. Do not attempt to use them with other electronic devices unless specified.
Do not remove the AC adapter from this device during operations (connecting the AC adapter during operations is possible).
The AC adapter included is designed for use with the viewer. Use of any other adapter could result in fire, electrical shock, or injury.
○Use only AC adapter model A351H with the viewer.
Do not connect the AC adapter when the battery is not installed. Otherwise, the viewer may be damaged.
Use only the power source that meets the power requirements indicated on the label attached to the product. If you are not sure of the power supply specifications in your area, contact your local power company or regulatory agency.
Make sure the total amperage of all devices plugged into the power outlet does not exceed the power outlet's ampere rating.
Do not use a damaged or frayed AC adapter.
If you use an extension cord with the viewer, make sure the total amperage of all devices plugged into the extension cord does not exceed the cord's amperage rating.
Never disassemble, modify, or attempt to repair the AC adapter by yourself.
Do not use power outlets controlled by wall switches or automatic timers.
Do not use power outlets on the same circuit as large motors or other appliances that may cause voltage fluctuations.
- Avoid using outlets on the same circuit as photocopiers or air control systems that regularly switch on and off.
To prevent fire or electric shock, do not cover the AC adapter with a blanket or similar covering.
- Position the viewer's power cord so that it will not be stepped on or run over.
Do not place any objects on the power cord and the AC adapter.
Keep the power cord straight at the ends and at the points where it enters the transformer.
The power cord should be placed to avoid abrasions, cuts, fraying, crimping, kinking, and other damage.
- If you cannot insert the plug into the power outlet, contact an electrician.
- Remove the AC plug from the outlet during lightning storms.
Using a Memory Card
○Only memory cards designed for the product's specifications can be used. (See page 16.)
The methods for using memory cards vary according to card type. See the documentation included with your memory card for details.
Do not remove a memory card or turn off the product while the memory card access light is flashing.
Using the LCD
The LCD panel on the viewer may contain a few small bright or dark spots. These are normal and do not mean that your LCD panel is damaged in any way.
○If the LCD panel on the viewer is damaged, contact Epson.
If the liquid crystal solution contained in the LCD panel on the viewer leaks out and gets onto your hands, wash them thoroughly with soap and water. If it gets into your eyes, flush them immediately with water. If discomfort or vision problems remain after a thorough flushing, see a doctor immediately.
○Use only a soft, dry cloth to clean the display. Do not use liquid or chemical cleaners.
Storing, Maintaining, or Transporting the Viewer
Do not store the viewer outdoors.
Do not store the viewer near water.
Do not store the viewer in a location subject to high temperature or humidity.
Do not store the viewer in a location subject to rapid changes in temperature or humidity.
Do not store the viewer in a location subject to direct sunlight or strong light sources.
○Unplug the viewer from the power outlet before cleaning it. Use a damp cloth for cleaning and do not use liquid or aerosol cleaners.
- Remove the battery and unplug the viewer and refer servicing to qualified service personnel under the following conditions: The power cord or plug is damaged; liquid has entered the viewer or its options; the viewer or its options have been dropped or the case is damaged; the viewer or its options do not operate normally or exhibit a distinct change in performance.
WARNING: The cords included with this product contain chemicals, including lead, known to the State of California to cause birth defects or other reproductive harm. Wash hands after handling. (provided in accordance with Proposition 65 in Cal. Health & Safety Code § 25249.5 et seq)
Standards and Approvals
Epson P-3000
EMC: FCC Part 15 Subpart B Class
CAN/CSA-CEI/IEC CISPR22 Class B
AC Adapter (Model A351H)
Safety: UL60950
CSA C22.2 No. 60950
EMC: CAN/CSA-CEI/IEC CISPR22 Class B
Battery (Model D111A)
Safety: UL2054
Specifications
General
LCD: 4 inches, 640 × 480 pixels, Approx. 16,770,000 colors
HDD: 2.5 inch HDD, 40GB, FAT 12/16/32 VFAT supported
Dimensions (without projections) and weight: Height 3.5 inches (88.7 mm) Width 5.9 inches (150 mm) Depth 1.3 inches (33.1 mm) Weight 15.0 oz (426 g), (approx.) including battery
Temperature: Operating (or charging): 41 to 95 °F (5 to 35 °C) Non-operating: -4 to 140 °F (-20 to 60 °C)
Humidity (without condensation): Operating: 30 to 80% Non-operating: 10 to 80%
Altitude Operating: 3000 m or less Non-operating: 12000 m or less
Memory card: CompactFlash memory card (Type I/Type II, including Microdrive); SD memory card, SD High-Capacity Card, MultiMedia Card, MultiMedia Card Plus
Note:
A commercially available CF adapter is needed to use other memory cards.
Power sources: Lithium-ion battery (Model D111A) AC adapter (Model A351H)
Battery life (when fully charged)*: Approx. 3 hours when playing a slide show (in the default settings) Approx. 3 hours when playing video (MPEG4, 2 Mbps, using headphones) Approx. 6 hours when playing audio (MP3, 128 kbps, using headphones)
* Times may vary depending on the memory card being used, the number of files, ambient temperature, and other factors.
Electrical
Input voltage: DC 5.0 V
Rated current: Maximum 2.3 A
Power 6.3 W (when using the battery) consumption: 7.9 W (when using the AC adapter)
Interface
USB connector: Two USB 2.0 (Mass Storage Class) interfaces Full Speed and High Speed mode Host: Standard A Device: Mini-B
A/V Out Quadrupole mini pin jack (∅ 3.5 mm) connector:
Headphone Out Quadrupole mini pin jack (∅ 3.5 mm) connector:
CF Card slot: One slot (Type 1/Type 2, 3.3V) for CompactFlash memory card or Microdrive
SD Card slot: One slot for SD memory card or MultiMedia card
Battery
Type: Rechargeable lithium-ion battery
Model: D111A
Size: 0.88 × 0.80 × 2.78 inches
(H× W× D) (22.45× 20.4× 71~mm)
Ratings: 3.7 V, 2600 mAh
Temperature: Storing: -4 to 104 °F (-20 to 60 °C)
Keep the battery in a cool place when storing for a long period.
AC Adapter
Model: A351H
Input: AC 100 to 240 V, 50 to 60 Hz, 0.3 to 0.1 A
Output: DC 5.0 V, 2.3 A
Power Maximum 18 W consumption:
Optional Accessory
Model: Lithium-ion battery, D111A
Product code: B32B818262
Index
A
A/V Out connector, 8, 32
AC adapter
connecting, 11
connector, 8
safety, 73 to 75
specifications, 78
standards, 76
Activity light, 12
Adobe Bridge, 55
AdobeRGB, 28, 62
Audio
conversion, 46
copying files to viewer, 34 to 35
creating playlist, 38 to 40
deleting files, 41
equalizer, 41
file formats, 36
playing, 36 to 41
problems, 65 to 66
repeat and shuffle, 38
B
Backing up
from memory cards, 19 to 21
preferences, 45
to/from USB devices, 47 to 49
to computer, 42 to 44
Backup Files icon, 14
Battery
charging, 10 to 11
cover, 8
disposing of, 73
icon, 11
installing, 10
removing, 11
replacing, 69
safety, 72 to 73
specifications, 78
Beep settings, 62
Bit rate
audio, 36
video, 30
Buttons
locking, 13
using, 9
C
Cable
USB, 42 to 44, 56 to 57
video, 32
Charge light, 10
Charging the battery, 10 to 11
Cleaning the viewer, 63
Codec, 30
Color space, 28, 62
CompactFlash
adapter, 16
card slot, 8, 17
icon, 14
Computer
connecting to, 34, 42
disconnecting from, 35, 44
Connecting
computer, 34, 42
printer, 56 to 57
TV or projector, 32
USB devices, 47
Copying
files from memory cards, 19 to 21
files to/from computer, 42 to 44
files to/from USB devices, 47 to 49
problems, 66
Customizing settings, 60 to 62
D
Date and time, setting, 12 to 13, 62
Deleting
audio files, 41
files and folders, 51
Device USB connector, 8, 34, 42 to 44, 56 to 57
Direct printing, 56 to 59
Display button, 27
Display modes, video, 32
Display Photo Enhance, 28
DivX, 30, 61
DNG files, 25
E
Eject button, 8
Electrical specifications, 78
Epson
Link2, 35, 38, 42 to 46
printers, 56
purchasing battery, 69
technical support, 69
Equalizer, 41
Error messages, 63 to 64
Exif, 27
F
File formats
audio, 36
image, 25
video, 30
File Operation settings, 61
Files
copying from memory card, 19 to 21
copying to/from computer, 42 to 44
copying to/from USB devices, 47 to 49
deleting, 51
locking, 53
problems copying, 66
problems viewing, 65
rating, 54 to 55
Firmware, updating, 67
Firmware version, 62
Folders
changing display, 24
copying files to, 21
creating, 22
deleting, 51
locking, 53
renaming, 51
setting as private, 49 to 51
setting as screen saver, 55
setting icon, 54
H
Hard drive capacity, 60
Headphones
connector, 8
using, 36
Histogram, 27
Hold icon, 14
Home screen, 14
Host USB connector, 8, 47
I
ID3 tags, 35
Images
copying to folder 22
displaying as a slide show, 28
displaying information, 27
display problems, 65
file formats, 25
printing, 56 to 59
rating, 54 to 55
rotating, 29, 61
viewing, 26 to 29
zooming, 27
Installing battery, 10
Interface specifications, 78
J
JPEG files, 25
L
Language setting, 12, 62
LCD, 8, 65, 75
Lights, 9
Link2 software
backing up files 43
copying files, 42 to 44
creating playlist, 38
setting preferences, 45
transferring music files, 35
Locking
buttons, 13
files and folders, 53
M
Macintosh
disconnecting from 44
system requirements, 70
Maximum bit rate, video, 30
Memory card
access light 15
adapter, 16
copying files, 19 to 21
safety instructions, 75
types, 16
Memory Card icon, 14
Memory Stick, 16
Menu options, 24 to 25
Metadata, 27
Microdrive, 16
Movie Settings, 61
MultiMedia card, 16
Music
conversion, 46
copying to viewer, 34 to 35
creating playlist, 38 to 40
deleting files, 41
equalizer, 41
file formats, 36
playing, 36 to 41
repeat and shuffle, 38
0
Overexposure preview, 27
P
Paper, types and sizes, 56
Password, 50
Photo Enhance, 28, 58
Photos, see Images
PictBridge, 56
Playing
music, 36 to 41
videos, 30 to 31
Playlist
creating, 38 to 40
modifying, 40
Pop-up menu, 24 to 25
Power
problems, 64
saving, 15, 60
switch, 8
turning off, 15
turning on, 12
Printing
photos, 56 to 59
problems, 67
videos, 59
Private folders, 49
Problems
audio and video, 65 to 66
copying and deleting files, 66
power, 64
printing, 67
solving, 63 to 67
viewing files, 65
Projector, connecting to, 32
Protecting files, 53
R
Rating photos, 54 to 55
RAW files, 25
Reset button, 8, 68
Resetting the viewer, 68
Rotating images, 29
s
Safety instructions, 71 to 76
Screen icons, 23
Screen saver, 55
Secure Digital
cards, 16
card slot, 8, 18
icon, 14
Settings
customizing, 60 to 62
Date and time, 12 to 13, 62
icon, 14
Language, 12, 62
Slide show
creating, 28
settings, 61
Sound
problems, 65 to 66
settings, 62
Speaker, 8
Specifications
AC adapter, 78
battery, 78
electrical, 78
general, 77
interface, 78
standards and approvals, 76
sRGB, 28, 62
Status and error messages, 63 to 64
Support, technical, 69
System requirements, 70
T
Technical support, 69
Time, setting, 12 to 13
Troubleshooting
audio and video problems, 65 to 66
error messages, 63 to 64
file operation problems, 66
file viewing problems, 65
power problems, 64
printing problems, 67
Turning off power, 15
Turning on power, 12
TV, connecting to, 32
U
Underexposure preview, 27
Updating firmware, 67
USB
cable, 34, 42 to 44, 56 to 57
connectors, 8
USB devices
connecting, 47
copying files, 47 to 49
types, 46
V
Video
codec, 30
conversion, 46
display modes, 32
DivX registration code, 61
file formats, 30
playing, 30 to 31
printing, 59
problems, 65 to 66
screen size, 31
selecting NTSC or PAL, 62
settings, 61
View Rated Files, 14
W
Wallpaper, 54
Windows
disconnecting from, 44
system requirements, 70
X
xD-Picture card, 16
Z
Zooming images, 27