
DS1000 - Computer Accessories DELL - Free user manual and instructions
Find the device manual for free DS1000 DELL in PDF.


| Product Type | Docking Station with Monitor Stand |
| Brand | Dell |
| Model | DS1000 |
| Dimensions (Base) | 315 mm x 195 mm x 426 mm |
| Weight | 2.8 kg (6.17 lb) |
| Supported Monitor Weight | 2.2 kg to 5.7 kg (4.9 lb to 12.6 lb) |
| Panel Mount Compatibility | VESA compliant, up to 27 inches |
| Input Interface | USB Type-C |
| Power Delivery to Computer | Up to 90 W |
| Video Ports | 1 x DisplayPort (DP 1.2), 1 x HDMI (1.4a), 1 x VGA |
| USB Ports | 2 x USB 3.0 (1 with PowerShare), 2 x USB 2.0 |
| Audio Ports | 1 x Headset, 1 x Line-out |
| Network Port | Gigabit Ethernet (RJ-45) |
| Height Adjustment Range | 130 mm |
| Tilt Range | -5° to 21° |
| Pivot Range | 90° bidirectional |
| Power Input | AC 100-240 V, 3.3 A-2.2 A |
| Standby Power Consumption | < 1.0 W |
| Operating Temperature | 0° to 35°C |
| Storage Temperature | -20° to 60°C |
| Operating Humidity | 10% to 80% (non-condensing) |
| System Requirements | Windows 7/8/8.1/10, 1 GB RAM, 1.6 GHz dual-core CPU, 30 MB free HDD space |
| Package Contents | Stand riser, riser cover, docking base with USB-C cable, power cord, VESA adapter plate set, Quick Setup Guide, Safety Information |
Frequently Asked Questions - DS1000 DELL
User questions about DS1000 DELL
0 question about this device. Answer the ones you know or ask your own.
Ask a new question about this device
Download the instructions for your Computer Accessories in PDF format for free! Find your manual DS1000 - DELL and take your electronic device back in hand. On this page are published all the documents necessary for the use of your device. DS1000 by DELL.
USER MANUAL DS1000 DELL
Notes, cautions, and warnings

NOTE: A NOTE indicates important information that helps you make better use of your computer.

CAUTION: A CAUTION indicates either potential damage to hardware or loss of data and tells you how to avoid the problem.

WARNING: A WARNING indicates a potential for property damage, personal injury, or death.
Copyright © 2016 Dell Inc. All rights reserved. This product is protected by U.S. and international copyright and intellectual property laws. Dell™ and the Dell logo are trademarks of Dell Inc. in the United States and/or other jurisdictions. All other marks and names mentioned herein may be trademarks of their respective companies.
2016 - 03
Rev. A00
Contents
1 Introduction......4
Important information....4
2 Before you begin....5
Package contents....5
Identifying components and features....6
3 Setting up the docking stand....9
Installing the stand riser assembly....9
4 Configuring the Intel HD Graphics utility.... 16
5 Technical specifications.... 19
Display resolution....21
6 Troubleshooting the Dell Dock with Monitor Stand DS1000....22
Symptoms and solutions.... 22
7 Contacting Dell.... 25
1
Introduction
The Dell Dock with Monitor Stand DS1000 is a device that links all your electronic devices to your computer using a USB Type-C cable interface. Connecting the computer to the docking station allows you to access all peripherals (mouse, keyboard, stereo speakers, external hard drive, and large-screen displays) without having to plug each one into the computer.
Important information
Update your computer's BIOS and the Dell Dock with Monitor Stand DS1000 drivers to the latest versions available at Dell.com/support before using the docking station. Older BIOS versions and drivers could result in your computer not recognizing the docking station or not functioning optimally.
2
Before you begin
Package contents
Your docking stand ships with the following components. Ensure that you have received all the components and contact Dell (see your invoice for contact information) if something is missing.
The components shipped are:
- Stand riser
- Riser front cover
- Docking base with USB Type-C cable
- Power cord
• VESA adapter plate set
• Safety, Environmental, and Regulatory Information - Quick Setup Guide
• Important Information Tech Sheet
Identifying components and features
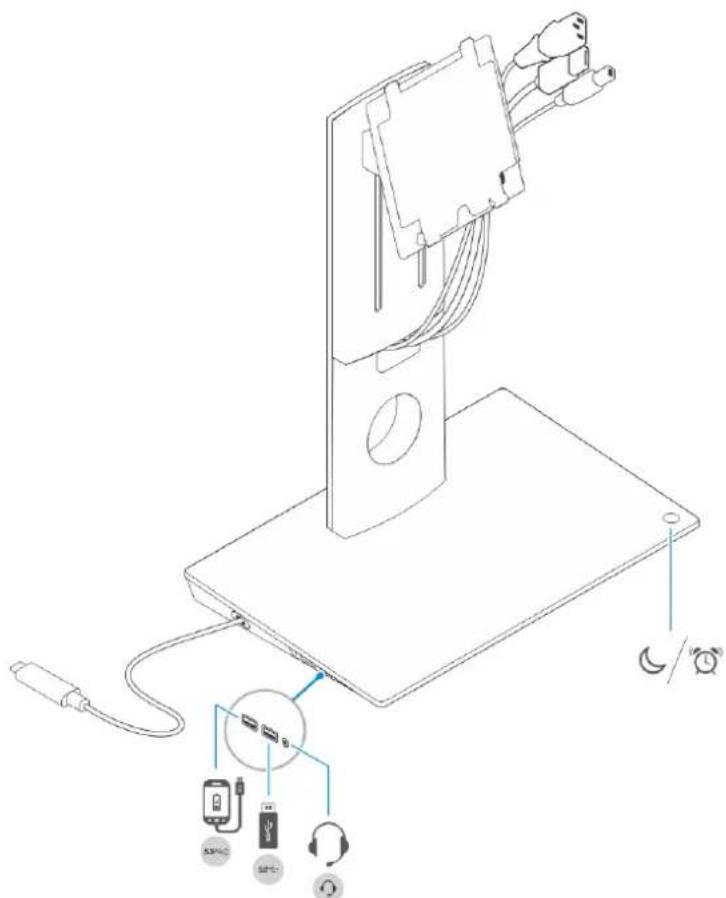
Figure 1. Identifying components and features — Side panel
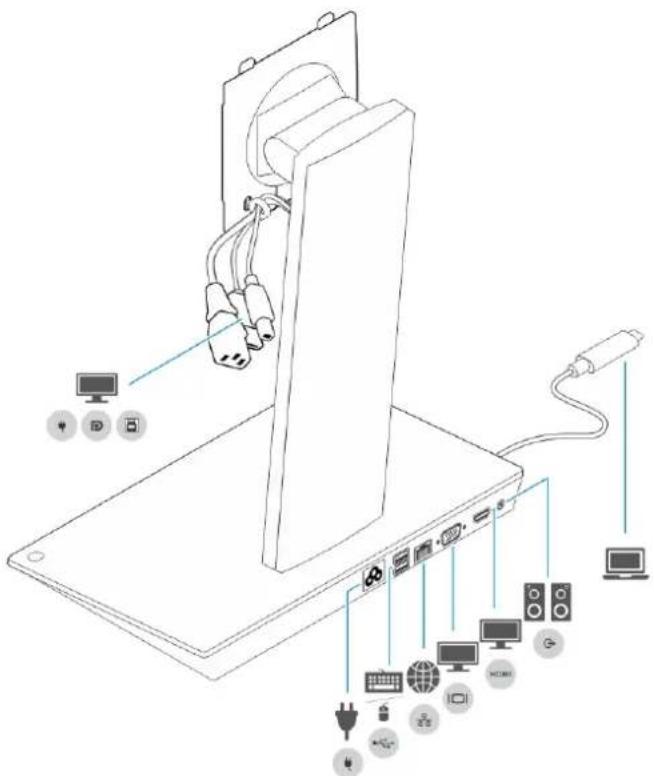
Figure 2. Identifying components and features — Back panel
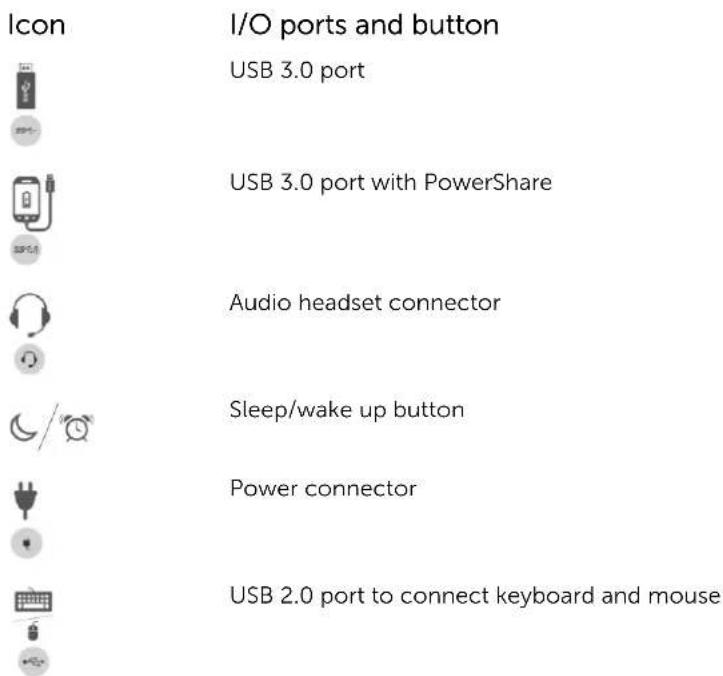
Icon I/O ports and button

Network connector (RJ - 45)
VGA port
HDMI port

Line-out connector
USB type-C connector to connect to the computer
Combo cable to the monitor consisting of the power cable, USB 2.0 cable, and the display cable.
Setting up the docking stand
Installing the stand riser assembly
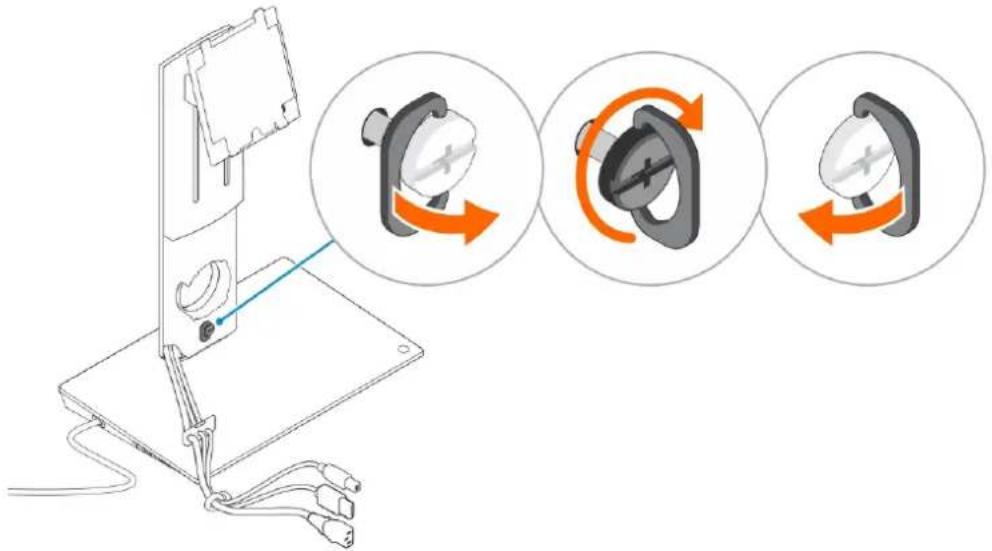
- Open and pull the screw handle on the stand riser to loosen the screw.
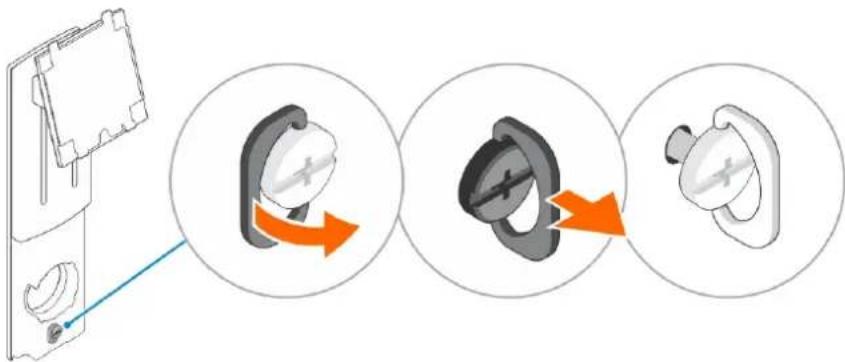
flowchart
graph TD
    A["Device with socket"] --> B["Inserted socket"]
    B --> C["Step 1: Inserted socket with orange arrow"]
    C --> D["Step 2: Inserted socket with black arrow"]
    D --> E["Step 3: Inserted socket with orange arrow"]
- Insert the stand riser assembly onto the tab on the docking stand.
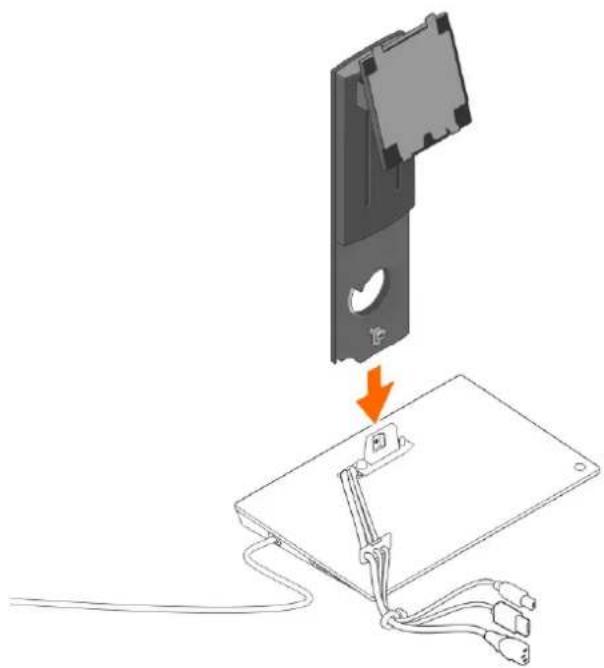
natural_image
Diagram showing a device being inserted into a clip, with an orange arrow indicating the insertion direction (no text or symbols present)- Open the screw handle and rotate it to lock the screw into place.
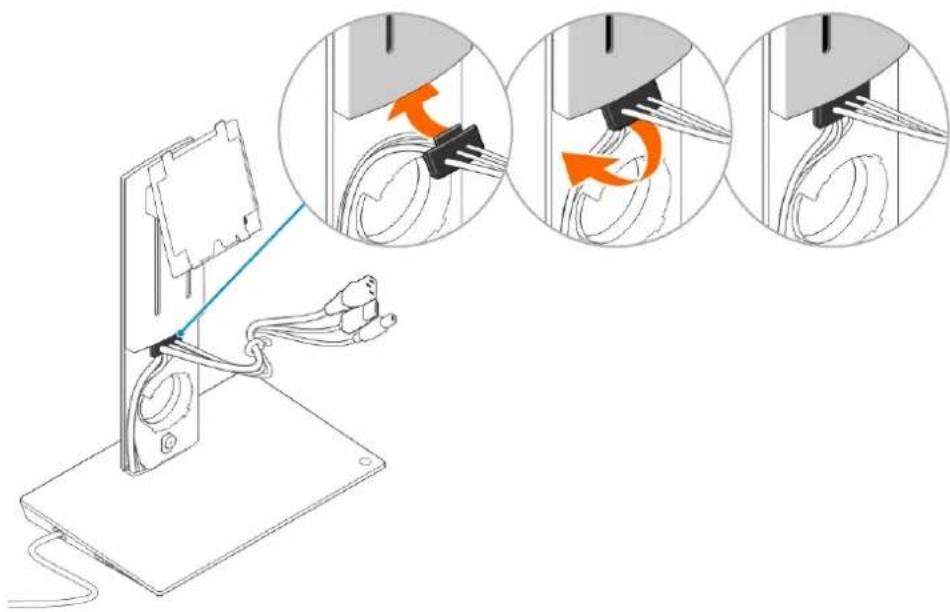
- Route the cables through the cable routing channel and insert the cable holder into the slot on the stand riser assembly.
- Align the tabs on the stand riser cover with the slots on the stand riser assembly and insert it into the slots.
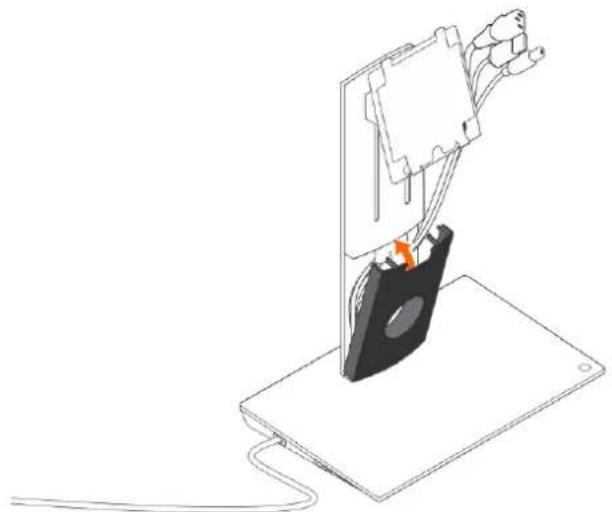
natural_image
Line drawing of a device with cable and plug, no text or symbols present- Insert the cable clip into the slot on the back of the VESA cover and rotate it to lock the cable clip into place.
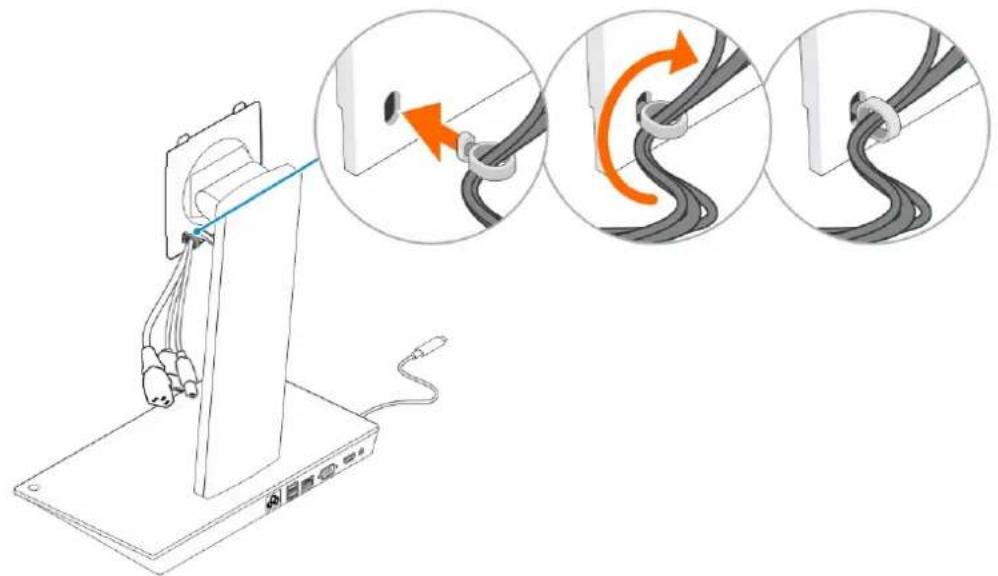
natural_image
Diagram of a cable device with connectors and wiring, showing three stages of cable connection (no text or symbols)- Place the monitor face-down and slide the tabs on the VESA plate into the slots on the monitor.
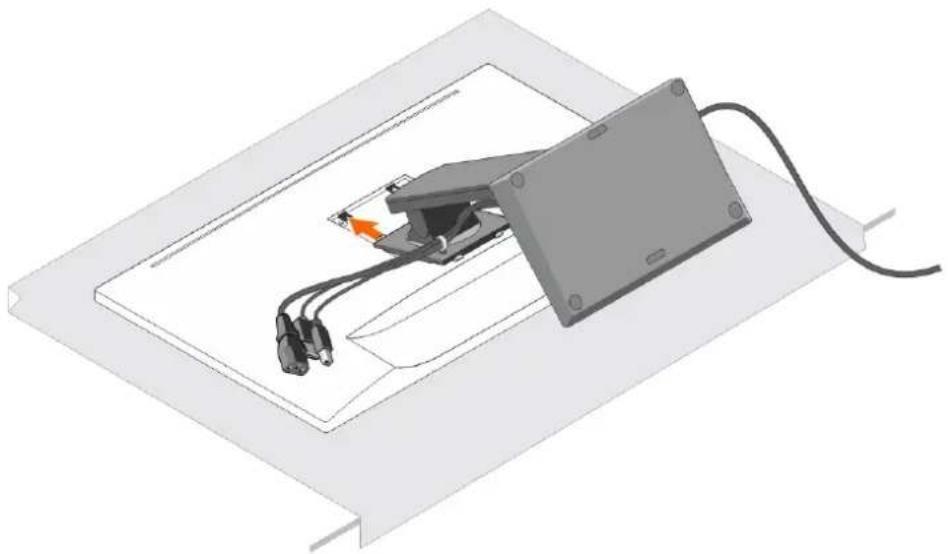
natural_image
3D diagram of a device with connectors and cables, no visible text or symbols- Insert the tabs on the VESA plate into the slots on the monitor.
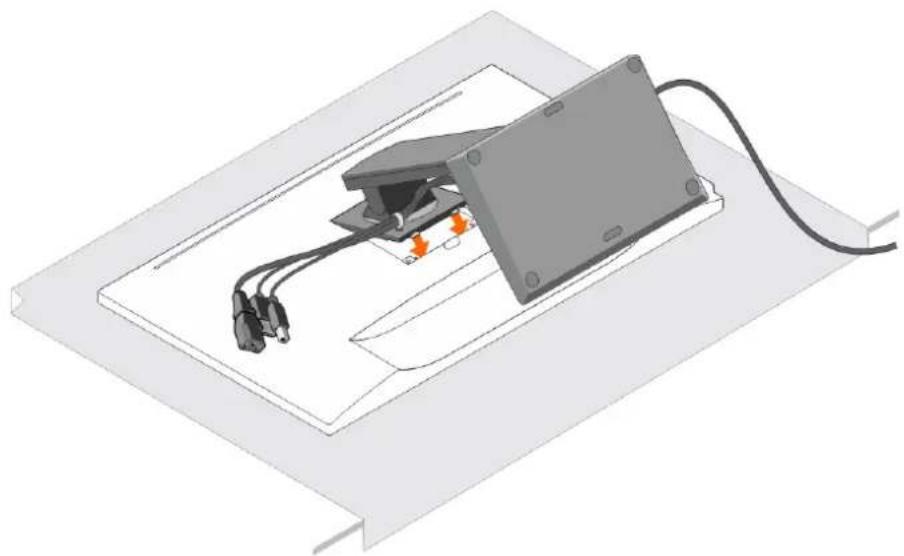
natural_image
3D diagram of a device with connectors and cables, no visible text or symbols- Rotate the monitor to the vertical position to connect the cables.
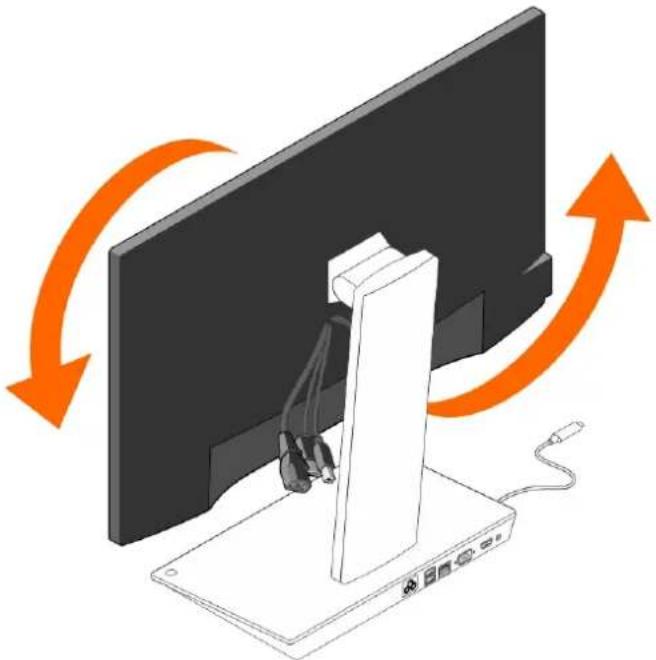
natural_image
Illustration of a computer monitor with an attached stand and cable, showing orange curved arrows indicating rotation or direction (no text or symbols present)- Connect the cables to the monitor.
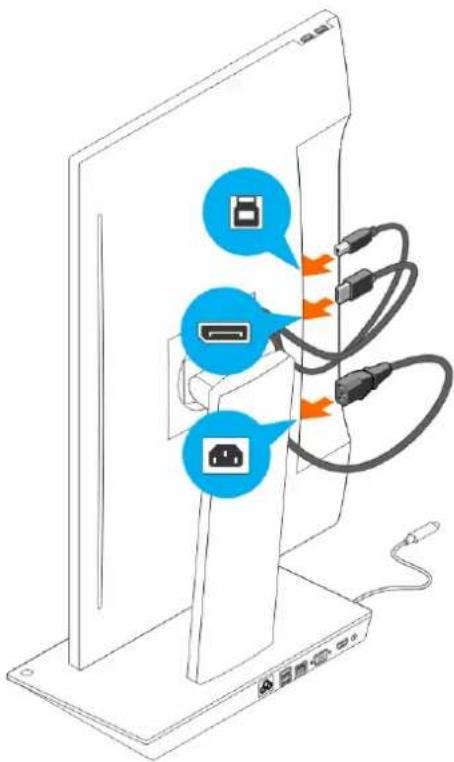
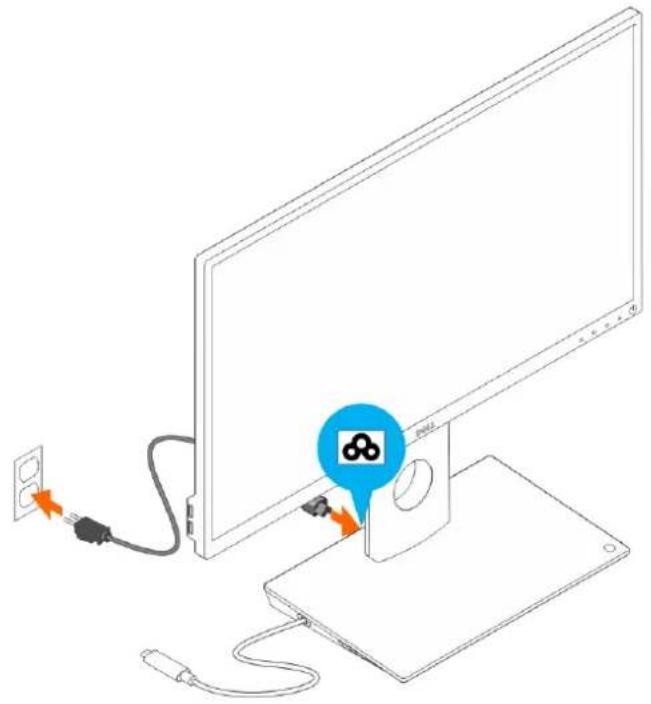
- Connect the power cable to the docking stand and a power source.
natural_image
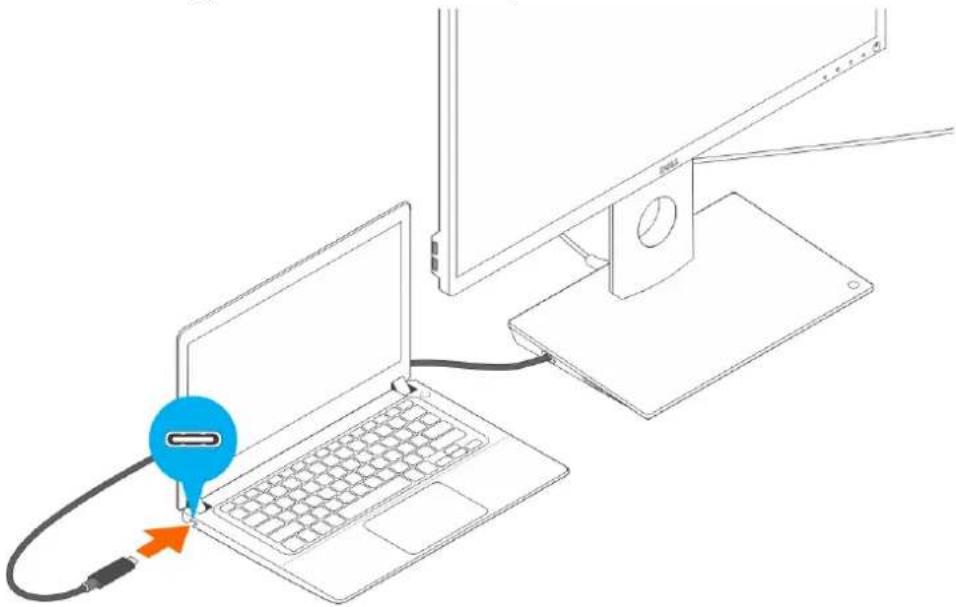
Diagram of a computer monitor connected to a power strip via cable, showing cable routing and a warning icon (no text or symbols present)- Connect the USB Type-C connector to the computer.
natural_image
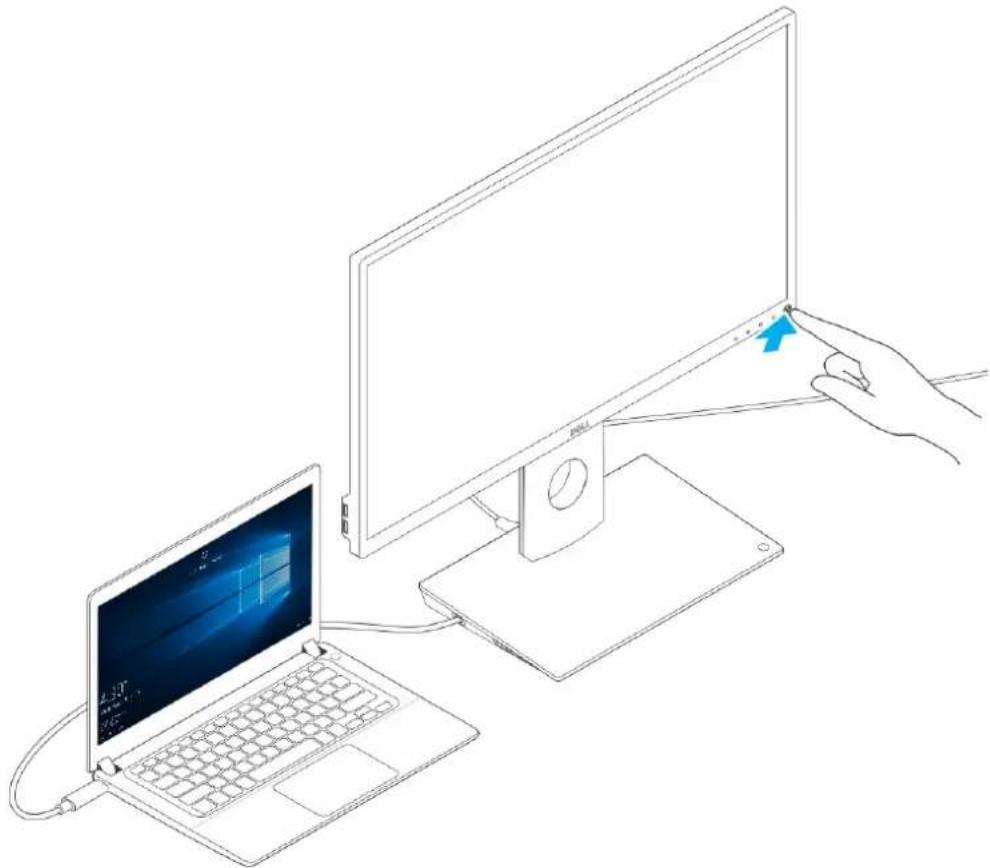
Line drawing of a laptop connected to a monitor, showing cable and cable connector (no text or symbols)- Turn on the monitor.
natural_image
Line drawing of a laptop connected to a desktop computer with a hand interacting with it (no text or symbols present)4
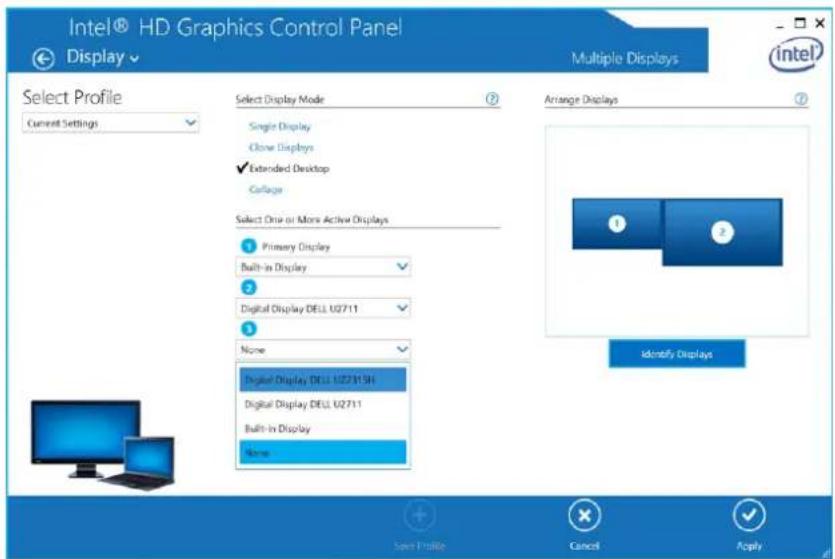
Configuring the Intel HD Graphics utility
If connecting two displays, follow these steps:
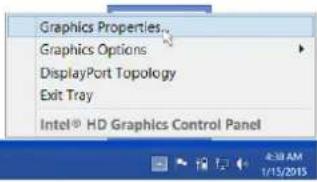
- Click the icon list on the task bar.

- Click the Intel HD Graphics utility on your taskbar as shown here.

- Click Graphics Properties.
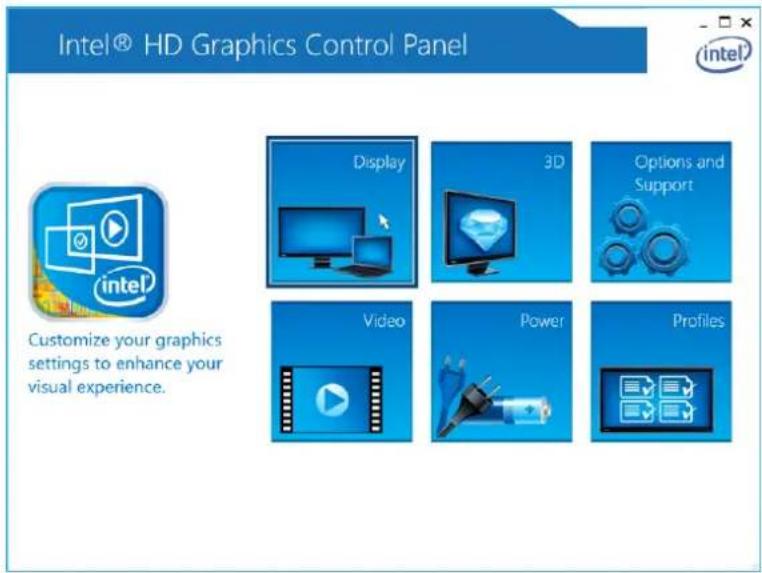
- Click Display.
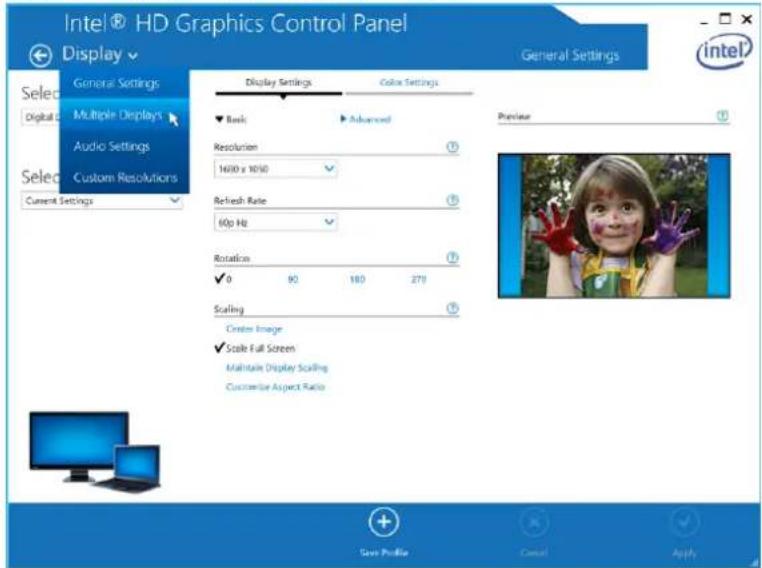
- Click Display and select Multiple Displays.
- Select your preferred Display Mode.
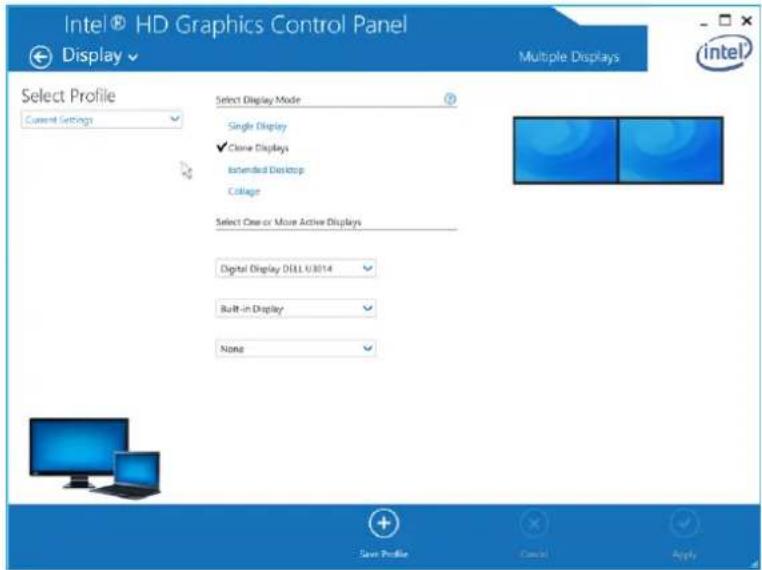
- Select and arrange your displays to your preferred positions and then click Apply for the changes to take effect.
Technical specifications
Input standard USB Type-C
Power delivery on Up to 90 W
Dell computer
Video ports
• One DisplayPort (supports DP 1.2)
• One HDMI (supports HDMI 1.4a)
- One VGA port
I/O ports
• One headset connector
- One speaker out
USB ports
- Two USB 3.0 ports on the side panel (one with PowerShare)
NOTE: Ports with PowerShare support high current charging up to 1.5 A for BC 1.2 compliant devices.
- Two USB 2.0 ports on the back panel
Network port
• Gigabit Ethernet (RJ-45)
Table 1. LED indicators
| Link speed indicators Ethernet activity indicator | |
| 10 Mb = Green Flashing Yellow | |
| 1000 Mb = Orange | |
| 1 Gb = Green + Orange | |
Temperature
- Operating: 0^ to 35^
- Non operating:
- Storage: -20^ to 60^
- Shipping: -20^ to 60^
Humidity
- Operating: 10% to 80% (non condensing)
- Non operating:
- Storage: 5% to 90% (non condensing)
- Shipping: 5% to 90% (non condensing)
Physical dimension
| • Dimension — Base: 315 mm (12.4 inches) x 195 mm (7.7 inches) x 426 mm (16.7 inches) |
| • Weight — 2.8 kg (6.17 lb) |
| • Monitor weight — 2.2 kg to 5.7 kg (4.9 lb to 12.6 lb) |
| • Panel mount — Supports Dell Quick Release monitors, VESA adapter plate for use with any VESA-compliant monitor up to 27 inches |
| • Height adjustment range — 130 mm |
| • Tilt range — -5° to 21° |
| • Pivot range — 90° bidirectional |
| • Button — computer sleep/wakeup; computer power off |
Minimum system requirements
| • Microsoft Windows 10 (32-bit or 64-bit) |
| • Microsoft Windows 8.1 (32-bit or 64-bit) |
| • Microsoft Windows 8 (32-bit or 64-bit) |
| • Microsoft Windows 7 (32-bit or 64-bit) |
| • 1 GB memory |
| • 1.6 GHz of dual-core Central Processing Unit (CPU) |
| • 30 MB of free space on the hard drive |
AC power input voltage/current
| AC 100-240 V |
| 3.3 A-2.2 A |
Standby power (without power)
| <1.0 W |
Display resolution
Table 2. Maximum resolution and refresh rate supported on your display
| Support max dual display output | |||
| D | HDMI | ICI | |
 | 1920 x 120060 Hz | 1920 x 120060 Hz | Not applicable |
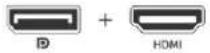 | 1920 x 120060 Hz | 1920 x 120060 Hz | Not applicable |
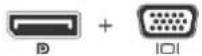 | 1920 x 120060 Hz | Not Applicable 1920 x 120060 Hz | |
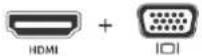 | Not applicable 1920 x 120060 Hz | 1920 x 120060 Hz | |
 | 3840 x 216030 Hz | Not applicable Not applicable | |
 | Not applicable 3840 x 216030 Hz | Not applicable | |
 | Not applicable Not applicable 1920 x 120060 Hz | ||

NOTE: Resolution support is also dependent on the Extended Display Identification Data (EDID) resolution of your monitor.
Troubleshooting the Dell Dock with Monitor Stand DS1000
Symptoms and solutions

NOTE: The Dell Dock with Monitor Stand DS1000 only works with DisplayPort over USB-C or Thunderbolt protocols and is not compatible with all USB-C ports.
Table 3. Symptoms and solutions
| Symptoms Suggested solutions | |
| No video on the monitors attached to the HDMI, DP cable, or the VGA port on the docking station. | ·Ensure that the computer is connected with the docking station to disconnect and reconnect to the docking station.·Ensure that the:– Video cable attached to the panel is tightly secured to the video port in the docking station– Monitor's display output setting is set to the correct output.·This may be due to the monitor(s) supporting higher resolutions than docking station is able to support. In the Intel Graphics Control Panel, under General Settings, ensure that the resolution is set to 1920 x 1200 or 1920 x 1080 at 59 Hz or 60 Hz for both the monitors.·If only one monitor is shown, while the other is not, go to the Intel Graphics Control Panel, and under Multiple Displays, select the output for the second monitor.·If your monitor is connected to a docking station, then the video output on your computer may be disabled. Consult your computer's user manual or contact your computer manufacturer for assistance on enabling this feature. |
| The video on the attached monitor is distorted or flickering. | ·Make sure the video cable attached to the monitor is tightly secured to the video port in the docking station.·When the monitor is distorted or flickering, please reset your monitor to restore it to its original settings. You can reset the monitor by pressing the Menu button on the monitor itself, and selecting Restore Factory Settings. Or disconnect the monitor from your docking station and power off and on to reset. |
| The video on the attached monitor is not displaying as an extended monitor. | Make sure the Intel HD Graphics software is installed in the Windows Device Manager.Open the Intel HD Graphics Control Panel and go to theMultiple Displayscontrol to set the display to the extended mode. |
| The audio connector is not functioning or there is a lag in the audio. | Ensure that the correct playback device is selected in the computer.If your BIOS setup has an Audio Enabled/Disabled option, make sure that it is set toEnabled.The most likely cause of audio output problems on the docking station is a bad audio-out connector. First try powering off and then powering on the docking station. If that fails, try to replug in the audio cable to the docking station from the external speaker output. |
| The USB ports are not functioning on the docking station. | Ensure that the computer is connected with the docking station. Try to disconnect and reconnect again with the docking station.If your BIOS setup has a USB Enabled/Disabled option, make sure that it is set toEnabled.Check the USB ports. Try plugging the USB device into another port.Please check if the plugged device is shown in the Windows Device Manager. |
| The HDCP content is not displayed on the attached monitor. | The docking station does not support HDCP content. |
| The LAN port is not functioning. | Ensure that the Ethernet cable connections are secured at the firewall and the hub or workstation.If your BIOS setup has a LAN/GBE Enabled/Disabled option, make sure that it is set toEnabled.Make sure the Realtek Gigabit Ethernet controller is installed in the Windows Device Manager.Please reinstall the Realtek Ethernet Driver or update your BIOS from Dell.com/support. |
| Cable LED is not ON after it is connected to your host. | Ensure that your DS1000 is connected to AC.Ensure that the computer is connected to the docking station. Try to disconnect and reconnect again with the docking station. |
| USB port does not function in pre-OS environment. | If your BIOS has a USB/Thunderbolt Configuration page, please make sure that the following options are checked:Enable USB Boot SupportEnable External USB Port3. Enable Thunderbolt Boot Support |
| PXE boot on dock does not function. | If your BIOS has an Integrated NIC page, please selectEnabled w/PXE.If your BIOS has a USB/Thunderbolt Configuration page, please make sure that the following options are checked:a. Enable USB Boot Supportb. Enable Thunderbolt Boot Support |
| USB Boot does not function. | If your BIOS has a USB/Thunderbolt Configuration page, please make sure that the following options are checked:1. Enable USB Boot Support2. Enable External USB Port3. Enable Thunderbolt Boot Support |
Contacting Dell
NOTE: If you do not have an active Internet connection, you can find contact information on your purchase invoice, packing slip, bill, or Dell product catalog.
Dell provides several online and telephone-based support and service options. Availability varies by country and product, and some services may not be available in your area. To contact Dell for sales, technical support, or customer service issues:
- Go to Dell.com/support.
- Select your support category.
- Verify your country or region in the Choose a Country/Region drop-down list at the bottom of the page.
- Select the appropriate service or support link based on your need.

- Notes, cautions, and warnings
- Contents
- Introduction......4
- Before you begin....5
- Setting up the docking stand....9
- Configuring the Intel HD Graphics utility.... 16
- Technical specifications.... 19
- Troubleshooting the Dell Dock with Monitor Stand DS1000....22
- Contacting Dell.... 25
- 1
- Introduction
- Important information
- 2
- Before you begin
- Package contents
- Identifying components and features
- Icon I/O ports and button
- Setting up the docking stand
- Installing the stand riser assembly
- 4
- Configuring the Intel HD Graphics utility
- Technical specifications
- Display resolution
- Troubleshooting the Dell Dock with Monitor Stand DS1000
- Symptoms and solutions
- Contacting Dell
Brand : DELL
Model : DS1000
Category : Computer Accessories