MT5078 - Computer Accessories Media-Tech - Free user manual and instructions
Find the device manual for free MT5078 Media-Tech in PDF.


User questions about MT5078 Media-Tech
0 question about this device. Answer the ones you know or ask your own.
Ask a new question about this device
Download the instructions for your Computer Accessories in PDF format for free! Find your manual MT5078 - Media-Tech and take your electronic device back in hand. On this page are published all the documents necessary for the use of your device. MT5078 by Media-Tech.
USER MANUAL MT5078 Media-Tech
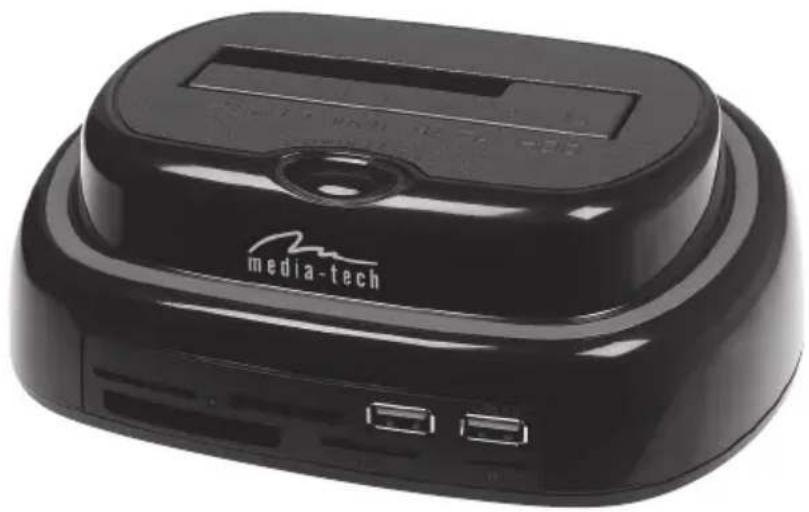
External HDD & Memory Card Management
natural_image
Black electronic device labeled 'media-tech' with two ports and a display screen (no readable text beyond branding)MT5078
User Manual
flowchart
graph TD
    A["OTB"] --> B["Device 1"]
    B --> C["Device 2"]
    C --> D["Device 3"]
    D --> E["Device 4"]
    E --> F["Device 5"]
    F --> G["Device 6"]
    G --> H["Device 7"]
    H --> I["Device 8"]
    I --> J["Device 9"]
    J --> K["Device 10"]
    K --> L["Device 11"]
    L --> M["Device 12"]
    M --> N["Device 13"]
    N --> O["Device 14"]
    O --> P["Device 15"]
    P --> Q["Device 16"]
    Q --> R["Device 17"]
    R --> S["Device 18"]
    S --> T["Device 19"]
    T --> U["Device 20"]
    U --> V["Device 21"]
    V --> W["Device 22"]
    W --> X["Device 23"]
    X --> Y["Device 24"]
    Y --> Z["Device 25"]
    Z --> AA["Device 26"]
    AA --> AB["Device 27"]
    AB --> AC["Device 28"]
    AC --> AD["Device 29"]
    AD --> AE["Device 30"]
    AE --> AF["Device 31"]
    AF --> AG["Device 32"]
    AG --> AH["Device 33"]
    AH --> AI["Device 34"]
    AI --> AJ["Device 35"]
    AJ --> AK["Device 36"]
    AK --> AL["Device 37"]
    AL --> AM["Device 38"]
    AM --> AN["Device 39"]
    AN --> AO["Device 40"]
    AO --> AP["Device 41"]
    AP --> AQ["Device 42"]
    AQ --> AR["Device 43"]
    AR --> AS["Device 44"]
    AS --> AT["Device 45"]
    AT --> AU["Device 46"]
    AU --> AV["Device 47"]
    AV --> AW["Device 48"]
    AW --> AX["Device 49"]
    AX --> AY["Device 50"]
Please read this user manual before installing and enabling device.
1. System requirement
Windows 2000/XP/Vista, Linux, Mac10.X
2. Package content
USB 2.0 data cable
Driver
■ User manual
■ Power Adapter
3. Connection
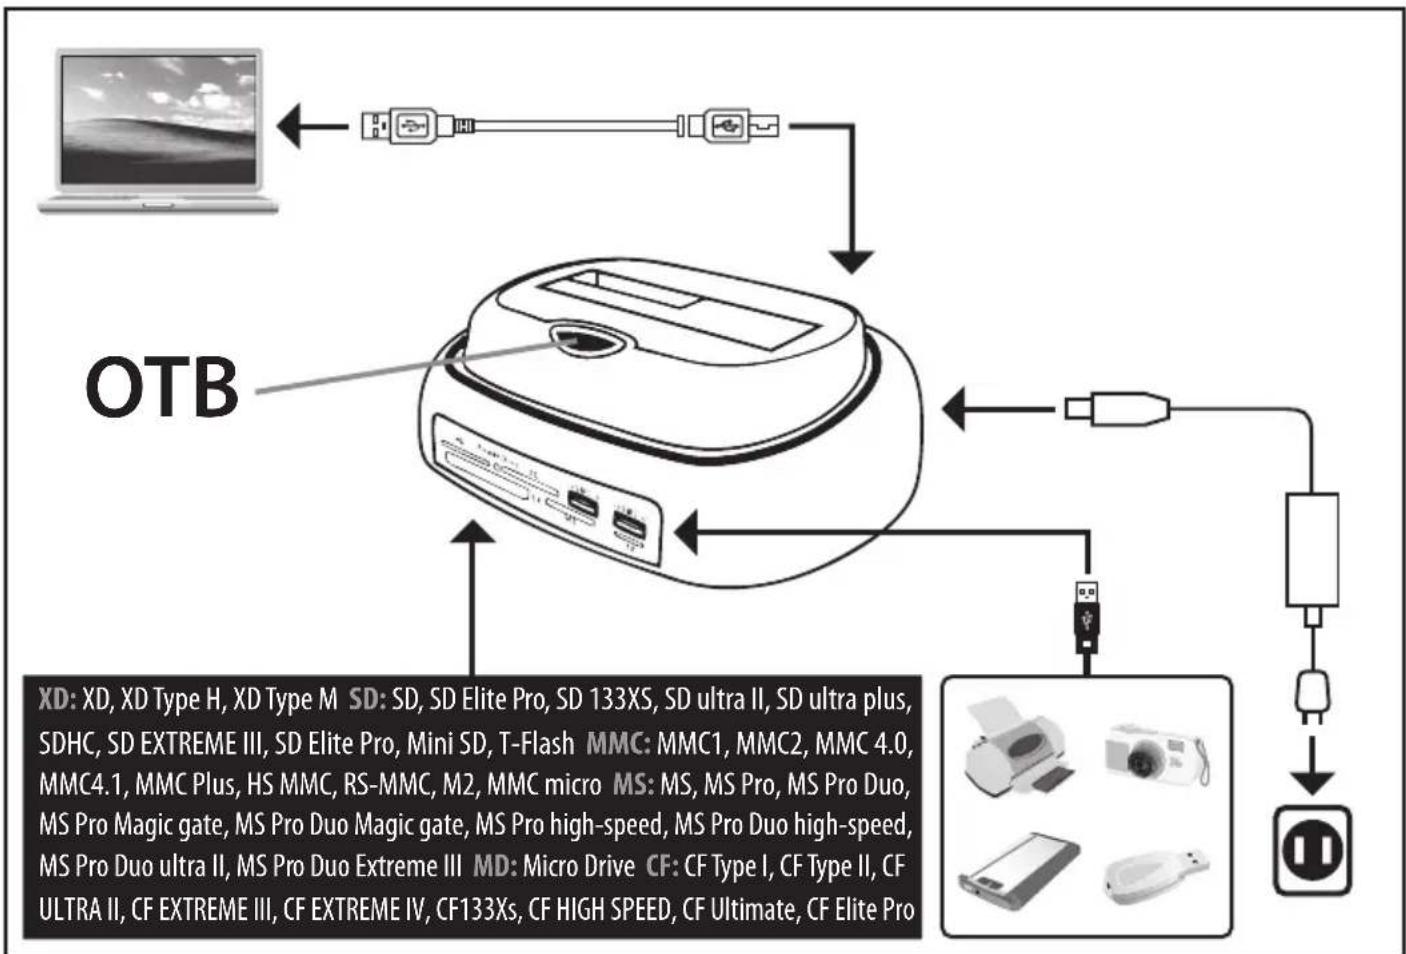
3.1 Connection to computer and power
◀ See page 2
3.2 Installing 2,5" HDD
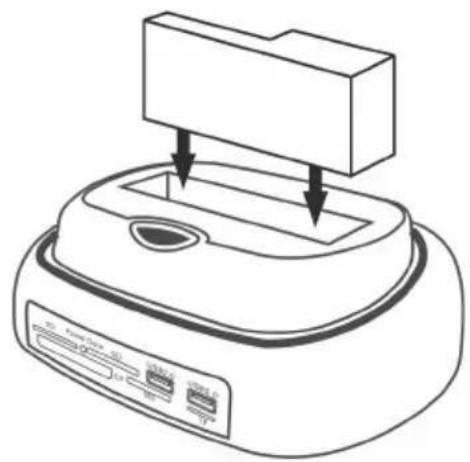
a) Put bracket inside the HDD compartment.
b) Switch off device. Put carefully 2,5" HDD into the HDD compartment.
a)
b)
natural_image
Line drawing of a device with a rectangular block and two arrows pointing to its top panel (no text or symbols)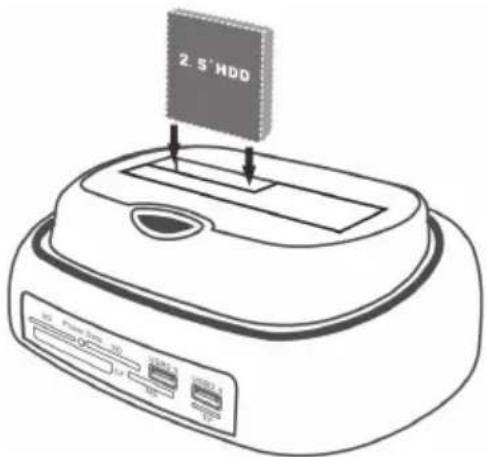
text_image
2.5'HDDc) Connect MT5078 with computer using USB2.0 cable or E-SATA cable (not included).
d) Enable device with ON/OFF switch.
NOTE. New (not partitioned) hard discs must be initialized in Windows system before formatting. HDD initialization procedure is described in MS Windows help (F1).
3.3 Installing 3,5" HDD
a) Remove bracket from HDD compartment.
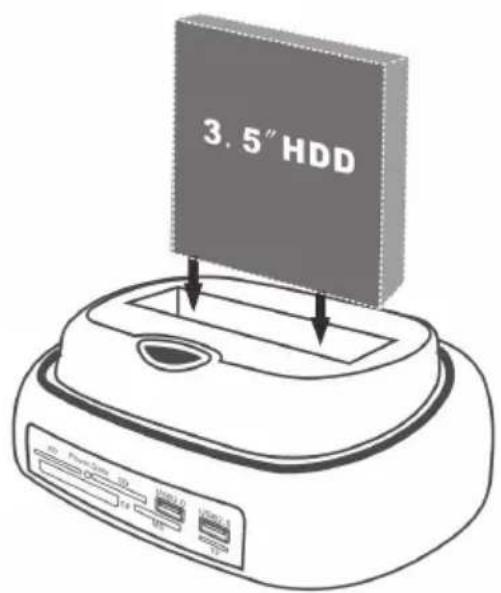
b) Switch off device. Put carefully 3,5" HDD into the HDD compartment.
c) Connect MT5078 with computer using USB2.0 cable or E-SATA cable (not included).
d) Enable device with ON/OFF switch.
NOTE.
New (not partitioned) hard discs must be initialized in Windows system before formatting. HDD initialization procedure is described in MS Windows help (F1).
NOTE.
Everytime when HDD is inserting or removing, COMBO TERMINAL must be switched OFF to avoid HDD electrical damage.
b)
text_image
3.5" HDD4. Use built-in card reader
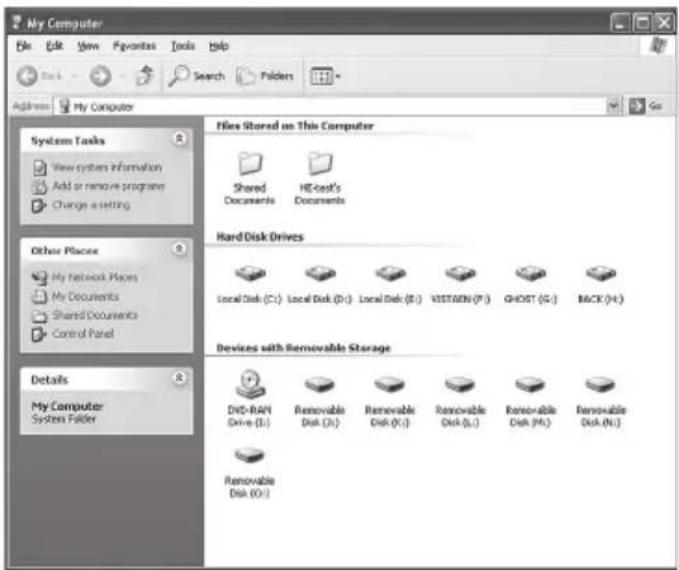
After device installation in the system inserted HDD and card reader will be identified as disk icons in My computer group. Insert carefully memory card to proper slot and click corresponding disk icon.
text_image
My Computer File Edit View Favorites Tools Help Address My Computer System Tasks View system information Add or remove programs Change a setting Other Places My Network Places My Documents Shared Documents Control Panel Details My Computer System Folder Files Stored on This Computer Shared Documents HE-text's Documents Hard Disk Drives Local Disk (C:) Local Disk (D:) Local Disk (E:) VISTAMN (F:) GHOST (G:) BACK (H:) Devices with Removable Storage DIN-RAIN Drive (I:) Removable Disk (J:) Removable Disk (K:) Removable Disk (L:) Removable Disk (M:) Removable Disk (N:)5. Use E-SATA
The E-SATA interface is working only for transmission data from/to inserted HDD. Card reader and USB hub requires USB connection.
NOTE.
System must be restarted after HDD connection through E-SATA interface.
6. One touch backup (OTB)
COMBO TERMINAL is equipped with OTB button to create automatic backup of specified files and folders when is connected to computer. To use this feature You have to install software first.
NOTE:
OTB function works only via USB. Will not works if HDD connected to E-SATA.
6.1 Installation
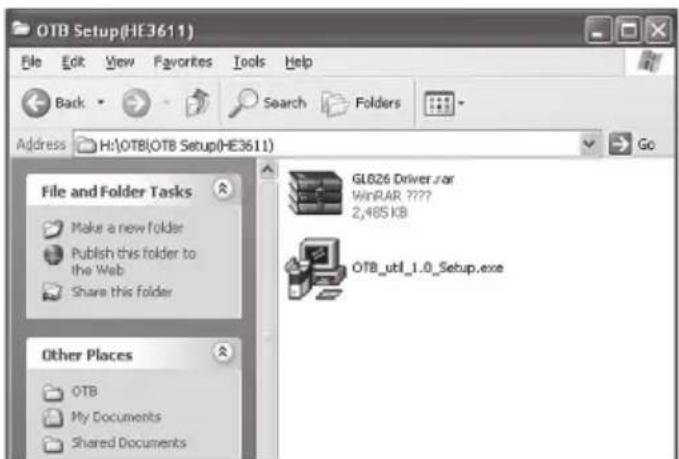
a) To install OTB software, insert software CD-ROM to optical drive and open "OTB_util_x_setup.exe" fi le.
text_image
OTB Setup(HE3611) File Edit View Favorites Tools Help Back Search Folders Address H:\OTB\OTB Setup(HE3611) File and Folder Tasks Make a new folder Publish this folder to the Web Share this folder Other Places OTB My Documents Shared Documents GL826 Driver.rar WinRAR 7???? 2,485 KB OTB Sahl_1.0_Setup.exeb) Click "Next"
text_image
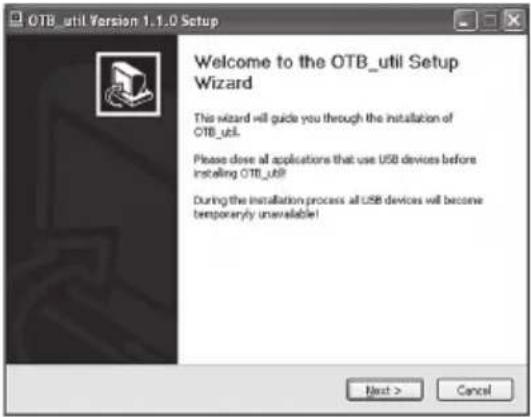
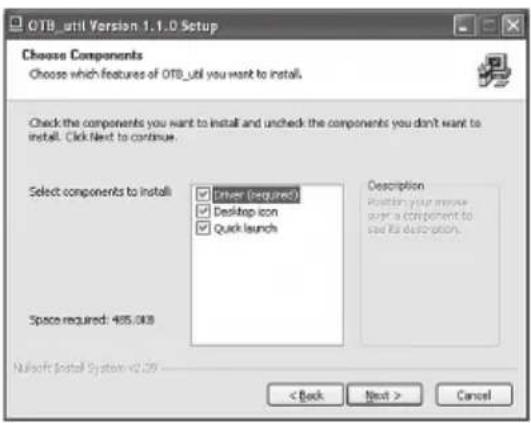
OTB_util Version 1.1.0 Setup Welcome to the OTB_util Setup Wizard This wizard will guide you through the installation of OTB_util. Please dose all applications that use USB devices before installing OTB_util During the installation process all USB devices will become temporarily unavailable! Next > Cancelc) Click "Next"
text_image
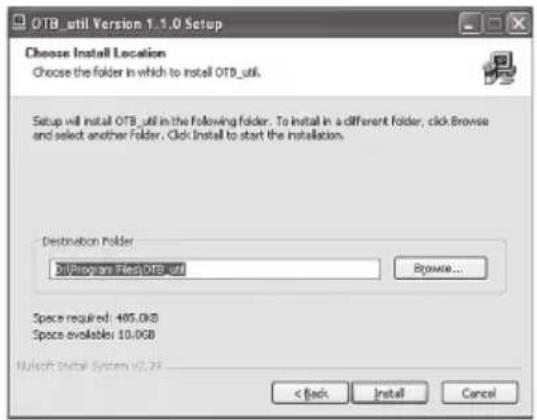
OTB_util Version 1.1.0 Setup Choose Components Choose which features of OTB_util you want to install. Check the components you want to install and uncheck the components you don't want to install. Click Next to continue. Select components to install Driver (required) Desktop icon Quick launch Description Default your mouse over a component to see its description. Space required: 485.088 Nullsoft Install System v2.09 < Back Next > Canceld) Click "Install"
text_image
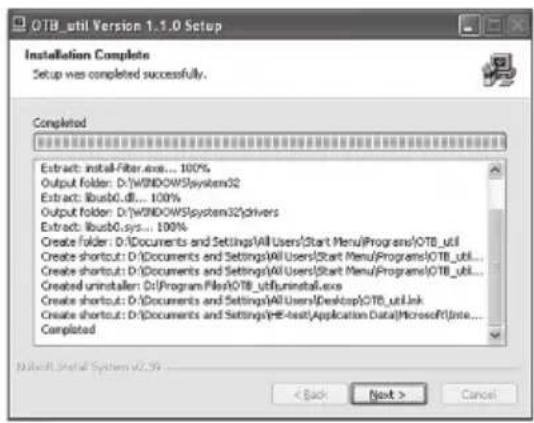
OTB_util Version 1.1.0 Setup Choose Install Location Choose the folder in which to install OTB_util. Setup will install OTB_util in the following folder. To install in a different folder, click Browse and select another Folder. Click Install to start the installation. Destination Folder All程序 Files OTB叁 Browse... Space required: 495.0KB Space available: 10.0KB N/A/NT Install System V2.3F < Back Install Cancele) Click "Next"
text_image
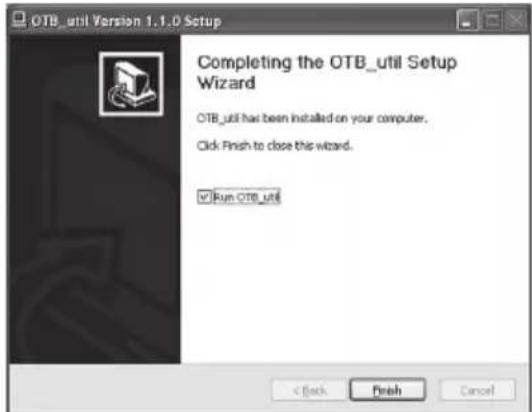
OTB_util Version 1.1.0 Setup Installation Complete Setup was completed successfully. Completed Extract: installFilter.exe... 100% Output folder: D:\WINDOWS\system32 Extract: Ibusb0.dll... 100% Output folder: D:\WINDOWS\system32\drivers Extract: Ibusb0.sys... 100% Create folder: D:\Documents and Settings\All Users\Start Menu\Programs\OTB_util Create shortcut: D:\Documents and Settings\All Users\Start Menu\Programs\OTB_util... Create shortcut: D:\Documents and Settings\All Users\Start Menu\Programs\OTB_util... Created uninstaller: D:\Program Files\OTB_util\install.exe Create shortcut: D:\Documents and Settings\All Users\Desktop\OTB_utilLink Create shortcut: D:\Documents and Settings\HE-text\Application Data\Microsoft\Inte... Completed < Back Next > Cancelf) Click "Finish"
text_image
OTB_util Version 1.1.0 Setup Completing the OTB_util Setup Wizard OTB_util has been installed on your computer. Click Finish to close this wizard. OK Run OTB_util < Back Finish Cancel6.2 Use OTB utility
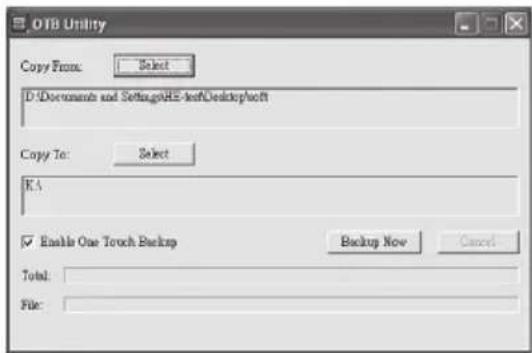
a) Open OTB utility
text_image
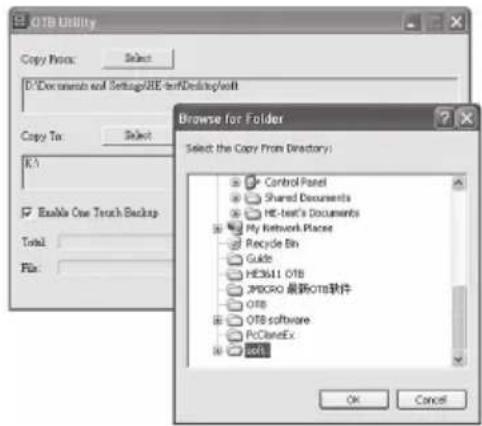
OTB Utility Copy From: Select D:\Documents and Settings\HES-let\Desktop\soft Copy To: Select K.S. Enable One Touch Backup Backup Now Cancel Total: File:b) Click "Copy From:" "Select", and choose source folder.
text_image
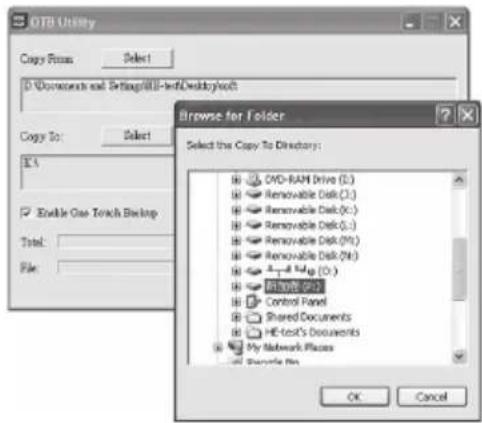
OTSB Utility Copy Price: Select D:\Documents and Settings\BE-text\Desktop\soft Copy To: Select K\ Enable One Touch Backup Total: File: Browse for Folder Select the Copy From Directory: Control Panel Shared Documents HCT-text's Documents My Network Places Recycle Bin Guide H3C611 OTB JPM800 最新OTS软件 OTB OTB software PCBoxEx Soft OK Cancelc) Click "Copy To:" "Select", and choose destination folder.
text_image
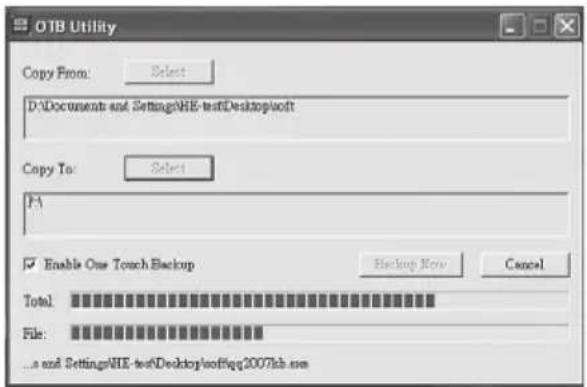
OTB Utility Copy From: Select D:\Documents and Settings\Hill-text\Desktop\hout Browse for Folder Select the Copy to Directory: DVD-RAM Drive (E:) Removable Disk (L:) Removable Disk (X:) Removable Disk (S:) Removable Disk (N:) Removable Disk (M:) A-14 Map (O:) Active PDF Control Panel Shared Documents HE-text's Documents My Network Places Remove Web OK Canceld) Press OTB (POWER/DATA) button on Product. Backup will start.
text_image
OTB Utility Copy From: Select D:\Documents and Settings\HE-testDesktopsoft Copy To: Select F\ Enable One Touch Backup Backup Now Cancel Total: File: ...and Settings\HE-testDesktopsoftqq2007xb.come) Backup fi nish.
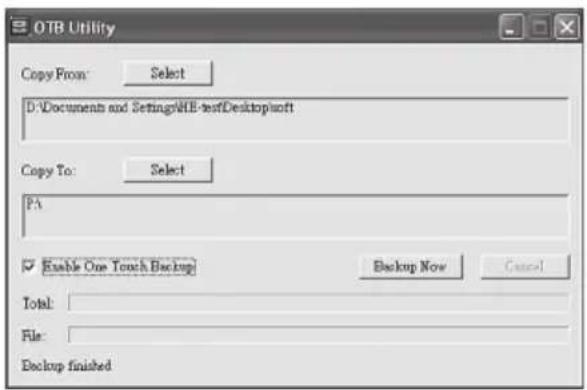
text_image
OTB Utility Copy From: Select D:\Documents and Settings\WEB-test\Desktop\soft Copy To: Select PA Enable One Touch Backup Backup Now Cancel Total: File: Backup finishedNOTE.
Media-Tech is not responsible for any lost of data on HDD and memory cards.