Deluxe Magnetic Elliptical 93600 - Elliptical bike Life Gear - Free user manual and instructions
Find the device manual for free Deluxe Magnetic Elliptical 93600 Life Gear in PDF.


| Product Type | Elliptical trainer |
| Resistance System | Magnetic with motorized adjustment |
| Maximum User Weight | 120 kg (265 lbs) |
| Programs | Manual, 12 Preset (Steps, Hill, Rolling, Valley, Fat Burn, Ramp, Mountain, Intervals, Random, Plateau, Fartlek, Precipice), 4 User, 5 Heart Rate Control (55%, 65%, 75%, 85%, Target), Watt Control, Body Fat |
| Display Functions | Time, Distance (km/miles), RPM, Watt, Speed, Calories, Pulse, Age, Target Heart Rate, Pulse Recovery, Clock, Temperature, Body Fat %, BMI, BMR |
| Resistance Levels | 24 levels (adjustable via UP/DOWN keys) |
| Power Supply | Adaptor (included) |
| Pulse Monitoring | Hand grip pulse sensors |
| Warranty | 1 year limited warranty on frame |
| Intended Use | Household use only |
| Safety Features | Emergency stop, levelers for stability, safety instructions |
| Maintenance | Clean with soap and damp cloth; no solvents |
| Assembly Required | Yes (includes step-by-step instructions) |
| Dimensions (Approx.) | Not specified in manual |
| Weight (Approx.) | Not specified in manual |
Frequently Asked Questions - Deluxe Magnetic Elliptical 93600 Life Gear
User questions about Deluxe Magnetic Elliptical 93600 Life Gear
0 question about this device. Answer the ones you know or ask your own.
Ask a new question about this device
Download the instructions for your Elliptical bike in PDF format for free! Find your manual Deluxe Magnetic Elliptical 93600 - Life Gear and take your electronic device back in hand. On this page are published all the documents necessary for the use of your device. Deluxe Magnetic Elliptical 93600 by Life Gear.
USER MANUAL Deluxe Magnetic Elliptical 93600 Life Gear
text_image
Get active for lifeThe specifications of this product may vary from this photo and are subject to change without notice. 2008. March
PAGE OF CONTENTS
| W | A | R | R | A | N | T | Y | |||||||||||||||||||||||||||||||||||||||||||||||||||||||||||||||||||||||||||||||||||||||||||||||||||||||||||||||||||||||||||||||||||||||||||||||||||||||||||||||||||||||||||||||||||||||||||||||||||||||||||||||||||||||||||||||||||||||||||||||||||||||||||||||||||||||||||||||||||||||||||||||||||||||||||||||||||||
| S | A | F | E | T | Y | I | N | S | T | R | U | C | T | I | O | N | S | 1 | ||||||||||||||||||||||||||||||||||||||||||||||||||||||||||||||||||||||||||||||||||||||||||||||||||||||||||||||||||||||||||||||||||||||||||||||||||||||||||||||||||||||||||||||||||||||||||||||||||||||||||||||||||||||||||||||||||||||||||||||||||||||||||||||||||||||||||||||||||||||||||||||||||||||||||
| OPERATING | INSTRUCTIONS | |||||||||||||||||||||||||||||||||||||||||||||||||||||||||||||||||||||||||||||||||||||||||||||||||||||||||||||||||||||||||||||||||||||||||||||||||||||||||||||||||||||||||||||||||||||||||||||||||||||||||||||||||||||||||||||||||||||||||||||||||||||||||||||||||||||||||||||||||||||||||||||||||||||||||||||||||||||||||||
| C | O | M | P | U | T | E | R | O | P | E | R | A | T | I | O | N | 3 | |||||||||||||||||||||||||||||||||||||||||||||||||||||||||||||||||||||||||||||||||||||||||||||||||||||||||||||||||||||||||||||||||||||||||||||||||||||||||||||||||||||||||||||||||||||||||||||||||||||||||||||||||||||||||||||||||||||||||||||||||||||||||||||||||||||||||||||||||||||||||||||||||||||||||||
| P | A | R | T | S | L | I | S | T | ||||||||||||||||||||||||||||||||||||||||||||||||||||||||||||||||||||||||||||||||||||||||||||||||||||||||||||||||||||||||||||||||||||||||||||||||||||||||||||||||||||||||||||||||||||||||||||||||||||||||||||||||||||||||||||||||||||||||||||||||||||||||||||||||||||||||||||||||||||||||||||||||||||||||||||||||||||
ONE YEAR LIMITED WARRANTY
LifeGear Inc. warrants to the original purchaser that this product is free from defects in material and workmanship when used for the purpose intended, under the conditions that it has been installed and operated in accordance with LifeGear's Owner's Manual. LifeGear's obligation under this warranty is limited to replacing or repairing, free of charge, any parts which may prove to be defective under normal home use. This warranty does not include any damage caused by improper operation, misuse or commercial application.
From the date of purchase, the frame is warranted to be free from defects for 1 (one) year. This warranty is extended only to the original owner and is not transferable.
When ordering replacement parts please have the following information ready:
- Owner's Manual
- Model Number
- Description of Parts
- Part Number
- Date of Purchase
SAFETY INSTRUCTIONS
Basic precautions should always be followed, including the following safety instructions when using this equipment: Read all instructions before using this equipment.
- Read all the instructions in this manual and do warm up exercises before using this equipment.
- Before exercise, in order to avoid injuring the muscle, warm-up exercise of every position of the body is necessary. Refer to Warm Up and Cool Down Routine page. After exercise, relaxation of the body is suggested for cool-down.
- Please make sure all parts are not damaged and fixed well before use. This equipment should be placed on a flat surface when using. Using a mat or other covering material on the ground is recommended.
- Please wear proper clothes and shoes when using this equipment; do not wear clothes that might catch any part of the equipment.
- Do not attempt any maintenance or adjustments other than those described in this manual. Should any problems arise, discontinue use and consult an Authorized Service Representative.
- Be careful when step on or leave the pedal always hold the handlebars first. Make the pedal at your side at the lowest position, step on the pedal, and stride over the main frame then step on the other pedal. When using, please hold the handlebar by hands, make the pedals running smoothly by push or pull handlebars, then run the equipment regularly by cooperation of hands and feet. After exercise, please also make one pedal at the lowest position and leave your foot on the higher pedal first and then another.
- Do not use the equipment outdoors.
- This equipment is for household use only.
- Only one person should be on the equipment while in use.
- Keep children and pets away from the equipment while in use. This machine is designed for adults only. The minimum free space required for safe operation is not less than two meters.
- If you feel any chest pains, nausea, dizziness, or short of breath, you should stop exercising immediately and consult your physician before continuing.
- The maximum weight capacity for this product is 120kgs.
WARNING: Before beginning any exercise program consult your physician.
This is especially important for the persons who are over 35 years old or who have pre-existing health problems. Read all instructions before using any fitness equipment.
CAUTION: Read all instructions carefully before operating this product.
Retain this Owner's Manual for future reference.
OPERATING INSTRUCTIONS
- Operate according to your own condition.
- Adjusting the adjustable leveler:
Turn the adjustable leveler on the rear stabilizer as needed to level the elliptical trainer.
COMPUTER OPERATION
The things you should know before exercise
A. Input Power:
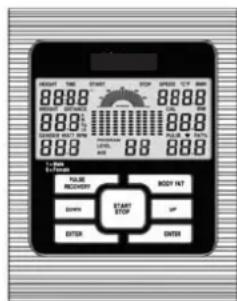
Plug in the adaptor to the equipment then the computer will produce a beep sound and turn on the computer at the Manual mode.
text_image
RIGHT TIME START ORDER 12TH 24TH 36TH 49TH 62TH 75TH 90TH 12TH 15TH 19TH 23TH 27TH 31TH 35TH 39TH 43TH 47TH 51TH 55TH 59TH 63TH 67TH 71TH 75TH 79TH 83TH 87TH 91TH 95TH 99TH 103TH 107TH 111TH 115TH 119TH 123TH 127TH 131TH 135TH 139TH 143TH 147TH 151TH 155TH 159TH 163TH 167TH 171TH 175TH 179TH 183TH 187TH 191TH 195TH 199TH 203TH 207TH 211TH 215TH 219TH 223TH 227TH 231TH 235TH 239TH 243TH 247TH 251TH 255TH 259TH 263TH 267TH 271TH 275TH 279TH 283TH 287TH 291TH 295TH 299TH 303TH 307TH 311TH 315TH 319TH 323TH 327TH 331TH 335TH 339TH 343TH 347TH 351TH 355TH 359TH 363TH 367TH 371TH 375TH 379TH 383TH 387TH 391TH 395TH 399TH 403TH 407TH 411TH 415TH 419TH 423TH 427TH 431TH 435TH 439TH 443TH 447TH 451TH 455TH 459TH 463TH 467TH 471TH 475TH 479TH 483TH 487THB. Program select and setting value:
- Use the UP or DOWN key to select program mode and then press ENTER to confirm your exercise mode.
- At the Manual mode, you may press the UP or DOWN key to set up your exercise TIME, DISTANCE, or CALORIES.
- Press the START/STOP key to start exercise.
- When you reach the target, the computer will produce beep sound and then stop.
- If you set up more than one target and you would like to reach next target, press START/STOP key to keep on exercise.
C. Clock Mode:
- After plug-in adaptor then the LCD will display at the Clock mode for user to input the current hour by 24 hours and minute by 60 minutes. After setting up the clock then the computer will display the hour-minute and second bar on the screen. Two seconds display one bar. Also display the current temperature on the screen. Press any key to quit the CLOCK mode except the ENTER key.
- The computer will enter into the clock mode when there is no signal input or no keys be pressed after 4 minutes. You can press the ENTER key to switch the clock and temperature at the clock mode or press other keys to quit the clock mode except the ENTER key.
- By holding the ENTER and UP keys together for over two seconds, you can switch to the CLOCK mode during the STOP mode.
- You can set up the CLOCK by holding ENTER key for over 2 seconds when switch to CLOCK mode from STOP mode then you can set up TIME by UP or DOWN keys.
Functions and Features:
- Quick Start key: Allows you to start the computer without selecting a program. TIME automatically begins to count up from zero. Use the UP and DOWN keys to adjust the resistance.
- TIME: Shows your elapsed workout time in minutes and seconds. Your computer will automatically count up from 0:00 to 99:59 per 1 second increment. You can also program your computer to count down from a set value by using the UP and DOWN keys. If you continue exercising once the time has reached 0:00, the computer will begin beeping, and reset itself to the original time set, letting you know your workout is done.
- DISTANCE: Displays the accumulative distance traveled during each workout up to a maximum of 99.9KM/MILE.
- RPM (Revolutions Per Minute): Your pedal cadence.
- WATT: The amount of mechanical power the computer is receiving from your exercise.
- SPEED: Displays your workout speed value in KM/MILE per hour.
- CALORIES: Your computer will estimate the cumulative calories burned at any given time during your workout.
- PULSE: Displays your pulse rate in beats per minute during your workout.
- AGE: Your computer is age-programmable from 10 to 99 years. If you do not set an age, this function will always default to age 35.
- TARGET HEART RATE (TARGET PULSE): The heart rate you should maintain is called your Target Hear Rate in beats per minute.
- PULSE RECOVERY: During the START stage, leave the hands holding on grips and then press "PULSE RECOVERY" key, all function displays will stop except "TIME". Time starts counting from 00:60 - 00:59 -- to 00:00. As soon as 00:00 is reached, the computer will display your heart rate recovery status with the grade F1.0 to F6.0.
1.0 means OUTSTANDING
1.0 < F < 2.0 means EXCELLENT
2.0≤F≤2.9 means GOOD
3.0≤F≤3.9 means FAIR
4.0≤F≤5.9 means BELOW AVERAGE
6.0 means POOR
Note: If no pulse signal input then the computer will show "P" on the PULSE window. If the computer shows "ERR" on the message window, please re-press the PULSE RECOVERY key and please make sure your hands are keeping well on the grips.
Key Function:
There are 6 button keys and the function description as follows:
- START/STOP key: a. Quick Start key function: Allows you to start the computer without selecting a program. Manual workout only. Time automatically begins to count up from zero.
b. During the exercise mode, press the key to STOP exercise.
c. During the stop mode, press the key to START exercise.
- UP key: a. Press the key to increase the resistance during exercise mode.
b. During the setting mode, press the key to increase the value of Time, Distance, Calories, Age and select Gender and Program.
- DOWN key: a. Press the key to decrease the resistance during exercise mode.
b. During the setting mode, press the key to decrease the value of Time, Distance, Calories, Age and select Gender and Program.
- ENTER/RESET key: a. During the setting mode, press the key to accept the current data entry.
b. At the stop mode, by holding this key for over two seconds the user can reset all values to zero or default value.
c. During setting the Clock, press this key can accept the setting hour and setting minute.
- BODY FAT / MEASURE key: Press the key to input your HEIGHT, WEKGHT, GENDER and AGE then to measure your body fat ratio.
- PULSE RECOVERY key: Press the key to activate heart rate recovery function.
Program Introduction & Operation:
Manual Program: Manual
P1 is a manual program. User can start exercise by pressing the START/STOP key. The default resistance level is 5. User may exercise in any desirous of resistance level (Adjusting by UP/DOWN key during the workout) with a period of time or a number of calories or a certain distance.
Operations:
- Use UP/DOWN keys to select the MANUAL (P1) program.
- Press the ENTER key to enter MANUAL program.
-
TIME will flash and you can press the UP or DOWN key to set your exercise TIME. Press the ENTER key to confirm your desired TIME.
-
DISTANCE will flash and you can press the UP or DOWN key to set your target DISTANCE. Press the ENTER key to confirm your desired DISTANCE.
-
CALORIES will flash and you can press the UP or DOWN key to set your exercise
CALORIES. Press the ENTER key to confirm your desired CALORIES.
- Press the START/STOP key to begin exercise.
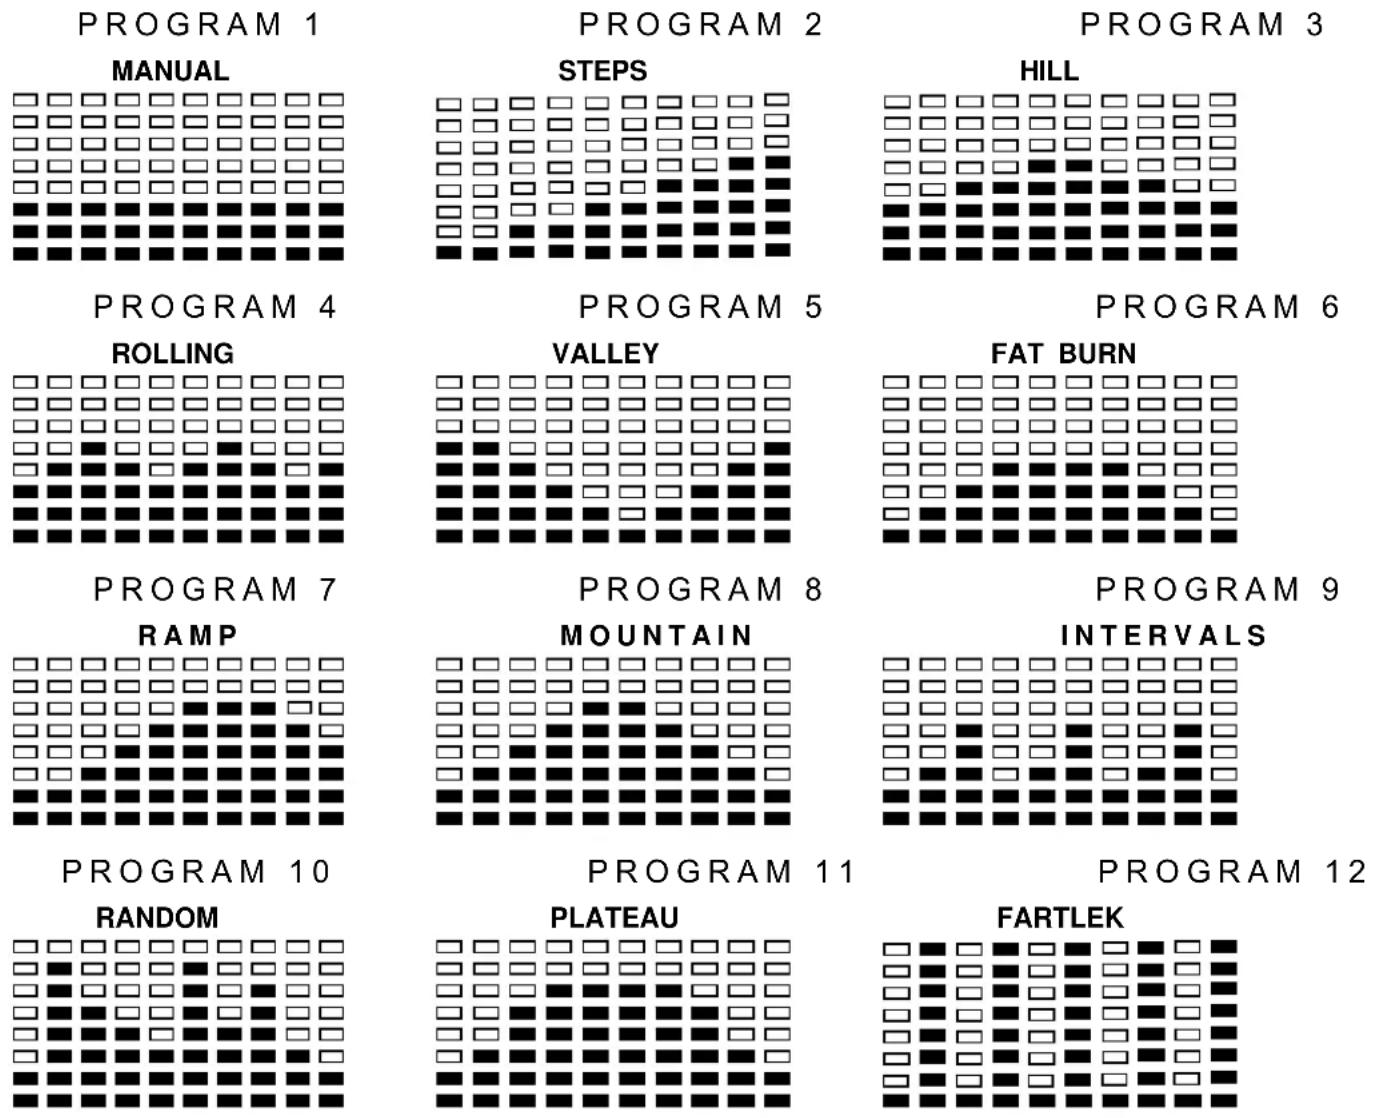
Preset Program: Steps, Hill, Rolling, Valley, Fat Burn, Ramp, Mountain, Intervals, Random, Plateau, Fartlek, and Precipice Program
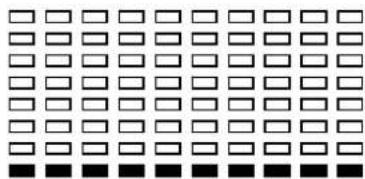
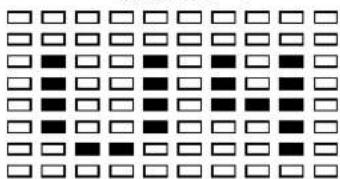
PROGRAM 2 to PROGRAM 13 is the preset programs. User can exercise with different level of loading in different intervals as the profiles show. User may exercise in any desirous of resistance level (adjusting by UP/DOWN key during the workout) with a period of time or a number of calories or a certain distance.
Operations:
- Use the UP or DOWN key to select one of the above programs from P2 to P13.
- Press the ENTER key to enter your workout program.
- TIME will flash and you can press the UP or DOWN key to set your exercise TIME. Press the ENTER key to confirm your desired TIME.
- DISTANCE will flash and you can press the UP or DOWN key to set your target DISTANCE. Press the ENTER key to confirm your desired DISTANCE.
- CALORIES will flash and you can press the UP or DOWN key to set your exercise CALORIES. Press the ENTER key to confirm your desired CALORIES.
- Press the START/STOP key to begin exercise.
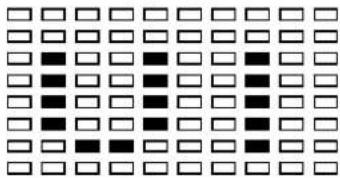
User Setting Program: User 1, User 2, User 3, and User 4
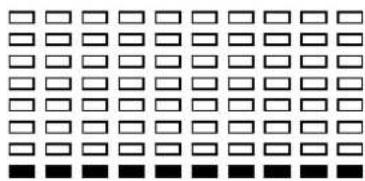
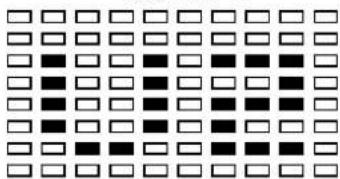
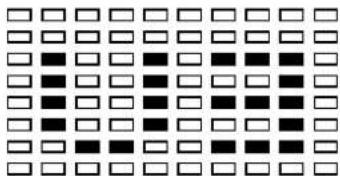
Program 14 to 17 is the user setting program. User is free to create the values in the order of TIME, DISTANCE, CALORIES and the resistance level in 10 columns. The values and profiles will be stored in the memory after setup. Users may also change the ongoing loading in each column by UP or DOWN key, and it will not change the resistance level stored in the memory.
Operations:
- Use the UP or DOWN key to select the USER program from P14 to P17.
- Press the ENTER key to enter your workout program.
- The column 1 will flash, and then use the UP or DOWN key to create your personal exercise profile. Press the ENTER key to confirm your first column of exercise profile. The default level is load 1.
- The column 2 will flash, and then use the UP or DOWN key to create your personal exercise profile. Press the ENTER key to confirm your second column of exercise profile.
-
Follow the above description to finish your personal exercise profiles. Press the ENTER key to confirm your desired exercise profile.
-
TIME will flash and you can press the UP or DOWN key to set your exercise TIME. Press the ENTER key to confirm your desired TIME.
- DISTANCE will flash and you can press the UP or DOWN key to set your target DISTANCE. Press the ENTER key to confirm your desired DISTANCE.
- CALORIES will flash and you can press the UP or DOWN key to set your exercise CALORIES. Press the ENTER key to confirm your desired CALORIES.
- Press the START/STOP key to begin exercise.
Heart Rate Control Program: 55% H.R.C., 65% H.R.C., 75% H.R.C., 85% H.R.C., and Target H.R.C.
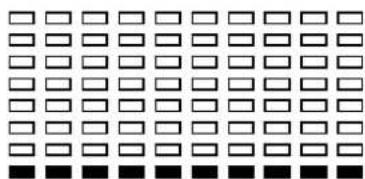
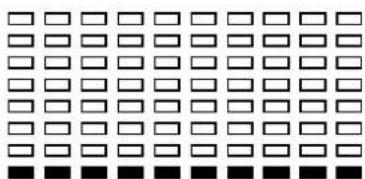
Program 18 to Program 22 is the Heart Rate Control Programs and Program 22 is the Target Heart Rate Control program.
Program 18 is the 55% Max H.R.C. -- Target H.R. = (220 - AGE) x 55%
Program 19 is the 65% Max H.R.C. -- Target H.R. = (220 - AGE) x 65%
Program 20 is the 75% Max H.R.C. -- Target H.R. = (220 - AGE) x 75%
Program 21 is the 85% Max H.R.C. -- Target H.R. = (220 - AGE) x 85%
Program 22 is the Target H.R.C. - - Workout by your target heart rate value.
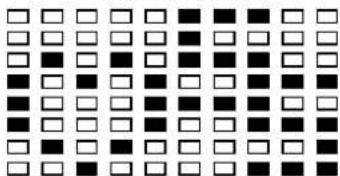
User can exercise according to your desired Heart Rate program by setting your AGE, TIME, DISTANCE, CALORIES or TARGET PULSE. In these programs, the computer will adjust the resistance level according to the heart rate detected. For example, the resistance level may increase every 20 seconds while the heart rate detected is lower than the TARGET H.R and then the computer will show “SLOW DOWN” on the message window. Also the resistance level may decrease every 20 seconds while the heart rate detected is higher than the TARGET H.R and then the computer will show “HURRY UP” on the message window. As a result, the user’s heart rate will be adjusted to close the TARGET H.R. between the range of TARGET H.R. +5 and TARGET H.R. -5 and then the computer will show “KEEP GOING” on the message window.
Operations:
- Use UP or DOWN key to select one of the heart rate control program from P18 to P22.
- Press the ENTER key to enter your workout program.
- AGE will flash at P18 to P21 programs and you can press the UP or DOWN key to set your AGE. The default age is 35.
- At the program 22, the TARGET PULSE will flash and you can press the UP or DOWN key to set your TARGET PULSE between 80 to 180. The default TARGET PULSE is 120.
-
TIME will flash and you can press the UP or DOWN key to set your exercise TIME. Press the ENTER key to confirm your desired TIME.
-
DISTANCE will flash and you can press the UP or DOWN key to set your target DISTANCE. Press the ENTER key to confirm your desired DISTANCE.
- CALORIES will flash and you can press the UP or DOWN key to set your exercise CALORIES. Press the ENTER key to confirm your desired CALORIES.
- Press the START/STOP key to begin exercise.
Watt Control Program: Watt Control
Program 23 is a Speed Independent Program. Press the ENTER key to set up the values of TARGET WATT, TIME, DISTANCE and CALORIES. During the exercise mode, the level of resistance is not adjustable. For example, the level of resistance may increase while the speed is too slow. Also the level of resistance may decrease while the speed is too fast. As a result, the calculated value of WATT will close to the value of TARGET WATT setup by users.
Operations:
- Use the UP or DOWN key to select the WATT CONTROL (P23) program.
- Press the ENTER key to enter your workout program.
- TIME will flash and you can press the UP or DOWN key to set your exercise TIME. Press the ENTER key to confirm your desired TIME.
- DISTANCE will flash and you can press the UP or DOWN key to set your target DISTANCE. Press the ENTER key to confirm your desired DISTANCE.
- WATT will flash and you can press the UP or DOWN key to set your target WATT value. Press the ENTER key to confirm your target WATT. The default WATT value is 100.
- CALORIES will flash and you can press the UP or DOWN key to set your exercise CALORIES. Press the ENTER key to confirm your desired CALORIES.
- Press the START/STOP key to begin exercise.
NOTE: 1. WATT = TORQUE (KGM) * RPM * 1.03
- In this program, the WATT value will keep constant value. It means that if you peddle quickly, the resistance level will decrease and if you peddle slowly, the resistance level will increase. Always try to keep you in the same watt value.
Body Fat Program: Body Fat
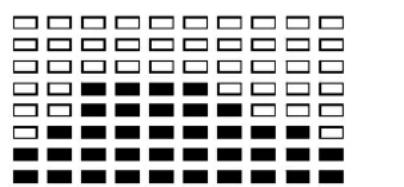
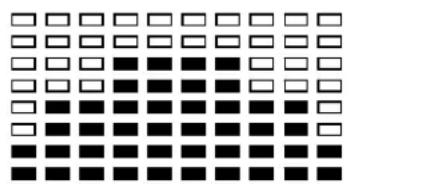
Program 24 is a special program design to calculate user's body fat ratio and to offer a specific loading profile for user. There are 3 body types divided according to the FAT% calculated.
Type1: BODY FAT% > 27
Type2: 27 ≥ BODY FAT% ≥ 20
Type3: BODY FAT % < 20
The computer will show the test results of FAT PERCENT, BMI and BMR.
Operations:
- Use the UP or DOWN key to select the BODY FAT (P24) program.
- Press the ENTER key to enter your workout program.
- HEIGHT will flash and you can press the UP or DOWN key to set your HEIGHT. Press the ENTER key to confirm your HEIGHT. The default HEIGHT is 170cm or 5'07" (5 feet 7 inches).
- WEIGHT will flash and you can press the UP or DOWN key to set your WEIGHT. Press the ENTER key to confirm your WEIGHT. The default WEIGHT is 70kgs or 155lbs.
- GENDER will flash and you can press the UP or DOWN key to select your gender. Number 1 means male and number 0 means female. Press the ENTER key to confirm your Gender. The default gender is 1 (FEMALE).
- AGE will flash and you can press the UP or DOWN key to set your AGE. Press the ENTER key to confirm your AGE. The default AGE is 35.
- Press the START/STOP key to begin body fat measurement. If the window shows E, please make sure your hands are attached well on the grips. Then press the START/STOP key again to begin body fat measurement.
- After finished your measurement, the computer will show the values of BMR, BMI and FAT PERCENT on the LCD display. Furthermore, the computer will show your own exercise profile for your body type.
- Press the START/STOP key to begin exercise.
Operation Guide:
- Sleep Mode:
The computer will enter the sleep mode when there is no signal input and no keys be pressed after 4 minutes. You can press any key to wake up the computer. - BMI (Body Mass Index): BMI is a measure of body fat based on height and weight that applies to both adult men and women.
- BMR (Basal Metabolic Rate): Your Basal Metabolic Rate (BMR) shows the number of calories your body needs to operate. This doesn't account for any activity, it's simply the energy needed to sustain a heartbeat, breathing and normal body temperature. It measures the body at rest, not sleep, at room temperature.
Error Message:
E1 (ERROR 1):
Normal state: During workout, when the computer did not get the count signal from the gear motor more than 4 seconds and check under successive 3 times then the LCD will show E1.
Power on state: The gear motor will return to zero automatically, when the signal of motor cannot be detected for more than 4 seconds then the gear motor's driver will be cut off immediately and show the E1 on the LCD display. All the other digital and function mark are blank, and the output signals are cut off also.
E2 (ERROR 2):
When the computer reads the memory data, if the I.D. code is not correct or the memory IC damages then the computer will show E2 immediately at power on.
E3 (ERROR 3):
After 4 seconds by start mode, the computer detects the faulty motor did not leave the zero point then the LCD bar displays "E3".
LCD Workout Graphics
PRESET PROGRAM PROFILES:
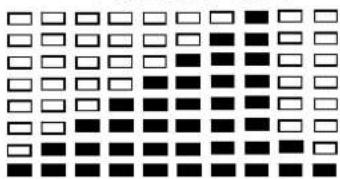
PROGRAM 13
PRECIPICE
natural_image
Grid of black and white squares with no text or symbolsUSER SETTING PROGRAM:
PROGRAM 14
USER 1
natural_image
Grid of white squares with black, white, and blue dots in a 2x3 pattern (no text or symbols)
natural_image
Grid of white and black rectangular shapes with no text or symbolsPROGRAM 15
USER 2
natural_image
Grid of white squares with black and white dots in the center (no text or symbols)
natural_image
Grid of white and black rectangular shapes with no text or symbolsPROGRAM 16
USER 3
natural_image
Grid of white squares with black and white borders, no text or symbols present
natural_image
Grid of 16 empty rectangular and black squares with no text or symbolsPROGRAM 17
USER 4
natural_image
Grid of 16 empty white and black squares with no text or symbols
natural_image
Grid of white and black rectangular shapes with no text or symbolsHEART RATE PROGRAM PROFILES:
PROGRAM 18
55% H.R.C.
natural_image
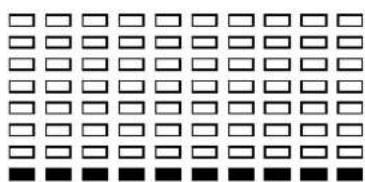
Grid of black and white squares with no text or symbolsPress ENTER key
natural_image
Grid of 16 empty rectangular boxes with black squares at the bottom (no text or symbols)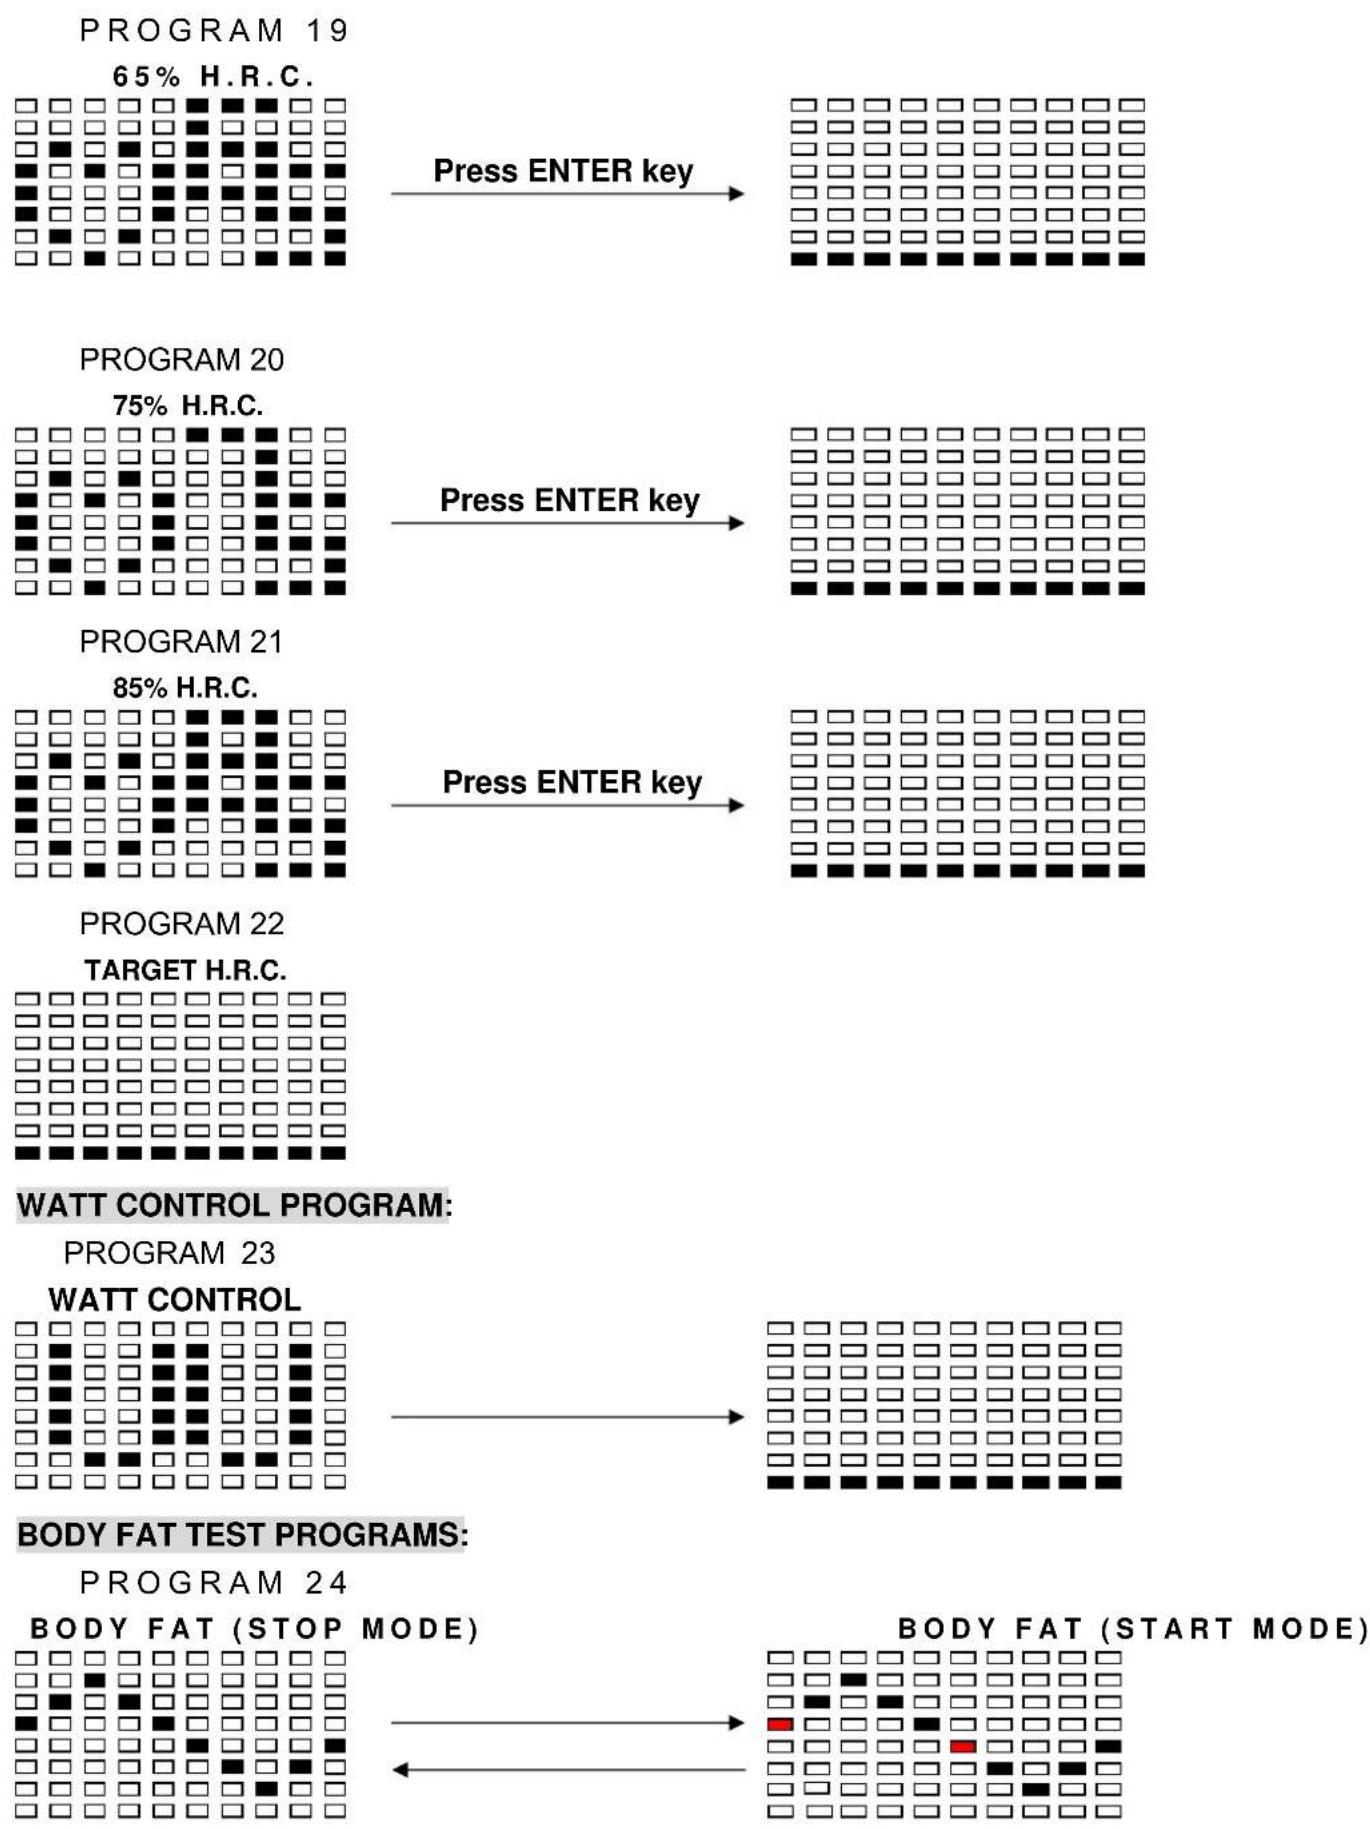
One of the Following Six Profiles Will Display Automatically after Measuring Your BODY FAT:
natural_image
Grid of black and white squares with no text or symbolsWorkout Time: 40 minutes
natural_image
Grid of black and white squares with no text or symbolsWorkout Time: 40 minutes
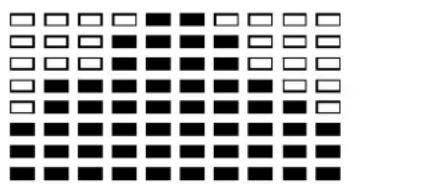
natural_image
Grid of black and white squares with no text or symbolsWorkout time: 20 minutes
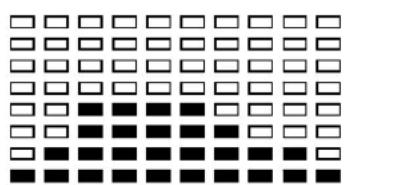
natural_image
Grid of black and white squares with no text or symbolsWorkout Time: 40 minutes
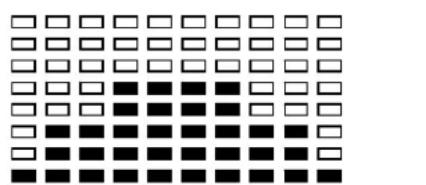
natural_image
Grid of 25 black and white squares with no text or symbolsWorkout Time: 40 minutes
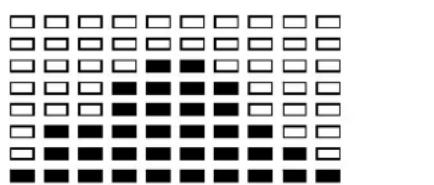
natural_image
Grid of black and white squares with no text or symbolsWorkout time: 20 minutes
PARTS LIST
| No. | Description | Qty | No. | Description | ||
| 001 | Main Frame 1 033 Hexagon Head Bolt M8x20 2 | |||||
| 002 | Front Post 1 034 Bolt M10x28 4 | |||||
| 003 | Upper Left Handrail 1 035 Bolt M5x15 4 | |||||
| 004 | Upper Right Handrail | 1 036 Bolt M5x12 | 10 | |||
| 005 | Lower Handrail | 2 037 Screw M5x12 | 14 | |||
| 006 | Left Foot Bar | 1 038 Screw M4x16 | 2 | |||
| 007 | Right Foot Bar | 1 | 039 | Washer M8x∅11xT4.5 | 4 | |
| 008 | Pedal Bar Bracket | 2 | 040 | Curve Washer M8 | 4 | |
| 009 | Crank | 2 | 041 | Wave Washer ∅16.5x∅21.7x0.25 | 2 | |
| 010 | Magnet Bracket | 1 | 042 | Washer M6x16x1.5 | 3 | |
| 011 | Idle Wheel Bracket | 1 | 043 | Washer M8x16x1.2 | 12 | |
| 012 | Handlebar | 1 | 044 | Washer M6x16x1.2 | 4 | |
| 013 | Front Stabilizer | 1 | 045 | Washer M8x28x1.5 | 4 | |
| 014 | Rear Stabilizer | 1 | 046 | Washer M10x∅21x2 | 1 | |
| 015 | Axle for Belt Pulley | 1 | 047 | Washer M12x∅15x0.3 | 2 | |
| 016 | Belt Pulley | 1 | 048 | Washer M6x∅19x1.5 | 1 | |
| 017 | Flywheel | 1 | 049 | Rubber Washer ∅6x∅22x1 | 1 | |
| 018 | Flywheel Axle | 1 | 050 | Washer for Foot Pedal | 4 | |
| 019 | Shaft for Foot Bar | 2 051 Screw #6-32x3/4"L | 1 | |||
| 020 | Handrail Axle | 1 | 052 | Nut 3/8"x26x9mm | 2 | |
| 021 | Small Disk | 1 053 M8 Nylon Nut | 7 | |||
| 022 | Spacer | 3 054 M6 Nylon Nut | 5 | |||
| 023 | Carriage Bolt M8x52 | 4 055 Nut 3/8"x26x7mm | 2 | |||
| 024 | Carriage Bolt M6x55 | 4 056 Nut M6 | 1 | |||
| 025 | Bolt M8x15 | 10 | 057 | Spring Washer M8(UCP) | 14 | |
| 026 | Bolt M8x20 | 2 | 058 | Spring Washer M6 | 4 | |
| 027 | Bolt M8x53 | 2 059 Bearing 6203ZZ | 4 | |||
| 028 | Bolt M8x25 | 2 060 Bearing 6001ZZ | 2 | |||
| 029 | Bolt M6x18 | 4 | 061 | Spring Clip C12 | 2 | |
| 030 | Bolt M8x52 | 1 | 062 | Spring Clip C17 | 3 | |
| 031 | Bolt M6x14 | 3 | 063 | Large Spring | 1 | |
| 032 | Bolt M6x65 | 1 | 064 | Spring 1.2x55L | 1 | |
PARTS LIST
| No. | Description | Qty | No. | Description | ||
| 065 | Upper Handrail Foam Grip 2 088 | Left Shroud 93600 1 | ||||
| 066 | Handlebar Foam Grip 1 089 Right Shroud 93600 1 | |||||
| 067 | Square Plug 30x70 1 090 Left Front Decorate Cover 93600 1 | |||||
| 068 | End Cap for Front Post 50.8 × T1.5 | 2 091 Right Front Decorate Cover 93600 1 | ||||
| 069 | End Cap for Left Upper Handrail 51 × 45.2 | 4 092 Bolt Cap M8x 19 4 | ||||
| 070 | Round Plug 34 × 22.2 | 2 093 Bolt Cap M8x 43 2 | ||||
| 071 | Upper Handrail End Cap 31.8 × T1.6 | 2 094 Computer B31132 1 | ||||
| 072 | Plastic Disc Cap 65xH=14 | 2 095 Hand Pulse Sensor (S1001) 2 | ||||
| 073 | Plastic Bushing | 8 096 Adaptor 1 | ||||
| 074 | Foot Pedal Knob M6 | 4 097 Motor with Cable 1 | ||||
| 075 | Sensor Bracket | 1 098 Sensor Wire I (L=900mm) 1 | ||||
| 076 | Belt 6PJ1321 | 1 099 Sensor Wire II (L=1100mm) 1 | ||||
| 077 | Left Front Stabilizer End Cap | 1 100 Sensor Wire III (L=150mm) 1 | ||||
| 078 | Right Front Stabilizer End Cap | 1 101 Hand Pulse Wire 560/1150L 1 | ||||
| 079 | Rear Stabilizer End Cap | 2 102 Bottom Section Power Supply Cable 1 | ||||
| 080 | Adjustable Leveler | 2 103 Wire Rod 1 | ||||
| 081 | Front Left Foot Bar Cover | 2 104 Magnet 1 | ||||
| 082 | Front Right Foot Bar Cover | 2 105 Screw M5x20 6 | ||||
| 083 | Plastic Spacer | 4 106 Screw M4x25 11 | ||||
| 084 | Rear Foot Bar Cover | 2 107 Screw M4x18 2 | ||||
| 085 | Safety Cover | 2 108 Spring Washer M8 6 | ||||
| 086 | Foot Pedal A112BH | 2 109 Power Fixed Plate 1 | ||||
| 087 | Crank Cover | 2 | ||||
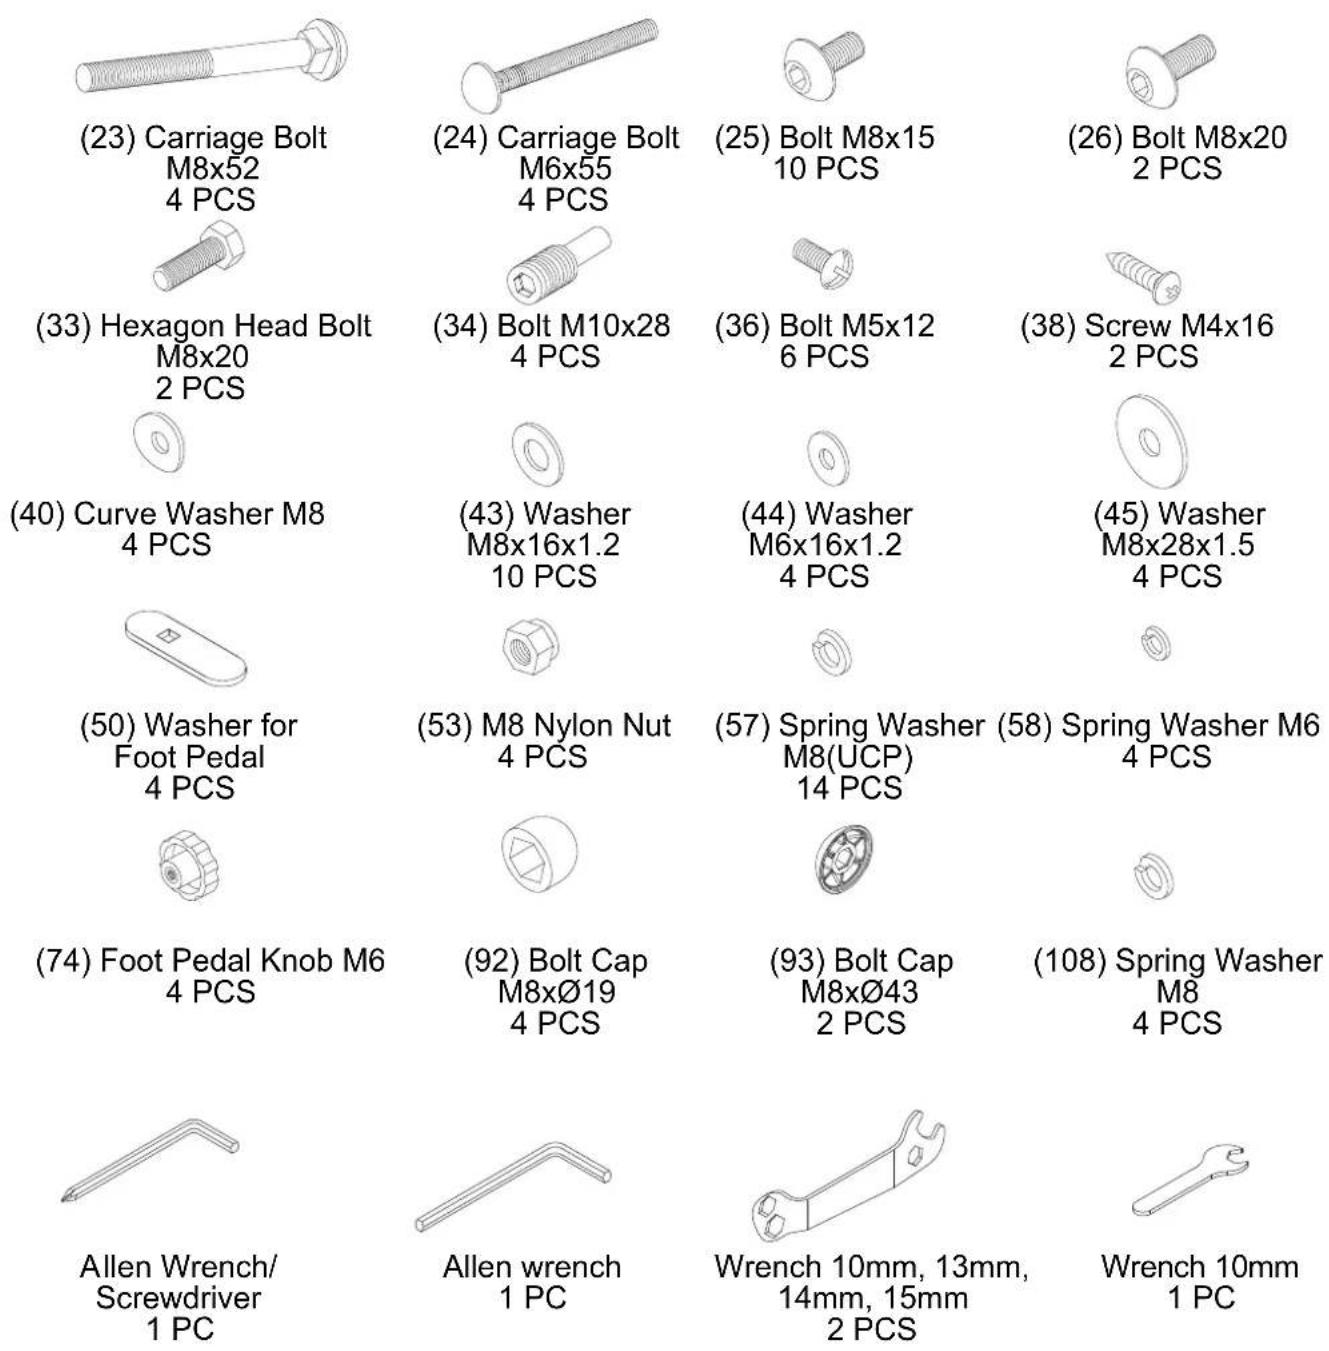
HARDWARE PACKING LIST
OVERVIEW DRAWING
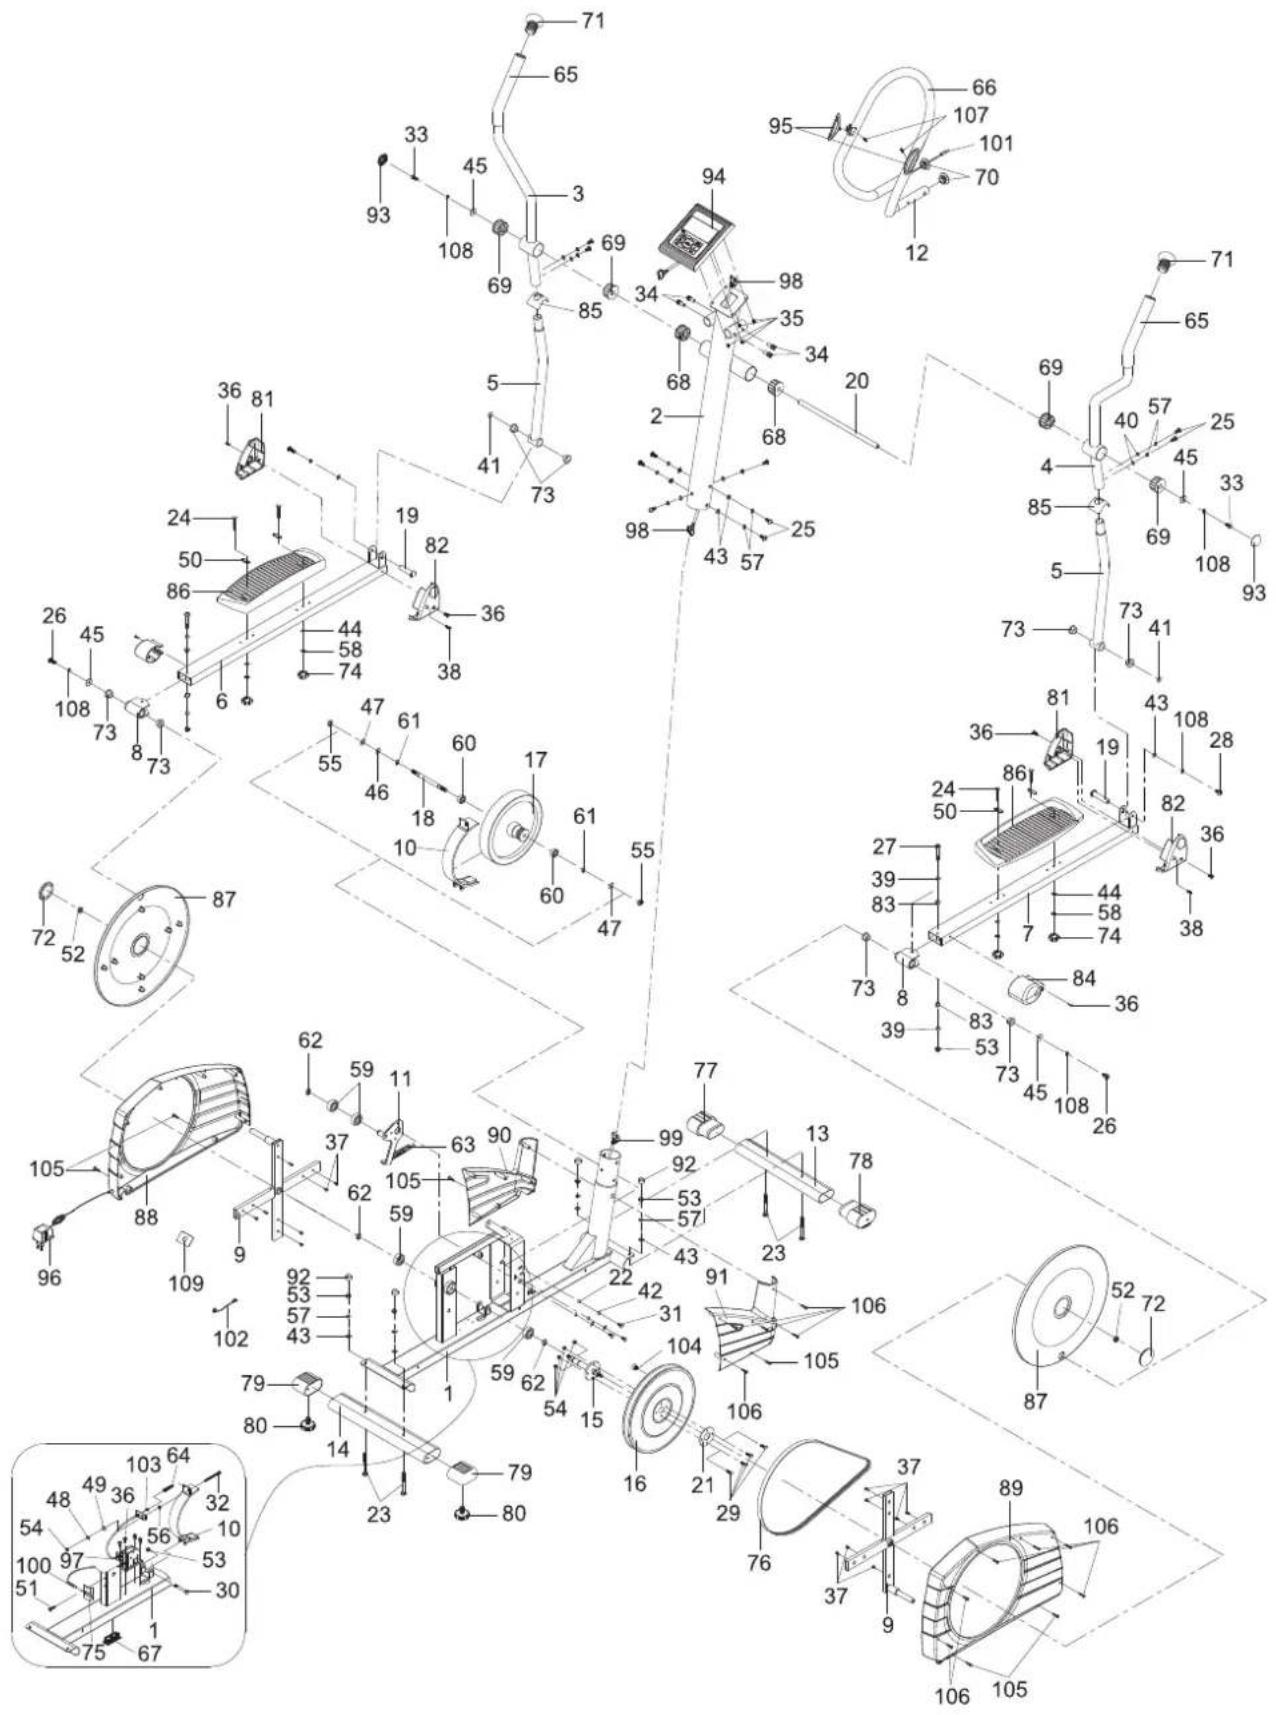
text_image
Technical diagram of a mechanical assembly with numbered components and exploded view, likely for engineering or manufacturing purposes.ASSEMBLY INSTRUCTIONS
1. Install the Front Stabilizer.
Attach the Front Stabilizer (13) onto the front curve plate of Main Frame (1) with two M8x52 Carriage Bolts (23), M8x16x1.2 Washers (43), M8 (UCP) Spring Washers (57), and M8 Nylon Nuts (53). Finally, cover the M8 Nylon Nuts (53) with two M8xØ19 Bolt Caps (92).
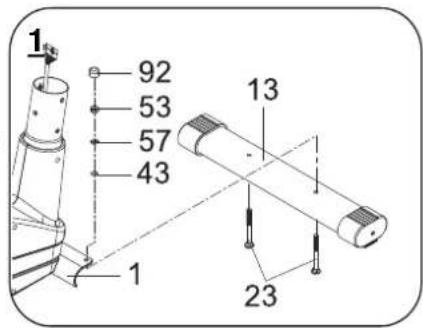
text_image
1 92 53 57 43 13 23 12. Install the Rear Stabilizer.
Attach the Rear Stabilizer (14) onto the rear curve plate of Main Frame (1) with two M8x52 Carriage Bolts (23), M8x16x1.2 Washers (43), M8 (UCP) Spring Washers (57), and M8 Nylon Nuts (53). Finally, cover the M8 Nylon Nuts (53) with two M8xØ19 Bolt Caps (92).
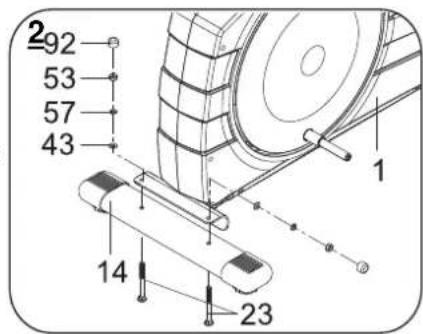
text_image
292 53 57 43 14 233. Install the Front Post.
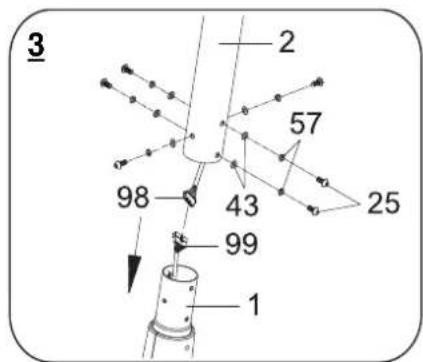
Connect Sensor Wire II (99) from Main Frame (1) to Sensor Wire I (98) from Front Post (2). Insert Front Post (2) into the tube of the Main Frame (1) and secure with six M8x15 Bolts (25), M8 (UCP) Spring Washers (57), and M8x16x1.2 Washers (43).
text_image
3 2 57 98 43 25 99 14. Install the Handrail Axle and the Upper Left/Right Handrails.
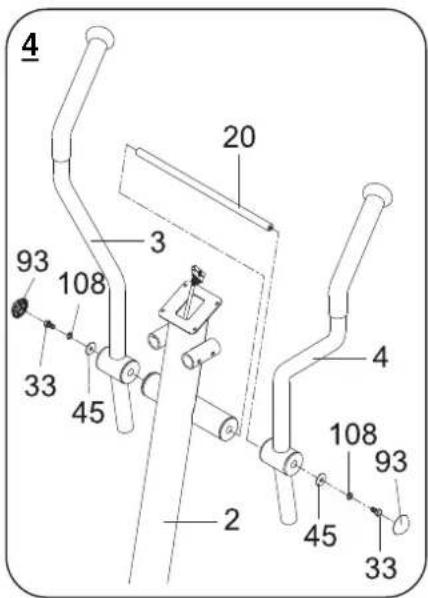
Insert the Handrail Axle (20) into the hole on the Right Upper Handrail (4) and secure with one M8x28x1.5 Washer (45), M8 Spring Washer (108), and M8x20 Hexagon Head Bolt (33). Insert the Handrail Axle (20) with Right Upper Handrail (4) into the hole on the Front Post (2). Attach the Left Upper Handrail (3) onto the other end of the Handrail Axle (20) with one M8x28x1.5 Washer (45), M8 Spring Washer (108), and M8x20 Hexagon Head Bolt (33). Finally, cover M8x28x1.5 Washers (45), M8 Spring Washers (108), and M8x20 Hexagon Head Bolts (33) with two M8xØ43 Bolt Caps (93).
text_image
4 20 3 93 108 33 45 4 108 93 2 45 335. Install the Lower Handrails and Left/Right Foot Bars.
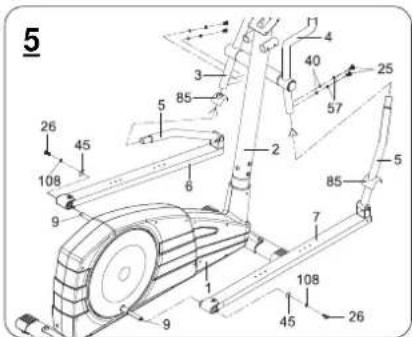
Install two Safety Covers (85) onto the Lower Handrails (5). Attach Left and Right Foot Bars (6, 7) to the Cranks (9) with two M8x28x1.5 Washers (45), M8 Spring Washers (108), and M8x20 Bolts (26).
Attach two Lower Handrails (5) to the Left and Right Upper Handrails (3, 4) with four M8 Curve Washers (40), M8(UCP) Spring Washers (57), and M8x15 Bolts (25).
text_image
5 26 45 108 9 85 3 5 1 6 2 25 40 57 85 7 108 45 26 96. Install the Left and Right Foot Pedals.
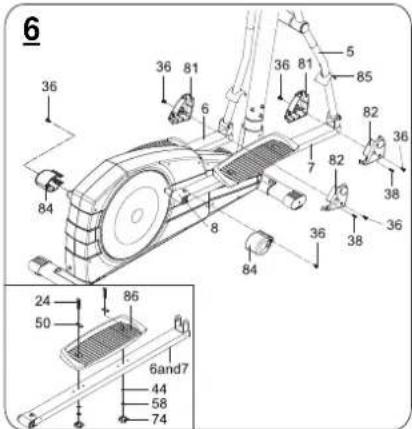
Attach Left and Right Foot Pedals (86) onto Left and Right Foot Bars (6, 7) with four Washers for Foot Pedal (50), M6x55 Carriage Bolts (24), M6x16x1.2 Washers (44), M6 Spring Washers (58), and M6 Foot Pedal Knobs (74). Attach both Rear Foot Bar Covers (84) onto the rear end of the Left and Right Foot Bars (6, 7) with two M5x12 Bolts (36).
Attach Front Left and Right Foot Bar Covers (81, 82) onto the front end of the Left and Right Foot Bars (6, 7) with two M4x16 Screws (38) and four M5x12 Bolts (36).
text_image
6 36 81 36 81 5 85 82 36 7 82 38 36 36 84 8 84 24 50 86 6and7 44 58 747. Install the Computer.
Remove four M5x15 Bolts (35) from the back of the Computer (94). Connect the Sensor Wire I (98) to the wire that comes from the Computer (94) and then attach the Computer (94) onto the top end of the Front Post (2) with four M5x15 Bolts (35) that were removed.
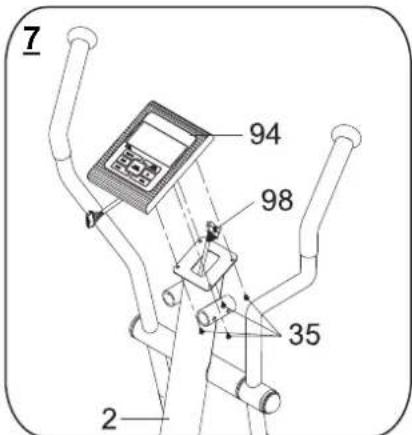
text_image
7 94 98 35 28. Install the Handlebar.
Insert the Hand Pulse Wire (101) into the left hole on the Front Post (2).
Attach the Handlebar (12) into the holes on the Front Post (2) with four M10x28 Bolts (34). Insert the Hand Pulse Wire (101) through into the hole on the ∅34×∅22.2 Round Plug (70) and pull then it out. Finally, cover the holes on the Front Post (2) with two ∅34×∅22.2 Round Plugs (70).
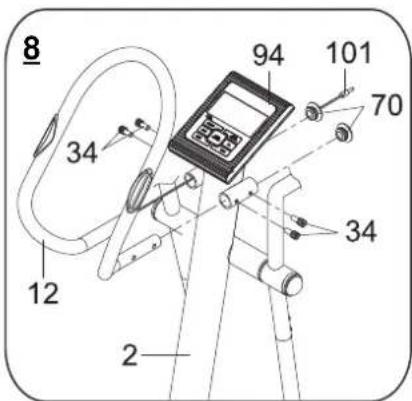
text_image
8 34 12 2 94 101 70 349. Plug in the socket.
Put the plug of the Hand Pulse Wire (101) in the socket on the back of the Computer (94).
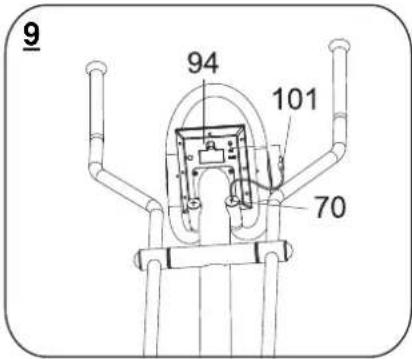
text_image
9 94 101 7010. Using the Adaptor.
Plug the wire of the Adaptor (96) into the power jack on the rear side of the Left Shroud (88) and then connect the Adaptor (96) to the electrical wall outlet.
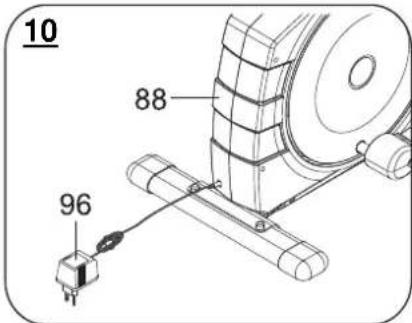
text_image
10 88 96TROUBLE SHOOTING GUIDE
-
Verify that all the bolts and nuts are locked properly and the turning parts should be turned freely without damaged parts.
-
Clean the equipment with soap and slightly damp cloth only. Please do not use any solvent to clean the equipment.
| Problem | Potential | Cause | Correction |
| Base is unstable. | Floor is not flat or there is small object under the front or rear stabilizer.The adjustable levelers on the rear stabilizer have not been leveled when adjusting. | Remove the object.Adjust the adjustable levelers. | |
| Handrails are shaking. | The bolts are loose. Tighten the | bolts. | |
| Loud noise from the moving parts. | The interval of the parts is improper tighten. | Open the covers to adjust. | |
| No resistance when riding the elliptical trainer. | Motor is not working.Running belt slips. | Open the covers to check.Open the covers to adjust. |
WARM UP AND COOL DOWN ROUTINE
A good exercise program consists of a warm-up, aerobic exercise, and a cool down. Do the entire program at least two to three times a week, resting for a day between workouts. After several months you can increase your workouts to four or five times per week.
AEROBIC EXERCISE is any sustained activity that sends oxygen to your muscles via your heart and lungs. Aerobic exercise improves the fitness of your lungs and heart. Aerobic fitness is promoted by any activity that uses your large muscles eg: legs, arms and buttocks. Your heart beats quickly and you breathe deeply. An aerobic exercise should be part of your entire exercise routine.
The WARM-UP is an important part of any workout. It should begin every session to prepare your body for more strenuous exercise by heating up and stretching your muscles, increasing your circulation and pulse rate, and delivering more oxygen to your muscles.
COOL DOWN at the end of your workout, repeat these exercises to reduce soreness in tired muscles.
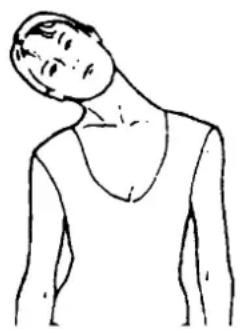
HEAD ROLLS
Rotate your head to the right for one count, feeling the stretch up the left side of your neck, then rotate your head back for one count, stretching your chin to the ceiling and letting your mouth open. Rotate your head to the left for one count, then drop your head to your chest for one count.
natural_image
Line drawing of a person's neck and shoulder (no text or symbols)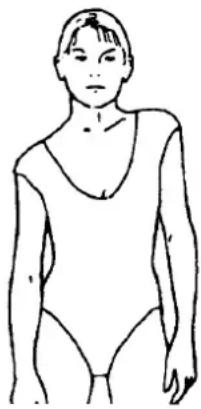
natural_image
Line drawing of a person wearing a leotard (no text or symbols)SHOULDER LIFTS
Lift your right shoulder toward your ear for one count. Then lift your left shoulder up for one count as you lower your right shoulder.
SIDE STRETCHES
Open your arms to the side and lift them until they are over your head. Reach your right arm as far toward the ceiling as you can for one count. Repeat this action with your left arm.

natural_image
Line drawing of a person performing a stretching exercise with arms raised (no text or symbols)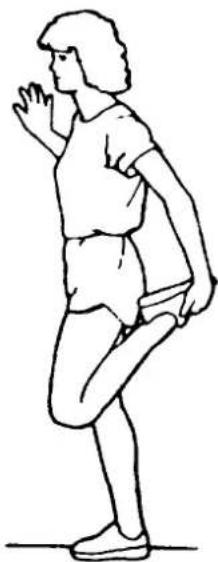
natural_image
Line drawing of a person in athletic attire performing a stretching or kneeling pose (no text or symbols)QUADRICEPS STRETCH
With one hand against a wall for balance, reach behind you and pull your right foot up. Bring your heel as close to your buttocks as possible. Hold for 15 counts and repeat with left foot.
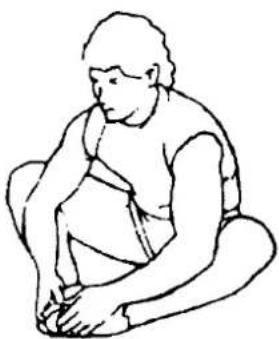
INNER THIGH STRETCH
Sit with the soles of your feet together and your knees pointing outward. Pull your feet as close to your groin as possible. Gently push your knees toward the floor. Hold for 15 counts.
natural_image
Line drawing of a seated person with hand on chin, no text or symbols present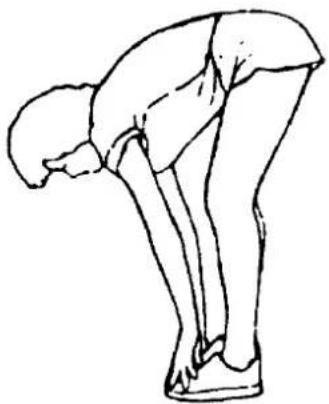
natural_image
Line drawing of a person bending forward with hands on hips (no text or symbols)TOE TOUCHES
Slowly bend forward from your waist, letting your back and shoulders relax as you stretch toward your toes. Reach as far as you can and hold for 15 counts.
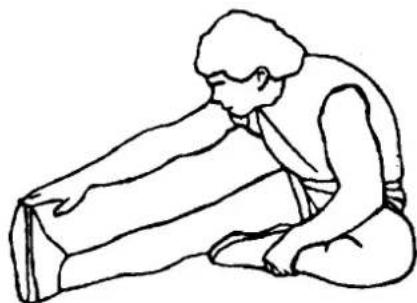
HAMSTRING STRETCHES
Extend your right leg. Rest the sole of your left foot against your right inner thigh. Stretch toward your toe as far as possible. Hold for 15 counts. Relax and then repeat with left leg.
natural_image
Line drawing of a person kneeling and stretching their back (no text or symbols)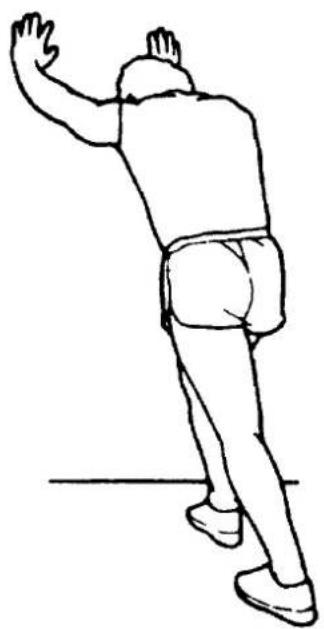
natural_image
Line drawing of a person in motion, possibly dancing or gesturing, with no text or symbols present.CALF/ACHILLES STRETCH
Lean against a wall with your left leg in front of the right and your arms forward. Keep your right leg straight and the left foot on the floor; then bend the left leg and lean forward by moving your hips toward the wall. Hold, then repeat on the other side for 15 counts.